Managing your Windows Storage Server 2012 R2 Essentials...
17
Transcript of Managing your Windows Storage Server 2012 R2 Essentials...

\ Managing your Windows Storage Server 2012 R2 Essentials NAS
· Overview of the Dashboard in Windows Server Essentials http://technet.microsoft.com/en-us/library/jj593264.aspx
· Overview of the Launchpad in Windows Server Essentials http://technet.microsoft.com/en-us/library/jj593233.aspx
· Manage Anywhere Access in Windows Server Essentials http://technet.microsoft.com/en-us/library/jj730374.aspx
· Manage Applications in Windows Server Essentials http://technet.microsoft.com/en-us/library/jj593209.aspx
· Manage Backup and Restore in Windows Server Essentials http://technet.microsoft.com/en-us/library/jj713536.aspx
· Manage BranchCache in Windows Server Essentials http://technet.microsoft.com/en-us/library/dn611824.aspx
· Manage Devices in Windows Server Essentials http://technet.microsoft.com/en-us/library/jj730388.aspx
· Manage Digital Media in Windows Server 2012 Essentials http://technet.microsoft.com/en-us/library/jj628151.aspx
· Manage Email Service Integration in Windows Server Essentials http://technet.microsoft.com/en-us/library/jj200131.aspx
· Manage Microsoft Online Services in Windows Server Essentials http://technet.microsoft.com/en-us/library/dn741200.aspx
· Manage Server Folders in Windows Server Essentials http://technet.microsoft.com/en-us/library/jj713503.aspx
· Manage Server Storage in Windows Server Essentials http://technet.microsoft.com/en-us/library/dn550731.aspx
· Manage System Health in Windows Server Essentials http://technet.microsoft.com/en-us/library/jj713532.aspx
· Manage User Accounts in Windows Server Essentials http://technet.microsoft.com/en-us/library/jj713507.aspx
2 3
Getting Started
Get
ting
Sta
rted
\ Getting Started
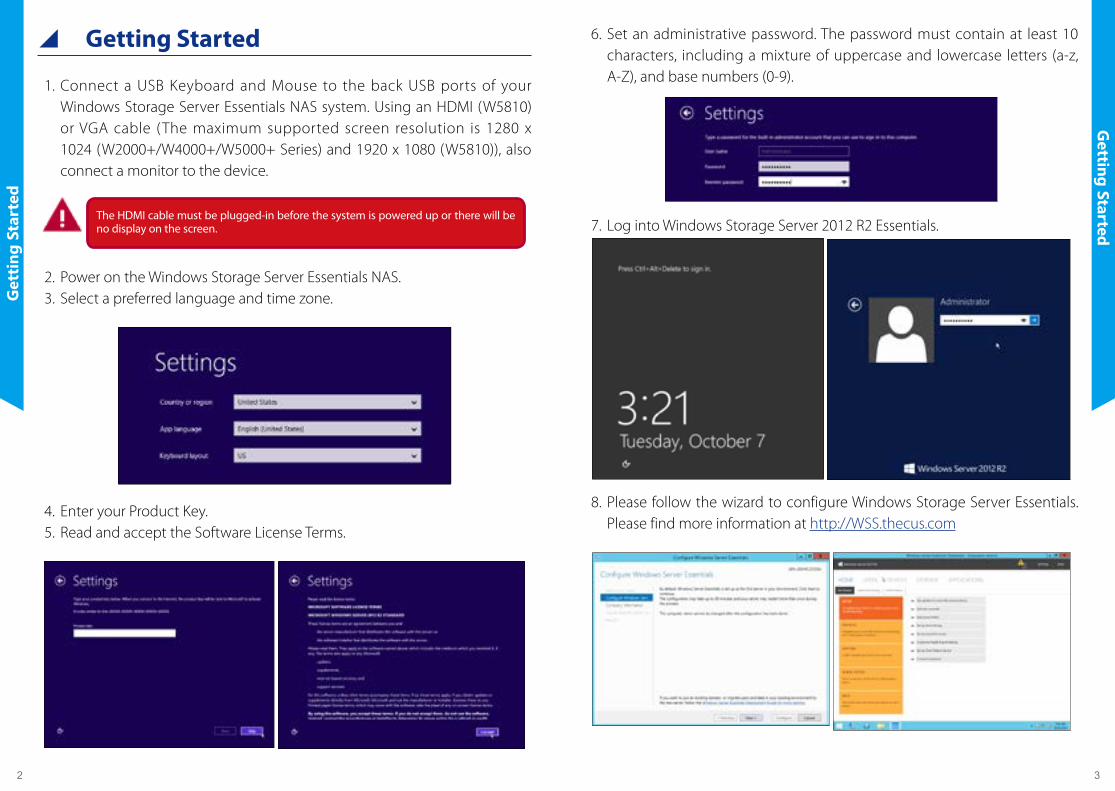
1. Connect a USB Keyboard and Mouse to the back USB ports of your Windows Storage Server Essentials NAS system. Using an HDMI (W5810) or VGA cable (The maximum supported screen resolution is 1280 x 1024 (W2000+/W4000+/W5000+ Series) and 1920 x 1080 (W5810)), also connect a monitor to the device.
The HDMI cable must be plugged-in before the system is powered up or there will be no display on the screen.
2. Power on the Windows Storage Server Essentials NAS.3. Select a preferred language and time zone.
4. Enter your Product Key.5. Read and accept the Software License Terms.
6. Set an administrative password. The password must contain at least 10 characters, including a mixture of uppercase and lowercase letters (a-z, A-Z), and base numbers (0-9).
7. Log into Windows Storage Server 2012 R2 Essentials.
8. Please follow the wizard to configure Windows Storage Server Essentials. Please find more information at http://WSS.thecus.com
4 5
Prise en main
Pris
e en
mai
n
\ Prise en main
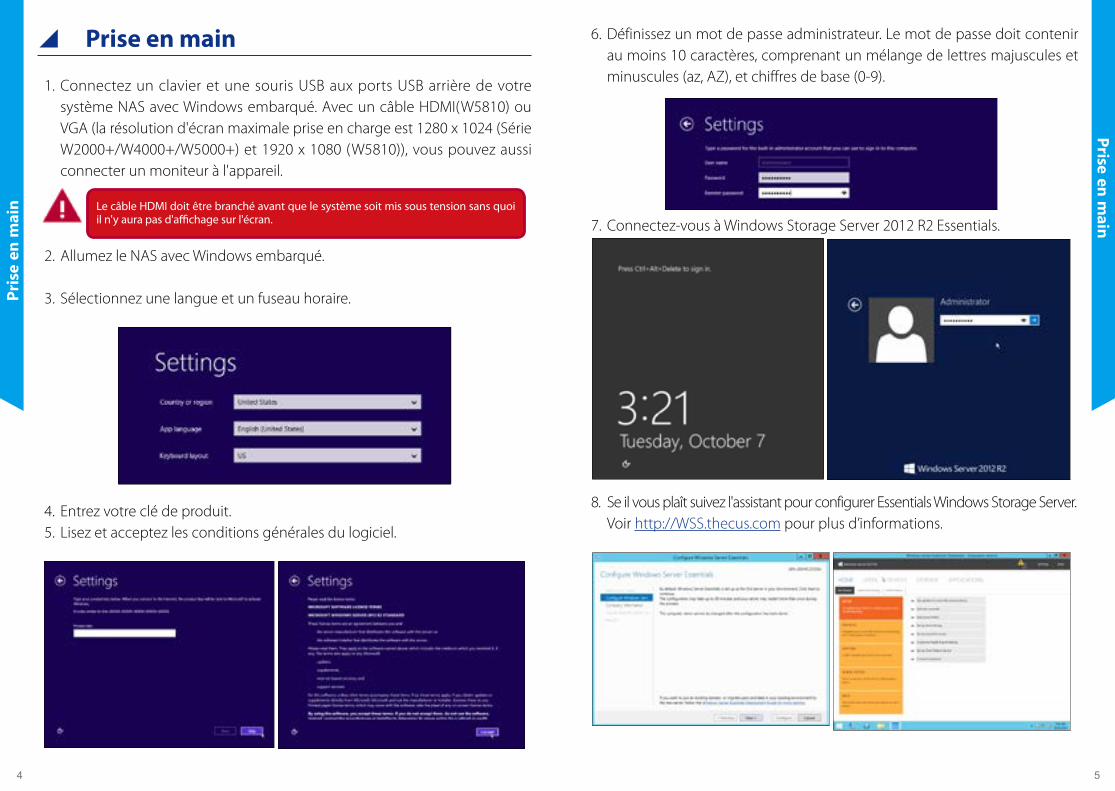
1. Connectez un clavier et une souris USB aux ports USB arrière de votre système NAS avec Windows embarqué. Avec un câble HDMI(W5810) ou VGA (la résolution d'écran maximale prise en charge est 1280 x 1024 (Série W2000+/W4000+/W5000+) et 1920 x 1080 (W5810)), vous pouvez aussi connecter un moniteur à l'appareil.
Le câble HDMI doit être branché avant que le système soit mis sous tension sans quoi il n'y aura pas d'affichage sur l'écran.
2. Allumez le NAS avec Windows embarqué.
3. Sélectionnez une langue et un fuseau horaire.
4. Entrez votre clé de produit.5. Lisez et acceptez les conditions générales du logiciel.
6. Définissez un mot de passe administrateur. Le mot de passe doit contenir au moins 10 caractères, comprenant un mélange de lettres majuscules et minuscules (az, AZ), et chiffres de base (0-9).
7. Connectez-vous à Windows Storage Server 2012 R2 Essentials.
8. Se il vous plaît suivez l'assistant pour configurer Essentials Windows Storage Server. Voir http://WSS.thecus.com pour plus d’informations.
6 7
Erste SchritteEr
ste
Schr
itte
\ Erste Schritte
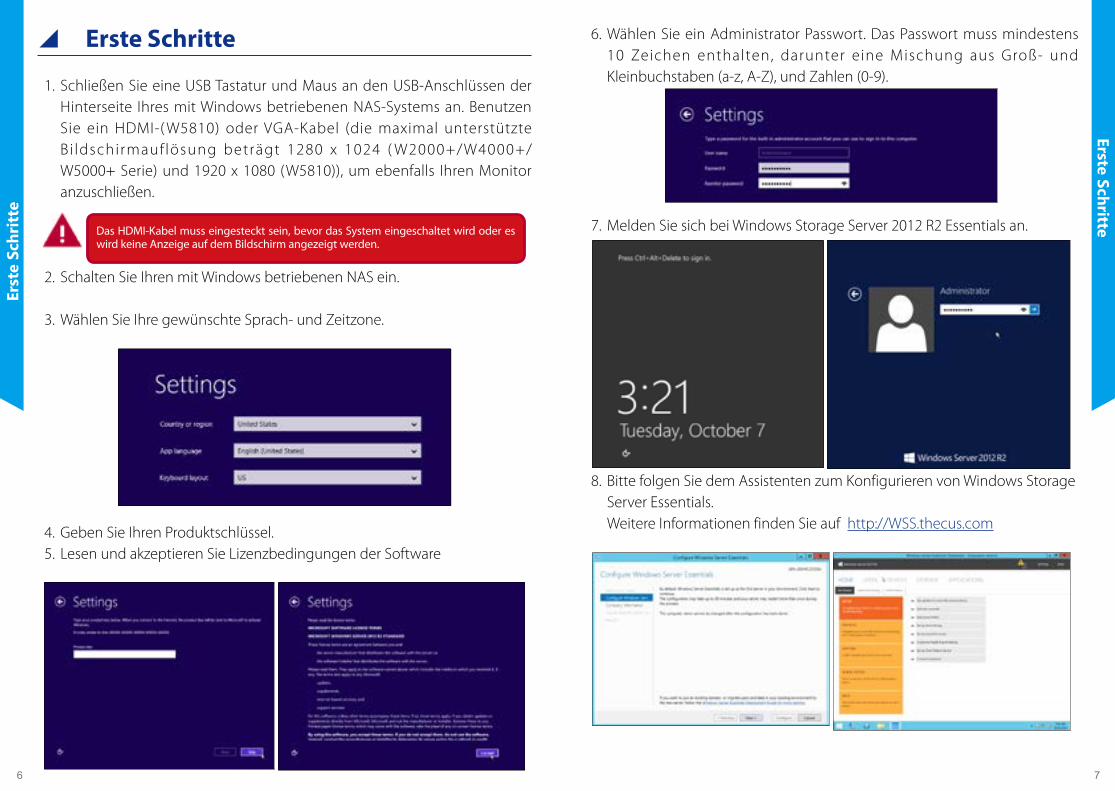
1. Schließen Sie eine USB Tastatur und Maus an den USB-Anschlüssen der Hinterseite Ihres mit Windows betriebenen NAS-Systems an. Benutzen Sie ein HDMI-( W5810) oder VGA-Kabel (die maximal unterstützte Bi ldschirmauf lösung beträgt 1280 x 1024 ( W2000+/W4000+/W5000+ Serie) und 1920 x 1080 (W5810)), um ebenfalls Ihren Monitor anzuschließen.
Das HDMI-Kabel muss eingesteckt sein, bevor das System eingeschaltet wird oder es wird keine Anzeige auf dem Bildschirm angezeigt werden.
2. Schalten Sie Ihren mit Windows betriebenen NAS ein.
3. Wählen Sie Ihre gewünschte Sprach- und Zeitzone.
4. Geben Sie Ihren Produktschlüssel.5. Lesen und akzeptieren Sie Lizenzbedingungen der Software
6. Wählen Sie ein Administrator Passwort. Das Passwort muss mindestens 10 Zeichen enthalten, darunter eine Mischung aus Groß- und Kleinbuchstaben (a-z, A-Z), und Zahlen (0-9).
7. Melden Sie sich bei Windows Storage Server 2012 R2 Essentials an.
8. Bitte folgen Sie dem Assistenten zum Konfigurieren von Windows Storage Server Essentials. Weitere Informationen finden Sie auf http://WSS.thecus.com
8 9
PresentazionePr
esen
tazi
one
\ Presentazione
1. Collegare una tastiera e un mouse USB alle porte USB posteriori del sistema NAS Windows Embedded. Tramite cavo HDMI (W5810) o VGA (La risoluzione massima dello schermo supportata è di 1280 x 1024 (Serie W2000+/W4000+/W5000+) e 1920 x 1080 (W5810)), collegare inoltre un monitor al dispositivo.
Il HDMI deve essere inserito prima che il sistema viene acceso o non ci sarà nessuna visualizzazione sullo schermo.
2. Accendere il NAS Windows Embedded.
3. Selezionare la lingua desiderata e il fuso orario.
4. Immettere il codice Product Key.5. Leggere e accettare i termini di licenza del software.
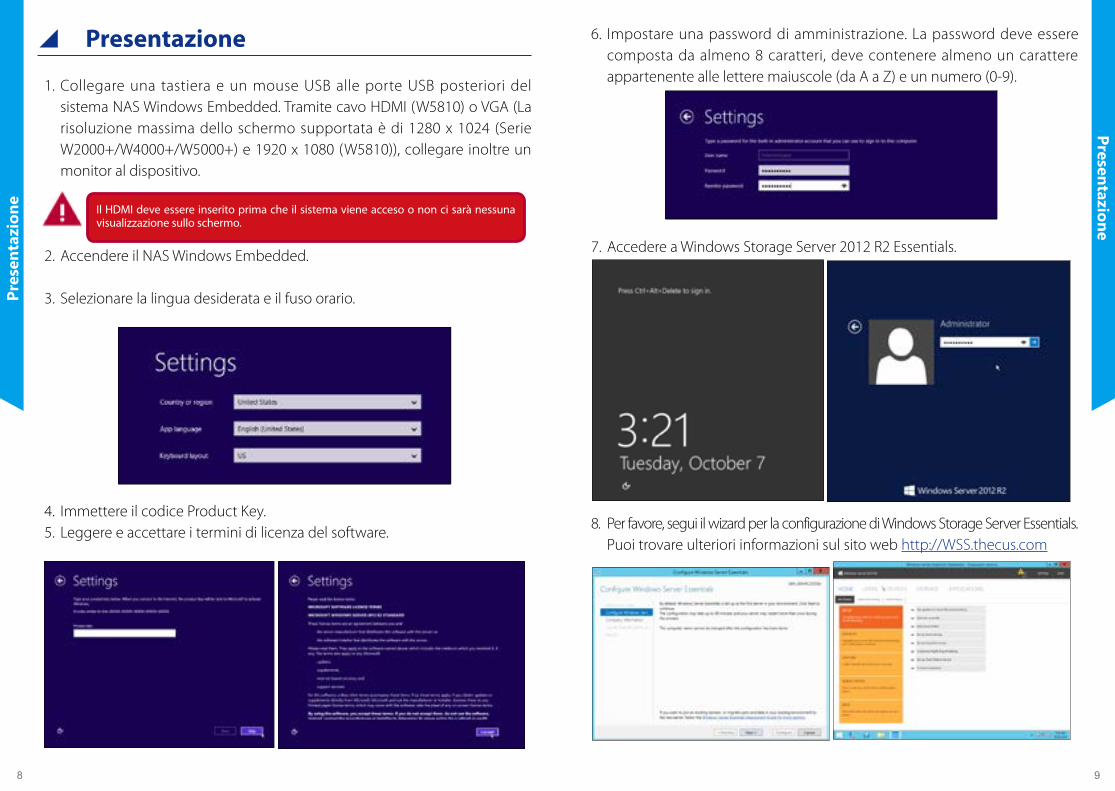
6. Impostare una password di amministrazione. La password deve essere composta da almeno 8 caratteri, deve contenere almeno un carattere appartenente alle lettere maiuscole (da A a Z) e un numero (0-9).
7. Accedere a Windows Storage Server 2012 R2 Essentials.
8. Per favore, segui il wizard per la configurazione di Windows Storage Server Essentials. Puoi trovare ulteriori informazioni sul sito web http://WSS.thecus.com

10 11
Начало работы
Нач
ало
рабо
ты
\ Начало работы
1. Подключите USB-клавиатуру и мышь к портам USB на задней панели вашего Windows Storage Server Essentials NAS system. С помощью HDMI (W5810) или VGA кабеля (Максимально поддерживаемое разрешение экрана 1280х1024 (Серия W2000+/W4000+/W5000+) и 1920 x 1080 (W5810)), также подключите монитор к устройству.
Кабель HDMI должен быть подсоединен до того, как система подключается к сети, в противном случае на мониторе не будет изображения.
2. Включите Windows Storage Server Essentials NAS.
3. Выберите язык и часовой пояс.
4. Введите ключ продукта.5. Прочтите и примите условия лицензии на программное обеспечение.
6. Установите пароль администратора. Пароль должен содержать не менее 10 символов, включая строчные и прописные буквы (AZ, AZ), любые цифры (0-9).
7. Войдите в сервере Windows Storage 2012 R2 Essentials.
8. Пожалуйста, следуйте инструкциям для настройки Windows Storage Server Essentials. Более подробная информация на http://WSS.thecus.com
12 13
Procedimientos iniciales
Proc
edim
ient
os in
icia
les
\ Procedimientos iniciales
1. Conecta un teclado y ratón en los puertos USB traseros de su Windows Storage Server Essentials NAS. A través de un cable HDMI(W5810) o VGA (Permite una resolución de pantalla máxima de 1280 x 1024 (Series W2000+/W4000+/W5000+) y 1920 x 1080 (W5810)), conecta también un monitor al dispositivo.
El cable HDMI debe estar enchufado antes de encender el sistema o no aparecerá la imagen en la pantalla.
2. Enciende el Windows Storage Server Essentials NAS.
3. Selecciona tu idioma y la franja horaria.
4. Ingrese su clave de producto.5. Lea y acepte los términos de licencia de software.
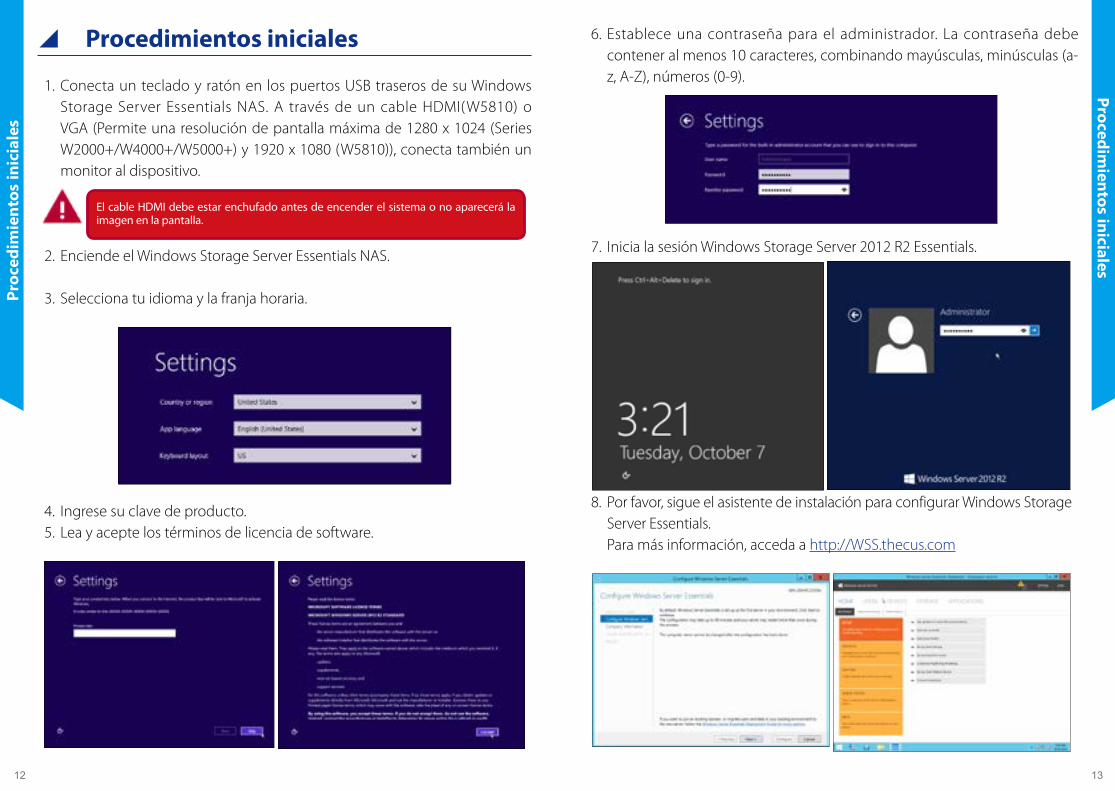
6. Establece una contraseña para el administrador. La contraseña debe contener al menos 10 caracteres, combinando mayúsculas, minúsculas (a-z, A-Z), números (0-9).
7. Inicia la sesión Windows Storage Server 2012 R2 Essentials.
8. Por favor, sigue el asistente de instalación para configurar Windows Storage Server Essentials. Para más información, acceda a http://WSS.thecus.com
14 15
はじめに
はじ
めに
\\ はじめに1. W i n d o w s S t o r a g e S e r v e r E s s e n t i a l s N A Sシス
テ ム の 裏 側 の U S B ポ ー ト に キ ー ボ ー ド と
マウスを接続します。また、HDMI (W5810)もしくはVGAにモニ
ターを接続します(最大解像度は1280x1024(W2000+/W4000+/W5000+シリーズ)、1920x1080(W5810)です。)
HDMIケーブルはシステム起動前に接続してください。起動後ではスクリーンに表示されません。
2. Windows Storage Server Essentials NASの電源をつけます。
3. 言語とタイムゾーンを設定します。
4. プロダクトキーを入力します。
5. ソフトウェアライセンス条項を読んでから、同意します。
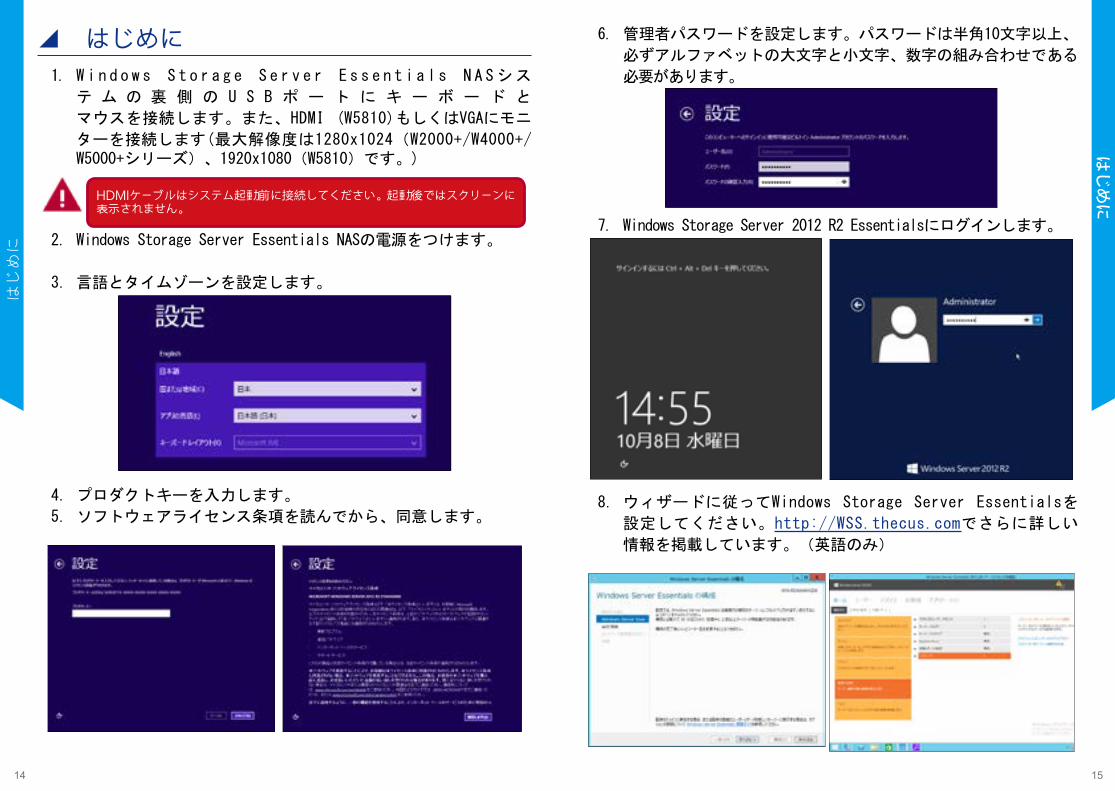
6. 管理者パスワードを設定します。パスワードは半角10文字以上、
必ずアルファベットの大文字と小文字、数字の組み合わせである
必要があります。
7. Windows Storage Server 2012 R2 Essentialsにログインします。
8. ウィザードに従ってWindows Storage Server Essentialsを
設定してください。http://WSS.thecus.comでさらに詳しい
情報を掲載しています。(英語のみ)
16 17
踏出第一步
踏出
第一
步
\\ 踏出第一步1. 将您的USB键盘和鼠标连接至WindowsStorageServer
Essen t i a l s NAS背板的USB连接端口,接着您可透过HDMI(W5810)或VGA端口(所支援的最高显示器解析度为1280 x 1024 (W2000+/W4000+/W5000+系列)及1920x1080(W5810))与您的显示器进行连接。
使用HDMI线時,请于开机前确认已连接至显示器,若于开机后才进行连接,影像可能会无法显示。
2. 开启WindowsStorageServerEssentialsNAS电源。
3. 选择您喜欢的语言及时区。
4. 输入您的产品密钥。5. 阅读并同意软体授权说明书。
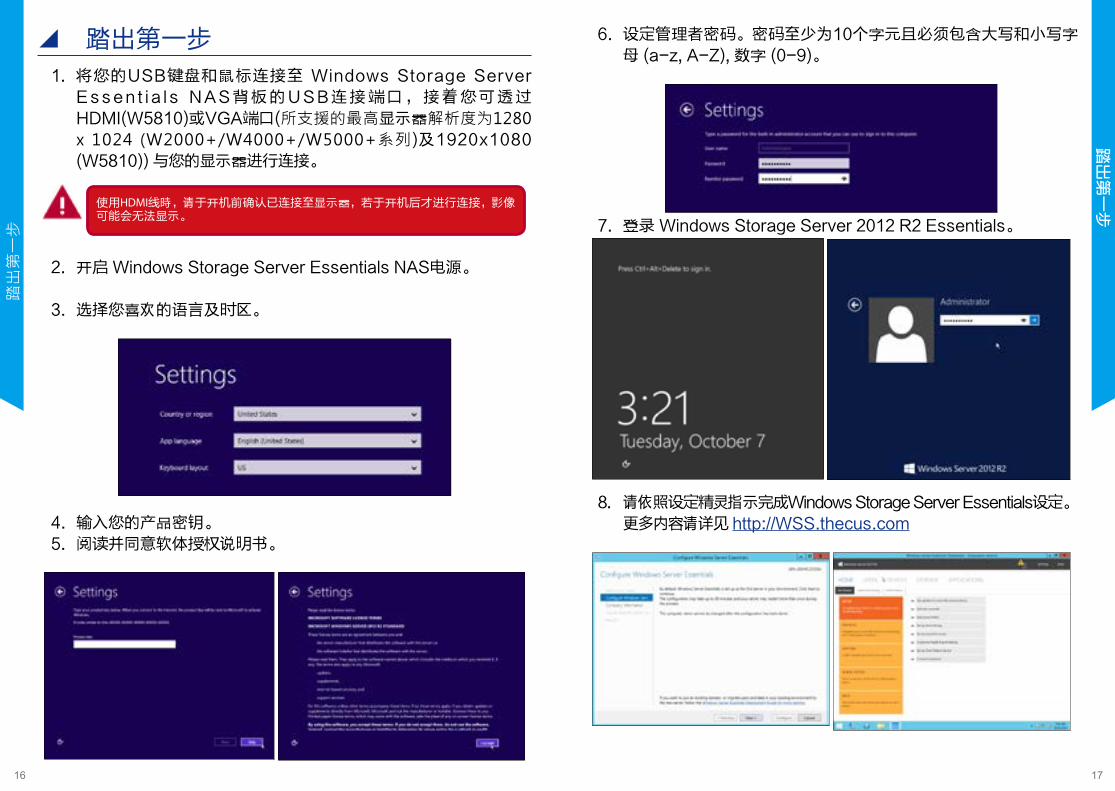
6. 设定管理者密码。密码至少为10个字元且必须包含大写和小写字母(a-z,A-Z),数字(0-9)。
7. 登录WindowsStorageServer2012R2Essentials。
8. 请依照设定精灵指示完成WindowsStorageServerEssentials设定。更多内容请详见http://WSS.thecus.com
18 19
踏出第一步
踏出
第一
步
\ 踏出第一步1. 將您的USB鍵盤和滑鼠連接至 Windows Storage Ser ver
Essentials NAS背板的USB連接埠,接著您可透過HDMI(W5810)或VGA(所支援的最高螢幕解析度為1280 x 1024 (W2000+/W4000+/W5000+系列)及1920x1080 (W5810))與您的螢幕進行連接。
使用HDMI線時,請於開機前確認已連接至螢幕,若於開機後才進行連接,影像可能會無法顯示。
2. 開啟 Windows Storage Server Essentials NAS電源。
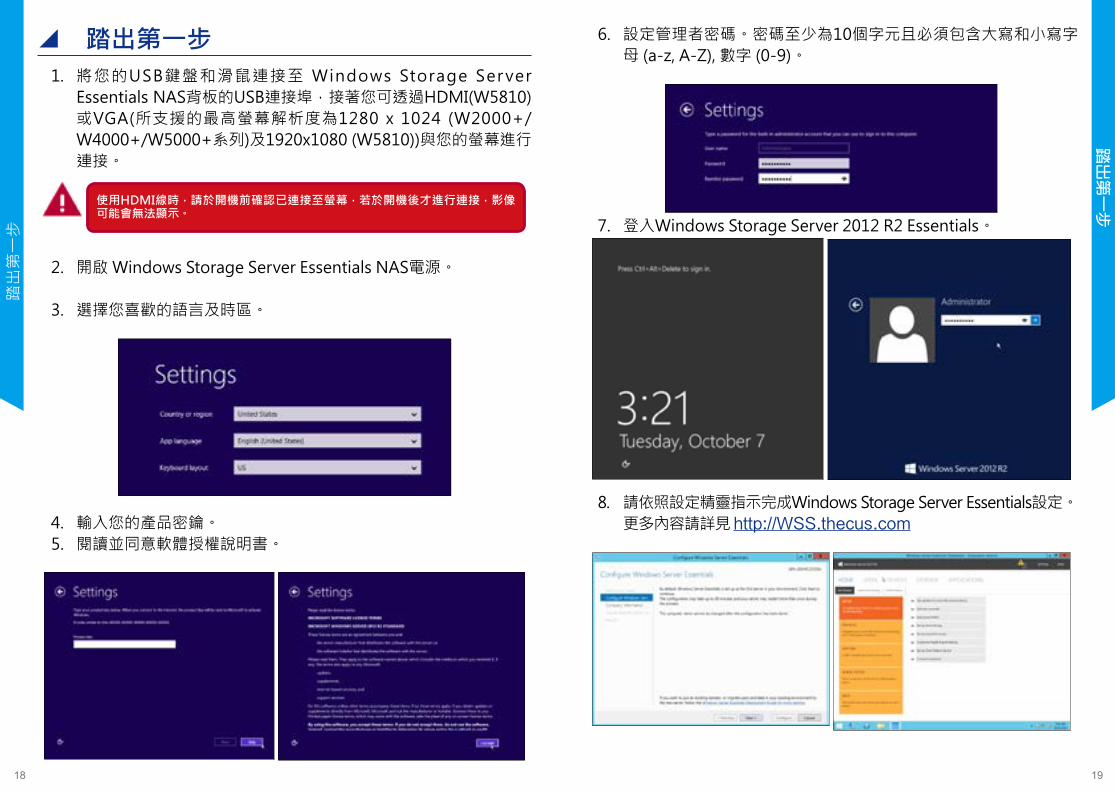
3. 選擇您喜歡的語言及時區。
4. 輸入您的產品密鑰。5. 閱讀並同意軟體授權說明書。
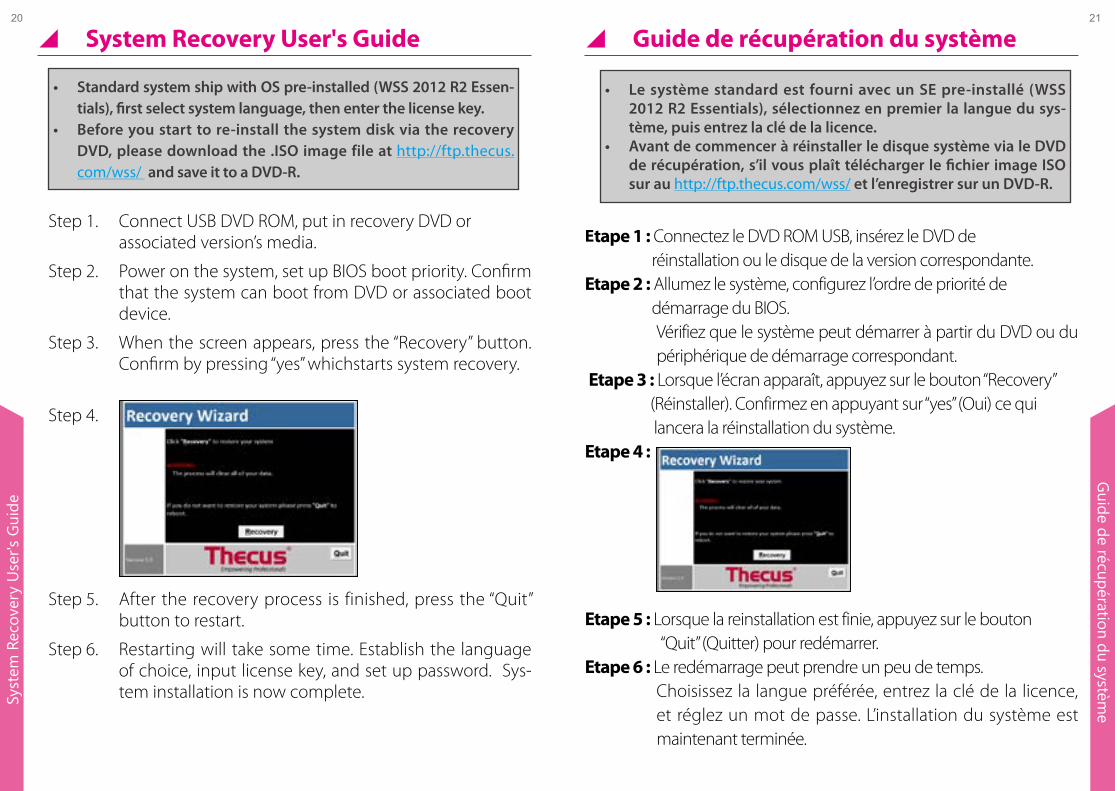
6. 設定管理者密碼。密碼至少為10個字元且必須包含大寫和小寫字母 (a-z, A-Z), 數字 (0-9)。
7. 登入Windows Storage Server 2012 R2 Essentials。
8. 請依照設定精靈指示完成Windows Storage Server Essentials設定。 更多內容請詳見 http://WSS.thecus.com
20 21
20 21G
uide de récupération du systèmeSy
stem
Rec
over
y U
ser's
Gui
de
\ System Recovery User's Guide
Step 1. Connect USB DVD ROM, put in recovery DVD or associated version’s media.
Step 2. Power on the system, set up BIOS boot priority. Confirm that the system can boot from DVD or associated boot device.
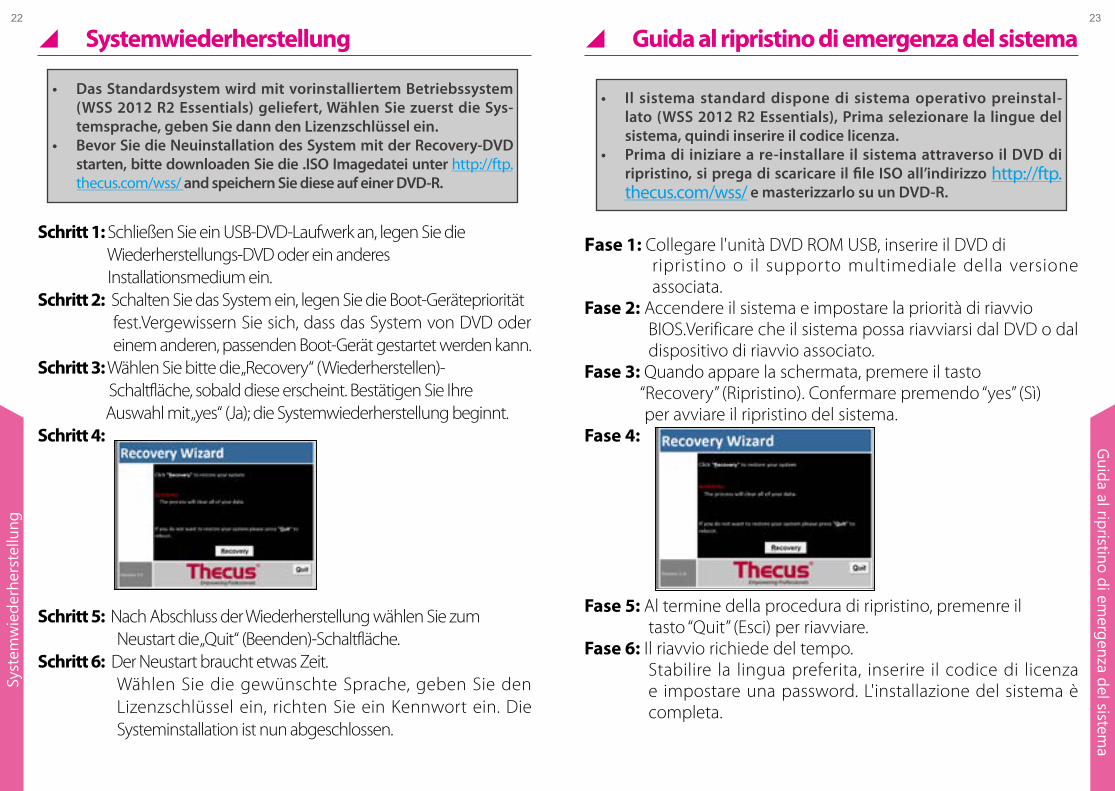
Step 3. When the screen appears, press the “Recovery” button. Confirm by pressing “yes” whichstarts system recovery.
Step 4.
Step 5. After the recovery process is finished, press the “Quit” button to restart.
Step 6. Restarting will take some time. Establish the language of choice, input license key, and set up password. Sys-tem installation is now complete.
• Standard system ship with OS pre-installed (WSS 2012 R2 Essen-tials), first select system language, then enter the license key.
• Before you start to re-install the system disk via the recovery DVD, please download the .ISO image file at http://ftp.thecus.com/wss/ and save it to a DVD-R.
\ Guide de récupération du système
Etape 1 : Connectez le DVD ROM USB, insérez le DVD de réinstallation ou le disque de la version correspondante.Etape 2 : Allumez le système, configurez l’ordre de priorité de démarrage du BIOS.
Vérifiez que le système peut démarrer à partir du DVD ou du périphérique de démarrage correspondant.
Etape 3 : Lorsque l’écran apparaît, appuyez sur le bouton “Recovery” (Réinstaller). Confirmez en appuyant sur “yes” (Oui) ce qui lancera la réinstallation du système.
Etape 4 :
Etape 5 : Lorsque la reinstallation est finie, appuyez sur le bouton “Quit” (Quitter) pour redémarrer.
Etape 6 : Le redémarrage peut prendre un peu de temps.Choisissez la langue préférée, entrez la clé de la licence, et réglez un mot de passe. L’installation du système est maintenant terminée.
• Le système standard est fourni avec un SE pre-installé (WSS 2012 R2 Essentials), sélectionnez en premier la langue du sys-tème, puis entrez la clé de la licence.
• Avant de commencer à réinstaller le disque système via le DVD de récupération, s’il vous plaît télécharger le fichier image ISO sur au http://ftp.thecus.com/wss/ et l’enregistrer sur un DVD-R.
22 23
22 23G
uida al ripristino di emergenza del sistem
aSy
stem
wie
derh
erst
ellu
ng
\ Systemwiederherstellung
Schritt 1: Schließen Sie ein USB-DVD-Laufwerk an, legen Sie die Wiederherstellungs-DVD oder ein anderes Installationsmedium ein.Schritt 2: Schalten Sie das System ein, legen Sie die Boot-Gerätepriorität
fest.Vergewissern Sie sich, dass das System von DVD oder einem anderen, passenden Boot-Gerät gestartet werden kann.
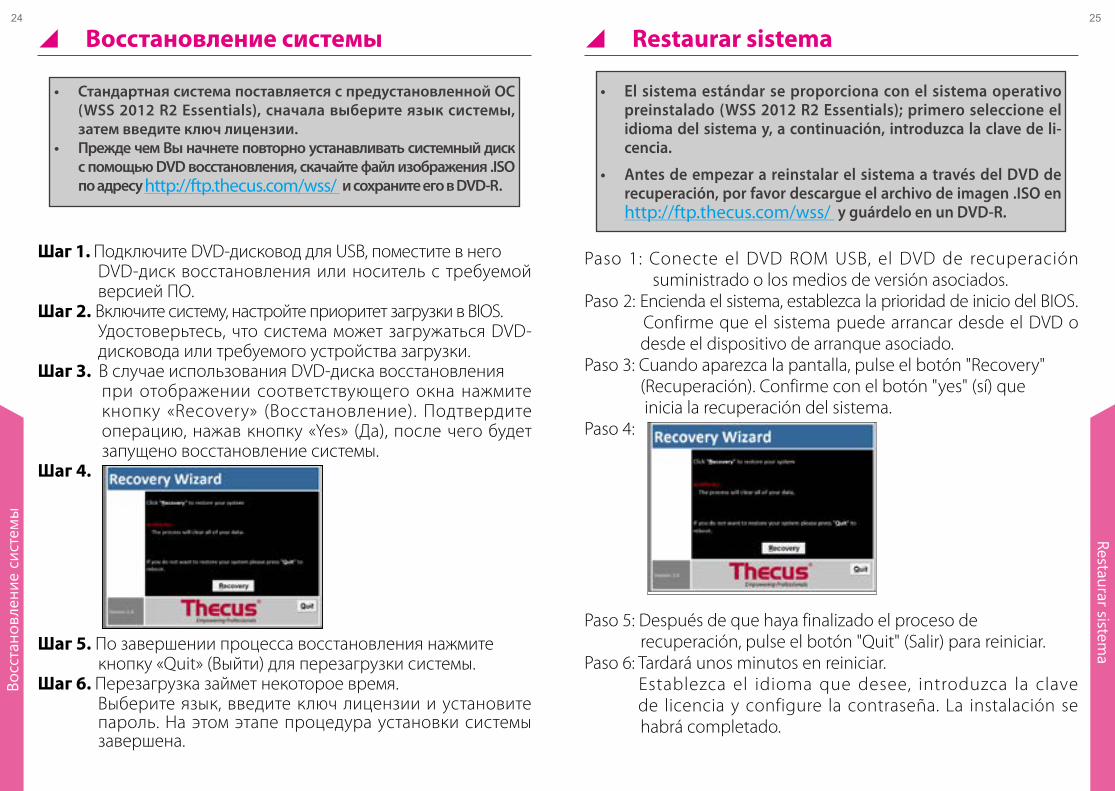
Schritt 3: Wählen Sie bitte die „Recovery“ (Wiederherstellen)- Schaltfläche, sobald diese erscheint. Bestätigen Sie Ihre Auswahl mit „yes“ (Ja); die Systemwiederherstellung beginnt.Schritt 4:
Schritt 5: Nach Abschluss der Wiederherstellung wählen Sie zum Neustart die „Quit“ (Beenden)-Schaltfläche.
Schritt 6: Der Neustart braucht etwas Zeit.Wählen Sie die gewünschte Sprache, geben Sie den Lizenzschlüssel ein, richten Sie ein Kennwort ein. Die Systeminstallation ist nun abgeschlossen.
• Das Standardsystem wird mit vorinstalliertem Betriebssystem (WSS 2012 R2 Essentials) geliefert, Wählen Sie zuerst die Sys-temsprache, geben Sie dann den Lizenzschlüssel ein.
• Bevor Sie die Neuinstallation des System mit der Recovery-DVD starten, bitte downloaden Sie die .ISO Imagedatei unter http://ftp.thecus.com/wss/ and speichern Sie diese auf einer DVD-R.
\ Guida al ripristino di emergenza del sistema
Fase 1: Collegare l'unità DVD ROM USB, inserire il DVD di ripristino o il supporto multimediale della versione associata.
Fase 2: Accendere il sistema e impostare la priorità di riavvio BIOS.Verificare che il sistema possa riavviarsi dal DVD o dal dispositivo di riavvio associato.
Fase 3: Quando appare la schermata, premere il tasto “Recovery” (Ripristino). Confermare premendo “yes” (Sì) per avviare il ripristino del sistema.Fase 4:
Fase 5: Al termine della procedura di ripristino, premenre il tasto “Quit” (Esci) per riavviare.
Fase 6: Il riavvio richiede del tempo.Stabilire la lingua preferita, inserire il codice di licenza e impostare una password. L'installazione del sistema è completa.
• Il sistema standard dispone di sistema operativo preinstal-lato (WSS 2012 R2 Essentials), Prima selezionare la lingue del sistema, quindi inserire il codice licenza.
• Prima di iniziare a re-installare il sistema attraverso il DVD di ripristino, si prega di scaricare il file ISO all’indirizzo http://ftp.thecus.com/wss/ e masterizzarlo su un DVD-R.
24 25
24 25Restaurar sistem
aВо
сста
новл
ение
сис
тем
ы
\ Восстановление системы
Шаг 1. Подключите DVD-дисковод для USB, поместите в него DVD-диск восстановления или носитель с требуемой версией ПО.
Шаг 2. Включите систему, настройте приоритет загрузки в BIOS.Удостоверьтесь, что система может загружаться DVD-дисковода или требуемого устройства загрузки.
Шаг 3. В случае использования DVD-диска восстановления при отображении соответствующего окна нажмите кнопку «Recovery» (Восстановление). Подтвердите операцию, нажав кнопку «Yes» (Да), после чего будет запущено восстановление системы.
Шаг 4.
Шаг 5. По завершении процесса восстановления нажмите кнопку «Quit» (Выйти) для перезагрузки системы.
Шаг 6. Перезагрузка займет некоторое время.Выберите язык, введите ключ лицензии и установите пароль. На этом этапе процедура установки системы завершена.
• Стандартная система поставляется с предустановленной ОС (WSS 2012 R2 Essentials), сначала выберите язык системы, затем введите ключ лицензии.
• Прежде чем Вы начнете повторно устанавливать системный диск с помощью DVD восстановления, скачайте файл изображения .ISO по адресу http://ftp.thecus.com/wss/ и сохраните его в DVD-R.
\ Restaurar sistema
Paso 1: Conecte el DVD ROM USB, el DVD de recuperación suministrado o los medios de versión asociados.Paso 2: Encienda el sistema, establezca la prioridad de inicio del BIOS. Confirme que el sistema puede arrancar desde el DVD o desde el dispositivo de arranque asociado.Paso 3: Cuando aparezca la pantalla, pulse el botón "Recovery" (Recuperación). Confirme con el botón "yes" (sí) que inicia la recuperación del sistema.Paso 4:
Paso 5: Después de que haya finalizado el proceso de recuperación, pulse el botón "Quit" (Salir) para reiniciar.Paso 6: Tardará unos minutos en reiniciar. Establezca el idioma que desee, introduzca la clave de licencia y configure la contraseña. La instalación se habrá completado.
• El sistema estándar se proporciona con el sistema operativo preinstalado (WSS 2012 R2 Essentials); primero seleccione el idioma del sistema y, a continuación, introduzca la clave de li-cencia.
• Antes de empezar a reinstalar el sistema a través del DVD de recuperación, por favor descargue el archivo de imagen .ISO en http://ftp.thecus.com/wss/ y guárdelo en un DVD-R.
26 27
26 27系
统还
原操
作步
骤シス
テム
の復
元
\ システムの復元
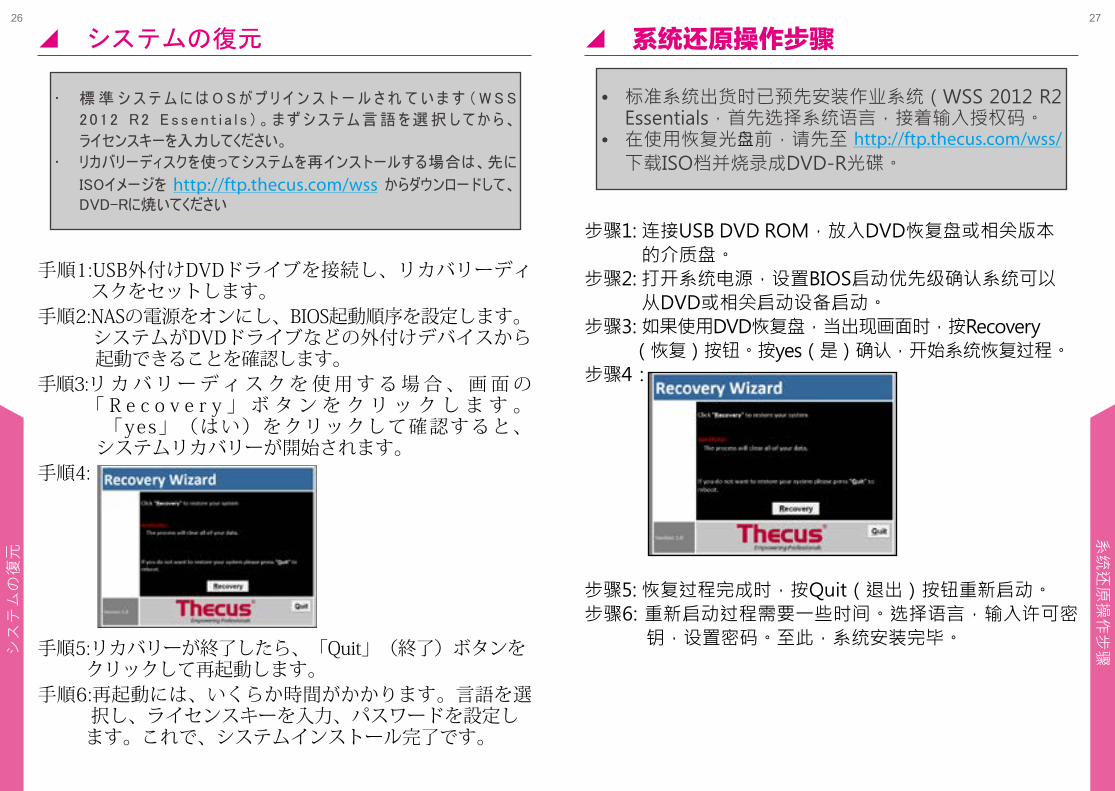
手順1:USB外付けDVDドライブを接続し、リカバリーディ スクをセットします。手順2:NASの電源をオンにし、BIOS起動順序を設定します。 システムがDVDドライブなどの外付けデバイスから 起動できることを確認します。手順3:リカバリーディスクを使用する場合、画面の 「 R e c o v e r y 」 ボ タンをクリックします。 「yes」(はい)をクリックして確認すると、 システムリカバリーが開始されます。手順4:
手順5:リカバリーが終了したら、「Quit」(終了)ボタンを クリックして再起動します。手順6:再起動には、いくらか時間がかかります。言語を選 択し、ライセンスキーを入力、パスワードを設定し ます。これで、システムインストール完了です。
• 標 準 シ ス テ ム に は O S が プ リ イ ン ス ト ー ル さ れ て い ま す ( W S S
2012 R2 Essen t i a l s )。まずシステム言語を選択してから、
ライセンスキーを入力してください。
• リカバリーディスクを使ってシステムを再インストールする場合は、先に
ISOイメージを http://ftp.thecus.com/wss からダウンロードして、
DVD-Rに焼いてください
\\ 系统还原操作步骤
• 标准系统出货时已预先安装作业系统(WSS 2012 R2 Essentials,首先选择系统语言,接着输入授权码。
• 在使用恢复光盘前,请先至 http://ftp.thecus.com/wss/ 下载ISO档并烧录成DVD-R光碟。
步骤1: 连接USB DVD ROM,放入DVD恢复盘或相关版本 的介质盘。步骤2: 打开系统电源,设置BIOS启动优先级确认系统可以 从DVD或相关启动设备启动。步骤3: 如果使用DVD恢复盘,当出现画面时,按Recovery (恢复)按钮。按yes(是)确认,开始系统恢复过程。步骤4:
步骤5: 恢复过程完成时,按Quit(退出)按钮重新启动。步骤6: 重新启动过程需要一些时间。选择语言,输入许可密 钥,设置密码。至此,系统安装完毕。
28
28系
統還
原操
作步
驟
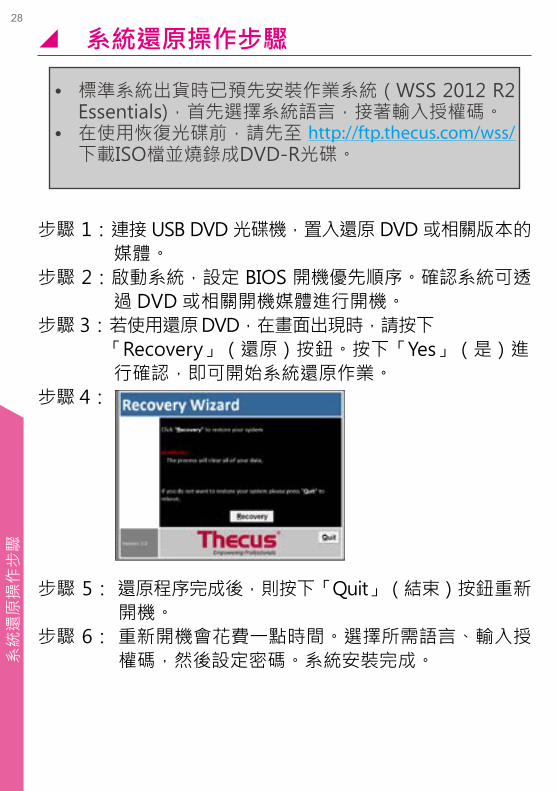
\ 系統還原操作步驟
步驟 1:連接 USB DVD 光碟機,置入還原 DVD 或相關版本的 媒體。步驟 2:啟動系統,設定 BIOS 開機優先順序。確認系統可透 過 DVD 或相關開機媒體進行開機。步驟 3:若使用還原 DVD,在畫面出現時,請按下 「Recovery」(還原)按鈕。按下「Yes」(是)進 行確認,即可開始系統還原作業。步驟 4:
步驟 5: 還原程序完成後,則按下「Quit」(結束)按鈕重新 開機。步驟 6: 重新開機會花費一點時間。選擇所需語言、輸入授 權碼,然後設定密碼。系統安裝完成。
• 標準系統出貨時已預先安裝作業系統(WSS 2012 R2 Essentials),首先選擇系統語言,接著輸入授權碼。
• 在使用恢復光碟前,請先至 http://ftp.thecus.com/wss/ 下載ISO檔並燒錄成DVD-R光碟。
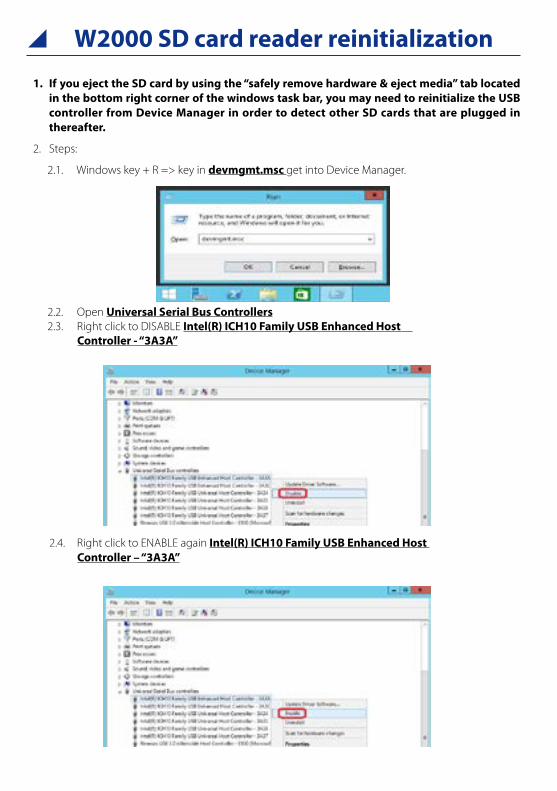
\ W2000 SD card reader reinitialization
1. If you eject the SD card by using the “safely remove hardware & eject media” tab located in the bottom right corner of the windows task bar, you may need to reinitialize the USB controller from Device Manager in order to detect other SD cards that are plugged in thereafter.
2. Steps:
2.1. Windows key + R => key in devmgmt.msc get into Device Manager.
2.2. Open Universal Serial Bus Controllers 2.3. Right click to DISABLE Intel(R) ICH10 Family USB Enhanced Host Controller - “3A3A”
2.4. Right click to ENABLE again Intel(R) ICH10 Family USB Enhanced Host Controller – “3A3A”


![Skaffold - storage.googleapis.com · [getting-started getting-started] Hello world! [getting-started getting-started] Hello world! [getting-started getting-started] Hello world! 5.](https://static.fdocuments.in/doc/165x107/5ec939f2a76a033f091c5ac7/skaffold-getting-started-getting-started-hello-world-getting-started-getting-started.jpg)