Managing the bank register -...
6
Quick lesson For more information, see Help > Contents > Bank register. Goal: Learn how to reconcile your bank register to your bank statement in Ajera. Managing the bank register In this quick lesson Step 1: Enter an adjusting entry – a bank transfer 2 Step 2: Enter an adjusting entry – a deposit 4 Step 3: Enter an adjusting entry – a voided check 5 Step 4: Reconcile the bank account 6 When do you reconcile the bank register? After you’ve done all of the following: Received your bank statement. Confirmed that your vendor payments and client receipts are entered into Ajera. Entered any additional adjustments for bank transfers, Electronic Funds Transfers, bank charges, and interest paid or earned. This quick lesson shows you how to make three kinds of adjusting entries – a bank transfer, deposit, and voided check – and how to reconcile the bank register afterward.
Transcript of Managing the bank register -...
Quick lesson For more information, see Help > Contents > Bank register.
Goal: Learn how to reconcile your bank register to your bank statement in Ajera.
Managing the bank register
In this quick lesson Step 1: Enter an adjusting entry – a bank transfer 2 Step 2: Enter an adjusting entry – a deposit 4 Step 3: Enter an adjusting entry – a voided check 5 Step 4: Reconcile the bank account 6
When do you reconcile the bank register?
After you’ve done all of the following:
Received your bank statement.
Confirmed that your vendor payments and client receipts are entered into Ajera.
Entered any additional adjustments for bank transfers, Electronic Funds Transfers, bank charges, and interest paid or earned.
This quick lesson shows you how to make three kinds of adjusting entries – a bank transfer, deposit, and voided check – and how to reconcile the bank register afterward.
2
Quick lesson: Managing the bank register For more information, see Help > Contents > Bank register.
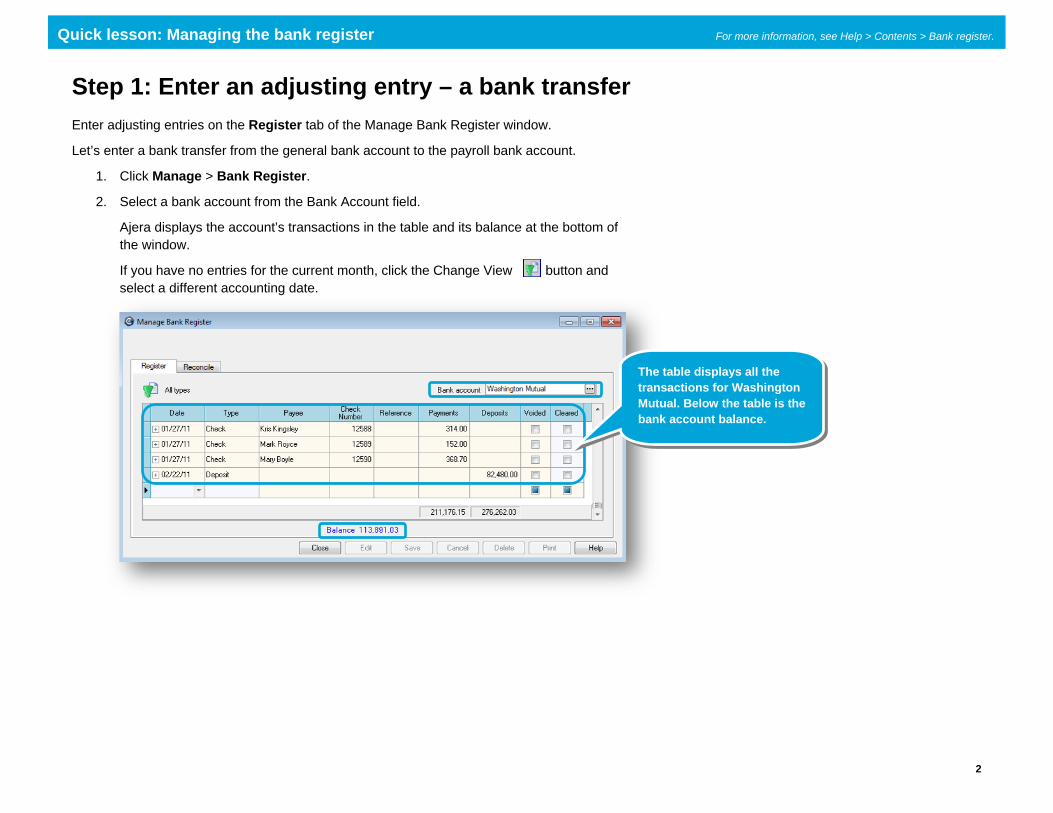
Step 1: Enter an adjusting entry – a bank transfer Enter adjusting entries on the Register tab of the Manage Bank Register window.
Let’s enter a bank transfer from the general bank account to the payroll bank account.
1. Click Manage > Bank Register.
2. Select a bank account from the Bank Account field.
Ajera displays the account’s transactions in the table and its balance at the bottom of the window.
If you have no entries for the current month, click the Change View button and select a different accounting date.
The table displays all the transactions for Washington Mutual. Below the table is the bank account balance.
3
Quick lesson: Managing the bank register For more information, see Help > Contents > Bank register.
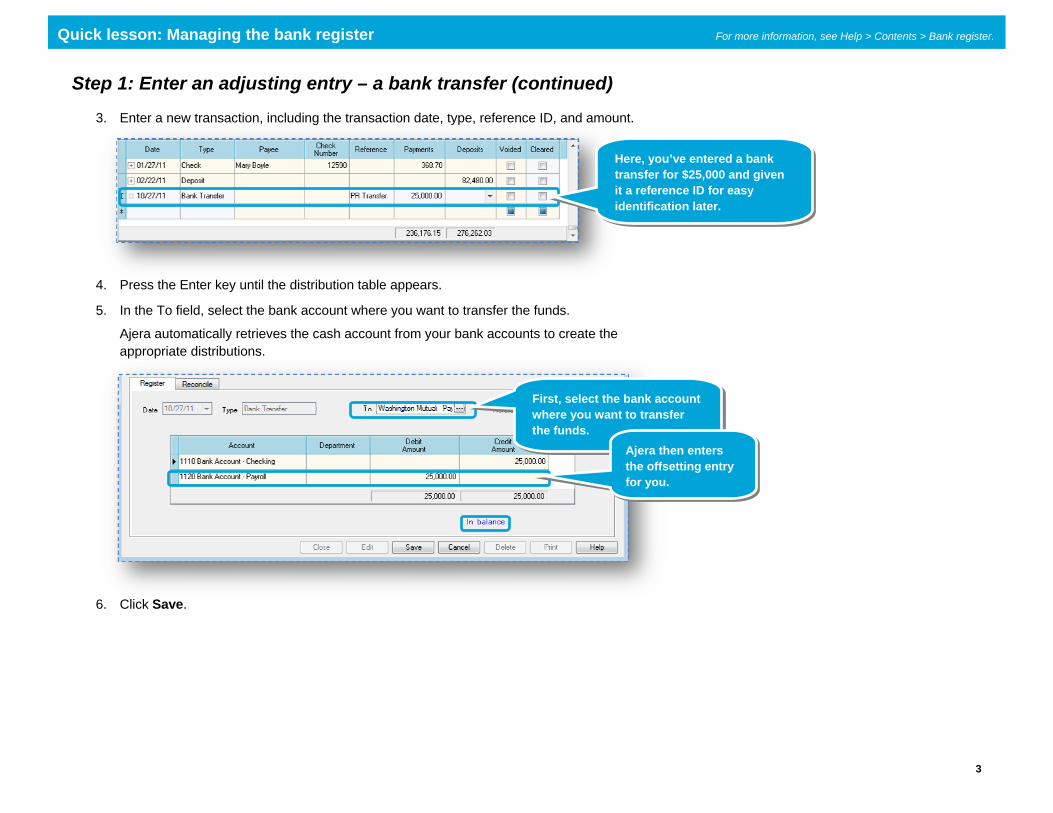
Step 1: Enter an adjusting entry – a bank transfer (continued)
3. Enter a new transaction, including the transaction date, type, reference ID, and amount.
4. Press the Enter key until the distribution table appears.
5. In the To field, select the bank account where you want to transfer the funds.
Ajera automatically retrieves the cash account from your bank accounts to create the appropriate distributions.
6. Click Save.
Here, you’ve entered a bank transfer for $25,000 and given it a reference ID for easy identification later.
First, select the bank account where you want to transfer the funds.
Ajera then enters the offsetting entry for you.

4
Quick lesson: Managing the bank register For more information, see Help > Contents > Bank register.
Step 2: Enter an adjusting entry – a deposit Let’s enter a deposit for the sale of an asset. It is recorded on the bank statement as an Electronic Funds Transfer.
1. On the Register tab, enter the transaction date, type, reference ID, and amount.
2. Press the Enter key until the distribution table appears.
3. In the first row of the distribution table, Ajera automatically displays the cash account from the bank account.
In the second row, select the account and, if needed, the department. If you are unsure of what account to select, please contact your CPA.
4. Click Save.
Here, you’ve entered an EFT deposit for $3,200 and given it a reference ID.
Make the offsetting entry here. You’ve selected the Gain/Loss Sale of Asset account and the Admin department.
If you wanted to distribute the amount among different departments, you would select an allocated account. To learn more, see the Setting up chart of accounts and departments quick lesson.

5
Quick lesson: Managing the bank register For more information, see Help > Contents > Bank register.
Step 3: Enter an adjusting entry – a voided check Let’s now record a voided check for audit purposes. You issued a manual check but made an error when writing the check and now need to record the voided check number.
1. On the Register tab, enter the transaction date, type, payee, and check number.
2. Press the Enter key. Notice that Ajera automatically selects the Voided and Cleared check boxes.
3. Click Save.
Here, you’ve entered a voided check for check 12586 to Willamette Office Supply.
Note: Although you select Void Check from the Type field, Ajera changes it to Check after you enter the check number.
6
Quick lesson: Managing the bank register For more information, see Help > Contents > Bank register.
Summary You now know to make adjusting entries and to reconcile your bank account in the bank register.
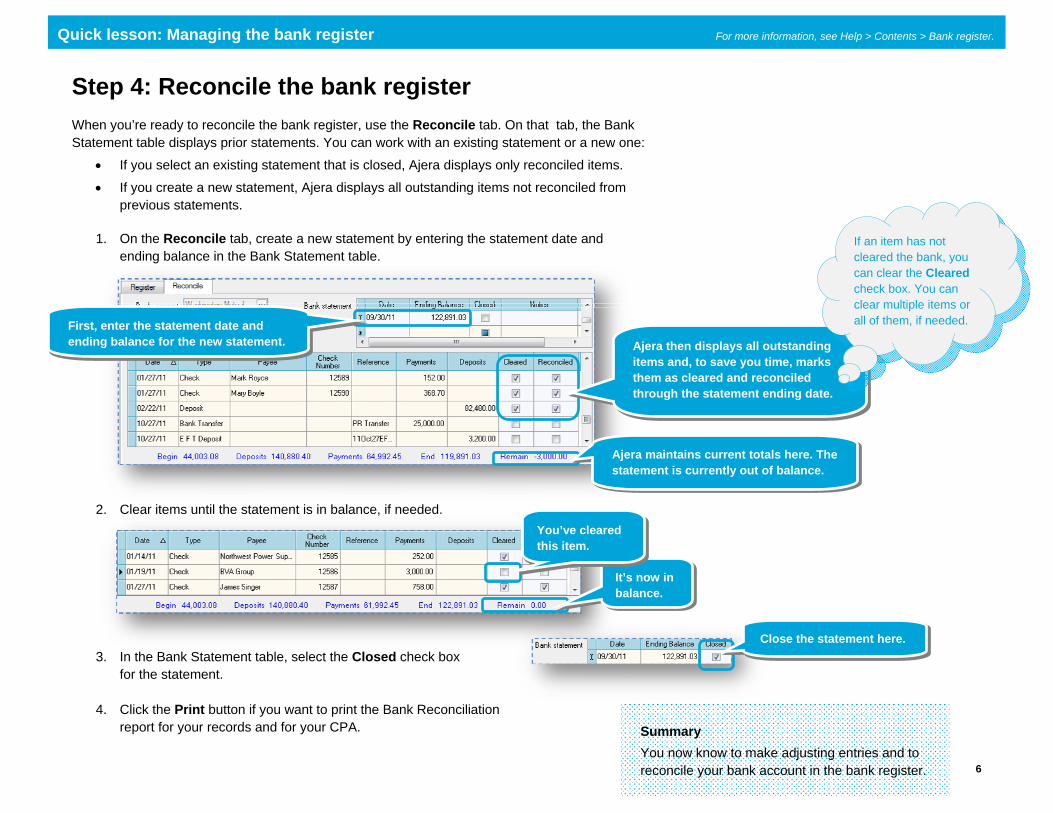
Step 4: Reconcile the bank register When you’re ready to reconcile the bank register, use the Reconcile tab. On that tab, the Bank Statement table displays prior statements. You can work with an existing statement or a new one:
If you select an existing statement that is closed, Ajera displays only reconciled items.
If you create a new statement, Ajera displays all outstanding items not reconciled from previous statements.
1. On the Reconcile tab, create a new statement by entering the statement date and ending balance in the Bank Statement table.
2. Clear items until the statement is in balance, if needed.
3. In the Bank Statement table, select the Closed check box
for the statement.
4. Click the Print button if you want to print the Bank Reconciliation report for your records and for your CPA.
Ajera then displays all outstanding items and, to save you time, marks them as cleared and reconciled through the statement ending date.
Ajera maintains current totals here. The statement is currently out of balance.
It’s now in balance.
First, enter the statement date and ending balance for the new statement.
Close the statement here.
If an item has not cleared the bank, you can clear the Cleared check box. You can clear multiple items or all of them, if needed.
You’ve cleared this item.