
Manage My Views User Guide - New Jersey · February 6, 2015 Manage My Views User Guide
12
http://www.cpms.osd.mil/ February 6, 2015 Manage My Views User Guide
Transcript of Manage My Views User Guide - New Jersey · February 6, 2015 Manage My Views User Guide
2
Table of Contents Introduction ............................................................................................................................................................. 3
Purpose ............................................................................................................................................................................... 3
Who Should Use This Guide ................................................................................................................................................ 3
Background ......................................................................................................................................................................... 3
Who to Call For Help? ......................................................................................................................................................... 3
Navigation Tips .................................................................................................................................................................... 3
Manage My Views .................................................................................................................................................. 4
What You Need to Know ..................................................................................................................................................... 4
Manage My Views - Edit Mode.............................................................................................................................. 5
Reposition a View ............................................................................................................................................................... 6
Exchange a View ................................................................................................................................................................. 7
Hide a View ......................................................................................................................................................................... 8
Add a View .......................................................................................................................................................................... 9
Reset the View .................................................................................................................................................................. 10
Save Your Changes ............................................................................................................................................................ 10
Additional References ........................................................................................................................................... 11
Quick Tip ........................................................................................................................................................................... 11
Available My Views ........................................................................................................................................................... 11
Table of Figures .................................................................................................................................................... 11

3
Introduction
Purpose The purpose of this user guide is to provide employees information and details
about managing the Views area on the MyBiz+ homepage. MyBiz+ is accessed
through the Defense Civilian Personnel Data System (DCPDS) Portal using the
link: https://compo.dcpds.cpms.osd.mil.
Who Should Use This Guide DoD Appropriated Fund, Non-Appropriated Fund (NAF) and Local National
(LN) employees
Background The Defense Civilian Personnel Advisory Service (DCPAS) and its technical
development organization, Enterprise Human Resources Information Systems
(EHRIS), championed the replacement of the legacy My Biz application to allow
employees to manage personnel data more easily. MyBiz+ is part of the Defense
Civilian Personnel Data System (DCPDS) and access to employee data is
protected by authenticated login.
Who to Call For Help? If you have a question regarding your HR data in MyBiz+, please contact your
servicing Human Resources office.
If you have a question regarding your login or access to other applications within
MyBiz+ pages or system functionality, please contact your Component Help
Desk. The Component Help Desk list is located at the bottom of the DCPDS
Portal page at https://compo.dcpds.cpms.osd.mil.
Navigation Tips Use Control and mouse click (Ctrl + Click) on the hyperlinked words to view
associated screenshots or move throughout the document. Use the keyboard
shortcut alt and left arrow (Alt + left arrow) to go back to where you were.

4
Manage My Views
Manage My Views is a design tool that allows you to personalize the look and feel of the Views area and make it
your own. The Views are located in the middle of the MyBiz+ homepage. Figure 1 depicts the default layout for
the six (6) views (Key Services, Leave, Pay, Insurance, Professional Development and Last Personnel Action)
most employees will see upon initial log in.
Figure 1 MyBiz+ Default Views
What You Need to Know
Use the link to access the edit mode. The link is located in the upper right corner of the
Views area depicted in figure 1. Your screen will refresh to reflect the edit mode and the following action links
will appear where the Manage My Views link once was: Add, Reset and Done (Add is only available if there are
five (5) or fewer Views on the page).
The edit mode also activates the following three (3) interactive functions available on the colored headers of
each View: Reposition, Exchange and Hide.
Action or function changes are done one at a time. Once all changes are completed, select the Done link to save
all changes.
There are eight (8) Views available, but only six (6) Views can display on the homepage at this time.
A minimum of one (1) View must remain on the homepage – such as Key Services. Key Services looks like the
other Views, but it does not contain personal information.
Tip: If all of the Views are hidden except for one, and if you try to hide the last one, then the default
Views will populate back onto the homepage and you will have to start all over again hiding each View.
Select the orange "TIP" to the right of Manage My Views for a quick reference drop down.
5
Manage My Views - Edit Mode
Select the Manage My Views link located on the upper right corner of the Views area and the screen will reset
into edit mode. The edit mode allows you to make the following changes:
Reposition a View within the Views area
Exchange a View out for another
Hide a View
Add a View
Reset the Views back to the default layout (Figure 1)
Save a new layout (Done)
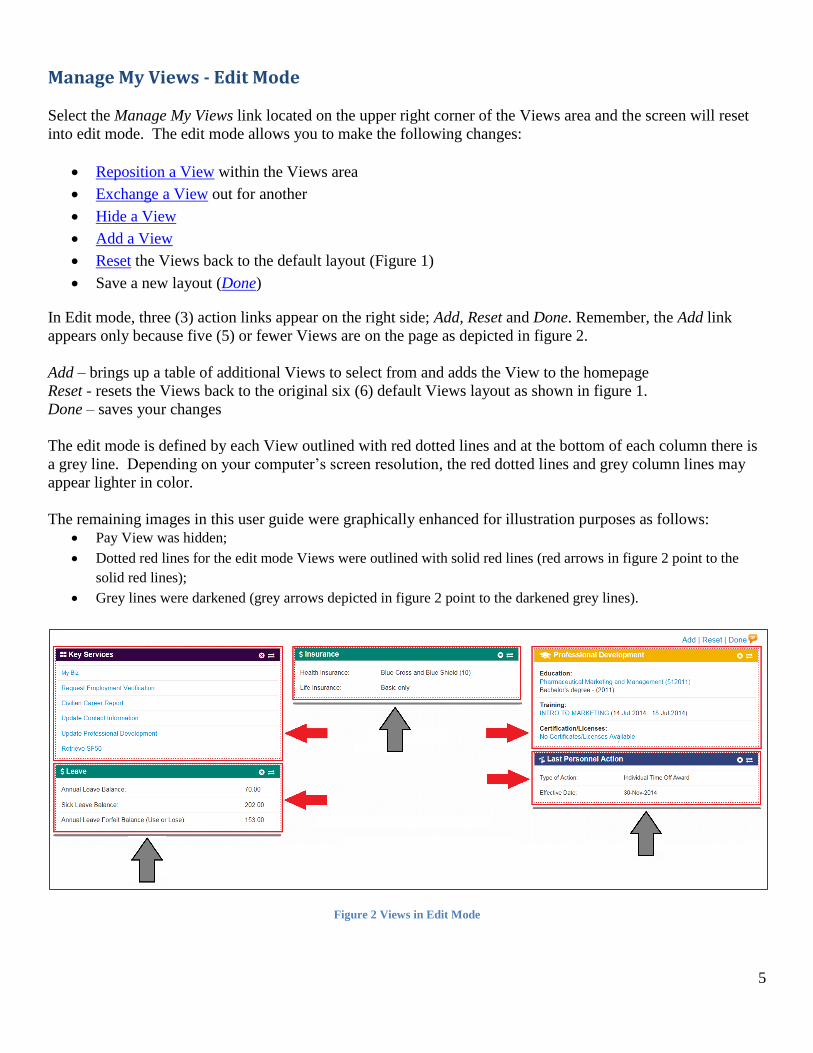
In Edit mode, three (3) action links appear on the right side; Add, Reset and Done. Remember, the Add link
appears only because five (5) or fewer Views are on the page as depicted in figure 2.
Add – brings up a table of additional Views to select from and adds the View to the homepage
Reset - resets the Views back to the original six (6) default Views layout as shown in figure 1.
Done – saves your changes
The edit mode is defined by each View outlined with red dotted lines and at the bottom of each column there is
a grey line. Depending on your computer’s screen resolution, the red dotted lines and grey column lines may
appear lighter in color.
The remaining images in this user guide were graphically enhanced for illustration purposes as follows:
Pay View was hidden;
Dotted red lines for the edit mode Views were outlined with solid red lines (red arrows in figure 2 point to the
solid red lines);
Grey lines were darkened (grey arrows depicted in figure 2 point to the darkened grey lines).
Figure 2 Views in Edit Mode

Reposition a View
Select the Manage My Views link. Use the mouse to drag the View by the colored tab; drag it, position it and
drop the View. When dragging a View, you must drag it above the gray column line to position it and drop it;
otherwise the View will not move.
Drag the View into the desired column (figure 3) and position the View above the gray column line.
Figure 3 Dragging a View
While dragging, notice the blank, (dotted line) section in between the Views in figure 4. Position the View
above the gray column line and within the blank section. This is where the View is positioned and dropped.
Figure 4 Positioning a View
Drop the View into the blank section above the gray line.
Figure 5 Dropping a View
7
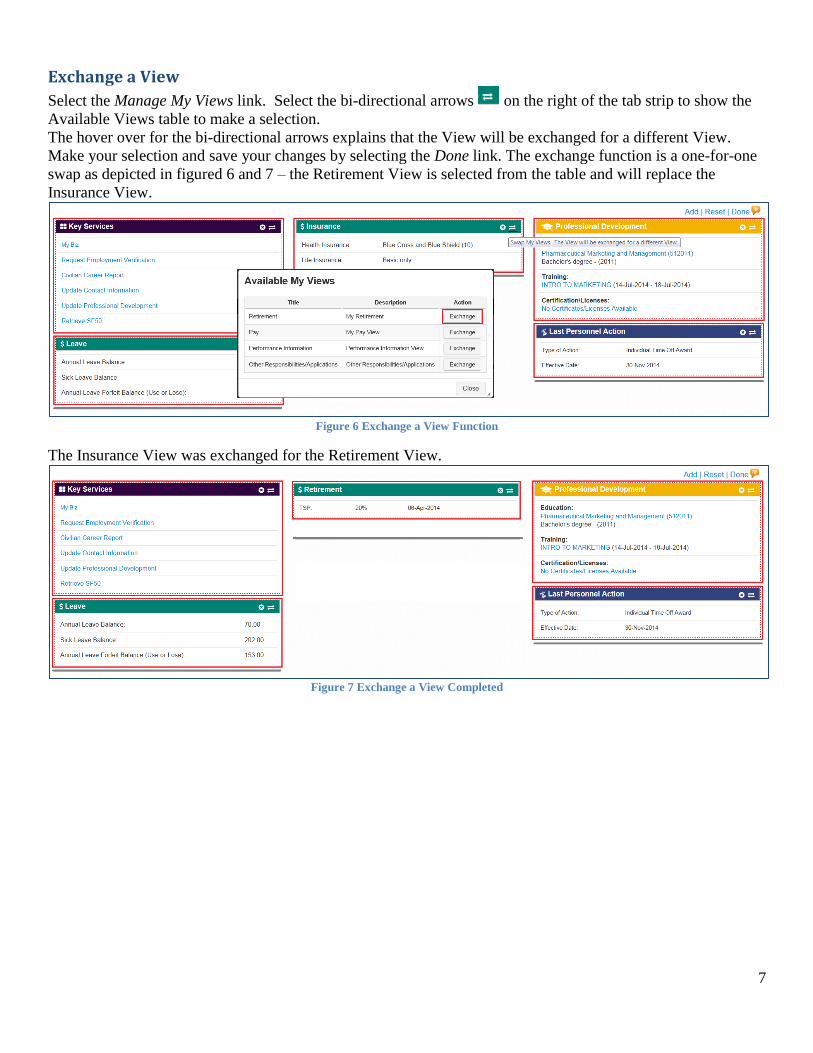
Exchange a View
Select the Manage My Views link. Select the bi-directional arrows on the right of the tab strip to show the
Available Views table to make a selection.
The hover over for the bi-directional arrows explains that the View will be exchanged for a different View.
Make your selection and save your changes by selecting the Done link. The exchange function is a one-for-one
swap as depicted in figured 6 and 7 – the Retirement View is selected from the table and will replace the
Insurance View.
Figure 6 Exchange a View Function
The Insurance View was exchanged for the Retirement View.
Figure 7 Exchange a View Completed

8
Hide a View
Select the Manage My Views link. Select the circled X on the right of the tab strip to Hide a View. The
hover over explains that the View will be removed from the layout. The Hide function moves the selected View
to the Available My Views table in the background. Select OK on the Confirmation screen to proceed. Save
your changes by selecting the Done link.
To bring a hidden View back on the homepage, use the Exchange or Add function to bring up the table of
Available Views and make a selection. Remember - the Add function is only available if there are fewer than
five (5) Views on the page.
Figure 8 Hide a View
The Retirement View is hidden.
Figure 9 A View is hidden

9
Add a View
Select the Manage My Views link. The Add function is available only if there are five (5) or fewer Views on the
homepage - as depicted in figures 10 and 11. The hover over explains that another View will be added to the
layout. Select the Add link at the top right of the Views area which brings up the table of Available Views.
Make your selection and save your changes by selecting the Done link.
A View added to the layout is positioned automatically at the bottom of the shortest column. After the View is
added, you can reposition it using the drag and drop functionality.
If the Add link is not available and you would like to make a change to the Views, use the Exchange function to
make a one-for-one swap from the table of Available Views, or Hide a View first, then Add a View from the
table of Available Views.
Figure 10 Add a View to the homepage
The Retirement View was added back to the Views layout.
Figure 11 View Added and Changes Saved

10
Reset the View
To reset the View layout back to the default, select the Reset link on the right and the Views area resets to the
original six (6) default views.
Figure 12 Reset Link
Save Your Changes
To save any changes to the layout, select the Done link which saves your changes and the screen refreshes to
the MyBiz+ homepage.
Figure 13 Done Link

11
Additional References
Quick Tip
Figure 14 Quick Tip Text
Available My Views
Figure 15 List of Available Views
Table of Figures
Figure 1 MyBiz+ Default Views ............................................................................................................................ 4 Figure 2 Views in Edit Mode .................................................................................................................................. 5 Figure 3 Dragging a View....................................................................................................................................... 6
Figure 4 Positioning a View ................................................................................................................................... 6 Figure 5 Dropping a View ...................................................................................................................................... 6 Figure 6 Exchange a View Function ....................................................................................................................... 7
Figure 7 Exchange a View Completed ................................................................................................................... 7
Figure 8 Hide a View .............................................................................................................................................. 8 Figure 9 A View is hidden ...................................................................................................................................... 8 Figure 10 Add a View to the homepage ................................................................................................................. 9 Figure 11 View Added and Changes Saved ........................................................................................................... 9 Figure 12 Reset Link ............................................................................................................................................. 10 Figure 13 Done Link ............................................................................................................................................. 10 Figure 14 Quick Tip Text ..................................................................................................................................... 11

12
Figure 15 List of Available Views ........................................................................................................................ 11