MAKING MY QUILTED POT HOLDER - Department of ...math.arizona.edu/~rbt/GS/BrownieDirections.pdfMAKING...
7
MAKING MY QUILTED POT HOLDER Created by Sharon L. Thompson and Richard B. Thompson Tucson Quilters Guild, 2006 You will need : Two pieces of fabric Batting Small Template Large Template Pencil Scissors Pins and needles Thread Embroidery floss Step 1 : Identify both sides of the fabric. Step 2 : Fabric layout. Right sides Wrong sides The two sides of fabric are different. The brighter, more colorful side is called the right side. The plainer side that shows less of the design is called the wrong side. A light colored strip along the edge of fabric is called the selvage.
Transcript of MAKING MY QUILTED POT HOLDER - Department of ...math.arizona.edu/~rbt/GS/BrownieDirections.pdfMAKING...

MAKING MY QUILTED POT HOLDER Created by Sharon L. Thompson and Richard B. Thompson
Tucson Quilters Guild, 2006
You will need: Two pieces of fabric Batting Small Template Large Template Pencil Scissors Pins and needles Thread Embroidery floss
Step 1: Identify both sides of the fabric. Step 2: Fabric layout.
Rightsides
Wrongsides
The two sides of fabric are different. The brighter, more colorful side is called the right side. The plainer side that shows less of the design is called the wrong side. A light colored strip along the edge of fabric is called the selvage.
-Quilted Pot Holder, page 2 -
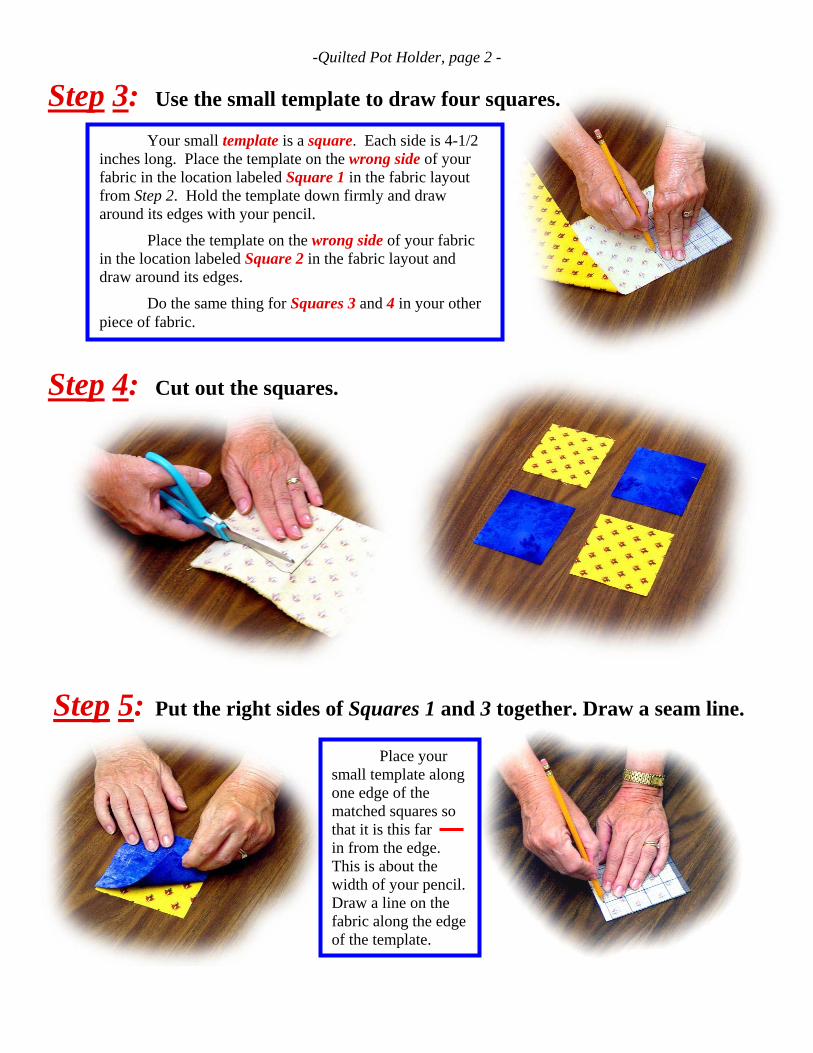
Step 3: Use the small template to draw four squares.
Step 4: Cut out the squares. Step 5: Put the right sides of Squares 1 and 3 together. Draw a seam line.
Your small template is a square. Each side is 4-1/2 inches long. Place the template on the wrong side of your fabric in the location labeled Square 1 in the fabric layout from Step 2. Hold the template down firmly and draw around its edges with your pencil.
Place the template on the wrong side of your fabric in the location labeled Square 2 in the fabric layout and draw around its edges.
Do the same thing for Squares 3 and 4 in your other piece of fabric.
Place your small template along one edge of the matched squares so that it is this far in from the edge. This is about the width of your pencil. Draw a line on the fabric along the edge of the template.

-Quilted Pot Holder, page 3 -
Step 6: Pin your two squares together.
Step 7: Thread your needle and practice a running stitch.
Step 8: Sew along the seam line.
The fabric outside of the seam line is called the seam allowance. This will not show in your finished quilt. Use two pins to hold the squares together. Place these inside the seam line. This will hold the squares together while you sew.
Tie a knot in your thread and start sewing with a running stitch at one end of the seam line. Sew along the entire seam line, using small stitches. When you are done, tie a knot in your thread and then cut off the extra thread.
A running stitch goes up and down along the seam line. The thread alternates between going down from above the seam line and up from below the seam line. The thread never goes around the edge of the fabric.

-Quilted Pot Holder, page 4 -
Step 9: Open up your squares and fold over the extra material.
Step 10: Redo Steps 5 – 9 using Squares 2 and 4.
Step 11: Sew your two strips together, as shown.
Use your fingers to fold over the seam allowances. Fold both seam allowances together, with the lighter fabric on top of the darker fabric. Press the allowances down firmly with your thumb. This is called finger pressing.
You now have two strips, with two squares in each strip.
Fit your two strips together, right side to right side. Draw a seam line and then sew along the line. Fold over the new seam allowances together and finger press them down.
Your have finished a quilt top! Each of the squares that you made is called quilt block. Sewing them together is called piecing the quilt top.
-Quilted Pot Holder, page 5 -
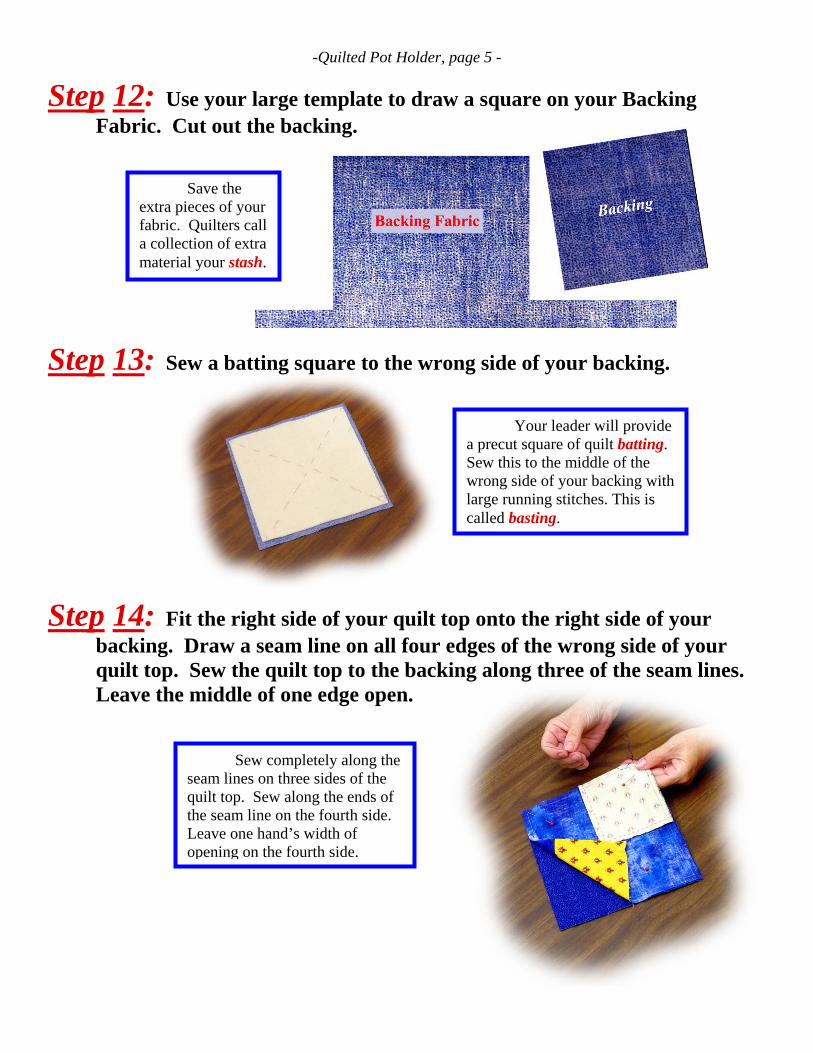
Step 12: Use your large template to draw a square on your Backing Fabric. Cut out the backing.
Step 13: Sew a batting square to the wrong side of your backing.
Step 14: Fit the right side of your quilt top onto the right side of your backing. Draw a seam line on all four edges of the wrong side of your quilt top. Sew the quilt top to the backing along three of the seam lines. Leave the middle of one edge open.
Your leader will provide a precut square of quilt batting. Sew this to the middle of the wrong side of your backing with large running stitches. This is called basting.
Save the extra pieces of your fabric. Quilters call a collection of extra material your stash.
Sew completely along the seam lines on three sides of the quilt top. Sew along the ends of the seam line on the fourth side. Leave one hand’s width of opening on the fourth side.

-Quilted Pot Holder, page 6 -
Step 15: Turn your project inside out. The right sides of the quilt top and backing will be on the outside. The batting will be on the inside.
Step 16: Sew the open edges together to close the quilt.
Step 17: Tie the middle of two opposite squares with embroidery floss.
Fold over the open top and backing edges. Finger press both seam allowances. Sew these together with a hem stitch. If done carefully, your seam will not be visible.
Pick a square to quilt with a tie. Draw lines between the two pairs of opposite corners. The lines will cross each other in the middle of the square. Start close to the middle. Use a needle to thread embroidery floss through the top and back up through the quilt. Tie the two ends with a square knot.

-Quilted Pot Holder, page 7 -
Step 18: Quilt from corner to corner in each of the squares that you did not tie.
Your quilted pot holder is finished!
Draw a quilt line between the opposite corners of the squares that you did not tie. Quilt along each line with a running stitch. Erase all pencil lines or rinse then off with cold water.