Making a snap lid box - Arizona · PDF fileMaking a snap lid box By Jeffrey A Lavine ... wood...
9
Making a snap lid box By Jeffrey A Lavine Some call them boxes, some call them lidded bowls, others call them vessels or containers but whatever you call them they are both enjoyable and a challenge to make. I have been making boxes of one sort or the other for twenty years now and the process still captivates and challenges me. For the present, I have more ideas then time to pursue them all. Over the years, I have refined my boxes to find a style of my own. I now call them snap lid boxes, a name given by the folks at my AAW chapter, ART (Association of Revolutionary Turners.) The neat thing about them is the way they pop open and snap closed, much like the snap on a jacket. The only difficult part is getting the lid to fit just right but this can be accomplish with a bit of practice and patience. In the following instructions anywhere that I am approximate regarding exact dimensions is due to the fact that every piece of wood is different. Measurements will depend on the size of the box, the workability of the materials and your specific design considerations. What is more important than exact measurements is to keep the elements of the box propionate to its size. Step 1: Find some wood. I like to use dense hard woods or burls. I usually make my boxes between 1 1/2" to 3 1/2" in diameter, also my boxes are turned face grain rather than end grain. Take this into consideration when sizing your blank. Start with a cube of wood, you can add a little height if a taller Step 2: Turn to a cylinder and true the face. Step 3: Reduce the diameter of the cylinder in two steps as shown in photo #3. The top step should be large enough to allow for the height and diameter of the lid, plus enough for a narrow parting tool. The next step is 1/16" to 1/8" larger than the lid diameter and also 1/16"to 1/8" taller or standing proud of the main body. These dimensions vary with the size and design of the box. design is desired. Glue the blank to a waste block mounted to a 2" faceplate, using double stick tape. A chuck can be used but I prefer a faceplate. It provides easier access when turning near the base of the box and for safety reasons there is less metal spinning around.
Transcript of Making a snap lid box - Arizona · PDF fileMaking a snap lid box By Jeffrey A Lavine ... wood...
Making a snap lid boxBy Jeffrey A Lavine
Some call them boxes, some call them lidded bowls,others call them vessels or containers but whateveryou call them they are both enjoyable and achallenge to make. I have been making boxes of one sort or theother for twenty years now and the process stillcaptivates and challenges me. For the present, Ihave more ideas then time to pursue them all. Overthe years, I have refined my boxes to find a style ofmy own. I now call them snap lid boxes, a name given bythe folks at my AAW chapter, ART (Association ofRevolutionary Turners.) The neat thing about themis the way they pop open and snap closed, muchlike the snap on a jacket. The only difficult part isgetting the lid to fit just right but this can beaccomplish with a bit of practice and patience. In the following instructions anywhere that I amapproximate regarding exact dimensions is due tothe fact that every piece of wood is different.Measurements will depend on the size of the box,the workability of the materials and your specificdesign considerations. What is more important thanexact measurements is to keep the elements of thebox propionate to its size.
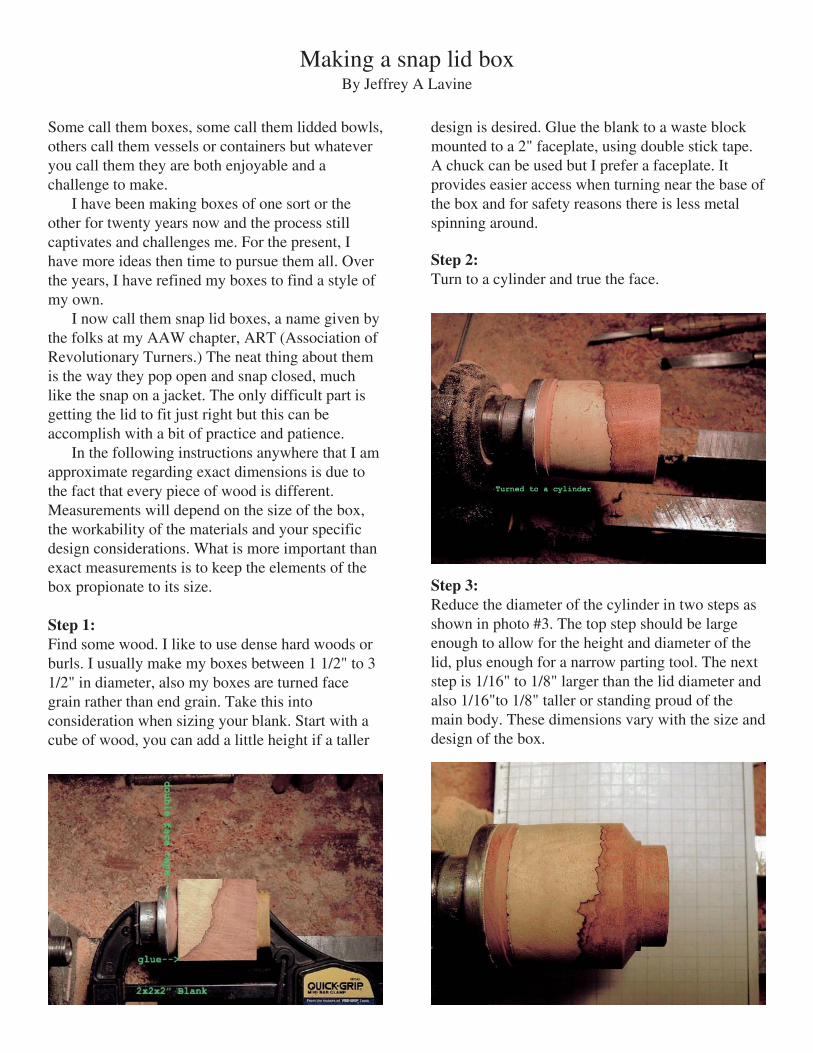
Step 1:Find some wood. I like to use dense hard woods orburls. I usually make my boxes between 1 1/2" to 31/2" in diameter, also my boxes are turned facegrain rather than end grain. Take this intoconsideration when sizing your blank. Start with acube of wood, you can add a little height if a taller
Step 2:Turn to a cylinder and true the face.
Step 3:Reduce the diameter of the cylinder in two steps asshown in photo #3. The top step should be largeenough to allow for the height and diameter of thelid, plus enough for a narrow parting tool. The nextstep is 1/16" to 1/8" larger than the lid diameter andalso 1/16"to 1/8" taller or standing proud of themain body. These dimensions vary with the size anddesign of the box.
design is desired. Glue the blank to a waste blockmounted to a 2" faceplate, using double stick tape.A chuck can be used but I prefer a faceplate. Itprovides easier access when turning near the base ofthe box and for safety reasons there is less metalspinning around.

Step 4:Round over the lid to a nice dome shape. (Photo #4)Using a narrow turf parting tool, begin a parting cutat the base of the lid but only go in approximately 1/8" at this time. Use a very sharp skew on its side orsand paper to give the bottom of the lid a bull noseprofile.
Step 5:Estimate where the bottom of the box will be andmake a parting cut down to the approximate
Step 6:Shape the box outside and continue to refine the lidshape if necessary. Several shape variations can beachieved by varying the size of the lid in relation tothe diameter of the body of the box. Sand to 2000
Step 7:Make a small cone shaped hole at the center of thelid with the long point of the skew, this will serve asthe starting point for a drill bit. Drill the hole for thefinial, going about as deep as the lid is thick. Thisstep must be precise, so practice getting the hole
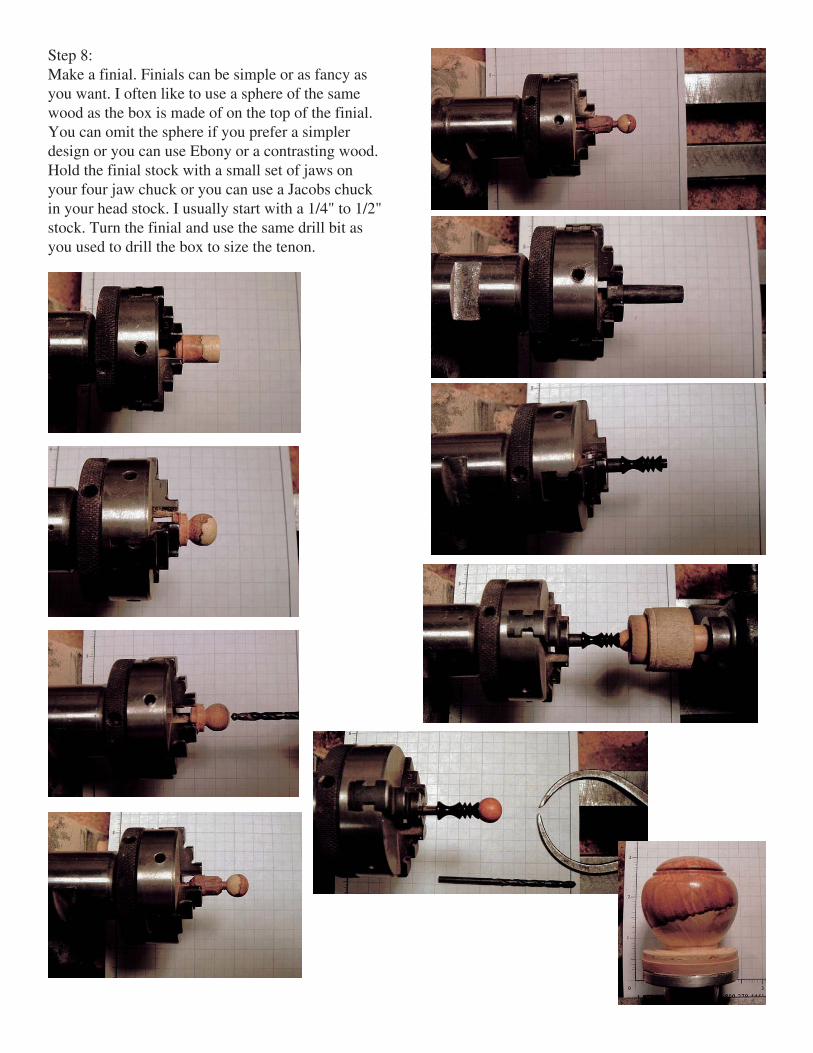
Step 8:Make a finial. Finials can be simple or as fancy asyou want. I often like to use a sphere of the samewood as the box is made of on the top of the finial.You can omit the sphere if you prefer a simplerdesign or you can use Ebony or a contrasting wood.Hold the finial stock with a small set of jaws onyour four jaw chuck or you can use a Jacobs chuckin your head stock. I usually start with a 1/4" to 1/2"stock. Turn the finial and use the same drill bit asyou used to drill the box to size the tenon.
Step 11:Prepare some wood for a jam chuck. Use an evengrain wood, slightly softer than the wood you areusing for the box, Poplar works well. Size the blanklong enough to contain the finial and lid plus someextra to allow for returning of jam chuck if youneed to. Mount on a spare face plate or a chuck.Back on the lathe, true up the sides and the face ofthe jam chuck. Drill a hole at the center, largeenough to accommodate the finial. Use a roundnose scraper to hog out the middle and form aconcave bottom. With the long point of a sharpskew, slowly peel away the sides to form a recess tofit the lid. The sides should slightly taper towardsthe center so that if the fit is loose, you can turn thebottom deeper until you find the point at which atight fit is achieved. Press the lid into the jam chuck. Be certain that thelid is making contact with both the bottom and thesides of the recess, to ensue that it will run true.You can check this with your finger nail or by usinga pencil with the lathe running. If touched lightlynear the rim of the lid, the pencil will leave a markat any high spot. You can now see where to makeadjustments. Back hollow the lid. I leave the area around thefinial a bit thicker than the rest of the lid to helpsupport the finial. If your finial was tightly fitted and was gluedproperly it should not pull out. (An optional step atthis point would be to add a inside finial orescutcheon on the inside bottom of lid.) Sand theinside of the lid to 2000 grit then finish witha friction polish. Carefully pop the lid out of the jamchuck with a pencil eraser through the back of thehole. If the lid gets stuck, turn away a bit of the jamchuck being sure to stay clear of the finished liduntil it can be removed.
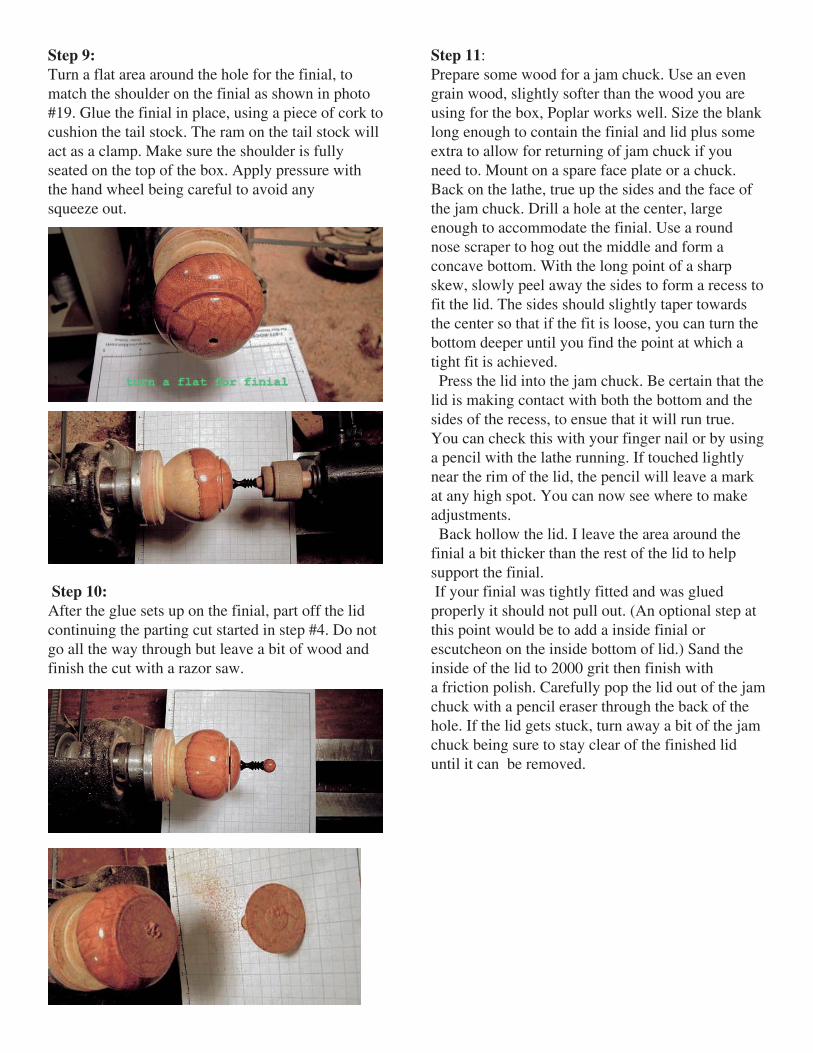
Step 9:Turn a flat area around the hole for the finial, tomatch the shoulder on the finial as shown in photo#19. Glue the finial in place, using a piece of cork tocushion the tail stock. The ram on the tail stock willact as a clamp. Make sure the shoulder is fullyseated on the top of the box. Apply pressure withthe hand wheel being careful to avoid anysqueeze out.
Step 10:After the glue sets up on the finial, part off the lidcontinuing the parting cut started in step #4. Do notgo all the way through but leave a bit of wood andfinish the cut with a razor saw.

Step 12:Remount the body of the box on the lathe andcarefully true the face. With a sharp skew turned onits side, using it as you would a scraper, turn ashallow coin shaped recess on what will be the topof the box. This recess should only be 128"” to64"”, just enough to feel when the lid sits firmly asshown in photo #25. Then turn another coin shapedrecess within the first, this one should be about 1/16"” to 1/8"” smaller in diameter than the first. Thedepth should be a bit shy of the size of the bull noseon the lid. This area will form the shelf that thebottom of lid will sit on as shown in photo #26. Theremaining material between these two recesses willbe turned later when fitting the lid. The final lidfitting is done after hollowing and sanding to ensurethat the fit is not affected by wood movement.(Photo #25 & #26)

Step 13:Use a 1/16" parting tool to cut a slot 1/4" deepbeginning about 1/8" inside of the shelf left by theprocedures in step #12 as shown in photo #27.Continue by hollowing out from the slot to about 1/2 of the finished depth as shown in photo #28.Using the same 1/16" parting too, undercut a slot onthe inside wall a bit thicker than your finished wallthickness, just beneath the shelf left by the previousoperation. Cut to a depth that will be just shy of thefinished wall thickness. I find that this relief cuthelps in the hollowing process and provides a guidefor gauging the wall thickness as shown in photo#29.
Step 14:At this point, set a depth gauge for the maximuminterior depth, remember to add a hair so as not toend up turning a lidded funnel. You can alwaysrefine the bottom later as shown in photo #30a.Hollow out the box to the finished wallthickness and depth. I prefer to use formed scrapers,some I buy from tool suppliers and others I make inmy shop. My favorite shape is the backwards Pshape, see the tools photo. Use whatever hollowingmethod you are most comfortable with. Check asyou go with calipers and the depth gauge. Stop when you reach a satisfactory wallthickness. I usually turn them to anywhere between1/32" to 1/8" . Keep in mind the thickness can varydue to the size of the box, stability of the materialand the skill level of the turner. Now sand the insideof the box to 2000 grit. Use surgical clamps withsand paper folded up to pad the tips of the clamps,to get where fingers can not reach as shown inphoto #31. Finish the inside with a friction polish.
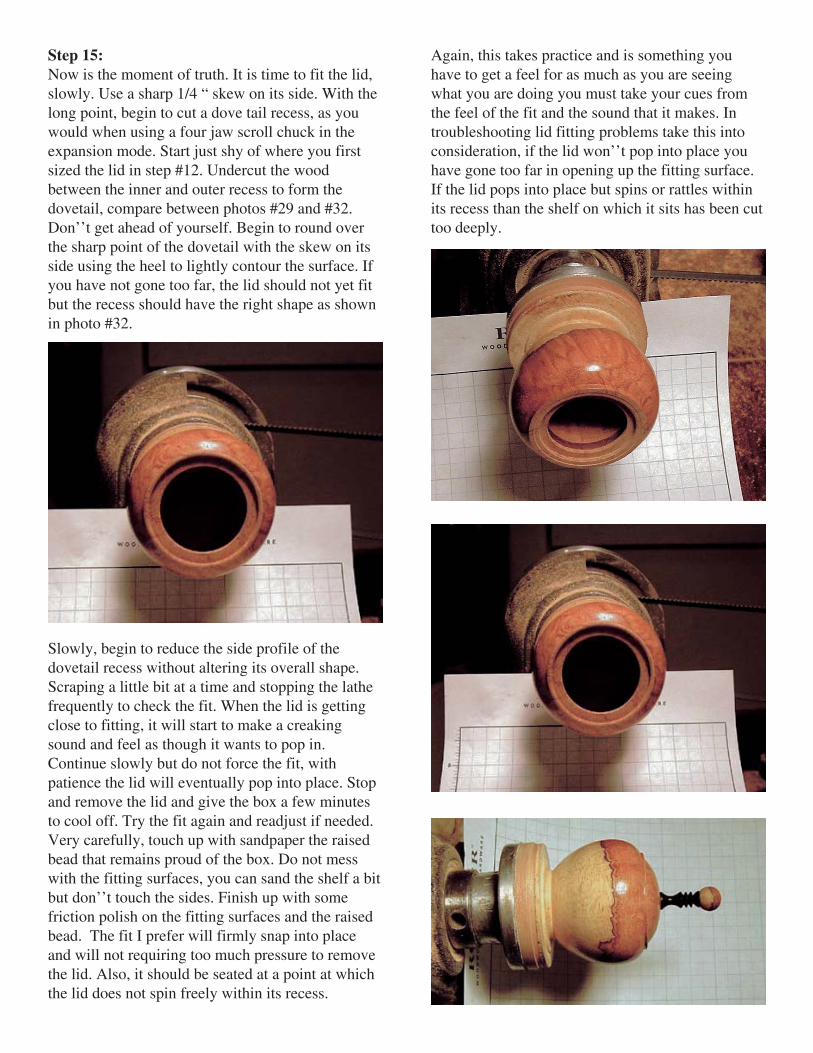
Step 15:Now is the moment of truth. It is time to fit the lid,slowly. Use a sharp 1/4 “ skew on its side. With thelong point, begin to cut a dove tail recess, as youwould when using a four jaw scroll chuck in theexpansion mode. Start just shy of where you firstsized the lid in step #12. Undercut the woodbetween the inner and outer recess to form thedovetail, compare between photos #29 and #32.Don’’t get ahead of yourself. Begin to round overthe sharp point of the dovetail with the skew on itsside using the heel to lightly contour the surface. Ifyou have not gone too far, the lid should not yet fitbut the recess should have the right shape as shownin photo #32.
Slowly, begin to reduce the side profile of thedovetail recess without altering its overall shape.Scraping a little bit at a time and stopping the lathefrequently to check the fit. When the lid is gettingclose to fitting, it will start to make a creakingsound and feel as though it wants to pop in.Continue slowly but do not force the fit, withpatience the lid will eventually pop into place. Stopand remove the lid and give the box a few minutesto cool off. Try the fit again and readjust if needed.Very carefully, touch up with sandpaper the raisedbead that remains proud of the box. Do not messwith the fitting surfaces, you can sand the shelf a bitbut don’’t touch the sides. Finish up with somefriction polish on the fitting surfaces and the raisedbead. The fit I prefer will firmly snap into placeand will not requiring too much pressure to removethe lid. Also, it should be seated at a point at whichthe lid does not spin freely within its recess.
Again, this takes practice and is something youhave to get a feel for as much as you are seeingwhat you are doing you must take your cues fromthe feel of the fit and the sound that it makes. Introubleshooting lid fitting problems take this intoconsideration, if the lid won’’t pop into place youhave gone too far in opening up the fitting surface.If the lid pops into place but spins or rattles withinits recess than the shelf on which it sits has been cuttoo deeply.
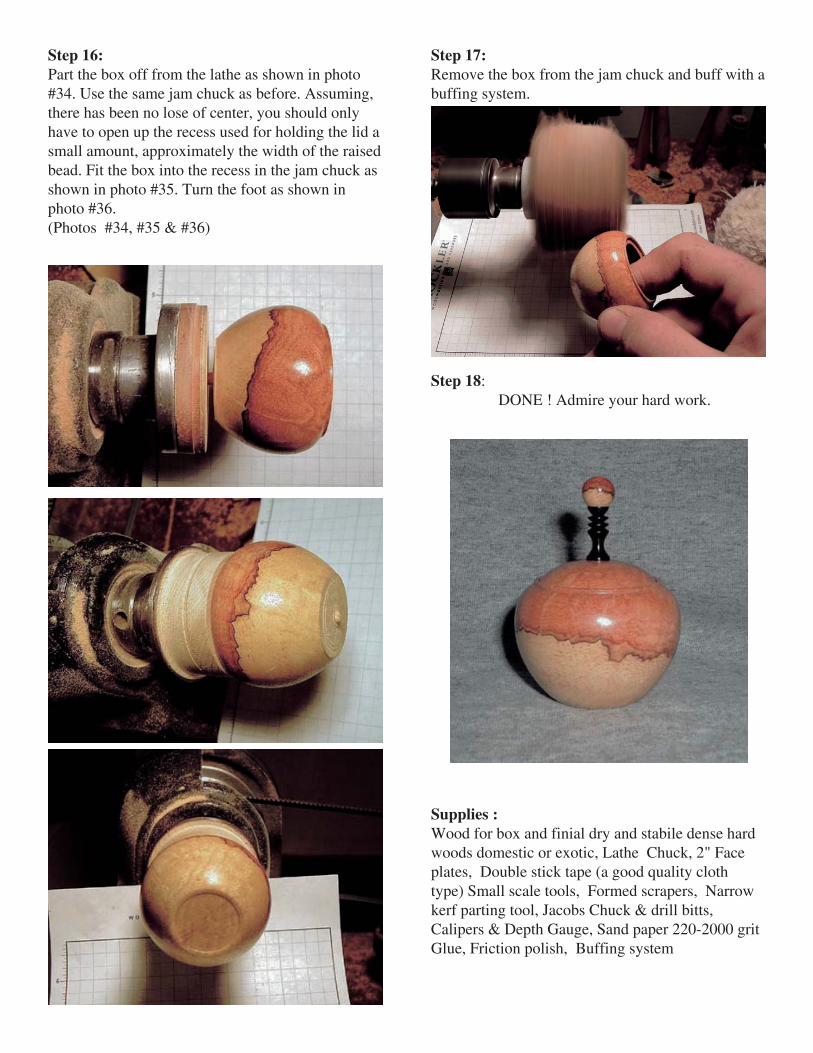
Step 16:Part the box off from the lathe as shown in photo#34. Use the same jam chuck as before. Assuming,there has been no lose of center, you should onlyhave to open up the recess used for holding the lid asmall amount, approximately the width of the raisedbead. Fit the box into the recess in the jam chuck asshown in photo #35. Turn the foot as shown inphoto #36.(Photos #34, #35 & #36)
Step 17:Remove the box from the jam chuck and buff with abuffing system.
Step 18: DONE ! Admire your hard work.
Supplies :Wood for box and finial dry and stabile dense hardwoods domestic or exotic, Lathe Chuck, 2" Faceplates, Double stick tape (a good quality clothtype) Small scale tools, Formed scrapers, Narrowkerf parting tool, Jacobs Chuck & drill bitts,Calipers & Depth Gauge, Sand paper 220-2000 gritGlue, Friction polish, Buffing system