
Making a ladle - Drew Langsner · guide to making a ladle with a few tools S ... traditional...
3
Making a ladle Drew Langsner offers a step-by-step guide to making a ladle with a few tools S wedish woodworker Wille Sundqvist introduced me to spoon carving on a serendipitous visit to our mountain farmstead in 1976. Wille was in the US as the curator and demonstrator for an exhibit of traditional Swedish handcrafts in New York City. When the exhibit closed, a mutual friend led Wille on a winding path from Vermont to southern Appalachia to meet American woodworkers. We were among the fortunate few to meet this tall, thin Viking with a sheath knife hanging from his belt. This was woodworking that fits my life. I was hooked on sloyd and believed that it was an approach worth spreading in this country. We invited Wille back, and his classes in Carving Swedish Woodenware were the start of Country Workshops’ course in traditional woodworking in 1978. As with most types of woodworking, there are many traditional and contemporary approaches to carving a spoon. A great deal depends on what tools and materials are available. For this article I will emphasize traditional, hand carved techniques, but I won’t feel compelled to stay strictly within the old methods. The tool kit can be kept simple and portable – perfect for taking on a vacation. Spoon carving utilises some very sharp tools that can cause serious injuries. Because these tools are used free hand – they are not jigged or fenced – it is extremely important to use them safely and carefully at all times. Design considerations Wooden spoons can be divided into several groups. Cooking spoons are the easiest to make, and as ever, they serve well in many contemporary kitchens. They are usually rather flat in profile, and made with sturdy bowls and straight handles. Eating and serving spoons have more complex requirements. The bowl section can have more variation in form and the handles are often curved (from a profile view) which aids in their usefulness. In addition, eating and serving spoons become part of a table setting. They should look attractive, and feel good between your fingers. The best spoons incorporate subtle design refinements that transform them into small, but compelling, sculptures. Such spoons must work well, but the good ones also fulfill the desire to live with beautiful objects. Lovespoons are in a different category – folk art. These non- utilitarian spoons were made in various rural areas by a single guy as an offering to a young maiden. In Scandinavia the designs for functional eating and serving spoons evolved slowly while countless generations of rural woodworkers carved these spoons – often during the long, dark winters. Each woodworker strived to develop his skills with axes, a gouge or two and carving knives. These were among the most common tools available in a pre- industrial setting. Over time many spoon carvers developed their own variations of the basic styles. These variations tend to be subtle differences in woodwork coming out of a folk culture where there was little emphasis on creativity. As a result, the designs evolved into many variations, but all striving for perfection in form and function. I like to think that such spoons are similar to bird bones that are in many variations, but which are all close to perfect for their requirements. Most spoons are symmetrical in plan view, although some have an asymmetric bowl. To work well, a spoon must be relatively strong, and easy to hold and use for the intended purpose. The weakest part is the leading edge of the bowl. This is invariably endgrain. Over time, it can fray or even split. The bowl can take various shapes: egg-like, squarish, or slanted at the leading edge. In Swedish spoons there is generally a rounded transition between the bowl and stem. In contrast, Norwegian spoons often have a clean break. The transition into the mid-section stem must also be strong. The diamond cross section of the stem is a specially attractive design feature in some Swedish spoons. It not only looks attractive, but also feels Project good between your thumb, first and second fingers. If the stem is narrow in plan view, the profile needs to be deepened for strength, like an I-beam. Beyond the middle stem there is often a transition section to a thin, but wider, flat area that I call the handle. This flat handle allows the spoon to rest comfortably between your thumb and the third or fourth joint of your first finger. (There are different ways of holding a spoon, depending on how it is being used.) In Scandinavian spoons the handle often ends with a decorative finial. This finial creates a visual balance to the bowl at the other end. Showing these design qualities in photographs turns out to be challenging. While it’s useful to start by thinking in terms of plan and profile view points, the best spoons incorporate design elements that only become apparent as you rotate the object to view it at myriad angles. In fact, the traditional spoon carving tools (hewing axe, gouge and carving knife) work best when developing a rotated and rounded 3-D shape, cutting around or within a form rather than just staying with artificial plan view and profile 42 May/June 2009 May/June 2009 43 Spoon Carving concepts. A very good spoon will look better with time and successive observation and use. I think this is a standard by which to judge any art form. An important element in spoon carving is using considerable time to study and really look at what you are making. How can this spoon (or the next one) be improved? Wille Sundqvist told me that an old carvers’ expression was that ‘the light shines in the dark.’ This conveys the idea of a craftsman studying the form he is developing with that very special low angle, raking light emanating from a single source that is not so bright as to wash out the appearance of both form and surface. An elusive but valuable element of our ancient human experience disappeared when the electric lights The finer work cleaning up the blank is done with a small axe, chipping away the bark. The hewing doesn’t have to be particularly good at this stage, but the bark side must be flat enough for the blank to be able to sit on it, split side upwards Hewing the split face of the blank, where the hollow of the bowl will be carved You should be able to achieve most of the shaping with an axe Where to start Drew marks up the section he wants to cleave from the log, making sure he avoids the pith. Then he uses a froe to split the blank roughly to shape. The diamond section on the stem looks and feels good “The best spoons incorporate design elements that only become apparent as you view the object at myriad angles”
Transcript of Making a ladle - Drew Langsner · guide to making a ladle with a few tools S ... traditional...

Making a ladleDrew Langsner offers a step-by-step guide to making a ladle with a few tools
Swedish woodworker Wille Sundqvist introduced me to spoon carving on a serendipitous visit to our mountain farmstead in 1976. Wille was in the US as
the curator and demonstrator for an exhibit of traditional Swedish handcrafts in New York City. When the exhibit closed, a mutual friend led Wille on a winding path from Vermont to southern Appalachia to meet American woodworkers. We were among the fortunate few to meet this tall, thin Viking with a sheath knife hanging from his belt. This was woodworking that fits my life. I was hooked on sloyd and believed that it was an approach worth spreading in this country. We invited Wille back, and his classes in Carving Swedish Woodenware were the start of Country Workshops’ course in traditional woodworking in 1978. As with most types of woodworking, there are many traditional and contemporary approaches to carving a spoon. A great deal depends on what tools and materials are available. For this article I will emphasize traditional, hand carved techniques, but I won’t feel compelled to stay strictly within the old methods. The tool kit can be kept simple and portable – perfect for taking on a vacation. Spoon carving utilises some very sharp tools that can cause serious injuries. Because these tools are used free hand – they are not jigged or fenced – it is extremely important to use them safely and carefully at all times.
Design considerationsWooden spoons can be divided into several groups. Cooking spoons are the easiest to make, and as ever, they serve well in many contemporary kitchens. They are usually rather flat in profile, and made with sturdy bowls and straight handles. Eating and serving spoons have more complex requirements. The bowl section can have more variation in form and the handles are often curved (from a profile view) which aids in their usefulness. In addition, eating and serving spoons become part of a table setting. They should look attractive, and feel good between your fingers. The best spoons incorporate subtle design refinements that transform them into small, but compelling, sculptures. Such spoons must work well, but the good ones also fulfill the desire to live with beautiful objects. Lovespoons are in a different category – folk art. These non-utilitarian spoons were made in various rural areas by a single guy as an offering to a young maiden. In Scandinavia the designs for functional eating and serving spoons evolved slowly while countless generations of rural woodworkers carved these spoons – often during the long, dark winters. Each
woodworker strived to develop his skills with axes, a gouge or two and carving knives. These were among the most common tools available in a pre-industrial setting. Over time many spoon carvers developed their own variations of the basic styles. These variations tend to be subtle differences in woodwork coming out of a folk culture where there was little emphasis on creativity. As a result, the designs evolved into many variations, but all striving for perfection in form and function. I like to think that such spoons are similar to bird bones that are in many variations, but which are all close to perfect for their requirements. Most spoons are symmetrical in plan view, although some have an asymmetric bowl. To work well, a spoon must be relatively strong, and easy to hold and use for the intended purpose. The weakest part is the leading edge of the bowl. This is invariably endgrain. Over time, it can fray or even split. The bowl can take various shapes: egg-like, squarish, or slanted at the leading edge. In Swedish spoons there is generally a rounded transition between the bowl and stem. In contrast, Norwegian spoons often have a clean break. The transition into the mid-section stem must also be strong. The diamond cross section of the stem is a specially attractive design feature in some Swedish spoons. It not only looks attractive, but also feels
Project
good between your thumb, first and second fingers. If the stem is narrow in plan view, the profile needs to be deepened for strength, like an I-beam. Beyond the middle stem there is often a transition section to a thin, but wider, flat area that I call the handle. This flat handle allows the spoon to rest comfortably between your thumb and the third or fourth joint of your first finger. (There are different ways of holding a spoon, depending on how it is being used.) In Scandinavian spoons the handle often ends with a decorative finial. This finial creates a visual balance to the bowl at the other end. Showing these design qualities in photographs turns out to be challenging. While it’s useful to start by thinking in terms of plan and profile view points, the best spoons incorporate design elements that only become apparent as you rotate the object to view it at myriad angles. In fact, the traditional spoon carving tools (hewing axe, gouge and carving knife) work best when developing a rotated and rounded 3-D shape, cutting around or within a form rather than just staying with artificial plan view and profile
42 May/June 2009 May/June 2009 43
Spoon Carving
concepts. A very good spoon will look better with time and successive observation and use. I think this is a standard by which to judge any art form. An important element in spoon carving is using considerable time to study and really look at what you are making. How can this spoon (or the next one) be improved? Wille Sundqvist told me that an
old carvers’ expression was that ‘the light shines in the dark.’ This conveys the idea of a craftsman studying the form he is developing with that very special low angle, raking light emanating from a single source that is not so bright as to wash out the appearance of both form and surface. An elusive but valuable element of our ancient human experience disappeared when the electric lights
The finer work cleaning up the blank is done with a small axe, chipping away the bark. The hewing doesn’t have to be particularly good at this stage, but the bark side must be flat enough for the blank to be able to sit on it, split side upwards
Hewing the split face of the blank, where the hollow of the bowl will be carved
You should be able to achieve most of the shaping with an axe
Where to start
Drew marks up the section he wants to cleave from the log, making sure he avoids the pith. Then he uses a froe to split the blank roughly to shape.
The diamond section on the stem looks and feels good
“The best spoons incorporate design elements that only become apparent as you view the object at myriad angles”
went on. Rural electrification came to rural Sweden relatively late. While my personal interest is in developing sculptural form, there’s another aesthetic aspect which many spoon carvers excel in. This is decoration and embellishment. Surface chip carving and engraving is an integral design element in many spoons. Patterns can be geometric or floral. Some of the best work has been carved by Sami woodworkers in northern Scandinavia. Wood for spoonsThe wood you choose must be relatively strong, durable, and free of odour or taste when put into service. Any finish must also be food safe. Use hardwoods that have a fine texture. These will take details well and are easy to clean. Many species are suitable. In Sweden spoons are generally carved from white birch. I have also used black birch (considerably harder than white), hard maple, beech, cherry, dogwood (very nice) and holly (very fine texture, but not particularly attractive). Apple and pear are excellent. Smaller shrubby species, such as rhododendron, can also be used. Avoid coarse grained woods like oak or walnut. The softer deciduous species (tulip poplar, silver maple, linden) and conifers are usually not strong enough to survive the rigours that spoons experience. But these softer woods (even linden and white pine) are excellent for practising knife grasps, and for doing a practice spoon when you are learning how to develop a shape with a challenging form. When possible, I prefer to use freshly gathered green wood. This is much easier to work than carving dry wood, but there are always risks of checks or splitting and warping during the drying process. As with most woodworking, it’s important to avoid incorporating the actual pith which is often the starting point of radial cracks that develop during drying. If green wood isn’t available you can also use dry stock. One year I made Christmas present cooking spoons from kiln dried hard maple. Blanks can be taken from small limbs or saplings that begin a little larger in diameter than the size of the intended spoon bowl. These can be straight, or bent ‘crooks.’ Small blanks are split (or sometimes sawed) in half lengthwise. I generally split larger stock into quarters. I then split off parallel-sided
slabs. This rectilinear splitting avoids the dimensional taper that results from radial splitting. Bent blanks allow you to develop profile forms with considerable curvature without compromising strength. Finding suitable crooks can be challenging. Wille Sundqvist once told me to ‘take spoon blanks when you find them.’ This means you should collect any good crooks and then carve them from dry wood if you can’t get to them right away. With crooks, the curve needs to bend below and just beneath the bowl, and then straighten out. ‘Banana’ curves are not suitable. Since most spoons are symmetrical, the curve must also lay in a relatively flat plane. In real life, most spoons are carved from straight blanks. Where we live it’s hard to find nicely shaped crooks. The serving spoon that I made for this article still has considerable bend in profile view. For this design I was careful to minimise the slope of the endgrain leading edge of the bowl. I also kept the stem deep in section. Because I used a slab-shaped straight blank it was easy to clamp the stock to a workbench for the initial hollowing of the generous-sized bowl.
Prepare the spoon blankFor this article I decided to make a large serving spoon that would be easy to see in the photographs. I’ve used a straight blank about 7in in diameter and 12in long, sawed from a freshly cut black birch that had fallen across our driveway. This tree had many small branches and buried knots so I had to search for a section with clear wood. If you haven’t made a spoon before, I suggest starting
Project
with a smaller blank. A 3-4in diameter sapling or limb should work well. The exact size and proportions don’t matter; work with any good stock you can come up with. After sawing a piece of wood to length carefully inspect both ends looking for cracks which usually originate at the pith. If there is a crack, orient your initial split along it, or incorporate the crack in a section that will be rejected. Split the piece into halves. (Use a club for the striking tool, not a steel hammer.) Inspect the splits. Your blank should have relatively straight grain. In most cases reject pieces with any knots. Use a water soluble pencil to draw an outline of the blank on one end. For this spoon the end view was 3in deep by 4in wide. It’s important to locate the high point of the spoon below the pith of the blank. This is one of the more important rules for preventing radial splits from occurring during drying.
44 May/June 2009 May/June 2009 45
Spoon Carving
If your blank is a large one like I used you can also split off some of the waste wood at the sides. For this project I decided to orient the spoon with the bowl rim facing up towards the split. The bowl cavity on this large server is roughed out on a workbench with a gouge and hammer. For smaller spoons I generally sit and hand hold the blank while I hollow the bowl with a gouge and/or spoon knives. Use your axe to hew off some of the rounded bark surface so that the blank will lay flat with the split up. This doesn’t have to be particularly good hewing. Draw a centreline on the split face. I use a plastic
quilter’s ruler so that I can see both sides of the centerline. Follow the grain. Extend the centreline down each end and along the bottom. Next, sketch the plan view. Draw everything somewhat oversized. For this server the bowl is not symmetrical. This is a right-handed serving spoon and the softer slope on the left side of the rim will be ergonomic and add some visual interest. In plan view the mid-section of the stem is the narrowest part but don’t let it get too skinny. (This is a common problem with many first-time spoon makers.) It gradually swells and flattens to make the handle. Sketch the side view. The leading edge of the bowl starts about 40% below the top of the blank. I want some nice curvature in the profile view, but it’s also important to remember that the leading edge of the bowl is endgrain which is not strong in a thin-
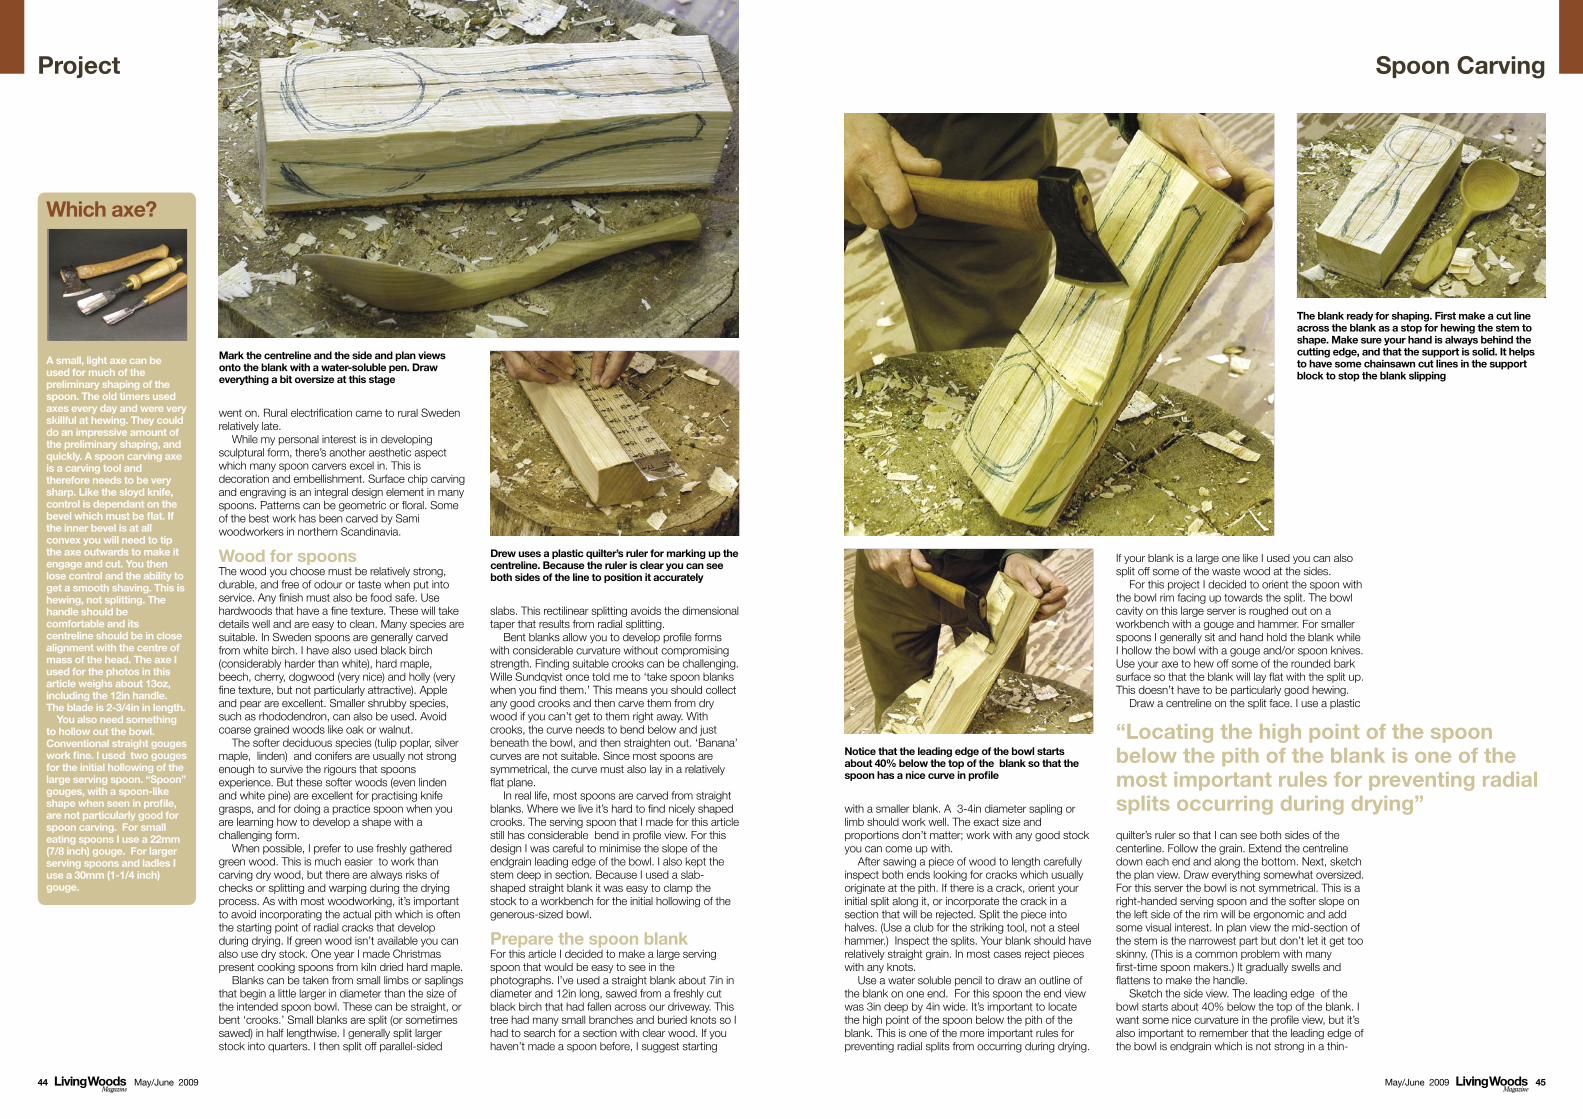
The blank ready for shaping. First make a cut line across the blank as a stop for hewing the stem to shape. Make sure your hand is always behind the cutting edge, and that the support is solid. It helps to have some chainsawn cut lines in the support block to stop the blank slipping
Drew uses a plastic quilter’s ruler for marking up the centreline. Because the ruler is clear you can see both sides of the line to position it accurately
“Locating the high point of the spoon below the pith of the blank is one of the most important rules for preventing radial splits occurring during drying”
Which axe?
A small, light axe can be used for much of the preliminary shaping of the spoon. The old timers used axes every day and were very skillful at hewing. They could do an impressive amount of the preliminary shaping, and quickly. A spoon carving axe is a carving tool and therefore needs to be very sharp. Like the sloyd knife, control is dependant on the bevel which must be flat. If the inner bevel is at all convex you will need to tip the axe outwards to make it engage and cut. You then lose control and the ability to get a smooth shaving. This is hewing, not splitting. The handle should be comfortable and its centreline should be in close alignment with the centre of mass of the head. The axe I used for the photos in this article weighs about 13oz, including the 12in handle. The blade is 2-3/4in in length. You also need something to hollow out the bowl. Conventional straight gouges work fine. I used two gouges for the initial hollowing of the large serving spoon. “Spoon” gouges, with a spoon-like shape when seen in profile, are not particularly good for spoon carving. For small eating spoons I use a 22mm (7/8 inch) gouge. For larger serving spoons and ladles I use a 30mm (1-1/4 inch) gouge.
Mark the centreline and the side and plan views onto the blank with a water-soluble pen. Draw everything a bit oversize at this stage
Notice that the leading edge of the bowl starts about 40% below the top of the blank so that the spoon has a nice curve in profile
section wall. This slope should not be too steep. The stem requires depth in the side view because it is narrow at this area in the plan view. For this spoon I drew the bottom with a long convex curve that rises slightly to a definite transition point a little more than half way from the leading edge. From the transition there is an upwards sweeping concave curve that terminates about 3/4in below the top of the blank. The lines on the upper surface mimic the lower curve. The bowl rim slopes downhill and is in a flat plane. Beyond the bowl there is a transition to a concave curve that continues past the transition point on the bottom. This is followed by another shallow concave curve that terminates at the split top of the blank. At this stage don’t be concerned about the lines on the sides that create the attractive facets and the diamond-section mid-stem.
Hollowing the bowlSpoon carvers often start by hewing or sawing the outline in plan view. For a large server I prefer to roughly hollow the bowl as soon as possible. (If you shape the plan view first the spoon becomes challenging to hold or secure to a workbench.) To do this you need to create the plane that defines the bowl rim. Make a saw kerf across the top of the blank. This is located at a low point safely behind the bowl. Terminate the kerf safely above the sketched spoon in the profile view. This kerf acts as a stop when you begin hewing the upper surface. You will need a chopping block for hewing with the axe. In the photos I’m working at an oak stump that I keep just for this purpose. If a stump isn’t
available you can set a smaller log round (or even a lumber scrap) on a workbench. Note that the stump has a rough surface texture and some ragged grooves made by a chain saw. This is done to help prevent the work from slipping during hewing. Using an axe for hewing and carving requires care and attention. Your workpiece must always be well supported on the chopping block. The primary safety rule is that your holding hand must always be
positioned on the back surface of the piece being axed. Never let your fingers wander over to the hewing surface, even though you might then get a better grip. The axe should be light-weight, so that your hands and wrists don’t become fatigued. This preliminary axe work is commonly done in two stages. First score across the fibres, cutting at maybe 30° to the surface. Then come back at a much closer angle to remove the loose wood. You can tip the work somewhat so that chopping is more-or-less downwards. Any striking energy that doesn’t actually cut the wood should be absorbed by the stump, not your holding hand. First hew the slope of the stem section, then the slope for the bowl. Start by hewing a wedge from one side arris (the junction of the side and top of the blank). Chop down to the saw cut, stopping at its base. Next chop off the opposite arris. Finish by hewing the left over material in the centre. Turn the blank so that the handle end is supported by the stump. Hew the bowl rim plane following the same procedure as with the stem section. This will be considerably more difficult. It’s further from the
Project
stump (and more prone to wobbling) and there is less wood to hold onto. Make this plane fairly flat. Recreate the center line and the drawing of the bowl and stem. Use two clamps to secure the blank to your work bench. For this server the hewed bark surface wasn’t really flat, so I put a small wedge underneath one section to provide good support. You want to eliminate any possible vibration.
Using straight gougesStart hollowing with a stout, straight gouge. Mine has brass ferules at each end of the handle, and a polyethylene plug at the striking end. I use a steel head hammer rather than a mallet, because it transmits energy more efficiently. Start at the center of the bowl and work outwards and deeper by excavating in layers. (Imagine deconstructing a halved onion starting from the center and working outwards.) Chop with the fibre direction. Alternately remove material from the front and rear of the bowl, chopping towards the center. The front of the bowl should have a fairly shallow slope; the rear slope can be considerably steeper. Shape the bottom of the bowl with a shallow curvature. The hollow should have round contours, not a V-bottom. When the bulk of the material is removed I switch to a smaller paring gouge which is used with arm and shoulder force. Take fine shaving so that you create a smooth bowl surface. At this stage you can pare down the sides working across the fibre. Try to get the bowl close to its final contours so that there won’t be a great deal of hand-held work on the interior during later stages of the process.
Hewing with a carving axeThe next step is developing the plan view. You could do this with a bowsaw or a bandsaw, but it’s rewarding and challenging to do most of the next steps with a carving axe. Also, working with an axe helps in making the transition from perpendicular plan and profile views to an interesting rounded and multi-faceted 3-dimensional form.
46 May/June 2009 May/June 2009 47
Spoon Carving
Make a saw kerf on both sides of the stem. These should be at the narrowest section, and not quite to the lines. Start by holding the bowl with the handle end on the stump. Hew a wedge off the plan/profile arris, then work so that you form a plane perpendicular to the top surface. Reverse the blank and hew to the side saw kerfs. Hew the other side of the handle following the same steps. Hew the bottom surface of the handle. As before, start by removing wood on each arris, and then hew out the mid section. Be careful to consider grain direction at all times. You don’t want to split off the reverse curve at the end of the handle. Recreate the centerline on the bottom of the spoon. I use a flexible stainless steel ruler which can be pressed down against the contour. Begin hewing the bowl exterior by removing wood from the base of the bowl working towards the stem. (You are still gripping the rather chunky front part of the bowl section.) As before, start hewing at the arris. Continue this hewing into the stem section, being careful not to hew past the center line. You are now beginning to form the distinctive diamond section of the stem and the arris that runs along the mid-section of each side of the handle. Repeat on the other side. The last step in hewing is shaping the front half of the bowl. Once this is done there won’t be much left to hold on to, so first take a look at, and refine any sections that have been previously worked. Again, start by hewing from the arris on each side of the bowl. Then work your way around the front to create the bowl shape. The slope at the front should not be too steep. Don’t chop to the bowl edge. Leave some material so that the rim can be refined.
“When the bulk of the material is removed I switch to a smaller paring gouge which is used with arm and shoulder force”
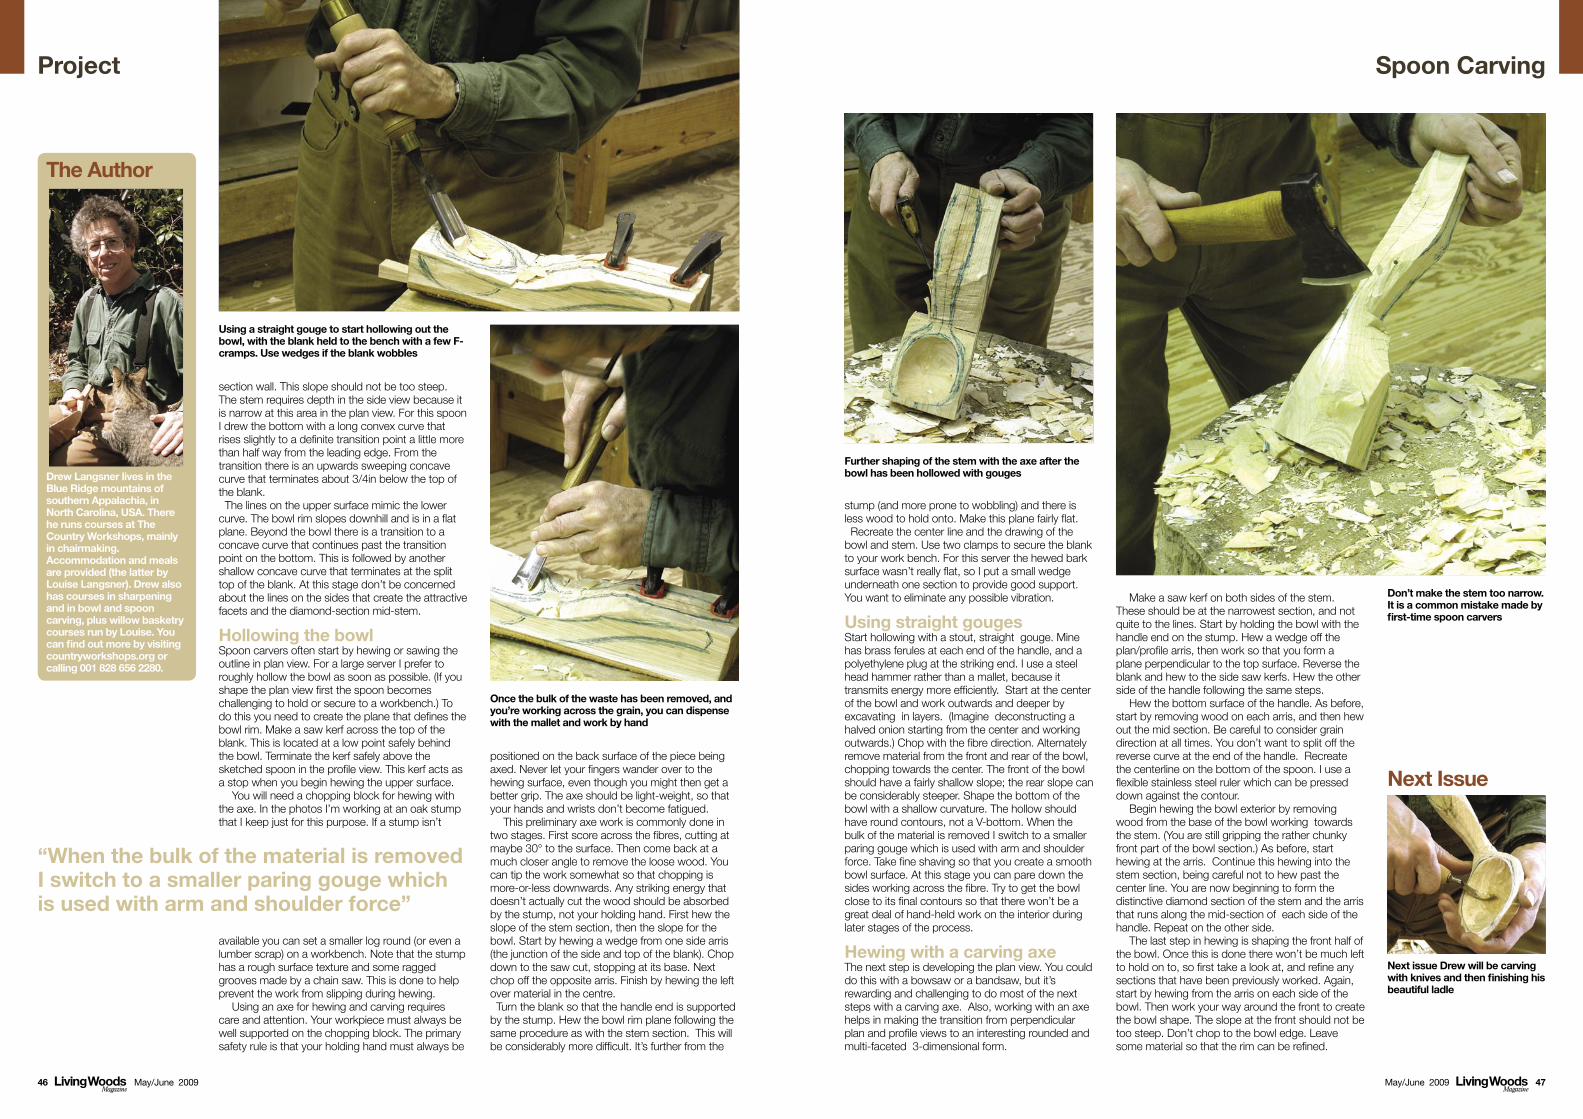
Don’t make the stem too narrow. It is a common mistake made by first-time spoon carvers
Once the bulk of the waste has been removed, and you’re working across the grain, you can dispense with the mallet and work by hand
Further shaping of the stem with the axe after the bowl has been hollowed with gouges
Using a straight gouge to start hollowing out the bowl, with the blank held to the bench with a few F-cramps. Use wedges if the blank wobbles
Next Issue
Next issue Drew will be carving with knives and then finishing his beautiful ladle
The Author
Drew Langsner lives in the Blue Ridge mountains of southern Appalachia, in North Carolina, USA. There he runs courses at The Country Workshops, mainly in chairmaking. Accommodation and meals are provided (the latter by Louise Langsner). Drew also has courses in sharpening and in bowl and spoon carving, plus willow basketry courses run by Louise. You can find out more by visiting countryworkshops.org or calling 001 828 656 2280.