Make Your Points on a wood lathe isn't as accurate as ... · PDF fileMake Your Points...
5
Make Your Points INTRODUCTION: I bought my first Oneway tailstock center for my Ulery bowl lathe longer ago than I care to remember. When I bought a Oneway 1018 lathe it came with another of their tailstock centers. Then when I bought a Powermatic 3520B it came with a tailstock center that was pretty much a clone of the Oneway center. The oldest Oneway used a slightly different center point--a #3 taper dowel pin instead of the #0 Morse taper the later versions and the clones use. This was nice, in a way, as tapered dowel pins are more readily available than #0 Morse taper pins, and I could easily modify tapered dowel pins to make my own points as long as they were small. Now that I had three of the tailstock centers, which is more than even a tool junky like me needs, I thought I could risk modifying one to take a large tapered dowel pin. I had tried some non-invasive ways of adding metal points for the Oneway, and some ways of adding tapered dowel pin points to cheaper tailstock centers, but was never entirely happy with the results. A #7 dowel pin was the best fit, as it only required reaming with no pre-drilling needed, and was big enough to make most points. It worked out fine, hence this article. Because you need to buy at least a clone of the Oneway center (the Woodworker's Supply version was the cheapest source I found) and a #7 tapered reamer this is not the kind of DIY project you do to save money. You would do it either because you need points that don't come with the pre-made sets or because you enjoy making your own tools. Briefly, first the tailstock is reamed for a #7 dowel pin reamer using a wood lathe. Tools and means for turning your own points are discussed, then a few sample points and their uses are shown. But don't limit yourself to points that I've thought of. PREPPING AND REAMING THE TAILSTOCK CENTER: Doing metal work on a wood lathe isn't as accurate as doing it on a metal lathe (and if I had a metal lathe I could just make my own #0 Morse tapers...) so the first step is to make a mark on the end of the tailstock center so that points can be remounted the same way every time. This will mostly compensate for any errors in reaming. Use the knockout rod to knock out the center point that came with the tailstock center. Mount the tailstock center in your lathe and rotate the tailstock center spindle until you can drop in the knockout rod to lock it. Use a triangular file to file a notch in the end of the cone as in Fig. 1. This not only gives you a reference for remounting points but also makes sure the spindle is soft enough to ream. Fig. 2 shows the completed notch. Figure #1: Filing a notch on the tailstock center cup. Figure #2: The completed notch. As you may want to ream deeper than the spindle locking slot, cut two 12D nails 5/8" long as in Fig. 3. Insert the nails into the tailstock center body to lock the spindle and use tape to hold them in place. Now insert the tailstock center firmly in the Morse Taper of your headstock. Use tape to indicate a reaming depth of 2-5/8" on the reamer. Mount a drill chuck holding the #7 taper reamer in the tailstock ram, and find something to use as a cutting lubricant. I used WD-40. The set-up for reaming is shown in Fig. 4. Figure #3: Cut nails to lock the tailstock center spindle without impeding reaming. Figure #4: The reaming set-up. Spray some lubricant into the throat of the tailstock center spindle and onto the reamer. Turn the lathe on at a slow speed, about 500 rpm and slowly advance the tailstock ram to begin reaming. Frequently withdraw the reamer to remove the metal swarf as in Fig. 5 and reapply lubricant. When you get close to the mark indicated by the tape, clean any swarf out of the bore and test fit one of the dowel pins as in Fig. 6. Continue to ream until you have the fit you want. Don't ream too far as longer dowel pins are longer at the small end for a given size.
-
Upload
nguyenmien -
Category
Documents
-
view
216 -
download
0
Transcript of Make Your Points on a wood lathe isn't as accurate as ... · PDF fileMake Your Points...
Make Your Points
INTRODUCTION: I bought my first Oneway tailstock center for my Ulery bowl lathe longer
ago than I care to remember. When I bought a
Oneway 1018 lathe it came with another of their tailstock centers. Then when I bought a
Powermatic 3520B it came with a tailstock
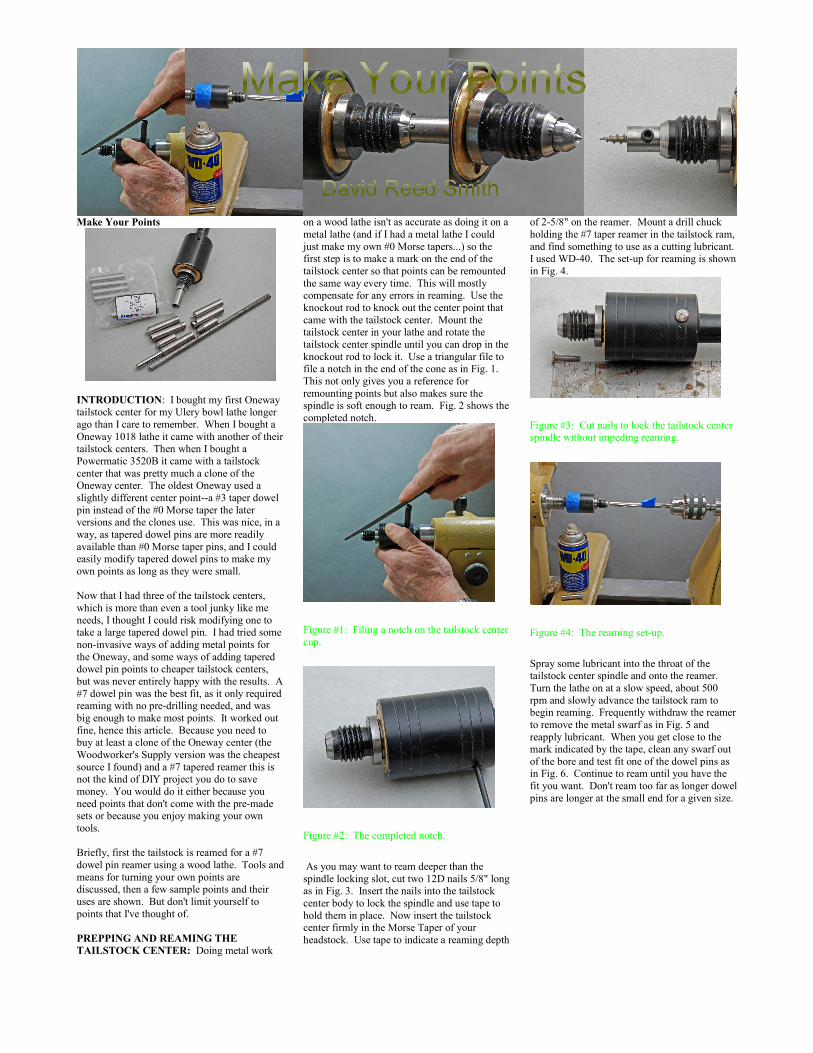
center that was pretty much a clone of the Oneway center. The oldest Oneway used a
slightly different center point--a #3 taper dowel
pin instead of the #0 Morse taper the later versions and the clones use. This was nice, in a
way, as tapered dowel pins are more readily
available than #0 Morse taper pins, and I could easily modify tapered dowel pins to make my
own points as long as they were small.
Now that I had three of the tailstock centers,
which is more than even a tool junky like me
needs, I thought I could risk modifying one to take a large tapered dowel pin. I had tried some
non-invasive ways of adding metal points for
the Oneway, and some ways of adding tapered dowel pin points to cheaper tailstock centers,
but was never entirely happy with the results. A
#7 dowel pin was the best fit, as it only required reaming with no pre-drilling needed, and was
big enough to make most points. It worked out
fine, hence this article. Because you need to buy at least a clone of the Oneway center (the
Woodworker's Supply version was the cheapest
source I found) and a #7 tapered reamer this is not the kind of DIY project you do to save
money. You would do it either because you
need points that don't come with the pre-made sets or because you enjoy making your own
tools.
Briefly, first the tailstock is reamed for a #7
dowel pin reamer using a wood lathe. Tools and
means for turning your own points are discussed, then a few sample points and their
uses are shown. But don't limit yourself to
points that I've thought of.
PREPPING AND REAMING THE
TAILSTOCK CENTER: Doing metal work
on a wood lathe isn't as accurate as doing it on a
metal lathe (and if I had a metal lathe I could
just make my own #0 Morse tapers...) so the first step is to make a mark on the end of the
tailstock center so that points can be remounted
the same way every time. This will mostly compensate for any errors in reaming. Use the
knockout rod to knock out the center point that
came with the tailstock center. Mount the tailstock center in your lathe and rotate the
tailstock center spindle until you can drop in the
knockout rod to lock it. Use a triangular file to file a notch in the end of the cone as in Fig. 1.
This not only gives you a reference for
remounting points but also makes sure the spindle is soft enough to ream. Fig. 2 shows the
completed notch.
Figure #1: Filing a notch on the tailstock center cup.
Figure #2: The completed notch.
As you may want to ream deeper than the
spindle locking slot, cut two 12D nails 5/8" long as in Fig. 3. Insert the nails into the tailstock
center body to lock the spindle and use tape to
hold them in place. Now insert the tailstock center firmly in the Morse Taper of your
headstock. Use tape to indicate a reaming depth
of 2-5/8" on the reamer. Mount a drill chuck
holding the #7 taper reamer in the tailstock ram,
and find something to use as a cutting lubricant. I used WD-40. The set-up for reaming is shown
in Fig. 4.
Figure #3: Cut nails to lock the tailstock center spindle without impeding reaming.
Figure #4: The reaming set-up.
Spray some lubricant into the throat of the tailstock center spindle and onto the reamer.
Turn the lathe on at a slow speed, about 500
rpm and slowly advance the tailstock ram to begin reaming. Frequently withdraw the reamer
to remove the metal swarf as in Fig. 5 and
reapply lubricant. When you get close to the mark indicated by the tape, clean any swarf out
of the bore and test fit one of the dowel pins as in Fig. 6. Continue to ream until you have the
fit you want. Don't ream too far as longer dowel
pins are longer at the small end for a given size.
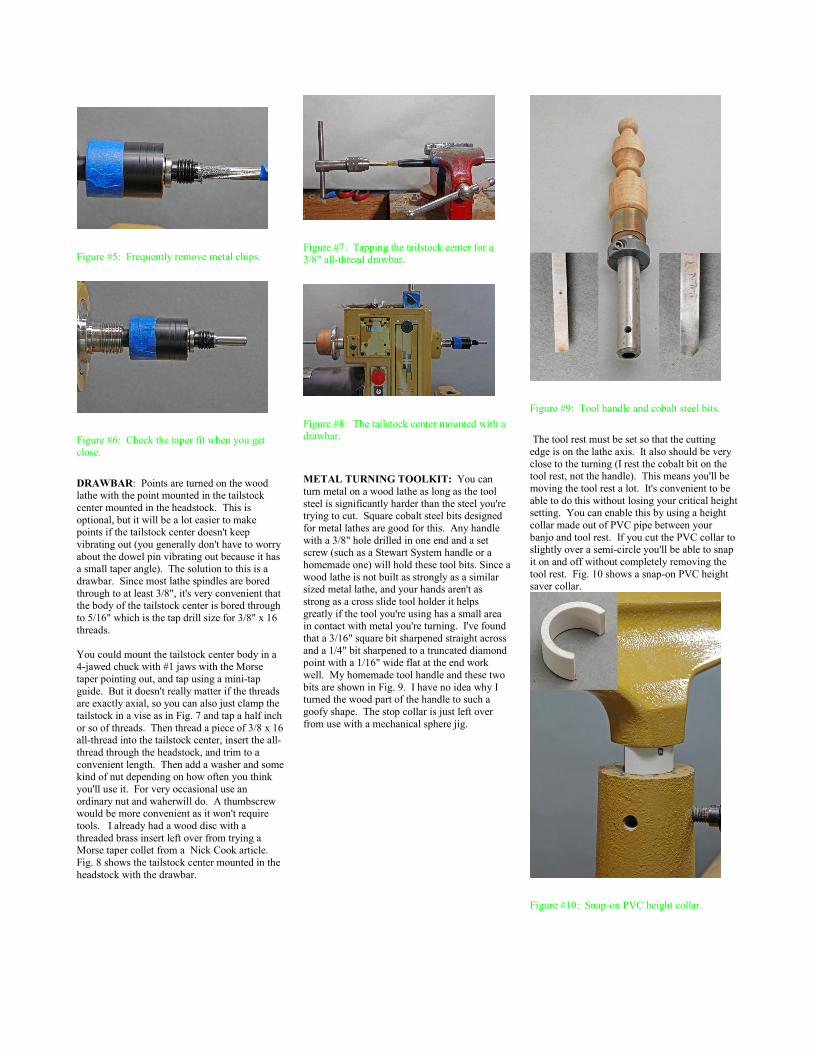
Figure #5: Frequently remove metal chips.
Figure #6: Check the taper fit when you get close.
DRAWBAR: Points are turned on the wood lathe with the point mounted in the tailstock
center mounted in the headstock. This is
optional, but it will be a lot easier to make points if the tailstock center doesn't keep
vibrating out (you generally don't have to worry
about the dowel pin vibrating out because it has a small taper angle). The solution to this is a
drawbar. Since most lathe spindles are bored
through to at least 3/8", it's very convenient that the body of the tailstock center is bored through
to 5/16" which is the tap drill size for 3/8" x 16
threads.
You could mount the tailstock center body in a 4-jawed chuck with #1 jaws with the Morse
taper pointing out, and tap using a mini-tap
guide. But it doesn't really matter if the threads are exactly axial, so you can also just clamp the
tailstock in a vise as in Fig. 7 and tap a half inch
or so of threads. Then thread a piece of 3/8 x 16 all-thread into the tailstock center, insert the all-
thread through the headstock, and trim to a
convenient length. Then add a washer and some kind of nut depending on how often you think
you'll use it. For very occasional use an
ordinary nut and waherwill do. A thumbscrew would be more convenient as it won't require
tools. I already had a wood disc with a
threaded brass insert left over from trying a Morse taper collet from a Nick Cook article.
Fig. 8 shows the tailstock center mounted in the
headstock with the drawbar.
Figure #7: Tapping the tailstock center for a 3/8" all-thread drawbar.
Figure #8: The tailstock center mounted with a drawbar.
METAL TURNING TOOLKIT: You can
turn metal on a wood lathe as long as the tool
steel is significantly harder than the steel you're trying to cut. Square cobalt steel bits designed
for metal lathes are good for this. Any handle
with a 3/8" hole drilled in one end and a set screw (such as a Stewart System handle or a
homemade one) will hold these tool bits. Since a
wood lathe is not built as strongly as a similar sized metal lathe, and your hands aren't as
strong as a cross slide tool holder it helps
greatly if the tool you're using has a small area in contact with metal you're turning. I've found
that a 3/16" square bit sharpened straight across
and a 1/4" bit sharpened to a truncated diamond point with a 1/16" wide flat at the end work
well. My homemade tool handle and these two
bits are shown in Fig. 9. I have no idea why I turned the wood part of the handle to such a
goofy shape. The stop collar is just left over
from use with a mechanical sphere jig.
Figure #9: Tool handle and cobalt steel bits.
The tool rest must be set so that the cutting
edge is on the lathe axis. It also should be very
close to the turning (I rest the cobalt bit on the tool rest, not the handle). This means you'll be
moving the tool rest a lot. It's convenient to be
able to do this without losing your critical height setting. You can enable this by using a height
collar made out of PVC pipe between your
banjo and tool rest. If you cut the PVC collar to slightly over a semi-circle you'll be able to snap
it on and off without completely removing the
tool rest. Fig. 10 shows a snap-on PVC height saver collar.
Figure #10: Snap-on PVC height collar.

To sum up, keep the contact area small and the
speed slow (500 rpm or so). Use lubricant for all metal cutting operations. Don't just rub the
tool and generate heat but continuously remove
metal. If maintaining a cut takes more force than you or the lathe like, add lubricant, reduce
the speed or contact area, or sharpen the tool bit.
GENERAL TECHNIQUES: The first step in
making a point is to mark the point for
consistent insertion. Push a dowel pin into place and use a marker to make a dot next to the
notch you filed in the rim of the tailstock
center's cup as in Fig. 11. Remove the point and use a center punch to make a permanent mark at
the dot as in Fig. 12. My much abused vise can
easily rack enough to hold the slightly tapered dowel pin. Then reinsert the dowel pin with the
dot aligned with the filed slot as in Fig. 13. Tap
it in firmly so it doesn't shift during turning.
Figure #11: Marking the point.
Figure #12: Punching a permanent alignment
mark.
Figure #13: Inserted dowel pin.
So maybe you're thinking, "if I tap the dowel pin in firmly won't I have trouble knocking it
out with the thin knockout rod?" Good point. I
gave mine a nice heron neck shape once. A heron neck is much like a swan neck only not as
graceful. By the way, after you've heard the cry
of an aggravated blue heron, say because you were playing paparazzi in your new kayak, it
won't seem so far-fetched that birds are
descended from dinosaurs. So cut a piece of 1/4" steel rod to make a more substantial
knockout rod.
The #7 1-3/4" tapered pins will be too long for a
lot of uses, but it's easy to cut them to length on
the lathe. Turn the lathe on at a moderate speed (again, 500 rpm is good) and use the corner of
the small tool bit to start a groove as in Fig. 14.
Then, with the lathe still running slowly so it does all the work, use a hacksaw to cut off the
point as in Fig. 15. Help the lathe out by
moving the saw slowly to clear chips and not concentrate all the wear on just a couple of
teeth.
Figure #14: A starting groove for cutting the
pin to length.
Figure #15: Cutting the pin to length.
Any time you want to drill the taper pin you
should create a starter dimple with a short rigid bit that won't deflect. Fig. 16 shows creating a
starter hole with a combined drill and
countersink. The combined drill and countersink is also useful for creating a dimple
for engaging a cone point tailstock center when
you'll benefit from additional support such as cutting a tenon like in Fig. 17.
Figure #16: Creating a starter hole with a
combined drill and countersink.
Figure #17: Using a tailstock center for support.
MINI-CUP CENTER: Cup centers have two
big advantages over cone centers--limited penetration/splitting and vibration suppression.
But sometimes the stock ones are just too darn
big. So make a small one. Mark for alignment and cut to length a tapered dowel pin. Mount
the point in the locked tailstock center mounted
in the headstock. Then use the truncated diamond point cutter to taper the end to the size
cup center you want as in Fig. 18. Then cut a
cup shaped recess, leaving a slightly proud center point as in Fig. 19. You'll need to cut
back the rim a bit. I don't think it's worth while
making a removable/adjustable point (they always go out of adjustment at the worst time
for me, not to mention being more work) but
you can do that if you'd rather. Find a suitable steel rod (nail?), drill a center hole for it, and
drill and tap the dowel pin for a set screw.
Figure #18 Taper the nose for a mini-cup
center.
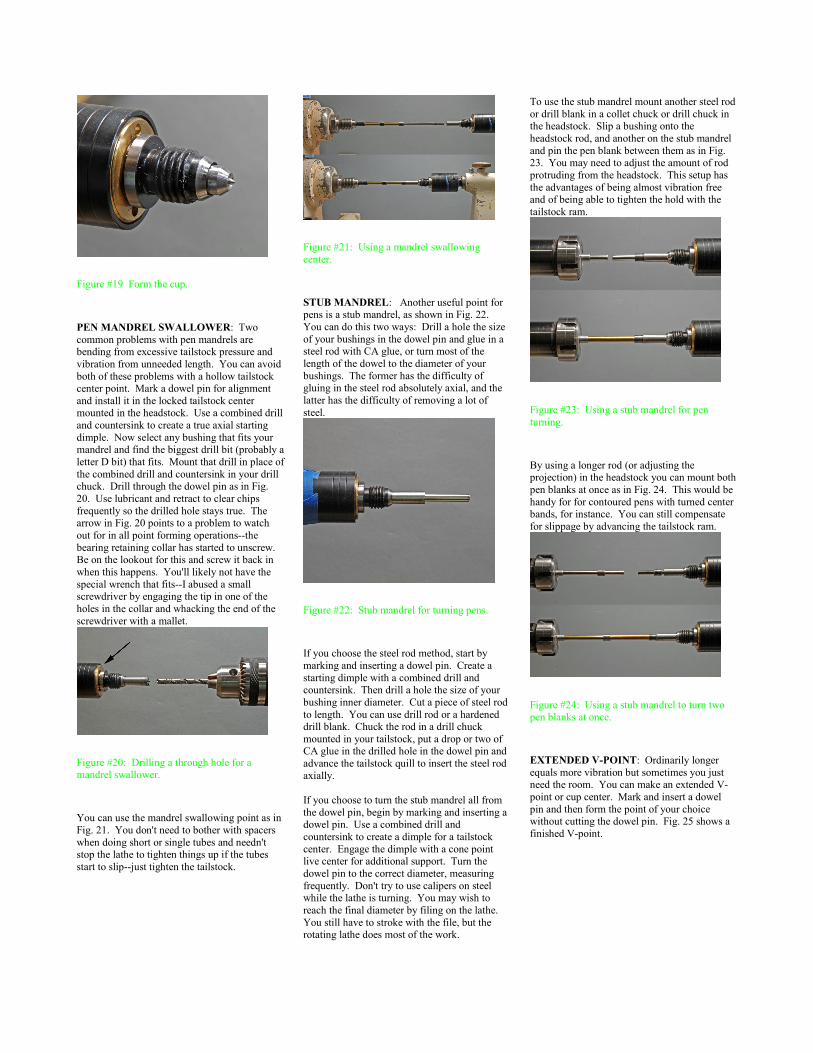
Figure #19 Form the cup.
PEN MANDREL SWALLOWER: Two
common problems with pen mandrels are bending from excessive tailstock pressure and
vibration from unneeded length. You can avoid
both of these problems with a hollow tailstock center point. Mark a dowel pin for alignment
and install it in the locked tailstock center mounted in the headstock. Use a combined drill
and countersink to create a true axial starting
dimple. Now select any bushing that fits your mandrel and find the biggest drill bit (probably a
letter D bit) that fits. Mount that drill in place of
the combined drill and countersink in your drill chuck. Drill through the dowel pin as in Fig.
20. Use lubricant and retract to clear chips
frequently so the drilled hole stays true. The arrow in Fig. 20 points to a problem to watch
out for in all point forming operations--the
bearing retaining collar has started to unscrew. Be on the lookout for this and screw it back in
when this happens. You'll likely not have the
special wrench that fits--I abused a small screwdriver by engaging the tip in one of the
holes in the collar and whacking the end of the
screwdriver with a mallet.
Figure #20: Drilling a through hole for a mandrel swallower.
You can use the mandrel swallowing point as in
Fig. 21. You don't need to bother with spacers
when doing short or single tubes and needn't stop the lathe to tighten things up if the tubes
start to slip--just tighten the tailstock.
Figure #21: Using a mandrel swallowing
center.
STUB MANDREL: Another useful point for pens is a stub mandrel, as shown in Fig. 22.
You can do this two ways: Drill a hole the size
of your bushings in the dowel pin and glue in a steel rod with CA glue, or turn most of the
length of the dowel to the diameter of your
bushings. The former has the difficulty of gluing in the steel rod absolutely axial, and the
latter has the difficulty of removing a lot of
steel.
Figure #22: Stub mandrel for turning pens.
If you choose the steel rod method, start by
marking and inserting a dowel pin. Create a
starting dimple with a combined drill and countersink. Then drill a hole the size of your
bushing inner diameter. Cut a piece of steel rod
to length. You can use drill rod or a hardened drill blank. Chuck the rod in a drill chuck
mounted in your tailstock, put a drop or two of CA glue in the drilled hole in the dowel pin and
advance the tailstock quill to insert the steel rod
axially.
If you choose to turn the stub mandrel all from
the dowel pin, begin by marking and inserting a dowel pin. Use a combined drill and
countersink to create a dimple for a tailstock
center. Engage the dimple with a cone point live center for additional support. Turn the
dowel pin to the correct diameter, measuring
frequently. Don't try to use calipers on steel while the lathe is turning. You may wish to
reach the final diameter by filing on the lathe.
You still have to stroke with the file, but the rotating lathe does most of the work.
To use the stub mandrel mount another steel rod
or drill blank in a collet chuck or drill chuck in the headstock. Slip a bushing onto the
headstock rod, and another on the stub mandrel
and pin the pen blank between them as in Fig. 23. You may need to adjust the amount of rod
protruding from the headstock. This setup has
the advantages of being almost vibration free and of being able to tighten the hold with the
tailstock ram.
Figure #23: Using a stub mandrel for pen
turning.
By using a longer rod (or adjusting the projection) in the headstock you can mount both
pen blanks at once as in Fig. 24. This would be
handy for for contoured pens with turned center bands, for instance. You can still compensate
for slippage by advancing the tailstock ram.
Figure #24: Using a stub mandrel to turn two pen blanks at once.
EXTENDED V-POINT: Ordinarily longer
equals more vibration but sometimes you just need the room. You can make an extended V-
point or cup center. Mark and insert a dowel
pin and then form the point of your choice without cutting the dowel pin. Fig. 25 shows a
finished V-point.
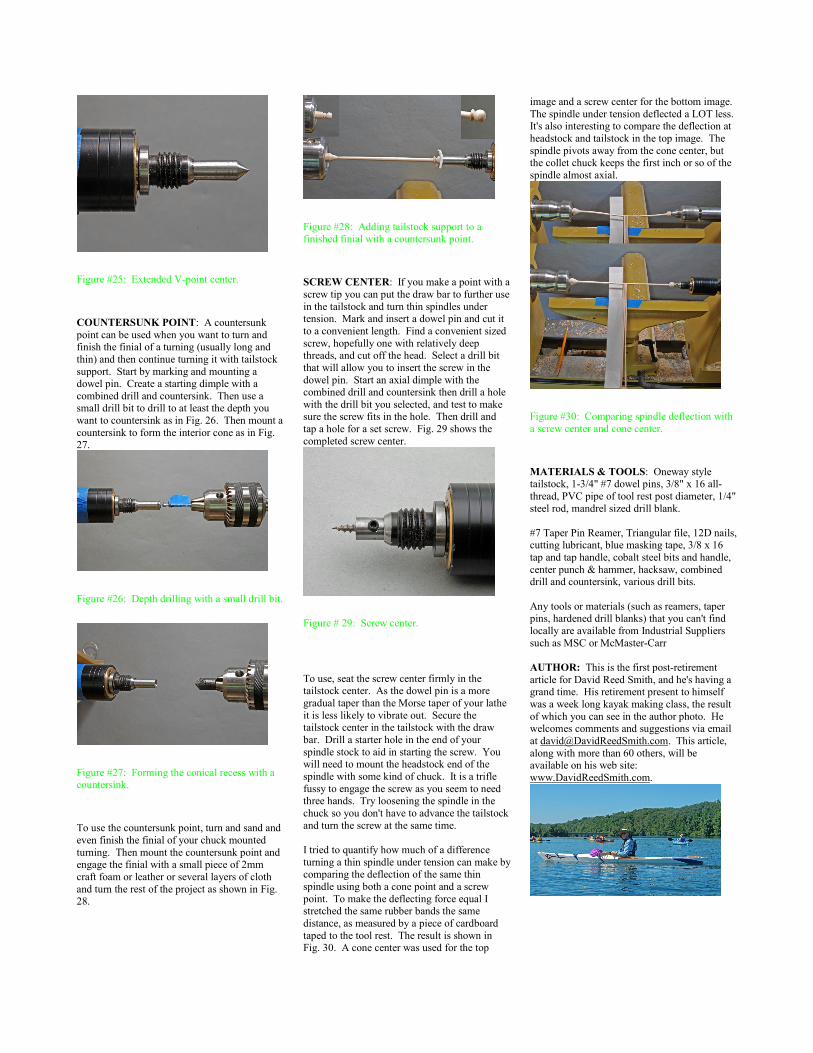
Figure #25: Extended V-point center.
COUNTERSUNK POINT: A countersunk
point can be used when you want to turn and finish the finial of a turning (usually long and
thin) and then continue turning it with tailstock
support. Start by marking and mounting a dowel pin. Create a starting dimple with a
combined drill and countersink. Then use a small drill bit to drill to at least the depth you
want to countersink as in Fig. 26. Then mount a
countersink to form the interior cone as in Fig. 27.
Figure #26: Depth drilling with a small drill bit.
Figure #27: Forming the conical recess with a countersink.
To use the countersunk point, turn and sand and
even finish the finial of your chuck mounted
turning. Then mount the countersunk point and engage the finial with a small piece of 2mm
craft foam or leather or several layers of cloth
and turn the rest of the project as shown in Fig. 28.
Figure #28: Adding tailstock support to a finished finial with a countersunk point.
SCREW CENTER: If you make a point with a
screw tip you can put the draw bar to further use
in the tailstock and turn thin spindles under tension. Mark and insert a dowel pin and cut it
to a convenient length. Find a convenient sized
screw, hopefully one with relatively deep threads, and cut off the head. Select a drill bit
that will allow you to insert the screw in the
dowel pin. Start an axial dimple with the combined drill and countersink then drill a hole
with the drill bit you selected, and test to make sure the screw fits in the hole. Then drill and
tap a hole for a set screw. Fig. 29 shows the
completed screw center.
Figure # 29: Screw center.
To use, seat the screw center firmly in the tailstock center. As the dowel pin is a more
gradual taper than the Morse taper of your lathe
it is less likely to vibrate out. Secure the tailstock center in the tailstock with the draw
bar. Drill a starter hole in the end of your
spindle stock to aid in starting the screw. You will need to mount the headstock end of the
spindle with some kind of chuck. It is a trifle
fussy to engage the screw as you seem to need three hands. Try loosening the spindle in the
chuck so you don't have to advance the tailstock
and turn the screw at the same time.
I tried to quantify how much of a difference
turning a thin spindle under tension can make by comparing the deflection of the same thin
spindle using both a cone point and a screw
point. To make the deflecting force equal I stretched the same rubber bands the same
distance, as measured by a piece of cardboard
taped to the tool rest. The result is shown in Fig. 30. A cone center was used for the top
image and a screw center for the bottom image.
The spindle under tension deflected a LOT less. It's also interesting to compare the deflection at
headstock and tailstock in the top image. The
spindle pivots away from the cone center, but the collet chuck keeps the first inch or so of the
spindle almost axial.
Figure #30: Comparing spindle deflection with
a screw center and cone center.
MATERIALS & TOOLS: Oneway style tailstock, 1-3/4" #7 dowel pins, 3/8" x 16 all-
thread, PVC pipe of tool rest post diameter, 1/4"
steel rod, mandrel sized drill blank.
#7 Taper Pin Reamer, Triangular file, 12D nails, cutting lubricant, blue masking tape, 3/8 x 16
tap and tap handle, cobalt steel bits and handle,
center punch & hammer, hacksaw, combined drill and countersink, various drill bits.
Any tools or materials (such as reamers, taper pins, hardened drill blanks) that you can't find
locally are available from Industrial Suppliers
such as MSC or McMaster-Carr
AUTHOR: This is the first post-retirement
article for David Reed Smith, and he's having a grand time. His retirement present to himself
was a week long kayak making class, the result
of which you can see in the author photo. He welcomes comments and suggestions via email
at [email protected]. This article,
along with more than 60 others, will be available on his web site:
www.DavidReedSmith.com.