Make it Yours - ColorMaster, Dual Paint & Primer, - · PDF filemake it yours how to spray...
36
Make it Yours HOW TO SPRAY PAINT FURNITURE, HOME DÉCOR PROJECTS, HOLIDAY CRAFTS AND MORE WITH KRYLON ® SPRAY PAINT
Transcript of Make it Yours - ColorMaster, Dual Paint & Primer, - · PDF filemake it yours how to spray...

Make it Yours
HOW TO SPRAY PAINT FURNITURE, HOME DÉCOR
PROJECTS, HOLIDAY CRAFTS AND MORE WITH
KRYLON® SPRAY PAINT
1
LETTER FROM THE EDITOR
Dear Reader:
Krylon® has been creating paints that deliver bright color, beautiful finishes and lasting durability, all while upholding amazing quality for decades. Krylon has a paint to add a personal touch to any project on any surface – wood, metal, ceramic, craft foam, glass, plastic and more. Whether you are trying to spruce up that old dresser, add decoration to your garden, or create a holiday themed gift, Krylon has the product you need.
These Krylon projects were created and submitted by spray paint fans just like you. The Krylon ebook is for the creative person who wants to transform something old into something new without breaking the bank. Included are basic instructions with complete materials lists for projects in a range of skill levels, making it easy for you to achieve incredible results.
For more Krylon product information, inspiration and ideas, visit www.Krylon.com.
We would like to thank www.FaveCrafts.com for helping create this eBook.
Sincerely, Krylon.com

2
CONTENTS
Dryer Vent Pumpkin ..........................................................................................................................3
Fabulous Funkins ................................................................................................................................4
Trick-or-Treat Frame ...........................................................................................................................5
Harvest Tablecloth ..............................................................................................................................6
Gift Wrapping Ensemble .................................................................................................................8
Two-sided Room Divider..............................................................................................................10
Glitter Topped Christmas Ornaments .................................................................................12
Holiday Subway Wall Art Project ..............................................................................................14
American Pride Freedom Table ................................................................................................16
Kitchen Storage Cabinet Makeover ........................................................................................17
Distressed Wicker Side Chest .....................................................................................................19
Chevron Striped Dresser ..............................................................................................................21
Thrifty Polka Dot Card Table Set ...............................................................................................22
DIY Starburst Mirror ........................................................................................................................24
Mirrored Vase .....................................................................................................................................26
Stenciled Flowers Birdhouse ......................................................................................................27
Can Vases ..............................................................................................................................................29
DIY Bike Planter Garden Craft ....................................................................................................30
Plastic Patio Chair Upgrade .........................................................................................................31
Clay Pot Wind Chime ......................................................................................................................32
Repurposed Chandelier with Solar Lights ..........................................................................34

3
Dryer Vent Pumpkin BY LANE MCLOUD
HOLIDAY
Who knew that a dryer vent could be transformed into a fes-tive fall decoration? Krylon® ColorMaster™ Paint + Primer in Pumpkin Orange was used to adorn what seems to be a typi-cal dryer vent. If you are feeling extra crafty, you could even
spray paint a jack-o’-lantern face on your pumpkin! The dryer vent pumpkin is an easy, thrifty way to capture the fall spirit.
Project Time: 1 hour Skill Level: 1Materials:
1. Set up a spray area by cover-ing your work area with a drop cloth. Make sure it is a well-ventilated area.
2. Using the scissors and wire cutters, cut the dryer vent into four equal pieces.
3. With each piece, form a circle pumpkin and glue edges of the dryer vent together with hot glue. Hold the edges until the glue dries.
4. Hold the can of Krylon ColorMaster Paint + Primer – Gloss Pumpkin Orange 6-8 inches from the pumpkin, paint-ing it by using a sweeping side-to-side motion with slight over-lap. Repeat this step until you obtain your desired color. Allow 10 minutes for the paint to dry.
5. Hot glue the cinnamon stick for the stem, and hot glue the leaves to the stem.
Instructions
• 1 can Krylon® ColorMaster™ Paint + Primer – Gloss Pumpkin Orange (#52411)
• 1 dryer vent flexible hose (8 feet)• 1 cinnamon stick
• 1-2 artificial leaves • Scissors• Wire cutters • Hot glue gun and glue stick • Drop cloth

4
Fabulous FunkinsDESIGNED BY VICKI O’DELL
HOLIDAY
1. Lay down newspaper to protect the work surface with newspaper.
2. Wipe down all surfaces with mineral spirits to remove dust and other particles.
3. Paint pumpkins in various colors of your choosing, according to the can instructions, using a side to side motion in even coats.
4. Allow to dry completely.
Instructions
Project Time: 1-2 hours Skill Level: 1Materials:• Krylon® Glitter Blast™ Glitter Spray – Golden Glow (#3801)• Krylon® Glitter Blast™ Glitter Spray – Bronze Blaze (#3803)• Krylon® Natural Stone Textured Finish – Limestone (#3703)• Krylon® Natural Stone Textured Finish – Jasper (#3706)• Krylon® Dual® Superbond® Paint + Primer Metallic Finish – Gold (#8845)• Krylon® Dual® Superbond® Paint + Primer Metallic Finish – Silver (#8846)

5
Trick-or-Treat FrameDESIGNED BY ROXI PHILLIPS
HOLIDAY
1. Remove glass and backing materials from all frames.
2. Spray paint frames with Krylon Make it Stone! in Black Granite; allow to dry completely.
3. To cut stencils, use a personal die-cut machine to cut each of the words “Trick”, “or”, and “Treat” from the center of an 8"x10" piece of adhesive-backed vinyl. If you don’t have a die-cut machine, trace letters onto vinyl and cut out with a craft knife. Remove each of the words from the vinyl rectangles, creating stencils.
4. Position and adhere stencils on center of glass with the stencil for “or” on the 5"x7" glass and the words “Trick” and “Treat” on the 8"x10" sheets of glass.
5. Spray paint each stenciled glass with a different color of Krylon ColorMaster Paint + Primer. Carefully remove stencils while last coat of paint is not quite dry. Note: If paint is allowed to dry completely before removing stencil the letter will lift off of the glass surface.
6. With paint pens, on the backside of the glass, draw a spider’s web on a corner of the top glass and extend the web onto the lower sections of glass. Draw a spider on the lower glass section, as detailed in project photo.
7. Insert glass back into frames leaving out all other backing materials; bend framing clips back onto glass to secure in place. If necessary to secure glass, add beads of hot glue around glass on the back of frame assuring it can not be seen from the front.
8. Lay frames upside down on flat surface. Position frames with a 1" gap between them. Cut black grosgrain ribbon into 4" pieces. Using a hot glue gun, adhere ribbon to backside of frames sections, linking them together.
9. From the decorative ribbon, cut an 18" length. Hot glue ends of ribbon to top corners of top frame creating a loop. With remaining ribbon, tie a bow around center of the loop.
Instructions
Project Time: 2 hours (plus dry time) Skill Level: 3Materials:• Krylon® Make It Stone® Textured Paint – Black Granite (#18201)• Krylon® ColorMaster™ Paint + Primer – Gloss Pumpkin Orange
(#52411)• Krylon® ColorMaster™ Paint + Primer – Gloss Black (#51601)• Krylon® ColorMaster™ Paint + Primer – Gloss Purple (#51913)• Krylon® Short Cuts® Paint Pens – Gloss White (SCP-913)• Krylon® Short Cuts® Paint Pens – Gloss Black (SCP-914)• Ribbon – 3-inch Decorative – 1 yard• Ribbon – ½-inch Black Grosgrain – 16-inches• Adhesive-backed vinylTools:• Personal die-cut machine or craft knife• Craft scissors• Hot glue gun and glue stick(s)
Turn a trio of picture frames into a fun halloween decoration.

6
Harvest TableclothDESIGNED BY VICKI O’DELL
HOLIDAY
Hand-painted table linens featuring autumn leaves and gourds will help you set a beautiful, bountiful table for fall gatherings.
Project Time: 8+ hoursSkill Level: 4Materials:• Krylon® ColorMaster™ Paint +
Primer – Satin Burgundy (#53503)• Krylon® ColorMaster™ Paint
+ Primer – Satin Catalina Mist (#53529)
• Krylon® ColorMaster™ Paint + Primer Metallic – Gold (#51510)
• Protective gloves and eye wear• Newspaper to protect work surface
& for masking• Painters Drop Cloth 6' x 9'• Steam Iron• Painters tape• Binder clips, 30-40 large• Vinyl, vinyl cutting machine or large
size stencils• Large table or plywood over saw
horses for a painting surface
1. Multiple drop cloths may need to be purchased in order to find one suitable for this project. Look for cloths that are evenly hemmed and without soil or large defects in the fabric.
2. Create a work surface that will allow the drop cloth to be laid out flat and pulled taut.
3. Iron the drop cloth smooth. 4. Using the binder clips, attach the
drop cloth to the surface, pulling taut and making sure there are no wrinkles.
5. Protect the work surface or overspray area with newspaper.
6. Create artwork and cut vinyl or purchase a large stencil.
7. Select a color to begin with (usually the lighter colors first) and then tape off areas that won’t be painted with newspaper and painters tape.
8. Paint open areas with Krylon ColorMaster Paint + Primer.
9. Let dry and remove the masking. 10. Continue to mask, paint and let
dry until the tablecloth is covered in the design.
11. Let dry thoroughly. 12. Allow the tablecloth to cure for 72
hours and then heat set with the iron (no steam) before using or laundering.
Instructions
7 © 2014 Krylon
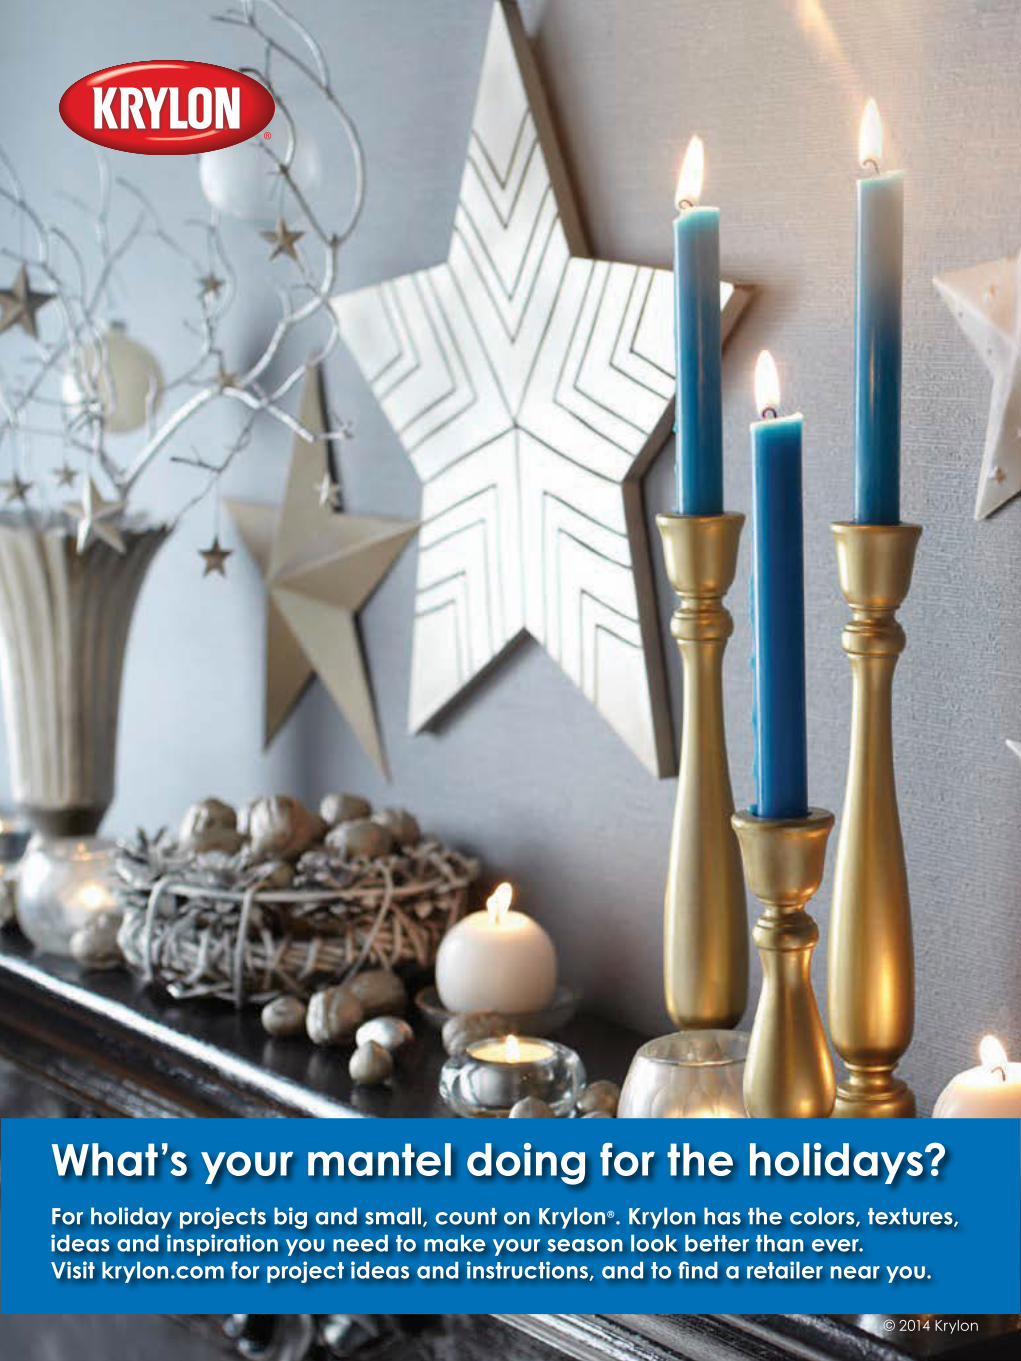
What’s your mantel doing for the holidays?For holiday projects big and small, count on Krylon®. Krylon has the colors, textures, ideas and inspiration you need to make your season look better than ever. Visit krylon.com for project ideas and instructions, and to find a retailer near you.

8
Gift Wrapping EnsembleDESIGNED BY ROXI PHILLIPS
HOLIDAY
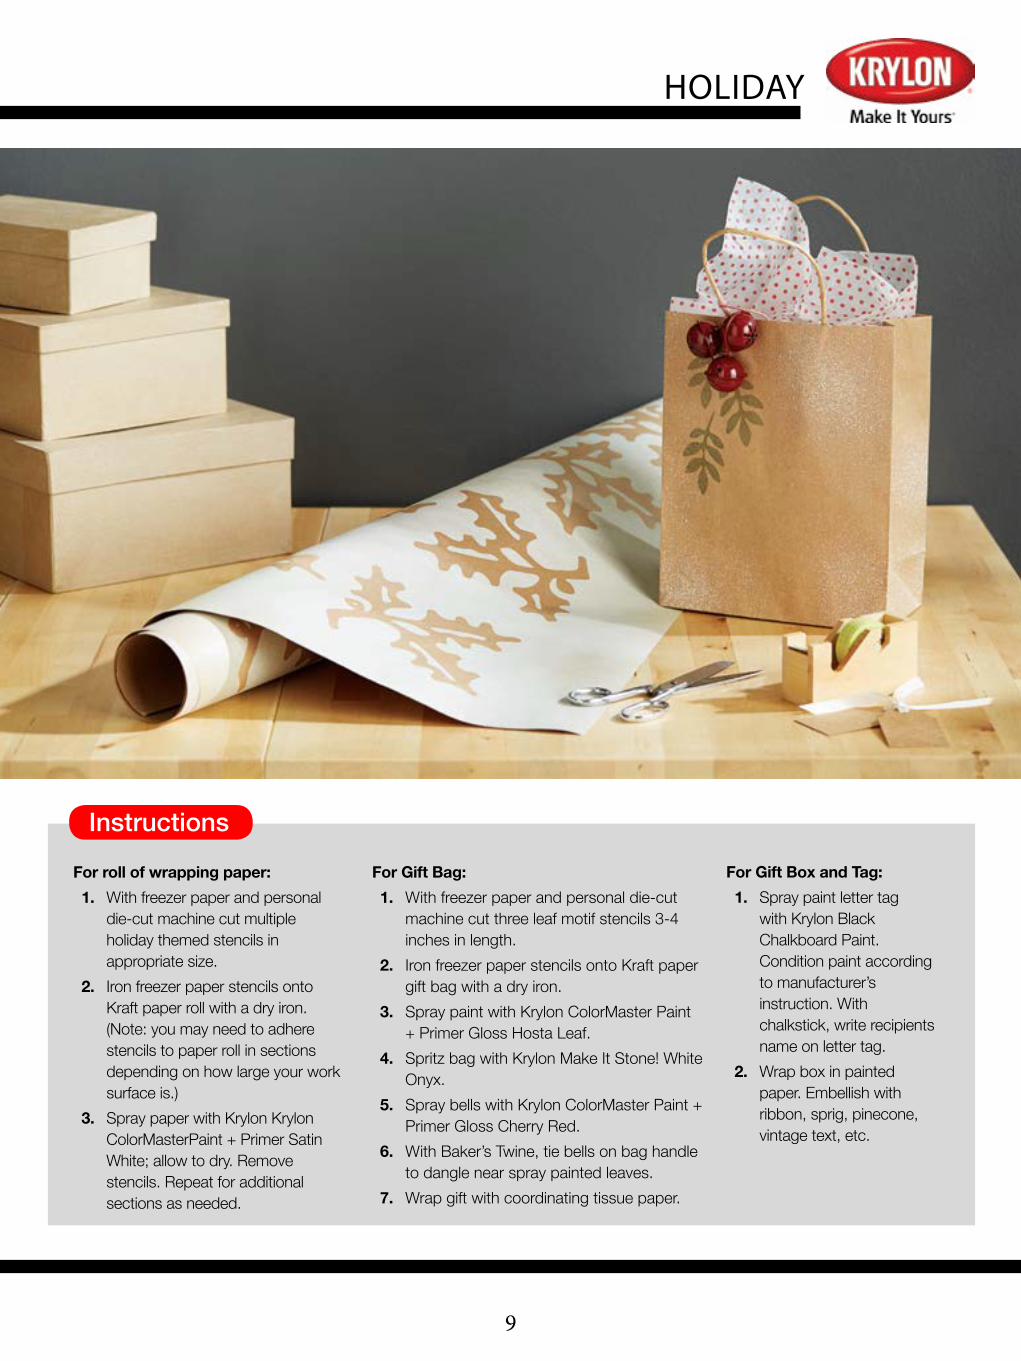
Create your own wrapping supplies with these simple techniques.
Project Time: 2 hours plus drying time Skill Level: (1-5) 2Materials::• Krylon® ColorMaster™ Paint + Primer – Gloss Cherry Red (#52101)• Krylon® ColorMaster™ Paint + Primer – Satin White (#53564)• Krylon® ColorMaster™ Paint + Primer – Gloss Hosta Leaf (#53541)• Krylon® Make It Stone®! – White Onyx (#18213)• Krylon® Chalkboard Paint – Black (#807)• Krylon® Glitter Spray – Shimmering Silver (#402)• Freezer paper: plastic coated• Metal letter: 5"• Gift Ribbon: wired• Embellishments: i.e. vintage text, greenery and berry sprig, pinecone »
• Jingle Bells: (3)• Baker’s Twine: (2') red & white • Kraft paper roll• Kraft paper gift bag• Tissue paper: coordinating• Masking paper and tape• Personal Die-cut machine• Craft scissors• Iron: dry• Chalk stick
9
For roll of wrapping paper: 1. With freezer paper and personal
die-cut machine cut multiple holiday themed stencils in appropriate size.
2. Iron freezer paper stencils onto Kraft paper roll with a dry iron. (Note: you may need to adhere stencils to paper roll in sections depending on how large your work surface is.)
3. Spray paper with Krylon Krylon ColorMasterPaint + Primer Satin White; allow to dry. Remove stencils. Repeat for additional sections as needed.
Instructions
HOLIDAY
For Gift Bag: 1. With freezer paper and personal die-cut
machine cut three leaf motif stencils 3-4 inches in length.
2. Iron freezer paper stencils onto Kraft paper gift bag with a dry iron.
3. Spray paint with Krylon ColorMaster Paint + Primer Gloss Hosta Leaf.
4. Spritz bag with Krylon Make It Stone! White Onyx.
5. Spray bells with Krylon ColorMaster Paint + Primer Gloss Cherry Red.
6. With Baker’s Twine, tie bells on bag handle to dangle near spray painted leaves.
7. Wrap gift with coordinating tissue paper.
For Gift Box and Tag: 1. Spray paint letter tag
with Krylon Black Chalkboard Paint. Condition paint according to manufacturer’s instruction. With chalkstick, write recipients name on letter tag.
2. Wrap box in painted paper. Embellish with ribbon, sprig, pinecone, vintage text, etc.

10
Two-sided Room DividerDESIGNED BY ROXI PHILLIPS
HOLIDAY
Decorative on one side, useful on the other...this is a room divider with a split personality!
Project Time: 6+ hours plus drying timeSkill Level: (1-5) 5Materials::• Krylon® Chalkboard Paint – Black (#807)• Krylon® ColorMaster™ Paint + Primer – Primer White (#51315)• Krylon® ColorMaster™ Paint + Primer – Gloss Ivy Leaf (#51515)• Krylon® ColorMaster™ Paint + Primer – Satin White (#53564)• Krylon® ColorMaster™ Paint + Primer – Satin Leather Brown
(#53566)• Krylon® Short Cuts® Paint Pen – Gloss Red Pepper (SCP-903)• Krylon® Short Cuts® Paint Pen – Gloss Hunter Green (SCP-911)• Krylon® Short Cuts® Paint Pen – Gloss White (SCP-913)• Krylon® Short Cuts® Paint Pen – Gloss Black (SCP-914)• Krylon® Leafing Pen – Silver (#9902)• Three-paneled room divider: Wooden framed, hinged• Kraft Paper roll• Painter’s Drop Cloth Canvas: 6'x10'• Ribbon: 5/8” (15 yds)• Hardboard: 1/8" thick, cut to fit each panel • Freezer Paper: plastic coated• Chalk-sticks• Decorative cording: 7yds• Batting: low loft, to fit two panels• Masking paper and tape• Fabric scissors• Iron: dry setting• Hot glue gun and glue-sticks• Sewing machine and thread• Personal Die-cut machine• Screw driver• Pencil• Straight pins• Yard stick »
11
1. Prepare screen by removing hinges; set aside. (note: it will help when re-assembling if you note the position of each panel so screw holes will line back up easily)
2. Spray paint screen frames with Krylon ColorMaster Paint + Primer, on all sides.
3. Spray paint primed frames with Krylon ColorMaster Paint + Primer Gloss Ivy Leaf, on all sides.
Sewing side of screen: 1. Spray paint one hardboard panel with Krylon Chalkboard
Paint. Condition as indicated by manufacturer’s instructions. Set panel aside.
2. Cut 2 pieces of batting to the same size of hardboard panels. Use hot glue to adhere batting to front side of two panels.
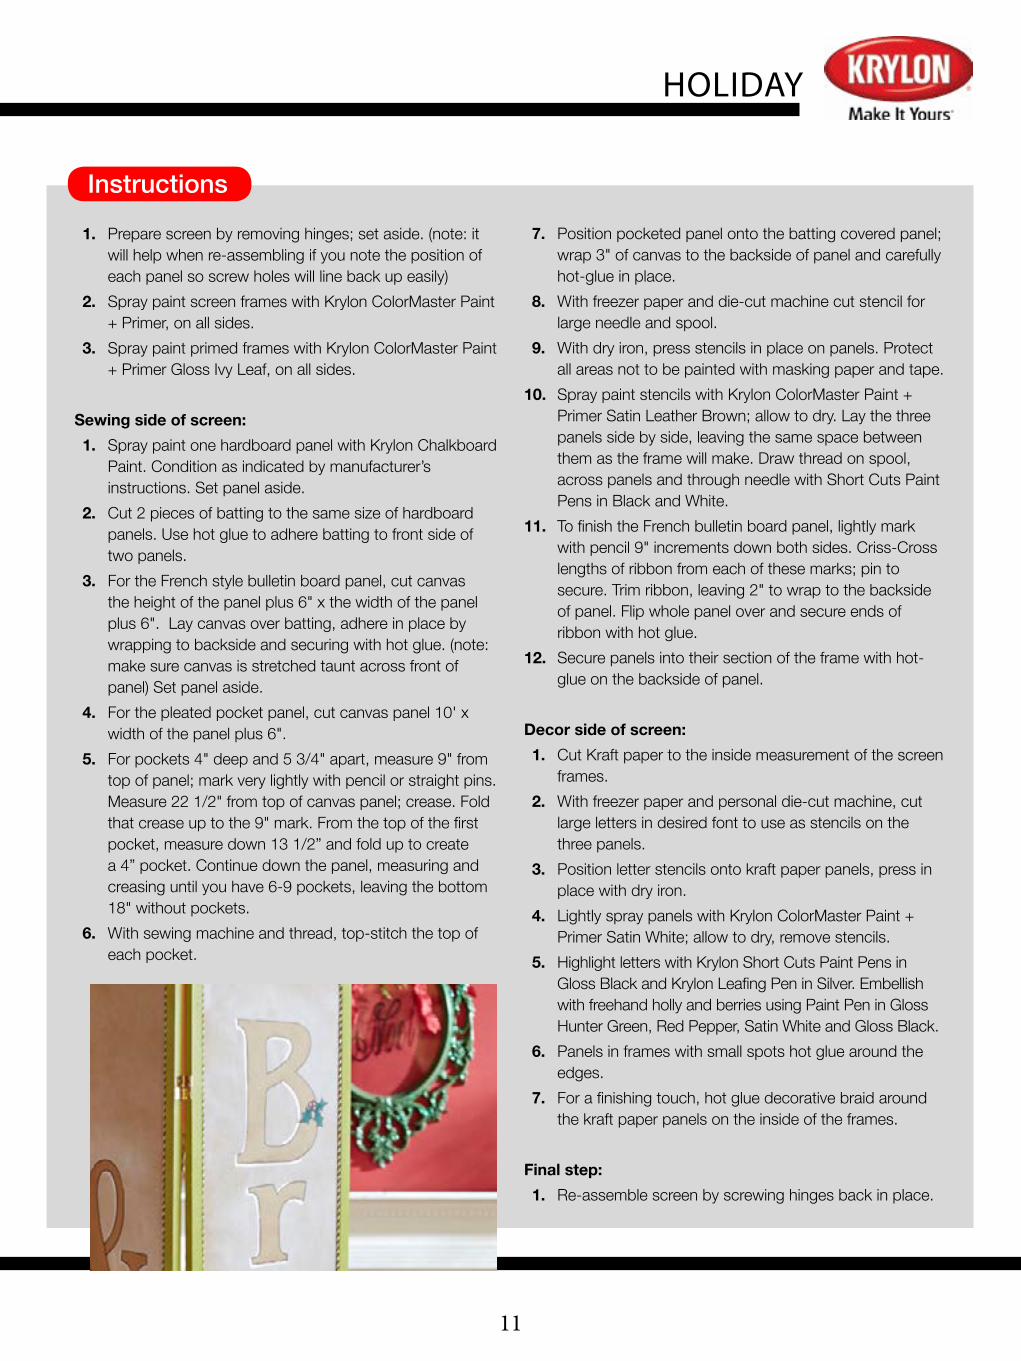
3. For the French style bulletin board panel, cut canvas the height of the panel plus 6" x the width of the panel plus 6". Lay canvas over batting, adhere in place by wrapping to backside and securing with hot glue. (note: make sure canvas is stretched taunt across front of panel) Set panel aside.
4. For the pleated pocket panel, cut canvas panel 10' x width of the panel plus 6".
5. For pockets 4" deep and 5 3/4" apart, measure 9" from top of panel; mark very lightly with pencil or straight pins. Measure 22 1/2" from top of canvas panel; crease. Fold that crease up to the 9" mark. From the top of the first pocket, measure down 13 1/2” and fold up to create a 4” pocket. Continue down the panel, measuring and creasing until you have 6-9 pockets, leaving the bottom 18" without pockets.
6. With sewing machine and thread, top-stitch the top of each pocket.
7. Position pocketed panel onto the batting covered panel; wrap 3" of canvas to the backside of panel and carefully hot-glue in place.
8. With freezer paper and die-cut machine cut stencil for large needle and spool.
9. With dry iron, press stencils in place on panels. Protect all areas not to be painted with masking paper and tape.
10. Spray paint stencils with Krylon ColorMaster Paint + Primer Satin Leather Brown; allow to dry. Lay the three panels side by side, leaving the same space between them as the frame will make. Draw thread on spool, across panels and through needle with Short Cuts Paint Pens in Black and White.
11. To finish the French bulletin board panel, lightly mark with pencil 9" increments down both sides. Criss-Cross lengths of ribbon from each of these marks; pin to secure. Trim ribbon, leaving 2" to wrap to the backside of panel. Flip whole panel over and secure ends of ribbon with hot glue.
12. Secure panels into their section of the frame with hot-glue on the backside of panel.
Decor side of screen: 1. Cut Kraft paper to the inside measurement of the screen
frames. 2. With freezer paper and personal die-cut machine, cut
large letters in desired font to use as stencils on the three panels.
3. Position letter stencils onto kraft paper panels, press in place with dry iron.
4. Lightly spray panels with Krylon ColorMaster Paint + Primer Satin White; allow to dry, remove stencils.
5. Highlight letters with Krylon Short Cuts Paint Pens in Gloss Black and Krylon Leafing Pen in Silver. Embellish with freehand holly and berries using Paint Pen in Gloss Hunter Green, Red Pepper, Satin White and Gloss Black.
6. Panels in frames with small spots hot glue around the edges.
7. For a finishing touch, hot glue decorative braid around the kraft paper panels on the inside of the frames.
Final step: 1. Re-assemble screen by screwing hinges back in place.
Instructions
HOLIDAY

12
Glitter Topped Christmas Ornaments
BY MICHELE KOVACK
HOLIDAY
Add some sparkle to your Christmas tree with these glitter-topped Christ-mas ornaments. This project is a quick, easy way to create your own
DIY Christmas craft that will shine on your tree for years to come. You can also add jingle bells and pretty ribbon to the top of your ornament for an even fancier look. So, gather some friends and get into the Christmas spirit with these beautiful glitter-topped ornaments.
Project Time: 1 hour Skill Level: 2Materials:
»
• 1 can Krylon® ColorMaster™ Paint + Primer – Gloss Blue Ocean Breeze (#51512)
• 1 can Krylon® Glitter Blast ™ – Silver Flash (#3802)
• 1 can Krylon® ColorMaster™ Paint + Primer – Gloss Ballet Slipper (#53534)
• Newspaper• Hot glue gun • Clear ornaments• Jingle bells • Crystal sprigs • White and silver ribbon• String• Painter’s tape

13
1. Set up a spray area by covering your work area with newspaper. Make sure it is a well-ventilated area.
2. Take the top off of the ornament. 3. Spray the inside of the ornament with Krylon
ColorMaster – Gloss Blue Ocean Breeze. 4. Shake Krylon ColorMaster – Gloss Blue
Ocean Breeze inside the ornament for one minute.
5. Let it dry for 10 minutes upside down, letting any excess paint drain out. Once it is dry, apply a second coat.
6. Using painter’s tape, cover the bottom half of the ornament.
7. Hold the can of Krylon Glitter Blast – Silver Flash 6-8 inches from the ornament, painting the top half. Allow 20 minutes to dry.
8. Collect jingle bells. Hold the can of Krylon ColorMaster – Gloss Ballet Slipper 6-8 inches from the bells using a sweeping side-to-side motion with a slight overlap.
9. Allow 10 minutes to dry, then turn bells and repeat step 8.
10. Tie the white sheer ribbon to the top of ornament. Use the glue gun to glue crystal sprigs at an angle.
11. Cut silver ribbon into thinner strips using fabric scissors. Fold in half.
12. Thread two jingle bells with white string and tie them around silver ribbon. Cut the ends to your desired length.
13. Use the glue gun to adhere bells and ribbon to the ornament.
Instructions
HOLIDAY
14
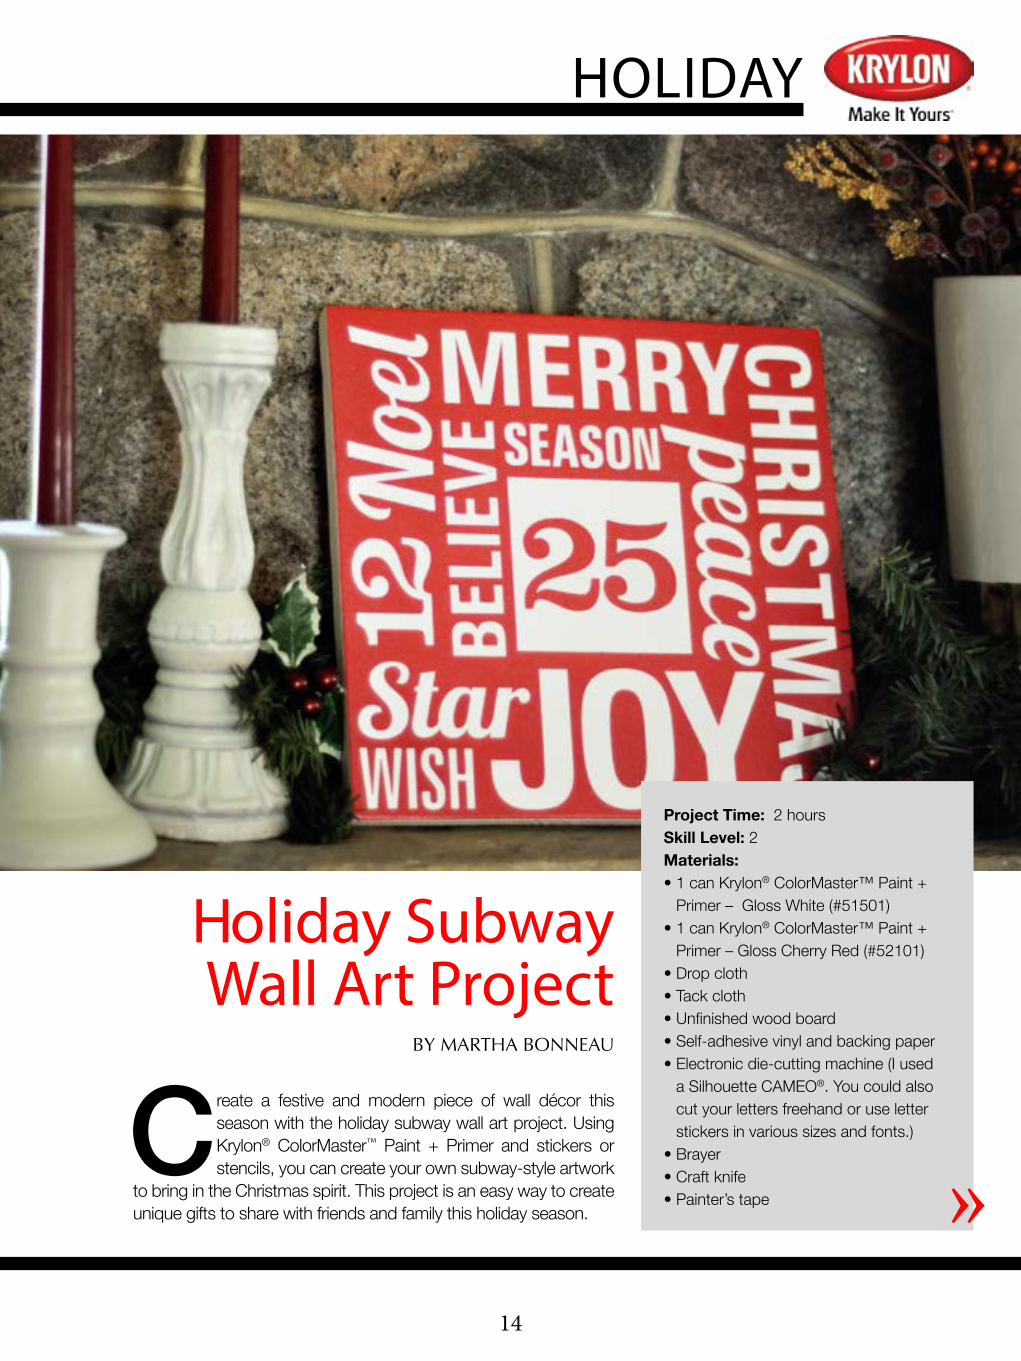
Holiday Subway Wall Art Project
BY MARTHA BONNEAU
HOLIDAY
Create a festive and modern piece of wall décor this season with the holiday subway wall art project. Using Krylon® ColorMaster™ Paint + Primer and stickers or stencils, you can create your own subway-style artwork
to bring in the Christmas spirit. This project is an easy way to create unique gifts to share with friends and family this holiday season. »
Project Time: 2 hours Skill Level: 2Materials:• 1 can Krylon® ColorMaster™ Paint +
Primer – Gloss White (#51501)• 1 can Krylon® ColorMaster™ Paint +
Primer – Gloss Cherry Red (#52101)• Drop cloth• Tack cloth • Unfinished wood board• Self-adhesive vinyl and backing paper• Electronic die-cutting machine (I used
a Silhouette CAMEO®. You could also cut your letters freehand or use letter stickers in various sizes and fonts.)
• Brayer• Craft knife • Painter’s tape

15
1. Set up a spray area by covering your work area with a drop cloth. Make sure it is a well-ventilated area.
2. Once you decide on a design for your piece, you can determine what size to cut your wood board.
3. Lightly sand the edges of your board. 4. Use the tack cloth to remove any
existing dust or debris from your board. 5. Hold the can of Krylon ColorMaster
Paint + Primer – Gloss White 6-8 inches from the surface, painting your board by using a sweeping side-to-side motion with a slight overlap. Repeat this step until you obtain your desired color. Allow 10 minutes to dry.
6. Using your electronic cutting machine, cut your design onto self-adhesive vinyl. If you do not have a CAMEO, Cricut®, etc., you can cut letters by hand from the vinyl or use letter stickers.
7. Once you have cut the design from the vinyl, use backing paper to transfer the design to your painted wood piece.
8. Use the brayer to apply your design. You can also use a credit card, popsicle stick or rub firmly with your hands.
9. Pull away the backing paper and discard; you should now have your wood piece with only the vinyl words on it.
10. Repeat step 5 using Krylon ColorMaster Paint + Primer – Gloss Cherry Red, painting over the vinyl letters. Allow 10 minutes to dry.
11. Once your piece has dried completely, you are now ready to remove the vinyl letters. Using a craft knife, carefully pull the edges of the vinyl letters up.
12. Once all of the vinyl has been removed, remove the tape from the edges, revealing your finished product.
Instructions
HOLIDAY

16
American Pride Freedom Table BY COURTNEY GIBSON
Show love for your country with this American pride freedom table. This table is perfect for Fourth of July parties and barbeques. This project
is easy enough for all ages and skill levels. If you do not have a circular table, this project can easily be adjusted for different shapes. This creative American craft is a fun way to get involved with the patriotic holidays.
FURNITURE
Project Time: 2 hours Skill Level: 2Materials:• 1 can Krylon® ColorMaster™ Paint +
Primer – Gloss True Blue (#51910)• 1 can Krylon® ColorMaster™ Paint +
Primer – Gloss White (#51501)• 1 can Krylon® ColorMaster™ Paint +
Primer – Gloss Banner Red (#52108)• 1 can Krylon® Easy-Tack™
Repositionable Adhesive (#7020) • 1 can Krylon® UV-Resistant Clear
Coating – Clear Gloss (#1305) • Drop cloth • Painter’s tape• Cardboard stencils
1. Set up a spray area by covering your work area with a drop cloth. Make sure it is a well-ventilated area.
2. Clean your table, making sure the surface is free of dirt and dust. 3. Hold the can of Krylon ColorMaster Paint + Primer – Gloss White
6-8 inches from the surface, painting the table by using a sweeping side-to-side motion with a slight overlap. Repeat this step until you obtain desired color. Allow 10 minutes for the paint to dry.
4. Apply painter’s tape to the table to create the stripes. 5. Repeat step 3 with Krylon ColorMaster Paint + Primer – Gloss
Banner Red painting the striped area. Repeat until you obtain your desired color. Allow 10 minutes for the paint to dry.
6. Using the cardboard, make stencils to create stars. 7. Apply Krylon Easy-Tack Repositionable Adhesive to the back of
stencil and place in desired location on table. 8. Repeat step 3 with Krylon ColorMaster Paint + Primer – Gloss True
Blue painting the star area. Repeat until you obtain desired color. Allow 10 minutes for the paint to dry.
9. Once it is dry, spray the whole table with Krylon UV-Resistant Clear Coating – Clear Gloss. Allow 10 minutes for the coating to dry.
Instructions

17
Kitchen Storage Cabinet Makeover
BY SAHANA AJEETHAN
Spruce up your kitchen while adding extra storage with this kitchen storage cabinet makeover. With this project, you do not need to spend a ton of cash to create a stylish and functional kitchen space. Be creative with Krylon® spray paint and match
the décor of your home while adding simple, painted kitchen utensils for a cute, extra touch.
FURNITURE
Project Time: 3-4 hoursSkill Level: 2Materials:• 2 cans Krylon® ColorMaster™ Paint
+ Primer – Gloss Blue Ocean Breeze (#51512)
• 2 cans Krylon® Dual® Superbond® Paint + Primer – Flat White (#8830)
• 1 can Krylon® ColorMaster™ Paint + Primer Metallic – Gold (#51510)
• 1 can Krylon® Fusion for Plastic® – Gloss Black (#2321)
• Tack cloth• Painter’s tape• 400-grit sandpaper• Drop cloth • X-ACTO® knife for cutting stencils»
18
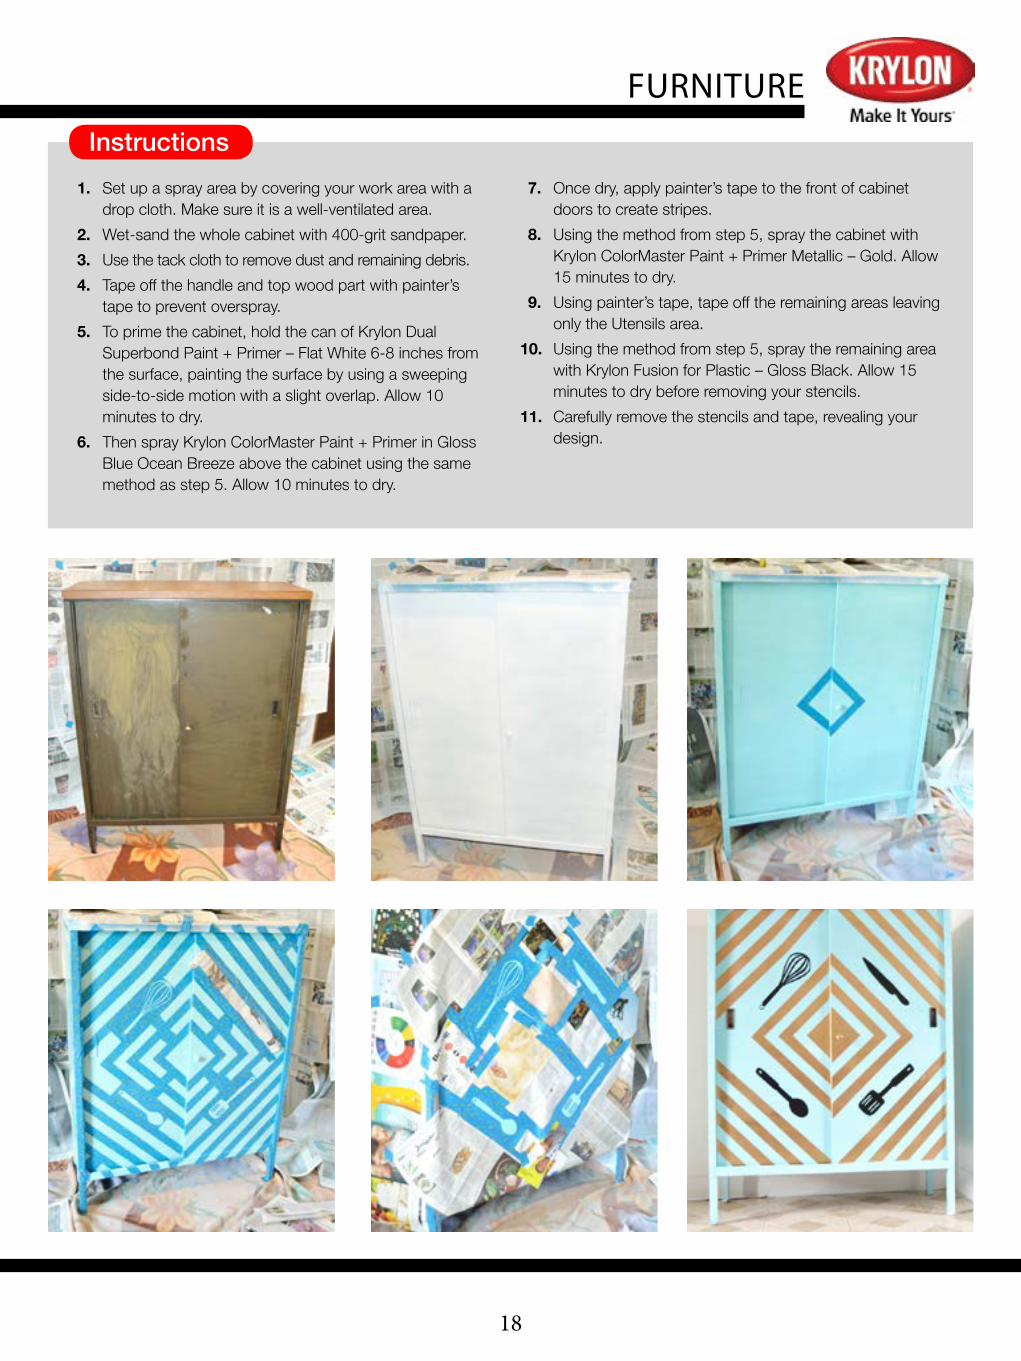
1. Set up a spray area by covering your work area with a drop cloth. Make sure it is a well-ventilated area.
2. Wet-sand the whole cabinet with 400-grit sandpaper. 3. Use the tack cloth to remove dust and remaining debris. 4. Tape off the handle and top wood part with painter’s
tape to prevent overspray. 5. To prime the cabinet, hold the can of Krylon Dual
Superbond Paint + Primer – Flat White 6-8 inches from the surface, painting the surface by using a sweeping side-to-side motion with a slight overlap. Allow 10 minutes to dry.
6. Then spray Krylon ColorMaster Paint + Primer in Gloss Blue Ocean Breeze above the cabinet using the same method as step 5. Allow 10 minutes to dry.
7. Once dry, apply painter’s tape to the front of cabinet doors to create stripes.
8. Using the method from step 5, spray the cabinet with Krylon ColorMaster Paint + Primer Metallic – Gold. Allow 15 minutes to dry.
9. Using painter’s tape, tape off the remaining areas leaving only the Utensils area.
10. Using the method from step 5, spray the remaining area with Krylon Fusion for Plastic – Gloss Black. Allow 15 minutes to dry before removing your stencils.
11. Carefully remove the stencils and tape, revealing your design.
Instructions
FURNITURE
19
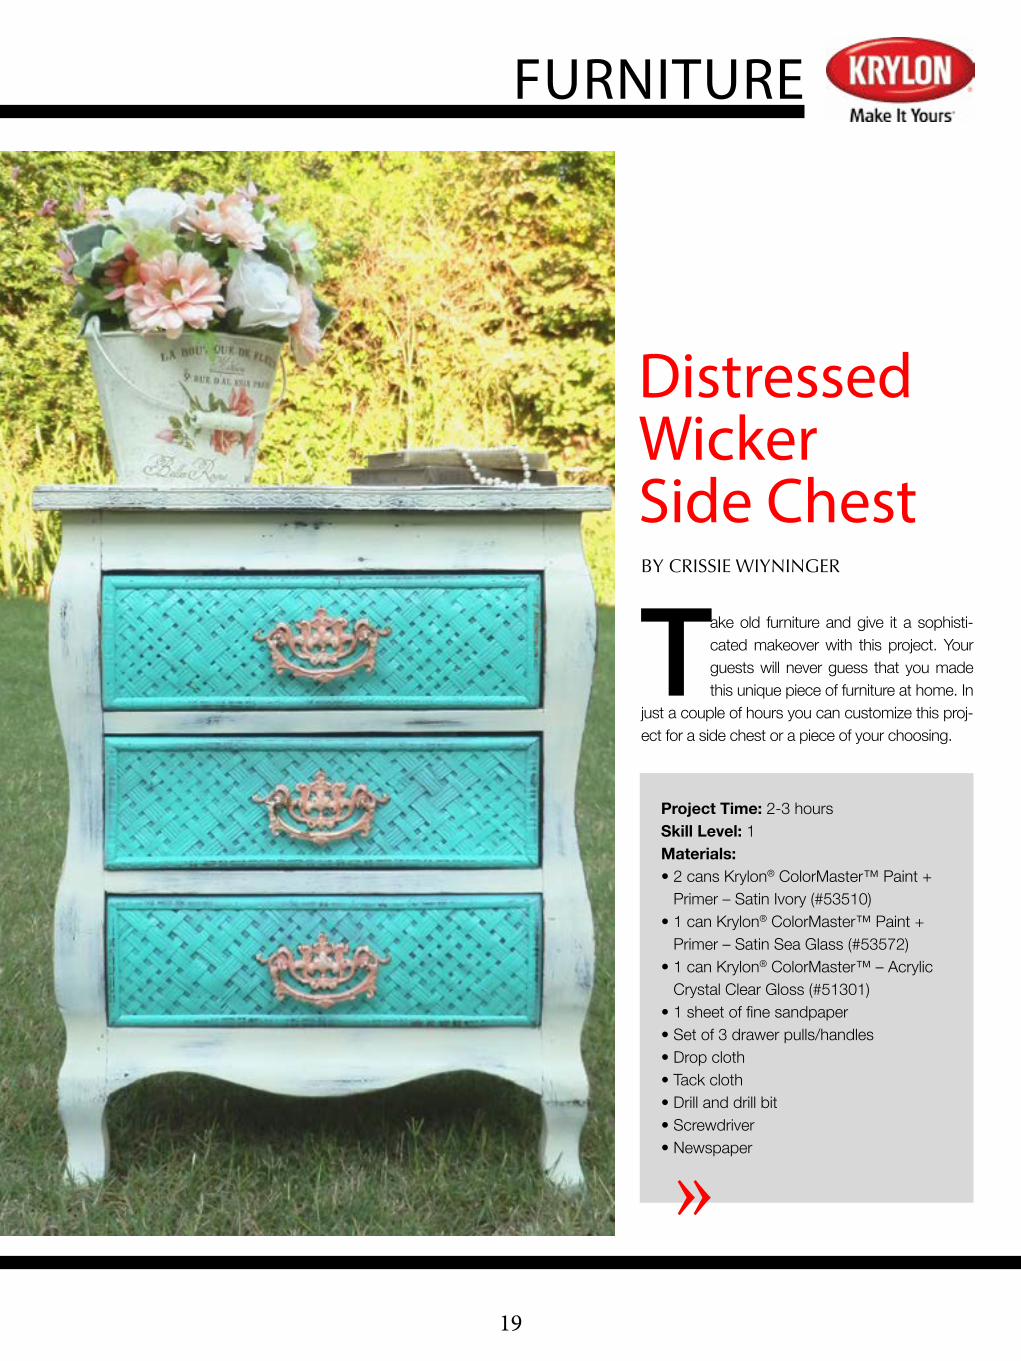
Distressed Wicker Side Chest BY CRISSIE WIYNINGER
Take old furniture and give it a sophisti-cated makeover with this project. Your guests will never guess that you made this unique piece of furniture at home. In
just a couple of hours you can customize this proj-ect for a side chest or a piece of your choosing.
FURNITURE
Project Time: 2-3 hours Skill Level: 1Materials:• 2 cans Krylon® ColorMaster™ Paint +
Primer – Satin Ivory (#53510)• 1 can Krylon® ColorMaster™ Paint +
Primer – Satin Sea Glass (#53572)• 1 can Krylon® ColorMaster™ – Acrylic
Crystal Clear Gloss (#51301)• 1 sheet of fine sandpaper• Set of 3 drawer pulls/handles• Drop cloth • Tack cloth • Drill and drill bit• Screwdriver• Newspaper
»
20
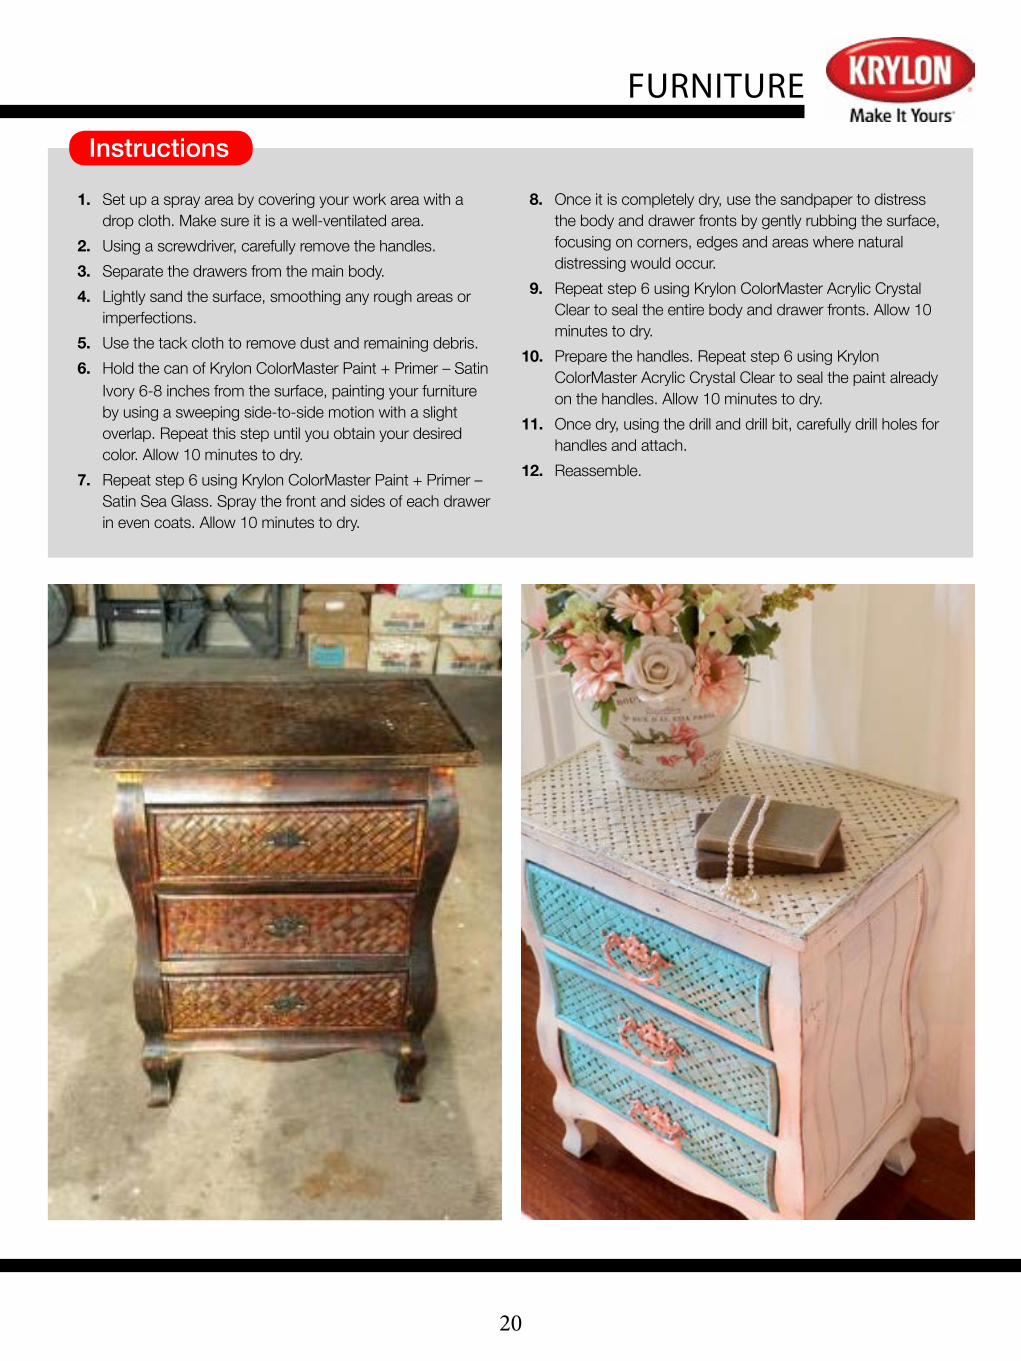
1. Set up a spray area by covering your work area with a drop cloth. Make sure it is a well-ventilated area.
2. Using a screwdriver, carefully remove the handles. 3. Separate the drawers from the main body. 4. Lightly sand the surface, smoothing any rough areas or
imperfections. 5. Use the tack cloth to remove dust and remaining debris. 6. Hold the can of Krylon ColorMaster Paint + Primer – Satin
Ivory 6-8 inches from the surface, painting your furniture by using a sweeping side-to-side motion with a slight overlap. Repeat this step until you obtain your desired color. Allow 10 minutes to dry.
7. Repeat step 6 using Krylon ColorMaster Paint + Primer – Satin Sea Glass. Spray the front and sides of each drawer in even coats. Allow 10 minutes to dry.
8. Once it is completely dry, use the sandpaper to distress the body and drawer fronts by gently rubbing the surface, focusing on corners, edges and areas where natural distressing would occur.
9. Repeat step 6 using Krylon ColorMaster Acrylic Crystal Clear to seal the entire body and drawer fronts. Allow 10 minutes to dry.
10. Prepare the handles. Repeat step 6 using Krylon ColorMaster Acrylic Crystal Clear to seal the paint already on the handles. Allow 10 minutes to dry.
11. Once dry, using the drill and drill bit, carefully drill holes for handles and attach.
12. Reassemble.
Instructions
FURNITURE

21
Chevron Striped Dresser
BY DINAH WULF
Give your old dresser a makeover with this chevron striped dresser project. This dresser is the perfect way to spruce up your closet, or bedroom, or even to store jewelry and makeup. With just a few coats of Krylon® ColorMaster™
Paint + Primer in your favorite colors, you will have a unique piece of furniture that you can be proud of.
FURNITURE
Project Time: 2-3 hours Skill Level: 2Materials:• 1 can Krylon® ColorMaster™ Paint +
Primer – Gloss Classic Grey (#53551)• 1 can Krylon® ColorMaster™ Paint
+ Primer – Gloss Peekaboo Blue (#51517)
• Drop cloth• Tack cloth• Dresser• Shape tape• Scissors • Painter’s tape
1. Set up a spray area by covering your work area with a drop cloth. Make sure it is a well-ventilated area.
2. Disassemble the dresser and remove all the hardware and drawers.
3. Use the tack cloth to remove any existing dust or debris.
4. Use the shape tape to apply chevron stripes on the drawers. Make sure to press and smooth out bubbles from the tape.
5. Use painter’s tape to protect the edges of the drawers.
6. Hold the can of Krylon ColorMaster Paint + Primer – Gloss Classic Grey 6-8 inches from the surface, painting the drawers by using a sweeping side-to-side motion with a slight overlap. Repeat this step until you obtain your desired color. Allow 10 minutes to dry.
7. Repeat step 6 using Krylon ColorMaster Paint + Primer – Gloss Peekaboo Blue to paint the dresser. Allow 10 minutes to dry.
8. Once the drawers are dry, carefully remove the shape tape, revealing the chevron pattern.
9. Reassemble the dresser.
Instructions
22
Thrifty Polka Dot Card Table Set
BY KELLI DAVIDSON
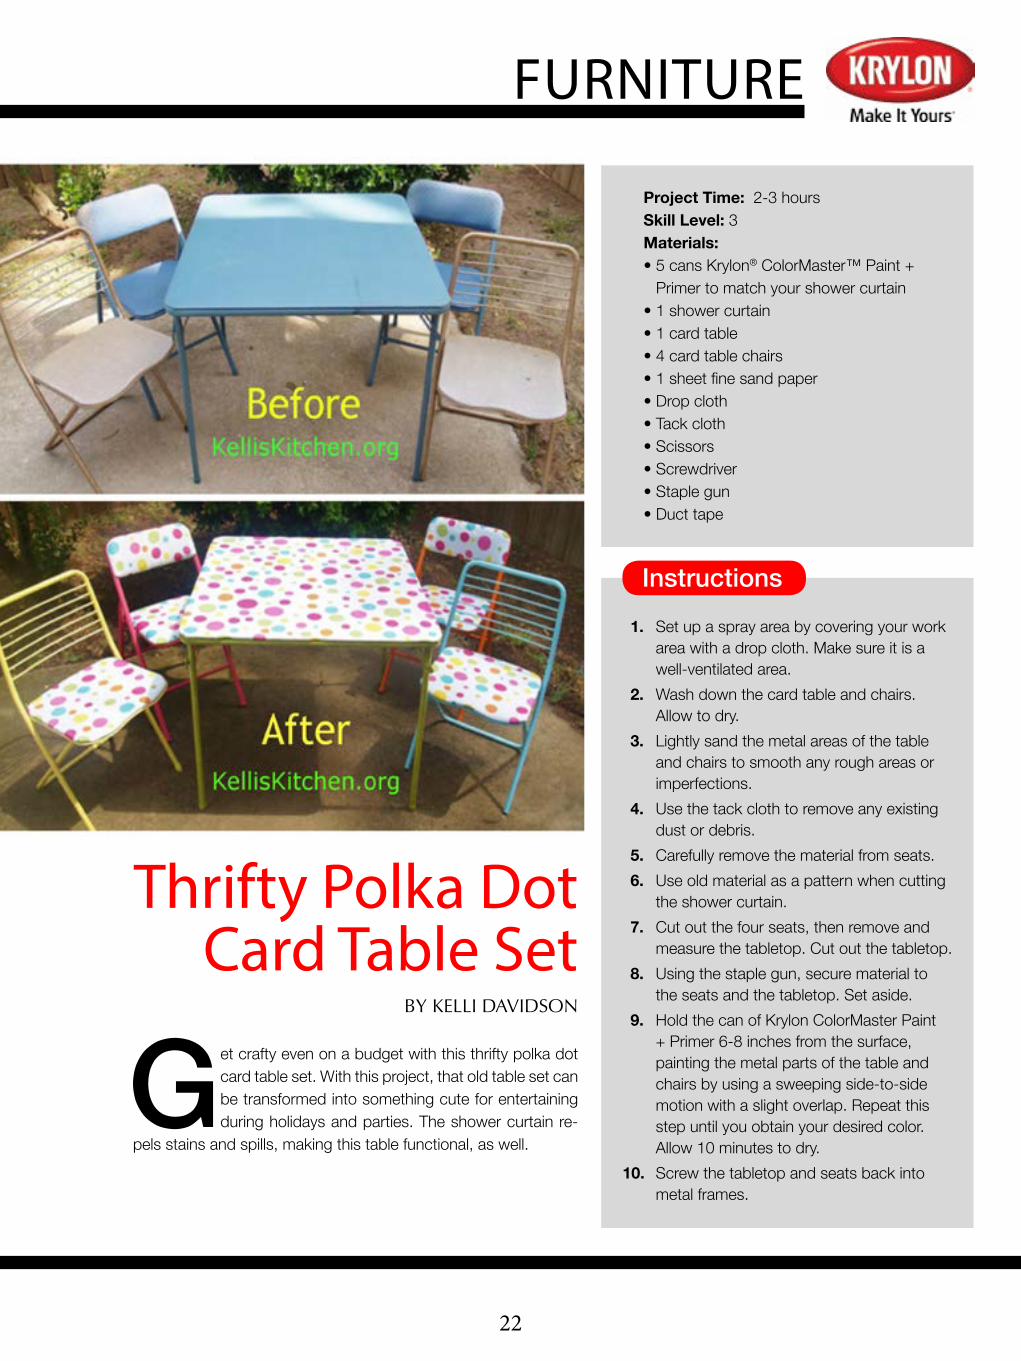
Get crafty even on a budget with this thrifty polka dot card table set. With this project, that old table set can be transformed into something cute for entertaining during holidays and parties. The shower curtain re-
pels stains and spills, making this table functional, as well.
FURNITURE
Project Time: 2-3 hours Skill Level: 3Materials:• 5 cans Krylon® ColorMaster™ Paint +
Primer to match your shower curtain• 1 shower curtain• 1 card table• 4 card table chairs• 1 sheet fine sand paper • Drop cloth • Tack cloth• Scissors • Screwdriver• Staple gun• Duct tape
1. Set up a spray area by covering your work area with a drop cloth. Make sure it is a well-ventilated area.
2. Wash down the card table and chairs. Allow to dry.
3. Lightly sand the metal areas of the table and chairs to smooth any rough areas or imperfections.
4. Use the tack cloth to remove any existing dust or debris.
5. Carefully remove the material from seats. 6. Use old material as a pattern when cutting
the shower curtain. 7. Cut out the four seats, then remove and
measure the tabletop. Cut out the tabletop. 8. Using the staple gun, secure material to
the seats and the tabletop. Set aside. 9. Hold the can of Krylon ColorMaster Paint
+ Primer 6-8 inches from the surface, painting the metal parts of the table and chairs by using a sweeping side-to-side motion with a slight overlap. Repeat this step until you obtain your desired color. Allow 10 minutes to dry.
10. Screw the tabletop and seats back into metal frames.
Instructions

23
Invite Krylon® to your party.With great colors, textures, ideas and inspiration, Krylon®
© 2014 Krylon

24
DIY Starburst Mirror
BY ROOPINI VARADARAJU
With this DIY starburst mirror, you can create something tru-ly stunning that’s sure to add a lovely touch to your home.
There is no need to spend a ton of money on wall décor when you can make something unique that is really yours. The DIY starburst mir-ror is the perfect decoration to display in your hallway or living room. This project is a great way to spruce up the walls of your home.
HOME DÉCOR
Project Time: 2 hours Skill Level: 3Materials:• 1 can Krylon® ColorMaster™ Paint + Primer – Gloss Equestrian
(#53553) • 18 wooden dowels of 0.47 cm thickness and 30" long• 6 wooden dowels of 0.3 cm thickness and 30" long• 48 small craft mirrors of varied sizes (I used 1", 0.5” and 0.25")• 9" round candle mirror• 8" round thin wooden board (to be used as a template)• 3 pencils or pens• Ruler• Drop cloth • Hot glue gun and glue sticks• Saw tooth knife• Saw tooth hanger• Wall nail and hammer »

25
HOME DÉCOR
1. Set up a spray area by covering your work area with a drop cloth. Make sure it is a well-ventilated area.
2. Using the saw tooth knife, cut 12 wooden dowel pieces of 0.47 cm thickness at 14" long each.
3. Cut additional 24 wooden dowel pieces of 0.47 cm thickness at 13" long each.
4. Cut 12 wooden dowel pieces of 0.3 cm thickness at 11" long each.
5. Tape the 8" circle template to the center of your project space. Mark lines on a wooden board by extending the lines from the template using a pencil and ruler.
6. Arrange the 14" long cut wooden dowels, 13" dowels and the 11" dowels one by one, using hot glue to create a pattern around the circle template.
7. Hold the can of Krylon ColorMaster Paint + Primer – Gloss Equestrian 6-8 inches from the surface, painting your board by using a sweeping side-to-side motion with a slight overlap. Repeat this step until you obtain your desired color. Allow 10 minutes to dry.
8. Once this is dry, apply hot glue around the inner edge of the dowels and place the 9" candle mirror on top.
9. Position the small mirrors on the dowels randomly according to your desired taste. Once you decide on a pattern for the mirrors, hot glue them to the dowels one by one.
10. Add a saw tooth hanger to the backside of the wooden board and hammer very gently. Add a nail or two to your wall to hang the star burst mirror.
Instructions

26
Mirrored VaseBY AMY LATTA OF ONE ARTSY MAMA
If you are a sucker for a good thrift store find, this project is for you. This mirrored vase is an inexpensive way to add a little shine to your décor! Whether you
use it to display seasonal flowers or place it on a table or shelf, this vase will lend itself to be a great conversation piece.
HOME DÉCOR
Project Time: 1 hour Skill Level: 1Materials:• Krylon® Looking Glass®
Mirror-Like Paint (#9033)• Clear glass vase• Newspaper
1. Set up a spray area by covering your work area with newspaper. Make sure it is a well-ventilated area.
2. Hold the can of Krylon Looking Glass Mirror-Like Paint 6-8 inches from the vase, painting it by using a sweeping side-to-side motion with slight overlap. Repeat this step until you obtain your desired color.
3. Allow 5 minutes for the paint to dry.
Instructions

27
Stenciled Flowers
BirdhouseBY CARMEN FLORES TANIS
Inspired by the street art of Los An-geles, the Stenciled Flowers Bird-house is a way you can bring this style indoors. Using Krylon® spray
paint in bright colors and overlapping stencils, you’ll create a one-of-a-kind piece for your home. Tip: Use contrast-ing colors of spray paint to make your designs really “pop.”
HOME DÉCOR
»

28
1. Set up a spray area by covering your work area with newspaper. Make sure it is a well-ventilated area.
2. Lightly sand your birdhouse to create a smooth surface. 3. Use tack cloth to remove any dust or debris. 4. Hold the can of Krylon Chalkboard Paint - Black 6-8 inches from the birdhouse,
painting it using a sweeping side-to-side motion with slight overlap. Repeat this step until you obtain desired color. *Allow up to 15 minutes for the paint to dry
5. Once dry, place strips of painters tape on the sides of the birdhouse to create the flower stems.
6. Cut leaf shapes from the adhesive shelf vinyl and apply them sticky side down onto the birdhouse.
7. Use paper and tape to mask off the roof protecting it from any overspray. 8. Hold the can of Krylon ColorMaster Paint+Primer – Satin Black 6-8 inches from the sides of
the birdhouse, painting it using a sweeping side-to-side motion with slight overlap. Repeat this step until you obtain desired color. *Allow up to 10 minutes for the paint to dry
9. Remove the paper tape, vinyl leaves, and the paper and tape from the roof. 10. Spray the back of the Daisies stencil lightly with Krylon Easy-Tack Repositionable Adhesive. 11. Adhere the stencil to the unmasked side of the roof. Use painters tape to mask off any
areas of the roof not covered by the stencil. 12. Using the same method as step 8, spray the roof with Krylon ColorMaster Paint+Primer
- Gloss Rich Plum. *Allow up to 10 minutes for the paint to dry 13. Once dry, reposition the stencil. 14. Using the same method as step 8, spray the roof with Krylon ColorMaster Paint+Primer
– Gloss Pumpkin Orange. *Allow up to 10 minutes for the paint to dry15. Reposition the stencil again and using the method from step 8, spray with Krylon Glitter
Blast. *Allow up to 20 minutes for the paint to dry16. Remove all the paper and tape.
Instructions
HOME DÉCOR
Project Time: 5+ hours Skill Level: 2Materials:• 1 Can of Krylon® Chalkboard Paint – Black (#807)• 1 Can of Krylon® ColorMaster™ Paint+Primer – Satin Black (#51613)• 1 Can of Krylon® ColorMaster™ paint - Gloss Pumpkin Orange (#52411)• 1 Can of Krylon® ColorMaster™ paint - Gloss Rich Plum (#51914)• 1 Can of Krylon® Easy-Tack™ Repositionable Adhesive (#7020)• 1 Plaid Delta Stencil Mania - Daisies• 1 wood birdhouse• Painters tape• Adhesive vinyl• Scrap paper• Scissors• Sandpaper• Tack cloth
29
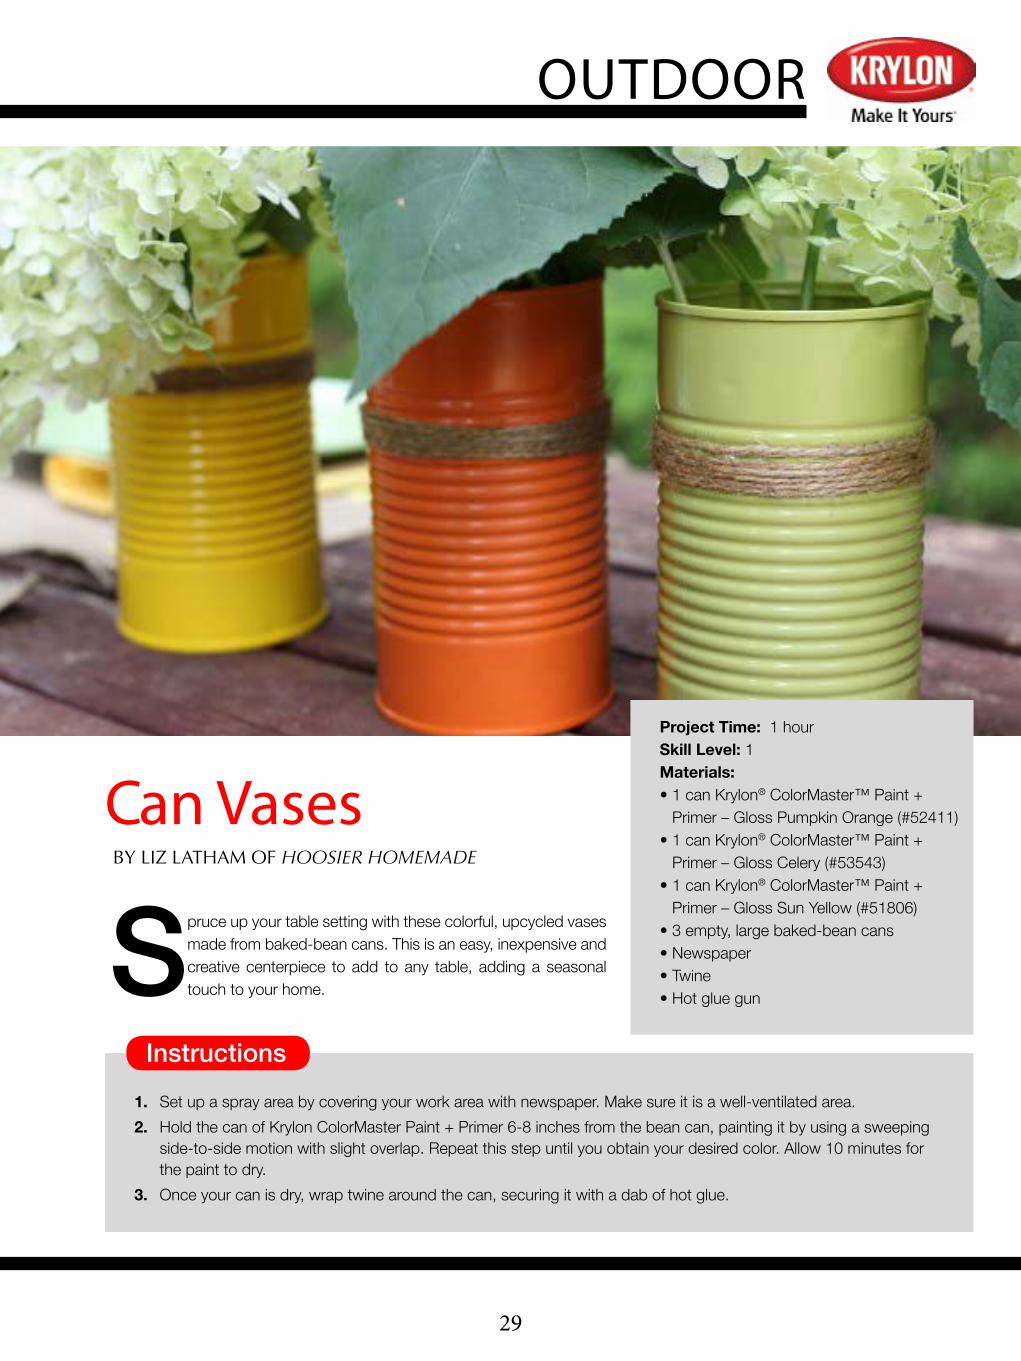
Can Vases BY LIZ LATHAM OF HOOSIER HOMEMADE
Spruce up your table setting with these colorful, upcycled vases made from baked-bean cans. This is an easy, inexpensive and creative centerpiece to add to any table, adding a seasonal touch to your home.
OUTDOOR
Project Time: 1 hour Skill Level: 1Materials:• 1 can Krylon® ColorMaster™ Paint +
Primer – Gloss Pumpkin Orange (#52411)• 1 can Krylon® ColorMaster™ Paint +
Primer – Gloss Celery (#53543)• 1 can Krylon® ColorMaster™ Paint +
Primer – Gloss Sun Yellow (#51806) • 3 empty, large baked-bean cans • Newspaper• Twine • Hot glue gun
1. Set up a spray area by covering your work area with newspaper. Make sure it is a well-ventilated area. 2. Hold the can of Krylon ColorMaster Paint + Primer 6-8 inches from the bean can, painting it by using a sweeping
side-to-side motion with slight overlap. Repeat this step until you obtain your desired color. Allow 10 minutes for the paint to dry.
3. Once your can is dry, wrap twine around the can, securing it with a dab of hot glue.
Instructions

30
DIY Bike Planter Garden Craft
BY TRACY BREWER
Cleaning out your garage or shed and finding an old bike you don’t know what to do with? Don’t throw it away! Give that bike new life by turning it into a planter for your garden. By using Krylon® ColorMaster™ Paint + Primer spray paint in Gloss
Peekaboo Blue, the DIY bike planter is a chic and rustic way to brighten up your backyard garden. You can even switch up the colors to create a decorative bike for any season.
OUTDOOR
Project Time: 1-2 hours Skill Level: 1Materials:• 3 cans Krylon® ColorMaster™ Paint + Primer – Gloss
Peekaboo Blue (#51517)• 1 sheet of 90-grit sandpaper• Drop cloth • Tack cloth
1. Set up a spray area by covering your work area with a drop cloth. Make sure it is a well-ventilated area.
2. Clean the bike well with soap and water, removing any dirt, cobwebs, grease and other elements.
3. With your sandpaper, sand down any rough spots or raised rust areas.
4. Use the tack cloth to remove any existing dust or debris.
5. Hold the can of Krylon ColorMaster Paint + Primer – Gloss Peekaboo Blue 6-8 inches from the surface, painting by using a sweeping side-to-side motion with a slight overlap. Repeat this step until you obtain your desired color. Allow 10 minutes to dry.
6. Once it is dry, place the finished project in garden and surround it with flowers of your choice.
Instructions

31
Plastic Patio Chair Upgrade
BY LINDA SWEARINGEN
Many of us use boring, generic plastic PVC chairs for extra outdoor seating. With Krylon® Fusion for Plastic® you can personalize these once boring chairs into exciting patio fur-niture. You and your guests will love the way these chairs
look at your next outdoor party.
OUTDOOR
Project Time: 2-3 hours Skill Level: 1Materials:• 1 can Krylon® Fusion for Plastic® – Satin Almond (#2437)• 4 PVC patio chairs • 2-3 plastic shopping bags • 1 stencil of your choice• Drop cloth • Masking tape• Scissors
1. Set up a spray area by covering your work area with a drop cloth. Make sure it is a well-ventilated area.
2. Using masking tape, mask your desired pattern on the seat and attach the stencil as desired.
3. Cut the shopping bags open and use them to shield all parts not being spray painted; secure with masking tape.
4. Hold the can of Krylon Fusion for Plastic – Satin Almond 6-8 inches from the surface, paint by using a sweeping side-to-side motion with a slight overlap. Repeat this step until you obtain your desired color. Allow 15 minutes to dry.
5. Once dry, carefully remove the bags, masking tape and stencil.
Instructions

32
Clay Pot Wind ChimeBY VICKI O’DELL OF THE CREATIVE GODDESS
Making your own set of wind chimes is quite easy. With just a few materials and a little imagination, you can enjoy the glorious sounds of this project. The gentle music they create in the breeze will pro-
vide a feeling of tranquility in your patio, garden or balcony.
OUTDOOR
Project Time: 1 hour Skill Level: 1Materials:• 5 Cans Krylon® Dual® Superbond® Paint + Primer –
Assorted Colors• Paint pens• Newspaper• 5 clay pots• Macramé cord (3-4 feet)• Scissors
1. Cover your work area with newspaper and make sure you are in a well-ventilated space.
2. Gather your five clay pots. Hold the can of Krylon Dual Superbond Paint + Primer in a color of your choice 6-8 inches from the clay pot, painting each one by using a sweeping side-to-side motion with slight overlap. Repeat this step until you obtain your desired color. Allow 10 hours for the paint to dry completely.
3. Decorate your pots with the paint pens. Follow the instructions for your paint pens to allow for adequate time to dry.
4. When your pots are decorated and dry, cut 3-4 feet of macramé cord and double. Tie a knot 3-4 inches from the doubled end in order to create a hanging loop. You may wish to wrap some clear tape around the ends to keep them from unraveling as you work.
5. Add a clay pot to the macramé cord by pushing the cording through the hole in the bottom of the pot. The pot will hang upside down. Tie another knot in the cord so that the knot is just slightly inside the pot. The pot will rest on the knot.
6. Continue attaching your clay pots with knots in the same manner, making sure the bottom of the pot is just slightly inside the previous one, until the desired length is reached.
7. Tie a knot inside the final pot and allow 3-5 inches of macramé cord to hang down.
8. Either fray the cord or tie a knot in each end.
For more help with this project, click here to see an instructional video provided by The Creative Goddess.
Instructions
33
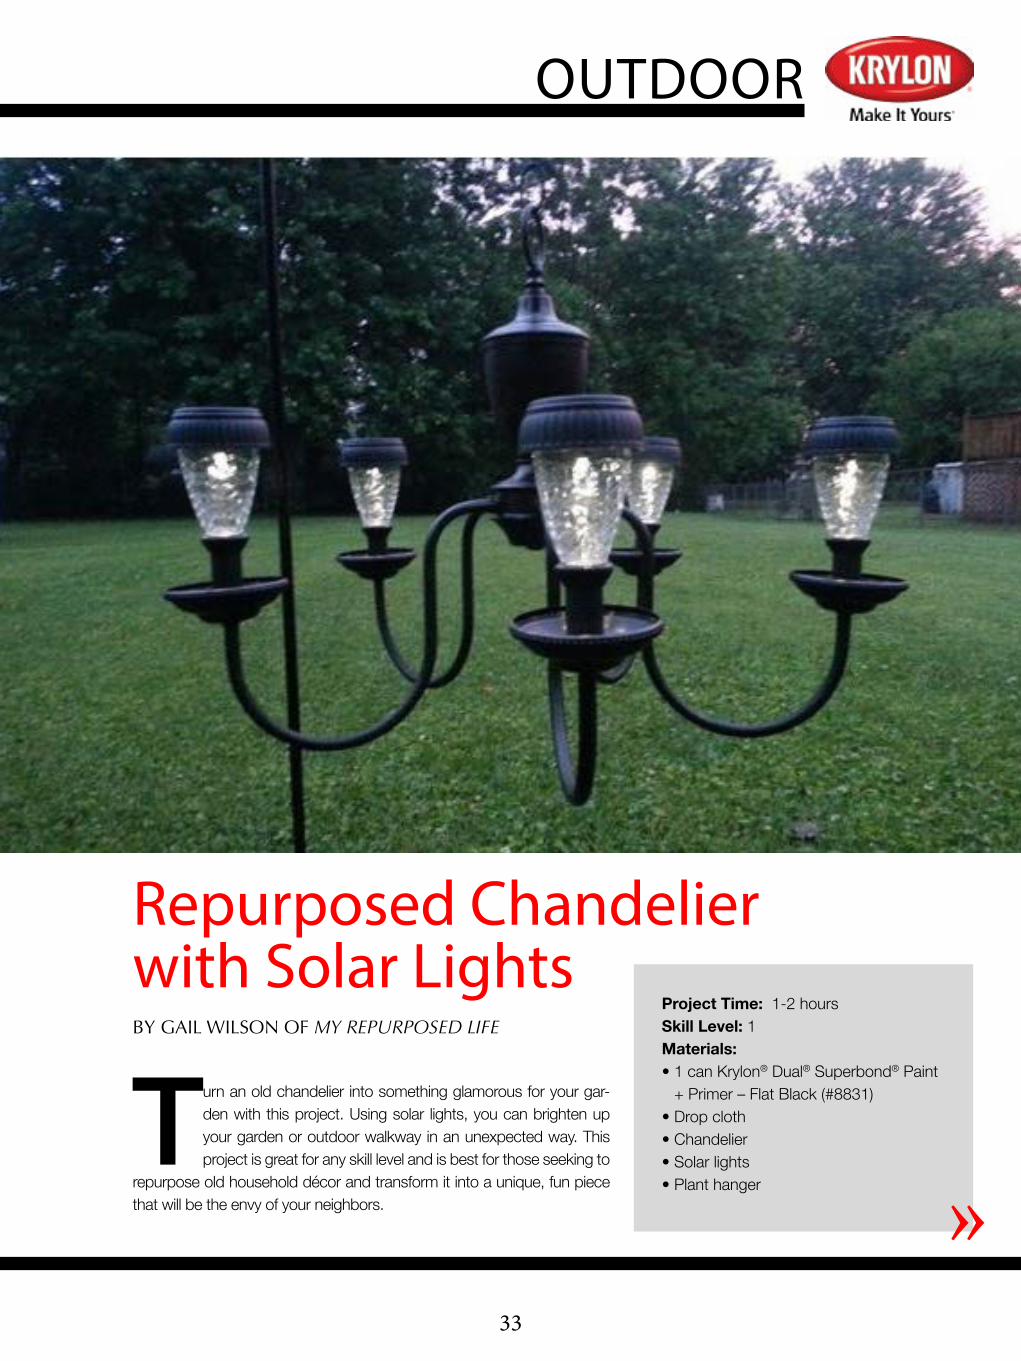
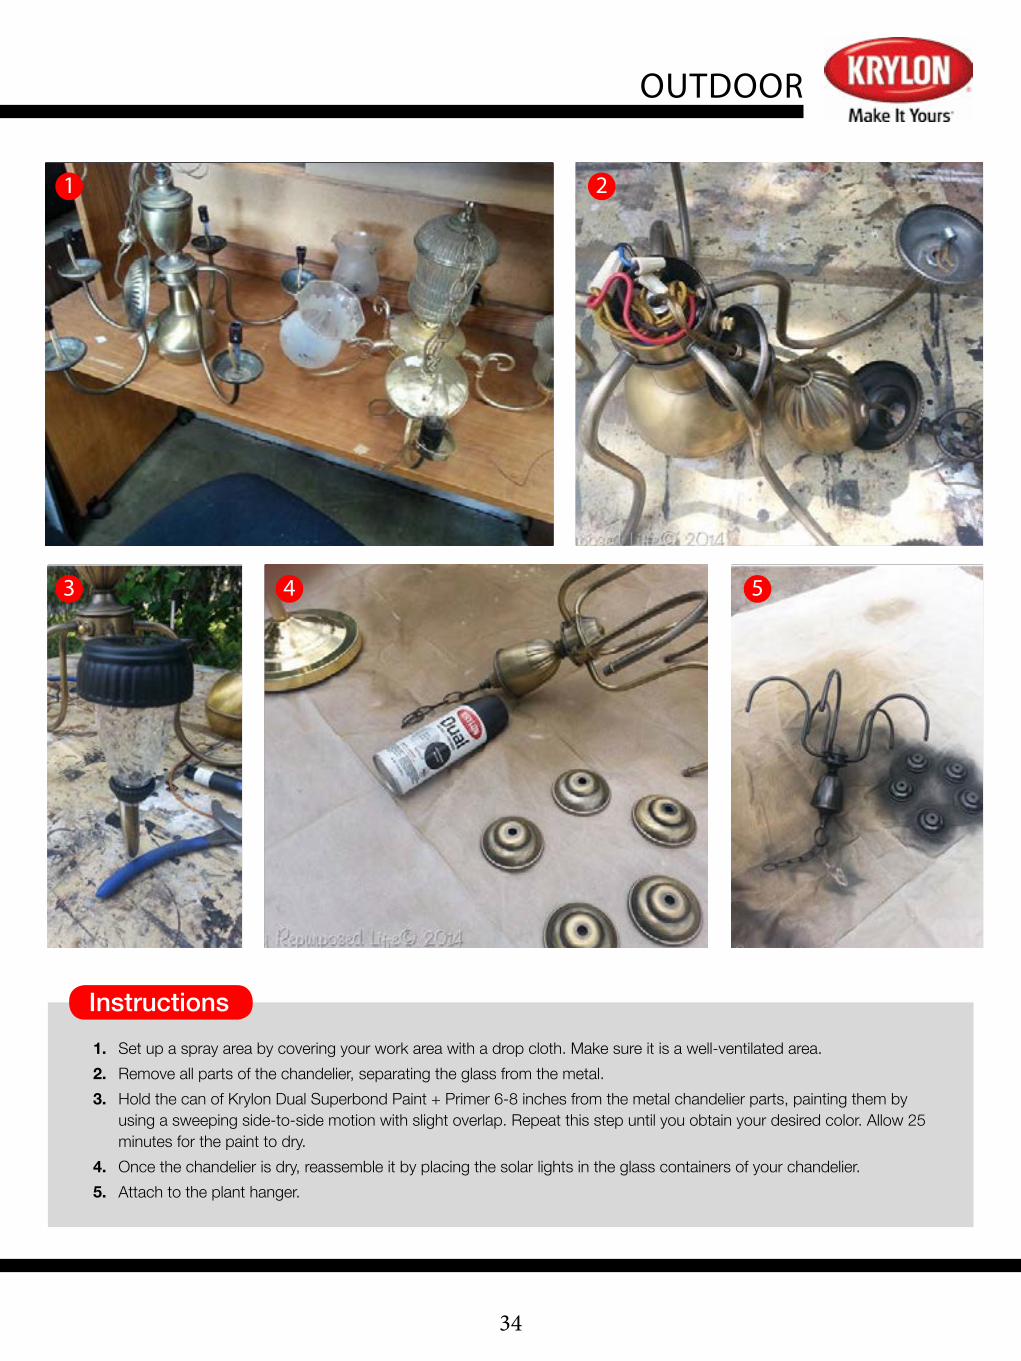
Repurposed Chandelier with Solar Lights BY GAIL WILSON OF MY REPURPOSED LIFE
Turn an old chandelier into something glamorous for your gar-den with this project. Using solar lights, you can brighten up your garden or outdoor walkway in an unexpected way. This project is great for any skill level and is best for those seeking to
repurpose old household décor and transform it into a unique, fun piece that will be the envy of your neighbors.
OUTDOOR
Project Time: 1-2 hours Skill Level: 1Materials:• 1 can Krylon® Dual® Superbond® Paint
+ Primer – Flat Black (#8831)• Drop cloth• Chandelier• Solar lights• Plant hanger »
34
OUTDOOR
1. Set up a spray area by covering your work area with a drop cloth. Make sure it is a well-ventilated area. 2. Remove all parts of the chandelier, separating the glass from the metal. 3. Hold the can of Krylon Dual Superbond Paint + Primer 6-8 inches from the metal chandelier parts, painting them by
using a sweeping side-to-side motion with slight overlap. Repeat this step until you obtain your desired color. Allow 25 minutes for the paint to dry.
4. Once the chandelier is dry, reassemble it by placing the solar lights in the glass containers of your chandelier. 5. Attach to the plant hanger.
Instructions
1 2
3 4 5