MAK-Corp Group-C MOD Group-C Manual-v1.1.pdf · MAK-Corp Group-C MOD General ... The main focus has...
17
MAK-Corp Group-C MOD General These amazingly fast cars, were made to achieve the fastest speeds using the lowest amount of fuel possible, which was key to success in that era. The Group C Mod was conceived for endurance races and for sprint races of at least an hour (one full tank). We have had the help of a former Porsche 962C driver throughout the development process and been given a lot of technical information about the car and the different tyres used. Simulation Vs Reality As the real cars changed from race to race and at every qualification, we had to make some directional choices, and that’s why the cars match the historical final speeds and lap times at some tracks, but not in others. The main focus has been put into handling, braking distances, tyres , fuel consumption, and the driving style needed to achieve the best performance from them. While the car gain speed it produce more and more ground effect from the bottom of the car, the effect pushes the car into the ground producing a huge amount of grip. Under braking this effect is reduced while the car loses speed, and needs attention to avoid locking the tyres. Below the speed of the ground effect activation, the cars rely on their tyres, and the ability of the driver to manage the power output on corner exit as they navigate the circuit. The turbo lag can also be a problem if it isn’t carefully matched with the right moment, but it could be helpful in other situations. Mazda 787B: Physics: Damian Baldi This is a light car with a carbon fiber chassis, a rotary engine and a gearbox with Porsche internal components. It's an easy car to drive with good engine response and consumption options. It has a very good braking thanks to carbon fiber disks. Handling is neutral and it has very good cornering behaviour thanks to a short wheelbase. It uses Dunlop tyres fitted on 18 inches rims. Two slick compounds are available, and a third compound for the rain. See details bellow. The engine have three mixture settings that can be changed on the garage or on the steering wheel while driving, “Enduro” (position 1/3), "Sprint" (position 2/3) and “Plus” (position 3/3). Each position offers more power but more fuel consumption. Check the fuel per lap usage and compare with lap times to build a race strategy.
Transcript of MAK-Corp Group-C MOD Group-C Manual-v1.1.pdf · MAK-Corp Group-C MOD General ... The main focus has...
MAK-Corp Group-C MOD
General
These amazingly fast cars, were made to achieve the fastest speeds using the lowest amount of
fuel possible, which was key to success in that era. The Group C Mod was conceived for endurance
races and for sprint races of at least an hour (one full tank). We have had the help of a former
Porsche 962C driver throughout the development process and been given a lot of technical
information about the car and the different tyres used.
Simulation Vs Reality
As the real cars changed from race to race and at every qualification, we had to make some
directional choices, and that’s why the cars match the historical final speeds and lap times at some
tracks, but not in others. The main focus has been put into handling, braking distances, tyres , fuel
consumption, and the driving style needed to achieve the best performance from them. While the
car gain speed it produce more and more ground effect from the bottom of the car, the effect
pushes the car into the ground producing a huge amount of grip. Under braking this effect is
reduced while the car loses speed, and needs attention to avoid locking the tyres. Below the speed
of the ground effect activation, the cars rely on their tyres, and the ability of the driver to manage
the power output on corner exit as they navigate the circuit. The turbo lag can also be a problem if
it isn’t carefully matched with the right moment, but it could be helpful in other situations.
Mazda 787B:
Physics: Damian Baldi This is a light car with a carbon fiber chassis, a rotary engine and a gearbox with Porsche internal components. It's an easy car to drive with good engine response and consumption options. It has a very good braking thanks to carbon fiber disks. Handling is neutral and it has very good cornering behaviour thanks to a short wheelbase. It uses Dunlop tyres fitted on 18 inches rims. Two slick compounds are available, and a third compound for the rain. See details bellow. The engine have three mixture settings that can be changed on the garage or on the steering wheel while driving, “Enduro” (position 1/3), "Sprint" (position 2/3) and “Plus” (position 3/3). Each position offers more power but more fuel consumption. Check the fuel per lap usage and compare with lap times to build a race strategy.
2
Specification
Weight: 860Kg Chassis: Carbon Fiber Brakes: Carbon Fiber Front wheels: 300x640mm Rim: 18 inches Rear wheels: 355x710mm Rim: 18 inches Tyres: Dunlop (Sprint/Enduro/Wet) Engine: Rotary 2.6 litre ~700HP @ 9000RPM
Porsche 962C: Physics: Damian Baldi
This 900Kg car is the most iconic from this era. The 962C set the benchmark for years, but by the late 80’s and early 90’s it was starting showing it’s age. The Aluminium chassis had many upgrades and modifications to keep it competitive, including several different engines, aero modifications and electronics changes. It has iron brake disks, so this car needs a longer braking distance than the Mazda. For this Mod the 962C is offered with two engines, a 3 litre twin turbo engine used as C1 class in WSC, and a 2.8 litre single turbo version as used in IMSA. The 3 litre version develops power in a gentle manner, making it easy to drive and oriented to endurance races, while the IMSA version with a huge single turbo have a more aggressive power output and lag at low RPMs. Both Engines have almost the same power and fuel consumption, the difference between them is their reaction to throttle. The turbo boost setting has 15 positions in total. Positions 1 to 6 are fuel saving settings and useful in rain. Position 7 ( 1.10 bar) is the recommended setting for endurance races with the best power/consumption ratio, and matches the Mazda's fuel consumption (in “Enduro” mode). Positions 8 to 10 (up to 1.25 bar) are used for sprint races, increasing the power output but with a higher fuel consumption and higher engine wear (not recommended for endurance events). Lastly, Position 15 is only recommended for qualification stints. This setting has very high fuel usage, and the health of the engine would be affected adversely under race lengths/conditions and prone to failure. A button for temporary boost could be added too, providing full boost while pressed. Specification
Weight: 900Kg Chassis: Aluminium Brakes: Iron, ventilated Front wheels: 300x650mm Rim: 17 inches Rear wheels: 365x720mm Rim: 18 inches (Goodyear), 19 inches (Yokohama) Tyres: Goodyear (R500/R600/Wet), Yokohama (Slick/Wet) Engine WSC: Flat-6 3.0 litre twin turbo 614-828HP @ 7950RPM Engine IMSA: Flat-6 2.8 litre single turbo 610-817HP @ 7950RPM
3
Porsche and Mazda: Aerodynamics, Tyres and Engine Health: Aerodynamics can be set for high speed tracks or high downforce tracks changing the front wing setting to “Low” (downforce and drag) or “High” (downforce and drag). The rear wing works as a balancer of the front wing, because most of the downforce comes from the ground effect's tunnel below the car. The recommended setting for high speed tracks (Le Mans and Daytona) is “Low” and “0 deg”, while for high downforce tracks is “High” and “9 deg” (or more). Tyres were thought around warming, not only wear and grip as main target. The R500/Sprint warms more than the others by only rolling, so this compound is good for tracks with long straights with few sections of corners. This tyre maintain the heat better for the next corner, and fit tracks like Sebring, Le Mans, Road America, but at some tracks like Interlagos or Estoril they can't cold down fast enough. The R600/Enduro compound is harder and resist better the long period of cornering. It warms less on the straights, so isn't so good at Le Mans or Sebring where they need some laps to warm up to operational temp. All the tyres have an operational pressure around 165-170 kpa, and they take 3 to 5 laps to reach the highest pressure. So check the pressure after some test laps to set the cold pressure at the garage. The car jump and move to the sides until the tyres reach higher pressure. - Goodyear R500 = Dunlop Sprint => (the softer compound) - Goodyear R600 = Dunlop Enduro => (the hardest compound) - Yokohama, this brand have an unique compound, the rear rim have a bigger diameter (19" instead 18") than the other brands. It is a hard compound with slow heating and very stable. It will last longer than the others tyres if it’s used into their thermal window. Excellent for long runs with medium boost. Rain tyres works well below 80C. This compound could be used while the track remains 60% wet, then it overheat easily. Engines have a 90000 seconds life (25 hours). Oil temp affects the health of the engines making
run the life counter faster or slower. Running the engine with 95C of oil temp is safe for 24 hs,
running at 100C is risky but possible, but over 105C can't be assured to reach the finish line.
Running the engine over the rev limiter while upshifting or while downshifting reduce the engine
life in a fast way.

4
Sauber C11: Physics: Alvaro Perez
After a successful season with the C9 in 1989, Sauber still evolved it and improved aerodynamics, ventilation, fuel consumption… Also a new carbon fibre chassis would embrace the formidable Mercedes engine and its twin KKK turbochargers.
10 turbo positions are available on the simulation, with the most conservative already offering 730hp and pushing hard from a very low 3500rpm. At the highest turbo settings more than 900hp explode at the wheel, but abuse will overheat the engine and harm tyres prematurely.
Remember that these Goodyear tyres (2 hard compounds) must also bear with one of the highest downforce levels of the grid. Harder tyres might be better choice when there are many fast kinks and long straights.
Choose your aerodynamic setting to obtain more traction and stability. The sacrifice of some turn-in response will be a reward when exiting the corner. Using same number for front and rear is a good way to start with a balanced chassis . After that, engine brake and differential settings can help you more than you expect to find your taste on corner entry and handling reactions.
Using soft springs can lead to aerodynamic issues, so it is recommended to go with the unconfortable rock hard suspension that doesn’t let you bite kerbs and spites at every bump.
Specification
Weight: 905Kg Chassis: Carbon fibre Brakes: Carbon, ventilated Engine: V8 5.0 litre twin turbo 730-940HP @ 7000RPM (see appendix for more information)
Which car is best for me?
The Mazda with just one brand of tyres, a narrow fuel consumption options and good handling it's
a great and safe choice for the race. On the Porsche's side, you have different options. You could
use soft Goodyear tyres and a higher turbo pressure to go as fast as you can, but bear in mind that
tyres will last less, and stints will be shorter due to the amount of fuel needed. A more
conservative choice could be to use Yokohama tyres with a lower turbo pressure to have a less
challenging car to drive. This way you could make longer stints with shorter pit stops due to
capability to double stint the tyres, putting the focus on the consistency. The C11 is heavier, it
doesn’t turn in so fast on twisty circuits. But it has good traction and lots of power to reach high
speeds. All cars have the same chance to fight for wins, it all depends on the driver to choose the
right combination that matches their driving style to get the best performance from the chosen
car.

5
Pit Stop Time: Tyres take 20 seconds to be changed and is the only action with a separated
time. Fuel takes 1 second per litre (100 seconds for the entire tank). All the other actions are
shared with the fuel time (driver change, repairs, settings changes). The amount of time that
appears as fuel time, is the total time for the pit stop.
Thanks to: Brian Davies, Avon Tyres Motorsport, www.avonmotorsport.com John Pearson, H.P Tyres Ltd, www.hptyres.com Autosport ‘Technical Forum’ Mulsanne’s Corner group. Special thanks to Oscar Larrauri, a great guy and fast driver, for his unconditional help and endless passion to make sure we had what we needed.

6
SAUBER MERCEDES C11
Engine: Mercedes-Benz M119 HL - V8 Turbo
Output:
Torque: 820Nm at 3500rpm (low boost)
Power: 730hp at 7000rpm (low boost) ; 944hp at 7000rpm (full boost)
Engine telemetry at minimum boost pressure
7
Max. recommended rpm: 7000-7200rpm (at 7200rpm engine life is halved)
Recommended radiator setting: 5 (Endurance) ;
Recommended oil temperature range: 112 – 123ºC (at 123ºC life is halved)
Recommended boost position:
Long endurance: 3 Endurance: 6 Qualifying: 9
Recommended mixture map use:
Lean (rain/save fuel): 1 Rich (maximum power): 2
Recommended engine brake setting:
Short braking distance : 1
Keep corner speed: 4
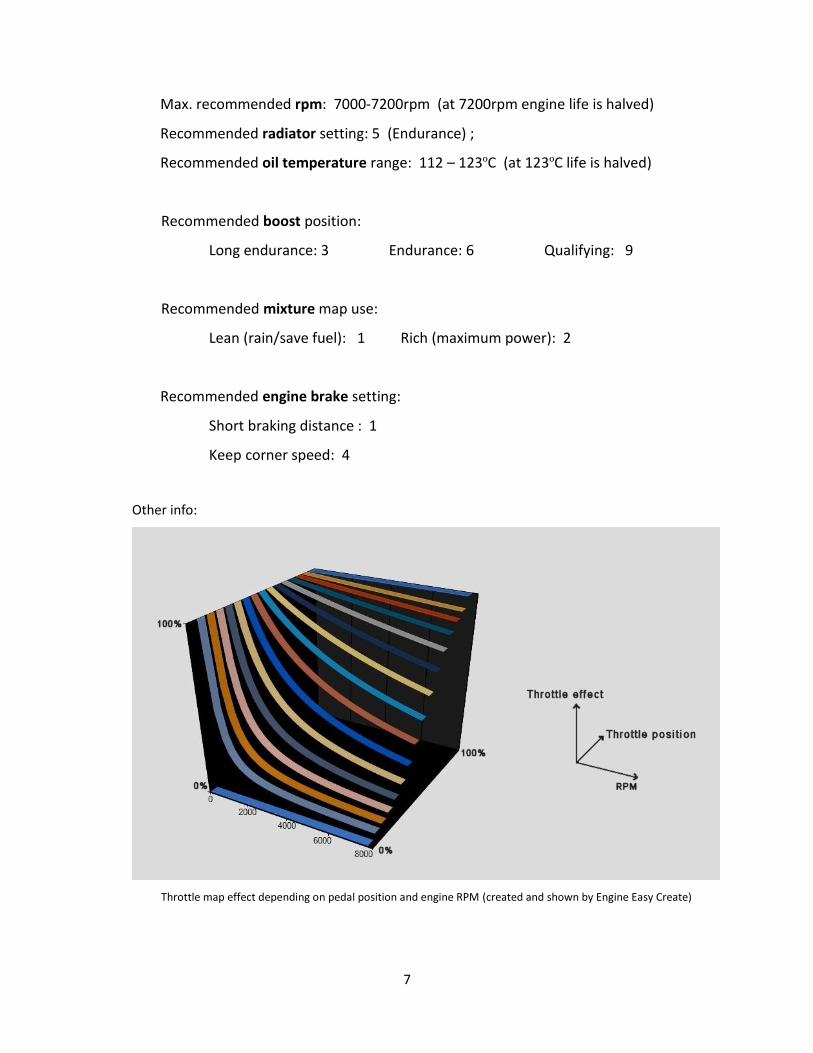
Other info:
Throttle map effect depending on pedal position and engine RPM (created and shown by Engine Easy Create)
8
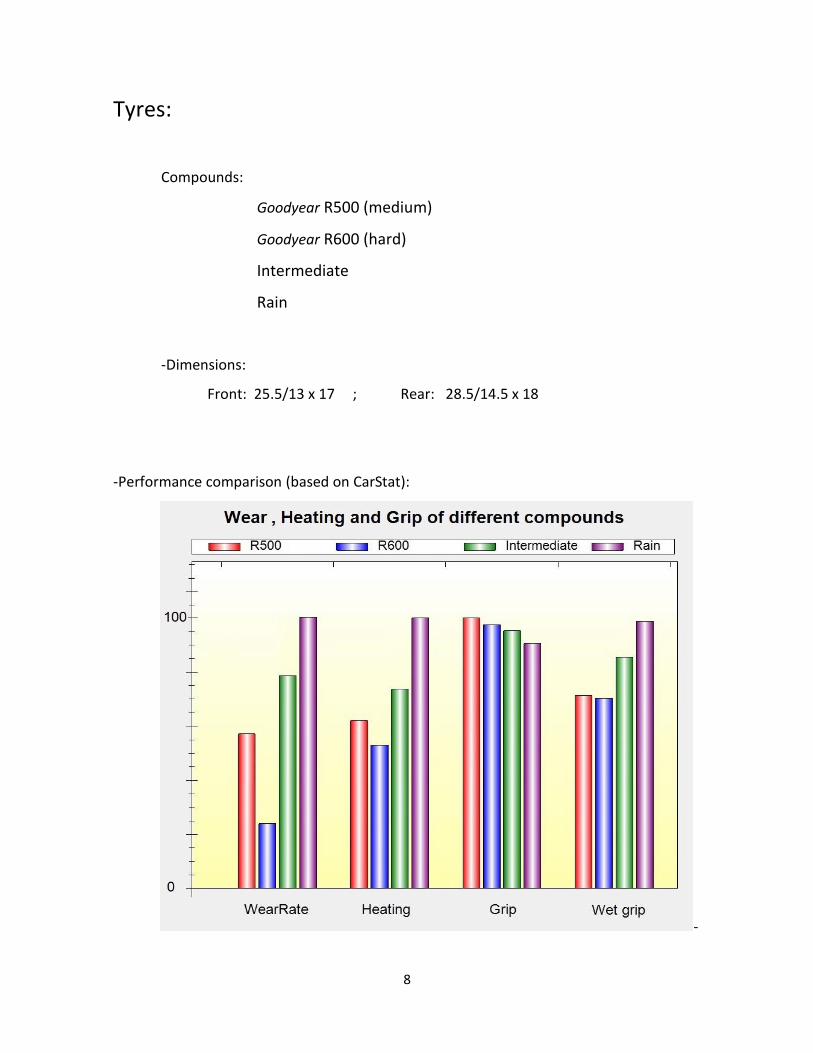
Tyres:
Compounds:
Goodyear R500 (medium)
Goodyear R600 (hard)
Intermediate
Rain
-Dimensions:
Front: 25.5/13 x 17 ; Rear: 28.5/14.5 x 18
-Performance comparison (based on CarStat):
-

9
-Optimum temperatures:
R500: 100ºC ; R600: 103ºC ; Intermediate: 78ºC ; Rain: 58ºC
-Abrasion degradation :
10
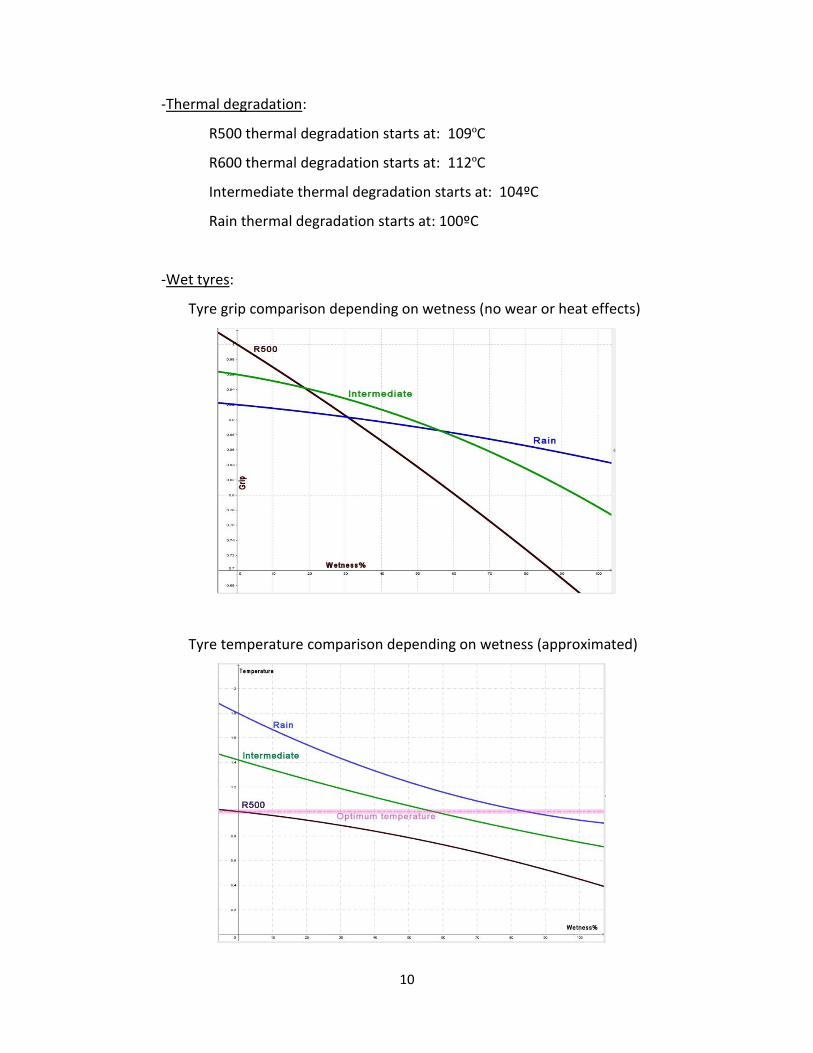
-Thermal degradation:
R500 thermal degradation starts at: 109ºC
R600 thermal degradation starts at: 112ºC
Intermediate thermal degradation starts at: 104ºC
Rain thermal degradation starts at: 100ºC
-Wet tyres:
Tyre grip comparison depending on wetness (no wear or heat effects)
Tyre temperature comparison depending on wetness (approximated)

11
Tyre wear comparison depending on wetness (approximated)
These are ideal representations on uniform constant wetness levels. However,
road state usually evolves depending on rain amount and cars on track, so that
wetness levels are usually dynamic and tarmac is often a mix of damp patches, dry
paths, puddles, etc,…
-Tyre characteristics and recommendations:
Tyres are very sensitive to slip angle. This means using excessive steering
angles may induce quick overheating on tyres surface, losing grip prematurely while
cornering. Sliding and going sideways may harm rear tyres.
Tyres are also sensitive to load and speed. They are not so effective at the
fastest corners, where sliding speed is higher and downforce increases tyre deformation,
so they lose grip and suffer faster overheating and wear.
Soft compounds are more sensitive to load, so probably you will notice that
they are much more grippy than hard compounds at low speed corners, but grip
difference is not so big at high speed corners.
12
Different compounds need different driving style according to their
temperature characteristics. Soft compounds are not very efficient when overheated,
while hard compounds are not efficient when cold. Probably hard compounds admit a
more aggressive style, which helps to reach optimum temperatures, while soft
compounds need to be gentle to not exceed them.
Chosen tyre compound must fit with ambient conditions and required task.
Soft tyres fit better with low fuel loads, high turbo positions and more oversteering
chassis. These are the typical conditions on short race stints and qualifying laps. It’s not
recommended to use soft tyres with high fuel loads, very hot ambient temperatures,
etc,... In the other hand, it is not recommended to use hard tyres with highest turbo
positions.
Never use rain tyres in a dry track. They will overheat and wear quickly,
making impossible to drive safely. When track is drying after the rain, use wetness left on
the straights to refrigerate your rain tyres.
Also, do not use slick tyres in the wet since they are easily affected by
aquaplanning.
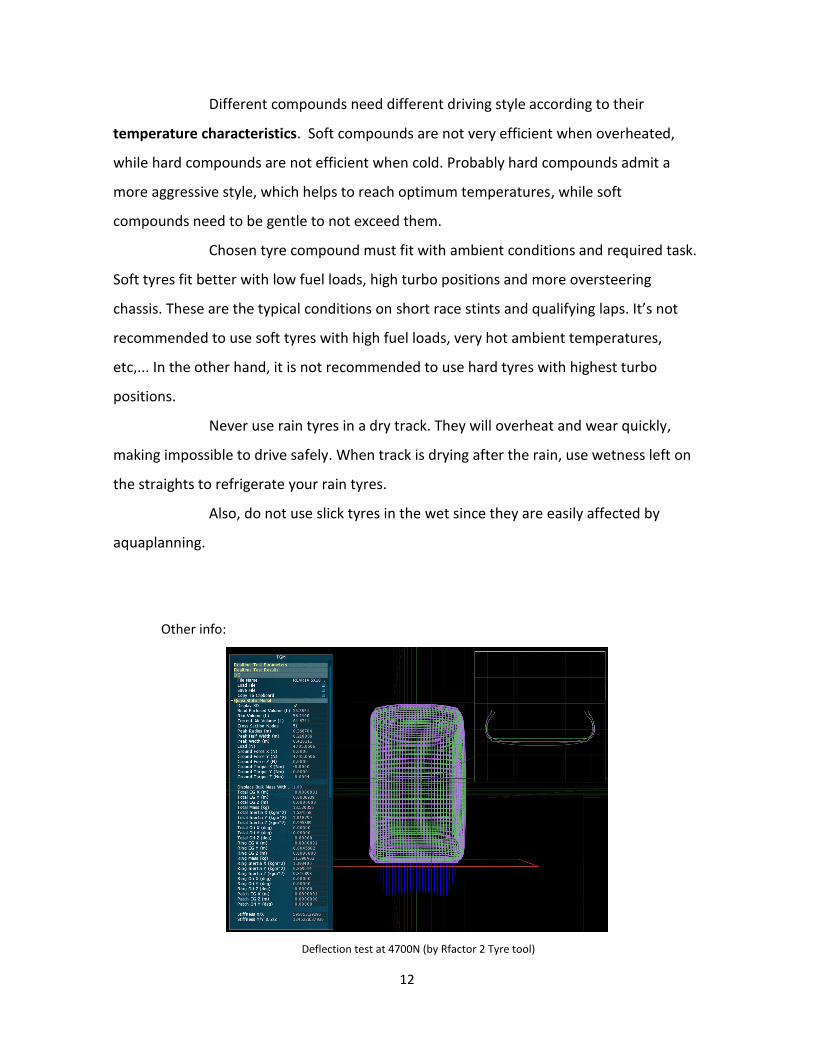
Other info:
Deflection test at 4700N (by Rfactor 2 Tyre tool)

13
Aerodynamics
Downforce:
Total normalized downforce and aerodynamic balance depending on garage aerodynamic settings
(shown by AeroGebra).
Drag:
Total drag and contributions, depending on garage aerodynamic settings.
As a start point, it is recommended to use same number for both
downforce settings.
Examples >>> Interlagos: front=6, rear=6 ; Monza: 4-4 ; Le Mans 1991: 3-3

14
Ride height:
How to choose best ride height, from aerodynamics point of view?
Ride height is dynamic, it changes all the time while driving due to different forces acting on the chassis. You should choose a static ride height that goes in favour of the optimum instant ride height on corners and straights of each track.
‘Static ride height’: Ride height setting. It is set on garage.
‘Instant ride height’: Actual ride height while driving. Normally, it is lower than static, because of aerodynamic downforce.
Rake is the difference between rear and front ride height. Rake is positive when rear is higher than front. Rake is negative when rear is lower than front.
‘Rake’ = ‘Rear ride height’ – ‘Front ride height’
We need to know how downforce and drag evolve depending on ride height:
Total downforce, drag, efficiency and balance depending on instant rear ride height (for instant front height = 31mm, which is the optimum).
Instant ride height for maximum downforce : Front: 31mm ; Rear: 43mm
Instant ride height for maximum efficiency : Front: 31mm ; Rear: 31mm

15
This means we need some positive rake to maximize downforce, and no rake to minimize drag.
Let’s check drag evolution for other front ride heights:
Total drag depending on instant rear ride height, for various instant front ride heights
Instant ride height for minimum aero drag : Front: 0mm ; Rear: 0mm
This confirms that:
- The lower is the car, the less aerodynamic drag there is.
- Drag also decreases when both front and rear heights are the same. That is: Rake generates extra drag, especially negative rake.
At the straights, rear height tends to go lower than front due to strong rear downforce. Use hard rear springs and/or increase rear height setting to avoid negative rake and speed loss. Avoid using too soft rear springs in combination with low rear ride heights. A change of +-1cm in rear height can make you lose 5kph of top speed.
As a conclusion, we recommend the following static ride height to obtain a balanced setup:
Recommended front static ride height setting: 45-50mm
Recommended rear static ride height setting: 60-70mm
16
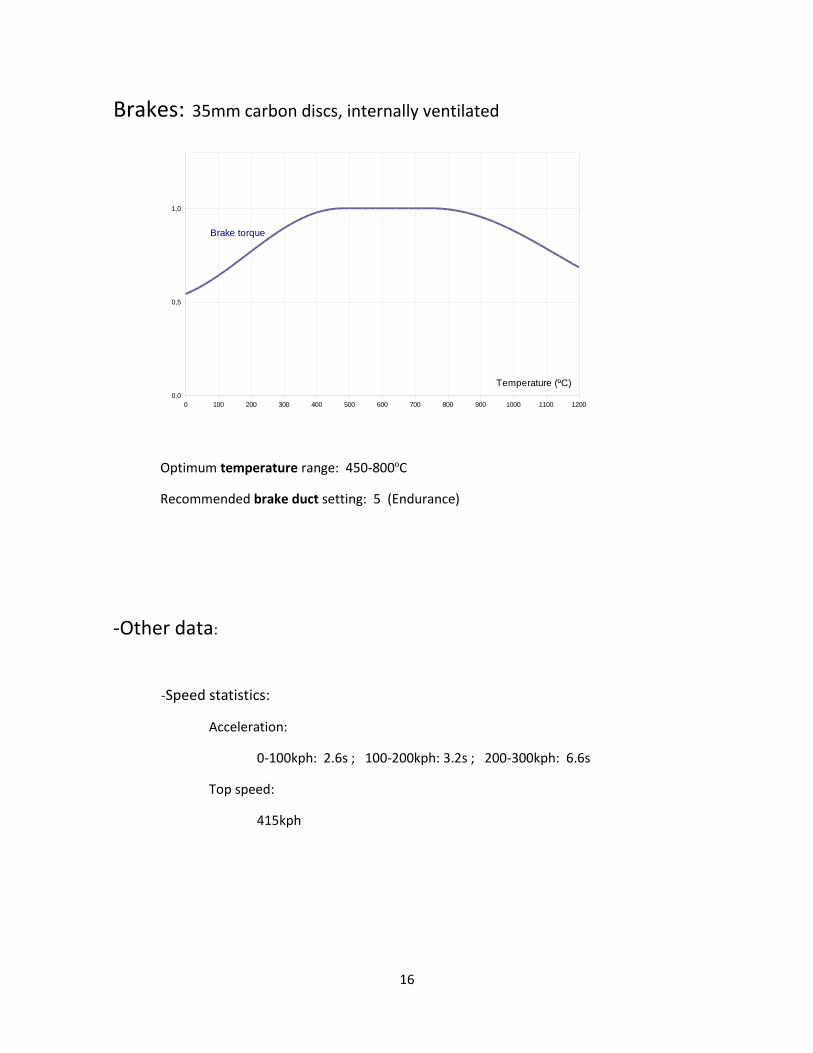
Brakes: 35mm carbon discs, internally ventilated
Optimum temperature range: 450-800ºC
Recommended brake duct setting: 5 (Endurance)
-Other data:
-Speed statistics:
Acceleration:
0-100kph: 2.6s ; 100-200kph: 3.2s ; 200-300kph: 6.6s
Top speed:
415kph
0 100 200 300 400 500 600 700 800 900 1000 1100 1200
0,0
0,5
1,0
Temperature (ºC)
Brake torque
17
-Driving recommendations:
- Caution! This is a 900HP machine. It is strongly recommended to carefully regulate throttle pedal when approaching corner exit, especially on low speed corners. It is possible to slide and to make opposite lock while using a portion of throttle, but never use full throttle until the car is firmly stabilized. Highest turbo positions are only recommended when riding new qualifying tyres or very good track conditions. Listen to turbo sound so that you know when the power is coming. When track is very wet, use ‘Rain’ engine mixture.
- Going sideways at high speed is not recommended. Severe grip loss can occur when trying to drift at higher speeds than 180kph.
- Stay on track limits, avoid driving over kerbs. Suspension travel is short and springs are usually very hard, so they don’t cope well with irregularities.
- After exiting pit lane or caution laps, brakes and tyres are usually cold. Avoid aggressive driving and late braking until car elements reach optimum work temperatures. Brakes can heat up after a pair of corners, but tyres may need rolling for two or more laps, depending on track and compound.
- Car settings should take in account fuel consumption and tyre wear. Car performance will change after some laps, so risky setups which are fast on new tyres can be dangerous for a long stint. Remember that car weight, balance and grip will change. For the race, choose tyre compounds which last longer in good state, and this applies also to rain tyres.


![Untitled-1 [] · MAK PARK SQUARE is a luxurious apartment complex and the design revolves around providing cross ventilation to ... MAK AJMERA STONE PARK MAK LIFESTYLE MAK MARK STATUS](https://static.fdocuments.in/doc/165x107/5f22e60bcd225029067a7748/untitled-1-mak-park-square-is-a-luxurious-apartment-complex-and-the-design-revolves.jpg)