Main Menu of Crime Incident Reporting System(E …didm.pnp.gov.ph/CIRS/CIRS Users Manual.pdfTo...
33
Transcript of Main Menu of Crime Incident Reporting System(E …didm.pnp.gov.ph/CIRS/CIRS Users Manual.pdfTo...


To access the PNP Crime Incident Reporting and E-Blotter System, click on the E-BLOTTER icon on your desktop. Upon loading the system, it will prompt the user to key-in valid USER ID and PASSWORD. Click the OK button to unlock the system.
If the USER ID and PASSWORD were entered incorrectly ( sub screen below will appear).Click OK button and re-enter valid username and password.
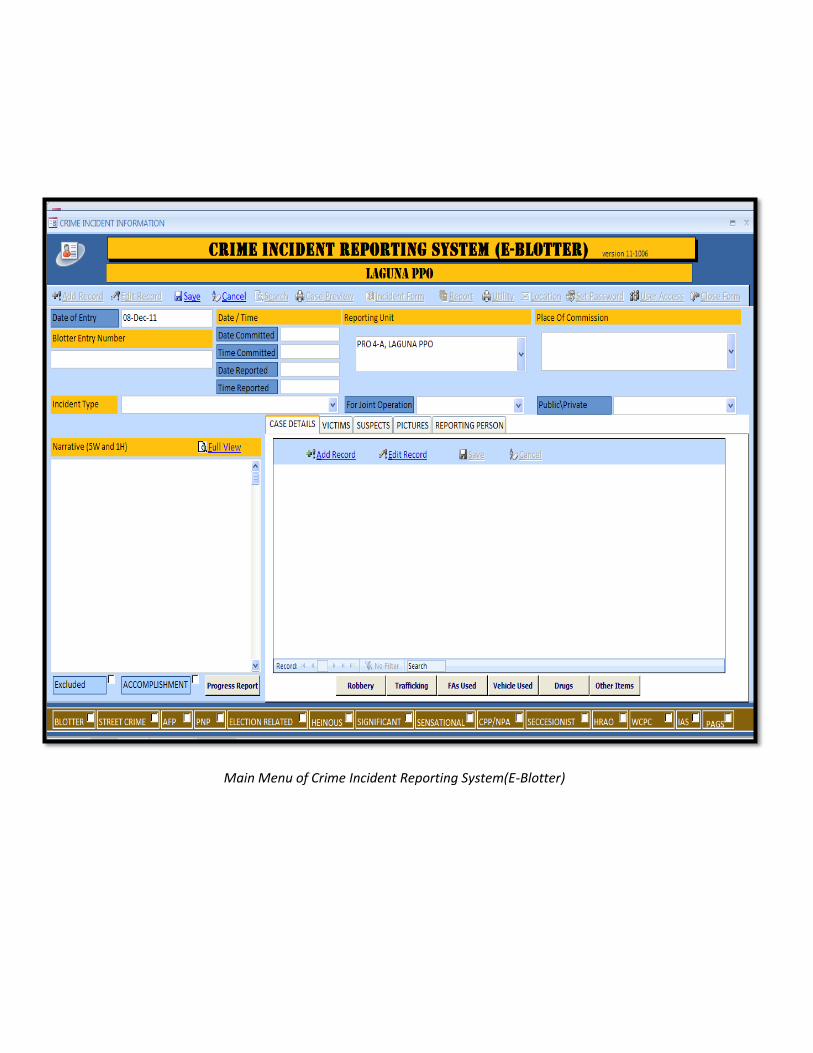
Main Menu of Crime Incident Reporting System(E-Blotter)
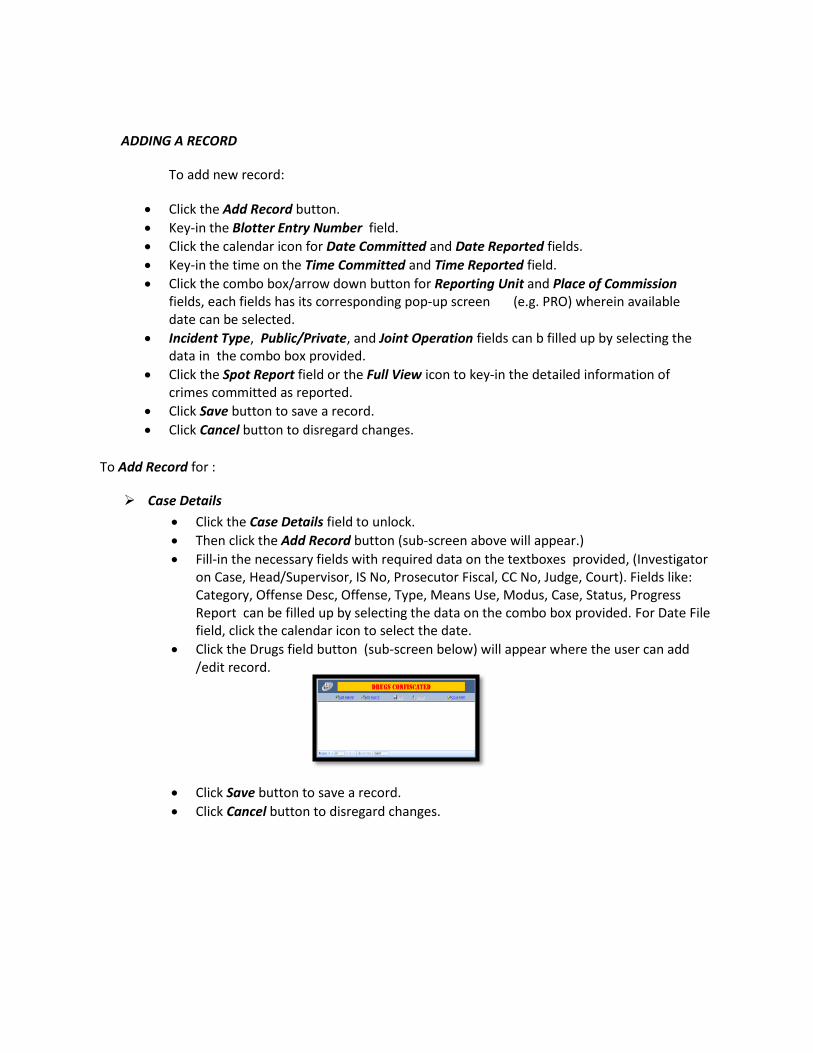
To Add Record for :
Case Details
Click the Case Details field to unlock.
Then click the Add Record button (sub-screen above will appear.)
Fill-in the necessary fields with required data on the textboxes provided, (Investigator on Case, Head/Supervisor, IS No, Prosecutor Fiscal, CC No, Judge, Court). Fields like: Category, Offense Desc, Offense, Type, Means Use, Modus, Case, Status, Progress Report can be filled up by selecting the data on the combo box provided. For Date File field, click the calendar icon to select the date.
Click the Drugs field button (sub-screen below) will appear where the user can add /edit record.
Click Save button to save a record.
Click Cancel button to disregard changes.
ADDING A RECORD
To add new record:
Click the Add Record button.
Key-in the Blotter Entry Number field.
Click the calendar icon for Date Committed and Date Reported fields.
Key-in the time on the Time Committed and Time Reported field.
Click the combo box/arrow down button for Reporting Unit and Place of Commission fields, each fields has its corresponding pop-up screen (e.g. PRO) wherein available date can be selected.
Incident Type, Public/Private, and Joint Operation fields can b filled up by selecting the data in the combo box provided.
Click the Spot Report field or the Full View icon to key-in the detailed information of crimes committed as reported.
Click Save button to save a record.
Click Cancel button to disregard changes.

FAs Used Vehicle Used
Drugs Other Items
To add records for the screens above:
Click the Add Record button.
Fill-in the necessary fields with required data on the textboxes provided.
For fields with combo box provided click the box to select the desired data.
Click Save button to save a record.
Click Cancel button to disregard changes.
Robbery screen Trafficking screen
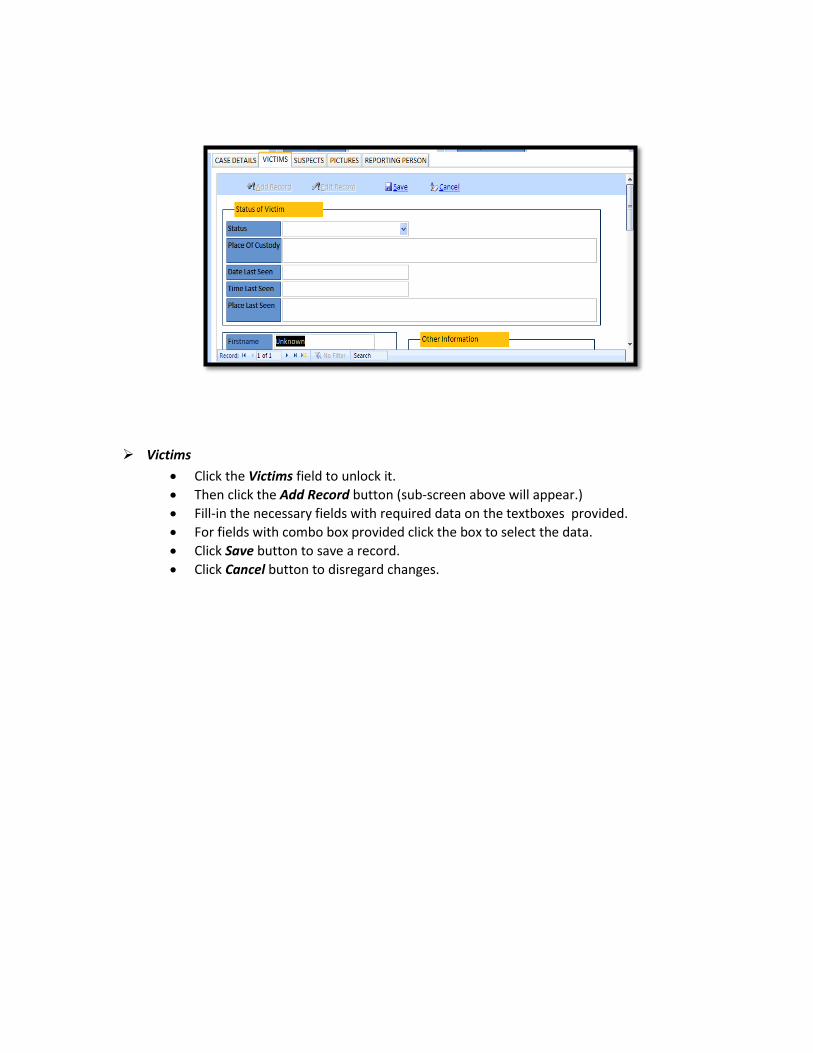
Victims
Click the Victims field to unlock it.
Then click the Add Record button (sub-screen above will appear.)
Fill-in the necessary fields with required data on the textboxes provided.
For fields with combo box provided click the box to select the data.
Click Save button to save a record.
Click Cancel button to disregard changes.
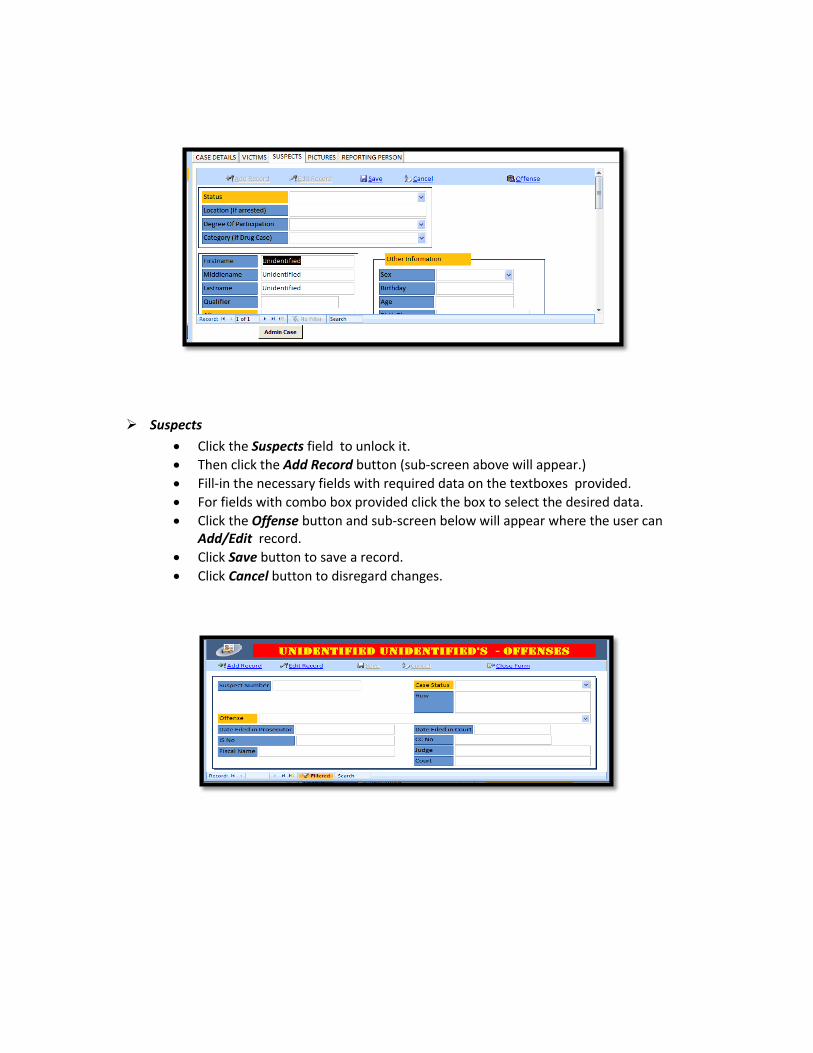
Suspects
Click the Suspects field to unlock it.
Then click the Add Record button (sub-screen above will appear.)
Fill-in the necessary fields with required data on the textboxes provided.
For fields with combo box provided click the box to select the desired data.
Click the Offense button and sub-screen below will appear where the user can Add/Edit record.
Click Save button to save a record.
Click Cancel button to disregard changes.
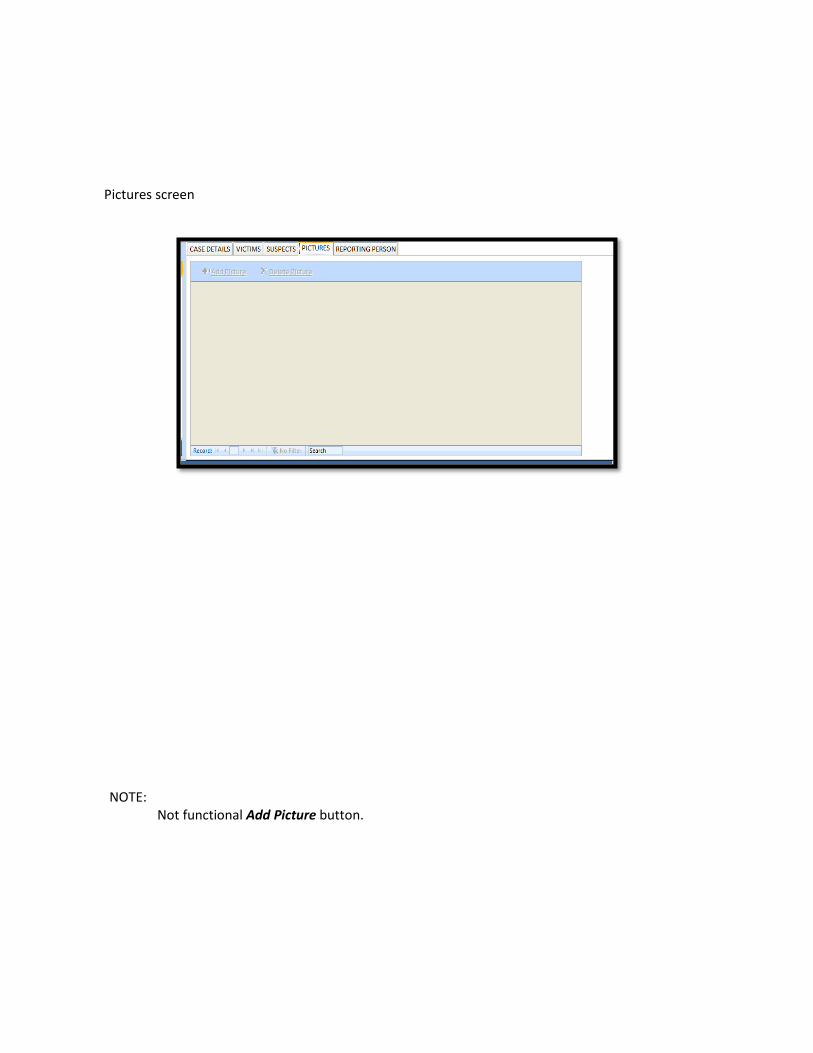
Pictures screen
NOTE: Not functional Add Picture button.

Reporting Person
Click the Reporting Person field to unlock it.
Then click the Add Record button (sub-screen above will appear.)
Fill-in the necessary fields with required data on the textboxes provided.
For fields with combo box provided click the box to select the desired data.
Click Save button to save a record.
Click Cancel button to disregard changes.

Search Button
How to edit record?
To edit record enter BLOTTER ENTRY NUMBER located at the right upper side
After searching on the records, click on the EDIT RECORD to unlock the fields
Edit the necessary fields
Click the SAVE button to save updated fields or CANCEL button to discard entries

This screen appears after clicking CASE DETAILS button
How to SEARCH/EDIT record on CASE DETAILS?
- Click the Search button to search for a record
- Click the EDIT button to unlock the fields. Edit the necessary fields.
- Click the SAVE button to save updated fields or CANCEL button to discard entries

This screen appears after clicking VICTIMS DETAILS button
How to SEARCH/EDIT record on VICTIMS DETAILS?
- Click the Search button to search for a record
- Click the EDIT button to unlock the fields. Edit the necessary fields.
- Click the SAVE button to save updated fields or CANCEL button to discard entries

This screen appears after clicking SUSPECT DETAILS button
How to SEARCH/EDIT record on SUSPECT DETAILS?
- Click the Search button to search for a record
- Click the EDIT button to unlock the fields. Edit the necessary fields.
- Click the SAVE button to save updated fields or CANCEL button to discard entries

This screen appears after clicking ROBBERY button

This screen appears after clicking the ADD button on ROBBERY Details
How to SEARCH/EDIT record on ROBBERY DETAILS?
- Click the EDIT button to unlock the fields. Edit the necessary fields.
- Click the SAVE button to save updated fields or CANCEL button to discard entries
- Click the CLOSE FORM Button to exit ROBBERY DETAILS

This screen appears after clicking TRAFFICKING button
How to SEARCH/EDIT record on TRAFFICKING?
- Click the Search button to search for a record
- Click the EDIT button to unlock the fields. Edit the necessary fields.
- Click the SAVE button to save updated fields or CANCEL button to discard entries
- Click the CLOSE FORM Button to exit TRAFFICKING

This screen appears after clicking FIREARMS USED/CONFISCATED button

This screen appears after clicking ADD button of FIREARMS USED/CONFISCATED
How to SEARCH/EDIT record on FIREARMS USED/CONFISCATED ?
Click the Search button to search for a record
- Click the EDIT button to unlock the fields. Edit the necessary fields.
- Click the SAVE button to save updated fields or CANCEL button to discard entries
- Click the CLOSE FORM Button to exit FIREARMS USED/CONFISCATED

This screen appears after clicking ADD button VEHICLE USED details
How to SEARCH/EDIT record on VEHICLE USED ?
- Click the Search button to search for a record
- Click the EDIT button to unlock the fields. Edit the necessary fields.
- Click the SAVE button to save updated fields or CANCEL button to discard entries
- Click the CLOSE FORM Button to exit VEHICLE USED

This screen appears after clicking ADD button of DRUGS details
How to SEARCH/EDIT record on DRUGS CONFISCATED ?
- Click the Search button to search for a record
- Click the EDIT button to unlock the fields. Edit the necessary fields.
- Click the SAVE button to save updated fields or CANCEL button to discard entries
- Click the CLOSE FORM Button to exit DRUGS CONFISCATED

This screen appears after clicking OTHER ITEMS details

This screen appears after clicking ADD button of OTHER ITEM CONFISCATED DETAILS details

To enable the Search module click the Search button from the main menu, screen
above will appear.
In Search module the user can search crime information by Suspect, Victim, Firearms
and Vehicle.
Click the Suspect field (screen below will appear)
Key-in the required data
Click the Search button to show the list of Suspects.
NOTE: Do the same procedure with other reference tables.

Case Preview screen
Click the Case Preview button to view the Crime Incident Report Form.

Incident Form

REPORTS Screen
This module allows the user to query and generate a hard copy of the reports.
There are two (2) Report Criteria that can be generated, the Detailed and Statistical
list of reports.

Detailed Statistical
To produce hardcopy for Detailed list of reports;
Click the Detailed button.
Click the arrow down keys to select .
Click on the Ok button (screen below will appear).

Click the period covered, fill-in the other required data.
Click the Preview button to view reports(as shown on screen below).
Click Close Form button to cancel.
NOTE: Do the same procedure for Statistical Report.

UTILITY
Receive Data Send Data
How to create ZIP file and send data:
Go to Utility
Click Send Data
Click Create Zip
Click OK to Finish
Copy/burn to a CD for submission
How to receive data:
Go to e-blotter Received Folder
Copy/Paste the Zip Folder to the
Received Folder
Go to the Main Form
Click Utility
Select Receive Data

LOCATION
Click the LOCATION menu to fill up the Office Information
Form
To fill up fields, click the combo box provided to select
appropriate information and for textbox, key in the
information required
Click SAVE
Select reporting unit/office level as illustrated below:

SET PASSWORD
To Set/Change password:
Click Update button.
Fill in the employee information ( Lastname, Firstname, &
Middlename)
Fill in the login information ( User ID, Password & confirmed
password)
Click Done button to save transaction.
Click Cancel button to cancel transaction.
Click Close button to exit.

To add a user’s account:
Click on Add button.
Fill in login information (User ID)
Fill in the employee information (Lastname, Firstname, Middlename)
Click the Account Permission given to the user.
Click on the Save button to save new user account.
Click Cancel button to discard added user account.
To edit a user’s account:
Click on Edit button.
Edit the employee information(User ID, Lastname, Firstname, Middlename).
Edit Account Permission given to the user by highlighting task and click button that will grant user access to the system.
Click on Save button to save edited user account.
Click on Cancel button to discard edited user account.
This User Access module is used to maintain the account of the system’s user. The system administration can add or edit the account/s of the systems users as well as limiting their access rights on the system.

To delete a user’s account:
Click on any First, Next, Previous, Last buttons to select the name of user to be deleted.
Once the name of user to be deleted appears click the Delete button. A confirmation box will appear as shown below to confirm;
click the Yes button to delete and No button to cancel.