MailEnable Enterprise Configuration Guide
142
Enterprise Edition Configuration Guide v 3.0 Page 1 MailEnable Enterprise Edition Configuration Guide Version 3.0 MailEnable Messaging Services for Microsoft Windows NT/2000/2003 MailEnable Pty. Ltd. 59 Murrumbeena Road Murrumbeena VIC 3163 Australia t: +61 3 9569 0772 f: +61 3 9530 4066 www.mailenable.com Date last modified 13/09/2007 11:16 PM
Transcript of MailEnable Enterprise Configuration Guide

Enterprise Edition Configuration Guide v 3.0
Page 1
MailEnable Enterprise Edition Configuration Guide Version 3.0
MailEnable Messaging Services for Microsoft Windows NT/2000/2003
MailEnable Pty. Ltd.59 Murrumbeena Road
MurrumbeenaVIC 3163Australia
t: +61 3 9569 0772f: +61 3 9530 4066
www.mailenable.com
Date last modified 13/09/2007 11:16 PM

Enterprise Edition Configuration Guide v 3.0
Page 2
Table of Contents MailEnable Enterprise Edition Configuration Guide Version 3.0................. 1
MailEnable Messaging Services for Microsoft Windows NT/2000/2003 ............................. 1 Table of Contents ................................................................................................................... 2 Warranty................................................................................................................................. 7
1 Introduction................................................................................................... 8 1.1 Contact the MailEnable Team.................................................................................... 8
1.1.1 Support ............................................................................................................................................ 8 1.2 How to download ....................................................................................................... 8 1.3 Pre-requisite hardware................................................................................................ 8 1.4 Pre-requisite software................................................................................................. 8 1.5 How Internet email works .......................................................................................... 9
1.5.1 Email clients.................................................................................................................................... 9 1.5.2 Email server .................................................................................................................................... 9 1.5.3 Sending and receiving mail ............................................................................................................. 9
2 Overview ...................................................................................................... 10 2.1 Structure of MailEnable ........................................................................................... 10
2.1.1 Services ......................................................................................................................................... 10 2.1.2 Connectors .................................................................................................................................... 11 2.1.3 Agents ........................................................................................................................................... 11
2.2 Administration.......................................................................................................... 11 2.3 Email delivery flow.................................................................................................. 13
2.3.1 Sending mail.................................................................................................................................. 13 2.3.2 Receiving mail .............................................................................................................................. 13
3 Installation and upgrading......................................................................... 14 3.1 Installation overview................................................................................................ 14 3.2 Installation process................................................................................................... 14
3.2.1 Welcome screen ............................................................................................................................ 14 3.2.2 License agreement......................................................................................................................... 14 3.2.3 Registration details........................................................................................................................ 14 3.2.4 Select installation components ...................................................................................................... 14 3.2.5 Select application directory........................................................................................................... 15 3.2.6 Select Program Manager group..................................................................................................... 15 3.2.7 Select configuration repository location........................................................................................ 15 3.2.8 Select message store repository location....................................................................................... 15 3.2.9 Creating an initial post office ........................................................................................................ 15 3.2.10 SMTP connector configuration ..................................................................................................... 15 3.2.11 Start installation ............................................................................................................................ 16 3.2.12 Select web application platform (ASP or .NET) ........................................................................... 16 3.2.13 Database schema warning ............................................................................................................. 16 3.2.14 Select web mail site....................................................................................................................... 16 3.2.15 Web administration ....................................................................................................................... 17 3.2.16 Antivirus plug-in notice ................................................................................................................ 17 3.2.17 HTTPMail notice .......................................................................................................................... 17 3.2.18 Completing installation ................................................................................................................. 17
3.3 Upgrading................................................................................................................. 17 3.3.1 Configuration repository location ................................................................................................. 17 3.3.2 Replace configuration files............................................................................................................ 18
3.4 Post-installation configuration ................................................................................. 19 3.4.1 MailEnable Diagnostic Utility....................................................................................................... 19 3.4.2 Check and configure DNS settings ............................................................................................... 20

Enterprise Edition Configuration Guide v 3.0
Page 3
3.4.3 To set up PTR records under Microsoft's DNS Server.................................................................. 21 3.4.4 Check mail services....................................................................................................................... 22
4 Administration ............................................................................................ 23 4.1 Overview .................................................................................................................. 23 4.2 Messaging Manager ................................................................................................. 24
4.2.1 General settings............................................................................................................................. 24 4.2.2 Security and authentication settings .............................................................................................. 24 4.2.3 Cluster management...................................................................................................................... 25
4.3 Post office configuration .......................................................................................... 25 4.3.1 General .......................................................................................................................................... 26 4.3.2 Agents ........................................................................................................................................... 27 4.3.3 Filters ............................................................................................................................................ 27 4.3.4 Restrictions.................................................................................................................................... 27 4.3.5 Service selection............................................................................................................................ 27 4.3.6 Feature selection............................................................................................................................ 28 4.3.7 Web Mail....................................................................................................................................... 28 4.3.8 Message store ................................................................................................................................ 29 4.3.9 Web admin .................................................................................................................................... 29
4.4 Post office actions .................................................................................................... 29 4.4.1 Create domain ............................................................................................................................... 30 4.4.2 Create mailbox .............................................................................................................................. 32 4.4.3 Export users................................................................................................................................... 38 4.4.4 Import Windows users .................................................................................................................. 38 4.4.5 Import users................................................................................................................................... 38 4.4.6 Delete messages ............................................................................................................................ 38 4.4.7 Email users (all) ............................................................................................................................ 38 4.4.8 Email users (individual) ................................................................................................................ 39 4.4.9 Set quotas ...................................................................................................................................... 39 4.4.10 Edit default message...................................................................................................................... 39 4.4.11 Create a group ............................................................................................................................... 39
4.5 Directory................................................................................................................... 39 4.6 Lists .......................................................................................................................... 40
4.6.1 General .......................................................................................................................................... 40 4.6.2 Options .......................................................................................................................................... 41 4.6.3 Headers.......................................................................................................................................... 42 4.6.4 Footers........................................................................................................................................... 42 4.6.5 Importing list members ................................................................................................................. 42 4.6.6 List commands .............................................................................................................................. 43 4.6.7 List Responder Options................................................................................................................. 43
4.7 Server configuration................................................................................................. 43 4.7.1 General configuration.................................................................................................................... 43 4.7.2 Policies .......................................................................................................................................... 44 4.7.3 Secure Sockets Layer (SSL) encryption........................................................................................ 45
4.8 Option files............................................................................................................... 46 5 Configuration of connectors, services and agents ................................... 47
5.1 SMTP connector....................................................................................................... 47 5.1.1 SMTP properties ........................................................................................................................... 47 5.1.2 Inbound ......................................................................................................................................... 48 5.1.3 Outgoing........................................................................................................................................ 49 5.1.4 Relay ............................................................................................................................................. 49 5.1.5 Security ......................................................................................................................................... 51 5.1.6 Advanced SMTP ........................................................................................................................... 52 5.1.7 Delivery......................................................................................................................................... 52 5.1.8 Smart host ..................................................................................................................................... 53 5.1.9 Logging ......................................................................................................................................... 54 5.1.10 Blocked addresses ......................................................................................................................... 54 5.1.11 White list ....................................................................................................................................... 54 5.1.12 Sender Policy Framework (SPF)................................................................................................... 55

Enterprise Edition Configuration Guide v 3.0
Page 4
5.1.13 Reverse DNS blacklisting ............................................................................................................. 56 5.1.14 IP Blocking ................................................................................................................................... 58 5.1.15 Greylisting..................................................................................................................................... 59
5.2 POP Service.............................................................................................................. 59 5.2.1 General .......................................................................................................................................... 60 5.2.2 Advanced ...................................................................................................................................... 62 5.2.3 Logging ......................................................................................................................................... 62
5.3 POP Retrieval connector .......................................................................................... 63 5.4 List server connector ................................................................................................ 64 5.5 Post office connector................................................................................................ 64
5.5.1 General .......................................................................................................................................... 65 5.5.2 Logging ......................................................................................................................................... 66
5.6 IMAP service............................................................................................................ 66 5.6.1 General .......................................................................................................................................... 67 5.6.2 Logging ......................................................................................................................................... 68
5.7 HTTPMail protocol .................................................................................................. 69 5.7.1 Configuration ................................................................................................................................ 70
5.8 Mail Transfer Agent (MTA) .................................................................................... 70 5.8.1 MTA properties............................................................................................................................. 71
5.9 Web mail .................................................................................................................. 71 5.9.1 Enterprise web mail features ......................................................................................................... 72 5.9.2 Web mail server configuration ...................................................................................................... 74 5.9.3 Publishing via host headers or virtual directories.......................................................................... 78 5.9.4 Configuring a host header for a website........................................................................................ 79 5.9.5 Web mail properties ...................................................................................................................... 80 5.9.6 Browser compatibility ................................................................................................................... 80
5.10 Web administration .................................................................................................. 80 5.10.1 Web administration server configuration ...................................................................................... 81 5.10.2 Site configuration .......................................................................................................................... 82 5.10.3 Web administration properties ...................................................................................................... 82 5.10.4 Accessing web administration....................................................................................................... 83
5.11 Management service................................................................................................. 83 5.11.1 Remote Management Agent.......................................................................................................... 83 5.11.2 Using Remote Administration....................................................................................................... 84 5.11.3 Mailbox clean-up agent................................................................................................................. 85 5.11.4 Quota Notification Agent .............................................................................................................. 86
5.12 COM Component ..................................................................................................... 87 5.12.1 Configuring the server................................................................................................................... 87 5.12.2 Using the COM component........................................................................................................... 87 5.12.3 Examples ....................................................................................................................................... 90
6 Using MySQL or Microsoft SQL Server.................................................. 91 6.1 Installing ODBC driver ............................................................................................ 91 6.2 Initializing the repository ......................................................................................... 91 6.3 Migrating data between providers............................................................................ 92
6.3.1 Activating the current provider ..................................................................................................... 92 6.3.2 Reverting to the former configuration provider ............................................................................ 93
7 Remote administration............................................................................... 94 8 Message filtering ......................................................................................... 95
8.1 Global message filters .............................................................................................. 95 8.1.1 Global message filter properties.................................................................................................... 95
8.2 Creating a global filter.............................................................................................. 96 8.2.1 Standard filter criteria.................................................................................................................... 96 8.2.2 Filter actions.................................................................................................................................. 99 8.2.3 Token Substitutions..................................................................................................................... 101
8.3 Mailbox filtering .................................................................................................... 101 8.3.1 Creating a mailbox filter ............................................................................................................. 101

Enterprise Edition Configuration Guide v 3.0
Page 5
8.3.2 Filter criteria................................................................................................................................ 101 8.3.3 Filter actions................................................................................................................................ 101
8.4 Antivirus filtering................................................................................................... 102 8.4.1 How to implement antivirus filtering .......................................................................................... 102 8.4.2 Configuring the antivirus filter.................................................................................................... 104 8.4.3 Testing antivirus configuration ................................................................................................... 105
8.5 Bayesian filtering ................................................................................................... 105 8.5.1 Setting up auto-training Bayesian filtering.................................................................................. 105 8.5.2 Step 1: Set up auto-training for the filter..................................................................................... 106 8.5.3 Step 2: Collecting spam for auto-training ................................................................................... 106 8.5.4 Step 3: Collecting ‘ham’ for auto-training .................................................................................. 107 8.5.5 Step 4: Create a global Bayesian filter ........................................................................................ 107 8.5.6 Step 5: Testing the Bayesian filter ............................................................................................. 107 8.5.7 Bayesian filter general settings.................................................................................................... 107 8.5.8 MailEnable Default Dictionary ................................................................................................... 108 8.5.9 Manual training ........................................................................................................................... 108 8.5.10 Spam Training Utility.................................................................................................................. 109
9 Scripted filtering ....................................................................................... 112 9.1 Overview ................................................................................................................ 112
9.1.1 Literal values............................................................................................................................... 112 9.1.2 Enumerations requiring the CriteriaMet syntax .......................................................................... 113
9.2 Basic Script Example ............................................................................................. 114 9.3 Advanced Script Example...................................................................................... 114
9.3.1 Reporting Matching Criteria ....................................................................................................... 114 10 Cluster management ............................................................................. 116
10.1 Connecting to a MailEnable cluster ....................................................................... 117 10.2 Windows Licensing for cluster setup ..................................................................... 117
11 Configuration of email clients.............................................................. 118 11.1 Netscape Messenger............................................................................................... 118 11.2 Microsoft Outlook Express .................................................................................... 118 11.3 Microsoft Outlook 2000 ......................................................................................... 118 11.4 Microsoft Outlook 2002/2003................................................................................ 119 11.5 Mozilla Thunderbird .............................................................................................. 119 11.6 Configuring clients for HTTPMail......................................................................... 119 11.7 Enabling Logging for Microsoft Outlook .............................................................. 120
11.7.1 Microsoft Outlook Express ......................................................................................................... 120 11.7.2 Microsoft Outlook....................................................................................................................... 120
12 Operational procedures........................................................................ 121 12.1 Backing up and restoring data................................................................................ 121 12.2 Debugging .............................................................................................................. 121 12.3 Inspecting log files ................................................................................................. 121 12.4 Licensing ................................................................................................................ 122
12.4.1 For computers connected to the Internet ..................................................................................... 122 12.4.2 For computers not connected to the Internet ............................................................................... 122 12.4.3 Registration key retrieval method ............................................................................................... 122
13 System utilities....................................................................................... 123 13.1 System Tray Utility (METray)............................................................................... 123
13.1.1 System summary ......................................................................................................................... 123 13.1.2 System overview ......................................................................................................................... 123 13.1.3 Diagnostic report......................................................................................................................... 124 13.1.4 Updates........................................................................................................................................ 124 13.1.5 Connections................................................................................................................................. 124
13.2 Activity Monitor..................................................................................................... 124 13.3 MEInstaller............................................................................................................. 124

Enterprise Edition Configuration Guide v 3.0
Page 6
13.4 Command Line Send Utility (MESend)................................................................. 125 13.5 Message Tracking .................................................................................................. 126 13.6 Directory Management Utility ............................................................................... 126 13.7 Backup utility ......................................................................................................... 126 13.8 Queue overview...................................................................................................... 127
14 Appendix ................................................................................................ 128 14.1 Overview of NTLM authentication........................................................................ 128
14.1.1 Configuring NTLM on the mail client ........................................................................................ 128 14.2 Accessing web mail for automatic sign-on ............................................................ 129 14.3 DNS error codes and descriptions.......................................................................... 129 14.4 Diagnosing Outlook/Outlook Express error codes................................................. 130 14.5 Manually testing if MailEnable can send mail to remote servers .......................... 131 14.6 Log analyser ........................................................................................................... 133
14.6.1 Troubleshooting SMTP connectivity issues & analyzing log files.............................................. 133 14.7 Antivirus configuration .......................................................................................... 134
14.7.1 Using your own antivirus scanner ............................................................................................... 134 14.7.2 Selecting an antivirus application................................................................................................ 135 14.7.3 Real time protection .................................................................................................................... 136
14.8 IIS configuration .................................................................................................... 137 14.9 Configuring redundant or backup (MX) mail servers............................................ 138 14.10 Increasing upload limit for Windows 2003........................................................ 138 14.11 Logical architecture and message flow .............................................................. 139
15 Glossary.................................................................................................. 142

Enterprise Edition Configuration Guide v 3.0
Page 7
Warranty You should carefully read the following terms and conditions before using this software. Unless you have a different license agreement signed by the respective owners, authors and copyright holders of the MailEnable product suite, herewith referred to as ("ME"), your use, distribution, or installation of this copy of MailEnable indicates your acceptance of this License.
All rights of any kind in MailEnable which are not expressly granted in this License are entirely and exclusively reserved to and by "ME". You may not rent, lease, modify, reverse engineer, translate, decompile and disassemble MailEnable without the permission of its owners, authors and copyright holders of MailEnable.
You are not permitted to commercialize derivative works of MailEnable without a written agreement signed by the respective owners, authors and copyright holders of MailEnable.
All accompanying files, data and materials, are distributed "as is" and with no warranties of any kind, whether express or implied.
This disclaimer of warranty constitutes an essential part of the agreement. Any liability of "ME" will be limited exclusively to refund of purchase price. In no event shall "ME", including but not limited to its principals, shareholders, officers, employees, affiliates, contractors, subsidiaries, or parent organizations, be liable for any incidental, consequential, or punitive damages whatsoever relating to the use of MailEnable, or your relationship with "ME".
In addition, in no event does "ME" authorize you to use MailEnable in applications or systems where "ME"'s failure to perform can reasonably be expected to result in a significant physical injury, or in loss of life. Any such use by you is entirely at your own risk, and you agree to hold "ME" harmless from any claims or losses relating to such unauthorized use.
You are specifically prohibited from charging, or requesting donations, for any copies, however made, and from distributing such copies with other products of any kind, commercial or otherwise, without prior written permission from "ME". "ME" reserves the right to revoke the above distribution rights at any time, for any or no reason.

Enterprise Edition Configuration Guide v 3.0
Page 8
1 Introduction
1.1 Contact the MailEnable Team
MailEnable Pty. Ltd. (ACN 100 453 674) is an Internet Messaging product company that develops, markets and supports software for hosted messaging solutions. MailEnable’s mail server suite provides a tightly integrated hosted messaging solution for the Microsoft platform.
MailEnable is a 100% privately owned Australian Company and was established in early 2001. MailEnable's customers include some of the worlds largest Internet/Application Service Providers, Educational Institutions, Organizations, Government Agencies and Corporates.
59 Murrumbeena Road Murrumbeena Victoria, Australia Tel: +613 9563-4177 (AEST) Fax: +613 9530-4066 Email: [email protected]
1.1.1 Support
For any support issues including program defects and general support inquiries, please follow the link below. The web page displayed here shows a form, which once correctly filled out, will permit the MailEnable support team to assist in any support requests.
http://www.mailenable.com/support/supportrequest.asp
1.1.1.1 Web site
MailEnable’s web site provides links to reference materials, product information, knowledge base, forums, etc.
1.1.1.2 Knowledge base
The MailEnable Knowledge base is available at http://www.mailenable.com/kb. It contains the latest information on user queries and application configuration issues.
1.1.1.3 Forums
MailEnable forums are found at http://forum.mailenable.com. The forums contain public posting and replies from MailEnable users.
1.2 How to download
To download MailEnable Enterprise Edition, follow the link below to obtain the latest supported update:
http://www.mailenable.com/download.asp
Any patches and hot fixes deemed necessary for the continual use of the MailEnable product will also be made available here.
1.3 Pre-requisite hardware
MailEnable will run on virtually any computer capable of running Windows NT, 2000/2003 or .NET Operating Systems.
Note: While the MailEnable product suite can be installed and has been tested on XP and workstation environments the company does not support these platforms.
1.4 Pre-requisite software
For Windows NT 4:

Enterprise Edition Configuration Guide v 3.0
Page 9
Service Pack 6a
IIS/Windows NT Option Pack 4 (Please refer to note below)
Microsoft Transaction Server, IIS
For Windows 2000/2003:
IIS (Please refer to note below) versions
Note: In order to install either the web administration or web mail components of MailEnable, Microsoft Internet Information Server (IIS) will need to be installed. If you do not intend to use these components, then IIS is not a requirement.
If using NT4, ensure IIS is installed from the Windows NT Option Pack.
If installing MailEnable on Windows 2000/2003, IIS is included with the default package.
MailEnable web mail and web administration use the Microsoft .Net Framework version 1.1. While the option to install the ASP version is available, it does not include a spell checker, multiple languages or light weight HTML editor.
1.5 How Internet email works
To administer a mail server on the Internet requires knowledge of how email works. It is important to know how messages are delivered and sent, how mail servers contact each other, and how users retrieve their email. This will help in diagnosing problems, tracking faults, and knowing who to contact (or blame!) when something goes wrong. The information in this section is not specific to MailEnable; this applies to all mail servers. This information is essential to know in order to properly administer an Internet mail server.
1.5.1 Email clients
An email client is a software application that is used to send, receive, store and view e-mail.
Some examples of email clients include
Microsoft Outlook
Microsoft Outlook Express
Mozilla Thunderbird
Pegasus Mail
1.5.2 Email server
An email server holds and distributes e-mail messages for email clients. The email client connects to the email server and retrieves messages. An email server may also be known as a mail server, or a mail exchange server.
1.5.3 Sending and receiving mail
To send Internet e-mail, requires an Internet connection and access to a mail server. The standard protocol used for sending Internet e-mail is called SMTP (Simple Mail Transfer Protocol). The SMTP protocol is used to both send and receive email messages over the Internet.
When a message is sent, the email client sends the message to the SMTP server. If the recipient of the email is local (i.e. at the same domain as the email originated from) the message is kept on the server for accessing by the POP, IMAP or other mail services for later retrieval.
If the recipient is remote (i.e. at another domain), the SMTP server communicates with a Domain Name Server (DNS) to find the corresponding IP address for the domain being sent to. Once the IP address has been resolved, the SMTP server connects with the remote SMTP server and the mail is delivered to this server for handling.
If the SMTP server sending the mail is unable to connect with the remote SMTP server, then the message goes into a queue. Messages in this queue will be retried periodically. If the message is still undelivered after a certain amount of time (30 hours by default), the message will be returned to the sender as undelivered.

Enterprise Edition Configuration Guide v 3.0
Page 10
2 Overview MailEnable has multiple services that interact in order to deliver a message to a mailbox. This interaction is done by a system of queues, which are used to move the emails around. The actual moving of the messages is done by the MTA service, which is logically the central service to the whole MailEnable system. The MTA will pick up messages waiting in a queue and move them to the queue of another service to be processed.
2.1 Structure of MailEnable
MailEnable is comprised of Connectors, Agents and Services. The definitions of these components are described in the table below and in detailed in following sections.
Component Definition
Connectors Connectors move mail between systems or subsystems (local or remote)
Agents Agents run perform specific management or operating functions for MailEnable itself. An example of an Agent is the Mail Transfer Agent. Its function is to move messages between connectors.
Services Services expose MailEnable functionality to external agents or programs. An example of a service is the POP3 service. This service allows mail clients to access mail from their post office.
Mail Transfer Agent (MTA)
SMTP Connector Postoffice Connector List Connector POP Retrieval
Connector
Mailboxes
Mail services: IMAP, POP, Web mail, HTTPMail etc.
Mail clients
Figure 2-1 Relationship between agents, connectors and mail services in MailEnable
2.1.1 Services
Services allow external programs (usually email clients) to access the message store.
When a user wants to read email that has been sent to their mail server for handling, there are several mail services that can be used to retrieve the email messages so that the user can read them in their email client. These services include:
Enterprise Edition Configuration Guide v 3.0
Page 11
POP3
IMAP4
HTTPMail
Web mail
Each of these mail services is described in more detail in Chapter 5.
2.1.2 Connectors
Mail connectors move mail between systems or subsystems (local or remote). A mail connector allows MailEnable to send and receive mail messages to and from external systems. MailEnable has several mail connectors: SMTP, POP Retrieval, Post office and List server connectors.
2.1.2.1 SMTP connector
The SMTP connector is responsible for both receiving inbound SMTP mail and delivering outbound SMTP mail.
2.1.2.2 Post office connector
The Post office connector is responsible for delivering mail to a post office. It processes mailbox level filters, handles quotas, auto responders, delivery events, groups and redirections.
2.1.2.3 List server connector
The list server connector is responsible for receiving and delivering mail to users that are subscribed to the lists.
2.1.2.4 POP Retrieval connector
The POP Retrieval connector will download mail from a remote POP server and deliver to a local mailbox.
2.1.3 Agents
2.1.3.1 Mail Transfer Agent (MTA)
The Mail Transfer Agent is responsible for moving messages between connectors. It also processes the pickup event and global filters.
2.2 Administration
From an administration perspective, MailEnable is comprised of the following components.
Post offices
Domains
Mailboxes
Lists
Groups
Enterprise Edition Configuration Guide v 3.0
Page 12
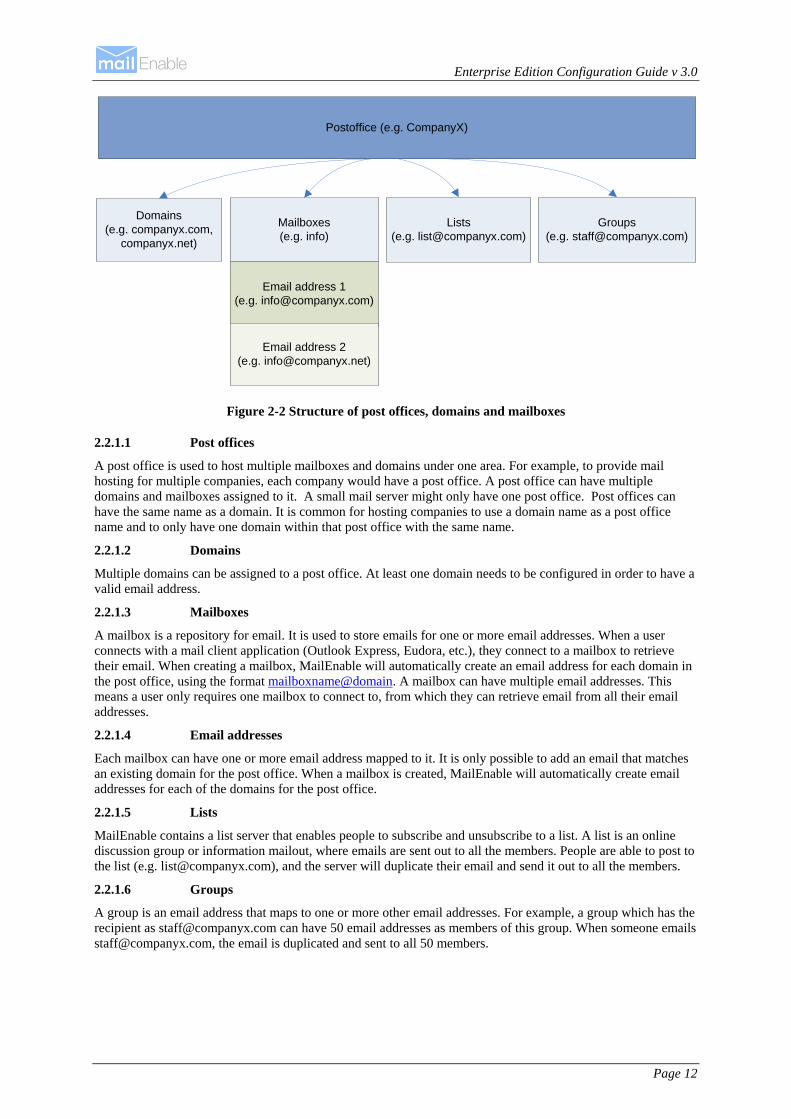
Postoffice (e.g. CompanyX)
Domains(e.g. companyx.com,
companyx.net)
Mailboxes(e.g. info)
Lists(e.g. [email protected])
Groups(e.g. [email protected])
Email address 1(e.g. [email protected])
Email address 2(e.g. [email protected])
Figure 2-2 Structure of post offices, domains and mailboxes
2.2.1.1 Post offices
A post office is used to host multiple mailboxes and domains under one area. For example, to provide mail hosting for multiple companies, each company would have a post office. A post office can have multiple domains and mailboxes assigned to it. A small mail server might only have one post office. Post offices can have the same name as a domain. It is common for hosting companies to use a domain name as a post office name and to only have one domain within that post office with the same name.
2.2.1.2 Domains
Multiple domains can be assigned to a post office. At least one domain needs to be configured in order to have a valid email address.
2.2.1.3 Mailboxes
A mailbox is a repository for email. It is used to store emails for one or more email addresses. When a user connects with a mail client application (Outlook Express, Eudora, etc.), they connect to a mailbox to retrieve their email. When creating a mailbox, MailEnable will automatically create an email address for each domain in the post office, using the format mailboxname@domain. A mailbox can have multiple email addresses. This means a user only requires one mailbox to connect to, from which they can retrieve email from all their email addresses.
2.2.1.4 Email addresses
Each mailbox can have one or more email address mapped to it. It is only possible to add an email that matches an existing domain for the post office. When a mailbox is created, MailEnable will automatically create email addresses for each of the domains for the post office.
2.2.1.5 Lists
MailEnable contains a list server that enables people to subscribe and unsubscribe to a list. A list is an online discussion group or information mailout, where emails are sent out to all the members. People are able to post to the list (e.g. [email protected]), and the server will duplicate their email and send it out to all the members.
2.2.1.6 Groups
A group is an email address that maps to one or more other email addresses. For example, a group which has the recipient as [email protected] can have 50 email addresses as members of this group. When someone emails [email protected], the email is duplicated and sent to all 50 members.

Enterprise Edition Configuration Guide v 3.0
Page 13
2.3 Email delivery flow
2.3.1 Sending mail
When mail is being sent to a non-local address, this is known as “relaying” i.e. MailEnable has to "relay" the email back out.
SMTP INBOUND
Queue
SMTP OUTGOING
Queue
Email outgoing MTA The
Internet
Figure 2-3 Email to remote (Relaying)
Requiring users to authenticate against the server prior to sending email can stop spammers from using the mail server to send email out to anyone.
When email is being delivered to a local address, this is not relaying, and MailEnable will always accept this email. This is how email is received from other mail servers on the Internet, as they do not need to authenticate.
2.3.2 Receiving mail
When an email arrives via SMTP, the SMTP service saves this message to its inbound queue. The MTA service is constantly checking this queue for new items. When the MTA sees the message arrive it examines the message to determine where it is to go. If the MTA service determines it is to go to a local mailbox, then it will move the message to the post office connector service outgoing queue. The post office connector will be checking its outgoing queue and can then process this message and deliver it to a users mailbox.
Email incoming
SMTP INBOUND
QueueMTA
Postoffice connector
OUTGOING Queue
Postoffice connector
Mailbox
Figure 2-4 Local email delivery flow
The naming of the Inbound/Outgoing queues may be confusing initially. But think of the queues as always relative to the MTA service. So the MTA service will check all the inbound queues of the services and move messages to the outgoing queues of the services. Services only check their outgoing queue and if they need to create a message then they will do this in their inbound queue.
Since the MTA service is the central service responsible for moving messages around the system, it is the logical place for all the global filters, and items such as anti-virus, Bayesian filtering, etc. (the features available are determined which version of MailEnable). Even messages arriving via SMTP and sent via SMTP are processed by the MTA service, since only the MTA can move the email from the SMTP Inbound queue to the SMTP Outgoing queue.
Utilizing different services in this way gives MailEnable a high level of flexibility, such as allowing services to be split across machines and to permit more than one type of service to be running on different servers. But this flexibility does create one hurdle for an administrator of MailEnable, and that is the problem of being able to track a message. A message being sent to a local mailbox will be logged in the SMTP logs, the MTA logs and the post office connector logs. Fortunately there are tools and monitoring software that come with MailEnable that makes this tracking easier, but understanding the queue mechanism will make administering the MailEnable server a lot easier.

Enterprise Edition Configuration Guide v 3.0
Page 14
3 Installation and upgrading
3.1 Installation overview
Note: Installing MailEnable Enterprise requires administrative privileges on the server MailEnable is to be installed on.
Run the installation executable. The installation program will then guide the rest of the installation process. Each screen of the installation program contains data entry fields, Next, Back and Cancel control buttons.
The Next button proceeds to the next step of the installation process.
The Back button steps back through the installation process.
To exit the installation at any time, select the Cancel button.
3.2 Installation process
3.2.1 Welcome screen
The welcome screen informs that MailEnable is about to be installed. It also provides a warning outlining the copyright protection of the MailEnable product suite.
To continue installing the application, click on the Next button.
Please click the Next button to continue.
3.2.2 License agreement
The License Agreement dialog box explains the licensing terms and conditions of installing and using the MailEnable product suite.
Read this carefully as it outlines all conceptual and legal issues between MailEnable and the End User in relation to the way the program can be used.
Please click the Yes button to continue.
3.2.3 Registration details
This screen is for entering registration details, which will be used and displayed in the Diagnostic Utility that will be outlined later in this document. Enter your name and company name in the boxes provided.
Please click the Next button to continue.
3.2.4 Select installation components
The next part of the installation process is to select the MailEnable components to install.
MailEnable Core Components (Server) – This will select the base programs and functionality. This option must be selected if MailEnable is being installed for the first time on this server.
Web Administration Service (Server) – This service will install web administration for MailEnable. This option requires that Microsoft Internet Information Services (IIS) is installed.
Web Mail Service (Server) – This will install web mail for MailEnable. This option requires that Microsoft Internet Information Services (IIS) is installed.
Select the components to install. Check that there is enough disk space required to install the selected components.

Enterprise Edition Configuration Guide v 3.0
Page 15
Please click the Next button to continue.
3.2.5 Select application directory
This specifies the location where application files for MailEnable will be installed.
Please click the Next button to continue.
3.2.6 Select Program Manager group
The installation wizard will now prompt for the program group in Windows for the MailEnable icons and shortcuts installed. Accept the default settings to install the icons under the “Mail Enable” Program Group
Please click the Next button to continue.
3.2.7 Select configuration repository location
The Configuration Repository is a place to store the configuration files of MailEnable. By default MailEnable uses a TAB Delimited file structure (flat file structure), and since the configuration files are accessed continually, consider using a fast disk I/O sub system for this storage path to improve performance.
If intending to cluster MailEnable, specify a shared file services as the Configuration Repository location. If the installation is only on a single server, use a directory that is local to that server (i.e. the default setting).
To install into a different folder, click Browse, and select another folder. If upgrading MailEnable, changing this directory will not move any existing data.
Please click the Next button to continue.
3.2.8 Select message store repository location
The message store repository is where all the email data is stored. Email data can take up a large amount of disk space, so ensure a drive with plenty of space for future expansion is selected.
If intending to cluster MailEnable, specify a shared file service as the Destination folder (this can also be configured via the Administration Program after installation). For a single server installation, use a directory that is local to the server (i.e. the default setting).
Please click the Next button to continue.
3.2.9 Creating an initial post office
When installing MailEnable for the first time, one requirement is to create a post office. A MailEnable post office should be created for each company or organization that is hosted under MailEnable. A MailEnable post office can contain multiple domain names. It is therefore advised that post offices are named to be something more generic than the domain name. For example, MailEnable Pty. Ltd. owns domains mailenable.com, mailenable.com.au and mailenable.co.uk, so the chosen name for the post office for MailEnable Pty. Ltd. could therefore be MailEnable. The domains owned by MailEnable Pty. Ltd. would then be assigned to the MailEnable post office. Another common configuration is to name the post office the actual domain name, as this simplifies mailbox log-on (as users are often aware of the domain they log into).
A password needs to be assigned for the manager or postmaster of this new post office. The mailbox for the manager of a post office is called postmaster and is given administrative privileges for that post office (this allows the postmaster to administer the post office via web administration). It is advisable to use a complex password for this mailbox, and this password can be changed later.
Please click the Next button to continue.
3.2.10 SMTP connector configuration
The installation will now prompt for specific details for the SMTP Connector.
These settings are outlined in the following table (all of these settings can be changed later):

Enterprise Edition Configuration Guide v 3.0
Page 16
Setting Explanation
Domain Name The first configuration setting is the Domain Name for this server. The domain name should be the domain name of the organization that owns or is operating the server. If this server is being used on the Internet, it is important that this domain name is registered. When MailEnable is sending out email to remote servers, it will announce itself as this domain.
DNS Host The DNS host used by the SMTP Connector to locate mail servers. To use multiple DNS addresses, enter these here, and separate the IP addresses with a space. In most cases, the same DNS host(s) should be included as configured under the network TCP/IP settings for the computer.
SMTP Port The SMTP port is almost always set to 25. Very rarely is another port number used and it is recommended that this setting remain as 25. Corporate or hosting companies/agencies may wish to use a different SMTP port to 25 to obscure the fact that the server is running SMTP services. If unsure, leave the setting as 25.
Please click the Next button to continue.
3.2.11 Start installation
The installation program will prompt before it commences installing files and registering the application.
Please click the Next button to continue.
The installation will now install files and display a progress window whilst the components are installed and configured.
3.2.12 Select web application platform (ASP or .NET)
Choose which platform to use for the web mail and the web administration interfaces. If ASP pages and icons/pictures in previous versions of MailEnable have been changed, ASP will need to be installed to continue using these. If unsure, or if this is a first installation of MailEnable, choose the default, .NET.
When installing .NET it is required that the .NET framework is installed. To verify whether the .NET framework installed, please go to the Windows update site.
3.2.13 Database schema warning
If MailEnable is being upgraded from a previous version, a warning will be shown that the database schemas for the configuration storage need to be updated. If a database is being used to store configuration information the Provider Migration Utility will need to be used (see Chapter 6) to ensure that the database schema is up to date. This should be done as soon as the installation is complete (do not perform this step before the installation has finished).
Please click the OK button to continue.
3.2.14 Select web mail site
If more than one web site is configured under IIS, the installation application will ask under which web site to install the web mail virtual directory. Install this either under the “Default Web Site” or an alternate site configured under IIS. Once the installation of MailEnable has completed, it will be possible to add or remove web mail from each of the web sites configured under IIS.
Note: Do not install MailEnable web mail under the “Administration Web Site”
Please click the Next button to continue.
The installation application will display a dialog box while it configures web mail. The configuration of web mail may take several minutes, so please be patient.

Enterprise Edition Configuration Guide v 3.0
Page 17
3.2.15 Web administration
Web administration is installed if it was selected as an option from the component list in section 3.2.4. If more than one web site is configured under IIS, the installation application will ask under which web site to install the WebAdmin Virtual Directory. Install the web administration under the “Default Web Site” or an alternate site configured under IIS.
Note: This functionality can be re-configured to another web site if required after the initial installation has been completed.
Please click the Next button to continue.
3.2.16 Antivirus plug-in notice
MailEnable’s Anti-Virus Plug-in provides an interface to Anti-virus software. Once the plug-in is installed, ensure that the selected antivirus software has been installed and licensed. MailEnable anti-virus settings should be configured after installation as described in section 8.2.
Please click the OK button to continue.
3.2.17 HTTPMail notice
MailEnable’s HTTP Mail (WebDAV) support will be installed on Port 8080 of the server. To access this service requires either Microsoft Outlook Express or Outlook XP configured to use the HTTP Mail provider.
Please see section 5.7 for more information on configuring HTTPMail support.
Please click the OK button to continue.
3.2.18 Completing installation
Finally, set-up will inform that the installation procedure completed successfully.
Please click the Finish button to complete installation of MailEnable.
The installation program will advise if a reboot is required after install or upgrade.
3.3 Upgrading
To upgrade to MailEnable Enterprise from either Standard Edition, Professional or earlier Enterprise Editions, follow the same steps as outlined in Chapter 3. As the same data stores are used, it is possible to run the installation over the top of the current configuration. MailEnable will detect the old version and retain the old settings (unless otherwise specified).
MailEnable set-up kits are available from the MailEnable web site at http://www.mailenable.com/download.asp
3.3.1 Configuration repository location
When MailEnable is installed over an existing installation, the installation program will prompt for the location of the configuration repository. It should default to the current configuration location as used by the existing installation of MailEnable.

Enterprise Edition Configuration Guide v 3.0
Page 18
Figure 3-1 Configuration repository location
3.3.2 Replace configuration files
The default setting of the installation is to Preserve Existing Configuration Data. Leave this option selected to retain current data and settings. To overwrite your configuration with clean installation, (i.e. do not retain post office or mailbox data) select the Overwrite Configuration Data option.
Figure 3-2 Replace or Preserve Configuration Data
The installation has the option to Backup Configuration Data BACKUP Directory. Selecting this will ensure that the data repositories are backed up, which is always good practice. It is also good practice to have used the MEBACKUP utility beforehand, however, since the installation makes its own backup, this is not imperative. If you are using a database for configuration storage, this is not backed up.
Simply follow the installation wizard, verifying the settings until the wizard completes. It may be required to reboot your sever at the end of the upgrade. The underlying configuration data and options are essentially the same for all MailEnable versions.
Note: Enterprise will use the same configuration data and options as Standard and Professional, but has two-way migration wizards for changing the configuration provider. E.g.: Tab delimited files >Database > Tab delimited files. Enterprise stores more data than Standard and Professional Editions, but the configuration format is backward compatible. See Section 6.3 for more information.

Enterprise Edition Configuration Guide v 3.0
Page 19
3.4 Post-installation configuration
3.4.1 MailEnable Diagnostic Utility
The MailEnable Diagnostic Utility checks the installation for system errors or warnings. The Diagnostic Utility also reports on the current system configuration. In most cases, the diagnostic report will provide enough information to determine whether the server is configured properly, or to diagnose system faults.
The MailEnable Diagnostic Utility can be found under:
1. the MailEnable Program Group under ‘System Tools’ or;
2. the MailEnable Administration Program under Servers>’localhost’>System>Diagnose
Once the Diagnostics Utility has been selected, it may take a few seconds to load (depending on the number of domains). A web page will be invoked and will give a test output of all services installed within the MailEnable program. In order to rerun the Diagnostic through the Administration program, right click on the Diagnose icon and select ‘Refresh’ from the popup menu. Below is an example of this test output and how it is displayed. The ‘Refresh’ option can also be used if the page does not properly load.
Figure 3-3 Diagnostic Report
The classes and test configurations that are run are as follows:
Option Description
Version Information Contains all required environment data and version information.
Configuration and Data Test
Verifies that all repository stores are valid and free from any corruptions or permissions errors.
Application Environment
Checks various system files on the server that MailEnable relies on.
System Services and Tests
A test on services and whether they are correctly installed and running. Some services are not installed in all versions of MailEnable, and so therefore may fail this test. Click the Status link for confirmation of whether this is the case.
Queue Status Calculation of the quantity of all inbound and outgoing emails is displayed here.
Host TCP/IP Settings Basic check on IP and DNS configurations.

Enterprise Edition Configuration Guide v 3.0
Page 20
Network Interface Report
Check of all Network Interface Cards and validation of drivers.
Mail Transfer Agent Reports details of the MTA service settings that can affect delivery and Antivirus/pickup event performance.
SMTP Configuration Test
Settings or properties of SMTP settings are defined. Checks security settings for this service.
SMTP Relay Settings Relay settings are checked here - verifies that only authorized addresses can send through the mail server. See section 5.1.4
SMTP Inbound Bindings Test
Provides information on the bindings to IP addresses.
SMTP Outgoing Configuration
Shows outgoing SMTP configurations.
SMTP Outgoing Queue Status Test
Shows status of messages queued to remote hosts.
DNS Resolution Test Resolves all DNS settings.
Host IP Reverse Lookup Tests
Outlines the reverse DNS configuration settings and verifies settings. Some mail servers will reject email if there is no PTR record configured for the IP address, so if this test fails a PTR record needs to be configured.
Hosted Domain Resolution Test
Checks whether local domains have MX records.
Reverse DNS Lookup Configuration
Indicates whether reverse DNS blacklists are enabled for the SMTP service.
Web Application Configuration Test
Checks web mail and web administration settings ensuring sites are correct.
Message Filtering/Antivirus
Shows the status of the MTA and configurations of any Filters and AV programs.
Authentication Tests Checks all authentications provided by MailEnable.
Post Office Status Tests Authenticates all post office accounts and domains.
Note: The Diagnostic Utility is also a separate application which can be run through the Program Files >Mail Enable >System Utilities menu.
3.4.2 Check and configure DNS settings
In order for remote mail servers to deliver email to the MailEnable server, the correct DNS entries need to be configured in the Domain Name Services (DNS) hosting the domain records.

Enterprise Edition Configuration Guide v 3.0
Page 21
The server should have a fixed IP address that is registered under the public DNS. If the server does not have a static IP address (i.e. the IP address changes) in order to direct emails and domains to the server, a dynamic DNS provider (e.g. no-ip.com) will be required. A dynamic DNS provider keeps track of the changing IP address and updates the DNS details accordingly. Companies that offer this service may charge a monthly fee, although there are some free services available. It is still possible to send email from MailEnable with a dynamic IP address, but unless the DNS is updated with the new IP address every time it changes, other mail servers will not be able to connect. Be aware that a number of mail servers will not accept email from the server if it does not have a static IP address, or if the server is using a cable/DSL connection.
Every domain registered on MailEnable should have mail exchanger (MX) records defined with your Internet Service Provider (ISP) or whoever is hosting the DNS.
Due to the vast array of combinations for DNS hosting and the number of vendor specific DNS implementations, consult your DNS provider for instructions or inform them of the servers published IP Address along with the domain names being hosted under MailEnable and request they configure the DNS accordingly.
If using MailEnable from a computer at your office or home, ensure that your Internet plan allows you to run a mail server. Some providers block incoming email to mail servers on their network, to avoid the possibility of spam abuse. They can also block all outgoing email that is not going through their mail server. If unsure, please contact your service provider. If MailEnable can send email correctly, but does not receive any, it is likely to be either the DNS settings, or your ISP has blocked incoming email to stop you running a mail server.
More information is available on configuring DNS in the MailEnable Knowledge Base (http://www.mailenable.com/kb).
The precise approach for configuring DNS depends on whether you are hosting your own DNS or whether an ISP or third party hosting the DNS. This section explains how you can configure your DNS if you are hosting your own DNS Server.
1. Using the DNS Management software for the DNS Server, ensure that a DNS "A" (Host) record has been created for the mail server. This record type allows the host to be identified by a host name rather than IP Address. To validate whether the A record was registered correctly, use the ping utility. Attempt to ping the host using its host name. If this works, then the A record was registered correctly.
2. Next, create an MX record that points to the A record. The way this is achieved depends on which DNS server/vendor being used
3. When selecting a DNS for MailEnable to use, choose one that can resolve all domain names, which is not necessarily the DNS which is hosting the domain names. For example, if you host your domain names through a third party, it is unlikely that you would use their DNS IP address to resolve.
An example for registering MX records using Microsoft DNS Server is available at: http://www.microsoft.com/technet/prodtechnol/windowsserver2003/library/ServerHelp/cb7a2363-0ed6-4c7c-87ba-7cc9592a8028.mspx
3.4.3 To set up PTR records under Microsoft's DNS Server
4. Ensure that DNS Forwarding is enabled on the server. This means that if a client cannot find DNS records on the mail server, the DNS server will forward request to your ISPs DNS servers. This can be accessed under the properties of the server - Forwarders Tab (within DNS Manager)
5. Create the Reverse Lookup Zone for address range of the public IP address (e.g.: 201.248.10.* ). Create this by selecting 'New Zone' under the properties of the server (within DNS Manager).
6. Create PTR Records for all of the IPs under the Zone outlined above (within DNS Manager).
7. Ensure the primary DNS IP addresses used by MailEnable's SMTP Connector is configured to use the local DNS rather than referring upstream to your ISPs. This is much faster and more efficient. (This is done via the MailEnable Administration program under the properties of the SMTP Connector)
8. Restart the SMTP Service to place DNS Server changes into effect (Service Control Manager)
Note: Check with your ISP that they allow PTR referrals to your server. This can be checked using resources at http://www.dnsstuff.com

Enterprise Edition Configuration Guide v 3.0
Page 22
3.4.4 Check mail services
There are various mail services installed with MailEnable. These services run in the background and handle the sending, receiving and distribution of email. Check that these services are running after the initial installation.
Expand the Servers >localhost >System branch, and click Services. A list of services and their status should be displayed.
The icons indicate the status of the service:
Indicates that the corresponding service is running
Indicates the service is not running, or could not be started
If a service is not running, it can be started by right clicking the service and selecting Start from the pop-up menu. The reason for a service failing to start will be displayed in the Status column. Failure of a service to start is usually due to another service running on the same port (such as the Microsoft SMTP Service).
Make sure the services that could possibly be interfering with MailEnable are disabled. If a service fails to start, check its respective Debug log for more details of the failure.

Enterprise Edition Configuration Guide v 3.0
Page 23
4 Administration
4.1 Overview
The majority of MailEnable configuration and maintenance is done through the MailEnable Administration program within a Microsoft Management Console.
Start this application by using the Start menu in Microsoft Windows and Navigating to MailEnable Enterprise by selecting:
Start > Programs >MailEnable >MailEnable Enterprise
The MailEnable Administration program will open and you will be presented with a window similar to the following:
Figure 4-1 MailEnable Administration Program
The tree view on the left navigates through the various components of MailEnable in order to configure them.
The first item in the display is MailEnable Management. By right clicking on this icon, the option to “Connect to a MailEnable cluster” is available. This section only describes how to configure a single server installation, refer to Chapter 10 for information covering multiple server configuration.
The second item in the display is Messaging Manager. This is where various global settings, such as Domains, Post Offices and Mailboxes can be modified. Explanations of these items are contained later in this document. The panel to the right of the tree view provides either icons for options, or a view of the configuration data determined by what you have selected in the tree view.
The third item in the left tree view of the Administration program, labeled Servers, is for configuring the various server specific configuration items for MailEnable.
Many of the tree view items have configuration options. These options can be accessed by right clicking on the icon and selecting the Properties item from the popup menu.

Enterprise Edition Configuration Guide v 3.0
Page 24
4.2 Messaging Manager
This section describes the configuration of the Messaging Manager. The Messaging Manager configures global settings for MailEnable. To access these settings, right click on the Messaging Manager icon and select the Properties item from the popup menu, or click the Configuration icon in the right hand panel
Figure 4-2 Messaging manager properties
4.2.1 General settings
General Settings for MailEnable’s configuration can be found under the properties of the Messaging Manager. The paths that MailEnable uses to store its configuration data can be configured here.
Setting Explanation
New mailboxes have size limit Configures the default quota for mailboxes, so every new mailbox created will have a quota configured. This can be enable/disabled in the mailbox settings.
Automatically create an email address for each domain with every new mailbox created.
If there are several domains in a post office and this setting is selected, then every time a mailbox is created in a post office a mail address or address mapping will be created for each domain for the mailbox.
Directory paths from the MailEnable system
Use these settings when clustering MailEnable and multiple servers are sharing the same configuration repository. This allows configuration of a clustered server array, or to change the location of the MailEnable configuration and storage repositories.
4.2.2 Security and authentication settings
The security tab contains the server settings for password encryption and Windows authentication integration as follows:

Enterprise Edition Configuration Guide v 3.0
Page 25
Setting Explanation
Password Details/Encrypt Passwords
When using Tab Delimited Configuration Providers, which is the default storage within MailEnable, MailEnable passwords are stored in text files with a TAB extension under the \config directory of the MailEnable directory structure. You can optionally specify to encrypt MailEnable passwords. If you are using integrated authentication, Windows credentials will take preference to these passwords.
Enable Integrated Authentication
This is a system wide setting that allows you to simply enable or disable authentication for all hosted MailEnable post offices.
MailEnable Integrated Authentication allows you to use Windows Authentication as well as MailEnable’s inbuilt authentication. It also allows you to have mailboxes created within MailEnable as users successfully authenticate using Windows Credentials. To enable integrated authentication, you must select Messaging Manager Properties (right click on Messaging Manager) and check the box labeled “Enable Integrated Authentication”.
4.2.3 Cluster management
The cluster tab contains settings for configuring server clustering. For more information on configuring server clusters see Chapter 10.
4.3 Post office configuration
For a description of post offices, refer to section 2.2.1.1.
To add a new post office:
1. Select the Messaging Manager branch in the left tree view window of the MailEnable Administration program.
2. In right window, an icon labeled Create Post office will be shown.
3. Click this icon to create a post office and enter a post office name.
4. A password for the postmaster mailbox that will be created for the post office will need to be specified
5. A new post office will be created.
Note: It is also possible to right click the post offices branch and select New >Post office to create a new post office. Functions that are represented by an icon are mostly available through right-clicking items in the left hand panel.
Post office configuration can be accessed using the Administration Console by selecting Messaging Manager > Post Offices > Post Office Name Properties (as shown below).
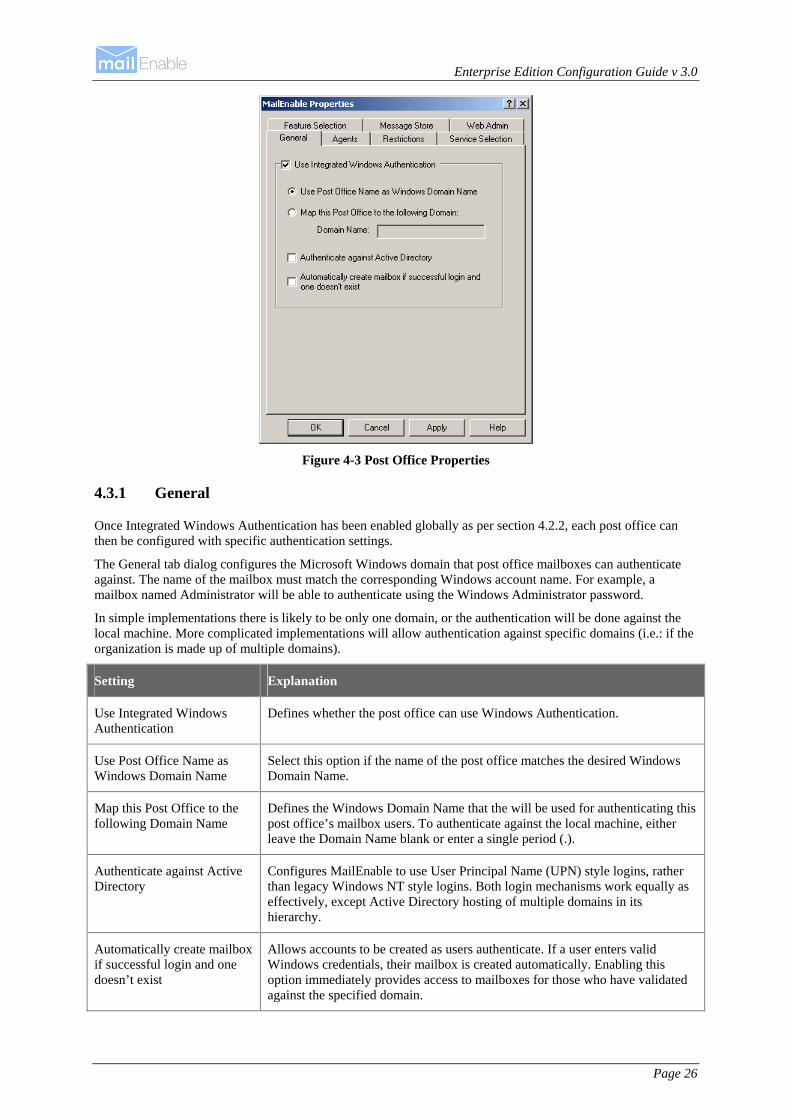
Enterprise Edition Configuration Guide v 3.0
Page 26
Figure 4-3 Post Office Properties
4.3.1 General
Once Integrated Windows Authentication has been enabled globally as per section 54.2.2, each post office can then be configured with specific authentication settings.
The General tab dialog configures the Microsoft Windows domain that post office mailboxes can authenticate against. The name of the mailbox must match the corresponding Windows account name. For example, a mailbox named Administrator will be able to authenticate using the Windows Administrator password.
In simple implementations there is likely to be only one domain, or the authentication will be done against the local machine. More complicated implementations will allow authentication against specific domains (i.e.: if the organization is made up of multiple domains).
Setting Explanation
Use Integrated Windows Authentication
Defines whether the post office can use Windows Authentication.
Use Post Office Name as Windows Domain Name
Select this option if the name of the post office matches the desired Windows Domain Name.
Map this Post Office to the following Domain Name
Defines the Windows Domain Name that the will be used for authenticating this post office’s mailbox users. To authenticate against the local machine, either leave the Domain Name blank or enter a single period (.).
Authenticate against Active Directory
Configures MailEnable to use User Principal Name (UPN) style logins, rather than legacy Windows NT style logins. Both login mechanisms work equally as effectively, except Active Directory hosting of multiple domains in its hierarchy.
Automatically create mailbox if successful login and one doesn’t exist
Allows accounts to be created as users authenticate. If a user enters valid Windows credentials, their mailbox is created automatically. Enabling this option immediately provides access to mailboxes for those who have validated against the specified domain.

Enterprise Edition Configuration Guide v 3.0
Page 27
4.3.2 Agents
The Agents tab dialog configures the agents that are scheduled to run against each post office.
Setting Explanation
Quota Notifications
Quota notifications can be disabled for each post office within this properties tab. This can be disabled for all mailboxes or, a warning message can be sent whenever a mailbox is within a set percentage of available space.
Any existing quota notification in a users inbox will be overwritten with the latest email – this causes the notification email to appear as a new message and stops unused mailboxes from filling up with the notifications.
Mailbox cleanup agent
Allows the automatic deletion of folders from Postmaster account inbox and all post office inboxes, deleted items, sent items to all Junk-Email items folders. It can be set not to delete any unread messages and delete messages in folder over a specified number of days old.
4.3.3 Filters
Under post office properties there is a new tab labeled “Filters”. This will allow the configuration of filters for messages going to this post office. These filters can be defined similar to System Filters, however they assume the scope of the respective postoffice.
4.3.4 Restrictions
Restrict the usage of particular messaging services e.g. restrict the number of messages sent per hour. Setting a value for a post office here overrides any settings that have been created for individual mailboxes.
Setting Explanation
Limit Maximum SMTP recipients
Throttles any mailbox from sending more than a configured number of emails per hour. This setting is useful for hindering spammers from sending and using the server as a source for spamming.
Same Domain Restriction
Under the Restrictions tab for a mailbox the checkbox “Users can only send to their local domain” prevents users of that mailbox from sending to any recipient that does not have the same domain name as they are sending from. This can also be configured at the mailbox level.
4.3.5 Service selection
Enable or disable mail services for a post office. If a service is ‘enabled’ it becomes available for all users in the selected post office.
Setting Explanation
Service Settings
Enabled services are configured at a post office level and then further arbitrated at a mailbox level. Disabling a service at a post office level will override any mailbox level service settings. For example, if web mail is disabled at a post office level, the mailboxes under the post office will not be able to access web mail.
For developers, the values are stored in the postoffice.sys and mailbox.sys files and can be managed by the System Object Provider. Details for using the System Object Provider are outlined in the API Guide.

Enterprise Edition Configuration Guide v 3.0
Page 28
4.3.6 Feature selection
Features such as Reverse DNS Blacklisting, antivirus scanning and delivery of junk mail to the junk folder can be enabled or disabled for each post office.
Setting Explanation
Enable Reverse DNS for Post Office
Allows the disabling of Reverse DNS testing for a post office.
Enable Antivirus Protection for Post Office
Similar to above, allows the disabling of Antivirus checking for a post office.
Deliver Junk Email to Junk Email folder
Disabling this feature for a post office will change the actions of any configured filters where the filter has an action of “Mark as spam”. The message will be delivered to the inbox as normal rather than the Junk E-Mail folder of a mailbox.
For emails to be delivered to the junk e-mail folder in users mailbox, the message has to have the following header item:
X-ME-Content: Deliver-To=Junk
Filters can add this header. See section 8.2.2.10 for more information.
Force Greylisting for all users
This setting allows you to enable Greylisting for all postoffice users.
Greylisting is a Spam reduction method where the server temporarily refuses to accept e-mail, and later succeeds. Many spammers will not attempt to re-try to send the e-mail, hence reducing the volume of spam received. Greylisting is described in more detail under the SMTP section of this document.
4.3.7 Web Mail
These options provide postoffice level options for Web Mail. The settings on this tab can also be configured globally under the Services|Web Mail options branch of the MMC.
Setting Explanation
Folder, Tasks, and Calendar Sharing
Enables Folder, Task and Calendar sharing for the post office.
Public Folder Modifications Permitted
Determines whether public folder is read only.
There are two settings:
Editing of public folders is permitted
Editing of public folders is not permitted
Mark As Spam Menu Option This allows you to select the post office level spam reporting options presented to webmail users.
The post office Report as spam option allows two choices:
Move spam to postoffice reported folder
Mark the sender IP as spam source

Enterprise Edition Configuration Guide v 3.0
Page 29
4.3.8 Message store
Enable or disable public folders for a post office. Public folders allow one or more mailboxes under the same post office to share data.
Setting Explanation
Enable Public Folders
Enables public folders for a post office. Once enabled, any directory or folder created in the following location will be made public or shared by all users using the IMAP, HTTP or web mail services.
C:\Program Files\MailEnable\Postoffices\[post office name]\PUBROOT
4.3.9 Web admin
Configures feature availability for web administration users for each post office. Further information on web administration can be found in Chapter 5.10
Setting Explanation
Enable web administration for Post Office
Enables web administration for the current post office.
Can create and edit mailboxes
Allows mailboxes to be created and edited in web administration.
Maximum no. of mailboxes Specify the maximum number of mailboxes that can be created for this post office.
Maximum and default mailbox size
Enforces a mailbox size for each newly created mailbox in web administration. This setting can be disabled or changed for each mailbox in the mailbox properties – see section 4.4.2.1.
Can select mailbox size (up to the default value)
Grants the web administrator the ability to create a quota for the post office mailboxes up to the configured default size.
Can create and edit lists Grants the web administrator the ability to create lists in web administration.
Maximum number of lists Sets the maximum number of lists a web administrator can create.
Maximum number of addresses in each list.
Limits the number of addresses a web administrator can add to a created list.
Can add and remove domains
Allows the user the ability to add and remove domains in the web administration page.
4.4 Post office actions
In the MailEnable Administration program, expand the post offices branch to display all the available post offices. Selecting the post office will display the available actions (as seen in the diagram below).

Enterprise Edition Configuration Guide v 3.0
Page 30
Figure 4-4 Administration program showing actions available for a post office
4.4.1 Create domain
Domains are placed under the post office that owns them. Use the MailEnable Administration program to manage the domains that are serviced by a post office (or customer). A domain is needed in order to create email addresses and allow users to send emails. To add a domain, from the right hand side window of the MailEnable Administration program select the Create Domain icon.

Enterprise Edition Configuration Guide v 3.0
Page 31
4.4.1.1 General
After selecting the Create Domain icon, the following window will appear:
Figure 4-5 Domain properties General TAB
Here, enter the full domain name to receive emails for. For instance, to receive emails such as [email protected] or [email protected], enter the domain mailenable.com here. The domain will now appear under the Domains branch of the MailEnable Administration program.
Multiple domains can be assigned to a post office. However, at least one domain needs to be configured in order to have a valid email address.
Setting Description
Domain is disabled
Stops email being sent to the domain.
Abuse Address
Enter the email address or select the mailbox for the abuse@domain email address.
Postmaster Address
Enter the email address or select the mailbox for the postmaster@domain email address. This is a mandatory setting.
Catchall Address
A catchall address will collect all emails for a domain that do not have a mapping to a mailbox. Either select an existing mailbox, or enter another email address to act as the catchall. Implementing a catchall will capture more spam, so make sure this mailbox is monitored.
Warning: It is advisable not to enter a remote email address or a local mailbox which is being redirected to a remote address as a catchall. Doing this will cause the server to on-send all the caught spam and is likely to result in blacklisting by the remote server and possibly putting the server on a global blacklist.
When an inbound connection via SMTP is made and there are multiple recipients to addresses that are destined for a catchall mailbox, only one message is delivered to prevent multiple copies of the same email being delivered. Messages that are delivered to a catchall will have the recipient list in the Received header, or on the alternate catchall header line, if this is enabled.

Enterprise Edition Configuration Guide v 3.0
Page 32
Act as Smart Host
Redirects all mail for the current domain to another mail server. This would be used if, for instance, the server was acting as a backup mail server for the domain. Specify a port number by adding a colon and port number after the IP address. e.g. 192.168.3.45:30. Do not enter the IP address of your MailEnable server, as it will create a message loop (the mail server will send to itself) and messages will finally end up in the Bad Mail directory. See section 5.1.8 for more information on smart hosting.
Use the ‘Only relay email from authenticated users’ option in order only to relay email from users that have met the SMTP relay option criteria. This can be used if a domain is configured to send to a specific relay server (e.g. you might configure the aol.com domain to relay through to another server for your users, but don’t want anyone to send aol.com messages through your server).
4.4.1.2 Blacklist
Add blacklisted domains for the selected domain. Blacklisted domains are unable to send mail to this domain. The Domain properties blacklist checks the envelope sender of the email, which may be different to the email contents.
Setting Description
Domains Remote hosts can be denied access to the system by adding them to the blacklist for a domain. This effectively denies a server the ability to send to the domain if the domain in a senders email address matches an item in the blacklist. For example, if you add the domain “mailenable.com” to the blacklist for a domain, then the domain will not accept any emails from mailenable.com.
4.4.2 Create mailbox
For a description of mailboxes, please see section 2.2.1.3.
When creating a mailbox, MailEnable will automatically create an email address for each domain in the post office (if the setting for automatically creating email addresses for each domain is enabled in the Messaging Manager Properties – see section 4.2.1) using the format mailboxname@domain. When a mail client application logs onto to MailEnable to retrieve email, it needs to have its username formatted as mailboxname@postofficename.
To create a mailbox, select the post office branch. Select Create Mailbox from the icons displayed.

Enterprise Edition Configuration Guide v 3.0
Page 33
4.4.2.1 General
The General tab of mailbox properties displays as below:
Figure 4-6 Mailbox Properties – General TAB
Setting Description
Mailbox Name This is the name of the mailbox. Once created, this cannot be changed. This both identifies the user and ensures there is no duplication of mailbox names. As the Mailbox Name is entered into the text box, the POP Logon name entry just below it will change to reflect the entry.
POP Username for mail clients
This is the username used for logging onto the server via POP3. Use this information to set up the client mail software. The POP Logon name is the same as the “User Name” that is used by mail clients when they connect to the server to retrieve email. MailEnable uses the @ symbol to identify the post office the mailbox belongs to. This way, the same mailbox names can exist in different post offices (although the username to retrieve their email will differ, since the username is formatted as mailboxname@postofficename).
Password The password for the mailbox. The client software uses this when connecting. If SMTP authentication is turned on, this password is also used for sending email. Other extensions to the MailEnable product may also use this username/password combination. The password that is set is the same as the password used by mail clients to authenticate when they connect to the server to retrieve email.
Select random password
Creates a random 8 character alphanumeric password.

Enterprise Edition Configuration Guide v 3.0
Page 34
Mailbox Type Determines the access level for the mailbox. If the mailbox is given "ADMIN" rights, then the user will be able to administer this post office in MailEnable via the web administration interface. If the user is given “SYSADMIN” rights, then they will be able to modify any post office settings.
Mailbox has a size limit
Limits the size of the mailbox. If an email will take the size of the inbox over this limit, the email is bounced back to the sender.
Prevent user from authenticating
If enabled, this will prevent a user from authenticating or logging into any service where the credentials for the mailbox are supplied.
Logon Disabled When a mailbox is disabled, it cannot be accessed via a service, such as POP3 or web mail. Useful for suspending account, it makes the mailbox or email mappings to the mailbox inactive, without deleting it.
Delete messages Delete messages from the mailbox.
4.4.2.2 Addresses
When creating a mailbox, email addresses are created for all the domains available in the post office. For instance, for the domain mailenable.com, if a mailbox called ‘sales’ was created, the email address [email protected] would be automatically created.
To create new email addresses, selecting the Addresses tab at the top of the mailbox properties window. A list of the current email addresses will be shown.
Figure 4-7 Addresses tab on mailbox properties
In order to add another email address for this mailbox, click the Add Email button. The first text box, Enter email name is where the first part of the email address is entered. E.g. to add [email protected], only requires the word sales to be entered. The full address of the email being added is displayed in the window.

Enterprise Edition Configuration Guide v 3.0
Page 35
The Available Domains list box in this window lists domains that are entered via the Create Domain icon. MailEnable can only add email addresses for the available domains in each post office account. For the purpose of this guide we have entered only one domain. In cases where there is more than one domain in a client’s post office account, these domains will appear in this list box. It is then possible to select the appropriate and then entering the email name that is required. Select OK on the Add Emails window when the address has been entered. It will now appear in the mappings list.
Select OK on the Mailbox Properties window as your mailbox has now been configured
Setting Description
Friendly Name The Friendly Name is used as the display name for emails sent via web mail and for the sender for auto-responder messages. When sending messages from email clients, the friendly name is configured within the client application, not on the server.
Reply To Address
This address is used as the reply to address for auto responders.
Email Addresses for Mailbox
Each mailbox can have one or more email address mapped to it. Use the Add Email… button to add new email addresses. It is only possible to add an email that matches an existing domain for the post office. When first creating a mailbox, MailEnable will automatically create email addresses for each of the domains for the post office.
4.4.2.3 Redirection
The redirection tab sets redirections for a specific mailbox to be forwarded to one or more email addresses.
Setting Description
Redirect this mailbox to
Redirect all email for the mailbox to an alternative email address or addresses. To enable redirection, select the ‘Redirect this mailbox to’ checkbox. Select the Add button to add email addresses. If more than one email address is listed, the email will be copied to all of the addresses listed. There is a limit of approximately 25 email addresses that can be redirected to (the limit depends on the length of each email address). For a large number of redirections, use a group (see 4.4.11) - this allows an unlimited number of addresses.
Keep a copy of the message in mailbox
By default, when redirecting a mailbox to another email address a local copy is not retained. Enabling this option keeps a copy of all messages that are being redirected.
4.4.2.4 Actions
The actions tab allows for the configuration of auto responders and delivery events.
Setting Description
Enable auto responder
Enabling this will send a message back to anyone who sends an email to the mailbox. The auto responder will not reply to a message marked as bulk. It is not possible to enable auto responders for the postmaster mailbox.

Enterprise Edition Configuration Guide v 3.0
Page 36
Enable delivery event
Allows a program to be executed on every message when it is delivered to a mailbox. The command line executed is:
program messagefilename connectortype
Where program is the program filename, messagefilename is the name of the message file and connectortype is the type of messages (i.e. SMTP, LS, SF). Be aware that the directory path to the message is not passed to the program. The program will need to read the directory path from the Windows registry.
The path to the message for the delivery event can be built from values retrieved from the Windows registry. The following registry key returns the root path of the messages queues for a server:
HKLM\SOFTWARE\Mail Enable\Mail Enable\Connectors\Connector Root Directory
To get the full path to the postoffice connector queue, which is holding the message for the delivery event, append the text "\SF\Outgoing\Messages" to the value retrieved. The parent of this folder has the command file for the message if required. Be aware that the path to the message file is different for the MTA pickup event, so scripts or external programs would have to be modified accordingly.
The delivery event will not execute for any messages marked as bulk. Bulk messages are mostly system generated messages such as delivery failures, delivery reports, and autoresponder replies. Messages from list servers may also not execute the delivery event.
4.4.2.5 Messages
The messages tab will list up to 200 messages in the currently selected mailbox and optionally allow all email to be forwarded to another mail account.
Setting Description
Messages Lists the messages in the current mailbox. Select an item to view the contents of a message. Only the most recent 200 messages are displayed.
Forward all email
Forward all email from this local mailbox to another mail account. It is possible to specify what account to have the messages forwarded from. This will forward the mail in the same way a mail client would. All mail will remain in the mailbox unless the option to delete mail is selected.
4.4.2.6 Service selection
The service selection tab allows you to enable or disable a mail service for a specific mailbox.
Setting Description
SMTP Service Enables or disables the SMTP service for this mailbox. Will prevent the mailbox from sending or receiving messages.
POP Service Enables or disables the POP service for this mailbox.
HTTPMail Service
Enables or disables the HTTPMail service for this mailbox.
Web mail Service
Enables or disables the web mail service for this mailbox.
IMAP Service Enables or disables the IMAP service for this mailbox.
4.4.2.7 Restrictions
Restrictions can be placed on the volume of messages sent per hour for a mailbox. Setting a value for a post office will override any values specified here for a mailbox.

Enterprise Edition Configuration Guide v 3.0
Page 37
Setting Description
Limit SMTP usage to a maximum of:
Limits the maximum number of messages that can be sent using the SMTP service on an hourly basis. This setting is useful for throttling an account suspected of spamming.
4.4.2.8 POP Retrieval
View remote or local mailboxes that have been configured for POP retrieval by the currently selected mailbox. The administrator can add and configure POP Retrieval from here, or a user may do so via the web mail interface, if permission to do so has been granted. If the feature is disabled in the Administration program only the administrator or accounts with access to Administration program can create a POP Retrieval account. See section 5.9.2.2 for more information on this setting.
Setting Description
Current POP retrieval items
Displays any remote or local mailboxes that have been configured to have their mail pulled down into this local mailbox.
Add Mailbox
The POP Retrieval service can connect to another mailbox and pull any mail in the mailbox into this local mailbox. This is useful to centralize mail receipt over many accounts and across many domains.
To set up an account the following details are required;
Mail Server – This is the MX record or DNS name of the remote server e.g.. mail.mailenable.com
Port – This is the port that is used to connect to the remote server. The default for this is port 110
Username – This is the username of the account. If it is a MailEnable mailbox this must be mailbox@postofficename
Password – The password for the account.
This server requires APOP authentication - APOP (Authenticated POP) is an extension of the standard POP3 protocol. Authenticating to a POP server will mean the username and password are both encrypted by the client before being passed "over the Internet". The receiving server must then be able to decrypt the password.
Only download new messages (leave messages on server) – Will download messages leaving a copy on the server.
Enabled – This setting allows the enabling or disabling of a POP retrieval service account. Disabling the account will retain the settings but will stop the account retrieving mail.
4.4.2.9 Filters
Enable, create and display mailbox filters.
Setting Description
Enable filters for this mailbox
Enables filtering for this mailbox only. Each mailbox can have filtering enabled or disabled... Users can change their mailbox filters via web mail. This means several filters can be turned off/on without having to delete and recreate them. For more information on creating mailbox level message filters see section 8.3 Mailbox filtering
Filters configured for this mailbox
Displays the filters configured for the mailbox. The user of the mailbox can set these filters in web mail. The complete range of filter criteria and actions are not available in web mail; see section 5.9.1.2 for more information on web mail filtering.

Enterprise Edition Configuration Guide v 3.0
Page 38
Add, Edit, Delete, Enable, Disable
Enables administration of the created filters. For more information on creating mailbox level message filters see section 8.3 Mailbox filtering.
4.4.2.10 Contact details
The Contact Details property tab stores contact details associated with the owner of the mailbox.
These contact details can optionally be published into the post office global address list for access by applications that use the global address list.
4.4.3 Export users
A user list can be exported in CSV (comma-separated value) format, with selected fields. To export users;
1. Find the post office where the user details are to be exported.
2. Right click the post office name, select All Tasks and then select Export Users.
3. From the list, select the fields to export to the file.
4. Enter the filename to save as and select Export.
4.4.4 Import Windows users
Windows users can be imported into a MailEnable post office. This will create a mailbox for each Windows user. To import users;
1. Select the post office to import the users to
2. Select either the icon for Import users, or right click the post office name, select All Tasks and then select Import Windows Users
3. Select the Windows users to import
4. Select whether to give them a specific quota, or allow them to have an unlimited amount of space
5. The password for all selected users can be set to the same, or MailEnable can generate random passwords for users. If generating random passwords, it is possible to export a list of all the users and the passwords assigned
6. By default, users are given an email address corresponding to a domain for the post office being imported into. Select the domain to assign email addresses for. Mailboxes are automatically enabled when created.
4.4.5 Import users
This feature allows you to import users to the local post office. A comma delimited file that is formatted as emailaddress,password,quota must be used. Password and quota is optional. If not provided then default settings are used and domains will be created if necessary.
If quota limits are not specified in the file, these can be set to a certain limit, or unlimited.
If password settings are not specified in the file, a random password may be generated or a set password can be created for all imported users.
4.4.6 Delete messages
Messages can be deleted from MailEnable either globally, or by post office, or mailbox. It is possible to specify how many days old the messages have to be, whether to delete all messages before a certain date, or to delete all messages.
4.4.7 Email users (all)
An administrator is able to e-mail all the users at a post office by selecting/clicking on the post office name under Messaging Manager >Post Offices.

Enterprise Edition Configuration Guide v 3.0
Page 39
Then administrator then clicks on the Email users icon to send an email to all users of a particular domain.
4.4.8 Email users (individual)
An administrator can e-mail a user/mailbox owner from within the Messaging Manager by right clicking on the mailbox and selecting Send email.
4.4.9 Set quotas
Selecting this option will reset all mailbox quotas for the post office to the specified value. This will only affect the current mailboxes, not any future ones that will be added.
4.4.10 Edit default message
This edits the default message (which has the filename default.mai) that is created in a mailbox when the mailbox is created. For more detailed information on this selection, please see: http://www.mailenable.com/kb/Content/Article.asp?ID=me020027
4.4.11 Create a group
For a description of groups, please see section 2.2.1.6
When creating a group, the group name is the full text description of the group (for ease of identification). The recipient address is the email address of the group and within this group there can contain multiple external groups. Groups can contain external addresses, so the one group can have different email addresses that are not hosted on the server.
Setting Description
Group name Create a name for the group e.g. [email protected]
Group is disabled
Stops the group from working so that if someone emails the group address, the email will bounce back indicating that the address is not valid
Add email Add other email addresses for the group e.g. [email protected]
To add a new group member to a group, right click the group, and select New > Group member. Type the email address in the box provided or select “Advanced” which will list all users in the post office. (NOTE: Be cautious of using the “Advanced” option if you have a large number of users in the post office)
To import users into a group from a text file, right click on the group icon in the tree view display and select the All Tasks>Import Members menu item.
4.5 Directory
The directory for a post office is a list of email addresses and corresponding display name which is used for web mail as a global contact list. Web mail users will be able to see all the entries under the Global Group when viewing the address book.
The configuration of the directory is done through the Administration program>Messaging Manager>Post Offices>Directory. This can be right clicked on to add a new addresses to the Global Group in web mail. Right click an address and select properties from the pop up menu to edit an address.
Right clicking the directory icon for a post office and selecting All tasks>Import directory entries from the pop up menu will allow you to populate this directory list from a text file which is formatted emailaddress,displayname.

Enterprise Edition Configuration Guide v 3.0
Page 40
4.6 Lists
For a description of lists, please see section 2.2.1.5
When a user wishes to subscribe to a list, they need to send an email to the list with the word “subscribe” in the subject. When the user wishes to be removed from the list, they need to send an email with the word “unsubscribe” in the subject.
To create a new list:
1. Under the Messaging Manager select the post office to create a list for
2. Right click the Lists folder and select New >List. This will load the List Properties window (see below) to configure a new list.
Figure 4-8 List Properties window
4.6.1 General
The general options associated with a list are outlined in the following table:
Setting Description
List name The name of the list. This determines the address that people email to in order to post to the list. The full email address for the list appears at the bottom of the General property page.
Select domain for this list
The domain used for the list name.
List owner email (also moderator)
The email address of the moderator. When a list is moderated, all the emails that are posted are sent to the moderator. It is the job of the moderator to decide whether or not the email is to be posted. Only emails coming from the moderators email address will be posted to the list.
List is disabled Disables the list so no one can post to it.
Enterprise Edition Configuration Guide v 3.0
Page 41
Enable list help Enables help for the list. If someone posts to the list with the subject of ‘help’ they will receive an email with details of what commands the list server will accept.
Send from Determines the From address which will be used for all emails coming from the list. This can be either the moderators email address or the list address. This does not determine where the reply goes.
List Type Determines whether the list is moderated or not. If moderated, all incoming emails will be sent to the moderator email address. If a password protected moderated list is configured, then users do not need to use the password, but the moderator does. All emails will go to the moderator, and the moderator needs to use the password in order to post to the list.
Description A description of the list. This is displayed in the Administration program to allow you to easily see what a list is about.
4.6.2 Options
MailEnable also provides advanced list configuration options. These options can control who can post to lists, where list replies should be directed, who can subscribe to lists and the format of any subject prefix that is applied to posts.
4.6.2.1 Subscription type
MailEnable can control how subscriptions are handled.
Setting Description
Anyone can subscribe to this list via email
Allows people to subscribe to the list by sending the word “subscribe” as the subject of an email to the list.
E-mail subscriptions are not permitted for this list
Stops people from subscribing to the list. List members can only be added through the administration program.
E-mail subscriptions need to be confirmed
Enforces a subscription confirmation code to be returned to the list for successful subscription. When this option is enabled a subscription code will be sent out after a message has been sent to list with “SUBSCRIBE” in the subject field of the message. The user then needs to reply to list using the confirmation code that was sent out to him/her to successfully subscribe to the list.
4.6.2.2 Posting permissions
MailEnable can control who can post to a list.
Setting Description
Anyone can post to this list
Anyone is allowed to send a message to the list.
Only subscribers can post to this list
The list will only accept posts from email addresses that exist in the list.
Posting to this list requires a password
Password protects the list. To send an email to a password protected list, users need to enclose the password in square brackets and colons e.g. [: and :]
4.6.2.3 Reply options
These options determine who should receive responses when a recipient replies to a post.

Enterprise Edition Configuration Guide v 3.0
Page 42
Setting Description
Subscribers reply to the list
The reply to address is set to the list address, so when users reply to a message that gets sent from the list, their email gets sent to the list.
Subscribers reply to the posters address
The reply to address is set to the email address of the sender, so when users reply to a message sent from the list, their email is sent to the person who made the original post.
Subscribers reply to the moderators address
The reply to address is set to the moderators email address, so when users reply to a message sent from the list, their email is sent to the moderator.
4.6.2.4 List subject prefix
Some lists place a prefix in the subject of the list messages. This allows subscribers to filter the messages that are dispatched to them via the list server. These options can control the prefix that is appended to the subject of messages that are dispatched to list subscribers.
Setting Description
Subject is prefixed with the name of the list
The list name, enclosed in square brackets ([ and ]) is added to the start of the subject line of emails posted to the list.
Subject is not altered Subject is not altered for any messages posted to the list.
Subject should have the following prefix
Specified text is added to the start of the subject line for all emails posted to the list.
4.6.3 Headers
Specify plain text or HTML headers for all list messages.
Setting Description
Attach header This text is added to the top of every email when the Attach header checkbox is selected.
4.6.4 Footers
Specify plain text or HTML footers for all list messages.
Setting Description
Attach footer This text is added to the bottom of every email when the Attach footer checkbox is selected.
4.6.5 Importing list members
MailEnable can import users from a text file to a list. To do this;
1. Under the Messaging Manager select the post office to import the list members into
2. Right click on the list icon in the tree view display and select the All Tasks>Import Members menu item
3. Select the file to import. The file should be in the format of emailaddress,displayname

Enterprise Edition Configuration Guide v 3.0
Page 43
4.6.6 List commands
Users send commands to the list by putting the command in the subject line. The available commands for the list server are:
Help – sends an email back with the available commands of the list server
Subscribe – adds the user to the list (if the list permissions allow them)
Unsubscribe – removes the user from the list
4.6.7 List Responder Options
Under the properties for a list there is a new tab option, labeled “Messages”. This allows the use of a custom message for the subscribe notification and the unsubscribe notification. The files that can be used for this need to be located in the following path:
Mail Enable\Config\Post Offices\[Post Office]\Annotations
The unsubscribe error message filename has to be prefixed with “ERROR-“ if this is to be custom as well.
The custom notification files recognize the following tags that can be replaced:
Setting Description
[ME_MEMBER_EMAIL] The member email address
[ME_POSTOFFICE] The post office of the list
[ME_LIST] The list name
[ME_LISTADDRESS] The email address of the list
[ME_FROMADDRESS] The moderator email address
[ME_TOADDRESS] The list address
[ME_MESSAGEID] The message ID formatted as <filename@localdomain>
[ME_DATE] The current date/time
4.7 Server configuration
4.7.1 General configuration
General Server Configuration Options are located under the properties of the Server name “localhost” to manage the local server. These settings are specific to the server that is selected.
The General tab specifies a default post office for the server and shows post office bindings to IP addresses.

Enterprise Edition Configuration Guide v 3.0
Page 44
Figure 4-9 Server Properties General TAB
Setting Description
Enable Default Post Office
Specify the default post office for your server. This means that any username that only has the mailbox name will be assumed to be from the default post office. E.g. the [email protected] user will only need to use sales to log on with.
Enable post office bindings
It is possible to bind each MailEnable post office to a particular IP address on the network card. This means that all post offices will only need to use the username to log-in (not just the default post office).
This will also allow the welcome message when a connection is made to the server return a value that is specific for each post office.
4.7.2 Policies
The Policies tab provides settings to lock out users after too many failed password attempts and prevent users from entering simple passwords.
Setting Description
Lock out user for one hour after
Keeps track of mailbox authentication failures per hour; all services have the authentication logged as one. When the number of failed attempts is reached, the account will be locked out for 1 hour.

Enterprise Edition Configuration Guide v 3.0
Page 45
Prevent simple passwords
When an administrator creates an account or a user changes a password, the password must meet the password complexity requirements, as outlined below, if this feature is enabled.
Passwords must be over 6 characters long
Passwords cannot match mailbox or account name, or have the mailbox or account name contained in the password string.
Password cannot be “password” or cannot have the word “password” contained in the password string.
4.7.3 Secure Sockets Layer (SSL) encryption
MailEnable Enterprise Edition has the ability to use SSL (Secure Sockets Layer) when transmitting data between mail clients and servers. SSL is available for IMAP, SMTP, POP, and HTTP related protocols.
Secure Sockets Layer (SSL) creates a secure connection between a client and a server over which any amount of data can be sent securely. It is a protocol for transmitting private documents via the Internet and is used with both web and email applications. URLs that require an SSL connection start with https: instead of http:.
Enabling SSL on the email client (e.g., Outlook, Netscape Messenger, Eudora) provides an added level of privacy and security for the data being sent over the network.
4.7.3.1 Obtaining an SSL Certificate
For the MailEnable mail services, only one SSL certificate can be configured on the server. The SMTP, POP and IMAP services all use the same certificate. Because only one certificate can be used for the server, when purchasing one, try to make it generic for the server (i.e. a default domain). For example, if the server was called mail.example.com, a certificate that is valid for that host name would need to be purchased and registered (or a certificate for the entire domain could be obtained thereby allowing SSL certificates to be generated for multiple hostnames e.g. mail.example.com, www.example.com, support.example.com, etc.).
The server setting for users to configure their email application needs to match this certificate in order to avoid a security warning being displayed indicating that the server does not match the certificate.
For example, if you have a SSL certificate for a website www.example.com, this can be configured in MailEnable as the SSL certificate. If a user wishes to connect to the server via SSL, they should use the www.example.com domain as their SMTP/POP/IMAP server. They can use alternate domain or the IP address, but their email application will display a warning.
To use SSL for web mail and web administration, then these would be configured under IIS normally, since IIS in this case is responsible for the SSL handling.
4.7.3.2 Registering an SSL Certificate on the mail server
Under the Windows platform, certificates can be registered into shared certificate containers which can be accessed via IIS and other SSL enabled applications. If an SSL certificate is already registered under IIS or for a web site running on the server then the certificate should be available to be used by MailEnable.
Microsoft provides a Microsoft Management Console (MMC) application that can be used to manage certificates on the server. Access the certificate manager MMC application as follows:
1. From the Windows Start Menu, select Run|mmc.exe
2. From within the MMC application select File | Add/Remove Snap-In | Standalone | Add
3. Select "Certificates" from the list and select the Add button.
4. Select "Computer Account" account, select finish
This application can be used to review and import SSL certificates into the various SSL certificate containers on the server. MailEnable should be able to use any certificates that have been configured in the “Personal Certificates” store of the Computer Account.
Detailed instructions for managing certificates on the Windows platform can also be found on the Microsoft Web Site.
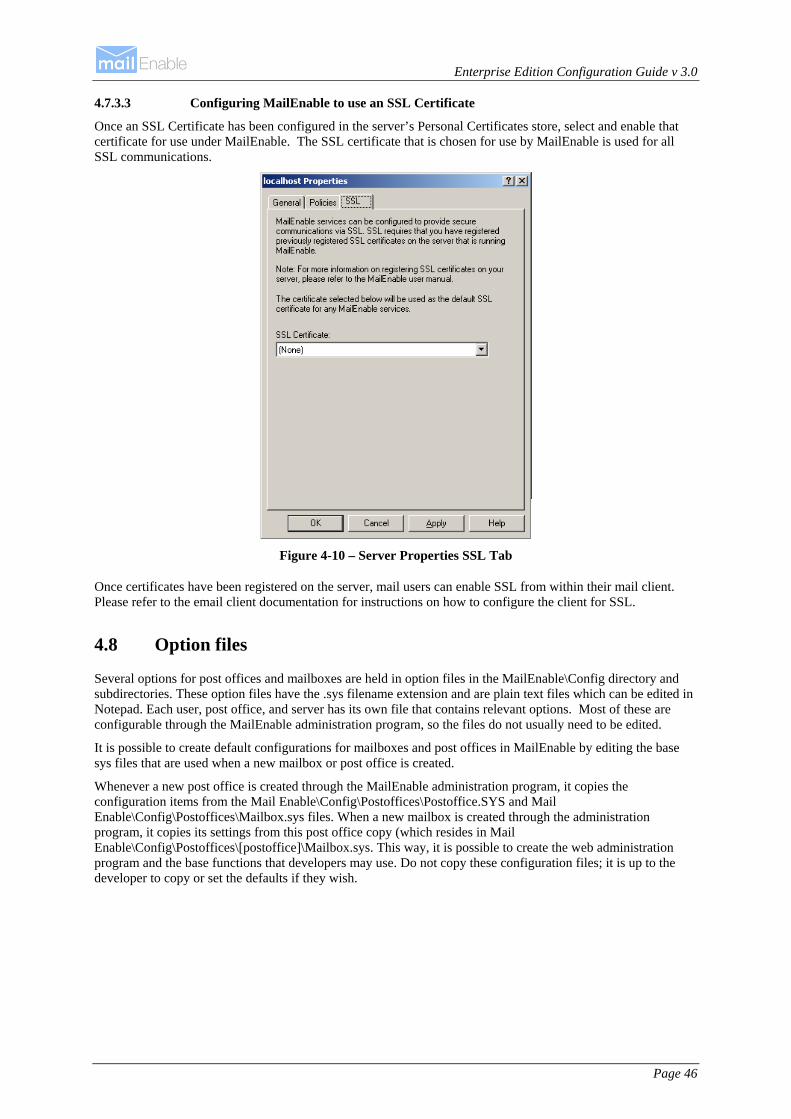
Enterprise Edition Configuration Guide v 3.0
Page 46
4.7.3.3 Configuring MailEnable to use an SSL Certificate
Once an SSL Certificate has been configured in the server’s Personal Certificates store, select and enable that certificate for use under MailEnable. The SSL certificate that is chosen for use by MailEnable is used for all SSL communications.
Figure 4-10 – Server Properties SSL Tab
Once certificates have been registered on the server, mail users can enable SSL from within their mail client. Please refer to the email client documentation for instructions on how to configure the client for SSL.
4.8 Option files
Several options for post offices and mailboxes are held in option files in the MailEnable\Config directory and subdirectories. These option files have the .sys filename extension and are plain text files which can be edited in Notepad. Each user, post office, and server has its own file that contains relevant options. Most of these are configurable through the MailEnable administration program, so the files do not usually need to be edited.
It is possible to create default configurations for mailboxes and post offices in MailEnable by editing the base sys files that are used when a new mailbox or post office is created.
Whenever a new post office is created through the MailEnable administration program, it copies the configuration items from the Mail Enable\Config\Postoffices\Postoffice.SYS and Mail Enable\Config\Postoffices\Mailbox.sys files. When a new mailbox is created through the administration program, it copies its settings from this post office copy (which resides in Mail Enable\Config\Postoffices\[postoffice]\Mailbox.sys. This way, it is possible to create the web administration program and the base functions that developers may use. Do not copy these configuration files; it is up to the developer to copy or set the defaults if they wish.

Enterprise Edition Configuration Guide v 3.0
Page 47
5 Configuration of connectors, services and agents
5.1 SMTP connector
SMTP is a protocol for transferring outgoing email messages from one server to another and also to accept email messages from other mail servers and email clients. SMTP is used with both POP3 and IMAP4.
Note: POP and SMTP servers are often the same server. However, in some cases, one server is used for receiving mail (POP server) and another server is used for sending mail (SMTP server); this is done mostly for load balancing and redundancy.
Using the Administration Console, the SMTP properties can be accessed by expanding the Servers > Localhost > Connectors branch.
Right click on the SMTP icon and select Properties. The options are explained below:
5.1.1 SMTP properties
Figure 5-1
Figure 5-2 SMTP Properties

Enterprise Edition Configuration Guide v 3.0
Page 48
Setting Description
Local Domain Name The domain name of the server that MailEnable is installed on, or the default domain for the configuration. It is used for system messages, to announce the server when it connects to remote server, and when remote servers connect to MailEnable if the host name has not been specified.
Default mail domain name
The default mail domain name for the server, which usually matches the default MX record. For example, if you have configured mail.example.com in your DNS to point to your mail server, then you would enter this here. If a host name has been specified for an IP address on the server, then that value will override this host name.
DNS Address The DNS that the local machine uses. If using more than one DNS, separate the addresses with a space character. If the SMTP service fails to connect to the first DNS, it will try the second or subsequent DNS. Use the DNS that is configured for the local network. Remember that this is not necessarily the DNS of where the domain name is registered.
Specify the email address when sending notifications
The address from which notifications are sent. When MailEnable sends out email such as message delivery delays, or delivery failures, it will use this address as the "from" email address. Usually this would be [email protected] (substitute your domain here). Make sure this is a valid email address.
Enable NTLM Authentication
If this feature is enabled then secure authentication between the server and the supported client is enabled. This will allow the server to accept requests from the client to use secure transmissions for the authentication method. The client also has to be enabled to use this secure authentication. For example, in Outlook the feature is called SPA – Secure Password Authentication. More information on NTLM can be found in section 514.1
Enable CRAM MD5 Authentication
CRAM-MD5 Challenge-Response Authentication Mechanism is intended to provide an authentication extension that neither transfers passwords in clear text nor requires significant security infrastructure in order to function. Only a hash value of the shared password is ever sent over the network, thus precluding plaintext transmission.
5.1.2 Inbound
Setting Description
SMTP service listens on port
Determines the port the SMTP service is running on. The default is 25. Inbound SMTP connections from remote servers expect the mail server to be listening on port 25, but some proxy or gateway software may require this to be changed.
SMTP Enable SSL (Default Port)
Enables SSL certificate encryption for the default port that SMTP is running on. Place a tick in this box to enable. The service also has to be enabled at a server level in the MailEnable Administration Program > Server > Localhost Properties > SSL tab.
Also listen on alternate port
The SMTP service can also listen on an alternate port by enabling this option. Usually this is done to cater for clients who may be on connections where their outgoing port 25 has been blocked.
SMTP Enable SSL (Alternate Port)
Enables SSL certificate encryption for the alternate port that SMTP is running on. The default port for this is 465. When enabling SSL make sure that a valid SSL certificate has been selected in the MailEnable Administration >Server > Localhost Properties >SSL tab.

Enterprise Edition Configuration Guide v 3.0
Page 49
Maximum number of concurrent connections
The number of connections that will be available for remote servers and email clients to connect to.
Advertised Maximum message size
Entering a value here will inform remote mail servers and email clients of the maximum size of an email that should be sent to the server. The size is represented in bytes. Clients or remote mail servers may ignore the value. A size of 0 means that there is no limit on message size.
Enforce this message size
Checks each inbound message size after it is received. If it is over the limit, it will be deleted and an error returned to the remote server or email client that is trying to send..
Access Control Specify who can connect to the email server. Specify a list of IP addresses that are either banned from connecting, or are the only ones allowed to connect. Use the * character as a wildcard.
Inbound IP Bindings
Select the IP addresses that the SMTP service will be bound to. On a multi-homed machine it may desirable to only listen to connections on particular IP addresses. ‘Always bind the service to all available IP addresses’ will allow connections on all IP addresses that are configured for the machine.
5.1.3 Outgoing
Setting Description
Maximum number of send threads
The number of threads that are used to send email.
Timeout for Remote Mail Servers
How long the SMTP service will wait for a response from a remote mail server before disconnecting.
Outgoing queue poll interval
How often the SMTP service polls the outgoing queue directory for mail messages to send. This is measured in seconds.
Limit outbound message size
Forces MailEnable to check the size of each message before delivering to a remote mail server. If the message cannot be delivered it will be returned to the sender (or sent to the bad mail directory if the message is system generated).
Outbound IP Binding
Forces the SMTP to use a specific IP address on the server when it is trying to deliver email.
5.1.4 Relay
Mail servers accept messages for recipients that have their mailboxes hosted on the mail server itself. Any attempt to send a message to a non-local recipient (i.e. a recipient on a different mail server) is called a ‘relay’. It is critical to regulate who can send messages to others (non-local recipients) or the server will be identified as an Open Relay. This means that people on the Internet can send email out through the server without authenticating. Secure the server by configuring strict rules as to who can relay messages to non-local recipients.
For a server on the Internet, the best relay setting to have is to only have Allow relay for authenticated senders checked, and leave Allow relay for local sender addresses unchecked. This will make everyone who wants to send email out via the server provide a username and password.
To access the SMTP Relay options, open the Administration program, expand the Servers > Localhost > Connectors branch, right click on the SMTP icon, select Properties from the popup menu, and click the Relay tab.

Enterprise Edition Configuration Guide v 3.0
Page 50
The following table provides an explanation of the various relay settings.
Setting Description
Enable Mail Relay Mail relaying needs to be enabled in order to send mail. Otherwise MailEnable will only be able to receive email. There are four options available to limit who can send mail out through the server. It is possible to select any combination of the four, however, a client only has to match one of the items in order to relay through the mail server.
Allow relay for authenticated senders
Requires that people sending mail through the server enter a username and password (i.e. this option enables SMTP authentication). To set this is different for various mail clients, but in Microsoft Outlook Express and Microsoft Outlook for instance, this is done in account properties via the "My server requires authentication" checkbox under the "Servers" tab. It is advisable to have this option enabled if the server is not using privileged IP ranges. Also, ensure that Secure Password Authentication (SPA) is not enabled.
Authentication method
Select the authentication method for authenticated senders.
MailEnable/integrated authentication – uses the MailEnable username/password
Windows authentication – uses the Windows username/password valid for that machine
Authenticate against the following username/password – specify your own username and password.
Allow relay for privileged IP ranges
Allows people with certain IP addresses to send email through the server. If the IP addresses of persons who are able to send email out through the server is known, use this option. DO NOT select this option if the list of IP addresses is unknown, as this may inadvertently allow everyone access. This option is usually required to allow sending through the server from a web server or web page.
Allow relay for local sender addresses
Allows people to send mail if their ‘From’ address has a domain that is hosted on MailEnable. For instance, if you host example.com, and someone sends a message from your server that has their ‘From’ address as [email protected], the email will be sent. Unfortunately, spammers may still abuse this by spoofing ‘from’ addresses, so most servers will not use this option. Using this option may cause some anti-spam blacklists to consider the server as “open relay” and block email from the server.
POP before SMTP authentication
The IP address of users who authenticate via POP is remembered and permitted to relay. The time period to remember the IP address for can be set. Some client applications will try to send email before retrieving (e.g.: Microsoft Outlook), so they will generate an error message on the first send try. Subsequent send attempts will then work if they are before the specified time.
This is required due to some ISPs and certain routers not allowing SMTP authentication. This feature will bypass this issue by authenticating a client using POP. If this authenticates then the SMTP service will allow this IP access for a designated period of time.
To remember the IP address, a file is written to the Mail Enable\Config\Connections directory. The file name is the IP address and the file extension is .pbs.

Enterprise Edition Configuration Guide v 3.0
Page 51
5.1.5 Security
Setting Description
Reject mail if sender address is from an invalid domain
When a user is sending mail to MailEnable, this option will check the From address in order to verify the domain it is coming from. It works through a senders (FROM) address in the envelope or command message for an email having the domain stripped from an email address. This will then have a DNS resolution lookup completed on the domain name MX record to see if it is registered as a mail server. If not then the message will fail with a permanent error.
This is used to stop people abusing the mail server by using incorrect information. The majority of people who use an incorrect From address are spammers. This may affect valid email from incorrectly configured clients, so monitor the logs often.
Authenticated senders must use valid sender address
If this is selected, users with authentication to send email must configure their email client with a valid email address that is assigned to the mailbox they are using to send on. This option is useful to force clients to use a legitimate email address, thereby reducing the possibility of spam.
Senders from local domains must authenticate to send email
When selected any user sending mail must not only have a valid sender email address it must also have authenticated with a valid MailEnable password for the account. This will help stop any spam coming into the server where the sender’s address is a local server account. This option is ignored if the sender is sending from a local IP address.
If using a sender address which does not include the @ symbol (a non-routable address), then the whole address is checked against the local domain list.
Hide IP addresses from email headers
By default, the IP address of a client connecting is displayed in the header of an email message. If the network has its own IP range which is to remain hidden to receivers of emails, this option will replace the IP address with 127.0.0.1
Require PTR DNS entry for unauthenticated connections
If an inbound connection has not been authenticated, MailEnable will look up to see if there is a PTR DNS entry for the connecting IP address. MailEnable will not validate whether the entry is valid, it will check to see if one exists. Local IP addresses are not checked for PTR entries.
Disable all catchalls Catchalls for domains will cause the email server to collect a lot more email and can cause the server to relay spam (i.e. if the server redirects a catchall to a remote email address). This option will stop all catchalls from working.
Allow domain literals MailEnable will allow inbound emails to be formatted as user@[IP Address], such as user@[192.168.3.10]. MailEnable will accept emails for any of the IP address that have been configured on the server. If using NAT, or to accept extra IP addresses which are not configured on the server, select the Advanced… button. This will allow these extra IP addresses to be entered.
Use alternate welcome message
When an email client or other mail server connects to MailEnable, a one line welcome message is displayed. By default, this indicates that the server is running MailEnable software, and shows the version of the software. If this option is enabled, it is possible to customize the welcome message. There are also two variables that can be used in the welcome text that will be replaced. These are:
%LOCALDOMAIN% - this will be replaced with the SMTP domain from the SMTP options
%TIME% - this will be replaced with the current time on the server

Enterprise Edition Configuration Guide v 3.0
Page 52
Restrict the number of recipients per email
It is possible to restrict the number of recipients per incoming email. Allowing a large number of recipients per message may help with sending to contact lists via email clients, but it also raises the benefit to spammers, as they can save on bandwidth and can send through more messages in a shorter amount of time.
Drop a connection when the failed number of commands or recipients reaches
Most email clients will recognize error codes returned by the mail server for an invalid recipient or similar. But some spammers and bulk email utilities may not recognize these errors and keep trying to send. By enabling this option, MailEnable will drop the client connection. It is recommended not to use a low value (5 for example), as some valid web scripts will not check the return codes either – but these will only produce a small number of failed commands.
Add to denied IP addresses if this number is reached
If a connection has reached the disconnection limit, it is possible to automatically add the IP address of the client to the SMTP Access Control list. Be aware that if enabling this option, the Access Control list can grow and adversely affect the performance of the SMTP service. Therefore it is recommended to check the Access Control list regularly.
5.1.6 Advanced SMTP
Setting Description
Enable alternate catch-all header
When mail is sent to an invalid recipient and they are specified as a BCC on the message, it is difficult for the mail administrator to know who should have received the message. The catch-all header allows you to specify the name of the message header field that is used to record any recipients that were delivered to the catch-all account. By default, MailEnable records this information into the Received By: message header; hence this setting is supplied to provide more control over how the information is recorded within the message. Only one copy of a message with multiple recipients is delivered to the catchall mailbox.
Add required headers for authenticated senders if needed
Some email clients or applications will not add a Message-ID or Date header line to their emails. Some mail servers require these items and will reject the email if they do not exist. By enabling this option, MailEnable will add the required lines (if they do not exist) to all users who are authenticated to relay through MailEnable.
Allowed SMTP Commands
The list of SMTP commands that can be disabled are shown here. For example, it is possible to disable the EXPN, which displays all the emails of users in a group.
5.1.7 Delivery
Setting Description
First Retry The delay before a message is retried for the first time. The default is 15 minutes.
Second Retry The delay before a message is retried for the second time. The default is 30 minutes.
Third Retry The delay before a message is retried for the third time. The default is 60 minutes.
Subsequent retries
The delay before a message is retried for the first time. The default is 240 minutes.

Enterprise Edition Configuration Guide v 3.0
Page 53
Failed Message Lifetime
This determines the amount of time a message will stay in the outbound queue before MailEnable gives up and moves the message to the Bad Mail directory. If the message has hit the maximum retry amounts, it will be moved to Bad Mail, even if the failed message lifetime has not been reached.
Delay notifications
When an email fails to be delivered, but the error is not permanent (which could happen if there was a network error, the remote server was down, or other errors), then MailEnable will send an email to the original sender to inform them that the message has been delayed. This option can either turn delay notifications off, send a message only on the first failure, or to send a message back for each send delay. There is also the option to only send delay notifications after a specified period of time from when the message send is first attempted. This will allow the SMTP service try to send the message more than once before the sender is informed that there is a delay.
Do not generate Non-delivery Receipts
When an email cannot be delivered and the error is permanent, then MailEnable will send a message to the original sender informing them of the error. Enabling this option will stop this message from being generated.
Delivery failure notifications can be customized for the SMTP service. Templates can be used for either a post office (if the message which fails can be attributed to a post office) or for the server.
The template files for a post office need to be configured in the following folder:
Mail Enable\Config\Postoffices\[postoffice]
If this template file does not exist, then the server level one will be used, which is located at:
Mail Enable\Config\Postoffices
MailEnable provides two template files for non-delivery reports:
Setting Description
SMTP-NDR-FAILEDRECIPS.TXT Non-Delivery Message that has a list of failed recipients (ie: one or more recipients were refused by the server)
SMTP-NDR.TXT Non-Delivery Message that has no failed recipients (ie: transmission errors, system errors)
The following tokens can be used in a template: [ME_POSTMASTERADDRESS], [ME_TOADDRESS], [ME_DATE], [ME_MESSAGEID], [ME_FAILEDRECIPIENTS] and [ME_MESSAGEHEADERS]
5.1.8 Smart host
Setting Description
Smart Host Enabled Enabling this option will force all outbound email to be sent to one server, which is entered here. Do not configure this to point back to the MailEnable server.
This server requires authentication
The server that is being forwarded all of the email may require SMTP authentication. If so, enable this option and enter the username and password that has been assigned. The login method used is AUTH LOGIN.
Domain smart-hosting takes priority
It may be desirable to configure a local domain in MailEnable and smart-host this to a different server to the general outbound email. Enabling this option will allow the smart-hosts that have been configured for individual domains to override the SMTP outbound smart-host.

Enterprise Edition Configuration Guide v 3.0
Page 54
5.1.9 Logging
Setting Description
Logging Options
MailEnable's SMTP Connector provides W3C, Activity and Debug logging. W3C logging is used to record service usage, Activity logging is used to record system activity and Debug logging is used to provide low-level information on system activity.
Enable Logging
Enables W3C logging for the SMTP service. W3C logging can specify which fields are logged and the rollover frequency. The directory can also be specified.
Activity Log
Enables the Activity Log.
Debug Log Enables the Debug Log.
5.1.10 Blocked addresses
Blocked addresses are those SMTP email addresses the server will not accept email for. Any email sent to one of these addresses via SMTP will receive an error indicating that the address does not exist.
Setting Description
Add Adds a new SMTP email address to block.
Remove Removes the selected blocked email address.
5.1.11 White list
White list IP addresses are those that are not checked for reverse DNS blacklisting or SPF and are not auto-blocked by the SMTP security options.
Setting Description
Enable white list Enables the SMTP white list.
Add Adds an IP address to the white list.
Remove Removes the selected IP address from the white list.
MailEnable can also automatically whitelist IP addresses to which it has addressed outbound e-mail. This helps reduce the SMTP service from rejecting email from valid senders, as it makes the assumption that if you send to an IP address then that IP is a valid mail server and incoming email from that IP should not be blocked.
Setting Description
Enable white list Enables the SMTP white list.
Add Adds an IP address to the white list.
Remove Removes the selected IP address from the white list.
Enterprise Edition Configuration Guide v 3.0
Page 55
5.1.12 Sender Policy Framework (SPF)
SPF is an acronym for Sender Policy Framework. It describes a method of verifying whether a sender is valid when accepting mail from a remote mail server or email client. An SPF check involves verifying the email address the sender is using to send from, and the IP address they connect to the SMTP service with. SPF uses the sender’s domain to retrieve a TXT DNS record (basically a small text snippet) that describes which IP addresses the domain sends on. The retrieved record is then compared against the connecting IP address and if it matches then the sender is determined to be valid; otherwise it indicates that the sender is impersonating the sending domain.
In basic terms, Sender Policy Framework (SPF) is a method of detecting when an email sender is forging their sender address. It does this by confirming with the senders alleged domain (via DNS lookups) as to whether the connecting IP address, or other details, are valid. For example, if a spammer was sending emails as [email protected], a lookup is done for SPF details against the AOL.com domain. Information returned from this lookup could determine that since the IP address of the spammer is not an AOL IP address then it is likely to be spam. Email can then be marked as likely spam, or not accepted. An SPF record can also be more complicated than just a list of IP addresses, in order to give more flexibility. For details on SPF, see the following website: http://spf.pobox.com
Setting Description
Enable SPF Enables SPF detection.
Reject failures If an incoming connection returns a SPF fail, then the email message will not be accepted by the SMTP service.
Add Received-SPF header for unauthenticated senders
Adds the Received-SPF header to all unauthenticated emails arriving via SMTP.
Pass local IP addresses (no checking will be done)
If an IP address is determined to be local, then an SPF check is not done.
Enable local white list policy
Use your own SPF white list policy. The local policy is checked when the all mechanism exists for the domain being checked and is not indicating a pass. The local policy only has an effect if it is passing the domain, so you would create an SPF that indicates requirements for domains you wish to pass. The white list policy can be a complete SPF record, but must exclude the SPF version string (i.e. Must not have “v=spf1”).
Apply best guess policy for domains without SPF records
For connections that do not have an SPF record further checks can be added in their place. A subsequent check could be done on an MX record or even an A record for the domain lookup.
With MailEnable, the results of a SPF test are added as a header item to the email. The header is Received-SPF. SPF tests return one of seven results, which are outlined below. The added header includes the result and a brief description. If there are filters running to check the header, the first string after the header is the result. E.g. Received-SPF: none, Received-SPF: fail. For information on configuring filters for handling SPF results, please see section 8.2.1.14.
Result Description
Pass The email comes from a valid source.
Softfail The email may not be from a valid source.
Fail The email does not come from a valid source.

Enterprise Edition Configuration Guide v 3.0
Page 56
Neutral The data is inconclusive in determining whether the email is coming from a valid source.
None The domain has no SPF record.
Error There is an error processing the SPF.
Unknown There is an error processing the SPF.
5.1.13 Reverse DNS blacklisting
Note: Reverse DNS Blacklisting is not available under Windows NT 4, and you will not see its configuration screen
Reverse DNS Blacklisting allows DNS based blacklists to be used with MailEnable. This can help to control spam. It is possible to select which RBL blacklist providers to use, however, only the select providers that are needed as this feature has an impact on performance.
DNS blacklists are lists of IP addresses that are not allowed to connect to the email server. These lists are formed in various ways. Some lists are simple listings by country, some list known spammers and some are reactive and add entries only after an IP address was responsible for sending out junk email. Blacklists have a high risk of causing "false positives", which means that legitimate email may be refused. Before using DNS blacklists, it is wise to do some research on how the lists are maintained, what the removal process for listed IPs is and what their motivations and goals are with their list.
Figure 5-3 Reverse DNS Blacklisting TAB
Configure reverse DNS blacklisting as follows:
1. From the Administration program select Servers > localhost >Connectors >SMTP >Properties
2. Select the DNS Blacklisting TAB

Enterprise Edition Configuration Guide v 3.0
Page 57
3. Check the option to Enable DNS Blacklisting
4. Select the desired action to complete - the default is “Don’t accept the email”
5. Select the Add button and the following window will be displayed
6. Select a blacklist followed by OK.
7. The selected blacklist will show in the “Current Enabled DNS Blacklists” display window.
8. Repeat this process to enable multiple lists.
5.1.13.1 DNS blacklists
Setting Explanation
Current Enabled DNS Blacklists
Shows all lists that have been enabled for the server. This includes the MailEnable defaults and any personally created lists.
Add Button To choose a blacklist, select this button, select a list and click OK. The list will now be displayed in the “Current enabled DNS Blacklists” window on the DNS Blacklisting TAB.
Remove Button To remove a list at any time, select the blacklist in the “Current enabled DNS Blacklists” window on the DNS Blacklisting TAB and select the Remove button.
Enable DNS Blacklisting
Enables or disables reverse DNS Blacklisting for the SMTP Connector.
Action when detected
The two actions here are;
Don’t accept the email - this will prevent connection by the remote server and respond accordingly. This is the best option for reducing server load.
Mark the message as spam - by adding a line to the header. If enabled the message will be delivered to the Junk E-mail folder within the email client. For further information on the Mark Message as Spam action please review section 4.3.6 on Feature selection.
Enable DNS Content Filtering
When enabled all messages will have their content scanned for links to web sites. When a link is found, then MailEnable will check the IP addresses of any URLs found to see whether they are contained in the selected blacklist.
Action when detected
The three actions here are;
Don’t accept the email - this will prevent connection by the remote server and respond accordingly. This is the best option for reducing server load.
Mark the message as spam - by adding a line to the email header indicating it is spam. This will allow locally delivered messages to be delivered to the Junk E-mail folder. For further information on the Mark Message as Spam action please review section 4.3.6 on Feature selection.
The “Replace the link” option will remove the failed link URL of the message and replace it with “Link is removed”.
Configure Blacklists Button
Opens a screen to allow blacklists to be created or added.
Lookup type The lookup type that will be used for the blacklist.
Zone Server The name of the DNS Zone or the IP Address of the DNS host that should be queried.
Record Type to check for
When the remote host or zone is queried, it may return one or more DNS Record types. Most implementations return an A record, but other implementations may return NS, PTR or MX records.

Enterprise Edition Configuration Guide v 3.0
Page 58
Response The response that can be sent to the client when a message has been rejected.
Note: It is possible to configure a white list that will override the reverse DNS blacklist. This is configured in the administration program by selecting the White list button on the Reverse DNS Blacklisting tab under the properties of the SMTP Connector.
Note: Reverse DNS blacklists affect the performance of incoming email. The reason for this is that for each inbound connection, MailEnable will perform a lookup in the remote DNS.
MailEnable provides a list of well-known Reverse DNS Blacklist providers. It is also possible to add your own blacklist provider by selecting the Configure... button.
Once the provider has been added, it can be configured using the screen outlined earlier. Select the Enable button before configuring the service provider’s details.
5.1.14 IP Blocking
IP Blocking acts on the IP addresses that are reported as spam by web mail users. There are two types of blocking which is used by the SMTP service. There is a system level block and a post office level block. A system level block is an IP address which is blocked for the whole server and a post office level block is done for a connection which can be attributed to a post office.
When a message is blocked by the web mail, it will add the IP entry to the post office level spam directory. For each IP address added a separate file is created which has the time the message was reported as spam, the user that reported it and the message filename. The IP is also checked against whether it has been reported at the system level for that post office. If not, then a new file is created for this IP address. The system level file contains the timestamp of the report, and the post office that reported it.
Whitelisting an IP address will prevent it from being testing against the IP blocking list. Whitelisting can be done either by adding its IP address in the SMTP Whitelist, or by it being listed as an outbound whitelisted IP address. Local server IP addresses also cannot be blocked.
Connections are given an error when they perform a RCPT TO: SMTP command. When an IP address is blocked for the system level or post office level, the following message is in the SMTP Debug log:
ME-E011X: [socket number] Message blocked: (IP address) was found in reported in System Spam database.
ME-E011X: [socket number] Message blocked: (IP address) was found in reported in Postoffice Spam database.
The connecting server will be given the error:
452 The IP Address you are sending from was reported as a source of Spam. Please contact your e-mail administrator.
5.1.14.1 Refuse e-mail from IP addresses reported as sending spam
When enabled, the SMTP service will not accept emails coming from a blocked IP address. The service determines that an IP address is blocked by using the number of reports and a time frame, set by the “Reports required” and the “Expire after” text boxes. System level records are checked first, then the post office level records. So in order for an IP address to be blocked for the whole server, it needs to be reported by more post offices than the “reports required” setting, and to be blocked to a post office needs to be reported just that many times by any post office user(s). This setting is only useful if either a post office or the server is set to allow users to mark sender IPs as a spam source, which is done either through the global web mail settings or the web mail settings for a post office.

Enterprise Edition Configuration Guide v 3.0
Page 59
5.1.14.2 Blocked Address Management
Since there can be a large number of blocked addresses reported, mailenable allows the management of such addresses. To remove an IP address that is blocked, select the “Remove IP…” button. To view details about a blocked IP address, select the “View Report…” button. When viewing a report about a spam item, the dialog displayed will indicate whether the IP address is a system level block or a post office level block.
5.1.15 Greylisting
Greylisting is configured under the SMTP options and works by initially delaying an incoming email from a particular IP address. Since mail servers would normally retry sending a message, when the message is attempted to be sent after this initial delay period it will be accepted. Spammers rarely retry messages, and therefore will be blocked. If a spammer does retry a message, hopefully within that time the IP address of the sender has been reported to a DNS blacklist that is in use, and can still be blocked.
Greylisting can be enabled for the SMTP service and the message retry initial delay time and the time the IP and sender/recipient is remembered for can be configured here.
Setting Explanation
Enable greylisting Use the post office level setting
Messages must be retried this many minutes after initial delay
When the SMTP service accepts a connection from an IP address it will remember the sender and recipient and the connection will be temporarily refused. The connection will be refused until after this initial delay period.
Senders will be remembered for
After a sender has sent the message the second time, the sender, recipient and sender IP address are remembered for this time period, to prevent the email being delayed again.
When a client or server is being delayed due to greylisting, they will receive the following SMTP message:
452 This server employs greylisting as a means of reducing spam. Please resend e-mail shortly.
5.2 POP Service
POP stands for Post Office Protocol. This is a mail protocol that enables emails to be retrieved from a remote mailbox. It allows you to collect emails from a hosted account on a server to your own email software, such as Outlook, Eudora etc.
POP and SMTP servers are often the same computer. However, in some cases, one server is used for receiving mail (POP server) and another server is used for sending mail (SMTP server).
Use the Administration Program to access the POP properties by expanding the Servers > Localhost > Connectors branch.
Right click on the POP icon and select Properties. The options are explained below:

Enterprise Edition Configuration Guide v 3.0
Page 60
Figure 5-4 POP Properties dialog box
5.2.1 General
The following table outlines the configuration options for MailEnable’s POP service:
Setting Description
Maximum concurrent connections
The number of concurrent connections from email clients that the service will allow.
Alternate @ characters
Some older mail clients don't allow the use of @ in the username section. Since the MailEnable usernames are formatted in mailboxname@postoffice format, this may cause problems. To solve this, MailEnable can specify the characters that can be used as a substitute. Just enter the list of characters such as #$%. This will allow users to log on using mailboxname@postoffice, mailboxname#postoffice, mailboxname$postoffice and mailboxname%postoffice.
POP Port The port MailEnable will allow client POP connections on. The default is 110.
POP Enable SSL (Default Port)
Enables SSL encryption for the default port that POP is running on. When enabling SSL make sure a valid SSL certificate has been selected in the MailEnable Administration > Server >Localhost Properties >SSL tab
Also listen on alternate port
Allows the POP service to listen on an alternate port. Usually this is done to cater for clients who may be on connections where their outbound port 110 has been blocked.

Enterprise Edition Configuration Guide v 3.0
Page 61
POP Enable SSL (Alternate Port)
Enables SSL certificate encryption for the alternate port that POP is running on. The default port number is 995. When enabling SSL make sure that a valid SSL certificate has been selected in the MailEnable Administration > Server > Localhost Properties >SSL tab.
Enable APOP authentication
Usually, the users’ username and password are sent in clear text format (i.e. not encrypted). Enabling this option will force clients to enable APOP authentication on their mail client software. Make sure users are using software that supports APOP, otherwise they will not be able to receive email. Some older mail clients do not support APOP.
Enable NTLM authentication
If this feature is enabled then secure authentication between the server and the supported client is enabled. This will allow the server to accept requests from the client to use secure transmissions for the authentication method. The client also has to be enabled to use this secure authentication. For example, in Outlook the feature is called SPA – Secure Password Authentication. More information on NTLM can be found in section 514.1
Enable CRAM-MD5 authentication
CRAM-MD5 Challenge-Response Authentication Mechanism is intended to provide an authentication extension that neither transfers passwords in clear text nor requires significant security infrastructure in order to function. Only a hash value of the shared password is ever sent over the network, thus precluding plaintext transmission.
Timeout for idle connections
If this setting is enabled, and a client connection has been idle or not passed any commands to the server for a set period of time, the connection will be dropped by the server. Timeout setting is in seconds.
Access Control The Access Control feature can specify who can connect to the POP service. A list of IP addresses that are either banned from connecting, or are the only ones allowed to connect by selecting the Access Control button can be specified.
IP Addresses to bind POP to
It is possible to select the IP addresses that the POP service will be bound to. On a multi-homed machine you may only wish to allow connections on particular IP addresses. ‘Always bind all IPs’ will allow connections on all IP addresses that are configured for the machine.

Enterprise Edition Configuration Guide v 3.0
Page 62
5.2.2 Advanced
Figure 5-5 POP Properties Advanced TAB
Setting Description
Use alternate welcome message
This is the welcome message which is displayed to email clients connecting to the service.
Inactivity timeout
Set the inactivity timeout for the POP service. If a connection is inactive for longer than the timeout period (in seconds) then the connection will be closed.
Allow concurrent mailbox access
By default POP servers only allow one connection to a mailbox at any time. Enabling this will allow multiple connections to the same mailbox. Be aware that some POP email clients expect they are the only connection to a mailbox and may produce warning or error messages if another connection deletes email during the connection
5.2.3 Logging
Setting Description
Enable Logging
Enables W3C logging for the POP service. W3C logging can specify which fields are logged and the rollover frequency. The directory can also be specified.
Logging Options
Produces a debug and activity log for the POP3 service. Use this to obtain more details about the service.

Enterprise Edition Configuration Guide v 3.0
Page 63
5.3 POP Retrieval connector
The POP Retrieval connector can retrieve email from remote POP sites and deliver to local mailboxes. Administrators are able to configure this through the administration program, and if enabled for web mail, users can configure it for their own mailboxes.
Using the Administration program, access the POP Retrieval Connector properties by expanding the Servers > Localhost >Connectors branch.
Right click on the POP Retrieval icon and select Properties. The options are explained below:
Note: Do not configure POP Retrieval to pull email down from the local server.
Figure 5-6 POP Retrieval Properties
Property Explanation
Poll Interval The delay between polling the remote mail server.
Max. number of threads
The maximum number of threads that the polling agent uses to poll remote mailboxes.
Days to keep history
In order to stop downloading the same email every time a poll is performed, MailEnable keeps a history of the messages downloaded from each server. In order to conserve resources, it is possible to specify how many days to keep this history of messages.
Add received header to retrieved emails
Emails retrieved via the POP Retrieval connector will be ordered in email clients at the time that they arrive in MailEnable. To avoid this, disabling this option will order them in the time that the arrived at the remote mail server.
Enable logging Enables logging for the service.
Advanced Logging This is the configuration and the enabling of each log namely the activity, debug and W3C.

Enterprise Edition Configuration Guide v 3.0
Page 64
5.4 List server connector
The List Server connector is mostly configurable through the creation and management of particular lists as described earlier in this manual.
Figure 5-7 List Server connector properties
Property Explanation
Generate posting failure notifications
By ticking this box, if a message is sent to a list and is rejected due to sender being rejected or incorrect password, then a posting failure notification is sent. Disabling this feature can help reduce traffic where spammers have sent to the address and used a forged email address.
Advanced Logging This setting allows the logging of list activity and any problems that may arise. To improve speed and to not create logs disable the activity and debug logs.
5.5 Post office connector
The post office connector performs the delivery of emails to mailboxes. It is responsible for executing mailbox filters, delivery events, auto responders and quota handling.
It is possible to determine whether the user is notified of the quota issue and whether the message is returned to the sender or sent to the postmaster for that post office.
MailEnable can configure what notifications are sent when a quota is reached, such options such as, Notify Sender only, notify sender and mailbox and send no notifications.
Non Delivery Receipts can be configured options such as not sending NDRs or allowing the SMTP service to handle and send all default Non Delivery Receipts.
Using the Administration Console you can access the Post Office Connector properties by expanding the Servers >Localhost >Connectors branch.
Right click on the Post office icon and select Properties. The options are explained below:

Enterprise Edition Configuration Guide v 3.0
Page 65
Figure 5-8 Post Office Connector Properties
5.5.1 General
Setting Description
When mailbox has reached quota
Specify what occurs when a mailbox’s quota is exceeded. Determine whether the user is notified of the quota issue and whether the message is returned to the sender, or, sent to the postmaster for that post office.
Notifications when quota is reached
Configure what notifications are sent when a quota is reached, such options such as, notify Sender only, notify sender and mailbox and send no notifications.
Quota enumeration When a mailbox is at its quota, it can be calculated in two different ways.
1. Only Inbox folder counts towards quota
2. All users mail folders counts towards quota (Example: Sent Items, Drafts, Inbox)
Auto responders enabled
When this setting is enabled there are two selections;
1. The default setting to “Always respond to the sender”
2. Send one response per sender per day can help reduce the problem of spammers generating unnecessary mail. Also if a sender needs to send to a MailEnable mailbox that has an auto responder configured, then they will not receive more than one auto-responder per day.
If the check box is cleared then the auto responder feature is disabled. This can aid in the diagnosis of mail loops or any possible auto responder issues.
NDR Generation Non Delivery Receipts can be configured. Options such as not sending NDRs or allowing the SMTP service to handle and send all default Non Delivery Receipts.

Enterprise Edition Configuration Guide v 3.0
Page 66
Redirection handling
Redirection handling has the following settings:
1. Normal redirection - will redirect emails. Redirected emails have the envelope sender of the original message preserved.
2. Remail from mailbox address - will redirect and send using the default email address for the mailbox. If a default address has not been set, the first address found for the mailbox will be used. This option will help prevent rejections from remote servers who are using SPF checking.
3. Disable all redirections – will prevent any redirections configured for a mailbox from working.
5.5.2 Logging
Figure 5-9 Post office properties - Logging
Setting Description
Logging Enables the activity and debug logs for the post office connector.
5.6 IMAP service
IMAP4 is a mail protocol that allows users to be disconnected from the main messaging system and still be able to process mail. Users can store messages on a local machine or on a server.
IMAP has distinct advantages over POP because it allows management of multiple folders on the server. Mail can be accessed from different machines, as the mail is hosted on the server (unlike POP which deletes mail from the server after being accessed) and allows the user to just download message headers and envelope information, until the user selects the email to download. This is useful when operating over slow speed dial-up connections.
IMAP4 can break up and download specific parts of a multi-part email message (MIME). This means that instead of having to wait for an email with attachments to download, it is possible to select only the text portion to download, and leave the attachments on the server.
Using the Administration Console, access the IMAP properties by expanding the Servers > Localhost > Services branch.

Enterprise Edition Configuration Guide v 3.0
Page 67
Right click on the IMAP icon and select Properties. The options are explained below:
Figure 5-10 IMAP Properties
5.6.1 General
The setup of IMAP is relatively simple, as it is a service that is bound to a listening port similar to HTTP. The IMAP service listens on this port and receives mail and various commands from the server. It is important to enable the default port of 143 on the firewall or any other port number stipulated in the properties of the IMAP service in the administration program as above.
To help in server traffic and load, also stipulate which IP address to bind the service to.
Setting Description
Max Concurrent connections (threads)
The number of threads that will be used by the IMAP service to handle client requests.
IMAP port Port for listening on. Default is 143.
IMAP Enable SSL (Default Port)
This will enable SSL certificate encryption for the default port that IMAP is running on. Place a tick in this box to enable the service. This also has to be enabled at a server level in the MailEnable Administration program under > Server >Localhost Properties > SSL tab.
Also listen on alternate port
An alternate port can be selected.
IMAP Enable SSL (Alternate Port)
This will enable SSL certificate encryption for the alternate port that IMAP is running on. The default port number is 993. Place a tick in this box to enable. The service also has to be enabled at a server level in the MailEnable Administration program > Server > Localhost Properties > SSL tab.
Client Connections
Select either an unlimited number of client connections, or specify a maximum number of concurrent connections. Specifying a maximum number of connections may reduce server load by limiting the threads that IMAP can use.

Enterprise Edition Configuration Guide v 3.0
Page 68
Enable public folders
Public Folders allow one or more mailboxes under the post office to share data (messages in a folder that is seen by all mailboxes in the post office.)
Anything placed in this folder (Program Files\MailEnable\Post Offices\[Post Office Name]\Pubroot) will become visible to all other mailboxes in the post office. This feature must be enabled for the post office in Post Office Properties.
Enable NTLM authentication
If enabled then secure authentication between the server and the supported client is enabled. This will allow the server to accept requests from the client to use secure transmissions for the authentication method. The client also has to be enabled use this secure authentication. For example, in Outlook the feature is called SPA – Secure Password Authentication. More information on NTLM can be found in section 14.1
Enable CRAM-MD5 authentication
CRAM-MD5 Challenge-Response Authentication Mechanism is intended to provide an authentication extension to IMAP4 that neither transfers passwords in clear text nor requires significant security infrastructure in order to function. Only a hash value of the shared password is ever sent over the network, thus precluding plaintext transmission.
Timeout for idle connections
If this setting is enabled and a client connection has not passed any commands to the server for the set period of time, the connection will be dropped by the server.
IP Addresses to bind to
It is possible to select the IP addresses that the POP service will be bound to. On a multi-homed machine it may be desirable to only allow connections on particular IP addresses. ‘Always bind all IPs’ will allow connections on all IP addresses that are configured for the machine.
5.6.2 Logging
Figure 5-11 IMAP Properties – Logging TAB
Setting Description
Logging Options
MailEnable's IMAP Connector provides W3C, activity and debug logging. W3C logging is used to record service usage, Activity logging is used to record system activity and debug logging is used to provide low-level information on system activity.

Enterprise Edition Configuration Guide v 3.0
Page 69
5.7 HTTPMail protocol
HTTP is the protocol that handles web traffic. It defines how web pages are formatted and the way they are delivered over the Internet. It also includes any information about the objects that are needed by proxy servers or a user's web browser. HTTPMail is a relatively new protocol for the server hosted messaging services. HTTPMail provides an alternative to using POP and SMTP, with the added benefit of allowing messages to be hosted on the server (rather than downloaded onto the client). Further to this, using HTTPMail, messages can be moved between the server and local stores as required.
HTTPMail utilizes WebDAV HTTP Extensions to provide remote access to server hosted mail folders using standard HTTP communication. This service allows mail messages to be hosted on the server and provides tight integration with Outlook 2002 (and later) and Outlook Express, although subfolders are not supported in HTTPMail. Unlike IMAP, it does not require SMTP to send messages. HTTPMail posts messages into the post office where they are either locally delivered or dispatched through the SMTP Connector.
Another benefit HTTPMail has over using POP and SMTP, is that it can be configured to operate over Port 80 enabling access to mail through corporate firewalls.
Using the Administration Console you can access the HTTPMail properties by expanding the Servers >Localhost >Services branch.
Right click on the HTTPMail icon and select Properties. The options are explained below:
Figure 5-12 HTTPMail Properties dialog box
Setting Description
HTTPMail Port The HTTPMail service will listen for connections on this port.
Session timeout Determines how long a connection will remain active for.
Enable public folders for post offices
Public Folders allow one or more mailboxes under the post office to share data (messages in a folder that is seen by all mailboxes in the post office.)
Anything placed in this folder (Program Files\MailEnable\Post Offices\[Post Office Name]\Pubroot) will become visible to all other mailboxes in the post office. This feature must be enabled for the post office in Post Office Properties.

Enterprise Edition Configuration Guide v 3.0
Page 70
IP addresses to bind HTTPMail to
It is possible to select the IP addresses that the HTTPMail service will be bound to. On a multi-homed machine you may only wish to allow connections on particular IP addresses. ‘Always bind all IPs’ will allow connections on all IP addresses that are configured for the machine.
5.7.1 Configuration
HTTPMail requires very few configuration settings. The major configuration settings are the IP address(es) and port bindings for the HTTPMail Service. If the option to install HTTPMail is selected, the service is published on port 8080 of the server (it is possible to change this setting to an alternate port, but 8080 is the default so that the service does not conflict with any existing web services that may be running). Features of HTTPMail can be enabled or disabled via the administration program.
If using Outlook Express or Outlook 2002 as a mail client, select the mail protocol as HTTP and enter in the following details:
My incoming Mail Server is a HTTP server
My HTTP mail service provider is: Other
Incoming mail (POP3, IMAP or HTTP) server:
http:// Your Server: 8080/MEHTTPMail
Since HTTPMail is an authenticated service, use the usual account credentials when prompted (i.e.: User@ Your Account/Postoffice). For a more detailed explanation of configuring HTTPMail for mail clients, please see section 11.6.
5.8 Mail Transfer Agent (MTA)
The Mail Transfer Agent (MTA) is primarily responsible for moving messages between connectors. The MTA moves messages from inbound queues to the respective outgoing queues of different connectors based on rules defined in an Address Map table.
Examples of MTA functionality follow:
Receiving inbound messages from mail connectors
Delivering mail to local mailboxes
Queuing mail for relay to other mail connectors (including themselves, as in SMTP Relay)
Executing external filters (such as antivirus) and pickup events

Enterprise Edition Configuration Guide v 3.0
Page 71
5.8.1 MTA properties
Figure 5-13 MTA Properties
The configuration options for the Mail Transfer Agent are outlined in the following table:
Setting Description
Inbound mail max. delivery time
The delay time before an inbound mail message is delivered.
Maximum threads
The number of concurrent threads that will be used to move emails around. Some command line virus checkers do not function correctly with multiple instances running, so the MTA can be restricted to using one thread to resolve this.
Enable pickup event
Executes a program or application when mail arrives. MailEnable will pass the mail message filename to the application. For example, if you write a VB script that adds some text to the end of each email that gets delivered, you would enable the pickup event. The command line used to execute the application is:
program messagefilename connectortype
Where program is the program filename, messagefilename is the name of the message file and connectortype is the type of messages (i.e. SMTP, LS, SF). Be aware that the directory path to the message is not passed to the program. The directory path will need to read from the registry in the program file. The pickup event is executed before any filters (antivirus for instance).
Logging Options
Produces a debug and activity log for the POP3 service. Use this to obtain more details about what the service is doing.
5.9 Web mail
The web mail information in this manual includes configuration and the various server options. For details on using web mail, please check the MailEnable Web Mail User Guide within the Start Menu >MailEnable Program Group >Documentation.

Enterprise Edition Configuration Guide v 3.0
Page 72
Web mail is a mail application that allows clients to send and receive email via the Internet. Once installed, web mail can be accessed from http://HostName/mewebmail - in place of the HostName in this example, use the server name as defined in DNS or under IIS. The IP address of the machine can also be used. When browsing to this location, a logon screen will be presented. Users should use the same username and password that the POP service uses. Remember that the username is formatted as: mailboxname@postofficename -if a default post office has been set using the administration program, there is no need to use the @postofficename after the mailbox name.
Leveraging Internet Information Services versions 4.0 and above, the web mail component can provide messaging services via the web browser. Users can access the messages hosted on the server to send and receive email via a web based front end.
Some of the features of MailEnable web mail include:
Add attachments to emails
Contact list
Management of POP retrieval
Configure redirection
Reply, reply to all, forwarding, read receipts, message priority
Viewing & editing of HTML mail
Support for various character sets (Big5, etc.)
Auto-signature
Manage folders
Configure POP Retrieval
Custom skins
MailEnable web mail is installed as a Virtual Directory under an existing IIS Web Site. Typically there are two web sites that are pre-configured under IIS, these are the “Default Web Site” and the “Administration Web Site”. IIS allows additional sites to be created (either using host-headers or additional IP addresses) using the Internet Services Manager.
5.9.1 Enterprise web mail features
The following features are available in the Enterprise web mail:
Configure web mail layout per domain
Configure web mail skin per domain
Save items as draft
Import contacts from Outlook and Outlook Express into web mail
Configure filters via web mail
Manage personal calendar items
Configure whether users can change passwords through web mail
Global contacts
Public folders
Rich text editing
Sub folders
Mailbox spam rules/filtering
New message notification
Quota usage display
Compose/view messages in a separate window
Enterprise Edition Configuration Guide v 3.0
Page 73
5.9.1.1 Calendaring support
MailEnable Enterprise Edition includes personal calendaring support, whereby a personal diary of appointments can be kept, as well as the ability to create meetings and invite others to attend.
5.9.1.2 Import contacts into web mail
The following is a list of field mappings that MailEnable uses when importing contacts into web mail. The first column is the text header that is looked for in the import file, and the second column is what MailEnable maps this to. The columns do not need to be in order.
"E-MAIL" Email address
"E-MAIL ADDRESS" Email address (if empty, then E-mail field is used)
"LAST NAME" Last Name
"FIRST NAME" First Name
"TITLE" Title
"NAME" Full name (if empty, then First name plus Last name are used)
"MIDDLE NAME" Middle name
"BUSINESS PHONE" Phone Work
"HOME PHONE" Phone Home
"MOBILE PHONE" Phone Mobile
"BUSINESS FAX" Phone Work Fax
"HOME FAX" Phone Home Fax
"COMPANY" Business
"DEPARTMENT" Department
Be aware that when users generate CSV files for import, that if they are using non-English client applications, that the first row may not be in English. This will prevent the import from being able to correctly match the columns and create the contacts.
5.9.1.3 Mailbox web mail filtering
Web mail mailbox filtering allows the mailbox owner to define rules that are applied to messages when they are delivered to their mailbox. Filtering must be enabled for the mailbox in the administration program in order for this option to be available for users. See section 4.4.2.9 Filters for information on enabling filters.
To access the mailbox filtering, open the Options page in web mail and select Filtering to open the filter list page. To create a new filter, follow these steps:
1. Give the filter a name; type the name in the filter description field.
2. Select the criteria to be used by the filter, by placing a tick in the tick box. (more than one criteria may be used.)
3. Select an action to be used for when the criteria is met.
4. Click on Apply to set the filter configuration.
Filter criteria:
Setting Description
Message To Filters any messages that contain email addresses specified in the Message To field. Generally used to filter recipient addresses.
Message Cc Filters any messages that contain addresses that have been entered in the Cc criteria field. Used to filter out addresses in the Cc field.

Enterprise Edition Configuration Guide v 3.0
Page 74
Message To and Cc
Filters messages that have either the To field or the Cc field that contain addresses that have been entered in the To or Cc criteria fields. Same as To and Cc but it checks if any of the two fields has addresses.
Attachments Filters any messages that have attached file extensions that have been specified in the attachment criteria field. Additional file extensions can be added to the list.
Message subject contains
Filters any messages that contain specific words entered into the Message subject criteria field.
Message contains Filters any messages that contain specific words entered into the Message contains field. Filters out messages containing the words used in the criteria in the body of the message.
5.9.2 Web mail server configuration
Features of web mail can be enabled or disabled via the administration program. The web mail properties are divided into three sections.
1. The first is the General options for how the web mail is globally configured.
2. The User options are for the user settings and options available.
3. Site options is for configuring the web mail on the various websites that are available under IIS.
5.9.2.1 General
Figure 5-14 Web mail properties
Setting Explanation
Enable Global address lists
Makes global address lists visible to web mail clients when a user selects the address “TO…” link in a new message. Global address lists are created in the administration program.

Enterprise Edition Configuration Guide v 3.0
Page 75
Enable Public folders
This allows usage of public folders within MailEnable.
Once enabled at a server level, it is possible to enable the public folders for each post office. To do this at the server level, navigate to Administration program>Messaging Manager>Post Office Properties>Message Store TAB>Enable public folders.
Once public folders has been enabled for a post office, any directory or folder created in the following location will be made public or shared by all users in that post office.
C:\Program Files\MailEnable\Postoffices\[post office name]\PUBROOT
Note: In web mail the public folder(s) can be seen but copying or moving messages to the public folder(s) is not possible.
Enable personal calendaring
This enables a calendar to be viewed and managed in web mail. This is not a shared calendar - each mailbox has its own calendar that can be used when logging in.
Enable notification of new emails
MailEnable allows for an alert pop up in the Windows task bar when the web mail inbox has received a new message. If the alert happens too frequently then the polling interval can be set by changing the value here “Check Every” – “X” number of minutes.
Display HTML mails in preview window
Selecting a message in the inbox the web mail message will be automatically displayed in the preview window underneath the inbox list. The main reason for not viewing in HTML would be performance reasons and, in some cases, security.
Create URL and email hyperlinks for plain text messages
Enables the underlining and HTML link creation for emails and URLs in a message formatted in plain text format.
Remove unknown tags and scripts from HTML emails
This option rebuilds HTML emails to remove any scripting or unrecognised HTML items in order to help prevent exploits or oddities from occurring.
Prevent the loading of remote images in HTML emails
When displaying HTML emails, links to external images can indicate to a remote server that you have read the email (so spammers know that it is a valid email address). This option will prevent any image from displaying in an email if the image is not contained within the email itself.
Number of messages per page
Controls the number of messages that will be displayed on the screen in the inbox list at one time.
Height of messages per page
The height (in pixels) of the message list on the screen. This will in turn affect the message display area. The more messages displaying in an inbox the less of the message display area that will be viewable without scrolling.
5.9.2.2 User
Setting Explanation
Users can configure POP Retrieval items
Determines whether the user can configure POP retrieval in the web mail options tab.
Enable Redirection for web mail
Determines whether web mail users are permitted to redirect their mail to alternate addresses.

Enterprise Edition Configuration Guide v 3.0
Page 76
Enable auto responder configuring
Determines whether web mail users are permitted to configure auto responses for their mailbox (e.g. Out of Office automatic replies).
Users can set their display name
Allows users to specify the friendly name to be used.
Users can set their display name
This allows a user to create a friendly name in the web mail options. This display name will only be used when sending from web mail.
Users can change passwords
This gives a mailbox user the ability to change their password in the options of the web mail.
Users can create filters
This allows the user to create filters inside the options of web mail. A limit can be placed on the number of filters each user can create. The filters that are available for each mailbox are as follows;
Message From:
Message To:
Message CC:
Message To or CC:
Attachments:
Message Subject Contains:
Message Contains:
Default Character Set
This is the character set that will be used as the default for web mail users. Users can change this option once they log in under the Settings option page. By default the character set is US-ASCII which does not cater for extended characters. If emails that have been sent from web mail and are missing extended characters or they are displayed incorrectly, it could mean that the user has not set their character set.
Default time zone
This is the time zone that will be used as the default for web mail users. Since the web server is accessible by users throughout the world, the server needs to adjust the displayed date of the messages in a user’s folder to properly reflect the time relative to their location. For example, if a user in Australia was using web mail on a server in the United States, they would want to see their inbox list displayed with the received date of the messages in their local time instead of a US time.
To do this, the web mail browser sends to the server the time zone offset configured on the client computer. If the client computer does not have the correct time zone configured, they will not see the messages with the correct times.
5.9.2.3 Site options
Setting Explanation
Base to use for sites which do not have one configured.
To set the base design for all sites, make a selection from the drop down combo box.

Enterprise Edition Configuration Guide v 3.0
Page 77
Site Configuration If the “Configure…” button is selected the “Site Configuration” screen is displayed (see Figure 5-15 Site configuration screen. This is where skin and web mail display options can be set on a per post office basis.
The screen will list all the web sites that are published under IIS. Web mail can then be installed or removed for each of these sites. By making selections within this screen the available skins can be seen and you can check what skins are available for the MailEnable web mail server base that you have selected and choose a base skin for a selected site.
See section 5.9.3.3 Web mail skin selection for more details.
Enable Web mail logging
This will enable and log web mail usage. The higher the level the more actions by a user that are logged. The default path to where this log file is saved is:
Program Files\MailEnable\Logging\Webmail
5.9.2.4 Logging
Web mail logging creates a web mail log file in your MailEnable directory. This feature should only be enabled if there is a requirement for additional logging or to debug/diagnose the web mail service.
Setting Explanation
Logging status
The logging status can be set to either ‘Disabled’, ‘Log to Debug log’ or “Log to Windows Event log’. The sliding bar sets the level of logging from low to high. Low level logging includes only logins, high level logging includes listing messages, folders, sending, receiving, actions, and retrieval.
5.9.2.5 Spam
The “Report as spam” web mail option allows web mail users to mark messages as spam and have an action perform on them. The following table lists the actions that can be undertaken when a webmail user marks a message as being spam:
Setting Explanation
Use post office settings Use the post office level setting,
Move spam to post office reported folder
The post office reported folder is:
Mail Enable\Post offices\[post office]\mail root\SPAM\Reported
Move spam to global spam folder
The global spam folder is the one selected under the Report as spam option.
Delete message Any message that is marked as spam will be deleted.
Mark the sender IP as spam source
Extracts the sending IP address of the message from the headers of the message and creates 2 records in the following locations:
Config\Postoffices\Postoffice\Connections\Spam
Config\Connections\Spam
The SMTP connector (and custom filters) can then use these records to determine whether or not to refuse mail from the IP address.
This action is configured in the administration program either globally or at a post office level. Global settings will override post office settings.

Enterprise Edition Configuration Guide v 3.0
Page 78
5.9.3 Publishing via host headers or virtual directories
MailEnable provides two ways of publishing web mail (or web administration) via the Internet. These approaches are referred to as configuring “Host Headers”, or a “Virtual Directory”.
The “Host Header” option allows web mail (or web administration) to be published through a single IIS web site. When a browser requests the URL, the host name portion of the URL request is mapped to the IIS web site that is publishing the MailEnable web mail (or web administration) application. This approach means web mail can be accessed through a URL like http://webmail.domainname or http://webadmin.domainname.
5.9.3.1 Publishing web mail through host headers
MailEnable Web Applications can be published through host headers through the following branch in the Administration Program:
MailEnable Administration > Servers > localhost > Services > Web Mail
The list displayed in the right hand pane contains the host names to which users can access the MailEnable application. To add a new host header, right click on the list and selecting New > Host Header…
This will present the following dialog which specifies the host name (e.g. webmail.yourdomain), the IP address that the host name is published as under DNS, and the port number.
The web mail skin, base and default language that will be used when someone attempts to access web mail via the given hostname can also be selected.
5.9.3.2 Publishing web mail through virtual directories
It is also possible to configure which IIS Web Sites can access web mail. To enable web mail access from multiple web sites on the server, a virtual directory can be created under each of the sites on the server. A utility that does this can be found in the administration program in the following location:
MailEnable Management | Servers | localhost |Services | WebMail | Properties | General.
Select the Site Options tab and Configure to bring up the Site Configuration screen. This utility appears as shown:
Figure 5-15 Site configuration screen
The utility lists all the web sites that are published under IIS. It is then possible to install or remove web mail on each of these sites.
Select the web sites to install web mail for by placing a tick in the box next to the site name. Then select the ‘Install web mail for selected sites’ button.
Web mail can be removed from web sites by placing a tick in the box next to the site name and selecting the ‘Remove web mail from selected sites’ button.

Enterprise Edition Configuration Guide v 3.0
Page 79
5.9.3.3 Web mail skin selection
MailEnable allows for the configuration of web mail bases and skins on a per server or domain basis. A web mail base is the viewable design or style sheet that the end user of web mail can use. Usually, these will have different features.
Within the administration program there is an option to set the server level base web mail design. See section 5.9.2.3 for information on setting the server level base design. This will be the default base for every domain on the server providing one has not been set for a particular domain, which would override the server setting.
To choose a base skin for a selected site or sites;
1. Select the site(s) in the top view by placing a tick in the tick box next to each domain or web site.
2. Select the button labeled Choose base for selected sites.
3. This will bring up a selection window. Using the drop down combo box, select the desired base for each of the web sites selected.
Once a base is selected per site or server, then it is possible to select a skin on a domain basis or web site basis. (also this generally occurs the same way in selecting a base).
4. To select a skin on a domain or website basis;
5. Place a tick in the tick box for each domain
6. Select “Choose Skin for selected sites…”
7. This will bring up a selection window. Using the drop down combo box, select the desired skin
8. Note: When selecting a skin, you need to make sure the skin exists in the base folder selected.
5.9.3.4 Web mail skin availability
This option allows skins to be made “Private” or “Public” for a selected URL in the Site configuration screen. To do this, select the Skin Availability button. Highlighting the skin and double clicking will toggle availability between ‘private’ and ‘public’.
Private – Skin will be unavailable for selection in the skin dropdown menu of web mail’s login page.
Public – Skin will be available for selection in the skin dropdown menu of web mail’s login page.
5.9.4 Configuring a host header for a website
To configure a host header for a website in the Site configuration window, launch the IIS manager in Windows Control panel >Administrative Tools >Internet Information Services.
5.9.4.1 Steps to configure a host header:
1. Navigate to the Web site tab and
2. In the website identification section, select Advanced
3. In the next window is it possible to configure multiple identities for the website
4. Select Add and select an available IP address in the dropdown menu, TCP port number and the host header name to be used.
5. Select Apply and exit IIS manager.
5.9.4.2 Host header skin configuration
6. In the Site selection window, select the website with the configured host header identity. This will open a site configuration window for the host header identities configured in IIS for the selected website.
Default Post office – designates a particular post office configured in the administration program for a host header name selected in the list.
Base – select a base site for a host header name selected in the list
Skin – host header name skin selection.
Language – language selection for the host header name site.

Enterprise Edition Configuration Guide v 3.0
Page 80
5.9.5 Web mail properties
Right clicking on a host header in the right hand screen under MailEnable Management > Servers > Web mail will then allow the web mail layout to be configured.
The IIS host details section configures a host header to add to the MailEnable web mail site that is configured under IIS during the initial installation of MailEnable. The host name, IP address and port are added to this site in order to direct users to the web mail.
Setting Description
Host name
The host name is the domain name users type in their web browser to access the web mail. You may wish to give the web mail a URL similar to webmail.example.com. A DNS entry has to be created in order to direct users to the IIS server.
IP Address
The address that the host header will be bound to. The DNS entry for the host name has to therefore point to this IP address.
Port The port that the host header will listen on
Base Set the base (Professional or Enterprise Edition) for web mail
Skin Set the skin for the web mail interface
Language Set the language for the mail interface
5.9.6 Browser compatibility
The following is a list of browsers that are compatible with composing HTML in web mail.
Browser Operating System
Internet Explorer 5.5 + Windows
Firefox Windows, Linux, Unix, Mac
Mozilla 1.7+ Windows, Linux, Unix, Mac
Netscape 7.1+ Windows, Linux, Unix, Mac
5.10 Web administration
“Admin” users, can manage users/mailboxes, lists, groups, and domains. If multiple post offices are being hosted (e.g. one per customer or company), each company can manage their own configuration.
Some of the many features are:
Works with IIS4.0 and greater, allowing easy integration
Manage domain related information
Manage the creation of email addresses
Manage email lists and groups
Custom skins, leveraging skins from web mail

Enterprise Edition Configuration Guide v 3.0
Page 81
5.10.1 Web administration server configuration
MailEnable Enterprise Edition provides an enhanced version of web administration. This console is better suited to managing post offices with thousands of users.
Web Administration is installed as an optional MailEnable component. The MailEnable installation program is configured to install web administration by default (i.e. it will only not be installed if you changed the options when you installed MailEnable). It is possible to validate whether web administration is installed by reviewing the MailEnable Diagnostic Report.
Ensure that web administration is enabled for a post office. This is done through the administration program.
1. Expand the MailEnable Administration program >Messaging Manager >Post Offices branch.
2. Right click on the post office name, and select Properties from the popup-menu.
3. A property page dialog will appear. Select the Web Admin tab at the top of the window to enter the properties page for the web administration.
4. To enable web administration, select the Enable web administration for post office checkbox.
Figure 5-16 Web Administration Set-up
It is now possible to configure the various options that the post office administrators can have access to. It is not recommended to give users the ability to add and edit domain properties, since changes or additions can cause problems with mail delivery.
Once web administration is enabled, specify which of the mailboxes in the post office are able to act as administrators. This is outlined below:
5. Right click on the desired mailbox and access the Mailbox Properties > General tab
6. Select ADMIN from the drop down list labeled Mailbox Type. If the mailbox has the ADMIN option selected, then the account can access the Web administration options for the post office that they belong to. If however the mail account has the option of SYSADMIN then the user can administer all post offices on the server; not only the one they are a member of.

Enterprise Edition Configuration Guide v 3.0
Page 82
5.10.2 Site configuration
The site configuration screen will list all the web sites that are published under IIS. Web administration can then be installed or removed for each of these sites. The site configuration screen can be accessed via MailEnable Management > Servers > Web admin. Right click and select Properties. The following screen will appear:
Figure 5-17 Site configuration for web administration
To configure web administration layouts (e.g. base, skin selection, language) by web site requires host headers to be configured. Please refer to section 5.9.4 for more information on how to configure host headers.
5.10.3 Web administration properties
Right clicking on a host header in the right hand screen under MailEnable Management > Servers > Web admin will then allow the web administration layout to be configured.
The IIS host details section configures a host header to add to the MailEnable web administration site that is configured under IIS during the initial installation of MailEnable. The host name, IP address and port are added to this site in order to direct users to the web administration.
Setting Description
Host name
The host name is the domain name users type in their web browser to access the web administration. You may wish to give the web administration a URL similar to webadmin.example.com. A DNS entry has to be created in order to direct users to the IIS server.
IP Address
The address that the host header will be bound to. The DNS entry for the host name has to therefore point to this IP address.
Port The port that the host header will listen on
Base Set the base (Professional or Enterprise Edition) for web administration
Skin Set the skin for the web administration interface
Language Set the language for the web administration interface

Enterprise Edition Configuration Guide v 3.0
Page 83
5.10.4 Accessing web administration
Once installed, Web Administration can be accessed from the following URL:
Example: http://HostName/meadmin
In place of the HostName in the above example, use the server name as defined in DNS or under IIS. The IP address of the machine can also be used.
When browsing to this location, the Web Administration logon screen will appear.
Note: In order to allow someone to log onto the web administration, a mailbox needs to be allocated to them in the MailEnable Administration program, and set the mailbox as “ADMIN”. Also ensure that the username is formatted as: mailboxname@postofficename
If the error “Invalid User” occurs, either the post office is not enabled for web administration or the mailbox is not set as an “Admin” user.
5.11 Management service
The management service is a general purpose feature which provides an interface to manage server wide properties. The management service includes:
Remote management agent
Mailbox clean-up agent
Quota management agent
Once the management service is enabled, the agents can be managed by clicking on the Management item in the following location.
MailEnable Management > Servers > localhost > Services > Management
5.11.1 Remote Management Agent
Options for configuring Remote Management are available by right clicking on the MailEnable Management > Servers > localhost > Services > Management icon.

Enterprise Edition Configuration Guide v 3.0
Page 84
Figure 5-18 Management Agent Properties
Remote administration will allow connection to a remote machine or cluster machine via the MailEnable administration interface. These remote servers can be added to the administration program (MMC) for ease of access, and they can then be managed in the same manner as a local machine using the MailEnable Administration program. The remote management services do not have the same complete functionality as local server management but most management features can be configured using the remote service.
Setting Description
Remote Administration Enabled
Enables the remote administration feature of MailEnable and binds the service to the specified port. This feature allows access and configuration of a remote server using the administration program.
Maximum number of concurrent connections
Limits the threads or connections that are available for this service on the bound port.
Listen Port The port that the service can listen on. (Default 8081)
Debug Log All purging and notification actions will be logged to a debug log.
IP Addresses to bind to Select the IP addresses that the Remote Admin service will be bound to. On a multi-homed machine it may be desirable to only allow connections on particular IP addresses.
5.11.2 Using Remote Administration
To connect to a remote server using MailEnable requires both the local and the remote server to be running a registered copy of MailEnable Enterprise Edition, with the Management Service running and connection to the service available through any proxies or firewalls on the designated port.
Step 1: Ensure the Management service is running and available as per the above instructions

Enterprise Edition Configuration Guide v 3.0
Page 85
Step 2: In the administration program, right click the MailEnable Management item in the tree view and select the ‘Connect to MailEnable cluster’ menu item.
Step 3: The following dialog will be presented:
Figure 5-19 Remote Management Login
Step 4: Enter the details in the username, password, server and port fields. Detailed descriptions are as follows:
Setting Description
Username The username on the remote server with permission to login through remote management.
Password The password for the account username provided
Server The IP of the remote server. That is, the IP that the management service is bound to on the remote server.
Port The port that the remote server has the IP for remote management bound to.
Step 5: Once these details have been entered, select the Login button.
The remote server can then be managed in the same way as the local server, using the administration program.
To confirm if the remote server is connected, ensure that the admin interface server shows the IP of the remote server found in the administration program under the Servers menu icon.
If the remote server is not visible, please review the connection specifics earlier in this chapter and retry connecting to the remote MailEnable server.
5.11.3 Mailbox clean-up agent
To access the Mailbox clean-up agent, navigate to MailEnable Management > Servers > localhost > Services > Management, select the Mailbox clean-up agent from the right panel. The Mailbox clean-up agent performs server-wide clean-up actions on the system and mailboxes. This agent is a purge utility that can be run to automatically delete mail that is older than a set number of days. It is possible to purge the Postmaster, All Post Office Inboxes, All Post Office Deleted Items, All Post Office Inboxes, and All Post Office Sent Items. The utility can be configured to purge emails from the Bad Mail and Quarantine folders on the server.
This purging interval is also relevant for the domain mailbox agents under:
MailEnable Management > Right Click on the Post Office >Properties>Agents Tab
The clean-up options for a post office are configured in the post office properties. See section 4.3.2 for information on configuring clean-up agents per post office.

Enterprise Edition Configuration Guide v 3.0
Page 86
Figure 6-22 Server Level Mailbox clean up agent
Setting Description
Enable Mailbox Clean-Up Agent on this server
Enables the polling and actions. The settings that have been configured for the Bad Mail or Quarantine folders are displayed in this screen. Also for the domain mailbox cleanup agent as mentioned in following section.
Polling interval for purging
Number of minutes between when the service will purge emails. In order to perform a purge, the service needs to examine each folder, and possibly emails for each user, which can be both time and resource intensive. It is recommended to time this so that it occurs only at off-peak times every few days, depending on the number of users configured on the server.
Properties (Folder clean up)
This can be set not to delete any unread messages and delete messages in folder over a specified number of days old.
5.11.4 Quota Notification Agent
To access the Quota notification agent, navigate to MailEnable Management > Servers > localhost > Services > Management, select the Quota notification agent from the right panel. Quota notifications are dispatched to all mailboxes on the server that exceed their quota. It is possible to configure whether or not quota notifications are enforced for the nominated post offices. See section 4.3.2 for information on configuring quota notifications per post office.
Figure 6-22 Server level Quota Notification agent properties dialog box
Enterprise Edition Configuration Guide v 3.0
Page 87
Setting Description
Enable Quota Notification Agent on this server
Quota notifications can be enabled or disabled for the server.
Quota notification interval
The quota notification interval determines how often the server will check for mailboxes that exceed quota. When a mailbox exceeds the quota, a message informing the user is placed in the Inbox for that mailbox. Only one notification message will appear in the Inbox, and if the mailbox remains over quota, this message will have its date changed so it appears as the most recent message. In order to check quotas, the service needs to examine the details for each user, which can be both time and resource intensive. It is recommended to time this so that it occurs only at off-peak times every few days, depending on the number of users configured on the server.
5.12 COM Component
This component can be used in any application that supports COM. For example, this component can be used in an ASP page to send email from a web application. This component will work against any SMTP mail server, not just MailEnable.
The COM component allows email to be sent to a mail server (this does not need to be a MailEnable mail server). Features include:
Attachment support
Easily create HTML emails
Custom headers
SMTP authentication
5.12.1 Configuring the server
There are no options to administer the COM component other than to control access to the DLL itself (using Windows permissions). This can be achieved by setting permissions on MEASP.DLL in MailEnable’s BIN directory.
IMPORTANT: If using the COM component, ensure that the appropriate relay rights have been granted to the application that is intending to use the COM component.
For example, to use the component to send mail from ASP on the local computer, ensure that relay rights have been granted to the local IP address of the computer.
5.12.2 Using the COM component
The COM component allows easy integration of emailing sending from within any COM supporting application. It not only supports sending email to a MailEnable server, but also can be used to send email to any SMTP compatible mail server.
5.12.2.1 Properties
Property Explanation
AttachmentFilename The name of the file that to add as an attachment.
AttachmentName The name to call the attachment.

Enterprise Edition Configuration Guide v 3.0
Page 88
AuthenticationMode Allows use of SMTP authentication.
0 = No SMTP authentication
1 = SMTP authentication. You must populate the Username and Password properties in order to authenticate
ContentType The ContentType of the email you are trying to send. For instance, if you wish to send a HTML email, use this property to set the content type to “text/html”.
ErrorString This contains the full English language description of the last error. If you encounter an error, you can check this string for a more detailed error.
MailBCC This is list of email addresses to BCC the email to. When using multiple email addresses, separate them with a semi-colon ";".
MailCC This is list of email addresses to CC the email to. When using multiple email addresses, separate them with a semi-colon ";".
MailCCDisplayName This is list of email addresses that are the display name corresponding to the email address set in MailCC. This list is optional. When using multiple email addresses, separate them with a semi-colon ";".
MailFrom This is the email address of the sender.
MailFromDisplayName The display name of the MailFrom email address. This is the friendly name that the end user will see instead of the email address. For example, you may place the full name of the sender, or the department from which the email is coming from.
MailTo The email address to send the email to. To send to multiple email addresses, separate the emails with a semi-colon ";".
MailToDisplayName This is the display name that will be shown as the To address. It is usually the full name of the recipient (e.g. "John Smith")
Messagebody The message contents.
MessageBodyText An optional property used to force the content for the textual content of the message. If the property is not set, MailEnable will generate a textual version of the message from the HTML content supplied (assuming the ContentType is set as text/html.
Password Password to be used for SMTP authentication.
Postoffice The post office name for the user
Server The email server to connect to. If none is supplied, it will try to connect to the local machine.
ServerPort The port to connect to. The default is 25.
Subject The subject of the email message.
Username Username to be used for SMTP authentication

Enterprise Edition Configuration Guide v 3.0
Page 89
5.12.2.2 Methods
Method Explanation
AddHeader Adds a custom header to the email. Be careful when using this function, as incorrectly formed headers could prevent the mail from being sent.
ClearHeaders Clears any custom headers that have been added with AddHeader. This would be used to send more than one message (i.e. put this call between the sends).
SendMessage Send the email that has been configured with the options. The function will return zero for failure and number greater than zero for success.
SetDefault Clears all the settings back to their default.
ClearAttachments Clears the attachments.
By setting the ContentType value to text/html, the component will generate a HTML and Plain Text representation of the message encapsulated in MIME format. You need only to set the ContentType property to text/HTML and, when the SendMessage method is called, the component generates the MIME encapsulated message with a multipart alternative content boundary. This boundary then contains respective text/plain and text/HTML boundaries. The mail client then determines which of the alternative content types it wants to read - based on the capabilities of the mail client or the users settings. If you set the MessageBody and MessageBodyPlain properties of the component, it will not generate a textual representation of the message and will use the property value specified for MessageBodyPlain.
5.12.2.3 Advanced settings
Server wide options for the MEMail component can be configured through the editing of Windows registry keys. If the registry key does not exist it will need to be added. These settings affect all uses of the component on the server.
The values are located under the following registry branch:
HKEY_LOCAL_MACHINE\SOFTWARE\mail enable\mail enable\Components\MEMail
Value Value Type
Description
Allow attachments
DWORD 1 (default) = attachments can be added to emails
0 = attachments cannot be added to emails
Attachment Path
String The path must include this string. If the postoffice or mailbox property value has been set on the object then the following variables can be used in the path:
%POSTOFFICE%
%MAILBOX%
If these values have been used in the path, but are not provided when someone is using the component then the path from "Default Attachment Path" will be used. The variables above cannot be used in the "Default Attachment Path" setting.
Default Attachment Path
String This path will be used if no path has been set in the "Attachment Path" setting.

Enterprise Edition Configuration Guide v 3.0
Page 90
5.12.3 Examples
5.12.3.1 Sending an HTML email from an ASP page
<% Dim oMail Set oMail = server.CreateObject("MEMail.Message") oMail.MailFrom = "[email protected]" oMail.MailFromDisplayName = "Test Account" oMail.UserName = "Andrew@mailenable" oMail.Password = "password" oMail.ContentType = "text/html;" oMail.MailTo = "[email protected]" oMail.Subject = "Welcome to our service" oMail.MessageBody = "<html><body><h1>Hello there,<BR>Welcome to our new
service.</h1></body></html>" oMail.SendMessage %>
5.12.3.2 Sending an email with an attachment
<% Dim oMail set oMail = server.CreateObject("MEMail.Message") oMail.MailFrom = "[email protected]" oMail.MailFromDisplayName = "Update Account" oMail.MailTo = "[email protected]" oMail.Attachmentfilename = "c:\documents\updateinfo_14_4.zip" oMail.Attachmentname = "updateinfo.zip" oMail.Subject = "New update information" oMail.MessageBody="Find the new info attached.” oMail.SendMessage %>

Enterprise Edition Configuration Guide v 3.0
Page 91
6 Using MySQL or Microsoft SQL Server The Provider Migration Utility allows the configuration data for MailEnable to be stored in either MySQL or Microsoft SQL server databases rather than the default TAB delimited files. The email data itself is not stored in the database. Using a database for configuration storage can improve performance when running with over 5000 mailboxes or addresses. The migration utility will move all the data between the different configuration types.
The Provider Migration Utility can be found under Start > Programs > Mail Enable > System Tools > Provider Migration Utility.
6.1 Installing ODBC driver
When converting from Tab Delimited files over to any SQL database, the machine must have an ODBC driver installed that corresponds to the database you are using. For example, to install the latest MySQL ODBC driver please go to the following link and select the driver available for the desired operating system:
http://www.mysql.com/downloads/api-myodbc.html
6.2 Initializing the repository
When the Provider Migration Utility is run it will present a dialog as shown below:
Figure 6-1 Provider Migration Utility
From the list, select the target repository to initialize by selecting the Provider and clicking Properties, or selecting an item. This example will assume Microsoft SQL Server. When clicking on the provider, the following dialog should be shown:
Figure 6-2 Data Source Logon

Enterprise Edition Configuration Guide v 3.0
Page 92
Leave the default values, with the exception of the Server Name.
If the target repository already contains data, then dialogue box will appear. To retain the existing data, select “No” when prompted to do so.
If a new database was created (by selecting “Yes”) then a prompt will be displayed informing that a new database has been created.
6.3 Migrating data between providers
At this stage MailEnable is configured to use both Tab Delimited Files, as well as the ability to store its configuration in Microsoft SQL Server. The Microsoft SQL Server repository will contain no data.
Figure 6-3 Provider Migration Utility
This utility exports the data from Tab Delimited Files to SQL Server. To export the data, select the Options button and then select the fields to migrate into the database.
Unless there is a specific reason for not doing so, select all fields and click OK.
6.3.1 Activating the current provider
6.3.1.1 Initialize
Now the data is ready to be initialized. This is where the database backend is configured, where tables and data fields are created. This action is required is to activate the new provider.
Once the Apply Changes button is selected, a dialog should be displayed that shows the status of the migration.
Note: It is good practice to compare the contents of the tables in SQL Server with the contents of the respective TAB files after an export is done.
6.3.1.2 Populate
The next step is to populate the database tables/fields that were created within the initialization routine with the data that was stored within the old tab delimited files. This may take several minutes if there is a substantial amount of data to be moved.
6.3.1.3 Activate
The final step is to activate the database. This is the most intricate part of the migration, as the process informs all the relevant engines that the SQL Server, MySQL or Tab Delimited files are to be used from this point onwards.
Once this has been completed, restart all MailEnable services including closing the administration program. It is advisable to reboot the server after this change as all registry settings are converted at this time.

Enterprise Edition Configuration Guide v 3.0
Page 93
6.3.2 Reverting to the former configuration provider
It is possible to revert back to your former configuration provider by selecting the provider in the list, and then clicking the Populate button followed by the Activate button.
Close the provider migration program and restart all MailEnable Services. It is advisable to reboot the server after this change.
NOTE: Most issues of database connectivity will be caused by one of the following:
1. Security/Permissions – Ensure that MailEnable has permission to access the Database
2. Environmental Issues (e.g.: Multilingual issues)
3. Network Connectivity – Network failures can be displayed in the Windows event log viewer.

Enterprise Edition Configuration Guide v 3.0
Page 94
7 Remote administration Remote administration uses the MailEnable Administration program to remotely connect to and manage servers. In order to remotely manage a server, MailEnable Enterprise Edition’s Management Service needs to be installed and configured on the backend MailEnable Server. See section 5.11.1 for more information on configuring the remote management agent.
To connect to a remote server, right click on the MailEnable Management icon and selecting Connect to MailEnable Cluster from the popup menu. This will prompt for authentication details as seen in the diagram below. To authenticate against a remote server, it is required to use a mailbox name that has its rights set to SYSADMIN.
Figure 7-1 Connecting to a cluster
Since a cluster can involve one or more servers, specify these servers when first connecting (the server that is being connected to is automatically added). Once these other hosts have been added, they are saved and will automatically appear when you next connect to the remote server. To add a new host, right click on the Servers item in the administration program and select Add host from the popup menu.

Enterprise Edition Configuration Guide v 3.0
Page 95
8 Message filtering MailEnable has two types of filters; global message filters and mailbox message filters.
1. Global message filters are processed by the MTA service and apply to all sent and received mail passing through the mail server. Global message filters are configurable by Administrators under the MailEnable Messaging Manager.
2. Mailbox message filters are processed by the post office connector service and apply to a message before it is delivered to a mailbox. These filters have a more limited selection of criteria and actions that can be applied. Mailbox filters can be configured in the administration program, or users can configure their own mailbox filters via web mail.
8.1 Global message filters
MailEnable’s Global Message Filters are configured under the Servers|localhost|Filters|MailEnable Message Filter section of the administration program.
When the MailEnable Message Filter branch is selected, the filters are listed in the right hand panel. Configure each of these by right clicking on them. By right clicking the Filters folder and selecting Properties, the system filters can be disabled or enabled for the server as shown in the diagram below.
Figure 8-1 Enable system filters
8.1.1 Global message filter properties
By selecting the properties of the MailEnable Message Filter branch, the general properties for the MailEnable Message Filter can be configured. These filter properties configure the infrastructure associated with content filtering.
The MailEnable Message Filter Properties window is shown below:

Enterprise Edition Configuration Guide v 3.0
Page 96
Figure 8-2 MailEnable Message Filter Properties
The configurable properties for the MailEnable Message Filter are outlined in the following table:
Setting Description
Activity Log
Specify the status and location of the activity log file generated by the filter. This log file contains details of the filters that have been executed and their respective status.
Scratch Directory
The Scratch directory is used by the filters to unpack messages for analysis. This occurs when messages are scanned by the integrated Antivirus agents (this process is explained in more detail later in this section). This is the directory to where MailEnable will decode the email attachments while scanning. Make sure this directory is not subject to real-time scanning by any resident antivirus application.
8.2 Creating a global filter
To add a new global filter;
1. Expand the Messaging Manager
2. Right click on Filters in the administration program
3. Select New > New Filter
4. A dialog box Add new filter item will appear.
5. To enable the filter tick the Filter is enabled tick box where the option to name the filter appears.
8.2.1 Standard filter criteria
Once a filter has been added, it will appear in the list of Filters. Right clicking on the filter and selecting Manage will manage the associated criteria. The following screen will be displayed.

Enterprise Edition Configuration Guide v 3.0
Page 97
Figure 8-3 Editing filter criteria
By selecting the criteria, it is possible to edit the associated attributes or conditions. As long as any of the criteria is matched, then the action(s) will be performed. Criteria for a filter can be enabled and disabled by ticking or un-ticking the box as shown above. Standard filtering when used in conjunction with each other will be considered with a case of OR separating the different criteria, for example;
Where the Subject header line contains specific words
OR
Where the message body contains specific words.
To use criteria with AND gates or a combination or AND/OR then scripted filtering is required which is covered further on in this section.
For filter criteria that rely on word or email address matching e.g. “Where Message Body contains specific words” or “Where the ‘To’ header line contains specific words”, wildcards can be used. Wildcards (*) can be used to locate a specific word that could be hiding in other words or characters (e.g. Filter identifies the word “porn” that is contained in the word Pornographic or 123porn1121). Wildcards (*) can also be used to cover a range of email addresses. The wildcard scenario can be used to complete an action on any message that arrives into the MTA from a specific domain. e.g. *@mailenable.com
Following is an explanation of each of the filter criteria.
8.2.1.1 Where the Subject header line contains specific words
Add and remove specific words to the criteria list by clicking the “Add” button. The criteria may be enabled or disabled by ticking the check box.
This filter is useful when incoming emails contain a re-occurring subject that needs to be filtered. Any word that is added into the filter list and is included within a subject line of a particular email going through the MailEnable MTA will be searched. If an exact match is found then the selected action (see 8.2.2 Filter actions) is completed.
8.2.1.2 Where Message Body contains specific words
Add and remove specific words to the criteria list by clicking the “Add” button. This filter is locates specific words in the body of the message (e.g. Viagra).
8.2.1.3 Where the 'To' header line contains specific words
This is used to specify a sender(s) email address. If an email address is matched, then the selected action is completed.

Enterprise Edition Configuration Guide v 3.0
Page 98
Enter email addresses here and then click the Add button. If multiple addresses are to be filtered, it is possible to add multiple addresses separated by a semi column - ensuring that no character spaces are contained in the entered line e.g. [email protected];[email protected]
8.2.1.4 Where the Cc header line contains specific words
The Cc criteria line is the same as the To criteria line in that any word or email address entered here will be identified by the filter. Cc is an abbreviation of carbon copy and in business terms is usually equated to “For Your inclusion” or “For Your Perusal”.
8.2.1.5 Where the ‘To’ or ‘Cc’ header line contains specific words
Filters words in the header lines in either of To and Cc fields. This is useful when messages contain a specific email address, that could be in the To or in the Cc fields of the message.
8.2.1.6 Where the 'From' header line contains specific words
Filter messages that contain a specific email address or domain name in the headers of the email.
8.2.1.7 Where the message is marked as priority
Filter emails that contain a priority. E.g. filtering all mail with a high priority.
8.2.1.8 Where the message size is more than the limit
Filter messages over a certain specified size limit. Tick the Size of message is greater than in the criteria properties window to enable the function and then specify the amount in bytes for the message size in the textbox.
8.2.1.9 Where the message has attachments
Filter particular file extensions attached to an email. To specify a file extension, the process is very similar to specifying email addresses or specific words. Simply type the file extension in the add window and select the Add button to add the file extension to the list. This filter can be used to find attachments containing viruses. This does not disinfect the file, however, the file can be moved or deleted by using an appropriate action.
8.2.1.10 Where the message has an attachment
Filters out emails with any type of attachment, i.e. filters emails that contain attachments of any file extension.
8.2.1.11 Bayesian filter spam probability
Filter to set the threshold for spam probability of Bayesian filtering e.g., define the filter to mark messages as junk if they have over 96.5% spam probability. See section 8.5 for information on configuring the Bayesian filter.
8.2.1.12 Where the message contains a virus
Scans a message for viruses using the virus checker (s) that have been configured in the antivirus settings. See section 8.2 for information on configuring the antivirus plug-in.
8.2.1.13 All messages
This criteria is processed for all messages.
8.2.1.14 Where the SPF test return results matching
This criteria enumerates the SPF test performed by the SMTP Connector and returns a nominated result.
8.2.1.15 Where the sender has authenticated
This criteria is met when the person sending the message has authenticated before sending the message. This relates to whether the sender has undertaken SMTP authentication.
8.2.1.16 Where the originators IP address matches
This enumerates the IP address of the person sending the message. It relates to the IP address that the SMTP transaction was received from.
8.2.1.17 Where the message is associated with this post office
Specify the associated post office for the transaction. MailEnable will attempt to allocate an associated post office for each message.

Enterprise Edition Configuration Guide v 3.0
Page 99
8.2.1.18 Where the message came from this MailEnable connector
Enumerates the connector that the message is being delivered from.
8.2.2 Filter actions
A filter action is an event that occurs when a filter criteria is met.
To create a filter action,
1. Select the filter to create an action for.
2. Select the criteria to create an action for.
3. Select the Add action button to add to the actions list. This will open an action list window.
4. Select the desired action and select the OK button.
Actions are performed in a prioritized list - first to last. To move a particular action in the list to a desired position, highlight the action to move and use the up and down arrows located to the right of the actions list.
The following is a description of the possible actions that can be performed when criteria is met.
8.2.2.1 Copy to badmail
A copy of the message is sent to bad mail folder. The message will still be delivered to the destination mailbox as well. To send to bad mail, and not deliver to the mailbox, create a Delete Message action to occur after the Copy to BadMail.
8.2.2.2 Copy to quarantine
Copies the message to the Quarantine folder. The quarantine folder is global area that filters can place email messages so they can be viewed or processed later by an administrator.
8.2.2.3 Delete message
Deletes the message.
8.2.2.4 Notify sender
This action will send a notification message to the sender of the message. The message filter allows system tokens to be inserted into notification message templates. When defining an action to notify a user with a message, a message template for the notification can then be specified.
The following table lists the tokens that can be used in message templates when constructing a notification message. Tokens are populated based on the criteria of the filter. For example, criteria for a filter that was specified to scan for viruses, only the “All” tokens and “Antivirus” tokens would be available within the notification template.
Token Name Description Applicable criteria
ME_ FILTERNAME Contains the name of the filter that executed the call All
ME_ ACTIONDESC The description of the current action that All
ME_MSG The system filename of the message All
ME_CON The system connector associated with the message All
ME_IP The originating IP Address of the message All
ME_ACCOUNT The account or post office “owning the message” All

Enterprise Edition Configuration Guide v 3.0
Page 100
ME_SENDER The sender of the message All
ME_ AVRESULT The antivirus agent return value Antivirus Scanning
ME_AVACTION The action performed by the antivirus agent when scanning
Antivirus Scanning
ME_AVAGENT The system name of the antivirus agent that was used to scan the message
Antivirus Scanning
ME_BADMAILSENDER The system BadMail Sender as defined under the SMTP connectors properties
All
ME_MID A system generated MessageID appropriate for the MessageID header
All
ME_HEADERS The RFC 822 headers of the original message All
ME_SZ The size of the original message Message Size Criteria
ME_SZL The size limit of the original message Message Size Criteria
ME_BFV The Bayesian filtering value resulting from the message
Spam Probability
ME_BFT The Bayesian filtering threshold for the message Spam Probability
8.2.2.5 Notify recipient
Sends a notification email to the recipient to inform them that an action has occurred on an inbound email. For example, if a message is deleted because an attachment is an executable, this option will notify the recipient that this has happened.
The same notification options as outlined can be used when performing the Notify Sender action (see section 8.2.2.4.)
8.2.2.6 Notify address
This will send a notification message to a specified address.
8.2.2.7 Forward to address
This filter action forwards the email to an email address.
8.2.2.8 Execute application
Execute an application on the email. Since the MTA may execute an action concurrently, make sure that the application specified can have multiple instances running. If not, it may be required to change the MTA service to only use one thread.
8.2.2.9 Add header
Adds a header line to the email. If the header line already exists it will be replaced.
8.2.2.10 Mark as spam
This will mark the message as spam, which will send the message to a users Junk E-mail folder if the post office option for this is set. See section 4.3.6 Feature selection for more information on this setting.
8.2.2.11 Add Subject Prefix
This action will add a prefix to the subject of the message. If the prefix already exists for the subject it will not be added.

Enterprise Edition Configuration Guide v 3.0
Page 101
8.2.2.12 Stop processing filters
This action stops the processing of any more filter actions.
8.2.3 Token Substitutions
Some actions can benefit from having text replaced with the value.
For example, if adding a header to a message, the header value could contain the [ME_CRITERIA] enumeration value to denote the name of the rule that caused the action to fire.
It is also possible to include the word or term that caused the filter to be triggered. For example, you could include the [ME_WORDLIST] token in the text associated.
[ME_CRITERIA] The short name of the rule that caused the action to trigger. e.g. SUBJECT, TO, FROM, HASATTACHMENT
[ME_WORDLIST] The optional word list associated with the criteria causing the filter to trigger.
[ME_BFV] The Bayesian filter value associated with a parsed message
[ME_BFT] The Bayesian filter threshold associated with a parsed message
8.3 Mailbox filtering
Mailbox filtering can be performed in two ways.
1. via the Administration program. See section 4.4.2.9 for details on enabling mailbox filtering
2. via web mail. See section 5.9.1.2 for details on how to configure this.
8.3.1 Creating a mailbox filter
To create a mailbox filter via the administration program;
1. Select a mailbox
2. Right click to bring up the Properties window
3. Select the Filters tab and then Add.
4. Create a name for the filter
5. Ensure the Enabled box is ticked and select OK.
6. Highlight the filter that has just been created and click the Edit button
By selecting the criteria, it is possible to edit the associated attributes or conditions. As long as any of the criteria is matched, then the action(s) will be performed. Criteria for a filter can be enabled and disabled in by ticking or un-ticking the box.
NOTE: Mailbox filtering has less available criteria and actions than global filtering.
8.3.2 Filter criteria
The available filter criteria for mailbox filtering are the same as for global filtering (see section 8.2.1) with the exception of “Bayesian filter spam probability” and “Where the message contains a virus” as both antivirus and Bayesian filter criteria are set at a global level.
8.3.3 Filter actions
The following actions are available for mailbox filtering:
8.3.3.1 Delete message
Deletes the message.

Enterprise Edition Configuration Guide v 3.0
Page 102
8.3.3.2 Move message to folder
Moves the original message to a folder
8.3.3.3 Copy message to folder
Copies the filtered message to another folder (i.e. retains the original message and creates a copy of the message in another folder)
8.3.3.4 Move to junk email folder
Moves the filtered message to the junk email folder
8.3.3.5 Move to quarantine folder
Moves the filtered message to the quarantine folder
8.4 Antivirus filtering
8.4.1 How to implement antivirus filtering
Configuring MailEnable to filter viruses requires both:
1. Configuration of the antivirus program to use, and also
2. Creation of an antivirus filter in MailEnable
For further advice on selecting or configuring an antivirus program, please see section 14.7 Antivirus configuration.
8.4.1.1 Configuring the antivirus program
1. Install the selected antivirus application onto the same server that has Enterprise Edition installed
2. Ensure that any resident or real-time protector capabilities of the antivirus application have been disabled (or all the MailEnable directories have been excluded from being protected by the software). NOTE: Running a real time antivirus protection on a server can cause issues and each resident antivirus protection agent can have its own problems. If the resident/real-time monitor is enabled, the problems range from blank messages showing up when MailEnable tries to deliver a message with a virus, to possible corruption of mail system configuration files or messages themselves.
As a general rule, consider the following:
Exclude MailEnable “Queues” and the “Config” Directories from the resident/real-time monitoring.
Disable the resident/real-time monitor if exclusion of MailEnable directories is not possible within the antivirus application.
3. Open the MailEnable Administration program. Expand the Servers >Local host >Filters branch, select the MailEnable Message Filter icon, then select the MailEnable Antivirus Filter item in the list which appears on the right side panel.

Enterprise Edition Configuration Guide v 3.0
Page 103
Figure 8-4 Antivirus filter
4. Select the appropriate item from the list of available antivirus applications.
5. Make sure that the "Enable" (or "Enable selected antivirus") is selected. It is possible to enable more than one antivirus application on the server, but this will affect the number of messages that can be scanned over a period of time.
6. Ensure that the correct program path to the command line virus scanner has been specified. Select the Options button to change this. Also ensure that the scratch directory exists. This directory is used to unpack the message as it is scanned for viruses.
7. Save changes.
8. Stop the MTA service.
9. Start the MTA service.
Make sure virus definition files are being updated. See the antivirus documentation for information on how to do this.
Some antivirus applications specifically require Administrative privileges to run. Since the MTA runs under the LocalSystem account, change this to an account with Administrative privileges. Open the Services control panel applet. For the "MailEnable Mail Transfer Agent" service, change the user account it runs under to a Windows user account that has Administrative rights (i.e. a member of the Administrators group).
The antivirus filter allows command line virus checkers to be used on emails that as they pass through the MailEnable server either for relay or for delivery to local mailboxes. The following presets are available but require a valid server license to use any of the following supported software:
F-Prot
Sophos
McAfee Virus Scan
Norton Antivirus Corporate Edition 7.6
Norman Virus Control
Panda Antivirus Command Line
Grisoft AVG

Enterprise Edition Configuration Guide v 3.0
Page 104
It is important to disable any Real Time Virus Protection software on the server (since it will interfere with the scanning process). Please see section 14.7.3 for more information on this.
8.4.1.2 Creating an antivirus filter
To enable antivirus filtering requires the creation of a filter in the MailEnable Administration program that detects when the message contains a virus and deletes the message or quarantines it, notifies sender, etc.
To create an antivirus filter:
1. Open the MailEnable Administration Program
2. Right click on the Messaging Manager|Filters branch and create a new filter.
3. In the name field enter something like "Antivirus Filter" (without the quotes).
4. Having created the filter, edit the criteria for the filter as follows:
5. Check the criteria "Where the message contains a virus"
6. Create the actions that are undertaken when the virus is detected. E.g. Copy the message to the Quarantine directory or Delete Message
8.4.2 Configuring the antivirus filter
The administration of antivirus filters can be accessed via selecting the properties of the MailEnable Antivirus Filter within the MailEnable administration program. It is possible to select which antivirus applications are used to analyze messages as they pass through the Mail Transfer Agent.
Once the Antivirus agents have been configured to be used by the server, they can be used by specific filters.
The configurable properties for antivirus agents are outlined in the following table:
Setting Description
Enable antivirus/filter support
Enables or disable all antivirus and other filters that may be installed for MailEnable.
Enable selected antivirus/filter
Indicates that the currently selected virus checker or filter will scan emails. It is possible to enable more than one antivirus/filter at once.
Options Sets the advanced options for the currently selected antivirus application.
Test Tests the currently selected antivirus program by writing out the test Eicar virus and determining whether the command line scanner can detect it. Be aware that this may not work with all command line scanners (Symantec’s Norton's Antivirus Corporate Edition is one of these). For scanners that do not work with the test button, check whether the antivirus program is functioning by running the MTA in debug mode.
8.4.2.1 Antivirus options
Setting Description
Program Path The path to the virus checker application. Only select the command line scanner for the antivirus application (the presets in MailEnable will point to the correct application).
Command line arguments
The command line arguments that are used to run the antivirus scanner. There should be no need to change these options unless adding your own antivirus scanner (i.e. not a preset).
Enterprise Edition Configuration Guide v 3.0
Page 105
Command line arguments will delete attachment
Selecting this will require that the command line scanner to delete any infected attachment. Some virus scanners cannot remove zip files that are infected with viruses using this option.
Return code will be checked against this list
This option will make MailEnable check the return code from a command line scanner. If the return code matches the return codes items in the list, then the attachment is detected as a virus. It is not possible to use any command line argument that deletes the attachment when this option is selected. Use the “any” keyword in order to check for any return code (i.e. other than 0)
Return code check Choose to detect the attachment as a virus if the return code is a number other than those in the list.
It is not advisable to notify the sender that the have an infected email. When a virus is sent via email, it will usually use a different senders address that it randomly picks from the infected machine. So by sending notifications back to the sender address it is probably not being sent to someone who is infected.
Also consider that virus-scanning email adds more load on the server. This is because the antivirus filter must extract and test every attachment that goes through the server. It is advisable to adjust the MTA maximum transfer threads under the MTA properties to ensure that the number of concurrent instances of virus scan agents is appropriately configured. Consider that each transfer thread could potentially mean a different concurrent instance of the agent’s command line scanner.
8.4.3 Testing antivirus configuration
The antivirus filter can be tested by emailing the Eicar test virus through the system. This test virus can be downloaded from http://www.eicar.com. To perform more advanced testing and debugging, follow the details in this article - http://www.mailenable.com/kb/viewarticle.asp?aid=85
8.5 Bayesian filtering
Bayesian Filtering is founded on having two pools of messages (good and bad) and creating a word dictionary that outlines the frequency of tokens (words or text snippets) within these messages. This dictionary allows MailEnable to analyze messages and provide a probability of a message being spam, as a new message can have its tokens compared against this dictionary. For example, if the token “FREE” occurs mostly in spam emails, but rarely in good emails and a new message has the token “FREE” in it, it is likely to be spam. As multiple tokens are used, the accuracy is improved. If an incoming email has the “FREE” token but also the token “mailenable”, which may appear only in good emails, then the good token will stop the email from being marked as spam.
The effectiveness of this approach is determined by having good samples of spam and non-spam. The process of compiling a dictionary from samples of spam and non-spam is called ‘training’.
MailEnable has four options for configuring Bayesian filtering:
1. Auto-training
2. Using the default dictionary
3. Manual training via a command line utility and scripts
4. A combination of both manual and auto-training
Setting up auto or manual training (although not essential) allows the Bayesian filter to better detect spam by continuously updating and adding to the dictionary.
The option of manually training the filter is a more complex process and is described in section 8.5.9.
8.5.1 Setting up auto-training Bayesian filtering
The following outlines the steps in the process of setting up auto-training Bayesian filtering for MailEnable. 1. Set up auto-training for the filter

Enterprise Edition Configuration Guide v 3.0
Page 106
2. Configure collection of spam for training
3. Configure collection of ham for training
4. Create a global Bayesian filter
5. Test Bayesian filter
8.5.2 Step 1: Set up auto-training for the filter
The Bayesian filter can be auto-trained using ‘good’ emails (ham) and ‘bad’ emails (spam). The auto-training feature can be enabled under Servers > Localhost > Filters > MailEnable Bayesian Filter > Properties > Auto-training tab.
Setting Description
Enable auto-training
Check this box to enable auto-training. While the Bayesian Filter is in auto training mode, the functions to manually update the dictionary using the “mespamcmd.exe” command utility (as mentioned in section 8.5.10) do not function. This is because when the auto-training is running, new additions to the dictionary are stored in memory, and not written to the hard drive until the MTA service is stopped.
A global filter with the 'Bayesian filter spam probability' criteria must be configured for auto-training to work. This is described in Step 4. If a filter is not configured with a Bayesian criteria, then no auto-training will occur.
Options (Process HTML content in Messages)
If this option is selected and the message contains HTML, then the HTML is parsed as well as the message plain/text boundary. Tokens will therefore also include data from the HTML messages. It makes the filter more likely to detect HTML as spam because the tokens/patterns of the HTML of bad messages can be used to calculate the probability of spam.
Spam Honeypot Email Addresses (Edit address list)
Define email addresses that do not receive valid mail for sampling. This is described in Step 2.
Ham Addresses (Edit address list)
Define "ham' or legitimate email addresses for sampling. This is described in Step 3.
Auto-training will only update the dictionary with additional spam messages when the corresponding total number of ‘good’ ham messages is the same or greater as the total number of ‘bad’ spam messages (and vice versa).
8.5.3 Step 2: Collecting spam for auto-training
By defining "honey pot" addresses, samples of spam email can be collected. "Honey pot” addresses are addresses that are designed to collect spam.
Collect spam by creating a catchall address. Set up a mailbox address (e.g. [email protected]) as a catchall address. This address will collect all emails for a domain that do not have a mapping to a mailbox. The majority of mail in this mailbox will be spam, as spammers will often send to unknown addresses for a domain. See section 4.4.1 for more information on setting up a catchall. If manual training is being used on conjunction with auto-training, the emails collected here should not be used for the manual training process. Also, since a catchall will collect a lot of email the mailbox will need to be purged often.

Enterprise Edition Configuration Guide v 3.0
Page 107
8.5.4 Step 3: Collecting ‘ham’ for auto-training
Desirable or legitimate e-mail is commonly referred to as “ham”. The ham addresses option under the auto-training settings is for valid email addresses that are used to sample legitimate email. Specify the e-mail addresses to be considered for sampling legitimate email under the administration program. It is best to sample from a variety of valid addresses in order to get a decent sample of messages, and a spread of valid types of messages.
8.5.5 Step 4: Create a global Bayesian filter
A global filter needs to be created in order for messages that pass through the server to be checked by the Bayesian filter and an appropriate action performed. The filter criteria can specify the level of spam probability and subsequent actions for those messages that are deemed to be spam. The following example will remove messages with over 95% spam probability.
1. Create a new filter called “Bayesian” here: Messaging Manager->Right Click Filters->New Filter
2. Set the criteria “Where the message has over a certain spam probability->95%”
3. Set the action to execute when a spam message is detected. This would normally be “Mark as spam”.
8.5.6 Step 5: Testing the Bayesian filter
To ensure Bayesian filtering is working correctly (i.e. the Bayesian filter is using the dictionary and the designated actions are completed when messages are delivered to the system) requires testing.
There are a few ways to determine if messages are being checked against the dictionary:
METray (see section 13.1) shows instances where the Bayesian filter has scanned and detected spam. When the METray display window is open, enable the “View statistics since services were restarted”. The section that details how many “Bayesian Scans” have completed along with “Bayesian Detections” will display how many emails were checked and how many have been detected as spam since the MTA service was last started.
Filter logs will also display any Bayesian detections. The logs are accessed via: MailEnable Administration program > Servers > Localhost > Filters > MailEnable Message Filter > Logs > Filters. If any messages have been detected and actioned by the Bayesian filter then a line in the logs will be displayed similar to the following:
[Date-Time] [Message ID] SMTP Bayesian COPY_TO_QUARANTINE,DELETE [SMTP:[email protected]] [IP_Address of sender]
Messages passing through the Bayesian filter will have a header line added indicated the spam probability that was calculated. The header item is:
X-ME-Bayesian: 0.000000
8.5.7 Bayesian filter general settings
There are additional settings for configuring the Bayesian filter. These settings for Bayesian filtering can be found under MailEnable Management > Servers > Localhost > Filters > MailEnable Bayesian filter >Properties.
Setting Description
Dictionary MailEnable Dictionaries are located under Program Files\Mail Enable\Dictionaries. MailEnable provides a default dictionary that can be used with the filter. This dictionary is located in Program Files\Dictionary\default and is called MAILENABLE.TAB. For more details please see section 8.5.8

Enterprise Edition Configuration Guide v 3.0
Page 108
Options (Process HTML content in Messages)
If this option is selected and the message contains HTML, then the HTML is parsed as well as the message plain/text boundary. Tokens will therefore also include data from the HTML messages. It makes the filter more likely to detect HTML as spam because the tokens/patterns of the HTML of bad messages can be used to calculate the probability of spam.
Spam Calculation method
When a message is split into its tokens/words for analysis each token in the message is given a probability of either being spam or non-spam.
As such, MailEnable can be configured to use a number of methods for calculating the final probability of a message being spam
Measure highest and lowest percentiles of the most frequent tokens - Only those tokens most frequently occurring in the message will be used/aggregated to measure the probability of the message being spam i.e. If this option is used, then messages containing multiple instances of a spam token will most likely be diagnosed as spam.
Measure all tokens in the message - This means that all tokens occurring in the message will be used/aggregated to calculate the probability of the message being spam. The recommended method to use is: "Measure all tokens in the message" because it provides a more balanced calculation.
Measure tokens within the highest and lowest percentiles - This means that only those tokens/words in the message that are most likely to denote the message as spam or non-spam are considered i.e. If this option is used, it will mean that a legitimate message containing the word 'viagra' would be more likely to be detected as spam.
8.5.8 MailEnable Default Dictionary
MailEnable is installed with a default dictionary which is trained with some basic spam and ham emails. While it is a good starting point for auto and manual training, it is not effective in reducing spam, so auto-training and/or manual training would also need to be configured.
8.5.9 Manual training
Manual training of the Bayesian filter involves using scripts and the Spam Training Utility to update the dictionary file with spam and ham. Manual training can occur alongside auto-training and is a good way of adding extra emails that had avoided detection to the dictionary so they can be caught in future.
Similar to auto-training, both spam and ham need to be collected, but the process for doing so varies, as detailed below.
8.5.9.1 Collecting spam for manual training
Two ways to collect spam for manual training purposes are:
1. Creating a catchall address. Set up a mailbox address (e.g. [email protected]) as a catchall address. This address will collect all emails for a domain that do not have a mapping to a mailbox. The majority of mail in this mailbox will be spam, as spammers will often send to unknown addresses for a domain. Do not use the same address as one that is being used for auto-training.
2. Using public folders. Set up public folders for post offices for the purpose of collecting spam. IMAP users can drag and drop spam messages from their inbox into the public folder for collection. A script can then be scheduled to copy the content of these folders to a single spam repository folder for addition to the dictionary. For an example script, see section 8.5.9.3.
8.5.9.2 Collecting ham for manual training
One way of collecting ham for manual training is to configure a filter that collects mail from senders who have authenticated. To do this, follow this procedure:
Create a mailbox in the domain called [email protected]

Enterprise Edition Configuration Guide v 3.0
Page 109
Create a global filter (see section ) called “Ham Collection” with the criteria of “Where the sender has authenticated” and the action “Forward message to [email protected]”. More advanced criteria can be used to determine which messages to use for training.
The inbox of this mailbox can then be used as a source for ham messages to be used for manual training.
8.5.9.3 Compiling the dictionary using a script
In order to add emails to a dictionary, the Spam Training Utility is used. This will take spams and hams from two specified folders, process them and add them to the dictionary. Since the emails to add could be located in various public folders and catchall mailboxes, a scheduled DOS script would normally be used to copy the emails from these locations and put into two folders for the Spam Training Utility.
An example script for this is below. This script will also stop and start the MTA service in order to allow it to be used along with auto-training. Since the Spam Training Utility only works on the dictionary on the hard drive, the MTA service needs to be stopped to write out any auto-training additions that have been made.
The script is just an example and would need to be modified to match the MailEnable configuration.
REM Copy mail stored by either a catchall account mailbox or filter into two folders, REM Spam and NoSpam which will be used by the training utility to add to the REM dictionary copy "C:\Program Files\Mail Enable\Postoffices\example.com\MAILROOT\spam\Inbox\*.mai" "C:\Program Files\Mail Enable\Dictionaries\Custom\Spam\*.*" del /Q "C:\Program Files\Mail Enable\Postoffices\example.com\MAILROOT\spam\Inbox\*.mai" copy "C:\Program Files\Mail Enable\Postoffices\example.com\MAILROOT\ham\Inbox\*.mai" "C:\Program Files\Mail Enable\Dictionaries\Custom\NoSpam\*.*" del /Q "C:\Program Files\Mail Enable\Postoffices\example.com\MAILROOT\ham\Inbox\*.mai" REM Now the email from Public folders is copied. Normally only junk emails will be REM used when using Public Folders for dictionary training copy "C:\Program Files\Mail Enable\Postoffices\example.com\PUBROOT\SPAM\*.mai" " C:\Program Files\Mail Enable\Dictionaries\Custom\Spam\*.*" REM Remove the index file and messages from the folder del /Q "C:\Program Files\Mail Enable\Postoffices\example.com\PUBROOT\SPAM\*.mai" del /Q "C:\Program Files\Mail Enable\Postoffices\example.com\PUBROOT\SPAM\*.xml" REM Stop the MTA service to write out any auto-training dictionary net stop MEMTAS REM Process the messages in the dictionary files and convert them to the dictionary token file. mespamcmd -m "c:\Program Files\Mail Enable\Dictionaries\default\mailenable.tab" “c:\Program Files\Mail Enable\Dictionaries\Custom\Spam” "c:\ Program Files\Mail Enable\Dictionaries\Custom\NoSpam" REM Clean up the dictionary spam and ham folders del /Q "C:\Program Files\Mail Enable\Dictionaries\Custom\Spam\*.MAI" del /Q "C:\Program Files\Mail Enable\Dictionaries\Custom\NoSpam\*.MAI" REM Start the MTA service net start MEMTAS
8.5.10 Spam Training Utility
MailEnable provides a command line utility that can be used to manage spam/non-spam dictionaries. This program is called MESPAMCMD.EXE and is located in the MailEnable BIN directory.
The spam training utility only works on the files stored on the hard disk. The auto-training feature should be disabled, or the MTA service stopped before any manual update of the dictionary occurs.

Enterprise Edition Configuration Guide v 3.0
Page 110
MESPAMCMD -[options] [dictionary, paths] [c] = Create Dictionary [v] = Verify messages in the specified folder against the nominated Dictionary [s] = Score a single message against the nominated Dictionary [m] = Merge Spam and NoSpam folders into nominated Dictionary [r] = Notifies the spam filter to reload the dictionary [p] = Prunes the Dictionary to allow insertion of more words Example: MESPAMCMD -c C:\TEST\ME.TAB C:\TEST\SPAM C:\TEST\NOSPAM
An example command line for compiling a dictionary based on the example shown follows:
MESPAMCMD -c C:\Progra~1\MailEn~1\Dictio~1\NewDic~1\MailEn~1.TAB C:\Progra~1\MailEn~1\Dictio~1\NewDic~1\Spam C:\Progra~1\MailEn~1\Dictio~1\NewDic~1\NoSpam
Note: The Spam Training Command Line Utility must use short style file paths (i.e.: the paths cannot contain spaces)
8.5.10.1 Using XML or Tab delimited files
Filtering dictionaries can be constructed as either XML or TAB delimited files.
XML files are slower to load, but may be more desirable if externally managing the dictionary. Tab files are much more efficient (faster loading), so it is advisable to use the default TAB files. The filter determines whether the file is XML or TAB delimited by the file extension. The format for the XML files is:
<ELEMENTS> <ENTRIES W="[number of ham emails]" B="[number of spam emails]"> <E W="[number in ham emails]" B="[number in spam emails]">word</E> <E W="[number in ham emails]" B="[number in spam emails]">word</E> … … </ENTRIES> </ELEMENTS>
8.5.10.2 Verifying a dictionary
The command line utility can be used to validate a directory of messages against the dictionary. This will provide a percentage probability of spam for each message in the folder.
MESPAMCMD -v MailEn~1.TAB C:\Progra~1\MailEn~1\Dictio~1\NewDic~1\Test
8.5.10.3 Scoring a message
Scoring a single message is much like verifying a directory, except the second parameter is a message file rather than a directory.
An example of scoring a message follows:
MESPAMCMD -s MailEn~1.TAB C:\Progra~1\MailEn~1\Dictio~1\NewDic~1\Test\1A38DF23D30845E0B5FF51530A266.MAI
8.5.10.4 Merging a dictionary
Merging a dictionary is much like creating a new dictionary, except that messages in the Spam and NoSpam directories are appended to the dictionary rather than re-creating it. This is useful to add new messages to the dictionary to refine Spam detection.
An example for merging new content with an existing spam dictionary follows:
MESPAMCMD -m MailEn~1.TAB C:\Progra~1\MailEn~1\Dictio~1\NewDic~1\Spam C:\Progra~1\MailEn~1\Dictio~1\NewDic~1\NoSpam

Enterprise Edition Configuration Guide v 3.0
Page 111
8.5.10.5 Reload a dictionary
If changes are made to a dictionary while the spam filter is running, it will not automatically reload it unless it is notified, as the dictionary is held in memory. The dictionary can be reloaded by either restarting the MTA service or using the –r option of the mespamcmd program to tell the spam filter to reload it.
MESPAMCMD –r
8.5.10.6 Pruning a dictionary
Pruning a directory involves removing any items from the dictionary that will not be able to be used effectively to determine spam or non-spam. This is done by removing items which very rarely occur, and items which occur almost equally in spam and non-spam emails. To prune, provide the path and filename to a dictionary file. After pruning, this file will be overwritten with the new dictionary.
MESPAMCMD -p MailEn~1.TAB
8.5.10.7 Checking the dictionary
To check the dictionary, open up the DIC.tab file in the following location using Notepad; C:\Program Files\Mail Enable\Dictionaries\DIC.tab
To check the integrity of the file make sure the first line shows the number of good and bad messages that have been added into the dictionary. The first number will equal the amount of messages that were in the SPAM folder and the second column equaling the NOSPAM folder. The first number in the line should equal the amount of bad messages (spam) merged into the dictionary the second number should match the good messages (ham). Each number after this first line equals the amount of good and bad words/tokens were found as a total in each message.
Enterprise Edition Configuration Guide v 3.0
Page 112
9 Scripted filtering
9.1 Overview
Scripted filtering provides a flexible and extensible means of creating complex filters. The scripting language used is similar to Microsoft VBScript and includes an in-built function for validating criteria. The variable called FilterResult is used as the return value from the filter and can be set at any time in the script. A FilterResult value of 0 indicates that the filter criteria were not met while a value of 1 indicates that the filter criteria were met, and the associated actions for the filter will be executed.
Criteria within scripts can be formed using literal values or tests. Literal values are tokens that are placed in the script and are substituted with their corresponding value. For example, a literal value of [ME_SIZE] can be placed directly in the script for comparison and will be substituted with the message size when the filter is executed. Tests are performed using the CriteriaMet function, and is used for non-numeric values, such as when string comparisons are being made.
9.1.1 Literal values
The following table lists the literal values which can be used in a script.
Token Value
[ME_SPAM_PROBABILITY] Contains a numeric value of the calculated Bayesian probability of a message being detected as spam.
[ME_SIZE] The size of the message in bytes
[ME_SENDERAUTH] Indicates whether the sender of the message authenticated in order to dispatch the message to MailEnable. The value is 1 if the sender authenticated, otherwise the value is 0.
[ME_HASVIRUS] Indicates whether the message contained a virus. The value is 1 if the message contained a virus, otherwise the value is 0. When a virus is detected by filter criteria it is automatically removed from the message.
[ME_HASANATTACHMENT] Indicates whether the message has an attachment. The value is 1 if the message has an attachment, otherwise the value is 0.
Literal enumeration example:
If ([ME_SENDERAUTH] = 0) Then ‘sender has not authenticated End If
Extra literal values are also available for substitution. These are formatted differently because they are not evaluated as the filter is being executed, but read from the command file for the message being processed.
Token Value
%IPADDRESS% The TCP/IP address of the originating message
%POSTOFFICE% The post office that can reasonably be assigned to the message.
%SENDER% The sender of the message in Internal format of [CONNECTOR:Address]. E.g. [SMTP:[email protected]]

Enterprise Edition Configuration Guide v 3.0
Page 113
%RECIPIENTS% The recipient(s) of the message in internal format of [CONNECTOR:Address];[CONNECTOR:Address2]. E.g. [SMTP:[email protected]];[SMTP:[email protected]]
%SUBJECT% The subject of the message.
Example 1: Check whether the subject of a message contains the letters ABC
If InStr(1,UCase("%SUBJECT%"),"ABC") > 0 then
FilterResult=1
End If
Example 2: Check if the Subject of the message contains "Re" at the start of it
If Left("%SUBJECT%",2) = "Re" then
FilterResult=1
End If
9.1.2 Enumerations requiring the CriteriaMet syntax
Token Value
[ME_TO] The message envelope recipients or the To: denoted in the message headers matches the designated criteria.
[ME_CC] The Cc: denoted in the message headers matches the designated criteria.
[ME_ToorCC] The message envelope recipients or the To: or Cc: denoted in the message headers matches the designated criteria.
[ME_FROM] The message envelope sender or the From: denoted in the message headers matches the designated criteria.
[ME_HEADERS_CONTAIN] The message headers contain data matching the designated criteria.
[ME_SUBJECT] The message subject contains data matching the designated criteria.
[ME_PRIORITY] The priority of the message meets the designated criteria.
[ME_SPF] The SPF response string associated with the message meets the designated criteria.
[ME_HASATTACHMENTSMATCHING] The message contains an attachment with a file name that meets the designated criteria.
[ME_BODY] The body of the message contains text meeting the designated criteria.
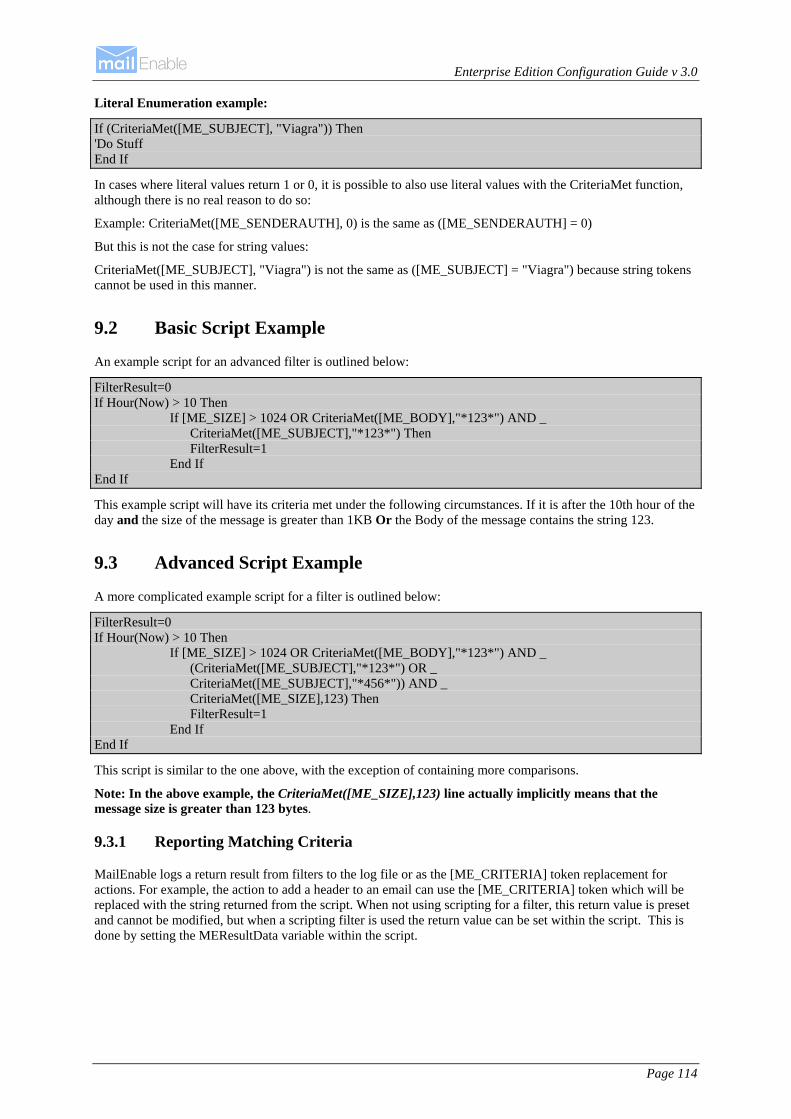
Enterprise Edition Configuration Guide v 3.0
Page 114
Literal Enumeration example:
If (CriteriaMet([ME_SUBJECT], "Viagra")) Then 'Do Stuff End If
In cases where literal values return 1 or 0, it is possible to also use literal values with the CriteriaMet function, although there is no real reason to do so:
Example: CriteriaMet([ME_SENDERAUTH], 0) is the same as ([ME_SENDERAUTH] = 0)
But this is not the case for string values:
CriteriaMet([ME_SUBJECT], "Viagra") is not the same as ([ME_SUBJECT] = "Viagra") because string tokens cannot be used in this manner.
9.2 Basic Script Example
An example script for an advanced filter is outlined below:
FilterResult=0 If Hour(Now) > 10 Then If [ME_SIZE] > 1024 OR CriteriaMet([ME_BODY],"*123*") AND _ CriteriaMet([ME_SUBJECT],"*123*") Then FilterResult=1 End If End If
This example script will have its criteria met under the following circumstances. If it is after the 10th hour of the day and the size of the message is greater than 1KB Or the Body of the message contains the string 123.
9.3 Advanced Script Example
A more complicated example script for a filter is outlined below:
FilterResult=0 If Hour(Now) > 10 Then If [ME_SIZE] > 1024 OR CriteriaMet([ME_BODY],"*123*") AND _ (CriteriaMet([ME_SUBJECT],"*123*") OR _ CriteriaMet([ME_SUBJECT],"*456*")) AND _ CriteriaMet([ME_SIZE],123) Then FilterResult=1 End If End If
This script is similar to the one above, with the exception of containing more comparisons.
Note: In the above example, the CriteriaMet([ME_SIZE],123) line actually implicitly means that the message size is greater than 123 bytes.
9.3.1 Reporting Matching Criteria
MailEnable logs a return result from filters to the log file or as the [ME_CRITERIA] token replacement for actions. For example, the action to add a header to an email can use the [ME_CRITERIA] token which will be replaced with the string returned from the script. When not using scripting for a filter, this return value is preset and cannot be modified, but when a scripting filter is used the return value can be set within the script. This is done by setting the MEResultData variable within the script.

Enterprise Edition Configuration Guide v 3.0
Page 115
Example: Setting the MEResultData variable within a scripted filter
If "%SUBJECT%" = "ABC" Then
MEResultData = "Subject matched ABC"
FilterResult=1
Else
If InStr(1,"%SUBJECT%","FRED") > 0 Then
MEResultData = "Subject contained Fred"
End If
End If
If not using a scripted filter, then a system-generated string is returned to denote which were the matching criteria. An example string returned when a filter is matching the term ‘Viagra’ at the beginning of the message subject follows:
CRITERIA=SUBJECT, DATA=<MF-W>Viagra*</MF-W>
An extract from an example log file is shown below. The filter column will show whether a scripted filter is being used or not.
Time Action Message ID
Connector Filter Result Account Sender IP Address
Data
08/21/06 21:42:15
Start - - - - - - - -
08/21/06 21:42:31
Exec A.MAI SMTP Scripted ADD_HEADER, NOTIFY_SENDER
[SMTP:[email protected]]
127.0.0.1 Subject matched ABC
08/21/06 21:43:37
Exec B.MAI SMTP Basic ADD_HEADER, NOTIFY_SENDER
[SMTP:[email protected]]
127.0.0.1 CRITERIA=SUBJECT, DATA=<MF-W>AB*</MF-W>
This example shows messages A.MAI and B.MAI being processed.
A.MAI was intercepted by a filter called “Scripted” because the scripted filter reported that the subject matched the term ABC.
B.MAI was intercepted by a filter called “Basic” because the Subject of the message matched a criteria string AB*. (Note: the <MF-W> mark-up around the term is used to indicate that the term was sourced from word list criteria).

Enterprise Edition Configuration Guide v 3.0
Page 116
10 Cluster management MailEnable stores all system data in a shared storage repository. Server specific information is stored in the Windows Registry (such as details about which IP addresses a service is bound to). This means that it is possible to install multiple server nodes and point them at the same storage repository.
By load balancing and clustering front-end servers (IIS, SMTP/POP, IMAP) the system can scale out easily from the front-end perspective. Ideally, there would be a single file service (probably network attached storage or a SAN) and point all the MailEnable servers to the same post office/configuration repository. This means that SMTP, POP or MTA servers can be added as required and IP load balancing can be used to provide a clustered IP address.
The cluster management window can configure whether an individual server is a standalone server, cluster controller or a server that is joined to another cluster controller. This utility will create the necessary file system share and modify MailEnable’s configuration depending on the mode selected for the server. MailEnable services will need to be restarted after making changes to the clustering.
Figure 10-1 Configuring MailEnable Clustering
A cluster controller is a server which has a hidden share called MAILENABLE$. This share needs to have both the configuration and data paths as a subdirectory, so the server must not have separate paths set for this. For example, in a default installation of MailEnable, this would be C:\Program Files\Mail Enable. By setting the server as a cluster controller, the hidden share will automatically be created.
A cluster member is a server that points its data and configuration storage at another server that is a cluster controller. By enabling a server as a cluster member, the necessary paths are altered and all the MailEnable services are optionally set to run under the IME_ADMIN Windows user account. The IME_ADMIN users on all servers must have the same password. Use the MEInstaller.exe application that is in the Mail Enable\bin directory to reset this password.
To remove the server from a cluster, or to prevent a server from being a cluster controller, select the option for the server to be standalone and apply the changes.
The cluster management utility configures whether an individual server is a standalone server, cluster controller or a server that is joined to another cluster controller. This utility will create the necessary file system shares and modify MailEnable’s configuration depending on the mode selected for the server. The MailEnable services will need to be restarted after making changes to the clustering.
Enterprise Edition Configuration Guide v 3.0
Page 117
To make the changes, select the option that best describes this server. If the server is member server, ensure that it is configured to point to the appropriate controlling server before clicking the apply button.
10.1 Connecting to a MailEnable cluster
To connect to a MailEnable cluster, right click the MailEnable Management icon in the Administration program and select the option “Connect to a MailEnable Cluster”. This will prompt for a username and password, and the server can be selected from the drop down box. Select “Login” to connect to the server. The username and password that is used to connect to a cluster needs to be a mailbox that has SYSADMIN rights.
Once you have connected to a cluster, servers will need to be added. This only needs to be done once on the machine from where the connection is made. Right click on the Servers icon in the administration program and select the Add Server… menu item. You will be prompted to enter the name of a server you wish to add to the cluster that is being administered. While the configuration data for mailboxes, domains and other items are global to the cluster, each server has its own configuration settings for services, agents and connectors. Not all features are available from remote administration, such as viewing log files.
10.2 Windows Licensing for cluster setup
MailEnable clustering uses Network Shares (UNC Shares) to allow member servers to access the message store and underlying configuration. When a server is established as a cluster controller (backend server), MailEnable creates a UNC share that is configured to "permit the maximum allowed number of users" to access the share.
However, even though MailEnable is configured to have the "maximum number allowed" users, the actual number of users permitted to access the server varies according to Windows licensing.
For a server, the maximum number of users is the number of users for which you have purchased Windows NT licenses. For an NT workstation there is a built-in limit of 10 simultaneous users for a shared resource (e.g.: UNC share).
When an application or service (e.g.: MailEnable) attempts to access a share that already has the maximum number of users, an error is generated and the connection is refused.
This error is typically formatted as “No more connections can be made to this remote computer at this time because there are already as many connections as the computer allows.”
When establishing a MailEnable cluster, carefully consider the licensing policy of the server that is hosting the message store and configuration files.
Ensure that you have purchased adequate Windows licenses to sustain connections from member servers to the backend storage server. At a minimum, this will require licenses for member servers as follows:
1 License for each member server for the IME_ADMIN (Web Mail and Web Administration service account) user.
1 License for each member server account that is used to administer the server. e.g.: Administrator or any other privileged account that uses the MMC on a member server.
e.g.: If there was 1 backend server and two front-end servers, the backend server would need to sustain or be licensed for at least 4 connections (above whatever connections are used by other applications or server functions).
The means of configuring Windows licenses varies depending on the Windows platform/version being used. Consult the respective Windows documentation to clarify this.

Enterprise Edition Configuration Guide v 3.0
Page 118
11 Configuration of email clients To read and send email from an email client, (e.g. Eudora, Microsoft Outlook or Outlook Express) requires the client to be configured and connected to MailEnable. The POP3 and SMTP server should be the server name that is running MailEnable. Email clients have to be able to resolve this server name to an IP address.
The username needs to be the full logon name for the mailbox. Remember that this is formatted as mailboxname@postofficename. Email will not be able to be retrieved if the full username is not used, unless a default post office has been specified. See section 4.7.1 for more information on specifying a default post office.
11.1 Netscape Messenger
1. Start Netscape
2. Select Edit then Preferences from the menu bar
3. Select the '+' symbol on the right of Mail & Group
4. Select the Mail Server option
5. Enter values in the input boxes
6. To prevent having to re-enter the password every time email is checked, select More Options, then tick Remember mail password
7. Click on Identity
8. Type in the full name or business name in Your Name: input box
9. Type in the email address (e.g. info@mydomain)
10. Type in your reply email address (e.g. info@mydomain)
11. Select OK to accept new settings.
11.2 Microsoft Outlook Express
1. Open Outlook Express
2. Select Tools | Accounts
3. Select the Mail tab
4. On the right hand side, select Properties
5. Select on the Servers tab.
Make sure the POP Logon name is the same as the Account name (username) that is used by mail clients when they connect to the server to retrieve email. E.g.: mailbox@postoffice. If SMTP Authentication is enabled on the server, check the option instructing Outlook Express that the outbound server requires authentication. The checkbox to do this is labeled ‘My server requires authentication’.
11.3 Microsoft Outlook 2000
1. Access the Tools | Accounts menu
2. Select the Mail tab and click Add | Mail
3. Enter an appropriate display name, then select the Next button
4. Enter the e-mail address, then select the Next button
5. Specify whether the account being set up is POP3 or IMAP
6. Specify the incoming and outgoing mail servers. e.g. mail.[mydomainname].com, then select the Next button

Enterprise Edition Configuration Guide v 3.0
Page 119
7. Specify the Account Name and Password, (account name is formatted as mailboxname@postofficename) then select the Next button
8. Specify the connection method
9. Select Finish.
11.4 Microsoft Outlook 2002/2003
1. Access the Tools | E-mail Accounts menu
2. Select the Add a new e-mail account option and select Next
3. Select either POP3 or IMAP, then select Next
4. Enter the email account settings
5. Specify the incoming and outgoing mail servers. E.g. mail.[mydomainname].com
6. Specify the account name and password (account name is formatted as mailboxname@postofficename).
11.5 Mozilla Thunderbird
1. Mozilla Thunderbird can configure the inbound email settings separate from the outgoing mail. To configure the incoming email server:
2. Access the Tools | Account Settings menu
3. Select Add Account
4. Select the Email account option in the Account Wizard window that appears and select Next
5. Enter name and e-mail address and select Next
6. Select whether to use POP or IMAP protocol and enter the incoming email mail servers. E.g. mail.[mydomainname].com, then select Next
7. Specify your Incoming User Name and select Next. (User Name is formatted as mailboxname@postofficename)
8. Enter the account name for this account select Next
9. Select Finish
Now to set the outgoing mail server details:
10. Access the Tools | Account Settings menu.
11. Select the Outgoing Server (SMTP) item in the list box
12. Enter the server name of the outgoing mail server. E.g.: mail.[mydomainname].com
13. Enable the username and password checkbox and enter the username (username is formatted as mailboxname@postofficename)
14. For the Use secure connection option, select No
15. Select OK to save changes.
11.6 Configuring clients for HTTPMail
The HTTPMail access protocol is currently only supported with Microsoft based clients. If using Outlook Express, Outlook 2002 or Outlook 2003 as a mail client, select the mail protocol as HTTP and enter in the following details:

Enterprise Edition Configuration Guide v 3.0
Page 120
Setting Value
Protocol: HTTP
Provider: Other
Incoming mail (POP3, IMAP or HTTP) server: http://machinename:8080/MEHTTPMail
Example:
From Outlook (in the example, Outlook Express) choose Tools | Accounts from the Menu.
1. Select Add | Mail... and
2. Enter the Display Name (Friendly Name), then select Next.
3. Enter the e-mail address; then select Next.
4. Select HTTP as the mail server type and enter the URL to the HTTPMail service (http://machinename:8080/MEHTTPMail); then select Next.
5. Enter the MailEnable credentials; then select Next.
Note: Since HTTPMail is an authenticated service, use the usual account credentials when prompted. (i.e.: User@ Your Account/Postoffice).
6. The wizard has now completed; please select Next.
The HTTPMail Service has now been configured under Outlook Express. For more information on using Outlook Express, please refer to the Outlook Express Online Help.
11.7 Enabling Logging for Microsoft Outlook
11.7.1 Microsoft Outlook Express
It is possible to log mail sessions using the Outlook Express Maintenance option. This option is found under Tools > Options >Maintenance. Once this setting is enabled, the entire session will be logged to a text file. The log files are usually located under Documents and Settings\Local Settings\Application Data\Identities\ Guid \Microsoft\Outlook Express folder. This is where all your Outlook Express messages and folders are stored also.
11.7.2 Microsoft Outlook
To enable logging in Outlook, navigate to the following location: Tools > Options > Other > Advanced Options > Enable email logging. This will log the session to a text file in the following path:
C:\Documents and Settings\[user]\Local Settings\Temp\Outlook Logging\[account]

Enterprise Edition Configuration Guide v 3.0
Page 121
12 Operational procedures
12.1 Backing up and restoring data
MailEnable has a backup utility which is accessible through the Program Files > Mail Enable> System Tools menu. This utility can pass /BACKUP as a parameter to use it as an automated command line backup utility. There are three main areas where MailEnable stores configuration and user data:
Registry: Server Configuration (Service Settings, Machine Specific Configuration Information)
File System: Queues, Post office and Account data, etc
Provider Store (File System: \CONFIG Directory or SQL Server Database; depending on provider).
It is simple to backup and restore MailEnable. The most primitive way is to copy everything under the Program Files directory to an alternate location. MailEnable mostly uses flat files for configuration (by design) and therefore all messages and configuration are simple to backup.
The only additional information to (optionally) backup is the information in the registry. The registry hosts server specific information (like connector settings, etc).
To do this requires the registry editor (REGEDIT) to export the HKEYLOCALMACHINE\SOFTWARE\MailEnable registry key (and all sub keys and values) to a reg file. (More information on how to use the registry editor is available from Microsoft's Web Site).
To recover the backup, stop all services, replace the directory tree from the backup and then import the saved registry file into the registry.
12.2 Debugging
Mail services can be run interactively in debug mode allowing debug messages to be written to the screen. The following instructions outline how to run the services in debug mode:
Open the regedit application and move to the HKEY_LOCAL_MACHINE\SOFTWARE\Mail Enable\Mail Enable\SMTP\Debug Mode Key.
Set the value of this key to 1. This tells the server to write debug messages to the console rather than to a file.
Then, run the Windows command prompt and type in the following command: C:\Program Files\Mail Enable\Bin\MESMTPC -debug
When the debug session is completed, close the console window.
Ensure that the value of the registry key is set back to 2 when the debug session has finished.
12.3 Inspecting log files
Log files are an important aspect of any mail server. Understanding the various log files that MailEnable produces will assist in finding and rectifying any problem. Fortunately, MailEnable can produce a large amount of logging information to help isolate a problem.
By default, MailEnable produces 3 logs for each service. They are called W3C, Activity and Debug logs.
The W3C log has all the information about what is passing to and from the mail server in W3C extended log file format (www.w3c.org).
The Activity log will display all the information that is passing to and from the server.
The Debug log is used to display information about what the service is actually doing.
When experiencing a problem with email, examining the various log files can quickly identify the problem.

Enterprise Edition Configuration Guide v 3.0
Page 122
12.4 Licensing
MailEnable is licensed on a per server basis. In order to avoid any restrictions on the features of MailEnable a license key needs to be applied to the installation. There are two ways to register.
12.4.1 For computers connected to the Internet
When MailEnable is installed, a registration application is made available under the MailEnable program group. This registration application queries the system and submits registration details to the licensing server. The server will need to be connected to the Internet to use this utility to register MailEnable. This utility provides a number of payment mechanisms ranging from online-credit card payments to faxed purchase orders. If registering using online credit card details, MailEnable will immediately acquire a registration key and register it with the server. However, if other payment mechanisms are selected, it simply lodges the registration request with the payment server (assuming that the payment will be reconciled by fax or purchase order). Once MailEnable receives notification of payment mechanism, the license key will be generated and mailed to the nominated e-mail address.
12.4.2 For computers not connected to the Internet
If the server to license is not connected to the Internet, MailEnable can be ordered via MailEnable's web site. Once this has been processed the license key will be generated and sent to the designated e-mail address. The license key must be manually entered into the registration utility (located under the Mail Enable program group on the server).
12.4.3 Registration key retrieval method
Retrieve a new license key by using our online services website at the following address:
http://www.mailenable.com/OnlineServices/default.asp
Here, use the email address that was used for the registration as the login, and the password that was created and emailed out when the product was purchased.
Alternatively, use the Registration Wizard on the new server as described below to get the updated key:
In order to license MailEnable Enterprise, run the Registration Wizard application that was added to the Windows Start menu when the product was installed (under Programs>Mail Enable).
This is to personalize the registration key code.
Internet access is required to request the license key using the Registration Wizard. If you do not have Internet access for the MailEnable server, please email the output from the Diagnostic Utility to [email protected] as this output contains the information necessary to generate a license code for the server.
When using the Registration Wizard, follow these steps:
1. Select Apply for a Registration Key via the Internet, select Next
2. Enter your details, select Next
3. Select Request License Key, select Next
4. Read the confirmation and select Next

Enterprise Edition Configuration Guide v 3.0
Page 123
13 System utilities
13.1 System Tray Utility (METray)
The MailEnable System Tray (METray.exe) utility provides monitoring, reporting and automatic updates for MailEnable.
Figure 13-1 System Overview -MailEnable System Tray Application (METray.exe)
METray is accessible via an icon in the system tray. Right clicking the icon shows a menu with options as detailed below.
Double clicking the METray icon will bring up the System Overview Screen as shown in Figure 13-1.
13.1.1 System summary
System reporting and monitoring can be enabled and disabled from within the System Summary. Tick the box to enable the feature or untick the box to disable the feature and click ‘Apply’. All MailEnable Services will need to be restarted or a reboot is required for these changes to take effect.
The System Summary provides details on the connectors (Post office, List and SMTP) showing polling intervals and queue lengths. These details are also viewable in the System Overview diagram.
13.1.2 System overview
The system overview screen provides a diagrammatic representation of the MailEnable system. The operational status of each of the services (POP, IMAP, web mail, HTTPMail) can be seen in the diagram.
The polling intervals and length of the inbound and outbound queues of each of the connectors can also be seen in the diagram. Clicking on the inbound and outbound queues in the diagram will produce a window with a list of the current connections, including the client IP address, remote domain, sender etc. POP and IMAP connections can be viewed by clicking on each of these services in the diagram. These connections can also be viewed under “Connections” in the METray menu.
The number of lookups and detections for antivirus scanning, Bayesian filtering, DNS blacklisting and content blacklisting are listed at the top of the System Overview window.
Ticking the box in the bottom right hand corner of the application window shows statistics since the services were restarted.

Enterprise Edition Configuration Guide v 3.0
Page 124
13.1.3 Diagnostic report
Provides a shortcut to generate a diagnostic report for MailEnable (this Diagnostic Report can also be accessed via the Administration Program or MailEnable Program Group).
13.1.4 Updates
Provides an automatically updated list of any major/minor updates or hotfixes that have been released for MailEnable. These updates can be selectively downloaded from the list.
13.1.5 Connections
Monitors incoming and outgoing connections for SMTP and shows a list of the current connections including the client IP address, remote domain, sender etc. A similar list of connection details for POP and IMAP services can be viewed also. Connections can also be viewed by clicking on the queues or services in the System Overview diagram.
13.2 Activity Monitor
The MailEnable Activity Monitor (MEActivityMonitor) allows MailEnable System Activity to be watched as it occurs. This utility is useful for tracking messages as they pass through the MailEnable system. The tool works by monitoring file I/O to the Activity and Debug logs on the server. Ensure that activity and debug logging are enabled whilst using this utility.
To avoid unnecessary consumption of system resources, this utility should only be run whilst interactively tracking MailEnable system activity.
13.3 MEInstaller
The MailEnable Installer (MEInstaller) utility is an application that allows various MailEnable configuration options to be reset without requiring a reinstall of the entire product. The program is located in the Mail Enable\bin directory and has the filename MEInstaller.exe. The following tasks can be performed:
Common Installation
Creates the IME_USER Windows user if it does not exist (and adds to Users group)
Sets the policies for IME_USER
Creates the IME_ADMIN Windows user if it does not exist (and adds to Users group)
Sets the policies for IME_ADMIN
Sets the permissions on the Mail Enable directories for IME_ADMIN
Sets the permission on required system files for IME_ADMIN and IME_USER
Web Mail Installation
Creates the IME_USER Windows user if it does not exist (and adds to Users group)
Sets the policies for IME_USER
Resets the password for IME_USER to the entered one
Creates the IME_ADMIN Windows user if it does not exist (and adds to Users group)
Sets the policies for IME_ADMIN
Resets the password for IME_ADMIN to the entered one
Creates the Mail Enable package in COM+/MTS under the IME_ADMIN account
Resets the package identity of Mail Enable Administration to IME_ADMIN
Creates the MEWebmail virtual directory under the selected IIS site

Enterprise Edition Configuration Guide v 3.0
Page 125
Sets the permissions on the Mail Enable bin directory for IME_ADMIN
Sets the permissions on the Mail Enable web mail directory for IME_ADMIN & IME_USER
Resets all MEWebmail virtual directories to use the new password
Resets all the MEAdmin virtual directories to use the new password
Sets default document and session state for selected website
WebAdmin Installation
Creates the IME_USER Windows user if it does not exist (and adds to Users group)
Sets the policies for IME_USER
Resets the password for IME_USER to the entered one
Creates the IME_ADMIN Windows user if it does not exist (and adds to Users group)
Sets the policies for IME_ADMIN
Resets the password for IME_ADMIN to the entered one
Creates the Mail Enable Administration package in COM+/MTS under the IME_ADMIN account
Resets the package identity of Mail Enable to IME_ADMIN
Creates the MEAdmin virtual directory under the selected IIS site
Sets the permissions on the Mail Enable Web Mail directory for IME_ADMIN & IME_USER
Resets all MEWebmail virtual directories to use the new password
Resets all the MEAdmin virtual directories to use the new password
Sets default document and session state for selected website
Re-Register MMC Components
Reregisters the MailEnable administration MMC DLLs
Set IIS Application Isolation Levels (Low > In Process)
Sets the MEAdmin and MEWebmail virtual directories application level to be low
Set IIS Application Isolation Levels (Medium >Pooled)
Sets the MEAdmin and MEWebmail virtual directories application level to be medium
Set IIS Application Isolation Levels (High >Isolated)
Sets the MEAdmin and MEWebmail virtual directories application level to be high
Clear System Blocking Files
Removes all the blocking files from the Mail Enable\Config directory
13.4 Command Line Send Utility (MESend)
MailEnable Command Line Send Utility is available in the MailEnable BIN directory (MeSend.exe). This utility allows you to send email via SMTP.
Syntax: MESend /H:{Mail Host} /F:{From Address} /T:{To Address} /S:{Subject} /A:{Attachment Local FilePath} /N:{Attachment Display Name} /B:{Message Body}
Example: MESend /F:[email protected] /T:[email protected] /S:Message Subject Line /A:C:\test.txt /N:test.txt /B:Message Body /H:127.0.0.1
Note: At least one recipient must be supplied.

Enterprise Edition Configuration Guide v 3.0
Page 126
13.5 Message Tracking
The message routing trace utility provides an interface to track messages through MailEnable. It is a useful tool to determine whether a message was accepted by the server and as to where it was directed to.
Setting Description
Connector
(mandatory)
From the drop down box, select the connector to trace the original message from.
Date (mandatory)
Date is formatted in YYMMDD format (e.g. 5th September 2006 = 060905)
Sender (optional)
Enter the sender’s email address
Recipient (optional)
Enter the recipient’s email address
After filling in these fields and selecting ‘Search’, a list of messages matching the criteria specified will be displayed. By selecting the Date/Time, Message ID or Data column headings, it is possible to sort the columns.
13.6 Directory Management Utility
The Directory Management utility provides a simple interface for adding, editing and managing global contacts for a post office.
Setting Description
Current directory
Select the directory to edit from the drop down box.
Add directory entry
Create a directory entry for the selected directory. Includes details such as first name, surname, street address, work telephone, company, department etc.
Edit directory entry
Edits the selected directory entry.
Remove directory entry
Removes the selected directory entry.
Import from address map
Imports email addresses from the post office address map into the post office directory.
13.7 Backup utility
The Backup utility allows for both backup and restore of MailEnable to local disk. The backup utility is a basic tool that copies the configuration data and email data to another location in case of server failure. It will not back up the configuration data if MailEnable is configured to use MySQL or Microsoft SQL Server for configuration storage. It is recommended that you include the MailEnable directories as part of the normal server backup processes you should have in place. Since the email data is stored in plain text files, there is no special process to follow and they can be handled like any other files.

Enterprise Edition Configuration Guide v 3.0
Page 127
Setting Description
Backup To backup MailEnable, select a descriptive name for the backup and select “Backup”.
Restore To restore an existing backup, select the back up set name from the drop down box and select “Restore”.
Calculate size Calculates the maximum storage size required in the backup location to successfully backup the complete configuration.
13.8 Queue overview
The Queue overview lists the number of messages in the outbound SMTP queue by the destination domain name.

Enterprise Edition Configuration Guide v 3.0
Page 128
14 Appendix
14.1 Overview of NTLM authentication
When MailEnable is configured to provide NTLM authentication, mail users with Outlook or Outlook Express will be able to select the option to use Secure Password Authentication when authenticating against the MailEnable Server. This provides a higher level of password encryption when clients authenticate.
NTLM is an authentication protocol used primarily by Microsoft applications to securely authenticate over a network. MailEnable provides NTLM support for the IMAP, POP, and SMTP, allowing NTLM capable mail clients to securely negotiate credentials when authenticating.
Microsoft Outlook and Outlook Express refer to the NTLM protocol as “Secure Password Authentication”. Generally speaking, unless the backend mail server can negotiate NTLM authentication, it is not possible to use the Secure Password Authentication feature of the mail client.
When the Secure Password Authentication feature is enabled within the mail client, the mail client will encrypt and send the currently logged in Windows username to the MailEnable server. The MailEnable server then looks up the user and verifies that they exist, and assuming so, will send down an encrypted password hash that can be used by the client to validate the password for that user.
This authentication mechanism, is well suited in environments where single sign-on is required or desirable. Using NTLM, once the user has logged in to Windows, they do not necessarily need to specify or configure the mail client with a designated username or password.
If the username of the currently logged in user cannot be validated against MailEnable, most mail clients will then use any credentials that have been associated with the account.
NTLM can be enabled/disabled at a service level. There are no other parameters that need to be configured other than whether it is enabled for the service or not.
Setting Description
Enable NTLM If this feature is enabled then secure authentication between the server and the supported client is enabled. This will allow the server to accept requests from the client to use secure transmissions for the authentication method. The client also has to be enabled use this secure authentication. E.g. in Outlook the feature is called SPA – Secure Password Authentication.
14.1.1 Configuring NTLM on the mail client
The Secure Password Authentication (SPA) feature in Outlook/Outlook Express is found under Tools > Accounts menu option when either creating or editing an email account.

Enterprise Edition Configuration Guide v 3.0
Page 129
Figure 14-1 Secure Password Authentication in Outlook
14.2 Accessing web mail for automatic sign-on
Configure MailEnable to automatically login by using the following path syntax:
Syntax:
http://Server/MEWebMail/base/default/lang/EN/login.asp?LanguageID=EN&UserID=Account&Password=Password&Method=Auto&skin=default
Example:
http://127.0.0.1/MEWebMail/base/default/lang/EN/login.asp?LanguageID=EN&UserID=James@MailEnable&Password=password&Method=Auto&skin=default
It is possible make this page the startup page or home page within your browser. Also, consider using HTTPS (If there is a certificate installed for the web server). This will avoid passwords being sent to the remote host in clear text.
14.3 DNS error codes and descriptions
The following table lists typical WIN32 DNS return codes. These return codes may appear in the SMTP Debug log file if the DNS is either incorrectly configured or there are DNS Errors being returned from the DNS Server.
9001 DNS server unable to interpret format.
9002 DNS server failure.
9003 DNS name does not exist.
9004 DNS request not supported by name server.
9005 DNS operation refused.
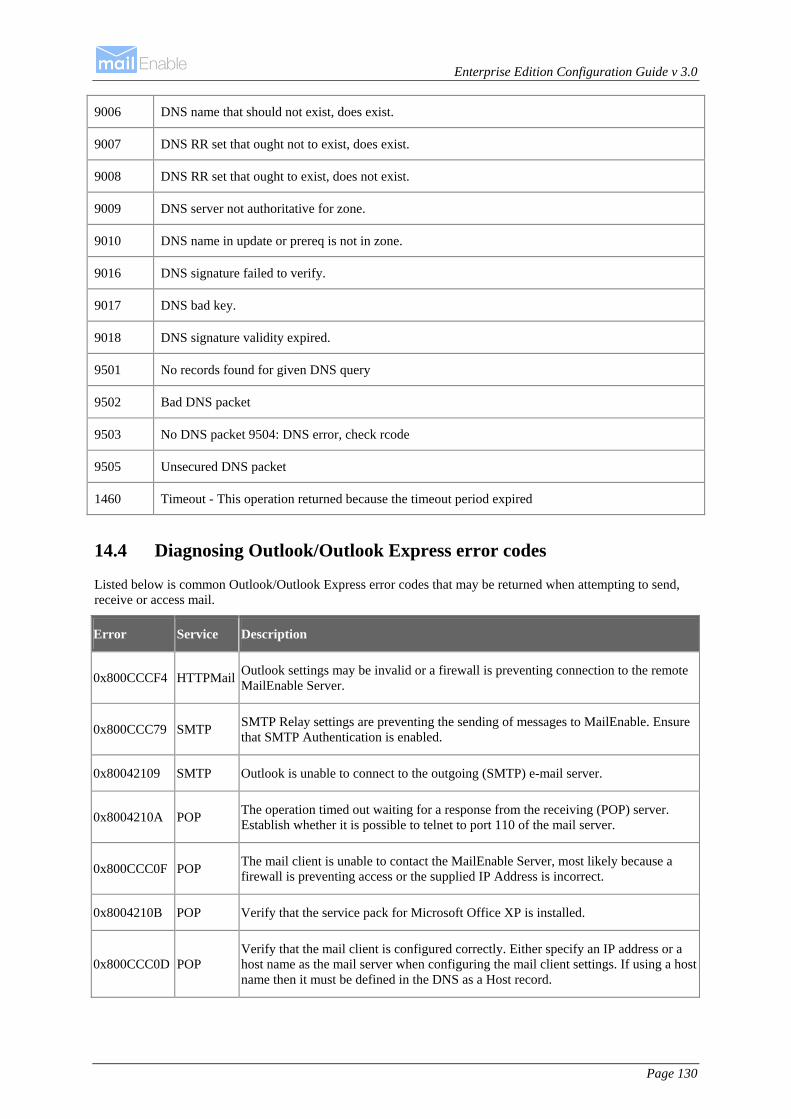
Enterprise Edition Configuration Guide v 3.0
Page 130
9006 DNS name that should not exist, does exist.
9007 DNS RR set that ought not to exist, does exist.
9008 DNS RR set that ought to exist, does not exist.
9009 DNS server not authoritative for zone.
9010 DNS name in update or prereq is not in zone.
9016 DNS signature failed to verify.
9017 DNS bad key.
9018 DNS signature validity expired.
9501 No records found for given DNS query
9502 Bad DNS packet
9503 No DNS packet 9504: DNS error, check rcode
9505 Unsecured DNS packet
1460 Timeout - This operation returned because the timeout period expired
14.4 Diagnosing Outlook/Outlook Express error codes
Listed below is common Outlook/Outlook Express error codes that may be returned when attempting to send, receive or access mail.
Error Service Description
0x800CCCF4 HTTPMail Outlook settings may be invalid or a firewall is preventing connection to the remote MailEnable Server.
0x800CCC79 SMTP SMTP Relay settings are preventing the sending of messages to MailEnable. Ensure that SMTP Authentication is enabled.
0x80042109 SMTP Outlook is unable to connect to the outgoing (SMTP) e-mail server.
0x8004210A POP The operation timed out waiting for a response from the receiving (POP) server. Establish whether it is possible to telnet to port 110 of the mail server.
0x800CCC0F POP The mail client is unable to contact the MailEnable Server, most likely because a firewall is preventing access or the supplied IP Address is incorrect.
0x8004210B POP Verify that the service pack for Microsoft Office XP is installed.
0x800CCC0D POP Verify that the mail client is configured correctly. Either specify an IP address or a host name as the mail server when configuring the mail client settings. If using a host name then it must be defined in the DNS as a Host record.
Enterprise Edition Configuration Guide v 3.0
Page 131
0X800CCC0E SMTP
This error means that the mail client is connecting to the server via POP, but the SMTP Service is either not running or is configured incorrectly. Verify if the SMTP service is running by using the telnet utility to telnet to port 25 of the mail server. If the server responds, then the issue is most likely that mail client settings are invalid.
14.5 Manually testing if MailEnable can send mail to remote servers
Many ISP’s block outbound SMTP traffic to ensure that spammers do not abuse their service. It is possible to validate whether mail can be sent to remote hosts by using the telnet utility. Instructions follow: 1. From the Windows Start Menu select Start|Run and enter CMD as the application to run. Select OK
2. At the command prompt, enter the following:
telnet mail.mailenable.com 25
The remote mail server should respond with an initiation string much like the following:
220 mailenable.com ESMTP Mail Enable SMTP Service, Version: 1.1 ready at 02/28/03 14:04:45
3. Type the word QUIT and then press enter. If this was successful, then no firewall (either local or the ISPs) is preventing outbound SMTP traffic. The next procedure to try is sending an actual message to the remote host (rather than just determining whether it is possible to connect). Firstly, determine which remote server to connect to. A domain may have more than one server that is accepting email, and these servers may not match the domain name. The MX records that have been configured in a DNS determine the mail servers for a domain. To retrieve the mail server details for a domain, use the nslookup command line utility. For example, to check which servers are accepting email for AOL, you can enter:
nslookup –type=MX aol.com
This will return the details of the mail servers, these results can be used as the hosts to connect to.
This is outlined as follows:
1. From the Windows Start Menu select Start|Run and enter CMD as the application to run. Select OK.
2. At the command prompt, enter the following: telnet mail.mailenable.com 25
The remote mail server should respond with an initiation string much like the following: 220 mailenable.com ESMTP Mail Enable SMTP Service, Version: 1.1 ready at 02/28/03 14:04:45
3. Type the following and press Enter: HELO YourDomainName
The server should reply with a line similar to: 250 Requested mail action okay, completed
4. Type the following and press Enter. Senderaddress is the email address you are sending from:
MAIL FROM:<senderaddress>
The server should reply with a line similar to: 250 Requested mail action okay, completed
5. Type the following and press Enter. Recipientaddress is the email address you are sending to:
RCPT TO:<recipientaddress>
The server should reply with a line similar to:

Enterprise Edition Configuration Guide v 3.0
Page 132
250 Requested mail action okay, completed
To have multiple recipients for an email, enter the recipient to line more than once. This is how a blind carbon copy works. If the recipient does not exist, this may generate an error such as:
550 Requested action not taken: mailbox unavailable or not local
6. Now indicate to the server that you want to send the email date. Type the following and press Enter: DATA
The server should reply with something like 354 Start mail input; end with <CRLF>.<CRLF>
7. Enter the text of an email as follows (Note: [CRLF] = Enter Key). The period character on the last line indicates that all the email content has been sent:
Subject: Test Message[CRLF]
[CRLF].[CRLF]
8. Type the following and press Enter:
QUIT
If this was successful, then MailEnable should be able to send messages to the remote host. If an abnormal response is received for any of the commands typed in, then search the MailEnable Knowledge Base for any articles that may give an indication of the cause of the error.
Example:
C:\>telnet mail.mailenable.com 25
220 mailenable.com ESMTP MailEnable Service, Version: -2.3- ready at 11/20/03
23:49:40
EHLO test.mydomain.com.au
250-mailenable.com [144.136.51.56], this server offers 4 extensions
250-AUTH LOGIN CRAM-MD5
250-SIZE 10120000
250-HELP
250 AUTH=LOGIN
MAIL FROM:<senderaddress>
250 Requested mail action okay, completed
RCPT TO:<recipientaddress>
250 Requested mail action okay, completed
DATA
354 Start mail input; end with [CRLF].[CRLF]
Subject: Test Message
250 Requested mail action okay, completed
QUIT
221 Service closing transmission channel
Connection to host lost.

Enterprise Edition Configuration Guide v 3.0
Page 133
14.6 Log analyser
The log analyser is a useful tool that is installed with MailEnable. It simplifies analysis of the server logs and provides an overview of any errors and displays causes and fixes for these. The log analyser retrieves the latest help information from the MailEnable website.
Figure 14-2 Log Analyser
Run the log analyzer by accessing the Start|Program Files|Mail Enable|System Tools|Log Analyzer menu. The various log files in the log path are displayed to the left. To view events in a log, click the filename. The program will scan the file for all the events and display these in the top right section. Select the item for more information concerning the event, along with a display of the instance in the log. Select the More Information button to be taken to the MailEnable website for further details.
To match up the item in the debug log with the actual data conversation between the MailEnable server and the remote application, select the instance item. It may take a few moments to scan through the activity log to find the match, depending on how large the log files are.
Some errors will always be seen if the server is connected to the Internet. People will try to relay through the server, timeout and connection issues can occur, and users can mistype email addresses when sending messages, which will all display in the logs. The number of errors that occur in the debug log is show in the square brackets in the box labeled Significant Event Instances. This gives a good indication of the severity of the event.
14.6.1 Troubleshooting SMTP connectivity issues & analyzing log files
MailEnable provides extensive logging of SMTP activity. There are three log files that are used by MailEnable. These are the debug, activity and W3C logs. The W3C log files are essentially a replica of the activity log, hence it is only required to investigate the activity and debug logs.
The debug log contains "wordy" explanations of significant actions undertaken by MailEnable. For example, when a user attempts to relay a mail message, this is recorded and time-stamped in the SMTP Debug log.
The activity log file contains a transcript of all SMTP commands exchanged between MailEnable and other remote clients or mail servers.
The simplest way to find a message and debug a SMTP transaction is to open the SMTP Activity log in Notepad and search it. You can also load the log file into Microsoft Excel as follows:
14.6.1.1 How to import the activity log into Microsoft Excel
1. File|Open Browse to C:\Program Files\Mail Enable\Logging\SMTP (or equivalent directory).
2. Change the Files of Type combo to All Files (*.*)
3. Select the activity file to open (the files are named as SMTP-Activity-YYMMDD).
4. Excels Text Import Wizard will now be displayed. Select the option to import the text as Delimited data and click Next

Enterprise Edition Configuration Guide v 3.0
Page 134
5. Select the format as Tab delimited and click next
6. Click Finish to import the data
A worksheet will be displayed with data represented as follows:
A=Transaction date and time
B=Transaction Type (Inbound or Outbound)
C=Message ID/Message filename (This is used to match with other logs to track messages)
D=Internal socket number that the SMTP transaction was occurring on
E=TCP/IP Address of the remote host involved in the SMTP transaction
F=The name of SMTP Command that relates to the transaction
G=The details for the SMTP command that relates to the current transaction
H=The details for the response to the SMTP command that relates to the current transaction
I=The number of bytes sent when executing this command
J=The number of bytes received in executing this command
There are two important types of transactions outlined in the SMTP Activity log file. These are SMTP Inbound Transactions and SMTP Outbound Transactions. These transactions are denoted in the log files as SMTP-IN and SMTP-OU in their respective lines in the Activity log file.
14.6.1.2 How to relate activity log entries to the debug log file
The most obvious way of relating an entry in the activity log file to the Debug log file is via the time stamp recorded in the file. The message ID can also be used (as this is often recorded in the debug log file). The message ID is also useful in tracking messages as they pass through the MTA. The MTA logs this message ID and therefore you can use the logs to track a message as it is routed through MailEnable's Connectors via the MTA.
For example, a user may complain that they cannot send mail from Outlook. In this case an error message will be reported back to the remote mail client.
e.g.: 503 This mail server requires authentication. Please check your mail client settings.
Use this error string to locate the transaction sequence in the SMTP Activity log. Once the entry has been found in the SMTP Activity log, then check the SMTP Debug log for the same time period. The log will have recorded the reason why the relay request was denied.
14.7 Antivirus configuration
14.7.1 Using your own antivirus scanner
If antivirus support is enabled, attachments in messages are unpacked and scanned as they pass through the Mail Transfer Agent. The MTA moves mail messages internally within MailEnable. When the MTA picks up a message from a connector’s queue, it unpacks it into a scratch directory and uses the command line specified in the administration program to scan each unpacked file. In most cases, command line virus checkers have the ability to automatically delete files. If one of the scanned attachments of the message is deleted, the Antivirus filter assumes that it has a virus and when the message is reconstructed, it replaces the offending content with a note indicating that offending content was removed. MailEnable can also check the return code from a command line scanner in order to determine whether the item it processed is infected.
For example, a sample argument line for a command line scanner is:
"[AGENT]" "[FILENAME]" -remove -s -nb -nc
This can be seen if you open the registry and access HKEY_LOCAL_MACHINE\SOFTWARE\Mail Enable\Mail Enable\Agents\MTA\Filters\[Virus Scanner Short Name].
Enterprise Edition Configuration Guide v 3.0
Page 135
Note that the [AGENT] and [FILENAME] tokens in this registry setting are replaced by the path to the A/V Command Line Scanner and the attachment name (which is generated by the system). The "-remove -s -nb -nc" part of this registry value is the part that will vary depending on the scanner application being used.
Ensuring that the A/V app supports auto deletion is a little limiting. As a result there are registry settings that allow the use of the scanners DOS error level or exit code.
The respective settings are:
"Exit Code Enabled": 0/1 - on/off
"Exit Codes": eg: 1 2 9: space delimited string containing application exit codes
"Exit Codes Error Inclusive": 0/1 - on/off: used to configure whether the "Exit Codes" indicate errors or successes
A sample registry import file is outlined below:
Windows Registry Editor Version 5.00
[HKEY_LOCAL_MACHINE\SOFTWARE\Mail Enable\Mail Enable\Agents\MTA\Filters\Custom]
"Status"=dword:00000000 "Antivirus Notification Message"=">"
"Antivirus Scratch Directory"="C:\\Program Files\\Mail Enable\\Scratch"
"Antivirus Parameters"="\"[AGENT]\" \"[FILENAME]\" -s -nb -nc"
"Antivirus Agent"="C:\\Program Files\\Virus Scanner\\CUSTOM.EXE"
"Provider DLL"="MEAVGEN.DLL"
"Program Name"="Custom"
"Program Info"="This is a template for new virus scanners."
"Exit Code Enabled"=dword:00000000
"Exit Codes Error Inclusive"=dword:00000001
"Exit Codes"="1"
This can be copied into Notepad, saved as a .reg file and imported using the registry editor. Once imported into the registry, the settings can be edited to those required by the antivirus command line application.
14.7.2 Selecting an antivirus application
MailEnable Enterprise Edition provides an antivirus plug-in that will allow scanning of mail messages for viruses as they pass through the Mail Transfer Agent. The following overviews are provided to assist in selecting an antivirus application.
14.7.2.1 F-Prot
Company: Frisk International
Product Name: F-Prot for Windows http://www.f-prot.com/
Configuration Guidelines: MailEnable Knowledge Base http://www.mailenable.com/kb/Content/Article.asp?ID=me020284
14.7.2.2 Sophos
Company: Sophos
Product Name: Sophos Antivirus http://www.sophos.com/
Configuration Guidelines: MailEnable Knowledge Base http://www.mailenable.com/kb/Content/Article.asp?ID=me020288
14.7.2.3 Norman Antivirus
Company: Norman
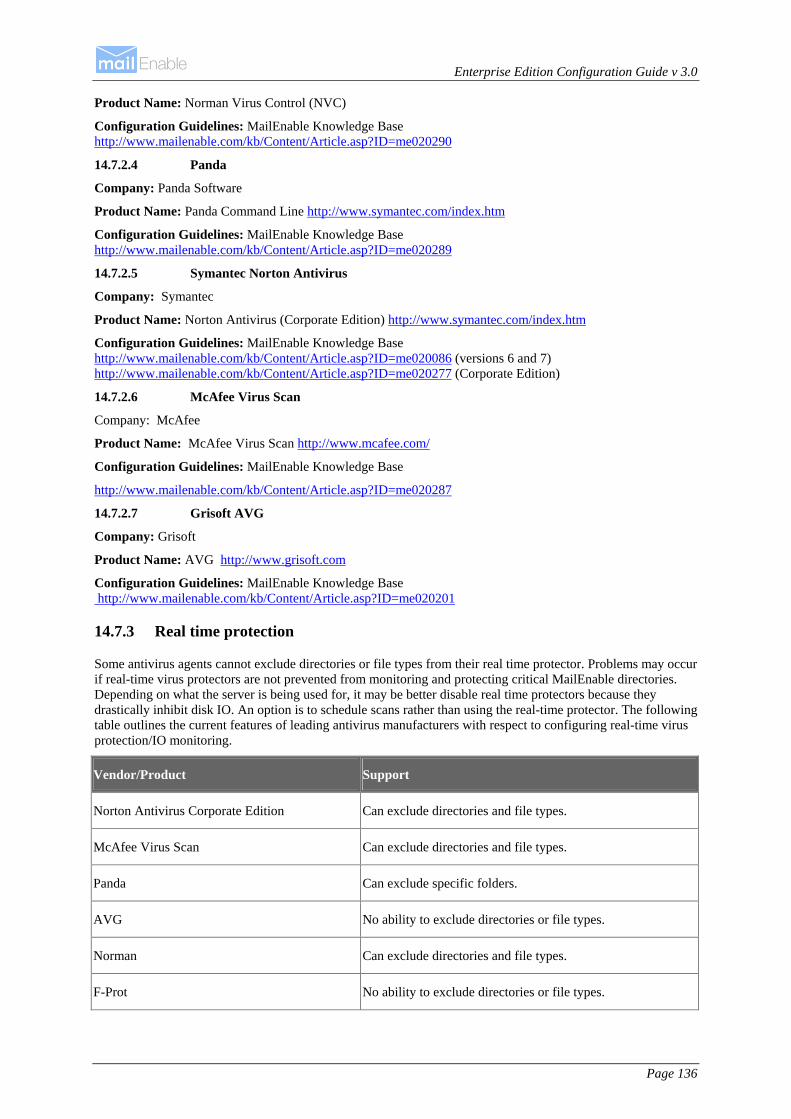
Enterprise Edition Configuration Guide v 3.0
Page 136
Product Name: Norman Virus Control (NVC)
Configuration Guidelines: MailEnable Knowledge Base http://www.mailenable.com/kb/Content/Article.asp?ID=me020290
14.7.2.4 Panda
Company: Panda Software
Product Name: Panda Command Line http://www.symantec.com/index.htm
Configuration Guidelines: MailEnable Knowledge Base http://www.mailenable.com/kb/Content/Article.asp?ID=me020289
14.7.2.5 Symantec Norton Antivirus
Company: Symantec
Product Name: Norton Antivirus (Corporate Edition) http://www.symantec.com/index.htm
Configuration Guidelines: MailEnable Knowledge Base http://www.mailenable.com/kb/Content/Article.asp?ID=me020086 (versions 6 and 7) http://www.mailenable.com/kb/Content/Article.asp?ID=me020277 (Corporate Edition)
14.7.2.6 McAfee Virus Scan
Company: McAfee
Product Name: McAfee Virus Scan http://www.mcafee.com/
Configuration Guidelines: MailEnable Knowledge Base
http://www.mailenable.com/kb/Content/Article.asp?ID=me020287
14.7.2.7 Grisoft AVG
Company: Grisoft
Product Name: AVG http://www.grisoft.com
Configuration Guidelines: MailEnable Knowledge Base http://www.mailenable.com/kb/Content/Article.asp?ID=me020201
14.7.3 Real time protection
Some antivirus agents cannot exclude directories or file types from their real time protector. Problems may occur if real-time virus protectors are not prevented from monitoring and protecting critical MailEnable directories. Depending on what the server is being used for, it may be better disable real time protectors because they drastically inhibit disk IO. An option is to schedule scans rather than using the real-time protector. The following table outlines the current features of leading antivirus manufacturers with respect to configuring real-time virus protection/IO monitoring.
Vendor/Product Support
Norton Antivirus Corporate Edition Can exclude directories and file types.
McAfee Virus Scan Can exclude directories and file types.
Panda Can exclude specific folders.
AVG No ability to exclude directories or file types.
Norman Can exclude directories and file types.
F-Prot No ability to exclude directories or file types.

Enterprise Edition Configuration Guide v 3.0
Page 137
Note: Any errors or omissions in the above are unintentional. For accurate and up to date information it is recommended to consult the manual or web site of the respective antivirus software package. Whilst MailEnable provides a means for you to integrate Antivirus software, you should always check the licensing agreement supplied with the Antivirus software to determine any licensing constraints.
14.8 IIS configuration
The following screenshot shows the Internet Information Server Management Console (Internet Service Manager) under Windows 2000.
Figure 14-3 IIS in Windows 2000
MailEnable web mail installs a component (COM DLL) under Component Services for Windows 2000 or later. Under Windows NT this is under Microsoft Transaction Server. This component is configured to run with the identity/security context of an account called IME_ADMIN.
The following screenshot shows Component Services under Windows 2000 and the Components contained within the MailEnable package.
Figure 14-4 Component Services

Enterprise Edition Configuration Guide v 3.0
Page 138
14.9 Configuring redundant or backup (MX) mail servers
There are two principal ways to configure redundancy with MailEnable.
The simplest way to achieve redundancy is to install a copy of MailEnable as the master server. Then install separate copies of MailEnable on other servers and smart host the domains to the IP address of the master server. This will mean that if the master server is down, that the auxiliary servers will accept mail for the domains and hold it until it is online.
The DNS/MX settings for the domains will need to be changed in order to configure the appropriate MX preferences. Other mail servers learn about your mail server via DNS MX records. They are the means by which someone enumerates a target domain to the server responsible for receiving mail for that domain. MX records have a preference associated with them that determines the order in which they are used.
The lowest preference is attempted first. The lower the preference value, the higher the priority. Hence an MX record with a preference of 1 would be attempted before an MX entry with a preference of 10. More info on DNS and MX records is available at: http://www.mailenable.com/kb/viewarticle.asp?aid=19
The above-mentioned approach is used if the backup mail servers are distributed in different geographic or logical locations.
A second alternative is to host all of the mail servers on the same local network and cluster the servers. This allows MailEnable to be installed on multiple servers and have them all use the same store for their messages and post office data. Any of these servers can then be used to access the mail. This requires that one of the servers share the mail data and configuration directories and that the others access them.
14.10 Increasing upload limit for Windows 2003
Windows 2003 restricts the maximum size of an upload to 200 kilobytes. If a user is accessing web mail and tries to upload a file over this size, they may receive the error 'The attachment could not be added to the message' when uploading files under Windows 2003. The additional error string reported is:
File save failed for the following reason: C:\Program Files\Mail Enable\POSTOFFICES\\MAILROOT\\Drafts\ is an invalid path
The following error may also display:
Error MEUP001: The ASP Session expired during the upload.
Reason: IIS6.0/Windows 2003 uses a setting called 'AspMaxRequestEntityAllowed' to specify the maximum number of bytes allowed in the body of an ASP request. File uploads typically contain more data than the 200K allowed by the default setting, and therefore this value needs to be updated to a higher value.
Solution:
Instructions for resolving this issue follow:
1. Stop the World Wide Web Publishing Service. This can be done from the Windows Command Prompt as: net stop w3svc
2. In the C:\Windows\System32\Inetsrv directory, locate a file called metabase.XML.
3. Copy the original file in notepad and find the line "AspMaxRequestEntityAllowed".
4. Change the value of this entry to "1073741824". (Specifies a maximum post size of 1 GB)
5. Save the file.
6. Start the World Wide Web Publishing Service. This can be done from the Windows Command Prompt as: net start w3svc
Note: If the Metabase.XML file is locked, try starting Windows in Safe-mode to be able to change that file.

Enterprise Edition Configuration Guide v 3.0
Page 139
14.11 Logical architecture and message flow
The diagram below outlines the core functionality of MailEnable and how its respective modules (Connectors, Services and Agents) interact. For simplicity, the diagram does not outline the functions of the POP retrieval Connector or List Server Connector.
Figure 14-5 Core Functionality of MailEnable

Enterprise Edition Configuration Guide v 3.0
Page 140
The following diagram provides a high level overview the POP Connector:
Figure 14-6 Overview of POP Connector

Enterprise Edition Configuration Guide v 3.0
Page 141
The List server connector is responsible for dispatching messages to large lists of mail addresses. The list server connector will allow members to subscribe to a list, enforce publishing rules for the list, add headers and footers to messages published via the list, etc.
Figure 14-7 List server connector

Enterprise Edition Configuration Guide v 3.0
Page 142
15 Glossary Address Map An address map is used to define source and target mail exchanges between Connectors by the
Mail Transfer Agent. For example, mail sent to the SMTP address [SMTP:[email protected]] is likely to have an address map to the post office address [SF:MailEnable/JONES].
Agents Agents run perform specific management or operating functions for MailEnable itself. An example of an Agent is the Mail Transfer Agent. Its function is to move messages between connectors.
Connector Connectors facilitate moving mail between systems or subsystems (whether they are local or remote).
DNS Domain Name Server (or System) is a database of Internet names and addresses which maps domain names to the official Internet Protocol (IP) address and vice versa.
Group A Group represents a logical combination of mail addresses addressable under a single mail address. Any mail addressed to the group is distributed to all the members belonging to that group.
IP Internet Protocol. A network and transport protocol used for transmitting data over the Internet. Every machine on the internet has its own IP number/address.
List A List is much like a group. The major difference between a list and a group is that lists are subscription based, can be moderated, and can have headers and footers applied to them.
Mailbox A mailbox is a repository for email. It used to store emails for one or more email addresses. When a user connects with a mail client application (Outlook Express, Eudora, etc.), they connect to a mailbox to retrieve their email.
MTA Mail Transfer Agent. A Windows Service that exchanges internal messages between MailEnable Connectors.
Post office A post office is used to host multiple mailboxes and domains under one area. For example, if you were providing email hosting for multiple companies, you would create a post office for each company. Within the post office you can assign multiple domains and mailboxes.
Provider Providers are used by Connectors, Agents and Services to allow them to read their configurations. An example of a provider is the Tab Delimited Address Map provider. This provider reads the address map that is used to determine mail routing between connectors. In order to allow the applications to read configuration data from different sources, different providers would be used. For instance, SQL Server would have its own providers.
Recipient The address to where the email is destined.
Services Services expose MailEnable functionality to external agents or programs. An example of a service is the POP3 service. This service allows mail clients to access mail from their post office. MailEnable employs standard Windows Services that make it compatible with Windows NT/2000/2003.