Mail Merge. T HE M AILINGS T AB The Mailings Tab: The Mailings tab replaces the Mail Merge Task Pane...
16
Mail Merge
-
Upload
margery-townsend -
Category
Documents
-
view
216 -
download
0
Transcript of Mail Merge. T HE M AILINGS T AB The Mailings Tab: The Mailings tab replaces the Mail Merge Task Pane...

Mail Merge
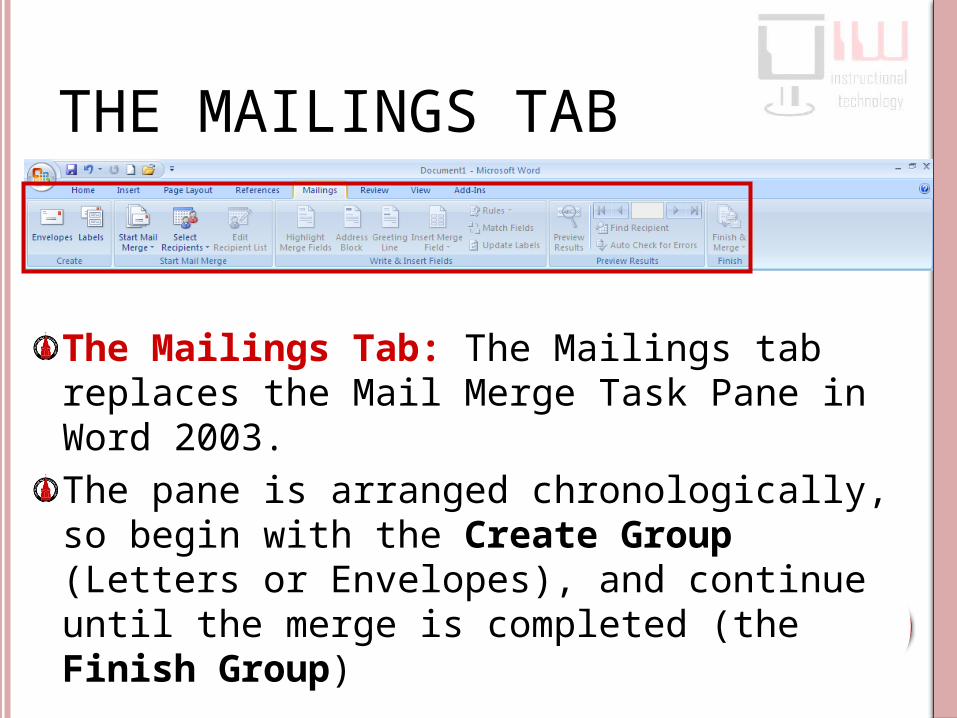
THE MAILINGS TAB
The Mailings Tab: The Mailings tab replaces the Mail Merge Task Pane in Word 2003. The pane is arranged chronologically, so begin with the Create Group (Letters or Envelopes), and continue until the merge is completed (the Finish Group)
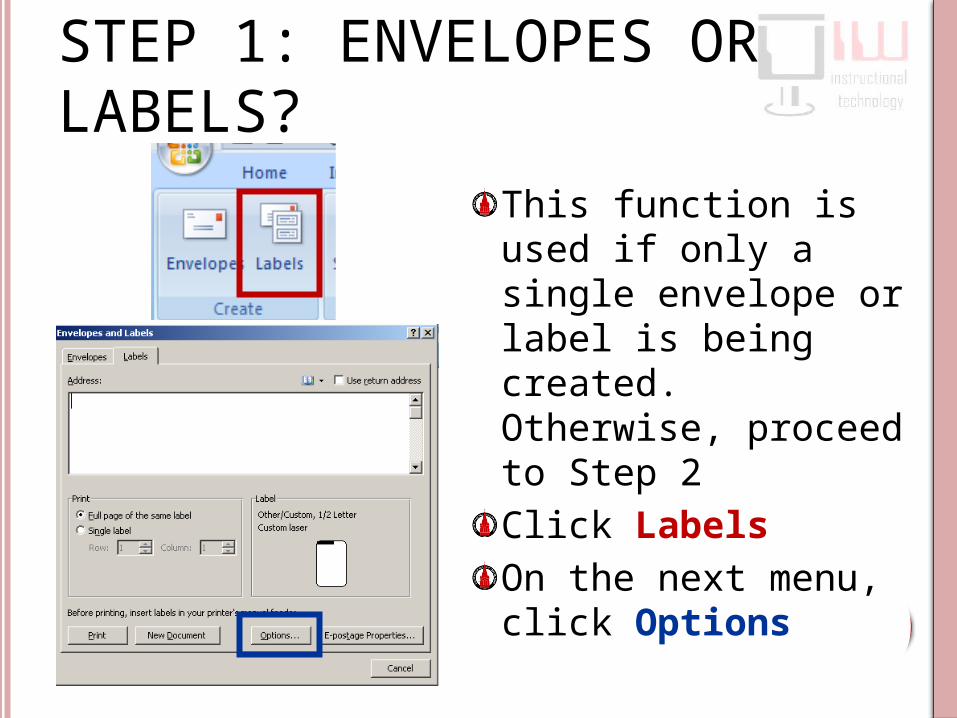
STEP 1: ENVELOPES OR LABELS?
This function is used if only a single envelope or label is being created. Otherwise, proceed to Step 2Click Labels On the next menu, click Options

STEP 1: ENVELOPES OR LABELS?
Locate the Brand of label from the Label Vendor listLocate Product numberClick OKFill out the address information on the next menu.

STEP 2: START MAIL MERGE
Begin with this step for multiple addressees or addressing lettersClick Start Mail MergeChoose Labels

STEP 2: START MAIL MERGE
Locate the brand of envelope from the Label Vendor listLocate Product numberClick OKFill out the address information on the next menu.

STEP 3: SELECT RECIPIENTSClick Select RecipientsChoose Use Existing List This feature is used if you have a spreadsheet or database from which to select recipients. A list may also be generated by manually creating a list or using an Outlook contact list

STEP 3: SELECT RECIPIENTS
Navigate to sampleaddressbookClick OpenOn the next menu, select the name of the worksheet containing addressee informationClick OK

STEP 4: EDIT RECIPIENTS (OPTIONAL)
This steep selects specific recipientsSelect recipients by selecting checkboxesTo select the entire list, click Select AllClick OK

STEP 5: INSERT FIELDSThe Address Block adds an address to a label or letter. In addition, a greeting line (i.e. Dear ---) may be added by clicking Greeting LineSpecific field information may be inserted manually using Insert Merge FieldAdd these fields by inserting the cursor where the filed will be placed
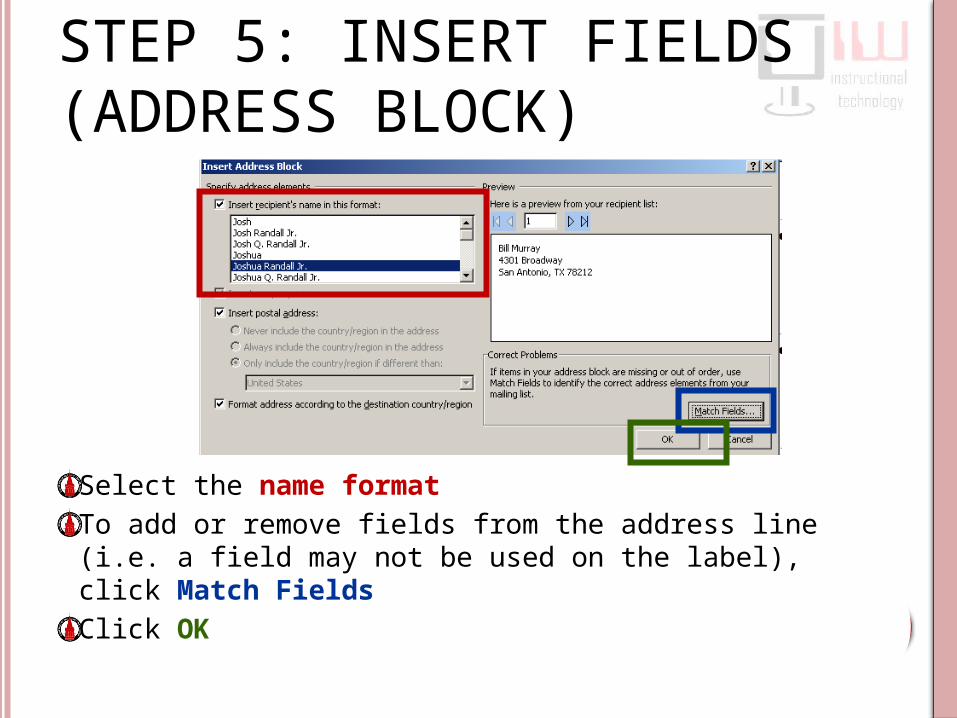
STEP 5: INSERT FIELDS (ADDRESS BLOCK)
Select the name formatTo add or remove fields from the address line (i.e. a field may not be used on the label), click Match FieldsClick OK

STEP 5: INSERT FIELDS (ADDRESS BLOCK)
Click on the drop-down menu to add a field by matching the field nameTo remove a field, change the field name to not matchedIf this is the format for all labels, crick the Remember checkboxClick OK

MAIL MERGE, STEP 5: INSERT FIELD (MERGE FIELDS)
Click Insert Merged Field Choose the field type to insertChoose the items to add to the letter from the listClick Insert after each item

MAIL MERGE, STEP 5PREVIEW LETTERS
Click Preview ResultsTo review each recipient, click on the recipient arrowsIf there is one label per page, click Update Labels

STEP 6 ; COMPLETING THE MERGE
Click Finish & Merge to complete the mergeClick Edit, Print, or Send to complete the process

QUESTIONS?Terence Peak, M.Ed.Coordinator of Technology TrainingBlackboard Certified TrainerThe University of the Incarnate Word(210) [email protected]

![Microsoft ® Office Word 2003 Training Use mail merge for mass mailings and more [Your company name] presents:](https://static.fdocuments.in/doc/165x107/56649e865503460f94b88b2d/microsoft-office-word-2003-training-use-mail-merge-for-mass-mailings-and.jpg)