Machine Quilting - Landauer Publishing Machine Quilting eGuide.pdf · basics 2 bringing up the...
16
A Basic Guide For Machine Quilting BONUS 8 super-simple free motion design ideas Photos, illustrations and text copyright © 2008 by Landauer Publishing, LLC. Projects copyright © 2008 by Lynn Witzenburg. No part of this ebook may be reproduced or transmitted in any form by any means, electronic or mechanical, including photocopying, recording, or by any information stor- age and retrieval system without permission in writing from the publisher. The scanning, uploading and distribution in full or in part via the Internet or any other means without permission from the publisher is illegal. The publisher presents the information in good faith. No warranty is given, nor are results guaranteed. Originally published in the book Machine Quilting The basics & beyond by Lynn Witzenburg Landauer Publishing, LLC | 3100 NW 101st Street, Urbandale, IA 50322 | www.landauerpub.com
Transcript of Machine Quilting - Landauer Publishing Machine Quilting eGuide.pdf · basics 2 bringing up the...
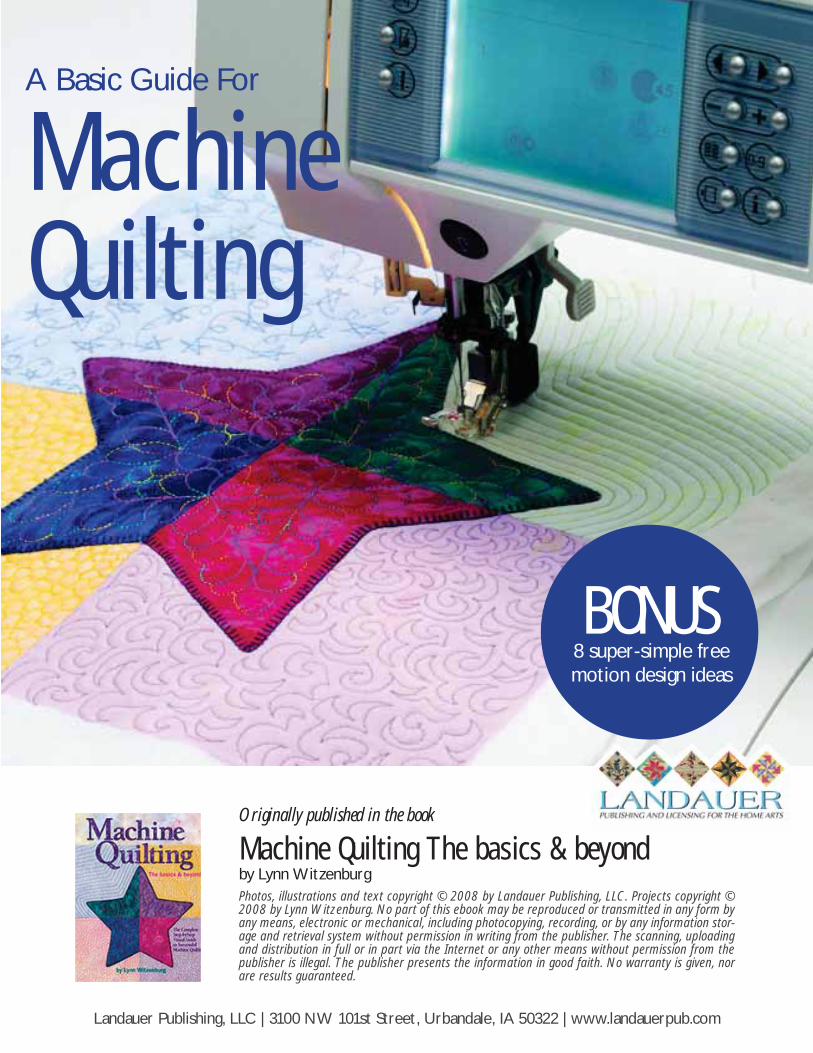
A Basic Guide For
MachineQuilting
BONUS8 super-simple free motion design ideas
Photos, illustrations and text copyright © 2008 by Landauer Publishing, LLC. Projects copyright © 2008 by Lynn Witzenburg. No part of this ebook may be reproduced or transmitted in any form by any means, electronic or mechanical, including photocopying, recording, or by any information stor-age and retrieval system without permission in writing from the publisher. The scanning, uploading and distribution in full or in part via the Internet or any other means without permission from the publisher is illegal. The publisher presents the information in good faith. No warranty is given, nor are results guaranteed.
Originally published in the book
Machine Quilting The basics & beyondby Lynn Witzenburg
Landauer Publishing, LLC | 3100 NW 101st Street, Urbandale, IA 50322 | www.landauerpub.com
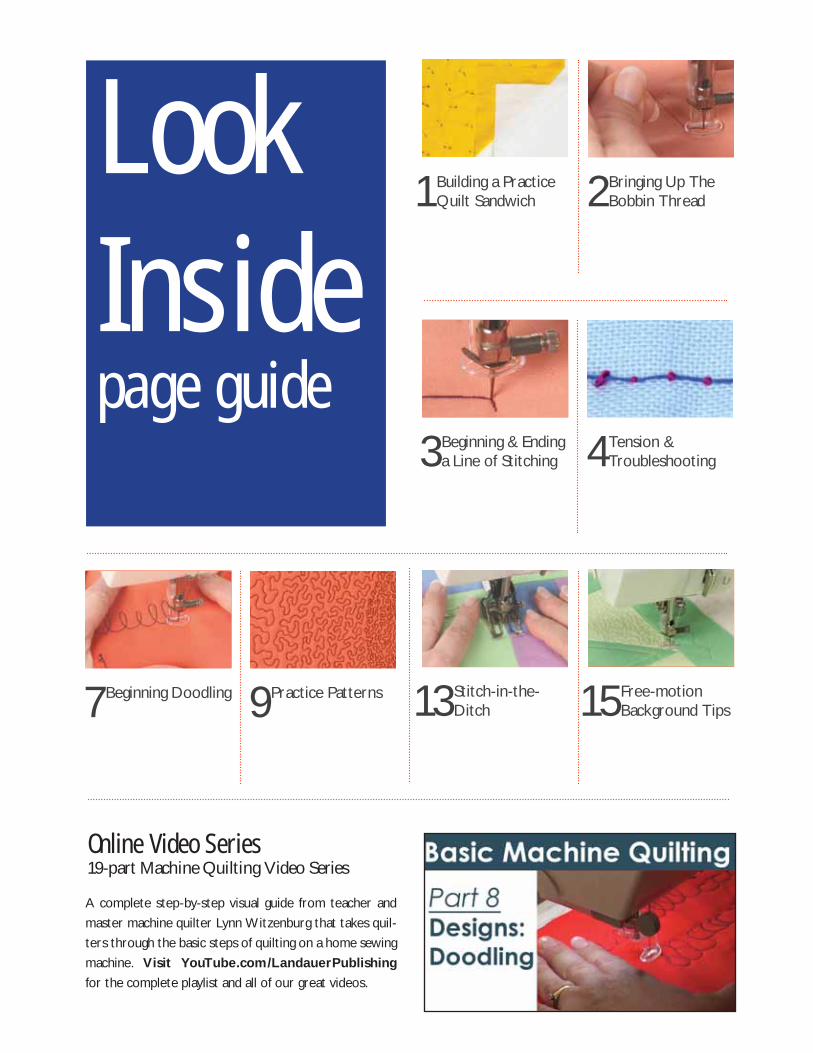
7Beginning Doodling 9Practice Patterns 13Stitch-in-the-Ditch
1Building a Practice Quilt Sandwich 2Bringing Up The
Bobbin Thread
3Beginning & Ending a Line of Stitching 4Tension &
Troubleshooting
A complete step-by-step visual guide from teacher and master machine quilter Lynn Witzenburg that takes quil-ters through the basic steps of quilting on a home sewing machine. Visit YouTube.com/LandauerPublishing for the complete playlist and all of our great videos.
Online Video Series19-part Machine Quilting Video Series
15Free-motion Background Tips
Look Insidepage guide

1
building a practice quilt sandwichA practice quilt sandwich can be any size as long as the back islarger than the top. I recommend a 22" x 22" piece of muslin forthe back and a 20" x 20" piece of muslin for the top. The battingneeds to be larger than the top so anything 21" x 21" or larger willwork. Using a lower loft batting will make things easier becausethere will be less bulk under the needle. Muslin or any other plaincotton fabric will work for the top and back. The color thread youchoose should contrast with the fabric.
Press both pieces of fabric flat. Lay the backing fabric on a table topand tape the four corners of the fabric to the table with maskingtape. The fabric should be taut, not stretched. Add one morepiece of tape to each side.
Smooth the batting over the backing. There is no need to tape itdown. Smooth the quilt top over the batting. There should bebacking and batting extending out from under the top piece on allfour sides.
Using your Kwik Klip™, insert safety pins in random order across the quilt top. Be sure to catch thebacking, batting, and top with the pins. When you place your closed fist on the quilt top, you should beable to feel one or two pins, if not add a few more. You don’t need any more pins than one or two per fistsize especially on a quilt top this small. Once all the pins are in, remove the tape, and you are ready tostart practicing.
Make it a habit to keep a practice quilt sandwich near your
sewing machine, so you can test the way various threads react
when you start a line of stitching. Different threads require
different levels of securing in order to keep them from
unraveling. For example, cotton threads are often the easiest
to secure, because the cotton fibers of the thread mesh
together easily with the fibers of the cotton fabric. Other
threads, such as polyester and rayon, are more slippery and
usually require taking a couple of extra stitches to secure.
Metallic threads can be even more challenging and require
extra locking stitches at the beginning of your line of quilting.
A practice quilt is a smart way to test your thread tension
before beginning any project.
Always keep a pract ice qu i l t sandwicht i p
b a s i c s
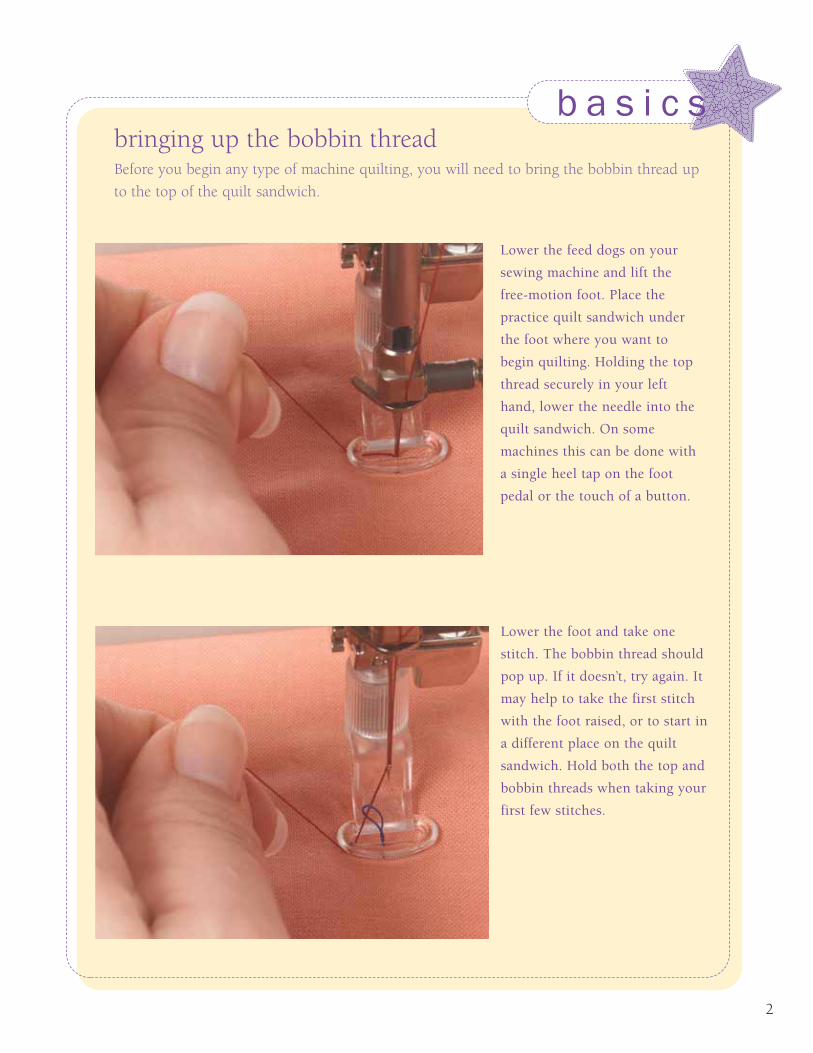
2
bringing up the bobbin threadBefore you begin any type of machine quilting, you will need to bring the bobbin thread up
to the top of the quilt sandwich.
Lower the foot and take one
stitch. The bobbin thread should
pop up. If it doesn’t, try again. It
may help to take the first stitch
with the foot raised, or to start in
a different place on the quilt
sandwich. Hold both the top and
bobbin threads when taking your
first few stitches.
Lower the feed dogs on your
sewing machine and lift the
free-motion foot. Place the
practice quilt sandwich under
the foot where you want to
begin quilting. Holding the top
thread securely in your left
hand, lower the needle into the
quilt sandwich. On some
machines this can be done with
a single heel tap on the foot
pedal or the touch of a button.
b a s i c s
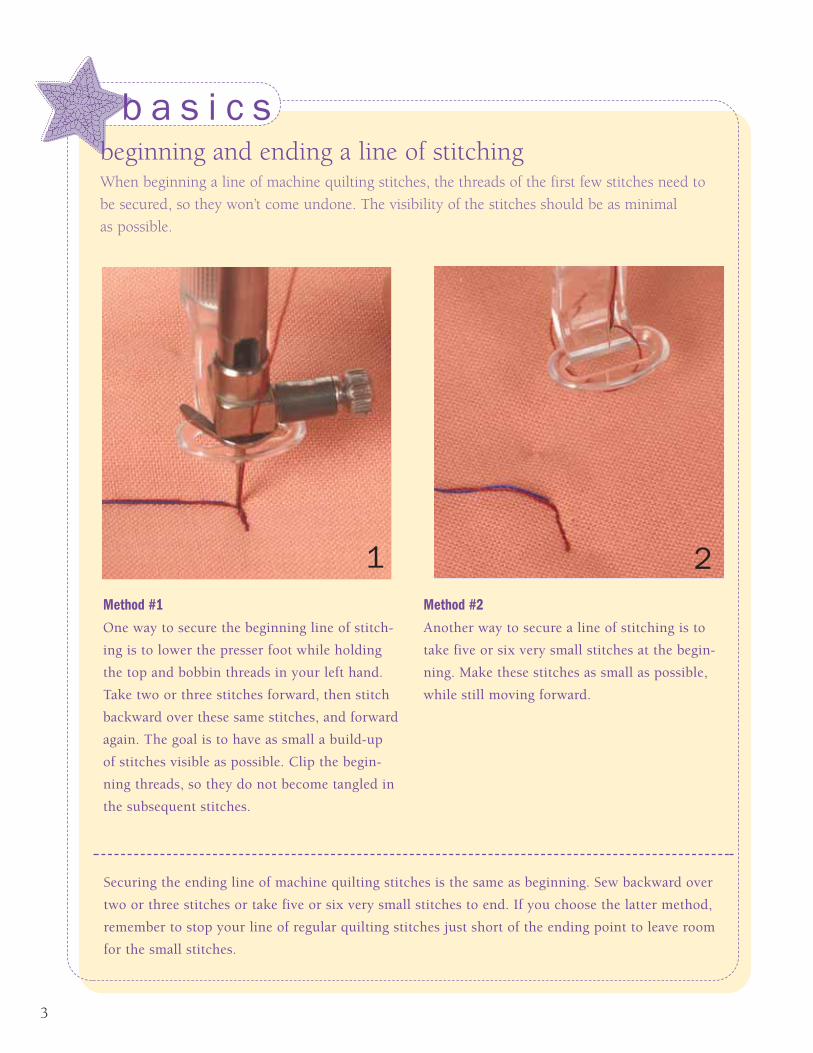
3
beginning and ending a line of stitchingWhen beginning a line of machine quilting stitches, the threads of the first few stitches need to
be secured, so they won’t come undone. The visibility of the stitches should be as minimal
as possible.
1Method #1One way to secure the beginning line of stitch-
ing is to lower the presser foot while holding
the top and bobbin threads in your left hand.
Take two or three stitches forward, then stitch
backward over these same stitches, and forward
again. The goal is to have as small a build-up
of stitches visible as possible. Clip the begin-
ning threads, so they do not become tangled in
the subsequent stitches.
Method #2Another way to secure a line of stitching is to
take five or six very small stitches at the begin-
ning. Make these stitches as small as possible,
while still moving forward.
2
Securing the ending line of machine quilting stitches is the same as beginning. Sew backward over
two or three stitches or take five or six very small stitches to end. If you choose the latter method,
remember to stop your line of regular quilting stitches just short of the ending point to leave room
for the small stitches.

t i p
4
thread tensionThe top thread and the bobbin thread on your machine should lock somewhere in the center of your quilt
sandwich with each stitch. This may mean adjusting the thread tension on your machine. It may seem a
bit intimidating if you have not done it before. Read through the following guidelines and tips to achieve
perfectly balanced quilting stitches.
Thread the top thread through a thread stand.This inexpensive tool is extremely helpful when using
large thread cones. It will also help eliminate thread ten-
sion problems. Set the thread cone or spool on the metal
post and thread it through the loop at the top and the
normal threading route on your sewing machine. This cre-
ates less pull as the machine takes the thread from the
spool, resulting in more even stitch tension.
Make only tiny adjustments to the top tension dial. Do not roll the tension dial on your machine. It is very
sensitive and often small changes are all that is
needed to correct the tension. Take time to test the ten-
sion by stitching on a practice quilt sandwich after each
adjustment. Evaluate your results and
then go back and make further small changes, if
necessary, until your stitches look perfect.
so keep in mind that threads from older spools may tend to break more often. Try a newer spool
to see if the problem goes away. Storing thread in plastic bags in the freezer keeps it from
aging as quickly.
Thread ages

b a s i c s
5
Bobbin thread showing on top
If you see the bobbin thread coming through
to the top of your quilt, the top tension is
too tight.
To correct this problem, lower the number of
the top tension dial on your machine 1/4 to
1/2 number to loosen it. Do some test stitching
on a practice quilt sandwich to see if your ten-
sion is better. Keep making small adjustments
and testing the results until the problem is
solved.Top thread showing on back
If dots of top thread are showing on the
back of your quilt, it means the top tension
is too loose.
To tighten the top tension on your machine
move the number on the dial higher.
Remember to always move the dial in tiny
increments until you solve the problem.
adjusting top tensionWhen practicing your quilting use contrasting thread colors on the top and in the bobbin to
make tension problems easily visible. When beginning an actual quilt, always test new thread
combinations on your practice quilt to get tension balanced.
b a s i c s
6
• Oil and clean your machine regularly.Make it a habit to clean and oil your
machine regularly. It will last longer
and produce better machine quilting
stitches. Have your machine serviced
yearly by a professional.
• Use the right needle for the right thread.Experiment with different needles if you're
having trouble balancing the tension. If you
are in doubt about which needle to use with
which thread, check with your local quilt
shop. Checking the web page of the thread
company for the thread you are using
can also be a great source of information
regarding which needle works best.
• Replace the needle of your machine.A dull needle could be the cause of your
thread tension problem. Try changing to a
new needle if you’re having problems and
know it’s been awhile since you’ve inserted a
new needle.
• Rethread the top and bobbin threads.Rethreading the top and bobbin threads can
sometimes solve the problem and is usually
the first thing I try when sudden tension
problems occur.
tension troubleshooting
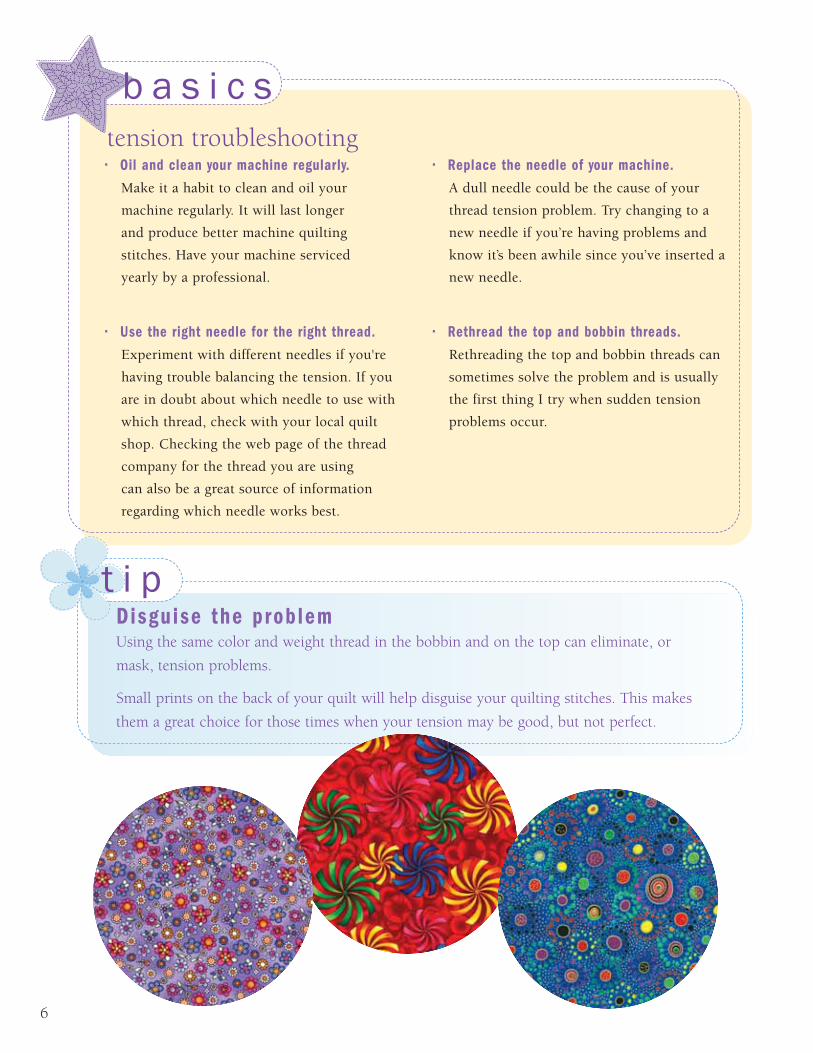
Using the same color and weight thread in the bobbin and on the top can eliminate, or
mask, tension problems.
Small prints on the back of your quilt will help disguise your quilting stitches. This makes
them a great choice for those times when your tension may be good, but not perfect.
Disguise the problemt i p

7
beginning doodlingI like to use the word “doodling” when talking about free-motion quilting. It conveys the idea ofsomething that is easy, relaxing, and fun. There are no rules that need to be followed when you doodleand it’s a great way to learn how to machine quilt. If you enjoy doodling on paper you are already on theway to becoming a great free-motion machine quilter.
Put the free-motion foot on your sewing machine, lower
the feed dogs, and place a plain practice quilt sandwich
beneath the needle. Bring up the bobbin thread and secure
the first stitches. Activate the needle down feature on your
machine, if you have it. Begin stitching slowly, focusing
on controlling your stitch length as you move the quilt
sandwich under the needle. Using your hands to guide
the quilt sandwich, control the speed of the needle with
the amount of pressure you put on the foot pedal. Relax and
stitch a few L-shaped loops. Practice coordinating the move-
ments of your hands with the pressure of your foot
on the foot pedal. This takes time and practice, but is impor-
tant to master at the beginning. Use any stitch length you like
as long as you strive for consistency from stitch
to stitch. Always keep the top edge of your practice quilt sand-
wich in the same position as you stitch. Move it around freely,
but do not turn it.
“L” LoopsIt’s easy to become good at free-motion quilting, when you stitch shapes already familiar to you. Loops that resemble a
lower-case, cursive “L” will allow you to become familiar with the motions needed for this type
of stitching.
1
2
Doodle another line of L-loops, focusing again on moving the
quilt sandwich and the foot pedal in rhythm. If your stitch
length looks too long, slow down the movements of your
hands, or press harder on the foot pedal as you stitch. If your
stitches are too short, speed up your hand movements, or
ease up on the foot pedal. If your
L-loops are not smooth and rounded, try speeding up the
movement of your hands and machine. Take your time and
cover the entire quilt sandwich with L-loops. You’ll be able to
see an improved progression between your first L-loops and
your final ones.

“Quilter’s gloves are very
helpful, but I often use a little
Neutrogena® hand cream instead
of the gloves. Be sure to rub it in
well. Either one will help you
keep a good grip on the fabric
and reduce the amount of stress
on your arms and shoulders.”
t i p
8
1
2
“C” StitchesLines of “C” stitches are great for developing the movements needed to quilt beautiful feather designs. Feather designs
require stitching back over the same line of stitches, as you do when quilting the letter “C”.
Get a gripKeep a good grip on the fabric under the needle. This is important for eliminating the possibility
of puckers on the back and front side of your work.
Begin by bringing up your bobbin thread and securing
your beginning line of stitching. Begin to move the quilt
sandwich so your stitches create the top curve of a
cursive letter “C”.
Retrace the top curve of the “C” and continue bringing your
line of stitching down to create the lower curve to finish the
letter. Stitch as many “C” shapes as you can on the quilt
sandwich. Make some large and some small. Keep practic-
ing. This stitch is essential when creating feather designs.
9
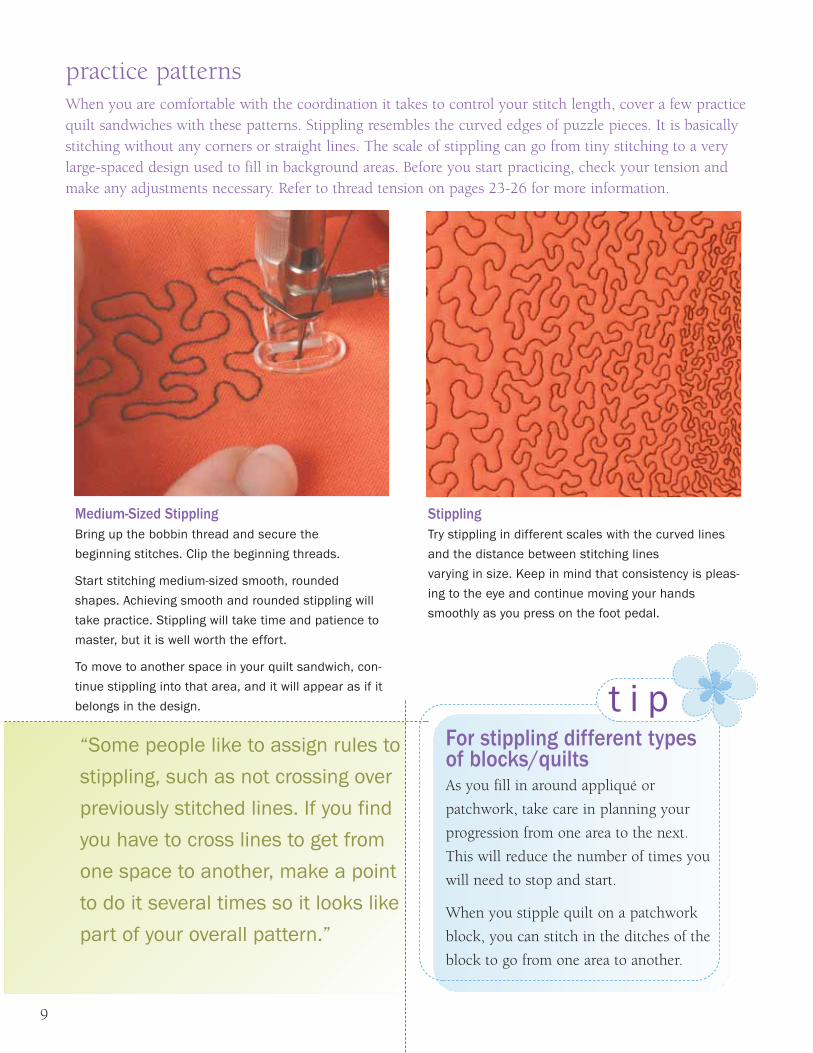
practice patternsWhen you are comfortable with the coordination it takes to control your stitch length, cover a few practicequilt sandwiches with these patterns. Stippling resembles the curved edges of puzzle pieces. It is basicallystitching without any corners or straight lines. The scale of stippling can go from tiny stitching to a verylarge-spaced design used to fill in background areas. Before you start practicing, check your tension andmake any adjustments necessary. Refer to thread tension on pages 23-26 for more information.
Medium-Sized StipplingBring up the bobbin thread and secure the
beginning stitches. Clip the beginning threads.
Start stitching medium-sized smooth, rounded
shapes. Achieving smooth and rounded stippling will
take practice. Stippling will take time and patience to
master, but it is well worth the effort.
To move to another space in your quilt sandwich, con-
tinue stippling into that area, and it will appear as if it
belongs in the design.
StipplingTry stippling in different scales with the curved lines
and the distance between stitching lines
varying in size. Keep in mind that consistency is pleas-
ing to the eye and continue moving your hands
smoothly as you press on the foot pedal.
t i pFor stippling different typesof blocks/quiltsAs you fill in around appliqué or
patchwork, take care in planning your
progression from one area to the next.
This will reduce the number of times you
will need to stop and start.
When you stipple quilt on a patchwork
block, you can stitch in the ditches of the
block to go from one area to another.
“Some people like to assign rules to
stippling, such as not crossing over
previously stitched lines. If you find
you have to cross lines to get from
one space to another, make a point
to do it several times so it looks like
part of your overall pattern.”

10
Hooks and CurvesTry playing with angles, or add hooks to your lines of
curved quilting.
Loops and StarsExperiment with stars and loops. I add the loop
between the stars because it helps reposition the nee-
dle for starting the next star.
“I learned small mistakes
are not a big deal. I've
quilted bobbles but didn’t
want to stop stitching and
correct at that time. Later
when I tried to find my
mistake, I could not see it
anywhere, no matter how
hard I searched.”
t i pDo not stitchover or too close to the safety pins in yourpractice quilt sandwich or in any quilt project.If the pins lie within 3" or 4" of the needle, stopand remove them before you continue stitching.
t i pIf your stitches areunevenspeed up and see if your stitches
become more uniform. If your
stitches are too long, move your
hands slower or speed up the
machine. If your stitches are too
little, move your hands a bit
faster or slow down the machine.

Flowers1. Stitch one petal. At the base of the petal make a
circle for the flower center.
2. Continue stitching petals around the center
connecting to it each time.
3. When all the petals have been stitched around the
center, retrace lines to continue to the
other side of the flower and begin making the next
flower.
1
CirclesVarying sizes of circles stitched close together will
resemble a cobblestone wall. This is easy once
you get the hang of it. Rocks and stones are not all the
same shape, so different sizes and shapes will look
natural.
SnowflakesYou will be stitching over previous lines of stitching to
form these flakes. Don’t let that scare you. The best
thing about snowflakes is no two are alike.

1
machine-guided stitchingStitching in the ditch is sewing quilting stitches along the seam lines in patchwork. This is a great way toaccentuate pieced designs and strengthen the seams in your quilt. Typically, I stitch all the outline or ditchstitching on my quilt first. This stabilizes the quilt and allows you to remove many basting pins. If youhave done a good job basting, you can begin stitching on any area of the quilt.
1
2Attach the walking foot, raise the feed
dogs, and place your quilt sandwich in the
machine. The first seam you want to stitch
should be under the needle. Bring up the
bobbin thread and secure the beginning
stitches. Take a few stitches and clip the
threads.
Grip the fabric on either side of the needle and pull seam apart firmly.
This will flatten the fabric and make the seam easy to see. Start stitching
directly into, or as close to, this seam line as possible. Keep a good grip
on the fabric as you stitch. Stitch to the end of the seam. Secure stitches
and clip the threads. Place the quilt sandwich in
position for stitching the next seam and repeat directions above for each
seam you want to stitch.
Stitch controlSince the machine is guiding the fabric, it will control your stitch
length. Adjust it using the stitch length regulator on your machine
to get the length you prefer. There are no rules, so use the stitch
length that appeals to you.
t i p

1
free-motion stitchingUsing a free-motion foot for stitching in the ditch enables you to quilt in any direction without turningyour quilt. Use a free-motion foot for any ditch quilting that does not extend from one end of a quilt topto the other.
Continue stitching in the ditch of each
seam. Stitch as far as possible without
stopping. This may take some planning but
will save time in the end. You can jump
from one stopping point to the next starting
point and clip the connecting threads later.
Remember that you can go any direction
necessary without turning the entire quilt.
When you reach an area where you can’t
stitch any farther, secure and clip the
threads.
1
2Attach the free-motion foot, lower the
feed dogs, and place your patchwork quilt
sandwich in the machine. The first seam
you want to stitch should be under the
needle. Bring the bobbin thread up and
secure the first stitches. Clip the begin-
ning threads.
Grip the fabric on either side of the needle and pull the seam apart.
Stitch directly into, or as close to, the seam line as possible. As you prac-
tice, don't be concerned with hitting the ditch perfectly with every stitch.
The more you practice the better your stitching will become.
t i pNo walkingLimit your use of the walking foot to stitching the seams that run the full width or length of yourquilt. Overuse of the walking foot can become a habit and create frustration when you’re stitching alarge quilt that is difficult to turn. Practice stitching in the ditch with the free-motion foot as muchas possible. It will speed up the process significantly.
3
1
free-motion unmarked background designsWhen quilting large free-motion unmarked designs in background areas, follow these suggestions.
Keep starts and stops to a minimum• Before you begin stitching it may be helpful to do some sketching on a piece of paper to determine how to keep your
design continuous. You do not need to mark background designs such as echo quilting, stippling, or other doodling
types of design.
Don’t stitch yourself into a corner• Try not to get yourself trapped in an area you can’t
stitch out of without stitching across a previous line
or stitching where you weren't planning to. If this hap-
pens, jump or stitch in the ditch to get to the next
unquilted area.
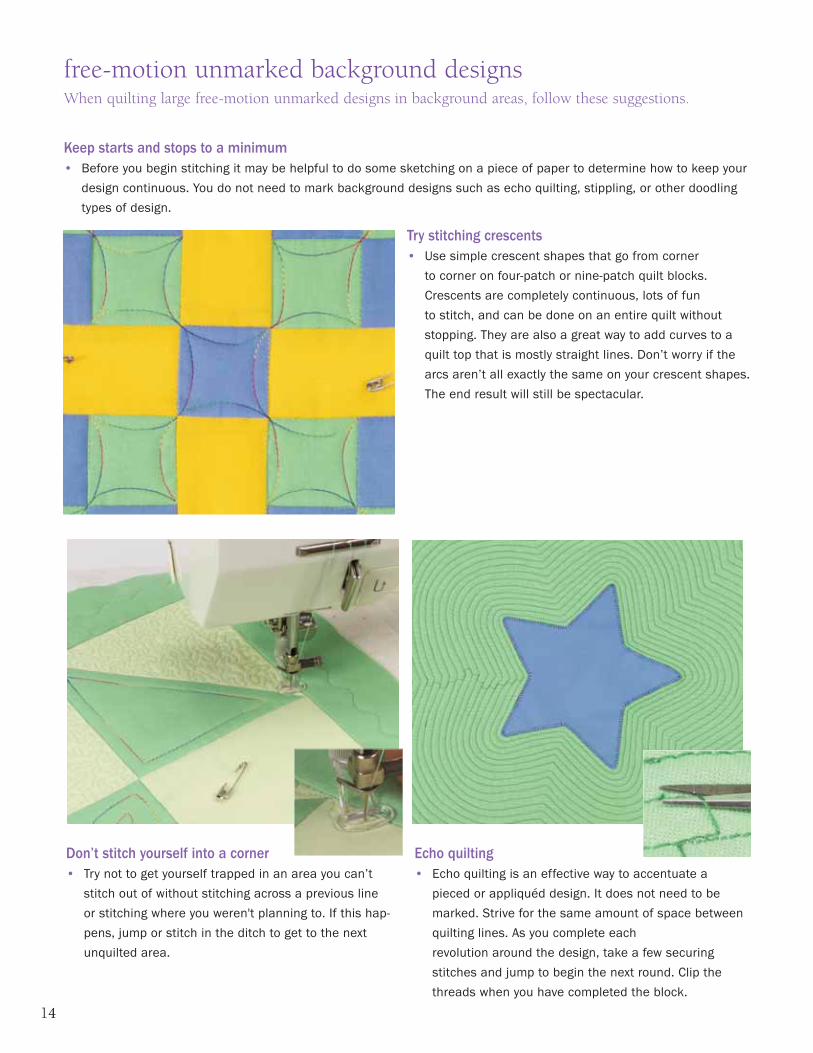
Try stitching crescents• Use simple crescent shapes that go from corner
to corner on four-patch or nine-patch quilt blocks.
Crescents are completely continuous, lots of fun
to stitch, and can be done on an entire quilt without
stopping. They are also a great way to add curves to a
quilt top that is mostly straight lines. Don’t worry if the
arcs aren’t all exactly the same on your crescent shapes.
The end result will still be spectacular.
Echo quilting• Echo quilting is an effective way to accentuate a
pieced or appliquéd design. It does not need to be
marked. Strive for the same amount of space between
quilting lines. As you complete each
revolution around the design, take a few securing
stitches and jump to begin the next round. Clip the
threads when you have completed the block.