M7 50Hz Technical Service Manual - Pool and Spa. Load Out Voltage ... The control panel activates...
32
50 Hz M-7 Technical Service Manual
Transcript of M7 50Hz Technical Service Manual - Pool and Spa. Load Out Voltage ... The control panel activates...

50 HzM-7 Technical Service Manual
2 800.645.3201
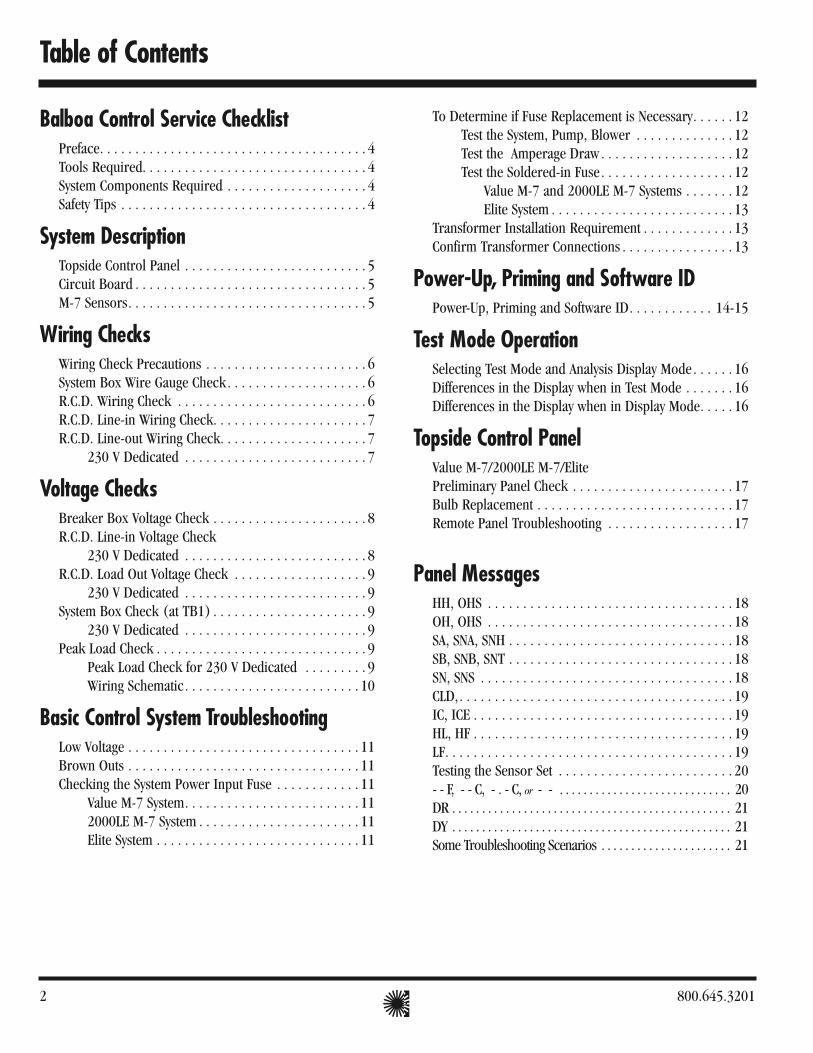
Table of Contents
Balboa Control Service ChecklistPreface. . . . . . . . . . . . . . . . . . . . . . . . . . . . . . . . . . . . . . 4Tools Required. . . . . . . . . . . . . . . . . . . . . . . . . . . . . . . . 4System Components Required . . . . . . . . . . . . . . . . . . . . 4Safety Tips . . . . . . . . . . . . . . . . . . . . . . . . . . . . . . . . . . . 4
System DescriptionTopside Control Panel . . . . . . . . . . . . . . . . . . . . . . . . . . 5Circuit Board . . . . . . . . . . . . . . . . . . . . . . . . . . . . . . . . . 5M-7 Sensors. . . . . . . . . . . . . . . . . . . . . . . . . . . . . . . . . . 5
Wiring ChecksWiring Check Precautions . . . . . . . . . . . . . . . . . . . . . . . 6System Box Wire Gauge Check. . . . . . . . . . . . . . . . . . . . 6R.C.D. Wiring Check . . . . . . . . . . . . . . . . . . . . . . . . . . . 6R.C.D. Line-in Wiring Check. . . . . . . . . . . . . . . . . . . . . . 7R.C.D. Line-out Wiring Check. . . . . . . . . . . . . . . . . . . . . 7 230 V Dedicated . . . . . . . . . . . . . . . . . . . . . . . . . . 7
Voltage ChecksBreaker Box Voltage Check . . . . . . . . . . . . . . . . . . . . . . 8R.C.D. Line-in Voltage Check 230 V Dedicated . . . . . . . . . . . . . . . . . . . . . . . . . . 8R.C.D. Load Out Voltage Check . . . . . . . . . . . . . . . . . . . 9 230 V Dedicated . . . . . . . . . . . . . . . . . . . . . . . . . . 9System Box Check (at TB1) . . . . . . . . . . . . . . . . . . . . . . 9 230 V Dedicated . . . . . . . . . . . . . . . . . . . . . . . . . . 9Peak Load Check . . . . . . . . . . . . . . . . . . . . . . . . . . . . . . 9
Peak Load Check for 230 V Dedicated . . . . . . . . . 9Wiring Schematic. . . . . . . . . . . . . . . . . . . . . . . . . 10
Basic Control System TroubleshootingLow Voltage . . . . . . . . . . . . . . . . . . . . . . . . . . . . . . . . . 11Brown Outs . . . . . . . . . . . . . . . . . . . . . . . . . . . . . . . . . 11Checking the System Power Input Fuse . . . . . . . . . . . . 11
Value M-7 System. . . . . . . . . . . . . . . . . . . . . . . . . 11 2000LE M-7 System . . . . . . . . . . . . . . . . . . . . . . . 11
Elite System . . . . . . . . . . . . . . . . . . . . . . . . . . . . . 11
To Determine if Fuse Replacement is Necessary. . . . . . 12Test the System, Pump, Blower . . . . . . . . . . . . . . 12Test the Amperage Draw . . . . . . . . . . . . . . . . . . . 12Test the Soldered-in Fuse . . . . . . . . . . . . . . . . . . . 12
Value M-7 and 2000LE M-7 Systems . . . . . . . 12Elite System . . . . . . . . . . . . . . . . . . . . . . . . . . 13
Transformer Installation Requirement . . . . . . . . . . . . . 13Confirm Transformer Connections . . . . . . . . . . . . . . . . 13
Power-Up, Priming and Software IDPower-Up, Priming and Software ID. . . . . . . . . . . . 14-15
Test Mode OperationSelecting Test Mode and Analysis Display Mode . . . . . . 16Differences in the Display when in Test Mode . . . . . . . 16Differences in the Display when in Display Mode. . . . . 16
Topside Control PanelValue M-7/2000LE M-7/ElitePreliminary Panel Check . . . . . . . . . . . . . . . . . . . . . . . 17Bulb Replacement . . . . . . . . . . . . . . . . . . . . . . . . . . . . 17Remote Panel Troubleshooting . . . . . . . . . . . . . . . . . . 17
Panel MessagesHH, OHS . . . . . . . . . . . . . . . . . . . . . . . . . . . . . . . . . . . 18OH, OHS . . . . . . . . . . . . . . . . . . . . . . . . . . . . . . . . . . . 18SA, SNA, SNH . . . . . . . . . . . . . . . . . . . . . . . . . . . . . . . . 18SB, SNB, SNT . . . . . . . . . . . . . . . . . . . . . . . . . . . . . . . . 18SN, SNS . . . . . . . . . . . . . . . . . . . . . . . . . . . . . . . . . . . . 18CLD,. . . . . . . . . . . . . . . . . . . . . . . . . . . . . . . . . . . . . . . 19IC, ICE . . . . . . . . . . . . . . . . . . . . . . . . . . . . . . . . . . . . . 19HL, HF . . . . . . . . . . . . . . . . . . . . . . . . . . . . . . . . . . . . . 19LF. . . . . . . . . . . . . . . . . . . . . . . . . . . . . . . . . . . . . . . . . 19Testing the Sensor Set . . . . . . . . . . . . . . . . . . . . . . . . . 20- - F, - - C, - . - C, or - - . . . . . . . . . . . . . . . . . . . . . . . . . . . . . 20DR . . . . . . . . . . . . . . . . . . . . . . . . . . . . . . . . . . . . . . . . . . . . . . . 21DY . . . . . . . . . . . . . . . . . . . . . . . . . . . . . . . . . . . . . . . . . . . . . . . 21Some Troubleshooting Scenarios . . . . . . . . . . . . . . . . . . . . . . 21

www.balboa-instruments.com 3
Table of Contents (cont.)
R.C.D. TroubleshootingIf Correct Wiring is Verified . . . . . . . . . . . . . . . . . . . . . 22To Disconnect the Heater. . . . . . . . . . . . . . . . . . . . . . . 22
Testing the Circuit Board OutputTo Use the Balboa Quick Check . . . . . . . . . . . . . . . . . . 23
Changing a System Circuit BoardHow to Remove a System Circuit Board . . . . . . . . . . . . 24How to Replace a System Circuit Board . . . . . . . . . . . . 24
Spa BehaviorGeneral Information. . . . . . . . . . . . . . . . . . . . . . . . . . . 25Heater Startup Information . . . . . . . . . . . . . . . . . . . . . 25
Dip Switch and Jumper SettingsValue M-7 TUV . . . . . . . . . . . . . . . . . . . . . . . . . . . . . . . 262000LE M-7 TUV . . . . . . . . . . . . . . . . . . . . . . . . . . . . . 26Elite TUV . . . . . . . . . . . . . . . . . . . . . . . . . . . . . . . . 27-28
Value M-7 TUV Circuit BoardValue M-7 TUV Circuit Board . . . . . . . . . . . . . . . . . . . 29
2000LE M-7 TUV Circuit Board2000LE M-7 TUV Circuit Board . . . . . . . . . . . . . . . . . . 30
Elite TUV Circuit BoardElite TUV Circuit Board . . . . . . . . . . . . . . . . . . . . . . . . 31
End User Warning
This Technical Service Manual is provided solely to aid qualified spa service technicians in troubleshooting and repairing spas with control systems manufactured by Balboa Instruments, Inc. Balboa controls have absolutely no end user serviceable parts. Balboa Instruments does not authorize attempts by the spa owner/user to repair or service any Balboa products. Non-qualified users should never open or remove covers, as this will expose dangerous voltage points and other dangerous risks. Please contact your dealer or authorized repair center for service.

Balboa Control Service Checklist
PrefaceThis manual is provided to aid the qualified service
technician in troubleshooting and correcting problems found in spas with M-7 Technology and control systems manufactured by Balboa Instruments, Inc.
Tools Required• Ammeter (50A)• Digital Multi-meter• Balboa Logic Jumper on a Stick• Balboa Six-in-one Screwdriver, Includes:
Two Phillips Head and Two Flathead Screwdrivers Along with a 7 mm and 8 mm Nut Driver
• 8 mm Socket• 7 mm Open End Wrench• Small Wire Cutters• Pliers & Needlenose
Pliers• Quick CheckTM Test
Kit• Precision Thermometer
- Digital Fever Type• Padlock (to lock electrical
disconnect during service)• Plumber’s Sealant
System Components Required• Fuses (30 and 20A time delay plus 20, 10 and 3A)• System Transformers (230 V)• System Sensor Assembly• System Panel(s)• System Circuit Board
ImportantDue to the danger of severe electrical shock, locate all
power disconnects before servicing a spa. Precautions must be taken whenever working with breaker boxes, R.C.D.’s, or service disconnects.
Always refer to the wiring diagram which is included with each system on the inside of the system box cover. Use this diagram for voltage measurement points, and for proper reconnection of wires.
ImportantBe sure to bring the correct circuit board, topside control
panel, components, and tools.
Safety Tips• Keep children and pets away.• Be aware of your surroundings. Standing in water while
repairing a spa puts you at serious risk.• Avoid working in cramped or crowded conditions.
Digital Fever Thermometer
Quick CheckTM Test Kit
DANGER: SHOCK HAZARD. DO NOT PROCEED IF UNQUALIFIED IN WORKING WITH HIGH VOLTAGE.
4 800.645.3201
Balboa Logic Jumper on a Stick

System Description
Topside Control PanelThe control panel activates functions at the touch of a
button. Each function will echo from the circuit board to the LCD in a corresponding manner. The panel will also display diagnostic messages which enable the service technician to easily troubleshoot the system.
Circuit BoardA typical circuit board has the following output
capabilities:• 230 VAC System• Two-speed pump 230 VAC, 50 Hz, 2 HP• Single-speed pump 230 VAC, 50 Hz, 2 HP• Blower 230 VAC, 50 Hz, 2 HP• Heater 230 VAC, 50 Hz, 5.5 kW• Light
12 V, 12 W, 50 Hz, 1A or120 V, 100 WIn addition to these outputs, the board receives input
from the two temperature sensors located within the heater housing.
ImportantDo not remove and replace the circuit board unless you
have tested all other components and proven that the circuit board is actually causing the problem.
Highly advanced microprocessor technology has been combined with solid-state electronic switches to produce the world’s finest, high quality state-of-the-art digital control systems. Balboa control systems are technologically sophisticated, yet easy to understand, use, and troubleshoot.
M-7 SensorsThe two sensors located within the heater housing
compare the inlet water temperature with the outlet water temperature (regardless of water flow direction) to determine the presence of water, low flow, temperature limits, and operating temperatures. The system will automatically select the sensor that is exposed to the lowest temperature as the spa water temp controlling sensor.
The sensors in combination with specific software allow the spa to be controlled without the use of external pressure switches, flow switches, or temperature sensors.
www.balboa-instruments.com 5
6 800.645.3201
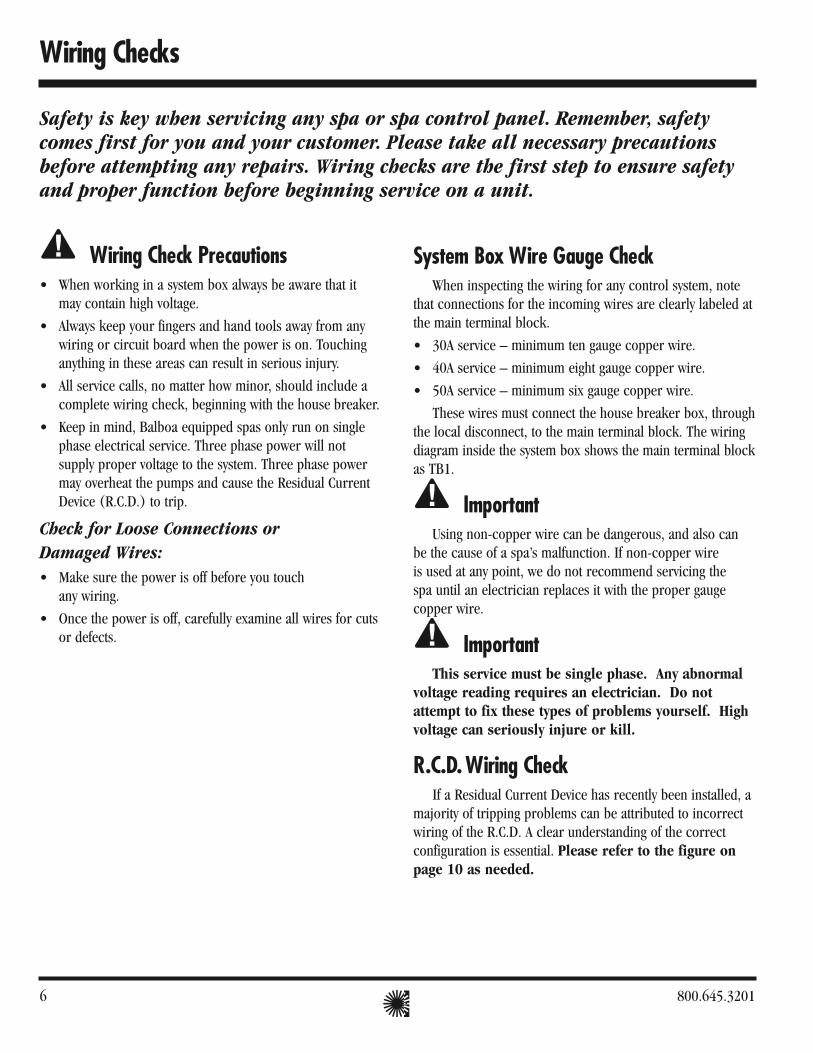
Wiring Check Precautions• When working in a system box always be aware that it
may contain high voltage.• Always keep your fingers and hand tools away from any
wiring or circuit board when the power is on. Touching anything in these areas can result in serious injury.
• All service calls, no matter how minor, should include a complete wiring check, beginning with the house breaker.
• Keep in mind, Balboa equipped spas only run on single phase electrical service. Three phase power will not supply proper voltage to the system. Three phase power may overheat the pumps and cause the Residual Current Device (R.C.D.) to trip.
Check for Loose Connections or Damaged Wires:• Make sure the power is off before you touch
any wiring.• Once the power is off, carefully examine all wires for cuts
or defects.
System Box Wire Gauge CheckWhen inspecting the wiring for any control system, note
that connections for the incoming wires are clearly labeled at the main terminal block.• 30A service – minimum ten gauge copper wire.• 40A service – minimum eight gauge copper wire.• 50A service – minimum six gauge copper wire.
These wires must connect the house breaker box, through the local disconnect, to the main terminal block. The wiring diagram inside the system box shows the main terminal block as TB1.
ImportantUsing non-copper wire can be dangerous, and also can
be the cause of a spa’s malfunction. If non-copper wireis used at any point, we do not recommend servicing the spa until an electrician replaces it with the proper gauge copper wire.
ImportantThis service must be single phase. Any abnormal
voltage reading requires an electrician. Do not attempt to fix these types of problems yourself. High voltage can seriously injure or kill.
R.C.D. Wiring CheckIf a Residual Current Device has recently been installed, a
majority of tripping problems can be attributed to incorrect wiring of the R.C.D. A clear understanding of the correct configuration is essential. Please refer to the figure on page 10 as needed.
Safety is key when servicing any spa or spa control panel. Remember, safety comes first for you and your customer. Please take all necessary precautions before attempting any repairs. Wiring checks are the first step to ensure safety and proper function before beginning service on a unit.
Wiring Checks

www.balboa-instruments.com 7
Wiring Check for R.C.D./Service Disconnect
ImportantMost regional
codes state that a service disconnect breaker box (an R.C.D. can be used for this purpose) must be located at least five feet away from the spa and should be conveniently located near the equipment bay. If it is not in plain sight, keep the disconnect padlocked when in the off position.
PrecautionsIn most areas, R.C.D.’s are required for spa installations.
In other areas, R.C.D.’s are recommended for spa installations, but are not mandatory.
If the spa you are servicing was not installed with a R.C.D., strongly urge your customer to improve safety and comply with current standards by installing one.Note: A suitable R.C.D. may be acquired through your local distributor.
Important!Remember, high voltage is still accessible in the house
breaker box even though you have turned off the spa breaker.
R.C.D. Line-in Wiring Check• Locate the proper circuit breaker and turn it off.• Remove the cover from the house breaker box. Check the
main service amperage rating to the breaker box.Note: Typically, a house circuit will require at least a 100 Amp service when a spa is installed.• From the circuit breaker, locate the brown load wire and
the blue neutral wire.• From the R.C.D. neutral bar, locate the blue load neutral,
and the green ground wire.• Be sure there are no other appliances on the spa
circuit. If there are, service must be re-wired to supply the spa only.
• Make sure all three wires exit the house breaker box via conduit, routed to the R.C.D. breaker box. The brown should be connected to the R.C.D. line-in. The blue load neutral connects to the neutral in.
R.C.D. Line-out Wiring Check for 230 V Dedicated System (3 wire system including ground wire)
The brown wire should connect to load out, the blue wire from neutral out. All wires will exit the box via conduit routed to the spa control system.
Once you have found all wiring correctly installed, begin to check for proper voltage.

8 800.645.3201
R.C.D. Line-In Voltage Check230 V Dedicated System:• Be sure the spa circuit breaker (located in the house
breaker box) is on.• Make sure the R.C.D. is off.• Probe the blue and brown wires at the R.C.D. Line In. The
meter should read 230 V.• Probe the blue and green ground wires. The meter
should read 0 V.• Probe the brown and green ground wires. This should
also read 230 V.• Turn on the R.C.D. breaker before continuing to the
system box.
Voltage Checks - Breaker Box/R.C.D.
When checking for proper voltage, please keep in mind that the acceptable voltage range is + 10% of the recommended voltage. Acceptable voltage when 230 V is specified as the desired voltage, is between 207 and 253 V.
Important!This service must be single phase. Any abnormal voltage
reading requires an electrician. Do not attempt to fix problems yourself. High voltage can seriously injure or kill.
Breaker Box Voltage Check• Set your multi-meter or voltmeter for AC Volts.• Make sure the R.C.D. is off.• Carefully turn on the spa circuit breaker.• At the house breaker box, probe the spa circuit breaker
between the blue and brown wires. Your meter should read 230 V.
• Probe between the brown and green ground wires. You should also see 230 V.
• The voltage between the blue load neutral and the green ground wire should be approximately 0 V.
www.balboa-instruments.com 9
Voltage Checks - System Box
R.C.D. Load Out Voltage Check230 V Dedicated System:• Be sure the house breaker is on.• Be sure the R.C.D. breaker is on.• Probe the blue and brown wires at the R.C.D. load out.
The voltage should be 230 V.• Probe the blue wire and the green ground wire.
The meter should read 0 V.• Probe the brown wire and the R.C.D. neutral bar. The
voltage should read 230 V.• Recheck voltage under peak load conditions.*
Important!If the voltage is not within the acceptable range, call
an electrician or the local electric company to diagnose the problem.
System Box Check (at TB1)230 V Dedicated System Check:• Be sure the R.C.D. breaker is on.• Probe the blue and brown wires. Look for 230 V.• Probe the blue and green ground wires for 0 V.• Probe the brown and green ground wires – also 230 V.• Recheck voltage under peak load conditions.*
*Peak Load CheckIt is important to check the voltage again under peak
load conditions. To reach peak load, turn on the blower, heater, light, and all pumps.
Peak Load Check for 230 V System:• Check the voltage between the blue and brown wires. The
acceptable voltage range is between 207 and 253 V.

10 800.645.3201
Wiring Schematic
System
Box
Value M-7 and 2000LE M-7 System
Elite System
In-Spa System Box
www.balboa-instruments.com 11
Basic Control System Troubleshooting
Low VoltageAt Balboa, it’s been our experience that the majority of the
problems associated with electronic control systems are due to low voltage.
Brown outs “Brown outs” can have an effect on the spa’s operation
in a variety of ways. The control panel may go blank, have scrambled messages on the LCD, or only a few features will function.• If the system is getting the proper voltage at TB1, but
still does not operate, then test for a blown power input fuse. If the system you are troubleshooting is a Prestige, 2000LE M-7, or Value M-7 System, the power input fuses snap directly to the circuit board.
Checking the System Power Input Fuse
WarningThese procedures are performed while the system is
powered up and running under peak loads. Be careful.
Value M-7 and 2000LE M-7 SystemsIf your system uses 230V peripheral devices:• Measure between the brown TB1 terminal and F5 power
input fuse on the side farthest away from the circuit board edge (opposite the F5 silkscreen). You should see 230 volts.
• If the system is equipped with the additional F6 power input fuse, measure F6 in the same manner. You should also see 230 volts.
• If you determine that there is no voltage at one or both locations, then the system power input fuse(s) need to be replaced. Both F5 and F6 use a 25A time delay fuse. Only use a fuse of the same type and amp rating when you replace any of these fuses.
Elite System• If the system is getting the proper voltage at TB1, but still
does not operate, then test for a blown power input fuse. If the system you are troubleshooting is a 2000LE M-7 or a Value M-7 System, the power input fuses snap directly to the circuit board.
• If you determine that there is no voltage at one or both locations, then the system power input fuse needs to be replaced. Both fingers 5 and 6 utilize a 30A time delay fuse.
• Remember, the system power input fuse may snap directly to the circuit board next to TB1.
• To check these fuses, probe finger 5 and the side of the system power input fuse farthest away from finger 6.
• If there is no voltage, the 30A time delay fuse must be replaced.
Note For All Systems: In each situation, the most likely reason for the system power input fuse to blow is a pump problem. However, on occasion, a blower problem may also cause this fuse to blow if a 10A blower fuse is not built in.Once the power input fuse has been changed:
• Probe the brown and blue neutral wires. Again, voltage must be between 207 and 253 V.
These readings should be taken under peak load conditions.
ImportantIf the voltage is not in the acceptable range, call an
electrician or the local electric company to diagnose the problem.
12 800.645.3201
Troubleshooting (cont.)
To Determine if Fuse Replacement is Necessary:To determine if fuse replacement is necessary, perform
the following sequence of tests:
Test the System:• Turn the power off.• Be sure to replace the system power input fuse with the
same type.• Unplug the blower and all pumps.• Restore the power and verify system operation.• If the fuse blows, then re-check the internal system wires
and connector for burns, cracks or cuts in insulation.• If the fuse does not blow, turn the power off and plug in
the pump.Note: Be sure to test each device individually.
Test the Pump:• Restore the power and activate the pump.• If the fuse blows, there is a pump problem.• If the fuse does not blow, turn off the power.
Test the Blower:• Plug in the blower.• Power up the system and activate the blower.• If the fuse blows, then there is a blower problem.• If the fuse does not blow, the combined pump and blower
amperage may be excessive. To verify this, first check with your spa manufacturer for amperage draw limits on each device.
• Since the blower should now be running, you can check the amperage draw with an ammeter by measuring around the black blower wire and compare with manufacturer’s specifications.
Test the Amperage Draw:• Turn off the power, disconnect the blower, make sure the
pump is plugged in, and restore power.• Start the pump and switch to high speed (if available),
this should draw the most current.• Make sure all jets and valves are open.• Check the amperage at the brown pump wire. Compare
your reading with manufacturer specifications. (If the other plug-in devices exist, they should be tested in the same way.)
• If the amperage draw for each device is within manufacturer’s specifications, the problem could be a nuisance spike in the pump, or water in the blower.
Test the Soldered-in Fuse:
Value M-7 and 2000LE M-7 Systems• Probe from the brown TB1 terminal and one side of the
soldered in fuse. The voltage should read 230 volts.• Probe from the brown TB1 terminal and the other side of
the soldered in fuse. The voltage should read 230 volts.
www.balboa-instruments.com 13
Troubleshooting (cont.)
Elite System• For a class 2 transformer circuit, a fuse must be
permanently installed to protect the circuit board.• If you have determined that the system is getting proper
voltage through the power input fuse, then you must check to see if the soldered-in fuse has blown.
• First, turn off the power. Next, unplug the transformer from the circuit board, then turn the power back on and probe from the red TB1 terminal to one side of the fuse.
• The voltage should read 230 V.• Probe from finger 5 to the other side of the soldered-in
fuse. The voltage should read 230 V.• If either side has 0 voltage, then the fuse is blown. If so, turn
off the power and replace the circuit board. (See page 24.)• Make sure that the transformer is properly rated for the
system. The voltage reading between fingers 5 and 6 on the circuit board will determine the proper transformer input voltage for Deluxe and Standard models.
• If you determine that the soldered-in fuse is not blown, this means that the transformer is receiving voltage.
Note: These slow-blow fuses are not always discolored when blown. Always test continuity of a fuse with an ohmmeter.Note: Miswiring of the spa is the most common reason for this fuse to blow. However, a lightning strike in the area is a possible, though less likely, cause of the failure.
Transformer Installation Requirement (Applies to Elite only; other systems have the transformer as a permanent part of the circuit board.)
Confirm Transformer Connections:Intermittent problems may occur when transformer
connections are loose. Make sure your fingers are away from exposed high voltage connections. Wiggle the transformer wires near the connector on the circuit board. This will determine if there is a loose transformer connection or bad pin on the circuit board.• If the system intermittently turns on and off, turn the
power off.• Plug in the test transformer, restore the power, and wiggle
the transformer wires again.• If there is no intermittent failure, no further analysis
is required.• Turn off the power and replace the transformer.• After installing your test transformer, intermittent
symptoms may still occur during the test.• If so, replace the circuit board (see page 24) and install
the original transformer.
ImportantBe sure to turn the power off before replacing any
component, especially a circuit board.
14 800.645.3201
Power-Up, Pump Priming and Software ID
Before applying voltage to the System, it is very important that you understand the sequence of events that occur when power is applied so that the pumps can be primed efficiently and faults created by no water flow can be prevented.
Please review the following procedures and power-up events before applying voltage to the System:1. Check the voltage at the main power panel to be sure
that you have the correct voltage for the System being used. Also, be sure that the voltage is within + or - 10% of the mean voltage. For 230 V it should be between 207 V and 253 V.
2. Test and reset the R.C.D. If it does not operate properly, do not apply voltage to the System until the problem has been corrected.
3. Fill the spa to its correct operating level. Be sure to open all valves in the plumbing system before filling to allow as much air as possible to escape from the plumbing and the heater during the filling process.
4. Vent air from the pump(s). Do this by loosening the union nuts on the discharge of all pumps. Allow a small amount of water and air to escape from the pump(s) and related plumbing. Retighten the union nuts.
5. Turn the power on at the main power panel. Depending on which top-side panel the System is configured for, the displays will go through specific sequences. During these sequences you will need to prime the pump(s) as described in the following:
The following will occur:• Display will show a series of numbers immediately
following Power-Up. On M-7 softwares created or updated since May 2001, this will be a series of four numbers. The first three numbers in combination are called the Software ID. The three numbers in order are the Software Manufacturer ID, the Software Product Type ID, and the Software Version ID. Following the Software ID will be either 12 or 24, indicating the heater wattage the software is configured for. There are differences in freeze protection between units that display a Software Version ID of 00 (or that don’t display a Software ID at all), versus units that display a Software Version ID of 01 or greater.
• Display will show “Pr” indicating that the System is in a pump priming mode. During this mode the heater is disabled to allow the priming process to be completed without the possibility of energizing the heater under low flow or no flow conditions. Nothing comes on automatically, but the pump(s) can be energized by pushing all Jet buttons.This mode will automatically last for about 4 minutes or you can manually exit the priming mode after the pump(s) have primed. (Manually exiting the priming mode is described later in this text). Regardless of whether the priming mode is automatically terminated or you manually exit the priming mode, the system will automatically return to the normal heating and filtering mode at the end of the priming mode.
• Pump Priming. As soon as “Pr” is indicated on the top-side panel, push all Jet buttons to start the pumps. On models with a combined Jet button, push it until all pumps are on high speed. All pumps need to be running in the high speed mode to facilitate priming. If the pumps have not primed after 2 minutes, and water is not flowing from the jets in the spa, do not allow the pumps to continue to run. Turn the power off at the main power panel and repeat the process of venting the air from the pump(s). (See step 4 on this page). After venting air from the pump(s) a second time, turn the power back on at the main power panel. This will initiate a new pump priming mode. Sometimes momentarily turning the pump off and on will help it to prime. Do not do this more than 5 times.
Important: A pump should not be allowed to run without priming for more than 2 minutes. Under NO circumstances should a pump be allowed to run without priming beyond the end of the 4 minute priming mode. Doing so may cause damage to the pump and cause the system to go into an overheat condition.• After pump priming, push all Jet buttons to turn off the
pump(s).• Next, manually exit the priming mode by pushing either
the “Warm” or “Cool” button (the “Temp” button on smaller panels). Note that if you do not manually exit the priming mode as described above, the priming mode will be automatically terminated after 4 minutes. Be sure that the pump(s) have been primed by this time.

www.balboa-instruments.com 15
Power-Up, Pump Priming and Software ID (cont.)
• After you have manually exited the priming mode or the system has automatically exited the priming mode, the top-side panel will momentarily display the set temperature and then dashes.Note that the display is not showing the temperature yet. This is because the system requires approximately 2minutes of water flowing through the heater to determine the water temperature.
• After 2 minutes of water flowing through the heater the temperature will be displayed.Push the “Warm” or “Temp” button to adjust the temperature to the desired setting. If the water temperature in the spa is less than the set temperature, the heat indicator will turn on signifying that the heater has been energized.
• When the System is in the “Standard” operational mode it will automatically heat the spa and maintain it at the set temperature. All user buttons will be functional. If a higher temperature is desired, simply push the “Warm” or “Temp” button until the desired temperature is displayed. (The maximum temperature setting is 40°C). Other energy-saving operation modes are selectable by pushing “Mode” (or mode button sequence).
6. After the System has been powered-up and the pumps have been primed, make a final voltage check at the System terminal block.• Voltage Check
1. Activate the low speed of the pump. 2. Adjust the temperature to turn on the heater. 3. Activate any other equipment that does not turn off the heater. 4. Activate the light. 5. Check the voltage.
The voltage for 230V systems should be 207-253 between line and neutral..
Note: If the voltage is not within tolerance while the System
is operating as described above, turn off the power at the main power panel and correct the problem before continuing to operate the System.

16 800.645.3201
Test Mode Operation
Selecting Test Mode and Analysis Display Mode• The software is in test mode when J43 is on 2 pins on the
Elite, or when DIP switch 1 is ON on all models that have a DIP switch at the edge of the circuit board.
• Test mode may be entered and exited (by changing the jumper or switch setting) at any time (no need to cycle power).
• The software goes into analysis display mode when in test mode and the light is on (at any intensity, if light is dimmable). Note that on models where the light button is combined with the pump button, it is not possible to go into analysis display mode without the pump running.
Differences in the display when in test mode (but not in analysis display mode)• In standard mode (circ or non-circ), temperature
shimmers when not current.• In economy mode (circ or non-circ), temperature
shimmers when not current, and is always displayed with "E" instead of "F" or "C".
• In sleep mode (circ or non-circ), temperature shimmers when not current, and is always displayed with "P" instead of "F" or "C".
Differences in the display when in analysis display mode:• On the Elite: Whether in standard, economy, or sleep
mode (and circ or non-circ), temperature display alternates between displaying "temp" connector sensor temperature with "t" instead of "F" or "C" and "high limit" connector sensor temperature with "H" instead of "F" or "C". (These sensors are not actually serving different "temp" versus "high limit" functions; the labeling on the circuit board simply predates M7 nomenclature.)
• On all other models: Whether in standard, economy, or sleep mode (and circ or non-circ), temperature display alternates between displaying "A" connector sensor temperature with "A" instead of "F" or "C" and "b" connector sensor temperature with "b" instead of "F" or "C".
• Pressing Mode toggles pump/blower/light timeouts off (displays “toOF" or "tF") and back on (displays "toOn" or "tn"). When timeouts are off, ozone disabling on function button presses is suppressed (but not retroactively to function buttons pressed before timeouts were turned off; it's thus suggested that timeouts be turned off as the first action after powering up the spa). This setting is not saved upon power down. NOTE: Even thought the main purpose of turning timeouts off is to disable timeouts on manual pump/blower/light turnons, on some models, leaving timeouts off can make a pump run "forever" once it's turned on automatically in certain situations. For this reason, it's imperative that the spa never be left in test mode for the user. And if you're unsure as to whether you turned timeouts off or not in test mode, it's safest to exit test mode and then cycle power on the spa.
On panels which cannot display a letter such as F or C after the temperature:
In test mode, the character that would be shown to the right of the temperature (A, b, F, C, E, or P) is instead shown for a split second before the temperature it's for, with an equal sign (=) to the right of it. For example, instead of 41A alternating with 40b, you'll see A= followed quickly by 41 alternating with b= followed quickly by 40.

www.balboa-instruments.com 17
Topside Control Panels
Preliminary Panel Check• If the problem is not obvious, look on the topside
control panel for diagnostic messages.If no messages are seen, run through all spa functions and note any inconsistent operation.
• If diagnostic messages appear on the topside control panel, see page 18 for troubleshooting tips.
Once you have determined that proper voltage is running through the circuit board and transformer, continue to the topside control panel. A panel that is not functioning properly may include the following symptoms: low voltage such as missing or scrambled segments, missing icons on the LCD, non-functional LED’s, or nonfunctional buttons. If any of these symptoms are present, perform the following:• Turn the power off and unplug the panel from
the circuit board.• Then, plug in your test panel and restore power. If
everything functions normally, replace the topside panel.• If you still see symptoms of low voltage, such as a
sluggish, blank or partially blank panel, or if the display or the LED’s do not function at all, turn the power off and replace the circuit board.
Bulb ReplacementAnother panel problem may be burned out backlighting
bulbs. These bulbs can easily be replaced.• With the power off, gently pry up the topside control
panel with a screwdriver. Next, locate the gray bulb holes in the back of the panel. Use a screwdriver to turn the bulb approximately 7 mm to remove and replace the bulb. (Needlenose pliers may also be useful.)
Remote Panel TroubleshootingRemote panel applications need special consideration
where the panels connect to the circuit board.
If You are Working on a Spa With a Remote Panel:• Before replacing the circuit board or any panel, remove
the gang connector from the system box and plug in each panel into the circuit board directly and individually. Test all functions with each panel separately.
If a Remote Panel Doesn’t Work:• Remove the remote panel from its location.• Be sure to secure the end of the panel cable.• Plug the remote panel directly into the board. This
removes the extension loom with its one-to-one connector from the circuit board and will help you determine whether you have one panel with a problem, a defective gang connector, a bad extension loom, a bad one-to-one connector, or a circuit board problem.
Available for the Value M-7
Available for the Elite and 2000LE M-7
Available for the Elite
Deluxe Panel
18 800.645.3201
Panel Messages (cont.)
www.balboa-instruments.com
• Check the water level.• Check the water temperature with an accurate
temperature thermometer. Remove the spa cover and allow the water to cool to below 42.0° C. Adding cool water may be necessary. Touch any button to reset the system. If the water is still hotter than the set temperature, press the blower button (if applicable) to cool the spa.
If the Problem Recurs, Test the Sensor Set. (See page 20)
The Panel Displays:
, , , orThe Panel Displays:
, ,
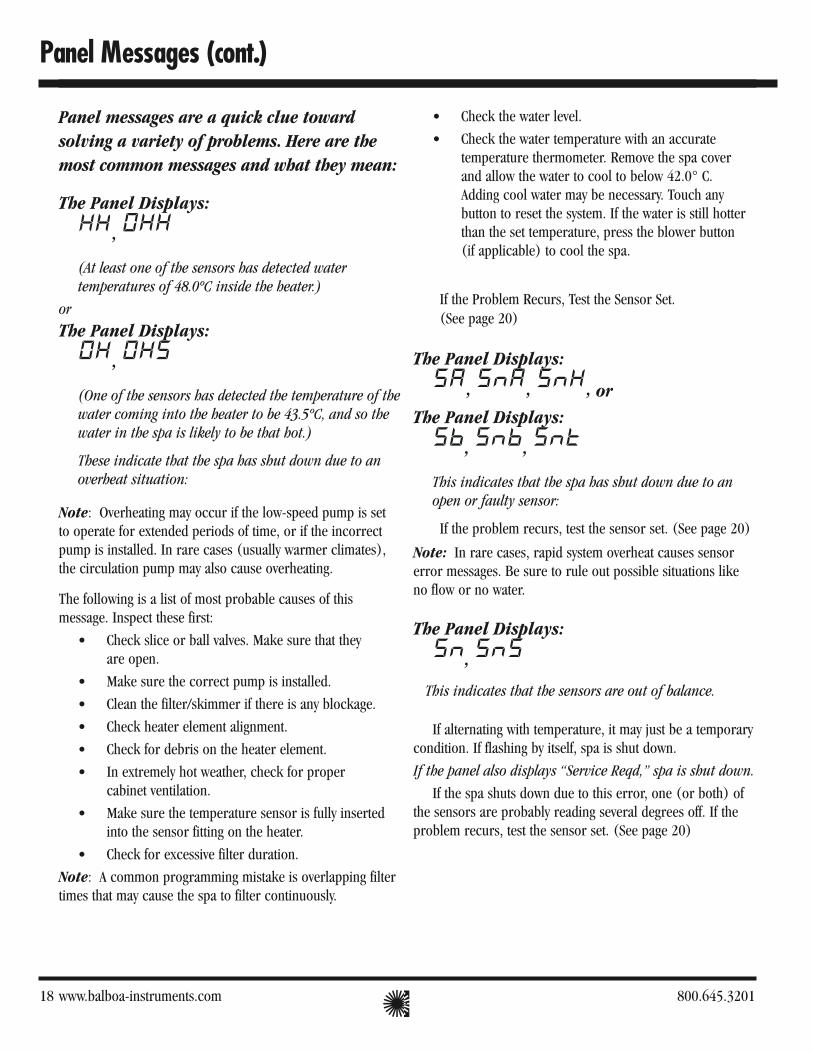
This indicates that the spa has shut down due to an open or faulty sensor:
If the problem recurs, test the sensor set. (See page 20)
Note: In rare cases, rapid system overheat causes sensor error messages. Be sure to rule out possible situations like no flow or no water.
The Panel Displays:
,
This indicates that the sensors are out of balance.
If alternating with temperature, it may just be a temporary condition. If flashing by itself, spa is shut down.If the panel also displays “Service Reqd,” spa is shut down.
If the spa shuts down due to this error, one (or both) of the sensors are probably reading several degrees off. If the problem recurs, test the sensor set. (See page 20)
Panel messages are a quick clue toward solving a variety of problems. Here are the most common messages and what they mean:
The Panel Displays:
,
(At least one of the sensors has detected water temperatures of 48.0ºC inside the heater.)
orThe Panel Displays:
,
(One of the sensors has detected the temperature of the water coming into the heater to be 43.5ºC, and so the water in the spa is likely to be that hot.)
These indicate that the spa has shut down due to an overheat situation:
Note: Overheating may occur if the low-speed pump is set to operate for extended periods of time, or if the incorrect pump is installed. In rare cases (usually warmer climates), the circulation pump may also cause overheating.
The following is a list of most probable causes of this message. Inspect these first:
• Check slice or ball valves. Make sure that they are open.
• Make sure the correct pump is installed.• Clean the filter/skimmer if there is any blockage.• Check heater element alignment.• Check for debris on the heater element.• In extremely hot weather, check for proper
cabinet ventilation.• Make sure the temperature sensor is fully inserted
into the sensor fitting on the heater.• Check for excessive filter duration.
Note: A common programming mistake is overlapping filter times that may cause the spa to filter continuously.

www.balboa-instruments.com 19
Panel Messages (cont.)
The Panel Displays:
,
This indicates that a sensor detects a possible freeze condition.This message does not appear on M-7 software showing a Software Version ID of 01 or greater.
This is a normal spa function; no further action is necessary.
When either sensor reads below 4.5° C, the system provides freeze protection. It automatically activates the pump (and the heater if necessary) to circulate the water and warm the plumbing. The equipment stays on until the sensors detect that the spa temperature has risen to within 8.0ºC of the set temperature. The other pumps and the blower will purge for 30 seconds to 2 minutes at the end of the freeze condition. If pump 1 was turned on due to this reason alone, this message will appear for up to two minutes right after very cold water is detected.
Note: Internal freeze protection only functions when there is proper power running to the spa, and the control system is operational. Using an optional freeze sensor may be necessary in extreme climates to prevent plumbing damage, but will only work properly if placed inside the spa skirt in the coldest area.All spa models are different in shape and size and have different thermal characteristics; therefore, Balboa Instruments, Inc. cannot be held responsible for freeze damage to the spa’s plumbing. Testing is the responsibility of the spa manufacturer and must be done to determine the best location for the freeze sensor.
The Panel Displays:
,
This indicates that the auxiliary sensor detects a possible freeze condition.
This is a normal spa function; no further action is necessary.
When the auxiliary sensor reads around 40°F (actual temperature dependent on specific auxiliary sensor used), the system provides freeze protection. It automatically activates all of the pumps and the blower to circulate water and warm the plumbing. Note: This auxiliary freeze protection functions at all times, even when another fault condition has occurred and has otherwise shut the spa down.
This message can also indicate “simplified” sensor freeze protection in progress (on M-7 software showing a Software Version ID of 01 or greater), which behaves as follows:
Any time the lower of the two temperature sensors goes below 7.0°C, all pumps/blowers turn on. They continue to run for 4 minutes after the temperature reaches 7.0°C or above. As soon as the temperature falls below 7.0°C again, this process restarts. This “simplified” sensor freeze protection functions at all times, even when another fault condition (other than total sensor failure) has occurred and has otherwise shut the spa down.
The Panel Displays:
,
This indicates that a substantial difference in temperature between sensors has been detectedduring heating.
This could indicate a flow problem. Check water level in spa. Refill, if necessary. If the water level is okay, make sure the pumps have been primed.
On the fifth occurrence of the above message the panel will display:
This indicates a persistent flow problem The heater is shut down while all other spa functions
continue to run normally. Power on the spa must be cycled before the heater will function again.
continued on page 21
20 800.645.3201
Panel Messages (cont.)
temperature, so the spa won't try to heat during this test, as there is no heater
protection during this test) and verify that they read the same temperature (within 1°F/0.5°C).
• If the problem is solved, replace the sensor set. If the problem is not solved, do not replace the sensor set.
• Plug in the original sensor set to verify that there is not a connection problem.
• If the problem continues after following the above steps, then replace the circuit board.
8. If you cannot get readings of the sensors on the topside panel even in M7 Test Mode / Analysis Display Mode (for example, because the system always indicates an Overheat condition when it shouldn’t):• You can use an ohmmeter to evaluate the validity
of each sensor independently (after unplugging the sensors from the circuit board).
• You will need sharp tips on the meter probes(or a Balboa Logic Jumper on a Stick) to be able to make contact with the little bit of metal of each of the two sensor wires visible through a window on the connector.
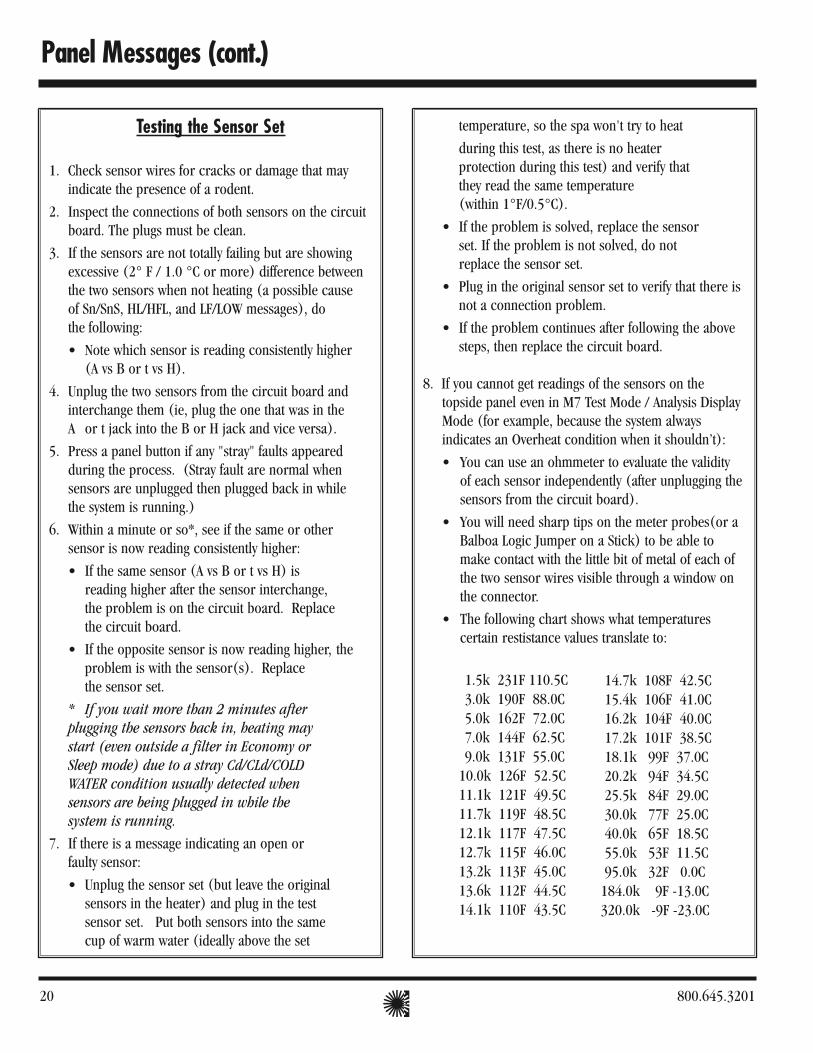
• The following chart shows what temperatures certain restistance values translate to:
1.5k 231F 110.5C 3.0k 190F 88.0C 5.0k 162F 72.0C 7.0k 144F 62.5C 9.0k 131F 55.0C
10.0k 126F 52.5C11.1k 121F 49.5C11.7k 119F 48.5C12.1k 117F 47.5C12.7k 115F 46.0C13.2k 113F 45.0C13.6k 112F 44.5C14.1k 110F 43.5C
Testing the Sensor Set
1. Check sensor wires for cracks or damage that may indicate the presence of a rodent.
2. Inspect the connections of both sensors on the circuit board. The plugs must be clean.
3. If the sensors are not totally failing but are showing excessive (2° F / 1.0 °C or more) difference between the two sensors when not heating (a possible cause of Sn/SnS, HL/HFL, and LF/LOW messages), do the following:• Note which sensor is reading consistently higher
(A vs B or t vs H).4. Unplug the two sensors from the circuit board and
interchange them (ie, plug the one that was in the A or t jack into the B or H jack and vice versa).
5. Press a panel button if any "stray" faults appeared during the process. (Stray fault are normal when sensors are unplugged then plugged back in while the system is running.)
6. Within a minute or so*, see if the same or other sensor is now reading consistently higher:• If the same sensor (A vs B or t vs H) is
reading higher after the sensor interchange, the problem is on the circuit board. Replace the circuit board.
• If the opposite sensor is now reading higher, theproblem is with the sensor(s). Replace the sensor set.
* If you wait more than 2 minutes after plugging the sensors back in, heating may start (even outside a filter in Economy or Sleep mode) due to a stray Cd/CLd/COLD WATER condition usually detected when sensors are being plugged in while the system is running.
7. If there is a message indicating an open or faulty sensor:• Unplug the sensor set (but leave the original
sensors in the heater) and plug in the test sensor set. Put both sensors into the same cup of warm water (ideally above the set
14.7k 108F 42.5C 15.4k 106F 41.0C 16.2k 104F 40.0C 17.2k 101F 38.5C 18.1k 99F 37.0C 20.2k 94F 34.5C 25.5k 84F 29.0C 30.0k 77F 25.0C 40.0k 65F 18.5C 55.0k 53F 11.5C 95.0k 32F 0.0C 184.0k 9F -13.0C 320.0k -9F -23.0C

www.balboa-instruments.com 21
Panel Messages (cont.)
The Panel Displays:
This indicates that there is not enough water in the heater. Spa shuts down for 15 minutes.
This could indicate poor flow or air bubbles in the heater.On the third consecutive occurrence of the above message (without a successful heating cycle in between) the panel will display:
Spa is shut down and will not reset in 15 minutes. Press any button to reset manually.
The Panel Displays:
, , orThis indicates that the temperature is completelyunknown because the pump has not yet run for 2 minutes after Priming Mode was exited. This is onlydisplayed for 2 minutes at power-up.
Some Troubleshooting Scenarios1. You find out the system is in “OHH.” This alone doesn't
explain a lot. What led up to the “OHH” is much more important. See if the user has any additional information (for example, how long before the “OHH” was the spa panel last checked, and how hot was the water then). If the spa has cooled, see whether the problem can happen again, this time watching carefully to see if there are additional clues leading to the “OHH” (for example, other messages that appear shortly before the “OHH” happens).
2. You find out the system keeps showing “HFL,” or is now in “LF,” or is shut down due to a "dry" fault. Put the spa in test mode with the light on, so that you see the two sensor temperatures. Are they normal (within 1°F / 0.5°C) when not heating? How far apart are they when heating? “HFL” happens when they are 6°F / 3°C apart (4°F / 2°C on 120V and other low-heater-wattage systems), see how quickly that happens after heating starts. If it's getting close to that right away, it's probably a consistent flow problem, but if it's nowhere close to the “HFL”-causing temperature difference, the flow problem may be intermittent or only occur in certain specific situations.
22 800.645.3201
R.C.D. Troubleshooting
If Correct Wiring is Verified• Check to see if the proper R.C.D. is installed.• Check the label in the system box near TB1 to determine
the maximum amperage draw for the system.• Be sure the R.C.D. is rated for more amperage than the
system will draw.• For a 230 V dedicated system, a 2-pole or 4-pole R.C.D.
with no load neutral is acceptable.• For a detailed wiring checklist, please review the previous
segment of this manual on proper R.C.D. wiring or the R.C.D. manufacturer’s instructions.
• If the wiring is correct and the R.C.D. will not reset, then unplug the pump and try to reset the R.C.D.If the R.C.D. trips again, then unplug the blower and push the reset button. If the R.C.D. continues to trip, then do the same procedure for the ozone generator.
• If the R.C.D. stops tripping after you unplugged one of the spa’s components, turn off the power to the spa then plug in each component except the one that tripped the R.C.D.
• Power up the system. If the R.C.D. no longer trips, then you have correctly identified the problem. Repair or replace the component as instructed by the spa manufacturer.
• If you have unplugged all of the spa’s components and the R.C.D. still doesn’t reset, then the problem is most likely a ground fault in the heater.
To Disconnect the Heater• First, turn off the main circuit breaker, then remove both
heater straps or wires from the terminal block, not the heater itself.
• After restoring the power, try to reset the R.C.D. again. If it no longer trips after the system calls for heat, then replace the heater.
• If the R.C.D. still trips, look for pinched or shorted wires at the transformer. Make sure that the screws that attach the transformer to the system box have not pinched or damaged the insulation of the transformer wires.
• If the transformer wires are undamaged, check for any other pinched wires. Refer to the wiring diagram to verify the correct wiring of the control system.
• If everything looks to be in perfect working order, then the R.C.D. may be defective.
Keep in mind that a majority of R.C.D. tripping problems can be attributed to incorrect wiring. R.C.D. troubleshooting usually finds the problem.

www.balboa-instruments.com 23
Testing the Circuit Board Output
Testing the Circuit Board OutputIf your topside control panel is working properly, but
a pump, blower, or other device does not activate when its panel button is pressed, further diagnosis is easily accomplished with the Balboa Quick CheckTM.
To use the Balboa Quick Check:• Turn off the power at the house breaker box.• Unplug the device in question, and plug the Quick Check
in its place.• Restore power to the spa and press the appropriate panel
button again. If the Quick Check’s light appears, the device in question is receiving voltage.
• An ordinary multi-meter can also be used to check for proper output voltage, except when working with a variable-speed blower or a dimmable spa light. In these cases, a component on the circuit board called a “triac” needs to be under a small load to test output voltage.
• Even if the system is not equipped with a blower triac, the best way to verify voltage output is with the Balboa Quick Check.
• If the Quick Check light does not appear after pressing the appropriate panel button, trace the wires from the corresponding connector in the system box back to the circuit board.
• Probe these connections at the circuit board after activating the function with the topside control panel.
• If you do not have correct voltage, double check the input voltage before you replace the circuit board.
• If you do have correct voltage at the circuit board, turn off the system power and check for a blown in-line fuse. Blowing the in-line fuse or the power input fuse is usually a symptom of a faulty pump, blower, or a short in the wiring to one of those devices.
• If the fuse is good, then replace the output connector.• If the high-speed pump comes on when the system calls
for heat or when the system goes into a filter cycle, the pump is most likely wired backwards. Verify that the blue (low speed) and brown (high speed) wires are not switched in the amp connector or the pump itself.
• Always check to make sure all devices are plugged into the proper location.
Note: If the spa light output is not detected with the Balboa Quick Check, be sure to check continuity of the light fuse on the circuit board.
Quick CheckTM Test Kit
J&J Adapter Set
24 800.645.3201
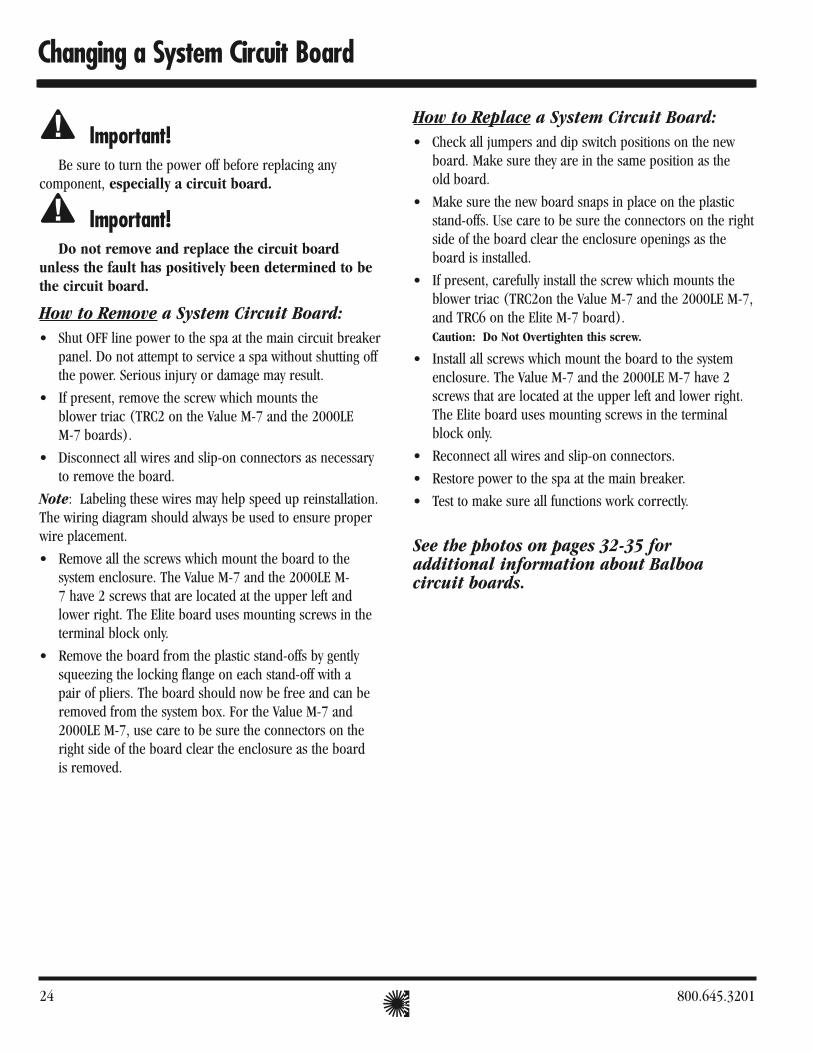
How to Replace a System Circuit Board:• Check all jumpers and dip switch positions on the new
board. Make sure they are in the same position as the old board.
• Make sure the new board snaps in place on the plastic stand-offs. Use care to be sure the connectors on the right side of the board clear the enclosure openings as the board is installed.
• If present, carefully install the screw which mounts the blower triac (TRC2on the Value M-7 and the 2000LE M-7, and TRC6 on the Elite M-7 board).Caution: Do Not Overtighten this screw.
• Install all screws which mount the board to the system enclosure. The Value M-7 and the 2000LE M-7 have 2screws that are located at the upper left and lower right. The Elite board uses mounting screws in the terminal block only.
• Reconnect all wires and slip-on connectors.• Restore power to the spa at the main breaker.• Test to make sure all functions work correctly.
See the photos on pages 32-35 for additional information about Balboa circuit boards.
Changing a System Circuit Board
Important!Be sure to turn the power off before replacing any
component, especially a circuit board.
Important!Do not remove and replace the circuit board
unless the fault has positively been determined to be the circuit board.
How to Remove a System Circuit Board:• Shut OFF line power to the spa at the main circuit breaker
panel. Do not attempt to service a spa without shutting off the power. Serious injury or damage may result.
• If present, remove the screw which mounts the blower triac (TRC2 on the Value M-7 and the 2000LEM-7 boards).
• Disconnect all wires and slip-on connectors as necessary to remove the board.
Note: Labeling these wires may help speed up reinstallation. The wiring diagram should always be used to ensure proper wire placement.• Remove all the screws which mount the board to the
system enclosure. The Value M-7 and the 2000LE M-7 have 2 screws that are located at the upper left and lower right. The Elite board uses mounting screws in the terminal block only.
• Remove the board from the plastic stand-offs by gently squeezing the locking flange on each stand-off with a pair of pliers. The board should now be free and can be removed from the system box. For the Value M-7 and 2000LE M-7, use care to be sure the connectors on the right side of the board clear the enclosure as the board is removed.
www.balboa-instruments.com 25
Heater Startup Information:On M-7 systems, the heater goes through a testing phase
every time it starts up to assure that there is adequate water flow. This provides sophisticated dry fire and low flow protection. It can be confusing if you don't know what to expect. Step by step, here is what happens (Note that the timing/temperature details may be slightly different on some older M7 systems):• Prior to heating, the pump is run for at least two minutes,
and then the temperature difference between the sensors is assessed. It must be 2°F / 1.0°C or less for heating to proceed, otherwise an error is issued.
• The heater turns on for 6.5 to 18 seconds (depending on heater voltage and wattage). At this point, the heat indicator on the panel is "solid." During this time the panel is not immediately responsive.
• The heater turns off for 90 seconds, making sure that the water flow keeps the temperature rise small and short. (Abnormal water flows, or lack of water, will produce a large and/or long temperature rise, and the system faults in that situation.) At this point, the heat indicator on the panel may appear to "shimmer" or "dim" (on some panels this may be less obvious from certain angles and more obvious from other angles, or in different lighting).
• If the dry fire test has passed, heating turns back on to heat the spa. The heat indicator on the panel returns to"solid".
• During spa heating, a difference between the sensors of 2°F / 1.0°C, or perhaps 3°F / 1.5°C (at least with 4-6kW230V heaters), is considered normal. A significantly higher difference, however, is usually indicative of a flow problem, and will cause a fault which disables the heating for at least a minute (and then restarts the whole above process).
Spa Behavior
See manufacturer's owners manual or reference card for general information on operating the spa, including programming filters and other settings that are changed from the topside control panel.
In Priming Mode, the “Mode” button toggles the ozone on/off (with a 15-second timeout). This can be useful if you want to verify ozone generator operation without waiting for a filter. This feature is not available on smaller panels where Mode is a multi-button sequence, since such a sequence exits Priming Mode.
General Filter Information• On any system with a Deluxe panel, the filter times and
durations are completely programmable from the topside control panel, and the first filter may not run for many hours after power-up. If you want the filter to run sooner, you have to either reprogram the filter or advance the time to just before the filter start.
• On all other systems, the first filter starts 6 minutes after power-up and the duration can be chosen (either using button sequences on the topside control panel or via a DIP switch) between several preset choices. Note that if you let Priming Mode exit automatically after 4 minutes, you have 2 more minutes before the first filter runs after power-up. Exiting Priming Mode by pressing the “Temp,” Warm,” or “Cool” buttons, allows up to 6 minutes available before the first filter runs.
IMPORTANT INFORMATION: If the filter settings have just been changed, it may take up to 24 hours for the filter cycle to reflect the changes. This is especially likely when changing from a very long filter duration (such as Continuous), to a short one, or vice versa.• The low-speed pump (on non-circ) and ozone generator
(if installed) will run during the filter cycles.• The blower runs for 30 seconds at the start of each filter
cycle. This will maintain water quality in the air channel.• The pumps (other than pump 1 in non-circ, including
pump 1 in circ) will run for 5 minutes at the start of each filter cycle.
26 800.645.3201
Dip Switch and Jumper Settings
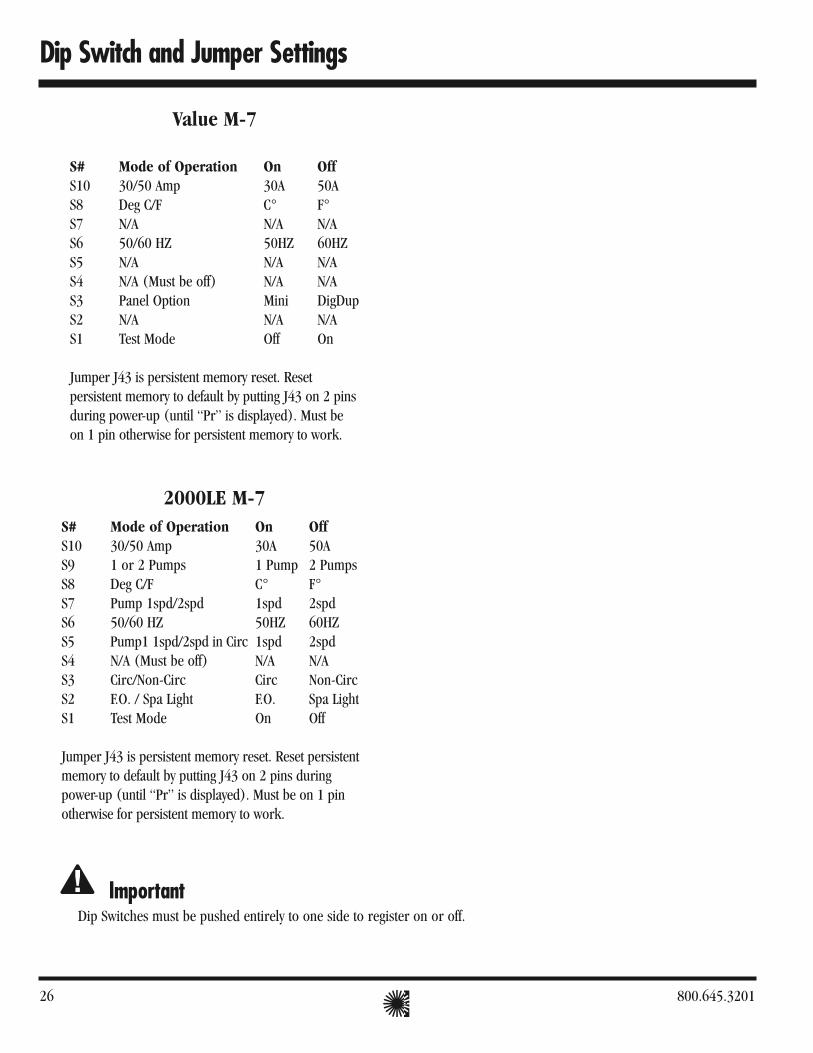
S# Mode of Operation On OffS10 30/50 Amp 30A 50AS8 Deg C/F C° F°S7 N/A N/A N/AS6 50/60 HZ 50HZ 60HZS5 N/A N/A N/AS4 N/A (Must be off) N/A N/AS3 Panel Option Mini DigDupS2 N/A N/A N/AS1 Test Mode Off On
Jumper J43 is persistent memory reset. Reset persistent memory to default by putting J43 on 2 pins during power-up (until “Pr” is displayed). Must be on 1 pin otherwise for persistent memory to work.
Value M-7
S# Mode of Operation On OffS10 30/50 Amp 30A 50AS9 1 or 2 Pumps 1 Pump 2 PumpsS8 Deg C/F C° F°S7 Pump 1spd/2spd 1spd 2spdS6 50/60 HZ 50HZ 60HZS5 Pump1 1spd/2spd in Circ 1spd 2spdS4 N/A (Must be off) N/A N/AS3 Circ/Non-Circ Circ Non-CircS2 F.O. / Spa Light F.O. Spa LightS1 Test Mode On Off
Jumper J43 is persistent memory reset. Reset persistent memory to default by putting J43 on 2 pins during power-up (until “Pr” is displayed). Must be on 1 pin otherwise for persistent memory to work.
2000LE M-7
ImportantDip Switches must be pushed entirely to one side to register on or off.

www.balboa-instruments.com 27
Dip Switch and Jumper Settings
Jumper orientation and configuration Logic
Jumper
Feature “ Off ”(Jumper on one pin)
Feature “ On ”(Jumper on two pins)
Feature “ A ” Enabled Feature “ B ” Enabled
The printed circuit boards (especially of the Elite System) utilize jumpers that control the operation of the Power System depending upon the model of the system and the top-side control panel being used. The jumpers are identified on the board with the letter “J” followed by a number.
These jumpers are positioned at the time of manufacture for specific system configurations. For configurations other than described, call Balboa Instruments.
Important!The illustrations at left indicate how the logic jumpers are used. If a jumper is installed on two pins, it is completing a circuit across the two pins. If it is installed on one pin, the circuit between the two pins is open. Sometimes a logic jumper will be used on a group of three pins and depending on which two pins have been connected by the jumper, feature “A” or “B” will be enabled.

28 800.645.3201
Dip Switch and Jumper Settings
Elite Chart
Portion of PC board for Elite showing location of jumpers.
Note: The above jumper settings are factory set and DO NOT need alteration for the configuration shown on page 22. This chart is for verification only.
* The Jumper symbols shown here are oriented to correspond to their actual positions on the printed circuit board.
J-6 Selects circ/non-circ pump option (Non-circ pump selected)
J-7 Selects top-side panel being used (Deluxe panel selected)
J-9 Selects 120V/230V logic 20A (230V, 50A logic selected)
J-10 Selects 1 or 2 speed pump 2 operation (1 speed operation selected)
J-16 Enables O3 message (03 message disabled)
J-24 Disables ORP (ORP disabled)
J-25 Spa light= 60HZ position, Fiber-optic light= 50HZ position (60hz, spa light operation selected)
J-36 Allows memory storage and resets memory (Memory storage allowed)
J-46 Disables pump 2 (Pump 2 enabled)
Jumper # Function of Jumper Position*
= Open Jumper = Closed Jumper = Selectable Function Jumper
J-7J-36 J-10J-16 J-25 J-6
J-46
J-9
J-24
NOTE: The Elite can also be equipped with the Standard Digital 6 button top-side panel (Part Number 54157) supporting one pump, or the Standard Digital 7 button top-side panel (Part Number 54156) supporting two pumps. Call Balboa for revised jumper settings.

www.balboa-instruments.com 29
Value M-7 TUV Circuit Board
Circuit Board Components:
1. A/C Input2. Onboard load fuses
a. F6 25Ab. F5 25A
3. Inboard fuse (F4)4. Spa and fiber optic light fuse 3A 250V (F1)5. Onboard blower fuse (F7)6. Transformer input7. Control panel input, duplex panel8. 10-position dip switch, modes of operation (see chart)9. Aux freeze protection circuit (J22, optional)10. a. Sensor A connection
b. Sensor B connection11. U4 main processor12. Pump 1 low relay (K1)13. Pump 1 low output (J29)14. Pump 1 hi relay (K6)
15. Pump 1 hi output (J28)16. Ozone relay (K7)17. Ozone output (J14)18. 12/230 VAC jumper option for spa light or fiber-optic
light (J56)(J57)29. Spa light and fiber optic light relay (K5)20. Spa light output only
a. (J27)b. (J4)
21. Heater relay (K2)22. Heater output A and B23. High-limit relays A and B24. Serial Number/Model Number Designation25. Blower26. Blower output (J19)
J43 Reset persistent memory to defaults by putting J43 on 2 pins during power-up (until “Pr” is displayed). Must
be on 1 pin otherwise for persistent memory to work.
8
9
7
17
2a
1912
15
10a
3
24
13
16
184
5
1
21
14
11
6
2b
7
10b
20a20b
23a
23b
22a 22b
25
J43
26
30 800.645.3201
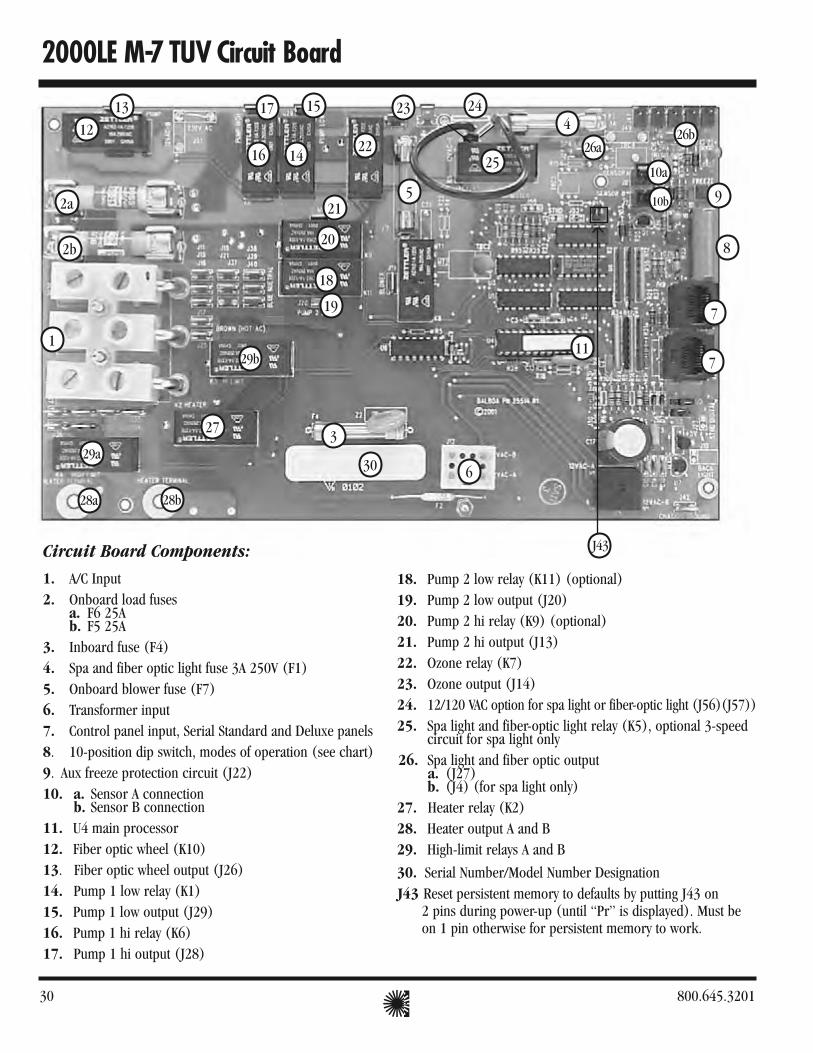
2000LE M-7 TUV Circuit Board
Circuit Board Components:1. A/C Input2. Onboard load fuses
a. F6 25Ab. F5 25A
3. Inboard fuse (F4)4. Spa and fiber optic light fuse 3A 250V (F1)5. Onboard blower fuse (F7)6. Transformer input7. Control panel input, Serial Standard and Deluxe panels8. 10-position dip switch, modes of operation (see chart)9. Aux freeze protection circuit (J22)10. a. Sensor A connection
b. Sensor B connection11. U4 main processor12. Fiber optic wheel (K10)13. Fiber optic wheel output (J26)14. Pump 1 low relay (K1)15. Pump 1 low output (J29)16. Pump 1 hi relay (K6)17. Pump 1 hi output (J28)
18. Pump 2 low relay (K11) (optional)19. Pump 2 low output (J20)20. Pump 2 hi relay (K9) (optional)21. Pump 2 hi output (J13)22. Ozone relay (K7)23. Ozone output (J14)24. 12/120 VAC option for spa light or fiber-optic light (J56)(J57))25. Spa light and fiber-optic light relay (K5), optional 3-speed
circuit for spa light only26. Spa light and fiber optic output
a. (J27) b. (J4) (for spa light only)
27. Heater relay (K2)28. Heater output A and B29. High-limit relays A and B30. Serial Number/Model Number DesignationJ43 Reset persistent memory to defaults by putting J43 on
2 pins during power-up (until “Pr” is displayed). Must be on 1 pin otherwise for persistent memory to work.
8
9
7
17
2a
19
12
15
10a
3
2413
16
18
4
5
1
14
11
6
2b
7
10b
26a26b
28a 28b
29a
29b
25
27
J43
20
21
22
23
30

www.balboa-instruments.com 31
Elite TUV Circuit Board
Circuit Board Components:
1. Blower Triac (TRC6) or optional 1-speed blower relay,Use Screw For Heat Sink Only. Do Not Overtighten.
2. Blower Hookup3. Control Panel Input4. Finger 55. Finger 66. Filter Select Jumper (Standard Only – J7)7a. Sensor A 7b. Sensor B8. Aux. Freeze Control Sensor Input (J15)9. 1/4 Amp 230V Fuse (F2)10. Light Fuse 3A 250V11. Main Processor with software number12. Orp Enable Jumper (J24)13. Ozone Enable Jumper (J16)14. Ozone Generator Hookup15. Perimeter Light Hookup or Optional Circ Pump16. pH/Orp Sensor Input (J11)17. Pump 1 Hookup Low18. Pump 2 Enable Jumper (J10)19. Pump 2 Hookup Low
20. Auxiliary Panel Input21. Serial Number/Model Number Designations22. Fiber Optic/Spa Light Option (J25)23. Soldered-in Thermal Fuse Protection24. Spa Light Hookup (J39)(J40)25. Transformer Input26. 50A/20A Jumper (J9)27. Battery Backup Enable Jumper (J36)28. Pump 1 Hookup High29. Pump 2 Hookup High30. Pump 1 High Common Hookup31. Fiber Optic Wheel Hookup (J43)32. Fiber Optic Light Hookup (J21)33. 12V or 230V Spa Light Jumper (J59)(J62)34. Misc 1 Jumper (J46)35. Misc 2 Jumper (J55)36. Misc 3 Jumper (J58) - M-7 Test Mode37. High Limit Relay (K6)(K7)38. Heater Relay (K8)
8
9
7a
17 19
12
15
10
4
23
13
2
16
20
4
5
1
22
14
11
6
2425
37b
14
27
26
2128 2930
31
32
33
35 36
37
37
38
1
18
24
12V
34

©Copyright 2001 Balboa Instruments, Inc. P/N DM918_A 03/01/2007