
M2000 HA System Software Initial Installation Guide (T5220&M4000&M5000, S10)(V200_06)
146
M2000 V200 HA System Software Initial Installation Guide (T5220&M4000&M5000, S10) Issue 06 Date 2010-06-15 Huawei Proprietary and Confidential Copyright © Huawei Technologies Co., Ltd.
-
Upload
le-quy-tinh -
Category
Documents
-
view
546 -
download
9
Transcript of M2000 HA System Software Initial Installation Guide (T5220&M4000&M5000, S10)(V200_06)

M2000
V200
HA System Software Initial Installation Guide(T5220&M4000&M5000, S10)
Issue 06
Date 2010-06-15
Huawei Proprietary and ConfidentialCopyright © Huawei Technologies Co., Ltd.
Huawei Technologies Co., Ltd. provides customers with comprehensive technical support and service. For anyassistance, please contact our local office or company headquarters.
Huawei Technologies Co., Ltd.Address: Huawei Industrial Base
Bantian, LonggangShenzhen 518129People's Republic of China
Website: http://www.huawei.com
Email: [email protected]
Copyright © Huawei Technologies Co., Ltd. 2010. All rights reserved.No part of this document may be reproduced or transmitted in any form or by any means without prior writtenconsent of Huawei Technologies Co., Ltd. Trademarks and Permissions
and other Huawei trademarks are the property of Huawei Technologies Co., Ltd.All other trademarks and trade names mentioned in this document are the property of their respective holders. NoticeThe purchased products, services and features are stipulated by the contract made between Huawei and thecustomer. All or part of the products, services and features described in this document may not be within thepurchase scope or the usage scope. Unless otherwise specified in the contract, all statements, information,and recommendations in this document are provided "AS IS" without warranties, guarantees or representationsof any kind, either express or implied.
The information in this document is subject to change without notice. Every effort has been made in thepreparation of this document to ensure accuracy of the contents, but all statements, information, andrecommendations in this document do not constitute the warranty of any kind, express or implied.
Huawei Proprietary and ConfidentialCopyright © Huawei Technologies Co., Ltd.

Contents
About This Document.....................................................................................................................1
1 Procedure for Installing the M2000 Software (HA).............................................................1-1
2 Preparing for Installation CD-ROM and Installation Package.........................................2-1
3 Checking M2000 Hardware Installation................................................................................3-1
4 Planning Solaris and Sybase Users........................................................................................4-1
5 Powering On and Powering Off the M2000 (HA, T5220)...................................................5-15.1 Powering On the M2000 (HA, T5220)...........................................................................................................5-25.2 Powering Off the M2000 (HA, T5220)...........................................................................................................5-4
6 Powering On and Powering Off the M2000 (HA, M4000/M5000).....................................6-16.1 Powering On the M2000 (HA, M4000/M5000)..............................................................................................6-26.2 Powering Off the M2000 (HA, M4000/M5000).............................................................................................6-4
7 Installing and Configuring the T5220 Server (HA).............................................................7-17.1 Partition Planning of the T5220 Server (HA).................................................................................................7-47.2 Planning the Host Name and IP Address for the T5220 Server (HA)............................................................7-57.3 Configuring the SC for the T5220 Server.......................................................................................................7-77.4 Installing the Solaris and Patches on the T5220 Server (HA).......................................................................7-107.5 Checking the Version and Patches of the Solaris..........................................................................................7-147.6 Checking the Disk Partitioning of the M2000 Server (HA)..........................................................................7-157.7 Checking the Mirrors of the Local Disk on the Server (HA, T5220)...........................................................7-167.8 Configuring the Hostname and the IP Address of the Server (HA)..............................................................7-167.9 Changing the IP Address of the S2600 Disk Array (Serial Port Mode).......................................................7-187.10 Changing the IP Address of the S3X00 Disk Array (Serial Port Mode).....................................................7-217.11 Configuring the S2600 Disk Array (HA)....................................................................................................7-237.12 Configuring the S3100 Disk Array (HA, T5220).......................................................................................7-267.13 Enabling Multi-Path I/O (HA)....................................................................................................................7-287.14 Labeling Volumes for the Disk Array (HA)...............................................................................................7-287.15 Installing and Configuring the Sun Cluster Software and Patches.............................................................7-307.16 Checking Installation of the Sun Cluster Software and Patches.................................................................7-327.17 Installing and Configuring the Volume Manager.......................................................................................7-337.18 Checking the Installation of the Volume Manager.....................................................................................7-35
HA System Software Initial Installation Guide(T5220&M4000&M5000, S10) Contents
Issue 06 (2010-06-15) Huawei Proprietary and ConfidentialCopyright © Huawei Technologies Co., Ltd.
i

7.19 Uploading the PlatformTools Installation Package to the Server...............................................................7-367.20 Configuring M2000 Disks (HA, T5220).....................................................................................................7-377.21 Checking the Disk Configurations of the M2000 Server (HA....................................................................7-387.22 Installing and Configuring the Sybase (HA)...............................................................................................7-407.23 Creating the M2000 Database (HA, T5220)...............................................................................................7-427.24 Troubleshooting: Failed to Set the Sybase Parameters by Using the PlatformTools (HA)........................7-447.25 Checking the Sybase Server Connection....................................................................................................7-467.26 Checking the Version and Patches of the Sybase.......................................................................................7-467.27 Installing the Sybase and Patches on Node2...............................................................................................7-47
8 Installing and Configuring the M4000/M5000 Server (HA)...............................................8-18.1 Partition Planning of the M4000/M5000 Server (HA)....................................................................................8-48.2 Planning the Host Name and IP Address for the M4000/M5000 Server (HA)...............................................8-58.3 Configuring the XSCF of the M4000/M5000 Server......................................................................................8-88.4 Installing Solaris and Its Patches on the M4000/M5000 Server...................................................................8-148.5 Checking the Version and Patches of the Solaris..........................................................................................8-178.6 Checking the Disk Partitioning of the M2000 Server (HA)..........................................................................8-188.7 Checking the Local Disk Mirroring of the M4000/M5000 Server...............................................................8-198.8 Configuring the Hostname and the IP Address of the Server (HA)..............................................................8-208.9 Changing the IP Address of the S2600 Disk Array (Serial Port Mode).......................................................8-218.10 Changing the IP Address of the S3X00 Disk Array (Serial Port Mode).....................................................8-258.11 Changing the IP Address of the 6140 Disk Array (Serial Port Mode)........................................................8-278.12 Configuring the S2600 Disk Array (HA)....................................................................................................8-308.13 Configuring the S3200 Disk Array (HA)....................................................................................................8-338.14 Configuring the 6140 Disk Array (HA)......................................................................................................8-358.15 Enabling Multi-Path I/O (HA)....................................................................................................................8-388.16 Labeling Volumes for the Disk Array (HA)...............................................................................................8-388.17 Installing and Configuring the Sun Cluster Software and Patches.............................................................8-408.18 Checking Installation of the Sun Cluster Software and Patches.................................................................8-428.19 Installing and Configuring the Volume Manager.......................................................................................8-438.20 Checking the Installation of the Volume Manager.....................................................................................8-458.21 Uploading the PlatformTools Installation Package to the Server...............................................................8-468.22 Configuring M2000 Disks (HA, M4000/M5000).......................................................................................8-478.23 Checking the Disk Configurations of the M2000 Server (HA....................................................................8-488.24 Installing and Configuring the Sybase (HA)...............................................................................................8-508.25 Creating the M2000 Database (HA, M4000/M5000).................................................................................8-528.26 Troubleshooting: Failed to Set the Sybase Parameters by Using the PlatformTools (HA)........................8-548.27 Checking the Sybase Server Connection....................................................................................................8-568.28 Checking the Version and Patches of the Sybase.......................................................................................8-568.29 Installing the Sybase and Patches on Node2...............................................................................................8-57
9 FAQs............................................................................................................................................. 9-19.1 How Should I Do When the System Fails to Read the CD-ROM..................................................................9-2
ContentsHA System Software Initial Installation Guide
(T5220&M4000&M5000, S10)
ii Huawei Proprietary and ConfidentialCopyright © Huawei Technologies Co., Ltd.
Issue 06 (2010-06-15)

9.2 What to Do When the Information Displayed on the Interface Is Abnormal?................................................9-2
HA System Software Initial Installation Guide(T5220&M4000&M5000, S10) Contents
Issue 06 (2010-06-15) Huawei Proprietary and ConfidentialCopyright © Huawei Technologies Co., Ltd.
iii


Figures
Figure 1-1 Flow chart for installing the software (HA).......................................................................................1-2Figure 5-1 S2600 disk array.................................................................................................................................5-2Figure 5-2 S3100 disk array.................................................................................................................................5-3Figure 5-3 T5220 server.......................................................................................................................................5-4Figure 5-4 T5220 server.......................................................................................................................................5-5Figure 5-5 Disk array (I)......................................................................................................................................5-6Figure 5-6 Disk array (II).....................................................................................................................................5-6Figure 6-1 S2600 disk array.................................................................................................................................6-2Figure 6-2 S3200 disk array.................................................................................................................................6-3Figure 6-3 Operation panel of the SPARC Enterprise M4000/M5000................................................................6-4Figure 6-4 Disk array (I)......................................................................................................................................6-6Figure 6-5 Disk array (II).....................................................................................................................................6-6Figure 7-1 Ports on the T5220 server...................................................................................................................7-6Figure 7-2 Ports on the S2600 disk array.............................................................................................................7-7Figure 7-3 Ports on the S3100 disk array.............................................................................................................7-7Figure 7-4 Ports provided by the SC....................................................................................................................7-8Figure 7-5 Serial ports provided by the S2600 disk array..................................................................................7-18Figure 7-6 Successful connection dialog box.....................................................................................................7-19Figure 7-7 Successful login dialog box..............................................................................................................7-20Figure 7-8 Serial ports provided by the S3X00..................................................................................................7-22Figure 8-1 Ports on the M4000 server..................................................................................................................8-7Figure 8-2 Ports on the M5000 server..................................................................................................................8-7Figure 8-3 Ports on the S2600 disk array.............................................................................................................8-7Figure 8-4 Ports on the S3200 disk array.............................................................................................................8-8Figure 8-5 Connectors provided by the XSCF.....................................................................................................8-9Figure 8-6 Mode switch on the operation panel.................................................................................................8-10Figure 8-7 Serial ports provided by the S2600 disk array..................................................................................8-22Figure 8-8 Successful connection dialog box.....................................................................................................8-23Figure 8-9 Successful login dialog box..............................................................................................................8-24Figure 8-10 Serial ports provided by the S3X00................................................................................................8-25Figure 8-11 Serial ports on the 6140 disk array.................................................................................................8-27
HA System Software Initial Installation Guide(T5220&M4000&M5000, S10) Figures
Issue 06 (2010-06-15) Huawei Proprietary and ConfidentialCopyright © Huawei Technologies Co., Ltd.
v


Tables
Table 1-1 Operation references for the software installation (HA)......................................................................1-3Table 2-1 Description of the installation CD-ROM.............................................................................................2-1Table 4-1 Description of users..............................................................................................................................4-1Table 7-1 Planning of the server disk partitions (T5220).....................................................................................7-4Table 7-2 Planning for the S3100 disk array........................................................................................................7-5Table 7-3 Planning for the S2600 disk array........................................................................................................7-5Table 7-4 Planning of the host names and IP addresses (HA, T5220).................................................................7-5Table 7-5 Planning the Logical IP Addresses Between Servers (HA, T5520).....................................................7-6Table 7-6 Cable sequence standards for the serial port cables between the SC and the PC................................7-8Table 7-7 Setting the properties of the serial port................................................................................................7-8Table 7-8 References for server disk partitions..................................................................................................7-15Table 7-9 Planning of the M2000 host name and IP address.............................................................................7-17Table 7-10 Setting the properties of the serial port............................................................................................7-19Table 7-11 Setting the properties of a serial port...............................................................................................7-22Table 7-12 References........................................................................................................................................7-46Table 8-1 Planning of the server disk partitions (M4000/M5000).......................................................................8-4Table 8-2 Planning for the S3200/6140 disk array...............................................................................................8-5Table 8-3 Planning for the S2600 disk array........................................................................................................8-5Table 8-4 Planning of the host names and IP addresses (HA, M4000/M5000)...................................................8-5Table 8-5 Planning of the logical IP addresses between servers (HA, M4000/M5000)......................................8-6Table 8-6 Wire sequence standards for the serial port cables between the XSCF and the PC.............................8-9Table 8-7 Setting the properties of a serial port.................................................................................................8-10Table 8-8 References for server disk partitions..................................................................................................8-19Table 8-9 Planning of the M2000 host name and IP address.............................................................................8-20Table 8-10 Setting the properties of the serial port............................................................................................8-23Table 8-11 Setting the properties of a serial port...............................................................................................8-26Table 8-12 Setting the properties of a serial port...............................................................................................8-28Table 8-13 References........................................................................................................................................8-56
HA System Software Initial Installation Guide(T5220&M4000&M5000, S10) Tables
Issue 06 (2010-06-15) Huawei Proprietary and ConfidentialCopyright © Huawei Technologies Co., Ltd.
vii


About This Document
PurposeThis document describes the procedures for installing the operating system and the relatedsoftware such as the Sybase database and for setting the parameters of the M2000 server andsoftware to build an operating environment for the M2000. This document describes theprocedures for installing the operating system, software, and configuration parameters when theM2000 uses an HA system. The software installation and configuration differ according to theserver type.
Product VersionThe following table lists the product versions related to this document.
Product Name Product Version
M2000 V200
Intended AudienceThis document is intended for network administrators.
Update History
06 (2010-06-15)Sixth formal release.
Compared with V200 05 (2010-03-23), the following content is modified.
HA System Software Initial Installation Guide(T5220&M4000&M5000, S10) About This Document
Issue 06 (2010-06-15) Huawei Proprietary and ConfidentialCopyright © Huawei Technologies Co., Ltd.
1

Content Description
7.1 Partition Planning of the T5220 Server(HA)
The procedure descriptions are changed.
8.1 Partition Planning of the M4000/M5000 Server (HA)
The procedure descriptions are changed.
05 (2010-03-23)Fifth formal release.
Compared with V200 04 (2010-02-20), the following content is modified.
Content Description
7.4 Installing the Solaris and Patches onthe T5220 Server (HA)
The procedure descriptions are changed.
01 (2010-02-20)Fourth formal release.
03 (2009-10-30)Third formal release.
Compared with V200 02(2009-06-30), the following content is modified.
Content Description
8.4 Installing Solaris and Its Patches on theM4000/M5000 Server
The content descriptions are changed.
02 (2009-06-30)Second formal release.
Compared with V200 02(2009-01-05), the following content is modified.
About This DocumentHA System Software Initial Installation Guide
(T5220&M4000&M5000, S10)
2 Huawei Proprietary and ConfidentialCopyright © Huawei Technologies Co., Ltd.
Issue 06 (2010-06-15)

Content Description
8 Installing and Configuring the M4000/M5000 Server (HA)
The content descriptions are changed.
01 (2009-01-05)Initial release. Also, the first formal release.
Organization1 Procedure for Installing the M2000 Software (HA)
This describes how to build an operating environment for the M2000.
2 Preparing for Installation CD-ROM and Installation Package
This describes how to keep the installation CD-ROM, installation package of the PlatformTools,VERITAS Volume Manager, and Sybase license ready.
3 Checking M2000 Hardware Installation
Before commissioning the M2000 system, you must make sure that the hardware devices areproperly arranged and the cable connections are correct and meet the industry standards.
4 Planning Solaris and Sybase Users
This describes how to plan the default passwords of the users required during the initialinstallation and operation of the M2000 system.
5 Powering On and Powering Off the M2000 (HA, T5220)
You need to follow specific operation sequences to power on and power off the M2000 systemto guarantee the system security.
6 Powering On and Powering Off the M2000 (HA, M4000/M5000)
You need to follow specific operation sequences to power on and power off the M2000 systemto guarantee the system security.
7 Installing and Configuring the T5220 Server (HA)
This describes how to install the Solaris software, Sybase software, Sun Cluster software, andtheir relevant patches on the M2000 HA system that is installed on the T5220 server, and howto configure other basic parameters and disk arrays for the server. After the installation andconfiguration, the server can meet the specified requirements of the M2000 application software.
8 Installing and Configuring the M4000/M5000 Server (HA)
This describes how to install the Solaris software, Sybase software, Sun Cluster software, andtheir relevant patches on the M2000 HA system that is installed on the M4000/M5000 server,and how to configure other basic parameters and disk arrays for the server. After the installationand configuration, the server can meet the specified requirements of the M2000 applicationsoftware.
HA System Software Initial Installation Guide(T5220&M4000&M5000, S10) About This Document
Issue 06 (2010-06-15) Huawei Proprietary and ConfidentialCopyright © Huawei Technologies Co., Ltd.
3

9 FAQs
This chapter describes FAQs and solutions related to the M2000.
ConventionsSymbol Conventions
The symbols that may be found in this document are defined as follows.
Symbol Description
Indicates a hazard with a high level of risk, which if notavoided,will result in death or serious injury.
Indicates a hazard with a medium or low level of risk, whichif not avoided, could result in minor or moderate injury.
Indicates a potentially hazardous situation, which if notavoided,could result in equipment damage, data loss,performance degradation, or unexpected results.
Indicates a tip that may help you solve a problem or savetime.
Provides additional information to emphasize or supplementimportant points of the main text.
General Conventions
The general conventions that may be found in this document are defined as follows.
Convention Description
Times New Roman Normal paragraphs are in Times New Roman.
Boldface Names of files, directories, folders, and users are inboldface. For example, log in as user root.
Italic Book titles are in italics.
Courier New Examples of information displayed on the screen are inCourier New.
Command Conventions
The command conventions that may be found in this document are defined as follows.
Convention Description
Boldface The keywords of a command line are in boldface.
About This DocumentHA System Software Initial Installation Guide
(T5220&M4000&M5000, S10)
4 Huawei Proprietary and ConfidentialCopyright © Huawei Technologies Co., Ltd.
Issue 06 (2010-06-15)

Convention Description
Italic Command arguments are in italics.
[ ] Items (keywords or arguments) in brackets [ ] are optional.
{ x | y | ... } Optional items are grouped in braces and separated byvertical bars. One item is selected.
[ x | y | ... ] Optional items are grouped in brackets and separated byvertical bars. One item is selected or no item is selected.
{ x | y | ... }* Optional items are grouped in braces and separated byvertical bars. A minimum of one item or a maximum of allitems can be selected.
[ x | y | ... ]* Optional items are grouped in brackets and separated byvertical bars. Several items or no item can be selected.
GUI Conventions
The GUI conventions that may be found in this document are defined as follows.
Convention Description
Boldface Buttons, menus, parameters, tabs, window, and dialog titlesare in boldface. For example, click OK.
> Multi-level menus are in boldface and separated by the ">"signs. For example, choose File > Create > Folder.
Keyboard Operations
The keyboard operations that may be found in this document are defined as follows.
Format Description
Key Press the key. For example, press Enter and press Tab.
Key 1+Key 2 Press the keys concurrently. For example, pressing Ctrl+Alt+A means the three keys should be pressed concurrently.
Key 1, Key 2 Press the keys in turn. For example, pressing Alt, A meansthe two keys should be pressed in turn.
Mouse Operations
The mouse operations that may be found in this document are defined as follows.
HA System Software Initial Installation Guide(T5220&M4000&M5000, S10) About This Document
Issue 06 (2010-06-15) Huawei Proprietary and ConfidentialCopyright © Huawei Technologies Co., Ltd.
5
Action Description
Click Select and release the primary mouse button without movingthe pointer.
Double-click Press the primary mouse button twice continuously andquickly without moving the pointer.
Drag Press and hold the primary mouse button and move thepointer to a certain position.
About This DocumentHA System Software Initial Installation Guide
(T5220&M4000&M5000, S10)
6 Huawei Proprietary and ConfidentialCopyright © Huawei Technologies Co., Ltd.
Issue 06 (2010-06-15)

1 Procedure for Installing the M2000 Software(HA)
This describes how to build an operating environment for the M2000.
Procedure
Step 1 When building an operating environment for the M2000, you can refer to Figure 1-1.
HA System Software Initial Installation Guide(T5220&M4000&M5000, S10) 1 Procedure for Installing the M2000 Software (HA)
Issue 06 (2010-06-15) Huawei Proprietary and ConfidentialCopyright © Huawei Technologies Co., Ltd.
1-1

Figure 1-1 Flow chart for installing the software (HA)
1 Procedure for Installing the M2000 Software (HA)HA System Software Initial Installation Guide
(T5220&M4000&M5000, S10)
1-2 Huawei Proprietary and ConfidentialCopyright © Huawei Technologies Co., Ltd.
Issue 06 (2010-06-15)

Table 1-1 lists the references for the installation.
Table 1-1 Operation references for the software installation (HA)
Operation Reference
Preparing for the installation For details, see 2 Preparing for InstallationCD-ROM and Installation Package.
Checking the hardware installation For details, see 3 Checking M2000Hardware Installation.
Powering on the system (T5220) For details, see 5.1 Powering On the M2000(HA, T5220).
Powering on the system (M4000/M5000) For details, see 6.1 Powering On the M2000(HA, M4000/M5000).
Configuring the SC of the server For details, see 7.3 Configuring the SC forthe T5220 Server.
Configuring the XSCF of the server For details, see 8.3 Configuring the XSCFof the M4000/M5000 Server.
Installing the Solaris software and its patcheson the server (T5220)
For details, see 7.4 Installing the Solaris andPatches on the T5220 Server (HA).
Installing the Solaris software and its patcheson the server (M4000/M5000)
For details, see 8.4 Installing Solaris and ItsPatches on the M4000/M5000 Server.
Setting the host name and IP address of theserver
For details, see 7.8 Configuring theHostname and the IP Address of the Server(HA).
Configuring the disk array For details, see 7.11 Configuring the S2600Disk Array (HA) or 8.13 Configuring theS3200 Disk Array (HA) or 8.14Configuring the 6140 Disk Array (HA).
Enabling I/O multipathing For details, see 7.13 Enabling Multi-Path I/O (HA).
Labeling the disk array volume For details, see 7.14 Labeling Volumes forthe Disk Array (HA).
Installing and configuring the Sun Cluster For details, see 7.15 Installing andConfiguring the Sun Cluster Software andPatches.
Installing and configuring the VolumeManager
For details, see 7.17 Installing andConfiguring the Volume Manager.
Uploading the installation package of thePlatformTools to the server
For details, see 7.19 Uploading thePlatformTools Installation Package to theServer.
HA System Software Initial Installation Guide(T5220&M4000&M5000, S10) 1 Procedure for Installing the M2000 Software (HA)
Issue 06 (2010-06-15) Huawei Proprietary and ConfidentialCopyright © Huawei Technologies Co., Ltd.
1-3

Operation Reference
Configuring the disk (T5220) For details, see 7.20 Configuring M2000Disks (HA, T5220).
Configuring the disk (M4000/M5000) For details, see 8.22 Configuring M2000Disks (HA, M4000/M5000).
Installing and configuring the Sybase For details, see 7.22 Installing andConfiguring the Sybase (HA).
Creating the database (T5220) For details, see 7.23 Creating the M2000Database (HA, T5220).
Creating the database (M4000/M5000) For details, see 8.25 Creating the M2000Database (HA, M4000/M5000).
----End
1 Procedure for Installing the M2000 Software (HA)HA System Software Initial Installation Guide
(T5220&M4000&M5000, S10)
1-4 Huawei Proprietary and ConfidentialCopyright © Huawei Technologies Co., Ltd.
Issue 06 (2010-06-15)

2 Preparing for Installation CD-ROM andInstallation Package
This describes how to keep the installation CD-ROM, installation package of the PlatformTools,VERITAS Volume Manager, and Sybase license ready.
PrerequisiteYou must have a user account in http://support.huawei.com and are authorized to download theinstallation package of the PlatformTools.
Procedurel Check whether the installation CD-ROM is complete. For details about the names and
functions of the installation CD-ROM, see Table 2-1.
Table 2-1 Description of the installation CD-ROM
Disk Name Installation Location Function
Auto_Install_DVD1/3_ForSolaris_OS_sun4u_V2.1
Server Installing the Solaris 10 andits patch Patch 9.0.1, forNetra240, V890, E4900,M4000, M5000
Auto_Install_DVD2/3_ForSolaris_OS_sun4v_V2.1
Server Installing the Solaris 10 andits patch Patch 9.0.1, forT5220
Auto_Install_DVD3/3_ForSolaris_APP_V2.1
Server Installing and configuringthe host software of diskarray management
Installing and configuringthe VERITAS VolumeManager 5.0
Installing and configuringthe Sun Cluster 3.2
HA System Software Initial Installation Guide(T5220&M4000&M5000, S10)
2 Preparing for Installation CD-ROM and InstallationPackage
Issue 06 (2010-06-15) Huawei Proprietary and ConfidentialCopyright © Huawei Technologies Co., Ltd.
2-1

Disk Name Installation Location Function
Installing the Sybase 15.0.3and its patch EBF16548
Creating the masterdatabase
SYBASE ASE15.0.3License
Server Installing the license of theSybase 15.0.3
l Obtain the installation package of the PlatformTools.
1. Log in to the http://support.huawei.com to apply for version download.2. Download the PlatformTools of the latest version to the PC.
– If the M2000 application version is V200R008, you need to download theinstallation package whose version is the latest and whose version name is similarto iManagerM2000-TOOL_Platform_2.0_V200R001CxxSPCxxx.tar.gz, forexample, iManagerM2000-TOOL_Platform_2.0_V200R001C01SPC018.tar.gz.
– If the M2000 application version is V200R009, you need to download theinstallation package whose version is the latest and whose version name is similarto iManagerM2000-TOOL_Platform_3.0_V200R009CxxSPCxxx.tar.gz, forexample, iManagerM2000-TOOL_Platform_3.0_V200R009C00SPC001.tar.gz.
– If the M2000 application version is V200R010, you need to download theinstallation package whose version is the latest and whose version name is similarto iManagerM2000-TOOL_Platform_4.0_V200R010CxxSPCxxx.tar.gz, forexample, iManagerM2000-TOOL_Platform_4.0_V200R010C00SPC001.tar.gz.
l Log in to the http://support.huawei.com to download the PuTTY to the PC.l For the M2000 configured with disk arrays, check whether the license of the VERITAS
Volume Manager is available. If not, contact Huawei Technologies Co., Ltd. for assistance.
----End
2 Preparing for Installation CD-ROM and InstallationPackage
HA System Software Initial Installation Guide(T5220&M4000&M5000, S10)
2-2 Huawei Proprietary and ConfidentialCopyright © Huawei Technologies Co., Ltd.
Issue 06 (2010-06-15)

3 Checking M2000 Hardware Installation
Before commissioning the M2000 system, you must make sure that the hardware devices areproperly arranged and the cable connections are correct and meet the industry standards.
Procedure
Step 1 Make sure that hardware devices are properly arranged and the power cable connections arecorrect and meet anti-static requirements. For details, see Checking M2000 HardwareInstallation in the M2000 Hardware Installation Guide of relevant server types.
You can obtain the hardware installation guide related to each server type from http://support.huawei.com.
l For details about how to configure the T5220 server, see the M2000 Hardware InstallationGuide (T5220).
l For details about how to configure the M5000 server, see the M2000 Hardware InstallationGuide (M4000&M5000).
----End
HA System Software Initial Installation Guide(T5220&M4000&M5000, S10) 3 Checking M2000 Hardware Installation
Issue 06 (2010-06-15) Huawei Proprietary and ConfidentialCopyright © Huawei Technologies Co., Ltd.
3-1


4 Planning Solaris and Sybase Users
This describes how to plan the default passwords of the users required during the initialinstallation and operation of the M2000 system.
Table 4-1 lists the to-be-created user names and passwords during the initial installation of theM2000 system and their creation time.
Table 4-1 Description of users
System orDevice
User Name Password Creation Time Description
Solaris root root During theinstallation of theSolaris operatingsystem
Superuser of theSolaris operatingsystem, responsiblefor managing theoperating system
dbuser dbuser After the installationof the Solarisoperating system andbefore theinstallation of theSybase database
Responsible forinstalling andmaintaining theSybase database
Sybase sa emsems During theinstallation of theSybase
Superuser of theSybase database,responsible foroperating the Sybase
SystemController(SC) of theT5220server
admin admin123 During theconfiguration of theSC for the T5220server
Logging In to theT5220 server throughthe SC
HA System Software Initial Installation Guide(T5220&M4000&M5000, S10) 4 Planning Solaris and Sybase Users
Issue 06 (2010-06-15) Huawei Proprietary and ConfidentialCopyright © Huawei Technologies Co., Ltd.
4-1

System orDevice
User Name Password Creation Time Description
eXtendedSystemControlFacility(XSCF) ofthe M4000/M5000server
adminuser adminuser During theconfiguration of theXSCF for theM4000/M5000server
Logging In to theM4000/M5000server through theXSCF
4 Planning Solaris and Sybase UsersHA System Software Initial Installation Guide
(T5220&M4000&M5000, S10)
4-2 Huawei Proprietary and ConfidentialCopyright © Huawei Technologies Co., Ltd.
Issue 06 (2010-06-15)

5 Powering On and Powering Off the M2000(HA, T5220)
About This Chapter
You need to follow specific operation sequences to power on and power off the M2000 systemto guarantee the system security.
5.1 Powering On the M2000 (HA, T5220)This describes how to power on the T5220 server where the M2000 is installed. Before poweringon the T5220 server, ensure that all the relevant devices meet the security specifications.
5.2 Powering Off the M2000 (HA, T5220)This describes how to power off the T5220 server by following a specific operation sequencewhen the M2000 system is installed on the T5220 server.
HA System Software Initial Installation Guide(T5220&M4000&M5000, S10) 5 Powering On and Powering Off the M2000 (HA, T5220)
Issue 06 (2010-06-15) Huawei Proprietary and ConfidentialCopyright © Huawei Technologies Co., Ltd.
5-1

5.1 Powering On the M2000 (HA, T5220)This describes how to power on the T5220 server where the M2000 is installed. Before poweringon the T5220 server, ensure that all the relevant devices meet the security specifications.
ProcedureStep 1 Prepare to power on the M2000.
1. Ensure that the power switch of each device in the cabinet is in the OFF state.2. Set the power switch of the cabinet to ON.
Step 2 Power on two disk arrays. The procedures for powering on the two disk arrays are the same.
Option Description
S2600 disk array Perform Step 2.1.
S3100 disk array or 6140 disk array Perform Step 2.2.
1. Insert the two plugs at the rear of the disk array into the socket, as shown in Figure 5-1.When the hard disk LEDs of all the disk arrays stop blinking, the disk array were startingsuccessfully.
CAUTIONl Each disk array has two plugs. Ensure that both plugs are inserted into the socket.
l The S2600 disk array does not have a power switch. After you insert the plug into thesocket, the S2600 disk array is automatically powered on.
Figure 5-1 S2600 disk array
(Disk array with a controller)
(Hard disk frame of the disk array)
5 Powering On and Powering Off the M2000 (HA, T5220)HA System Software Initial Installation Guide
(T5220&M4000&M5000, S10)
5-2 Huawei Proprietary and ConfidentialCopyright © Huawei Technologies Co., Ltd.
Issue 06 (2010-06-15)
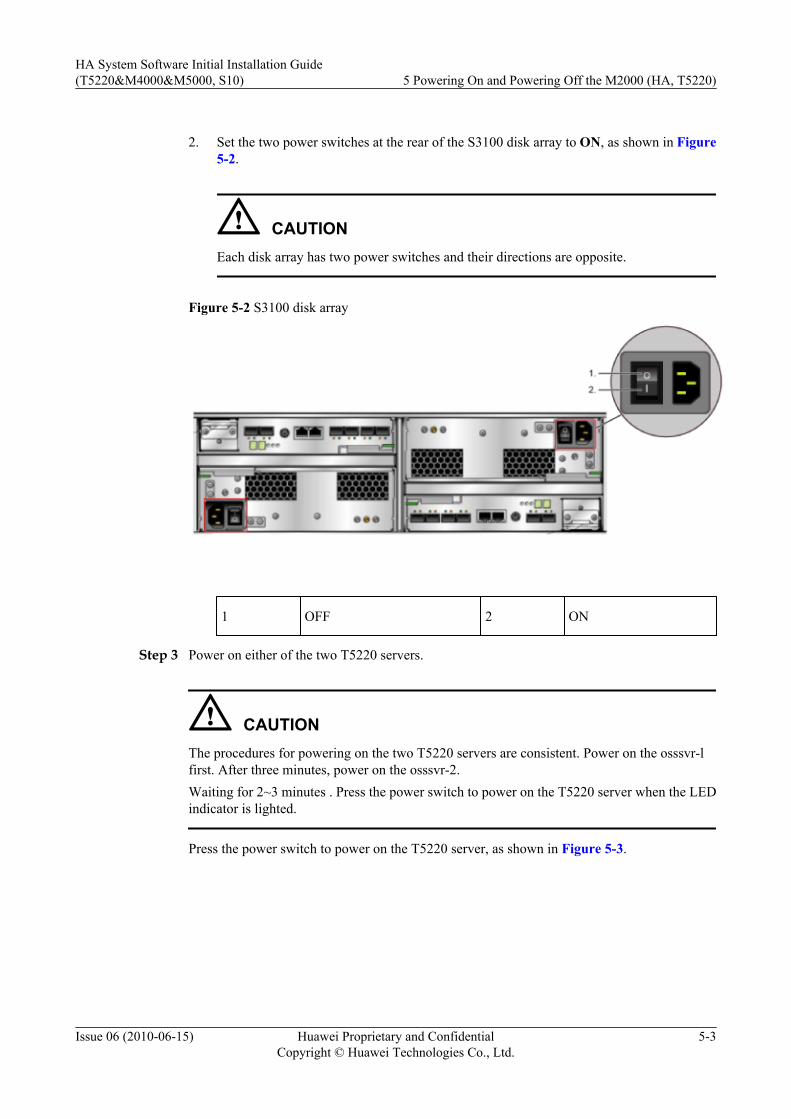
2. Set the two power switches at the rear of the S3100 disk array to ON, as shown in Figure
5-2.
CAUTIONEach disk array has two power switches and their directions are opposite.
Figure 5-2 S3100 disk array
1 OFF 2 ON
Step 3 Power on either of the two T5220 servers.
CAUTIONThe procedures for powering on the two T5220 servers are consistent. Power on the osssvr-lfirst. After three minutes, power on the osssvr-2.Waiting for 2~3 minutes . Press the power switch to power on the T5220 server when the LEDindicator is lighted.
Press the power switch to power on the T5220 server, as shown in Figure 5-3.
HA System Software Initial Installation Guide(T5220&M4000&M5000, S10) 5 Powering On and Powering Off the M2000 (HA, T5220)
Issue 06 (2010-06-15) Huawei Proprietary and ConfidentialCopyright © Huawei Technologies Co., Ltd.
5-3

Figure 5-3 T5220 server
l If the Solaris operating system is not installed on the server, the server switches to the ok
state.l If the Solaris operating system is correctly installed on the server, the Solaris automatically
starts after the server is powered on. If the Solaris operating system is not automaticallystarted and the system switches to the ok state, enter boot to start the Solaris.
Step 4 Repeat Step 3 to start the other T5220 server.
----End
5.2 Powering Off the M2000 (HA, T5220)This describes how to power off the T5220 server by following a specific operation sequencewhen the M2000 system is installed on the T5220 server.
Procedure
Step 1 Switch over the two T5220 servers to ok.
1. Log in to the two nodes as user root through telnet and run the following command,respectively.
# sync; sync; sync; sync; sync; sync2. Run the following command on node 1 and node 2 respectively to set them to ok.
# /usr/cluster/bin/scshutdown -y -g0
NOTE
Cluster and Sybase are correctly installed in the system. The system automatically stops the Sybaseservices.
Step 2 Power off the two T5220 servers. The procedures for powering off the two T5220 servers arethe same.
Press the power switch to power off the T5220 server, as shown in Figure 5-4.
5 Powering On and Powering Off the M2000 (HA, T5220)HA System Software Initial Installation Guide
(T5220&M4000&M5000, S10)
5-4 Huawei Proprietary and ConfidentialCopyright © Huawei Technologies Co., Ltd.
Issue 06 (2010-06-15)

Figure 5-4 T5220 server
Step 3 Power off two disk arrays. The procedures for powering off the two disk arrays are consistent.
Option Description
S2600 disk array Perform Step 3.1 and Step 3.2.
S3100 disk array or 6140 disk array Perform Step 3.3 and Step 3.4.
1. Check whether the I/O activities of the disk arrays are stopped.
NOTE
a. Wait for two minutes. If the LED indicators of all the drives and caches stop blinking, you caninfer that the read and write operations of the disk array are stopped.
b. Check the cache LED on the controller and determine whether any data on the cache needs to bewritten to the disk.
c. Ensure that the LEDs of all the drive and caches stop blinking.
2. Remove the two plugs at the rear of the disk array from the socket.3. Check whether the I/O activities of the disk arrays are stopped.
a. Wait for two minutes. If all the LEDs stop blinking, you can infer that all the data iswritten into the disk and that the cache does not hold data. See Figure 5-5.
HA System Software Initial Installation Guide(T5220&M4000&M5000, S10) 5 Powering On and Powering Off the M2000 (HA, T5220)
Issue 06 (2010-06-15) Huawei Proprietary and ConfidentialCopyright © Huawei Technologies Co., Ltd.
5-5

Figure 5-5 Disk array (I)
1 OFF 2 ON
b. Ensure that all the LEDs of all the disk drives at the front of the controller stop blinking.See Figure 5-6.
Figure 5-6 Disk array (II)
4. Set the two power switches at the rear of the controller to OFF.
NOTE
Each disk array has two power switches and their directions are opposite.
Step 4 If required, switch off the power of the cabinet and the devices in the cabinet.
----End
5 Powering On and Powering Off the M2000 (HA, T5220)HA System Software Initial Installation Guide
(T5220&M4000&M5000, S10)
5-6 Huawei Proprietary and ConfidentialCopyright © Huawei Technologies Co., Ltd.
Issue 06 (2010-06-15)

6 Powering On and Powering Off the M2000(HA, M4000/M5000)
About This Chapter
You need to follow specific operation sequences to power on and power off the M2000 systemto guarantee the system security.
6.1 Powering On the M2000 (HA, M4000/M5000)This describes how to power on the M4000/M5000 server where the M2000 is installed. Beforepowering on the M4000/M5000 server, ensure that all the relevant devices meet the securityspecifications.
6.2 Powering Off the M2000 (HA, M4000/M5000)This describes how to power off the M4000/M5000 server by following a specific operationsequence when the M2000 system is installed on the M4000/M5000 server.
HA System Software Initial Installation Guide(T5220&M4000&M5000, S10)
6 Powering On and Powering Off the M2000 (HA, M4000/M5000)
Issue 06 (2010-06-15) Huawei Proprietary and ConfidentialCopyright © Huawei Technologies Co., Ltd.
6-1
6.1 Powering On the M2000 (HA, M4000/M5000)This describes how to power on the M4000/M5000 server where the M2000 is installed. Beforepowering on the M4000/M5000 server, ensure that all the relevant devices meet the securityspecifications.
Procedure
Step 1 Prepare for powering on the M2000.1. Ensure that the power switch of each device in the cabinet is in OFF state.2. The power switch of the cabinet is set to ON.
Step 2 Power on two disk arrays. The procedures for powering on the two disk arrays are consistent.
Option Description
S2600 disk array Perform Step 2.1.
S3200 disk array or 6140 disk array Perform Step 2.2.
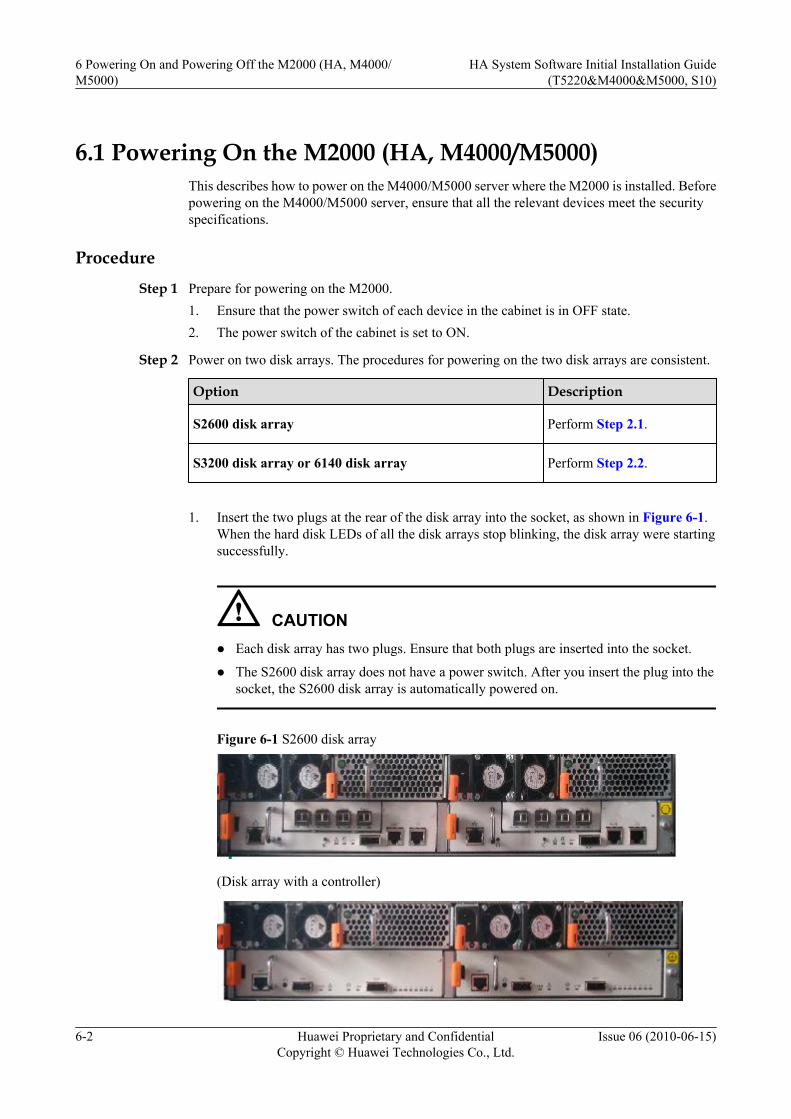
1. Insert the two plugs at the rear of the disk array into the socket, as shown in Figure 6-1.When the hard disk LEDs of all the disk arrays stop blinking, the disk array were startingsuccessfully.
CAUTIONl Each disk array has two plugs. Ensure that both plugs are inserted into the socket.
l The S2600 disk array does not have a power switch. After you insert the plug into thesocket, the S2600 disk array is automatically powered on.
Figure 6-1 S2600 disk array
(Disk array with a controller)
6 Powering On and Powering Off the M2000 (HA, M4000/M5000)
HA System Software Initial Installation Guide(T5220&M4000&M5000, S10)
6-2 Huawei Proprietary and ConfidentialCopyright © Huawei Technologies Co., Ltd.
Issue 06 (2010-06-15)

(Hard disk frame of the disk array)
2. Set the two power switches at the rear of the S3200 disk array to ON, as shown in Figure
6-2.
CAUTIONEach disk array has two power switches and their directions are opposite.
Figure 6-2 S3200 disk array
1 OFF 2 ON
Step 3 Start either of the two M4000/M5000 servers.1. Run the telnet IP address of the XSCF of the server to log in to the XSCF. For details of
the IP address of the XSCF, see 8.2 Planning the Host Name and IP Address for theM4000/M5000 Server (HA).
CAUTIONl Enter the IP address of the XSCF of the M4000/M5000 server based on the actual
situation.l If the XSCF of the M4000/M5000 is not configured, configure it by referring to 8.3
Configuring the XSCF of the M4000/M5000 Server.
2. Enter the user nameadminuser and password adminuser to log in to the XSCF.3. Switch the key on the front panel to the position of maintenance. Figure 6-3 shows the
panel.
HA System Software Initial Installation Guide(T5220&M4000&M5000, S10)
6 Powering On and Powering Off the M2000 (HA, M4000/M5000)
Issue 06 (2010-06-15) Huawei Proprietary and ConfidentialCopyright © Huawei Technologies Co., Ltd.
6-3

Figure 6-3 Operation panel of the SPARC Enterprise M4000/M5000
1. "Power" indicator 2. "XSCF ready" indicator 3. "Check" indicator
4. Power switch 5. Mode switch -
4. Run the following command to power on domain 0.
XSCF> poweron -d 0
DomainIDs to power on: 00Continue? [y|n] :y
5. Run the following command to open domain 0.
XSCF> console -d 06. Check that the indicator that indicating "XSCF ready" is lighted in green.7. On the operation panel, press the power button to power on the server. The server starts
and performs an automatic diagnosis. This process takes about 20 minutes.l If the Solaris operating system is not installed on the server, the server switches to the
ok state.l If the Solaris operating system is correctly installed on the server, the Solaris
automatically starts after the server is powered on. If the Solaris operating system is inok status without automatic restart, enter boot to start it.
8. Switch the key on the front panel to the position of locked.
Step 4 Repeat Step 3 to start the other M4000/M5000 server.
----End
6.2 Powering Off the M2000 (HA, M4000/M5000)This describes how to power off the M4000/M5000 server by following a specific operationsequence when the M2000 system is installed on the M4000/M5000 server.
6 Powering On and Powering Off the M2000 (HA, M4000/M5000)
HA System Software Initial Installation Guide(T5220&M4000&M5000, S10)
6-4 Huawei Proprietary and ConfidentialCopyright © Huawei Technologies Co., Ltd.
Issue 06 (2010-06-15)

Procedure
Step 1 Switch over the two M4000/M5000 servers to ok.
1. Log in to the two nodes as user root through telnet and run the following command,respectively.
# sync; sync; sync; sync; sync; sync
2. Run the following command on node 1 and node 2 respectively to set them to ok.
# /usr/cluster/bin/scshutdown -y -g0
NOTE
Cluster and Sybase are correctly installed in the system. The system automatically stops the Sybaseservices.
Step 2 Power off the two M4000/M5000 servers. The procedures for powering off the two M4000/M5000 servers are the same.1. Run the telnet IP address of the XSCF of the server command to log in to the XSCF. Type
the user name adminuser to enter the platform shell.
NOTE
l If the IP address of the XSCF is not configured, use the HyperTerminal to log in from the serialport of the SC.
l Use the serial port cable to connect the serial port of the XSCF and the COM port of the PC. Oneend of the serial port cable uses the RJ-45 connector, which is inserted into the serial port of theXSCF. The other end uses the DB-9 connector, which is inserted into the COM port of the PC.The port properties of the HyperTerminal must be set to the default values. This means that youmust set the baud rate to 9600, data digit to 8, parity check to none, stop bit to 1, and data streamcontrol to none.
2. Run the following command to power off domain 0. Except the two XSCFs, all boards arepowered off.
XSCF> poweroff -d 0
Step 3 Power off two disk arrays. The procedures for powering off the two disk arrays are consistent.
Option Description
S2600 disk array Perform Step 3.1 and Step 3.2.
S3200 disk array or 6140 disk array Perform Step 3.3 and Step 3.4.
1. Check whether the I/O activities of the disk arrays are stopped.
NOTE
a. Wait for two minutes. If the LED indicators of all the drives and caches stop blinking, you caninfer that the read and write operations of the disk array are stopped.
b. Check the cache LED on the controller and determine whether any data on the cache needs to bewritten to the disk.
c. Ensure that the LEDs of all the drive and caches stop blinking.
2. Remove the two plugs at the rear of the disk array from the socket.3. Check whether the I/O activities of the disk arrays are stopped.
HA System Software Initial Installation Guide(T5220&M4000&M5000, S10)
6 Powering On and Powering Off the M2000 (HA, M4000/M5000)
Issue 06 (2010-06-15) Huawei Proprietary and ConfidentialCopyright © Huawei Technologies Co., Ltd.
6-5

a. Wait for two minutes. If all the LEDs stop blinking, you can infer that all the data iswritten into the disk and that the cache does not hold data. See Figure 6-4
.
Figure 6-4 Disk array (I)
1 OFF 2 ON
b. Ensure that all the LEDs of all the disk drives at the front of the controller stop blinking.See Figure 6-5.
Figure 6-5 Disk array (II)
4. Set the two power switches at the rear of the controller to OFF.
NOTE
Each disk array has two power switches and their directions are opposite.
Step 4 Set the power switches of the cabinet and other devices in the cabinet to OFF as required.
----End
6 Powering On and Powering Off the M2000 (HA, M4000/M5000)
HA System Software Initial Installation Guide(T5220&M4000&M5000, S10)
6-6 Huawei Proprietary and ConfidentialCopyright © Huawei Technologies Co., Ltd.
Issue 06 (2010-06-15)

7 Installing and Configuring the T5220 Server(HA)
About This Chapter
This describes how to install the Solaris software, Sybase software, Sun Cluster software, andtheir relevant patches on the M2000 HA system that is installed on the T5220 server, and howto configure other basic parameters and disk arrays for the server. After the installation andconfiguration, the server can meet the specified requirements of the M2000 application software.
7.1 Partition Planning of the T5220 Server (HA)This describes the planning of partition names and sizes of the server disk, and the redundantmode of the disk arrays.
7.2 Planning the Host Name and IP Address for the T5220 Server (HA)This describes the default host names and the IP addresses of the M2000 system planned beforedelivery.
7.3 Configuring the SC for the T5220 ServerThis describes how to configure the System Controller (SC) for the T5220 server through a PC.
7.4 Installing the Solaris and Patches on the T5220 Server (HA)This describes how to use a PC to log in to the T5220 server through the System Controller (SC),and then install the Solaris and its patches on the server.
7.5 Checking the Version and Patches of the SolarisThis describes how to check the version and patches of the Solaris operating system and to makesure that the M2000 server application can be installed in the operating system of the designatedversion. For the mapping between the M2000 server versions and the operating system versions,see the version configuration table. Perform this operation on both nodes.
7.6 Checking the Disk Partitioning of the M2000 Server (HA)To ensure that the M2000 server software can function properly, you need to check whether theactual partitioning is consistent with that predefined in the server disk partitioning plan. If theactual partitioning is different, contact Huawei technical support personnel for assistance. Youneed to check the partitioning on both nodes.
7.7 Checking the Mirrors of the Local Disk on the Server (HA, T5220)
HA System Software Initial Installation Guide(T5220&M4000&M5000, S10) 7 Installing and Configuring the T5220 Server (HA)
Issue 06 (2010-06-15) Huawei Proprietary and ConfidentialCopyright © Huawei Technologies Co., Ltd.
7-1

This describes how to check whether the mirroring of local disks is successful to guarantee thenormal operation of the server. If the actual partitioning is different, contact Huawei technicalsupport personnel for assistance. You need to check the partitioning on both nodes.
7.8 Configuring the Hostname and the IP Address of the Server (HA)Run the script file to set the host name and IP address of the server and other basic parameters.You need to perform the operation on both node 1 and node 2.
7.9 Changing the IP Address of the S2600 Disk Array (Serial Port Mode)This section describes how to change the IP address of the S2600 disk array in serial port mode.Before configuring the disk array, you need to change the IP address of the disk array. The IPaddress of each S2600 disk array needs to be changed.
7.10 Changing the IP Address of the S3X00 Disk Array (Serial Port Mode)This section describes how to change the IP address of the S3X00 disk array in serial port mode.Before configuring the disk array, you need to change the IP address of the disk array. The IPaddress of each S3X00 disk array needs to be changed.
7.11 Configuring the S2600 Disk Array (HA)This section describes how to configure the S2600 disk array. Each S2600 disk array has anactive controller and a standby controller. You can configure the S2600 disk array by setting upa connection between the server and the active controller. Both of the S2600 disk arrays needto be configured.
7.12 Configuring the S3100 Disk Array (HA, T5220)Each S3100 disk array has an active controller and a standby controller. You can configure theS3100 disk arrays by setting up a connection between the server and the active controller. Boththe two S3100 disk arrays need to be configured.
7.13 Enabling Multi-Path I/O (HA)This describes how to enable the I/O multipathing of the Solaris system. You need to performthe operation on both node 1 and node 2.
7.14 Labeling Volumes for the Disk Array (HA)This describes how to label each logical partition so that the operating system can find theassociated logical partitions of the disks on the disk array.
7.15 Installing and Configuring the Sun Cluster Software and PatchesThe Sun Cluster software is used to manage the system resource. Thus, system resource can beautomatically switched to the standby server to keep the normal operation of the system whenthe active server is faulty.
7.16 Checking Installation of the Sun Cluster Software and PatchesAfter installing the Sun Cluster software and its patch on Node1 and Node2, you must checkthat the Sun Cluster software is correctly installed and the software is operational. This operationis performed only on Node1.
7.17 Installing and Configuring the Volume ManagerThis describes how to install the VERITAS Volume Manager on the server. You can regroupseveral physical disks on the disk array into logical devices to facilitate the management. Thelogical devices refers to volumes. You need to perform the operation on both node 1 and node2.
7.18 Checking the Installation of the Volume ManagerThis describes how to check whether the Volume Manager and its license are installedsuccessfully on both Node1 and Node2.
7.19 Uploading the PlatformTools Installation Package to the Server
7 Installing and Configuring the T5220 Server (HA)HA System Software Initial Installation Guide
(T5220&M4000&M5000, S10)
7-2 Huawei Proprietary and ConfidentialCopyright © Huawei Technologies Co., Ltd.
Issue 06 (2010-06-15)

Creating the M2000 database and setting the disks on the server are both performed through thePlatformTools. Therefore, you should upload the PlatformTools installation package to theserver beforehand. Perform this task on each server.
7.20 Configuring M2000 Disks (HA, T5220)This section describes how to set disks on the disk array by using the PlatformTools. The settingof disks involves the creation of volumes on the disk array and the creation of file system on theexporthome volume. Before configuring the disk array, you must customize the operatingsystem. You must customize the operating system on both node 1 and node 2 and need toconfigure the disk array only on node 1.
7.21 Checking the Disk Configurations of the M2000 Server (HAThis describes how to check whether the local disk configurations are the same as planned. Inthe case of inconsistency, contact Huawei technical support personnel.
7.22 Installing and Configuring the Sybase (HA)This describes how to install the Sybase and its patches on the server.
7.23 Creating the M2000 Database (HA, T5220)This describes how to create the M2000 database through the PlatformTools. To optimize theperformance of the database, you need to set Sybase-related parameters before creating thedatabase. You need to perform the operation on only node 1.
7.24 Troubleshooting: Failed to Set the Sybase Parameters by Using the PlatformTools (HA)This describes a solution to the problem that you fail to set the Sybase parameters by using thePlatformTools.
7.25 Checking the Sybase Server ConnectionThis describes how to check the Sybase server connection to ensure that the Sybase database isconnected. You need to perform this operation on only the active node.
7.26 Checking the Version and Patches of the SybaseThis describes how to check whether the Sybase application software and patches listed in theversion configuration table are installed. The installation of the right version of Sybaseapplication software and patches is essential to the normal operation of the M2000 system.Youneed to perform this operation on only the active node.For an HA system, you need to performthis operation on only the active node.
7.27 Installing the Sybase and Patches on Node2This is performed to install the Sybase and patches on Node2. To install the Sybase and patcheson Node2, you must copy the installation files from Node1 to Node2 and execute the installation.
HA System Software Initial Installation Guide(T5220&M4000&M5000, S10) 7 Installing and Configuring the T5220 Server (HA)
Issue 06 (2010-06-15) Huawei Proprietary and ConfidentialCopyright © Huawei Technologies Co., Ltd.
7-3
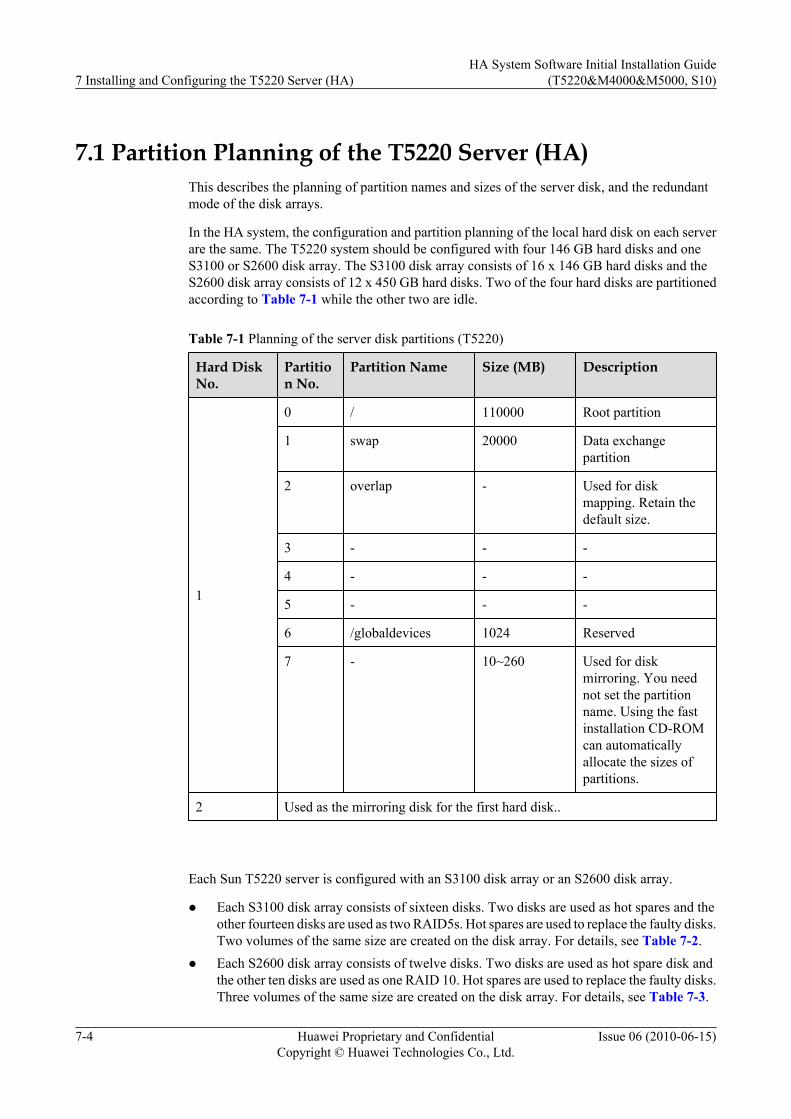
7.1 Partition Planning of the T5220 Server (HA)This describes the planning of partition names and sizes of the server disk, and the redundantmode of the disk arrays.
In the HA system, the configuration and partition planning of the local hard disk on each serverare the same. The T5220 system should be configured with four 146 GB hard disks and oneS3100 or S2600 disk array. The S3100 disk array consists of 16 x 146 GB hard disks and theS2600 disk array consists of 12 x 450 GB hard disks. Two of the four hard disks are partitionedaccording to Table 7-1 while the other two are idle.
Table 7-1 Planning of the server disk partitions (T5220)
Hard DiskNo.
Partition No.
Partition Name Size (MB) Description
1
0 / 110000 Root partition
1 swap 20000 Data exchangepartition
2 overlap - Used for diskmapping. Retain thedefault size.
3 - - -
4 - - -
5 - - -
6 /globaldevices 1024 Reserved
7 - 10~260 Used for diskmirroring. You neednot set the partitionname. Using the fastinstallation CD-ROMcan automaticallyallocate the sizes ofpartitions.
2 Used as the mirroring disk for the first hard disk..
Each Sun T5220 server is configured with an S3100 disk array or an S2600 disk array.
l Each S3100 disk array consists of sixteen disks. Two disks are used as hot spares and theother fourteen disks are used as two RAID5s. Hot spares are used to replace the faulty disks.Two volumes of the same size are created on the disk array. For details, see Table 7-2.
l Each S2600 disk array consists of twelve disks. Two disks are used as hot spare disk andthe other ten disks are used as one RAID 10. Hot spares are used to replace the faulty disks.Three volumes of the same size are created on the disk array. For details, see Table 7-3.
7 Installing and Configuring the T5220 Server (HA)HA System Software Initial Installation Guide
(T5220&M4000&M5000, S10)
7-4 Huawei Proprietary and ConfidentialCopyright © Huawei Technologies Co., Ltd.
Issue 06 (2010-06-15)

Table 7-2 Planning for the S3100 disk array
Disk Array No. Volume Name Size (GB)
1 oss_v0 810
oss_v1 810
2 Used as the mirrored disk array of the first disk array
Table 7-3 Planning for the S2600 disk array
Disk Array No. Volume Name Size (GB)
1 oss_app0 671
oss_app1 671
oss_app2 671
2 Used as the mirrored disk array of the first disk array
7.2 Planning the Host Name and IP Address for the T5220Server (HA)
This describes the default host names and the IP addresses of the M2000 system planned beforedelivery.
For details about the default host names and IP addresses of the M2000system, see Table 7-4and Table 7-5.
Table 7-4 Planning of the host names and IP addresses (HA, T5220)
EthernetPortFunction
Ethernet PortName
Host Name Physical IPAddress
Logical IPAddress ofIPMP
Service/IPMPport
e1000g0 osssvr-1-e1000g0
192.168.8.59 192.168.8.11
osssvr-2-e1000g0
192.168.8.61 192.168.8.12
e1000g2 osssvr-1-e1000g2
192.168.8.60 192.168.8.11
osssvr-2-e1000g2
192.168.8.62 192.168.8.12
Remote serialport
SC LAN osssvr-1-sc 192.168.8.141 None
osssvr-2-sc 192.168.8.142
HA System Software Initial Installation Guide(T5220&M4000&M5000, S10) 7 Installing and Configuring the T5220 Server (HA)
Issue 06 (2010-06-15) Huawei Proprietary and ConfidentialCopyright © Huawei Technologies Co., Ltd.
7-5

EthernetPortFunction
Ethernet PortName
Host Name Physical IPAddress
Logical IPAddress ofIPMP
Maintenanceport of thedisk array
Ctrl A Ethernetport 1
S2600-1/S3100-1
192.168.8.39 None
S2600-2/S3100-2
192.168.8.41
Ctrl B Ethernetport 1
S2600-1/S3100-1
192.168.8.40
S2600-2/S3100-2
192.168.8.42
Table 7-5 Planning the Logical IP Addresses Between Servers (HA, T5520)
Server Host Name Physical IPAddress(Logical IPAddress ofIPMP)
Logical HostName
Logical IPAddress
Node 1 osssvr-1 192.168.8.11 osssvr 192.168.8.31
Node 2 osssvr-2 192.168.8.12 osssvr 192.168.8.31
During the configuration of the maintenance dual plane, the IP address of node 1, that is,192.168.8.11, is used as the logical IP address of Ethernet ports e1000g0 and e1000g2 on node1.
During the configuration of the maintenance dual plane, the IP address of node 2, that is,192.168.8.12, is used as the logical IP address of Ethernet ports e1000g0 and e1000g2 on node2.
For details about the planning of the ports on the T5220 server, see Figure 7-1. For details aboutthe ports on the disk array, see Figure 7-2 or Figure 7-3.
Figure 7-1 Ports on the T5220 server
7 Installing and Configuring the T5220 Server (HA)HA System Software Initial Installation Guide
(T5220&M4000&M5000, S10)
7-6 Huawei Proprietary and ConfidentialCopyright © Huawei Technologies Co., Ltd.
Issue 06 (2010-06-15)

Figure 7-2 Ports on the S2600 disk array
Figure 7-3 Ports on the S3100 disk array
7.3 Configuring the SC for the T5220 ServerThis describes how to configure the System Controller (SC) for the T5220 server through a PC.
Prerequisitel A serial port cable is available.
l A PC is available.
ContextNOTEYou should configure the SC only during the initial installation.
Procedure
Step 1 Use the serial port cable to connect the serial port of the SC and that of the PC.
One end of the serial port cable is an RJ-45 connector that connects the Serial Mgt Port, as shownin Figure 7-4. The other end is a DB-9 connector that connects the serial port of the PC (COM1or COM2).
HA System Software Initial Installation Guide(T5220&M4000&M5000, S10) 7 Installing and Configuring the T5220 Server (HA)
Issue 06 (2010-06-15) Huawei Proprietary and ConfidentialCopyright © Huawei Technologies Co., Ltd.
7-7

Figure 7-4 Ports provided by the SC
For details about the cable sequence and related signals, see Table 7-6.
Table 7-6 Cable sequence standards for the serial port cables between the SC and the PC
RJ-45 Signal DB-9 Socket
3 TXD/RXD 2
4 REF/GND 5
5 REF/GND 5
6 RXD/TXD 3
After the PC and the SC are connected, the physical connection between the PC and the T5220server is set up.
Step 2 To configure a PC as a HyperTerminal, perform the following steps:1. Start the T5220 server.2. Switch on the PC.3. Choose Start > Programs (P) > Accessories > Communications > HyperTerminal on
the PC.4. In the Connection Description dialog box, enter the name of the new connection.5. Select the PC serial port that connects to the SC, for instance, COM1.6. Set the properties of the serial port, as listed in Table 7-7. Then, click OK.
Table 7-7 Setting the properties of the serial port
Property Value
Bits per second 9600
Data bits 8
Parity None.
Stop bits 1
7 Installing and Configuring the T5220 Server (HA)HA System Software Initial Installation Guide
(T5220&M4000&M5000, S10)
7-8 Huawei Proprietary and ConfidentialCopyright © Huawei Technologies Co., Ltd.
Issue 06 (2010-06-15)
Property Value
Flow control None.
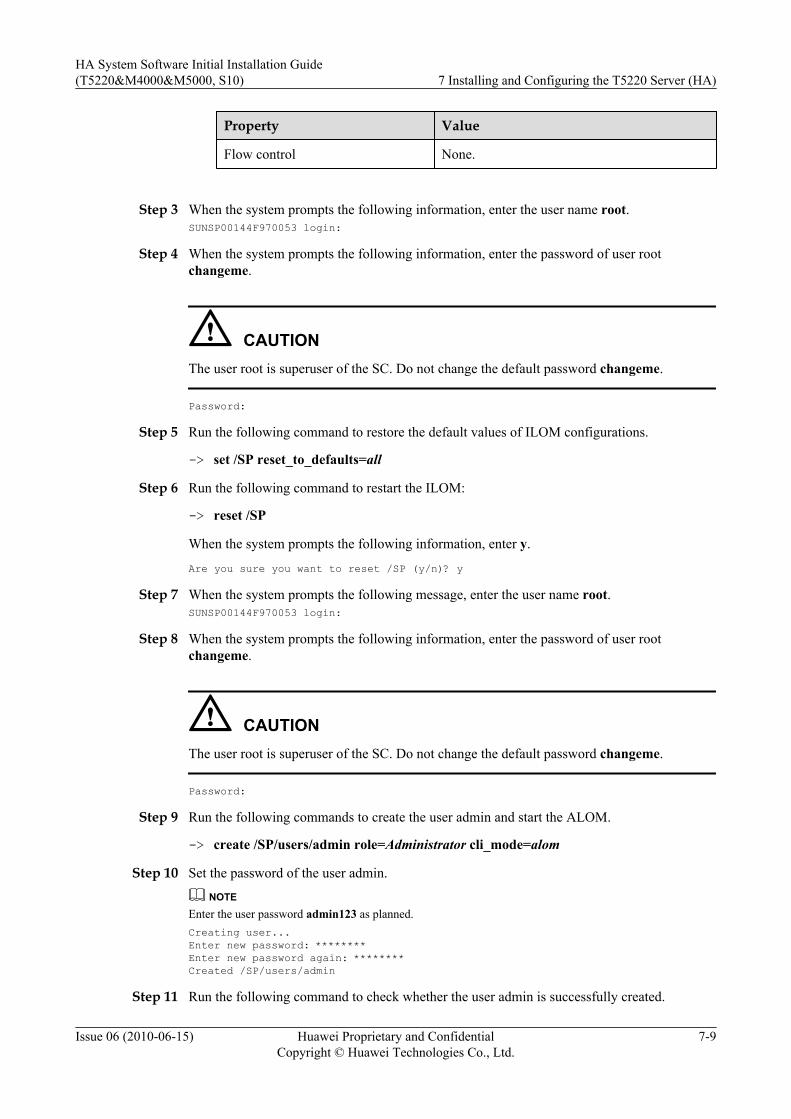
Step 3 When the system prompts the following information, enter the user name root.SUNSP00144F970053 login:
Step 4 When the system prompts the following information, enter the password of user rootchangeme.
CAUTIONThe user root is superuser of the SC. Do not change the default password changeme.
Password:
Step 5 Run the following command to restore the default values of ILOM configurations.
-> set /SP reset_to_defaults=all
Step 6 Run the following command to restart the ILOM:
-> reset /SP
When the system prompts the following information, enter y.
Are you sure you want to reset /SP (y/n)? y
Step 7 When the system prompts the following message, enter the user name root.SUNSP00144F970053 login:
Step 8 When the system prompts the following information, enter the password of user rootchangeme.
CAUTIONThe user root is superuser of the SC. Do not change the default password changeme.
Password:
Step 9 Run the following commands to create the user admin and start the ALOM.
-> create /SP/users/admin role=Administrator cli_mode=alom
Step 10 Set the password of the user admin.
NOTEEnter the user password admin123 as planned.Creating user...Enter new password: ********Enter new password again: ********Created /SP/users/admin
Step 11 Run the following command to check whether the user admin is successfully created.
HA System Software Initial Installation Guide(T5220&M4000&M5000, S10) 7 Installing and Configuring the T5220 Server (HA)
Issue 06 (2010-06-15) Huawei Proprietary and ConfidentialCopyright © Huawei Technologies Co., Ltd.
7-9

-> show /SP/users
/SP/users Targets: root admin
If the system output contains the user admin, you can infer that the user is created. Otherwiserun Step 9 and Step 10 to create the user admin again.
Step 12 Run the following command to quit ILOM:
-> exit
Step 13 When the system prompts the following message, enter the user name admin and the passwordadmin123.SUNSP00144F970053 login: adminPassword:
Step 14 Run the following command to disable the DHCP function.
sc> setsc netsc_dhcp false
Step 15 Set the IP address, subnet mask, and gateway IP address of the SC on the server.
sc> setsc netsc_ipaddr IP address of the SC
sc> setsc netsc_ipnetmask subnet mask of the SC
sc> setsc netsc_ipgateway gateway IP address of the SC
Step 16 Run the following command to submit the modification.
sc> setsc netsc_commit true
Step 17 Run the following command to quit SC:
sc> logout
Step 18 Closed the HyperTerminal.
----End
7.4 Installing the Solaris and Patches on the T5220 Server(HA)
This describes how to use a PC to log in to the T5220 server through the System Controller (SC),and then install the Solaris and its patches on the server.
Prerequisitel You have configured the SC for the T5220 server.
l The communication between the PC and the server SC is normal.
l The Auto_Install_DVD3/3_For Solaris_APP_V2.1 disk is available.
7 Installing and Configuring the T5220 Server (HA)HA System Software Initial Installation Guide
(T5220&M4000&M5000, S10)
7-10 Huawei Proprietary and ConfidentialCopyright © Huawei Technologies Co., Ltd.
Issue 06 (2010-06-15)

ContextNOTE
When the Auto_Install_DVD3/3_For Solaris_APP_V2.1 disk is used for installation, the installation logis recorded in the /opt/installtmp/autoinstall.log file.
CAUTIONl If the same IP address is used to install the Solaris software and its patches for multiple
M2000 systems in one network segment, the IP addresses of different systems may conflictwith each other. Change the IP address of devices and the problem is solved.
l During the installation of the Solaris software and its patches, the superuser root of theoperating system is automatically created. The initial password of the superuser is set to root.Be sure to remember the password of user root.
Procedure
Step 1 Connect the PC terminal and the SC through the SSH protocol of PuTTY.
In the PuTTY window, select SSH. Then enter the IP address of the SC in Host Name (or IPAddress). Click Open.
Step 2 Enter the user name admin and the password to log in to the SC. The sc> prompt is displayed.
Step 3 Run the console command. Press Enter. The system switches to the ok state.sc> consoleok
NOTE
If the Console session already in use. [view mode] message is displayed after you runthe console command, you can infer that the user does not log out when exiting the administration consolelast time. Run the console -f command to connect the server. In the displayed information, enter y. Then,press Enter.
Step 4 Connect the server.1. Run the console command. Then, press Enter.
NOTE
l If the Console session already in use. [view mode] message is displayed afteryou run the console command, you can infer that the user does not log out when exiting theadministration console last time. Run the console -f command to connect the server. In thedisplayed information, enter y. Then, press Enter.
l If the system is in self-check state, the ok prompt cannot be displayed after you run the consoleor console -f command. You need to run either of the commands after the system is startedcompletely.
2. When the Enter #. to return to ALOM. prompt is displayed, press Enter.
3. When the console login: prompt is displayed, enter root. Then, press Enter.
If the operating system has been pre-installed, you may see the host name before consolelogin:.
4. When the Password: prompt is displayed, enter the password of user root. Then, pressEnter.
HA System Software Initial Installation Guide(T5220&M4000&M5000, S10) 7 Installing and Configuring the T5220 Server (HA)
Issue 06 (2010-06-15) Huawei Proprietary and ConfidentialCopyright © Huawei Technologies Co., Ltd.
7-11

If no password is set during the pre-installation of the operating system, this step is skipped.5. When the # prompt is displayed, enter init 0. Then, press Enter. The system switches to
the ok state.
If the system prompts the following information, enter o.
Program terminatedr)eboot, o)k prompt, h)alt?
Step 5 Remove all the network cables of network ports on the server except that of the SC.
Step 6 Insert the Auto_Install_DVD2/3_For Solaris_OS_sun4v_V2.1 disk into the DVD-ROM driveof the server.
Step 7 Run the following commands to enter the single-user mode.
ok boot cdrom -s
After about 20 minutes, the system prompts # .
Step 8 Create the RAID 1 of the disk.1. Run the following command to check the number of hard disks and then press Ctrl + C to
return # .
# format
AVAILABLE DISK SELECTIONS: 0. c1t0d0 <SUN146G cyl 14087 alt 2 hd 24 sec 848> /pci@0/pci@0/pci@2/scsi@0/sd@0,0 1. c1t1d0 <SUN146G cyl 14087 alt 2 hd 24 sec 848> /pci@0/pci@0/pci@2/scsi@0/sd@1,0 2. c1t2d0 <SUN146G cyl 14087 alt 2 hd 24 sec 848> /pci@0/pci@0/pci@2/scsi@0/sd@2,0 3. c1t3d0 <SUN146G cyl 14087 alt 2 hd 24 sec 848> /pci@0/pci@0/pci@2/scsi@0/sd@3,0
2. Run the following command to create the RAID 1 relationship between the first and seconddisks.
# raidctl -c c1t0d0 c1t1d0
When the system displays the following message, enter yes for confirmation.
Creating RAID volume will destroy all data on spare space of member disks, proceed (yes/no)?
3. Run the following command to check whether the RAID 1 of hard disks is successfullycreated.
# format
If the number of hard disks is three instead of four, you can infer that the RAID 1 of harddisks is successfully created.
4. Perform the following operations to mark the hard disk numbered 0.
When the system displays the following message, enter 0 to select the hard disk numbered0.
Specify disk (enter its number): 0
When the system prompts the following information, enter y.
Disk not labeled. Label it now? y
7 Installing and Configuring the T5220 Server (HA)HA System Software Initial Installation Guide
(T5220&M4000&M5000, S10)
7-12 Huawei Proprietary and ConfidentialCopyright © Huawei Technologies Co., Ltd.
Issue 06 (2010-06-15)
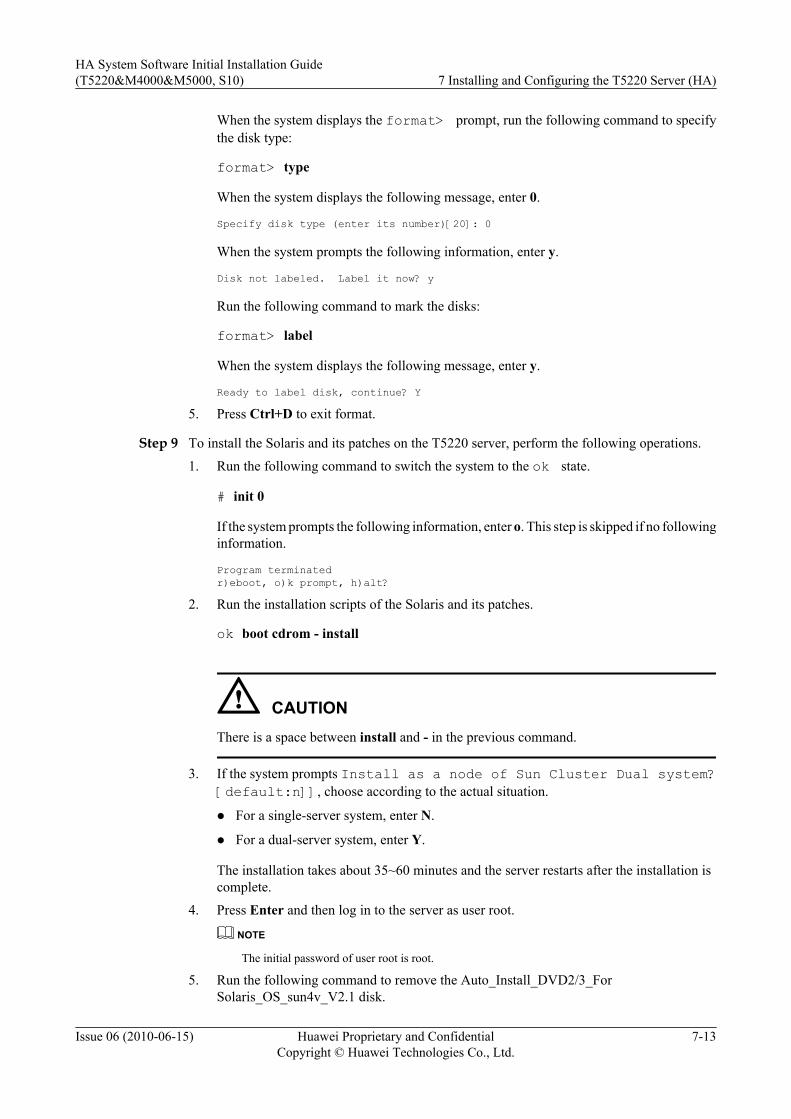
When the system displays the format> prompt, run the following command to specifythe disk type:
format> type
When the system displays the following message, enter 0.
Specify disk type (enter its number)[20]: 0
When the system prompts the following information, enter y.
Disk not labeled. Label it now? y
Run the following command to mark the disks:
format> label
When the system displays the following message, enter y.
Ready to label disk, continue? Y
5. Press Ctrl+D to exit format.
Step 9 To install the Solaris and its patches on the T5220 server, perform the following operations.
1. Run the following command to switch the system to the ok state.
# init 0
If the system prompts the following information, enter o. This step is skipped if no followinginformation.
Program terminatedr)eboot, o)k prompt, h)alt?
2. Run the installation scripts of the Solaris and its patches.
ok boot cdrom - install
CAUTIONThere is a space between install and - in the previous command.
3. If the system prompts Install as a node of Sun Cluster Dual system?[default:n]], choose according to the actual situation.
l For a single-server system, enter N.
l For a dual-server system, enter Y.
The installation takes about 35~60 minutes and the server restarts after the installation iscomplete.
4. Press Enter and then log in to the server as user root.
NOTE
The initial password of user root is root.
5. Run the following command to remove the Auto_Install_DVD2/3_ForSolaris_OS_sun4v_V2.1 disk.
HA System Software Initial Installation Guide(T5220&M4000&M5000, S10) 7 Installing and Configuring the T5220 Server (HA)
Issue 06 (2010-06-15) Huawei Proprietary and ConfidentialCopyright © Huawei Technologies Co., Ltd.
7-13

NOTE
After the server restarts, if the system prompts No default media available, run thefollowing commands to start the DVD-ROM drive:
# /etc/init.d/volmgt stop
# /etc/init.d/volmgt start
# cd /
# eject
6. Reconnect all the cables to the Ethernet ports on the server.As planned, the main configurations performed during the installation of the Solaris and itspatches are as follows:l Partition of the local disks of the server.
l Mirroring of the local disks.
l Setting of the active Ethernet port on the server. The e1000g0 of the server should be setas the active port.
----End
7.5 Checking the Version and Patches of the SolarisThis describes how to check the version and patches of the Solaris operating system and to makesure that the M2000 server application can be installed in the operating system of the designatedversion. For the mapping between the M2000 server versions and the operating system versions,see the version configuration table. Perform this operation on both nodes.
PrerequisiteYou have logged in to the M2000 server as user root.
Procedure
Step 1 Run the following command to view information about the version and patches of the Solaris.
# uname -X
System = SunOS Node = osssvr-1Release = 5.10KernelID = Generic_141414-07......
NOTE
In the system output, the values of Node and NumCPU vary with the system configuration.
In the system output, Release specifies the version of the operating system and its value is5.10 ; KernelID specifies the Version ID of the kernel and its value is Generic_141414-07 ora value indicating a later version. A greater number of the KernelID indicates a later version.
If the versions of the operating system and its patches are different from those in the versionconfiguration table, contact Huawei technical support personnel for assistance.
----End
7 Installing and Configuring the T5220 Server (HA)HA System Software Initial Installation Guide
(T5220&M4000&M5000, S10)
7-14 Huawei Proprietary and ConfidentialCopyright © Huawei Technologies Co., Ltd.
Issue 06 (2010-06-15)

7.6 Checking the Disk Partitioning of the M2000 Server (HA)To ensure that the M2000 server software can function properly, you need to check whether theactual partitioning is consistent with that predefined in the server disk partitioning plan. If theactual partitioning is different, contact Huawei technical support personnel for assistance. Youneed to check the partitioning on both nodes.
PrerequisiteLog in to the two nodes as user root, respectively.
Procedure
Step 1 Check the partitioning of the first local disk of the server.
# format
Enter 0 to check the first local hard disk.
Specify disk (enter its number): 0
format> p
partition> p
In the system output, Part indicates the partition number and Size indicates the size of thepartition. Check whether the actual partitioning of the disk is consistent with that predefined inTable 7-8. You need to pay attention to only Part and Size. unassigned may be displayedin Tag, this is normal. If the actual partitioning is different, contact Huawei technical supportpersonnel for assistance.
CAUTIONBecause the Solaris system automatically adjusts the size of each partition during thepartitioning, the actual sizes of partitions are slightly different from the planned sizes. You canignore the difference.
Table 7-8 References for server disk partitions
Server type References
T5220 7.1 Partition Planning of the T5220 Server(HA)
M4000/M5000 8.1 Partition Planning of the M4000/M5000 Server (HA)
Step 2 Run the following command to quit partition>.
partition>q
HA System Software Initial Installation Guide(T5220&M4000&M5000, S10) 7 Installing and Configuring the T5220 Server (HA)
Issue 06 (2010-06-15) Huawei Proprietary and ConfidentialCopyright © Huawei Technologies Co., Ltd.
7-15

Step 3 Run the following command to exit from format.
format> q
----End
7.7 Checking the Mirrors of the Local Disk on the Server(HA, T5220)
This describes how to check whether the mirroring of local disks is successful to guarantee thenormal operation of the server. If the actual partitioning is different, contact Huawei technicalsupport personnel for assistance. You need to check the partitioning on both nodes.
PrerequisiteLog in to the two nodes as user root, respectively.
Procedure
Step 1 Run the following command to check whether the disk mirroring relation is successfully set up.
# raidctl -l c1t0d0
Volume Size Stripe Status Cache RAID Sub Size Level Disk ----------------------------------------------------------------c1t0d0 136.6G N/A OPTIMAL N/A RAID1 0.0.0 136.6G GOOD 0.1.0 136.6G GOOD
Check the system output. Ensure that the value of RAID Level is RAID1. Ensure that theDISK column has two values and the status is GOOD. If not, contact Huawei technical supportpersonnel for assistance.
----End
7.8 Configuring the Hostname and the IP Address of theServer (HA)
Run the script file to set the host name and IP address of the server and other basic parameters.You need to perform the operation on both node 1 and node 2.
Prerequisitel The communication between the PC and the server is normal.
l You have logged in to node 1 and node 2 as user root.
l The Auto_Install_DVD3/3_For Solaris_APP_V2.1 disk is available.
7 Installing and Configuring the T5220 Server (HA)HA System Software Initial Installation Guide
(T5220&M4000&M5000, S10)
7-16 Huawei Proprietary and ConfidentialCopyright © Huawei Technologies Co., Ltd.
Issue 06 (2010-06-15)
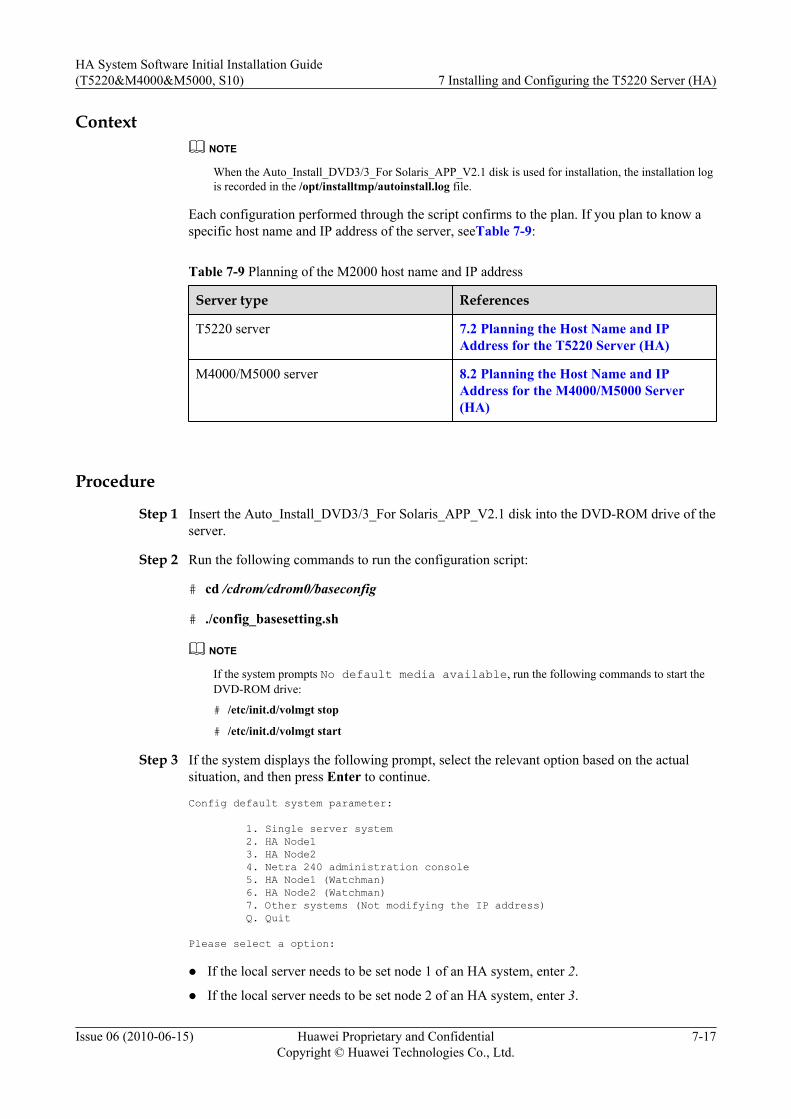
ContextNOTE
When the Auto_Install_DVD3/3_For Solaris_APP_V2.1 disk is used for installation, the installation logis recorded in the /opt/installtmp/autoinstall.log file.
Each configuration performed through the script confirms to the plan. If you plan to know aspecific host name and IP address of the server, seeTable 7-9:
Table 7-9 Planning of the M2000 host name and IP address
Server type References
T5220 server 7.2 Planning the Host Name and IPAddress for the T5220 Server (HA)
M4000/M5000 server 8.2 Planning the Host Name and IPAddress for the M4000/M5000 Server(HA)
Procedure
Step 1 Insert the Auto_Install_DVD3/3_For Solaris_APP_V2.1 disk into the DVD-ROM drive of theserver.
Step 2 Run the following commands to run the configuration script:
# cd /cdrom/cdrom0/baseconfig
# ./config_basesetting.sh
NOTE
If the system prompts No default media available, run the following commands to start theDVD-ROM drive:
# /etc/init.d/volmgt stop
# /etc/init.d/volmgt start
Step 3 If the system displays the following prompt, select the relevant option based on the actualsituation, and then press Enter to continue.
Config default system parameter:
1. Single server system 2. HA Node1 3. HA Node2 4. Netra 240 administration console 5. HA Node1 (Watchman) 6. HA Node2 (Watchman) 7. Other systems (Not modifying the IP address) Q. Quit
Please select a option:
l If the local server needs to be set node 1 of an HA system, enter 2.
l If the local server needs to be set node 2 of an HA system, enter 3.
HA System Software Initial Installation Guide(T5220&M4000&M5000, S10) 7 Installing and Configuring the T5220 Server (HA)
Issue 06 (2010-06-15) Huawei Proprietary and ConfidentialCopyright © Huawei Technologies Co., Ltd.
7-17

Step 4 When the system displays Are you sure ?[Y/N] Y, enter Y for confirmation.
NOTE
This process takes about five minutes. The host name and IP address of the server are initialized and otherbasic parameters are configured during the process. After the configuration is complete, the serverautomatically restarts.
----End
7.9 Changing the IP Address of the S2600 Disk Array (SerialPort Mode)
This section describes how to change the IP address of the S2600 disk array in serial port mode.Before configuring the disk array, you need to change the IP address of the disk array. The IPaddress of each S2600 disk array needs to be changed.
Prerequisitel The communication between the disk array and the server is normal.l The disk array is powered on.
Contextl Each disk array has an active controller and a standby controller. Each controller has one
CLI serial port.l Before changing the IP address of the disk array, you must familiarize yourself with the
default IP address planning at delivery. Then, determine whether to reconfigure the IPaddress according to the actual situation.
l The IP address mentioned here is only an example. Replace it with the actual IP address.l If you change the IP address of the disk array on different network segments, continue to
change the IP address of the maintenance Ethernet port on the corresponding server toensure that the two changed IP addresses are on the same network segment.
ProcedureStep 1 Use the serial port cable to connect any serial port on a controller of the disk array and a serial
port on the PC. Figure 7-5 shows the disk array.
Figure 7-5 Serial ports provided by the S2600 disk array
7 Installing and Configuring the T5220 Server (HA)HA System Software Initial Installation Guide
(T5220&M4000&M5000, S10)
7-18 Huawei Proprietary and ConfidentialCopyright © Huawei Technologies Co., Ltd.
Issue 06 (2010-06-15)
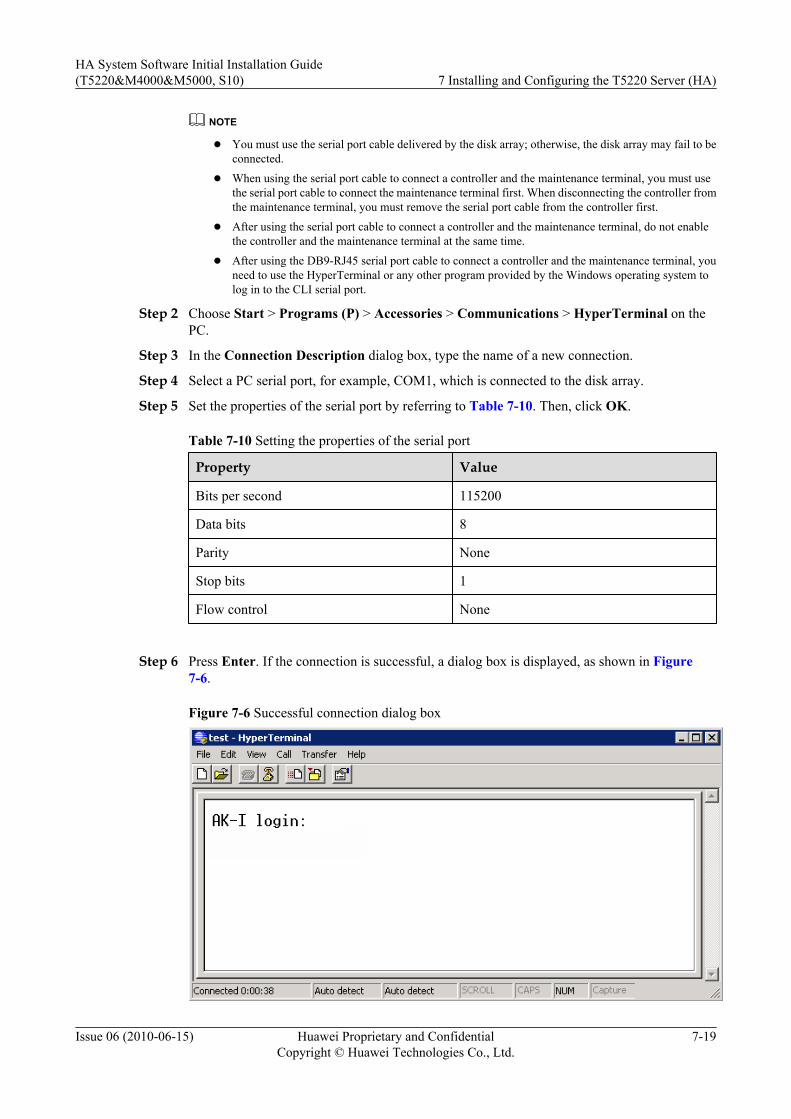
NOTE
l You must use the serial port cable delivered by the disk array; otherwise, the disk array may fail to beconnected.
l When using the serial port cable to connect a controller and the maintenance terminal, you must usethe serial port cable to connect the maintenance terminal first. When disconnecting the controller fromthe maintenance terminal, you must remove the serial port cable from the controller first.
l After using the serial port cable to connect a controller and the maintenance terminal, do not enablethe controller and the maintenance terminal at the same time.
l After using the DB9-RJ45 serial port cable to connect a controller and the maintenance terminal, youneed to use the HyperTerminal or any other program provided by the Windows operating system tolog in to the CLI serial port.
Step 2 Choose Start > Programs (P) > Accessories > Communications > HyperTerminal on thePC.
Step 3 In the Connection Description dialog box, type the name of a new connection.
Step 4 Select a PC serial port, for example, COM1, which is connected to the disk array.
Step 5 Set the properties of the serial port by referring to Table 7-10. Then, click OK.
Table 7-10 Setting the properties of the serial port
Property Value
Bits per second 115200
Data bits 8
Parity None
Stop bits 1
Flow control None
Step 6 Press Enter. If the connection is successful, a dialog box is displayed, as shown in Figure7-6.
Figure 7-6 Successful connection dialog box
HA System Software Initial Installation Guide(T5220&M4000&M5000, S10) 7 Installing and Configuring the T5220 Server (HA)
Issue 06 (2010-06-15) Huawei Proprietary and ConfidentialCopyright © Huawei Technologies Co., Ltd.
7-19

Step 7 Type the correct user name and password. The successful login dialog box is displayed, as shownin Figure 7-7.
CAUTIONThe initial user name and password of the administrator are admin and 123456, respectively. Toensure the system security, you need to change the password after the initial login.
Figure 7-7 Successful login dialog box
Step 8 Run the following command to set the IP address of the management Ethernet port on controllerA:
OceanStor: admin> chgctrlip -c a -a IP address of controller A -s subnet mask -ggateway
For example, to change the IP address of the management Ethernet port on controller A to192.168.8.39, run the following command:
OceanStor: admin> chgctrlip -c a -a 192.168.8.39 -s 255.255.255.0 -g 192.168.8.1
When the system displays the following prompt, type y.
OceanStor: admin> chgctrlip -c a -a 192.168.8.39 -s 255.255.255.0This operation will change your controller's IP configuration. if you want to change the IP of the controller you logged in, you will log out after you set thenew IP. However, if you change the IP of the peer controller, you needn't log out.Do you want to continue? y or n: y
Step 9 Run the following command to check whether the changed IP address is correct:
OceanStor: admin> showctrlip -c a
7 Installing and Configuring the T5220 Server (HA)HA System Software Initial Installation Guide
(T5220&M4000&M5000, S10)
7-20 Huawei Proprietary and ConfidentialCopyright © Huawei Technologies Co., Ltd.
Issue 06 (2010-06-15)

Controller IP Address Subnet Mask Gateway MAC Address A 192.168.8.39 255.255.255.0 192.168.8.1 00:18:82:e2:00:fb
Step 10 Run the following command to set the IP address of the management Ethernet port on controllerB:
OceanStor: admin> chgctrlip -c b -a new IP address of controller B -s subnet mask -ggateway
For example, to change the IP address of the management Ethernet port on controller B to192.168.8.40, run the following command:
OceanStor: admin> chgctrlip -c b -a 192.168.8.40 -s 255.255.255.0 -g 192.168.8.1
When the system displays the following prompt, type y.
This operation will change your controller's IP configuration. if you want to change the IP of the controller you logged in, you will log out after you set thenew IP. However, if you change the IP of the peer controller, you needn't log out.Do you want to continue? y or n: y
Step 11 Run the following command to check whether the changed IP address is correct:
OceanStor: admin> showctrlip -c b
Controller IP Address Subnet Mask Gateway MAC Address B 192.168.8.40 255.255.255.0 192.168.8.1 00:18:82:e2:01:57
----End
7.10 Changing the IP Address of the S3X00 Disk Array(Serial Port Mode)
This section describes how to change the IP address of the S3X00 disk array in serial port mode.Before configuring the disk array, you need to change the IP address of the disk array. The IPaddress of each S3X00 disk array needs to be changed.
Prerequisitel The communication between the disk array and the server is normal.
l The disk array is powered on.
Contextl Each disk array has an active controller and a standby controller. Each controller has one
CLI serial port.l Before changing the IP address of the disk array, you must familiarize yourself with the
default IP address planning at delivery. Then, determine whether to reconfigure the IPaddress according to the actual situation.
l The IP address mentioned here is only an example. Replace it with the actual IP address.
l If you change the IP address of the disk array on different network segments, continue tochange the IP address of the maintenance Ethernet port on the corresponding server toensure that the two changed IP addresses are on the same network segment.
HA System Software Initial Installation Guide(T5220&M4000&M5000, S10) 7 Installing and Configuring the T5220 Server (HA)
Issue 06 (2010-06-15) Huawei Proprietary and ConfidentialCopyright © Huawei Technologies Co., Ltd.
7-21

ProcedureStep 1 Use the serial port cable to connect the serial port of the disk array controller and that of the PC.
Figure 7-8 shows the disk array.
Figure 7-8 Serial ports provided by the S3X00
NOTE
Do use the serial port cable delivered with the disk array. This cable is designed for storage devices. If youuse a serial port cable for other devices, the communication may fail. The controller connected through theserial port indicates the one that is being set. Controller A is on the left side and controller B on the right.
Step 2 Choose Start > Programs (P) > Accessories > Communications > HyperTerminal on thePC.
Step 3 In the Connection Description dialog box, enter the name of the new connection.
Step 4 Specify a serial port of the PC to connect the SC, for instance, COM1.
Step 5 Set the properties of the serial port. For details about how to set the properties of the serial port,see Table 7-11. Then, click OK.
Table 7-11 Setting the properties of a serial port
Property Property Value
Bits per second 38400
Data bits 8
Parity None
Stop bits 1
Flow control None
Step 6 Press Ctrl+Break to activate the Shell serial port.
Step 7 When the following message is displayed in the HyperTerminal window, press Esc in 5 seconds.The Shell login window is displayed.Press within 5 seconds: <S> for Service Interface , <BREAK> for band rate
Step 8 When the following information is displayed, type the login password infiniti and then pressEnter to log in to the configuration shell of the disk array.
7 Installing and Configuring the T5220 Server (HA)HA System Software Initial Installation Guide
(T5220&M4000&M5000, S10)
7-22 Huawei Proprietary and ConfidentialCopyright © Huawei Technologies Co., Ltd.
Issue 06 (2010-06-15)

Enter password to access shell:
Step 9 Run the following command to view the information about Ethernet port configuration on thecurrent controller.
-> netCfgShow
Step 10 Run the netCfgSet command to set the IP address for the Ethernet port. In the IP Address if0filed, type 192.168.8.39. If you need to modify the subnet mask, type the new value in the SubnetMask if0 filed.
NOTE
You need to configure only if0.
Step 11 Press Enter. When the modification tasks effect, the following information is displayed:
Network Configuration successfully written to NVSRAM.
Step 12 Connect the serial port cable to controller B and then perform the same procedure.
----End
7.11 Configuring the S2600 Disk Array (HA)This section describes how to configure the S2600 disk array. Each S2600 disk array has anactive controller and a standby controller. You can configure the S2600 disk array by setting upa connection between the server and the active controller. Both of the S2600 disk arrays needto be configured.
Prerequisitel You have installed the operating system and its patches on the server.
l You have logged in to node 1 as user root.
l The connection between servers and the connection between servers and the disk array arenormal.
l The S2600 disk array is powered on.
l The Auto_Install_DVD3/3_For Solaris_APP_V2.1 DVD-ROM is available.
Context
CAUTIONIf the configuration of the script fails when the two IP addresses of the S2600 disk array can bepinged, run the script again or even twice. If the configuration of the script fails again, contactHuawei technical engineers for assistance.
Procedure
Step 1 Insert the Auto_Install_DVD3/3_For Solaris_APP_V2.1 DVD-ROM into the DVD-ROM driveof node 1.
HA System Software Initial Installation Guide(T5220&M4000&M5000, S10) 7 Installing and Configuring the T5220 Server (HA)
Issue 06 (2010-06-15) Huawei Proprietary and ConfidentialCopyright © Huawei Technologies Co., Ltd.
7-23
Step 2 Run the following command to install the expect package.1. Run the following commands to run the installation script of the expect package:
# cd /cdrom/cdrom0/HWS2600Array
# ./install_expectpkg.sh
2. When the following information is displayed, type osssvr-1 osssvr-2, that is, the host namesof node 1 and node 2. Use a space to separate the two host names.
NOTE
Typing the host names of both nodes indicates that the expect package is installed on both node 1and node 2. If you type only one host name, it indicates that the expect package is installed on onlyone node.
Input the system names separated by space on which to Expect PKG:[default:osssvr-1]osssvr-1 osssvr-2
3. When the following information is displayed, type y.Are you sure to continue? [y/n]y
If no error information is displayed, it indicates that the installation is successful.
Step 3 Configure the volumes of the S2600 disk array.1. Run the following commands to configure the RAID of the S2600 disk array:
CAUTIONThe creation of the disk array volume takes about 100 to 180 minutes. If the disk statusindicator remains green and does not blink, you can infer that the volumes are createdsuccessfully. After the configuration script is executed, check that the volumes of the diskarray are created. Then, you can use PlatformTools to create volumes.
# cd /cdrom/cdrom0/HWS2600Array
# ./create_RAID_HA.sh
When the system displays the following prompt, type the corresponding values:
Are you sure to continue? [y/n] y Please input the array controller A IP address: IP address of controller A of the S2600 disk array Please input the array controller A IP address: IP address of controller B of the S2600 disk arrayInput the system names separated by spaces for HA servers :[default:osssvr-1 osssvr-2] osssvr-1 osssvr-2Input the DiskArray names:[default:S2600-1]: If the first disk array, input S2600-1; if the second disk array, input S2600-2Input the DiskArray password for admin user:[default:123456]:Input the password of admin userInput the DiskArray password for DB configuration:[default:654321]:Input the password of DB configurationAre you sure to continue? [y/n] y
When the system displays Configure the diskarray successfully, you caninfer that the script is successfully executed.
Step 4 Check the volumes of the S2600 disk array.1. Run the following command to log in to the S2600 disk array:
7 Installing and Configuring the T5220 Server (HA)HA System Software Initial Installation Guide
(T5220&M4000&M5000, S10)
7-24 Huawei Proprietary and ConfidentialCopyright © Huawei Technologies Co., Ltd.
Issue 06 (2010-06-15)

# ssh admin@IP address of controller A of the S2600 disk array: 192.168.8.39
Password:<The initial password of the administrator is 123456>
CAUTIONAfter you log in to the S2600 disk array, the system displays the following information:locale: Cannot set LC_CTYPE to default locale: No such file or directory locale: Cannot set LC_ALL to default locale: No such file or directoryThis problem is related to the setting of environment variables, and does not affect theconfiguration of the S2600 disk array. You can ignore the information when installing thedisk array. If the disk status indicator remains green and does not blink, you can infer thatthe RAID is created. After running the configuration script, ensure that the RAID of thedisk array is created. Then, you can use the PlatformTools to create volumes.
2. Run the following command to check the information about the mapping and host group:
OceanStor: admin> showlun
ID RAID ID Status Ctrler Capacity(MB) LUN Name 0 0 Formatting A 687103 oss_app0 1 0 Formatting B 687103 oss_app1 2 0 Formatting A 687103 oss_app2
The information about at least three volumes is displayed. If the value of Status isFormatting, you can infer that the RAID of the S2600 disk array is being created. If thevalue of Status is Normal, you can infer that the RAID is created.
OceanStor: admin> showmap -gi 1
Map ID Ctrler Dev LUN ID Host LUN Mapped to RAID ID Dev LUN Cap(MB) 0x10000 A 0 0 Group: 1 0 687103 0x10001 B 1 1 Group: 1 0 687103 0x10002 A 2 2 Group: 1 0 687103
If the system output contains three records, you can infer that the mapping is successful.
OceanStor: admin> showhostport -i 0
Port ID Port Name Port Information Port Type Host ID 0 osssvr-1_ 500110a00015354c FC 0 port_0 1 osssvr-1_ 500110a0001532ae FC 0 port_1 2 osssvr-1_ 500110a00015354c FC 0 port_0 3 osssvr-1_ 500110a0001532ae FC 0 port_1
If the system output contains four records, you can infer that the host group is successfullycreated.
OceanStor: admin> showhostport -i 1
Port ID Port Name Port Information Port Type Host ID 0 osssvr-2_ 500110a00015354d FC 0 port_0 1 osssvr-2_ 500110a0001532ad FC 0 port_1 2 osssvr-2_ 500110a00015354d FC 0 port_0 3 osssvr-2_ 500110a0001532ad FC 0 port_1
HA System Software Initial Installation Guide(T5220&M4000&M5000, S10) 7 Installing and Configuring the T5220 Server (HA)
Issue 06 (2010-06-15) Huawei Proprietary and ConfidentialCopyright © Huawei Technologies Co., Ltd.
7-25

If the system output contains four records, you can infer that the host group is successfullycreated.
3. Run the following command to log out of the S2600 disk array:
OceanStor: admin> exit
Step 5 Repeat Step 3 through Step 4 to complete the configuration of the second disk array.
Step 6 Restart the server.
# sync; sync; sync; sync; sync; sync
# shutdown -y -g0 -i6
Step 7 After you log in to the server again, remove the DVD-ROM.
# cd /
# eject
----End
7.12 Configuring the S3100 Disk Array (HA, T5220)Each S3100 disk array has an active controller and a standby controller. You can configure theS3100 disk arrays by setting up a connection between the server and the active controller. Boththe two S3100 disk arrays need to be configured.
Prerequisitel You have installed the operating system and patches on the server.
l You have logged in to node 1 and node 2 as user root.
l The communication between the disk array and the server is normal.
l The Auto_Install_DVD3/3_For Solaris_APP_V2.1 disk is available.
Context
CAUTIONl You should install the management host software of the disk array both on node 1 and node
2.l If the configuration of the script fails when the IP addresses of the two 6140 disk arrays
can be pinged, run the script again or even twice. If the configuration of the script still fails,contact Huawei engineers for technical support.
Procedure
Step 1 Insert the Auto_Install_DVD3/3_For Solaris_APP_V2.1 disk into the DVD-ROM drive of theserver.
7 Installing and Configuring the T5220 Server (HA)HA System Software Initial Installation Guide
(T5220&M4000&M5000, S10)
7-26 Huawei Proprietary and ConfidentialCopyright © Huawei Technologies Co., Ltd.
Issue 06 (2010-06-15)
Step 2 Install the management host software of the disk array on the server.1. Run the following commands to run the script of the management host software:
# cd /cdrom/cdrom0/S3X00array
# ./install_S3X00software.sh2. When the system displays Are you sure ?[Y/N], enter Y.
Step 3 Configuring the Disk Array. This operation is performed only on Node1.
CAUTIONThe creation of the disk array volume takes about 90~120 minutes. If the disk status indicatorremains green and does not blink, you can infer that the volumes are created. You can use thePlatformTools to create volumes only when checking that the volumes of the disk array arecreated after the configuration scripts are run.
TIP
Run the following commands to check whether the volumes are created successfully.
# SMcli 192.168.8.39 192.168.8.40 -c "show volume["oss_v0"] actionProgress;"
# SMcli 192.168.8.39 192.168.8.40 -c "show volume["oss_v1"] actionProgress;"
1. Run the following command to run the configuration script:
# cd /cdrom/cdrom0/S3X00array
# ./create_S3X00_raid.sh
When the system displays the following message, enter y for confirmation.
Are you sure to continue? [y/n]2. When the system displays the following message, enter the IP address of controller A, for
example, 192.168.8.39.
Please input the array controller A IP address:3. When the system displays the following message, enter the IP address of controller B for
example, 192.168.8.40.
Please input the array controller B IP address:4. When the system displays the following message, enter S3100-1, the name of the disk array.
Please input the array name:5. When the system displays the following message, enter y for confirmation.
Are you sure to continue? [y/n]
Step 4 Check the configuration of the disk array.
*************************************Current Volumes****************************
Number of standard volumes: 2
See other Volumes sub-tabs for premium feature information.
NAME STATUS CAPACITY RAID LEVEL VOLUME GROUP oss_v0 Optimal 800 GB 5 1 oss_v1 Optimal 800 GB 5 2
HA System Software Initial Installation Guide(T5220&M4000&M5000, S10) 7 Installing and Configuring the T5220 Server (HA)
Issue 06 (2010-06-15) Huawei Proprietary and ConfidentialCopyright © Huawei Technologies Co., Ltd.
7-27

********************************Current hotspare disks*************************** Disk 85,15 : Mode: Hot spare standby Disk 85,16 : Mode: Hot spare standby Configure the S3100 diskarray successfully. Please reboot server.
After the configuration is complete, verify that the two volumes naming oss_v0 and oss_v1 existunder the Current Volumes, the RAID value in two volumes is 5, and two records beginningwith Disk are available under the Current hotspare disks. If the actual situation does not meetthe requirement, perform Step 3 for reconfiguration.
Step 5 Repeat Step 3 through Step 4 to implement the configuration of the second disk array.
----End
7.13 Enabling Multi-Path I/O (HA)This describes how to enable the I/O multipathing of the Solaris system. You need to performthe operation on both node 1 and node 2.
PrerequisiteYou have logged in to the server as user root.
Procedure
Step 1 Run the following command to enable the I/O multipathing:
# stmsboot -D fp -e
Step 2 When the system displays the following prompt, press Enter to continue:
WARNING: This operation will require a reboot.Do you want to continue ? [y/n] (default: y)
Step 3 When the system displays the following prompt, press Enter to continue:
The changes will come into effect after rebooting the system.Reboot the system now ? [y/n] (default: y)
The operating system restarts twice.
----End
7.14 Labeling Volumes for the Disk Array (HA)This describes how to label each logical partition so that the operating system can find theassociated logical partitions of the disks on the disk array.
Prerequisitel You have labeled the logical partitions on the disks of the disk array.
l You have logged in to the server as user root.
7 Installing and Configuring the T5220 Server (HA)HA System Software Initial Installation Guide
(T5220&M4000&M5000, S10)
7-28 Huawei Proprietary and ConfidentialCopyright © Huawei Technologies Co., Ltd.
Issue 06 (2010-06-15)

ContextThere are three standard models of disk arrays coming with the system: StorEdge 6140,OceanStor S2600 or OceanStor S3200 disk arrays. The methods for labeling volumes of bothmodels are the same. This takes the OceanStor S2600 as an example.
Procedure
Step 1 Check whether the operating system can find the logical partitions of the disks on the S2600disk array.
You need to perform the operation on both node 1 and node 2.
# format
View the displayed information, and check whether the information about the six logicalpartitions is contained.
AVAILABLE DISK SELECTIONS:0. c1t0d0 <LSILOGIC-LogicalVolume-3000 cyl 65533 alt 2 hd 16 sec 273> /pci@0/pci@0/pci@2/scsi@0/sd@0,01. c1t2d0 <LSILOGIC-LogicalVolume-3000 cyl 65533 alt 2 hd 16 sec 273> /pci@0/pci@0/pci@2/scsi@0/sd@2,02. c6t6001882100E6B4BB4AE099D900000000d0 <S2600-1 cyl 65533 alt 2 hd 64 sec 335> /scsi_vhci/ssd@g6001882100e6b4bb4ae099d9000000003. c6t6001882100E6B4BB4AE099DB00000001d0 <S2600-1 cyl 65533 alt 2 hd 64 sec 335> /scsi_vhci/ssd@g6001882100e6b4bb4ae099db000000014. c6t6001882100E6B4BB4AE099DD00000002d0 <S2600-1 cyl 65533 alt 2 hd 64 sec 335> /scsi_vhci/ssd@g6001882100e6b4bb4ae099dd000000025. c6t6001882100E6B6114AE0BF9A00000000d0 <S2600-1 cyl 65533 alt 2 hd 64 sec 335> /scsi_vhci/ssd@g6001882100e6b6114ae0bf9a000000006. c6t6001882100E6B6114AE0BF9B00000001d0 <S2600-1 cyl 65533 alt 2 hd 64 sec 335> /scsi_vhci/ssd@g6001882100e6b6114ae0bf9b000000017. c6t6001882100E6B6114AE0BF9D00000002d0 <S2600-1 cyl 65533 alt 2 hd 64 sec 335> /scsi_vhci/ssd@g6001882100e6b6114ae0bf9d00000002Specify disk (enter its number):
If the Solaris operating system does not find the disks in the disk array, perform Step 2 to searchfor the disks in the disk array again.
Step 2 Run the following command to search for the disks on the disk array again:
# cfgadm -al
The system displays the following information:
Ap_Id Type Receptacle Occupant Condition……….c2 fc-private connected unconfigured unknownc2::200400a0b817e7b8 disk connected unconfigured unknownc2::200500a0b817e7b8 disk connected unconfigured unknownc2::210000e08b104d10 unknown connected unconfigured unknownc3 fc-private connected unconfigured unknownc3::200400a0b817e7b9 disk connected unconfigured unknownc3::200500a0b817e7b9 disk connected unconfigured unknownc3::210000e08b102a73 unknown connected unconfigured unknown
Identify fc-private in the column Type and the corresponding values in AP_Id. Then, runthe following command on each matching AP_Id: In this sample, the corresponding values inAP_Id are c2 and c3.
# cfgadm -c configure c2
# cfgadm -c configure c3
HA System Software Initial Installation Guide(T5220&M4000&M5000, S10) 7 Installing and Configuring the T5220 Server (HA)
Issue 06 (2010-06-15) Huawei Proprietary and ConfidentialCopyright © Huawei Technologies Co., Ltd.
7-29

Then, perform Step 1 to view the information about the logical partitions.
Step 3 Perform the following steps to label the logical partitions found by the operating system:
Perform this operation only on node1.
1. The system displays the following message after you run the format command. Enter thenumber corresponding to the logical partition on the disk array, which is 2 in this example.
Specify disk (enter its number):22. Label the logical partitions of the disks.
Enter y at the following information:
selecting c6t6001882100E6B4BB4AE099D900000000d0[disk formatted]Disk not labeled. Label it now?
After running the command label, enter yes at the following information:
FORMAT MENU: disk - select a disk type - select (define) a disk type partition - select (define) a partition table current - describe the current disk format - format and analyze the disk repair - repair a defective sector label - write label to the disk analyze - surface analysis defect - defect list management backup - search for backup labels verify - read and display labels save - save new disk/partition definitions inquiry - show vendor, product and revision volname - set 8-character volume name !<cmd> - execute <cmd>, then return quit
format> labelReady to label disk, continue?
3. Repeat Step 3.1 and Step 3.2 to label other logical partitions after running the followingcommand:
format> disk
Step 4 Exit from format.
format> q
----End
7.15 Installing and Configuring the Sun Cluster Softwareand Patches
The Sun Cluster software is used to manage the system resource. Thus, system resource can beautomatically switched to the standby server to keep the normal operation of the system whenthe active server is faulty.
Prerequisitel You have installed the operating system and its patches on the server.
7 Installing and Configuring the T5220 Server (HA)HA System Software Initial Installation Guide
(T5220&M4000&M5000, S10)
7-30 Huawei Proprietary and ConfidentialCopyright © Huawei Technologies Co., Ltd.
Issue 06 (2010-06-15)

l You have logged in to node 1 and node 2 as user root.
l You have inserted the Auto_Install_DVD3/3_For Solaris_APP_V2.1 disk into the DVD-ROM drive of the server.
Procedure
Step 1 Install the Sun Cluster software and patches. Run the operation on both node 1 and node 2.1. Run the following command to install the Sun Cluster software and patches.
# cd /cdrom/cdrom0/suncluster3.2
# ./install_suncluster.sh
When the system displays Are you sure ?[Y/N] , enter Y.
NOTE
The installation lasts for about 25 minutes.
2. Run the following command to install the Sybase Agent
# ./install_sybase_SUN_agent.sh
When the system displays Are you sure ?[Y/N] , enter Y.
3. Run the following command to install the Sun Cluster software and patches.
# ./install_suncluster_patch.sh
When the system displays Are you sure ?[Y/N] , enter Y.
NOTE
You can ignore the failed messages during the installation. This process lasts about 10 minutes. Then,the server automatically restarts.
Step 2 Configure the Sun Cluster.1. Run the following command on node 1 to configure the Sun Cluster.
# cd /cdrom/cdrom0/suncluster3.2
# ./config_suncluster.sh
When the system displays Are you sure ?[Y/N] , enter Y.
CAUTIONNode 1 automatically restarts. After the restart of node 1 is complete, perform Step 2.2 toconfigure the Sun Cluster on node 2.
2. Run the following command on node 2 to configure the Sun Cluster.
# cd /cdrom/cdrom0/suncluster3.2
# ./config_suncluster.sh
When the system displays Are you sure ?[Y/N] , enter Y.
HA System Software Initial Installation Guide(T5220&M4000&M5000, S10) 7 Installing and Configuring the T5220 Server (HA)
Issue 06 (2010-06-15) Huawei Proprietary and ConfidentialCopyright © Huawei Technologies Co., Ltd.
7-31

CAUTIONNode 2 automatically restarts. After the restart of node 2 is complete, perform Step 2.4 toconfigure the Sun Cluster on node 2.
3. Log in to node 1 as user root again.4. Run the following command on node 1 to configure qurom device.
# cd /cdrom/cdrom0/suncluster3.2
# ./config_qurom_device.sh
When the system displays Are you sure ?[Y/N] , enter Y.
----End
7.16 Checking Installation of the Sun Cluster Software andPatches
After installing the Sun Cluster software and its patch on Node1 and Node2, you must checkthat the Sun Cluster software is correctly installed and the software is operational. This operationis performed only on Node1.
PrerequisiteYou have logged in to the server as root.
Procedure
Step 1 Check the status of Node1 and Node2.
# scstat -q
If the displayed information meets all the following conditions, you can infer that the Cluster isproperly installed:
l The number of Quorum votes possible and that of Quorum votes present is3.
l The values of Status on both Node1 and Node2 are Online.
l The value of Status in Device votes is Online.-- Quorum Summary --
Quorum votes possible: 3 Quorum votes needed: 2 Quorum votes present: 3
-- Quorum Votes by Node --
Node Name Present Possible Status --------- ------- -------- ------ Node votes: osssvr-1 1 1 Online Node votes: osssvr-2 1 1 Online
7 Installing and Configuring the T5220 Server (HA)HA System Software Initial Installation Guide
(T5220&M4000&M5000, S10)
7-32 Huawei Proprietary and ConfidentialCopyright © Huawei Technologies Co., Ltd.
Issue 06 (2010-06-15)

-- Quorum Votes by Device --
Device Name Present Possible Status ----------- ------- -------- ------ Device votes: /dev/did/rdsk/d4s2 1 1 Online
----End
7.17 Installing and Configuring the Volume ManagerThis describes how to install the VERITAS Volume Manager on the server. You can regroupseveral physical disks on the disk array into logical devices to facilitate the management. Thelogical devices refers to volumes. You need to perform the operation on both node 1 and node2.
Prerequisitel You have installed the operating system and its patches on the server.
l You have logged in to the server as user root.
l The Auto_Install_DVD3/3_For Solaris_APP_V2.1 disk is available.
l You have obtained the license of the Volume Manage. If the license is not available, contactHuawei technical support personnel for assistance.
Procedure
Step 1 Insert the Auto_Install_DVD3/3_For Solaris_APP_V2.1 disk into the DVD-ROM drive of theserver.
Step 2 Run the following commands to install the Volume Manager:
# cd /cdrom/cdrom0/veritas5.0
# ./install_VXVM.sh
When the system displays Are you sure ?[Y/N] , enter Y.
NOTE
The process takes about 15~30 minutes.
Step 3 Install the patches of the Volume Manager.
# ./install_VXVM_patch.sh
When the system displays Are you sure ?[Y/N] , enter Y.
NOTE
This process takes about 15 to 30 minutes. Then, the server automatically restarts.
Step 4 Log in to the server as user root again.
Step 5 Configure the Volume Manager.1. Run the configuration script file of the Volume Manager.
# cd /cdrom/cdrom0/veritas5.0
# ./config_VXVM.sh
HA System Software Initial Installation Guide(T5220&M4000&M5000, S10) 7 Installing and Configuring the T5220 Server (HA)
Issue 06 (2010-06-15) Huawei Proprietary and ConfidentialCopyright © Huawei Technologies Co., Ltd.
7-33

When the system displays Are you sure ?[Y/N] , enter Y.
2. When the system displays Enter your license key :, enter the license of theVolume Manager.
The system displays the following message after the configuration is complete:
Creating a report on all VERITAS products installed on this system
-----------------***********************-----------------
License Key = ****-****-****-****-****-****-****-** Product Name = VERITAS Volume Manager Serial Number = 22854 License Type = PERMANENT OEM ID = 2002
Features :=
VxVM = Enabled CPU Count = Not Restricted Platform = Solaris Version = 4.1
Current vxdctl mode:mode: enabled
In the previous message, if the value of VxVM is Enabled, you can infer that the installationand configuration of the Volume Manager are correct. Otherwise, perform Step 2 throughStep 5 to install and configure the Volume Manager again.
NOTE
The process takes about 10 minutes.
Step 6 After installing the VERITAS Volume Manager software on node 1 and node 2, check whetherthe field values of vxio and did in the /etc/name_to_major file on node 1 are consistent withthat on node 2.
NOTE
In the system output, the values of vxio and did vary with the system configuration. The following takesthe values 318 and 239 as an example.
1. Run the following command on node 1 to view the node information.
# grep "vxio" /etc/name_to_major
vxio 318
# grep "did" /etc/name_to_major
did 239
2. Run the following command on node 2 to view the node information.
# grep "vxio" /etc/name_to_major
vxio 318
# grep "did" /etc/name_to_major
did 239
3. Check whether the field values of vxio and did in the /etc/name_to_major file on node 1are consistent with that on node 2. In the case of inconsistency, proceed with Step 6.4 and
7 Installing and Configuring the T5220 Server (HA)HA System Software Initial Installation Guide
(T5220&M4000&M5000, S10)
7-34 Huawei Proprietary and ConfidentialCopyright © Huawei Technologies Co., Ltd.
Issue 06 (2010-06-15)

Step 6.5, change the values of node 2 to ensure that the values are consistent with that ofnode 1.
4. Run the following command on node 2 to modify the node information.
a. Run the following command to backup the /etc/name_to_major.# cp /etc/name_to_major /etc/name_to_major.bak
b. Run the following command to modify the value of vxio.# grep -v vxio /etc/name_to_major > /tmp/name_to_major.new# echo "vxio 318" >> /tmp/name_to_major.new# mv /tmp/name_to_major.new /etc/name_to_major# chmod 644 /etc/name_to_major
c. Run the following command to modify the value of did.# grep -v did /etc/name_to_major > /tmp/name_to_major.new# echo "did 239" >> /tmp/name_to_major.new# mv /tmp/name_to_major.new /etc/name_to_major# chmod 644 /etc/name_to_major
5. Run the following command on node 2 to restart the node.
# sync;sync;sync;sync;sync;sync
# shutdown -g0 -y -i6
----End
7.18 Checking the Installation of the Volume ManagerThis describes how to check whether the Volume Manager and its license are installedsuccessfully on both Node1 and Node2.
Prerequisitel You have logged in to the M2000 server as user root.
l The license number of the Volume Manager is available.
Procedure
Step 1 Check whether the license of the Volume Manager is installed successfully.
# vxlicrep
In the output information, if the License Type is DEMO, you can infer that the licenseinstalled is a temporary one.
NOTE
The license installed before the delivery is a demo. Therefore, you need to apply for a commercial licenseand replace the demo with the commercial license on site.
Step 2 Check whether the Volume Manager is correctly installed.
# vxdctl mode
HA System Software Initial Installation Guide(T5220&M4000&M5000, S10) 7 Installing and Configuring the T5220 Server (HA)
Issue 06 (2010-06-15) Huawei Proprietary and ConfidentialCopyright © Huawei Technologies Co., Ltd.
7-35

mode: enabled
If mode is enabled, you can infer that the Volume Manager is correctly installed.
----End
7.19 Uploading the PlatformTools Installation Package tothe Server
Creating the M2000 database and setting the disks on the server are both performed through thePlatformTools. Therefore, you should upload the PlatformTools installation package to theserver beforehand. Perform this task on each server.
Prerequisitel You have logged in to the server as user root.
l The PlatformTools installation package is available.
Procedure
Step 1 Upload the PlatformTools installation package from the PC to the server.TIP
If the file path contains a space, enclose the path with double quotation marks in DBC case. Otherwise, thesystem cannot identify this path. As a result, the files cannot be uploaded or downloaded. Do not place thefile on the desktop of the PC that uses the Microsoft Windows operating system, because the desktop pathcontains spaces.
1. Switch to the command mode on the PC and run the ftp command.
ftp IP address of the server2. Enter the user name and password of user root.3. Set the file path on the PC and the server.
ftp> lcd path of the installation package on the PC
ftp> cd /opt4. Set the transfer mode to binary mode.
ftp> bin5. Upload the installation package.
ftp> put *M2000-TOOL*Platform*.tar.gz
The installation package starts to be uploaded to the server. After the file transfer iscomplete, the system is switched to the ftp> state.
6. Quit the ftp.
ftp> bye
Step 2 To unpack the file package of PlatformTools, run the following command on the server:
# cd /opt
# /usr/sfw/bin/gtar zxf *M2000-TOOL*Platform*.tar.gz
7 Installing and Configuring the T5220 Server (HA)HA System Software Initial Installation Guide
(T5220&M4000&M5000, S10)
7-36 Huawei Proprietary and ConfidentialCopyright © Huawei Technologies Co., Ltd.
Issue 06 (2010-06-15)

Step 3 To set authorization to the PlatformTools directory, run the following command on the server:
# cd /opt/PlatformTools
# chmod -R 750 /opt/PlatformTools
----End
7.20 Configuring M2000 Disks (HA, T5220)This section describes how to set disks on the disk array by using the PlatformTools. The settingof disks involves the creation of volumes on the disk array and the creation of file system on theexporthome volume. Before configuring the disk array, you must customize the operatingsystem. You must customize the operating system on both node 1 and node 2 and need toconfigure the disk array only on node 1.
Prerequisitel You have logged in to node 1 and node 2 as user root.
l The network connection between the PC and node 1 and that between the PC and node 2are normal.
l The file package of PlatformTools has been unpacked to the /opt directory of the server.
Context
CAUTIONWhen the PlatformTools tool is running, ensure that the PC is connected with the server.After starting the PlatformTools, you can type R on the system interface to return to the previousmenu, or type Q to exit the PlatformTools.
Procedure
Step 1 Perform the following operations on node 1 and node 2 separately to customize the Solarissystem parameters.
1. Run the following commands to start the PlatformTools:
# cd /opt/PlatformTools
# ./setup2. Choose Installation > Dual system > NodeN > T5220.
In the previous menus, N indicates the current node where you perform operations. Forexample, if you perform operations on node 1, N indicates 1.
When the system displays the following message, type y, and then press Enter.
Are you sure to continue? [y/n]3. Enter y to continue after confirming the displayed information.
Are you sure to continue? [y/n]
HA System Software Initial Installation Guide(T5220&M4000&M5000, S10) 7 Installing and Configuring the T5220 Server (HA)
Issue 06 (2010-06-15) Huawei Proprietary and ConfidentialCopyright © Huawei Technologies Co., Ltd.
7-37

4. On the displayed interface, choose Customize the Solaris.
When the system displays the following message, type y, and then press Enter to startcustomizing the Solaris system.Do you want to customizing solaris? [y/n]
NOTEWhen the system displays Customize the Solaris completed successfully., itindicates that the system is customized successfully.
If ... Then ...
Node 1 Perform Step 2 to Step 3.
Node 2 Perform Step 3.
Step 2 Perform the following operations on node 1 to create volumes.
1. On the displayed system, choose Create volumes to create volumes.
When the system displays the following message, type y, and then press Enter to startcreating volumes.
Do you want to create volumes? [y/n]
NOTE
If no fail or no error information is displayed, it indicates that the volumes are created.
This process takes about 120 minutes.
2. When the system displays the following message, press Enter to continue.Hit RETURN to go back
Step 3 When the system returns to the main interface, type Q to quit the PlatformTools.
----End
7.21 Checking the Disk Configurations of the M2000 Server(HA
This describes how to check whether the local disk configurations are the same as planned. Inthe case of inconsistency, contact Huawei technical support personnel.
Prerequisitel You have logged in to node 1 and node 2 as user root.
l The network connection between the PC and node 1 and that between the PC and node 2are normal.
Procedure
Step 1 Run the following command to check whether node 1 is the active node.
# scstat -g
7 Installing and Configuring the T5220 Server (HA)HA System Software Initial Installation Guide
(T5220&M4000&M5000, S10)
7-38 Huawei Proprietary and ConfidentialCopyright © Huawei Technologies Co., Ltd.
Issue 06 (2010-06-15)

View the system output to determine the active and standby nodes. For example, if the host nameis osssvr_rs and disk name is ossdg_rs. the server whose resource status is online is the activenode and the server whose resource status is offline is the standby node.
Step 2 If node 1 is the standby node, run the following command to switch node 1 to the active node:
# scswitch -S -h hostname of node 2
After the switchover, perform Step 1 to check whether node 1 is the active node. If node 1 isnot the active node, performStep 2.
Step 3 Run the following command on node 1 to check the settings of the disk array.
# vxprint -pv
If the values of STATE in the v and pl columns are ACTIVE in the displayed message, you caninfer that the disks on the disk array are successfully set.
NOTEThe values of ASSOC in the columns where the TY NAME is dm varies according to the serverconfiguration.
Step 4 Run the following commands on node 1 to check whether the exporthome volume is mountedto the export/home directory.
# df -k
Filesystem kbytes used avail capacity Mounted on/dev/md/dsk/d100 17146994 10350431 6625094 61% //devices 0 0 0 0% /devicesctfs 0 0 0 0% /system/contractproc 0 0 0 0% /procmnttab 0 0 0 0% /etc/mnttabswap 9496440 1320 9495120 1% /etc/svc/volatileobjfs 0 0 0 0% /system/objectfd 0 0 0 0% /dev/fdswap 9495184 64 9495120 1% /tmpswap 9495224 104 9495120 1% /var/runswap 9495120 0 9495120 0% /dev/vx/dmpswap 9495120 0 9495120 0% /dev/vx/rdmp/dev/md/dsk/d215 1020815 3604 955963 1% /global/.devices/node@1/dev/md/dsk/d115 1020815 3602 955965 1% /global/.devices/node@2/dev/vx/dsk/ossdg/exporthome 144506594 2647322 140414207 2% /export/home
Ensure that the system output displays that the /dev/vx/dsk/ossdg/exporthome disk device ismounted to the /export/home directory. If the disk device is not mounted to the directory, contactHuawei technical support personnel for assistance.
Step 5 Run the following commands on node 2 to check whether the exporthome volume is mountedto the export/home directory.
# df -k
Filesystem kbytes used avail capacity Mounted on/dev/md/dsk/d100 17146994 10350431 6625094 61% //devices 0 0 0 0% /devicesctfs 0 0 0 0% /system/contractproc 0 0 0 0% /procmnttab 0 0 0 0% /etc/mnttabswap 9496440 1320 9495120 1% /etc/svc/volatileobjfs 0 0 0 0% /system/objectfd 0 0 0 0% /dev/fdswap 9495184 64 9495120 1% /tmpswap 9495224 104 9495120 1% /var/run
HA System Software Initial Installation Guide(T5220&M4000&M5000, S10) 7 Installing and Configuring the T5220 Server (HA)
Issue 06 (2010-06-15) Huawei Proprietary and ConfidentialCopyright © Huawei Technologies Co., Ltd.
7-39

swap 9495120 0 9495120 0% /dev/vx/dmpswap 9495120 0 9495120 0% /dev/vx/rdmp/dev/md/dsk/d215 1020815 3604 955963 1% /global/.devices/node@1/dev/md/dsk/d115 1020815 3602 955965 1% /global/.devices/node@2
Ensure that the system output displays that no disk is mounted to /export/home directory.
Step 6 Run the following command to check whether the resource group is normal. The resource groupmust be in online status on either of the two nodes.
# scstat -D-- Device Group Servers --
Device Group Primary Secondary ------------ ------- --------- Device group servers: ossdg osssvr-2 osssvr-1
-- Device Group Status --
Device Group Status ------------ ------ Device group status: ossdg Online
-- Multi-owner Device Groups --
Device Group Online Status ------------ -------------
Step 7 Run the following command to check whether the shared devices are normal. The shared devicesmust be in online status on either of the two nodes.
# scstat -g-- Resource Groups and Resources --
Group Name Resources ---------- --------- Resources: oss_rg osssvr_rs ossdg_rs
-- Resource Groups --
Group Name Node Name State ---------- --------- ----- Group: oss_rg osssvr-1 Offline Group: oss_rg osssvr-2 Online
-- Resources --
Resource Name Node Name State Status Message ------------- --------- ----- -------------- Resource: osssvr_rs osssvr-1 Offline Offline Resource: osssvr_rs osssvr-2 Online Online - LogicalHostname online.
Resource: ossdg_rs osssvr-1 Offline Offline Resource: ossdg_rs osssvr-2 Online Online
----End
7.22 Installing and Configuring the Sybase (HA)This describes how to install the Sybase and its patches on the server.
7 Installing and Configuring the T5220 Server (HA)HA System Software Initial Installation Guide
(T5220&M4000&M5000, S10)
7-40 Huawei Proprietary and ConfidentialCopyright © Huawei Technologies Co., Ltd.
Issue 06 (2010-06-15)

Prerequisitel The communication between the PC and the server is normal.
l You have logged in to node 1 and node 2 as user root through the PuTTY.
l The Auto_Install_DVD3/3_For Solaris_APP_V2.1 and SYBASE ASE15.0.3 License diskare available.
Procedure
Step 1 You have inserted the Auto_Install_DVD3/3_For Solaris_APP_V2.1 disk into the DVD-ROMdrive of node 1.
Step 2 Install the Sybase software and patches on node 1.
# cd /cdrom/cdrom0/sybase
# ./install_sybase.sh /opt/sybase Y
When the system displays Are you sure ?[Y/N] , enter Y.
NOTE
This process takes about 30 minutes. During the process, user dbuser is automatically created and thepassward of the user is set to dbuser.
Step 3 Run the following commands to remove the Auto_Install_DVD3/3_For Solaris_APP_V2.1disk:
# cd /
# eject
Step 4 Perform the following operations to install the Sybase license.1. Insert the Sybase 15.0.3 license disk into the DVD-ROM drive of the server.2. Copy the license file from the disk to the /opt/sybase/SYSAM-2_0/licenses directory.
# rm -rf /opt/sybase/SYSAM-2_0/licenses/*
# cd /cdrom/cdrom0/ase15_li/solaris_
# cp *.lic /opt/sybase/SYSAM-2_0/licenses
# chown dbuser:staff /opt/sybase/SYSAM-2_0/licenses/*
NOTE
The extension of the Sybase license file is .lic.
3. Remove the license installation disk.
# cd /
# eject
Step 5 Insert the Auto_Install_DVD3/3_For Solaris_APP_V2.1 disk into the DVD-ROM drive of node1 again.
Step 6 Create the Sybase database server on node 1.
This process takes about 30 minutes.
HA System Software Initial Installation Guide(T5220&M4000&M5000, S10) 7 Installing and Configuring the T5220 Server (HA)
Issue 06 (2010-06-15) Huawei Proprietary and ConfidentialCopyright © Huawei Technologies Co., Ltd.
7-41

CAUTIONl 192.168.8.31 in the following command is the planned logical IP address of node 1 and node
2. Replace the IP address based on the actual situation. For the T5220 server, see 7.2 Planningthe Host Name and IP Address for the T5220 Server (HA). For the M4000/M5000 server,see 8.2 Planning the Host Name and IP Address for the M4000/M5000 Server (HA).
l In the following command, SYB is the name of the database server. Do not change this nameunless otherwise specified.
# cd /cdrom/cdrom0/sybase
# ./create_sybase_master.sh /export/home/sybdev 192.168.8.31 SYB
When the system displays Are you sure ?[Y/N] , enter Y.
Step 7 Run the following commands to remove the Auto_Install_DVD3/3_For Solaris_APP_V2.1disk:
# cd /
# eject
Step 8 Insert the Auto_Install_DVD3/3_For Solaris_APP_V2.1 disk into the DVD-ROM drive of node2.
Step 9 Creat user dbuser and the passward on node 2.
# cd /cdrom/cdrom0/sybase
# ./install_sybase.sh /opt/sybase N
When the system displays Are you sure ?[Y/N] , enter Y.
Step 10 Run the following commands to remove the Auto_Install_DVD3/3_For Solaris_APP_V2.1disk:
# cd /
# eject
----End
7.23 Creating the M2000 Database (HA, T5220)This describes how to create the M2000 database through the PlatformTools. To optimize theperformance of the database, you need to set Sybase-related parameters before creating thedatabase. You need to perform the operation on only node 1.
Prerequisitel You have logged in to node 1 as user root through the PuTTY.
l You have decompressed the file package of the PlatformTools to the /opt directory of theserver.
7 Installing and Configuring the T5220 Server (HA)HA System Software Initial Installation Guide
(T5220&M4000&M5000, S10)
7-42 Huawei Proprietary and ConfidentialCopyright © Huawei Technologies Co., Ltd.
Issue 06 (2010-06-15)

Context
CAUTIONWhen the PlatformTools tool is running, ensure that the PC is connected with the server.
Procedure
Step 1 Run the following commands on the server to start the PlatformTools.
# cd /opt/PlatformTools
# ./setup
NOTE
After starting the PlatformTools, you can type R on the system interface to return to the upper-level menuor type Q to exit the PlatformTools.
Step 2 On the displayed interface, choose Installation > Dual system > Node1 > T5220.
When the system displays the following message, type y, and then press Enter.
Are you sure to continue? [y/n]
Step 3 On the displayed interface, choose Set Sybase parameters to configure the Sybase parameters.
When the system displays the following prompt, type y to configure the parameters of the Sybasedatabase.
Do you want to modify the parameters of Sybase? [y/n]
Step 4 When the system displays the following message, type the server name of the Sybase databasethat runs on the current server, and then press Enter:
CAUTIONThe name of the Sybase database server that you enter must be consistent with that set in " Createthe Sybase database server " in 7.22 Installing and Configuring the Sybase (HA).
Please input Database server , "q" to quit:
Step 5 When the system displays the following message, type sa, and then press Enter:Please input Database user name , "q" to quit:
Step 6 When the system displays the following information, enter the password of user sa created onthe current server. Then, press Enter.
The default password of user sa is emsems.
Please input Database password , "q" to quit:
NOTE
When the system displays Set the parameters of Sybase completed successfully.,you can infer that the Sybase parameters are set successfully.
HA System Software Initial Installation Guide(T5220&M4000&M5000, S10) 7 Installing and Configuring the T5220 Server (HA)
Issue 06 (2010-06-15) Huawei Proprietary and ConfidentialCopyright © Huawei Technologies Co., Ltd.
7-43

Step 7 When the system displays the following message, press Enter to continue.Hit RETURN to go back
Step 8 On the displayed interface, choose Create an OMC database to create the database.When the system displays the following prompt, type y to create the database device.Do you want to create database? [y/n]
Step 9 When the system displays the following message, type the server name of the Sybase databasethat runs on the current server, and then press Enter:
CAUTIONThe name of the Sybase database server that you enter must be consistent with that set in " Createthe Sybase database server " in 7.22 Installing and Configuring the Sybase (HA).
Please input Database server , "q" to quit:
Step 10 When the system displays the following message, type sa, and then press Enter:Please input Database user name , "q" to quit:
Step 11 When the system displays the following information, enter the password of user sa created onthe current server. Then, press Enter.
The default password of user sa is emsems.
Please input Database password , "q" to quit:
NOTE
When the system displays Create database completed successfully., you can infer thatthe database is created successfully. This process takes about 90 to 180 minutes.
----End
7.24 Troubleshooting: Failed to Set the Sybase Parametersby Using the PlatformTools (HA)
This describes a solution to the problem that you fail to set the Sybase parameters by using thePlatformTools.
Symptom
When you are setting the Sybase parameters by using the PlatformTools, the system displaysthe following message to acknowledge the failure to set the Sybase parameters.
Set the parameters of Sybase failed. Please check the log file.
Fault Analysis
Excessive memory is allocated to the database parameters defined by the current databaseconfiguration file SYB.cfg. Thus, free memory cannot meet the requirements for setting Sybaseparameters.
7 Installing and Configuring the T5220 Server (HA)HA System Software Initial Installation Guide
(T5220&M4000&M5000, S10)
7-44 Huawei Proprietary and ConfidentialCopyright © Huawei Technologies Co., Ltd.
Issue 06 (2010-06-15)
Troubleshooting:Log in to the server as user dbuser and restore the Sybase parameter configuration file.
1. Run the following commands to stop the Sybase:-bash-3.00$ isql -SSYB -Usa -P password of user sa1> shutdown SYB_BACKUP2>go1> shutdown2>go
NOTE
l Run the command ps -ef | grep sybase | grep -v grep to check whether the Sybase is stopped. Ifno output is displayed, you can infer that the Sybase is stopped. If the Sybase is not stopped, runthe kill -9 PID of Sybase command to forcibly stop the Sybase process.
l SYB in the previous commands refers to the name of the database server. Enter the name of thedatabase server based on the actual situation.
2. Run the following command to restore the Sybase parameter configuration file.-bash-3.00$ cd /opt/sybase/ASE-15_0-bash-3.00$ cp SYB.cfg /tmp/SYB.bak-bash-3.00$ cp -p SYB.001 SYB.cfg
3. Restart the Sybase.-bash-3.00$ cd /opt/sybase/ASE-15_0/install-bash-3.00$ ./startserver -f ./RUN_SYB
NOTE
It takes about 30 seconds to start the Sybase. Please wait.
Press Enter. When the -bash-3.00$ prompt is displayed, run the following command:-bash-3.00$ nohup ./startserver -f ./RUN_SYB_backSYB in the previous commands refers to the name of the database server. Enter the nameof the database server based on the actual situation.
4. Run the following commands to check whether the Sybase is started:-bash-3.00$ cd /opt/sybase/ASE-15_0/install-bash-3.00$ ./showserverUID PID PPID C STIME TTY TIME CMD dbuser 1594 1589 0 10:53:40 ? 0:01 /opt/sybase/ASE-15_0/bin/dataserver -ONLINE:5,0,0x65008686, 10000000000, 0x1fc0 dbuser 1597 1589 0 10:53:41 ? 0:01 /opt/sybase/ASE-15_0/bin/dataserver -ONLINE:8,0,0x65008686, 10000000000, 0x1fc0 ... ... dbuser 1608 1607 0 10:54:58 pts/2 0:00 /opt/sybase/ASE-15_0/bin/backupserver -e/opt/sybase/ASE-15_0/install/SYB_back.lIf the output information contains dataserver and backupserver, you can infer that the dataservice and backup service of the database are normally started.
5. User dbuser logs out.-bash-3.00$ exit
6. Log in to the server as user root and reset the Sybase parameters. For details, see Table7-12.
HA System Software Initial Installation Guide(T5220&M4000&M5000, S10) 7 Installing and Configuring the T5220 Server (HA)
Issue 06 (2010-06-15) Huawei Proprietary and ConfidentialCopyright © Huawei Technologies Co., Ltd.
7-45
Table 7-12 References
System Type References
T5220 7.23 Creating the M2000 Database (HA,T5220)
M4000/M5000 8.25 Creating the M2000 Database (HA,M4000/M5000)
7.25 Checking the Sybase Server ConnectionThis describes how to check the Sybase server connection to ensure that the Sybase database isconnected. You need to perform this operation on only the active node.
Prerequisitel The database is normally started.
l You have logged in to the M2000 server as user dbuser.
Procedure
Step 1 Run the following command to view the database server name:
-bash-3.00$ cd /opt/sybase/ASE-15_0/install
-bash-3.00$ ls
If the system displays the following information, you can infer that the name of the databaseserver is SYB.
RUN_SYBRUN_SYB_back
Step 2 Run the following command to check whether the database server can be connected.
In the command, SYB indicates the database server name that you view in Step 1. Replace itwith an actual database server name.
-bash-3.00$ isql -SSYB -Usa -Ppassword of user sa
l If the system output contains 1> , you can infer that the database server is operating normally.Enter exit to log out of the M2000 server.
l If the system output does not contain 1> , you can infer that the database is operatingabnormally. You need to contact Huawei technical support personnel for assistance.
----End
7.26 Checking the Version and Patches of the SybaseThis describes how to check whether the Sybase application software and patches listed in theversion configuration table are installed. The installation of the right version of Sybaseapplication software and patches is essential to the normal operation of the M2000 system.You
7 Installing and Configuring the T5220 Server (HA)HA System Software Initial Installation Guide
(T5220&M4000&M5000, S10)
7-46 Huawei Proprietary and ConfidentialCopyright © Huawei Technologies Co., Ltd.
Issue 06 (2010-06-15)

need to perform this operation on only the active node.For an HA system, you need to performthis operation on only the active node.
PrerequisiteYou have logged in to the M2000 server as user dbuser.
Context
CAUTIONIn the following commands, SYB indicates the name of the database server. Replace it with anactual database server name.
Procedure
Step 1 To check that the Sybase database software and EBF16548 patch are installed, run the followingcommands:
-bash-3.00$ isql -SSYB -Usa -Ppassword of user sa
1> select @@version
2> go
Adaptive Server Enterprise/15.0.3/EBF 16548 ESD#1/P/Sun_svr4/OS 5.8/ase1503/2680/64-bit/FBO/Thu Mar 5 09:39:28 2009
In the system output, 15.0.3 indicates the version number of the current Sybase; 16548indicates the patch number of the installed patch. The version number of the Sybase and thepatch number must be consistent with those provided in the version relation table; otherwise,contact Huawei technical support personnel for assistance.
Step 2 To check that the license of the Sybase database is installed, run the following commands:
1> sp_lmconfig
2> go
If the system output contains ASE_CORE of Expiry Date is Permanent, you can infer thatthe license of the Sybase database is successfully installed. Otherwise, contact Huawei technicalsupport personnel for assistance.
Step 3 To exit isql, run the following command:
1> exit
----End
7.27 Installing the Sybase and Patches on Node2This is performed to install the Sybase and patches on Node2. To install the Sybase and patcheson Node2, you must copy the installation files from Node1 to Node2 and execute the installation.
HA System Software Initial Installation Guide(T5220&M4000&M5000, S10) 7 Installing and Configuring the T5220 Server (HA)
Issue 06 (2010-06-15) Huawei Proprietary and ConfidentialCopyright © Huawei Technologies Co., Ltd.
7-47
Prerequisitel Install the Sybase and patches on Node1.
l Log in to Node1 as user dbuser.
Procedure
Step 1 To stop the Sybase on Node1, execute the following command:
-bash-3.00$ isql -SSYB -Usa -PPassword of sa
1> shutdown SYB_BACKUP
2> go
1> shutdown
2> go
Step 2 To pack the Sybase on Node1, log in to Node1 as root, and execute the following commands:
# cd /opt
# tar cvf sybase.tar sybase
Step 3 Execute FTP to transmit the /opt/sybase.tar file from Node1 to the /opt directory on Node2.
1. Transmit the file to Node2 through FTP.
# ftp Active adaptor IP for the public network of Node2
2. Enter root and the password to go to the opt directory on Node2.
3. Enter the /opt directory on Node2.
# cd /opt
4. Set the binary mode for transmitting the file.
ftp> bin
5. Transmit the file /opt/sybase.tar.
ftp> put /opt/sybase.tar
6. Exit FTP.
ftp> quit
Step 4 To install the Sybase on Node2, log in to Node2 as root, and execute the following commandson Node2:
# cd /opt
# tar xvf sybase.tar
# chown -R dbuser:staff /opt/sybase
----End
7 Installing and Configuring the T5220 Server (HA)HA System Software Initial Installation Guide
(T5220&M4000&M5000, S10)
7-48 Huawei Proprietary and ConfidentialCopyright © Huawei Technologies Co., Ltd.
Issue 06 (2010-06-15)

8 Installing and Configuring the M4000/M5000 Server (HA)
About This Chapter
This describes how to install the Solaris software, Sybase software, Sun Cluster software, andtheir relevant patches on the M2000 HA system that is installed on the M4000/M5000 server,and how to configure other basic parameters and disk arrays for the server. After the installationand configuration, the server can meet the specified requirements of the M2000 applicationsoftware.
8.1 Partition Planning of the M4000/M5000 Server (HA)This describes the planning of names and sizes of the M4000/M5000 server disk partitions, andthe redundancy mode of the disk arrays.
8.2 Planning the Host Name and IP Address for the M4000/M5000 Server (HA)This describes the default host names and the IP addresses of the M2000 system planned beforedelivery.
8.3 Configuring the XSCF of the M4000/M5000 ServerThis section describes how to configure the eXtended System Controller facility (XSCF) of theM4000/M5000 by using a PC. You need to perform this operation on each server.
8.4 Installing Solaris and Its Patches on the M4000/M5000 ServerThis describes how to use a PC to log in to the M4000/M5000 server through an XSCF and theninstall the Solaris software and its patches on the server. Perform this task on each server.
8.5 Checking the Version and Patches of the SolarisThis describes how to check the version and patches of the Solaris operating system and to makesure that the M2000 server application can be installed in the operating system of the designatedversion. For the mapping between the M2000 server versions and the operating system versions,see the version configuration table. Perform this operation on both nodes.
8.6 Checking the Disk Partitioning of the M2000 Server (HA)To ensure that the M2000 server software can function properly, you need to check whether theactual partitioning is consistent with that predefined in the server disk partitioning plan. If theactual partitioning is different, contact Huawei technical support personnel for assistance. Youneed to check the partitioning on both nodes.
HA System Software Initial Installation Guide(T5220&M4000&M5000, S10) 8 Installing and Configuring the M4000/M5000 Server (HA)
Issue 06 (2010-06-15) Huawei Proprietary and ConfidentialCopyright © Huawei Technologies Co., Ltd.
8-1

8.7 Checking the Local Disk Mirroring of the M4000/M5000 ServerThis describes how to check the status of the local disk mirroring to ensure the proper functioningof the server.
8.8 Configuring the Hostname and the IP Address of the Server (HA)Run the script file to set the host name and IP address of the server and other basic parameters.You need to perform the operation on both node 1 and node 2.
8.9 Changing the IP Address of the S2600 Disk Array (Serial Port Mode)This section describes how to change the IP address of the S2600 disk array in serial port mode.Before configuring the disk array, you need to change the IP address of the disk array. The IPaddress of each S2600 disk array needs to be changed.
8.10 Changing the IP Address of the S3X00 Disk Array (Serial Port Mode)This section describes how to change the IP address of the S3X00 disk array in serial port mode.Before configuring the disk array, you need to change the IP address of the disk array. The IPaddress of each S3X00 disk array needs to be changed.
8.11 Changing the IP Address of the 6140 Disk Array (Serial Port Mode)This section describes how to change the IP address of the 6140 disk array in serial port mode.Before configuring the disk array, you need to change the IP address of the disk array. The IPaddress of each 6140 disk array needs to be changed.
8.12 Configuring the S2600 Disk Array (HA)This section describes how to configure the S2600 disk array. Each S2600 disk array has anactive controller and a standby controller. You can configure the S2600 disk array by setting upa connection between the server and the active controller. Both of the S2600 disk arrays needto be configured.
8.13 Configuring the S3200 Disk Array (HA)Each S3200 disk array has an active controller and a standby controller. You can configure theS3200 disk arrays by setting up a connection between the server and the active controller. Youneed to configure the two S3200 disk arrays.
8.14 Configuring the 6140 Disk Array (HA)Each 6140 disk arrays have an active controller and a standby controller. You can configure the6140 disk arrays by setting up a connection between the server and the active controller. Boththe two disk arrays need to be configured.
8.15 Enabling Multi-Path I/O (HA)This describes how to enable the I/O multipathing of the Solaris system. You need to performthe operation on both node 1 and node 2.
8.16 Labeling Volumes for the Disk Array (HA)This describes how to label each logical partition so that the operating system can find theassociated logical partitions of the disks on the disk array.
8.17 Installing and Configuring the Sun Cluster Software and PatchesThe Sun Cluster software is used to manage the system resource. Thus, system resource can beautomatically switched to the standby server to keep the normal operation of the system whenthe active server is faulty.
8.18 Checking Installation of the Sun Cluster Software and PatchesAfter installing the Sun Cluster software and its patch on Node1 and Node2, you must checkthat the Sun Cluster software is correctly installed and the software is operational. This operationis performed only on Node1.
8.19 Installing and Configuring the Volume Manager
8 Installing and Configuring the M4000/M5000 Server (HA)HA System Software Initial Installation Guide
(T5220&M4000&M5000, S10)
8-2 Huawei Proprietary and ConfidentialCopyright © Huawei Technologies Co., Ltd.
Issue 06 (2010-06-15)

This describes how to install the VERITAS Volume Manager on the server. You can regroupseveral physical disks on the disk array into logical devices to facilitate the management. Thelogical devices refers to volumes. You need to perform the operation on both node 1 and node2.
8.20 Checking the Installation of the Volume ManagerThis describes how to check whether the Volume Manager and its license are installedsuccessfully on both Node1 and Node2.
8.21 Uploading the PlatformTools Installation Package to the ServerCreating the M2000 database and setting the disks on the server are both performed through thePlatformTools. Therefore, you should upload the PlatformTools installation package to theserver beforehand. Perform this task on each server.
8.22 Configuring M2000 Disks (HA, M4000/M5000)This section describes how to configure disks on the disk array by using the PlatformTools.Configuring disks involves creating volumes on the disk array and creating the file system onthe exporthome volume. Before configuring the disk array, you must customize the operatingsystem. You must customize the operating system on both node 1 and node 2 and need toconfigure the disk array only on node 1.
8.23 Checking the Disk Configurations of the M2000 Server (HAThis describes how to check whether the local disk configurations are the same as planned. Inthe case of inconsistency, contact Huawei technical support personnel.
8.24 Installing and Configuring the Sybase (HA)This describes how to install the Sybase and its patches on the server.
8.25 Creating the M2000 Database (HA, M4000/M5000)This describes how to create the M2000 database through the PlatformTools. To optimize theperformance of the M2000 database, you need to set the Sybase parameters before creating theM2000 database. The M2000 database needs to be created only on node 1.
8.26 Troubleshooting: Failed to Set the Sybase Parameters by Using the PlatformTools (HA)This describes a solution to the problem that you fail to set the Sybase parameters by using thePlatformTools.
8.27 Checking the Sybase Server ConnectionThis describes how to check the Sybase server connection to ensure that the Sybase database isconnected. You need to perform this operation on only the active node.
8.28 Checking the Version and Patches of the SybaseThis describes how to check whether the Sybase application software and patches listed in theversion configuration table are installed. The installation of the right version of Sybaseapplication software and patches is essential to the normal operation of the M2000 system.Youneed to perform this operation on only the active node.For an HA system, you need to performthis operation on only the active node.
8.29 Installing the Sybase and Patches on Node2This is performed to install the Sybase and patches on Node2. To install the Sybase and patcheson Node2, you must copy the installation files from Node1 to Node2 and execute the installation.
HA System Software Initial Installation Guide(T5220&M4000&M5000, S10) 8 Installing and Configuring the M4000/M5000 Server (HA)
Issue 06 (2010-06-15) Huawei Proprietary and ConfidentialCopyright © Huawei Technologies Co., Ltd.
8-3

8.1 Partition Planning of the M4000/M5000 Server (HA)This describes the planning of names and sizes of the M4000/M5000 server disk partitions, andthe redundancy mode of the disk arrays.
In the HA system, the configuration and partition planning of the local hard disk on each serverare the same. The M4000/M5000 system should be configured with two 146 GB hard disks andone S3200/6140 or S2600 disk array. The S3200/6140 disk array consists of 16 x 146 GB harddisks and the S2600 disk array consists of 12 x 450 GB hard disks. The two local hard disks arepartitioned according to Table 8-1.
Table 8-1 Planning of the server disk partitions (M4000/M5000)
Hard DiskNo.
Partition No.
Partition Name Size (MB) Description
1
0 / 110000 Root partition
1 swap 20000 Data exchangepartition
2 overlap - Used for diskmapping. Retain thedefault size.
3 - - -
4 - - -
5 - - -
6 /globaldevices 1024 Reserved
7 - 10~260 Used for diskmirroring. You do notneed to set the partitionname. Using the fastinstallation CD-ROMcan automaticallyallocate the sizes ofpartitions.
2 Used as the mirroring disk for the first hard disk
Each Sun M4000/M5000 server is configured with an S3200/6140 disk array or an S2600 diskarray.
l Each S3200/6140 disk array consists of sixteen disks. Two disks are used as hot spares andthe other fourteen disks are used as two RAID5s. Hot spares are used to replace the faultydisks. Two volumes of the same size are created on the disk array. For details, see Table8-2.
8 Installing and Configuring the M4000/M5000 Server (HA)HA System Software Initial Installation Guide
(T5220&M4000&M5000, S10)
8-4 Huawei Proprietary and ConfidentialCopyright © Huawei Technologies Co., Ltd.
Issue 06 (2010-06-15)
l Each S2600 disk array consists of twelve disks. Two disks are used as hot spare disk andthe other ten disks are used as one RAID 10. Hot spares are used to replace the faulty disks.Three volumes of the same size are created on the disk array. For details, see Table 8-3.
Table 8-2 Planning for the S3200/6140 disk array
Disk Array No. Volume Name Size (GB)
1 oss_v0 810
oss_v1 810
2 Used as the mirrored disk array of the first disk array
Table 8-3 Planning for the S2600 disk array
Disk Array No. Volume Name Size (GB)
1 oss_app0 671
oss_app1 671
oss_app2 671
2 Used as the mirrored disk array of the first disk array
8.2 Planning the Host Name and IP Address for the M4000/M5000 Server (HA)
This describes the default host names and the IP addresses of the M2000 system planned beforedelivery.
For details about the default host names and IP addresses of the M2000 system, see Table 8-4and Table 8-5.
Table 8-4 Planning of the host names and IP addresses (HA, M4000/M5000)
EthernetPortFunction
Ethernet PortName
Host Name Physical IPAddress
Logical IPAddress ofIPMP
Service/IPMPport
bge0 osssvr-1-bge0 192.168.8.59 192.168.8.11
osssvr-2-bge0 192.168.8.61 192.168.8.12
nxge0 osssvr-1-nxge0 192.168.8.60 192.168.8.11
osssvr-2-nxge0 192.168.8.62 192.168.8.12
Maintenanceport
nxge3 osssvr-1-nxge3 192.168.8.241 None
osssvr-2-nxge3 192.168.8.242
HA System Software Initial Installation Guide(T5220&M4000&M5000, S10) 8 Installing and Configuring the M4000/M5000 Server (HA)
Issue 06 (2010-06-15) Huawei Proprietary and ConfidentialCopyright © Huawei Technologies Co., Ltd.
8-5

EthernetPortFunction
Ethernet PortName
Host Name Physical IPAddress
Logical IPAddress ofIPMP
Remote serialport
XSCF LAN0 osssvr-1-xscf0 192.168.8.141 NoneNOTE
The IP addressesof the towEthernet ports ofeach server are intwo differentnetworksegments.
osssvr-2-xscf0 192.168.8.142
XSCF LAN1 osssvr-1-xscf1 192.168.9.141
osssvr-2-xscf1
Maintenanceport of thedisk array
Ctrl A Ethernetport 1
S2600-1/S3200-1
192.168.8.39 None
S2600-2/S3200-2
192.168.8.41
Ctrl B Ethernetport 1
S2600-1/S3200-1
192.168.8.40
S2600-2/S3200-2
192.168.8.42
Table 8-5 Planning of the logical IP addresses between servers (HA, M4000/M5000)
Server Host Name Physical IPAddress(Logical IPAddress ofIPMP)
Logical HostName
Logical IPAddress
Node 1 osssvr-1 192.168.8.11 osssvr 192.168.8.31
Node 2 osssvr-2 192.168.8.12 osssvr 192.168.8.31
During the configuration of the maintenance dual plane, the IP address of node 1, that is,192.168.8.11, is used as the logical IP address of Ethernet ports bge0 and nxge0 on node 1.
During the configuration of the maintenance dual plane, the IP address of node 2, that is,192.168.8.12, is used as the logical IP address of Ethernet ports bge0 and nxge0 on node 2.
For details about the planning of the ports on the M4000/M5000 server, see Figure 8-1 or Figure8-2. For details about the ports on the disk array, see Figure 8-3 or Figure 8-4.
8 Installing and Configuring the M4000/M5000 Server (HA)HA System Software Initial Installation Guide
(T5220&M4000&M5000, S10)
8-6 Huawei Proprietary and ConfidentialCopyright © Huawei Technologies Co., Ltd.
Issue 06 (2010-06-15)

Figure 8-1 Ports on the M4000 server
Figure 8-2 Ports on the M5000 server
Figure 8-3 Ports on the S2600 disk array
HA System Software Initial Installation Guide(T5220&M4000&M5000, S10) 8 Installing and Configuring the M4000/M5000 Server (HA)
Issue 06 (2010-06-15) Huawei Proprietary and ConfidentialCopyright © Huawei Technologies Co., Ltd.
8-7

Figure 8-4 Ports on the S3200 disk array
8.3 Configuring the XSCF of the M4000/M5000 ServerThis section describes how to configure the eXtended System Controller facility (XSCF) of theM4000/M5000 by using a PC. You need to perform this operation on each server.
Prerequisitel A serial port cable is available.
l A PC is available.
ContextNOTEYou should configure the XSCF only during the initial installation.
Procedure
Step 1 Use the serial port cable to connect the serial port of the XSCF and that of the PC.
One end of the serial port cable is an RJ-45 connector that is connected to the serial port of theXSCF, as shown in Figure 8-5. The other end is a DB-9 connector that is connected to the serialport of the PC (COM1 or COM2).
8 Installing and Configuring the M4000/M5000 Server (HA)HA System Software Initial Installation Guide
(T5220&M4000&M5000, S10)
8-8 Huawei Proprietary and ConfidentialCopyright © Huawei Technologies Co., Ltd.
Issue 06 (2010-06-15)

Figure 8-5 Connectors provided by the XSCF
1 Serial port 2 LAN1 (Ethernet #1) 3 LAN0 (Ethernet #0)
4 Uninterrupted power supply port,namely, UPC1
5 Uninterrupted power supply port,namely, UPC0
- -
For details about the cable sequence and related signals, see Table 8-6.
Table 8-6 Wire sequence standards for the serial port cables between the XSCF and the PC
RJ-45 Signal DB-9 Socket
3 TXD/RXD 2
4 REF/GND 5
5 REF/GND 5
6 RXD/TXD 3
After the PC and the XSCF are connected, the physical connection between the PC and the SunM4000/M5000 server is set up.
HA System Software Initial Installation Guide(T5220&M4000&M5000, S10) 8 Installing and Configuring the M4000/M5000 Server (HA)
Issue 06 (2010-06-15) Huawei Proprietary and ConfidentialCopyright © Huawei Technologies Co., Ltd.
8-9

Step 2 To configure a PC as a HyperTerminal, perform the following steps:1. Set the key on the operation panel to the position of maintenance. Figure 8-6 shows the
mode switch of the operation panel. The handle icon indicates the maintenance position,and the lock icon indicates the locked position.
Figure 8-6 Mode switch on the operation panel
2. Power on the PC.3. Choose Start > Programs (P) > Accessories > Communications > HyperTerminal.4. In the Connection Description dialog box, enter the name of the new connection.5. Specify a serial port of the PC to connect the XSCF, for example, COM1.6. Set the properties of the serial port by referring to Table 8-7, and then click OK.
Table 8-7 Setting the properties of a serial port
Property Property Value
Bits per second 9600
Data bits 8
Parity None
Stop bits 1
Flow control None
Step 3 In the window of the HyperTerminal, enter the user name default when the followinginformation is displayed.login:
Step 4 When the following information is displayed, set the key on the operation panel to the lockedposition, and then press Enter.
Change the panel mode switch to Locked and press return...
Step 5 When the following information is displayed, set the key on the operation panel to themaintenance position, and then wait for five seconds to press Enter.
8 Installing and Configuring the M4000/M5000 Server (HA)HA System Software Initial Installation Guide
(T5220&M4000&M5000, S10)
8-10 Huawei Proprietary and ConfidentialCopyright © Huawei Technologies Co., Ltd.
Issue 06 (2010-06-15)

Leave it in that position for at least 5 seconds. Change the panel mode switch to Service, and press return...
Step 6 Run the following command to restore the default values of the XSCF. During the restore of thedefault values, enter yes when the system prompts you to enter [yes/no].
XSCF> restoredefaults -c factory
Step 7 When the following information is displayed, the XSCF restarts automatically.
Please stand by while rebooting the system.(15)Restarting system.
NOTEWhen the following information is displayed, this state remains for a long period of time. In such a case,you need to pull out all the power cables of the server and then connect the power cables again in 10 secondsto restart the XSCF. After you connect the power cables again, the restart process automatically continues.XSCF BOOT STOP (recover by NFB-OFF/ON)
Step 8 When the system displays the following message again, enter the user name default.login:
Step 9 When the following information is displayed, set the key on the operation panel to the lockedposition, and then press Enter.
Change the panel mode switch to Locked and press return...
Step 10 When the following information is displayed, set the key on the operation panel to themaintenance position, and then wait for five seconds to press Enter.
Leave it in that position for at least 5 seconds. Change the panel mode switch to Service, and press return...
Step 11 Run the following command to create user adminuser:
XSCF> adduser adminuser
Step 12 Add the user rights of user adminuser.
XSCF> setprivileges adminuser platadm useradm auditadm fieldeng mode
Step 13 Set the password of user adminuser. The recommended password is adminuser.
XSCF> password adminuser
New XSCF password:*********Retype new XSCF password:*********
Step 14 Run the following command to exit user default:
XSCF> exit
Step 15 When the system displays the following message, enter the user name adminuser and thepassword adminuser.login: adminuserPassword:
Step 16 Set the timeout for logout. The recommended time is 60min.
XSCF> setautologout -s 60
Step 17 Set the XSCF network configurations.1. Run the following command to configure the XSCF:
HA System Software Initial Installation Guide(T5220&M4000&M5000, S10) 8 Installing and Configuring the M4000/M5000 Server (HA)
Issue 06 (2010-06-15) Huawei Proprietary and ConfidentialCopyright © Huawei Technologies Co., Ltd.
8-11

XSCF> setupplatform2. When the system displays Do you want to set up an account? [y|n]:,
enter n.3. When the system displays Do you want to set up networking? [y|n]:,
enter y.4. When the system displays Do you want to set up the XSCF network
interfaces? [y|n]:, enter y.
5. Set the IP address, subnet mask, and gateway IP address of xscf#0-lan#0.
a. When the system displays Do you want to configure xscf#0-lan#0?[y|n]:, enter y.
b. When the system displays the following information, enter the planned IP address,subnet mask, and gateway IP address of port 0 on the XSCF:xscf#0-lan#0 ip address? []: xscf#0-lan#0 netmask? [255.255.255.0]: xscf#0-lan#0 default gateway? []:
c. Check the entered information.xscf#0-lan#0 ip address: 192.168.8.141 xscf#0-lan#0 netmask: 255.255.255.0xscf#0-lan#0 default gateway: 192.168.8.254Are these settings correct? [y|n]: y
6. Set the IP address, subnet mask, and gateway IP address of xscf#0-lan#1.
a. When the system displays Do you want to configure xscf#0-lan#1?[y|n]: , enter y.
b. When the system displays the following information, enter the planned IP address,subnet mask, and gateway IP address of port 1 on the XSCF:xscf#0-lan#1 ip address? []: xscf#0-lan#1 netmask? [255.255.255.0]: xscf#0-lan#1 default gateway? []:
c. Check the entered information.xscf#0-lan#1 ip address: 192.168.9.141 xscf#0-lan#1 netmask: 255.255.255.0xscf#0-lan#1 default gateway: 192.168.9.254Are these settings correct? [y|n]: y
7. When the system displays Do you want to configure lan#0? [y|n]:, entern. It indicates that the take over function for Ethernet adapter 0 is not configured.
8. When the system displays Do you want to configure lan#1? [y|n]:, entern. It indicates that the take over function of Ethernet adapter 1 is not configured.
9. When the system displays Do you want to set up the DSCP network? [y|n]:, enter n. It indicates that the DSCP protocol is not configured.
10. Set the domain name of the server.
a. When the system displays Do you want to set up the domain nameservice? [y|n]:, enter y.
b. When the system displays Primary DNS server ip address? []:, enter0.0.0.0. The default IP address of the DNS server is 0.0.0.0.
c. When the system displays Do you want a secondary DNS server? [y|n]:, enter n. It indicates that the secondary DNS server is not configured.
d. When the system displays the following information, enter the default domain nameomc.com.
8 Installing and Configuring the M4000/M5000 Server (HA)HA System Software Initial Installation Guide
(T5220&M4000&M5000, S10)
8-12 Huawei Proprietary and ConfidentialCopyright © Huawei Technologies Co., Ltd.
Issue 06 (2010-06-15)

Do you want to specify a domain name? [y|n]: yDomain name [localdomain]: omc.com
e. When the system displays the following information, enter <host name of theserver>-xscf0 in hostname of the Ethernet adapter 0 on the XSCF.XSCF#0 hostname [localhost]:
f. Check the entered information.Primary DNS server ip address: 0.0.0.0Secondary DNS server ip address: Tertiary DNS server ip address: Domain name: omc.comXSCF#0 hostname: osssvr-1-xscf0Are these settings correct? [y|n]: y
11. When the system displays Do you want to set up the network timeprotocol? [y|n]:, enter n. It indicates that the NTP service is not configured.
12. Configure the SSH service.
a. When the system displays Do you want to set up ssh? [y|n]:, enter yto configure the SSH protocol.
b. When the system displays Enable ssh service? [y|n]:, enter y to start theSSH service.
13. When the system displays Do you want to set up https? [y|n]:, enter n. Itindicates that https is not enabled.
14. When the system displays Do you want to configure email reports? [y|n]:, type n. It indicates that the email function is not enabled.
15. Perform operations for the network configuration to take effect.
a. When the system displays Do you want to apply the networkchanges? [y|n]:, enter y.
b. Check the XSCF network configuration.The following network settings will be applied: xscf#0 hostname :osssvr-1-xscf0 DNS domain name :
interface :xscf#0-lan#0 status :up IP address :192.168.8.141 netmask :255.255.255.0 route :-n 0.0.0.0 -m 0.0.0.0 -g 192.168.8.254
interface :xscf#0-lan#1 status :up IP address :192.168.9.141 netmask :255.255.255.0 route :-n 0.0.0.0 -m 0.0.0.0 -g 192.168.9.254
Continue? [y|n] :y
Step 18 Set the altitude of the XSCF.1. When the system displays Do you want to reboot the XSCF now? [y|
n]:, enter n. It indicates that the XSCF is not restarted temporarily.
2. When the system displays Do you want to set up the chassis altitude?[y|n]:, enter y to set the altitude.
3. When the system displays Chassis altitude in meters:, enter 500.
4. Confirm the altitude information about the XSCF.
HA System Software Initial Installation Guide(T5220&M4000&M5000, S10) 8 Installing and Configuring the M4000/M5000 Server (HA)
Issue 06 (2010-06-15) Huawei Proprietary and ConfidentialCopyright © Huawei Technologies Co., Ltd.
8-13

Chassis altitude in meters: 500Is this setting correct? [y|n]: y
Step 19 Set the time zone, date, and time of the XSCF.
1. When the system displays Do you want to reboot the XSCF now? [y|n]:, enter n. It indicates that the XSCF is not restarted temporarily.
2. When the system displays Do you want to set up the XSCF time zone?[y|n]:, enter y to set the time zone.
3. When the system displays Continue setting up the XSCF time zone? [y|n]:, enter y.
4. When the system prompts the following message, enter 490. The number of the time zoneis 490 (PRC).0 Africa/Abidjan1 Africa/Accra2 Africa/Addis_Ababa3 Africa/Algiers…Enter number to choose time zone or return for next set of time zones:
CAUTIONYou need to enter the number of the time zone based on the actual situation. This step takesthe time zone number of PRC is 490 as an example.
5. Confirm the time zone information, and then enter y.
XSCF time zone: PRCIs this setting correct? [y|n]: y
6. Run the following command to start the servicetag agents:
XSCF> setservicetag -c enable
7. Run the following command to start the telnet:
XSCF> settelnet -c enable
8. Run the following command to set the date and time. You need to set the date and timebased on the actual situation. The format is YYYY.MM.DD-HH:MM:SS.
XSCF> setdate -s 2008.10.08-16:10:00
Step 20 When the system displays The XSCF will be reset. Continue? [y|n] :, entery to complete the configuration the XSCF of the Server.
----End
8.4 Installing Solaris and Its Patches on the M4000/M5000Server
This describes how to use a PC to log in to the M4000/M5000 server through an XSCF and theninstall the Solaris software and its patches on the server. Perform this task on each server.
8 Installing and Configuring the M4000/M5000 Server (HA)HA System Software Initial Installation Guide
(T5220&M4000&M5000, S10)
8-14 Huawei Proprietary and ConfidentialCopyright © Huawei Technologies Co., Ltd.
Issue 06 (2010-06-15)
Prerequisitel The XSCF of the server is configured.
l The communication between the PC and the Ethernet port of the server XSCF is normal.
l The Auto_Install_DVD1/3_For Solaris_OS_sun4u_V2.1 disk is available.
ContextNOTE
The installation log of the Auto_Install_DVD1/3_For Solaris_OS_sun4u_V2.1 disk is saved in the /var/sadm/system/logs/install_log file.
CAUTIONl If the same IP address is used to install the Solaris and its patches for multiple M2000
systems in one network segment, the IP addresses of different systems may conflict witheach other. Change the IP address of devices and the problem is solved.
l During the installation of the Solaris and its patches, the superuser root of the operatingsystem is automatically created. The initial password of the superuser is set to root. Be sureto remember the password of user root.
Procedure
Step 1 Use the Telnet Protocol to connect the PC and the XSCF through PuTTY.
In the window of PuTTY, select telnet. In the Host Name (or IP Address) field, type the XSCFIP Address. Click Open to log in.
Step 2 Enter the user name adminuser and the password to log in to the XSCF. The system displaysXSCF>.
Step 3 Perform the following steps to connect to the server:1. Run the console command. Then, press Enter.
XSCF> console -d 0
Connect to DomainID 0?[y|n] :y
2. If the system displays the console login: information, type root and then pressEnter.
3. If the system prompts you for Password:, type the password of user root and then pressEnter.
4. If the system displays #, type init 0 and then press Enter.
5. When the system displays ok, type #..
Step 4 Run the poweron command to power on domain 0.
XSCF> poweron -d 0
DomainIDs to power on:00Continue? [y|n] :y
HA System Software Initial Installation Guide(T5220&M4000&M5000, S10) 8 Installing and Configuring the M4000/M5000 Server (HA)
Issue 06 (2010-06-15) Huawei Proprietary and ConfidentialCopyright © Huawei Technologies Co., Ltd.
8-15

Step 5 Run the console command. Press Enter for several times. The system switches to the ok promptstate of Solaris.
XSCF> console -d 0
Connect to DomainID 0?[y|n] :y
Aborting auto-boot sequence. {0} ok
Step 6 Run the following command to disable the automatic boot function:
ok setenv auto-boot? false
Step 7 Run the set-defaults command to restore the default value of OBP.
Step 8 Run the following commands to set disk0 and disk1.
ok nvalias disk0 /pci@0,600000/pci@0/pci@8/pci@0/scsi@1/disk@0
ok nvalias disk1 /pci@0,600000/pci@0/pci@8/pci@0/scsi@1/disk@1
ok nvstore
ok setenv boot-device disk0 disk1
ok setenv diag-device disk0 disk1
Step 9 Run the reset-all command to restart the OBP.
NOTE
It is normal that the message containing Error CPU Check is displayed during system restart. In such asituation, ignore the message.
Step 10 Run the following command to enable the automatic boot function:
ok setenv auto-boot? true
Step 11 Remove all the cables connecting to the Ethernet ports except the XSCF port.
Step 12 Shut down all the disk arrays.
Step 13 Insert the Auto_Install_DVD1/3_For Solaris_OS_sun4u_V2.1 to the DVD-ROM drive of theserver.
Step 14 Run the following command to execute the scripts for installing the Solaris software and itspatches.
ok boot cdrom - install
CAUTIONThere is a space between install and - in the previous command.
Step 15 When the system displays Allocate disk space for application?[default:n], type n to continue if the system is configured with an external disk array. Ifthe system is not configured an external disk array and uses only the local disks, type y tocontinue.
8 Installing and Configuring the M4000/M5000 Server (HA)HA System Software Initial Installation Guide
(T5220&M4000&M5000, S10)
8-16 Huawei Proprietary and ConfidentialCopyright © Huawei Technologies Co., Ltd.
Issue 06 (2010-06-15)

Step 16 When the system displays Mirror the system local disk? [default:y], typey to continue.
Step 17 When the system displays Install as the SECOND node of Sun Cluster Dualsystem? [default:n], type y if node 2 of the HA system is to be installed. Otherwise,type n to continue.
About 35 minutes later, the installation is complete and the server automatically restarts.
Step 18 Type the user name root and the password to log in to the server.
NOTE
The initial password of user root is root.
Step 19 Run the following command to remove the Auto_Install_DVD1/3_For Solaris_OS_sun4u_V2.1disk.
NOTE
After the server is restarted, run the following commands to start the DVD-ROM when the system displaysNo default media available:
# /etc/init.d/volmgt stop
# /etc/init.d/volmgt start
# cd /
# eject
Step 20 Reconnect all the cables to the Ethernet ports on the server.
Step 21 Start all the disk arrays.
----End
Result
The main configurations to be performed during the installation of the Solaris software and itspatches are as follows:
l Partitioning of the local disks.
l Mirroring of the local disks.
l Setting of the active Ethernet port. Set bge0 as the active Ethernet port.
8.5 Checking the Version and Patches of the SolarisThis describes how to check the version and patches of the Solaris operating system and to makesure that the M2000 server application can be installed in the operating system of the designatedversion. For the mapping between the M2000 server versions and the operating system versions,see the version configuration table. Perform this operation on both nodes.
PrerequisiteYou have logged in to the M2000 server as user root.
HA System Software Initial Installation Guide(T5220&M4000&M5000, S10) 8 Installing and Configuring the M4000/M5000 Server (HA)
Issue 06 (2010-06-15) Huawei Proprietary and ConfidentialCopyright © Huawei Technologies Co., Ltd.
8-17

Procedure
Step 1 Run the following command to view information about the version and patches of the Solaris.
# uname -X
System = SunOS Node = osssvr-1Release = 5.10KernelID = Generic_141414-07......
NOTE
In the system output, the values of Node and NumCPU vary with the system configuration.
In the system output, Release specifies the version of the operating system and its value is5.10 ; KernelID specifies the Version ID of the kernel and its value is Generic_141414-07 ora value indicating a later version. A greater number of the KernelID indicates a later version.
If the versions of the operating system and its patches are different from those in the versionconfiguration table, contact Huawei technical support personnel for assistance.
----End
8.6 Checking the Disk Partitioning of the M2000 Server (HA)To ensure that the M2000 server software can function properly, you need to check whether theactual partitioning is consistent with that predefined in the server disk partitioning plan. If theactual partitioning is different, contact Huawei technical support personnel for assistance. Youneed to check the partitioning on both nodes.
PrerequisiteLog in to the two nodes as user root, respectively.
Procedure
Step 1 Check the partitioning of the first local disk of the server.
# format
Enter 0 to check the first local hard disk.
Specify disk (enter its number): 0
format> p
partition> p
In the system output, Part indicates the partition number and Size indicates the size of thepartition. Check whether the actual partitioning of the disk is consistent with that predefined inTable 8-8. You need to pay attention to only Part and Size. unassigned may be displayedin Tag, this is normal. If the actual partitioning is different, contact Huawei technical supportpersonnel for assistance.
8 Installing and Configuring the M4000/M5000 Server (HA)HA System Software Initial Installation Guide
(T5220&M4000&M5000, S10)
8-18 Huawei Proprietary and ConfidentialCopyright © Huawei Technologies Co., Ltd.
Issue 06 (2010-06-15)

CAUTIONBecause the Solaris system automatically adjusts the size of each partition during thepartitioning, the actual sizes of partitions are slightly different from the planned sizes. You canignore the difference.
Table 8-8 References for server disk partitions
Server type References
T5220 7.1 Partition Planning of the T5220 Server(HA)
M4000/M5000 8.1 Partition Planning of the M4000/M5000 Server (HA)
Step 2 Run the following command to quit partition>.
partition>q
Step 3 Run the following command to exit from format.
format> q
----End
8.7 Checking the Local Disk Mirroring of the M4000/M5000 Server
This describes how to check the status of the local disk mirroring to ensure the proper functioningof the server.
PrerequisiteYou have logged in to the server as user root through PuTTY.
Procedure
Step 1 Run the following command to check the mirroring of server system disk:
If an HA system or an SLS system is used, this task must be performed on each server.
# metastat
In the command result, if State of each item is Okay, you can infer that the mirroring of systemdisks is successful. Otherwise, contact Huawei technical support engineers for assistance.
Step 2 Run the following command to check whether the disk mirroring relation is set up successfully.
# metadb
flags first blk block count a m p luo 16 8192 /dev/dsk/c0t0d0s7
HA System Software Initial Installation Guide(T5220&M4000&M5000, S10) 8 Installing and Configuring the M4000/M5000 Server (HA)
Issue 06 (2010-06-15) Huawei Proprietary and ConfidentialCopyright © Huawei Technologies Co., Ltd.
8-19

a p luo 8208 8192 /dev/dsk/c0t0d0s7 a p luo 16400 8192 /dev/dsk/c0t0d0s7 a p luo 16 8192 /dev/dsk/c0t1d0s7 a p luo 8208 8192 /dev/dsk/c0t1d0s7 a p luo 16400 8192 /dev/dsk/c0t1d0s7
In the command result, check whether each disk stores three backup records. If so, you can inferthat the mirroring relation is successfully set up. If not, contact Huawei technical supportpersonnel for assistance.
NOTE
l /dev/dsk/c0t0d0s7 indicates the number 7 partition on the first hard disk. /dev/dsk/c0t1d0s7 indicatesthe number 7 partition 7 on the second hard disk. In the command result, you can view that three backuprecords exist in the number 7 partition on each hard disk.
l In the previous command result, the corresponding values of the "first blk" and "block count" columnsvary according to size of the local disk.
----End
8.8 Configuring the Hostname and the IP Address of theServer (HA)
Run the script file to set the host name and IP address of the server and other basic parameters.You need to perform the operation on both node 1 and node 2.
Prerequisitel The communication between the PC and the server is normal.
l You have logged in to node 1 and node 2 as user root.
l The Auto_Install_DVD3/3_For Solaris_APP_V2.1 disk is available.
ContextNOTE
When the Auto_Install_DVD3/3_For Solaris_APP_V2.1 disk is used for installation, the installation logis recorded in the /opt/installtmp/autoinstall.log file.
Each configuration performed through the script confirms to the plan. If you plan to know aspecific host name and IP address of the server, seeTable 8-9:
Table 8-9 Planning of the M2000 host name and IP address
Server type References
T5220 server 7.2 Planning the Host Name and IPAddress for the T5220 Server (HA)
M4000/M5000 server 8.2 Planning the Host Name and IPAddress for the M4000/M5000 Server(HA)
8 Installing and Configuring the M4000/M5000 Server (HA)HA System Software Initial Installation Guide
(T5220&M4000&M5000, S10)
8-20 Huawei Proprietary and ConfidentialCopyright © Huawei Technologies Co., Ltd.
Issue 06 (2010-06-15)

Procedure
Step 1 Insert the Auto_Install_DVD3/3_For Solaris_APP_V2.1 disk into the DVD-ROM drive of theserver.
Step 2 Run the following commands to run the configuration script:
# cd /cdrom/cdrom0/baseconfig
# ./config_basesetting.sh
NOTE
If the system prompts No default media available, run the following commands to start theDVD-ROM drive:
# /etc/init.d/volmgt stop
# /etc/init.d/volmgt start
Step 3 If the system displays the following prompt, select the relevant option based on the actualsituation, and then press Enter to continue.
Config default system parameter:
1. Single server system 2. HA Node1 3. HA Node2 4. Netra 240 administration console 5. HA Node1 (Watchman) 6. HA Node2 (Watchman) 7. Other systems (Not modifying the IP address) Q. Quit
Please select a option:
l If the local server needs to be set node 1 of an HA system, enter 2.
l If the local server needs to be set node 2 of an HA system, enter 3.
Step 4 When the system displays Are you sure ?[Y/N] Y, enter Y for confirmation.
NOTE
This process takes about five minutes. The host name and IP address of the server are initialized and otherbasic parameters are configured during the process. After the configuration is complete, the serverautomatically restarts.
----End
8.9 Changing the IP Address of the S2600 Disk Array (SerialPort Mode)
This section describes how to change the IP address of the S2600 disk array in serial port mode.Before configuring the disk array, you need to change the IP address of the disk array. The IPaddress of each S2600 disk array needs to be changed.
Prerequisitel The communication between the disk array and the server is normal.
l The disk array is powered on.
HA System Software Initial Installation Guide(T5220&M4000&M5000, S10) 8 Installing and Configuring the M4000/M5000 Server (HA)
Issue 06 (2010-06-15) Huawei Proprietary and ConfidentialCopyright © Huawei Technologies Co., Ltd.
8-21

Contextl Each disk array has an active controller and a standby controller. Each controller has one
CLI serial port.
l Before changing the IP address of the disk array, you must familiarize yourself with thedefault IP address planning at delivery. Then, determine whether to reconfigure the IPaddress according to the actual situation.
l The IP address mentioned here is only an example. Replace it with the actual IP address.
l If you change the IP address of the disk array on different network segments, continue tochange the IP address of the maintenance Ethernet port on the corresponding server toensure that the two changed IP addresses are on the same network segment.
Procedure
Step 1 Use the serial port cable to connect any serial port on a controller of the disk array and a serialport on the PC. Figure 8-7 shows the disk array.
Figure 8-7 Serial ports provided by the S2600 disk array
NOTE
l You must use the serial port cable delivered by the disk array; otherwise, the disk array may fail to beconnected.
l When using the serial port cable to connect a controller and the maintenance terminal, you must usethe serial port cable to connect the maintenance terminal first. When disconnecting the controller fromthe maintenance terminal, you must remove the serial port cable from the controller first.
l After using the serial port cable to connect a controller and the maintenance terminal, do not enablethe controller and the maintenance terminal at the same time.
l After using the DB9-RJ45 serial port cable to connect a controller and the maintenance terminal, youneed to use the HyperTerminal or any other program provided by the Windows operating system tolog in to the CLI serial port.
Step 2 Choose Start > Programs (P) > Accessories > Communications > HyperTerminal on thePC.
Step 3 In the Connection Description dialog box, type the name of a new connection.
Step 4 Select a PC serial port, for example, COM1, which is connected to the disk array.
Step 5 Set the properties of the serial port by referring to Table 8-10. Then, click OK.
8 Installing and Configuring the M4000/M5000 Server (HA)HA System Software Initial Installation Guide
(T5220&M4000&M5000, S10)
8-22 Huawei Proprietary and ConfidentialCopyright © Huawei Technologies Co., Ltd.
Issue 06 (2010-06-15)

Table 8-10 Setting the properties of the serial port
Property Value
Bits per second 115200
Data bits 8
Parity None
Stop bits 1
Flow control None
Step 6 Press Enter. If the connection is successful, a dialog box is displayed, as shown in Figure8-8.
Figure 8-8 Successful connection dialog box
Step 7 Type the correct user name and password. The successful login dialog box is displayed, as shownin Figure 8-9.
CAUTIONThe initial user name and password of the administrator are admin and 123456, respectively. Toensure the system security, you need to change the password after the initial login.
HA System Software Initial Installation Guide(T5220&M4000&M5000, S10) 8 Installing and Configuring the M4000/M5000 Server (HA)
Issue 06 (2010-06-15) Huawei Proprietary and ConfidentialCopyright © Huawei Technologies Co., Ltd.
8-23

Figure 8-9 Successful login dialog box
Step 8 Run the following command to set the IP address of the management Ethernet port on controllerA:
OceanStor: admin> chgctrlip -c a -a IP address of controller A -s subnet mask -ggateway
For example, to change the IP address of the management Ethernet port on controller A to192.168.8.39, run the following command:
OceanStor: admin> chgctrlip -c a -a 192.168.8.39 -s 255.255.255.0 -g 192.168.8.1
When the system displays the following prompt, type y.
OceanStor: admin> chgctrlip -c a -a 192.168.8.39 -s 255.255.255.0This operation will change your controller's IP configuration. if you want to change the IP of the controller you logged in, you will log out after you set thenew IP. However, if you change the IP of the peer controller, you needn't log out.Do you want to continue? y or n: y
Step 9 Run the following command to check whether the changed IP address is correct:
OceanStor: admin> showctrlip -c a
Controller IP Address Subnet Mask Gateway MAC Address A 192.168.8.39 255.255.255.0 192.168.8.1 00:18:82:e2:00:fb
Step 10 Run the following command to set the IP address of the management Ethernet port on controllerB:
OceanStor: admin> chgctrlip -c b -a new IP address of controller B -s subnet mask -ggateway
For example, to change the IP address of the management Ethernet port on controller B to192.168.8.40, run the following command:
OceanStor: admin> chgctrlip -c b -a 192.168.8.40 -s 255.255.255.0 -g 192.168.8.1
When the system displays the following prompt, type y.
8 Installing and Configuring the M4000/M5000 Server (HA)HA System Software Initial Installation Guide
(T5220&M4000&M5000, S10)
8-24 Huawei Proprietary and ConfidentialCopyright © Huawei Technologies Co., Ltd.
Issue 06 (2010-06-15)

This operation will change your controller's IP configuration. if you want to change the IP of the controller you logged in, you will log out after you set thenew IP. However, if you change the IP of the peer controller, you needn't log out.Do you want to continue? y or n: y
Step 11 Run the following command to check whether the changed IP address is correct:
OceanStor: admin> showctrlip -c b Controller IP Address Subnet Mask Gateway MAC Address B 192.168.8.40 255.255.255.0 192.168.8.1 00:18:82:e2:01:57
----End
8.10 Changing the IP Address of the S3X00 Disk Array(Serial Port Mode)
This section describes how to change the IP address of the S3X00 disk array in serial port mode.Before configuring the disk array, you need to change the IP address of the disk array. The IPaddress of each S3X00 disk array needs to be changed.
Prerequisitel The communication between the disk array and the server is normal.l The disk array is powered on.
Contextl Each disk array has an active controller and a standby controller. Each controller has one
CLI serial port.l Before changing the IP address of the disk array, you must familiarize yourself with the
default IP address planning at delivery. Then, determine whether to reconfigure the IPaddress according to the actual situation.
l The IP address mentioned here is only an example. Replace it with the actual IP address.l If you change the IP address of the disk array on different network segments, continue to
change the IP address of the maintenance Ethernet port on the corresponding server toensure that the two changed IP addresses are on the same network segment.
ProcedureStep 1 Use the serial port cable to connect the serial port of the disk array controller and that of the PC.
Figure 8-10 shows the disk array.
Figure 8-10 Serial ports provided by the S3X00
HA System Software Initial Installation Guide(T5220&M4000&M5000, S10) 8 Installing and Configuring the M4000/M5000 Server (HA)
Issue 06 (2010-06-15) Huawei Proprietary and ConfidentialCopyright © Huawei Technologies Co., Ltd.
8-25

NOTE
Do use the serial port cable delivered with the disk array. This cable is designed for storage devices. If youuse a serial port cable for other devices, the communication may fail. The controller connected through theserial port indicates the one that is being set. Controller A is on the left side and controller B on the right.
Step 2 Choose Start > Programs (P) > Accessories > Communications > HyperTerminal on thePC.
Step 3 In the Connection Description dialog box, enter the name of the new connection.
Step 4 Specify a serial port of the PC to connect the SC, for instance, COM1.
Step 5 Set the properties of the serial port. For details about how to set the properties of the serial port,see Table 8-11. Then, click OK.
Table 8-11 Setting the properties of a serial port
Property Property Value
Bits per second 38400
Data bits 8
Parity None
Stop bits 1
Flow control None
Step 6 Press Ctrl+Break to activate the Shell serial port.
Step 7 When the following message is displayed in the HyperTerminal window, press Esc in 5 seconds.The Shell login window is displayed.
Press within 5 seconds: <S> for Service Interface , <BREAK> for band rate
Step 8 When the following information is displayed, type the login password infiniti and then pressEnter to log in to the configuration shell of the disk array.
Enter password to access shell:
Step 9 Run the following command to view the information about Ethernet port configuration on thecurrent controller.
-> netCfgShow
Step 10 Run the netCfgSet command to set the IP address for the Ethernet port. In the IP Address if0filed, type 192.168.8.39. If you need to modify the subnet mask, type the new value in the SubnetMask if0 filed.
NOTE
You need to configure only if0.
Step 11 Press Enter. When the modification tasks effect, the following information is displayed:
Network Configuration successfully written to NVSRAM.
8 Installing and Configuring the M4000/M5000 Server (HA)HA System Software Initial Installation Guide
(T5220&M4000&M5000, S10)
8-26 Huawei Proprietary and ConfidentialCopyright © Huawei Technologies Co., Ltd.
Issue 06 (2010-06-15)
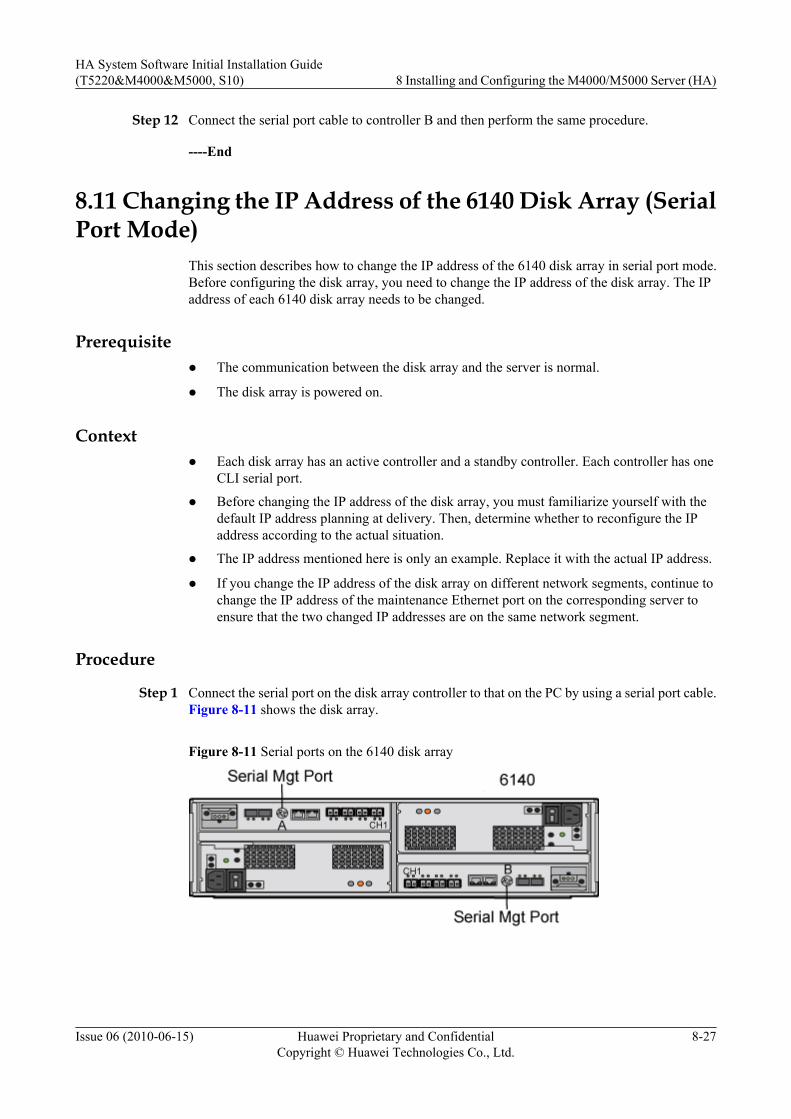
Step 12 Connect the serial port cable to controller B and then perform the same procedure.
----End
8.11 Changing the IP Address of the 6140 Disk Array (SerialPort Mode)
This section describes how to change the IP address of the 6140 disk array in serial port mode.Before configuring the disk array, you need to change the IP address of the disk array. The IPaddress of each 6140 disk array needs to be changed.
Prerequisitel The communication between the disk array and the server is normal.
l The disk array is powered on.
Contextl Each disk array has an active controller and a standby controller. Each controller has one
CLI serial port.
l Before changing the IP address of the disk array, you must familiarize yourself with thedefault IP address planning at delivery. Then, determine whether to reconfigure the IPaddress according to the actual situation.
l The IP address mentioned here is only an example. Replace it with the actual IP address.
l If you change the IP address of the disk array on different network segments, continue tochange the IP address of the maintenance Ethernet port on the corresponding server toensure that the two changed IP addresses are on the same network segment.
Procedure
Step 1 Connect the serial port on the disk array controller to that on the PC by using a serial port cable.Figure 8-11 shows the disk array.
Figure 8-11 Serial ports on the 6140 disk array
HA System Software Initial Installation Guide(T5220&M4000&M5000, S10) 8 Installing and Configuring the M4000/M5000 Server (HA)
Issue 06 (2010-06-15) Huawei Proprietary and ConfidentialCopyright © Huawei Technologies Co., Ltd.
8-27

NOTEYou need to use the serial port cable delivered with the disk array. The serial port cable is specially designedfor storage devices and cannot be replaced by the serial port cable of other devices. If the dedicated serialport cable is not used, the communication may fail. The controller connected through the serial portindicates the controller that is being set. Controller A is on the left and controller B is on the right.
Step 2 Choose Start > Programs (P) > Accessories > Communications > HyperTerminal.
Step 3 In the Connection Description dialog box, type the name of the new connection.
Step 4 Choose the PC serial port that connects to the controller, for example, COM1.
Step 5 Set the properties of the serial port by referring to Table 8-12, and then click OK.
Table 8-12 Setting the properties of a serial port
Property Property Value
Bits per second 38400
Data bits 8
Parity None
Stop bits 1
Flow control None
After the connection is complete, a physical connection between the PC and the 6140 disk arrayis set up.
Step 6 Press Ctrl + Break. The serial port responds with a request to synchronize the baud rate withthe terminal.Set baud rate: press <space> within 5 seconds
NOTE
The serial ports on the disk array request that Break be accepted. Set the corresponding escape sequencefor the terminal to send the mandatory Break to the disk array controller. For example, you can pressCtrl and Break at the same time to generate Break on some terminals.
Step 7 Press the spacebar within five seconds. The serial port defines the baud rate for the setup of theconnection.Baud rate set to 38400
Step 8 Press Ctrl + Break. The serial port responds with the following information:Press within 5 seconds: <S> for Service Interface, <BREAK> for baud rate
Step 9 Press S. The system prompts you to enter the password of the serial port.Enter Password to access Service Interface (60 sec timeout):
Step 10 Type kra16wen, that is, the password of the serial port, and then press Enter.
Step 11 When the system displays the following information, type 2.Servinxge Interfanxge Main Menu==============================1) Display IP Configuration2) Change IP Configuration3) Reset Storage Array (SYMbol) Password
8 Installing and Configuring the M4000/M5000 Server (HA)HA System Software Initial Installation Guide
(T5220&M4000&M5000, S10)
8-28 Huawei Proprietary and ConfidentialCopyright © Huawei Technologies Co., Ltd.
Issue 06 (2010-06-15)

Q) Quit MenuEnter Selection:
Step 12 When the system displays the following information, type 1.Select Ethernet Port==============================1) Ethernet Port: 02) Ethernet Port: 1Q) QuitEnter Selection:
Step 13 If the system displays the following information, type n. Do not use the DHCP function toconfigure the dynamic IP address for the port.Configure using DHCP ? (Y/N):
Step 14 When the system displays the following information, enter the IP address and the subnet maskof the controller.
NOTEThe settings of the subnet mask and gateway are optional.
Press '.' to clear the field;Press '-' to return to the previous field;Press <ENTER> and then ^D to quit (Keep Changes) Current Configuration New ConfigurationIP Address if1 : 192.168.128.101 IP-addressSubnet Mask if1 : 255.255.255.0 Subnet MaskGateway IP Address if1 : <ENTER>
After the configuration, the system displays a message for confirming the specified IP address.
Step 15 When the system displays the following information, type 1.Servinxge Interfanxge Main Menu==============================1) Display IP Configuration2) Change IP Configuration3) Reset Storage Array (SYMbol) PasswordQ) Quit MenuEnter Selection:
Step 16 When the system displays the following information, type 1.Select Ethernet Port==============================1) Ethernet Port: 02) Ethernet Port: 1Q) QuitEnter Selection: 1
The IP address of the selected Ethernet port is displayed. Check whether the changed IP addressis correct. If the changed IP address is incorrect, perform Step 11 through Step 16 to reconfigurethe IP address of the controller.
Step 17 When the system displays the following information, enter Q to exit.Servinxge Interfanxge Main Menu==============================1) Display IP Configuration2) Change IP Configuration3) Reset Storage Array (SYMbol) PasswordQ) Quit MenuEnter Selection:
Step 18 Connect the serial port on controller B to that on the PC by using the serial port cable. You canchange the IP address of the configuration Ethernet port of the other controller by following thesame procedure.
----End
HA System Software Initial Installation Guide(T5220&M4000&M5000, S10) 8 Installing and Configuring the M4000/M5000 Server (HA)
Issue 06 (2010-06-15) Huawei Proprietary and ConfidentialCopyright © Huawei Technologies Co., Ltd.
8-29
8.12 Configuring the S2600 Disk Array (HA)This section describes how to configure the S2600 disk array. Each S2600 disk array has anactive controller and a standby controller. You can configure the S2600 disk array by setting upa connection between the server and the active controller. Both of the S2600 disk arrays needto be configured.
Prerequisitel You have installed the operating system and its patches on the server.
l You have logged in to node 1 as user root.
l The connection between servers and the connection between servers and the disk array arenormal.
l The S2600 disk array is powered on.
l The Auto_Install_DVD3/3_For Solaris_APP_V2.1 DVD-ROM is available.
Context
CAUTIONIf the configuration of the script fails when the two IP addresses of the S2600 disk array can bepinged, run the script again or even twice. If the configuration of the script fails again, contactHuawei technical engineers for assistance.
Procedure
Step 1 Insert the Auto_Install_DVD3/3_For Solaris_APP_V2.1 DVD-ROM into the DVD-ROM driveof node 1.
Step 2 Run the following command to install the expect package.1. Run the following commands to run the installation script of the expect package:
# cd /cdrom/cdrom0/HWS2600Array
# ./install_expectpkg.sh2. When the following information is displayed, type osssvr-1 osssvr-2, that is, the host names
of node 1 and node 2. Use a space to separate the two host names.
NOTE
Typing the host names of both nodes indicates that the expect package is installed on both node 1and node 2. If you type only one host name, it indicates that the expect package is installed on onlyone node.
Input the system names separated by space on which to Expect PKG:[default:osssvr-1]osssvr-1 osssvr-2
3. When the following information is displayed, type y.Are you sure to continue? [y/n]y
If no error information is displayed, it indicates that the installation is successful.
8 Installing and Configuring the M4000/M5000 Server (HA)HA System Software Initial Installation Guide
(T5220&M4000&M5000, S10)
8-30 Huawei Proprietary and ConfidentialCopyright © Huawei Technologies Co., Ltd.
Issue 06 (2010-06-15)

Step 3 Configure the volumes of the S2600 disk array.1. Run the following commands to configure the RAID of the S2600 disk array:
CAUTIONThe creation of the disk array volume takes about 100 to 180 minutes. If the disk statusindicator remains green and does not blink, you can infer that the volumes are createdsuccessfully. After the configuration script is executed, check that the volumes of the diskarray are created. Then, you can use PlatformTools to create volumes.
# cd /cdrom/cdrom0/HWS2600Array
# ./create_RAID_HA.sh
When the system displays the following prompt, type the corresponding values:
Are you sure to continue? [y/n] y Please input the array controller A IP address: IP address of controller A of the S2600 disk array Please input the array controller A IP address: IP address of controller B of the S2600 disk arrayInput the system names separated by spaces for HA servers :[default:osssvr-1 osssvr-2] osssvr-1 osssvr-2Input the DiskArray names:[default:S2600-1]: If the first disk array, input S2600-1; if the second disk array, input S2600-2Input the DiskArray password for admin user:[default:123456]:Input the password of admin userInput the DiskArray password for DB configuration:[default:654321]:Input the password of DB configurationAre you sure to continue? [y/n] y
When the system displays Configure the diskarray successfully, you caninfer that the script is successfully executed.
Step 4 Check the volumes of the S2600 disk array.1. Run the following command to log in to the S2600 disk array:
# ssh admin@IP address of controller A of the S2600 disk array: 192.168.8.39
Password:<The initial password of the administrator is 123456>
CAUTIONAfter you log in to the S2600 disk array, the system displays the following information:locale: Cannot set LC_CTYPE to default locale: No such file or directory locale: Cannot set LC_ALL to default locale: No such file or directoryThis problem is related to the setting of environment variables, and does not affect theconfiguration of the S2600 disk array. You can ignore the information when installing thedisk array. If the disk status indicator remains green and does not blink, you can infer thatthe RAID is created. After running the configuration script, ensure that the RAID of thedisk array is created. Then, you can use the PlatformTools to create volumes.
2. Run the following command to check the information about the mapping and host group:
OceanStor: admin> showlun
HA System Software Initial Installation Guide(T5220&M4000&M5000, S10) 8 Installing and Configuring the M4000/M5000 Server (HA)
Issue 06 (2010-06-15) Huawei Proprietary and ConfidentialCopyright © Huawei Technologies Co., Ltd.
8-31

ID RAID ID Status Ctrler Capacity(MB) LUN Name 0 0 Formatting A 687103 oss_app0 1 0 Formatting B 687103 oss_app1 2 0 Formatting A 687103 oss_app2
The information about at least three volumes is displayed. If the value of Status isFormatting, you can infer that the RAID of the S2600 disk array is being created. If thevalue of Status is Normal, you can infer that the RAID is created.
OceanStor: admin> showmap -gi 1
Map ID Ctrler Dev LUN ID Host LUN Mapped to RAID ID Dev LUN Cap(MB) 0x10000 A 0 0 Group: 1 0 687103 0x10001 B 1 1 Group: 1 0 687103 0x10002 A 2 2 Group: 1 0 687103
If the system output contains three records, you can infer that the mapping is successful.
OceanStor: admin> showhostport -i 0
Port ID Port Name Port Information Port Type Host ID 0 osssvr-1_ 500110a00015354c FC 0 port_0 1 osssvr-1_ 500110a0001532ae FC 0 port_1 2 osssvr-1_ 500110a00015354c FC 0 port_0 3 osssvr-1_ 500110a0001532ae FC 0 port_1
If the system output contains four records, you can infer that the host group is successfullycreated.
OceanStor: admin> showhostport -i 1
Port ID Port Name Port Information Port Type Host ID 0 osssvr-2_ 500110a00015354d FC 0 port_0 1 osssvr-2_ 500110a0001532ad FC 0 port_1 2 osssvr-2_ 500110a00015354d FC 0 port_0 3 osssvr-2_ 500110a0001532ad FC 0 port_1
If the system output contains four records, you can infer that the host group is successfullycreated.
3. Run the following command to log out of the S2600 disk array:
OceanStor: admin> exit
Step 5 Repeat Step 3 through Step 4 to complete the configuration of the second disk array.
Step 6 Restart the server.
# sync; sync; sync; sync; sync; sync
# shutdown -y -g0 -i6
Step 7 After you log in to the server again, remove the DVD-ROM.
# cd /
# eject
----End
8 Installing and Configuring the M4000/M5000 Server (HA)HA System Software Initial Installation Guide
(T5220&M4000&M5000, S10)
8-32 Huawei Proprietary and ConfidentialCopyright © Huawei Technologies Co., Ltd.
Issue 06 (2010-06-15)

8.13 Configuring the S3200 Disk Array (HA)Each S3200 disk array has an active controller and a standby controller. You can configure theS3200 disk arrays by setting up a connection between the server and the active controller. Youneed to configure the two S3200 disk arrays.
Prerequisitel You have installed the operating system and patches on the server.
l You have logged in to node 1 and node 2 as user root.
l The communication between the disk array and the server is normal.
l The Auto_Install_DVD3/3_For Solaris_APP_V2.1 disk is available.
Context
CAUTIONl You should install the management host software of the disk array both on node 1 and node
2.l If the configuration of the script fails when the IP addresses of the two 6140 disk arrays
can be pinged, run the script again or even twice. If the configuration of the script still fails,contact Huawei technical support personnel for assistance.
Procedure
Step 1 Insert the Auto_Install_DVD3/3_For Solaris_APP_V2.1 disk into the DVD-ROM drive of theserver.
Step 2 Install the management host software of the disk array on the server.1. Run the following commands to run the script of the management host software:
# cd /cdrom/cdrom0/S3X00array
# ./install_S3X00software.sh
2. When the system displays Are you sure ?[Y/N], enter Y.
Step 3 Configure the disk array. This operation is performed only on Node1.
CAUTIONThe creation of the disk array volume takes about 90 minutes. If the disk status indicator remainsgreen and does not blink, you can infer that the volumes are created. You can use thePlatformTools to create volumes only when checking that the volumes of the disk array arecreated after the configuration scripts are run.
HA System Software Initial Installation Guide(T5220&M4000&M5000, S10) 8 Installing and Configuring the M4000/M5000 Server (HA)
Issue 06 (2010-06-15) Huawei Proprietary and ConfidentialCopyright © Huawei Technologies Co., Ltd.
8-33

TIP
Run the following commands to check whether the volumes are created successfully.
# SMcli 192.168.8.39 192.168.8.40 -c "show volume["oss_v0"] actionProgress;"
# SMcli 192.168.8.39 192.168.8.40 -c "show volume["oss_v1"] actionProgress;"
1. Run the following command to run the configuration script:
# cd /cdrom/cdrom0/S3X00array
# ./create_S3X00_raid.sh
When the system displays the following message, enter y for confirmation.
Are you sure to continue? [y/n]
2. When the system displays the following message, enter the IP address of controller A, forexample, 192.168.8.39.
Please input the array controller A IP address:
3. When the system displays the following message, enter the IP address of controller B, forexample, 192.168.8.40.
Please input the array controller B IP address:
4. When the system displays the following message, enter S3100-1, the name of the disk array.
Please input the array name:
5. When the system displays the following message, enter y for confirmation.
Are you sure to continue? [y/n]
Step 4 Check the configuration of the disk array.
*************************************Current Volumes****************************
Number of standard volumes: 2
See other Volumes sub-tabs for premium feature information.
NAME STATUS CAPACITY RAID LEVEL VOLUME GROUP oss_v0 Optimal 800 GB 5 1 oss_v1 Optimal 800 GB 5 2 ********************************Current hotspare disks*************************** Disk 85,15 : Mode: Hot spare standby Disk 85,16 : Mode: Hot spare standby Configure the S3200 diskarray successfully. Please reboot server.
After the configuration is complete, verify that the two volumes naming oss_v0 and oss_v1 existunder the Current Volumes, the RAID value in two volumes is 5, and two records beginningwith Disk are available under the Current hotspare disks. If the actual situation does not meetthe requirement, perform Step 3 for reconfiguration.
Step 5 Repeat Step 3 through Step 4 to implement the configuration of the second disk array.
----End
8 Installing and Configuring the M4000/M5000 Server (HA)HA System Software Initial Installation Guide
(T5220&M4000&M5000, S10)
8-34 Huawei Proprietary and ConfidentialCopyright © Huawei Technologies Co., Ltd.
Issue 06 (2010-06-15)

8.14 Configuring the 6140 Disk Array (HA)Each 6140 disk arrays have an active controller and a standby controller. You can configure the6140 disk arrays by setting up a connection between the server and the active controller. Boththe two disk arrays need to be configured.
Prerequisitel You have installed the operating system and patches on the server.
l You have logged in to node 1 and node 2 as user root.
l The communication between the disk array and the server is normal.
l The Auto_Install_DVD3/3_For Solaris_APP_V2.1 disk is available.
Context
CAUTIONl You should install the management host software of the disk array both on node 1 and node
2.l If the configuration of the script fails when the IP addresses of the two 6140 disk arrays can
be pinged, run the script again or even twice. If the configuration of the script still fails,contact Huawei technical support engineers for assistance.
Procedure
Step 1 Insert the Auto_Install_DVD3/3_For Solaris_APP_V2.1 CD into the DVD-ROM drive of theserver.
Step 2 Install the management host software of the 6140 disk array on the server.
NOTE
You need to perform the operation on both node 1 and node 2, the other operations needs to perform onlyon node 1.
1. Run the following commands to run the script of the management host software:
# cd /cdrom/cdrom0/6140array
# ./install_6140array_host_sw.sh2. When the system displays Are you sure ?[Y/N], type Y.
Step 3 Perform the following operations to register the 6140 disk array:1. Run the registration script of the 6140 disk array.
# cd /cdrom/cdrom0/6140array
# ./register_6140_array.sh2. When the system displays the following information, type the password of user root. Then,
press Enter.
HA System Software Initial Installation Guide(T5220&M4000&M5000, S10) 8 Installing and Configuring the M4000/M5000 Server (HA)
Issue 06 (2010-06-15) Huawei Proprietary and ConfidentialCopyright © Huawei Technologies Co., Ltd.
8-35

Register 6140 Array.
Please input the root passwordType your password:
3. When the system displays Please input the array ip address: , type theIP address of the disk array controller A.
NOTE
For the initial registration, type the default IP address 192.168.128.101 of controller A. Otherwise,type the actual IP address.
4. When the system displays the following prompt, enter n.Do you want registere another Array?[y/n]:n
Step 4 Perform the following steps to change the name of the disk array:1. Run the script for changing the name of the disk array.
# cd /cdrom/cdrom0/6140array
# ./modify_6140_arrayname.sh2. When the system displays the following information, enter the password of user root.
Type your password:3. When the system displays the following information, enter 1 to select the current disk array.
1--unamed
Please select the array:14. When the system displays Do you want to modify Array name of unamed?
[y/n] y, enter y.
5. When the system displays Please input the new name for the array: ,enter the planned name of the disk array.
Step 5 Create the RAID 5 of the 6140 disk array.1. Run the following script to create the RAID 5 of the 6140 disk array:
# cd /cdrom/cdrom0/6140array
# ./create_6140_raid.sh2. When the system displays the following information, enter the password of user root.
Create Raid of 6140 Array.Type your password:
3. When the system displays Please input the array ip address: , enter theIP address of controller A of the disk array.
4. When the system displays Please input the name for the array: , enterthe name of the disk array.
5. When the system displays the following information, type y.*********************************************************************** !!WARNING!! !!WARNING!! !!WARNING!! !!WARNING!! This script will destroy all the data of the array!! ***********************************************************************
Are you sure to continue? [y/n]
Step 6 Create the host name and launcher corresponding to the disk array.1. To check and record the WWN number of the FC port on each server, perform the following
steps on each server:
8 Installing and Configuring the M4000/M5000 Server (HA)HA System Software Initial Installation Guide
(T5220&M4000&M5000, S10)
8-36 Huawei Proprietary and ConfidentialCopyright © Huawei Technologies Co., Ltd.
Issue 06 (2010-06-15)

# cd /cdrom/cdrom0/6140array
# ./hbamap
hbamap Version 2.5.0 (12/04/07)
FOUND PATH TO 3 LEADVILLE HBA PORTS
C# INST# PORT WWN MODEL FCODE STATUS DEVICE PATH-- ----- -------- ----- ----- ------ -----------c8 qlc1 2100001b3207b242 SG-XPCI1FC-QF4 1.24 CONNECTED /pci@9,600000/SUNW,qlc@1c9 qlc2 2100001b32079d43 SG-XPCI1FC-QF4 1.24 CONNECTED /pci@9,600000/SUNW,qlc@2c10 qlc1 2100001b3207b243 SG-XPCI1FC-QF4 1.24 NOT CONNECTED /pci@9,600000/SUNW,qlc@1c11 qlc2 2100001b32079d53 SG-XPCI1FC-QF4 1.24 NOT CONNECTED /pci@9,600000/SUNW,qlc@2
In the system output that is similar to the previously displayed information, the path beforeCONNECTED is the physical path of the FC of the server. Two CONNECTED FCs existon each server. To differentiate the physical paths of the two FCs in the following steps,the physical path of the first CONNECTED FC is represented as WWN number of FC1,and the physical path of the second CONNECTED FC is represented as WWN number ofFC2.
2. Map the server and the disk array according to the WWN number.
# cd /cdrom/cdrom0/6140array
# ./map_6140_lun.sh
3. When the system displays the following information, enter the password of user root. Map luns of 6140 Array.Type your password:
4. When the system displays the following information, enter 1 to select the current disk array,and then press Enter.1--ST6140-1
Please select the array:1
NOTE
In the previously displayed information, ST6140-1 refers to the name of the disk array and it variesaccording to the disk array name entered in Step 4.5.
5. When the system displays Please input the hostname:, enter the name of thehost to which the disk array is mapped, for example, osssvr-1.
6. When the system displays Please input the first wwn: , enter WWN numberof FC1 recorded in Step 6.1.
7. When the system displays Are you want to input another wwn? [y/n],enter y.
8. When the system displays Please input the second wwn: , enter WWN numberof FC2 recorded in Step 6.1.
9. When the system displays the following information, enter y, and then press Enter. Map ST6140-1 to osssvr-1
Are you sure to continue? [y/n] y
HA System Software Initial Installation Guide(T5220&M4000&M5000, S10) 8 Installing and Configuring the M4000/M5000 Server (HA)
Issue 06 (2010-06-15) Huawei Proprietary and ConfidentialCopyright © Huawei Technologies Co., Ltd.
8-37

NOTE
In the previously displayed information, ST6140-1 refers to the name of the disk array andosssvr-1 refers to the name of the host corresponding to the disk array. The two parameters varyaccording to the actual situations.
Step 7 Repeat Step 3 through Step 6 to implement the configuration of the second disk array.
----End
8.15 Enabling Multi-Path I/O (HA)This describes how to enable the I/O multipathing of the Solaris system. You need to performthe operation on both node 1 and node 2.
PrerequisiteYou have logged in to the server as user root.
Procedure
Step 1 Run the following command to enable the I/O multipathing:
# stmsboot -D fp -e
Step 2 When the system displays the following prompt, press Enter to continue:
WARNING: This operation will require a reboot.Do you want to continue ? [y/n] (default: y)
Step 3 When the system displays the following prompt, press Enter to continue:
The changes will come into effect after rebooting the system.Reboot the system now ? [y/n] (default: y)
The operating system restarts twice.
----End
8.16 Labeling Volumes for the Disk Array (HA)This describes how to label each logical partition so that the operating system can find theassociated logical partitions of the disks on the disk array.
Prerequisitel You have labeled the logical partitions on the disks of the disk array.
l You have logged in to the server as user root.
ContextThere are three standard models of disk arrays coming with the system: StorEdge 6140,OceanStor S2600 or OceanStor S3200 disk arrays. The methods for labeling volumes of bothmodels are the same. This takes the OceanStor S2600 as an example.
8 Installing and Configuring the M4000/M5000 Server (HA)HA System Software Initial Installation Guide
(T5220&M4000&M5000, S10)
8-38 Huawei Proprietary and ConfidentialCopyright © Huawei Technologies Co., Ltd.
Issue 06 (2010-06-15)
Procedure
Step 1 Check whether the operating system can find the logical partitions of the disks on the S2600disk array.
You need to perform the operation on both node 1 and node 2.
# format
View the displayed information, and check whether the information about the six logicalpartitions is contained.
AVAILABLE DISK SELECTIONS:0. c1t0d0 <LSILOGIC-LogicalVolume-3000 cyl 65533 alt 2 hd 16 sec 273> /pci@0/pci@0/pci@2/scsi@0/sd@0,01. c1t2d0 <LSILOGIC-LogicalVolume-3000 cyl 65533 alt 2 hd 16 sec 273> /pci@0/pci@0/pci@2/scsi@0/sd@2,02. c6t6001882100E6B4BB4AE099D900000000d0 <S2600-1 cyl 65533 alt 2 hd 64 sec 335> /scsi_vhci/ssd@g6001882100e6b4bb4ae099d9000000003. c6t6001882100E6B4BB4AE099DB00000001d0 <S2600-1 cyl 65533 alt 2 hd 64 sec 335> /scsi_vhci/ssd@g6001882100e6b4bb4ae099db000000014. c6t6001882100E6B4BB4AE099DD00000002d0 <S2600-1 cyl 65533 alt 2 hd 64 sec 335> /scsi_vhci/ssd@g6001882100e6b4bb4ae099dd000000025. c6t6001882100E6B6114AE0BF9A00000000d0 <S2600-1 cyl 65533 alt 2 hd 64 sec 335> /scsi_vhci/ssd@g6001882100e6b6114ae0bf9a000000006. c6t6001882100E6B6114AE0BF9B00000001d0 <S2600-1 cyl 65533 alt 2 hd 64 sec 335> /scsi_vhci/ssd@g6001882100e6b6114ae0bf9b000000017. c6t6001882100E6B6114AE0BF9D00000002d0 <S2600-1 cyl 65533 alt 2 hd 64 sec 335> /scsi_vhci/ssd@g6001882100e6b6114ae0bf9d00000002Specify disk (enter its number):
If the Solaris operating system does not find the disks in the disk array, perform Step 2 to searchfor the disks in the disk array again.
Step 2 Run the following command to search for the disks on the disk array again:
# cfgadm -al
The system displays the following information:
Ap_Id Type Receptacle Occupant Condition……….c2 fc-private connected unconfigured unknownc2::200400a0b817e7b8 disk connected unconfigured unknownc2::200500a0b817e7b8 disk connected unconfigured unknownc2::210000e08b104d10 unknown connected unconfigured unknownc3 fc-private connected unconfigured unknownc3::200400a0b817e7b9 disk connected unconfigured unknownc3::200500a0b817e7b9 disk connected unconfigured unknownc3::210000e08b102a73 unknown connected unconfigured unknown
Identify fc-private in the column Type and the corresponding values in AP_Id. Then, runthe following command on each matching AP_Id: In this sample, the corresponding values inAP_Id are c2 and c3.
# cfgadm -c configure c2
# cfgadm -c configure c3
Then, perform Step 1 to view the information about the logical partitions.
Step 3 Perform the following steps to label the logical partitions found by the operating system:
Perform this operation only on node1.
HA System Software Initial Installation Guide(T5220&M4000&M5000, S10) 8 Installing and Configuring the M4000/M5000 Server (HA)
Issue 06 (2010-06-15) Huawei Proprietary and ConfidentialCopyright © Huawei Technologies Co., Ltd.
8-39

1. The system displays the following message after you run the format command. Enter thenumber corresponding to the logical partition on the disk array, which is 2 in this example.
Specify disk (enter its number):2
2. Label the logical partitions of the disks.
Enter y at the following information:
selecting c6t6001882100E6B4BB4AE099D900000000d0[disk formatted]Disk not labeled. Label it now?
After running the command label, enter yes at the following information:
FORMAT MENU: disk - select a disk type - select (define) a disk type partition - select (define) a partition table current - describe the current disk format - format and analyze the disk repair - repair a defective sector label - write label to the disk analyze - surface analysis defect - defect list management backup - search for backup labels verify - read and display labels save - save new disk/partition definitions inquiry - show vendor, product and revision volname - set 8-character volume name !<cmd> - execute <cmd>, then return quit
format> labelReady to label disk, continue?
3. Repeat Step 3.1 and Step 3.2 to label other logical partitions after running the followingcommand:
format> disk
Step 4 Exit from format.
format> q
----End
8.17 Installing and Configuring the Sun Cluster Softwareand Patches
The Sun Cluster software is used to manage the system resource. Thus, system resource can beautomatically switched to the standby server to keep the normal operation of the system whenthe active server is faulty.
Prerequisitel You have installed the operating system and its patches on the server.
l You have logged in to node 1 and node 2 as user root.
l You have inserted the Auto_Install_DVD3/3_For Solaris_APP_V2.1 disk into the DVD-ROM drive of the server.
8 Installing and Configuring the M4000/M5000 Server (HA)HA System Software Initial Installation Guide
(T5220&M4000&M5000, S10)
8-40 Huawei Proprietary and ConfidentialCopyright © Huawei Technologies Co., Ltd.
Issue 06 (2010-06-15)

Procedure
Step 1 Install the Sun Cluster software and patches. Run the operation on both node 1 and node 2.
1. Run the following command to install the Sun Cluster software and patches.
# cd /cdrom/cdrom0/suncluster3.2
# ./install_suncluster.sh
When the system displays Are you sure ?[Y/N] , enter Y.
NOTE
The installation lasts for about 25 minutes.
2. Run the following command to install the Sybase Agent
# ./install_sybase_SUN_agent.sh
When the system displays Are you sure ?[Y/N] , enter Y.
3. Run the following command to install the Sun Cluster software and patches.
# ./install_suncluster_patch.sh
When the system displays Are you sure ?[Y/N] , enter Y.
NOTE
You can ignore the failed messages during the installation. This process lasts about 10 minutes. Then,the server automatically restarts.
Step 2 Configure the Sun Cluster.
1. Run the following command on node 1 to configure the Sun Cluster.
# cd /cdrom/cdrom0/suncluster3.2
# ./config_suncluster.sh
When the system displays Are you sure ?[Y/N] , enter Y.
CAUTIONNode 1 automatically restarts. After the restart of node 1 is complete, perform Step 2.2 toconfigure the Sun Cluster on node 2.
2. Run the following command on node 2 to configure the Sun Cluster.
# cd /cdrom/cdrom0/suncluster3.2
# ./config_suncluster.sh
When the system displays Are you sure ?[Y/N] , enter Y.
HA System Software Initial Installation Guide(T5220&M4000&M5000, S10) 8 Installing and Configuring the M4000/M5000 Server (HA)
Issue 06 (2010-06-15) Huawei Proprietary and ConfidentialCopyright © Huawei Technologies Co., Ltd.
8-41
CAUTIONNode 2 automatically restarts. After the restart of node 2 is complete, perform Step 2.4 toconfigure the Sun Cluster on node 2.
3. Log in to node 1 as user root again.4. Run the following command on node 1 to configure qurom device.
# cd /cdrom/cdrom0/suncluster3.2
# ./config_qurom_device.sh
When the system displays Are you sure ?[Y/N] , enter Y.
----End
8.18 Checking Installation of the Sun Cluster Software andPatches
After installing the Sun Cluster software and its patch on Node1 and Node2, you must checkthat the Sun Cluster software is correctly installed and the software is operational. This operationis performed only on Node1.
PrerequisiteYou have logged in to the server as root.
Procedure
Step 1 Check the status of Node1 and Node2.
# scstat -q
If the displayed information meets all the following conditions, you can infer that the Cluster isproperly installed:
l The number of Quorum votes possible and that of Quorum votes present is3.
l The values of Status on both Node1 and Node2 are Online.
l The value of Status in Device votes is Online.-- Quorum Summary --
Quorum votes possible: 3 Quorum votes needed: 2 Quorum votes present: 3
-- Quorum Votes by Node --
Node Name Present Possible Status --------- ------- -------- ------ Node votes: osssvr-1 1 1 Online Node votes: osssvr-2 1 1 Online
8 Installing and Configuring the M4000/M5000 Server (HA)HA System Software Initial Installation Guide
(T5220&M4000&M5000, S10)
8-42 Huawei Proprietary and ConfidentialCopyright © Huawei Technologies Co., Ltd.
Issue 06 (2010-06-15)

-- Quorum Votes by Device --
Device Name Present Possible Status ----------- ------- -------- ------ Device votes: /dev/did/rdsk/d4s2 1 1 Online
----End
8.19 Installing and Configuring the Volume ManagerThis describes how to install the VERITAS Volume Manager on the server. You can regroupseveral physical disks on the disk array into logical devices to facilitate the management. Thelogical devices refers to volumes. You need to perform the operation on both node 1 and node2.
Prerequisitel You have installed the operating system and its patches on the server.
l You have logged in to the server as user root.
l The Auto_Install_DVD3/3_For Solaris_APP_V2.1 disk is available.
l You have obtained the license of the Volume Manage. If the license is not available, contactHuawei technical support personnel for assistance.
Procedure
Step 1 Insert the Auto_Install_DVD3/3_For Solaris_APP_V2.1 disk into the DVD-ROM drive of theserver.
Step 2 Run the following commands to install the Volume Manager:
# cd /cdrom/cdrom0/veritas5.0
# ./install_VXVM.sh
When the system displays Are you sure ?[Y/N] , enter Y.
NOTE
The process takes about 15~30 minutes.
Step 3 Install the patches of the Volume Manager.
# ./install_VXVM_patch.sh
When the system displays Are you sure ?[Y/N] , enter Y.
NOTE
This process takes about 15 to 30 minutes. Then, the server automatically restarts.
Step 4 Log in to the server as user root again.
Step 5 Configure the Volume Manager.1. Run the configuration script file of the Volume Manager.
# cd /cdrom/cdrom0/veritas5.0
# ./config_VXVM.sh
HA System Software Initial Installation Guide(T5220&M4000&M5000, S10) 8 Installing and Configuring the M4000/M5000 Server (HA)
Issue 06 (2010-06-15) Huawei Proprietary and ConfidentialCopyright © Huawei Technologies Co., Ltd.
8-43

When the system displays Are you sure ?[Y/N] , enter Y.
2. When the system displays Enter your license key :, enter the license of theVolume Manager.
The system displays the following message after the configuration is complete:
Creating a report on all VERITAS products installed on this system
-----------------***********************-----------------
License Key = ****-****-****-****-****-****-****-** Product Name = VERITAS Volume Manager Serial Number = 22854 License Type = PERMANENT OEM ID = 2002
Features :=
VxVM = Enabled CPU Count = Not Restricted Platform = Solaris Version = 4.1
Current vxdctl mode:mode: enabled
In the previous message, if the value of VxVM is Enabled, you can infer that the installationand configuration of the Volume Manager are correct. Otherwise, perform Step 2 throughStep 5 to install and configure the Volume Manager again.
NOTE
The process takes about 10 minutes.
Step 6 After installing the VERITAS Volume Manager software on node 1 and node 2, check whetherthe field values of vxio and did in the /etc/name_to_major file on node 1 are consistent withthat on node 2.
NOTE
In the system output, the values of vxio and did vary with the system configuration. The following takesthe values 318 and 239 as an example.
1. Run the following command on node 1 to view the node information.
# grep "vxio" /etc/name_to_major
vxio 318
# grep "did" /etc/name_to_major
did 239
2. Run the following command on node 2 to view the node information.
# grep "vxio" /etc/name_to_major
vxio 318
# grep "did" /etc/name_to_major
did 239
3. Check whether the field values of vxio and did in the /etc/name_to_major file on node 1are consistent with that on node 2. In the case of inconsistency, proceed with Step 6.4 and
8 Installing and Configuring the M4000/M5000 Server (HA)HA System Software Initial Installation Guide
(T5220&M4000&M5000, S10)
8-44 Huawei Proprietary and ConfidentialCopyright © Huawei Technologies Co., Ltd.
Issue 06 (2010-06-15)

Step 6.5, change the values of node 2 to ensure that the values are consistent with that ofnode 1.
4. Run the following command on node 2 to modify the node information.
a. Run the following command to backup the /etc/name_to_major.# cp /etc/name_to_major /etc/name_to_major.bak
b. Run the following command to modify the value of vxio.# grep -v vxio /etc/name_to_major > /tmp/name_to_major.new# echo "vxio 318" >> /tmp/name_to_major.new# mv /tmp/name_to_major.new /etc/name_to_major# chmod 644 /etc/name_to_major
c. Run the following command to modify the value of did.# grep -v did /etc/name_to_major > /tmp/name_to_major.new# echo "did 239" >> /tmp/name_to_major.new# mv /tmp/name_to_major.new /etc/name_to_major# chmod 644 /etc/name_to_major
5. Run the following command on node 2 to restart the node.
# sync;sync;sync;sync;sync;sync
# shutdown -g0 -y -i6
----End
8.20 Checking the Installation of the Volume ManagerThis describes how to check whether the Volume Manager and its license are installedsuccessfully on both Node1 and Node2.
Prerequisitel You have logged in to the M2000 server as user root.
l The license number of the Volume Manager is available.
Procedure
Step 1 Check whether the license of the Volume Manager is installed successfully.
# vxlicrep
In the output information, if the License Type is DEMO, you can infer that the licenseinstalled is a temporary one.
NOTE
The license installed before the delivery is a demo. Therefore, you need to apply for a commercial licenseand replace the demo with the commercial license on site.
Step 2 Check whether the Volume Manager is correctly installed.
# vxdctl mode
HA System Software Initial Installation Guide(T5220&M4000&M5000, S10) 8 Installing and Configuring the M4000/M5000 Server (HA)
Issue 06 (2010-06-15) Huawei Proprietary and ConfidentialCopyright © Huawei Technologies Co., Ltd.
8-45
mode: enabled
If mode is enabled, you can infer that the Volume Manager is correctly installed.
----End
8.21 Uploading the PlatformTools Installation Package tothe Server
Creating the M2000 database and setting the disks on the server are both performed through thePlatformTools. Therefore, you should upload the PlatformTools installation package to theserver beforehand. Perform this task on each server.
Prerequisitel You have logged in to the server as user root.
l The PlatformTools installation package is available.
Procedure
Step 1 Upload the PlatformTools installation package from the PC to the server.TIP
If the file path contains a space, enclose the path with double quotation marks in DBC case. Otherwise, thesystem cannot identify this path. As a result, the files cannot be uploaded or downloaded. Do not place thefile on the desktop of the PC that uses the Microsoft Windows operating system, because the desktop pathcontains spaces.
1. Switch to the command mode on the PC and run the ftp command.
ftp IP address of the server2. Enter the user name and password of user root.3. Set the file path on the PC and the server.
ftp> lcd path of the installation package on the PC
ftp> cd /opt4. Set the transfer mode to binary mode.
ftp> bin5. Upload the installation package.
ftp> put *M2000-TOOL*Platform*.tar.gz
The installation package starts to be uploaded to the server. After the file transfer iscomplete, the system is switched to the ftp> state.
6. Quit the ftp.
ftp> bye
Step 2 To unpack the file package of PlatformTools, run the following command on the server:
# cd /opt
# /usr/sfw/bin/gtar zxf *M2000-TOOL*Platform*.tar.gz
8 Installing and Configuring the M4000/M5000 Server (HA)HA System Software Initial Installation Guide
(T5220&M4000&M5000, S10)
8-46 Huawei Proprietary and ConfidentialCopyright © Huawei Technologies Co., Ltd.
Issue 06 (2010-06-15)

Step 3 To set authorization to the PlatformTools directory, run the following command on the server:
# cd /opt/PlatformTools
# chmod -R 750 /opt/PlatformTools
----End
8.22 Configuring M2000 Disks (HA, M4000/M5000)This section describes how to configure disks on the disk array by using the PlatformTools.Configuring disks involves creating volumes on the disk array and creating the file system onthe exporthome volume. Before configuring the disk array, you must customize the operatingsystem. You must customize the operating system on both node 1 and node 2 and need toconfigure the disk array only on node 1.
Prerequisitel You have logged in to node 1 and node 2 as user root.
l The network connection between the PC and node 1 and that between the PC and node 2are normal.
l The installation package of the PlatformTools is decompressed to the /opt directory on theserver.
Context
CAUTIONEnsure that the PC is connected to the server during the execution of the PlatformTools.
After starting the PlatformTools, you can type R on the system interface to return to the previousmenu, or type Q to exit the PlatformTools.
Procedure
Step 1 Perform the following operations on node 1 and node 2 separately to customize the Solarissystem parameters.1. Run the following commands to start the PlatformTools:
# cd /opt/PlatformTools
# ./setup2. On the displayed interface, choose Installation > Dual system > NodeN > M4000/
M5000.
In the previous menus, N indicates the current node where you perform operations. Forexample, if you perform operations on node 1, N indicates 1.
When the system displays the following message, type y, and then press Enter.
Are you sure to continue? [y/n]
HA System Software Initial Installation Guide(T5220&M4000&M5000, S10) 8 Installing and Configuring the M4000/M5000 Server (HA)
Issue 06 (2010-06-15) Huawei Proprietary and ConfidentialCopyright © Huawei Technologies Co., Ltd.
8-47

3. On the displayed interface, choose Customize the Solaris.
When the system displays the following message, type y, and then press Enter to startcustomizing the Solaris system.
Do you want to customizing solaris? [y/n]
NOTEWhen the system displays Customize the Solaris completed successfully., itindicates that the system is customized successfully.
If ... Then ...
Node 1 Perform Step 2 to Step 3.
Node 2 Perform Step 3.
Step 2 Perform the following operations on node 1 to create volumes.1. On the displayed interface, choose Create volumes to create volumes.
When the system displays the following message, type y, and then press Enter to startcreating volumes.
Do you want to create volumes? [y/n]
NOTE
If no fail or no error information is displayed, it indicates that the volumes are created.
This process takes about 120 minutes.
2. When the system displays the following message, press Enter to continue.Hit RETURN to go back
Step 3 When the system returns to the main interface, type Q to quit the PlatformTools.
----End
8.23 Checking the Disk Configurations of the M2000 Server(HA
This describes how to check whether the local disk configurations are the same as planned. Inthe case of inconsistency, contact Huawei technical support personnel.
Prerequisitel You have logged in to node 1 and node 2 as user root.
l The network connection between the PC and node 1 and that between the PC and node 2are normal.
Procedure
Step 1 Run the following command to check whether node 1 is the active node.
# scstat -g
8 Installing and Configuring the M4000/M5000 Server (HA)HA System Software Initial Installation Guide
(T5220&M4000&M5000, S10)
8-48 Huawei Proprietary and ConfidentialCopyright © Huawei Technologies Co., Ltd.
Issue 06 (2010-06-15)

View the system output to determine the active and standby nodes. For example, if the host nameis osssvr_rs and disk name is ossdg_rs. the server whose resource status is online is the activenode and the server whose resource status is offline is the standby node.
Step 2 If node 1 is the standby node, run the following command to switch node 1 to the active node:
# scswitch -S -h hostname of node 2
After the switchover, perform Step 1 to check whether node 1 is the active node. If node 1 isnot the active node, performStep 2.
Step 3 Run the following command on node 1 to check the settings of the disk array.
# vxprint -pv
If the values of STATE in the v and pl columns are ACTIVE in the displayed message, you caninfer that the disks on the disk array are successfully set.
NOTEThe values of ASSOC in the columns where the TY NAME is dm varies according to the serverconfiguration.
Step 4 Run the following commands on node 1 to check whether the exporthome volume is mountedto the export/home directory.
# df -k
Filesystem kbytes used avail capacity Mounted on/dev/md/dsk/d100 17146994 10350431 6625094 61% //devices 0 0 0 0% /devicesctfs 0 0 0 0% /system/contractproc 0 0 0 0% /procmnttab 0 0 0 0% /etc/mnttabswap 9496440 1320 9495120 1% /etc/svc/volatileobjfs 0 0 0 0% /system/objectfd 0 0 0 0% /dev/fdswap 9495184 64 9495120 1% /tmpswap 9495224 104 9495120 1% /var/runswap 9495120 0 9495120 0% /dev/vx/dmpswap 9495120 0 9495120 0% /dev/vx/rdmp/dev/md/dsk/d215 1020815 3604 955963 1% /global/.devices/node@1/dev/md/dsk/d115 1020815 3602 955965 1% /global/.devices/node@2/dev/vx/dsk/ossdg/exporthome 144506594 2647322 140414207 2% /export/home
Ensure that the system output displays that the /dev/vx/dsk/ossdg/exporthome disk device ismounted to the /export/home directory. If the disk device is not mounted to the directory, contactHuawei technical support personnel for assistance.
Step 5 Run the following commands on node 2 to check whether the exporthome volume is mountedto the export/home directory.
# df -k
Filesystem kbytes used avail capacity Mounted on/dev/md/dsk/d100 17146994 10350431 6625094 61% //devices 0 0 0 0% /devicesctfs 0 0 0 0% /system/contractproc 0 0 0 0% /procmnttab 0 0 0 0% /etc/mnttabswap 9496440 1320 9495120 1% /etc/svc/volatileobjfs 0 0 0 0% /system/objectfd 0 0 0 0% /dev/fdswap 9495184 64 9495120 1% /tmpswap 9495224 104 9495120 1% /var/run
HA System Software Initial Installation Guide(T5220&M4000&M5000, S10) 8 Installing and Configuring the M4000/M5000 Server (HA)
Issue 06 (2010-06-15) Huawei Proprietary and ConfidentialCopyright © Huawei Technologies Co., Ltd.
8-49
swap 9495120 0 9495120 0% /dev/vx/dmpswap 9495120 0 9495120 0% /dev/vx/rdmp/dev/md/dsk/d215 1020815 3604 955963 1% /global/.devices/node@1/dev/md/dsk/d115 1020815 3602 955965 1% /global/.devices/node@2
Ensure that the system output displays that no disk is mounted to /export/home directory.
Step 6 Run the following command to check whether the resource group is normal. The resource groupmust be in online status on either of the two nodes.
# scstat -D-- Device Group Servers --
Device Group Primary Secondary ------------ ------- --------- Device group servers: ossdg osssvr-2 osssvr-1
-- Device Group Status --
Device Group Status ------------ ------ Device group status: ossdg Online
-- Multi-owner Device Groups --
Device Group Online Status ------------ -------------
Step 7 Run the following command to check whether the shared devices are normal. The shared devicesmust be in online status on either of the two nodes.
# scstat -g-- Resource Groups and Resources --
Group Name Resources ---------- --------- Resources: oss_rg osssvr_rs ossdg_rs
-- Resource Groups --
Group Name Node Name State ---------- --------- ----- Group: oss_rg osssvr-1 Offline Group: oss_rg osssvr-2 Online
-- Resources --
Resource Name Node Name State Status Message ------------- --------- ----- -------------- Resource: osssvr_rs osssvr-1 Offline Offline Resource: osssvr_rs osssvr-2 Online Online - LogicalHostname online.
Resource: ossdg_rs osssvr-1 Offline Offline Resource: ossdg_rs osssvr-2 Online Online
----End
8.24 Installing and Configuring the Sybase (HA)This describes how to install the Sybase and its patches on the server.
8 Installing and Configuring the M4000/M5000 Server (HA)HA System Software Initial Installation Guide
(T5220&M4000&M5000, S10)
8-50 Huawei Proprietary and ConfidentialCopyright © Huawei Technologies Co., Ltd.
Issue 06 (2010-06-15)
Prerequisitel The communication between the PC and the server is normal.
l You have logged in to node 1 and node 2 as user root through the PuTTY.
l The Auto_Install_DVD3/3_For Solaris_APP_V2.1 and SYBASE ASE15.0.3 License diskare available.
Procedure
Step 1 You have inserted the Auto_Install_DVD3/3_For Solaris_APP_V2.1 disk into the DVD-ROMdrive of node 1.
Step 2 Install the Sybase software and patches on node 1.
# cd /cdrom/cdrom0/sybase
# ./install_sybase.sh /opt/sybase Y
When the system displays Are you sure ?[Y/N] , enter Y.
NOTE
This process takes about 30 minutes. During the process, user dbuser is automatically created and thepassward of the user is set to dbuser.
Step 3 Run the following commands to remove the Auto_Install_DVD3/3_For Solaris_APP_V2.1disk:
# cd /
# eject
Step 4 Perform the following operations to install the Sybase license.1. Insert the Sybase 15.0.3 license disk into the DVD-ROM drive of the server.2. Copy the license file from the disk to the /opt/sybase/SYSAM-2_0/licenses directory.
# rm -rf /opt/sybase/SYSAM-2_0/licenses/*
# cd /cdrom/cdrom0/ase15_li/solaris_
# cp *.lic /opt/sybase/SYSAM-2_0/licenses
# chown dbuser:staff /opt/sybase/SYSAM-2_0/licenses/*
NOTE
The extension of the Sybase license file is .lic.
3. Remove the license installation disk.
# cd /
# eject
Step 5 Insert the Auto_Install_DVD3/3_For Solaris_APP_V2.1 disk into the DVD-ROM drive of node1 again.
Step 6 Create the Sybase database server on node 1.
This process takes about 30 minutes.
HA System Software Initial Installation Guide(T5220&M4000&M5000, S10) 8 Installing and Configuring the M4000/M5000 Server (HA)
Issue 06 (2010-06-15) Huawei Proprietary and ConfidentialCopyright © Huawei Technologies Co., Ltd.
8-51

CAUTIONl 192.168.8.31 in the following command is the planned logical IP address of node 1 and node
2. Replace the IP address based on the actual situation. For the T5220 server, see 7.2 Planningthe Host Name and IP Address for the T5220 Server (HA). For the M4000/M5000 server,see 8.2 Planning the Host Name and IP Address for the M4000/M5000 Server (HA).
l In the following command, SYB is the name of the database server. Do not change this nameunless otherwise specified.
# cd /cdrom/cdrom0/sybase
# ./create_sybase_master.sh /export/home/sybdev 192.168.8.31 SYB
When the system displays Are you sure ?[Y/N] , enter Y.
Step 7 Run the following commands to remove the Auto_Install_DVD3/3_For Solaris_APP_V2.1disk:
# cd /
# eject
Step 8 Insert the Auto_Install_DVD3/3_For Solaris_APP_V2.1 disk into the DVD-ROM drive of node2.
Step 9 Creat user dbuser and the passward on node 2.
# cd /cdrom/cdrom0/sybase
# ./install_sybase.sh /opt/sybase N
When the system displays Are you sure ?[Y/N] , enter Y.
Step 10 Run the following commands to remove the Auto_Install_DVD3/3_For Solaris_APP_V2.1disk:
# cd /
# eject
----End
8.25 Creating the M2000 Database (HA, M4000/M5000)This describes how to create the M2000 database through the PlatformTools. To optimize theperformance of the M2000 database, you need to set the Sybase parameters before creating theM2000 database. The M2000 database needs to be created only on node 1.
Prerequisitel You have logged in to node 1 as user root through the PuTTY.
l The installation package of the PlatformTools has been decompressed to the /opt directoryon the server.
8 Installing and Configuring the M4000/M5000 Server (HA)HA System Software Initial Installation Guide
(T5220&M4000&M5000, S10)
8-52 Huawei Proprietary and ConfidentialCopyright © Huawei Technologies Co., Ltd.
Issue 06 (2010-06-15)

Context
CAUTIONWhen the PlatformTools is running, ensure that the PC is connected with the server.
Procedure
Step 1 Run the following commands on the server to start the PlatformTools.
# cd /opt/PlatformTools
# ./setup
NOTE
After starting the PlatformTools, you can type R on the system interface to return to the upper-level menuor type Q to exit the PlatformTools.
Step 2 On the displayed interface, choose Installation > Dual system > Node1 > M4000/M5000.
When the system displays the following message, type y, and then press Enter.
Are you sure to continue? [y/n]
Step 3 On the displayed interface, choose Set Sybase parameters to configure the Sybase parameters.
When the system displays the following prompt, type y to configure the parameters of the Sybasedatabase.
Do you want to modify the parameters of Sybase? [y/n]
Step 4 When the system displays the following message, type the server name of the Sybase databasethat runs on the current server, and then press Enter:
CAUTIONThe typed name of the database server must be consistent with the name set in "Creating theSybase Database Server" in 8.24 Installing and Configuring the Sybase (HA).
Please input Database server , "q" to quit:
Step 5 When the system displays the following message, type sa, and then press Enter:Please input Database user name , "q" to quit:
Step 6 When the system displays the following information, enter the password of user sa created onthe current server. Then, press Enter.
The default password of user sa is emsems.
Please input Database password , "q" to quit:
NOTE
When the system displays Set the parameters of Sybase completed successfully.,you can infer that the Sybase parameters are set successfully.
HA System Software Initial Installation Guide(T5220&M4000&M5000, S10) 8 Installing and Configuring the M4000/M5000 Server (HA)
Issue 06 (2010-06-15) Huawei Proprietary and ConfidentialCopyright © Huawei Technologies Co., Ltd.
8-53

Step 7 When the system displays the following message, press Enter to continue.Hit RETURN to go back
Step 8 On the displayed interface, choose Create an OMC database to create the database.When the system displays the following prompt, type y to create the database device.Do you want to create database? [y/n]
Step 9 When the system displays the following message, type the server name of the Sybase databasethat runs on the current server, and then press Enter:
CAUTIONThe typed name of the database server must be consistent with the name set in "Creating theSybase Database Server" in 8.24 Installing and Configuring the Sybase (HA).
Please input Database server , "q" to quit:
Step 10 When the system displays the following message, type sa, and then press Enter:Please input Database user name , "q" to quit:
Step 11 When the system displays the following information, enter the password of user sa created onthe current server. Then, press Enter.
The default password of user sa is emsems.
Please input Database password , "q" to quit:
NOTE
When the system displays Set the parameters of Sybase completed successfully.,you can infer that the Sybase parameters are set successfully.
----End
8.26 Troubleshooting: Failed to Set the Sybase Parametersby Using the PlatformTools (HA)
This describes a solution to the problem that you fail to set the Sybase parameters by using thePlatformTools.
Symptom
When you are setting the Sybase parameters by using the PlatformTools, the system displaysthe following message to acknowledge the failure to set the Sybase parameters.
Set the parameters of Sybase failed. Please check the log file.
Fault Analysis
Excessive memory is allocated to the database parameters defined by the current databaseconfiguration file SYB.cfg. Thus, free memory cannot meet the requirements for setting Sybaseparameters.
8 Installing and Configuring the M4000/M5000 Server (HA)HA System Software Initial Installation Guide
(T5220&M4000&M5000, S10)
8-54 Huawei Proprietary and ConfidentialCopyright © Huawei Technologies Co., Ltd.
Issue 06 (2010-06-15)

Troubleshooting:Log in to the server as user dbuser and restore the Sybase parameter configuration file.
1. Run the following commands to stop the Sybase:-bash-3.00$ isql -SSYB -Usa -P password of user sa1> shutdown SYB_BACKUP2>go1> shutdown2>go
NOTE
l Run the command ps -ef | grep sybase | grep -v grep to check whether the Sybase is stopped. Ifno output is displayed, you can infer that the Sybase is stopped. If the Sybase is not stopped, runthe kill -9 PID of Sybase command to forcibly stop the Sybase process.
l SYB in the previous commands refers to the name of the database server. Enter the name of thedatabase server based on the actual situation.
2. Run the following command to restore the Sybase parameter configuration file.-bash-3.00$ cd /opt/sybase/ASE-15_0-bash-3.00$ cp SYB.cfg /tmp/SYB.bak-bash-3.00$ cp -p SYB.001 SYB.cfg
3. Restart the Sybase.-bash-3.00$ cd /opt/sybase/ASE-15_0/install-bash-3.00$ ./startserver -f ./RUN_SYB
NOTE
It takes about 30 seconds to start the Sybase. Please wait.
Press Enter. When the -bash-3.00$ prompt is displayed, run the following command:-bash-3.00$ nohup ./startserver -f ./RUN_SYB_backSYB in the previous commands refers to the name of the database server. Enter the nameof the database server based on the actual situation.
4. Run the following commands to check whether the Sybase is started:-bash-3.00$ cd /opt/sybase/ASE-15_0/install-bash-3.00$ ./showserverUID PID PPID C STIME TTY TIME CMD dbuser 1594 1589 0 10:53:40 ? 0:01 /opt/sybase/ASE-15_0/bin/dataserver -ONLINE:5,0,0x65008686, 10000000000, 0x1fc0 dbuser 1597 1589 0 10:53:41 ? 0:01 /opt/sybase/ASE-15_0/bin/dataserver -ONLINE:8,0,0x65008686, 10000000000, 0x1fc0 ... ... dbuser 1608 1607 0 10:54:58 pts/2 0:00 /opt/sybase/ASE-15_0/bin/backupserver -e/opt/sybase/ASE-15_0/install/SYB_back.lIf the output information contains dataserver and backupserver, you can infer that the dataservice and backup service of the database are normally started.
5. User dbuser logs out.-bash-3.00$ exit
6. Log in to the server as user root and reset the Sybase parameters. For details, see Table8-13.
HA System Software Initial Installation Guide(T5220&M4000&M5000, S10) 8 Installing and Configuring the M4000/M5000 Server (HA)
Issue 06 (2010-06-15) Huawei Proprietary and ConfidentialCopyright © Huawei Technologies Co., Ltd.
8-55

Table 8-13 References
System Type References
T5220 7.23 Creating the M2000 Database (HA,T5220)
M4000/M5000 8.25 Creating the M2000 Database (HA,M4000/M5000)
8.27 Checking the Sybase Server ConnectionThis describes how to check the Sybase server connection to ensure that the Sybase database isconnected. You need to perform this operation on only the active node.
Prerequisitel The database is normally started.
l You have logged in to the M2000 server as user dbuser.
Procedure
Step 1 Run the following command to view the database server name:
-bash-3.00$ cd /opt/sybase/ASE-15_0/install
-bash-3.00$ ls
If the system displays the following information, you can infer that the name of the databaseserver is SYB.
RUN_SYBRUN_SYB_back
Step 2 Run the following command to check whether the database server can be connected.
In the command, SYB indicates the database server name that you view in Step 1. Replace itwith an actual database server name.
-bash-3.00$ isql -SSYB -Usa -Ppassword of user sa
l If the system output contains 1> , you can infer that the database server is operating normally.Enter exit to log out of the M2000 server.
l If the system output does not contain 1> , you can infer that the database is operatingabnormally. You need to contact Huawei technical support personnel for assistance.
----End
8.28 Checking the Version and Patches of the SybaseThis describes how to check whether the Sybase application software and patches listed in theversion configuration table are installed. The installation of the right version of Sybaseapplication software and patches is essential to the normal operation of the M2000 system.You
8 Installing and Configuring the M4000/M5000 Server (HA)HA System Software Initial Installation Guide
(T5220&M4000&M5000, S10)
8-56 Huawei Proprietary and ConfidentialCopyright © Huawei Technologies Co., Ltd.
Issue 06 (2010-06-15)
need to perform this operation on only the active node.For an HA system, you need to performthis operation on only the active node.
PrerequisiteYou have logged in to the M2000 server as user dbuser.
Context
CAUTIONIn the following commands, SYB indicates the name of the database server. Replace it with anactual database server name.
Procedure
Step 1 To check that the Sybase database software and EBF16548 patch are installed, run the followingcommands:
-bash-3.00$ isql -SSYB -Usa -Ppassword of user sa
1> select @@version
2> go
Adaptive Server Enterprise/15.0.3/EBF 16548 ESD#1/P/Sun_svr4/OS 5.8/ase1503/2680/64-bit/FBO/Thu Mar 5 09:39:28 2009
In the system output, 15.0.3 indicates the version number of the current Sybase; 16548indicates the patch number of the installed patch. The version number of the Sybase and thepatch number must be consistent with those provided in the version relation table; otherwise,contact Huawei technical support personnel for assistance.
Step 2 To check that the license of the Sybase database is installed, run the following commands:
1> sp_lmconfig
2> go
If the system output contains ASE_CORE of Expiry Date is Permanent, you can infer thatthe license of the Sybase database is successfully installed. Otherwise, contact Huawei technicalsupport personnel for assistance.
Step 3 To exit isql, run the following command:
1> exit
----End
8.29 Installing the Sybase and Patches on Node2This is performed to install the Sybase and patches on Node2. To install the Sybase and patcheson Node2, you must copy the installation files from Node1 to Node2 and execute the installation.
HA System Software Initial Installation Guide(T5220&M4000&M5000, S10) 8 Installing and Configuring the M4000/M5000 Server (HA)
Issue 06 (2010-06-15) Huawei Proprietary and ConfidentialCopyright © Huawei Technologies Co., Ltd.
8-57

Prerequisitel Install the Sybase and patches on Node1.
l Log in to Node1 as user dbuser.
Procedure
Step 1 To stop the Sybase on Node1, execute the following command:
-bash-3.00$ isql -SSYB -Usa -PPassword of sa
1> shutdown SYB_BACKUP
2> go
1> shutdown
2> go
Step 2 To pack the Sybase on Node1, log in to Node1 as root, and execute the following commands:
# cd /opt
# tar cvf sybase.tar sybase
Step 3 Execute FTP to transmit the /opt/sybase.tar file from Node1 to the /opt directory on Node2.
1. Transmit the file to Node2 through FTP.
# ftp Active adaptor IP for the public network of Node2
2. Enter root and the password to go to the opt directory on Node2.
3. Enter the /opt directory on Node2.
# cd /opt
4. Set the binary mode for transmitting the file.
ftp> bin
5. Transmit the file /opt/sybase.tar.
ftp> put /opt/sybase.tar
6. Exit FTP.
ftp> quit
Step 4 To install the Sybase on Node2, log in to Node2 as root, and execute the following commandson Node2:
# cd /opt
# tar xvf sybase.tar
# chown -R dbuser:staff /opt/sybase
----End
8 Installing and Configuring the M4000/M5000 Server (HA)HA System Software Initial Installation Guide
(T5220&M4000&M5000, S10)
8-58 Huawei Proprietary and ConfidentialCopyright © Huawei Technologies Co., Ltd.
Issue 06 (2010-06-15)

9 FAQs
About This Chapter
This chapter describes FAQs and solutions related to the M2000.
9.1 How Should I Do When the System Fails to Read the CD-ROMThis describes what to do when the system fails to read the CD during the installation of theserver.
9.2 What to Do When the Information Displayed on the Interface Is Abnormal?This section describes what to do when the information displayed on the interface is abnormal.
HA System Software Initial Installation Guide(T5220&M4000&M5000, S10) 9 FAQs
Issue 06 (2010-06-15) Huawei Proprietary and ConfidentialCopyright © Huawei Technologies Co., Ltd.
9-1
9.1 How Should I Do When the System Fails to Read the CD-ROM
This describes what to do when the system fails to read the CD during the installation of theserver.
Questionl What should we do when the system fails to access the DVD-ROM and displays No
default media available after the restart?
l What should we do when the system fails to read the CD and displays No such deviceor address?
AnswerRun the following commands to restart the Volume Manager service.
# /etc/init.d/volmgt stop
# /etc/init.d/volmgt start
9.2 What to Do When the Information Displayed on theInterface Is Abnormal?
This section describes what to do when the information displayed on the interface is abnormal.
QuestionWhen we are configuring or maintaining the server through the character interface, theinformation displayed on the interface is abnormal. To solve this problem, what should we do?
Answer1. If the abnormality occurs when you are editing a file by using the vi command, press Esc
and then run the :q! to exit the vi editor.2. (Optional) Run the clear command to clear the screen.3. Run the following command to set the type of the terminal to vt100. Then, proceed with
the next operation.# TERM=vt100; export TERM
9 FAQsHA System Software Initial Installation Guide
(T5220&M4000&M5000, S10)
9-2 Huawei Proprietary and ConfidentialCopyright © Huawei Technologies Co., Ltd.
Issue 06 (2010-06-15)

![Sun SPARC Enterprise™ …f.genais.free.fr/tutoSun/821-0338-10.pdfSubmit comments about this document by clicking the Feedback[+] link at: Sun SPARC Enterprise M3000/M4000/M5000/M8000/M9000](https://static.fdocuments.in/doc/165x107/5b31de797f8b9ae1108bf91b/sun-sparc-enterprise-f-comments-about-this-document-by-clicking-the-feedback.jpg)