![17Q4 Oct SMI inventorypricing-filtered V2 · W í ì l î ó l î ì í ó ' } v W : ] u u Ç > u Ì W Z } v W ô ï î r ô ó ì r õ ô õ ì ' } v W ^ À , u u } v](https://static.fdocuments.in/doc/165x107/5ea57e7526d7536cdb46d77a/17q4-oct-smi-inventorypricing-filtered-v2-w-l-l-v-w.jpg)
M a n u a l d e l u s u a r i o U s e r 's m a n u a l · - 6 -dm domos multiradio fg centrales de...
60
M a n u a l d e l u s u a r i o M a n u a l d e l u s u a r i o U s e r 's m a n u a l E S P A Ñ O L E N G L I S H
Transcript of M a n u a l d e l u s u a r i o U s e r 's m a n u a l · - 6 -dm domos multiradio fg centrales de...
M
a n
u
a
l
d
e l
u
s u
a
r
i o
M
a n
u
a
l
d
e l
u
s u
a
r
i o
U
s
e
r
's
m
a
n
u
a
l
E S
P A
Ñ O
L
E N G
L I
S H

- 2 -
D MD O M O S M U L T I R A D I O
fg
INDICE / INDEX
Descripción general / Overview ............................................................................................................... 3C11F, C17F, C12F: Centrales / Central units .............................................................................. 4 - 5C18F, C16F, C14F C19F: Centrales con radio FM / FM Radio Central units ..................... 6 - 11D24D, D25D, D13D, D41U, D42U, D45U, D44U: Mandos de sonido / Sound Control units ......... 12 - 14D26D, D46U: Mandos con intercom / Intercom Control units .............................................. 15 - 17D28D: Mando multiservicio / Multiservice Control unit ...................................................... 18 - 23J12U: Intercomunicador / Intercom unit ..................................................................................... 24 - 26D47U: Mando de sonido con sintonizador FM / Sound Control unit with built-in FM tuner ........... 27 - 28M17U, M18U, M19N: Sistema de transmisión de órdenes de Mando a distancia por infrarrojosentre habitaciones / IR remote command multi-room transmission system ................................. 29D48U: Mando intercomunicador de 2 canales estéreo / Intercom-control unit with 2stereo channels ............................................................................................................................. 30 - 43M20U: Módulo / Module unit ................................................................................................................ 44M13N: Mando a distancia / Remote Control .............................................................................. 45 - 54Productos de próxima aparición / Forthcoming products ............................................................. 55Auriculares y walkman® / Headphones and walkman® ............................................................... 56Adaptación de fuentes musicales a la Central / Adapting musical sources to the Central unit .... 57Potencia y calidad de sonido / Sound power and quality ........................................................... 58Garantía / Guarantee .............................................................................................................................. 59
1 C Nº de canales de sonidoSound channel number
Sonido monoMono
Sonido mono o estéreoMono or stereo
TimerSleep timer
Entrada de walkman®Walkman® input
Toma de auricularesHeadphones socket
Potencia de sonidoSound power
3 W
ScanScan
Tonos (graves/agudos)Tone (bass/treble)
Conex. portero automáticoDoor entry system
Reloj/despertadorAlarm-clock
12:30
IntercomunicaciónIntercom
Sintonizador FMFM tuner
Mando a distanciaRemote control
Distinguido Sr. / Sra:
En le agradecemos el haber adquirido nuestros productos depositando su confianza en nuestrafirma.
Por nuestra parte esperamos que la calidad y tecnología incorporadas en ellos, así como el cuidadoque hemos puesto en su construcción, le proporcionen un magnífico funcionamiento durante muchosaños.
Desde este momento quedamos a su disposición para responder de la garantía de nuestros productos,y le rogamos lea detenidamente las instrucciones de funcionamiento que le permitirán sacar todo elprovecho a esta Instalación.
Dear Sir or Madam:
thanks you for the trust you have placed in our company and for buying ourproducts.
On our side, we hope that the quality and technology incorporated in them, and thecare we have devoted in their manufacturing, will provide you with the best servicefor many years.
From this moment on, we are at your disposal to vouch for the guarantee of ourproducts, and we kindly request you to read carefully the user instructions, that willallow you to get the maximum benefit from this installation.

- 3 -
D MD O M O S M U L T I R A D I O
hk
DESCRIPCION GENERAL DE LA INSTALACION DE SONIDOE INTERCOMUNICACIÓN DOMOS.
Su vivienda está equipada con un Sistema de Sonido DOMOS de , con el que dispondrá de uno o varioscanales de Sonido con control independiente en cada habitación.
El Sistema de Sonido comienza en el módulo Central que se encarga de recibir las señales de audioprocedentes de las Fuentes Musicales y de controlar el encendido y apagado a distancia de las mismas.Fuente Musical es todo aparato reproductor de sonido (Radio, Walkman®, Equipo de Música, TV, CD, HiloMusical, etc.), con una salida de audio utilizable, como la de auriculares, altavoces, etc.
Si dispone de una Central con Radio FM Estéreo incorporada, podrá seleccionar, para su audición en lashabitaciones, entre la Radio y la Fuente Musical que Vd. conecte a la Central (por ejemplo su equipo de música).
En cada habitación Vd. dispone de un Mando de Sonido para controlar el encendido y apagado de los Altavocesde esa habitación y regular el Volumen, además de poner en marcha a distancia la Fuente Musical conectadaa la Central o la Radio.
También podrá conectar auriculares para la escucha personal, o utilizar la Instalación de su habitación comoAmplificador para su Walkman® o su PC y poder así escucharlo por los Altavoces con gran potencia y calidad.
En algunos de los módulos, Vd. podrá controlar, además de las funciones citadas, los tonos Graves y Agudosy el Balance del sonido.
Si su Central dispone de Radio podrá, desde cualquier Mando o Mando a Distancia en cualquier habitación,cambiar hasta 8 emisoras presintonizadas por canal (Scan).
Finalmente, los Altavoces o Baffles efectuarán la difusión del Sonido en mono (1 altavoz) o en estéreo (2 o másaltavoces) con calidad y potencia.
Es posible que los Mandos de su vivienda dispongan de la función Intercomunicación. Si es así, podrácomunicarse entre las diferentes habitaciones, vigilar niños, etc, aprovechando su Sistema de Sonido .Y si tiene instalados los Mandos Multifunción D28D dispondrá, además, de reloj despertador y acceso al porteroautomático desde cada habitación.
OVERVIEW OF THE DOMOS INTERCOMAND SOUND SYSTEM INSTALLATION
You have an DOMOS sound system at home, so you will dispose of one or more soundchannels independently controlled in each room.
The sound system begins with the Central module, that is in charge of receiving all the audiosignals from the Musical Sources. It also offers a remote-controlled turn on/off. Musicalsources include sound appliances of all kinds (radio, walkman®, music equipment, TV, CD,background sound system, etc.) with an available audio output, such as headphones,loudspeakers, etc.
If your Central unit has a built-in FM stereo radio, you will be able to select what will be heardin the rooms: the radio or the musical source that you have connected to the Central unit (e.g.your music equipment).
In each room you will have a Sound Control unit to turn on/off the loudspeakers of that room,control the volume and moreover to switch on the musical source connected to the Central unitor the radio.
You can also connect your headphones for an individual hearing, or use the sound installationof your room like an amplifier for your walkman® or your PC, so you can listen to it throughthe loudspeakers with good quality and power.
In some of the Control units, besides the functions mentioned above, you can control the bass,treble, and the sound balance.
If your Central includes a radio, you will be able to select up to 8 preset stations per channel(scan), with any Control unit or Remote Control from any room.
Finally, the loudspeakers will diffuse the sound with quality and power in mono (1 loudspeaker)or in stereo sound (2 or more loudspeakers).
You may have Control units with Intercom functions in your home. If so, you will be able tocommunicate between the different rooms, keep an eye on the children, and so on, using your
Sound System. If you have installed the D28D Multifunction Control units, you will alsohave an alarm clock and control of the door entry system from each room.

- 4 -
D MD O M O S M U L T I R A D I O
fg
C11F 1 C
C17F 2 C
0623
[ 1 ] [ 2 ]
[ 3 ]
CENTRALES DE 1, 2 ó 4 CANALES DE SONIDO / CENTRAL UNITS WITH 1, 2 OR 4 SOUND CHANNELS
[ 1 ] INTERRUPTOR GENERAL / MAIN SWITCHPara la conexión o desconexión de toda la Instalación.To turn on/off the entire installation.
[ 2 ] PILOTO DE ENCENDIDO (verde) / TURN ON LAMP (green)Indica que la Instalación está en disposición de uso. Se iluminará en cuanto se accione el interruptor general.Indicates that the sound installation is available to be used. It lights when the main switch is on.
[ 3 ] PILOTO DE SOBRECARGA (rojo) / OVERLOAD LAMP (red)Indica que hay una avería o que la instalación carece de potencia suficiente. Avise a su instalador.Indicates that the installation has not enough power or a failure. Contact your installer.
[ 4 ] CONECTOR PARA FUENTE MUSICAL EXTERIOR / CONNECTOR FOR EXTERNAL MUSICAL SOURCEPermite conectar cualquier Fuente Musical a la Instalación de Sonido (equipo de música, walkman®, radio-cassette, TV, hilomusical, etc.). Pida a su instalador que le conecte a la Central el aparato que Vd. desee. Hasta 4 Fuentes en el modelo C12F.IMPORTANTE: A la hora de conectar la fuente musical externa tenga en cuenta que el conector de la Central es de unasola posición. Su inserción forzada en una posición distinta puede dañar la Central.NOTA: Para más información ver pág. 57 - Adaptación de Fuentes Musicales a la Central.It allows you to connect any musical source (HI-FI system, walkman®, radio, TV, background sound system, etc.)to the sound installation. Ask your installer to connect the sound equipment you wish to the Central unit. Up tofour sources in C12F model.IMPORTANT: When attemting to connect a music source to the Central Unit, please take into account that theconnection has only one possible position. If the connector is forced to be connected in a different position,the Central Unit may result damaged.NOTE: For further information see the page 57 - Adapting musical sources to the Central unit -.
[ 5 ] ENCHUFE DE RED TELECONTROLADO / TELECONTROLLED MAINS SOCKETControla su Fuente Musical (equipo, radio, etc.). Este enchufe sólo dispone de tensión cuando hay algún Mando de Sonido enmarcha en cualquier lugar de la Instalación, por lo que pondrá en marcha la fuente musical sólo cuando sea preciso.IMPORTANTE: No use nunca este enchufe para conectar otro aparato eléctrico, salvo su Fuente Musical, pues podría dañarseriamente la Central.It controls your musical source (HI-FI system, radio, etc.). This socket is only powered when any sound controlis turned on anywhere in the installation; so, the musical source will be turned on only when necessary.IMPORTANT: Never use this socket to connect any electrical appliance apart of your musical source, becauseit could seriously damage your Central unit.
C12F 4 C
[ 5 ] [ 4 ]

- 5 -
D MD O M O S M U L T I R A D I O
hk
���������
���
[ 6 ] PILOTO DE TELECONTROL (amarillo) / TELECONTROL LAMP (yellow)Se ilumina al encender cualquier Mando. Indica la existencia de tensión en el enchufe de red telecontrolado correspondiente [ 5 ].It lights when you turn on any Control unit. It shows the presence of voltage in the corresponding telecontrolledmains socket [ 5 ].
[ 7 ] PILOTO DE AUDIO (verde) / AUDIO LAMP (green)Indica, con su parpadeo, la presencia de música en la Central.It blinks, showing the presence of sound in the Central unit.
[ 8 ] PULSADOR LUMINOSO DE ENCENDIDO MANUAL (rojo) / MANUAL TURN ON LIGHTING BUTTON (red)Activa, de forma manual, el telecontrol poniendo así en marcha la Fuente Musical.Activates manually the telecontrol, therefore turning on the music source.
NOTA: Para que la música ambiental esté en disposición permanente de uso, la Central ha de permanecer encendida. Elconsumo de energía es insignificante.NOTE: To have the sound system permanently available, the Central unit must remain turned on. Theenergy consumption is negligible.
[ 6 ]
[ 7 ] [ 8 ]
C11F 1 C
C17F 2 C
C12F 4 C
0624
De 1 a 4 fuentes musicales (según modelo)Up to 4 audio sources (depending on the model)
- 6 -
D MD O M O S M U L T I R A D I O
fg
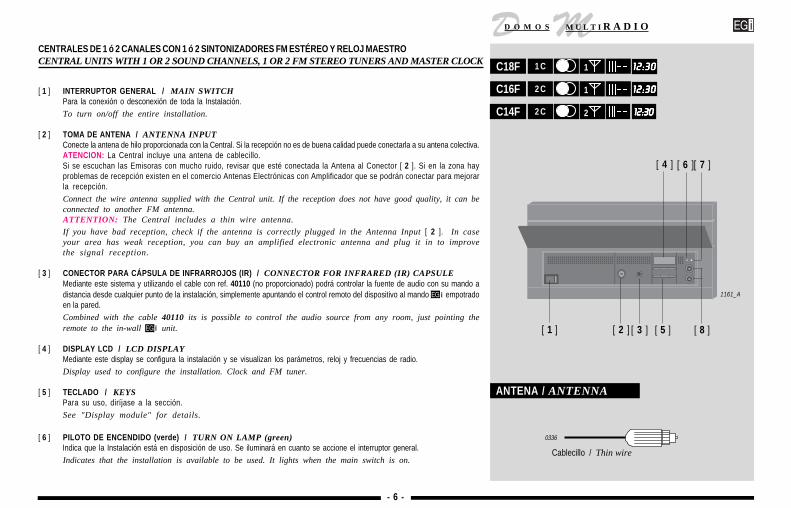
CENTRALES DE 1 ó 2 CANALES CON 1 ó 2 SINTONIZADORES FM ESTÉREO Y RELOJ MAESTROCENTRAL UNITS WITH 1 OR 2 SOUND CHANNELS, 1 OR 2 FM STEREO TUNERS AND MASTER CLOCK
[ 1 ] INTERRUPTOR GENERAL / MAIN SWITCHPara la conexión o desconexión de toda la Instalación.To turn on/off the entire installation.
[ 2 ] TOMA DE ANTENA / ANTENNA INPUTConecte la antena de hilo proporcionada con la Central. Si la recepción no es de buena calidad puede conectarla a su antena colectiva.ATENCION: La Central incluye una antena de cablecillo.Si se escuchan las Emisoras con mucho ruido, revisar que esté conectada la Antena al Conector [ 2 ]. Si en la zona hayproblemas de recepción existen en el comercio Antenas Electrónicas con Amplificador que se podrán conectar para mejorarla recepción.Connect the wire antenna supplied with the Central unit. If the reception does not have good quality, it can beconnected to another FM antenna.ATTENTION: The Central includes a thin wire antenna.
If you have bad reception, check if the antenna is correctly plugged in the Antenna Input [ 2 ]. In caseyour area has weak reception, you can buy an amplified electronic antenna and plug it in to improvethe signal reception.
[ 3 ] CONECTOR PARA CÁPSULA DE INFRARROJOS (IR) / CONNECTOR FOR INFRARED (IR) CAPSULEMediante este sistema y utilizando el cable con ref. 40110 (no proporcionado) podrá controlar la fuente de audio con su mando adistancia desde cualquier punto de la instalación, simplemente apuntando el control remoto del dispositivo al mando empotradoen la pared.Combined with the cable 40110 its is possible to control the audio source from any room, just pointing theremote to the in-wall unit.
[ 4 ] DISPLAY LCD / LCD DISPLAYMediante este display se configura la instalación y se visualizan los parámetros, reloj y frecuencias de radio.Display used to configure the installation. Clock and FM tuner.
[ 5 ] TECLADO / KEYSPara su uso, diríjase a la sección.See "Display module" for details.
[ 6 ] PILOTO DE ENCENDIDO (verde) / TURN ON LAMP (green)Indica que la Instalación está en disposición de uso. Se iluminará en cuanto se accione el interruptor general.Indicates that the installation is available to be used. It lights when the main switch is on.
ANTENA / ANTENNA
0336
Cablecillo / Thin wire
1161_A
[ 1 ] [ 5 ][ 2 ]
[ 6 ][ 7 ][ 4 ]
[ 3 ] [ 8 ]
C18F 1 C 1
C14F 2 C 2 12:3012:3012:3012:3012:30
C16F 2 C 1 12:3012:3012:3012:3012:30
12:3012:3012:3012:3012:30

- 7 -
D MD O M O S M U L T I R A D I O
hk
1161
_B
[ 7 ] PILOTO DE AUDIO (rojo) / AUDIO LAMP (red)Indica, con su parpadeo, la presencia de sonido en la entrada RCA.It blinks, showing the presence of sound in the RCA input.
[ 8 ] CONECTOR RCA PARA FUENTE MUSICAL EXTERIOR / RCA CONNECTOR FOR EXTERNAL MUSICAL SOURCEPermite conectar cualquier Fuente Musical a la Instalación de Sonido (equipo de música, MP3, radio-cassette, TV, hilo musical,etc.). Pida a su Instalador que le conecte a la Central el aparato que Vd. desee.NOTA: Para más información ver pág. 57 - Adaptación de Fuentes Musicales a la Central.It allows you to connect any musical source (HI-FI system, MP3, radio, TV, background sound system, etc.) to thesound installation. Ask your installer to connect the sound equipment you wish to the Central unit.NOTE: For further information see the page 57 - Adapting musical sources to the Central unit -.
MÓDULO DISPLAY / DISPLAY MODULE
Este módulo presenta en su display la configuración y servicios de la Central. Permite ajustar la hora del sistema y hace de sintonizadorde radio. A través de este módulo, podrá también realizar ajustes de audio en su sistema.
This module shows the configuration and services programmed in the Central unit. Audio adjustements can also bemade from the module.
ELEGIR EL CANAL DE SONIDO / CHOSSING AN AUDIO CHANNELDependiendo del tipo de Central, se podrá elgir entre un canal externo o sintonizador (C18F), un canal externo y un sintonizador FM (C16F)o un canal externo y dos sintonizadores FM (C14F).Presionando CH1, se ilumina el LED correspondiente a CH1 y aparece:
• Aud en el display si en el canal 1 está seleccionada la fuente de audio externo.• La frecuencia en MHz del sintonizador si la radio está seleccionada.
Al volver a pulsar CH1 se vuelve al estado inicial ( en el display).Presionando CH2 (sólo C16F y C14F), se ilumina el LED correspondiente a CH2 y aparece:
• Aud en el display si en el canal 2 está seleccionada la fuente de audio externo.• La frecuencia en MHz del sintonizador si la radio está seleccionada.
Al volver a pulsar CH2 se vuelve al estado inicial ( en el display).
Depending on the Central unit model, an external source or FM tuner (C18F) an external source and FM tuner (C16F)or an external source and 2 FM tuners (C14F).Pressing CH1, turns on CH1 led, and on the display appears:
• Aud if external audio is selected for CH1.• Frequency in MHz if tuner is selected.
Pressing CH1 again, brings the unit to the original state ( on the display).Pressing CH2 (only C16F and C14F) turns on CH2 led, and on the display appears:
• Aud if external audio is selected for CH2.• Frequency in MHz if tuner is selected.
Pressing CH2 again, brings the unit to the original state.
Sólo/Only C16F; C14F
C18F 1 C 1
C14F 2 C 2 12:3012:3012:3012:3012:30
C16F 2 C 1 12:3012:3012:3012:3012:30
12:3012:3012:3012:3012:30

- 8 -
D MD O M O S M U L T I R A D I O
fg
Sólo/Only C16F; C14F
1161
_C
RADIO. SINTONIZACIÓN Y PROGRAMACIÓN / RADIO. TUNING AND PROGRAMMINGPara escuchar la radio en el sistema, se selecciona CH1 o CH2. Una vez que se presenta la última frecuencia sintonizada en el display, se puede:
• Cambiar manualmente esta frecuencia.• Memorizar la frecuencia.• Navegar entre frecuencias almacenadas en memoria (9 emisoras).
Press CH1 or CH2 to select the FM tuner. Now, you can:• Manually change the frequency.• Store the frequency.• Recall a preset station (9 stations).
CAMBIO MANUAL DE FRECUENCIA / MANUAL FREQUENCY SELECTMediante la pulsación y se realizan incrementos o decrementos en la frecuencia sintonizada. Si se mantiene cualquiera de las teclaspulsadas, se realiza una búsqueda automática de emisoras. Mientras esto sucede, aparecerá en el display "- - - -". Si la emisora sintonizadano está memorizada, la cifra de la frecuencia parpadeará.
By pressing and tuned frequency increases or decreases. If any of the keys is hold, the device performs anautomatic tuning. "- - - -" blinks as the operation is performed. If the tuned station is not stored, the frequency willblink on the display.
MEMORIZAR LA FRECUENCIA / PRESET STATIONSCuando se tiene seleccionada la frecuencia a memorizar, pulsar OK. Aparece la posición de memoria ("Pr. X") en la que se memorizará la frecuencia.Para cambiar esta posición, pulsar MENU hasta llegar al número (entre 1 y 9 ) donde se desea almacenar. En el display se alternan laposición de memoria y la frecuencia a memorizar.Cuando la posición sea la deseada, pulsar OK.Aparece en el display "Pr.X" siendo "X" la posición de memoria elegida.Si se desea que aparezca en el display la frecuencia sintonizada, pulsar MENU.NOTA: Almacenar una nueva frecuencia en una posición ya usada, sobrescribe la frecuencia anterior.When the station is tuned, press OK. "Pr.X" appears on the display. To change the position where the station will bestored press MENU. When the correct memory position has been found, press OK.
NAVEGAR ENTRE FRECUENCIAS ALMACENADAS EN MEMORIA / LISTENING TO PRESET STATIONSSe pueden almacenar hasta 9 frecuencias para su acceso directo. Para acceder a estas memorias,Seleccionar el canal (CH1 y/o CH2) donde se encuentre el sintonizador.Pulsar MENU para pasar de una presintonía a otra. Una pulsación breve muestra la frecuencia, mientras que una posición más larga, muestrala posición de programa.Up to 9 stations can be stored for direct access.
Select the FM tuner channel (CH1 or CH2).
Press MENU to select the desired station.
C18F 1 C 1
C14F 2 C 2 12:3012:3012:3012:3012:30
C16F 2 C 1 12:3012:3012:3012:3012:30
12:3012:3012:3012:3012:30

- 9 -
D MD O M O S M U L T I R A D I O
hk
1161
_D
AJUSTES DEL SISTEMA / SYSTEM ADJUSTEMENTS
AJUSTE HORA / SETTING THE TIMECon una pulsación larga de la tecla MENU se accede al menú para modificar la hora del sistema.Aparece la hora actual, con la cifra de las horas parpadeando. Usar las teclas y para modificarla.Volviendo a pulsar MENU brevemente, se pasa a la modificación de los minutos de la misma manera.Press MENU more than 2 seconds.Hours blink an the display. Use and to adjust minutes by pressing or .
AJUSTE DESFASE RELOJ / CLOCK READJUSTINGTras ajustar el reloj, una pulsación breve de la tecla MENU, lleva a una ventana con "O. 0." La cifra parpadeará. Este parámetro corrigeel desfase en el reloj que pueden deberse a factores atmosféricos de temperatura y humedad que afecten a los componentes electrónicos.Para calibrar correctamente el reloj, conviene dejar este parámetro a cero, y controlar el sistema durante un mes. Al final de este mes, secomprueba el retraso/adelanto del aparato, y se corrige en este parámetro.EJEMPLO: Después de un mes de funcionamiento, el reloj del sistema se ha retrasado 3 minutos. Se accedería a este menú, y se colocaríaun 3. Si en vez de retraso, fuese adelanto, se colocaría un -3.Once the minutes are adjusted, pressing MENU will bring "O. 0." on the display. This parameter corrects clockaccuracy. The clock must be adjusted after it has been working for one month.EXAMPLE: 3 min. back: +3 / 3 min. forward: –3.
AJUSTE GANANCIA SINTONIZADOR / ADJUST TUNER GAINSi la calidad de recepción del sintonizador no es buena, puede intentar mejorarse mediante este parámetro.Pulse MENU hasta que aparezca parpadeando la hora.Pulse brevemente MENU varias veces hasta llegar al parámetro "G".Los valores que puede tomar el valor de ganancia son 1, 2, 3, 4 o A, donde "A" es automático. En este modo, el sistema tratará de ajustarpor sí mismo la ganancia para el funcionamiento óptimo.If FM reception is impaired, or there is interference, gain can be adjusted for better reception.Press MENU for more than 2 seconds and then shortly several times until "G" appears on the display.Use or for 0, 1, 2, 3, A (Auto).
SELECCIÓN MODO OPERACIÓN / OPERATION MODE SELECTIONMediante este modo, podrá definir el modo en el que funciona la central con respecto al sistema.Pulse MENU hasta que aparezca parpadeando la horaPulse brevemente MENU hasta llegar al parámetro "CHXX". En este punto, aparece "XX" parpadeando, donde "XX" es 12 ó 34.Si es 12 la Central actúa como principal y es la que se encarga de la gestión de los sitemas de NIÑERA/VIGILANCIA, del envío de horay de la gestión de los canales de audio 1 y 2.Si es 34 la Central es secundaria y sólo se encargará de la gestión de canales de audio 3 y 4.This defines the tasks of the Central unit in the system.Press MENU for more than 2 seconds / Press MENU shortly "CHXX" appears. "XX" can be 12 or 34.If the digits are 12, the Central unit controls all services of the system (surveillance, main clock...).If the digits are 34, the Central unit only controls audio channels 3 and 4.
Sólo/Only C16F; C14F
C18F 1 C 1
C14F 2 C 2 12:3012:3012:3012:3012:30
C16F 2 C 1
******
*** Algún Mando en la instalación está activo.There are in-wall control units activated.
** Función INTERCOMUNICACIÓN activada.INTERCOM function activated.
* Función NIÑERA/VIGILANCIA activada.SURVEILLANCE/LISTEN function activated.
NOTA: Estos servicios NO están disponibles en todas las instalaciones.NOTE: These services may not be available for all installations.
12:3012:3012:3012:3012:30
12:3012:3012:3012:3012:30

- 10 -
D MD O M O S M U L T I R A D I O
fg
C19F - CENTRAL DE 2 CANALES CON 1 SINTONIZADOR FM ESTÉREO Y RELOJ MAESTROC19F - CENTRAL UNIT WITH 2 SOUND CHANNELS, 1 FM STEREO TUNER AND MASTER CLOCK
[ 1 ] INTERRUPTOR GENERAL / MAIN SWITCHPara la conexión o desconexión de toda la Instalación.To turn on/off the entire installation.
[ 2 ] PILOTO DE ENCENDIDO (verde) / TURN ON LAMP (green)Indica que la Instalación está en disposición de uso. Se iluminará en cuanto se accione el interruptor general.Indicates that the installation is available to be used. It lights when the main switch is on.
[ 3 ] PILOTO DE SOBRECARGA (rojo) / OVERLOAD LAMP (red)Indica que hay una avería o que la instalación carece de potencia suficiente. Avise a su instalador.Indicates that the installation has not enough power or a failure. Contact your installer.
[ 4 ] CONECTOR PARA FUENTE MUSICAL EXTERIOR / CONNECTOR FOR EXTERNAL MUSICAL SOURCEPermite conectar cualquier Fuente Musical a la Instalación de Sonido (equipo de música, walkman®, radio-cassette, TV, hilomusical, etc.). Pida a su Instalador que le conecte a la Central el aparato que Vd. desee.IMPORTANTE: A la hora de conectar la fuente musical externa tenga en cuenta que el conector de la Central es de unasola posición. Su inserción forzada en una posición distinta puede dañar la Central.NOTA: Para más información ver el apartado "Adaptación de Fuentes Musicales a la Central".It allows you to connect any musical source (HI-FI system, walkman®, radio, TV, background sound system, etc.)to the sound installation. Ask your installer to connect the sound equipment you wish to the Central unit.IMPORTANT: When attempting to connect a music source to the Central Unit, please take into account that theconnection has only one possible position. If the connector is forced to be connected in a different position,the Central Unit may result damaged.NOTE: See section entitled "Adapting musical sources to the Central unit" for more information.
[ 5 ] BASE DE RED TELECONTROLADA / REMOTE-CONTROLLED MAINS SOCKETControla su Fuente Musical (Equipo, Radio, etc.). Este enchufe sólo dispone de tensión cuando hay algún Mando de Sonidoen marcha en cualquier lugar de la Instalación, por lo que pondrá en marcha la fuente musical sólo cuando sea preciso.IMPORTANTE: No use nunca este enchufe para conectar otro aparato eléctrico, salvo su Fuente Musical, pues podríadañar seriamente la Central.It controls your musical source (HI-FI system, radio, etc.). This socket is only powered when any soundcontrol is turned on anywhere in the installation; so, the musical source will be turned on only whennecessary.IMPORTANT: Never use this socket to connect any electrical appliance apart of your musical source,because it could seriously damage your Central unit.
1140
[ 1 ] [ 5 ] [ 4 ]
[ 2 ] [ 3 ]
C19F 2 C 1

- 11 -
D MD O M O S M U L T I R A D I O
hk
[ 6 ] PILOTO DE TELECONTROL (amarillo) / REMOTE CONTROL INDICATOR LAMP (yellow)Se ilumina al encender cualquier Mando. Indica la existencia de tensión en el enchufe de red telecontrolado [ 5 ].It lights when any of the control units are switched on. It indicates that there is voltage in the remote-controlledmains socket [ 5 ].
[ 7 ] PILOTO DE AUDIO (verde) / AUDIO LAMP (green)Indica, con su parpadeo, la presencia de música en la Central.It blinks, showing the presence of sound in the Central unit.
[ 8 ] PULSADOR LUMINOSO DE ENCENDIDO MANUAL (rojo) / MANUAL TURN ON LIGHTING BUTTON (red)Activa, de forma manual, el telecontrol poniendo así en marcha la fuente musical.Activates manually the telecontrol, therefore turning on the music source.
[ 9 ] TOMA DE ANTENA / ANTENNA INPUTConecte la antena de hilo proporcionada con la Central. Si la recepción no es de buena calidad puede conectarla a su antena colectiva.
ATENCION: La Central incluye una antena de cablecillo.Si se escuchan las emisoras con mucho ruido, revisar que esté conectada la antena al conector [ 9 ]. Si en la zona hayproblemas de recepción existen en el comercio antenas electrónicas con amplificador que se podrán conectar para mejorarla recepción.Connect the wire antenna supplied with the Central unit. If the reception does not have good quality, it can beconnected to another FM antenna.
ATTENTION: The Central includes a thin wire antenna.
If you have bad reception, check if the antenna is correctly plugged in the antenna input [ 9 ]. In caseyour area has weak reception, you can buy an amplified electronic antenna and plug it in to improvethe signal reception.
[ 10 ] CONECTOR PARA CAPSULA DE INFRARROJOS (IR) / CONNECTOR FOR INFRARED (IR) CAPSULEPermite la conexión de hasta 3 cápsulas de infrarrojos (IR) para controlar hasta 3 aparatos (video, equipo HI-FI, TV digital, etc).It allows up to 3 infrared (IR) capsules to be connected to control up to 3 appliances (video, HI-FI equipment,digital TV, etc.).
M19N - CAPSULA (IR) / M19N - IR CAPSULE
[ 1 ] CAPSULA (IR) / IR CAPSULESe coloca sobre el receptor de infrarrojos del aparato a controlar mediante el adhesivo de doble cara.To attach to the infrared receiver of the appliance to be controlled using double-sided adhesive tape
ANTENA / ANTENNA
0336
Cablecillo / Thin wire
C19F 2 C 1
1140
[ 7 ]
[ 8 ]
[ 9 ] [ 6 ]
[ 10 ]
0922
M19N
[ 1 ]

- 12 -
D MD O M O S M U L T I R A D I O
fg
MANDOS DE SONIDO / SOUND CONTROLS UNITS
[ 1 ] PULSADOR DE ENCENDIDO / APAGADO / ON/OFF BUTTONUna pulsación enciende y la siguiente apaga el Altavoz de esa habitación y la Fuente Musical conectada a la Central.ATENCION: Este pulsador también se puede utilizar presionando en el centro de la tapa cerrada.One press turns on and the next press turns off the loudspeaker in that room and the musical sourceconnected to the Central unit.ATTENTION: This button can also be used pressing the centre of the closed lid.
PILOTO DE TIMER (sólo en D24D y D13D) / SLEEP TIMER LAMP (only in D24D and D13D)Si al encender el Mando se mantiene la pulsación durante más de 2 segundos, se iluminará el piloto del TIMER y elSonido se apagará automáticamente en 30 minutos. Para desactivar el TIMER basta con apagar el Mando.When turning on the Control unit, if you keep the button pressed for more than two seconds, the TIMER lampwill light and the sound will turn off automatically in 30 minutes. To disable the TIMER, simply turn off theControl unit.
[ 2 ] PILOTOS DE ENCENDIDO E INDICADORES DEL CANAL SELECCIONADO / ON AND MUSIC CHANNEL INDICATOR LAMPSIndica el funcionamiento de la Instalación en esa habitación y el canal de sonido seleccionado.These indicate the working state of the installation in that room and the selected sound channel.
[ 3 ] REGULADOR DE VOLUMEN CON LOUDNESS / VOLUME CONTROL (with loudness)Permite elegir el Volumen y ecualiza automáticamente el sonido para mejorar la audición de los tonos graves y agudos aniveles de escucha reducidos.Lets you choose the volume and automatically equalizes the sound in order to improve the hearing ofthe bass and treble tones at reduced listening levels.
[ 4 ] CONECTOR PARA AURICULARES ESTÉREO (Ver pág. 56) / STEREO HEADPHONES SOCKET (See page 56)
[ 5 ] ENTRADA PARA WALKMAN® O PC (Ver pág. 56) / STEREO AUDIO INLET FOR WALKMAN® OR PC (See page 56)
[ 6 ] CAMBIO DE CANAL (sólo D13D) / CHANNEL SELECTOR (only D13D)Si dispone de una Central con más de 1 canal de música (C12F, C14F, C16F, C17F) con esta tecla seleccionará losdistintos canales.If you have a Central unit with more than one music channel (C12F, C14F, C16F, C17F) you can selectthe different channels with this key.
[ 7 ] SCAN / SCANEste pulsador permite, si se dispone de una Central con Radio incorporada, cambiar las emisoras presintonizadas desdecualquier habitación. A cada pulsación la Central irá cambiando las 8 presintonías que hayamos memorizado.This button allows you, if you have a Central unit with built-in radio, to change the preset station, fromany room. Every time you press it, the Central unit will change between the eight preset stations youhave memorised.
D25D 1.5 W
D24D 1 C 3 W
D13D 2-4 C 3 W
1 C
0647
D13D
[ 2 ]
[ 3 ] [ 1 ] [ 5 ][ 4 ][ 7 ][ 6 ]
0156
[ 5 ]
D25DD24D
[ 7 ] [ 4 ][ 3 ] [ 1 ]
[ 2 ]

- 13 -
D MD O M O S M U L T I R A D I O
hk
D41U
D42U
ON
MANDOS DE SONIDO / SOUND CONTROLS UNITS
[ 1 ] PULSADOR DE ENCENDIDO / APAGADO / ON/OFF BUTTON Una pulsación enciende y la siguiente apaga los altavoces de esa habitación y la Fuente Musical conectada a la Central.NOTA: Puede encender el Mando a volumen reducido pulsando mientras está apagado.One press turns on and the next press turns off the loudspeakers in that room and the music source connectedto the Central unit.NOTE: The Control unit can be turned on at a moderate volume level by pressing .
[ 2 ] PILOTO DE ENCENDIDO / ON LAMP "ON"Indica el funcionamiento de la instalación en esa habitación.Indicate that the sound installation is available to be used in that room.
[ 3 ] PILOTO DE TIMER / SLEEP TIMER LAMP Si el pulsador de encendido [ 1 ] lo mantiene apretado más de 2 segundos, se iluminará el piloto del TIMER y el Sonido se apagaráautomáticamente en 45 minutos. Para desactivar el TIMER basta con apagar el Mando.When turning on the Control unit, if you keep the button pressed for more than two seconds, the TIMER lampwill light and the sound will turn off automatically in 45 minutes. To disable the TIMER , simply turn off theControl unit.
[ 4 ] AJUSTE DE VOLUMEN / VOLUME CONTROLPara subir o bajar el nivel de sonido.To turn up or down the volume of the control unit.
[ 5 ] SCAN / SCAN Este pulsador permite, si dispone de un Central con Radio incorporada, cambiar las emisoras presintonizadas desde cualquierhabitación. A cada pulsación la Central irá cambiando las 8 presintonías que hayamos memorizado.This button allows you, if you have a Central unit with built-in radio, to change the preset station, from anyroom. Every time you press it, the Central unit will change between the eight preset stations you have memorised.
[ 6 ] CONECTOR PARA AURICULARES ESTÉREO (Ver pág. 56) / STEREO HEADPHONES SOCKET (See page 56)
[ 7 ] ENTRADA PARA WALKMAN® O PC (Ver pág. 56) / STEREO AUDIO INLET FOR WALKMAN® OR PC (See page 56)
0789
0790
[ 2 ][ 3 ]
[ 1 ]
D42U
D42U 1 C 3 W
D41U 1.5 W1 C
[ 4 ]
[ 5 ]
ON
D41U
[ 2 ][ 3 ]
[ 1 ]
[ 4 ]
[ 5 ]
[ 4 ]
[ 6 ][ 7 ]
- 14 -
D MD O M O S M U L T I R A D I O
fg
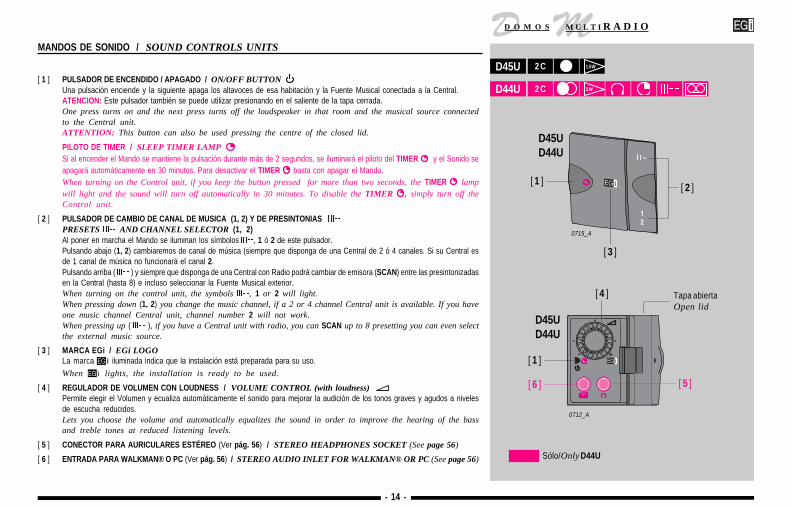
Sólo/Only D44U
MANDOS DE SONIDO / SOUND CONTROLS UNITS
[ 1 ] PULSADOR DE ENCENDIDO / APAGADO / ON/OFF BUTTON Una pulsación enciende y la siguiente apaga los altavoces de esa habitación y la Fuente Musical conectada a la Central.ATENCION: Este pulsador también se puede utilizar presionando en el saliente de la tapa cerrada.One press turns on and the next press turns off the loudspeaker in that room and the musical source connectedto the Central unit.ATTENTION: This button can also be used pressing the centre of the closed lid.
PILOTO DE TIMER / SLEEP TIMER LAMP Si al encender el Mando se mantiene la pulsación durante más de 2 segundos, se iluminará el piloto del TIMER y el Sonido seapagará automáticamente en 30 minutos. Para desactivar el TIMER basta con apagar el Mando.When turning on the Control unit, if you keep the button pressed for more than two seconds, the TIMER lampwill light and the sound will turn off automatically in 30 minutes. To disable the TIMER , simply turn off theControl unit.
[ 2 ] PULSADOR DE CAMBIO DE CANAL DE MUSICA (1, 2) Y DE PRESINTONIAS PRESETS AND CHANNEL SELECTOR (1, 2)Al poner en marcha el Mando se iluminan los símbolos , 1 ó 2 de este pulsador.Pulsando abajo (1, 2) cambiaremos de canal de música (siempre que disponga de una Central de 2 ó 4 canales. Si su Central esde 1 canal de música no funcionará el canal 2.Pulsando arriba ( ) y siempre que disponga de una Central con Radio podrá cambiar de emisora (SCAN) entre las presintonizadasen la Central (hasta 8) e incluso seleccionar la Fuente Musical exterior.When turning on the control unit, the symbols , 1 or 2 will light.When pressing down (1, 2) you change the music channel, if a 2 or 4 channel Central unit is available. If you haveone music channel Central unit, channel number 2 will not work.When pressing up ( ), if you have a Central unit with radio, you can SCAN up to 8 presetting you can even selectthe external music source.
[ 3 ] MARCA EGi / EGi LOGOLa marca iluminada indica que la instalación está preparada para su uso.When lights, the installation is ready to be used.
[ 4 ] REGULADOR DE VOLUMEN CON LOUDNESS / VOLUME CONTROL (with loudness) Permite elegir el Volumen y ecualiza automáticamente el sonido para mejorar la audición de los tonos graves y agudos a nivelesde escucha reducidos.Lets you choose the volume and automatically equalizes the sound in order to improve the hearing of the bassand treble tones at reduced listening levels.
[ 5 ] CONECTOR PARA AURICULARES ESTÉREO (Ver pág. 56) / STEREO HEADPHONES SOCKET (See page 56)
[ 6 ] ENTRADA PARA WALKMAN® O PC (Ver pág. 56) / STEREO AUDIO INLET FOR WALKMAN® OR PC (See page 56)
D45U 1.5 W
D44U 2 C 3 W
2 C
[ 3 ]
[ 1 ]
0715_A
D45UD44U
0712_A
[ 6 ] [ 5 ]
[ 1 ]
[ 2 ]
[ 4 ]
D45UD44U
Tapa abiertaOpen lid

- 15 -
D MD O M O S M U L T I R A D I O
hk0668
D26D
D26D
[ 1 ][ 2 ][ 4 ]
[ 4 ]
[ 2 ]
[ 5 ]
[ 1 ]
0717_A
D46U
[ 2 ]
[ 3 ][ 6 ]
2 C 3 W
D46U
[ 3 ]
[ 6 ]
D26D Y D46U MANDOS CON INTERCOM
Estos Mandos le proporcionan las siguientes prestaciones:- 2 canales de música- Intercomunicación (Llamada general)- Vigilancia de una habitación (Baby-phone)- Manejo del portero automático* ATENCION: Esta función sólo estará disponible si la instala-
ción cuenta con el Interface de portero J11G/B.
D26D & D46U INTERCOM CONTROL UNITS
This Control unit provides the following features:- 2 Ambient Sound channels- Intercom (general call)- Room Monitoring (Baby-phone)- Operation of door entry system* WARNING: This function is only avaible if an inter-
face J11G/B is present in the installation.
[ 1 ] PULSADOR DE ENCENDIDO/APAGADO Y TIMER / ON/OFF AND TIMER BUTTON Una pulsación enciende el Mando iluminándose los símbolos y 1 ó 2, otra pulsación lo apaga.Si al Encender mantiene pulsado el botón más de 3 sg. activará el TIMER (apagado automático en 40 minutos). Paradesactivar el TIMER basta con apagar el Mando.One press turns on the Control unit, lighting the red lamps and 1 or 2. Another press turns it off.When turning on, if the button is pressed and held for more than three seconds, then the TIMER (automatic turn off in forty minutes) will be activated. To disable the TIMER , just turn the Controlunit off.
[ 2 ] CAMBIO DE CANAL Y PILOTOS INDICADORES / CHANNEL SELECTOR AND INDICATOR LAMPS (1, 2)Si dispone de una Central con 2 canales de música con esta tecla seleccionará los canales.If you have a Central unit with 2 channels you can select the different channels with this key.
[ 3 ] SCAN / SCAN Este pulsador permite, si se dispone de una Central con Radio incorporada, cambiar las emisoras presintonizadas desdecualquier habitación. A cada pulsación la Central irá cambiando las 8 presintonías que hayamos memorizado. Un tono leavisará cuando tiene seleccionada la entrada de fuente musical exterior apareciendo " " en el display de la Central.This button allows you, if you have a Central unit with built-in radio, to change the preset station, fromany room. Every time you press it, the Central unit will change between the eight preset stations youhave memorised. A external audio source can also be selected with this button, what will be notified bya tone and the message" " in the display of the Central unit.
[ 4 ] PULSADOR DE HABLAR / PUSH TO TALK ( )Para realizar una Llamada General a otras habitaciones. No se escuchará en las que tengan activada la función "nomolestar" . También se usa para responder las llamadas del portero automático.To make a General Call to the other rooms, which won't be heard in those which have the function "donot disturb" active. The same button is used to answer the calls from the door entry system.
[ 5 ] MARCA EGi / EGi TRADEMARKLa marca iluminada indica que la instalación está preparada para su uso.The Trademark lights showing that the system is ready for use.
[ 6 ] ABREPUERTA DEL PORTERO AUTOMATICO / DOOR OPENING BUTTON OF THE DOOR ENTRY SYSTEMSólo actúa después de recibir una llamada en el portero automático. Antes de abrir puede hablar con la persona que llamamediante la tecla [ 4 ] . Pulse para hablar y suelte para escuchar.It only works after receiving a call from the door entry system. Before opening, you can talk with theperson who has made call by means of the button [ 4 ] . Push to talk and free the button to hear.
- 16 -
D MD O M O S M U L T I R A D I O
fg
GE
0669
TRE
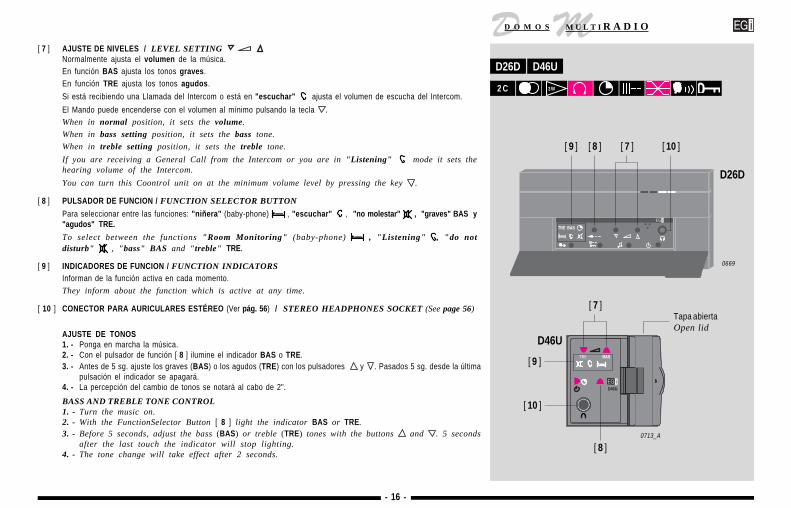
[ 7 ] AJUSTE DE NIVELES / LEVEL SETTING Normalmente ajusta el volumen de la música.En función BAS ajusta los tonos graves.En función TRE ajusta los tonos agudos.
Si está recibiendo una Llamada del Intercom o está en "escuchar" ajusta el volumen de escucha del Intercom.
El Mando puede encenderse con el volumen al mínimo pulsando la tecla .When in normal position, it sets the volume.
When in bass setting position, it sets the bass tone.
When in treble setting position, it sets the treble tone.
If you are receiving a General Call from the Intercom or you are in "Listening" mode it sets thehearing volume of the Intercom.
You can turn this Coontrol unit on at the minimum volume level by pressing the key .
[ 8 ] PULSADOR DE FUNCION / FUNCTION SELECTOR BUTTON
Para seleccionar entre las funciones: "niñera" (baby-phone) , "escuchar" , "no molestar" , "graves" BAS y"agudos" TRE.
To select between the functions "Room Monitoring" (baby-phone) , "Listening" , "do notdisturb" , "bass" BAS and "treble" TRE.
[ 9 ] INDICADORES DE FUNCION / FUNCTION INDICATORSInforman de la función activa en cada momento.They inform about the function which is active at any time.
[ 10 ] CONECTOR PARA AURICULARES ESTÉREO (Ver pág. 56) / STEREO HEADPHONES SOCKET (See page 56)
AJUSTE DE TONOS1. - Ponga en marcha la música.2. - Con el pulsador de función [ 8 ] ilumine el indicador BAS o TRE.3. - Antes de 5 sg. ajuste los graves (BAS) o los agudos (TRE) con los pulsadores y . Pasados 5 sg. desde la última
pulsación el indicador se apagará.4. - La percepción del cambio de tonos se notará al cabo de 2".
BASS AND TREBLE TONE CONTROL1. - Turn the music on.2. - With the FunctionSelector Button [ 8 ] light the indicator BAS or TRE.3. - Before 5 seconds, adjust the bass (BAS) or treble (TRE) tones with the buttons and . 5 seconds
after the last touch the indicator will stop lighting.4. - The tone change will take effect after 2 seconds.
D46U
D26D
[ 7 ]
[ 7 ]
[ 10 ]
[ 8 ][ 9 ]
[ 9 ]
[ 8 ]0713_A
[ 10 ]
D26D
2 C 3 W
D46U
Tapa abiertaOpen lid

- 17 -
D MD O M O S M U L T I R A D I O
hk
GE
0669
D26D
[ 8 ][ 9 ]
VIGILANCIA / MONITORING
Esta función le permite vigilar la habitación de la casa que desee desde cualquier otra.La aplicación más frecuente es en el cuidado de niños o enfermos y en esto vamos a basar la explicación del funcionamiento.
1. - En la habitación del niño pulsaremos la tecla [ 8 ] hasta que se encienda el piloto indicando "preparado paravigilancia".
2.- En el Mando de la habitación desde la que se desee vigilar al niño pulsaremos también la tecla [ 8 ] hasta que se enciendael indicador de función que indica "escuchar" . En la habitación del niño parpadeará el piloto indicando que le escuchan.
La habitación del niño no recibirá Llamadas Generales y sólo podrá escuchar la voz de la persona que lo cuida cuando esta pulsela tecla [ 4 ] "hablar" ( ) en su aparato.La persona que cuida al niño sí recibirá Llamadas Generales, pero para efectuarlas deberá salir antes de la función Vigilanciapulsando de nuevo la tecla [ 8 ].
This function allows you to monitor any room of the house from any other room.It is mostly used for baby sitting or to take care of ill people, and our explanation will be based on thesepurposes.
1. - In the room where the baby or the ill person stays, we will press the key [ 8 ] until the indicator lights,what means "ready for surveillance".
2.- In the Control unit of the room from where we want to hear the baby we will press the same key [ 8 ] untilthe indicator "listening" lights. In the baby's room, the indicator will blink, showing that someone ishearing that room.
The baby's room will not receive any general call, and will only be able to hear the voice of the monitoringperson, when he presses the key [ 4 ] "talk" ( ) in his Control unit.The person who monitors the baby will be able to receive General Calls, but if he/she wants to make a call, he/she has to exit monitoring function before, by pressing again the key [ 8 ].
NOTA: Si en alguna ocasión parpadean simultáneamente los símbolos y apague la Central durante un minuto y vuelvaa encenderla. Si el parpadeo continua avise a su Instalador ya que podría haber avería en la Intercomunicación.Si al pulsar el botón de hablar ( ) parpadea el piloto de "escuchar" es que la línea está ocupada.Sólo puede haber un Mando en escucha, si hay otro se desconectará automáticamente.Los Mandos D26D y D46U, mezclados en la misma instalación con Mandos D28D, actúan como si estuvieran todos ellosasignados a la misma zona (zona 1).
NOTE: If at any time the indicator and are blinking simultaneously, turn off the Central unit for aminute and turn it on again. If the blinking continues please contact your Installer as there might be amalfunction in the Intercom.
If, when you press the button to talk ( ) the listening indicator blinks, this means that the line is busy.
It can only be one Control unit in mode "monitoring". If a second one is set in this function, the first one willautomatically disconnect.
The Control units D26D and D46U, if mixed in the same installation with units D28D, act as if they were allassigned to the same zone (zone 1).
D26D
2 C 3 W
D46U
[ 4 ]
TRE
[ 8 ]0713_A0717_A
[ 9 ]
[ 4 ]
D46U
Tapa abiertaOpen lid

- 18 -
D MD O M O S M U L T I R A D I O
fg
D28D MANDO CON INTERCOMUNICADOR
Este Mando le proporciona las siguientes prestaciones:- Música - Portero automático- Intercomunicación - Reloj / Despertador- Vigilancia de una habitación
Todas las funciones de este Mando se pueden activar con elMando a Distancia M13N.
D28D CONTROL WITH INTERCOM
This Control unit provides the following features:- Ambient Sound - Door Entry System- Intercom - Clock / Alarm Clock- Room Monitoring (Baby-phone)
All the functions of this Control unit can be activatedwith the M13N Remote Control .
MUSICA / AMBIENT SOUND
[ 1 ] PULSADOR DE ENCENDIDO/APAGADO Y TIMER / ON/OFF AND TIMER BUTTON Una pulsación enciende el Mando iluminándose uno de los pilotos rojos [ 6 ] que nos indica el canal de música en el que estamos.Otra pulsación lo apaga.Si al Encender mantiene pulsado el botón más de 3 sg. activará el TIMER (apagado automático en 30 minutos). La iluminación delpiloto confirmará que se activa el TIMER.Para desactivar el TIMER basta con apagar el Mando.One press turns on the Control unit, lighting one of the red lamps [ 6 ] that shows which is the active musicchannel. Another press turns it off.
When turning on, if the button is pressed and held for more than three seconds, then the TIMER (automatic turnoff in thirty minutes) will be activated. The lighting of the lamp will confirm that the TIMER is activated. Todisable the TIMER, just turn the Control unit off.
[ 2 ] PILOTO INDICADOR DE TIMER / TIMER LAMP Al iluminarse nos indica que la música se apagará en 30 minutos aproximadamente.When lighted, shows that the music will be turned off in about thirty minutes.
[ 3 ] CAMBIO DE CANAL / CHANNEL SELECTOR Si dispone de una Central con más de 1 canal de música con esta tecla seleccionará los distintos canales.If you have a Central unit with more than one music channel you can select the different channels with this key.
[ 4 ] SCAN / SCAN Si dispone de Central con radio incorporada, pulse esta tecla para cambiar las emisoras presintonizadas, desde cualquier habitación.El visualizador nos indicará el número de presintonía de la forma siguiente: III-2III-2III-2III-2III-2If you have a Central unit with built-in radio, press this key to change the preset station, from any room. Thedisplay will show the preset number in the following format: III-2III-2III-2III-2III-2
D28D 4 C 3 W
12:3012:3012:3012:3012:30
AM
PM
GE
AM
PM
0627
0592
[ 1 ][ 3 ]
[ 2 ][ 4 ] [ 6 ]

- 19 -
D MD O M O S M U L T I R A D I O
hk
[ 5 ] AJUSTE DE VOLUMEN / VOLUME SETTING Para subir o bajar el nivel de sonido. El visualizador nos indicará el nivel de la forma siguiente: 5050505050Estas teclas se pueden usar también en intercomunicación, vigilancia y portero automático para regular el volumen de escucha anuestro gusto. El ajuste ha de hacerse en el momento que estamos escuchando, p.ej. mientras vigilamos a un niño.NOTA: Puede encender el Mando a volumen reducido pulsando mientras está apagado.To raise and lower the volume. The display will show the level in following format: 5050505050These keys can also be used to regulate the listening volume to suit you when using the intercom,monitoring and door entry features. The setting should be done as you are listening, for example, whilemonitoring a child.NOTE: The Control unit can be turned on at a moderate volume level by pressing .
[ 6 ] PILOTOS INDICADORES DE CANAL DE MUSICA / MUSIC CHANNEL INDICATORSCuando alguno de ellos está encendido la función música está activada. El de la derecha es el canal 1 y el de la izquierdaes el canal 4.When any of these are lighted, the music function is activated. The rightmost is channel 1 and the leftmostis channel 4.
[ 7 ] CONECTOR PARA AURICULARES ESTÉREO (Ver pág. 56) / STEREO HEADPHONES SOCKET (See page 56)
[ IR ] RECEPTOR DE MANDO A DISTANCIA / REMOTE CONTROL RECEIVERTodas las funciones de este Mando pueden ser manejadas desde el Mando a distancia M13N.All the functions of this Control unit can be operated with the M13N Remote Control.
REGULACION DE TONOS GRAVES Y AGUDOS / BASS AND TREBLE TONE CONTROLSólo accesible mediante Mando a distancia M13N. Ver pág. 45.Los tonos salen de fábrica sin realce ni atenuación. Para ajustarlos al gusto personal es necesario el Mando M13N.El ajuste queda memorizado hasta nuevo cambio.These can only be adjusted with a M13N Remote Control. See page 45.
The tone is factory-set to flat (no equalisation). To adjust the tone to your personal preference, youwill need the M13N Remote Control. This setting will be memorised until you change the tone again.
D28D 4 C 3 W
12:3012:3012:3012:3012:30
AM
PM
GE
0627_A
[ 6 ] [ 7 ]
[ IR ][ 5 ]

- 20 -
D MD O M O S M U L T I R A D I O
fg
AM
PM
GE
0627
[ 12 ]
AM
PM
0592
[ 8 ][ 9 ]
[ 10 ]
INTERCOMUNICACION / INTERCOM
[ 8 ] PULSADOR SELECTOR DE ZONA A LLAMAR / ZONE SELECTOR BUTTONPara elegir la zona con la que queremos hablar. El visualizador nos lo indicará de así: C05.C05.C05.C05.C05. La zona 0000000000 es la llamada general.To select the zone you want to talk to. The display will show the zone in the format: C05.C05.C05.C05.C05. Zone 0000000000 is general call.
[ 9 ] PULSADOR PARA HABLAR / PUSH TO TALK Al pulsar efectuaremos una llamada a la zona que hayamos elegido con el pulsador selector de zona, si es la C00C00C00C00C00 esuna llamada general, y mientras lo mantengamos pulsado podremos hablar a esa zona.When this is pressed, a call will be made to the zone selected with the Zone Selector button. Zone C00C00C00C00C00is a general call. While pressing the button, you will be able to talk to the selected zone.
[ 10 ] PILOTO INDICADOR DE HABLAR / TALKING LAMP Su iluminación y un tono nos indicará que podemos hablar.Its lighting and a tone will indicate that you can talk.
[ 11 ] PILOTO DE NO MOLESTAR / DO NOT DISTURB LAMP Nos indica que ese Mando no recibirá ninguna llamada desde otras zonas.Shows that the Control unit will not receive any call from other zones.
[ 12 ] PULSADOR SELECTOR DE FUNCIONES / FUNCTION SELECTOR Para elegir entre las funciones "niñera", "escucha" y "no molestar".Por ejemplo: Para activar la función "no molestar" pulse hasta que se ilumine el piloto "no molestar" [ 11 ] . Pulsándolo denuevo apagaremos ese piloto y desconectaremos la función "no molestar".To choose between the "Baby Sitting", "Listening" and "Do Not Disturb" functions.For instance: To activate the "Do Not Disturb" function, press until the "Do Not Disturb" [ 11 ] lamp islighted. Pressing this button again will turn the lamp off and the "Do Not Disturb" function will be disabled.
NOTA: Si efectuamos una llamada a una zona que está con la función "no molestar", en el Mando que efectúa la llamada elvisualizador nos indicará . Si hay otro Mando efectuando una llamada el visualizador nos indicará (busy =ocupado).NOTE: If a call is made to a zone that is in "Do Not Disturb" state, the display of the calling Controlunit will show . If another Control unit is making a call, the display will show (busy).
MANOS LIBRES / HANDS-FREESi lo desea, su instalador puede programarle algunos Mandos en "manos libres". Cuando un Mando "manos libres"recibe una llamada dispone de 5 sg. para contestar sin tener que pulsar ninguna tecla. Muy útil cuando estamos en la duchao para habitaciones de niños que no saben pulsar para responder.If you desire, your installer can program some of the Control units for "Hands-free" operation. When a"Hands-free" Control unit receives a call, you may answer within 5 seconds without pressing any keys. Thisis useful when you are taking a shower or for rooms of children that do not know how to press to answer.
D28D 4 C 3 W
12:3012:3012:3012:3012:30
[ 11 ]

- 21 -
D MD O M O S M U L T I R A D I O
hk
VIGILANCIA (sólo con Centrales C18F, C16F o C14F) / MONITORING (only with C14F, C16F or C18F Central units)
[ 12 ] PULSADOR DE FUNCION / FUNCTION BUTTON Para elegir el modo de funcionamiento entre "niñera" [ 13 ] y "escucha" [ 14 ].To choose between "Baby Sitting" [ 13 ] and "Listening" [ 14 ] working modes.
[ 13 ] PILOTO DE NIÑERA / BABY SITTING LAMP Indica que podremos escuchar, a través de otros Mandos en posición "escucha", los sonidos de esta habitación.When lighted, indicates that you can hear the sounds of this room through the Control units that are in"Listening" mode.
[ 14 ] PILOTO DE ESCUCHA / LISTENING LAMP Indica que escucharemos en este Mando los sonidos que se produzcan en las habitaciones en función "niñera".When lighted, indicates that you will hear in this Control unit the sounds from the "Baby Sitting" rooms.
FUNCIONAMIENTO1. - Iremos a las habitaciones que queremos escuchar y pulsaremos el botón selector de funciones [ 12 ] hasta que
se ilumine el piloto de la función niñera [ 13 ] (podemos poner varios Mandos en esta función).2.- En la habitación desde la que queramos escuchar accionaremos el pulsador de selección de funciones [ 12 ]
hasta que se ilumine el piloto de escucha [ 14 ] .Después de transcurridos unos segundos, el visualizador nos indicará la habitación que estamos escuchando de la formasiguiente: l03l03l03l03l03 (habitación 3), y escucharemos los sonidos que se produzcan en esta habitación, simultáneamente en lahabitación 3 se enciende el piloto de hablar [ 10 ] .Si hay más de un Mando en función "niñera" escucharemos consecutivamente cada uno de ellos en intervalos de 10 sg.Se pueden poner varios Mandos escuchando la misma habitación.
3.- Mientras estemos escuchando una habitación si pulsamos la tecla de hablar [ 9 ] nos pondremos en comunicacióncon esa habitación como si fuera una llamada normal.
OPERATION
1. - Go to the rooms you want to listen to and press the Function Selector button [ 12 ] until the BabySitting [ 13 ] lamp turns on (you can set several Control units to this function).
2.- In the room where you want to listen, press the Function Selector button [ 12 ] until theListening [ 14 ] lamp turns on.After several seconds have elapsed, the display will show the room you are listening to in the followingformat: l03 l03 l03 l03 l03 (room 3). You will now hear the sounds from this room; at the same time the Talk [ 10 ] lampturns on in room 3.If there is more than one Control unit set to "Baby Sitting", each will be heard consecutively in 10 secondsintervals.Several Control units can be set to listen to the same room.
3.- While you are listening to a room, if you press the Talk [ 9 ] key you will be able to communicate withthat room as if it were a normal call.
D28D 4 C 3 W
12:3012:3012:3012:3012:30
AM
PM
GE
0627
AM
PM
0592
[ 9 ]
[ 13 ] [ 14 ]
[ 12 ]

- 22 -
D MD O M O S M U L T I R A D I O
fg
PORTERO AUTOMATICO / DOOR ENTRY SYSTEM
Esta función sólo está disponible con el módulo de interface J11G/B de la serie DOMOS.This function is only available with the J11G/B Interface Module of the DOMOS Series.
[ 15 ] PILOTO DEL PORTERO AUTOMATICO / DOOR ENTRY SYSTEM LAMP Se iluminará cuando se reciba una llamada del portero automático.It will light when a call is received from the door entry system.
[ 16 ] PULSADOR ABREPUERTA / OPEN DOOR BUTTONSi está iluminado el piloto del portero automático al pulsarlo se abrirá la cerradura de la puerta de la casa.
If the door entry system lamp is turned on, pressing the button unlocks the house door.
FUNCIONAMIENTOCuando se produce una llamada en el portero automático se iluminará el piloto [ 15 ] y sonará un DIN-DON avisandoque han llamado. El visualizador nos indicará: d01d01d01d01d01 (puerta 1).
Para contestar a la llamada mantener pulsado el botón de hablar [ 9 ].Al soltar el pulsador se escuchará a la persona que ha llamado.
Para finalizar la comunicación pulsar la tecla [ 1 ] ON/OFF. El visualizador nos indicará offoffoffoffoff confirmando así elfinal de la comunicación.
Si queremos abrir la puerta pulsaremos el botón abrepuerta [ 16 ] (en lugar del [ 1 ] ON/OFF) activando la cerraduraeléctrica de la puerta. En este caso el visualizador nos indica: opnopnopnopnopn.
Cuando un Mando contesta a la llamada de portero automático, el resto de los Mandos no podrán hacerlo.Si al cabo de 30 sg. no se contesta a la llamada del portero, automáticamente se anula.
OPERATIONWhen a call is made at the door entry system, the lamp [ 15 ] will turn on and a bell sound willindicate the call. The display will show: d01d01d01d01d01 (door 1).
To answer the call press and hold the talk button [ 9 ].When the button is released, the calling person will be heard.
To end the call, press the ON/OFF [ 1 ] key. The display will show offoffoffoffoff, thus confirming the end of the call.
If you want to open the door, press the Open Door button [ 16 ] (instead of ON/OFF [ 1 ] ) to releasethe electric lock of the door. The display will show: opnopnopnopnopn.
When a Control unit answers a call from the door entry system, the remaining Control units will not beable to answer.If the call from the door entry system is not answered in 30 seconds, it is automatically cancelled.
D28D 4 C 3 W
12:3012:3012:3012:3012:30
AM
PM
0592
[ 9 ]
[ 16 ] [ 15 ]
[ 1 ]

- 23 -
D MD O M O S M U L T I R A D I O
hk
RELOJ/DESPERTADOR (sólo con Central C14F) / CLOCK/ALARM CLOCK (only with C14F Central)
[ 16 ] PULSADOR DESPERTADOR / ALARM CLOCK BUTTONActiva y desactiva la función despertador.Activates and disables the alarm clock function.
[ 17 ] PILOTO INDICADOR DE LA FUNCION DESPERTADOR / ALARM CLOCK FUNCTION LAMPCuando está iluminado indica que la función despertador está activada.When the alarm clock function is activated, this lamp lights.
FUNCIONAMIENTOEl visualizador indica la hora cuando no hay otra función activa.La hora se prefija en la Central para todos los Mandos. La indicación de la hora es en formato AM/PM.
Para activar la función despertador pulsar el botón [ 16 ] y el piloto [ 17 ] parpadeará indicando que podemos ajustarla hora del despertador que aparece en el visualizador. Esta hora la podemos cambiar con los pulsadores de volumen [4]o con el Mando a distancia M13N. Asegúrese de que los pilotos AM/PM están en la franja horaria que deseamos.
Después de 5 sg. sin activar ningún pulsador el piloto [ 17 ] deja de parpadear y se queda encendido indicándonos queel despertador está activado.
Si queremos desactivar el despertador pulsaremos en [ 16 ] y se apagará el piloto [ 17 ].Cuando coincide la hora del reloj con la del despertador se oirá un tono durante un minuto. Si queremos apagarlo antes,pulsaremos cualquier tecla del Mando D28D o del Mando a distancia M13N.Se puede programar el Mando para despertar con música (ver instrucciones del Mando a distancia M13N, pág. 47).
OPERATIONThe display shows the time if there are no other activated functions.
The time is preset in the Central unit for all the Controls. The time is shown in AM/PM format.
To activate the alarm clock function, press the button [ 16 ]; the lamp [ 17 ] will blink, indicating thatyou can set the alarm time that appears in the display. This time can be changed with the volume buttons[ 4 ] or with the M13N Remote Control. Make sure that the AM/PM lamps are in the correct time band.
After 5 seconds without pressing any buttons the lamp [ 17 ] will stop blinking and will remainlighted indicating that the alarm clock is activated.
If you want to deactivate the alarm clock function, press [ 16 ] and the lamp [ 17 ] will turn off.
When the clock time matches the alarm time, a tone will be heard for one minute. If you want to stop itsooner, press any key on the D28D Control or M13N Remote Control.The Control unit can be programmed to wake you up with music (see the M13N Remote Controlinstructions, page 47).
NOTA: El despertador no funcionará en ausencia de fluido eléctrico en el momento de despertar.NOTE: The alarm clock will not work if there is no power at wake-up time.
D28D 4 C 3 W
12:3012:3012:3012:3012:30
AM
PM
GE
0627
[ 4 ]
AM
PM
0592
[ 16 ] [ 17 ]

- 24 -
D MD O M O S M U L T I R A D I O
fg
[ 2 ]
[ 1 ]
0760_A
0761_A
[ 5 ]
[ 1 ]
[ 3 ]
Tapa abiertaOpen lid
J12U INTERCOMUNICADOR
Este Intercom le proporciona las siguientes prestaciones: Interco-municación, portero automático y vigilancia de una habitación.
J12U INTERCOM UNIT
This Intercom unit provides the following features: Intercom,
Door Entry System and Room Monitoring (Baby-phone).
INTERCOMUNICACION / INTERCOM
[ 1 ] PULSADOR DE LLAMADA GENERAL / GENERAL CALL BUTTON Al pulsar efectuaremos una llamada general y mientras lo mantengamos pulsado podremos hablar a todas las zonas.ATENCION: Este pulsador también se puede utilizar presionando en el saliente de la tapa cerrada.When this button is pressed, a general call is made to all the rooms at the same time. As long as the button keepspressed, the user can talk and his speech will be heard in every room.ATTENTION: This button can also be operated by pressing the centre of the closed lid.
[ 2 ] MARCA EGi / EGi LOGOLa marca iluminada indica que la instalación está preparada para su uso.When lights, the installation is ready to be used.
[ 3 ] PULSADORES SELECTORES DE ZONA A LLAMAR / ZONE SELECTOR BUTTONSPara elegir la zona con la que queremos hablar. El selector visualizador nos lo indicará así: 15. La zona 0 es la llamada generalTo select the zone which we want to address. The display will show the number of the selected zone. Zone 0 meansgeneral call.
[ 4 ] PULSADOR PARA HABLAR / PUSH TO TALK Al pulsar efectuaremos una llamada a la zona que hayamos elegido con los pulsadores selectores de zona, si es la 0 es una llamadageneral, mientras lo mantengamos pulsado podremos hablar a esa zona.When this is pressed, a call will be made to the zone selected with the Zone Selector buttons. Zone 0 is a generalcall. While pressing the button, you will be able to talk to the selected zone.
[ 5 ] PULSADOR SELECTOR DE FUNCIONES / FUNCTION SELECTOR Para elegir entre las funciones "niñera", "escucha" y "no molestar".Por ejemplo: Para activar la función "no molestar" pulse hasta que se ilumine el piloto "no molestar" [ 6 ] . Pulsándolo de nuevoapagaremos ese piloto y desconectaremos la función "no molestar".To choose between the "Baby Sitting", "Listening" and "Do Not Disturb" functions.For instance: To activate the "Do Not Disturb" function, press until the "Do Not Disturb" [ 6 ] lamp is lighted.Pressing this button again will turn the lamp off and the "Do Not Disturb" function will be disabled.
[ 6 ] PILOTO NO MOLESTAR / DO NOT DISTURB LAMP Nos indica que ese Mando no recibirá ninguna llamada desde otras zonas.Shows that the Control unit will not receive any call from other zones.
NOTA: Si efectuamos una llamada a una zona que está con la función "no molestar", en el Intercom que efectúa la llamada elvisualizador nos indicará . Si hay otro Mando efectuando una llamada el visualizador nos indicará (busy = ocupado).NOTE: If a call is made to a zone that is in "Do Not Disturb" state, the display of the calling Intercom will show
. If another Control unit is making a call, the display will show (busy).
J12U
[ 4 ]
[ 6 ]

- 25 -
D MD O M O S M U L T I R A D I O
hk
VIGILANCIA (sólo con Centrales C18F, C16F o C14F) / MONITORING (only with C14F, C16F or C18F Central units)
[ 5 ] PULSADOR DE FUNCION / FUNCTION BUTTON Para elegir el modo de funcionamiento entre "niñera" [ 8 ] y "escucha" [ 7 ].To choose between "Baby Sitting" [ 8 ] and "Listening" [ 7 ] functions.
[ 7 ] PILOTO DE ESCUCHA / LISTENING LAMP
Indica que escucharemos en este Mando los sonidos que se produzcan en las habitaciones en función "niñera".When lighted, indicates that you will hear in this Intercom unit the sounds from the "Baby Sitting" rooms.
FUNCIONAMIENTO1. - Iremos a las habitaciones que queremos escuchar y pulsaremos el botón selector de funciones [ 5 ] hasta que
se ilumine el piloto de la función niñera [ 8 ] (podemos poner varios Mandos en esta función).
2.- En la habitación desde la que queramos escuchar accionaremos el pulsador de selección de funciones [ 5 ]hasta que se ilumine el piloto de escucha [ 7 ].Después de transcurridos unos segundos, el visualizador nos indicará la habitación que estamos escuchando de la formasiguiente: 33333 (habitación 3), parpadea el piloto de escucha [ 7 ] y escucharemos los sonidos que se produzcan en estahabitación, simultáneamente en la habitación 3 parpadea el piloto de niñera [ 8 ].Si hay más de un Mando en función "niñera" escucharemos consecutivamente cada uno de ellos en intervalos de 10 sg.Se pueden poner varios Mandos escuchando la misma habitación.
3.- Mientras estemos escuchando una habitación si pulsamos la tecla de hablar [ 4 ] nos pondremos en comunicación conesa habitación como si fuera una llamada normal.
OPERATION
1. - Go to the rooms you want to listen to and press the Function Selector button [ 5 ] until the BabySitting [ 8 ] lamp turns on (you can set several Control units to this function).
2.- In the room where you want to listen, press the Function Selector button [ 5 ] until theListening [ 7 ] lamp turns on.After several seconds have elapsed, the display will show the room you are listening to in the followingformat: 3 3 3 3 3 (room 3), the listening lamp will blink and we will hear the sounds generated in that room. At thesame time, in the room which is under surveillance 33333, the baby sitting lamp will blink.If there is more than one Control unit set to "Baby Sitting", each will be heard consecutively in 10 secondsintervals.Several Control units can be set to listen to the same room.
3.- While you are listening to a room, if you press the Talk [ 4 ] key you will be able to communicate with thatroom as if it were a normal call.
[ 8 ] PILOTO DE NIÑERA / BABY SITTING LAMP Indica que podremos escuchar, a través de otros Mandos en posición "escucha", los sonidos de esta habitación.When lighted, indicates that you can hear the sounds of this room through the Intercom units that are in"Listening" mode.
[ 2 ]
[ 1 ]
0760_A
0761_A
[ 8 ]
[ 3 ]
Tapa abiertaOpen lid
J12U
[ 4 ]
[ 5 ]
[ 7 ]
- 26 -
D MD O M O S M U L T I R A D I O
fg
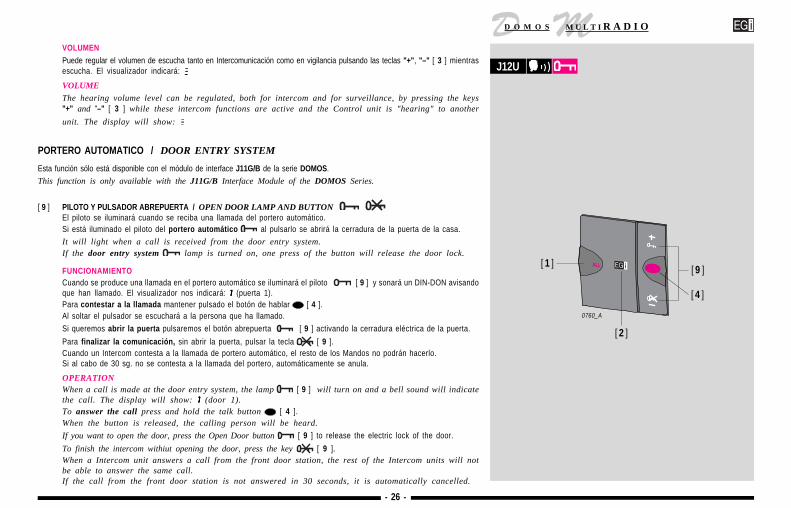
VOLUMENPuede regular el volumen de escucha tanto en Intercomunicación como en vigilancia pulsando las teclas "+", "–" [ 3 ] mientrasescucha. El visualizador indicará:
VOLUME
The hearing volume level can be regulated, both for intercom and for surveillance, by pressing the keys"+" and "–" [ 3 ] while these intercom functions are active and the Control unit is "hearing" to another
unit. The display will show:
PORTERO AUTOMATICO / DOOR ENTRY SYSTEM
Esta función sólo está disponible con el módulo de interface J11G/B de la serie DOMOS.This function is only available with the J11G/B Interface Module of the DOMOS Series.
[ 9 ] PILOTO Y PULSADOR ABREPUERTA / OPEN DOOR LAMP AND BUTTON El piloto se iluminará cuando se reciba una llamada del portero automático.Si está iluminado el piloto del portero automático al pulsarlo se abrirá la cerradura de la puerta de la casa.It will light when a call is received from the door entry system.If the door entry system lamp is turned on, one press of the button will release the door lock.
FUNCIONAMIENTOCuando se produce una llamada en el portero automático se iluminará el piloto [ 9 ] y sonará un DIN-DON avisandoque han llamado. El visualizador nos indicará: 11111 (puerta 1).Para contestar a la llamada mantener pulsado el botón de hablar [ 4 ].Al soltar el pulsador se escuchará a la persona que ha llamado.
Si queremos abrir la puerta pulsaremos el botón abrepuerta [ 9 ] activando la cerradura eléctrica de la puerta.
Para finalizar la comunicación, sin abrir la puerta, pulsar la tecla [ 9 ].Cuando un Intercom contesta a la llamada de portero automático, el resto de los Mandos no podrán hacerlo.Si al cabo de 30 sg. no se contesta a la llamada del portero, automáticamente se anula.
OPERATIONWhen a call is made at the door entry system, the lamp [ 9 ] will turn on and a bell sound will indicatethe call. The display will show: 11111 (door 1).To answer the call press and hold the talk button [ 4 ].When the button is released, the calling person will be heard.
If you want to open the door, press the Open Door button [ 9 ] to release the electric lock of the door.
To finish the intercom withiut opening the door, press the key [ 9 ].When a Intercom unit answers a call from the front door station, the rest of the Intercom units will notbe able to answer the same call.If the call from the front door station is not answered in 30 seconds, it is automatically cancelled.
[ 1 ]
0760_A
[ 9 ]
J12U
[ 4 ]
[ 2 ]

- 27 -
D MD O M O S M U L T I R A D I O
hk
MANDO DE SONIDO CON SINTONIZADOR FM / SOUND CONTROL UNIT WITH BUILT-IN FM TUNER
[ 1 ] PULSADOR DE ENCENDIDO / APAGADO Y TIMER / ON/OFF AND TIMER PUSH-BUTTON Una pulsación enciende y la siguiente apaga los altavoces de esa habitación y la Fuente Musical conectada a la Central si estáseleccionado el programa musical de la instalación.Cuando se enciende el Mando este se conecta en el último estado con el que se apagó. El sintonizador local FM guarda siemprela última emisora sintonizada.One press turns on and the next press turns off the Control Unit and –if the general music program of the systemis selected- also the audio source connected to the Central Unit. When the Control Unit is activated, it isautomatically set in the same condition as it was when disconnected. The local FM tuner always stores the lastselected FM station.
PILOTO DE TIMER / SLEEP TIMER LAMP Si el pulsador de encendido [ 1 ] se mantiene pulsado más de 2 segundos parpadeará el piloto del programa que esté seleccionadoy el Sonido se apagará automáticamente en 45 minutos. Para desactivar el TIMER basta con apagar el Mando. Al accionar elpulsador [ 2 ] para cambiar entre el programa musical y el sintonizador, se mantendrá la función TIMER si está activada.If, when turning on the Control unit, the button keeps pressed for more than two seconds, the pilot lampcorresponding to the selected sound source (either the “central” audio program coming from the Central Unitof the system or the “local” FM tuner of the Control Unit) will blink. This shows that the sound willautomatically turn off in 45 minutes. To disable the TIMER , simply turn off the Control unit. If the push-button[ 2 ] to select between the “central” and the “local” audio source is used, the TIMER function will keep on –if previously activated-.
[ 2 ] PULSADOR DE SELECCION RADIO/MUSICA / "CENTRAL" "LOCAL" AUDIO SOURCE SELECTORPermite seleccionar la radio local del Mando o el programa musical de la Central a la que se conecta.It allows the user to select between the “Central” audio program provided by the Central Unit of the system orthe “local” audio program provided by the FM tuner of the Control Unit.
[ 3 ] PILOTO DE RADIO / "LOCAL" FM TUNER PILOT LAMPIndica el funcionamiento del sintonizador del Mando.It shows that the local FM tuner of the control unit is working.
[ 4 ] PILOTO DE MUSICA / "CENTRAL" AUDIO PROGRAM PILOT LAMPIndica la selección del programa musical de la Central.It shows that the "Central" audio program provided by the Central Unit has been selected.
[ 5 ] AJUSTE DE VOLUMEN / VOLUME CONTROLPara subir o bajar el volumen de sonido. Estando apagado el Mando, si pulsamos la tecla el Mando se encenderá a unvolumen discreto.To turn up or down the volume of the control unit. If, when the control unit is off, the key keeps pressedfor a few seconds, the unit will turn on at a moderate volume level.
D47U 1 . 25 W1 C
D47U
0867
[ 2 ]
[ 1 ][ 4 ]
[ 5 ]
[ 3 ]
[ 5 ]

- 28 -
D MD O M O S M U L T I R A D I O
fg
[ 6 ] PULSADOR DE SINTONIA (TUNING) / TUNING PUSH-BUTTONPulsador para buscar emisoras en el sintonizador del Mando. Busca la siguiente emisora a la seleccionada en sentido ascendente(de 88 a 108 MHz). Cuando llega al final de la banda (108 MHz) se debe pulsar la tecla RESET [ 7 ] para volver al principio.This push-button enables the search of radio stations in the local FM tuner of the Control Unit. When pressed,it searches the next available station –going from lower to higher frequency, between 88 and 108 MHz-. Whenthe end of the band has been reached (108 MHz), the RESET [ 7 ] key must be pressed to turn back to the beginningof the frequency range.
[ 7 ] PULSADOR RESET / RESET PUSH-BUTTONVuelve al principio de la banda FM (88 MHz).It turns back the tuning process to the beginning of the frequency band (88 MHz).
[ 8 ] CONECTOR PARA AURICULARES ESTÉREO (Ver pág. 56) / STEREO HEADPHONES SOCKET (See page 56)
0867
[ 6 ][ 7 ]
D47U
[ 8 ]
D47U 1 . 25 W1 C

- 29 -
D MD O M O S M U L T I R A D I O
hk
SISTEMA DE TRANSMISION DE ORDENES DE MANDO A DISTANCIA POR INFRARROJOS ENTREHABITACIONES / IR REMOTE COMMAND MULTI-ROOM TRANSMISSION SYSTEM
M17U - RECEPTOR DE INFRARROJOS (IR) / M17U - IR RECEIVER
[ 1 ] PILOTO DE RECEPCIÓN / PILOT LAMP FOR RECEPTIONAl parpadear indica recepción de infrarrojos desde un Mando a distancia.It blinks when it receives commands from a remote control.
[ 2 ] AJUSTE DE FRECUENCIA / FREQUENCY ADJUSTMENTPermite ajustar la frecuencia de recepción de los receptores de la instalación.It allows the user to adjust the receiving frequency of the IR receivers.
IMPORTANTE: Este receptor de infrarrojos también puede estar alojado en una rejilla para altavoz de techo con referencia M17U.1.WARNING: This IR receiver can also be placed at a ceiling speaker grille ref. M17U.1.
M18U - EMISOR DE INFRARROJOS (IR) / M18U - IR TRANSMITTER
[ 1 ] CONECTOR PARA CAPSULA DE INFRARROJOS (IR) / IR CAPSULE SOCKETPermite la conexión de hasta 3 cápsulas de infrarrojos (IR) para controlar hasta 3 aparatos (video, equipo HI-FI, TV digital, etc).It allows the connection of up to 3 IR capsules in order to control up to 3 devices (HI-FI system, TV, VCR, pay-TV receiver, etc.).
M19N - CAPSULA (IR) / M19N - IR CAPSULE
[ 1 ] CAPSULA (IR) / IR CAPSULESe coloca sobre el receptor de infrarrojos del aparato a controlar mediante el adhesivo de doble cara.Se permite hasta 9 cápsulas por instalación.It is placed on the IR eye of the device which must be controlled, by means of a double-sided sticking tape.Up to 9 capsules can be used in an installation.
M17U
M17U
0920
[ 1 ] [ 2 ]
M18U
0922
M18U
0921
[ 1 ]
M19N
[ 1 ]

- 30 -
D MD O M O S M U L T I R A D I O
fg
D48U - MANDO INTERCOMUNICADOR DE 2 CANALES ESTÉREO
[ 1 ] PULSADOR DE ENCENDIDO/APAGADO / OKActiva la fuente musical , valida opciones de menú y permite acceder a funciones rápidas. Cancela la llamada a portero sin abrirla puerta.
[ 2 ] PILOTO DE ENCENDIDO Indica la activación de la fuente de sonido en esa habitación.
[ 3 ] PILOTO DE OKIndica la posibilidad de confirmar la selección de la opción de menú activa.
[ 4 ] PULSADOR MENU/PORTERO Acceso a los diferentes menús y funciones de acceso rápido. Abre la puerta en caso de llamada desde el portero.
[ 5 ] AJUSTE DE VOLUMEN Aumenta el volumen de la música y los niveles de graves y agudos, compensa el balance, permite localizar la zona de llamada paraintercomunicación y activar las opciones de distintos menús.
[ 6 ] AJUSTE DE VOLUMEN Disminuye el volumen de la música y los niveles de graves y agudos, compensa el balance, permite localizar la zona de llamadapara intercomunicación y desactivar las opciones de distintos menús.
[ 7 ] PULSADOR DE LLAMADA / CANCELActiva la llamada para intercomunicación tanto general como para una zona específica una vez localizada o responde a una llamadapara el mando. Permite cancelar la opción de menú activa para salir de un menú al menú anterior.
[ 8 ] PILOTO DE LLAMADA Con este piloto iluminado permite la función de intercomunicación.
[ 9 ] PILOTO CANCELInforma de la posibilidad de cancelar la opción de menú activa.
[ 10 ] RECEPTOR DE INFRARROJOS Y MICROFONO INTERNOLas instrucciones transmitidas por cualquier Mando a distancia por infrarrojos son captadas por el Mando D48U y éste las envía porla instalación hasta la Central. En la Central pueden conectar la cápsula M19N y situarla en el visor de infrarrojos del equipo musical.De esta forma Vd. podrá gobernar el equipo musical desde cualquier habitación como si estuviera frente al mismo.
[ 11 ] VISUALIZADORMuestra información mediante textos alfanuméricos y flechas que indican funciones activas.
FUNCIONAMIENTO1. - Una vez instalado correctamente el módulo D48U dentro de la instalación podremos acceder a toda la funcionalidad de este
módulo.2.- Mientras la fuente musical no está activa, la retroiluminación del visualizador permanece a un nivel bajo para no resultar
molesta y permitir la visualización de la hora.3.- Cuando se activa la fuente musical, el mando recupera el último estado antes de ser apagado tanto en la presintonía como el
volumen. En este estado, podremos controlar el volumen con las teclas / .
4.- Independientemente de que la fuente musical esté o no activa, podemos hacer una llamada general pulsando la tecla oacceder a los menús de configuración pulsando la tecla MENU.
D48U 2 C 2 W
12:30
D48U
1138
[ 9 ][ 2 ]
[ 11 ]
D48U
[ 4 ]
[ 8 ]
[ 11 ]
[ 6 ]
[ 10 ]
[ 5 ]
[ 3 ]
[ 1 ] [ 7 ]
1138

- 31 -
D MD O M O S M U L T I R A D I O
hk
CONTROL DE LA RADIOEl funcionamiento de las opciones de búsqueda de presintonías y el control del módulo de radio en la central C19F es intuitivo.Cuando se decide grabar una presintonía, se sobrescribirá sobre la presintonia actual: no hay tecla de borrado.
LLAMADA A ZONASUna vez realizada una llamada a una zona especifica se dispone de 20 segundos para que, cada vez que se pulse la tecla ,se responda a la zona que ha llamado.Durante la recepción de una llamada, con las teclas / podremos ajustar el volumen de intercomunicación. Éste es independientedel volumen de la música y es guardado aunque el módulo pierda la alimentación.
LLAMADA DE PORTEROTras la llamada desde el portero, se dispone de 30 segundos para contestar, bien cancelando con la tecla OK, bien abriendo la puertacon la tecla MENU/PORTERO o bien estableciendo comunicación con la tecla .
CONTROL DE VIGILANCIA El control de las funciones de vigilancia es realizado por la central C19F.La función VIGILANCIA activa el micrófono del mando para poder escuchar este mando desde cualquier otro mando que tengaactivada la función ESCUCHA . Mientras está activada la función de VIGILANCIA , el módulo no acepta llamadas generalesni de portero.La función ESCUCHA activa el canal de intercomunicación pasando a escuchar la "cama" activa en ese momento. Si existenvarias "camas", la central C19F se encargará de asignar 10 sg. a cada "cama". Mientras está activada esta función, al pulsar la tecla
se realiza una llamada a la "cama" activa en ese momento. También son aceptadas llamadas generales entrantes.La función NO MOLESTAR inhibe la recepción de llamadas generales o específicas de zona y/o portero. En caso de recibir unade éstas, envía un mensaje de respuesta indicando "ocupado" OCUPOCUPOCUPOCUPOCUP.
SLEEPEsta función activa un contador programable de 1 a 59 minutos para apagado del mando. Si este se apaga manualmente, el contadorse desactivará automáticamente. También existe tecla de acceso rápido a esta función mediante la pulsación mantenida de la tecla
con el mando previamente encendido.
DESPERTADORPrimero se introducirán los minutos ajustándolos con las teclas / y se validarán con la tecla OK. Después se introducirá la horade la misma forma. Cuando se han validado ambos parámetros, el módulo preguntará si se desea activar la función despertador odesactivarla.
SIMULACIÓN DE PRESENCIAPermite programar, de igual forma que el despertador, la hora de comienzo y la hora de finalización de la función de simulación depresencia
NIVELES DE GRAVES, AGUDOS Y BALANCEMediante las teclas / ajustaremos el nivel de graves, agudos y el control del balance en habitaciones estereofónicas.
SECUENCIA DEL MENÚ PRINCIPAL
Reposo MENU -MUSIC-MUSIC-MUSIC-MUSIC-MUSIC MENU MENU -INTCOM-INTCOM-INTCOM-INTCOM-INTCOM MENU RELOJRELOJRELOJRELOJRELOJ
D48U 2 C 2 W
12:30
D48U
[ 9 ][ 2 ]
[ 11 ]
D48U
[ 4 ]
[ 8 ]
[ 11 ]
[ 6 ]
[ 10 ]
[ 5 ]
[ 3 ]
[ 1 ] [ 7 ]
1138
1138

- 32 -
D MD O M O S M U L T I R A D I O
fg
MENU DE NAVEGACIÓN
Menú MUSIC
Submenú CANALES- Teclas / se elije el canal deseado.- Tecla CANCEL vuelve a menú principal -MUSIC-MUSIC-MUSIC-MUSIC-MUSIC (Música).- Tecla MENU avanza a submenú BALBALBALBALBAL (Balance).
Submenú BALANCE- Tecla compensa el balance del canal izquierdo en 16 intervalos (de L0 a L16).
- Tecla compensa el balance del canal derecho en 16 intervalos (de R0 a R16).- Tecla CANCEL vuelve a menú principal -MUSIC-MUSIC-MUSIC-MUSIC-MUSIC (Música).
- Tecla MENU avanza a submenú (Agudos).
Submenú AGUDOS- Tecla disminuye los tonos agudos en 6 pasos de 2 dB.
- Tecla incrementa los tonos agudos en 6 pasos de 2 dB.- Tecla CANCEL vuelve a menú principal -MUSIC-MUSIC-MUSIC-MUSIC-MUSIC (Música).- Tecla MENU avanza a submenú GRAVGRAVGRAVGRAVGRAV (Graves).
Submenú GRAVES- Tecla disminuye los tonos graves en 6 pasos de 2 dB.
- Tecla incrementa los tonos graves en 6 pasos de 2 dB.- Tecla CANCEL vuelve a menú principal -MUSIC-MUSIC-MUSIC-MUSIC-MUSIC (Música).- Tecla MENU avanza a submenú (Sonido espacial).
Submenú 3D - SONIDO ESPACIAL- Tecla desactiva la reproducción del sonido en modo espacial.
- Tecla activa la reproducción del sonido en modo espacial.- Tecla CANCEL vuelve a menú principal -MUSIC-MUSIC-MUSIC-MUSIC-MUSIC (Música).- Tecla MENU vuelve a menú principal -MUSIC-MUSIC-MUSIC-MUSIC-MUSIC (Música).
CANCEL
-MUSICOK
MENU
CANAL 2MENU
Cambiade canal
MENU
BAL R03MENU
Cambiabalance
MENU
Cambiaagudos
GRAV-02 Cambiagraves
MENU
Pone/quitaespacial
MENU
CANCEL
CANCEL
CANCEL
CANCEL
CANCEL
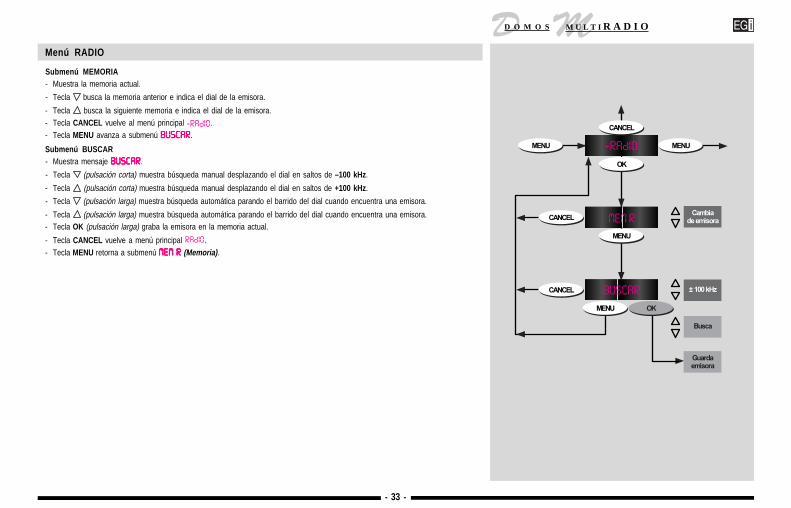
- 33 -
D MD O M O S M U L T I R A D I O
hk
Menú RADIO
Submenú MEMORIA- Muestra la memoria actual.
- Tecla busca la memoria anterior e indica el dial de la emisora.
- Tecla busca la siguiente memoria e indica el dial de la emisora.- Tecla CANCEL vuelve al menú principal .- Tecla MENU avanza a submenú BUSCARBUSCARBUSCARBUSCARBUSCAR.
Submenú BUSCAR- Muestra mensaje BUSCARBUSCARBUSCARBUSCARBUSCAR.
- Tecla (pulsación corta) muestra búsqueda manual desplazando el dial en saltos de –100 kHz.
- Tecla (pulsación corta) muestra búsqueda manual desplazando el dial en saltos de +100 kHz.
- Tecla (pulsación larga) muestra búsqueda automática parando el barrido del dial cuando encuentra una emisora.
- Tecla (pulsación larga) muestra búsqueda automática parando el barrido del dial cuando encuentra una emisora.- Tecla OK (pulsación larga) graba la emisora en la memoria actual.
- Tecla CANCEL vuelve a menú principal .- Tecla MENU retorna a submenú MEM RMEM RMEM RMEM RMEM R (Memoria).

- 34 -
D MD O M O S M U L T I R A D I O
fg
Menú INTERCOM
Submenú LLAMADA A ZONA- Muestra mensaje ZONA 00ZONA 00ZONA 00ZONA 00ZONA 00 o última zona llamada.- Se ilumina el led y se apaga el de CANCEL.- Tecla / busca la zona a llamar. Permite pulsación mantenida. No permite seleccionar la zona propia. No permite pasar del número
total de zonas.- Tecla envía llamada a la zona especificada.
• Activa el micrófono mientras la tecla está pulsada.• Desactiva el micrófono al soltar la tecla y envía comando fin de llamada a la zona.
- Tecla CANCEL vuelve al menú principal -INTCOM-INTCOM-INTCOM-INTCOM-INTCOM (Intercom).- Tecla MENU cambia a submenú MICMICMICMICMIC (Micrófono).Submenú MIC - Muestra mensaje MIC SIMIC SIMIC SIMIC SIMIC SI o MIC NOMIC NOMIC NOMIC NOMIC NO. Se ilumina el led CANCEL y se desactiva el led .- Tecla desactiva el modo VIGILANCIA . Se desactiva el icono de señalización.- Tecla activa el modo VIGILANCIA y se desactivan los modos ESCUCHA y NO MOLESTAR si estaban activados. Se ilumina el
icono de señalización .- Tecla CANCEL vuelve al menú principal -INTCOM-INTCOM-INTCOM-INTCOM-INTCOM (Intercom).- Tecla MENU cambia a submenú OIROIROIROIROIR.Submenú OIR - Muestra mensaje OIR SIOIR SIOIR SIOIR SIOIR SI u OIR NOOIR NOOIR NOOIR NOOIR NO.- Se ilumina el led y se apaga el de CANCEL.- Tecla desactiva el modo ESCUCHA . Se desactiva el icono de señalización.- Tecla activa el modo ESCUCHA y se desactivan los modos VIGILANCIA y NO MOLESTAR si estaban activados. Se activa el
icono de señalización .- Tecla CANCEL vuelve al menú principal -INTCOM-INTCOM-INTCOM-INTCOM-INTCOM (Intercom).- Tecla MENU cambia a submenú PRIVPRIVPRIVPRIVPRIV (No molestar).Submenú PRIV - Muestra mensaje PRIV SIPRIV SIPRIV SIPRIV SIPRIV SI o PRIV NOPRIV NOPRIV NOPRIV NOPRIV NO.- Tecla desactiva el modo NO MOLESTAR . Se desactiva el icono de señalización.- Tecla activa el modo NO MOLESTAR y se desactivan los modos VIGILANCIA y ESCUCHA si estaban activados. Se activa el
icono de señalización .- Tecla CANCEL vuelve al menú principal -INTCOM-INTCOM-INTCOM-INTCOM-INTCOM (Intercom).- Tecla MENU cambia a submenú EXTEXTEXTEXTEXT (Modo extendido de número de Zonas).Submenú EXT (modo extendido de número de Zonas). (*)- Muestra mensaje EXT SIEXT SIEXT SIEXT SIEXT SI o EXT NOEXT NOEXT NOEXT NOEXT NO.- Tecla desactiva el modo EXTEXTEXTEXTEXT (Modo extendido de número de Zonas).- Tecla activa el modo EXTEXTEXTEXTEXT. Sólo influye en el SETUP.- Tecla CANCEL vuelve al menú principal -INTCOM-INTCOM-INTCOM-INTCOM-INTCOM (Intercom).- Tecla MENU vuelve al menú principal -INTCOM-INTCOM-INTCOM-INTCOM-INTCOM (Intercom).(*)Este submenú sólo debe manipularse en la configuración de la instalación.
Se elige EXT SIEXT SIEXT SIEXT SIEXT SI en el caso de ser todos los Mandos D48U.Se elige EXT NOEXT NOEXT NOEXT NOEXT NO si está conviviendo un Mando D48U con otro tipo de intercomunicador (D28D, J12U).
ZONA 00MENU
Cambiade zona
MENU
MIC NOMENU
SI / NONiñera
OIR NOMENU
SI / NOEscucha
PRIV SI SI / NONo molesten
MENU
EXT NOSI / NOZona
extendida
MENU
CANCEL
CANCEL
CANCEL
CANCEL
CANCEL
-INTCOMOK
MENU
Llama a zona

- 35 -
D MD O M O S M U L T I R A D I O
hk
Menú RELOJSubmenú ALARMA (Despertador)Se programa la hora a la que se desea activar el Mando automáticamente en el programa musical en el que se apagó.- Muestra mensaje ALRM SIALRM SIALRM SIALRM SIALRM SI o ALRM NOALRM NOALRM NOALRM NOALRM NO.- Tecla desactiva la función alarma. Desactiva el icono de señalización.- Tecla activa la función alarma. Activa el icono de señalización.- Tecla OK activa el modo de introducción de la hora de alarma, pasando directamente a la introducción de los minutos.
• Tecla decrementa minutos.• Tecla incrementa minutos.• Tecla OK activa el modo de introducción de la hora.
- Tecla decrementa horas.- Tecla incrementa horas.- Tecla OK valida la hora de la alarma y vuelve a submenú ALRMALRMALRMALRMALRM (Despertador).
- Tecla CANCEL vuelve al menú principal RELOJRELOJRELOJRELOJRELOJ.- Tecla MENU cambia a submenú SLEPSLEPSLEPSLEPSLEP (Apagado temporizado).Submenú SLEEP (Apagado temporizado)- Muestra mensaje SLEP SISLEP SISLEP SISLEP SISLEP SI o SLEP NOSLEP NOSLEP NOSLEP NOSLEP NO.- Tecla desactiva la función sleep. Desactiva el icono de señalización.- Tecla activa la función sleep. Activa el icono de señalización.- Tecla OK activa el modo de introducción de los minutos de desconexión.
• Tecla decrementa minutos.• Tecla incrementa minutos.
- Tecla CANCEL vuelve al menú principal -RELOJ-RELOJ-RELOJ-RELOJ-RELOJ.- Tecla MENU cambia a submenú PROGPROGPROGPROGPROG (Simulación de presencia).Submenú PROGRAMACIÓN (Simulación de presencia)- Muestra mensaje PROG SIPROG SIPROG SIPROG SIPROG SI o PROG NOPROG NOPROG NOPROG NOPROG NO.- Tecla desactiva la función programación. Desactiva el icono de señalización.- Tecla activa la función programación. Activa el icono de señalización.- Tecla OK permite la introducción de la hora inicial (marcada con la letra P). Mismo funcionamiento que la introducción de la hora de
alarma.• Tecla OK valida la hora inicial y permite la introducción de la hora final (marcada con la letra F). Mismo funcionamiento que la
introducción d la hora de alarma.• Tecla OK valida la hora final y vuelve al submenú PROGPROGPROGPROGPROG (Simulación de presencia).
- Tecla CANCEL vuelve al menú principal -RELOJ-RELOJ-RELOJ-RELOJ-RELOJ.- Tecla MENU cambia a submenú HORAHORAHORAHORAHORA.Submenú HORA- Muestra mensaje HORA.- Tecla OK permite la introducción de la hora del sistema (marcada con la letra H). Mismo funcionamiento que la introducción de la hora
de alarma.- Tecla OK valida la hora del sistema, envía el comando al resto de la instalación vuelve al submenú HORAHORAHORAHORAHORA.- Tecla CANCEL vuelve al menú principal -RELOJ-RELOJ-RELOJ-RELOJ-RELOJ.- Tecla MENU cambia a submenú ALRMALRMALRMALRMALRM (Despertador).
ALRM SIMENU
SI / NODespertador
MENU
SLEP NO
PROG NO SI / NOProgramac.
HORA
CANCEL
CANCEL
CANCEL
CANCEL
CANCEL
-RELOJOK
Set min. despertadorOK
OK
Set hora despertador
OK
Set min. sleepOK
OK
MENU
SI / NODesconectar
MENU Set min. inicioOK
OK
Set hora inicio
OK
MENU OKSet min. final
OK
Set hora finalSet min. reloj
OK
Set hora reloj
OK
OK

- 36 -
D MD O M O S M U L T I R A D I O
fg
D48U - MANDO INTERCOMUNICADOR DE 2 CANALES ESTÉREO
TECLAS DE ACCESO RÁPIDOCon el mando en situación de reposo y mediante las siguientes combinaciones de teclas, es posible acceder a las funciones que sedescriben a continuación:
Combinación de teclas Función
MENU + Acceso al menú de selección de zonas de intercomunicación.
Mantener / OK Activación/Desactivación de la función SLEEP.
MENU + / OK Desconexión del programa musical en todos los Mandos de la instalación.
TECLA PORTERO En el momento que se detecte una llamada a través del interface de portero J11G/B, los mandos que reciban dicha llamada se configuraránen modo "portero" indicando la puerta desde la que están recibiendo dicha llamada.
Combinación de teclas Función
Inicia una comunicación de voz con el portero.OK / Cancela la llamada sin abrir la puerta.
MENU / Abre la puerta y cancela la comunicación.
D48U
D48U 2 C 2 W
1138
12:30

- 37 -
D MD O M O S M U L T I R A D I O
hk
D48U - INTERCOM-CONTROL UNIT WITH 2 STEREO CHANNELS
[ 1 ] ON/OFF/OK BUTTON It activates the music source, validates menu options and allows quick access to functions. It cancels the callto the door intercom without opening the door.
[ 2 ] OK LAMP It indicates that the music source is on in that room.
[ 3 ] "OK" LAMPIt indicates the possibility of confirming the selection of the option on the active menu.
[ 4 ] MENU/DOOR INTERCOM BUTTON Access to the different menus and to quick access functions. It opens the door if a call is made from the doorintercom.
[ 5 ] VOLUME CONTROL It increases the volume of music and bass, treble and balance levels.
[ 6 ] VOLUME CONTROL It lowers the volume of music and bass, treble and balance levels, it allows the call zone to be located forintercommunication, and deactivates the options of the different menus.
[ 7 ] CALL / CANCEL BUTTONIt activates the call function for general intercommunication and intercommunication with a specific zone onceit is located, or it responds to a call for the control unit. It allows the active menu option to be cancelled andto exit a menu to return to a previous menu.
[ 8 ] CALL LAMP The lighting of this lamp shows that the intercom function is available.
[ 9 ] CANCEL LAMPIt indicates the possibility of cancelling the active menu option.
[ 10 ] INFRARED RECEIVER AND INTERNAL MICROPHONEThe instructions transmitted by any remote control unit, by infrareds, are picked up by the D48U Control Unitand sent through the installation to the Central Unit. The M19N capsule can be connected at the central unitand placed on the infrared receiver of the music equipment. It is thus possible to control the music equipmentfrom any room in the same way as if you were next to it.
[ 11 ] DISPLAYIt displays information using alphanumeric texts and arrows, indicating the functions that are active.
OPERATION1. - Once the D48U module has been correctly installed, all of the functions of this module will be available.2.- When the music source is not on, the display backlight remains low so that it doestn't disturb but still
brights enough for the time to be clearly seen.3. - When the music source is activated, the control unit returns to its status prior to being switched off both
with regards to preset station and volume and all other parameters: surveillance mode, alarm clock, etc.In this state the volume can be controlled with the / keys.
4.- Regardless of whether the music source is on or not, a general call can be made by pressing the buttonand the setup menus can be accessed by pressing the MENU key.
D48U 2 C 2 W
12:30
D48U
1138
[ 9 ][ 2 ]
[ 11 ]
D48U
[ 4 ]
[ 8 ]
[ 11 ]
[ 6 ]
[ 10 ]
[ 5 ]
[ 3 ]
[ 1 ] [ 7 ]
1138

- 38 -
D MD O M O S M U L T I R A D I O
fg
RADIO CONTROLPre-set stations search options and control of the radio module in the C19F central unit are intuitive. Whenyou decide to record a pre-set station, the current pre-set stations is overwritten. There is no delete key.
ZONE CALLOnce a call has been made to a specific zone and a response has been received , there is a period of 20 secondsso that each time the key is pressed a response is sent to the zone called.When the call is being received, the / keys can be used to adjust the intercommunication volume. This optionis separate from the music volume and is saved in memory even if the power supply is cut off.
DOOR INTERCOMAfter a call is made from the door intercom there is a 30 second period to respond to the call, either by cancellingwith the OK key or by opening the door with the MENU/DOOR INTERCOM key or establishing communicationwith the key.
SURVEILLANCE CONTROL Control of surveillance functions is carried out by the C19F central unit.The SURVEILLANCE function activates the control unit microphone in one room to be able to listen to thatroom from any other control unit which has the LISTEN function activated. When the SURVEILLANCE function is activated the module does not accept general calls or door intercom calls.The LISTEN function activates the intercommunication line so that the “bed” activated at that moment can belistened to. If there are several "beds" the C19F central unit assigns 10 seconds to each “bed”. When thisfunction is activated, if the key is pressed a call is made to the "bed" that is active at that time. Generalincoming calls are also accepted . The DO NOT DISTURB function inhibits the reception of general calls orspecific zone calls and /or door intercom calls. If such a call is sent a "BUSY" response call is sent out.
SLEEPThis function activates a counter, which can be programmed for 1 to 59 minutes, that switches off the musicsource. If the music source is switched off manually, the counter will be automatically deactivated. There is alsoa shortcut key which works by pressing and holding down the key when in the active music source state.
ALARMFirst enter the minutes using the / keys and then validate using the OK button. Enter and validate the hourin the same way. When both parameters have been confirmed the module asks you if you wish to activate ordeactivate the alarm function.
PRESENCE SIMULATIONIt allows the start and end time of the presence simulation function to be programmed in the same way as thealarm function.
BASS, TREBLE AND BALANCE LEVELSUsing the / keys the level of bass, treble and balance control in stereophonic rooms can be adjusted.
MAIN MENU SEQUENCE
Idle MENU -MUSIC-MUSIC-MUSIC-MUSIC-MUSIC MENU MENU -INTCOM-INTCOM-INTCOM-INTCOM-INTCOM MENU CLOCKCLOCKCLOCKCLOCKCLOCK
D48U 2 C 2 W
12:30
D48U
[ 9 ][ 2 ]
[ 11 ]
D48U
[ 4 ]
[ 8 ]
[ 11 ]
[ 6 ]
[ 10 ]
[ 5 ]
[ 3 ]
[ 1 ] [ 7 ]
1138
1138

- 39 -
D MD O M O S M U L T I R A D I O
hk
NAVIGATION MENU
MUSIC menu
CHANNELS submenu- / keys to choose the channel.- CANCEL key to return to main -MUSIC-MUSIC-MUSIC-MUSIC-MUSIC menu.
- MENU key to go to BALBALBALBALBAL (balance) submenu
BALANCE submenu- key compensates the left channel balance in 16 intervals (from L0 to L16).
- key compensates the right channel balance in 16 intervals (from R0 to R16).- CANCEL key returns to main -MUSIC-MUSIC-MUSIC-MUSIC-MUSIC menu.
- MENU key goes to TREBLETREBLETREBLETREBLETREBLE submenu.
TREBLE submenu- key reduces the treble tones in six 2 dB steps.
- key increases the treble tones in six 2 dB steps.- CANCEL key returns to the main -MUSIC-MUSIC-MUSIC-MUSIC-MUSIC menu.
- MENU key goes to the BASSBASSBASSBASSBASS submenu.
BASS submenu- key reduces the bass tones in six 2 dB steps.
- key increases the bass tones in six 2 dB steps.- CANCEL key returns to the main -MUSIC-MUSIC-MUSIC-MUSIC-MUSIC menu.
- MENU key goes to the (spatial sound) submenu.
3D – SPATIAL SOUND submenu- key deactivates spatial sound play.
- key activates spatial sound play.- CANCEL key returns to the main -MUSIC-MUSIC-MUSIC-MUSIC-MUSIC menu.
- MENU key returns to the main -MUSIC-MUSIC-MUSIC-MUSIC-MUSIC menu.
CANCEL
-MUSICOK
MENU
INPUT 2MENU
Changechannel
MENU
BAL R03MENU
Changebalance
MENU
Changetrebles
BASS-02 Changebasses
MENU
Activate/deactivate
spatial
MENU
CANCEL
CANCEL
CANCEL
CANCEL
CANCEL TRBL-03
OK

- 40 -
D MD O M O S M U L T I R A D I O
fg
RADIO menu
MEMORY submenu- It displays the current memory.
- The key searches for the previous pre-set station and indicates the station frequency number.
- The key searches for the following pre-set station and indicates the station frequency number.
- The CANCEL key returns to the main menu.
- The MENU key goes to the SEARCHSEARCHSEARCHSEARCHSEARCH submenu.
SEARCH submenu- It displays the message SEARCHSEARCHSEARCHSEARCHSEARCH.
- The key (short press) displays the manual search option which adjusts the tuner in intervals of –100 kHz.
- The key (short press) displays the manual search option which adjusts the tuner in intervals of +100 kHz.
- The key (long press) displays the automatic search in which the tuning scan stops each time a radio station is found.
- The key (long press) displays the automatic search in which the tuning scan stops each time a radio station is found.
- The OK key (long press) records the radio channel in the current memory.
- The CANCEL key returns to the main menu.
- The MENU key returns to the MEM RMEM RMEM RMEM RMEM R (Memory) submenu.

- 41 -
D MD O M O S M U L T I R A D I O
hk
INTERCOM menu
CALL TO ZONE submenu- It displays the message ZONE 00ZONE 00ZONE 00ZONE 00ZONE 00 or last zone called.- The led lights and the CANCEL led goes off.- The / key searches for the zone to be called. It can be kept pressed for continuous search. Each control unit can
not select its own zone number. The total number of system zones cannot be exceeded.- The key sends a call to the zone specified.
• It activates the microphone whilst the key is being pressed.• It deactivates the microphone when the key is released and sends an "end of call" command to the zone.
- The CANCEL key returns to the main –INTCOM (Intercom) menu.- The MENU key changes to the MICMICMICMICMIC submenu (microphone)
MIC submenu - It displays the message MIC OKMIC OKMIC OKMIC OKMIC OK or MIC NOMIC NOMIC NOMIC NOMIC NO. The CANCEL led lights up and the led is deactivated.- The key deactivates the SURVEILLANCE mode. The icon is deactivated.- The key activates the SURVEILLANCE mode and deactivates the LISTEN and DO NOT DISTURB modes if they
were active. The icon lights up.- The CANCEL key returns to the main -INTCOM-INTCOM-INTCOM-INTCOM-INTCOM (Intercom) menu.- The MENU key changes to the HEARHEARHEARHEARHEAR submenu.
HEAR submenu - It displays the message LST OKLST OKLST OKLST OKLST OK or LST NOLST NOLST NOLST NOLST NO.- The led lights and the CANCEL led goes off.- The key deactivates the LISTEN mode. The icon is deactivated.- The key activates the LISTEN mode and deactivates the SURVEILLANCE and DO NOT DISTURB modes if they
were active. The icon is activated.- The CANCEL key returns to the main -INTCOM-INTCOM-INTCOM-INTCOM-INTCOM (Intercom) menu.- The MENU key changes to the PRIVPRIVPRIVPRIVPRIV (do not disturb) submenu.
PRIV submenu - It displays the message PRIV OKPRIV OKPRIV OKPRIV OKPRIV OK or PRIV NOPRIV NOPRIV NOPRIV NOPRIV NO.- The key deactivates the DO NOT DISTURB mode. The icon is deactivated.- The key activates the DO NOT DISTURB mode and deactivates the SURVEILLANCE and LISTEN modes if they
were active. The icon is activated.- The CANCEL key returns to the main -INTCOM-INTCOM-INTCOM-INTCOM-INTCOM (Intercom) menu.- The MENU key changes to the EXTEXTEXTEXTEXT (Number of Zones extended mode) submenu.
EXT submenu (Number of Zones extended mode). (*)- It displays the EXT OKEXT OKEXT OKEXT OKEXT OK or EXT NOEXT NOEXT NOEXT NOEXT NO message.- The key deactivates the EXTEXTEXTEXTEXT (Number of Zones extended mode) mode.- The key activates the EXTEXTEXTEXTEXT mode. This is only relevant in SETUP.- The CANCEL key returns to the main -INTCOM-INTCOM-INTCOM-INTCOM-INTCOM (Intercom) menu.- The MENU key returns to the main -INTCOM-INTCOM-INTCOM-INTCOM-INTCOM (Intercom) menu.
(*)This submenu should only be used in the installation setup.EXT OKEXT OKEXT OKEXT OKEXT OK is selected if all the control units are D48U.EXT NOEXT NOEXT NOEXT NOEXT NO is selected if a D48U control unit is being used with another type of intercom system (D28D, J12U).
ZONE 00MENU
Changezone
MENU
MIC NOMENU
Baby-sitterYES / NO
LST NOMENU
PRIV OK Do no disturbYES / NO
MENU
EXT NOExtended
zoneYES / NO
MENU
CANCEL
CANCEL
CANCEL
CANCEL
CANCEL
-INTCOMOK
MENU
Call zone
ListenYES / NO

- 42 -
D MD O M O S M U L T I R A D I O
fg
CLOCK menuALARM clock submenuTo programme the time at which the Control Unit is automatically activated in the music programme that was selectedwhen it was switched off.- It displays the message ALRM OKALRM OKALRM OKALRM OKALRM OK or ALRM NOALRM NOALRM NOALRM NOALRM NO.- The key deactivates the alarm function. It deactivates the icon.- The key activates the alarm function. It activates the icon.- The OK key activates the enter alarm time mode, starting with the adjustment of the minutes.
• The key decreases minutes.• The key increases minutes.• The OK key activates the enter hour mode.
- The key decreases hours.- The key increases hours.- The OK key validates the alarm time and returns to the ALRMALRMALRMALRMALRM (alarm) submenu.
- The CANCEL key returns to the main CLOCKCLOCKCLOCKCLOCKCLOCK menu.- The MENU key changes to the SLPSLPSLPSLPSLP submenu (Timed switch-off).
SLEEP submenu (Timed switch-off)- It displays the message SLP OKSLP OKSLP OKSLP OKSLP OK or SLP NOSLP NOSLP NOSLP NOSLP NO.- The key deactivates the sleep function. It deactivates the icon.- The key activates the sleep function. It actives the icon.- The OK key activates the mode for entering the minutes until switch-off, starting with the adjustment of the minutes.
• The key decreases minutes.• The key increases minutes.
- The CANCEL key returns to the main CLOCKCLOCKCLOCKCLOCKCLOCK menu.- The MENU key changes to the PROGPROGPROGPROGPROG (presence simulation) submenu.
The PROGRAMMING (presence simulation) submenu- It displays the message PROG OKPROG OKPROG OKPROG OKPROG OK or PROG NOPROG NOPROG NOPROG NOPROG NO.- The key deactivates the programming function. It deactivates the icon.- The key activates the programming function. It activates the icon.- The OK key allows the start time to be entered (marked with S). The same procedure as the one used to enter the alarm
time.• The OK key validates the start time and allows the end time to be entered (marked with F). The same operation
as for entering the alarm time.• The OK key validates the end time and returns to the PROG (presence simulation) submenu.
- The CANCEL key returns to the main CLOCKCLOCKCLOCKCLOCKCLOCK menu.- The MENU key changes to the TIMETIMETIMETIMETIME submenu.
TIME submenu- It displays the message TIMETIMETIMETIMETIME.- The OK key allows the system time (marked with H) to be entered. Same operation as that for entering the alarm time.- The OK key validates the system time, sends the information to the rest of the installation, and returns to the TIMETIMETIMETIMETIME
submenu.- The CANCEL key returns to the main CLOCKCLOCKCLOCKCLOCKCLOCK menu.- The MENU key changes to the ALRMALRMALRMALRMALRM (alarm clock) submenu.
ALRM OKMENU
AlarmYES / NO
MENU
SLP NO
PROG NO ProgrammingYES / NO
TIME
CANCEL
CANCEL
CANCEL
CANCEL
CANCEL
CLOCKOK
Set min. alarmOK
OK
Set hour alarm
OK
Set min. sleepOK
OK
MENU
Switch offYES / NO
MENU Set min. startOK
OK
Set hour start
OK
MENU OKSet min. end
OK
Set hour endSet min. clock
OK
Set hour clock
OK
OK

- 43 -
D MD O M O S M U L T I R A D I O
hk
D48U - INTERCOM-CONTROL UNIT WITH 2 STEREO CHANNELS
SHORTCUT KEYSWith the control unit in standby mode, the following key combinations can be used to access the described functions:
Key combination Function
MENU + Access to menu for the selection of intercommunication zones.
Hold / OK Activation/Deactivation of SLEEP function.
MENU + / OK Switches off the audio program in all the control units of the installation.
DOOR INTERCOM KEY As soon as a call is detected through the J11G/B door intercom interface, the control units which receive the call changeto "door intercom" mode, indicating the door from which said call is being received.
Key combination Function
Speak to the door intercom.OK / Cancels the call without opening the door.
MENU / Opens the door and cancels the communication.
D48U
D48U 2 C 2 W
1138
12:30

- 44 -
D MD O M O S M U L T I R A D I O
fg
MÓDULO M20U / M20U MODULE UNIT
[ 1 ] CONECTOR PARA AURICULARES / HEADPHONES SOCKETPara la escucha individual, introducir unos auriculares estéreo en este conector. Los Altavoces de la habitación sedesconectarán automáticamente. Conector apto para cualquier Auricular ESTÉREO con clavija de 3.5 mm. No use nuncaauriculares monofónicos (para un solo oído).For individual listening, plug the stereo headphones in this socket. The loudspeakers of this room willbe switched off automatically. Any stereo headphone with a 3.5 mm plug, can be connected. Never usemono headphones.
[ 2 ] ENTRADA PARA WALKMAN® Y PC / AUX INPUTVd. podrá conectar al Módulo cualquier aparato musical (walkman®, CD, cassette, mini-radios, PC, etc.) a través de lasalida de auriculares.El sonido de su fuente musical se amplificará y se escuchará sólo en los Altavoces de esa habitación, con la potencia desonido que desee. En la figura le indicamos como conectarlo; puede adquirir el cable en cualquier tienda de electrónica,sonido o grandes almacenes (muestre este dibujo a la hora de adquirirlo).El volumen del sonido se regula en la propia fuente musical. Recuerde poner en marcha el Mando con el pulsador [ 1 ].NOTA: El resto de las habitaciones continuará con su funcionamiento normal.
Any external audio source can be connected to the Control unit (walkman®, CD, tape recorder, PC, etc.).The sound from your audio source will be amplified and will be played only trough the loudspeakersof that room, at the selected sound level. The drawing shows how to connect it; you can buy the cablein any electronics or HI-FI shop or in a department store (just show this drawing when you buy thecable).The volume level has to be set from the audio source. Remember to turn on the Control unit with thebutton [ 1 ].NOTE: The other rooms will continue working normally.
M20U
DETALLE DE FUENTE MUSICAL Y AURICULARESDETAIL OF HEADPHONES & AUX SOURCE CONNECTION
Conector estéreo / Stereo plug Ø 3,5 mm.
ESTÉREO
Fuente musicalAudio source
M20U
1142
[ 2 ] [ 1 ]

- 45 -
D MD O M O S M U L T I R A D I O
hk
1 2 3
4 5 6
8 97
0/10 1-/11 2-/12
SET MUTETV
VIDEO
MAC1
MAC2
MAC3
MAC4
KIDS
TXT / TV
EGi SYSTEM AUX1
AUX2
AUX3
TV1
TV2
VCR1
VCR2
SAT1
SAT2
OFF
M13N
MANDO A DISTANCIA M13N / M13N REMOTE CONTROL
GENERAL / GENERAL
SET TECLA PARA GRABAR LAS FUNCIONES DE OTROS MANDOS A DISTANCIA (ver pág. 48)KEY TO LEARN THE FUNCTIONS OF OTHER REMOTE CONTROLS (see page 49)
PILOTO DE GRABACION / LEARNING LAMPIndica el estado de grabación. Significa que el M13N está atento a recibir comandos de otro mando a distancia y grabarlos.Indicates learning status. Means that the M13N is ready to receive commands from another remotecontrol and learn them.
CONTROLES DE MUSICA / MUSIC CONTROLSPara acceder a los controles correspondientes a su Central de audio , pulse "EGi SYSTEM".A continuación, para elegir el canal que desea escuchar, pulse las teclas 1, 2, 3 ó 4 que corresponden con los canales 1 al 4 ensu instalación (el número de canales de audio en su sistema dependerá de su configuración. Consulte el apartado de Centralesde este manual).
To activate the controls for the audio systems, press "EGi SYSTEM".
Then, select the audio channel by pressing keys 1, 2, 3 or 4 corresponding to channel 1 to channel 4 of yourinstallation (the number of audio channel may vary, depending on the system configuration. Please refer toyour Central unit user manual).
ON/ ENCENDIDO Y SELECCION DE CANALES DE MUSICA / ON AND MUSIC CHANNEL SELECTION
OFF APAGADO / OFF
SCAN (cambio de las emisoras presintonizadas en la Central) / SCAN (Change of preset stations in the Central unit)
VOLUMEN DEL SONIDO / VOLUME REGULATION
CONTROL DE TONOS GRAVES / BASS CONTROL
CONTROL DE TONOS AGUDOS / TREBLE CONTROL
CONTROL DE BALANCE / BALANCE CONTROL
TIMER: APAGADO TEMPORIZADO (30 minutos) / SLEEP TIMER (30 min.)
1130_B
Piloto de grabaciónLearning lamp

- 46 -
D MD O M O S M U L T I R A D I O
fg
M13N
1130_C
FUNCIONES DE INTERCOMUNICACION DEL MANDO D28D / D28D CONTROL INTERCOM FUNCTIONS
Todas las funciones del Mando Multifunción D28D están disponibles desde el Mando a distancia M13N.
All the functions of the D28D Multifunction Control unit are available from the M13N Remote Control.
INTERCOMUNICACION Y VIGILANCIA / INTERCOM AND MONITORING
PARA SELECCIONAR LA HABITACION CON LA QUE QUEREMOS HABLARTO SELECT THE ROOM YOU WANT TO TALK TO
PULSAR PARA HABLAR / PUSH TO TALK
ACTIVA Y DESACTIVA LA FUNCION NIÑERA EN ESA HABITACIONACTIVATES AND DISABLES THE BABY-SITTING FUNCTIONFOR THE SELECTED ROOM
ACTIVA Y DESACTIVA LA FUNCION ESCUCHAACTIVATES AND DISABLES THE LISTENING FUNCTION
ACTIVA Y DESACTIVA LA FUNCION NO MOLESTARACTIVATES AND DISABLES THE DO NOT DISTURB FUNCTION
PORTERO AUTOMATICO / DOOR ENTRY SYSTEM
PULSAR PARA HABLAR CON EL PORTERO / PRESS TO TALK USING THE DOOR ENTRY SYSTEMSoltar para escuchar.Release to listen.
PULSAR PARA ABRIR LA PUERTA / PRESS TO OPEN THE DOOR
Cuando en el mando D28D está iluminado el piloto , al pulsar esta tecla accionaremos el abre-puerta (sólo con móduloJ11G/B).
When the lamp in the control unit D28D is on, pressing this key will release the door lock (only withJ11G/B module).
Funciones del "pulsador selectorde funciones" [ 12 ], pág. 20."Functions selector" options
[ 12 ], page 20.
1 2 3
4 5 6
8 97
0/10 1-/11 2-/12
SET MUTETV
VIDEO
MAC1
MAC2
MAC3
MAC4
KIDS
TXT / TV
EGi SYSTEM AUX1
AUX2
AUX3
TV1
TV2
VCR1
VCR2
SAT1
SAT2
OFF

- 47 -
D MD O M O S M U L T I R A D I O
hk
M13N
1130_D
CONTROLES DE DESPERTADOR DEL MANDO D28D / D28D CONTROL UNIT ALARM CLOCK FUNCTIONS
ACTIVA Y DESACTIVA EL DESPERTADOR / ACTIVATES AND DISABLES THE ALARM CLOCKVer funcionamiento del pulsador [16] en el Mando D28D, pág. 23See the operation of the button [16] in the D28D Control unit, page 23
TECLA PARA DESPERTAR CON MUSICA / WAKE-UP WITH MUSIC KEYPodemos programar el Mando D28D para despertarnos con música pulsando la tecla .
You can program the D28D Control unit to wake you up with music pressing the key.
FUNCIONAMIENTO1.- Encender la música en el canal y con el volumen que deseemos despertarnos.2.- Programe la hora del despertador tal y como se indica en la pág. 23. Para esto puede valerse tanto de los controles
en el Mando D28D como del Mando a distancia M13N.3.- Mientras todavía parpadea el piloto pulsar en el Mando a distancia la tecla , el Mando responderá con
un tono.Cuando coincide la hora del reloj con la del despertador se oirá un tono durante un minuto, tras el cual comenzará asonar la música. Pulsando cualquier tecla en el Mando D28D o en el M13N comenzará la música, salvo que pulsemoslas teclas OFF o en cuyo caso cesará el tono pero no se activará la música.Para desactivar la función "despertar con música" pulse la tecla y a continuación la tecla con la músicaapagada.
OPERATION1.- Turn on the music to the channel and the volume level you want to wake-up with.2.- Set the time for the alarm clock following the instructions on page 23. You can do this by using
whether the keys in the Control unit D28D or the buttons in the remote control M13N.3.- While the lamp is still blinking, press the key in the Control unit, the Control unit will
answer with a tone.When the clock time matches the alarm time, a tone will be heard for a minute, after which the musicwill start playing. Pressing any key in the D28D or the M13N Control unit will start the music,except if the OFF or keys are pressed, in which case the tone will stop but the music will notactivate.To disable the "wake up with music" function, please press the key an then the key withthe music turned off.
07 : 30 PULSADORES PARA AJUSTAR LA HORA DEL DESPERTADOR / BUTTONS TO SET THE ALARM TIME07 : 30 Funcionamiento similar a los pulsadores [4] del Mando D28D, pág. 23.
Operation similar to the buttons [4] in the D28D Control unit, page 23.
1 2 3
4 5 6
8 97
0/10 1-/11 2-/12
SET MUTETV
VIDEO
MAC1
MAC2
MAC3
MAC4
KIDS
TXT / TV
EGi SYSTEM AUX1
AUX2
AUX3
TV1
TV2
VCR1
VCR2
SAT1
SAT2
OFF

- 48 -
D MD O M O S M U L T I R A D I O
fg
1
2
3
4
5
6
8
9
7
0/10
1-/11
2-/12
SET
MUTE
TV VIDEO
MAC1
MAC2
MAC3
MAC4
KIDS
TXT /
TV
EGi SYST
EM
AUX1
AUX2
AUX3
TV1
TV2VCR1
VCR2SAT1
SAT2
OFF
COMO PROGRAMAR EN EL M13N FUNCIONES DE OTROS MANDOS A DISTANCIA
El Mando M13N, además de las funciones de su instalación , es capaz de aprender otras funciones de uso común de otros mandos adistancia. De esta forma, en muchas ocasiones, puede utilizarse un sólo Mando M13N para todo, guardando los otros. Para ello dispone devarios bancos de funciones libres, además del denominado "EGi SYSTEM" donde guardar funciones de otros aparatos.Para una mayor facilidad existen una serie de bancos preprogramados, en total más de 3500 modelos de TV, CDR, VCR, DVC, SAT, LC, CD,VCD... de los que adjuntamos códigos en "Anexo".El proceso de programación es este:1.- Ponga el Mando a distancia cuyas funciones desee grabar frente al M13N, a una distancia de 1 a 3 cm. aproximadamente.2.- Pulse SET y al mismo tiempo la tecla correspondiente al dispositivo cuyos comandos desea grabar (TV1, TV2 ...). Mantener ambas
teclas pulsadas hasta que se ilumine el LED y soltar a continuación.3.- Pulse 3 veces la tecla "0" [ 000 ] y el mando M13N entrará en la secuencia de grabación de comandos.4.- Pulse por un momento la tecla del M13N en la que desee grabar el primer comando del mando a distancia original. El LED parpadeará
confirmando que el M13N está a la espera de recibir un comando (si en 15 segundos no se oprime ninguna tecla, el M13N saldráautomáticamente de la secuencia de grabación).
5.- A continuación, mantenga pulsada por unos instantes en el mando original la tecla correspondiente a la función que desee grabar. ElLED del M13N permanecerá encendido mostrando que el nuevocomando está siendo analizado. Preste atención a dicho LED, cuyarespuesta conducirá a una de las siguientes opciones:- Si parpadea 1 vez y, a continuación, permanece encendido, la grabación del comando se ha realizado satisfactoriamente. Ya
puede soltar el botón y continuar con las otras funciones desde el punto 4.- Si parpadea 3 veces y, a continuación permanece encendido, existe un error de grabación del comando. Compruebe que la
posición de los mandos corresponde al dibujo adjunto, limpie los cristales transmisores y compruebe las baterías.- Si parpadea 6 veces la memoria de grabación del M13N es insuficiente. Puede intentarlo de nuevo o bien volver a pulsar la tecla
de dispositivo (TV1, TV2 ...) para salir.Si, tras llevar a cabo la secuencia de programación, regresa al punto 3 e introduce el código "9 1 0" los comandos grabados se aseguraráncontra posibles errores por desactivación o mezcla. Esta protección se mejorará también durante el periodo de cambio de baterías.Si tras llevar a cabo la secuencia de programación, regresaal punto 3 e introduce el código "9 9 0", todos los nuevos comandos grabadosse borrarán y el mando regresará asu configuración original en fábrica.
ACTIVACIÓN DE OTROS EQUIPOS ELECTRÓNICOS
Para hacer uso del mando a distancia con otros equipos se debe elegir el banco de comandos al que pertenezca el equipo electrónicoque se quiere gobernar.Pulsar SET y simultáneamente la tecla correspondiente al dispositivo (TV1, VCR1, SAT2, etc.). El piloto de grabación quedaráencendido.Introducir el código numérico que corresponda según indican los anexos de las páginas 50 a 54 de este mismo manual. Una vezintroducido el código del equipo el piloto se apagará.
M13N
1130_E
M13N
3 cm.
1130
_A
Bancos libres
Banco (no grabar)
Grabando las funciones de otros mandos

- 49 -
D MD O M O S M U L T I R A D I O
hk
1
2
3
4
5
6
8
9
7
0/10
1-/11
2-/12
SET
MUTE
TV VIDEO
MAC1
MAC2
MAC3
MAC4
KIDS
TXT /
TV
EGi SYST
EM
AUX1
AUX2
AUX3
TV1
TV2VCR1
VCR2SAT1
SAT2
OFF
PROGRAMING OTHER REMOTE CONTROLS FUNCTIONS IN THE M13N
The M13N Remote control is able to learn other commonly used functions from other remote controls in adition to thefunctions of your installation. Most of the time you can use a single M13N Remote control for everything and putaway the others. You have three free function banks available, in adition to "EGi SOUND SYSTEM", to store functionsfrom other appliances.
The codes of over 3500 models of TV, CRD, VCR, DVC, SAT, LC, CD, VCD, etc. are also saved in a pre-programmed memory.These codes are listed in the "Annex" section.
The programming sequence is as follows:
1.- Put the remote control whose functions are going to be copied opposite to the M13N, at approx. 3 cm.
2.- Press SET + the key that corresponds to the device (TV1, TV2, ...) in which you want to save the new set of commands.Release both keys when the LED turns ON.
3.- Press the key "0" three times [enter "000"] and the unit will enter the command storage mode.
4.- Press the key of the M13N where you want to save the first command. Then release it. The LED will blink showingthat the M13N is waiting to receive a command from the original remote controller. (After 15 seconds withoutpressing any key the M13N will exit the storage mode).
5.- Press continuously the key in the original remote controller that corresponds to the function that you want to“copy”. The LED of the M13N will light continuously showing that the command is being analysed. Pay attentionto this LED, and see what of the three following options happen:
- If it blinks once and then it stays ON, the storage is O.K. and you can release the button and proceed with the nextcommand from point 4 on.
- If it blinks three times and then it stays ON, there is a storage error. Check the position of the remote controllers(see attached drawing), clean the transmitters and check the batteries.
- If it blinks six times then the M13N is out of memory. You can try again or press the device key again (TV1, TV2...) to exit.
If, after the programming sequence, you return to point 3 and enter the code "910", the commands will be safed fromalteration or misinterpretation, even during the process of battery replacement.
If, after the programming sequence, you return to point 3 and enter the code "990", all the new commands that have beenstored will be erased, and the remote controller will be reset back to its default set of commands.
HOW TO ACTIVATE THE SET OF COMMANDS FOR OTHER DEVICES
To use the M13N remote control unit with other electronic devices, first you must choose the command bank thatmatches with the electronic device that has to be controlled (TV, VCR, DVD, etc).
To do that, press the “SET” key and, simultaneously, the key that represents the device (TV1, VCR1, SAT2, etc) to beconnected. The record led will light.
After that, enter the numeric code corresponding to the specific device, that can be found in the annex at pages 50 to54 of this manual. Once the code is entered, the led will turn off.
M13N
1130_E
M13N
3 cm.
1130
_A
Free banks
Bank (do not record)
Recording functions from other remote controls

- 50 -
D MD O M O S M U L T I R A D I O
fg
MARCA / BRAND TV - TXT VCR SAT - DSS CABLE HI-FI CD LD - DVD - VCD AUX
AB 812
ABC 452
ACE 713
Admiral 032, 155
AEON 502
Aiwa 261 581 626
Akai 005, 159, 169 269, 270, 271, 309,310, 356, 357
Alba 407
Albiral 001
Alfa Gold 810, 811
AlphaStar 826
Amstar 847
Amstrad 006 371, 372, 408, 488
Anitsch 311
Ankaro 373
APEX 672
APO 516
Apollo 402
ASA 007, 013, 032, 282094, 155, 161
Asiagiant 501, 513
Astra 372, 409, 488
ASTRIX 840, 842, 843, 846
ATLE 579
ATLM 671
ATLM 671Audiosonic 160
Aura 430, 487Ausind 008Autovox 004, 007, 012, 014,
015, 078, 079, 104, 153AWA 033, 159, 160,
189, 220Baird 162 271, 273
Barcom 373Basic Line 163
BEKO 170, 226Benjamin 468
BEST 453 498010, 017, 018, 020, 272, 274, 275, 568 569 (VHS)
Blaupunkt 054, 231, 232, 233, 312, 369234, 236, 241
BPL 026, 160, 162, 163Brionvega 104, 155, 164, 165, 276, 283
200, 201, 257Bruns 158BSR 016, 019, 021, 253
Bush (UK) 022 281 402Cabletime 246, 247, 251 524, 525,
526 (CTV)Cambridge 375CANAL + 804
ANEXO / ANEX
MARCA / BRAND TV - TXT VCR SAT - DSS CABLE HI-FI CD LD - DVD - VCD AUX
Caravell 622
Century 145, 146, 155CGE 019, 023, 024, 145, 270, 277
151, 169, 170,CGM 093 291
Chaparral 216 216, 374, 410Clarivox 001, 166, 167CONIC 673Contec 033, 253Crosley 024, 025, 145, 155, 231
CTC Clatronic 096Daewoo 168, 209 660Dansai 281DCS 642
Decca(UK) 002, 004, 026, 028, 278031, 258
Denca 665Denon 547 564 (TUNE)
566 (DECK)DNT 409, 428, 430, 487Drake 376, 445, 446,
447, 495Dual 255, 258 273, 279
Dual-Tec 004, 011, 019, 029Dumont 155Dynasat 491, 492Easten 507, 508
509, 510377, 378, 379, 386,409, 411, 412, 457,
Echostar 458, 460, 461, 462,486, 800, 821,
827, 862EH. Galaxy 514
EISAT 822Elbe 001, 171 313
Electrosat 870Elite 108
Elman 019, 029Emerson 146, 155 286
EMME ESSE 463, 464, 465Europhon 000, 004, 019,
029, 30, 146Eurosky 421
Euro Space 850Eurostar 465, 872Fenner 033, 193, 240
Fidelity (UK) 003, 034, 229Filmnet 202, 248
007, 008, 009, 013, 278 414, 415Finlux 025, 026, 029, 035,
094, 161, 169, 221Fisher 025, 036, 155, 280, 314, 315, 316 529 546
167, 170, 255Force 836
Formenti-Phoenix 003, 008, 025,037, 038, 159
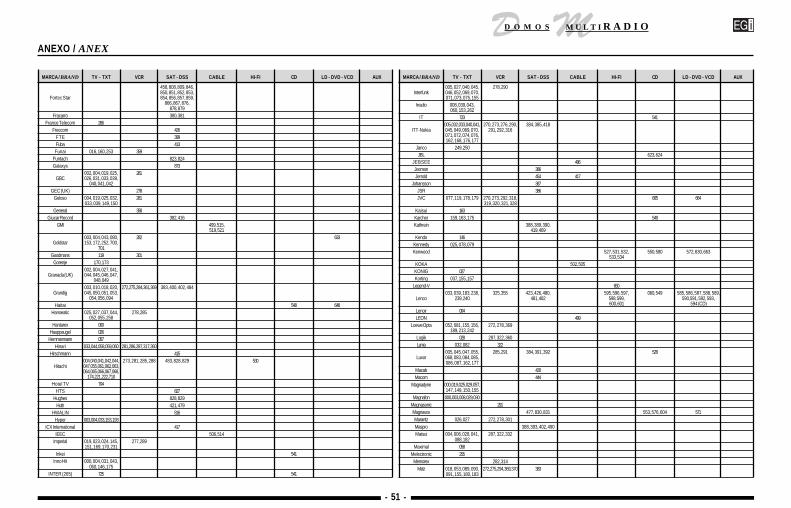
- 51 -
D MD O M O S M U L T I R A D I O
hk
MARCA / BRAND TV - TXT VCR SAT - DSS CABLE HI-FI CD LD - DVD - VCD AUX
458, 808, 809, 846,850, 851, 852, 853,
Fortec Star 854, 856, 857, 859,866, 867, 876,
878, 879Fracarro 380, 381
France Telecom 266Freecom 426
FTE 399Fuba 413Funai 016, 160, 253 359
Funtach 823, 824Galaxys 873
002, 004, 019, 025, 281GBC 026, 031, 033, 039,
040, 041, 042GEC (UK) 278
Geloso 004, 019, 025, 032, 281033, 039, 149, 150
General 358Giucar Record 382, 416
GMI 499, 515,519, 521
003, 004, 043, 080, 282 633Goldstar 153, 172, 252, 700,
701Goodmans 119 301
Gorenje 170, 173002, 004, 027, 041,
Granada (UK) 044, 045, 046, 047,048, 049
003, 010, 018, 020, 272, 275, 284, 361, 369 383, 400, 402, 484Grundig 045, 050, 051, 053,
054, 056, 094Haitai 548 648
Hanseatic 025, 027, 037, 044, 278, 285052, 055, 258
Hantarex 000Hauppaugel 026
Hemmermann 057Hinari 033, 044, 058, 059, 060 281, 286, 287, 317, 360
Hirschmann 415004, 040, 041, 042, 044, 273, 281, 285, 288 483, 828, 829 530
Hitachi 047, 055, 061, 062, 063,064, 065, 066, 067, 068,
174, 221, 222, 710Hotel TV 704
HTS 827Hughes 828, 829
Huth 421, 479HWALIN 816
Hyper 003, 004, 033, 153, 193ICX International 417
IEEC 506, 514Imperial 019, 023, 024, 145, 277, 289
151, 169, 170, 231Inkei 541
Inno Hit 000, 004, 031, 043,060, 146, 175
INTER (265) 725 541
ANEXO / ANEX
MARCA / BRAND TV - TXT VCR SAT - DSS CABLE HI-FI CD LD - DVD - VCD AUX
005, 027, 040, 045, 278, 290Interfunk 046, 052, 069, 070,
071, 073, 075, 155Irradio 008, 039, 043,
060, 153, 262IT 723 541
005, 032, 033, 040, 041, 270, 273, 276, 290, 384, 385, 418ITT-Nokia 045, 049, 069, 070, 291, 292, 316
071, 072, 074, 076,162, 168, 176, 177
Janco 249, 250JBL 623, 624
JEBSEE 496Jeemon 386Jerrold 454 417
Johansson 387JSR 386JVC 077, 119, 178, 179 270, 273, 292, 318, 605 664
319, 320, 321, 328Kaisui 163Karcher 159, 163, 175 549Kathrein 388, 389, 390,
419, 469Kendo 146
Kennedy 025, 078, 079Kenwood 527, 531, 532, 550, 580 572, 630, 663
533, 534KOKA 502, 505KONIG 027Korting 037, 155, 157
Legend-V 650033, 039, 183, 238, 325, 355 423, 426, 480, 595, 596, 597, 060, 549 585, 586, 587, 588, 589,
Lenco 239, 240 481, 482 598, 599, 590,591, 592, 593,600, 601 594 (CD)
Lenoir 004LEON 499
Loewe Opta 052, 081, 155, 156, 272, 278, 369189, 213, 242
Logik 028 287, 322, 360Luma 032, 082 322
005, 045, 047, 055, 285, 291 384, 391, 392 528Luxor 068, 083, 084, 085,
086, 087, 162, 177Macab 420Macom 444
Magnadyne 000, 019, 025, 029, 057,147, 149, 150, 155
Magnafon 000, 003, 008, 029, 030Magnasonic 291Magnavox 477, 830, 831 553, 576, 604 571Marantz 026, 027 272, 278, 301Maspro 388, 393, 402, 490Matsui 004, 006, 028, 041, 287, 322, 332
088, 182Maximal 058
Melectronic 255Memorex 282, 314
Metz 018, 053, 089, 090, 272, 275, 294, 369, 370 383091, 155, 180, 183

- 52 -
D MD O M O S M U L T I R A D I O
fg
MARCA / BRAND TV - TXT VCR SAT - DSS CABLE HI-FI CD LD - DVD - VCD AUX
Phonola 175 278, 335Pilot (1621Y) 753 (Video2)Pilot (1624Y) 729 (PIP)
Pilot (P1528Y) 752Pilot (P1707Y) 721Pilot (P3033) 727Pilot (P3050) 754Pilot (P4005) 726Pilot (P567) 728Pilot (P716) 724
Pioneer 000, 027, 067, 243 278, 320, 334, 336, 474 545 554, 555, 610 571, 658363, 364, 365
Polestar 214Prandoni-Prince 008, 032, 146
Praxis 217Premier 802
Primestat 454Prosat 001 405, 451, 479Proton 553PSR 858PYE 320
Quartz 314004, 005, 007, 008, 009,010, 013, 026, 027, 028,
Quelle 045, 050, 051, 052, 069,094, 153, 221, 231, 232,
234, 235, 236, 253Radiola 242
Radiotone 409, 428, 430, 487 549Radix 487
Rank (UK) 022RBM (UK) 022, 094
RCA 204, 210, 211 349 450, 818, 835 602, 661, 667RC-AK 456
Rediffusion (UK) 005, 041, 116 822REX 011, 021, 032, 078, 273, 292, 319
079, 118RM (RM2200) 860
Roadstar 039ROTEL 553, 582, 583 584 (TAPE)
RTG. (SpaceNet) 846SABA 000, 065, 067, 075, 085, 270, 273, 279, 292,
098, 099, 100, 103, 117, 295, 318, 319, 321,155, 185, 186, 222, 224 326, 337, 338
SAE 553Saisho 004, 006, 028, 088, 286, 287, 322, 332, 360
182, 244Sakura 397, 398Salora 005, 047, 048, 055, 066, 283, 285, 314 391, 418
068, 069, 076, 082, 086,097, 162, 177, 195, 249,
250, 267, 268Sambers 000, 004, 008, 029,
030, 043Samsung 026, 033, 043, 159, 289 459, 475, 476, 637, 666
160, 170, 175, 212, 801, 877215, 702, 70
Sansui 320013, 031, 044, 074, 119, 291, 314, 316, 339 539 604, 606
Sanyo 120, 121, 122, 123, 162,167, 170
MARCA / BRAND TV - TXT VCR SAT - DSS CABLE HI-FI CD LD - DVD - VCD AUX
Micromega 675Microsat 874
MINA 494Minerva 010, 018, 045, 051, 053 272, 275, 369 383, 400, 484Mission 553
Mitsubishi 044, 052, 092, 119, 154, 278, 281, 293, 320, 489 662155, 181, 182, 707 362, 751
Mivar 000, 003, 093, 094,095, 245, 259
MME 217Morgans 421
Multisystem 159Multitech 096, 170, 172 281, 325
Murphy (UK) 041NAD 363NEC 184 273, 313, 320 422, 478, 493, 822 551
Neckermann 004, 026, 044, 055, 270, 272, 273, 278, 421082, 097, 170 285, 286, 369
N.E.I. 166Neosat 845Network 394Nobliko 003, 008, 029, 051, 146 272, 369NOKIA 720 720, 807
065, 067, 075, 098, 099, 270, 273, 279, 292, 295, 535, 549Nordmende 100, 101, 102, 103, 104, 296, 297, 318, 319, 321,
134, 185, 186, 222 323, 324, 326, 327, 328,329, 330
OAK 500Obritech 426
Oceanic (F) 005, 040, 105, 106, 107Onceas 004Onkyo 536, 537 613, 614
615, 616Orion 006, 016, 028, 057, 286, 322, 331, 332,
088, 108, 109, 187, 333, 360188, 189, 253
Osaki 282Otto Versand 025, 027, 044, 052, 055 278, 285
Pace 394, 395, 400, 402,485, 814, 815
Pael 003, 008Palcom 396
Palladium 197 271, 356 421Palsat 423
Panasat 819, 863Panasonic 001, 003, 019, 037, 040, 274, 290, 312, 354 473, 832 538 573, 574, 629, 639
106, 110, 111, 112, 114,190, 212, 241
Pansat 455Paragon 806Penney 313Pentax 288Philco 019, 023, 024, 025, 151,
155, 169, 170, 231Philex 229
003, 026, 027, 046, 278, 302, 334, 402, 424, 425, 477, 552, 553 559, 675 560 (EQ), 561 (PIP),Philips 073, 113, 115, 155, 335, 336, 369 803, 830, 831, 841 579, 604 562 (TAPE),
191, 192, 193, 194, 565 (TUNE)223, 266, 230, 242
ANEXO / ANEX

- 53 -
D MD O M O S M U L T I R A D I O
hk
ANEXO / ANEX
MARCA / BRAND TV - TXT VCR SAT - DSS CABLE HI-FI CD LD - DVD - VCD AUX
SAT 100 372, 488
Sateco 426Sat. Receiver 514
Schneider 004, 011, 015, 019, 025, 278, 281, 289036, 038, 255, 258, 262
Scientific Atlanta 452Sears 315SEG 096 281, 289
Seleco 011, 058, 078 309Senta 277SET 825, 837, 838, 839Sharp 044, 054, 119, 124, 301, 302, 341 531 550, 566 628
196, 198, 225, 227Sherwood 540, 541, 577, 578Shinton 356SHOV 033Siarem 000, 025, 029, 155Sicatel 001
Siemens 010, 231, 232, 233, 272, 275, 291, 369 383234, 236
Siesta 254Signal 456, 850, 855Silver 160Singer 025, 029, 147, 149, 155
Sintrack 427006, 016, 025, 026, 029 278, 287
Sinudyne 057, 109, 125, 155, 192,197, 253
Sky Digital 880, 881Skygiant 511, 512
Skymaster 479028, 119, 126, 127, 298, 299, 340, 342, 472, 834 617 556, 557, 575, 631, 657 563 (TAPE)
Sony 128, 129, 130, 182, 343, 344, 367, 750 575, 607 575 (CDV)199, 228, 260, 705 618 (TUNE)
Star 459, 470, 802, 846,868, 871, 875
Stern 078Strong 399, 423, 426, 480,
492, 864, 865, 868STS 393STV 413
Sun Moon Star 813Super Max 846, 848, 849, 850
Supex 858, 862, 869Sylvania 553, 604TADA 448, 523Tadiran 817Taicom 502
Tai Wah. 218, 219Tandberg 180, 253, 266 322Tantec 396Tatung 002, 004, 026, 028, 278 659
031, 131Tay Shoen 506, 517
Teac 608, 611Technics 542 558, 609Technisat 409, 428, 429,
430, 431, 487
MARCA / BRAND TV - TXT VCR SAT - DSS CABLE HI-FI CD LD - DVD - VCD AUX
Technosat 263, 467, 802, 869Technovision 263
Tedelex 466Teknika 471Tele +1 248Teleavia 186
Telefunken 067, 075, 098, 132, 270, 273, 279, 292,133, 134, 135, 140, 318, 319, 321, 323,185, 186, 231, 235 330, 345, 346, 347
Telemax 432Telemeister 359 398, 409, 428,
430, 469, 487Teleservice 203, 246
Tensai 013, 016, 033, 037,039, 178
065, 067, 075, 078, 270, 273, 279, 292,Thomson 098, 100, 103, 185, 318, 323, 324, 328
186, 222, 722001, 135, 136, 137, 270, 273, 300, 303, 304, 394, 395, 400,
Thorn-Ferguson 140, 144, 148, 152, 305, 306, 308, 319, 401, 402, 433, 485160, 186, 229, 256 329, 330, 348, 368
TMK 286Toshiba 022, 044, 094, 119, 273, 292, 307 442, 444, 833 522 571, 640
138, 139, 141, 142TPS 805Trans 497, 518, 520Uher 011, 012, 036, 037, 273, 289
038, 078, 255Ultravox 003, 025, 082, 276
096, 146, 155Unbranded 481
Uniden 403, 404, 406,443, 830, 831
United Satellite 440Universum 094, 160, 221
Univox 001US Electronics 417
Vector 313 430, 487Vegavox 169Victor 318, 328, 366 605Video 313
Videocon 033, 138, 141, 715Viewstar 477Vortec 459, 801, 855
Vortic Star 801Voxson 032, 155Vtech 434
Watson 037Watt Radio 001, 003, 025,
029, 030, 057Wega Color 119, 143
White Westinghouse 003, 037, 159 276, 282Winer 080, 387, 449, 844 501WISI 409, 420, 435, 436,
437, 438, 439WISO 503, 504Xenon 322
Yamaha 543, 544 612Yoko 004, 159

- 54 -
D MD O M O S M U L T I R A D I O
fg
ANEXO / ANEX
MARCA / BRAND TV - TXT VCR SAT - DSS CABLE HI-FI CD LD - DVD - VCD AUX
SAT 100 372, 488
Zanussi 078Zehnder 390Zenith 203, 237 441, 444, 445, 570
446, 447Others 206, 207, 208, 264, 265 350, 351, 352, 353 820, 861 674 (627, 643) 625 (A-BSwitch)
(BEIJING) 706, 711(BBK) 654
(Chang Hong) 141, 175, 711, 649717, 718, 719
(TCL) 632(Shinco) 647(MKT) 651
(KONKA) 706, 712, 714(SMC) 636
(Xiaxing) 652(IDALL) 635, 653(Yinhe) 656
(PANDA) 706 645

- 55 -
D MD O M O S M U L T I R A D I O
hk
Reservada para nuevos productos de próxima apariciónReserved for new and forthcoming products

- 56 -
D MD O M O S M U L T I R A D I O
fg
CONECTOR PARA AURICULARES / HEADPHONES SOCKET
Para la escucha individual, introducir unos auriculares estéreo en este conector. Los Altavoces de la habitación se desconectaránautomáticamente. Conector apto para cualquier Auricular ESTÉREO con clavija de 3.5 mm. No use nunca auriculares monofónicos(para un solo oído).
For individual listening, plug the stereo headphones in this socket. The loudspeakers of this room will beswitched off automatically. Any stereo headphone with a 3.5 mm plug, can be connected. Never use mono
headphones.
ENTRADA PARA WALKMAN® Y PC / AUX INPUT
En la habitación que desee, Vd. podrá conectar al Mando cualquier aparato musical (walkman®, CD, cassette, mini-radios, PC, etc.).El sonido de su fuente musical se amplificará y se escuchará sólo en los Altavoces de esa habitación, con la potencia de sonidoque desee. En la figura le indicamos como conectarlo; puede adquirir el cable en cualquier tienda de electrónica, sonido o grandesalmacenes (muestre este dibujo a la hora de adquirirlo).El volumen del sonido se regula en la propia fuente musical. Recuerde poner en marcha el Mando con el pulsador [ 1 ].NOTA: El resto de las habitaciones continuará con su funcionamiento normal.
Any external audio source can be connected to the Control unit (walkman®, CD, tape recorder, PC, etc.).The sound from your audio source will be amplified and will be played only trough the loudspeakers of that room, atthe selected sound level. The drawing shows how to connect it; you can buy the cable in any electronics or HI-FI shopor in a department store (just show this drawing when you buy the cable).The volume level has to be set from the audio source. Remember to turn on the Control unit with the button [ 1 ].NOTE: The other rooms will continue working normally.
Estos conectores sólo están disponibles en algunos modelos de Mando.These sockets are only available on some models of Control units.
DETALLE DE FUENTE MUSICAL Y AURICULARESDETAIL OF HEADPHONES & AUX SOURCE CONNECTION
0174_B
STEREO
Fuente musicalAudio source
Conector estéreo / Stereo plugØ 3,5 mm.

- 57 -
D MD O M O S M U L T I R A D I O
hk
ADAPTACION DE FUENTES MUSICALES A LA CENTRAL
Las Centrales admiten como Fuente Musical casi cualquier tipo de aparato del mercado, por ejemplo: radio, cassettes, CD, equipos musicales HI-FI, minicadenas, TV, hilo musical, sonido vía satélite, etc. Parael correcto funcionamiento del conjunto deberá dar los siguientes pasos:
1. Pida a su Instalador que le conecte a la Central el aparato musical que Vd. desee.
2. Si la Fuente Musical ha sido conectada a la Central tomando la señal de la salida de altavoces o de la toma de auriculares (suele ser así en radio-cassettes, minicadenas, equipos compactos, walkman®,etc.) será preciso regular el volumen de la fuente musical de forma adecuada para que no distorsione el sonido por exceso de volumen. Dé los siguientes pasos:A - Regule el volumen de la fuente musical al mínimo.B - Si la fuente musical es una radio sintonice una emisora de FM o si es un cassette, CD, etc. pulse PLAY para iniciar la reproducción de música.C - Suba gradualmente el volumen de la fuente musical hasta que el piloto verde de modulación de la Central parpadee apreciablemente siguiendo la música. Este es el nivel de volumen suficiente para
la instalación; con un nivel más alto la Central activará su limitador automático de señal y evitará que la Instalación pueda llegar a distorsionar el sonido.Sin embargo puede ocurrir que si ajusta el volumen de su fuente musical a un nivel demasiado elevado, se produzca una elevada distorsión del sonido por saturación de la propia fuente musical. Estoes particularmente probable en walkman® o pequeños radio-cassettes alimentados sólo por 2 baterías (3 V).RECUERDE: Si hay distorsión del sonido en su Instalación probablemente se deba a un exceso de volumen en su fuente musical.
3. En las Fuentes Musicales conectadas a la Central utilizando salidas de señal de audio directas (aquellas que no son afectadas por un regulador de volumen) como CD, sintonizadores de radio, equiposde sonido HI-FI, etc., no es precisa regulación alguna. Estas salidas de audio directas proporcionan los mejores resultados y se indican normalmente como LINE OUT, REC OUT, TAPE o AUDIO.
ADAPTING MUSICAL SOURCES TO THE CENTRAL UNIT
The Central units accept as musical source almost any kind of device in the market, for instance: radios, cassette players, CD's, HI-FI musical sets, sound mini-systems, TV sets,Backgroud sound systems, satellite sound, etc. For a correct operation of the set, you should go through the following steps:
1. Ask your installer to connect the musical device that you want to the Central unit.
2. If the musical source has been connected to the Central unit taking the signal from the loudspeakers output or from the headphones socket (it is usually so in radio-cassettesets, sound mini-systems, compact HI-FI systems, walkman®, etc.) you must set the volume at the musical source in a proper order to prevent sound distortion caused by aexcessive volume. Go through the following steps:
A - Set the volume of the musical source to the minimum level.
B - If the musical source is a radio set, tune a FM station or if it is a cassette or CD set and so on, press PLAY to start the music playing.
C - Gradually rise the volume of the musical source until the green modulation lamp in the Central unit flashes noticeably following the music. This is enough volume level for theinstallation; with a louder level the Central unit will activate its automatic signal limiter that will prevent the installation from reaching the point of distorting the sound.However, it can happen that if you set the volume of your musical source to a very loud level, the saturation of the musical source would cause a high sound distortion. Thisis specially likely in walkman® or small radio-cassette sets powered only with two batteries (3 V).
REMEMBER: If there is distortion in your installation it is probably caused by an excess of volume in your musical source.
3. In the musical sources connected to the Central unit using direct audio signal outputs (those that are not affected by a volume regulator) like CD's, radio tuners, HI-FI soundsystems, etc., there is no need of regulation. This direct audio outputs provide the best results and are usually called LINE OUT, REC OUT, TAPE or AUDIO.

- 58 -
D MD O M O S M U L T I R A D I O
fg
POTENCIA DEL SONIDO EN CADA HABITACIÓN / SOUND POWER IN EACH ROOM
Su Instalación de Sonido DOMOS le proporciona normalmente una potencia de 2 W de Sonido en cada habitación, aunque en función del tamaño de los altavoces dispondrá de mayor o menor nivel sonoro.NOTA: En el caso de que algunas habitaciones dispongan de Amplificador, esta potencia será mucho mayor.Los Altavoces de mayor tamaño tienen un rendimiento acústico superior para la misma potencia de audio. Si la habitación cuenta con 2 altavoces el volumen disponible también será mayor. Por lo tanto, nodebe extrañarle que una habitación con 2 altavoces en el techo disponga de un volumen mas elevado que otra con un pequeño altavoz situado al lado del Mando, por ejemplo.Si considera que precisa más potencia de sonido en algunas habitaciones sólo tiene que indicárselo a su Instalador, ya que, en la mayoría de los casos, la ampliación es posible y fácil.Your DOMOS Sound Installation usually gives you a sound power of 2 W in each room, although depending on the size of the loudspeakers you will have a higher or lower sound level.
NOTE: In the case of rooms that have an amplifier, this power will be much larger.The loudspeakers of larger sizes have a higher acoustic performance for the same audio power. If the room has two loudspeakers, the available volume will also be greater.Therefore, you should not find strange that a room with two loudspeakers in the ceiling has a louder volume than another room with a small loudspeaker placed beside theControl unit, for instance.If you think that you need more sound power in some of the rooms, you only have to point it out to your installer, because in most cases, the upgrade will be possible and easy.
CALIDAD DEL SONIDO EN CADA HABITACION / SOUND QUALITY IN EACH ROOM
Dado que los módulos electrónicos de su Instalación son todos de Alta Fidelidad, los elementos que definen la calidad acústica del sonido son los altavoces y la forma en que se han instalado.Aquellos altavoces que cuenten con una buena cámara de aire en su parte posterior proporcionarán una mejor reproducción de notas graves (bajos). Será el caso de los empotrados en techos de escayola o debovedilla, en armarios empotrados, en muros con cámara de aislamiento térmico, etc. y sobre todo aquellos que hayan sido instalados encima de las puertas de las habitaciones para aprovechar, como cámaraacústica, el hueco del techo de escayola presente habitualmente en los pasillos.
pone a su disposición 3 calidades de Altavoces en cada formato (Standard, Banda Ancha e HI-FI), para que Vd. pueda elegir la calidad de sonido que desee en cada habitación. El cambio de altavoceses sencillísimo y su Instalador puede hacerlo en pocos minutos.Así mismo, suele ser posible convertir el sonido de una habitación Mono (1 altavoz) en Estéreo (2 altavoces); la mejora de la calidad de sonido así obtenida es destacable y además esta operación duplica lapotencia disponible.Ponemos a su disposición unos discretos Bafles de Alta Fidelidad de 2 vías y 50 watios especialmente diseñados para empotrar y cuyo frontal pasa desapercibido en cualquier techo o muro de color blanco.As all the electronic modules of your installation are HI-FI, the elements that define the acoustic quality of the sound are the loudspeakers and the way these have been installed.
Those loudspeakers that have a good air chamber at their back will provide a better play of the deep notes (bass). This will be the case of those fitted in plaster ceilings or ceilingsmade with floor arches, in built-in cupboards, in walls provided with a thermal isolation chamber, etc. and most of all those that have been installed over the doors of the roomsto benefit of the hollow in the plaster ceiling commonly found in the corridors, using it as an acoustic chamber.
puts at your disposal three qualities of loudspeakers for each format (Standard, Wide-Band, and HI-FI), so you can choose the audio quality you want for each room. Theloudspeaker change is very easy and your Installer can do it in a few minutes.
Also, it is usually possible to convert the sound of a room from Mono (1 loudspeaker) to Stereo (2 loudspeakers); the improvement in the sound quality so obtained is remarkable.This operation also duplicates the available power.
We put at your disposal a range of HI-FI Baffles specially designed to be embedded and which front part will go unnoticed in any white ceiling or wall.

GARANTIA
garantiza sus fabricados electrónicos y electroacústicos contra cualquier defecto de fabricación que afectea su funcionamiento durante 36 meses a partir de la fecha de su producción (indicada en cada fabricado),comprometiéndose a reparar o reponer los módulos defectuosos cuyo fallo, siempre a juicio de , se deba adefecto de fabricación, sin cargos de repuestos.Esta garantía no incluye gastos de envío de módulos, ni mano de obra de sustitución en la instalación de loscitados módulos electrónicos y electroacústicos. En ningún caso la garantía cubre los desperfectos o roturas depiezas embellecedoras (rejillas, embellecedores, carátulas, marquillos...).Esta garantía se refiere únicamente al concepto de sustitución en fábrica de los módulos producidos por
, excluyéndose cualquier otra cobertura o responsabilidad sobre el resto de materiales o el conjunto de lainstalación puesta a disposición del usuario, pero que no suministra ni ejecuta.Por lo tanto no quedan cubiertas por esta garantía:
a) La instalación e interconexionado entre sus módulos.b) Las consecuencias de abuso o mal uso del producto, incluyendo pero no limitado a:
b.1.) No usar el producto para fines normales, o no seguir las instrucciones de , para el correctouso y mantenimiento del mismo.
b.2.) La instalación o utilización de los productos de forma no concordante con las normas técnicas ode seguridad vigentes.
c) Las averías producidas por la incorrecta instalación de los módulos, o con cable que no sea el adecuado.
d) Las averías generadas por intervención de persona no autorizada por .e) Las consecuencias de mezcla con equipos de otro origen, así como adaptaciones, modificaciones, ajustes
y/o tentativas de ajustes, irrespectivamente de que ello haya sido efectuado de forma técnicamentecorrecta en principio, siempre que no exista expresa autorización por .
f) Las consecuencias de accidentes, catástrofes naturales o cualquier causa ajena al control de ,incluyendo pero no limitado al rayo, agua y disturbios públicos.
En todos estos casos excluidos de la garantía, y siempre que los módulos no sean juzgados como defectuosospor parte de , su remitente deberá hacerse cargo del importe total de la reparación, y caso de producirsevisita de nuestros técnicos, su solicitante correrá con los gastos originados sin causa justificada de garantía.
ATENCION: Si Vd. observa algún problema en su instalación nuestro Servicio de Atención al cliente leatenderá de 9h. a 13h.
- 59 -
GUARANTEE
guarantees its electronic and electroacoustic products against any manufacturing defect that affects itsoperation for 36 months from the production date (indicated in every manufacture), taking the commitmentof repairing or replacing the faulty modules which failure, always to the discretion of , is caused by amanufacturing defect, without any charge for spare parts.This guarantee does not include charges for the shipping and handling of the modules, nor the labour chargesfor the replacement in the installation of the aforementioned electronic and electroacoustic modules. Theguarantee will not cover in any case the damages or breakings of the trimming pieces (lattices, trims, masks,frames...).
This guarantee refers only to the concept of replacement in factory of the modules produced by , excludingany other cover or responsibility on the rest of the materials or the whole of the installation that is put at theuser disposal, but that is not supplied nor executed by .Therefore this guarantee does not cover:
a) The fitting up and the interconnection between the modules.b) The results from the abuse or misuse of the product, including but not limited to:
b.1.) Not using the product for usual purposes, or not following the instructions from for thecorrect use and maintenance of the product.
b.2.) The installation or use of the products in a way that is not concordant with the technical orsecurity rules now in force.
c) The malfunctions caused by the wrong installation of the modules, or by an installation with inappropiatecables.
d) The malfunctions caused by the intervention of a person non-authorised by .e) The consequences of mixing with equipment from other sources, and also adaptations, modifications,
adjustments and/or adjustment attempts, irrespectively of those that have been performed in a technicallycorrect way, provided that there is not an express authorisation by .
f) The consequences of accidents, natural catastrophes or any cause beyond control, including butnot limited to lightning, water and public disturbances.
In all these cases that are excluded from the guarantee, and every time that the modules are not considered asfaulty by , the sender should take responsibility of the full amount of the repair, and in the event of a visitfrom our technicians, the requesting person will bear the expenses originated without a cause justified in theguarantee.
ATTENTION: If you notice any problem in your installation, our Customer Support Service will attendyou from 9h. to 13h (Central European Time).
PREGUNTENOS 976 40 53 53 o consulte a su instalador eléctrico habitual ASK US +34 976 40 53 56 or contact your usual electric installer

SEDE CENTRALAvda. Almozara, 7950003 ZARAGOZA - EspañaT. 976 40 53 53F. 976 40 53 54http//: www.egiaudio.come-mail: [email protected]
Fecha de la instalación / Installation date
Empresa instaladora / Installer
EXPORT DEPARTMENTAvda. Almozara, 7950003 ZARAGOZA - SpainT. +34 976 40 53 56F. +34 976 40 53 54http//: www.egiaudio.come-mail: [email protected]
0051
46
05/
2009
•
Z
-377
3/99
![> µ î ó W s ] µ o u u } Ç v](https://static.fdocuments.in/doc/165x107/624eb863cc46354fb3067cc7/gt-w-s-o-u-u-v.jpg)


![< s/E ,K>>/E'^tKZd, U ZK< Z >/&KZE/ Z >/ E^ · ì í ó ñ ì î ó ó · 2021. 2. 19. · wzk&kzd yw e^ ^ w ¨ í ó ó u ì ì ì ~ Æ o µ } ( ] } v o u p wzk&kzd](https://static.fdocuments.in/doc/165x107/6143e3726cc38f259c25d2b9/-se-ketkzd-u-zk-z-kze-z-e-.jpg)


![Ks ó ò ó ì u D } µ o Á ] Z µ ] v }](https://static.fdocuments.in/doc/165x107/6290d7573b735451ac27528e/ks-u-d-o-z-v.jpg)


![pure.uvt.nl€¦ · 3 &KZ /'E E d/KE > WZ/^KE Z^ ñ ó ] ( } u Z ô ó } µ v ] ] ] o } } ] o } u } v](https://static.fdocuments.in/doc/165x107/5f082d167e708231d420b7a4/pureuvtnl-3-kz-e-e-dke-wzke-z-u-z-v-.jpg)