Lure Making – the 7cm Powell Minnow - Fishing Monthly Group
6
92 • JANUARY 2011 Lure Making – the 7cm Powell Minnow Travers Powell MAITLAND Lure fishing is one of the most enjoyable ways to catch a fish. To know you have fooled a fish, with a brain the size of a pea, into eating a painted stick with hooks is just so… well, you know what I mean. Imagine then the unique feeling of catching a fish on a lure you have made? There really is nothing quite like it in the lure fishing scene and over the next three issues of this magazine we will be showing you how to make an exceptional fish catching lure – a 7cm minnow. This lure will catch just about anything. In the salt the list is massive with flathead, bream, tailor, salmon, perch and bass all being likely candidates. And in the fresh this lure will certainly account for golden perch, bass, silver perch, trout and redfin just to name a few. So let’s get into making our own lure to catch some fish. Continued page ? PREPARING THE LURE BLANK The first step is to select the timber. The choices are almost limitless but there are a few popular varieties most lure makers use. White beech and brown beech are the best carving timbers. Australian red cedar is also an excellent carving timber. Other common timbers, used for carving lures, include jelutong, meranti and paulownia. The right meranti, purchased from a hardware shop, is cheap, accessible and a good way to start off. You need to choose the soft, white and open-grained meranti, not the hard red or brown meranti. 12mm x 100mm meranti costs about $5 per metre and 56 lures can be produced from 1m of this timber at 12mm thickness. Either purchase timber that is the desired thickness or use a thicknesser/planer to plane the timber to the desired thickness. Vernier callipers can be used to measure the thickness of timber. The 7cm Minnow is made from 12 mm thick meranti or Australian red cedar. Use the lure template on the facing page to draw the lure shape on the timber. Be sure to mark the bib slot position. If you are using 12mm x 100mm meranti draw a line across the timber at 14cm intervals. In each 14cm section trace 4 back to back lures. It is essential to make sure the timber grain is running along the length of the lure. Use a ruler to mark where the bib slot needs to be cut. Be very sure to mark the two points that show the angle of the bib slot. Then mark a 1cm bib slot for the 7cm Minnow between the two marker points. Always cut the bib slots before you cut out the individual lure blanks. This ensures that the timber is sitting dead flat on the bandsaw bench, resulting in the bib slot being ‘square’ to the edge of the blank. Cut the lure out with the band saw. Ensure you work slowly and accurately at this stage to ensure your lure starts off on the right foot. Draw the centre line all the way around the lure. Start on the top of the lure until you find the exact centre (the top centre line is not important) by running your middle finger on the side of the lure and the pen in the middle of the lure. Draw a short line from one side of the lure, then from the other side – if you are in the middle, you will only have one line. When you have dead centre, draw the centre line on the under surface of the lure blank from both sides of the lure – this is the MOST IMPORTANT part of the lure making process. Draw the carving lines around the top and bottom of the lure. They will be half way between the centre line and the edge of the lure blank. On the sides of the lure, the carving line will be about the thickness of the tail section. 1 2 3 4 5 6 7
Transcript of Lure Making – the 7cm Powell Minnow - Fishing Monthly Group

92 • JANUARY 2011
Lure Making – the 7cm Powell MinnowTraversPowellMAITLAND
Lure fishing is one of the most enjoyable ways to
catch a fish. To know you have fooled a fish, with a brain the size of a pea, into eating a painted stick with hooks is just so… well, you know what I mean.
Imagine then the unique feeling of catching a fish on a lure you have made? There really is nothing quite like it in the lure fishing scene and over the next three issues
of this magazine we will be showing you how to make an exceptional fish catching lure – a 7cm minnow. This lure will catch just about anything. In the salt
the list is massive with flathead, bream, tailor, salmon, perch and bass all being likely candidates. And in the fresh this lure will certainly account for
golden perch, bass, silver perch, trout and redfin just to name a few. So let’s get into making our own lure to catch some fish.
Continued page ?
PREPARING THE LURE BLANK
The first step is to select the timber. The choices are almost limitless but there are a few popular varieties most lure makers use. White beech and brown beech
are the best carving timbers. Australian red cedar is also an excellent carving timber. Other common timbers, used for carving lures, include jelutong, meranti and paulownia. The right meranti, purchased from a hardware shop, is cheap, accessible and a good way to start off. You need to choose the soft, white and
open-grained meranti, not the hard red or brown meranti. 12mm x 100mm meranti costs about $5 per metre and 56 lures can be produced from 1m of this timber
at 12mm thickness. Either purchase timber that is the desired thickness or use a thicknesser/planer to plane the timber to the desired thickness. Vernier callipers can be used to measure the thickness of timber. The 7cm Minnow is made from
12 mm thick meranti or Australian red cedar.
Use the lure template on the facing page to draw the lure shape on the timber. Be sure to mark the bib slot position. If you are using 12mm x 100mm meranti draw a line across the timber at 14cm intervals. In each 14cm section trace 4 back to back lures. It
is essential to make sure the timber grain is running along the length of the lure.
Use a ruler to mark where the bib slot needs to be cut. Be very sure to mark the two points that show the angle of the bib slot. Then mark a 1cm bib slot for
the 7cm Minnow between the two marker points.
Always cut the bib slots before you cut out the individual lure blanks. This ensures that the timber is sitting dead flat on the bandsaw bench, resulting in the
bib slot being ‘square’ to the edge of the blank.
Cut the lure out with the band saw. Ensure you work slowly and accurately at this stage to ensure your lure starts off on the right foot.
Draw the centre line all the way around the lure. Start on the top of the lure until you find the exact centre (the top centre line is not important) by running your
middle finger on the side of the lure and the pen in the middle of the lure. Draw a short line from one side of the lure, then from the other side – if you are in the middle, you will only have one line. When you have dead centre, draw the centre line on the under surface of the lure blank from both sides of the lure – this is the
MOST IMPORTANT part of the lure making process.
Draw the carving lines around the top and bottom of the lure. They will be half way between the centre line and the edge of the lure blank. On the sides of
the lure, the carving line will be about the thickness of the tail section.
1
2
3
4
5
6
7
QFMJan11 74-93.indd 92 9/12/10 10:57 AM

93• JANUARY 2011
GAMEFISHING
Lure Making – the 7cm Powell Minnow
From page ?
100% SCALE LURE TEMPLATE
Use the non-retracting Stanley knife with long, heavy-duty blades to mark the centre line, at the bib slot. This allows you to locate the centre line, after the lure has been
carved and sanded, to centre the bib at gluing time.
8
Use a sharp scribe to mark the location of the nose and underbelly eyelets. Drill the eyelet holes. A 1/16” drill bit is perfect for the 0.9mm wire used in the 7cm Minnow.
You now have 2 back to back lure blanks ready for the next stage in the lure making process, the carving of the 7cm Minnow.
9
For more information visitFor more information visitwww.stacer.com.auwww.stacer.com.au
ON THE WATER, THEY DEMAND ATTENTION! STACER’S STYLISH LINES, NEW EVO ADVANCE HULL AND OUTSTANDING SAFETY
FEATURES REALLY GET HEADS TURNING. THE NEW EVO ADVANCE HULL HAS
MADE STACER’S LEGENDARY SOFT, COMFORTABLE RIDE EVEN SMOOTHER.
TURN ON TO A STACER THAT FITS YOUR LIFESTYLE AND DISCOVER WHY THEY
ARE THE HOTTEST BOATS ON THE WATER!
T a p _ a d . p d f P a g e 1 2 9 / 0 7 / 1 0 , 3 : 5 7 P M
■ BRISBANEWYNNUM MARINE - 31 Fox St Wynnum, 4179Ph 07·3396 9777Email: [email protected]
■ GLADSTONECURTIS COAST MARINE - 40 Chapple St GladstonePH 07·4972 0135 FAX 07·4972 0136
■ GOLD COAST NITRO MARINE - 34 Smith St. Southport 4215PH 07·5532 5812 FAX 07·5531 2311Email: [email protected] Web: www.nitromarine.com
■ BRISBANENORTHSIDE MARINE - 2294 Sandgate Rd Boondall 4034PH 07·3265 8000 FAX 07·3265 8099Email: [email protected]
■ BUNDABERGADRIANS MARINE CENTRE - 28 Ritchie St, Bundaberg 4670PH 07·4153 1819 FAX 07·4153 1819Email: [email protected]
■ TOWNSVILLEMOTOR MARINE - 419 Bayswater RdPH 07·4779 3263 FAX 07·4775 3144Email: [email protected] Web: www.motormarine.com.au
■ MACKAYSHANE MORRISON MARINE - 18 Evans Ave North MackayPH 07· 4951 1991 FAX 07·4944 0991
Con
tact
you
r lo
cal d
eale
r to
day
or v
isit
ww
w.s
tace
r.co
m.a
u
QFMJan11 74-93.indd 93 9/12/10 10:58 AM

66 • february 2010
Lure Making – the 7cm Powell MinnowTraversPowellMaITLaND
Now that you have the timber ready for carving, it’s time to really make this lump of wood look like a lure.
Carving lures is not that difficult, but it does require a steady hand and a patient approach until you are more
confident and comfortable with the steps. At this stage we also cut and shape the bib, a process
where the utmost of care needs to be taken to ensure the end product swims straight and true. So without
further preamble, let’s take our Stanley knives in hand and get into carving our 7cm Minnow.
Continued page 67
Carving The lure
15
6
2
3
4
Carve between the carving lines, all the way around both blanks. Use a non-retractable Stanley knife (or similar) with long, heavy duty blades. Take great
care when carving, especially of fingers and don’t carve with the grain or the timber will split off. Always cut across the grain.
Cut the tail section in, being very careful not to cut yourself. A leather nail bag provides good protection at this stage. Start the tail cut about a 1/3 up the lure length from the tail.
Lightly trim the edges around the carving lines. This will make it easier to sand the lure when the time comes.
Use 120 grit aluminium oxide sandpaper and a sanding block to sand the lure to shape. Use a lot of wrist action and sand around and around the lure to get a rounded profile. When the lure is rounded and taken the desired shape,
sand with 180 grit and 240 grit paper for a smooth finish.
File the bib to get smooth edges and a symmetrical shape. When you are happy that the bib is symmetrical, flatten the bib between two pieces of steel.
A 4cm strip of 1.2mm flat aluminium is required for the bib. First mark a line 90 degrees to the edge of the aluminium (use 1.2mm thick aluminium). Then use the bib template to draw the bib shape (a half bib template is used to ensure the bib is symmetrical and can be found on these pages). Roughly cut the aluminium about 2-3 mm away from the lines – this makes it easier to cut around the curved line.
Then use a small pair of tin snips to cut the bib shape.
Make the wire eyelets and hook hangers. For a 1/16” drill hole, use 0.9mm stainless steel or galvanised tie wire. Push the wire into the hole and bend it about
1 cm out from the lure. Remove the wire and bend the wire so the 2 pieces are parallel. Cut the long end. Hold the cut ends tightly with pliers and use a drill and cup hook to twist the wires together tightly. Alternatively, twist the wire by hand around a nail, but note this is difficult. Cut the twisted wire to the correct length.
QFMFeb11 56-73.indd 66 13/01/11 9:14 AM

67february 2010 •
GAMEFISHING
From page 66
100% scale bib template
7
Glue the lure together. Fill the eyelet holes with super strength Araldite or a similar glue and never use a 5 minute epoxy-style glue. A syringe, with a 16 gauge
vaccinating needle is suitable for a 1/16” drill hole. Alternatively, use a piece of wire to poke glue into the drill holes. Cover the twisted wire with glue and push it into the hole.
Clean up excess glue as best as possible to minimise sanding when the glue dries.
Next, glue in the bib. Use a piece of wire to coat the inside of the bib slot with glue. Cover the lower section of the bib (both sides) with glue. Align the centre line of the bib with the centre line cut on the lure. Push the bib into the slot and
sight along the lure to make sure the bib is sitting straight. Clean off excess glue and fill the edges of the bib slot, if necessary.
Place the lure in a position that allows the glue to dry and set. Sand off the excess glue when dry.
The lure is now ready for undercoating, which is what we will look at next issue.
QFMFeb11 56-73.indd 67 13/01/11 9:14 AM

56 • MARCH 2011
Lure Making – the 7cm Powell MinnowTraversPowellMAITLAND
Continued page 57
finishing The lure
2
With everything in place, it’s time to really make this look like a lure. Painting lures is one of the real arts in lure making.
Even though fish will smash a lure that has a poor paint job, anglers really do love a good paint job on lures. If you are going to sell your
lures then a great paint job is almost essential. If you are just going to use the lures for yourself and a few mates, then paint them
in the colours and patterns you want. The painting stage is the expression stage and you can run riot or stick
with a few tried and proven patterns. So let’s get into making these little sticks with hooks that look like real lures.
Tuning the lure. I always tank test the lure before sanding and painting, to avoid affecting the final paint job. After the undercoat is dry, swim the lure in a pool or bathtub to check that it is running straight and has sufficient action. If the lure is leaning to one side, bend the nose eyelet slightly in the direction of the lean
(eg. if the lure is leaning to the left, bend the nose eyelet slightly to the left). If the lure is not wobbling, or not wobbling enough,
bend the nose eyelet down toward the bib.
Undercoating the lure. The simplest method to paint the lure is to buy pressure pack enamel undercoat and paint from a department or hardware store. It’s cheap and it
dries hard. Make sure that you read the instructions, and follow them, particularly when it comes to recoating with additional coats of paint. With my lures, I use acrylic lacquers. Acrylic lacquers dry fast and can be sprayed very fine. To undercoat, I dip my lures into
thinned Primer Filler Acrylic Lacquer undercoat, then hang them up to dry for a day. The lures get 5 coats of the undercoat over a 5 day period.
1
3
Wet and dry sanding the undercoated lure. Use 600 grit wet and dry with a bucket of water or running water to gently sand the undercoat to a smooth
finish. Be careful not to sand through the undercoat. After sanding, wash the lures in clean water and hang up to dry.
Pressure pack enamel is the easiest and cheapest paint to use. Acrylic lacquer, in pressure packs, will give quicker drying times than using enamel, and can be purchased at most automotive shops. I use a small, gravity feed touch-up
gun and a compressor to spray acrylic lacquer.
4
5
When spraying the lures, make sure that you are not in a confined area where the paint fumes may be a health problem. If you are concerned about breathing the spay vapour, you should wear an appropriate respirator. For the best results with painting, don’t try to paint your lures on humid days. The acrylic lacquer will
absorb moisture from the air and cause the paint to go dull or ‘milky’, giving a very poor finish. Paint only on warm days, when the humidity is less than 60%. Apply the base-colour paint in light even coats. A second coat of acrylic lacquer can be applied within minutes of the first coat. If you are using pressure pack enamels,
make sure that you follow the instructions for recoating.
Painting vertical stripes on the lure is simple. All you need is a piece of aluminium, plastic or cardboard with some slots cut in it. Place the lure behind the slotted material and spray. Curtain material is great for patterns – the difficult bit is removing the curtain
material without smudging the paint. Scales are easily applied by wrapping tulle around the lure and then spraying the lure
QFMMar11 56-73.indd 56 10/02/11 10:03 AM
57MARCH 2011 •
GAMEFISHING
From page 56
If you want to check out some of Travers’ work log onto either www.lurelovers.com or www.lureandmore.com and search for Powell Lures.
Ed’s note: Travers Powell is an exceptional lure crafter from the northern NSW coast and his lures are in high demand from collectors and users of lures. He was trained
7
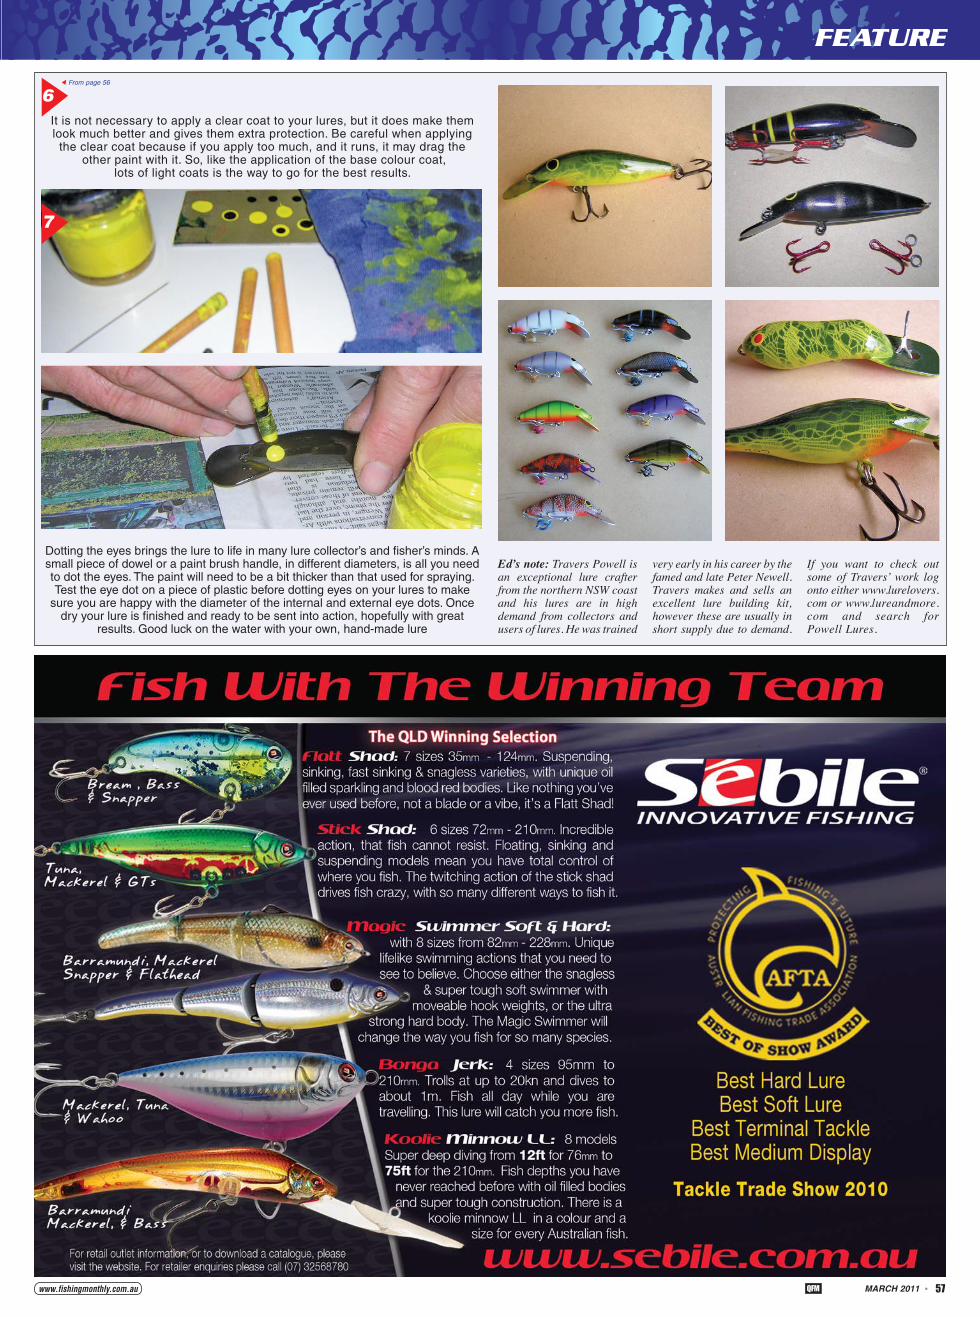
6It is not necessary to apply a clear coat to your lures, but it does make them look much better and gives them extra protection. Be careful when applying the clear coat because if you apply too much, and it runs, it may drag the
other paint with it. So, like the application of the base colour coat, lots of light coats is the way to go for the best results.
Dotting the eyes brings the lure to life in many lure collector’s and fisher’s minds. A small piece of dowel or a paint brush handle, in different diameters, is all you need to dot the eyes. The paint will need to be a bit thicker than that used for spraying. Test the eye dot on a piece of plastic before dotting eyes on your lures to make
sure you are happy with the diameter of the internal and external eye dots. Once dry your lure is finished and ready to be sent into action, hopefully with great
results. Good luck on the water with your own, hand-made lure
very early in his career by the famed and late Peter Newell. Travers makes and sells an excellent lure building kit, however these are usually in short supply due to demand.
QFMMar11 56-73.indd 57 10/02/11 10:04 AM