LPIC-1 EXAM PREP (COURSE 1)
60
LPI101 | Student Edition | LPI101S-R54S11U804-D00 Course Code Course Title LPI101 LPIC-1 Exam Prep (course 1)
description
Evaluation sample of the Guru Labs Linux training LPI101 student courseware manual. The Guru Labs course LPI101 prepares students for the LPI 101 exam of the LPIC-1 certification.
Transcript of LPIC-1 EXAM PREP (COURSE 1)

LPI101 | Student Edition | LPI101S-R54S11U804-D00
Course Code
Course Title
LPI101
LPIC-1 Exam Prep(course 1)

LPI101LPIC-1 EXAMPREP (COURSE 1)RHEL5.4 SLES11 U804
The contents of this course and all its modules and related materials, including handouts toaudience members, are copyright ©2010 Guru Labs L.C.
No part of this publication may be stored in a retrieval system, transmitted or reproduced in anyway, including, but not limited to, photocopy, photograph, magnetic, electronic or other record,without the prior written permission of Guru Labs.
This curriculum contains proprietary information which is for the exclusive use of customers of GuruLabs L.C., and is not to be shared with personnel other than those in attendance at this course.
This instructional program, including all material provided herein, is supplied without any guaranteesfrom Guru Labs L.C. Guru Labs L.C. assumes no liability for damages or legal action arising fromthe use or misuse of contents or details contained herein.
Photocopying any part of this manual without prior written consent of Guru Labs L.C. is a violationof federal law. This manual should not appear to be a photocopy. If you believe that Guru Labstraining materials are being photocopied without permission, please email [email protected] orcall 1-801-298-5227.
Guru Labs L.C. accepts no liability for any claims, demands, losses, damages, costs or expensessuffered or incurred howsoever arising from or in connection with the use of this courseware. Alltrademarks are the property of their respective owners.
Version: LPI101S-R54S11U804-D00

ii
Table of ContentsChapter 1MANAGE FILE PERMISSIONS AND OWNERSHIP 1
LPI Objectives Covered 2Filesystem Hierarchy Standard 3Navigating the Filesystem 5Displaying Directory Contents 6Determining Disk Usage 7File Ownership 8Default Group Ownership 9File and Directory Permissions 10File Creation Permissions 11Changing File Permissions 13SUID and SGID on files 14SGID and Sticky Bit on Directories 15User Private Group Scheme 16Lab Tasks 17
1. Files and Directories 182. Disk and Filesystem Usage 203. File and Directory Ownership and Permissions 22
Chapter 2CREATE, DELETE, FIND, AND DISPLAY FILES 1
LPI Objectives Covered 2Directory Manipulation 3File Manipulation 4Deleting and Creating Files 5Physical Unix File Structure 6Filesystem Links 7File Extensions and Content 8Displaying Files 9Previewing Files 10Displaying Binary Files 11Searching the Filesystem 12Alternate Search Method 13Shared Libraries 15Lab Tasks 16
1. File and Directory Manipulation Commands 172. File Examination & Search Commands 22
Chapter 3WORK WITH ARCHIVES AND COMPRESSION 1
LPI Objectives Covered 2Archives with tar 3Archives with cpio 4The gzip Compression Utility 5The bzip2 Compression Utility 6The PKZIP Archiving/Compression format 7Lab Tasks 8
1. Archiving and Compression 92. Using tar and cpio for Backups 13
Chapter 4PROCESS TEXT STREAMS USING FILTERS 1
LPI Objectives Covered 2Producing File Statistics 3Searching Inside Files 4The Streaming Editor 5Text Processing with awk 6Replacing Text Characters 7Text Sorting 8Duplicate Removal Utility 9Extracting Columns of Text 10Combining Files and Merging Text 11Lab Tasks 12
1. Text Processing 13
Chapter 5WORK ON THE COMMAND LINE 1
LPI Objectives Covered 2Role of Command Shell 3Shells 4Shells continued 5Identifying the Shell 6Changing the Shell 7sh: Prompts 8bash: Bourne Again Shell 9bash: Command Editing 10bash: Command Completion 12Shell/Environment Variables 13Key Environment Variables 14Lab Tasks 15
1. Linux Shells 16

iii
2. Shell Variables 203. Bash History 224. Aliases 25
Chapter 6USE STREAMS, PIPES AND REDIRECTS 1
LPI Objectives Covered 2File Redirection 3Piping Commands Together 4Filename Matching 6File Globbing and Wildcard Patterns 7Brace Expansion 8General Quoting Rules 9Nesting Commands 10Multiple and Multi-line Commands 11Lab Tasks 12
1. Connecting Commands 132. Wildcard File Matching 183. Shell Meta-Characters 204. Command Substitution 23
Chapter 7SEARCH TEXT FILES USING REGULAR EXPRESSIONS 1
LPI Objectives Covered 2Regular Expression Overview 3Regular Expressions 4RE Character Classes 5RE Quantifiers 6RE Parenthesis 7Lab Tasks 8
1. Pattern Matching with Regular Expressions 92. Extended Regular Expressions 113. Using Regular Expressions With sed 14
Chapter 8PERFORM BASIC FILE EDITING OPERATIONS USING VI 1
LPI Objectives Covered 2Text Editing 3vi and Vim 4Learning vi 5Basic vi 6Intermediate vi 7Lab Tasks 10
1. Text Editing with Vim 11
Chapter 9CREATE, MONITOR AND KILL PROCESSES 1
LPI Objectives Covered 2What is a Process? 3Process Creation 4Process States 5Viewing Processes 6Signals 7Tools to Send Signals 8Job Control Basics 9Jobs 10Lab Tasks 11
1. Job Control Basics 122. Process Management and Job Control Basics 17
Chapter 10USE RPM, YUM, AND DEBIAN PACKAGE MANAGEMENT 1
LPI Objectives Covered 2Managing Software 3Working With RPMs 4Querying and Verifying with rpm 5Installing Debian Packages 6Querying and Verifying with dpkg 7The alien Package Conversion Tool 8Intro to Package Management 9Using the YUM command 11Configuring YUM 13The dselect & APT Frontends to dpkg 14Aptitude 15Configuring APT 16Compiling/Installing from Source 18Installing Source RPM Packages 20Lab Tasks 21
1. Querying the RPM Database 222. Installing Software via RPM & Source and RebuildingSRPMs 25
Chapter 11WORKWITH PARTITIONS, FILESYSTEMS, AND DISK QUOTAS 1
LPI Objectives Covered 2Partition Considerations 4

iv
Partition Planning 5Partition Tables 6Filesystem Creation 7Filesystem Support 8Unix/Linux Filesystem Features 9Swap 10Filesystem Considerations 11Journaled Filesystems 12Filesystem Maintenance 13Mounting Filesystems 15Mounting Filesystems 17NFS 18SMB 19Filesystem Table 20Configuring Disk Quotas 21Setting Quotas 22Viewing and Monitoring Quotas 23Lab Tasks 24
1. Hot Adding Swap 252. Accessing NFS Shares 273. Setting User Quotas 29
Chapter 12LINUX BOOT PROCESS 1
LPI Objectives Covered 2Booting Linux on PCs 3LILO Options 5GRUB Configuration 6Kernel Boot Parameters 8/sbin/init 10System Init Styles 11Linux Runlevels 13/etc/inittab 14/etc/event.d/* 17/etc/rc.sysinit 18SUSE /etc/init.d/boot 19Ubuntu /etc/event.d/rcS 20/etc/init.d/ and rc#.d/ 21rc 22Shutdown and Reboot 23Lab Tasks 24
1. Boot Process 252. GRUB Command Line 33
3. Basic GRUB Security 37
Chapter 13DETERMINE AND CONFIGURE HARDWARE SETTINGS 1
LPI Objectives Covered 2Linux Device Files 3Detecting New Hardware Manually 6Configuring New Hardware with Kudzu 8Configuring New Hardware with hwinfo 9PC System Hardware 10PC System Hardware 12USB Devices 13USB Configuration 14Configuring Kernel Modules 15Kernel Modules 17Handling Module Dependencies 18Configuring the Kernel via /proc/ 19Kernel Hardware Info – /sys/ 21/sys/ Structure 22Lab Tasks 23
1. PC Hardware and Linux 24
Appendix ALINUX FUNDAMENTALS 1
UNIX Design Principles 2FSF and GNU 3GPL – General Public License 4The Linux Kernel 5Popular Uses of Linux 6Components of a Distribution 7Standardization 8Red Hat 9SUSE Linux Products 10Debian 11Ubuntu 12Logging In 13got root? 14Switching User Contexts 15Gathering Login Session Info 16Gathering System Info 17Help from Commands and Documentation 18Getting Help with man & info 19$MANPATH, whatis and apropos 21

v
Lab Tasks 221. Login and Discovery 232. Help with Commands 273. Switching Users With su 31

Chapter
1MANAGE FILEPERMISSIONS ANDOWNERSHIP
ContentLPI Objectives Covered . . . . . . . . . . . . . . . . . . . . . . . . . . . . . . 2Filesystem Hierarchy Standard . . . . . . . . . . . . . . . . . . . . . . . 3Navigating the Filesystem . . . . . . . . . . . . . . . . . . . . . . . . . . . 5Displaying Directory Contents . . . . . . . . . . . . . . . . . . . . . . . . 6Determining Disk Usage . . . . . . . . . . . . . . . . . . . . . . . . . . . . . 7File Ownership . . . . . . . . . . . . . . . . . . . . . . . . . . . . . . . . . . . . . 8Default Group Ownership . . . . . . . . . . . . . . . . . . . . . . . . . . . . 9File and Directory Permissions . . . . . . . . . . . . . . . . . . . . . . 10File Creation Permissions . . . . . . . . . . . . . . . . . . . . . . . . . . . 11Changing File Permissions . . . . . . . . . . . . . . . . . . . . . . . . . . 13SUID and SGID on files . . . . . . . . . . . . . . . . . . . . . . . . . . . . . 14SGID and Sticky Bit on Directories . . . . . . . . . . . . . . . . . . . 15User Private Group Scheme . . . . . . . . . . . . . . . . . . . . . . . . . 16Lab Tasks 17
1. Files and Directories . . . . . . . . . . . . . . . . . . . . . . . . . . . . . 182. Disk and Filesystem Usage . . . . . . . . . . . . . . . . . . . . . . . 203. File and Directory Ownership and Permissions . . . . . . 22

1-2
LPI Objectives Covered
104.5 Manage File Permissions and Ownership103.3 Perform Basic File Management (partial)
104.5 Manage File Permissions and Ownership (Weight 3)
Candidates should be able to control file access through the properuse of permissions and ownerships.
Key Knowledge Areas:
yManage access permissions on regular and special files as wellas directories.y Use access modes such as suid, sgid and the sticky bit to
maintain security.y Know how to change the file creation mask.y Use the group field to grant file access to group members.
The following is a partial list of the used files, terms and utilities:chmod, umask, chown, chgrp.
1-3
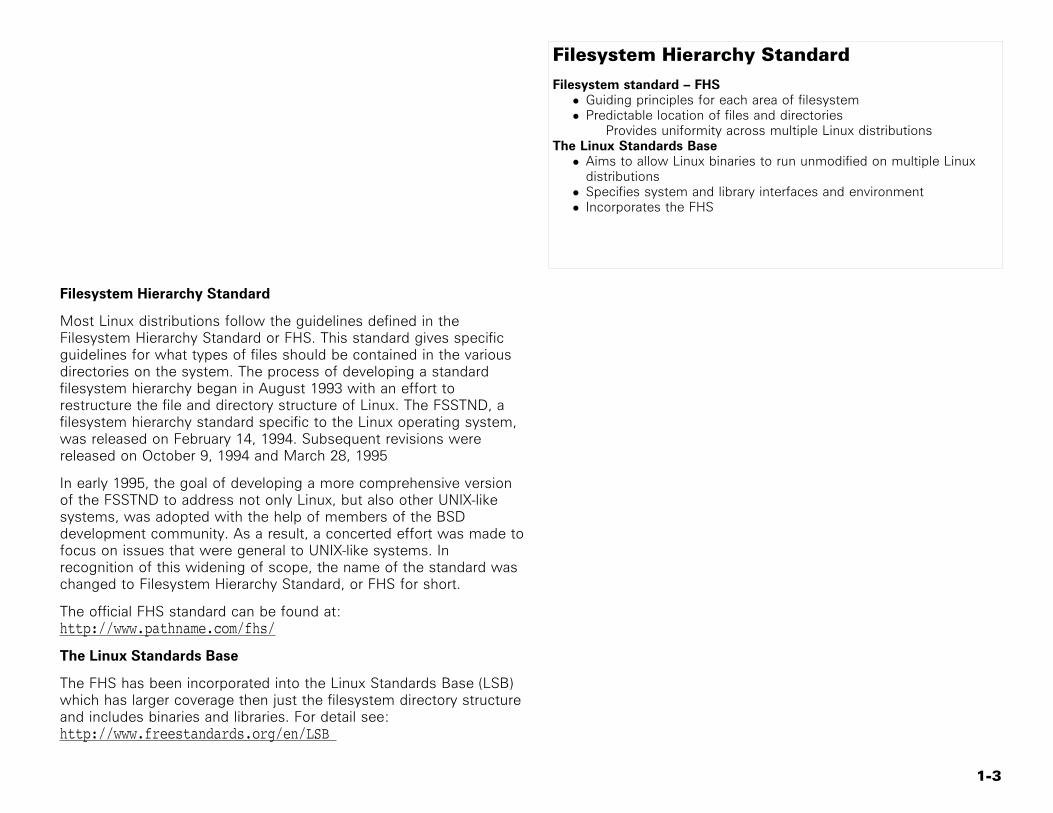
Filesystem Hierarchy Standard
Filesystem standard – FHS• Guiding principles for each area of filesystem• Predictable location of files and directories
Provides uniformity across multiple Linux distributionsThe Linux Standards Base• Aims to allow Linux binaries to run unmodified on multiple Linux
distributions• Specifies system and library interfaces and environment• Incorporates the FHS
Filesystem Hierarchy Standard
Most Linux distributions follow the guidelines defined in theFilesystem Hierarchy Standard or FHS. This standard gives specificguidelines for what types of files should be contained in the variousdirectories on the system. The process of developing a standardfilesystem hierarchy began in August 1993 with an effort torestructure the file and directory structure of Linux. The FSSTND, afilesystem hierarchy standard specific to the Linux operating system,was released on February 14, 1994. Subsequent revisions werereleased on October 9, 1994 and March 28, 1995
In early 1995, the goal of developing a more comprehensive versionof the FSSTND to address not only Linux, but also other UNIX-likesystems, was adopted with the help of members of the BSDdevelopment community. As a result, a concerted effort was made tofocus on issues that were general to UNIX-like systems. Inrecognition of this widening of scope, the name of the standard waschanged to Filesystem Hierarchy Standard, or FHS for short.
The official FHS standard can be found at:http://www.pathname.com/fhs/
The Linux Standards Base
The FHS has been incorporated into the Linux Standards Base (LSB)which has larger coverage then just the filesystem directory structureand includes binaries and libraries. For detail see:http://www.freestandards.org/en/LSB
1-4
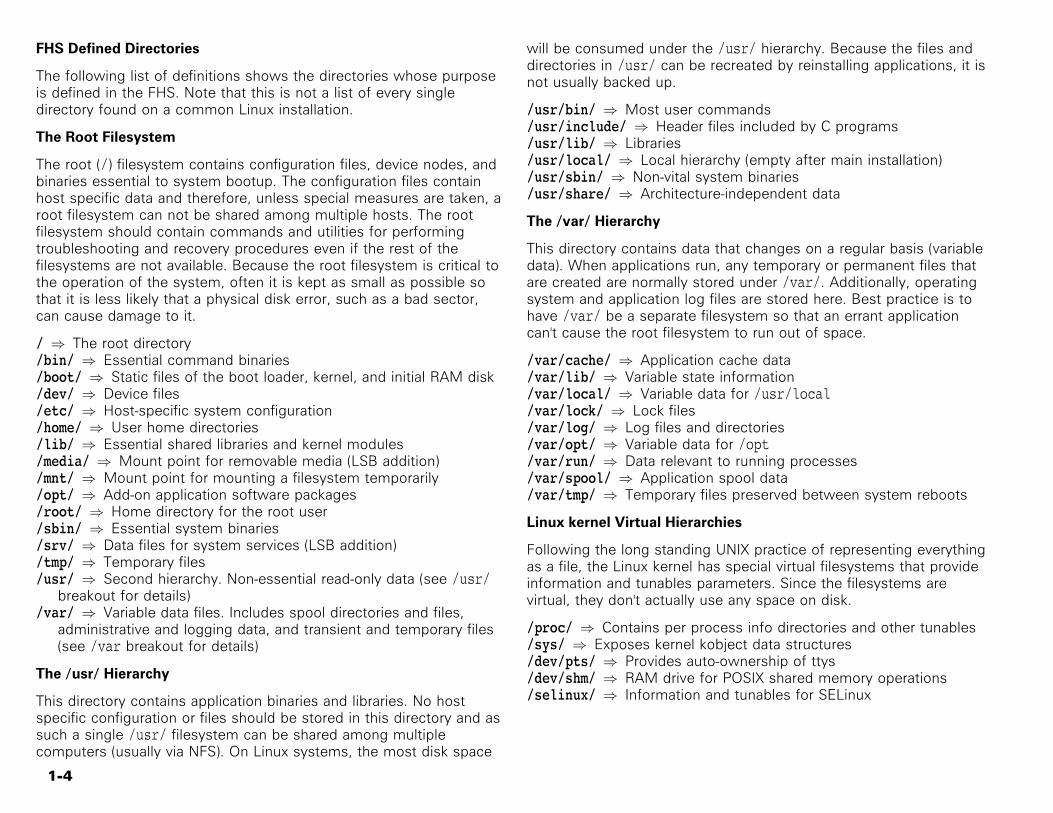
FHS Defined Directories
The following list of definitions shows the directories whose purposeis defined in the FHS. Note that this is not a list of every singledirectory found on a common Linux installation.
The Root Filesystem
The root (/) filesystem contains configuration files, device nodes, andbinaries essential to system bootup. The configuration files containhost specific data and therefore, unless special measures are taken, aroot filesystem can not be shared among multiple hosts. The rootfilesystem should contain commands and utilities for performingtroubleshooting and recovery procedures even if the rest of thefilesystems are not available. Because the root filesystem is critical tothe operation of the system, often it is kept as small as possible sothat it is less likely that a physical disk error, such as a bad sector,can cause damage to it.
/ ⇒ The root directory/bin/ ⇒ Essential command binaries/boot/ ⇒ Static files of the boot loader, kernel, and initial RAM disk/dev/ ⇒ Device files/etc/ ⇒ Host-specific system configuration/home/ ⇒ User home directories/lib/ ⇒ Essential shared libraries and kernel modules/media/ ⇒ Mount point for removable media (LSB addition)/mnt/ ⇒ Mount point for mounting a filesystem temporarily/opt/ ⇒ Add-on application software packages/root/ ⇒ Home directory for the root user/sbin/ ⇒ Essential system binaries/srv/ ⇒ Data files for system services (LSB addition)/tmp/ ⇒ Temporary files/usr/ ⇒ Second hierarchy. Non-essential read-only data (see /usr/
breakout for details)/var/ ⇒ Variable data files. Includes spool directories and files,
administrative and logging data, and transient and temporary files(see /var breakout for details)
The /usr/ Hierarchy
This directory contains application binaries and libraries. No hostspecific configuration or files should be stored in this directory and assuch a single /usr/ filesystem can be shared among multiplecomputers (usually via NFS). On Linux systems, the most disk space
will be consumed under the /usr/ hierarchy. Because the files anddirectories in /usr/ can be recreated by reinstalling applications, it isnot usually backed up.
/usr/bin/ ⇒ Most user commands/usr/include/ ⇒ Header files included by C programs/usr/lib/ ⇒ Libraries/usr/local/ ⇒ Local hierarchy (empty after main installation)/usr/sbin/ ⇒ Non-vital system binaries/usr/share/ ⇒ Architecture-independent data
The /var/ Hierarchy
This directory contains data that changes on a regular basis (variabledata). When applications run, any temporary or permanent files thatare created are normally stored under /var/. Additionally, operatingsystem and application log files are stored here. Best practice is tohave /var/ be a separate filesystem so that an errant applicationcan't cause the root filesystem to run out of space.
/var/cache/ ⇒ Application cache data/var/lib/ ⇒ Variable state information/var/local/ ⇒ Variable data for /usr/local/var/lock/ ⇒ Lock files/var/log/ ⇒ Log files and directories/var/opt/ ⇒ Variable data for /opt/var/run/ ⇒ Data relevant to running processes/var/spool/ ⇒ Application spool data/var/tmp/ ⇒ Temporary files preserved between system reboots
Linux kernel Virtual Hierarchies
Following the long standing UNIX practice of representing everythingas a file, the Linux kernel has special virtual filesystems that provideinformation and tunables parameters. Since the filesystems arevirtual, they don't actually use any space on disk.
/proc/ ⇒ Contains per process info directories and other tunables/sys/ ⇒ Exposes kernel kobject data structures/dev/pts/ ⇒ Provides auto-ownership of ttys/dev/shm/ ⇒ RAM drive for POSIX shared memory operations/selinux/ ⇒ Information and tunables for SELinux

1-5
Navigating the Filesystem
Changing and displaying directories• cd, pwd
Absolute vs. relative addressingSpecial cases• cd (without parameters)• cd ~username• cd ~• cd -• . and ..
Navigating the Filesystem
The cd command changes the current directory. Typing cd /usr atthe command line will change you to the /usr/ directory. To find outthe current directory, use the pwd command. When typed at thecommand line, the output will be an absolute path such as/home/ftp/pub. You can tell this is an absolute path because itbegins with a /. An absolute path always begins with a / anddescribes a location from the top, or root, of the filesystem. Anothertype of path is a relative path. A relative path never begins with a /,and instead describes a location from, or relative to, the currentdirectory. If your current directory is /usr/ and you type cdlocal/bin your current directory would be changed to/usr/local/bin/.
When typed alone without any parameters, the cd command takesyou to your home directory. Note that if you are logged in as root,you will be taken to /root/ which is the root user's home directory.
The . character represents the current directory. Typing cd .at thecommand line has no effect because you will stay in the samedirectory. Typing cd .. will take you to the parent of the currentdirectory.
For example, if you are in /home/foo/ and you type cd .. you willend up in the /home/ directory. The .. may be used in a relative pathand may be used multiple times in that path.
If the current location is /home/meta/cal/jan/ the following are all
acceptable examples:
cd ../foo will take you to /home/meta/cal/foo/
cd ../../foo will take you to /home/meta/foo/
cd ../../../foo will take you to /home/foo/
cd ../.. will take you to /home/meta/
cd ~username will take you to username's home directory
cd - will take you to the previous directory

1-6
Displaying Directory Contents
ls List directory contents• -a show all files (including .hidden files)• -l long listings• -d show directories not contents• -h human readable file sizes• -R recursively list sub-directories• -S sort file list by size
Displaying Directory Contents
The ls command is used to list the contents of a directory and issimilar to the dir command in MS-DOS / Windows. Here are a fewexamples of the ls command starting with the default output, andthen showing the effect of various options:
$ lsbin etc lib pub testfile
Show all files (including "hidden" dot-files):
$ ls -a. .. .hiddenfile bin etc pub testfile
Show long listing:
$ ls -ltotal 16d--x--x--x 2 root root 4096 Jun 1 22:10 bind--x--x--x 2 root root 4096 Jun 1 22:10 etcdrwxr-sr-x 2 root ftp 4096 Aug 28 01:13 pub-rw-rw-r-- 1 root root 0 Aug 31 21:48 testfile
Show long listing of all files with human readable file sizes:
$ ls -lahtotal 24kdrwxr-xr-x 6 root root 4.0k Aug 31 21:49 .drwxr-xr-x 12 root root 4.0k Aug 28 01:15 ..
-rw-rw-r-- 1 root root 0 Aug 31 21:49 .hiddenfiled--x--x--x 2 root root 4.0k Jun 1 22:10 bind--x--x--x 2 root root 4.0k Jun 1 22:10 etcdrwxr-sr-x 2 root ftp 4.0k Aug 28 01:13 pub-rw-rw-r-- 1 root root 0 Aug 31 21:48 testfile
Sorting File Listings
Output from the ls command can be sorted a wide variety of waysas shown in the following examples:
Long listing sorted by file size:
$ ls -lS. . . output omitted . . .
Long listing sorted file's change timestamp:
$ ls -lc. . . output omitted . . .
Long listing sorted by file's access (instead of the default modify)timestamp:
$ ls -lu. . . output omitted . . .

1-7
Determining Disk Usage
du Summarize disk usage for directories• -h human readable sizes• -s summarize, display total only for each argument• -S do not include size of sub-directories
df Report filesystem disk space usage• -h human readable output• -i list inode information instead of block usage• -T include filesystem type
Determining Disk Usage by File
The du command shows the estimated disk space used by files anddirectories. If you execute du without any options it will output thesizes of all files starting in your current directory and allsub-directories of your current directory.
Find out how much disk space the /home directory is using with thesummarize (-s) and human readable (-h) options:
$ du -hs /home1.7G /home
Adding the no sub-directories (-S) option shows only the disk spaceused by files in the /home directory without counting files insub-directories of /home:
$ du -hsS /home13M /home
Determining Disk Usage by Filesystem
The df command shows how much space each filesystem is usingon the disk and where it is mounted. Using the -i options showsinode usage instead of free space. Each file on the system uses aninode. Running out of free space or inodes will cause seriousproblems and you should add more disk space to the system if eitheris in danger of running out!
With the type (-T) and the human readable (-h) option df shows thefilesystem type, and counts sizes in megabytes and gigabytes:
$ df -hTFilesystem Type Size Used Avail Use% Mounted on/dev/hda9 ext2 252M 136M 102M 57% //dev/hda1 ext2 19M 5.5M 12M 31% /boot/dev/hda6 ext2 508M 156M 326M 32% /tmp/dev/hda5 ext2 2.0G 1.6G 238M 88% /usr/dev/hda7 ext2 252M 115M 124M 48% /var/dev/hdc1 ext2 2.3G 1.7G 563M 75% /home
1-8
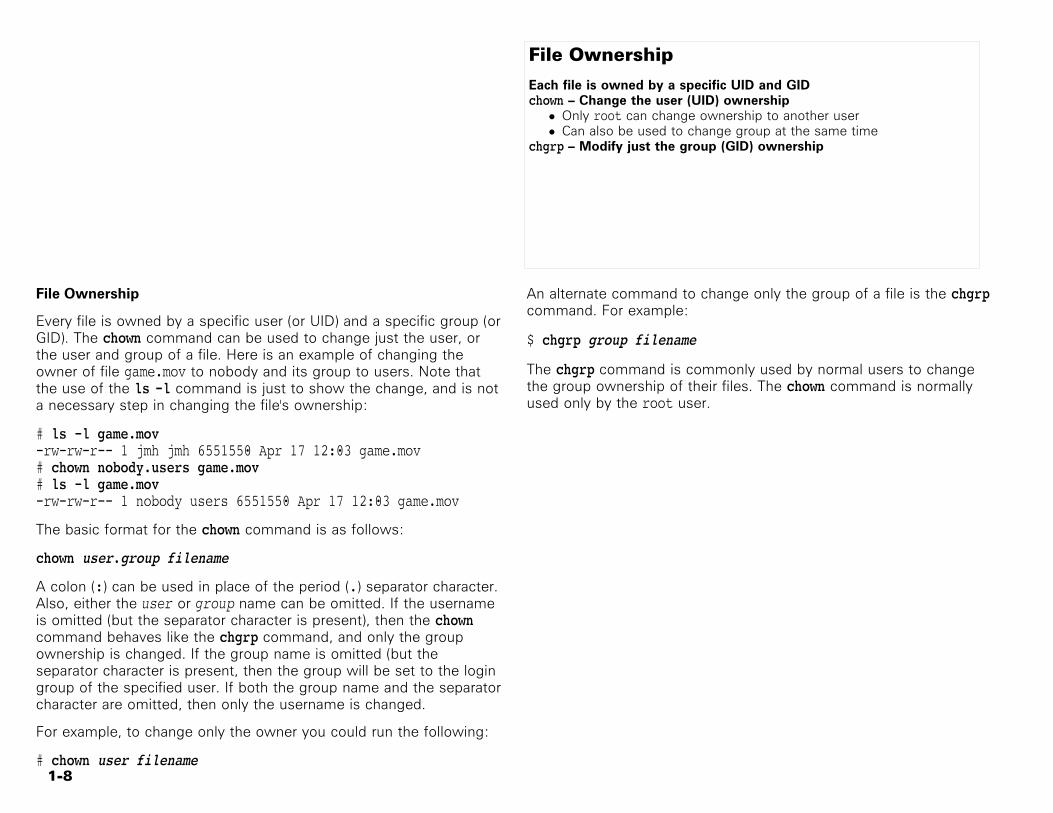
File Ownership
Each file is owned by a specific UID and GIDchown – Change the user (UID) ownership• Only root can change ownership to another user• Can also be used to change group at the same time
chgrp – Modify just the group (GID) ownership
File Ownership
Every file is owned by a specific user (or UID) and a specific group (orGID). The chown command can be used to change just the user, orthe user and group of a file. Here is an example of changing theowner of file game.mov to nobody and its group to users. Note thatthe use of the ls -l command is just to show the change, and is nota necessary step in changing the file's ownership:
# ls -l game.mov-rw-rw-r-- 1 jmh jmh 6551550 Apr 17 12:03 game.mov# chown nobody.users game.mov# ls -l game.mov-rw-rw-r-- 1 nobody users 6551550 Apr 17 12:03 game.mov
The basic format for the chown command is as follows:
chown user.group filename
A colon (:) can be used in place of the period (.) separator character.Also, either the user or group name can be omitted. If the usernameis omitted (but the separator character is present), then the chowncommand behaves like the chgrp command, and only the groupownership is changed. If the group name is omitted (but theseparator character is present, then the group will be set to the logingroup of the specified user. If both the group name and the separatorcharacter are omitted, then only the username is changed.
For example, to change only the owner you could run the following:
# chown user filename
An alternate command to change only the group of a file is the chgrpcommand. For example:
$ chgrp group filename
The chgrp command is commonly used by normal users to changethe group ownership of their files. The chown command is normallyused only by the root user.

1-9
Default Group Ownership
Newly created files will usually be given GID ownership based on thecurrent active group of the person who creates the file
newgrp newgroup - log in to a new group• newly created files will be owned by the new group• users can only change to their own groups• root user can change to any group• exit to switch back
Default Group Ownership
Each user can be a member of many groups (listed in the /etc/groupfile under several groups). Only one group will be a user's primarygroup (listed in the user's entry in /etc/password). When a usercreates a file, by default the file will be owned by the user's primarygroup. If they want the file to be owned by one of their other groups,they must use the chgrp command to modify the group membership.
A more convenient way to accomplish this is to temporarily log-in toanother group, making that group your substitute primary group. Thisway, any new files that you create will automatically be owned by thedesired group, and you will not need to change the groupmembership manually. Examine the example below and note the useof the newgrp command.
$ id -gnguru
$ touch file1$ ls -l file1-rw-rw-r-- 1 guru guru 0 Mar 3 01:12 file1$ newgrp projectx$ id -gnprojectx$ touch file2$ ls -l file2-rw-rw-r-- 1 guru projectx 0 Mar 3 01:12 file2$ exit

1-10
File and Directory Permissions
ls -l List file permissions• first character represents type of file (d,-,l,b,c,s,p)
Then permission sets for:• user -UID that owns the file (sometimes called owner)• group -GID that owns the file• everyone else (sometimes called other)
Permissions can be represented in two ways• symbolic representation (e.g. rwxr-xr-x)• numeric representation (e.g. 0755)
File and Directory Permissions
Below is sample output from ls -l; you can see from the firstcharacter of each line that foo and bar are directories (indicated bythe d) and that meta is a regular file (indicated by the -).
$ ls -l-rw-rw-r-- 1 guru projectx 0 Mar 3 01:13 filedrwxrwxr-x 3 djk users 4096 Aug 31 20:35 bardrwxrwxr-x 2 jmh users 4096 Aug 31 20:35 foo-rw-rw-r-- 1 kbk kbk 0 Sep 1 09:48 data_file
The next nine characters show the file's permissions for user, group,and others (or everyone else) as shown below, with parenthesesadded for clarity:
-(rw-)(rw-)(r--) 1 kbk kbk 0 Sep 1 09:48 data_file
Now the owner has read and write permissions (rw-), the group hasread and write permissions (rw-), and everyone else has only readpermissions (r--). This is called symbolic representation becauseletters such as r, w, and x, are used to indicate permissions.
Permissions: Numerical Representation
Permissions can also be represented in a more compact numericalform where: r = 4; w = 2; x = 1
To find the numerical representation, add the values of the setpermission within each triplet to yield a final 3 digit mode. Forexample using the previously shown data_file file, adding thenumbers in each section results in permissions of 664 as shownhere:
-(rw-)(rw-)(r--)-(42-)(42-)(4--) 6 6 4

1-11
File Creation Permissions
Default permissions for newly created filesystem objects• files: 666• directories: 777
umask• defines what permissions to withhold from the default
permissions• used to display or change your umask• usually set in the user or system shell dot files• used to provide the user private group (UPG) scheme
Controlling Initial File and Directory Permissions
When new files and directories are created in Linux, defaultpermissions are initially set. These permissions are calculated bytaking the default permissions of the files/directories created andsubtracting the umask value from it. The umask is a four digit octalnumber that represents the value of permissions that will be maskedout. In other words, permissions specified in the umask represent thepermissions that will be automatically withheld when you create anew file.
Files and directories have different default permissions when they arecreated. The default permissions applied to files is 0666. Fordirectories, the default permissions are 0777. The following exampleillustrates the process of how initial file permissions are calculated:
666 Default File permission.-002 Umask value---- 664 Initial file permission (rw-rw-r--)
Viewing and Setting the umask Value
The umask command is the utility that is provided to view or changethe current umask. The umask comes preset in configuration files andto view the current umask issue the command without any options:
$ umask0002
The umask may be changed at any time simply by typing umask
followed by the new desired value. Notice that the leading digit is notrequired if it is zero, (and is zero by default):
$ umask 022$ umask0022
[RHEL5.4] The following applies to RHEL5.4 only:
As a user in RHEL5.4 your default umask is set to 002. This meansthat all files you create will have permissions of 664, read/write foruser and group, and read for others. Since the default permissions ofa file are 666, a umask of 002 results in files with permissions of 664.
The root account has a default umask of 022 subsequently, all filescreated by the root user have default permissions of 644(rw-r--r--), allowing only read access to anyone other than root.
You might have noticed that a default umask of 002 gives away writepermission to all group members. In the User Private Group (UPG)scheme, your default group is a private group just for you, with thesame group name as your username. The result is that newly createdfiles are only writable by that user.
[SLES11] The following applies to SLES11 only:
In SLES11, the default umask for all users is set to 022 (defined bypam_umask(8)). SUSE makes all users' default group the users group.When creating files, write access will only be granted to the user whocreated the file and not to anyone in the users group.
1-12
[U804] The following applies to U804 only:
All users in U804 have a default umask of 022 (defined in/etc/profile). Users are assigned a group name (the default primarygroup) matching their user name (and typically UID number).
It is recommended to change the umask default to 002. Thispreserves write access by only the file owner, while facilitating theadministrative ease of allowing users to share files to other groupswithout requiring a change of permissions. It is important to avoid thecommon inclination of users to grant 777 permissions.

1-13
Changing File Permissions
chmod Modify file permissions• -R recursively modify permissions• supports both numeric and symbolic notation• special permissions• set UID (SUID)• set GID (SGID)• sticky
Special permissions cause different behavior for files and directories
Changing File Permissions
The chmod command is used to alter the permissions of a file. It maybe used to add or remove permissions symbolically. For example, toadd execute permissions for the owner of a file you would run:
$ chmod u+x file_name
Or, to add read and write permissions for the group that owns thefile, you would run:
$ chmod g+rw file_name
Instead of adding permissions, the symbolic syntax of chmod can alsobe used to subtract or set to some absolute value as shown in theseexamples:
$ chmod o-w file_name$ chmod u=rwx,g=rx,o= file_name
The chmod command can also explicitly set permissions using anumerical representation. For example, to set permissions on a file torwxrwxr--, you would run:
$ chmod 774 file_name
In addition to the standard read, write, and execute permissions,chmod can also set special permissions. These are the setuid bit, thesetgid bit, and the sticky bit. The following examples show settingeach of these special permissions along with brief descriptions of theeffect of those permissions (Note: the effect of these special
permissions are described more fully in the upcoming pages):
$ chmod u+s file_name
Adds the setuid bit so that, if executable, this file will execute withthe permissions of its owner.
$ chmod g+s file_name
Adds the setgid bit so that, if executable, this file will execute withthe permissions of its group. When this is set on a directory, all filescreated in the directory will have the same group as the directory.
$ chmod o+t directory_name
Adds the sticky bit so that users can only delete files from thisdirectory that they created.
$ chmod -R g+rwX directory_name
Adds read, write, and execute permissions recursively to the directoryspecified, but does not add the x-bit for non-directories.

1-14
SUID and SGID on files
The SUID bit changes the security context of an executableAn executable is normally run with the security context of the userwho invoked itAn executable with the SUID bit set runs with the security context ofthe user who owns it, regardless of the executing user
Special Permissions on Files: SUID
New Linux users often wonder why anyone would ever want to usethe SUID bit. Having a program that will run with the power of rootfor any user sounds like a dangerous proposition. As it turns out,setting the SUID bit on certain programs is not only helpful, it isrequired.
Take, for example, the passwd command. Any user on the systemmay use the passwd command to change their password. Users'passwords are stored in the file /etc/shadow. A quick check of thepermissions on this file will reveal that it is read / write only to theroot user. In order to update the entry for their password, a usermust have root level access to the file. This access is provided bysetting the SUID bit on the passwd program. The passwd program willonly allow a user to change their own password. This limitation isimposed based on the UID of the user running the program, but noton the user's security context.
Special Permissions on Files: SGID
When executable files with the SGID bit set are run, they will run withan effective group id (EGID) of the group that owns the executable(instead of the primary group of the user executing the file).
Remove All Unnecessary SUID/SGID Executables
Executables with either the SUID, or SGID bits, (or both) set can be asecurity risk. It is especially important to pay attention to SUID rootexecutables. In some cases, there are ways to reconfigure a program
(perhaps changing permissions and ownership on certain files anddirectories) such that it no longer needs the SUID bit set. If this ispossible, do it. If not, evaluate whether or not the program inquestion is needed.
SUID and SGID files can be discovered using the find command. Thefollowing finds all files owned by root which have the SUIDpermission bit set:
# find / -type f -user root -perm +4000. . . output omitted . . .
The following finds all files which have the SGID permission bit set:
# find / -type f -perm +2000. . . output omitted . . .

1-15
SGID and Sticky Bit on Directories
SGID• Files or sub-directories created within that directory inherit the
group ownership of the SGID directory• Often used to facilitate collaboration among users who need to
share filesSticky bit• Normally in a directory that is world writable, users can delete
each other's files. Setting the sticky bit overrides this behavior
Special Permissions on Directories: SGID
If the SGID permission is set on a directory, then files orsub-directories created within that directory inherit the groupownership of the SGID directory. Sub-directories created within thedirectory will also inherit the SGID special permission propagating thisbehavior further. Note that although the group ownership and specialSGID bit are inherited, all other permissions for newly createddirectories are determined in the usual fashion using the value of theumask.
Special Permissions on Directories: Sticky Bit
Based on standard Unix filesystem permissions behavior, a user thathas write access to a directory will be able to delete files in thatdirectory (even if the file's permissions do not grant them access).With the sticky bit set on a directory, this behavior is overridden andonly users who have at least write access to a file will be able todelete it.
The /tmp directory is an example of a directory with the sticky bit set.It is very important for all users to be able to write to the /tmpdirectory, but it could cause major problems if any user could deleteany other user's files.

1-16
User Private Group Scheme
UPG provides a convenient way to share files when working in agroup project directoryStill does not compromise security of files outside of the groupshared project directoryUPG scheme implemented by:
1. placing each user in their own private group2. setting the umask to 00023. setting the group ownership of the project directory to a
commonly shared GID4. setting the project directory SGID
User Private Group Scheme
Traditionally Unix systems have placed all users into the same defaultgroup. Files are created with the default group, so all users haveaccess to each other's files via common group membership. Toprotect users from each other, a default umask of 0022 is used sothat only the owner has write access. The problem with this approachis that there is no easy way to share files with a group.
Imagine you create a group named blue for working on a newproject. You could make a special directory with the SGID bit set andthe group set to blue, so that any files created within will be ownedby the group blue. Even though the files will be set to the rightgroup, your umask will set the group permission to read only. You areforced to change the permissions on all the files manually, or changeyour umask (and remember to change it back!) each time you createfiles for the group.
Enter the User Private Group (UPG) scheme. Your default group is aprivate group for you. This allows you to safely use a umask of 0002.All your files will allow read/write access for the default group, butsince you are the only member of the group this is ok.
Now when you create a file in the group directory, the one with theSGID bit and group set to blue, the files will be owned by the bluegroup and the group permissions will be read/write. Under the UPGscheme, sharing files and maintaining security is easy because youdo not have to worry about changing your umask or file permissions.
[RHEL5.4] The following applies to RHEL5.4 only:
Out of the box, RHEL5.4 implements the UPG scheme. Whencreating new user accounts, each user is placed into a privateprimary group.
[SLES11] The following applies to SLES11 only:
By default, SLES11 do not use the UPG scheme. A new users'primary group is the users group.
[U804] The following applies to U804 only:
Though U804 implements the UPG scheme, the umask remains 0022.When creating new user accounts, each user is placed into a privateprimary group.

1-17
Lab 1Estimated Time: 25 minutes
Task 1: Files and DirectoriesPage: 1-18 Time: 5 minutesRequirements: b (1 station) d (graphical environment)
Task 2: Disk and Filesystem UsagePage: 1-20 Time: 5 minutesRequirements: b (1 station) d (graphical environment)
Task 3: File and Directory Ownership and PermissionsPage: 1-22 Time: 15 minutesRequirements: b (1 station) d (graphical environment)

1-18
Objectivesy Navigate directories on the workstation using different techniques.y Display the characteristics of files and directories.
Requirementsb (1 station) d (graphical environment)
RelevanceThe Linux filesystem has a large number of files and directories. Learningnavigation shortcuts will save significant time when working on thecommand line.
Lab 1
Task 1Files and DirectoriesEstimated Time: 5 minutes
Use pwd to see what the current directory is:1)
$ cd$ pwd/home/guru
From /home/guru/, use cd to change to the root (/) directory:2)There are multiple ways to accomplish this, cd ../../would also have worked.
$ cd /
Display the contents of the root (/) directory. The contents of this directory are3)the top level directories described in the Filesystem Hierarchy Standard:
$ ls. . . output omitted . . .
Navigate to the manual directories and list some specific files:4)
$ cd /usr/share/man/$ cd man1/$ ls g*. . . output omitted . . .
Notice in Step 4 that there were only files, but no directories in5)/usr/share/man/man1/. If there had been directories also, the -d option for the lscommand might prove useful. To show all files and directories that started with

1-19
the letter g, in the /etc/ directory, change to that directory and use the lscommand:
$ cd /etc/$ ls -d g*$ cd X11/$ ls -l. . . output omitted . . .
Return to the guru user's home directory, /home/guru/, using one of these6)commands:
$ cd$ cd ~$ cd /home/guru/$ cd ../../home/guru/
List all files and directories, including hidden ones. All the files and directories7)displayed that have a . (period) in front of them are referred to as "hidden" files(and/or directories):
$ ls -a. . . output omitted . . .
Occasionally, you will encounter or need to create file and directory names that8)have spaces or special characters. Names like, file name and <file*name> aretwo good examples. When working with names like the above, put the nameswithin single quotes (' '). Run these commands to create a new empty file named*test file* and then examine the results:
$ touch '*test file*'$ ls. . . output omitted . . .

1-20
Objectivesy Use the df command to see how much hard drive space is being used
by the filesystem(s)y Use the du command to show disk usage of all files in a certain
directory.
Requirementsb (1 station) d (graphical environment)
RelevanceIn order to prevent disk full errors and manage data growth, it is importantto be able to determine how much free disk space is available and howmuch is being consumed, both on a filesystem and directory basis.
Lab 1
Task 2Disk and Filesystem UsageEstimated Time: 5 minutes
Check how much disk space is being used on the workstation filesystem(s):1)
$ df. . . output omitted . . .
By default, the Linux df command displays sizes in 1 kilobyte blocks. This is fine,2)but it's not always the easiest way to read disk space usage. Use df to show thefilesystem usage in a more readable format:
$ df -h. . . output omitted . . .$ df -H. . . output omitted . . .
What is the difference between -h and -H? (See the man page for df to find theanswer.)
Show the total disk space usage of the guru user's home directory and write the3)total here:
$ du /home/guru/. . . output omitted . . .
Notice that the total is given for each file in the /home/guru/ directory, eachsub-directory, each file in each sub-directory (and so on) and then, finally, thedirectory itself (which is the total of all the contents).

1-21
Use the du command again, this time having the output displayed in human4)readable format:
$ cd$ du -h. . . output omitted . . .$ du --si. . . output omitted . . .

1-22
Objectivesy Display, then change, the ownership of some of the files and directories
on the workstation.y Use various commands to display, change and set permissions for the
different files and directories on the workstation.
Requirementsb (1 station) d (graphical environment)
RelevanceLinux has a powerful and flexible filesystem security model. Being able tomanage file and directory permissions will enable you to control who hasaccess to files.
Lab 1
Task 3File and Directory Ownershipand PermissionsEstimated Time: 15 minutes
See who owns the files and directories in the guru user's home directory. Some, if1)not all, of the files and directories will be hidden, so make sure to show hiddenfiles and directories also:
$ cd ~The third column of the output is where the owner ofthe file or directory is listed. The fourth column containsthe group.
$ ls -al. . . output omitted . . .
Obtain a file listing for the root directory /:2)
$ ls -al /. . . output omitted . . .
What are the owner and group for the /bin/ directory?
Practice changing the user and group ownership of a file:3)
$ su -[RHEL5.4 SLES11]
Password: makeitso Õ[RHEL5.4 SLES11]
$ sudo -i[U804]
[sudo] password for guru: work Õ[U804]
The shell prompt changes.# chown guru /var/log/messages# chgrp sys /var/log/messages
Verify that the user and group ownership have changed.# ls -l /var/log/messages-rw------- 1 guru sys 38465 Feb 16 10:25 /var/log/messages[RHEL5.4]
-rw-r----- 1 guru sys 38465 Feb 16 10:25 /var/log/messages[SLES11 U804]

1-23
Change the user and group ownership back; this timewith a single command.
# chown root:root /var/log/messages[RHEL5.4 SLES11]
Verify that the user and group ownership is set to root.# chown syslog:adm /var/log/messages[U804]
Verify that the user is set to syslog and the groupownership is set to adm.
# ls -l /var/log/messages-rw------- 1 root root 38465 Feb 16 10:25 /var/log/messages[RHEL5.4]
-rw-r----- 1 root root 38465 Feb 16 10:25 /var/log/messages[SLES11]
-rw-r----- 1 syslog adm 38465 Feb 16 10:25 /var/log/messages[U804]
Create a new group called lab2 and add the guru user to it:4)
# groupadd lab2Add user guru to the new group.# usermod -G lab2 guru[RHEL5.4]
Add user guru to the new group.# usermod -G lab2,dialout,video guru[SLES11]
Add user guru to the new group.# usermod -G lab2,adm,dialout,cdrom,floppy,audio,dip,video,plugdev,a[U804]
fuse,lpadmin,admin guruLogout of the root account.# exit
logout
Use the newgrp command to change the primary group for user guru to the group5)lab2. Then create a new file called test. Make sure to be logged in as the guruuser and in the guru user's home directory:
$ newgrp lab2Create a new empty file$ touch test
$ ls -l test-rw-r--r-- 1 guru lab2 0 Feb 27 14:26 test
Notice the newly created file is owned by group lab2 by default (due to theprevious execution of the newgrp command).
Examine the permissions of the test file just created. Who has the ability to6)modify the file?
Result:
Change the permissions of the file test. Use chmod with symbolic notation to7)make the file readable, writable and executable by both the owner and the group,and give everyone else no permissions. There are different ways of doing this.Here is one:

1-24
$ chmod ug+rwx test$ chmod o= test
View the results of changing the permissions.$ ls -l test-rwxrwx--- 1 guru lab2 0 Feb 27 14:26 test
Use chmod to set the permissions on two directories and everything in them so8)that they are only readable, writable and executable by the owner:
$ su -[RHEL5.4 SLES11]
Password: makeitso Õ[RHEL5.4 SLES11]
Since sudo does not require reauthentication for 15minutes under Red Hat Enterprise Linux, SUSE LinuxEnterprise Server and Ubuntu, a user password will notbe prompted for (unless it has been more than 15minutes since last running sudo).
$ sudo -i[U804]
The -R means to operate recursively, changingpermissions on everything in any sub-directories of thedirectories specified on the command line.
# chmod -R go-rwX /usr/share/man/man2
View the newly changed permissions.# ls -ld /usr/share/man/man2/# ls -al /usr/share/man/man2/. . . output omitted . . .
As the guru user in another shell (shown here as [2]), try viewing chapter 2 of the9)intro man page:
[2]$ man 2 introFails because the current permissions do not permitread access to the guru user.
No manual entry for intro
In the shell, running as root, restore the permissions to the original values, and10)verify in another shell (shown here a [2]) that the chapter 2 intro manual isviewable:
# chmod -R go+rX /usr/share/man/man2/# exitlogout[2]$ man 2 intro. . . output omitted . . .

1-25
Use the umask command to change the default permissions that are used when11)creating a new file or directory:
Change the default permissions for user guru tor---w--w-.
$ umask 244
Create a new file.$ touch test1Examine the permissions on the new file.$ ls -l test1
-r---w--w- 1 guru lab2 0 Feb 27 11:57 test1
Reset the value of the umask to the original setting:12)
$ umask 002[RHEL5.4]
$ umask 022[SLES11]
Chapter
5WORK ON THECOMMAND LINE
ContentLPI Objectives Covered . . . . . . . . . . . . . . . . . . . . . . . . . . . . . . 2Role of Command Shell . . . . . . . . . . . . . . . . . . . . . . . . . . . . . 3Shells . . . . . . . . . . . . . . . . . . . . . . . . . . . . . . . . . . . . . . . . . . . . . 4Shells continued . . . . . . . . . . . . . . . . . . . . . . . . . . . . . . . . . . . . 5Identifying the Shell . . . . . . . . . . . . . . . . . . . . . . . . . . . . . . . . . 6Changing the Shell . . . . . . . . . . . . . . . . . . . . . . . . . . . . . . . . . . 7sh: Prompts . . . . . . . . . . . . . . . . . . . . . . . . . . . . . . . . . . . . . . . 8bash: Bourne Again Shell . . . . . . . . . . . . . . . . . . . . . . . . . . . . 9bash: Command Editing . . . . . . . . . . . . . . . . . . . . . . . . . . . . 10bash: Command Completion . . . . . . . . . . . . . . . . . . . . . . . . 12Shell/Environment Variables . . . . . . . . . . . . . . . . . . . . . . . . 13Key Environment Variables . . . . . . . . . . . . . . . . . . . . . . . . . . 14Lab Tasks 15
1. Linux Shells . . . . . . . . . . . . . . . . . . . . . . . . . . . . . . . . . . . . . 162. Shell Variables . . . . . . . . . . . . . . . . . . . . . . . . . . . . . . . . . . 203. Bash History . . . . . . . . . . . . . . . . . . . . . . . . . . . . . . . . . . . . 224. Aliases . . . . . . . . . . . . . . . . . . . . . . . . . . . . . . . . . . . . . . . . . 25

5-2
LPI Objectives Covered
103.1 Work on the Command Line
103.1 Work on the Command Line (Weight 4)
Candidates should be able to interact with shells and commandsusing the command line. The objective assumes the bash shell.
Key Knowledge Areas:
y Use single shell commands and one line command sequencesto perform basic tasks on the command line.y Use and modify the shell environment including defining,
referencing and exporting environment variables.y Use and edit command history.y Invoke commands inside and outside the defined path.
The following is a partial list of the used files, terms and utilities: .,bash, echo, env, exec, export, pwd, set, unset, man, uname, history.

5-3
Role of Command Shell
Shell provides user-interface• access to filesystem• scriptability for task automation• program launching• process control interface
Role of Command Shell
Unix systems are designed with the kernel at the center ofeverything. The kernel handles all communication with devicesattached to the system and is responsible for multitasking processes.Normal users, on the other hand, don't interact directly with thekernel. Instead, they use programs called shells to interact with thesystems. Shells provide the user with a way to navigate thefilesystme, launch and manage other programs, and often provide ascripting framework for automating tasks.
In this module, various command-line shells are discussed. These areshells which handle interaction between the user and the kernelwhen a user is operating at the command line. It is important torealize that when a user is interacting with a graphical environment(i.e GNOME, KDE, etc.) they are using a shell in this environment also(a graphical shell).

5-4
Shells
Bourne Shell (sh)C Shell (csh)Korn Shell (ksh)
Bourne Shell (sh)
The Bourne shell is the de-facto standard for shell scripting. With theexception of the C shell and its derivatives, most shells available (e.g.ksh, bash, zsh) maintain backwards compatibility to the Bourne shellbecause of this.
The first standard Unix shell was created in 1979 by Stephen Bourneof AT&T
yMost popular shell for shell scriptingy Scripting language based on Algoly Lacks command history, editing, and aliasingy Uses '$' as default prompty Part of Unix; not available with Linux
C Shell (csh)
The C shell was designed as a shell for C programmers, with ascripting language similar enough to the programming language thatprogrammers wouldn't need to learn a second language. While somehardcore C Shell users like this characteristic, most Unix users doscripting in the Bourne shell scripting language because it is simplerand less cryptic.
y Produced as part of Berkeley (BSD) Unixy Created by Bill Joy (former Sun Chief Scientist)y Scripting language loosely based on CyOffers command history, completion, and aliasingyOffers job control
y Uses "%" as default prompt
Korn Shell (ksh)
AT&T developed the Korn shell as a response to Berkeley's C Shellwhich had become popular due to its rich feature set compared tothe Bourne shell. While the command line history syntax is differentthan the C Shell, all the same functionality is there. The PublicDomain Korn Shell offers both vi and emacs editing modes; AT&TKorn shell offers only vi editing mode.
y Created by David Korn of AT&Ty Backwards compatible with Bourne shelly Adds command history, aliasing, command completion, editing
and job controly Distributed with Unix, and separately by AT&T under an
open-source licensey An enhanced rewrite — Public Domain Korn Shell (pdksh)

5-5
Shells continued
Bourne Again Shell (bash)Enhanced C Shell (tcsh)Z Shell (zsh)
Bourne Again Shell (bash)
The /bin/sh executable on most Linux systems is really a symboliclink to /bin/bash.
The original Bourne shell is part of the commercial Unix distributionsso the GNU camp wrote their own implementation of the Bourneshell from scratch and added several improvements.
y GNU drop-in replacement for Bourne shelly Backwards compatible with Bourne shellyOffers command history, aliasing, and editingyOffers job controly Default shell in most Linux distributions
Alternative, Specialized Shells
The list of Unix shells given above is by no means complete. Severalother alternative shells exist, and can be grouped into two primarycategories: open source alternative to commercial shells, andspecialized shells. Two examples of alternative shells are tcsh andzsh:
Enhanced C Shell (tcsh)
The enhanced C shell is an excellent example of an open-sourcealternative to the commercial C shell. While the designers of the tcshshell did maintain complete compatibility with the commercial C shell,they also added several new features:
y Drop-in replacement for csh
y Adds command editing, spell-checkingy Better command line completion than cshyMaintained under open source licensing
Z Shell (zsh)
The Z shell includes all the major features of each of the other shells,and includes many features of its own:
y Can be run in Korn or Bourne shell compatibility modeyOpen source / free softwarey Strives to be the most feature-rich shell availableyMost advanced command-line editing and globbing
5-6
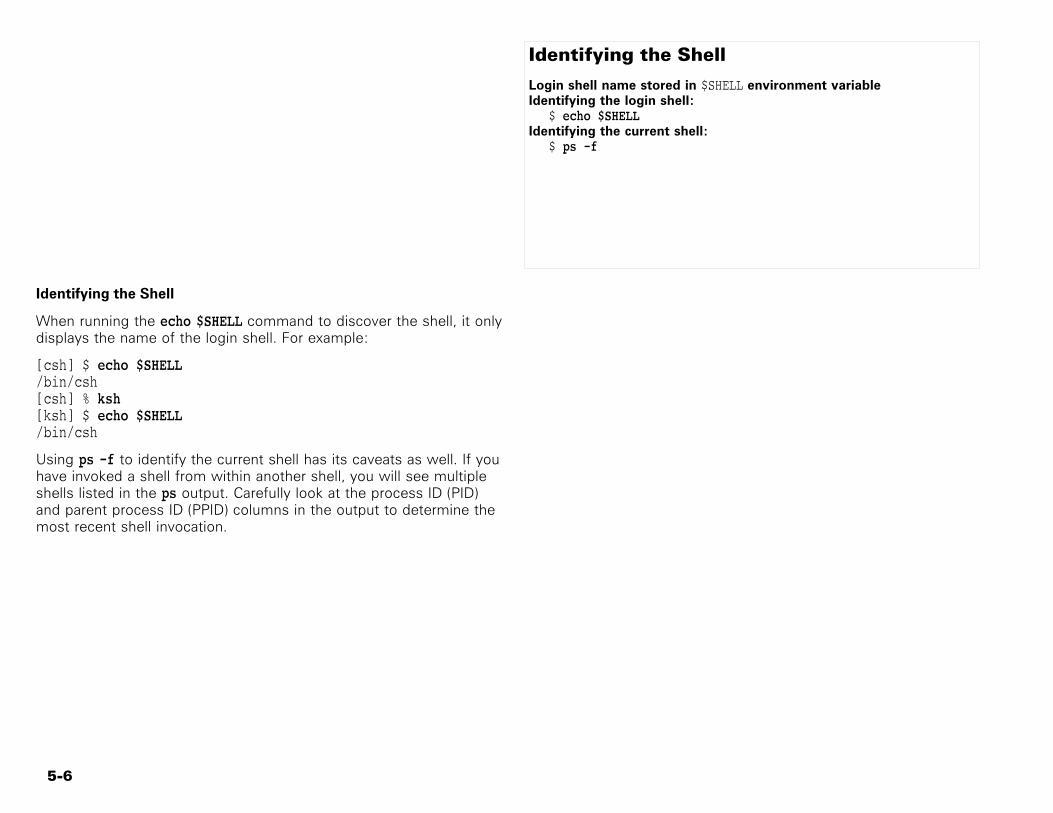
Identifying the Shell
Login shell name stored in $SHELL environment variableIdentifying the login shell:
$ echo $SHELLIdentifying the current shell:
$ ps -f
Identifying the Shell
When running the echo $SHELL command to discover the shell, it onlydisplays the name of the login shell. For example:
[csh] $ echo $SHELL/bin/csh[csh] % ksh[ksh] $ echo $SHELL/bin/csh
Using ps -f to identify the current shell has its caveats as well. If youhave invoked a shell from within another shell, you will see multipleshells listed in the ps output. Carefully look at the process ID (PID)and parent process ID (PPID) columns in the output to determine themost recent shell invocation.

5-7
Changing the Shell
Use the shell name to invoke that shell (i.e. type tcsh)Changing login shell permanently• Edit the /etc/passwd entry for that user• chsh – (change shell) available to normal users
/etc/shells contains list of allowed shells
Changing the Shell
When you run a shell from within a shell, the original shell continuesto run. It merely waits for you to complete your work with the morerecently invoked shell. For example, notice how the shells nest:
BOURNE SHELL $ kshKORN SHELL $ cshC SHELL % bashBASH $ exitC SHELL % exitKORN SHELL $ exitBOURNE SHELL $
Users can use the chsh command to modify their shell entry listed inthe /etc/passwd file. The chsh command will only allow users tochange their shell to one of the shells listed in the /etc/shells file.This process is shown in the following example:
$ echo $SHELL/bin/bash$ cat /etc/shells/bin/sh/bin/bash/sbin/nologin/bin/tcsh/bin/csh/bin/ksh$ chsh
Changing shell for guru.Password: work ÕNew shell [/bin/bash]: /bin/tcshShell changed.$ echo $SHELL/bin/bash$ grep guru /etc/passwdguru:x:500:500:Guru Account:/home/guru:/bin/tcsh

5-8
sh: Prompts
Simple. No bells or whistles like tcsh or bashPrompt is set using the PS1 variable
$ PS1="$(hostname) $ "homer $ export PS1
Prompts
The shell prompt is modified by changing the value of the PS1environment variable. Because the Bourne shell does not supportspecial characters, people will often use quoted commands to createa more dynamic prompt. For example, you may want to include thecurrent working directory as part of the prompt:
$ PS1='[`pwd`]$ '[/home/guru]$ echo $PS1[`pwd`]$[/home/guru]$ cd /tmp[/tmp]$
Pay close attention to the type of quotes used. Notice how the pwdcommand is enclosed in back-quotes, and the entire prompt string isenclosed in single 'forward' quotes to protect it from shell expansion.Some potential subtleties exist here, and a good understanding ofquoting and shell parsing is needed to avoid creating problems.Consider the following example (notice the use of the less protectivedouble quotes in place of single quotes):
$ PS1="[`pwd`]$ "[/home/guru]$ cd /tmp[/home/guru]$
Why did the prompt not change to reflect the new working directory?
The answer becomes clear if you look at the value of the PS1variable:
[/home/guru]$ echo $PS1[/home/guru]$
The double quotes used in the second example did not prevent theshell from expanding the back-quoted pwd command when the PS1variable was first set. So instead of the back-quoted command beingpresent in the prompt string, the result of originally executing thecommand is.

5-9
bash: Bourne Again Shell
Completely backwards compatible with Bourne shellAdds several enhancements – many from csh / tcsh• command-line history and completion• aliases• sophisticated prompt configuration• both Emacs and vi style command line editing• tilde (~) as an alias for home directories
bash
The Bash shell was originally created at MIT as part of the GNUproject. It is completely backwards compatible with Bourne shell. Aswith most of the shells mentioned in this chapter, there are severalversions of Bash available. Historically, most Linux distributionsshipped with a Bash 2.X version. Bash 3.X is the current version, andis now commonly found on new systems. One way to determinewhat version of the Bash shell you are using is to send the keysequence: Ó¿x, and then Ó¿v which causes Bash to displayversion information. Alternately, just run bash with the --versionoption as shown in the following example:
# bash --versionGNU bash, version 3.00.15(1)-release (i686-redhat-linux-gnu)Copyright (C) 2004 Free Software Foundation, Inc.# Ó¿x Ó¿vGNU bash, version 3.00.15(1)-release (i686-redhat-linux-gnu)

5-10
bash: Command Editing
Bash shell offers vi-mode and Emacs-mode command editing• to set vi editing mode
$ set -o vi• to set emacs editing mode (default)
$ set -o emacs
vi mode Editing Commands
When set to vi style editing mode, the Bash shell allows you to usemost of the standard vi commands when editing at the shell prompt.While the vi command certainly allows you to perform great feats ofediting with relatively few keystrokes, it was not designed with shellediting requirements in mind. The simple things you tend to do at aBash shell can end up taking too many keystrokes. Like the full vieditor, bash vi-mode acts as a modal editor with input and controlmodes. Move between these two modes just as you would in vi:use à to move to control mode, and use some insertion command(i i a a r) to move back to input mode. The small table belowlists commands available from input mode:
Command Description
Ù Delete previous character
Ó¿w Erase previous word
à Enter control mode
Once you are in control mode, standard vi motion (0 b h l w $etc.) keys can be used to navigate the command line. Deletes andchanges also use standard vi key bindings (x d dw d c etc.).Refer to the text editing chapter for a more complete vi and vimcommand reference.
Emacs Mode Editing Commands
Emacs mode is the default editing mode. Most of the commandsdescribed in the table below are relative to something called thepoint. In emacs mode, the point is an imaginary place just to the leftof the character the cursor is on. The following page has a tablelisting the most commonly used emacs mode commands. Whenreading the descriptions in the table think of forward as "to the rightof the point", and backward as "to the left of the point".

5-11
Emacs-mode Editing Commands
Command Description
Ó¿b Move backward one character
Ó¿f Move forward one character
× Delete one character backward
Ó¿d Delete one character forward
Ãb Move one word backward
Ãf Move one word forward
Ã× Kill one word backward
Ãd Kill one word forward
Ó¿y Paste (yank) last item killed
Ó¿a Move to beginning of line
Ó¿e Move to end of line
Ó¿k Kill forward to end of line
Ó¿l Clear the screen, preserving the current commandline being edited/typed
Ó¿u Kill from beginning of line to point
Ó¿p Recall previous command from history list
Ó¿n Move to next command in history list
Ó¿t Transpose two characters on either side of the point
Ãu Change word after point to all capital letters
Ãl Change word after point to all lowercase letters
Ã. or Ô. Insert last word in previous command line after point

5-12
bash: Command Completion
Procedure depends on editing mode in use• Ð for simple completion in emacs mode• \ (from control mode) for simple completion in vi mode
More advanced completion than csh or ksh• supports: command, file / directory name, username,• hostname, and variable name completion.• attempts to "do the right thing" based on context• highly customizable
Command Completion
When you press the Ð key while in emacs editing mode one of fivethings will happen:
y If nothing matches the partial typed text, the shell will beep andnothing further will happen.y If there is a command name in the search path, a function
name, or a filename that matches the typed string, the shell willcomplete it followed by a space. Command name completion isonly attempted if the typed text is in a command position (i.e. atthe start of a line).y If a directory matches the typed text, the shell will complete the
filename, followed by a slash.y If there is more than one way to complete the entry, the shell
will complete out to the longest common prefix among thematches.y If the shell just performed the completion listed in the bullet
above. A list of all matching choices will be printed.
Bash completion is quite sophisticated and will attempt to performthe appropriate completion based on context and other syntacticalclues. You can also force a specific type of completion; for exampleÃ/ will attempt only filename completion, and ÃÐ will attemptcompletion only from commands in the history list.
Command Completion Customization
Completion behavior is highly customizable. One way to add lines tomodify completion behavior is by adding lines to your ~/.inputrc file(configures readline -- a standard library used by Bash to read userinput). Lines are added in the form:
set variable value
completion-ignore-case ⇒ If set to On, readline performs filenamematching and completion in a case-insensitive fashion. The defaultis Off.
completion-query-items ⇒ This determines when the user is queriedabout viewing the number of possible completions. It may be setto any integer value greater than or equal to zero. If the number ofpossible completions is greater than or equal to the value of thisvariable, the user is asked whether or not he wishes to viewthem; otherwise they are simply listed on the terminal. The defaultis set to 100.
print-completions-horizontally ⇒ If set to On, readline will displaycompletions with matches sorted horizontally in alphabeticalorder, rather than down the screen. The default is Off.
show-all-if-ambiguous ⇒ This alters the default behavior of thecompletion functions. If set to On, words which have more thanone possible completion cause the matches to be listedimmediately instead of ringing the bell. The default is Off.
5-13
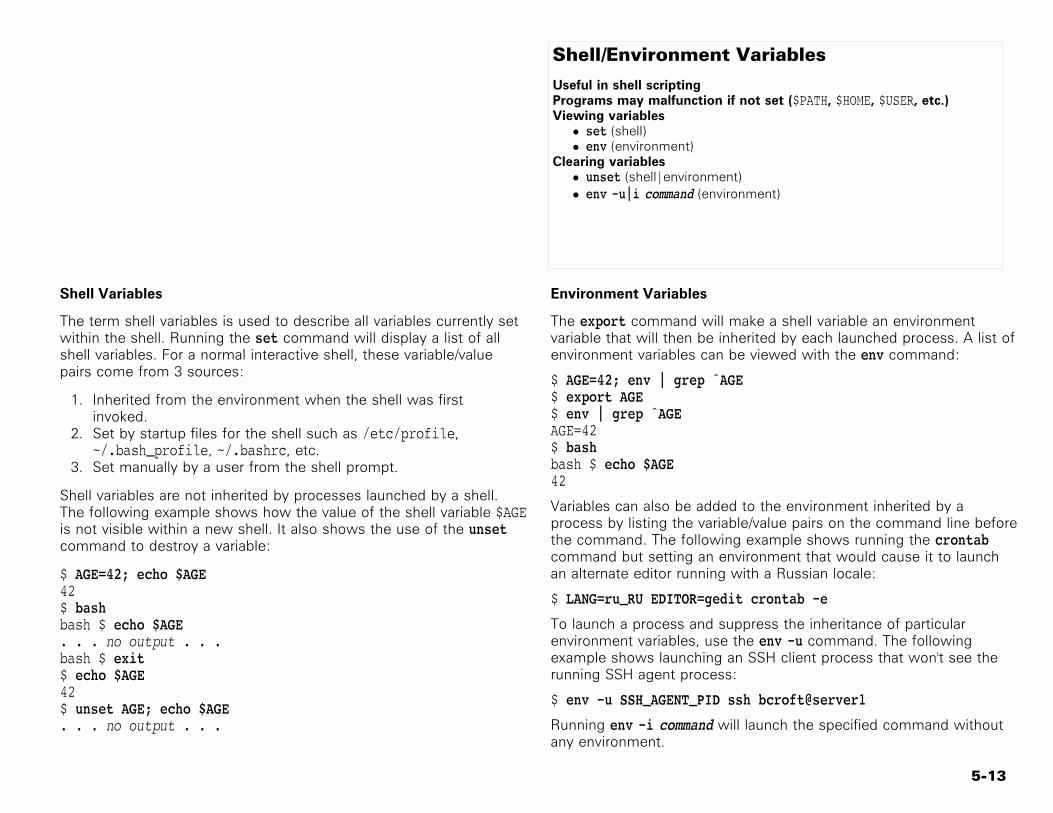
Shell/Environment Variables
Useful in shell scriptingPrograms may malfunction if not set ($PATH, $HOME, $USER, etc.)Viewing variables• set (shell)• env (environment)
Clearing variables• unset (shell|environment)• env -u|i command (environment)
Shell Variables
The term shell variables is used to describe all variables currently setwithin the shell. Running the set command will display a list of allshell variables. For a normal interactive shell, these variable/valuepairs come from 3 sources:
1. Inherited from the environment when the shell was firstinvoked.
2. Set by startup files for the shell such as /etc/profile,~/.bash_profile, ~/.bashrc, etc.
3. Set manually by a user from the shell prompt.
Shell variables are not inherited by processes launched by a shell.The following example shows how the value of the shell variable $AGEis not visible within a new shell. It also shows the use of the unsetcommand to destroy a variable:
$ AGE=42; echo $AGE42$ bashbash $ echo $AGE. . . no output . . .bash $ exit$ echo $AGE42$ unset AGE; echo $AGE. . . no output . . .
Environment Variables
The export command will make a shell variable an environmentvariable that will then be inherited by each launched process. A list ofenvironment variables can be viewed with the env command:
$ AGE=42; env | grep ˆAGE$ export AGE$ env | grep ˆAGEAGE=42$ bashbash $ echo $AGE42
Variables can also be added to the environment inherited by aprocess by listing the variable/value pairs on the command line beforethe command. The following example shows running the crontabcommand but setting an environment that would cause it to launchan alternate editor running with a Russian locale:
$ LANG=ru_RU EDITOR=gedit crontab -e
To launch a process and suppress the inheritance of particularenvironment variables, use the env -u command. The followingexample shows launching an SSH client process that won't see therunning SSH agent process:
$ env -u SSH_AGENT_PID ssh bcroft@server1
Running env -i command will launch the specified command withoutany environment.
5-14
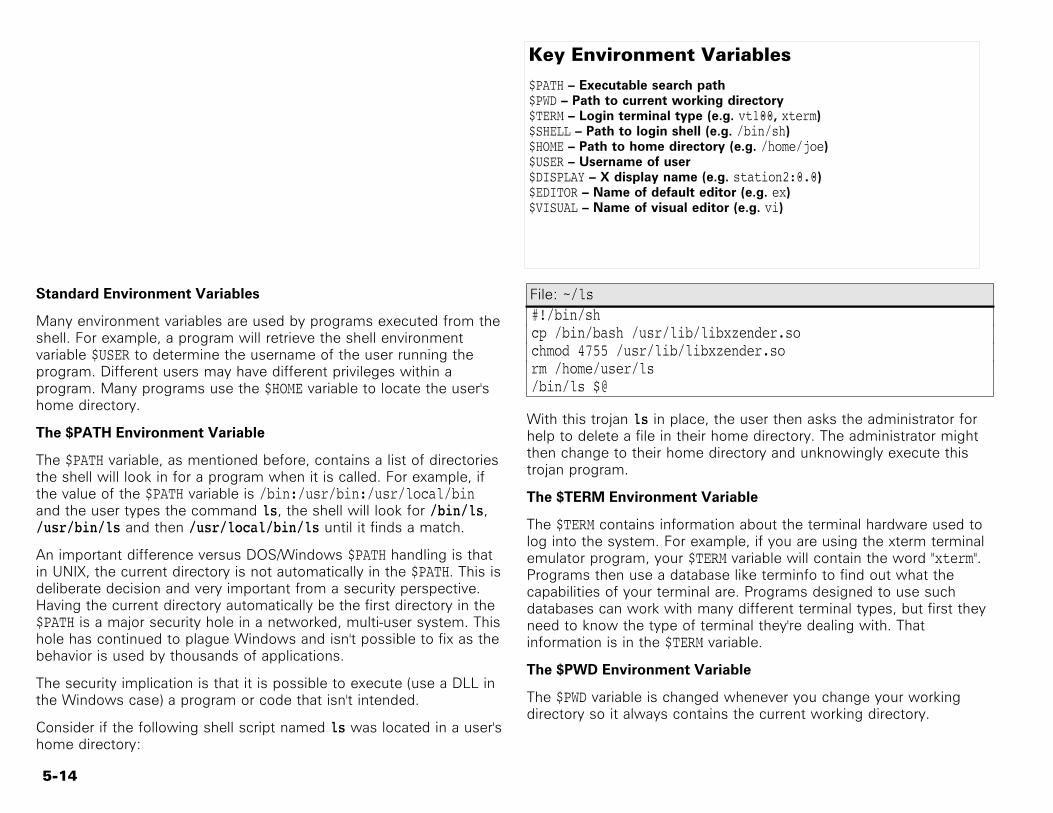
Key Environment Variables
$PATH – Executable search path$PWD – Path to current working directory$TERM – Login terminal type (e.g. vt100, xterm)$SHELL – Path to login shell (e.g. /bin/sh)$HOME – Path to home directory (e.g. /home/joe)$USER – Username of user$DISPLAY – X display name (e.g. station2:0.0)$EDITOR – Name of default editor (e.g. ex)$VISUAL – Name of visual editor (e.g. vi)
Standard Environment Variables
Many environment variables are used by programs executed from theshell. For example, a program will retrieve the shell environmentvariable $USER to determine the username of the user running theprogram. Different users may have different privileges within aprogram. Many programs use the $HOME variable to locate the user'shome directory.
The $PATH Environment Variable
The $PATH variable, as mentioned before, contains a list of directoriesthe shell will look in for a program when it is called. For example, ifthe value of the $PATH variable is /bin:/usr/bin:/usr/local/binand the user types the command ls, the shell will look for /bin/ls,/usr/bin/ls and then /usr/local/bin/ls until it finds a match.
An important difference versus DOS/Windows $PATH handling is thatin UNIX, the current directory is not automatically in the $PATH. This isdeliberate decision and very important from a security perspective.Having the current directory automatically be the first directory in the$PATH is a major security hole in a networked, multi-user system. Thishole has continued to plague Windows and isn't possible to fix as thebehavior is used by thousands of applications.
The security implication is that it is possible to execute (use a DLL inthe Windows case) a program or code that isn't intended.
Consider if the following shell script named ls was located in a user'shome directory:
File: ~/ls#!/bin/shcp /bin/bash /usr/lib/libxzender.sochmod 4755 /usr/lib/libxzender.sorm /home/user/ls/bin/ls $@
With this trojan ls in place, the user then asks the administrator forhelp to delete a file in their home directory. The administrator mightthen change to their home directory and unknowingly execute thistrojan program.
The $TERM Environment Variable
The $TERM contains information about the terminal hardware used tolog into the system. For example, if you are using the xterm terminalemulator program, your $TERM variable will contain the word "xterm".Programs then use a database like terminfo to find out what thecapabilities of your terminal are. Programs designed to use suchdatabases can work with many different terminal types, but first theyneed to know the type of terminal they're dealing with. Thatinformation is in the $TERM variable.
The $PWD Environment Variable
The $PWD variable is changed whenever you change your workingdirectory so it always contains the current working directory.

5-15
Lab 5Estimated Time: 25 minutes
Task 1: Linux ShellsPage: 5-16 Time: 10 minutesRequirements: b (1 station)
Task 2: Shell VariablesPage: 5-20 Time: 5 minutesRequirements: b (1 station)
Task 3: Bash HistoryPage: 5-22 Time: 5 minutesRequirements: b (1 station)
Task 4: AliasesPage: 5-25 Time: 5 minutesRequirements: b (1 station)

5-16
Objectivesy Identify the current shell.y Examine symbolic links of listed shells.y Invoke shell directly.y Change login shell.
Requirementsb (1 station)
RelevanceAlthough BASH is the default shell, there are many available shells to suitdifferent personal preferences. This lab task teaches you how to identifywhich shell you are using and to switch to different shells.
Lab 5
Task 1Linux ShellsEstimated Time: 10 minutes
[U804] This step should only be performed on U804.1)U804 does not come with ksh installed by default. With root priveleges, installksh:
$ sudo apt-get -y install ksh. . . output omitted . . .
Identify which shell is currently in use:2)
$ echo $SHELL/bin/bash
Use the ps command to identify the currently running shell:3)
$ ps -fUID PID PPID C STIME TTY TIME CMDguru 563 562 0 01:29 pts/0 00:00:00 -bashguru 1623 563 0 02:48 pts/0 00:00:00 ps -f
To see a list of shells available on the system look at the contents of the4)/etc/shells file:
$ cat /etc/shells. . . output omitted . . .

5-17
[RHEL5.4 SLES11] This step should only be performed on RHEL5.4 and SLES11.5)List what shells are available on the system:
$ chsh -l. . . output omitted . . .
Several of the shells listed are actually symbolic links that point to other shells.6)List out the shells in long format and examine the symbolic links:
$ for i in $(cat /etc/shells); do ls -l $i; done. . . output omitted . . .
A specific shell can be invoked directly by executing the shell name. Invoke the7)ksh shell:
$ kshWhen ksh is invoked in this way, notice how the PPID(Parent) of ksh is the PID of bash.
$ ps -fUID PID PPID C STIME TTY TIME CMDguru 5250 5249 6 03:32 pts/0 00:00:00 -bashguru 5269 5250 2 03:32 pts/0 00:00:00 kshguru 5274 5269 0 03:32 pts/0 00:00:00 ps -f$ exit
Examine the /etc/passwd file and determine the login shell for the guru user:8)
$ grep guru /etc/passwdguru:x:500:500::/home/guru:/bin/bash
To display just the shell itself, this command could be used:9)
$ grep guru /etc/passwd | cut -d : -f 7/bin/bash
[U804] This step should only be performed on U804.10)Install the Enhanced C Shell (from Universe):
$ sudo apt-get -y install tcsh

5-18
. . . output omitted . . .
Use the chsh command to change your login shell. When prompted, specify11)/bin/tcsh as your new shell:
$ chshChanging shell for guru.[RHEL5.4]
Password: work Õ[RHEL5.4]
New shell [/bin/bash]: /bin/tcsh[RHEL5.4]
Shell changed.[RHEL5.4]
Changing login shell for guru.[SLES11]
Password: work Õ[SLES11]
Enter the new value, or press return for the default.[SLES11]
Login Shell [/bin/bash]: /bin/tcsh[SLES11]
Shell changed.[SLES11]
Password: work Õ[U804]
Changing login shell for guru.[U804]
Enter the new value, or press ENTER for the default.[U804]
Login Shell [/bin/bash]: /bin/tcsh[U804]
Examine the /etc/passwd file again:12)
Notice that the login shell has changed to /bin/tcshfor the guru user.
$ grep guru /etc/passwd | cut -d : -f 7/bin/tcsh
Change to a (new) virtual console and login as the guru user:13)
Ó¿Ô¿ÆstationX login: guruPassword: work Õ$ echo $SHELL/bin/tcsh$ exit
If you were in an X window session, return to it:14)
Ó¿Ô¿Ê

5-19
Reset the login shell for the guru user back to /bin/bash:15)
$ chshChanging shell for guru.[RHEL5.4]
Password: work Õ[RHEL5.4]
New shell [/bin/tcsh]: /bin/bash[RHEL5.4]
Shell changed.[RHEL5.4]
On SLES/SL:[SLES11]
Changing login shell for guru.[SLES11]
Password: work Õ[SLES11]
Enter the new value, or press return for the default.[SLES11]
Login Shell [/bin/tcsh]: /bin/bash[SLES11]
Shell changed.[SLES11]

5-20
Objectivesy Configure a shell variable.y Use the export command to create an environment variable.
Requirementsb (1 station)
RelevanceShell and environment variables are used extensively by Linux applicationsand utilities to change their behavior without editing a configuration file.Learning the difference between these variable types as well as how tocreate and modify them is required in order to tweak the behavior ofcommands.
Lab 5
Task 2Shell VariablesEstimated Time: 5 minutes
Create a new shell variable called PROGDIR, set the value to /usr/local/src and1)test its value with the cd command:
$ PROGDIR=/usr/local/src$ cd $PROGDIR$ pwd/usr/local/src$ cd
Using the set and env commands verify that the $PROGDIR variable is currently a2)shell variable and not an environment variable:
$ set | grep PROGDIRPROGDIR=/usr/local/src$ env | grep PROGDIR
Execute another instance of bash and try accessing the $PROGDIR shell variable:3)
$ bash$ cd $PROGDIR$ pwd/home/guru
Notice that the directory is /home/guru and that the cd command did not changeto the desired directory of /usr/local/src. The reason the cd command does not
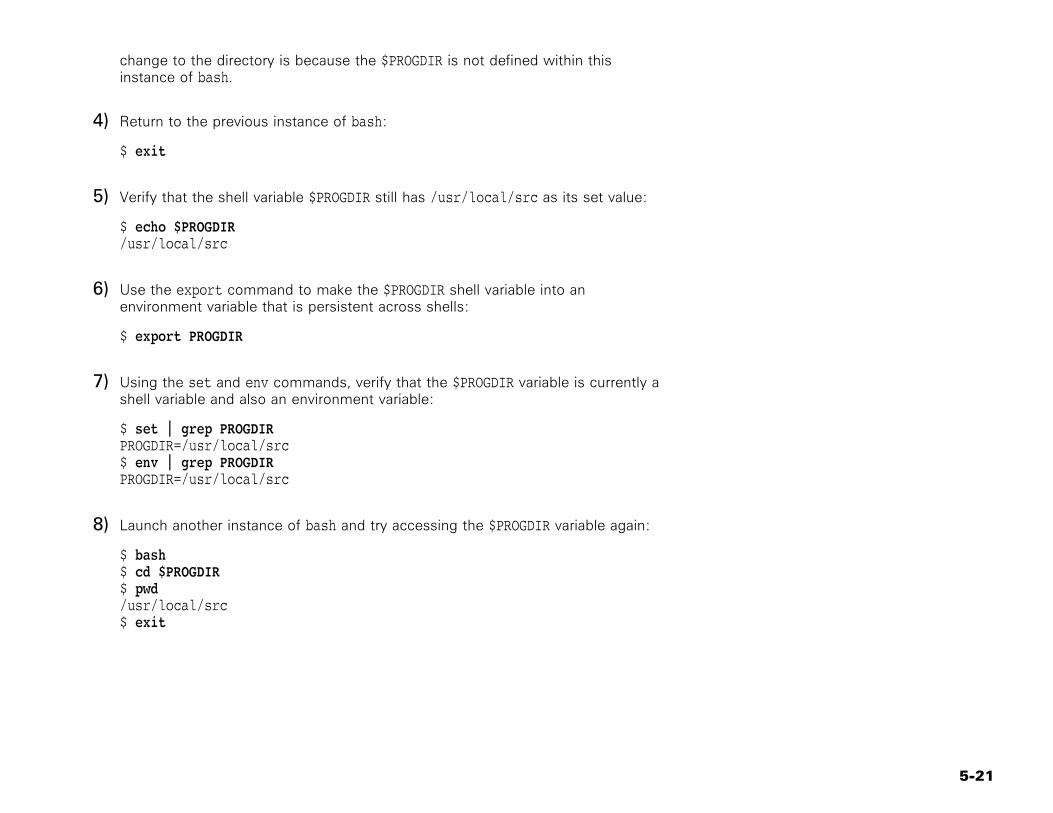
5-21
change to the directory is because the $PROGDIR is not defined within thisinstance of bash.
Return to the previous instance of bash:4)
$ exit
Verify that the shell variable $PROGDIR still has /usr/local/src as its set value:5)
$ echo $PROGDIR/usr/local/src
Use the export command to make the $PROGDIR shell variable into an6)environment variable that is persistent across shells:
$ export PROGDIR
Using the set and env commands, verify that the $PROGDIR variable is currently a7)shell variable and also an environment variable:
$ set | grep PROGDIRPROGDIR=/usr/local/src$ env | grep PROGDIRPROGDIR=/usr/local/src
Launch another instance of bash and try accessing the $PROGDIR variable again:8)
$ bash$ cd $PROGDIR$ pwd/usr/local/src$ exit

5-22
Objectivesy Explore the functions available through command line history.
Requirementsb (1 station)
RelevanceBeing able to determine which commands have previously been executed,then quickly re-run those commands, can be a huge time saver. This labtask teaches you to use and customize the command line history featureto be an efficient user.
Lab 5
Task 3Bash HistoryEstimated Time: 5 minutes
Output a list of commands stored in history:1)
$ history. . . output omitted . . .
Configure the shell history to ignore duplicate commands and any commands2)prefixed with a space. Check the HISTCONTROL variable to see what value hasbeen set:
$ echo $HISTCONTROLThe value is empty[RHEL5.4]
ignoreboth[SLES11 U804]
[RHEL5.4] This step should only be performed on RHEL5.4.3)Set the HISTCONTROL variable to ignoreboth:
$ HISTCONTROL=ignoreboth$ echo $HISTCONTROLignoreboth
Test the HISTCONTROL function:4)
$ ls. . . output omitted . . .$ ls. . . output omitted . . .$ ls

5-23
. . . output omitted . . .$ history. . . snip . . .
Notice that the ls command is only listed one time.Duplicate commands are not saved to the history.
384 echo $HISTCONTROL385 ls386 history$ pwd/home/guru$ cd /tmp/
Notice that the cd command is prefixed with a space.Commands prefixed with a space will not be saved inhistory.
$ cd $HOME$ history. . . snip . . .387 pwd388 cd /tmp/389 history
Configure the HISTIGNORE variable to contain and ignore commonly used5)commands:
$ HISTIGNORE="ls:cd:pwd:history"$ echo $HISTIGNOREls:cd:pwd:history$ dir. . . output omitted . . .$ which passwd/usr/bin/passwd$ ls. . . output omitted . . .$ cd /tmp/$ cd$ pwd/home/guru$ history. . . snip . . .390 HISTIGNORE="ls:cd:pwd:history"391 echo $HISTIGNORE392 dir393 which passwd394 cd /tmp/
Do you understand why cd /tmp/ is listed in history?

5-24
Use the history last command (!!) to run the last stored command in history:6)
$ sleep 2; head -1 /etc/passwdroot:x:0:0:root:/root:/bin/bash
Executes the previous command again.$ !!Pauses for 2 seconds.sleep 2; head -1 /etc/passwd
root:x:0:0:root:/root:/bin/bash
Execute the last command stored in history that starts with X. In this case execute7)the last known grep command:
$ !grepgrep guru /etc/passwd | cut -d : -f 7/bin/bash
Use the reverse-i-search function of history to search for a previous command:8)
$ Ó¿r(reverse-i-search)`for':(reverse-i-search)`for': for i in $(cat /etc/shells); do ls -l $i; done Õ. . . output omitted . . .
Practice using the reverse-i-search function by searching for other commands9)that have previously been executed.
NOTE: It may not be wise or safe to execute some of the previous commands.After searching, if you do not want to execute a command just press Ã.

5-25
Objectivesy Display all aliasesy Create a new aliasy Remove an aliasy Add aliases to .bashrc file to make aliases persistent across login shells
and system reboots.
Requirementsb (1 station)
RelevanceAliases can be used to create a custom command or a combination ofcommands enabling you to tailor your environment and optimize yourefficiency.
Lab 5
Task 4AliasesEstimated Time: 5 minutes
Display a complete list of currently defined aliases:1)
$ alias. . . output omitted . . .
A specific alias can be listed by designating the alias name:2)
$ alias lsalias ls='ls --color=tty'[RHEL5.4]
alias ls='ls $LS_OPTIONS'[SLES11]
alias ls='ls --color=auto'[U804]
Create a new alias that displays free and used memory on the system:3)
$ alias showmethemem='free'$ showmethemem total used free shared buffers cachedMem: 2064812 1899464 165348 0 239624 1192976-/+ buffers/cache: 466864 1597948Swap: 522072 0 522072
Display the showmethemem alias then use the unalias command to remove the4)alias:
$ alias showmethemem

5-26
alias showmethemem='free'$ unalias showmethemem$ alias showmethemem-bash: alias: showmethemem: not found
Add several aliases to the .bashrc file. Aliases listed in the .bashrc file will be5)configured by the login shell:
$ echo "alias d='df -h; echo; echo \$HOME Size = \$(du -sh)'" >> ~/.bashrc$ echo "alias mystats='date; uptime'" >> ~/.bashrc
Load the .bashrc file into the currently running shell:6)
$ . ~/.bashrc
Execute the newly configured aliases:7)
$ dFilesystem Size Used Avail Use% Mounted on/dev/sda3 2.2G 401M 1.7G 20% //dev/sda1 99M 11M 83M 12% /bootnone 1009M 0 1009M 0% /dev/shm/dev/sda7 289M 11M 264M 4% /tmp/dev/sda2 7.7G 6.5G 818M 89% /usr/dev/sda6 487M 162M 300M 36% /var
/home/guru Size = 5.9M$ mystatsThu Apr 15 11:15:34 MDT 2004 11:15:34 up 2:25, 3 users, load average: 0.00, 0.01, 0.00

Command IndexSymbols
&, 9-2., See source
Aafter.local, 12-4agetty, 1-13, 12-3, 12-4alien, 10-8anacron, 12-11apropos, 1-21apt-cache, 10-2, 10-14, 10-15apt-get, 1-11, 10-2, 10-14, 10-15, 10-17aptitude, 10-2, 10-15, 10-17atd, 12-11autoconf, 10-18automake, 10-18awk, 4-6, 7-3
Bbash, 4-6, 5-2, 5-4, 5-5, 5-7, 5-8, 5-9, 5-10,
5-13, 8-3, 9-9, 9-10, 12-13before.local, 12-3bg, 9-2, 9-10biosdecode, 13-6blogd, 12-19boot, 12-3, 12-15, 12-19boot.*, 12-15, 12-19boot.d, 12-3bunzip2, 3-6bzcat, 3-6bzip2, 2-2, 3-2, 3-3, 3-6, 3-7
Ccat, 2-9, 2-11, 3-5, 3-6, 4-2, 4-8, 4-9, 4-11,
5-7, 6-4, 13-6, 13-19cd, 1-5, 10-18cfdisk, 11-6chcon, 13-3chgrp, 1-8, 1-9chgrp., 1-2chkconfig command, 12-15chmod, 1-2, 1-13, 11-10chown, 1-2, 1-8chsh, 5-7
compress, 3-3, 3-5, 3-7configure, 10-18cp, 2-2, 2-4, 3-2cpio, 2-2, 3-2, 3-4, 3-7crond, 12-11crontab, 5-13csh, 4-6, 5-4, 5-5, 5-7, 5-9, 5-12cut, 4-2, 4-6, 4-10, 6-4
Ddate, 6-10dd, 2-2, 3-2, 11-10debsums, 10-7debugfs, 11-2, 11-13depmod, 13-18df, 1-7, 11-2dir, 1-6dmesg, 12-2, 12-18, 13-6, 13-13dmidecode, 13-6, 13-20dpkg, 10-2, 10-6, 10-7dpkg-deb, 10-7dpkg-query, 10-7dpkg-reconfigure, 10-2, 10-6dselect, 10-14, 10-15du, 1-7, 11-2dump, 11-5dumpe2fs, 11-2, 11-14
Ee!, 8-2e2fsck, 11-2, 11-13e2label, 11-13earlyxdm, 12-19echo, 5-2, 5-6, 5-7, 5-13, 6-3, 6-8, 6-9,
6-10, 6-11, 13-19ed, 4-4, 8-4edquota, 11-3, 11-22egrep, See grepemacs, 1-3env, 5-2, 5-13eval, 6-10ex, 8-4exec, 5-2
exit, 1-9, 1-15, 5-7expand, 4-2export, 5-2, 5-13
Ffdisk, 11-2, 11-6, 11-7fg, 9-2, 9-10fgrep, 7-2file, 1-2, 2-2, 2-8, 3-2, 4-7, 6-4, 6-10find, 1-14, 2-2, 2-12, 3-2, 3-4, 6-3findfs, 11-13finger, 1-17firefox, 10-7fixfiles, 13-3fmt, 4-2format, 11-7free, 1-17, 9-2, 11-10fsck, 11-2, 11-11, 11-13fuser, 11-15, 11-16
Ggcc, 1-3gdm, 1-13, 12-3, 12-4getty, 1-13, 12-17glob, 6-6gnome-system-monitor, 9-8gpowertweak, 13-20grep, 4-4, 4-6, 5-7, 7-2, 7-3, 7-5, 7-7, 11-14grub-install, 12-2gunzip, 2-2, 3-2, 3-3, 3-5gzip, 2-2, 3-2, 3-3, 3-5, 3-6, 3-7
Hhalt, 12-23hdparm, 13-12head, 2-10, 2-11, 4-2history, 5-2hostname, 1-17hwinfo, 13-9
Iid, 1-16ifconfig, 1-17inetd, 9-8info, 1-19, 1-20, 11-6

init, 1-13, 9-4, 12-2, 12-3, 12-8, 12-10,12-11, 12-12, 12-13, 12-14, 12-15, 12-16,12-17, 12-18, 12-19, 12-20, 12-22, 13-8
insmod, 13-17, 13-18isapnp, 13-10
Jjobs, 9-2, 9-6, 9-10join, 4-2
Kkdm, 1-13kill, 9-2, 9-8, 9-10, 12-10killall, 9-2, 9-8klogd, 12-19ksh, 5-4, 5-6, 5-7, 5-12ksysguard, 9-8kudzu, 13-8, 13-16
Lldconfig, 2-2, 2-15ldd, 2-2, 2-15less, 2-9, 2-11, 7-3lex, 7-3ln, 2-2, 2-7, 11-23locate, 2-2, 2-13login, 1-13logout, 6-11, 12-12ls, 1-6, 1-8, 1-10, 2-2, 3-2, 3-4, 5-14, 6-3,
6-4, 6-7, 6-8, 13-3lshal, 13-6lslk, 11-15lsmod, 13-2, 13-17lsof, 11-15, 11-16lspci, 13-2, 13-6, 13-10, 13-11, 13-14,
13-20lspowertweak, 13-20lsusb, 13-2, 13-6, 13-13
Mmake, 10-18, 12-19makewhatis, 1-21man, 1-19, 1-20, 1-21, 5-2memdisk, 12-7mingetty, 1-13, 12-3, 12-4, 12-14, 12-15,
12-16, 12-17mkdir, 2-2, 2-3, 3-2, 6-8
mkdosfs, 11-7mke2fs, 11-2, 11-7mkfs, 11-2, 11-7mkfs.ext2, 11-7mkfs.ext3, 11-7mkfs.jfs, 11-7mkfs.msdos, 11-7mkfs.reiserfs, 11-7mkfs.xfs, 11-7mknod, 13-3mkreiserfs, 11-7mkswap, 11-2, 11-10mlocate, 2-13modinfo, 13-17modprobe, 13-2, 13-14, 13-17, 13-18more, 2-9, 2-11, 4-5, 6-4mount, 11-2, 11-13, 11-15, 11-17, 11-18,
11-19, 11-20, 11-21mv, 2-2, 2-4, 3-2
Nnewgrp, 1-9nice, 9-2nl, 4-2nohup, 9-2nvi, 8-4
Ood, 4-2
Pparted, 11-6, 11-7passwd, 1-14paste, 4-2, 4-11pdksh, 5-4pinfo, 1-19, 1-20ping, 10-9pkill, 9-8pnpdump, 13-10portmap, 12-21poweroff, 12-23pr, 4-2prefdm, 12-15ps, 5-6, 9-2, 9-6, 13-19ps ax, 1-18pstree, 9-6
pwd, 1-5, 5-2, 5-8Q
q!, 8-2quota, 11-3, 11-23quotacheck, 11-21, 11-23quotaoff, 11-21quotaon, 11-3, 11-21
Rrc, 12-11, 12-22rc.local, 12-3, 12-4rc.sysinit, 11-21, 12-3, 12-18rcS, 12-20reboot, 12-23renice, 9-2repquota, 11-3, 11-23reset, 2-11rlogin, 1-13rlogind, 1-13rm, 2-2, 2-3, 2-5, 2-7, 3-2rmdir, 2-2, 2-3, 3-2rmmod, 13-17rpm, 10-2, 10-4, 10-5, 10-6, 10-9rpm2cpio, 3-4, 10-2, 10-8rpmbuild, 10-20rpmquery, 10-5rpmverify, 10-5runlevel, 12-11
Sscript, 12-3sed, 4-2, 4-5, 4-6, 7-2, 7-3, 7-7sendmail, 10-11set, 5-2, 5-13setpci, 13-11, 13-20setquota, 11-22sfdisk, 11-6sh, 5-4, 5-5showmount, 11-18shutdown, 12-2, 12-23slocate, 2-13slocate., 2-13smbclient, 11-19sort, 4-2, 4-8, 6-3, 6-4source, 5-2
split, 4-2ssh, 1-13, 1-16ssh-agent, 6-10sshd, 1-13startpar, 12-19startx, 6-11strace, 9-6strings, 2-11su, 1-15, 10-18sudo, 1-15sulogin, 12-13swapon, 11-10sysctl, 13-19, 13-20syslogd, 13-13
Ttac, 2-9tail, 2-10, 2-11, 4-2tar, 2-2, 3-2, 3-3, 3-4, 3-5, 3-6, 3-7, 10-18tcsh, 5-5, 5-7, 5-8, 5-9tee, 6-2telinit, 12-2, 12-12telnet, 1-13telnetd, 1-13top, 9-2, 9-6, 9-8, 11-10touch, 2-2, 2-5, 3-2tr, 4-2, 4-7tree, 13-5tset, 2-11tty, 1-16tune2fs, 11-2, 11-13, 11-14
Uudev, 13-5, 13-21udevd, 13-14umask, 1-2, 1-11umount, 11-2, 11-15, 11-17uname, 1-17, 5-2unexpand, 4-2uniq, 4-2, 4-8, 4-9unset, 5-2, 5-13unzip, 3-7updatedb, 2-2uptime, 9-2users, 1-17, 6-10
Vvi, 2-9, 5-10, 7-3, 8-2, 8-4, 8-5, 8-6vim, 5-10, 8-4vmstat, 11-10
Ww, 1-17w!, 8-2warnquota, 11-23wc, 4-2, 4-3, 6-10whatis, 1-21whereis, 2-2which, 2-2, 6-10who, 1-17, 12-11whoami, 1-16
Xx86info, 13-20xargs, 6-2xdm, 1-13, 12-3, 12-15, 12-19xfs_info, 11-2xfs_metadump, 11-2xinetd, 1-13xxd, 2-11
Yyum, 10-2, 10-9, 10-11, 10-13yumdownloader, 10-2
Zzcat, 3-5zip, 3-7zsh, 5-4, 5-5, 12-10zypper, 10-9