
LPC Profile Management - Login Step 1 · LPC Profile Management - Profile - Tabs About the middle...
15
LPC Profile Management - Login Step 1 Web site URL http://www.lpc.ms.gov/ Click the Login button at the bottom of the menu to go to the login screen. Page 1
Transcript of LPC Profile Management - Login Step 1 · LPC Profile Management - Profile - Tabs About the middle...

LPC Profile Management - Login Step 1
Web site URL http://www.lpc.ms.gov/Click the Login button at the bottom of the menu to go to the login screen.
Page 1
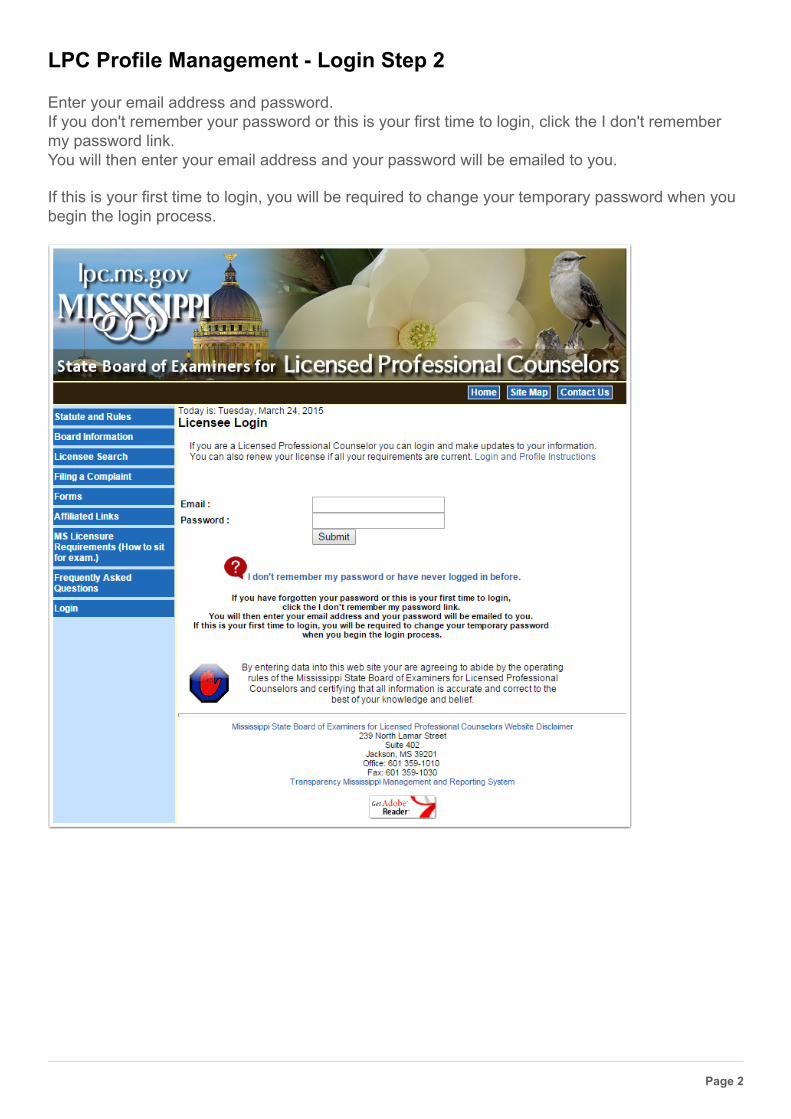
LPC Profile Management - Login Step 2
Enter your email address and password.If you don't remember your password or this is your first time to login, click the I don't remembermy password link.You will then enter your email address and your password will be emailed to you.
If this is your first time to login, you will be required to change your temporary password when youbegin the login process.
Page 2
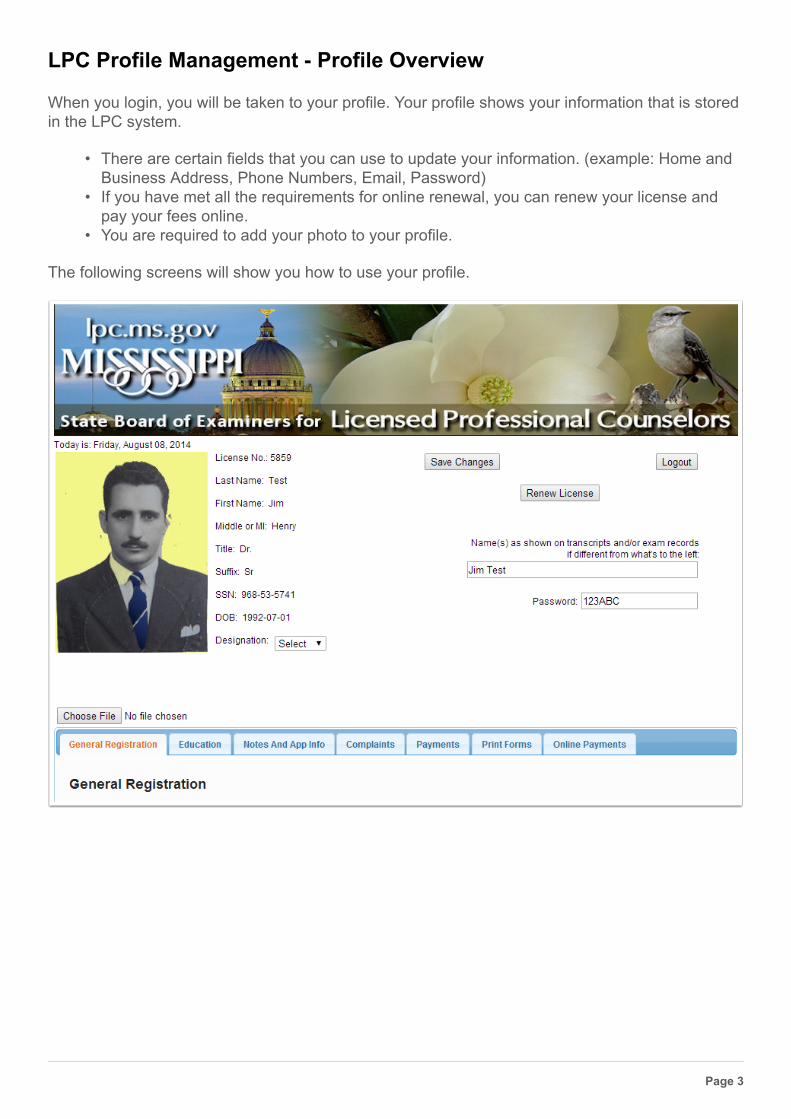
LPC Profile Management - Profile Overview
When you login, you will be taken to your profile. Your profile shows your information that is storedin the LPC system.
• There are certain fields that you can use to update your information. (example: Home andBusiness Address, Phone Numbers, Email, Password)
• If you have met all the requirements for online renewal, you can renew your license andpay your fees online.
• You are required to add your photo to your profile.
The following screens will show you how to use your profile.
Page 3
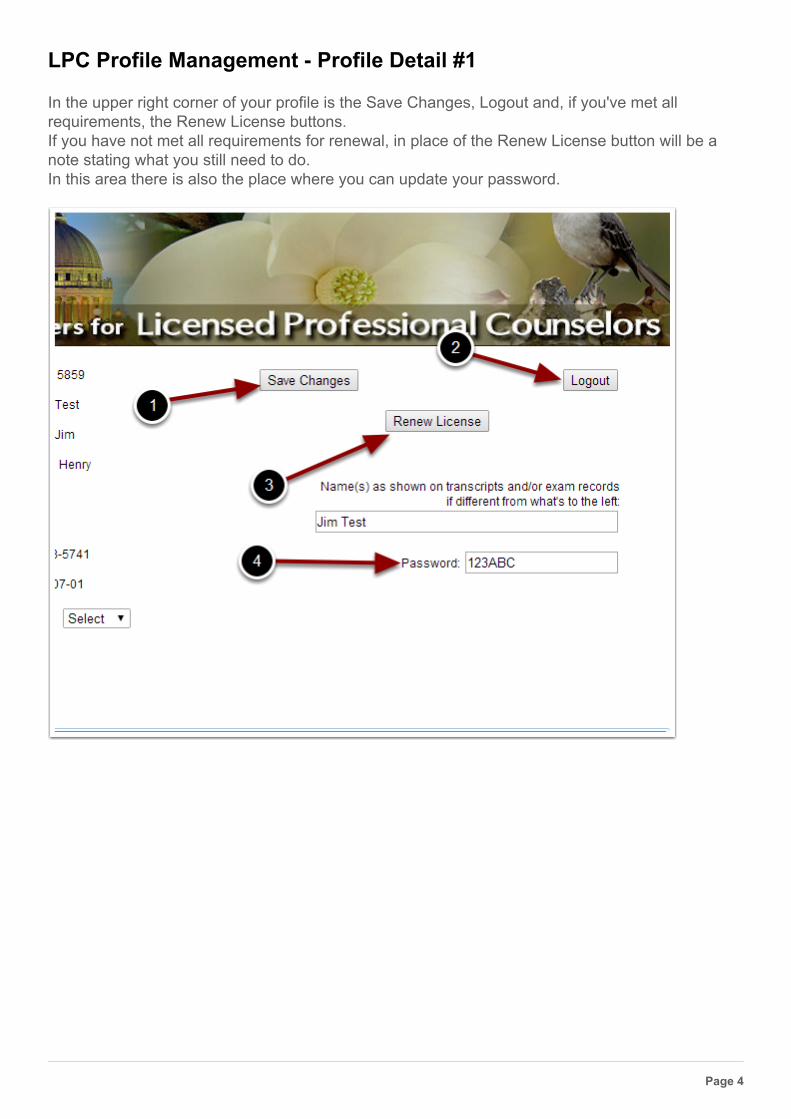
LPC Profile Management - Profile Detail #1
In the upper right corner of your profile is the Save Changes, Logout and, if you've met allrequirements, the Renew License buttons.If you have not met all requirements for renewal, in place of the Renew License button will be anote stating what you still need to do.In this area there is also the place where you can update your password.
Page 4
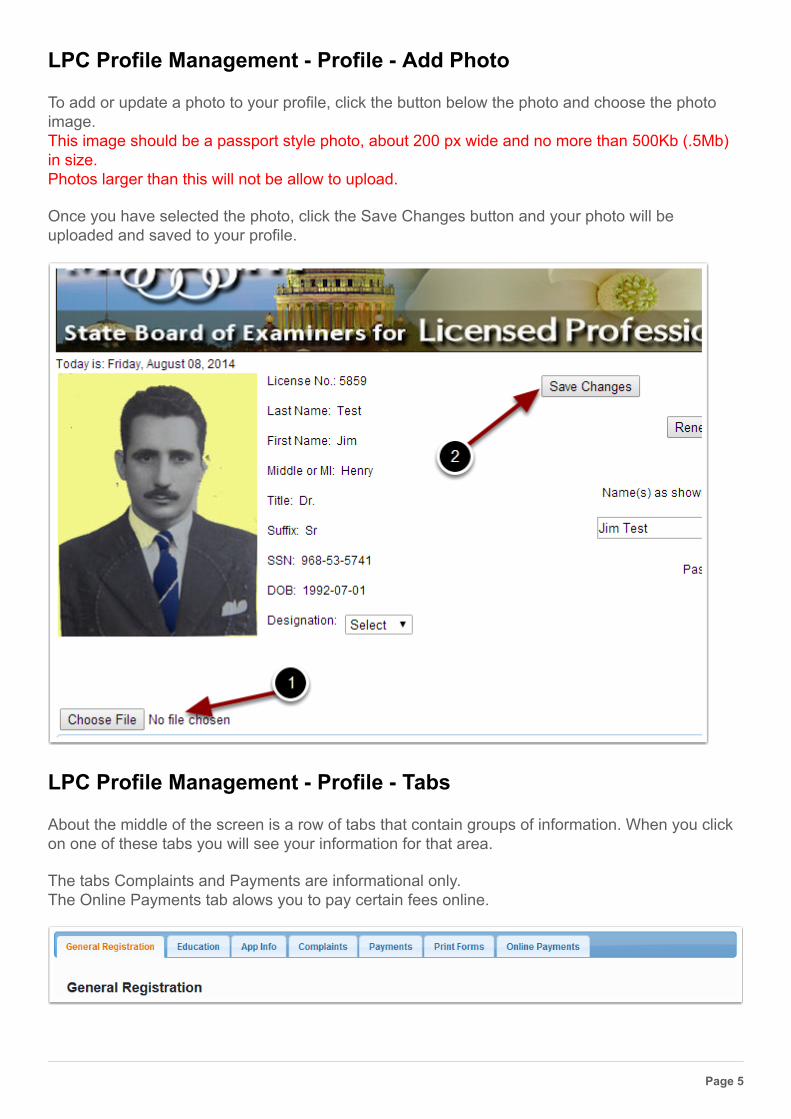
LPC Profile Management - Profile - Add Photo
To add or update a photo to your profile, click the button below the photo and choose the photoimage.This image should be a passport style photo, about 200 px wide and no more than 500Kb (.5Mb)in size.Photos larger than this will not be allow to upload.
Once you have selected the photo, click the Save Changes button and your photo will beuploaded and saved to your profile.
LPC Profile Management - Profile - Tabs
About the middle of the screen is a row of tabs that contain groups of information. When you clickon one of these tabs you will see your information for that area.
The tabs Complaints and Payments are informational only.The Online Payments tab alows you to pay certain fees online.
Page 5
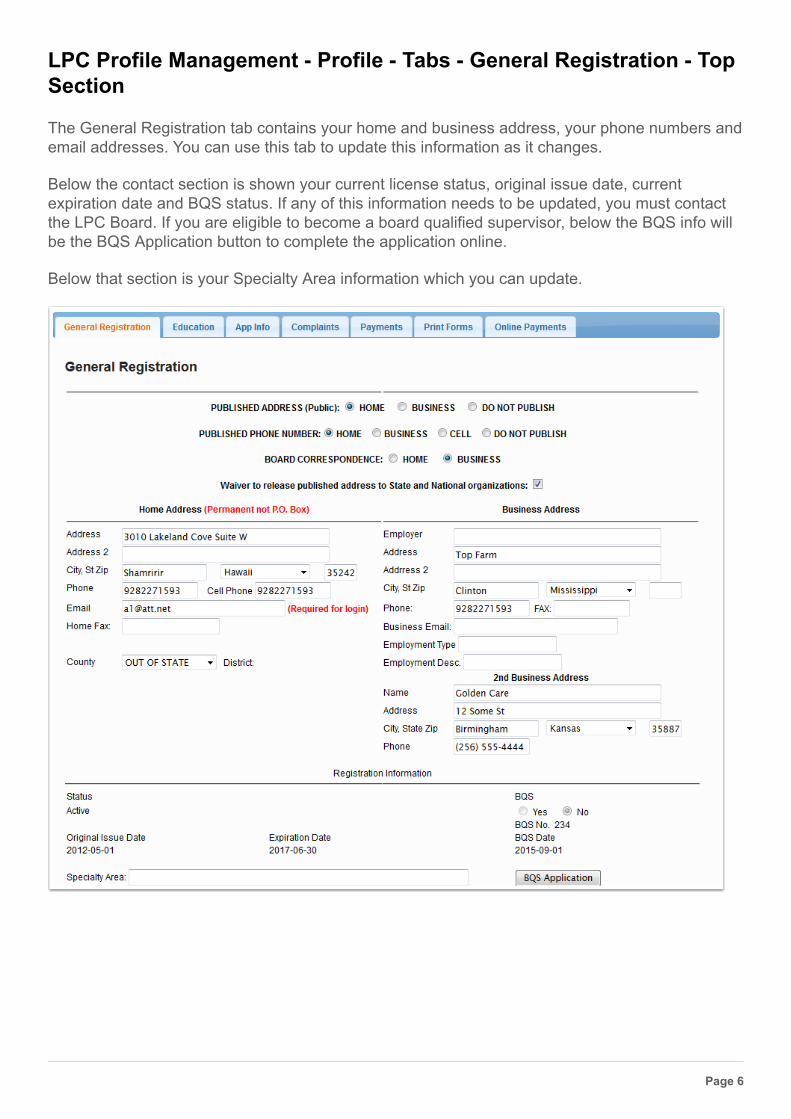
LPC Profile Management - Profile - Tabs - General Registration - TopSection
The General Registration tab contains your home and business address, your phone numbers andemail addresses. You can use this tab to update this information as it changes.
Below the contact section is shown your current license status, original issue date, currentexpiration date and BQS status. If any of this information needs to be updated, you must contactthe LPC Board. If you are eligible to become a board qualified supervisor, below the BQS info willbe the BQS Application button to complete the application online.
Below that section is your Specialty Area information which you can update.
Page 6
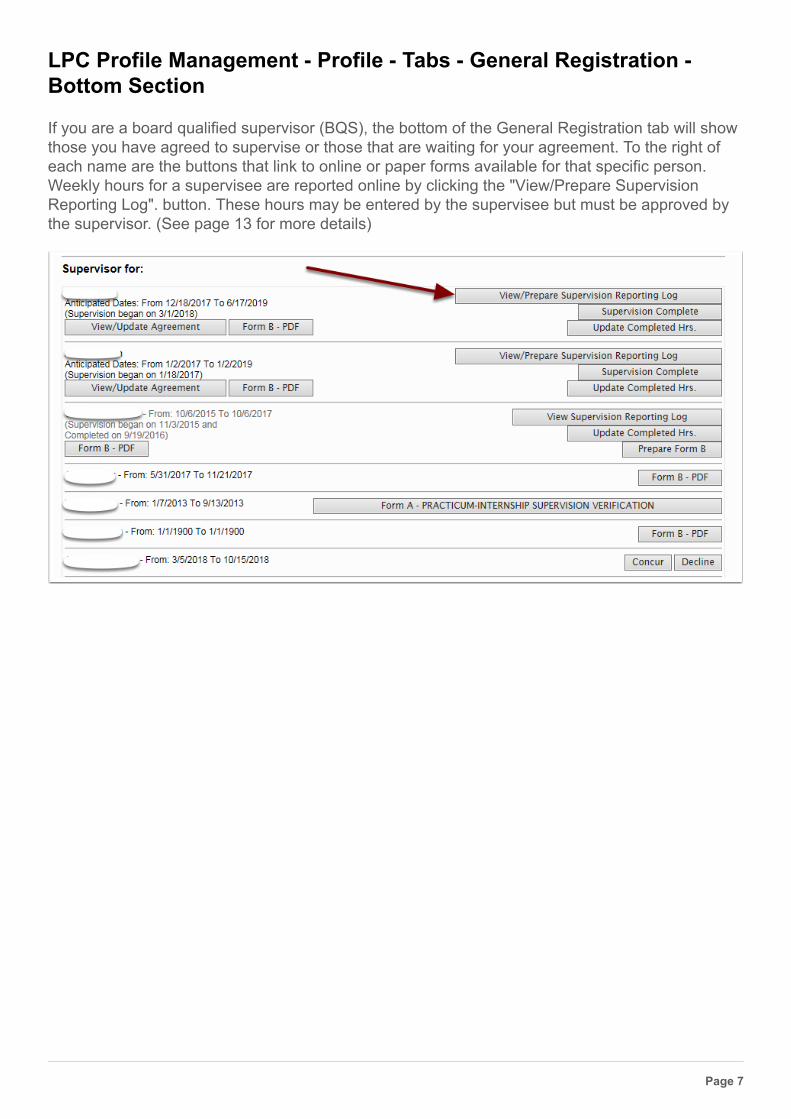
LPC Profile Management - Profile - Tabs - General Registration -Bottom Section
If you are a board qualified supervisor (BQS), the bottom of the General Registration tab will showthose you have agreed to supervise or those that are waiting for your agreement. To the right ofeach name are the buttons that link to online or paper forms available for that specific person.Weekly hours for a supervisee are reported online by clicking the "View/Prepare SupervisionReporting Log". button. These hours may be entered by the supervisee but must be approved bythe supervisor. (See page 13 for more details)
Page 7
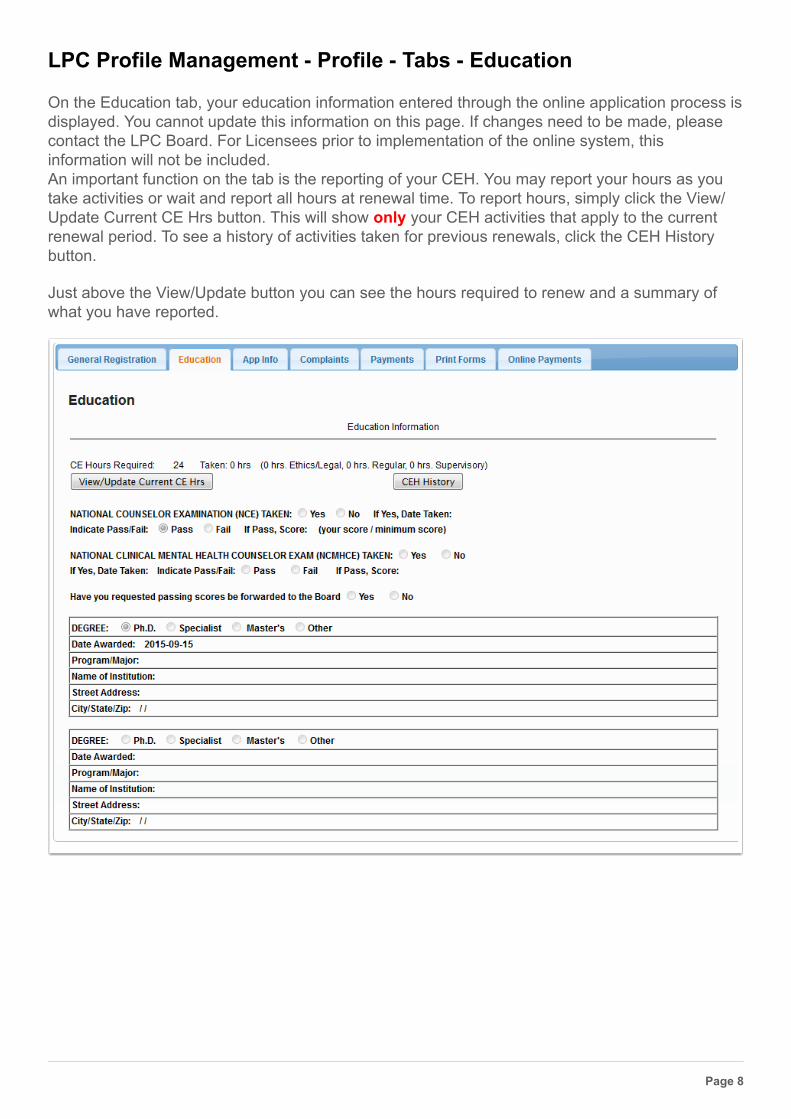
LPC Profile Management - Profile - Tabs - Education
On the Education tab, your education information entered through the online application process isdisplayed. You cannot update this information on this page. If changes need to be made, pleasecontact the LPC Board. For Licensees prior to implementation of the online system, thisinformation will not be included.An important function on the tab is the reporting of your CEH. You may report your hours as youtake activities or wait and report all hours at renewal time. To report hours, simply click the View/Update Current CE Hrs button. This will show only your CEH activities that apply to the currentrenewal period. To see a history of activities taken for previous renewals, click the CEH Historybutton.
Just above the View/Update button you can see the hours required to renew and a summary ofwhat you have reported.
Page 8
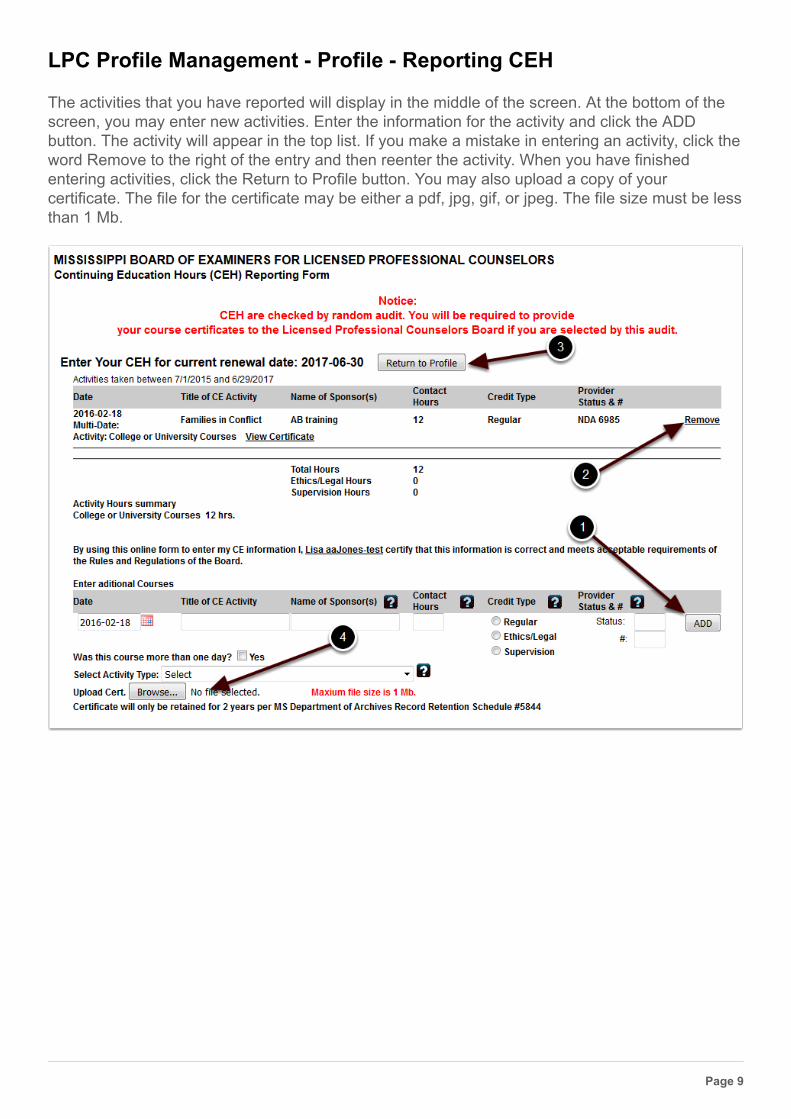
LPC Profile Management - Profile - Reporting CEH
The activities that you have reported will display in the middle of the screen. At the bottom of thescreen, you may enter new activities. Enter the information for the activity and click the ADDbutton. The activity will appear in the top list. If you make a mistake in entering an activity, click theword Remove to the right of the entry and then reenter the activity. When you have finishedentering activities, click the Return to Profile button. You may also upload a copy of yourcertificate. The file for the certificate may be either a pdf, jpg, gif, or jpeg. The file size must be lessthan 1 Mb.
Page 9
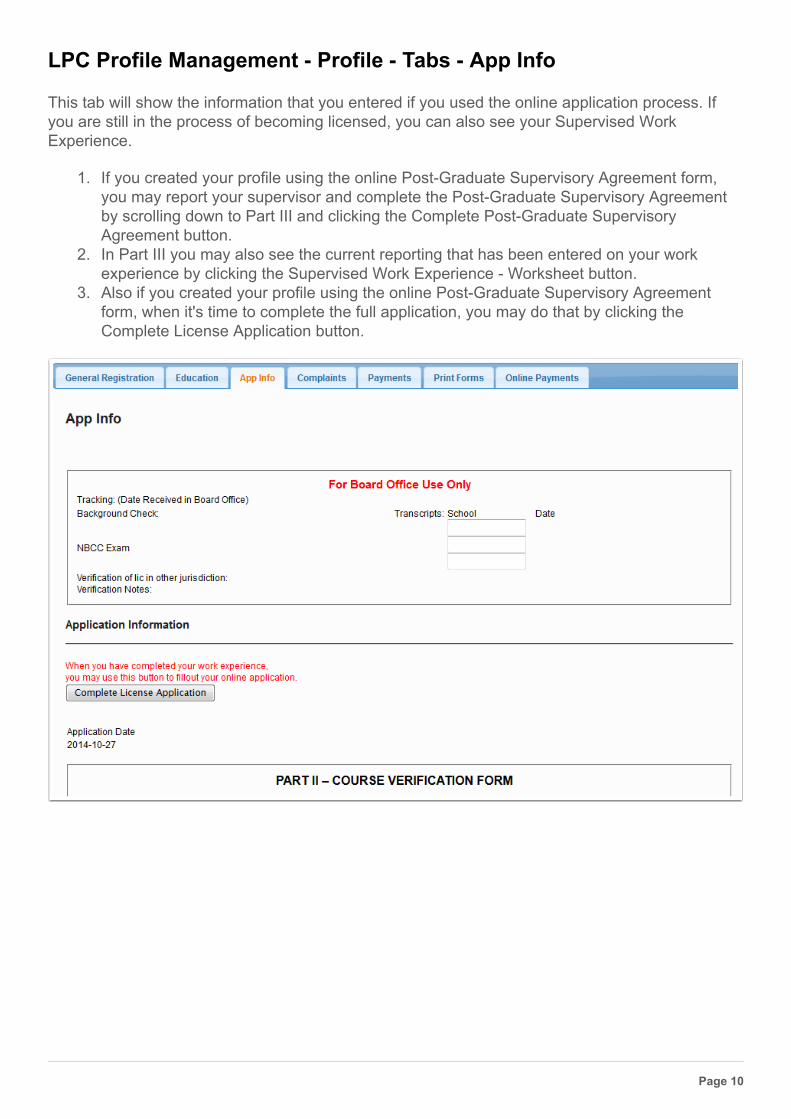
LPC Profile Management - Profile - Tabs - App Info
This tab will show the information that you entered if you used the online application process. Ifyou are still in the process of becoming licensed, you can also see your Supervised WorkExperience.
1. If you created your profile using the online Post-Graduate Supervisory Agreement form,you may report your supervisor and complete the Post-Graduate Supervisory Agreementby scrolling down to Part III and clicking the Complete Post-Graduate SupervisoryAgreement button.
2. In Part III you may also see the current reporting that has been entered on your workexperience by clicking the Supervised Work Experience - Worksheet button.
3. Also if you created your profile using the online Post-Graduate Supervisory Agreementform, when it's time to complete the full application, you may do that by clicking theComplete License Application button.
Page 10

LPC Profile Management - Profile - Tabs - Post-Graduate SupervisorAgreement - Supervisee - Step 1
When you click the Post-Graduate Supervisory Agreement button on your profile to beginsupervision with an LPC-S, you will be taken to the screen below. Here you will select the LPC-Sthat has agreed to be your supervisor. After you finish the next screen, this LPC-S will receive anemail asking them to concur or deny the agreement.
The dropdown list will show all counselors that are Board qualified.
Page 11

LPC Profile Management - Profile - Tabs - Post-Graduate SupervisorAgreement - Supervisee - Step 2
Fill out the form below to complete your part of the agreement process.
You must check the box that says I affirm.
Page 12
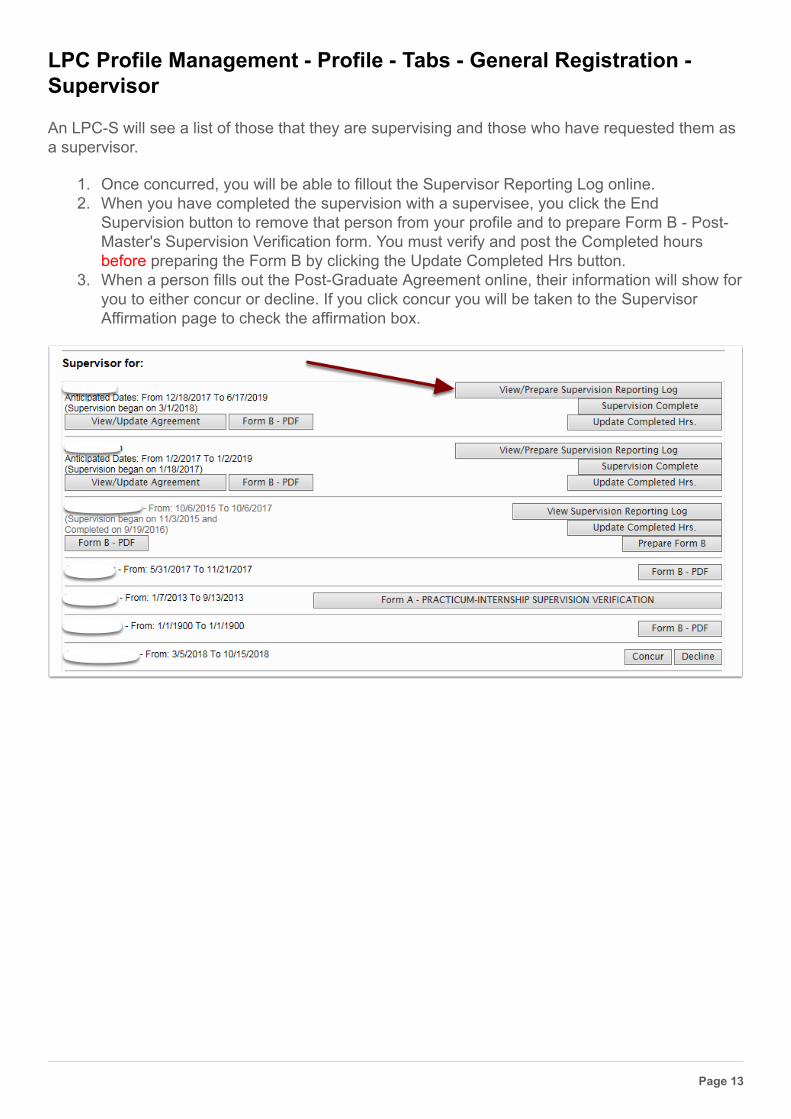
LPC Profile Management - Profile - Tabs - General Registration -Supervisor
An LPC-S will see a list of those that they are supervising and those who have requested them asa supervisor.
1. Once concurred, you will be able to fillout the Supervisor Reporting Log online.2. When you have completed the supervision with a supervisee, you click the End
Supervision button to remove that person from your profile and to prepare Form B - Post-Master's Supervision Verification form. You must verify and post the Completed hoursbefore preparing the Form B by clicking the Update Completed Hrs button.
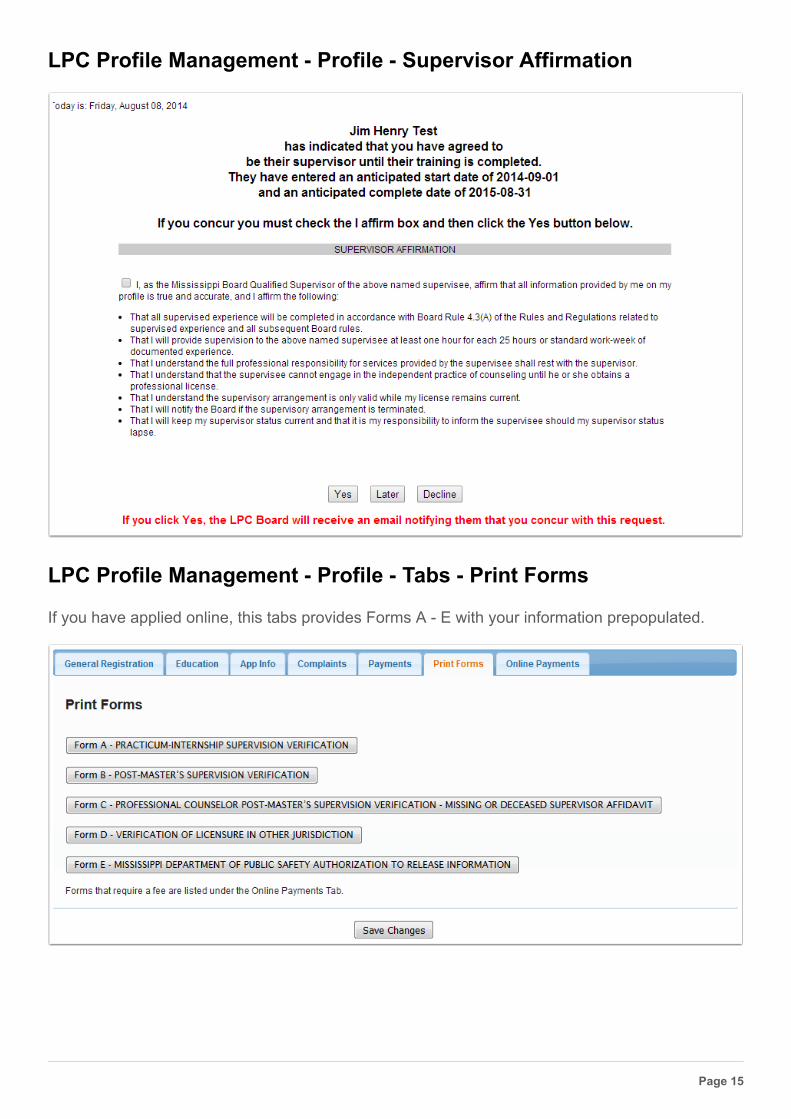
3. When a person fills out the Post-Graduate Agreement online, their information will show foryou to either concur or decline. If you click concur you will be taken to the SupervisorAffirmation page to check the affirmation box.
Page 13
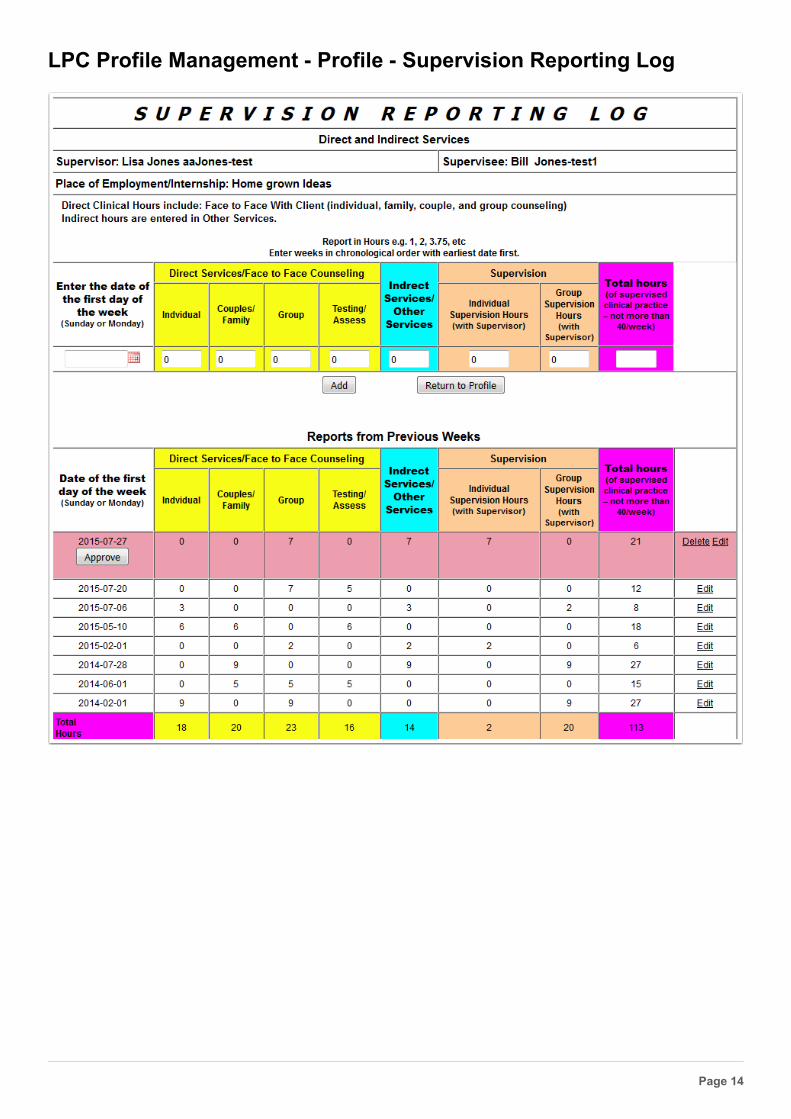
LPC Profile Management - Profile - Supervision Reporting Log
Page 14
LPC Profile Management - Profile - Supervisor Affirmation
LPC Profile Management - Profile - Tabs - Print Forms
If you have applied online, this tabs provides Forms A - E with your information prepopulated.
Page 15