LP-100 Manual - Telepost Inc. Home Page · HF Wattmeter Operating & ... This display shows the...
42
1 LP-100 Digital Vector HF Wattmeter Operating & Assembly Manual June 2007 TelePost Incorporated Rev. C29 Current through firmware release ver. 1.1.6.1b
Transcript of LP-100 Manual - Telepost Inc. Home Page · HF Wattmeter Operating & ... This display shows the...

1
LP-100Digital VectorHF Wattmeter
Operating &Assembly Manual
June 2007TelePost Incorporated
Rev. C29Current through firmware release ver. 1.1.6.1b

2
Compliance Statements…
Federal Communications CommissionStatement (USA)
This device complies with Part 15 of the FCC Rules. Operation is subject to the following twoconditions: (1) this device may not cause harmful interference, and (2) this device must accept anyinterference received, including interference that may cause undesired operation.
European Union Declaration of Conformity
TelePost Inc. declares that the product:
Product Name: Digital Vector RF WattmeterModel Number:LP-100Conforms to the following Product Specifications:
EN 55022: 1998 Class B
following the provisions of the Electromagnetic Compatibility Directive 89/336/EEC, tested and verified3-17-2006 at FCC accredited laboratory.
Industry Canada Compliance StatementCanada Digital Apparatus EMI Standard
This Class B digital apparatus meets all the requirements of the Canadian Interference-CausingEquipment Regulations.
Cet appareil numerique de la classe B respecte toutes les exigences du Reglement sur le materialbrouilleur du Canada.
Copyright and Trademark Disclosures
LP-100 is a trademark of TelePost Inc. Windows® is a registered trademark of Microsoft Corporation. Teflon® is aregistered trademark of E.I. du Pont de Nemours and Company. PICmicro® is a registered trademark of MicroChipTechnology Inc.
Material in this document copyrighted © 2007 TelePost Inc. All rights reserved. All firmware and software used in the LP-100, LP-100 VCP and LP-100 Plot programs copyrighted © 2004-2007 TelePost Inc. All rights reserved. MicroCodeLoader is a copyrighted program from Mecanique, http://www.mecanique.co.uk/.

3
Table of Contents
Introduction ............................................................................................................ 4
Parts List................................................................................................................. 5
Assembly Instructions ............................................................................................ 8
Initial Checkout .................................................................................................... 16
Setup/Calibration .................................................................................................. 18
Operation.............................................................................................................. 22
Circuit Description ............................................................................................... 27
Schematic ............................................................................................................ 29
Troubleshooting ................................................................................................... 31
Software................................................................................................................ 33
Specifications and CAL Table ............................................................................. 38
Warranty .............................................................................................................. 39
Appendix A .......................................................................................................... 40

4
IntroductionThe LP-100 is designed as an accurate instrument for monitoring station performance. It provides a number of unique features not seenbefore in a ham radio wattmeter.
The most obvious of these is the vector display. This display shows the complex impedance of the load in two ways. The top line of thedisplay shows impedance in polar form… i.e., magnitude and phase of the impedance. The bottom line shows the real and imaginarycomponents of impedance… i.e., R +jX. The parameters are displayed in a range of 0.1 to 999.9 ohms. Phase is displayed in 0.1degree increments from 0-180 degrees.
Features include…
• Fast, high contrast PLED display with bargraphs for power and SWR, along with numerical readout for both• Professional dBm / Return Loss display• 50 mW to ~3000W with three autoranging scales• Power display resolution of 0.01 to 1W depending on scale• Frequency coverage of 1.8-54 MHz, with automatic band-by-band correction• Z, R, |X| display from 0-999.9 ohms each• Separate coupler with 50 ohm ports for uncluttered desktop• Peak-hold numerical power readout with "hang" characteristic for power and SWR• SWR accuracy < .15 (5%) from about .1W to 2500W, .05 typical• Power accuracy is 5% typical at any rated power level or frequency from .5W to ~3000W after calibration, usable to 0.05W• Can be easily matched in the field to external standard to within 0.1% on each band• Power display is Fwd or Net power delivered to the load ( Fwd minus Ref power).• SWR Alarm system with set points for Off, 1.5, 2.0. 2.5, 3.0 and user setting. Includes “snooze” button for tuning, and power threshold.• Windows freeware Virtual Control Panel for software / remote control• Support within TRX-Manager for direct remote monitoring• Advanced automatic charting capability for SWR, RL, Z, R, X , theta and Smith Chart• Built-in bootloader to allow for firmware upgrades to be downloaded and installed.• Call sign screen saver to extend life of display• Direct input for bench testing & field strength measurements, -15 to +33 dBm.• Conforms to FCC Part 15 A & B, ICAS and CE radiated emission limits, tested and verified by accredited lab
This manual will address the assembly of the LP-100, initial checkout, calibration and operation. You may wish to read through thecircuit description and study the schematic before beginning assembly to familiarize yourself with the project. It is highly recommendedthat you thoroughly read through the Assembly section before even unpacking the LP-100 kit.
RoHS Statement
The EU adopted a set of standards for the “Reduction of Hazardous Substances” in July 2006. There is considerable confusion overwhich devices and companies are affected by the new rules. It is our opinion that home-built kits are exempt from this legislation, andthere may well be a further exemption under the heading “Measurement Equipment” for the LP-100. Also, since TelePost does not havea presence in Europe, we do not import to or export from a member State, as stipulated in the rules.
Regardless of these exemptions, every effort has been made to provide 100% RoHS compliant parts, PCBs and SMT assemblyprocesses on the LP-100. We recommend the use of standard Pb/Sn alloy solders for assembly of LP-100 kits, mainly for performancereasons. This is perfectly acceptable under the rules for “own use built equipment (hobbyist)”. Use of lead-free solder is alsopermissible, since the PCBs are lead-free, but be aware that special equipment and techniques are required to use lead-free solder,and PCB rework has a much higher chance of damaging the PCB.
In layman’s terms, the LP-100 is as lead-free as possible without compromising performance or long-term reliability, and builders inmember States are free to assemble an LP-100 with whatever solder they wish.
Hardware Upgrades
Starting with serial #101, the LP-100 uses an upgraded PIC processor, with twice the memory of the previous chip. This allows foryears of firmware development and added features. Any owner of an earlier LP-100 is entitled to a free upgrade to the new processor,but will need to do an additional calibration to take advantage of the new capabilities. As a convenience to any LP-100 owner, TelePostwill do the chip swap and a free recalibration if the owner returns the LP-100 to TelePost at his shipping expense, and pays for returnshipping ($12 for Fedex Ground insured). Alternatively, TelePost can ship a new processor to the owner in exchange for the old one, orfor a small charge if the owner wishes to keep the old processor as a backup. In this case, it is up to the owner to recalibrate his meter,and to save and re-program his CAL table into the new chip. For details on chip swapping, send an email to [email protected].

5
Parts List - Subject to change without notice.Pre-installed SMT partsQTY Part No. Description4 C9,10,12,13 0.01uF 50V2 R4,18 Resistor 26.7 1% .25W2 R5, 12 Resistor 49.9 1% .5W2 R6,21 Resistor 56.2 1% .25W2 R9, 27 Resistor 56.2 1% .5W2 R10, 20 Resistor 422 1% .25W1 R24 Resistor 174 1% .25W1 R30 Resistor 120 1% .25W1 R33 Resistor 32.4 1% .25W1 R35 Resistor 75 1% .25W1 D8 HSMS-2805 dual Schottky diode1 U1 AD83021 U9 AD83671 U10 Gali-74 MMIC1 T1 ADP-2-1 Transformer
Parts to be installed – main chassisQTY Part No. Description14 C1,2,5,6,7,11,14, 20,22,32,33,40,42,43 0.1uF 25 or 50V marked 1043 C3,27,41 10uF 25 or 50V1 C4 0.33uF 25 or 50V marked 3348 C8,21,28,29,30,34,38,39 0.01uF 25 or 50V marked 1037 C15,16,17,18,19,31,35 1uF 50V2 C23,24 0.001 marked 1022 C25,26 0.002 marked 2021 C36 330pF 50V marked 3311 D2 Rt. Ang. LED Red1 D3 Rt. Ang. LED Green1 D4 1N40011 D5 1N41481 RC1 ribbon cable assembly2 J1,P1 16-pin DIL header for display2 J2,7 BNC jack, rt. angle1 J3 Power jack 2.5mm1 J4 DB9 PCB mount1 J6 Dual RCA PCB mount2 JP1,2 2-pin SIL header2 Shorting jumper4 L1,2,3,7 1mH, 100mA molded choke (large green) (br-blk-red-gold) or
470 uH, 100 mA molded choke (large brown) (yel-viol-br-silver)
2 L4, 6 470uH, 30 mA molded choke (small green or brown) (yel-viol-br-gold)1 L5 1 mH, 30 mA molded choke (medium green)(br-blk-red-silver)
or 1mH, 100mA molded choke (large green) (br-blk-red-gold)1 Q1 2N44011 LCD-1 PLED display 20x22 R1,13 1M 1% 1/8w br-blk-blk-yel-br3 R2,41,42 10k 5% 1/8w br-blk-or3 R3,16,17 1k 5% 1/4w br-blk-red (may be 1/8w depending on board version)5 R7,11,14,34,36 1k 5% 1/8W br-blk-red1 R8 20k pot1 R15 22k 5% 1/8W red-red-or

6
QTY Part No. Description2 R19,29 4.7 5% 1/4W yel-viol-gold1 R22 150k 1% 1/8W br-grn-blk-or-br2 R23,25 10k 1% 1/8w br-blk-blk-red-br1 R26 6.34k 1% 1/8W blu-or-yel-br-br1 R31 100 5% 1/8W br-blk-br1 R32 174 1% 1/8 or 1/4W br-viol-yel-blk-br1 R37 57.6 1% 1/8 or 1/4W grn-viol-blu-gold-br (blue body)1 R39 120 5% 1W br-red-blk-blk-br (brown or rust colored body)1 RL1 Omron G5V-2-H1-DC51 S1 CEM-1212C Piezo transducer3 SW1, 2, 3 4mm tactile switch, rt. Angle3 Switch keycaps1 T2 Toroid core FT37-611 U2 LM78051 U3 18F26201 U4 TLC-271ACP1 U5 MAX6225BEPA1 U6 MAX232N1 U7 LM34DZ1 U8 MCP33041 Y1 Resonator 10 MHz1 #28 wire for xfmr (2) 6” (15.24cm) lengths – two colors1 Pwr Cable 2.5mm1 Enclosure Main Enclosure (top & bottom)1 PCB Main PCB w/pre-installed SMT parts1 Heatsink Heatsink for 7805 regulator2 IC Socket 8-pin sockets2 IC Socket 16-pin sockets (Socket not used for the relay)1 IC Socket 28-pin socket4 Rubber Feet Square
Parts to be installed – couplerQTY Part No. Description1 Enclosure Coupler1 PCB Coupler2 T1, 2 Toroid cores FT140-612 UHF Connector SO-239, Teflon®/silver2 BNC Connector UG1094/U2 BNC cable 6' (1.83m) M/M – RG58U4 R3, 4, 9,10 75 ohm 1% 1W (2512 SMT)8 R1, 2, 5-8, 11,12 301 ohm 1% 1W (2512 SMT)2 Nylon bushings One with 3/16” (4.76mm) hole, one with ¼” (6.35mm) hole, 3/16” (4.76mm) & 1/8”
(3.18mm) on serial #s after 200)6 Adhesive Teflon® tape 2 long and 4 short pieces (2 long & 2 short on serial #s after 200)1 Terminal Strip 2 lug terminal strip1 #20 wire for xfmrs (2) 45” (1.14m) lengths1 RG-142B/U Teflon® coax (1) 2” (5.08cm) length1 RG-316U Teflon® coax (1) 2” (5.08cm) length4 Rubber Feet Round1 Adhesive Label Coupler Top Label

7
HardwareQTY Part No. Description1 4-40 x 1.5” (3.81cm) threaded standoff (.625” (1.59cm) on serial #s after 200)1 4-40 x 0.75” (1.91cm) machine screw (serial #s after 200)14 #4 self-tapping screws – 1/4” (6.35mm) – plated (for coupler)14 #4 lockwashers (9 for coupler, 3 for main chassis)
(11 for coupler, 3 for main chassis starting about serial # 350)1 #4 split lockwasher for coupler PCB10 4-40 x 3/8” (9.53mm) machine screws – plated(8 for SO-239s, 2 for DB9)
(plus 1 for attaching voltage xfmr standoff starting about serial # 350)5 4-40 x 1/4” (6.35mm) machine screws – plated (3 for coupler, 1 for heatsink)
(1 fewer starting about serial # 350)9 4-40 nuts – large (for coupler)4 4-40 nuts – small (1 for coupler PCB, 3 for main chassis)16 4-40 x 3/16” (4.76mm) machine screws – black (for main chassis)8 4-40 x ¼” (6.35mm) threaded standoffs (for main chassis)6 #4 x ¼” (6.35mm) self-tapping screws – black (for main enclosure)1 #4 x 3/8” (9.53mm) self-tapping screw – black (for RCA connector)1 #4 Solder Lug (2 on serial #s after 200)
You should check all parts before starting to allow you to start the process of obtaining replacement parts as soon as possible. It is alsoa good idea to sort the parts in advance… egg cartons are handy for this (passive parts only). Many crafts stores, Like Michael’s, alsohave nice plastic cases with dividers at low prices. Note: parts subject to change without notice. For instance, there are a couple caseswhere a resistor is called out for 1/8W where the supplied one might be ¼W, as in R32 & R37. Also, the original part for R39 was acompact 1W resistor where the current part is larger. This is due to sketchy availability of the earlier parts. The PCB layout will berevised in the future if it becomes clear that the original parts will no longer be available. In the case of the larger resistors, just form theleads under the part as shown below if this happens. This can also happen with lead spacing on caps.

8
AssemblyImportant warnings – read this before starting assembly
You should visually inspect all the solder pads/traces with a magnifier for any etching problems. This is done before shipping, but Irecommend the builder do a second inspection as well. We also now do 100% continuity checks of all pads before shipment, and Irecommend the builder do this as well. This is a result of a couple bad boards found in production run #3. These two steps will takeabout 15 minutes, but could save a lot of work. To do the continuity check, turn the board upside down, and connect one lead of yourDMM to the ground plane. Touch each pad on the bottom that is not a thermal ground pad (one with a “+” shaped connection to theground plane). None of the normal pads should have continuity to ground except for two near T1, the SMT xfmr, which provides a DCpath to ground for those pads. NOTE: the dozens of little “vias” tie the top to the bottom ground planes, and these do not need to bechecked as they are supposed to be grounded.
All of the SMT components are pre-installed on the main board for your convenience. SMT parts are supplied wherever necessary forperformance or availability reasons. CAUTION: Be very careful handling this board to avoid damage to the installed parts. Anti-staticmeasures are highly recommended, such as use of an anti-static mat, grounded soldering iron and wrist band.
You may wish to clean the flux from the board after assembly, although it is not necessary with most modern solders. A toothbrush andalcohol are good for this. Only use rosin core solder. Use of acid core solder voids the warranty. Lead-free solder is OK, and the boardsare RoHS compliant, but it will be more difficult to remove parts without damaging the board should you have to.
Overview
Below is a parts layout of the main PCB. These markings match the silk-screening on the PCB, but are repeated here for clarity. Youcan also cross out the parts on this graphic as they are installed. Note: DO NOT use this manual for assembly of kits with serialnumbers before #101. Use LP-100 Manual Rev. B listed on the LP-100 webpage at www.telepostinc.com/lp100.html instead. Somepictures in this manual are of boards or components from earlier production runs. These may be slightly different than later versions.For instance, L8, R28, C44, and C45 were deleted on later versions, and C27 and J8 were changed.

9
Assembly cont’dI recommend approaching assembly in the following order…
Install all IC socketsInstall resistorsInstall capacitorsInstall connectors and switchesInstall 7805 regulatorInstall T2Install jumpers at DL1 and for PTTInstall chokes selectively as outlined in the instructions
This allows the board to remain flat during most of the construction. Following this order will also facilitate initial checkout. The chokeswill be selectively installed to allow for checkout of various sections of the circuit.
Checkout will follow this order…
Verify proper +5vdc before powering any devicesInstall L2, PIC and PLED and check display for proper PIC operationInstall L1, L3, U5, U7 and U8 and verify proper operation of ADCInstall L5 and U4 and verify proper power detectionInstall L7 and verify proper frequency counter operationInstall U6 and verify proper serial port operation
The above checks will require only a DVM and the Setup screens except for the power display check. To check the power display, youwill need a transmitter and completed coupler. I will list expected current drain in red at each step so that you can verify that nothing isshorted in each section. A current limited or fused power supply with 0.25 amp maximum fuse should be used during checkout.
To calibrate the power readings of the LP-100 will require a minimum of an accurate 50-ohm dummy load and a means to measure rfpower. You will need a diode peak detector or a calibrated oscilloscope to measure rf voltage across the load. An alternative would bean accurate reference wattmeter.
To calibrate the impedance gain and phase detectors you will also need a 25 ohm dummy load. This can be easily made up out ofinexpensive 3W, 5% metal oxide resistors, such as used in my LP-200 or the Elecraft DL-1. Alternatively, you can use a pair of 50 ohmdummy loads with coax adapters to allow them to be paralleled to provide 25 ohms. This calibration can be done with as little as 5W ofpower. This adjustment is not imperative, as the default value is quite acceptable.
SWR calibration requires setting offset and slope adjustments for the AD8302 gain detector. Calibration of the AD8302 phase detectorrequires a delay line of known electrical length. You can get pretty close by using a high quality piece of poly dielectric RG-58, andcalculate the electrical length in degrees using the following formula…
Phase = (360*L*F)/(984*VF)
Where Delay is in degrees, L is in feet and F in MHz. VF would be 0.66 for poly dielectric. A convenient length is about 6’ (1.83m),which would provide a delay of ~45 degrees (the center of the range) at 14 MHz. You will find more about calibration in the Calibrationsection. I am contemplating an inexpensive calibration kit in the $25 range, which would include a switchable dummy load PCB andpre-cut delay line. I will also calibrate any assembled LP-100 kit free of charge if you pay for return shipping.
You will need the following tools to complete assembly…
Adjustable soldering iron – 800 degrees maximum60/40 alloy solder… .020” (0.51mm) diameter recommended for thermal padsNeedle-nose pliersWire cuttersSmall Philips head screwdriverRazor knifeDigital Multimeter
NOTE: The LP-100 is what I would call an intermediate level kit. If care is taken, you should have no difficulty building it. I would peg theassembly time at about 8 hours total, plus some reading through the manual in advance, and some time for calibration. Take your time,and double-check your work. A change was made after serial #100 to make the thermal pads to ground easier to solder. The board isnow also RoHS compliant. This should not pose any problem. In fact, I find the newer boards easier to solder.

10
Assembly cont’dStep-by-step assembly instructions for main board.
Below is a picture of the assembled PCB. The SMT parts come pre-installed.
It is recommended that you print this manual to allow for easy reference while building, and to allow you to check off the steps as youcomplete them. There will also be a table of calibration values you can enter as you do the calibration. This will enable you to return tothe original settings should you need to in the future.
Make sure your work area is static-free to avoid damage to the pre-installed SMT parts. It is also advisable to wear an anti-static wristband. Refer to the parts placement graphic on page 6 or the above picture for questions regarding parts placement. You can zoom intothe pdf version of this document for easier parts identification if needed.
q Install all IC sockets, keeping the board flat as you go to avoid gaps.
q Install resistors. To avoid messiness when trimming leads, I would do about 6 at a time. If you are unsure of the colors used bysome of the manufacturers for the color code, measure the value with a DMM.
q Install all .01 uF caps (marked 103), in groups of about 6.
q Install all .1 uF caps (marked 104). This should be done in at least two batches. On some runs, these parts have formed leads. Youcan straighten the leads are just snap the part in as designed.
q Install remaining caps, leaving the 10 uF caps for last. Observe polarity on electrolytics. Referring to the component placementguide and picture may help with parts placement, for instance for C27 which was changed to an electrolytic.
q Install green and red LEDs. NOTE: Do not install these tight against the board. Because of manufacturing tolerances on theseparts, they may not line up with the front panel holes when installed tight against the board. It is desirable to leave about 1/16” ofspacing below the LEDs, so that they can be bent forward to line up if necessary.
11
Assembly cont’dq Install miscellaneous parts such as resonator, Piezo transducer, transistor, diodes, etc. NOTE: Remove the protective covering on
the transducer before using. Also, the “+” lead goes to the side with the jumper, per the placement guide. The outside leads of theresonator are interchangeable. Do not install chokes yet.
q Install connectors and switches, except for J4, the DB9 connector. You will probably have to prop sections of the board up toensure that the parts are flush with the board. Install the header on the PLED PCB. The header is installed on the back side of thePLED PCB with the long pins pointing away from the board.
q Install 7805 regulator. Attach heatsink to the regulator before installing on PCB, using 4-40 x ¼” (6.35mm)” machine screw andsmall hex nut. It doesn’t matter which side the nut is on. Position the heatsink to avoid D4.
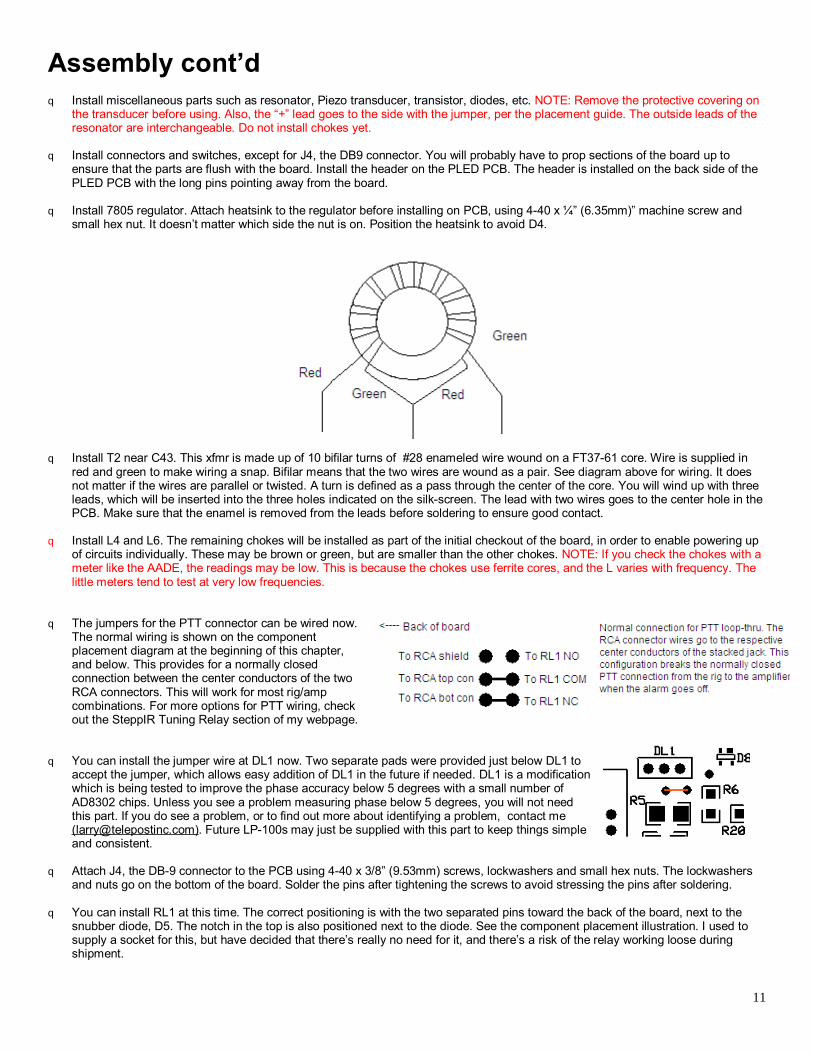
q Install T2 near C43. This xfmr is made up of 10 bifilar turns of #28 enameled wire wound on a FT37-61 core. Wire is supplied inred and green to make wiring a snap. Bifilar means that the two wires are wound as a pair. See diagram above for wiring. It doesnot matter if the wires are parallel or twisted. A turn is defined as a pass through the center of the core. You will wind up with threeleads, which will be inserted into the three holes indicated on the silk-screen. The lead with two wires goes to the center hole in thePCB. Make sure that the enamel is removed from the leads before soldering to ensure good contact.
q Install L4 and L6. The remaining chokes will be installed as part of the initial checkout of the board, in order to enable powering upof circuits individually. These may be brown or green, but are smaller than the other chokes. NOTE: If you check the chokes with ameter like the AADE, the readings may be low. This is because the chokes use ferrite cores, and the L varies with frequency. Thelittle meters tend to test at very low frequencies.
q The jumpers for the PTT connector can be wired now.The normal wiring is shown on the componentplacement diagram at the beginning of this chapter,and below. This provides for a normally closedconnection between the center conductors of the twoRCA connectors. This will work for most rig/ampcombinations. For more options for PTT wiring, checkout the SteppIR Tuning Relay section of my webpage.
q You can install the jumper wire at DL1 now. Two separate pads were provided just below DL1 toaccept the jumper, which allows easy addition of DL1 in the future if needed. DL1 is a modificationwhich is being tested to improve the phase accuracy below 5 degrees with a small number ofAD8302 chips. Unless you see a problem measuring phase below 5 degrees, you will not needthis part. If you do see a problem, or to find out more about identifying a problem, contact me([email protected]). Future LP-100s may just be supplied with this part to keep things simpleand consistent.
q Attach J4, the DB-9 connector to the PCB using 4-40 x 3/8” (9.53mm) screws, lockwashers and small hex nuts. The lockwashersand nuts go on the bottom of the board. Solder the pins after tightening the screws to avoid stressing the pins after soldering.
q You can install RL1 at this time. The correct positioning is with the two separated pins toward the back of the board, next to thesnubber diode, D5. The notch in the top is also positioned next to the diode. See the component placement illustration. I used tosupply a socket for this, but have decided that there’s really no need for it, and there’s a risk of the relay working loose duringshipment.

12
Assembly cont’dInitial checkout of main board.
q Step 1. Make sure that your bench is clean and the PCB is not sitting on any cut off component leads. Connect supplied powercable to a supply of 12-15 VDC. The dashed white lead on the supplied power cable is the +lead (center pin). Make sure you havea jumper installed at JP2. Using your DMM, check for 5.0 VDC at pin 3 of U2. The voltage should be within 0.25V of 5.0 VDC. ~7mA.
q Remove power and install L2, U7, Y1 and the PIC. Temporarily connect the PLED display. Be careful to make sure there is nothingon your bench which could short out anything on the PLED PCB. The ribbon cable should be oriented as shown in the interiorphoto below. Make sure that the ribbon connectors are centered on the headers at both ends.
q Step 2. Power the board up again, and verify that you are seeing the “splash” screen with version and copyright information,followed by the main LP-100 screen. The main screen should look like the screen on the photo at the top of the “Operation” sectionof this manual. If you don’t see the display, adjust the setting of R8. The proper setting is just at the point where the displayreaches maximum brightness. This will ensure that the brightness drops to the proper level when the first step of the screen savertimer is reached. A finer adjustment can be made after the screen-saver starts. The correct voltage for the PLED at the junction ofR8 and R15 is 3.0V at full brightness while displaying the main screen. It will drop to 2.4 – 2.5V in the screen saver mode. ~35mA
q Step 3. Install L1, L3, U5, and U8. ~82 mA. Temporarily enter the Setup mode. NOTE: On firmware versions before1.1.44, this isdone by briefly pressing the Mode (SW1) and Alarm (SW2) buttons almost simultaneously. The Mode button should be pressedslightly ahead of the Alarm button. Starting with firmware version 1.1.44, entering (or exiting) Setup is accomplished by holding theMode button for about a second until the screen changes. You should now see the first Calibrate screen, shown below for firmwareprior to 1.1.47. The second screen is for firmware 1.1.47 and after. This screen shows the reference voltage generated by U1 (thegain/phase detector), the Received Signal Strength Indicator voltage from U9 (the AGC chip) and temperature in degrees F and C(from the temp sensor, U7). Note: the RSSI reading shown in this photo is with RF power applied. The resting voltage with no RF isgenerally between .150 and .250. Newer firmware displays Temp in degrees C or F depending on the selection.
q Step 4. Install L5, L7, U4 and U6 and check the current. ~160 mA. If all is well, set the board aside until the coupler assembly iscompleted to allow checkout of the power detector circuit and frequency counter.

13
Assembly cont’dStep-by-step assembly instructions for the coupler.
Refer to the drawing and pictures during assembly of the coupler. The top picture is courtesy of Dario, N5QVF, and the lower right oneis courtesy of Stan, W5EWA. The sequence of pictures below is from Jack K8ZOA. Jack developed a clever way to ensure properwinding of the cores, both for spacing and coverage of the windings. Details of Jack’s winding methodology is found below.

14
Assembly cont’dConstruction of the coupler consists of only a few steps. The main components are the transmission line, toroidal transformers and theattenuator PCB. The most critical step is the winding of the transformers. They are wound with 26 turns each of #20 enameled wire.The cores are wound in opposite directions, i.e. they should be mirror images of each other. The windings should be evenly spacedover ~60% of the core, as shown later. The cores are supported by nylon bushings with Teflon tape over them, which are inserted intothe core centers after winding. If the wires are wound tightly, the cores should fit snugly, but should not have to be forced. The coresshould be wound by hand, don’t use any tools on the cores or wires as they may break.
Here are some details of the winding aid that Jack, K8ZOA developed. Hecreated the rule using Excel, using the following method.
Start with a fresh Excel workbook. Click on the upper left cell, and selectunderline. Right click and select copy, then highlight cells 2 thru 25 in row 1,right click and select paste. You should now have a stack of 25 lines in row 1.Adjust row height for 0.10" (2.54mm) between lines, which corresponds to arow height of 7.2. Do this by highlighting the 25 rows, select Format > Row >Height in the toolbar, and set row height to 7.2. This gives 60% coveragewhich matches the small Teflon tape size gap. Copy the cells and paste extracopies so that you will have at least two to use after printing.
The reduced size screen capture to the right shows what the screen shouldlook like before printing. Print the screen, cut to the rules out and tape to thecores. Use a white laundry marker or grease pencil to mark the lines on thetoroids. Jack recommends the use of a tight fitting cork to hold the windingsin place as you proceed, and to help flatten the wire against the core on theinside.
The bushing with the larger hole is mounted between the SO-239connectors, and supported by the RG-142 Teflon® coax. This piece of coaxforms the primary winding of the current sampling transformer. The othertransformer is supported by a 0.625” (1.59cm) standoff and 1.0” (2.54cm)screw which forms the primary of the voltage sampling transformer. One endof this standoff is grounded, and the other connects to the attenuator PCB.The transformer secondaries are wired as shown in the drawing. It isimportant that the cores be positioned as shown, and the wires be routed asshown. Improper routing or core orientation will affect performance,especially above 25 MHz.
q Install the two SO-239 UHF connectors using 4-40 x 3/8” (9.53mm) machine screws, #4 lockwashers and large #4 hex nuts for 7 ofthe mounting holes. The remaining hole, uses 4-40 x 3/8” (9.53mm) hardware and a solder lug as shown. The solder cups on theSO-239s should be facing upward.
q Solder two short pigtails about 1.5” (3.81cm) long into the center pin of the two BNCs. You can use cut ends from other parts forthis. Install the two BNC connectors using the supplied special hardware, including solder lugs, as shown.
15
Assembly cont’dq Prepare the two pieces of coax as shown in the diagram. Make sure that the shield wires don’t short out to the center conductor on
either end. RG-142 is double silver shielded. Leave a little shield showing on one end as shown in the pics above, and then wrap ashort pigtail of wire around it. It is safe to apply a reasonable amount of heat to the Teflon coax without worry about melting theinsulation.
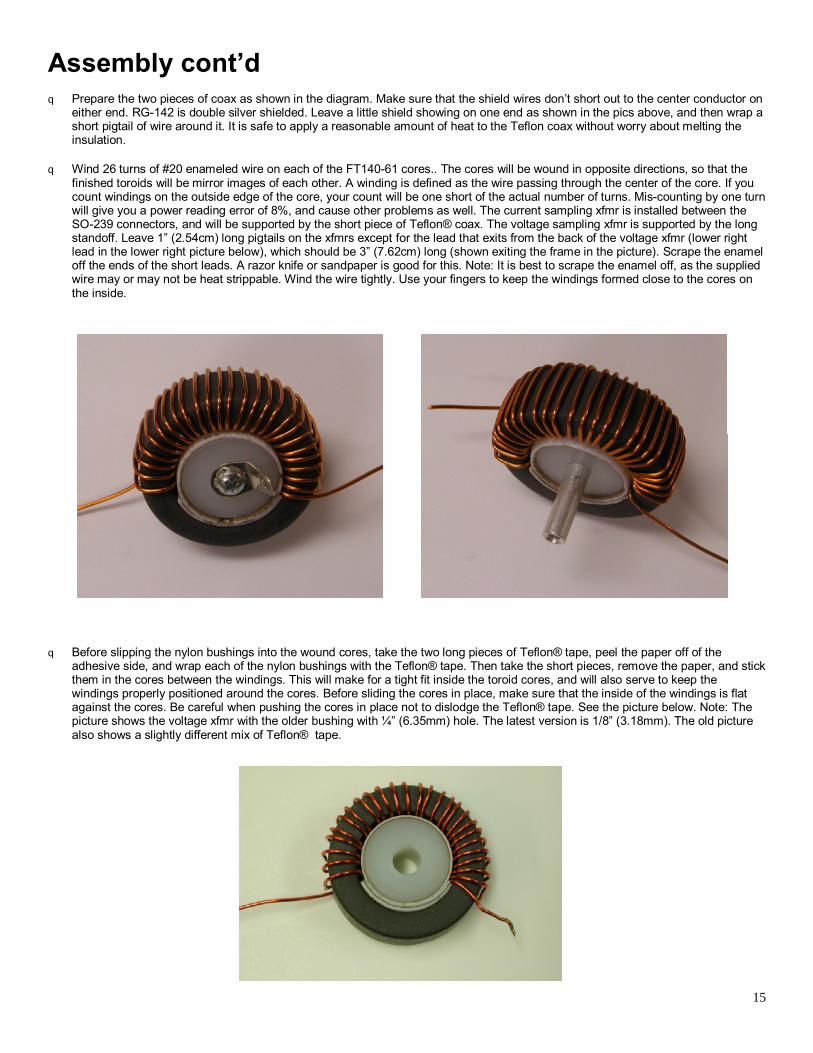
q Wind 26 turns of #20 enameled wire on each of the FT140-61 cores.. The cores will be wound in opposite directions, so that thefinished toroids will be mirror images of each other. A winding is defined as the wire passing through the center of the core. If youcount windings on the outside edge of the core, your count will be one short of the actual number of turns. Mis-counting by one turnwill give you a power reading error of 8%, and cause other problems as well. The current sampling xfmr is installed between theSO-239 connectors, and will be supported by the short piece of Teflon® coax. The voltage sampling xfmr is supported by the longstandoff. Leave 1” (2.54cm) long pigtails on the xfmrs except for the lead that exits from the back of the voltage xfmr (lower rightlead in the lower right picture below), which should be 3” (7.62cm) long (shown exiting the frame in the picture). Scrape the enameloff the ends of the short leads. A razor knife or sandpaper is good for this. Note: It is best to scrape the enamel off, as the suppliedwire may or may not be heat strippable. Wind the wire tightly. Use your fingers to keep the windings formed close to the cores onthe inside.
q Before slipping the nylon bushings into the wound cores, take the two long pieces of Teflon® tape, peel the paper off of theadhesive side, and wrap each of the nylon bushings with the Teflon® tape. Then take the short pieces, remove the paper, and stickthem in the cores between the windings. This will make for a tight fit inside the toroid cores, and will also serve to keep thewindings properly positioned around the cores. Before sliding the cores in place, make sure that the inside of the windings is flatagainst the cores. Be careful when pushing the cores in place not to dislodge the Teflon® tape. See the picture below. Note: Thepicture shows the voltage xfmr with the older bushing with ¼” (6.35mm) hole. The latest version is 1/8” (3.18mm). The old picturealso shows a slightly different mix of Teflon® tape.
16
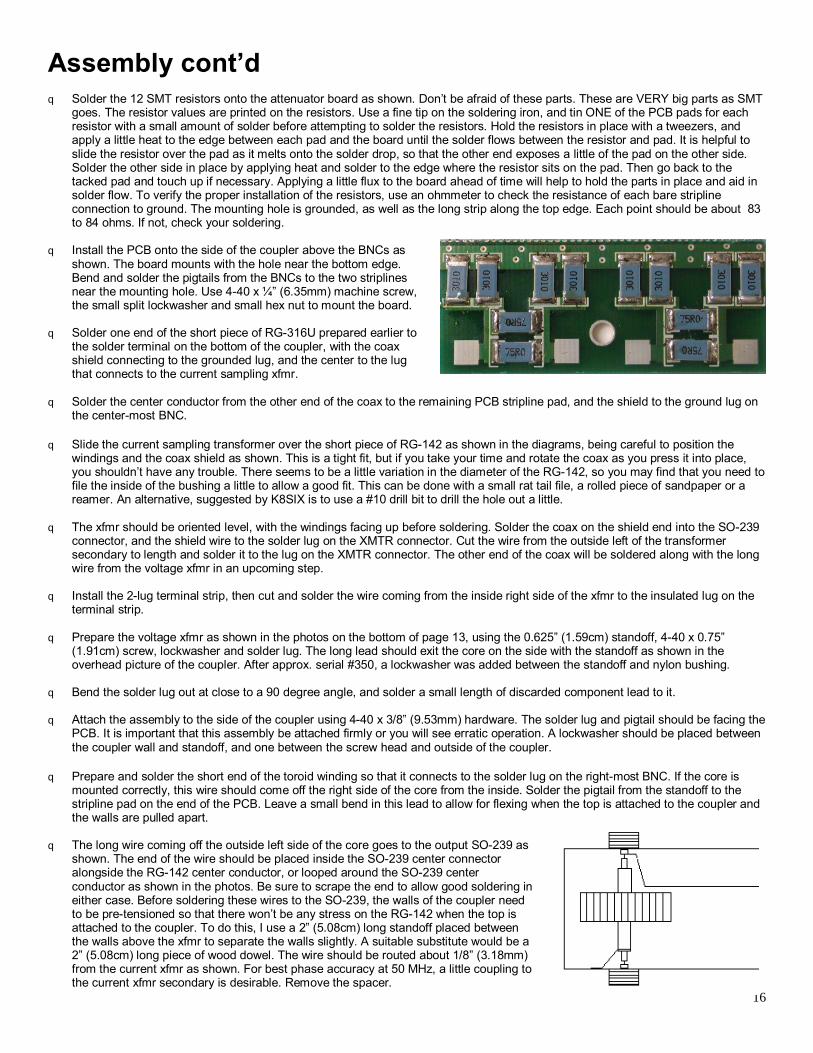
Assembly cont’dq Solder the 12 SMT resistors onto the attenuator board as shown. Don’t be afraid of these parts. These are VERY big parts as SMT
goes. The resistor values are printed on the resistors. Use a fine tip on the soldering iron, and tin ONE of the PCB pads for eachresistor with a small amount of solder before attempting to solder the resistors. Hold the resistors in place with a tweezers, andapply a little heat to the edge between each pad and the board until the solder flows between the resistor and pad. It is helpful toslide the resistor over the pad as it melts onto the solder drop, so that the other end exposes a little of the pad on the other side.Solder the other side in place by applying heat and solder to the edge where the resistor sits on the pad. Then go back to thetacked pad and touch up if necessary. Applying a little flux to the board ahead of time will help to hold the parts in place and aid insolder flow. To verify the proper installation of the resistors, use an ohmmeter to check the resistance of each bare striplineconnection to ground. The mounting hole is grounded, as well as the long strip along the top edge. Each point should be about 83to 84 ohms. If not, check your soldering.
q Install the PCB onto the side of the coupler above the BNCs asshown. The board mounts with the hole near the bottom edge.Bend and solder the pigtails from the BNCs to the two striplinesnear the mounting hole. Use 4-40 x ¼” (6.35mm) machine screw,the small split lockwasher and small hex nut to mount the board.
q Solder one end of the short piece of RG-316U prepared earlier tothe solder terminal on the bottom of the coupler, with the coaxshield connecting to the grounded lug, and the center to the lugthat connects to the current sampling xfmr.
q Solder the center conductor from the other end of the coax to the remaining PCB stripline pad, and the shield to the ground lug onthe center-most BNC.
q Slide the current sampling transformer over the short piece of RG-142 as shown in the diagrams, being careful to position thewindings and the coax shield as shown. This is a tight fit, but if you take your time and rotate the coax as you press it into place,you shouldn’t have any trouble. There seems to be a little variation in the diameter of the RG-142, so you may find that you need tofile the inside of the bushing a little to allow a good fit. This can be done with a small rat tail file, a rolled piece of sandpaper or areamer. An alternative, suggested by K8SIX is to use a #10 drill bit to drill the hole out a little.
q The xfmr should be oriented level, with the windings facing up before soldering. Solder the coax on the shield end into the SO-239connector, and the shield wire to the solder lug on the XMTR connector. Cut the wire from the outside left of the transformersecondary to length and solder it to the lug on the XMTR connector. The other end of the coax will be soldered along with the longwire from the voltage xfmr in an upcoming step.
q Install the 2-lug terminal strip, then cut and solder the wire coming from the inside right side of the xfmr to the insulated lug on theterminal strip.
q Prepare the voltage xfmr as shown in the photos on the bottom of page 13, using the 0.625” (1.59cm) standoff, 4-40 x 0.75”(1.91cm) screw, lockwasher and solder lug. The long lead should exit the core on the side with the standoff as shown in theoverhead picture of the coupler. After approx. serial #350, a lockwasher was added between the standoff and nylon bushing.
q Bend the solder lug out at close to a 90 degree angle, and solder a small length of discarded component lead to it.
q Attach the assembly to the side of the coupler using 4-40 x 3/8” (9.53mm) hardware. The solder lug and pigtail should be facing thePCB. It is important that this assembly be attached firmly or you will see erratic operation. A lockwasher should be placed betweenthe coupler wall and standoff, and one between the screw head and outside of the coupler.
q Prepare and solder the short end of the toroid winding so that it connects to the solder lug on the right-most BNC. If the core ismounted correctly, this wire should come off the right side of the core from the inside. Solder the pigtail from the standoff to thestripline pad on the end of the PCB. Leave a small bend in this lead to allow for flexing when the top is attached to the coupler andthe walls are pulled apart.
q The long wire coming off the outside left side of the core goes to the output SO-239 asshown. The end of the wire should be placed inside the SO-239 center connectoralongside the RG-142 center conductor, or looped around the SO-239 centerconductor as shown in the photos. Be sure to scrape the end to allow good soldering ineither case. Before soldering these wires to the SO-239, the walls of the coupler needto be pre-tensioned so that there won’t be any stress on the RG-142 when the top isattached to the coupler. To do this, I use a 2” (5.08cm) long standoff placed betweenthe walls above the xfmr to separate the walls slightly. A suitable substitute would be a2” (5.08cm) long piece of wood dowel. The wire should be routed about 1/8” (3.18mm)from the current xfmr as shown. For best phase accuracy at 50 MHz, a little coupling tothe current xfmr secondary is desirable. Remove the spacer.

17
Assembly cont’dq Make sure that all connections are soldered well, and that the cores are level. Slip the top on and attach with (14) 4-40 x ¼”
(6.35mm) sheet metal screws. Apply pressure the ends of the cover to prevent gaps from forming as the screws are tightened.
q Clean and wipe the top of the coupler. Carefully line up the top label and apply starting at one end and smoothing as you go toprevent the formation of bubbles.
Final Checkout and Assembly
Before going through the Setup screens, it is necessary to verify that the remaining basic circuits are working. Power up the LP-100,and verify that the current draw is correct. (160 mA ). Connect the Current and Voltage ports of the controller and coupler togetherusing the supplied 6’ (1.83m) coax cables. You may want to bundle the cables using electrical tape to make for a neater installation.One cable should be marked with colored tape at both ends so that the cables are always connected consistently in the future. I alsomark the Current jacks on both ends so that the colored cable always connects to Current. This prevents crossing of the cables, andalso eliminates errors due to cable variations.
Connect a 50 ohm dummy load to the LOAD port. Select the Fast mode for the display (press Fast/Slow button until you see a lowercase “w” after the power value), and apply a small amount of power. The Power and SWR bargraphs should deflect upward, and thenumerical readouts should display a number very close to the expected value. Switch to the vector display (press Mode button once),and you should see values close to 50 ohms for Z and R, and close to zero for phase.
Next, enter Setup mode as described in Initial Setup, and scroll to the Gain/Phase Zero screen. Advance to the Gain/Phase Zeroscreen by pressing Mode twice. You should see the band indicated in the lower left corner during transmission. This should match theband you are transmitting on. The Band indicator should remain on the last used band after transmission.
Using the Alarm Set button, set the Alarm for “1.5”. Remove the dummy load and transmit into the coupler at low power. The Red AlarmLED should light on the front panel, and the relay should click. If you have JP1 in place, the Piezo transducer should also sound. Note:the transducer will sound pretty loud since it’s not inside a case at this point. Reconnecting the dummy load will cancel the alarm after asecond or so. You can double-check the PTT connections with an ohmmeter at this time. The center conductors of the RCA connectorswould be normally shorted together, and open when the alarm sounds.
You are now ready to install the controller board in the case. Before installing the board, it is a good idea to sand away the paintoverspray inside the case, near the holes for the PCB and display. This will ensure good electrical contact to the case. Then, looselyinstall the 4-40 x ¼” (6.35mm) threaded standoffs on the bottom of the case using 4-40 x ¼” (6.35mm) black machine screws. Next,slide the board into the rear holes as you drop the front down toward the bottom. Be careful not to scrape the bottom of the board onthe front panel as you slide it.
Once the board is in place, align the front holes with the switches and LEDs, and screw the board down with four more 4-40 x ¼”(6.35mm) black screws. Tighten the bottom screws. The switch caps will be installed after calibration, in case a problem shows up thatrequires removal of the board from the case. The caps can be scratched during removal if they are installed.
Install the four remaining 4-40 x ¼” (6.35mm)standoffs on the front of the PLED PCB, usingfour 4-40 x ¼” (6.35mm) black machine screws,and tighten. Mount the PLED PCB to the frontusing the remaining black machine screws, andinstall the ribbon cable between the two PCBs asshown in the picture. Don’t forget to remove theprotective film from the PLED display surfacebefore mounting. Again, make sure that theribbon jack lines up properly with the header pins.The top cover will be installed after calibration.
Connections…Power: 11-16 VDC, center pin +, 2.5mm. The lead with the white stripe on the supplied cable is +PTT: Loop the PTT between your amplifier and rig through the LP-100 using RCA connectorsRS-232: Connects to computer… standard M-F straight through DB9 serial cable.Current/Voltage: Connect to corresponding jacks on the coupler using supplied RG-58U cables.
18
Setup/CalibrationNote: This section assumes you are using firmware version 1.1.1 or later, and of course the upgrade PIC processor. If you own a kitfrom the first production run (serial # 100 or older), then it is highly recommended that you upgrade to the new processor beforecalibration to avoid having to calibrate twice. This is a no charge upgrade (except for shipping cost).
Enter the Setup mode again as described in Initial Checkout. Below you will see a picture of each Setup screen along with a briefsynopsis of what it does and what the controls adjust. Remember, for firmware 1.1.45 or later, it is a single, long, Mode button press.
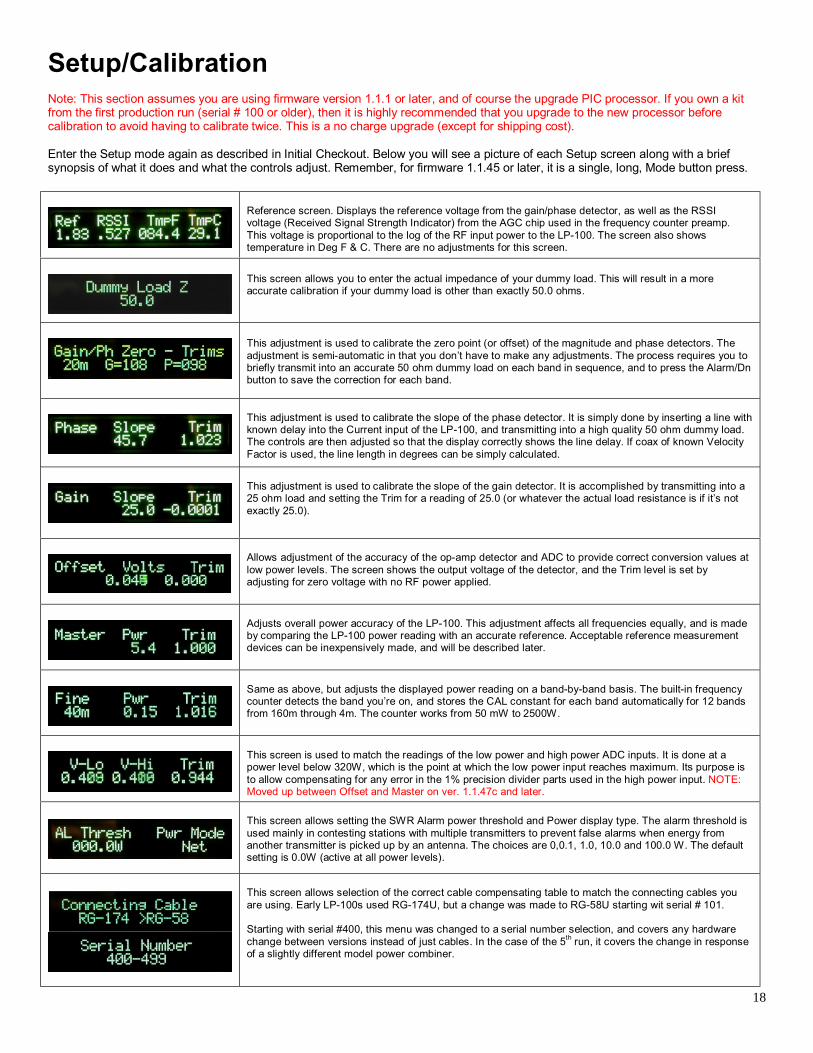
Reference screen. Displays the reference voltage from the gain/phase detector, as well as the RSSIvoltage (Received Signal Strength Indicator) from the AGC chip used in the frequency counter preamp.This voltage is proportional to the log of the RF input power to the LP-100. The screen also showstemperature in Deg F & C. There are no adjustments for this screen.
This screen allows you to enter the actual impedance of your dummy load. This will result in a moreaccurate calibration if your dummy load is other than exactly 50.0 ohms.
This adjustment is used to calibrate the zero point (or offset) of the magnitude and phase detectors. Theadjustment is semi-automatic in that you don’t have to make any adjustments. The process requires you tobriefly transmit into an accurate 50 ohm dummy load on each band in sequence, and to press the Alarm/Dnbutton to save the correction for each band.
This adjustment is used to calibrate the slope of the phase detector. It is simply done by inserting a line withknown delay into the Current input of the LP-100, and transmitting into a high quality 50 ohm dummy load.The controls are then adjusted so that the display correctly shows the line delay. If coax of known VelocityFactor is used, the line length in degrees can be simply calculated.
This adjustment is used to calibrate the slope of the gain detector. It is accomplished by transmitting into a25 ohm load and setting the Trim for a reading of 25.0 (or whatever the actual load resistance is if it’s notexactly 25.0).
Allows adjustment of the accuracy of the op-amp detector and ADC to provide correct conversion values atlow power levels. The screen shows the output voltage of the detector, and the Trim level is set byadjusting for zero voltage with no RF power applied.
Adjusts overall power accuracy of the LP-100. This adjustment affects all frequencies equally, and is madeby comparing the LP-100 power reading with an accurate reference. Acceptable reference measurementdevices can be inexpensively made, and will be described later.
Same as above, but adjusts the displayed power reading on a band-by-band basis. The built-in frequencycounter detects the band you’re on, and stores the CAL constant for each band automatically for 12 bandsfrom 160m through 4m. The counter works from 50 mW to 2500W.
This screen is used to match the readings of the low power and high power ADC inputs. It is done at apower level below 320W, which is the point at which the low power input reaches maximum. Its purpose isto allow compensating for any error in the 1% precision divider parts used in the high power input. NOTE:Moved up between Offset and Master on ver. 1.1.47c and later.
This screen allows setting the SWR Alarm power threshold and Power display type. The alarm threshold isused mainly in contesting stations with multiple transmitters to prevent false alarms when energy fromanother transmitter is picked up by an antenna. The choices are 0,0.1, 1.0, 10.0 and 100.0 W. The defaultsetting is 0.0W (active at all power levels).
This screen allows selection of the correct cable compensating table to match the connecting cables youare using. Early LP-100s used RG-174U, but a change was made to RG-58U starting wit serial # 101.
Starting with serial #400, this menu was changed to a serial number selection, and covers any hardwarechange between versions instead of just cables. In the case of the 5th run, it covers the change in responseof a slightly different model power combiner.
19
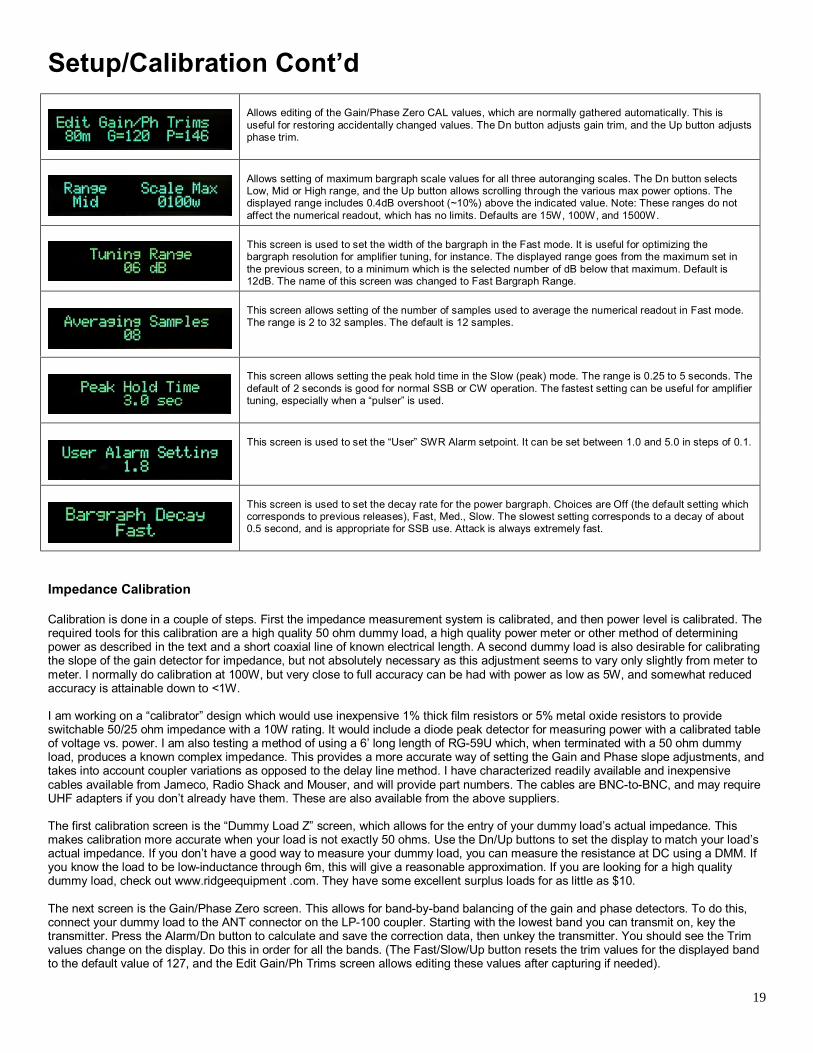
Setup/Calibration Cont’dAllows editing of the Gain/Phase Zero CAL values, which are normally gathered automatically. This isuseful for restoring accidentally changed values. The Dn button adjusts gain trim, and the Up button adjustsphase trim.
Allows setting of maximum bargraph scale values for all three autoranging scales. The Dn button selectsLow, Mid or High range, and the Up button allows scrolling through the various max power options. Thedisplayed range includes 0.4dB overshoot (~10%) above the indicated value. Note: These ranges do notaffect the numerical readout, which has no limits. Defaults are 15W, 100W, and 1500W.
This screen is used to set the width of the bargraph in the Fast mode. It is useful for optimizing thebargraph resolution for amplifier tuning, for instance. The displayed range goes from the maximum set inthe previous screen, to a minimum which is the selected number of dB below that maximum. Default is12dB. The name of this screen was changed to Fast Bargraph Range.
This screen allows setting of the number of samples used to average the numerical readout in Fast mode.The range is 2 to 32 samples. The default is 12 samples.
This screen allows setting the peak hold time in the Slow (peak) mode. The range is 0.25 to 5 seconds. Thedefault of 2 seconds is good for normal SSB or CW operation. The fastest setting can be useful for amplifiertuning, especially when a “pulser” is used.
This screen is used to set the “User” SWR Alarm setpoint. It can be set between 1.0 and 5.0 in steps of 0.1.
This screen is used to set the decay rate for the power bargraph. Choices are Off (the default setting whichcorresponds to previous releases), Fast, Med., Slow. The slowest setting corresponds to a decay of about0.5 second, and is appropriate for SSB use. Attack is always extremely fast.
Impedance Calibration
Calibration is done in a couple of steps. First the impedance measurement system is calibrated, and then power level is calibrated. Therequired tools for this calibration are a high quality 50 ohm dummy load, a high quality power meter or other method of determiningpower as described in the text and a short coaxial line of known electrical length. A second dummy load is also desirable for calibratingthe slope of the gain detector for impedance, but not absolutely necessary as this adjustment seems to vary only slightly from meter tometer. I normally do calibration at 100W, but very close to full accuracy can be had with power as low as 5W, and somewhat reducedaccuracy is attainable down to <1W.
I am working on a “calibrator” design which would use inexpensive 1% thick film resistors or 5% metal oxide resistors to provideswitchable 50/25 ohm impedance with a 10W rating. It would include a diode peak detector for measuring power with a calibrated tableof voltage vs. power. I am also testing a method of using a 6’ long length of RG-59U which, when terminated with a 50 ohm dummyload, produces a known complex impedance. This provides a more accurate way of setting the Gain and Phase slope adjustments, andtakes into account coupler variations as opposed to the delay line method. I have characterized readily available and inexpensivecables available from Jameco, Radio Shack and Mouser, and will provide part numbers. The cables are BNC-to-BNC, and may requireUHF adapters if you don’t already have them. These are also available from the above suppliers.
The first calibration screen is the “Dummy Load Z” screen, which allows for the entry of your dummy load’s actual impedance. Thismakes calibration more accurate when your load is not exactly 50 ohms. Use the Dn/Up buttons to set the display to match your load’sactual impedance. If you don’t have a good way to measure your dummy load, you can measure the resistance at DC using a DMM. Ifyou know the load to be low-inductance through 6m, this will give a reasonable approximation. If you are looking for a high qualitydummy load, check out www.ridgeequipment .com. They have some excellent surplus loads for as little as $10.
The next screen is the Gain/Phase Zero screen. This allows for band-by-band balancing of the gain and phase detectors. To do this,connect your dummy load to the ANT connector on the LP-100 coupler. Starting with the lowest band you can transmit on, key thetransmitter. Press the Alarm/Dn button to calculate and save the correction data, then unkey the transmitter. You should see the Trimvalues change on the display. Do this in order for all the bands. (The Fast/Slow/Up button resets the trim values for the displayed bandto the default value of 127, and the Edit Gain/Ph Trims screen allows editing these values after capturing if needed).

20
Setup/Calibration Cont’dThe next adjustment screen is Phase Slope. This adjustment sets the slope of the transfer curve of the phase detector so that themeasurement limits are correct. The above Zero adjustment ensures that zero degrees reads close to zero. This adjustment ensuresthat higher phase delays display accurately. Together they define the slope of the phase detection curve.
As mentioned in the Overview, adjusting the Phase Slope is simply a matter of matching the reading to a known delay line value. Again,the formula for determining delay in degrees is…
Phase Delay (Degrees) = (360*L*F)/(984*VF)
Where L is in feet and F in MHz. VF would generally be 0.66 for polyethylene dielectric. Foam dielectrics are generally have a VF ofabout .80. Check for the correct value of the coax type/brand you are using. A 6’ length with poly dielectric will provide a delay of near45 degrees at 14 MHz. This is a good range to use, as it places the phase display at about midrange.
Insert the delay line into the Current cable between the controller and coupler, using a BNC barrel connector. With a 50 ohm load, thephase should read close to the calculated value in degrees. If not, use the Dn/Up buttons to adjust the reading to the correct value.Leaving this setting at the default 1.000 will result in a maximum phase error of a few degrees over most of the frequency range.
The last impedance adjustment screen is called Gain Slope. This sets the slope of the gain detector so that it is linear with increasing Z.The adjustment requires a load other than 50 ohms, A convenient value is 25 ohms, which can be created easily by paralleling two 50ohm loads using a “T” connector. It is important when making this adjustment that there is no coax between the 25 ohm load and thecoupler “Load” connector, otherwise the line will transform the 25 ohm resistive load to some mixed R+jX value. The easiest way to dothis is to screw a UHF Tee connector directly to the Load connector, and then use adapters or lengths of 50 ohm coax to connect to thetwo 50 ohm loads. With the transmitter set to 20m, apply power and see what the impedance reads on this screen. If the displayedvalue is slightly higher or lower than the actual value, adjust the Dn/Up buttons to match the load’s actual Z (or resistance on a DMM). Ifa 25 ohm load reads 100 ohms, you have the current and voltage cables crossed. Correct this and start calibration over from the top.Remember to return to a 50 ohm load after this test. The expected trim value should be in the range -.0004 to +.0004, and will usuallybe even closer than that. Leaving this adjustment at 0.0000 will result in a maximum error of a few tenths of an ohm.
Power Calibration
Before starting calibration, it should be pointed out that calibration is not absolutely necessary. In calibrating hundreds of the assembledversions of the LP-100, it was found that the maximum error, as read on a HP-436A power meter, was +/- 1.5% before calibration on160-10m. The error on 6m can be more like +/- 5-10% before calibration. Of course, there is more consistency in coupler constructionon the assembled units than there would be with dozens of different builders, but it would be unlikely that the error would be more thanabout 5% if care is taken to follow the instructions on the coupler assembly.
The first test requires no test equipment. While in the Setup > Offset screen, adjust the Dn/Up buttons for a zero reading of thedisplayed voltage with no RF power applied. This nulls out the residual offset voltage of the op-amp detector.
The next screen allows for the adjustment of Master power sensitivity. This value will normally be near 1. Both the Master and Finepower adjustments have a range of +/- 12.5% in 0.1% increments.
The Fine sensitivity adjustment is made while transmitting into the LP-100. The adjustments affect the trim values for the band beingdisplayed. The frequency display follows the transmit frequency automatically when you transmit.
Before adjusting either the Mstr or Fine trims, it is necessary to provide an accurate means of measuring power that is independent ofthe LP-100. The simplest approach to this is to borrow a high quality meter like a Bird or Alpha to use as a reference, and connect itbetween the LP-100 and dummy load with a UHF male-male adapter. An even better approach, which is what is used for the factorycalibration, uses a calibrated 30 dB attenuator feeding a laboratory power meter (HP436A or Boonton 4200 in my case). The powermeter is calibrated against an NIST (National Institute of Standards and Technology) traceable reference calibration signal.
The most accurate simple method for doing this with common tools is to use a high quality dummy load with a diode peak voltagedetector and DMM. Here is the setup…

21
Setup/Calibration Cont’dThe following formula can be used to determine power.
P (watts)=(Vpk + .25) * (Vpk + .25) / 100
The diode is a 1N5711 Schottky diode, and the cap is .01uF. A convenient power level to use is 10W, as it is within the PIV specs of the1N5711. 10W produces a peak voltage of ~31 V across a 50 ohm load. The diode will handle up to 40W, but I have only tested thecircuit for accuracy at 10W. The voltage needs to be measured by a high impedance DMM with good accuracy. Most quality DMMshave > 1 meg input impedance, and many have > 10 meg input impedance.
The accuracy of this setup will mainly be related to the quality of the load. If the dummy load error is 5%, then the power calculation willbe roughly 5% off. You can roughly guess at the RF resistance of your dummy load by measuring it at DC with a DMM, although thatmethod will most likely be inaccurate at 50 MHz, and probably at 28 MHz as well. Make sure you measure the resistance with the loadat operating temperature. Also, all connecting cables / adapters need to be as short as possible. If you are unsure of the quality of yourdummy load, I recommend visiting www.ridgeequipment.com to look at some of their offerings. These are high quality loads, andfor a small fee they will supply you with a calibration table and chart of the return loss of the load.
The actual diode drop will very likely be within about .2V of the assumed value in the formula, for a voltage error of under 2%.If you don’t have access to these methods, you can send your completed LP-100 back to me for calibration if you are willing to pay forreturn shipping costs.
Before doing the power calibration, make sure that you have the correct style of connecting cables selected in the Connecting Cablescreen. The choices are RG-174 and RG-58. Early serial numbers used RG-174, but later models switched to RG-58. The ConnectingCable screen allows you to select the cable type that matches your meter, which then sets the correct cable compensation table for thatcable. Note: This screen has been changed to one where you select the serial number range of your meter. This allows compensationfor other small hardware factors that may change from run to run as well.
The first step in power calibration is to set the Master Trim value. This should be done on 3.5 or 7.0 MHz. Make sure the Fine Trimsetting for this band is 1.000, then transmit at a known power level and adjust the Master Trim for the correct power reading. The Mstrsetting will not be touched after this.
To adjust the Fine power constants for each band, simply transmit on the band of interest and adjust the Dn/Up buttons for the correctpower readings. Move through all bands in sequence until they have all been adjusted. You will notice that when you transmit now, theband indicator shows the band you are transmitting on and the Trim value changes automatically based on the band.
The Mstr Trim setting will typically be within 2% , and the variation of Fine Trim setting should be < 1% from 160-20m, <2% through10m and <10% on 6m. This is dependent on a number of factors to do with xfmr winding, positioning and wire routing, and so will varyfrom builder to builder… BUT the calibration routine will eliminate any variances. Setting the trims to the following values will typicallyresult in better than 5% accuracy without calibration through 10m…
Mstr – 1.000 160-80m – 1.000 60-30m – 0.998 20m – 0.995 17/12m – 0.993 10m – 1.000
6m can be left at 1.000, but it can be as much as 10% off without specific calibration.
The last screen to adjust is the Hi/Lo screen. This is used to match the power readings for the high and low power ranges. If youtransmit at a power of 100W, the two readings should roughly match. If not, adjust the Dn/Up buttons to match the readings. The Hireading has less resolution, so it will jump around a little and you may not get an exact match. If that’s the case, err on the high side.
Log all your constants for future reference, and you’re done. There is a page at the end of this manual to make that easy. NOTE:Normal use of the LP-100, including the flash programming of a new firmware version, will not disturb the saved CAL constants unlessyou have the MCLoader software set to “Program Data”. Jotting the values down will allow you to return to your original settings in caseyou accidentally change a value by mistake. I am planning a Windows utility to allow saving, editing and restoring of the CAL table.
Final details
If everything has checked out to this point, you can complete the assembly of the controller by adjusting the LEDs on the front panel toline up with the holes, and snap the switch caps in place on the switches. You can also attach the rear panel to the RCA connectorsusing the 4-40 x 3/8” (9.53mm) self-tapping screw provided. Don’t overtighten. You can now install the cover on the controller using the4-40 x ¼” (6.35mm) self-tapping screws provided. NOTE: Do not accidentally use the longer 3/8” (9.53mm) screw at the case locationnear the PLED display connector. It is imperative that this screw not be longer than ¼” (6.35mm) or it will short out the connector.
If you wish to add a power switch to the LP-100, you can do so at this time. I provided a 2-pin header to wire the switch to using a plug.In this way, the LP-100 PCB can be removed in the future by unplugging the switch.
22
Operation
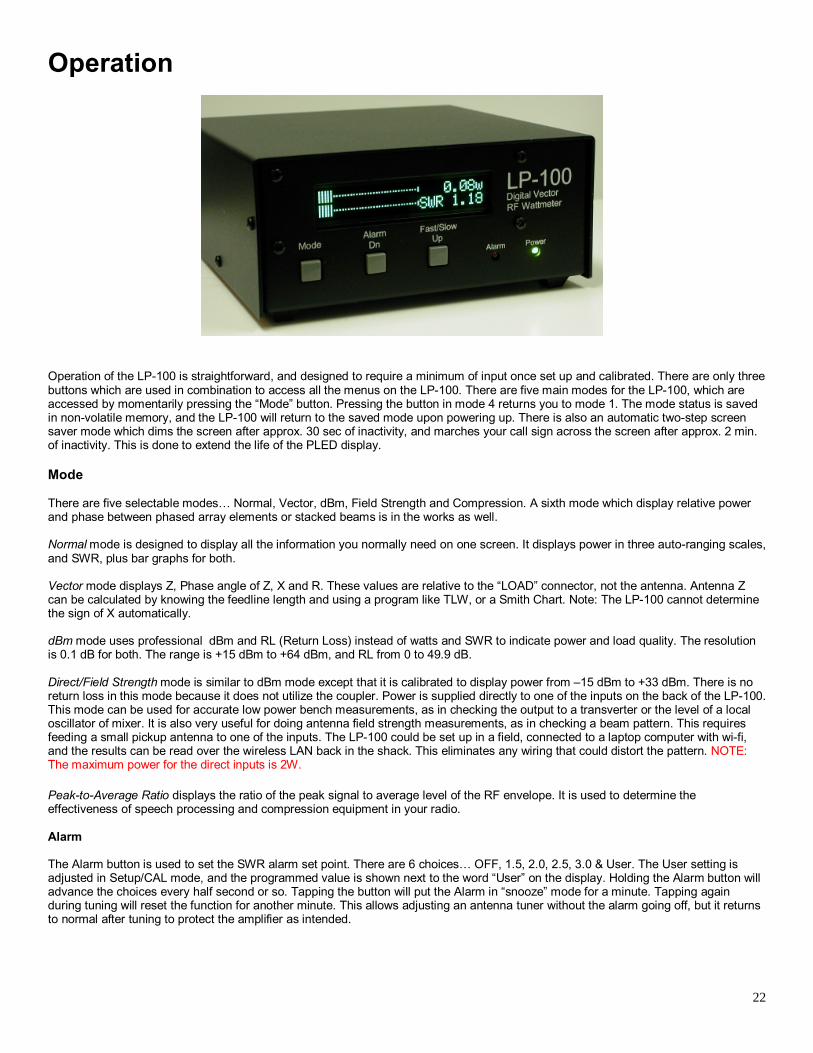
Operation of the LP-100 is straightforward, and designed to require a minimum of input once set up and calibrated. There are only threebuttons which are used in combination to access all the menus on the LP-100. There are five main modes for the LP-100, which areaccessed by momentarily pressing the “Mode” button. Pressing the button in mode 4 returns you to mode 1. The mode status is savedin non-volatile memory, and the LP-100 will return to the saved mode upon powering up. There is also an automatic two-step screensaver mode which dims the screen after approx. 30 sec of inactivity, and marches your call sign across the screen after approx. 2 min.of inactivity. This is done to extend the life of the PLED display.
Mode
There are five selectable modes… Normal, Vector, dBm, Field Strength and Compression. A sixth mode which display relative powerand phase between phased array elements or stacked beams is in the works as well.
Normal mode is designed to display all the information you normally need on one screen. It displays power in three auto-ranging scales,and SWR, plus bar graphs for both.
Vector mode displays Z, Phase angle of Z, X and R. These values are relative to the “LOAD” connector, not the antenna. Antenna Zcan be calculated by knowing the feedline length and using a program like TLW, or a Smith Chart. Note: The LP-100 cannot determinethe sign of X automatically.
dBm mode uses professional dBm and RL (Return Loss) instead of watts and SWR to indicate power and load quality. The resolutionis 0.1 dB for both. The range is +15 dBm to +64 dBm, and RL from 0 to 49.9 dB.
Direct/Field Strength mode is similar to dBm mode except that it is calibrated to display power from –15 dBm to +33 dBm. There is noreturn loss in this mode because it does not utilize the coupler. Power is supplied directly to one of the inputs on the back of the LP-100.This mode can be used for accurate low power bench measurements, as in checking the output to a transverter or the level of a localoscillator of mixer. It is also very useful for doing antenna field strength measurements, as in checking a beam pattern. This requiresfeeding a small pickup antenna to one of the inputs. The LP-100 could be set up in a field, connected to a laptop computer with wi-fi,and the results can be read over the wireless LAN back in the shack. This eliminates any wiring that could distort the pattern. NOTE:The maximum power for the direct inputs is 2W.
Peak-to-Average Ratio displays the ratio of the peak signal to average level of the RF envelope. It is used to determine theeffectiveness of speech processing and compression equipment in your radio.
Alarm
The Alarm button is used to set the SWR alarm set point. There are 6 choices… OFF, 1.5, 2.0, 2.5, 3.0 & User. The User setting isadjusted in Setup/CAL mode, and the programmed value is shown next to the word “User” on the display. Holding the Alarm button willadvance the choices every half second or so. Tapping the button will put the Alarm in “snooze” mode for a minute. Tapping againduring tuning will reset the function for another minute. This allows adjusting an antenna tuner without the alarm going off, but it returnsto normal after tuning to protect the amplifier as intended.

23
Operation cont’dFast/Slow
This button toggles between a fast responding numerical display, a peak-hold display and starting with firmware version 1.1.47, a tunemode. In all cases, the bar graphs remain in fast mode. The character after the numerical power readout indicates which mode you arein. A “W” indicates peak mode, a “w” indicates fast mode and a “T” indicates tune mode. Fast mode is best for taking accuratemeasurements with steady state signals, or for tuning an antenna tuner. Slow (peak) is best for CW or SSB operating. Note: The PeakMode is VERY fast, and can respond to a lip smack, mic button click, etc. Don’t be alarmed by this… it is normal, and allows the LP-100to provide an accurate indication of peak power. Unless a lot of compression is used, the peak reading will occasionally be somewhathigher than the indication with a carrier… as much as 30% depending on the ALC attack time in your rig, and power supply regulationof rig or amplifier. Tune mode is similar to Slow mode, except that the peak hold time constant is set to 0.25 sec as opposed to the holdtime set in Setup. The Fast and Tune modes use the preset bargraph range in the setup section, while the Slow mode shows a fixed 13dB range. The Tune mode is designed mainly for tuning an amplifier using a pulser, and locks the bargraph in high power range toeliminate range hunting. In this mode, you will normally not see any bargraph when using just an exciter. NET power correction is alsodisabled I this mode.
Setup
NOTE: The screens and ordering of the screens vary slightly from version to version of the firmware. These descriptionsare based on firmware version 1.1.47b or newer.
The calibration modes can be accessed through this menu. To enter Setup mode, press Mode and Alarm in quick succession with alittle overlap. This sounds tricky, but it’s easy to master. . NOTE: Starting with firmware version 1.1.44, entering (or exiting) Setup isaccomplished by holding the Mode button for about a second until the screen changes. Once in Setup mode, the Mode button is usedto cycle through the calibration modes. There are 8 setup screens…
Reference. This screen display the reference voltage from the gain/phase detector, the RSSI output from the counter AGC amplifierand temperature in degrees F & C. It is only mainly for diagnostics. Pressing the Alarm button in this mode resets the PIC, quite usefulwhen flash programming the PIC. Pressing the Fast/Slow button toggles the Temp display between degrees C and F.
Dummy Load Z. This allows you to enter the actual Z of your dummy load before calibrating. Most dummy loads are not exactly 50.0ohms, and this will improve the accuracy of your calibration by providing the correct reference.
Gain/Phase Zero. This screen allows band-by-band calibration of the balance of the gain and phase detectors. The process simplyrequires a short transmission on each band into a dummy load, and the pressing of the Alarm/Dn button (which acts as a Save buttonon this screen). The Fast/Slow/Up button becomes a Reset button in this mode, clearing the currently set corrections for the indicatedband. The LP-100 automatically gathers the correction factor and saves it indexed to frequency. The built-in frequency counterautomatically determines the frequency.
Phase Slope. Allows calibrating the phase detector. This requires a delay line of known value. In its simplest form, this can be done bycalculating the electrical length of an existing piece of coax in the 3-10’ range, and matching the readout to the calculated length at thefrequency used for the calculation. More on this in the Calibration section. I am also working on a calibrator kit to simplify this.
Gain Slope. Allows setting the slope of the magnitude for proper Z at a value removed from 50 ohms. This can be done with anyreasonable known load in the 25 or 75-100 ohm range. I am also working on a calibrator kit to simplify this.
Offset. Provides for calibrating the low level ADC converter accuracy. The screen shows the output voltage of the detector, and theTrim level is set by adjusting for zero voltage with no RF power applied.
Hi/Lo. This screen allows the matching of the direct and divided inputs to the ADC to account for any slight variations in the precisiondivider. NOTE: This menu moved up to this position starting with version 1.1.47.
Master. Adjusts the overall gain for power readout for all frequencies.
Fine. Adjusts gain by band for power readout, indexed by frequency. Frequency is determined automatically by a built-in frequencycounter.
AL Thresh/Pwr Mode. Allows selection of a power threshold for the SWR alarm. The normal setting is zero, meaning that the alarm willwork at any power level. Values of 0, 0.1, 1.0, 10.0, 100.0W. This is useful for multi-transmitter contest setups where significant energyfrom a nearby antenna might be present on the output of the LP-100 coupler. If the energy is from another band, the LP-100 will displaySWR, which will be high. By setting a power threshold for the alarm, it will keep the alarm from tripping on induced power. The PwrMode allows selection of Net or Fwd power. Net is Fwd-Ref… or delivered power. Fwd is the total incident power (including Ref) asdisplayed on typical wattmeters like a Bird 43.

24
Operation cont’dConnecting Cable (Serial Number). All LP-100s after serial #100 are supplied with RG-58U connecting cables between the coupler andmain chassis. Earlier versions used RG-174U. This screen allows selection of the appropriate cable. It selects the proper correctiontable for the cable loss vs. frequency. On later versions, this screen name was changed to Serial Number to compensate for otherhardware changes as well as cable type.
Edit Gain/Phase Trims. Allows editing of the Gain/Phase Zero adjustments, which are normally set automatically. The Dn button scrollsfrom 0-255 with wraparound for gain trim, and the Up button does the same for phase trim.
Range. Allows setting of maximum bargraph scale values for all three autoranging scales. The Dn button selects Low, Mid or Highrange, and the Up button allows scrolling through the various max power options. The displayed range includes 0.4dB overshoot(~10%) above the indicated value. Note: These ranges do not affect the numerical readout, which has no limits. Defaults are 15W,100W, and 1500W.
Bargraph Max Range. Sets the maximum excursion of the bargraph for the three automatically selected ranges. The choices are…
Low – 5, 10, 15, 20, 25WMid – 50, 75, 100, 125, 150, 175, 200, 225, 250WHigh – 500, 750, 1000, 1250, 1500, 1750, 2000, 2250, 2500W
Defaults are 15W, 100W and 1500W.
Each range includes 0.4dB overage, so that the 100W selection would extend to 110W, for example. Note: These settings do not affectthe numerical readout, which has no limits of any kind.
The center button selects the range, and the right button sets the power level, with wraparound to the beginning value.
Fast Bargraph Range. Sets the width of the bargraph in Fast mode from 2dB to 10dB. This allows tailoring of the bargraph resolution foramplifier tuning to simulate an analog meter. The response is still logarithmic to minimize jitter, and be more like the typical square lawanalog meter response. The default is 12dB.
Averaging Samples. Sets the number of samples for power averaging, adjustable from 2 to 32 samples. Default is 8 samples.
Peak Hold Time. Sets the hold time in Slow (peak) mode. Adjustable from 0.25 to 5 seconds. The default setting is 2 seconds fornormal SSB or CW operation.
Alarm User Setting. Allows setting an alarm threshold other than the preset choices. Any setting from 1.0 to 5.0 is permissible.
Bargraph Decay. Allows setting the decay time of the power bargraph. The default setting is Off, and provides instantaneous responseto any power change… even between dits at 60 wpm. The longest setting is Slow, and provides about a 0.5 second decay.
After entering the Setup mode, these various screens can be accessed by cycling through them using the Mode button. In Setup mode,the Alarm button becomes a Dn (or Save or Select) button and the Fast/Slow button becomes Up (or Reset). You can adjust the valueof the CAL constant for each screen using these buttons. The value of the CAL constant is stored in non-volatile memory. You may alsowant to write down your values on the page provided at the end of this manual.
Screen Saver
The screen saver dims the screen after approx. 30 sec of inactivity, and marches your call sign across the screen after approx. 2 min.of inactivity. This is done to extend the life of the PLED display. Check the software section of the manual for instructions onprogramming your callsign into the LP-100. Application of RF power will return the LP-100 to normal display. Alternatively, pressing theFast/Slow button will do the same thing if not in Calibration Mode. Note: Make sure you are in the desired Fast/Slow mode after usingthe button to cancel the screen saver.
Normal Operation
In normal operation, the LP-100 is left in the Normal mode. For SSB or CW operation, you should use the Slow (or peak-hold) Powermode. This mode will show peak power and SWR and hold them for the preset hold time unless a higher peak is detected, at whichtime the timer resets. Do not use this mode for steady-state power or SWR measurements, as it will be affected by momentary powerfluctuations that many modern rigs have.

25
Operation cont’dThe peak power reading can be as much as 30% higher than steady-state power readings taken in the Fast mode. This is because ofthe ability of the transmitter or amplifier to deliver short bursts of higher power due mainly to power supply regulation issues. This isespecially true of older amplifiers with unregulated power supplies, but also is affected by the ALC timing characteristics of modern rigsin both CW and SSB. The peak detector in the LP-100 is very fast, and will grab even the smallest peak.
Peak SWR will show values a little higher than steady-state at times due to the wide dynamic range of the LP-100. As power drops tobelow 100 mW during speech, the SWR detector can sometimes grab a higher peak because of the lower accuracy at extreme lowpower levels. The worst-case error in this case should be < .10. For best accuracy during measurements, use the fast mode and atleast .5 watts of power. The directivity of the LP-100 can easily be greater than 40 dB as you may have noticed during calibration, evenat low power.
For amplifier tuning, you should switch to Tune mode for fast update of both bargraph and numerical readout. The bargraph sampling inthe LP-100 is about 100 samples/second, and it will display a single dit at 60 wpm, or a string of pulses as with a pulser or keyer set forhigh speed. Full accuracy should be attainable down to about 500 mW for both power and SWR. Good accuracy should still bemaintained down to < 100 mW. Note: The bargraph scale is fixed on the High scale in this mode to prevent autoranging from cloudingadjustments. For antenna tuner adjustment, the fast mode is best, or dBm/RL if you prefer peaking rather than dipping.
Normally, the SWR Alarm should be set for 2.0:1 unless you purposely operate with an antenna that is close to 2.0:1 SWR. It is up toyou whether to enable the Piezo transducer, by using JP1. In any case, it is recommended that you loop your amplifier PTT through theLP-100. This not only helps protect your amplifier, but also the coupler in the LP-100… especially if you have an older amplifier which iscapable of delivering full power into a high SWR load.
Vector Mode
In the vector mode, you can see the impedance of the load in two ways. The top line of the display shows the magnitude and phase ofthe complex impedance, and the lower line shows the resistive and reactive components, ie. R + jX. It is important to note here that thesign of the reactive, or imaginary component cannot be determined automatically by the LP-100.
If you QSY up from your current frequency, and the reactance goes up, then the reactance is inductive (sign is “+”), and conversely if itgoes down, then the reactance is capacitive (sign is “-“). A suitable distance is QSY is about 100 kHz or more. The LP-Plot program hasthe ability to determine sign automatically, since it can control your transmitter’s frequency. When it plots a range of frequencies, it usesthe slope of the reactance curve to determine sign, and plots the results accordingly.
It is important to remember that the impedance displayed on the screen is referenced to the coupler LOAD port. This value is related toactual feedpoint impedance of the antenna by factors relating to the characteristic Z of the line, line length and loss. I plan to add theability to display actual antenna feedpoint Z into the LP-100 VCP and Plot programs by providing input boxes for feedline type andlength.
A simple way to provide reasonably accurate antenna Z on the LP-100 display would be to use a feedline which is a multiple of ½wavelength in electrical length. There would still be some residual error due to feedline loss, but it would give a better representation offeedpoint Z. I am considering adding a CAL screen to allow selection of feedline loss to compensate for this, and I may also allow thefuture entry of feedline length and Zo data. There will be more info on this and other Impedance related subjects in the upcomingAppendix A.
dBm/RL Mode
Displays power in dBm from +15 to +64 dBm, and load integrity in dB of return loss from 0 to 49.9 dB. Selecting this mode automaticallyreturns the Fast/Slow mode to Fast.
Direct Input/Field Strength Mode
Similar to dBm mode except that it is calibrated to display power from –15 dBm to +33 dBm. There is no return loss in this modebecause it does not utilize the coupler. Power is supplied directly to either one of the inputs on the back of the LP-100. This mode canbe used for accurate low power bench measurements, as in checking the output to a transverter or the level of a local oscillator ormixer.

26
Operation cont’dIt is also very useful for doing antenna field strength measurements, as in checking a beam pattern. This requires feeding a smallpickup antenna to one of the inputs. Selecting this mode automatically returns the Fast/Slow mode to Fast. NOTE: The maximumpower for the direct inputs is 2W.
Peak-to-Average Mode
This mode lets you determine the average power in a signal by taking 40,000 samples/second, and compares this to the peak power inthe signal. The result is displayed as a ratio in dB. I provide a couple test tones, which are available on my website athttp://www.telepostinc.com/Files/two-level-tone-loop3.zip and http://www.telepostinc.com/Files/loud_tone.zip. The loud tone is used toset the maximum power and proper ALC range (with processing OFF). The two-level tone is used to determine the peak-to-averageratio of the output signal. It can be played back on your PC, or converted to mp3 and played on a portable player. It can be played overa speaker into the microphone, or directly into the mic input. The two-level tone provides alternating loud and soft tones with 20 dBdifference in level. This tone should provide the following Peak-to-Average ratios vs. effective compression ratio.
Compression Ratio Peak-to-Average Ratio0dB 5.2dB5dB 5.6dB10dB 3.6dB15dB 2.2dB20dB 0dB
I plan more test tones with different characteristics in the future, which is why I decided to keep the display as Peak-to-Average asopposed to Compression, which would only be accurate with one test signal. I will provide additional tables such as the one above withthe additional test signals.

27
Circuit DescriptionThe LP-100 is unique in it’s design in several regards. Refer to the following block diagram during this discussion.
First, instead of using a coupler that produces forward and reflected power signals, the LP-100 uses a pair of transformers that samplecurrent in the transmission line and voltage across the load. The samples are split into two paths, which provide signals to both thegain/phase comparator and the power detector.
With a 50 ohm non-reactive load, the levels of these two signals will be virtually identical, and the phase between them will be zerodegrees. The combiner adds these two samples vectorially, providing a maximum output of 2x the input power with a perfect load, andproportionately less with less perfect loads.
The power sample is rectified in the Schottky diode detector, which uses a special dual diode package to eliminate errors associatedwith temperature tracking and forward / reverse voltage drop differences. The output of the detector is fed through precision voltagedividers to produce two power ranges, and in combination with a 12-bit A/D converter and precision 2.5V reference chip, provides aneffective resolution 12 to 13.6 bits (higher resolution on the lower range).
The power sample also feeds an AGC amp which provides a constant, clean 5v p-p sine-wave output signal over a 50dB+ range ofinput power. This signal feeds the frequency counter in the PIC to allow automatic frequency detection at all power levels. This allowsfor automatic band-by-band calibration of the power readout of the LP-100.
The AGC amp also provides a DC “Received Signal Strength Indicator” which is used for a number of level detection tasks within thePIC. The A/D converter also receives temperature information from the temp sensor to compensate for any residual temperaturerelated effects in the power detection circuitry.
The combiner also provides isolated signals to the gain/phase detector, providing 50dB of isolation between the signals, so that theycan be accurately sampled at the input of the gain/phase comparator without affecting each other. The gain/phase comparatorproduces a DC voltage which is proportional to the log of the magnitude difference between its inputs, and another which is proportionalto the phase difference between the inputs. These voltages are sampled by the A/D converter and the result is sent to the PIC over aSerial Peripheral Interface.
Remaining connections to the PIC include switch inputs for the three front panel switches, interfacing to the PLED display and an SWRalarm relay which is used to kill the PTT to your amplifier to protect both the antenna and amplifier. The SWR alarm also lights a frontpanel LED, and optionally can be jumpered to sound a piezo transducer. The PIC uses all these signals to calculate all the variousdisplayed parameters.

28
Circuit Description cont’dFinally, the PIC provides a standard RS-232 serial interface for remote control and monitoring of the LP-100. Functions of the LP-100can be controlled from a Windows® “Virtual Control Panel” program, either locally or over a network connection, including the internet.The PIC’s firmware can also be updated through downloadable hex files which can be “flashed” into the PIC’s memory. A programentitled MicroCode Loader (MCLoader), from Mecanique®, is provided to do this.
A Windows® charting program is also provided to allow graphing of any of the LP-100s parameters including Z, R, X, SWR and phaseangle vs. frequency. The Plot program also offers a Smith Chart display, and I plan to add a translation function to both programs toallow for automatic transformation of coupler load Z to antenna feedpoint Z. The programs will provide for inputting feedline length andtype for popular types of feedline. More on this is Appendix A.

29
Schematic Page 1

30
Schematic Page 2
Coupler Schematic

31
TroubleshootingBelow are some problems that have been reported and solutions. If you still have a problem, I am always available byemail at [email protected] and the newly formed LP-100 Yahoo Group is available at http://groups.yahoo.com/group/LP-100/For excessive current, always check for solder bridges and proper orientation of ICs first. If a step calls for more than one IC to beadded and current is excessive, remove the ICs and re-install one-by-one until you narrow the source of the high current.
Problem Suggested solution
No +5 VDC at Initial Checkout Step 1. Check wiring of U2 and D5, and that the white-striped wire on thepower cord is connected to the + lead of the supply.
Excessive current at Initial Checkout Step 1. Check for proper polarity on D5.
Excessive current at Initial Checkout Step 2. Check for proper placement of U7 and U3 (PIC).
Improper display at Initial Checkout Step 2. Check setting of R8 to make sure the contrast is in range. Checkthat Y1 is soldered properly. Check that the PLED cable isinstalled properly. If all this checks out, the PIC firmware may bebad. Try flashing with the latest firmware on the LP-100-Updatespage.
Excessive current at Initial Checkout Step 3. Check for proper placement of the added ICs.
Incorrect operation of buttons. Check for good ground lead connection on three tactile switches.
Incorrect values for RSSI or Temp. Check U5 & U8 for proper orientation. Check output voltage of U5at pin 6. It should be very close to 2.500 V. Check for properorientation of U7 for Temp. Check soldering around U9 for RSSI.
Excessive current at Initial Checkout Step 4. Check the added jumper between U4 pins 7&8 to make sure it isnot touching ground (on ser #s 1-100 only). Check R39 and C42for proper wiring.
Power reading is erratic Make sure C37 wasn’t installed. This part is shown on the silk-screening, but was deleted before production along with 4 otherparts. This is covered in the Overview paragraph at the top of theAssembly section. Also, make sure that the standoff on couplerxfmr T2 is firmly bolted down and that the short wire is also solidlyattached. Make sure that the two BNC connectors on thecontroller PCB are soldered properly.
Frequency counter is not registering the correct band Check U9 by looking at the RSSI voltage on the Reference CALscreen. It should vary with applied RF power. Normal voltages are~0.400V at 5W, ~0.660V at 100W. Also check the wiring of T2,and make sure the enamel has been removed from the wires, andthat the wires are properly soldered to the pads.
Temperature is not being displayed Check that U7 is installed properly. Remember, the silk-screeningis backwards for this part on serial #s 1-100.
Impedance display is backwards (ie., 25 ohms displays as 100ohms and vice versa).
Current and Voltage cables are reversed.

32
SoftwareConnecting to the computer
The LP-100 provides a RS-232 serial port. The serial settings are 38,400 baud, 8 bits, no parity, 1 stop bit. The required cable is astraight through (not crossover or null modem), with a male DB9 at one end and a female DB9 at the other. With typical motherboard orbus card provided serial ports, there are no settings required in the computer or driver, just in the application which controls the LP-100.In the case of the provided software such as LP-100 VCP and Plot, these settings are automatic except for com port selection. Any freecom port from 1-15 is acceptable.
If your computer doesn’t have a serial port, which is becoming increasingly the case, there is a simple solution as long as the computerhas a USB port, which is usually the case. A number of USB to serial adapters are available on the web or at computer/appliancestores. The LP-100 has been successfully used with a number of these. I can personally vouch for the Keyspan USA-19HS, although Idon’t know if they have a driver yet for the 64-bit version of Microsoft Vista. An inexpensive converter that some have reported goodresults with is the Y-105 from ByteRunner, www.byterunner.com. They cost $8.69 plus shipping as of this date, and provide fullhandshaking (not needed for LP-100, but useful for some rigs and devices) and Vista support. This adapter uses the Prolific chipset,which may not be supported in the future. ByteRunner also sells an adapter which uses the well supported FTDI chipset for about $18.These adapters are both much cheaper than the ones typically sold at computer stores, and should work well. I have been asked abouta USB port for the LP-100, and it would be easy to do, but since all ham software has native RS-232 com support, and older machinesdon’t have USB ports, I think a RS-232 port with an inexpensive USB adapter where needed is the most flexible choice.
The LP-100 has been used successfully over the Internet using serial device servers such as those offered by Lantronix and Digi. Ihave personally used several of the Lantronix models with no problems.
LP-100 VCP
The LP-100 VCP (Virtual Control Panel) is provided for computer or remote operation of your LP-100 wattmeter. The LP-100 VCPallows you to control the basic functions of the LP-100, and it also allows you to monitor the LP-100 parameters remotely.
The are three views for the VCP, selectable under the Style pulldown. The two shown above, plus one which shows all but the setupinfo. The Menu choices provide the following functionality…
Style: Selects among the three views mentioned aboveUpgrade: Launches the MCLoader program. This program can also be launched manually by adding a shortcut to the program.Help: A work in progress.
The setup controls include Com port selection, callsign entry and a polling rate slider, adjustable from 50 msec to 5 sec. The normalsetting is 80 msec, which gives an update rate of 12 samples per second. On slower computers, or over the internet, you can use aslower rate.
Monitoring…Power SWRImpedance PhaseResistance ReactanceAlarm Status
Control…Alarm SetFast/Slow ModeCall Sign Entry

33
Software cont’dThe buttons on the VCP perform the following functions…
* Range: Allows switching the maximum power range of the display. Choices are 25, 250, 2500W and Auto for autoranging.* Alarm: Sets the SWR Alarm set point. Choices are Off,1.5,2.0,2.5,3.0. If the alarm on the LP-100 trips, the Alarm button turns red.* Fast/Slow: Switches between normal and peak-hold modes. The current mode is displayed under the power reading.
There are two other versions coming for use with TRX-Manager. The first, called LP-100 VCP Slave, allows the LP-100 to broadcast itsdata to TRX-Manager for display inside TRX-Manager, either locally or over the internet. The other, LP-100 VCP Master, allows the LP-100 to use TRX-Manager’s remote telnet facility to make a remote connection between the LP-100 and the VCP. In addition to the LP-100 VCP, you can communicate with the LP-100 with a terminal program or your own software using the following commands…
;A? Increments Alarm Set Point selection;M? Increments Mode selection;F? Toggles Power Fast/Slow selection;C “Callsign” ? Sets callsign, where “Callsign” is a 6-digit alphanumeric value. Examples…;CN8LP ? ;CWA1ABC? (Add spaces to pad out to 6 digits);P? Poll for data. Example of response…;1457.00,49.3,005.0,2,N8LP ,0,2,61.6,1.02From left to right, the comma separated values represent…
Power, Z, Phase, SWR Alarm Set Point: 0=off, 1=1.5, 2=2.0, 3=2.5, 4=3.0, Callsign (6 digits with space padding), Power range: 0=High,1=Mid, 2=Low, Peak Hold Mode: 0=Fast, 1= Peak Hold, dBm, SWR
The serial settings are 38,400 baud, 8 bits, no parity, 1 stop bit. NOTE: Firmware versions before 1.0.3 used a baud rate of 19,200 anddid not report dBm or SWR values.
MicroCode Loader
Before attempting to flash new firmware, make sure the connection between the LP-100 and PC is solid.You can do this by running the VCP program. MicroCode Loader works with the MCLoader bootstraploader program installed on your PIC. It allows the user to easily update the firmware in the LP-100. Thecorrect settings for MicroCode Loader, found under the Options pulldown, are as shown. NOTE: Makesure you settings match these before starting. If you select Program Data, the factory defaults will beloaded into your CAL constant table.
All that is required is to download the latest version of the firmware from my website, save it to aconvenient folder, such as C:\Program Files\LP-100-VCP\Updates and then load the file into MCLoaderusing the File>Open menu. Note: It is important to open the file you want each time you launchMCLoader, or else it will start up with the last used file, and you may forget to open a new file andreprogram your LP-100 with an older version. It is even possible that you might have a file from another device loaded, since MCLoaderis used by other manufacturers as well.
Once MCLoader is running, and you have the correct firmware file open, you need to set the correct LP-100 com port for the LP-100,and set the Baud Rate to 19,200 (under Options). When all of this is done, click on Load>Program. You will see a message to Resetthe PIC. This is done on older firmware by cycling the power to the LP-100. On firmware after ver. 1.1.47b, you can do a software resetby entering Setup (hold Mode button for 1 second) until the first CAL screen is displayed, release the mode button and then pressAlarm. A progress bar in MCLoader will show the progress of the programming, and the LP-100 will start again when programming isfinished. The “Splash” screen will now indicate the new version at startup. During programming, the LP-100 displays “PIC Reset” if thesoftware reset is used.

34
Software cont’dLP-100 Plot
Plot version 0.99 is available for download on the LP-100 Current Software page at http://www.telepostinc.com/LP-100-Update.html.
The LP-100 Plot program is designed to interface between your rig and the LP-100 Digital vector Wattmeter, to enable scanning ofantennas or other loads and displaying performance parameters versus frequency. The program is not limited in terms of the frequencyrange which can be scanned, but of course when an antenna is the load, you must limit the transmit frequencies to bands you arelicensed for. The first second plot above is shown in Diagnostic display mode, and the second in Normal mode. These options arechosen in the Setup menu.
Control of the rig is provided in two ways. Kenwood and Elecraft radios can be directly controlled by the Plot program. Other rigs can becontrolled with linking to several popular CAT/logging programs... TRX-Manager, DXLabs Commander and Ham Radio Deluxe (HRD).Transmit mode is also selectable. For most rigs, FSK is a good choice, but AM and CW are also available. To use CW, you willprobably need an interface which uses the RTS or DTR handshaking pins of a serial port for keying, either homebrew or part of a riginterface like RigBlaster. In the case of the Elecraft K2, the "tune" mode is used, since the rig doesn't support FSK or AM modes.
The Plot program can display either raw data, or attempt to determine sign of reactance/phase based on impedance and phase slopes.This works quite well for most antennas, and in the cases where it fails, it's pretty easy to see the bad points. These points can be fixedby clicking on each bad point, which reverses the sign of that point.
Display types are...
Linear... points are connected by straight linesSpline... points are connected with a cubic spline functionBest Fit... Curve fitting using 4th order polynomialexpression
Display modes are...
R+jX... Resistance and ReactanceImpedance (Z)... Magnitude and phase angleSWRReflection CoefficientReturn LossSmith Chart
Scanning parameters...
Start Freq.Stop Freq.Step SizeSample Time
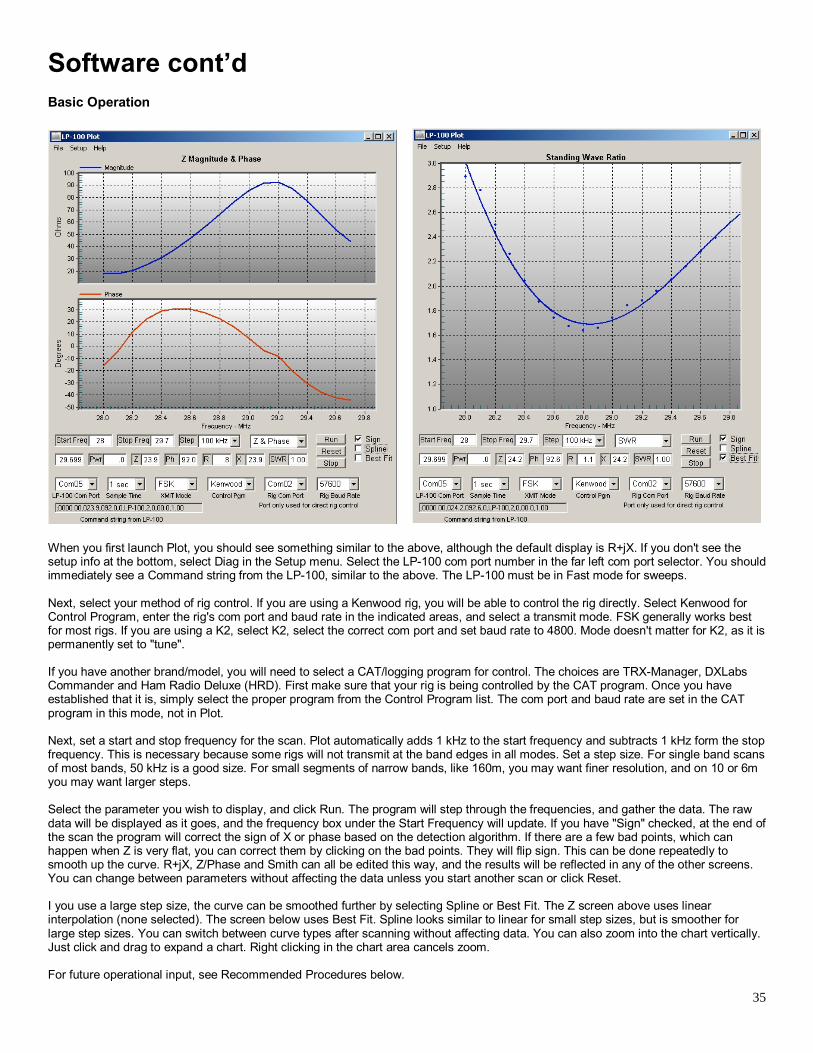
35
Software cont’dBasic Operation
When you first launch Plot, you should see something similar to the above, although the default display is R+jX. If you don't see thesetup info at the bottom, select Diag in the Setup menu. Select the LP-100 com port number in the far left com port selector. You shouldimmediately see a Command string from the LP-100, similar to the above. The LP-100 must be in Fast mode for sweeps.
Next, select your method of rig control. If you are using a Kenwood rig, you will be able to control the rig directly. Select Kenwood forControl Program, enter the rig's com port and baud rate in the indicated areas, and select a transmit mode. FSK generally works bestfor most rigs. If you are using a K2, select K2, select the correct com port and set baud rate to 4800. Mode doesn't matter for K2, as it ispermanently set to "tune".
If you have another brand/model, you will need to select a CAT/logging program for control. The choices are TRX-Manager, DXLabsCommander and Ham Radio Deluxe (HRD). First make sure that your rig is being controlled by the CAT program. Once you haveestablished that it is, simply select the proper program from the Control Program list. The com port and baud rate are set in the CATprogram in this mode, not in Plot.
Next, set a start and stop frequency for the scan. Plot automatically adds 1 kHz to the start frequency and subtracts 1 kHz form the stopfrequency. This is necessary because some rigs will not transmit at the band edges in all modes. Set a step size. For single band scansof most bands, 50 kHz is a good size. For small segments of narrow bands, like 160m, you may want finer resolution, and on 10 or 6myou may want larger steps.
Select the parameter you wish to display, and click Run. The program will step through the frequencies, and gather the data. The rawdata will be displayed as it goes, and the frequency box under the Start Frequency will update. If you have "Sign" checked, at the end ofthe scan the program will correct the sign of X or phase based on the detection algorithm. If there are a few bad points, which canhappen when Z is very flat, you can correct them by clicking on the bad points. They will flip sign. This can be done repeatedly tosmooth up the curve. R+jX, Z/Phase and Smith can all be edited this way, and the results will be reflected in any of the other screens.You can change between parameters without affecting the data unless you start another scan or click Reset.
I you use a large step size, the curve can be smoothed further by selecting Spline or Best Fit. The Z screen above uses linearinterpolation (none selected). The screen below uses Best Fit. Spline looks similar to linear for small step sizes, but is smoother forlarge step sizes. You can switch between curve types after scanning without affecting data. You can also zoom into the chart vertically.Just click and drag to expand a chart. Right clicking in the chart area cancels zoom.
For future operational input, see Recommended Procedures below.

36
Software cont’dSaveAs/Export/Print Dialog
This screen is accessed under the File menu. It allows saving and printing of the plot results in a variety of formats. The basicprocedure for its use is to select the file type at the top, select a destination and size, and then click export. If you select Text/Data andFile as the destination, a standard Windows explorer type file dialog will appear, where you can navigate to the folder you want andname a file, etc. When you click Export, you be given more options for the file format. This is also the case for ClipBoard destination.
When saving pictures, JPG and PNG produce the smallest files. Also, changing the size to 500 x 414 will make smaller picture files.When Printer is selected, the first radio button under Object Size will change to Full Page. Click on Millimeters or Inches to produce asmaller picture. Initially the size will be half size on width and height. You can change dimensions, but you have to keep the ratio thesame or the picture will be distorted. Full Page can be useful for Smith charts if you want to add other data manually to them. Generally,half size is better. When you click on Export, you will see a standard Windows Printer Dialog.
See Recommended Procedures for more info.
Recommended Procedures
* Select 1 sec for sampling unless you have a SteppIR antenna. Longer delays between samples allow a SteppIR to tune beforesamples are taken. 2-3 seconds are good. If your rig is sluggish when using a CAT program, a longer sample time is also necessary.
* If you are plotting R+jX or Z/Phase, I suggest starting with Spline off and running a sweep. If there are any sign detection errors,correct by clicking on the bad points. It's easier to see these without Spline on. A "hand" will appear when you hover over the point.Clicking will reverse the sign. You can do this repeatedly to toggle the point. How can you tell the sign is "bad"? Generally speaking, Xor Phase never "bounce" off of zero or swing radically through zero (like from +20 to -20) over a 50 kHz span. If this happens, reversethe first point after the bounce or error, and any others as necessary to make a smooth curve. With a little practice it will become easyto spot a problem. You can double-check your result by looking at the Smith Chart as well. The curve should be smooth and semi-circular. Reactance / phase will generally cross zero at a resonance point (peak or dip in Z or Resistance). Generally, a mistake willusually only happen when the resonance point is broad or ambiguous... or very narrow as in a screwdriver antenna. With very narrowantennas, select 10 kHz step size. After fixing the curve, you can display other screens as you like, and save or print them. The datawill remain until you run a new scan, press Reset or close the program.
* To stop the program while in a sweep, press Stop. You may have to click it a few times for it to register.
* When saving pictures, I recommend jpg or png. For a given size picture, png will produce the smallest file. The default size is 1000 x828. It may be more convenient to save a quarter size picture, ie. 500 x 414. You can enter the values manually. For a text file Irecommend List format, with Comma Separated Values. This can easily be imported into Excel. Printing will be faster by selecting achoice other than Full Page, which produces a picture size based on the screen resolution, but you can print full screen if desired. Thismay be useful for Smith Charts if you plan to develop a matching network from the plot. BTW, in the future I plan to offer this feature inthe program, along with transmission line transformations based on length.
* Make sure any internal antenna tuner in your rig is off when making plots, or else the results will not be accurate.
* It is recommended that the CAT program, if selected, be running before starting a sweep.
* If results appear erratic, try a larger step time. I found no problem at 1 second with my K2 or TS-480S using either direct or CATcontrol, but other rigs may vary.

37
Software cont’dPolarPlot:
PolarPlot is a freeware program written by Bob Freeth, G4HFQ. It is designed mainly to create polar antenna plots from power samples,but it can also produce histograms of power over time. Combined with the nifty Field Strength feature of the LP-100, PolarPlot providesa slick way to plot beam patterns, calculate gain, etc. I have added support for PolarPlot in LP-100_VCP ver. 1.0.7.
Here are some links to PolarPlot 3.2.0 for downloading the program and help file.
http://www.g4hfq.co.uk/ - Bob’s main web pagehttp://www.g4hfq.co.uk/download.html – download pagehttp://s4468.gridserver.com/g4hfq/PolarPlotSetup.exe – direct link to installation filehttp://www.g4hfq.co.uk/plphelp/plphelp.htm – direct link to help file
I will not go into detail here on the use of PolarPlot, but I will briefly discuss the basic operation as it pertains to the LP-100. The basicsetup would be to set the LP-100 up for operation in Field Strength mode (sampling antenna plugged into one of the ports on the backof the main LP-100 chassis). This will allow you to plot received levels in the –15 dBm to +33 dBm range. This range should work wellfor HF/6m antenna plotting. The sampling antenna can either be the beam under test, or a small dipole. In the case of the beam, aneighbor in the far field (~10 wavelengths away) or a remote transmitter of sufficient power supplies the signal. Alternatively, thesampling antenna can be a small dipole, with the transmitter connected to the beam. In this case, good isolation of the feedline to theremote antenna would be needed, or the LP-100 located remotely with a laptop computer which would allow remote control of the LP-100.
To use PolarPlot with the LP-100, you just need to set the LP-100 up for Field Strength measurement, launch VCP and then launchPolarPlot. In PolarPlot, you select LP-100 by clicking on the Choose Input button, and clicking on the LP-100 entry. A "dB Meter" dialogbox will pop up showing 9999 as the current signal level from the LP-100. Transmit with the beam pointed at 0 degrees (front), anddouble-click on Calibrate. You will see a new reading in the dB Meter window. Click on the wide button that says "Calibrate the currentreading as 0dB". This will set the outer 0dB ring of the plot to maximum.
Next, set the Rotation Time slider for the time it takes your rotator to turn 360 degrees. All that is necessary now is to start the rotator at0 degrees and click the "Collect Data" button at the same time. If your rotator is not consistent in its timing, you can set the time for alittle longer than a rotation takes, and when the rotator reaches 360 degrees, click on the Halt Collection button, and then the Rescalebutton. This will rescale the plot both in amplitude and azimuth, spreading the collected data equally over 360 degrees. It also "fattensup" the dotted curve. There is no harm in using this button just to fatten up curves, even if your rotator is consistent.
Double clicking in the plot area will open a setup screen where you can change colors, etc. I find making the lines gray and the plots redprovides better contrast, but you can play with it.
Refer to Bob's help file and the LP-100 manual for more info, or email me for help. Bob and I are both interested in feedback on this.

38
Specifications(after factory calibration, preliminary data subject to change without notice)
Useful Power Range: 0.05W to ~ 3000WNominal Impedance: 50 ohmsAbsolute Power Accuracy: 5% or better above 1WRelative Power Accuracy: Typically <2%, band-to-band, 1.8 - 54 MHzSWR Range: 1.00 to 9.99SWR Accuracy: <.05 above 0.5W, <.15 below 0.5W, +/- 1LSBDirectivity: 30+ dB, 160 – 6 meters (40 dB typical)Insertion Loss <0.05 dB, 1.8-50 mHz, (typical)Impedance: 0-999.9 ohms Z, R and |X|, <5% typical, 10-250 ohmsPhase: 0-180.0 degrees, <5 degrees (3 degrees typical, 10-170 degrees)Frequency counter: 1 MHz to >100 MHz, +15 to +23 dBm sensitivity (~0.5% accuracy)Power handling 1500W continuous duty, 3000W peakBargraph response >90 HzDirect Inputs: -15 to +33 dBm, 50 ohms, 0.1 to 650 MHz +0/-1.5 dB, 2W maxDC Power: 11-15 VDC @ 160 maOperating temp range: 0 to 50 degrees CClock: 40 mHzProgram memory: 64kBSize: Controller: 6.0" x 6.0" x 2.75" (5.08cm x 5.08cm x 6.99cm) Coupler: 2.25” x 2.40” x 5.00” (5.72cm x 6.1cm x 12.7cm)Weight: 3 pounds (1.36 kg)
CAL Table
Description Fine Power Gain Zero Phase Zero160m80m60m40m30m20m17m15m12m10m6mOffset TrimMaster Power TrimGain Slope TrimPhase Slope TrimLo/Hi Power TrimReference
Log the initial CAL constants for your LP-100 in this table. If you ever make changes, you can log additional constants in the spacesprovided.

39
WarrantyFactory assembled LP-100s are warranted against failure due to defects in materials and workmanship for one year from the date ofpurchase from TelePost Inc. Warranty does not cover damage caused by abuse, accident, improper or abnormal usage, improperinstallation, alteration, lightning or other incidence of excessive voltage or current.
Units built from kit are only covered against failure due to defects in materials, with the further limitation that any parts damaged as aresult of improper kit assembly are not warranted. Parts delivered damaged or missing will be replaced by TelePost Inc. at company’sexpense, including shipping.
If failure occurs within the warranty period, return the LP-100 to TelePost Inc. at your shipping expense. The device will be repaired orreplaced, at our option, without charge, and returned to you at our shipping expense. Repaired or replaced items are warranted for theremainder of the original warranty period. You will be charged for repair or replacement of the LP-100 made after the expiration of thewarranty period or where, in our reasonable opinion, the damage is due to improper assembly of the kit.
TelePost Inc. shall have no liability or responsibility to customer or any other person or entity with respect to any liability, loss ordamage caused directly or indirectly by use or performance of the product or arising out of any breach of this warranty, including, butnot limited to, any damages resulting from inconvenience, loss of time, data, property, revenue or profit, or any indirect, specialincidental, or consequential damages, even if TelePost Inc. has been advised of such damages.
Under no circumstances is TelePost Inc. liable for damage to your amateur radio equipment resulting from use of the LP-100,whether in accordance with the instructions in this Manual or otherwise.

40
Appendix APowering the LP-100:
How should I power the LP-100?
This is up to you, but the most common methods are…
Wall wart power supply capable of delivering 11-16 VDC @ 160 mAA RigRunner type power manifold powered by the main or accessory station power supplyA battery pack capable of the required power
I recommend a linear power supply, although there are some good switching supplies available. In my case, I power my entire stationfrom a deep cycle battery and charger so that it will operate uninterrupted in the case of a power failure. If you use a wall wart, it is agood idea to select one which will provide the required current and voltage, without soaring above 16 VDC with no load.
Placement of LP-100 in the transmission line:
Where should I place the LP-100 in the transmission line between the rig and antenna?
The best place for the LP-100 coupler to be inserted is between the rig (including any amplifier) and any antenna tuner. The tunershould be considered part of the antenna system. Use of an internal tuner in the rig will result in inaccurate power and SWR readingson the LP-100 (or any other external wattmeter). The LP-100 is designed to work with a 50 ohm source impedance. When an internalantenna tuner is used, the output impedance of the rig will no longer be 50 ohms. You will also experience a power loss in the tuner ofup to 20% or so, which will be seen on the LP-100. To measure an antenna’s actual impedance requires that any internal tuner bebypassed, as well as any external tuner which follows the LP-100. With an external tuner following the LP-100, you can adjust the tunerwhile monitoring SWR or Return Loss on the LP-100 until a match is found. Switching the external tuner between operate and bypasswill show the effect of the tuner.
Power Measurement Accuracy:
This is a subject that’s almost as controversial as antenna gain measurement. It seems like it should be much simpler, since it’s ameasurement that can be done in a controlled laboratory environment, but it is an insidiously complicated measurement to make. Theprocess used by TelePost, the other reputable wattmeter manufacturers AND the ARRL lab is basically this…
Connect the wattmeter being calibrated to a lab quality digital wattmeter such as the HP436A or HP437B, with a calibrated precisionthermocouple sensor. These sensors are generally designed to operate in the 0.1 to 1W range. This necessitates the need for aprecision power attenuator between the meter under test and the sensor. A convenient value for a 0.1W sensor is 30 dB, and for a 1Wsensor it’s 20 dB. This allows direct reading of the power in watts by viewing the milliwatt scale of the meter.
There are a number of error sources which need to be managed in this scenario…
Actual attenuation vs. frequency for the attenuatorInput and output Return Loss of the attenuatorInput Return Loss of the sensorSensor response vs. frequencyNon-linearity of the sensor or meter with varying power levelsOutput impedance of the transmitter vs. frequencyCalibration lab errors for the sensor vs.NIST standard
Some of these factors are small, but some can be significant. The sensor frequency response is specified by HP when the sensor issent in for calibration, and a table of Cal Factors is supplied with the calibrated sensor. The actual attenuation of the attenuator vs.frequency can be characterized using a Vector Network Analyzer. This is what we do at TelePost. We use a HP 8284A power sensorcoupled with a JFW 50FH-030-100 attenuator. The attenuator is measured with our HP87510A VNA. The total measured error vs.frequency of this setup, including N type adapters, is just under 0.1 dB (~2%) before correction, but after applying the measuredcorrections, the residual error is about 0.02 dB (~0.5%). There other smaller errors, like termperature related ones, return loss relatedones, etc. To be conservative, we specify the band-to-band peak error as 2%. The absolute power accuracy of the HP meter/sensor,compared to NIST, is about 2%, which may add to the total.
As you can see, it is very difficult to specify the accuracy relative to NIST as any better than about 5% for any given band and powerlevel, even with this level of test equipment. I have had a number of discussions with the lab staff at ARRL, who confirm this. Theyspecify their measurement error for power as +/- 5%, and for PEP power, +/- 8%. Mike Tracy, KC1SX, of the ARRL lab wrote aninteresting sidebar in the QST review of the Alpha 4510 power meter which discusses these issues. The sidebar appears in the July2006 issue of QST.

41
Appendix A cont’dPeak Power Readings:
How should peak readings compare with steady state readings? Because of the speed and response of the LP-100, this is a loadedquestion, as you will see by reading on.
First of all, a little background on digital wattmeters. Almost all digital wattmeters use a diode peak detector to detect power. There area few which use log detectors such as the Analog Devices AD8307. I know of none which use a true RMS detector, although Analogmakes several of these chips. The Analog chips have advantages, but the biggest problem with them is accuracy, generally stated atabout 0.3dB to 0.5 dB (6-10%). This error could be calibrated out, of course, but to do so at all power levels would be expensive, andnot amenable to user adjustment.
A peak diode detector rectifies the RF envelope and charges a small filter cap to the peak voltage level of the applied signal. Theresponse time of the detector is determined by the time constant of the cap and load resistance. In the case of the LP-100, this time isvery small. To obtain a true “average” reading requires taking many samples over a period of time and calculating the arithmetic mean.This slows down the response of the meter to power changes in the average mode, of course. In the case of the LP-100, the samplingis adjustable, and can reach levels as high as 40,000 samples/second in the Peak-to-Average mode.
Getting back to the original question, there are several things that affect peak readings…
Where on the envelope the sample hitsThe response time of the rigs ALCThe power supply regulation of the rig/amplifier
These items can all result in higher readings than steady state. All ALC circuits have overshoot… meaning that they can’t respondinstantly to set the requested power output level, especially at the leading edge of a CW character or voice syllable. This behavior alsodepends on the resting time between characters. The effect is exaggerated when the SWR is high, since the rig will try to back downthe power due to high SWR, but can’t respond quickly enough. Because the meter reads and holds the “highest” peak, it will usually bea value greater than the steady state reading for this reason. The same effect happens with a linear amplifier whose power supply isusually not regulated. There is more voltage available at the onset of power delivery than there is once the supply has stabilized. This isbecause the no load voltage will soar to a higher voltage than the voltage under load.
These phenomena only last for milliseconds, but the LP-100 will catch and display them until the next peak hold counter reset, whichresults in you seeing the transient peak power being delivered. It is up to the user to determine if this is important to you in the tuning ofyour amplifier.
Here are some examples of overshoot…
The first picture is my TS-480S in CW mode. This is in the middle of a string of dits. The effect is exaggerated if the character is the firstone after a long pause. Not having a digital scope, I couldn’t capture one of those. The second picture is from Jack, K8ZOA’s ElecraftK2 and shows a tone burst in SSB, with the input signal on top and the RF output envelope on the bottom. It is taken from a digitalscope, and illustrates the effect after a pause. Note: Since these are voltage displays, you would have to square them to get the effecton power overshoot. In Jack’s photo, you can see that the voltage overshoot is about 12.5%, which represents a power overshoot ofabout 26% (1.125*1.125=1.265). This is the value the LP-100 would grab and display if the sampling window caught the leading edge.Sampling is done at close to 100 samples/second, and the detector time constant is fast enough, that there is a good chance that peakslike this will periodically be displayed. This is normal and represents an actual event.

42
Appendix A cont’dThe peak modes should not be used for critical power measurements because of the chance for transients when initializingtransmission. If critical peak power measurements are desired, you should use the T mode or W mode with a hold setting 0.25 second,and take several readings to avoid random peaks. It also might make sense to start at a lower power and raise power up to the desiredlevel.
When I developed the LP-100, I was at first confused by the occasional high peak readings, thinking there might be a problem with themeter. I built a test setup just to test this, consisting of my HP-8640B signal generator, RF Communications Model 805 10Winstrumentation amp and a Totsu RF relay. This setup always produced the correct peak reading for either steady state or choppedsignals.
Transmission Line Z vs. Antenna Feedpoint Z:
The LP-100 measures the SWR/Z at the Load connector of the coupler. This relates to the actual antenna Z based on the type andlength of transmission line. For a 50 ohm antenna load, the only difference will be determined by line loss. For a higher SWR load, thecomplex Z (R+jX) of the antenna will be converted by the transformer action of the feedline to some other value, which could evenreverse the sign of the reactance. I am planning to add entry screens for both the VCP and Plot programs to allow for this conversion tobe done automatically for a number of user saved feedline/antenna combinations. I also plan to incorporate manipulation of the SmithChart display to allow easy display of the effects of delay lines and matching stubs sometime in the future.
For a comprehensive review of the principles and math involved in transmission line theory, line transformations, etc., visithttp://www.cebik.com/trans/zcalc.html This is copyrighted material published by L.B Cebik, W4RNL. He tackles a very complex subjectand makes it as understandable as possible.
Another excellent source of reading is the site of Dan Maguire, AC6LA, http://www.ac6la.com/ See particularlyhttp://www.ac6la.com/stss.html for a treatment of the Smith Chart and other topics. Dan wrote one of my favorite antenna modelingprograms, MultiNEC, unfortunately no longer available.
Many of the formulas used in impedance transformation are also included in the HamCalc collection by George Murphy, VE3ERP.
Sign of X and Phase:
The LP-100 is not capable of determining the sign of X or Phase on its own. With a VNA this is possible because they use quadraturesignals and multiple detectors to eliminate the phase ambiguity. There are one or two antenna analyzers which also do this in a similaror different way with good to excellent results. This is relatively easy if you are generating the signal internally, but in the case of the LP-100 the source is a high power signal out of the control of the LP-100.
I have provided an automatic sign detection algorithm in the LP-100 Plot program which works quite well. It is based on detecting slopeof both magnitude and phase. I also provide a means to easily reverse the displayed phase/reactance of errant datapoints beforesaving/printing. With a little practice, it will become easy to recognize and fix these points. The Plot program requires a serial interfacebetween the PC and rig to allow control of the transmitter.