LOCAL AMBASSADOR TRAINING -...
17
LOCAL AMBASSADOR TRAINING GENERAL DESCRIPTION The Local Ambassador will take panoramas inside shops, restaurants and other businesses to create an online/interactive tour of the establishment. This guide will cover: I. Equipment and Equipment Setup II. How to take An EveryScape panorama III. Tour planning IV. Client interaction CAMERA EQUIPMENT 1) DSLR – 6 megapixels or higher (recommended Canon or Nikon) 2) Sigma 8mm Fisheye (for a list of other accepted lenses please go to the ambassador site) 3) Nodal Ninja 3 MKII Package (see also; other Nodal Ninja mounts for larger camera bodies) http://www.nodalninja.com/product_selector.html 4) Wireless Camera Remote or Wire Trigger 5) A Sturdy Tripod 6) Lens cleaner CAMERA SETTINGS 1) Camera Settings a. Quality : Large/Fine (JPEG) b. Red-eye: Off c. Shoot w/o card: Off d. AEB: 2 Stop bracketing (some cameras do not have 2 stop AEB – see page 4 for information about bracketing with 1 stop AEB) e. Picture Style: Standard f. Auto rotate: On 2) Camera Body: a. Dial mode should be set to Manual b. Flash should be off c. Focus should be set to Manual (Auto-focus off). d. Drive mode set to “continuous shooting”. Holding down shutter release should fire 3 consecutive shots. 3) Lens: Focus on the Lens should be set and taped in place (see below).
Transcript of LOCAL AMBASSADOR TRAINING -...

LOCAL AMBASSADOR TRAINING
GENERAL DESCRIPTION
The Local Ambassador will take panoramas inside shops, restaurants and other businesses to create an
online/interactive tour of the establishment. This guide will cover:
I. Equipment and Equipment Setup
II. How to take An EveryScape panorama
III. Tour planning
IV. Client interaction
CAMERA EQUIPMENT
1) DSLR – 6 megapixels or higher (recommended Canon or Nikon)
2) Sigma 8mm Fisheye (for a list of other accepted lenses please go to the ambassador site)
3) Nodal Ninja 3 MKII Package (see also; other Nodal Ninja mounts for larger camera bodies)
http://www.nodalninja.com/product_selector.html
4) Wireless Camera Remote or Wire Trigger
5) A Sturdy Tripod
6) Lens cleaner
CAMERA SETTINGS
1) Camera Settings
a. Quality : Large/Fine (JPEG)
b. Red-eye: Off
c. Shoot w/o card: Off
d. AEB: 2 Stop bracketing (some cameras do not have 2 stop AEB – see page 4 for information
about bracketing with 1 stop AEB)
e. Picture Style: Standard
f. Auto rotate: On
2) Camera Body:
a. Dial mode should be set to Manual
b. Flash should be off
c. Focus should be set to Manual (Auto-focus off).
d. Drive mode set to “continuous shooting”. Holding down shutter release should fire 3
consecutive shots.
3) Lens:
Focus on the Lens should be set and taped in place (see below).

Finding the optimal focus on your fisheye lens
The idea is to have everything in your field of view in focus. This simple test will allow you to adjust your
lens so everything that should be in focus, will be in focus. And that’s everything.
Set up a test shot where there are objects at varying distances from the camera. At least 4 objects. I
would recommend distances of 3 feet, 10 feet, 25 feet and 100 feet. If you are shooting outside
(recommended) you also have the horizon to work with. Make sure the closest object has some fine
details, like text.
Start with the focus set to infinite, and take a single shot. Adjust the focus in small increments, taking a
single shot at each setting. (The distance between infinite and 3feet/1meter is an acceptable
increment.)
Upload the images to your machine. Select the image where everything pictured is in the best focus.
Set your lens to the focus setting that gave you the best image. Tape the lens in place and make sure
the auto-focus is OFF.
Congratulations! You’ve found the sweet spot!
Our Studio did some testing and found that the best focal distance for the canon sigma was is 1.25f/.4m. This distance is not marked on the lens, but is in between 1ft/.3m and 1.5ft/.5m For the Nikon Sigma Lens the best focal distance was .5m. -Results may vary for each Sigma lens, so make sure you test your lens to find the best results. It is also a good idea to check your focus often.

NODAL NINJA MOUNT ASSEMBLY
1) Secure lower rail to your tripod. Then attach the lower rail assembly and the upper rail assembly. Shorter
arm of upper rail assembly should face rotator
2) Attach Camera Mounting Plate to Camera body. It should be perpendicular to the camera body and
parallel to the lens.
3) Attach the camera mounting plate & camera to the upper rail with the knob and secure tightly.
4) IMPORTANT: When taking off the lens cap make sure to take BOTH the front cap and the front cap
adapter from the fisheye before shooting.

NODAL NINJA MOUNT CALIBRATION
The point of calibration is to set your camera to a position where it rotates around a single Nodal Point. If your
mount is calibrated your panorama will stitch correctly without seams caused by parallax.
1) Adjust vertical rail so that Center of the View finder lines up with Pivot point of the rotator knob
2) Line up front rim of lens with the pivot point of the rotator knob
3) Insert Rail stops to mark calibration for future use
PART II: HOW TO TAKE AN EVERYSCAPE PANORAMA
Note: This tutorial was created using the Canon XS and Sigma 8mm Fisheye lens. Apply any appropriate
adjustments to a different camera.
Your camera should be set to automatic 2 stop bracketing.
BRACKETING USING CAMERAS WITH ONLY 1 STOP BRACKETING
Set your AEB to 1 stop at 5 frames. This will give you the following values (0, -2, -1, +1, +2). You would then delete
your -1 and +1 exposures. You would need to do this for each set of 3 shots.
An easy way to do this is after you transfer the images to your computer, open the folder containing the images.
Resize the window until you can see 5 images across. Select the 3rd and 4th columns. Delete them.
OR
Set your AEB to 1 stop at 9 frames. This will give you the following values (0, -4, -3, -2, -1, +1, +2, +3, +4).
You would then delete 3 exposures from this range. Ideally it would be -3, -1 and +1, but use your best judgment.
This will give you the full 6 shot range for each direction.
WHAT MAKES A GOOD PANORAMA?
An ideal panorama has both accurate color and no loss of information-- nothing in the image blown out or lacking
in shadow detail. In post processing the images are automatically stitched and then hand tone-mapped by the
EveryScape studio. It is the Local Ambassador’s job to get the best raw materials for the Studio to work with.
HOW MANY SHOTS DO I NEED TO TAKE FOR ONE PANORAMA?
* SIGMA 8MM LENS
24 shots for 1 white balance. 6 shots in 4 directions
48 shots for 2 white balances. 12 shots in 4 directions
To create one set of panorama images 4 shots are taken at 90 degree intervals rotated clockwise.

But because of exposure bracketing and White balance bracketing you may take as many as 48 shots for one
panorama. This may sound intimidating at first but your camera does a lot of the bracketing work automatically.
With the correct exposure bracketing settings it takes 3 different exposures with one button push.
With exposure bracketing you will take 24 shots (6 per direction). The number of shots doubles to 48 shots (12
shots per direction) if you need two white balances.
EXAMPLE: 24 IMAGES FOR 1 WHITE BALANCE

EXAMPLE: 48 IMAGES FOR 2 WHITE BALANCES
*MAKE SURE YOU SHOOT BOTH WB FOR EACH DIRECTION BEFORE YOU ROTATE THE CAMERA
HOW MANY SHOTS DO I NEED TO TAKE FOR ONE PANORAMA?
* OTHER APPROVED LENSES (SEE EQUIPMENT PAGE FOR ACCEPTED LENSES)
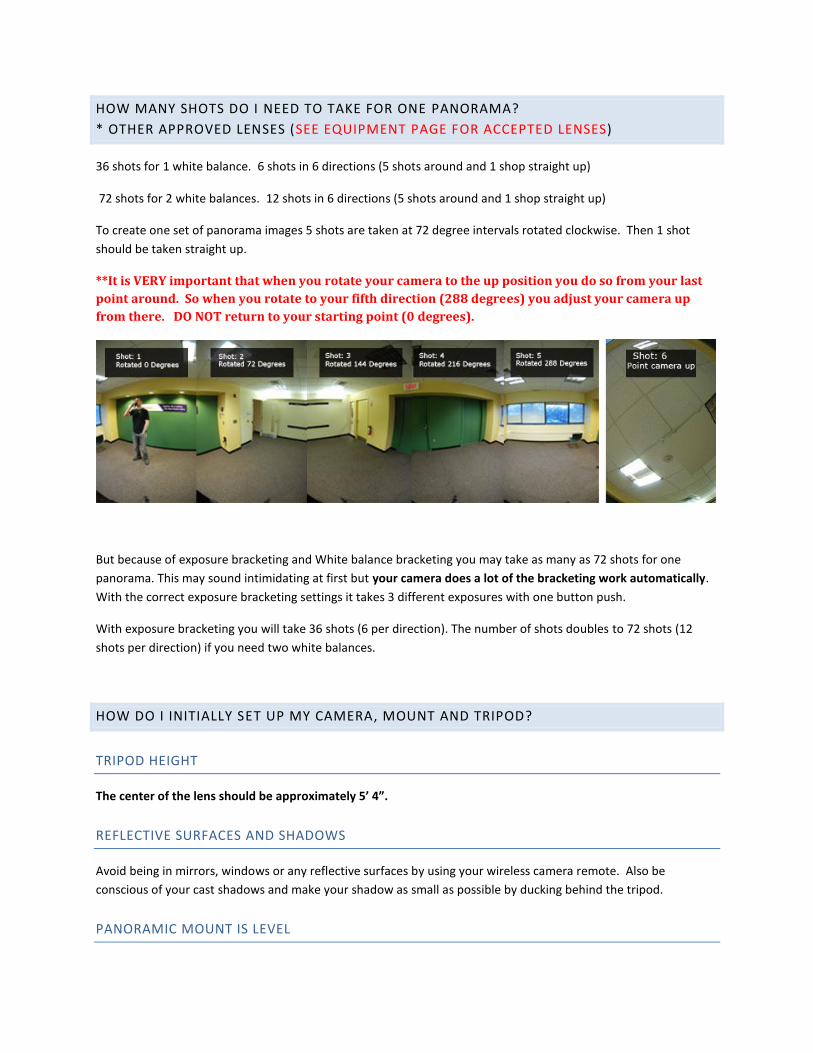
36 shots for 1 white balance. 6 shots in 6 directions (5 shots around and 1 shop straight up)
72 shots for 2 white balances. 12 shots in 6 directions (5 shots around and 1 shop straight up)
To create one set of panorama images 5 shots are taken at 72 degree intervals rotated clockwise. Then 1 shot
should be taken straight up.
**It is VERY important that when you rotate your camera to the up position you do so from your last
point around. So when you rotate to your fifth direction (288 degrees) you adjust your camera up
from there. DO NOT return to your starting point (0 degrees).
But because of exposure bracketing and White balance bracketing you may take as many as 72 shots for one
panorama. This may sound intimidating at first but your camera does a lot of the bracketing work automatically.
With the correct exposure bracketing settings it takes 3 different exposures with one button push.
With exposure bracketing you will take 36 shots (6 per direction). The number of shots doubles to 72 shots (12
shots per direction) if you need two white balances.
HOW DO I INITIALLY SET UP MY CAMERA, MOUNT AND TRIPOD?
TRIPOD HEIGHT
The center of the lens should be approximately 5’ 4”.
REFLECTIVE SURFACES AND SHADOWS
Avoid being in mirrors, windows or any reflective surfaces by using your wireless camera remote. Also be
conscious of your cast shadows and make your shadow as small as possible by ducking behind the tripod.
PANORAMIC MOUNT IS LEVEL

Center the bubble in the level indicator located on the mount to ensure your camera is level.
AIM CAMERA UPWARDS
SIGMA 8MM LENS Adjust the camera angle to about -11 degrees (pointing slightly upward) to help stitching at the apex of the panorama.
ALTERNATE LENSES Adjust the camera angle to about +10 degrees (pointing slightly downward) when using other approved lenses
HOW DO I DETERMINE WHICH WHITE BALANCES TO USE?
On location you need to determine whether you need to shoot the panorama with 1 or 2 white balance settings
and to determine the correct white balance settings. With this technique you can use the presets that are in your
camera.
**Do not use an auto white balance because the colors may change for each direction and could affect stitching.
You should always use one of the preset white balances.
Most of the time for interiors and occasionally for exteriors you will take 2 white balances. The problem with
using just one setting is an interior with incandescent lighting will look too blue with the Sunny day setting, and
the exterior will look too orange with the Incandescent setting. More often than not you will run into an interior
with large windows or an outdoor with clear view of an interior. If you are unsure take two white balances.
HOW DO I DETERMINE THE INITIAL SHUTTER SPEED, F-STOP, AND ISO?
1) Point your camera at the darkest area of the room. The Exposure Level Indicator (ELI) can help you
determine that.
2) Set your ISO as low as possible
3) Adjust your F-stop and shutter speed so that the Exposure Level Mark is set to the Standard Exposure
Index (red arrow).
4) If the Exposure Level Mark cannot reach the Standard Exposure Index. Incrementally lengthen the
shutter speed and/or increase the ISO.

6 SHOT EXPOSURE BRACKETING FOR EACH DIRECTION
The reason we set the first shot this way is because of the exposure bracketing method. With automatic exposure
bracketing your camera will continuously take 3 shots. They will be set at Standard, Decreased, and Increased
exposure.
FIRST SET OF EXPOSURES:
If you shoot at a shutter speed of 1/15s with your automatic 2 stop bracketing your camera will capture at shutter
speeds of: 1/15s, 1/60s, 1/4s
Shutter Speed
Order of Shot Manual or Auto Exposure Relative to First Shot
1/4000
1/3000
1/2000
1/1500
1/1000
1/750
1/500
1/350
1/250
1/180
1/125
1/90
1/60 Second Shot Automatically shot Decreased
1/45
1/30
1/20
1/15 First Shot Manually Set Standard
1/10
1/8
1/6
1/4 Third Shot Automatically shot Increased
1/3
1/2
1

SECOND SET OF EXPOSURES:
You ultimately want 6 exposures per direction. After taking your first three shots, you need to manually set your
fourth shot. Your camera will automatically take the 5th
and 6th
shot.
To get the widest range of exposures with no overlapping you would need to set the fourth shot manually at a
shutter speed of 1/1000s(6 stops underexposed from 1/15). Notice in the list below the wide range and even
spacing between the shutter speeds.
Shutter Speed Order of Shot Manual or Auto Exposure Relative to First Shot
1/4000 Fifth Shot Automatically shot Decreased
1/3000
1/2000
1/1500
1/1000 Fourth Shot Manually Set Standard
1/750
1/500
1/350
1/250 Sixth Shot Automatically shot Increased
1/180
1/125
1/90
1/60 Second Shot Automatically shot Decreased
1/45
1/30
1/20
1/15 First Shot Manually Set Standard
1/10
1/8
1/6
1/4 Third Shot Automatically shot Increased
1/3
1/2
1
SHUTTER SPEED PAIRINGS CHART:
Memorize these Shutter speed pairings to quickly set your 4th shot.
** 1/15 and 1/1000 is an example. You will likely start with slower shutter speeds in darker
situations

NOTE: YOUR SHUTTER SPEED SHOULD NOT BE FASTER THAN 1/15 FOR YOUR FIRST SHOT.
If you shoot 1/15s for your first shot you will need to manually set your second shot to 1/1000s. If your shutter
speed is faster than 1/1000s for your manually set fourth shot, your fifth (most underexposed) shot will be
1/4000s. Many cameras will not shoot any faster than 1/4000s and your range of exposures will be not be evenly
spaced. The 1/15s and 1/1000s pairing work well for well lit locations but for dimmer light settings you may need
to use the slower shutter speed pairings. Refer to the shutter speed chart (above).
OVERVIEW OF 48 SHOT PROCESS (TWO WHITE BALANCES)
Initial setup:
- Set tripod height to 5’ 4”
- Make sure the camera mount is level.
- Fisheye Lens should be clean
Let’s imagine you need to shoot a panorama in a well-lit indoor setting with indoor
incandescent lighting and natural light shining through large windows.
You determine you need to shoot 2 White Balances because of 2 different light source types (Natural Light and
Incandescent Light). Then you estimate that 1/8s and 1/500s shutter speed pairings are a good starting point.
1) Look through your viewer finder and find the DARKEST part of the room.
2) Set your ISO as low as possible depending on the light setting. (The higher the ISO the grainier the
images)
3) Set your White Balance to “Natural Light” setting.
4) Set your camera’s shutter speed to 1/8s
5) Lightly press the shutter button so that the Exposure Level Indicator appears.
6) Adjust your F-stop so that the Exposure Level Mark (red) is at the Standard Exposure Index (center) in the
lighter direction.
Shutter Speeds for First Shot – Use Exposure Level Indicator to determine first shot
Shutter Speeds for Fourth Shot – Manually Set based on initial shot
1/4 s 1/250 s
1/6 s 1/ 350 s
1/ 8 s 1/ 500 s
1/ 10 s 1/750 s
1/ 15 s 1/1000 s

NOTE: If the Exposure Level Mark cannot reach the Standard Exposure Index. Incrementally lengthen
the shutter speed and/or increase the ISO.
7) Shoot your first three shots: 1/8 s (First Shot – Manually set)
1/30 s (Second Shot – Auto)
1/2 s (Third Shot – Auto)
8) Next manually set your fourth shot to the Shutter Speed of 1/500s: 1/500 s (Fourth Shot – Manually Set)
1/2000 s (Fifth Shot – Auto)
1/125 s (Sixth Shot – Auto)
9) Change the cameras white balance from “Natural Light” setting to “Incandescent”.
10) Shoot another 6 shots by repeating steps 7 and 8 with the “Incandescent” white balance.
NOTE: Now all the shots for one direction are complete.
11) Rotate your camera mount clockwise exactly 90 degrees and change your white balance back to
“Natural Light”.
12) Repeat steps 8-12 until ALL 4 directions are shot.
NOTE: Once set your F-Stop and ISO are the same for all 4 directions. You are alternating between white
balances and shutter speeds.
** If you are using one of the other approved lenses please follow all of the same bracketing methods shown
above, while rotating the camera 72 degrees as opposed to 90 degrees and shoot straight up. You will end up with
5 shots around and 1 shot straight up.
**It is VERY important that when you rotate your camera to the up position you do so from your last
point around. So when you rotate to your fifth direction(288 degrees) you adjust your camera up
from there. DO NOT return to your starting point( 0 degrees).

ARTISTIC CONSIDERATIONS
PEOPLE IN THE SHOTS
Staff posing for pictures adds a feeling of hospitality to pictures. When possible ask staff to smile and pose for the pictures when possible.
Ask your on-site business contact to help keep moving patrons out of the pictures. If it is too difficult to keep patrons out of the shots, try to photograph them when they are not moving too much.
LIGHTING CONDITIONS
Have staff turn on all available lights or open shades to allow more light into the space.
UNSIGHTLY OBJECTS HIDDEN
Encourage the staff to hide any unsightly objects/debris which create a negative perception of the business.
LIMIT MOVEMENT
You will most likely have to deal with moving cars and people in your shots. Moving objects create a “Ghosting” effect in the panoramas. Time your shots so there is little to no movement in your pictures.
Make sure your tripod, panoramic mount and camera don’t move throughout the shoot. Reshoot the panorama if your equipment moves while capturing images.
PART III: TOUR PLANNING
ON SITE:
Here are some onsite variables that may affect your shot placements.
1) Businesses “Selling points" (Client Input)
2) Number of shots and connections between shots
3) Obstructions
SHOT PLACEMENT & CONNECTIVITY
SINGLE PANORAMA:
For a single panorama you don’t have to worry about connecting to other panoramas but there are still other
factors to consider:
Clearest view of key aspects and “selling points” of the business
No obstructions in front of the camera
CONNECTING MULTIPLE PANORAMAS:
Do a walk-through of the business and determine the essential shot locations. Also think about connections
between panoramas. The connecting movies between panoramas are called morphs. Where you take a shot
determines whether the morph provides a natural transitional experience or not. A clear Line of sight makes for
the ideal morph experience.
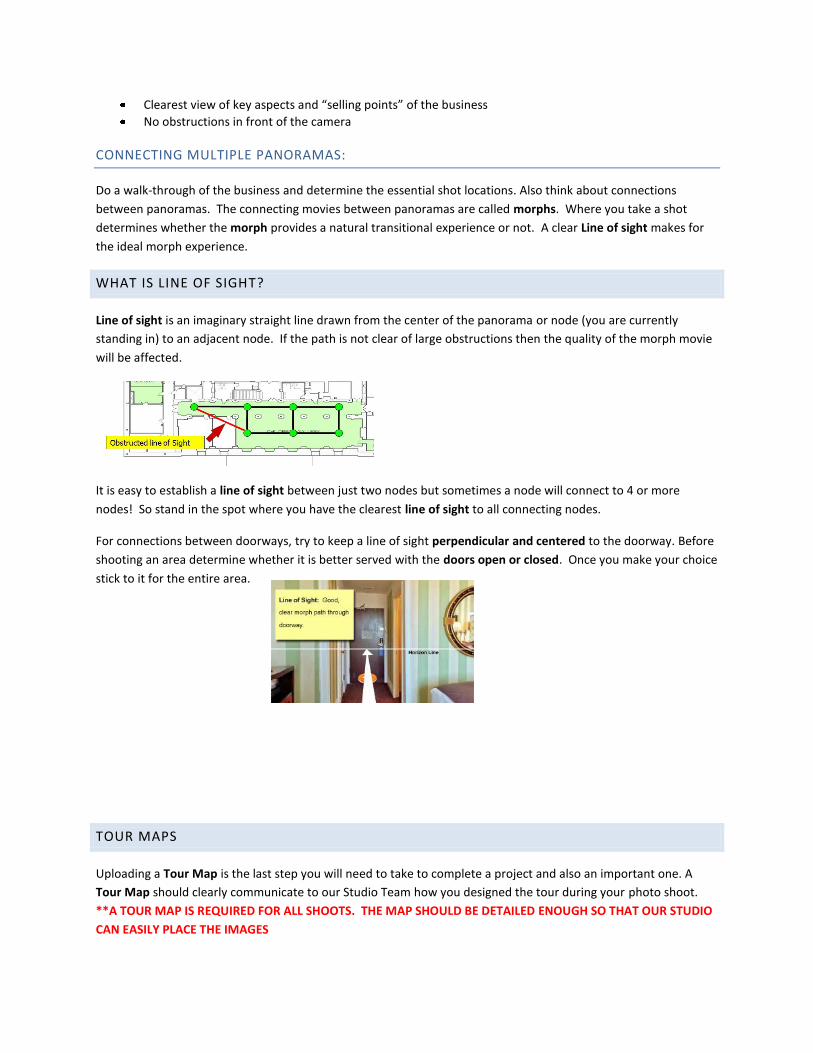
WHAT IS LINE OF SIGHT?
Line of sight is an imaginary straight line drawn from the center of the panorama or node (you are currently
standing in) to an adjacent node. If the path is not clear of large obstructions then the quality of the morph movie
will be affected.
It is easy to establish a line of sight between just two nodes but sometimes a node will connect to 4 or more
nodes! So stand in the spot where you have the clearest line of sight to all connecting nodes.
For connections between doorways, try to keep a line of sight perpendicular and centered to the doorway. Before
shooting an area determine whether it is better served with the doors open or closed. Once you make your choice
stick to it for the entire area.
TOUR MAPS
Uploading a Tour Map is the last step you will need to take to complete a project and also an important one. A
Tour Map should clearly communicate to our Studio Team how you designed the tour during your photo shoot.
**A TOUR MAP IS REQUIRED FOR ALL SHOOTS. THE MAP SHOULD BE DETAILED ENOUGH SO THAT OUR STUDIO
CAN EASILY PLACE THE IMAGES

PART IV: CLIENT INTERACTIONS
Besides being a photographer for EveryScape you are an ambassador for our brand.
DEFINITION OF A BRAND AMBASSADOR

Brand Ambassadors are the face and voice of the brand, everything they touch, the brand is touching. Brand
Ambassadors form the public image of brands and are the people companies use to deliver their message to the
public.
As a Local Ambassador you get the unique opportunity to meet and greet local businesses face-to-face. While on
the job, do your best to put your best foot forward for yourself and the EveryScape brand.
Review the following guidelines:
REQUIRED: Arrived appropriately dressed (business casual) for all photo-shoots
Be accommodating and friendly to all staff and patrons of a business
Politely ask the business contact or business manager help you with the photo-shoot
o Hide unsightly objects
o Have Employees pose for the shots
o “Crowd Control” so that patrons don’t walk in front of your shot
After the shoot, thank your business contact for their time and remind the client that they will be
contacted via email when tour is live (within 3 weeks).