LMP Migration: Guide for Worry-Free Services Purpose Contents · LMP Migration: Guide for...
9
LMP Migration: Guide for Worry-Free Services Purpose To guide Service Providers (SPs) to Migrate to Worry-Free Services End Customers to the License Management Platform (LMP) without the need to either recreate settings in the new console or reinstall agents. Contents i. Introduction ii. Preparation a. How to prepare your Worry-Free Business Security Services Account ? b. How to prepare your LMP Account? c. How to Complete the CSV document provided by Trend Micro? d. How to submit the completed form? iii. What happens during/after the Migration? iv. What WFBS-SVC settings are migrated? v. How to migrate mobile devices (Android and iOS) to LMP?
Transcript of LMP Migration: Guide for Worry-Free Services Purpose Contents · LMP Migration: Guide for...

LMP Migration: Guide for Worry-Free Services
Purpose
To guide Service Providers (SPs) to Migrate to Worry-Free Services End Customers to the License Management Platform (LMP) without the need to either recreate settings in the new console or reinstall agents.
Contents
i. Introduction ii. Preparation
a. How to prepare your Worry-Free Business Security Services Account ? b. How to prepare your LMP Account? c. How to Complete the CSV document provided by Trend Micro? d. How to submit the completed form?
iii. What happens during/after the Migration?
iv. What WFBS-SVC settings are migrated?
v. How to migrate mobile devices (Android and iOS) to LMP?

I. Introduction
Most Service Provider customers who offer Worry Free Business Services (WFBS-SVC) currently use a single WFBS-
SVC account and key to support multiple end customers, all of which are associated with a single seat count and
expiry date. The migration to LMP gives Service Providers the ability to give each of their customers a unique
WFBS-SVC account, which provides many benefits:
- Greater control of customers: Each customer now has an individual license key, with its own maximum seat
count and expiry date. This allows the Service Provider to set per-customer limits on the total number of seats,
preventing misuse and allowing more accurate billing. Customers can also be ceased, should they decide to no
longer consume the service, without affecting other customers.
- Delegated Administration: Each customer can now log into their own unique account and perform self-
management if needed, as well as being able to configure notifications of security incidents and regular report
generation. This reduces helpdesk burdens; however the Service Provider can leverage Remote Manager to
assist the customer if access to their account is needed.
In order to use the enhanced features that LMP provides, your WFBS-SVC account needs to be migrated to the new
platform. During the migration process, all devices registered within your WFBS-SVC account will be migrated to
new accounts under the Licensing Management Platform (LMP), along with their associated policies. End users
with Windows or Mac devices can be migrated automatically with no end-user intervention; however mobile
devices will require some changes which are detailed later in this document.
In order to be able to split the existing single WFBS-SVC account into individual customers, each customer in the
existing console needs to be placed within a group. During the migration process each group will be migrated with
the same name to a new unique account within LMP and associated with a “Service Plan”, which defines the
subscription terms for their service (e.g. A monthly recurring subscription)
II. Preparation
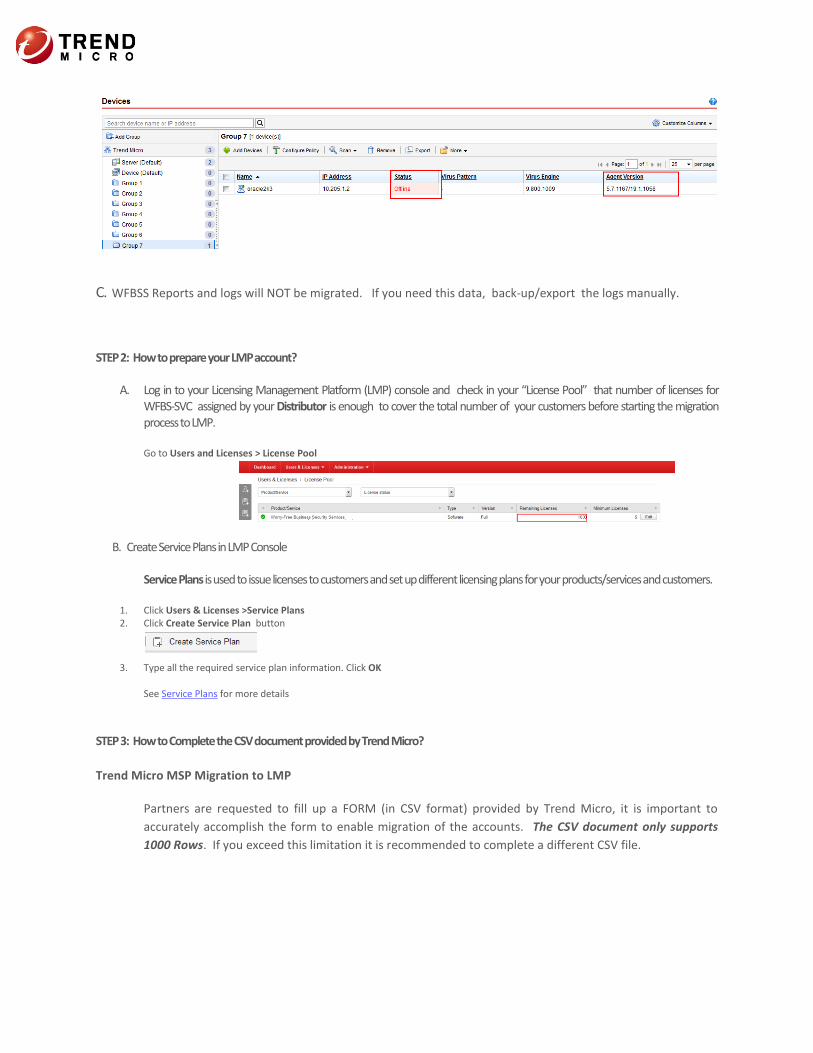
STEP 1: How to prepare your Worry-Free Business Security Services (WFBS-SVC) Account? A. Review the list of DEVICES assigned to each group.
- We support migration of one or multiple “device group” to one “End Customer/User” LMP account. - Migrating “one device group” to multiple end user account(s) is NOT supported. - Only DESKTOP (Windows and MAC OS ) and Servers can be migrated automatically.
Example: Customer only has one group for all devices.
- If the devices belong to different end users, Service Providers need to create new groups and “import settings from the existing group” per each end customer. Move the “devices” manually and associate to the correct group to be able to migrate the devices to the correct to end user LMP account.

Creating “new groups” and importing security settings from an existing group: Create groups to collectively manage multiple clients.
Note: Clients must be associated with the correct Group. 1. Navigate to Devices. 2. Click Add Group. 3. Update the following as required and Click Save.
a. Group name b. Settings: Imports security settings from an existing group. This setting automatically copy the
configuration of the existing group.
Moving Devices: WFBS-SVC gives you the option to move devices from one Group to another.
1. Go to Devices > {group} Select the target device(s) that you want to move by checking the tick box .
2. Drag the device into another group. ( You can group Desktop devices and Server to one group) The device will inherit the settings of the new group
B. Upgrade your Security Agent to the latest version and build. Security Agent with lower version and build cannot be migrated to LMP automatically. Security Agent Requirements:
Minimum version supported:
Build version
Windows Agent 5.8.1209
Mac Agent 9.0.1155
Android Device 2.0.1255
Agent Status: ONLINE
Note: OFFLINE agents during migration will automatically move to the new LMP account when the status is changed to ONLINE.
C. WFBSS Reports and logs will NOT be migrated. If you need this data, back-up/export the logs manually.
STEP 2: How to prepare your LMP account?
A. Log in to your Licensing Management Platform (LMP) console and check in your “License Pool” that number of licenses for WFBS-SVC assigned by your Distributor is enough to cover the total number of your customers before starting the migration process to LMP.
Go to Users and Licenses > License Pool
B. Create Service Plans in LMP Console Service Plans is used to issue licenses to customers and set up different licensing plans for your products/services and customers.
1. Click Users & Licenses >Service Plans 2. Click Create Service Plan button
3. Type all the required service plan information. Click OK See for more details Service Plans
STEP 3: How to Complete the CSV document provided by Trend Micro?
Trend Micro MSP Migration to LMP
Partners are requested to fill up a FORM (in CSV format) provided by Trend Micro, it is important to
accurately accomplish the form to enable migration of the accounts. The CSV document only supports
1000 Rows. If you exceed this limitation it is recommended to complete a different CSV file.

A. Click >Enable Editing
B. Click >Enable Content
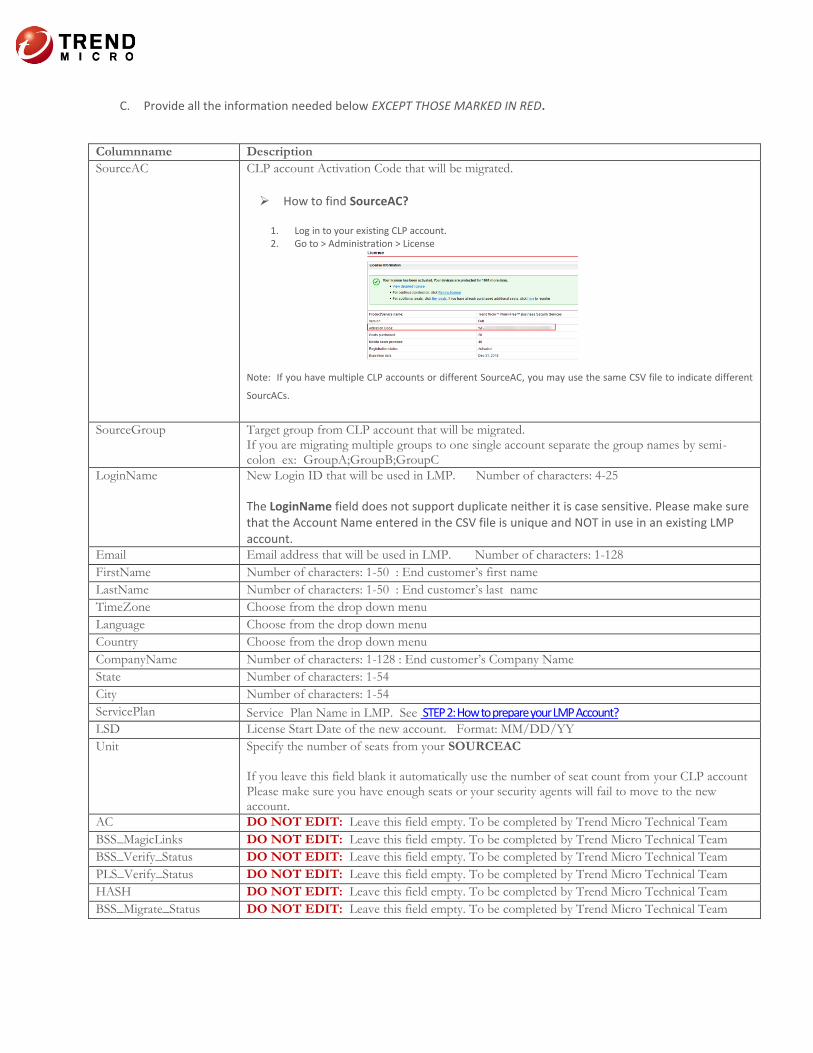
C. Provide all the information needed below EXCEPT THOSE MARKED IN RED.
Columnname Description
SourceAC CLP account Activation Code that will be migrated.
How to find SourceAC?
1. Log in to your existing CLP account. 2. Go to > Administration > License
Note: If you have multiple CLP accounts or different SourceAC, you may use the same CSV file to indicate different
SourcACs.
SourceGroup Target group from CLP account that will be migrated. If you are migrating multiple groups to one single account separate the group names by semi-colon ex: GroupA;GroupB;GroupC
LoginName New Login ID that will be used in LMP. Number of characters: 4-25
The LoginName field does not support duplicate neither it is case sensitive. Please make sure that the Account Name entered in the CSV file is unique and NOT in use in an existing LMP account.
Email Email address that will be used in LMP. Number of characters: 1-128
FirstName Number of characters: 1-50 : End customer’s first name
LastName Number of characters: 1-50 : End customer’s last name
TimeZone Choose from the drop down menu
Language Choose from the drop down menu
Country Choose from the drop down menu
CompanyName Number of characters: 1-128 : End customer’s Company Name
State Number of characters: 1-54
City Number of characters: 1-54
ServicePlan Service Plan Name in LMP. See STEP 2: How to prepare your LMP Account? LSD License Start Date of the new account. Format: MM/DD/YY
Unit Specify the number of seats from your SOURCEAC If you leave this field blank it automatically use the number of seat count from your CLP account Please make sure you have enough seats or your security agents will fail to move to the new account.
AC DO NOT EDIT: Leave this field empty. To be completed by Trend Micro Technical Team
BSS_MagicLinks DO NOT EDIT: Leave this field empty. To be completed by Trend Micro Technical Team
BSS_Verify_Status DO NOT EDIT: Leave this field empty. To be completed by Trend Micro Technical Team
PLS_Verify_Status DO NOT EDIT: Leave this field empty. To be completed by Trend Micro Technical Team
HASH DO NOT EDIT: Leave this field empty. To be completed by Trend Micro Technical Team
BSS_Migrate_Status DO NOT EDIT: Leave this field empty. To be completed by Trend Micro Technical Team

Important: If you have not been assigned licenses within your WFBS-SVC license pool by your Distributor,
agents will fail to move automatically. Ask your distributor for additional licenses please . see STEP 2
Example 1: Migrating Multiple Groups to one end user account.
Under Source Group column “Service Provider(s)” input different groups in one row and separate the
group names by semi-colon. This will ensure the groups are assigned to one single end user console.
Example 2: Migrating Multiple Groups to different end customer’s account.
Under Source Group column “Service Provider(s)” need to put the different groups in different rows to
associate the different groups to different accounts.
Example 3. Combination of example one and two is supported
D. Click >Save as CSV file. If you need to edit a previously saved CSV document please click Import CSV
file and edit using the same form.
Note: Please review the information in the CSV document and verify if it’s correct before submitting a copy to Trend
Micro. The migration process is irreversible once performed by our technical team.
STEP 4: How t Submit the completed form?
Please submit a copy of the completed form to Trend Micro at: [email protected]
Important: Please be informed that by sending back the list CSV file to Trend Micro you consent to the Trend Micro xSP technical team having access to the information of your End Customers and confirm your understanding that you shall be responsible for the accuracy of the data that you forward to us via such list. Trend Micro confirm that the information received will be used as the migration data and only be used by the technical team to fulfil the migration and will not be shared with any other department or third party. Unless we hear back from you to the contrary within the next 7 days your acceptance of this provision will be assumed.
III. What happens during/after the Migration?
Warning: DO NOT TO LOGIN to WFBS-SVC and LMP Console during migration. Wait for the final notification from
Trend Micro that the account migration is completed before accessing the console.
a. What happens to my CLP account?
- The CLP account remains accessible after the migration. Partners can verify which security agents
have not migrated to LMP if any.
IV. What WFBS-SVC settings are migrated?
What settings are migrated?
1. Group Policy Settings ( Windows, Mac, Mobile)
2. Manual and scheduled scan settings
3. Notification Setting
4. Global Setting
What information/settings are NOT migrated?
1. Live Status
2. Device Enrollment Settings
3. Manage Co-Administrators accounts.

4. License
5. Smart Protection Network Setting
6. Trend Micro Remote Manager.
7. Reports and Logs.
V. How to migrate mobile devices (Android and iOS) to LMP?
Android Devices
- After the migration customer needs to enroll android devices to LMP end user account.
- Email Installation Link to Others: Send an email message to users so they can download the Installer
package and install the Agent.
For more information, see Agent Installation – Email Link
- In your Android device. Start the app and type your authentication code.
Tap Continue.
- The Android device will register to your New LMP account.
iOS Devices
- Upload APN Certificate to WFBS-SVC LMP console See Enrolling iOS Mobile Devices
- Remove existing Profile in iOS
1. Go to Settings > Profiles. 2. Tap the profile to remove. 3. Tap Uninstall.
- Re-Install the security agent.