Little Dreamer Double Workshop - cdn. · PDF fileLittle Dreamer Double Workshop ... 4 1/2 x 1...
18
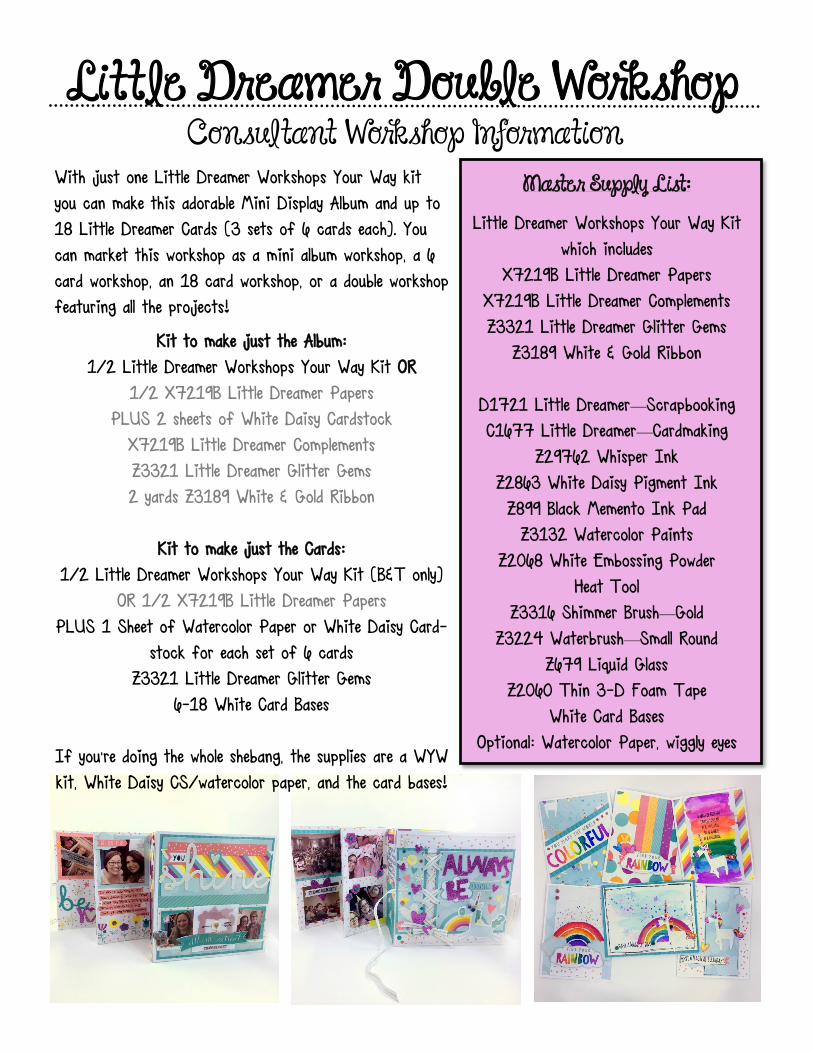
Little Dreamer Double Workshop Master Supply List: Little Dreamer Workshops Your Way Kit which includes X7219B Little Dreamer Papers X7219B Little Dreamer Complements Z3321 Little Dreamer Glitter Gems Z3189 White & Gold Ribbon D1721 Little Dreamer—Scrapbooking C1677 Little Dreamer—Cardmaking Z29762 Whisper Ink Z2863 White Daisy Pigment Ink Z899 Black Memento Ink Pad Z3132 Watercolor Paints Z2068 White Embossing Powder Heat Tool Z3316 Shimmer Brush—Gold Z3224 Waterbrush—Small Round Z679 Liquid Glass Z2060 Thin 3-D Foam Tape White Card Bases Optional: Watercolor Paper, wiggly eyes Consultant Workshop Information With just one Little Dreamer Workshops Your Way kit you can make this adorable Mini Display Album and up to 18 Little Dreamer Cards (3 sets of 6 cards each). You can market this workshop as a mini album workshop, a 6 card workshop, an 18 card workshop, or a double workshop featuring all the projects! Kit to make just the Album: 1/2 Little Dreamer Workshops Your Way Kit OR 1/2 X7219B Little Dreamer Papers PLUS 2 sheets of White Daisy Cardstock X7219B Little Dreamer Complements Z3321 Little Dreamer Glitter Gems 2 yards Z3189 White & Gold Ribbon Kit to make just the Cards: 1/2 Little Dreamer Workshops Your Way Kit (B&T only) OR 1/2 X7219B Little Dreamer Papers PLUS 1 Sheet of Watercolor Paper or White Daisy Card- stock for each set of 6 cards Z3321 Little Dreamer Glitter Gems 6-18 White Card Bases If you’re doing the whole shebang, the supplies are a WYW kit, White Daisy CS/watercolor paper, and the card bases!
Transcript of Little Dreamer Double Workshop - cdn. · PDF fileLittle Dreamer Double Workshop ... 4 1/2 x 1...
Little Dreamer Double Workshop
Master Supply List:
Little Dreamer Workshops Your Way Kit which includes
X7219B Little Dreamer Papers X7219B Little Dreamer Complements Z3321 Little Dreamer Glitter Gems
Z3189 White & Gold Ribbon
D1721 Little Dreamer—Scrapbooking C1677 Little Dreamer—Cardmaking
Z29762 Whisper Ink Z2863 White Daisy Pigment Ink Z899 Black Memento Ink Pad
Z3132 Watercolor Paints Z2068 White Embossing Powder
Heat Tool Z3316 Shimmer Brush—Gold
Z3224 Waterbrush—Small Round Z679 Liquid Glass
Z2060 Thin 3-D Foam Tape White Card Bases
Optional: Watercolor Paper, wiggly eyes
Consultant Workshop Information With just one Little Dreamer Workshops Your Way kit you can make this adorable Mini Display Album and up to 18 Little Dreamer Cards (3 sets of 6 cards each). You can market this workshop as a mini album workshop, a 6 card workshop, an 18 card workshop, or a double workshop featuring all the projects!
Kit to make just the Album: 1/2 Little Dreamer Workshops Your Way Kit OR
1/2 X7219B Little Dreamer Papers PLUS 2 sheets of White Daisy Cardstock
X7219B Little Dreamer Complements Z3321 Little Dreamer Glitter Gems 2 yards Z3189 White & Gold Ribbon
Kit to make just the Cards:
1/2 Little Dreamer Workshops Your Way Kit (B&T only) OR 1/2 X7219B Little Dreamer Papers
PLUS 1 Sheet of Watercolor Paper or White Daisy Card-stock for each set of 6 cards
Z3321 Little Dreamer Glitter Gems 6-18 White Card Bases
If you’re doing the whole shebang, the supplies are a WYW kit, White Daisy CS/watercolor paper, and the card bases!

Little Dreamer Double Workshop Consultant Tips and Tricks
The instructional handouts for this workshop are separated into three sets; one for the mini album and 2 versions for the cards. Because the workshops are intended to fit into half of a WYW kit, the cutting guides for each project are not overlapping or combined. I’ve included both a 6 card workshop version and an 18 card workshop version, as a half packet of paper will make up to 18 cards (3 of each design) or (3) six card workshop kits. Just print off the section(s) you need for the workshop you choose to market to your customers!
When embossing the Unicorns for the cards I used our Ranger white embossing powder mixed with an (optional) big pinch of super fine pris-ma glitter for extra sparkle. You could also em-boss the unicorns and then paint over with our clear Shimmer pen.
I did not have the matching Thin Cuts, but they would be a great tool and a fabulous upsell.
For a card workshop setting I would set up a single station to stamp and emboss all their uni-corns at once. They can paint and fussy cut the unicorns at their own spots. If you have a group of beginners, consider pre-embossing the unicorns to speed up the card making since that’s not the focus technique. That could be a good follow up workshop!
WATERCOLOR VS. WHITE DAISY
White Daisy or Watercolor?
I made a full set of cards on both papers us-ing our fabulous watercolor paints, and I feel confident saying you can use the paper that fits your workshop budget. I certainly found
that our Watercolor paper made the colors more vibrant and reactive and makes a great upsell. I was careful not to include this information in the customer instructions so you can choose how to best proceed for your customers and budget. I did iron the panels for both papers
to flatten them if they curled.
WHITE DAISY WATERCOLOR

The 1st measurement is always a horizontal cut. (3 x 12 = cut at 3”)
Bold means look out for a vertical first or other special cut.
Grey areas = Scrap
Arrows indicate Print direction
Thistle Rainbow/Lagoon Stripe* Heart/Mini Dot* B&T
2B*
4 1/2 x 1 1/2
Little Dreamer Album Workshop Little Dreamer Album Workshop
Rainbow Stripe/Mini Floral* B&T Unicorn/Big Dots* B&T
1C
1 3/4
x
5 3/4
Sometimes smaller cuts will be listed above the cutting guide box.
2E = Page 2, Piece E.
Paper types are listed below each cutting guide. * = use back side pattern (4E*)
NO
TES
:
Blossom Floral/Clouds* B&T
White Daisy CS (cut/score 2 sheets)
Album Section Part 1
Score at 6”
2A
5 3/4 x
5 3/4
1F
5 3/4 x 2
3A
3 x 6
5A
3 x 6
2D*
4 1/2 x 4
1A*
5 3/4 x
5 3/4
1G* see above
1G* see above
1G* see above
3B
*
3B
*
1G*: 1 3/4 x 1 3/4 (cut 3), 3B*: 1/2 x 3 (cut 2)
2C*
4 1/4 x 1 1/4
2E*
4 1/4 x
3 3/4
1B*
5 1/2 x
5 1/2
9B*
2 3/4 x
2 3/4
Album
Center
3 x 6
Album
Center
3 x 6
Album
Center
3 x 6
Album
Center
3 x 6
Album
Center*
3 x 6
Album
Center*
3 x 6
Album
Center*
3 x 6
Album
Center*
3 x 6
4A
3 x 6
6A
3 x 6
Album Section Part 2
Score at 3”
Score at 6”
Score at 9”
Additional Cuts: 1: 5” Pink Heart Zip Strip, 5 3/4” Lagoon Stripe Zip Strip 4: Be A Unicorn PML Card, Orange Dot & Purple Stripe Zip Strips 6: Unicorn PML Card, Today Journal PML, Orange Dot Zip Strip 8. Polka Dot and Pink Heart PML Card, Pink Heart and Purple Sparkle Zip Strips 9: Pink Polk Dot PML Card 10: Magical You PML Card
see above
7A
3 x 6
9A
3 x 6
8A
3 x 6

Little Dreamer Album Workshop Album Base Assembly
Each section of this Mini Album Base is constructed from 1 sheet of White Daisy Cardstock. I used Pink and green in the pictures for better contrast. For this project we will need 2 Album Sections (so 2 sheets of White Daisy Cardstock total) to create our finished project. You can easily continue to expand the album with additional sec-tions if desired. Be sure to fold the score lines well with a bone folder!
For each album section you’ll need (1) 6” x 12” piece of Cardstock (Green in Pics) scored at 6” and (1) 6” x 12” piece of Cardstock scored at 3”, 6” and 9” (Pink in pics). (Figure 1)
Fold the piece scored at 6” in half to make a 6x6 card; set aside. (Figure 2).
Fold the piece scored at 3”, 6” and 9” in half at the 6” score line to make a 6x6 card; then fold the first scored flap back to the center fold. (Figure 3).
Turn over the card and fold the other scored flap back to the center fold. (Figure 4).
It should look like an “M” when folded correctly. (Figure 5). You need 1 6x6 card and 1 “M” for each completed album section. Don’t forget we need two of these sections to make the completed Album Base.
I wanted my papers inside the album to alternate patterns, so I’ve included pic-tures of how I laid out the inner B&T papers. I found this easier to do before I assembled the Album Sections. Adhere your liner papers along the center folds of each piece as shown. Look carefully, as simply alternating the papers will not give you alternating liners when you assemble the album. The upper piece pictured is the piece scored at 6”. The lower piece pictured is the “M” fold piece. (Figure 6)
1
2
3
4
5 Glue
Glue
Glue
Glue
Glue
Glue
Glue
Glue
Inner Liners Section 1 Inner Liners Section 2
Glue
Glue
6
Little Dreamer Album Workshop Album Base Assembly Continued
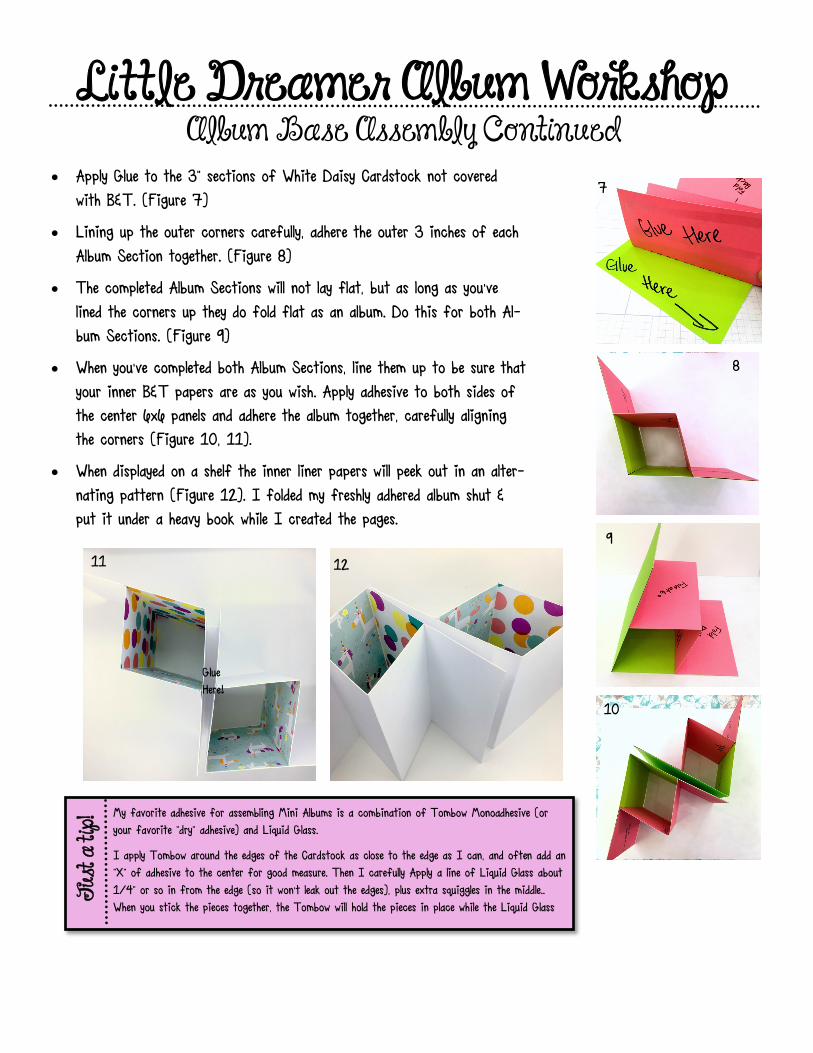
Apply Glue to the 3” sections of White Daisy Cardstock not covered with B&T. (Figure 7)
Lining up the outer corners carefully, adhere the outer 3 inches of each Album Section together. (Figure 8)
The completed Album Sections will not lay flat, but as long as you’ve lined the corners up they do fold flat as an album. Do this for both Al-bum Sections. (Figure 9)
When you’ve completed both Album Sections, line them up to be sure that your inner B&T papers are as you wish. Apply adhesive to both sides of the center 6x6 panels and adhere the album together, carefully aligning the corners (Figure 10, 11).
When displayed on a shelf the inner liner papers will peek out in an alter-nating pattern (Figure 12). I folded my freshly adhered album shut & put it under a heavy book while I created the pages.
WHITE DAISY WATERCOLOR
My favorite adhesive for assembling Mini Albums is a combination of Tombow Monoadhesive (or your favorite “dry” adhesive) and Liquid Glass.
I apply Tombow around the edges of the Cardstock as close to the edge as I can, and often add an “X” of adhesive to the center for good measure. Then I carefully Apply a line of Liquid Glass about 1/4” or so in from the edge (so it won’t leak out the edges), plus extra squiggles in the middle.. When you stick the pieces together, the Tombow will hold the pieces in place while the Liquid Glass
Jus
t a ti
p!
Glue Here!
7
8
9
10
11 12
Front and Back Cover Page Assembly Little Dreamer Album Workshop
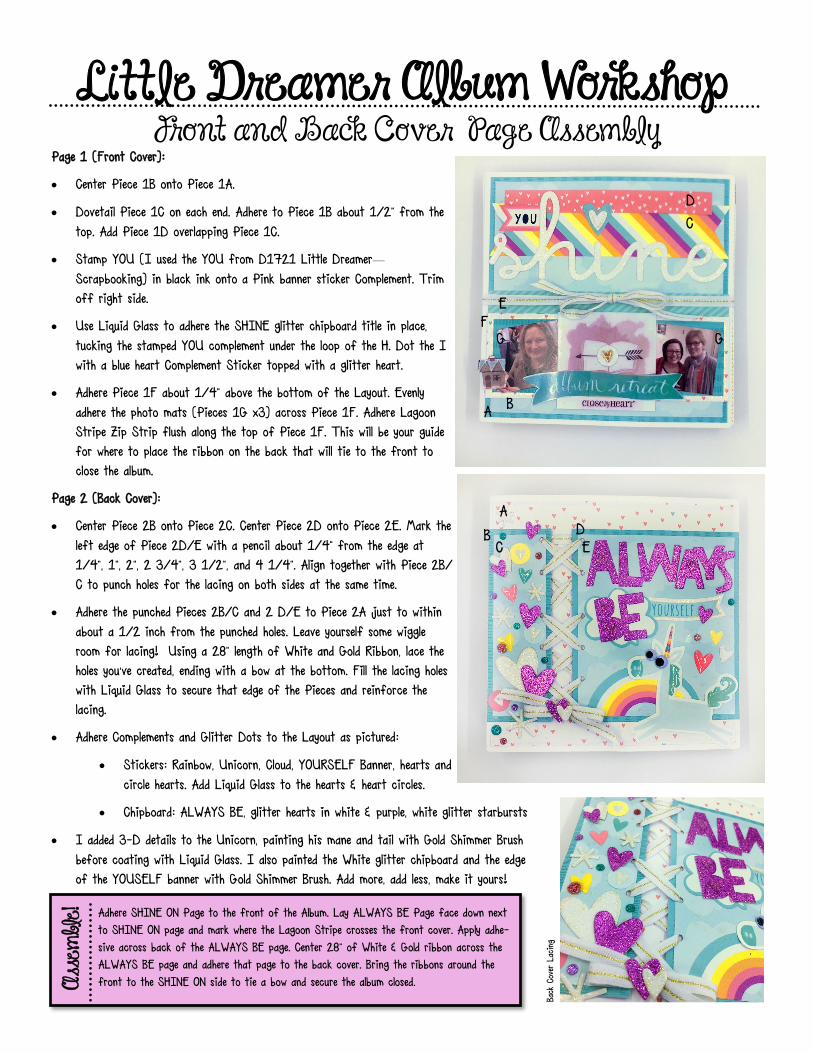
Page 1 (Front Cover):
Center Piece 1B onto Piece 1A.
Dovetail Piece 1C on each end. Adhere to Piece 1B about 1/2” from the top. Add Piece 1D overlapping Piece 1C.
Stamp YOU (I used the YOU from D1721 Little Dreamer—Scrapbooking) in black ink onto a Pink banner sticker Complement. Trim off right side.
Use Liquid Glass to adhere the SHINE glitter chipboard title in place, tucking the stamped YOU complement under the loop of the H. Dot the I with a blue heart Complement Sticker topped with a glitter heart.
Adhere Piece 1F about 1/4” above the bottom of the Layout. Evenly adhere the photo mats (Pieces 1G x3) across Piece 1F. Adhere Lagoon Stripe Zip Strip flush along the top of Piece 1F. This will be your guide for where to place the ribbon on the back that will tie to the front to close the album.
Page 2 (Back Cover):
Center Piece 2B onto Piece 2C. Center Piece 2D onto Piece 2E. Mark the left edge of Piece 2D/E with a pencil about 1/4” from the edge at 1/4”, 1”, 2”, 2 3/4”, 3 1/2”, and 4 1/4”. Align together with Piece 2B/C to punch holes for the lacing on both sides at the same time.
Adhere the punched Pieces 2B/C and 2 D/E to Piece 2A just to within about a 1/2 inch from the punched holes. Leave yourself some wiggle room for lacing! Using a 28” length of White and Gold Ribbon, lace the holes you’ve created, ending with a bow at the bottom. Fill the lacing holes with Liquid Glass to secure that edge of the Pieces and reinforce the lacing.
Adhere Complements and Glitter Dots to the Layout as pictured:
Stickers: Rainbow, Unicorn, Cloud, YOURSELF Banner, hearts and circle hearts. Add Liquid Glass to the hearts & heart circles.
Chipboard: ALWAYS BE, glitter hearts in white & purple, white glitter starbursts
I added 3-D details to the Unicorn, painting his mane and tail with Gold Shimmer Brush before coating with Liquid Glass. I also painted the White glitter chipboard and the edge of the YOUSELF banner with Gold Shimmer Brush. Add more, add less, make it yours!
Back
Cov
er L
acing
A B
C
D
E F
G G
A
B C
D E
WHITE DAISY WATERCOLOR
Adhere SHINE ON Page to the front of the Album. Lay ALWAYS BE Page face down next to SHINE ON page and mark where the Lagoon Stripe crosses the front cover. Apply adhe-sive across back of the ALWAYS BE page. Center 28” of White & Gold ribbon across the ALWAYS BE page and adhere that page to the back cover. Bring the ribbons around the front to the SHINE ON side to tie a bow and secure the album closed. A
ssem
ble!

Pages 3-6 Assembly Little Dreamer Album Workshop
Page 3:
Adhere (1) Piece 3B about 1/4” from the top edge of Piece 3A.
Apply Adhesive to the bottom edge of your photo (mine was 3 x 2 1/2) and adhere that edge to the other Piece 3B, allowing about 1/4” of overlap. Apply adhesive to the top edge of the photo and place over the original Piece 3B to create a Lagoon Stripe matted photo.
Add a second photo or Journaling at the bottom, Embellish as desired!
Page 4:
Trim the Unicorn PML card to 3 x 3 1/3”. Adhere towards the top of Piece 4A. Add Gold Shimmer Pen around the edges and on “Unicorn”.
I used a pictured at the bottom that is 2 1/4” x 2 1/4”. The mat is created using 2 1/2” strips of Orange Dot (x3) and Purple Sparkle (x2)zip strips. Apply adhesive to the back of the photo and adhere the zip strips in an alternating pattern. Trim around the photo leaving an 1/8” edge for the mat.
Add Complement star stickers (topped with Liquid Glass) and glitter dots.
Page 5:
I added two photos that were 2 1/4” x 2 1/4”. Trim off one side of a Sparkle complements banner sticker and attach over the bottom photo.
Top with Complements chipboard flower pieces filled with glitter dots.
Page 6:
Trim the Unicorn PML card to 2 7/8” x 2 7/8”. Attach to Piece 6A centered at the bottom of the page. Adhere SO SWEET Complements sticker over the top of the PML card and trim flush to edge of page.
Trim the Today Journaling PML card to 2” tall by 2 3/4” wide (just the lines). Adhere centered at the top of the page.
Dovetail one end of a 2 1/2” strip of Orange Dot zip strip. Adhere slanted across the top of the journaling PML card and top with the Complements chipboard heart banner. Fill the hearts with Liquid Glass.
Add Complements heart stickers, chipboard heart, and a chipboard sparkle.
Add Shimmer pen to Unicorn PML card image and top the unicorn mane, tail, and nose with Liquid Glass.
Assembly:
Adhere each page to one 3-6 area on the right side of the album. Make sure the pages fit as you adhere them into the album and don’t impede the folding action. You might need to trim them slightly along the folds.
Page
s 3-
6
A
B
B
Page 3 Page 4
A
B
Page 5 Page 6
A
A
B
C
Pages 7-10 Assembly Little Dreamer Album Workshop
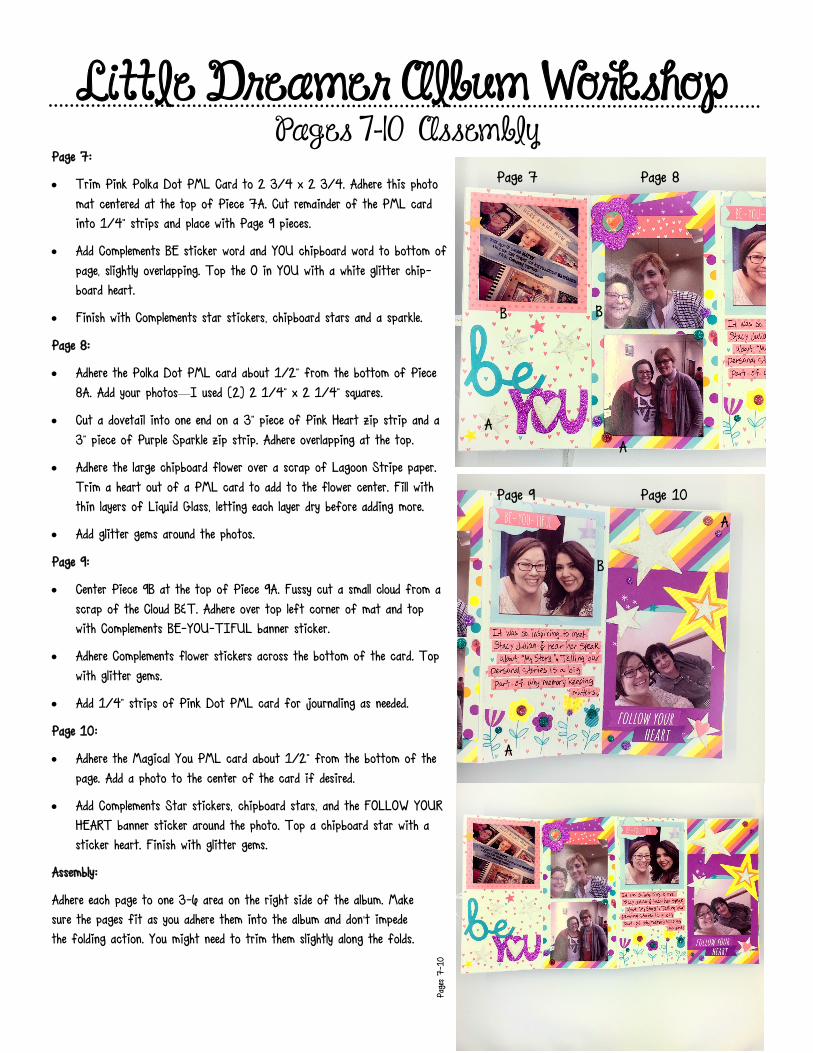
Page 7:
Trim Pink Polka Dot PML Card to 2 3/4 x 2 3/4. Adhere this photo mat centered at the top of Piece 7A. Cut remainder of the PML card into 1/4” strips and place with Page 9 pieces.
Add Complements BE sticker word and YOU chipboard word to bottom of page, slightly overlapping. Top the O in YOU with a white glitter chip-board heart.
Finish with Complements star stickers, chipboard stars and a sparkle.
Page 8:
Adhere the Polka Dot PML card about 1/2” from the bottom of Piece 8A. Add your photos—I used (2) 2 1/4” x 2 1/4” squares.
Cut a dovetail into one end on a 3” piece of Pink Heart zip strip and a 3” piece of Purple Sparkle zip strip. Adhere overlapping at the top.
Adhere the large chipboard flower over a scrap of Lagoon Stripe paper. Trim a heart out of a PML card to add to the flower center. Fill with thin layers of Liquid Glass, letting each layer dry before adding more.
Add glitter gems around the photos.
Page 9:
Center Piece 9B at the top of Piece 9A. Fussy cut a small cloud from a scrap of the Cloud B&T. Adhere over top left corner of mat and top with Complements BE-YOU-TIFUL banner sticker.
Adhere Complements flower stickers across the bottom of the card. Top with glitter gems.
Add 1/4” strips of Pink Dot PML card for journaling as needed.
Page 10:
Adhere the Magical You PML card about 1/2” from the bottom of the page. Add a photo to the center of the card if desired.
Add Complements Star stickers, chipboard stars, and the FOLLOW YOUR HEART banner sticker around the photo. Top a chipboard star with a sticker heart. Finish with glitter gems.
Assembly:
Adhere each page to one 3-6 area on the right side of the album. Make sure the pages fit as you adhere them into the album and don’t impede the folding action. You might need to trim them slightly along the folds.
Page
s 7-1
0
A
B
Page 7 Page 8
A
B
Page 9 Page 10
A
A
B
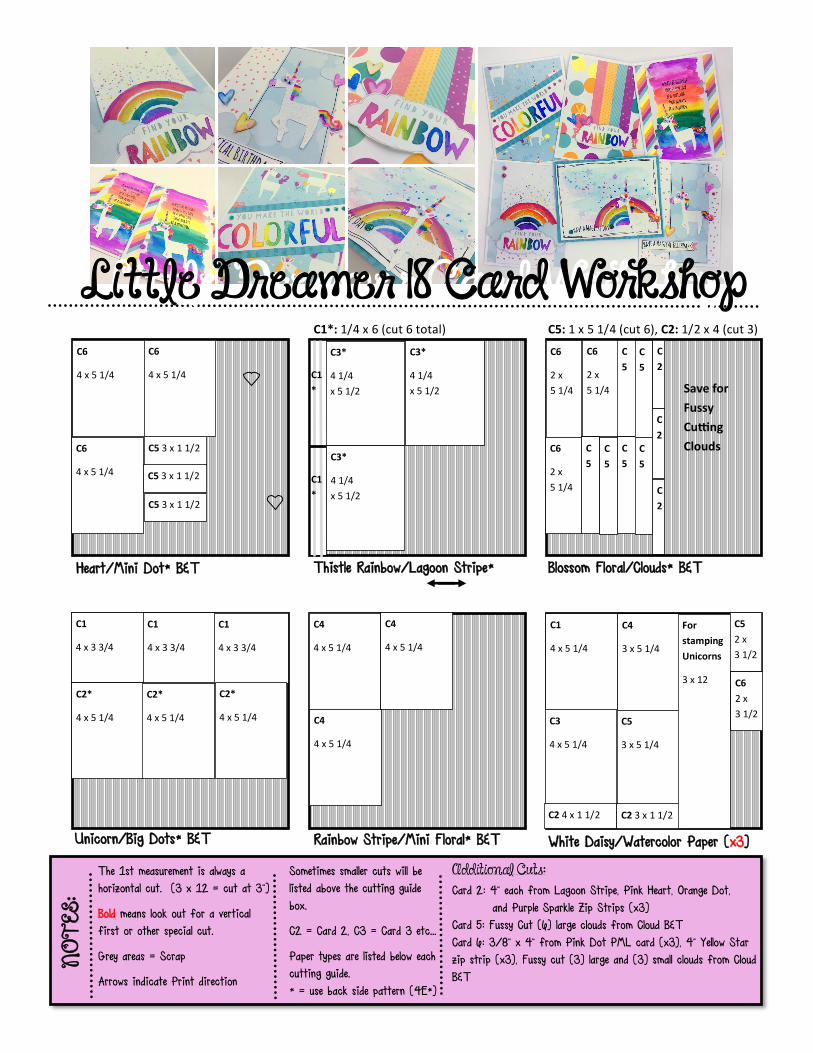
The 1st measurement is always a horizontal cut. (3 x 12 = cut at 3”)
Bold means look out for a vertical first or other special cut.
Grey areas = Scrap
Arrows indicate Print direction
Thistle Rainbow/Lagoon Stripe* Heart/Mini Dot* B&T
C5 3 x 1 1/2
Little Dreamer Card Workshop Little Dreamer 18 Card Workshop
Rainbow Stripe/Mini Floral* B&T
Sometimes smaller cuts will be listed above the cutting guide box.
C2 = Card 2, C3 = Card 3 etc...
Paper types are listed below each cutting guide. * = use back side pattern (4E*)
NO
TES
:
Blossom Floral/Clouds* B&T
White Daisy/Watercolor Paper (x3)
C1*: 1/4 x 6 (cut 6 total)
C1
4 x 3 3/4
Unicorn/Big Dots* B&T
Additional Cuts: Card 2: 4” each from Lagoon Stripe, Pink Heart, Orange Dot, and Purple Sparkle Zip Strips (x3) Card 5: Fussy Cut (6) large clouds from Cloud B&T Card 6: 3/8” x 4” from Pink Dot PML card (x3), 4” Yellow Star zip strip (x3), Fussy cut (3) large and (3) small clouds from Cloud B&T
C1
4 x 3 3/4
C1
4 x 3 3/4
C2*
4 x 5 1/4
C2*
4 x 5 1/4
C2*
4 x 5 1/4
C4
4 x 5 1/4
C4
4 x 5 1/4
C4
4 x 5 1/4
C6
4 x 5 1/4
C6
4 x 5 1/4
C6
4 x 5 1/4
C5 3 x 1 1/2
C5 3 x 1 1/2
C1
*
C1
*
C3*
4 1/4
x 5 1/2
C3*
4 1/4
x 5 1/2
C3*
4 1/4
x 5 1/2
C6
2 x
5 1/4
C6
2 x
5 1/4
C6
2 x
5 1/4
C
5
C
5
C
5
C
5
C
5
C
5
C5: 1 x 5 1/4 (cut 6), C2: 1/2 x 4 (cut 3)
C
2
C
2
C
2
Save for
Fussy
Cutting
Clouds
C1
4 x 5 1/4
C3
4 x 5 1/4
C2 4 x 1 1/2
C4
3 x 5 1/4
C5
3 x 5 1/4
C2 3 x 1 1/2
For
stamping
Unicorns
3 x 12
C5
2 x
3 1/2
C6
2 x
3 1/2

Little Dreamer Card Workshop Watercolor Gradient Technique
For these cards we are going to be stamping all our images in Whisper Ink and coloring with watercolor paints over the inked images to blend our colors.
For most images you will want to ink the stamp in Whisper ink, then stamp that off onto scratch paper, and then stamp the im-age onto your project cardstock. You want just enough image to help you see where to paint.
For card number 1, I inked the image, stamped it off onto scratch paper, then reinked just the top part of the image to create the coloring image while keeping the senti-ment at the top bold. (images 1 & 2)
Add water to the rainbow of paints you plan to use (see tip be-low). Keep the paint wet but not too wet—we are looking for real-ly vibrant colors to blend for these gradients.
Using a small waterbrush or paintbrush, trace the image with your lightest color. Do not squeeze, as we don’t want this to be super wet. I like to keep the color more intense on one side and barely dampen the second side. Pick up a bit of a second, darker color and touch it to the still wet first color. The colors will naturally run to fill in the dampened areas, giving you a nice gradient!
Keep a clean paper towel handy—if the colors run away you can quickly and care-fully mop up the paint and try again.
If your paper curls up when you are working with it, iron it on high in a sand-wich of clean sheets of copy paper. Keep the iron moving—it only takes a sec!
WHITE DAISY WATERCOLOR
I number my watercolor palette with a sharpie pen starting from the top left corner so I can easily identify which colors I’m using. For this project my colors were Red (17), Orange (7), Yellow (4), Green (30), Blue (25), and Purple (20). I number my colors on the outside and the inside of the case so I can see what colors I am using and create projects more easily! J
ust a
tip!
Inking
the sen
time
nt f
or c
ard
1 Re
ady to
wat
erco
lor!
Adding
Red
to
the Or
ange
letter—
let it ble
ed n
aturally!
Rainbo
w read
y to
blen
d—let
the b
ackg
roun
d dry first !

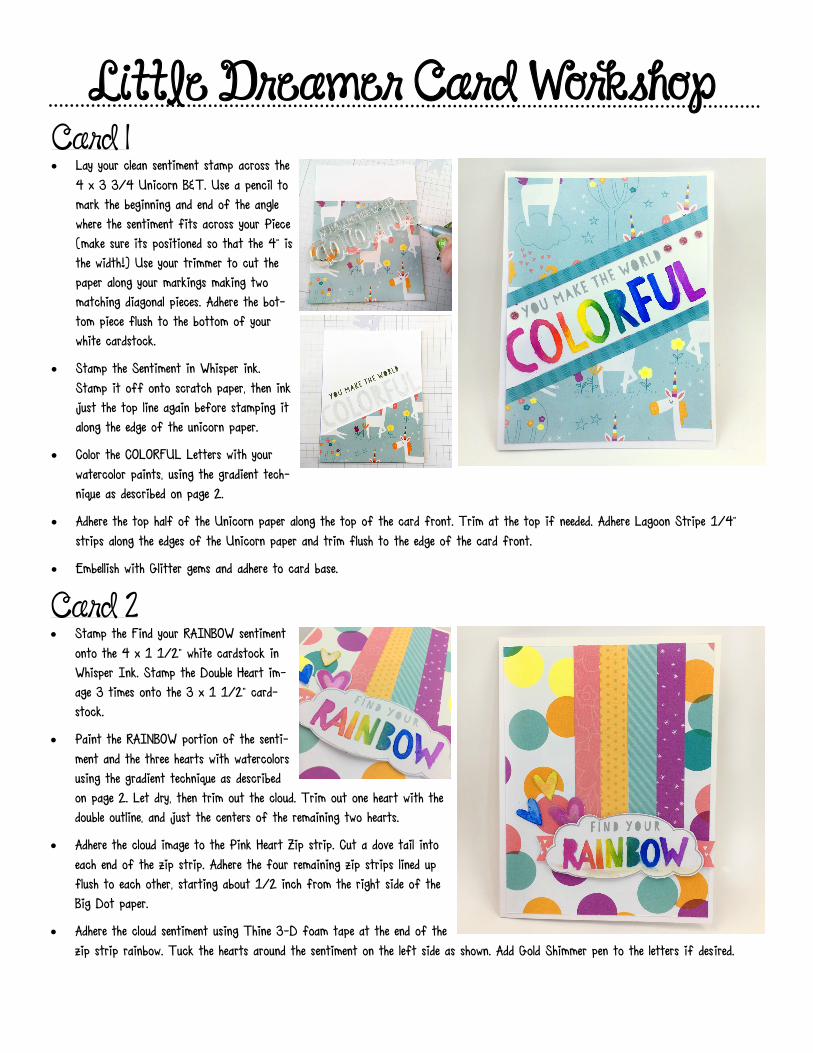
Card 1
Lay your clean sentiment stamp across the 4 x 3 3/4 Unicorn B&T. Use a pencil to mark the beginning and end of the angle where the sentiment fits across your Piece (make sure its positioned so that the 4” is the width!) Use your trimmer to cut the paper along your markings making two matching diagonal pieces. Adhere the bot-tom piece flush to the bottom of your white cardstock.
Stamp the Sentiment in Whisper ink. Stamp it off onto scratch paper, then ink just the top line again before stamping it along the edge of the unicorn paper.
Color the COLORFUL Letters with your watercolor paints, using the gradient tech-nique as described on page 2.
Adhere the top half of the Unicorn paper along the top of the card front. Trim at the top if needed. Adhere Lagoon Stripe 1/4” strips along the edges of the Unicorn paper and trim flush to the edge of the card front.
Embellish with Glitter gems and adhere to card base.
Little Dreamer Card Workshop
Card 2
Stamp the Find your RAINBOW sentiment onto the 4 x 1 1/2” white cardstock in Whisper Ink. Stamp the Double Heart im-age 3 times onto the 3 x 1 1/2” card-stock.
Paint the RAINBOW portion of the senti-ment and the three hearts with watercolors using the gradient technique as described on page 2. Let dry, then trim out the cloud. Trim out one heart with the double outline, and just the centers of the remaining two hearts.
Adhere the cloud image to the Pink Heart Zip strip. Cut a dove tail into each end of the zip strip. Adhere the four remaining zip strips lined up flush to each other, starting about 1/2 inch from the right side of the Big Dot paper.
Adhere the cloud sentiment using Thine 3-D foam tape at the end of the zip strip rainbow. Tuck the hearts around the sentiment on the left side as shown. Add Gold Shimmer pen to the letters if desired.

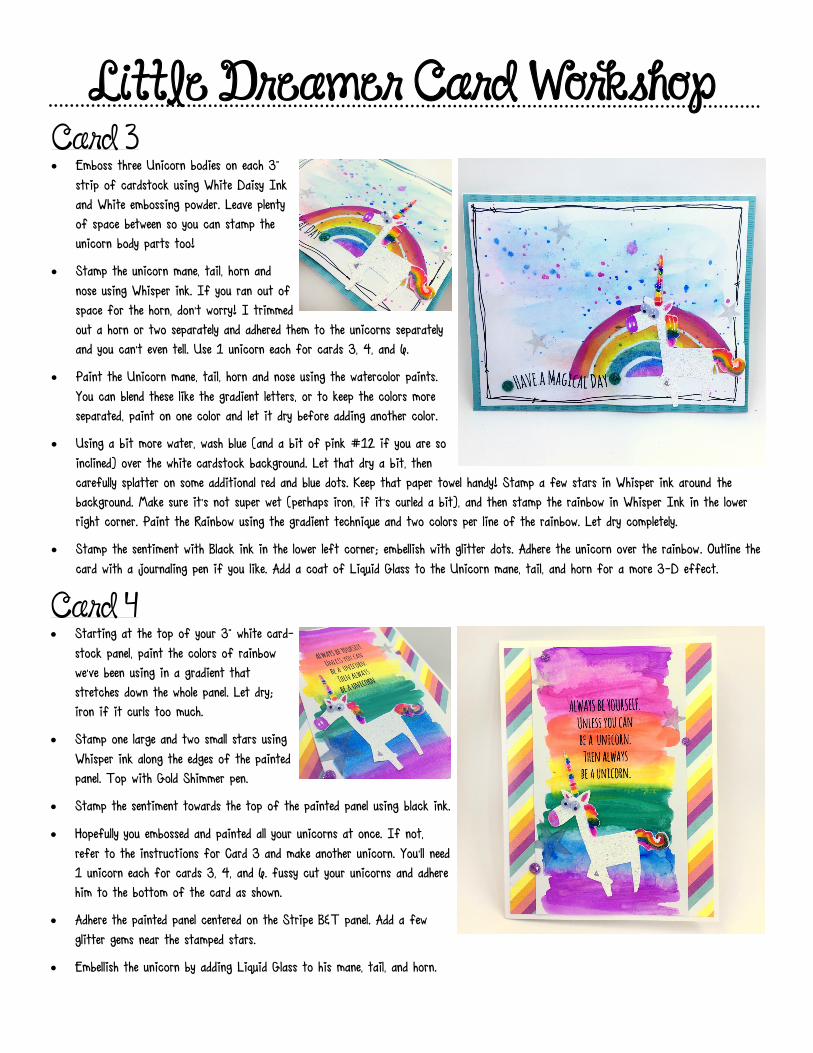
Card 4
Starting at the top of your 3” white card-stock panel, paint the colors of rainbow we’ve been using in a gradient that stretches down the whole panel. Let dry; iron if it curls too much.
Stamp one large and two small stars using Whisper ink along the edges of the painted panel. Top with Gold Shimmer pen.
Stamp the sentiment towards the top of the painted panel using black ink.
Hopefully you embossed and painted all your unicorns at once. If not, refer to the instructions for Card 3 and make another unicorn. You’ll need 1 unicorn each for cards 3, 4, and 6. fussy cut your unicorns and adhere him to the bottom of the card as shown.
Adhere the painted panel centered on the Stripe B&T panel. Add a few glitter gems near the stamped stars.
Embellish the unicorn by adding Liquid Glass to his mane, tail, and horn.
Card 3
Emboss three Unicorn bodies on each 3” strip of cardstock using White Daisy Ink and White embossing powder. Leave plenty of space between so you can stamp the unicorn body parts too!
Stamp the unicorn mane, tail, horn and nose using Whisper ink. If you ran out of space for the horn, don’t worry! I trimmed out a horn or two separately and adhered them to the unicorns separately and you can’t even tell. Use 3 unicorns each for cards 3, 4, and 6.
Paint the Unicorn mane, tail, horn and nose using the watercolor paints. You can blend these like the gradient letters, or to keep the colors more separated, paint on one color and let it dry before adding another color.
Using a bit more water, wash blue (and a bit of pink #12 if you are so inclined) over the white cardstock background. Let that dry a bit, then carefully splatter on some additional red and blue dots. Keep that paper towel handy! Stamp a few stars in Whisper ink around the background. Make sure it’s not super wet (perhaps iron, if it’s curled a bit), and then stamp the rainbow in Whisper Ink in the lower right corner. Paint the Rainbow using the gradient technique and two colors per line of the rainbow. Let dry completely.
Stamp the sentiment with Black ink in the lower left corner; embellish with glitter dots. Adhere the unicorn over the rainbow. Outline the card with a journaling pen if you like. Add a coat of Liquid Glass to the Unicorn mane, tail, and horn for a more 3-D effect.
Little Dreamer Card Workshop

Card 6
Stamp three of the Double outline heart images in Whisper ink onto the small white cardstock. Paint with watercolor paints using the gradient technique. Let dry, then trim out just the centers of the hearts.
Adhere the Cloud B&T strip onto the Heart B&T about 3/4” from the edge. Add a stitched line down each side with a fine tipped journaling pen if desired.
Stamp the MAGICAL BIRTHDAY sentiment onto the Yellow Star Zip Strip. Cut a dovetail into the right side of the sentiment. Outline with a journaling pen if desired. Cut a dovetail in one end of the 3/8” piece of Pink Dot PML card and adhere behind the sentiment banner, peeking out from the right side.
Adhere the fussy cut clouds onto the card as shown. Trim flush to the card front. Attach the sentiment banner over the bottom cloud base.
Fussy cut your last unicorn and adhere him in the middle of the Cloud B&T. Add Liquid Glass to detail the unicorn if desired. Embellish with the painted hearts and glitter gems.
Card 5
Adhere the Heart B&T at the bottom of the white cardstock panel.
Stamp the Rainbow image in Whisper Ink just above the Heart B&T. Stamp the sparkle image in Whisper cardstock around the top of the Rainbow. Stamp the RAIN-BOW cloud sentiment onto the small white cardstock panel in Whisper ink.
Paint the rainbow image and the word RAINBOW from the sentiment us-ing the gradient technique and watercolor paints. As you work with each color, flick the tip of your waterbrush across the Whisper sparkle images to add some rainbow speckles up there too. Cover the Heart B&T with a post-it if you are nervous about the flicking.
Adhere the 1” Cloud B&T pieces onto either side of your card base. Adhere the Rainbow painted panel centered on the card base, overlapping the Cloud B&T strips.
Attach the fussy cut clouds onto the ends of your rainbow. Attach the RAINBOW sentiment using This 3-D foam tape. Add Gold Shimmer pen to the clouds and RAINBOW letters.
Embellish with glitter gems.
Little Dreamer Card Workshop
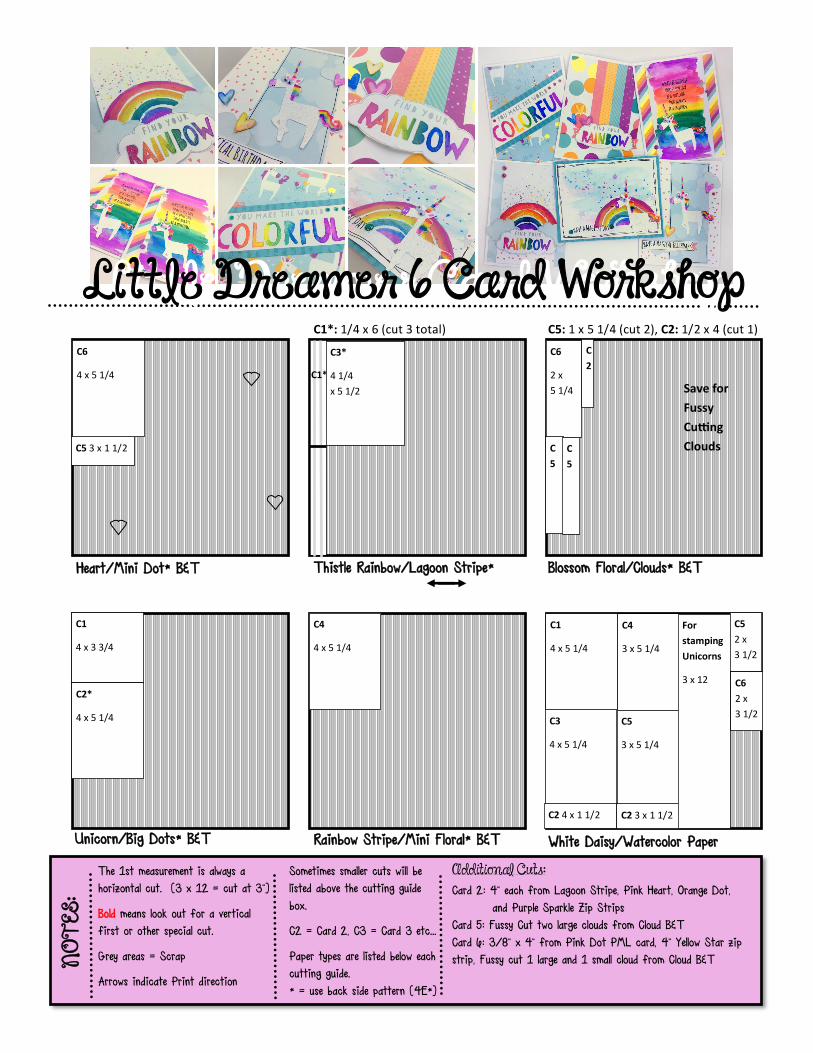
The 1st measurement is always a horizontal cut. (3 x 12 = cut at 3”)
Bold means look out for a vertical first or other special cut.
Grey areas = Scrap
Arrows indicate Print direction
Thistle Rainbow/Lagoon Stripe* Heart/Mini Dot* B&T
C5 3 x 1 1/2
Little Dreamer Card Workshop Little Dreamer 6 Card Workshop
Rainbow Stripe/Mini Floral* B&T
Sometimes smaller cuts will be listed above the cutting guide box.
C2 = Card 2, C3 = Card 3 etc...
Paper types are listed below each cutting guide. * = use back side pattern (4E*)
NO
TES
:
Blossom Floral/Clouds* B&T
White Daisy/Watercolor Paper
C1*: 1/4 x 6 (cut 3 total)
C1
4 x 3 3/4
Unicorn/Big Dots* B&T
Additional Cuts: Card 2: 4” each from Lagoon Stripe, Pink Heart, Orange Dot, and Purple Sparkle Zip Strips Card 5: Fussy Cut two large clouds from Cloud B&T Card 6: 3/8” x 4” from Pink Dot PML card, 4” Yellow Star zip strip, Fussy cut 1 large and 1 small cloud from Cloud B&T
C2*
4 x 5 1/4
C4
4 x 5 1/4
C6
4 x 5 1/4
C1*
C3*
4 1/4
x 5 1/2
C6
2 x
5 1/4
C
5
C
5
C5: 1 x 5 1/4 (cut 2), C2: 1/2 x 4 (cut 1)
C
2
Save for
Fussy
Cutting
Clouds
C1
4 x 5 1/4
C3
4 x 5 1/4
C2 4 x 1 1/2
C4
3 x 5 1/4
C5
3 x 5 1/4
C2 3 x 1 1/2
For
stamping
Unicorns
3 x 12
C5
2 x
3 1/2
C6
2 x
3 1/2

Little Dreamer Card Workshop Watercolor Gradient Technique
For these cards we are going to be stamping all our images in Whisper Ink and coloring with watercolor paints over the inked images to blend our colors.
For most images you will want to ink the stamp in Whisper ink, then stamp that off onto scratch paper, and then stamp the im-age onto your project cardstock. You want just enough image to help you see where to paint.
For card number 1, I inked the image, stamped it off onto scratch paper, then reinked just the top part of the image to create the coloring image while keeping the senti-ment at the top bold. (images 1 & 2)
Add water to the rainbow of paints you plan to use (see tip be-low). Keep the paint wet but not too wet—we are looking for real-ly vibrant colors to blend for these gradients.
Using a small waterbrush or paintbrush, trace the image with your lightest color. Do not squeeze, as we don’t want this to be super wet. I like to keep the color more intense on one side and barely dampen the second side. Pick up a bit of a second, darker color and touch it to the still wet first color. The colors will naturally run to fill in the dampened areas, giving you a nice gradient!
Keep a clean paper towel handy—if the colors run away you can quickly and care-fully mop up the paint and try again.
If your paper curls up when you are working with it, iron it on high in a sand-wich of clean sheets of copy paper. Keep the iron moving—it only takes a sec!
WHITE DAISY WATERCOLOR
I number my watercolor palette with a sharpie pen starting from the top left corner so I can easily identify which colors I’m using. For this project my colors were Red (17), Orange (7), Yellow (4), Green (30), Blue (25), and Purple (20). I number my colors on the outside and the inside of the case so I can see what colors I am using and create projects more easily! J
ust a
tip!
Inking
the sen
time
nt f
or c
ard
1 Re
ady to
wat
erco
lor!
Adding
Red
to
the Or
ange
letter—
let it ble
ed n
aturally!
Rainbo
w read
y to
blen
d—let
the b
ackg
roun
d dry first !
Card 1
Lay your clean sentiment stamp across the 4 x 3 3/4 Unicorn B&T. Use a pencil to mark the beginning and end of the angle where the sentiment fits across your Piece (make sure its positioned so that the 4” is the width!) Use your trimmer to cut the paper along your markings making two matching diagonal pieces. Adhere the bot-tom piece flush to the bottom of your white cardstock.
Stamp the Sentiment in Whisper ink. Stamp it off onto scratch paper, then ink just the top line again before stamping it along the edge of the unicorn paper.
Color the COLORFUL Letters with your watercolor paints, using the gradient tech-nique as described on page 2.
Adhere the top half of the Unicorn paper along the top of the card front. Trim at the top if needed. Adhere Lagoon Stripe 1/4” strips along the edges of the Unicorn paper and trim flush to the edge of the card front.
Embellish with Glitter gems and adhere to card base.
Little Dreamer Card Workshop
Card 2
Stamp the Find your RAINBOW sentiment onto the 4 x 1 1/2” white cardstock in Whisper Ink. Stamp the Double Heart im-age 3 times onto the 3 x 1 1/2” card-stock.
Paint the RAINBOW portion of the senti-ment and the three hearts with watercolors using the gradient technique as described on page 2. Let dry, then trim out the cloud. Trim out one heart with the double outline, and just the centers of the remaining two hearts.
Adhere the cloud image to the Pink Heart Zip strip. Cut a dove tail into each end of the zip strip. Adhere the four remaining zip strips lined up flush to each other, starting about 1/2 inch from the right side of the Big Dot paper.
Adhere the cloud sentiment using Thine 3-D foam tape at the end of the zip strip rainbow. Tuck the hearts around the sentiment on the left side as shown. Add Gold Shimmer pen to the letters if desired.
Card 4
Starting at the top of your 3” white card-stock panel, paint the colors of rainbow we’ve been using in a gradient that stretches down the whole panel. Let dry; iron if it curls too much.
Stamp one large and two small stars using Whisper ink along the edges of the painted panel. Top with Gold Shimmer pen.
Stamp the sentiment towards the top of the painted panel using black ink.
Hopefully you embossed and painted all your unicorns at once. If not, refer to the instructions for Card 3 and make another unicorn. You’ll need 1 unicorn each for cards 3, 4, and 6. fussy cut your unicorns and adhere him to the bottom of the card as shown.
Adhere the painted panel centered on the Stripe B&T panel. Add a few glitter gems near the stamped stars.
Embellish the unicorn by adding Liquid Glass to his mane, tail, and horn.
Card 3
Emboss three Unicorn bodies on each 3” strip of cardstock using White Daisy Ink and White embossing powder. Leave plenty of space between so you can stamp the unicorn body parts too!
Stamp the unicorn mane, tail, horn and nose using Whisper ink. If you ran out of space for the horn, don’t worry! I trimmed out a horn or two separately and adhered them to the unicorns separately and you can’t even tell. Use 1 unicorn each for cards 3, 4, and 6.
Paint the Unicorn mane, tail, horn and nose using the watercolor paints. You can blend these like the gradient letters, or to keep the colors more separated, paint on one color and let it dry before adding another color.
Using a bit more water, wash blue (and a bit of pink #12 if you are so inclined) over the white cardstock background. Let that dry a bit, then carefully splatter on some additional red and blue dots. Keep that paper towel handy! Stamp a few stars in Whisper ink around the background. Make sure it’s not super wet (perhaps iron, if it’s curled a bit), and then stamp the rainbow in Whisper Ink in the lower right corner. Paint the Rainbow using the gradient technique and two colors per line of the rainbow. Let dry completely.
Stamp the sentiment with Black ink in the lower left corner; embellish with glitter dots. Adhere the unicorn over the rainbow. Outline the card with a journaling pen if you like. Add a coat of Liquid Glass to the Unicorn mane, tail, and horn for a more 3-D effect.
Little Dreamer Card Workshop

Card 6
Stamp three of the Double outline heart images in Whisper ink onto the small white cardstock. Paint with watercolor paints using the gradient technique. Let dry, then trim out just the centers of the hearts.
Adhere the Cloud B&T strip onto the Heart B&T about 3/4” from the edge. Add a stitched line down each side with a fine tipped journaling pen if desired.
Stamp the MAGICAL BIRTHDAY sentiment onto the Yellow Star Zip Strip. Cut a dovetail into the right side of the sentiment. Outline with a journaling pen if desired. Cut a dovetail in one end of the 3/8” piece of Pink Dot PML card and adhere behind the sentiment banner, peeking out from the right side.
Adhere the fussy cut clouds onto the card as shown. Trim flush to the card front. Attach the sentiment banner over the bottom cloud base.
Fussy cut your last unicorn and adhere him in the middle of the Cloud B&T. Add Liquid Glass to detail the unicorn if desired. Embellish with the painted hearts and glitter gems.
Card 5
Adhere the Heart B&T at the bottom of the white cardstock panel.
Stamp the Rainbow image in Whisper Ink just above the Heart B&T. Stamp the sparkle image in Whisper cardstock around the top of the Rainbow. Stamp the RAIN-BOW cloud sentiment onto the small white cardstock panel in Whisper ink.
Paint the rainbow image and the word RAINBOW from the sentiment us-ing the gradient technique and watercolor paints. As you work with each color, flick the tip of your waterbrush across the Whisper sparkle images to add some rainbow speckles up there too. Cover the Heart B&T with a post-it if you are nervous about the flicking.
Adhere the 1” Cloud B&T pieces onto either side of your card base. Adhere the Rainbow painted panel centered on the card base, overlapping the Cloud B&T strips.
Attach the fussy cut clouds onto the ends of your rainbow. Attach the RAINBOW sentiment using This 3-D foam tape. Add Gold Shimmer pen to the clouds and RAINBOW letters.
Embellish with glitter gems.
Little Dreamer Card Workshop