Little Dipper Processor User Manual - SciGene · Non ‐Electrical ... Little Dipper® Processor...
22
www.scigene.com 1287 Reamwood Avenue, Sunnyvale, CA 94089 USA • Tel 408‐733‐7337 • Fax 408‐733‐7336 • [email protected] Little Dipper ® Processor USER MANUAL FISH — Cat. #1080‐70‐1 (115V) and 1080‐70‐2 (230V) Agilent — Cat. #1080‐40‐1 (115V) and 1080‐40‐2 (230V) Illumina — Cat. #1080‐30‐1 (115V) and 1080‐30‐2 (230V) Affymetrix — Cat. #1080‐65‐1 (115V) and 1080‐65‐2 (230V) Self‐spotted — Cat. #1080‐50‐1 (115V) and 1080‐50‐2 (230V) FOR RESEARCH USE ONLY
Transcript of Little Dipper Processor User Manual - SciGene · Non ‐Electrical ... Little Dipper® Processor...

www.scigene.com
1287 Reamwood Avenue, Sunnyvale, CA 94089 USA • Tel 408‐733‐7337 • Fax 408‐733‐7336 • [email protected]
Little Dipper® Processor USER MANUAL
FISH — Cat. #1080‐70‐1 (115V) and 1080‐70‐2 (230V)
Agilent — Cat. #1080‐40‐1 (115V) and 1080‐40‐2 (230V) Illumina — Cat. #1080‐30‐1 (115V) and 1080‐30‐2 (230V)
Affymetrix — Cat. #1080‐65‐1 (115V) and 1080‐65‐2 (230V) Self‐spotted — Cat. #1080‐50‐1 (115V) and 1080‐50‐2 (230V)
FOR RESEARCH USE ONLY

Little Dipper® Processor — USER MANUAL
Version 2.1, May 2015 1 (408) 733‐7337, [email protected]
Serial Number The following serial number identifies the specific instrument you have purchased and must be referenced when requesting service. A copy is affixed to the instrument.
Technical Service: (408) 733‐7337, [email protected]
Warranty SciGene warrants that the electrical instrument described in this manual shall be free of defects in materials and workmanship for a period of 12 months from date of delivery. This warranty does not cover removable baths or accessories. In the event of a defect during the warranty period, SciGene’s limit of liability will be to provide replacement parts at no charge or, at its sole discretion, replace the product. The foregoing warranty is void in the event the unit was abused or modified or used in a manner inconsistent with its intended purpose. SciGene makes no other warranty, expressed or implied including warranties of merchantability and fitness for a particular purpose. In no event shall SciGene be liable for any direct, indirect, special, incidental or consequential damages or for any damages resulting from loss arising out of or in connection with the sale, use or performance of the product. Copyright Copyright ©2005‐2015 SciGene Corporation. All rights reserved. SciGene and Little Dipper are trademarks of SciGene Corporation, Sunnyvale, CA. All other trademarks used in this manual are the property of their respective owners.
Little Dipper® Processor — USER MANUAL
Version 2.1, May 2015 2 (408) 733‐7337, [email protected]
Table of Contents
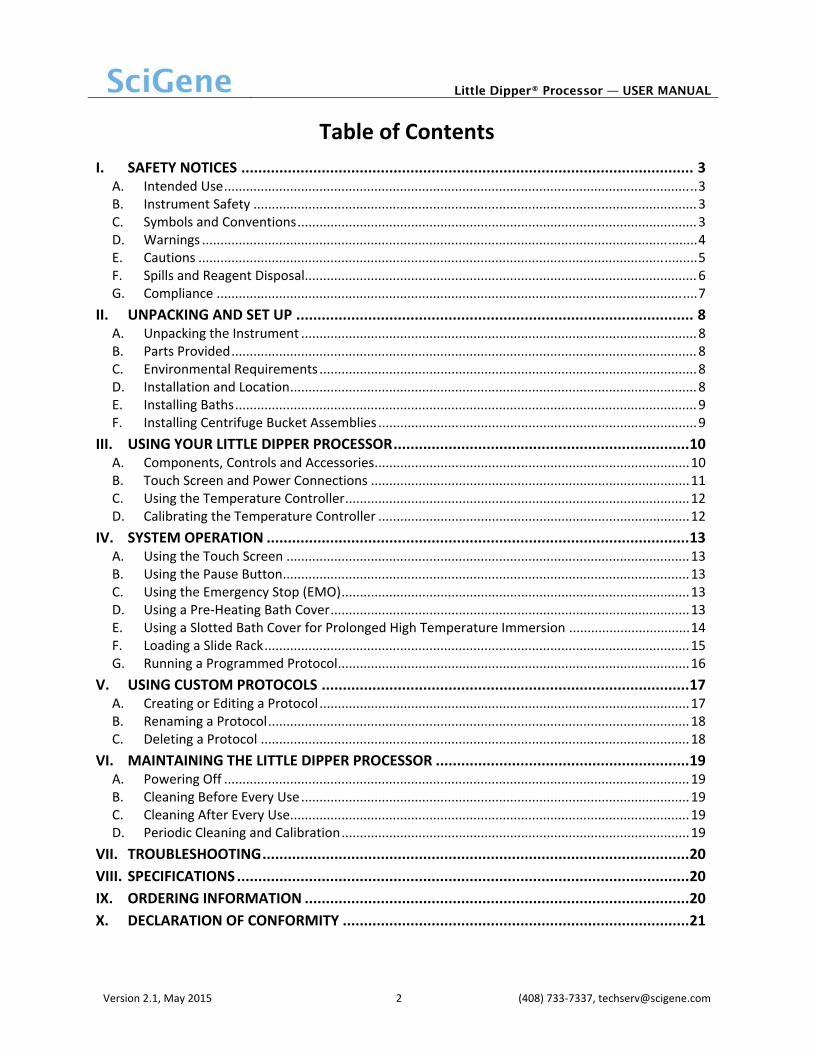
I. SAFETY NOTICES ........................................................................................................... 3 A. Intended Use ................................................................................................................................. 3 B. Instrument Safety ......................................................................................................................... 3 C. Symbols and Conventions ............................................................................................................. 3 D. Warnings ....................................................................................................................................... 4 E. Cautions ........................................................................................................................................ 5 F. Spills and Reagent Disposal........................................................................................................... 6 G. Compliance ................................................................................................................................... 7
II. UNPACKING AND SET UP .............................................................................................. 8 A. Unpacking the Instrument ............................................................................................................ 8 B. Parts Provided ............................................................................................................................... 8 C. Environmental Requirements ....................................................................................................... 8 D. Installation and Location ............................................................................................................... 8 E. Installing Baths .............................................................................................................................. 9 F. Installing Centrifuge Bucket Assemblies ....................................................................................... 9
III. USING YOUR LITTLE DIPPER PROCESSOR ...................................................................... 10 A. Components, Controls and Accessories ...................................................................................... 10 B. Touch Screen and Power Connections ....................................................................................... 11 C. Using the Temperature Controller .............................................................................................. 12 D. Calibrating the Temperature Controller ..................................................................................... 12
IV. SYSTEM OPERATION .................................................................................................... 13 A. Using the Touch Screen .............................................................................................................. 13 B. Using the Pause Button ............................................................................................................... 13 C. Using the Emergency Stop (EMO) ............................................................................................... 13 D. Using a Pre‐Heating Bath Cover .................................................................................................. 13 E. Using a Slotted Bath Cover for Prolonged High Temperature Immersion ................................. 14 F. Loading a Slide Rack .................................................................................................................... 15 G. Running a Programmed Protocol ................................................................................................ 16
V. USING CUSTOM PROTOCOLS ....................................................................................... 17 A. Creating or Editing a Protocol ..................................................................................................... 17 B. Renaming a Protocol ................................................................................................................... 18 C. Deleting a Protocol ..................................................................................................................... 18
VI. MAINTAINING THE LITTLE DIPPER PROCESSOR ............................................................ 19 A. Powering Off ............................................................................................................................... 19 B. Cleaning Before Every Use .......................................................................................................... 19 C. Cleaning After Every Use............................................................................................................. 19 D. Periodic Cleaning and Calibration ............................................................................................... 19
VII. TROUBLESHOOTING ..................................................................................................... 20
VIII. SPECIFICATIONS ........................................................................................................... 20
IX. ORDERING INFORMATION ........................................................................................... 20
X. DECLARATION OF CONFORMITY .................................................................................. 21
Little Dipper® Processor — USER MANUAL
Version 2.1, May 2015 3 (408) 733‐7337, [email protected]
I. SAFETY NOTICES
A. Intended Use
The Little Dipper Processor automates slide washing and drying for applications including FISH (fluorescence in situ hybridization), G‐Banding and microarray analyses.
Le processeur automatise le lavage et le séchage de diapositives pour les applications y compris FISH (hybridation fluorescente in situ), G‐ bandes et des analyses de micropuce.
B. Instrument Safety
Before operating the instrument, read the information in this section concerning hazards and potential hazards. Ensure that anyone involved with the instrument’s operation is instructed in both general safety practices for laboratories and specific safety practices for the instrument.
Avant d'utiliser l'instrument, lire les informations dans cette section concernant les dangers et les risques potentiels. Assurez‐vous que toute personne impliquée avec le fonctionnement de l'instrument est chargé dans les deux pratiques générales de sécurité pour les laboratoires et les pratiques de sécurité spécifiques pour l'instrument.
C. Symbols and Conventions
The following list is an illustrated glossary of the electrical symbols that are used on the Little Dipper Processor. Whenever such symbols appear on instruments, please observe appropriate safety measures.
Le tableau suivant est un glossaire illustré des symboles électriques qui sont utilisées sur le système. Chaque fois que ces symboles apparaissent sur les instruments, veuillez observer les mesures de sécurité appropriées. 1. Electrical Symbols
This symbol indicates that this is a protected ground terminal that must be connected to earth ground before any other electrical connections are made to the instrument. Ce symbole indique qu'il s'agit d'un terminal de terrain protégé qui doit être connecté à la terre avant que toutes les autres connexions électriques sont apportées à l'instrument.
CAUTION: This symbol alerts you to an electrical hazard. Please consult this User Manual for further information and proceed with caution. ATTENTION: Ce symbole vous avertit à consulter ce guide de l'utilisateur pour plus d'informations et de procéder avec prudence.
This symbol indicates the OFF position of the main POWER switch. Ce symbole indique la position OFF de l'interrupteur principal.
This symbol indicates the ON position of the main POWER switch. Ce symbole indique la position ON de l'interrupteur principal.

Little Dipper® Processor — USER MANUAL
Version 2.1, May 2015 4 (408) 733‐7337, [email protected]
2. Non‐Electrical Symbols
CAUTION: This symbol illustrates a heat hazard. Proceed with caution when working around these areas to avoid being burned by hot components. ATTENTION: Ce symbole illustre un danger pour la chaleur. Faire preuve de prudence lorsque vous travaillez autour de ces zones pour éviter d'être brûlé par les composants du chauds.
CAUTION: This symbol alerts you to consult this User’s Manual for further information and to proceed with caution. ATTENTION: Ce symbole vous avertit à consulter ce guide de l'utilisateur pour plus d'informations et de procéder avec prudence.
This symbol indicates the potential for a pinch point. Do not place fingers in the slot in the Z‐axis tower. Ce symbole indique la possibilité d'un point de pincement. Ne placez pas les doigts dans la fente dans la tour de l'axe Z.
Biological hazards can be associated with the materials used on this instrument. Potentially infectious waste and other hazardous waste must be treated in accordance with good laboratory practice guidelines. Les dangers biologiques peuvent être associés à des matériaux utilisés dans cet instrument. Potentiellement déchets infectieux et d'autres déchets dangereux doivent être traités conformément aux lignes directrices de bonnes pratiques de laboratoire.
This symbol indicates the presence of a fire or explosion hazard. Consult this Operator’s Manual for further information. Ce symbole indique la présence d' un risque d'incendie ou d'explosion. Consultez le manuel de l'utilisateur pour plus d'informations.
D. Warnings
Failure to comply with the following warnings that are affixed to the product can lead to possible personal injury or death.
Défaut de respecter les avertissements suivants qui sont apposées sur le produit peut conduire à possibles lésions corporelles ou la mort.
This symbol indicates the presence of hazardous voltage. Always disconnect the power cord before attempting any repairs. Ce symbole indique la tension dangereux de présence. Toujours débrancher le cordon d'alimentation avant de tenter toute réparation.
Warning‐ Do not use in the vicinity of flammable or combustible materials. Fire or explosion may result. Avertissement‐ Ne pas utiliser à proximité de matières inflammables ou combustibles. Incendie ou une explosion peuvent en résulter.
Little Dipper® Processor — USER MANUAL
Version 2.1, May 2015 5 (408) 733‐7337, [email protected]
E. Cautions
Failure to comply with the following cautionary statement affixed to the product may lead to possible personal injury.
Omission de se conformer à la mise en garde suivante apposée sur le produit peut entraîner des blessures possibles.
This symbol indicates the potential for a pinch point. Do not place fingers in the slot in the Z‐axis tower. Ce symbole indique la possibilité d'un point de pincement. Ne placez pas les doigts dans la fente dans la tour de l'axe Z
This symbol indicates the potential presence of a hot surface. Turn off the temperature controller and leave sufficient time for cooling or use heat protection prior to handling a bath or cleaning in this area. Ce symbole indique la présence potentielle d'une surface chaude. Eteignez le contrôleur de température et de laisser suffisamment de temps pour le refroidissement ou utilisez une protection de chaleur avant de manipuler un bain ou de nettoyage dans ce domaine.
Do not touch the bottom metal surface of the bath during operation. Ne touchez pas la surface du métal fond de la baignoire pendant le fonctionnement.
Biological hazards can be associated with the materials used on this instrument. Potentially infectious waste and other hazardous waste must be treated in accordance with good laboratory practice guidelines. Les dangers biologiques peuvent être associés à des matériaux utilisés dans cet instrument. Potentiellement déchets infectieux et d'autres déchets dangereux doivent être traités conformément aux lignes directrices de bonnes pratiques de laboratoire.
This symbol on the rear of the instrument indicates the presence of the fuse box. Warning: For Continued Protection Against Fire, Replace Only with Same Type Rating of Fuse. Always disconnect the power cord before attempting to replace the fuse. Ce symbole sur l'arrière de l'instrument indique la présence de la boîte de fusibles. Avertissement: Pour le maintien de la Protection contre l'incendie, remplacer uniquement avec la même cote de Type de fusible. Toujours débrancher le cordon d'alimentation avant d'essayer de remplacer le fusible.
Always insert a bath liner and fill with buffer before turning on power to each bath. Toujours insérer une doublure de bain et remplir avec un tampon avant de l'allumer à chaque bain
The instrument weighs approximately 59 lbs (26.5 kg). Use caution when liftingthe unit to avoid personal injury. L'instrument pèse environ 26,5 kg. Soyez prudent lorsque vous soulevez l'unité pour éviter toute blessure.
Do not under any circumstances lift the unit by the cylindrical tower or its extended gripper arm! This will damage the instrument! Ne pas en aucun cas soulever l'unité par la tour cylindrique ou son bras de préhension prolongée! Cela pourrait endommager l'appareil!
Little Dipper® Processor — USER MANUAL
Version 2.1, May 2015 6 (408) 733‐7337, [email protected]
Never run a protocol while a bath cover is installed.Ne jamais faire fonctionner un protocole tandis qu'un couvercle de la cuve est installée.
To achieve temperatures above 70˚C, a bath cover must be used to obtain and maintain temperatures. When the robot is in use, baths running at high temperatures may need to be topped off due to evaporation. Pour atteindre des températures supérieures à 70° C, une couverture de bain est utilisé. Lorsque le robot est en fonctionnement, des bains à haute température peuvent avoir besoin de tampon supplémentaire.
Avoid spills on the cabinet.Évitez les déversements sur l'armoire.
F. Spills and Reagent Disposal
Observe all national, regional, and local regulations for waste disposal and management. Respecter toutes les réglementations nationales, régionales et locales pour l'élimination des déchets et management.
Biological and other hazards can be associated with the materials used on this instrument. Potentially infectious and other hazardous waste materials must be treated in accordance with good laboratory practices. Dangers biologiques et matériaux potentiellement infectieux et d'autres déchets dangereux peuvent être utilisées sur cet instrument et doivent être traités conformément aux bonnes pratiques de laboratoire.
This symbol indicates the potential presence of a hot surface. Use care when cleaning a spill in this area to avoid being burned. Ce symbole indique la présence potentielle d'une surface chaude. Faites attention lors du nettoyage d'un déversement pour éviter d'être brûlé.
1. Cleaning Spills
a. Turn off the instrument.
b. Wipe the spill using an absorbent material. Always pull the liquid to the front of the instrument, away from the control panel and around the bath positions.
c. Wipe the deck dry with a dust‐free towel and 70% ethanol (or similar).
d. Dispose of the material in accordance with good laboratory practices.
2. Disposing of Reagents
Chemicals used on this instrument may be hazardous. Adhere to good laboratory practices when disposing of any hazardous chemicals.

Little Dipper® Processor — USER MANUAL
Version 2.1, May 2015 7 (408) 733‐7337, [email protected]
G. Compliance
1. Electromagnetic Compatibility (CE)
All instruments shipped to the European Union (EU; formerly known as the European Community) have the “CE” label on the back of the instrument, signifying that these instruments comply with the Electromagnetic Compatibility and Low Voltage Directives.
2. Restriction of Hazardous Substances (RoHS)
The RoHS directive was adopted in February 2003 by the European Union. It restricts (with exceptions) the use of six hazardous materials (including lead and mercury) in the manufacture of various types of electronic equipment. All SciGene instruments carrying the CE mark are also RoHS compliant.
3. Electrical and Electronic Equipment Waste (WEEE)
WEEE is a European Community directive that became European Law in February 2003. The crossed out wheelie bin symbol on a product or its packaging indicates that it must NOT be disposed of with standard waste at the end of its lifetime. Instead, it is your responsibility to return it to a designated collection point for electronic equipment recycling. Contact your local SciGene distributor for information on drop off locations.
4. Laboratory Equipment Standards
This symbol indicates the instrument meets Laboratory Equipment standards UL 61010‐1:2004 R7.05 and CAN/CSA‐C22.2 61010‐1:2004 as certified by TÜV Rheinland of North America, Inc.
5. Electromagnetic Compatibility (EMC)
The Little Dipper Processor is a Class A digital device under FCC Title 47 Part 15B and designated as Class A electrical equipment for measurement, control, and laboratory use (EN61326).
Note regarding Canadian EMC compliance: Le present appareil numerique n’emet pas de bruits radioelectrique depassant les limites applicables aux appareils numeriques de class A prescrites dans le reglement sur le brouillage radioelectrique edicte par le Ministere des Communications du Canada.

Little Dipper® Processor — USER MANUAL
Version 2.1, May 2015 8 (408) 733‐7337, [email protected]
II. UNPACKING AND SET UP
A. Unpacking the Instrument
The Little Dipper Processor weighs about 59 lbs (26.5 kg) and is generally shipped in two cartons. A large carton contains the processing unit along with an interior box for the touchscreen, power cord and user manual. The second smaller carton contains baths, racks and other accessories, depending on configuration. Caution is needed when lifting the unit to protect yourself and others from personal injury. Two people are required to lift the unit, one on each side, keeping it balanced and sharing the load.
1. Open the large carton and remove the protective foam. 2. With the assistance of another person, place fingers under the bottom of the
instrument and carefully lift out and place on the bench. 3. Cut the white tie wrap securing the gripper arm. NEVER lift the unit by the robot arm. Always grip from the bottom when lifting!!
If the instrument is damaged upon arrival, please retain all shipping materials and contact SciGene or your local distributor for assistance.
B. Parts Provided
The following items may be included with the instrument or in separate carton, depending on configuration:
Touchscreen with cable
Power cord
Digital thermometer
Centrifuge buckets
Baths Slide racks Pads, spacers or covers User Manual
C. Environmental Requirements
Ensure that the area where the instrument is installed meets the following conditions, for reasons of safety and performance:
Ambient temperature +15 to +32°C (58 to 90°F)
Relative humidity 20 to 80% RH non‐condensing
Air flow clearance 6 inches (15 cm) minimum at back of unit
D. Installation and Location
Place the instrument on a lab bench or stable, level surface of at least 30 x 22 inches (76 x 56 cm) with a vertical clearance of 30 inches (76 cm) within a few feet of a power source that delivers 20 Amps of constant power. Position the instrument with 6 inches of clearance at the back to allow adequate air flow of the cooling fan and ensure unimpeded access to the main power and emergency shut off (EMO) switches on the right side of the instrument.
Little Dipper® Processor — USER MANUAL
Version 2.1, May 2015 9 (408) 733‐7337, [email protected]
E. Installing Baths
1. Clean baths, slide racks and stir bars by rinsing in running tap water, followed by 100 ml of DI water and then 100 ml of ethanol. Dry with a lint‐free towel.
2. Clean temperature sensors with DI water and a lint‐free towel. 3. Insert baths in the black basins. Rotate temperature sensors up prior to inserting
any standard or low volume heatable (LVH) baths, and then ensure all temperature sensors are lowered down prior to starting a protocol.
4. Place a stir bar in each bath.
Never pour any liquid into the black basins! A removable bath must be inserted prior to adding buffer. Ne jamais verser de liquide dans les bassins noirs! Un bain amovible doit être insérée avant d'ajouter tampon.
Never heat a bath without buffer! Baths may need more buffer added due to evaporation. Ne chauffez jamais un bain sans tampon! Bains peuvent avoir besoin de davantage de tampon ajoutée due à l'évaporation.
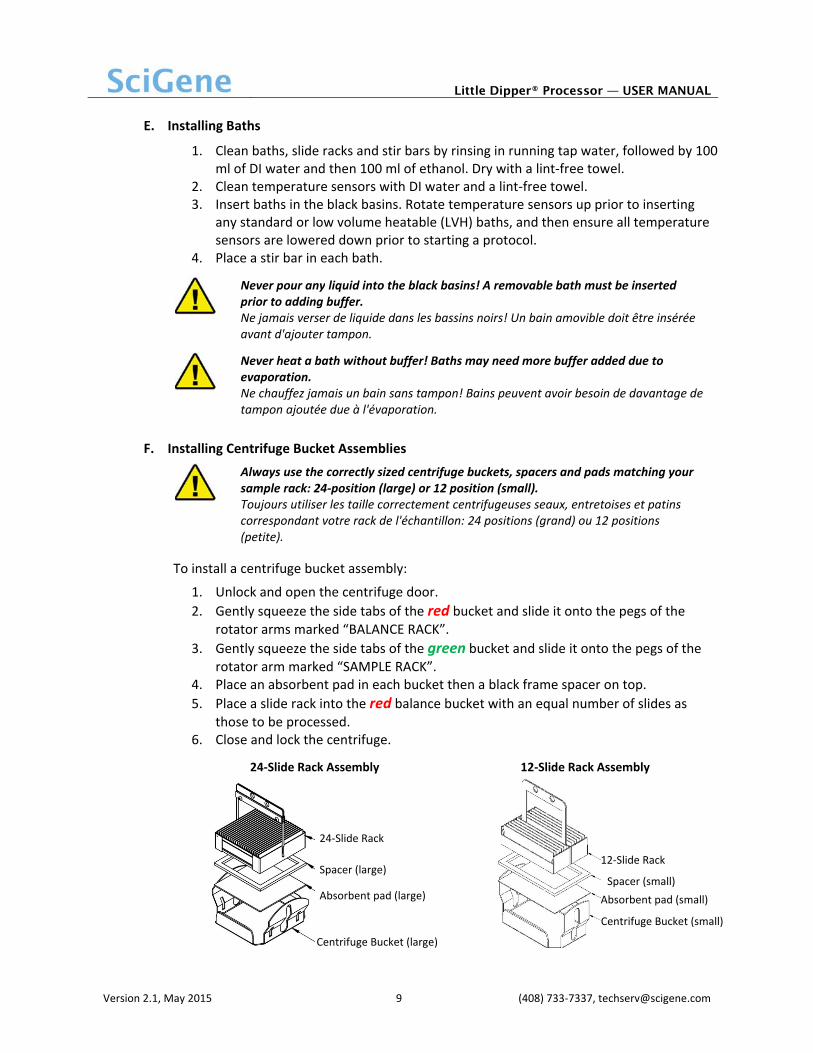
F. Installing Centrifuge Bucket Assemblies
Always use the correctly sized centrifuge buckets, spacers and pads matching your sample rack: 24‐position (large) or 12 position (small). Toujours utiliser les taille correctement centrifugeuses seaux, entretoises et patins correspondant votre rack de l'échantillon: 24 positions (grand) ou 12 positions (petite).
To install a centrifuge bucket assembly:
1. Unlock and open the centrifuge door.
2. Gently squeeze the side tabs of the red bucket and slide it onto the pegs of the rotator arms marked “BALANCE RACK”.
3. Gently squeeze the side tabs of the green bucket and slide it onto the pegs of the rotator arm marked “SAMPLE RACK”.
4. Place an absorbent pad in each bucket then a black frame spacer on top.
5. Place a slide rack into the red balance bucket with an equal number of slides as
those to be processed. 6. Close and lock the centrifuge.
24‐Slide Rack Assembly 12‐Slide Rack Assembly
24‐Slide Rack
12‐Slide RackSpacer (large)
Spacer (small)Absorbent pad (large) Absorbent pad (small)
Centrifuge Bucket (large)
Centrifuge Bucket (small)

Little Dipper® Processor — USER MANUAL
Version 2.1, May 2015 10 (408) 733‐7337, [email protected]
III. USING YOUR LITTLE DIPPER PROCESSOR
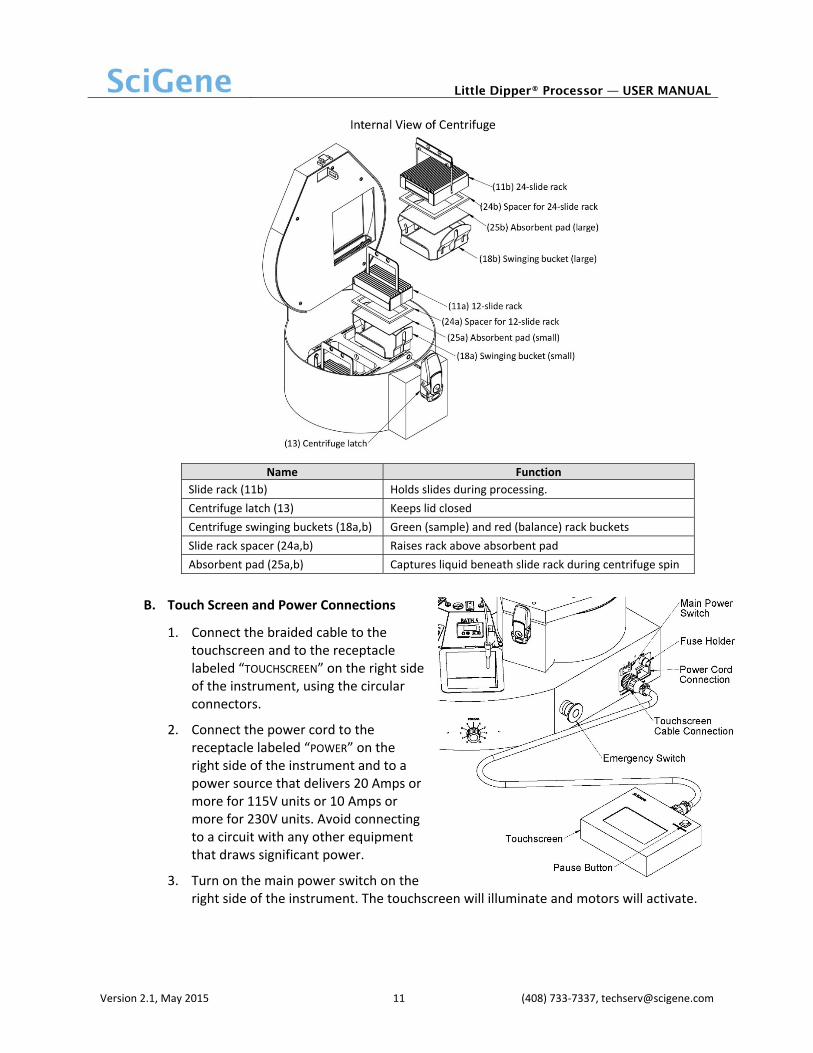
A. Components, Controls and Accessories
Name Function
Main power switch (1) Turns on power to the unit
Bath power switch (2) Turns on power to each bath, for heating liquid
Temperature controller (3) Used to set and observe bath temperature
Temperature sensor (4) Transmits bath temperature to controller.
Standard bath (5) Removable insert, compatible with most liquids/solvents
Low volume bath (6) Removable stainless steel insert
Gripper arm (7) Rotates and moves slide racks up and down in baths
Gripper (8) Opens, closes and secures the slide rack assembly
Fan (9) Draws air through the instrument cabinet for cooling
Emergency switch (10) Cuts power for safety
Slide rack (11a,b) Holds slides during processing.
Centrifuge panel / trap door (12) Automatically opens for the gripper to insert a slide rack
Centrifuge latch (13) Keeps lid closed
Centrifuge lock (14) Internal lock for safety
Touchscreen cable connection (15) Receptacle for attaching control cable
Touchscreen (16) Used to create, store and run protocols and for calibration
Pause button (17) Toggle switch that stops and restarts a running protocol
Temperature calibration jack (19) Receptacle for cable to thermometer
Power cord connection (20) Receptacle for power cord
Stir bar speed control (21) Rotating switch to adjust stir bar speed
Stir bar (22) Creates a gentle vortex in the bath
Bath cover (23a, b) Lids help achieve and maintain temperatures above 70°C
*Optional accessories
Little Dipper® Processor — USER MANUAL
Version 2.1, May 2015 11 (408) 733‐7337, [email protected]
Name Function
Slide rack (11b) Holds slides during processing.
Centrifuge latch (13) Keeps lid closed
Centrifuge swinging buckets (18a,b) Green (sample) and red (balance) rack buckets
Slide rack spacer (24a,b) Raises rack above absorbent pad
Absorbent pad (25a,b) Captures liquid beneath slide rack during centrifuge spin
B. Touch Screen and Power Connections
1. Connect the braided cable to the touchscreen and to the receptacle labeled “TOUCHSCREEN” on the right side of the instrument, using the circular connectors.
2. Connect the power cord to the receptacle labeled “POWER” on the right side of the instrument and to a power source that delivers 20 Amps or more for 115V units or 10 Amps or more for 230V units. Avoid connecting to a circuit with any other equipment that draws significant power.
3. Turn on the main power switch on the right side of the instrument. The touchscreen will illuminate and motors will activate.

Little Dipper® Processor — USER MANUAL
Version 2.1, May 2015 12 (408) 733‐7337, [email protected]
C. Using the Temperature Controller
The Little Dipper Processor is equipped with a Watlow EZ‐Zone temperature controller calibrated at the factory to provide accurate temperatures from 35 to 95°C. The controller has two LED displays and four push buttons. The left display shows ACTUAL temperature in red. The right display shows the SET or programmed temperature in green. To enter the SET temperature, simply push the up and down arrows until the desired temperature is shown in the green display on the right. The instrument will adjust the heat until the SET temperature is attained.
D. Calibrating the Temperature Controller
The EZ‐Zone controllers are calibrated at the factory to provide accurate bath temperatures from ambient 35 to 95°C. Re‐calibration is recommended only if the display varies by more than one degree (1°C) to the temperature shown on an externally connected NIST certified digital thermometer (Cat. #1051‐52‐0).
To adjust a controller to achieve accurate temperatures:
1. Turn ON the instrument and set the controller to 65°C. Allow 30 minutes for temperature to stabilize.
2. Using the cable provided with the digital thermometer, plug one end into the blue receptacle found above the controller.
3. Turn on the thermometer. Allow 1 minute for thermometer to stabilize. The actual temperature of the bath will be displayed.
4. Calculate the difference between the temperature shown on the controller and on the digital thermometer. For example, if the controller displays 65.0°C and the thermometer displays 66.5°C, the difference (offset) is 1.5°C.
5. On the controller, press the up and down arrows simultaneously for 3 seconds. The left display shows “A1” and the right display shows “open”.
6. Press the Advance Button (green circle) 3 times until the right display shows “i.CA”. The left display shows the offset value between the controller and thermometer when the unit was last calibrated.
7. Use the up or down arrow to adjust the offset value to the temperature difference calculated in Step 4. For example, if the controller shows a temperature 1.5°C lower than the thermometer, adjust the offset by adding 1.5 to the value shown on the display.
8. Press the Infinity Key (∞) twice to exit calibra on and return to the opera on display. Verify that the temperature on the thermometer matches the display. The controller is now calibrated to provide accurate temperatures from 35 to 95°C.
Little Dipper® Processor — USER MANUAL
Version 2.1, May 2015 13 (408) 733‐7337, [email protected]
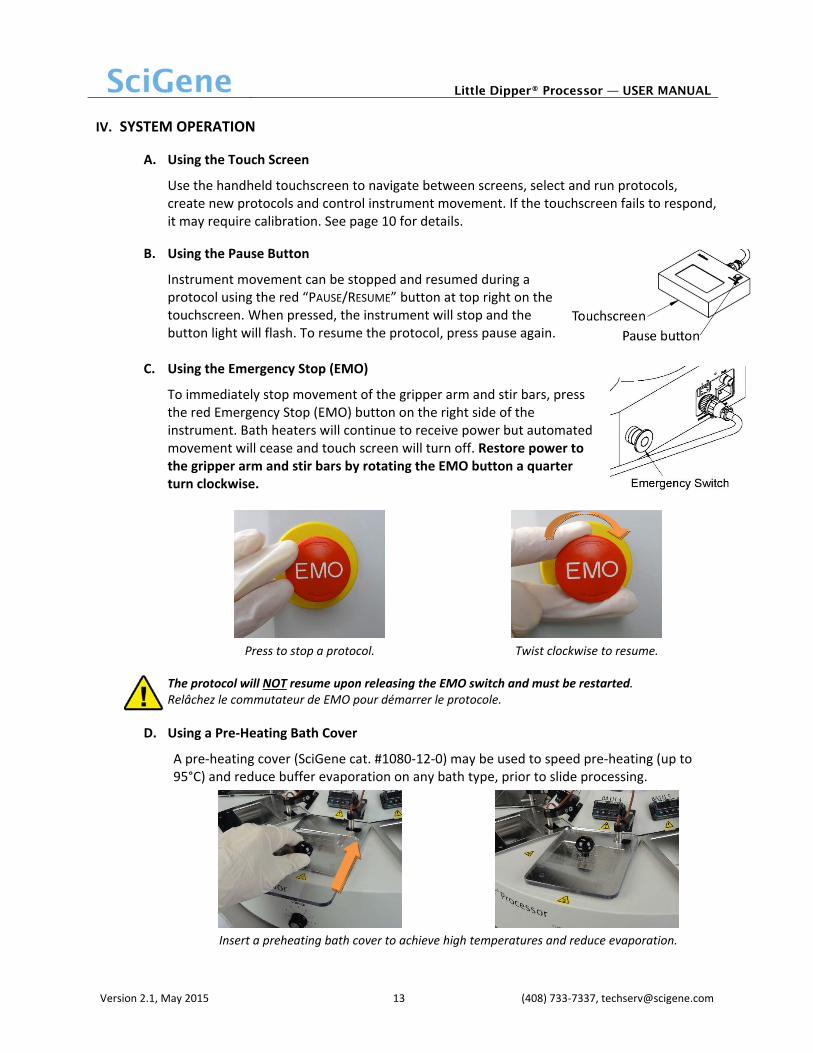
IV. SYSTEM OPERATION
A. Using the Touch Screen
Use the handheld touchscreen to navigate between screens, select and run protocols, create new protocols and control instrument movement. If the touchscreen fails to respond, it may require calibration. See page 10 for details.
B. Using the Pause Button
Instrument movement can be stopped and resumed during a protocol using the red “PAUSE/RESUME” button at top right on the touchscreen. When pressed, the instrument will stop and the button light will flash. To resume the protocol, press pause again.
C. Using the Emergency Stop (EMO)
To immediately stop movement of the gripper arm and stir bars, press the red Emergency Stop (EMO) button on the right side of the instrument. Bath heaters will continue to receive power but automated movement will cease and touch screen will turn off. Restore power to the gripper arm and stir bars by rotating the EMO button a quarter turn clockwise.
Press to stop a protocol. Twist clockwise to resume.
The protocol will NOT resume upon releasing the EMO switch and must be restarted. Relâchez le commutateur de EMO pour démarrer le protocole.
D. Using a Pre‐Heating Bath Cover
A pre‐heating cover (SciGene cat. #1080‐12‐0) may be used to speed pre‐heating (up to 95°C) and reduce buffer evaporation on any bath type, prior to slide processing.
Insert a preheating bath cover to achieve high temperatures and reduce evaporation.
Little Dipper® Processor — USER MANUAL
Version 2.1, May 2015 14 (408) 733‐7337, [email protected]
Bath covers must be removed before starting any protocol unless the protocol includes a User Controlled Pause in the step prior to the bath with the protocol. Couvercles de bain doivent être enlevés avant de commencer tout protocole et ne peuvent pas être utilisés pendant le fonctionnement.
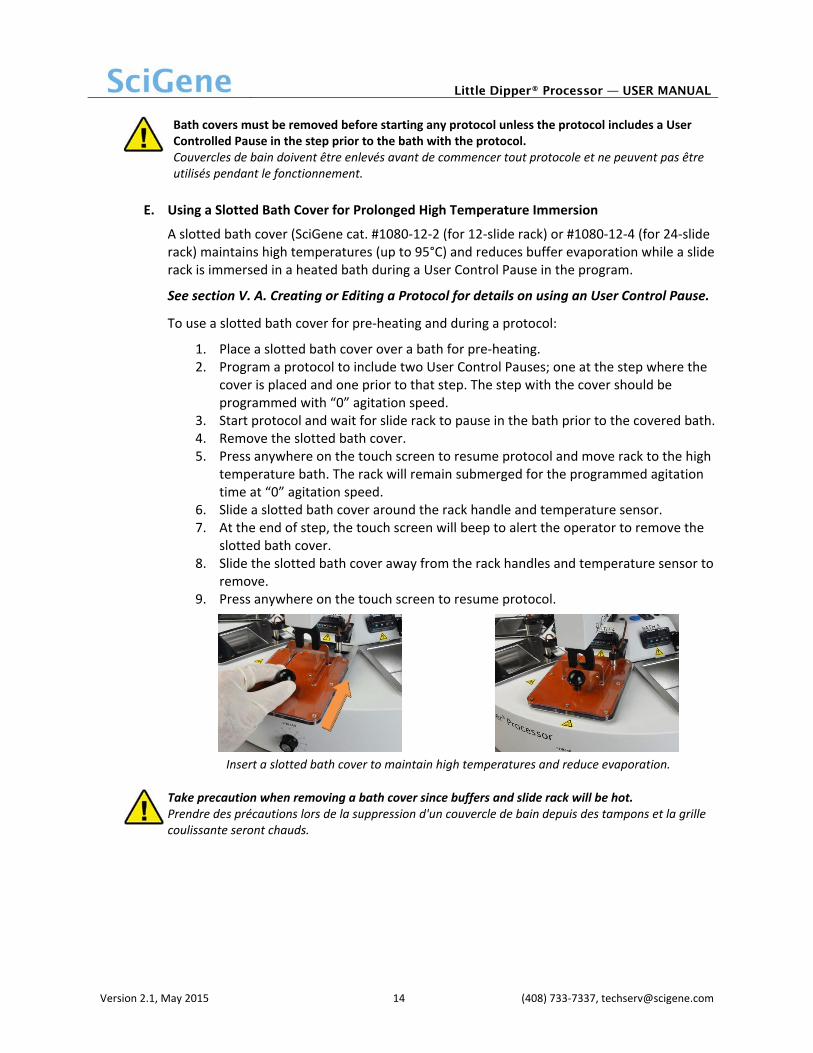
E. Using a Slotted Bath Cover for Prolonged High Temperature Immersion
A slotted bath cover (SciGene cat. #1080‐12‐2 (for 12‐slide rack) or #1080‐12‐4 (for 24‐slide rack) maintains high temperatures (up to 95°C) and reduces buffer evaporation while a slide rack is immersed in a heated bath during a User Control Pause in the program.
See section V. A. Creating or Editing a Protocol for details on using an User Control Pause.
To use a slotted bath cover for pre‐heating and during a protocol:
1. Place a slotted bath cover over a bath for pre‐heating. 2. Program a protocol to include two User Control Pauses; one at the step where the
cover is placed and one prior to that step. The step with the cover should be programmed with “0” agitation speed.
3. Start protocol and wait for slide rack to pause in the bath prior to the covered bath. 4. Remove the slotted bath cover. 5. Press anywhere on the touch screen to resume protocol and move rack to the high
temperature bath. The rack will remain submerged for the programmed agitation time at “0” agitation speed.
6. Slide a slotted bath cover around the rack handle and temperature sensor. 7. At the end of step, the touch screen will beep to alert the operator to remove the
slotted bath cover. 8. Slide the slotted bath cover away from the rack handles and temperature sensor to
remove. 9. Press anywhere on the touch screen to resume protocol.
Insert a slotted bath cover to maintain high temperatures and reduce evaporation.
Take precaution when removing a bath cover since buffers and slide rack will be hot. Prendre des précautions lors de la suppression d'un couvercle de bain depuis des tampons et la grille coulissante seront chauds.

Little Dipper® Processor — USER MANUAL
Version 2.1, May 2015 15 (408) 733‐7337, [email protected]
F. Loading a Slide Rack
The pre‐loaded Quik‐tst protocol provides the operator an opportunity to practice loading the slide rack onto the gripper. An empty slide rack is moved automatically from bath to bath with up/down agitation, followed by brief centrifugation. No liquid is required. Power switches for baths should remain in the OFF position.
1. Ensure that baths and centrifuge buckets are properly installed and correspond to size of the slide rack to be used.
2. Place an empty slide rack in the red balance bucket in the centrifuge. 3. Verify all temperature sensors are rotated down and power to all baths are turned off.
4. Turn on main power located on the right side of the instrument.
5. Using the touchscreen, press Run Protocol from the home screen and select Quik‐tst.
6. Hold an empty slide rack in your left hand centered in Bath #1 and aligned with the black lines on the instrument as shown below.
7. Press Start Now on the touchscreen. The arm will lower into Bath #1 with the gripper open. When the gripper arm reaches the end of its downward travel, align the holes in the handle with the two bumps in the gripper paddle as it slowly closes.
Hold slide rack in Bath #1 to load. Place and hold rack on gripper bumps.
Release rack as gripper closes. Use thumbpad to load or remove rack manually.
If the slide rack does NOT load properly, press the pause button and use the thumbpads on the gripper to manually open and load the rack. Press pause again to continue.
Si la grille coulissante ne se chargent pas correctement, appuyez sur le bouton de pause et d'utiliser les thumbpads sur la pince à ouvrir manuellement et charger le rack. Appuyez sur Pause pour continuer.
8. The instrument will agitate the rack in each bath and then transfer it to the centrifuge. When the protocol is complete, unlock and open the centrifuge lid to remove the rack.
Little Dipper® Processor — USER MANUAL
Version 2.1, May 2015 16 (408) 733‐7337, [email protected]
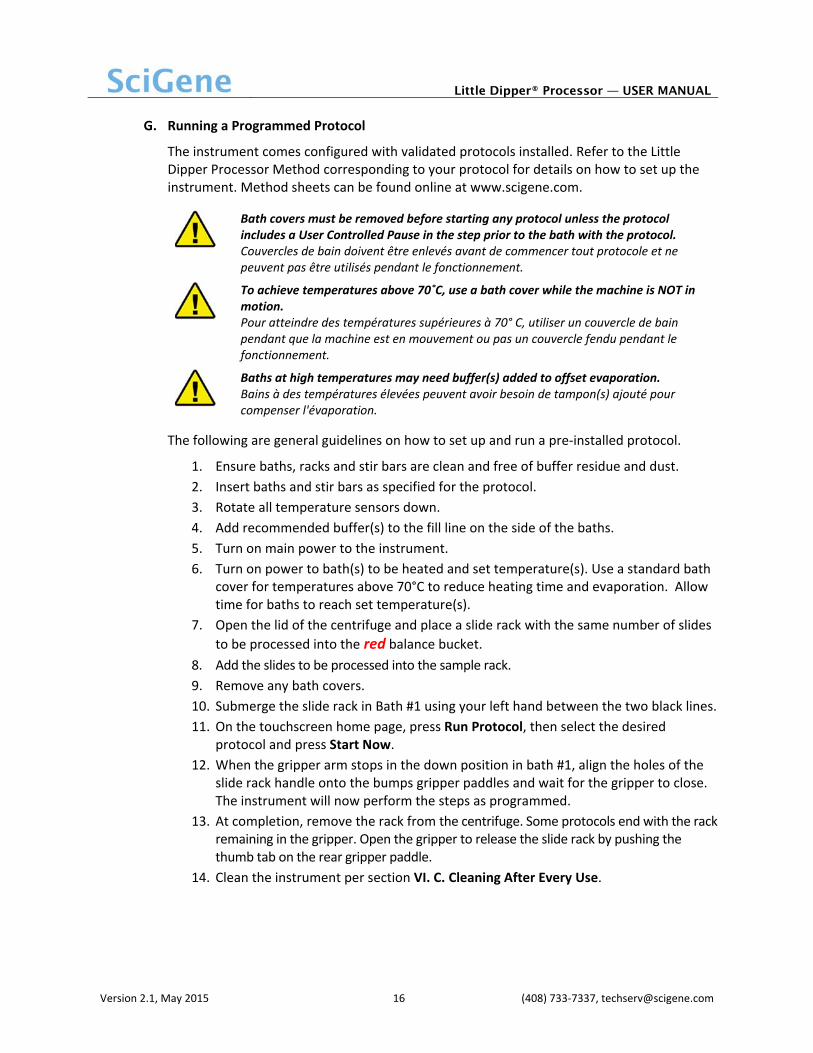
G. Running a Programmed Protocol
The instrument comes configured with validated protocols installed. Refer to the Little Dipper Processor Method corresponding to your protocol for details on how to set up the instrument. Method sheets can be found online at www.scigene.com.
Bath covers must be removed before starting any protocol unless the protocol includes a User Controlled Pause in the step prior to the bath with the protocol. Couvercles de bain doivent être enlevés avant de commencer tout protocole et ne peuvent pas être utilisés pendant le fonctionnement.
To achieve temperatures above 70˚C, use a bath cover while the machine is NOT in motion. Pour atteindre des températures supérieures à 70° C, utiliser un couvercle de bain pendant que la machine est en mouvement ou pas un couvercle fendu pendant le fonctionnement.
Baths at high temperatures may need buffer(s) added to offset evaporation.Bains à des températures élevées peuvent avoir besoin de tampon(s) ajouté pour compenser l'évaporation.
The following are general guidelines on how to set up and run a pre‐installed protocol.
1. Ensure baths, racks and stir bars are clean and free of buffer residue and dust.
2. Insert baths and stir bars as specified for the protocol.
3. Rotate all temperature sensors down.
4. Add recommended buffer(s) to the fill line on the side of the baths.
5. Turn on main power to the instrument.
6. Turn on power to bath(s) to be heated and set temperature(s). Use a standard bath cover for temperatures above 70°C to reduce heating time and evaporation. Allow time for baths to reach set temperature(s).
7. Open the lid of the centrifuge and place a slide rack with the same number of slides
to be processed into the red balance bucket.
8. Add the slides to be processed into the sample rack.
9. Remove any bath covers.
10. Submerge the slide rack in Bath #1 using your left hand between the two black lines.
11. On the touchscreen home page, press Run Protocol, then select the desired protocol and press Start Now.
12. When the gripper arm stops in the down position in bath #1, align the holes of the slide rack handle onto the bumps gripper paddles and wait for the gripper to close. The instrument will now perform the steps as programmed.
13. At completion, remove the rack from the centrifuge. Some protocols end with the rack remaining in the gripper. Open the gripper to release the slide rack by pushing the thumb tab on the rear gripper paddle.
14. Clean the instrument per section VI. C. Cleaning After Every Use.

Little Dipper® Processor — USER MANUAL
Version 2.1, May 2015 17 (408) 733‐7337, [email protected]
V. USING CUSTOM PROTOCOLS
A. Creating or Editing a Protocol
Custom protocols can be created using the touchscreen. The touchscreen can store up to 14 protocols with 1 to 9 steps each. All protocols start from Bath #1.
1. From the touchscreen Home page, press New/Edit Protocol. On the Create/Edit Protocol screen, use the up/down buttons to move the cursor to “NEW”. Press Select to go to the Name Protocol screen.
If editing a protocol, select it to go directly to the Step Input Screen to make the desired changes.
2. Within the Name Protocol screen, use the shift key to move the “^” (up arrow) within the alphanumeric 10 key pad until the desired letter or number is indicated. Select up to eight characters.
3. When finished, press Enter to go to the Step Input screen and then press Step 1. Depending on your instrument configuration, you will have options for either drip time or stroke length but not both.
Step Input screen with Drip Time option Step Input screen with Stroke Length option
4. When the Parameters screen displays, press the Bath # button, enter “1”, and then press Enter. Step 1 must always originate from Bath #1.
5. Select the remaining Step 1 parameters and enter the desired values within the ranges indicated below (*if so equipped):
Agitation Speed: 0 to 600
Agitation Time: 0‐32,000 seconds
Stroke Length*: toggle selection of “std” or “long”
Drip Time*: 1‐32,000 seconds (time rack is held above bath before next step)
Pause Time:
Timed Pause: enter 1‐32,000 seconds for rack to remain submerged at the end of a step. After time elapses, the protocol resumes automatically.
User Control Pause: enter 9999 for rack to remain submerged at the end of a step until the operator presses the touchscreen to resume the protocol. This is useful for protocols that require more than 5 baths.
6. When all values for Step 1 are entered, press Save and Exit to return to the Step Input screen.
Little Dipper® Processor — USER MANUAL
Version 2.1, May 2015 18 (408) 733‐7337, [email protected]
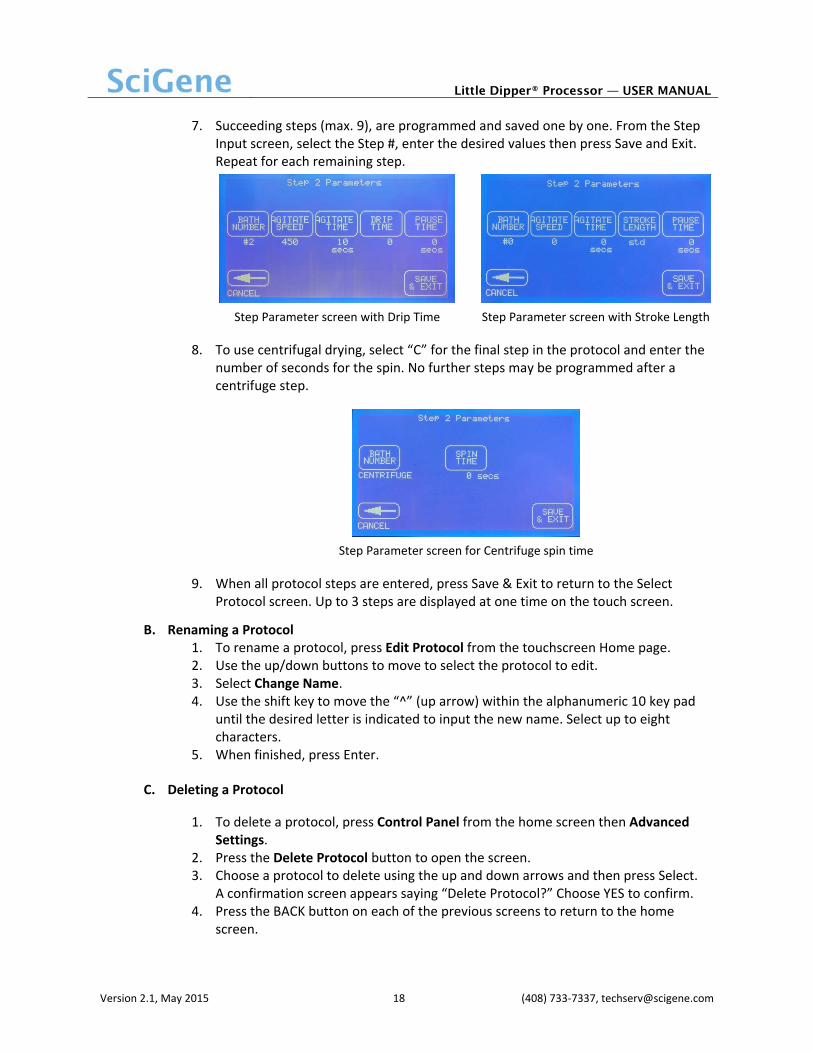
7. Succeeding steps (max. 9), are programmed and saved one by one. From the Step Input screen, select the Step #, enter the desired values then press Save and Exit. Repeat for each remaining step.
Step Parameter screen with Drip Time Step Parameter screen with Stroke Length
8. To use centrifugal drying, select “C” for the final step in the protocol and enter the number of seconds for the spin. No further steps may be programmed after a centrifuge step.
Step Parameter screen for Centrifuge spin time
9. When all protocol steps are entered, press Save & Exit to return to the Select Protocol screen. Up to 3 steps are displayed at one time on the touch screen.
B. Renaming a Protocol 1. To rename a protocol, press Edit Protocol from the touchscreen Home page. 2. Use the up/down buttons to move to select the protocol to edit. 3. Select Change Name. 4. Use the shift key to move the “^” (up arrow) within the alphanumeric 10 key pad
until the desired letter is indicated to input the new name. Select up to eight characters.
5. When finished, press Enter.
C. Deleting a Protocol
1. To delete a protocol, press Control Panel from the home screen then Advanced Settings.
2. Press the Delete Protocol button to open the screen. 3. Choose a protocol to delete using the up and down arrows and then press Select.
A confirmation screen appears saying “Delete Protocol?” Choose YES to confirm. 4. Press the BACK button on each of the previous screens to return to the home
screen.

Little Dipper® Processor — USER MANUAL
Version 2.1, May 2015 19 (408) 733‐7337, [email protected]
VI. MAINTAINING THE LITTLE DIPPER PROCESSOR
A. Powering Off
Turn the power switch to the OFF position and unplug the power cord before performing any service procedure.
B. Cleaning Before Every Use
Baths, racks and stir bars must be free of buffer residue and dust before processing slides. If they were not cleaned and stored properly after the last use, wash and dry them as follows:
1. Fill baths containing the rack(s) and stir bars with tap water.
2. Wipe racks, stir bars and baths with a lint‐free towel.
3. Rinse in running tap water.
4. Rinse with approximately 100‐200 ml of DI water.
5. Rinse with 100 ml of ethanol and dry with a lint‐free towel.
6. Clean temperature sensors with DI water and a lint‐free towel.
C. Cleaning After Every Use
1. Wash baths, stir bars and racks with running tap water then rinse in DI water and ethanol and dry with a lint‐free towel. Store in clean plastic bags to protect from dust.
2. Clean temperature sensors with DI water and lint‐free towel.
3. Wipe exterior of instrument cabinet with a damp paper towel.
D. Periodic Cleaning and Calibration
1. Calibrate bath temperatures using a NIST‐certified thermometer. See section VI. A. Temperature Controller Calibration.
2. Remove and wash the centrifuge buckets and spacers using warm water and lint‐free towels.
3. Replace the absorbent pad in each centrifuge bucket.
4. Clean all exterior surfaces of the cabinet, gripper paddles and gripper arm housing with damp, lint‐free towels.
5. Remove the centrifuge buckets. Clean the inside surfaces of the centrifuge and rotor with damp, lint‐free towels.
6. Inspect the centrifuge buckets for signs of wear or deformation where they hang from the rotor. Replace if worn or bent.

Little Dipper® Processor — USER MANUAL
Version 2.1, May 2015 20 (408) 733‐7337, [email protected]
VII. TROUBLESHOOTING
Symptom Cause Solution
Instrument does not turn on. Blown fuse(s) Replace fuse(s) near main power switch.
Touch screen does not illuminate when main power is on.
Not connected or EMO is engaged.
Check connections and rotate EMO switch to release the emergency stop.
Touch screen does not respond when buttons are pressed.
Touch screen is faulty.
Contact SciGene or your local distributor for assistance.
VIII. SPECIFICATIONS
Electrical
Voltage 115V AC; 50/60 Hz; 20A or 230V AC; 50/60 Hz; 10A
Dimensions
Size (HxWxD) 20 x 28 x 22 inches (51x 71 x 56 cm)
Weight 59 lbs (26.5 kg) net
Performance and Controls
Temperature Range Ambient +5°C to 95°C
Temperature Regulation ± 0.5°C from set point
Agitation Speed 0 to 600 relative units
Centrifuge RPM/Force 690 RPM / 50 g
Protocol Storage Up to 14 protocols, 1 to 9 steps each
Digital Thermometer Output T‐type Thermocouple
IX. ORDERING INFORMATION
Cat. # Description UoM
1080‐10‐1 Standard Bath, 670 ml. EA
1080‐10‐2 Low Volume Bath, 210 ml. EA
1080‐10‐5 Low Volume Heatable Bath, 275 ml. EA
1080‐12‐0 Bath cover for Little Dipper. Use for pre‐heating only. EA
1080‐12‐1 Bath cover for Little Dipper, 5/PK. Use for pre‐heating only. PK
1080‐12‐2 Bath cover, slotted, for Little Dipper 12‐position slide rack. EA
1080‐12‐4 Bath cover, slotted, for Little Dipper 24‐position slide rack. EA
1080‐20‐1 Slide Rack, 12‐Position for standard 3 inch slides. Includes handle. EA
1080‐20‐5 Slide Rack, 24‐Position for standard 3 inch slides. Includes handle. EA
1080‐21‐0 Absorbent Pads for Slide Rack Buckets, 4‐Position and 24‐Position, 25/PK. PK
1080‐21‐1 Absorbent Pads for Slide Rack Buckets, 12‐Position, 25/PK. PK
1051‐52‐0 Digital thermometer. Includes cable and NIST certificate. EA
2022‐00‐2 CytoZyme Stabilized Pepsin, 50X Concentrate, 20 ml. Store at 4°C. EA
2022‐00‐3 CytoZyme Stabilized Pepsin, 50X Concentrate, 100 ml. Store at 4°C. EA
2022‐10‐2 CytoZyme Reaction Buffer, 1L. Store at RT. EA
2022‐10‐3 CytoZyme Reaction Buffer, 4L. Store at RT. EA
2010‐00‐1 FISH Wash Buffer 1 (0.4xSSC/0.3% IGEPAL, pH 7), 4L. Store at RT. EA
2010‐00‐2 FISH Wash Buffer 2 (2xSSC/0.1% IGEPAL, pH 7), 4L. Store at RT. EA
Little Dipper® Processor — USER MANUAL
Version 2.1, May 2015 21 (408) 733‐7337, [email protected]
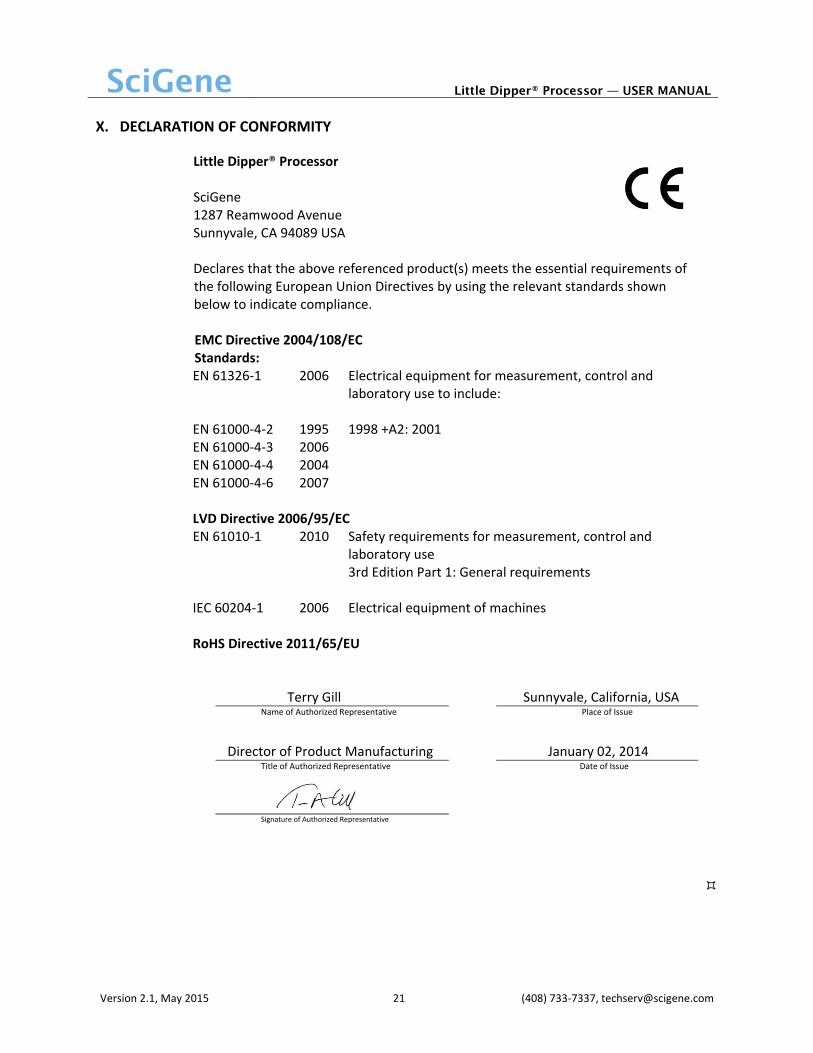
X. DECLARATION OF CONFORMITY
Little Dipper® Processor SciGene 1287 Reamwood Avenue Sunnyvale, CA 94089 USA Declares that the above referenced product(s) meets the essential requirements of the following European Union Directives by using the relevant standards shown below to indicate compliance. EMC Directive 2004/108/EC Standards: EN 61326‐1 2006 Electrical equipment for measurement, control and
laboratory use to include: EN 61000‐4‐2 1995 1998 +A2: 2001 EN 61000‐4‐3 2006 EN 61000‐4‐4 2004 EN 61000‐4‐6 2007 LVD Directive 2006/95/EC EN 61010‐1 2010 Safety requirements for measurement, control and
laboratory use 3rd Edition Part 1: General requirements
IEC 60204‐1 2006 Electrical equipment of machines RoHS Directive 2011/65/EU
Terry Gill Sunnyvale, California, USA Name of Authorized Representative Place of Issue
Director of Product Manufacturing January 02, 2014
Title of Authorized Representative Date of Issue
Signature of Authorized Representative