Lista Script Labeling Software User’s Guide Script Labeling Software User’s Guide 5 Templates,...
26
Lista Script Labeling Software User’s Guide
Transcript of Lista Script Labeling Software User’s Guide Script Labeling Software User’s Guide 5 Templates,...
Lista Script Labeling Software
User’s Guide
Lista Script Labeling Software User’s Guide
2
User’s Guide – Contents
Installation . . . . . . . . . . . . . . . . . . . . . . . . . . . . . . . . . . . . . . . . . .3
Quick start . . . . . . . . . . . . . . . . . . . . . . . . . . . . . . . . . . .3
Templates, files and designs . . . . . . . . . . . . . . . . . . . . . . . . . . . . .5
User interface . . . . . . . . . . . . . . . . . . . . . . . . . . . . . . . . . . . . . . . 6
Menu bar . . . . . . . . . . . . . . . . . . . . . . . . . . . . . . . . . . . . . . . . . . 8
Symbol bars . . . . . . . . . . . . . . . . . . . . . . . . . . . . . . . . . . . . . . . .9
Tool bar . . . . . . . . . . . . . . . . . . . . . . . . . . . . . . . . . . . . . . . . . . . 9
Formatting texts . . . . . . . . . . . . . . . . . . . . . . . . . . . . . . . . . . . . .10
Graphics, symbol library . . . . . . . . . . . . . . . . . . . . . . . . . . . . . .13
Bar codes . . . . . . . . . . . . . . . . . . . . . . . . . . . . . . . . . . . . . . . . . 14
Color bar . . . . . . . . . . . . . . . . . . . . . . . . . . . . . . . . . . . . . . . . .14
Fill effects . . . . . . . . . . . . . . . . . . . . . . . . . . . . . . . . . . . . . . . . .15
Database – Using data from an external source . . . . . . . . . . . . . .16
Printing . . . . . . . . . . . . . . . . . . . . . . . . . . . . . . . . . . . . . . . . . . .23
Lista Script Labeling Software User’s Guide
3
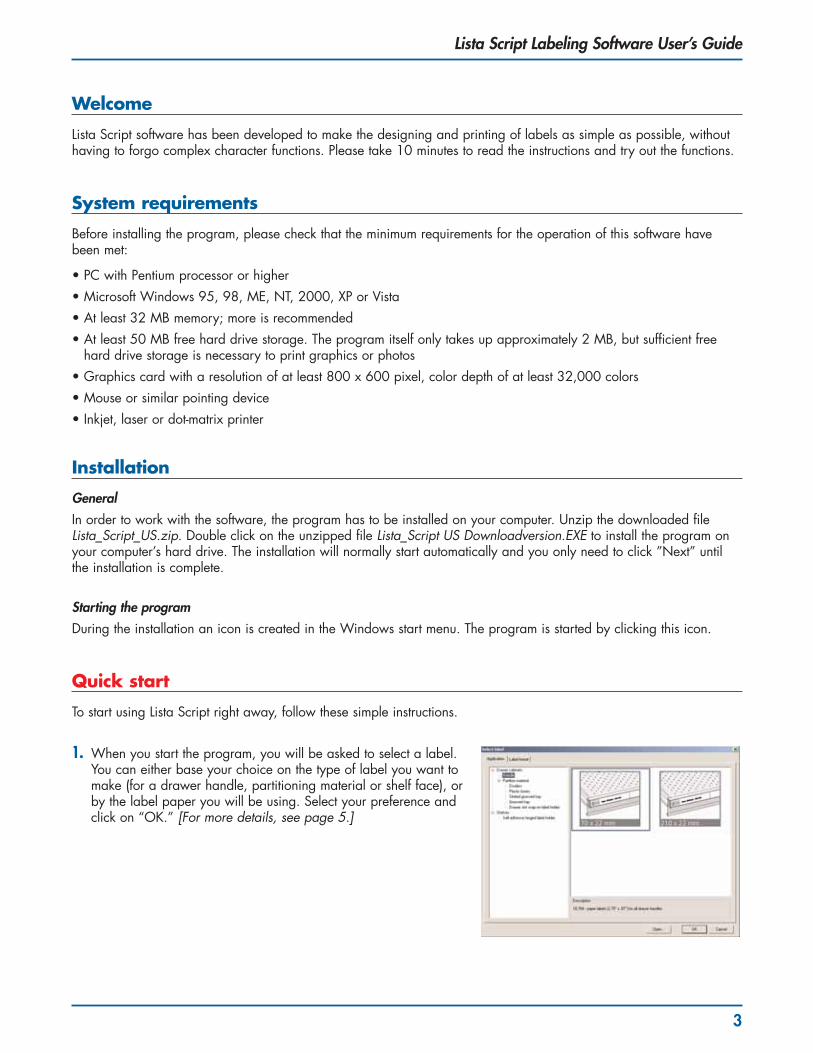
Welcome
Lista Script software has been developed to make the designing and printing of labels as simple as possible, withouthaving to forgo complex character functions. Please take 10 minutes to read the instructions and try out the functions.
System requirements
Before installing the program, please check that the minimum requirements for the operation of this software havebeen met:
• PC with Pentium processor or higher• Microsoft Windows 95, 98, ME, NT, 2000, XP or Vista• At least 32 MB memory; more is recommended• At least 50 MB free hard drive storage. The program itself only takes up approximately 2 MB, but sufficient free
hard drive storage is necessary to print graphics or photos• Graphics card with a resolution of at least 800 x 600 pixel, color depth of at least 32,000 colors• Mouse or similar pointing device• Inkjet, laser or dot-matrix printer
Installation
GeneralIn order to work with the software, the program has to be installed on your computer. Unzip the downloaded fileLista_Script_US.zip. Double click on the unzipped file Lista_Script US Downloadversion.EXE to install the program onyour computer’s hard drive. The installation will normally start automatically and you only need to click ”Next” untilthe installation is complete.
Starting the programDuring the installation an icon is created in the Windows start menu. The program is started by clicking this icon.
Quick start
To start using Lista Script right away, follow these simple instructions.
1. When you start the program, you will be asked to select a label.You can either base your choice on the type of label you want tomake (for a drawer handle, partitioning material or shelf face), orby the label paper you will be using. Select your preference andclick on “OK.” [For more details, see page 5.]
Lista Script Labeling Software User’s Guide
4
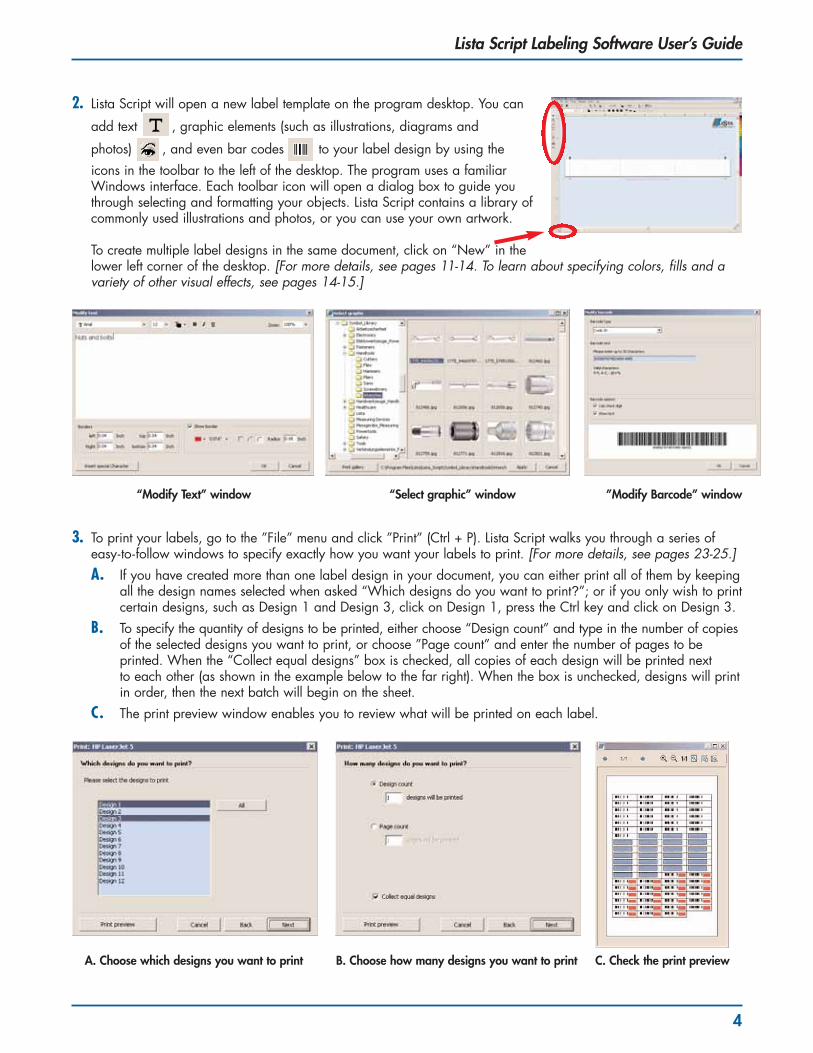
2. Lista Script will open a new label template on the program desktop. You can
add text , graphic elements (such as illustrations, diagrams and
photos) , and even bar codes to your label design by using the icons in the toolbar to the left of the desktop. The program uses a familiarWindows interface. Each toolbar icon will open a dialog box to guide youthrough selecting and formatting your objects. Lista Script contains a library ofcommonly used illustrations and photos, or you can use your own artwork.
To create multiple label designs in the same document, click on “New” in thelower left corner of the desktop. [For more details, see pages 11-14. To learn about specifying colors, fills and avariety of other visual effects, see pages 14-15.]
3. To print your labels, go to the ”File” menu and click ”Print” (Ctrl + P). Lista Script walks you through a series ofeasy-to-follow windows to specify exactly how you want your labels to print. [For more details, see pages 23-25.]A. If you have created more than one label design in your document, you can either print all of them by keeping
all the design names selected when asked “Which designs do you want to print?”; or if you only wish to printcertain designs, such as Design 1 and Design 3, click on Design 1, press the Ctrl key and click on Design 3.
B. To specify the quantity of designs to be printed, either choose “Design count” and type in the number of copiesof the selected designs you want to print, or choose ”Page count” and enter the number of pages to be printed. When the “Collect equal designs” box is checked, all copies of each design will be printed next to each other (as shown in the example below to the far right). When the box is unchecked, designs will print in order, then the next batch will begin on the sheet.
C. The print preview window enables you to review what will be printed on each label.
“Modify Text” window “Select graphic” window ”Modify Barcode” window
A. Choose which designs you want to print B. Choose how many designs you want to print C. Check the print preview
Lista Script Labeling Software User’s Guide
5
Templates, files and designs
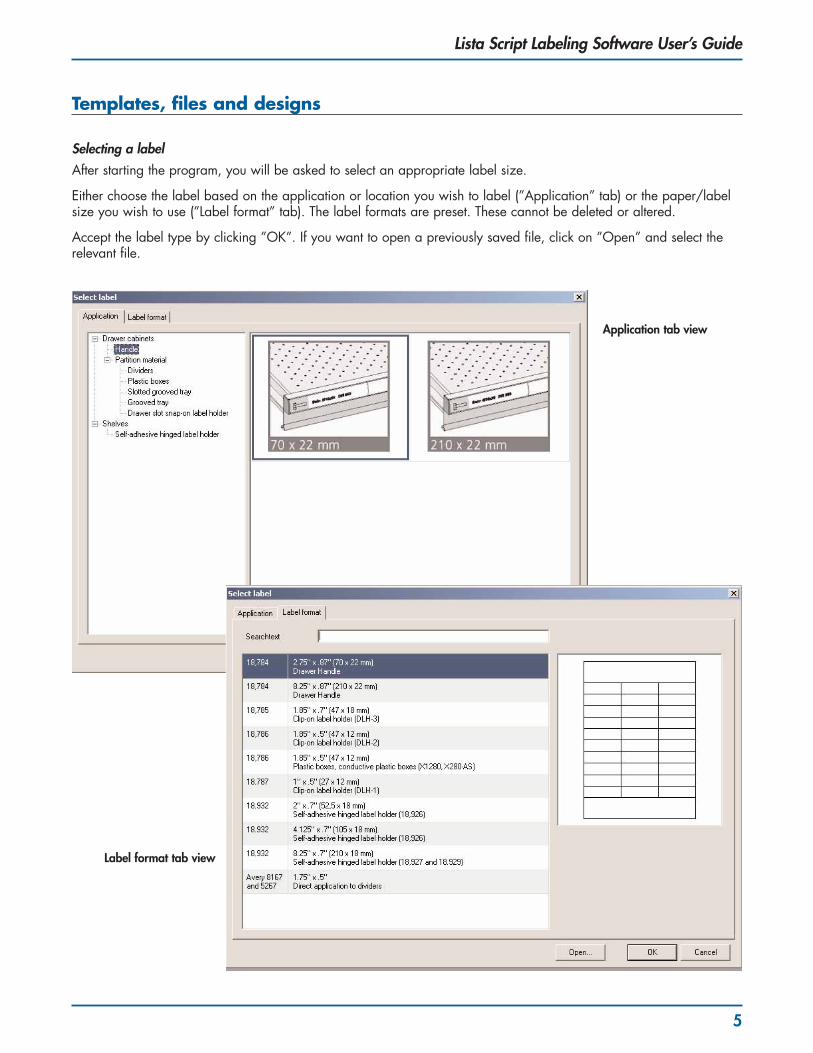
Selecting a labelAfter starting the program, you will be asked to select an appropriate label size.
Either choose the label based on the application or location you wish to label (”Application” tab) or the paper/labelsize you wish to use (”Label format” tab). The label formats are preset. These cannot be deleted or altered.
Accept the label type by clicking ”OK”. If you want to open a previously saved file, click on ”Open” and select therelevant file.
Application tab view
Label format tab view
Lista Script Labeling Software User’s Guide
6
Changing label formatsIf you would like to select another type of label while working with the program, you can do so by going to the”Format” menu and clicking on ”Select label”. Your current design will be transferred to this label and positioned inthe same place in relation to the upper left-hand corner of the label.
If any of the elements are no longer visible on the screen after changing the label, press F4 on your keyboard tozoom onto all of the elements. All of the elements will now be on the screen and can be reduced and positioned onthe label as required.
Opening a fileA file is a saved design which can consist of several individual designs. The maximum number of individual designsdepends on how many labels there are on the template.
Select a saved file by going to the ”File” menu and clicking on ”Open”. The preview will help you to see what the filecontains. However, it only displays the first design in the saved file.
Saving a fileYou can save your design by going to the ”File” menu and clicking on ”Save”. When you save it for the first time youwill be asked to enter the name of the file. The file name should not contain special characters and should normallynot be longer than about 50 characters.
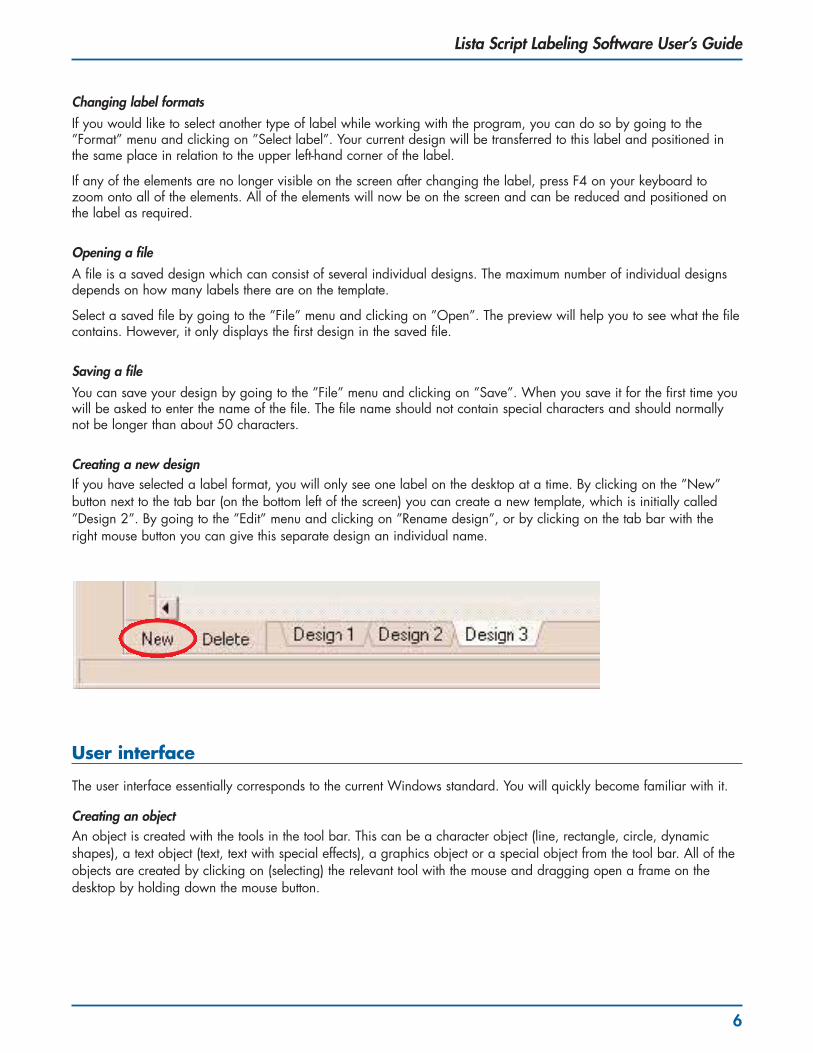
Creating a new designIf you have selected a label format, you will only see one label on the desktop at a time. By clicking on the ”New”button next to the tab bar (on the bottom left of the screen) you can create a new template, which is initially called”Design 2”. By going to the ”Edit” menu and clicking on ”Rename design”, or by clicking on the tab bar with theright mouse button you can give this separate design an individual name.
User interface
The user interface essentially corresponds to the current Windows standard. You will quickly become familiar with it.
Creating an objectAn object is created with the tools in the tool bar. This can be a character object (line, rectangle, circle, dynamicshapes), a text object (text, text with special effects), a graphics object or a special object from the tool bar. All of theobjects are created by clicking on (selecting) the relevant tool with the mouse and dragging open a frame on thedesktop by holding down the mouse button.
Lista Script Labeling Software User’s Guide
7
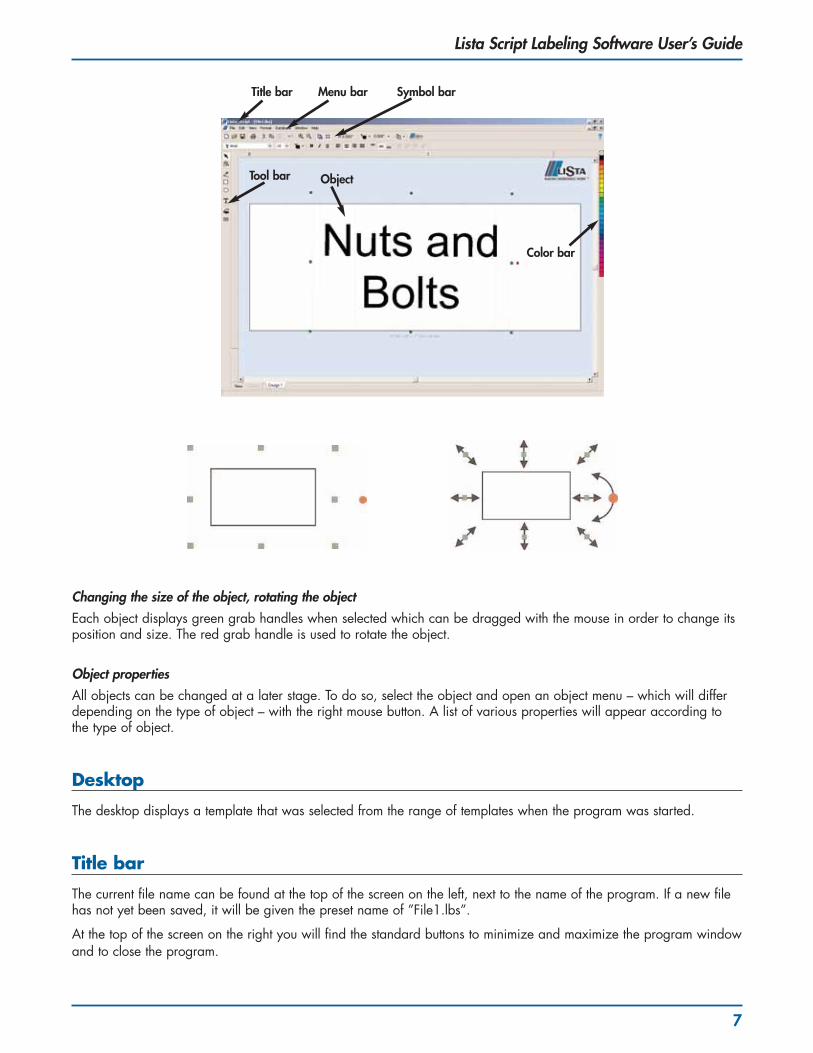
Changing the size of the object, rotating the objectEach object displays green grab handles when selected which can be dragged with the mouse in order to change itsposition and size. The red grab handle is used to rotate the object.
Object propertiesAll objects can be changed at a later stage. To do so, select the object and open an object menu – which will differdepending on the type of object – with the right mouse button. A list of various properties will appear according tothe type of object.
Desktop
The desktop displays a template that was selected from the range of templates when the program was started.
Title bar
The current file name can be found at the top of the screen on the left, next to the name of the program. If a new filehas not yet been saved, it will be given the preset name of ”File1.lbs”.
At the top of the screen on the right you will find the standard buttons to minimize and maximize the program windowand to close the program.
Title bar Menu bar Symbol bar
ObjectTool bar
Color bar
Lista Script Labeling Software User’s Guide
8
Menu bar
As in all Windows programs, all of the important control and function commands can be found in text form in themenu bar. The most important of these are also displayed as symbols (icons) in the symbol bar.
Special attention is drawn to the following functions:
File > PrintSee the chapter on printing (page 23).
Edit > UndoThis function enables you to undo the last action. If, for example, you have accidentally shifted an element, you canreturn it to its original position by means of the ”Undo” function. Note, however, that there is no ”Redo” function.
Edit > Select allIf you have created several objects and would like to copy or shift all of them at once or combine them to make oneunit, you can use this function to select all of the objects simultaneously.
Edit > Align elementsSelected objects can be aligned to each other quickly and easily.
Edit > Refresh screenThe image on the screen can be manually updated by means of ”Refresh screen”, should the image not do this itself.
Edit > LAYERING COMMANDSThe commands ”To front”, ”To back” and so on are used to layer objects. They are only activated if several objectshave been created. “One front” moves the object to the next highest layer; “To front” moves an object to the top layer;“One back” moves an object to the next lower layer, and “To back” moves an object to the very back layer.
For example, you may want to have a gradated color background and to position various text objects on top. If youfirst create the rectangle with the gradated color and write the text on it, the problem often arises that you cannot simply select the text with the mouse, but instead select the background.
In this case it is better to first create the text without the background and to place the rectangle with the gradated colorover them. Since this will now cover the writing, you need to send it to the back with the layering function ”To back”.
Edit > GroupIt is only possible to group when at least two objects have been selected. This function should be used if, for example,you have created a complex design and the elements are now to be treated as a single object. You can split theobjects into separate elements again by means of the function ”Ungroup”.
View > Original size, template width, etc.Quickly switch to other zoom settings.
View > Print bordersEvery printer has areas on which it cannot print. For most printers these are areas of up to 5mm at the top and sides.At the bottom edge of the paper the area which cannot be printed on is between 5 and 17mm, depending on themodel of printer. The Lista Script software reads these figures from the current printer drive and plots them on your tem-plate on the screen so that you can see in advance that there might be a printing problem. By unchecking ”View >Print borders” you can remove the margin display.
View > GridWith this function you can activate or deactivate the 5mm grid (similar to a piece of squared paper) on the screen display. The grid is a good way to check the size of the template.
Lista Script Labeling Software User’s Guide
9
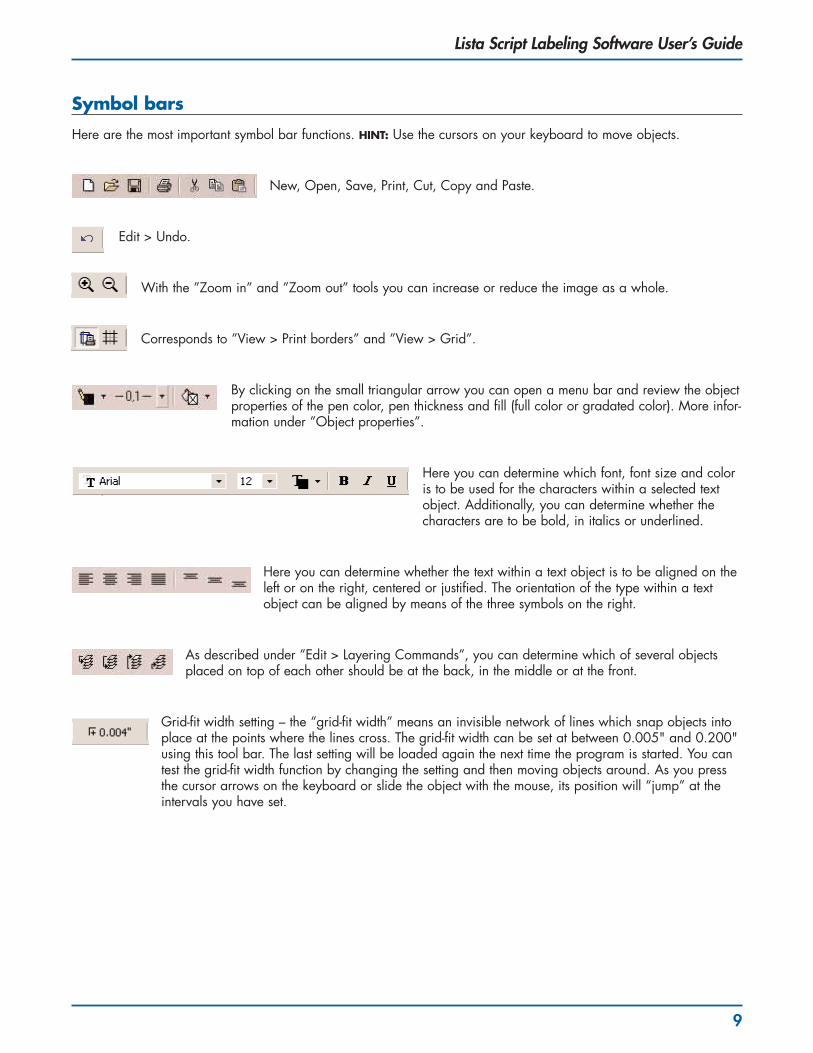
Symbol bars
Here are the most important symbol bar functions. HINT: Use the cursors on your keyboard to move objects.
New, Open, Save, Print, Cut, Copy and Paste.
Edit > Undo.
With the ”Zoom in” and ”Zoom out” tools you can increase or reduce the image as a whole.
Corresponds to ”View > Print borders” and ”View > Grid”.
By clicking on the small triangular arrow you can open a menu bar and review the objectproperties of the pen color, pen thickness and fill (full color or gradated color). More infor-mation under ”Object properties”.
Here you can determine which font, font size and coloris to be used for the characters within a selected textobject. Additionally, you can determine whether thecharacters are to be bold, in italics or underlined.
Here you can determine whether the text within a text object is to be aligned on theleft or on the right, centered or justified. The orientation of the type within a textobject can be aligned by means of the three symbols on the right.
As described under ”Edit > Layering Commands”, you can determine which of several objectsplaced on top of each other should be at the back, in the middle or at the front.
Grid-fit width setting – the “grid-fit width” means an invisible network of lines which snap objects intoplace at the points where the lines cross. The grid-fit width can be set at between 0.005" and 0.200"using this tool bar. The last setting will be loaded again the next time the program is started. You cantest the grid-fit width function by changing the setting and then moving objects around. As you pressthe cursor arrows on the keyboard or slide the object with the mouse, its position will “jump” at theintervals you have set.
Lista Script Labeling Software User’s Guide
10
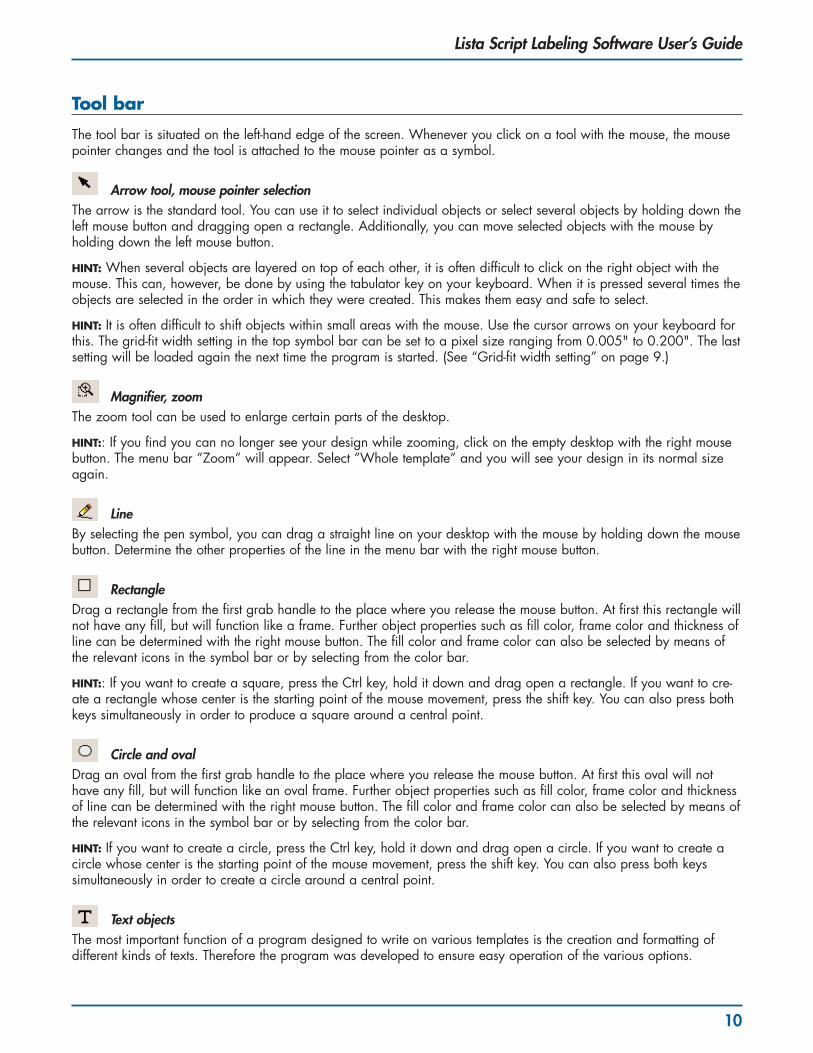
Tool bar
The tool bar is situated on the left-hand edge of the screen. Whenever you click on a tool with the mouse, the mousepointer changes and the tool is attached to the mouse pointer as a symbol.
Arrow tool, mouse pointer selectionThe arrow is the standard tool. You can use it to select individual objects or select several objects by holding down theleft mouse button and dragging open a rectangle. Additionally, you can move selected objects with the mouse byholding down the left mouse button.
HINT: When several objects are layered on top of each other, it is often difficult to click on the right object with themouse. This can, however, be done by using the tabulator key on your keyboard. When it is pressed several times theobjects are selected in the order in which they were created. This makes them easy and safe to select.
HINT: It is often difficult to shift objects within small areas with the mouse. Use the cursor arrows on your keyboard forthis. The grid-fit width setting in the top symbol bar can be set to a pixel size ranging from 0.005" to 0.200". The lastsetting will be loaded again the next time the program is started. (See “Grid-fit width setting” on page 9.)
Magnifier, zoomThe zoom tool can be used to enlarge certain parts of the desktop.
HINT:: If you find you can no longer see your design while zooming, click on the empty desktop with the right mousebutton. The menu bar ”Zoom” will appear. Select ”Whole template” and you will see your design in its normal sizeagain.
LineBy selecting the pen symbol, you can drag a straight line on your desktop with the mouse by holding down the mousebutton. Determine the other properties of the line in the menu bar with the right mouse button.
RectangleDrag a rectangle from the first grab handle to the place where you release the mouse button. At first this rectangle willnot have any fill, but will function like a frame. Further object properties such as fill color, frame color and thickness ofline can be determined with the right mouse button. The fill color and frame color can also be selected by means ofthe relevant icons in the symbol bar or by selecting from the color bar.
HINT:: If you want to create a square, press the Ctrl key, hold it down and drag open a rectangle. If you want to cre-ate a rectangle whose center is the starting point of the mouse movement, press the shift key. You can also press bothkeys simultaneously in order to produce a square around a central point.
Circle and ovalDrag an oval from the first grab handle to the place where you release the mouse button. At first this oval will nothave any fill, but will function like an oval frame. Further object properties such as fill color, frame color and thicknessof line can be determined with the right mouse button. The fill color and frame color can also be selected by means ofthe relevant icons in the symbol bar or by selecting from the color bar.
HINT: If you want to create a circle, press the Ctrl key, hold it down and drag open a circle. If you want to create acircle whose center is the starting point of the mouse movement, press the shift key. You can also press both keyssimultaneously in order to create a circle around a central point.
Text objectsThe most important function of a program designed to write on various templates is the creation and formatting of different kinds of texts. Therefore the program was developed to ensure easy operation of the various options.
Lista Script Labeling Software User’s Guide
11
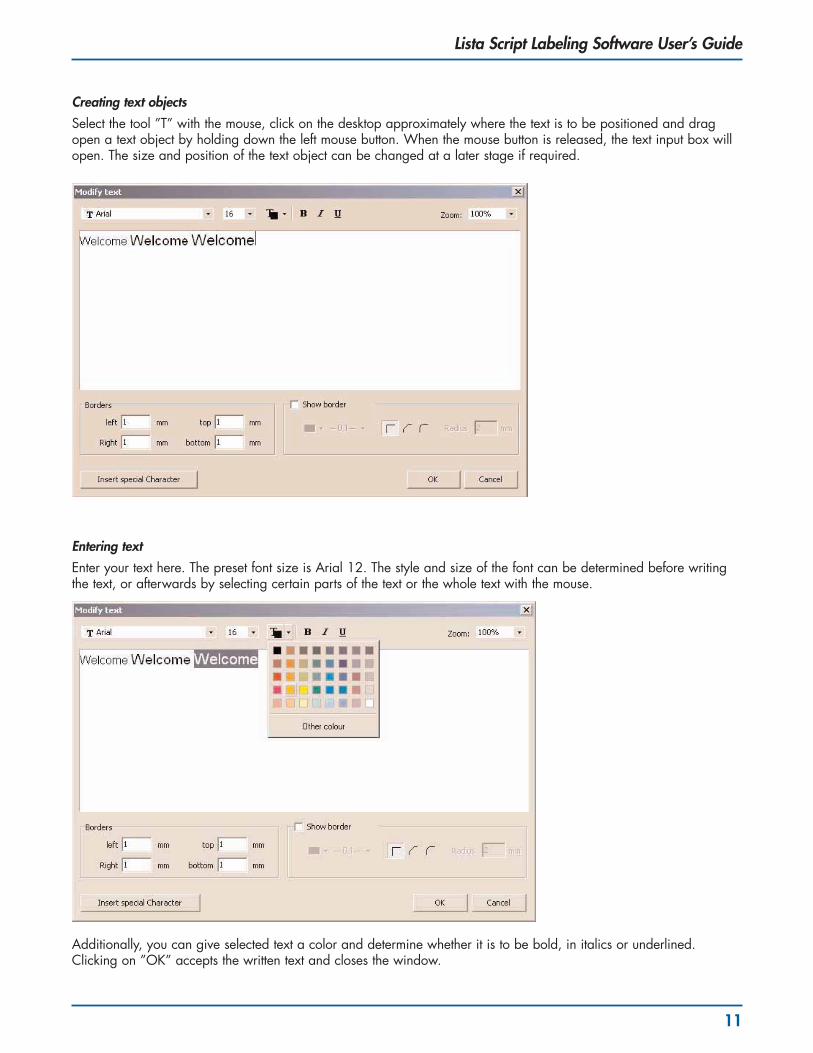
Creating text objectsSelect the tool ”T” with the mouse, click on the desktop approximately where the text is to be positioned and dragopen a text object by holding down the left mouse button. When the mouse button is released, the text input box willopen. The size and position of the text object can be changed at a later stage if required.
Entering textEnter your text here. The preset font size is Arial 12. The style and size of the font can be determined before writingthe text, or afterwards by selecting certain parts of the text or the whole text with the mouse.
Additionally, you can give selected text a color and determine whether it is to be bold, in italics or underlined.Clicking on ”OK” accepts the written text and closes the window.
Lista Script Labeling Software User’s Guide
12
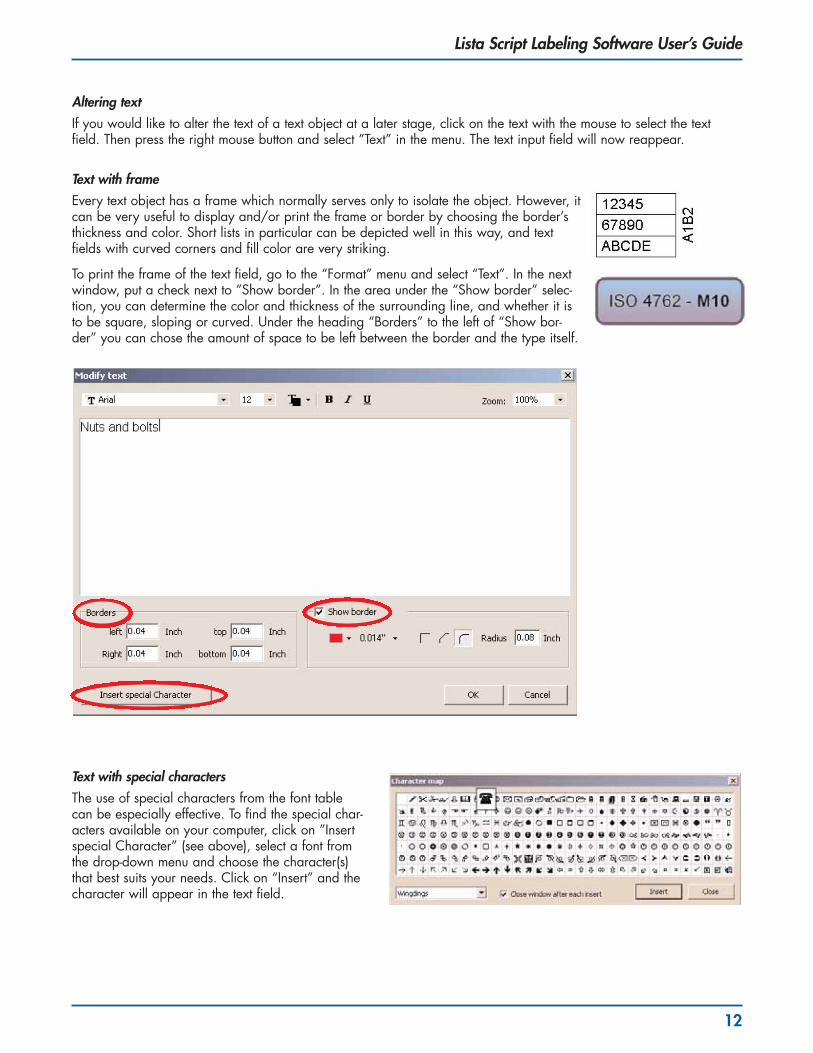
Altering textIf you would like to alter the text of a text object at a later stage, click on the text with the mouse to select the textfield. Then press the right mouse button and select ”Text” in the menu. The text input field will now reappear.
Text with frameEvery text object has a frame which normally serves only to isolate the object. However, itcan be very useful to display and/or print the frame or border by choosing the border’sthickness and color. Short lists in particular can be depicted well in this way, and textfields with curved corners and fill color are very striking.
To print the frame of the text field, go to the “Format” menu and select “Text”. In the nextwindow, put a check next to ”Show border”. In the area under the “Show border” selec-tion, you can determine the color and thickness of the surrounding line, and whether it isto be square, sloping or curved. Under the heading “Borders” to the left of “Show bor-der” you can chose the amount of space to be left between the border and the type itself.
Text with special charactersThe use of special characters from the font tablecan be especially effective. To find the special char-acters available on your computer, click on ”Insertspecial Character” (see above), select a font fromthe drop-down menu and choose the character(s)that best suits your needs. Click on “Insert” and thecharacter will appear in the text field.

Lista Script Labeling Software User’s Guide
13
Insert Image Tool: Graphics, Symbol Library
Selecting graphicsSelect the Insert Image tool and drag open a frame on your desktop by holding down the mouse. It should be approx-imately the same size as the picture that you want to insert. The “Select graphic” options window will appear.
On the left you will see the folder structure of your computer. Select the directory in which you have saved your pic-tures or graphics. If you wish to select pictures or graphics from a CD, select the relevant CD ROM drive. If there arephotos, pictures or graphics in BMP, JPG, TIFF, GIF, PCX or WMF formats in the directory you have selected, these willbe read in and displayed. To speed up the repeated data access, the small preview pictures will be saved in a file(lwthumbs.dat). The graphics are inserted into a design by a double click or by clicking on ”Apply”.
Graphics formatsBMP is a pixel-based graphics format for drawings and photos. Graphics in this format can also be created andprocessed with the standard Windows PAINT program. Please note that these graphics are not transparent. Whiteareas around the actual graphics are not transparent, either, and are printed ”white”. If you insert large BMP graphicsor pictures, other pictures or text previously created in the same position will be covered by the BMP. The BMP can bemoved to the back by means of the ”Layering” function. JPG and TIFF are mainly used for photos. GIF is mainly usedfor graphics files. WMF is a vector-based graphics format. Not every pixel is saved in the file, but rather charactercommands for simple elements such as lines or polygons. The format is most suitable for symbol graphics and logos.Unlimited enlargement of WMF graphics is possible without loss of quality.
Rotating graphicsBy means of ”holding” the red grab handle with the mouse, all graphics can be rotated in steps of 90 degrees. WMFgraphics can even be freely rotated.
Instructions for scanning graphicsBy using a scanner, the user has almost unlimited options when it comes to using pictures and graphics.
Please make sure that you use an appropriate resolution when scanning pictures or photos. The correct scanning reso-lution depends on the following factors: original picture size, size to be printed and printer resolution. The output sizeof the picture that is to be printed should have a resolution of 150dpi – 300dpi. Higher resolutions are only necessaryif you wish to copy small parts of large pictures and later print them in a large format (e.g. an individual person froma group photo).
Lista Script Labeling Software User’s Guide
14
Printing a graphics galleryA useful additional function of this software is the option to print the graphics and pictures of a complete folder as anoverview in a small format. You will find the button ”Print gallery...” on the left at the bottom of the graphics window.You can then determine various settings in the printer options window that will open. We recommend that you firstprint a small directory containing between 5 and 20 pictures to test the print quality and speed.
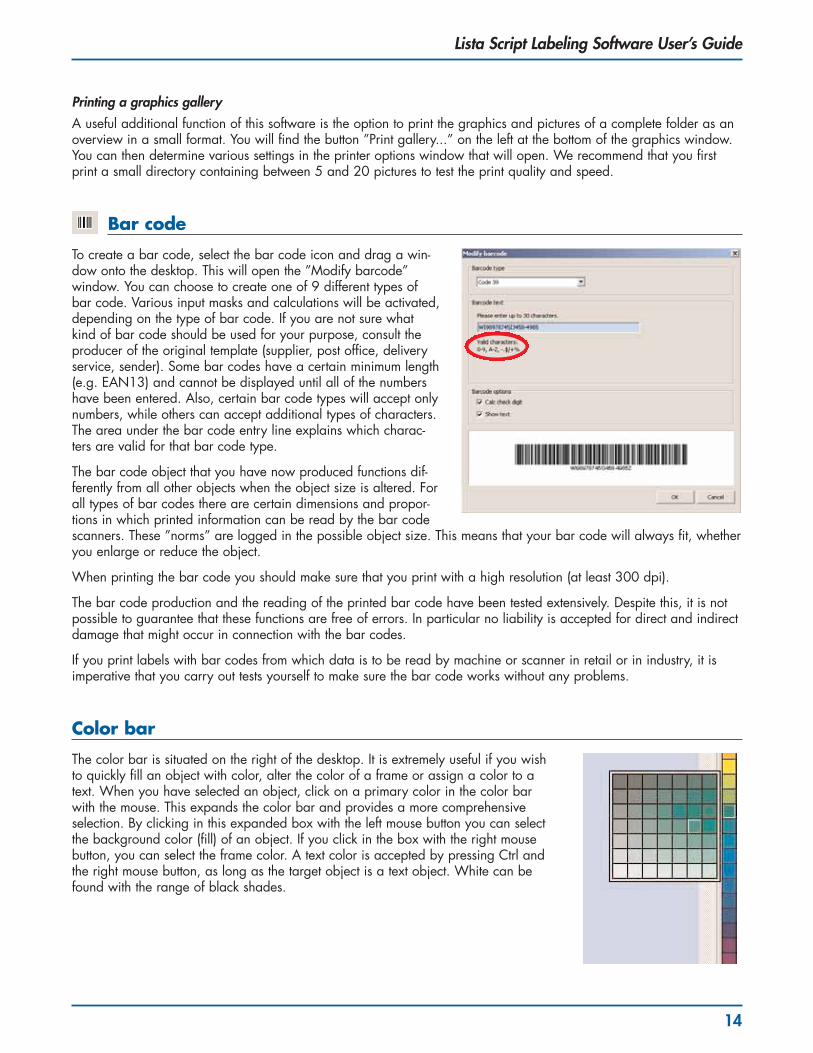
Bar code
To create a bar code, select the bar code icon and drag a win-dow onto the desktop. This will open the ”Modify barcode” window. You can choose to create one of 9 different types ofbar code. Various input masks and calculations will be activated,depending on the type of bar code. If you are not sure whatkind of bar code should be used for your purpose, consult theproducer of the original template (supplier, post office, deliveryservice, sender). Some bar codes have a certain minimum length(e.g. EAN13) and cannot be displayed until all of the numbershave been entered. Also, certain bar code types will accept onlynumbers, while others can accept additional types of characters.The area under the bar code entry line explains which charac-ters are valid for that bar code type.
The bar code object that you have now produced functions dif-ferently from all other objects when the object size is altered. Forall types of bar codes there are certain dimensions and propor-tions in which printed information can be read by the bar codescanners. These ”norms” are logged in the possible object size. This means that your bar code will always fit, whetheryou enlarge or reduce the object.
When printing the bar code you should make sure that you print with a high resolution (at least 300 dpi).
The bar code production and the reading of the printed bar code have been tested extensively. Despite this, it is notpossible to guarantee that these functions are free of errors. In particular no liability is accepted for direct and indirectdamage that might occur in connection with the bar codes.
If you print labels with bar codes from which data is to be read by machine or scanner in retail or in industry, it isimperative that you carry out tests yourself to make sure the bar code works without any problems.
Color bar
The color bar is situated on the right of the desktop. It is extremely useful if you wishto quickly fill an object with color, alter the color of a frame or assign a color to atext. When you have selected an object, click on a primary color in the color barwith the mouse. This expands the color bar and provides a more comprehensiveselection. By clicking in this expanded box with the left mouse button you can selectthe background color (fill) of an object. If you click in the box with the right mousebutton, you can select the frame color. A text color is accepted by pressing Ctrl andthe right mouse button, as long as the target object is a text object. White can befound with the range of black shades.
Lista Script Labeling Software User’s Guide
15
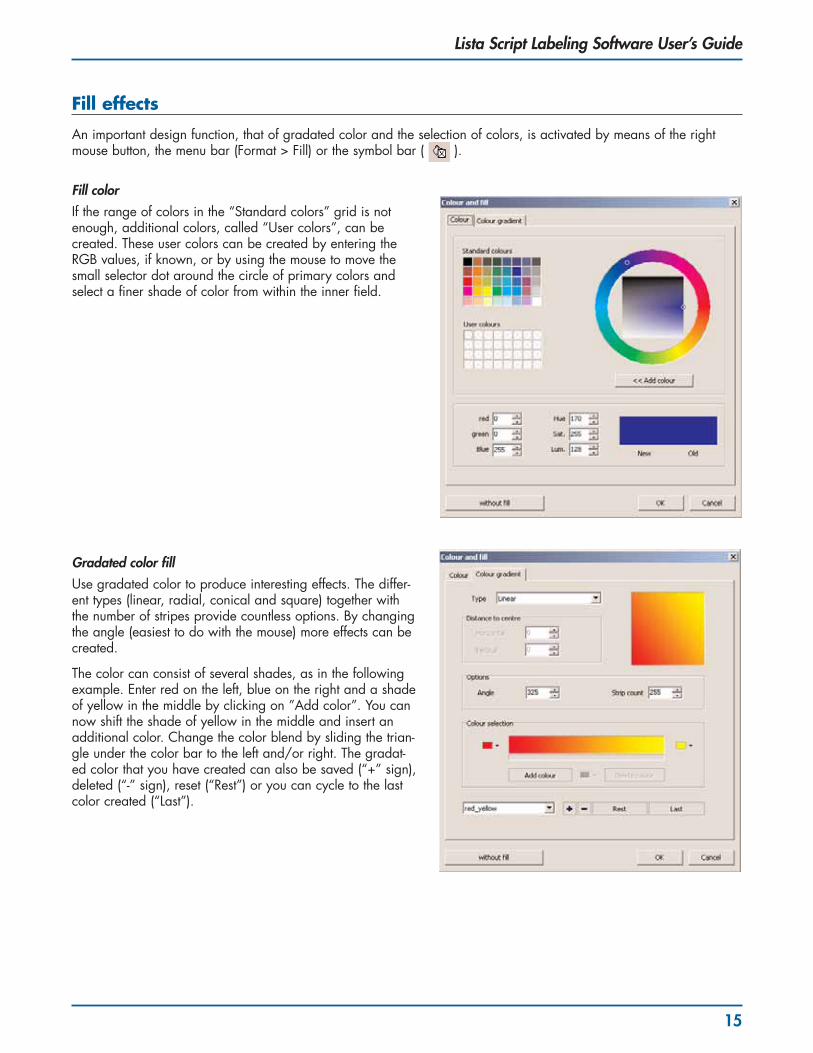
Fill effects
An important design function, that of gradated color and the selection of colors, is activated by means of the rightmouse button, the menu bar (Format > Fill) or the symbol bar ( ).
Fill colorIf the range of colors in the “Standard colors” grid is notenough, additional colors, called “User colors”, can be created. These user colors can be created by entering theRGB values, if known, or by using the mouse to move thesmall selector dot around the circle of primary colors andselect a finer shade of color from within the inner field.
Gradated color fillUse gradated color to produce interesting effects. The differ-ent types (linear, radial, conical and square) together withthe number of stripes provide countless options. By changingthe angle (easiest to do with the mouse) more effects can becreated.
The color can consist of several shades, as in the followingexample. Enter red on the left, blue on the right and a shadeof yellow in the middle by clicking on ”Add color”. You cannow shift the shade of yellow in the middle and insert anadditional color. Change the color blend by sliding the trian-gle under the color bar to the left and/or right. The gradat-ed color that you have created can also be saved (“+” sign),deleted (“-” sign), reset (“Rest”) or you can cycle to the lastcolor created (“Last”).
Lista Script Labeling Software User’s Guide
16
Database – Using data from an external source
With Lista Script, you can open external databases and print its data on your labels.
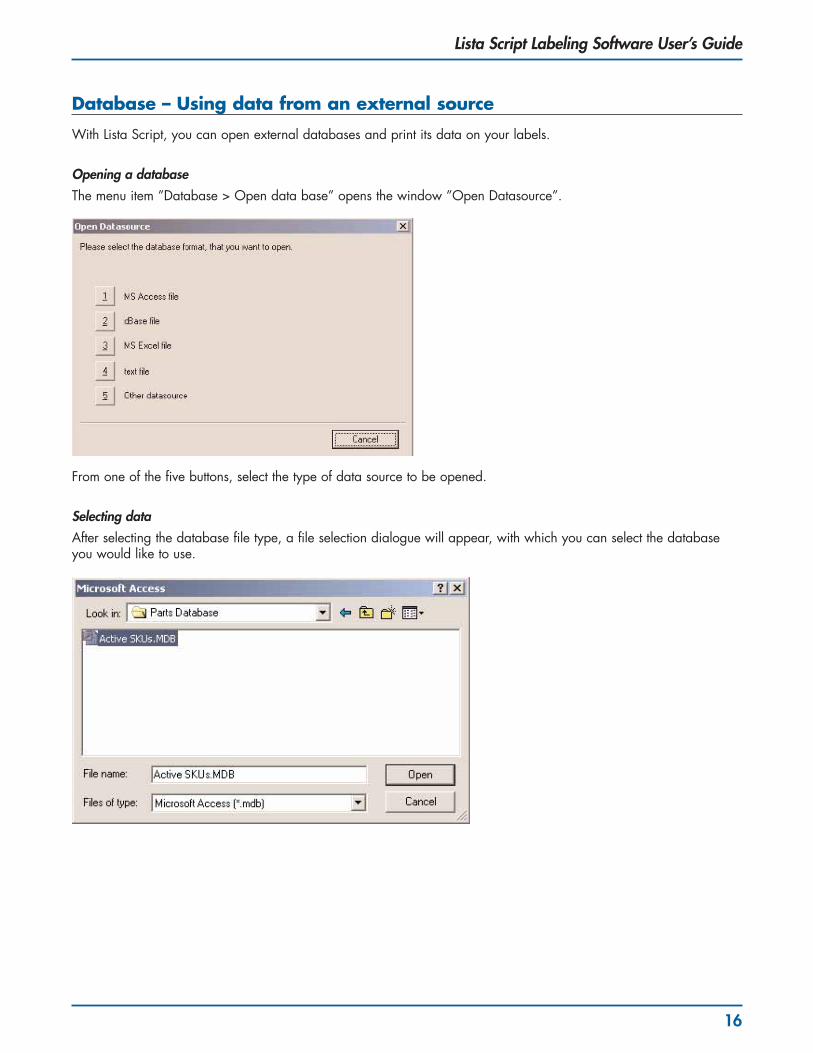
Opening a databaseThe menu item ”Database > Open data base” opens the window ”Open Datasource”.
From one of the five buttons, select the type of data source to be opened.
Selecting dataAfter selecting the database file type, a file selection dialogue will appear, with which you can select the databaseyou would like to use.
Lista Script Labeling Software User’s Guide
17
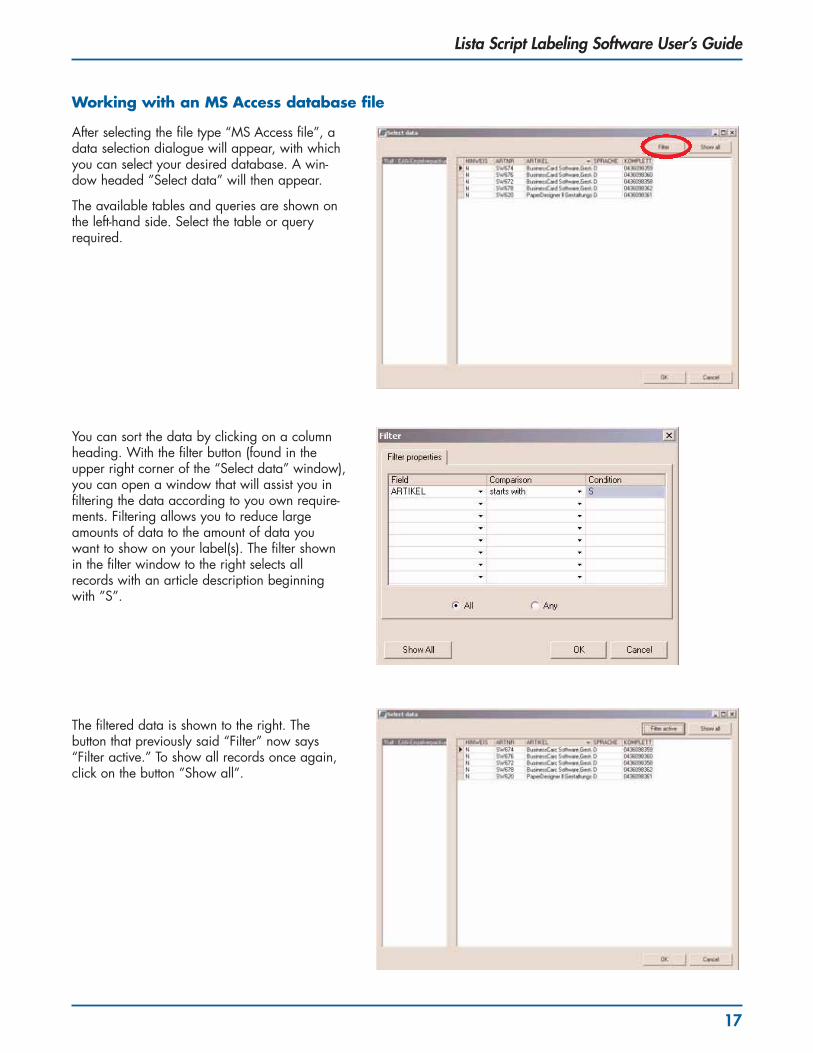
Working with an MS Access database file
After selecting the file type “MS Access file”, adata selection dialogue will appear, with whichyou can select your desired database. A win-dow headed ”Select data” will then appear.
The available tables and queries are shown onthe left-hand side. Select the table or queryrequired.
You can sort the data by clicking on a columnheading. With the filter button (found in theupper right corner of the “Select data” window),you can open a window that will assist you infiltering the data according to you own require-ments. Filtering allows you to reduce largeamounts of data to the amount of data youwant to show on your label(s). The filter shownin the filter window to the right selects allrecords with an article description beginningwith ”S”.
The filtered data is shown to the right. The button that previously said “Filter” now says“Filter active.” To show all records once again,click on the button ”Show all”.
Lista Script Labeling Software User’s Guide
18
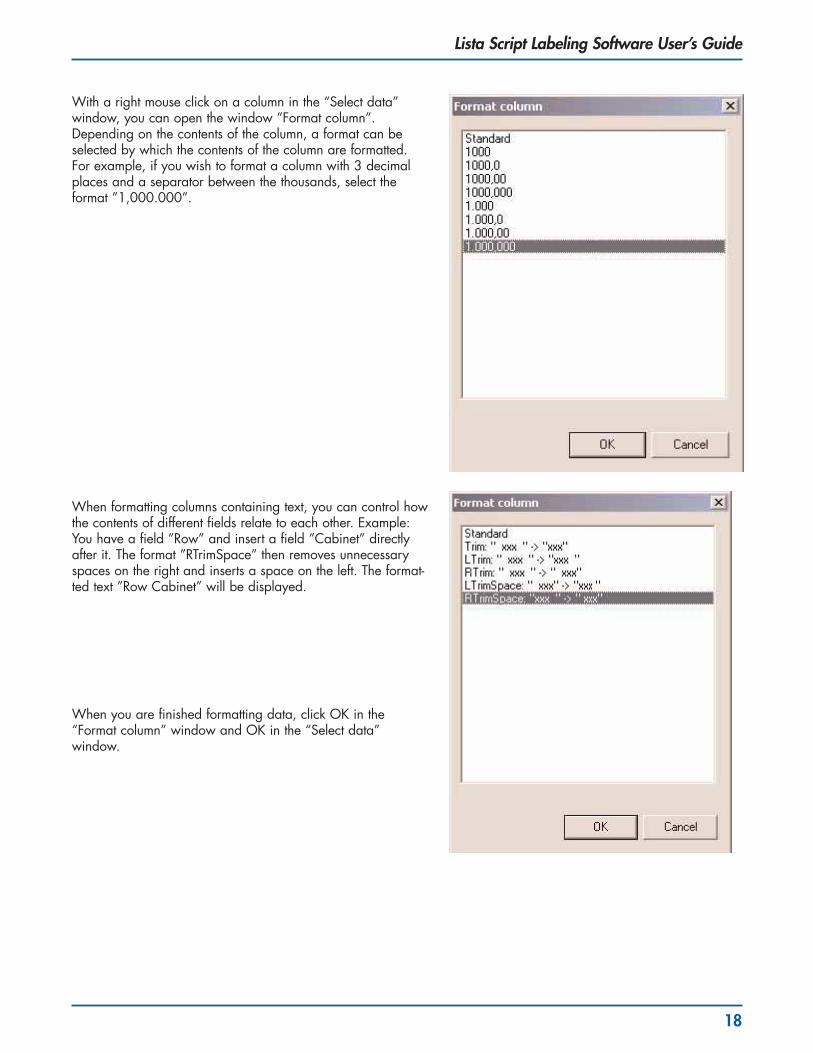
With a right mouse click on a column in the “Select data” window, you can open the window ”Format column”.Depending on the contents of the column, a format can beselected by which the contents of the column are formatted.For example, if you wish to format a column with 3 decimalplaces and a separator between the thousands, select the format ”1,000.000”.
When formatting columns containing text, you can control howthe contents of different fields relate to each other. Example:You have a field ”Row” and insert a field ”Cabinet” directlyafter it. The format ”RTrimSpace” then removes unnecessaryspaces on the right and inserts a space on the left. The format-ted text ”Row Cabinet” will be displayed.
When you are finished formatting data, click OK in the“Format column” window and OK in the “Select data” window.
Lista Script Labeling Software User’s Guide
19
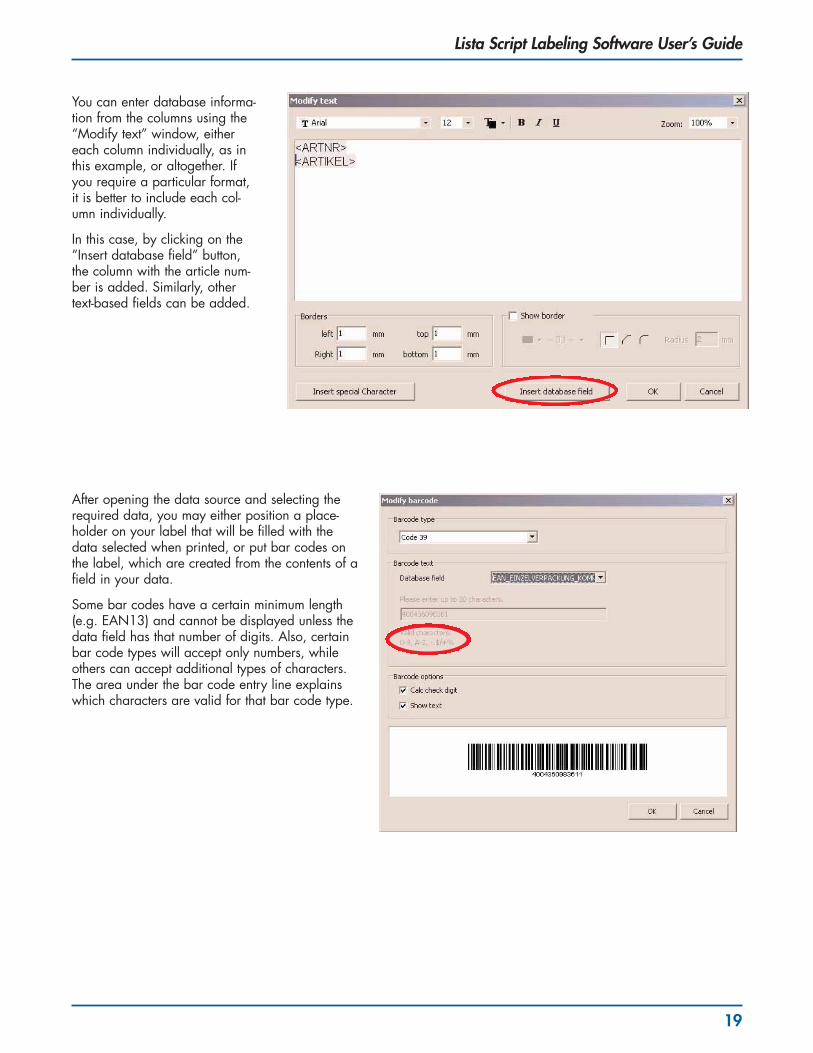
You can enter database informa-tion from the columns using the“Modify text” window, eithereach column individually, as inthis example, or altogether. Ifyou require a particular format,it is better to include each col-umn individually.
In this case, by clicking on the”Insert database field” button,the column with the article num-ber is added. Similarly, othertext-based fields can be added.
After opening the data source and selecting therequired data, you may either position a place-holder on your label that will be filled with thedata selected when printed, or put bar codes onthe label, which are created from the contents of afield in your data.
Some bar codes have a certain minimum length(e.g. EAN13) and cannot be displayed unless thedata field has that number of digits. Also, certainbar code types will accept only numbers, whileothers can accept additional types of characters.The area under the bar code entry line explainswhich characters are valid for that bar code type.
Lista Script Labeling Software User’s Guide
20
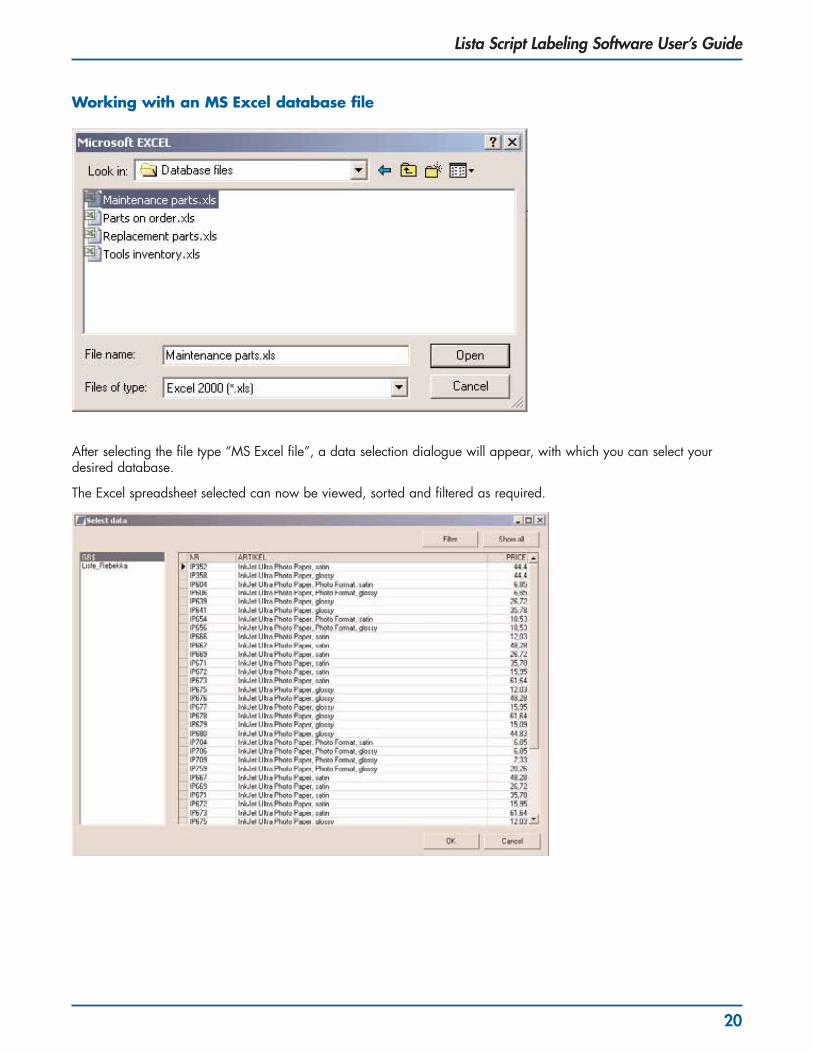
Working with an MS Excel database file
After selecting the file type “MS Excel file”, a data selection dialogue will appear, with which you can select yourdesired database.
The Excel spreadsheet selected can now be viewed, sorted and filtered as required.

Lista Script Labeling Software User’s Guide
21
By clicking OK, you import the Excel spread-sheet into Lista Script. Here you can open thecolumns using the “Modify text” window,either each column individually, as in thisexample, or altogether. If you require a partic-ular format, it is better to include each columnindividually.
In this case, by clicking on the ”Insert data-base field” button, the column with the articlenumber is added. Similarly, ”Description” and”Price” can be added.
It is now possible to include additional non-databasetext on the label. In the example shown below, theword “Offer” has been added at the top of the label.Before the price the word ”only” has been entered, andafter the price the word ”Euro”. The font size has beenincreased and the color red selected. For the field”Description”, which includes longer text, a smaller fontsize has been selected and the field size increased, sothat there is room for three lines of text.
Lista Script Labeling Software User’s Guide
22
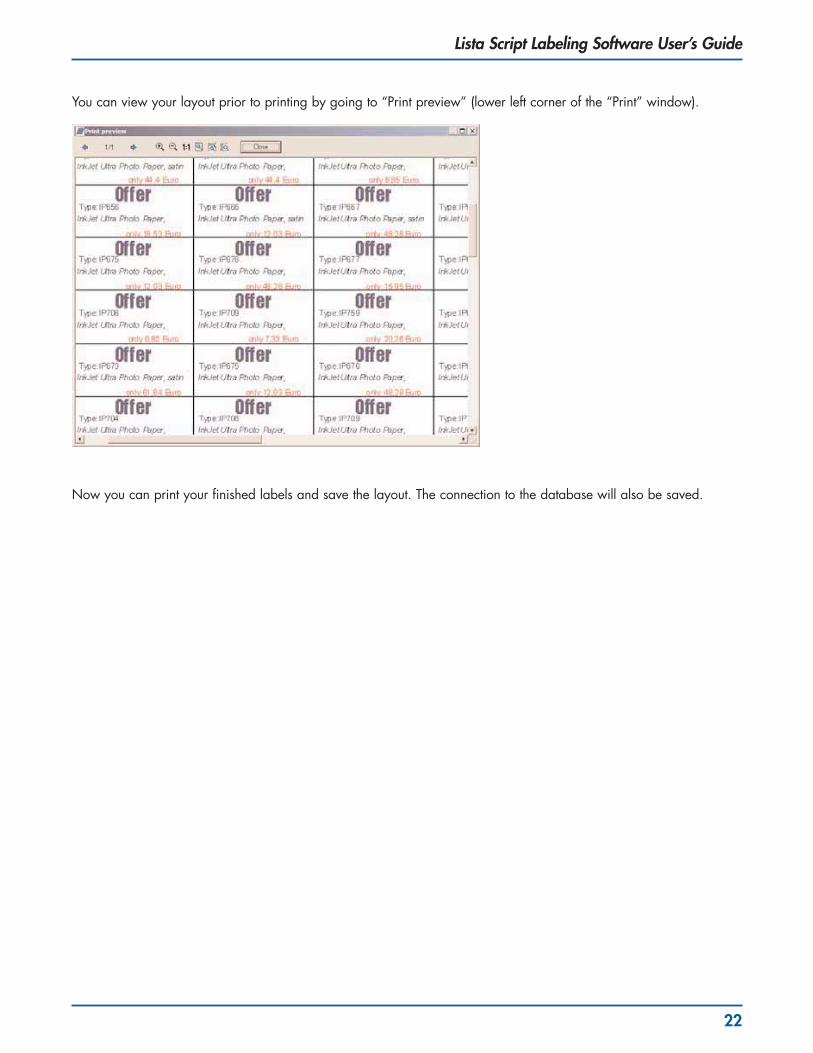
You can view your layout prior to printing by going to “Print preview” (lower left corner of the “Print” window).
Now you can print your finished labels and save the layout. The connection to the database will also be saved.
Lista Script Labeling Software User’s Guide
23
Printing
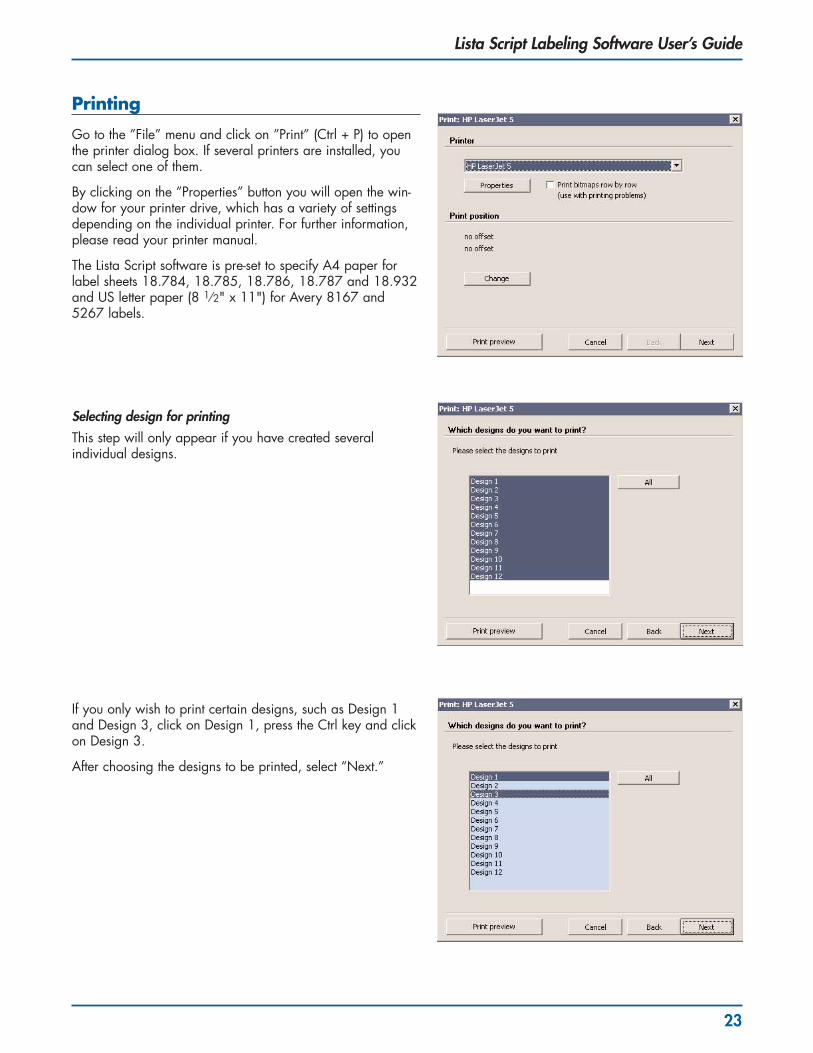
Go to the ”File” menu and click on ”Print” (Ctrl + P) to openthe printer dialog box. If several printers are installed, youcan select one of them.
By clicking on the ”Properties” button you will open the win-dow for your printer drive, which has a variety of settingsdepending on the individual printer. For further information,please read your printer manual.
The Lista Script software is pre-set to specify A4 paper forlabel sheets 18.784, 18.785, 18.786, 18.787 and 18.932and US letter paper (8 1⁄2" x 11") for Avery 8167 and5267 labels.
Selecting design for printingThis step will only appear if you have created several individual designs.
If you only wish to print certain designs, such as Design 1and Design 3, click on Design 1, press the Ctrl key and clickon Design 3.
After choosing the designs to be printed, select “Next.”
Lista Script Labeling Software User’s Guide
24
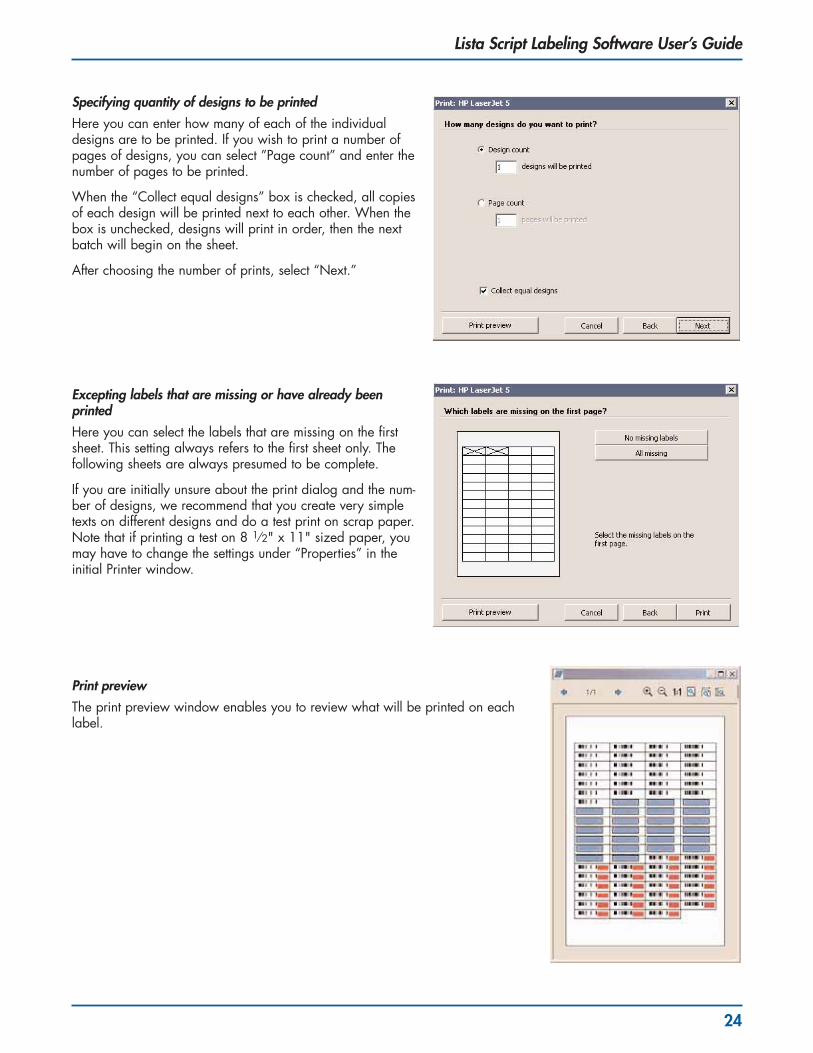
Specifying quantity of designs to be printedHere you can enter how many of each of the individualdesigns are to be printed. If you wish to print a number ofpages of designs, you can select ”Page count” and enter thenumber of pages to be printed.
When the “Collect equal designs” box is checked, all copiesof each design will be printed next to each other. When thebox is unchecked, designs will print in order, then the nextbatch will begin on the sheet.
After choosing the number of prints, select “Next.”
Excepting labels that are missing or have already been printedHere you can select the labels that are missing on the firstsheet. This setting always refers to the first sheet only. The following sheets are always presumed to be complete.
If you are initially unsure about the print dialog and the num-ber of designs, we recommend that you create very simpletexts on different designs and do a test print on scrap paper.Note that if printing a test on 8 1⁄2" x 11" sized paper, youmay have to change the settings under “Properties” in the initial Printer window.
Print previewThe print preview window enables you to review what will be printed on eachlabel.
Lista Script Labeling Software User’s Guide
25
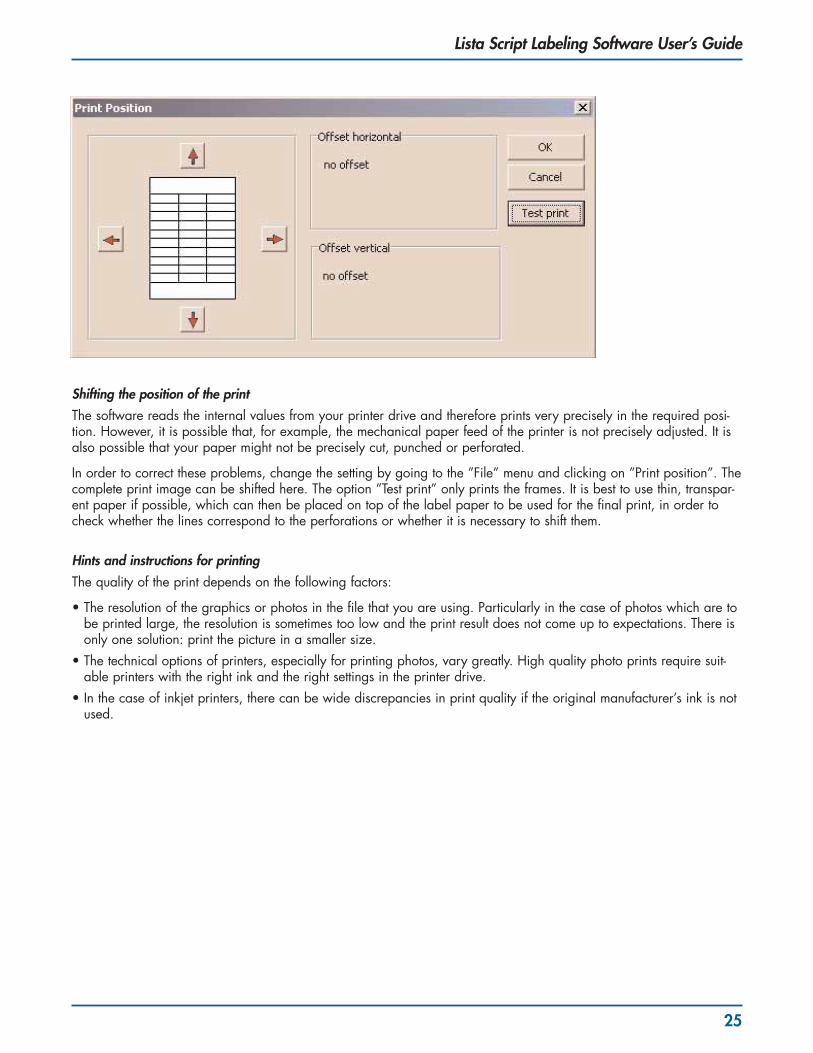
Shifting the position of the printThe software reads the internal values from your printer drive and therefore prints very precisely in the required posi-tion. However, it is possible that, for example, the mechanical paper feed of the printer is not precisely adjusted. It isalso possible that your paper might not be precisely cut, punched or perforated.
In order to correct these problems, change the setting by going to the ”File” menu and clicking on ”Print position”. Thecomplete print image can be shifted here. The option ”Test print” only prints the frames. It is best to use thin, transpar-ent paper if possible, which can then be placed on top of the label paper to be used for the final print, in order tocheck whether the lines correspond to the perforations or whether it is necessary to shift them.
Hints and instructions for printingThe quality of the print depends on the following factors:
• The resolution of the graphics or photos in the file that you are using. Particularly in the case of photos which are tobe printed large, the resolution is sometimes too low and the print result does not come up to expectations. There isonly one solution: print the picture in a smaller size.
• The technical options of printers, especially for printing photos, vary greatly. High quality photo prints require suit-able printers with the right ink and the right settings in the printer drive.
• In the case of inkjet printers, there can be wide discrepancies in print quality if the original manufacturer’s ink is notused.

Lista Script Labeling Software User’s Guide
26
Lista International Corporation106 Lowland Street, Holliston, MA 01746-2094Telephone: (800) 722-3020 Fax: (508) 626-0353www.listaintl.com E-mail: [email protected]
ISO 9001 Certified