LIONESS documentation - Read the Docs
61
LIONESS documentation Release 0.06 Read the Docs Feb 18, 2022
Transcript of LIONESS documentation - Read the Docs

LIONESS documentationRelease 0.06
Read the Docs
Feb 18, 2022


User Documentation
1 Online experiments: challenges and solutions 31.1 Get started . . . . . . . . . . . . . . . . . . . . . . . . . . . . . . . . . . . . . . . . . . . . . . . . 41.2 Develop your experiment . . . . . . . . . . . . . . . . . . . . . . . . . . . . . . . . . . . . . . . . 121.3 Compile and test your experiment . . . . . . . . . . . . . . . . . . . . . . . . . . . . . . . . . . . . 151.4 Set up your own experimental server . . . . . . . . . . . . . . . . . . . . . . . . . . . . . . . . . . 201.5 Run your experiment . . . . . . . . . . . . . . . . . . . . . . . . . . . . . . . . . . . . . . . . . . . 251.6 Share with others . . . . . . . . . . . . . . . . . . . . . . . . . . . . . . . . . . . . . . . . . . . . . 271.7 Notes on experimental design . . . . . . . . . . . . . . . . . . . . . . . . . . . . . . . . . . . . . . 291.8 Reference manual . . . . . . . . . . . . . . . . . . . . . . . . . . . . . . . . . . . . . . . . . . . . 321.9 Further details . . . . . . . . . . . . . . . . . . . . . . . . . . . . . . . . . . . . . . . . . . . . . . 561.10 Go back to the LIONESS website . . . . . . . . . . . . . . . . . . . . . . . . . . . . . . . . . . . . 57
i

ii

LIONESS documentation, Release 0.06
LIONESS Lab is a free web-based platform for online interactive experiments. LIONESS experiments include stan-dardized methods to deal with group formation, handling participant dropout and other challenges of online interactiveexperiments.
With LIONESS Lab you can readily develop and test your LIONESS experiments online in an user-friendly environ-ment. You can develop experiments from scratch in a point-and-click fashion or start from an existent design from ourgrowing repository and adjust it according your own requirements. A what-you-see-is-what-you-get interface allowsyou to easily define screens. You can use JavaScript for any programming - e.g. to calculate payoffs or manipulate vari-ables. You can use a range of ready-made functions to get data from (and write to) the server. This way, researchersusing LIONESS Lab require little programming skills. At the same time, users with more advanced programmingskills can use JavaScript to flexibly add a wide range of functionalities to their experiments.
Once your LIONESS experiment is ready, you can download it and run it on your own server. Participants can theninvited to online sessions, e.g. by using Amazon Mechanical Turk (MTurk). At the end of a session, you can downloada spreadsheet with the data, as well as a file to automate bonus payments on MTurk. Using LIONESS Lab you canchoose to share LIONESS experiments with your co-authors and other experimenters.
LIONESS experiments regulate the information flow between participants. Before a session, the experimenter uploadsthe LIONESS experiment to the server. In a typical online experiment participants log in to the server via a link postedon a crowd-sourcing website (e.g. Amazon Mechanical Turk or Prolific). Participants interact through their webbrowsers and receive a code to collect their payment upon completion. Throughout the session, the control paneldisplays the participants’ progress in the experiment.
LIONESS experiments provide a set of standarized methods for group formation, attrition and other challenges ofinteractive online experiments. This is extensively discussed in a paper by Arechar et al.
User Documentation 1

LIONESS documentation, Release 0.06
2 User Documentation

CHAPTER 1
Online experiments: challenges and solutions
Conducting experiments online presents a set of methodological and logistical challenges not present in the traditionaldecision making laboratory. LIONESS experiments have built-in features that deal with these challenges. The mostimportant one is driving down dropouts.
In online experiments, participants may drop out. Typically they complete their experiment from home, and can getdistracted (especially when waiting on others), have a bad internet connection or may just leaving a session by closingthe experimental pages. This will lead to missing data. Moreover, in interactive experiments, dropouts can also affectother participants (e.g. group mates). LIONESS experiments help avoid dropouts with measures reducing waitingtimes.
Timers can be added to decision pages, keeping up the pace of decision making in a group. Experimenters can chooseto remove unresponsive participants from the experiment and let the others proceed. Furthermore, groups can beformed on-the-fly. Participants often do not enter experimental sessions exactly at the same time, and they will varyin the time they take to read instructions (and complete control questions). Groups can be started as soon as sufficientparticipants are ready to start making decisions.
Should dropouts occur, standard procedures are in place to adequately deal with that. Experimenters can choose toallow participants to complete the experiment if one (or more) of their group mates have dropped out. This preventsdisappointment for participants (in case they wouldn’t be able to complete the experiment and might earn less thanthey expected), and, related, negative online reviews potentially damaging the experimenter’s reputation.
Note: While LIONESS Lab has been specifically designed to accommodate interactive experiments, it can also beused for solo-tasks and non-interactive questionnaire studies.
Note: You can also download this documentation as a PDF. Please note that we update the documentation so pleasecheck for new version of the documentation from time to time.
3
LIONESS documentation, Release 0.06
1.1 Get started
1.1.1 Get access to LIONESS Lab
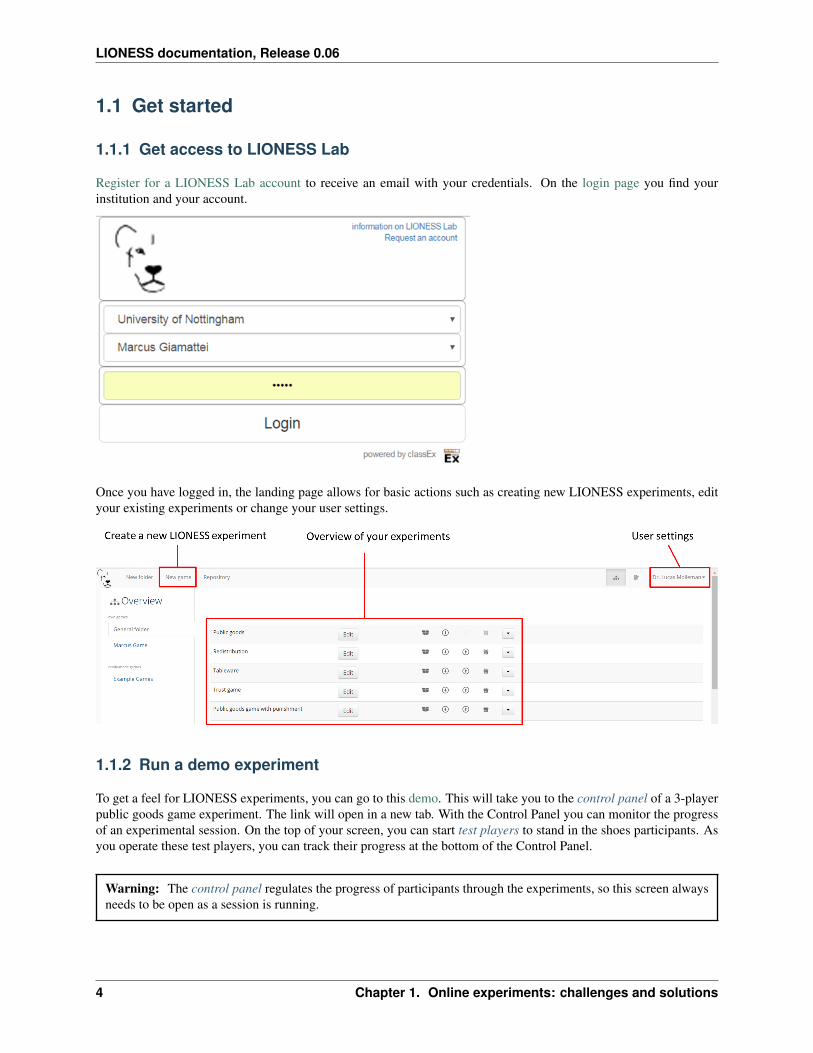
Register for a LIONESS Lab account to receive an email with your credentials. On the login page you find yourinstitution and your account.
Once you have logged in, the landing page allows for basic actions such as creating new LIONESS experiments, edityour existing experiments or change your user settings.
1.1.2 Run a demo experiment
To get a feel for LIONESS experiments, you can go to this demo. This will take you to the control panel of a 3-playerpublic goods game experiment. The link will open in a new tab. With the Control Panel you can monitor the progressof an experimental session. On the top of your screen, you can start test players to stand in the shoes participants. Asyou operate these test players, you can track their progress at the bottom of the Control Panel.
Warning: The control panel regulates the progress of participants through the experiments, so this screen alwaysneeds to be open as a session is running.
4 Chapter 1. Online experiments: challenges and solutions
LIONESS documentation, Release 0.06
1.1.3 Quick tutorial: develop your first experiment
Note: Expected time to complete this tutorial: 30-40 minutes.
In this section you find a quick start tutorial to familiarize with LIONESS Lab. Later in the documentation you canfind more detailed instructions. The steps below show you the basics of LIONESS Lab by taking you through thedevelopment a simple 3-player repeated public goods game. Box 1 shows the general setup of this experiment game.Following the steps below will make you familiar with using the basic features of LIONESS Lab. For your reference,a finished version of the experiment we will develop here can also be directly imported from the is directly availableat the example game folder.
Box 1: Public goods game
In each period of this game, each of the three participants in a group receives 10 points. Each group membersimultaneously decides how many of these points to contribute to a group project (and how many to keep forthemselves). The contributed points of all three group members will be multiplied by 1.5 and equally dividedamong the group members, irrespective of their contributions. This setup reflects a social dilemma: average payoffin a group is optimal when all group members contribute all 10 points, but it is individually optimal to contributenothing and benefit from any contributions from the other group members. After making all group members havemade their contribution decisions, they will be informed of the outcome of that period and a new period will start.
Create a new experiment
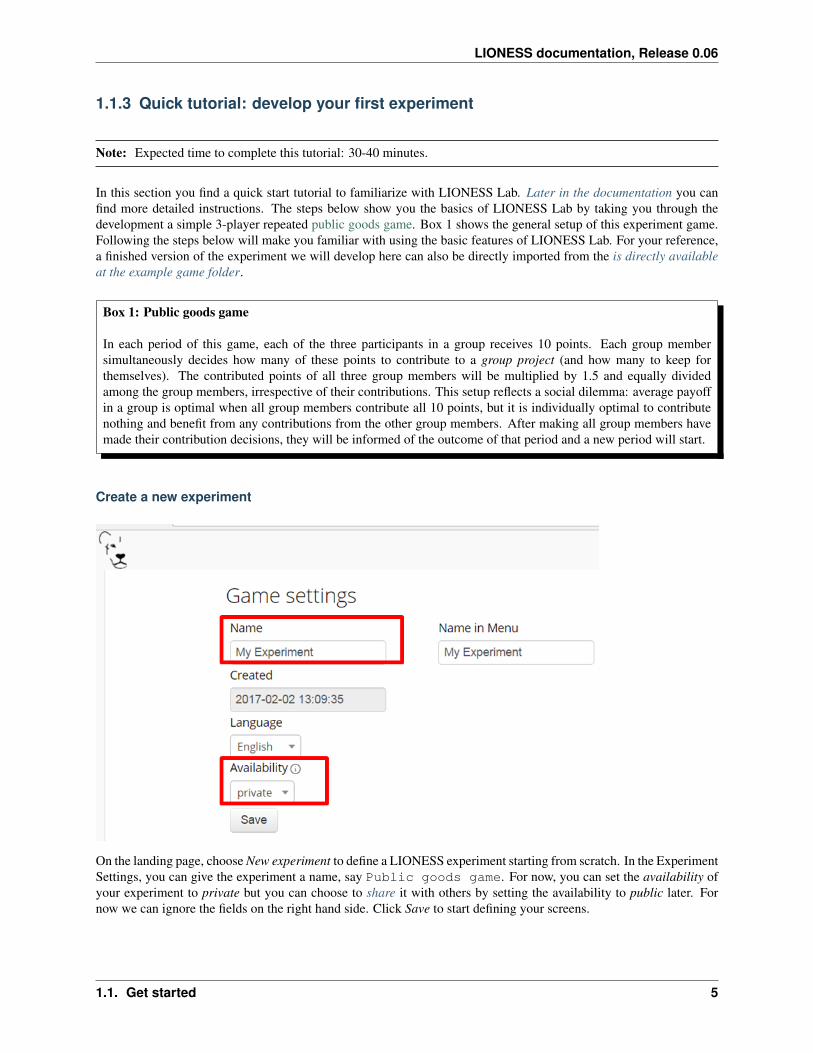
On the landing page, choose New experiment to define a LIONESS experiment starting from scratch. In the ExperimentSettings, you can give the experiment a name, say Public goods game. For now, you can set the availability ofyour experiment to private but you can choose to share it with others by setting the availability to public later. Fornow we can ignore the fields on the right hand side. Click Save to start defining your screens.
1.1. Get started 5
LIONESS documentation, Release 0.06
Define screens (stages)
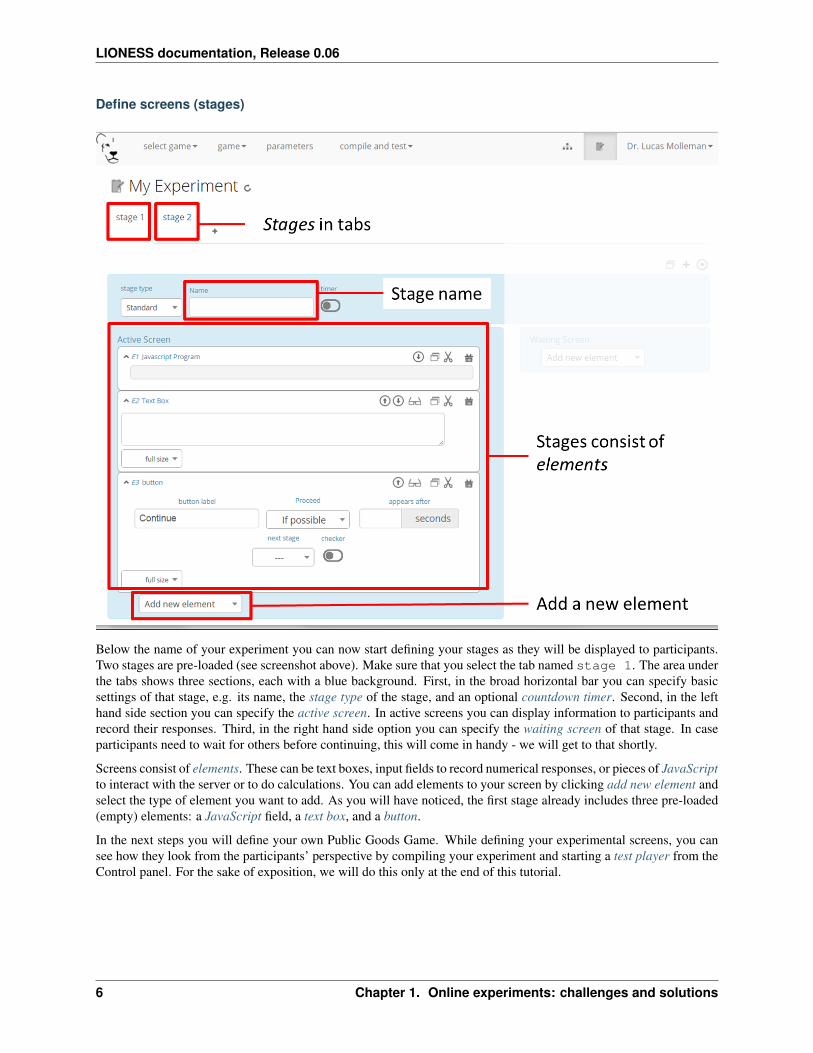
Below the name of your experiment you can now start defining your stages as they will be displayed to participants.Two stages are pre-loaded (see screenshot above). Make sure that you select the tab named stage 1. The area underthe tabs shows three sections, each with a blue background. First, in the broad horizontal bar you can specify basicsettings of that stage, e.g. its name, the stage type of the stage, and an optional countdown timer. Second, in the lefthand side section you can specify the active screen. In active screens you can display information to participants andrecord their responses. Third, in the right hand side option you can specify the waiting screen of that stage. In caseparticipants need to wait for others before continuing, this will come in handy - we will get to that shortly.
Screens consist of elements. These can be text boxes, input fields to record numerical responses, or pieces of JavaScriptto interact with the server or to do calculations. You can add elements to your screen by clicking add new element andselect the type of element you want to add. As you will have noticed, the first stage already includes three pre-loaded(empty) elements: a JavaScript field, a text box, and a button.
In the next steps you will define your own Public Goods Game. While defining your experimental screens, you cansee how they look from the participants’ perspective by compiling your experiment and starting a test player from theControl panel. For the sake of exposition, we will do this only at the end of this tutorial.
6 Chapter 1. Online experiments: challenges and solutions
LIONESS documentation, Release 0.06
Stage 1: instructions
In this basic public goods game, we want the participants to read instructions first. Name this stage Instructionsin the broad horizontal blue bar. In the active screen you can add instruction text by double-clicking the text box(second element). You can write instructions in the rich-text editor by yourself or but for now just copy in the templatetext from the Box 2.
Finalise your instructions stage by specifying the button at the bottom of the screen. Make sure that the next stage isStage 2 and retain the default options for the button (so that participants can proceed if possible). Your changes to theexperiment will be automatically saved upon every mouse click.
At any time during development of your game, you can view the experimental pages as the participants will see them.To do this, simply compile and test your experiment and start a test player.
Listing 1: Box 2: Instructions for the public goods game
Your task <br>At the beginning of each round, each participant receives 20 Points. You have to→˓decide how many of the 20 Points you want to contribute to a group project. The→˓other three members of your group make this decision at the same time. The Points→˓you do not contribute, you keep for yourself. These Points are added to your total.→˓<br>After all group members have made their decision, all Points contributed to the group→˓project are added up, and this number of Points is multiplied by $multiplier$. The→˓resulting number of Points is then divided equally among the group members→˓(irrespective of how much they individually contributed to the group project). <br>→˓<br><u>In summary</u><br> Your income in a round = <br>The Points you keep for yourself <br><i>plus</i><br>The Points you receive from the group project </p>
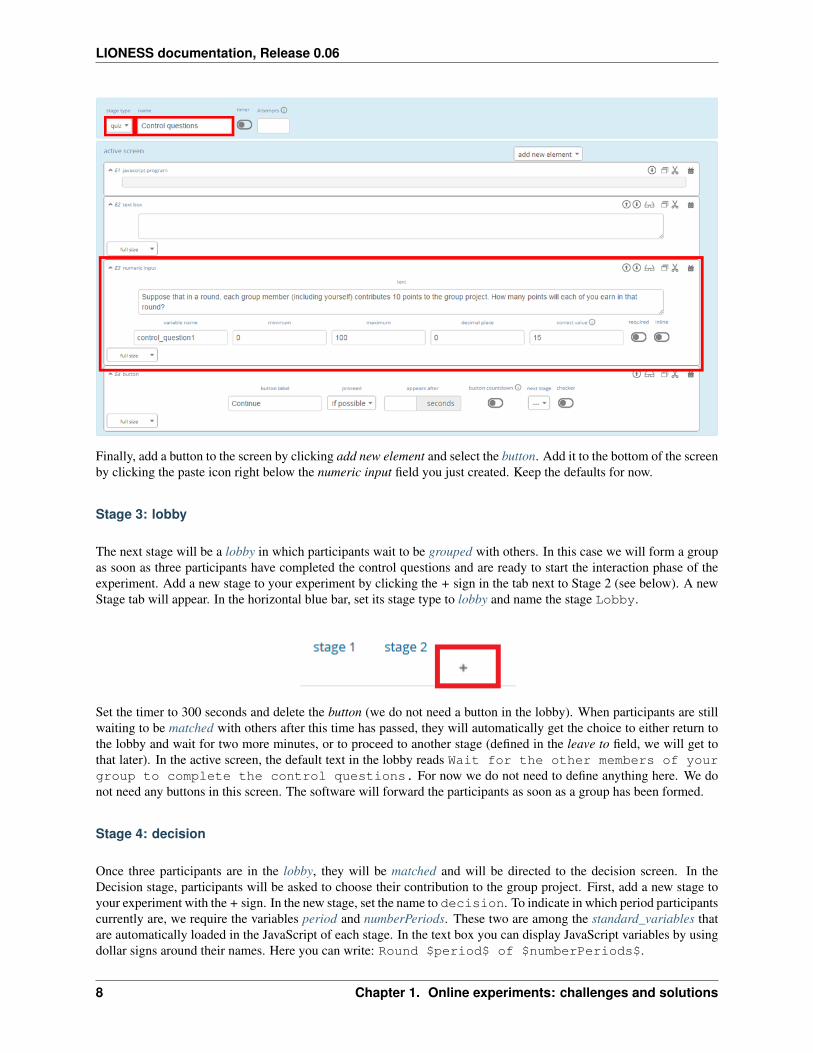
Stage 2: control questions
In the next stage, we will define a set of control questions to ensure that participants have understood the instructions.Click on the tab Stage 2 and name this stage Control questions. In the broad horizontal bar, set the stage typeto quiz. In quiz stages, the LIONESS software automatically records the number of attempts by each participant toanswer the control questions.
Announce the control questions in the pre-loaded text box. To add your first control question, click add an elementand choose numeric input from the drop-down list. Small paste icons will appear between each of the elements inthe screen. Click on the icon right under the text box to add the numeric input element. Once this element is addedto the screen you can write the question in the text field of the element. In this case, write Suppose that ina round, each group member (including yourself) contributes 10 points to thegroup project. How many points will each of you earn in that round?.
Add a variable name, say control_question1. Specify the range of numbers that participants may enter. In thiscase you can set the minimum to 0 and the maximum to 100. Set the decimal place to 0 such that the participants’screen will only accept integers as a response to this question. By clicking the required switch you can make sure thatparticipants require to give a response to an element. Set the field correct value to 15.
1.1. Get started 7
LIONESS documentation, Release 0.06
Finally, add a button to the screen by clicking add new element and select the button. Add it to the bottom of the screenby clicking the paste icon right below the numeric input field you just created. Keep the defaults for now.
Stage 3: lobby
The next stage will be a lobby in which participants wait to be grouped with others. In this case we will form a groupas soon as three participants have completed the control questions and are ready to start the interaction phase of theexperiment. Add a new stage to your experiment by clicking the + sign in the tab next to Stage 2 (see below). A newStage tab will appear. In the horizontal blue bar, set its stage type to lobby and name the stage Lobby.
Set the timer to 300 seconds and delete the button (we do not need a button in the lobby). When participants are stillwaiting to be matched with others after this time has passed, they will automatically get the choice to either return tothe lobby and wait for two more minutes, or to proceed to another stage (defined in the leave to field, we will get tothat later). In the active screen, the default text in the lobby reads Wait for the other members of yourgroup to complete the control questions. For now we do not need to define anything here. We donot need any buttons in this screen. The software will forward the participants as soon as a group has been formed.
Stage 4: decision
Once three participants are in the lobby, they will be matched and will be directed to the decision screen. In theDecision stage, participants will be asked to choose their contribution to the group project. First, add a new stage toyour experiment with the + sign. In the new stage, set the name to decision. To indicate in which period participantscurrently are, we require the variables period and numberPeriods. These two are among the standard_variables thatare automatically loaded in the JavaScript of each stage. In the text box you can display JavaScript variables by usingdollar signs around their names. Here you can write: Round $period$ of $numberPeriods$.
8 Chapter 1. Online experiments: challenges and solutions

LIONESS documentation, Release 0.06
To add the field in which the participants can enter their contributions, click add new element, choose nu-meric input and paste this element below the text box you just defined. In the text field of this element,you can write: You received 10 points to start with. How many points (0-10) do youwant to contribute to the group project?. Set the variable name to contribution, set the minimumto 0, the maximum to 10 and the decimals to 0. Switch on the required option to ensure that all participants make adecision, which will be stored in the decisions table of this experiment’s database.
Note: Participants’ entries in input fields will be automatically recorded in the database. Variable names of inputitems need to be unique (so, no variable name should appear more than once in your experiment). In addition, makesure that within a screen, variable names of input elements are different from variables names you use in JS elements.
Finally, in the button at the bottom of the screen, specify proceed as wait for others. This will ensure that the par-ticipants will only be able to continue to the next stage when all group members are ready. Participants will wait forothers in the waiting screen on the right hand side section. When nothing is defined in the waiting screen, a defaultwaiting text will be shown. For now we can leave the waiting screen undefined.
Stage 5: results
Once all participants in a group have made their decisions, they will be shown the outcome of that period. First, again,add a new stage to your experiment with the + sign. Name this new stage results. To calculate the outcome of thisperiod of the public goods game, we need to get the decisions of the others from the database. LIONESS Lab providesa set of JavaScript functions to do this in a simple way. In the Javascript element, you can copy the code from Box 3.
Note that JavaScript code will be executed in the browsers of the participants, so any JavaScript code should be writtenfrom the perspective of the participant.
The key functions we use here are getValue() and getValues(). In this case,getValue('contribution') will return the value of contribution in the database from the current par-ticipant from the current period. Likewise, getValues('contribution') will return an array with thecontributions of all group members in the current period. With record() you can write a variable from Javascriptto the database. In this case we will store for each round the total earnings of each player.
Note: These functions write to and read from the database on the server in an asynchronous way (that is, the functionsare executed one by one). While this setup is easy to use, please note that having many instances of getValue() ona single page may lead to heavy load on the server. Please make sure to use these functions sparingly, but, moreimportantly, to use a server with sufficiently high computational power when collecting your data.
To display the calculated variables, again use the dollar signs around the variables names in the text box.
The Results stage is the second and last stage of a period. To define the correct routing of the participants through yourexperiment, you should specify which of the stages comprise a period which will be repeated. Technically, this meansthat the program will loop through these periods for a number of times. You can do this in the parameters table. Youcan find this at the horizontal grey bar at the top of your screen. Here you can specify the basic parameters underlyingyour experiment. To specify the beginning and end of the periods in your experiment, set loopStart to Decision andloopEnd to Results. Now you are editing the parameters table, you can also set the number of periods (numberPeriods)to 5. By clicking the Back button at the top you return to the page in which you define your experiment. You arealmost done specifying your experiment.
For now you can leave the next stage field of the button empty.
1.1. Get started 9

LIONESS documentation, Release 0.06
Listing 2: Box 3: JS code for public goods logic
1 // specify the initial endowment2 endowment = 10;3 // retrieve data4 myContribution = getValue('contribution');5 keptForSelf = endowment - myContribution;6 allContributions = getValues('contribution');7 // apply public goods logic8 sum = 0;9 for (var i=0; i<allContributions.length; i++){
10 sum += allContributions[i];11 }12 averageContribution = sum / currentGroupSize;13 product = 1.5 * sum;14 share = product / currentGroupSize;15 earningsThisPeriod = keptForSelf + share;16 record('payoff', earningsThisPeriod);
Listing 3: Box 4: Results text
1 Round $period$ of $numberPeriods$: Results2
3 Your contribution to the group project: $myContribution$.4 Average contribution in your group: $averageContribution$.5 Sum of contributions in your group: $sum$.6 This amount is multiplied by 1.5, yielding $product$.7 Each group member receives an equal share: $share$.8
9 Your earnings10
11 Points kept for yourself: $keptForSelf$.12 Your share from the group project: $share$.13 Your total earnings in this round: $earningsThisPeriod$.
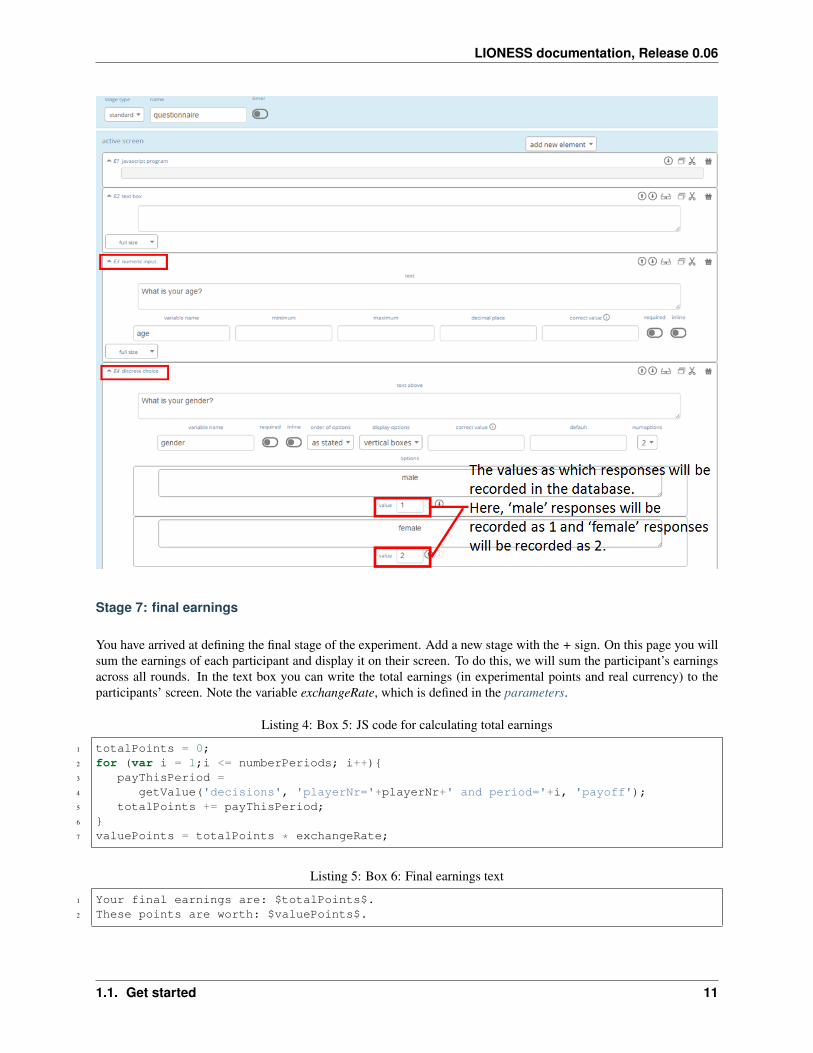
Stage 6: questionnaire
Once the decision making part of the experiment is over, you might want to add a questionnaire stage. Add a newstage, again by clicking the + sign in the rightmost tab. Add a new numeric input for the question What is yourage?. For these numeric inputs you need to define a range of allowed values. Then, add a discret choice for thequestion What is your gender?. For the numeric element for the age you should now be able to define it. Forthe discrete choice, you can specify the question in the text field. At the bottom of this element you can define the textinside each of the choice options that the participants will choose from. In the value field of each choice option youhave to specify the value as it will be recorded in the database (which, for this element type, stores the responses asnumbers). Ensure that the button allows participants to proceed if possible.
10 Chapter 1. Online experiments: challenges and solutions
LIONESS documentation, Release 0.06
Stage 7: final earnings
You have arrived at defining the final stage of the experiment. Add a new stage with the + sign. On this page you willsum the earnings of each participant and display it on their screen. To do this, we will sum the participant’s earningsacross all rounds. In the text box you can write the total earnings (in experimental points and real currency) to theparticipants’ screen. Note the variable exchangeRate, which is defined in the parameters.
Listing 4: Box 5: JS code for calculating total earnings
1 totalPoints = 0;2 for (var i = 1;i <= numberPeriods; i++){3 payThisPeriod =4 getValue('decisions', 'playerNr='+playerNr+' and period='+i, 'payoff');5 totalPoints += payThisPeriod;6 }7 valuePoints = totalPoints * exchangeRate;
Listing 5: Box 6: Final earnings text
1 Your final earnings are: $totalPoints$.2 These points are worth: $valuePoints$.
1.1. Get started 11
LIONESS documentation, Release 0.06
Set parameters
Before we start testing, we need to set the parameters. You can do so by clicking parameters in the top horizontalmenu. In the parameter table we will define where a period starts, and where it ends. In the predefined parameterstable tab you can set the parameters loopStart to Decision and loopEnd to Results by using the drop-down menus. Thismeans that at the end of a period, and when a new period starts, groups will move from the Results stage to Decisionstage. Once the period number reaches numberPeriods, participants will proceed to Questionnaire (the stage definedright after Results).
Compile and test
Your experiment is now ready for testing. In the horizontal bar on the top of your screen, click compile and test.LIONESS Lab will compile your experiment and will open the control panel of your experiment in a new tab.
Control panel
In the control panel, you can start testing your experiment by switching on the test mode and start a test players. Anew tab will open with the experimental pages you defined - this allows you to see how the pages you defined will bedisplayed to participants. If needed, you can start a second test player (e.g. to play in a group after being matched inthe lobby).
1.2 Develop your experiment
There are two basic ways to develop your LIONESS experiment. You can either start from scratch, or build on anexisting experiment. The Repository contains a range of different LIONESS experiments for you to use and adjust toaccommodate your requirements.
Here we describe how to develop your LIONESS experiment from scratch. We describe how to create a new experi-ment and define your screens. If you have already completed the tutorial, many of the steps described here will lookfamiliar to you. This chapter gives a fuller description of the features that LIONESS Lab has to offer.
1.2.1 Create experiment
On the LIONESS Lab landing page, you can create a new LIONESS experiment by clicking new experiment in thetop horizontal bar.
In the next screen you can define basic settings of your experiment by filling out the appropriate screens.
12 Chapter 1. Online experiments: challenges and solutions

LIONESS documentation, Release 0.06
With the drop-down menu under availability you can choose to keep experiment private, or to share it with otherLIONESS Lab users by making it public. Other users will be able to copy public experiments from the repository totheir LIONESS Lab accounts and edit these for their own purposes. Experiments’ settings can be adjusted at any time.
With the input fields on the right you can give additional information on your experiment (e.g. you can use thecomments section to list the number of sessions run with this experiment, or add any caveats you might have). Thisinformation can then be used by other LIONESS Lab users that might want to build on (parts of) your experiment.
1.2.2 Defining your screens
Your screens consist of three sections: settings, an active screen and a waiting screen.
Stage settings (top panel)
In the top horizontal bar, you can give the stage a name, and define its type: (standard, quiz or lobby). Also, you canadd an optional timer.
1.2. Develop your experiment 13

LIONESS documentation, Release 0.06
Active screen (left panel)
The active screen is the main screen of a stage. Typically, this section will be used for displaying information (e.g.instructions, results from previous periods) and recording participants’ responses.
You can build up these screens step-by-step using elements. You can add these elements by clicking the button addnew element and paste it in the place you want. On the participant screens, elements will in principle be placed beloweach other, in the order you define them in your LIONESS Lab screen.
In many cases, one will mainly use text boxes to display information to participants (for example, in instructionscreens). In other cases, a program needs to be executed to do some calculations. This is done with JavaScript (JS), acommon web language. If you already know how to program your experiments in z-Tree, using JS in LIONESS Labwill be relatively easy, as programming on both platforms works in a very similar way. A useful hands-on guide forlearning the basics of JavaScript can be found here.
You can display JS variables in other elements (e.g. text boxes or buttons) by putting dollar signs on both sides of thevariable name. For example: $myVariable$. Note that JS will be evaluated in the order they appear in your screen.So, in the case of this example, when you want to display the value of $myVariable$ in, say, a text element, this textelement needs to be below the JS element where that variable is defined.
Typically, the final element of an active screen is a button, that submits any responses of the participant in that screen,and directs them to the next screen. In this button, you can also define whether the participants can move on to thenext screen as soon as they have finished, or whether they have to wait for their group mates to also finish this screen.In the latter case, participants will be directed to the Waiting screen of this stage (see below).
Waiting screen (right panel)
In case you allow participants to move to the next stage only when all group members have completed the stage (bysetting the proceed condition in the active screen button to wait for others), participants will be directed to the Waitingscreen of the stage.
You can add elements to the Waiting screen in the same way as you add them to the Active screen. If you do not defineany element there, the Waiting screen will show a default text indicating that participants should wait for all groupmates to complete.
1.2.3 Setting parameters
For testing (and running) your experiment, you need to set the experiment parameters. Make sure that the loopStartand loop end parameters are set to the stages that mark the beginning and end of a period, respectively. The full list ofparameters together with an explanation can be found here.
1.2.4 Additional CSS for participants
If you want to add additional CSS for participants, you can do so by clicking on additional CSS for participants in thetop right corner. By clicking on the program box, a CSS editor opens and you can add custom CSS. The CSS is loadedfor every page of the participant.
1.2.5 Build on an existing experiment
Go to the repositiory and import an existing experiment. Any experiment that was made public can is shared with, andcan be imported by, other experimenters. After importing an experiment it will be visible in your landing page withthe overview of your experiments. If you want to the imported experiment,you have to make a copy of it. To do this,click View next to the experiment on your landing page. In the experiment’s page, you will see you cannot edit the
14 Chapter 1. Online experiments: challenges and solutions

LIONESS documentation, Release 0.06
experiment as it was created by another user. Click experiment in the top bar, and then copy experiment. An editablecopy of the experiment will be created in your account.
1.3 Compile and test your experiment
Once you are ready specifying your experimental screens, you can test your LIONESS experiment. Here we describethe basic procedures of how test your experiment and make adjustments on the fly. Once you are done testing, you candownload your experiment, put it on your own server, and run your experiment online.
1.3.1 Compile your LIONESS experiment
In LIONESS Lab, click compile and test, and compile your experiment by selecting compile from the drop-downmenu. During the compilation process, LIONESS Lab activates a script that will build the database underlying yourexperiment and creates the experimental pages from the stages that you defined in each of the tabs. Once the compi-lation process has completed, a new tab will open with the control panel of your LIONESS experiment. All furthertesting can be done from the control panel.
In case you want to make any changes to your screens, you can go back to LIONESS Lab. You can use the Updatescreens option from the same drop-down menu. This will create the experimental pages, without re-building the tables.In most cases this means that you can directly view your changes by refreshing the page in the participant’s screen,and continue testing. In cases where you added new variables (e.g. by adding a new input element or by using the ‘‘record()‘‘ function in a JavaScript element), you have to re-build the tables and start a new test session.
Note: You can call Update screen by the keystroke combination Alt+U.
1.3.2 Control panel
The control panel allows the experimenter to control the experimental flow (start and stop the experiment), observethe data collection and download the data and payment file. The control panel also triggers the central controlleralgorithm.
Warning: During a session, the control panel of the experiment needs to be open on the experimenter’s computer.
1.3. Compile and test your experiment 15

LIONESS documentation, Release 0.06
Global control
The horizontal top bar contain basic control functions.
Controller algorithm
The controller algorithm is called by the control panel page. Each second, the control panel will run a PHP script onthe server performing checks related to the flow of the experiment. This is indicated with the animated heartbeat nextto the LIONESS icon. Specifically, the controller algorithm:
• Controls the registration of new participants. Participants automatically receive a unique playerNr uponentering the experimental pages. If the button Game active is switched off, no participant can enter a session,but those that are already in will be able to proceed.
• Regulates grouping. It tracks the number of participants waiting in the lobby, and groups together those that areready. Various pre-programmed grouping procedures are available.
16 Chapter 1. Online experiments: challenges and solutions
LIONESS documentation, Release 0.06
• Regulates group progress. It tracks for each group the number of participants that are ready to proceed to thenext period (or a next stage, in case the experiment requires participants to wait for their fellow group mates)and controls their proceeding to the next period
• Handles dropouts. In case a participant has dropped out (that is, the server cannot detect that their are active),the controller algorithm can take action. Upon dropout, you can choose to have the group continue with reducedsize, terminate the whole group, or to take no action at all. You can define your dropout handling preferences inthe parameters table of an experiment.
Global settings
Game active / inactive
With the Game (in)active button, you can block new participants from entering. When switched to inactive, partici-pants will be directed to a page that they cannot participate at this time. You can customize the default text shown inthese cases in the experiment’s parameters table.
Terminate player
You can manually remove a participant from a session by entering their value of playerNr in the field next to Terminateplayer. This will take that participant to a screen indicating that they can no longer proceed. The software will treatthis participant as a dropout, that is, the group will proceed according to the dropout handling settings. Note thatterminating a participant is a last resort measure.
Export database
With this button the database of the experiment is exported as an Excel file. Each of the experiment tables willbe shown in a separate Excel tab. The decisions table will typically be the most interesting one as it contains theparticipants’ responses in the experiment.
Empty data tables
With this button you can empty the tables of the experiment’s database. This will not emtpy the globals table. Beaware that this cannot be undone. LIONESS Lab does not store old results.
Map
By clicking this button, an external program will create a map showing the location of the participants of your session.These locations are based on the participants’ IP addresses (which are encrypted upon entrance) and may be notcorrect. The tool is just to get an overview from where participants are logged in.
Logout
Log out of the experiment. Logging out implies that the controller algorithm is no longer running. Typically you’dwant to click this button only after an experimental session is over.
1.3. Compile and test your experiment 17
LIONESS documentation, Release 0.06
Test mode
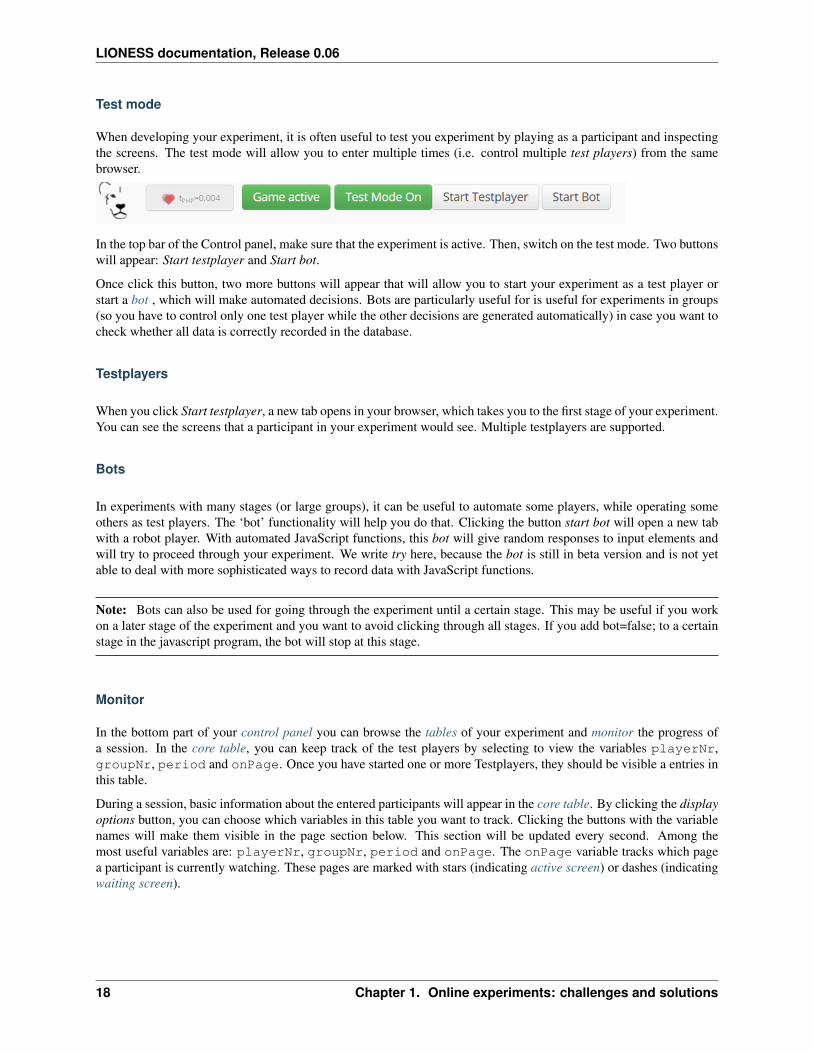
When developing your experiment, it is often useful to test you experiment by playing as a participant and inspectingthe screens. The test mode will allow you to enter multiple times (i.e. control multiple test players) from the samebrowser.
In the top bar of the Control panel, make sure that the experiment is active. Then, switch on the test mode. Two buttonswill appear: Start testplayer and Start bot.
Once click this button, two more buttons will appear that will allow you to start your experiment as a test player orstart a bot , which will make automated decisions. Bots are particularly useful for is useful for experiments in groups(so you have to control only one test player while the other decisions are generated automatically) in case you want tocheck whether all data is correctly recorded in the database.
Testplayers
When you click Start testplayer, a new tab opens in your browser, which takes you to the first stage of your experiment.You can see the screens that a participant in your experiment would see. Multiple testplayers are supported.
Bots
In experiments with many stages (or large groups), it can be useful to automate some players, while operating someothers as test players. The ‘bot’ functionality will help you do that. Clicking the button start bot will open a new tabwith a robot player. With automated JavaScript functions, this bot will give random responses to input elements andwill try to proceed through your experiment. We write try here, because the bot is still in beta version and is not yetable to deal with more sophisticated ways to record data with JavaScript functions.
Note: Bots can also be used for going through the experiment until a certain stage. This may be useful if you workon a later stage of the experiment and you want to avoid clicking through all stages. If you add bot=false; to a certainstage in the javascript program, the bot will stop at this stage.
Monitor
In the bottom part of your control panel you can browse the tables of your experiment and monitor the progress ofa session. In the core table, you can keep track of the test players by selecting to view the variables playerNr,groupNr, period and onPage. Once you have started one or more Testplayers, they should be visible a entries inthis table.
During a session, basic information about the entered participants will appear in the core table. By clicking the displayoptions button, you can choose which variables in this table you want to track. Clicking the buttons with the variablenames will make them visible in the page section below. This section will be updated every second. Among themost useful variables are: playerNr, groupNr, period and onPage. The onPage variable tracks which pagea participant is currently watching. These pages are marked with stars (indicating active screen) or dashes (indicatingwaiting screen).
18 Chapter 1. Online experiments: challenges and solutions

LIONESS documentation, Release 0.06
In the example above, there are 5 participants in the experiment. Participants 1-4 have just passed the lobby and havebeen grouped together - the value of groupNr is 1 for each of these participants. They are currently in period 1, on thepage Decision. Participant 5 is currently on a page called Instructions (which in this case comes before the lobby).
One of the key purposes of testing is to check whether participants’ responses are recorded correctly, and to verify ifany calculations are performed as they should. For this, the decisions table is most useful. For each period, a new rowis added to this table for each participant. Values should appear there once they are entered in the participants’ screens.
1.3.3 Experiment tables
core
The variables in this table form the core of the experiment. These variables regulate the flow of the experiment,and are used by the controller algorithm to detect progress. This table is the most useful table to monitor during anexperimental session. It allows you to track the participants’ group number, the page that they are currently on (thevariable onPage) and their current period number. All columns in the table are explained in detail here
decisions
This table stores the data that is generated by the participants. All their responses are stored in this table. For eachperiod, for each participant, one row will be added to this table to store any responses generated in that period. Thistable also contains the response times (in seconds) for those pages that are visited in a given period.
globals
This table stores the parameters of the session. These can be manipulated in LIONESS Lab, in the parameter tables ofan experiment. In addition, this table contains the message texts displayed to participants once they have dropped outof a session, or cannot or cannot participate. These messages can explain to participants the reasons why they droppedout, or why they cannot participate.
logEvents
This table documents key events during the experiment, such as participant entry and dropout. Entries are automaticlyadded by the controller algorithm.
1.3. Compile and test your experiment 19
LIONESS documentation, Release 0.06
session
This table contains session data. Each participant is associated with one row in this table.
1.3.4 Debugging program code
One of the key purposes of testing your experiment is to check whether all program code works as intended. Findpointers to debug the code in your JavaScript elements in the next section.
Debugging your JavaScript code
Needless to say, it is critical for the functioning experiments that the program code works correctly. The JS editor inLIONESS Lab provides some support in detecting syntax errors, but not all bugs in your code will be automaticallydetected. These bugs will only surface when you test your experiment.
The JavaScript code of LIONESS experiments is executed in the participants’ browsers. In case variables are displayedas NaN, or not displayed at all, chances are that your JS code has not been executed correctly. One downside ofJavaScript is that the code stops being evaluated after the evaluation process has run into a mistake.
But, don’t worry. Many browsers will have built-in solutions to track the error on the page. While testing yourexperiment as a Test player, you can activate these solutions to keep track of any JavaScript errors that might occur.
In Chrome and Firefox, you can start the Developer Tools, simply by pressing F12 on your keyboard. Your screenwill be split, showing the original page, and its underlying code (which you generated with LIONESS Lab). On thetop of this code section you find a number of tabs (Elements, Console, Sources, . . . ). The execution of JavaScript canbe viewed in the Console tab. In the majority of cases, bugs are easily identified here. Common bugs are spellingmistakes in variables, or mistakes in calling functions.
When you have spotted the mistake on a participant page, you can go back to LIONESS Lab and spot the mistake inthe JS code in the corresponding screen. If you make a change, you can press Compile and test and then recompileexperiment (keep tables) to immediately see whether your change has fixed the bug.
Commenting your JavaScript code
It is always a good idea to add comments to your code. It makes your code transparent to others and can also helpyou understanding it when you get back to it at a later time. Now, the usual way to add comments to JS code (e.g. foradding clarifications), is by using the double slash “//”.
Note: Note that not all web servers will interpret this code the same way. This has to do with line breaks surroundingthis code. To prevent your code from being corrupted, use “/* . . . */”, where the any comments go on the placeholderdots.
1.4 Set up your own experimental server
While testing your experiment, the web pages you navigated were on the LIONESS Lab server. This server is fordevelopment purposes only. For conducting your online experiment, you need to put your LIONESS experiment onyour own server.
20 Chapter 1. Online experiments: challenges and solutions
LIONESS documentation, Release 0.06
Important: The requirement for your own server is a standard web server with PHP running. PHP version must beat least 7.1
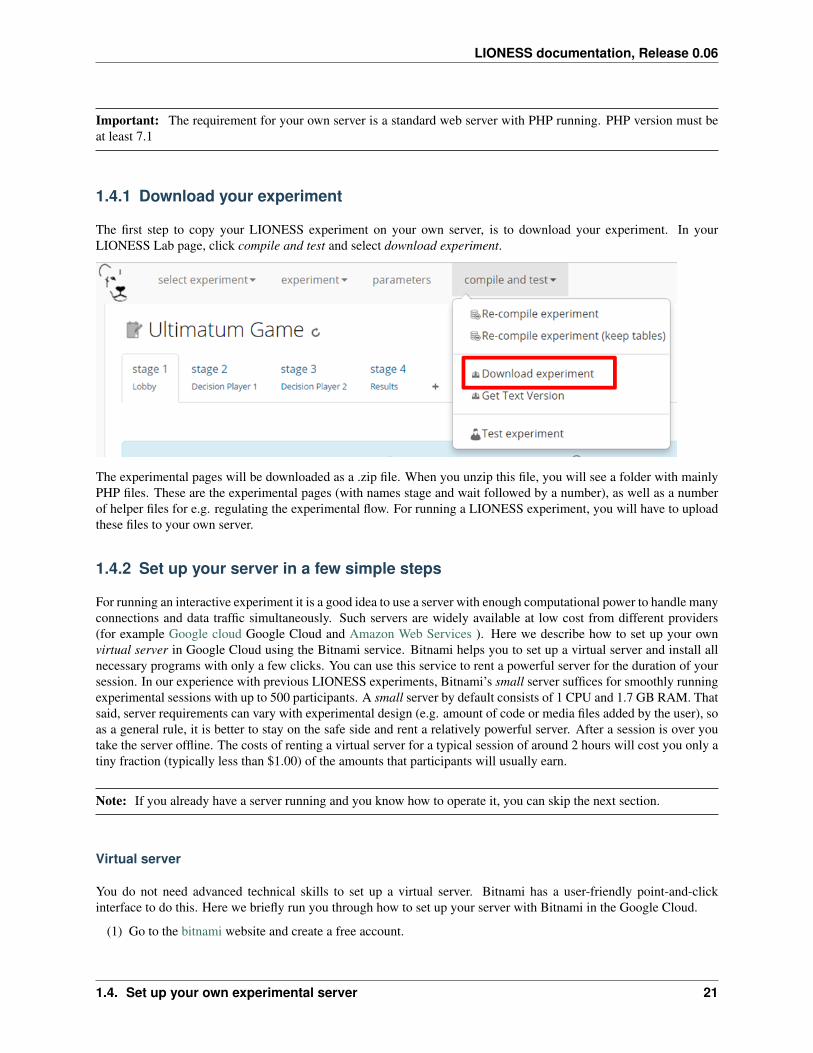
1.4.1 Download your experiment
The first step to copy your LIONESS experiment on your own server, is to download your experiment. In yourLIONESS Lab page, click compile and test and select download experiment.
The experimental pages will be downloaded as a .zip file. When you unzip this file, you will see a folder with mainlyPHP files. These are the experimental pages (with names stage and wait followed by a number), as well as a numberof helper files for e.g. regulating the experimental flow. For running a LIONESS experiment, you will have to uploadthese files to your own server.
1.4.2 Set up your server in a few simple steps
For running an interactive experiment it is a good idea to use a server with enough computational power to handle manyconnections and data traffic simultaneously. Such servers are widely available at low cost from different providers(for example Google cloud Google Cloud and Amazon Web Services ). Here we describe how to set up your ownvirtual server in Google Cloud using the Bitnami service. Bitnami helps you to set up a virtual server and install allnecessary programs with only a few clicks. You can use this service to rent a powerful server for the duration of yoursession. In our experience with previous LIONESS experiments, Bitnami’s small server suffices for smoothly runningexperimental sessions with up to 500 participants. A small server by default consists of 1 CPU and 1.7 GB RAM. Thatsaid, server requirements can vary with experimental design (e.g. amount of code or media files added by the user), soas a general rule, it is better to stay on the safe side and rent a relatively powerful server. After a session is over youtake the server offline. The costs of renting a virtual server for a typical session of around 2 hours will cost you only atiny fraction (typically less than $1.00) of the amounts that participants will usually earn.
Note: If you already have a server running and you know how to operate it, you can skip the next section.
Virtual server
You do not need advanced technical skills to set up a virtual server. Bitnami has a user-friendly point-and-clickinterface to do this. Here we briefly run you through how to set up your server with Bitnami in the Google Cloud.
(1) Go to the bitnami website and create a free account.
1.4. Set up your own experimental server 21

LIONESS documentation, Release 0.06
(2) You receive an email from bitnami to confirm and activate your account.
(3) For your LIONESS experiment, you need to set up a so-called LAMP stack, which you can do here.
(4) Choose Launch in the cloud by clicking the button.
(5) To start a Virtual Machine, you need to start a project in your cloud account. A menu will guide you throughsome basic settings in the developer console. This will enable a few features essential for a server to run on themachine (like the application programming interface (API), and billing details). The brief instructions on theBitnami website make this a straightforward process.
(6) When you return to your New Virtual Machine page, you can pick your machine specifications (see above forpointers about what to choose).
(7) On the right hand side there’s a map where you can choose the location of your server. For optimal perfor-mance, choose something near the location of your prospective participants (e.g. for an MTurk session with USparticipants, choose a US server). Note that the hourly rates (in $) might slightly vary between locations.
(8) Click create and your server is live! A launchpad will open, which shows some details of your server (e.g. itsIP address).
(9) Check your server by entering the IP address in a browser.
1.4.3 Upload your LIONESS experiment to your server
Now your server has been set up, you can upload your LIONESS experiment to your server. To transfer the experimentto your server, you have to install an FTP application. A decent (and free) option is FileZilla. Choose the FileZillaClient. When installing, stick to the default options.
Once FileZilla is installed, choose File. . . in the top horizontal menu, and then Site manager.
For the dialog box that pops up, the screenshot below illustrates the settings you need: choose New site and add the IPaddress of the virtual server in the Host field. You can find this IP address in the bitnami launchpad as shown in thescreenshot below. For Protocol, choose SFTP-SSH.
22 Chapter 1. Online experiments: challenges and solutions

LIONESS documentation, Release 0.06
Enter bitnami as User, and a Key file as Logon type. You can download this key file from the Launchpad. InFileZilla, find this file by using Browse. . . . Clicking Connect at the bottom should give you access to the server.
1.4. Set up your own experimental server 23

LIONESS documentation, Release 0.06
FileZilla will show you the contents of your local machine (typically on the left hand side) and the contents of theserver you just connected to (right hand side). On the server, locate the folder htdocs. This is the folder from whichthe experimental pages will be served.
Enter the folder htdocs and create a subfolder with the name of your experiment (e.g. PGG). Note that this namewill be part of the web address that your participants will visit, so you might want to use a non-descriptive name (e.g.PGG or task). Copy the whole LIONESS experiment from your local machine into that subfolder.
For an easy setup LIONESS needs to be able to write the server credentials to a file. To allow that, find the filecredentials.php in the folder of your experiment. In FileZilla Right-click on this file, and select File permis-sions. . . . A dialog box will open. Make sure that the Read and Write boxes are checked for Public permissions. If notcheck them and save the changes.
You can go to the control panel through the address http://[your server name]/[your experimentname]/controlpanel.php (so, for example http://101.248.10.293/PGG/controlpanel.php).To find your server’s IP address, see Bitnami Launchpad).
Upon first entrance, you will be prompted to enter the server credentials, so that your LIONESS experiment caninteract with the server. By default, LIONESS experiments enter the most common values, but you will have to addthe server password. This, again, can be found in the Bitnami Launchpad.
Your experiment is now ready to run. You can access the controlpanel by going to controlpanel.php or to _beginCon-trol.php
24 Chapter 1. Online experiments: challenges and solutions
LIONESS documentation, Release 0.06
Important: For security reasons, delete ENABLESETUP.php from your server after setting up your server so that noone else can set up (or destroy) the database.
1.5 Run your experiment
Once you have completed testing and setting up your experiment, you can run your LIONESS experiment online.Here we describe the steps to collect data with participants recruited from Amazon Mechanical Turk. Before you runyour experiment online, it is useful to take a look at this paper discussing best practices and methodological details ofconducting interactive experiments online.
Note: LIONESS experiments can of course also be used in the physical decision making laboratory. As dropouts arevery unlikely to occur, please make sure that you set the parameter dropoutHandling to disable exclusion.
1.5.1 Recruit participants
If you have access to an established laboratory participant pool (e.g. through your research institute), you may be ableto recruit your participants for your LIONESS experiment from there. Alternatively, there are several crowd-sourcingplatforms available to recruit participants for online experiments. Here we describe how to recruit participants fromAmazon Mechanical Turk (AMT). Prolific has very similar procedures.
Participants will enter your experiment through a URL link, which you can find in the Control Panel, under ‘link forparticipants’.
Note: You can send parameters from MTurk (or Prolific) to your LIONESS experiment using theURL parameter ‘tic’. For example, the ‘link for participants’ you post on MTurk or Prolific could read[your_ip]/[your_experiment]/_beginParticipant.php?tic={{%PROLIFIC_PID%}}.
Setting up a HIT on Amazon Mechanical Turk
Once you logged into your AMT account, click on the tab Create and then choose New project. Among the optionsdisplayed, you might want to use Survey Link. This type of project will allow you to request a code for the task tobe paid. Hence, participants in your study will complete their task, see a unique code at the end of your LIONESSexperiment and then enter it as a code in this type of survey.
Select Create Project and fill in the required details for the tab Properties as you like (title, description, reward perassignment, etc). Select Design Layout (shown below). In this page edit the content that you want your participants tosee, usually the title and description you already used in the previous tab will be enough.
Once you are done with the edition, press Source and search for the two instances where http://www.linktomysurvey.com appears. Replace these with the link to your LIONESS experiment. You can find thelink in the control panel under address for participants. Press Source again, and finally click on Preview. If you arehappy with the way your task looks, press Finish.
General pointers for writing a HIT description and setting up a can be found in a paper by Arechar et al..
1.5. Run your experiment 25

LIONESS documentation, Release 0.06
Warning: Make sure you have the Control panel of your interactive experiment open. The Control panel regulatesthe synchronisation of participants throughout the experiment and regulates their progress through any loops. Whenrunning your experiment, <b>make sure that only a single LIONESS experiment is active in your browser</b>.Having open multiple experiments simultaneously in the same browser leads to conflicts which may stop synchro-nisation. Also, before you launch your experiment, make sure that the number of allowed players is high enoughwhen you publish your HIT.
1.5.2 Monitor your experiment
During a session you can monitor your experiment using the control panel. This allow you to track the session’progress, and browse through all data associated with the session (parameter settings, participants’ decisions, etc).
1.5.3 End of a session
At the end of a session, you can download all data as an Excel file by clicking the button Export database. This willdownload the database of the experiment in Excel format. The first five tabs correspond to the five tables underlyingyour experiment. The most informative table for the data analysis will often be the decisions table, as it stores theresponses of the participants in the experiment.
1.5.4 Pay your participants
Warning: As of June 2019, Amazon stopped supporting Command Line Tools. The description below is basedon the new (and more user friendly) Command Line Interface.
The participation fees of your experiment can be paid painlessly via the MTurk website. Bonuses (which are oftenperformance-specific) can be assigned manually in the AMT user interface. However, especially when sessions arelarge, it is often handy to pay participants with the help of a script. One useful software for this is Amazon’s CommandLine Interface (CLI). Click here to go to the installation webpage for CLI. When you install, you can stick to all defaultsettings. Here we assume that you use Windows. For other platforms, the procedures are very similar.
Once the CLI has been installed, open your command line shell (in Windows type cmd in the search bar of your Startmenu, in Mac OS and Linux it is called Terminal) and locate CLI on your hard drive (the default is C:/ProgramFiles/Amazon/AWSCLI/bin so your command line needs to point to that location). Connect CLI to your Ama-zon account by typing the command aws configure and hit enter. This opens an interface for entering the credentialsof your MTurk account (the access key and the secret key, which can be found in your AWS account). The region codeneeds to match the one you set when you created your AWS account (the default is us-east-1). Set the output formatto text.
You can check whether the connection to your MTurk account has been successful by typing aws mturkget-account-balance. This should return the current balance in your account.
Once your CLI has been successfully set up, you can pay participants of your session by following these steps:
• On MTurk, download and open Batch results file
• Copy all its contents to the clipboard
• Open the LIONESS results file in Excel and paste the copied cells to cell A1 of the tab ‘batchResults’. TheExcel file will automatically link the LIONESS code and its earnings to the MTurk worker ID of the participant.NB: make sure that when pasting the copied cells, Excel parses the csv into about 30 separate columns (thisparsing is the default for the English version of Excel, but might be different for other language versions, e.g.
26 Chapter 1. Online experiments: challenges and solutions

LIONESS documentation, Release 0.06
German; please also make sure you use periods (‘.’) rather than commas to separate digits). In case you usedmultiple smaller batches on MTurk to recruit your participants, you can paste the data from the csv files rightbelow each other.
• The tab paymentsMTurk then contains the ready-made codes you can use in MTurk Command Line Tools.
• Double-check if the bonus amounts in the column bonus are correct
• Add a description explaining participants why they earned this bonus and copy that into all rows of that column
• The column MTurkPaymentToolsCode will contain a list of codes that can you can paste into CLT (without thecolumn header)
Note: In case you run your experiment in the decision making laboratory, you can refer to the session table tocalculate the payments for each participant. If your laboratory uses a system with numbered cubicles, you mightconsider recording the cubicle number in a screen of your experiment; right in the first screen typically makes sense.Then, at the end of your experiment (e.g. in the final screen) you can calculate the participants’ total earnings andwrite that to the database, for example, by using the JS command setBonus. This procedure will allow you to matchthe LIONESS-internal playerNr to the cubicle number in your laboratory.
1.6 Share with others
LIONESS Lab encourages its users to share their experiments once they are ready. Experiments are shared through therepository. By sharing your experiments, you can contribute to the number of experimental designs that are availablefor others to build on.
Sharing your experiments is important for a number of reasons. A large set of usable and customisable designs fa-cilitates the easy development of experiments, and helps avoiding that experimenters are re-inventing the wheel byprogramming from scratch their own solutions to common issues. Moreover it promotes reproducibility of experimen-tal methods and results.
1.6.1 Repository
The Repository allow you to browse the experiments of other LIONESS Lab users and import them to your ownaccount. You can then view the experiment, test it, copy it to your account and customise it as you wish. By makingyour own experiments public (see below), other users may also import your experiment to their accounts and adjust itto meet their own requirements.
The Repository aims to facilitate easy development of experiments, avoid that experimenters are re-inventing the wheelby programming from scratch their own solutions to common issues, and to promote reproducibility of experimentalmethods and results.
Using the repository
You can access the Repository of LIONESS Lab experiments from the landing page.
1.6. Share with others 27

LIONESS documentation, Release 0.06
You can search for experiments by using the field on the top right.
In case you with to view an experiment, you can simply import it to your account by clicking on the + sign. Thesystem will take you right to your own account, and the newly imported experiment will be ready for viewing. Notethat you cannot make any changes until you have made a copy of the imported experiment in your own account.
28 Chapter 1. Online experiments: challenges and solutions

LIONESS documentation, Release 0.06
Making your experiment available in the repository
When you have made your experiment public in the experiment settings page, your experiment will be visible to othersin the Repository. You can always change the settings for an experiment by adjusting this setting in the experimentsettings.
And then make your choice from the dropdown menu.
1.7 Notes on experimental design
Based on running numerous experiments online, we suggest that LIONESS experiments follow a basic structure withthe components in the order listed below. Each component may be one stage (as is the case in the quick start), butcan of course be expanded to include multiple stages. Here we briefly discuss these components, and as we go alongwe describe some aspects you might want to consider when designing your online experiment. A methodologicaldiscussion of running interactive experiments online can be found in this paper.
The most important methodological issue with running interactive experiments online is the possiblity of dropouts.As mentioned elsewhere, LIONESS experiments have a number of built-in measures to drive down dropouts. A smartdesign for your online experiment can help drive down dropouts even further. As a general rule, experimental designslikely to produce a smooth data collection online are simple, short, and done in small groups.
This section can be seen as a practical guide that helps developing such a smart design. It mostly includes notes on theuse of LIONESS experiments with participants recruited from MTurk.
1.7.1 Instructions
At the beginning of your experimental task, you have to tell the participants what is expected from them. Apart fromexplaining the task they are about to complete, this is a good place to inform them about the duration of the experiment,as well as the earnings they may expect. Being clear about these things helps avoiding disappointment on the part ofparticipants. If expectations are not met, online participants may discuss this on forums like turkopticon. This may
1.7. Notes on experimental design 29
LIONESS documentation, Release 0.06
damage the reputation of your (or your institute’s) account used for administering experiments online. In addition, itis often useful to inform participants that they will only get paid if they complete the task until the end.
1.7.2 Quiz
One big difference between online sessions and sessions in the laboratory is that you, as an experimenter, are notphysically present. This means that participants cannot ask any questions to clarify the instructions. To ensure thatparticipants understand their instructions, it is useful to introduce a set of compulsory comprehension questions, beforethey proceed to the lobby. You can make responses to input elements compulsory by clicking the required switch insidethe element. You can set a target value for an input element in the parameter field correct value.
For each participant, LIONESS experiments will automatically record the number of attempts for each quiz item. Thisis stored in the session table.
1.7.3 Lobby
To reduce waiting times as much as possible, you can place the lobby. after the comprehension questions. This ensuresthat participants in the lobby understand the game and are matched as soon as sufficient participants are ready to startinteracting. By default, the lobby of LIONESS experiments will display the number of participants currently necessaryto form a group.
Note that the risk of participant dropout increases when participants have to wait on others (in this case, for their groupto be formed). It is therefore important that waiting times are minimized. For smooth group formation, participantsshould enter the lobby at a decent rate.
This means that participants should enter your experiment at a decent rate to begin with (this is why Amazon MTurkcan work well as a platform for recruiting participants; the sheer size of the pool of potential participants allows forvery high entrance rates). Entrance rates will typically depend on expected earnings and the expected completiontime, which should be announced beforehand. Setting relatively generous completion fees and possible bonusesmay promote entrance rates. As entrance rates tend taper off after some time, it is often advisable to take down theadvertisement for your experiment and then publish it again. For that you can set the HIT expiration time on MTurkto 30 minutes.
To minimize the variation in completing reading of the instructions and the control questions, it is often worth spendingsome time in making your instructions as clear and concise as your research question allows.
Furthermore, smaller groups can obviously form more rapidly simply because they require fewer people to be formed.Smaller groups also tend to progress faster through an experiment, which also drives down dropouts. It is thereforeadvisable to design your experiment for groups as small as your research question allows you to.
From experiments we conducted on MTurk, we noticed that participants often just leave the task when they have towait long, or when they have no information as to how long they have to wait. This is why the lobby has a timer. Whenthis timer reaches 0, participants can choose to leave the HIT and get their participation fees. Alternatively, they canchoose to return to the lobby and wait two more minutes (after which they again can choose to either leave or wait foranother two minutes).
Experimenters can choose 3 types of matching procedures. Using multiple treatments within one experimental sessionis possible, but will lead to longer waiting times in the lobby (as more participants need to be ready to form a group).A similar logic applies to group size: the smaller the groups, the faster matching will be, and the smaller the chancesare of dropouts.
Note: The lobby automatically shows the number of participants missing to proceed. To deactive this, add a JSelement to the lobby stating: getNumberReadyLobby = 0;
30 Chapter 1. Online experiments: challenges and solutions

LIONESS documentation, Release 0.06
1.7.4 Decision
As soon as participants are matched, the first period begins. Typically, participants progress through the experimentat the speed of the slowest member of a group. As is the case for group formation (see above), here smaller groupswill have lower waiting times, and are therefore less prone to suffer from dropouts. In many cases it will be useful usecountdown timers to make sure that the participants do not have to wait too long. Non-responsive participants can beremoved from the experimental session.
1.7.5 Results
Once all group members have made their decisions in a period, you typically want to show results. You can retrievedecisions from the database with JavaScript and display these in test boxes. If this is the last stage of a period,participants will be directed to a waiting screen and pushed on to the next period once all group members are finishedviewing the results. Also for stages displaying results, it is often useful to add countdown timers to keep up the paceof a session.
1.7.6 Questionnaire
Once the periods of interaction are over, you may want to record some information about the participants. Commonitems include age, gender and questions on social and economic status. It can also be useful to ask participants abouttheir prior experience with tasks similar to yours; especially on MTurk, non-naïveté to common paradigms may impactyour results (see, for example Peer et al. 2017 and Chander et all 2014).
1.7.7 Final earnings
Once participants have finalized the experiment, you can show them their final earnings. In a typical experiment, youcan store a participant’s earnings for each period in a variable in the decisions table. For example, you may store themin a variable called payoffThisPeriod. In the final earnings screen, you can then sum the participant’s earnings with thefollowing code:
totalEarnings = 0;for (var i=1; i <= numberPeriods; i+){
totalEarnings += getValue('decisions', 'playerNr=' + playerNr + ' and period=' + i,→˓ 'payoffThisPeriod');}setBonus(totalEarnings);
Note that JavaScript is evaluated in the participants’ browsers. This means that you have to make sure that payoffsare calculated in a way that is refresh-safe (that is, if participants refresh their page, payoffs should not change). It istherefore advisable to calculate payoffs anew from a final earnings page (i.e. sum up over all rounds starting from 0).With the function setBonus(), the bonus earnings of the participant is written to the session table. It is then usedfor automatic payment later.
For linking participants’ earnings to their IDs in crowdsourcing platforms (where participants are typically recruitedfrom), the final stage of your experiment should display random ID. LIONESS experiments have a unique code forevery participant available, which can be displayed as $randomid$. You can prompt the participants to fill out thiscode on the crowdsourcing website to arrange their payment.
1.7. Notes on experimental design 31

LIONESS documentation, Release 0.06
1.8 Reference manual
This reference manual covers details of LIONESS Lab. It details the experimental flow, the definition of experimentalscreens, their elements and the functioning of JavaScript elements. If you encounter any issues or notice that someinformation is missing, please do not hesitate to get in touch via [email protected].
1.8.1 Experimental Flow
In LIONESS Lab you can create LIONESS experiments. These experiments include a set of standard features enablingonline interactive experiments. Here we describe these features. This section provides an overview of the structureand functioning of LIONESS experiments. Implementation issues are discussed in the develop section.
The following figure shows the flow of a typical LIONESS experiment.
1. Participants enter the experiment via a web link from an external website (e.g. Amazon MTurk), and are reg-istered on the server (that is, they receive a ‘player number’, a unique number to identify them during theexperiment).
2. They complete the experiment by navigating the pages. (Click here for a typical experimental design, includingtips and tricks.)
3. At the end they return to the external site to collect their earnings (euro sign).
The blue arrows show the typical experimental flow. The red arrows show exceptions to the typical flow (most notably,dropouts) and the mechanisms in place that deal with those exceptions. The blue line around the experimental stages
32 Chapter 1. Online experiments: challenges and solutions

LIONESS documentation, Release 0.06
mark the boundaries of a LIONESS experiment.
When participants enter the experiment, they are registered and get a unique player number. Then they go to thefirst stage of the experiment (typically instructions). This is a standard stage that provides information to participants.After that, an optional quiz may follow in which participants have to answer control questions to ensure understanding.After passing the quiz, participants wait in the lobby to be matched to a group. The lobby is a key stage of an interactiveexperiment. It is not needed for solo tasks. Once they are matched in a group, participants make their decisions andreceive feedback (possibly over several rounds). Once they completed the interactions rounds, they are informed abouttheir payoffs. From there they are directed back to the external site (e.g. MTurk) to collect their payment.
While participants complete the experiment, various exceptions might happen. Below we list how LIONESS experi-ments handle these issues.
Note: Upon dropout participants receive different standard messages, which can be customized in the parameters.For all list of all messages see also here. All messages refer to the terminology HIT which is a task on Amazon MTurk.
Warning: LIONESS experiments do their best to prevent double participation by IP address check and cookiesin the browser. These measures can still be circumvented with some effort.
Note: You can send parameters from MTurk (or Prolific) to your LIONESS experiment using theURL parameter ‘tic’. For example, the ‘link for participants’ you post on MTurk or Prolific could read[your_ip]/[your_experiment]/_beginParticipant.php?ext={{%PROLIFIC_PID%}}.
a) Internet Explorer
LIONESS experiments (like many other modern web applications) do not support Internet Explorer (IE). Experi-menters can announce this upon recruitment (e.g. in their MTurk HIT). In case an IE user attempts to enter theexperiment, they are directed to a page explaining that they cannot participate. By default, this message reads:
message As indicated in our HIT text on MTurk, our HIT does not support Microsoft Internet Explorer.Please return this HIT. We apologise for any inconvenience caused.
Participants can return using a different browser.
b) Task not active
Experimenters can set the experiment inactive or active in the control panel. If the task is inactive, new participantscannot enter and receive the following default message:
message This HIT is currently offline. You cannot participate at this time.
When an experiment is switched to inactive in the middle of a session (for example, when an experimenter realizesthat something is wrong), participants who are already in the experiment can continue and complete the experiment.
c) Double login
LIONESS experiments record the IP addresses of participant in an anonymized way to protect personal data. With theanyonimized IP addresses it can be checked if two participants log in from the same IP address. The actual IP addresscannot be retrieved.
If a login attempt is made from the same IP address, the participant is blocked and receives the following message:
1.8. Reference manual 33
LIONESS documentation, Release 0.06
message According to our records, your device has already been connected to the server during thissession. Participants are only allowed to enter a session once. Thank you for your understanding.
This IP address check is deactivated when the test mode is on.
Note: If you think that your participants may use the same IP address (which may be common in a laboratory setup)you may switch to test mode. Otherwise participants cannot enter the experiment.
d) Session full
In the experiment parameters, you can set the total number of players allowed into your session. When this numberhas been reached, further participants cannot enter anymore. They receive the message:
message We have sufficient participants for this HIT. Unfortunately, you cannot participate at this time.Thank you for your understanding.
This functionality is deactivated when the test mode is on.
Note: When a participant tries to enter an experiment, the current number of participants is compared to the totalnumber of players allowed. The current participants also include those who started the experiment but dropped out(see f), g), i), j) and k)). It is therefore often useful to set the total players higher than the number of participants youactually need.
e) Not registered
Participants can only enter a LIONESS experiment through the registration page. Navigating to a stage somewhere inthe middle of an experiment without being registered leads to a page reading:
message You are currently not logged in. You cannot participate in the HIT.
f) Time out
In each stage, you can define a maximum time participants have to complete the stage. This is useful to keep up thepace of the experiment (avoiding long waiting times, which risk dropouts). If a participant does not respond in time,they can be directed towards a different stage in the experiment, or to the standard time out page which shows thefollowing message:
message You did not make a decision before the time was up. You have been removed from the HIT. Youcan close down this window.
g) Kicked out by experimenter
In the control panel (top-right menu), experimenters can remove participants by entering their player number and clickterminate player. They receive the following message and get their show-up fee:
message Unfortunately, this HIT was terminated for a technical reason! You cannot continue. You willreceive your guaranteed participation fee of $ $participationFee$. To collect your earnings, pleasefill out this random code on MTurk: $randomid$ Once you have filled out this code, you can closethis window. Thank you for your participation.
34 Chapter 1. Online experiments: challenges and solutions

LIONESS documentation, Release 0.06
Note: the values between $ signs are filled by the values set in the parameter table. Terminating participants should,of course, be done with care. This feature is intended for cases in which technical problems occur.
h) No re-entering possible
If participants try to re-enter after being removed from the experiment, they are informed that they cannot participatein the experiment anymore.
message You are currently not logged in. You cannot participate in the HIT.
Note: This information that a participant has been kicked out is based on the IP address (if the test mode is switchedoff) and a cookie in the browser. If the participant uses a different browser from a different IP address he or she canstill enter as a new participant.
i) Too many quiz errors
In the quiz stage, the experimenter can specify a maximum number of quiz failures. It the participant fails more thanthat, he is excluded from the experiment and receives the following message:
message You did not answer the quiz correctly and were excluded from further participation.
j) No group match
In the lobby, participants wait until they are matched. You can set the maximum waiting time. If there is no otherparticipant within that time, the participant is directed to a page where they can choose to wait an additional twominutes or to leave the experiment. In the latter case the participant is directed to a page (set by the experimenter)where they would typically be informed that they receive the guaranteed participation fee.
k) Group aborted
The experimenter can choose how their LIONESS experiment handle dropouts. In particular, it is important to definewhat happens to the other participants if one drops out. The default option in LIONESS experiment is continue withreduced group, so that the other group members can finish the experiment, avoiding participant disappointment andpotential reputation damage on the part of the experimenter. The settings for dropout handling can be found in thehandle dropouts.
If terminate group is selected as the dropout handling option, all players of the group are removed from the experimentand receive the following message:
message Unfortunately, one of the players in your group dropped out of the HIT! You cannot continue.You will receive your guaranteed participation fee of $ $participationFee$. To collect your earnings,please fill out this random code on MTurk: $randomid$ Once you have filled out this code, you canclose this window. Thank you for your participation.
1.8.2 Stage type
There are three different types of stages, the names of which are largely self-explanatory.
1.8. Reference manual 35

LIONESS documentation, Release 0.06
Standard
Standard stages are the most commonly used types. In this stage types, all Elements are available to use. This stagetype is typically used for instructions, screens that require responses, and feedback screens.
Quiz
Quiz stages have the same functionality available as Standard stages, but there is one feature on top of that. For Quizstages, LIONESS documents the number of attempts a participant needs to proceed. Typically, input Elements in quizstages will have the field correct value defined. The variable quizFail in the session table tracks the total number ofattempts a participant has made. For each player, it both stores the total and by-item number of mistakes.
For a quiz stage you can set the maximum number of attempts that participants have, using the ‘Attempts’ field. Ifthis field is defined, participants will see how many attempts they have left. If a participant fails to solve all questionscorrectly within the specified number of attempts, they are sent to a page (defined in the parameters table; see ‘toomany quiz errors’) telling them that they cannot participate.
Lobby
In lobby stages, participants are matched in groups. The matching procedure is defined globally in the parameter table.In case no elements are defined in a lobby stage, a default text will be shown, along with an auto-updated messageindicating how many other participants are currently needed to form a group. This message gives the participants anidea how long they will have to wait before their interactive task starts (see example below).
Note: LIONESS experiments currently only support one lobby.
Matching procedures
Once sufficiently many participants are in the lobby a group can be formed. Experimenters can choose 3 types ofmatching:
First come, first serve This is the default option. As soon as the number of participants in the lobbyequals groupSize they are matched and can start interacting. This setting aims to minimize waitingtime.
Before the lobby, experimenters can assign different roles to players (using the variable role in the core table). Theother two available types of matching make use of this variable role to form groups.
match groups with unique roles In some cases you might want to allocate roles before you assign par-ticipants to groups. Before participants enter the lobby, they can be assigned a role (by setting theirvariable role in the core table. Roles need to start with 1, and run up to value value of the groupSize.
36 Chapter 1. Online experiments: challenges and solutions
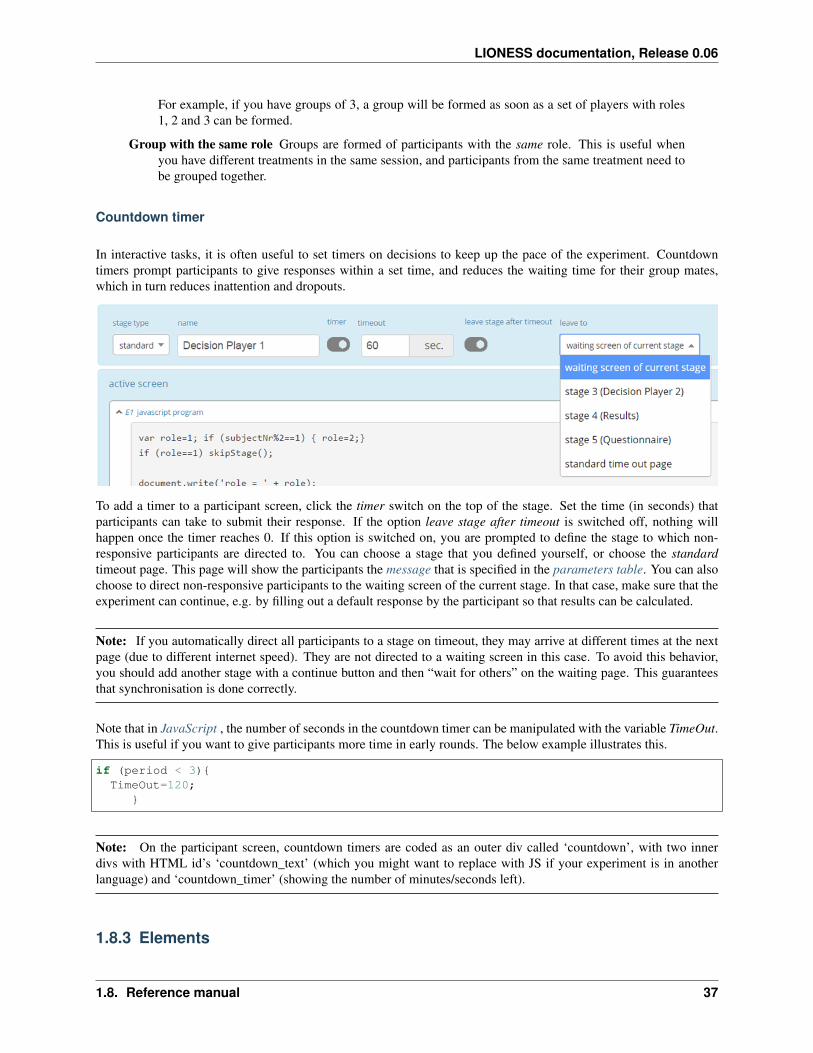
LIONESS documentation, Release 0.06
For example, if you have groups of 3, a group will be formed as soon as a set of players with roles1, 2 and 3 can be formed.
Group with the same role Groups are formed of participants with the same role. This is useful whenyou have different treatments in the same session, and participants from the same treatment need tobe grouped together.
Countdown timer
In interactive tasks, it is often useful to set timers on decisions to keep up the pace of the experiment. Countdowntimers prompt participants to give responses within a set time, and reduces the waiting time for their group mates,which in turn reduces inattention and dropouts.
To add a timer to a participant screen, click the timer switch on the top of the stage. Set the time (in seconds) thatparticipants can take to submit their response. If the option leave stage after timeout is switched off, nothing willhappen once the timer reaches 0. If this option is switched on, you are prompted to define the stage to which non-responsive participants are directed to. You can choose a stage that you defined yourself, or choose the standardtimeout page. This page will show the participants the message that is specified in the parameters table. You can alsochoose to direct non-responsive participants to the waiting screen of the current stage. In that case, make sure that theexperiment can continue, e.g. by filling out a default response by the participant so that results can be calculated.
Note: If you automatically direct all participants to a stage on timeout, they may arrive at different times at the nextpage (due to different internet speed). They are not directed to a waiting screen in this case. To avoid this behavior,you should add another stage with a continue button and then “wait for others” on the waiting page. This guaranteesthat synchronisation is done correctly.
Note that in JavaScript , the number of seconds in the countdown timer can be manipulated with the variable TimeOut.This is useful if you want to give participants more time in early rounds. The below example illustrates this.
if (period < 3){TimeOut=120;
}
Note: On the participant screen, countdown timers are coded as an outer div called ‘countdown’, with two innerdivs with HTML id’s ‘countdown_text’ (which you might want to replace with JS if your experiment is in anotherlanguage) and ‘countdown_timer’ (showing the number of minutes/seconds left).
1.8.3 Elements
1.8. Reference manual 37

LIONESS documentation, Release 0.06
Note: Input elements will be automatically recorded in the decisions table. Make sure that each input element hasa unique ‘variable name’. Please avoid using variable names that may interfere with PHP, such as ‘order’, ‘sort’,‘where’, ‘connect’, and ‘create’. This will lead to errors on the participant’s page.
Adding an element
You can add a new element to a stage by clicking on the drop-down menu add new element.
Once you have clicked on the element type of your choice, you paste it by clicking on the ‘paste’ button.
Generic properties of elements
Move element
move up
move down
38 Chapter 1. Online experiments: challenges and solutions

LIONESS documentation, Release 0.06
display condition
For each display element, you can use the JS variables defined above it (as well as global variables) to specify displayconditions. These conditions are evaluated in JavaScript directly. This means that setting display conditions forelements, you do not need the dollar signs to refer to variables.
JavaScript elements do not have display conditions. Display items generated by JS (written to the participant screenwith, e.g., document.write() ) will be placed at the position of the JS element.
For example, if you want to display a text box in period 1 only, you can define its display condition as follows:
Copy element
Cut element
Delete element
Element types
1.8. Reference manual 39

LIONESS documentation, Release 0.06
Text box
Here is an example of how textbox element looks like:
This text box element will show the following text to the participants.
In the textbox element, you can insert text, such as the description of your experiment. When you double click thearea inside the text box, a user friendly WYSIWYG editor will appear.
In this interface you can adjust text fonts and colour, but you can also use standard HTML. You can toggle betweenWYSIWYG and HTML view by double clicking in the editor. By clicking the < > sign you can toggle back and editthe HTML directly.
Note: A text box allows for basically all standard HTML content. If you want to show images, you can load thesein the standard HTML way, using the <img> tag, referring to the location (e.g. the url) of its source file. If thislocation is not secure (http), you might need to allow insecure content on the lioness.uni-passau.de site (which ishttps). Otherwise, your browser might block the images from being shown in the developer environment.
40 Chapter 1. Online experiments: challenges and solutions

LIONESS documentation, Release 0.06
Button
The Button element mainly functions as a trigger to move on to the next desired stage. There are six sub elements inthe Button element. They are like the following:
Button label You can define the name of the button which will appear to the participant, in this casecontinue.
Proceed In the proceed element, you can define whether pressing the button automatically leads to thenext desired page or wait until all other participants press the button so that all participants cancontinue simultaneously. For the former case you can select if possible, and for the latter case youcan select Wait for others.
Note: All buttons on one stage should all have the same setting: all Wait for others. or all if possible. If you mix thetwo options, some players A wait for players B of their group which already have proceded (due to players B havingif possible). Players A will then never be pushed forward.
Appears after If you would like to set a restriction that participants can proceed only after some amountof time, then you can define after how many seconds will the participants be able to proceed to thenext stage. If you wish not to use this function, then you can just leave it as it is.
Button countdown If this is activated, then a countdown is shown until the button appears.
Next stage In this menu, you can define onto which stage the experiment proceed. Default is it willproceed to the next stage so you can just leave it as it is if this is the case, but you can also define itto jump to another page. Jumping to another page is useful when you want to skip certain pages inthe middle.
Checker If you want to execute JavaScript code when a participant clicks a button, you can use thechecker element. One useful application of this option is checking whether two values in two sepa-rate input fields add up to a certain value, for example:
if (value1+value2 != 10) {showError('The total number should be 10!');return false;}
Note: Buttons have an outer div with the id “buttonXX” where XX is the ID of the element. They have an inner divwith the id “buttonclickXX”, which binds the onclick event. The innerdiv is also member of the class “lionessbutton”.
JavaScript program
JavaScript programs allow you to interact with the server and do calculations. A set of pre~defined functions isavailable to get variables from the database and to write data to the database tables. When you start defining yourJavaScript element, LIONESS Lab will open an editor.
1.8. Reference manual 41

LIONESS documentation, Release 0.06
By default, JavaScript programs will be executed in the participants’ browsers when the page loads. One exception tothis is the checker functionality in button elements, which is executed once the button is clicked.
Note that JavaScript elements allow for great flexibility. For example, with a bit of programming experience youcan add design your own display items (e.g. in an SVG canvas), add interactive elements to your page revealinginformation upon mouse~click, or animate items in your screen. We have a few examples available.
Also note that JavaScript is a language widely used by web programmers. The large user base ensures that you will beable to solve the vast majority of your programming issues with a simple Google search.
JavaScript programs are limited to 500 lines.
Numeric input
An example of using numeric input element in an experiment is like the following.
This content will show the following screen to participants.
In this element, you can collect participant’s responses in numbers.
42 Chapter 1. Online experiments: challenges and solutions
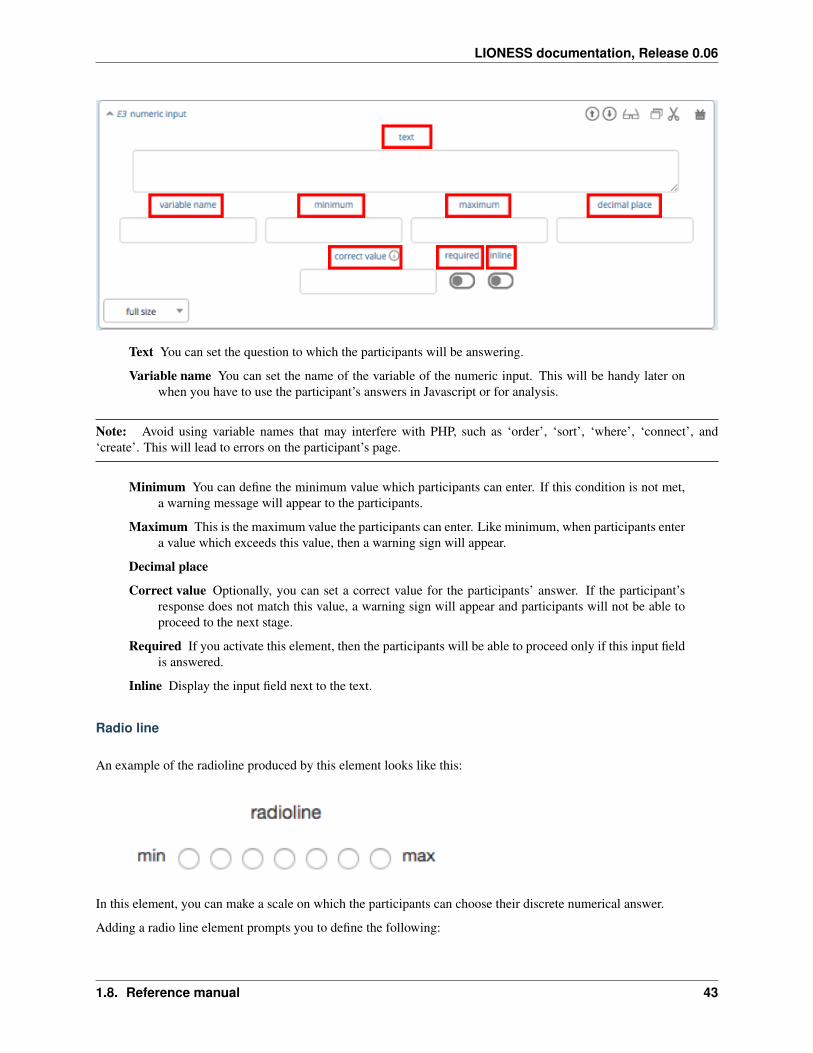
LIONESS documentation, Release 0.06
Text You can set the question to which the participants will be answering.
Variable name You can set the name of the variable of the numeric input. This will be handy later onwhen you have to use the participant’s answers in Javascript or for analysis.
Note: Avoid using variable names that may interfere with PHP, such as ‘order’, ‘sort’, ‘where’, ‘connect’, and‘create’. This will lead to errors on the participant’s page.
Minimum You can define the minimum value which participants can enter. If this condition is not met,a warning message will appear to the participants.
Maximum This is the maximum value the participants can enter. Like minimum, when participants entera value which exceeds this value, then a warning sign will appear.
Decimal place
Correct value Optionally, you can set a correct value for the participants’ answer. If the participant’sresponse does not match this value, a warning sign will appear and participants will not be able toproceed to the next stage.
Required If you activate this element, then the participants will be able to proceed only if this input fieldis answered.
Inline Display the input field next to the text.
Radio line
An example of the radioline produced by this element looks like this:
In this element, you can make a scale on which the participants can choose their discrete numerical answer.
Adding a radio line element prompts you to define the following:
1.8. Reference manual 43

LIONESS documentation, Release 0.06
Text above Define the question to which the participants will answer. It will be located where radiolineis in the example.
Variable name You can set the name of the variable of the numeric input. This will be handy later onwhen you have to use the participant’s answers in Javascript or for analysis.
Minimum The minimum value is the value of the leftmost option of the radioline. However, the absolutevalue of the minimum option does not appear to the participants. Subtracting maximum value byminimum value determines how many dots (options) there are between minimum and maximumvalue.
Maximum The maximum value is the value of the rightmost option of the radioline. However, theabsolute value of the maximum option does not appear to the participants. Subtracting maximumvalue by minimum value determines how many dots (options) there are between minimum andmaximum value.
Label left You can assign a name for the lowest value on the radio line. For example, if you were toindicate in a scale of 1 to 7 about liking, then usually the value on the left is most negative.
Label right You can assign a name for the highest value on the radio line. For example, if you were toindicate in a scale of 1 to 7 about liking, then usually the value on the right is most positive.
Required If you activate this element, then the participants will be able to proceed only if this input fieldis answered.
Correct value Optionally, you can set a correct value for the participants* answer. If the participant’sresponse does not match this value, a warning sign will appear and participants will not be able toproceed to the next stage.
Slider
This is an example of how a slider element looks like to the participants.
In this element, you can make a slider on which participants can indicate their discrete numerical answer by slidingthe button onto a certain location in the slider. It is basically same as radio line.
44 Chapter 1. Online experiments: challenges and solutions

LIONESS documentation, Release 0.06
Variable name You can set the name of the variable of the numeric input. This will be handy later onwhen you have to use the participant’s answers in Javascript or for analysis.
Minimum The minimum value is the value of the leftmost option of the slider. However, the absolutevalue of the minimum option does not appear to the participants. Subtracting maximum value byminimum value determines how many dots (options) there are between minimum and maximumvalue.
Maximum The maximum value is the value of the rightmost option of the slider. However, the absolutevalue of the maximum option does not appear to the participants. Subtracting maximum value byminimum value determines how many dots (options) there are between minimum and maximumvalue.
Stepsize This indicates the unit which the button can be incremented or decremented along the slider.For example, if the stepsize is big, then the distance among possible locations of the button will bealso larger.
Default The starting position of the slider. This is the value that the slider takes when it is not moved bythe participant.
Label left You can assign a name for the lowest value on the slider. For example, if you were to indicatein a scale of 1 to 7 about liking, then usually the value on the left is most negative.
Label right You can assign a name for the highest value on the slider. For example, if you were toindicate in a scale of 1 to 7 about liking, then usually the value on the right is most positive.
Correct value Optionally, you can set a correct value for the participants’ answer. If the participant’sresponse does not match this value, a warning sign will appear and participants will not be able toproceed to the next stage.
Discrete choice
This is an example of a discrete choice element shown to the participants.
1.8. Reference manual 45

LIONESS documentation, Release 0.06
Discrete choice element is basically just like a multiple~choice question. Participants can choose their answers amongthe given options.
Text above You can set the question to which the participants will be answering.
Variable name You can set the name of the variable of the discrete choice the participants will make.
Required If you activate this element, then the participants will be able to proceed only if this input fieldis answered.
Inline Display the input field next to the text.
Order of options There are two ways of presenting options - one is as stated and one is random. In theformer case, the order of options will appear exactly how the experimenter arranged the order, andfor the latter the order of options will be random for each subject.
Display of options There are three ways to display options - vertical boxes, horizontal boxes, and drop-down list.
Correct value Optionally, you can set a correct value for the participants’ answer. If the participant’sresponse does not match this value, a warning sign will appear and participants will not be able toproceed to the next stage.
Default
Num options Here, you can define among how many discrete choices the participants can make theirchoice.
Options You can write the name of the options which will be appeared to the participants. Also, pre-senting images instead of text is possible by providing a link: <img src = link of theimage>. Beware that the image should be uploaded on another open access website. The ‘value’
46 Chapter 1. Online experiments: challenges and solutions
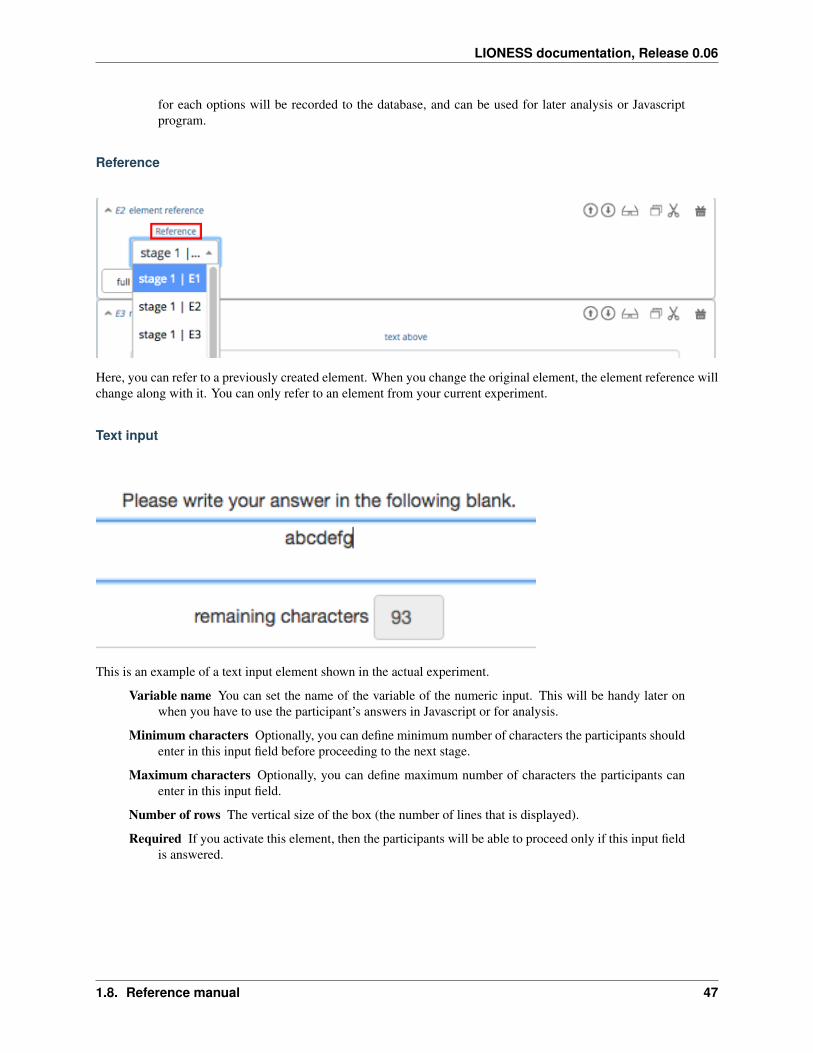
LIONESS documentation, Release 0.06
for each options will be recorded to the database, and can be used for later analysis or Javascriptprogram.
Reference
Here, you can refer to a previously created element. When you change the original element, the element reference willchange along with it. You can only refer to an element from your current experiment.
Text input
This is an example of a text input element shown in the actual experiment.
Variable name You can set the name of the variable of the numeric input. This will be handy later onwhen you have to use the participant’s answers in Javascript or for analysis.
Minimum characters Optionally, you can define minimum number of characters the participants shouldenter in this input field before proceeding to the next stage.
Maximum characters Optionally, you can define maximum number of characters the participants canenter in this input field.
Number of rows The vertical size of the box (the number of lines that is displayed).
Required If you activate this element, then the participants will be able to proceed only if this input fieldis answered.
1.8. Reference manual 47

LIONESS documentation, Release 0.06
Back button
Button label You can define the name of the button which will appear to the participant, in this caseback.
Back to In this menu, you can define onto which stage the experiment will go back. The default settingis it will go back to the stage right before so you can just leave it as it is if this is the case. You canalso define it to jump to another page.
Note: Buttons have an outer div with the id “buttonXX” where XX is the ID of the element. They have an inner divwith the id “buttonclickXX”, which binds the onclick event. The innerdiv is also member of the class “lionessbutton”.
1.8.4 JavaScript
LIONESS experiments use JavaScript to do calculations and to interact with the database JavaScript (JS) is a widelyused language for web programming. JS is executed in the browser of the participants (so, not on the server).
JavaScript code can be added to any stage of your LIONESS experiment through a JavaScript element.
Warning: If you use comments in your code, you should always use /* comment */ instead of // comment. Somebrowsers (Safari) may misinterpreted commenting out single lines with //.
Access JS variables
Values of JS variables can be accessed in other elements (e.g. a text box) by adding dollar signs on both sides of thevariable name (e.g. $contribution$).
Default variables
When a participant’s page loads, all variables defined in the globals table are loaded. This is also true for the followingdefault variables from the core table. This means that these variables are defined (i.e. have a value) in every screenand their values are accessible in JS.
48 Chapter 1. Online experiments: challenges and solutions

LIONESS documentation, Release 0.06
Variable name DetailsplayerNr Number of the focal player within the sessiongroupNr Group number of the focal playersubjectNr Number of the focal player within groupperiod Period number of the focal player within sessiontStart System time in seconds upon page loadcurrentGroupSize Total number of players in the current grouprole The role of the current player, used for matchingbot Is the current player a botrandomid The randomid to handle payment
Note: It is advisable to not change the variables loaded from the globals table.
Note: The difference between playerNr and subjectNr is that subjectNr are unique within a group and only assignedwhen the group is formed in the lobby. E.g. if the playerNr 3, 5, 7 and grouped together in the lobby, the get thesubjectNr 1, 2, 3. SubjectNr are always sorted according to the playerNr.
Interacting with the database
LIONESS experiment reply on a combination of JavaScript (code that is executed in the participants’ browsers), andPHP (to generate the web pages on the experimental server) and MySQL (for managing the database).
Variables specified in input elements’ (numeric input, choice buttons, etc) will be automatically stored in the tabledecisions. These variables have to have unique names. Using duplicate names can lead to unexpected behaviour ofthe experiment.
JavaScript elements allow you to read from and write to the database, using the below functions. Note that eachfunction has a simple and a full version. The simple versions always assume that the function pertains to the currentplayer, the current group, and the current period (and uses the decisions table). In the below examples, the simple andfull versions are equivalent.
Warning: Italic function parameters are optional.
Writing to the database
You can directly write to the decisions table of the experiment’s database, using the following functions.
Note: You can use the functions to write to the tables decisions, session and core. If you want to write to the globalstable, please use setGlobal(varriable name, value).
Function setValue()
Arguments table name, condition, variable name, value
Simple example setValue(‘payoffThisPeriod’, payoff);
Full example setValue(‘decisions’, ‘playerNr=’+playerNr+’ and period=’+period, ‘pay-offThisPeriod’, payoff);
1.8. Reference manual 49

LIONESS documentation, Release 0.06
Function record()
Arguments variable name, value
Simple example record(‘PGGshare’, publicGoodShare);
Function setBonus()
Arguments amount
Simple example setBonus(payoff);
Function setRole()
Arguments role
Simple example setRole(role);
Function setValueAtTimeout()
Arguments table name, condition, variable name, value
Simple example setValue(‘payoffThisPeriod’, payoff);
Full example setValue(‘decisions’, ‘playerNr=’+playerNr+’ and period=’+period, ‘pay-offThisPeriod’, payoff);
The function record() will create a variable in the decisions table with the name of the first argument and the value ofthe second argument. In the example above, the decisions table would have one column with the name ‘PGGshare’,the value of which would equal the value of the JavaScript variable ‘publicGoodShare’. By contrast, the functionsetValue() will update the value of an existing variable in the database, which may be created with a standard inputelement, or with the record() function.
Warning: Make sure that the variables you write to the database have unique names. SQL is not case sensitive,that is variable and Variable are considered non unique! In addition, for database management reasons, it iscurrently not possible to create new variables in the database using for loops or while loops. In addition, avoid usingthe record() function inside if (or else) statements. Create the variable before the if statement and use setValue()inside the if statement.
The function setBonus() will write the value in its argument to the variable bonusAmount in the ‘sessions’ table. It willalso update the variable totalEarnings in that table to the sum of bonusAmount and participationFee.
Warning: The value argument cannot contain any operators, such as the + or the - sign.
The function setRole() will write the value in its argument to the variable role in the core table. The variable role isused for the matching procedure
The function setValueAtTimeout()‘works the same as ‘setValue() but can be called to store values when the page is leftat timeout (when the timer is running out).
Reading from the database
Note: You can use the functions to read from the tables decisions, session and core. If you want to read from theglobals table, please use getGlobal(varriable name)
Function getValue()
50 Chapter 1. Online experiments: challenges and solutions

LIONESS documentation, Release 0.06
Arguments table name, condition, variable name
Return value one element
Simple example getValue(‘someVariable’);
Full example getValue(‘decisions’, ‘playerNr=’+playerNr+’ and period=’+period,‘someVariable’);
This function retrieves a single value from the database. NB: the ‘simple’ example will return the value from thecurrent player in the current period.
Function getValues()
Arguments table name, condition, variable name, sort by
Return value array
Simple example getValues(‘someVariable’);
Full example getValues(‘decisions’, ‘groupNr=’+groupNr+’ and period=’+period,‘someVariable’,’playerNr’);
This function retrives the values from different players and gives back an array which is sorted by playerNr. It startswith index 0.
There are special functions for retrieving the values from others in the group, in the current period.
Function getValuesOthers()
Arguments variable name
Return value array starting from 0 ordered by subjectNr
Simple example getValuesOthers(‘someVariable’);
Note: To access individual values in the array returned by this function, you need to use indicators for its elements(e.g., someVariable[0]).
In addition, there are functions for retrieving the values from the PREVIOUS period.
Function getOldValue()
This function is similar to getValue() but retrieves the value from the previous period.
Function getOldValues()
This function is similar to getValues() but retrieves values from the previous period.
Note: These functions write to and read from the database on the server in an asynchronous way (that is, the functionsare executed one by one). Having many instances of getValue() on a single stage may lead to heavy load on the server.Please make sure to use these functions sparingly, and avoid using them in for-loops. Oftentimes, multiple getValue()requests can be replaced by a single getValues() request. This will improve speed. Perhaps more importantly, to use aserver with sufficiently high computational power when collecting your data.
1.8. Reference manual 51
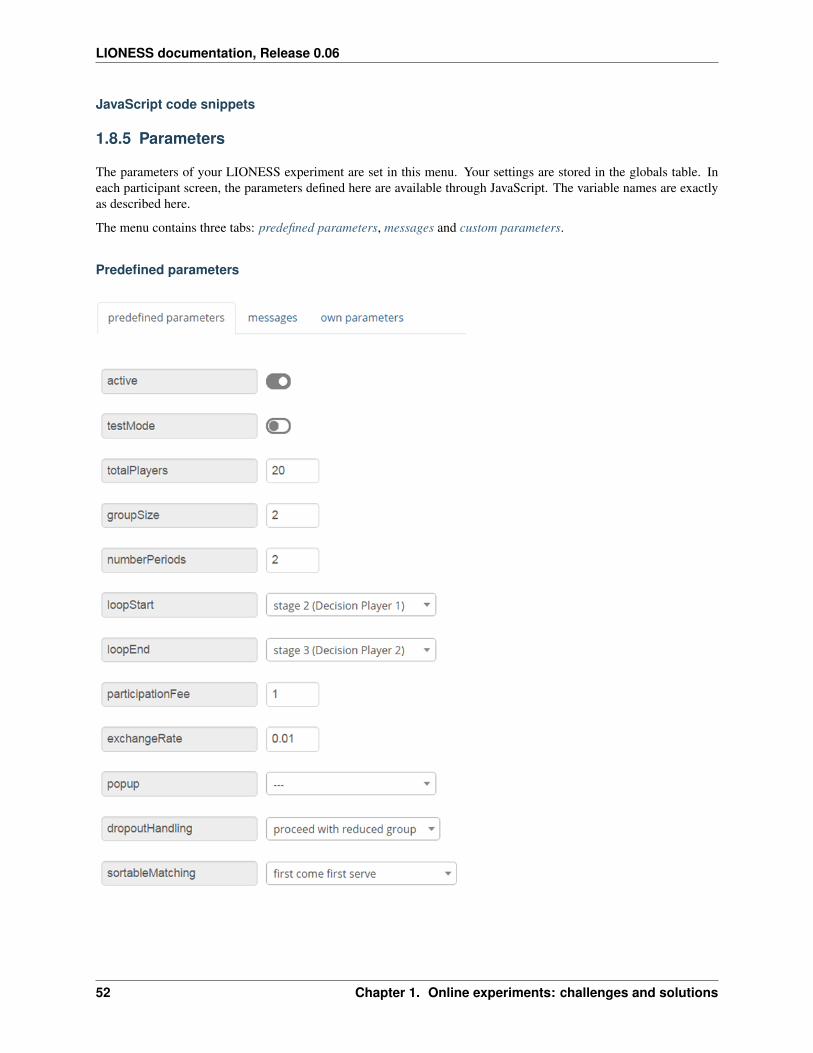
LIONESS documentation, Release 0.06
JavaScript code snippets
1.8.5 Parameters
The parameters of your LIONESS experiment are set in this menu. Your settings are stored in the globals table. Ineach participant screen, the parameters defined here are available through JavaScript. The variable names are exactlyas described here.
The menu contains three tabs: predefined parameters, messages and custom parameters.
Predefined parameters
52 Chapter 1. Online experiments: challenges and solutions

LIONESS documentation, Release 0.06
active
This parameter regulates whether the experiment is active, and is set in the control panel. When the experiment isactive, the value of this parameter is 1, otherwise it is 0. Participants can only enter active experiments.
testMode
This parameter regulates the test mode, and is set in the control panel. In the test mode, multiple participants can beoperated from the same browser, using different tabs. This is useful when developing your LIONESS experiment.TestMode can be set in the Control panel and should not been changed here.
totalPlayers
This parameter sets a cap on the total number of participants allowed to enter an experimental setting. In test mode thecap is removed. When a participant tries to enter a session after this number has been reached, they will be redirectedto a screen displaying a message1 indicating that the current session is full.
groupSize
This parameter defines the size of the groups. Once the number of participants waiting in the lobby equals this number,the controller algorithm will match them into a group and pushes them to the next stage. Typically, this next stage willbe thefirst stage of a period (see loopStart).
numberPeriods
This parameter defines the total number of periods in the experiment. Periods start with the stage defined in loopStartand end with loopEnd).
loopStart
The parameter defines which stage is the first stage of a period. When a group reaches the stage define in loopEnd, allparticipants in that group will be directed here, if the period number has not reached the value set in numberPeriods.
loopEnd
This parameter defines which stage is the last stage of a period. When a group reaches this stage, the period numberof this group will be increased with 1, and all members will be redirected to the stage defined in loopStart. When theperiod number has reached numberPeriods, the group will proceed to the stage defined right next to this stage. Notethat in the last stage of a period, participants will typically have to wait for all of their group mates to finish the period,that is, they have to wait for all before they can proceed.
participationFee
This parameter sets the guaranteed participation fee, which participants will receive independently of their perfor-mance in the experiment.
1.8. Reference manual 53
LIONESS documentation, Release 0.06
exchangeRate
The exchange rate can be used to convert experimental points into real money.
dropoutHandling
This parameter defines how dropouts should be handled. There is not much a software can do for participants who losetheir connection to the experimental server (e.g. due to unstable internet), or close down their browser in the middleof an experimental session. Participants who dropped out by failing to respond within the set time will be directed toa screen displaying a message indicating that their task is over.
LIONESS experiments automatically notice dropouts like these, and will de-register disconnected participants fromthe experiment. Technically, upon dropout, the controller algorithm (activated with the script behind the heartbeat inthe Control panel) reduces the variable ‘currentGroupSize’ with 1, for all the participants in the group of the participantwho dropped out. From the parameter menu, you can choose from three options defining how to deal with the othergroup members.
terminate group If one participant drops out, the other participants in their group will be led to a screendisplaying a message indicating that one of the group mates has dropped out and that the sessionis over. When you choose this option, consider taking measures to compensate these group matesas they might expect to earn some more in the periods they will not be able to complete due to thisdropout.
proceed with reduced group This is the default setting. Once a participant drops out, the other groupmembers continue with a group reduced in size. The variable currentGroupSize in the core tablewill be reduced with 1. When you choose this option, consider adding a warning message to theother participants. For this you can use a JS element that displays a message under the condition thatcurrentGroupSize < groupSize. Finally, please keep in mind that in many cases, the data generatedby groups reduced in size requires special treatment in analyses.
disable exclusion This option is best used for individual (non-interactive) tasks, or when you deployLIONESS in the laboratory (that is, not with participants recruited online), where dropouts are atyp-ical. When a participant loses connection to the server (e.g. due to network problems), you can tryto solve this without the participant dropping out. The other members of the group typically waitand continue once the problem is solved.
Note that currently, LIONESS Lab does not have any standard measures in place to have dropouts replaced by otherplayers, or by bots. In case you are considering an experimental design with features like these, you can program thismanually using JavaScript elements in the appropriate (decision) screens. Note that, however, the data stemming fromgroups that include computer-generated responses may be compromised, and may require careful consideration in anyanalyses. We are aware of at least some experimenters having used techniques like this in LIONESS Lab. Do nothesitate to get in touch if you require further information on this.
sortableMatching
This defines how the participants in the lobby are matched in groups. There are three options to choose from.
reEnter
This parameter is default set to 0, which means that participants cannot re-enter once they have been excluded from anexperiment (due to timeouts). With being turned on, a participant can re-enter and is directed back to the stage wherehe or she left (if the participants uses the initial link from the experiment).
54 Chapter 1. Online experiments: challenges and solutions
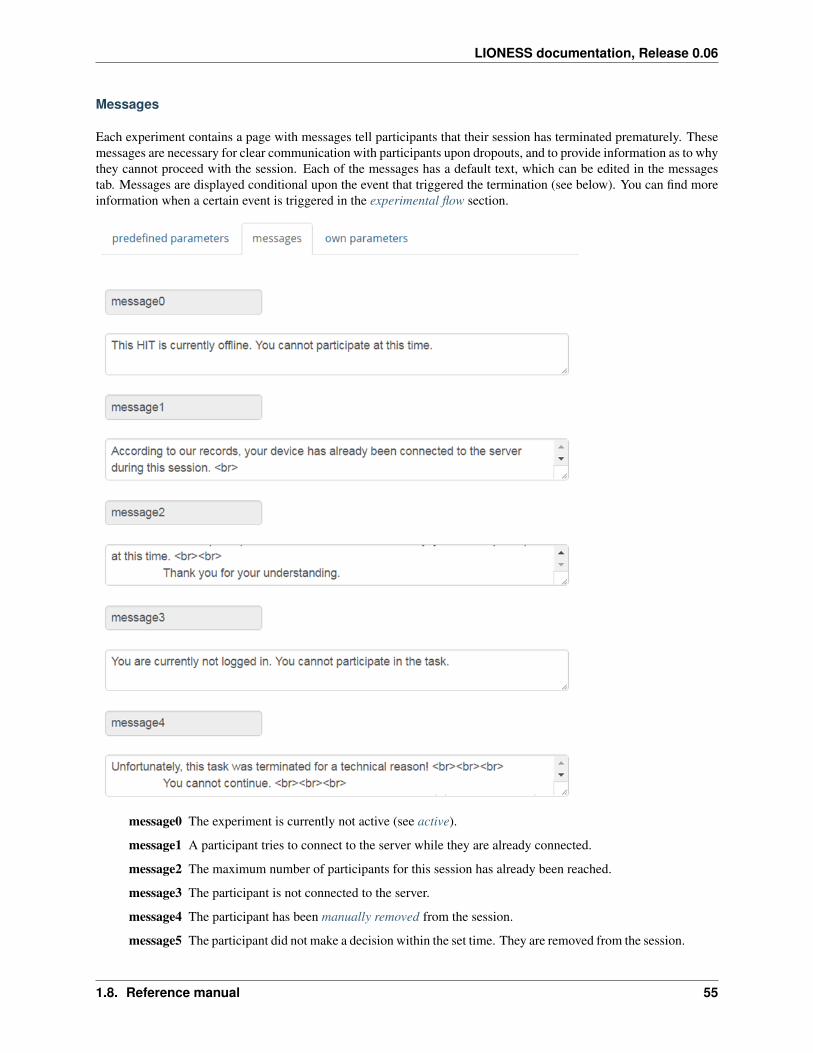
LIONESS documentation, Release 0.06
Messages
Each experiment contains a page with messages tell participants that their session has terminated prematurely. Thesemessages are necessary for clear communication with participants upon dropouts, and to provide information as to whythey cannot proceed with the session. Each of the messages has a default text, which can be edited in the messagestab. Messages are displayed conditional upon the event that triggered the termination (see below). You can find moreinformation when a certain event is triggered in the experimental flow section.
message0 The experiment is currently not active (see active).
message1 A participant tries to connect to the server while they are already connected.
message2 The maximum number of participants for this session has already been reached.
message3 The participant is not connected to the server.
message4 The participant has been manually removed from the session.
message5 The participant did not make a decision within the set time. They are removed from the session.
1.8. Reference manual 55

LIONESS documentation, Release 0.06
message6 The participant’s group has been terminated due to a dropout of a fellow group mate. This isonly used when the dropout handling has been set to terminate group.
message7 The participant tries to enter a session using Internet Explorer. This browser is not supported.
message8 The participant has not successfully completed the control questions after the set number ofattempts. They cannot continue.
Custom parameters
You can add your own parameters by clicking the + sign. In the left hand side field you can give the variable a name,and in the right hand side field you can set its value. Only numerical values are supported. The parameter will beavailable for JavaScript in all the participant stages. You can delete your parameters by clicking the bin icon.
1.9 Further details
1.9.1 Terms of Use
Terms of Use
1.9.2 Version
Please notice that LIONESS Lab is still a beta version. It comes with ABSOLUTELY NO WARRANTY.
We are constantly improving our platform. Experimenters using our platform, as well as ourselves continuouslycontribute new designs to the repository. Moreover, the basic functionality of the builder tool is continuously beingupdated.
1.9.3 Contact
If you have any questions, support issues or would like to report a bug, please contact us at https://groups.google.com/forum/#!forum/lioness-lab or [email protected].
1.9.4 Acknowledgements
The basic LIONESS logic was developed by Lucas Molleman, Antonio A. Aréchar and Simon Gächter at the Centrefor Decision Research and Experimental Economics (CeDEx) at the University of Nottingham, with support fromthe European Research Council (ERC-AdG 295707). LIONESS Lab is powered by classEx, developed by MarcusGiamattei and Johan Graf Lambsdorff at the University of Passau.
56 Chapter 1. Online experiments: challenges and solutions

LIONESS documentation, Release 0.06
1.10 Go back to the LIONESS website
Click here to go back to the LIONESS website: https://lioness-lab.org/
1.10. Go back to the LIONESS website 57