![[Linux] Installation Manual for U-Boot v2.9](https://static.fdocuments.in/doc/165x107/577cc3c71a28aba71197228d/linux-installation-manual-for-u-boot-v29.jpg)
Linux and LPIC Quick Reference Guide 07-05-2013 - GUTL · Linux Professional Institute 3/39 System...
41
Linux & LPIC Quick Reference Guide
Transcript of Linux and LPIC Quick Reference Guide 07-05-2013 - GUTL · Linux Professional Institute 3/39 System...

Linux & LPICQuick Reference Guide

Foreword
This guide stems from the notes I have taken while working with Linux and preparing the LPIC-1 certification. As such, it includes (almost) all topics of the LPIC-1 exam. This guide, which I started writing in 2013, is a work in progress and my aim is to update it periodically to make it as complete as possible. Please check the date in the right bottom corner of each page to ensure you're reading the latest version.
You are authorized to use and share this guide both in electronic and in printed form (for instance as a course material), provided that you distribute intact either the whole guide or the single pages, and you do it not-for-profit. For any other use please email me. Feel free to contact me also for any error, inaccuracy, or unclear point so I can correct it in future versions.
Happy Linux hacking,
Daniele Raffo
IndexHardware settings............................1
/proc filesystem...............................2System boot....................................3Runlevels........................................4Fileystem........................................5
Partitions........................................6Boot manager..................................7Shared libraries...............................8Package management.......................9
Command line...............................10Text streams..................................11Processes......................................12File permissions.............................13
Links............................................14
Find system files............................15Shell environment..........................16Scripting.......................................17Flow control...................................18
SQL..............................................19X Window System..........................20User accounts................................21User management..........................22
Job scheduling...............................23Localization...................................24System time..................................25Logging.........................................26
E-mail...........................................27
Printing.........................................28Network addressing........................29Subnetting....................................30Network services............................31
Network tools................................32Network scanning...........................33Net config files...............................34Net config commands.....................35
SSH..............................................36GPG.............................................37OpenSSL.......................................38Key bindings..................................39

Linux Professional Institute 1/39 Hardware settings
Hardware settings
hdparm Get/set disk parameters
hdparm -g /dev/sda Display drive geometry (cylinders, heads, sectors) of /dev/sda
hdparm -tT /dev/sda Perform benchmarks on the /dev/sda drive
hdparm -p 12 /dev/hda Reprogram IDE interface chipset of /dev/sda to mode 4. Use with caution!
lsdev List information about the system's hardware
lspci List PCI devices
lspci -d 8086: List all Intel hardware present. PCI IDs are stored in /usr/share/misc/pci.ids (Debian)
or /usr/share/hwdata/pci.ids (Red Hat)
lsusb List USB devices
lsusb -d 8086: List all Intel USB devices present. USB IDs are stored in /var/lib/usbutils/usb.ids
lsmod List loaded kernel modules
insmod [module] Insert a module into the running kernel
rmmod [module] Remove a module from the running kernel
modinfo [module] Display information about a module
modprobe Load/remove/list modules from the kernel
The Hardware Abstraction Layer (HAL) manages device files and provides plug-and-play facilities. The HAL daemon hald maintains the list of devices in a database. udev creates the device nodes in /dev/ . When a device is added, removed, or changes state, the kernel sends an uevent
received by the udevd daemon.
udevadm monitor (Debian)
udevmonitor (Red Hat)Monitor uevents
dbus-monitor Monitor messages going through a D-Bus message bus
dbus-monitor --session Monitor session messages (default)
dbus-monitor --system Monitor system messages
dmesg [options] Print the logs of the kernel ring buffer
dmesg -n 1 Set the logging level to 1 (= only panic messages)
Almost all Linux commands accept the option -v (verbose), and many commands also accept the option -vv (very verbose).
© Daniele Raffo www.crans.org/~raffo 07/05/2013

Linux Professional Institute 2/39 /proc filesystem
/proc filesystem
/proc pseudo filesystem
Directory Meaning Equivalent command
/proc/ n/ Information about process with PID n ps n
/proc/ n/cmdline Command line the process was launched by
/proc/ n/cwd Working directory of process
/proc/uptime Time elapsed since boot uptime
/proc/sys/ sysfs
/proc/sys/kernel/ Kernel information and parameters
/proc/sys/net/ Network information and parameters
/proc/partitions Drive partition information
/proc/mounts Mounted partitions mount
/proc/devices Drivers currently loaded
/proc/modules Kernel modules currently loaded lsmod
/proc/bus Buses (PCI, USB, PC Card...)
/proc/ioports I/O addresses in use
/proc/dma DMA channels in use
/proc/interrupts Current interrupts
/proc/cpuinfo CPUs information
/proc/meminfo Total and free memory free
/proc/version Linux version uname -a
© Daniele Raffo www.crans.org/~raffo 07/05/2013

Linux Professional Institute 3/39 System boot
System boot
Boot sequence
POST(Power-On Self Test)
Low-level check of PC hardware.
BIOS(Basic I/O System)
Detection of disks and hardware.
Chain loaderGRUB
(GRand Unified Bootloader)
GRUB stage 1 is loaded from the MBR and executes GRUB stage 2 from filesystem. GRUB chooses which OS to boot on.The chain loader hands over to the boot sector of the partition on which resides the OS.The chain loader may also load initrd, an initial ramdisk to be used as the initial root
device during kernel boot.
Linux kernel
Kernel decompression into memory.Kernel execution.
Detection of devices.Root filesystem is mounted on / in place of the initial ramdisk.
init Execution of the first process (PID 1): /sbin/init
Startup System loads startup scripts and runlevel scripts.
X Server (Optional) The X Display Manager starts the X Server.
© Daniele Raffo www.crans.org/~raffo 07/05/2013
Linux Professional Institute 4/39 Runlevels
Runlevels
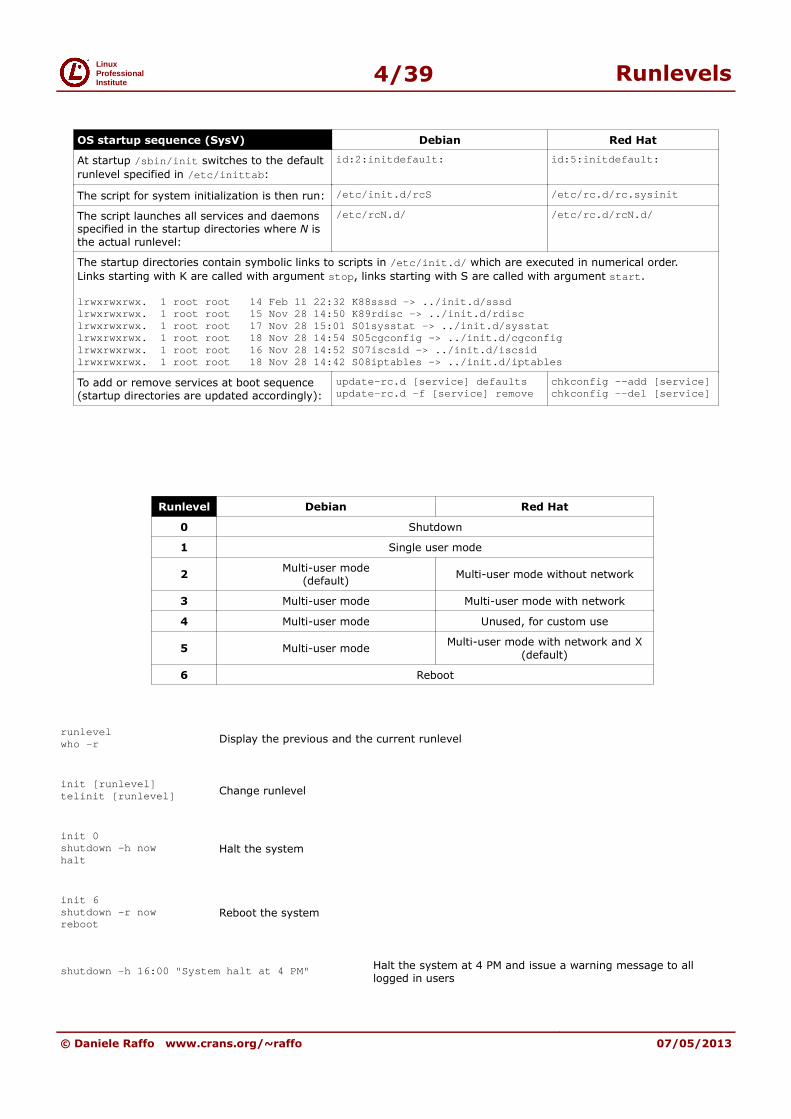
OS startup sequence (SysV) Debian Red Hat
At startup /sbin/init switches to the default
runlevel specified in /etc/inittab :
id:2:initdefault: id:5:initdefault:
The script for system initialization is then run: /etc/init.d/rcS /etc/rc.d/rc.sysinit
The script launches all services and daemons specified in the startup directories where N is
the actual runlevel:
/etc/rc N.d/ /etc/rc.d/rc N.d/
The startup directories contain symbolic links to scripts in /etc/init.d/ which are executed in numerical order.
Links starting with K are called with argument stop , links starting with S are called with argument start .
lrwxrwxrwx. 1 root root 14 Feb 11 22:32 K88sssd -> ../init.d/sssdlrwxrwxrwx. 1 root root 15 Nov 28 14:50 K89rdisc -> ../init.d/rdisclrwxrwxrwx. 1 root root 17 Nov 28 15:01 S01sysst at -> ../init.d/sysstatlrwxrwxrwx. 1 root root 18 Nov 28 14:54 S05cgcon fig -> ../init.d/cgconfiglrwxrwxrwx. 1 root root 16 Nov 28 14:52 S07iscsi d -> ../init.d/iscsidlrwxrwxrwx. 1 root root 18 Nov 28 14:42 S08iptab les -> ../init.d/iptables
To add or remove services at boot sequence
(startup directories are updated accordingly):
update-rc.d [service] defaultsupdate-rc.d -f [service] remove
chkconfig --add [service]chkconfig --del [service]
Runlevel Debian Red Hat
0 Shutdown
1 Single user mode
2Multi-user mode
(default)Multi-user mode without network
3 Multi-user mode Multi-user mode with network
4 Multi-user mode Unused, for custom use
5 Multi-user modeMulti-user mode with network and X
(default)
6 Reboot
runlevelwho -r Display the previous and the current runlevel
init [runlevel]telinit [runlevel] Change runlevel
init 0shutdown -h nowhalt
Halt the system
init 6shutdown -r nowreboot
Reboot the system
shutdown -h 16:00 "System halt at 4 PM" Halt the system at 4 PM and issue a warning message to all logged in users
© Daniele Raffo www.crans.org/~raffo 07/05/2013

Linux Professional Institute 5/39 Fileystem
Fileystem
Filesystem Hierarchy Standard (FHS)
/bin Essential command binaries
/boot Bootloader files (kernel, initrd...)
/dev Devices and partitions
/etc System configuration files
/home Home directories for users
/lib Libraries for the binaries in /bin and /sbin , kernel modules
/media Mount points for removable media
/mnt Mount points for temporary filesystems
/opt Optional application software packages
/proc Virtual filesystem providing kernel and processes information
/root Home directory for root
/sbin Essential system binaries
/srv Data for services provided by the system
/tmp Temporary files
/usr User utilities and applications
/usr/bin Non-essential command binaries (for all users)
/usr/lib Libraries for the binaries in /usr/bin and /usr/sbin
/usr/sbin Non-essential system binaries (daemons and services)
/usr/src Source code
/var Variable files (logs, caches, mail spools...)
Linux-supported filesystems
ext2 Linux filesystem
ext3 ext2 with journaling
(the journal logs changes before committing them to the filesystem; ensures faster recovery and less corruption in case of a crash)
ext4 Linux journaling filesystem
reiserfs Journaling filesystem
fat32 MS-Windows FAT filesystem
iso9660 CD-ROM filesystem
cramfs Compressed RAM disk
© Daniele Raffo www.crans.org/~raffo 07/05/2013

Linux Professional Institute 6/39 Partitions
Partitions
/dev/hda, /dev/hdb, ... first, second, ... IDE hard drive
/dev/sda, /dev/sdb, ... first, second, ... SATA hard drive
/dev/sda1, /dev/sda2, ... first, second, ... partition of the first SATA drive
Partitioning limits for Linux:Max 4 primary partitions per hard disk, or 3 primary partitions + 1 extended partition Partition numbers: 1-4Max 11 logical partitions per hard disk (inside the extended partition) Partition numbers: 5-15
Required partitions for Linux:
/ root containing the whole Linux distributionswap virtual memory used as RAM extension
The Logical Volume Manager permits disk hotswapping, partition resizing, dynamic logical volume assignment, backup via snapshots.The superblock contains information relative to the filesystem (filesystem type, size, status, metadata structures...).The Master Boot Record (MBR) is a 512-byte program located in the first sector of the hard disk; it contains information about
hard disk partitions and has the duty of loading the OS.
fdisk -l [device] List the partition table
fdisk [device] Disk partitioning interactive tool
cfdisk Text-based UI for fdisk
gparted Graphical UI for fdisk in GNOME
partprobe Notify the OS of partition table changes (without needing to reboot)
mkfs -t [fstype] [device] Create a filesystem of specified type on a partition
mke2fs /dev/sda Create a ext2 filesystem on first SATA drive
mke2fs -j /dev/sda Create a ext3 filesystem (with journaling) on first SATA drive
mkswap [options] [device] Create a swap filesystem on a partition
swapon [options] [device] Enable a swap partition
swapoff [options] [device] Disable a swap partition
mount /dev/sda /mnt Mount a filesystem to mount point /mnt (mount directory must exist)
mount Print the currently mounted filesystems
df Report filesystem disk space usage
© Daniele Raffo www.crans.org/~raffo 07/05/2013

Linux Professional Institute 7/39 Boot manager
Boot manager
GRUB (Grand Unified Bootloader) is the standard bootloader on modern Linux distros, which may use either version: GRUB
Legacy or GRUB 2. Older Linux distros used LILO (Linux Loader) instead.
GRUB Stage 1 (446 bytes), as well as the partition table (64 bytes) and the boot signature (2 bytes), is stored in the 512-
byte MBR. It accesses the GRUB configuration and commands available on the filesystem.
grub-install /dev/sda Install GRUB on first SATA drive
GRUB Legacy configuration file (/boot/grub/menu.lst or /boot/grub/grub.conf)
timeout 10 # Boot the default kernel after 10 seco ndsdefault 0 # Default kernel is 0
# Section 0: Linux boottitle Debian # Menu item to show on GRUB bootmen uroot (hd0,0) # root filesystem is /dev/hda1kernel /boot/vmlinuz-2.6.24-19-generic root=/dev/hd a1 ro quiet splashinitrd /boot/initrd.img-2.6.24-19-generic
# Section 1: Windows boot title Microsoft Windows XProot (hd0,1) # root filesystem is /dev/hda2savedefaultmakeactive # set the active flag on this parti tion chainloader +1 # read 1 sector from start of parti tion and run
Common kernel parameters:
root= Defines filesystem root
ro Mount read-only on boot
quiet Disable most log messages
debug Enable kernel debugging
GRUB 2 configuration file (/boot/grub/grub.cfg)
# Linux Red Hatmenuentry "Fedora 2.6.32" { # Menu item to show o n GRUB bootmenuset root=(hd0,1) # root filesystem is /dev/hda1linux /vmlinuz-2.6.32 ro root=/dev/hda5 mem=2048Minitrd /initrd-2.6.32}
# Linux Debianmenuentry "Debian 2.6.36-experimental" {set root=(hd0,1)linux (hd0,1)/bzImage-2.6.36-experimental ro root=/ dev/hda6}
# Windowsmenuentry "Windows" {set root=(hd0,2)chainloader +1}
Is not meant to be edited manually.Instead, you must edit:/etc/grub.d//etc/default/gruband then run update-grub
© Daniele Raffo www.crans.org/~raffo 07/05/2013
Linux Professional Institute 8/39 Shared libraries
Shared libraries
The runtime loader ld.so loads the required libraries of the program into RAM, searching in this order:
LD_LIBRARY_PATH Environment variable specifying the list of directories where libraries should be searched for first
/etc/ld.so.cache Cache file
/lib and /usr/lib Default locations for shared libraries
/etc/ld.so.conf Configuration file used to specify other shared library locations (other than the default ones /lib and /usr/lib )
ldconfig Create a cache file /etc/ld.so.cache of all available dynamically linked libraries.
To be run when the system complains about missing libraries
ldd [program or lib] Print library dependencies
© Daniele Raffo www.crans.org/~raffo 07/05/2013

Linux Professional Institute 9/39 Package management
Package management
Package management Debian Red Hat
Low-level tools
Install a package file dpkg -i package.deb rpm -i package.rpm
Remove a package dpkg -r package rpm -e package
Upgrade a package
(and remove old versions)rpm -U package.rpm
Upgrade a package
(only if an old version is already installed)rpm -F package.rpm
List installed packages and their state dpkg -l rpm -qa
List the content of an installed package dpkg -L package rpm -ql package
List the content of a package file dpkg -c package.deb rpm -qpl package.rpm
Show the package containing a specific file dpkg -S file rpm -qf file
Reconfigure a package dpkg-reconfigure package
Install a package source file rpm -i package.src.rpm
Compile a package source file rpm -ba package.spec
High-level tools
(can install remote
packages,
automatically
solves
dependencies)
Install a package apt-get install package yum install package
Remove a package apt-get remove package yum remove package
Upgrade an installed package yum update package
Upgrade all installed packages apt-get upgrade yum update
Upgrade all installed packages and handle
dependencies with new versionsapt-get dist-upgrade
Get the source code for a package apt-get source package
Check for broken dependencies and update
package cacheapt-get check
Fix broken dependencies apt-get install -f
Update information about available packages apt-get update
List all available packages yum list
Search for a package apt-cache search package yum search package
Show package dependencies apt-cache depends package yum deplist package
Show package records apt-cache show package yum list package
Show information about a package apt-cache showpkg package yum info package
Update information about package contents apt-file update
List the content of an uninstalled package apt-file list package
Show the package containing a specific file apt-file search file yum provides file
Add a CD-ROM to the list of available sources apt-cdrom add
Download package and resolve dependenciesyumdownloader --resolve package
List the URLs that would be downloadedyumdownloader --urls package
Text-based UI or
graphical toolsManage packages and dependencies
aptitude
dselect
Other tools
Convert a RPM package to DEB and installs it.
May break the package system!alien -i package.rpm
Convert a RPM package to cpio archive rpm2cpio package.rpm
Miscellaneous information
List of available sources /etc/apt/sources.list /etc/yum.repos.d
Package formatcompressed with ar(package binutils )
compressed with cpio
© Daniele Raffo www.crans.org/~raffo 07/05/2013
Linux Professional Institute 10/39 Command line
Command line
man 7 [command] Show manpage 7 for a command
man man Show information about manpages' content:
1 Executable programs or shell commands2 System calls (functions provided by the kernel)3 Library calls (functions within program libraries)4 Special files
5 File formats and conventions6 Games7 Miscellaneous8 System administration commands (usually only for root)
9 Kernel routines
cd [directory] Change to the specified directory
cd - Change to the previously used directory
pwd Print the current directory you are in
history Show the history of command lines executed up to this moment.
Commands prepended by a space will be executed but won't show up in the history.Once you logout from Bash, history is saved into ~/.bash_history
! n Execute command number n in the command line history
history -c Delete command line history
uname -a Print system information
vlockaway Lock the virtual console (terminal)
Bash shortcuts
. Current directory
.. Parent directory
~ Home directory of current user
~jdoe Home directory of user jdoe
© Daniele Raffo www.crans.org/~raffo 07/05/2013

Linux Professional Institute 11/39 Text streams
Text streams
cat myfile Print a text file
cat myfile1 myfile2 > myfile3 Concatenate text files
head myfilehead -n 10 myfile Print the first 10 lines of a text file
tail myfiletail -n 10 myfile Print the last 10 lines of a text file
tail -f myfile Output appended data as the text file grows; useful to read logs in realtime
tac myfile Print a text file in reverse, from last line to first line
fmt -w 75 myfile Format a text file so that each line has a max width of 75 chars
pr myfile Format a text file for a printer
nl myfile Prepend line numbers to a text file
wc myfile Print the number of lines, words, and bytes of a text file
join myfile1 myfile2 Join lines of two text files on a common field
paste myfile1 myfile2 Merge lines of text files
split -l 1 myfile Split a text file into 1-line files (named xaa , xab , xac , ...)
uniq myfile Print the unique lines of a text file, omitting consecutive identical lines
sort myfile Sort alphabetically the lines of a text file
expand myfile Convert tabs into spaces
unexpand myfile Convert spaces into tabs
od myfile Dump a file into octal
cut -d: -f3 myfile Cut the lines of a file, considering : as the delimiter and printing only the 3rd field
cut -d: -f1 /etc/passwd Print the list of user accounts in the system
sed s/foo/bar/ myfile Replace the first occurrence of foo with bar (Stream Editor)
sed s/foo/bar/g myfile Replace all occurrences of foo with bar
tr a-z A-Z <myfiletr [:lower:] [:upper:] <myfile Convert all lowercase into uppercase in a text file (Translate characters)
tr -d 0-9 <myfiletr -d [:digit:] <myfile Delete all digits from a text file
© Daniele Raffo www.crans.org/~raffo 07/05/2013

Linux Professional Institute 12/39 Processes
Processes
Any application/program/script that runs on the system is a process. Signals are used for inter-process communication.
Each process has an unique PID (Process ID) and a PPID (Parent Process ID); when a process spawns a child, its PID is assigned as the child's PPID.The /sbin/init process, run at bootup, has PID 1; is the ancestor of all processes and becomes the parent of any orphaned
process. When a child process dies, its status becomes EXIT_ZOMBIE and a SIGCHLD is sent to the parent. The parent should then
call the wait() system call to read the dead process' exit status and other info; until that moment, the child stays zombie.
ps -ef (UNIX options)
ps aux (BSD options)List all processes
pstree Display all processes in hierarchical format
tophtop Monitor processes in realtime
free Show the amount of free and used memory in the system
vmstat Show virtual memory statistics
uptime Show how long the system has been up, and the system load averages
kill -9 1132 Send a signal 9 (SIGKILL) to process 1132, killing it
killall -9 sshd Kill processes whose name is sshd
pgrep -u root sshd Show processes whose name is sshd and are owned by root (pgrep and pkill accept
the same options)pkill -9 -u root sshd Kill processes whose name is sshd and are owned by root
jobs List all jobs (i.e. processes whose parent is a Bash shell)
Suspend a job, putting it in the stopped state (send a SIGTSTP)
bg %1 Put job #1 in the background (send a SIGCONT)
fg %1 Resume job #1 in the foreground and make it the current job (send a SIGCONT)
kill %1 Kill job #1
When a Bash shell is terminated cleanly via exit , its jobs will became child of the Bash's parent and will continue running.
When a Bash is killed instead, it issues a SIGHUP to his children which will terminate.
nohup myscript.sh Prevent a process from receiving a SIGHUP (hence terminating) when its parent Bash dies
To each process is associated a niceness value: the lower the niceness, the higher the priority.The niceness value ranges from -20 to 19, and a newly created process has a default niceness of 0.Unprivileged users can modify a process' niceness only within the range from 1 to 19.
nice -n -5 [command] Start a command with a niceness of -5 (if niceness is omitted, a default value of 10 is used)
renice -5 [command] Change the niceness of a running command to -5
Most frequently used signals
Signal number Signal name Meaning
1 SIGHUP Used by many daemons to reload their configuration
2 SIGINT Interrupt, stop
9 SIGKILL Kill unconditionally (this signal cannot be ignored)
15 SIGTERM Terminate gracefully
18 SIGCONT Continue execution
20 SIGTSTP Stop execution
© Daniele Raffo www.crans.org/~raffo 07/05/2013
CTRL Z
Linux Professional Institute 13/39 File permissions
File permissions
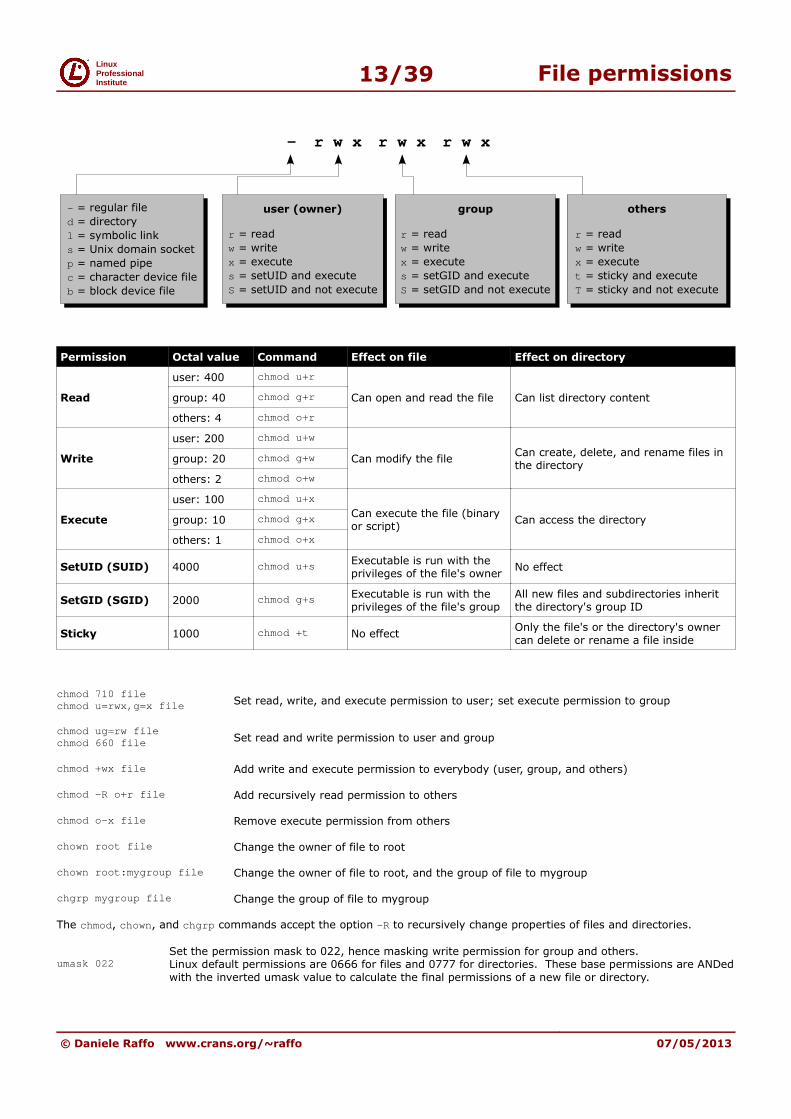
- r w x r w x r w x
Permission Octal value Command Effect on file Effect on directory
Read
user: 400 chmod u+r
Can open and read the file Can list directory contentgroup: 40 chmod g+r
others: 4 chmod o+r
Write
user: 200 chmod u+w
Can modify the fileCan create, delete, and rename files in the directory
group: 20 chmod g+w
others: 2 chmod o+w
Execute
user: 100 chmod u+x
Can execute the file (binary or script)
Can access the directorygroup: 10 chmod g+x
others: 1 chmod o+x
SetUID (SUID) 4000 chmod u+s Executable is run with the privileges of the file's owner
No effect
SetGID (SGID) 2000 chmod g+s Executable is run with the privileges of the file's group
All new files and subdirectories inherit the directory's group ID
Sticky 1000 chmod +t No effectOnly the file's or the directory's owner
can delete or rename a file inside
chmod 710 filechmod u=rwx,g=x file Set read, write, and execute permission to user; set execute permission to group
chmod ug=rw filechmod 660 file Set read and write permission to user and group
chmod +wx file Add write and execute permission to everybody (user, group, and others)
chmod -R o+r file Add recursively read permission to others
chmod o-x file Remove execute permission from others
chown root file Change the owner of file to root
chown root:mygroup file Change the owner of file to root, and the group of file to mygroup
chgrp mygroup file Change the group of file to mygroup
The chmod, chown, and chgrp commands accept the option -R to recursively change properties of files and directories.
umask 022Set the permission mask to 022, hence masking write permission for group and others.Linux default permissions are 0666 for files and 0777 for directories. These base permissions are ANDed
with the inverted umask value to calculate the final permissions of a new file or directory.
© Daniele Raffo www.crans.org/~raffo 07/05/2013
user (owner)
r = read
w = write
x = execute
s = setUID and execute
S = setUID and not execute
user (owner)
r = read
w = write
x = execute
s = setUID and execute
S = setUID and not execute
group
r = read
w = write
x = execute
s = setGID and execute
S = setGID and not execute
group
r = read
w = write
x = execute
s = setGID and execute
S = setGID and not execute
others
r = read
w = write
x = execute
t = sticky and execute
T = sticky and not execute
others
r = read
w = write
x = execute
t = sticky and execute
T = sticky and not execute
- = regular file
d = directory
l = symbolic link
s = Unix domain socket
p = named pipe
c = character device file
b = block device file
- = regular file
d = directory
l = symbolic link
s = Unix domain socket
p = named pipe
c = character device file
b = block device file

Linux Professional Institute 14/39 Links
Links
A Linux directory contains a list of structures, which are associations between a filename and an inode.
An inode contains file metadata: file type, permissions, owner, group, size, access/change/modification/deletion times, number of links, attributes, ACLs, and address where the actual file content (data) is stored.
ls -i Show a listing of the directory with the files' inode numbers
Hard link Symbolic link or soft link
What it is A link to an already existing inode A path to a filename, like a shortcut
How to create it ln myfile hardlink ln -s myfile symlink
If original file is moved or deleted, is the link still valid?
Yes (because the link references the inode
the original file pointed to)
No (the path now references a non-
existent file)
Can link to a file in another filesystem?
No (because inode numbers make sense
only within a determinate filesystem)
Yes
Can link to a directory? No Yes
Link permissionsReflect the original file's permissions, even when these are changed
rwxrwxrwx
Link attributes - (regular file) l (symbolic link)
Inode number The same as the original file A new inode number
© Daniele Raffo www.crans.org/~raffo 07/05/2013

Linux Professional Institute 15/39 Find system files
Find system files
find / -name "foo*" Find all files, starting from the root dir, whose name start with foo
find / -name "foo*" -print Find all files whose name start with foo and print their path
find / -name "foo*" -exec chmod 700 {} \; Find all files whose name start with foo and apply permission 700 to
all of them
find / -name "foo*" -ok chmod 700 {} \; Find all files whose name start with foo and apply permission 700 to all of them, asking for confirmation before each file
find / -perm -4000 -type f Find all files with SUID set (a possible security risk, because a shell with SUID root is a backdoor)
find / -perm -2000 -type f Find all files with SGID set
locate lsslocate ls
Locate the command ls by searching the file index, not by actually
walking the filesystem. The search is quick but will only held results relative to the last rebuilding of the file index (/etc/updatedb.conf )
updatedb Build the file index (/etc/updatedb.conf )
which command Locate a binary executable command within the PATH
which -a command Locate all matches of command, not only the first one
whereis command Locate the binary, source, and manpage files for command
whereis -b command Locate the binary files for command
whereis -s command Locate the source files for command
whereis -m command Locate the manpage files for command
file myfile Analyse the content of a file or directory
type command Determine if command is a program or a shell builtin
© Daniele Raffo www.crans.org/~raffo 07/05/2013

Linux Professional Institute 16/39 Shell environment
Shell environment
Bash shell event Files run
When a login shell is launched
/etc/profile ~/.bash_profile~/.bash_login~/.profile
The shell executes the system-wide profile file, then
the first of the 3 user files that exists and is readable
When a login shell exits ~/.bash_logout
When a non-login shell is launched/etc/bash.bashrc~/.bashrc
function myfunc { [commands] }myfunc() { [commands] } Define a function
myfunc arg1 arg2 ... Call a function
typeset -f Show functions defined in the current Bash session
MYVAR=myvalue Set a variable
unset MYVAR Delete a variable
export MYVAR Export a variable so it can be seen by Bash child processes
echo $MYVAR Print the value of a variable
echo ${MYVAR:-mymessage} If variable exists and is not null, print its value, otherwise print a message
echo ${MYVAR:+mymessage} If variable exists and is not null, print a message, otherwise print nothing
set ${MYVAR:=myvalue} Set a variable only if it does not exist or is null
set Display all Bash variables
set -o Show the status of all Bash options
set -o [option] Enable a Bash option
set +o [option] Disable a Bash option
env Display all environment variables
alias ls='ls -lap' Set up a command alias
alias Show current aliases
\ls/bin/ls
Run the non-aliased version of the command ls
© Daniele Raffo www.crans.org/~raffo 07/05/2013
Linux Professional Institute 17/39 Scripting
Scripting
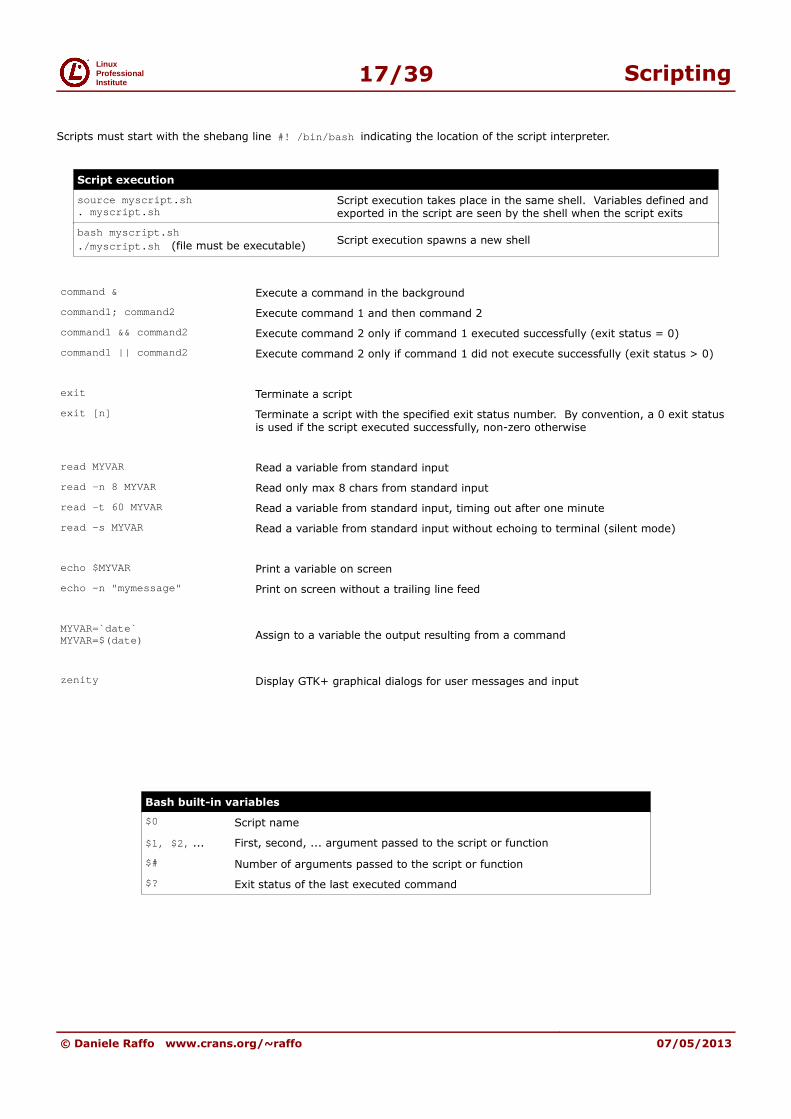
Scripts must start with the shebang line #! /bin/bash indicating the location of the script interpreter.
Script execution
source myscript.sh. myscript.sh
Script execution takes place in the same shell. Variables defined and exported in the script are seen by the shell when the script exits
bash myscript.sh./myscript.sh (file must be executable)
Script execution spawns a new shell
command & Execute a command in the background
command1; command2 Execute command 1 and then command 2
command1 && command2 Execute command 2 only if command 1 executed successfully (exit status = 0)
command1 || command2 Execute command 2 only if command 1 did not execute successfully (exit status > 0)
exit Terminate a script
exit [n] Terminate a script with the specified exit status number. By convention, a 0 exit status is used if the script executed successfully, non-zero otherwise
read MYVAR Read a variable from standard input
read -n 8 MYVAR Read only max 8 chars from standard input
read -t 60 MYVAR Read a variable from standard input, timing out after one minute
read -s MYVAR Read a variable from standard input without echoing to terminal (silent mode)
echo $MYVAR Print a variable on screen
echo -n "mymessage" Print on screen without a trailing line feed
MYVAR=`date`MYVAR=$(date) Assign to a variable the output resulting from a command
zenity Display GTK+ graphical dialogs for user messages and input
Bash built-in variables
$0 Script name
$1, $2, ... First, second, ... argument passed to the script or function
$# Number of arguments passed to the script or function
$? Exit status of the last executed command
© Daniele Raffo www.crans.org/~raffo 07/05/2013

Linux Professional Institute 18/39 Flow control
Flow control
test $MYVAR = "myvalue" && mycommand[ $MYVAR = "myvalue" ] && mycommandif [ $MYVAR = "myvalue" ]; then mycommand; fi
Perform a test; if it holds true, the command is executed
Test operators
Integer operators File operators Expression operators
-eq Equal to -e or -a Exists -a Logical AND
-ne Not equal to -d Is a directory -o Logical OR
-lt Less than -b Is a block special file ! Logical NOT
-le Less than or equal to -c Is a character special file \( \) Priority
-gt Greater than -f Is a regular file
-ge Greater than or equal to -r Is readable
String operators -w Is writeable
-z Is zero length -x Is executable
-n or nothing Is non-zero length -s Is non-zero length
= or == Is equal to -u Is SUID
!= Is not equal to -g Is SGID
< Is alphabetically before -k Is sticky
> Is alphabetically after -h Is a symbolic link
expr $MYVAR = "39 + 3" Evaluate an expression; the variable will hold the value 42
expr [string] : [regex] Return the length of the substring matching the regex
expr [string] : \([regex]\) Return the substring matching the regex
Evaluation operators
= Equal to + Plus string : regex
match string regexString matches regex
!= Not equal to - Minus
< Less than \* Multiplied by substr string position length Substring
<= Less than or equal to / Divided by index string chars Index of any chars in string
> Greater than % Remainder length string String length
>= Greater than or equal to
Tests
if [test 1]then [command block 1]elif [test 2]then [command block 2]else [command block 3]fi
case $VAR in [pattern 1]) [command 1] ;; [pattern 2]) [command 2] ;; *) [command 3]esac
Loops
while [test]do [command block]done
for $I in [list]do [command operating on $I]done
break Terminate a loop
continue Jump to the next iteration
© Daniele Raffo www.crans.org/~raffo 07/05/2013

Linux Professional Institute 19/39 SQL
SQL
SQL syntax
USE MyDatabase; Choose which database to use
SHOW DATABASES; Show all existing databases
SHOW TABLES; Show all tables from the selected database
DESC tableCustomers; Describe the columns of a table
SELECT * FROM tableCustomers; Select all columns from the table
SELECT * FROM tableCustomers ORDER BY columnLastnam e LIMIT 5; Select only the first 5 records of customers as ordered by last name
SELECT columnFirstname, columnLastname FROM tableCu stomers WHERE columnZipcode = 00123;
Select only first and last name of customers
whose zip code is 00123
SELECT columnCustomerID, SUM(columnSalary) FROM tab lePayments GROUP BY columnCustomerID;
Select all salary payments grouped by customer ID, summed up
SELECT tableCustomers.columnLastname, tablePayments .columnAmount FROM tableCustomers, tablePayments WHERE tableCustomers.columnCustomerID = tablePayments.col umnCustomerID;
Perform a join by selecting data from two tables that are linked
INSERT INTO tableCustomers (columnFirstname,columnLastname,columnDOB) VALUES (Arthur,Dent,1959-08-01);
Insert new data
UPDATE tableCustomers SET columnCity = 'London' WHE RE columnZipcode = 00789; Modify data
SHOW GRANTS FOR 'user'@'localhost'; Show permissions for a user
GRANT ALL PRIVILEGES ON MyDatabase.* TO 'user'@'loc alhost'; Grant permissions to a user
REVOKE ALL PRIVILEGES FROM 'user'@'localhost'; Revoke permissions from a user
SELECT Host,User FROM mysql.user; List MySQL users
CREATE USER 'user'@'localhost' IDENTIFIED BY 'p4ssw 0rd'; Create a MySQL user
SET PASSWORD FOR 'user'@'localhost' = PASSWORD('p4s sw0rd'); Set a password for a MySQL user
MySQL command line syntax
mysql -u root -p Login to MySQL as root, prompting for the password
mysql -u root -ps3cr3t Login to MySQL as root with password s3cr3t
mysql -u root -p -e 'CREATE DATABASE NewDatabase' Create a new database by passing a SQL command to MySQL
mysql -u root -p NewDatabase < newdb.sql Create a new database from an external file (.sql files are
composed of SQL commands)
mysqldump -u root -p MyDatabase > backup.sql Backup a database on an external file
© Daniele Raffo www.crans.org/~raffo 07/05/2013
Linux Professional Institute 20/39 X Window System
X Window System
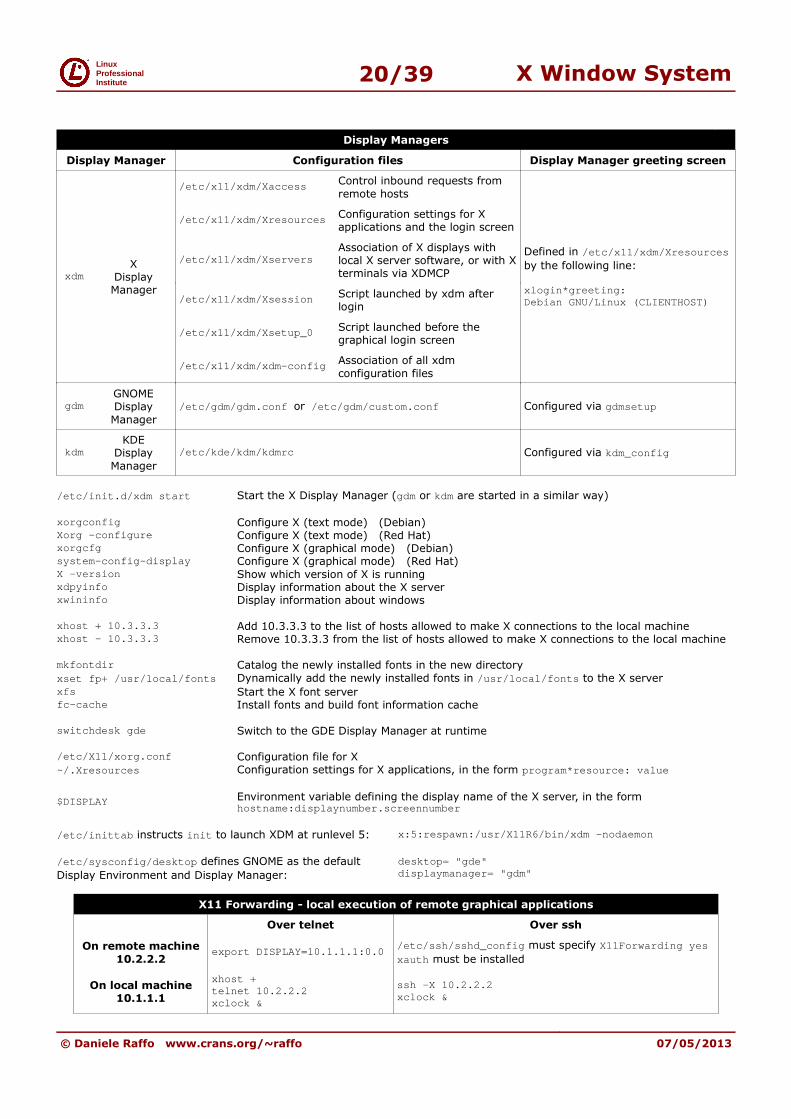
Display Managers
Display Manager Configuration files Display Manager greeting screen
xdmX
Display Manager
/etc/x11/xdm/Xaccess Control inbound requests from
remote hosts
Defined in /etc/x11/xdm/Xresourcesby the following line:
xlogin*greeting: Debian GNU/Linux (CLIENTHOST)
/etc/x11/xdm/Xresources Configuration settings for X applications and the login screen
/etc/x11/xdm/XserversAssociation of X displays with local X server software, or with X terminals via XDMCP
/etc/x11/xdm/Xsession Script launched by xdm after login
/etc/x11/xdm/Xsetup_0 Script launched before the graphical login screen
/etc/x11/xdm/xdm-config Association of all xdm
configuration files
gdmGNOME Display
Manager
/etc/gdm/gdm.conf or /etc/gdm/custom.conf Configured via gdmsetup
kdmKDE
Display
Manager
/etc/kde/kdm/kdmrc Configured via kdm_config
/etc/init.d/xdm start Start the X Display Manager (gdm or kdm are started in a similar way)
xorgconfig Configure X (text mode) (Debian)Xorg -configure Configure X (text mode) (Red Hat)xorgcfg Configure X (graphical mode) (Debian)system-config-display Configure X (graphical mode) (Red Hat)X -version Show which version of X is runningxdpyinfo Display information about the X serverxwininfo Display information about windows
xhost + 10.3.3.3 Add 10.3.3.3 to the list of hosts allowed to make X connections to the local machinexhost - 10.3.3.3 Remove 10.3.3.3 from the list of hosts allowed to make X connections to the local machine
mkfontdir Catalog the newly installed fonts in the new directory
xset fp+ /usr/local/fonts Dynamically add the newly installed fonts in /usr/local/fonts to the X server xfs Start the X font serverfc-cache Install fonts and build font information cache
switchdesk gde Switch to the GDE Display Manager at runtime
/etc/X11/xorg.conf Configuration file for X~/.Xresources Configuration settings for X applications, in the form program*resource: value
$DISPLAY Environment variable defining the display name of the X server, in the form hostname:displaynumber.screennumber
/etc/inittab instructs init to launch XDM at runlevel 5: x:5:respawn:/usr/X11R6/bin/xdm -nodaemon
/etc/sysconfig/desktop defines GNOME as the default
Display Environment and Display Manager:
desktop= "gde"displaymanager= "gdm"
X11 Forwarding - local execution of remote graphical applications
Over telnet Over ssh
On remote machine
10.2.2.2export DISPLAY=10.1.1.1:0.0
/etc/ssh/sshd_config must specify X11Forwarding yesxauth must be installed
On local machine10.1.1.1
xhost +telnet 10.2.2.2xclock &
ssh -X 10.2.2.2xclock &
© Daniele Raffo www.crans.org/~raffo 07/05/2013
Linux Professional Institute 21/39 User accounts
User accounts
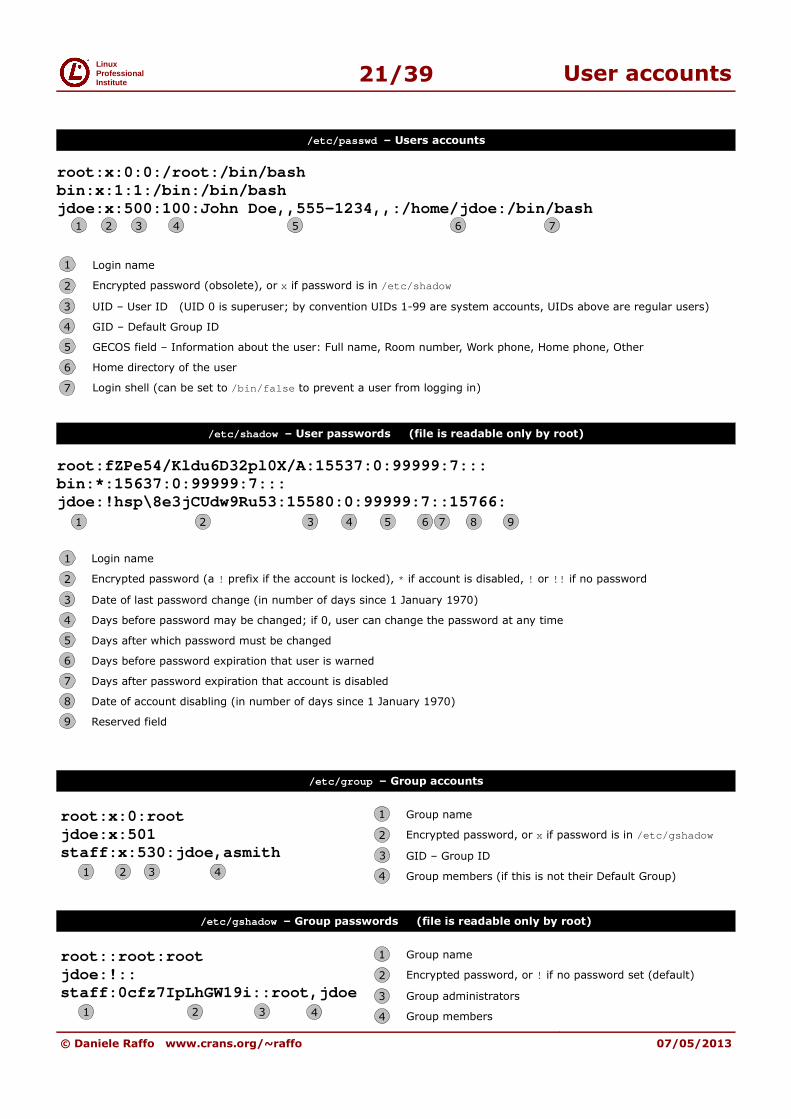
/etc/passwd – Users accounts
root:x:0:0:/root:/bin/bashbin:x:1:1:/bin:/bin/bashjdoe:x:500:100:John Doe,,555-1234,,:/home/jdoe:/bin/bash
Login name
Encrypted password (obsolete), or x if password is in /etc/shadow
UID – User ID (UID 0 is superuser; by convention UIDs 1-99 are system accounts, UIDs above are regular users)
GID – Default Group ID
GECOS field – Information about the user: Full name, Room number, Work phone, Home phone, Other
Home directory of the user
Login shell (can be set to /bin/false to prevent a user from logging in)
/etc/shadow – User passwords (file is readable only by root)
root:fZPe54/Kldu6D32pl0X/A:15537:0:99999:7:::bin:*:15637:0:99999:7:::jdoe:!hsp\8e3jCUdw9Ru53:15580:0:99999:7::15766:
Login name
Encrypted password (a ! prefix if the account is locked), * if account is disabled, ! or !! if no password
Date of last password change (in number of days since 1 January 1970)
Days before password may be changed; if 0, user can change the password at any time
Days after which password must be changed
Days before password expiration that user is warned
Days after password expiration that account is disabled
Date of account disabling (in number of days since 1 January 1970)
Reserved field
/etc/group – Group accounts
root:x:0:rootjdoe:x:501staff:x:530:jdoe,asmith
Group name
Encrypted password, or x if password is in /etc/gshadow
GID – Group ID
Group members (if this is not their Default Group)
/etc/gshadow – Group passwords (file is readable only by root)
root::root:rootjdoe:!::staff:0cfz7IpLhGW19i::root,jdoe
Group name
Encrypted password, or ! if no password set (default)
Group administrators
Group members
© Daniele Raffo www.crans.org/~raffo 07/05/2013
1 2 3 4 5 6 7
1 2 3 4 5 7 8 96
2
3
4
5
6
7
1
2
3
4
5
6
7
8
9
1
1 3 42
1
2
3
4
1 2
1
2
3 4
3
4

Linux Professional Institute 22/39 User management
User managementuseradd -m jdoe Create a user account, creating and populating his homedir from /etc/skeluseradd -mc "John Doe" jdoe Create a user account, specifying his full nameuseradd -ms /bin/ksh jdoe Create a user account, specifying his login shelluseradd -D Show default values (specified in /etc/login.defs ) for user account creation
usermod -c "Jonas Doe" jdoe Modify the GECOS field of a user account(usermod accepts many
useradd options)usermod -L jdoe Lock a user accountusermod -U jdoe Unlock a user account
userdel -r jdoe Delete a user and his homedir
chfn jdoe Change the GECOS field of a user
chsh jdoe Change the login shell of a user
passwd jdoe Change the password of a userpasswd -l jdoe Lock a user account
chage -E 2013-02-14 jdoe Change the password expiration date, locking the account at that date chage -d 13111 jdoe Change the date (in number of days since 1 January 1970) of last password changechage -d 0 jdoe Force the user to change password at his next loginchage -M 30 jdoe Change the max number of days during which a password is validchage -m 7 jdoe Change the min number of days between password changeschage -W 15 jdoe Change the number of days before password expiration that the user will be warnedchage -I 3 jdoe Change the number of days after password expiration before the account is lockedchage -l jdoe List password aging information for a user
groupadd staff Create a group
groupmod -n newstaff staff Change a group name
groupdel staff Delete a group
gpasswd staff Set or change the password of a groupgpasswd -a jdoe staff Add a user to a groupgpasswd -d jdoe staff Delete a user from a groupgpasswd -A jdoe staff Add a user to the list of administrators of the group
adduserdeluseraddgroupdelgroup
User-friendly front-ends for user and group management (Debian)
who am iwhoami Print your effective user ID
who Print the list of users logged into the systemw Print the list of users logged into the system, and what they are doing
su jdoe Run a shell as the specified user. If user is not specified, assume rootsu -c "fdisk -l" Pass a single command to the shell
su -su -l
Ensure that the spawned shell is a login shell, hence running login scripts and setting the correct environment variables. Recommended option
sudo fdisk -l Run a command as root. Sudo commands are logged via syslogsudo -ujdoe fdisk -l Run a command as another user
sudoedit /etc/passwdsudo -e /etc/passwd
Edit a protected file. It is recommended to use this instead of allowing users to sudo text editors as root, which is a security problem if the editor spawns a shell
visudo Edit /etc/sudoers , the configuration file that specifies access rights to sudo
/var/log/auth.log Log containing user logins and authentication mechanisms
/etc/nologin If this file exists, login and sshd deny login to the system
© Daniele Raffo www.crans.org/~raffo 07/05/2013

Linux Professional Institute 23/39 Job scheduling
Job scheduling
cron – repeated scheduled execution
/etc/crontab
# m h dom mon dow user command 25 6 * * 1 root myscript.sh
m = minutes
h = hours
dom = day of month (1-31)
mon = month (1-12 or jan-dec)
dow = day of week (0-7 or sun-sat; 0=7=Sunday)
25 6 * * 1 = every Monday at 6:25 AM
*/5 16 * * * = from 4:00 to 4:55 PM every 5 mins, everyday
0,30 7 25 12 * = on 25th December at 7:00 and 7:30 AM
3 17 * * 1-5 = at 5:03 PM everyday, from Monday to Friday
The crond daemon checks the /etc/crontab system-wide file every minute and executes command as user at the specified
times.Each user may also set his own crontab scheduling, which will result in a file /var/spool/cron/[user] . A user' crontab file
has the same format, except that the user field is not present.
/etc/anacrontab
# period delay job-identifier command 7 10 cron-weekly myscript.sh
period = period in days
delay = delay in minutes
job-identifier = job identifier in anacron messages
Anacron jobs are run by crond , and permit the execution of periodic jobs on a machine that is not always running, such as a
laptop.If the job has not been executed in the last period , the system waits for delay and then executes command.
If /etc/cron.allow exists, only users listed therein can access the service.
If /etc/cron.deny exists, all users except those listed therein can access the service.
If none of these files exist, all users can access the service.
crontab -e Edit your user crontab file
crontab -l List the contents of your crontab file
crontab -e -u jdoe Edit the crontab file of another user (only root can do this)
/etc/cron.hourly/etc/cron.daily/etc/cron.weekly/etc/cron.monthly
Scripts placed in these directories will be automatically executed with the specified periods
at – scheduled execution once
If /etc/at.allow exists, only users listed therein can access the service.
If /etc/at.deny exists, all users except those listed therein can access the service.
If none of these files exist, no user except root can access the service.
at 5:00pm tomorrow myscript.shat -f mylistofcommands.txt 5:00pm tomorrowecho "rm file" | at now+2 minutes
Execute a command once at the specified time (absolute or relative)
at -latq List the scheduled jobs
at -d 3atrm 3 Remove job number 3 from the list
© Daniele Raffo www.crans.org/~raffo 07/05/2013

Linux Professional Institute 24/39 Localization
Localization
Locale environment variables
LANGLANGUAGE
Language, stored in /etc/default/locale .
When scripting, you should set LANG=C because this
specifies the minimal locale environment for C translation, and guarantees a standard collation and formats for the execution of scripts
These locale variables are in the format[language]_[territory].[encoding]
e.g. en_US.UTF-8
The list of supported locales is stored in/usr/share/i18n/SUPPORTED
LC_CTYPE Character classification and case conversion
LC_NUMERIC Non-monetary numeric formats
LC_TIME Date and time formats
LC_COLLATE Alphabetical order
LC_MONETARY Monetary formats
LC_MESSAGES Language and encoding of system messages and user
input
LC_PAPER Paper size
LC_NAME Personal name formats
LC_ADDRESS Geographic address formats
LC_TELEPHONE Telephone number formats
LC_MEASUREMENT Measurement units (metric or others)
LC_IDENTIFICATION Metadata about locale
LC_ALL Special variable overriding all others
locale Show locale environment variables
locale-gen it_IT.UTF-8 Generate a locale by compiling a list of locale definition files
apt-get install manpages-it language-pack-it Install a different locale (system messages and manpages)
iconv -f IS6937 -t IS8859 myfilein > myfileout Convert a text file from a codeset to another
ISO/IEC-8859 is a standard for 8-bit encoding of printable characters.The first 256 characters in ISO/IEC-8859-1 (Latin-1) are identical to those in Unicode.UTF-8 encoding can represent every character in the Unicode set, and was designed for backward compatibility with ASCII.
© Daniele Raffo www.crans.org/~raffo 07/05/2013

Linux Professional Institute 25/39 System time
System time
tzselecttzconfigdpkg-reconfigure tzdata (Debian)
Set the timezone, stored in /etc/timezone
Timezone is also set as a symbolic link from /etc/localtime to the correct timezone file in /usr/share/zoneinfo/
date Show current date and time
date -d "9999 days ago" Show a different date
date -d "1970/01/01 + 14662" Convert number of days since 1 January 1970 (e.g. 14662) in a canonical date
date +"%F %H:%M:%S" Show date in the format specified
date -s "20130305 23:30:00" Set the date
date 030523302013 Set the date in the format MMDDhhmmYYYY
ntpd NTP daemon, keeps the clock in sync with Internet time servers
ntpd -q Synchronize the time once and quit
ntpd -g Force NTP to start even if clock is off by more than the panic threshold (1000 secs)
ntpd -n -g -q Start NTP as a non-daemon, force set the clock, and quit
ntpq -p [server] Query the time server for a list of peers
ntpdate [server] Synchronizes the clock with the specified time server
ntpdate -b [server] Brutally set the clock, without waiting for a slow adjusting
ntpdate -q [server] Query the time server without setting the clock
hwclock --show hwclock -r Show the hardware clock
hwclock --hctosys hwclock -s Set the system time from the hardware clock
hwclock --systohc hwclock -w Set the hardware clock from system time
hwclock --utc Indicate that the hardware clock is kept in Coordinated Universal Time
hwclock --localtime Indicate that the hardware clock is kept in local time
© Daniele Raffo www.crans.org/~raffo 07/05/2013

Linux Professional Institute 26/39 Logging
Logging
Syslog logging facility:syslogdklogd
Daemon logging events from user processes
Daemon logging events from kernel processes
/etc/syslog.conf
# facility.level action*.info;mail.none;authpriv.none /var/log/messagesauthpriv.* /var/log/securemail.* /var/log/maillog*.alert root*.emerg *local5.* @10.7.7.7local7.* /var/log/boot.log
FacilityCreator of the message
LevelSeverity of the message
ActionDestination of the message
auth or security †authprivcrondaemonkernlprmailmark (for syslog internal use)newssysloguseruucplocal0 ... local7 (custom)
emerg or panic † (highest)alertcriterr or error †
warning or warn †noticeinfodebug (lowest)
none (facility disabled)
filename
@hostname
user1,user2,user3
*
message is written into a logfile
message is sent to a logger server(via UDP port 514)
message is sent to users' consoles
message is sent to all logged-in users' consoles
† deprecated
logger -p auth.info "Message" Send a message to syslogd with the specified facility and priority
man 3 syslog Syslog manpage listing facilities and levels
logrotate Rotate logs (by gzipping, renaming, and eventually deleting old logfiles) according to /etc/logrotate.conf
tail -f /var/log/messages Print the last lines of a file, moving forward as the file grows (useful to read logs in real-time)
zgrep [grep options] [file] Grep search in a gzipped file
zcat /var/log/messages.1.gz Print a gzipped file on stdout
/var/log/messages /var/log/syslog /var/log/kern.log
System and kernel logs
© Daniele Raffo www.crans.org/~raffo 07/05/2013

Linux Professional Institute 27/39 E-mail
Examples of MTAs: Sendmail, Exim, Postfix, qmail
mail -s "Subject" -c "[email protected]" < body Send a mail message
~/.forward Specifies one or more mail addresses to forward the user's mail to
/etc/aliases/etc/mail/aliases
Aliases database for users on the local machine; each line is on the form alias: user
newaliasessendmail -bi Update the aliases database (must be run after any change)
/var/spool/mail/user Inbox for user on the local machine
/var/log/mail.log (Debian)
/var/log/maillog (Red Hat)Mail logs
Exim (MTA)
mailqexim4 -bp Examine the mail queue
exim4 -M [message id] Attempt delivery of message
exim4 -Mrm [message id] Remove a message from the mail queue
exim4 -Mvh [message id] See the headers of a message in the mail queue
exim4 -Mvb [message id] See the body of a message in the mail queue
exim4 -Mvc [message id] See a message in the mail queue
exim4 -qf [domain] Force a queue run
exim4 -Rff [domain] Attempt delivery of all queued messages for a domain
exim4 -bV Show version and other info
exinext Give the times of the next queue runs
exigrep Search through Exim logfiles
exicyclog Rotate Exim logfiles
© Daniele Raffo www.crans.org/~raffo 07/05/2013
MUA (Mail User Agent)
mailclient of sender
MTA (Mail Transfer Agent)
SMTP server of sender
MTA (Mail Transfer Agent)
remote host
MDA (Mail Delivery Agent)
mailserver of recipient
MUA (Mail User Agent)
mailclient of recipient
Linux Professional Institute 28/39 Printing
Printing
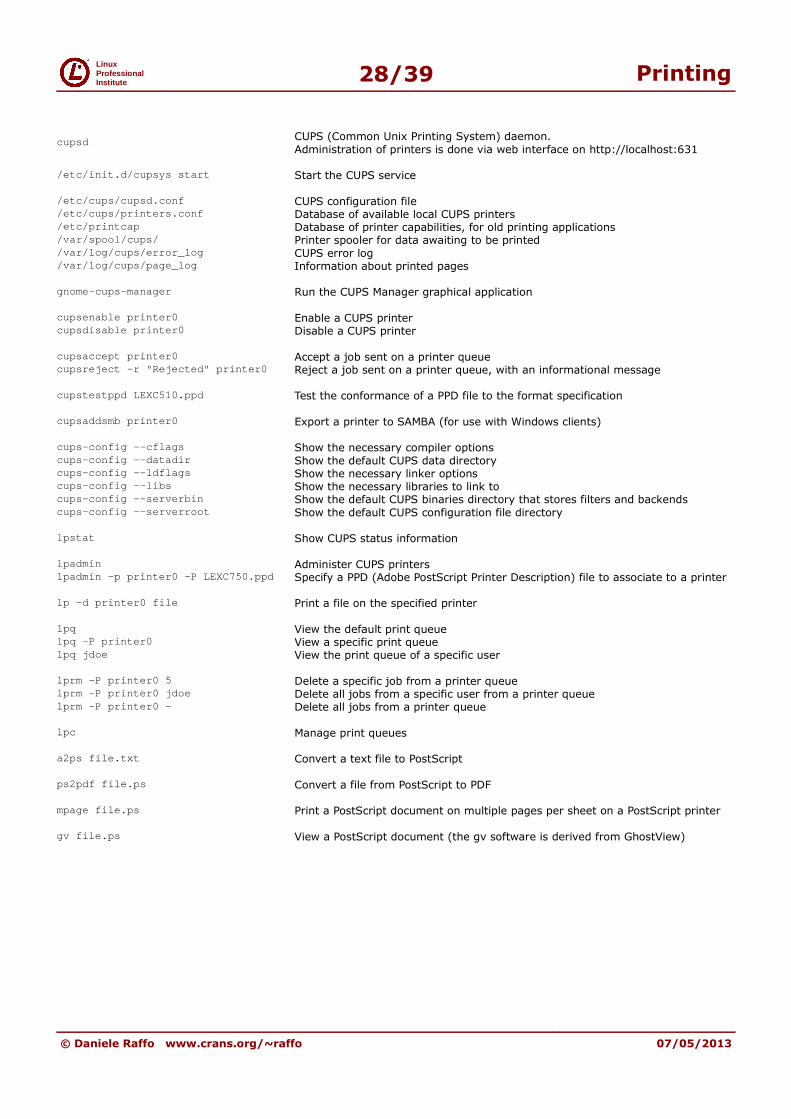
cupsd CUPS (Common Unix Printing System) daemon.
Administration of printers is done via web interface on http://localhost:631
/etc/init.d/cupsys start Start the CUPS service
/etc/cups/cupsd.conf CUPS configuration file/etc/cups/printers.conf Database of available local CUPS printers/etc/printcap Database of printer capabilities, for old printing applications/var/spool/cups/ Printer spooler for data awaiting to be printed/var/log/cups/error_log CUPS error log/var/log/cups/page_log Information about printed pages
gnome-cups-manager Run the CUPS Manager graphical application
cupsenable printer0 Enable a CUPS printer cupsdisable printer0 Disable a CUPS printer
cupsaccept printer0 Accept a job sent on a printer queuecupsreject -r "Rejected" printer0 Reject a job sent on a printer queue, with an informational message
cupstestppd LEXC510.ppd Test the conformance of a PPD file to the format specification
cupsaddsmb printer0 Export a printer to SAMBA (for use with Windows clients)
cups-config --cflags Show the necessary compiler optionscups-config --datadir Show the default CUPS data directorycups-config --ldflags Show the necessary linker optionscups-config --libs Show the necessary libraries to link tocups-config --serverbin Show the default CUPS binaries directory that stores filters and backendscups-config --serverroot Show the default CUPS configuration file directory
lpstat Show CUPS status information
lpadmin Administer CUPS printerslpadmin -p printer0 -P LEXC750.ppd Specify a PPD (Adobe PostScript Printer Description) file to associate to a printer
lp -d printer0 file Print a file on the specified printer
lpq View the default print queuelpq -P printer0 View a specific print queuelpq jdoe View the print queue of a specific user
lprm -P printer0 5 Delete a specific job from a printer queuelprm -P printer0 jdoe Delete all jobs from a specific user from a printer queuelprm -P printer0 - Delete all jobs from a printer queue
lpc Manage print queues
a2ps file.txt Convert a text file to PostScript
ps2pdf file.ps Convert a file from PostScript to PDF
mpage file.ps Print a PostScript document on multiple pages per sheet on a PostScript printer
gv file.ps View a PostScript document (the gv software is derived from GhostView)
© Daniele Raffo www.crans.org/~raffo 07/05/2013

Linux Professional Institute 29/39 Network addressing
Network addressing
IPv4 IPv6
193.22.33.44
32-bitdivised in 4 octects
(dotted-quad)
4 billion addresses
2130:0000:0000:0000:0007:0040:15bc:235f
2130:0:0:0:7:40:15bc:235f
2130::7:40:15bc:235f
128-bitdivised in 8 16-bit sections
3 × 1038 addresses
IPv4 classful addressing
Address range Prefix Number of addresses Reference
Classful
Class A (Unicast) 0.0.0.0 – 127.255.255.255
first octet: 0XXX XXXX
/8 128 networks ×
16,777,216 addresses
RFC 791
Class B (Unicast) 128.0.0.0 – 191.255.255.255
first octet: 10XX XXXX
/16 16,384 networks ×
65,536 addresses
RFC 791
Class C (Unicast) 192.0.0.0 – 223.255.255.255
first octet: 110X XXXX
/24 2,097,152 networks ×
256 addresses
RFC 791
Class D (Multicast) 224.0.0.0 – 239.255.255.255
first octet: 1110 XXXX
/4 268,435,456 RFC 3171
Class E (Experimental) 240.0.0.0 – 255.255.255.255
first octet: 1111 XXXX
/4 268,435,456 RFC 1166
Private
Private Class A 10.0.0.0 – 10.255.255.255 10/8 16,777,216 RFC 1918
Private Class B 172.16.0.0 – 172.31.255.255 172.16/12 1,048,576 RFC 1918
Private Class C 192.168.0.0 – 192.168.255.255 192.168/16 65,536 RFC 1918
Reserved
Source 0.0.0.0 – 0.255.255.255 0/8 16,777,216 RFC 1700
Loopback 127.0.0.0 – 127.255.255.255 127/8 16,777,216 RFC 1700
Autoconf 169.254.0.0 – 169.254.255.255 169.254/16 65,536 RFC 3330
TEST-NET 192.0.2.0 – 192.0.2.255 192.0.2/24 256 RFC 3330
6to4 relay anycast 192.88.99.0 – 192.88.99.255 192.88.99/24 256 RFC 3068
Device benchmarks 198.18.0.0 – 198.19.255.255 198.18.0.0/15 131,072 RFC 2544
© Daniele Raffo www.crans.org/~raffo 07/05/2013

Linux Professional Institute 30/39 Subnetting
Subnetting
VLSM chart - Last octet subnetting
Prefix: /24
Netmask: .0
000000001 subnet
254 hosts each
254 total hosts
Prefix: /25
Netmask: .128
100000002 subnets
126 hosts each
252 total hosts
Prefix: /26
Netmask: .192
110000004 subnets
62 hosts each
248 total hosts
Prefix: /27
Netmask: .224
111000008 subnets
30 hosts each
240 total hosts
Prefix: /28
Netmask: .240
1111000016 subnets
14 hosts each
224 total hosts
Prefix: /29
Netmask: .248
1111100032 subnets
6 hosts each
192 total hosts
Prefix: /30
Netmask: .252
1111110064 subnets
2 hosts each
128 total hosts
.0
.0
.0
.0
.0
.0.0
.4
.8.8
.12
.16
.16.16
.20
.24.24
.28
.32
.32
.32.32
.36
.40.40
.44
.48
.48.48
.52
.56.56
.60
.64
.64
.64
.64.64
.68
.72.72
.76
.80
.80.80
.84
.88.88
.92
.96
.96
.96.96
.100
.104.104
.108
.112
.112.112
.116
.120.120
.124
.128
.128
.128
.128
.128.128
.132
.136.136
.140
.144
.144.144
.148
.152.152
.156
.160
.160
.160.160
.164
.168.168
.172
.176
.176.176
.180
.184.184
.188
.192
.192
.192
.192.192
.196
.200.200
.204
.208
.208.208
.212
.216.216
.220
.224
.224
.224.224
.228
.232.232
.236
.240
.240.240
.244
.248.248
.252
Each block of a column identifies a subnet, whose range of valid hosts addresses is [network address +1 — broadcast address -1] inclusive.
The network address of the subnet is the number shown inside a block.
The broadcast address of the subnet is the network address of the block underneath -1 or, for the bottom block, .255.
© Daniele Raffo www.crans.org/~raffo 07/05/2013

Linux Professional Institute 31/39 Network services
Network services
Well-known ports
Port number Service
20 TCP FTP (data)
21 TCP FTP (control)
22 TCP SSH
23 TCP Telnet
25 TCP SMTP
53 TCP/UDP DNS
67 UDP BOOTP/DHCP (server)
68 UDP BOOTP/DHCP (client)
80 TCP HTTP
110 TCP POP3
119 TCP NNTP
139 TCP/UDP Microsoft NetBIOS
143 TCP IMAP
161 UDP SNMP
443 TCP HTTPS
465 TCP SMTP over SSL
993 TCP IMAPS
995 TCP POP3S
1-1023:1024-65535:
privileged portsunprivileged ports
used server-sideused client-side
The well-known ports are listed in /etc/services
Protocol stack models
© Daniele Raffo www.crans.org/~raffo 07/05/2013
Physical
Data LinkNetwork Access
Network Internet
Transport Transport
Session
Presentation
ISO/OSI TCP/IP
1
2
3
4
5
6
7 Application
Application
Ethernet, Wi-Fi, PPP, ...
IPv4, IPv6, ICMP, ...
TCP, UDP, ...
HTTP, SMTP, POP, SSH, ...

Linux Professional Institute 32/39 Network tools
Network tools
dig example.org (most powerful)host example.orgnslookup example.org (deprecated)
Perform a DNS lookup for the specified domain or hostname
dig @10.7.7.7 -t MX example.org Perform a DNS lookup for the MX record of the domain example.org, querying nameserver 10.7.7.7
dig -x 192.0.32.8 Perform a reverse lookup on the IP address 192.0.32.8
host example.org 10.7.7.7 Perform a DNS lookup for the domain example.org, querying nameserver 10.7.7.7
whois example.org Query the WHOIS service for a Internet resource, usually a domain name
ping 192.0.32.8Test reachability and measure the round-trip time to a remote host (by sending an ICMP ECHO_REQUEST datagram and expecting an ICMP
ECHO_RESPONSE)
traceroute 192.0.32.8tracepath 192.0.32.8 Print the route packets trace to a remote host
telnet 192.0.32.8 23 Establish a TELNET connection to host 192.0.32.8 on port 23
(if port is omitted, use default port 23)
ftp 192.0.32.8 Establish an interactive FTP connection with a host
wget --recursive --no-clobber \--page-requisites –html-extension \ --convert-links --domains example.org \--no-parent www.example.org/foobar
Download a whole website www.example.org/foobar
© Daniele Raffo www.crans.org/~raffo 07/05/2013

Linux Professional Institute 33/39 Network scanning
Network scanning
netstat Display network connections
netstat –-tcp Display active TCP connections
netstat -a Display all listening and non-listening sockets
netstat -n Display network connections, without resolving hostnames or portnames
netstat -p Display network connections, with PID and name of program to which each socket belongs
netstat -i Display network interfaces
netstat -s Display protocol statistics
netstat -r Display kernel routing tables (equivalent to route -en )
nmap 192.0.32.8nmap -sS 192.0.32.8 Scan for open ports (TCP SYN scan by default) on remote host
nmap -sP 192.0.32.8 Do a ping sweep on remote host
nmap -sU 192.0.32.8 Scan UDP ports on remote hosts
nmap -p 1-65535 192.0.32.8 Scan all ports (1-65535) on remote host, not only the common ports
nmap -sV 192.0.32.8 Do a service and version scan on open ports
nmap -O 192.0.32.8 Find which operating system is running on remote host (OS fingerprinting)
tcpdump ip host 10.3.3.3 tcp port 25 Sniff network packets on TCP port 25 from and to the specified host
tcpdump ether host '45:67:89:ab:cd:ef' Sniff traffic from and to the network interface with that MAC address
lsof List all open files
lsof -u jdoe List all files currently open by a user
lsof -i List open files and their sockets (equivalent to netstat -anp )
lsof [email protected] List connections of local processes to remote host 10.2.2.2
iptraf IP LAN monitor (ncurses GUI)
© Daniele Raffo www.crans.org/~raffo 07/05/2013
Linux Professional Institute 34/39 Net config files
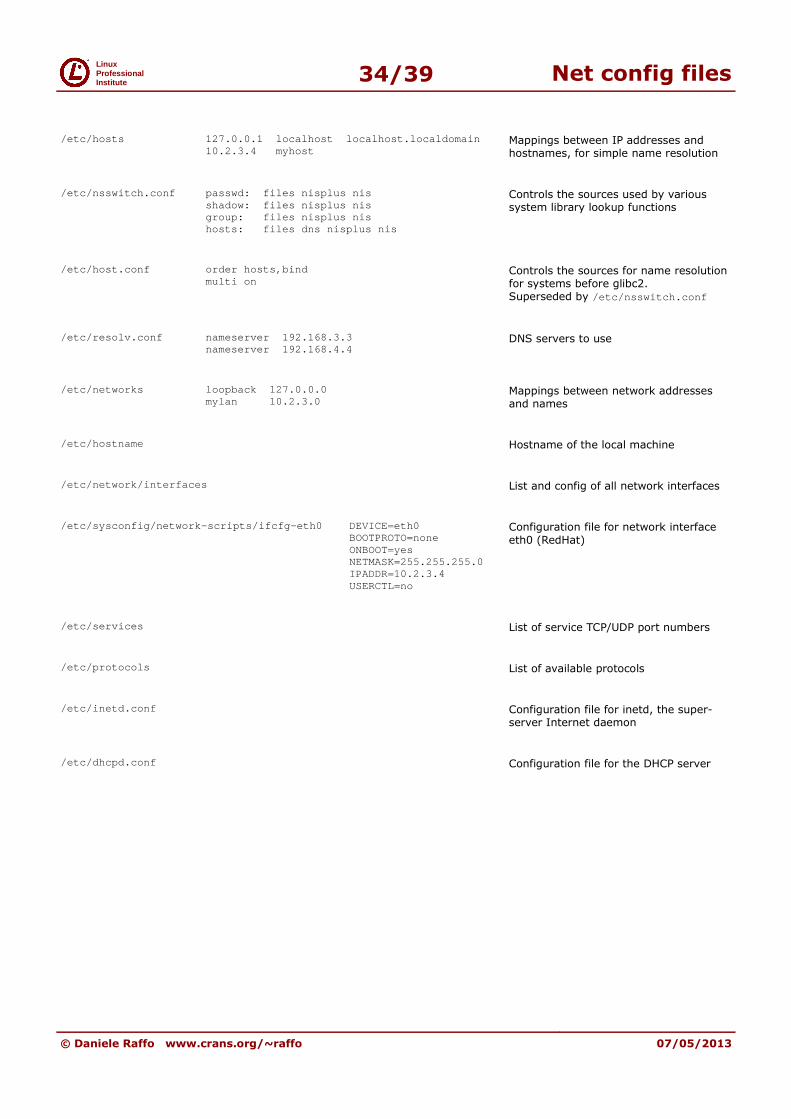
Net config files
/etc/hosts 127.0.0.1 localhost localhost.localdoma in10.2.3.4 myhost
Mappings between IP addresses and hostnames, for simple name resolution
/etc/nsswitch.conf passwd: files nisplus nisshadow: files nisplus nisgroup: files nisplus nishosts: files dns nisplus nis
Controls the sources used by various system library lookup functions
/etc/host.conf order hosts,bindmulti on
Controls the sources for name resolution for systems before glibc2. Superseded by /etc/nsswitch.conf
/etc/resolv.conf nameserver 192.168.3.3nameserver 192.168.4.4
DNS servers to use
/etc/networks loopback 127.0.0.0mylan 10.2.3.0
Mappings between network addresses and names
/etc/hostname Hostname of the local machine
/etc/network/interfaces List and config of all network interfaces
/etc/sysconfig/network-scripts/ifcfg-eth0 DEVICE=eth 0BOOTPROTO=noneONBOOT=yesNETMASK=255.255.255.0IPADDR=10.2.3.4USERCTL=no
Configuration file for network interface
eth0 (RedHat)
/etc/services List of service TCP/UDP port numbers
/etc/protocols List of available protocols
/etc/inetd.conf Configuration file for inetd, the super-server Internet daemon
/etc/dhcpd.conf Configuration file for the DHCP server
© Daniele Raffo www.crans.org/~raffo 07/05/2013

Linux Professional Institute 35/39 Net config commands
Net config commands
ifconfig -a Display all configured network interfaces
ifconfig eth0 Display configuration of eth0
ifconfig eth0 upifup eth0 Activate eth0
ifconfig eth0 down ifdown eth0 Shut down eth0
ifconfig eth0 10.2.3.4 netmask 255.255.255.0 broadc ast 10.2.3.255 Configure IP address of eth0
ifconfig eth0 hw ether 45:67:89:ab:cd:ef Configure MAC address of eth0
dhclientpump Request an IP address via DHCP
iwlist wlan0 scanning Scan for wireless networks
routeroute -enroute -F
Display IP routing table
Gateway: [host] gateway name
* no gateway
- rejected route
Flags:U route is up
G use gateway
H target is host
! rejected route
D dynamically installed by daemon
M modified from routing daemon
R reinstate route for dynamic routing
route -C Display kernel routing cache
route add default gw 10.2.3.1 eth0 Add a default route via eth0
route add -host 10.7.0.9 gw 10.7.0.1 Add a route for a host
route add -net 10.7.0.0 netmask 255.255.0.0 gw 10.7 .0.1 Add a route for a network
route del -host 10.7.0.66 gw 10.7.0.1 Delete a route for a host
arp Show the ARP cache table
arp 10.7.0.9 Show the ARP cache for a host
arp -s 10.7.0.9 01:23:45:67:89:ab Add a new ARP entry for a host
arp -d 10.7.0.9 Delete a ARP entry
hostname Get or set the hostname (stored in /etc/hostname )
/etc/init.d/networking/etc/init.d/network Initialize network services
© Daniele Raffo www.crans.org/~raffo 07/05/2013
Linux Professional Institute 36/39 SSH
SSH
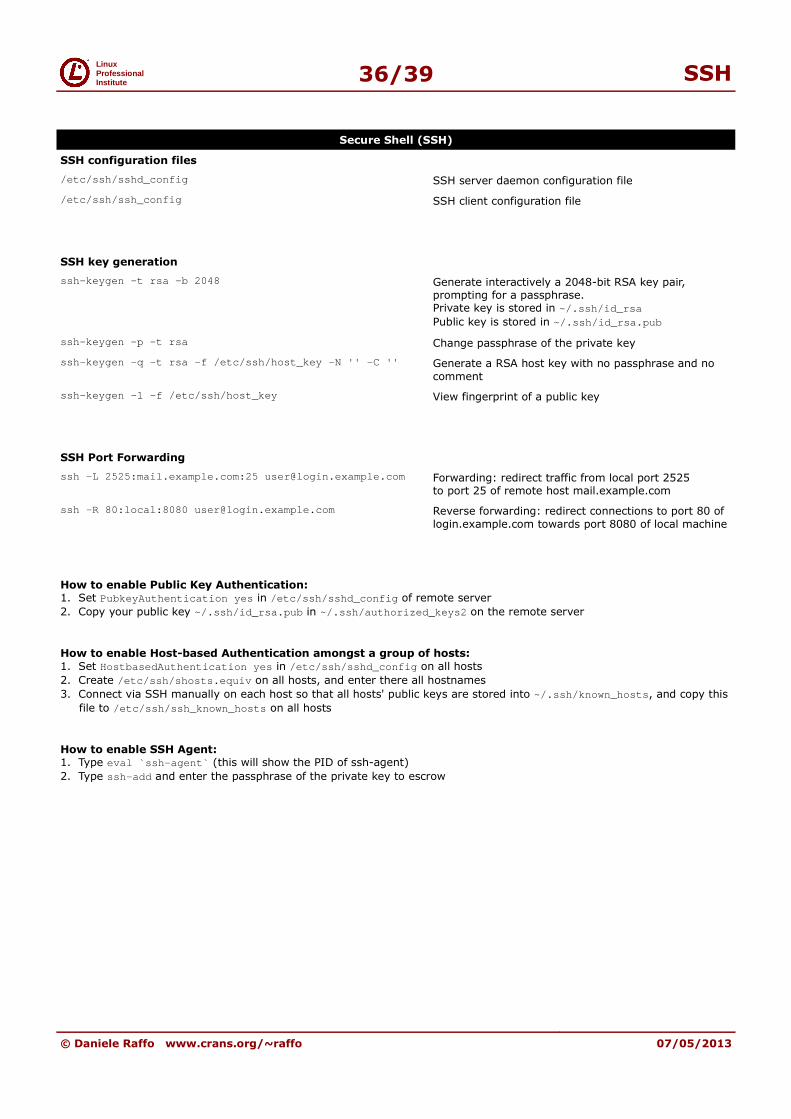
Secure Shell (SSH)
SSH configuration files
/etc/ssh/sshd_config SSH server daemon configuration file
/etc/ssh/ssh_config SSH client configuration file
SSH key generation
ssh-keygen -t rsa -b 2048 Generate interactively a 2048-bit RSA key pair, prompting for a passphrase.Private key is stored in ~/.ssh/id_rsaPublic key is stored in ~/.ssh/id_rsa.pub
ssh-keygen -p -t rsa Change passphrase of the private key
ssh-keygen -q -t rsa -f /etc/ssh/host_key -N '' -C '' Generate a RSA host key with no passphrase and no
comment
ssh-keygen -l -f /etc/ssh/host_key View fingerprint of a public key
SSH Port Forwarding
ssh -L 2525:mail.example.com:25 [email protected]. com Forwarding: redirect traffic from local port 2525to port 25 of remote host mail.example.com
ssh -R 80:local:8080 [email protected] Reverse forwarding: redirect connections to port 80 of
login.example.com towards port 8080 of local machine
How to enable Public Key Authentication:1. Set PubkeyAuthentication yes in /etc/ssh/sshd_config of remote server
2. Copy your public key ~/.ssh/id_rsa.pub in ~/.ssh/authorized_keys2 on the remote server
How to enable Host-based Authentication amongst a group of hosts:
1. Set HostbasedAuthentication yes in /etc/ssh/sshd_config on all hosts
2. Create /etc/ssh/shosts.equiv on all hosts, and enter there all hostnames
3. Connect via SSH manually on each host so that all hosts' public keys are stored into ~/.ssh/known_hosts , and copy this
file to /etc/ssh/ssh_known_hosts on all hosts
How to enable SSH Agent:1. Type eval `ssh-agent` (this will show the PID of ssh-agent)
2. Type ssh-add and enter the passphrase of the private key to escrow
© Daniele Raffo www.crans.org/~raffo 07/05/2013

Linux Professional Institute 37/39 GPG
GPG
GNU Privacy Guard (GPG)
gpg --gen-key Generate a key pair
gpg --import alice.asc Import Alice's public key into your keyring
gpg --list-keys List the keys contained into your keyring
gpg --list-secret-keys List your private keys contained into your keyring
gpg --list-public-keys List the public keys contained into your keyring
gpg --export -o keyring_backup.gpg Export your whole keyring to a file
gpg --export-secret-key -a "You" -o private.key Export your private key (username You) to a file
gpg --export-public-key -a "Alice" -o alice.pub Export Alice's public key to a file
gpg --edit-key "Alice" Sign Alice's public key
gpg -e -u "You" -r "Alice" file.txt Encrypt a file (to Alice i.e. with Alice's public key), signing it with your private key
gpg -d file.txt.gpg Decrypt a file (with your own public key)
© Daniele Raffo www.crans.org/~raffo 07/05/2013

Linux Professional Institute 38/39 OpenSSL
OpenSSL
openssl x509 -text -in certif.crt -noout Read a certificate
openssl req -text -in request.csr -noout Read a Certificate Signing Request
openssl req -new -key private.key -out request.csr Generate a Certificate Signing Request for the
public key of a key pair
openssl req -new -nodes -keyout newprivate.key \ -out request.csr -newkey rsa:2048
Create a 2048-bit RSA key pair and generates a Certificate Signing Request for it
openssl ca -config ca.conf -in request.csr \-out certif.cer -days validity -verbose
Sign a certificate
openssl ca -config ca.conf -gencrl -revoke certif.c er \-crl_reason why
Revoke a certificate
openssl ca -config ca.conf -gencrl -out crlist.crl Generate a Certificate Revocation List containing
all revoked certificates so far
openssl x509 -in certif.pem -outform DER \-out certif.der
Convert a certificate from PEM to DER
openssl pkcs12 -export -in certif.pem \-inkey private.key -out certif.pfx -name friendlyna me
Convert a certificate from PEM to PKCS#12 including the private key
openssl dgst -hashfunction -out file.hash file Generate the digest of a file
openssl dgst -hashfunction file | cmp -b file.hash Verify the digest of a file (if there is no output, then digest verification is successful)
openssl dgst -hashfunction -sign private.key \-out file.sig file
Generate the signature of a file
openssl dgst -hashfunction -verify public.key \-signature file.sig file
Verify the signature of a file
openssl enc -e -cipher -in file -out file.enc -salt Encrypt a file
openssl enc -d -cipher -in file.enc -out file Decrypt a file
openssl genpkey -algorithm RSA -cipher 3des \ -pkeyopt rsa_keygen_bits:2048 -out key.pem
Generate a 2048-bit RSA key pair protected by TripleDES passphrase
openssl genrsa -des3 -out key.pem 2048 Generate a 2048-bit RSA key pair protected by
TripleDES passphrase (older versions of OpenSSL)
openssl pkey -text -in private.key -noout Examine a private key
openssl rsa -text -in private.key -noout Examine a private key (older versions of OpenSSL)
openssl pkey -in old.key -out new.key -cipher Change a private key's passphrase
openssl rsa -in old.key -out new.key -cipher Change a private key's passphrase (older versions of OpenSSL)
openssl s_client -connect www.website.com:443 > tmp file
openssl x509 -in tmpfile -text
Retrieve and inspect a certificate from a website
openssl list-message-digest-commands List all available hash functions
openssl list-cipher-commands List all available ciphers
© Daniele Raffo www.crans.org/~raffo 07/05/2013
CTRL C

Linux Professional Institute 39/39 Key bindings
Key bindings
Key Alternate key Function
Move cursor forward one char
Move cursor backward one char
Move cursor to beginning of line
Move cursor to end of line
Delete char to the left of cursor
Delete word to the left of cursor
Delete all chars to the left of cursor
Delete all chars to the right of cursor
Swap current char with previous char
Swap current word with previous word
Scroll up the buffer
Scroll down the buffer
Clear screen (same as clear )
Previous command in history
Next command in history
Reverse history search
Autocomplete file and directory names
Line feed
Carriage return
Pause trasfer to terminal
Resume transfer to terminal
Send a SIGTSTP to put the current job in background
Send a SIGINT to stop the current process
Send a EOF to current process (same as logout on shell prompt)
Reboot the machine (same as shutdown -r now )
Switch between text consoles
Switch between X Window consoles
Increase X Window screen resolution
Decrease X Window screen resolution
Change between X Window tasks
Reboot the X Window server
© Daniele Raffo www.crans.org/~raffo 07/05/2013
CTRL F RIGHT ARROW
CTRL B LEFT ARROW
CTRL A HOME
CTRL E END
CTRL H BACKSPACE
CTRL W
CTRL U
CTRL K
CTRL T
ESC T
SHIFT PAGE UP
SHIFT PAGE DOWN
CTRL L
CTRL P UP ARROW
CTRL N DOWN ARROW
CTRL R
TAB
CTRL J RETURN
CTRL M
CTRL S
CTRL Q
CTRL Z
CTRL C
CTRL D
CTRL ALT DEL
CTRL ALT F1 ... F6
CTRL ALT F7 ... F11
CTRL ALT +
CTRL ALT -
CTRL TAB
CTRL ALT BACKSPACE