LinkedIn Sales Navigator for Salesforce Installation Guide: Lightning View · Salesforce...
15
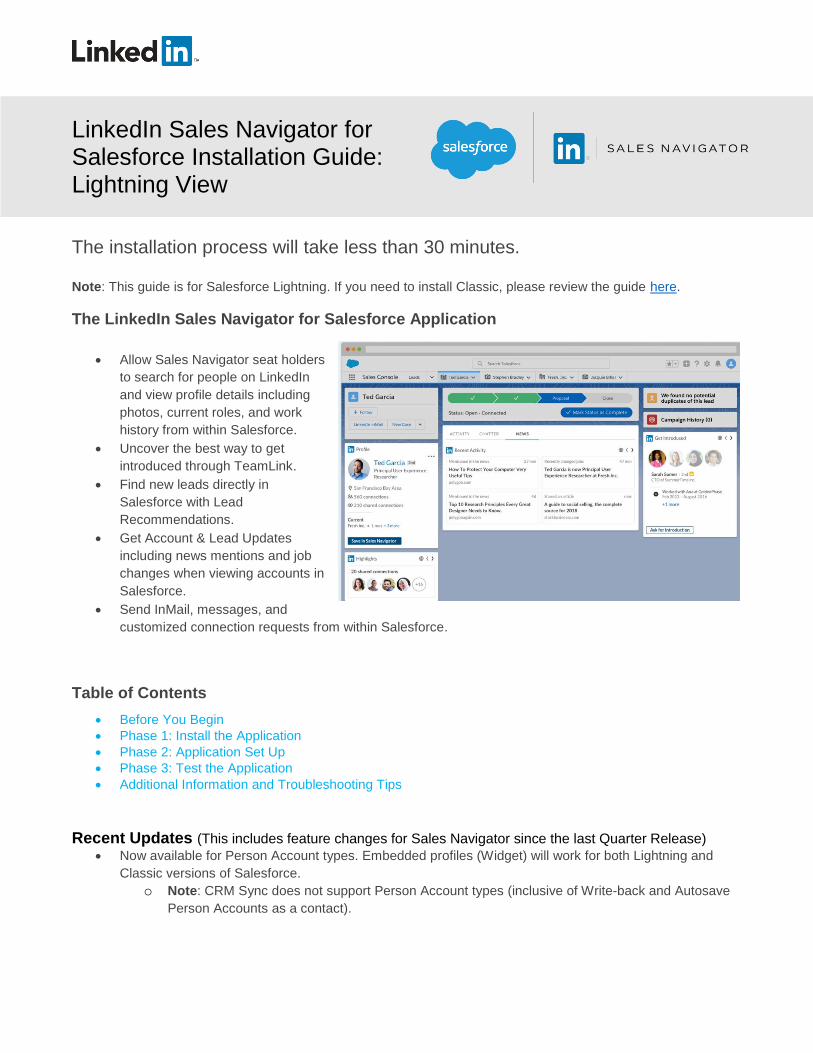
LinkedIn Sales Navigator for Salesforce Installation Guide: Lightning View The installation process will take less than 30 minutes. Note: This guide is for Salesforce Lightning. If you need to install Classic, please review the guide here. The LinkedIn Sales Navigator for Salesforce Application • Allow Sales Navigator seat holders to search for people on LinkedIn and view profile details including photos, current roles, and work history from within Salesforce. • Uncover the best way to get introduced through TeamLink. • Find new leads directly in Salesforce with Lead Recommendations. • Get Account & Lead Updates including news mentions and job changes when viewing accounts in Salesforce. • Send InMail, messages, and customized connection requests from within Salesforce. Table of Contents • Before You Begin • Phase 1: Install the Application • Phase 2: Application Set Up • Phase 3: Test the Application • Additional Information and Troubleshooting Tips Recent Updates (This includes feature changes for Sales Navigator since the last Quarter Release) • Now available for Person Account types. Embedded profiles (Widget) will work for both Lightning and Classic versions of Salesforce. o Note: CRM Sync does not support Person Account types (inclusive of Write-back and Autosave Person Accounts as a contact).
Transcript of LinkedIn Sales Navigator for Salesforce Installation Guide: Lightning View · Salesforce...
LinkedIn Sales Navigator for Salesforce Installation Guide: Lightning View
The installation process will take less than 30 minutes. Note: This guide is for Salesforce Lightning. If you need to install Classic, please review the guide here.
The LinkedIn Sales Navigator for Salesforce Application
• Allow Sales Navigator seat holders
to search for people on LinkedIn
and view profile details including
photos, current roles, and work
history from within Salesforce.
• Uncover the best way to get
introduced through TeamLink.
• Find new leads directly in
Salesforce with Lead
Recommendations.
• Get Account & Lead Updates
including news mentions and job
changes when viewing accounts in
Salesforce.
• Send InMail, messages, and
customized connection requests from within Salesforce.
Table of Contents
• Before You Begin
• Phase 1: Install the Application
• Phase 2: Application Set Up
• Phase 3: Test the Application
• Additional Information and Troubleshooting Tips
Recent Updates (This includes feature changes for Sales Navigator since the last Quarter Release)
• Now available for Person Account types. Embedded profiles (Widget) will work for both Lightning and
Classic versions of Salesforce.
o Note: CRM Sync does not support Person Account types (inclusive of Write-back and Autosave
Person Accounts as a contact).
KEY CALLOUTS
• Note: Installation of Sales Navigator will create new Record Types for Tasks and assign custom defaults. If
you do not have “Task” Record Types created, this can cause Record Types for Global Actions (e.g.
New Event, Log a Call, New Task, etc.) to default to "--Master--" which would remove existing Global
Actions from the Activities list.
• If after enablement you find that Global Actions are missing, please take the following steps:
o To Start this process, navigate to Objects and Fields in the Setup menu using “Quick Find”.
Next, click Object Manager followed by Task. From here, click on Record Types followed by
“New” in top right corner.
o Create a new Record Type labeled “Generic Task” or desired custom name. Make it Active
and Enable for desired profiles.
o Next, from the Setup menu “Quick Find”, navigate to User Interface and then click Global
Actions.
o Click “Edit” for each of the missing Global Actions, then click on the Record Type drop down
menu. Select the custom Generic Task you previously created and then Save.
• Note: If you previously created a custom or generic Task for Record Types, this should not have any
impact on you. Please double check to ensure custom Task is set as the default post installation of
Sales Navigator.
Before You Begin
• Please note that by installing this application, you are NOT enabling CRM Sync. To enable Sync,
please complete this installation and visit the admin settings within Sales Navigator.
• The application is only compatible with Enterprise, Performance, Unlimited, Developer and Professional
editions of Salesforce. (Note: This is NOT compatible with Salesforce1)
• Available for Leads, Contacts, Business Accounts, Person Accounts and Opportunities.
• You will need to be a Salesforce administrator to install the application.
• If you do not have My Domain enabled in your Account and would like to use the Lightning Page
Components you will need to enable My Domain (see Enable My Domain, below) before continuing to
support additional security requirements.
• You will need a LinkedIn account. Join now.
• You will need to sign your team up for LinkedIn Sales Navigator Team or Sales Navigator Enterprise
edition.
• We recommend having a Sales Navigator Administrator + Team Member seat to complete the installation,
however you may use a Sales Navigator Administrator seat.
• You will need to use a JavaScript enabled browser.
Note: To review the Sales Navigator for Salesforce application in the Salesforce app exchange please visit:
Sales Navigator for Salesforce.
Phase 1: Install the Application
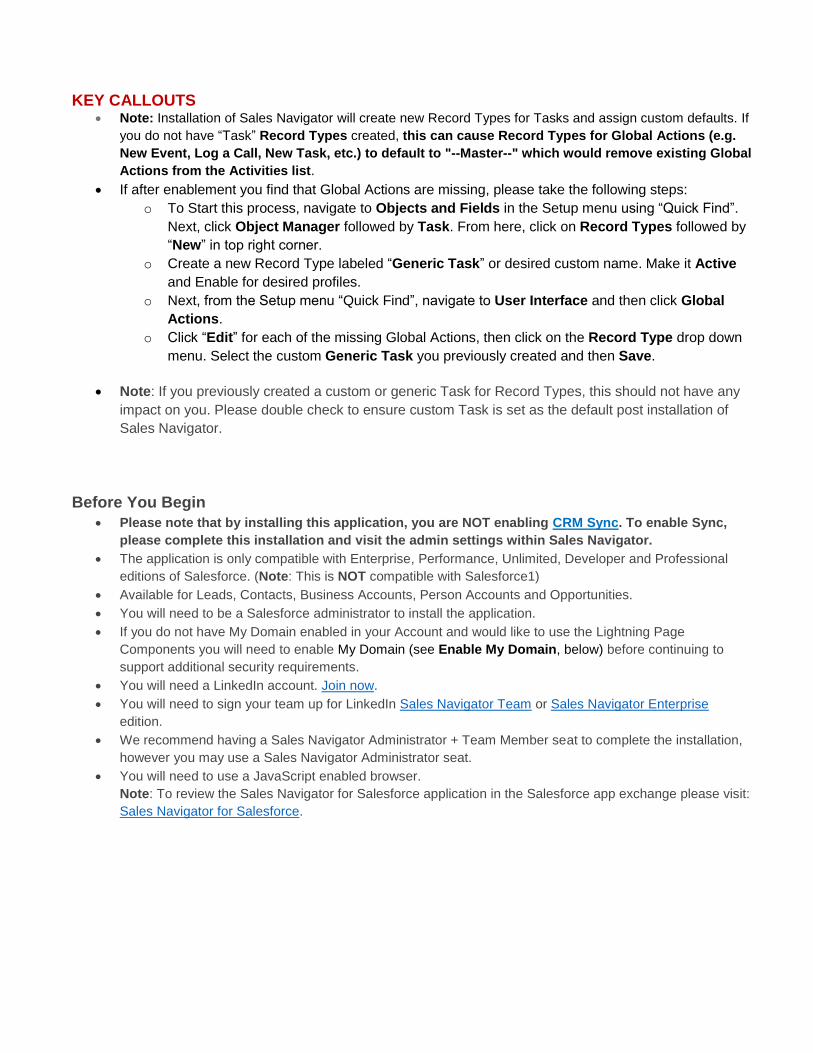
1. Download the latest version of Sales
Navigator for Salesforce and sandbox.
2. Choose a security level. We recommend
choosing, Grant access to all users
but you may wish to limit access to
certain profiles and users for whom you
have already provisioned Sales
Navigator Team licenses. Click Install.
• Note: Users will need a
provisioned Sales Navigator
Team or Enterprise account to
use the application.
3. You will see one of two screens:
a. An Install Complete screen will
appear. Move on to domain setup
steps below.
b. A Processing screen will appear.
You will be sent an email when the
installation completes, at which
point you can move on to Phase 2.
Note: If you get any errors during the installation process please take the needed steps to troubleshoot according to the error message.
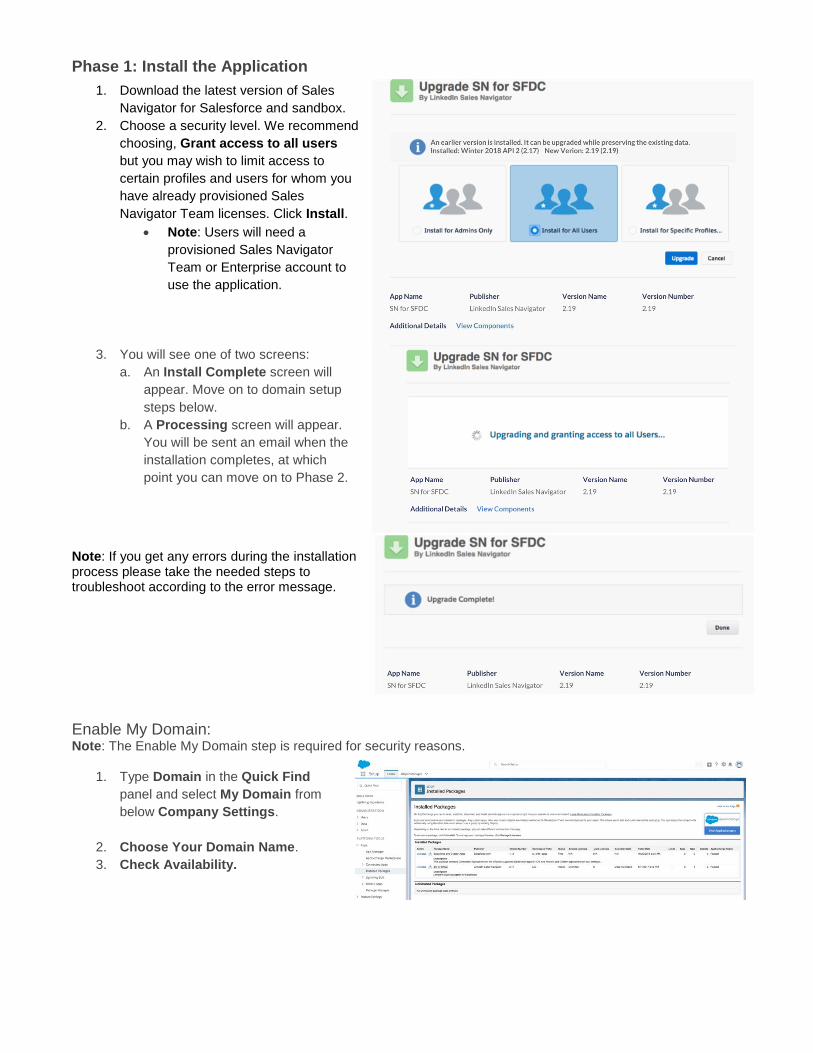
Enable My Domain: Note: The Enable My Domain step is required for security reasons.
1. Type Domain in the Quick Find
panel and select My Domain from
below Company Settings.
2. Choose Your Domain Name.
3. Check Availability.
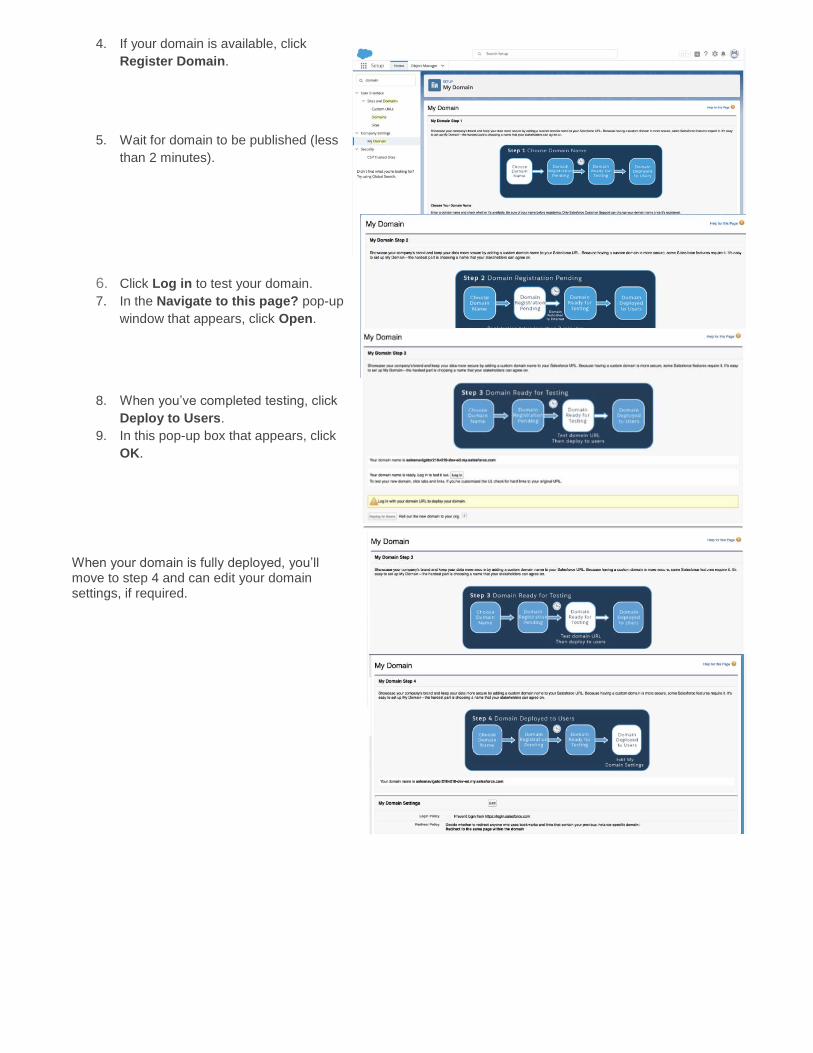
4. If your domain is available, click
Register Domain.
5. Wait for domain to be published (less
than 2 minutes).
6. Click Log in to test your domain.
7. In the Navigate to this page? pop-up
window that appears, click Open.
8. When you’ve completed testing, click
Deploy to Users.
9. In this pop-up box that appears, click
OK.
When your domain is fully deployed, you’ll move to step 4 and can edit your domain settings, if required.
Phase 2: Application Set Up
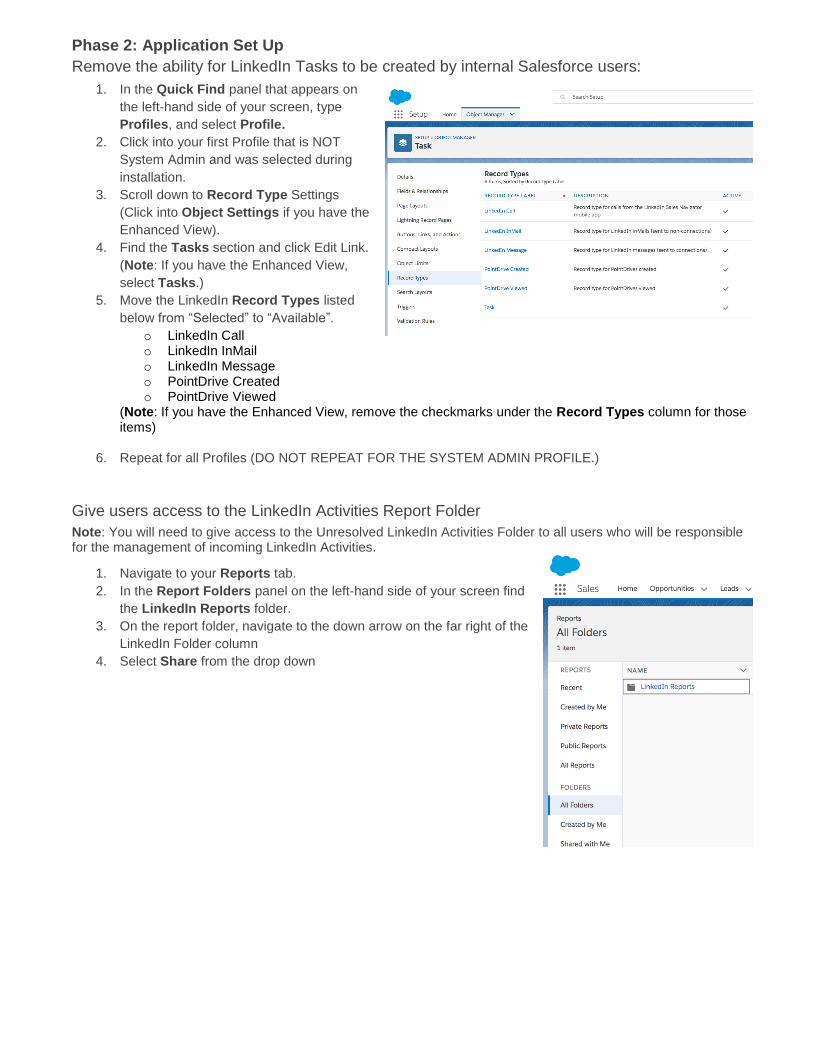
Remove the ability for LinkedIn Tasks to be created by internal Salesforce users:
1. In the Quick Find panel that appears on
the left-hand side of your screen, type
Profiles, and select Profile.
2. Click into your first Profile that is NOT
System Admin and was selected during
installation.
3. Scroll down to Record Type Settings
(Click into Object Settings if you have the
Enhanced View).
4. Find the Tasks section and click Edit Link.
(Note: If you have the Enhanced View,
select Tasks.)
5. Move the LinkedIn Record Types listed
below from “Selected” to “Available”.
o LinkedIn Call o LinkedIn InMail o LinkedIn Message o PointDrive Created o PointDrive Viewed
(Note: If you have the Enhanced View, remove the checkmarks under the Record Types column for those items)
6. Repeat for all Profiles (DO NOT REPEAT FOR THE SYSTEM ADMIN PROFILE.)
Give users access to the LinkedIn Activities Report Folder
Note: You will need to give access to the Unresolved LinkedIn Activities Folder to all users who will be responsible for the management of incoming LinkedIn Activities.
1. Navigate to your Reports tab.
2. In the Report Folders panel on the left-hand side of your screen find
the LinkedIn Reports folder.
3. On the report folder, navigate to the down arrow on the far right of the
LinkedIn Folder column
4. Select Share from the drop down
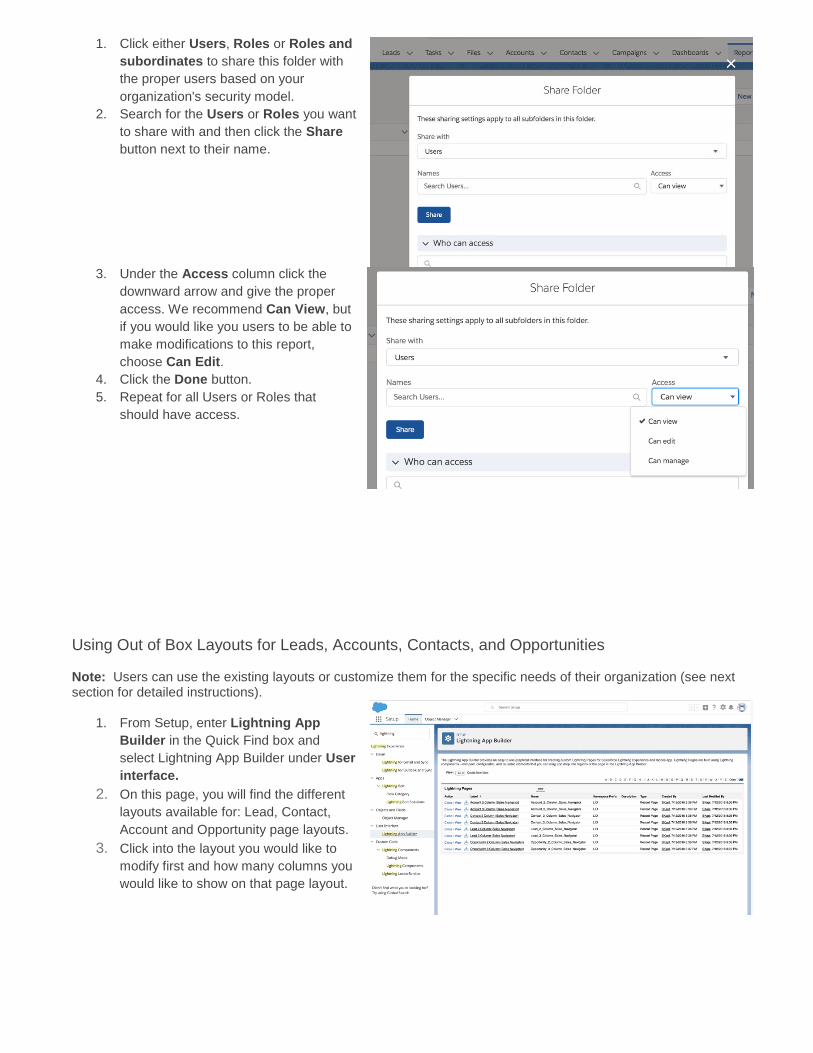
1. Click either Users, Roles or Roles and
subordinates to share this folder with
the proper users based on your
organization's security model.
2. Search for the Users or Roles you want
to share with and then click the Share
button next to their name.
3. Under the Access column click the
downward arrow and give the proper
access. We recommend Can View, but
if you would like you users to be able to
make modifications to this report,
choose Can Edit.
4. Click the Done button.
5. Repeat for all Users or Roles that
should have access.
Using Out of Box Layouts for Leads, Accounts, Contacts, and Opportunities Note: Users can use the existing layouts or customize them for the specific needs of their organization (see next section for detailed instructions).
1. From Setup, enter Lightning App
Builder in the Quick Find box and
select Lightning App Builder under User
interface.
2. On this page, you will find the different
layouts available for: Lead, Contact,
Account and Opportunity page layouts.
3. Click into the layout you would like to
modify first and how many columns you
would like to show on that page layout.
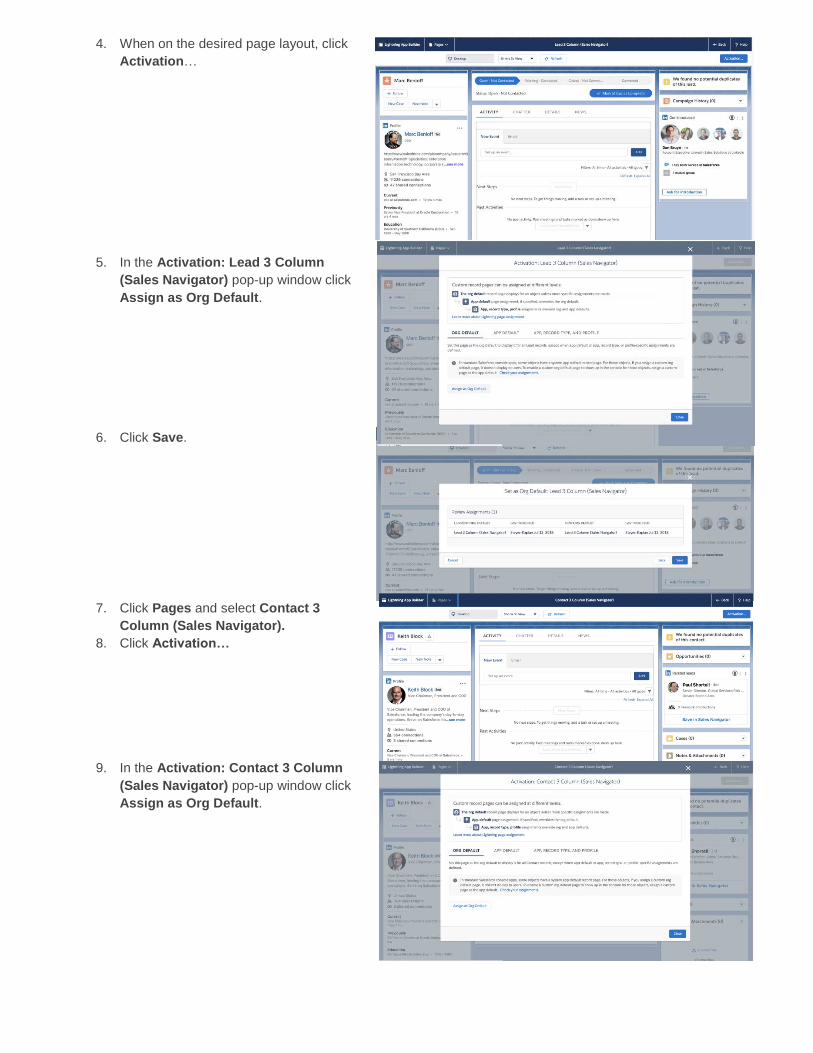
4. When on the desired page layout, click
Activation…
5. In the Activation: Lead 3 Column
(Sales Navigator) pop-up window click
Assign as Org Default.
6. Click Save.
7. Click Pages and select Contact 3
Column (Sales Navigator).
8. Click Activation…
9. In the Activation: Contact 3 Column
(Sales Navigator) pop-up window click
Assign as Org Default.
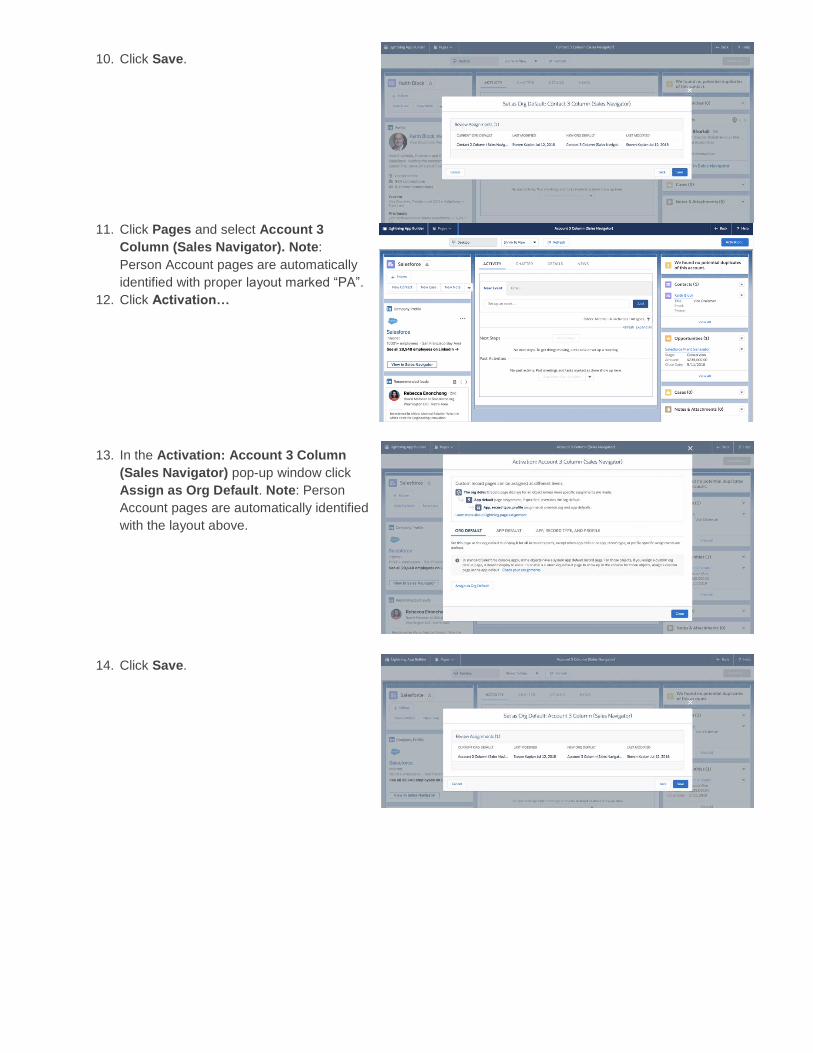
10. Click Save.
11. Click Pages and select Account 3
Column (Sales Navigator). Note:
Person Account pages are automatically
identified with proper layout marked “PA”.
12. Click Activation…
13. In the Activation: Account 3 Column
(Sales Navigator) pop-up window click
Assign as Org Default. Note: Person
Account pages are automatically identified
with the layout above.
14. Click Save.
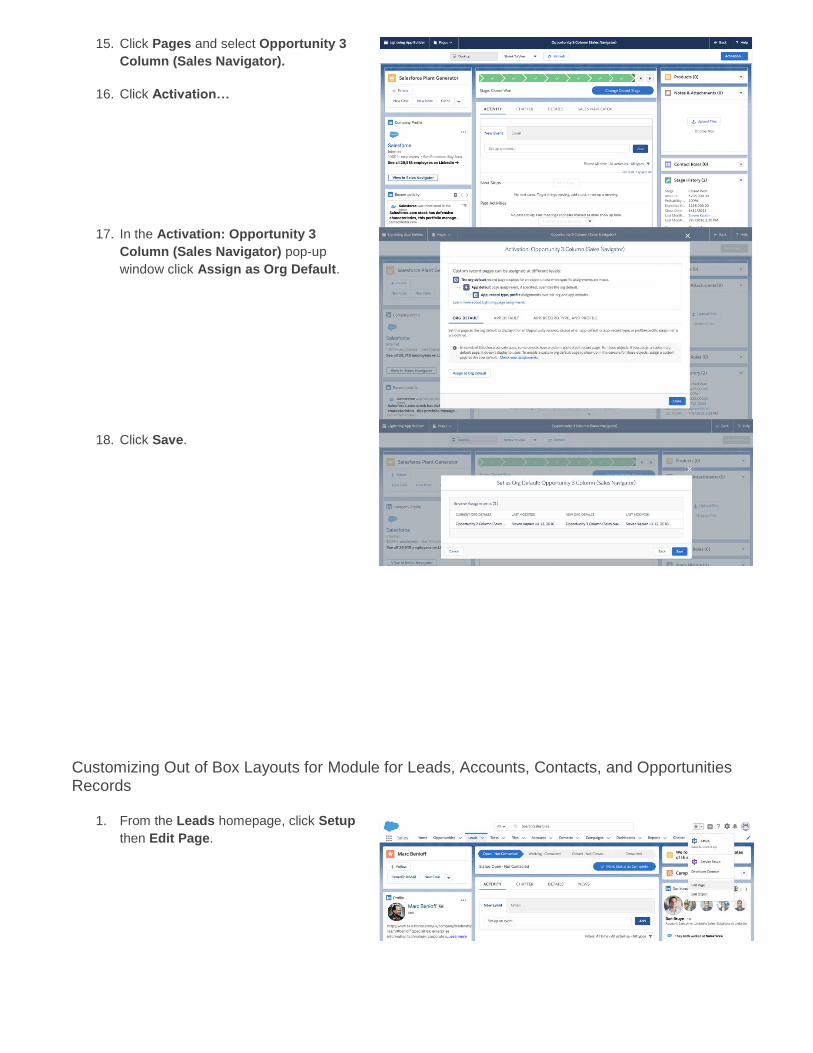
15. Click Pages and select Opportunity 3
Column (Sales Navigator).
16. Click Activation…
17. In the Activation: Opportunity 3
Column (Sales Navigator) pop-up
window click Assign as Org Default.
18. Click Save.
Customizing Out of Box Layouts for Module for Leads, Accounts, Contacts, and Opportunities Records
1. From the Leads homepage, click Setup
then Edit Page.
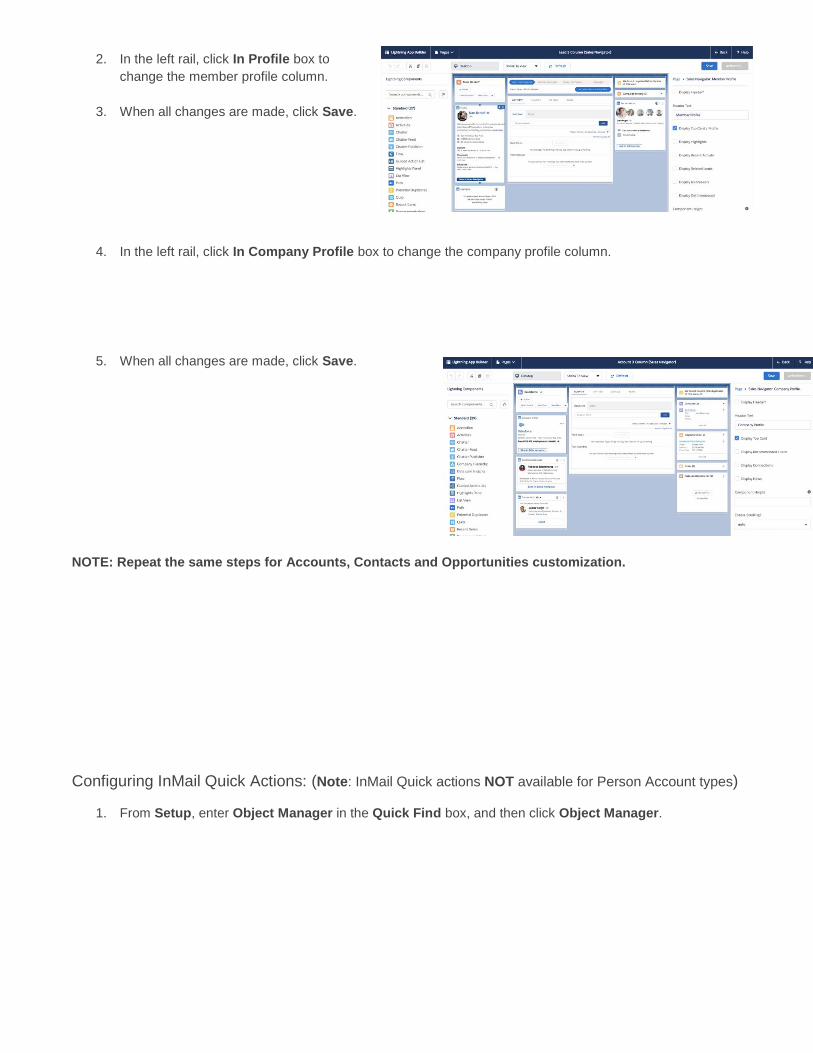
2. In the left rail, click In Profile box to
change the member profile column.
3. When all changes are made, click Save.
4. In the left rail, click In Company Profile box to change the company profile column.
5. When all changes are made, click Save.
NOTE: Repeat the same steps for Accounts, Contacts and Opportunities customization.
Configuring InMail Quick Actions: (Note: InMail Quick actions NOT available for Person Account types)
1. From Setup, enter Object Manager in the Quick Find box, and then click Object Manager.
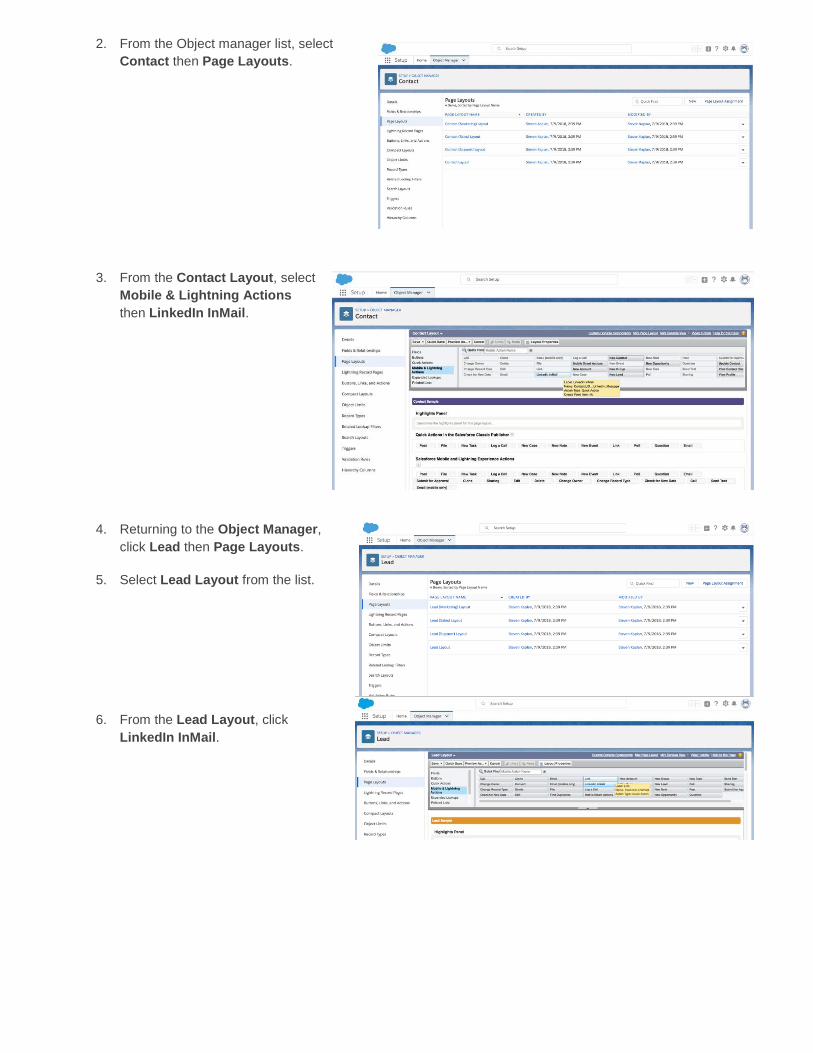
2. From the Object manager list, select
Contact then Page Layouts.
3. From the Contact Layout, select
Mobile & Lightning Actions
then LinkedIn InMail.
4. Returning to the Object Manager,
click Lead then Page Layouts.
5. Select Lead Layout from the list.
6. From the Lead Layout, click
LinkedIn InMail.
Phase 3: Test the Application
Congratulations!
You have finished installing and deploying the Sales Navigator for Salesforce application. Please ensure your team has been granted their LinkedIn Sales Navigator Team or Enterprise seats to view the application in Salesforce.
To view the Sales Navigator for Salesforce application, please go to a lead, contact, opportunity, or company record in Salesforce. For your first time viewing the application, you will be asked to login to your LinkedIn profile. Your LinkedIn login will not be required after your initial login. Your experience will match the initial images on Page 1. KEY CALLOUTS: As directed on page 2, Installation of Sales Navigator may have resulted in removal of previously used Global Actions. Please check to see if Global Actions (e.g. New Event, Log a Call, New Task, etc.) still appear in Lightning Experience Activities tab. If not, please reference page 2 or the following article to fix it: Global Actions Restore
NEXT STEP: We highly recommend you proceed to enabling the CRM Sync from within the Sales Navigator Admin settings. (Note: requires Sales Navigator Teams or Sales Navigator Enterprise). You may find further information here.
• Sync and write-back functionality is NOT supported with Person Account Types.
• Salesforce Professional Edition requires API Access Enabled in order for CRM Sync functionality to work
(an additional purchase may be required. Contact Salesforce for more details.)
CRM Sync for Sales Navigator:
• Automatically imports Accounts, Leads, and Contacts into Sales Navigator associated with open
Opportunities in your CRM.
• Saves information you create in Sales Navigator directly in your CRM, including InMails, Messages, and
Notes, with optional write-back.
• Enablement requires less than 10 minutes.
For further information regarding CRM application, CRM sync, and CRM security and technical documentation, along with using your CRM for Seat Management in Sales Navigator, please visit here.
If you have additional questions or require assistance, you can reach LinkedIn Sales Solutions support at https://www.linkedin.com/help/sales-navigator/ask
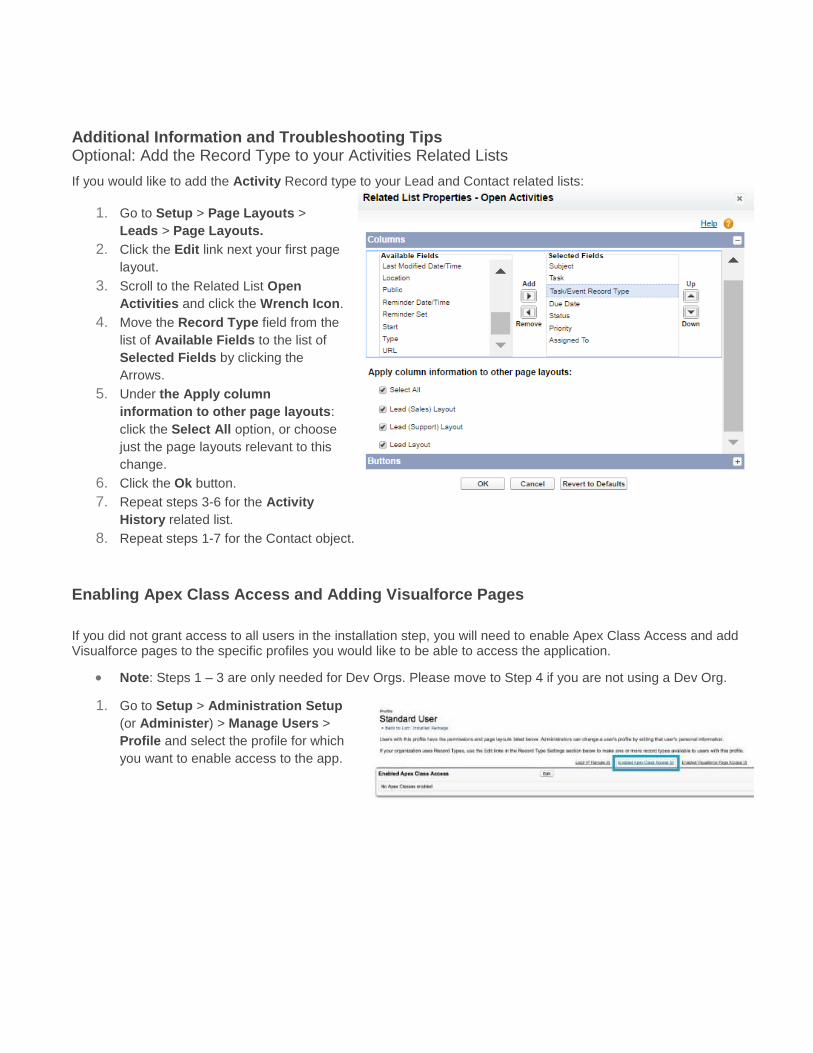
Additional Information and Troubleshooting Tips Optional: Add the Record Type to your Activities Related Lists
If you would like to add the Activity Record type to your Lead and Contact related lists:
1. Go to Setup > Page Layouts >
Leads > Page Layouts.
2. Click the Edit link next your first page
layout.
3. Scroll to the Related List Open
Activities and click the Wrench Icon.
4. Move the Record Type field from the
list of Available Fields to the list of
Selected Fields by clicking the
Arrows.
5. Under the Apply column
information to other page layouts:
click the Select All option, or choose
just the page layouts relevant to this
change.
6. Click the Ok button.
7. Repeat steps 3-6 for the Activity
History related list.
8. Repeat steps 1-7 for the Contact object.
Enabling Apex Class Access and Adding Visualforce Pages
If you did not grant access to all users in the installation step, you will need to enable Apex Class Access and add Visualforce pages to the specific profiles you would like to be able to access the application.
• Note: Steps 1 – 3 are only needed for Dev Orgs. Please move to Step 4 if you are not using a Dev Org.
1. Go to Setup > Administration Setup
(or Administer) > Manage Users >
Profile and select the profile for which
you want to enable access to the app.
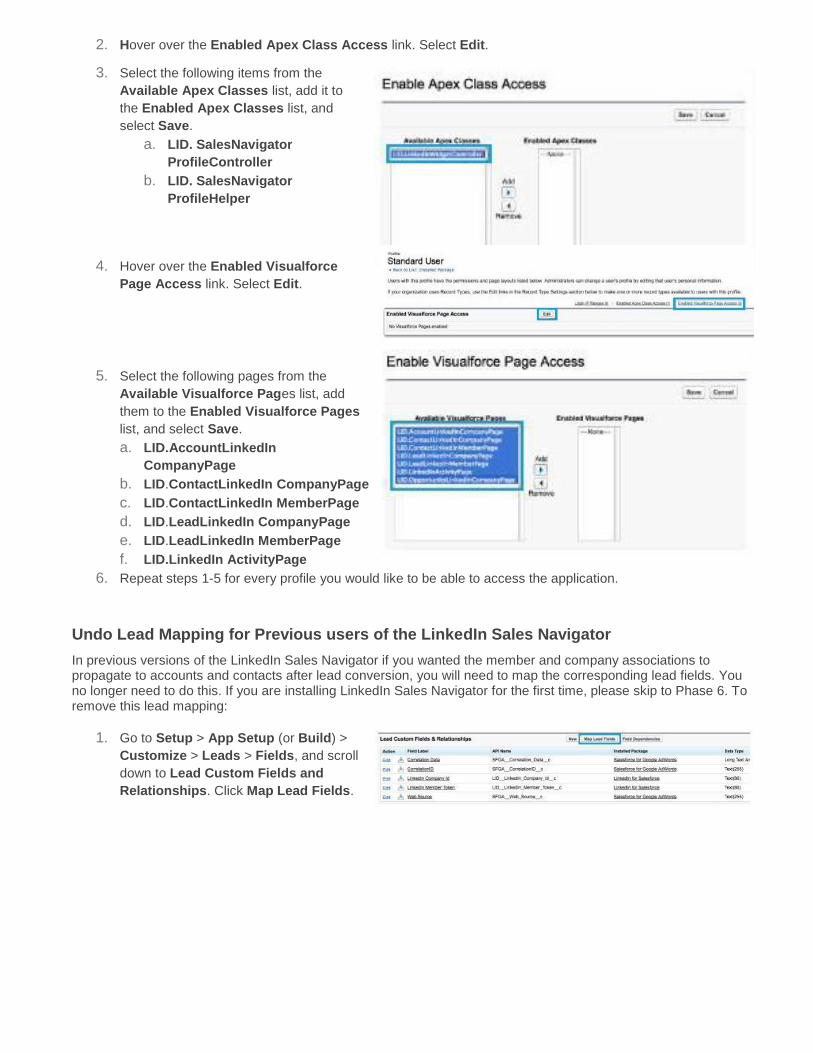
2. Hover over the Enabled Apex Class Access link. Select Edit.
3. Select the following items from the
Available Apex Classes list, add it to
the Enabled Apex Classes list, and
select Save.
a. LID. SalesNavigator
ProfileController
b. LID. SalesNavigator
ProfileHelper
4. Hover over the Enabled Visualforce
Page Access link. Select Edit.
5. Select the following pages from the
Available Visualforce Pages list, add
them to the Enabled Visualforce Pages
list, and select Save.
a. LID.AccountLinkedIn
CompanyPage
b. LID.ContactLinkedIn CompanyPage
c. LID.ContactLinkedIn MemberPage
d. LID.LeadLinkedIn CompanyPage
e. LID.LeadLinkedIn MemberPage
f. LID.LinkedIn ActivityPage
6. Repeat steps 1-5 for every profile you would like to be able to access the application.
Undo Lead Mapping for Previous users of the LinkedIn Sales Navigator
In previous versions of the LinkedIn Sales Navigator if you wanted the member and company associations to propagate to accounts and contacts after lead conversion, you will need to map the corresponding lead fields. You no longer need to do this. If you are installing LinkedIn Sales Navigator for the first time, please skip to Phase 6. To remove this lead mapping:
1. Go to Setup > App Setup (or Build) >
Customize > Leads > Fields, and scroll
down to Lead Custom Fields and
Relationships. Click Map Lead Fields.
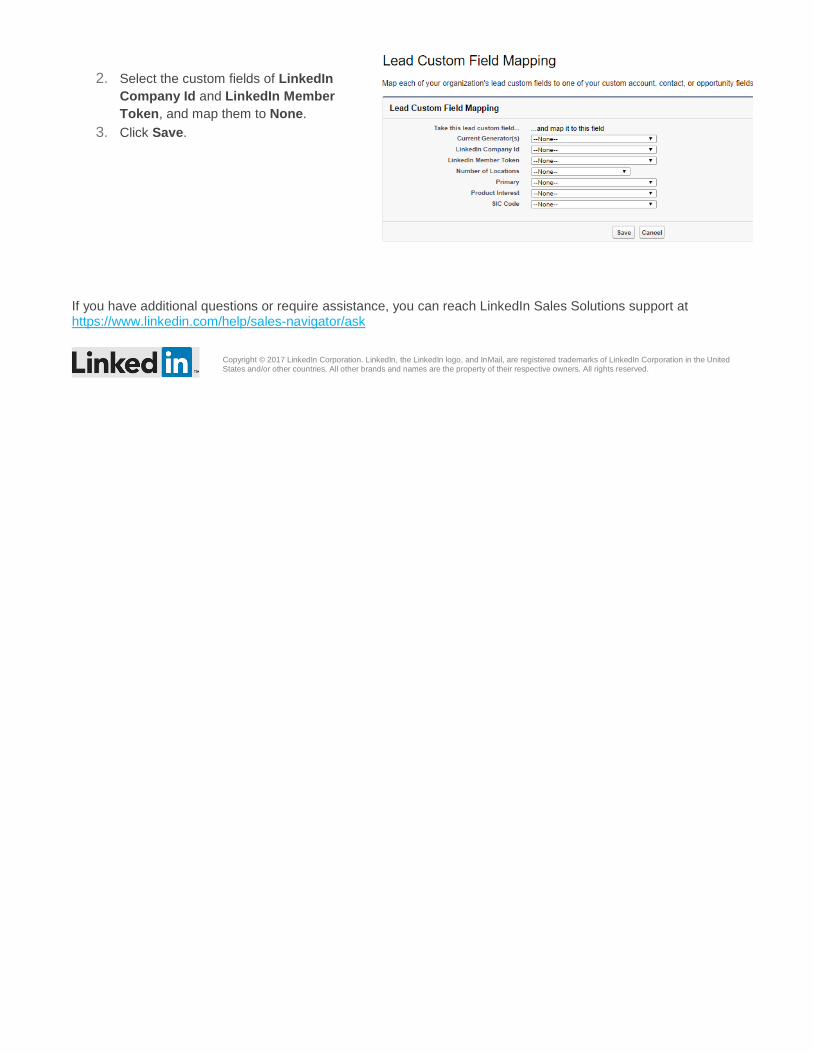
2. Select the custom fields of LinkedIn
Company Id and LinkedIn Member
Token, and map them to None.
3. Click Save.
If you have additional questions or require assistance, you can reach LinkedIn Sales Solutions support at https://www.linkedin.com/help/sales-navigator/ask
Copyright © 2017 LinkedIn Corporation. LinkedIn, the LinkedIn logo, and InMail, are registered trademarks of LinkedIn Corporation in the United States and/or other countries. All other brands and names are the property of their respective owners. All rights reserved.