Line of Communications
64
Line of Communications December 2007 Line of Communications Number 3 December 2007 Lightning War Cyberboard Europa Invasion of Spain
Transcript of Line of Communications
Line of Communications December 2007
�
Line of CommunicationsNumber 3December 2007
Lightning War
Cyberboard Europa
Invasion of Spain
Line of Communications December 2007
2
Editor: Luiz Cláudio DuartePublished quarterly at Brasília, Brazilhttp://www.luiz.claudio.nom.br/loc/LOC is distributed free of charge. We will publish small ads for free, as long as they’re Europa-related.The Europa series and trademark are a creation of Rich Banner and Frank Chadwick. The Europa trademark is used by permission of Paul Richard Banner.Glory and The Great War are trademarks of HMS/GRD and used with permission.
Got anything to say?Then write to LOC at [email protected].
Cover: Defend Moscow (Soviet war poster)
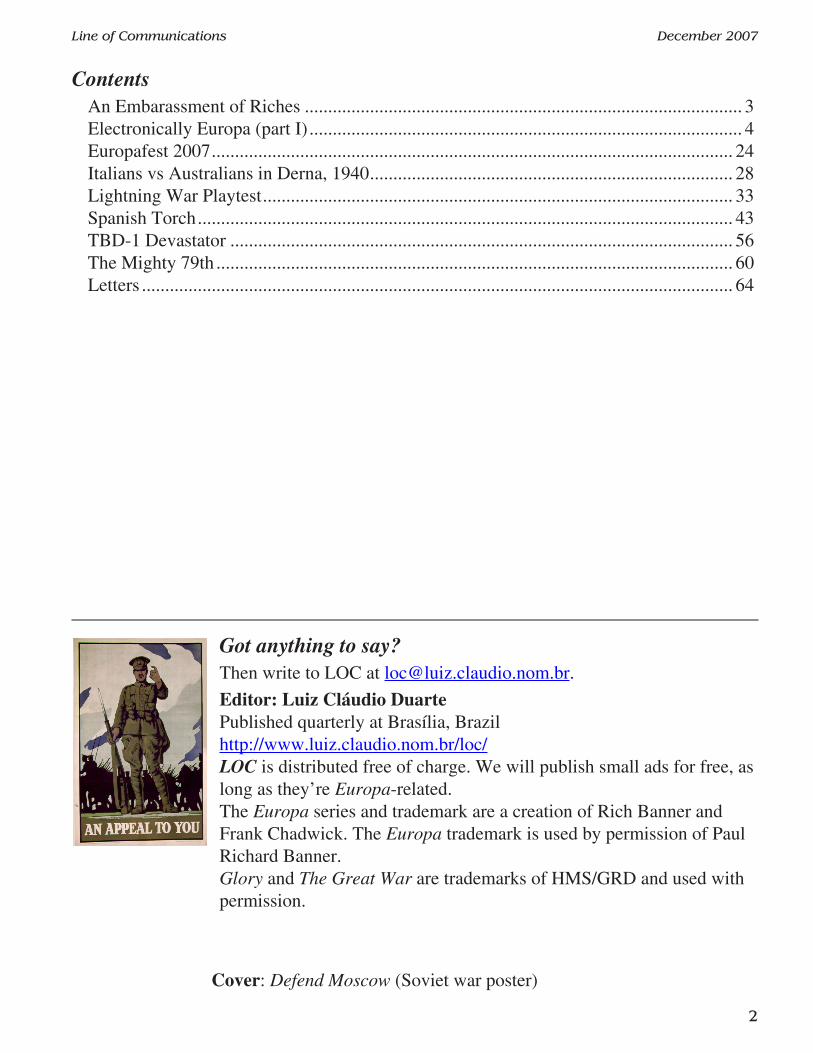
ContentsAn Embarassment of Riches .............................................................................................. 3Electronically Europa (part I) ............................................................................................. 4Europafest 2007 ................................................................................................................ 24Italians vs Australians in Derna, 1940 .............................................................................. 28Lightning War Playtest ..................................................................................................... 33Spanish Torch ................................................................................................................... 43TBD-1 Devastator ............................................................................................................ 56The Mighty 79th ............................................................................................................... 60Letters ............................................................................................................................... 64

Line of Communications December 2007
3
Editorial Lines
An Embarassment of RichesLuiz Cláudio Duarte
I must confess, for a few days I thought that I would have to write this issue all by myself.And then the Europa community saved me. This issue is by far the largest to date, and I
already have some material for the next one.This only showcases the strength of the Europa community. What has made these games
thrive for so long isn’t the rules, or the maps, or the painstakinlgy researched OBs — it’s the deep interest of their players, which shines through the articles in this issue.
First there is the first part of a massive undertaking, Don Lazov’s 1943 campaign of Fire in the East and Scorched Earth played via Cyberboard. Cyberboard itself can be found at http://cyberboard.brainiac.com; players interested in Don’s game box can e-mail him at [email protected]. This issue brings the German set-up; the Russian set-up will be published on next issue.
Thanks to Tom Johnson, you can see some photos of Europafest 2007. He actually sent me a lot more photos, but this issue was already too big, so I saved some for the future.
There are three historical articles, two by Stefan Farrelly (on the Aussies in Derna and on the British 79th Armored Division) and one by Tim Tow (on the TBD-1 Devastator).
Two more replays round up this issue, one of a Lightning War playtest by Jim Boston, and one of the “Invasion of Spain” scenario (from For Whom the Bell Tolls) by Ralph Sunley.
Please keep writing for LOC, folks. This is your fanzine.Thanks to all who sent their best wishes. And please note that only messages sent to
[email protected] will be published in the Letters section; messages sent to one of my personal addresses won’t be published, only deeply appreciated. g
Line of Communications December 2007
�
Replays
Electronically Europa (part I)Don Lazov
BackgroundCurrently there are many mediums to play Europa electronically; the three main tools are
ADC2, Cyberboard and VASSAL. Of these three tools the one I am going to use and do my player’s AAR is called Cyberboard, mainly because I created the game box using this game aid.
My game box currently (Nov 6 2007) covers the portion of Europa that pertains to the Eastern Front, roughly from the western portions of Germany to the western portions of the Urals, Volga and Central Asian Military Districts (MD), and from all of Norway down to Crete in the southwest and to Yerevan in the southeast.
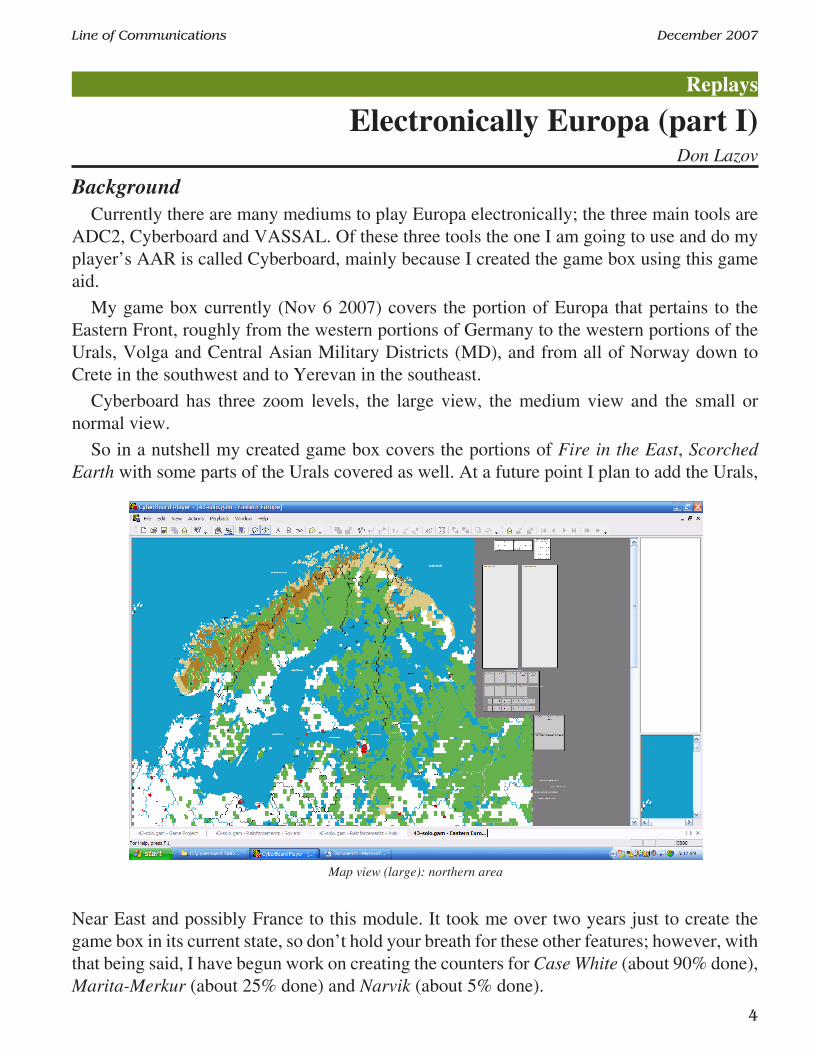
Cyberboard has three zoom levels, the large view, the medium view and the small or normal view.
So in a nutshell my created game box covers the portions of Fire in the East, Scorched Earth with some parts of the Urals covered as well. At a future point I plan to add the Urals,
Near East and possibly France to this module. It took me over two years just to create the game box in its current state, so don’t hold your breath for these other features; however, with that being said, I have begun work on creating the counters for Case White (about 90% done), Marita-Merkur (about 25% done) and Narvik (about 5% done).
Map view (large): northern area
Line of Communications December 2007
�
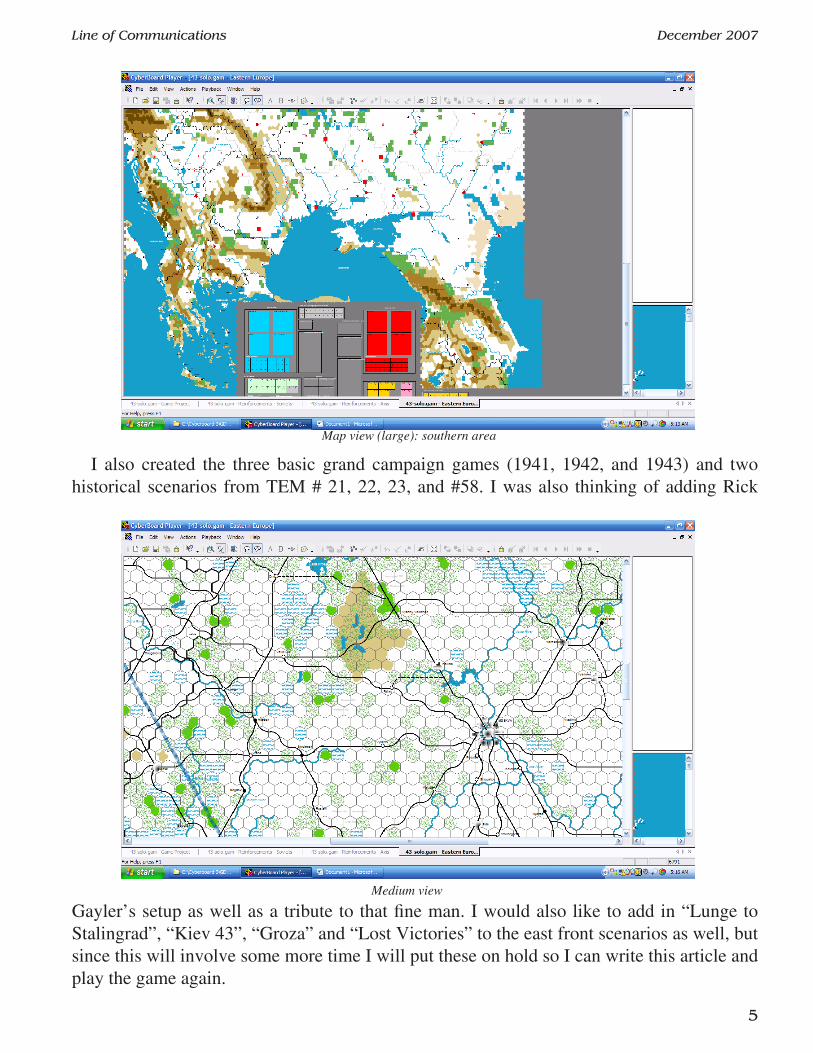
I also created the three basic grand campaign games (1941, 1942, and 1943) and two historical scenarios from TEM # 21, 22, 23, and #58. I was also thinking of adding Rick
Gayler’s setup as well as a tribute to that fine man. I would also like to add in “Lunge to Stalingrad”, “Kiev 43”, “Groza” and “Lost Victories” to the east front scenarios as well, but since this will involve some more time I will put these on hold so I can write this article and play the game again.
Map view (large): southern area
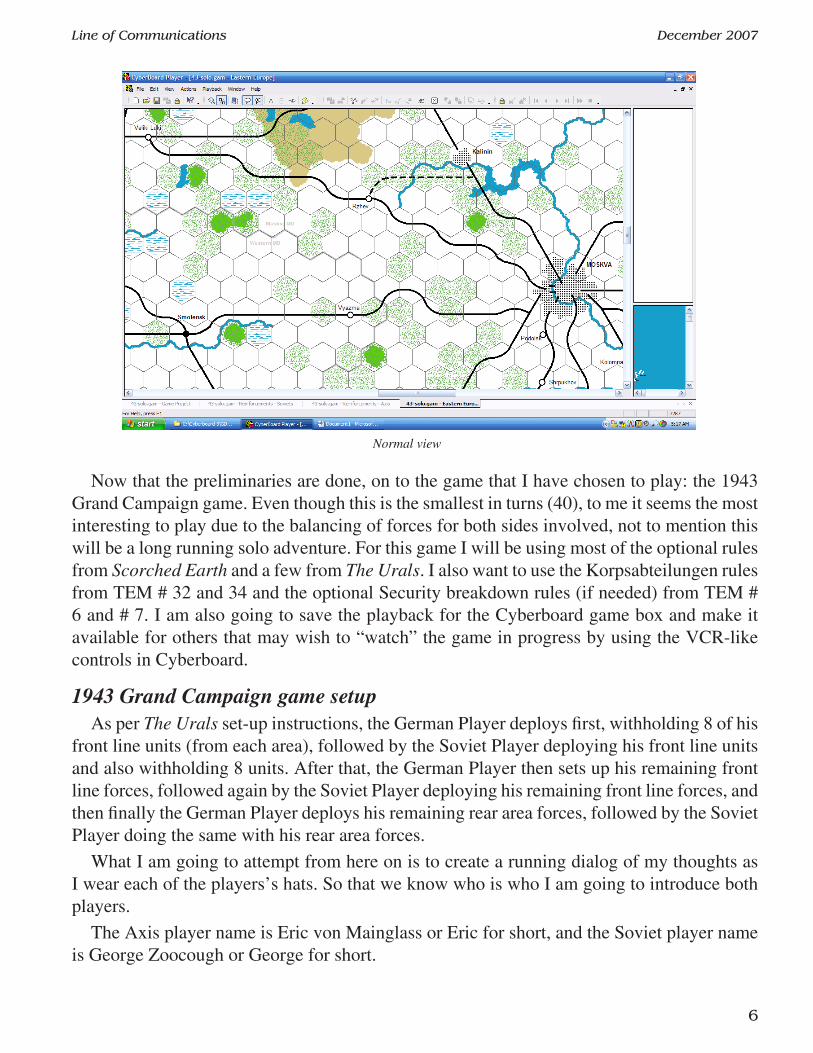
Medium view
Line of Communications December 2007
�
Now that the preliminaries are done, on to the game that I have chosen to play: the 1943 Grand Campaign game. Even though this is the smallest in turns (40), to me it seems the most interesting to play due to the balancing of forces for both sides involved, not to mention this will be a long running solo adventure. For this game I will be using most of the optional rules from Scorched Earth and a few from The Urals. I also want to use the Korpsabteilungen rules from TEM # 32 and 34 and the optional Security breakdown rules (if needed) from TEM # 6 and # 7. I am also going to save the playback for the Cyberboard game box and make it available for others that may wish to “watch” the game in progress by using the VCR-like controls in Cyberboard.
1943 Grand Campaign game setupAs per The Urals set-up instructions, the German Player deploys first, withholding 8 of his
front line units (from each area), followed by the Soviet Player deploying his front line units and also withholding 8 units. After that, the German Player then sets up his remaining front line forces, followed again by the Soviet Player deploying his remaining front line forces, and then finally the German Player deploys his remaining rear area forces, followed by the Soviet Player doing the same with his rear area forces.
What I am going to attempt from here on is to create a running dialog of my thoughts as I wear each of the players’s hats. So that we know who is who I am going to introduce both players.
The Axis player name is Eric von Mainglass or Eric for short, and the Soviet player name is George Zoocough or George for short.
Normal view

Line of Communications December 2007
7
Axis Player Setup, Strategy and NotesEric here, the first order of business is to remove the 8 reserve units from each starting
area, from top to bottom (or north to south):
Finish Front6 Nord SS Mtn XX (7-8)2, 6, 7 Mtn XX (6-8)139 Mtn III (3-8)18 SS Mtn Pol III (2-8)1 Jager, 2 Jager Finish Ski X (3-8)
Army Group North18 Mot XX (6-10)Flandern SS Mot X (3-10)502 Pz II (4-3-8)Fuhrer Begleit Mot II (1-10)563 Mot AT II (1-10)10 Mot MG II (1-8)49, 110 Mot Art III (1-2-8)
Army Group Centre12, 20 Pz XX (14-10)8, 18 Pz XX (13-10)20, 25 Mot XX (6-10)900 Lehr X (3-10)901 Lehr III (3-10)
Army Group South2 Das Reich SS Pz XX (17-10)Leibstandarte-SS Adolf Hitler Pz XX (16-10)Totenkopf SS Pz XX (14-10)3 Pz XX (16-10)6 Pz XX (15-10)7 Pz XX (15-10)19 Pz XX (14-10)17 Pz XX (13-10)
Army Group A13 Pz XX / Cadre (7-8 / 16-10)125 Inf XX (7-6)4 Mtn XX (6-8)1 Mtn XX / Cadre (2-8 / 6-8)2 High Mtn II (1-8)242 Aslt Gun II (2-1-10)704 Art II (5-3-8)2 Rumanian Mtn XX (4-8)
After setting aside these units as reserves the next order of business is to place the forts and permanent airfields in each area and then to deploy the rest of the front line units. My basic
Line of Communications December 2007
�
strategy in placement of forts was to cover the most exposed sections or most vulnerable hexes from Soviet attack (i.e., bridgeheads or weakened portions of the front line.
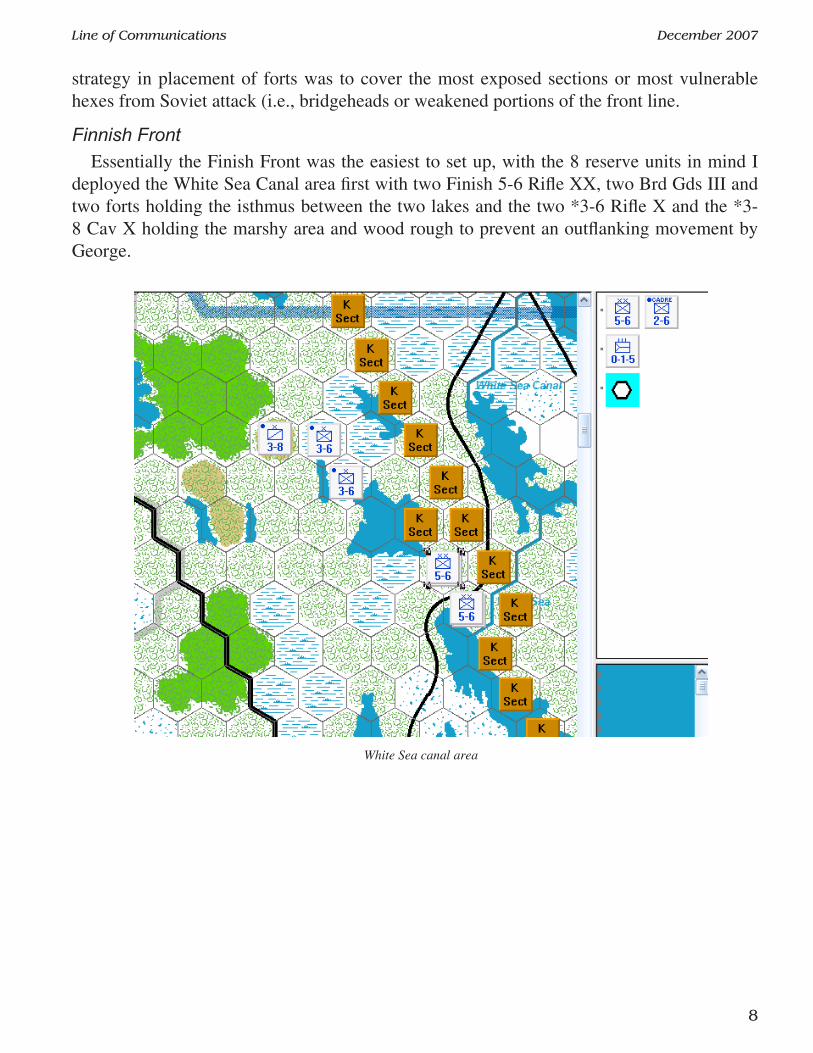
Finnish FrontEssentially the Finish Front was the easiest to set up, with the 8 reserve units in mind I
deployed the White Sea Canal area first with two Finish 5-6 Rifle XX, two Brd Gds III and two forts holding the isthmus between the two lakes and the two *3-6 Rifle X and the *3-8 Cav X holding the marshy area and wood rough to prevent an outflanking movement by George.
White Sea canal area
Line of Communications December 2007
�
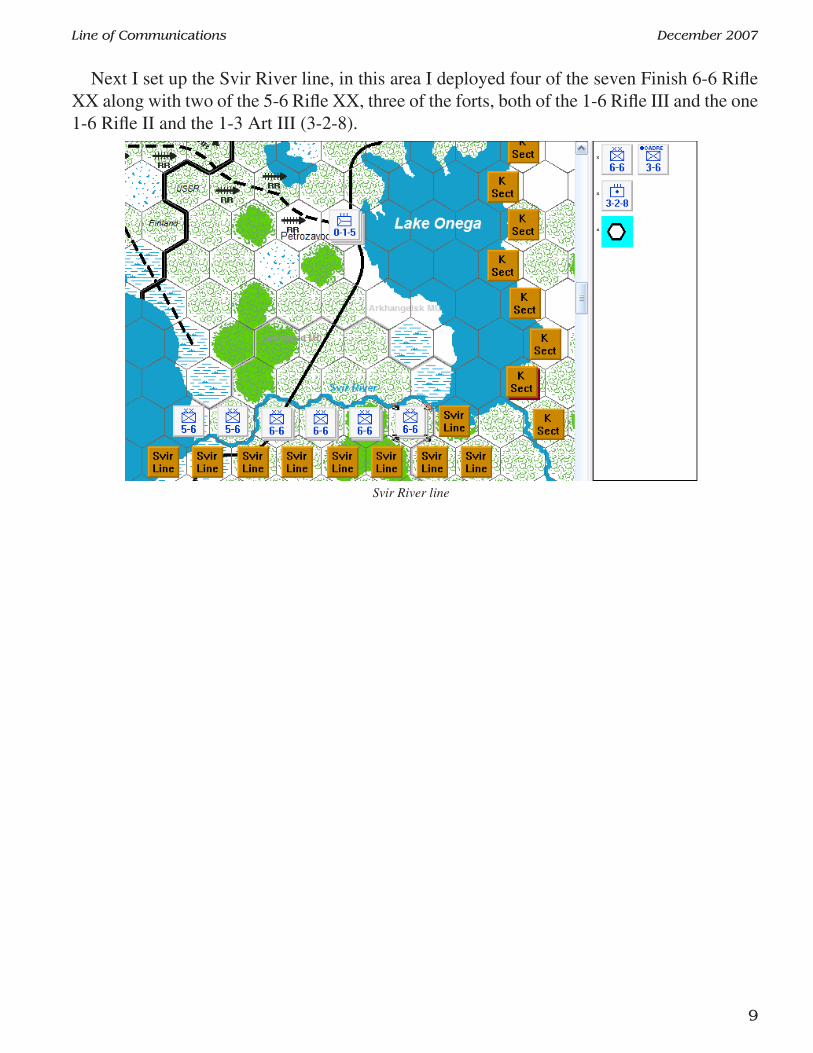
Next I set up the Svir River line, in this area I deployed four of the seven Finish 6-6 Rifle XX along with two of the 5-6 Rifle XX, three of the forts, both of the 1-6 Rifle III and the one 1-6 Rifle II and the 1-3 Art III (3-2-8).
Svir River line
Line of Communications December 2007
�0
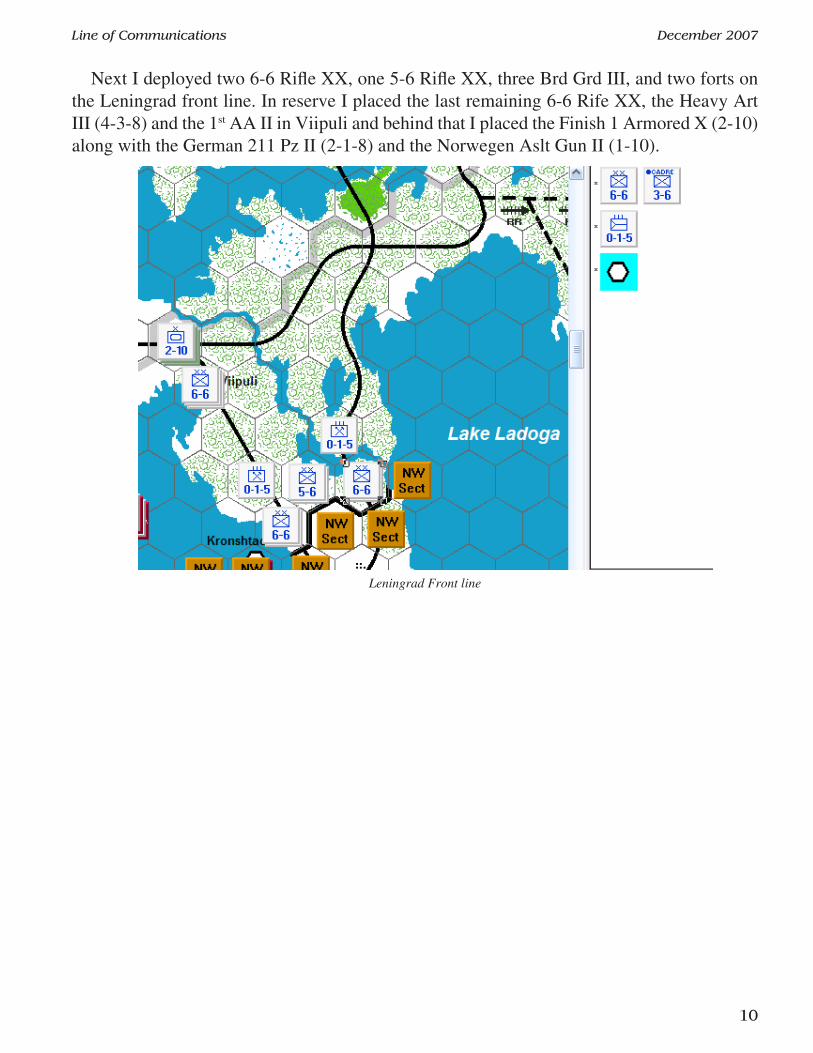
Next I deployed two 6-6 Rifle XX, one 5-6 Rifle XX, three Brd Grd III, and two forts on the Leningrad front line. In reserve I placed the last remaining 6-6 Rife XX, the Heavy Art III (4-3-8) and the 1st AA II in Viipuli and behind that I placed the Finish 1 Armored X (2-10) along with the German 211 Pz II (2-1-8) and the Norwegen Aslt Gun II (1-10).
Leningrad Front line

Line of Communications December 2007
��
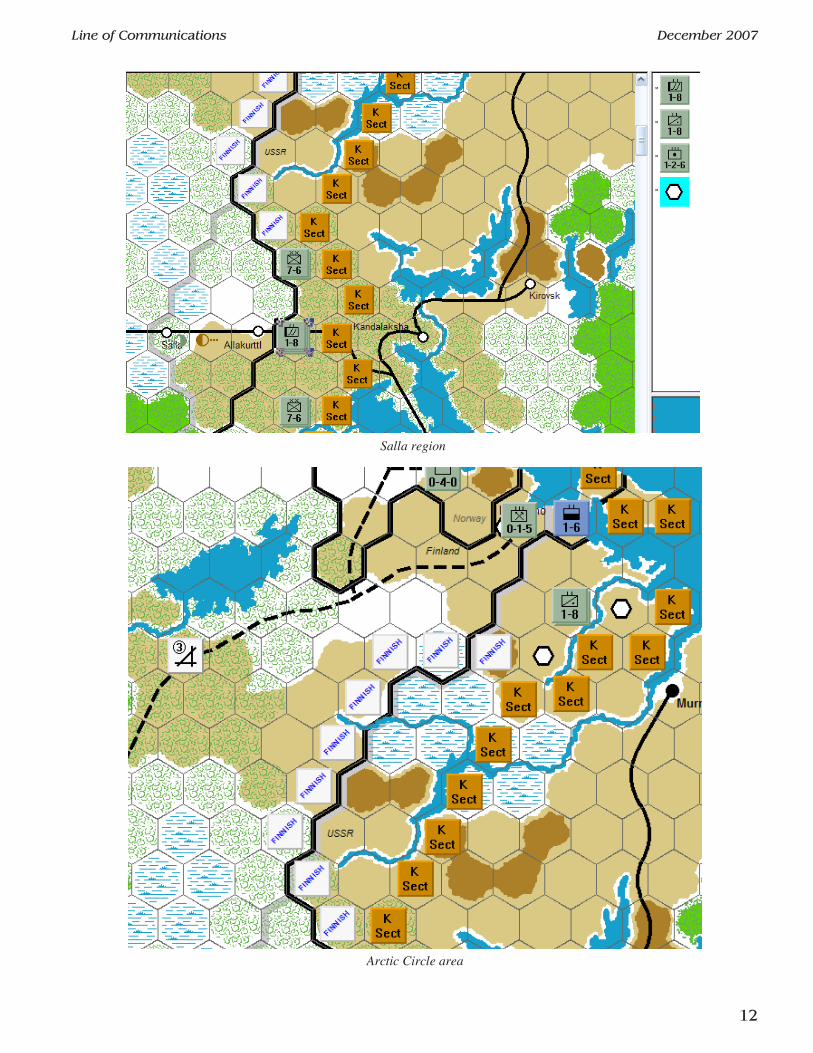
Finally I placed the Arctic Circle forces. Since I have 8 units in reserve that are mostly Mountain type units, I placed one Finish 5-6 Rifle XX and two German 2-6 Inf III in the southern portion and I placed main German infantry forces in the Salla section consisting of both German 7-6 Inf XX, all three of the Ski MG II, the bicycle II, the German Finland Art III (1-2-6) and two forts.
Southern Circle
Line of Communications December 2007
�2
Salla region
Arctic Circle area
Line of Communications December 2007
�3
I stole one of the resource points from the reserve pool and built one of the forts in the exposed bridgehead in the extreme northern portion of the Arctic Circle. I put the KM 1-6 Punitive II unit east of Petsamo to guard against any Soviet deployment in this area or to guard against any sneak attack. The remaining Murmansk line will be manned by some of the mountain divisions in reserve depending on the Soviet dispositions.
Notes: Any remaining holes in the Arctic Circle can be filled — depending on how the Soviet player setups — from units in reserve.
Army Group North SetupOkay, the first order of business (since the reserves have been removed and the forts deployed)
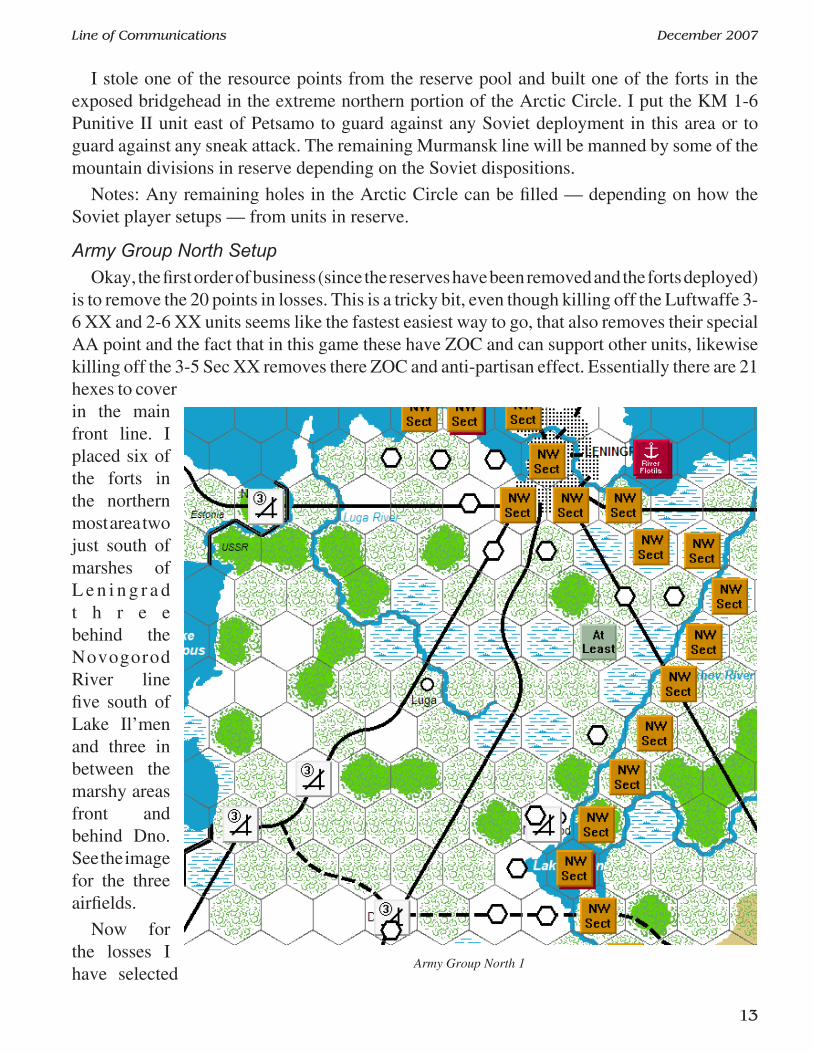
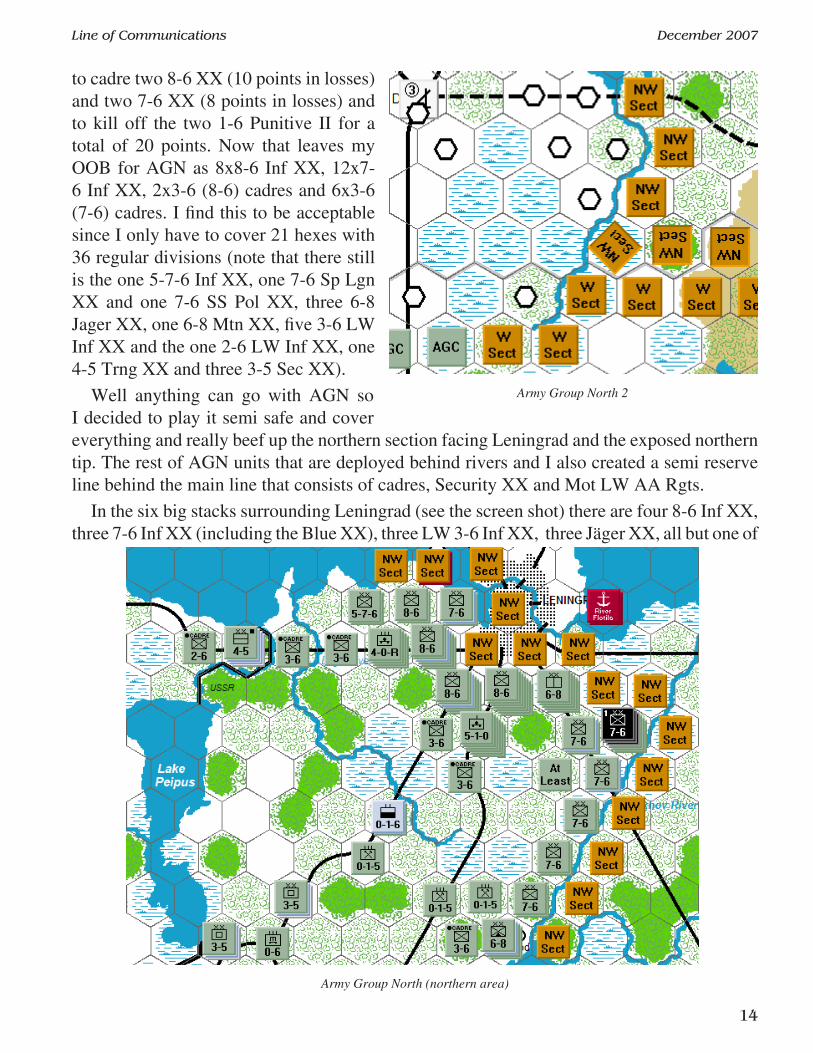
is to remove the 20 points in losses. This is a tricky bit, even though killing off the Luftwaffe 3-6 XX and 2-6 XX units seems like the fastest easiest way to go, that also removes their special AA point and the fact that in this game these have ZOC and can support other units, likewise killing off the 3-5 Sec XX removes there ZOC and anti-partisan effect. Essentially there are 21 hexes to cover in the main front line. I placed six of the forts in the northern most area two just south of marshes of L e n i n g r a d t h r e e behind the Novogorod River line five south of Lake Il’men and three in between the marshy areas front and behind Dno. See the image for the three airfields.
Now for the losses I have selected
Army Group North 1
Line of Communications December 2007
��
to cadre two 8-6 XX (10 points in losses) and two 7-6 XX (8 points in losses) and to kill off the two 1-6 Punitive II for a total of 20 points. Now that leaves my OOB for AGN as 8x8-6 Inf XX, 12x7-6 Inf XX, 2x3-6 (8-6) cadres and 6x3-6 (7-6) cadres. I find this to be acceptable since I only have to cover 21 hexes with 36 regular divisions (note that there still is the one 5-7-6 Inf XX, one 7-6 Sp Lgn XX and one 7-6 SS Pol XX, three 6-8 Jager XX, one 6-8 Mtn XX, five 3-6 LW Inf XX and the one 2-6 LW Inf XX, one 4-5 Trng XX and three 3-5 Sec XX).
Well anything can go with AGN so I decided to play it semi safe and cover everything and really beef up the northern section facing Leningrad and the exposed northern tip. The rest of AGN units that are deployed behind rivers and I also created a semi reserve line behind the main line that consists of cadres, Security XX and Mot LW AA Rgts.
In the six big stacks surrounding Leningrad (see the screen shot) there are four 8-6 Inf XX, three 7-6 Inf XX (including the Blue XX), three LW 3-6 Inf XX, three Jäger XX, all but one of
Army Group North 2
Army Group North (northern area)

Line of Communications December 2007
��
the Siege Art units, two Eng III and two Art units, also stacked behind these stacks are all the RR Art units. One other stack of note is the SS Korps in the exposed swamp. This stack consists of the 7-6 SS Pol XX, both SS Inf X (5-6 and 3-6) and Eng III, both Rkt Art III (3-1-8) and a fort. To meet the required 20 RE within 2 hexes of 2A:1330 there are no less then 42 REs in that area. To view the rest in detail please download the current game box and my setup files from (url later).
Notes: Both of those SS X will be removed during the first Axis turn per the reinforcement track. Also notice I placed the four Aslt Gun II around Dno as a mobile reserve. Depending how the Soviet player deploys I can stick the eight reserves with these due to the poor terrain further north and keep them as a mobile reserve.
Army Group Center SetupThere is a lot of ground to cover (45 hexes) and a lot of it is not favorable terrain for
defense and with only 25 forts to start off with and 30 Resource points to share between AGC and AGS I think that AGC will take the lion share of resource points (20) so that they can have a fort in every hex. This decision also means that all resource points will be used for forts only and not airfields. Essentially every AGC front line contains a fort. Now for the losses, another tough decision, but I think that the best approach is to flip five of the 7-6 Inf XX (20 points of losses), flip three of the 5-6 Inf XX (9 points in losses) and kill the one 1-6 punitive II for the total of 30 points losses. This still leaves one 9-8 Inf XX, thirteen 8-6 Inf XX, thirty 7-6 Inf XX, one 5-6 Inf XX, one 7-6 LW Para XX, and four LW 2-6 Inf XX to man the front line with.
Army Group North (southern tip)
Line of Communications December 2007
��
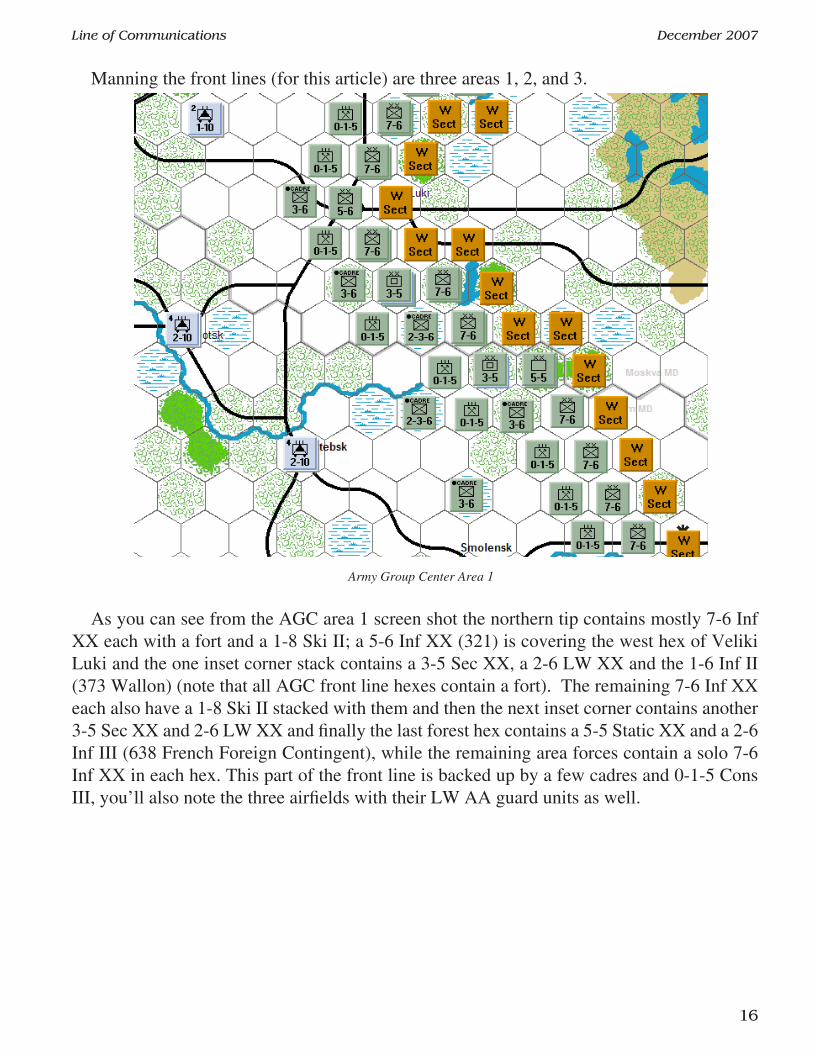
Manning the front lines (for this article) are three areas 1, 2, and 3.
As you can see from the AGC area 1 screen shot the northern tip contains mostly 7-6 Inf XX each with a fort and a 1-8 Ski II; a 5-6 Inf XX (321) is covering the west hex of Veliki Luki and the one inset corner stack contains a 3-5 Sec XX, a 2-6 LW XX and the 1-6 Inf II (373 Wallon) (note that all AGC front line hexes contain a fort). The remaining 7-6 Inf XX each also have a 1-8 Ski II stacked with them and then the next inset corner contains another 3-5 Sec XX and 2-6 LW XX and finally the last forest hex contains a 5-5 Static XX and a 2-6 Inf III (638 French Foreign Contingent), while the remaining area forces contain a solo 7-6 Inf XX in each hex. This part of the front line is backed up by a few cadres and 0-1-5 Cons III, you’ll also note the three airfields with their LW AA guard units as well.
Army Group Center Area 1
Line of Communications December 2007
�7
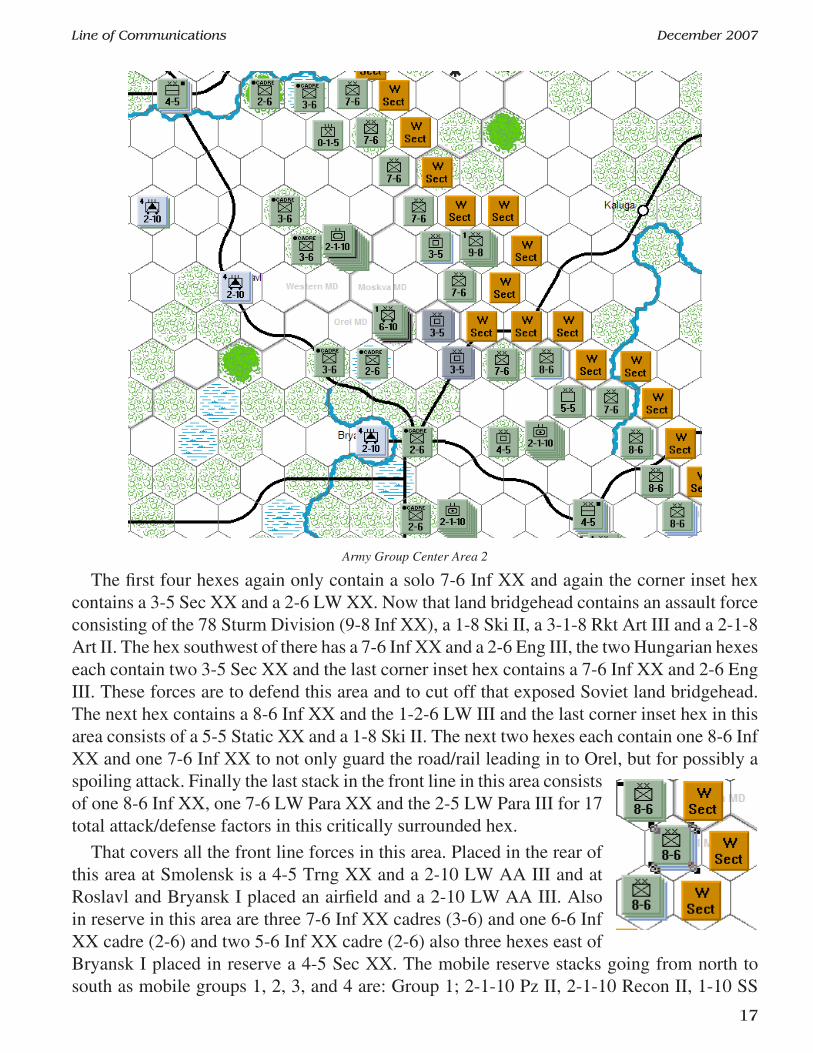
The first four hexes again only contain a solo 7-6 Inf XX and again the corner inset hex contains a 3-5 Sec XX and a 2-6 LW XX. Now that land bridgehead contains an assault force consisting of the 78 Sturm Division (9-8 Inf XX), a 1-8 Ski II, a 3-1-8 Rkt Art III and a 2-1-8 Art II. The hex southwest of there has a 7-6 Inf XX and a 2-6 Eng III, the two Hungarian hexes each contain two 3-5 Sec XX and the last corner inset hex contains a 7-6 Inf XX and 2-6 Eng III. These forces are to defend this area and to cut off that exposed Soviet land bridgehead. The next hex contains a 8-6 Inf XX and the 1-2-6 LW III and the last corner inset hex in this area consists of a 5-5 Static XX and a 1-8 Ski II. The next two hexes each contain one 8-6 Inf XX and one 7-6 Inf XX to not only guard the road/rail leading in to Orel, but for possibly a spoiling attack. Finally the last stack in the front line in this area consists of one 8-6 Inf XX, one 7-6 LW Para XX and the 2-5 LW Para III for 17 total attack/defense factors in this critically surrounded hex.
That covers all the front line forces in this area. Placed in the rear of this area at Smolensk is a 4-5 Trng XX and a 2-10 LW AA III and at Roslavl and Bryansk I placed an airfield and a 2-10 LW AA III. Also in reserve in this area are three 7-6 Inf XX cadres (3-6) and one 6-6 Inf XX cadre (2-6) and two 5-6 Inf XX cadre (2-6) also three hexes east of Bryansk I placed in reserve a 4-5 Sec XX. The mobile reserve stacks going from north to south as mobile groups 1, 2, 3, and 4 are: Group 1; 2-1-10 Pz II, 2-1-10 Recon II, 1-10 SS
Army Group Center Area 2
Line of Communications December 2007
��
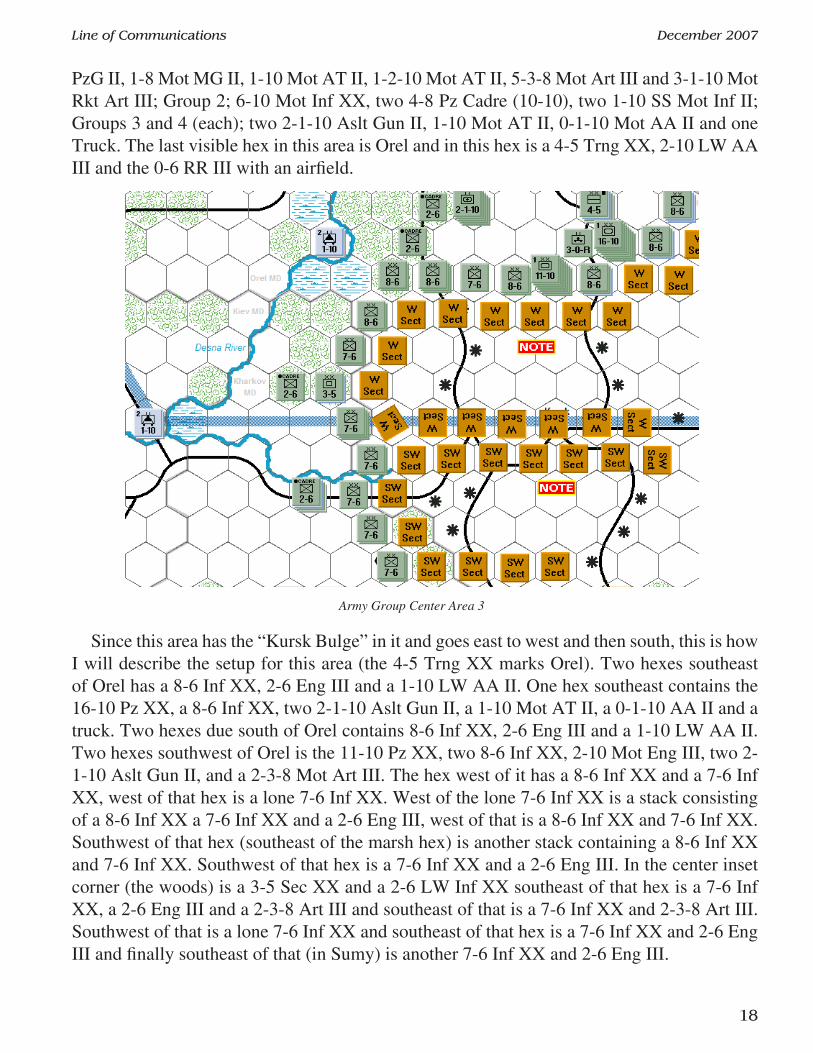
PzG II, 1-8 Mot MG II, 1-10 Mot AT II, 1-2-10 Mot AT II, 5-3-8 Mot Art III and 3-1-10 Mot Rkt Art III; Group 2; 6-10 Mot Inf XX, two 4-8 Pz Cadre (10-10), two 1-10 SS Mot Inf II; Groups 3 and 4 (each); two 2-1-10 Aslt Gun II, 1-10 Mot AT II, 0-1-10 Mot AA II and one Truck. The last visible hex in this area is Orel and in this hex is a 4-5 Trng XX, 2-10 LW AA III and the 0-6 RR III with an airfield.
Since this area has the “Kursk Bulge” in it and goes east to west and then south, this is how I will describe the setup for this area (the 4-5 Trng XX marks Orel). Two hexes southeast of Orel has a 8-6 Inf XX, 2-6 Eng III and a 1-10 LW AA II. One hex southeast contains the 16-10 Pz XX, a 8-6 Inf XX, two 2-1-10 Aslt Gun II, a 1-10 Mot AT II, a 0-1-10 AA II and a truck. Two hexes due south of Orel contains 8-6 Inf XX, 2-6 Eng III and a 1-10 LW AA II. Two hexes southwest of Orel is the 11-10 Pz XX, two 8-6 Inf XX, 2-10 Mot Eng III, two 2-1-10 Aslt Gun II, and a 2-3-8 Mot Art III. The hex west of it has a 8-6 Inf XX and a 7-6 Inf XX, west of that hex is a lone 7-6 Inf XX. West of the lone 7-6 Inf XX is a stack consisting of a 8-6 Inf XX a 7-6 Inf XX and a 2-6 Eng III, west of that is a 8-6 Inf XX and 7-6 Inf XX. Southwest of that hex (southeast of the marsh hex) is another stack containing a 8-6 Inf XX and 7-6 Inf XX. Southwest of that hex is a 7-6 Inf XX and a 2-6 Eng III. In the center inset corner (the woods) is a 3-5 Sec XX and a 2-6 LW Inf XX southeast of that hex is a 7-6 Inf XX, a 2-6 Eng III and a 2-3-8 Art III and southeast of that is a 7-6 Inf XX and 2-3-8 Art III. Southwest of that is a lone 7-6 Inf XX and southeast of that hex is a 7-6 Inf XX and 2-6 Eng III and finally southeast of that (in Sumy) is another 7-6 Inf XX and 2-6 Eng III.
Army Group Center Area 3
Line of Communications December 2007
��
That is the main front line forces for this area and the only reserves in this area are two 2-6 cadres (5-6 Inf XX) one of which is from area 2 and stacked due west of the lone 7-6 Inf XX (on the road/rail) is a 2-6 cadre (5-6 Inf XX) a 1-10 Mot AA II and the last remaining 0-6 RR Eng III along with an airfield. Also of note is in the west (west of the marsh on the edge of the screen) is a 1-10 Mot II on an airfield.
Notes: In reserves are two powerful Panzer Korps each consisting of one 14-10 Pz XX, one 13-10 Pz XX, one 6-10 Mot Inf XX and one 3-10 Mot Inf III (12, 8 Pz XX, 20 Mot XX, and 901 Lehr and 20, 18 Pz XX, 25 Mot XX and 900 Lehr) these forces will be deployed depending on how George deploys his main body and can be used to exploit or add to an attack along this sector.
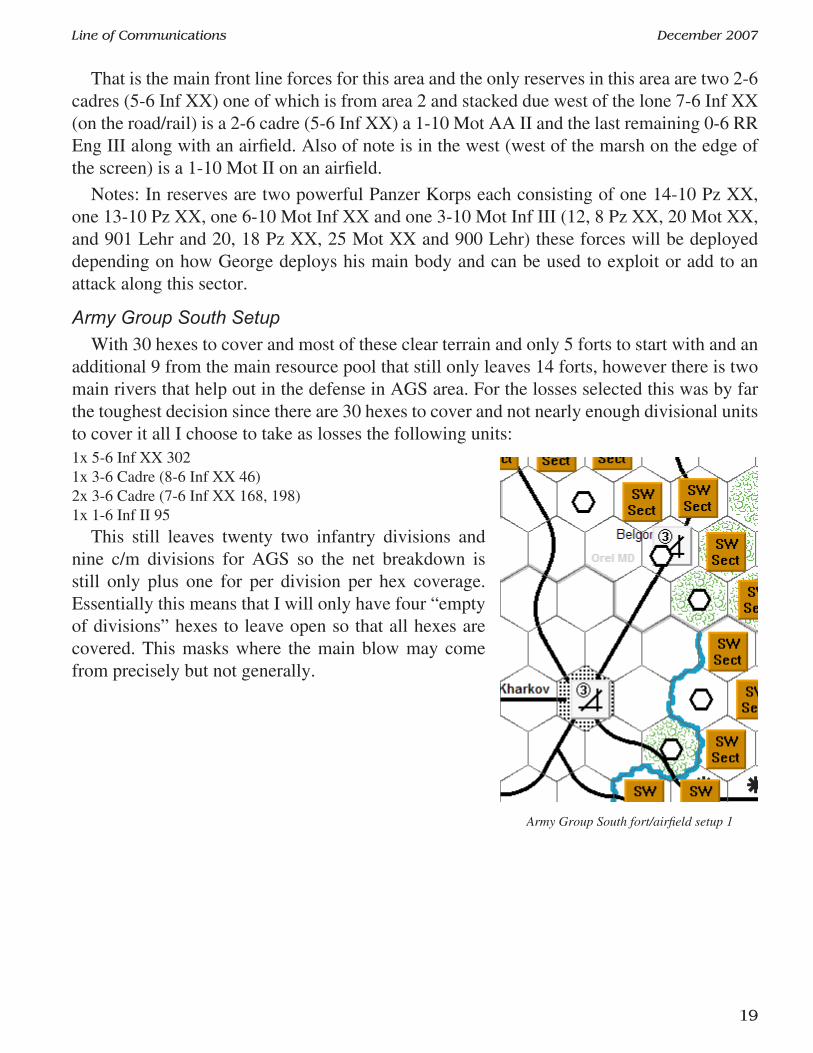
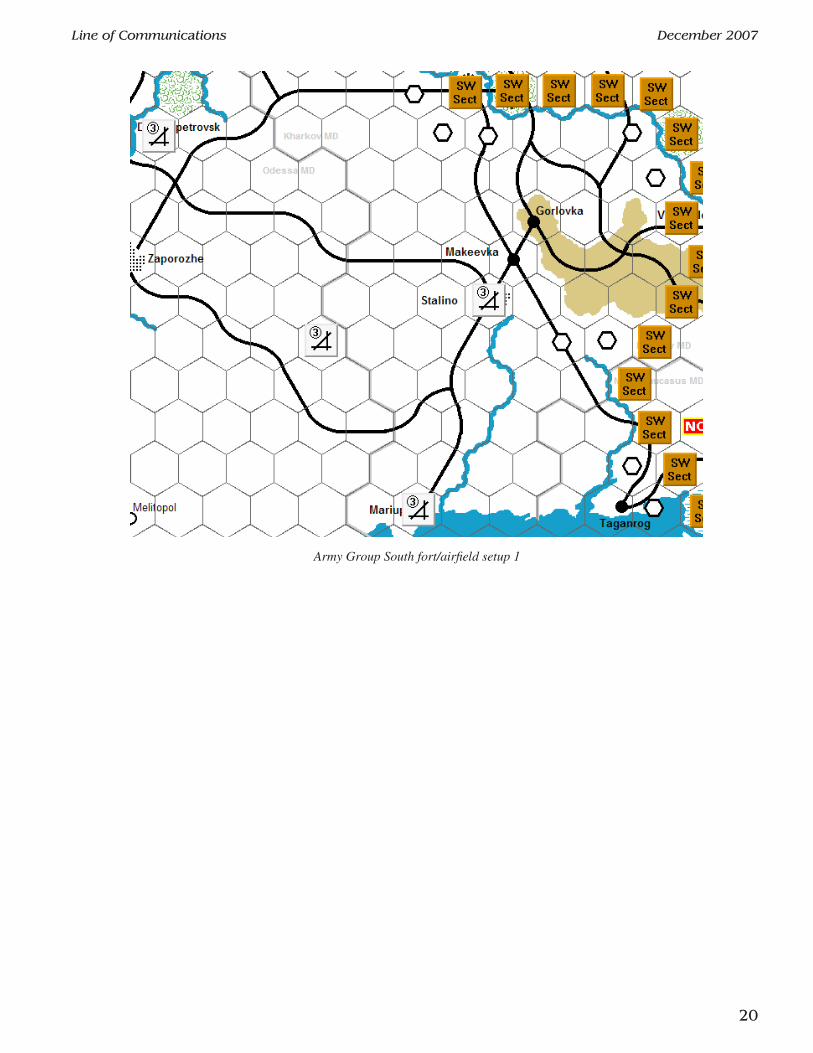
Army Group South SetupWith 30 hexes to cover and most of these clear terrain and only 5 forts to start with and an
additional 9 from the main resource pool that still only leaves 14 forts, however there is two main rivers that help out in the defense in AGS area. For the losses selected this was by far the toughest decision since there are 30 hexes to cover and not nearly enough divisional units to cover it all I choose to take as losses the following units:1x 5-6 Inf XX 3021x 3-6 Cadre (8-6 Inf XX 46)2x 3-6 Cadre (7-6 Inf XX 168, 198)1x 1-6 Inf II 95
This still leaves twenty two infantry divisions and nine c/m divisions for AGS so the net breakdown is still only plus one for per division per hex coverage. Essentially this means that I will only have four “empty of divisions” hexes to leave open so that all hexes are covered. This masks where the main blow may come from precisely but not generally.
Army Group South fort/airfield setup 1
Line of Communications December 2007
20
Army Group South fort/airfield setup 1
Line of Communications December 2007
2�
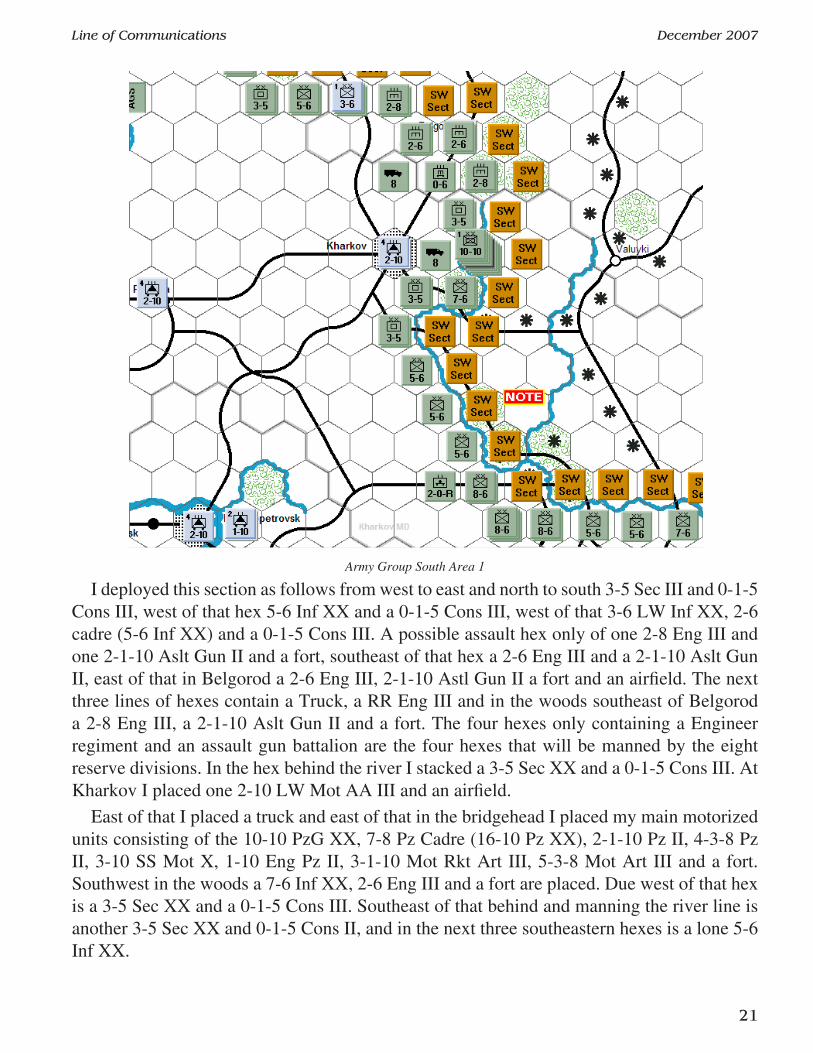
I deployed this section as follows from west to east and north to south 3-5 Sec III and 0-1-5 Cons III, west of that hex 5-6 Inf XX and a 0-1-5 Cons III, west of that 3-6 LW Inf XX, 2-6 cadre (5-6 Inf XX) and a 0-1-5 Cons III. A possible assault hex only of one 2-8 Eng III and one 2-1-10 Aslt Gun II and a fort, southeast of that hex a 2-6 Eng III and a 2-1-10 Aslt Gun II, east of that in Belgorod a 2-6 Eng III, 2-1-10 Astl Gun II a fort and an airfield. The next three lines of hexes contain a Truck, a RR Eng III and in the woods southeast of Belgorod a 2-8 Eng III, a 2-1-10 Aslt Gun II and a fort. The four hexes only containing a Engineer regiment and an assault gun battalion are the four hexes that will be manned by the eight reserve divisions. In the hex behind the river I stacked a 3-5 Sec XX and a 0-1-5 Cons III. At Kharkov I placed one 2-10 LW Mot AA III and an airfield.
East of that I placed a truck and east of that in the bridgehead I placed my main motorized units consisting of the 10-10 PzG XX, 7-8 Pz Cadre (16-10 Pz XX), 2-1-10 Pz II, 4-3-8 Pz II, 3-10 SS Mot X, 1-10 Eng Pz II, 3-1-10 Mot Rkt Art III, 5-3-8 Mot Art III and a fort. Southwest in the woods a 7-6 Inf XX, 2-6 Eng III and a fort are placed. Due west of that hex is a 3-5 Sec XX and a 0-1-5 Cons III. Southeast of that behind and manning the river line is another 3-5 Sec XX and 0-1-5 Cons II, and in the next three southeastern hexes is a lone 5-6 Inf XX.
Army Group South Area 1

Line of Communications December 2007
22
Covering the Soviet bridgehead in assault formation are a 8-6 Inf XX, 3-1-8 Rkt Art III and a fort, southeast of that hex is a 8-6 Inf XX, 3-1-8 Rkt Art III, 1-0-6 Siege Art II and a fort. East of that hex is another 8-6 Inf XX, 3-1-8 Rkt Art III and a fort. These forces will not only attempt to stop any further expansion of the Soviet bridgehead and will attempt to crush it as well. Behind these assault formations are on three separate rail lines one each 2-0-R RR Art II.
The next river line going east will be covered in area 2.In this area I will
continue on with AGS area 1 units picking up behind the river line units. Right after the last assault group hex (8-6 Inf XX, 3-1-8 Rkt Art and fort) is the hex due west having a lone 5-6 Inf XX and west of that hex is another lone 5-6 Inf XX in the river bend is a 7-6 Inf XX and a fort. Southeast of that hex is anther 7-6 Inf XX and a fort and southwest of that hex is a 8-6 Inf XX and fort. In the rough terrain southeast of that hex is a 6-8 Mtn XX, 2-8 SS Cav Cadre (5-8 SS Cav XX) and a 0-1-5 Cons III. Southwest of that hex in the rough terrain is assault group 1; 5-8 Pz Cadre (12-10 Pz XX 23), 2-10 Mot Eng III, three 2-1-10 Aslt Gun II, 3-8 Mot Art III and a 0-1-5 Cons III. Southwest of that hex is assault group 2; 5-8 Pz Cadre (12-10 Pz XX GD), 2-10 Mot Eng III, two 2-1-10 Aslt Gun II, 2-1-10 Pz II, 3-8 Mot Art III and a 0-1-5 Cons III. These two assault group will be used to push the line here back a bit if possible.
Lastly behind the river is a 6-6 Inf XX and a 0-1-5 Cons III, southwest of that is a 7-6 Inf XX, and a 2-6 Eng III southwest across the river line is a lone 7-6 Inf XX and a fort, and in Taganrog is a 2-6 Eng III, 1-8 Ski II, 0-1-10 Mot AA, a 2-3-8 Art III, and a fort. I shortened the line one hex to cover all hexes effectively enough.
Army Group South Area 2
Line of Communications December 2007
23
Notes: Since the first turn begins in April and may consist of mud the main assault may not begin until May, June or July therefore, units can be shuffled around or repositioned depending on how the Soviets deploy.
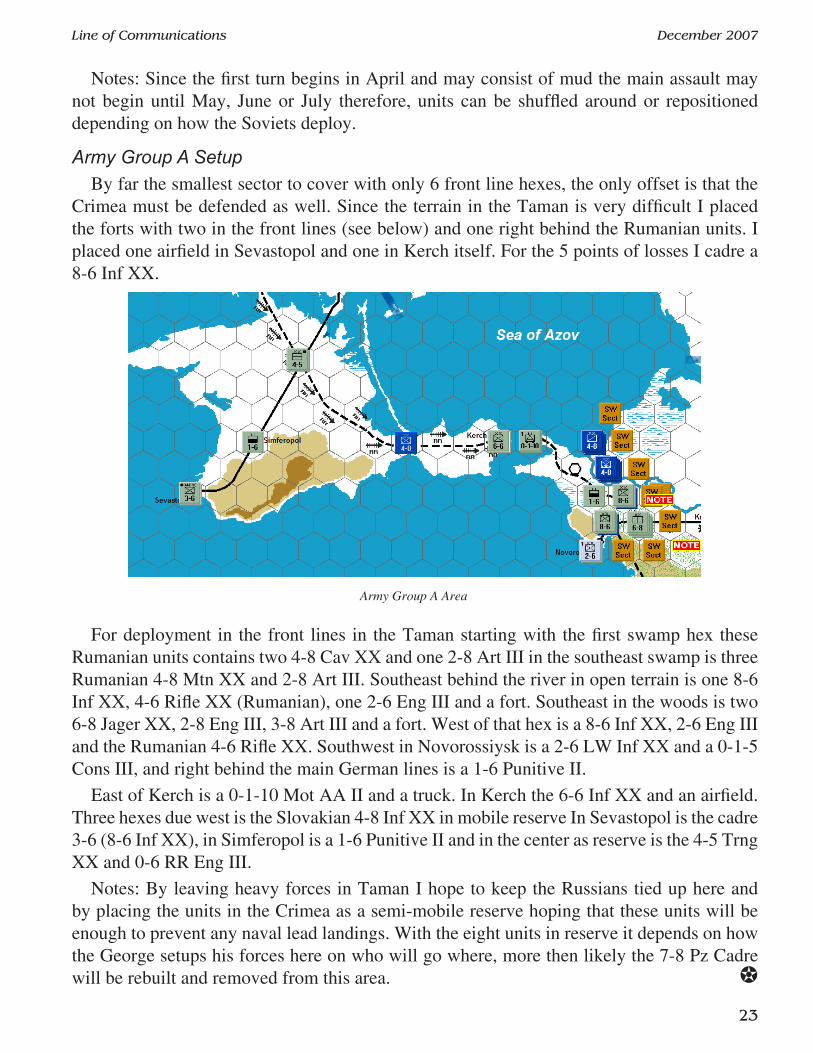
Army Group A SetupBy far the smallest sector to cover with only 6 front line hexes, the only offset is that the
Crimea must be defended as well. Since the terrain in the Taman is very difficult I placed the forts with two in the front lines (see below) and one right behind the Rumanian units. I placed one airfield in Sevastopol and one in Kerch itself. For the 5 points of losses I cadre a 8-6 Inf XX.
For deployment in the front lines in the Taman starting with the first swamp hex these Rumanian units contains two 4-8 Cav XX and one 2-8 Art III in the southeast swamp is three Rumanian 4-8 Mtn XX and 2-8 Art III. Southeast behind the river in open terrain is one 8-6 Inf XX, 4-6 Rifle XX (Rumanian), one 2-6 Eng III and a fort. Southeast in the woods is two 6-8 Jager XX, 2-8 Eng III, 3-8 Art III and a fort. West of that hex is a 8-6 Inf XX, 2-6 Eng III and the Rumanian 4-6 Rifle XX. Southwest in Novorossiysk is a 2-6 LW Inf XX and a 0-1-5 Cons III, and right behind the main German lines is a 1-6 Punitive II.
East of Kerch is a 0-1-10 Mot AA II and a truck. In Kerch the 6-6 Inf XX and an airfield. Three hexes due west is the Slovakian 4-8 Inf XX in mobile reserve In Sevastopol is the cadre 3-6 (8-6 Inf XX), in Simferopol is a 1-6 Punitive II and in the center as reserve is the 4-5 Trng XX and 0-6 RR Eng III.
Notes: By leaving heavy forces in Taman I hope to keep the Russians tied up here and by placing the units in the Crimea as a semi-mobile reserve hoping that these units will be enough to prevent any naval lead landings. With the eight units in reserve it depends on how the George setups his forces here on who will go where, more then likely the 7-8 Pz Cadre will be rebuilt and removed from this area. g
Army Group A Area
Line of Communications December 2007
2�
Conventions
Europafest 2007Tom Johnson
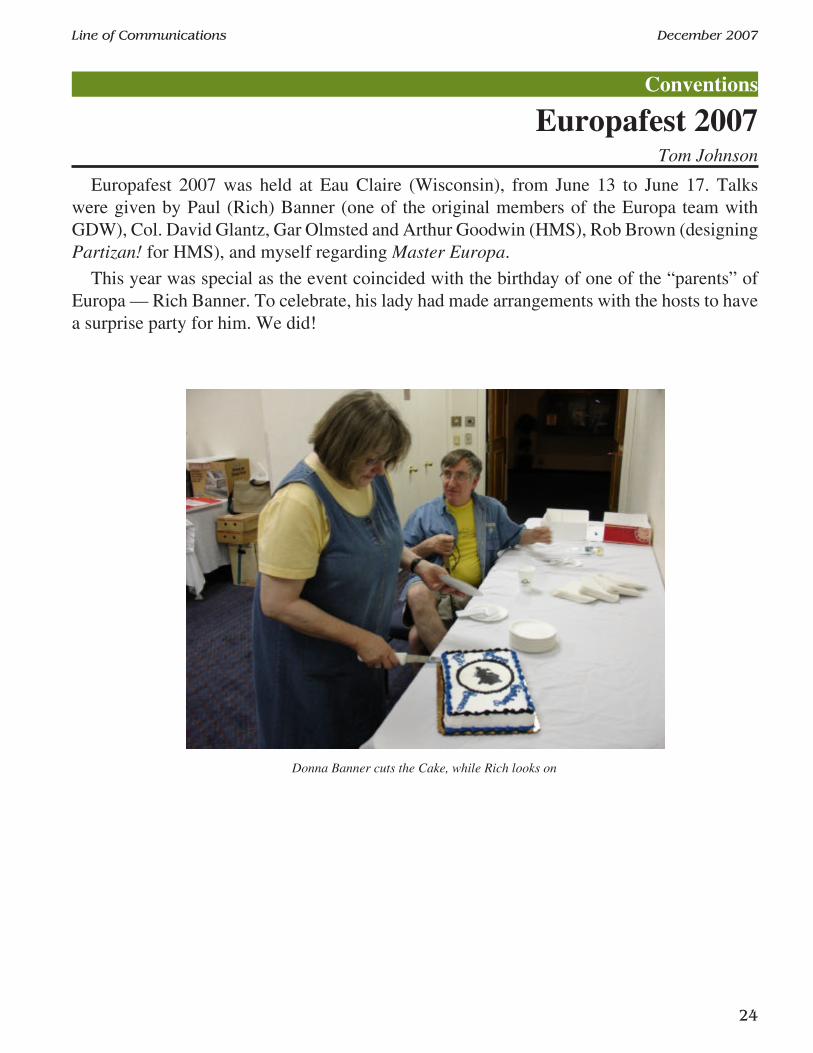
Europafest 2007 was held at Eau Claire (Wisconsin), from June 13 to June 17. Talks were given by Paul (Rich) Banner (one of the original members of the Europa team with GDW), Col. David Glantz, Gar Olmsted and Arthur Goodwin (HMS), Rob Brown (designing Partizan! for HMS), and myself regarding Master Europa.
This year was special as the event coincided with the birthday of one of the “parents” of Europa — Rich Banner. To celebrate, his lady had made arrangements with the hosts to have a surprise party for him. We did!
Donna Banner cuts the Cake, while Rich looks on

Line of Communications December 2007
2�
What could be more appropriate?
Col. Glantz speaks in the lecture hall.Center left, with dark shirt: Gar Olmsted
Center, with striped shirt: Arthur Goodwin
As always, speakers are a central part of the event, with historical information, and product history and future projects being discussed.
Line of Communications December 2007
2�
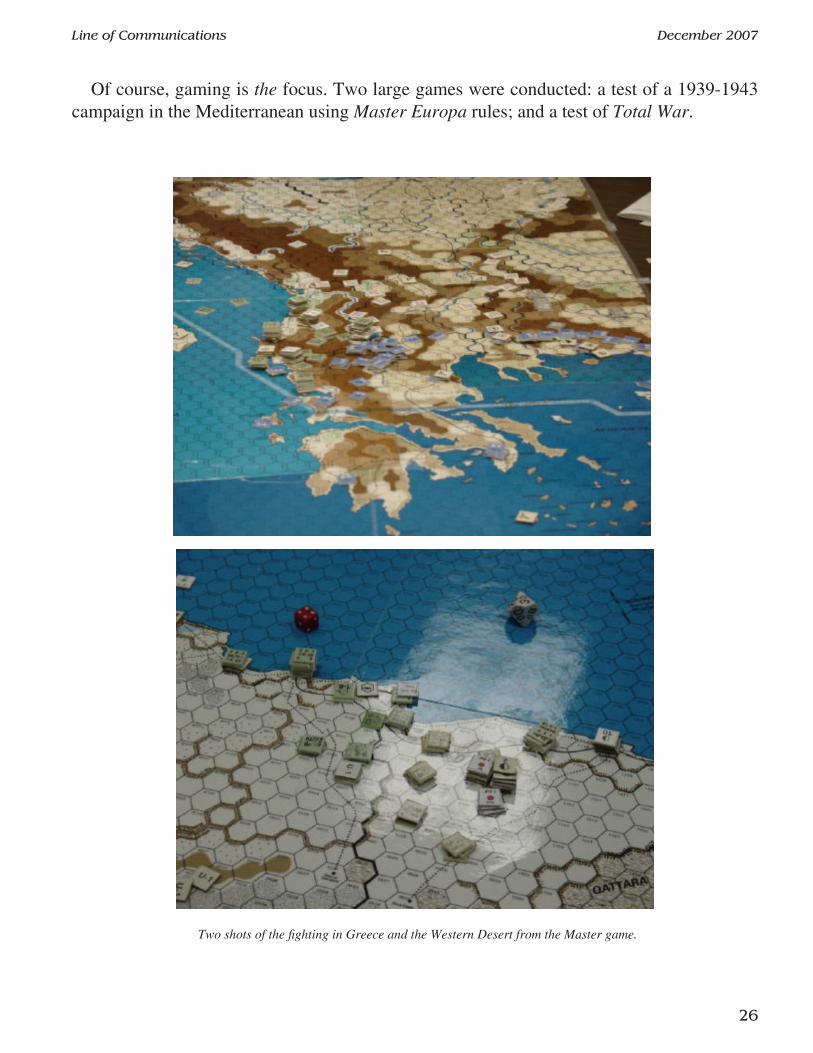
Of course, gaming is the focus. Two large games were conducted: a test of a 1939-1943 campaign in the Mediterranean using Master Europa rules; and a test of Total War.
Two shots of the fighting in Greece and the Western Desert from the Master game.

Line of Communications December 2007
27
Total War, 2nd day. Odessa area.
Total War, 3rd day. Army Group Center.
Planning for E2008 has begun; the tentative dates are May 22-25 in Eau Claire, WI. Check the website www.mastereuropa.com for more details and updates. g
Line of Communications December 2007
2�
IntroductionI embarked on writing this article after seeing a document compiled by Alessandro Gazzi
which showed that in early 1941 the Australian 6th division was rebuffed in their early efforts to capture Derna from the Italians. Little has been written in detail comparing the forces involved on both sides and the desperate struggle that took place, involving Italian Paratroopers and Bersaglieri, as well as regular troops. Normally modern literature simply mentions the campaign as a whole, how the Italians were quickly overrun and the victorious Allied army swept across Cyrenaica utterly defeating the Italian army and capturing Benghazi. The Australian 6th division soon gained a reputation as one of the best Infantry divisions in the North African campaign, but little is known of their failure to capture Derna against determined Italian resistance.
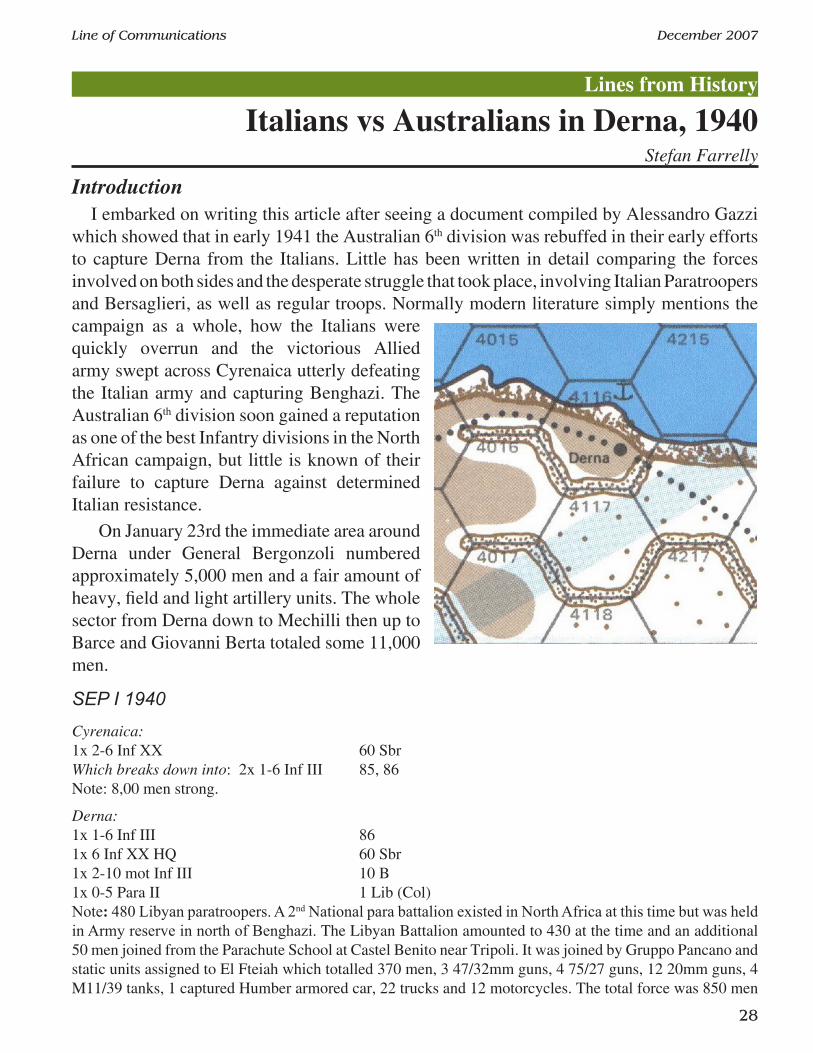
On January 23rd the immediate area around Derna under General Bergonzoli numbered approximately 5,000 men and a fair amount of heavy, field and light artillery units. The whole sector from Derna down to Mechilli then up to Barce and Giovanni Berta totaled some 11,000 men.
SEP I 1940
Cyrenaica:1x 2-6 Inf XX 60 SbrWhich breaks down into: 2x 1-6 Inf III 85, 86Note: 8,00 men strong.
Derna:1x 1-6 Inf III 861x 6 Inf XX HQ 60 Sbr1x 2-10 mot Inf III 10 B1x 0-5 Para II 1 Lib (Col)Note: 480 Libyan paratroopers. A 2nd National para battalion existed in North Africa at this time but was held in Army reserve in north of Benghazi. The Libyan Battalion amounted to 430 at the time and an additional 50 men joined from the Parachute School at Castel Benito near Tripoli. It was joined by Gruppo Pancano and static units assigned to El Fteiah which totalled 370 men, 3 47/32mm guns, 4 75/27 guns, 12 20mm guns, 4 M11/39 tanks, 1 captured Humber armored car, 22 trucks and 12 motorcycles. The total force was 850 men
Lines from History
Italians vs Australians in Derna, 1940Stefan Farrelly
Line of Communications December 2007
2�
strong and combining their weapons brought the total to: 8x 47/32mm guns, 8 Fiat M35 machineguns, 30 Breda M30 LMGs, and 12x 20mm guns. This new force was renamed Gruppo Mobile Tonini (1-6 Para Inf II Tonini).1x 0 pos AA AA=11x 0-1-6 Inf II 18 Lib (Col)Note: Libyan battalion acting as Derna garrison and AA unit consisting of 5 batteries of 75/27mm guns and one MVSN company.
El Mechilli:1x 3-8 arm cadre (7-6-8) S (special)Note: The forming ‘Special’ armoured brigade, or Babini armoured brigade after its commander. Intended to form into a full division. At this stage 2 medium tank battalions, 1 motorcycle battalion, artillery and support units. The rest of its units, another medium tank battalion and all of the 10th Bersaglieri regiment have yet to join to begin completing the forming up process.
Italian OBFteiah airfield area:
60th Bersaglieri Motorcycle Company (less 2 platoons)an M11 medium tank platoon with 4 tanks14th anti-aircraft battery (6 x 20mm guns)(this, barring the tanks, was the small garrison the Australians faced in their initial
attack in the airfield area)Martuba-Derna crossroads, west of Fteiah (northern Derna line portion):Libyan Paratroop Battalion a 75/27 field arty battery from 10th Arty Rgteleven 47/32 AT gunssix 20mm guns(this force fought tenaciously against the advancing Australians) – at the airfield ?
Wadi Derna (southern portion of the Derna line):2nd Battalion, 86th Inf. Rgt., Sabratha DivisionDepot infantry battalion from 115th Inf. Rgt, Marmarica Division17th Machinegun Battalion from Brescia Division
Town of Derna:Elements, 55th Machinegun Bn from Savona Division18th Libyan Inf. Bn.an artillery battery
Fort Piemonte, Fteiah plain:2 x 75/27 guns1 x 47/32 gun

Line of Communications December 2007
30
a machinegun platoon
Fort Rudero, Fteiah plain:2 x 75/27 guns1 x 47/32 guna machinegun platoon
Reserve:2 platoons of 201st Bersaglieri Motorcycle Coy.4 x 20mm guns2 armored cars (decrepit Lancia WWI model)a Motorcycle Carabinieri team
Derna Sector Artillery:1st Group (=Battalion), 75/27 field guns (20 guns used in anti-tank role)7th Group, 75/46 AA guns (7 guns)5th 20mm AA battery256th 65/17 light gun battery5 x 47/32 gunsone 76/40 gun batterytwo 102/45 gun batteriesone 152/45 gun batteryone 120/45 gun batteryseven Scotti light gunsOf all the Italian troops remaining in Cyrenaica many of the best of them were to be
found in the Derna Area in January 1941. Two of the 4 independent (divisional) Bersaglieri motorcycle battalions, the veteran Libyan para battalion, and 2 battalions of the newly arrived 10th Bersaglieri regiment, all strengthened with large amounts of artillery and a few tanks. The Australian official history correctly identified the 10th Bersaglieri regiment, but not the other units.
Australian OB19 X/6th XX. 2/4, 2/5, 2/6, 2/7, 2/8 bns (part of 17 X too)January 14th to 22nd, fighting in the Derna sector was limited to patrol skirmishes.The Australians attacked hard on Jan. 23rd-26th in the northern area. The Italian and
Australian versions may differ in several details, but basically the battle went as follows: the Australians seized, not without some difficulty, the airfield facilities, but could not push farther west due to a powerful artillery barrage pinning them down and the stiff resistance put up by the Libyan paratroops and other small units. The four Italian medium tanks were soon

Line of Communications December 2007
3�
put out of combat (Australian version) or they proved quite effective to thwart an Australian flanking move (Italian version).
On January 26th Australian elements crossed Wadi Derna, in the southern sector, and began to drive the defenders back. A counterattack launched by a weak company-sized Italian infantry force went nowhere. Alarmed by the gaping hole on Wadi Derna and the Australian push, the Italian commanders ordered a larger scale counterattack to be executed on the following day, Jan, 27th, by the 10th Bersaglieri Regiment (less one battalion).
Jan. 27th the counterattack was launched and succeeded to throw the Australians back to the eastern side of the Wadi (Australian version: running short of ammo, they had to withdraw to avoid being cut off). However, in the north the two forts Piemonte and Rudero and their tiny garrisons were battered by enemy artillery and overwhelmed by enemy infantry.
On Jan. 28th, Graziani, alarmed by the overall situation steadily getting worse (but not at Derna), decided to break contact and withdraw. On Jan. 30th/31st, the garrison of Derna slipped off unmolested, except a few tiny rearguard elements left in place to delay the Australian advance which were obviously overrun.
Before converting the information I wrote down into an article, give me an opportunity of completing the picture with more, and more dramatic and colorful info drawn from other sources. What if I tell you that on 23 January, Lt. Fiammingo, commander of 2nd Company, Libyan Paratroops Battalion, sent a group of paratroopers with a truck-mounted 20mm gun and 2 machineguns, led by Lt. Sainas to support the Fteiah airfield defenders? On the following day, during the fighting an artillery shell destroyed the 20mm gun truck (the blast is recorded even by the Australian history!) and Sainas had to withdraw to a nearby post where he found a 47/32 mm gun. After reorganizing his men, at night he returned to the battle scene, drove temporarily off the Australians and carried the bodies of the dead 20mm gun crew back to Italian lines. (Both Sainas and Fiammingo were heavily wounded in action a few days later).
And what about the Libyan paratrooper Bubakr Ramalon, awarded the Silver Medal for Valour as he was wounded twice while hurling hand grenades at the enemy, and fought on in spite of the wounds? And Libyan Sergeant Mohammed Iden, who, wounded in action, rescued under enemy fire his wounded officer as the latter was about to be captured?
Some more details on Derna. It seems the toughest fighting the Derna paratroopers force was involved in took place on 25 January. It is difficult to identify the various phases of the fighting and where precisely they took place, anyway after a morning of sharp combat, in the evening after 5:00pm a heavy attack pushed back the forward posts of the Italian defensive line and some Australian companies almost managed to outflank and encircle a portion of the line. According to the Italian account, this attack was repelled thanks to local counterattacks and hand-to-hand fighting on some occasions.
A source (actually not very reliable, though: Nino Arena, History of the Italian Paratroopers) gives an Italian casualties figure for 25 January, 40 dead and 54 wounded. That the losses near Derna were at any rate severe, decidedly higher than Australian losses, is demonstrated

Line of Communications December 2007
32
by the OH figure for the whole period from the beginning of the battle for Derna to 26 January, when the Fteiah airport was seized by the Australians and the Derna garrison folded back behind the steep cliff east of the town: 87 dead and 131 wounded. Contrary to their habit Australian and Commonwealth sources don’t mention “hordes” of Italian prisoners, an omission usually signalling hard fighting and few prisoners taken.
BibliographyThe basis for this article was a well researched document compiled by Alessandro Gazzi ,
who very kindly agreed for me to use it as a primary source here.Vicini, Diego (General), The history of the 8th Bersaglieri regiment, 1982 [not only a
history of the 8th regiment but also a masterly survey of the whole campaign and all the other Bersaglieri units in Africa until 1943]
3 of the Italian Official Histories on North Africa.Pignato & Cappellano, Combat vehicles of the Italian Army, volume 2 (1940-1945).
USSME, 2002 (official history). Cappellano, F. Artillery of the Italian Army in the Second World War, Storia Militrare,
1998.Lucio Ceva & Andrea Curami. The Mechanization of the Italian Army until 1943. USSME,
1994. (official history)[the 3 titles above translated from their Italian titles]
Map of Derna area showing the newly built Italian road from El Mechili to Slonta (3718) – the one not on Allied maps which allowed the Babini armoured brigade to escape northwards from 7th armoured trying to encircle it. Giovanni Berta is in 3917,
HQ of XX Corps and 60th Infantry
g
Line of Communications December 2007
33
The game Andrei Mellits and I played was the first go-round of Lightning War that we are helping GRD to update. We started with the Fall of France and Their Finest Hour rules and using Second Front and Wavell’s War rules for updating the rules format. We also included a more detailed set of naval rules. We designed the game around what happened in history and what both sides were capable of doing based on the political systems and military doctrine of each nation at that time.
The game has three distinct phases; the land warfare on the continent, the battle for the Atlantic sea lanes, and the battle of Britain. The continental battle and the battle for Britain are sequential in time with the battle of the Atlantic running throughout the full game. The strategies for the game design and the playing of the game seemed, to us, to follow the same sequence.
The Dutch strategy was to fall back to a defendable line running along the Ijssel and Maas-Waal Rivers and then along the fortified line of 16A:0721 and 16A:0821 to 16A:0921 and then along the Maas-Waal River. They would stay in their fortified area until France, Britain and Belgium started the counter attack against Germany. At that point they would cover the left flank of the allied advance.
The Belgium strategy and to maintain their national pride, was to keep a three hex front with the British on their right and the French seventh army on their left. The frontage is based on what they held in 1940. Their national pride would not let the army leave Belgium but when their losses reached a certain level, no more allied divisions in Belgium, and loss of Belgium supply sources they will leave the war.
The British strategy in the game is to protect the BEF first and then help out their allies the best they could. Based on the British-French military agreements before the war the British would man a front equal to two hexes, about 30 miles in real life. This will force the British to keep most of the BEF forces on or close to the front line. When they see that their route to their supply ports might be cut off they will start heading to their western supply ports to get back to England. In the air, Fighter Command, in Britain, is restricted to their command areas and not allowed to leave their areas until the Germans land in Britain. At sea, they must keep close to 60% of their destroyers and destroyer escorts, 19 half-flotillas, in the Western Approaches to protect their west coast ports from the German u-boats in the area.
The French strategy is to send their Seventh Army to Holland, to keep them in the war, which will force the Germans to stretch the front lines northward. The French assumed that the Germans would make two major attacks; one through Belgium and one to take back Alsace-Lorraine. This is why they placed a large part of their reserves in the southeast.
The German strategy is to first knock out Holland by May I, Belgium by May II, and France by Jun II. After this is completed, destroy the British air force and any naval units
Lightning War PlaytestJim Boston
Replays

Line of Communications December 2007
3�
they can reach. As soon as they have air superiority over southern England, hopefully no later then Sept I, invade England. The weather will be a major factor in the invasion of England. While all of this is going on the u-boats will do as much damage to the flow of raw and war materials going to England.
The Italian strategy is to set back and see how well the Germans do. If and when it looks like the Germans will soon defeat the French the Italians will enter the war on the German side. If it looks like the Germans will not win the Italians will remain neutral.
The play of the first play test, with rule changes and OOB changes going on through out the game proceeded as follows.
Surprise turn and May turnsIn the north the Germans started out by defeating Holland by the end of May I. This was
done when the Sixth Army’s motorized units isolated Holland from Belgium, overland, with units and zones-of-control and the German air mobile units cut the island route between Holland and Belgium. The Eighteenth Army destroyed as much of the Dutch army that they can reach.
The drive through the Ardennes went well, reaching the Meuse River at Sudan at the end of May I and had a spearhead three hexes south of Lille by the end of May II. While this was going on the Germans were able to find a weak spot along the Rhine River at 16A:2926 (May I) then to 16A:2927 (May II) and established a foot hold there that they kept expanding throughout the battle with France.
The French forces stood still from Luxembourg south. In the north the French First, Seventh and part of the Ninth armies, along with the BEF, raced eastward into Belgium and Holland. Allied forces reached one hex east of Bruxelles.
A part time play tester wanted to see if the Germans could trap the BEF in an area where they could be rescued. His thinking was it would be worth the extra time to kill off the BEF so England would have fewer units to defend against the invasion. So the plan is for the panzers to turn north by north-east to cut off all beach hexes within five hexes of any British port, maximum distance for the naval evacuation. The Germans were planning on going toward Paris from the northeast. This change in plans slowed up the killing of French and Belgium units to the extent that Belgium lasted longer then historically and received victory points for their stand. This extra time gave the French time to build up a better defensive line to the west. This line held out until the end of summer, putting off the air battle over England until the fall.
On May II the Allied forces, in Belgium slowly moved NW toward France, in most cases moving only one hex do to harassment hits and ZOC. But this was enough to put the Allied units in Belgium back in supply.
In France, to the west of the German line, the French (all of the BEF are still in Belgium) formed up a solid line against the German spotty spearhead. This new defensive line takes most of the French forces north of the French-Belgium-Luxemburg border. This line will
Line of Communications December 2007
3�
not stand long unless massive reinforcements from the south arrive in time. The French also formed a solid line around the German bridgehead alone the Rhine. Do to lack of rail points the line is not as solid as the French would like. The southern reserves must be divided between holding the Germans along the Rhine and helping out in the north..
June IThe Admiral Hipper (CA) coming home from a cruse in the Atlantic decides to make a
run up the channel to a German home port (this was done more to test the naval combat rules then anything else). British costal command aircraft failed to find him as well as the Suffix commanded TF. But, a French TF commanded by the Paris (BB) does find the Admiral Hipper. After a running naval battle between the French ships (1 BB, 1 CL, 5 DD half flotillas) and the Hipper, the Hipper is sunk after inflecting 1 hit on the Paris. While this was going on, in the North Sea, the Scharnhorst, returning from Norway, gets spotted by the Braham TF and starts to chase it down. The LW in Norway goes after the Braham TF and inflicted 1 point damage to the Braham but in the process receives 3 aborts. The Scharnhorst was able to slip away from the British and make it back to a German port.
The Germans pushed as many units into the Rhine pocket (hexes 2927, 2926, 3026) as possible. This offensive is keeping more French divisions (14) pinned down in the south then German divisions (12). The French will have to soon decide to either keep that pocket small or move some of the French units north to help stop the German onslaught in the Lille area. The Germans once again cut off the British and French units in Belgium. The Germans now have a solid line running along hexes 0828, 0929-1227. German infantry units pushed to the west and southwest to widen the central push along the Belgium-French border from 1330 through 1927.
The British send over three small brigades to France. With the weather in the Atlantic still bad the British fleet could not find any German U-Boats but lost DDs equaling 1/2 flotilla. The German naval patrols (Ju88A1 and He111H4), out of Holland, found and sank the French sub Sarcouf. On the ground the French finished removing all non-fortress divisions from the Maginot Line, all but one reserve corps headed north to the main battle fields. Allied construction units have a fort line along the Somme River-17A:1302, 17A:1402, 17A:1502, 17A:1601, 17A:1701- Marne river at 17A:1003.
The Allied main line, west of the Germans, has no gaps but very little reserve units behind the line.
June IIThe German u-boats just returned depleted flotillas and sent out others to replace them in
the Atlantic. The Germans pushed as many non-combat motorized units into the area from Antwerp west to the Belgium-French coastline. They are after, and succeed in destroying, the French and two Belgian corps close the coast and all the Belgians outside Antwerp. The Germans pushed what units they could into the gap, around 1730-1731, caused by the French westward retreat. And they kept pushing toward Strasburg along the Rhine river.
Line of Communications December 2007
3�
In the Allied turn the British naval actions saw no action due to bad weather once again. The troops in France plugged up holes in the line and place their reserves in better locations.
July IThe Axis turn saw action between German U-boats and British DD with the British come
out the losers, a half-strength DD flotilla sunk with no losses to the Germans.The Germans concentrated their armor around hex 0930 and infantry at Antwerpen and
between hexes 1429-1731-1830-1827. The Rhine forces pushed at hexes 2824 and 3127.The attack on Antwerpen, with a surrounded DR destroyed all the Belgians non-divisional
units and their three divisions were cadred and retreat into hex 1026. The British surrounded corps 16A:0927 was eliminated with a DH. The Allies lose units in three other locations along the frontline.
Once again the German U-Boats inflict enough damage on incoming war material that the British had to disband a divisional HQ.
Belgium surrenders after losing Antwerpen to the German assault. And the British and French units on Walcheren Island (0727) are U-3 and isolated. There are no other out-of-supply units on the map. The British have no units left on the frontline, they are hoping to build a line along the Somme River.
The British DDs and DEs play cat and mouse with the German U-Boats in the Western Approaches. Contact was made several times but no sinkings were confirmed.
On the ground the French rebuilt some of their combat motorized units, hopping to destroy a German corps in 16A:1330, which they do with a HX, surrounded. The Allies once again spend time straightening out their lines for a better defense. During the Exploitation Phase the French pull back their attacking combat motorized units to better defensive positions.
July IIThe German Type VII U-Boats head for home and R&R. The RN did not find any of the
U-Boats anywhere nor did costal command find any German ships. In the Ground Phase the Germans concentrated their armor to the south of Lillie and pushing at all of the weak spots they could find and reach. They lost only 1 panzer division while destroying 5 hexes on the line from hex row 07xx through 14xx The Rhine forces are pushing at hexes 2824 and 3227. The French did better on the defense in the south, only losing 3 hexes all along the French border from hex 2029 through 2824. After combat the French only have 1 infantry corps and 4 armor and 2 mot infantry divisions left north of hex row 14xx east of the Somme. In the Exploitation Phase the Germans moved 2 panzer corps toward the Somme River, putting all French units north of hex row 12xx out of supply. They also dropped supply by air to the 2 panzer corps.
During this time period the British DDs and DEs found and sunk a half-strength u-boat flotilla but in the process lost 2 full-strength DD flotillas. On the ground the French c/m units moved west to the Somme River but were not able to cross over due to ZOC, isolation status
Line of Communications December 2007
37
and harassment. For the rest of the line the French, once again, straighten out their lines for better defense.
August I2 of the 3 German U-Boats, all in the Western Approaches, were resupplied at sea. Three
more 1/2-flotillas of U-Boats will arrive their. On the ground the Germans concentrate their armor on the retreating French motorized units. Of the remaining French motorized corps one is still behind the German lines (17A:0703) and one is behind the frontlines. All German forces, with a big push between 16A:1631-16A:2029-16A:2028, and around 16A:2324 and the Rhine forces at 16A:2724 (Strasbourg).
Lillie, surrounded, is finally captured. Strasbourg also falls to the Germans. The French Rohrb fortress division was attacked but a DR was rolled. Since the unit was in a Maginot Line hex it did not retreat. In the Exploitation Phase a U-Boat 1/2-flotilla was sunk. The Germans moved there panzer corps around to better cut off the 2 remaining French corps in their backfield. They also made a major rail bombing effort in the south of French to stop/slow any reinforcements reaching the Somme area.
The British, during this time found and sunk one half-strength u-boat flotilla but lost 1 full-strength DD flotilla in the process. In the Ground Phase the French moved their non-isolated c/m units behind their lines, as a reserve/blocking force against the German’s next group of attacks. The Allies were able to create a solid line all along the German front.
August IIThe Germans refuel a half-flotilla of U-Boats at sea. In France the Germans concentrated
their armor just to the south of the Allied fort line running from hex 17A:1003-1302-1402-1701. The Germans destroyed the 2 French isolated groups behind their lines and try to pick off a few more Allied corps else where along the front line. This attack against the Rohrb division in 16A:2423 produced a DE. The hex is now held by the Rohrb cadre with no possible reinforcements. The attacks may place the Allies in a position where they may not be able to form a full defensive line during their turn.
During the Allied Naval Phase the British navy search but do not find any German U-Boats. In the Ground Phase the French move their c/m units, from north of Paris to the south of Paris. This covers the capital from the German c/m units to the southeast of Paris. Most of the German c/m units are behind the main French front and in supply because of the open corridor created by the remaining c/m units.
September IBy the end of the turn the two more U-boats arrive in the Western Approaches. In the
Western Approaches, one of the 6 U-boat groups was refueled at sea (a roll of 6 on the success table), and two groups headed home, each having only one load of torpedoes left.
A German mixed c/m group overran a French construction regiment in 17A:2602 then moved to Dijon (17A:2902). This action cut all but one rail line between the Maginot Line
Line of Communications December 2007
3�
and French supply sources. Isolating the Maginot Line is one of the conditions for France to surrender and for Italy to enter the war. All the German c/m units, except for the ones in Dijon, all moved west to a line 17A:2104 to 16A:2132. From there they will attack a French armored corps (1 armor and 1 motorized division), a lone French armor division and a French infantry corps. This will clear most Allied divisions that are between the German c/m units and Paris. All the siege guns that could be found were set to the area around Amiens (17A:1202). This will help in destroying the fort in the hex and avoid the halving of combat value when attacking across the river around Amiens. The German shuffle a few units around to get better odds in the south Rhine area (16A:3127-2726-2724). The battles for the approaches to Paris, resulted in one exchange one DH, one DH turning into a DE (ZOC) and two DEs (four German divisions cadred). To The north of Paris there was one attack, against Amiens (17A:1202). The Germans used three infantry corps, including most of their siege guns and enough engineers to over come the fort in the hex. In The south the Germans take 16A:2427 plus 3 additional hexes. At the end of the southern combats a ZOC is placed on the only remaining rail line for The French to move units from the forming southern pocket.
In The Exploitation Phase panzer corps overruns French units south of Paris and enters the southwestern hex of Paris (17A:1704). The Germans reinforce the units in Dijon to 20 points and then fly in 12 General Supply Points. The German supply trucks move to the liberated (?) Paris hex.
The Germans bombed 5 rail lines in the south, to once again slow The French movement from this area of operations.
A British convoy carrying the Canadian 5th brigade was informed about possible U-boats in the Western Approaches so they went way south to avoid them. They were able to make it to England without sighting any U-boats.
The British DDs and DEs, in the Western Approaches, go looking for U-Boats there. The British are able to make up 10 sweep groups (each group tries to have 8 ASW points) to go after the 6 U-boat groups. In the 10 sweeps there were only three contacts made. In two of the contacts the U-boats were able to escape without loss. The other British contact resulted in a lot of shells and torpedoes being fired but only killing fish. On four of the other sweeps the U-boats were able to get torpedoes launched, and were able to sink a 1/2-strength destroyer group.
At the same time four British construction brigades left France and landed in England.The British BEF pulled back from the Somme River line (17A:1003 & 1103) to just west
of the Seine River.The French rail net is at 38 points. The units in Paris have all left and the units to the north
and east have moved as far west as possible. The units in the south could not move to far because of the harassment hits. So, the ones that could not pass the bottlenecks at 17A:2902 and 16A:2727 surrounded the two hexes and attacked. The attack on 17A:2902 forced a ZOC DR, killing all of the Germans except for the “V” SS motorized division that became cadred. The other attacked grounded to a halt before it got far (AS).

Line of Communications December 2007
3�
September IIThe Italians declare war on France and England.The Germans send two more U-boats toward the Western Approaches. In the Western
Approaches, two of the U-boat groups were refueled at sea and one group headed home, having only one load of torpedoes left.
On the ground The Germans stage 3 Me109E aircraft to Italy, all of the French air force are now in the south. The Italians are sending all of their best troops to attack 17A:4803, it has 10 defensive points. Nice, which can only be attacked from one hex this
turn has 19 defensive points and a fort.The Germans overrun four French groups, mostly construction regiments, in 16A:2425,
17A:1402, 1403, and 1504. The Germans in the south are trying to cut the rail line supplying the Maginot line. The Germans are now occupying all of Paris and the German armor is heading towards the BEF, hoping to cut them off from their debarkation ports. The Germans are also running along the French along the English Channel coast.
The French sent in their air force to protect 17A:4803. The Italian attack against the hex resulted in an AS. The Germans made many high odds attacks to clear up the map and a few critical attacks that might end the Battle of France by the end of the next turn.
The Germans are attacking anything they can get next to that gives them at list a fifty percent chance of killing the Allies with no possible AH or AE results. Most of the attacks came to the north and west of Paris. In the south the rail line to the Maginot Line is closed after two good attacks. After the combats the panzer units keep rolling over small French units and ending up surrounding the remaining BEF from all of their ports.
During this time period the British have the Ark Royal (CV), Revenge (BB), Sheffield (CL), and a half-flotilla of Shoreham class DEs coming back to England. They will be
entering on the 12A:2700 row. The DDs and DEs in the Western Approaches will regroup in task forces to attack the German U-Boats. Costal Command once again cannot
locate any u-boats. A DD task force 16 finds Wolf-Pack 6. The DDs do minor damage to the U-Boats but the U-boats were able sink a half-flotilla. DD task force 12 fines Wolf-Pack 7 and sinks the half-flotilla. While DD Task Force 11 did not find any U-Boats Wolf-pack 8 found them but was not able to any damage. DD Task Force 16 also did not find any U-Boats but Wolf-Pack 9 did find them. The U-boats again sank a half-flotilla of the DDs. While DD Task Force 17 was looking for U-Boats, Wolf-pack 5 found them but was not able to sink anything.
The RN transported the 30th motorized brigade and the Canadian TS and SLI MG battalions from St. Brieuc (17A:0817) and the Polish 10th mountain brigade and the Czech 2nd brigade to England.While most Allied units moved, most did not go far. The French added a North African
mountain artillery battalion and 1 point positional AA to the Nice defense. They built up the area round Lyon (17A:3603-3608) and as far west as Clermont-Ferrand. The retreating unit
Line of Communications December 2007
�0
from the Rhine river defense surrounded the 15 panzer corps (16A:3029), a DR will kill off most of the German units. But the odds, without air, are 19 Germans to 23. The ride of the doomed.
The isolated units to the east of Paris stayed in the forts, 2 of 3 hexes have forts. The French pushed up an armored corps to the 14 panzer corps (17A:1208). The Germans are now surrounded by the 2 British corps and are U-1 and isolated.
There are only 3 isolated groups; the 15 panzer corps, the British 4 corps (17A:1108), and the British 5 corps (17A:1207). The 15 panzer corps receives 6 Ju88s as
DAS. There are no aircraft in range to support the 14 panzer corps.The British fly their bomber force, 15 aircraft, as GS for the brake out attempt against the
14 panzer corps. The Germans switch their 13 Me109s from CAP to intercept. The Germans lost no fighters but the British had 5 groups destroyed (K), 2 groups damaged (A), 3 groups disrupted so bad they were not able to give any support (R). This left 3 bombers getting past the fighters and with the 2 groups not touched by the fighters, the British have 5 groups braving the German 2 points of AA. Two Hamp bomber groups were turned back; this gives the Allied player 4 more points on the attack which did not change the 2:1 odds. The Allies rolled a AH. The French must lose at least 12 points and the British 8 points. In the exploitation phase the British 1st armored division reaches Brest and the French 1 armored corps moves to 17A:2010 with the French 5th motorized corps ending up in 17A:1712.
October IA Sunder 1 finds a U-Boat, but missed. The Germans transfer their three fighters from Italy
to the English Channel coast. Along the French Mediterranean coast the Italians are able to move to the eastern edge of Toulon and in the north.they are still in the Alps. The Germans have cleared southeastern France up to Dijon. Along the English Channel the have taken Caen and completely encircled the remaining British and Polish units.
The Germans destroy the isolated British 5th corps. During the exploitation phase the German panzer group that was in the battle against the British 5th corps now reinforce the units surrounding the British 4th corps, the last British corps in France. A panzer corps ends up in Cherbourg. The Germans send their first big air attack against England. They go after a radar station in 17A:4503. The British send up 10 of their fighters from the 11th fighter group, the Germans have 15 Me109s fly escort. The air combat came out very close ARP wise (British 1 killed, 6 aborted, 2 returned; German 3 killed, 1 aborted, 4 returned) with the British needed 8 ARPs to bring them all back and the Germans needing 7 ARPs. The British have 2 light AA points to go against the German bombers and dive bombers. The AA missed all the aircraft and the Germans inflect 7 points damage on the radar unit. The after action air photos showed that the radar station and surrounding area was so badly damaged that there is no way it can be repaired (a zero damage marker). Most of the German air force is now north of Paris.
Line of Communications December 2007
��
While this was going on a RN convoy, from Canada, arrives in England. Transports are picking up the construction brigade at 17A:0817 and the armored division and transport counter at 17A:0522. Once again the Coastal Command’s Sunder 1 goes hunting for U-Boats and finds and sinks a half-flotilla.
The RN units in the Western Approaches form up to cover 5 areas looking for U-Boats. One DD Task Force contacted a group of U-boats but was not able to do any damage. Two DD TFs were looking but did not see anythingU-boats, but both groups of U-boats found and shoot at them doing no damage. A DE TF picked up some U-boats on radar but was never able to track them down. The other DE TF found and did minor damage to the U-boats but the U-boats were able to repair all damage while underway.
October IIThe Sunder 1 once again finds but does no damage to the German U_Boats. The Germans divide their fighters and bombers into two groups each going after a different
radar site, both in Fighter Group 9’s area. The British send all of their Fighter Group 9’s aircraft to the radar station at 11A:4307. This leaves the second radar station, at 12A:4132 with out fighter protection.
The Germans have 8 Me109s escorting the bombers to 12A:4132, the British have 10 fighters intercepting. The British send their Spit2 and Bftr1F to bypass and the rest take on the Me109s. The Germans get an upper hand, aborting two Hurri1s, one Spit1 and kill one Hurri1. In return the Germans have one fighter aborted and three returned. Each bypassing fighter takes on a Ju88A1. The Ju88A1 become aborted but the Spirt2 is also aborted. The British have 1 heavy AA point going against 22 bombers. All but one bomber made it through, it was returned. The Germans have 57 bombing points and make 8 hits, this puts the radar station out of action, maximum damage level is 5 (Germans do not know this).
The radar station in 12A:4132 is under attack by 20 bombers and 9 dive bombers, with only 2 heavy AA points to defend it. Three of the bombers were returned, and none of the dive bombers were affected. The Germans do 11 points damage. This radar station has a maximum damage level of 7.
Three Italian BR.20M night bombers stage to Paris the fly to London to terror bomb the capital. The capital is protected by 7 heavy AA points but the attack is done at night. All of the bombers get through but do no damage.
The Germans destroy the isolated British U-2 4th corps. The British are down to 10.5 points in the Bocage (17A:1008). The Germans send in two panzer corps and two infantry corps (one crossing the narrow straits
Once again a Coastal Command’s “Sunder 1” group goes hunting for U-Boats and finds and sinks a half-strength U-Boat flotilla. The RN units in the Western Approaches form up to cover 8 areas looking for U-Boats. The sea fight goes all the way for the Germans, losing 2 half-flotillas to the British lost of six half-flotillas of DDs.
Line of Communications December 2007
�2
The British move around their AA and construction units to better protect their radar stations.
The rest of the game was just Germans bombing the remaining radar stations then going after the airfields close to the coast to keep the RAF away from the possible invasion areas. The weather never was good for an invasion, all but two turns had the Atlantic rough or stormy conditions. The Germans had air superiority over the south of England only the weather kept the Germans from trying an invasion.
The air part of the Battle of Britain was an easy win for the Germans. They used their full air force every turn against England after France was destroyed. The Germans had no problem keeping their full air force on the board every turn. The British were not able to do so. Each Fighter Command group was not allowed to leave their command area. This put 11 Group at a bad advantage against the Germans. Either the Germans should not be allowed to fly their full air force every turn or the ARPs for both sides need to be adjusted. Nether the RN or the German surface fleet risked their ships to the other side’s air force. How real was this???
The Battle of the Atlantic at first was balanced in favor of the surface fleets against the submarines. With a small adjustment this problem seemed to be fixed. There was a lot of hunting by the RN for U-Boats and after the small change the killing of U-boats dropped close to the actual figures.
The Germans can defeat the French in historical time but they must always remember the Paris is their goal and always go for that. The air war over France followed the old Fall of France results with the French and British always, except for the first turn or two, to little to late. The air war over England seemed not quite right, the British was losing aircraft faster then they could replace them when sending up all of 11 Group’s fighters every turn. The Germans were able to keep the kill ratio even or in their favor. The German ARP level might be two high. Not having good weather after France was defeated left the question of the invasion of England still up in the air. But our next play test will be just on the invasion of England, so we will see.
Overall, this should be an enjoyable game after the needed minor changes are made. g
Line of Communications December 2007
�3
Spanish InvasionBeing a fan of ‘what-if’ scenarios, I decided to pull out For Whom the Bell Tolls and fire
up a solitaire version of the “Invasion of Spain” scenario included within the larger Spanish Civil War game.
The scenario deals with a hypothetical attack on Spain by Germany in 1941, in an attempt to seize Gibraltar. It must be assumed that a Mediterranean strategy is being pursued by the Axis, so only a portion of the German Army is sent to the Iberian Peninsula. British involvement is also limited to roughly a reinforced Corps, plus significant Royal Navy assets. Historically the Germans tried to pressure Spain into allowing free passage for their troops to assault Gibraltar (Operation Felix), but Franco refused unless paid with an enormous amount of oil and other raw materials. Hitler balked at the price, and in any case was already starting to look to the east.
Germany is hoping for a quick victory, but the Spanish Army is sizeable, and the terrain is difficult. There are also supply implications due to the Iberian gauge rail network of both Spain and Portugal. On the other side of the equation, Spain has very little armour or antitank weaponry, and is totally outclassed in the air by the Luftwaffe.
March 41Hitler meets General Franco in a rail carriage near the French border, in a final attempt to
secure passage for German troops to carry out Operation Felix, a direct assault on the British bastion of Gibraltar. Although sympathetic, Franco is trying to rebuild a nation devastated by 4 years of Civil War. He demands huge amounts of food, resources and war materiel. Hitler refuses, declaring that he would rather have teeth pulled than meet with the Spanish leader again. Upon arrival in Berlin, he orders his general staff to prepare for an invasion of Spain, with the intention of capturing Gibraltar, and with it control of the Western Mediterranean. The Spanish Army, along with any reinforcements sent from Britain, is to be wiped out.
April I 41To secure assembly areas for the assault, Germany occupies Vichy France. Various tank
and infantry units head south from the Bordeaux area as part of the occupation. This sudden move prompts French Morocco to declare that it is no longer loyal to the Vichy government, but is instead a part of Free France. Spain also responds to the provocation, ordering turn 2 of general mobilisation. Britain details the 1st Canadian infantry division plus two smaller units to be sent to the area to defend Gibraltar, and they arrive by sea. Mobilised Spanish units are sent to the border area to join the main force that has been redeployed there during the winter months as a precaution against any surprise attack.
Replays
Spanish TorchRalph Sunley
Line of Communications December 2007
��
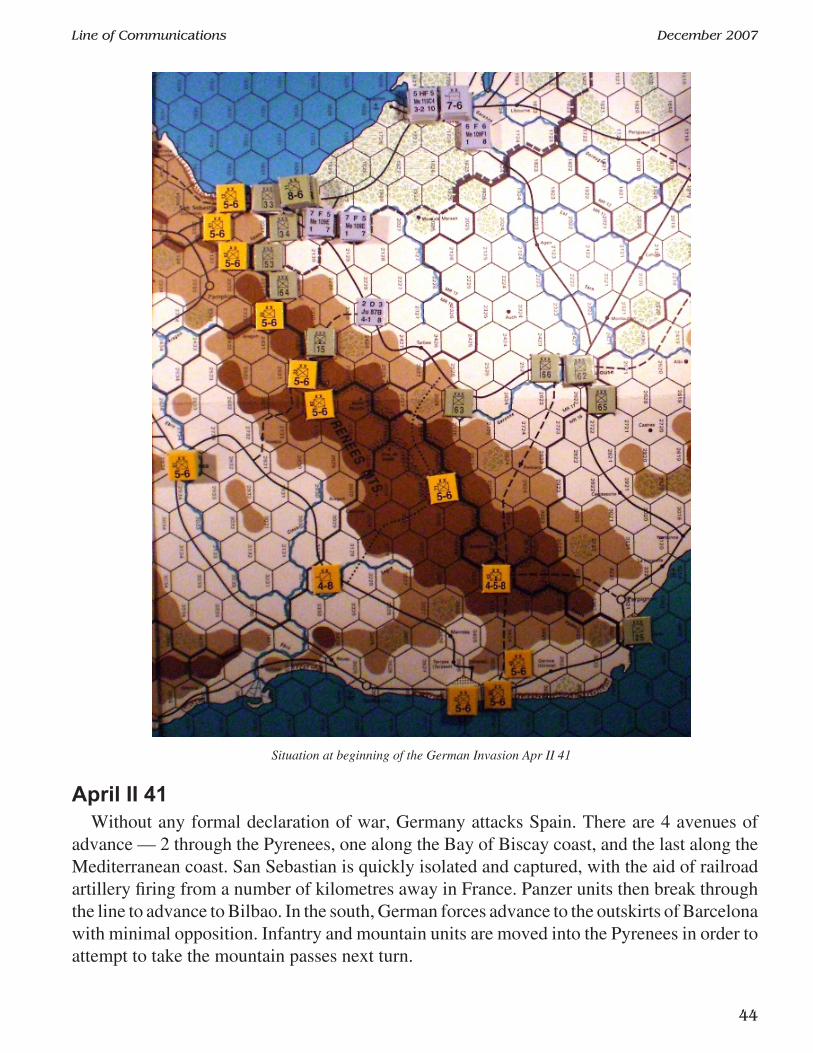
April II 41Without any formal declaration of war, Germany attacks Spain. There are 4 avenues of
advance — 2 through the Pyrenees, one along the Bay of Biscay coast, and the last along the Mediterranean coast. San Sebastian is quickly isolated and captured, with the aid of railroad artillery firing from a number of kilometres away in France. Panzer units then break through the line to advance to Bilbao. In the south, German forces advance to the outskirts of Barcelona with minimal opposition. Infantry and mountain units are moved into the Pyrenees in order to attempt to take the mountain passes next turn.
Situation at beginning of the German Invasion Apr II 41

Line of Communications December 2007
��
Spain completes turn 3 of mobilisation, and receives numerous small garrison units which are activated due to their regions being invaded. Three British divisions and support units are made available for the theatre in the UK, and 2 Infantry divisions are transported to Gibraltar. The Spanish navy is also kept busy, transporting a number of units to the mainland from both Spanish Morocco and the Canary Islands. On the ground, the Spanish begin the work of destroying rail hexes in order to deny them to the Germans. Also, the cities of Valencia, Santander and Gijon are reinforced by various formations which arrive via rail. Finally, in diplomatic circles, the British are very disappointed to learn that their negotiations with Portugal to secure transit rights for Allied forces have broken down. Portugal will remain strictly neutral during the conflict, unless attacked.
May I 41With orders to capture rail marshalling yards as quickly as possible; the Germans continue
a major advance along the Biscay coast. Bilbao is assaulted by overwhelming German forces and the defenders are forced to retreat out of the city with heavy losses. In the south, 3 German Corps succeed in occupying the outer suburbs of Barcelona, securing the partial city hex with minimal loss. Meanwhile, the Pyrenees is the scene of 2 major actions. In a victory for the Spanish, the German 15th Mountain Corps is thrown back after trying to remove the well dug in Spanish 82nd Infantry division from hex 2630. The second operation is more successful for the Axis. An invasion of Andorra creates a diversion, allowing the 62nd and 63rd Corps to defeat the Spanish 43rd Mountain division at the cost of an artillery regiment. Panzer units break through to take the rail junction of Calatyud, as well as mopping up a couple of cadres.
Allied mobilisation continues, with the British 1st Tank division arriving by sea, and Spain receiving its final mobilisation reinforcements (mostly much needed artillery). Fortifications are begun outside Gibraltar and in Valencia by Allied engineer units. The artillery reinforcements are sent from their starting hexes to bolster various cities such as Gijon, Madrid and Valencia. The use of Spanish Landing craft as ferries allows the elite Spanish colonial units stationed in Spanish Morocco to enter the Spanish mainland. Around Barcelona, an attempt is made to form a delaying force around the north-western flank of the city, with the hope of preventing its fall next turn. Forward units in the Pyrenees fall back where possible, but the remnants of the 43rd Mountain division move to try and stop the Germans leaving
Andorra. A screening force has been deployed along the coastal road to Valencia, which should prove to be quite a speed hump for the invaders. Naval activity is again heavy, with more units being brought from the Canaries and Spanish Morocco to the mainland.
May II 41The Germans continue to rapidly advance in the north and central sectors. Zaragoza is
surrounded by infantry, armour and mountain units and is crushed without material loss to the attacker. North of Madrid, Valladolid is confronted by the 53rd Corps and the SS Totenkopf division, which races behind the city to cut off any retreat. As a result the non divisional units
Line of Communications December 2007
��
in the city are wiped out, with many prisoners being taken. Lastly the city of Santander is destroyed as a result of fierce house to house fighting. The Germans achieve their objective, but their 11th Infantry division is reduced to cadre after suffering heavy casualties. Its direct opponent, the Spanish 11th Infantry division, is finally destroyed, along with its support units. At the southern end of the map, the Spanish units on the flank of Barcelona are easily dealt with by the 25th Panzer Corps. It advances to completely cut off the city. The main attack is conducted by the 65th and 62nd Corps, backed up with siege artillery and numerous combat engineers. Over a week of pitched battles rage amongst the city streets, but finally Barcelona falls. The Germans lose 3 engineer regiments and an Infantry division to cadre, plus an artillery unit, while the Spanish lose 2 divisions plus support units. The Germans now possess an important rail junction and airbase for their Mediterranean operations. In the exploitation phase, the inland city of Leon is occupied, and the 33rd Corps advances to within 2 hexes of Madrid, overrunning a bicycle unit that has been ripping up rail tracks in the area. The German advance has now reached the limit of its supply lines, so the capture of further rail capacity is now vital.
Spanish and British forces begin to set up a defensive perimeter around Gibraltar, using the Guadalquivir river and the mountains of the Cordillera Penibetica as the front line. Valencia is the next major city in the sights of the Germans, so further screening units are sent along the coast to guard the narrow terrain between the sea and the mountains. The mountain pass to the north of the city is also garrisoned to prevent a flanking attack from the centre of the country. Madrid is the focus of some activity, with 2 divisions sent to the very important mountain pass to the north in hex 2412, and some shuffling of units in the city itself is done in response the German Panzers appearing nearby. Further British ground reinforcements arrive by seas along with 3 bombers, which will help prop up the hard pressed Spanish air force. Additional units continue to arrive from the Canary Islands and Spanish Morocco.
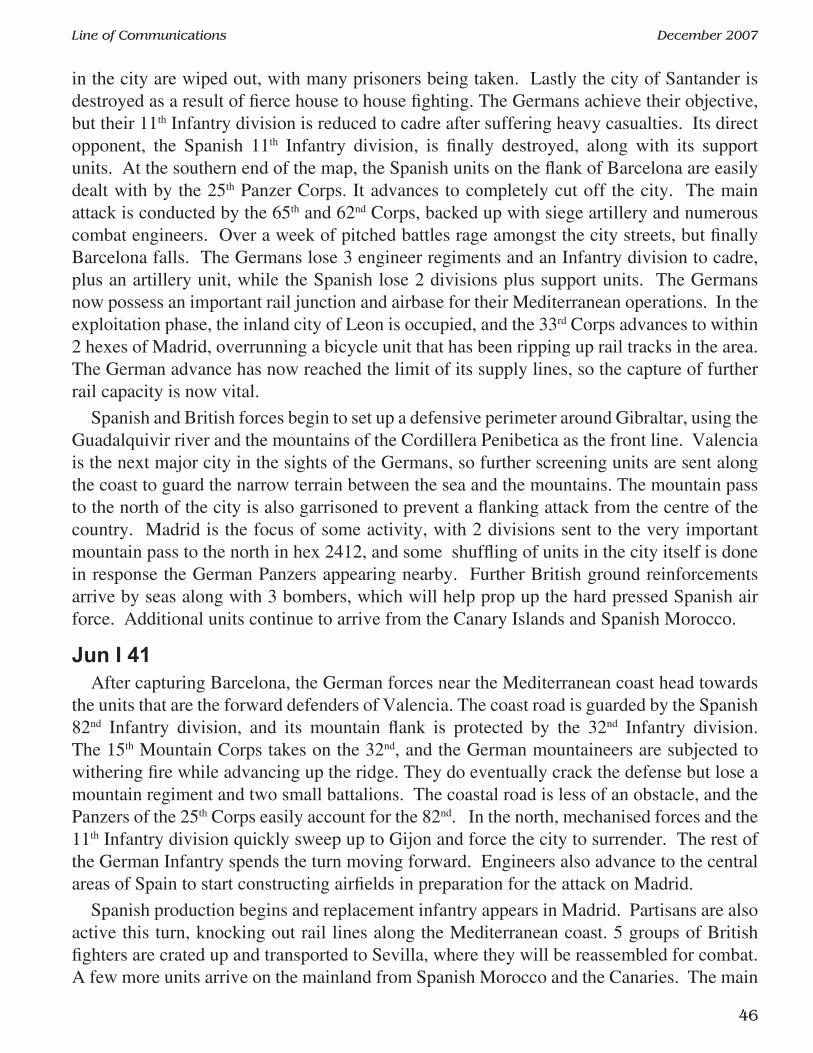
Jun I 41After capturing Barcelona, the German forces near the Mediterranean coast head towards
the units that are the forward defenders of Valencia. The coast road is guarded by the Spanish 82nd Infantry division, and its mountain flank is protected by the 32nd Infantry division. The 15th Mountain Corps takes on the 32nd, and the German mountaineers are subjected to withering fire while advancing up the ridge. They do eventually crack the defense but lose a mountain regiment and two small battalions. The coastal road is less of an obstacle, and the Panzers of the 25th Corps easily account for the 82nd. In the north, mechanised forces and the 11th Infantry division quickly sweep up to Gijon and force the city to surrender. The rest of the German Infantry spends the turn moving forward. Engineers also advance to the central areas of Spain to start constructing airfields in preparation for the attack on Madrid.
Spanish production begins and replacement infantry appears in Madrid. Partisans are also active this turn, knocking out rail lines along the Mediterranean coast. 5 groups of British fighters are crated up and transported to Sevilla, where they will be reassembled for combat. A few more units arrive on the mainland from Spanish Morocco and the Canaries. The main
Line of Communications December 2007
�7
activity conducted this turn is the destruction of rail lines, and many hexes are knocked out around the country. Otherwise most of the Allied units remain fairly static.
Jun II 41A traffic jam forms on the road to Valencia, with the Germans constrained by the mountains
that overlook the coast and Spanish units in 3633. These non-divisional units are not able to be overrun, but they are easily outflanked and rolled up by the advancing Germans. Nonetheless, they do their job of keeping the Axis away from Valencia for another turn. Madrid is the next target on the list for the Wehrmacht, and the equivalent of 5 Corps are sent in its direction. Engineers are also kept busy constructing numerous airfields north of the city to base the short ranged Stukas and Me109s. In a precursor to the coming battle, the Luftwaffe raids Madrid, indiscriminately targeting the civilian population. The Spanish air force and city AA manage to abort 2 German aircraft and return two others, but 2 terror bombing hits are still achieved.
In response to the appearance of the enemy at the gates of Madrid, Franco’s government relocates to a rear suburb of Madrid. The elite 91st Infantry division is also sent to bolster the city defenses. In Andalucia, 2 stacks of reserves are formed behind the main defensive line.
Axis forces closing in on Madrid – Jun II 41

Line of Communications December 2007
��
These units a drawn mostly from forces that have arrived from the Spanish colonies, and will be a useful stopgap force should the Germans penetrate through to the area. Some position AA arrives from the UK, and a Colonial brigade is brought in from Sidi Ifni. The 5 British fighters are put back together and undergo flight testing near Sevilla. They will be operational in early July.
Jul I 41Germany has captured enough Spanish rail marshalling yards to be able to use the Iberian
rail net for supply. It spends 9 resource points to build rolling stock which will be available next turn. The railroad engineer units still continue to advance the northern and southern railheads into Spain as quickly as they can with their limited manpower. There are two main battles in the turn. The Spanish 52Exp Infantry division left Valencia to take up a flank position outside the city, forcing the Germans to delay their assault by yet another turn. Nonetheless the 25th Panzer Corps makes short work of the enemy unit, completely eliminating it. The main action takes place at Madrid. In the skies over the city, Spanish pilots flying Me109s and CR32 biplanes escort a He111 to a successful DS mission in support of the city. Along the way they shoot down one German Me109 and abort another at no loss to themselves, in a big win. For their part, a Luftwaffe armada is sent to bomb the defenders – 11 bombers plus 3 fighters carrying bombs. Although 3 Axis air units are aborted by AA and 2 returned, a significant amount of air power is able to influence the battle. 4 German Corps press home the assault and despite the confines of the city streets they are able to flush the defenders out of the city, with many prisoners taken.
In response to the imminent loss of the capital, Franco is forced to flee and his government relocates to Sevilla. News of this causes confusion amongst Spanish Army units. A major effort is made to prop up Valencia. Firstly 3 RAF fighters are rebased into the city, making the total 4 in the port city. The Royal Navy is also tasked to intervene, and Force H is recalled from other duties into the theatre. It joins up with the Spanish surface naval units and takes station outside Valencia, ready to provide heavy gunfire support. No major ground movement is undertaken by the Allies, as Madrid is not in a position to be reinforced, and there are no other active sectors. Partisans continue to damage the rail network behind the German lines, inflicting 2 more hits.
Jul II 41Due to the sudden appearance of the Royal Navy outside Valencia, extra preparations are
now required before an assault can be made. German engineers are made to work overtime repairing the rail lines leading to the city. This allows the German rail artillery to be brought within range. Since the Valencia operation is to be delayed, German forces around the city are tasked to clear the surrounding areas of opposition, particularly the mountain pass in 3404. 3 Spanish regiments are overwhelmed by 2 German Corps backed up by a Panzer division. In the centre of the country, the last hex of Madrid is now totally surrounded. A bloody exchange takes place in the air, which sees 2 Spanish air units shot down, 1 of which
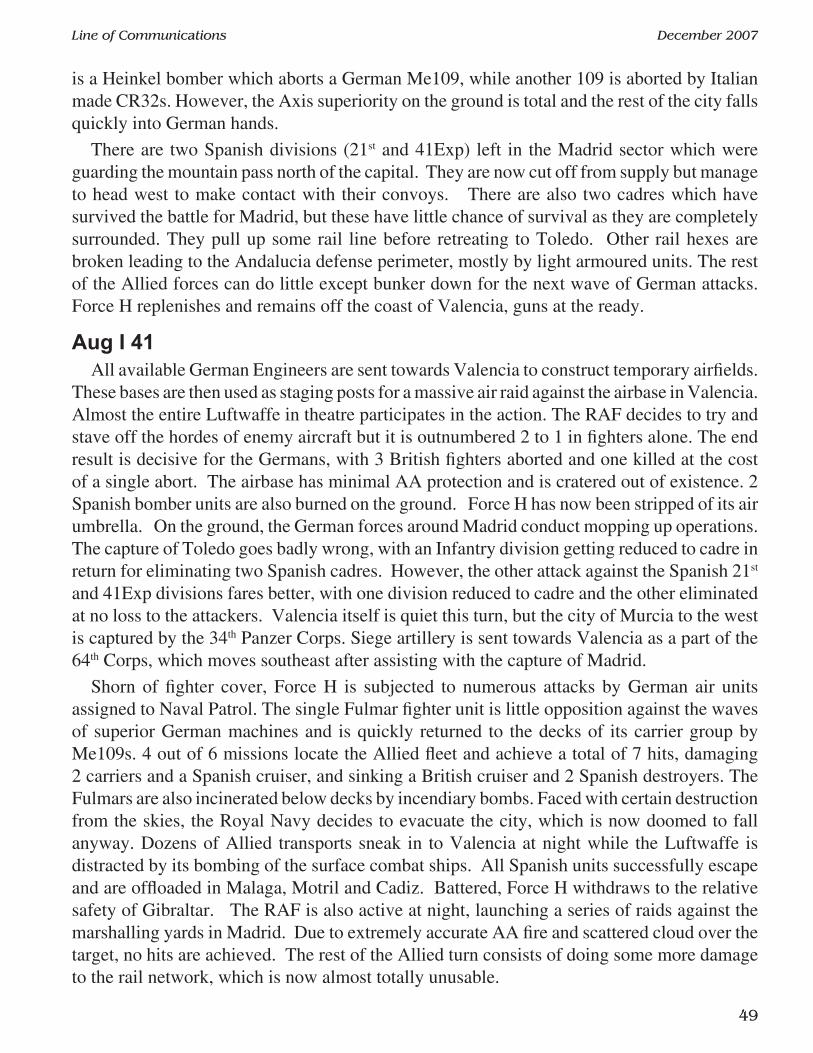
Line of Communications December 2007
��
is a Heinkel bomber which aborts a German Me109, while another 109 is aborted by Italian made CR32s. However, the Axis superiority on the ground is total and the rest of the city falls quickly into German hands.
There are two Spanish divisions (21st and 41Exp) left in the Madrid sector which were guarding the mountain pass north of the capital. They are now cut off from supply but manage to head west to make contact with their convoys. There are also two cadres which have survived the battle for Madrid, but these have little chance of survival as they are completely surrounded. They pull up some rail line before retreating to Toledo. Other rail hexes are broken leading to the Andalucia defense perimeter, mostly by light armoured units. The rest of the Allied forces can do little except bunker down for the next wave of German attacks. Force H replenishes and remains off the coast of Valencia, guns at the ready.
Aug I 41All available German Engineers are sent towards Valencia to construct temporary airfields.
These bases are then used as staging posts for a massive air raid against the airbase in Valencia. Almost the entire Luftwaffe in theatre participates in the action. The RAF decides to try and stave off the hordes of enemy aircraft but it is outnumbered 2 to 1 in fighters alone. The end result is decisive for the Germans, with 3 British fighters aborted and one killed at the cost of a single abort. The airbase has minimal AA protection and is cratered out of existence. 2 Spanish bomber units are also burned on the ground. Force H has now been stripped of its air umbrella. On the ground, the German forces around Madrid conduct mopping up operations. The capture of Toledo goes badly wrong, with an Infantry division getting reduced to cadre in return for eliminating two Spanish cadres. However, the other attack against the Spanish 21st and 41Exp divisions fares better, with one division reduced to cadre and the other eliminated at no loss to the attackers. Valencia itself is quiet this turn, but the city of Murcia to the west is captured by the 34th Panzer Corps. Siege artillery is sent towards Valencia as a part of the 64th Corps, which moves southeast after assisting with the capture of Madrid.
Shorn of fighter cover, Force H is subjected to numerous attacks by German air units assigned to Naval Patrol. The single Fulmar fighter unit is little opposition against the waves of superior German machines and is quickly returned to the decks of its carrier group by Me109s. 4 out of 6 missions locate the Allied fleet and achieve a total of 7 hits, damaging 2 carriers and a Spanish cruiser, and sinking a British cruiser and 2 Spanish destroyers. The Fulmars are also incinerated below decks by incendiary bombs. Faced with certain destruction from the skies, the Royal Navy decides to evacuate the city, which is now doomed to fall anyway. Dozens of Allied transports sneak in to Valencia at night while the Luftwaffe is distracted by its bombing of the surface combat ships. All Spanish units successfully escape and are offloaded in Malaga, Motril and Cadiz. Battered, Force H withdraws to the relative safety of Gibraltar. The RAF is also active at night, launching a series of raids against the marshalling yards in Madrid. Due to extremely accurate AA fire and scattered cloud over the target, no hits are achieved. The rest of the Allied turn consists of doing some more damage to the rail network, which is now almost totally unusable.
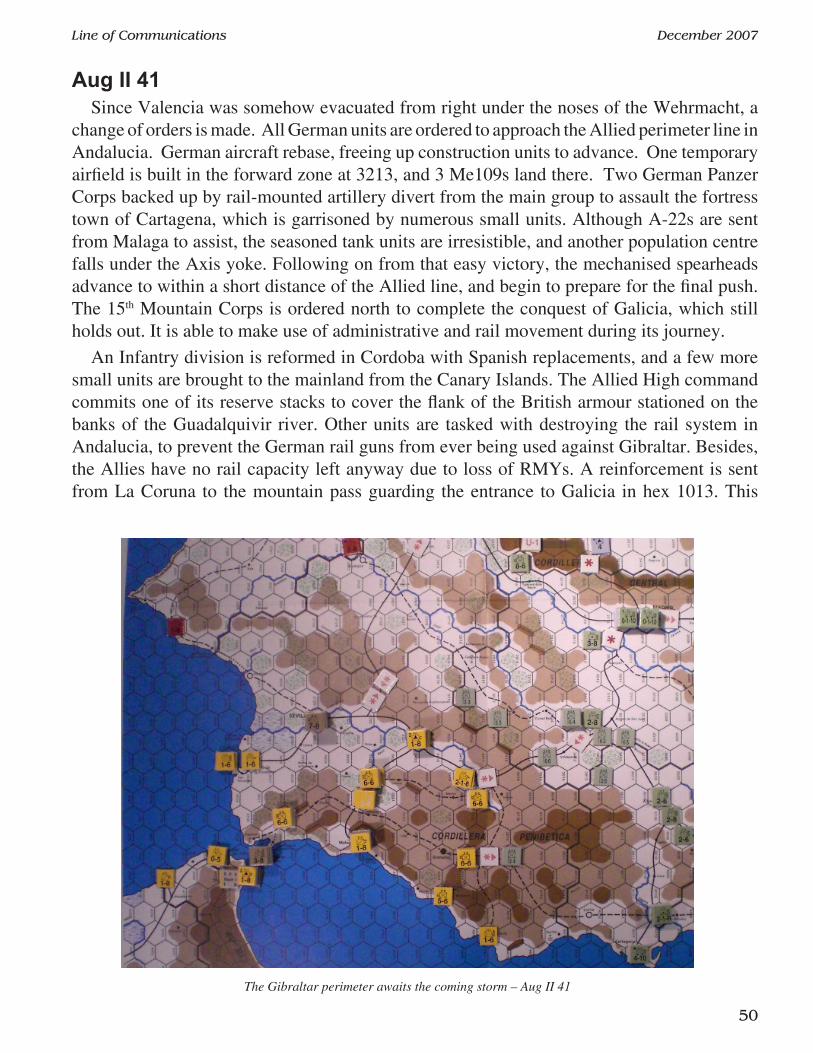
Line of Communications December 2007
�0
Aug II 41Since Valencia was somehow evacuated from right under the noses of the Wehrmacht, a
change of orders is made. All German units are ordered to approach the Allied perimeter line in Andalucia. German aircraft rebase, freeing up construction units to advance. One temporary airfield is built in the forward zone at 3213, and 3 Me109s land there. Two German Panzer Corps backed up by rail-mounted artillery divert from the main group to assault the fortress town of Cartagena, which is garrisoned by numerous small units. Although A-22s are sent from Malaga to assist, the seasoned tank units are irresistible, and another population centre falls under the Axis yoke. Following on from that easy victory, the mechanised spearheads advance to within a short distance of the Allied line, and begin to prepare for the final push. The 15th Mountain Corps is ordered north to complete the conquest of Galicia, which still holds out. It is able to make use of administrative and rail movement during its journey.
An Infantry division is reformed in Cordoba with Spanish replacements, and a few more small units are brought to the mainland from the Canary Islands. The Allied High command commits one of its reserve stacks to cover the flank of the British armour stationed on the banks of the Guadalquivir river. Other units are tasked with destroying the rail system in Andalucia, to prevent the German rail guns from ever being used against Gibraltar. Besides, the Allies have no rail capacity left anyway due to loss of RMYs. A reinforcement is sent from La Coruna to the mountain pass guarding the entrance to Galicia in hex 1013. This
The Gibraltar perimeter awaits the coming storm – Aug II 41

Line of Communications December 2007
��
is to try and at least delay the approaching German mountain troops in the form of the 15th Mountain Corps.
Sep I 41A plethora of temporary airfields are constructed within range of the Allied positions. This
allows the Germans to bring their Me109s and Ju87s to bear. There are 3 Allied stacks behind the Guadalquivir river. The right flank is covered by the Cordillera Penibetica, while the heavily garrisoned city of Cordoba is on the left. Fatally, however, there is a gap in the line between Cordoba and the Spanish forces in 3418 built around the elite 101st Infantry division. The 33rd Panzer Corps thrusts across the river and through the hole, cutting off the defenders and allowing it to attack without penalty. The attack is joined by the 53rd Infantry and 25th Panzer Corps. Allied fighters attempt to disrupt the significant German bomber force, but the air battle is inconclusive, allowing Luftwaffe air power to be decisive. The Spanish are completely eliminated. Meanwhile, the southern end of the line is anchored at the town of Jaen. It is attacked by the 64th and 66th Corps over the river, backed up by the 34th Panzer Corps which makes a daring move through the mountain trails to the south of the city. The Spanish 23rd and 92nd Infantry divisions are well dug in, but cannot hold on for long against continuous German attacks. They retreat in good order westwards out of Jaen. Along the Mediterranean coast, Almeria is seized by the GD Motorised regiment, which easily accounts for the local defenders.
The smashing of the main Allied line leaves the British and Spanish armour in a tricky situation. Their position in the centre was not attacked, but the forces on both flanks were dislodged. Although their supply lines are cut by the Axis, they manage to extricate themselves
Makeshift Allied line in the west of Andalucia – Sep I 41
Line of Communications December 2007
�2
and fall back to a hastily constructed second line which runs from Cordoba to 3420, then a solid 5 hexes southeast to the mountain pass at 3918. Unfortunately, there is not enough fuel for the British 8th Artillery brigade to get away, and it is ordered to spike its guns before capture. Local Spanish reserves are sent to bolster the front, but it would seem that it will not hold next turn, despite not having any gaps in it.
Sep II 41The region of Galicia has remained free of German attack, but it now comes in for attention
by the Wehrmacht. The 15th Mountain Corps and 22nd Air Landing division take on the small units defending the mountains that screen the Atlantic ports. The Spanish put up a determined defense, despite the attack being at 6:1, and an EX result ensures that German infantry losses are high. However, there is virtually nothing in the rear, so the cities in the area will be quickly swept up next turn. In Andalucia, the new Allied line is subjected to 3 attacks. Cordoba is held by the 1st Canadian Infantry division plus numerous good quality Spanish units. It is assaulted by the 25th, 65th and 66th Corps. A prolonged artillery bombardment softens up the defenders sufficiently for the battle to be won by the Germans, though they do have a division reduced to cadre. All the Allied forces surrender or are destroyed. After the city falls, the 25th Corps motors ahead into the heart of Allied territory, threatening vital supply lines. 2 hexes to the south of Cordoba, a stack of mostly Colonial non-divisional units is in the sights of the 53rd and 64th Corps. The attackers do not coordinate the operation properly, but are so overwhelming in number that they still easily account for the Spaniards at the cost of another cadre. Lastly, strong mechanised forces of the 33rd and 34th Corps take on the 23rd and 93rd Infantry divisions in 3719. As per the previous turn, the Spanish units are able to form a screen that delays the Germans while the bulk of the formation retreats with minimal loss.
Faced with Panzers in the rear, the Allied High Command issues the order to fall back towards Gibraltar. British replacements from the Rock are also used to reconstitute the 1st Canadian Infantry division and an Artillery brigade. The Allied armour is again in danger of being outflanked but it is able to evade German patrols and escape westwards. A few Spanish units are left behind in front of the Germans in order to delay them further.
Oct I 41With the days getting shorter, the Germans are running out of time to seize Gibraltar before
the weather turns. A decisive attack on Sevilla is ordered, with the objective of capturing General Franco. The 25th, 64th, 65th and 66th Corps are beefed up with siege artillery and sent towards the city. Inside the provisional Spanish capital are the British 3rd and 43rd Infantry divisions plus support units. The RAF takes to the sky in its entirety in an attempt to stave off the German columns. However the British bombers mostly fall victim to German AA and have only a minimal effect. 2 weeks of intense house to house fighting reduces the city to ruins. The British have had a long time to prepare their strongpoints, and their antitank weaponry takes a fearsome toll of the Panzers in the narrow streets. Finally though, the artillery that continuously rains down on Allied positions proves to be pivotal to the ultimate outcome,

Line of Communications December 2007
�3
and the British surrender. An EX result means the Germans cadre two Panzer divisions but the British are all eliminated. General Franco’s cabinet is discovered in a basement in the centre of the city, still overseeing operations. He is taken away by the SS. News of the fall of the government quickly spreads throughout the remaining Spanish Army units, causing widespread demoralisation. Elsewhere, Granada is held by the rearguard force of the 93rd Infantry division. Without support units or air cover, it is quickly defeated by the German 52nd Corps and GD Motorised regiment. In front of Malaga at a gap in the mountain ridge, the Spanish 23rd and 92nd divisions are again attacked by German armour. Unfortunately though, the third time is lucky for the attackers, and the Spanish are reduced to cadres. The village of Lucena in the centre is also occupied by rearguard units consisting of artillery and AA units. The lack of infantry proves crucial, as only a British artillery brigade is able to escape the clutches of the German 53rd Corps. The final operation for the turn takes place in Galicia, where the last remnants of Spanish resistance are easily mopped up by the Mountain and Air Landing divisions in the area.
With the collapse of the Spanish government, Allied resistance starts to fail. All Allied units are ordered back to Gibraltar or to escape to Spanish Morocco by any means possible. The Home Fleet is also activated in Britain and sent south to help defend the Rock against any attack. During the evacuation of Huelva, the Spanish heavy escorts are spotted by German scout planes and subjected to attack by 3 Heinkels. 2 hits are achieved, causing heavy damage,
Sevilla and the Spanish government have been captured – Oct I 41
Line of Communications December 2007
��
but none of the cargo is harmed. The rest of the Allied fleet is kept busy transporting units out of Atlantic and Mediterranean ports under the cover of darkness. Two positions are set up outside Gibraltar to hold up the Germans, but many other units use the Spanish ferries to cross the Straits of Gibraltar into Spanish Morocco. The only other city still held in strength is Malaga.
Oct II 41Spain officially surrenders, but no regular army units lay down their arms, confident that
the fight can continue from exile. A transitional government is set up in the Canary Islands to continue the war. The German response is to continue attempts to reach Gibraltar. The outermost defending units are overrun by the 25th Corps, which has had all of its tank losses replaced. This sets up an assault on La Linea de la Concepcion. 3 German Corps attack a combined Allied force which is backed up by the heavy guns of Force H and the Home Fleet Task Force. Unused to having such heavy fire pouring on to their assembly areas, the German attack is broken up before it gets going, and an AS is the result. To the east, Malaga still holds out but is now isolated. The 53rd, 62nd and 66th German Corps approach the city and easily overwhelm the defenders. Other mopping up operations take place, with the Germans capturing Cadiz and Huelva with little opposition.
By stopping the Germans outside Gibraltar, the units from La Linea are able to make their way into Spanish Morocco. Meanwhile, the Luftwaffe takes aim at the Allied fleet in the Straits that has been providing fire support. Due to deteriorating weather, only 1 mission is able to find the enemy. An RAF fighter is shot down but the concentrated AA guns of the battleships is enough to disrupt the aim of the Stuka pilots, and no hits are registered.
Since the only place left in Allied hands is an impregnable Gibraltar, and with the weather forecast poor, the Axis calls off the campaign at this point.
ConclusionsAs the scenario is hypothetical, it is obviously difficult to compare the game as played to
any potential real-world events. However, with the materials at hand, I have the following observations about this game
It is rather one sided, and quite suitable for solitaire play. In my view it is similar to First to Fight, as the Allies have few chances to attack and only one real strategy – delay.
The forces available to the Germans are not the right kind of units and are insufficient in number for the job at hand. Considering the terrain in Spain, there should be a lot more mountain, jaeger and other specialised units as part of the invasion force. Also, the Spanish have roughly one division for every German division, a ratio which is difficult to quickly overwhelm, even with strong air and armoured assets.
It would have been interesting to see an option for Italian involvement via the Regia Marina. A case could be made that the Italians could have been promised Vichy territories in return for their participation, and it would have made life for the Royal Navy a bit more challenging, at least in the Mediterranean.
Line of Communications December 2007
��
The victory point table is rather unrealistic. In the scenario as played, the Germans did not take Gibraltar, but they conquered Spain with minimal losses, and would have been able to significantly impact naval traffic through the straits of Gibraltar. However, the scenario result was a decisive Allied Victory. There are two VP awards that seem out of place – points for controlling off map areas that the Germans can never reach, and the 50 points per turn after Jul I that there are supplied Allied units on the Spanish mainland. This is a very high penalty, and seems to imply that the Germans have somewhere else to be. If they are still planning to launch Operation Barbarossa after attacking Spain, then I view that as extremely ambitious. Nonetheless, it is very difficult for the Germans to make the Spanish fall over in a hurry due to several factors – terrain, the surrender rules and the supply rules
The supply and rail conversion rules are a big impediment to the Axis. They cannot use the Iberian rail net for supply until they have 10REs of capacity on that net. This is difficult to achieve, since they must capture at least Madrid, Barcelona and 6 dot cities, plus use all their resource points to permanently increase capacity up to 10. The other problem is that they have only two RR engineers, and they can only regauge 2 hexes each per turn to European gauge with the rules as written. It has been pointed out to me that these rules are in fact in error, and the FitE rules should be used, but I had already started the game so kept going with the RAW.
Partisans are a very effective tool for the Allies, who receive 3 attacks per turn. The only restriction is that an attack cannot take place in an enemy occupied hex. Without any security troops, the Axis is very vulnerable to these operations. g

Line of Communications December 2007
��
This unit represents the standard US Navy carrier based torpedo squadron at the start of World War 2, comprising 15 Devastator TBD-1 torpedo planes. A total of 129 Devastators were built, all before December 7, 1941. With a top speed of approximately 200 miles per hour, a range of 435 miles, the Devastator carried as its main payload either a single aerial torpedo or a single 1000 lb bomb. Carrying a torpedo limited top speed to about 100 mph and required the Devastator to take a straight approach to its target.
This left the Devastators extremely vulnerable when not covered by fighters. At the Battle of Midway, the Devasator’s last major battle, this lack of fighter protection would prove costly.
When provided with fighter escort and unopposed by enemy aircraft, the Devastator served effectively in early 1942, participating in strikes in the Solomons, and assisting in the sinking of the Shoho with 4 torpedo hits at the Battle of Coral Sea.
Although the Devastator was state of the art when it was introduced into service in 1937, it was far outclassed by 1942 and was already slated for replacement by the Grumman Avenger TBF-1. Armed with 1 forward-firing .30 caliber or .50 caliber and 1 rear-firing .30 caliber machine gun, the Devastator carried a crew of 3, a pilot, bombardier, and a radioman/rear gunner, the squadrons took off only with the pilots and radioman/gunners since the bombardiers were not required for torpedo attacks.
Of the 3 US navy torpedo squadrons operating from the USS Hornet, USS Yorktown, and USS Enterprise, it was VT-8 from the USS Hornet which suffered the most grievous casualties losing all 15 planes with 29 of the 30 pilots and crew being killed in action. In total, 35 out of 41 Devastators were lost to enemy action.
Led by 43 year old John Waldron, a Lt. Commander and Naval Academy graduate, who trained his men exceptionally well,
Lines from History
TBD-1 DevastatorTim Tow
Douglas TBD-1 torpedo plane in flight, late 1941
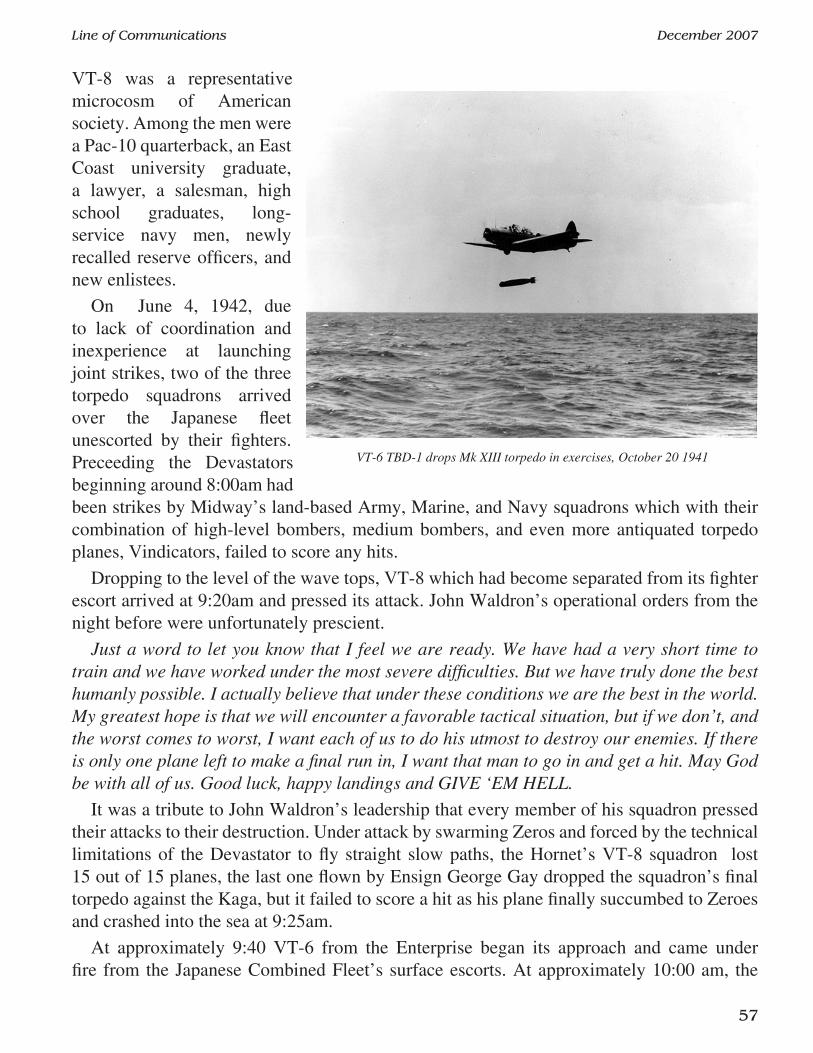
Line of Communications December 2007
�7
VT-8 was a representative microcosm of American society. Among the men were a Pac-10 quarterback, an East Coast university graduate, a lawyer, a salesman, high school graduates, long-service navy men, newly recalled reserve officers, and new enlistees.
On June 4, 1942, due to lack of coordination and inexperience at launching joint strikes, two of the three torpedo squadrons arrived over the Japanese fleet unescorted by their fighters. Preceeding the Devastators beginning around 8:00am had been strikes by Midway’s land-based Army, Marine, and Navy squadrons which with their combination of high-level bombers, medium bombers, and even more antiquated torpedo planes, Vindicators, failed to score any hits.
Dropping to the level of the wave tops, VT-8 which had become separated from its fighter escort arrived at 9:20am and pressed its attack. John Waldron’s operational orders from the night before were unfortunately prescient.
Just a word to let you know that I feel we are ready. We have had a very short time to train and we have worked under the most severe difficulties. But we have truly done the best humanly possible. I actually believe that under these conditions we are the best in the world. My greatest hope is that we will encounter a favorable tactical situation, but if we don’t, and the worst comes to worst, I want each of us to do his utmost to destroy our enemies. If there is only one plane left to make a final run in, I want that man to go in and get a hit. May God be with all of us. Good luck, happy landings and GIVE ‘EM HELL.
It was a tribute to John Waldron’s leadership that every member of his squadron pressed their attacks to their destruction. Under attack by swarming Zeros and forced by the technical limitations of the Devastator to fly straight slow paths, the Hornet’s VT-8 squadron lost 15 out of 15 planes, the last one flown by Ensign George Gay dropped the squadron’s final torpedo against the Kaga, but it failed to score a hit as his plane finally succumbed to Zeroes and crashed into the sea at 9:25am.
At approximately 9:40 VT-6 from the Enterprise began its approach and came under fire from the Japanese Combined Fleet’s surface escorts. At approximately 10:00 am, the
VT-6 TBD-1 drops Mk XIII torpedo in exercises, October 20 1941
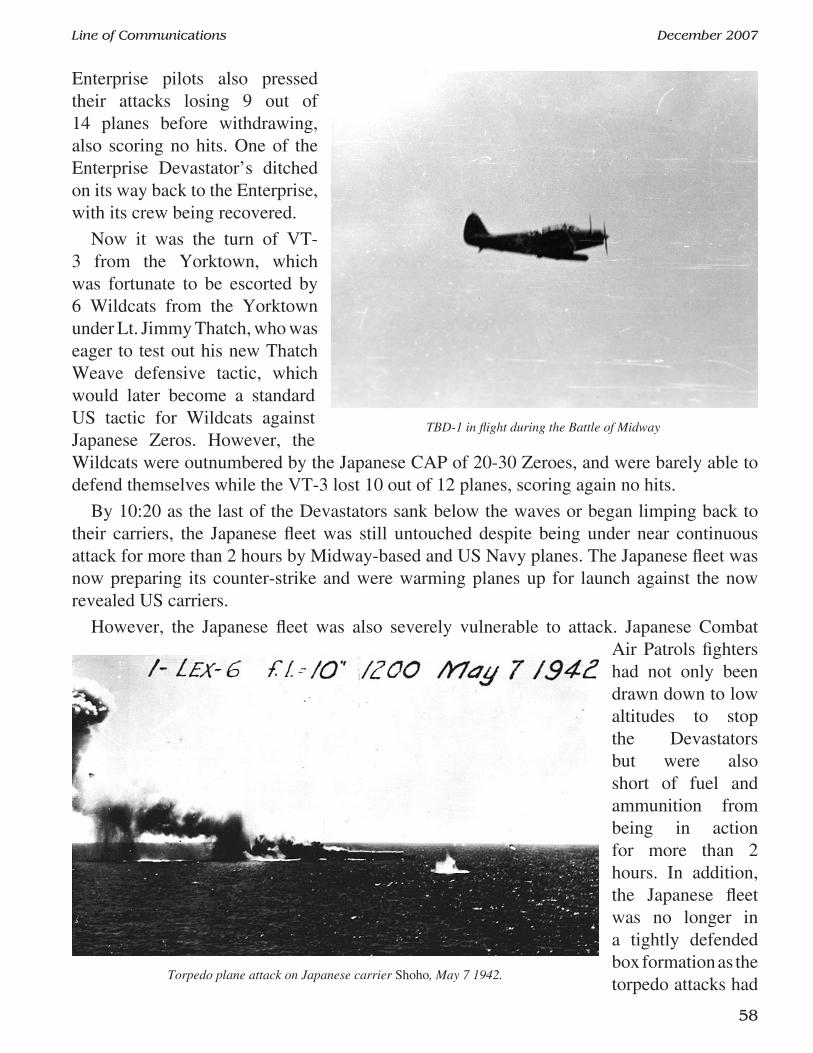
Line of Communications December 2007
��
Enterprise pilots also pressed their attacks losing 9 out of 14 planes before withdrawing, also scoring no hits. One of the Enterprise Devastator’s ditched on its way back to the Enterprise, with its crew being recovered.
Now it was the turn of VT-3 from the Yorktown, which was fortunate to be escorted by 6 Wildcats from the Yorktown under Lt. Jimmy Thatch, who was eager to test out his new Thatch Weave defensive tactic, which would later become a standard US tactic for Wildcats against Japanese Zeros. However, the Wildcats were outnumbered by the Japanese CAP of 20-30 Zeroes, and were barely able to defend themselves while the VT-3 lost 10 out of 12 planes, scoring again no hits.
By 10:20 as the last of the Devastators sank below the waves or began limping back to their carriers, the Japanese fleet was still untouched despite being under near continuous attack for more than 2 hours by Midway-based and US Navy planes. The Japanese fleet was now preparing its counter-strike and were warming planes up for launch against the now revealed US carriers.
However, the Japanese fleet was also severely vulnerable to attack. Japanese Combat Air Patrols fighters had not only been drawn down to low altitudes to stop the Devastators but were also short of fuel and ammunition from being in action for more than 2 hours. In addition, the Japanese fleet was no longer in a tightly defended box formation as the torpedo attacks had
Torpedo plane attack on Japanese carrier Shoho, May 7 1942.
TBD-1 in flight during the Battle of Midway

Line of Communications December 2007
��
forced the Japanese carriers to loosen their formation and become separated from coordinated defense by their surface escorts.
Distracted by the Devastators, the Japanese were surprised when at 10:22, the first SBD from the Enterprise’s dive bomber squadron, VB-6, points its nose downwards toward the Japanese carrier Soryu.
Although out-dated and out-classed mechanically and doctrinally, the Douglas Devastator TBD-1 played an important role at Midway, that cost the lives of many of its pilots of crew, but it was not a sacrifice that was in vain, as they diverted the Japanese fleet’s attention at a critical time and through their courage and dedication did what their machines could not, win the battle at Midway.
SourcesGay, George. Sole Survivor. Midway Publishers: 1983.Kernan, Alvin. The Unknown Battle of Midway. Yale University Press: 2005.“TBD Devastator” [Online] Available at http://en.wikipedia.org/wiki/TBD_Devastator
(retrieved November 19, 2007)Interrogation of Japanese Officials NAV No. 8 US Strategic Bombing Survey [Pacific]
No. 46 http://www.ibiblio.org/hyperwar/AAF/USSBS/IJO/IJO-8.html (retrieved November 19, 2007)
Photos from US Naval Historical Center http://www.history.navy.mil/branches/org11-2.htm g
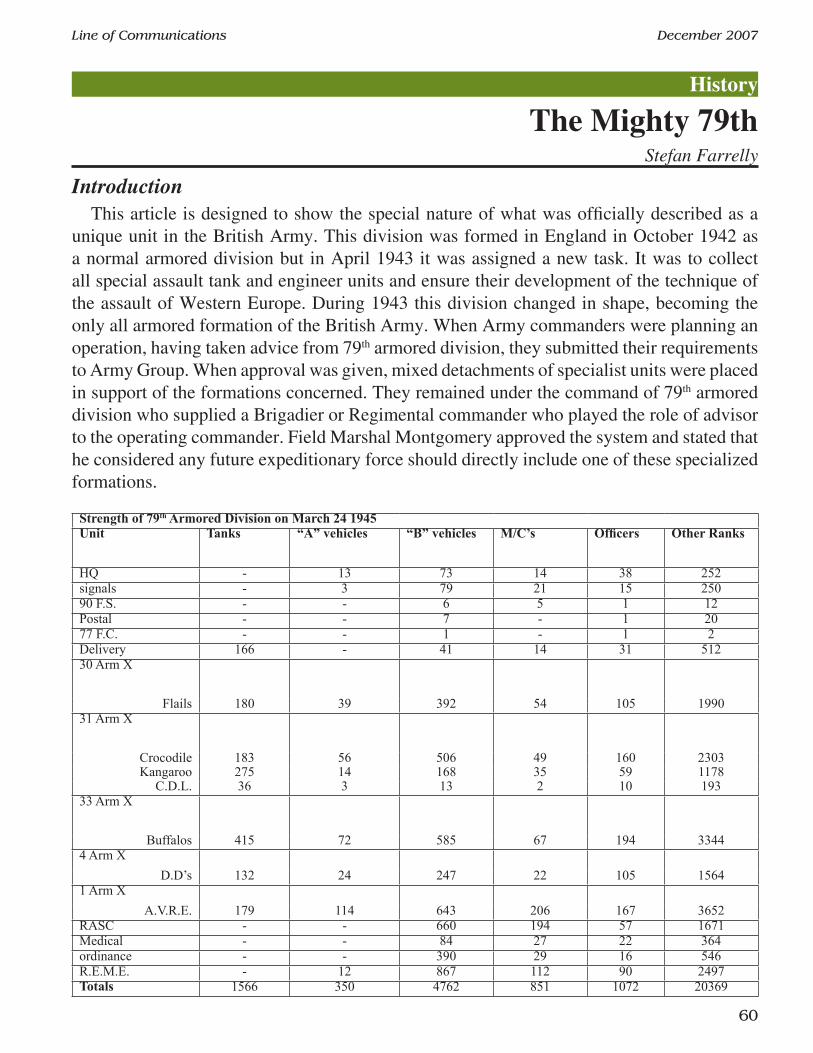
Line of Communications December 2007
�0
IntroductionThis article is designed to show the special nature of what was officially described as a
unique unit in the British Army. This division was formed in England in October 1942 as a normal armored division but in April 1943 it was assigned a new task. It was to collect all special assault tank and engineer units and ensure their development of the technique of the assault of Western Europe. During 1943 this division changed in shape, becoming the only all armored formation of the British Army. When Army commanders were planning an operation, having taken advice from 79th armored division, they submitted their requirements to Army Group. When approval was given, mixed detachments of specialist units were placed in support of the formations concerned. They remained under the command of 79th armored division who supplied a Brigadier or Regimental commander who played the role of advisor to the operating commander. Field Marshal Montgomery approved the system and stated that he considered any future expeditionary force should directly include one of these specialized formations.
Strength of 79th Armored Division on March 24 1945Unit Tanks “A” vehicles “B” vehicles M/C’s Officers Other Ranks
HQ - 13 73 14 38 252signals - 3 79 21 15 25090 F.S. - - 6 5 1 12Postal - - 7 - 1 2077 F.C. - - 1 - 1 2Delivery 166 - 41 14 31 51230 Arm X
Flails 180 39 392 54 105 199031 Arm X
Crocodile 183 56 506 49 160 2303Kangaroo 275 14 168 35 59 1178
C.D.L. 36 3 13 2 10 19333 Arm X
Buffalos 415 72 585 67 194 33444 Arm X
D.D’s 132 24 247 22 105 15641 Arm X
A.V.R.E. 179 114 643 206 167 3652RASC - - 660 194 57 1671Medical - - 84 27 22 364ordinance - - 390 29 16 546R.E.M.E. - 12 867 112 90 2497Totals 1566 350 4762 851 1072 20369
The Mighty 79thStefan Farrelly
History

Line of Communications December 2007
��
Explanation of abbreviations above;F.S. Field security sectionF.C. Field cashierDelivery Delivery tank squadrons, for control of supplies of specialized tanks due to their
limited supplyFlails Sherman gun tanks equipped with mine clearing flails (Crab)Crocodile Churchill tanks with flamethrowersKangaroo Infantry carrying armored vehiclesC.D.L. Searchlight mounted on a gun tankBuffalos Amphibious infantry carrying armored vehiclesD.D’s An amphibious gun tank capable of navigating at sea (Sherman)A.V.R.E. Churchill Armoued Vehicle Royal Engineers operating either a bridge, Petard
(large mortar), plough, Fascine (wood bundle for obstacles), Bobbin (carpet) or Conger (mine clearer)
R.E.M.E. Royal Electrical and Mechanical Engineers
The 79th Armored XX in Second FrontFor the preceding table the 5 component tank brigades of 79th armored division in March
1945 are; 1x 5-3-6 Aslt Eng Tank X 1 RE 1x 6-4-10 Amph Arm X 4Note: Cant see a counter for 4 Arm X in SF 1x 5-3-10 Eng Tank X 301x 4-3-6 Tank X 31 T has been converted (Oct I 44) to; 2x 2-1-6 fl Tank II 1 F&F, 7 RTalso part of 31 Tank X; 1x 2-1-6 fl Tank II 141 RACand its kangaroos are shown as; 1x (+1)-10 APC counter (1 RE) 49 APC 1x (+1)-10 APC counter (1 RE) 1 APC (Can)1x 6-4-10 Arm X 33 has been converted (Jan I 45) to; 1x 8 LVT counter (3 REs) 33and already added to the division in Nov 44; 1x 8 LVT counter (1 RE) 11 RTNote: 415 buffalos equals a 3 RE LVT counter and 1 RE LVT counter (approx. 100 each) and the 275 Kangaroos are two armored carrier regiments (approx. 135 each).
SPECIALAs of March 45 if all the above units are stacked together(except the LVT and APC counters) then they can form into something like;1x 23-14-10º Arm XX 79
Line of Communications December 2007
�2
Note: The mightiest Allied division of the war! All right, it has no artillery (unsupported) and no infantry - but that’s reflected in its low defense strength. It has 1,566 tracked AFV and over 21,400 men compared to a normal armored division of 350 AFV and 14,400 men. Their historical record (see bibliography below) claims all this anyway.
Historical OB for the 79th Armored divisionOCT I 42
Britain
Forming:1x 8-7-10 Arm XX 79Note: 27th Armored brigade and 185th infantry brigade.
APR I 43Convert forming 1x 8-7-10 Arm XX 79 to forming:1x 10º Arm XX HQ (AA=0) 79Note: no counter for the HQ in Second Front. I think the 79th Armored division HQ should be shown in Europa. It has quite a proud history (according to their historical record – see Bibliography below), quite a few forces including delivery tank squadrons containing replacement tanks for its regiments (over 160 tanks according to the March table above) - even though it has its artillery and AA regiments removed (unsupported and no AA). I like to think of Europa as being as historically accurate as possible so I think the HQ warrants inclusion.1x 5-3-6 Aslt Eng Tank X (1 RE)Note: In SF the above unit doesn’t get created until Dec I 43 from the 2-3-8 Eng X GHQ.1x 6-4-6 Tank X 33 T1x 4-2-6 Tank Trng X 35
DEC I 43Add to 79th Armored division:1x 6-4-10 Arm X 30Note: This brigade is created in Oct I 43 from the 42nd Armored division.
JAN I 44Convert 1x 6-4-10 Arm X 30 to:1x 5-3-10 Eng Tank X 30
MAR I 44Replace 1x 4-2-6 Tank Trng X 35 wth:1x 4-3-6 Tank X 1 TNote: Cant find a counter for 1st Tank brigade in SF. It only has 2 regiments. Convert 1x 6-4-6 Tank X 33 T to:1x 6-4-10 Arm X 33
SEP I 44Add to 79th Armored division:1x 4-3-6 Tank X 311x 2-1-6 fl Tank II 141 RACNote: These units are created in Nov I 43 from the 53rd Mixed division.
OCT I 44Convert 1x 4-3-6 Tank X 31 to:2x 2-1-6 fl Tank II 1 F&F, 7 RT
Line of Communications December 2007
�3
OCT II 44Convert 1x 4-3-6 Tank X 1 T to:1x (+1)-10 APC counter (1 RE) 49 APC1x 8 LVT counter (1 RE) 11 RTNote: 11th Royal Tanks with 104 buffalos stays with the division – was part of 1st Tank brigade, as was 49th Royal Tanks which is now re-equipped with Kangaroos. At the same time the 1st Canadian armored carrier regiment joins the division – also equipped with Kangaroos. There is a 1 RE LVT counter in SF in Sep I 44, but no ID attached so unsure if this is the 11 RT counter above.Add to 79th Armored division:1x (+1)-10 APC counter (1 RE) 1 APC (Can)Note: The above unit is created Sep I 44 in SF.
FEB I 45Convert 1x 6-4-10 Arm X 33 to:1x 8 LVT counter (3 REs) 33
MAR I 45Add to 79th Armored division:1x 6-4-10 Amph Arm X 4
A note on the Delivery squadrons. The 79th Armored division was always in the forefront of assaults and consequently suffered heavy losses in vehicles during offensives. During one month, March 1945, one of the delivery squadrons alone (264 Special Delivery Squadron) passed through 283 tanks of all types as replacements (!).
BibliographyUnknown. The Story of the 79th Armored Division, privately published, Hamburg, 1945.Stacey, C. Official History of the Canadian Army in the Second World War, Volume III
– The Victory Campaign; The operations in North-West Europe 1944-45. Ottawa, 1960Chamberlain & Ellis, British and American Tanks of World War Two, Cassell & Co,
1969. g

Line of Communications December 2007
��
Lee Hanna In LOC #2, there were photos from James Broshot from the Origins 2003 playtest of Bloody Eagles, Balkan Web and March to Victory. I was a part-time participant in that game. Someone called for any details of that event, so I am dredging my memory to see what I can add to each picture. I was only available for part of the convention time that year, so I ran the Russians during the morning and afternoon. James Hapner had the other Russians. We set up to play the autumn of 1914, and we ended up playing through the winter, and into the spring, I believe. For what it’s worth, I’m in the bottom right of pictures 6,7, and 8. I remember that the Germans pushed very hard on the French & British, and continued the pressure, pushing nearly to Paris by game’s end, as can be seen in some photos. As the Russians, we mounted attacks on both wings (Austrian and German), but I think we were following “Plan A” and concentrating on the Austro-Hungarian flank. I think we had good attacks going against at least one of the big fortresses there, and maybe we took it. The Russian Army has a lot of rifle divisions, ome nice cavalry corps, and quite a few airplanes — I think we started the war with four Recon groups and a balloon or two. The heavy artillery is rare, so not many sieges can be run at once.
Thanks, Lee, this complements Jim’s photos nicely.
g
Lines from Home
Letters