LIGHT IT. SHOOT IT. ighting Retouching for eadshots...
21
1 Lighting & Retouching for Headshots notes LIGHT IT. SHOOT IT. RETOUCH IT. LIVE! For each session, we will build a lighting setup. You’ll see us build each lighting setup, do the shoot, and then do the retouching and finishing touches. Before we do, here is some information about what gear we will be using. We use gear that is the best value for the money. It’s not super-expensive. Elinchrom BRX 500- watt lights. For about $100.00 more than a Nikon flash, you can get one of these lights. A couple of softboxes, a maximum of three lights, but mostly one or two lights for each lighting setup. These lights have the receivers built in, which makes it incredibly easy to adjust the power of the lights from the camera. On the back of the lights, there is a readout that tells you the power of the light. The range of the lights is about 2.3 to 6.3 on the 500-watt lights. With thee light kits, you get a little matchbox-size transmitter, called a Skyport, that goes on top of your camera that transmits wirelessly to your lights. From the transmitter on the camera, you can adjust the power of the lights. I set the main light to channel 1, the secondary light is on channel 2, and a background light would be on channel 3. You can move them all or individually. TODAY’S GEAR: We use the same camera gear, tripod rig, and background support throughout the day. TODAY’S CAMERA GEAR • Canon 1Dx • Canon 70-200mm f/2.8 with Really Right Stuff LCF-10 Foot • Elinchrom Skyport Trigger TODAY’S TRIPOD RIG • Gitzo GT3451XLS Mountaineer Tripod • Manfrotto 131DDB Accessory Arm • Tether Tools JerkStopper • Tether Tools 15 ft. USB Tether Cable • Tether Tools Aero Traveler Laptop Plate • Really Right Stuff BH-55 or BH-40 Ballhead • Tether Tools Aero XDC Duo Hard Drive Compartment • Tether Tools Secure Strap (secures laptop to plate) TODAY’S BACKGROUND SUPPORT • (2) Avenger A635B Stands • Manfrotto 2983 Adjustable Crossbar
Transcript of LIGHT IT. SHOOT IT. ighting Retouching for eadshots...
1
Lighting & Retouching for Headshots
notes
LIGHT IT. SHOOT IT. RETOUCH IT. LIVE!
For each session, we will build a lighting setup. You’ll see us build each lighting setup, do the shoot, and then do the retouching and finishing touches. Before we do, here is some information about
what gear we will be using. We use gear that is the best value for the money. It’s not super-expensive. Elinchrom BRX 500-watt lights. For about $100.00 more than a Nikon flash, you can get one of these lights. A couple of softboxes, a maximum of three lights, but mostly one or two lights for each lighting setup. These lights have the receivers built in, which makes it incredibly easy to adjust the power of the lights from the camera. On the back of the lights, there is a readout that tells you the power of the light. The range of the lights is about 2.3 to 6.3 on the 500-watt lights.
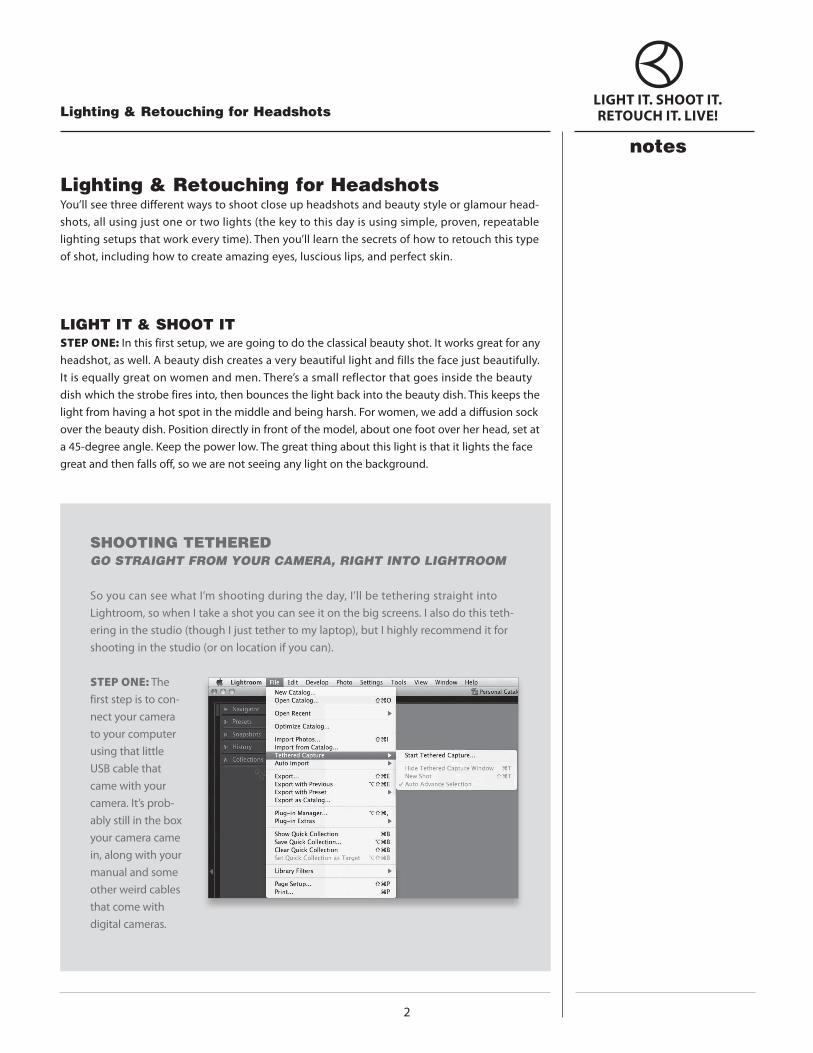
With thee light kits, you get a little matchbox-size transmitter, called a Skyport, that goes on top of your camera that transmits wirelessly to your lights. From the transmitter on the camera, you can adjust the power of the lights. I set the main light to channel 1, the secondary light is on channel 2, and a background light would be on channel 3. You can move them all or individually.
TODAY’S GEAR: We use the same camera gear, tripod rig, and background support throughout the day.
TODAY’S CAMERA GEAR• Canon 1Dx• Canon70-200mmf/2.8withReallyRightStuffLCF-10Foot
• ElinchromSkyportTrigger
TODAY’S TRIPOD RIG• GitzoGT3451XLSMountaineerTripod• Manfrotto131DDBAccessoryArm•TetherToolsJerkStopper•TetherTools15ft.USBTetherCable•TetherToolsAeroTravelerLaptopPlate• ReallyRightStuffBH-55orBH-40Ballhead•TetherToolsAeroXDCDuoHardDriveCompartment•TetherToolsSecureStrap(secureslaptoptoplate)
TODAY’S BACKGROUND SUPPORT• (2)AvengerA635BStands
• Manfrotto2983AdjustableCrossbar
notes
2
Lighting & Retouching for HeadshotsLIGHT IT. SHOOT IT. RETOUCH IT. LIVE!
Lighting & Retouching for HeadshotsYou’ll see three different ways to shoot close up headshots and beauty style or glamour head-shots,allusingjustoneortwolights(thekeytothisdayisusingsimple,proven,repeatablelightingsetupsthatworkeverytime).Thenyou’lllearnthesecretsofhowtoretouchthistypeof shot, including how to create amazing eyes, luscious lips, and perfect skin.
LIGHT IT & SHOOT ITSTEP ONE: In this first setup, we are going to do the classical beauty shot. It works great for any headshot, as well. A beauty dish creates a very beautiful light and fills the face just beautifully. It is equally great on women and men. There’s a small reflector that goes inside the beauty dish which the strobe fires into, then bounces the light back into the beauty dish. This keeps the light from having a hot spot in the middle and being harsh. For women, we add a diffusion sock overthebeautydish.Positiondirectlyinfrontofthemodel,aboutonefootoverherhead,setata45-degreeangle.Keepthepowerlow.Thegreatthingaboutthislightisthatitlightsthefacegreat and then falls off, so we are not seeing any light on the background.
SHOOTING TETHERED GO STRAIGHT FROM YOUR CAMERA, RIGHT INTO LIGHTROOM
So you can see what I’m shooting during the day, I’ll be tethering straight into Lightroom,sowhenItakeashotyoucanseeitonthebigscreens.Ialsodothisteth-eringinthestudio(thoughIjusttethertomylaptop),butIhighlyrecommenditforshootinginthestudio(oronlocationifyoucan).
STEP ONE: The first step is to con-nect your camera to your computer using that little USBcablethatcame with your camera. It’s prob-ably still in the box your camera came in, along with your manual and some other weird cables that come with digital cameras.
notes
2 3
Lighting & Retouching for HeadshotsLIGHT IT. SHOOT IT. RETOUCH IT. LIVE!
STEP TWO:NowgounderLightroom’sFilemenu,underTetheredCapture,andchooseStartTetheredCapture.Inthedialog,whereyouenterprettymuchthesameinfoasyouwouldintheImportwindow(youtypeinthenameofyourshootatthetop in the Session Name field, and you choose whether you want the images to have a custom name or not. You also choose where on your hard drive you want these imagessavedto,andifyouwantanymetadataorkeywordsadded—justlikeusual).
STEP THREE:WhenyouclickOK,theTetheredCapturewindowappears,andifLightroomseesyourcamera,you’llseeyourcameramodel’snameappearontheleft(ifyouhavemorethanonecameraconnected,youcanchoosewhichcamerayouwanttousebyclickingonthecamera’snameandchoosingfromthepop-upmenu).IfLightroomdoesn’tseeyourcamera,it’llread“NoCameraDetected,”inwhichcaseyouneedtomakesureyourUSBcableisconnectedcorrectly,andthatLightroomsupports your camera’s make and model. To the right of the camera’s model, you’ll see the camera’s current settings, including f-stop, shutter speed, and ISO. To the right of that,youhavetheoptionofapplyingaDevelopmodulepreset.
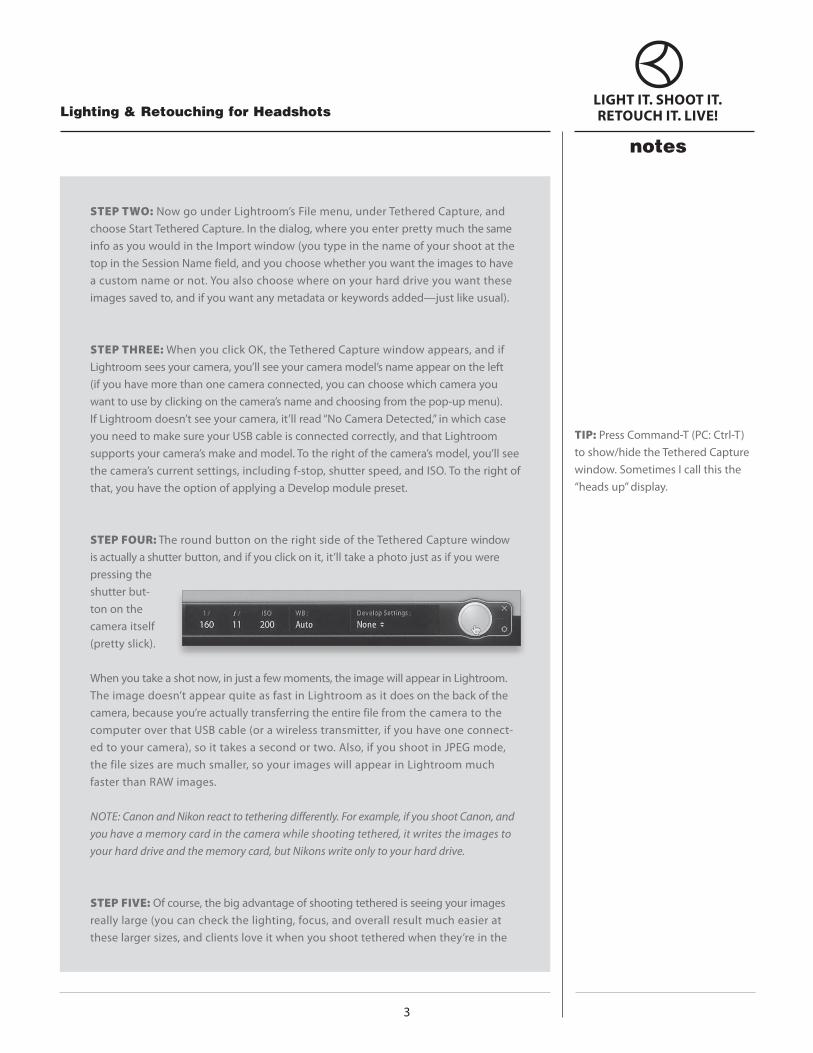
STEP FOUR:TheroundbuttonontherightsideoftheTetheredCapturewindowis actually a shutter button, and if you click on it, it’ll take a photo just as if you were pressing the shutter but-ton on the camera itself (prettyslick).
Whenyoutakeashotnow,injustafewmoments,theimagewillappearinLightroom.Theimagedoesn’tappearquiteasfastinLightroomasitdoesonthebackofthecamera, because you’re actually transferring the entire file from the camera to the computeroverthatUSBcable(orawirelesstransmitter,ifyouhaveoneconnect-edtoyourcamera),soittakesasecondortwo.Also,ifyoushootinJPEGmode,thefilesizesaremuchsmaller,soyourimageswillappearinLightroommuchfaster than RAW images.
NOTE: Canon and Nikon react to tethering differently. For example, if you shoot Canon, and you have a memory card in the camera while shooting tethered, it writes the images to your hard drive and the memory card, but Nikons write only to your hard drive.
STEP FIVE: Of course, the big advantage of shooting tethered is seeing your images reallylarge(youcancheckthelighting,focus,andoverallresultmucheasieratthese larger sizes, and clients love it when you shoot tethered when they’re in the
TIP:PressCommand-T(PC:Ctrl-T)toshow/hidetheTetheredCapturewindow. Sometimes I call this the “headsup”display.
notes
4
Lighting & Retouching for HeadshotsLIGHT IT. SHOOT IT. RETOUCH IT. LIVE!
studio, because they can see how it’s going without looking over your shoulder and squintingtoseeatinyscreen).So,double-clickonanyoftheimagestojumpuptoLoupeview(asshownhere),whereyougetamuchbiggerviewasyourimagesappearinLightroom.
NOTE: If you do want to shoot in Grid view, and just make your thumbnails really big, then you’ll probably want to go to the toolbar and, to the left of Sort Order, click on the A–Z button, so your most recent shot always appears at the top of the grid.
STEP SIX:WhenI’mshootingtethered(whichIalwaysdowhenI’minthestudio,andasoftenasIcanonlocation),ratherthanlookingattheLibrarymodule’sLoupeview,IswitchtotheDevelopmodule,soifIneedtomakeaquicktweaktoanything,I’m already in the right place. Also when shooting tethered, my goal is to make the imageasbigaspossibleonscreen,soIhideLightroom’spanelsbypressingShift-Tab,which enlarges the size of your image to take up nearly the whole screen. Then lastly, IpresstheletterLtwicetoenterLightsOutmode,soallIseeisthefull-screen-sizedimage centered on a black background, with no distractions. If I want to adjust some-thing,IpressLtwice,thenShift-Tabtogetthepanelsback.
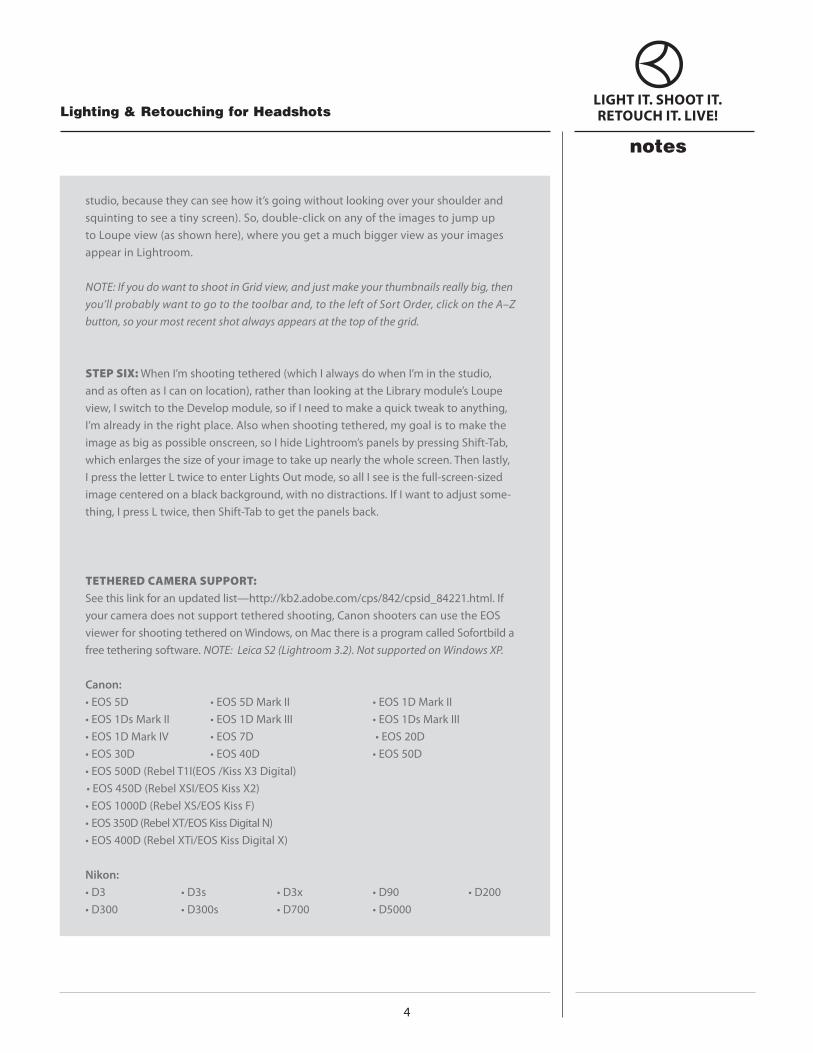
TETHERED CAMERA SUPPORT: Seethislinkforanupdatedlist—http://kb2.adobe.com/cps/842/cpsid_84221.html.Ifyourcameradoesnotsupporttetheredshooting,CanonshooterscanusetheEOSviewerforshootingtetheredonWindows,onMacthereisaprogramcalledSofortbildafree tethering software. NOTE: Leica S2 (Lightroom 3.2). Not supported on Windows XP.
Canon: • EOS5D •EOS5DMarkII •EOS1DMarkII• EOS1DsMarkII •EOS1DMarkIII •EOS1DsMarkIII• EOS1DMarkIV •EOS7D • EOS20D• EOS30D •EOS40D •EOS50D• EOS500D(RebelT1I(EOS/KissX3Digital)• EOS450D(RebelXSI/EOSKissX2)• EOS1000D(RebelXS/EOSKissF)• EOS350D(RebelXT/EOSKissDigitalN)• EOS400D(RebelXTi/EOSKissDigitalX)
Nikon:• D3 •D3s •D3x •D90 •D200• D300 •D300s •D700 •D5000
notes
4 5
Lighting & Retouching for HeadshotsLIGHT IT. SHOOT IT. RETOUCH IT. LIVE!
CAMERA SETTINGS: • Exposure:Manual• Canon 1Ds / 5D Mark III
• Aperture(f-stop)f/8• Lens:70–200mmf/2.8
• Shutter:1/125sec• ISO:100 •FocalLength200Note:
The shutter speed and ISO will remain the same all day.
STEP TWO:Nowhavethemodelholdagraycard.InLightroom,gettheWhiteBalanceSelector(W) andclickonthelightgrayinthegraycardanditsetsthewhitebalance.Peopletendtolookbetteralittlewarmer,soItweaktheTemperaturesettinginLRandthen,fromtheheadsupdis-play,chooseSameasPrevious.Now,allphotoswillhavethesamesettingsapplied.It’simportanttokeeptalkingtoyourmodel.Givethemfeedbacksotheyknowtheyaredoingwell.Whengivingdirections, use your hand and signal which way you want the model to move and avoid the whole “Yourright.No,no,myright”debacle.
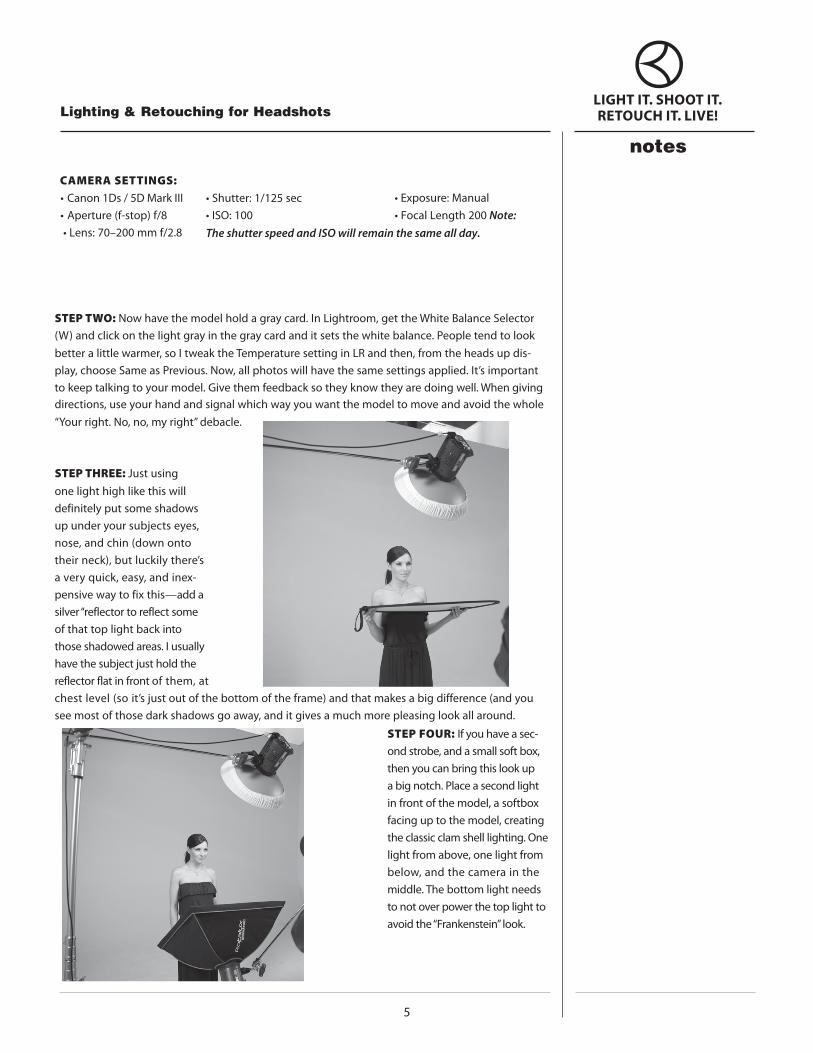
STEP THREE:Justusingone light high like this will definitely put some shadows up under your subjects eyes, nose,andchin(downontotheirneck),butluckilythere’sa very quick, easy, and inex-pensive way to fix this —add a silver ‘‘reflector to reflect some of that top light back into those shadowed areas. I usually have the subject just hold the reflector flat in front of them, at chestlevel(soit’sjustoutofthebottomoftheframe)andthatmakesabigdifference(andyousee most of those dark shadows go away, and it gives a much more pleasing look all around.
STEP FOUR: If you have a sec-ond strobe, and a small soft box, then you can bring this look up abignotch.Placeasecondlightin front of the model, a softbox facing up to the model, creating the classic clam shell lighting. One light from above, one light from below, and the camera in the middle. The bottom light needs to not over power the top light to avoidthe“Frankenstein”look.

notes
6
Lighting & Retouching for HeadshotsLIGHT IT. SHOOT IT. RETOUCH IT. LIVE!
STEP FIVE: Now we add one more light to get a completely white back-ground. To do that, we are going to put a softbox and put it about one foot behindher.Makesuretoaimitupat a45-degreeangletoavoidcreating lens flare. With the light set up like this, we will have beautiful light wrapping around the sides of her hair and face.
STEP SIX: For this shot we are going to have the model pull her hair back in a ponytail, have a fresh, clean look to her face in her makeup application and wear an off-the-shoulder type top.
STEP SEVEN:Inthestudio,IsetmycameratoManualmode,shootinginRAW,andattheclean-estISOIcanget.OnNikonthatisISO200andonCanonitisISO100.Isetmyshutterspeedto1/125ofasecondandthenstarttheaperture(f-stop)atf/9,eventhoughIwanttobeatf/11.Atf/11,IcangetashotwithmaximumdetailwhichiswhatIamlookingfor.Whentakingthisimage, set the focus on the model’s eye.
Shooting tethered I can see very clearly what I need to adjust. One thing to watch out for is the warning triangleinthehistograminLightroom’sDevelopmodule. When that triangle is black, it means I am not clipping anywhere. The red on the photo alerts me so I know if there is any blown out skin. When shooting tethered with the light behind the model, you will have to turn off the clipping warning. (See page 2 for the Shooting Tethered steps.)
GEAR USED: We use the same camera gear, tripod rig, and background support throughout the day (see page 1 for details).
SETUP•(3)ElinchromBXRi500Strobes • Elinchrom27”Softbox•Elinchrom39”Softbox • (2)AvengerA635BLightStands•AvengerA625BLightStand • Elinchrom17”BeautyDishwithDiffuserSock•Lastolite5-in-130”CircularReflector&Diffuser•Savage107”#1SuperWhiteSeamlessPaperAvenger•D520LExtensionArmw/AvengerD200GripHead&AvengerE6506”Pin
notes
6 7
Lighting & Retouching for HeadshotsLIGHT IT. SHOOT IT. RETOUCH IT. LIVE!
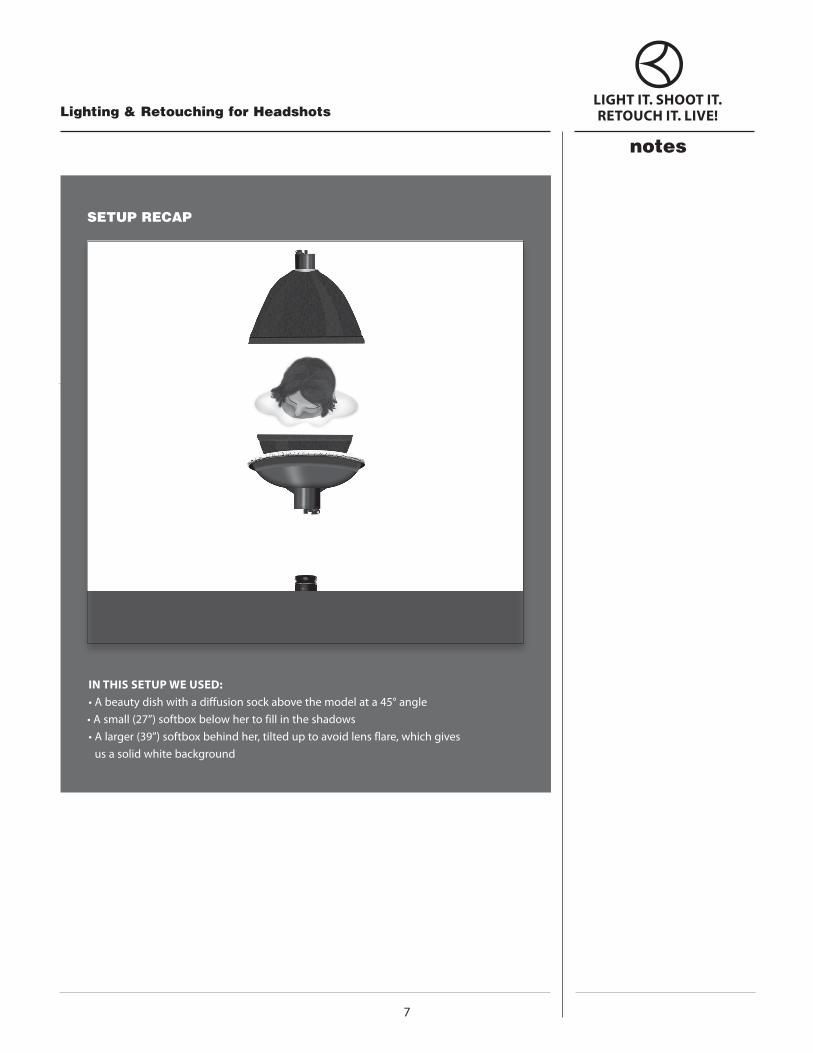
SETUP RECAP
IN THIS SETUP WE USED: • Abeautydishwithadiffusionsockabovethemodelata45°angle•Asmall(27”)softboxbelowhertofillintheshadows•Alarger(39”)softboxbehindher,tilteduptoavoidlensflare,whichgives
us a solid white background
notes
8
Lighting & Retouching for HeadshotsLIGHT IT. SHOOT IT. RETOUCH IT. LIVE!
RETOUCH IT:START IN LIGHTROOM: If you don’t see much clipping, and the white balance is okay, then pressCommand-E(PC:Ctrl-E)anditwillopeninPhotoshop.
FINISH IN PHOTOSHOP:Firstaskyourself,whatdoIwishwasdifferentinthisphoto?Usually,my goal is to make the image look how I saw it. Our eyes tend to filter out bad things—until we openitupinPhotoshop.Idoalotoflittlethingsthatindividuallymaynotmakemuchdifference,but when you add them up, really make a huge difference.
STEP ONE: REMOVE BLEMISHES Iusuallystartwithblemishes.CreateanewlayerandusetheHealingBrush(J)andmakethebrushsizealittlebitlargerthantheblemishyouwanttoremove.Option-Click(PC:Alt-Click)inanearbyarea,movetheHealingBrushovertheblemishandtapthepenonce(orclickthemouse).TIP: Use your thumb on the spacebar to move around quickly. Work on a few blemishes, then zoom out to make sure you don’t overwork the skin. Also, make sure to work in the direction of the skin. The skin on the forehead is different than the skin on the cheeks.
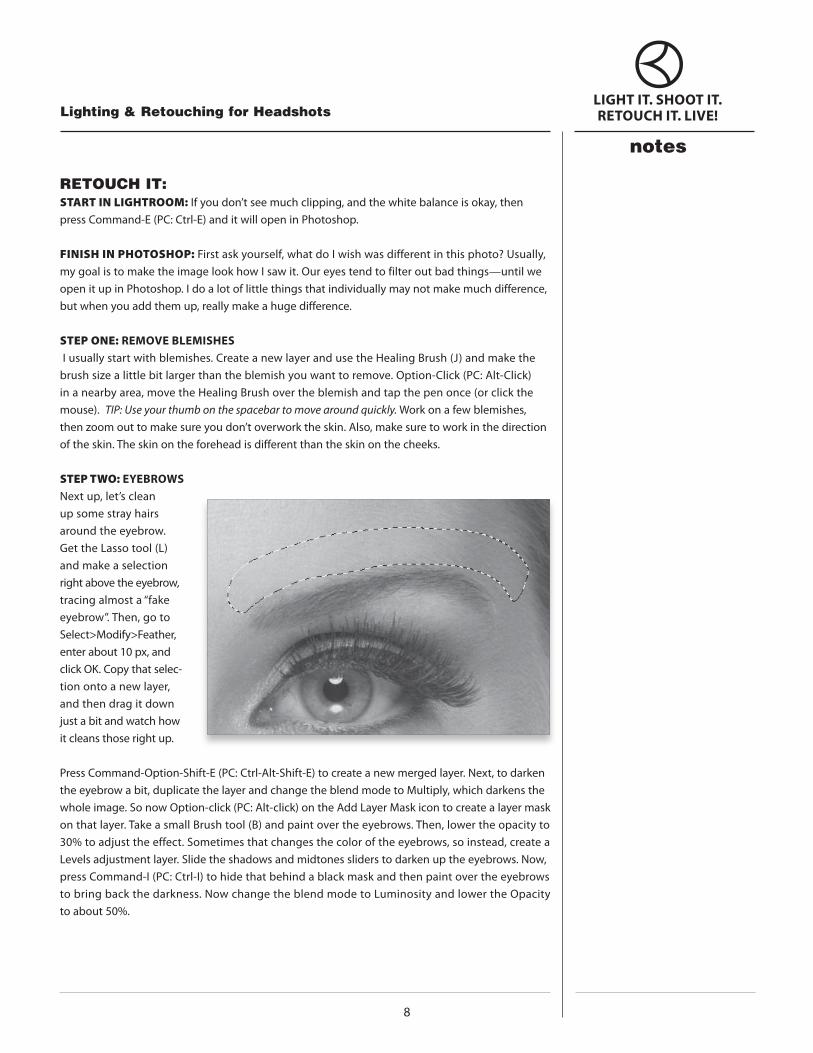
STEP TWO: EYEBROWS Next up, let’s clean up some stray hairs around the eyebrow. GettheLassotool(L)and make a selection right above the eyebrow, tracingalmosta“fakeeyebrow”.Then,gotoSelect>Modify>Feather,enter about 10 px, and clickOK.Copythatselec-tion onto a new layer, and then drag it down just a bit and watch how it cleans those right up.
PressCommand-Option-Shift-E(PC:Ctrl-Alt-Shift-E)tocreateanewmergedlayer.Next,todarkentheeyebrowabit,duplicatethelayerandchangetheblendmodetoMultiply,whichdarkensthewholeimage.SonowOption-click(PC:Alt-click)ontheAddLayerMaskicontocreatealayermaskonthatlayer.TakeasmallBrushtool(B)andpaintovertheeyebrows.Then,lowertheopacityto30% to adjust the effect. Sometimes that changes the color of the eyebrows, so instead, create a Levelsadjustmentlayer.Slidetheshadowsandmidtonessliderstodarkenuptheeyebrows.Now,pressCommand-I(PC:Ctrl-I)tohidethatbehindablackmaskandthenpaintovertheeyebrowstobringbackthedarkness.NowchangetheblendmodetoLuminosityandlowertheOpacityto about 50%.
notes
8 9
Lighting & Retouching for HeadshotsLIGHT IT. SHOOT IT. RETOUCH IT. LIVE!
STEP THREE: CLEAN UP THE EYES Createamergedlayerontopandcleanupthewhitesoftheeyes.Addablanklayerontopandzoominclosetotheeye.GettheBrushtool,settheOpacityto20%,anduseaverysmallbrush.Option-clicknext to a vein in the eye and then paint over the vein to remove it.
NOTE: Keep Option-clicking to select color from right next to each vein you are working on. Now, go to Filter>Noise>Add Noise and enter just 1%.
STEP FOUR: ADD CONTRAST TO THE EYES Createamergedlayerontop.Nowlet’saddsomecontrasttotheeyes.GotoLayer>NewAdjustmentLayer>Levels.Inthehistogram,dragtheshadowstotheright,anddragthehighlightstotheleft,lookingjustattheeyes.PressCommand-Itohidethatdarklayerbehindamask.Paintovertheeyesat 100% Opacity and bring that contrast back in. If you go too far, just press X to swap the Foreground color.Now,ifitchangesthecoloroftheeyesabit,changetheblendmodetoLuminosity.
STEP FIVE: BRIGHTEN THE WHITES OF THE EYES Tobrightenthewhitesoftheeyes,startonanewmergedlayerandthenduplicatethelayer(pressCommand-J[PC:Ctrl-J])andswitchtheblendmodetoScreen.Hideitbehindablackmask(Option-clickontheAddLayerMaskicon)anduseanicesoftbrushtopaintovertheeyes.TIP:Overpainttheeyes,thenpressXtogoinandcorrectit.LowertheOpacityofthelayerbetween40%–50%.
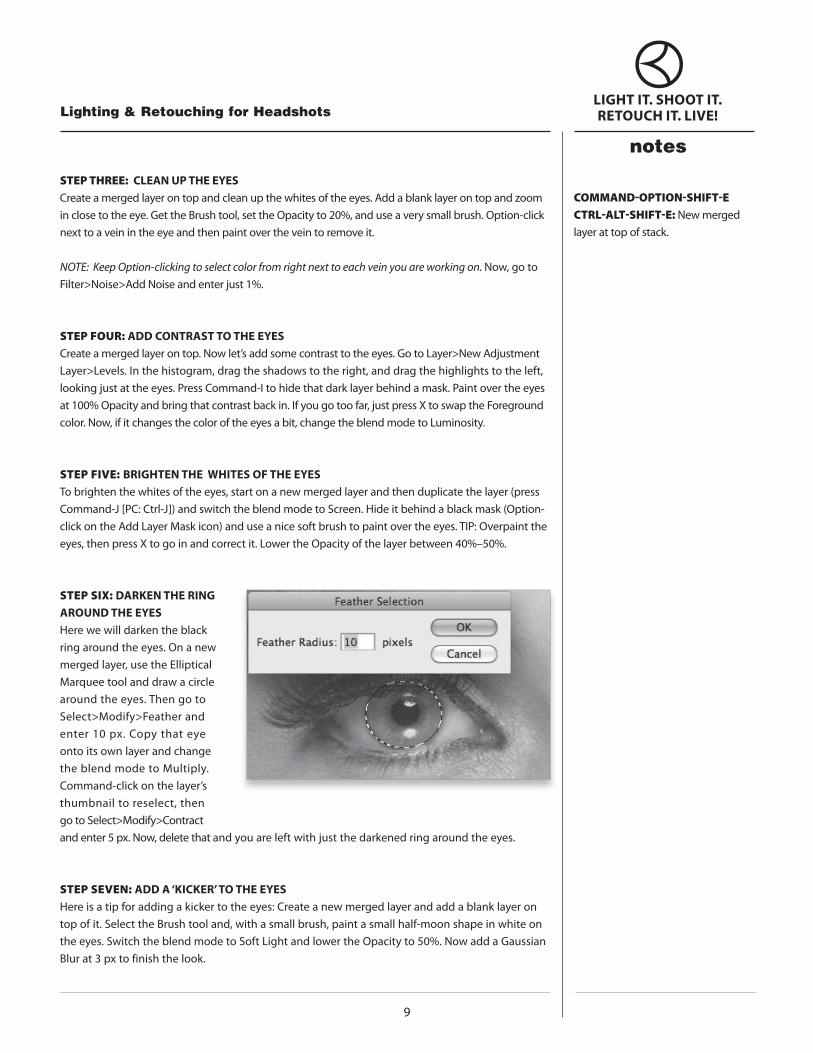
STEP SIX: DARKEN THE RING AROUND THE EYES Herewewilldarkentheblackring around the eyes. On a new merged layer, use the Elliptical Marqueetoolanddrawacirclearound the eyes. Then go to Select>Modify>Featherandenter10px.Copythateyeonto its own layer and change theblendmodetoMultiply. Command-clickonthelayer’sthumbnail to reselect, then gotoSelect>Modify>Contract and enter 5 px. Now, delete that and you are left with just the darkened ring around the eyes.
STEP SEVEN: ADD A ‘KICKER’ TO THE EYES Hereisatipforaddingakickertotheeyes:Createanewmergedlayerandaddablanklayerontop of it. Select the Brush tool and, with a small brush, paint a small half-moon shape in white on theeyes.SwitchtheblendmodetoSoftLightandlowertheOpacityto50%.NowaddaGaussianBlur at 3 px to finish the look.
COMMAND-OPTION-SHIFT-ECTRL-ALT-SHIFT-E: New merged layer at top of stack.
notes
10
Lighting & Retouching for HeadshotsLIGHT IT. SHOOT IT. RETOUCH IT. LIVE!
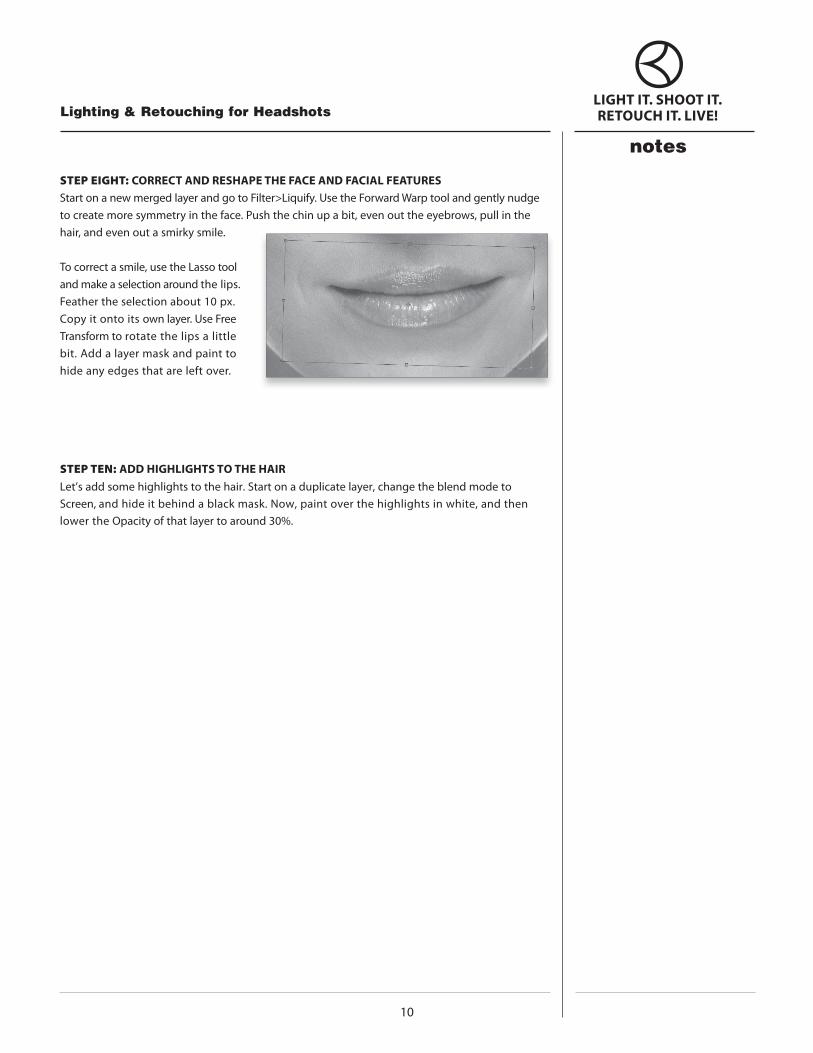
STEP EIGHT: CORRECT AND RESHAPE THE FACE AND FACIAL FEATURES StartonanewmergedlayerandgotoFilter>Liquify.UsetheForwardWarptoolandgentlynudgetocreatemoresymmetryintheface.Pushthechinupabit,evenouttheeyebrows,pullinthehair, and even out a smirky smile.
Tocorrectasmile,usetheLassotooland make a selection around the lips. Feather the selection about 10 px. Copyitontoitsownlayer.UseFreeTransform to rotate the lips a little bit. Add a layer mask and paint to hide any edges that are left over.
STEP TEN: ADD HIGHLIGHTS TO THE HAIR Let’saddsomehighlightstothehair.Startonaduplicatelayer,changetheblendmodetoScreen,and hide it behind a black mask. Now, paint over the highlights in white, and then lower the Opacity of that layer to around 30%.
13
Dramatic Light and Retouching Techniques
notes
LIGHT IT. SHOOT IT. RETOUCH IT. LIVE!
Dramatic Light You’ll learn how easy it is to create a dramatic look to your lighting and how to retouch these types of images. You’ll learn simple one-light and two-light setups and how just changing a few little details makes a big difference. Plus, you’ll learn how to vary this setup for a totally different look in just 60 seconds.
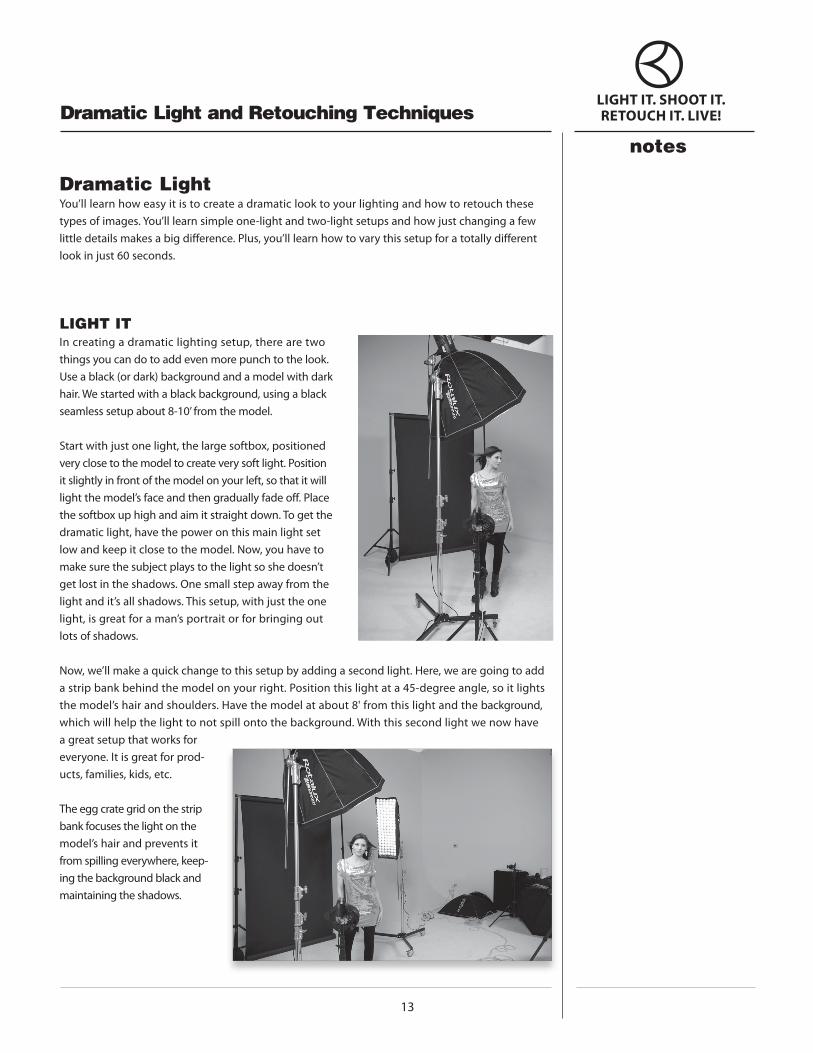
LIGHT IT In creating a dramatic lighting setup, there are two things you can do to add even more punch to the look. Use a black (or dark) background and a model with dark hair. We started with a black background, using a black seamless setup about 8-10’ from the model.
Start with just one light, the large softbox, positioned very close to the model to create very soft light. Position it slightly in front of the model on your left, so that it will light the model’s face and then gradually fade off. Place the softbox up high and aim it straight down. To get the dramatic light, have the power on this main light set low and keep it close to the model. Now, you have to make sure the subject plays to the light so she doesn’t get lost in the shadows. One small step away from the light and it’s all shadows. This setup, with just the one light, is great for a man’s portrait or for bringing out lots of shadows.
Now, we’ll make a quick change to this setup by adding a second light. Here, we are going to add a strip bank behind the model on your right. Position this light at a 45-degree angle, so it lights the model’s hair and shoulders. Have the model at about 8' from this light and the background, which will help the light to not spill onto the background. With this second light we now have a great setup that works for everyone. It is great for prod-ucts, families, kids, etc.
The egg crate grid on the strip bank focuses the light on the model’s hair and prevents it from spilling everywhere, keep-ing the background black and maintaining the shadows.
notes
14
Dramatic Light and Retouching TechniquesLIGHT IT. SHOOT IT. RETOUCH IT. LIVE!
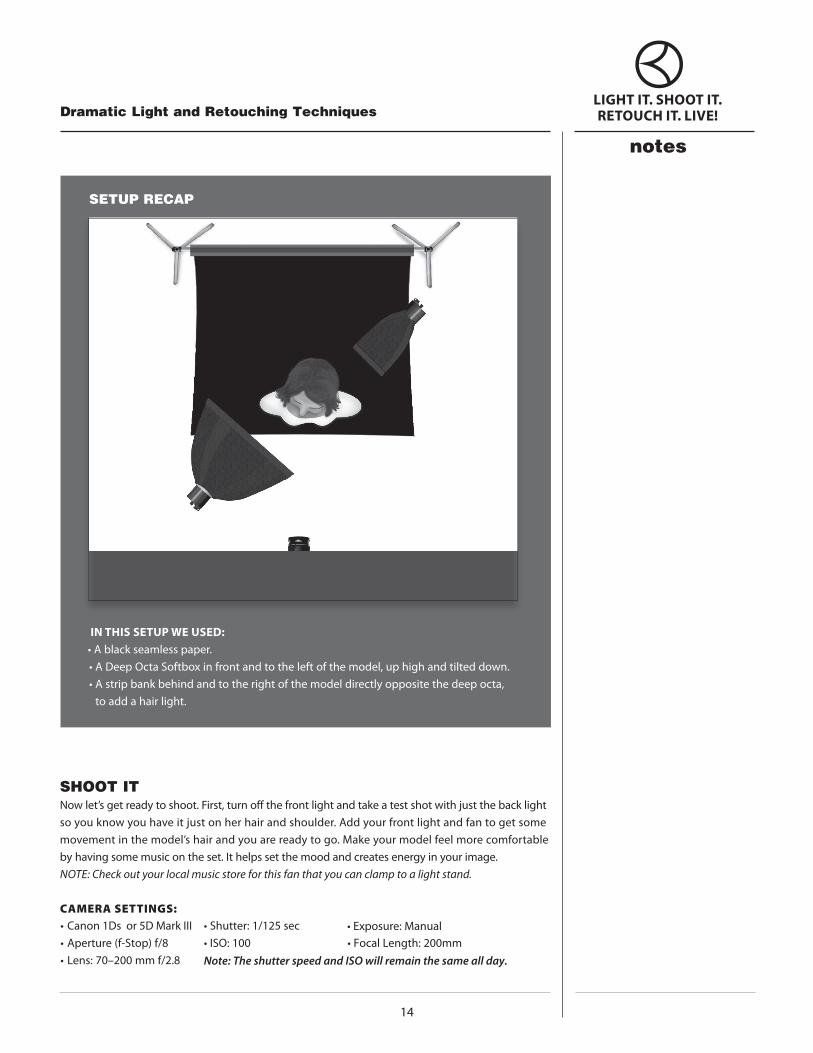
SETUP RECAP
IN THIS SETUP WE USED: •Ablackseamlesspaper.•ADeepOctaSoftboxinfrontandtotheleftofthemodel,uphighandtilteddown.•Astripbankbehindandtotherightofthemodeldirectlyoppositethedeepocta,
to add a hair light.
SHOOT IT Now let’s get ready to shoot. First, turn off the front light and take a test shot with just the back light soyouknowyouhaveitjustonherhairandshoulder.Addyourfrontlightandfantogetsomemovement in the model’s hair and you are ready to go. Make your model feel more comfortable by having some music on the set. It helps set the mood and creates energy in your image. NOTE: Check out your local music store for this fan that you can clamp to a light stand.
CAMERA SETTINGS: •Exposure:Manual• Canon 1Ds or 5D Mark III
• Aperture(f-Stop)f/8• Lens:70–200mmf/2.8
• Shutter:1/125sec• ISO:100 •FocalLength:200mmNote: The shutter speed and ISO will remain the same all day.
notes
14 15
Dramatic Light and Retouching TechniquesLIGHT IT. SHOOT IT. RETOUCH IT. LIVE!
GEAR USED:
We use the same camera gear, tripod rig, and background support throughout the day (see page 1 for details).
SETUP•(2)ElinchromBXRi500Strobes • ElinchromDeepOctaSoftbox•BlowItFan •(2)AvengerA635BLightStands•Savage107”#20SuperBlackSeamlessPaper•Westcott12x36”StripBankw/FabricEggcrateGrid
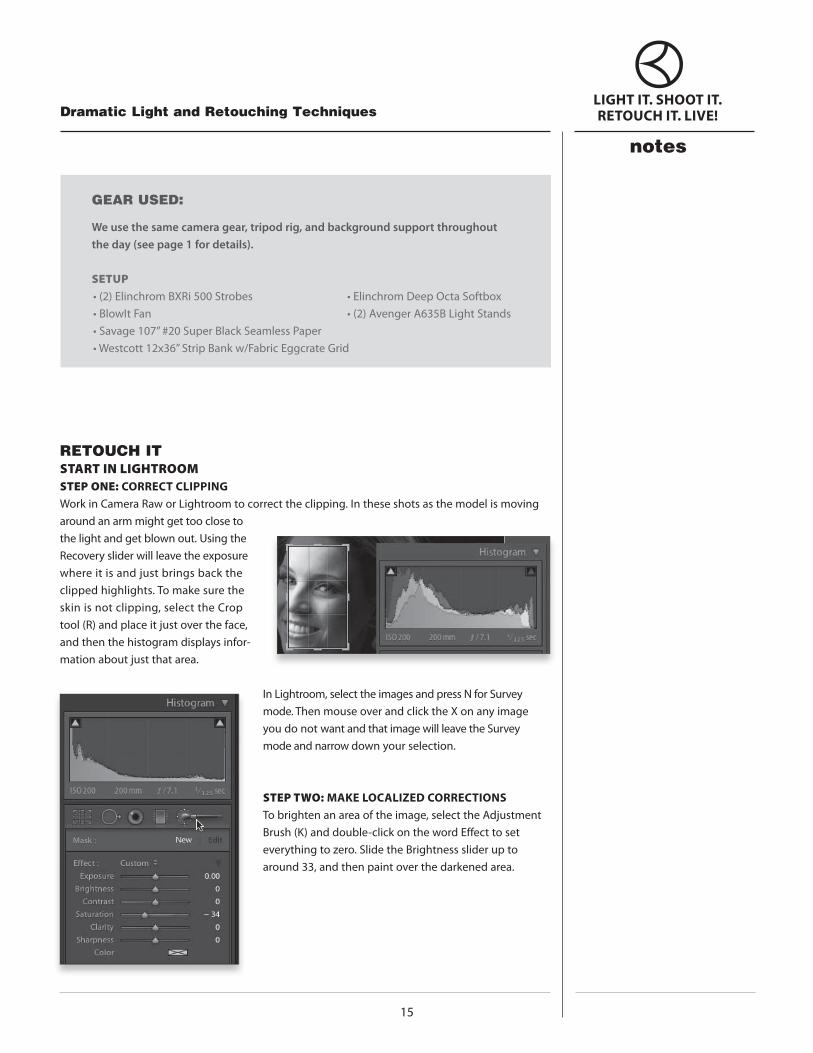
RETOUCH ITSTART IN LIGHTROOMSTEP ONE: CORRECT CLIPPING WorkinCameraRaworLightroomtocorrecttheclipping.Intheseshotsasthemodelismovingaround an arm might get too close to the light and get blown out. Using the Recoverysliderwillleavetheexposurewhere it is and just brings back the clipped highlights. To make sure the skin is not clipping, select the Crop tool(R)andplaceitjustovertheface,and then the histogram displays infor-mation about just that area.
InLightroom,selecttheimagesandpressNforSurveymode.ThenmouseoverandclicktheXonanyimageyou do not want and that image will leave the Survey mode and narrow down your selection.
STEP TWO: MAKE LOCALIZED CORRECTIONS Tobrightenanareaoftheimage,selecttheAdjustmentBrush(K)anddouble-clickonthewordEffecttoseteverythingtozero.SlidetheBrightnessslideruptoaround 33, and then paint over the darkened area.
notes
16
Dramatic Light and Retouching TechniquesLIGHT IT. SHOOT IT. RETOUCH IT. LIVE!
STEP THREE: CHANGE THE LIGHT ON THE MODEL’S HAIR NowIwanttochangethelightonthemodel’shair,whichlooksabityellow.InLR(andCameraRaw)usetheHSLpaneltodecreasetheSaturationofthecolorsyouwanttoremove.However,itremovesthatcolorfromtheentirephoto.Instead,usetheAdjustmentBrushanddragtheSaturationslidertothe left and paint over the hair. If it is too much, just drag the slider back up a bit.
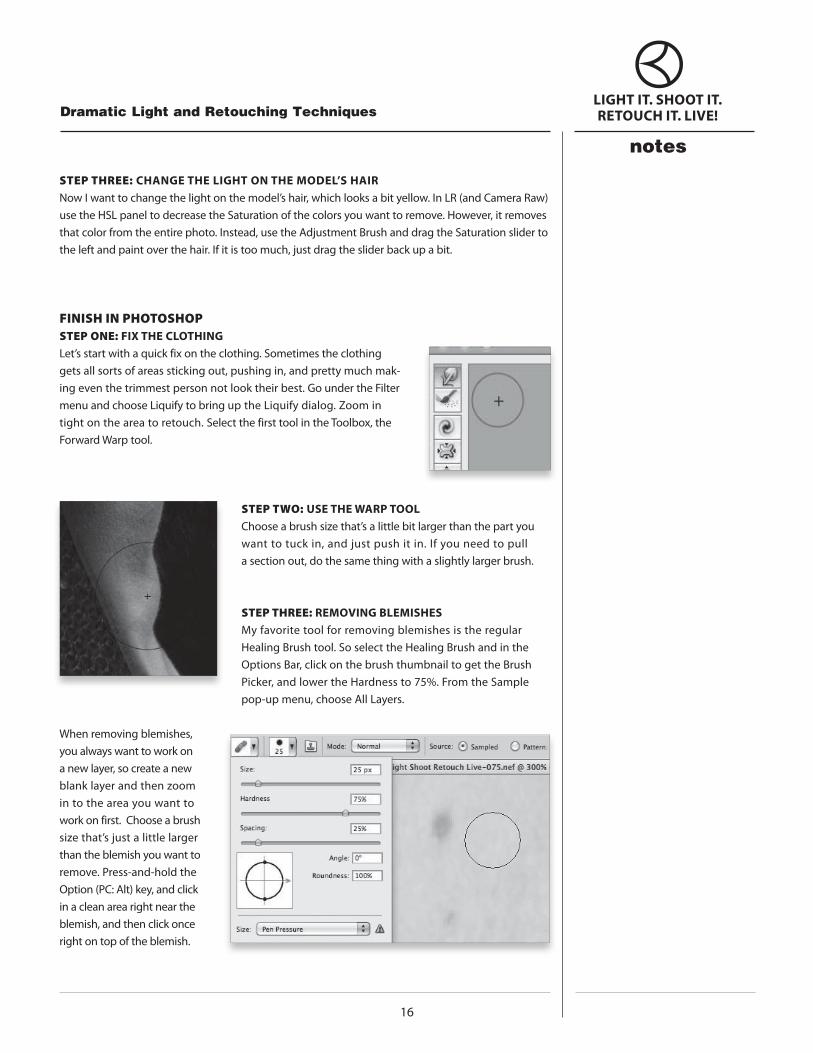
FINISH IN PHOTOSHOP STEP ONE: FIX THE CLOTHING Let’sstartwithaquickfixontheclothing.Sometimestheclothinggets all sorts of areas sticking out, pushing in, and pretty much mak-ingeventhetrimmestpersonnotlooktheirbest.GoundertheFiltermenuandchooseLiquifytobringuptheLiquifydialog.Zoomintight on the area to retouch. Select the first tool in the Toolbox, the Forward Warp tool.
STEP TWO: USE THE WARP TOOL Choose a brush size that’s a little bit larger than the part you want to tuck in, and just push it in. If you need to pull a section out, do the same thing with a slightly larger brush.
STEP THREE: REMOVING BLEMISHES My favorite tool for removing blemishes is the regular HealingBrushtool.SoselecttheHealingBrushandintheOptionsBar,clickonthebrushthumbnailtogettheBrushPicker,andlowertheHardnessto75%.FromtheSamplepop-upmenu,chooseAllLayers.
When removing blemishes, you always want to work on a new layer, so create a new blank layer and then zoom in to the area you want to work on first. Choose a brush size that’s just a little larger than the blemish you want to remove. Press-and-hold the Option(PC:Alt)key,andclickin a clean area right near the blemish, and then click once right on top of the blemish.
notes
16 17
Dramatic Light and Retouching TechniquesLIGHT IT. SHOOT IT. RETOUCH IT. LIVE!
NOTE: Keep sampling from each area of the face (body) you are working, as each area has a slightly different texture.
Keepworkingontherestoftheblemishes,veins,etc.,ontheface,arms,andhands,etc.Andbesure to zoom back out often, so you don’t overwork an area.
STEP FOUR: REDUCE OR REMOVE WRINKLESWhen you just remove all the wrinkles, the person looks weird. So instead, what we are going to do is reduce or lighten the wrinkles. Ideally, you want to make the person look about 10 years younger. So keep that in mind as we are working.
Thefirstthingtodoismergethelayerstogetherandthencreateanewblanklayertoworkon.GettheHealingBrushagainand,intheOptionsBar,chooseaverysmallbrushsize.FromtheSamplepop-upmenu,chooseAllLayers.Option-click(PC:Alt-click)inacleanareanearthewrinkles,makingsuretosample from skin that is the same texture as the area with the wrinkles. Now, paint over the wrinkles withtheHealingBrush.You don’t have to worry about being perfect. Just keep working until you have removed all the wrinkles from the model’s skin (don’t forget all of the skin, not just the face).
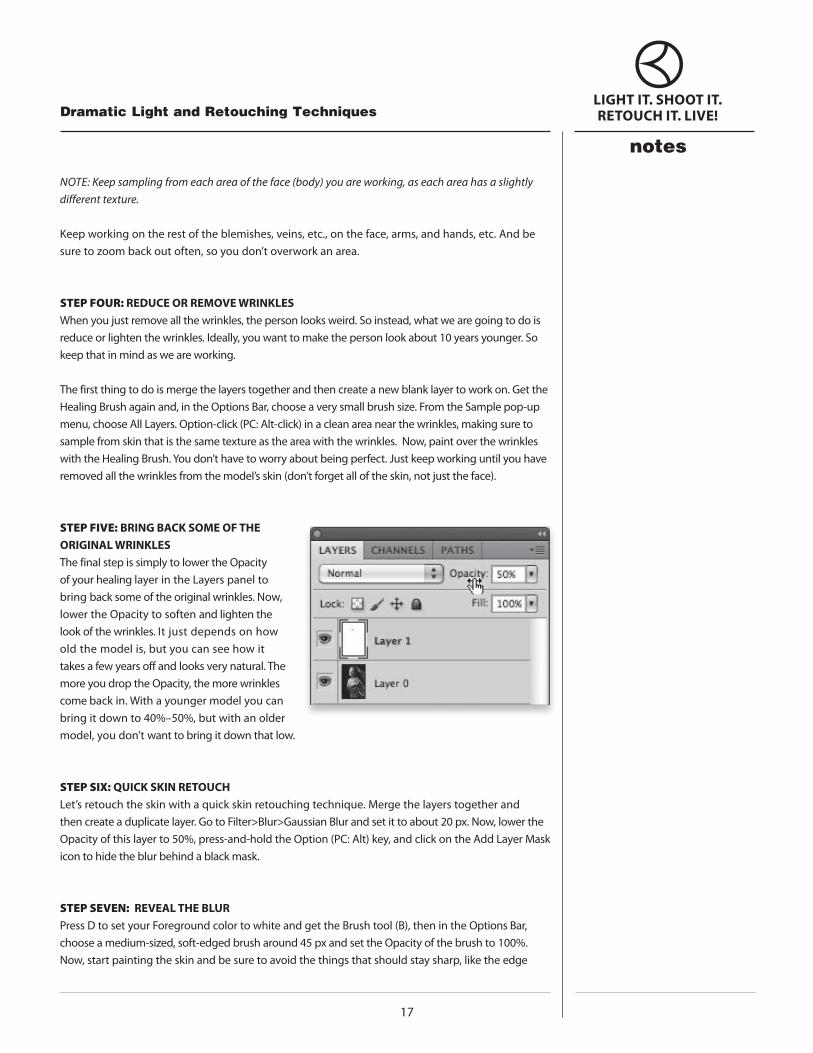
STEP FIVE: BRING BACK SOME OF THE ORIGINAL WRINKLES The final step is simply to lower the Opacity ofyourhealinglayerintheLayerspaneltobring back some of the original wrinkles. Now, lower the Opacity to soften and lighten the look of the wrinkles. It just depends on how old the model is, but you can see how it takes a few years off and looks very natural. The more you drop the Opacity, the more wrinkles come back in. With a younger model you can bringitdownto40%–50%,butwithanoldermodel, you don’t want to bring it down that low.
STEP SIX: QUICK SKIN RETOUCH Let’sretouchtheskinwithaquickskinretouchingtechnique.Mergethelayerstogetherandthencreateaduplicatelayer.GotoFilter>Blur>GaussianBlurandsetittoabout20px.Now,lowertheOpacityofthislayerto50%,press-and-holdtheOption(PC:Alt)key,andclickontheAddLayerMask icon to hide the blur behind a black mask.
STEP SEVEN: REVEAL THE BLURPressDtosetyourForegroundcolortowhiteandgettheBrushtool(B),thenintheOptionsBar,choose a medium-sized, soft-edged brush around 45 px and set the Opacity of the brush to100%.Now, start painting the skin and be sure to avoid the things that should stay sharp, like the edge
notes
18
Dramatic Light and Retouching TechniquesLIGHT IT. SHOOT IT. RETOUCH IT. LIVE!
ofherface,eyebrows,teeth,eyes,etc.,changingthesizeofyourbrushasyouwork.Remembertoretouch the skin on the face, and neck, and hands.
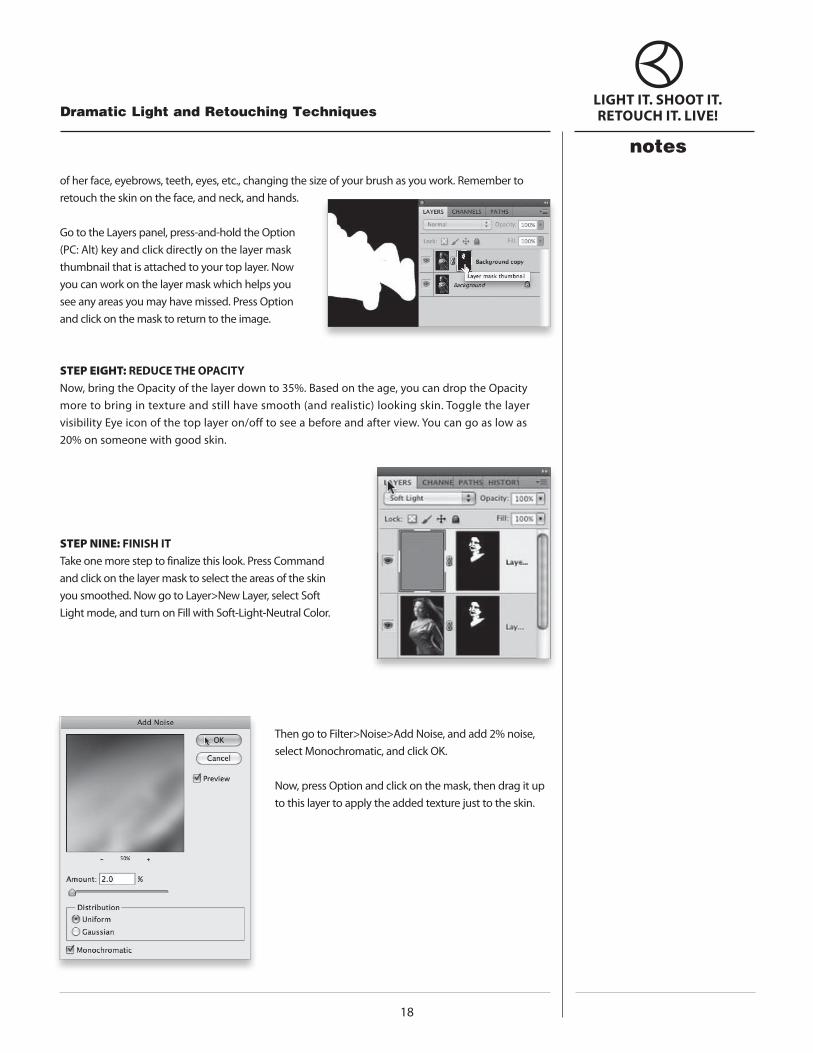
GototheLayerspanel,press-and-holdtheOption(PC:Alt)keyandclickdirectlyonthelayermaskthumbnail that is attached to your top layer. Now you can work on the layer mask which helps you see any areas you may have missed. Press Option and click on the mask to return to the image.
STEP EIGHT: REDUCE THE OPACITY Now,bringtheOpacityofthelayerdownto35%.Basedontheage,youcandroptheOpacitymore to bring in texture and still have smooth (and realistic) looking skin. Toggle the layer visibilityEyeiconofthetoplayeron/offtoseeabeforeandafterview.Youcangoaslowas 20%onsomeonewithgoodskin.
STEP NINE: FINISH IT Take one more step to finalize this look. Press Command and click on the layer mask to select the areas of the skin yousmoothed.NowgotoLayer>NewLayer,selectSoft Lightmode,andturnonFillwithSoft-Light-NeutralColor.
ThengotoFilter>Noise>AddNoise,andadd2%noise,selectMonochromatic,andclickOK.
Now, press Option and click on the mask, then drag it up to this layer to apply the added texture just to the skin.
31
Lighting & Retouching for Fashion and Glamour
notes
LIGHT IT. SHOOT IT. RETOUCH IT. LIVE!
In this lesson you’ll learn great, simple, can’t miss lighting setups that really flatter your fashion and glamour subjects, and then you’ll learn the latest Photoshop portrait retouching tech-niques that will take your look over the top.
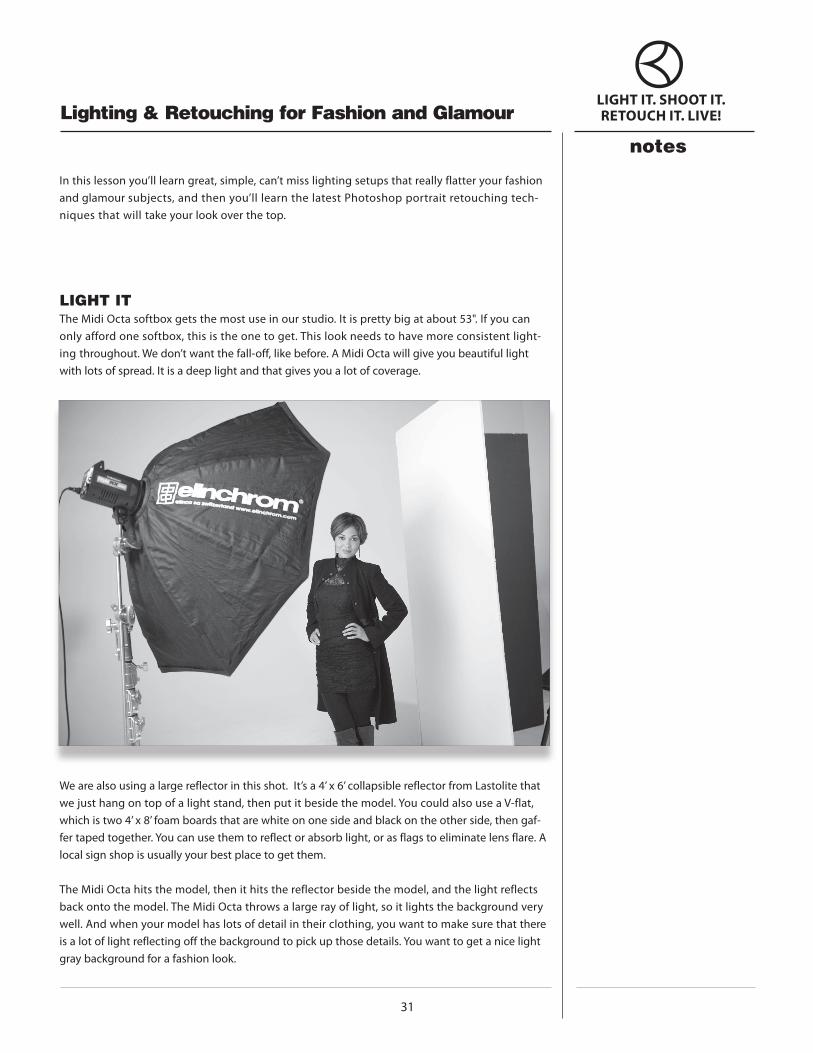
LIGHT ITThe Midi Octa softbox gets the most use in our studio. It is pretty big at about 53". If you can only afford one softbox, this is the one to get. This look needs to have more consistent light-ing throughout. We don’t want the fall-off, like before. A Midi Octa will give you beautiful light with lots of spread. It is a deep light and that gives you a lot of coverage.
We are also using a large reflector in this shot. It’s a 4’ x 6’ collapsible reflector from Lastolite that we just hang on top of a light stand, then put it beside the model. You could also use a V-flat, which is two 4’ x 8’ foam boards that are white on one side and black on the other side, then gaf-fer taped together. You can use them to reflect or absorb light, or as flags to eliminate lens flare. A local sign shop is usually your best place to get them.
The Midi Octa hits the model, then it hits the reflector beside the model, and the light reflects back onto the model. The Midi Octa throws a large ray of light, so it lights the background very well. And when your model has lots of detail in their clothing, you want to make sure that there is a lot of light reflecting off the background to pick up those details. You want to get a nice light gray background for a fashion look.

notes
32
Lighting & Retouching for Fashion and GlamourLIGHT IT. SHOOT IT. RETOUCH IT. LIVE!
Now, add a strobe to light the background, power down the light all the way to keep the back-ground a nice light gray. Add more power on that strobe lighting the background for a more white background, and to bring out more detail in the clothing.
SETUP RECAP
IN THIS SETUP WE USED:•Awhiteseamlesspaper•A53”MidiOctasoftboxtotheleftofthemodel•Alargewhitereflectorontherightsideofhertofillinshadows
notes
32 33
Lighting & Retouching for Fashion and GlamourLIGHT IT. SHOOT IT. RETOUCH IT. LIVE!
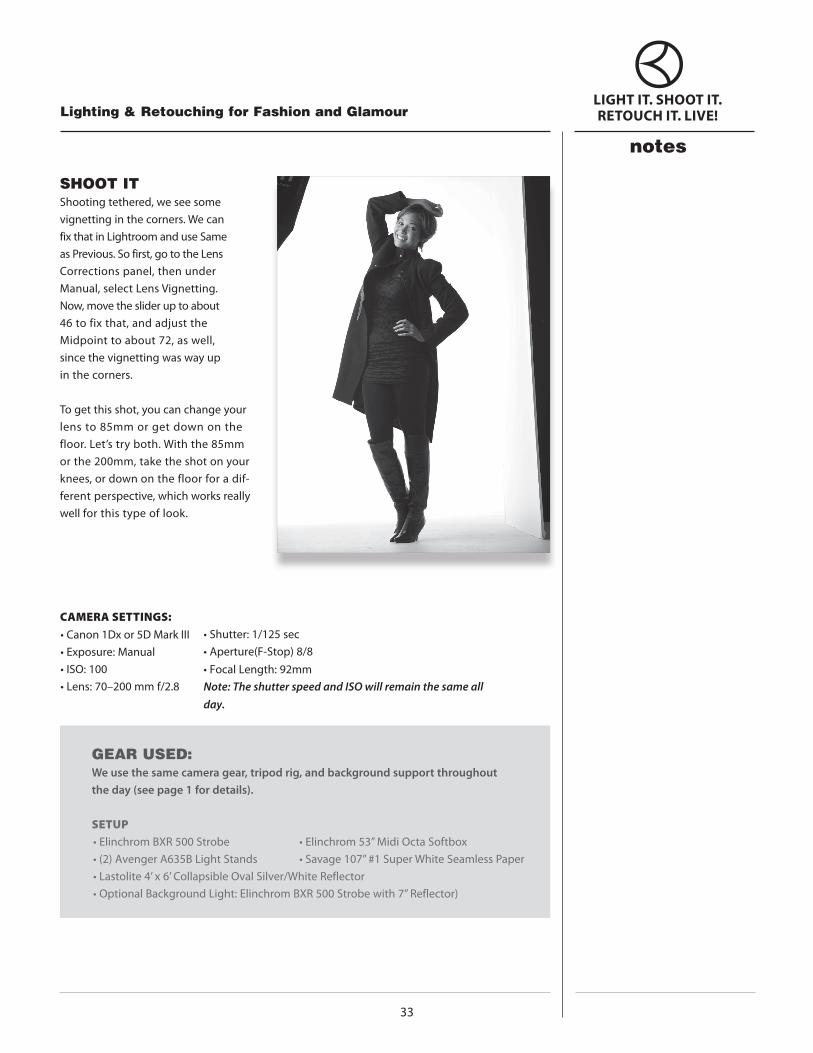
SHOOT ITShooting tethered, we see some vignetting in the corners. We can fix that in Lightroom and use Same as Previous. So first, go to the Lens Corrections panel, then under Manual, select Lens Vignetting. Now, move the slider up to about 46 to fix that, and adjust the Midpoint to about 72, as well, since the vignetting was way up in the corners.
To get this shot, you can change your lens to 85mm or get down on the floor. Let’s try both. With the 85mm or the 200mm, take the shot on your knees, or down on the floor for a dif-ferent perspective, which works really well for this type of look.
CAMERA SETTINGS: • Canon 1Dx or 5D Mark III• Exposure:Manual• ISO:100• Lens:70–200mmf/2.8
• Shutter:1/125sec• Aperture(F-Stop)8/8• FocalLength:92mm Note: The shutter speed and ISO will remain the same all
day.
GEAR USED: We use the same camera gear, tripod rig, and background support throughout the day (see page 1 for details).
SETUP• Elinchrom53”MidiOctaSoftbox• Savage107”#1SuperWhiteSeamlessPaper
• ElinchromBXR500Strobe• (2)AvengerA635BLightStands• Lastolite4’x6’CollapsibleOvalSilver/WhiteReflector• OptionalBackgroundLight:ElinchromBXR500Strobewith7”Reflector)
notes
34
Lighting & Retouching for Fashion and GlamourLIGHT IT. SHOOT IT. RETOUCH IT. LIVE!
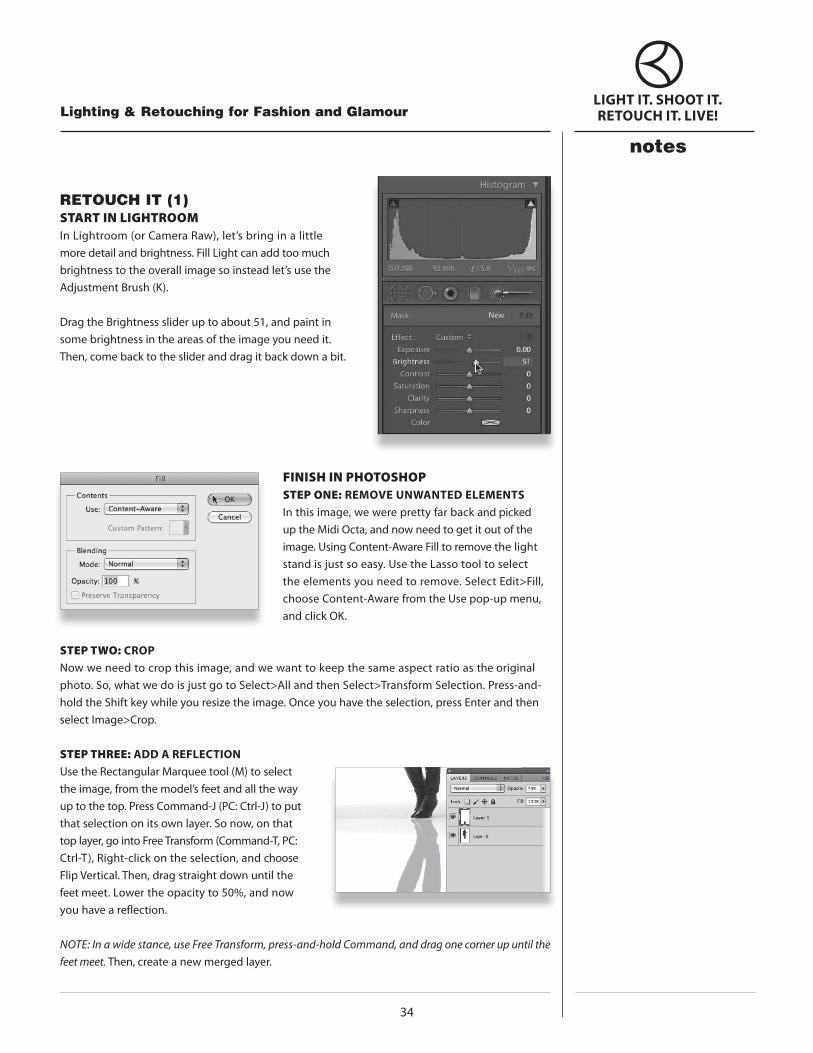
RETOUCH IT (1)START IN LIGHTROOMInLightroom(orCameraRaw),let’sbringinalittlemoredetailandbrightness.FillLightcanaddtoomuchbrightness to the overall image so instead let’s use the AdjustmentBrush(K).
DragtheBrightnessslideruptoabout51,andpaintinsome brightness in the areas of the image you need it. Then, come back to the slider and drag it back down a bit.
FINISH IN PHOTOSHOPSTEP ONE: REMOVE UNWANTED ELEMENTS In this image, we were pretty far back and picked up the Midi Octa, and now need to get it out of the image.UsingContent-AwareFilltoremovethelightstand is just so easy. Use the Lasso tool to select theelementsyouneedtoremove.SelectEdit>Fill,choose Content-Aware from the Use pop-up menu, andclickOK.
STEP TWO: CROP Now we need to crop this image, and we want to keep the same aspect ratio as the original photo.So,whatwedoisjustgotoSelect>AllandthenSelect>TransformSelection.Press-and-holdtheShiftkeywhileyouresizetheimage.Onceyouhavetheselection,pressEnterandthenselectImage>Crop.
STEP THREE: ADD A REFLECTION UsetheRectangularMarqueetool(M)toselectthe image, from the model’s feet and all the way uptothetop.PressCommand-J(PC:Ctrl-J)toputthat selection on its own layer. So now, on that toplayer,gointoFreeTransform(Command-T,PC:Ctrl-T),Right-clickontheselection,andchooseFlipVertical.Then,dragstraightdownuntilthefeet meet. Lower the opacity to 50%, and now you have a reflection.
NOTE: In a wide stance, use Free Transform, press-and-hold Command, and drag one corner up until the feet meet. Then, create a new merged layer.
notes
34 35
Lighting & Retouching for Fashion and GlamourLIGHT IT. SHOOT IT. RETOUCH IT. LIVE!
STEP FOUR: ADD DETAIL TO CLOTHING Now,toaddsomedetailintheclothing,wearegoingtoselectFilter>NikSoftware>ColorEfexPro.Add50%ofTonalContrastandclickOK.NOTE: If we just select it from the top of the menu, it will apply it to the flattened image, so by doing it this way, it adds the effect on its own layer. Now, hide the layer behind a mask and paint it back in over her hair, clothes, shoes. Lower the Opacity of the layer to about 50% for a more natural effect.
QUICK TIP:Here’satricktohelpyoufind(andremove)thingsinthebackground:AddaCurves.adjustmentlayerand,intheAdjustmentspanel,clicktoaddtwopoints.Dragthemtocreateacurve,asshown.Everythingyoumissed—dustonthefloor,strayhairs,blemishesontheskin,etc.—willallstandout.YouthenclickontheBackgroundlayer,selecttheHealingBrushandchooseCurrentLayerfromtheSamplepop-upmenu.UsetheHealingBrushtoremoveanystrayparticles.
STEP FIVE: ADD SOME HIGHLIGHTS TO THE HAIR Okay, now merge the layers together and then duplicate the layer and change its blend mode toScreen.Option-click(PC:Alt-click)ontheAddLayerMaskicontohideitbehindablackmask.WiththeBrushtool(B),goinandpaintovertheexistinghighlightsonherhair.Itmakesyourlighting look better. Just lower the Opacity of the layer a bit to soften the look.
STEP SIX: REMOVE BLEMISHES, WRINKLES CreateanewblanklayerandusetheHealingBrushtoremoveblemishes.Then,onanotherlayer,remove all the wrinkles and lower the Opacity of the layer to bring a few of them back in.
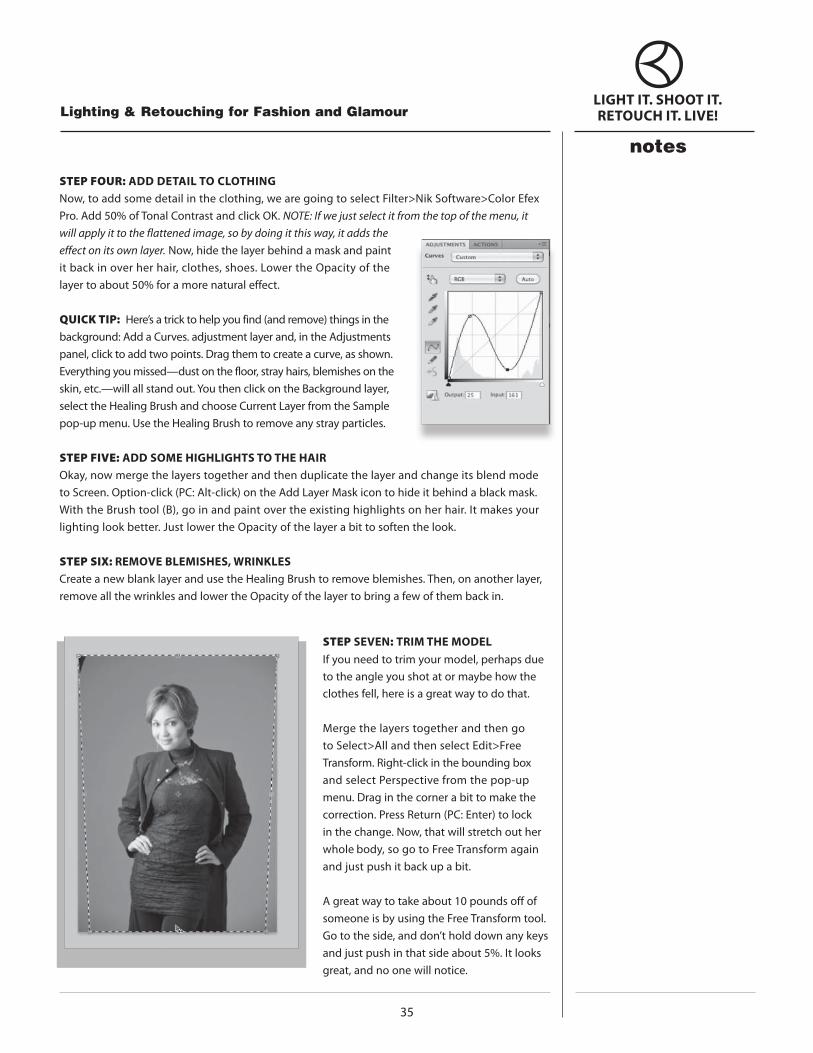
STEP SEVEN: TRIM THE MODEL If you need to trim your model, perhaps due to the angle you shot at or maybe how the clothes fell, here is a great way to do that.
Merge the layers together and then go toSelect>AllandthenselectEdit>FreeTransform.Right-clickintheboundingbox and select Perspective from the pop-up menu.Draginthecornerabittomakethecorrection.PressReturn(PC:Enter)tolockin the change. Now, that will stretch out her wholebody,sogotoFreeTransformagainand just push it back up a bit.
A great way to take about 10 pounds off of someoneisbyusingtheFreeTransformtool.Go to the side, and don’t hold down any keys and just push in that side about 5%. It looks great, and no one will notice.