Let's Make Mice! - Mother Goose Nursery Rhymes, … of Contents Mother Goose Mice ..... How to Make...
27
Let's Make Mice! © Leslie Wilson, www.MotherGoose.com mice, cheese, and a kitty cat purse lovable toys you and your children can make! Learn to Craft with Mother Goose
Transcript of Let's Make Mice! - Mother Goose Nursery Rhymes, … of Contents Mother Goose Mice ..... How to Make...
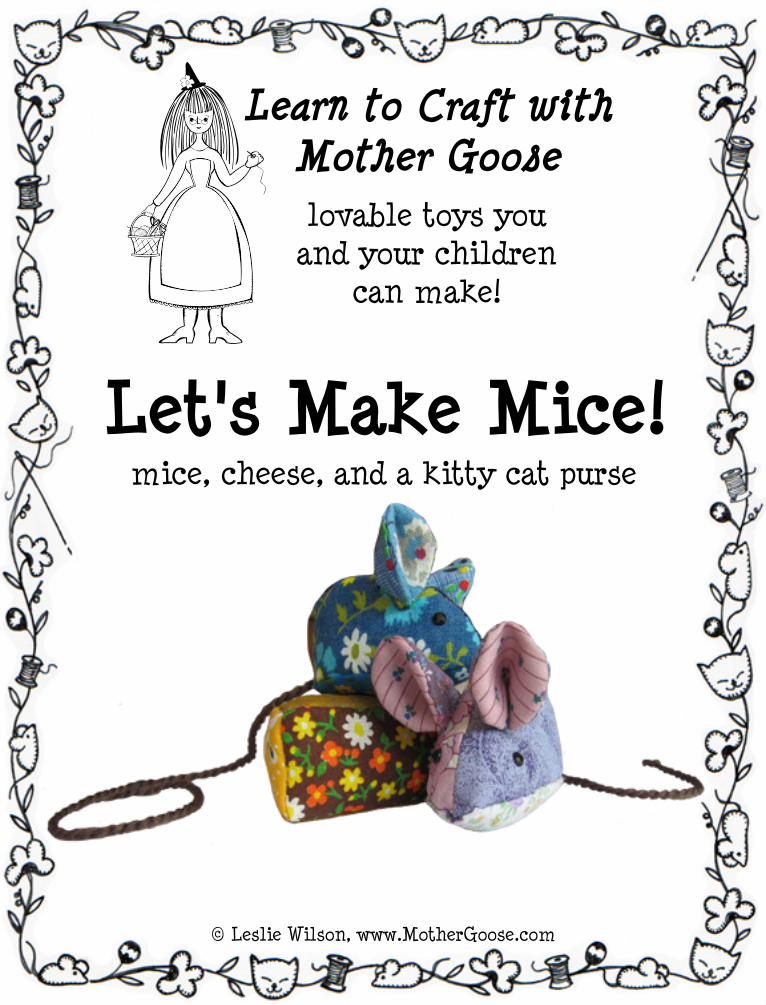
Let's Make Mice!
© Leslie Wilson, www.MotherGoose.com
mice, cheese, and a kitty cat purse
lovable toys you and your children
can make!
Learn to Craft withMother Goose
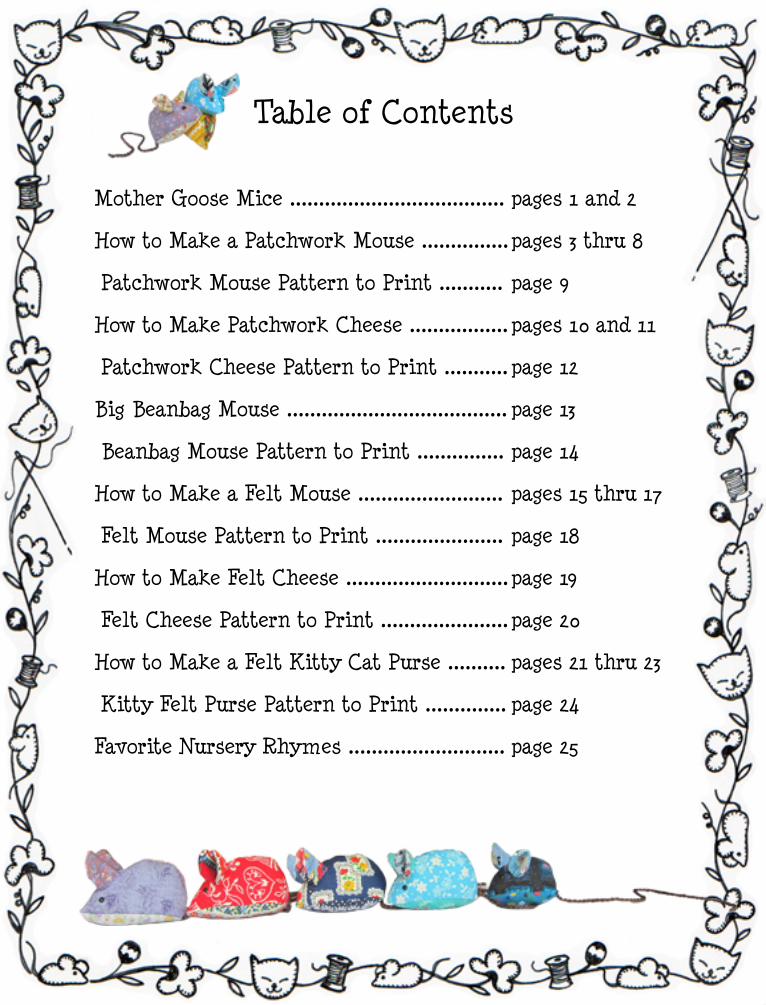
Table of Contents
Mother Goose Mice .....................................
How to Make a Patchwork Mouse ...............
Patchwork Mouse Pattern to Print ...........
How to Make Patchwork Cheese .................
Patchwork Cheese Pattern to Print ...........
Big Beanbag Mouse ...................................... Beanbag Mouse Pattern to Print ...............
How to Make a Felt Mouse .........................
Felt Mouse Pattern to Print ......................
How to Make Felt Cheese ............................
Felt Cheese Pattern to Print ......................
How to Make a Felt Kitty Cat Purse ..........
Kitty Felt Purse Pattern to Print ..............
Favorite Nursery Rhymes ...........................
pages 1 and 2
pages 3 thru 8
page 9
pages 10 and 11
page 12
page 13
page 14
pages 15 thru 17
page 18
page 19
page 20
pages 21 thru 23
page 24
page 25
pages 1 and 2
pages 3 thru 8
page 9
pages 10 and 11
page 12
page 13
page 14
pages 15 thru 17
page 18
page 19
page 20
pages 21 thru 23
page 24
page 25
Mother Goose Mice1
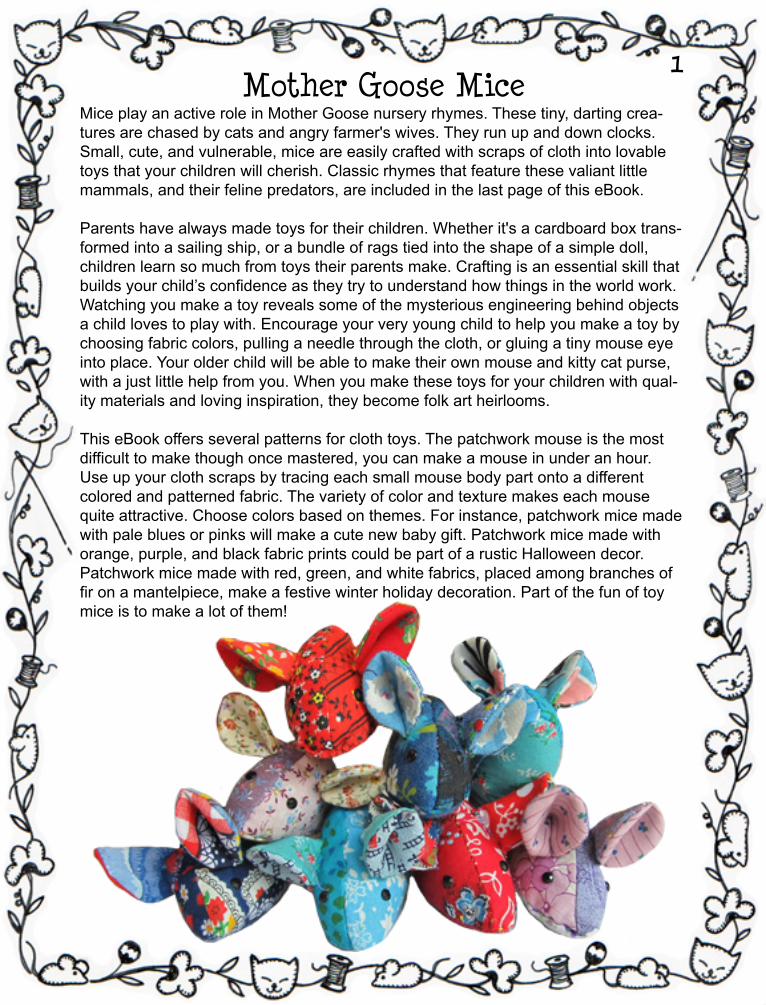
Mice play an active role in Mother Goose nursery rhymes. These tiny, darting crea-tures are chased by cats and angry farmer's wives. They run up and down clocks. Small, cute, and vulnerable, mice are easily crafted with scraps of cloth into lovable toys that your children will cherish. Classic rhymes that feature these valiant little mammals, and their feline predators, are included in the last page of this eBook.
Parents have always made toys for their children. Whether it's a cardboard box trans-formed into a sailing ship, or a bundle of rags tied into the shape of a simple doll, children learn so much from toys their parents make. Crafting is an essential skill that builds your child’s confidence as they try to understand how things in the world work. Watching you make a toy reveals some of the mysterious engineering behind objects a child loves to play with. Encourage your very young child to help you make a toy by choosing fabric colors, pulling a needle through the cloth, or gluing a tiny mouse eye into place. Your older child will be able to make their own mouse and kitty cat purse, with a just little help from you. When you make these toys for your children with qual-ity materials and loving inspiration, they become folk art heirlooms.
This eBook offers several patterns for cloth toys. The patchwork mouse is the most difficult to make though once mastered, you can make a mouse in under an hour. Use up your cloth scraps by tracing each small mouse body part onto a different colored and patterned fabric. The variety of color and texture makes each mouse quite attractive. Choose colors based on themes. For instance, patchwork mice made with pale blues or pinks will make a cute new baby gift. Patchwork mice made with orange, purple, and black fabric prints could be part of a rustic Halloween decor. Patchwork mice made with red, green, and white fabrics, placed among branches of fir on a mantelpiece, make a festive winter holiday decoration. Part of the fun of toy mice is to make a lot of them!
Mother Goose Mice2
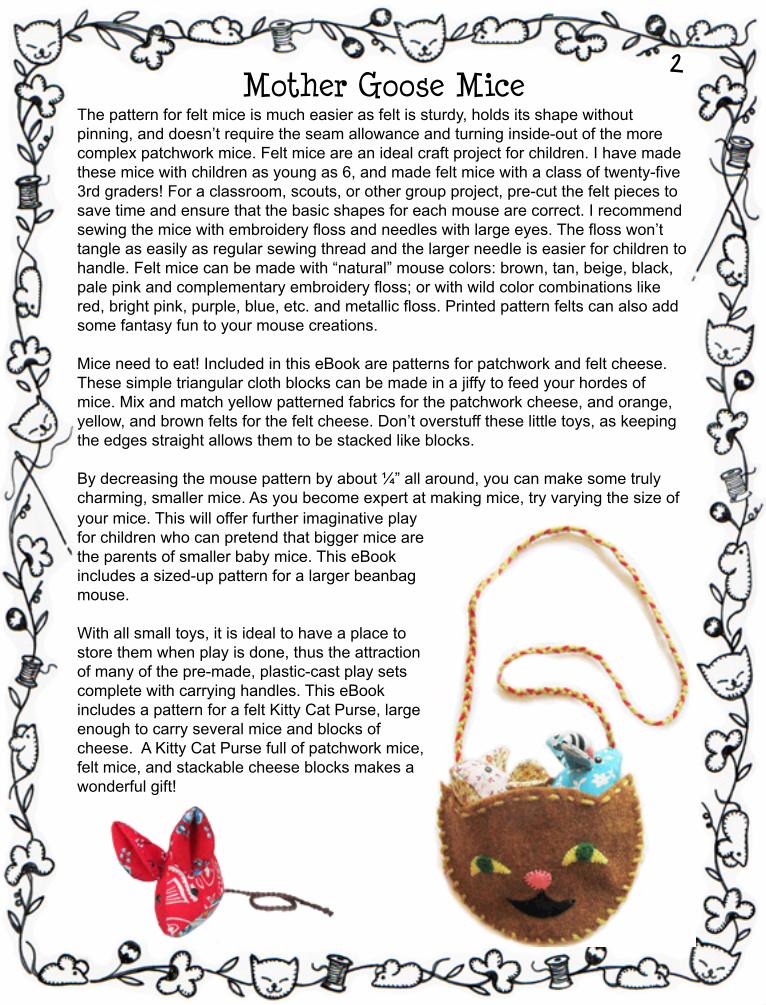
The pattern for felt mice is much easier as felt is sturdy, holds its shape without pinning, and doesn’t require the seam allowance and turning inside-out of the more complex patchwork mice. Felt mice are an ideal craft project for children. I have made these mice with children as young as 6, and made felt mice with a class of twenty-five 3rd graders! For a classroom, scouts, or other group project, pre-cut the felt pieces to save time and ensure that the basic shapes for each mouse are correct. I recommend sewing the mice with embroidery floss and needles with large eyes. The floss won’t tangle as easily as regular sewing thread and the larger needle is easier for children to handle. Felt mice can be made with “natural” mouse colors: brown, tan, beige, black, pale pink and complementary embroidery floss; or with wild color combinations like red, bright pink, purple, blue, etc. and metallic floss. Printed pattern felts can also add some fantasy fun to your mouse creations.
Mice need to eat! Included in this eBook are patterns for patchwork and felt cheese. These simple triangular cloth blocks can be made in a jiffy to feed your hordes of mice. Mix and match yellow patterned fabrics for the patchwork cheese, and orange, yellow, and brown felts for the felt cheese. Don’t overstuff these little toys, as keeping the edges straight allows them to be stacked like blocks.
By decreasing the mouse pattern by about ¼” all around, you can make some truly charming, smaller mice. As you become expert at making mice, try varying the size of your mice. This will offer further imaginative play for children who can pretend that bigger mice are the parents of smaller baby mice. This eBook includes a sized-up pattern for a larger beanbag mouse.
With all small toys, it is ideal to have a place to store them when play is done, thus the attraction of many of the pre-made, plastic-cast play sets complete with carrying handles. This eBook includes a pattern for a felt Kitty Cat Purse, large enough to carry several mice and blocks of cheese. A Kitty Cat Purse full of patchwork mice, felt mice, and stackable cheese blocks makes a wonderful gift!
How to Make a Patchwork Mouse3
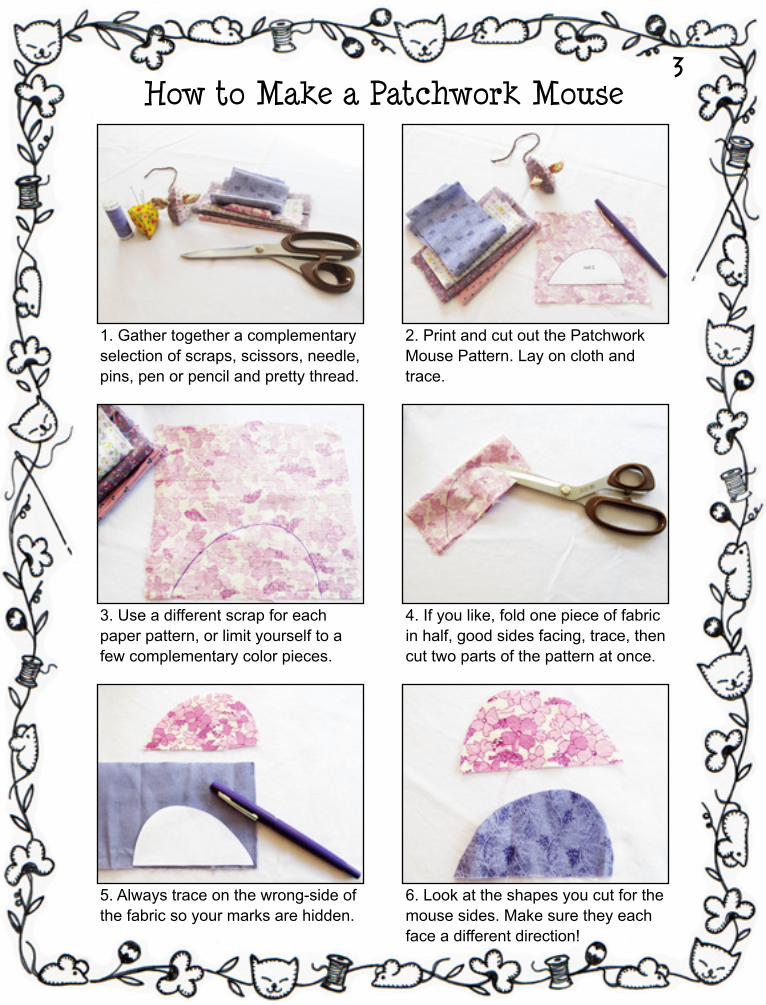
1. Gather together a complementary selection of scraps, scissors, needle, pins, pen or pencil and pretty thread.
3. Use a different scrap for each paper pattern, or limit yourself to a few complementary color pieces.
2. Print and cut out the Patchwork Mouse Pattern. Lay on cloth and trace.
4. If you like, fold one piece of fabric in half, good sides facing, trace, then cut two parts of the pattern at once.
5. Always trace on the wrong-side of the fabric so your marks are hidden.
6. Look at the shapes you cut for the mouse sides. Make sure they each face a different direction!

How to Make a Patchwork Mouse4
7. Pin two sides together, good-sides facing in and sew with small straight stitches about 1/8" in from the edge.
9. Turn the mouse body inside out and smooth the seam with your fingers. Here is the basic mouse shape.
11. Line the pointed end of the bottom piece with the pointed end of the body piece. Pin in place.
8. Snip small cuts around the curved edges. Be careful not to cut your stitches!
10. Turn the mouse body inside-out again. Now it's time to attach the mouse's bottom piece. It’s tummy!
12. Sew all along the edge with small stitches. Make sure the curved edges always match up.
How to Make a Patchwork Mouse5
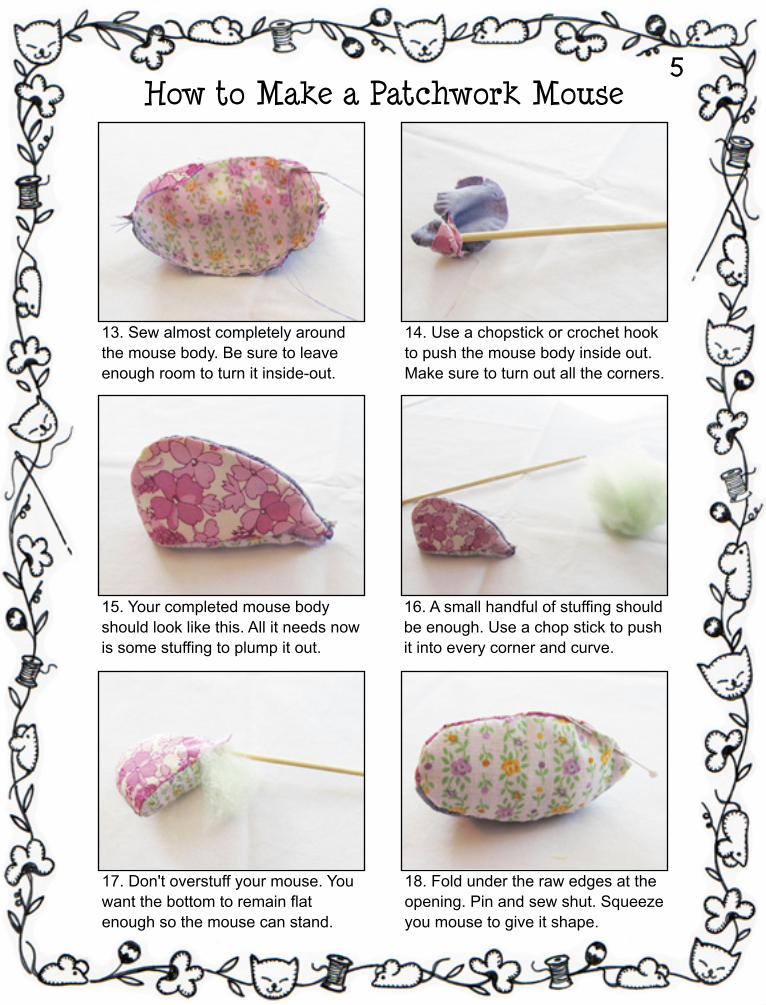
13. Sew almost completely around the mouse body. Be sure to leave enough room to turn it inside-out.
14. Use a chopstick or crochet hook to push the mouse body inside out. Make sure to turn out all the corners.
15. Your completed mouse body should look like this. All it needs now is some stuffing to plump it out.
16. A small handful of stuffing should be enough. Use a chop stick to push it into every corner and curve.
17. Don't overstuff your mouse. You want the bottom to remain flat enough so the mouse can stand.
18. Fold under the raw edges at the opening. Pin and sew shut. Squeeze you mouse to give it shape.
pages 1 and 2
pages 3 thru 8
page 9
pages 10 and 11
page 12
page 13
page 14
pages 15 thru 17
page 18
page 19
page 20
pages 21 thru 23
page 24
page 25
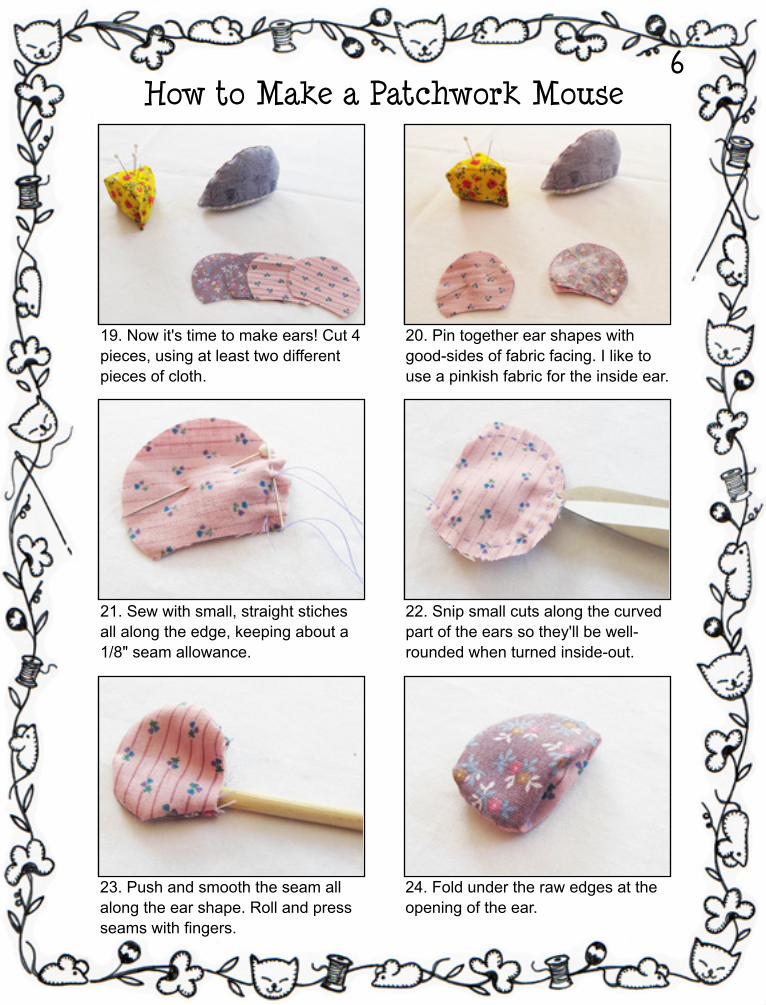
How to Make a Patchwork Mouse6
19. Now it's time to make ears! Cut 4 pieces, using at least two different pieces of cloth.
20. Pin together ear shapes with good-sides of fabric facing. I like to use a pinkish fabric for the inside ear.
21. Sew with small, straight stiches all along the edge, keeping about a 1/8" seam allowance.
22. Snip small cuts along the curved part of the ears so they'll be well-rounded when turned inside-out.
23. Push and smooth the seam all along the ear shape. Roll and press seams with fingers.
24. Fold under the raw edges at the opening of the ear.
pages 1 and 2
pages 3 thru 8
page 9
pages 10 and 11
page 12
page 13
page 14
pages 15 thru 17
page 18
page 19
page 20
pages 21 thru 23
page 24
page 25
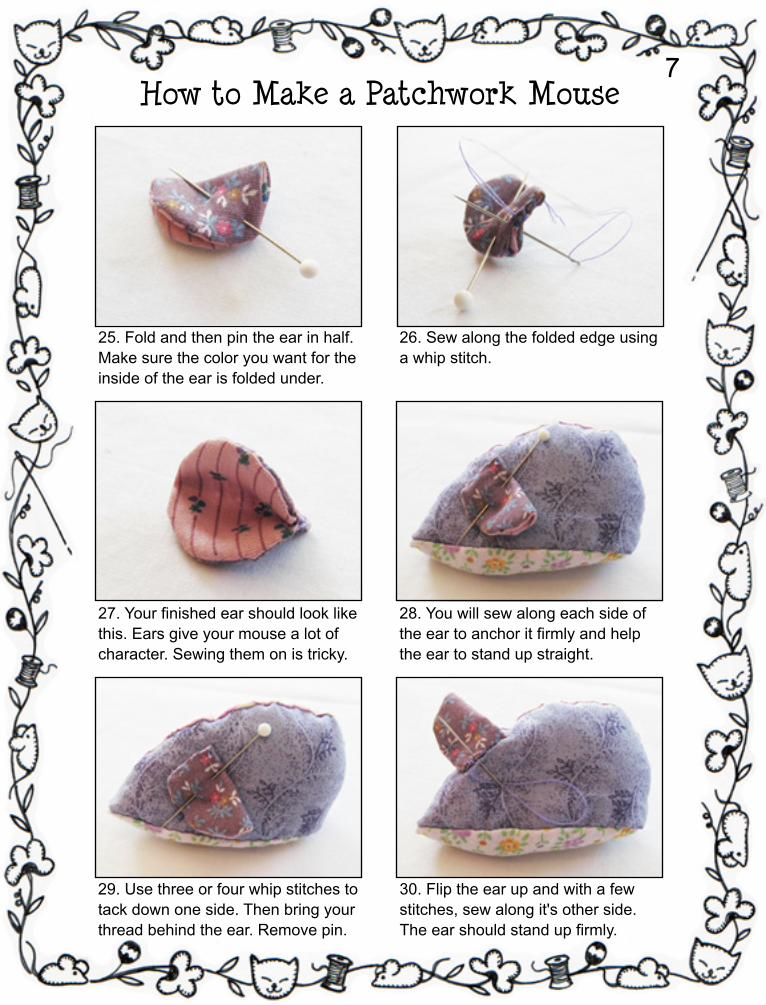
How to Make a Patchwork Mouse7
25. Fold and then pin the ear in half. Make sure the color you want for the inside of the ear is folded under.
26. Sew along the folded edge using a whip stitch.
27. Your finished ear should look like this. Ears give your mouse a lot of character. Sewing them on is tricky.
28. You will sew along each side of the ear to anchor it firmly and help the ear to stand up straight.
29. Use three or four whip stitches to tack down one side. Then bring your thread behind the ear. Remove pin.
30. Flip the ear up and with a few stitches, sew along it's other side. The ear should stand up firmly.
How to Make a Patchwork Mouse8
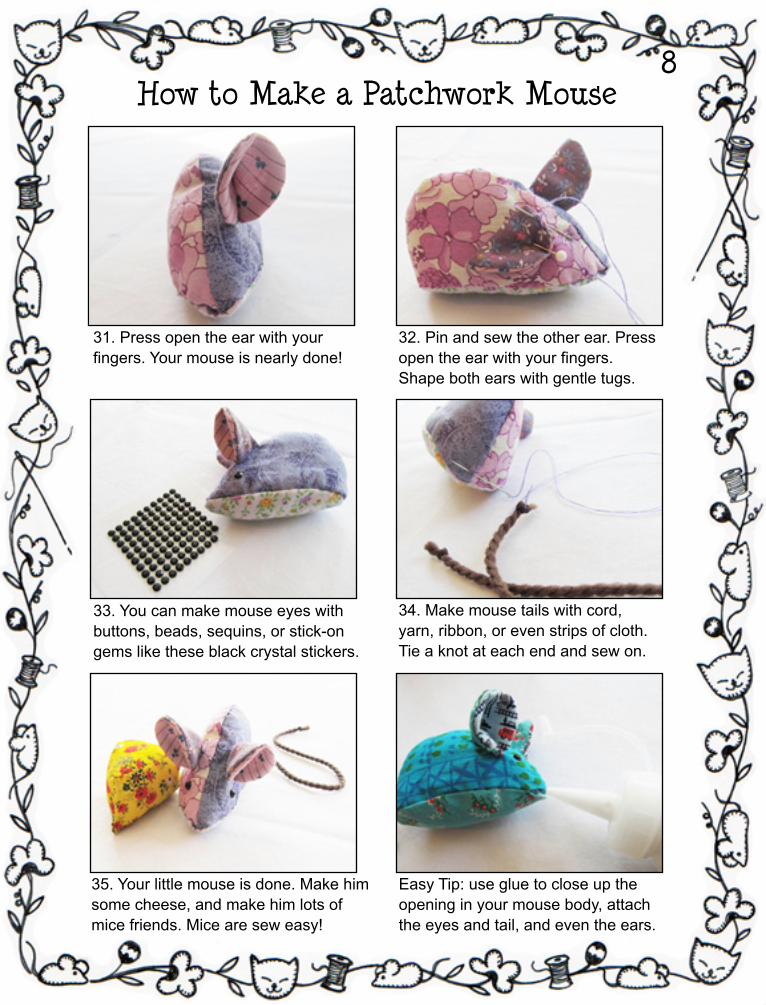
31. Press open the ear with your fingers. Your mouse is nearly done!
32. Pin and sew the other ear. Press open the ear with your fingers. Shape both ears with gentle tugs.
33. You can make mouse eyes with buttons, beads, sequins, or stick-on gems like these black crystal stickers.
34. Make mouse tails with cord, yarn, ribbon, or even strips of cloth. Tie a knot at each end and sew on.
35. Your little mouse is done. Make him some cheese, and make him lots of mice friends. Mice are sew easy!
Easy Tip: use glue to close up the opening in your mouse body, attach the eyes and tail, and even the ears.
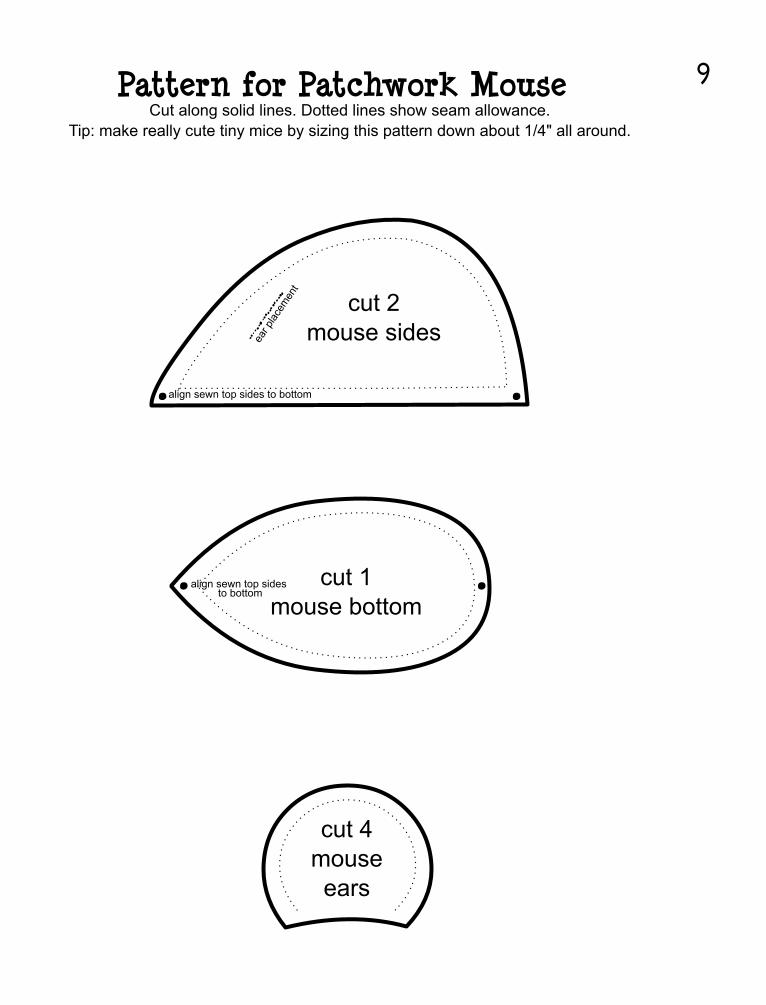
cut 4mouseears
cut 1mouse bottom
cut 2mouse sides
Pattern for Patchwork MouseCut along solid lines. Dotted lines show seam allowance.
Tip: make really cute tiny mice by sizing this pattern down about 1/4" all around.
align sewn top sides to bottom
align sewn top sides to bottom
9
ear p
lacem
ent
How to Make a Patchwork Cheese10
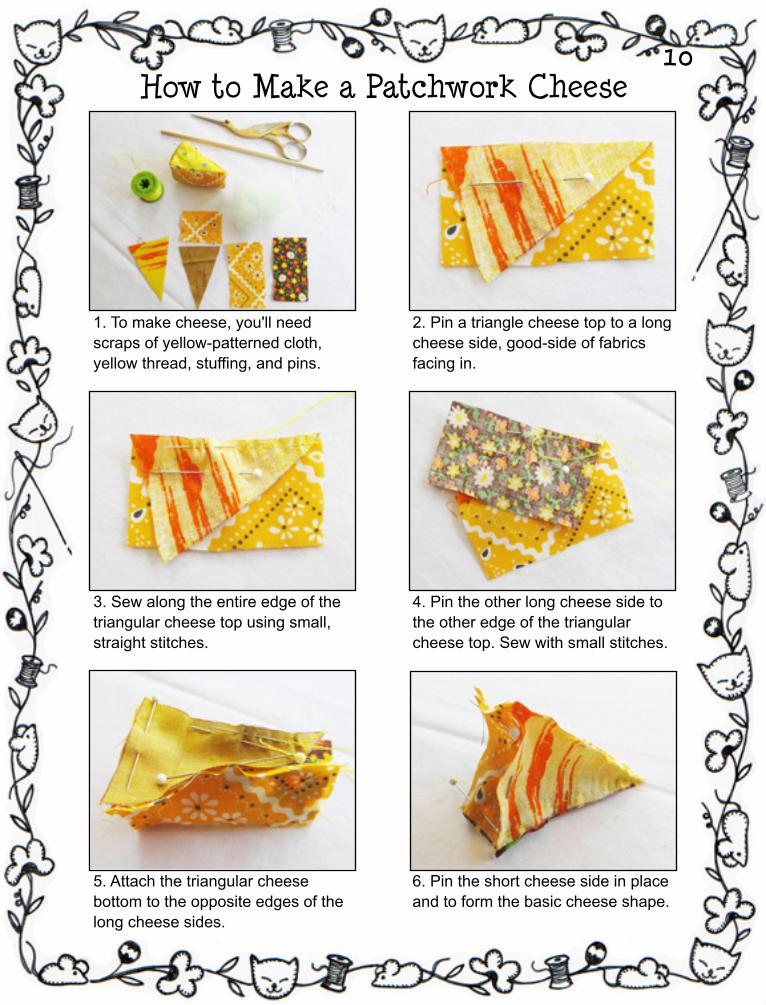
1. To make cheese, you'll need scraps of yellow-patterned cloth, yellow thread, stuffing, and pins.
2. Pin a triangle cheese top to a long cheese side, good-side of fabrics facing in.
3. Sew along the entire edge of the triangular cheese top using small, straight stitches.
4. Pin the other long cheese side to the other edge of the triangular cheese top. Sew with small stitches.
5. Attach the triangular cheese bottom to the opposite edges of the long cheese sides.
6. Pin the short cheese side in place and to form the basic cheese shape.
How to Make a Patchwork Cheese11
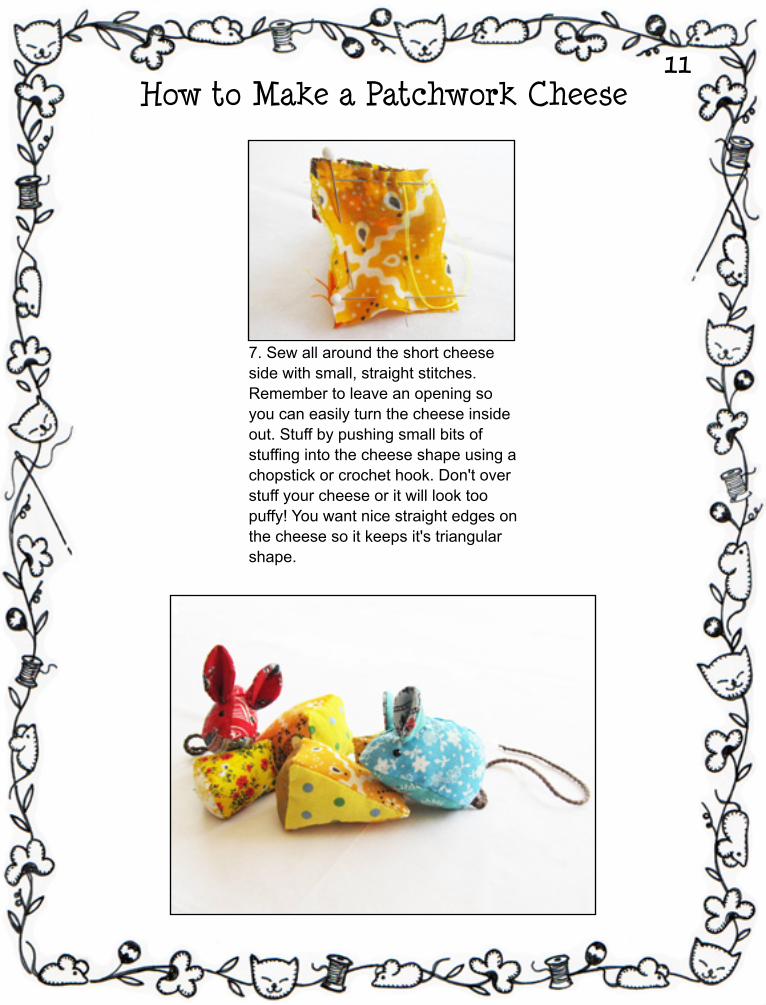
7. Sew all around the short cheese side with small, straight stitches. Remember to leave an opening so you can easily turn the cheese inside out. Stuff by pushing small bits of stuffing into the cheese shape using a chopstick or crochet hook. Don't over stuff your cheese or it will look too puffy! You want nice straight edges on the cheese so it keeps it's triangular shape.
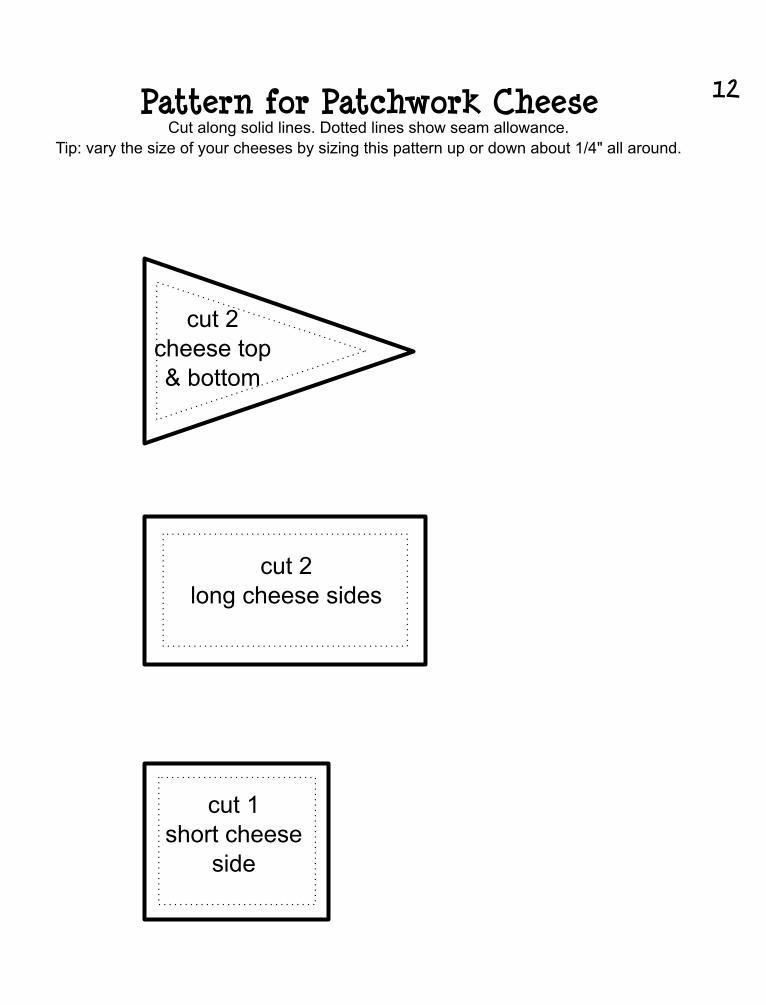
Pattern for Patchwork Cheese
cut 1short cheese
side
cut 2long cheese sides
cut 2cheese top& bottom
Cut along solid lines. Dotted lines show seam allowance.Tip: vary the size of your cheeses by sizing this pattern up or down about 1/4" all around.
12
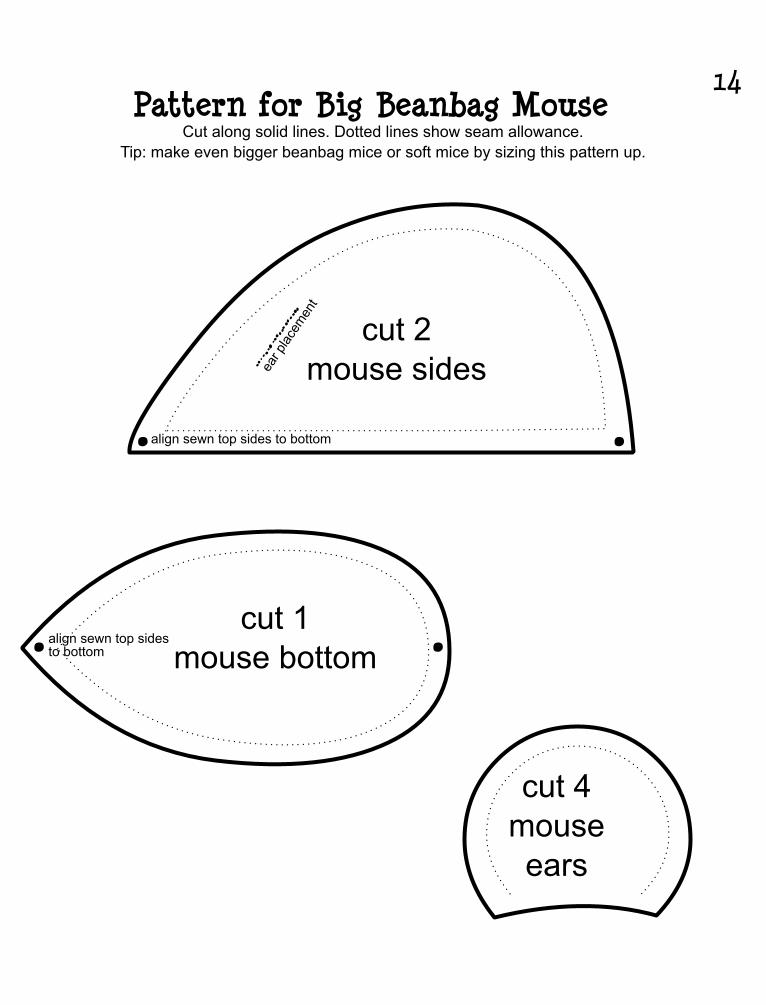
How to Make a Big Beanbag Mouse13
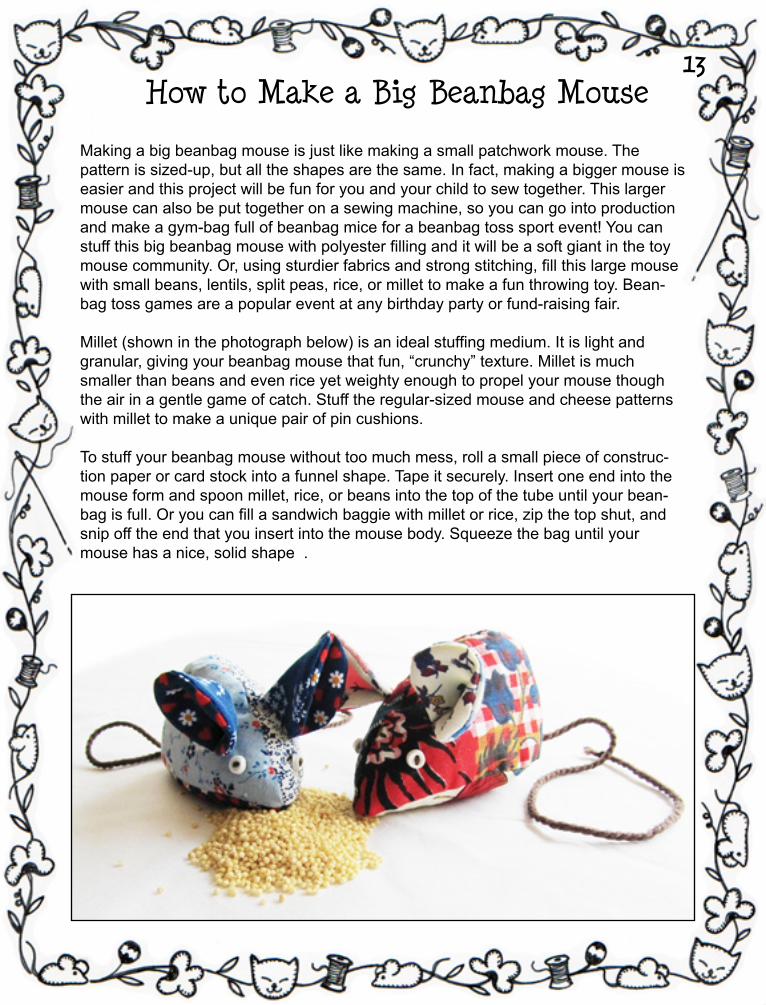
Making a big beanbag mouse is just like making a small patchwork mouse. The pattern is sized-up, but all the shapes are the same. In fact, making a bigger mouse is easier and this project will be fun for you and your child to sew together. This larger mouse can also be put together on a sewing machine, so you can go into production and make a gym-bag full of beanbag mice for a beanbag toss sport event! You can stuff this big beanbag mouse with polyester filling and it will be a soft giant in the toy mouse community. Or, using sturdier fabrics and strong stitching, fill this large mouse with small beans, lentils, split peas, rice, or millet to make a fun throwing toy. Bean-bag toss games are a popular event at any birthday party or fund-raising fair.
Millet (shown in the photograph below) is an ideal stuffing medium. It is light and granular, giving your beanbag mouse that fun, “crunchy” texture. Millet is much smaller than beans and even rice yet weighty enough to propel your mouse though the air in a gentle game of catch. Stuff the regular-sized mouse and cheese patterns with millet to make a unique pair of pin cushions.
To stuff your beanbag mouse without too much mess, roll a small piece of construc-tion paper or card stock into a funnel shape. Tape it securely. Insert one end into the mouse form and spoon millet, rice, or beans into the top of the tube until your bean-bag is full. Or you can fill a sandwich baggie with millet or rice, zip the top shut, and snip off the end that you insert into the mouse body. Squeeze the bag until your mouse has a nice, solid shape .
Pattern for Big Beanbag Mouse
cut 4mouseears
cut 1mouse bottom
cut 2mouse sides
align sewn top sides to bottom
ear p
lacem
ent
align sewn top sides to bottom
14
Cut along solid lines. Dotted lines show seam allowance.Tip: make even bigger beanbag mice or soft mice by sizing this pattern up.
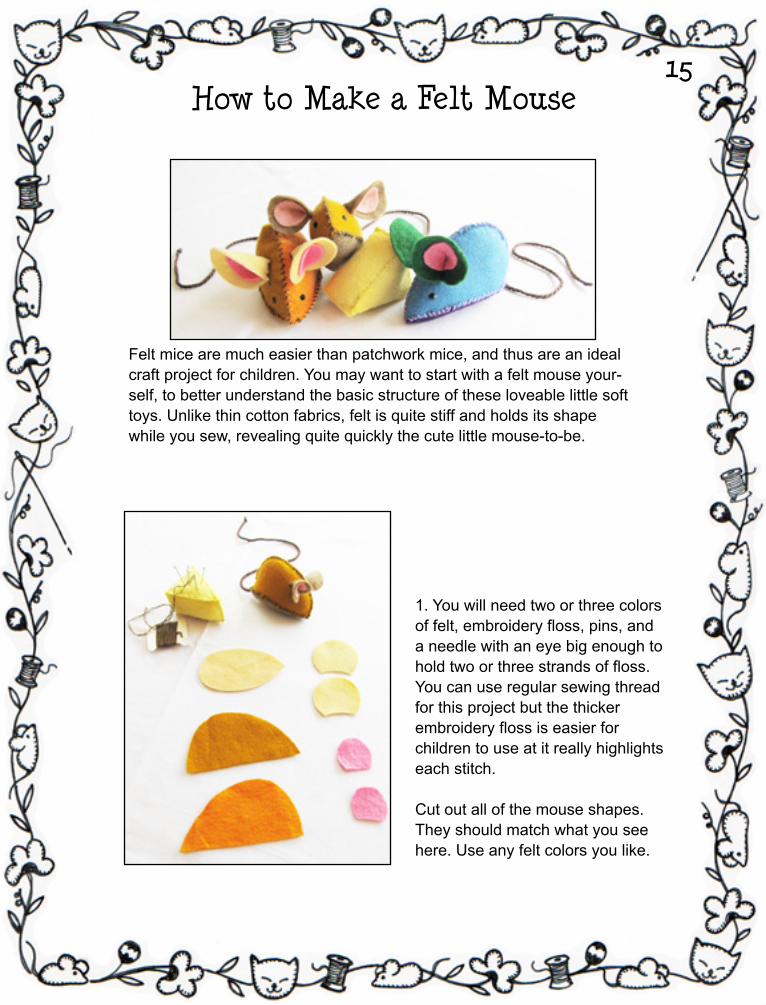
How to Make a Felt Mouse15
Felt mice are much easier than patchwork mice, and thus are an ideal craft project for children. You may want to start with a felt mouse your-self, to better understand the basic structure of these loveable little soft toys. Unlike thin cotton fabrics, felt is quite stiff and holds its shape while you sew, revealing quite quickly the cute little mouse-to-be.
1. You will need two or three colors of felt, embroidery floss, pins, and a needle with an eye big enough to hold two or three strands of floss. You can use regular sewing thread for this project but the thicker embroidery floss is easier for children to use at it really highlights each stitch.
Cut out all of the mouse shapes. They should match what you see here. Use any felt colors you like.
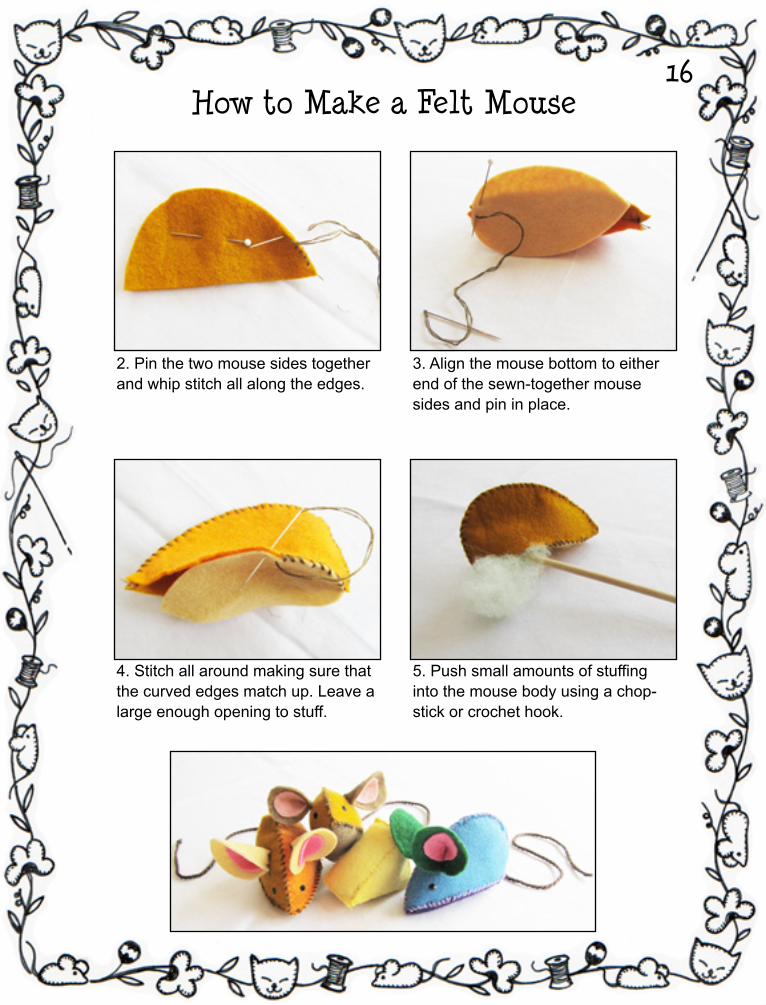
How to Make a Felt Mouse16
2. Pin the two mouse sides together and whip stitch all along the edges.
3. Align the mouse bottom to either end of the sewn-together mouse sides and pin in place.
4. Stitch all around making sure that the curved edges match up. Leave a large enough opening to stuff.
5. Push small amounts of stuffing into the mouse body using a chop-stick or crochet hook.
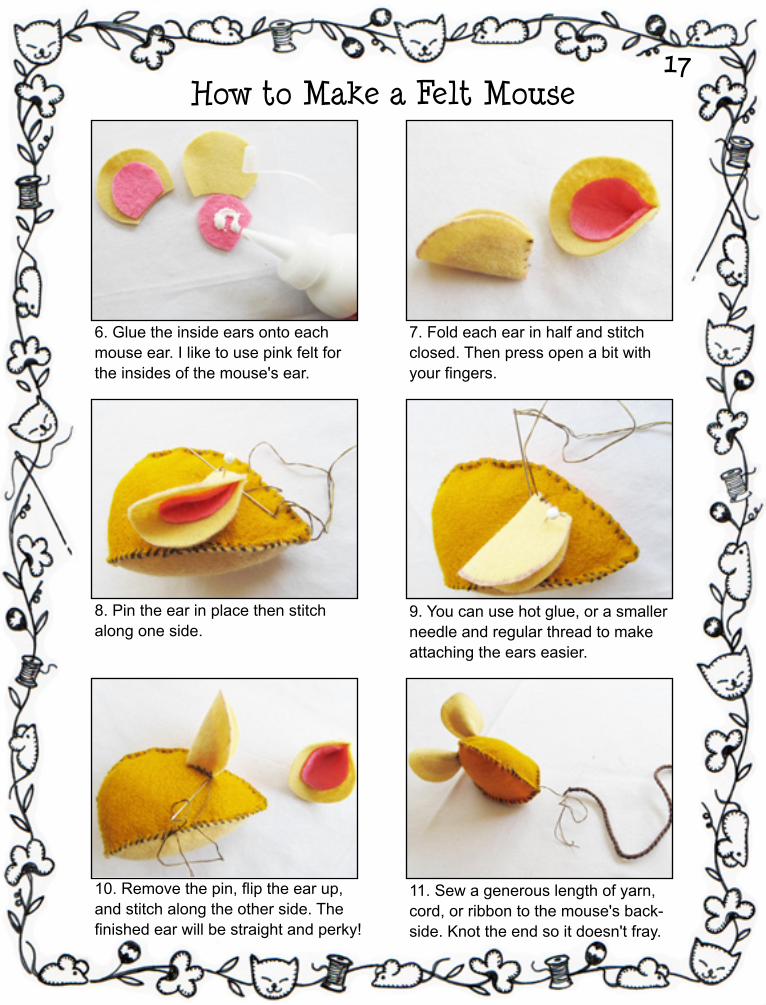
How to Make a Felt Mouse17
6. Glue the inside ears onto each mouse ear. I like to use pink felt for the insides of the mouse's ear.
7. Fold each ear in half and stitch closed. Then press open a bit with your fingers.
10. Remove the pin, flip the ear up, and stitch along the other side. The finished ear will be straight and perky!
11. Sew a generous length of yarn, cord, or ribbon to the mouse's back-side. Knot the end so it doesn't fray.
8. Pin the ear in place then stitch along one side.
9. You can use hot glue, or a smaller needle and regular thread to make attaching the ears easier.
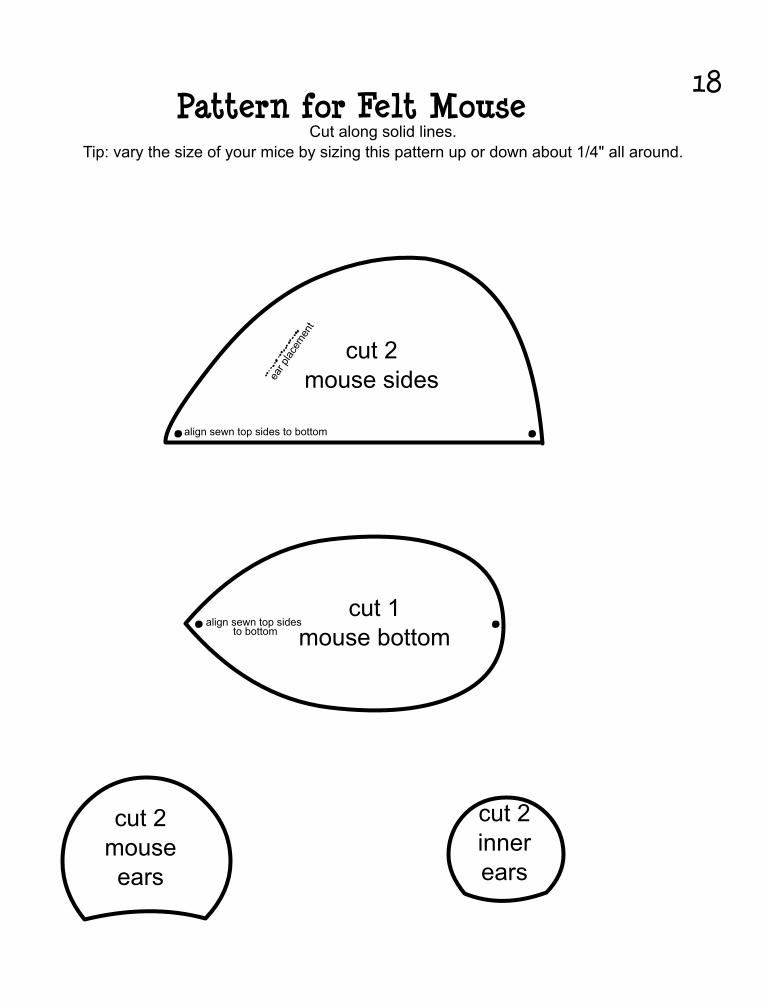
Pattern for Felt Mouse
cut 2mouseears
cut 1mouse bottom
cut 2mouse sides
cut 2innerears
align sewn top sides to bottom
ear p
lacem
ent
align sewn top sides to bottom
18
Cut along solid lines.Tip: vary the size of your mice by sizing this pattern up or down about 1/4" all around.
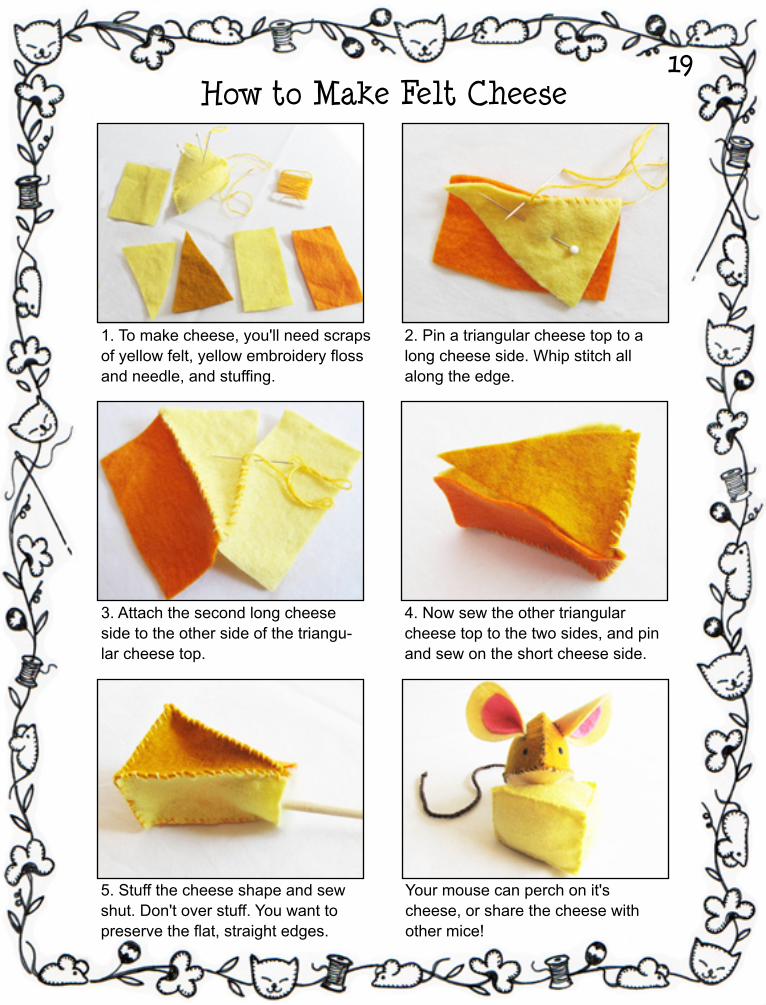
How to Make Felt Cheese19
1. To make cheese, you'll need scraps of yellow felt, yellow embroidery floss and needle, and stuffing.
2. Pin a triangular cheese top to a long cheese side. Whip stitch all along the edge.
3. Attach the second long cheese side to the other side of the triangu-lar cheese top.
4. Now sew the other triangular cheese top to the two sides, and pin and sew on the short cheese side.
5. Stuff the cheese shape and sew shut. Don't over stuff. You want to preserve the flat, straight edges.
Your mouse can perch on it's cheese, or share the cheese with other mice!
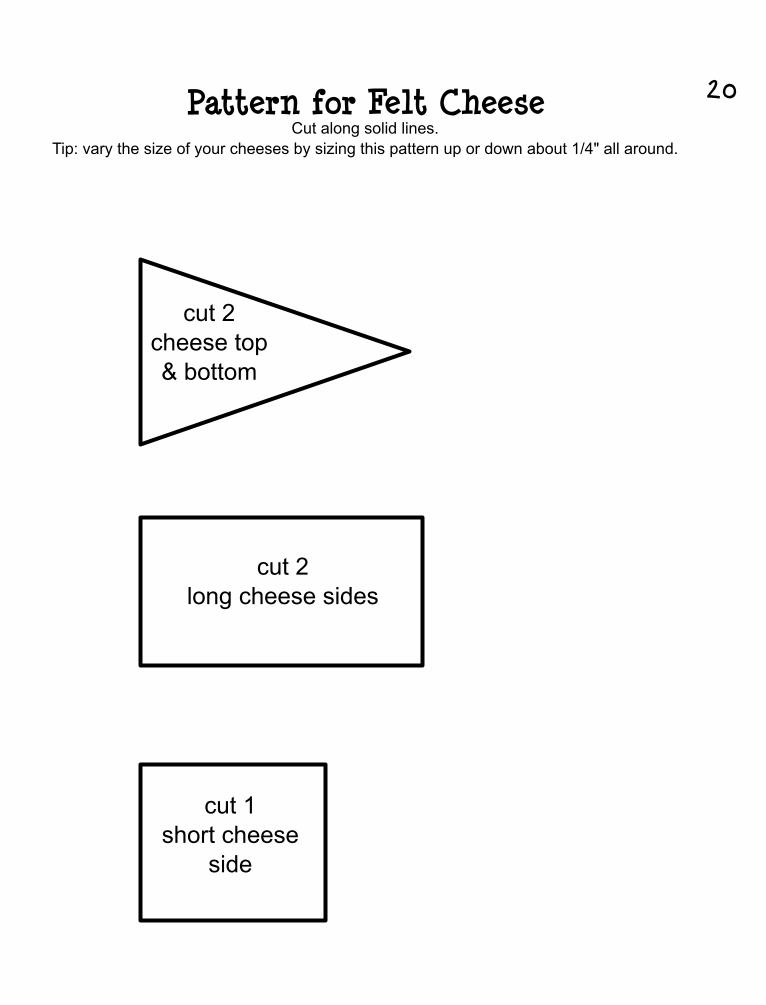
Pattern for Felt Cheese
cut 1short cheese
side
cut 2long cheese sides
cut 2cheese top& bottom
Cut along solid lines.Tip: vary the size of your cheeses by sizing this pattern up or down about 1/4" all around.
20
How to Make a Felt Kitty Cat Purse21
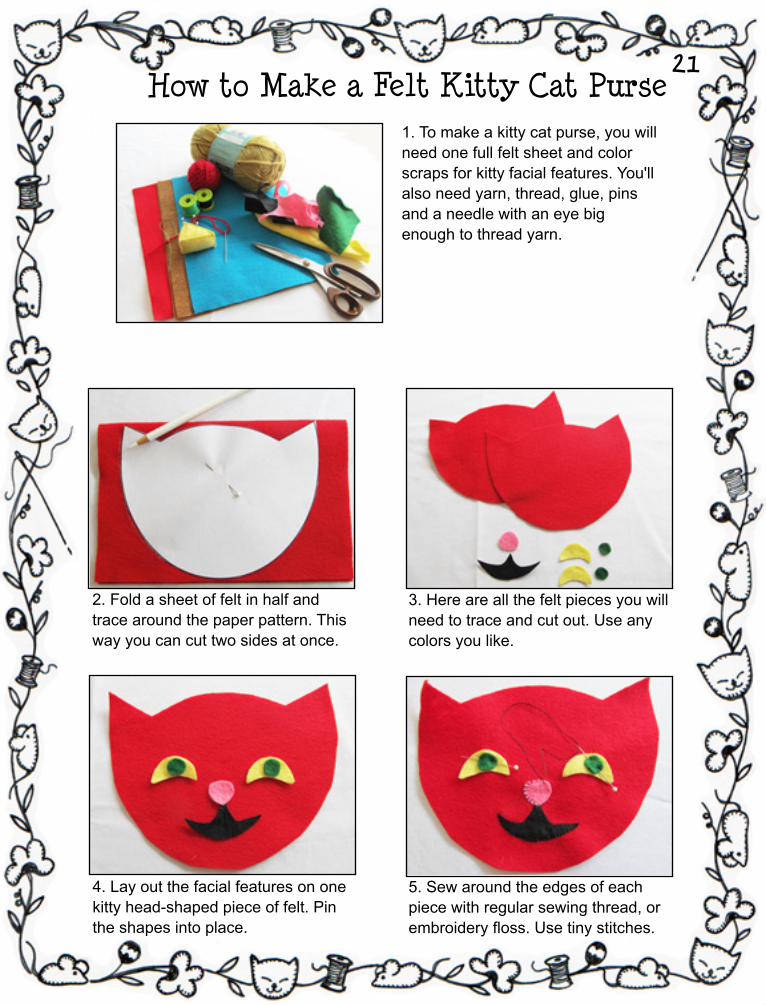
1. To make a kitty cat purse, you will need one full felt sheet and color scraps for kitty facial features. You'll also need yarn, thread, glue, pins and a needle with an eye big enough to thread yarn.
2. Fold a sheet of felt in half and trace around the paper pattern. This way you can cut two sides at once.
4. Lay out the facial features on one kitty head-shaped piece of felt. Pin the shapes into place.
3. Here are all the felt pieces you will need to trace and cut out. Use any colors you like.
5. Sew around the edges of each piece with regular sewing thread, or embroidery floss. Use tiny stitches.
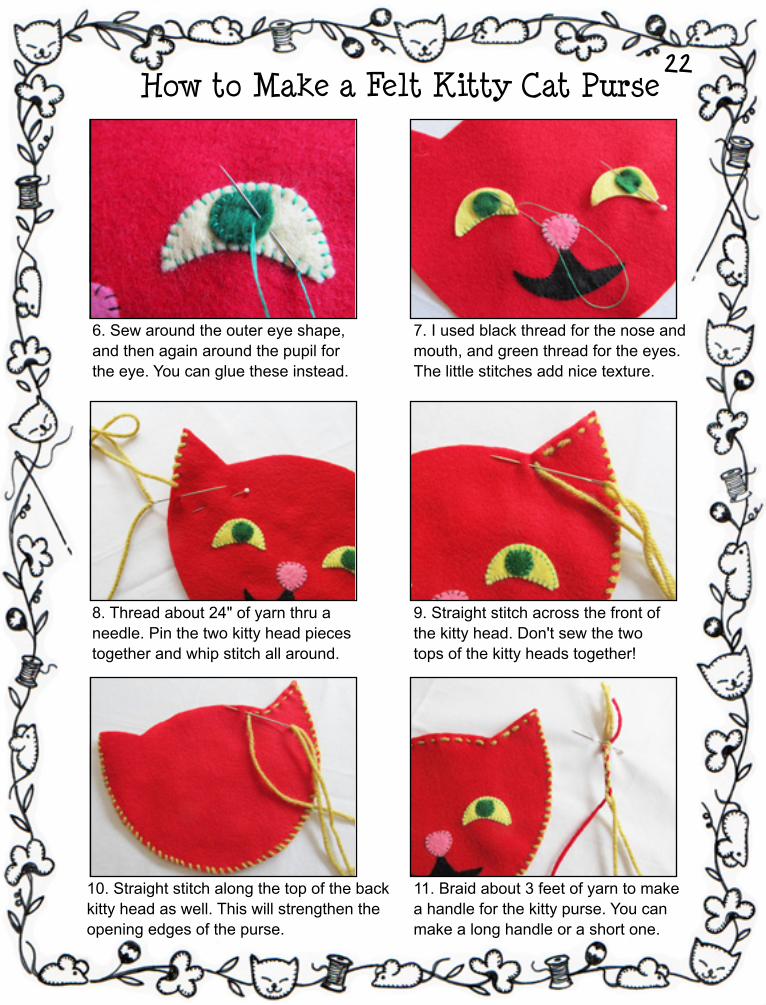
How to Make a Felt Kitty Cat Purse22
6. Sew around the outer eye shape, and then again around the pupil for the eye. You can glue these instead.
7. I used black thread for the nose and mouth, and green thread for the eyes. The little stitches add nice texture.
8. Thread about 24" of yarn thru a needle. Pin the two kitty head pieces together and whip stitch all around.
9. Straight stitch across the front of the kitty head. Don't sew the two tops of the kitty heads together!
10. Straight stitch along the top of the back kitty head as well. This will strengthen the opening edges of the purse.
11. Braid about 3 feet of yarn to make a handle for the kitty purse. You can make a long handle or a short one.
How to Make a Felt Kitty Cat Purse23
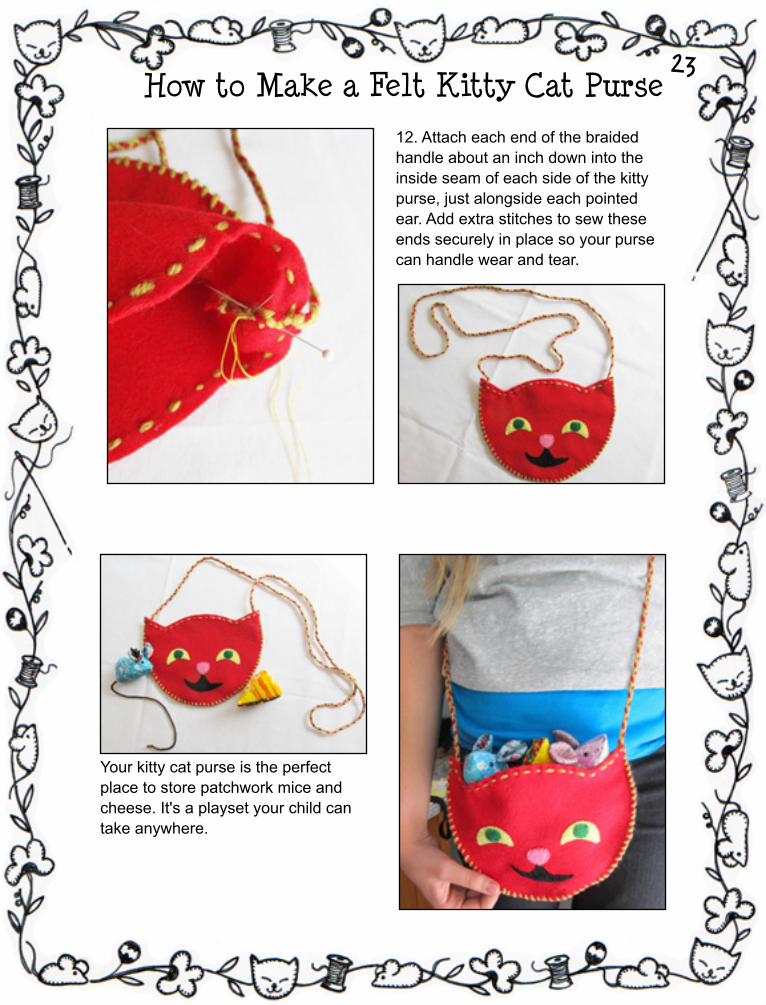
12. Attach each end of the braided handle about an inch down into the inside seam of each side of the kitty purse, just alongside each pointed ear. Add extra stitches to sew these ends securely in place so your purse can handle wear and tear.
Your kitty cat purse is the perfect place to store patchwork mice and cheese. It's a playset your child can take anywhere.
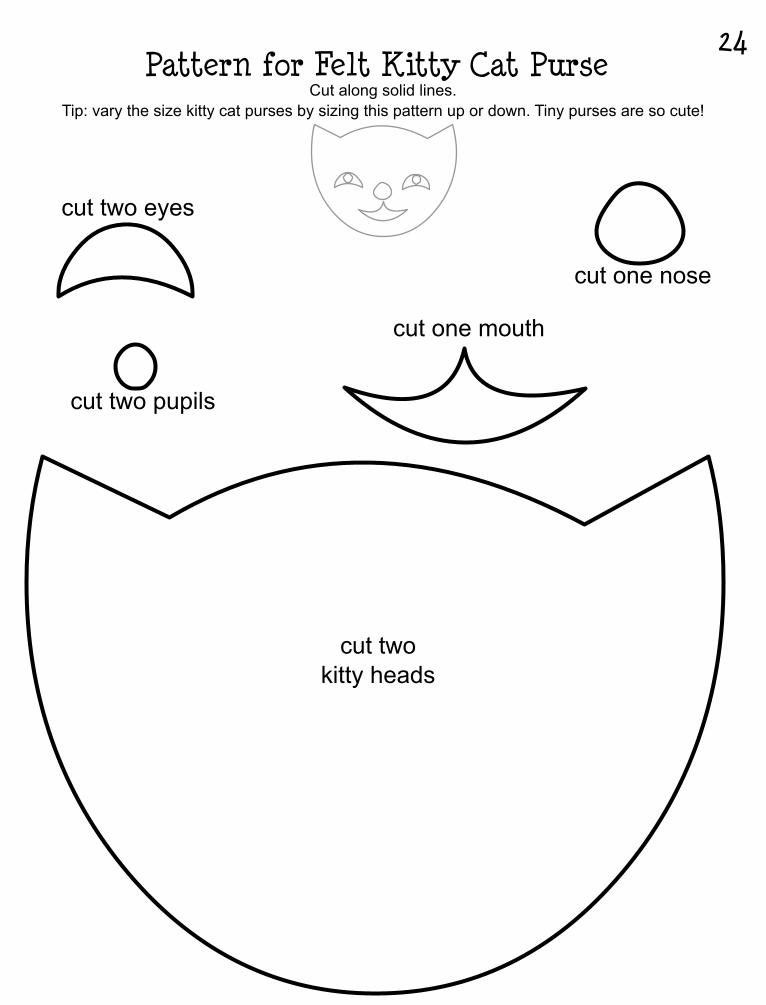
Pattern for Felt Kitty Cat Purse
cut twokitty heads
cut two eyes
cut two pupils
cut one mouth
cut one nose
24
Cut along solid lines.Tip: vary the size kitty cat purses by sizing this pattern up or down. Tiny purses are so cute!
Favorite Nusery Rhymes
THE MOUSE AND THE CLOCKHickory, dickory, dock!
The mouse ran up the clock;The clock struck one,
And down he run,Hickory, dickory, dock!
MY KITTENHey, my kitten, my kitten,
And hey, my kitten, my deary!Such a sweet pet as this
Was neither far nor neary.
TREE BLIND MICEThree blind mice! See how they run!They all ran after the farmer’s wife,
Who cut off their tails with a carving knife.Did you ever see such a thing in your life
As three blind mice?
PUSSY-CAT AND THE DUMPLINGSPussy-cat ate the dumplings,
the dumplings,Pussy-cat ate the dumplings.
Mamma stood by, and cried, “Oh, fie!Why did you eat the dumplings?”
SWEET LITTLE MOUSEOh, what a sweet little white Mouse!Oh, what a dear little bright Mouse!
With his eyes of pink,Going winky-wink,
Oh, what a sweet little white Mouse.
THE LITTLE MOUSEI have seen you, little mouse,Running all about the house,
Through the hole your little eyeIn the wainscot peeping sly,
Hoping soon some crumbs to steal,To make quite a hearty meal.Look before you venture out,
See if pussy is about.If she’s gone, you’ll quickly run
To the larder for some fun;Round about the dishes creep,
Taking into each a peep,To choose the daintiest that’s there,
Spoiling things you do not care.
PRETTY JOHN WATTSPretty John Watts,
We are troubled with rats,Will you drive them out of the house?
We have mice, too, in plenty,That feast in the pantry,
But let them stayAnd nibble away,
What harm in a little brown mouse?
THE CATS WENT OUT TO SERENADEThe cats went out to serenadeAnd on a banjo sweetly played;
And summer nights they climbed a treeAnd sang, "My love, oh, come to me!"
THREE LITTLE KITTENSThree little kittens,
They lost their mittens,And they began to cry,
"Oh, mother dear, we sadly fearOur mittens we have lost."
25


![Patchwork Shapes[1]](https://static.fdocuments.in/doc/165x107/577ce4d81a28abf1038f3cf3/patchwork-shapes1.jpg)