LESSON ASSIGNMENT LESSON OBJECTIVESLESSON ASSIGNMENT LESSON 1 Body Mechanics, Patient Handling, and...
53
LESSON ASSIGNMENT LESSON 1 Body Mechanics, Patient Handling, and Positioning. LESSON ASSIGNMENT Paragraphs 1-1 through 1-20. LESSON OBJECTIVES After completing this lesson, you should be able to: 1-1. Identify definitions of the base of support, center of gravity, and body mechanics. 1-2. Identify general rules for lifting and carrying heavy objects. 1-3. Identify criteria for assessing patient mobility. 1-4. Identify procedures for moving a patient who is able/unable to assist from: a. Wheelchair to X-ray table. b. Stretcher to X-ray table. 1-5. Identify procedures for positioning a patient in the supine, lateral, and prone positions. 1-6. Identify special precautions for handling trauma patients, and patients with casts. SUGGESTION After reading and studying the assignment, complete the exercises at the end of this lesson. These exercises will help you to achieve the lesson objectives. MD0961 1-1
Transcript of LESSON ASSIGNMENT LESSON OBJECTIVESLESSON ASSIGNMENT LESSON 1 Body Mechanics, Patient Handling, and...

LESSON ASSIGNMENT LESSON 1 Body Mechanics, Patient Handling, and Positioning. LESSON ASSIGNMENT Paragraphs 1-1 through 1-20. LESSON OBJECTIVES After completing this lesson, you should be able to: 1-1. Identify definitions of the base of support, center of gravity, and body mechanics. 1-2. Identify general rules for lifting and carrying heavy objects. 1-3. Identify criteria for assessing patient mobility. 1-4. Identify procedures for moving a patient who is able/unable to assist from: a. Wheelchair to X-ray table. b. Stretcher to X-ray table. 1-5. Identify procedures for positioning a patient in the supine, lateral, and prone positions. 1-6. Identify special precautions for handling trauma patients, and patients with casts. SUGGESTION After reading and studying the assignment, complete the exercises at the end of this lesson. These exercises will help you to achieve the lesson objectives.
MD0961 1-1

LESSON 1
BODY MECHANICS, PATIENT HANDLING, AND POSITIONING
Section I. PROTECTING YOUR BACK 1-1. INTRODUCTION a. According to registered occupational therapist, Kathryn Ryan, in 1989, work-related injuries in California reached "epidemic proportions" (over 370,000 injuries were reported, with 100,000 back-related). Ryan says that the combined occurrence of back pain at work and home means that "eight out of ten of us will suffer back pain sometime in our lives”. b. Common injuries, such as acute sprains and strains, cause back injury. Everyday stress and wear and tear can cause chronic muscle and joint strain that slowly builds up. Actual case load and specific duties play a role in the incidence of back, injury. But, the job of a radiologic technologist (RT) is somewhere in the middle as compared to other jobs for susceptibility to back injury (somewhere between light office work and heavy labor). c. Most back injuries affect the discs, cushions of the spine, ligaments connecting the vertebra, and muscles of the lumbar area. Bad habits like excessive bending can weaken the wall of the back discs causing disc strain or bulge.” The worst problem, nucleus protrusion; can require surgery. Protrusion occurs when the disc nucleus projects beyond the discs outer shell and onto the spinal cord or nerve roots. Loss of bladder control and paralysis can result. Bad posture, poor body mechanics, high stress, poor physical condition, and erratic sleep habits increase the risk of back injury. Bad posture can cause you back pain. Soft mattresses do not support the spine. Sleeping on your stomach can strain the neck and back 1-2. AN OUNCE OF PREVENTION a. Avoiding Injury and Lawsuits. As stated earlier slip-and-fall injuries, which account for malpractice suits in the radiology department, are one category of injury which the radiologic technologist often has direct responsibility. You do not want to be responsible for malpractice suits. So, you must do your best to prevent injury while moving or lifting the patient, especially when the patient needs assistance. By preventing injuries resulting from negligence, you will also help reduce the number of malpractice suits in the radiology department.
MD0961 1-2

b. Avoiding Injury to Oneself. Patients are not the only ones who incur injury in the radiology department technologists also suffer injury themselves, especially through abuse of the spine. You are most likely to do this while lifting or moving a patient. Have you ever tried to lift a 350-pound patient? You may suffer injury if you fail to apply the principles of good body mechanics in performing tasks that require stooping, lifting, pushing, pulling, and carrying. The injury will not only cause you discomfort, but it will cause you to function at a reduced level of efficiency. This will place a greater burden on your colleagues or even result in injury to the patient. c. The Importance of Good Body Mechanics. For the reasons stated above, you must know and apply the principles of good body mechanics, which include proper body alignment, proper movement, and proper use of balance. Doing so will help minimize patient injury and costly litigation that may result, as well as injury to yourself. This lesson outlines key concepts of body mechanics and patient handling. NOTE: Body mechanics is the safe and efficient use of the body in movement. 1-3. BODY ALIGNMENT a. Lining Up the Major Body Parts. Correct body alignment is essential to the safe and efficient use of good body mechanics. As the term suggests, good alignment means lining up the major body segments (pelvis, thorax, and head) in proper relationship to one another. When body segments are properly lined up, it becomes easier to maintain body balance (see figure 1-1). With good balance, the body is stable, and steady. Thus, you are less likely to tip over or fall. NOTE: Body alignment is the lining up the pelvis, thorax, and head in proper relationship to each other so as to maintain body balance.
Figure 1-1. (a) Good alignment-pelvis, thorax, and head lined up in proper relationship
to each other. (b) Poor body alignment.
MD0961 1-3

b. Small Structures Support Main Body Segments. Relatively small vertebrae in the spinal column support the main body segments, small neck bones support the head, and small bones in the feet support the pelvis. Your ligaments and muscles must, therefore, be used property in order for these small structures to correctly support the right relationship and balance among anatomical parts. 1-4. BASE OF SUPPORT a. Your Contact With the Ground. The base of support, the part of the body in contact with the ground (or other horizontal surface), may be represented by an imaginary line. When standing, your feet provide the base of support. An imaginary line drawn between your feet would represent your base of support. b. The Base of Support. If you were lying on your back, with the entire length of your body in contact with the bed, that imaginary line would now run the entire length of your body. The base of support keeps you from toppling and provides stability for lifting, pushing, or pulling. NOTE: Base of support is an imaginary line created by body parts that are in contact with the ground or other horizontal surface. c. The Broader the Base of Support, the Better. When lying down, for example, your body is very stable because you have a broad base of support. Conversely, it is harder to maintain your balance if your feet are close together because your base of support is narrow. Remember, when moving or lifting a patient, spread your feet slightly for improved stability. See figures 1-2, 1-3, and 1-4.
Figure 1-2. A stack of film cassettes has a broad base of support
MD0961 1-4

Figure 1-3. Spreading your feet broadens the base of, support, providing greater stability.
Figure 1-4. Standing on the tip of one foot provides only a narrow, thus, less stable base of support.
1-5. THE LINE OF GRAVITY a. The line of gravity is an imaginary vertical line that passes through the center of gravity (figure 1-5). Follow the line of gravity in the profile shot (left half) of figure 1-6. When erect, the line of gravity passes behind the ear. It continues just behind the center of the hip joint. Then the line descends along the knee and ankle joints. (The exact location of the line of gravity will, of course, vary according to individual differences in body build and the curvature of the spine.)
MD0961 1-5
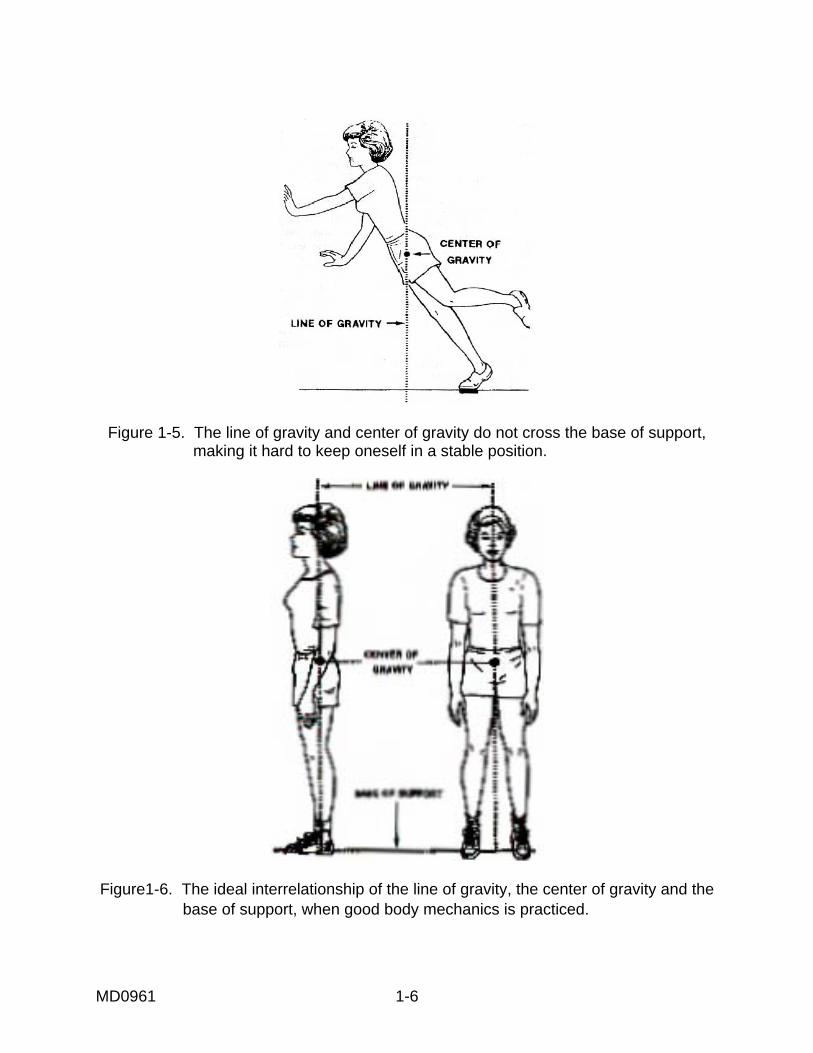
Figure 1-5. The line of gravity and center of gravity do not cross the base of support, making it hard to keep oneself in a stable position.
Figure1-6. The ideal interrelationship of the line of gravity, the center of gravity and the
base of support, when good body mechanics is practiced.
MD0961 1-6

b. As you can see from figure 1-6, when good body mechanics is practiced, the center of gravity is low. Note, too, that the line of gravity crosses the center of gravity and the base of support. Consider the frontal pose (right-hand portion, figure 1-6). Note that the base of support is wide, since the feet are spread apart. c. The body is most stable when the line of gravity bisects the base of support. You can protect your back while carrying heavy objects by maintaining good posture and holding your load close to the body (figure 1-7). When the load is held close to the body, the line of gravity will bisect the base of support. Did you notice that one foot is placed slightly in front of the other? This provides the advantage of added front-to-back stability.
Figure 1-7. Carry the load close to your body. Keep feet apart, with one foot slightly in
front of the other. d. Figure 1-8 is an example of what not to do! You are inviting back injury, if you hold the load away from your body. The line of gravity will not bisect the base of support. The consequence of this technique is suffering fatigue, strain, and possible injury. This will not only mean personal discomfort, but a heavier workload for colleagues who might have to fill in for you if you are not able to work because of an injury. Do not allow failure to practice common sense body mechanics place you out of commission. Take a moment to think before acting in order to plan your movements for maximum ease and efficiency and minimum strain.
MD0961 1-7

Figure 1-8. Avoid this! Holding the load away from the body will cause strain, fatigue,
and possible injury
1-6. THE CENTER OF GRAVITY a. Located at Mid-Pelvis or Lower Abdominal Area. The center of gravity (or center of body weight) is the point around which the weight of your body is balanced. Allowing for some variation based on body build, the center of gravity is generally located at the mid-pelvis region (about the level of the second sacral vertebrae) or in the lower abdominal region. (See figure 1-6.) NOTE: The center of gravity is the point around which the weight of the body is balanced (mid-pelvis or lower abdomen, depending upon body build). b. About Half Your Weight Above, Half Below. About half of your body weight is distributed above the center of gravity and half below that point. Your center of gravity is affected by the size and position of the load you are carrying. The size and location of the load add to the weight placed on the base of support. This, in turn, effects the location of the center of gravity.
MD0961 1-8

c. A Broad Base of Support and a Low Center of Gravity Desirable. Stable objects have a broad base of support and a low center of gravity. The recumbent figure and the box of chemicals in figure 1-9 are very stable because they have a broad base of support and a low center of gravity. The body is most stable when the center of gravity is nearest the center of the base of support. By carrying a load close to your body rather than away from your body, the load will be close to your center of gravity. You will expend less energy, feel less strain, and be less likely to suffer injury.
Figure 1-9. Factors promoting stability: a broad base of support, a low center of gravity, a line of gravity that intersects the base of support.
d. Keeping the Center of Gravity Over the Base of Support. Note that in figure 1-10, the line of gravity does not pass through the base of support. However, in figure 1-11, the line of gravity passes through the base of support. This is a desirable configuration that should be applied when lifting objects. When lifting an object, bend at the knees and hips and keep your back straight (figure 1-11). Positioned in this manner, the center of gravity will remain over the base of support (the feet) as it ought to be, making it easier to keep your balance. 1-7. RULES FOR LIFTING AND CARRYING HEAVY OBJECTS a. The tips for good body mechanics and six common-sense rules for lifting and carrying heavy objects, outlined below, recap the highlights of goad body mechanics. By applying these principles, you will minimize strain on the weakest pan of your muscular system, the muscles of the back. You rely, instead, more heavily on the stronger muscles of the thighs, arms, and abdomen.
TIPS FOR GOOD BODY MECHANICS
Center of gravity is low. Base of support is wide.
Line of gravity passes through base of support. Body parts are in good alignment.
MD0961 1-9
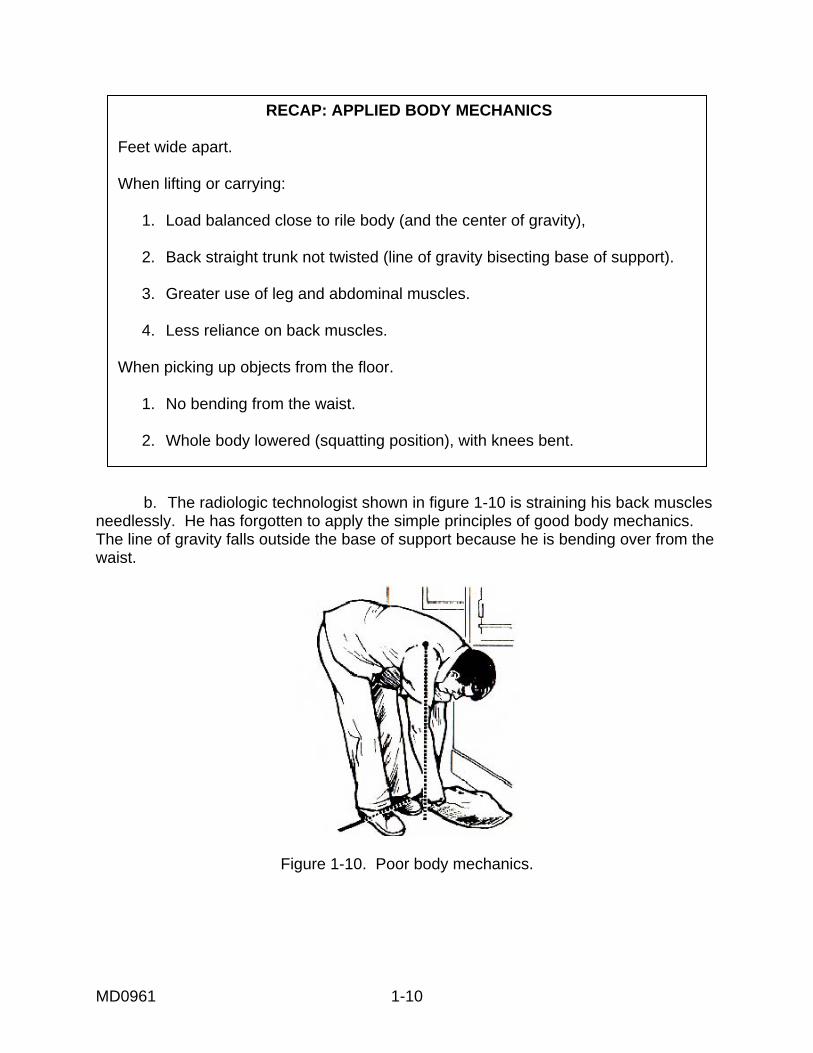
RECAP: APPLIED BODY MECHANICS
Feet wide apart.
When lifting or carrying:
1. Load balanced close to rile body (and the center of gravity), 2. Back straight trunk not twisted (line of gravity bisecting base of support). 3. Greater use of leg and abdominal muscles. 4. Less reliance on back muscles. When picking up objects from the floor. 1. No bending from the waist. 2. Whole body lowered (squatting position), with knees bent.
b. The radiologic technologist shown in figure 1-10 is straining his back muscles needlessly. He has forgotten to apply the simple principles of good body mechanics. The line of gravity falls outside the base of support because he is bending over from the waist.
Figure 1-10. Poor body mechanics.
MD0961 1-10

c. The RT shown in figure 1-11 is applying principles of good body mechanics. Instead of straining the weaker back muscles, he is relying on the long and strong muscles of the legs and arms. He is also holding the object close to his body so that the line of gravity falls within the base of support.
Figure 1-11. Good body mechanics. 1-8. AVOIDING BACK INJURY ON THE JOB a. Everything you do of work can put you at risk for back injury. A common mistake is lifting with the back bent and legs straight using last jerky movements. Bending increases the pressure on the discs and twisting applies even more pressure to them. b. If reading this section has made you want to change your ways, keep in mind that it will take of least two weeks of concerted effort both at home and at work before new work habits became second nature. c. Key suggestions are to use body momentum, keep the back neutral, get help, use assisting devices, keep loads close to the body, and avoid twisting activities.
Continue with Exercises
MD0961 1-11

EXERCISES, LESSON 1, SECTION I When you have completed all of the exercises to your satisfaction, turn to the solutions that follow to check all of your answers. MATCHING. For exercises 1 through 4, match the term in the left-hand column with the applicable definition in the right-hand column. Enter the letter you have selected in the space provided (One definition will not be selected.) 1. _____ Body mechanics. a. Imaginary line created by body parts in contact with horizontal surface. 2. _____ Base of support. b. The safe and efficient use of the body in movement. 3. _____ Center of gravity. c. Imaginary vertical line that passes through center of gravity. 4. _____ Line of gravity. d. Point around which body weight is balanced. e. Severe muscle strain resulting from misalignment of body parts. MULTIPLE-CHOICE. For exercises 5 through 11, select the ONE word or phrase that BEST completes the statement or BEST answers the question. 5. It is important to know and apply the basic principles of good body mechanics in order to avoid_________ in the radiology department. a. Moving, lifting, and carrying patients. b. Ethically questionable behavior. c. Patient/self injury and malpractice suits. d. Damage to equipment.
MD0961 1-12

6. When carrying a load close to your body, the line of gravity should: a. Bisect the base of support. b. Fall in front of the base of support. c. Fall behind the base of support. 7. A wide and stable base of support is obtained by: a. Standing with your feet apart. b. Lunging forward. c. Rounding your shoulders slightly. d. Limbering up before using your muscles. 8. You will protect your back most effectively if you carry a load: a. Extended approximately 12 inches from the waist. b. Close to the body. c. Unevenly balanced, favoring your dominant side. d. Above your head. 9. When the pelvis, thorax, and head are properly __________ , it is easy to keep the body stable and steady and to prevent tipping or falling over. a. Shaped. b. Joined. c. Aligned. d. Exercised.
MD0961 1-13

10. Which of the following is NOT a principle of good body mechanics a. Maintain a wide stance with the load held close to the body. b. Rely on your back muscles as much as possible when lifting and moving heavy objects. c. Keep your back straight when lifting or carrying objects. d. Avoid twisting the trunk of your body when lifting or carrying objects. 11. When moving, lifting, or carrying heavy objects you should NOT: a. Bend your knees and lower your body when picking up objects. b. Use leg and abdominal muscles. c. Roll or push heavy objects. d. Bend from the waist when reaching near the floor. IDENTIFICATION. For exercises 12 through 15, indicate whether the illustration shows good or bad body mechanics by entering a "yes" or "no" in the space provided. 12. Retrieving an object from the waist._________
MD0961 1-14

13. Retrieving an object using your leg and thigh muscles.___________
14. Pushing a portable X-ray machine using your arm and chest muscles. _________
15. Pulling a portable X-ray machine, using your back muscles.__________
Check Your Answers on Next Page
MD0961 1-15

SOLUTIONS, LESSON 1, SECTION I Be sure to re-read and study the paragraph(s) pertaining to any exercises you might have answered incorrectly. The relevant paragraph(s) is (are) listed after each of the answers below. 1. b para 1-2c) 2. a (para 1-4) 3. d (para 1-5) 4. c (para 1-6a) 5. c (para 1-2) 6. a (para 1-6b) 7. a (para 1-4) 8. b (para 1-5c) 9. c (para 1-3a) 10. b (para 1-7) 11. d (para 1-7, chart: "Applied Body Mechanics," rule number five.) 12. no para 1-7; chart, rule no. 5) 13. yes para 1-7; chart, rule no. 6) 14. yes para 1-7; chart, rule no. 2) 15. no para 1-7)
MD0961 1-16
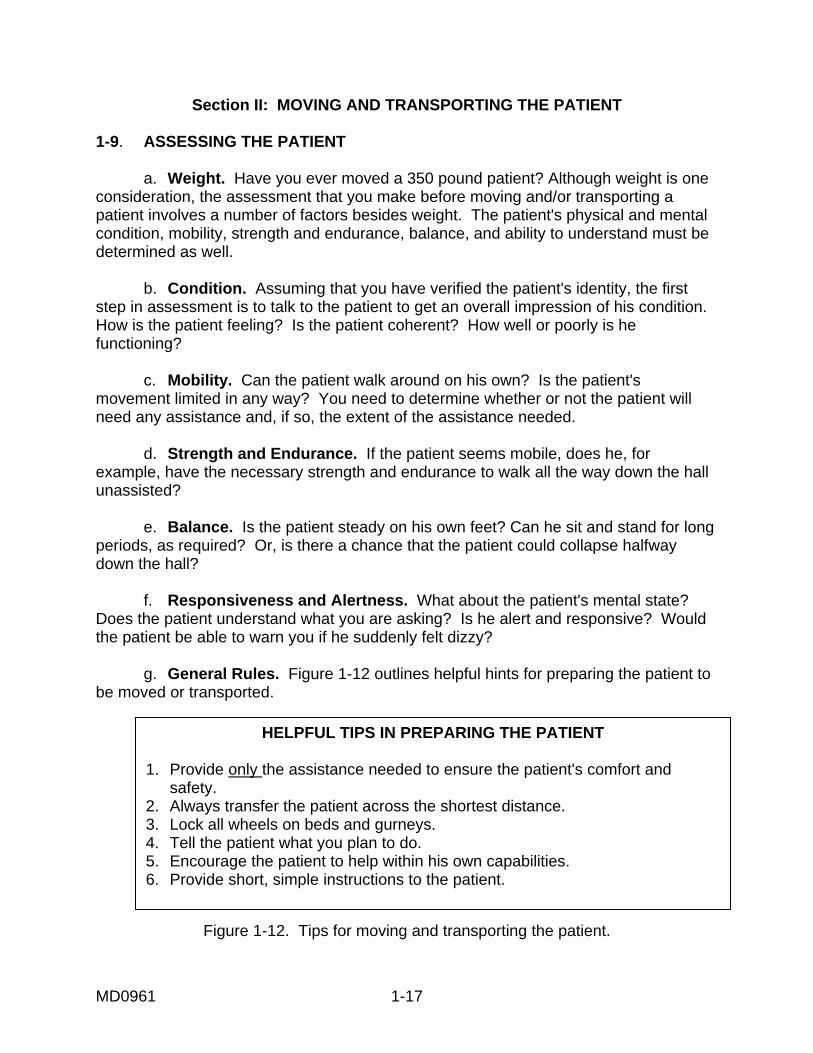
Section II: MOVING AND TRANSPORTING THE PATIENT 1-9. ASSESSING THE PATIENT a. Weight. Have you ever moved a 350 pound patient? Although weight is one consideration, the assessment that you make before moving and/or transporting a patient involves a number of factors besides weight. The patient's physical and mental condition, mobility, strength and endurance, balance, and ability to understand must be determined as well. b. Condition. Assuming that you have verified the patient's identity, the first step in assessment is to talk to the patient to get an overall impression of his condition. How is the patient feeling? Is the patient coherent? How well or poorly is he functioning? c. Mobility. Can the patient walk around on his own? Is the patient's movement limited in any way? You need to determine whether or not the patient will need any assistance and, if so, the extent of the assistance needed. d. Strength and Endurance. If the patient seems mobile, does he, for example, have the necessary strength and endurance to walk all the way down the hall unassisted? e. Balance. Is the patient steady on his own feet? Can he sit and stand for long periods, as required? Or, is there a chance that the patient could collapse halfway down the hall? f. Responsiveness and Alertness. What about the patient's mental state? Does the patient understand what you are asking? Is he alert and responsive? Would the patient be able to warn you if he suddenly felt dizzy? g. General Rules. Figure 1-12 outlines helpful hints for preparing the patient to be moved or transported.
HELPFUL TIPS IN PREPARING THE PATIENT
1. Provide only the assistance needed to ensure the patient's comfort and safety. 2. Always transfer the patient across the shortest distance. 3. Lock all wheels on beds and gurneys. 4. Tell the patient what you plan to do. 5. Encourage the patient to help within his own capabilities. 6. Provide short, simple instructions to the patient.
Figure 1-12. Tips for moving and transporting the patient.
MD0961 1-17
1-10. AN ON-THE-JOB INJURY a. A civilian RT injured his back during a failed attempt to lift a patient. The technologist, a slight man of 5 foot 4 inches, did not want to take the time to get help in moving his patient, a rather heavy-set, but mobile individual. The RT had already experienced some difficulty in assisting the patient with the initial move from wheelchair to X-ray table, which was supposed to have been patient-assisted. b. The mishap occurred when the partially-mobile patient was stepping down from a step stool. He lost his footing and toppled over the RT. As a result of this fell, the technologist injured his back, suffering nerve damage and rupturing his L-5 disc. The injury resulted in chronic pain and discomfort, which led to absenteeism. This, in turn, caused a personnel shortage within the department for a full six months. The RT, who loved his job, ended up getting Workmen's Compensation and being medically retired. He wanted to work, but no longer could because of one hasty decision based on a mistaken notion about saving time. c, The fall was, almost literally, the straw that broke the camel's back. This radiologic technologist's back had already been weakened by years of misuse resulting from poor body mechanics. As a secondary observation, if he had known how to take the fall, his injury might have been less serious. 1-11. TRANSFERRING A PATIENT FROM A WHEELCHAIR TO AN X-RAY TABLE a. Patient Able to Assist. Even a mobile patient must be given some help in making the transfer from wheelchair to X-ray table, or from the X-ray table to the wheelchair. While it is desirable to let the patient assist to the extent possible, the patient might, in fact, not be as strong as he thinks. A sudden movement, for example, may make the patient dizzy and fall. So, you must be on the alert, ready to provide the assistance needed. The next series of figures shows what you need to do for a patient who is able to assist from properly positioning the wheelchair in relation to the table (figure 1-13), helping the patient to stand up (figure 1-14), helping the patient onto the step stool (figure 1-15), easing the patient onto the table (figure 1-16), positioning the patient on the table (figure 1-17), and placing him in the supine position (figure 1-18).
MD0961 1-18

Figure 1-13. Positioning the wheelchair. Steps: 1. Wheelchair, parallel to table.
2. Brakes locked.
4. Step stool nearby.
Figure 1-14. Helping the patient to stand up.
Steps: 1. Patient’s hands on your shoulder. 2. Your hands under patient’s arms, in axilla.
3. You lift as patient stands. 4. You pause, so patient can regain balance.
MD0961 1-19
3. Footrest out of the way.

Figure 1-15. Onto the step stool. Steps: 1. Patient places one hand on stool.
2. Places other arm across your nearest shoulder.
Figure 1-16. Help patient onto table. Steps: 1. Patient pivots so back is to X-ray table.
2. You support patient, as he eases into sitting position.
MD0961 1-20

Figure 1-17. Position patient on table.
Step: Place one arm around patient’s shoulder, the other under knees.
Figure 1-18. Place patient in supine position. Steps: 1. In one single motion, place patient’s legs on table.
2. Lower the head and shoulders on to table.
MD0961 1-21

b. Patient Unable to Assist. It the patient cannot assist, find someone else to help you. Two movers are needed when a patient cannot provide assistance. Follow the procedures given in figures 1-19 through 1-24.
Figure 1-19. Two movers in position, one on each side of the wheelchair, shoulder to axilla.
Steps: 1. The mover on the left places right shoulder under patient's left axilla and places left arm under patient's thighs,
2. The mover on the right places left shoulder under patient’s right axilla and places right arm under patient’s thighs.
Figure 1-20. The wrist grasp. Step: Grasp each other’s wrist.
MD0961 1-22

Figure 1-21. Hands across the back.
Step: Wrap your free hand around the patient’s back, to provide support.
Figure 1-22. The lift begins. Step: Lift the patient at the leader’s signal, generally, “One, two, three, lift.”
MD0961 1-23

Figure 1-23. Place patient on table. Step: Turn sideways to place the patient on the X-ray table.
Figure 1-24. Place in supine position. Step: Assist the patient to lie down.
MD0961 1-24

1-12. TRANSPORTING FROM STRETCHER TO X-RAY TABLE (PATIENT ASSISTED) a. Advantages of Stretcher. A patient coming to the radiology department may have to wait some time in the department before or after an exam. If the patient cannot stand safely or sit comfortably for extended periods, a stretcher should be selected as the method of transport. A parent can be moved more easily to an X-ray table from a stretcher than from a wheelchair. (Table height can't be adjusted.) b. Patient Able to Assist. If the patient is not too heavy and is able to assist, you may be able to transfer the patient from the stretcher to the X-ray table by yourself. It is always desirable, however, to allow the parent to assist to the extent possible (figures 1-25 and 1-26). If the patient is able to assist, place yourself on the outer side of the table to hold the stretcher in place, flush against the table as the patient moves onto the stretcher. If the parent is too heavy for you or too weak, do not hesitate to seek assistance. Again, take special note of the warning to place the stretcher flush up against the X-ray table with no space in between the two (figure 1-25). If there is the slightest space between the stretcher and the X-ray table, the stretcher could swing away as the patient attempts to hoist himself onto the table, causing the patient to fall to the floor and, quite possibly, get hurt.
Figure 1-25. Equipment preparation. Steps: 1. Stretcher is parallel and flush against the table.
There is no space in between. 2. Stretcher wheels are locked.
MD0961 1-25
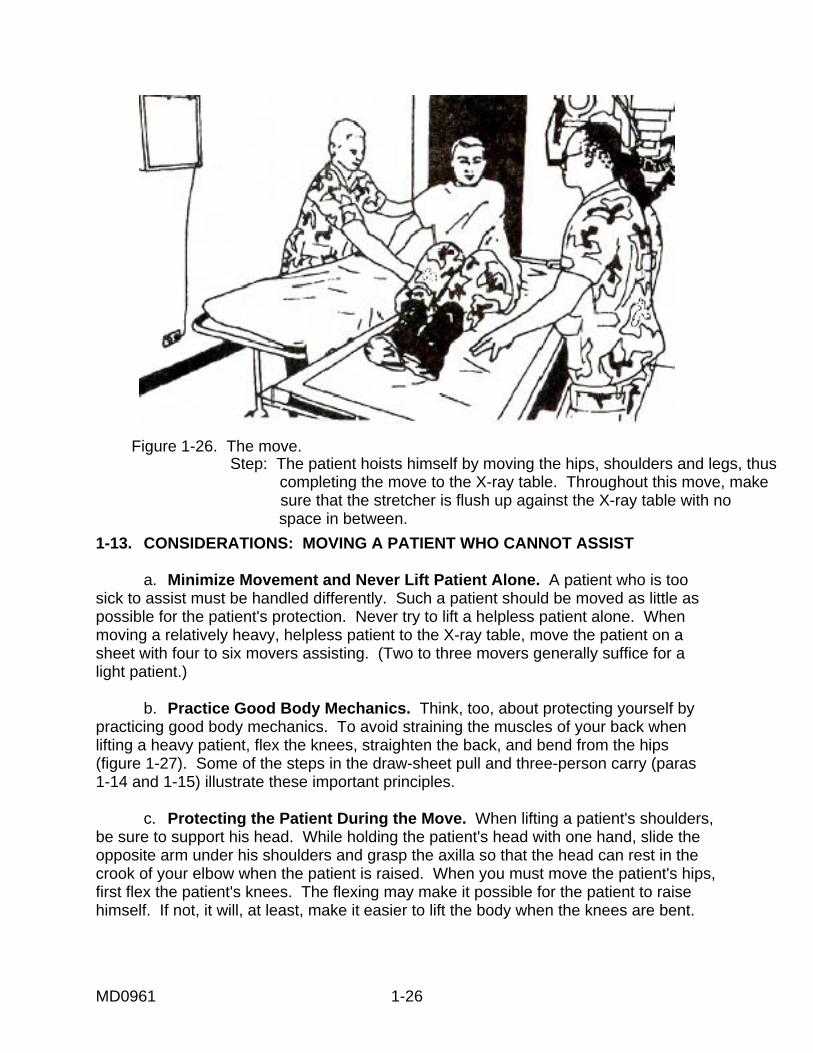
Figure 1-26. The move. Step: The patient hoists himself by moving the hips, shoulders and legs, thus
completing the move to the X-ray table. Throughout this move, make sure that the stretcher is flush up against the X-ray table with no
space in between. 1-13. CONSIDERATIONS: MOVING A PATIENT WHO CANNOT ASSIST a. Minimize Movement and Never Lift Patient Alone. A patient who is too sick to assist must be handled differently. Such a patient should be moved as little as possible for the patient's protection. Never try to lift a helpless patient alone. When moving a relatively heavy, helpless patient to the X-ray table, move the patient on a sheet with four to six movers assisting. (Two to three movers generally suffice for a light patient.) b. Practice Good Body Mechanics. Think, too, about protecting yourself by practicing good body mechanics. To avoid straining the muscles of your back when lifting a heavy patient, flex the knees, straighten the back, and bend from the hips (figure 1-27). Some of the steps in the draw-sheet pull and three-person carry (paras 1-14 and 1-15) illustrate these important principles. c. Protecting the Patient During the Move. When lifting a patient's shoulders, be sure to support his head. While holding the patient's head with one hand, slide the opposite arm under his shoulders and grasp the axilla so that the head can rest in the crook of your elbow when the patient is raised. When you must move the patient's hips, first flex the patient's knees. The flexing may make it possible for the patient to raise himself. If not, it will, at least, make it easier to lift the body when the knees are bent.
MD0961 1-26
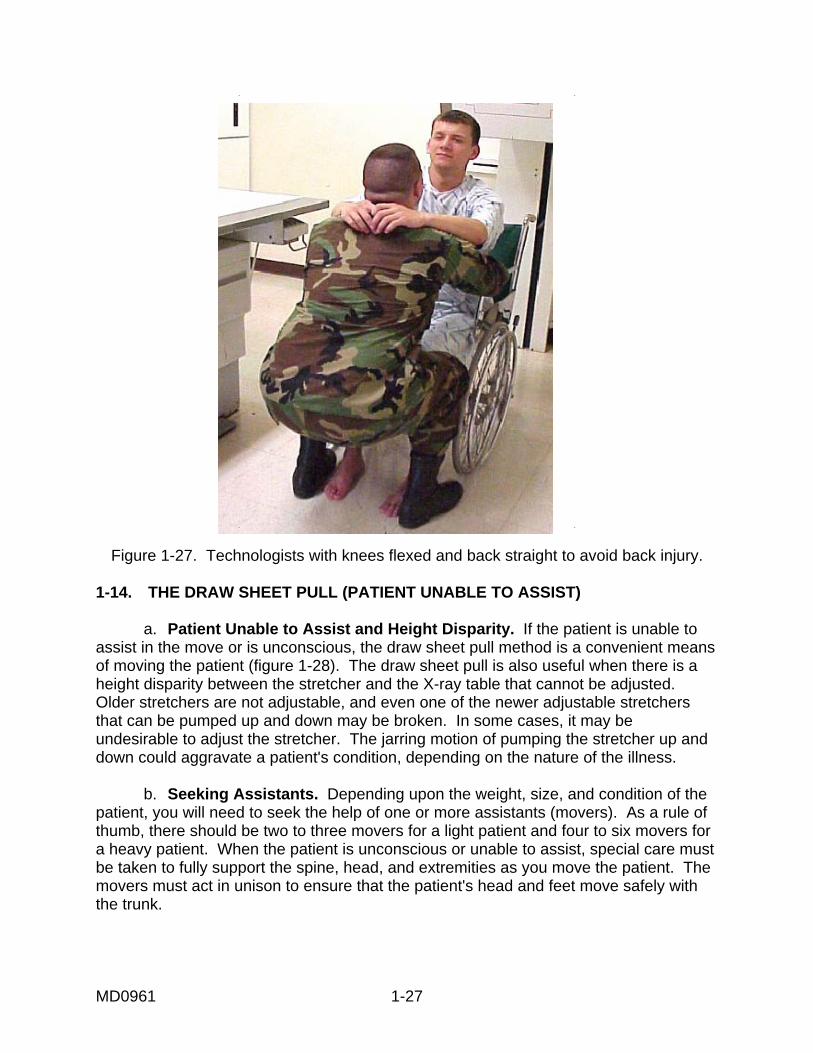
Figure 1-27. Technologists with knees flexed and back straight to avoid back injury. 1-14. THE DRAW SHEET PULL (PATIENT UNABLE TO ASSIST) a. Patient Unable to Assist and Height Disparity. If the patient is unable to assist in the move or is unconscious, the draw sheet pull method is a convenient means of moving the patient (figure 1-28). The draw sheet pull is also useful when there is a height disparity between the stretcher and the X-ray table that cannot be adjusted. Older stretchers are not adjustable, and even one of the newer adjustable stretchers that can be pumped up and down may be broken. In some cases, it may be undesirable to adjust the stretcher. The jarring motion of pumping the stretcher up and down could aggravate a patient's condition, depending on the nature of the illness. b. Seeking Assistants. Depending upon the weight, size, and condition of the patient, you will need to seek the help of one or more assistants (movers). As a rule of thumb, there should be two to three movers for a light patient and four to six movers for a heavy patient. When the patient is unconscious or unable to assist, special care must be taken to fully support the spine, head, and extremities as you move the patient. The movers must act in unison to ensure that the patient's head and feet move safely with the trunk.
MD0961 1-27

Figure 1-28. Draw sheet is a single sheet that is folded in half and placed under the patient and over the middle third of the bed.
NOTE: Get an additional mover to hold the intravenous infusion (IV) pole, if applicable. c. Preparing the Sheet. The draw sheet pull method requires the use of a sheet that is slipped under the patient in order to slide the patient from one surface to another (figure 1-28). You will need a heavy draw sheet or a full sheet folded in half for this purpose. Normally, there will already be a full sheet folded in half on the stretcher. A draw sheet is a single sheet folded in half. It is placed under the patient and over the middle third of the bed. A draw sheet is used, as a matter of routine, for those patients who need frequent help in order to move about. Just before moving the patient, the edges of the draw sheet are loosened from the bed and rolled up close to the patient's body to form handholds. d. Padding and Other Precautions. If the X-ray table is the stationary cradle type, extra padding will be needed to protect the patient from the metal parts of the table's edge. For cradle tables with a floating surface, move the tabletop as far forward as possible toward the stretcher to prevent injury to the patient. Move tube housings above the radiographic table out of the way to protect both the patient and the movers. Instruct the patient not to sit up in order to avoid bumping into the unit. e. Moving the Lighter Patient. After you have prepared the draw sheet and assembled your movers as described above, you are ready to follow the steps shown in figures 1-29 through 1-31.
MD0961 1-28

Figure 1-29. Equipment preparation.
Steps: 1. Mover 1 holds stretcher flush against table with wheels locked. 2. Movers loosen their side of draw sheet and roll it toward patient to form handholds. 3. Mover three supports patient's head.
Figure 1-30. Grasping handholds and beginning the move. Step: Movers 1 and 2 grasp the handholds and slide
the patent onto the X-ray table while mover 3 supports the patients head.
MD0961 1-29

Figure 1-31. Completing the move. Step: With the patient safely transferred to the X-ray table, the move is completed.
f. Moving the Heavier Patient. After you have prepared the draw sheet and assembled your four to six movers, you are now ready to follow the steps shown in figures 1-32 and 1-33.
Figure 1-32. Positioning and preparing for the move. Steps: 1. Movers (on stretcher side) hold stretcher flush against the table with stretcher wheels locked.
2. Movers loosen and roll each side of the draw sheet toward patient to form handholds.
3. Mover (at head of table) supports patient’s head.
MD0961 1-30

Figure 1-33. Moving in unison.
Steps: Moving in unison to the leader’s count of three, movers use handholds to hoist patient while ensuring that the head
and feet move safely in unison with the trunk.
Recap--Draw-Sheet Pull
1. Place stretcher parallel to and flush up against X-ray table (no space between stretcher and table).
2. Lock stretcher wheels. 3. On the stretcher side, loosen the edges of the draw sheet from the bed and
roll the up close to the patient's body to form a handhold. 4. Similarly, leaning across from the X-ray table side, make a handhold from the
loosened sheet on the other side of the patient. 5. With one or more persons at head and shoulder level and the others at hip
level, firmly grasp the sheet close to the patient's body. 6. If necessary, have an additional mover to support patient's head. 7. In unison, drag the patient across the stretcher and onto the X-ray table.
MD0961 1-31

1-15. PLACTIC SLIDE-BOARD IN LIEU OF DRAW SHEET In some hospitals, a plastic slide-board is used in lieu of the draw sheet (figure 1-34). The slide-board (with a sheet on top) is placed under the patient. The slide-board has three handholds on each side that are built into the board. These handholds are grasped by the movers to accomplish the move. Using the slide-board requires less effort because the surface is smoother and, thus, produces less friction. The board, itself, is thin, slightly pliable, and very lightweight. It is a little wider and longer than the patient.
Figure 1-34. Using a slide-board. 1-16. THE THREE-PERSON LIFT AND CARRY a. An Alternative to the Draw Sheet Pull Method. The three-person lift together with the three-person carry constitutes an alternative to the draw sheet pull. Like the draw sheet pull, the three-person carry permits you to move a patient who cannot assist and compensates for any disparity in height between the stretcher and the X-ray table. Like the draw sheet pull method, the three person carry permits you to move a helpless or unresponsive patient while keeping him in a horizontal position with the back straight. As the name suggests, you will need the help of two other movers (carriers) for this method. For ease of understanding, the preliminary lift and the subsequent carry are described separately. But, in fact, they are both part of the same method of moving a helpless patient, known as the three-person carry.
THREE PERSON CARRY
1. A suitable alternative to the draw sheet pull. 2. Used for unresponsive or helpless patients. 3. Compensates for differences in height between stretcher and table.
MD0961 1-32

b. Position of Carriers. Those assisting with the carry should position themselves in order of height (figure 1-35). The tallest, carrier 1, should be standing near the patient's head. (The reason is that a tall individual is more likely to have long arms that can fully support the patient's head and shoulders.) Carrier 2, the next tallest, should stand in the middle, facing the patient's midsection. Carrier 3, the shortest, stands facing the patient's legs.
Figure 1-35. Carriers in order of height, with the tallest at the patient head.
c. Preparing for the Lift. Equipment safety precautions with regard stretcher wheels are the same for this method of transporting a helpless or unresponsive patient as for other methods of transporting a patient discussed so far. As with previous methods, make sure that the wheels of the stretcher are locked. Then, place the stretcher appropriately in relation to the X-ray table: at right angles, in tandem, or parallel. The limitations of the room and the patient's condition will determine how you place the stretcher in relation to the X-ray table. (Placement of the stretcher will be discussed in more detail in paragraph 1-17.) d. Arm Placement of Carriers. The way that the carriers place there arms under the patient's body is crucial to correctly supporting the patient during the lift and carry. Carriers should place their arms as shown in figure 1-36. Here, carrier 1 appears on the far left of the figure shown, but still near the patient's head.
Figure 1-36. Carrier arm placement. (L to R—C!, C2, C3)
MD0961 1-33
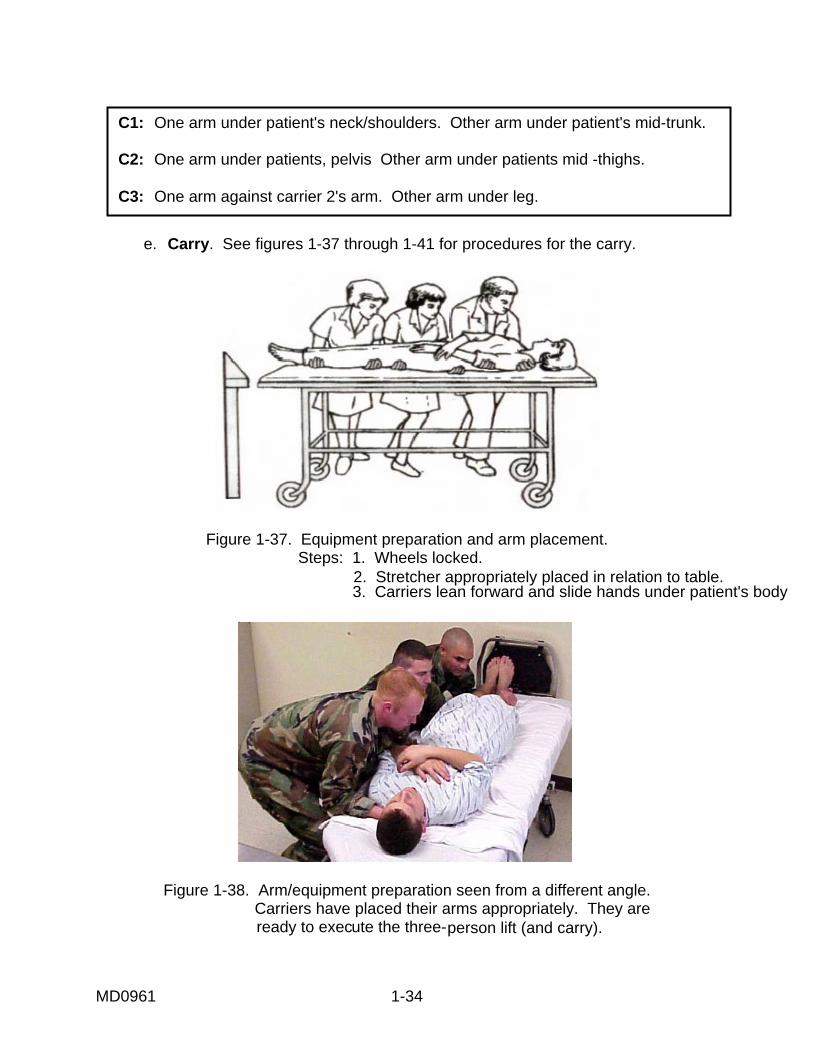
C1: One arm under patient's neck/shoulders. Other arm under patient's mid-trunk. C2: One arm under patients, pelvis Other arm under patients mid -thighs. C3: One arm against carrier 2's arm. Other arm under leg.
e. Carry. See figures 1-37 through 1-41 for procedures for the carry.
Figure 1-37. Equipment preparation and arm placement. Steps: 1. Wheels locked.
2. Stretcher appropriately placed in relation to table. 3. Carriers lean forward and slide hands under patient's body
Figure 1-38. Arm/equipment preparation seen from a different angle. Carriers have placed their arms appropriately. They are
ready to execute the three-person lift (and carry).
MD0961 1-34

Figure 1-39. Lifting the patient.
Carriers rock back, lift the patient, and logroll the patient. Carriers logroll the patient toward their chest. Note that the patient’s weight is borne by the carrier’s arms and chest.
Figure 1-40. Carriers pivot toward the table.
MD0961 1-35

Figure 1-41. Lowering patient. Carriers move in unison to lower the patient onto the table to complete the carry.
1-17. STRETCHER PLACEMENT IN THE THREE-PERSON CARRY a. Order of Events for the Three Person Lift and Carry. The mechanics of the lift and, to some extent, the carry were explained in the previous paragraph. In this segment, the placement of the stretcher in relation to the X-ray table and the carry itself is explained in more detail. Note that when actually performing this carry, you begin by placing the stretcher appropriately and locking the wheels. Then, you proceed to the lift and carry. The moves of the carry will vary somewhat according to the placement of the stretcher. See the chart below for the actual order of events.
ORDER OF EVENTS: THREE-PERSON LIFT/CARRY 1. Place stretcher appropriately in relation to table lock stretcher wheels. 2. Rock back and simultaneously lift and logroll patient toward you (three-person lift). 3. Carry the patient to the table (three-person carry).
b. Three Options on Placing the Stretcher. You have three different options in placing the stretcher in relation to the X-ray table. The stretcher and table may be: (1) at right angles, (2) in tandem with each other, or (3) parallel. The placement option you choose will depend on the configuration of the room, the type of X-rays you will be taking, and the special equipment that the patient might have to take into the room, such as an IV pole or oxygen tank.
MD0961 1-36

c. Stretcher at Right Angles to the X-ray Table. This placement is the most practical if you have a lot of equipment with which to contend. You might be taking a cervical (C)-spine on a patient who needs the use of an oxygen tank and an IV pole. In that case, the wide open L-shaped area formed by the stretcher and the X-ray table when placed at right angles to each other (figure 1-42) would be suited to your special needs.
Figure 1-42. Placement option 1. Stretcher at right angles to X-ray table. d. Stretcher in Tandem with the Table. In a mass casualty situation in which many X-rays must be taken quickly and in assembly-style fashion, you would place the stretcher in tandem with the table (figure 1-43). For such a mass casualty situation, you would place the stretcher in tandem with the table, to get the job done as quickly and efficiently as possible.
Figure 1-43. Placement option 2. Stretcher in tandem with table.
MD0961 1-37

e. Stretcher Parallel to and a Short Distance from the Table. This placement is suitable for a patient undergoing surgery who must be X-rayed just before or after the operation. Since the X-ray rooms used for this purpose are very small, parallel placement (figure 1-44), which makes the best use of a confined area, would be your placement choice for this type of situation.
Figure 1-44. Placement option 3. Stretcher parallel to X-ray table.
f. How Placement Affects the Moves of the Carry. Depending on which placement option you have selected, you will have a different set of final moves to make in getting the patient from the stretcher to the X-ray table. These specific moves relate to the last part of the three-person carry. You have already lifted the patient off the stretcher as you rocked back and you have log rolled him toward your chest. You are now ready to move away from the stretcher and toward the table to actually place the unresponsive patient on the table. You have moved away from the stretcher with the limp and helpless patient weighing heavily in your arms and your arms be getting tired. You don't want to mess things up at this point, when you are two-thirds of the way through. Depending on which stretcher-to-table placement you have chosen, you will have slightly different final moves. These final moves of the three-person carry are described in figures 1-45 through 1-47.
Figure 1-45. With a right angle placement, carriers turn through 90 degrees in the finalmoves of the three-person carry.
MD0961 1-38

Figure 1-46. With a tandem placement, carriers step sideways in the final moves of the
three-person carry.
Figure 1-47. With the parallel placement, carriers turn in formation through 180 degrees, in the final moves of the three-person carry.
NOTE: Stretcher is a short distance from table (head of stretcher to foot of table.)
MD0961 1-39

1-18. USING GOOD BODY MECHANICS THROUGHOUT THE THREE-PERSON CARRY Don't lose sight of the principles of good body mechanics discussed earlier. They do apply to all the carries (also to every move you make, on and off the job, for that matter). The illustrations show that the three carriers preparing to lift the patient have their arms well under the patient, with the greatest support given to the patient's heaviest part, the midsection. Each corner has a relatively wide base of support (the legs are open). Each person is leaning in close to the patient in preparation for the lift. Knees are bent to prevent possible back strain. A wide base of support and flexed knees are also maintained, as the patient is lowered to the X-ray table. The carriers make sure to follow the patient down to the table with their bodies for greater support. 1-19. POSITIONING THE PATIENT ON THE X-RAY TABLE a. Good Alignment Critical. With the three-person carry completed, the patient is now ready to be positioned in preparation for the X-rays that you will be taking. When positioning the patient, it is essential to ensure that the entire body is in good alignment with the X-ray table. The entire body, including the extremities, must be solidly positioned on the table so that the head, spinal column, and the pelvis are in a straight line. b. The Supine Position. In this position, the patient is lying flat on his back (figure 1-48).
Figure 1-48. The supine position.
STEPS TO ASSIST PATIENT TO ASSUME SUPINE POSITION 1. Patient's head, neck, and spine in a straight tine.
2. Arms and legs parallel to body and hips.
3. Knees and feet straight.
MD0961 1-40
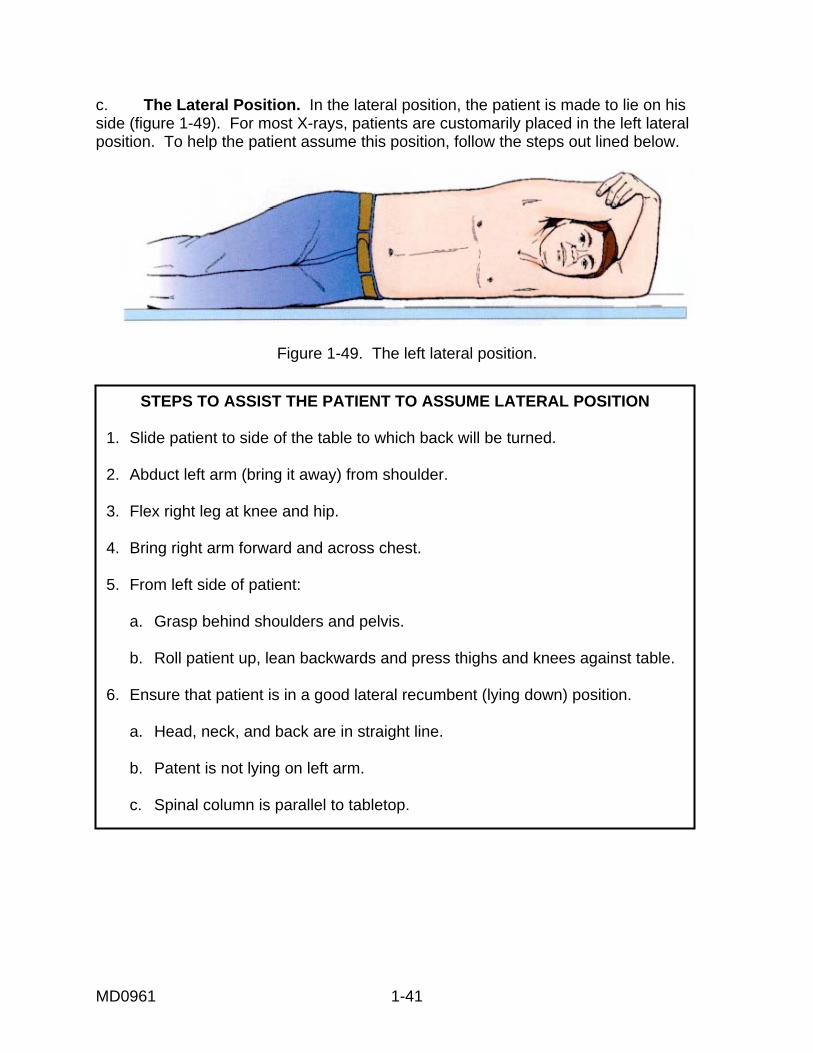
c. The Lateral Position. In the lateral position, the patient is made to lie on his side (figure 1-49). For most X-rays, patients are customarily placed in the left lateral position. To help the patient assume this position, follow the steps out lined below.
Figure 1-49. The left lateral position.
STEPS TO ASSIST THE PATIENT TO ASSUME LATERAL POSITION 1. Slide patient to side of the table to which back will be turned. 2. Abduct left arm (bring it away) from shoulder. 3. Flex right leg at knee and hip. 4. Bring right arm forward and across chest. 5. From left side of patient: a. Grasp behind shoulders and pelvis. b. Roll patient up, lean backwards and press thighs and knees against table. 6. Ensure that patient is in a good lateral recumbent (lying down) position. a. Head, neck, and back are in straight line. b. Patent is not lying on left arm. c. Spinal column is parallel to tabletop.
MD0961 1-41

d. The Prone Position. In the prone position, the patient is lying lace dawn on his abdomen. Make sure that the patient's body is positioned as shown in figure 1-50.
Figure 1-50. The prone position.
STEPS TO ASSIST THE PATIENT TO ASSUME PRONE POSITION. 1. Parent's head, neck, and spine in straight line.
2. Head turned to side.
3. Arms parallel to body.
4, Legs straight.
1-20. SPECIAL SITUATIONS a. Trauma. Additional safety precautions must be taken when handling trauma patients in order to avoid inadvertently causing additional injury. Special precautions must be taken particularly when handling patients with skull, spinal, or long bone injuries or patients with fractures, dislocations, fresh casts, splints, and bandages. The positioning technique must be adapted to the patient so that he is moved as little as possible. b. Spinal Injuries. Never move a patient with a possible spinal injury. A patient with a spinal injury should be brought in on a backboard. The X-rays will be taken directly through the backboard or across the X-ray table. Then, based on preliminary X-ray results, the physician will instruct you whether or not to move the patient. c. Ideal Setup. The ideal setup for dealing with trauma patients is a specially equipped radiographic room adjoining the emergency room. Many hospitals now have such special units equipped with special radiographic equipment and stretchers with radiolucent tops. Severely injured patients can, thus, be examined in the position in which they arrive. If you do not have such a setup in your hospital, then the trauma patient must be moved as little as possible while being conveyed to the main radiology department. This patient should, of course, have precedence over non-emergency cases.
MD0961 1-42

SPECIAL PRECAUTIONS WHEN HANDLING TRAUMA PATIENTS
1. Move trauma patients as little as possible. 2. Never move a patient with a possible spinet injury. 3. Never try to manipulate patient beyond his or capabilities, if a fracture
dislocation is suspected. 4. Do not remove splints or bandages unless so directed by the physician.
d. Cast Care. A patient with a cast requires special care. Remember that a fresh (wet) cast can be inadvertently compressed by rough handling, thus causing further injury. Incorrect handling (figure 1-51) can also exert pressure on the skin, resulting in impaired circulation. The correct way to handle a patient with a cast is with open hands (figure 1-52). An open hand provides a flat surface and helps avoid the danger of creating indentations in the cast.
Figure 1-51. Danger! Indentations in the cast can impair circulation.
Figure 1-52. Handle cast carefully. Open hand lessens the chance of making indentations in a fresh cast.
MD0961 1-43

e. Checking Circulation of Patients with Casts. It is important to, check for signs of impaired circulation. This check should be performed every 15 minutes. The signs of impaired circulation are listed in the chart below. If there is evidence of poor circulation, you will need to immediately notify the emergency room physician or nurse and ask them to check the cast.
SIGNS OF IMPAIRED CIRCULATION 1. Fingers or toes cold to the touch.
2. Patient complaints of burning or tingling.
3. Swelling.
4. Color changes in the nail bed (bluish color).
5. Numbness or inability to move.
THE CARE OF A CAST
1. Handle a fresh (wet) cast carefully. 2. Avoid grasping a fresh cast with your fingers. 3. Handle a cast with hands open. 4. Check the patient every 15 minutes for signs of impaired circulation.
Continue with Exercises
MD0961 1-44
Return to Table of Contents

EXERCISE, LESSON 1, SECTION II MULTIPLE-CHOICE. For exercises 1 through 15, select the ONE word or phrase that BEST completes the statement or BEST answers the question. 1. Before moving a patient, you should: a. Assess the patient's approximate weight, condition, mobility, strength, endurance, balance, responsiveness, and alertness. b. Select the longest route to ensure a safe move. c. Give detailed and lengthy instructions so that the patient knows exactly what to do. d. Discourage the patient from assisting in the move to avoid mishaps and possible lawsuits. e. Unlock all wheels on beds and gurney. 2. If the patient is mobile, you should. a. Allow him to make the move unassisted to encourage the patient along on the road to recovery. b. Provide your assistance; the patient may not be as strong as he thinks he is. c. Use the draw-sheet pull or three-person lift. d. Perform a two-person carry. 3. If the patient is unable to assist in the transfer from wheelchair to X-ray table you will need to: a. Use a portable X-ray machine. b. Move the patient yourself. c. Find another person or persons to help you. d. Reschedule the X-rays.
MD0961 1-45

4. If a patient has an intravenous line and is capable of assisting in the move, you should: a. Find another person to move the IV at the same time that you move the patient. b. Have the patient hold IV during the move. c. Remove the IV temporarily to ensure that it does not become dislodged. d. Increase drip rate of the IV for the duration of the move. 5. Transport the patient on a stretcher rather than a wheelchair if the patient: a. Has an IV. b. Is an outpatient. c. Cannot sit or stand for extended periods. d. Is wearing a cast. 6. If moving a patient who is of average weight and able to assist, you will ____________________ to move him from a stretcher to a table. a. Need someone to assist you. b. Have to seek the help of two other movers. c. Be able to transfer the patient by yourself. d. Use the draw sheet pull method of transfer. 7. When transferring a patient from a stretcher to an X-ray table, be sure that: a. The stretcher and table are parallel and that there is no space between them. b. The wheels are unlocked. c. The patient moves his legs first. d. The stretcher is about three inches lower than the table.
MD0961 1-46

8. The draw sheet pull or the three-person carry should be used if: a. The technologist is feeling weak. b. The patient is unable to assist or there is a stretcher to table height disparity that cannot be adjusted. c. The patient has a fresh cast. d. There is a long distance to travel. 9. In the _________ method, the bed sheet is loosened from either side of the bed and rolled up close to the patient's body to provide handholds for pulling and lifting the patient. a. Three-person lift. b. Three-person carry. c. Draw sheet pull. d. Patient-assisted move. 10. In the draw sheet pull, the carriers should be sure to move the patient: a. In unison, so the head and feet move safely with the trunk. b. Hips first. c. At a ninety-degree angle from the stretcher. d. Parallel to their bodies. 11. In _________________, the patient is lifted and rolled with the patient's weight borne by the movers' upper arms and chests. a. The three-person carry. b. The draw-sheet pull. c. The patient-assisted move. d. All of the above.
MD0961 1-47

12. In the three-person carry, the tallest mover stands near the patient's: a. Head. b. Midsection. c. Legs. 13. Which of the following is NOT a special precaution for handling trauma patients? a. Never move a suspected spinal injury patient. b. Never manipulate patient beyond his capabilities. c. Do not remove splints or bandages unless directed by the physician. d. Never take X-rays. 14. Which of the following is NOT a sign of impaired circulation in a patient with a cast? a. Fingers or toes that are cold to the touch. b. Swelling, burning, or tingling. c. Color change, numbness, or an inability to move. d. Itching. 15. Which of the following is NOT part of the special care required for patients with casts? a. Handle a fresh cast carefully. b. Grasp a fresh cast gently with your fingers. c. Check for impaired circulation every 15 minutes. d. Handle a cast with open hands.
MD0961 1-48
IDENTIFICATION AND SEQUENCING . For exercises 16 through 21. The steps of procedure for various methods of transporting or positioning the patient are listed below. For each exercise item, there is one step that is NOT part of the procedure and SHOULD NOT BE SELECTED. Indicate the correct sequence for the remaining steps that you have selected by numbering them on the space provided. 16. Number the applicable initial steps for transferring a patient from a wheelchair to an X-ray table using the numbers 1 through 6. a. _____ Your hands under patient's axilla. b. _____ Brakes locked. c. _____ Patient's hands on your shoulders. d. _____ Wheelchair parallel to table. e. _____ Footrests out of the way. f. _____ Sheet rolled tightly. g. _____ Stool nearby. 17. Number the remaining applicable steps for transferring a patient from a wheelchair to an X-ray table using the numbers 7 through 13. a. _____ Patient puts one hand on stool, the other across your shoulder. b. _____ You lift while patient tries to stand. c. _____ You pause; patient regains balance. d. _____ You ease patient into sitting position. e. _____ You place one arm around patient's shoulders and the other arm under his knees. f. _____ Patient steps on stool and pivots, back to table. g. _____ With single motion, patient places legs on table and lowers head and shoulders into supine position. h. _____ Patient pivots slowly with minimal assistance.
MD0961 1-49

18. Number the applicable steps for transferring a patient from wheelchair to X-ray table (patient unable to assist), using the numbers 1 through 5. a. _____ Movers assume their positions on either side of the chair. b. _____ Patient hoists himself or herself onto the table. c. _____ Wheelchair parallel to the table; patient facing foot end of table. d. _____ Pivot wheelchair to face head of table. e. _____ Mover on left, puts shoulder under patient's left axilla and left arm under the patient's left thigh. f. _____ Mover on right, puts shoulder under the patient's right axilla and right arm under the patient's thighs. 19. Number the remaining applicable steps for moving a patient from wheelchair to X- ray table (patient unable to assist) using the numbers 6 through 10. a. _____ Movers assist the patient to lie down. b. _____ Movers lift patient upon signal. c. _____ Patient grasps mover's neck. d. _____ Movers step forward and turn sideways to place patient on table. e. _____ Movers grasp each other's wrists under patient's thighs. f. _____ Movers join their free hands across patient's back.
MD0961 1-50

20. Number the applicable steps for the draw-sheet pull method using the numbers 1 through 5. a. _____ Place stretcher parallel to X-ray table. b. _____ Allow the patient to assist. c. _____ In unison, the movers pull pt. toward them and across table. d. _____ Movers lock all wheels. e. _____ With one mover at head and shoulder level and the other at hip level, firmly grasp the sheet lose to the patient's body. f. _____ Movers lean across X-ray table and roll sheet in toward patient. 21. Number the applicable steps of the three-person carry, using the numbers 1 through 5. a. _____ Strap the patient in. b. _____ Slide the patient to the edge of the area from which he or she is to be lifted. c. _____ Patient can now be moved to the table. d. _____ Position the stretcher at right angles to the end of the X-ray table. e. _____ All three movers stand on the same side of stretcher that the patient has been edged toward and place bodies against the area on which the patient is lying. f. _____ On command, the patient is lifted and rolled; weight borne in the upper arms of the movers.
Check Your Answers on Next Page
MD0961 1-51

SOLUTIONS, LESSON 1, SECTION II 1. a (para 1-9) 2. b (para 1-11a) 3. c (para 1-13a) 4. a (para 1-14c) 5. c (para 1-12a) 6. c (para 1-12b) 7. a (figure 1-25, steps) 8. c (paras 1-14a, 1-16a) 9. a (para 1-14e) 10. a (para 1-14b) 11. a (figure 1-39) 12. a (para 1-16b) 13. d (para 1-20c) 14. d (para 1-20e) 15. b (para 1-20d) 16. Wheelchair to table (para 1-11a) a. 6 b. 2 c. 5 d. 1 e. 3 f. --- g. 4
MD0961 1-52

17. Wheelchair to table (para 1-11a) a. 9 b. 7 c. 8 d. 11 e. 12 f. 10 g. 13 h. --- 18. Wheelchair to table, patient unable to assist. (para 1-11b) a. 3 b. --- c. 1 d. 2 e. 4 f. 5 19. Wheelchair to table, patient unable to assist (para 1-11b) a. 10 b. 8 c. --- d. 9 e. 6 f. 7 20. Draw sheet pull (para 1-14) a. 1 b. --- c. 5 d. 2 e. 4 f. 3 21. Three-person lift (para 1-16) a. --- b. 1 c. 5 d. 2 e. 3 f. 4
Return to Table of Contents
MD0961 1-53