Lesson 17 Hands and Feet - Proximususers.skynet.be/awerkers/WetCanvas/class_101-17.pdf · Drawing...
17
Basic 101: Class 17 Page 1 Hands and Feet I have been reflecting lately how I might be of better service to this thread so I decided to try something new this time. I have included “practice” drawings for the "Time Challenged"--they are basic drawings that you can practice on before committing yourself to good paper. When I first started drawing hands, I used to just create all of these blocks and cylinders and would try to work the hand out geometrically. Naturally after the third or fourth attempt, I fell asleep from the boredom. There are many ways to draw hands. 1. Lee Hammond likes the grid method--A LOT of people use this method and it DOES yield suprisingly good results--It does limit you to having to depend on a reference source to grid so gridding can become a self imposed artist pen or corral--much akin to artistically mopping yourself into a corner. 2. Shinichi Ishioka (how to draw manga) prefers breaking the hand down into blocks--while this works--i'd rather be gridding--I have a tendancy to follow the blocks the letter and so my drawings end up looking confined. 3. John Buscema breaks his hand down into cylinders then building from there--same here but in all fairness this is an excellent technique for comic art. 4. I use contour drawing and then I map the shadows--Hey, it works for me. 5. The greatest artist who ever was at WC and you know who you are (yes, I am talking to you) just snaps them off freehand—no fuss, no muss, because you are a major talent. As Life dictates, however, most of us have to work and struggle for a living and we each have our own little quirky ways of creating hands and feet. Here is how I do it for BOTH feet and hands: 1. Make a mitten. That is right--I said MITTEN. For those of you who do not have the ability to understand Jaydspeak, that means an arm, wrist or leg with an oval on the end of it—NO fingers and NO detail. Easy. 2. Still leaving out the detail, start to form the shape of the hand or foot that you want using CONTOURS ONLY. 3. Once you have the SHAPE of the hand or foot, look at your model and start to draw in as
Transcript of Lesson 17 Hands and Feet - Proximususers.skynet.be/awerkers/WetCanvas/class_101-17.pdf · Drawing...
Basic 101: Class 17
Page 1
Hands and Feet
I have been reflecting lately how I might be of better service to this thread so I decided to trysomething new this time. I have included “practice” drawings for the "Time Challenged"--theyare basic drawings that you can practice on before committing yourself to good paper.
When I first started drawing hands, I used to just create all of these blocks and cylinders andwould try to work the hand out geometrically. Naturally after the third or fourth attempt, I fellasleep from the boredom. There are many ways to draw hands.
1. Lee Hammond likes the grid method--A LOT of people use this method and it DOES yieldsuprisingly good results--It does limit you to having to depend on a reference source to grid sogridding can become a self imposed artist pen or corral--much akin to artistically moppingyourself into a corner.
2. Shinichi Ishioka (how to draw manga) prefers breaking the hand down into blocks--while thisworks--i'd rather be gridding--I have a tendancy to follow the blocks the letter and so mydrawings end up looking confined.
3. John Buscema breaks his hand down into cylinders then building from there--same here but inall fairness this is an excellent technique for comic art.
4. I use contour drawing and then I map the shadows--Hey, it works for me.
5. The greatest artist who ever was at WC and you know who you are (yes, I am talking to you)just snaps them off freehand—no fuss, no muss, because you are a major talent.
As Life dictates, however, most of us have to work and struggle for a living and we each haveour own little quirky ways of creating hands and feet. Here is how I do it for BOTH feet andhands:
1. Make a mitten. That is right--I said MITTEN. For those of you who do not have the ability tounderstand Jaydspeak, that means an arm, wrist or leg with an oval on the end of it—NO fingersand NO detail. Easy.
2. Still leaving out the detail, start to form the shape of the hand or foot that you want usingCONTOURS ONLY.
3. Once you have the SHAPE of the hand or foot, look at your model and start to draw in as
Basic 101: Class 17
Page 2
shapes, the shadows. DO NOT FILL IN SHADOWS—THIS IS LINE SHAPES ONLY at thisstage.
4. Once you have the shape and the map of the shadows established start lightly filling in theshadow shapes so that you start getting a semblance of a foot or hand.
5. Using tortillions or your favorite smudging or blending device, begin blending the map of theshadows together.
6. Once the blending is complete, go back and deepen your shadows. Make any necessarycorrections.
YOU CAN SEE THIS TECHNIQUE IN THE EXAMPLES
Anatomy:
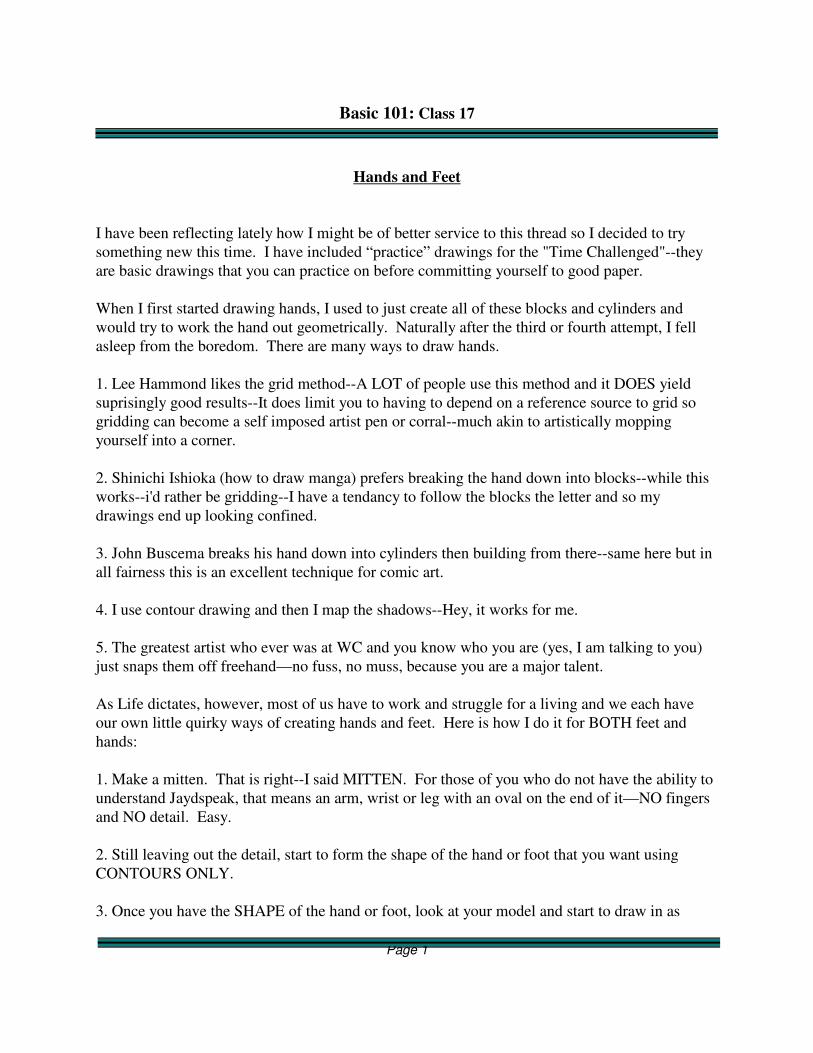
Hands and feet look relatively simple in construction but they are actually quite complex. Belowis a chart of a hand and a foot. Please keep in mind that underneath your drawing is bones—thethings that really keeps a hand or an foot together. They are nature's tent poles.
How many bones are there? Well for the hand there is:
1. Distal Phalanx (your finger tips)2. DIP joint3. Middle Phalanx4. Proximal Phlanx5. Metacarpals6. Carpals7. Hamate9 Capitate10 Pisiform11. Triquetrum12. Scaphoid13. Lunate14. Ulna 15. Radius
Basic 101: Class 17
Page 3
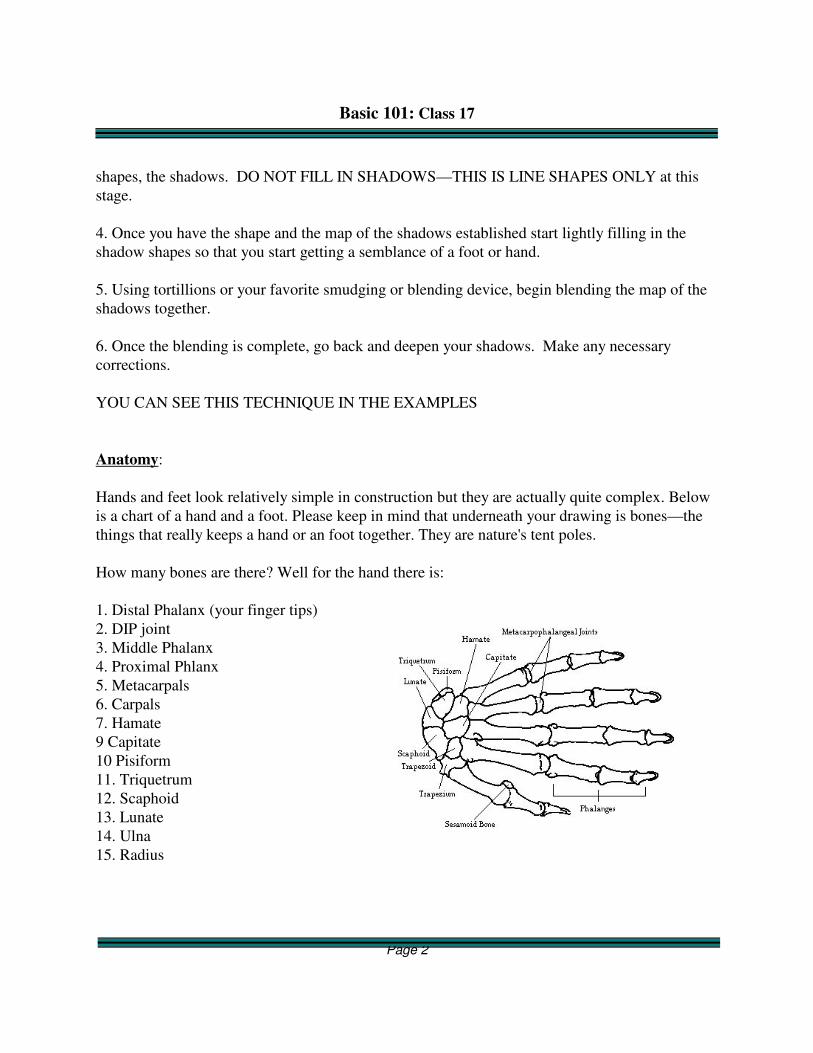
For the foot:
1. Fibula2. Achilles Tendon3. Tibia4. Astraballus5 Scaphoid6. Cuneiforms7. Phalanges8. Heel9. Cuboid10. Metatarsals
Examine the charts and get to know these positions.
The Examples
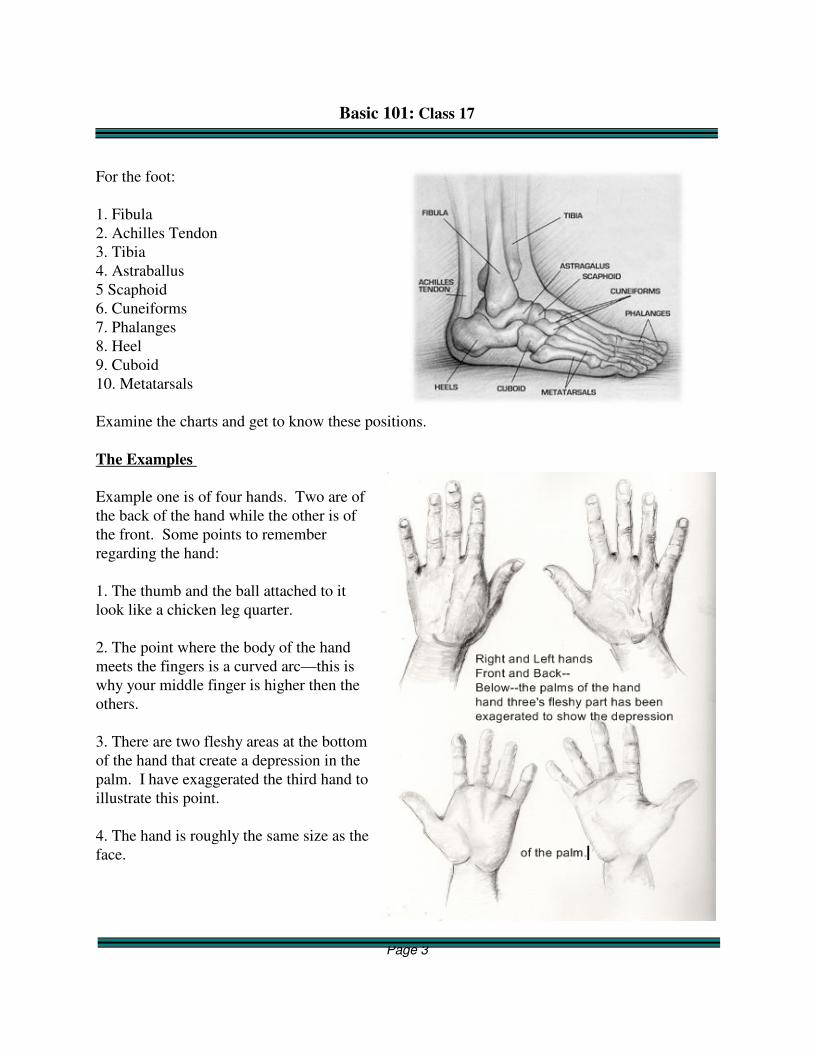
Example one is of four hands. Two are ofthe back of the hand while the other is ofthe front. Some points to rememberregarding the hand:
1. The thumb and the ball attached to itlook like a chicken leg quarter.
2. The point where the body of the handmeets the fingers is a curved arc—this iswhy your middle finger is higher then theothers.
3. There are two fleshy areas at the bottomof the hand that create a depression in thepalm. I have exaggerated the third hand toillustrate this point.
4. The hand is roughly the same size as theface.

Basic 101: Class 17
Page 4
Regarding the feet:
1. The inside ankle is always higher and further toward the front then the outside ankle
2. The foot is roughly larger (read longer) then the face.
3. The little toe is generally back around one quarter the length of the foot
4. The outer ridge of the sole will bulge a bit.
5. If you stand on your tiptoes, the toes will spread in order to support your weight.
6. Oddly, when some toes are totally relaxed they can bend downward as much as 90 degrees.
Example Two is a hand grasping a pole. Notehow the hand naturally curves around the pole. I have left the lower hand undrawn and havemarked the positions of the bones so that youcan see how I drew this hand. Again, Mitten,general shape of the hand I want todraw—note shadows—fill in shadows andblend.
Here are the FootNOTES er...the footexamples:
Example Three is a foot that I have drawn ina semi-tiptoe postion. Note how the toesflatten out and slightly spread. The foot isvery springy. Note that I have penciled in asecond foot for you to practice on.

Basic 101: Class 17
Page 5
Example Four is the back of a foot. Notehow it slightly leans and note the Achillestenden in the back. Again, I haveincluded yet another foot for you practicewith.
Recommended Reading Lists:
1. How to Draw Manga: Bodies & Anatomy –no author listed
2. Drawing the head and Figure by Jack Hamm—this is an excellent detail book for the humanfigure.
3. Drawing Real Hands by Lee Hammond—Personally, I am not fond of this book because itplaces COMPLETE dependence on the use of grids.
Originally posted by Rosic, here are some important links:
How to Draw the Hands and Feet:http://www.polykarbon.com/tutorials/hands/hands.htm http://www.polykarbon.com/tutorials/hand2/hands.htm http://susanooh.anime.net/Art/Class/03/index.html http://drawsketch.about.com/library...y/aa112402a.htm http://mcduffies.keenspace.com/tutorbody.html http://drawsketch.about.com/library/bl_handstudies.htm

Basic 101: Class 17
Page 6
Artist Field Trip of the Week:
This week’s artist is Rimbauds Shop—this artist has one of the most unique drawing styles that Ihave seen here at the WC. I have seen some old Japanese erotic prints that come close to thisstyle. Note how he handles the hands and feet and pay attention to how he integrates the handand feet with the entire body. It is one thing to be able to draw hands and feet but it is another tomake the parts fit and this artist does this extremely well. Sit back, click on the link, enjoy andlearn:
http://www.wetcanvas.com/forums/showthread.php?t=262883 http://www.wetcanvas.com/forums/showthread.php?t=260902 http://www.wetcanvas.com/forums/showthread.php?t=262704 http://www.wetcanvas.com/forums/showthread.php?t=261951 http://www.wetcanvas.com/forums/showthread.php?t=259989 http://www.wetcanvas.com/forums/showthread.php?t=259547 http://www.wetcanvas.com/forums/showthread.php?t=258179 http://www.wetcanvas.com/forums/showthread.php?t=257756 http://www.wetcanvas.com/forums/showthread.php?t=257241 http://www.wetcanvas.com/forums/showthread.php?t=255609 http://www.wetcanvas.com/forums/showthread.php?t=255250 http://www.wetcanvas.com/forums/showthread.php?t=254687 http://www.wetcanvas.com/forums/showthread.php?t=254197 http://www.wetcanvas.com/forums/showthread.php?t=252452 http://www.wetcanvas.com/forums/showthread.php?t=253206 http://www.wetcanvas.com/forums/showthread.php?t=250541 http://www.wetcanvas.com/forums/showthread.php?t=249111 http://www.wetcanvas.com/forums/showthread.php?t=249622 http://www.wetcanvas.com/forums/showthread.php?t=248673

Basic 101: Class 17
Page 7
CLASS ASSIGNMENTS:
1. use the practice lined drawing and develop (optional)
2. Draw your own hands and feet in various poses of course.
3. Try copying from the masters
4. Go back to the folds lesson and fix your hand and feet-(optional)
5. For God's Sake--HAVE FUN!!!
Our Field Trip featured artist is a good example of that notion. His lines are free and looseflowing--there is an element of sarcasm or parody in his work that I love but he puts together areally nice package.

Basic 101: Class 17
Page 8
Notes from Jolanta:
Drawing hands and feet is not any different than drawing anything else. First of all, we need toget rid of this panic feeling - when it comes to hands and feet it is HARD! It's not.
Let me remind you what is drawing or painting in general. It is translating a 3D image to a 2Ddrawing on flat paper by using correct shapes and values. Well - what's the difference betweendrawing a face, hand, landscape, still life? It's all about learning how to read correctly (i.e. see)the values and drawing the exact shape of them. That's all!
I want you all to forget about all you heard about how hard it is to draw hands and just thinkabout drawing the right shape of what you see and the right value you see. The right shape ofshadows is very important. If you think going a bit farther will not make a difference - you arewrong. It has to be exact.
I want to show you two of my drawings I did a while ago. I was in a lot of pain and wanted toget lost in drawing. I am not trying to show off but I want you to get all excited and believe youcan draw hands very well just because they are just another thing to draw. Nothing special. It'sall about observation. I was very sick as a child. I remember I was playing with my hands whileI was laying flat in bed for a very looooong time. It was worth it. I can draw hands now. I knowwhat they look like.
Basic 101: Class 17
Page 9
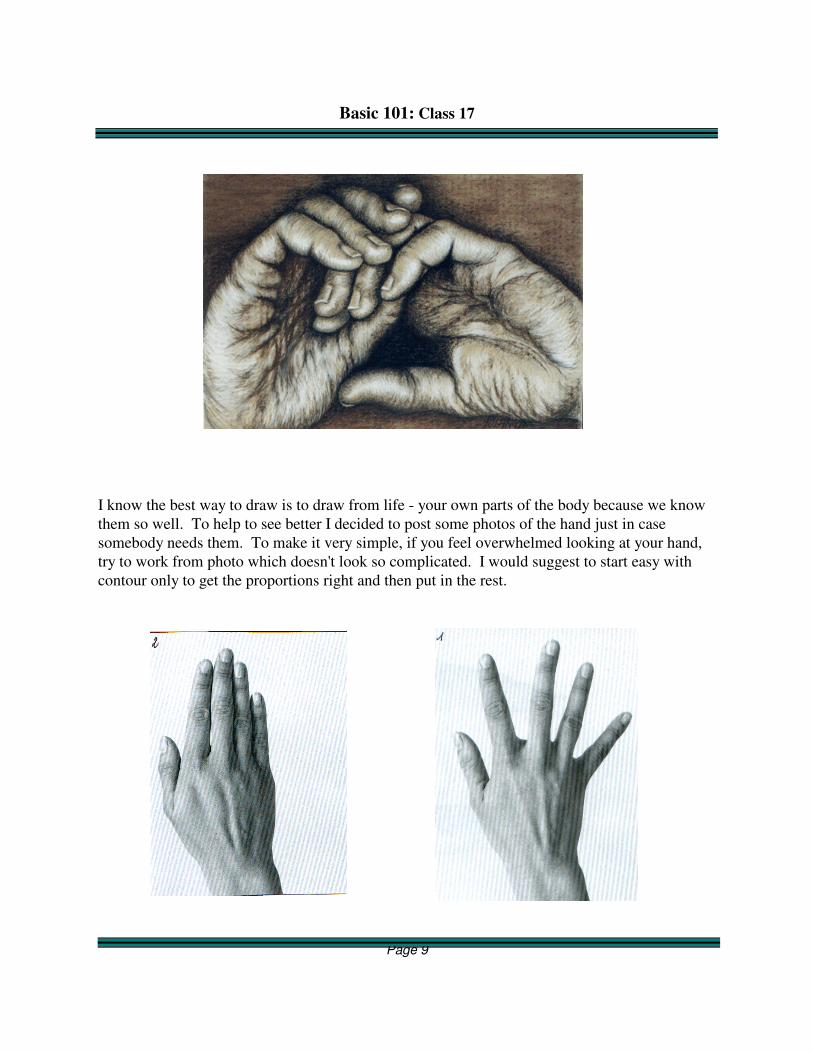
I know the best way to draw is to draw from life - your own parts of the body because we knowthem so well. To help to see better I decided to post some photos of the hand just in casesomebody needs them. To make it very simple, if you feel overwhelmed looking at your hand,try to work from photo which doesn't look so complicated. I would suggest to start easy withcontour only to get the proportions right and then put in the rest.

Basic 101: Class 17
Page 10
Basic 101: Class 17
Page 11
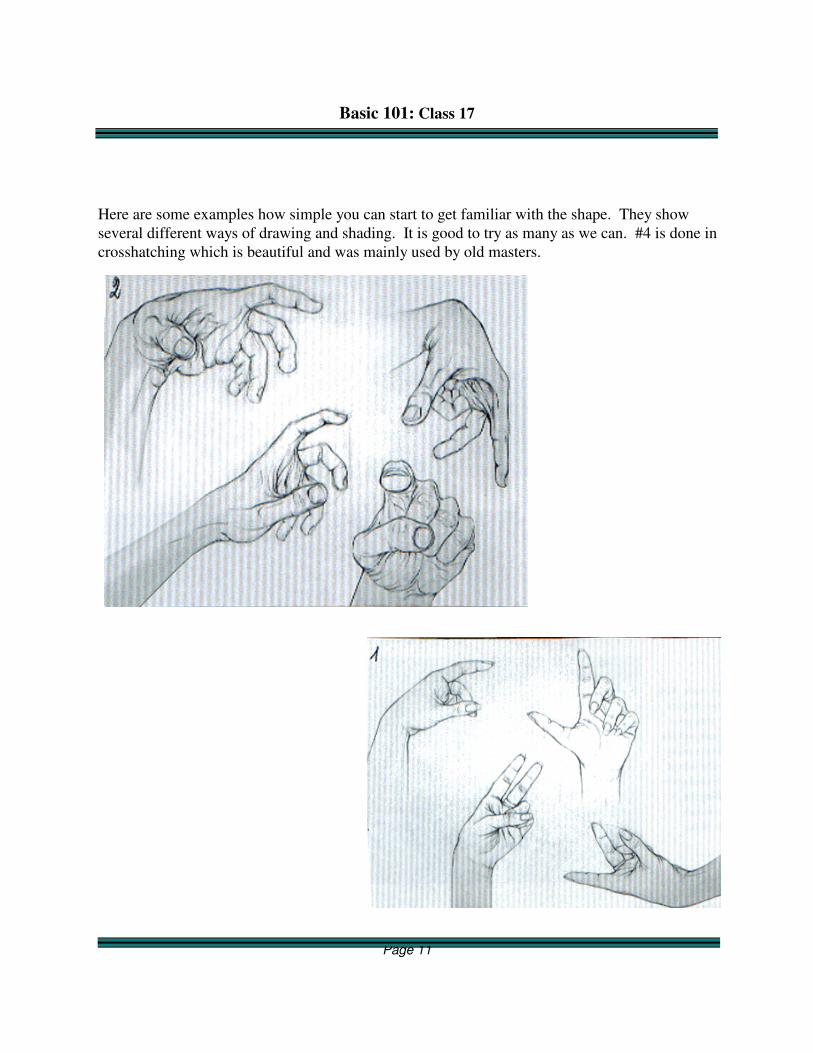
Here are some examples how simple you can start to get familiar with the shape. They showseveral different ways of drawing and shading. It is good to try as many as we can. #4 is done incrosshatching which is beautiful and was mainly used by old masters.

Basic 101: Class 17
Page 12
Basic 101: Class 17
Page 13
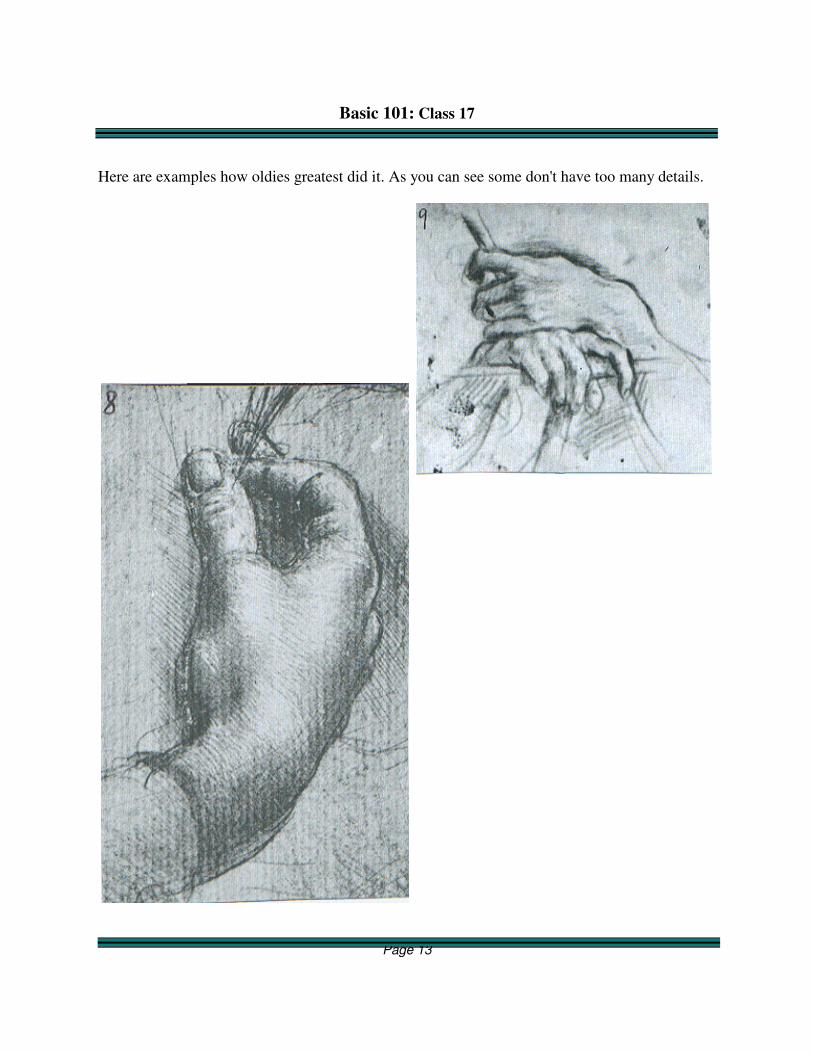
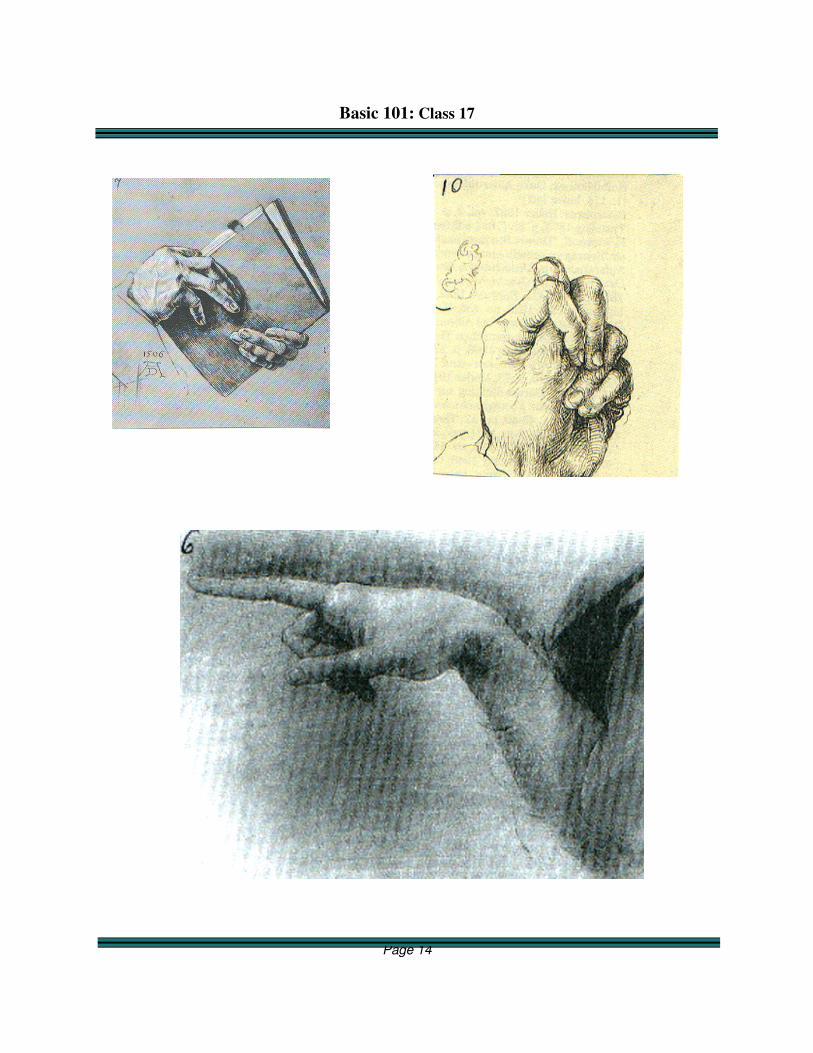
Here are examples how oldies greatest did it. As you can see some don't have too many details.
Basic 101: Class 17
Page 14
Basic 101: Class 17
Page 15
From JayD: Let me make one comment regarding some of your presentations and let me knowif you agree--but I get so tired of people telling me to draw my own hand--which is what peopleare doing here because I suggested it!!! It is good to start that way but I really believe that wecannot always be objective regarding our own hands, feet etc...
I am a firm advocate of copying from the masters--the reason being, and I hope this makes sense,but the masters seem to have a singular respect and admiration for the hands and feet that seemsto be lost in some circles today. You see it everywhere--hands in pockets or behind the figure or,heck, not even draws. Hands and feet are our Mount Everest--climb it because it is there--climband conquer.
I also think we tend over complicate hands and feet--keep them simple--draw a contour and putthe detail in last.
From Jolanta: I am sure it is several different reasons why artists don't like to draw hands. Weneed to realize that the most expressive parts are faces and hands. Too many artists try to avoidthem so they pose the model to hide the hands and so on. They don't want to take time to learnthis. They want to learn how to paint or draw FAST. Some will lock themselves away and drawone subject only because they know how to feel secure and confident so they do the same thingover and over. What they don't realize is they limit themselves and will never feel the freedomof being able to draw just about anything. Some will start art going straight to painting with nodrawing skills or very little and work very hard on painting. I read somewhere a great saying "Ifyou don't know how to draw and if you don't learn how to draw, you will only paint as good asyou can draw". This says it all.
Another reason is the belief "hands are very hard to draw" so I will not even try it. I don't knowwhere this came from but I believe once we learn how to see, we can draw anything. Maybe forsome, learning how to draw hands will take a bit longer but if we want to draw people, we don'twant to skip hands.
Another important thing - One drawing of the hand in one position is simply not enough. Justlike creating one successful portrait will not make us a good artist. If it looks too hard let's drawone finger only,then add another,or just the palm. (I don't know anything about anatomy but Iam a good observer and this is good enough).
Here comes another reason for avoiding hands - learning all the anatomy about them scarespeople away. It is very helpful but not really necessary. Take a good look at your handeverybody. It is in front of your eyes all the time available. At least give it a try. If you needhelp - we are here.
Basic 101: Class 17
Page 16
If somebody wants to try it - start with outline in as many positions as you can. It will not takelong. Then you can shade it, making the whole hand middle gray using side of pencil. Justcover the whole hand in one middle value. Put some darks with the same pencil and lifthighlights with eraser. Another way to shade is hatching and crosshatching. If you have aproblem with proportions, look at negative spaces. Some people can see better negative spaces. Whatever it takes, but please try
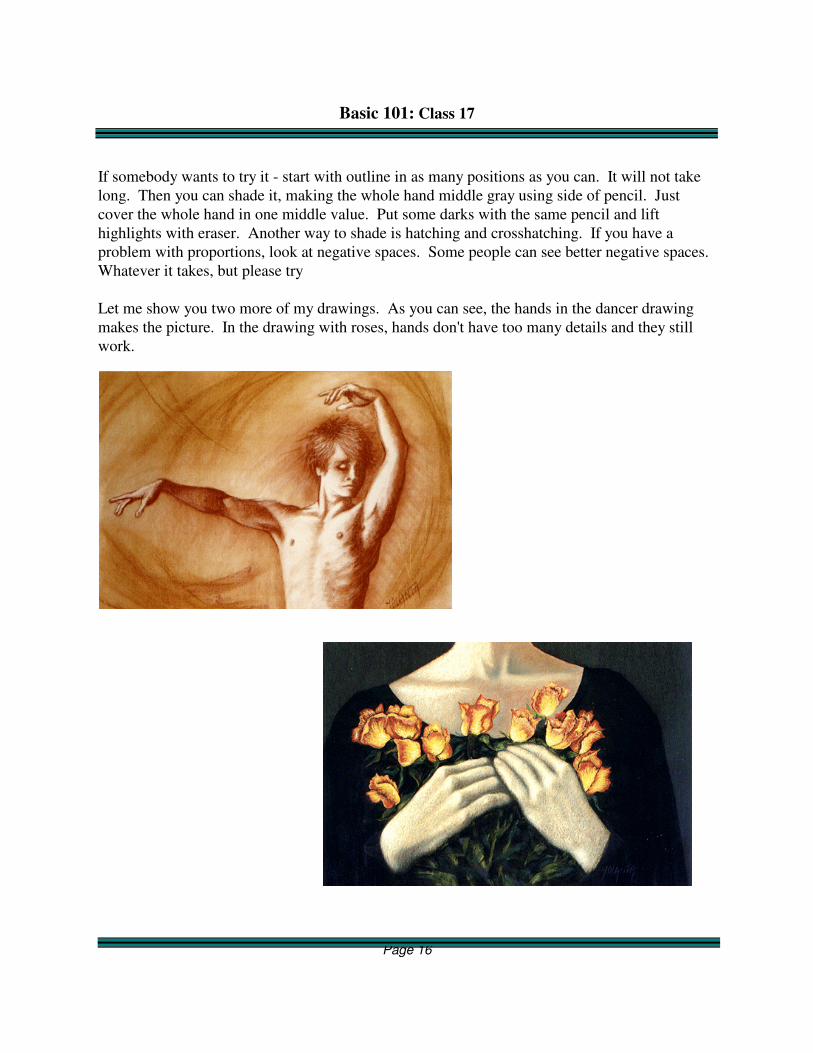
Let me show you two more of my drawings. As you can see, the hands in the dancer drawingmakes the picture. In the drawing with roses, hands don't have too many details and they stillwork.

Basic 101: Class 17
Page 17