LESSON 15 Customizing forms and writing QuickBooks...
30
419 •••••••••• LESSON 15 15 Lesson objectives, 420 Supporting materials, 420 Instructor preparation, 420 To start this lesson, 420 About QuickBooks forms, 421 Customizing invoices, 421 Creating new templates, 422 Customizing fields on forms, 425 Changing field order on forms, 426 Displaying your customized form, 429 Designing custom layouts for forms, 430 Changing the position of fields on forms, 431 Changing field widths, 435 Changing fonts, borders, and colors, 436 Previewing new forms, 438 Customizing the design for all your forms, 439 Using QuickBooks Letters, 440 Preparing collection letters, 441 Editing QuickBooks Letters, 444 Customizing forms and writing QuickBooks Letters
Transcript of LESSON 15 Customizing forms and writing QuickBooks...

• • • • • • • • • •
LESSON 15 Customizing forms and writing QuickBooks Letters
1 5
Lesson objectives, 420
Supporting materials, 420
Instructor preparation, 420
To start this lesson, 420
About QuickBooks forms, 421
Customizing invoices, 421Creating new templates, 422Customizing fields on forms, 425Changing field order on forms, 426Displaying your customized form, 429
Designing custom layouts for forms, 430Changing the position of fields on forms, 431Changing field widths, 435Changing fonts, borders, and colors, 436Previewing new forms, 438
Customizing the design for all your forms, 439
Using QuickBooks Letters, 440Preparing collection letters, 441Editing QuickBooks Letters, 444
419

C u s t o m i z i n g f o r m s a n d w r i t i n g Q u i c k B o o k s L e t t e r s
Lesson objectives To learn how to modify a preset invoice form
To design a custom invoice form
To see how to print invoices
To learn how to prepare a collection letter for overdue customers
To learn how to edit a prewritten letter in QuickBooks
Supporting materials PowerPoint file: Lesson 15
Video tutorial: Customize sales forms
Instructor preparation Review this lesson, including the examples, to make sure you’re familiar with the
material.
Ensure that all students have a copy of qblesson.qbb on their computer’s hard disk.
To start this lesson
Before you perform the following steps, make sure you have installed the exercise file (qblesson.qbb) on your hard disk. See “Installing the exercise file” in the Introduction to this guide if you haven’t installed it.
The following steps restore the exercise file to its original state so that the data in the file matches what you see on the screen as you proceed through each lesson.
To restore the exercise file (qblesson.qbb):1 From the File menu in QuickBooks, choose Open or Restore Company.
QuickBooks displays the Open Company: Type window.
2 Select “Restore a backup copy (.QBB) and click Next.
3 In the Restore Backup: Method window, select Local Backup and click Next.
4 In the Open window, navigate to your c:\QBtrain directory.
5 Select the qblesson.qbb file, and then click Open.
6 In the “Restore Backup: To Location” window, click Next.
7 Navigate to your c:\QBtrain directory.
8 In the File name field of the Restore To window, type lesson 15 and then click Save.
9 Click OK when you see the message that the file has been successfully restored.
420

L E S S O N 1 5
About QuickBooks forms
Each form you use in QuickBooks has its own layout—that is, its own arrangement of fields and columns for entering information. If the layout of a particular form doesn’t meet your needs, you can create your own custom layout and use your version instead of the QuickBooks version.
In Lesson 6, you learned about the preset formats for invoices that are included with QuickBooks. If these formats don’t precisely meet your needs, you can create your own invoice templates. You can also create templates for other sales and purchase forms.
For each form, you can decide which fields and columns to include, what they are called, and where to place them. Once you have created your forms, you can save the new layouts as templates—to use whenever you wish, and to modify whenever you want. The forms you can customize in QuickBooks are the invoice, sales receipt, credit memo, statement, purchase order, estimate, and sales order (QuickBooks Premier and higher editions only).
Customizing invoices
QuickBooks lets you customize an invoice form to suit the needs of your business, but there may be times when you want to design a completely different invoice form. QuickBooks lets you do that, too. You can use the Layout Designer to create a new form design for your business. In the Layout Designer, you can move, resize, or change the width of columns, turn on or off borders around fields, and control font type and size for each field.
In the following exercises, you’ll use both the customize forms and Layout Designer features in QuickBooks to create a custom invoice.
Note that these features affect only the printed forms; you cannot customize the onscreen version of QuickBooks forms.
421

C u s t o m i z i n g f o r m s a n d w r i t i n g Q u i c k B o o k s L e t t e r s
Creating new templates
To create a new invoice template:1 From the Lists menu, choose Templates.
QuickBooks displays the Templates list.
2 Click the Templates menu button, and then choose New.
QuickBooks displays the Select Template Type window.
422

L E S S O N 1 5
3 Click OK to select the invoice form.
QuickBooks displays the Basic Customization window.
4 Click the Manage Templates button to give the template a name.
5 In the Template Name field, type My Invoice and click OK.
This is the name you’ll use for the new template.
6 Look at the options in the Logo & Fonts section of the Basic Customization window.
Use this section to change the fonts for various textual elements on the form and to choose a color scheme.
If you wanted to add your company logo to the form, you would select the Use Logo checkbox and tell QuickBooks which file to use. QuickBooks supports BMP, JPEG, TIFF, PNG, WMF, EMF, and GIF graphic formats.
7 In the Company & Transaction section, select the Phone Number checkbox.
Use this section of the window to specify which pieces of company information to include on your sales and purchase forms.
QuickBooks displays a message that you can use the Layout Designer to change the layout of your form. You’ll learn how to use the Layout Designer later in this lesson.
423

C u s t o m i z i n g f o r m s a n d w r i t i n g Q u i c k B o o k s L e t t e r s
8 Select the “Do not display this message in the future” checkbox, and then click OK.
Your window should look like the following graphic.
If you don’t want QuickBooks to print the status stamp (paid, pending, etc.) on forms, clear the Print Status Stamp checkbox on this tab.
9 Leave the Basic Customization window open. You’ll use it in the next exercise.
424

L E S S O N 1 5
Customizing fields on forms
You can further customize your invoice template by setting formatting options and changing how fields display.
To customize fields on a template:1 Click the Additional Customization button at the bottom of the window.
QuickBooks displays the Additional Customization window, which uses multiple tabs to display several sets of formatting options. Each area of the form is represented by a tab. To display the available formatting options, click the tab for the area of the form you want to change. QuickBooks shows you a preview of the invoice as you make selections on the tabs.
Notice that the Header tab is currently selected. The Header tab is where you select which fields you want to appear onscreen, on paper, both, or neither. You can specify your own title (label) for each field. You can enter a new title by highlighting the current title text and typing your new one.
If you want to track information about a particular invoice, but don’t want your customer to see this information, select the Screen checkbox and clear the Print checkbox.
Suppose you want to remind customers of payment due dates at the time you send the invoice. You can customize the invoice form to display the Due Date field.
425

C u s t o m i z i n g f o r m s a n d w r i t i n g Q u i c k B o o k s L e t t e r s
2 To have the Due Date field display both on screen and on the printed form, click the Screen checkbox for Due Date to select it.
3 Click the Print checkbox for Due Date.
Checkmarks appear in both checkboxes.
4 Clear the Screen and Print checkboxes for the P.O. No. field to remove the field from the form.
Notice that the invoice preview shows the changes you’ve made.
Changing field order on forms
The lower half of the standard QuickBooks invoice form is where you enter details about the items or services purchased by the customer. You can change the order of these fields as they appear on your invoices.
The Order column shows you how fields display from left to right on the invoice form. Currently, Item is the first column and Amount is the last column. Suppose you want the Qty field to appear after the Item field, and before the Description field.
To change the order of fields on a form:1 Click the Columns tab.
2 Double-click the Order column in the Quantity row to select the number.
3 Type 2.
4 Double-click the Order column in the Description row to select it.
426

L E S S O N 1 5
5 If it has not changed to 3 automatically, type 3.
Your screen should look like the following figure.
If you use progress invoices or sales orders, use the Prog Cols tab to customize the columns on those forms.
6 Click the Footer tab.
The Footer tab contains information that you usually find at the bottom of the form. It also provides a place for you to enter free-form text, such as a disclaimer, on your form. In the next exercise, you’ll learn how to move fields on forms.
427

C u s t o m i z i n g f o r m s a n d w r i t i n g Q u i c k B o o k s L e t t e r s
7 Click the Print tab.
Use the Print tab to associate print settings with individual form templates. For example, if you print most forms in Portrait mode, but have one form that you print in Landscape, you can associate the Landscape print setting with that form’s template. When you send the form to the printer, QuickBooks knows to print it in Landscape.
If your forms print on multiple pages, select whether or not you want to print page numbers.
8 Click OK to record the changes.
9 Click OK again and then close the Templates window.
428

L E S S O N 1 5
Displaying your customized form
Now display the customized form to see the changes you made in the previous exercise.
To display the custom form:1 From the Customers menu, choose Create Invoices.
QuickBooks displays the Create Invoices window with the Intuit Product Invoice template displayed.
429

C u s t o m i z i n g f o r m s a n d w r i t i n g Q u i c k B o o k s L e t t e r s
2 In the Template field, choose My Invoice from the drop-down list.
Notice how this form reflects the changes you made in the Customize Invoice window. The Due Date field now displays onscreen and the Qty column appears in its new order before the Description field.
The phone number field that you added to the form only shows on the printed form, so you do not see it onscreen.
3 Leave the Create Invoices window open, you’ll use it in the next exercise.
Designing custom layouts for forms
With the QuickBooks Layout Designer, you can change the design or layout of a form. In the Layout Designer, you can move, resize, change the width of columns, turn on or off borders around fields, add colored backgrounds, and control the font type and size for each field.
Here are a few examples of what you can do with a custom layout:
Give your company name, address, and logo special treatment on the form. For example, you could center your logo at the top of the form and put your company name and address in a special font immediately below the logo.
Enlarge a custom field so that it can display more information.
Position the customer’s billing address so that it coincides with the address window in the envelopes you use.
Change the borders on fields, add background colors, and add extra text fields.
Add multiple graphics to a form.
430

L E S S O N 1 5
Changing the position of fields on forms
Next, you’ll use the Layout Designer to move the Phone # and Bill To fields, and to decrease the width of the Quantity column.
To move fields on forms:1 In the Create Invoices window, click the customize icon (the icon with the pencil
and ruler). (Don’t click the down arrow next to customize icon; that displays a menu you won’t be using for this exercise.)
2 Click Customize Data Layout.
431

C u s t o m i z i n g f o r m s a n d w r i t i n g Q u i c k B o o k s L e t t e r s
QuickBooks displays the Additional Customization window that you used to customize the form.
Now, you’ll use the Layout Designer to change the design of the form.
3 Click Layout Designer.
432

L E S S O N 1 5
QuickBooks displays the Layout Designer window.
By clicking the Zoom buttons, you can zoom out to see an overall view of the form or zoom in for a closer look at a small section of the form.
4 Click the Bill To field.
5 Press and hold the Shift key.
Holding down the Shift key when clicking on an object allows you to select multiple fields at the same time. Having multiple fields selected lets you move the fields together.
433

C u s t o m i z i n g f o r m s a n d w r i t i n g Q u i c k B o o k s L e t t e r s
6 Click the field directly below the Bill To field (the field containing the words “This is sample text”).
Notice the four-directional arrow that appears when you move the cursor over the selected fields. The selected fields on your screen should look like this.
7 Release the Shift key.
8 With the cursor over the selected fields, press and hold the left mouse button.
9 Drag the selected fields down about one inch.
Note: If you see that the fields are too wide to fit, deselect both fields by clicking outside the fields. Select each field separately. Move the mouse over the dark square along the right edges of the fields. Hold the mouse button and drag to the left to reduce the width of each field.
10 Release the mouse button.
Your screen should now look like this.
11 Select the field containing Rock Castle’s address.
12 Move the mouse over one of the dark squares on the bottom of the field and then hold the mouse button while you drag the bottom of the field up to a point just below the address—the goal being to get rid of the extra space below the address so you can place the phone number directly beneath it.
434

L E S S O N 1 5
13 Scroll to the bottom of the screen and select the Phone # field.
14 Click Remove.
15 Select the field containing the numbers 555-555-5555.
16 Holding down the mouse button, drag the field so that it sits just below Rock Castle’s address.
Changing field widths
In the next exercise, you’ll change the font size for Rock Castle’s phone number to make it match the address, but first you want to make the field wider so that the phone number isn’t cut off.
To change the width of a field:1 Select the field containing the telephone number and drag the right border further
to the right while holding down the mouse button.
The fields should resemble the figure below.
Rock Castle Construction rarely enters a quantity greater than two characters, so you want to make the QTY column smaller. Decreasing the width of the QTY column also increases the width of the Description column.
2 In the Layout Designer window, scroll until the Qty column is visible.
3 Click the Qty column to select it.
Your screen should resemble the figure below.
435

C u s t o m i z i n g f o r m s a n d w r i t i n g Q u i c k B o o k s L e t t e r s
Notice that when the cursor is positioned between the QTY and DESCRIPTION columns, it turns into a two-directional arrow.
4 Click and hold the left mouse button on the line separating the Qty and Description columns.
5 While holding down the mouse button, drag the column line to the left (to the one-inch mark on the ruler).
6 Release the mouse button.
The forms area on your screen should resemble the figure below.
Changing fonts, borders, and colors
Using the Properties window in the Layout Designer, you can change font size and style, text justification. You can also add, remove, or change the borders around fields.
To change fonts, borders, and colors:
1 With the phone number field selected, click Properties.
QuickBooks displays the Properties window.
436

L E S S O N 1 5
2 On the Text tab, select Left for horizontal justification.
3 Click Font.
4 In the Size list, select 12, and then click OK.
5 Click the Border tab.
6 Click to clear the Top, Bottom, Right, and Left checkboxes.
7 Click OK to save your changes in the Properties window.
8 Click OK to save the changes in the Layout Designer.
9 Click OK to close the Additional Customization window.
This exercise covers only a portion of the changes you can make with the customization and layout tools. For example, you could use the Add button to add empty fields into which you can enter your own text—or to add data fields that you forgot to select in the Customize window. If you want a field to appear on a form more than once, select the field and click Copy.
We encourage you to experiment with the tools available to create your own custom forms. For examples of what you can achieve, visit the forms library at http://community.intuit.com/library/forms.
You can download templates from the forms library to use in your own business.
437

C u s t o m i z i n g f o r m s a n d w r i t i n g Q u i c k B o o k s L e t t e r s
Previewing new forms
Notice that the invoice form displayed by QuickBooks doesn’t show the changes you just made in the Layout Designer. This is because changes made in the Layout Designer only affect the printed invoice and not the invoice QuickBooks displays onscreen for data entry.
To preview the invoice:1 To see how the printed invoice form will look, click the Print Preview button (above
the Template drop-down list).
QuickBooks displays the Print Preview window.
438

L E S S O N 1 5
The invoice displayed in the Print Preview window shows exactly how the printed invoice will look. Notice that the changes you made in the Layout Designer are reflected in this preview.
2 When you are finished looking at the preview, click Close.
3 Click OK to close the Additional Customization window.
Leave the Create Invoices window open. You will use it for the next exercise.
Customizing the design for all your forms
You can create a new design that reflects your business identity, or brand and use if for all your QuickBooks forms to give them a consistent professional look.
To customize the design of your forms:1 In the Create Invoices window, click the customize icon.
2 Click Create New Design.
A new window opens and connects to the Intuit QuickBooks Forms Customization web page.
3 Follow the onscreen instructions to customize the design of your forms.
439

C u s t o m i z i n g f o r m s a n d w r i t i n g Q u i c k B o o k s L e t t e r s
4 In the Apply Design window, select the QuickBooks forms that you want to use your new design.
5 Click Apply.
6 Click OK in the confirmation screen.
7 If you want, give the design a name and click Save to save it online. Then you will be able to use it to customize Intuit products like checks, or to use it again for additional forms.
8 Close the form designer window.
9 Close the Create Invoices window.
Using QuickBooks Letters
From time to time, you may need to send a letter to a customer or vendor (or someone on your employee list or other names list), or to another list of people. With QuickBooks, you can easily add the pertinent QuickBooks data (such as name, address, and balance information) to a letter without having to re-type it.
QuickBooks provides a number of business letters focusing on collections, news, and announcements. You can edit these letters as needed to suit your business and style of communication.
Note: To proceed with this lesson, you must be using Microsoft Word 2000, 2002, 2003, or 2007.
440
L E S S O N 1 5
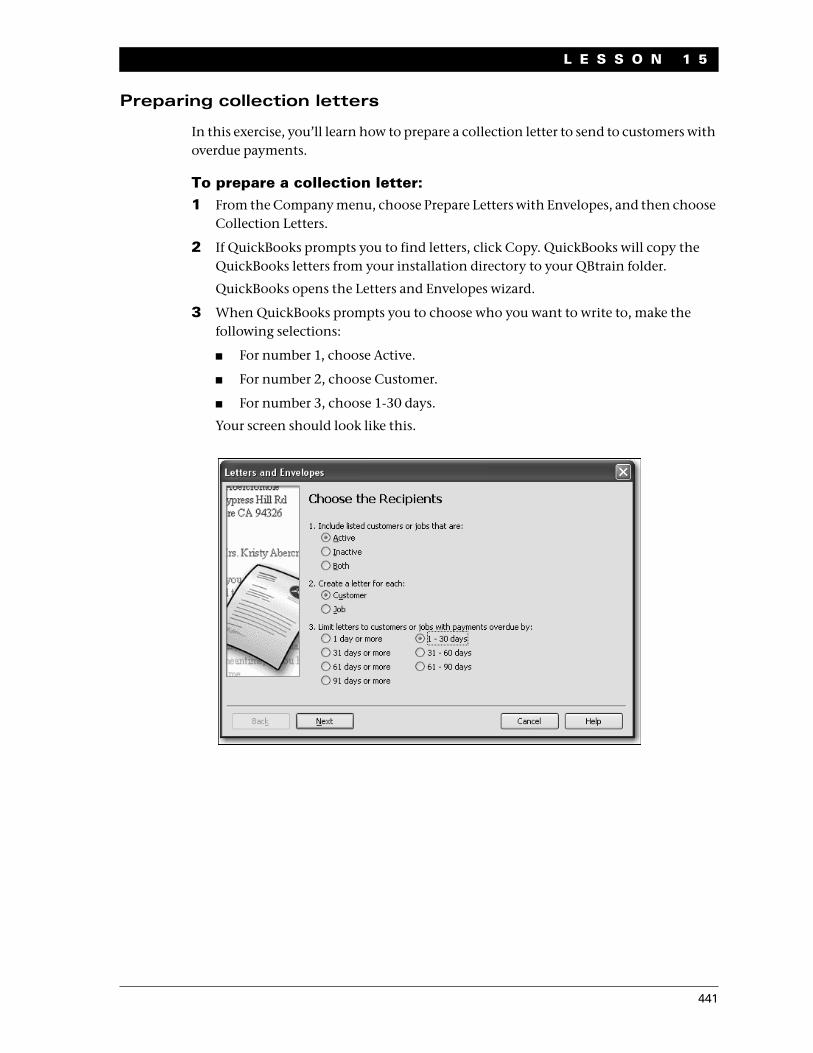
Preparing collection letters
In this exercise, you’ll learn how to prepare a collection letter to send to customers with overdue payments.
To prepare a collection letter:1 From the Company menu, choose Prepare Letters with Envelopes, and then choose
Collection Letters.
2 If QuickBooks prompts you to find letters, click Copy. QuickBooks will copy the QuickBooks letters from your installation directory to your QBtrain folder.
QuickBooks opens the Letters and Envelopes wizard.
3 When QuickBooks prompts you to choose who you want to write to, make the following selections:
For number 1, choose Active.
For number 2, choose Customer.
For number 3, choose 1-30 days.
Your screen should look like this.
441

C u s t o m i z i n g f o r m s a n d w r i t i n g Q u i c k B o o k s L e t t e r s
4 Click Next.
QuickBooks displays a list of all active customers with payments due.
5 Leave Lew Plumbing selected and click Next.
6 When QuickBooks prompts you to choose the letter you want to use, click “Friendly collection” and click Next.
442

L E S S O N 1 5
7 In the Name field of the next screen, type Tom Ferguson. In the Title field, type President.
8 Click Next.
443

C u s t o m i z i n g f o r m s a n d w r i t i n g Q u i c k B o o k s L e t t e r s
9 If QuickBooks displays a message about missing information, click OK.
QuickBooks starts Microsoft Word (if it’s not running already) and displays the collection letter for the customer.
Notice that QuickBooks entered Tom Ferguson’s name and title at the end of the letter.
10 Close the Microsoft Word file without saving the letter.
When you do save letters you’ve created using QuickBooks Letters, don’t save them to the QuickBooks Letter Templates folder. The QuickBooks Letter Templates folder should only be used to store the original QuickBooks Letters installed with the QuickBooks software program and any templates you’ve created and want to access through the Letters and Envelopes wizard.
To print the letter, you would choose Print from the Microsoft Word File menu.
11 Return to QuickBooks and click Cancel.
Editing QuickBooks Letters
You can make changes to individual letters using Microsoft Word, or you can make global changes by editing the QuickBooks Letter used to generate a specific letter.
In this exercise, you’ll edit the collection letter you prepared in the last exercise (Friendly collection). However, instead of working with completed letters with customer information already filled in, you’ll work with the underlying QuickBooks Letter used to create the letters.
444

L E S S O N 1 5
To edit a QuickBooks Letter:1 From the Company menu, choose Prepare Letters with Envelopes, then select
Customize Letter Templates.
2 Click “View or Edit Existing Letter Templates.”
3 Click Next.
4 When QuickBooks prompts you to choose the letter template you want to view or edit, click Collection, and then select “Friendly collection” from the list of available letters.
445

C u s t o m i z i n g f o r m s a n d w r i t i n g Q u i c k B o o k s L e t t e r s
5 Click Next.
QuickBooks opens Microsoft Word (if it’s not running already) and displays the letter (Friendly collection) and a toolbar (QuickBooks Collection Letter Fields) that you’ll use to add information from QuickBooks to the letter in Word.
Note that you can move the toolbar by clicking it with your mouse pointer and dragging it to a new location.
Now, you’ll enter more text and use the toolbar to insert data from QuickBooks into the “Friendly collection” letter.
6 Click your mouse pointer after the period at the end of the first sentence and the press the Space bar once. (You’ll insert a sentence into the paragraph.)
7 Type Our records show that your balance is past due.
8 Click your mouse pointer after the word is in the sentence you just typed, and press the Space bar again.
446

L E S S O N 1 5
9 From the Insert Collection Info. Fields drop-down list on the QuickBooks Collection Letter Fields toolbar, select Range(days) of Overdue Invoices.
QuickBooks adds the <<OverdueRange>> field to the sentence you just typed.
When you create letters using this modified QuickBooks letter, QuickBooks will replace the <<OverdueRange>> field with the number of days each customer you create a letter for is past due.
10 From the Word File menu, choose Save As.
447

C u s t o m i z i n g f o r m s a n d w r i t i n g Q u i c k B o o k s L e t t e r s
11 Enter a new filename and click Save.
If you save the file to this folder without changing the filename, you will overwrite the original QuickBooks Letter.
12 To see how this change affects the final letter output, close the letter file in Microsoft Word, click Use Template in QuickBooks, and go through the wizard again (all of your previous choices should still be selected).
13 When you get to the “Choose a Letter Template” screen, select the name of the file you just saved, and then click Next.
When you’re done, your letters should resemble the following.
14 Close Microsoft Word.
15 Click Cancel in QuickBooks.
448