
Leica Geosystems GS20 - GEFOS Leica · Leica Geosystems GS20 Field Guide-2.0.0en 2 Leica Geosystems...
116
Leica Geosystems GS20 Field Guide Version 2.0 English
Transcript of Leica Geosystems GS20 - GEFOS Leica · Leica Geosystems GS20 Field Guide-2.0.0en 2 Leica Geosystems...

Leica Geosystems GS20
Field GuideVersion 2.0English

Leica Geosystems GS20 Field Guide-2.0.0en 2
Leica Geosystems GS20
Congratulations on your purchase of a new Leica Geosystems System GS20.
To use the product in a permitted manner, please refer to the detailed safety directions in the User Manual.
Symbols Used in This Manual
Symbols used in this manual have the following meanings:
Important paragraphs which must be adhered to in practice as they enable the product to be used in a technically correct and efficient manner
Tip: Indicates useful information that may help you execute a task.
Trademarks• Windows (registered trademark of Microsoft Corporation)• Bluetooth (registered trademark of Bluetooth SIG, Inc.)All other trademarks are the property of their respective owners.

View of chaptersLeica Geosystems GS20 Field Guide-2.0.0en 3
View of chapters
1. Basic Operation ................................................................112. Data Collection ..................................................................213. Data Management .............................................................374. Navigation ..........................................................................455. Job Management ...............................................................496. Codelist Management .......................................................557. Applications ......................................................................578. Utilities ...............................................................................699. Setup ..................................................................................71
10. Status ...............................................................................10911. Glossary ...........................................................................11112. Index .................................................................................115

IntroductionLeica Geosystems GS20 Field Guide-2.0.0en 4
Introduction
The Leica Geosystems GS20The Leica Geosystems GS20 PDM was conceived to provide the GIS community with a GPS data collection device that combines the simplicity of a recreational GPS handheld with the power and flexibility of a professional grade mapping system. The Leica Geosystems GS20 represents a true turnkey GPS/GIS mapping solution by integrating the GPS receiver and antenna within the chassis of handheld data collector. Add to this the built-in efficiency of Bluetooth wireless technology and you have the most efficient GPS / GIS Data Collector in the Market.
Philosophy of Operation• Data Collection is used for the initial recording and
attribution of points, lines, and areas.• Data Management is used for the update of attribution
and geometry of an object; including relocation and continuation of existing geometry
• Navigation is only used for the purpose of finding a known location. Any update to the navigated object must be done in Data Management.
• Utilities contains File Browser, Firmware Update and Sensor Transfer
• Setup allows the user to configure software operation settings such as GPS controls, Data Collection Quality Control, Interfaces, Units and Formats, and Languages.
• Status provides the user with information related to GPS, external interfaces and the condition of the hardware and software.

Table of ContentsLeica Geosystems GS20 Field Guide-2.0.0en 5
Table of Contents
1. Basic Operation............................................ 111.1 Batteries and Charging ............................... 11
1.1.1 Battery Status ...........................................111.2 Powering On the Unit .................................. 121.3 Icons ............................................................ 12
1.3.1 Accuracy Indicator ....................................121.3.2 Stop and Go Indicators .............................131.3.3 Satellite Indicator ......................................131.3.4 Differential Corrections .............................131.3.5 Memory Card Status .................................131.3.6 Battery and Time Indicators ......................13
1.4 Button Functions ......................................... 141.4.1 Alpha Numeric Keys .................................141.4.2 Power Key ................................................141.4.3 Enter and Escape .....................................151.4.4 Cursor Keys ..............................................151.4.5 Menu Button .............................................151.4.6 The Main Menu .........................................161.4.7 Paging .......................................................16
1.5 Software User Interface .............................. 171.5.1 Map Views ................................................171.5.2 GPS Symbol and Zoom Controls ..............181.5.3 Context Menus ..........................................18
1.5.4 Tables and Filtering ..................................191.5.5 Filtering .....................................................19
1.5.5.1 Map Filters ................................................191.5.5.2 Table Filters ..............................................20
2. Data Collection ............................................. 212.1 Job Management ........................................ 212.2 Background Files in the GS20 .................... 22
2.2.1 Overview ...................................................222.2.2 Adding Background Files to a GS20 Job ..222.2.3 Creating a Background File in
GIS DataPRO ...........................................232.2.4 Transferring a background File .................232.2.5 Viewing the Map .......................................242.2.6 Turning off the background in the Map
Display ......................................................242.2.7 Label Features ..........................................25
2.3 Code Management ...................................... 252.3.1 Creating Codelists ....................................252.3.2 Using the Codelist Manager .....................262.3.3 Steps for codelist creation ........................27
2.3.3.1 Step 1: Creating a new codelist in GIS DataPRO ...........................................27
2.3.3.2 Step 2: Creating Codes in GIS DataPRO .28

Table of ContentsLeica Geosystems GS20 Field Guide-2.0.0en 6
2.3.3.3 Step 3: Creating Attributes ....................... 282.3.3.4 Step 4: Display Attributes: Attaching Map
Symbology ............................................... 292.3.3.5 Step 5: Transferring Codelists to
the GS20 .................................................. 302.4 Feature and Attribute Data Collection ......... 30
2.4.1 Open Job ..................................................302.4.2 New Job ....................................................312.4.3 Attribution ..................................................322.4.4 Point Collection .........................................32
2.4.4.1 Point Offsets ............................................. 332.4.5 Line and Area Collection ...........................342.4.6 Modes of Collection ..................................352.4.7 Freehand Collection ..................................36
3. Data Management......................................... 373.1 Philosophy of Feature Selection ................. 37
3.1.1 Options with Nothing Selected ..................373.1.2 Options with a Feature Selected ...............373.1.3 Options with a Node Selected ..................38
3.2 Selecting a Feature ..................................... 383.2.1 Feature Management ...............................38
3.2.1.1 Table Filtering .......................................... 393.2.2 Selecting a Node or “Vertex” ....................39
3.2.2.1 Node Management ................................... 393.2.3 Feature Table ...........................................393.2.4 Node Submenu .........................................40
3.2.4.1 Re-Occupying Nodes ................................403.2.4.2 Copying and Pasting Nodes .....................413.2.4.3 Inserting, Appending, and Prepending
in Existing Lines and Areas ......................413.3 Using the Geographic Clipboard ................. 42
3.3.1 Purpose of the Geographic Clipboard ......423.3.2 Flow of use (Sharing a common node
between blocks) ........................................433.3.3 Creating Point Topology ...........................44
4. Navigation..................................................... 454.1 The Navigation Screen ................................ 464.2 Waypoint Selection and Management ........ 474.3 Creating a New Waypoint Feature .............. 474.4 Updating a Navigated Feature .................... 48
5. Job Management.......................................... 495.1 Coordinate Systems .................................... 50
5.1.1 Introduction ...............................................505.1.2 Overview ...................................................515.1.3 Attaching a Coordinate System ................515.1.4 Geoid Field File .........................................52

Table of ContentsLeica Geosystems GS20 Field Guide-2.0.0en 7
6. Codelist Management .................................. 556.1 Creating a New Codelist ............................. 556.2 Creating a New Code .................................. 56
6.2.1 Creating a New Attribute ...........................56
7. Applications.................................................. 577.1 Cultivated Field Control ............................... 57
7.1.1 Introduction ...............................................577.1.2 Setup ........................................................577.1.3 Using the Program ....................................59
7.2 File Conversion ........................................... 637.2.1 ASCII Conversion .....................................63
7.2.1.1 ASCII Import ............................................. 637.2.1.2 ASCII Export ............................................ 647.2.1.3 ESRI's Shapefile conversion .................... 65
8. Utilities .......................................................... 698.1 File Browser ................................................ 69
8.1.1 Browser Controls ......................................698.1.2 Context Menu ...........................................698.1.3 Firmware Update ......................................708.1.4 Sensor Transfer ........................................708.1.5 Clear System Memory ..............................70
9. Setup ............................................................. 719.1 Selecting, Modifying and Creating
Configurations ............................................. 719.1.1 Selecting ...................................................729.1.2 Modifying ..................................................729.1.3 Setting Password protection for your
configuration settings ................................729.1.4 Creating ....................................................73
9.2 Tree Directory Navigation ........................... 739.3 Hardware Management ............................... 74
9.3.1 Hardware ..................................................749.3.2 Contrast ....................................................749.3.3 Wireless (Bluetooth Connectivity) .............74
9.3.3.1 Selecting a Wireless Device ....................759.3.4 Clearing a Selected Device ......................759.3.5 Real-Time Corrections with a Mobile Phone
(RTNet Configuration Set) ........................759.3.6 Linking with the Bluetooth .........................769.3.7 Creating a User Defined Configuration Set
with an Existing Device .............................779.3.8 Configuring your Device ...........................789.3.9 Modifying your Configuration ....................799.3.10Status Indication .......................................799.3.11Connecting to the Station .........................799.3.12NTRIP .......................................................80
9.3.12.1 An Overview About NTRIP .......................80
Table of ContentsLeica Geosystems GS20 Field Guide-2.0.0en 8
9.3.12.2 NTRIP Client ............................................ 819.3.12.3 NTRIP Server ........................................... 819.3.12.4 NTRIP Caster ........................................... 819.3.12.5 Using GS20 with NTRIP service .............. 81
9.4 ID Template Management ........................... 859.4.1 Creating an ID Template ...........................859.4.2 Modifying an Existing Template ................86
9.5 Device Manager .......................................... 869.5.1 Creating a New Device .............................869.5.2 Modifying an Existing Device ....................86
9.6 GPS Controls .............................................. 879.6.1 Tracking ....................................................879.6.2 Minimum Satellites ....................................879.6.3 Antenna Type ...........................................879.6.4 Logging .....................................................879.6.5 Initialization ...............................................88
9.7 Data Collection ............................................ 889.7.1 Quality Monitor ..........................................88
9.8 Interfaces .................................................... 899.8.1 Real-Time .................................................899.8.2 GS20 Phase Wizard .................................90
9.8.2.1 Overview .................................................. 909.8.2.2 Static Phase ............................................. 919.8.2.3 Kinematic Phase ...................................... 919.8.2.4 The Interface ............................................ 919.8.2.5 Collecting Static points, including
kinematic points of initialization ................ 92
9.8.3 SBAS ........................................................939.8.3.1 Understanding the SBAS Corrections ......949.8.3.2 Changes to the Real-Time Screen ...........95
9.8.4 Connecting to WoRCS Beacon ................959.8.4.1 Powering on the WoRCS ..........................969.8.4.2 Checking the Bluetooth Link .....................969.8.4.3 Checking the WoRCS Real-Time Link ......979.8.4.4 WoRCS Real-Time Beacon ......................97
9.8.5 Connecting to WoRCS Real-Time Satellite (RTS) ..........................................98
9.8.5.1 Powering on the WoRCS ..........................999.8.5.2 Checking the Bluetooth Link ...................1009.8.5.3 Checking the WoRCS Real-Time Link ....1019.8.5.4 WoRCS RTS ...........................................101
9.8.6 Offset Devices ........................................1029.8.6.1 Configuration of the GS20 ......................1029.8.6.2 Overview of the basic methodologies
of point offset data collection ..................1049.8.6.3 Explanation of individual point offset
data collection methodologies ................1059.8.7 ASCII Input .............................................107
9.9 Units and Formats ..................................... 1089.9.1 Units of Measure .....................................1089.9.2 Language ................................................1089.9.3 Formats ...................................................108

Table of ContentsLeica Geosystems GS20 Field Guide-2.0.0en 9
10.Status.......................................................... 10910.1 GPS ........................................................... 109
10.1.1Position ...................................................10910.1.2Satellite Information ................................10910.1.3Satellite View ..........................................110
10.2 Interfaces .................................................. 11010.2.1Real-Time ...............................................110
10.2.1.1 RTB Coast Guard Beacon ..................... 11010.3 Hardware ................................................... 110
11.Glossary ..................................................... 111
12.Index ........................................................... 115

Table of ContentsLeica Geosystems GS20 Field Guide-2.0.0en 10

Basic OperationLeica Geosystems GS20 Field Guide-2.0.0en 11
1. Basic Operation
1.1 Batteries and ChargingLeica Geosystems GEB90, 7.2 volt, 2100 mAh Lithium-Ion batteries must be used to power the Leica GS20 and WoRCS equipment. Charge only with the Leica Geosystems battery charger provided in the system.
1.1.1 Battery StatusThe Leica Geosystems GEB90 battery uses a microprocessor to accurately monitor the battery status. To adjust the battery microprocessor, allow the Leica Geosystems GS20 to rundown and automatically power off.
Use only the Leica Geosystems batteries, chargers, and accessories, or accessories recommended by Leica Geosystems.
Basic OperationLeica Geosystems GS20 Field Guide-2.0.0en 12
1.2 Powering On the UnitPress and release the Power Button located on lower left of the keyboard. The unit will reply with an audible tone, then proceed to a splash screen and then to the Main Menu.
Although the unit can power on without the flash card, most functionality will not be available.
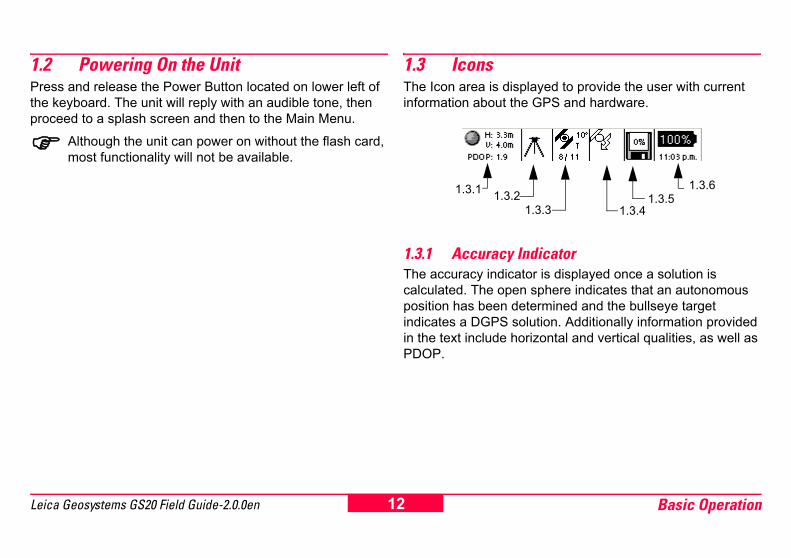
1.3 IconsThe Icon area is displayed to provide the user with current information about the GPS and hardware.
1.3.1 Accuracy IndicatorThe accuracy indicator is displayed once a solution is calculated. The open sphere indicates that an autonomous position has been determined and the bullseye target indicates a DGPS solution. Additionally information provided in the text include horizontal and vertical qualities, as well as PDOP.
1.3.1 1.3.21.3.3 1.3.4
1.3.51.3.6

Basic OperationLeica Geosystems GS20 Field Guide-2.0.0en 13
1.3.2 Stop and Go IndicatorsWhen a static position is located, such as a point or a node (in a line or area), the stop and go indicator is displayed as a tripod. Once the icon returns to the walkingman, the user can proceed to the next collection point.
1.3.3 Satellite IndicatorThe satellite indicator provides text based information including the satellite tracking angle, the number of satellites visible (according to the almanac) and the number of satellites currently tracked. (Satellites Tracked / Satellites Visible)
1.3.4 Differential CorrectionsWhen differential corrections are received and interpreted, the differential icon appears. If the correction is lost after 1/3 of the selected age (see 9.8.1 "Real-Time"), an exclamation point will appear in the lower left hand corner of the window. If it is still absent after 2/3 of the selected age, an additional exclamation mark will appear. If corrections are lost beyond the selected age, a third exclamation will appear and the icon will then disappear.
1.3.5 Memory Card StatusThe memory card status icon provides a graphical representation of the percentage of the compact flash used.
1.3.6 Battery and Time IndicatorsThe battery and time indicators provide information about the current status of the onboard battery and the current time obtained by satellites.• Because the battery indicator is based on a
microprocessor in the Lithium Ion battery, only the onboard battery status can be provided in percentages.
• Because the Leica Geosystems GS20 does not rely on internal batteries for clock function, time is only displayed when 1 or more satellites is tracked.

Basic OperationLeica Geosystems GS20 Field Guide-2.0.0en 14
1.4 Button Functions
1.4.1 Alpha Numeric KeysKeys 1-9 represent the alpha numeric entry keys of the GS20. Similar to a cellular phone, buttons 2-9 contain alpha characters; by pressing the key continuously, all characters on that key will be scrolled. The selection of a character can be made by either selecting a different key, or waiting for the 2 second time-out. Special characters ( .,+-_*:#!?^\=/@" ) can be found on the decimal key on the lower right of the keyboard.
1.4.2 Power KeyTo power the unit on, press and release the power key. The unit will then respond with an audible tone, followed by the splash screen.
Time to splash screen may depend on compact flash size and the amount of data on disk.
While in operation, the backlight can be turned on with a button press of less than 3 seconds.If the power key is depressed and held for three seconds, the unit will power down and display a message confirming the power down and saving of data.
Depressing and holding the key acts like multiple key presses.
Multiple functions: Keys 3 and 9 have been provided with additional functionality. In a map display, 3 and 9 function as zoom keys; in a table, 3 and 9 function as page up and page down.

Basic OperationLeica Geosystems GS20 Field Guide-2.0.0en 15
1.4.3 Enter and EscapeSimilar to standard Windows’ controls, the Enter key is used to either accept a choice or advance an action. The Escape key functions both as a back key, to escape from a current screen; as well as a backspace in edit fields.
1.4.4 Cursor KeysCursor keys are found on the face and the side of the unit; the side cursors function exactly the same as the up and down cursor on the face. If held down, the cursor key will automatically speed up, such as in the map display, table, or edit field. Because the cursor key is so integral to control and entry, its functions vary in different controls.
1. Menus: Left and Right function as home and end.2. Edit Fields: Up and Down function as home and end.3. Check Boxes and Radio Buttons: Left/Right toggle makes
a field selection.4. Combo Box and Spin Controls: Left and Right scroll
selections.5. Map: Controls the cursor
1.4.5 Menu ButtonThe Menu key is the prime key in the Leica Geosystems GS20 user interface. Not only can Menu bring you quickly back to the Main Menu to load the paging queue and select a new application, it also opens the context menu which contains all of the high level controls for the unit.
Table 1-1: Overloaded Button Functions
Map Table
3 Down Zoom In Page Down
9 Up Zoom Out Page Up

Basic OperationLeica Geosystems GS20 Field Guide-2.0.0en 16
1.4.6 The Main MenuThe Main Menu is the base level of the Leica Geosystems GS20 user interface. The Main Menu can be quickly accessed from any application by double clicking the Menu button. By returning to the Main Menu in an open application, it is possible to run several applications simultaneously; this is referred to as the paging function.
1.4.7 PagingBecause it is often necessary to access several applications at once (e.g. data collection, navigation, satellite view, etc.) Leica Geosystems has created the Power Paging function. Power Paging allows the user to quickly and easily flip through running applications in the order they were opened. To place an application in the paging queue, simply open the application from the Main Menu. To add an additional application to the queue, double click Menu to return to the Main Menu, then open a new application. The paging button will then page through the open applications. To remove an application from the page, simply Escape from the application to the Main Menu.

Basic OperationLeica Geosystems GS20 Field Guide-2.0.0en 17
1.5 Software User Interface
1.5.1 Map ViewsThe map view is the common interface on which all main applications are built. Data Collection, Data Management and Navigation all contain a map interface that has similar controls and are continuously updated, but have independent settings. Zooms, filtering, selection, and autopan GPS are all unique to each applications mapview.
Normal: Standard features in MapviewSelected: The currently active feature selectionFiltered: Display of features in a current table
Table 1-2: Mapview Legend
Points Lines and Areas
Normal
Selected
Filtered
Selected Node

Basic OperationLeica Geosystems GS20 Field Guide-2.0.0en 18
1.5.2 GPS Symbol and Zoom ControlsBy default, an open mapping screen zooms to the full extent of data in a job; however if no data exists, the map will be centered on the GPS location (scaled to 1:20m) awaiting collected data.
The map submenu contains zoom controls for• Zoom In, Zoom Out, Zoom To Full Extents• Center Cursor, Center GPS, Center Selected• Autopan GPS
“3” and “9” function as zoom controls !
The mapview is only capable of displaying 12,000 nodes, being points or line/area verticies. A warning will be issued at 9500 nodes, that the map will be discontinued. A final warning will be issued before the map display is turned off.
Tip: To minimize nodes in a job; consider streaming lines and areas by distance or at a slower rate. An 8 hour constant collection at a 5 second interval only produces 5760 nodes.
The map display can be turned off in the Job Management Screen.
1.5.3 Context MenusThe context menu in the Leica Geosystems GS20 functions similarly to a Windows’ context menu. However, the right mouse click is replaced with the Menu button. When the Menu button is depressed, a list of choices will be displayed based on the application and the actions taken.• Choices in the context menu can either be selected using
the cursor arrows (Left and Right being home and end) or directly accessed via the number keys.
• To simplify submenus appear where common groupings exist such as map control functions. The submenu is denoted with a right arrow and is accessed via enter or the number key. In some instances, sub-submenus exist.

Basic OperationLeica Geosystems GS20 Field Guide-2.0.0en 19
1.5.4 Tables and FilteringTables are used to display multiple attribute data that cannot be directly edited. The table can be navigated by the cursor keys (left and right being home and end) as well as the overload keys 3 Page Down and 9 Page Up.Two main types of tabular data found in the GS20 are selectable and informative.• Selectable fields allow the user to make a selection such
as choosing a Job or Codelist, and are usually identified by a radio button (selectable circle). Additional options, such as New, Delete, etc. usually exist in the context menu.
• Informative fields allow the user to view and manipulate information about the tabled object.
1.5.5 FilteringIn order to provide power and flexibility to the user, the Leica Geosystems GS20 maintains separate filters for individual tables and maps.
1.5.5.1 Map FiltersMap filters provide the user with the ability to hide or display data in the map.Map filters allow the user to discriminate data based on• Feature Code (Layer name)• Feature Name (Feature ID)• Feature Type (Point, Line, or Area)• Time of collection• Waypoint Status (Flag as Waypoint (i.e. to be navigated to)
or Visited)Similarly data can be filtered in a table for selection, edits, clipboard function or changing the Waypoint status.

Basic OperationLeica Geosystems GS20 Field Guide-2.0.0en 20
1.5.5.2 Table FiltersTable filters allow the user to search for data based upon the same criteria as listed above in map filters.Once a table is filtered, the user can select from the filtered table, or view the selected filters in the map view via the context menu choice Table Features.
This differs from map filtering in that the data remains displayed, but appears highlighted.

Data CollectionLeica Geosystems GS20 Field Guide-2.0.0en 21
2. Data Collection
2.1 Job ManagementWhen Data Collection is opened, if no job is currently selected, the user will be prompted to either “Open” an existing job or create a “New” job to continue. If a new or empty job is selected, the unit will prompt the user to attach a codelist; otherwise the program will proceed to the Data Collection map.
Tip: When you create a new job, you have the option of attaching a Coordinate System and Geoid file with creation of the job.
Tip: See 5. "Job Management" for more info

Data CollectionLeica Geosystems GS20 Field Guide-2.0.0en 22
2.2 Background Files in the GS20Often it is important for a user to see the location of their current position and those features they have collected within a larger context. However, it is not always necessary or even beneficial to have that data selectable. With the ability to create vector background data, the GS20 can now:• Attach larger vector reference files• Use the same vector reference file for multiple jobs• Reference multiple files to a job• Reference previously collected jobs in an open job• Only re-import collected or updated data• Directly display ESRI shapefiles to navigate in the field
2.2.1 OverviewGS20 background files are graphic files that can be created in GIS DataPRO or from ESRI shapefiles onboard the GS20, and are automatically created when job data is collected in the GS20. The graphic file contains the file extension qtr, which stands for quadtree; a method of spatially indexing vector data. When a job is created in the GS20, a graphic file of that same name is also created. From job management, a background screen can be accessed, allowing the user to reference other “background” graphical data to the job. Background graphic files are for visual reference only, and are not selectable.
2.2.2 Adding Background Files to a GS20 JobTo add a background map, enter Job Management, highlight a selected job, and select “Background Maps” from the context menu.

Data CollectionLeica Geosystems GS20 Field Guide-2.0.0en 23
A status of available memory will be available to provide information on how much information can be attached to a job. Memory used in background files will affect the amount of map data that can be collected, so be conservative in your estimates.A successful attachment will be shown in the Status column and Memory Available will be recalculated.
2.2.3 Creating a Background File in GIS DataPROIn order to create a graphic file in GIS DataPRO, it will be necessary to first import the data into the GIS DataPRO database. Data that is added to GIS DataPRO with the +, or "Add Shapes" cannot be converted into a graphics file.To create the Graphics file, select “Create GS20 Graphic File” from the Tools pull-down menu.A dialog will prompt for a filename and path, with the default being active. The user can select to create a background from all data, or only selected objects.
2.2.4 Transferring a background FileTo transfer a graphic file from GIS DataPRO to your GS20, select Sensor Transfer from the Tools menu. Right click on Sensors, and select "Add Sensor". Browse through "My Computer" to locate the background graphics file. Right Click on the Graphic File and send to your connected Device.

Data CollectionLeica Geosystems GS20 Field Guide-2.0.0en 24
2.2.5 Viewing the MapThe background graphic will be attached to the current job, and will be displayed in Map View applications. The memory used by the graphic files is not recovered during use, therefor it is necessary to reboot to reclaim lost space once a background file is detached from a job.
2.2.6 Turning off the background in the Map DisplaySimilar to the filtering ability of layers and data types in a Map View, Background files can be turned on and off. To turn off a background file, press Menu in Job Management and select Background Maps, and press enter on the layer with the new Background Icon.

Data CollectionLeica Geosystems GS20 Field Guide-2.0.0en 25
2.2.7 Label FeaturesThe GS20 provides the ability to label features in a job by name. This capability is available in both the Navigation and Data Management items. To enable press the Menu button, select Map and the check "Show Feature Name".
To turn it off, just uncheck this option.
2.3 Code ManagementA Codelist contains the coding information that may be defined during measurement in the field. Generally, a Codelist consists of Codes as primary building blocks, and Attributes as tertiary building blocks.
2.3.1 Creating CodelistsWhat is a Code? Codes are used to describe objects of the same type. The term Code in GIS DataPRO is equivalent to the term theme in ArcView 3.2. Each code has it’s feature geometry: point, line or polygon. For example: Tree (Point), Roads(Line), Parcels(Polygon).A code contains attribute information that may be assigned to the codes (points, lines or areas) during measurement in the field.For example: Fire Hydrant (Code): Serial Number and Color (Attributes).A Codelist contains codes to be collected in a job, and is attached to a job.A codelist can be created in three ways:
1. Create your own codelist/code.2. Copy another codelist/code from another project.3. Import codes from existing shapefile.

Data CollectionLeica Geosystems GS20 Field Guide-2.0.0en 26
Codelists are created in the Codelist Manager in GIS DataPRO.
2.3.2 Using the Codelist Manager1. In GIS DataPRO, select Codelist Manager Form from
Tools menu.
2. The Codelist Manager Interface appears (see following graphic).

Data CollectionLeica Geosystems GS20 Field Guide-2.0.0en 27
2.3.3 Steps for codelist creation1. Create a Codelist in GIS DataPRO2. Create Codes -
Unlimited codes in a codelist3. Create Attributes -
Maximum 60 Attributes per code4. Attach Map Symbology to each code in a codelist5. Save codelist6. Transfer a Codelist to sensor.
2.3.3.1 Step 1: Creating a new codelist in GIS DataPRO1. Click on Codelist and select New Codelist.
2. Type in name of the New Codelist.3. Click OK.
Your new codelist is now created, highlighted and ready to be populated.
When a codelist is created the first code is always Waypoint and cannot be changed!

Data CollectionLeica Geosystems GS20 Field Guide-2.0.0en 28
2.3.3.2 Step 2: Creating Codes in GIS DataPRO1. From the Code menu select New Code.
2. Enter codename, type and description to define new code.
2.3.3.3 Step 3: Creating Attributes1. From the Attributes menu choose New Attribute
2. Fill in the attribute name and properties.
3. The Attribute Type can be Normal, Mandatory or Fixed4. The attribute's Value Type can be Text, Real or Integer

Data CollectionLeica Geosystems GS20 Field Guide-2.0.0en 29
5. The attribute's value region can be None, Choice List or Range
6. The Default Value can be typed in if None or Range was selected in the Value region. It can be selected if Choice List was used.
Facts About Attributes:1. The Z attribute is reserved and cannot be changed.2. The Z attribute contains elevation data3. Maximum 256 characters per Choice List4. Attribute names must begin with a letter5. Limit the attribute names to 10 characters6. Maximum 60 Attributes per Code
2.3.3.4 Step 4: Display Attributes: Attaching Map SymbologyThe display properties are used to display each feature in the GIS DataPRO after data collection.From the Code pull down, choose “Set Display Attributes.The Codelist may now be saved with map symbology intact.

Data CollectionLeica Geosystems GS20 Field Guide-2.0.0en 30
2.3.3.5 Step 5: Transferring Codelists to the GS201. Open Sensor Transfer2. Add Sensor3. Browse to location where codelists are stored (default
location: C:\GDP_Data\Codelists)4. Right click on codelist and select Send Files...5. In the Send Files... dialog select the codes you would like
transferred6. Select the appropriate COM port and select Codelist from
the File Type ChoiceWith your codelist now on the GS20, you are ready to attach it to your job and collect GIS Data.
2.4 Feature and Attribute Data Collection
2.4.1 Open JobTo begin feature and attribute data collection, a job must be open. Select 1 Data Collection.
To open an existing job select Open. The Job Management screen is displayed.

Data CollectionLeica Geosystems GS20 Field Guide-2.0.0en 31
Select an existing job and then press the escape key and return to Data Collection. If the job is not associated with a codelist, choose to open an existing codelist or create a new codelist.
2.4.2 New JobTo create a new job, select New. The job Management New Job screen opens.
Assign a jobname, creator, coordinate system as well as a Geoid and CSCS file if appropriate. Press the menu button when complete and select Save. A message returns indicating that the job is not associated with a codelist.

Data CollectionLeica Geosystems GS20 Field Guide-2.0.0en 32
After the codelist is created, if the job does not contain any data, the Data Collection Codes screen is displayed. Select the code for which to begin collecting data and press the Enter key. The feature occupation screen opens.
2.4.3 AttributionAfter a code is selected, press Enter to open the feature occupation screen. By using the cursor and Enter key, attribution values can be entered. Additional occupation selections can be accessed via the context menu.
2.4.4 Point CollectionPoint collection is often as simple as entering attributes, pressing Occupy and Save; however different user defined quality settings can determine how the feature is collected (see Setup/Data Collection.) In addition to direct locations, the user can also choose from a list of point offsets.

Data CollectionLeica Geosystems GS20 Field Guide-2.0.0en 33
2.4.4.1 Point OffsetsWhen a point cannot be collected directly, an offset can be used to collect a point from a more accessible location. Offset information can be entered either manually, or via an external rangefinder. The choice of point offsets available are listed below.
Example of Dist.Dist O/S
Offset Methods (Graphical)
Azimuth Distance
Aux “A” 125 o30’00”
35m
+ O/S Pt
+Azimuth - Azimuth
Aux “A” Aux “B”
O/S Pt
110o
220o
+
Aux “A” Aux “B”
O/S Pt (Left Solution)
35m 25m
R(Right Solution)Distance Distance

Data CollectionLeica Geosystems GS20 Field Guide-2.0.0en 34
When collecting a point offset, the offset data must be input prior to the collection of the auxiliary point.• Azimuth Distance: Enter Azimuth, Distance and Delta
Height before occupying the point.• Azimuth Azimuth: Enter Azimuth and Delta Ht for 1st
position from Aux Pt. A; then repeat for PT B.• Distance Distance: Enter Distance and Delta Ht for 1st
position from Aux Pt A; repeat for position B and choose the solution method (i.e. Left or Right)
Because two solutions exist for a double distance intersections, the user must tell the software on what side of point A-B the offset point lies.
• Backwards Azimuth and Distance: Useful when locating a point by direct occupation when no GPS exists. This method works by providing an azimuth and distance to a previously located point. The calculation then reverses the course and distance.
2.4.5 Line and Area CollectionUnlike point collection, lines and areas offer multiple methods of collection; noding (i.e. collecting by vertex), streaming by time or distance, locating nodes by point offsets, creating linear offsets to either side of the collected line, pasting a node from the clipboard, and nesting additional features. Because the Start/Stop button is necessary to both stop in noding and pause in streaming, features must be saved by the Done button or the Save Feature in the context menu.
Tip: When escaping the feature collection, a dialog will allow the user to save or discard the current feature.

Data CollectionLeica Geosystems GS20 Field Guide-2.0.0en 35
2.4.6 Modes of CollectionWhen a line or area feature is selected, the feature occupation screen displays the current mode of collection (i.e. stream or node.) The last selected mode becomes the default by being stored in the user’s recent value file.
2 Node Mode is the manual collection of nodes or “vertices.” Like points, nodes can be collected using the autostop which can be found in Data Collection\Quality Control settings in the Setup menu.
3 Streaming is the automatic collection of nodes (i.e. vertices) based on time or distance (length between nodes.) Additionally, streaming criteria can be based on the horizontal quality defined in 8 Setup, 1 Config Sets. Select the proper configuration setting, select Data Collection and Quality Control in the Setup configuration. Streaming options can be selected from the attribution\ collection screen via the context menu.4 Line Offsets allow the user to enter linear offsets, either left, right or in both directions with different values. When in node mode, the offset selection will become a submenu offering all methods of point collection for individual nodes.The 8 More selection allows the user to Paste from Clipboard, as well as Append or Prepend an existing line.Paste from Clipboard allows multiple features to share common nodes. In order to paste a node, it must first be 3 Copied to Clipboard in Data Management. (See 3.2.4.2 "Copying and Pasting Nodes")
Point features cannot be created with pasted node data in Data Collection. However, points already collected can have their node replaced with the 2 Paste from Clipboard function, allowing multiple point features to share a common node.

Data CollectionLeica Geosystems GS20 Field Guide-2.0.0en 36
2.4.7 Freehand CollectionFreehand collection (or digitizing) is an easy way to collect lines, points and polygons without having a GPS position for specific codes. This is very usefull if you have to complete attributes but are not receiving GPS position due to heavy canopy. To digitize a feature on the map, select a code in Data Collection, then press the Menu key, select More followed by Freehand Collection. The Map View will open (Key 3 and 9 function as Zoom). Move the cursor to the proper position. Press the Enter key to store the node. For lines and areas press the Escape key after digitizing the feature and confirm by selecting Done.

Data ManagementLeica Geosystems GS20 Field Guide-2.0.0en 37
3. Data Management
3.1 Philosophy of Feature SelectionData Management allows the user to perform feature, node and attribute level data maintenance and editing. Data Management selection options and context menus behave differently depending on what data has been selected. Once a feature is selected, the user must 3 Deselect via the context menu in order to select another feature. Several levels of selection exist in Data Management.
3.1.1 Options with Nothing Selected With nothing selected, the user can select features either graphically in the map, tabularly via the Feature Management or view and select all nodes in the entire job via 2 Nodes table.
3.1.2 Options with a Feature SelectedWith a feature selected, the user has the ability to:
1. Select from a list of nodes common to the selected feature either graphically in the map or tabularly via the 5 Nodes table.
2. View or modify the feature’s 1 Attribution.3. Copy, delete or flag the selected feature as a Waypoints
via the 7 More submenu, or4. 3 Deselect the currently selected feature.

Data ManagementLeica Geosystems GS20 Field Guide-2.0.0en 38
3.1.3 Options with a Node SelectedWhen a node is selected on a feature, the user can select another node common to the feature graphically in the map, view the coordinates or re-occupy the node via 1 Geography, or use the 2 Node submenu to:
1. Progress to the First, Last, Previous or Next node. 2. Copy to, Select from, or Paste from a node via the
Clipboard.3. Insert new nodes before or after the current node selected.4. Delete the selected nodes.
3.2 Selecting a FeatureIn order to view or manipulate feature data, a feature must first be selected. Selection can be performed from a table of features via Feature Management, or graphically from a map.
3.2.1 Feature ManagementTabular selection of a feature is done from the Features Menu. Initially,
1. Features are listed alphabetically in the Features Menu.2. Features are grouped by geometry.However, by choosing Menu and Sort the table can be sorted by Name, Code, Feature Type and by Ascending or Descending order.• To view the attributes of a table selection, press menu and
choose 1 Attribution, or simply press Enter.• To select the feature, press Menu and choose 3 Select
from the context menu.Other operations that can be performed upon a selected feature include feature manipulation (e.g. delete and clipboard functions) and the ability to flag a selected feature as a Waypoint.
Tip: Linear Perimeter and Polygon area can be calculated in the Attribution screen if a coordinate system has been selected.

Data ManagementLeica Geosystems GS20 Field Guide-2.0.0en 39
3.2.1.1 Table FilteringAs previously discussed in chapter 1.5.4 "Tables and Filtering", Table Filtering provides a way to search based on:• Code (Feature Name)• Feature Type (i.e. Point, Line or Area)• Code/Feature Name (using wildcards)• Range of Time• Waypoint Status Once data has been filtered, the user can either manipulate or select based on the filtered table, or display the filter in the map using the context menu choice Tabled Features and Highlight. The Traverse submenu choice, allows the user to graphically progress through each filtered table feature row by row.
Filtered data is shown by a bold outline and can be progressed through using the feature Next and 2 Previous submenu choice.
3.2.2 Selecting a Node or “Vertex”
3.2.2.1 Node ManagementNodes can be selected from the context menu when nothing is selected, providing a list of all nodes in a job.
3.2.3 Feature TableWhen an object is selected at the feature level, the Feature Table provides the user with the ability to
1. See the attribution of a feature, and calculate line lengths or perimeter / area of polygon.
2. See the nodes of a feature.3. Select and highlight it on the mapview.4. Delete the selected feature.
Leica Geosystems GS20 does not have Undo!5. Set a database flag indicating the feature is a Waypoint
and if it has been visited.6. Sort the features either by Name, Code, Type and define
the sorting order.7. Copy the feature to clipboard.

Data ManagementLeica Geosystems GS20 Field Guide-2.0.0en 40
3.2.4 Node SubmenuWhen a node or "vertex" of a feature has been selected on a feature the node submenu provides additional node selection ability as well as the ability to modify features on a node level, including:
1. Send the Node to Geography and ReOccupy the node.2. Choose the 1 First, 2 Previous, 3 Next, or 4 Last node on
a feature.3. Deselect the feature.4. Delete the node (you can't delete nodes from a line
composed of less than 3 nodes, or from a polygon composed of less than 4 nodes.)
5. Insert single nodes or stream to append to an existing object.
6. Alter the MapView settings.
3.2.4.1 Re-Occupying NodesNodes can be moved or Re-Occupied by choosing 1 Geography from the menu. When the Re-Occupy soft key is selected the attribution/collection screen is opened.
Node Re-Occupation works in the same way as point collection.

Data ManagementLeica Geosystems GS20 Field Guide-2.0.0en 41
3.2.4.2 Copying and Pasting NodesIn order to copy a node, a node must first be selected. This can be done directly from a node table, or most commonly on a feature level.
Copying1. Select the desired feature either graphically or from
Feature Menu Item.2. Select a node either graphically or by highlighting a feature
from the Feature table and selecting 2 Nodes from the submenu.
3. Select 7 More and 2 Clipboard.4. Select Copy to.
Pasting1. Select the desired feature either graphically or from
Feature Submenu.2. Select a node adjacent to the point you wish to insert either
graphically or from the Node table.3. Select menu and choose the 2 Node submenu.4. In Node table select Modify.5. Select to paste Before, 2 After, or 3 Replace.
3.2.4.3 Inserting, Appending, and Prepending in Existing Lines and AreasPreviously collected lines and areas can be amended or continued by Inserting, Appending, or Prepending with noded or streamed data. One of the complexities of adding new data is knowing the order in which a feature was collected. This can be done by using the Previous and Next commands in the Node submenu to discern the direction of collection.
Inserting into a Feature (Node Mode)1. Select the desired feature to be appended, either
graphically or from Features Item.2. Select the feature which includes the node.3. Select Menu and choose the 2 Node submenu.4. Select 5 Modify and insert New.5. Select Before or 2 After.Tip: Because the nature of collection is to continue in the
same direction as the collected feature, it is advised to insert After an existing node for multiple nodes or streaming!

Data ManagementLeica Geosystems GS20 Field Guide-2.0.0en 42
Appending a Line or Area by Streaming1. To append a line or area by streaming, select the last node
of the line and insert 2 After.2. In the attribution/collection screen, change the collection
mode to stream and occupy as you would with a normal collection.
Prepending a Line or Area by StreamingTip: If you are adding to the beginning of a line by
streaming, you will need to reverse the direction of your collection
1. To prepend a line or area, select the first node and insert Before.
2. In the attribution/collection screen, select 6 More.3. Select the insertion order 2 Prepend. This will reverse the
direction of collection.
Advance usage of Prepend and Append can be used to approach the beginning or end of a line from the opposite direction.
3.3 Using the Geographic Clipboard
3.3.1 Purpose of the Geographic ClipboardUnique to the GS20 is the Geographic Clipboard functionality. The clipboard functionality is similar to the copy and paste functionality found in many Windows styled applications.This functionality allows the user to select and copy a feature or node to the clipboard, and in turn, the user can paste to or “Select from” the clipboard.Nodes can be shared between features to create shared edges. For example: Street Intersections and Water Lines can have a node topology that facilitates network analysis. Parcel corners and edges can allow for shared boundaries. Parent / Child Topology of point objects can allow a transformer to be intrinsically tied to a power pole. Thus moving or deleting the parent, would result in the child is also being moved or deleted. By creating this topology in the field, you remove the guesswork from the office.

Data ManagementLeica Geosystems GS20 Field Guide-2.0.0en 43
3.3.2 Flow of use (Sharing a common node between blocks)Select a Feature, and then select a node. If the feature is a point object, you can copy the feature or the node.
1. Open Data Collection2. Open Data Management, select a feature, and then select
a node.3. Copy the node to the clipboard.
4. Page to Data Collection.
5. From Data Collection, select New Feature

Data ManagementLeica Geosystems GS20 Field Guide-2.0.0en 44
6. Select More from the menu choices, and Paste the node from the clipboard.
7. Repeat as necessary.
3.3.3 Creating Point TopologyPoints features can be linked to other points or nodes by taking advantage of the paste functionality in the Point offset menu. Because the pasted point is the base reference of the newly created feature, when the base is moved or deleted, the connected feature is also modified.Once a point or node is copied (as shown above), it can be pasted as the Auxiliary or base point in a point offset. This can be done from Azimuth Distance, using the paste function, or is done automatically with Back. Azimuth Dist.

NavigationLeica Geosystems GS20 Field Guide-2.0.0en 45
4. NavigationThe Navigation application is a means to guide the user to a point with known coordinate values. In GPS, these known point locations are referred to as "Waypoints". The user also has the option to navigate to points that have never been visited before.Rather than having a special feature code for “Waypoints,” the Leica Geosystems GS20 uses a database flag for the feature to set a Waypoint as: Flagged: As a feature that should be navigated to or Visited: Providing closure to the workflow
Waypoints can be created in the Leica Geosystems GS20 by several methods:• Select points graphically from the mapview in both
Navigation and Data Management.• Table a known feature and setting the database Waypoint
flag in Data Management.• Set the node on a linear feature as a temporary Waypoint
in both Navigation and Data Management.• Create a new Waypoint by entering known coordinates in
Data Management.• Upload GIS or CAD data set with a Waypoint flag from
Leica Geosystems GIS DataPro to the Leica GS20.• Import points from an ASCII file.

NavigationLeica Geosystems GS20 Field Guide-2.0.0en 46
4.1 The Navigation Screen
The navigation screen is framed to provide the map display along with active navigational controls and text. The framed control panel contains a directional guidance arrow, and text fields providing:
1. Azimuth to the Waypoint.2. Distance to the Waypoint.3. The user’s course Azimuth 4. The user’s course Velocity.
Because the GPS bearing and velocity are calculated using GPS positions, the user must be moving for course data to be displayed.
• If the user is stopped, the arrow and course fields will become inactive.
• If the user is moving, but no Waypoint is selected, the arrow becomes a North Compass.

NavigationLeica Geosystems GS20 Field Guide-2.0.0en 47
4.2 Waypoint Selection and ManagementSimilar to Data Management, the Navigation context menu changes depending on whether data is selected.When features or nodes have not been selected, the context menu provides the user with access to:
1. Waypoint Management which provides a list of features or nodes flagged as Waypoints.
2. Select from Clipboard if a node was previously copied from Data Management.
If a feature is selected, the context menu then provides Waypoint with the options for the feature or node to be:• Create New Waypoint Feature.• Flag a point as 2 Visited once it has been navigated to.• Access back to 1 Waypoints.
4.3 Creating a New Waypoint FeatureWaypoint features may be created by pressing the Menu key, selecting WayPoint and Create New WayPoint Feature from the navigation screen.
This menu allows the user to add a waypoint using WGS84 or Local Grid Coordinate Systems. To access the local coordinate system options, press the Menu key and select local grid. This selection will remain aplied until changed by the user.

NavigationLeica Geosystems GS20 Field Guide-2.0.0en 48
4.4 Updating a Navigated FeatureOnce a Waypoint has successfully been reached, a feature or node can be updated via several methods:
1. Select the Menu key and choose 5 More and Copy to Clipboard.
2. If Data Management is currently open, page to the Data Management application. Otherwise, press the Menu key twice to return to the Main Menu, then Select 2 Data Management.
3. In Data Management, select the Menu key and choose Nodes, then browse to the Node you want to update and select 6 More, 2 Clipboard and 2 Select from Clipboard. The feature of the node can now be modified as previously discussed in chapter 3. "Data Management".
Tip: Keep both Navigation and Data Management in the paging queue to easily update Waypoints.

Job ManagementLeica Geosystems GS20 Field Guide-2.0.0en 49
5. Job ManagementJobs are created, opened, closed, deleted and modified in Job Management.
1. Creation of a job is performed by preesing the Menu key and selecting 1 New.
2. Selection and deselection of existing jobs is toggled using the Enter key or choosing 2 Open or 3 Close in the context menu.
3. 5 Deleting is performed via the context menu4. Viewing or modifying job 4 Properties must be selected in
the context menu5. Rebuilding, Repairing or Disabling the 6 Map is performed
in the context menu.
Coordinate systems can be attached to a job after the job is opened.
A Coordinate System must be attached to a project to calculate perimeter, area or local coordinates.
Coordinate Systems and Codelists are linked to a job, however only the coordinate system is a control in the job properties. The last selected codelist of an open job will be attached to the job.
In order to save a new or modified job, it is necessary to select Save in the context menu or escape dialog.

Job ManagementLeica Geosystems GS20 Field Guide-2.0.0en 50
5.1 Coordinate Systems
5.1.1 IntroductionAlthough the GS20 stores all GPS data in a WGS84 geographic coordinate format, it is possible to translate your data into a local datum, projection, or coordinate system. A pre-defined coordinate system is usually made up of
1. An ellipsoid, or a spheroid created to model the earths surfacea. If different from WGS84, a translation is necessary for
orientation2. A Projection - or a means to transform a spherical surface
to a 2 dimensional grida. Cones and Cylinders are the most common forms of
projection3. A transformation - a shifting of the system
a. 3 dimensional transformations involve both Cartesian X,Y,Z shift, as well as a rotation and scaling factor
b. 2 dimensional transformation usually involve an Euclidean X,Y shift, as well as a rotation, and scaling factor. The Z value, perpendicular to the XY plane can also be shifted.
4. Geoid - an equipotential surface which coincides with mean-sea level, and which may be imagined to extend through the continents. This surface is everywhere perpendicular to the direction of the force of gravitya. The geoid is also an interpolation file, and is based on
a grid network of gravity reading. Usually this type of file is local to a geographic region, such as a country or continent.
5. CSCS (Country Specific Coordinate System) - an interpolation file that estimates nonlinear error between known points with both WGS and local coordinate valuesa. These CSCS can be geographic. Cartesian or local grid
in nature. An example of this is the NADCON or North American Datum Conversion.

Job ManagementLeica Geosystems GS20 Field Guide-2.0.0en 51
5.1.2 OverviewWhen creating a job, it is possible to attach a pre-defined coordinate system, as well as interpolation files for non-linear transformations, and calculations of elevation above mean sea level. It is also possible to re-project a job into a coordinate system of datum at any time in the Job management application.Coordinate Systems can be created in either GIS DataPRO or Leica Geo Office office software, or downloaded from local websites. Coordinate systems can be transferred via bluetooth, serial cable, or directly onto the compact flash, and are contained in a GPSTRF.dat file.Although the CSCS and Geoid files are attached to a coordinate system in the office software, it is necessary to make a smaller more localized “Field file” for use in the GPS hardware. These files can then be used in conjunction with the coordinate system on the GS20 to provide transformations, and orthometric height values.
5.1.3 Attaching a Coordinate SystemA coordinate system can be attached to a new job upon creation, or to an existing job via the job properties in job Management. In order for a Geoid or CSCS field file to be attached to a selected coordinate system, it is necessary that the system be defined with a Global Geoid or CSCS file attachment. This is done in either DataPRO or Leica Geo Office coordinate system management.
Coordinate System Definition Dialog in GDP

Job ManagementLeica Geosystems GS20 Field Guide-2.0.0en 52
5.1.4 Geoid Field File
Geoid Field FileThe field file is a subset of the global interpolation file. A subset is used to reduce the overall memory the file occupies on the hardware.In this example, the GEOID99 was reduced to a field file called LA to serve the Los Angeles Area. The CSCS was named after the global Field File NADCON (North America Data Conversion). To create a field file in DataPRO or Leica Geo Office, simply select the field file generator from the tools pull-down.
or

Job ManagementLeica Geosystems GS20 Field Guide-2.0.0en 53
1. To Create a Geoid Field file, choose the Global Geoid file, and then select a center and radius, or South-West and North-East limits can be selected.
• Geographic or Grid coordinate entry will be determined based on the coordinate type defined in your global geoid file.
• Pay special attention to the cardinal direction of geographic coordinates
2. Select a spacing for the field file to be interpolated extrapolate to.• Geoid99 was created on a grid of 1 arc minute, or
roughly 1800 meters. It is probably not necessary to expand or refine this spacing.
3. Select a Radius if using the Center and Radius method, and Save
Save the Geoid file to the C:\GDP_Data\Geoid directory for easy transfer using data exchange. CSCS field files work under the same methodology, without the need to choose spacing, and instead save to a path C:\GDP_Data\CSCS.

Job ManagementLeica Geosystems GS20 Field Guide-2.0.0en 54

Codelist ManagementLeica Geosystems GS20 Field Guide-2.0.0en 55
6. Codelist ManagementThe Codelist Management application is used to create, select, deselect, delete, and modify codelists. New Codelists, Codes, and Attributes can only be created in the Codelist Manager (i.e. not in the Data Collection codelist).
6.1 Creating a New Codelist1. Select 5 Codelist Management from the Main Menu. 2. Press the Menu key and select 1 New. 3. Enter a unique codelist name or accept the default.4. A Creator Name can also be entered (Optional).

Codelist ManagementLeica Geosystems GS20 Field Guide-2.0.0en 56
6.2 Creating a New Code1. Highlight an existing Codelist, press the Menu key, and
select 6 Code Management.2. Press the Menu key and select 1 New Code.3. Enter a unique code name or accept the default.4. Select the Code Type (i.e. Point, Line, or Area).5. A Code Description can also be entered (Optional).
6.2.1 Creating a New Attribute1. Highlight an existing Codelist, press the Menu key and
select 6 Code Management. (Assuming you are not already in the Code Management screen)
2. Press the Menu key and select 2 New Attribute. Edit an Attribute Name, otherwise a default will be provided.
Tip: Because of shapefile conventions, Attribute names must start with a letter!
3. Select the Attribute type:• Text: All alpha numeric character types• Decimal: Real number values• Integer: Whole number values

ApplicationsLeica Geosystems GS20 Field Guide-2.0.0en 57
7. Applications
7.1 Cultivated Field Control
7.1.1 IntroductionCFC or Cultivated Field Control is a GS20 application aimed at providing an accurate record of crop quantities and tolerance in accordance with European Union CAP subsidies. A user can collect or select a polygon, and calculate the area with an error estimate corresponding to a user-defined tolerance. Additional functionality also allows the user to subtract areas within the external area, and save the subsequent data to a text log file that can be exported to a personal computer.CFC is an additional application that requires a keycode file. To purchase the application and receive a keycode, please contact your local Leica representative.
7.1.2 SetupWith the possibility to use a mask file, the application is open to a variety of output into different ASCII file interfaces. The mask file *.MAS is a simple ASCII text file that can be opened in any PC text editor.
• The @LEICA CFC MASK@ is the identifier for any mask file.
• The @@@ is the identifier for the end of the mask file.• A maximum of 15 lines, each capable of containing a
maximum of 80 characters, are contained between the beginning and the end identifiers.
• The @00@ until @99@ are placeholders for the numerical values or code/ attribute info. This gives full and easy flexibility to create different output masks for any ASCII type.
• A sample Leica.mas file (right) is provided and can be edited to the needs of the user.

ApplicationsLeica Geosystems GS20 Field Guide-2.0.0en 58
All identifiers are listed below:Case 00: // new lineCase 01: // @Case 05: // Active Job-nameCase 06: // Current DateCase 07: // Current TimeCase 09: // Number of excluded areasCase 10: // Area Size [m²]Case 11: // Area Accuracy [m²]Case 12: // Perimeter [m]Case 13: // EC Tolerance [m²]Case 14: // EC Tolerance [% ]Case 15: // Area IdCase 16: // lower Boundary [m²]/ upper boundary [m²]Case 17: // lower Boundary [m²]Case 18: // upper boundary [m²]Case 20: // Area CodeCase 21: // Attribute...Case 40: // Area Attribute Value 1-20Case 41: // Area Code NoteCase 60: // point idCase 61: // north(*)Case 62: // east(*)Case 63: // height [m]
Case 64: // height type (Orthometric/Ellipsoidal)Case 65: // geoid height [m]Case 66: // Point DateCase 67: // Point TimeCase 71: // CQ North [m]Case 72: // CQ East [m]Case 73: // CQ Hgt [m]Case 74: // CQ Pos [m]Case 75: // CQ 3D [m]Case 80: // iterator, starts with 1 for first point of each area point block.Case 99: // end of point block, only necessary to divide point block from footer lines.
(*) north and east are displayed with 3 digits in meter [m]. If no coordinate system definition is available it is displayed as 360 degree decimal with 9 digits.
The *.MAS file should be placed in the Data/Apps/CFC directory of the GS20 compact flash. A LOG file name defined by the user will be output to this directory as well.

ApplicationsLeica Geosystems GS20 Field Guide-2.0.0en 59
7.1.3 Using the ProgramCultivated Field Control within the applications menu. If a job is not yet opened, the workflow will request that you open or create a job. Once in the CFC main screen, the user will be required to:• Select the Area for calculation (Mandatory)• Select any internal areas to be subtracted from the
calculation (Optional)• Select a mask file (Mandatory to save a log file)• Provide the name of the Log file to be saved.• Select a tolerance or error limit for the calculation.
The main Cultivated Field Control menu provides the ability to:• Select a feature for which to calculate area• Select interior features to exclude from the calculations• Choose a mask file to properly format the output file• Enter the name of the output or “LOG” file• Enter the tolerance or error of calculation
To Select a feature, place the cursor in the feature box and press the Menu key. Areas can also be calculated from this menu.
An area can be selected from the table by highlighting the area and pressing enter.An area may also be selected by copying it to the clipboard from a map or table display in Data Management or Navigation.

ApplicationsLeica Geosystems GS20 Field Guide-2.0.0en 60
Areas internal to the main feature, or parent area, can be excluded from the calculation. The selection process is identical to selecting a main feature, but it is possible to select multiple features to be excluded. The 09 command will not only provide the number of features excluded, but willprovide detail about each feature.
The application does not verify that the area is within the parent object. Be careful when calculating!
Available mask files will appear in the mask selection box.
A mask file is necessary to create an output file!• Enter the name of the Logfile to be saved
(\Data\APPS\CFC)• Select a Tolerance or limit of error.To Calculate, press the Menu key and select Calculate. A log file of the calculation results will appear on screen.

ApplicationsLeica Geosystems GS20 Field Guide-2.0.0en 61
To save your data, and/or get a view of the generated log file, press enter and select Write Log or Write & View Log.
The log file will now be available from the flash card, either directly, or through Sensor Transfer..

ApplicationsLeica Geosystems GS20 Field Guide-2.0.0en 62
Using Power Paging function from the CFC application with an opened log file:
1. In CFC click two times
2. From Main Menu select 1 Data Collection3. Select a feature and occupy the nodes. Save the feature.
4. To return to CFC, press twice
5. Calculate the next area and attach it to the opened log file.
6. From Main Menu you can page to every opened application.
7. In Main Menu select CFC from the table.

ApplicationsLeica Geosystems GS20 Field Guide-2.0.0en 63
7.2 File Conversion
7.2.1 ASCII Conversion
7.2.1.1 ASCII Import
The File Conversion application enables the user to Import ASCII into a job or Export a job as ASCII or GSI.This application is accessed by selecting 6 Applications from the Main Menu and then 2 File Conversion.
To Import• Select Import ASCII
Files to be imported into a job must be placed in the Data directory on the Compact Flash card.
If a job is open, the following Import interface will appear:
If a job is not open, you will be prompted to open one before proceeding with the import process.
• Once in the Import interface choose the Import File Type.• Choose the From File - the file to be imported into the
current job.

ApplicationsLeica Geosystems GS20 Field Guide-2.0.0en 64
• Select the Coordinate System of the nodes in the file.
• Select the Coordinate Units of the nodes in the file• Select the Height Type - Ellipsoid or Orthometric.• Select the Delimiter - a character marking the beginning or
end of a unit of data.• Select the field position that contains the Node Name,
Northing, Easting and Elevation.
7.2.1.2 ASCII Export
• Select 6 Applications from the Main Menu, 2 File Conversion and 2 Export ASCII.
• Choose the Export File Type.• Select the Format File. This is a user defined file, created
with the assistance of Format Manager office software. This file specifies what data (e.g. Northing, Easting, Code,) are to be passed along in the export file. This file should be created in Format Manager and placed in the Convert directory of the CF card.
• Enter a name (with extension) for the exported file in the To File input box.

ApplicationsLeica Geosystems GS20 Field Guide-2.0.0en 65
• Select Export.
The exported file is placed in the Data directory on the Compact Flash card.
7.2.1.3 ESRI's Shapefile conversion
The File Conversion application enables the user to import ESRI shapefiles as a background map or export a job as ESRI shapefile.
To Import• Select a job in the Job Management menu
Press the Menu button and select Background Maps.

ApplicationsLeica Geosystems GS20 Field Guide-2.0.0en 66
In the Background Maps table, press the Menu button and select Import Shapefile Background.
The following Import interface will appear:
• Once in the Import interface select the folder in which the Shapefile is stored (they are located in the SHP directory of the compactflash card).
• Highlight the Shapefile you want to import and press Menu and Import Shapefile Background to create a vector background data.
ApplicationsLeica Geosystems GS20 Field Guide-2.0.0en 67
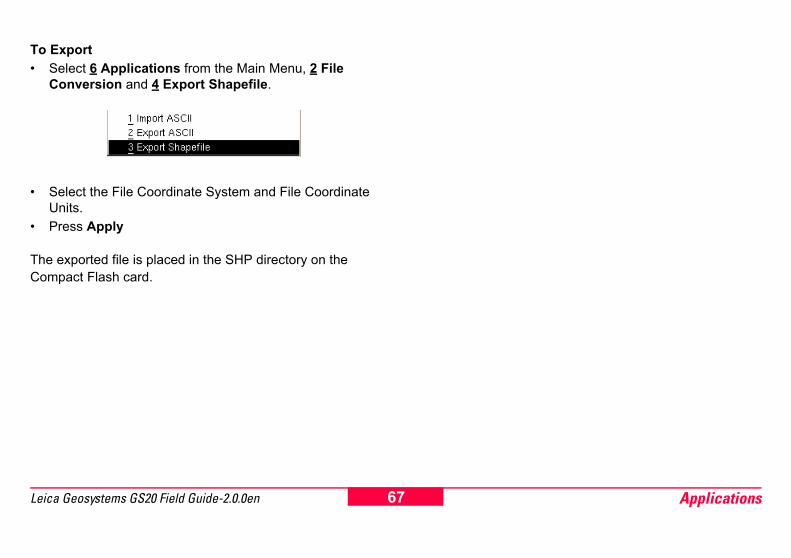
To Export• Select 6 Applications from the Main Menu, 2 File
Conversion and 4 Export Shapefile.
• Select the File Coordinate System and File Coordinate
Units.• Press Apply
The exported file is placed in the SHP directory on theCompact Flash card.

ApplicationsLeica Geosystems GS20 Field Guide-2.0.0en 68

UtilitiesLeica Geosystems GS20 Field Guide-2.0.0en 69
8. Utilities
8.1 File BrowserThe File Browser is the Leica Geosystems GS20 equivalent of Windows’ File Explorer. The file browser provides the ability to view the directory and file structure of the compact flash and system memory. Other functions of the file browser include the ability to:
1. Copy, Paste, Rename and Delete files.2. Format the Flashcard.3. Select and Deselect individual, multiple, and all files.
8.1.1 Browser ControlsThe File Browser screen can be reduced to four main controls.• The Device/Path control allows the user to choose
between the PCCARD and the SM “System Memory.”• The File list allows the selection of files and directories. To
open a directory, press Enter once, to select a file, press Enter twice. Multiple files can be selected and HOME/END PGUP/PGDN are valid.
Tip: To move up one directory, press “..”; Escape will exit the File Browser.
• The Group by name control allows the user to group all job files into a single selection for easier viewing and manipulation.
• The Filter allows for files to be viewed by extension.
8.1.2 Context MenuMost of the File Browser tools are available via the context menu, including:• 2 Copy, 3 Paste, 4 Delete• Compact Flash 5 Format utility• 6 Select All, 7 Deselect All

UtilitiesLeica Geosystems GS20 Field Guide-2.0.0en 70
8.1.3 Firmware UpdateWhen new firmware (or software) is available for the Leica Geosystems GS20, the update will normally be provided on compact flash media. If however the file is delivered in another format, (e.g. E-mail or ftp) it will need to be copied to compact flash in order to perform the upgrade.
Tip: It is advisable to load firmware files directly onto a compact flash card via a card reader for the most sufficient firmware upgrade.
There are three types of firmware upgrades available for the Leica Geosystems GS20 Sensor1. Firmware: Application software (Ven#####.bin)2. Sensor: GPS Engine software (Indigo.run)3. Loader: System boot, diagnostics and upgrade utilities
(Loader.Bin)
All firmware upgrade files must be placed in the GPS\Prog directory. Make sure to have a fully charged battery and exit all applications before beginning the update process. After start is selected, the program will prompt a reboot to begin the update process. After the update is finished the user will be prompted to reboot the device to continue.
8.1.4 Sensor TransferSensor Transfer is used to transfer files between Leica Geosystems GIS DataPRO and the Leica Geosystems GS20 via serial cable or bluetooth. Sensor Transfer provides the ability to choose the port (Port1 or Bluetooth), define the port settings (i.e. baud, parity, bits, etc.) and accept any changes.
Tip: Device setting are available via the context menu.
Because of the exclusive nature of Sensor Transfer, all other applications must be shutdown before beginning a transfer.
8.1.5 Clear System MemoryClear System Memory: will set all user defined configs, recent settings, ID-templates, stations, ports e.t.c. back to factory defaults. This application requires also a full shut-down immediately after proceeding.

SetupLeica Geosystems GS20 Field Guide-2.0.0en 71
9. SetupThe Setup application contains both default and user defined configurations that determine how a unit operates. Eight default configurations are preloaded on the Leica Geosystems GS20 to allow the user to begin data collection immediately. New configurations can be created and default configurations can be modified, but any modifications to a default must be saved under a different name.
9.1 Selecting, Modifying and Creating Configurations
Several default configuration sets are provided with the GS20 to facilitate the commencement of data collection. New configurations can be created and default configurations can be modified, but any modifications upon a default must be saved as a different name. Below is an explanation of four commonly used default configuration sets provided with the GS20:
• STATIC refers to post processing static phase. This type of data collection is used for high accuracy, single point occupations, which require that each ambiguity resolution is a separate calculation. For this type of data collection, a status indicator provides user feedback regarding the appropriate length of time necessary to occupy a data point in order to provide a high level of confidence that the ambiguity of the point will be resolved.
• KINEMATIC is also a form of phase data collection. Ambiguities are resolved on an initial static point and then these corrections are applied to all collected data within an unbroken kinematic chain. If, at any time, the number of available satellites drops below 4 the chain will be broken and the user will be required to initialize upon another static point.
• SBAS, Satellite Based Augmentation System, is a free real-time or differential correction technique. WAAS is the correction available in North America and EGNOS is the European equivalent.

SetupLeica Geosystems GS20 Field Guide-2.0.0en 72
• REFOUT is utilizing the GS20 as a reference station. This configuration will send a real-time message out of a port of the GS20 receiver. The following sections explain how to create new configurations, modify existing configurations and step through the configuration setup of these four methods to better understand their differences.
• POSTPROC is the default configuration set for postprocessing code solutions in GIS DataPro.
• RTNET enables the GS20 to receive real-time corrections via mobile phone or GSM. This setting allows the GS20 to receive corrections and rebroadcast NMEA on the same port at the same time.
The Setup screen opens to a setup menu that displays the Config Sets, Hardware Management, ID Template Management and Device Management.
9.1.1 SelectingA configuration can be selected by selecting Config Sets and highlighting the table row and pressing Enter. The selection is shown by a filled circle or "radio button".
9.1.2 ModifyingIf Enter is pressed again on a selected field, Setup will open the configuration for editing. If a Default Configuration is modified, the user will have to 1 Save As via the context menu, or exit dialog on Escaping.
Tip: Changes will not take place until the configuration is saved.
9.1.3 Setting Password protection for your configura-tion settings
You can protect your user-defined configuration sets with a password. To turn on the password protection you have to check "Advanced Mode" in Hardware Management -> Hardware. The default password is SMARTGUY.

SetupLeica Geosystems GS20 Field Guide-2.0.0en 73
9.1.4 CreatingTo create a new configuration from the table, select Menu and choose 1 New. A text entry dialog will open requiring a name to be entered and saved. The configuration will then be selected and editable.
When creating a new configuration, values will be copied from the previously highlighted configuration.
9.2 Tree Directory NavigationThe tree style directory menu of Setup groups similar screens into expandable branches. Each branch of the tree can be navigated using the up and down arrows. Sub-branches of a tree are depicted by a “+” to the left of the branch; this can be expanded by pressing Enter. Similarly an expanded branch is depicted by a “-” to the left of the branch and can be contracted by pressing Enter. If no sub-branch exists for a branch, it is a application screen that can be opened by pressing Enter.
The main branches of the Setup tree, including:• GPS: Satellite tracking, logging controls and antenna
settings.• Data Collection: Quality assurance and autostop
functions.• Interfaces: External devices connected via wireless or
hardware serial ports, NMEA output settings, ASCII input controls and device settings for real-time correction systems.
• Units and Formats: How data is entered and displayed on the unit.

SetupLeica Geosystems GS20 Field Guide-2.0.0en 74
9.3 Hardware ManagementHardware Management is used to modify functions unique to the Leica Geosystems GS20 unit. This is accessed by selecting 8 Setup from the Main Menu and 2 Hardware Management.
9.3.1 Hardware1. Allows the user to personalize the unit name, by default the
unit name is the serial number.
The Unit Name directly effects the prefix of the datafile names.
2. Backlight time-out dictates how long the backlight is active after the power key is depressed.
3. Enable or disable the speaker.4. Character edit time-out changes the amount of time a
character is in edit mode. After the time-out the selected becomes an entered value, and the cursor moves right to the next edit field.
9.3.2 ContrastProvides contrast controls using the left and right arrow.
Tip: Blind access to the contrast controls are always available by pressing Menu in the Main Menu. (i.e. pressing Menu on Startup or 3 Menus from any screen)
9.3.3 Wireless (Bluetooth Connectivity)The Bluetooth connectivity controls provide the user with the ability to select and connect to the Leica Geosystems WoRCS accessory belt and the PC Sensor Transfer unit.
Either a Bluetooth name or the device address will be displayed upon sucessful inquiry.

SetupLeica Geosystems GS20 Field Guide-2.0.0en 75
9.3.3.1 Selecting a Wireless Device1. Expand the “Wireless” and “Bluetooth: Leica” tree
branches.2. Highlight the wireless port to be connected (i.e. WoRCS,
Sensor Transfer, Virtual Serial 1, Virtual Serial 2) and press Enter.
3. Select Inquire to search for bluetooth devices. "Please wait..." will be displayed during the search, Cancel will stop the inquiry.
4. When the soft button returns to Inquire, select from the list of Available devices.
5. Select Menu and choose Save.
9.3.4 Clearing a Selected Device1. Expand the “Wireless” and “Bluetooth: Leica” tree
branches.2. Highlight the wireless port to be cleared and select Menu
and choose Clear.
9.3.5 Real-Time Corrections with a Mobile Phone (RTNet Configuration Set)
Just as real-time corrections can be broadcast over UHF/VHF radio and satellite signals,correction packets can be sent via mobile phone and modem alike. Version 4 builds on thecurrent real-time capabilities of the GS20 by adding GSM and modem capabilities.Version 4 also provides support for additional RTK data correction formats such as RTCM 18-21, Leica NTrip and Trimble CMR. Finally by using the Bluetooth technology, your real-time correction system can be as small as your GS20 and your phone.
OverviewIn order to use the GSM or Modem abilities with the GS20, you must either have a hardware device currently supported (see list), or information concerning the AT commands for a particular device. GSM or modem devices can be connected to the GS20 in 3 ways:
1. Bluetooth connection directly to the GS20: Using a Virtual BT Port.
2. Bluetooth connection via the WoRCS belt: Using Lemo or DB9 connection.
3. Bluetooth connection directly to the GS20: Using a modified cable with RTS/CTS leads.

SetupLeica Geosystems GS20 Field Guide-2.0.0en 76
This cable can also be created by modifying the existing download cable 731354.
This will not affect the functionality of the cable for sensor transfer or connection to external devices.
A reference station list must be defined either on the device, or by a text file which includes:• Dial in number: Mandatory• Reference Station name: Mandatory• Reference Coordinates: Optional. However reference
coordinates provides baseline data.Finally, a configuration must be created that will reference the device being used, the connection type listed above, and the real-time correction format.
9.3.6 Linking with the BluetoothThe cleanest way to link to a mobile phone is using a Bluetooth Virtual Serial port. Although Bluetooth is a consortium standard, Bluetooth devices don’t always work together. By all means, try a device before you buy a device, or call your local Leica support technician.
Making the connect1. From the Main Menu, select 8 Setup, and 2 Hardware
Management.
2. At the bottom of the Hardware Management screen, you will find the:• Wireless• Bluetooth• Virtual Serial 1 and 2
3. Enter the Virtual Screen, and Inquire for a Bluetooth Device.
Make sure to expand the list to ensure you have the correct device.
4. Select Menu and Save.
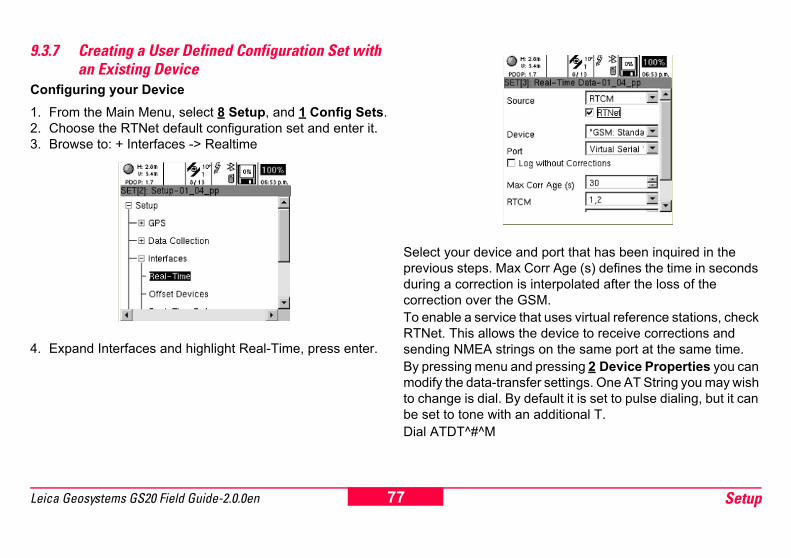
SetupLeica Geosystems GS20 Field Guide-2.0.0en 77
9.3.7 Creating a User Defined Configuration Set with an Existing Device
Configuring your Device1. From the Main Menu, select 8 Setup, and 1 Config Sets.2. Choose the RTNet default configuration set and enter it.3. Browse to: + Interfaces -> Realtime
4. Expand Interfaces and highlight Real-Time, press enter.
Select your device and port that has been inquired in the previous steps. Max Corr Age (s) defines the time in seconds during a correction is interpolated after the loss of the correction over the GSM.To enable a service that uses virtual reference stations, check RTNet. This allows the device to receive corrections and sending NMEA strings on the same port at the same time.By pressing menu and pressing 2 Device Properties you can modify the data-transfer settings. One AT String you may wish to change is dial. By default it is set to pulse dialing, but it can be set to tone with an additional T.Dial ATDT^#^M

SetupLeica Geosystems GS20 Field Guide-2.0.0en 78
The Device also requires that a station is selected. However, it is necessary to create a station list or transfer from an external source. To create a station file, select Menu, 3 Station and 2 New.From the station list, enter a dialing number and station name. For the initial test, keep the station analog, unless your provider is accepting ISDN connections. You can also add coordinate values if you have them. Pressing the escape button and confirming the dialogues with yes saves your changes. Save the user defined config set and label it according your needs.
9.3.8 Configuring your Device1. From the Main Menu, select 8 Setup, and 4 Device
Management.2. Choose your device from the list, and create a new device
based on that.
Once you enter the edit field the up arrow is home and the down arrow is end.
3. Modify your Device Name to begin with Z! This makes it easy to access from the bottom of the list.
4. One AT String you may wish to change is dial. By default it is set to pulse dialing, but it can be set to tone with an additional T.Dial ATDT^#^M
5. The Device Also Requires that a station be selected. However, it is necessary to create a station list or transfer from an external source. To create a station file, select Menu and 3 Station. Create a New Station
6. From the Station list, enter a dialing number and station name. For the initial test, keep the station Analog, unless experience dictates otherwise. You can also add coordinate values if you have them.
7. Save the Station file, and select the newly created station in the Device.

SetupLeica Geosystems GS20 Field Guide-2.0.0en 79
9.3.9 Modifying your ConfigurationFor this exercise, we will select the existing Beacon configuration, and create a user defined configuration from it.
1. From the Main Menu, select 8 Setup, and 1 Config Sets2. Highlight the Beacon Configuration, Select Menu and
Create New3. Name the configuration GSM or Modem and Select and
Open the configuration4. Enter the +Interface +Real-time Screen5. From the Real-time, select
a. The format of the reference station corrections. (i.e. RTCM, Leica, or CMR)
b. The Device Being used (Press the right arrow to go to the end of the list “Z”)
c. The Port being used (Virtual 1)6. Save the configuration
If you chose to use a Bluetooth Device• After saving the Configuration, power off both the GS20
and the Mobile Phone• Power On both units, and you should be prompted for a
Keycode for bonding.
9.3.10 Status IndicationIf everything has been configured correctly, you should have• A real-time icon arrow (hollow)• A Bluetooth icon, if Bluetooth is used, with a chain "link"
beneath it• A mobile phone icon with a link
9.3.11 Connecting to the StationFrom Data Collection, select Feature Occupation, press the Menu key and select Connect. To disconnect press the Menu key and select Disconnect.
More StatusIf your station connects, you will receive a link under the arrow, but it is still hollow.If your corrections are good you should receive a solid arrow, and an indication in the status bar.

SetupLeica Geosystems GS20 Field Guide-2.0.0en 80
If your corrections are processed with the GPS, your positional icon should be a bullseye, and your qualities will reflect the corrections.
9.3.12 NTRIPWith firmware version 4.0, it is possible with GS20 to access the Internet and to use Internet Services such as the Network Transport of RTCM via Internet Protocol (NTRIP) service. These notes describe how to configure and use a GS20 sensor as a real-time rover connected to the Internet using a GPRS device and receiving RTCM data from the NTRIP service.
In order to connect to the Internet with GS20 and use the NTRIP Service, it is necessary to have hardware version 2 or higher.
9.3.12.1 An Overview About NTRIPNTRIP is the protocol for streaming GPS RTCM data over the Internet. For detailed information about NTRIP technology, concepts, documents, different broadcaster addresses and other information, access: http://igs.ifag.de/index_NTRIP.htm
Also available on this site is information about data transmission rate of pseudorange and carrier phase corrections, latency and accuracy of DGPS data streaming via the Internet.
NTRIP basically consists of three system components:• NTRIP Clients• NTRIP Servers (connected to NTRIP Sources)• NTRIP Caster
The NTRIP Protocol is based on Internet HTTP (Hypertext Transfer Protocol). The NTRIP Caster is acting as the HTTP Server (TCP/IP server), whereas both the NTRIP Client and the NTRIP Server are acting as HTTP Clients (TCP/IP clients).

SetupLeica Geosystems GS20 Field Guide-2.0.0en 81
9.3.12.2 NTRIP ClientThe NTRIP Client receives data streams - in our case, RTCM data streams. The NTRIP Client needs to be first accepted by the NTRIP Caster and if authorized, will receive RTK data from the NTRIP Caster. In order to receive RTCM data, the Client needs to send access parameters (user ID and password) to the NTRIP Caster. Additionally the Client has to give the Caster information from which Mountpoint (source) he wants to receive data. If the Client wants to know which Mountpoints are available from the Caster, then the Caster can provide a list of available Mountpoints to the Client in a so-called Source-Table.
9.3.12.3 NTRIP ServerThe NTRIP Server transfers RTCM data to the NTRIP Caster using TCP/IP connection. The NTRIP Server needs to be first accepted by the NTRIP Caster and if authorized, can pass RTCM data to the NTRIP Caster.The NTRIP Source generates the RTCM data streams.
The NTRIP server could be a PC using LEICA GPS Spider.
The NTRIP Server also sends the identification name of the NTRIP Source, the so-called Mountpoint, and other additional information parameters relating to the Source, which identifies the Source to the NTRIP Caster. Such additional information may include which RTCM format is transferred or if the Client (rover) needs to send NMEA positions in order to receive an individualized RTCM stream from a reference station network.
9.3.12.4 NTRIP CasterThe NTRIP Caster is basically an Internet (HTTP) Server, which handles the different data streams to and from the NTRIP Servers.The Caster checks the received request messages from NTRIP Clients and Servers to see if the Client Server is registered and authorized to receive or provide RTCM data streams. Depending on those messages, the NTRIP Caster decides whether there is streaming data to be sent or to be received.
9.3.12.5 Using GS20 with NTRIP service
How to configure and use a GS20 Sensor as a real-time rover connected to the Internet using a GPRS device receiving RTCM data from the NTRIP service.

SetupLeica Geosystems GS20 Field Guide-2.0.0en 82
Accessing the Internet with a GS20 Sensor
When using a GPRS device to connect a GS20 sensor to the Internet, then the sensor will always be used as an Internet TCP/IP Client - this is one of the "features" of using a GPRS device to connect to the Internet. Operating the sensor as an Internet Client means that the sensor connects to another "Computer" in the Internet in order to receive RTCM corrections.
To connect a GS20 with a GPRS device please refer to the chapter 9.3.6 "Linking with the Bluetooth".
1. From the Main Menu, select 8 Setup, and 1 Config Sets.2. Choose the RTNet default configuration set and enter it.3. Browse to: + Interfaces -> Realtime4. Select your previously configured GPRS device5. Press the Menu key and select Device Properties
6. Press the Enter key to enable GPRS/Internet and further down Use Internet at the bottom of the Device Property table. You can enter a name for this Internet Profile or choose from an existing list, if you have already configured one.

SetupLeica Geosystems GS20 Field Guide-2.0.0en 83
7. Press the Menu key and select Internet and New for a new Internet configuration
8. In the Internet Profile Property table can change between your different profiles (so-called Devices) if you have previously configured it.
9. Select Use Static IP if your GPRS provider don't distributes dynamic IP's. In most cases you don't have to enable Static IP. In this case leave Local IP Address blank.
10.Check Autoconnect if you want an automatic reconnection after a loss of connection
11.User ID and Password has to be completed if your GPRS provider requires this information. In most cases you can leave it blank.
12.In the TCP/IP settings you can either choose from a list of profiles if you have already configured one, or create a new by simply typing in a name.

SetupLeica Geosystems GS20 Field Guide-2.0.0en 84
13.In the "Connect Using..." tab, you can select Host IP Address which is the Internet Protocol address of the NTRIP Caster or you can select Host Name, which requires a Domain Name Service (DNS) from your GPRS provider. The TCP/IP Port defines the port on which NTRIP is streamed.
14.Enable "Use NTRIP". Again you can choose from a list of already configured profiles or you create a new.
15.Complete the NRIP User ID and NTRIP Password which are given from the NTRIP service provider. Passwords are in most cases case-sensitive. You can change from Upper to Lower case by pressing the Menu key and selecting Lower or Upper Case.

SetupLeica Geosystems GS20 Field Guide-2.0.0en 85
After the first connection to the NTRIP service you have a list of Mountpoints from where you can select which format you want. If the Mountpoint is already known you can complete it by pressing the Enter key.
16.Establish the connection by pressing the Menu key and selecting Connect in the Data Collection Menu.
9.4 ID Template ManagementThe ID Template Management application allows for points, auxiliary points (offset base points), lines, and area features to be automatically and sequentially marked for easier selection and query. Templates can be modified, created and Deleted via the context menu.By Default, each existing ID Template type comes with two existing templates. Time and Date, and the Template type followed by ##### (e.g. Point00001). Additionally, No Template can be selected, allowing for manual entry by the user.
9.4.1 Creating an ID Template1. From the ID Template Manager, select Menu and choose
1 New.2. Choose the Object Type from the drop down picklist.3. Enter a template Prefix (i.e. USGS)4. Select the start number, otherwise defaulted to 1.5. Select an auto increment number.
SetupLeica Geosystems GS20 Field Guide-2.0.0en 86
9.4.2 Modifying an Existing Template1. In the ID Template Manager, select the Object Type to be
modified.2. Select the ID Template Name to be modified.3. Edit the Prefix, Start # and Auto Increment fields.4. Select Menu and enter on Save.
9.5 Device ManagerThe Device Manager provides a library of all devices available for Real-Time, Offset, and ASCII Input. The Device Manager allows for existing devices to be modified and new devices to be created.
9.5.1 Creating a New Device 1. From the Device List, select Menu and choose 1 New.
Tip: The Properties of the previously highlighted device will be copied, including the next sequential number of the Device name.
2. Edit the Device name, and edit the hardware port settings if necessary.
3. Select Menu and choose Save.
9.5.2 Modifying an Existing Device1. From the Device List, select Menu and choose
2 Properties.2. Modify the Device name, and edit the hardware port
settings if necessary.3. Select Menu and choose Save.

SetupLeica Geosystems GS20 Field Guide-2.0.0en 87
9.6 GPS ControlsThe GPS subgroup allows the user to specify tracking and logging parameters, set antenna parameters and enter initial coordinates for first time tracking to a new region.
9.6.1 TrackingThe tracking screen is comprised of three controls.• Max Accuracy / Max Track / Hyper Track radio button:
Max Track and Hyper Track are Leica Geosystems innovations that allow for signals to be tracked at a lower strength threshold to provide reception in dense foliage.
Tip: Max/Hyper Track does not allow for phase collection. High precision points should be collected in Max Accuracy.
• Mask Angle - the angle above the horizon which determines the cutoff for tracking satellites.
Because a greater distance through the atmosphere must be penetrated for low elevation satellites, a default of 10 degrees is preset and recommended as a minimum!
• The DOP, or Dilution of Precision Filter is user definable mask based on satellite geometry. This is a setting normally used for autonomous (i.e. correctionless) collection.
9.6.2 Minimum SatellitesThe Minimum Satellite control allows the user to define how many satellites must be tracked to calculate a positions. The default setting is 4 satellites, because a minimum of 4 satellites is necessary to calculate a 3 dimensional position.
Three satellites can calculate a position assuming a fixed ellipsoidal elevation; however this is only recommended for navigational purposes.
9.6.3 Antenna TypeA default library of 3 antenna types is available, the Leica Geosystems GS20 Internal, the AT501 Pole (external), and the AT501 Tripod (external) and AT1201. For normal use, the user only needs to define the height of antenna above the point being occupied.
Tip: The Leica Geosystems GS20 automatically senses when an antenna has been plugged in or unplugged. The unit opens and resets the antenna configuration accordingly.
9.6.4 LoggingThe Logging screen contains controls to store raw pseudo- range data for post-processing, static and moving observations, and positional update rate for the receiver (default 1 second.)

SetupLeica Geosystems GS20 Field Guide-2.0.0en 88
Data collected without enabling the logging cannot be post processed for corrections!
To enable post processing, select the static or moving check box and set the observable logging rate. This rate controls both moving and static logging rates, so it is recommended that 1 second be used when collecting lines and areas in a job.
9.6.5 InitializationThe time and initial position controls help the unit to obtain satellites faster in a new geographic location or when there is no almanac data present on the unit.Time/Date and position controls can be edited by selecting 8 Setup, 2 Hardware Management, GPS, Initialization.
New almanac data is sent by a satellite every 12.5 minutes. After the first position is calculated, the Time and Initial Position fields will update to reflect the last position.
Valid limits are 0-90 degrees for Latitude and 0-180 degrees (East and West) for Longitude.
9.7 Data CollectionThe Data Collection subgroup is where quality minimums are defined for both automatic collection and notification alarms.
9.7.1 Quality MonitorThe Quality Monitor controls are subdivided into Point Quality (which is also applicable for linear node collection) and Line/ Area streaming.
Point Quality1. Point Quality can be reported in terms of horizontal,
vertical, horizontal & vertical or none.
If only Horizontal or Vertical quality is chosen, the other edit field will be disabled!
2. Point Autostop:• None: Occupation is manually controlled (i.e. started
and stopped) by the user.• Quality: The occupation will be stopped once the
Quality defined (e.g. Horizontal) is achieved.• Positions: The occupation will be stopped once the
number of positions required are collected.
Positions must achieve the required quality to be stored.

SetupLeica Geosystems GS20 Field Guide-2.0.0en 89
3. CQ Warning (Coordinate Quality): Even if Point Autostop is set to none, a notification alarm can be set to alert the user that the defined quality has been exceeded.
Line Quality1. Defines the horizontal quality tolerance for linear
streaming.
Tip: The Line Quality can be used to filter or just notify the user of positions that exceed quality. This setting can be found in the Streaming Options in Data Collection.
9.8 InterfacesThe Interface subgroup controls how external devices interact with the Leica Geosystems GS20. The interfaces are further subdivided into Real-Time, Offset Devices, and NMEA Output.
9.8.1 Real-TimeReal-Time or “Differential” correction allows a GPS to use a known reference position to correct the less accurate autonomous position. The Leica Geosystems GS20 supports two combined message formats of the RTCM "Radio Technical Commission for Maritime services" standard. RTCM (9,2) (1,2) (18,19) and (20,21).Several default devices are available for Real-Time Interface.• RTB: CSI Real Time Coast Guard Beacon.• RTS: Racal LandStar Satellite Subscription Service.• RS232: An open standard for 3rd party devices.• GSM• Modem DevicesTo view or edit the properties of the device being used, Select Menu and choose 2 Device Properties.
Tip: Additional properties unique to a device such as the RTB (Frequency, Bit Rate) and RTS (Channel and Station) can be defined by the user in Device Properties.

SetupLeica Geosystems GS20 Field Guide-2.0.0en 90
Port: Three ports are currently available for connection to a Real-Time device. • Port 1: Serial Lemo connection on the bottom of the GS20• WoRCS 1: The 5 pin Lemo Port located on the bottom of
the WoRCS Bluetooth Hub.• WoRCS 2: The 8 pin Lemo Port located on the switch side
of the WoRCS Bluetooth Hub.
The Bluetooth must be connected to the WoRCS in the Hardware Management.
Log without Corrections: If Real-Time corrections are lost, data can continue to be recorded for post-processing in the GIS DataPRO office software.Maximum Age of Correction: The user can define how long to use corrections to calculate a Real-Time position after the correction source is lost.
Although old corrections can be used for longer time periods, the degradation of quality becomes exponential with time.
RTCM: The user can choose from type (9,2) which is used with RTB Coast Guard Beacon, or (1,2) which is used with RTS and other Satellite correction sources.
(See above section ALMANAC for further explanation)
9.8.2 GS20 Phase WizardThis document is intended to provide the user with insight into how the Phase Wizard works, and step-by-step instructions on its use. Because the GS20 can be used with both SKI PRO and GIS DataPRO, both platforms will be discussed below. For additional information about the use of SKI PRO or GIS DataPRO, please refer to the documentation included with those packages.
9.8.2.1 OverviewThe phase wizard was created to provide the user with an easy to use interface for collecting high-accuracy data with the GS20. Additionally, the phase wizard collects data in a way that can be processed more efficiently in SKI PRO or GIS DataPRO, creating a simplified process for the user in the field and office.The GS20 Phase Wizard allows the user to select from Static Phase Collection, Kinematic Phase collection, or No-Phase (Code only) Collection. By choosing one of these methods, the setup/configuration file is automatically modified without additional input from the user.

SetupLeica Geosystems GS20 Field Guide-2.0.0en 91
9.8.2.2 Static Phase Static Phase collection is optimized for high accuracy single point occupations, which require that each ambiguity resolution be a separate calculation. In order to optimize this collection, moving or kinematic chain data is not logged and streaming occupation is unavailable. In this configuration, the user will enter antenna height and baseline length from the reference station. A status indicator will then provide user feedback on the length of time needed to occupy a point to provide a high level of confidence that the ambiguity of the point will be resolved.
9.8.2.3 Kinematic Phase Kinematic Phase collection is designed to resolve ambiguities on an initial static point, and apply those same corrections to all collected data within an unbroken “kinematic chain”. The user is prompted to occupy a initialisation point, and the method of collection is similar to that of static phase collection. Once the point has been occupied for a sufficient amount of time based on satellite geometry, baseline length and antenna parameters, indicated by a status bar. Point and linear streaming data can be collected in a normal fashion. If, however, at any time the GPS lock drops below 4 satellites, the phase chain will be broken and the user is required to initialize another static point.
9.8.2.4 The InterfaceIn order to select a mode of phase collection,the user simply needs to press the menu button in the Codes screen. The user will then have the ability to select from three modes of collection:
1. No Phase2. Static Phase3. Kinematic Phase

SetupLeica Geosystems GS20 Field Guide-2.0.0en 92
When a phase mode has been switched, a message will pop up to indicate that configuration settings may have been changed. If you are currently in a default configuration, the system will indicate that the changes must be saved into a new configuration, and a prompt will appear to name that configuration.
9.8.2.5 Collecting Static points, including kinematic points of initializationA status indicator reports the amount of occupation time required to resolve phase ambiguities. This figure is based upon the number of satellites, satellite geometry and the baseline length to the reference GPS.
In order to provide the correct information, the user must enter a baseline selection. Both the baseline length and antenna height of an occupation can be entered from the menu dialog in the codes screen.

SetupLeica Geosystems GS20 Field Guide-2.0.0en 93
9.8.3 SBASThe Satellite Based Augmentation System or SBAS is a free real-time correction. The system available in North America is referred to as WAAS and is comparable to the European EGNOS correction, currently in a testing phase. These corrections are broadcast on the same frequency as GPS, can be received without the need for additional hardware and are free of charge. To set SBAS as the active correction, you can either use the default configuration, create a new configuration or edit a user defined configuration.
1. Select 8 Setup from the Main Menu and 1 Config Sets. SBAS is selectable from this MENU.
2. The simplest way to receive a SBAS correction is to select the default.

SetupLeica Geosystems GS20 Field Guide-2.0.0en 94
3. Most likely, you will want to select a User Defined configuration or press Menu and create a New configuration based on your highlighted default.
4. Enter the configuration, and expand the interfaces branch. Select Tracking and press the Enter key.
5. Set the source to SBAS.
9.8.3.1 Understanding the SBAS Corrections1. The immediate and most notable change will be the SBAS
Satellite Icon in the real-time window. This indicates the unit is set for SBAS corrections.
2. When the icon becomes a solid fill, this indicates that the SBAS signal is being received.
3. Once the corrections have been calculated, the SBAS Satellite Icon will become Bold, the status bar will indicate Reference Data is Available, and the positional Indicator will become a bulls eye.
4. SBAS corrections are able to extrapolate, or coast for 60 seconds. If the correction is lost, a numeric indicator under the SBAS Satellite Icon will display how many seconds since the last correction.
5. SBAS Satellites can be viewed in the Satellite Status Screen. SBAS Signal Strength is also indicated in the Status Real-time Screen.

SetupLeica Geosystems GS20 Field Guide-2.0.0en 95
9.8.3.2 Changes to the Real-Time ScreenA new Source selection allows the user to select none (no correction), SBAS, RTCM (Including Real-time Beacon, and Real-time Satellite), Leica and Trimble CMR.If the RTCM, Leica or Trimble CMR source is selected, you must then specify a device.
New devices can be created and configured in the Setup \ Device Management screen.
User defined quality settings can determine how the feature is collected (see Setup\Data Collection.) In addition to direct locations, the user can also choose from a list of point offsets.
9.8.4 Connecting to WoRCS BeaconIf you purchased the Leica Geosystems GS20 with the Wireless real-time Correction System (WoRCS) you are only steps away from collecting real-time sub-meter data. The WoRCS comes preconfigured with Bluetooth linked to your GS20.
WoRCS Belt

SetupLeica Geosystems GS20 Field Guide-2.0.0en 96
9.8.4.1 Powering on the WoRCS1. The Bluetooth Module is the only belt item with
configurable controls. By default, power should be set to on and line should be set to Bluetooth.
2. Follow the procedure listed previously for charging the batteries. Once the batteries are fully charged, you can place them in any of the three bays of the battery insert shown below. The battery insert is both hot swappable and self-switching. The batteries will be drawn down from bay one to bay three without interruption in power.
9.8.4.2 Checking the Bluetooth LinkIf your Bluetooth link is successfully connected, the bluetooth icon with a chain below and a status message “Bluetooth Link Restored” will appear at the bottom of the screen. You can now proceed to checking the real-time link: If not, follow the steps listed below:
1. Power on the GS20 and select 8 Setup, 2 Hardware Management and the Bluetooth_Wireless Selection.
2. Expand the Wireless tree, expand the Bluetooth, and view WoRCS.
3. If the GS20 has been linked to the WoRCS Bluetooth Module, an address that corresponds to the address on the top of the Bluetooth Module will appear. If the address does not correspond, press menu and select clear.
4. If the address area displays zeros, you will need to establish a connection.
5. Highlight the WoRCS branch and press enter; this will take you to the Bluetooth Setup screen.
6. Press Inquire and wait until the Cancel button becomes Inquire again.
7. You will see the Available Devices in the choice list. By highlighting the available devices and pressing Enter, you will see the entire list of available bluetooth devices in the choice list. If multiple devices have been found, select the device that matches your WoRCS bluetooth address, displayed on the top of the bluetooth module.

SetupLeica Geosystems GS20 Field Guide-2.0.0en 97
8. Finally, press the Menu key and Save, then Escape back to the main menu.
Tip: Ensure batteries are charged and correctly inserted. Ensure bluetooth module is set to line and on. The single flashing red light indicates that power is available. When the light changes to green a BLUETOOTH connection is established but no data is exchanged. When both green lights are flashing data is exchanged.
9.8.4.3 Checking the WoRCS Real-Time LinkOnce the Bluetooth Link is established, you will need to make sure that your real-time device is linked and active. If the status message “Reference Data is Available” appears, setup is complete, and there is no need to proceed any further. Otherwise, follow the steps of the status check below.
9.8.4.4 WoRCS Real-Time Beacon1. From the Main Menu select 9 Status. Expand the
Interfaces branch and select Real-Time. If you have communication with the Real-time Beacon module (RTB), you will see information about the frequency, signal strength etc; otherwise, you will see all zero values.
The real-time screen does not refresh automatically; to refresh the values, you will need to escape and re-enter.

SetupLeica Geosystems GS20 Field Guide-2.0.0en 98
2. If the Real-time values are all zero, there is no communication to the real-time beacon module. So you will need to verify the configuration.
3. Escape to the Main Menu and select 8 Setup.
Verify the user-defined configuration named "WORCSBCN" is selected; if "WORCSBCN" exists and is not selected, highlight and press Enter, otherwise select the default “Beacon”.
4. Press Enter again on the selected configuration to edit the setup values.
5. Expand the Interfaces branch, highlight the Real-time branch and press enter.
6. Make sure the Device is set to RTB, and the port is set WoRCS 2.
7. Escape and save the values, press the Escape key and save the configuration.
If you are editing a default configuration, you will be prompted to provide a configuration name.
8. Escape to the main menu, and return to the status/Interface/Real-time branch to check the status of the real-time device. You should now see values for the frequency, bitrate, etc.
9.8.5 Connecting to WoRCS Real-Time Satellite (RTS)If you purchased the Leica Geosystems GS20 with the Wireless real-time Correction System (WoRCS), you are only steps away from collecting real-time sub-meter data. The WoRCS comes preconfigured with the Bluetooth linked to your GS20.

SetupLeica Geosystems GS20 Field Guide-2.0.0en 99
WoRCS Belt
1. WoRCS Power Supply Module2. WoRCS RTB Module3. WoRCS BLUETOOTH Module4. WoRCS Belt with Belt keepers5. WoRCS Power Supply Jacked6. WoRCS RTB Module Jacked7. WoRCS BLUETOOTH Module Jacked8. Power Supply to BLUETOOTH Module Cable
9.8.5.1 Powering on the WoRCS1. The Bluetooth Module is the only belt item with
configurable controls. By Default, Power should be set to On, and Line should be set to Bluetooth.
2. Follow the procedure listed previously for charging the batteries. Once the batteries are fully charged, you can place them in any of the three bays of the battery insert shown below. The battery insert is both hot swappable and self-switching. The batteries will be drawn down from bay one to bay three without interruption in power.

SetupLeica Geosystems GS20 Field Guide-2.0.0en 100
9.8.5.2 Checking the Bluetooth LinkIf your Bluetooth link is successfully connected, you will see
the bluetooth icon appear with a chain below and a status message “Bluetooth Link Restored” will appear at the bottom of the screen. You can now proceed to Checking the real-time Link; if not follow the steps listed below:
1. Power on the GS20 and select 8 Setup, 2 Hardware Management and the Bluetooth_Wireless Selection.
2. Expand the Wireless tree, expand the Bluetooth, and view WoRCS.
3. If the GS20 has been linked to the WoRCS Bluetooth Module, an address that corresponds to the address on the top of the Bluetooth Module will appear. If the address does not correspond, press menu and select clear.
4. If the address area displays zeros, you will need to establish a connection.
5. Highlight the WoRCS branch and press enter; this will take you to the Bluetooth Setup screen.
6. Press Inquire and wait until the Cancel button becomes Inquire again.
7. You will see the Available Devices in the choice list. By highlighting the available devices and pressing Enter, you will see the entire list of available bluetooth devices in the choice list. If multiple devices have been found, select the device that matches your WoRCS bluetooth address, displayed on the top of the bluetooth module.
8. Finally, press the Menu key and Save, then Escape back to the main menu.

SetupLeica Geosystems GS20 Field Guide-2.0.0en 101
Tip: Ensure batteries are charged and correctly inserted. Ensure bluetooth module is set to line and on. The single flashing red light indicates that power is available. When the light changes to green a BLUETOOTH connection is established but no data is exchanged. When both green lights are flashing data is exchanged.
9.8.5.3 Checking the WoRCS Real-Time LinkOnce the Bluetooth Link is established, you will need to make sure that your real-time device is linked and active. If the status message “Reference Data is Available” appears, setup is complete, and there is no need to proceed any further. Otherwise, follow the steps of the status check below.
9.8.5.4 WoRCS RTS1. From the Main Menu select Status. Expand the Interfaces
branch and select Real-Time. If you have communication with the Real-Time-Satellite module (RTS), you will see information about the Station ID, frequency, signal strength etc.
The real-time screen does not refresh automatically; to refresh the values, you will need to escape and re-enter.
2. If the Station = -1, this means the RTS Unit does not have a subscription. You will need to contact Racal-LandStar to check the status of your subscription. To find the office nearest you, go to www.omnistar.nl (former RACAL Landstar).
3. If the station id is present and all lights are on, on the RTS Module, escape to the Main Menu and select 8 Setup.
Verify the user-defined configuration named "WORCSRTS" is selected; if "WORCSRTS" exists and is not selected, highlight and press Enter, otherwise select the default “RACAL”.

SetupLeica Geosystems GS20 Field Guide-2.0.0en 102
4. Press Enter again on the selected configuration to edit the setup values.
5. Expand the Interfaces branch, highlight the Real-time branch and press enter.
6. Make sure the Device is set to RTS, and the port is set to WoRCS 1.
7. Escape and save the values, then escape and save the configuration.
If you are editing a default configuration, you will be prompted to provide a configuration name.
8. Escape to the main menu, and return to the status/Interface/Real-time branch to check the status of the real-time device. You should now see values for the Station ID, frequency, bitrate, etc.
9.8.6 Offset Devices
9.8.6.1 Configuration of the GS20When points cannot easily or accurately be accessed by direct GPS occupation, you have the option of calculating using an offset method.The GS20 offers four point offset collection methods and works with most laser range finders.The bluetooth modul supports laser range finders and transmits the data cablefree to the GS20.

SetupLeica Geosystems GS20 Field Guide-2.0.0en 103
The DISTO plus can be interfaced with the GS20 directly via bluetooth. Data can then be transmitted to the GS20 cable free.
If using a DB9 cable interface, it may be necessary to use a null modem.A null modem switches the 2 and 3 pin of a serial interface.Once the Rangefinder is connected to the system via one of the above methods, you will need to configure the port for the specific device. This will depend upon the device you are using and how you chose to connect it to the system.
1. From the GS20 Main Menu, select Setup and Enter your selected configuration.
2. Expand the Interface branch and select Offset Devices.3. Select the appropriate device and the corresponding port.
Selecting Virtual Serial connects to the GS20 via bluetooth.
Leica DISTO plus - the innovative hand-held laser meter for fast and easy distance measurements of length, squares and volumes with the press of a button.

SetupLeica Geosystems GS20 Field Guide-2.0.0en 104
Before connecting with the DISTO plus, make sure the bluetooth setting of the Virtual Serial Port has been inquired and saved.
4. Escape and save changes. Once you have the device and port settings set to match the offset device and port connection you are using, you will be ready to collect data.
9.8.6.2 Overview of the basic methodologies of point offset data collectionWhen collecting a point offset, it is important to input the offset data before occupying the auxiliary point.Azimuth Distance: Enter Azimuth, Distance and Delta Height before occupying the point.Azimuth Azimuth: Enter Azimuth and Delta Ht for 1st posi-tion from Aux Pt. A; then repeat for PT B.
Azimuth Distance
Aux “A” 125 o30’00”
35m
+ O/S Pt
+Azimuth - Azimuth
Aux “A” Aux “B”
O/S Pt
110o
220
o
+
Aux “A” Aux “B”
O/S Pt (Left Solution)
35m 25m
R(Right Solution)Distance Distance

SetupLeica Geosystems GS20 Field Guide-2.0.0en 105
Distance Distance: Enter Distance and Delta Ht for 1st position from Aux Pt A; repeat for position B and choose the solution method (i.e. Left or Right)
Because two solutions exist for a double distance intersections, the user must tell the software on what side of point A-B the offset point lies.
Backwards Azimuth and Distance: Useful when locating a point by direct occupation when no GPS exists. This works by providing an azimuth and distance to a previously located point. The calculation then reverses the course and distance.
9.8.6.3 Explanation of individual point offset data collection methodologiesTo Collect a Point using offset methods, select the desired code as you would for a standard point collection. In the feature collection screen, select Menu and choose 2 Offset. You will then be presented with the following options for collection:
1. Once in the offset screen, select Azimuth Distance.
2. Collect the value with your rangefinder or enter them manually.

SetupLeica Geosystems GS20 Field Guide-2.0.0en 106
3. If your rangefinder only calculates a distance, you must manually enter the other parameters.
4. Select Occupy, similar to normal point collection. Both manual and auto-stop work in offset occupation.
Although a default Auxiliary or base point is created for the offset, you can use the geo-clipboard to select from a stored base point for multiple occupations.
Double Azimuth or Double Distance.Collecting an offset using double Azimuth or Double distance methods requires collecting both range and occupation information from two locations.
1. Populate the “A” fields manually or with a range finder, then occupy the point.
2. After the “A” occupation has taken place, the “A” fields are no longer editable.
3. Populate the “B” fields, then take the “B” occupation. Escaping will allow for points to be re-occupied, however it is not possible to keep the “B” collection and re-occupy “A”.

SetupLeica Geosystems GS20 Field Guide-2.0.0en 107
Reverse Azimuth and Distance.The backward, or reverse Azimuth and Distance method allows you to calculate your position, by sighting a reference point of known origin.A known node or point feature must be copied to the Geo-Clipboard.The node or point can be copied to the Geo-Clipboard by map or table in Data Management or Navigation.The known feature is automatically selected from the Geo-Clipboard in the offset screen. No Occupation is necessary.
By Calculating the backward azimuth distance offset without populating the fields (i.e. zero), it is possible to create new features with a shared topology to the parent “pasted” node. This topology is maintained when the parent node is post-processed or deleted.
9.8.7 ASCII InputData from external devices can be incorporated into node and feature data for applications such as:• Photos hyperlinked to features.• Depth Finders to range water depth from a GPS position• Bar Code Scanners
To link an external ASCII Device:1. Set the RS232 Device Properties by Selecting Menu and
choose 2 Device Properties.2. Select the Port to be used.3. Define if the ASCII device being defines the end of
message by CR “Character Return”, LF “Line Feed” or a combination of the two.
4. Select User Defined if the ASCII information should be written to an Attribute field. If selected, enter the name of the Attribute field.

SetupLeica Geosystems GS20 Field Guide-2.0.0en 108
9.9 Units and FormatsUnits and Formats allow the Leica Geosystems GS20 to be entered and display according to the users specifications.
9.9.1 Units of MeasureA list of choice controls defining• Length• Area• Velocity• Angle Units• Angle Formats (And Point of Reference)
Tip: Magnetic Azimuth and Bearing Information can be entered and displayed. However, the user must define the local declination.
9.9.2 LanguageLanguage selections for the software interface can be selected if additional language files are available on the unit.
9.9.3 Formats• Local Time Zones (Arranged by distance from Greenwich
Mean Time)• Daylight Savings Time: Check box• Date Format• 12/24 Hour or Civilian/Military Time• Coordinate Format: Radio Button

StatusLeica Geosystems GS20 Field Guide-2.0.0en 109
10. StatusThe Status application of the Leica Geosystems GS20 provides feedback concerning current position, satellite location, signal strength, real-time differential corrections, and system information.Similar to Setup, the Status application is displayed in a tree view, with like items grouped into branches. Setup can be accessed as choice 9. from the Main Menu.
10.1 GPS
10.1.1 PositionThe position screen provides coordinate information containing:• Coordinate system toggle• Current time• X,Y coordinates• Ellipsoidal Elevation (EHeight)• Position and Height Quality
10.1.2 Satellite InformationThe satellite information screen displays a tabular listing of the satellites that should be visible based on the current almanac and setup mask angle. Data in the table includes:• Tracking status of the satellite (Check box)• Satellite Number (Sat)• Elevation above the horizon and information if the satellite
is rising or falling. (^ = rising) (Elev)• Azimuth (A)• Signal to Noise Ratio, or strength of reception (SNR)

StatusLeica Geosystems GS20 Field Guide-2.0.0en 110
10.1.3 Satellite ViewThe satellite view provides a user friendly interface for viewing visible vs. tracked satellites. Satellites are displayed by their corresponding number. Tracked satellites appear highlighted with the satellite number inverted.
The exterior ring represents the mask angle, the next interior ring is 45 degrees, and the most interior 60 degrees.
10.2 Interfaces
10.2.1 Real-TimeThe real-time interface provides information about the RTCM corrections being received by the device. Interface data will be specific to the device being used, for example:
10.2.1.1 RTB Coast Guard Beacon• Station ID• Frequency• Channel• Bit Rate• Signal Strength• Signal to Noise Ratio (SNR)• Correction Age• % Correction Received
10.3 HardwareThe hardware screen displays information pertaining to • Serial Number• Firmware Version• Total Available RAM (in bytes)• Battery Level

GlossaryLeica Geosystems GS20 Field Guide-2.0.0en 111
11. GlossaryAlmanac
Library of coarse satellite orbital data used to calculate satellite position, rise time, elevation, and azimuth.
ASCIIAmerican Standard Code for Information Interchange, developed through the American National Standards Institute. ASCII is a scheme of binary notation for machine-readable data.
AttributeA data field of a database, often defined by the type of string, integer, real-number or boolean.
Auxiliary pointsA base or reference point used to collect an offset point or feature.
AzimuthA horizontal angle measured clockwise from a direction (such as North)
BluetoothA non-proprietary wireless cable replacement.
Code1. A template of a feature layer, containing information about the feature type and attribution.2. C/A Code: The Coarse Acquisition GPS data message modulated on the L1 signal.
Coordinate SystemsThe combination of an Ellipsoidal with a referenced angular or grid projection.
Course AzimuthAzimuth of the GPS operators direction.
Course VelocityVelocity of the GPS operator.
DGPS (Differential GPS)A GPS system that utilizes differential code corrections to achieve an enhanced positional accuracy; usually 0.5-5 meters.
Differential CorrectionsThe determination of relative coordinates between the rover receiver from a reference receiver which are simultaneously tracking the same GPS signals.

GlossaryLeica Geosystems GS20 Field Guide-2.0.0en 112
Dilution of precision (DOP )A description of the geometric contribution of uncertainty in a position fix.
EGNOSEuropean Geostationary Navigation Overlay Service
EllipsoidA mathematical figure formed by revolving an ellipse about its minor axis, used in geodesy to best fit the shape of the earth.
Ellipsoidal elevationThe vertical distance of a point above the ellipsoid.
ESTBEGNOS Satellite Test Bed
FirmwareEmbedded software that resides on a hardware device.
GeoidAn equipotential surface which coincides with mean sea level and extends everywhere, perpendicular with the force of gravity.
GIS (Geographic Information System)Geographic Information System
GIS DataPROThe office software used to interact between the Leica Geosystems GS20 and GIS and CAD packages.
GPSGlobal Positioning System
GPS TimeA continous time system based on the Coordinated Universal Time (UTC) from 6th January 1980.
Greenwich Mean TimeThe mean solar time of the meridian of Greenwhich. Used as the prime basis of standard time throughout the world.
HyperTrackLeica’s Trademark tracking technology created for areas with heavy canopy, for ex. Urban Canyons.
JobA Leica Geosystems GS20 Project consisting of multiple filetypes.
LatitudeThe angle between the ellipsoidal normal and the equatorial plane. Latitude is zero on the equator and 90° at the poles.
LoaderThe software that loads the firmware into the hardwares system memory on boot.
Local TimeLocal time equals GPS time + time zone.

GlossaryLeica Geosystems GS20 Field Guide-2.0.0en 113
Logging rateThe rate in which raw GPS data are written
LongitudeLongitude is the angle between the meridian ellipse which passes through Greenwich and the meridian ellipse containing the point in question.
Mask AngleThe minimum elevation angle below which no more GPS satellites are tracked by the receiver.
Max Accuracy (ClearTrack)The tracking mode incorporating carrier phase smoothing with the highest discriminating tracking algorithms.
Max TrackLeica’s Trademark tracking technology created for areas of heavy canopy.
Maximum Age of CorrectionThe amount of time a real-time correction will be used to adjust a GPS position, once the correction link is lost.
MeridianAn imaginary line joining north to south pole and passing through the equator at 90o.
Multipath ErrorA positioning error resulting from interference between split radio waves which have travelled to the receiver from differing paths.
NMEANational Marine Electronics Association. A standard originally defined to enable marine electronics instruments, communication, and navigation equipment to communicate.
Orthometric HeightThe distance of a point above the geoid (or mean sea level). Ortho = Ellipsoid - Geoid.
PDOPPositional dilution of precision. See DOP
Post-processingThe process of computing positions in non-real-time, using data previously collected by GPS receivers. See differential corrections.
Pseudo-rangeA measure of the apparent signal propagation time from the satellite to the receiver antenna, scaled into distance by the speed of light. Pseudorange differs from the actual range by the inlfuence of satellite and user clock.

GlossaryLeica Geosystems GS20 Field Guide-2.0.0en 114
QualityA measure of precision calculated by residuals calculated using a 2D sigma (67% confidence)
Real-TimeA DGPS position calculated by correcting autonomous GPS with a differential correction.
RTCMRadio Technicial Commission for Maritime services. Commission set up to define differential data link to relay GPS messages from a monitor station to a field user.
SBASThe Satellite Based Augmentation System is a free real-time correction for GPS available in several continents (see WAAS)
Selective AvailabilityDegradation of GPS point positioning accuracy for civilian users by the U.S. Department of Defense. SA is produced by clock dithering or orbit degradation.
Signal to Noise RatioA ratio of the radio frequency signal strength and the noise floor.
Time and Initial PositionThe time and position value a GPS receiver will use with an almanac to more quickly locate satellites.
WAASThe Wide Area Augmentation System (WAAS) is a free real-time correction for GPS available in North America, and is comparable to the European EGNOS correction, currently in a testing phase. Because this correction which is broadcast on the same frequency as GPS, it can be received without the need for additional hardware, and free of charge.
WaypointsA point, or node on a line or area flagged for navigation.

IndexLeica Geosystems GS20 Field Guide-2.0.0en 115
12. IndexAAlmanac ................................................... 13, 88ASCII ............................................................... 86Attribute ........................................................... 56Auxiliary points ............................................... 85Azimuth .................................................. 34, 109
BBluetooth ......................................................... 74
CCFC .................................................................. 57CFC Mask ....................................................... 57Code ................................................................ 25Coordinate systems ...................................... 49Course Azimuth ............................................. 46Course Velocity .............................................. 46Cultivated Field Control ................................ 57
DDGPS .............................................................. 12Differential Corrections ................................. 13DOP ................................................................. 87
EEllipsoidal Elevation .................................... 109Ellipsoidal elevation ...................................... 87
FFirmware ..........................................................70
GGeoid Field File ..............................................52GIS DataPRO .................................................70GPS ..................................................................18Greenwich Mean Time ................................108
JJob ....................................................................19
LLatitude ............................................................88Loader ..............................................................70Logging rate ....................................................88Longitude .........................................................88
MMask Angle .....................................................87Max Accuracy .................................................87Max Track ........................................................87Maximum Age of Correction ........................90Multiple functions
3 ................................................................149 ................................................................14
NNMEA .............................................................. 89
PPaging ............................................................. 16Post Processing ............................................. 88Pseudo-range ................................................ 87
QQuality ............................................................. 88
RReal-Time ....................................................... 89RTCM .............................................................. 89
SSBAS ................................................71, 93, 114Sensor ............................................................. 74Signal to Noise Ratio .................................. 109
TTime and Initial Position ............................... 88
WWAAS ...............................................71, 93, 114Waypoints ....................................................... 45

Leica Geosystems AGCH-9435 Heerbrugg
(Switzerland)Phone +41 71 727 31 31
Fax +41 71 727 46 73www.leica-geosystems.com
Leica Geosystems AG, Heerbrugg, Switzerland, has been certified as being equipped with a quality system which meets the International Standards of Quality Management and Quality Systems (ISO standard 9001) and Environmental Management Systems (ISO standard 14001).
733607-2.0.0en
Printed in Switzerland - Copyright Leica Geosystems AG, Heerbrugg, Switzerland 2005Original text
Total Quality Management- Our commitment to total customer satisfaction.Ask your local Leica dealer formore information about our TQMprogram.