LEGO Mindstorms Programming - Florida Gulf Coast...
189
FLORIDA GULF COAST UNIVERSITY LEGO Mindstorms Programming Senior Software Design Nicholas Alteen Michael Humphries Evan McKeon Spring 2012 An introductory programming lesson using LEGO Mindstorms NXT 2.0 robots developed in C, Java, and G languages.
-
Upload
nguyenlien -
Category
Documents
-
view
213 -
download
0
Transcript of LEGO Mindstorms Programming - Florida Gulf Coast...
FLORIDA GULF COAST UNIVERSITY
LEGO Mindstorms Programming
Senior Software Design
Nicholas Alteen
Michael Humphries
Evan McKeon
Spring 2012
An introductory programming lesson using LEGO Mindstorms NXT 2.0 robots developed in C,
Java, and G languages.
II
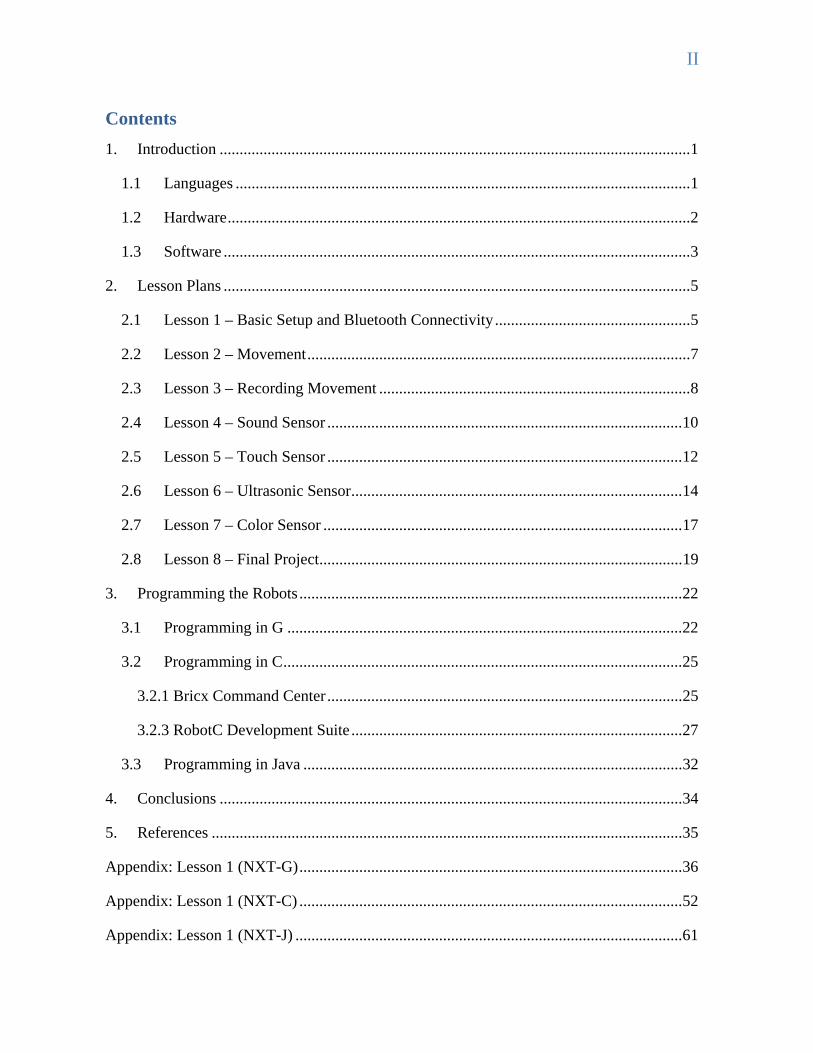
Contents
1. Introduction ...................................................................................................................... 1
1.1 Languages .................................................................................................................. 1
1.2 Hardware .................................................................................................................... 2
1.3 Software ..................................................................................................................... 3
2. Lesson Plans ..................................................................................................................... 5
2.1 Lesson 1 – Basic Setup and Bluetooth Connectivity ................................................. 5
2.2 Lesson 2 – Movement ................................................................................................ 7
2.3 Lesson 3 – Recording Movement .............................................................................. 8
2.4 Lesson 4 – Sound Sensor ......................................................................................... 10
2.5 Lesson 5 – Touch Sensor ......................................................................................... 12
2.6 Lesson 6 – Ultrasonic Sensor ................................................................................... 14
2.7 Lesson 7 – Color Sensor .......................................................................................... 17
2.8 Lesson 8 – Final Project ........................................................................................... 19
3. Programming the Robots ................................................................................................ 22
3.1 Programming in G ................................................................................................... 22
3.2 Programming in C .................................................................................................... 25
3.2.1 Bricx Command Center ......................................................................................... 25
3.2.3 RobotC Development Suite ................................................................................... 27
3.3 Programming in Java ............................................................................................... 32
4. Conclusions .................................................................................................................... 34
5. References ...................................................................................................................... 35
Appendix: Lesson 1 (NXT-G) ................................................................................................ 36
Appendix: Lesson 1 (NXT-C) ................................................................................................ 52
Appendix: Lesson 1 (NXT-J) ................................................................................................. 61
III
Appendix: Lesson 2 (NXT-J) ................................................................................................. 72
Appendix: Lesson 3 (NXT-G) ................................................................................................ 80
Appendix: Lesson 4 (NXT-C) ................................................................................................ 96
Appendix: Lesson 5 (NXT-J) ............................................................................................... 109
Appendix: Lesson 5 (NXT-C) .............................................................................................. 116
Appendix: Lesson 6 (NXT-J) ............................................................................................... 129
Appendix: Lesson 6 (NXT-G) .............................................................................................. 136
Appendix: Lesson 7 (NXT-C) .............................................................................................. 158
Appendix: Lesson 8 (NXT-G) .............................................................................................. 171
P a g e | 1
1. Introduction
The purpose of this project is to create a lesson plan and implementation for teachers
to use in introductory programming classes in a high school or middle school environment.
The lessons are documented using a standard template and format available for download
from Microsoft Word. The language and hardware requirements are listed in the sections
below. Lessons are designed using an iterative development scheme where students will
learn proper object-oriented programming skills from high level design down to algorithm
implementation. In each lesson, students are introduced to a new concept or tool used in
LEGO NXT 2.0 robots, which they can use to expand their previous programming
knowledge in a fun and interactive manner. The final lesson serves as a test of their
programming skill.
These lessons are designed for team development (2-4 students per group). Each
robot will also require some space to maneuver in. Along with those requirements, there are
language and hardware specifications that must be met.
1.1 Languages
Teachers planning to use this project as a model for programming education must
have a working knowledge of C and Java programming, as well as NXT-G (the language
native to these robot kits). Though not widely different from normal programming
languages, the visual development environment requires some hands-on knowledge before
using it as a tool to teach students.
Students are not required to possess any previous programming skills or experience,
as the lessons rely more on problem solving skills than syntax and API memorization.
Through the course of this project, students will gain some knowledge of C, Java, and G, but
the overall goal of this project is to familiarize students with the types of problems
associated with programming in a robotics environment.
P a g e | 2
1.2 Hardware
In order to utilize the lessons included in the appendix of this project documentation,
some robotics equipment is required that is not normally associated with a computer
programming classroom at this level.
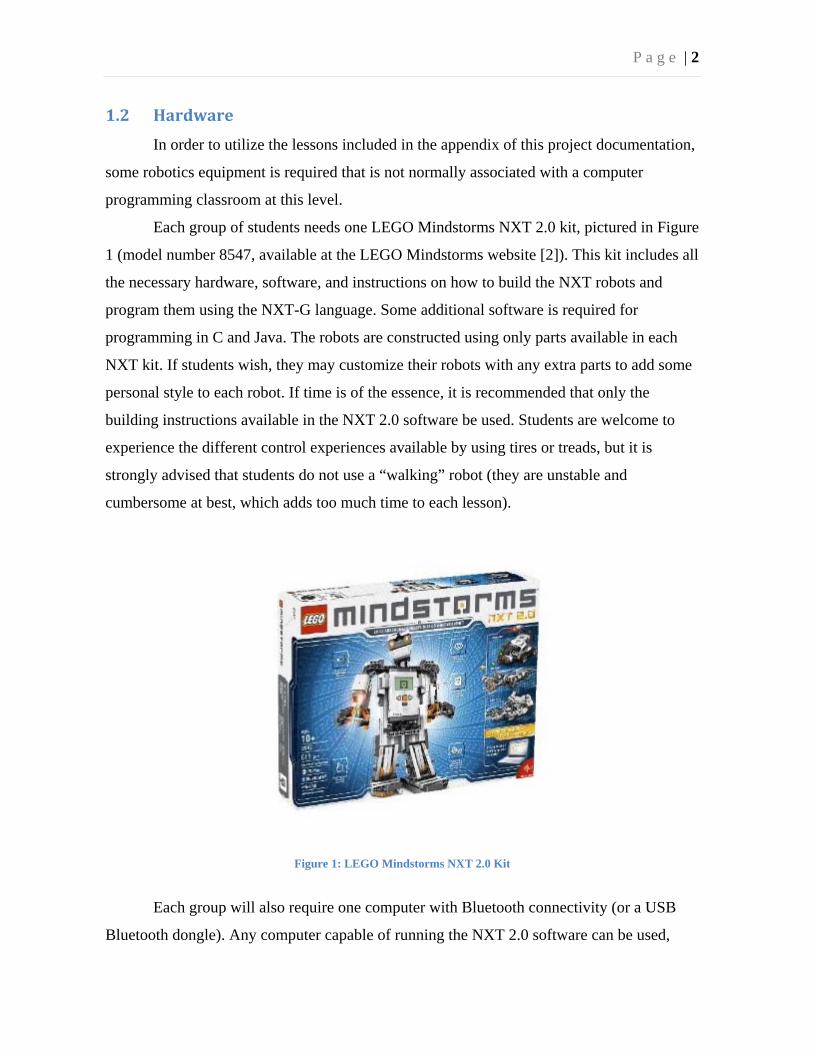
Each group of students needs one LEGO Mindstorms NXT 2.0 kit, pictured in Figure
1 (model number 8547, available at the LEGO Mindstorms website [2]). This kit includes all
the necessary hardware, software, and instructions on how to build the NXT robots and
program them using the NXT-G language. Some additional software is required for
programming in C and Java. The robots are constructed using only parts available in each
NXT kit. If students wish, they may customize their robots with any extra parts to add some
personal style to each robot. If time is of the essence, it is recommended that only the
building instructions available in the NXT 2.0 software be used. Students are welcome to
experience the different control experiences available by using tires or treads, but it is
strongly advised that students do not use a “walking” robot (they are unstable and
cumbersome at best, which adds too much time to each lesson).
Figure 1: LEGO Mindstorms NXT 2.0 Kit
Each group will also require one computer with Bluetooth connectivity (or a USB
Bluetooth dongle). Any computer capable of running the NXT 2.0 software can be used,
P a g e | 3
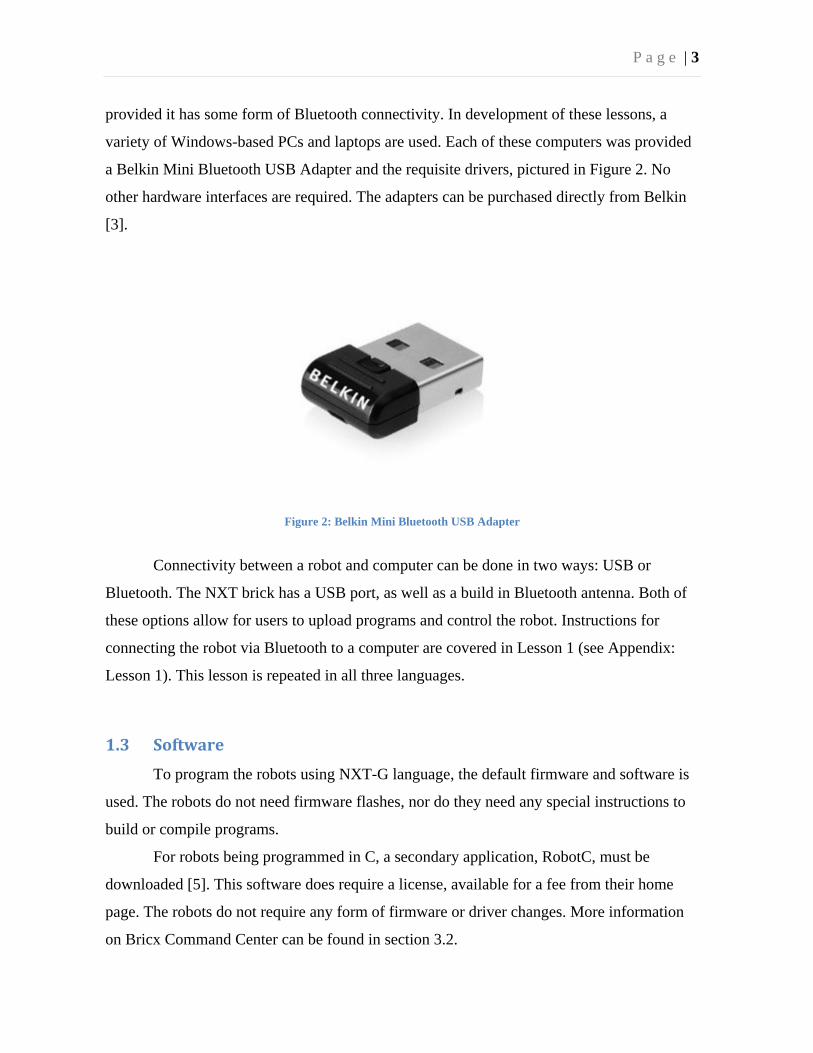
provided it has some form of Bluetooth connectivity. In development of these lessons, a
variety of Windows-based PCs and laptops are used. Each of these computers was provided
a Belkin Mini Bluetooth USB Adapter and the requisite drivers, pictured in Figure 2. No
other hardware interfaces are required. The adapters can be purchased directly from Belkin
[3].
Figure 2: Belkin Mini Bluetooth USB Adapter
Connectivity between a robot and computer can be done in two ways: USB or
Bluetooth. The NXT brick has a USB port, as well as a build in Bluetooth antenna. Both of
these options allow for users to upload programs and control the robot. Instructions for
connecting the robot via Bluetooth to a computer are covered in Lesson 1 (see Appendix:
Lesson 1). This lesson is repeated in all three languages.
1.3 Software
To program the robots using NXT-G language, the default firmware and software is
used. The robots do not need firmware flashes, nor do they need any special instructions to
build or compile programs.
For robots being programmed in C, a secondary application, RobotC, must be
downloaded [5]. This software does require a license, available for a fee from their home
page. The robots do not require any form of firmware or driver changes. More information
on Bricx Command Center can be found in section 3.2.
P a g e | 4
For robots being programmed in Java, the firmware must be flashed. The new
firmware must be downloaded from the leJOS NXJ download page [7]. In order to make
sure everything is installed correctly, the tutorial for the proper operating system should be
followed at the leJOS Getting Started page [8].
P a g e | 5
2. Lesson Plans
In total, there are nine lesson plans as described in the following subsections. Each
lesson has a “problem” to be solved, i.e., reacting to when the robot runs into a wall.
Consecutive programming steps documented in each lesson plan demonstrate proper
program development processes, with a focus on object-oriented, iterative development.
Each lesson includes two components: autonomous and manual control options. The
autonomous component solves the problem in a way that does not require user input (the
robot will start the program and perform the necessary steps to solve the problem). The
manual component requires user control to solve the problem (users control the movement
of the robot and any actions, while sensor input reacts to varying environmental conditions
to change how user input affects the robot).
Each of these lessons can be is briefly outlined below. They are presented in full in
the corresponding Appendix sections.
2.1 Lesson 1 – Basic Setup and Bluetooth Connectivity
The first lesson begins with a short set of instructions on how to access the building
guide for the robots to be used in the consecutive lessons. For the purposes of this project,
there is very little focus on the actual robots. The core of the project focuses instead on the
information required to successfully program the robots. The lesson continues with
instruction on how to connect the robot to the computer via Bluetooth and USB (see Figure
3).
P a g e | 6
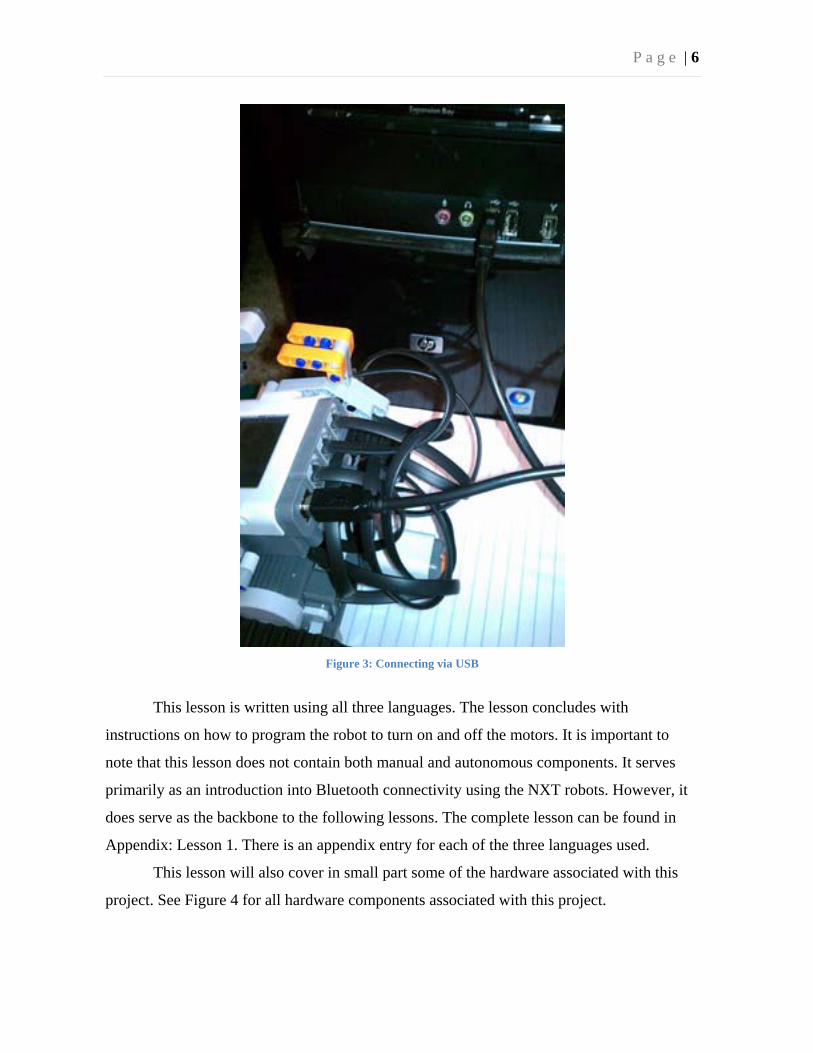
Figure 3: Connecting via USB
This lesson is written using all three languages. The lesson concludes with
instructions on how to program the robot to turn on and off the motors. It is important to
note that this lesson does not contain both manual and autonomous components. It serves
primarily as an introduction into Bluetooth connectivity using the NXT robots. However, it
does serve as the backbone to the following lessons. The complete lesson can be found in
Appendix: Lesson 1. There is an appendix entry for each of the three languages used.
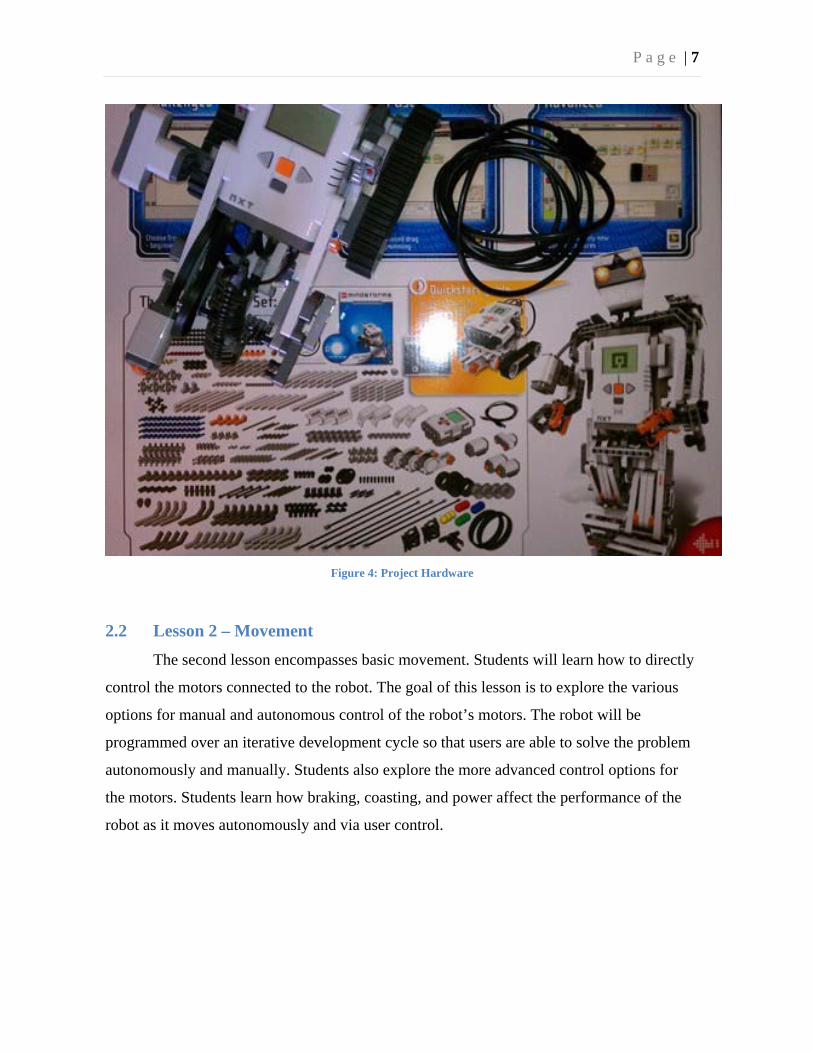
This lesson will also cover in small part some of the hardware associated with this
project. See Figure 4 for all hardware components associated with this project.
P a g e | 7
Figure 4: Project Hardware
2.2 Lesson 2 – Movement
The second lesson encompasses basic movement. Students will learn how to directly
control the motors connected to the robot. The goal of this lesson is to explore the various
options for manual and autonomous control of the robot’s motors. The robot will be
programmed over an iterative development cycle so that users are able to solve the problem
autonomously and manually. Students also explore the more advanced control options for
the motors. Students learn how braking, coasting, and power affect the performance of the
robot as it moves autonomously and via user control.
P a g e | 8
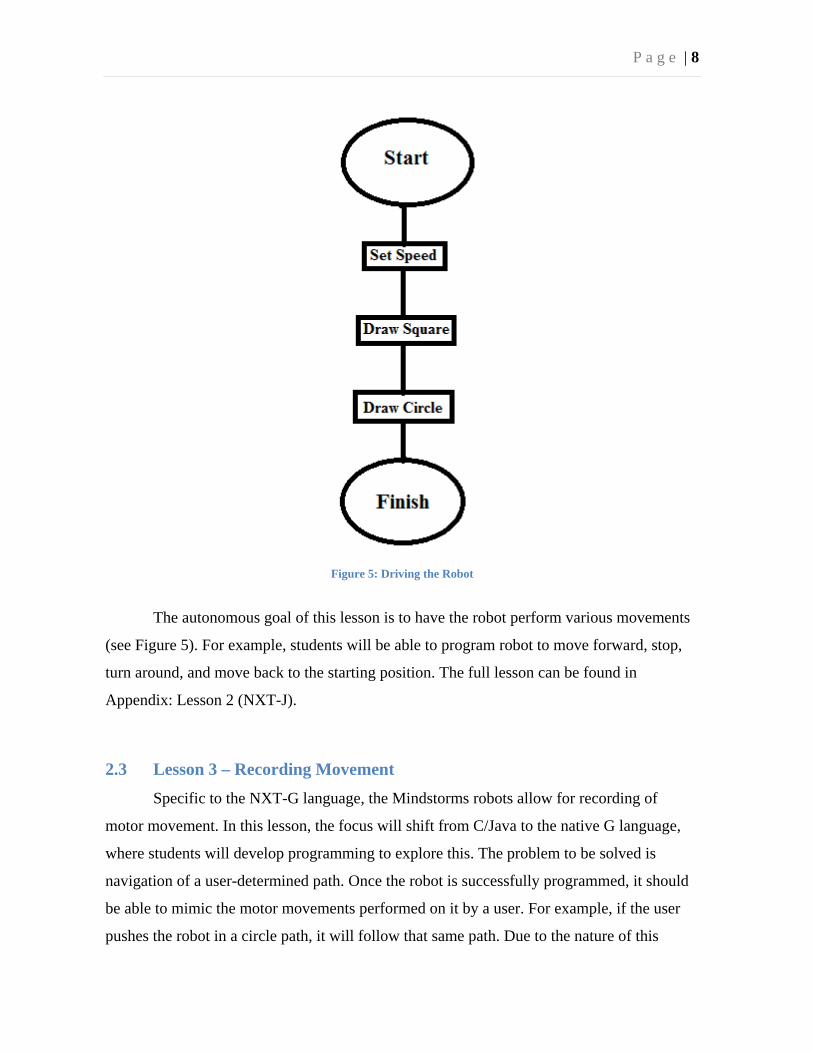
Figure 5: Driving the Robot
The autonomous goal of this lesson is to have the robot perform various movements
(see Figure 5). For example, students will be able to program robot to move forward, stop,
turn around, and move back to the starting position. The full lesson can be found in
Appendix: Lesson 2 (NXT-J).
2.3 Lesson 3 – Recording Movement
Specific to the NXT-G language, the Mindstorms robots allow for recording of
motor movement. In this lesson, the focus will shift from C/Java to the native G language,
where students will develop programming to explore this. The problem to be solved is
navigation of a user-determined path. Once the robot is successfully programmed, it should
be able to mimic the motor movements performed on it by a user. For example, if the user
pushes the robot in a circle path, it will follow that same path. Due to the nature of this
P a g e | 9
lesson, manual and autonomous components will be combined into a single program with
two parts: the first part of the program will control user input (manual), and the second part
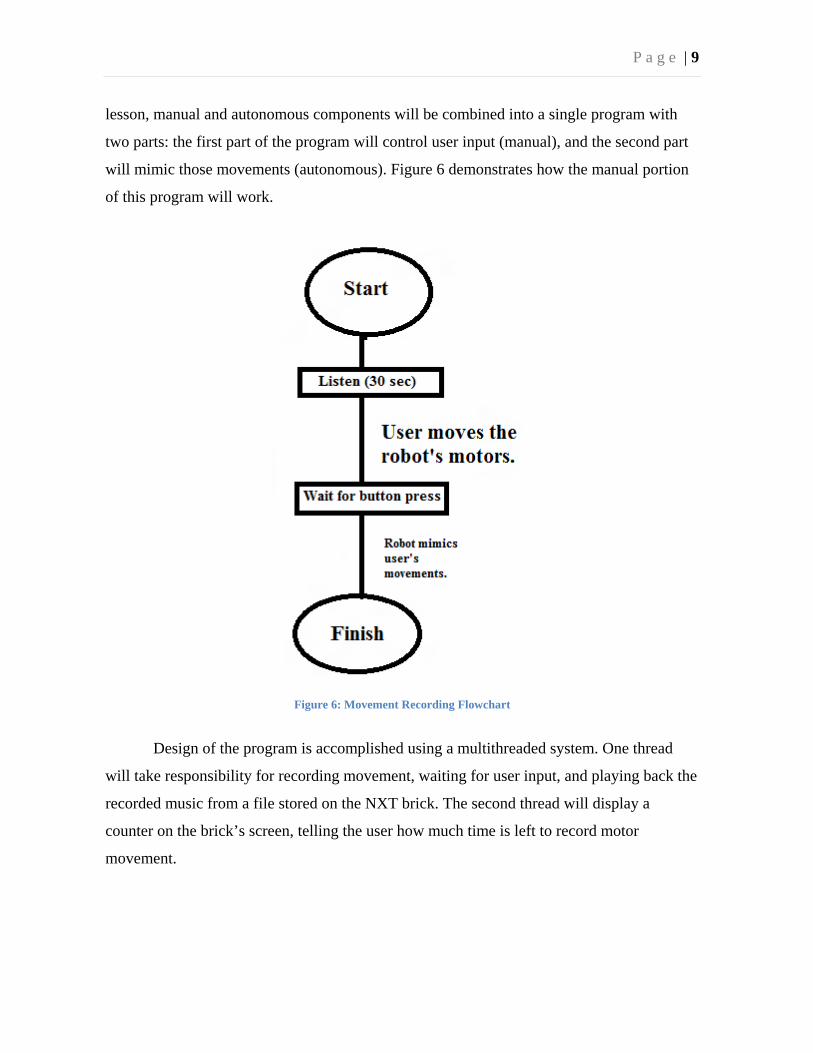
will mimic those movements (autonomous). Figure 6 demonstrates how the manual portion
of this program will work.
Figure 6: Movement Recording Flowchart
Design of the program is accomplished using a multithreaded system. One thread
will take responsibility for recording movement, waiting for user input, and playing back the
recorded music from a file stored on the NXT brick. The second thread will display a
counter on the brick’s screen, telling the user how much time is left to record motor
movement.
P a g e | 10
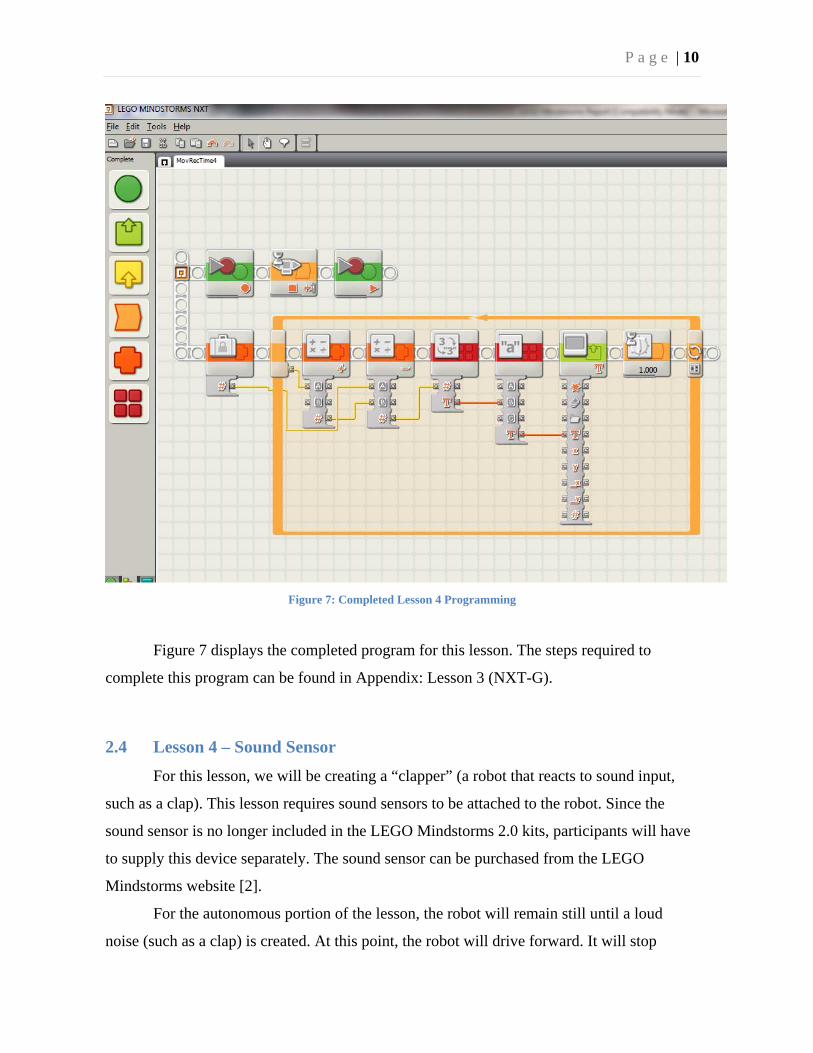
Figure 7: Completed Lesson 4 Programming
Figure 7 displays the completed program for this lesson. The steps required to
complete this program can be found in Appendix: Lesson 3 (NXT-G).
2.4 Lesson 4 – Sound Sensor
For this lesson, we will be creating a “clapper” (a robot that reacts to sound input,
such as a clap). This lesson requires sound sensors to be attached to the robot. Since the
sound sensor is no longer included in the LEGO Mindstorms 2.0 kits, participants will have
to supply this device separately. The sound sensor can be purchased from the LEGO
Mindstorms website [2].
For the autonomous portion of the lesson, the robot will remain still until a loud
noise (such as a clap) is created. At this point, the robot will drive forward. It will stop
P a g e | 11
moving once another loud noise is created. The robot will listen infinitely for claps, and will
start/stop movement whenever one is heard by the sensor. For the manual portion of this
lesson, a user will have normal control of the robot. However, the robot will stop
immediately any time a clap is heard.
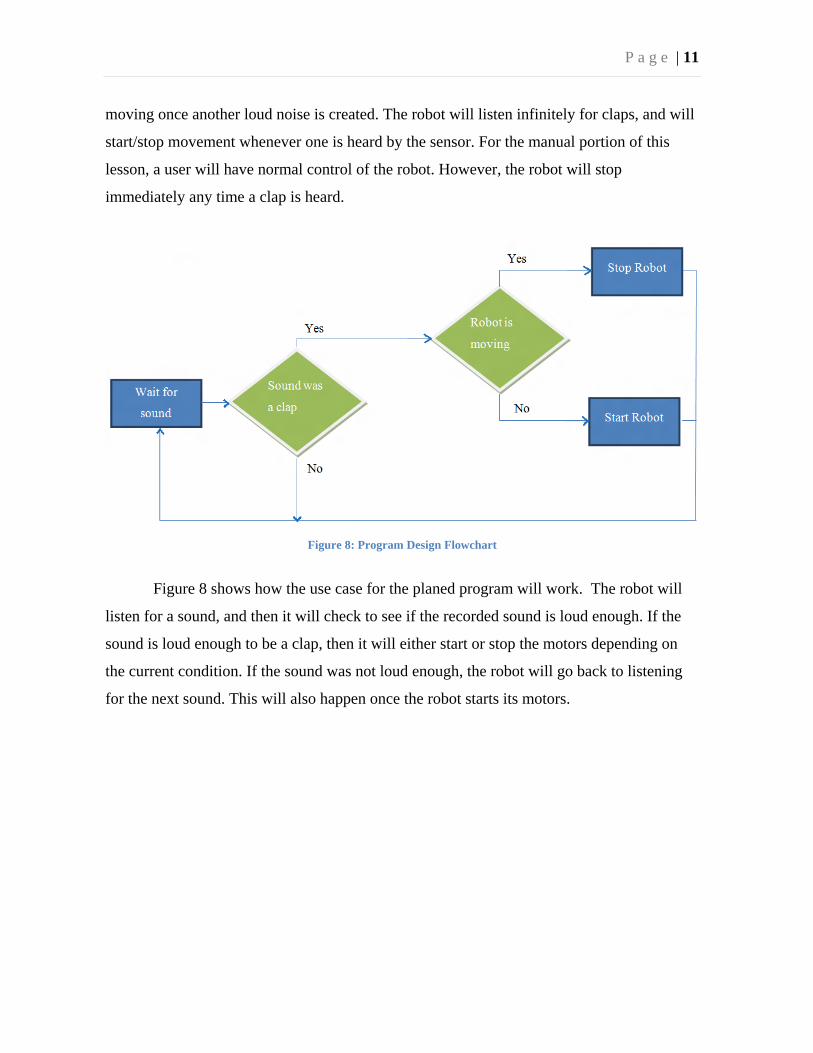
Figure 8: Program Design Flowchart
Figure 8 shows how the use case for the planed program will work. The robot will
listen for a sound, and then it will check to see if the recorded sound is loud enough. If the
sound is loud enough to be a clap, then it will either start or stop the motors depending on
the current condition. If the sound was not loud enough, the robot will go back to listening
for the next sound. This will also happen once the robot starts its motors.

P a g e | 12
Figure 9: Sample Implementation Code.
Figure 9 shows a sample of the code to be used for this lesson. As the image
displays, this lesson will make use of programming concepts such as while loops, waits, and
until statements. Please see Appendix: Lesson 4 (NXT-C) for the full lesson plan.
2.5 Lesson5–TouchSensor
The purpose of this lesson is to explore the programming options made available
through use of the touch sensor. This sensor sends a signal to the NXT “brick” whenever it
is pressed, released, or “bumped” (a quick press followed immediately by a release). The
goal of this assignment is to program the robot in a way that allows it to autonomously and
manually navigate any room. Normally, the robot will not know if it has hit a wall, and will
keep moving in the same direction infinitely. Using conditional programming, the robot will
read the information sent to it by the touch sensor and react accordingly. For example, if the
robot reads no contact from the touch sensor, it will keep moving. If it hits an obstacle or
wall, the touch sensor will send a signal to the robot telling it to change direction. This is
shown graphically in Figure 10.
P a g e | 13
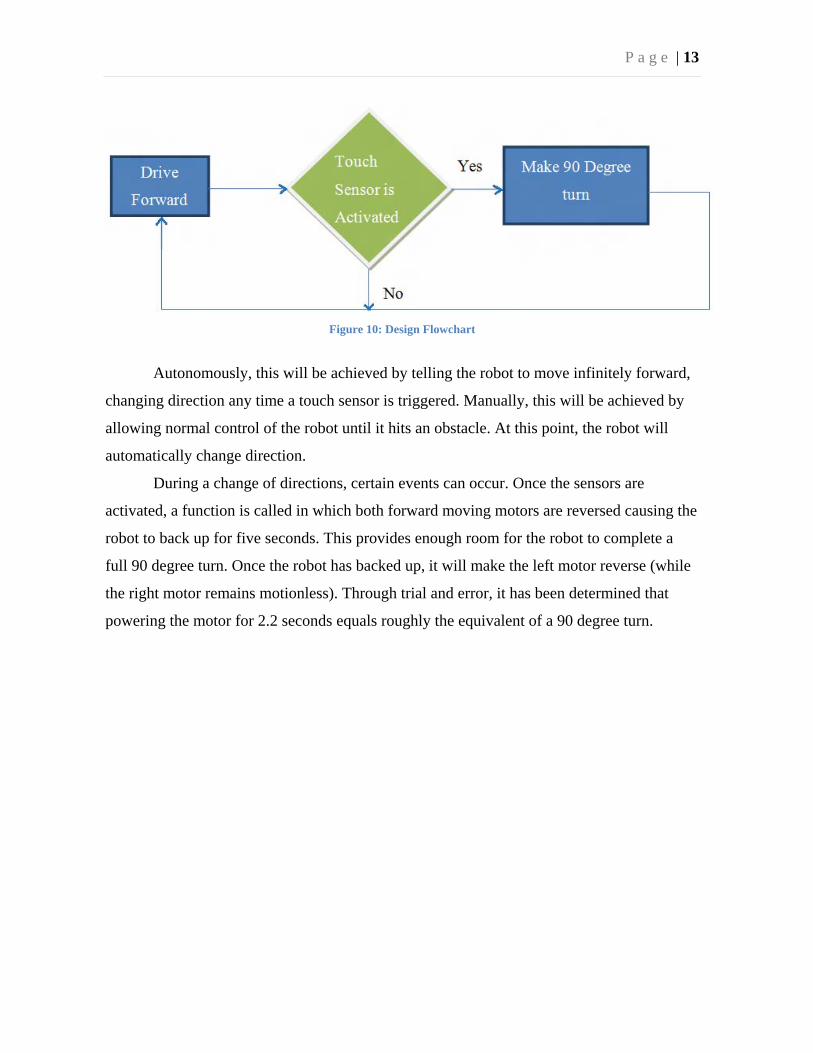
Figure 10: Design Flowchart
Autonomously, this will be achieved by telling the robot to move infinitely forward,
changing direction any time a touch sensor is triggered. Manually, this will be achieved by
allowing normal control of the robot until it hits an obstacle. At this point, the robot will
automatically change direction.
During a change of directions, certain events can occur. Once the sensors are
activated, a function is called in which both forward moving motors are reversed causing the
robot to back up for five seconds. This provides enough room for the robot to complete a
full 90 degree turn. Once the robot has backed up, it will make the left motor reverse (while
the right motor remains motionless). Through trial and error, it has been determined that
powering the motor for 2.2 seconds equals roughly the equivalent of a 90 degree turn.

P a g e | 14
Figure 11: Sample Left Turn Code.
Figure 11 shows a sample implementation code for the touch sensors. Please see
Appendix: Lesson 5 (NXT-C) for implementation in C/C++, and Appendix: Lesson 5
(NXT-J) for implementation in Java.
2.6 Lesson 6 – Ultrasonic Sensor
By the time this lesson is reached, students should have a reasonable grasp of
programming concepts such as if/else statements and looping. The focus will shift to the
use of the ultrasonic sensor to allow the robot to “see” its surroundings. In this lesson, the
students have the problem of how to program a robot to “hunt” using this new sensor.
Autonomously, the robot should continuously look for a target to come within range. As
soon as this occurs, it should move directly forward while simultaneously shooting at the
target (Note: This lesson requires use of the Shooterbot model, instructions for which are
available in the NXT software). Manually, users should be able to directly control the robot.
Once a user brings the robot in range of a target, it should automatically fire at it (as long as
P a g e | 15
it is still in range). This lesson relies heavily on studying the possible states and conditions
of the robot.
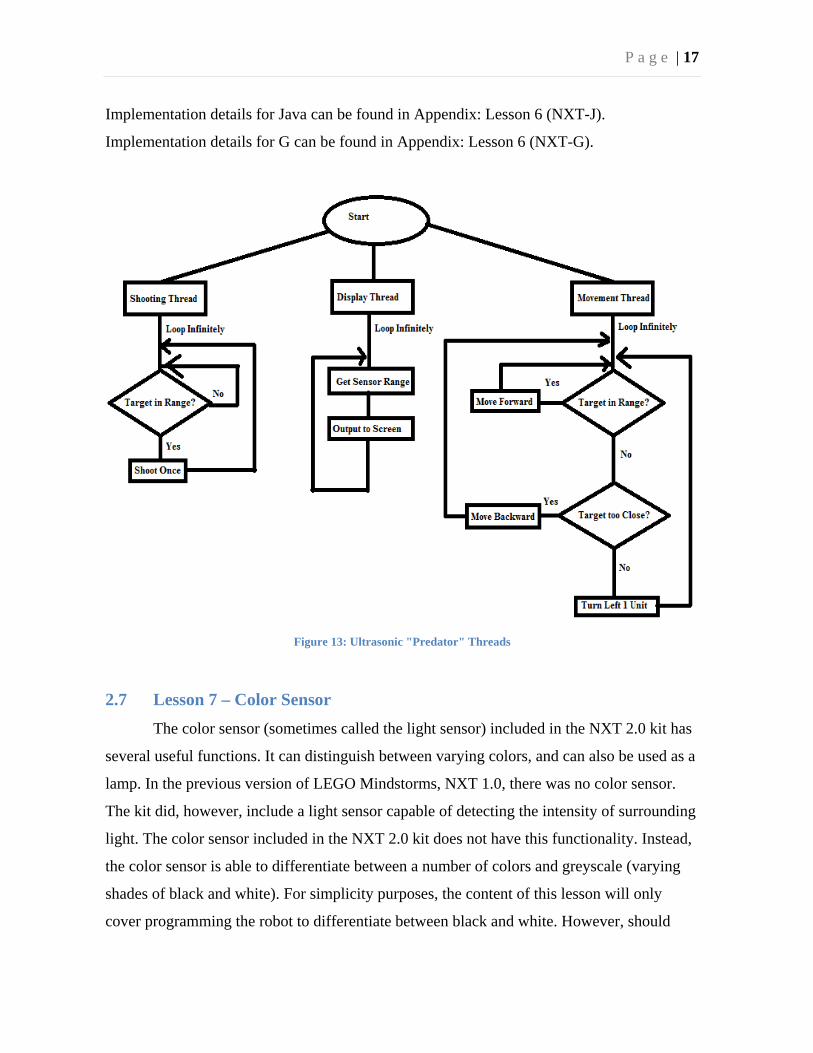
From a design standpoint, this lesson will utilize three threads of programming. The
first thread will be responsible for controlling the movement of the robot. Autonomously,
the robot will circle until an obstacle comes in range, at which point it will start moving
towards it while shooting. Manually, the robot will not allow the user to move forward if it
is too close to a target, and it will shoot any time a target is in range.
P a g e | 16
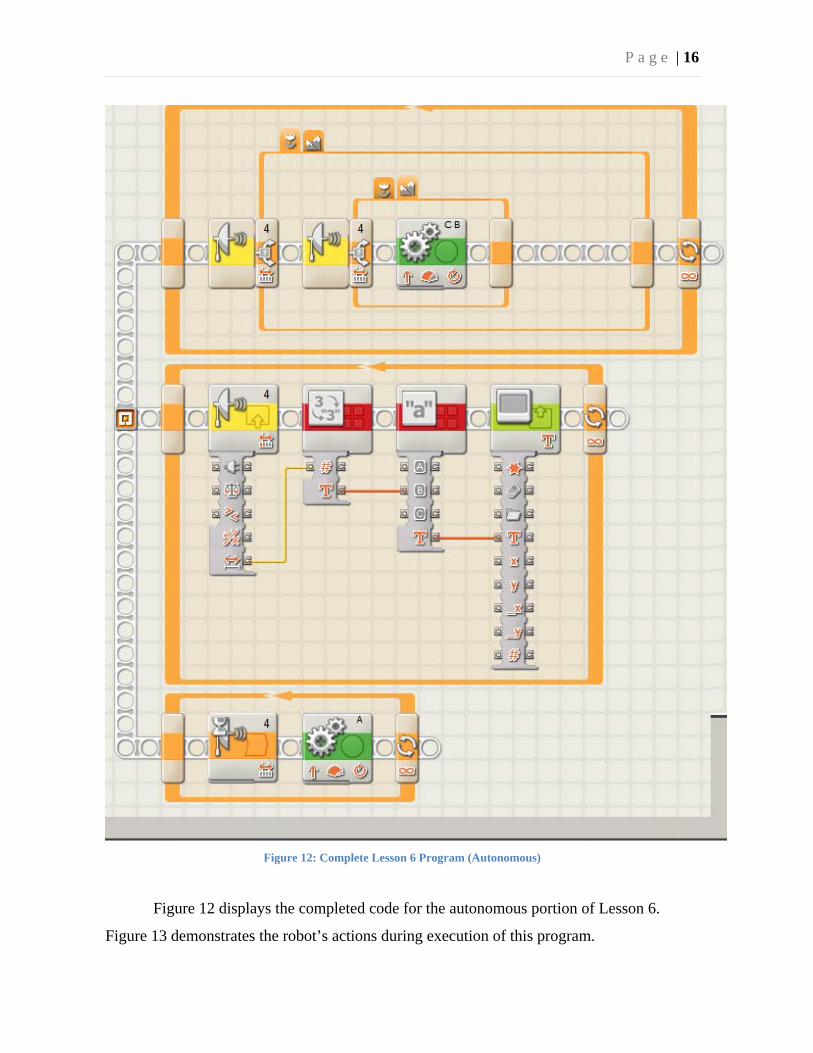
Figure 12: Complete Lesson 6 Program (Autonomous)
Figure 12 displays the completed code for the autonomous portion of Lesson 6.
Figure 13 demonstrates the robot’s actions during execution of this program.
P a g e | 17
Implementation details for Java can be found in Appendix: Lesson 6 (NXT-J).
Implementation details for G can be found in Appendix: Lesson 6 (NXT-G).
Figure 13: Ultrasonic "Predator" Threads
2.7 Lesson 7 – Color Sensor
The color sensor (sometimes called the light sensor) included in the NXT 2.0 kit has
several useful functions. It can distinguish between varying colors, and can also be used as a
lamp. In the previous version of LEGO Mindstorms, NXT 1.0, there was no color sensor.
The kit did, however, include a light sensor capable of detecting the intensity of surrounding
light. The color sensor included in the NXT 2.0 kit does not have this functionality. Instead,
the color sensor is able to differentiate between a number of colors and greyscale (varying
shades of black and white). For simplicity purposes, the content of this lesson will only
cover programming the robot to differentiate between black and white. However, should
P a g e | 18
students be interested in exploring this sensor in more depth, they are encouraged to try
programming the robot to respond to other colors (for example, programming the robot to
start and stop depending on the colors it detects).
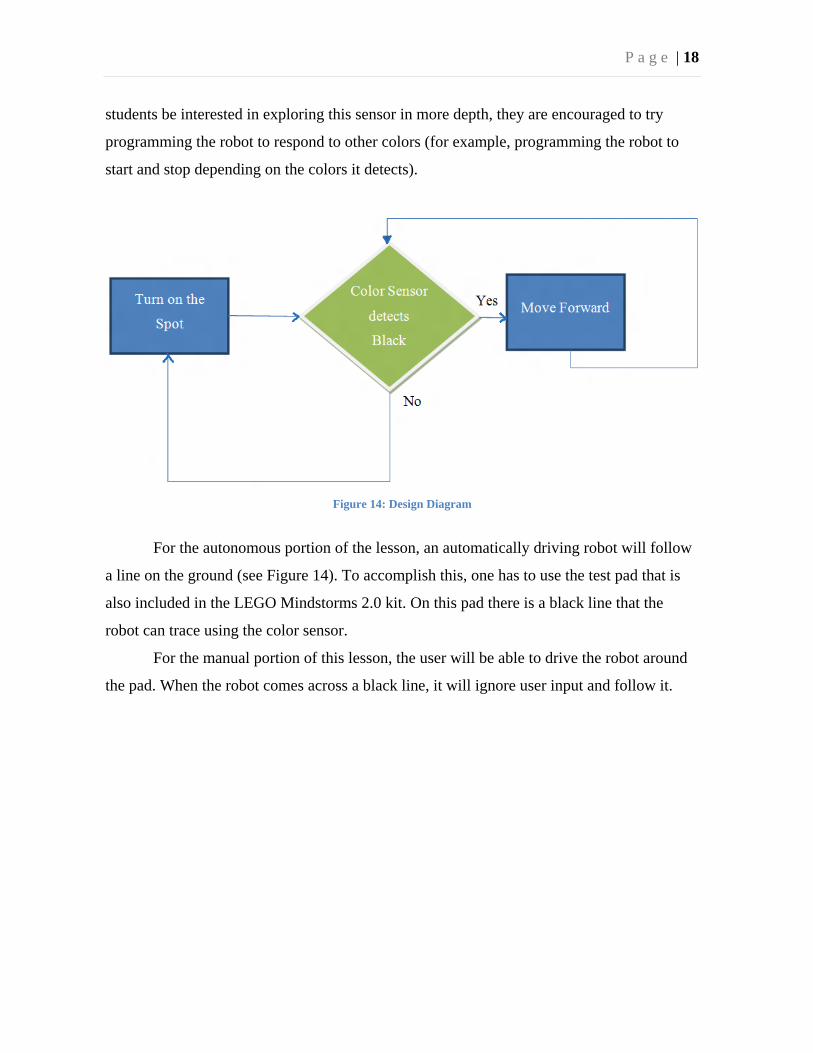
Figure 14: Design Diagram
For the autonomous portion of the lesson, an automatically driving robot will follow
a line on the ground (see Figure 14). To accomplish this, one has to use the test pad that is
also included in the LEGO Mindstorms 2.0 kit. On this pad there is a black line that the
robot can trace using the color sensor.
For the manual portion of this lesson, the user will be able to drive the robot around
the pad. When the robot comes across a black line, it will ignore user input and follow it.
P a g e | 19
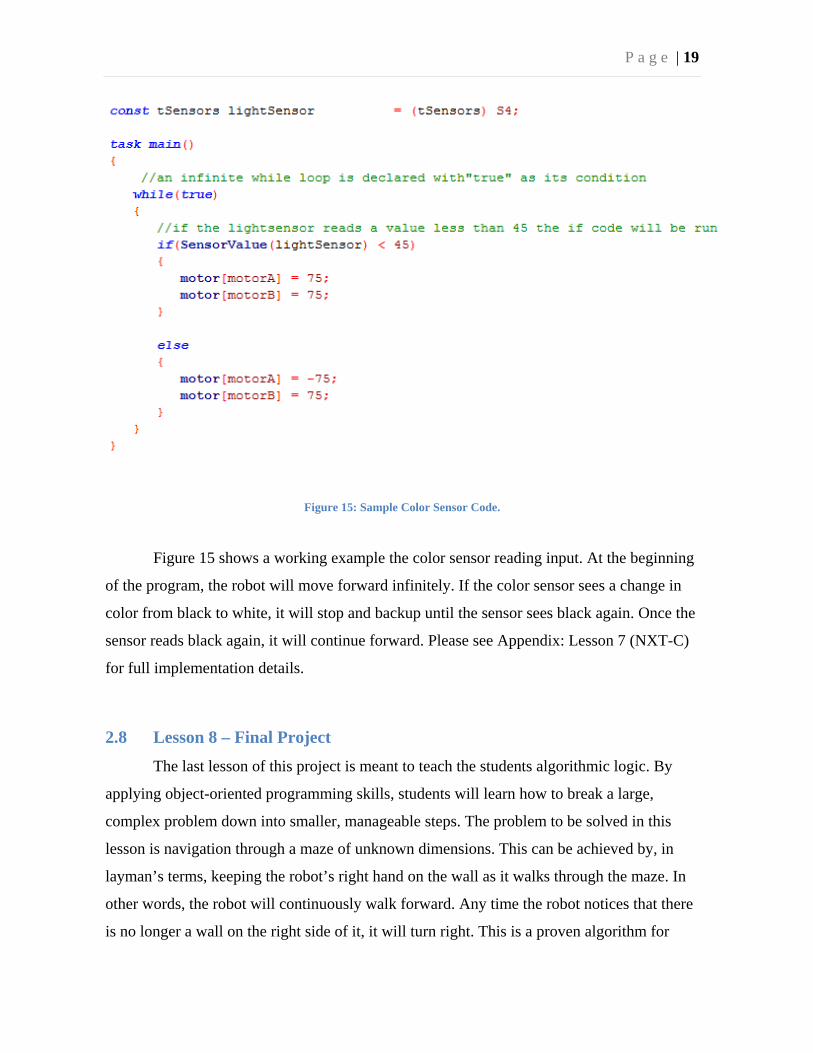
Figure 15: Sample Color Sensor Code.
Figure 15 shows a working example the color sensor reading input. At the beginning
of the program, the robot will move forward infinitely. If the color sensor sees a change in
color from black to white, it will stop and backup until the sensor sees black again. Once the
sensor reads black again, it will continue forward. Please see Appendix: Lesson 7 (NXT-C)
for full implementation details.
2.8 Lesson 8 – Final Project
The last lesson of this project is meant to teach the students algorithmic logic. By
applying object-oriented programming skills, students will learn how to break a large,
complex problem down into smaller, manageable steps. The problem to be solved in this
lesson is navigation through a maze of unknown dimensions. This can be achieved by, in
layman’s terms, keeping the robot’s right hand on the wall as it walks through the maze. In
other words, the robot will continuously walk forward. Any time the robot notices that there
is no longer a wall on the right side of it, it will turn right. This is a proven algorithm for
P a g e | 20
navigation through any two-dimensional maze. It is likely that students will notice that the
robot does not take the most direct path through the maze. This is because it is difficult for
the robot to know the full layout. In programming terms, it is impossible for the programmer
to know the entire set of inputs of a program. As long as he/she knows the types of inputs
that will be encountered, an algorithm can be designed to handle any sequence of these
inputs.
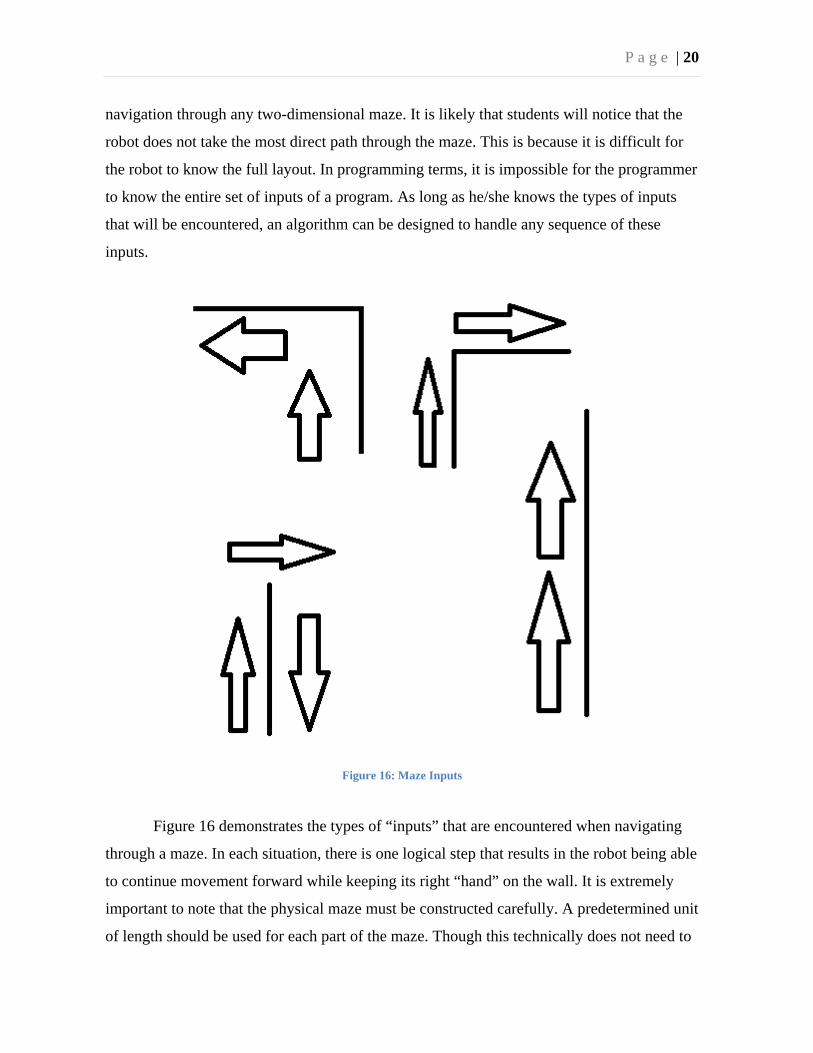
Figure 16: Maze Inputs
Figure 16 demonstrates the types of “inputs” that are encountered when navigating
through a maze. In each situation, there is one logical step that results in the robot being able
to continue movement forward while keeping its right “hand” on the wall. It is extremely
important to note that the physical maze must be constructed carefully. A predetermined unit
of length should be used for each part of the maze. Though this technically does not need to
P a g e | 21
be done, the NXT robots are somewhat limited in fine-tuned control, so simplicity makes for
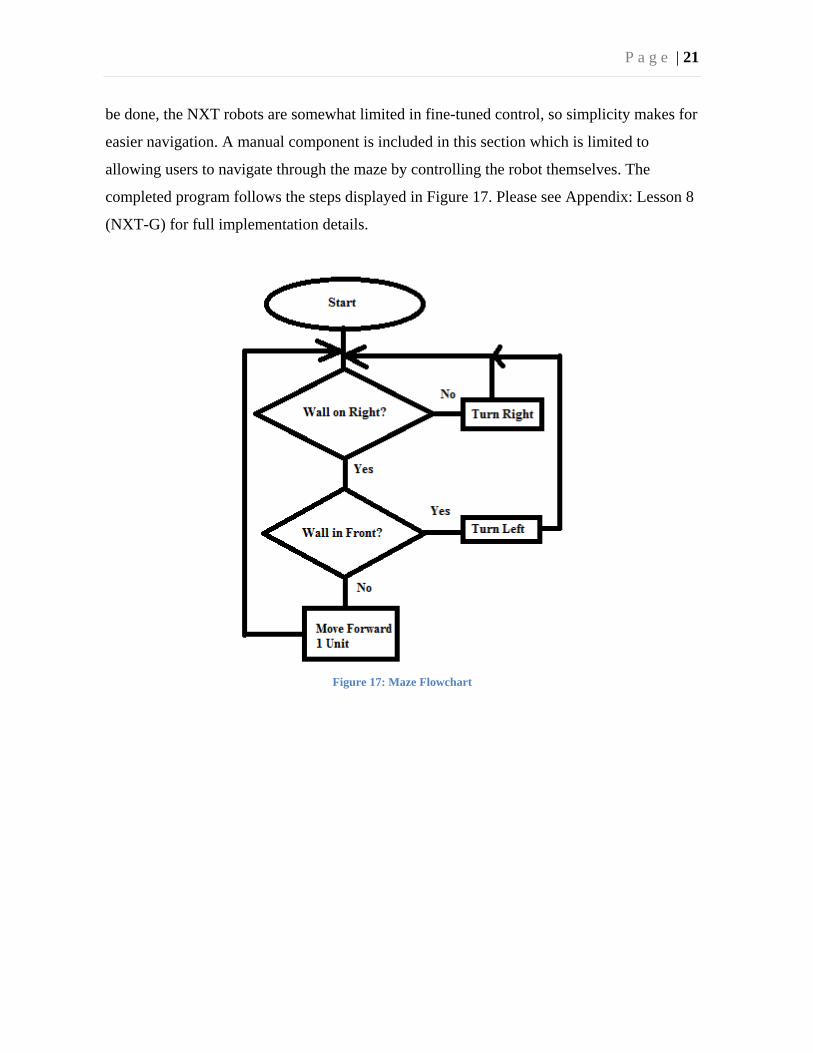
easier navigation. A manual component is included in this section which is limited to
allowing users to navigate through the maze by controlling the robot themselves. The
completed program follows the steps displayed in Figure 17. Please see Appendix: Lesson 8
(NXT-G) for full implementation details.
Figure 17: Maze Flowchart
P a g e | 22
3. Programming the Robots
It is important that students learn proper object-oriented programming skills while
completing the listed lessons. For this reason, the role of the teacher will be to ensure that
students are documenting the programs they are developing in proper fashion. Before any
programming of the robots occurs, students should have a detailed plan of what they wish
the robot to do, and how they will accomplish this goal. Students are encouraged to draw
flowcharts, pseudo code, or any diagrams that will help them visualize the process they wish
the robot to follow. Each lesson plan will contain snippets of code as it is developed in
documented, iterative steps (for brevity, the actual code is contained only in the lesson
plans).
The teacher is encouraged to break the problem down into small steps, and discuss
with the students how they would best accomplish each of these steps in a way that allows
for flexibility and further development with the robots. In a sense, any program developed in
these lessons should be easily modified, added, or converted to another program that will
run correctly on the robots. It is also important that the teacher stresses the usefulness of
adding comments and notes in their code, as well as proper naming practices for variables,
classes, and methods.
There are three main components of creating and running a program on the NXT
bricks: editing, compiling, and uploading.
3.1 ProgramminginG
As stated in section 1.3, the lessons encompassing G are developed using the default
software, LEGO Mindstorms NXT 2.0 (a CD for which is included in each kit). This is a
visual programming language based on LabView [4].
The process of editing a program to be uploaded to the robot is accomplished
entirely in the Mindstorms application. Here, a student is able to drag and drop
programming “blocks” which correspond to different actions taken by the NXT “brick” (the
computer attached to the robot). Such actions include loops, motor movement, sensor input,
and so on. To start the development environment, one has to navigate to Start-> All
Programs-> LEGO Mindstorms NXT 2.0. This brings up the user interface (see figure 11).
P a g e | 23
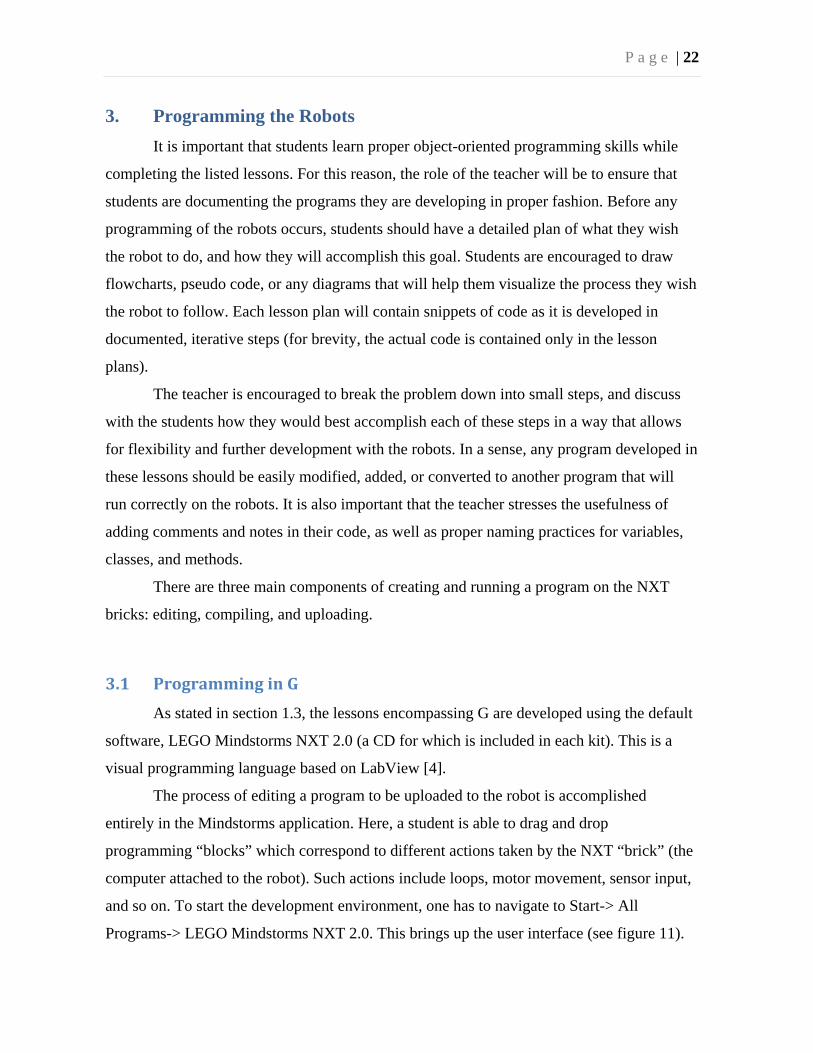
From here, the user can open or create a program (the middle navigation pane), as well as
access the building instructions for the robots used in the lessons (the rightmost navigation
pane).
Figure 18: User Interface
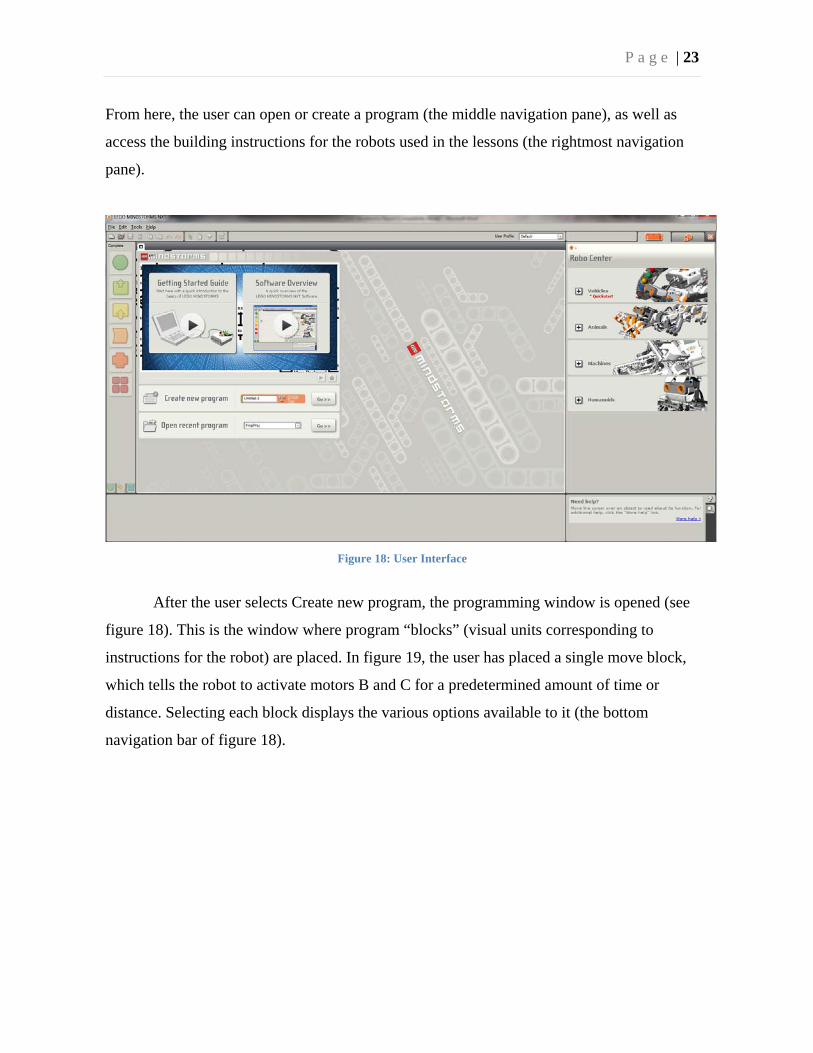
After the user selects Create new program, the programming window is opened (see
figure 18). This is the window where program “blocks” (visual units corresponding to
instructions for the robot) are placed. In figure 19, the user has placed a single move block,
which tells the robot to activate motors B and C for a predetermined amount of time or
distance. Selecting each block displays the various options available to it (the bottom
navigation bar of figure 18).
P a g e | 24
Figure 19: The Mindstorms Interface
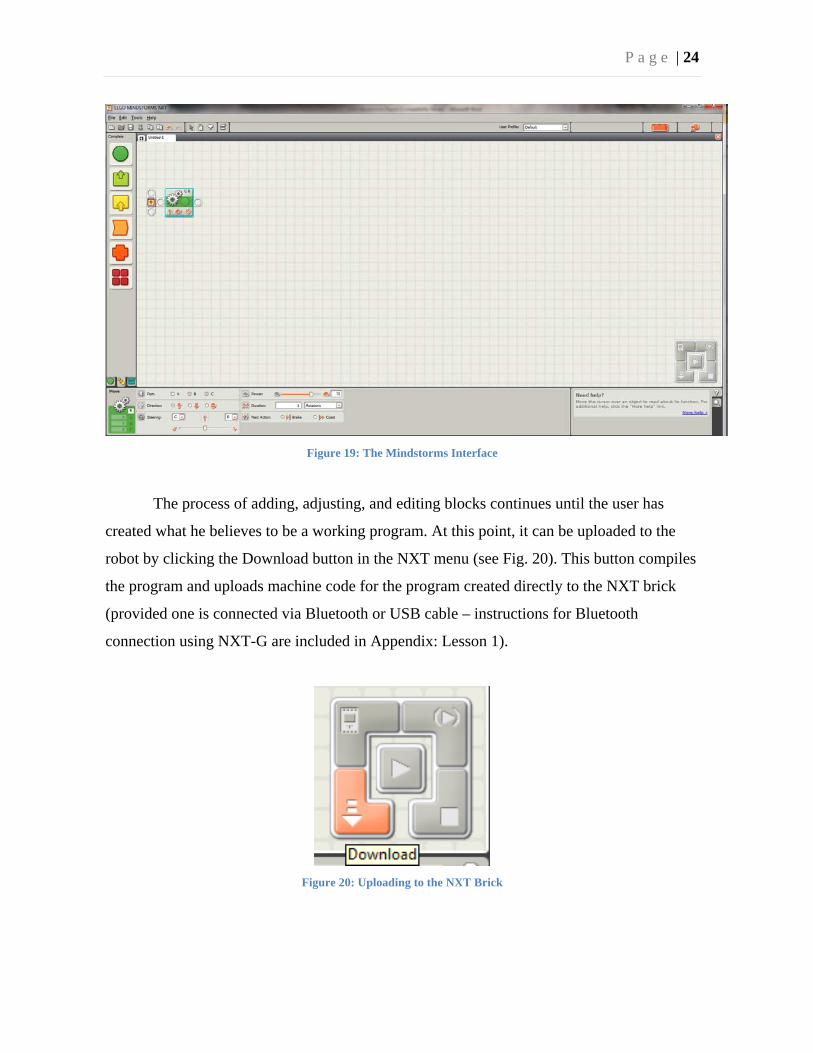
The process of adding, adjusting, and editing blocks continues until the user has
created what he believes to be a working program. At this point, it can be uploaded to the
robot by clicking the Download button in the NXT menu (see Fig. 20). This button compiles
the program and uploads machine code for the program created directly to the NXT brick
(provided one is connected via Bluetooth or USB cable – instructions for Bluetooth
connection using NXT-G are included in Appendix: Lesson 1).
Figure 20: Uploading to the NXT Brick

P a g e | 25
3.2 ProgramminginC
3.2.1BricxCommandCenter
For development in C, a useful tool called Bricx Command Center is used (available
free from the Bricx Download Page [1]). This software is one of the several most popular
programs for development in NXT-C. Bricx allows for location of the NXT device (i.e. what
port it is connected to on the computer), editing code, and compiling, downloading, and
running the code on the NXT.
The Bricx Command Center utility uses the “Not Exactly C” (NXC) language to
program the robot. NXC is a high-level, open-source language that shares a number of
similarities to C/C++.
Once Bricx is installed, opening the application from the Start menu will display the
window shown in Figure 21. After connecting a NXT brick to the computer (either via USB
or by turning on Bluetooth), a user will set the options in the Find Brick window as pictured
in Figure 21. Once a user clicks OK, the command center will search for a connected NXT
brick (this search includes Bluetooth devices).
Figure 21: Bricx NXT Location Utility.
Once an NXT brick is found, the window will close and the command center will
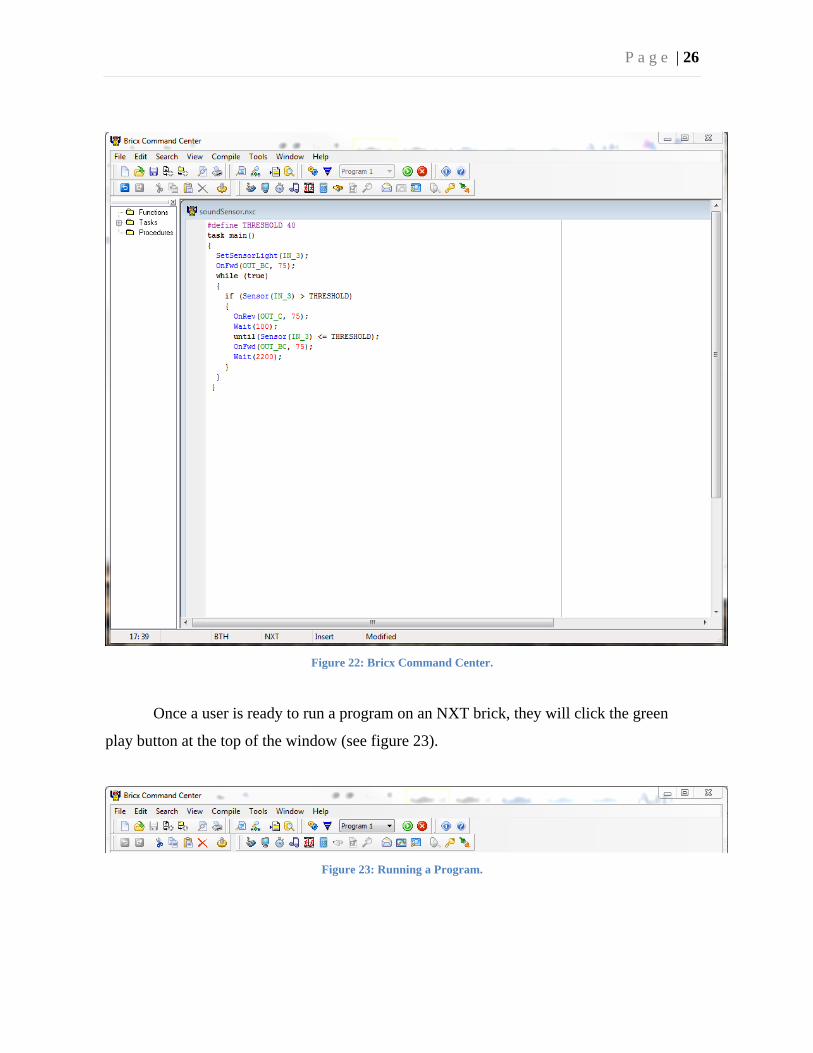
open. Figure 22 shows for a screenshot of the command center. In this part of the
application, users will be able to create, write, and edit code for their programs. Once this is
done, a user can then download the code to a robot.
P a g e | 26
Figure 22: Bricx Command Center.
Once a user is ready to run a program on an NXT brick, they will click the green
play button at the top of the window (see figure 23).
Figure 23: Running a Program.
P a g e | 27
Pressing the run causes automatic compilation of the code and uploads it to the
connected NXT brick. After this is complete, the command center automatically runs the
code on the brick.
Bricx Command Center is a useful option for cost-minded users. However, it is more
productive to use another, licensed tool called RobotC [5].
3.2.3RobotCDevelopmentSuite
Since RobotC is proprietary, a software license is required to use it. RobotC does
provide more options for a developer from a friendlier workspace to access to more API
calls to the LEGO Mindstorms robots.
RobotC uses a programming language based on C for VEX. VEX is a much-
optimized firmware for the LEGO Mindstorms robots which allows for faster execution of
programs. Faster execution means that a more complex instruction set will execute in the
same amount of time (or even less) than a less complex one on the original firmware. Along
with this feature, VEX compresses files more comprehensively, allowing for a larger
amount of data to be stored on a single brick.
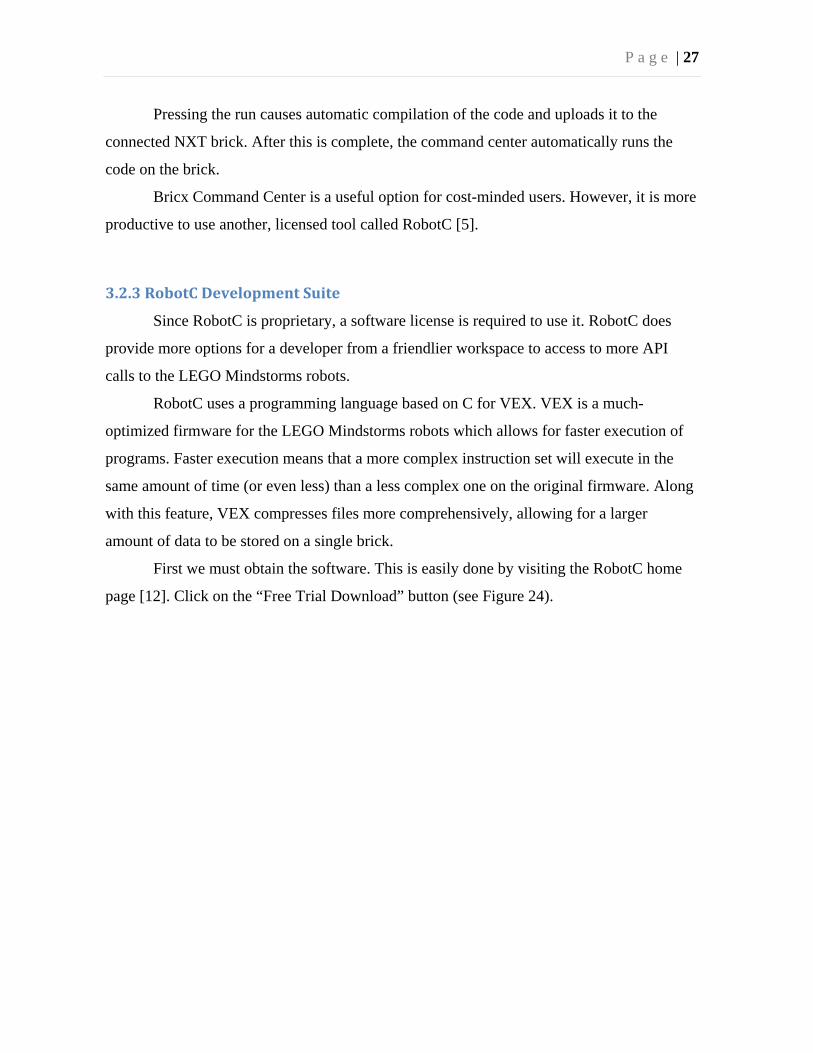
First we must obtain the software. This is easily done by visiting the RobotC home
page [12]. Click on the “Free Trial Download” button (see Figure 24).
P a g e | 28
Figure 24: RobotC Download Page
Once the setup file is downloaded, run it. Then follow the on screen prompts. The
setup is similar to any windows based installation.
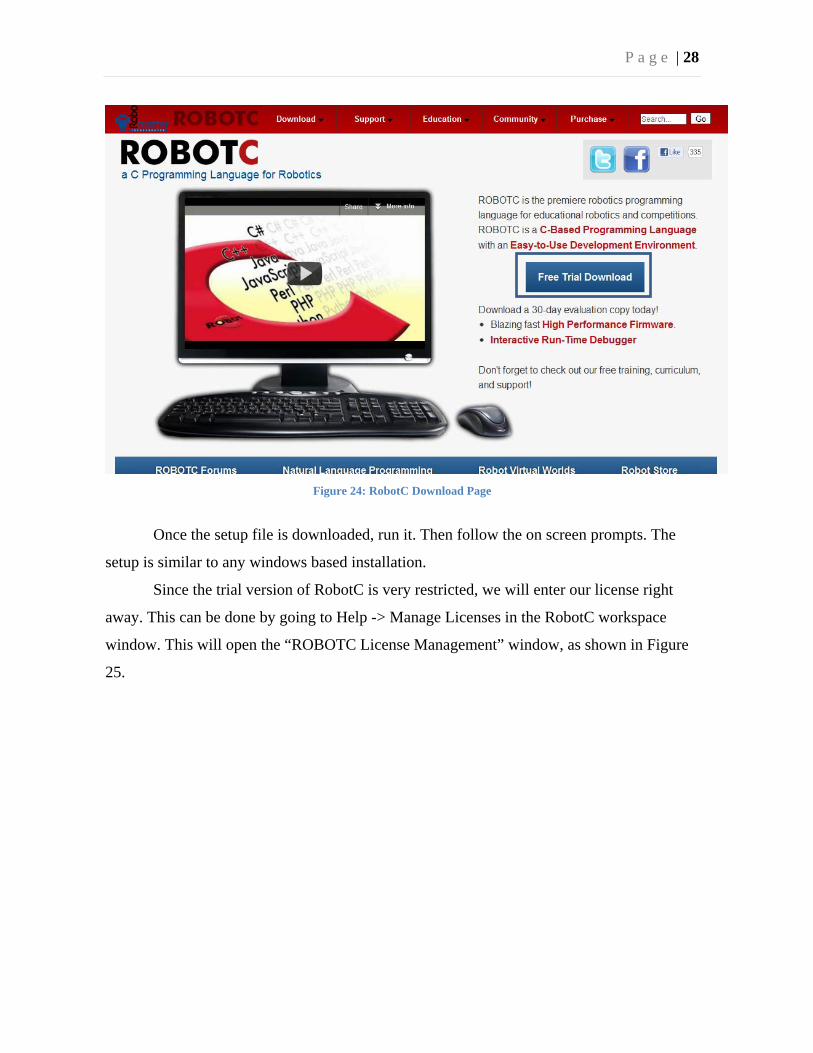
Since the trial version of RobotC is very restricted, we will enter our license right
away. This can be done by going to Help -> Manage Licenses in the RobotC workspace
window. This will open the “ROBOTC License Management” window, as shown in Figure
25.
P a g e | 29
Figure 25: RobotC License Management Window
With the License ID and password in hand, click “Add License”. In this window you
can enter your License ID and password. Make sure to select “ROBOTC for LEGO
MINDSTORMS” in the “Product:” drop down. Check Figure 26 as reference. Then click
“Activate Online”.
Figure 26: Add New ROBOTC License Window
P a g e | 30
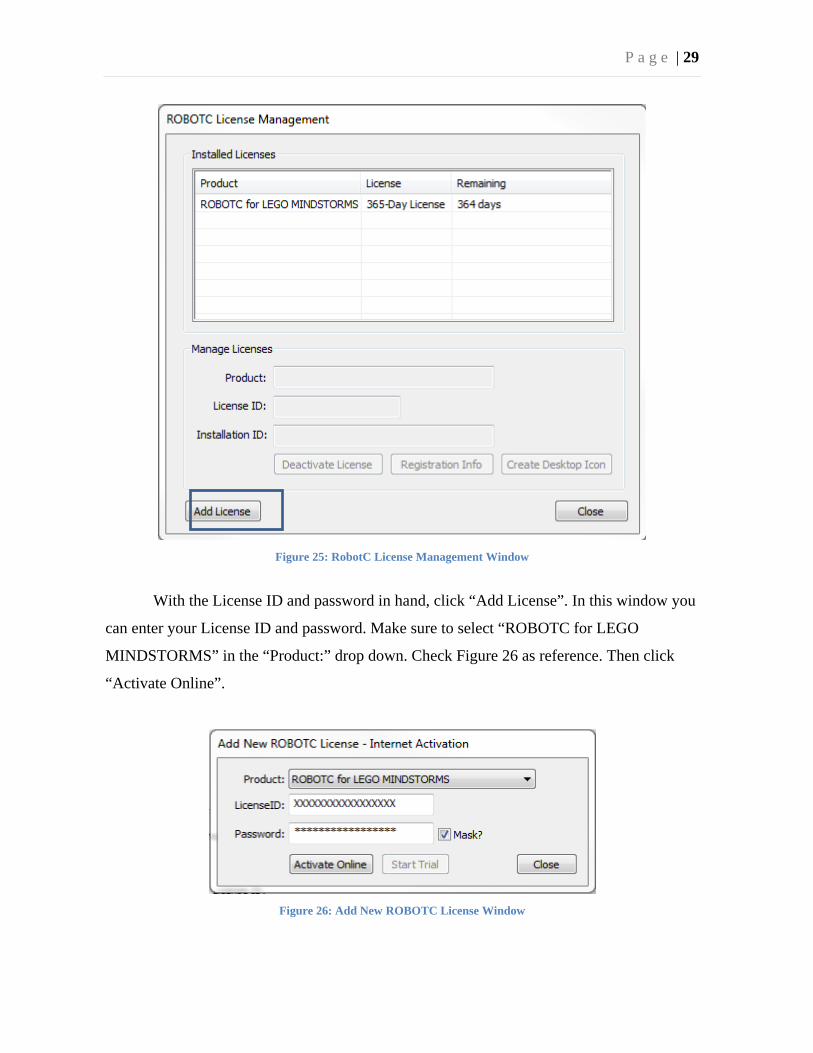
Now we can begin editing, compiling and uploading code. To create a new program
click on the new file icon highlighted in the square in Figure 27.
Figure 27: Create a New File
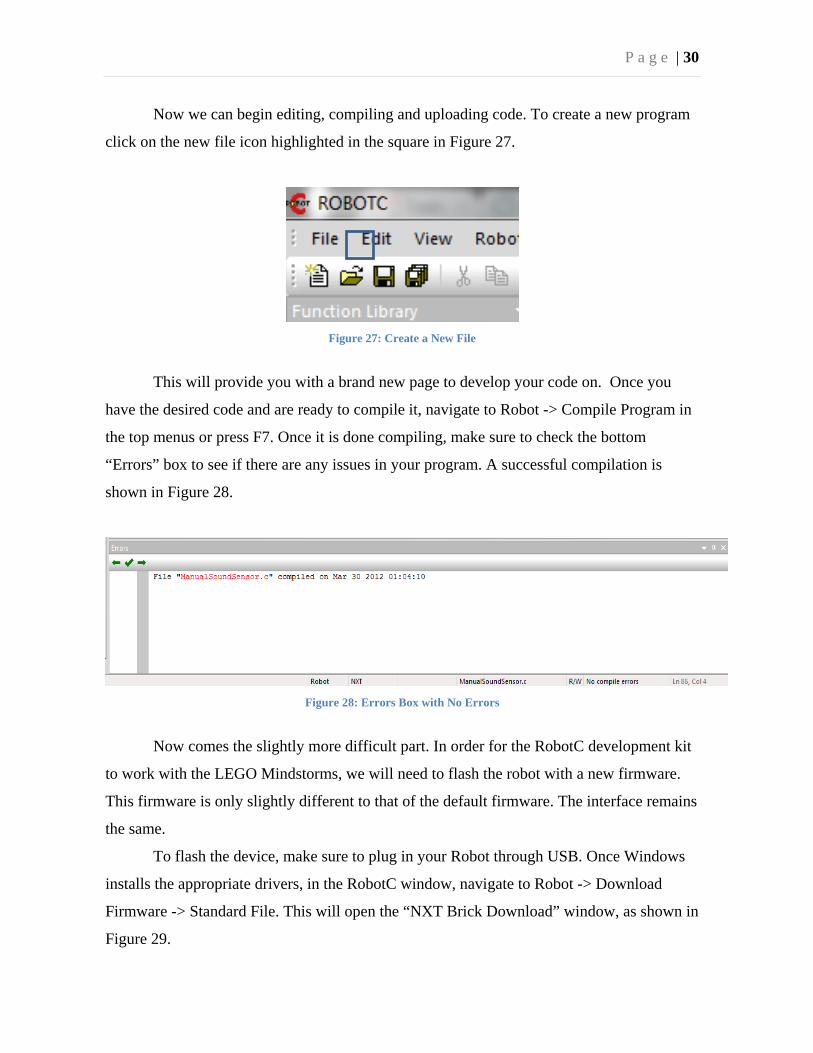
This will provide you with a brand new page to develop your code on. Once you
have the desired code and are ready to compile it, navigate to Robot -> Compile Program in
the top menus or press F7. Once it is done compiling, make sure to check the bottom
“Errors” box to see if there are any issues in your program. A successful compilation is
shown in Figure 28.
Figure 28: Errors Box with No Errors
Now comes the slightly more difficult part. In order for the RobotC development kit
to work with the LEGO Mindstorms, we will need to flash the robot with a new firmware.
This firmware is only slightly different to that of the default firmware. The interface remains
the same.
To flash the device, make sure to plug in your Robot through USB. Once Windows
installs the appropriate drivers, in the RobotC window, navigate to Robot -> Download
Firmware -> Standard File. This will open the “NXT Brick Download” window, as shown in
Figure 29.
P a g e | 31
Figure 29: NXT Brick Download
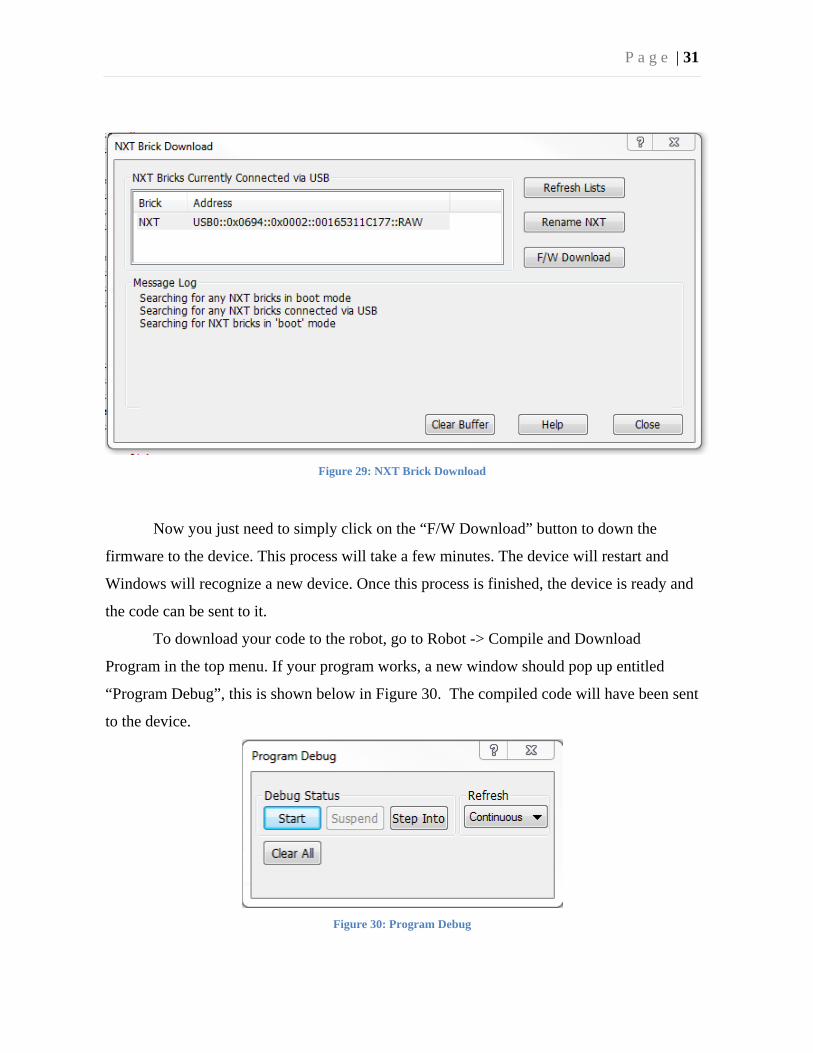
Now you just need to simply click on the “F/W Download” button to down the
firmware to the device. This process will take a few minutes. The device will restart and
Windows will recognize a new device. Once this process is finished, the device is ready and
the code can be sent to it.
To download your code to the robot, go to Robot -> Compile and Download
Program in the top menu. If your program works, a new window should pop up entitled
“Program Debug”, this is shown below in Figure 30. The compiled code will have been sent
to the device.
Figure 30: Program Debug
P a g e | 32
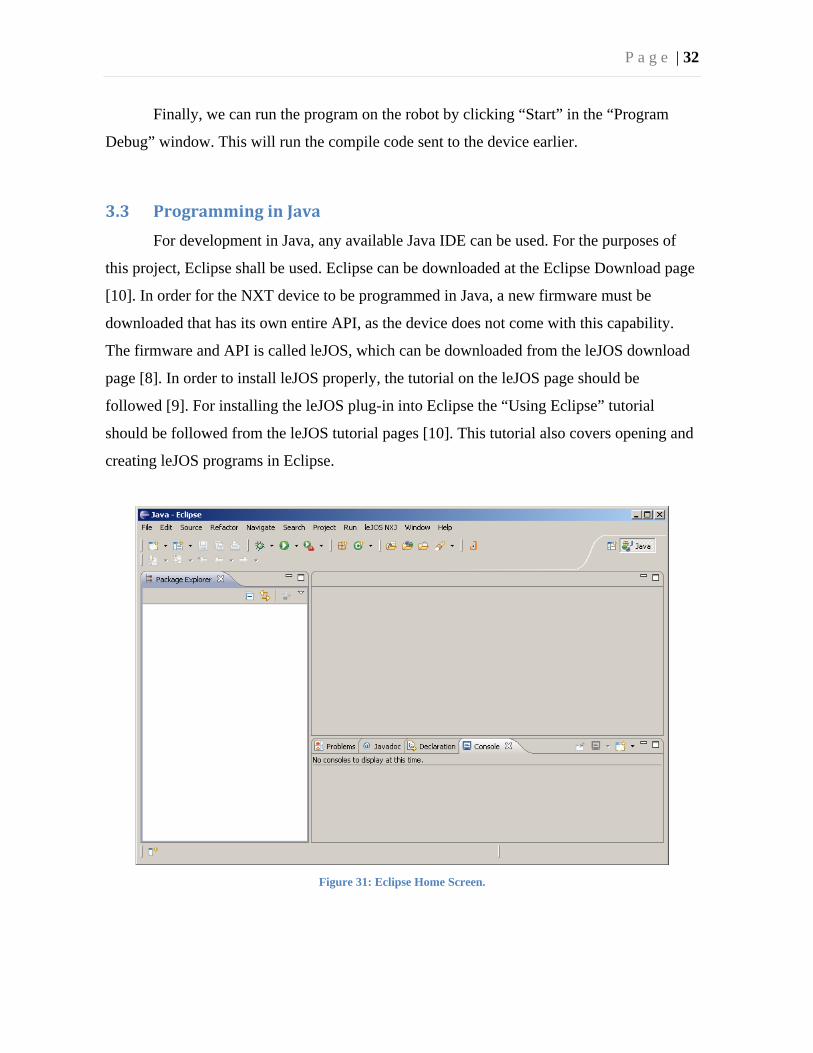
Finally, we can run the program on the robot by clicking “Start” in the “Program
Debug” window. This will run the compile code sent to the device earlier.
3.3 ProgramminginJava
For development in Java, any available Java IDE can be used. For the purposes of
this project, Eclipse shall be used. Eclipse can be downloaded at the Eclipse Download page
[10]. In order for the NXT device to be programmed in Java, a new firmware must be
downloaded that has its own entire API, as the device does not come with this capability.
The firmware and API is called leJOS, which can be downloaded from the leJOS download
page [8]. In order to install leJOS properly, the tutorial on the leJOS page should be
followed [9]. For installing the leJOS plug-in into Eclipse the “Using Eclipse” tutorial
should be followed from the leJOS tutorial pages [10]. This tutorial also covers opening and
creating leJOS programs in Eclipse.
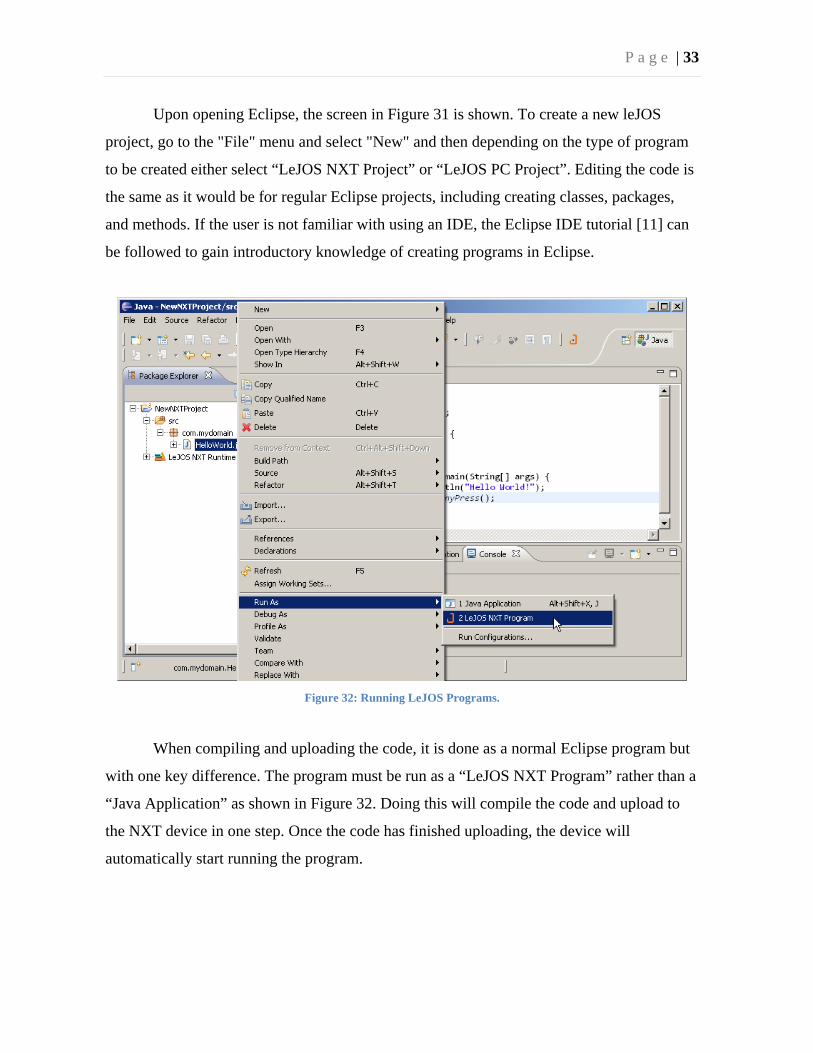
Figure 31: Eclipse Home Screen.
P a g e | 33
Upon opening Eclipse, the screen in Figure 31 is shown. To create a new leJOS
project, go to the "File" menu and select "New" and then depending on the type of program
to be created either select “LeJOS NXT Project” or “LeJOS PC Project”. Editing the code is
the same as it would be for regular Eclipse projects, including creating classes, packages,
and methods. If the user is not familiar with using an IDE, the Eclipse IDE tutorial [11] can
be followed to gain introductory knowledge of creating programs in Eclipse.
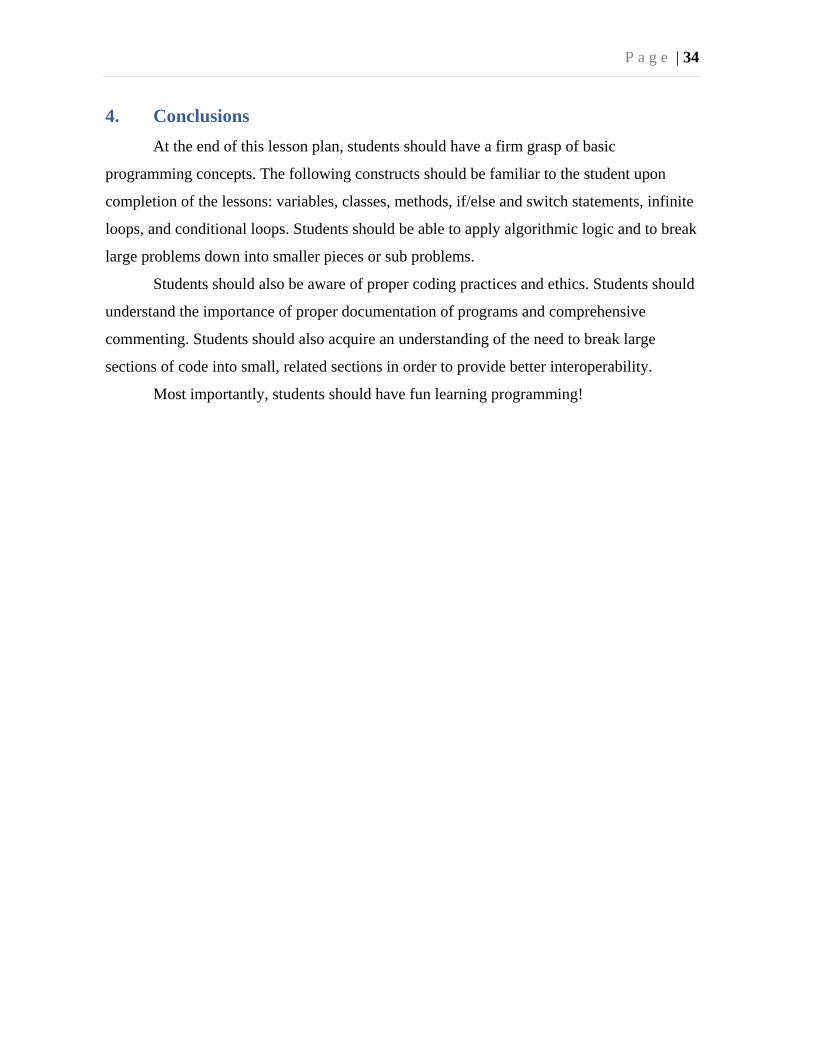
Figure 32: Running LeJOS Programs.
When compiling and uploading the code, it is done as a normal Eclipse program but
with one key difference. The program must be run as a “LeJOS NXT Program” rather than a
“Java Application” as shown in Figure 32. Doing this will compile the code and upload to
the NXT device in one step. Once the code has finished uploading, the device will
automatically start running the program.
P a g e | 34
4. Conclusions
At the end of this lesson plan, students should have a firm grasp of basic
programming concepts. The following constructs should be familiar to the student upon
completion of the lessons: variables, classes, methods, if/else and switch statements, infinite
loops, and conditional loops. Students should be able to apply algorithmic logic and to break
large problems down into smaller pieces or sub problems.
Students should also be aware of proper coding practices and ethics. Students should
understand the importance of proper documentation of programs and comprehensive
commenting. Students should also acquire an understanding of the need to break large
sections of code into small, related sections in order to provide better interoperability.
Most importantly, students should have fun learning programming!
P a g e | 35
5. References
1. Bricx Command Center Download Page
http://sourceforge.net/projects/bricxcc/files/bricxcc/
2. LEGO Mindstorms Home Page
http://mindstorms.lego.com/en-us/Default.aspx
3. Belkin Mini Bluetooth Adapter Page
http://www.belkin.com/IWCatProductPage.process?Product_Id=398674
4. LabView Home Page
http://www.ni.com/labview/
5. RobotC Home Page
http://www.robotc.net/
6. Lejos Home Page
http://lejos.sourceforge.net/index.php
7. leJOS NXJ download page
http://lejos.sourceforge.net/nxj-downloads.php
8. leJOS Getting Started Tutorial
http://lejos.sourceforge.net/nxt/nxj/tutorial/Preliminaries/GettingStarted.htm
9. Eclipse Download Page
http://www.eclipse.org/epsilon/download/
10. Using Eclipse
http://lejos.sourceforge.net/nxt/nxj/tutorial/Preliminaries/UsingEclipse.htm
11. Eclipse IDE Tutorial
http://www.vogella.de/articles/Eclipse/article.html
12. RobotC Home Page
http://www.robotc.net/

P a g e | 36
Appendix:Lesson1(NXT‐G)
P a g e | 37
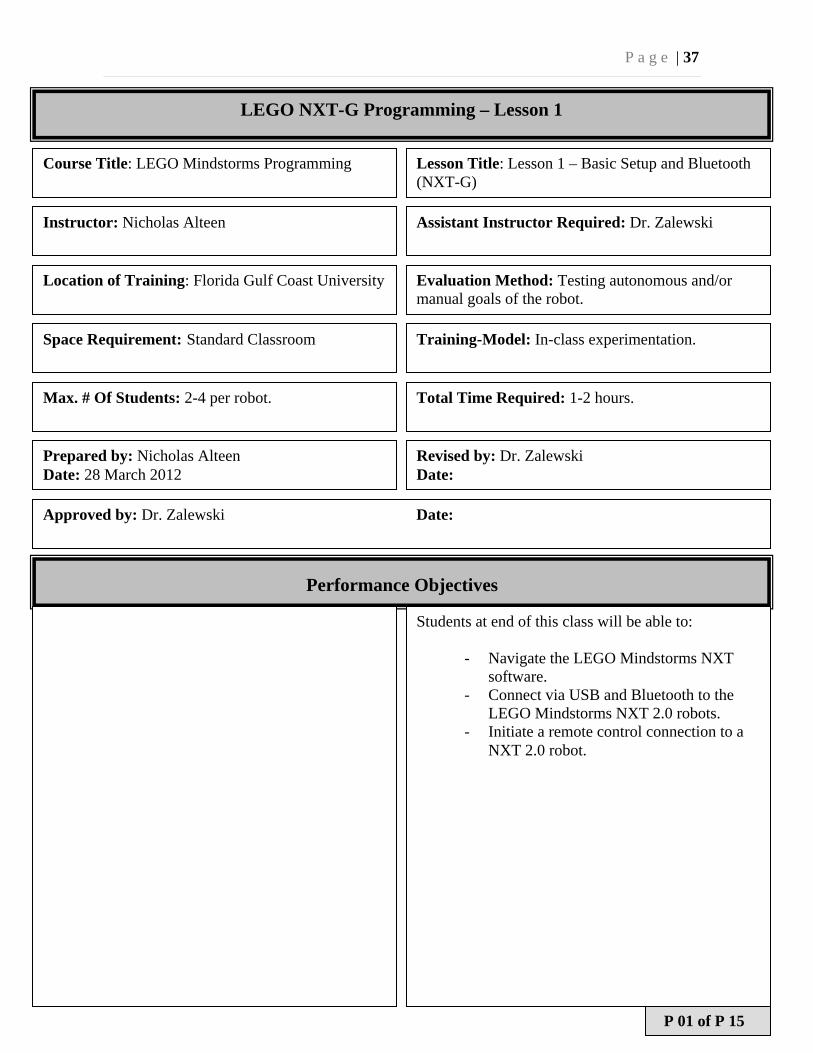
LEGO NXT-G Programming – Lesson 1
Course Title: LEGO Mindstorms Programming Lesson Title: Lesson 1 – Basic Setup and Bluetooth (NXT-G)
Instructor: Nicholas Alteen Assistant Instructor Required: Dr. Zalewski
Location of Training: Florida Gulf Coast University Evaluation Method: Testing autonomous and/or manual goals of the robot.
Space Requirement: Standard Classroom Training-Model: In-class experimentation.
Max. # Of Students: 2-4 per robot. Total Time Required: 1-2 hours.
Prepared by: Nicholas Alteen Date: 28 March 2012
Revised by: Dr. Zalewski Date:
Performance Objectives
Students at end of this class will be able to:
- Navigate the LEGO Mindstorms NXT software.
- Connect via USB and Bluetooth to the LEGO Mindstorms NXT 2.0 robots.
- Initiate a remote control connection to a NXT 2.0 robot.
Approved by: Dr. Zalewski Date:
P 01 of P 15
P a g e | 38
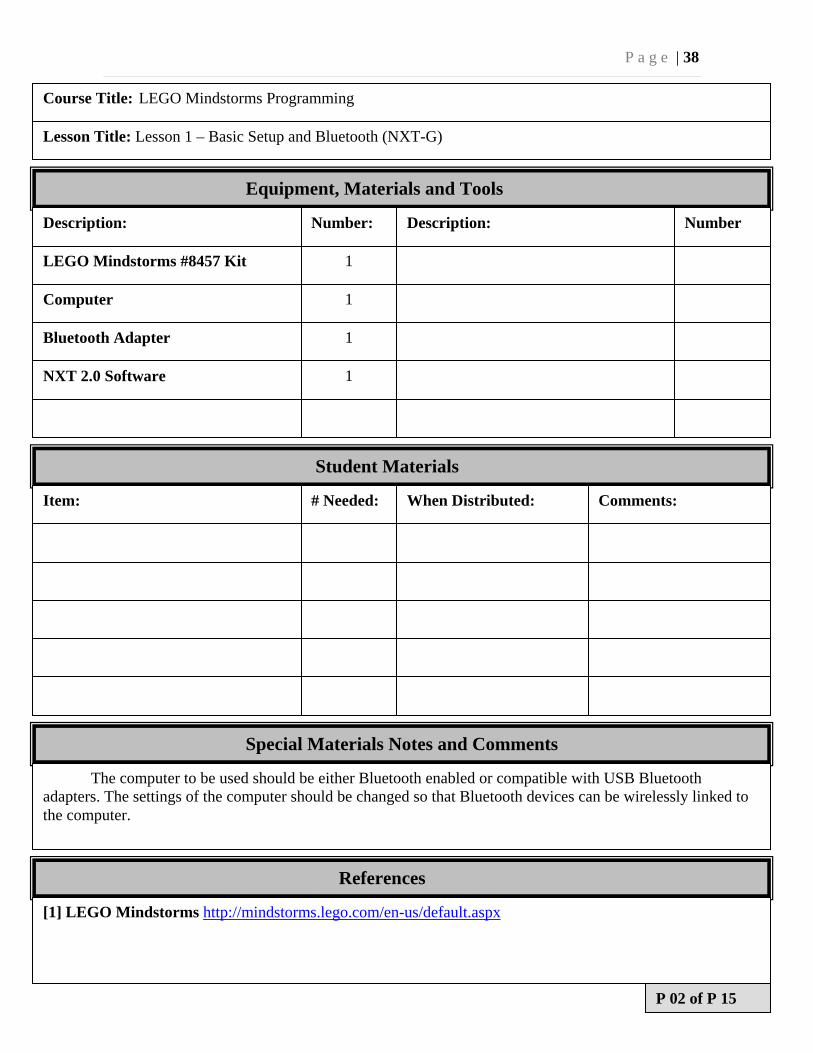
Course Title: LEGO Mindstorms Programming
Lesson Title: Lesson 1 – Basic Setup and Bluetooth (NXT-G)
Equipment, Materials and Tools
Description: Number: Description: Number
LEGO Mindstorms #8457 Kit 1
Computer 1
Bluetooth Adapter 1
NXT 2.0 Software 1
Student Materials
Item: # Needed: When Distributed: Comments:
Special Materials Notes and Comments
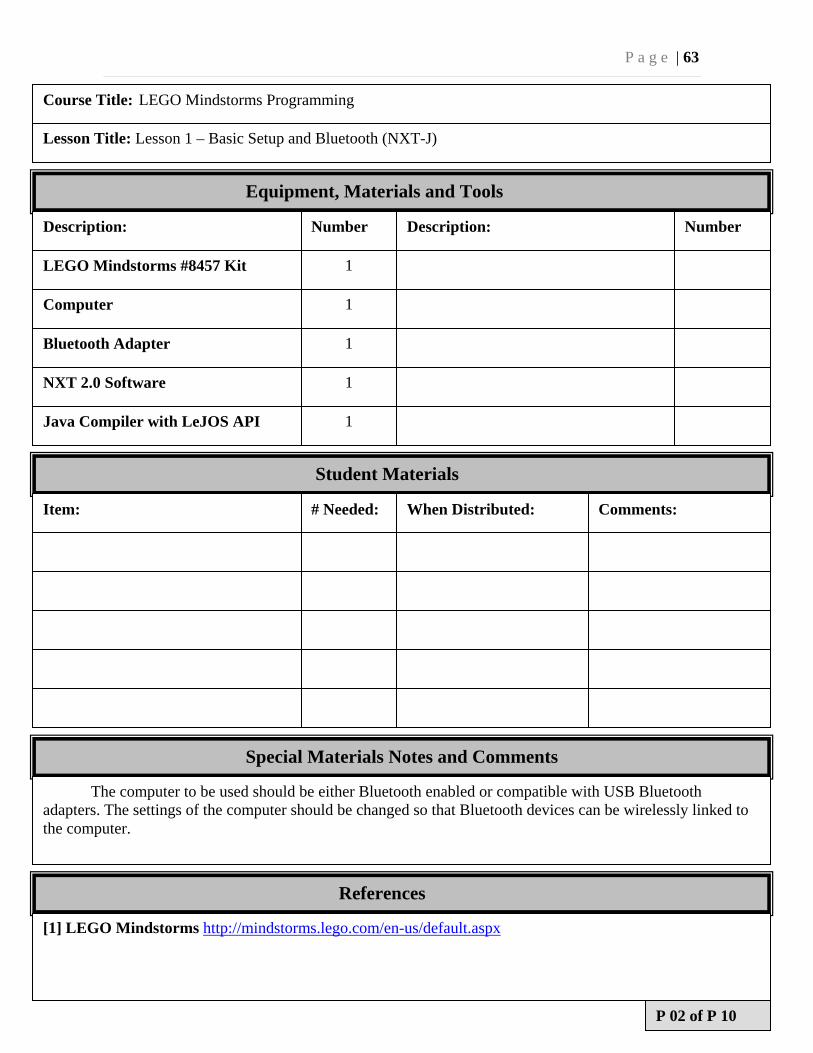
The computer to be used should be either Bluetooth enabled or compatible with USB Bluetooth adapters. The settings of the computer should be changed so that Bluetooth devices can be wirelessly linked to the computer.
References
[1] LEGO Mindstorms http://mindstorms.lego.com/en-us/default.aspx
P 02 of P 15
P a g e | 39
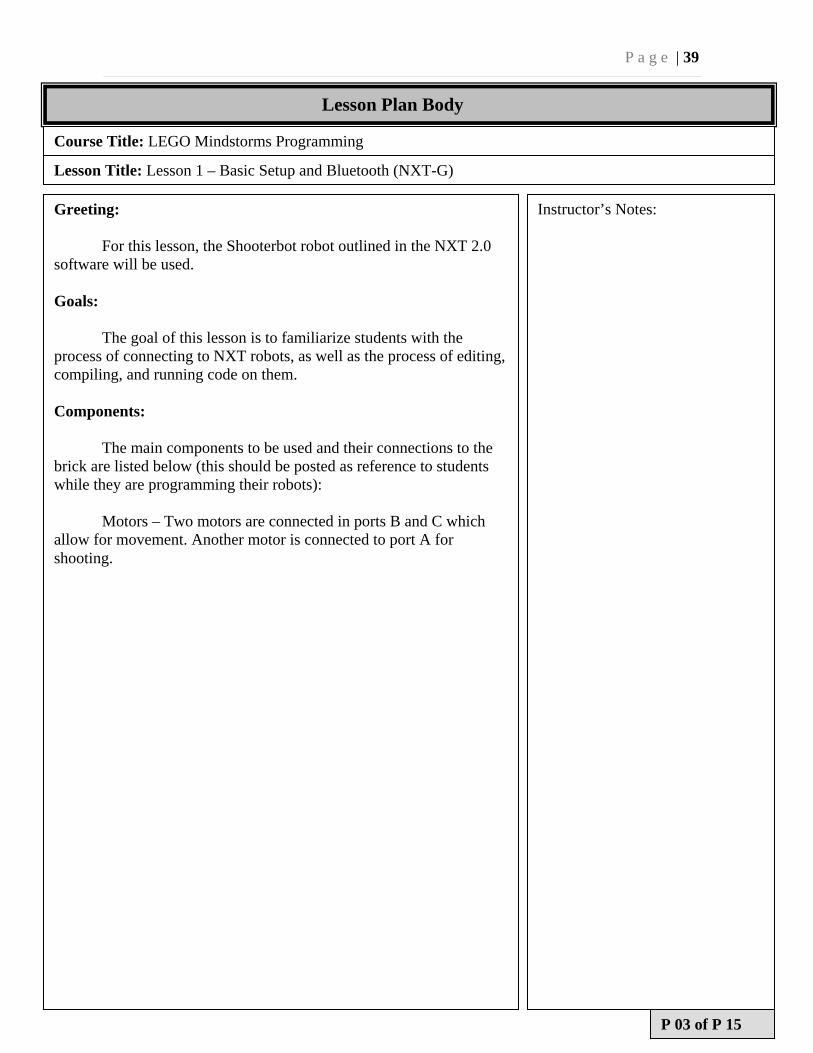
Lesson Plan Body
Course Title: LEGO Mindstorms Programming
Lesson Title: Lesson 1 – Basic Setup and Bluetooth (NXT-G)
Greeting: For this lesson, the Shooterbot robot outlined in the NXT 2.0 software will be used. Goals: The goal of this lesson is to familiarize students with the process of connecting to NXT robots, as well as the process of editing, compiling, and running code on them. Components: The main components to be used and their connections to the brick are listed below (this should be posted as reference to students while they are programming their robots): Motors – Two motors are connected in ports B and C which allow for movement. Another motor is connected to port A for shooting.
Instructor’s Notes:
P 03 of P 15
P a g e | 40
Lesson Plan Body
Course Title: LEGO Mindstorms Programming
Lesson Title: Lesson 1 – Basic Setup and Bluetooth (NXT-G)
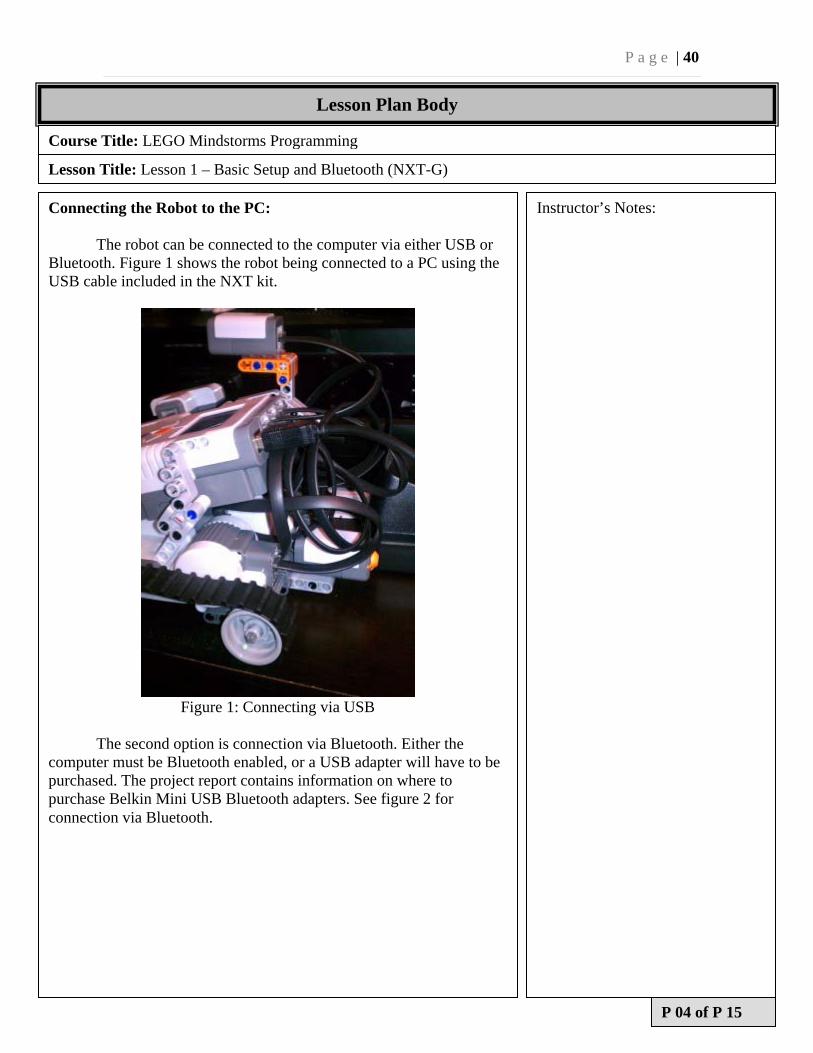
Connecting the Robot to the PC: The robot can be connected to the computer via either USB or Bluetooth. Figure 1 shows the robot being connected to a PC using the USB cable included in the NXT kit.
Figure 1: Connecting via USB
The second option is connection via Bluetooth. Either the computer must be Bluetooth enabled, or a USB adapter will have to be purchased. The project report contains information on where to purchase Belkin Mini USB Bluetooth adapters. See figure 2 for connection via Bluetooth.
Instructor’s Notes:
P 04 of P 15
P a g e | 41
Course Title: LEGO Mindstorms Programming
Lesson Title: Lesson 1 – Basic Setup and Bluetooth (NXT-G)
Connecting the Robot to the PC:
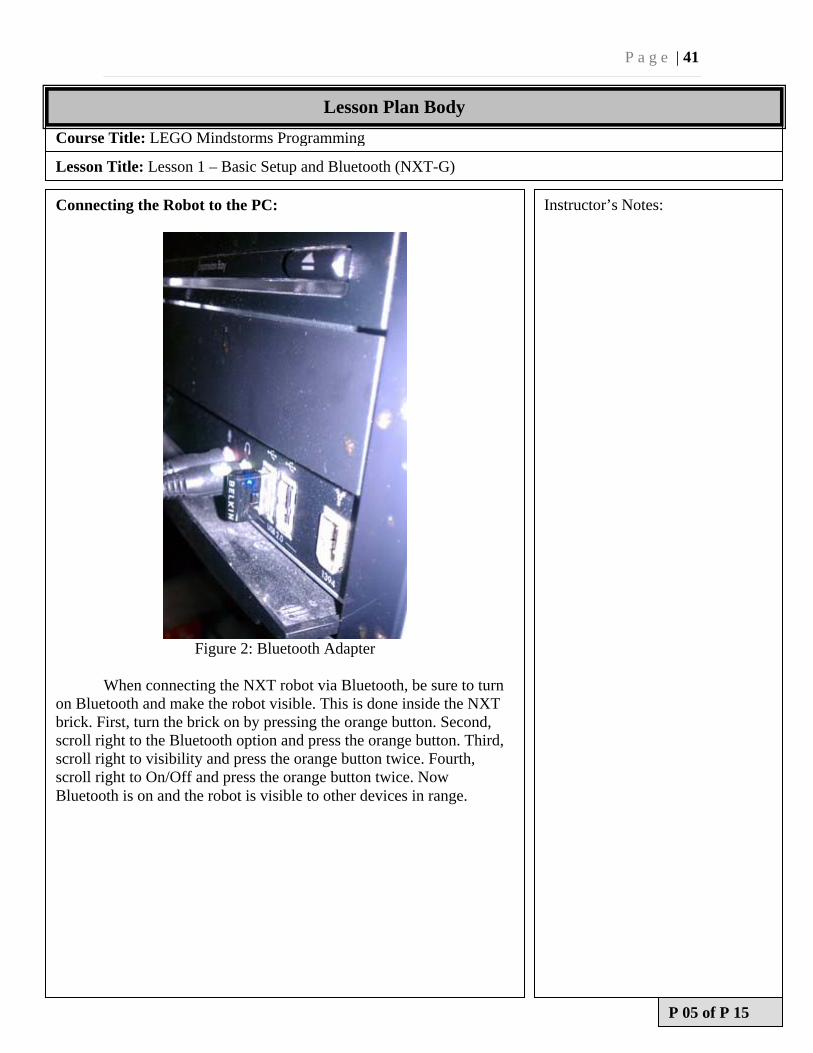
Figure 2: Bluetooth Adapter
When connecting the NXT robot via Bluetooth, be sure to turn on Bluetooth and make the robot visible. This is done inside the NXT brick. First, turn the brick on by pressing the orange button. Second, scroll right to the Bluetooth option and press the orange button. Third, scroll right to visibility and press the orange button twice. Fourth, scroll right to On/Off and press the orange button twice. Now Bluetooth is on and the robot is visible to other devices in range.
Instructor’s Notes:
P 05 of P 15
Lesson Plan Body
P a g e | 42
Course Title: LEGO Mindstorms Programming
Lesson Title: Lesson 1 – Basic Setup and Bluetooth (NXT-G)
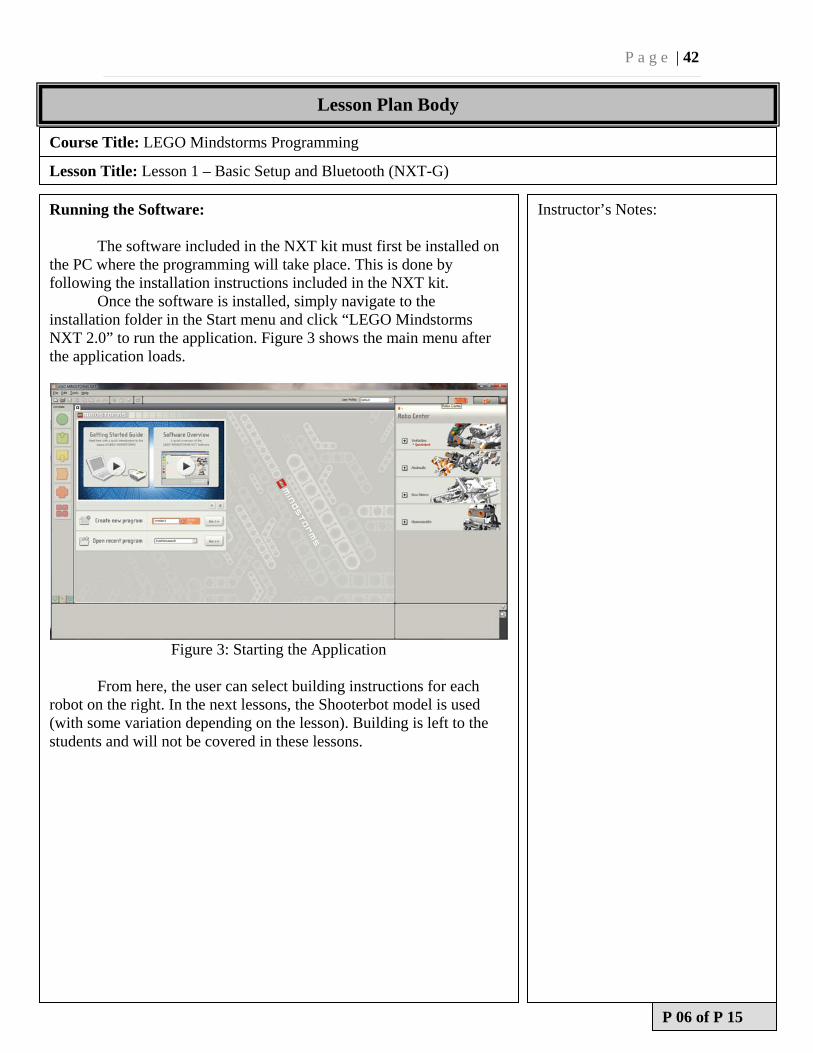
Running the Software: The software included in the NXT kit must first be installed on the PC where the programming will take place. This is done by following the installation instructions included in the NXT kit. Once the software is installed, simply navigate to the installation folder in the Start menu and click “LEGO Mindstorms NXT 2.0” to run the application. Figure 3 shows the main menu after the application loads.
Figure 3: Starting the Application
From here, the user can select building instructions for each robot on the right. In the next lessons, the Shooterbot model is used (with some variation depending on the lesson). Building is left to the students and will not be covered in these lessons.
Instructor’s Notes:
P 06 of P 15
Lesson Plan Body
P a g e | 43
Course Title: LEGO Mindstorms Programming
Lesson Title: Lesson 1 – Basic Setup and Bluetooth (NXT-G)
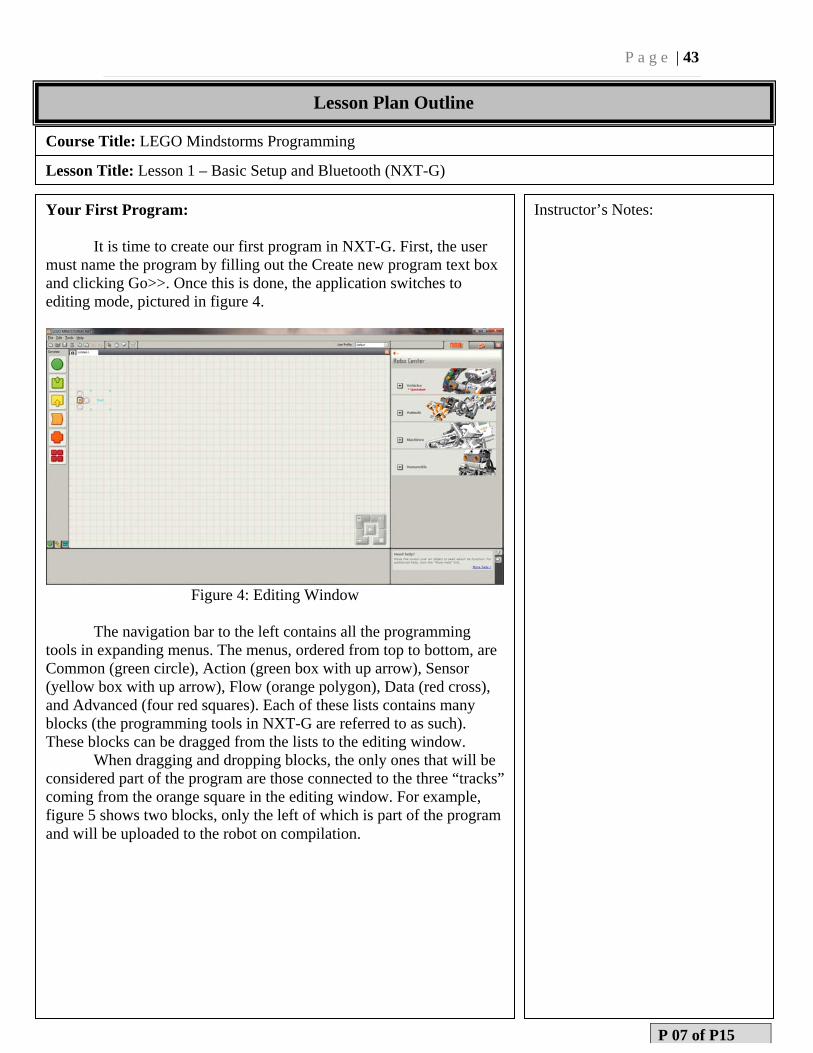
Your First Program: It is time to create our first program in NXT-G. First, the user must name the program by filling out the Create new program text box and clicking Go>>. Once this is done, the application switches to editing mode, pictured in figure 4.
Figure 4: Editing Window
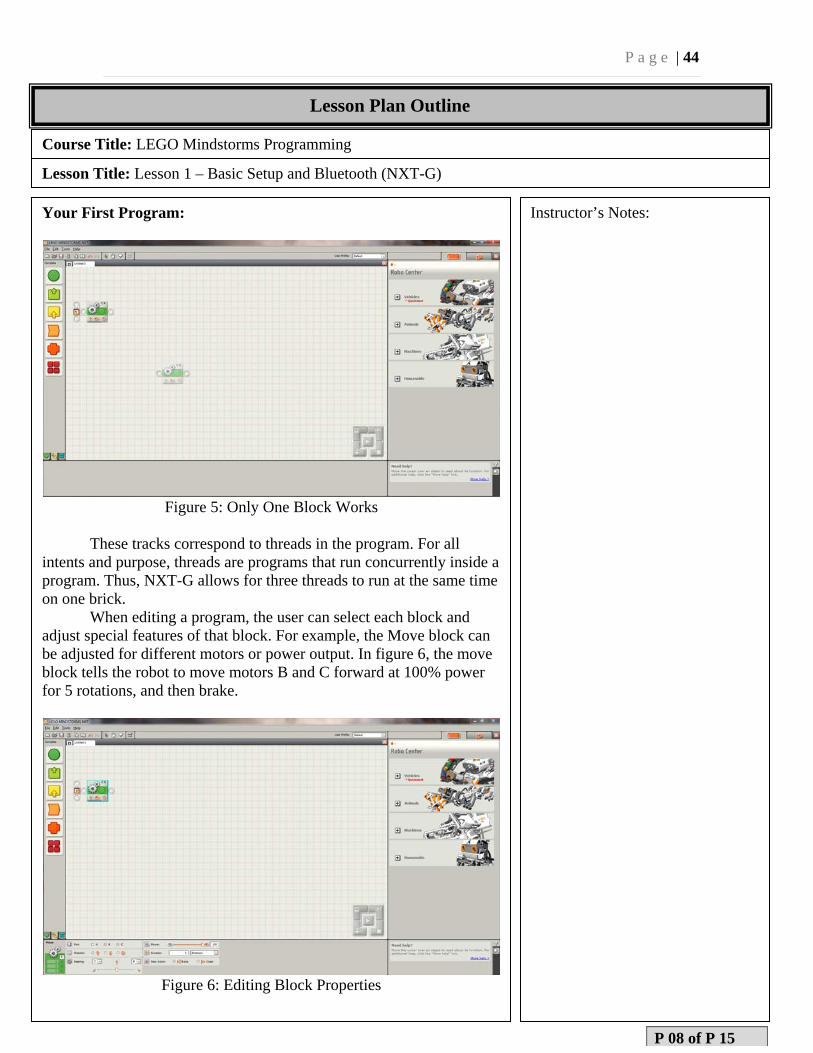
The navigation bar to the left contains all the programming tools in expanding menus. The menus, ordered from top to bottom, are Common (green circle), Action (green box with up arrow), Sensor (yellow box with up arrow), Flow (orange polygon), Data (red cross), and Advanced (four red squares). Each of these lists contains many blocks (the programming tools in NXT-G are referred to as such). These blocks can be dragged from the lists to the editing window. When dragging and dropping blocks, the only ones that will be considered part of the program are those connected to the three “tracks” coming from the orange square in the editing window. For example, figure 5 shows two blocks, only the left of which is part of the program and will be uploaded to the robot on compilation.
Instructor’s Notes:
P 07 of P15
Lesson Plan Outline
P a g e | 44
Course Title: LEGO Mindstorms Programming
Lesson Title: Lesson 1 – Basic Setup and Bluetooth (NXT-G)
Your First Program:
Figure 5: Only One Block Works
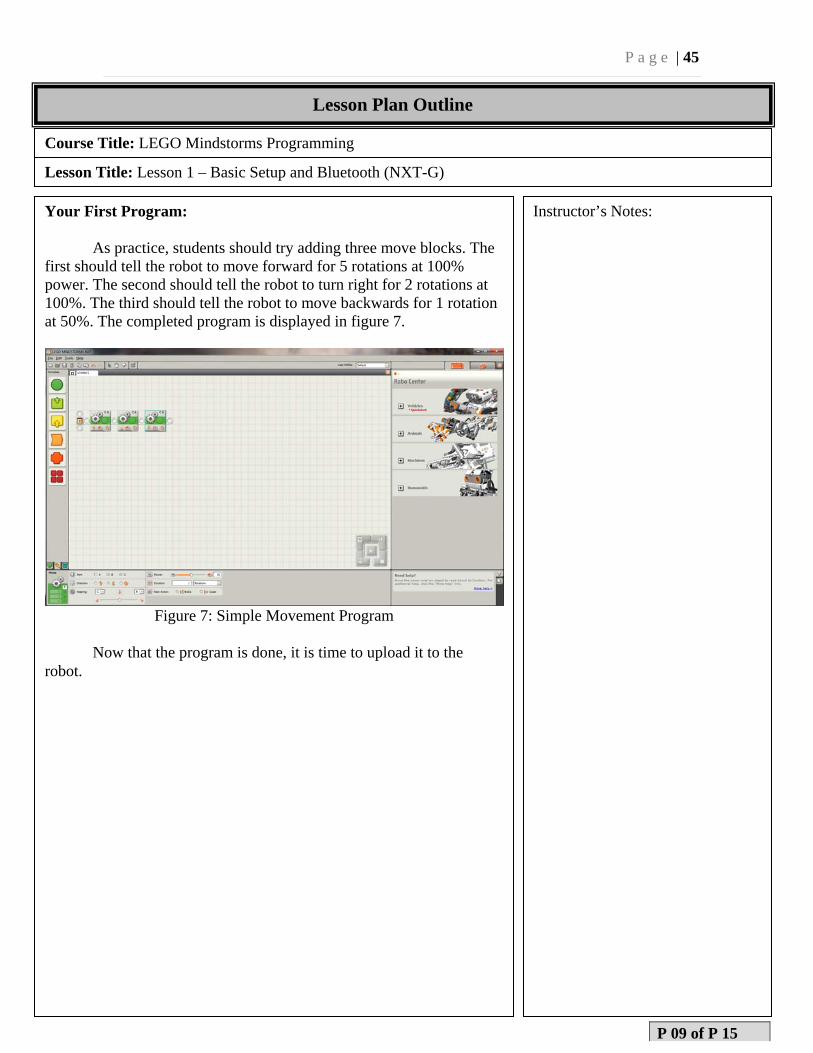
These tracks correspond to threads in the program. For all intents and purpose, threads are programs that run concurrently inside a program. Thus, NXT-G allows for three threads to run at the same time on one brick. When editing a program, the user can select each block and adjust special features of that block. For example, the Move block can be adjusted for different motors or power output. In figure 6, the move block tells the robot to move motors B and C forward at 100% power for 5 rotations, and then brake.
Figure 6: Editing Block Properties
Instructor’s Notes:
P 08 of P 15
Lesson Plan Outline
P a g e | 45
Course Title: LEGO Mindstorms Programming
Lesson Title: Lesson 1 – Basic Setup and Bluetooth (NXT-G)
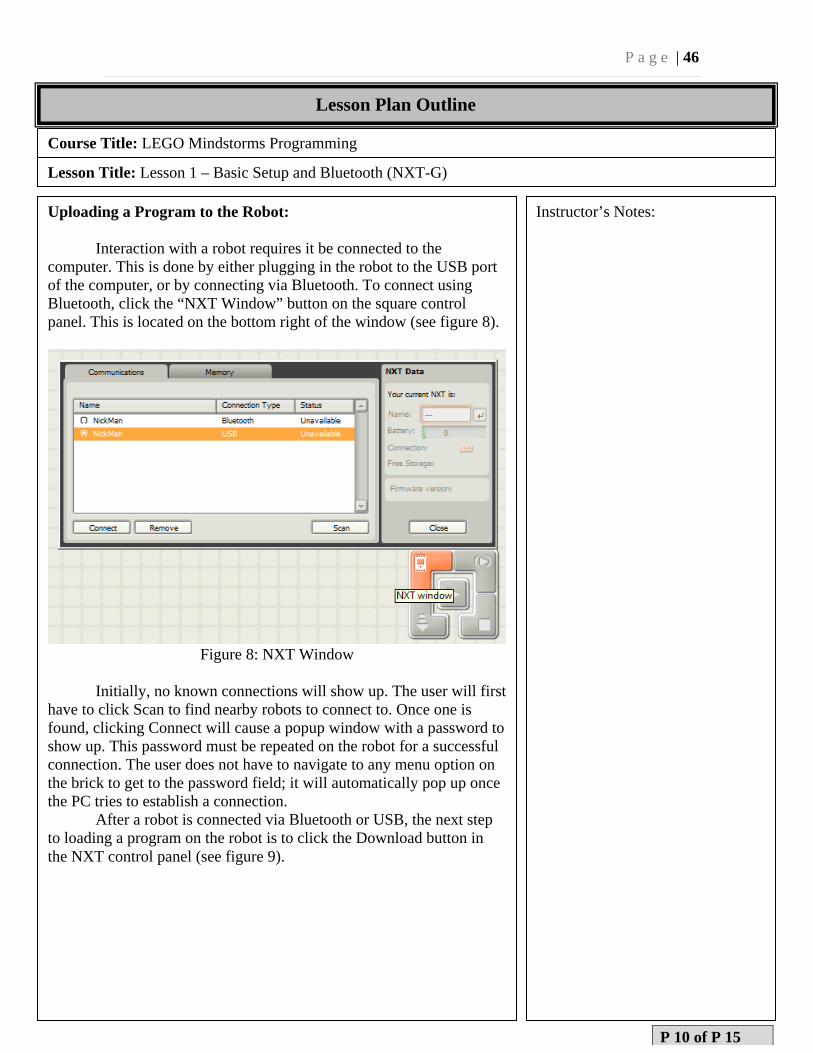
Your First Program: As practice, students should try adding three move blocks. The first should tell the robot to move forward for 5 rotations at 100% power. The second should tell the robot to turn right for 2 rotations at 100%. The third should tell the robot to move backwards for 1 rotation at 50%. The completed program is displayed in figure 7.
Figure 7: Simple Movement Program
Now that the program is done, it is time to upload it to the robot.
Instructor’s Notes:
P 09 of P 15
Lesson Plan Outline
P a g e | 46
Course Title: LEGO Mindstorms Programming
Lesson Title: Lesson 1 – Basic Setup and Bluetooth (NXT-G)
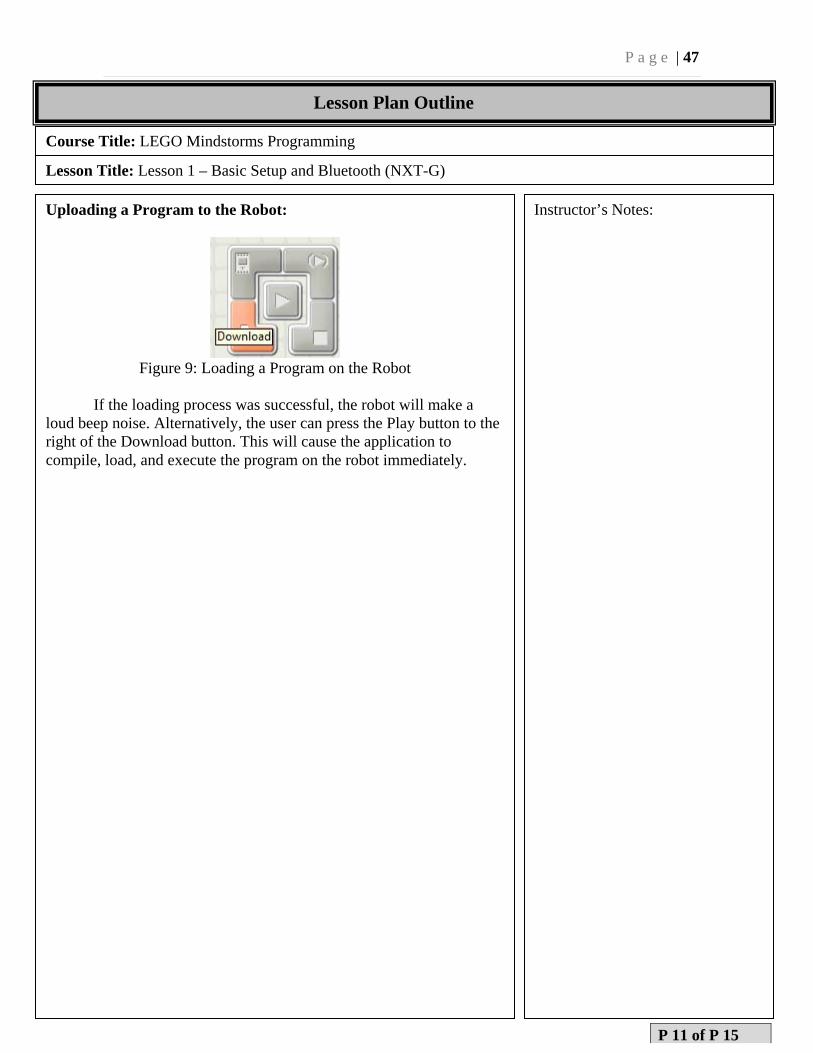
Uploading a Program to the Robot: Interaction with a robot requires it be connected to the computer. This is done by either plugging in the robot to the USB port of the computer, or by connecting via Bluetooth. To connect using Bluetooth, click the “NXT Window” button on the square control panel. This is located on the bottom right of the window (see figure 8).
Figure 8: NXT Window
Initially, no known connections will show up. The user will first have to click Scan to find nearby robots to connect to. Once one is found, clicking Connect will cause a popup window with a password to show up. This password must be repeated on the robot for a successful connection. The user does not have to navigate to any menu option on the brick to get to the password field; it will automatically pop up once the PC tries to establish a connection. After a robot is connected via Bluetooth or USB, the next step to loading a program on the robot is to click the Download button in the NXT control panel (see figure 9).
Instructor’s Notes:
P 10 of P 15
Lesson Plan Outline
P a g e | 47
Course Title: LEGO Mindstorms Programming
Lesson Title: Lesson 1 – Basic Setup and Bluetooth (NXT-G)
Uploading a Program to the Robot:
Figure 9: Loading a Program on the Robot
If the loading process was successful, the robot will make a loud beep noise. Alternatively, the user can press the Play button to the right of the Download button. This will cause the application to compile, load, and execute the program on the robot immediately.
Instructor’s Notes:
P 11 of P 15
Lesson Plan Outline
P a g e | 48
Course Title: LEGO Mindstorms Programming
Lesson Title: Lesson 1 – Basic Setup and Bluetooth (NXT-G)
Running a Program on the Robot: Now that a program exists on the robot, the user can navigate to it on the NXT brick to run or delete it. This is done by pressing the orange button (if it is not already on). From here, the user first navigates to My Files and press the orange button. Second, select Software Files and press the orange button. Third, navigate to the program from the list of available files and press the orange button. From here, pressing the orange button again causes the program to immediately execute. If so desired, the user can press the grey button any time during execution to halt the program and return to its menu. Users can also delete programs on their NXT bricks by navigating to the trash can after selecting the program file and pressing the orange button. Turning the robot off is accomplished by pressing the grey button repeatedly, until Turn Off appears. From here, pressing the orange button powers off the robot.
Instructor’s Notes:
P 12 of P 15
Lesson Plan Outline
P a g e | 49
Course Title: LEGO Mindstorms Programming
Lesson Title: Lesson 1 – Basic Setup and Bluetooth (NXT-G)
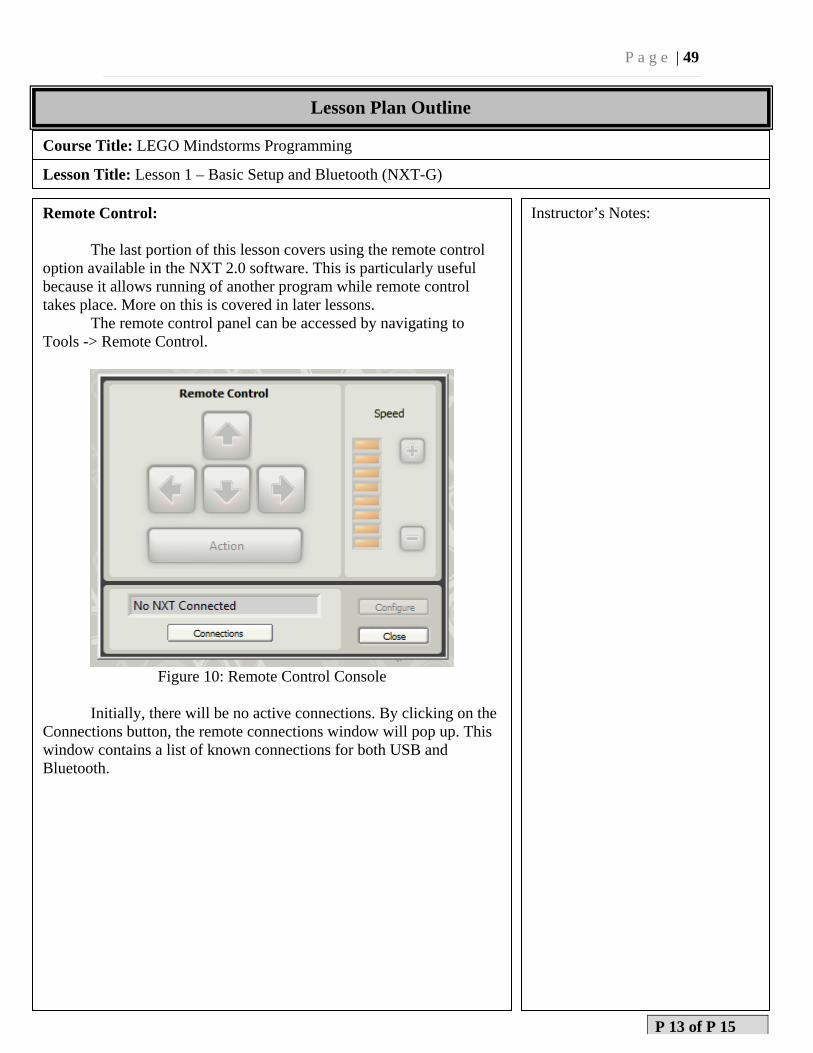
Remote Control: The last portion of this lesson covers using the remote control option available in the NXT 2.0 software. This is particularly useful because it allows running of another program while remote control takes place. More on this is covered in later lessons. The remote control panel can be accessed by navigating to Tools -> Remote Control.
Figure 10: Remote Control Console
Initially, there will be no active connections. By clicking on the Connections button, the remote connections window will pop up. This window contains a list of known connections for both USB and Bluetooth.
Instructor’s Notes:
P 13 of P 15
Lesson Plan Outline
P a g e | 50
Course Title: LEGO Mindstorms Programming
Lesson Title: Lesson 1 – Basic Setup and Bluetooth (NXT-G)
Remote Control:
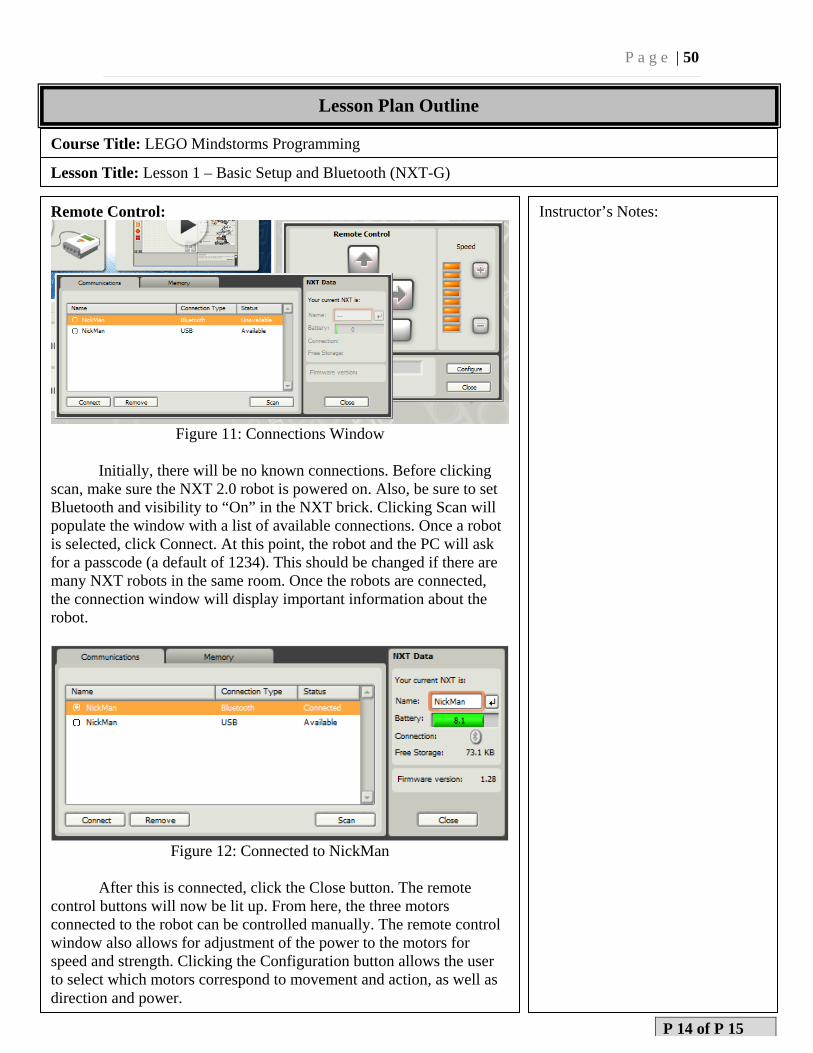
Figure 11: Connections Window
Initially, there will be no known connections. Before clicking scan, make sure the NXT 2.0 robot is powered on. Also, be sure to set Bluetooth and visibility to “On” in the NXT brick. Clicking Scan will populate the window with a list of available connections. Once a robot is selected, click Connect. At this point, the robot and the PC will ask for a passcode (a default of 1234). This should be changed if there are many NXT robots in the same room. Once the robots are connected, the connection window will display important information about the robot.
Figure 12: Connected to NickMan
After this is connected, click the Close button. The remote control buttons will now be lit up. From here, the three motors connected to the robot can be controlled manually. The remote control window also allows for adjustment of the power to the motors for speed and strength. Clicking the Configuration button allows the user to select which motors correspond to movement and action, as well as direction and power.
Instructor’s Notes:
P 14 of P 15
Lesson Plan Outline
P a g e | 51
Course Title: LEGO Mindstorms Programming
Lesson Title: Lesson 1 – Basic Setup and Bluetooth (NXT-G)
Remote Control:
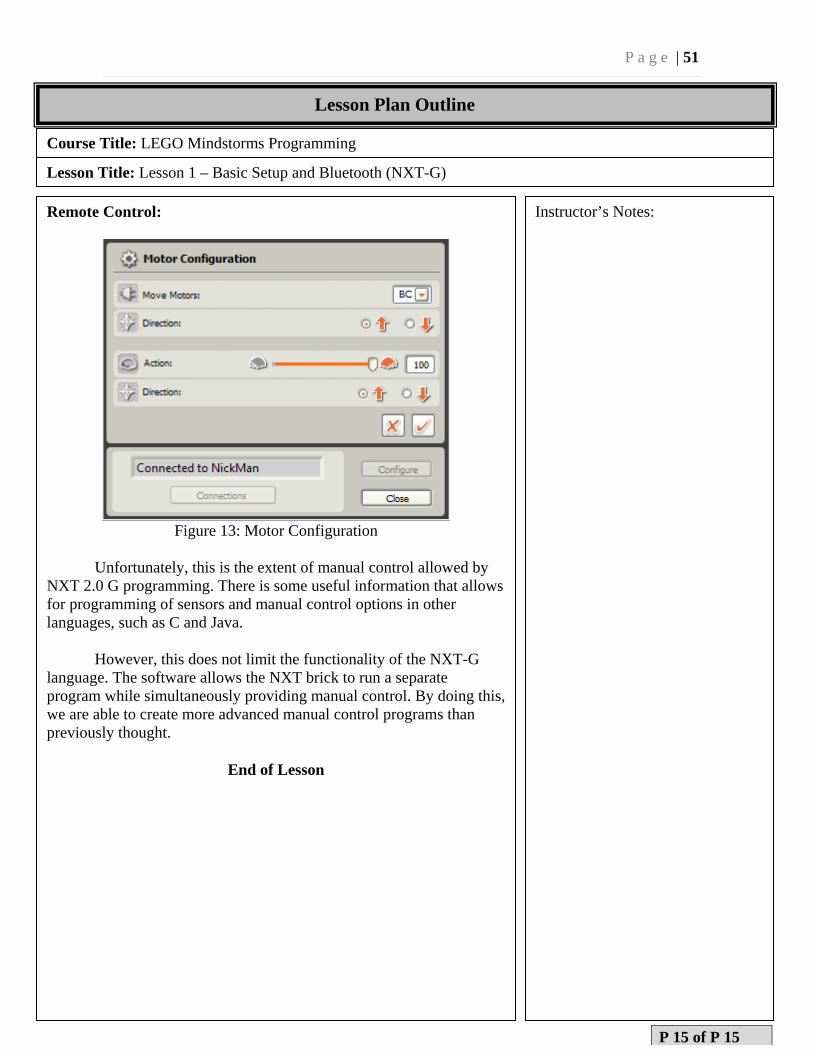
Figure 13: Motor Configuration
Unfortunately, this is the extent of manual control allowed by NXT 2.0 G programming. There is some useful information that allows for programming of sensors and manual control options in other languages, such as C and Java. However, this does not limit the functionality of the NXT-G language. The software allows the NXT brick to run a separate program while simultaneously providing manual control. By doing this, we are able to create more advanced manual control programs than previously thought.
End of Lesson
Instructor’s Notes:
P 15 of P 15
Lesson Plan Outline

P a g e | 52
Appendix:Lesson1(NXT‐C)
P a g e | 53
LEGO NXT-C Programming – Lesson 1
Course Title: LEGO Mindstorms Programming Lesson Title: Lesson 1 – Basic Setup and Bluetooth (NXT-C)
Instructor: Michael Humphries Assistant Instructor Required: Dr. Zalewski
Location of Training: Florida Gulf Coast University Evaluation Method: Testing autonomous and/or manual goals of the robot.
Space Requirement: Standard Classroom Training-Model: In-class experimentation.
Max. # Of Students: 2-4 per robot. Total Time Required: 1-2 hours.
Prepared by: Michael Humphries Date: 13 April 2012
Revised by: Dr. Zalewski Date:
Performance Objectives
Students at end of this class will be able to:
- Navigate the RobotC software suite. - Connect via USB and Bluetooth to the
LEGO Mindstorms NXT 2.0 robots. - Initiate a remote control connection to a
NXT 2.0 robot.
Approved by: Dr. Zalewski Date:
P 01 of P 08
P a g e | 54
Course Title: LEGO Mindstorms Programming
Lesson Title: Lesson 1 – Basic Setup and Bluetooth (NXT-C)
Equipment, Materials and Tools
Description: Number: Description: Number
LEGO Mindstorms #8457 Kit 1
Computer 1
Bluetooth Adapter 1
RobotC Software 1
Student Materials
Item: # Needed: When Distributed: Comments:
Special Materials Notes and Comments
The computer to be used should be either Bluetooth enabled or compatible with USB Bluetooth adapters. The settings of the computer should be changed so that Bluetooth devices can be wirelessly linked to the computer.
References
[1] LEGO Mindstorms http://mindstorms.lego.com/en-us/default.aspx
P 02 of P 08
P a g e | 55
Lesson Plan Body
Course Title: LEGO Mindstorms Programming
Lesson Title: Lesson 1 – Basic Setup and Bluetooth (NXT-C)
Greeting: This lesson discusses how to use the Lego Mindstorms robot with Bluetooth. Goals: The goal of this lesson is to familiarize students with the process of connecting to NXT robots, as well as the process of editing, compiling, and running code on them. Components: The main components to be used and their connections to the brick are listed below (this should be posted as reference to students while they are programming their robots): Motors – Two motors are connected in ports B and C which allow for movement.
Instructor’s Notes:
P 03 of P 08
P a g e | 56
Lesson Plan Body
Course Title: LEGO Mindstorms Programming
Lesson Title: Lesson 1 – Basic Setup and Bluetooth (NXT-C)
Connecting the Device: The easiest way to connect the robot to your computer is through the USB cable. The second option is connection via Bluetooth. Either the computer must be Bluetooth enabled, or a USB adapter will have to be purchased. The project report contains information on where to purchase Belkin Mini USB Bluetooth adapters. When connecting the NXT robot via Bluetooth, be sure to turn on Bluetooth and make the robot visible. This is done inside the NXT brick. First, turn the brick on by pressing the orange button. Second, scroll right to the Bluetooth option and press the orange button. Third, scroll right to visibility and press the orange button twice. Fourth, scroll right to On/Off and press the orange button twice. Now Bluetooth is on and the robot is visible to other devices in range.
Instructor’s Notes:
P 04 of P 08

P a g e | 57
Lesson Plan Body
Course Title: LEGO Mindstorms Programming
Lesson Title: Lesson 1 – Basic Setup and Bluetooth (NXT-C)
Start Programming:
Since RobotC is proprietary, a software license is required to use it. RobotC does provide more development options than any open source software, from a friendlier workspace to availability of a robust API. First we must obtain the software. This is easily done by visiting the RobotC home page. Click on the “Free Trial Download” button (see Figure 1).
Figure 1: Download
Once the setup file is downloaded, run it. Then follow the on
screen prompts. The setup is similar to any Windows-based installation.
Since the trial version of RobotC is very restricted, we will enter our license right away. This can be done by going to Help -> Manage Licenses in the RobotC workspace window. This will open the “ROBOTC License Management” window, as shown in Figure 2.
Instructor’s Notes:
P 05 of P 08
P a g e | 58
Course Title: LEGO Mindstorms Programming
Lesson Title: Lesson 1 – Basic Setup and Bluetooth (NXT-C)
Start Programming:
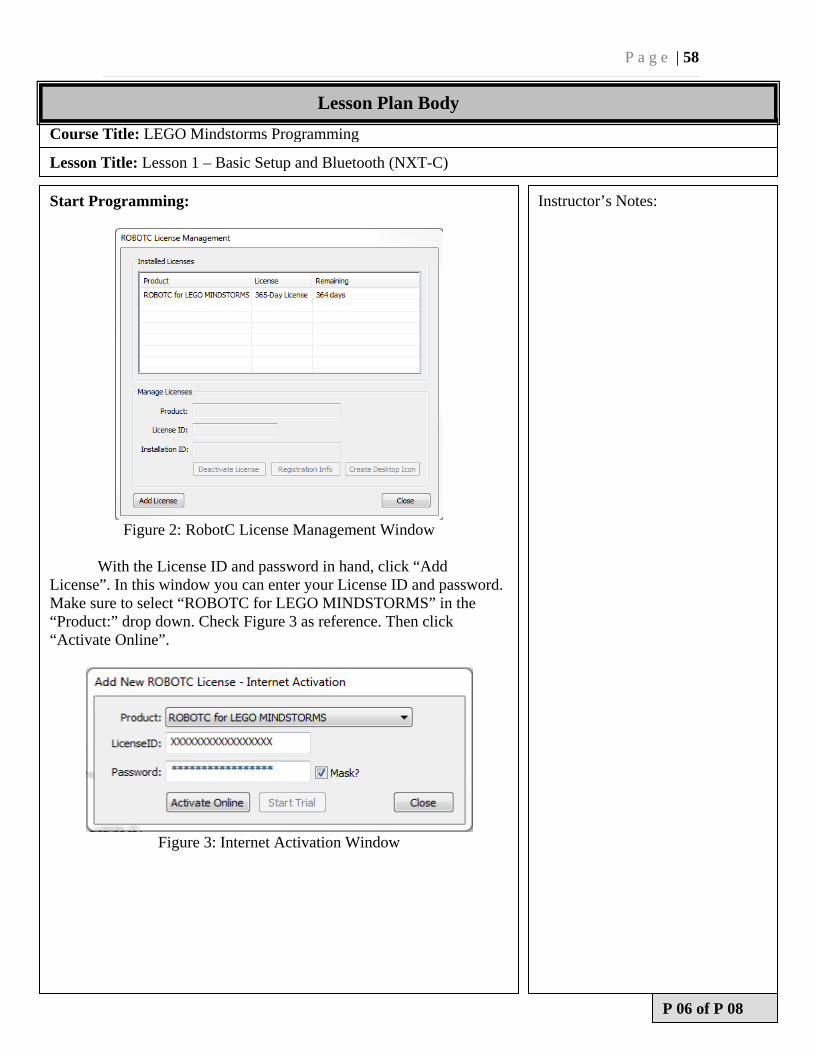
Figure 2: RobotC License Management Window
With the License ID and password in hand, click “Add
License”. In this window you can enter your License ID and password. Make sure to select “ROBOTC for LEGO MINDSTORMS” in the “Product:” drop down. Check Figure 3 as reference. Then click “Activate Online”.
Figure 3: Internet Activation Window
Instructor’s Notes:
P 06 of P 08
Lesson Plan Body
P a g e | 59
Course Title: LEGO Mindstorms Programming
Lesson Title: Lesson 1 – Basic Setup and Bluetooth (NXT-C)
Start Programming:
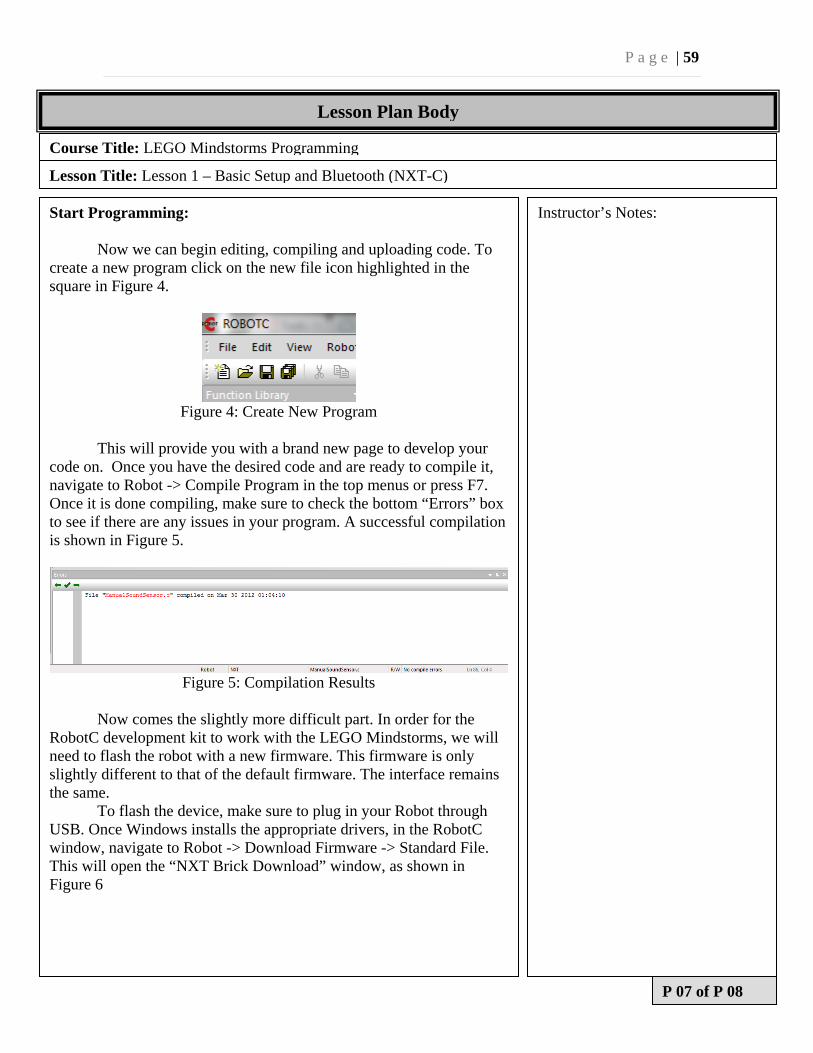
Now we can begin editing, compiling and uploading code. To create a new program click on the new file icon highlighted in the square in Figure 4.
Figure 4: Create New Program
This will provide you with a brand new page to develop your
code on. Once you have the desired code and are ready to compile it, navigate to Robot -> Compile Program in the top menus or press F7. Once it is done compiling, make sure to check the bottom “Errors” box to see if there are any issues in your program. A successful compilation is shown in Figure 5.
Figure 5: Compilation Results
Now comes the slightly more difficult part. In order for the
RobotC development kit to work with the LEGO Mindstorms, we will need to flash the robot with a new firmware. This firmware is only slightly different to that of the default firmware. The interface remains the same. To flash the device, make sure to plug in your Robot through USB. Once Windows installs the appropriate drivers, in the RobotC window, navigate to Robot -> Download Firmware -> Standard File. This will open the “NXT Brick Download” window, as shown in Figure 6
Instructor’s Notes:
P 07 of P 08
Lesson Plan Body
P a g e | 60
Programming Logic (Autonomous):
Course Title: LEGO Mindstorms Programming
Lesson Title: Lesson 1 – Basic Setup and Bluetooth (NXT-C)
Start Programming:
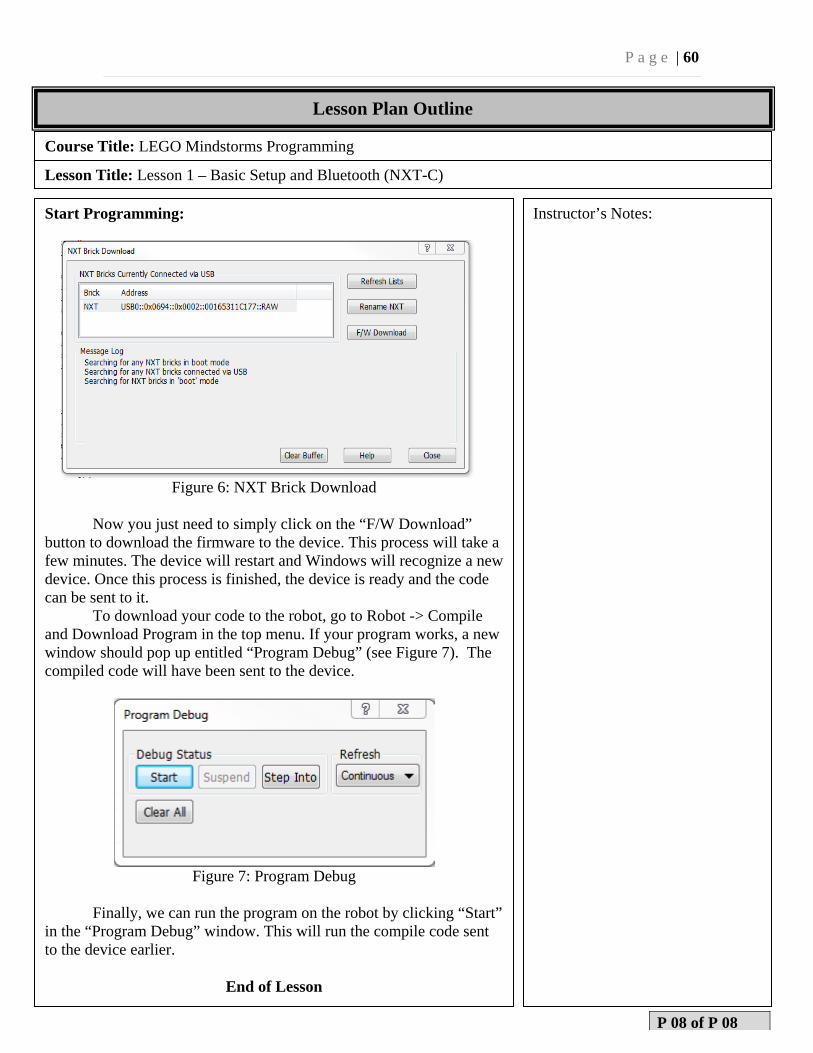
Figure 6: NXT Brick Download
Now you just need to simply click on the “F/W Download”
button to download the firmware to the device. This process will take a few minutes. The device will restart and Windows will recognize a new device. Once this process is finished, the device is ready and the code can be sent to it. To download your code to the robot, go to Robot -> Compile and Download Program in the top menu. If your program works, a new window should pop up entitled “Program Debug” (see Figure 7). The compiled code will have been sent to the device.
Figure 7: Program Debug
Finally, we can run the program on the robot by clicking “Start” in the “Program Debug” window. This will run the compile code sent to the device earlier.
End of Lesson
Instructor’s Notes:
P 08 of P 08
Lesson Plan Outline

P a g e | 61
Appendix:Lesson1(NXT‐J)
P a g e | 62
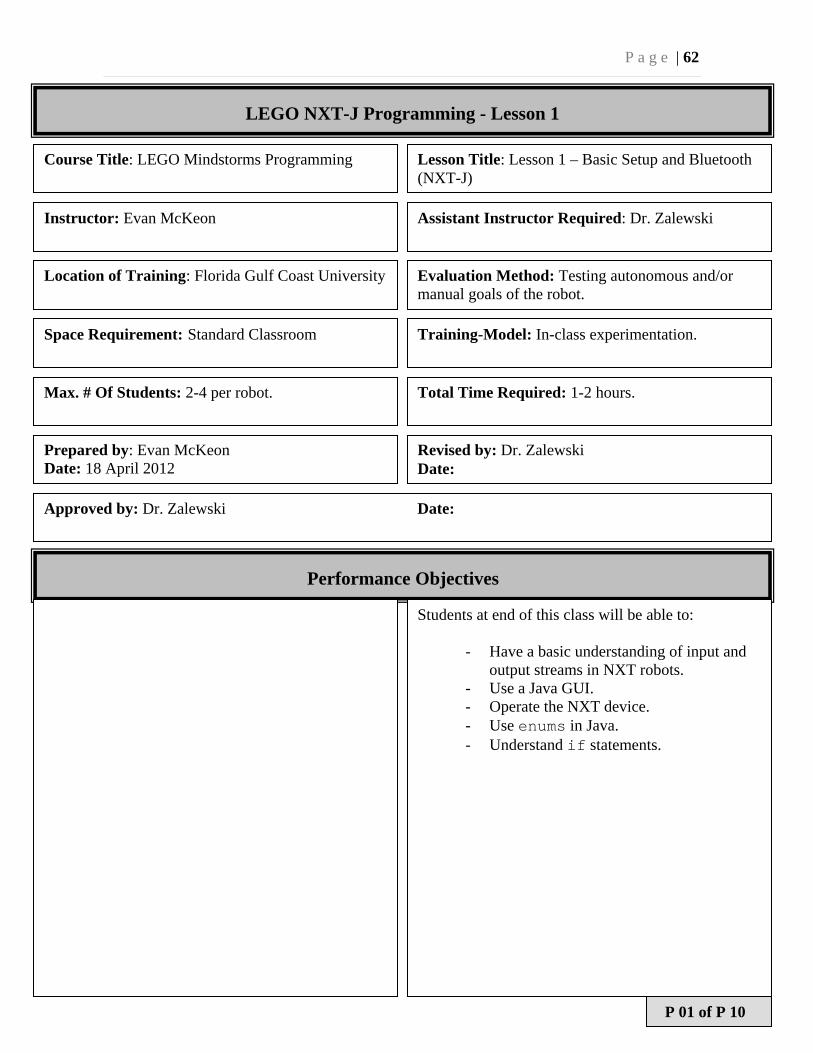
LEGO NXT-J Programming - Lesson 1
Course Title: LEGO Mindstorms Programming Lesson Title: Lesson 1 – Basic Setup and Bluetooth (NXT-J)
Instructor: Evan McKeon Assistant Instructor Required: Dr. Zalewski
Location of Training: Florida Gulf Coast University Evaluation Method: Testing autonomous and/or manual goals of the robot.
Space Requirement: Standard Classroom Training-Model: In-class experimentation.
Max. # Of Students: 2-4 per robot. Total Time Required: 1-2 hours.
Prepared by: Evan McKeon Date: 18 April 2012
Revised by: Dr. Zalewski Date:
Performance Objectives
Students at end of this class will be able to:
- Have a basic understanding of input and output streams in NXT robots.
- Use a Java GUI. - Operate the NXT device. - Use enums in Java. - Understand if statements.
Approved by: Dr. Zalewski Date:
P 01 of P 10
P a g e | 63
Course Title: LEGO Mindstorms Programming
Lesson Title: Lesson 1 – Basic Setup and Bluetooth (NXT-J)
Equipment, Materials and Tools
Description: Number Description: Number
LEGO Mindstorms #8457 Kit 1
Computer 1
Bluetooth Adapter 1
NXT 2.0 Software 1
Java Compiler with LeJOS API 1
Student Materials
Item: # Needed: When Distributed: Comments:
Special Materials Notes and Comments
The computer to be used should be either Bluetooth enabled or compatible with USB Bluetooth adapters. The settings of the computer should be changed so that Bluetooth devices can be wirelessly linked to the computer.
References
[1] LEGO Mindstorms http://mindstorms.lego.com/en-us/default.aspx
P 02 of P 10
P a g e | 64
Lesson Plan Body
Course Title: LEGO Mindstorms Programming
Lesson Title: Lesson 1 – Basic Setup and Bluetooth (NXT-J)
Greeting: For the purpose of this lesson, the basic robot presented in the beginning of the user guide for the NXT 2.0 will be used, with no additional sensors. However, a computer with Bluetooth and LeJOS programming environment installed is required. This lesson focuses on remote control of the robot. Goals:
The autonomous goal of this lesson is as follows: Students will explore the NXT software and learn how to control the robot using the Java GUI provided. Students will also see the basics of input and output stream as well as learn how to use enums. Components:
- Basic NXT robot.
Instructor’s Notes:
P 03 of P 10
P a g e | 65
Lesson Plan Body
Course Title: LEGO Mindstorms Programming
Lesson Title: Lesson 1 – Basic Setup and Bluetooth (NXT-J)
Programming Logic (Autonomous):
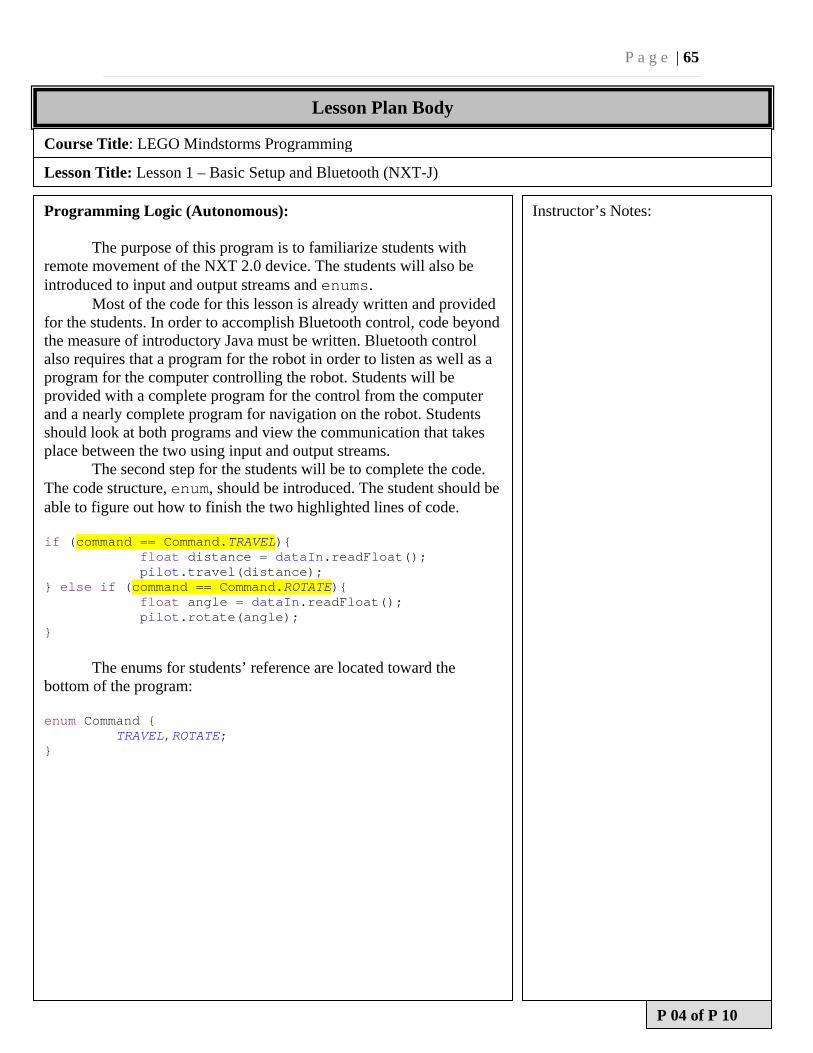
The purpose of this program is to familiarize students with remote movement of the NXT 2.0 device. The students will also be introduced to input and output streams and enums.
Most of the code for this lesson is already written and provided for the students. In order to accomplish Bluetooth control, code beyond the measure of introductory Java must be written. Bluetooth control also requires that a program for the robot in order to listen as well as a program for the computer controlling the robot. Students will be provided with a complete program for the control from the computer and a nearly complete program for navigation on the robot. Students should look at both programs and view the communication that takes place between the two using input and output streams.
The second step for the students will be to complete the code. The code structure, enum, should be introduced. The student should be able to figure out how to finish the two highlighted lines of code. if (command == Command.TRAVEL){ float distance = dataIn.readFloat(); pilot.travel(distance); } else if (command == Command.ROTATE){ float angle = dataIn.readFloat(); pilot.rotate(angle); }
The enums for students’ reference are located toward the bottom of the program: enum Command { TRAVEL,ROTATE; }
Instructor’s Notes:
P 04 of P 10
P a g e | 66
Course Title: LEGO Mindstorms Programming
Lesson Title: Lesson 1 – Basic Setup and Bluetooth (NXT-J)
Programming Logic (Autonomous):
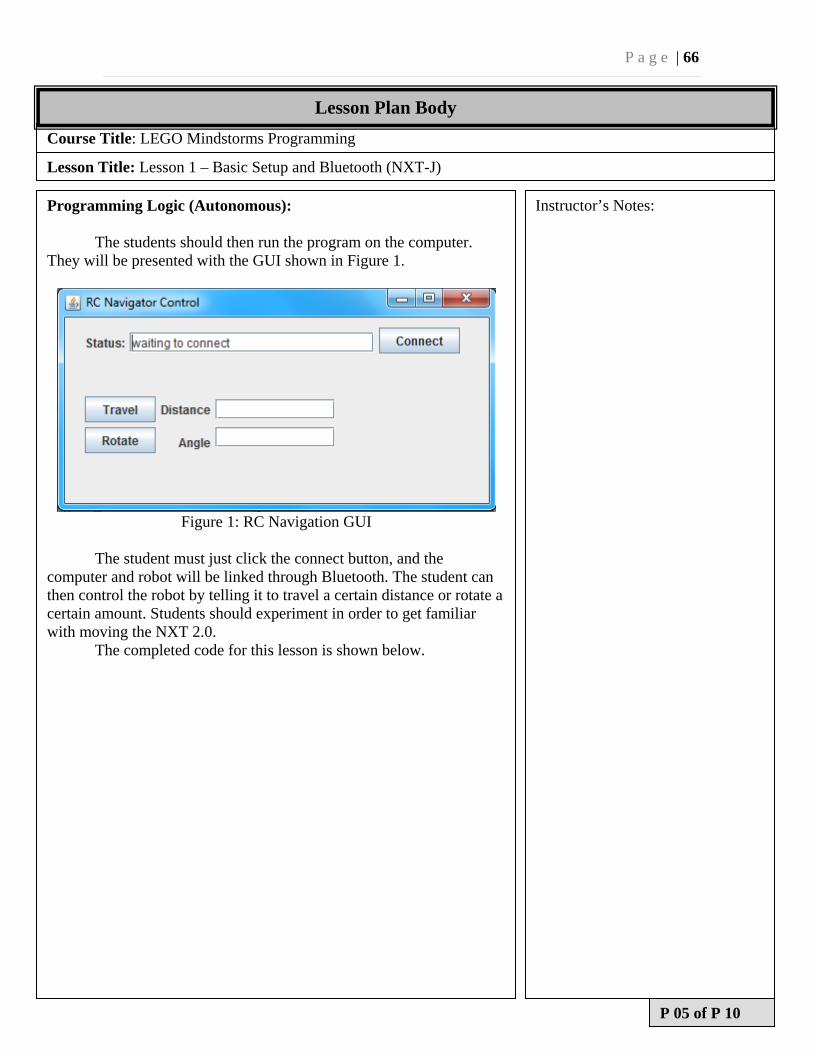
The students should then run the program on the computer. They will be presented with the GUI shown in Figure 1.
Figure 1: RC Navigation GUI
The student must just click the connect button, and the
computer and robot will be linked through Bluetooth. The student can then control the robot by telling it to travel a certain distance or rotate a certain amount. Students should experiment in order to get familiar with moving the NXT 2.0.
The completed code for this lesson is shown below.
Instructor’s Notes:
P 05 of P 10
Lesson Plan Body
P a g e | 67
Course Title: LEGO Mindstorms Programming
Lesson Title: Lesson 1 – Basic Setup and Bluetooth (NXT-J)
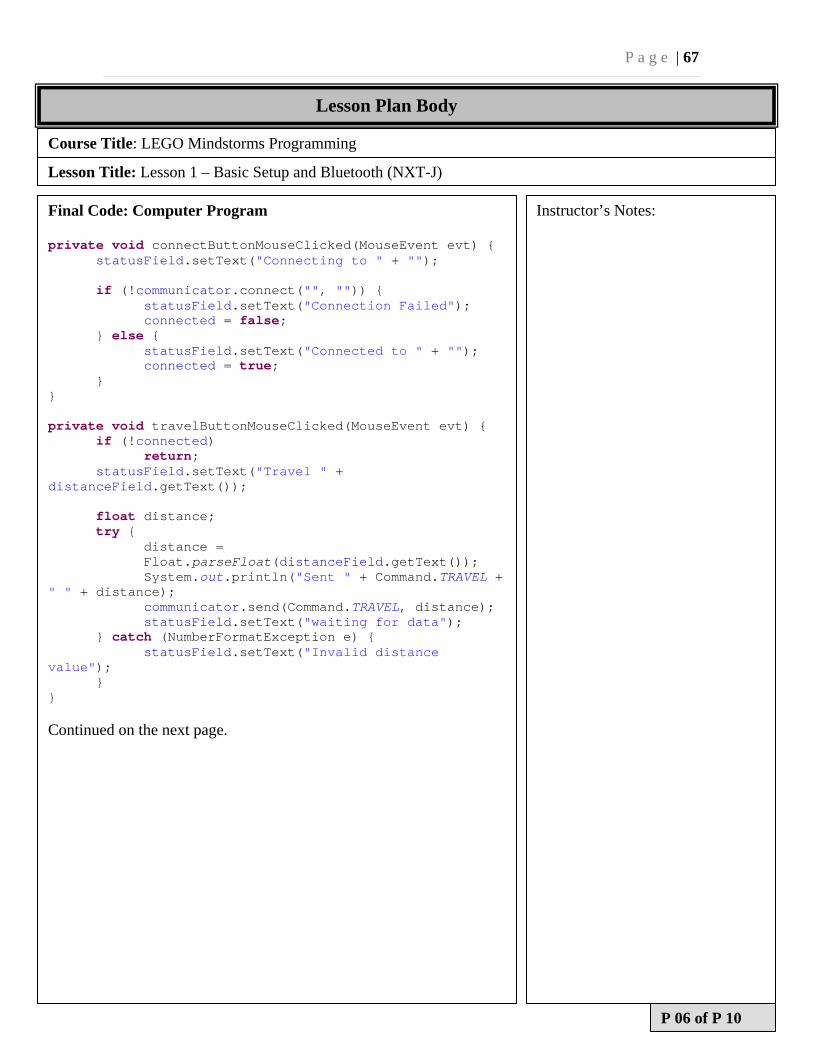
Final Code: Computer Program private void connectButtonMouseClicked(MouseEvent evt) {
statusField.setText("Connecting to " + "");
if (!communicator.connect("", "")) { statusField.setText("Connection Failed"); connected = false; } else { statusField.setText("Connected to " + ""); connected = true; } } private void travelButtonMouseClicked(MouseEvent evt) { if (!connected) return;
statusField.setText("Travel " + distanceField.getText());
float distance; try {
distance = Float.parseFloat(distanceField.getText());
System.out.println("Sent " + Command.TRAVEL + " " + distance); communicator.send(Command.TRAVEL, distance); statusField.setText("waiting for data"); } catch (NumberFormatException e) { statusField.setText("Invalid distance value"); } } Continued on the next page.
Instructor’s Notes:
P 06 of P 10
Lesson Plan Body

P a g e | 68
Course Title: LEGO Mindstorms Programming
Lesson Title: Lesson 1 – Basic Setup and Bluetooth (NXT-J)
Final Code: Computer Program private void rotateButtonMouseClicked(MouseEvent evt) { if (!connected) return; statusField.setText("Rotate " + angleField.getText()); float angle; try { angle=Float.parseFloat(angleField.getText()); System.out.println("Sent " + Command.ROTATE + " " + angle); communicator.send(Command.ROTATE, angle); statusField.setText("waiting for data"); } catch (NumberFormatException e) { statusField.setText("Invalid angle value");
} }
Instructor’s Notes:
P 07 of P 10
Lesson Plan Body
P a g e | 69
Course Title: LEGO Mindstorms Programming
Lesson Title: Lesson 1 – Basic Setup and Bluetooth (NXT-J)
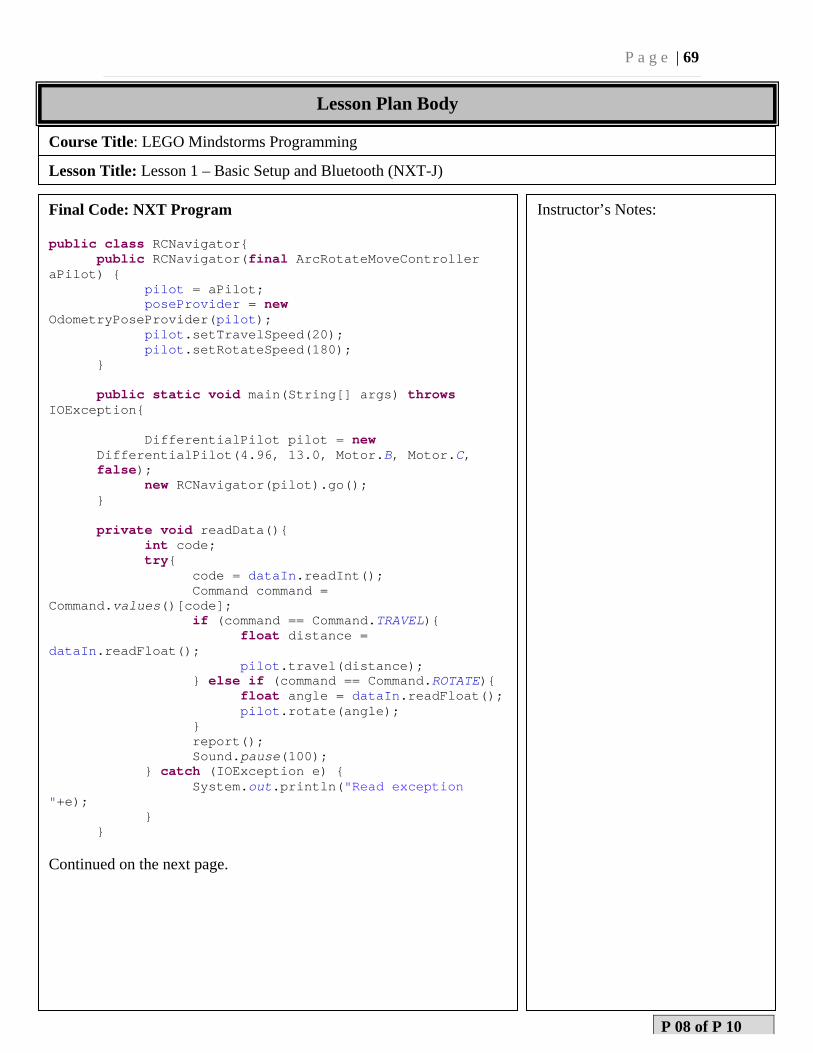
Final Code: NXT Program public class RCNavigator{ public RCNavigator(final ArcRotateMoveController aPilot) { pilot = aPilot; poseProvider = new OdometryPoseProvider(pilot); pilot.setTravelSpeed(20); pilot.setRotateSpeed(180); }
public static void main(String[] args) throws IOException{
DifferentialPilot pilot = new DifferentialPilot(4.96, 13.0, Motor.B, Motor.C, false);
new RCNavigator(pilot).go(); }
private void readData(){ int code; try{ code = dataIn.readInt(); Command command = Command.values()[code]; if (command == Command.TRAVEL){ float distance = dataIn.readFloat(); pilot.travel(distance); } else if (command == Command.ROTATE){ float angle = dataIn.readFloat(); pilot.rotate(angle); } report(); Sound.pause(100); } catch (IOException e) { System.out.println("Read exception "+e); } } Continued on the next page.
Instructor’s Notes:
P 08 of P 10
Lesson Plan Body
P a g e | 70
Course Title: LEGO Mindstorms Programming
Lesson Title: Lesson 1 – Basic Setup and Bluetooth (NXT-J)
Final Code: NXT Program
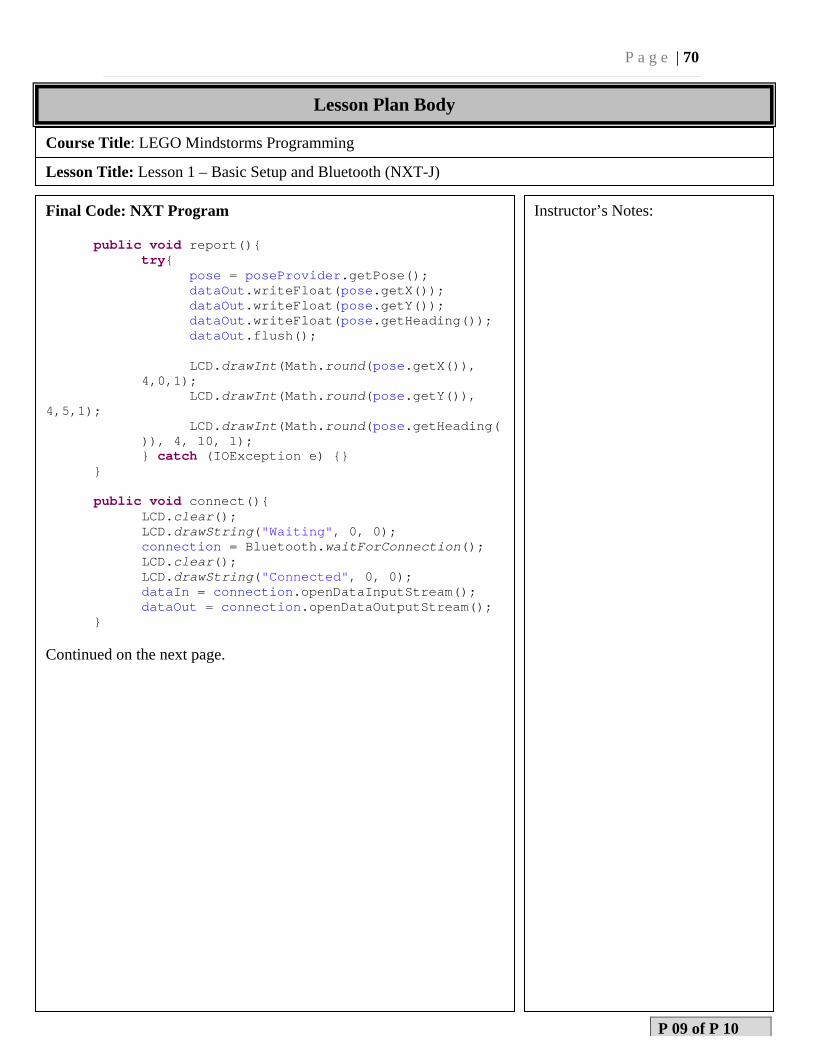
public void report(){ try{ pose = poseProvider.getPose(); dataOut.writeFloat(pose.getX()); dataOut.writeFloat(pose.getY()); dataOut.writeFloat(pose.getHeading()); dataOut.flush();
LCD.drawInt(Math.round(pose.getX()), 4,0,1);
LCD.drawInt(Math.round(pose.getY()), 4,5,1);
LCD.drawInt(Math.round(pose.getHeading()), 4, 10, 1);
} catch (IOException e) {} } public void connect(){ LCD.clear(); LCD.drawString("Waiting", 0, 0); connection = Bluetooth.waitForConnection(); LCD.clear(); LCD.drawString("Connected", 0, 0); dataIn = connection.openDataInputStream(); dataOut = connection.openDataOutputStream(); } Continued on the next page.
Instructor’s Notes:
P 09 of P 10
Lesson Plan Body
P a g e | 71
Course Title: LEGO Mindstorms Programming
Lesson Title: Lesson 1 – Basic Setup and Bluetooth (NXT-J)
Final Code: NXT Program
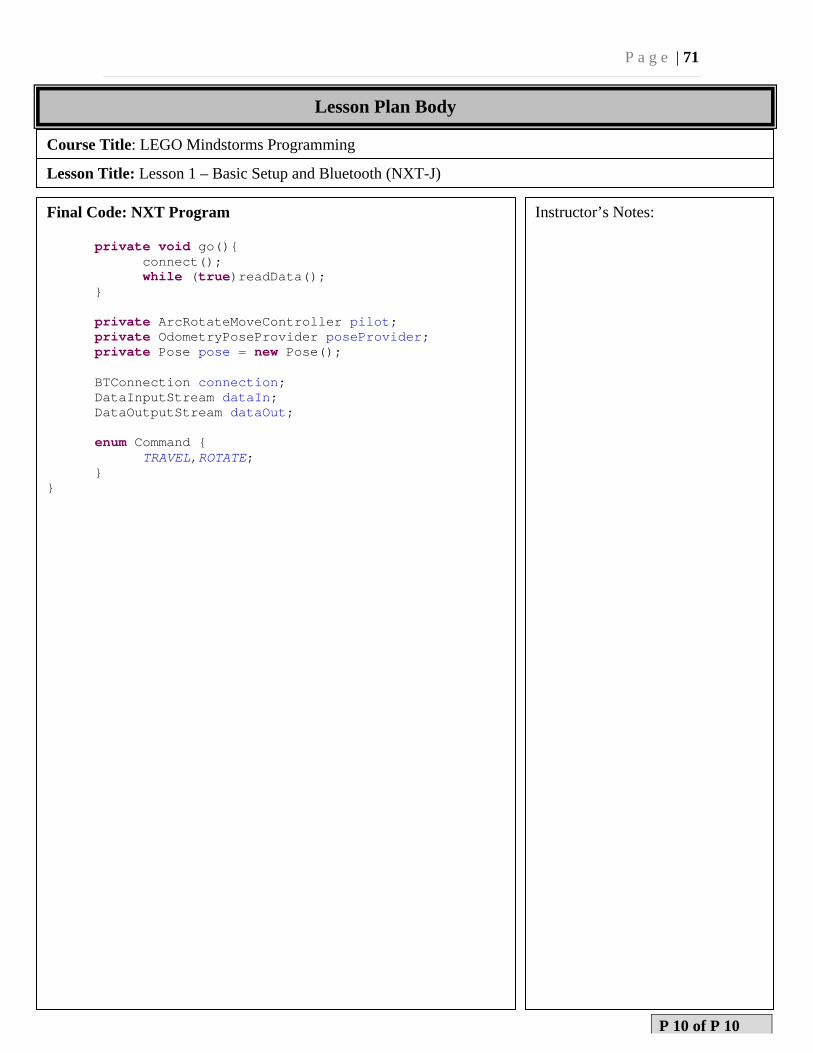
private void go(){ connect(); while (true)readData(); }
private ArcRotateMoveController pilot; private OdometryPoseProvider poseProvider; private Pose pose = new Pose();
BTConnection connection; DataInputStream dataIn; DataOutputStream dataOut; enum Command { TRAVEL,ROTATE; } }
Instructor’s Notes:
P 10 of P 10
Lesson Plan Body

P a g e | 72
Appendix:Lesson2(NXT‐J)
P a g e | 73
LEGO NXT-G Programming – Lesson 2
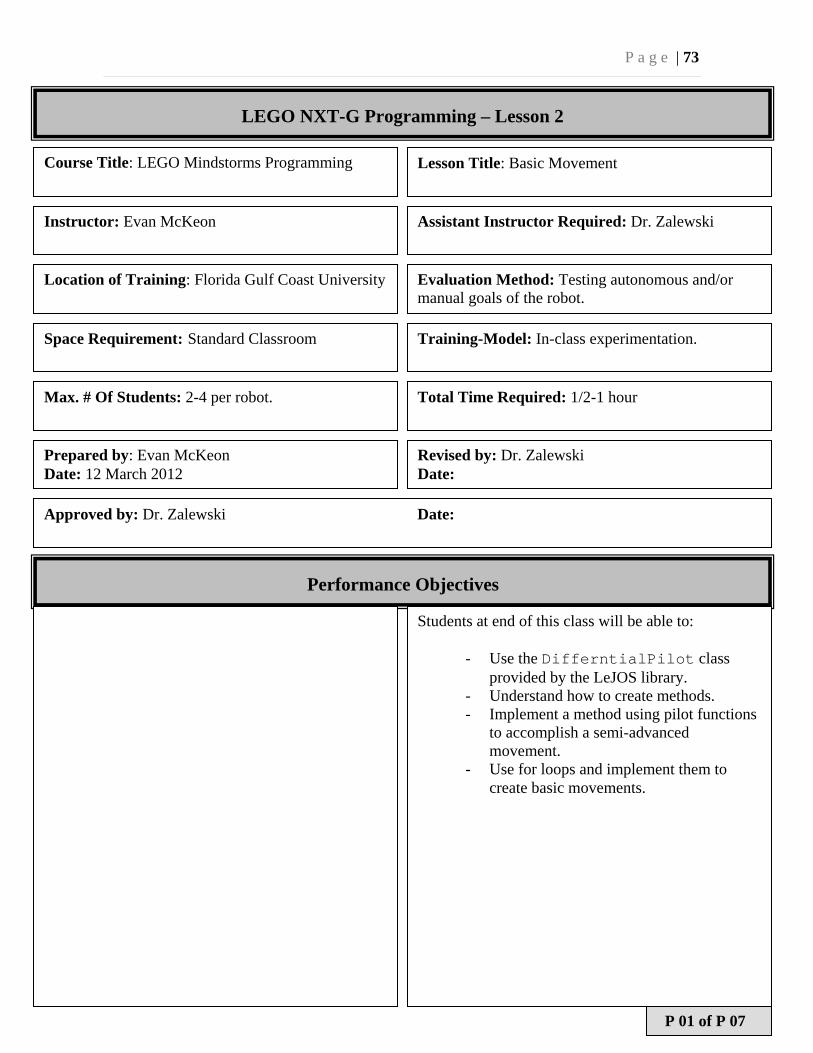
Course Title: LEGO Mindstorms Programming Lesson Title: Basic Movement
Instructor: Evan McKeon Assistant Instructor Required: Dr. Zalewski
Location of Training: Florida Gulf Coast University Evaluation Method: Testing autonomous and/or manual goals of the robot.
Space Requirement: Standard Classroom Training-Model: In-class experimentation.
Max. # Of Students: 2-4 per robot. Total Time Required: 1/2-1 hour
Prepared by: Evan McKeon Date: 12 March 2012
Revised by: Dr. Zalewski Date:
Performance Objectives
Students at end of this class will be able to:
- Use the DifferntialPilot class provided by the LeJOS library.
- Understand how to create methods. - Implement a method using pilot functions
to accomplish a semi-advanced movement.
- Use for loops and implement them to create basic movements.
Approved by: Dr. Zalewski Date:
P 01 of P 07

P a g e | 74
Course Title: LEGO Mindstorms Programming
Lesson Title: Lesson 2 – Basic Movement
Equipment, Materials and Tools
Description: Number: Description: Number:
LEGO Mindstorms #8457 Kit 1
Computer 1
Bluetooth Adapter 1
NXT 2.0 Software 1
Java Compiler with LeJOS library 1
Student Materials
Item: # Needed: When Distributed: Comments:
Special Materials Notes and Comments
The computer to be used should be either Bluetooth enabled or compatible with USB Bluetooth adapters. The settings of the computer should be changed so that Bluetooth devices can be wirelessly linked to the computer.
References
[1] LEGO Mindstorms http://mindstorms.lego.com/en-us/default.aspx [2] The leJOS NXJ Tutorial http://lejos.sourceforge.net/nxt/nxj/tutorial/index.htm [3] LeJOS API http://lejos.sourceforge.net/nxt/nxj/api/index.html
P 02 of P 07
P a g e | 75
Lesson Plan Body
Course Title: LEGO Mindstorms Programming
Lesson Title: Lesson 2 – Basic Movement
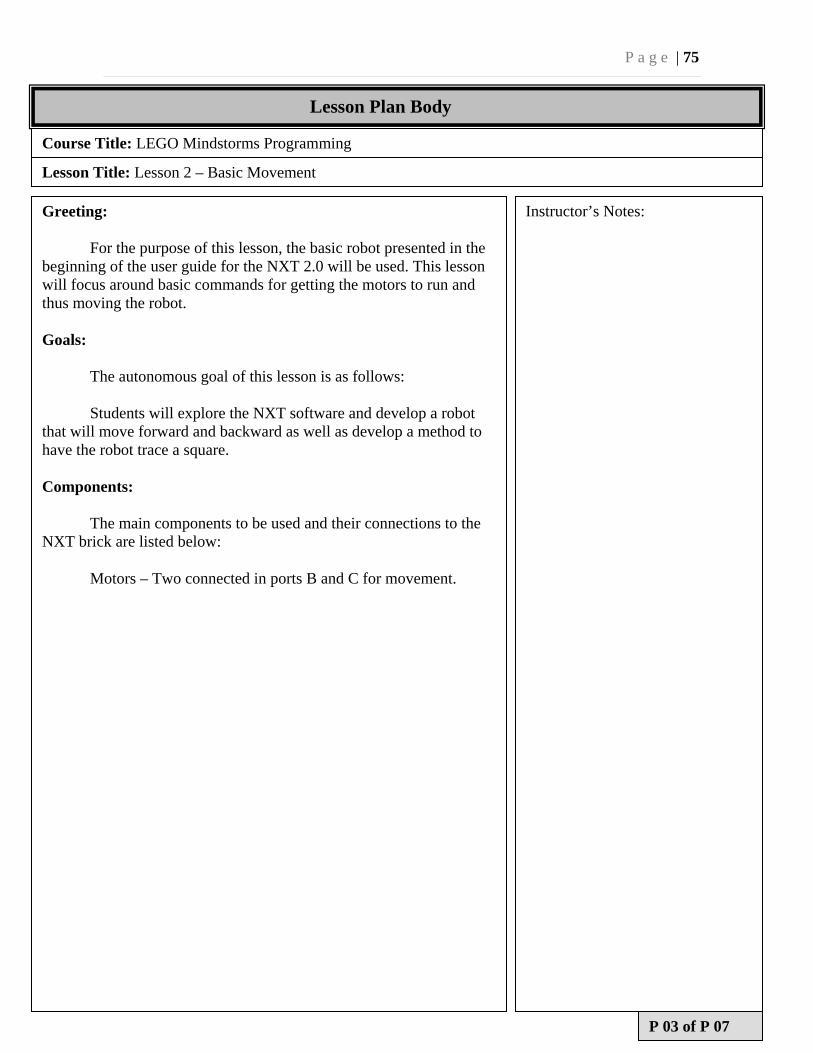
Greeting: For the purpose of this lesson, the basic robot presented in the beginning of the user guide for the NXT 2.0 will be used. This lesson will focus around basic commands for getting the motors to run and thus moving the robot. Goals:
The autonomous goal of this lesson is as follows: Students will explore the NXT software and develop a robot that will move forward and backward as well as develop a method to have the robot trace a square. Components:
The main components to be used and their connections to the NXT brick are listed below:
Motors – Two connected in ports B and C for movement.
Instructor’s Notes:
P 03 of P 07
P a g e | 76
Lesson Plan Body
Course Title: LEGO Mindstorms Programming
Lesson Title: Lesson 2 – Basic Movement
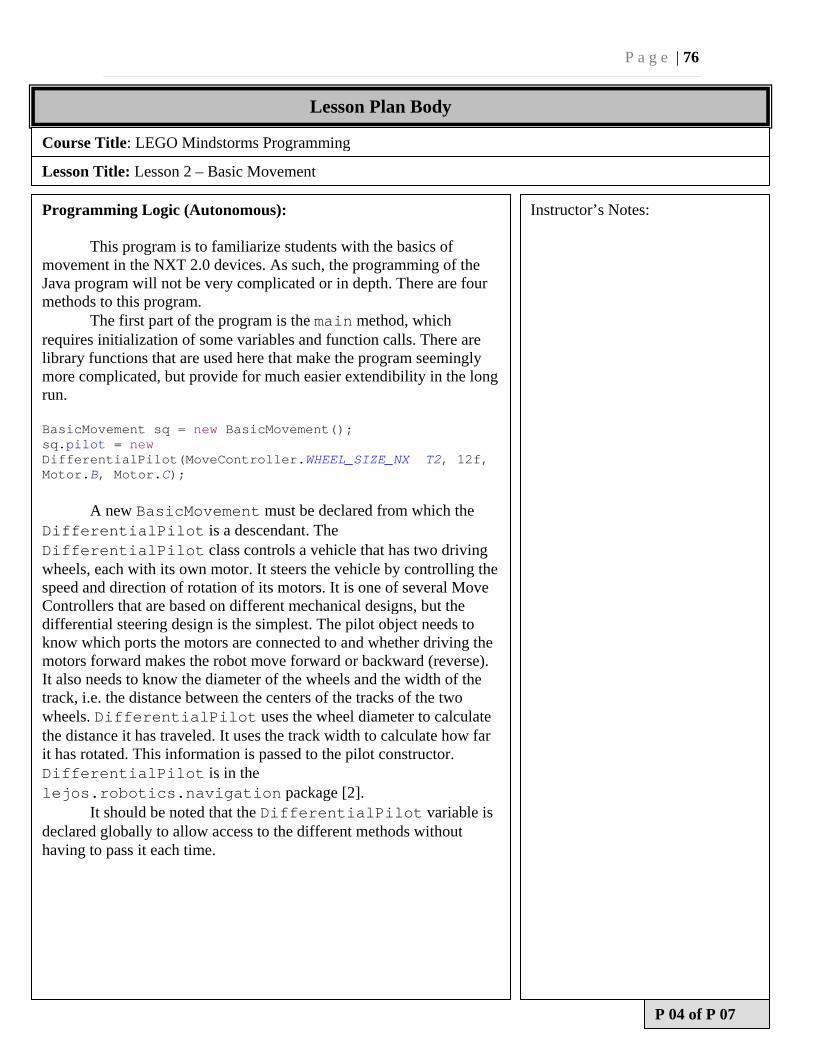
Programming Logic (Autonomous):
This program is to familiarize students with the basics of movement in the NXT 2.0 devices. As such, the programming of the Java program will not be very complicated or in depth. There are four methods to this program.
The first part of the program is the main method, which requires initialization of some variables and function calls. There are library functions that are used here that make the program seemingly more complicated, but provide for much easier extendibility in the long run. BasicMovement sq = new BasicMovement(); sq.pilot = new DifferentialPilot(MoveController.WHEEL_SIZE_NX T2, 12f, Motor.B, Motor.C);
A new BasicMovement must be declared from which the DifferentialPilot is a descendant. The DifferentialPilot class controls a vehicle that has two driving wheels, each with its own motor. It steers the vehicle by controlling the speed and direction of rotation of its motors. It is one of several Move Controllers that are based on different mechanical designs, but the differential steering design is the simplest. The pilot object needs to know which ports the motors are connected to and whether driving the motors forward makes the robot move forward or backward (reverse). It also needs to know the diameter of the wheels and the width of the track, i.e. the distance between the centers of the tracks of the two wheels. DifferentialPilot uses the wheel diameter to calculate the distance it has traveled. It uses the track width to calculate how far it has rotated. This information is passed to the pilot constructor. DifferentialPilot is in the lejos.robotics.navigation package [2].
It should be noted that the DifferentialPilot variable is declared globally to allow access to the different methods without having to pass it each time.
Instructor’s Notes:
P 04 of P 07
P a g e | 77
Course Title: LEGO Mindstorms Programming
Lesson Title: Lesson 2 – Basic Movement
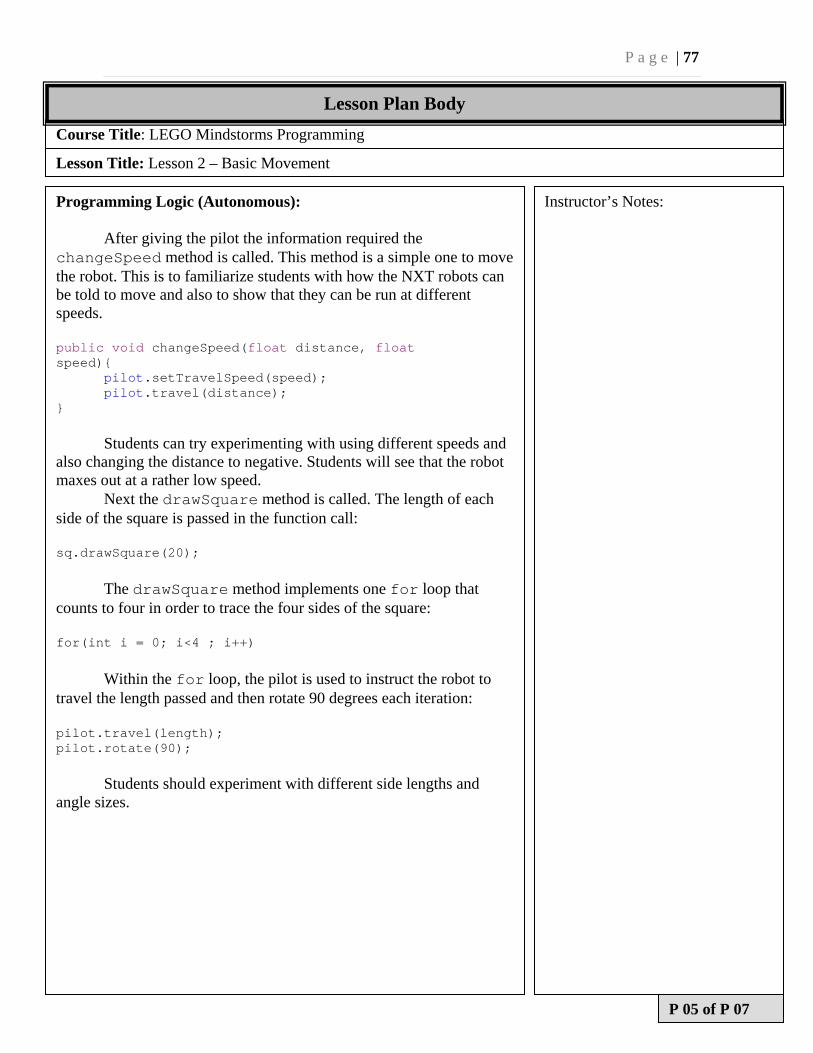
Programming Logic (Autonomous): After giving the pilot the information required the
changeSpeed method is called. This method is a simple one to move the robot. This is to familiarize students with how the NXT robots can be told to move and also to show that they can be run at different speeds. public void changeSpeed(float distance, float speed){ pilot.setTravelSpeed(speed); pilot.travel(distance); }
Students can try experimenting with using different speeds and also changing the distance to negative. Students will see that the robot maxes out at a rather low speed.
Next the drawSquare method is called. The length of each side of the square is passed in the function call: sq.drawSquare(20);
The drawSquare method implements one for loop that counts to four in order to trace the four sides of the square: for(int i = 0; i<4 ; i++)
Within the for loop, the pilot is used to instruct the robot to travel the length passed and then rotate 90 degrees each iteration: pilot.travel(length); pilot.rotate(90);
Students should experiment with different side lengths and angle sizes.
Instructor’s Notes:
P 05 of P 07
Lesson Plan Body
P a g e | 78
Course Title: LEGO Mindstorms Programming
Lesson Title: Lesson 2 – Basic Movement
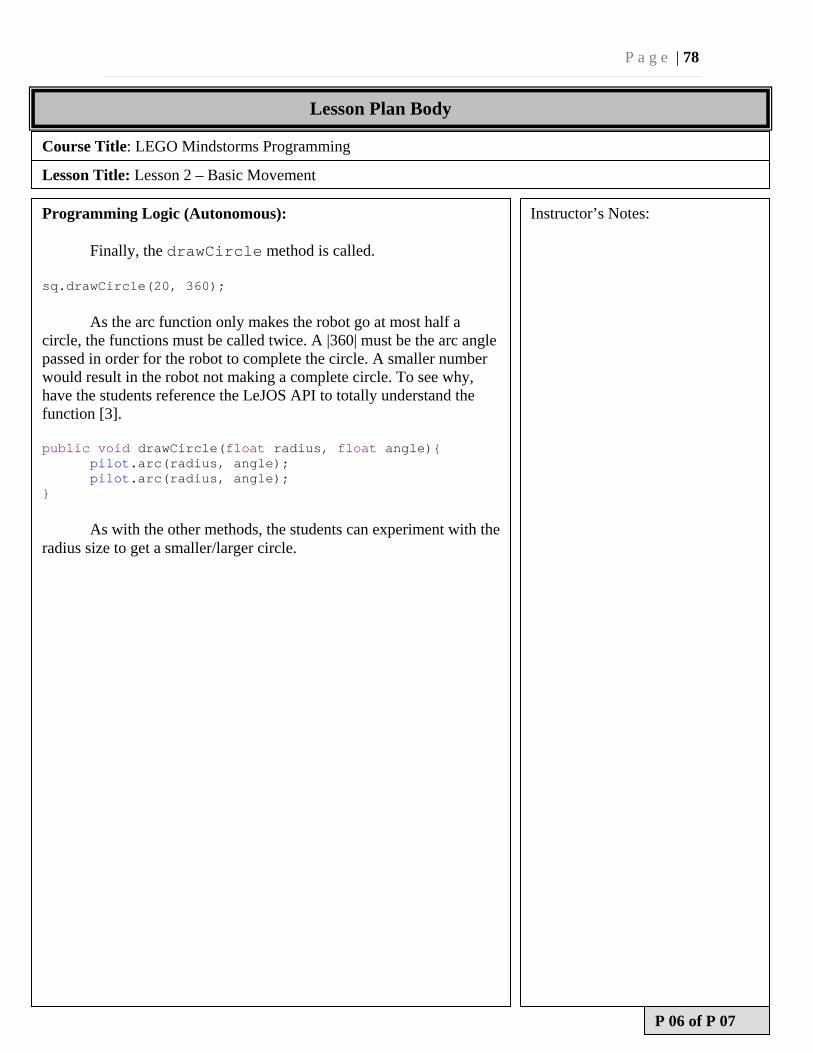
Programming Logic (Autonomous): Finally, the drawCircle method is called.
sq.drawCircle(20, 360);
As the arc function only makes the robot go at most half a circle, the functions must be called twice. A |360| must be the arc angle passed in order for the robot to complete the circle. A smaller number would result in the robot not making a complete circle. To see why, have the students reference the LeJOS API to totally understand the function [3]. public void drawCircle(float radius, float angle){ pilot.arc(radius, angle); pilot.arc(radius, angle); }
As with the other methods, the students can experiment with the radius size to get a smaller/larger circle.
Instructor’s Notes:
P 06 of P 07
Lesson Plan Body

P a g e | 79
Course Title: LEGO Mindstorms Programming
Lesson Title: Lesson 2 – Basic Movement
Final Code: import lejos.nxt.Motor; import lejos.robotics.navigation.DifferentialPilot; import lejos.robotics.navigation.MoveController; public class BasicMovement { DifferentialPilot pilot ; public static void main(String[] args){ BasicMovement sq = new BasicMovement(); sq.pilot = new DifferentialPilot(MoveController.WHEEL_SIZE_NXT2, 12f, Motor.B, Motor.C); sq.changeSpeed(100, 100); sq.drawSquare(20); sq.drawCircle(20, 360); } public void changeSpeed(float distance, float speed){ pilot.setTravelSpeed(speed); pilot.travel(distance); } public void drawSquare(float length){ for(int i = 0; i<4 ; i++){ pilot.travel(length); pilot.rotate(187); } } public void drawCircle(float radius, float angle){ pilot.arc(radius, angle); pilot.arc(radius, angle); } }
End of Lesson
Instructor’s Notes:
P 07 of P 07
Lesson Plan Outline

P a g e | 80
Appendix:Lesson3(NXT‐G)
P a g e | 81
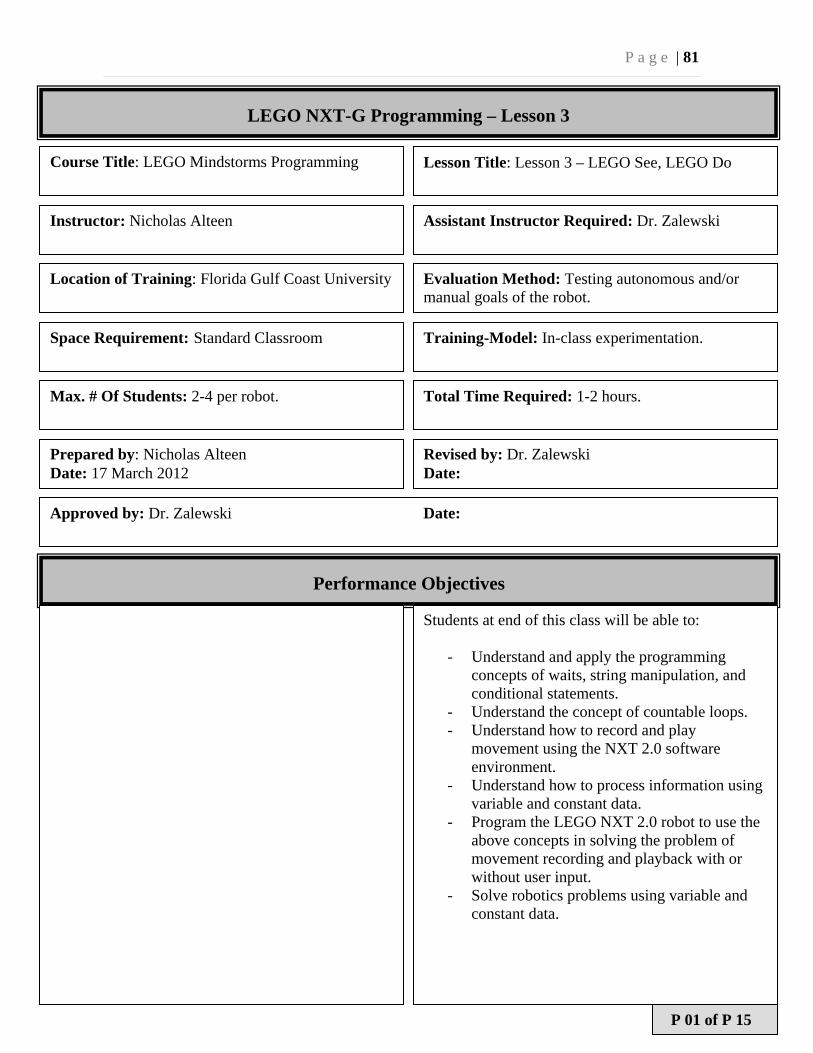
LEGO NXT-G Programming – Lesson 3
Course Title: LEGO Mindstorms Programming Lesson Title: Lesson 3 – LEGO See, LEGO Do
Instructor: Nicholas Alteen Assistant Instructor Required: Dr. Zalewski
Location of Training: Florida Gulf Coast University Evaluation Method: Testing autonomous and/or manual goals of the robot.
Space Requirement: Standard Classroom Training-Model: In-class experimentation.
Max. # Of Students: 2-4 per robot. Total Time Required: 1-2 hours.
Prepared by: Nicholas Alteen Date: 17 March 2012
Revised by: Dr. Zalewski Date:
Performance Objectives
Students at end of this class will be able to:
- Understand and apply the programming concepts of waits, string manipulation, and conditional statements.
- Understand the concept of countable loops. - Understand how to record and play
movement using the NXT 2.0 software environment.
- Understand how to process information using variable and constant data.
- Program the LEGO NXT 2.0 robot to use the above concepts in solving the problem of movement recording and playback with or without user input.
- Solve robotics problems using variable and constant data.
Approved by: Dr. Zalewski Date:
P 01 of P 15
P a g e | 82
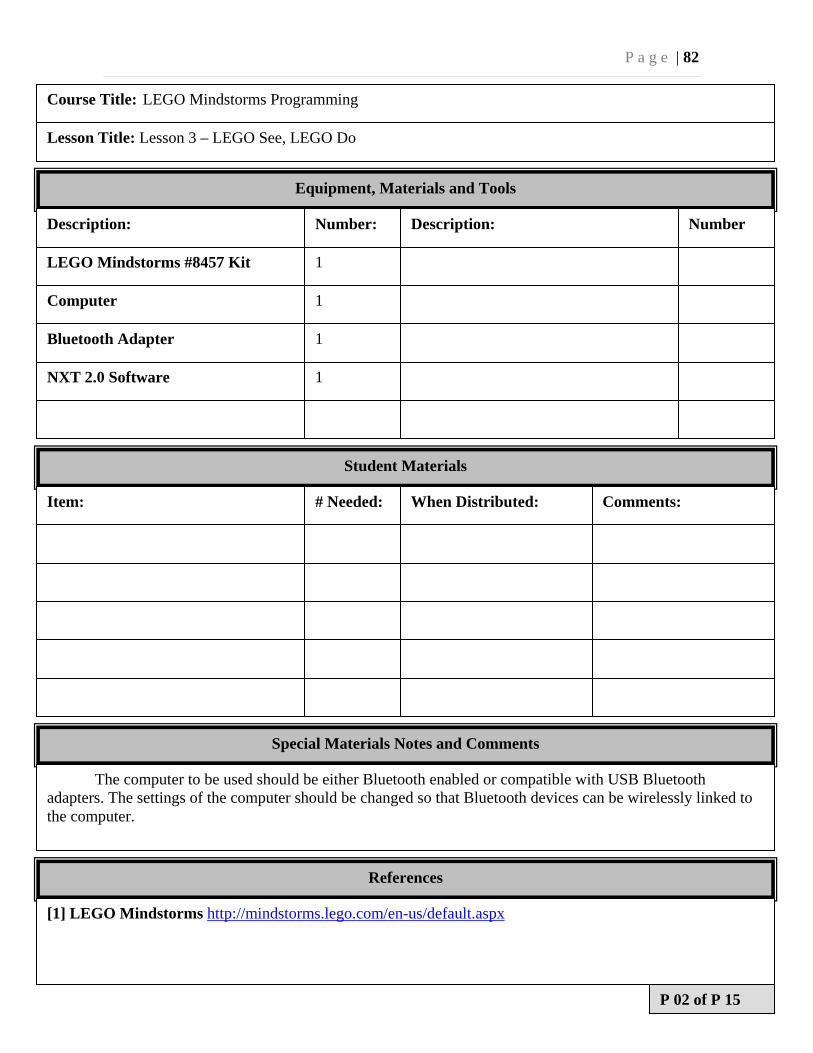
Course Title: LEGO Mindstorms Programming
Lesson Title: Lesson 3 – LEGO See, LEGO Do
Equipment, Materials and Tools
Description: Number: Description: Number
LEGO Mindstorms #8457 Kit 1
Computer 1
Bluetooth Adapter 1
NXT 2.0 Software 1
Student Materials
Item: # Needed: When Distributed: Comments:
Special Materials Notes and Comments
The computer to be used should be either Bluetooth enabled or compatible with USB Bluetooth adapters. The settings of the computer should be changed so that Bluetooth devices can be wirelessly linked to the computer.
References
[1] LEGO Mindstorms http://mindstorms.lego.com/en-us/default.aspx
P 02 of P 15

P a g e | 83
Lesson Plan Body
Course Title: LEGO Mindstorms Programming
Lesson Title: Lesson 3 – LEGO See, LEGO Do
Greeting: For this lesson, the Shooterbot robot outlined in the NXT 2.0 software will be used. By adjusting the robot to travel using wheels instead of treads, students will have more accurate control of the motors when recording movement of the robot. Goals: The autonomous goal of this lesson is as follows: Students will physically move the robot for a predetermined amount of time, which will count down on the NXT brick’s display screen. After this time, students will press a button on the NXT brick to start playback of the recorded movement. The manual goal of this lesson is as follows: Students will manually control the robot via Bluetooth for a predetermined amount of time, which will count down on the NXT brick’s display screen. After this time, students will press a button on the NXT brick to start playback of the recorded movement. Components: The main components to be used and their connections to the brick are listed below (this should be posted as a reference to students while they are programming their robots): Motors – Two motors are connected in ports B and C which allow for movement. Another motor is connected to port A for shooting.
Instructor’s Notes:
P 03 of P 15

P a g e | 84
Lesson Plan Body
Course Title: LEGO Mindstorms Programming
Lesson Title: Lesson 3 – LEGO See, LEGO Do
Programming Logic (Autonomous): There are two main logic components to the problem: movement recording and movement playback. Each section of the program is handled by the same code block, albeit with different settings.
Figure 1: Record/Play Block
The record/play block has two settings: record and play. By selecting the record option, we tell the robot to listen to any movements from the selected motors and store them in a file on the NXT brick. The Recording option lets the user select which motors to listen to, and the time options determines for how many seconds to listen. The name of the file can be manually entered in the Simple Text field (special note: no special characters other than alphanumeric may be used, and the file name should not start with a number). This is an important area to point out proper naming conventions for programming. Proper naming convention includes the following rules:
- File, class, and structure names should start with capital letters.
- Variable, method, and data members should start with lower case letters.
- Every word after the first in a name should be capitalized. - Names may include numbers, but not before letters. - No special characters should be used. - Words in the name may be separated by the “_” character.
Otherwise, no separation is needed. - No spaces!
Instructor’s Notes:
P 04 of P 15
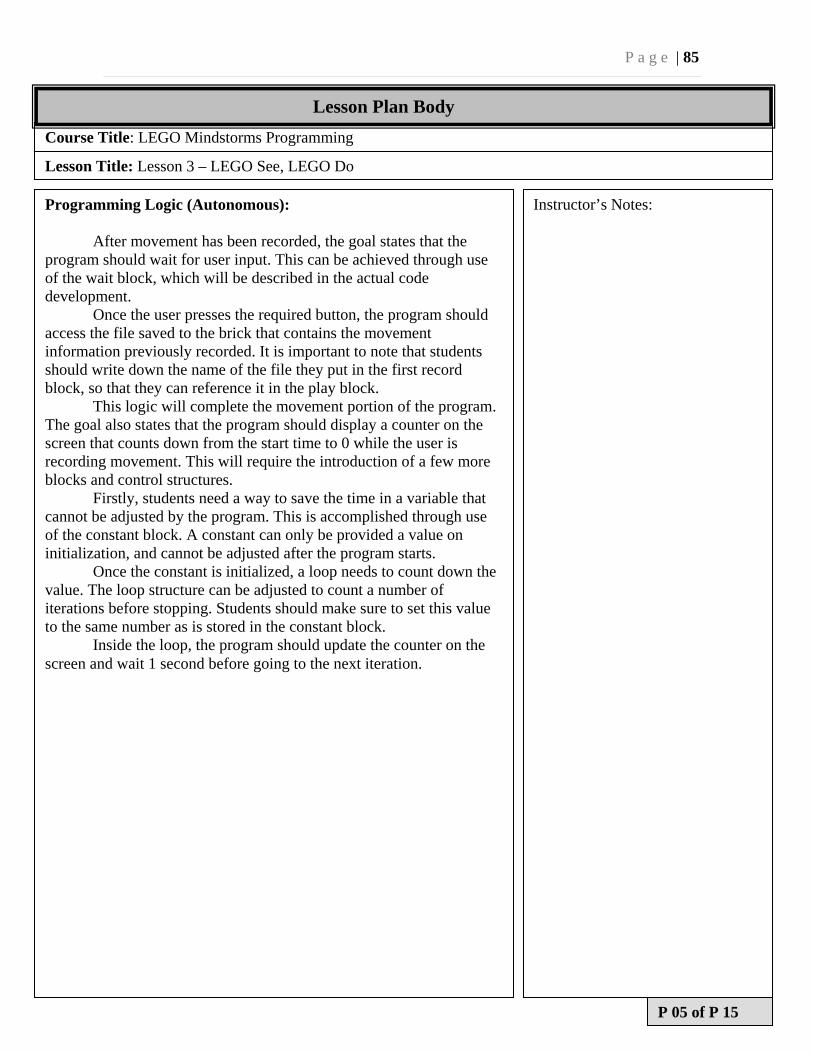
P a g e | 85
Course Title: LEGO Mindstorms Programming
Lesson Title: Lesson 3 – LEGO See, LEGO Do
Programming Logic (Autonomous): After movement has been recorded, the goal states that the program should wait for user input. This can be achieved through use of the wait block, which will be described in the actual code development. Once the user presses the required button, the program should access the file saved to the brick that contains the movement information previously recorded. It is important to note that students should write down the name of the file they put in the first record block, so that they can reference it in the play block. This logic will complete the movement portion of the program. The goal also states that the program should display a counter on the screen that counts down from the start time to 0 while the user is recording movement. This will require the introduction of a few more blocks and control structures. Firstly, students need a way to save the time in a variable that cannot be adjusted by the program. This is accomplished through use of the constant block. A constant can only be provided a value on initialization, and cannot be adjusted after the program starts. Once the constant is initialized, a loop needs to count down the value. The loop structure can be adjusted to count a number of iterations before stopping. Students should make sure to set this value to the same number as is stored in the constant block. Inside the loop, the program should update the counter on the screen and wait 1 second before going to the next iteration.
Instructor’s Notes:
P 05 of P 15
Lesson Plan Body
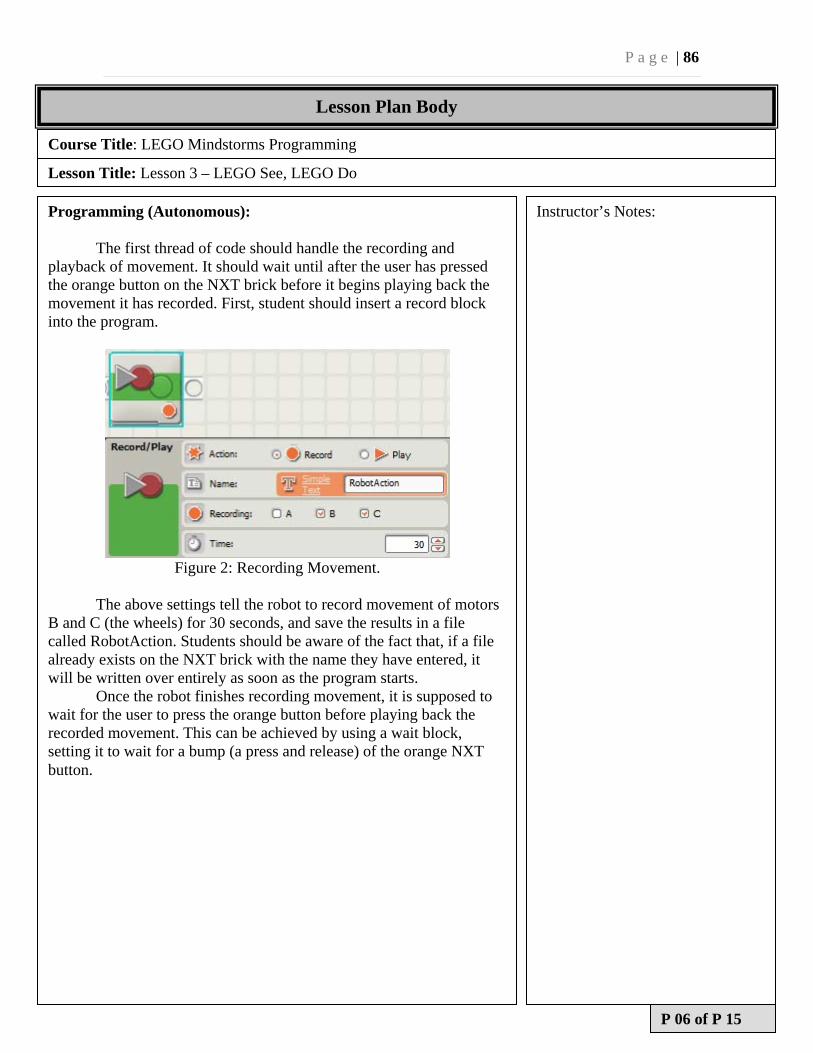
P a g e | 86
Course Title: LEGO Mindstorms Programming
Lesson Title: Lesson 3 – LEGO See, LEGO Do
Programming (Autonomous): The first thread of code should handle the recording and playback of movement. It should wait until after the user has pressed the orange button on the NXT brick before it begins playing back the movement it has recorded. First, student should insert a record block into the program.
Figure 2: Recording Movement.
The above settings tell the robot to record movement of motors B and C (the wheels) for 30 seconds, and save the results in a file called RobotAction. Students should be aware of the fact that, if a file already exists on the NXT brick with the name they have entered, it will be written over entirely as soon as the program starts. Once the robot finishes recording movement, it is supposed to wait for the user to press the orange button before playing back the recorded movement. This can be achieved by using a wait block, setting it to wait for a bump (a press and release) of the orange NXT button.
Instructor’s Notes:
P 06 of P 15
Lesson Plan Body
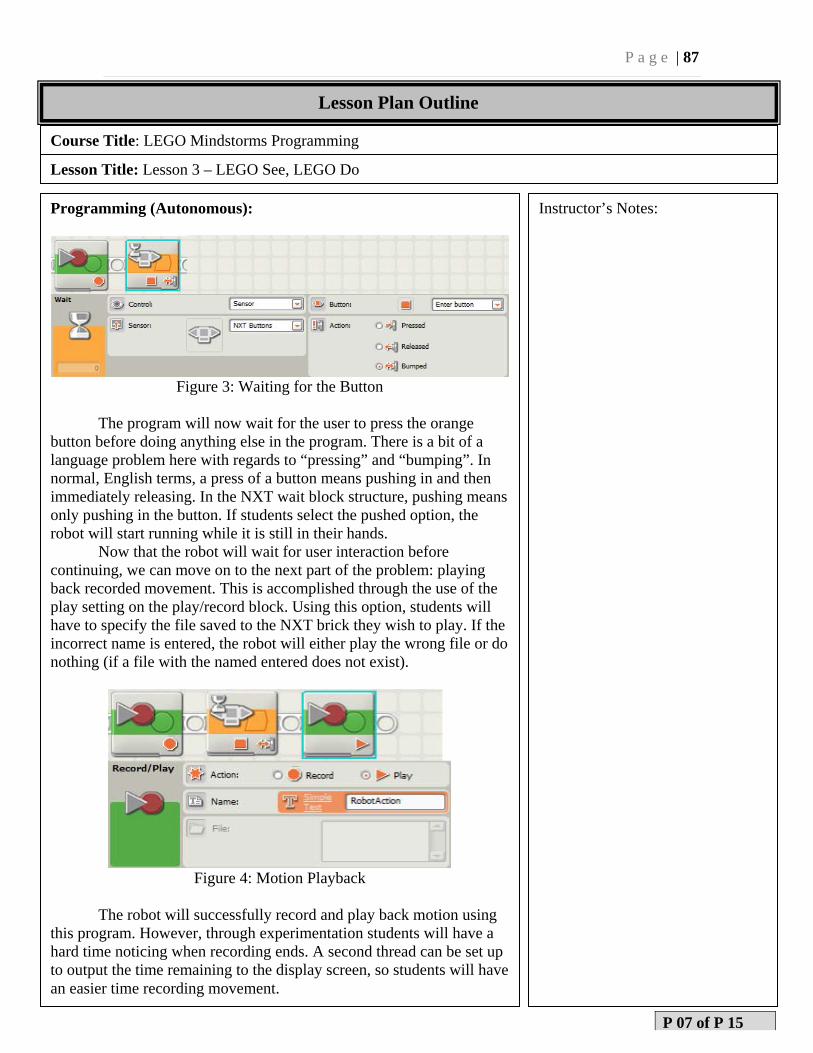
P a g e | 87
Course Title: LEGO Mindstorms Programming
Lesson Title: Lesson 3 – LEGO See, LEGO Do
Programming (Autonomous):
Figure 3: Waiting for the Button
The program will now wait for the user to press the orange button before doing anything else in the program. There is a bit of a language problem here with regards to “pressing” and “bumping”. In normal, English terms, a press of a button means pushing in and then immediately releasing. In the NXT wait block structure, pushing means only pushing in the button. If students select the pushed option, the robot will start running while it is still in their hands. Now that the robot will wait for user interaction before continuing, we can move on to the next part of the problem: playing back recorded movement. This is accomplished through the use of the play setting on the play/record block. Using this option, students will have to specify the file saved to the NXT brick they wish to play. If the incorrect name is entered, the robot will either play the wrong file or do nothing (if a file with the named entered does not exist).
Figure 4: Motion Playback
The robot will successfully record and play back motion using this program. However, through experimentation students will have a hard time noticing when recording ends. A second thread can be set up to output the time remaining to the display screen, so students will have an easier time recording movement.
Instructor’s Notes:
P 07 of P 15
Lesson Plan Outline
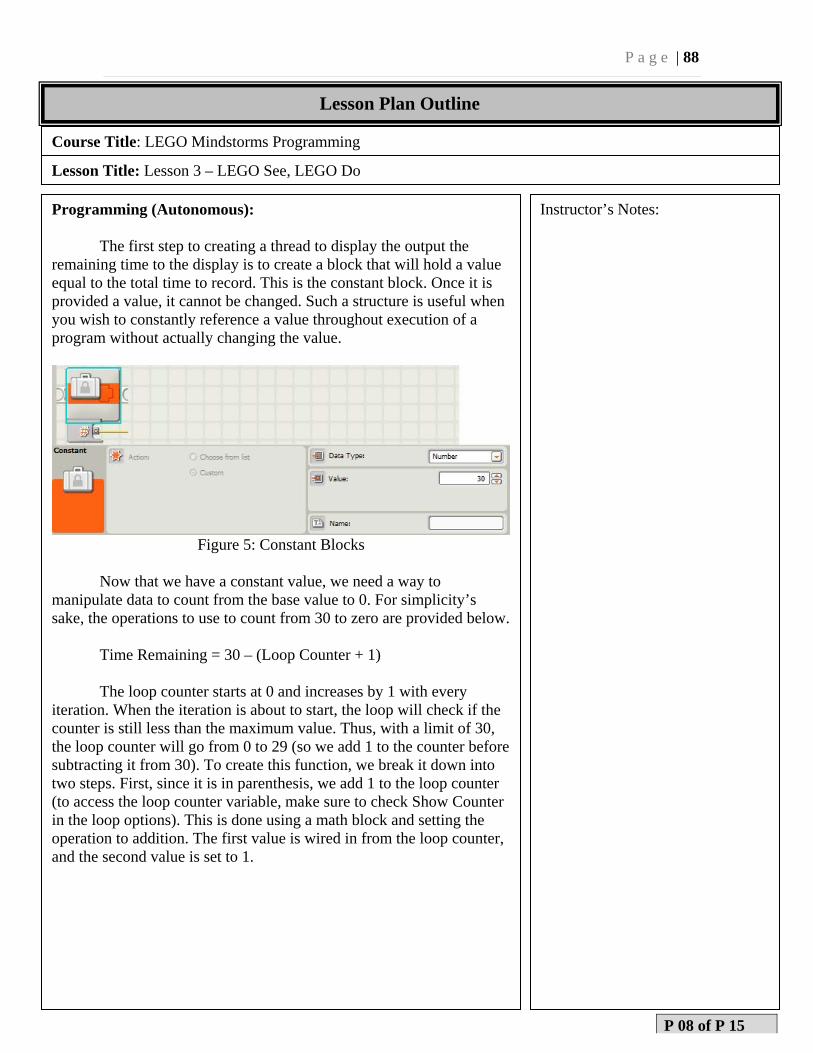
P a g e | 88
Course Title: LEGO Mindstorms Programming
Lesson Title: Lesson 3 – LEGO See, LEGO Do
Programming (Autonomous): The first step to creating a thread to display the output the remaining time to the display is to create a block that will hold a value equal to the total time to record. This is the constant block. Once it is provided a value, it cannot be changed. Such a structure is useful when you wish to constantly reference a value throughout execution of a program without actually changing the value.
Figure 5: Constant Blocks
Now that we have a constant value, we need a way to manipulate data to count from the base value to 0. For simplicity’s sake, the operations to use to count from 30 to zero are provided below. Time Remaining = 30 – (Loop Counter + 1) The loop counter starts at 0 and increases by 1 with every iteration. When the iteration is about to start, the loop will check if the counter is still less than the maximum value. Thus, with a limit of 30, the loop counter will go from 0 to 29 (so we add 1 to the counter before subtracting it from 30). To create this function, we break it down into two steps. First, since it is in parenthesis, we add 1 to the loop counter (to access the loop counter variable, make sure to check Show Counter in the loop options). This is done using a math block and setting the operation to addition. The first value is wired in from the loop counter, and the second value is set to 1.
Instructor’s Notes:
P 08 of P 15
Lesson Plan Outline
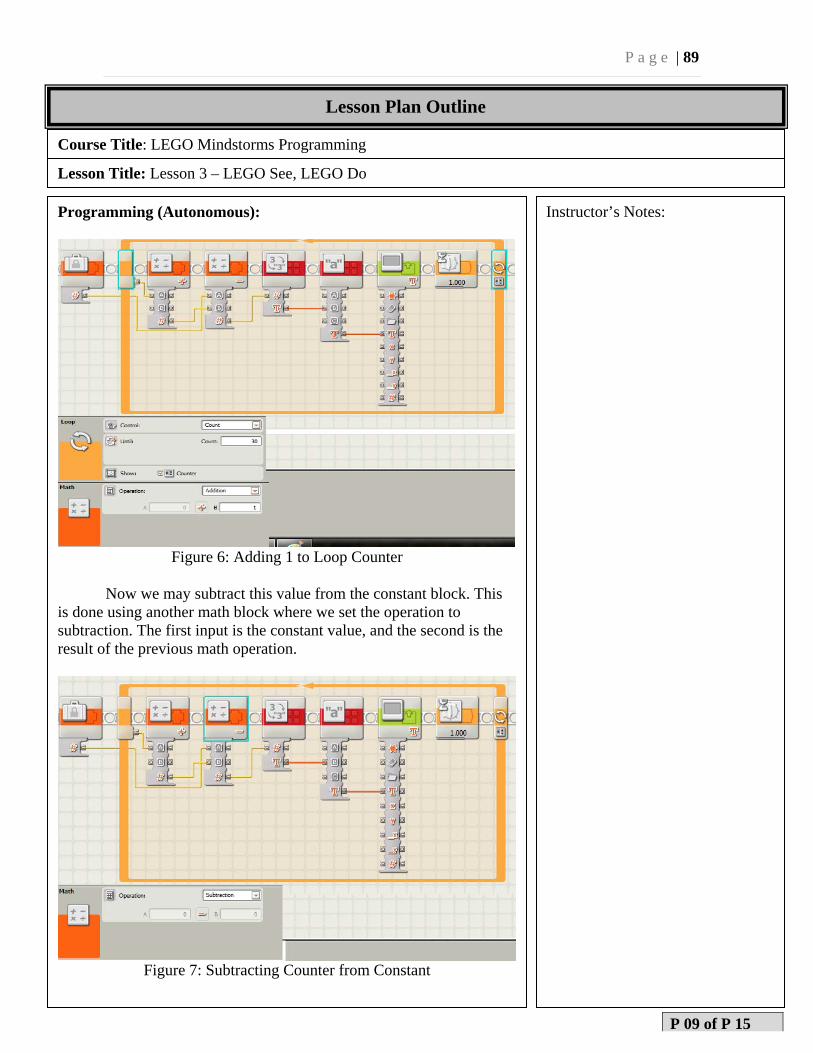
P a g e | 89
Course Title: LEGO Mindstorms Programming
Lesson Title: Lesson 3 – LEGO See, LEGO Do
Programming (Autonomous):
Figure 6: Adding 1 to Loop Counter
Now we may subtract this value from the constant block. This is done using another math block where we set the operation to subtraction. The first input is the constant value, and the second is the result of the previous math operation.
Figure 7: Subtracting Counter from Constant
Instructor’s Notes:
P 09 of P 15
Lesson Plan Outline
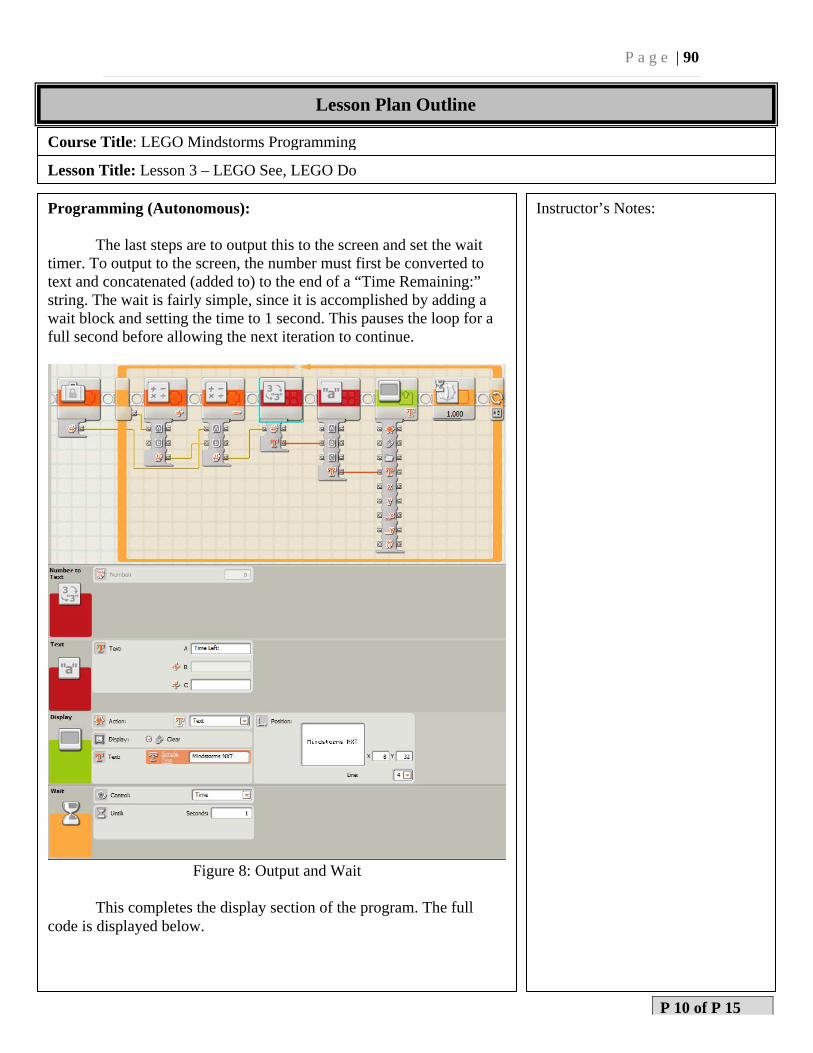
P a g e | 90
Course Title: LEGO Mindstorms Programming
Lesson Title: Lesson 3 – LEGO See, LEGO Do
Programming (Autonomous): The last steps are to output this to the screen and set the wait timer. To output to the screen, the number must first be converted to text and concatenated (added to) to the end of a “Time Remaining:” string. The wait is fairly simple, since it is accomplished by adding a wait block and setting the time to 1 second. This pauses the loop for a full second before allowing the next iteration to continue.
Figure 8: Output and Wait
This completes the display section of the program. The full code is displayed below.
Instructor’s Notes:
P 10 of P 15
Lesson Plan Outline
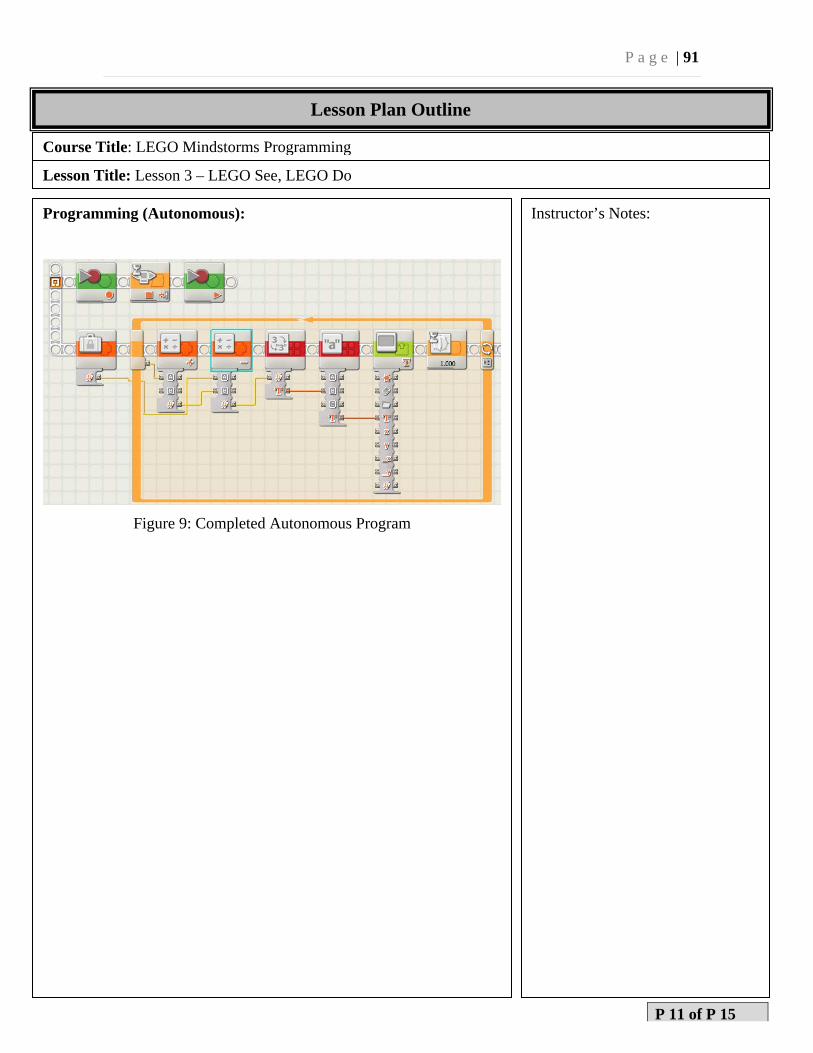
P a g e | 91
Course Title: LEGO Mindstorms Programming
Lesson Title: Lesson 3 – LEGO See, LEGO Do
Programming (Autonomous):
Figure 9: Completed Autonomous Program
Instructor’s Notes:
P 11 of P 15
Lesson Plan Outline
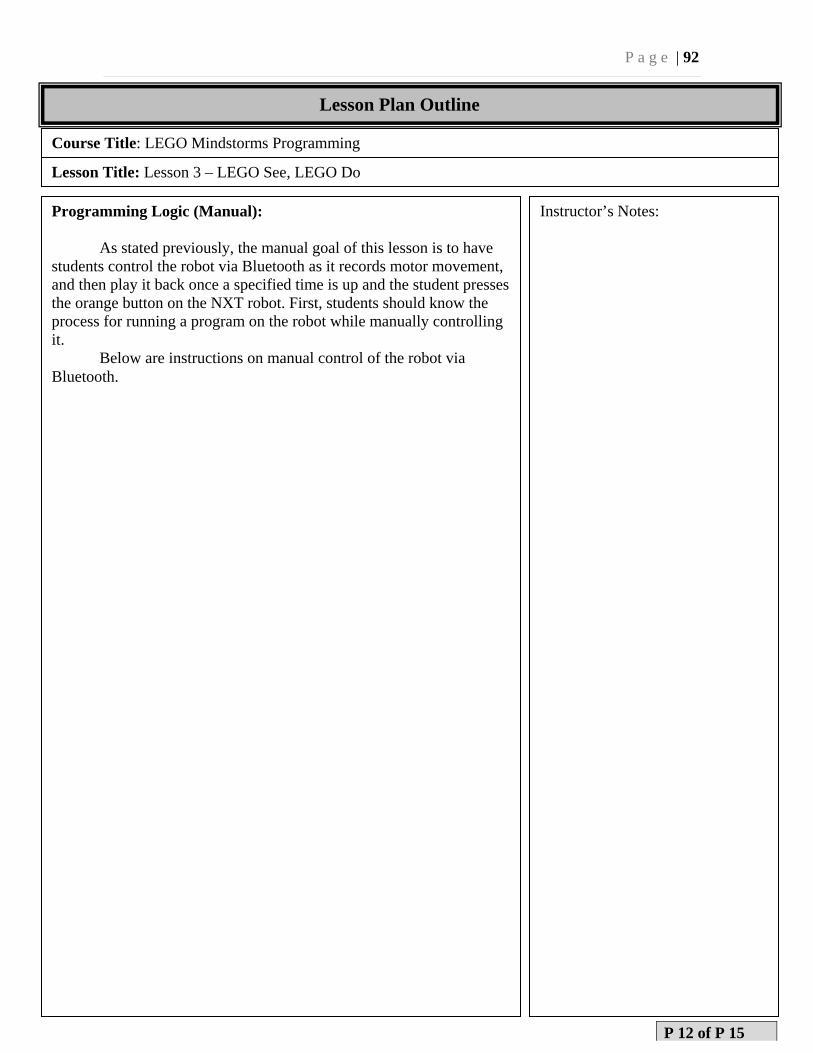
P a g e | 92
Course Title: LEGO Mindstorms Programming
Lesson Title: Lesson 3 – LEGO See, LEGO Do
Programming Logic (Manual): As stated previously, the manual goal of this lesson is to have students control the robot via Bluetooth as it records motor movement, and then play it back once a specified time is up and the student presses the orange button on the NXT robot. First, students should know the process for running a program on the robot while manually controlling it. Below are instructions on manual control of the robot via Bluetooth.
Instructor’s Notes:
P 12 of P 15
Lesson Plan Outline

P a g e | 93
Course Title: LEGO Mindstorms Programming
Lesson Title: Lesson 3 – LEGO See, LEGO Do
Programming Logic (Manual): Manual control of the NXT 2.0 robots using the native G software is very good for its ease of use, but very limited in its functionality. For the scope of this lesson, it is limited to manual control of the three motors on the robot. Though it does not allow for reading from the ultrasonic sensor manually, a small tutorial on connecting to and controlling NXT robots is included as replacement for the manual control section of this lesson. The remote control panel can be accessed by navigating to Tools -> Remote Control.
Figure 10: Remote Control Console
Initially, there will be no active connections. By clicking on the Connections button, the remote connections window will pop up. This window contains a list of known connections for both USB and Bluetooth.
Instructor’s Notes:
P 13 of P 15
Lesson Plan Outline
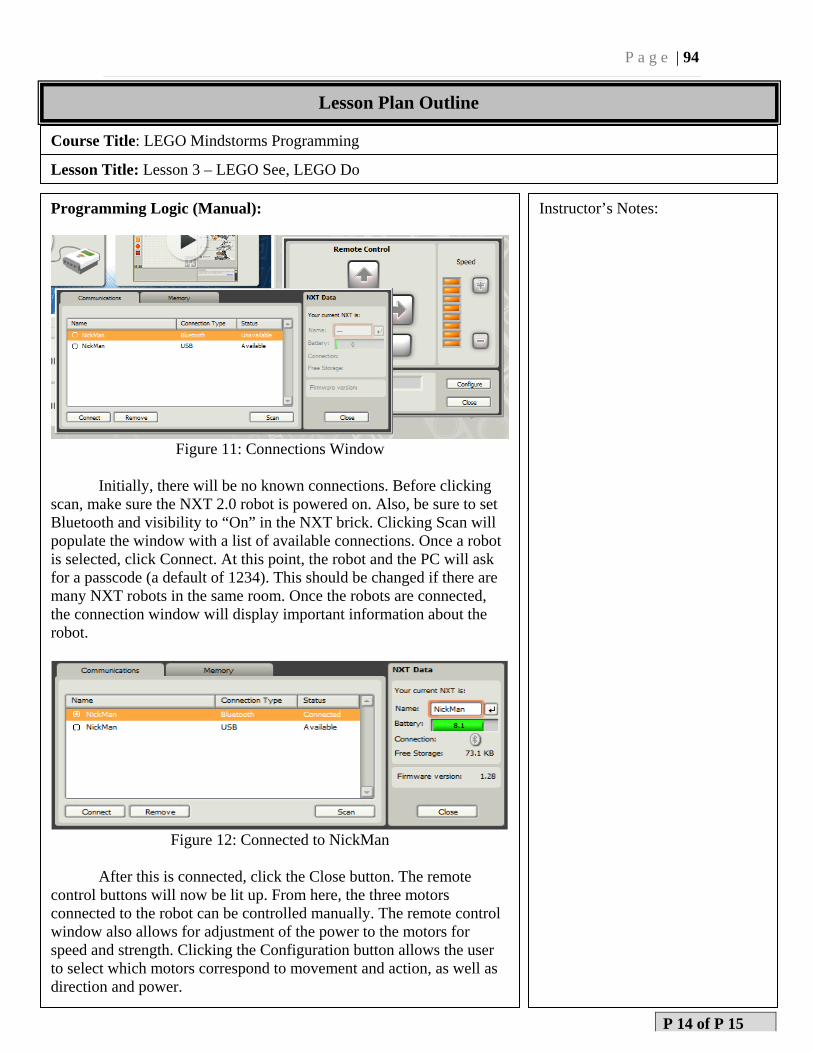
P a g e | 94
Course Title: LEGO Mindstorms Programming
Lesson Title: Lesson 3 – LEGO See, LEGO Do
Programming Logic (Manual):
Figure 11: Connections Window
Initially, there will be no known connections. Before clicking scan, make sure the NXT 2.0 robot is powered on. Also, be sure to set Bluetooth and visibility to “On” in the NXT brick. Clicking Scan will populate the window with a list of available connections. Once a robot is selected, click Connect. At this point, the robot and the PC will ask for a passcode (a default of 1234). This should be changed if there are many NXT robots in the same room. Once the robots are connected, the connection window will display important information about the robot.
Figure 12: Connected to NickMan
After this is connected, click the Close button. The remote control buttons will now be lit up. From here, the three motors connected to the robot can be controlled manually. The remote control window also allows for adjustment of the power to the motors for speed and strength. Clicking the Configuration button allows the user to select which motors correspond to movement and action, as well as direction and power.
Instructor’s Notes:
P 14 of P 15
Lesson Plan Outline
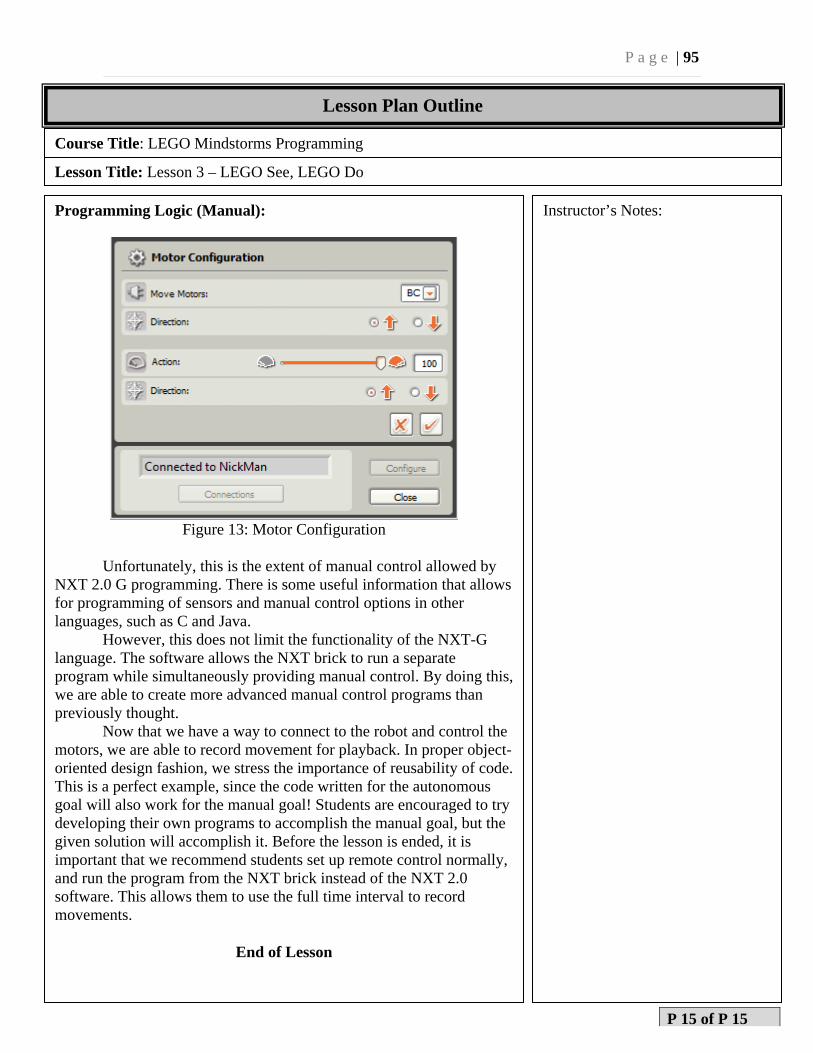
P a g e | 95
Course Title: LEGO Mindstorms Programming
Lesson Title: Lesson 3 – LEGO See, LEGO Do
Programming Logic (Manual):
Figure 13: Motor Configuration
Unfortunately, this is the extent of manual control allowed by NXT 2.0 G programming. There is some useful information that allows for programming of sensors and manual control options in other languages, such as C and Java. However, this does not limit the functionality of the NXT-G language. The software allows the NXT brick to run a separate program while simultaneously providing manual control. By doing this, we are able to create more advanced manual control programs than previously thought. Now that we have a way to connect to the robot and control the motors, we are able to record movement for playback. In proper object-oriented design fashion, we stress the importance of reusability of code. This is a perfect example, since the code written for the autonomous goal will also work for the manual goal! Students are encouraged to try developing their own programs to accomplish the manual goal, but the given solution will accomplish it. Before the lesson is ended, it is important that we recommend students set up remote control normally, and run the program from the NXT brick instead of the NXT 2.0 software. This allows them to use the full time interval to record movements.
End of Lesson
Instructor’s Notes:
P 15 of P 15
Lesson Plan Outline

P a g e | 96
Appendix:Lesson4(NXT‐C)
P a g e | 97
LEGO NXT-C Programming – Lesson 4
Course Title: LEGO Mindstorms Programming Lesson Title: Lesson 4 - Sound Sensor
Instructor: Michael Humphries Assistant Instructor Required: Dr. Zalewski
Location of Training: Florida Gulf Coast University Evaluation Method: Testing autonomous and/or manual goals of the robot.
Space Requirement: Standard Classroom Training-Model: In-class experimentation.
Max. # Of Students: 2-4 per robot. Total Time Required: 1-2 hours.
Prepared by: Michael Humphries Date: 4 April 2012
Revised by: Dr. Zalewski Date:
Performance Objectives
Students at end of this class will be able to:
- Use the LEGO Mindstorms Sound Sensor to control their robot.
Approved by: Dr. Zalewski Date:
P 01 of P 12
P a g e | 98
Course Title: LEGO Mindstorms Programming
Lesson Title: Lesson 4 – Sound Sensor
Equipment, Materials and Tools
Description: Number: Description: Number
LEGO Mindstorms #8457 Kit 1
Computer 1
Bluetooth Adapter 1
RobotC Software 1
Sound Sensor 1
Student Materials
Item: # Needed: When Distributed: Comments:
Special Materials Notes and Comments
The computer to be used should be either Bluetooth enabled or compatible with USB Bluetooth adapters. The settings of the computer should be changed so that Bluetooth devices can be wirelessly linked to the computer.
References
[1] LEGO Mindstorms http://mindstorms.lego.com/en-us/default.aspx
P 02 of P 12
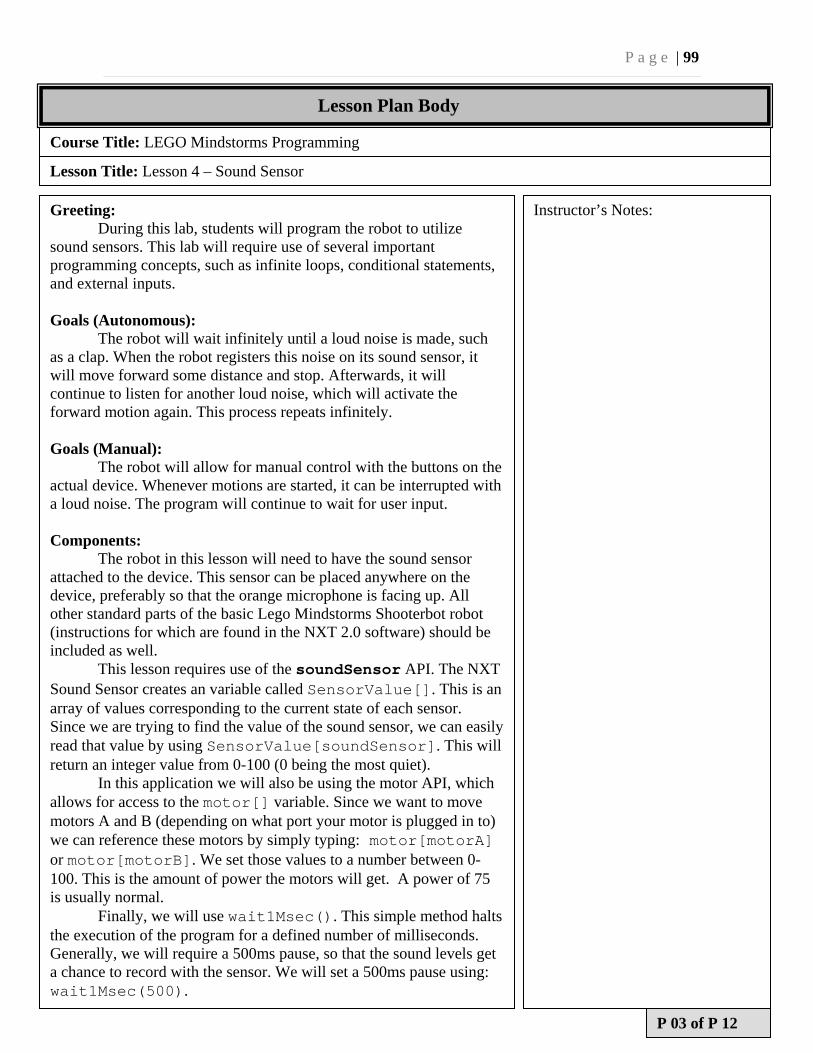
P a g e | 99
Lesson Plan Body
Course Title: LEGO Mindstorms Programming
Lesson Title: Lesson 4 – Sound Sensor
Greeting: During this lab, students will program the robot to utilize
sound sensors. This lab will require use of several important programming concepts, such as infinite loops, conditional statements, and external inputs. Goals (Autonomous):
The robot will wait infinitely until a loud noise is made, such as a clap. When the robot registers this noise on its sound sensor, it will move forward some distance and stop. Afterwards, it will continue to listen for another loud noise, which will activate the forward motion again. This process repeats infinitely. Goals (Manual):
The robot will allow for manual control with the buttons on the actual device. Whenever motions are started, it can be interrupted with a loud noise. The program will continue to wait for user input. Components:
The robot in this lesson will need to have the sound sensor attached to the device. This sensor can be placed anywhere on the device, preferably so that the orange microphone is facing up. All other standard parts of the basic Lego Mindstorms Shooterbot robot (instructions for which are found in the NXT 2.0 software) should be included as well.
This lesson requires use of the soundSensor API. The NXT Sound Sensor creates an variable called SensorValue[]. This is an array of values corresponding to the current state of each sensor. Since we are trying to find the value of the sound sensor, we can easily read that value by using SensorValue[soundSensor]. This will return an integer value from 0-100 (0 being the most quiet).
In this application we will also be using the motor API, which allows for access to the motor[] variable. Since we want to move motors A and B (depending on what port your motor is plugged in to) we can reference these motors by simply typing: motor[motorA] or motor[motorB]. We set those values to a number between 0-100. This is the amount of power the motors will get. A power of 75 is usually normal.
Finally, we will use wait1Msec(). This simple method halts the execution of the program for a defined number of milliseconds. Generally, we will require a 500ms pause, so that the sound levels get a chance to record with the sensor. We will set a 500ms pause using: wait1Msec(500).
Instructor’s Notes:
P 03 of P 12
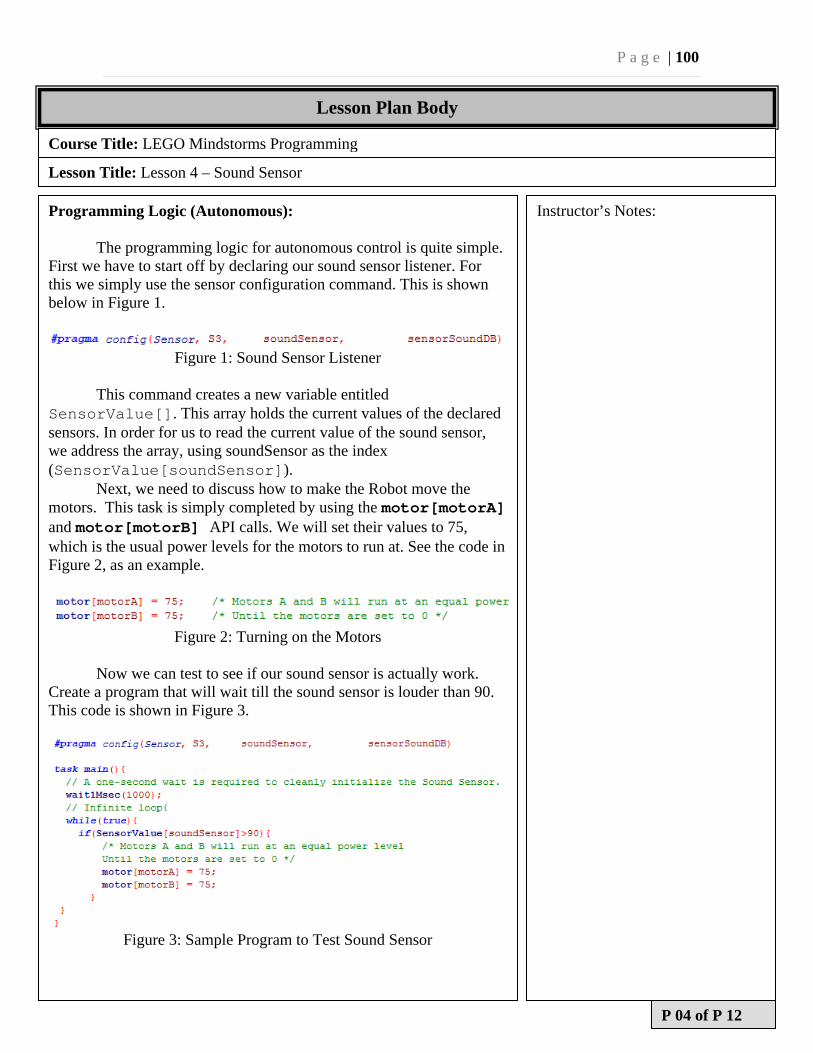
P a g e | 100
Lesson Plan Body
Course Title: LEGO Mindstorms Programming
Lesson Title: Lesson 4 – Sound Sensor
Programming Logic (Autonomous):
The programming logic for autonomous control is quite simple. First we have to start off by declaring our sound sensor listener. For this we simply use the sensor configuration command. This is shown below in Figure 1.
Figure 1: Sound Sensor Listener
This command creates a new variable entitled
SensorValue[]. This array holds the current values of the declared sensors. In order for us to read the current value of the sound sensor, we address the array, using soundSensor as the index (SensorValue[soundSensor]).
Next, we need to discuss how to make the Robot move the motors. This task is simply completed by using the motor[motorA] and motor[motorB] API calls. We will set their values to 75, which is the usual power levels for the motors to run at. See the code in Figure 2, as an example.
Figure 2: Turning on the Motors
Now we can test to see if our sound sensor is actually work. Create a program that will wait till the sound sensor is louder than 90. This code is shown in Figure 3.
Figure 3: Sample Program to Test Sound Sensor
Instructor’s Notes:
P 04 of P 12
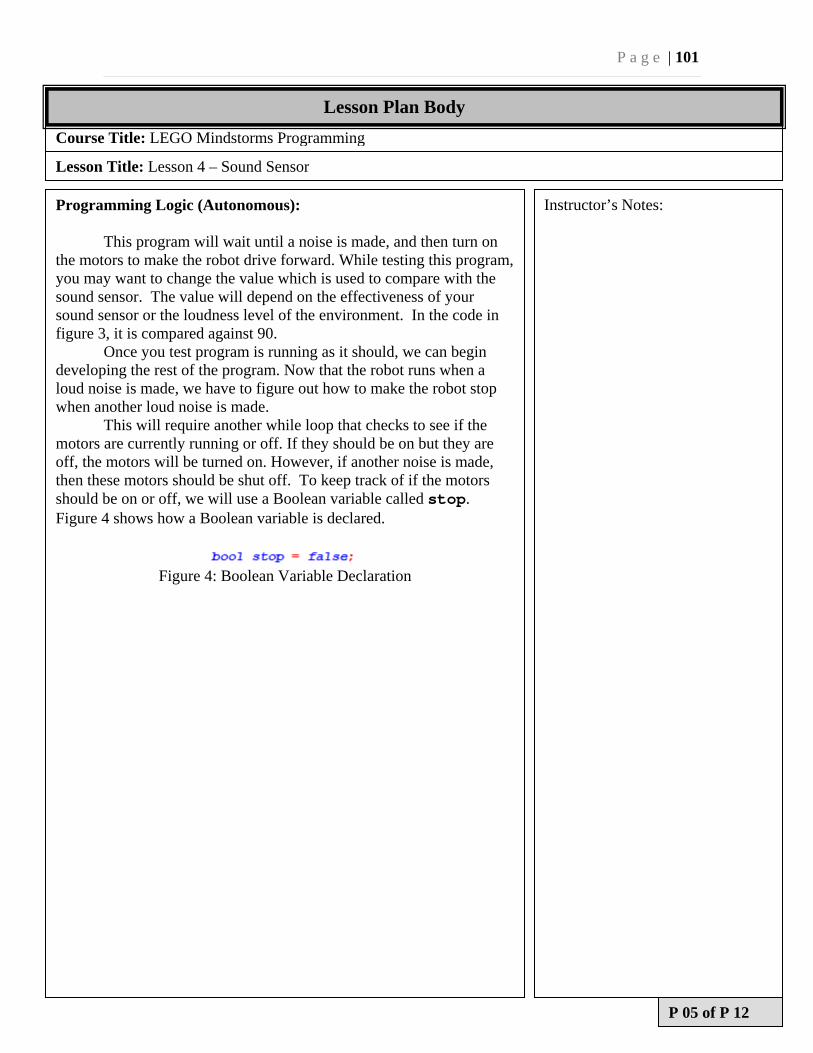
P a g e | 101
Course Title: LEGO Mindstorms Programming
Lesson Title: Lesson 4 – Sound Sensor
Programming Logic (Autonomous): This program will wait until a noise is made, and then turn on
the motors to make the robot drive forward. While testing this program, you may want to change the value which is used to compare with the sound sensor. The value will depend on the effectiveness of your sound sensor or the loudness level of the environment. In the code in figure 3, it is compared against 90.
Once you test program is running as it should, we can begin developing the rest of the program. Now that the robot runs when a loud noise is made, we have to figure out how to make the robot stop when another loud noise is made.
This will require another while loop that checks to see if the motors are currently running or off. If they should be on but they are off, the motors will be turned on. However, if another noise is made, then these motors should be shut off. To keep track of if the motors should be on or off, we will use a Boolean variable called stop. Figure 4 shows how a Boolean variable is declared.
Figure 4: Boolean Variable Declaration
Instructor’s Notes:
P 05 of P 12
Lesson Plan Body
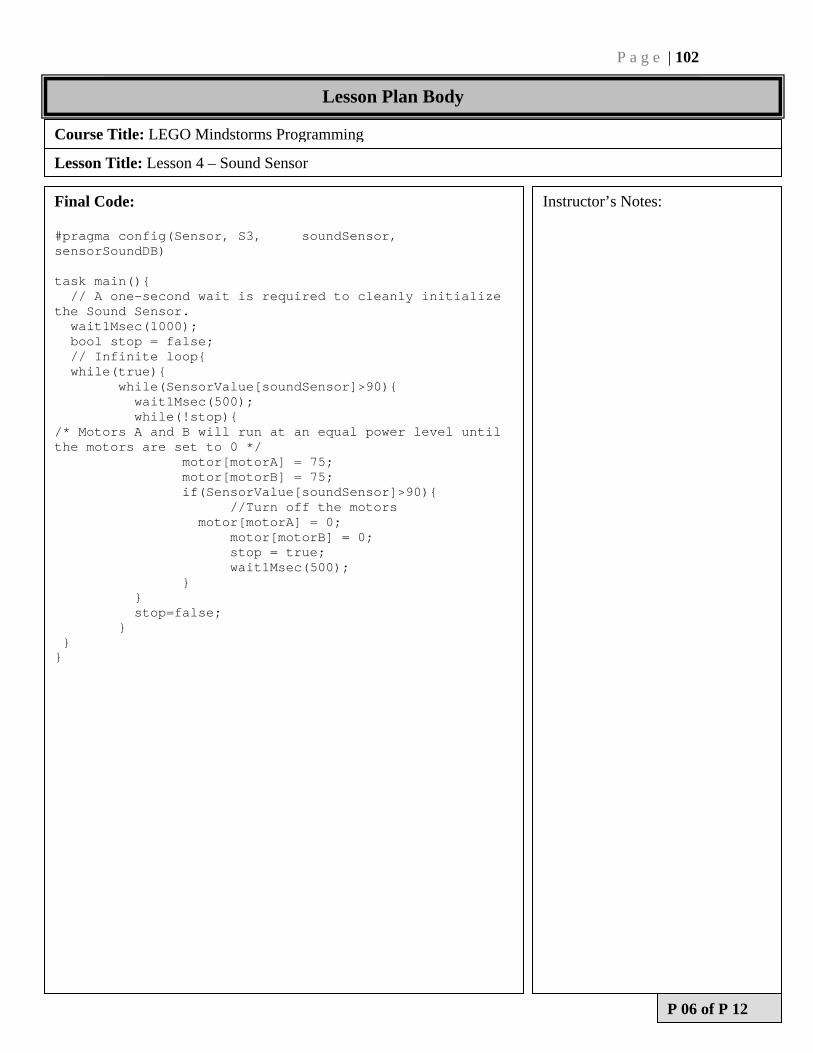
P a g e | 102
Course Title: LEGO Mindstorms Programming
Lesson Title: Lesson 4 – Sound Sensor
Final Code: #pragma config(Sensor, S3, soundSensor, sensorSoundDB) task main(){ // A one-second wait is required to cleanly initialize the Sound Sensor. wait1Msec(1000); bool stop = false; // Infinite loop{ while(true){ while(SensorValue[soundSensor]>90){ wait1Msec(500); while(!stop){ /* Motors A and B will run at an equal power level until the motors are set to 0 */ motor[motorA] = 75; motor[motorB] = 75; if(SensorValue[soundSensor]>90){ //Turn off the motors motor[motorA] = 0; motor[motorB] = 0; stop = true; wait1Msec(500); } } stop=false; } } }
Instructor’s Notes:
P 06 of P 12
Lesson Plan Body

P a g e | 103
Course Title: LEGO Mindstorms Programming
Lesson Title: Lesson 4 – Sound Sensor
Programming Logic (Manual):
To begin with manual control, we will temporarily forget about our sound sensor.
Since RobotC does not provide any kind of console or GUI for the host PC to interact with the robot, we will have to use the buttons on the actual device.
First we have to create listeners on the buttons. These listeners will update their values to 1 if the button is clicked. See Figure 5 to see how listeners are set.
Figure 5: Button Listeners
Next we need to make the motors react to the click of a button.
If the left button is clicked, motor A will be set to 75 and motor B will be set to -75. This counter action will make the robot turn left. This is reversed for a right turn. Motor A will be set to -75 and motor B will be set to 75.
If the center orange button is pressed, this will mean forward motion. Pressing this button will set the power of both motors to 75.
Instructor’s Notes:
P 07 of P 12
Lesson Plan Outline
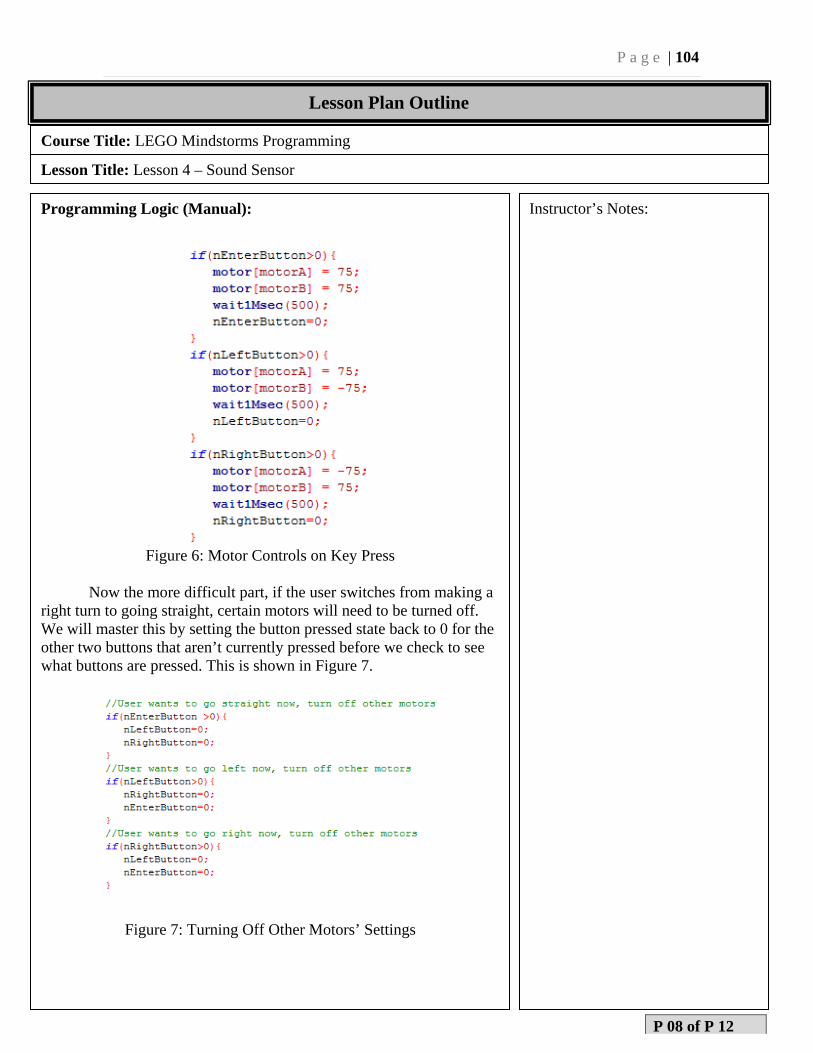
P a g e | 104
Course Title: LEGO Mindstorms Programming
Lesson Title: Lesson 4 – Sound Sensor
Programming Logic (Manual):
Figure 6: Motor Controls on Key Press
Now the more difficult part, if the user switches from making a
right turn to going straight, certain motors will need to be turned off. We will master this by setting the button pressed state back to 0 for the other two buttons that aren’t currently pressed before we check to see what buttons are pressed. This is shown in Figure 7.
Figure 7: Turning Off Other Motors’ Settings
Instructor’s Notes:
P 08 of P 12
Lesson Plan Outline
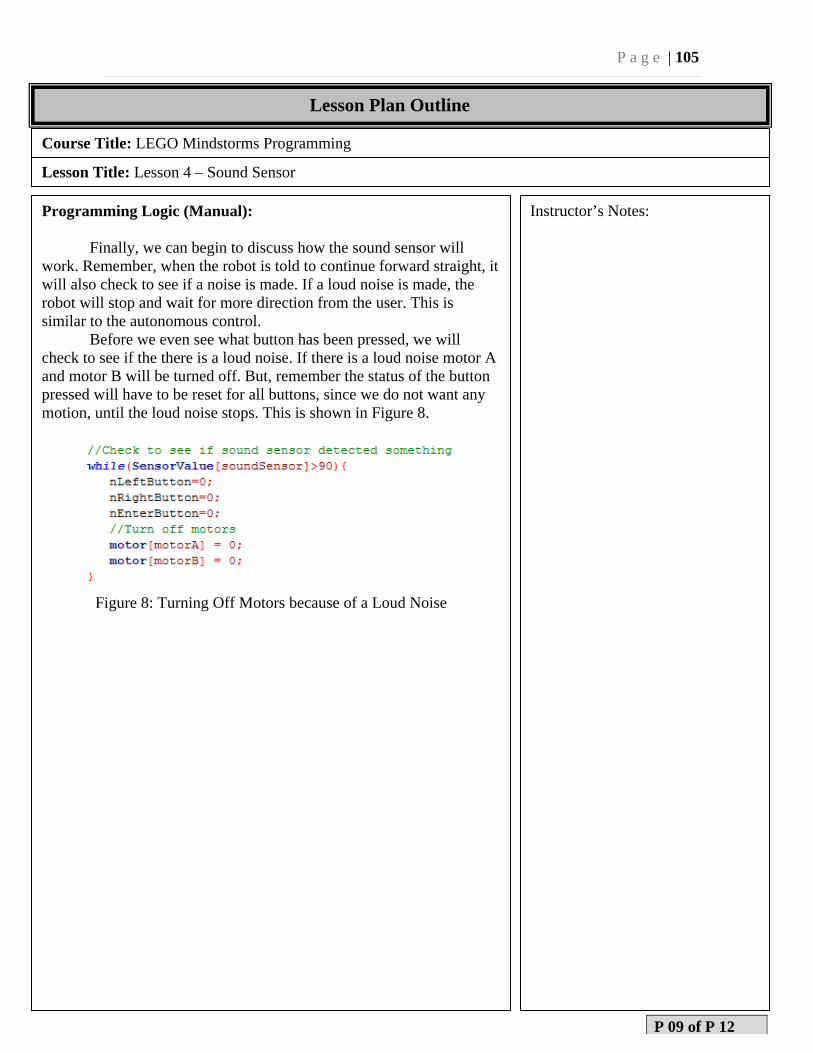
P a g e | 105
Course Title: LEGO Mindstorms Programming
Lesson Title: Lesson 4 – Sound Sensor
Programming Logic (Manual): Finally, we can begin to discuss how the sound sensor will
work. Remember, when the robot is told to continue forward straight, it will also check to see if a noise is made. If a loud noise is made, the robot will stop and wait for more direction from the user. This is similar to the autonomous control.
Before we even see what button has been pressed, we will check to see if the there is a loud noise. If there is a loud noise motor A and motor B will be turned off. But, remember the status of the button pressed will have to be reset for all buttons, since we do not want any motion, until the loud noise stops. This is shown in Figure 8.
Figure 8: Turning Off Motors because of a Loud Noise
Instructor’s Notes:
P 09 of P 12
Lesson Plan Outline
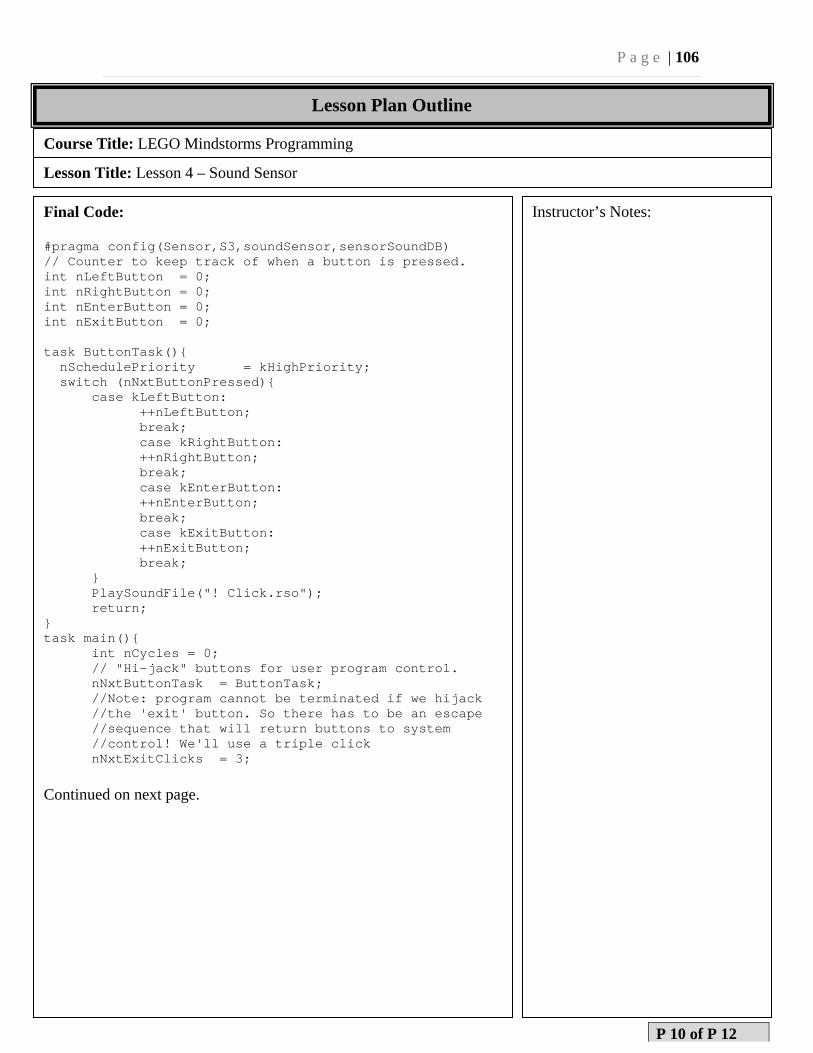
P a g e | 106
Course Title: LEGO Mindstorms Programming
Lesson Title: Lesson 4 – Sound Sensor
Final Code: #pragma config(Sensor,S3,soundSensor,sensorSoundDB) // Counter to keep track of when a button is pressed. int nLeftButton = 0; int nRightButton = 0; int nEnterButton = 0; int nExitButton = 0; task ButtonTask(){ nSchedulePriority = kHighPriority; switch (nNxtButtonPressed){ case kLeftButton:
++nLeftButton; break;
case kRightButton: ++nRightButton; break;
case kEnterButton: ++nEnterButton; break;
case kExitButton: ++nExitButton; break;
} PlaySoundFile("! Click.rso"); return; } task main(){ int nCycles = 0; // "Hi-jack" buttons for user program control. nNxtButtonTask = ButtonTask;
//Note: program cannot be terminated if we hijack //the 'exit' button. So there has to be an escape //sequence that will return buttons to system //control! We'll use a triple click
nNxtExitClicks = 3; Continued on next page.
Instructor’s Notes:
P 10 of P 12
Lesson Plan Outline
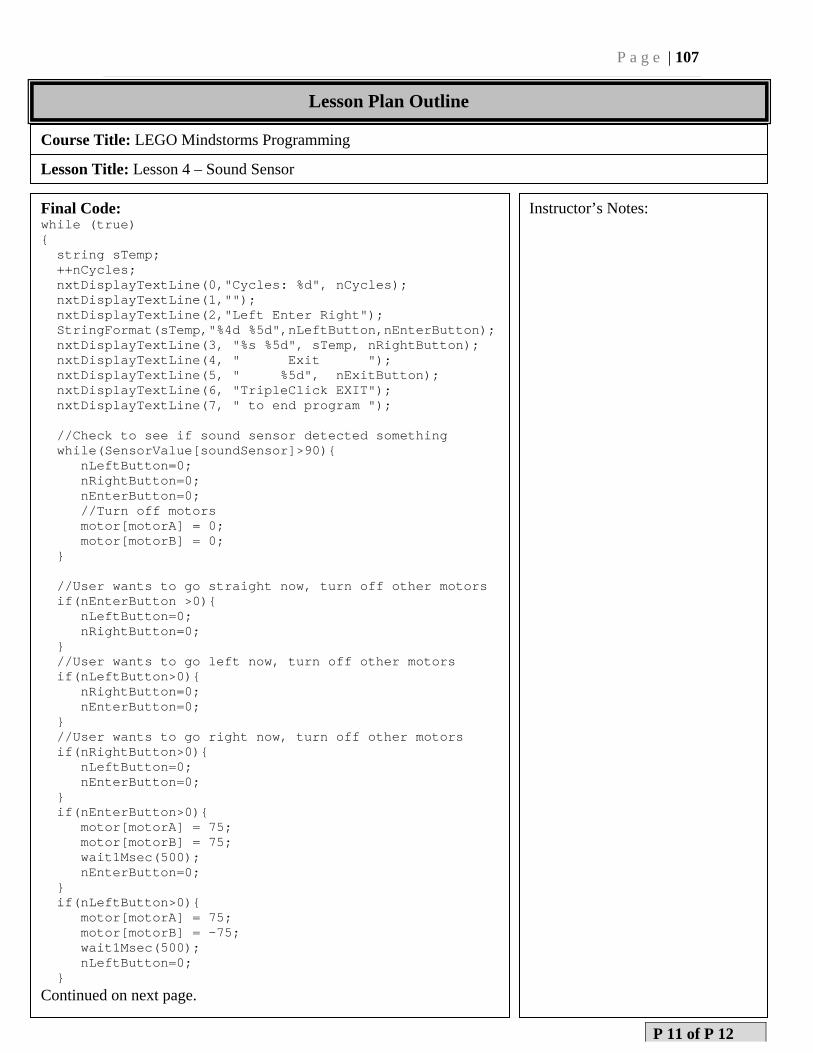
P a g e | 107
Course Title: LEGO Mindstorms Programming
Lesson Title: Lesson 4 – Sound Sensor
Final Code: while (true) { string sTemp; ++nCycles; nxtDisplayTextLine(0,"Cycles: %d", nCycles); nxtDisplayTextLine(1,""); nxtDisplayTextLine(2,"Left Enter Right"); StringFormat(sTemp,"%4d %5d",nLeftButton,nEnterButton); nxtDisplayTextLine(3, "%s %5d", sTemp, nRightButton); nxtDisplayTextLine(4, " Exit "); nxtDisplayTextLine(5, " %5d", nExitButton); nxtDisplayTextLine(6, "TripleClick EXIT"); nxtDisplayTextLine(7, " to end program "); //Check to see if sound sensor detected something while(SensorValue[soundSensor]>90){ nLeftButton=0; nRightButton=0; nEnterButton=0; //Turn off motors motor[motorA] = 0; motor[motorB] = 0; } //User wants to go straight now, turn off other motors if(nEnterButton >0){ nLeftButton=0; nRightButton=0; } //User wants to go left now, turn off other motors if(nLeftButton>0){ nRightButton=0; nEnterButton=0; } //User wants to go right now, turn off other motors if(nRightButton>0){ nLeftButton=0; nEnterButton=0; } if(nEnterButton>0){ motor[motorA] = 75; motor[motorB] = 75; wait1Msec(500); nEnterButton=0; } if(nLeftButton>0){ motor[motorA] = 75; motor[motorB] = -75; wait1Msec(500); nLeftButton=0; } Continued on next page.
Instructor’s Notes:
P 11 of P 12
Lesson Plan Outline
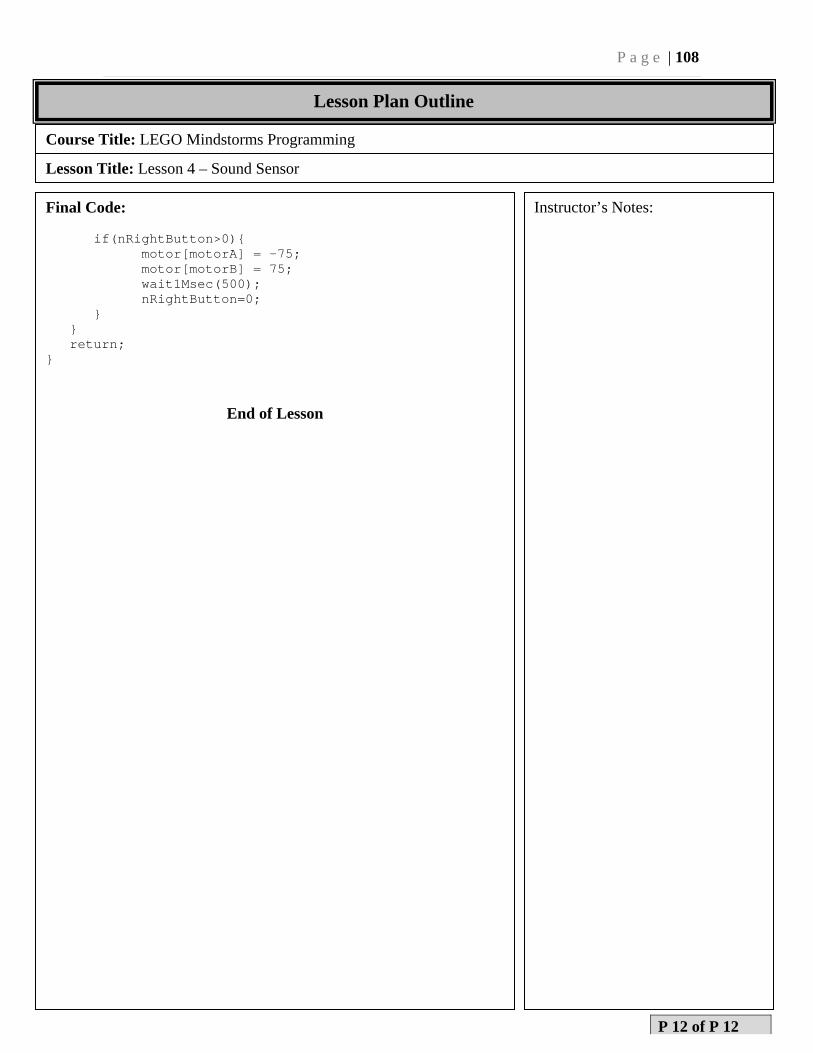
P a g e | 108
Course Title: LEGO Mindstorms Programming
Lesson Title: Lesson 4 – Sound Sensor
Final Code: if(nRightButton>0){
motor[motorA] = -75; motor[motorB] = 75; wait1Msec(500); nRightButton=0; } } return; }
End of Lesson
Instructor’s Notes:
P 12 of P 12
Lesson Plan Outline

P a g e | 109
Appendix:Lesson5(NXT‐J)
P a g e | 110
LEGO NXT-J Programming – Lesson 5
Course Title: LEGO Mindstorms Programming Lesson Title: Touch Sensor
Instructor: Evan McKeon Assistant Instructor Required: Dr. Zalewski
Location of Training: Florida Gulf Coast University Evaluation Method: Testing autonomous and/or manual goals of the robot.
Space Requirement: Standard Classroom Training-Model: In-class experimentation.
Max. # Of Students: 2-4 per robot. Total Time Required: 1/2-1 hour
Prepared by: Evan McKeon Date: 28 March 2012
Revised by: Dr. Zalewski Date:
Performance Objectives
Students at end of this class will be able to:
- Use the random number generator in Java. - Use conditional statements. - Understand how to implement while
loops. - Increment variables. - Understand how to set the NXT on an
infinite path.
Approved by: Dr. Zalewski Date:
P 01 of P 06

P a g e | 111
Course Title: LEGO Mindstorms Programming
Lesson Title: Lesson 5 – Touch Sensor
Equipment, Materials and Tools
Description: Number: Description: Number
LEGO Mindstorms #8457 Kit 1
Computer 1
Bluetooth Adapter 1
NXT 2.0 Software 1
Java Compiler with LeJOS library 1
Student Materials
Item: # Needed: When Distributed: Comments:
Special Materials Notes and Comments
The computer to be used should be either Bluetooth enabled or compatible with USB Bluetooth adapters. The settings of the computer should be changed so that Bluetooth devices can be wirelessly linked to the computer.
References
[1] LEGO Mindstorms http://mindstorms.lego.com/en-us/default.aspx [2] Java Random API http://docs.oracle.com/javase/1.4.2/docs/api/java/util/Random.html#nextInt()
P 02 of P 06

P a g e | 112
Lesson Plan Body
Course Title: LEGO Mindstorms Programming
Lesson Title: Lesson 5 – Touch Sensor
Greeting:
For the purpose of this lesson, the basic robot presented in the beginning of the user guide for the NXT 2.0 will be used, with the addition of two touch sensors to the front of the robot. This lesson will focus on using the touch sensors to get the robot to perform an action. Goals:
The autonomous goal of this lesson is as follows: Students will explore the NXT software and develop a robot that will move forward until running into an object. Upon running into something, one of the touch sensors will be triggered. The robot will then turn a random amount (at least 90 degrees to avoid running into the same object) and then start moving again. The robot should repeat this ten times. Components:
The main components to be used and their connections to the NXT brick are listed below:
Motors – Two connected in ports B and C for movement.
Touch Sensor – Two attached to the front and connected in ports 1 and 2.
Instructor’s Notes:
P 03 of P 06
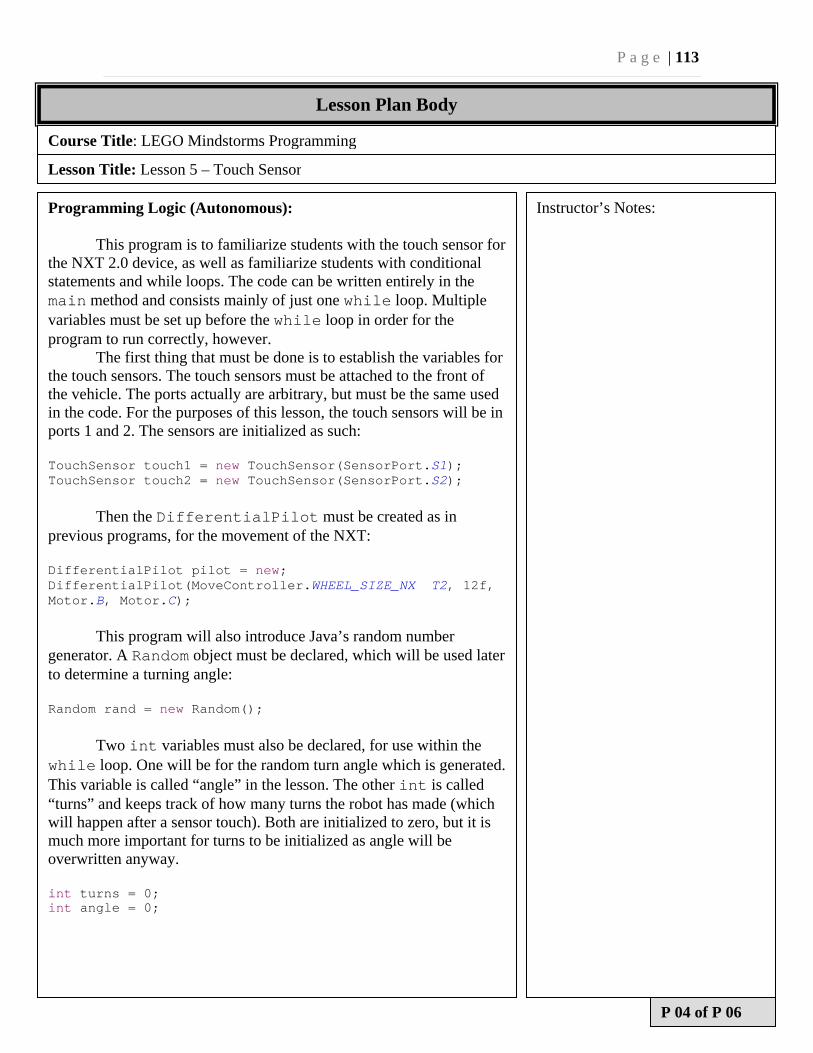
P a g e | 113
Lesson Plan Body
Course Title: LEGO Mindstorms Programming
Lesson Title: Lesson 5 – Touch Sensor
Programming Logic (Autonomous):
This program is to familiarize students with the touch sensor for the NXT 2.0 device, as well as familiarize students with conditional statements and while loops. The code can be written entirely in the main method and consists mainly of just one while loop. Multiple variables must be set up before the while loop in order for the program to run correctly, however.
The first thing that must be done is to establish the variables for the touch sensors. The touch sensors must be attached to the front of the vehicle. The ports actually are arbitrary, but must be the same used in the code. For the purposes of this lesson, the touch sensors will be in ports 1 and 2. The sensors are initialized as such: TouchSensor touch1 = new TouchSensor(SensorPort.S1); TouchSensor touch2 = new TouchSensor(SensorPort.S2);
Then the DifferentialPilot must be created as in previous programs, for the movement of the NXT: DifferentialPilot pilot = new; DifferentialPilot(MoveController.WHEEL_SIZE_NX T2, 12f, Motor.B, Motor.C);
This program will also introduce Java’s random number generator. A Random object must be declared, which will be used later to determine a turning angle: Random rand = new Random();
Two int variables must also be declared, for use within the while loop. One will be for the random turn angle which is generated. This variable is called “angle” in the lesson. The other int is called “turns” and keeps track of how many turns the robot has made (which will happen after a sensor touch). Both are initialized to zero, but it is much more important for turns to be initialized as angle will be overwritten anyway. int turns = 0; int angle = 0;
Instructor’s Notes:
P 04 of P 06
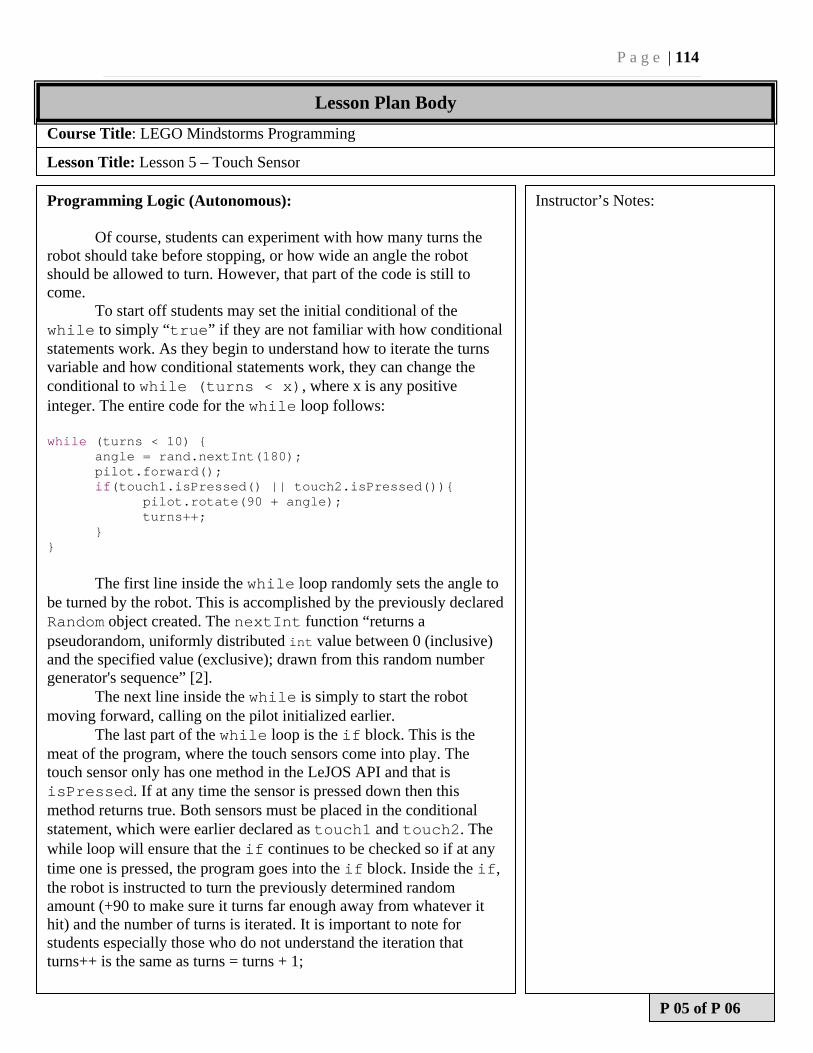
P a g e | 114
Course Title: LEGO Mindstorms Programming
Lesson Title: Lesson 5 – Touch Sensor
Programming Logic (Autonomous): Of course, students can experiment with how many turns the
robot should take before stopping, or how wide an angle the robot should be allowed to turn. However, that part of the code is still to come.
To start off students may set the initial conditional of the while to simply “true” if they are not familiar with how conditional statements work. As they begin to understand how to iterate the turns variable and how conditional statements work, they can change the conditional to while (turns < x), where x is any positive integer. The entire code for the while loop follows: while (turns < 10) {
angle = rand.nextInt(180); pilot.forward(); if(touch1.isPressed() || touch2.isPressed()){
pilot.rotate(90 + angle); turns++;
} }
The first line inside the while loop randomly sets the angle to be turned by the robot. This is accomplished by the previously declared Random object created. The nextInt function “returns a pseudorandom, uniformly distributed int value between 0 (inclusive) and the specified value (exclusive); drawn from this random number generator's sequence” [2].
The next line inside the while is simply to start the robot moving forward, calling on the pilot initialized earlier.
The last part of the while loop is the if block. This is the meat of the program, where the touch sensors come into play. The touch sensor only has one method in the LeJOS API and that is isPressed. If at any time the sensor is pressed down then this method returns true. Both sensors must be placed in the conditional statement, which were earlier declared as touch1 and touch2. The while loop will ensure that the if continues to be checked so if at any time one is pressed, the program goes into the if block. Inside the if, the robot is instructed to turn the previously determined random amount (+90 to make sure it turns far enough away from whatever it hit) and the number of turns is iterated. It is important to note for students especially those who do not understand the iteration that turns++ is the same as turns = turns + 1;
Instructor’s Notes:
P 05 of P 06
Lesson Plan Body
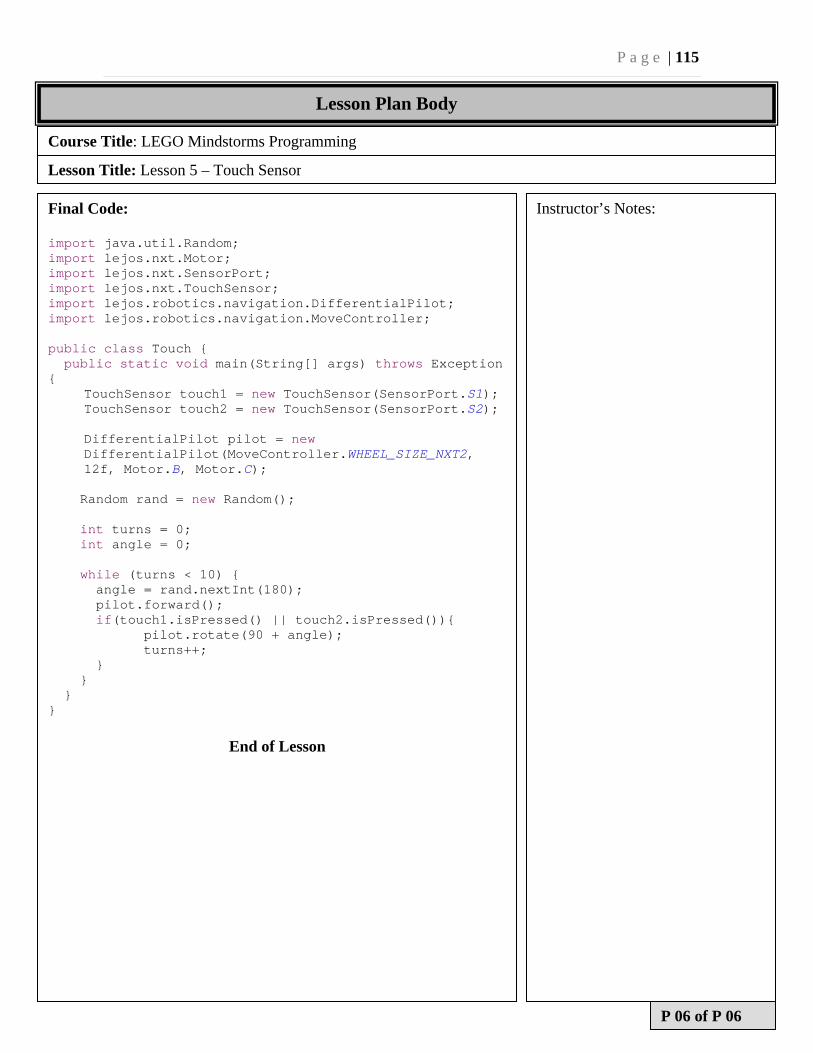
P a g e | 115
Course Title: LEGO Mindstorms Programming
Lesson Title: Lesson 5 – Touch Sensor
Final Code: import java.util.Random; import lejos.nxt.Motor; import lejos.nxt.SensorPort; import lejos.nxt.TouchSensor; import lejos.robotics.navigation.DifferentialPilot; import lejos.robotics.navigation.MoveController; public class Touch { public static void main(String[] args) throws Exception {
TouchSensor touch1 = new TouchSensor(SensorPort.S1); TouchSensor touch2 = new TouchSensor(SensorPort.S2);
DifferentialPilot pilot = new DifferentialPilot(MoveController.WHEEL_SIZE_NXT2, 12f, Motor.B, Motor.C);
Random rand = new Random(); int turns = 0; int angle = 0; while (turns < 10) { angle = rand.nextInt(180); pilot.forward(); if(touch1.isPressed() || touch2.isPressed()){ pilot.rotate(90 + angle); turns++; } } } }
End of Lesson
Instructor’s Notes:
P 06 of P 06
Lesson Plan Body

P a g e | 116
Appendix:Lesson5(NXT‐C)
P a g e | 117
LEGO NXT-C Programming – Lesson 5
Course Title: LEGO Mindstorms Programming Lesson Title: Lesson 5 – Touch Sensor
Instructor: Michael Humphries Assistant Instructor Required: Dr. Zalewski
Location of Training: Florida Gulf Coast University Evaluation Method: Testing autonomous and/or manual goals of the robot.
Space Requirement: Standard Classroom Training-Model: In-class experimentation.
Max. # Of Students: 2-4 per robot. Total Time Required: 1-2 hours.
Prepared by: Michael Humphries Date: 17 March 2012
Revised by: Dr. Zalewski Date:
Performance Objectives
Students at end of this class will be able to:
- Students will be able to use methods in the NXC language.
- Students will understand the following program logic: loops and conditional statements.
Approved by: Dr. Zalewski Date:
P 01 of P 12
P a g e | 118
Course Title: LEGO Mindstorms Programming
Lesson Title: Lesson 5 – Touch Sensor
Equipment, Materials and Tools
Description: Number: Description: Number:
LEGO Mindstorms #8457 Kit 1
Computer 1
Bluetooth Adapter 1
NXT 2.0 Software 1
RobotC License 1
Student Materials
Item: # Needed: When Distributed: Comments:
Special Materials Notes and Comments
The computer to be used should be either Bluetooth enabled or compatible with USB Bluetooth adapters. The settings of the computer should be changed so that Bluetooth devices can be wirelessly linked to the computer.
References
[1] LEGO Mindstorms http://mindstorms.lego.com/en-us/default.aspx [2] NXC Tutorial http://bricxcc.sourceforge.net/nbc/nxcdoc/NXC_tutorial.pdf
P 02 of P 12
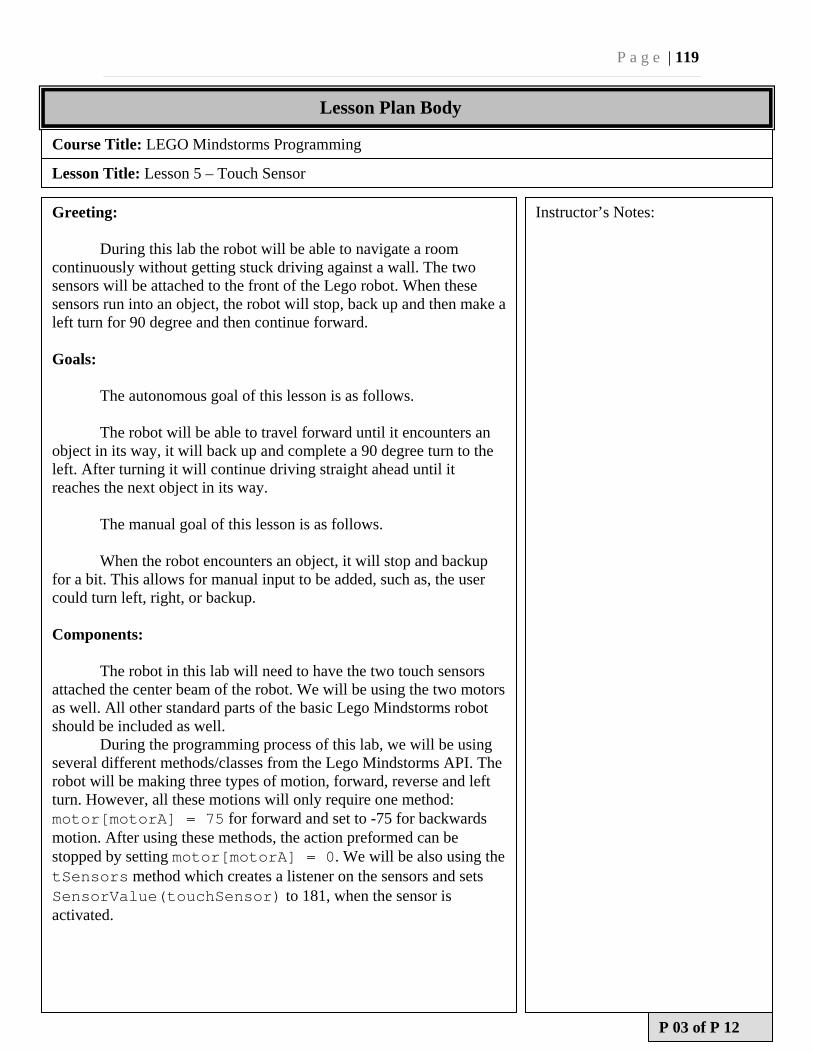
P a g e | 119
Lesson Plan Body
Course Title: LEGO Mindstorms Programming
Lesson Title: Lesson 5 – Touch Sensor
Greeting:
During this lab the robot will be able to navigate a room continuously without getting stuck driving against a wall. The two sensors will be attached to the front of the Lego robot. When these sensors run into an object, the robot will stop, back up and then make a left turn for 90 degree and then continue forward.
Goals: The autonomous goal of this lesson is as follows.
The robot will be able to travel forward until it encounters an object in its way, it will back up and complete a 90 degree turn to the left. After turning it will continue driving straight ahead until it reaches the next object in its way.
The manual goal of this lesson is as follows. When the robot encounters an object, it will stop and backup
for a bit. This allows for manual input to be added, such as, the user could turn left, right, or backup. Components:
The robot in this lab will need to have the two touch sensors attached the center beam of the robot. We will be using the two motors as well. All other standard parts of the basic Lego Mindstorms robot should be included as well.
During the programming process of this lab, we will be using several different methods/classes from the Lego Mindstorms API. The robot will be making three types of motion, forward, reverse and left turn. However, all these motions will only require one method: motor[motorA] = 75 for forward and set to -75 for backwards motion. After using these methods, the action preformed can be stopped by setting motor[motorA] = 0. We will be also using the tSensors method which creates a listener on the sensors and sets SensorValue(touchSensor) to 181, when the sensor is activated.
Instructor’s Notes:
P 03 of P 12
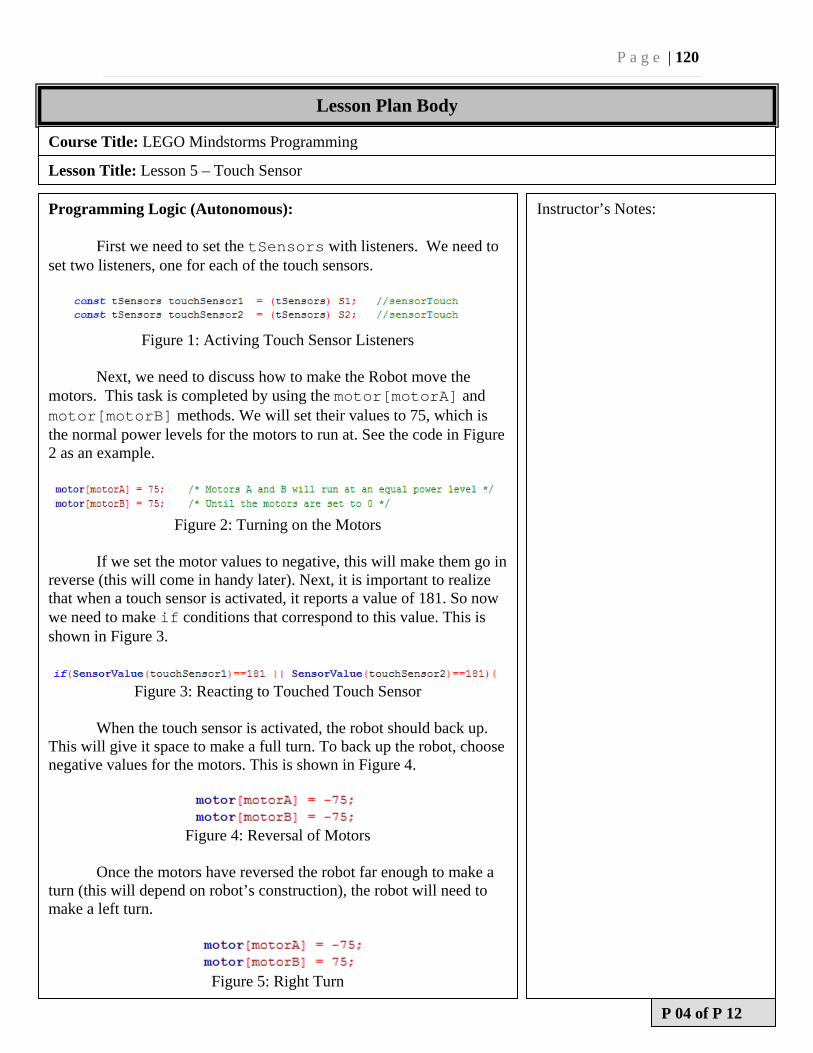
P a g e | 120
Lesson Plan Body
Course Title: LEGO Mindstorms Programming
Lesson Title: Lesson 5 – Touch Sensor
Programming Logic (Autonomous):
First we need to set the tSensors with listeners. We need to set two listeners, one for each of the touch sensors.
Figure 1: Activing Touch Sensor Listeners
Next, we need to discuss how to make the Robot move the
motors. This task is completed by using the motor[motorA] and motor[motorB] methods. We will set their values to 75, which is the normal power levels for the motors to run at. See the code in Figure 2 as an example.
Figure 2: Turning on the Motors
If we set the motor values to negative, this will make them go in
reverse (this will come in handy later). Next, it is important to realize that when a touch sensor is activated, it reports a value of 181. So now we need to make if conditions that correspond to this value. This is shown in Figure 3.
Figure 3: Reacting to Touched Touch Sensor
When the touch sensor is activated, the robot should back up.
This will give it space to make a full turn. To back up the robot, choose negative values for the motors. This is shown in Figure 4.
Figure 4: Reversal of Motors
Once the motors have reversed the robot far enough to make a
turn (this will depend on robot’s construction), the robot will need to make a left turn.
Figure 5: Right Turn
Instructor’s Notes:
P 04 of P 12
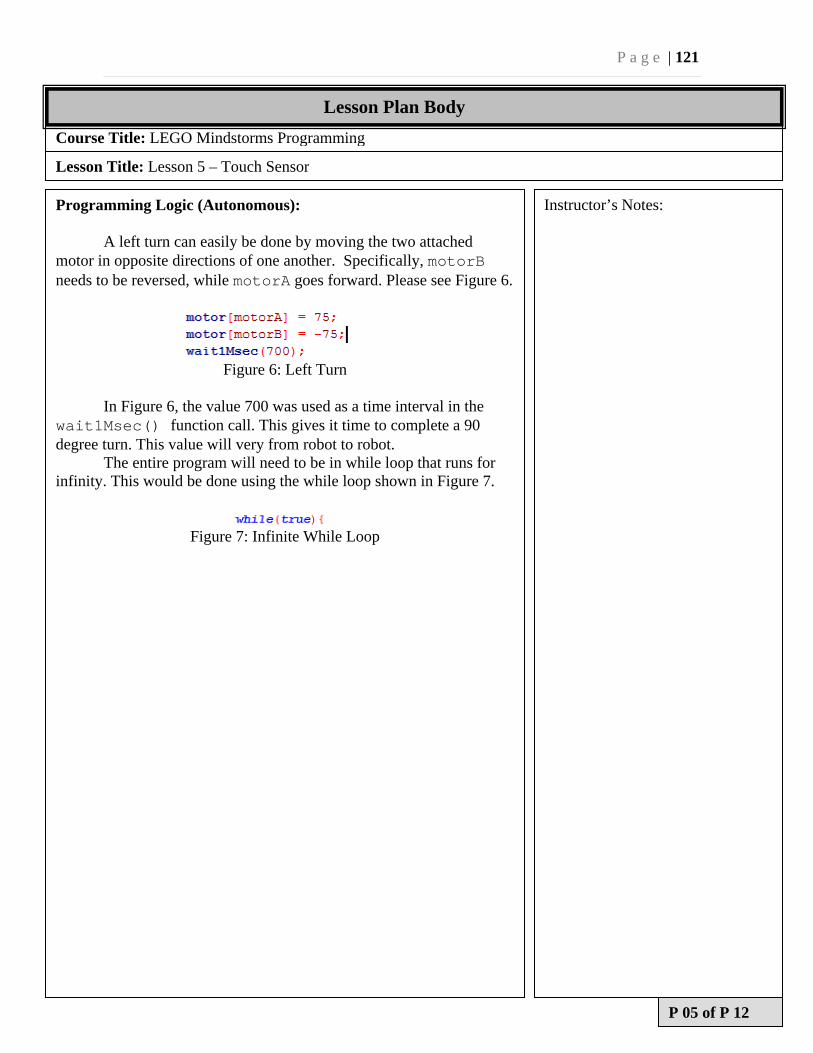
P a g e | 121
Course Title: LEGO Mindstorms Programming
Lesson Title: Lesson 5 – Touch Sensor
Programming Logic (Autonomous):
A left turn can easily be done by moving the two attached motor in opposite directions of one another. Specifically, motorB needs to be reversed, while motorA goes forward. Please see Figure 6.
Figure 6: Left Turn
In Figure 6, the value 700 was used as a time interval in the
wait1Msec() function call. This gives it time to complete a 90 degree turn. This value will very from robot to robot.
The entire program will need to be in while loop that runs for infinity. This would be done using the while loop shown in Figure 7.
Figure 7: Infinite While Loop
Instructor’s Notes:
P 05 of P 12
Lesson Plan Body
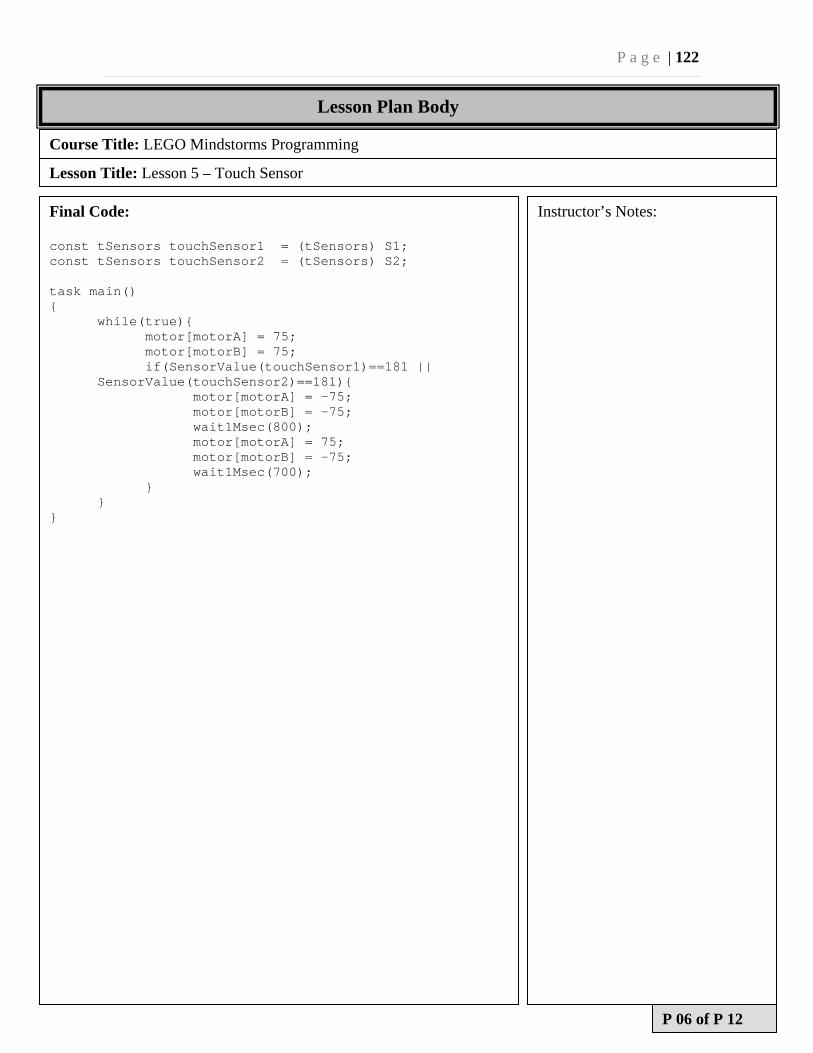
P a g e | 122
Course Title: LEGO Mindstorms Programming
Lesson Title: Lesson 5 – Touch Sensor
Final Code: const tSensors touchSensor1 = (tSensors) S1; const tSensors touchSensor2 = (tSensors) S2; task main() {
while(true){ motor[motorA] = 75;
motor[motorB] = 75; if(SensorValue(touchSensor1)==181 || SensorValue(touchSensor2)==181){
motor[motorA] = -75; motor[motorB] = -75; wait1Msec(800); motor[motorA] = 75; motor[motorB] = -75; wait1Msec(700); } }
}
Instructor’s Notes:
P 06 of P 12
Lesson Plan Body
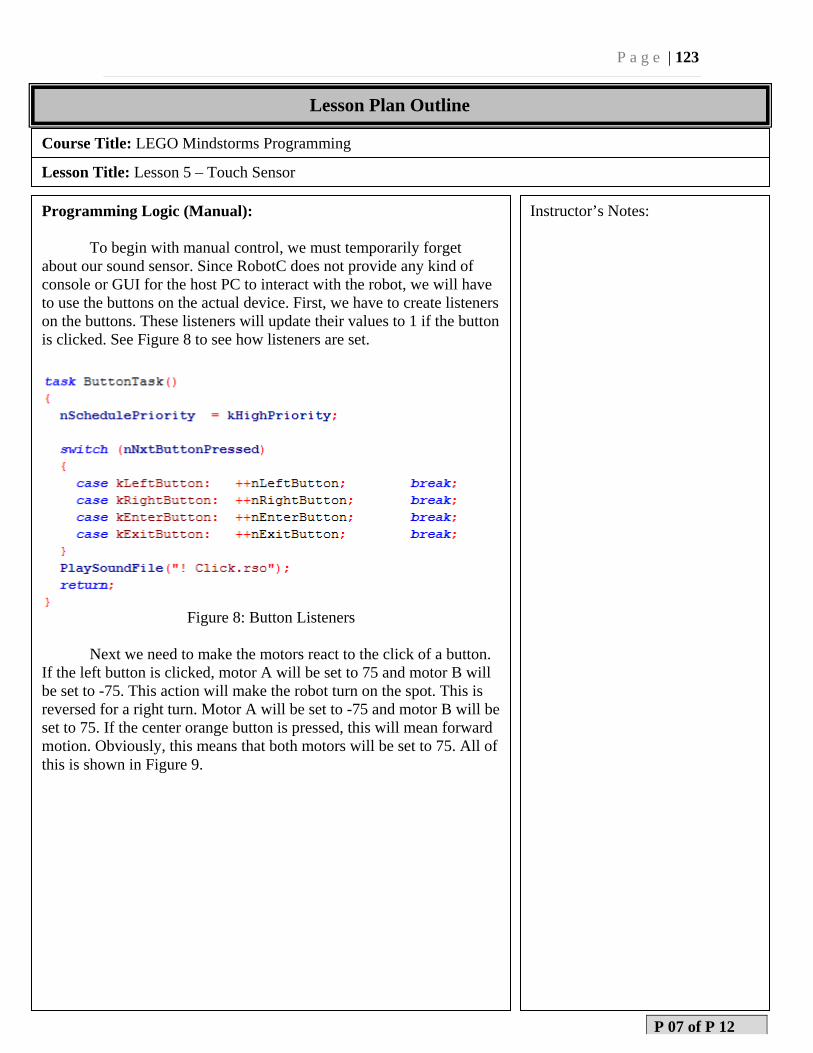
P a g e | 123
Course Title: LEGO Mindstorms Programming
Lesson Title: Lesson 5 – Touch Sensor
Programming Logic (Manual):
To begin with manual control, we must temporarily forget about our sound sensor. Since RobotC does not provide any kind of console or GUI for the host PC to interact with the robot, we will have to use the buttons on the actual device. First, we have to create listeners on the buttons. These listeners will update their values to 1 if the button is clicked. See Figure 8 to see how listeners are set.
Figure 8: Button Listeners
Next we need to make the motors react to the click of a button.
If the left button is clicked, motor A will be set to 75 and motor B will be set to -75. This action will make the robot turn on the spot. This is reversed for a right turn. Motor A will be set to -75 and motor B will be set to 75. If the center orange button is pressed, this will mean forward motion. Obviously, this means that both motors will be set to 75. All of this is shown in Figure 9.
Instructor’s Notes:
P 07 of P 12
Lesson Plan Outline
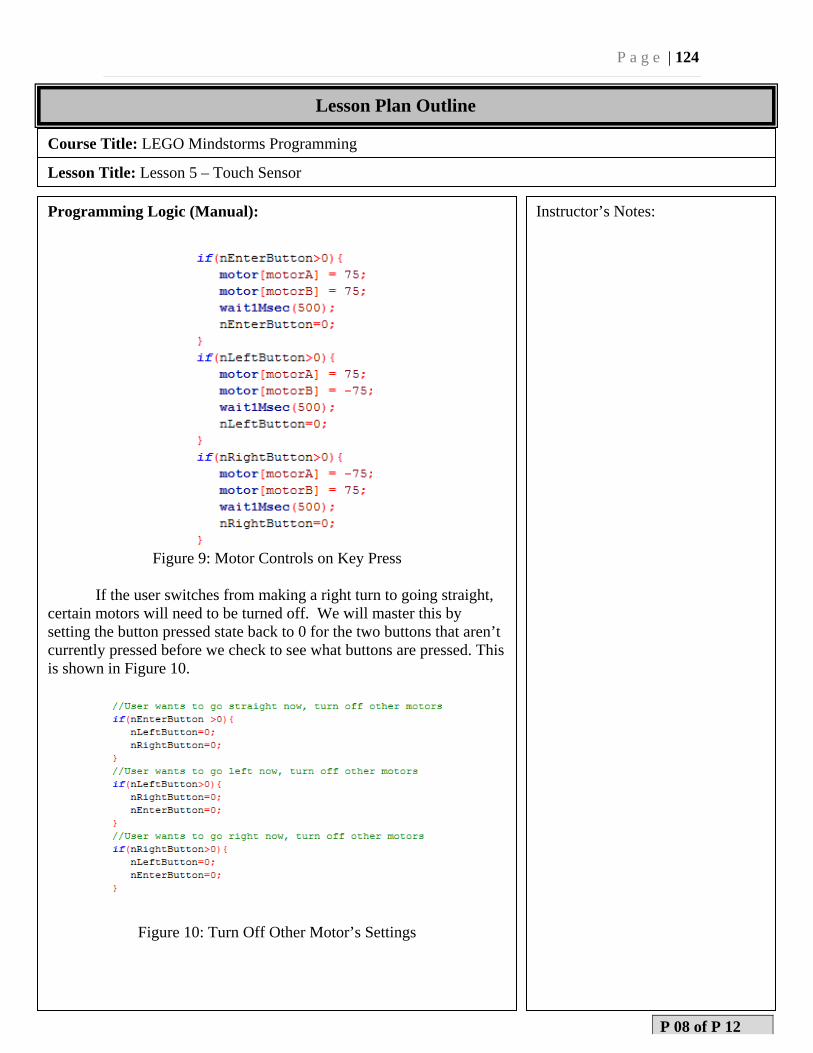
P a g e | 124
Course Title: LEGO Mindstorms Programming
Lesson Title: Lesson 5 – Touch Sensor
Programming Logic (Manual):
Figure 9: Motor Controls on Key Press
If the user switches from making a right turn to going straight,
certain motors will need to be turned off. We will master this by setting the button pressed state back to 0 for the two buttons that aren’t currently pressed before we check to see what buttons are pressed. This is shown in Figure 10.
Figure 10: Turn Off Other Motor’s Settings
Instructor’s Notes:
P 08 of P 12
Lesson Plan Outline
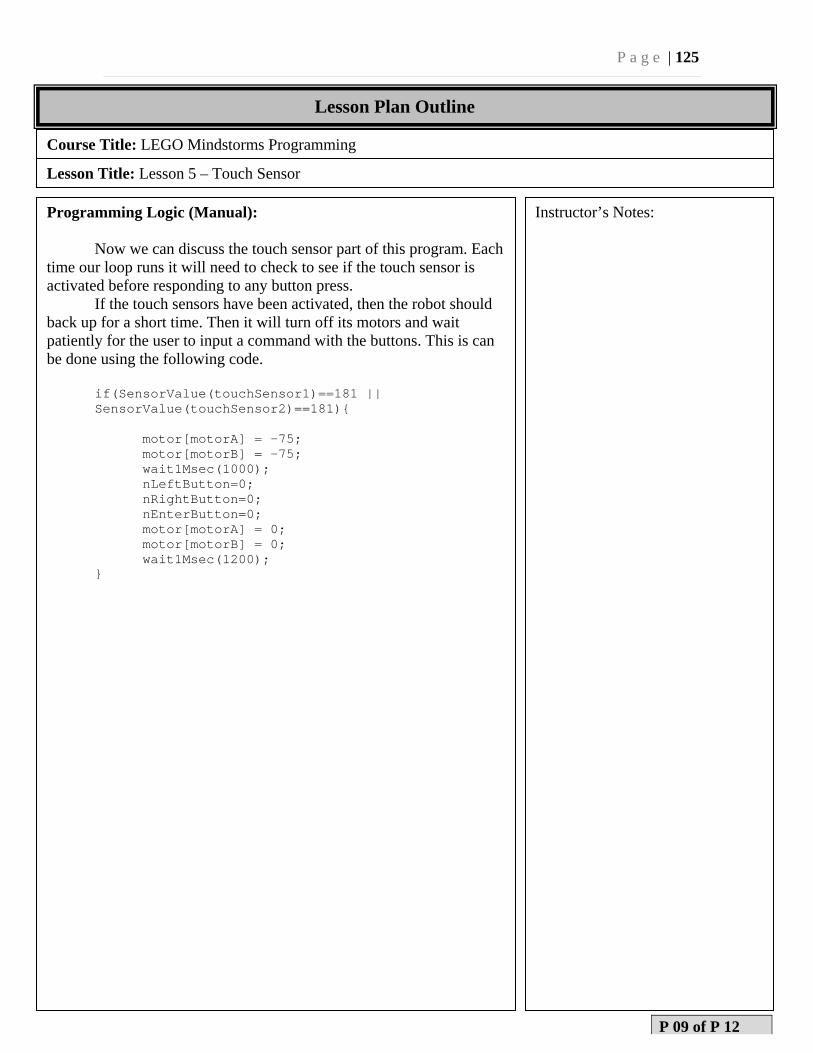
P a g e | 125
Course Title: LEGO Mindstorms Programming
Lesson Title: Lesson 5 – Touch Sensor
Programming Logic (Manual):
Now we can discuss the touch sensor part of this program. Each time our loop runs it will need to check to see if the touch sensor is activated before responding to any button press.
If the touch sensors have been activated, then the robot should back up for a short time. Then it will turn off its motors and wait patiently for the user to input a command with the buttons. This is can be done using the following code.
if(SensorValue(touchSensor1)==181 || SensorValue(touchSensor2)==181){
motor[motorA] = -75; motor[motorB] = -75; wait1Msec(1000); nLeftButton=0; nRightButton=0; nEnterButton=0; motor[motorA] = 0; motor[motorB] = 0; wait1Msec(1200);
}
Instructor’s Notes:
P 09 of P 12
Lesson Plan Outline
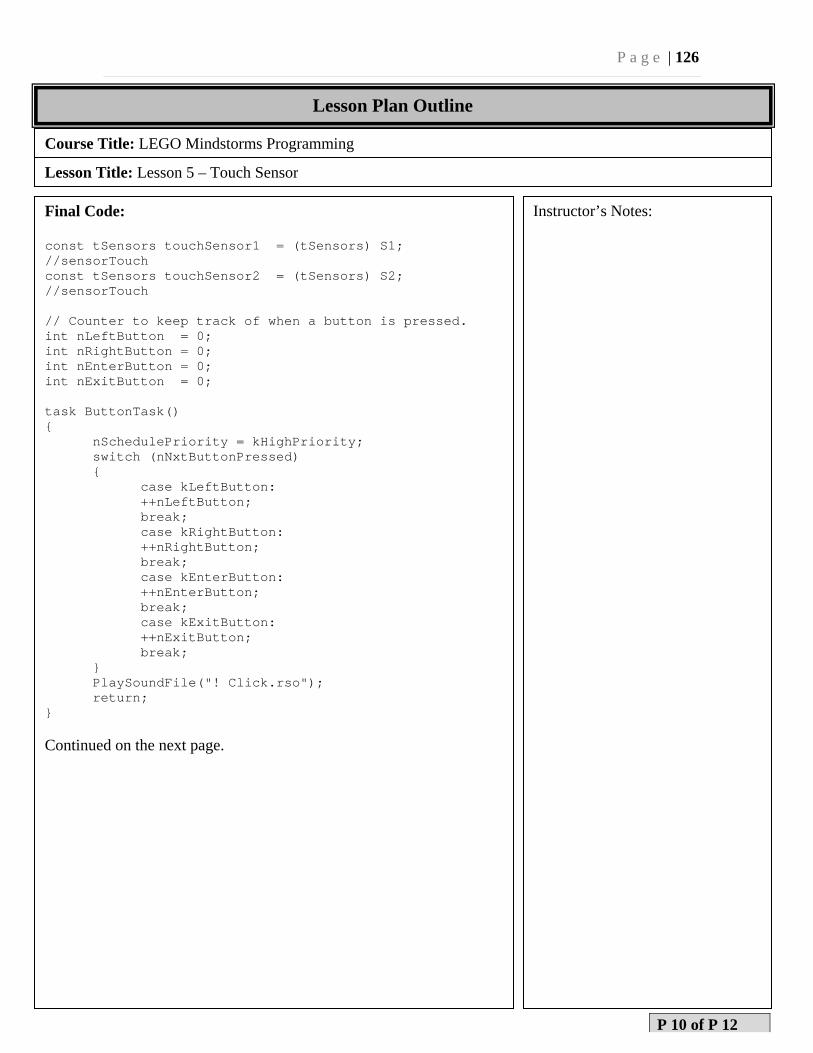
P a g e | 126
Course Title: LEGO Mindstorms Programming
Lesson Title: Lesson 5 – Touch Sensor
Final Code: const tSensors touchSensor1 = (tSensors) S1; //sensorTouch const tSensors touchSensor2 = (tSensors) S2; //sensorTouch // Counter to keep track of when a button is pressed. int nLeftButton = 0; int nRightButton = 0; int nEnterButton = 0; int nExitButton = 0; task ButtonTask() {
nSchedulePriority = kHighPriority; switch (nNxtButtonPressed) {
case kLeftButton: ++nLeftButton; break;
case kRightButton: ++nRightButton; break; case kEnterButton: ++nEnterButton; break; case kExitButton: ++nExitButton; break;
} PlaySoundFile("! Click.rso"); return;
} Continued on the next page.
Instructor’s Notes:
P 10 of P 12
Lesson Plan Outline
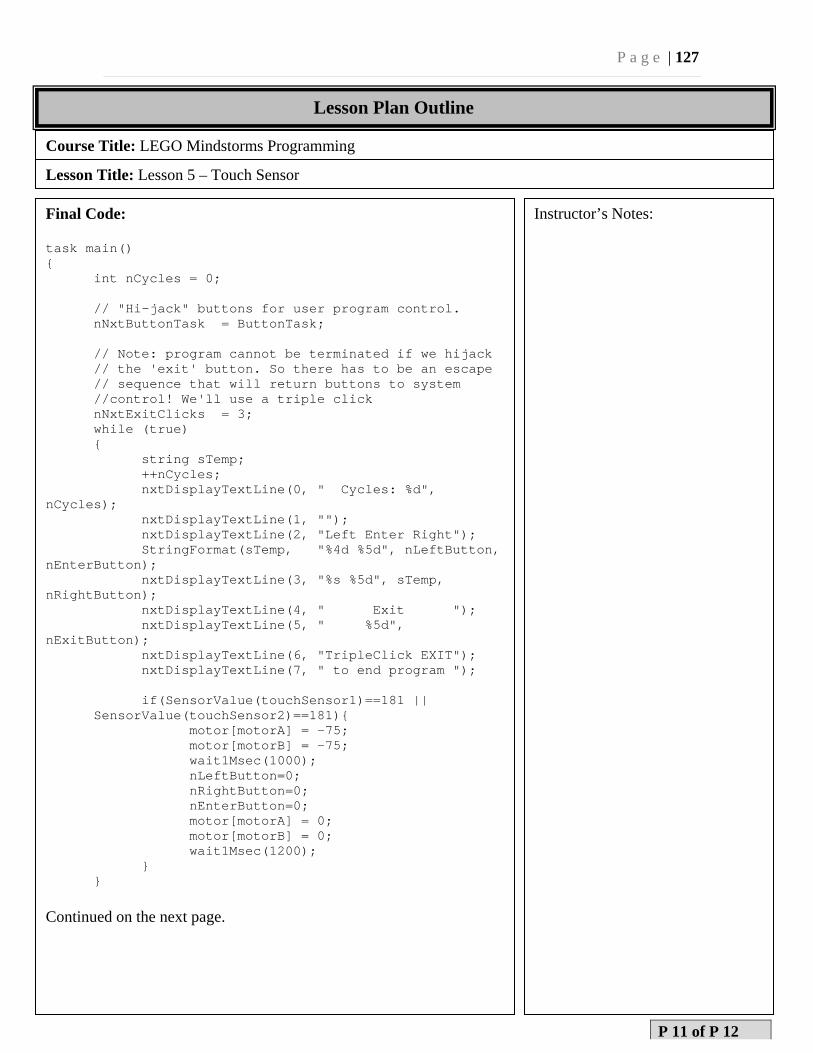
P a g e | 127
Course Title: LEGO Mindstorms Programming
Lesson Title: Lesson 5 – Touch Sensor
Final Code: task main() {
int nCycles = 0; // "Hi-jack" buttons for user program control. nNxtButtonTask = ButtonTask; // Note: program cannot be terminated if we hijack
// the 'exit' button. So there has to be an escape // sequence that will return buttons to system //control! We'll use a triple click
nNxtExitClicks = 3; while (true) { string sTemp; ++nCycles; nxtDisplayTextLine(0, " Cycles: %d", nCycles); nxtDisplayTextLine(1, ""); nxtDisplayTextLine(2, "Left Enter Right"); StringFormat(sTemp, "%4d %5d", nLeftButton, nEnterButton); nxtDisplayTextLine(3, "%s %5d", sTemp, nRightButton); nxtDisplayTextLine(4, " Exit "); nxtDisplayTextLine(5, " %5d", nExitButton); nxtDisplayTextLine(6, "TripleClick EXIT"); nxtDisplayTextLine(7, " to end program ");
if(SensorValue(touchSensor1)==181 || SensorValue(touchSensor2)==181){
motor[motorA] = -75; motor[motorB] = -75; wait1Msec(1000); nLeftButton=0; nRightButton=0; nEnterButton=0; motor[motorA] = 0; motor[motorB] = 0; wait1Msec(1200);
} } Continued on the next page.
Instructor’s Notes:
P 11 of P 12
Lesson Plan Outline
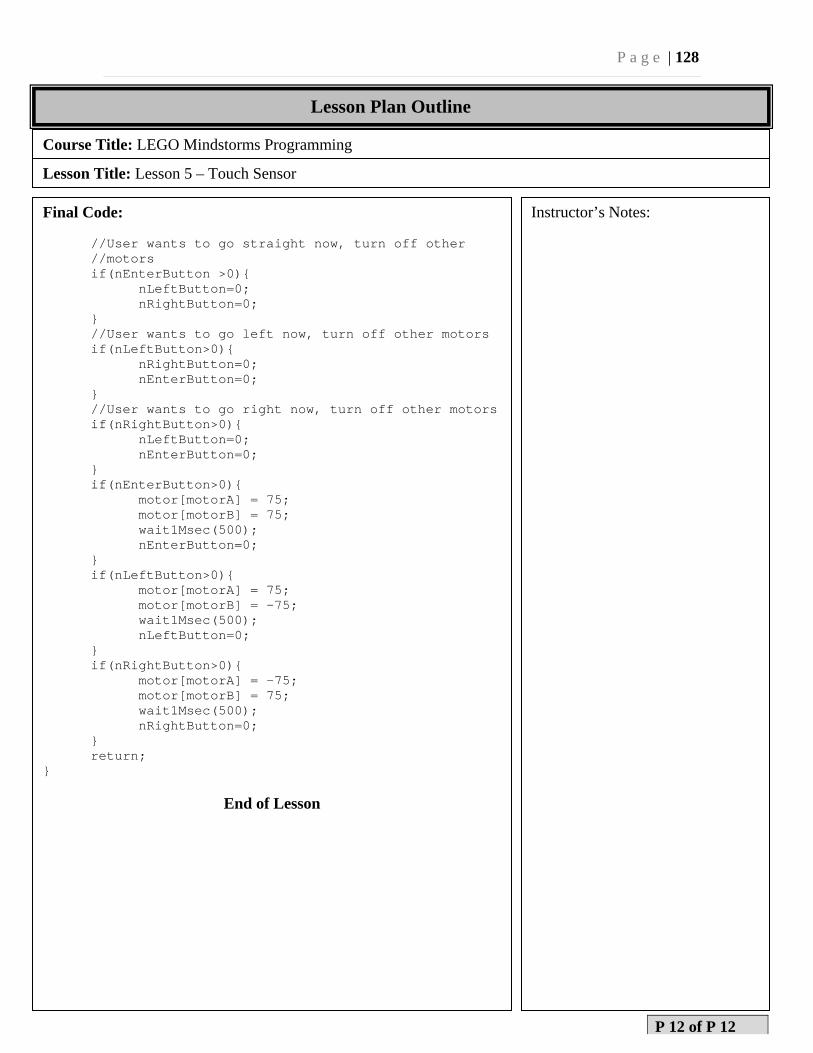
P a g e | 128
Course Title: LEGO Mindstorms Programming
Lesson Title: Lesson 5 – Touch Sensor
Final Code:
//User wants to go straight now, turn off other //motors if(nEnterButton >0){
nLeftButton=0; nRightButton=0; } //User wants to go left now, turn off other motors if(nLeftButton>0){ nRightButton=0; nEnterButton=0; } //User wants to go right now, turn off other motors if(nRightButton>0){ nLeftButton=0; nEnterButton=0; } if(nEnterButton>0){ motor[motorA] = 75; motor[motorB] = 75; wait1Msec(500); nEnterButton=0;
} if(nLeftButton>0){ motor[motorA] = 75; motor[motorB] = -75; wait1Msec(500); nLeftButton=0;
} if(nRightButton>0){ motor[motorA] = -75; motor[motorB] = 75; wait1Msec(500); nRightButton=0; } return; }
End of Lesson
Instructor’s Notes:
P 12 of P 12
Lesson Plan Outline

P a g e | 129
Appendix:Lesson6(NXT‐J)
P a g e | 130
LEGO NXT-J Programming – Lesson 6
Course Title: LEGO Mindstorms Programming Lesson Title: Lesson 6 - Ultrasonic Sensor
Instructor: Evan McKeon Assistant Instructor Required: Dr. Zalewski
Location of Training: Florida Gulf Coast University Evaluation Method: Testing autonomous and/or manual goals of the robot.
Space Requirement: Standard Classroom Training-Model: In-class experimentation.
Max. # Of Students: 2-4 per robot. Total Time Required: 1/2-1 hour
Prepared by: Evan McKeon Date: 28 March 2012
Revised by: Dr. Zalewski Date:
Performance Objectives
Students at end of this class will be able to:
- Utilize the Ultrasonic sensor. - Set individual motor speeds. - Output to the NXT LCD screen - Understand conditional statements and
while loops
Approved by: Dr. Zalewski Date:
P 01 of P 06
P a g e | 131
Course Title: LEGO Mindstorms Programming
Lesson Title: Lesson 6 - Ultrasonic Sensor
Equipment, Materials and Tools
Description: Number: Description: Number
LEGO Mindstorms #8457 Kit 1
Computer 1
Bluetooth Adapter 1
NXT 2.0 Software 1
Java Compiler with LeJOS library 1
Student Materials
Item: # Needed: When Distributed: Comments:
Special Materials Notes and Comments
The computer to be used should be either Bluetooth enabled or compatible with USB Bluetooth adapters. The settings of the computer should be changed so that Bluetooth devices can be wirelessly linked to the computer.
References
[1] LEGO Mindstorms http://mindstorms.lego.com/en-us/default.aspx
P 02 of P 06
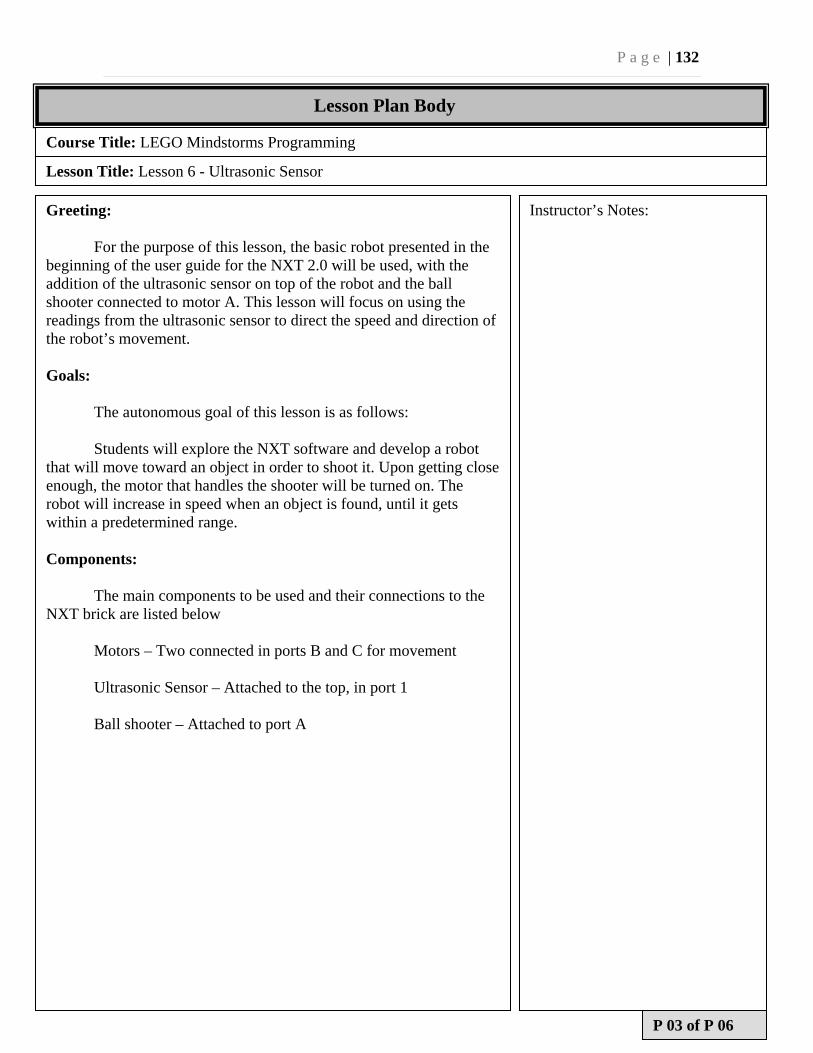
P a g e | 132
Lesson Plan Body
Course Title: LEGO Mindstorms Programming
Lesson Title: Lesson 6 - Ultrasonic Sensor
Greeting: For the purpose of this lesson, the basic robot presented in the beginning of the user guide for the NXT 2.0 will be used, with the addition of the ultrasonic sensor on top of the robot and the ball shooter connected to motor A. This lesson will focus on using the readings from the ultrasonic sensor to direct the speed and direction of the robot’s movement. Goals:
The autonomous goal of this lesson is as follows: Students will explore the NXT software and develop a robot that will move toward an object in order to shoot it. Upon getting close enough, the motor that handles the shooter will be turned on. The robot will increase in speed when an object is found, until it gets within a predetermined range. Components:
The main components to be used and their connections to the NXT brick are listed below Motors – Two connected in ports B and C for movement
Ultrasonic Sensor – Attached to the top, in port 1
Ball shooter – Attached to port A
Instructor’s Notes:
P 03 of P 06
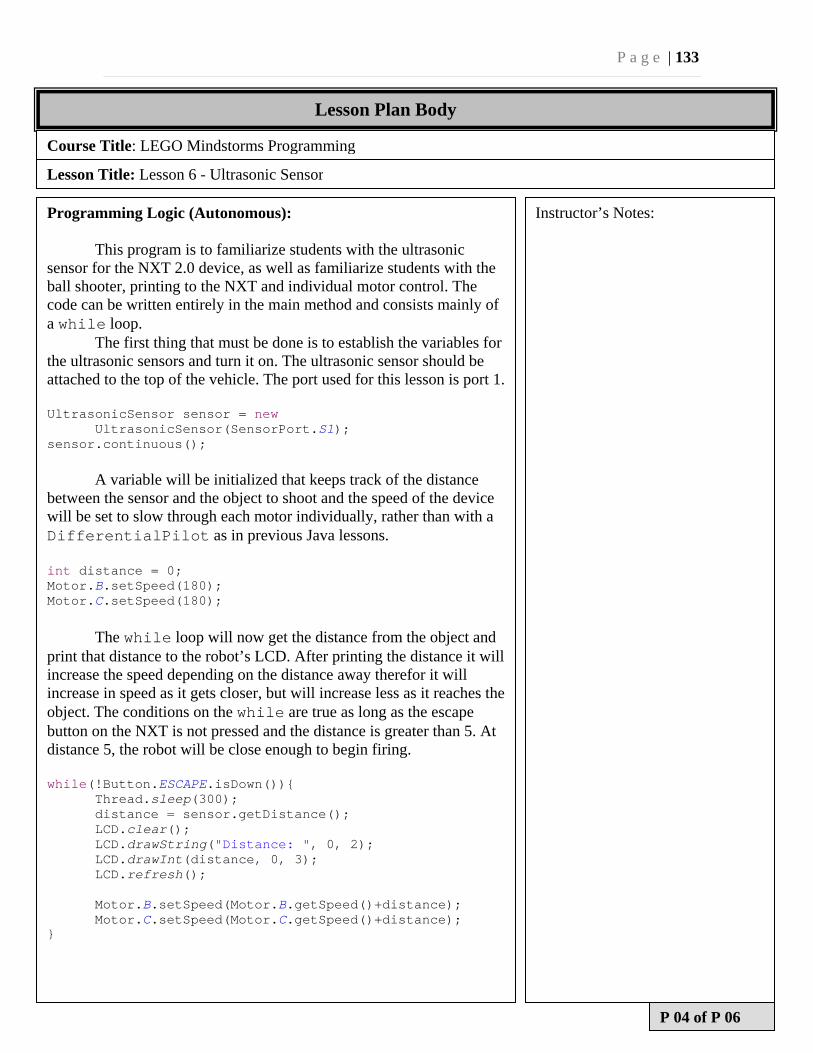
P a g e | 133
Lesson Plan Body
Course Title: LEGO Mindstorms Programming
Lesson Title: Lesson 6 - Ultrasonic Sensor
Programming Logic (Autonomous): This program is to familiarize students with the ultrasonic sensor for the NXT 2.0 device, as well as familiarize students with the ball shooter, printing to the NXT and individual motor control. The code can be written entirely in the main method and consists mainly of a while loop.
The first thing that must be done is to establish the variables for the ultrasonic sensors and turn it on. The ultrasonic sensor should be attached to the top of the vehicle. The port used for this lesson is port 1. UltrasonicSensor sensor = new UltrasonicSensor(SensorPort.S1); sensor.continuous();
A variable will be initialized that keeps track of the distance between the sensor and the object to shoot and the speed of the device will be set to slow through each motor individually, rather than with a DifferentialPilot as in previous Java lessons. int distance = 0; Motor.B.setSpeed(180); Motor.C.setSpeed(180);
The while loop will now get the distance from the object and print that distance to the robot’s LCD. After printing the distance it will increase the speed depending on the distance away therefor it will increase in speed as it gets closer, but will increase less as it reaches the object. The conditions on the while are true as long as the escape button on the NXT is not pressed and the distance is greater than 5. At distance 5, the robot will be close enough to begin firing. while(!Button.ESCAPE.isDown()){ Thread.sleep(300); distance = sensor.getDistance(); LCD.clear(); LCD.drawString("Distance: ", 0, 2); LCD.drawInt(distance, 0, 3); LCD.refresh(); Motor.B.setSpeed(Motor.B.getSpeed()+distance); Motor.C.setSpeed(Motor.C.getSpeed()+distance); }
Instructor’s Notes:
P 04 of P 06
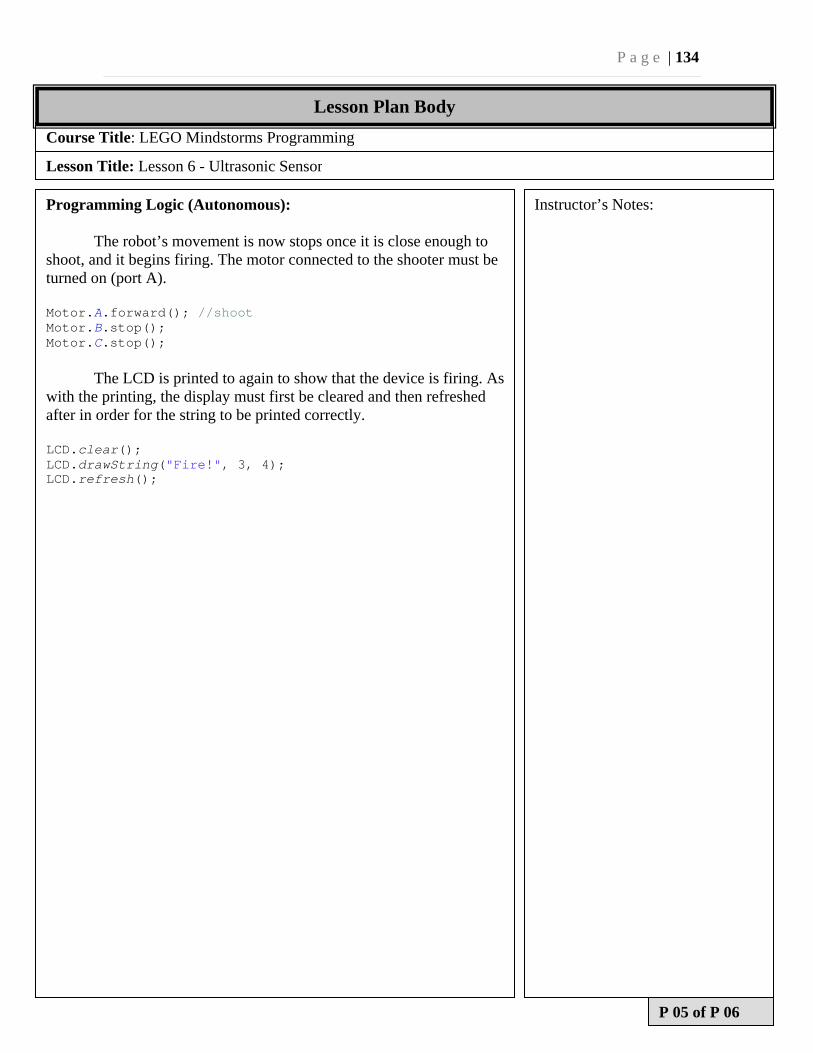
P a g e | 134
Course Title: LEGO Mindstorms Programming
Lesson Title: Lesson 6 - Ultrasonic Sensor
Programming Logic (Autonomous): The robot’s movement is now stops once it is close enough to
shoot, and it begins firing. The motor connected to the shooter must be turned on (port A). Motor.A.forward(); //shoot Motor.B.stop(); Motor.C.stop();
The LCD is printed to again to show that the device is firing. As with the printing, the display must first be cleared and then refreshed after in order for the string to be printed correctly. LCD.clear(); LCD.drawString("Fire!", 3, 4); LCD.refresh();
Instructor’s Notes:
P 05 of P 06
Lesson Plan Body
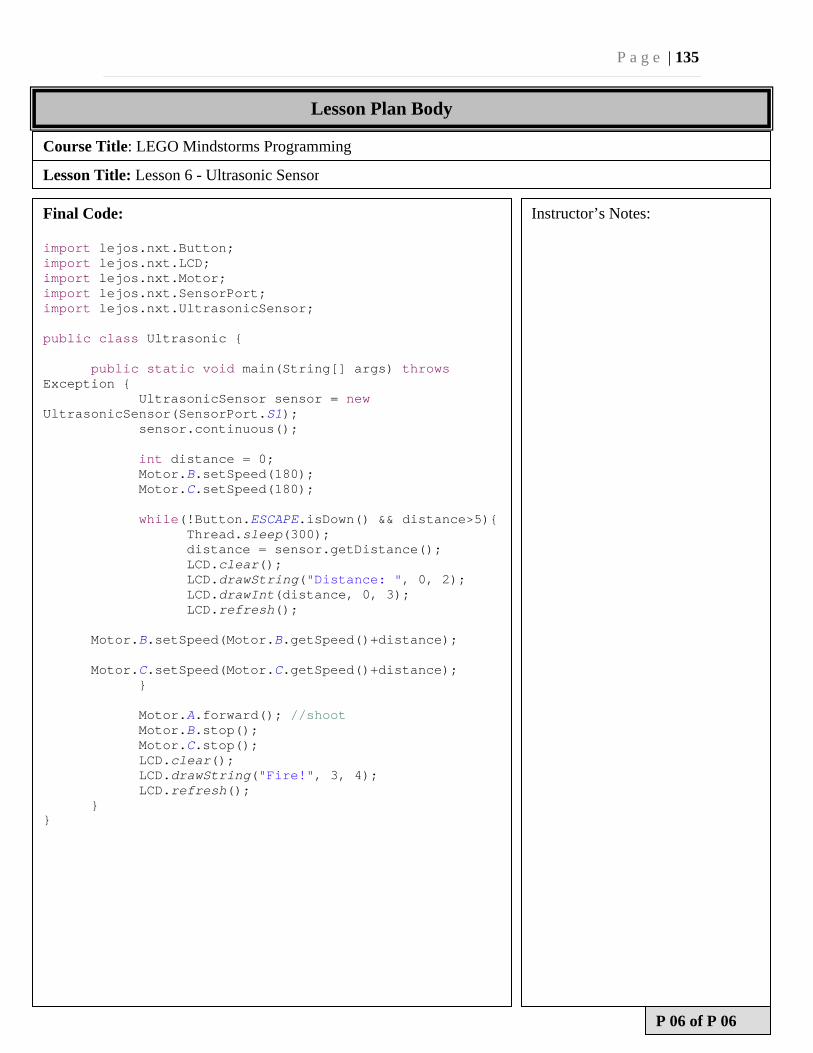
P a g e | 135
Course Title: LEGO Mindstorms Programming
Lesson Title: Lesson 6 - Ultrasonic Sensor
Final Code: import lejos.nxt.Button; import lejos.nxt.LCD; import lejos.nxt.Motor; import lejos.nxt.SensorPort; import lejos.nxt.UltrasonicSensor; public class Ultrasonic { public static void main(String[] args) throws Exception { UltrasonicSensor sensor = new UltrasonicSensor(SensorPort.S1); sensor.continuous(); int distance = 0; Motor.B.setSpeed(180); Motor.C.setSpeed(180); while(!Button.ESCAPE.isDown() && distance>5){ Thread.sleep(300); distance = sensor.getDistance(); LCD.clear(); LCD.drawString("Distance: ", 0, 2); LCD.drawInt(distance, 0, 3); LCD.refresh(); Motor.B.setSpeed(Motor.B.getSpeed()+distance); Motor.C.setSpeed(Motor.C.getSpeed()+distance); } Motor.A.forward(); //shoot Motor.B.stop(); Motor.C.stop(); LCD.clear(); LCD.drawString("Fire!", 3, 4); LCD.refresh(); } }
Instructor’s Notes:
P 06 of P 06
Lesson Plan Body

P a g e | 136
Appendix:Lesson6(NXT‐G)
P a g e | 137
LEGO NXT-G Programming - Lesson 6
Course Title: LEGO Mindstorms Programming Lesson Title: Lesson 6 – Ultrasonic “Predator”
Instructor: Nicholas Alteen Assistant Instructor Required: Dr. Zalewski
Location of Training: Florida Gulf Coast University Evaluation Method: Testing autonomous and/or manual goals of the robot.
Space Requirement: Standard Classroom Training-Model: In-class experimentation.
Max. # Of Students: 2-4 per robot. Total Time Required: 1-2 hours.
Prepared by: Nicholas Alteen Date: 6 March 2012
Revised by: Dr. Zalewski Date:
Performance Objectives
Students at end of this class will be able to:
- Understand and apply the programming concepts of conditional waits.
- Understand the differences between infinite and conditional loops.
- Understand the concept of nested loops and their effect in a robotics programming environment.
- Understand how to collect and process data using wires and data blocks in the NXT 2.0 software.
- Program the LEGO NXT 2.0 robot to use the above concepts in conjunction with the ultrasonic sensor included in the Mindstorms kit.
- Solve robotics problems using looping and conditional waits.
Approved by: Dr. Zalewski Date:
P 01 of P 21
P a g e | 138
Course Title: LEGO Mindstorms Programming
Lesson Title: Lesson 6 – Ultrasonic “Predator”
Equipment, Materials and Tools
Description: Number: Description: Number
LEGO Mindstorms #8457 Kit 1
Computer 1
Bluetooth Adapter 1
NXT 2.0 Software 1
Student Materials
Item: # Needed: When Distributed: Comments:
Special Materials Notes and Comments
The computer to be used should be either Bluetooth enabled or compatible with USB Bluetooth adapters. The settings of the computer should be changed so that Bluetooth devices can be wirelessly linked to the computer.
References
[1] LEGO Mindstorms http://mindstorms.lego.com/en-us/default.aspx
P 02 of P 21
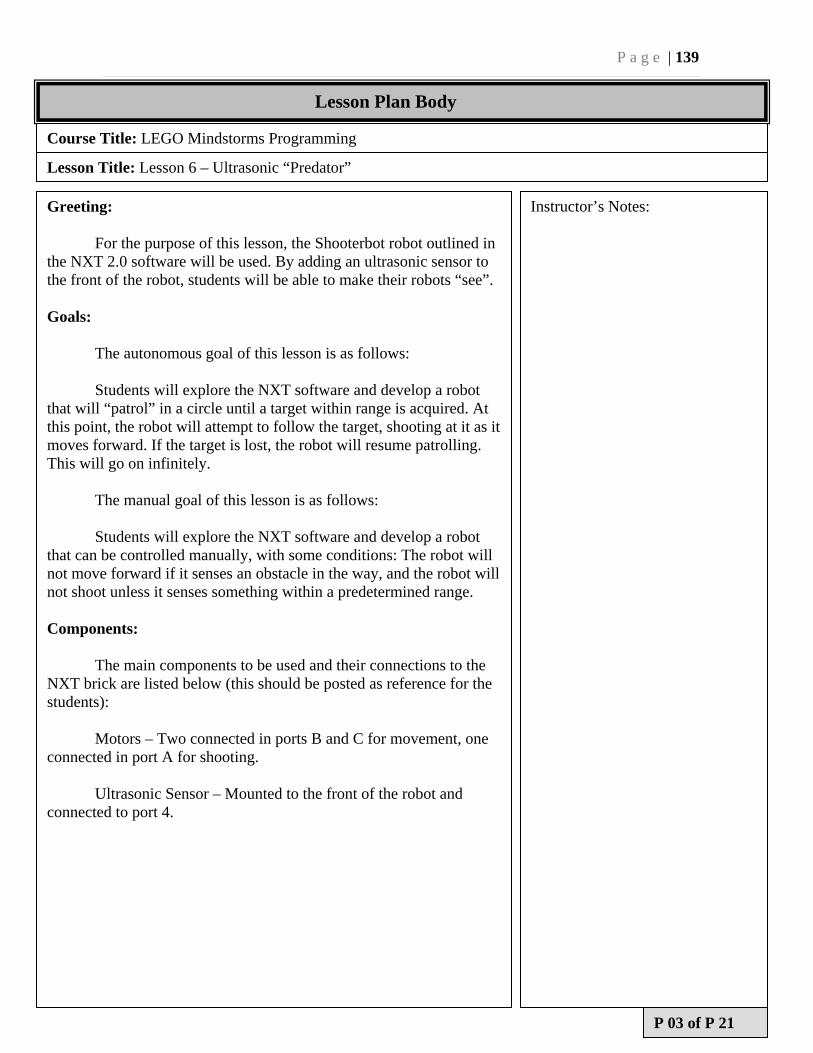
P a g e | 139
Lesson Plan Body
Course Title: LEGO Mindstorms Programming
Lesson Title: Lesson 6 – Ultrasonic “Predator”
Greeting: For the purpose of this lesson, the Shooterbot robot outlined in the NXT 2.0 software will be used. By adding an ultrasonic sensor to the front of the robot, students will be able to make their robots “see”. Goals: The autonomous goal of this lesson is as follows: Students will explore the NXT software and develop a robot that will “patrol” in a circle until a target within range is acquired. At this point, the robot will attempt to follow the target, shooting at it as it moves forward. If the target is lost, the robot will resume patrolling. This will go on infinitely. The manual goal of this lesson is as follows: Students will explore the NXT software and develop a robot that can be controlled manually, with some conditions: The robot will not move forward if it senses an obstacle in the way, and the robot will not shoot unless it senses something within a predetermined range. Components: The main components to be used and their connections to the NXT brick are listed below (this should be posted as reference for the students): Motors – Two connected in ports B and C for movement, one connected in port A for shooting. Ultrasonic Sensor – Mounted to the front of the robot and connected to port 4.
Instructor’s Notes:
P 03 of P 21
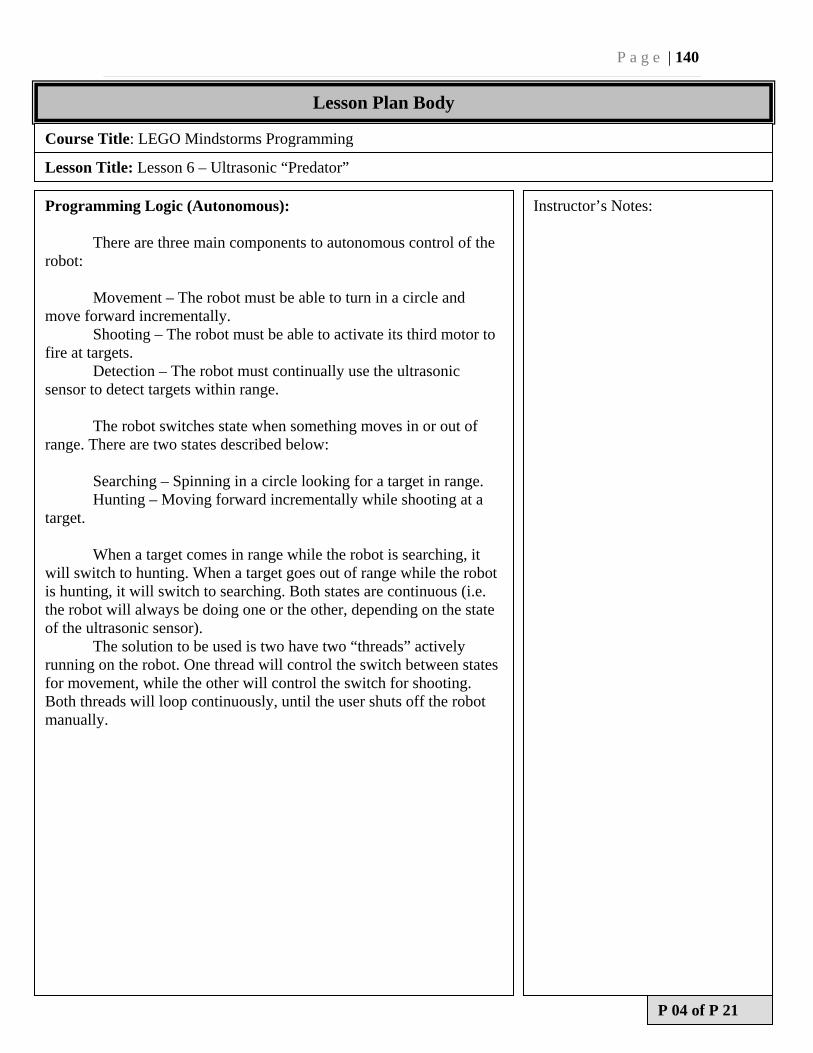
P a g e | 140
Lesson Plan Body
Course Title: LEGO Mindstorms Programming
Lesson Title: Lesson 6 – Ultrasonic “Predator”
Programming Logic (Autonomous): There are three main components to autonomous control of the robot: Movement – The robot must be able to turn in a circle and move forward incrementally. Shooting – The robot must be able to activate its third motor to fire at targets. Detection – The robot must continually use the ultrasonic sensor to detect targets within range. The robot switches state when something moves in or out of range. There are two states described below: Searching – Spinning in a circle looking for a target in range. Hunting – Moving forward incrementally while shooting at a target. When a target comes in range while the robot is searching, it will switch to hunting. When a target goes out of range while the robot is hunting, it will switch to searching. Both states are continuous (i.e. the robot will always be doing one or the other, depending on the state of the ultrasonic sensor). The solution to be used is two have two “threads” actively running on the robot. One thread will control the switch between states for movement, while the other will control the switch for shooting. Both threads will loop continuously, until the user shuts off the robot manually.
Instructor’s Notes:
P 04 of P 21
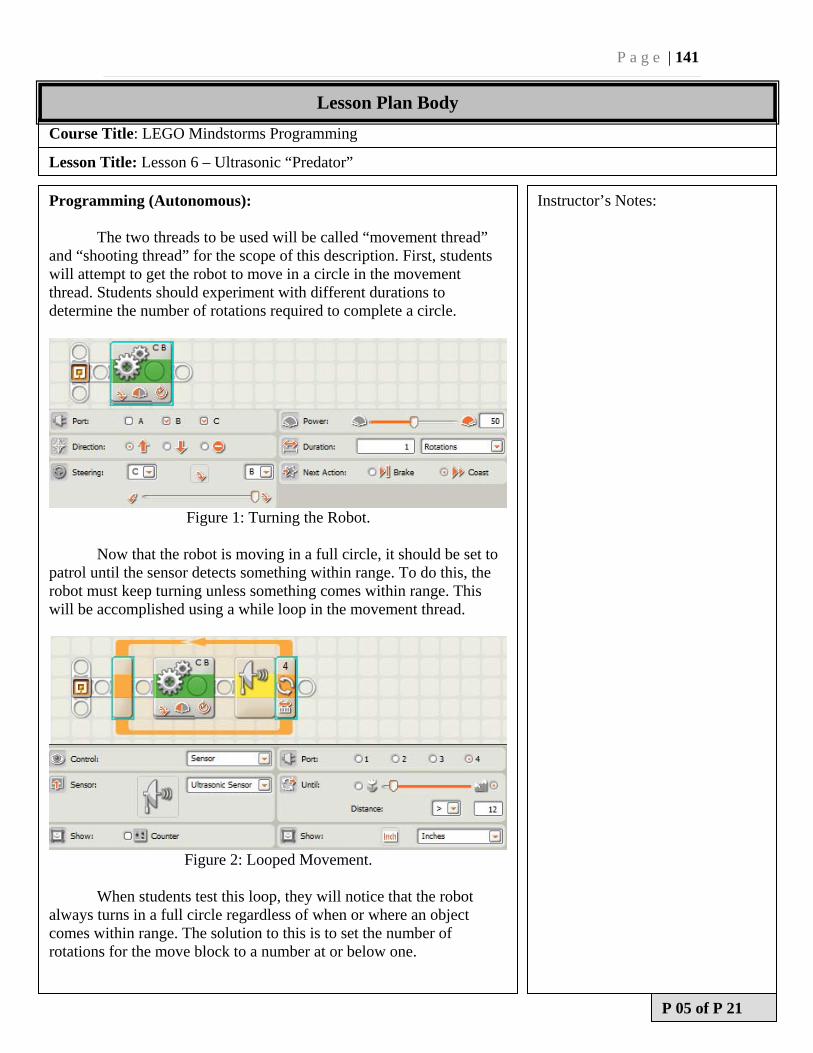
P a g e | 141
Course Title: LEGO Mindstorms Programming
Lesson Title: Lesson 6 – Ultrasonic “Predator”
Programming (Autonomous): The two threads to be used will be called “movement thread” and “shooting thread” for the scope of this description. First, students will attempt to get the robot to move in a circle in the movement thread. Students should experiment with different durations to determine the number of rotations required to complete a circle.
Figure 1: Turning the Robot.
Now that the robot is moving in a full circle, it should be set to patrol until the sensor detects something within range. To do this, the robot must keep turning unless something comes within range. This will be accomplished using a while loop in the movement thread.
Figure 2: Looped Movement.
When students test this loop, they will notice that the robot always turns in a full circle regardless of when or where an object comes within range. The solution to this is to set the number of rotations for the move block to a number at or below one.
Instructor’s Notes:
P 05 of P 21
Lesson Plan Body
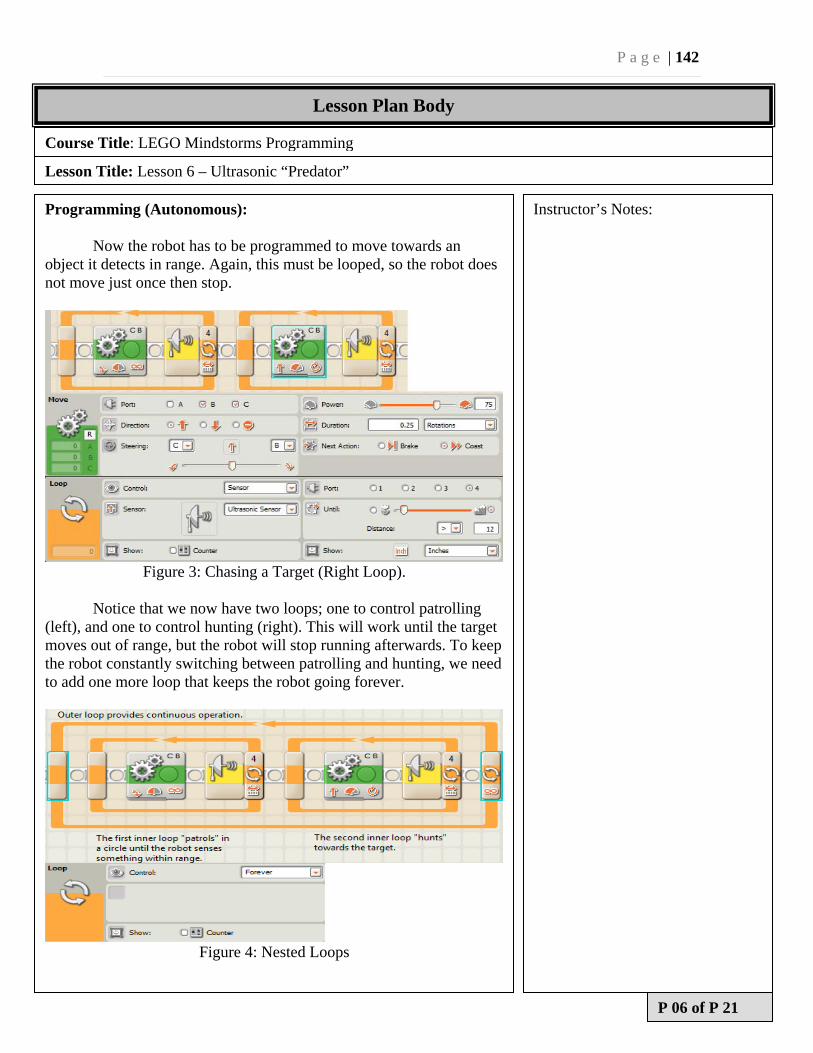
P a g e | 142
Course Title: LEGO Mindstorms Programming
Lesson Title: Lesson 6 – Ultrasonic “Predator”
Programming (Autonomous): Now the robot has to be programmed to move towards an object it detects in range. Again, this must be looped, so the robot does not move just once then stop.
Figure 3: Chasing a Target (Right Loop).
Notice that we now have two loops; one to control patrolling (left), and one to control hunting (right). This will work until the target moves out of range, but the robot will stop running afterwards. To keep the robot constantly switching between patrolling and hunting, we need to add one more loop that keeps the robot going forever.
Figure 4: Nested Loops
Instructor’s Notes:
P 06 of P 21
Lesson Plan Body
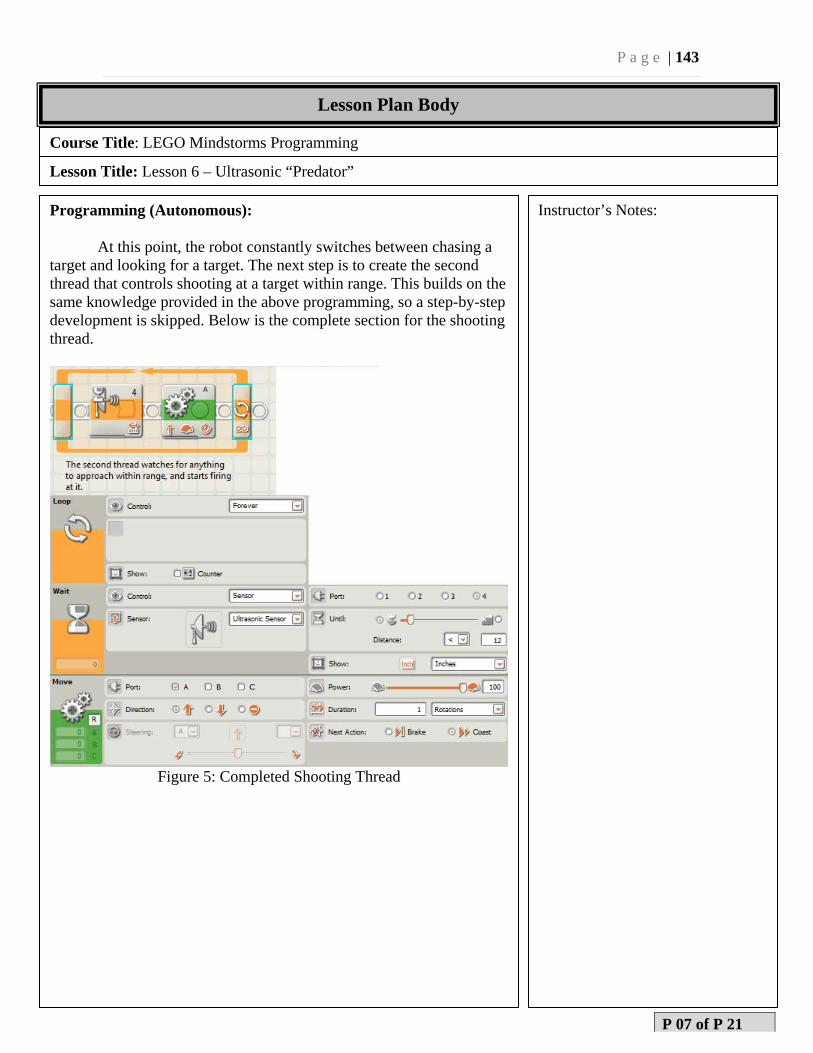
P a g e | 143
Course Title: LEGO Mindstorms Programming
Lesson Title: Lesson 6 – Ultrasonic “Predator”
Programming (Autonomous): At this point, the robot constantly switches between chasing a target and looking for a target. The next step is to create the second thread that controls shooting at a target within range. This builds on the same knowledge provided in the above programming, so a step-by-step development is skipped. Below is the complete section for the shooting thread.
Figure 5: Completed Shooting Thread
Instructor’s Notes:
P 07 of P 21
Lesson Plan Body
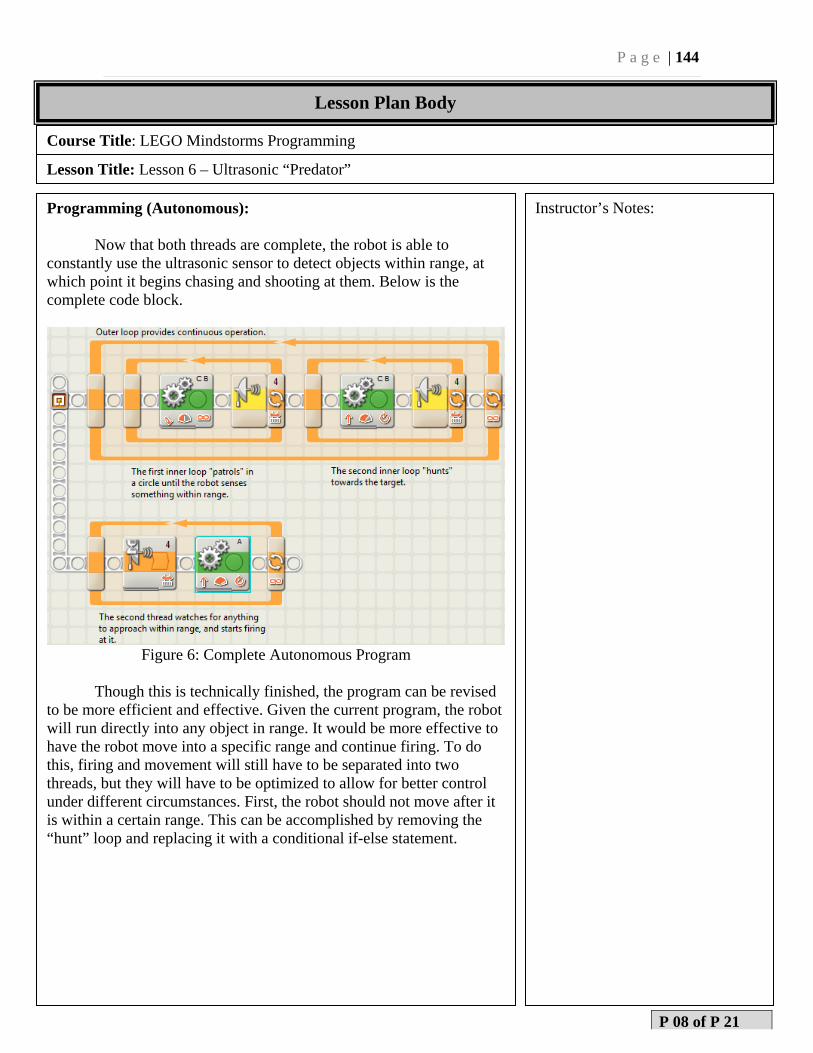
P a g e | 144
Course Title: LEGO Mindstorms Programming
Lesson Title: Lesson 6 – Ultrasonic “Predator”
Programming (Autonomous): Now that both threads are complete, the robot is able to constantly use the ultrasonic sensor to detect objects within range, at which point it begins chasing and shooting at them. Below is the complete code block.
Figure 6: Complete Autonomous Program
Though this is technically finished, the program can be revised to be more efficient and effective. Given the current program, the robot will run directly into any object in range. It would be more effective to have the robot move into a specific range and continue firing. To do this, firing and movement will still have to be separated into two threads, but they will have to be optimized to allow for better control under different circumstances. First, the robot should not move after it is within a certain range. This can be accomplished by removing the “hunt” loop and replacing it with a conditional if-else statement.
Instructor’s Notes:
P 08 of P 21
Lesson Plan Body
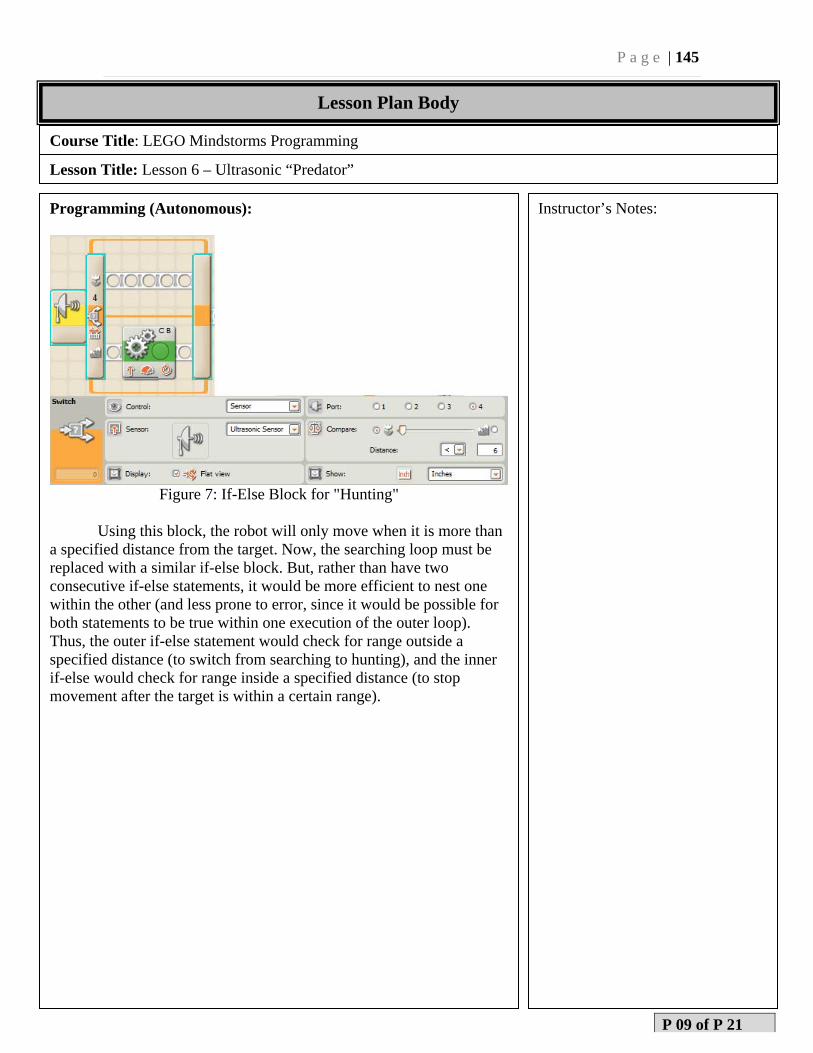
P a g e | 145
Course Title: LEGO Mindstorms Programming
Lesson Title: Lesson 6 – Ultrasonic “Predator”
Programming (Autonomous):
Figure 7: If-Else Block for "Hunting"
Using this block, the robot will only move when it is more than a specified distance from the target. Now, the searching loop must be replaced with a similar if-else block. But, rather than have two consecutive if-else statements, it would be more efficient to nest one within the other (and less prone to error, since it would be possible for both statements to be true within one execution of the outer loop). Thus, the outer if-else statement would check for range outside a specified distance (to switch from searching to hunting), and the inner if-else would check for range inside a specified distance (to stop movement after the target is within a certain range).
Instructor’s Notes:
P 09 of P 21
Lesson Plan Body
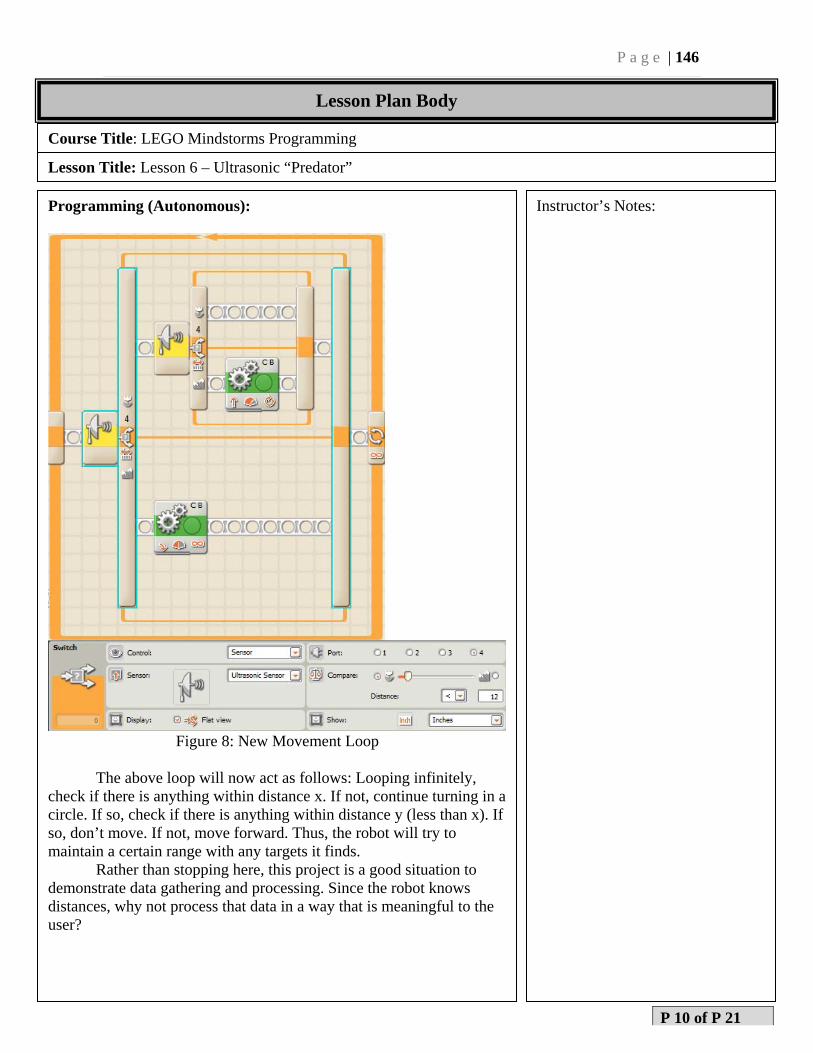
P a g e | 146
Course Title: LEGO Mindstorms Programming
Lesson Title: Lesson 6 – Ultrasonic “Predator”
Programming (Autonomous):
Figure 8: New Movement Loop
The above loop will now act as follows: Looping infinitely, check if there is anything within distance x. If not, continue turning in a circle. If so, check if there is anything within distance y (less than x). If so, don’t move. If not, move forward. Thus, the robot will try to maintain a certain range with any targets it finds. Rather than stopping here, this project is a good situation to demonstrate data gathering and processing. Since the robot knows distances, why not process that data in a way that is meaningful to the user?
Instructor’s Notes:
P 10 of P 21
Lesson Plan Body
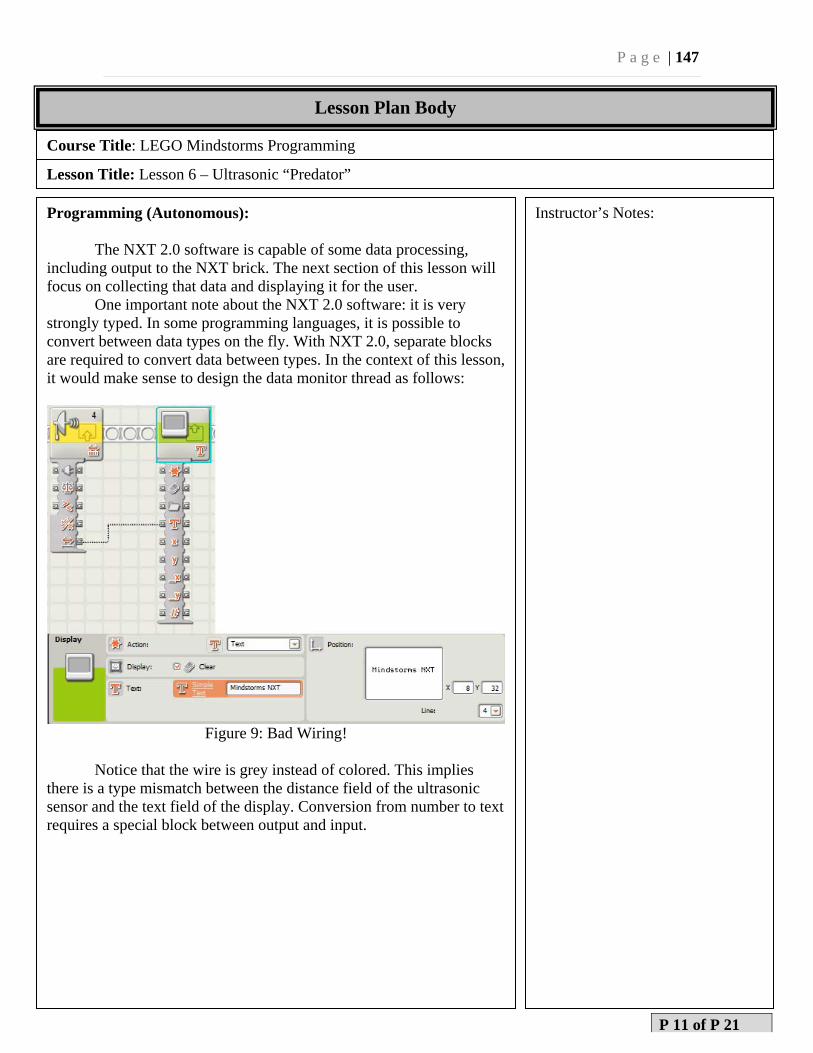
P a g e | 147
Course Title: LEGO Mindstorms Programming
Lesson Title: Lesson 6 – Ultrasonic “Predator”
Programming (Autonomous): The NXT 2.0 software is capable of some data processing, including output to the NXT brick. The next section of this lesson will focus on collecting that data and displaying it for the user. One important note about the NXT 2.0 software: it is very strongly typed. In some programming languages, it is possible to convert between data types on the fly. With NXT 2.0, separate blocks are required to convert data between types. In the context of this lesson, it would make sense to design the data monitor thread as follows:
Figure 9: Bad Wiring!
Notice that the wire is grey instead of colored. This implies there is a type mismatch between the distance field of the ultrasonic sensor and the text field of the display. Conversion from number to text requires a special block between output and input.
Instructor’s Notes:
P 11 of P 21
Lesson Plan Body
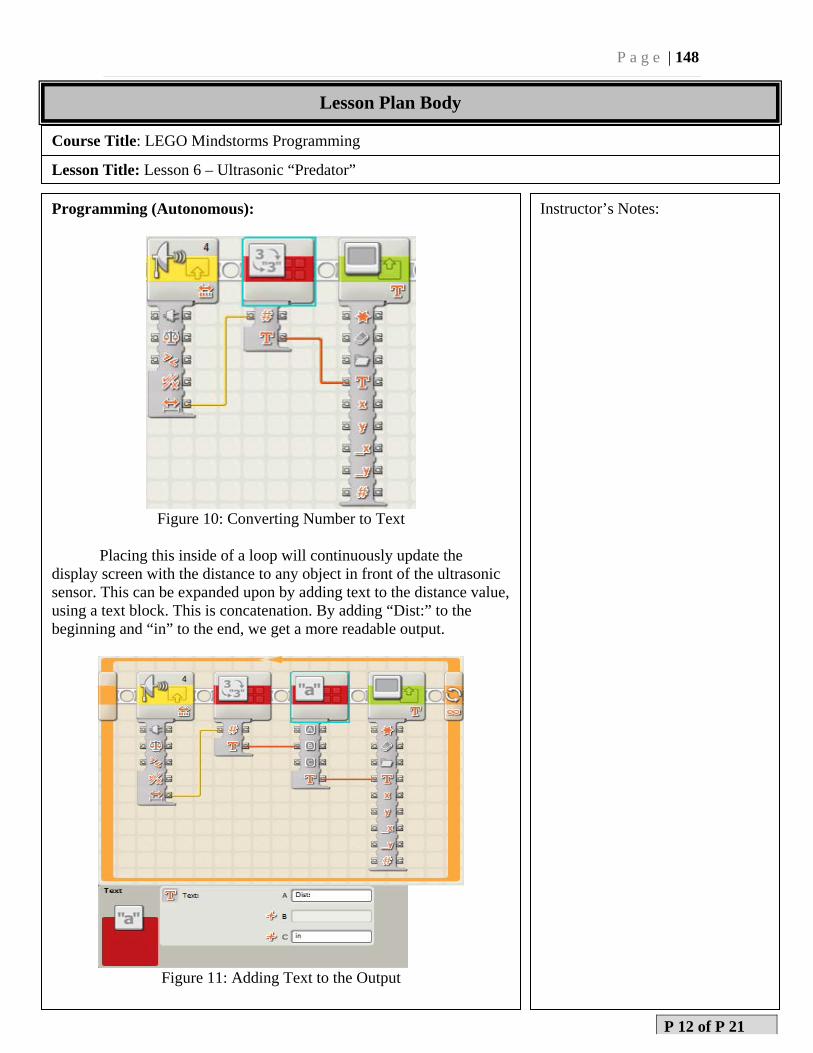
P a g e | 148
Course Title: LEGO Mindstorms Programming
Lesson Title: Lesson 6 – Ultrasonic “Predator”
Programming (Autonomous):
Figure 10: Converting Number to Text
Placing this inside of a loop will continuously update the display screen with the distance to any object in front of the ultrasonic sensor. This can be expanded upon by adding text to the distance value, using a text block. This is concatenation. By adding “Dist:” to the beginning and “in” to the end, we get a more readable output.
Figure 11: Adding Text to the Output
Instructor’s Notes:
P 12 of P 21
Lesson Plan Body
P a g e | 149
Course Title: LEGO Mindstorms Programming
Lesson Title: Lesson 6 – Ultrasonic “Predator”
Programming (Autonomous): Now that the robot is complete, it is time to test it. A simple testing method is to turn the robot on, making sure there are no objects around it, and have students use their hands to block the ultrasonic sensor periodically. This will show them how the robot changes states between hunting and searching, as well as how the robot stops moving once it is close enough to a target. Make sure that each student’s robot functions correctly, and displays the distance to target on the NXT brick. The completed code block for this section is below.
Instructor’s Notes:
P 13 of P 21
Lesson Plan Body
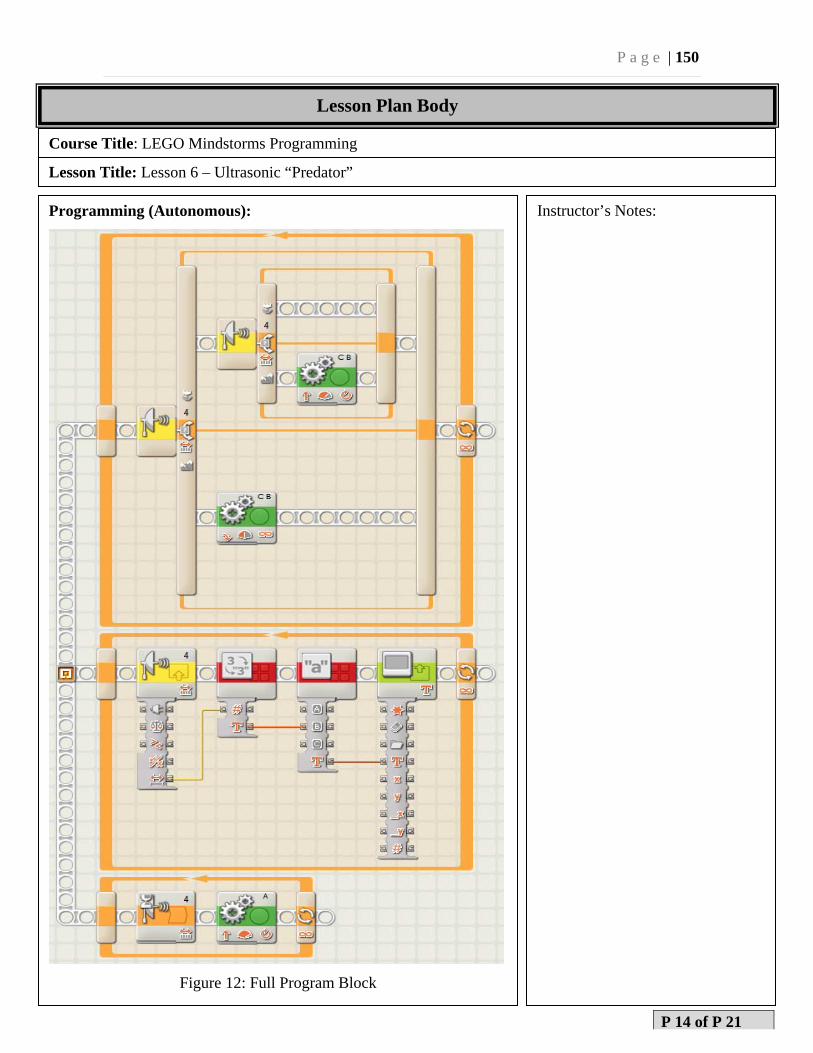
P a g e | 150
Course Title: LEGO Mindstorms Programming
Lesson Title: Lesson 6 – Ultrasonic “Predator”
Programming (Autonomous):
Figure 12: Full Program Block
Instructor’s Notes:
P 14 of P 21
Lesson Plan Body
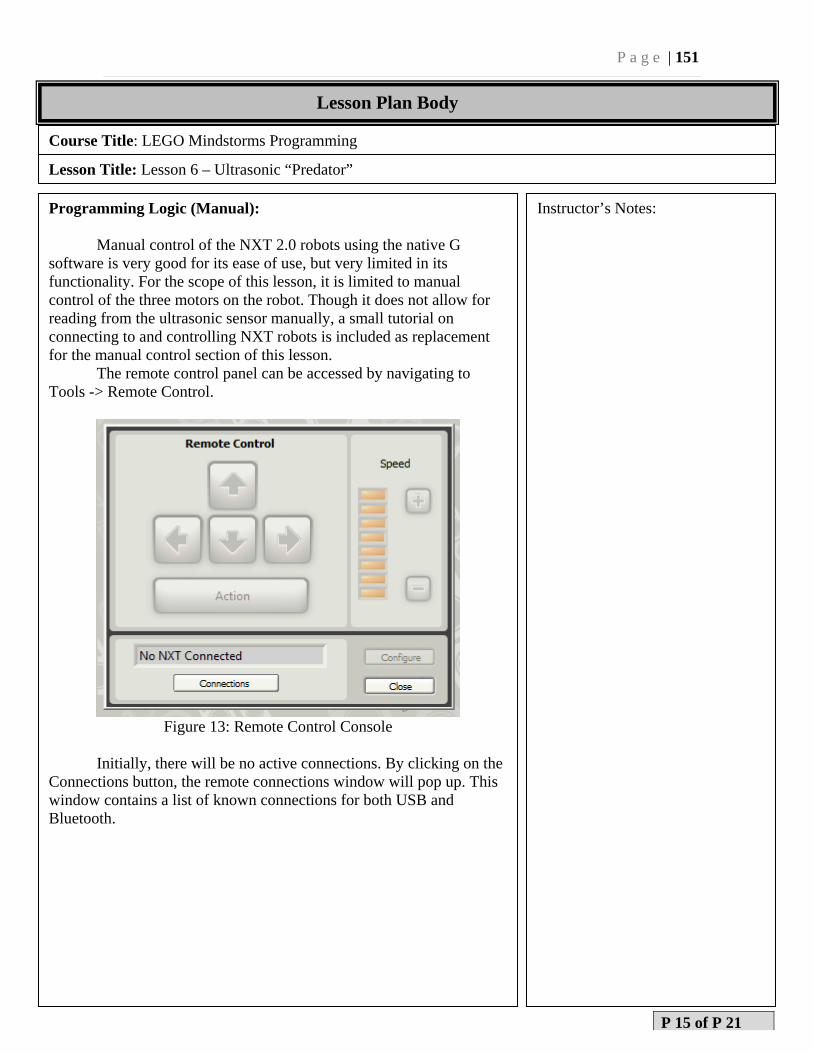
P a g e | 151
Course Title: LEGO Mindstorms Programming
Lesson Title: Lesson 6 – Ultrasonic “Predator”
Programming Logic (Manual): Manual control of the NXT 2.0 robots using the native G software is very good for its ease of use, but very limited in its functionality. For the scope of this lesson, it is limited to manual control of the three motors on the robot. Though it does not allow for reading from the ultrasonic sensor manually, a small tutorial on connecting to and controlling NXT robots is included as replacement for the manual control section of this lesson. The remote control panel can be accessed by navigating to Tools -> Remote Control.
Figure 13: Remote Control Console
Initially, there will be no active connections. By clicking on the Connections button, the remote connections window will pop up. This window contains a list of known connections for both USB and Bluetooth.
Instructor’s Notes:
P 15 of P 21
Lesson Plan Body
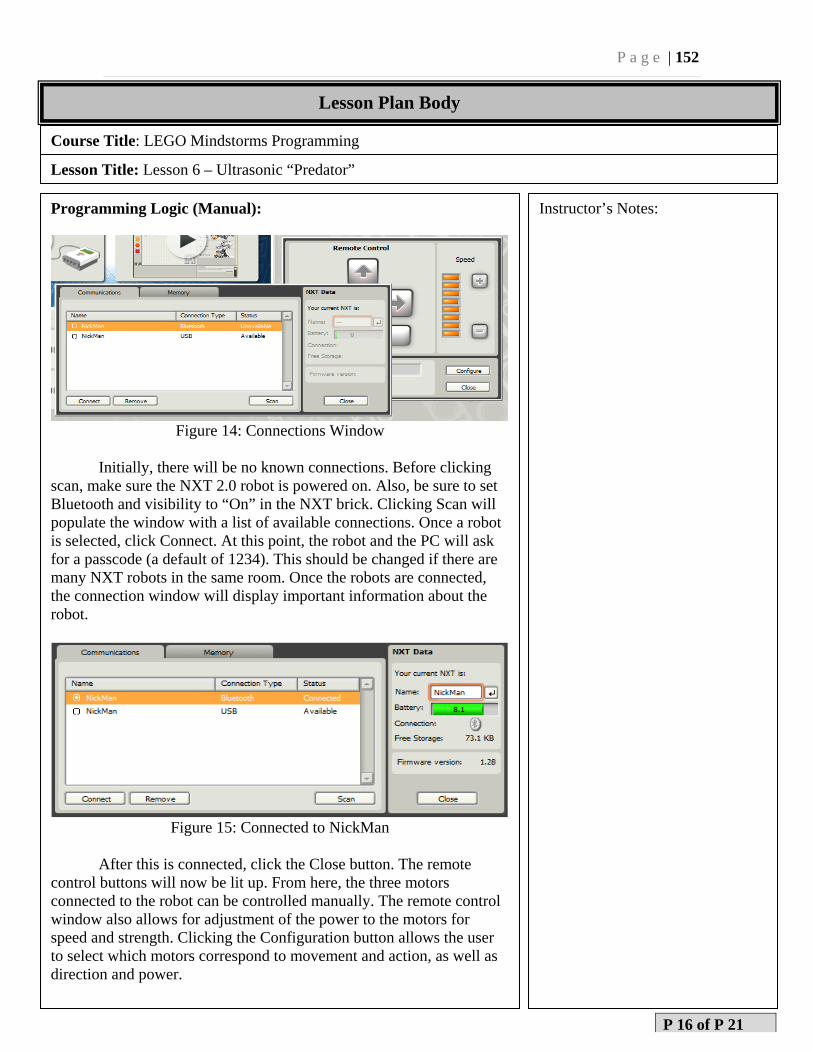
P a g e | 152
Course Title: LEGO Mindstorms Programming
Lesson Title: Lesson 6 – Ultrasonic “Predator”
Programming Logic (Manual):
Figure 14: Connections Window
Initially, there will be no known connections. Before clicking scan, make sure the NXT 2.0 robot is powered on. Also, be sure to set Bluetooth and visibility to “On” in the NXT brick. Clicking Scan will populate the window with a list of available connections. Once a robot is selected, click Connect. At this point, the robot and the PC will ask for a passcode (a default of 1234). This should be changed if there are many NXT robots in the same room. Once the robots are connected, the connection window will display important information about the robot.
Figure 15: Connected to NickMan
After this is connected, click the Close button. The remote control buttons will now be lit up. From here, the three motors connected to the robot can be controlled manually. The remote control window also allows for adjustment of the power to the motors for speed and strength. Clicking the Configuration button allows the user to select which motors correspond to movement and action, as well as direction and power.
Instructor’s Notes:
P 16 of P 21
Lesson Plan Body
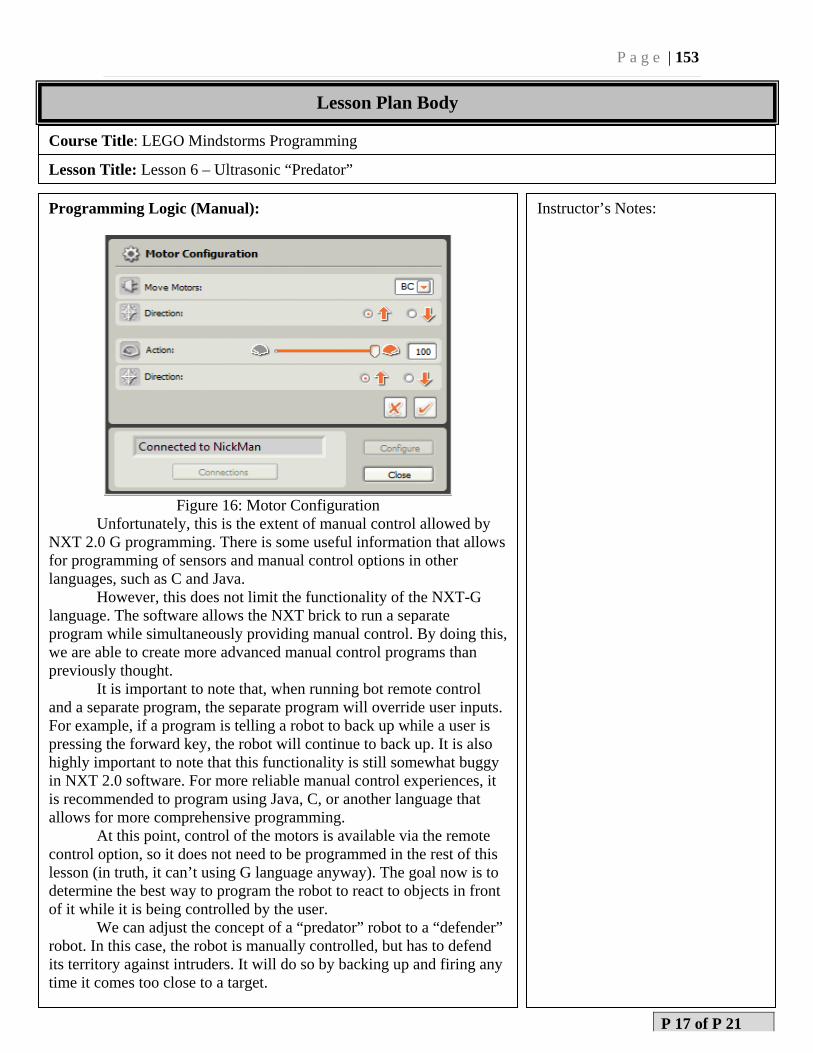
P a g e | 153
Course Title: LEGO Mindstorms Programming
Lesson Title: Lesson 6 – Ultrasonic “Predator”
Programming Logic (Manual):
Figure 16: Motor Configuration
Unfortunately, this is the extent of manual control allowed by NXT 2.0 G programming. There is some useful information that allows for programming of sensors and manual control options in other languages, such as C and Java. However, this does not limit the functionality of the NXT-G language. The software allows the NXT brick to run a separate program while simultaneously providing manual control. By doing this, we are able to create more advanced manual control programs than previously thought. It is important to note that, when running bot remote control and a separate program, the separate program will override user inputs. For example, if a program is telling a robot to back up while a user is pressing the forward key, the robot will continue to back up. It is also highly important to note that this functionality is still somewhat buggy in NXT 2.0 software. For more reliable manual control experiences, it is recommended to program using Java, C, or another language that allows for more comprehensive programming. At this point, control of the motors is available via the remote control option, so it does not need to be programmed in the rest of this lesson (in truth, it can’t using G language anyway). The goal now is to determine the best way to program the robot to react to objects in front of it while it is being controlled by the user. We can adjust the concept of a “predator” robot to a “defender” robot. In this case, the robot is manually controlled, but has to defend its territory against intruders. It will do so by backing up and firing any time it comes too close to a target.
Instructor’s Notes:
P 17 of P 21
Lesson Plan Body
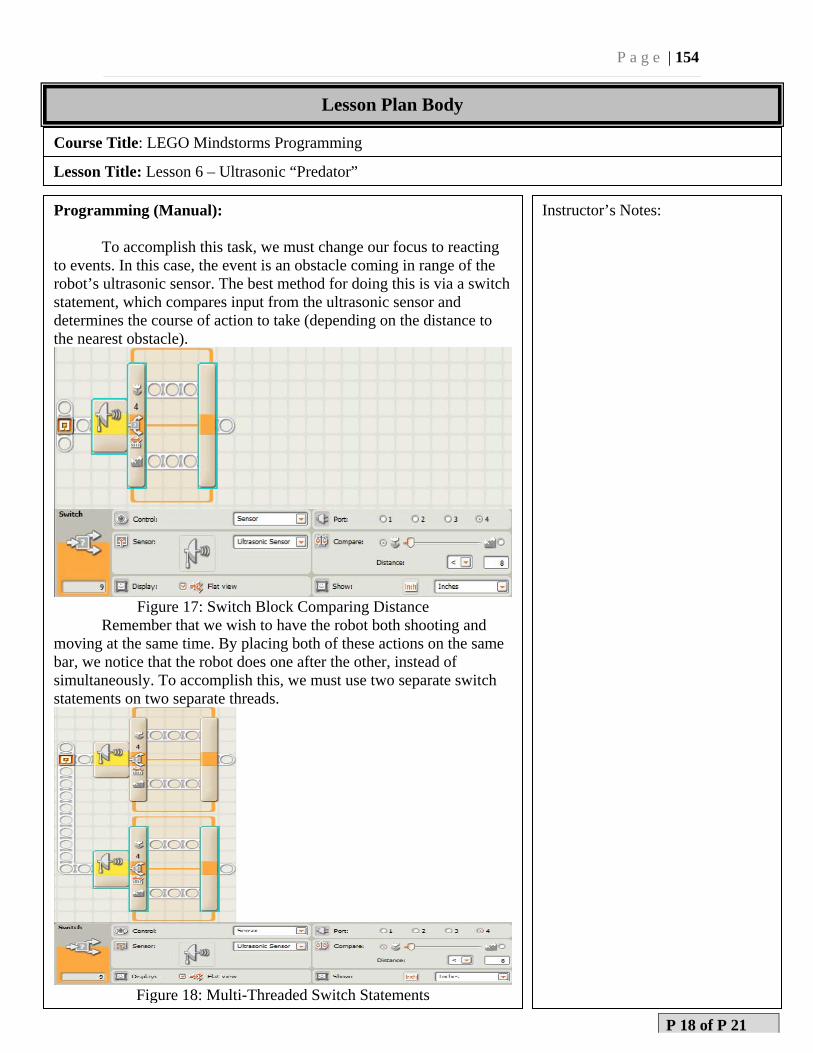
P a g e | 154
Course Title: LEGO Mindstorms Programming
Lesson Title: Lesson 6 – Ultrasonic “Predator”
Programming (Manual): To accomplish this task, we must change our focus to reacting to events. In this case, the event is an obstacle coming in range of the robot’s ultrasonic sensor. The best method for doing this is via a switch statement, which compares input from the ultrasonic sensor and determines the course of action to take (depending on the distance to the nearest obstacle).
Figure 17: Switch Block Comparing Distance
Remember that we wish to have the robot both shooting and moving at the same time. By placing both of these actions on the same bar, we notice that the robot does one after the other, instead of simultaneously. To accomplish this, we must use two separate switch statements on two separate threads.
Figure 18: Multi-Threaded Switch Statements
Instructor’s Notes:
P 18 of P 21
Lesson Plan Body
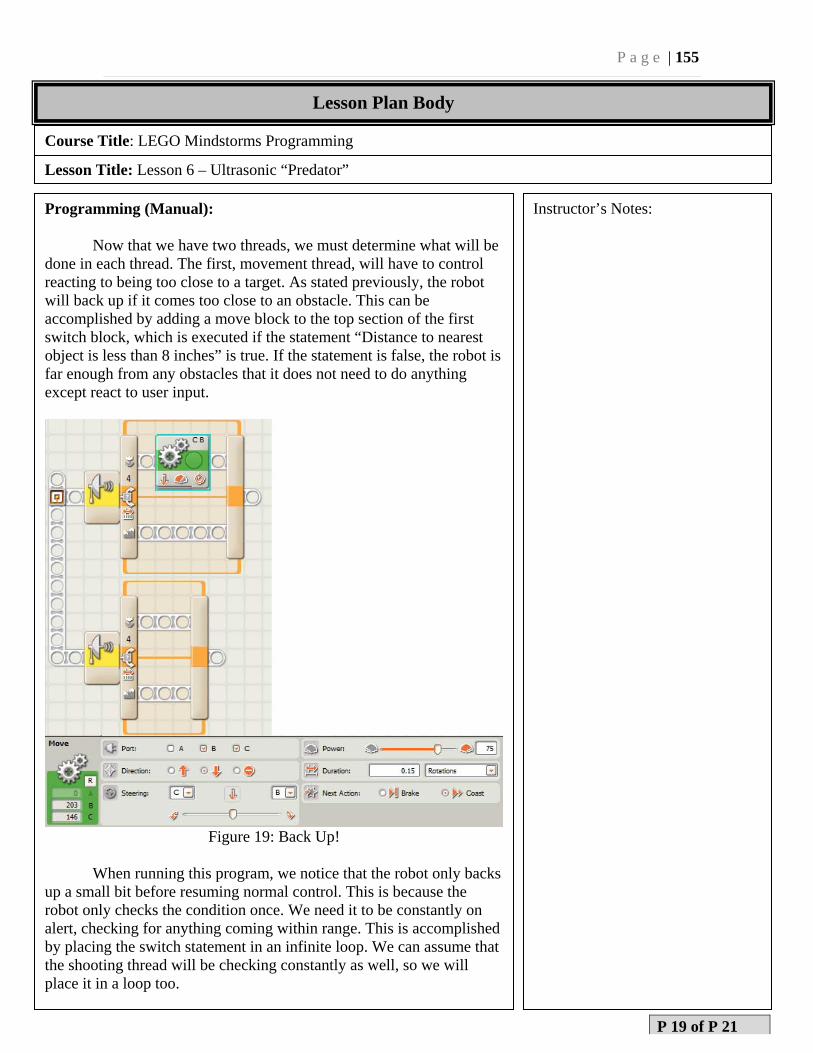
P a g e | 155
Course Title: LEGO Mindstorms Programming
Lesson Title: Lesson 6 – Ultrasonic “Predator”
Programming (Manual): Now that we have two threads, we must determine what will be done in each thread. The first, movement thread, will have to control reacting to being too close to a target. As stated previously, the robot will back up if it comes too close to an obstacle. This can be accomplished by adding a move block to the top section of the first switch block, which is executed if the statement “Distance to nearest object is less than 8 inches” is true. If the statement is false, the robot is far enough from any obstacles that it does not need to do anything except react to user input.
Figure 19: Back Up!
When running this program, we notice that the robot only backs up a small bit before resuming normal control. This is because the robot only checks the condition once. We need it to be constantly on alert, checking for anything coming within range. This is accomplished by placing the switch statement in an infinite loop. We can assume that the shooting thread will be checking constantly as well, so we will place it in a loop too.
Instructor’s Notes:
P 19 of P 21
Lesson Plan Body
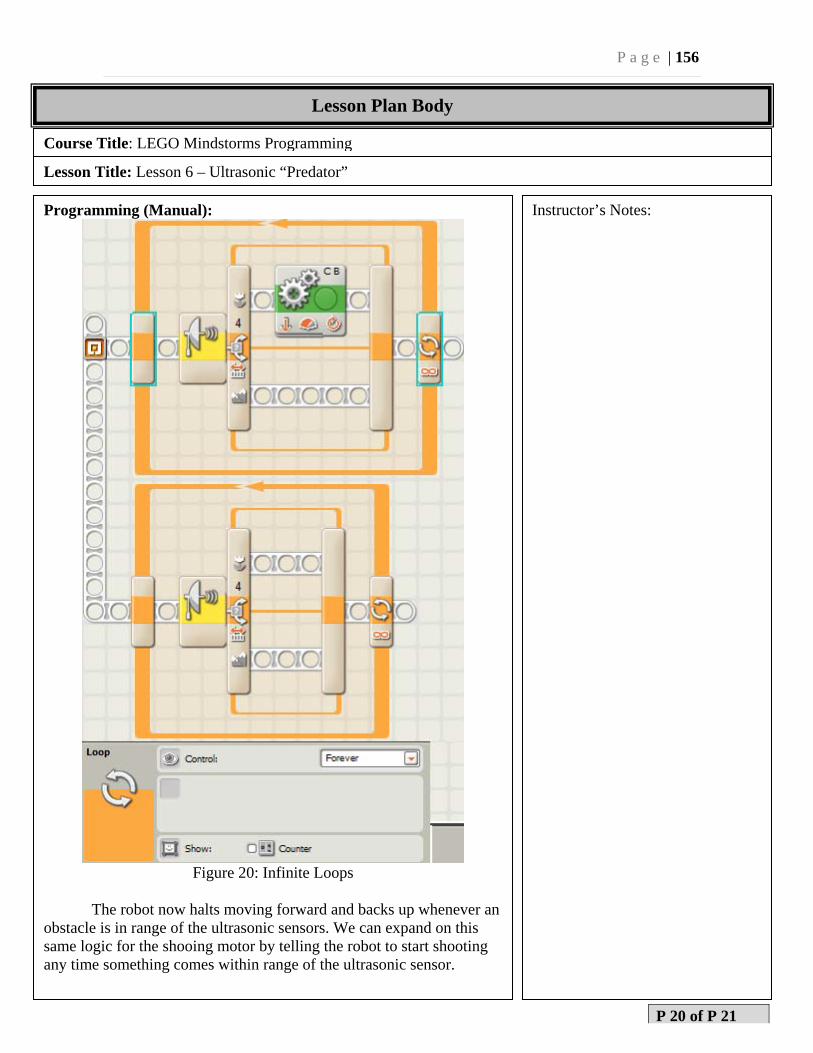
P a g e | 156
Course Title: LEGO Mindstorms Programming
Lesson Title: Lesson 6 – Ultrasonic “Predator”
Programming (Manual):
Figure 20: Infinite Loops
The robot now halts moving forward and backs up whenever an obstacle is in range of the ultrasonic sensors. We can expand on this same logic for the shooing motor by telling the robot to start shooting any time something comes within range of the ultrasonic sensor.
Instructor’s Notes:
P 20 of P 21
Lesson Plan Body
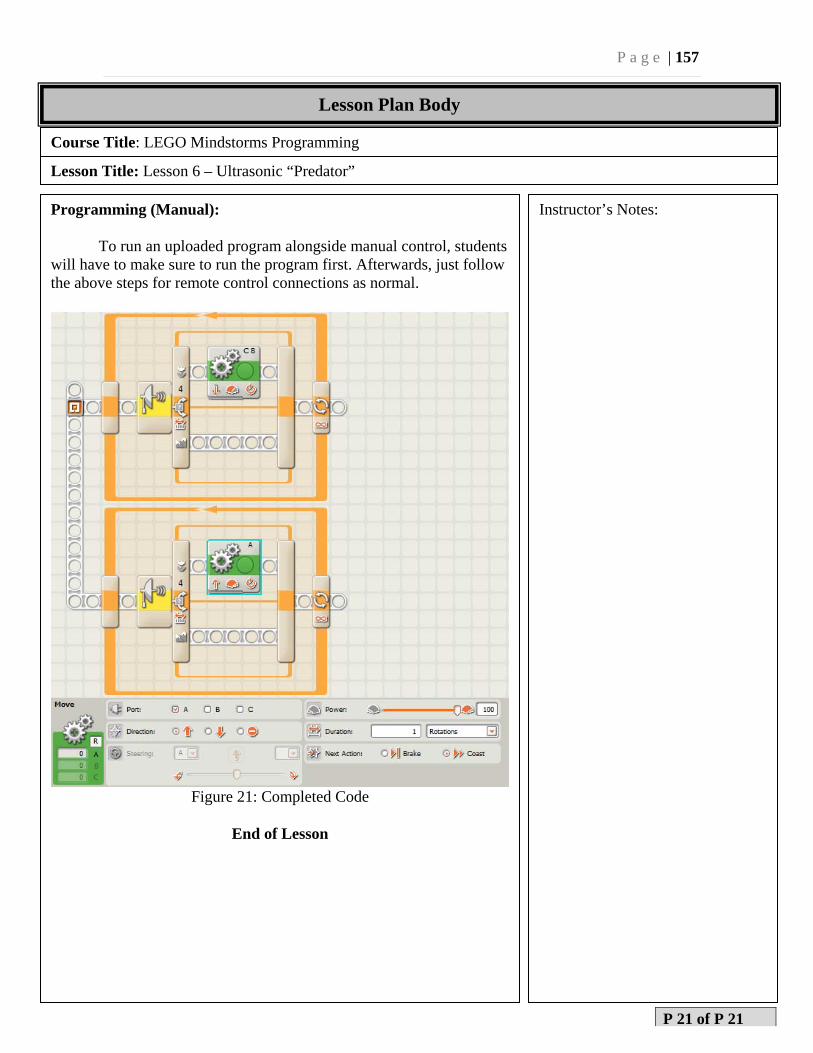
P a g e | 157
Course Title: LEGO Mindstorms Programming
Lesson Title: Lesson 6 – Ultrasonic “Predator”
Programming (Manual): To run an uploaded program alongside manual control, students will have to make sure to run the program first. Afterwards, just follow the above steps for remote control connections as normal.
Figure 21: Completed Code
End of Lesson
Instructor’s Notes:
P 21 of P 21
Lesson Plan Body

P a g e | 158
Appendix:Lesson7(NXT‐C)
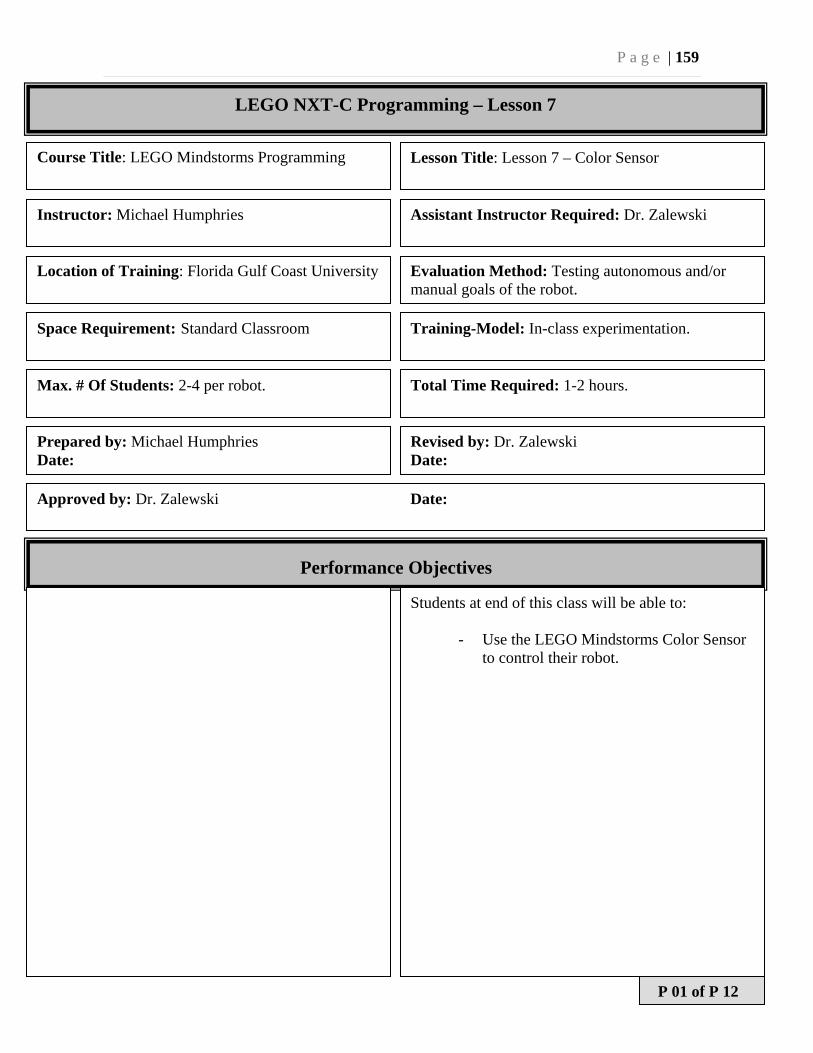
P a g e | 159
LEGO NXT-C Programming – Lesson 7
Course Title: LEGO Mindstorms Programming Lesson Title: Lesson 7 – Color Sensor
Instructor: Michael Humphries Assistant Instructor Required: Dr. Zalewski
Location of Training: Florida Gulf Coast University Evaluation Method: Testing autonomous and/or manual goals of the robot.
Space Requirement: Standard Classroom Training-Model: In-class experimentation.
Max. # Of Students: 2-4 per robot. Total Time Required: 1-2 hours.
Prepared by: Michael Humphries Date:
Revised by: Dr. Zalewski Date:
Performance Objectives
Students at end of this class will be able to:
- Use the LEGO Mindstorms Color Sensor to control their robot.
Approved by: Dr. Zalewski Date:
P 01 of P 12
P a g e | 160
Course Title: LEGO Mindstorms Programming
Lesson Title: Lesson 7 – Color Sensor
Equipment, Materials and Tools
Description: Number: Description: Number
LEGO Mindstorms #8457 Kit 1
Computer 1
Bluetooth Adapter (Not Required) 1
RobotC Software 1
NXT Test Pad
Student Materials
Item: # Needed: When Distributed: Comments:
Special Materials Notes and Comments
The computer to be used should be either Bluetooth enabled or compatible with USB Bluetooth adapters. The settings of the computer should be changed so that Bluetooth devices can be wirelessly linked to the computer.
References
[1] LEGO Mindstorms http://mindstorms.lego.com/en-us/default.aspx
P 02 of P 12
P a g e | 161
Lesson Plan Body
Course Title: LEGO Mindstorms Programming
Lesson Title: Lesson 7 – Color Sensor
Greeting:
This lesson will configure the LEGO Mindstorms color sensor so that it will tell a robot to follow a black line on the ground. This requires that the robot has the color sensor attached to the front of it, pointing to the ground. Goals: The autonomous goal of this lesson is as follows.
The robot will drive in a circle until a black line is found. This means the robot should be placed on top of the black line on the test pad, or that the black line lies within its path. Once the robot finds the line firmly, it will drive forward. If the robot goes off the line, it will drive in a circle to find its track again. The manual goal of this lesson is as follows.
Instead of having to place the robot on the test pad, the user can drive the robot with the controls to the black line on the pad. Whenever the robot detects a black line, it will follow the line. Components:
The robot is required to have the color sensor attached. The color sensor should be placed on the front of the robot as closely as possible to the ground. Make sure the color sensor is facing downwards. It should also be in the center of the device.
We will use the colorPort API. The NXT Light Sensor creates an variable called SensorValue[]. This is an array of sensor’s current activities. Since we are trying to find the value of the light sensor, we can easily grab that value by using SensorValue[colorPort]. This will return a string of the color the sensor is detecting. In this application we will also be using the motor API. For this we use the variable motor[]. Since we want to move motors A and B (depending on what port your motor is plugged in to) we can reference these motors by simply typing: motor[motorA] or motor[motorB]. We set those values to a number between 0-100. This is the amount of power the motors will get. A power of 75 is considered normal.
Instructor’s Notes:
P 03 of P 12
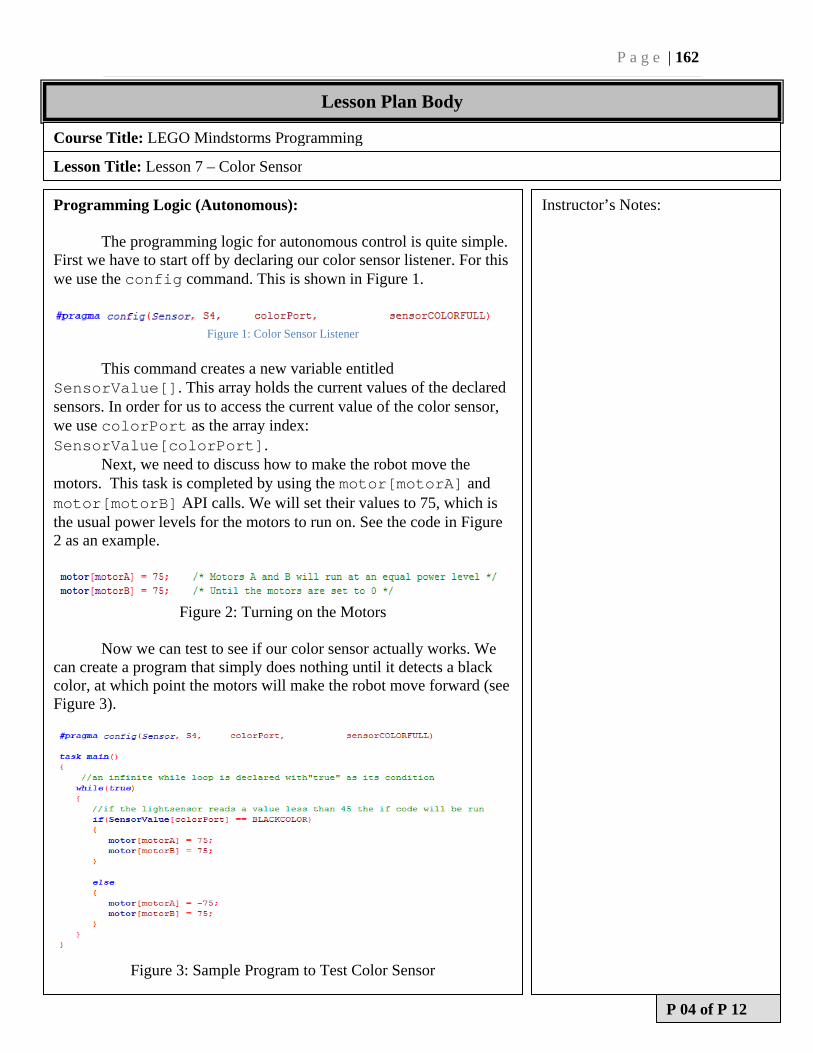
P a g e | 162
Lesson Plan Body
Course Title: LEGO Mindstorms Programming
Lesson Title: Lesson 7 – Color Sensor
Programming Logic (Autonomous):
The programming logic for autonomous control is quite simple. First we have to start off by declaring our color sensor listener. For this we use the config command. This is shown in Figure 1.
Figure 1: Color Sensor Listener
This command creates a new variable entitled
SensorValue[]. This array holds the current values of the declared sensors. In order for us to access the current value of the color sensor, we use colorPort as the array index: SensorValue[colorPort].
Next, we need to discuss how to make the robot move the motors. This task is completed by using the motor[motorA] and motor[motorB] API calls. We will set their values to 75, which is the usual power levels for the motors to run on. See the code in Figure 2 as an example.
Figure 2: Turning on the Motors
Now we can test to see if our color sensor actually works. We
can create a program that simply does nothing until it detects a black color, at which point the motors will make the robot move forward (see Figure 3).
Figure 3: Sample Program to Test Color Sensor
Instructor’s Notes:
P 04 of P 12
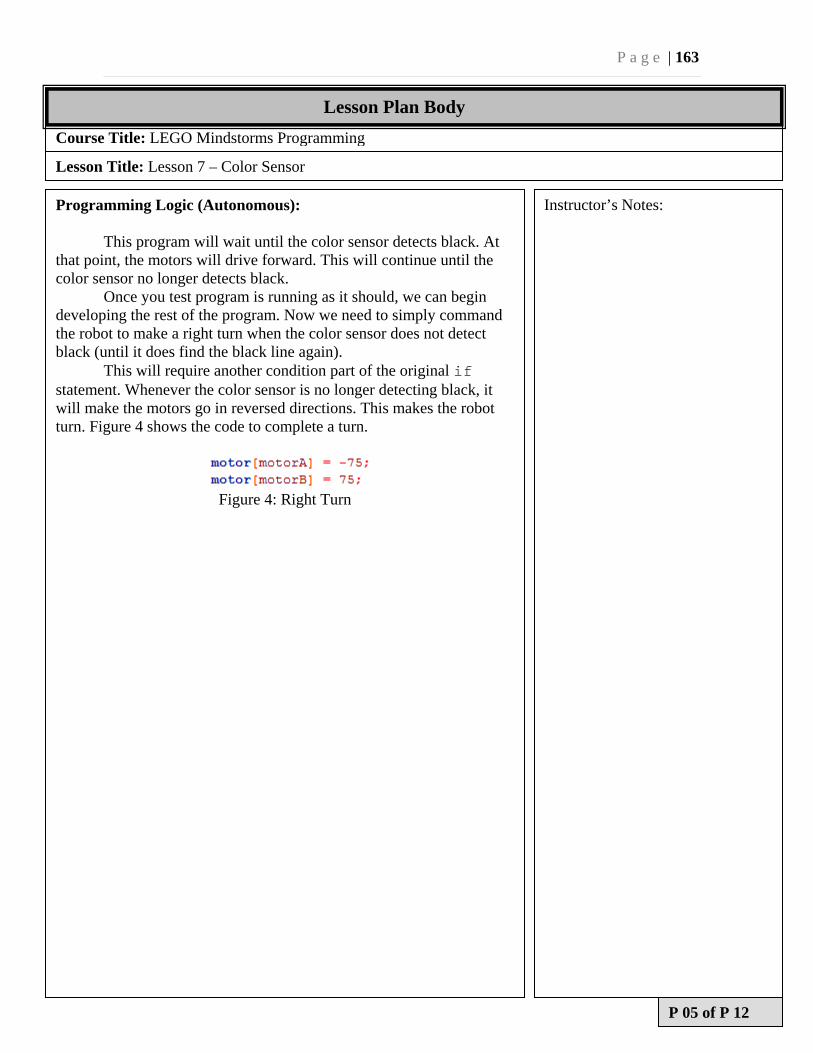
P a g e | 163
Course Title: LEGO Mindstorms Programming
Lesson Title: Lesson 7 – Color Sensor
Programming Logic (Autonomous):
This program will wait until the color sensor detects black. At that point, the motors will drive forward. This will continue until the color sensor no longer detects black.
Once you test program is running as it should, we can begin developing the rest of the program. Now we need to simply command the robot to make a right turn when the color sensor does not detect black (until it does find the black line again).
This will require another condition part of the original if statement. Whenever the color sensor is no longer detecting black, it will make the motors go in reversed directions. This makes the robot turn. Figure 4 shows the code to complete a turn.
Figure 4: Right Turn
Instructor’s Notes:
P 05 of P 12
Lesson Plan Body
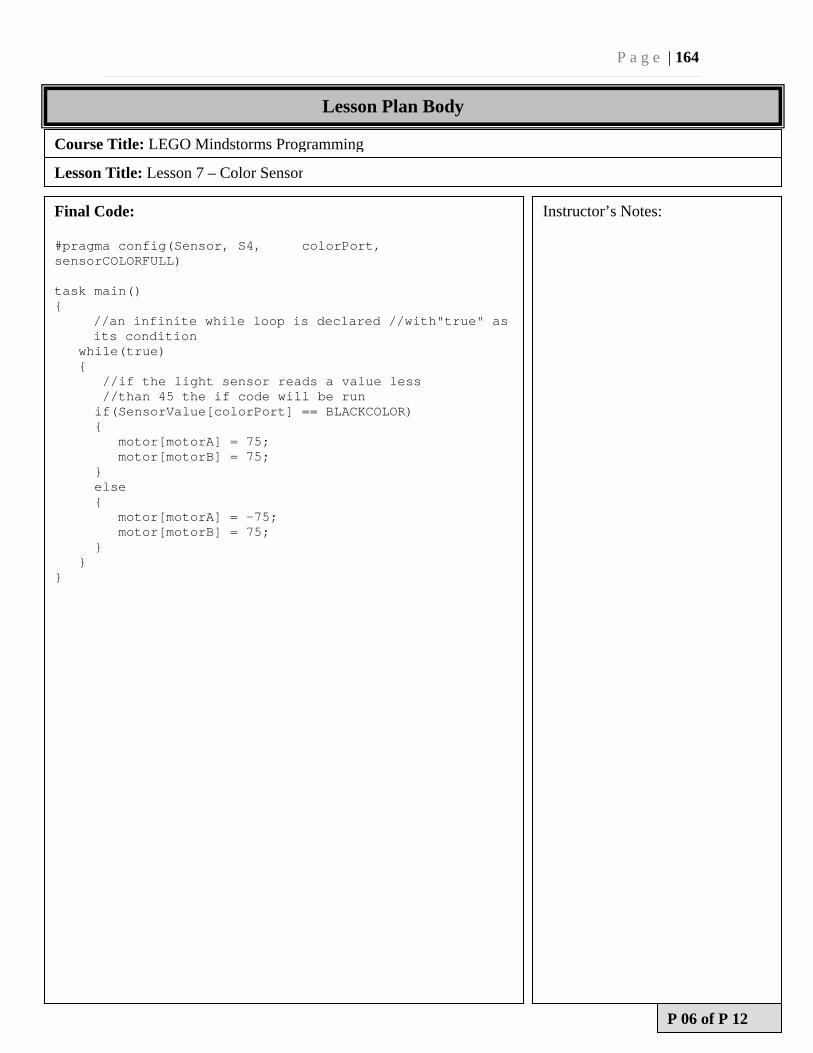
P a g e | 164
Course Title: LEGO Mindstorms Programming
Lesson Title: Lesson 7 – Color Sensor
Final Code: #pragma config(Sensor, S4, colorPort, sensorCOLORFULL) task main() {
//an infinite while loop is declared //with"true" as its condition
while(true) {
//if the light sensor reads a value less //than 45 the if code will be run
if(SensorValue[colorPort] == BLACKCOLOR) { motor[motorA] = 75; motor[motorB] = 75; } else { motor[motorA] = -75; motor[motorB] = 75; } } }
Instructor’s Notes:
P 06 of P 12
Lesson Plan Body
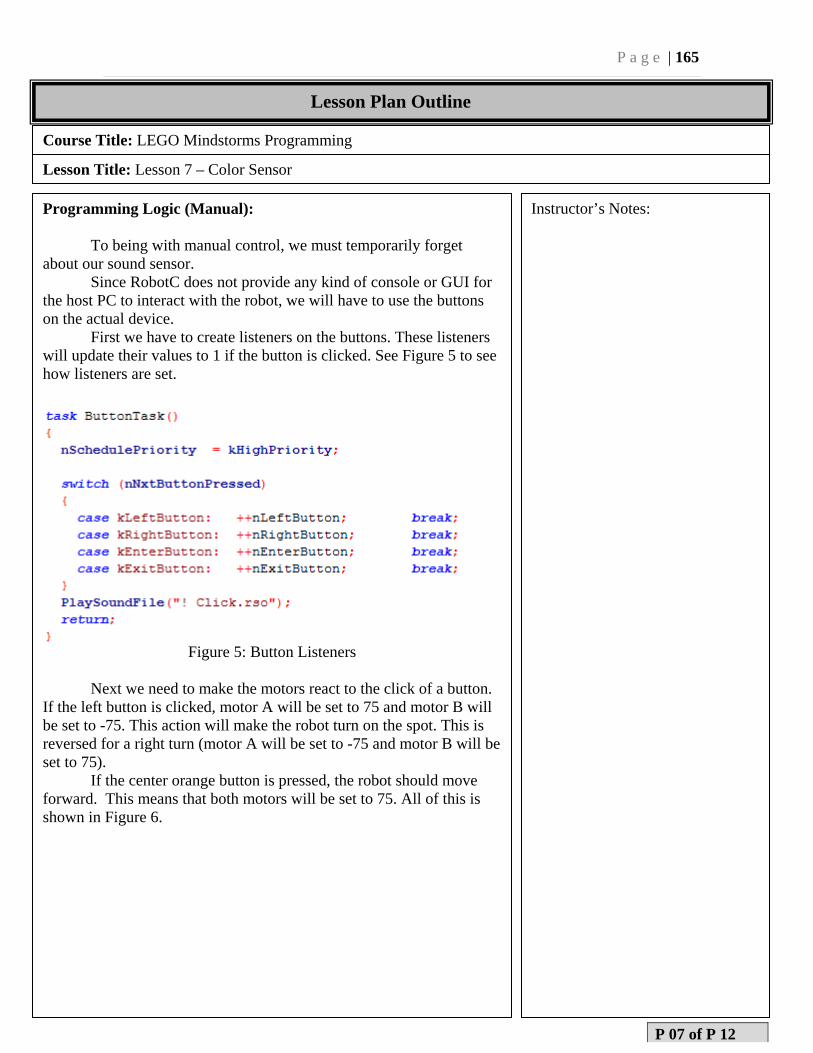
P a g e | 165
Programming Logic (Autonomous):
Course Title: LEGO Mindstorms Programming
Lesson Title: Lesson 7 – Color Sensor
Programming Logic (Manual):
To being with manual control, we must temporarily forget about our sound sensor.
Since RobotC does not provide any kind of console or GUI for the host PC to interact with the robot, we will have to use the buttons on the actual device.
First we have to create listeners on the buttons. These listeners will update their values to 1 if the button is clicked. See Figure 5 to see how listeners are set.
Figure 5: Button Listeners
Next we need to make the motors react to the click of a button.
If the left button is clicked, motor A will be set to 75 and motor B will be set to -75. This action will make the robot turn on the spot. This is reversed for a right turn (motor A will be set to -75 and motor B will be set to 75).
If the center orange button is pressed, the robot should move forward. This means that both motors will be set to 75. All of this is shown in Figure 6.
Instructor’s Notes:
P 07 of P 12
Lesson Plan Outline
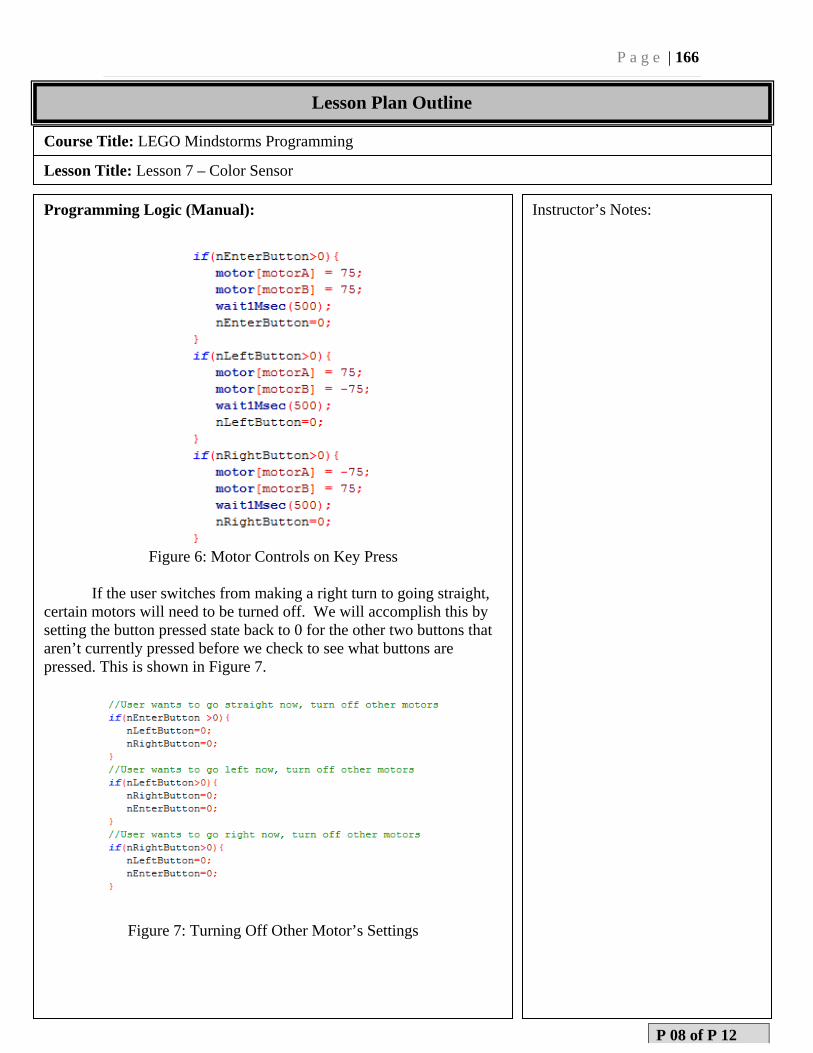
P a g e | 166
Course Title: LEGO Mindstorms Programming
Lesson Title: Lesson 7 – Color Sensor
Programming Logic (Manual):
Figure 6: Motor Controls on Key Press
If the user switches from making a right turn to going straight,
certain motors will need to be turned off. We will accomplish this by setting the button pressed state back to 0 for the other two buttons that aren’t currently pressed before we check to see what buttons are pressed. This is shown in Figure 7.
Figure 7: Turning Off Other Motor’s Settings
Instructor’s Notes:
P 08 of P 12
Lesson Plan Outline

P a g e | 167
Course Title: LEGO Mindstorms Programming
Lesson Title: Lesson 7 – Color Sensor
Programming Logic (Manual):
Finally, we can begin to discuss how the color sensor will work. The user now has the ability to control the robot to the black line. Once the line is found, the robot will follow the line. This means we can take the code right from the autonomous section.
Before a button is pressed we will check to see if the color sensor has sensed a black line. This will happen every time before a button is pressed.
If the color sensor has detected a black line, it will run an infinite loop which follows the black line. Figure 8 shows the code taken from the autonomous section that we can put right into the manual code.
Figure 8: Activating the Line-Following Code
Instructor’s Notes:
P 09 of P 12
Lesson Plan Outline
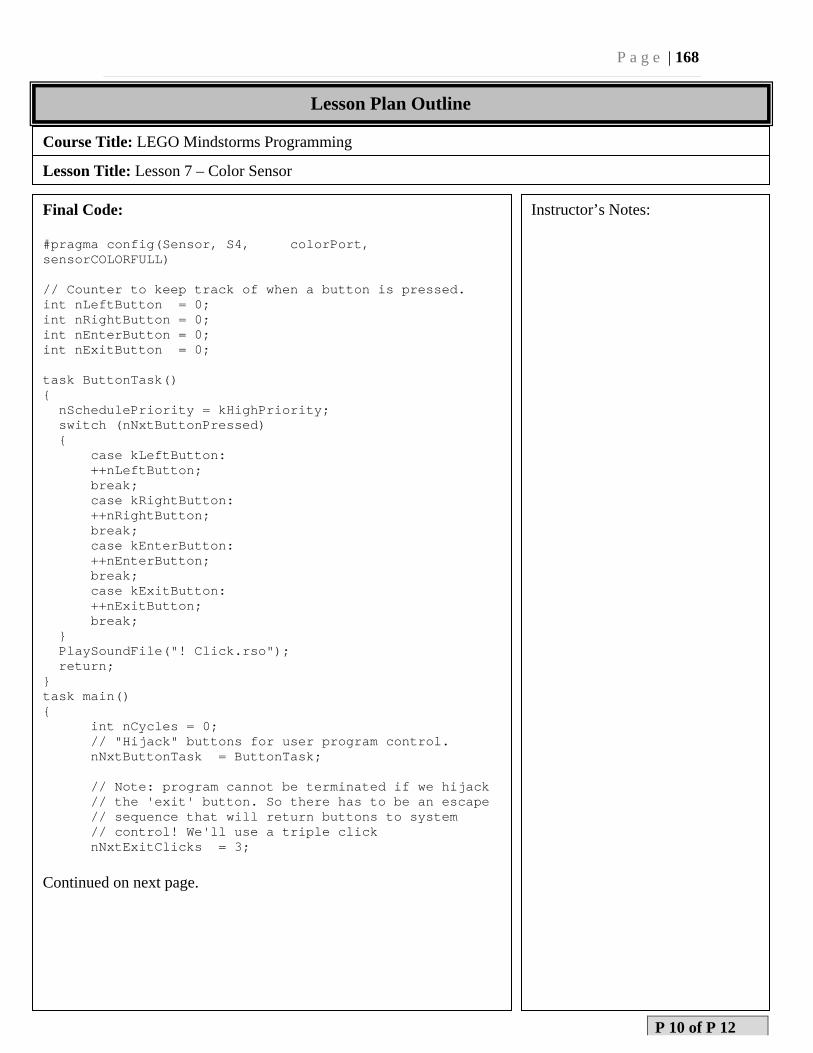
P a g e | 168
Course Title: LEGO Mindstorms Programming
Lesson Title: Lesson 7 – Color Sensor
Final Code: #pragma config(Sensor, S4, colorPort, sensorCOLORFULL) // Counter to keep track of when a button is pressed. int nLeftButton = 0; int nRightButton = 0; int nEnterButton = 0; int nExitButton = 0; task ButtonTask() { nSchedulePriority = kHighPriority; switch (nNxtButtonPressed) { case kLeftButton:
++nLeftButton; break;
case kRightButton: ++nRightButton; break;
case kEnterButton: ++nEnterButton; break;
case kExitButton: ++nExitButton; break;
} PlaySoundFile("! Click.rso"); return; } task main() { int nCycles = 0; // "Hijack" buttons for user program control. nNxtButtonTask = ButtonTask; // Note: program cannot be terminated if we hijack
// the 'exit' button. So there has to be an escape // sequence that will return buttons to system // control! We'll use a triple click
nNxtExitClicks = 3; Continued on next page.
Instructor’s Notes:
P 10 of P 12
Lesson Plan Outline
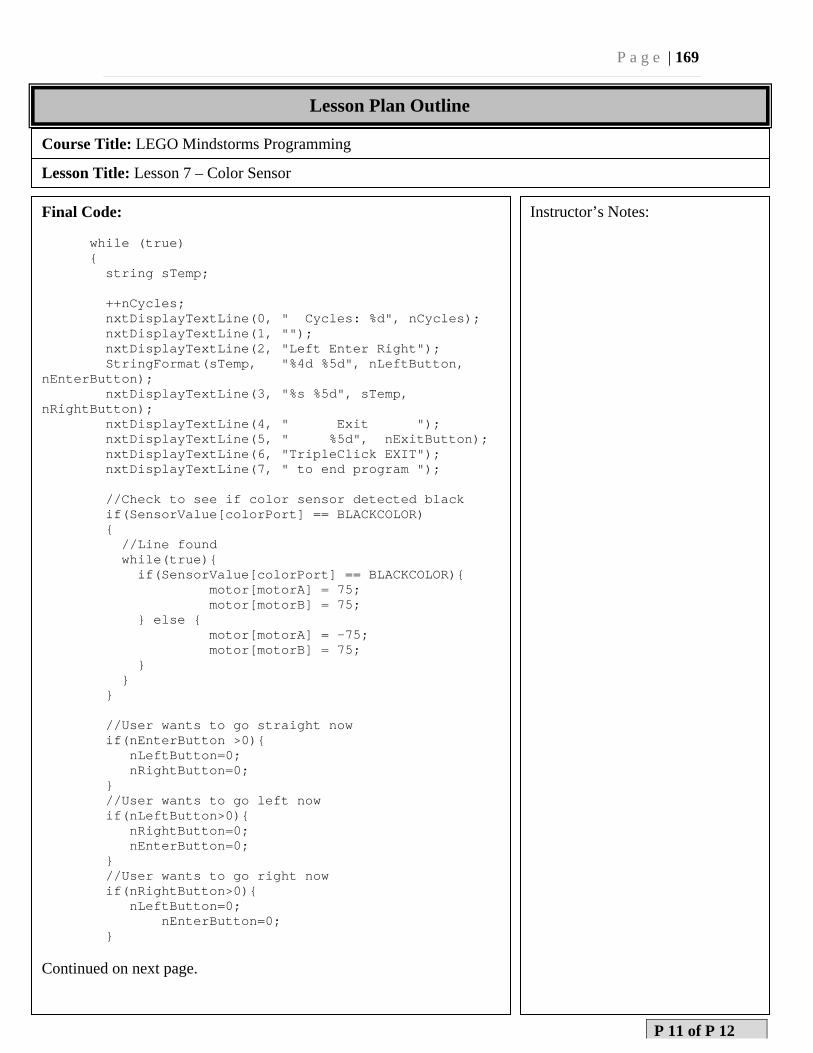
P a g e | 169
Course Title: LEGO Mindstorms Programming
Lesson Title: Lesson 7 – Color Sensor
Final Code:
while (true) { string sTemp; ++nCycles; nxtDisplayTextLine(0, " Cycles: %d", nCycles); nxtDisplayTextLine(1, ""); nxtDisplayTextLine(2, "Left Enter Right"); StringFormat(sTemp, "%4d %5d", nLeftButton, nEnterButton); nxtDisplayTextLine(3, "%s %5d", sTemp, nRightButton); nxtDisplayTextLine(4, " Exit "); nxtDisplayTextLine(5, " %5d", nExitButton); nxtDisplayTextLine(6, "TripleClick EXIT"); nxtDisplayTextLine(7, " to end program "); //Check to see if color sensor detected black if(SensorValue[colorPort] == BLACKCOLOR) { //Line found while(true){ if(SensorValue[colorPort] == BLACKCOLOR){ motor[motorA] = 75; motor[motorB] = 75; } else { motor[motorA] = -75; motor[motorB] = 75; } } } //User wants to go straight now if(nEnterButton >0){ nLeftButton=0; nRightButton=0; } //User wants to go left now if(nLeftButton>0){ nRightButton=0; nEnterButton=0; } //User wants to go right now if(nRightButton>0){ nLeftButton=0; nEnterButton=0; } Continued on next page.
Instructor’s Notes:
P 11 of P 12
Lesson Plan Outline
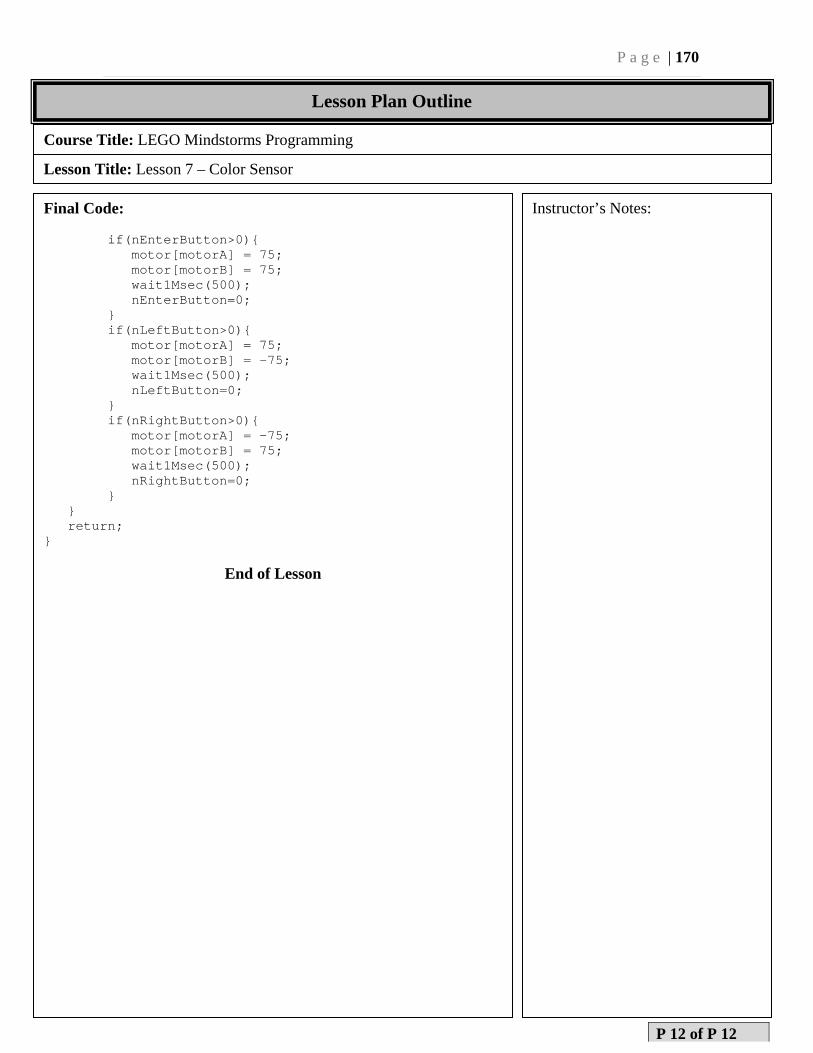
P a g e | 170
Course Title: LEGO Mindstorms Programming
Lesson Title: Lesson 7 – Color Sensor
Final Code:
if(nEnterButton>0){ motor[motorA] = 75;
motor[motorB] = 75; wait1Msec(500); nEnterButton=0; } if(nLeftButton>0){ motor[motorA] = 75; motor[motorB] = -75; wait1Msec(500); nLeftButton=0; } if(nRightButton>0){ motor[motorA] = -75; motor[motorB] = 75; wait1Msec(500); nRightButton=0; } } return; }
End of Lesson
Instructor’s Notes:
P 12 of P 12
Lesson Plan Outline

P a g e | 171
Appendix:Lesson8(NXT‐G)
P a g e | 172
LEGO NXT-G Programming – Lesson 8
Course Title: LEGO Mindstorms Programming Lesson Title: Lesson 8 – Final Project
Instructor: Nicholas Alteen Assistant Instructor Required: Dr. Zalewski
Location of Training: Florida Gulf Coast University Evaluation Method: Testing autonomous and/or manual goals of the robot.
Space Requirement: Standard Classroom Training-Model: In-class experimentation.
Max. # Of Students: 2-4 per robot. Total Time Required: 1-2 hours.
Prepared by: Nicholas Alteen Date: 28 March 2012
Revised by: Dr. Zalewski Date:
Performance Objectives
Students at end of this class will be able to:
- Understand and apply the programming concepts of looping, if/else and switch statements.
- Understand the differences between infinite and conditional loops.
- Understand how greedy algorithms work and how to apply them in a robotics programming environment.
- Program the LEGO NXT 2.0 robot to use the above concepts to solve the listed problem.
Approved by: Dr. Zalewski Date:
P 01 of P 15
P a g e | 173
Course Title: LEGO Mindstorms Programming
Lesson Title: Lesson 8 – Final Project
Equipment, Materials and Tools
Description: Number: Description: Number
LEGO Mindstorms #8457 Kit 1
Computer 1
Bluetooth Adapter 1
NXT 2.0 Software 1
Student Materials
Item: # Needed: When Distributed: Comments:
Special Materials Notes and Comments
The computer to be used should be either Bluetooth enabled or compatible with USB Bluetooth adapters. The settings of the computer should be changed so that Bluetooth devices can be wirelessly linked to the computer.
References
[1] LEGO Mindstorms http://mindstorms.lego.com/en-us/default.aspx
P 02 of P 15
P a g e | 174
Lesson Plan Body
Course Title: LEGO Mindstorms Programming
Lesson Title: Lesson 8 – Final Project
Greeting: For the purpose of this lesson, the Shooterbot robot outlined in the NXT 2.0 software will be used, with two adjustments: First, the ultrasonic sensor must be mounted on the right approximately halfway between the front and rear of the robot (pointing to the right). Second, the robot must have a touch sensor mounted to the very front, a short distance ahead of the rest of the robot. Students are encouraged to be creative with this design decision. Goals: The autonomous goal of this lesson is as follows: Students will program a robot to navigate through a maze with no user input or adjustment. This requires creative problem solving, since the robot does not know the layout of the maze. The manual goal of this lesson is as follows: Students should have normal manual control of the robot. The focus of this lesson is on advanced application of programming logic and concepts to solve a complex problem. For this reason, the focus of this lesson will be primarily on autonomous control. Components: The main components to be used and their connections to the NXT brick are listed below (this should be posted as reference for the students): Motors – Two connected in ports B and C for movement. Ultrasonic Sensor – Mounted on the right of the robot, pointing right. It is connected to port 4. Touch Sensor – Mounted to the front of the robot, pointing forward. It is connected to port 1.
Instructor’s Notes:
P 03 of P 15
P a g e | 175
Lesson Plan Body
Course Title: LEGO Mindstorms Programming
Lesson Title: Lesson 8 – Final Project
Programming Logic (Autonomous): The most important aspect to this lesson is determining how to break a seemingly impossible problem down into simple, easy steps. From the perspective of the robot, it is very difficult to know the full layout of the maze. The only way it would know ahead of time is if we programmed it to run through the correct route without looking. This idea, however, poses a significant problem. The robot would only know how to navigate through that particular maze. The goal of this lesson is to program the robot to navigate through any maze, regardless of layout. Students have the task of designing a maze for the robot with the following constraints:
1. It must be wide enough for the robot to move through. 2. It must be wide enough for the robot to turn left and right. 3. The walls of the maze must be high enough to pass over the
full height of the robot (otherwise the ultrasonic sensor may not work).
One of the core concepts behind computer programming is algorithmic logic: the process of breaking down a near-unsolvable, complex problem into simple, logical steps that lead to the same solution as if the problem was tackled in full. This concept is applied here to break any maze down into simple steps that the robot can take one-by-one until it is out of the maze. Teachers are encouraged to create a discussion with students on ways to walk through a maze that guarantee success. For brevity, this lesson skips immediately to the solution: keeping your right hand on a wall. If a person is walking through a maze, keeping his or her right hand on the nearest wall from the very start guarantees that he or she will make it out at some point in time. It is important to note that this does not always lead to the fastest solution. In programming terms, it is better to create an algorithm that isn’t always fastest but always works than one that is fast but sometimes fails.
Instructor’s Notes:
P 04 of P 15
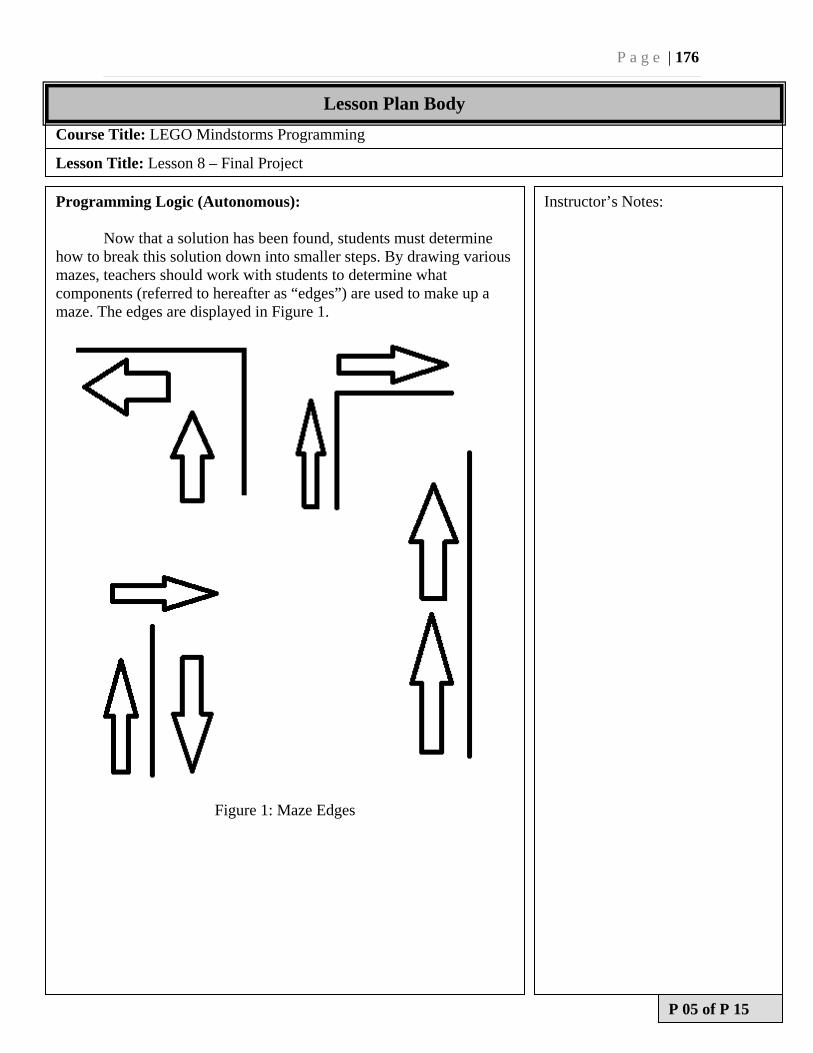
P a g e | 176
Course Title: LEGO Mindstorms Programming
Lesson Title: Lesson 8 – Final Project
Programming Logic (Autonomous): Now that a solution has been found, students must determine how to break this solution down into smaller steps. By drawing various mazes, teachers should work with students to determine what components (referred to hereafter as “edges”) are used to make up a maze. The edges are displayed in Figure 1.
Figure 1: Maze Edges
Instructor’s Notes:
P 05 of P 15
Lesson Plan Body
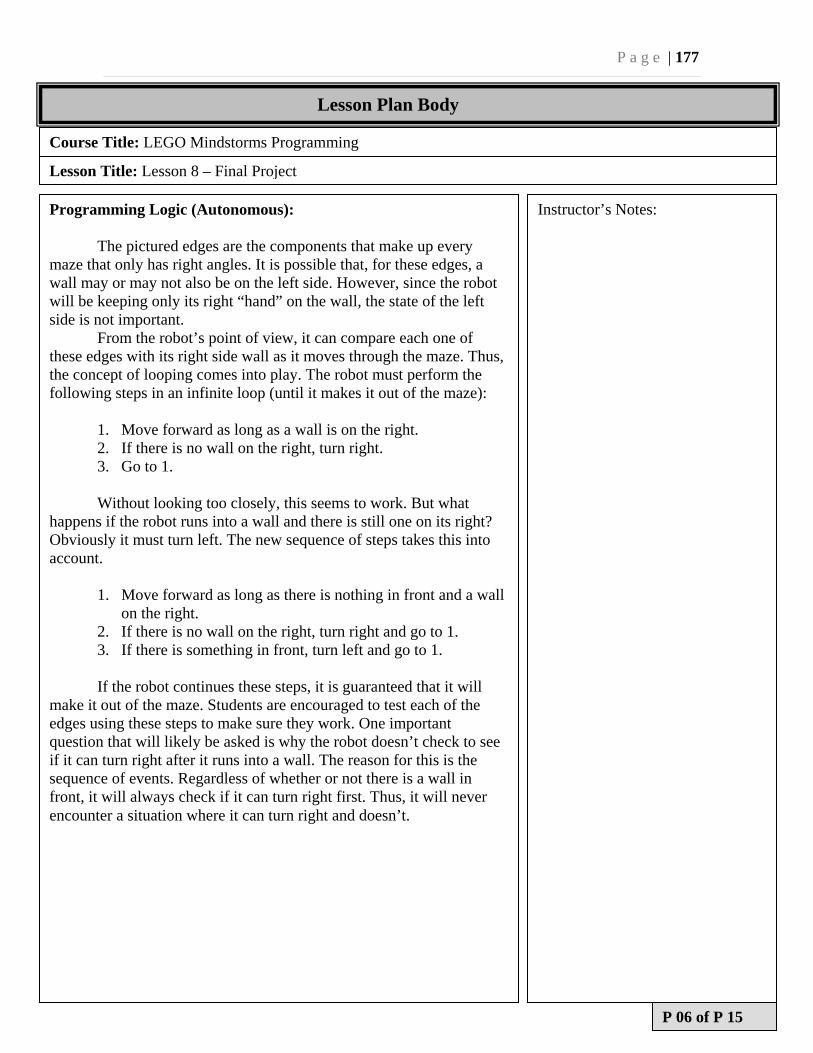
P a g e | 177
Course Title: LEGO Mindstorms Programming
Lesson Title: Lesson 8 – Final Project
Programming Logic (Autonomous): The pictured edges are the components that make up every maze that only has right angles. It is possible that, for these edges, a wall may or may not also be on the left side. However, since the robot will be keeping only its right “hand” on the wall, the state of the left side is not important. From the robot’s point of view, it can compare each one of these edges with its right side wall as it moves through the maze. Thus, the concept of looping comes into play. The robot must perform the following steps in an infinite loop (until it makes it out of the maze):
1. Move forward as long as a wall is on the right. 2. If there is no wall on the right, turn right. 3. Go to 1.
Without looking too closely, this seems to work. But what happens if the robot runs into a wall and there is still one on its right? Obviously it must turn left. The new sequence of steps takes this into account.
1. Move forward as long as there is nothing in front and a wall on the right.
2. If there is no wall on the right, turn right and go to 1. 3. If there is something in front, turn left and go to 1.
If the robot continues these steps, it is guaranteed that it will make it out of the maze. Students are encouraged to test each of the edges using these steps to make sure they work. One important question that will likely be asked is why the robot doesn’t check to see if it can turn right after it runs into a wall. The reason for this is the sequence of events. Regardless of whether or not there is a wall in front, it will always check if it can turn right first. Thus, it will never encounter a situation where it can turn right and doesn’t.
Instructor’s Notes:
P 06 of P 15
Lesson Plan Body
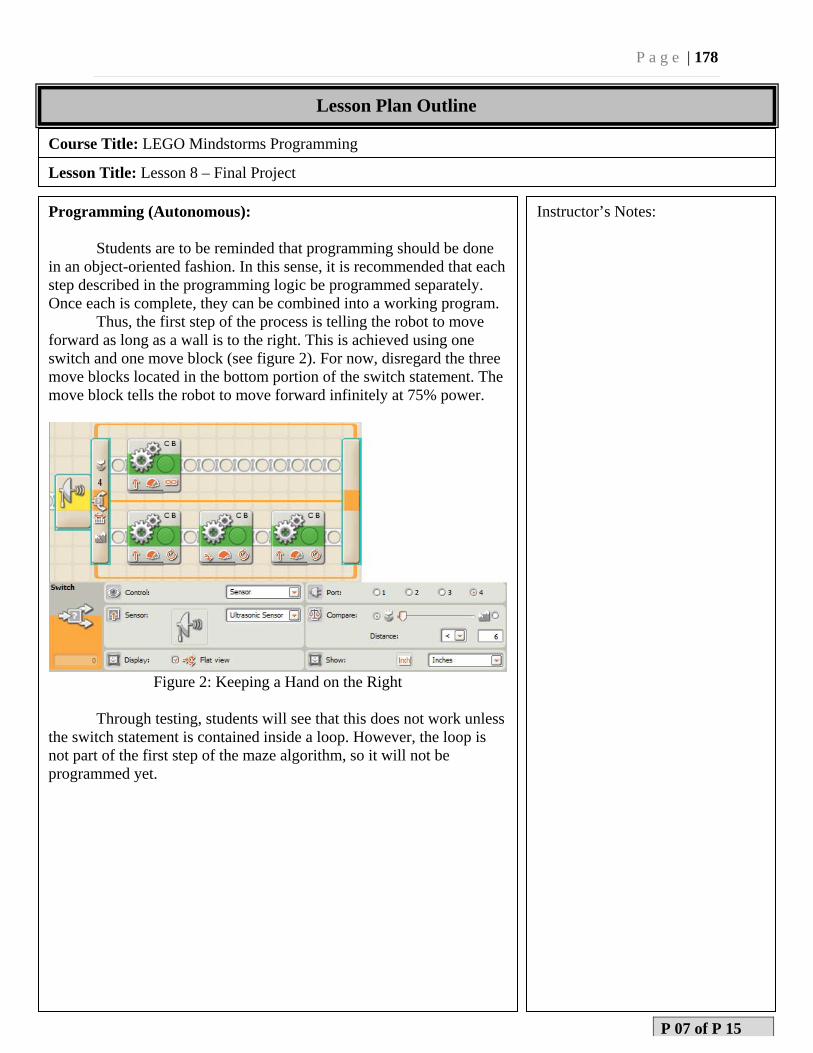
P a g e | 178
Course Title: LEGO Mindstorms Programming
Lesson Title: Lesson 8 – Final Project
Programming (Autonomous): Students are to be reminded that programming should be done in an object-oriented fashion. In this sense, it is recommended that each step described in the programming logic be programmed separately. Once each is complete, they can be combined into a working program. Thus, the first step of the process is telling the robot to move forward as long as a wall is to the right. This is achieved using one switch and one move block (see figure 2). For now, disregard the three move blocks located in the bottom portion of the switch statement. The move block tells the robot to move forward infinitely at 75% power.
Figure 2: Keeping a Hand on the Right
Through testing, students will see that this does not work unless the switch statement is contained inside a loop. However, the loop is not part of the first step of the maze algorithm, so it will not be programmed yet.
Instructor’s Notes:
P 07 of P 15
Lesson Plan Outline
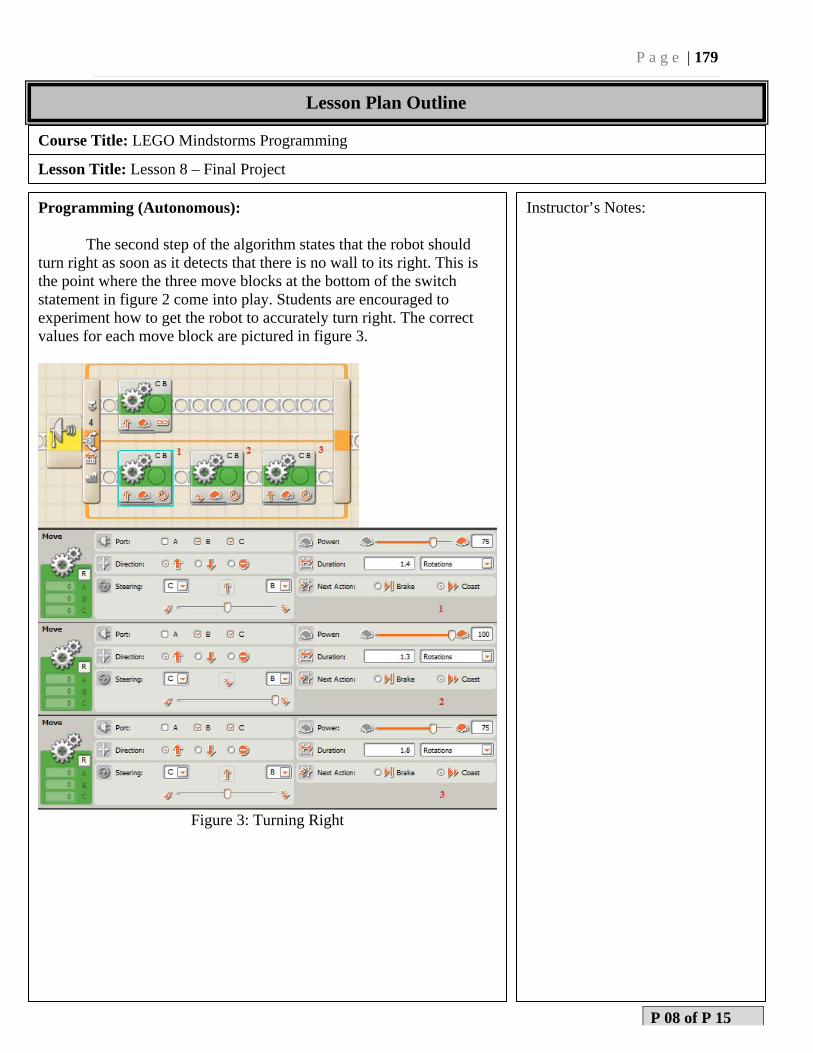
P a g e | 179
Course Title: LEGO Mindstorms Programming
Lesson Title: Lesson 8 – Final Project
Programming (Autonomous): The second step of the algorithm states that the robot should turn right as soon as it detects that there is no wall to its right. This is the point where the three move blocks at the bottom of the switch statement in figure 2 come into play. Students are encouraged to experiment how to get the robot to accurately turn right. The correct values for each move block are pictured in figure 3.
Figure 3: Turning Right
Instructor’s Notes:
P 08 of P 15
Lesson Plan Outline
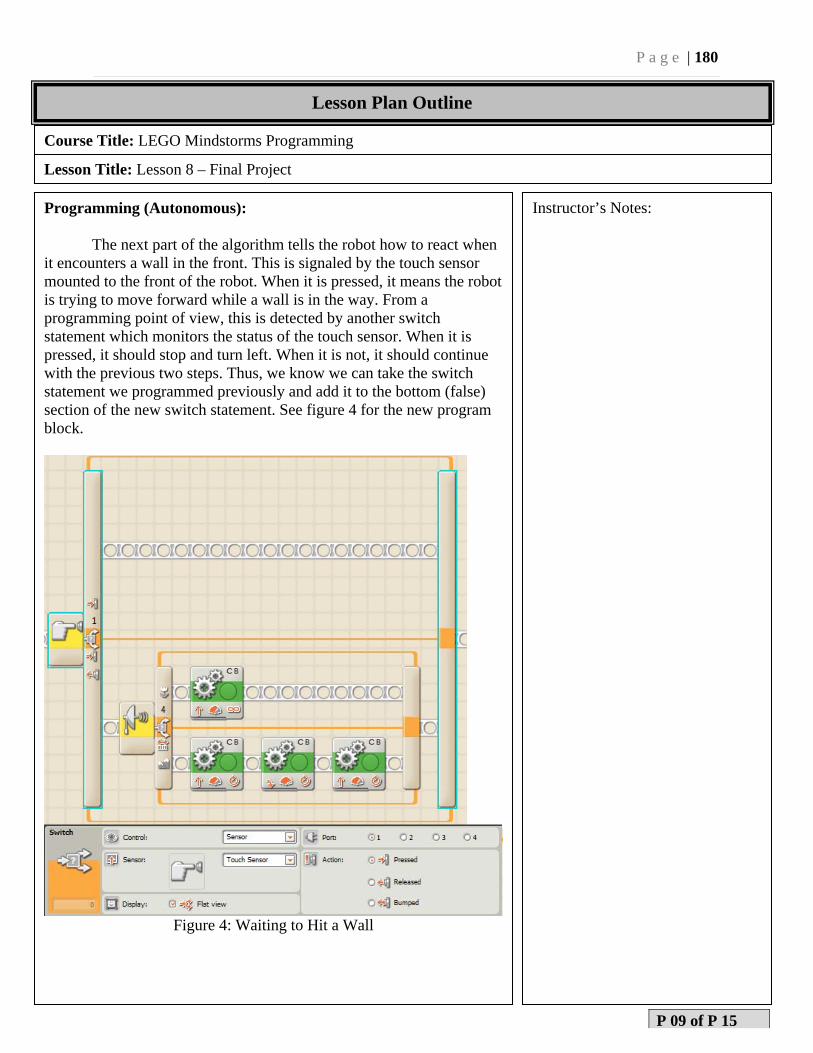
P a g e | 180
Course Title: LEGO Mindstorms Programming
Lesson Title: Lesson 8 – Final Project
Programming (Autonomous): The next part of the algorithm tells the robot how to react when it encounters a wall in the front. This is signaled by the touch sensor mounted to the front of the robot. When it is pressed, it means the robot is trying to move forward while a wall is in the way. From a programming point of view, this is detected by another switch statement which monitors the status of the touch sensor. When it is pressed, it should stop and turn left. When it is not, it should continue with the previous two steps. Thus, we know we can take the switch statement we programmed previously and add it to the bottom (false) section of the new switch statement. See figure 4 for the new program block.
Figure 4: Waiting to Hit a Wall
Instructor’s Notes:
P 09 of P 15
Lesson Plan Outline
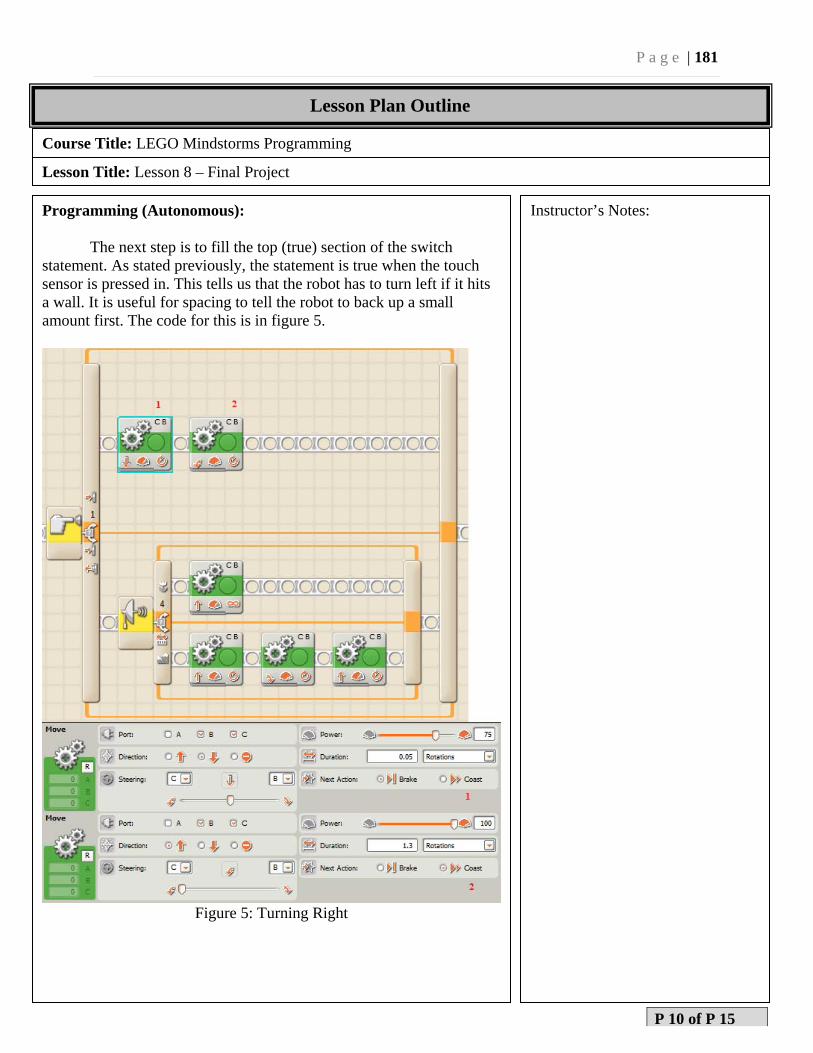
P a g e | 181
Course Title: LEGO Mindstorms Programming
Lesson Title: Lesson 8 – Final Project
Programming (Autonomous): The next step is to fill the top (true) section of the switch statement. As stated previously, the statement is true when the touch sensor is pressed in. This tells us that the robot has to turn left if it hits a wall. It is useful for spacing to tell the robot to back up a small amount first. The code for this is in figure 5.
Figure 5: Turning Right
Instructor’s Notes:
P 10 of P 15
Lesson Plan Outline
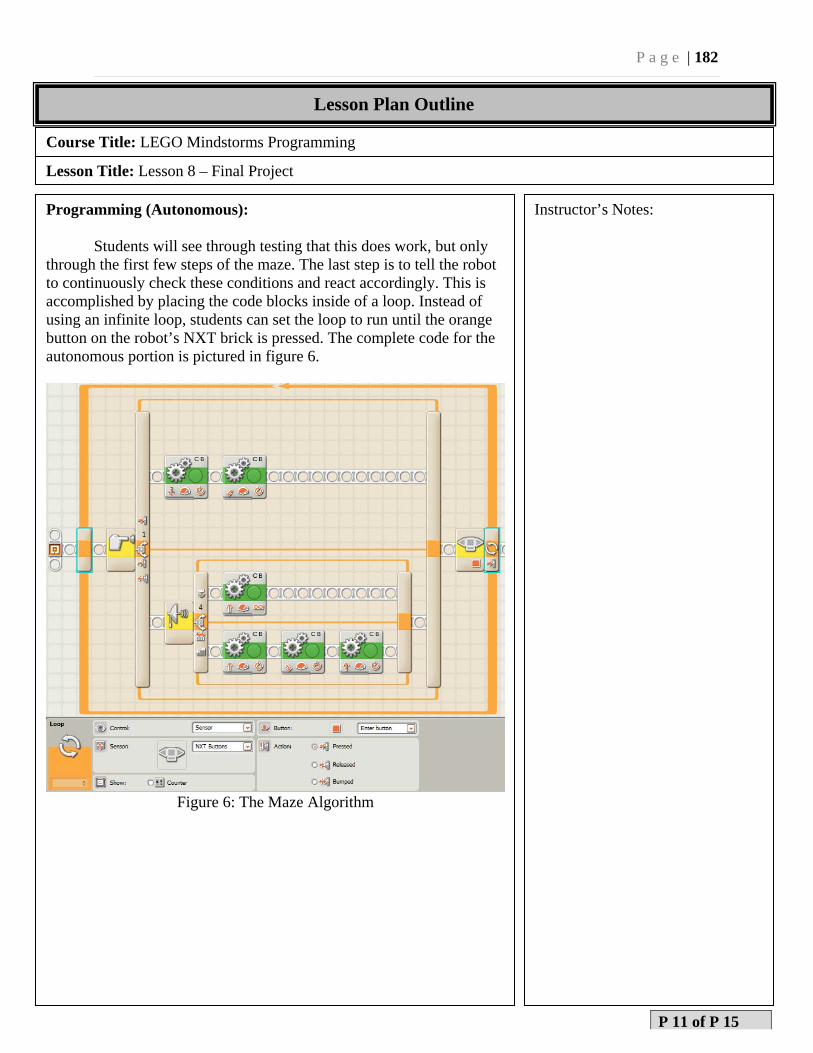
P a g e | 182
Course Title: LEGO Mindstorms Programming
Lesson Title: Lesson 8 – Final Project
Programming (Autonomous): Students will see through testing that this does work, but only through the first few steps of the maze. The last step is to tell the robot to continuously check these conditions and react accordingly. This is accomplished by placing the code blocks inside of a loop. Instead of using an infinite loop, students can set the loop to run until the orange button on the robot’s NXT brick is pressed. The complete code for the autonomous portion is pictured in figure 6.
Figure 6: The Maze Algorithm
Instructor’s Notes:
P 11 of P 15
Lesson Plan Outline
P a g e | 183
Course Title: LEGO Mindstorms Programming
Lesson Title: Lesson 8 – Final Project
Programming Logic (Manual): As stated at the beginning, the primary focus of this lesson is to teach students how to break a large problem into small steps which are easy to implement using NXT-G. However, for consistency with the other lessons, instructions are included for remote connection to the robot so students can navigate the robots through their mazes manually. Below are instructions on manual control of the robot via Bluetooth.
Instructor’s Notes:
P 12 of P 15
Lesson Plan Outline
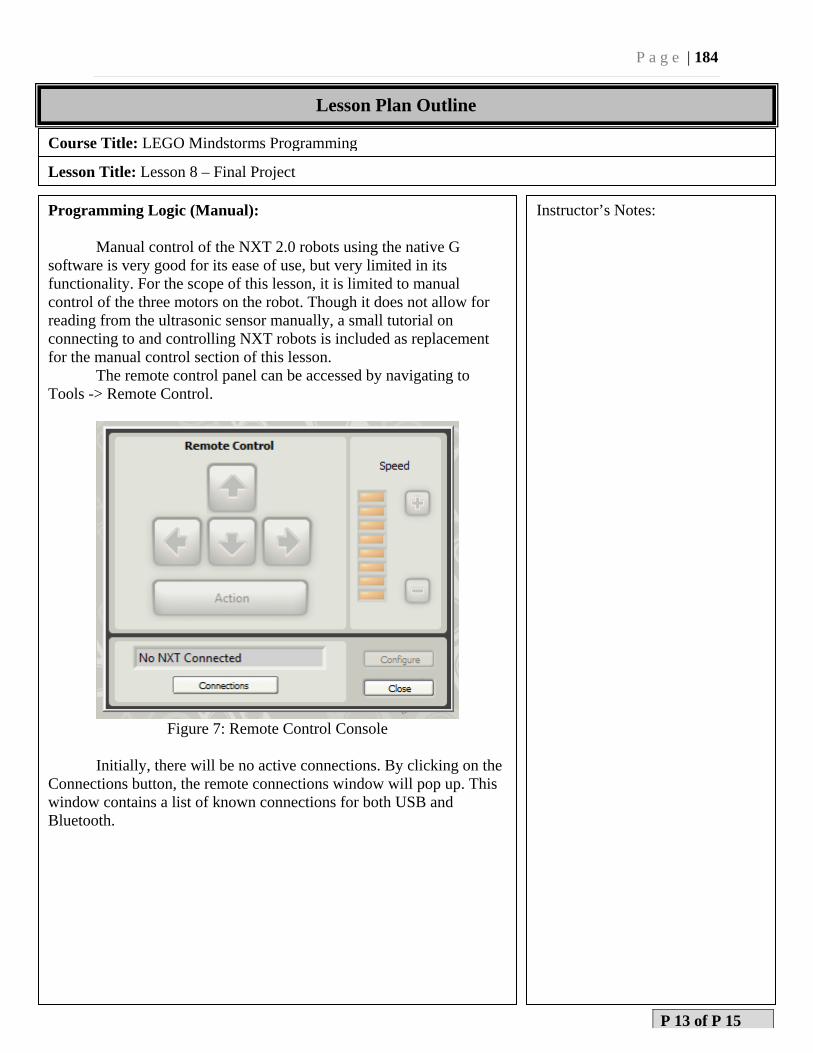
P a g e | 184
Course Title: LEGO Mindstorms Programming
Lesson Title: Lesson 8 – Final Project
Programming Logic (Manual): Manual control of the NXT 2.0 robots using the native G software is very good for its ease of use, but very limited in its functionality. For the scope of this lesson, it is limited to manual control of the three motors on the robot. Though it does not allow for reading from the ultrasonic sensor manually, a small tutorial on connecting to and controlling NXT robots is included as replacement for the manual control section of this lesson. The remote control panel can be accessed by navigating to Tools -> Remote Control.
Figure 7: Remote Control Console
Initially, there will be no active connections. By clicking on the Connections button, the remote connections window will pop up. This window contains a list of known connections for both USB and Bluetooth.
Instructor’s Notes:
P 13 of P 15
Lesson Plan Outline
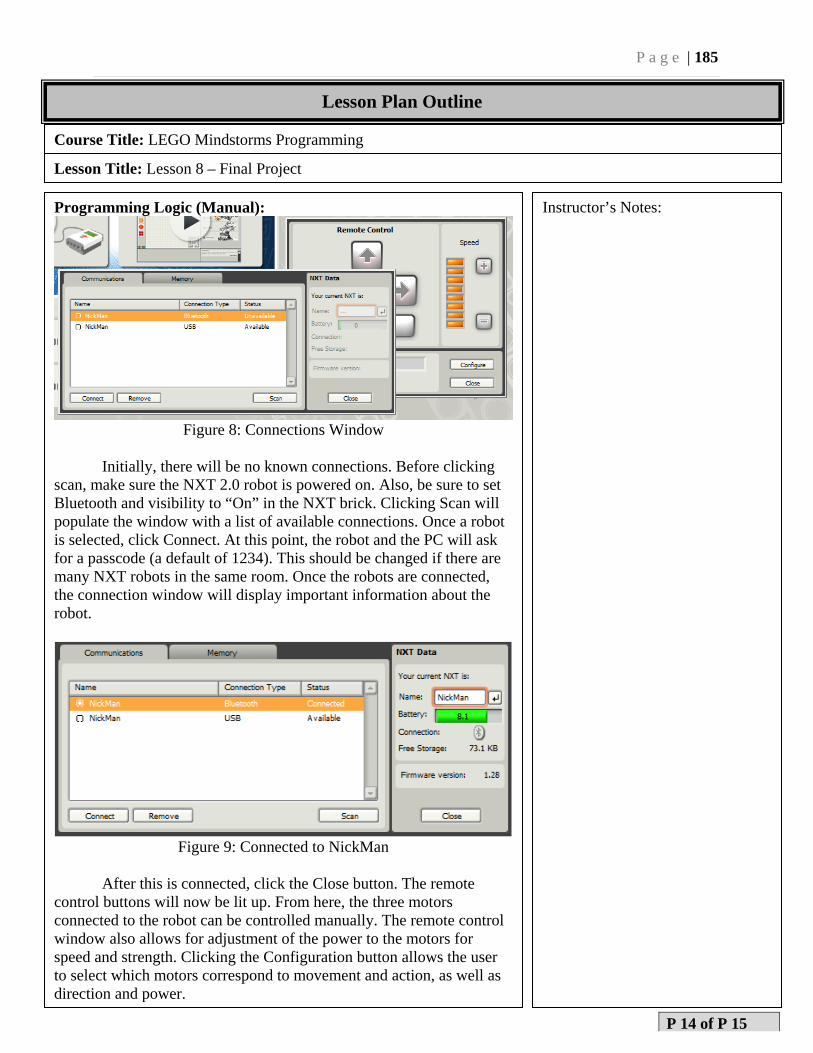
P a g e | 185
Course Title: LEGO Mindstorms Programming
Lesson Title: Lesson 8 – Final Project
Programming Logic (Manual):
Figure 8: Connections Window
Initially, there will be no known connections. Before clicking scan, make sure the NXT 2.0 robot is powered on. Also, be sure to set Bluetooth and visibility to “On” in the NXT brick. Clicking Scan will populate the window with a list of available connections. Once a robot is selected, click Connect. At this point, the robot and the PC will ask for a passcode (a default of 1234). This should be changed if there are many NXT robots in the same room. Once the robots are connected, the connection window will display important information about the robot.
Figure 9: Connected to NickMan
After this is connected, click the Close button. The remote control buttons will now be lit up. From here, the three motors connected to the robot can be controlled manually. The remote control window also allows for adjustment of the power to the motors for speed and strength. Clicking the Configuration button allows the user to select which motors correspond to movement and action, as well as direction and power.
Instructor’s Notes:
P 14 of P 15
Lesson Plan Outline
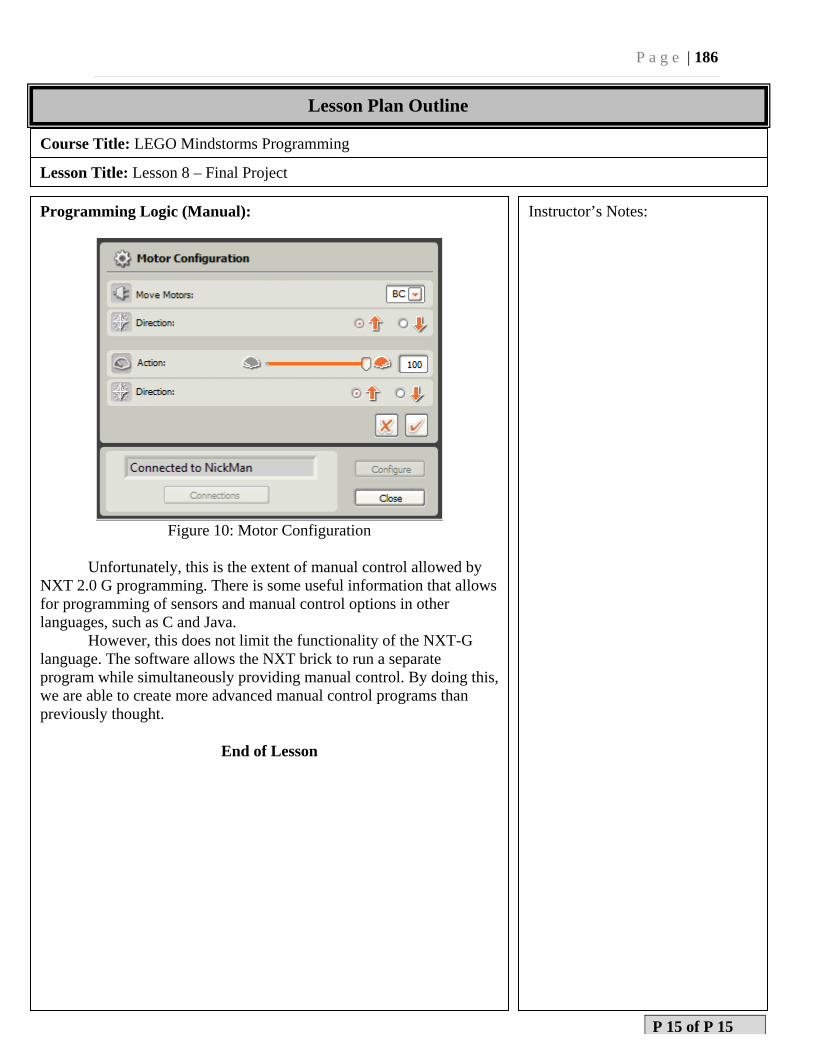
P a g e | 186
Course Title: LEGO Mindstorms Programming
Lesson Title: Lesson 8 – Final Project
Programming Logic (Manual):
Figure 10: Motor Configuration
Unfortunately, this is the extent of manual control allowed by NXT 2.0 G programming. There is some useful information that allows for programming of sensors and manual control options in other languages, such as C and Java. However, this does not limit the functionality of the NXT-G language. The software allows the NXT brick to run a separate program while simultaneously providing manual control. By doing this, we are able to create more advanced manual control programs than previously thought.
End of Lesson
Instructor’s Notes:
P 15 of P 15
Lesson Plan Outline