LEGAL DISCLAIMER - Frequency Generation...
12
Transcript of LEGAL DISCLAIMER - Frequency Generation...
2
LEGAL DISCLAIMER The zapper devices by Frequency Generation are made according to the most recent published designs by Hulda Clark Ph.D., N.D. Dr. Hulda Clark defines a Zapper as any unit that generates a positive offset frequency between 10 Hz and 500,000 Hz using a 9-volt battery. Please remember that Dr. Clark's books have not been evaluated by the United States Food and Drug Administration, and the Clark Zapper is not licensed as a medical device in the United States. Zappers can only be sold as experimental devices for educational research. Not intended for use in the cure, mitigation, treatment, or prevention of any disease in humans or animals. If you are pregnant or wearing a pacemaker, please do not experiment with a zapper. All information is for educational purposes only and not intended as medical advice. Consult a licensed health professional before attempting any self health program. For more information on how to build and use the zapper, please read the books by Dr. Hulda Clark. This guide is to help one easily set up their Hulda Clark related experiments correctly. No medical or health information is intended. Be sure to read the latest books by Dr. Hulda Clark before experimenting with a Zapper or Zappicator. All books by Hulda Clark are available online at: www.HuldaClark.com
2011 © www.FrequencyGeneration.com
3
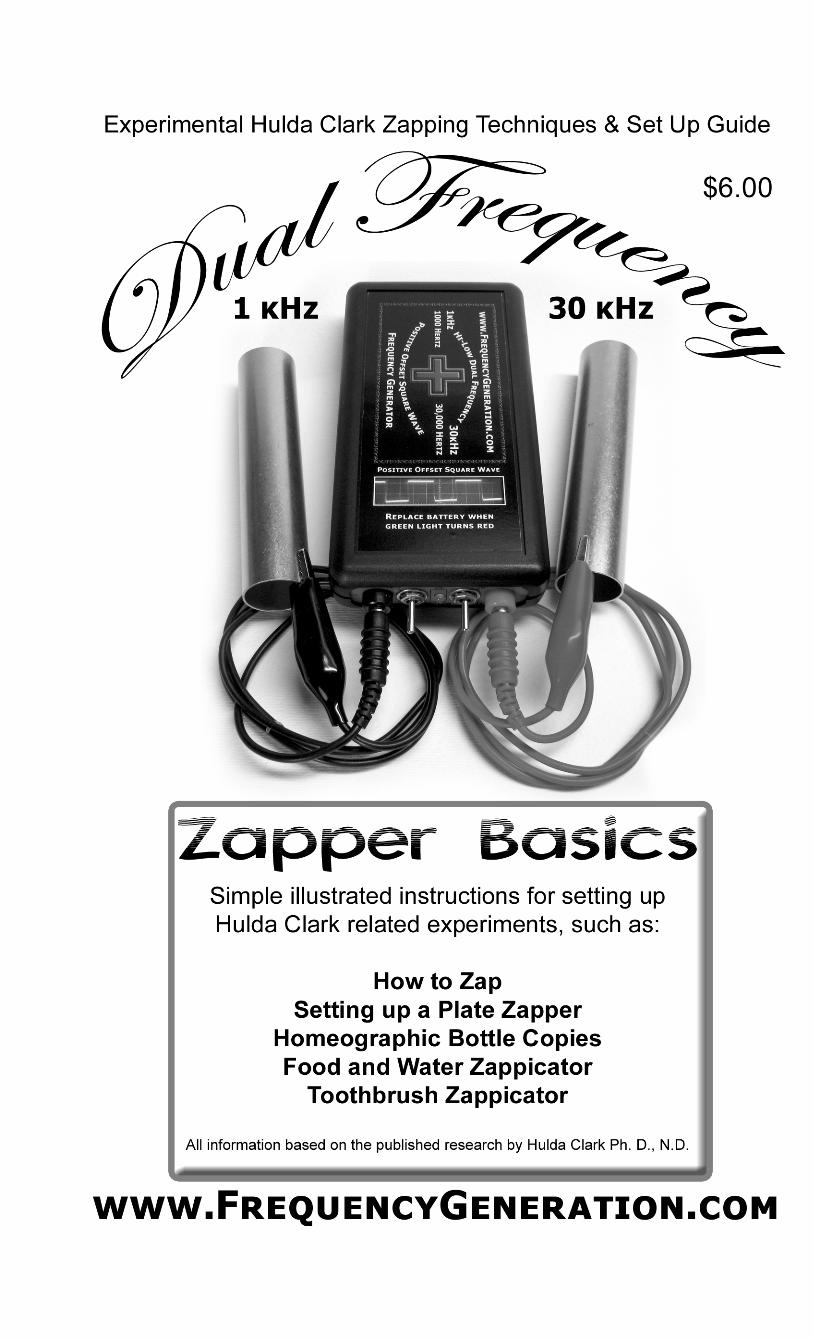
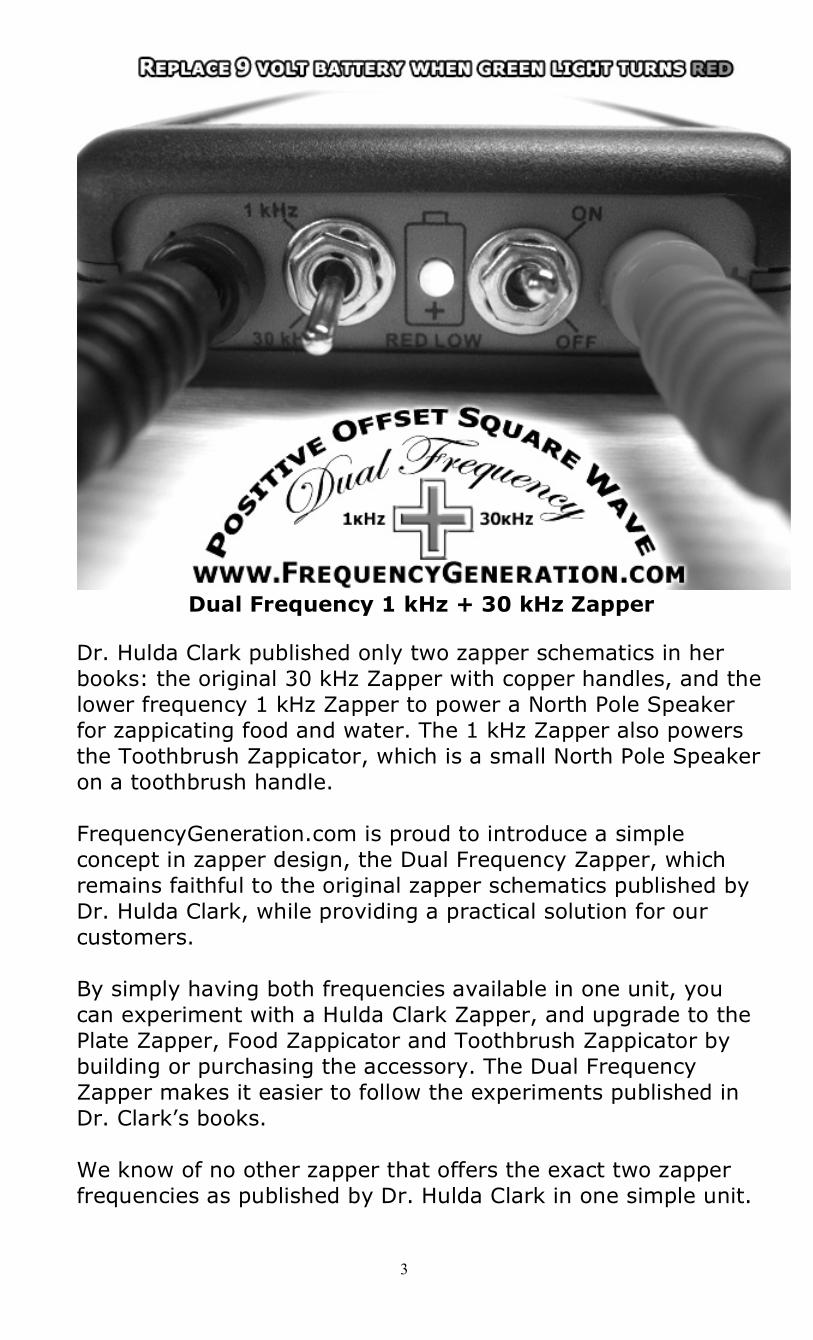
Dual Frequency 1 kHz + 30 kHz Zapper
Dr. Hulda Clark published only two zapper schematics in her books: the original 30 kHz Zapper with copper handles, and the lower frequency 1 kHz Zapper to power a North Pole Speaker for zappicating food and water. The 1 kHz Zapper also powers the Toothbrush Zappicator, which is a small North Pole Speaker on a toothbrush handle. FrequencyGeneration.com is proud to introduce a simple concept in zapper design, the Dual Frequency Zapper, which remains faithful to the original zapper schematics published by Dr. Hulda Clark, while providing a practical solution for our customers. By simply having both frequencies available in one unit, you can experiment with a Hulda Clark Zapper, and upgrade to the Plate Zapper, Food Zappicator and Toothbrush Zappicator by building or purchasing the accessory. The Dual Frequency Zapper makes it easier to follow the experiments published in Dr. Clark’s books. We know of no other zapper that offers the exact two zapper frequencies as published by Dr. Hulda Clark in one simple unit.
4
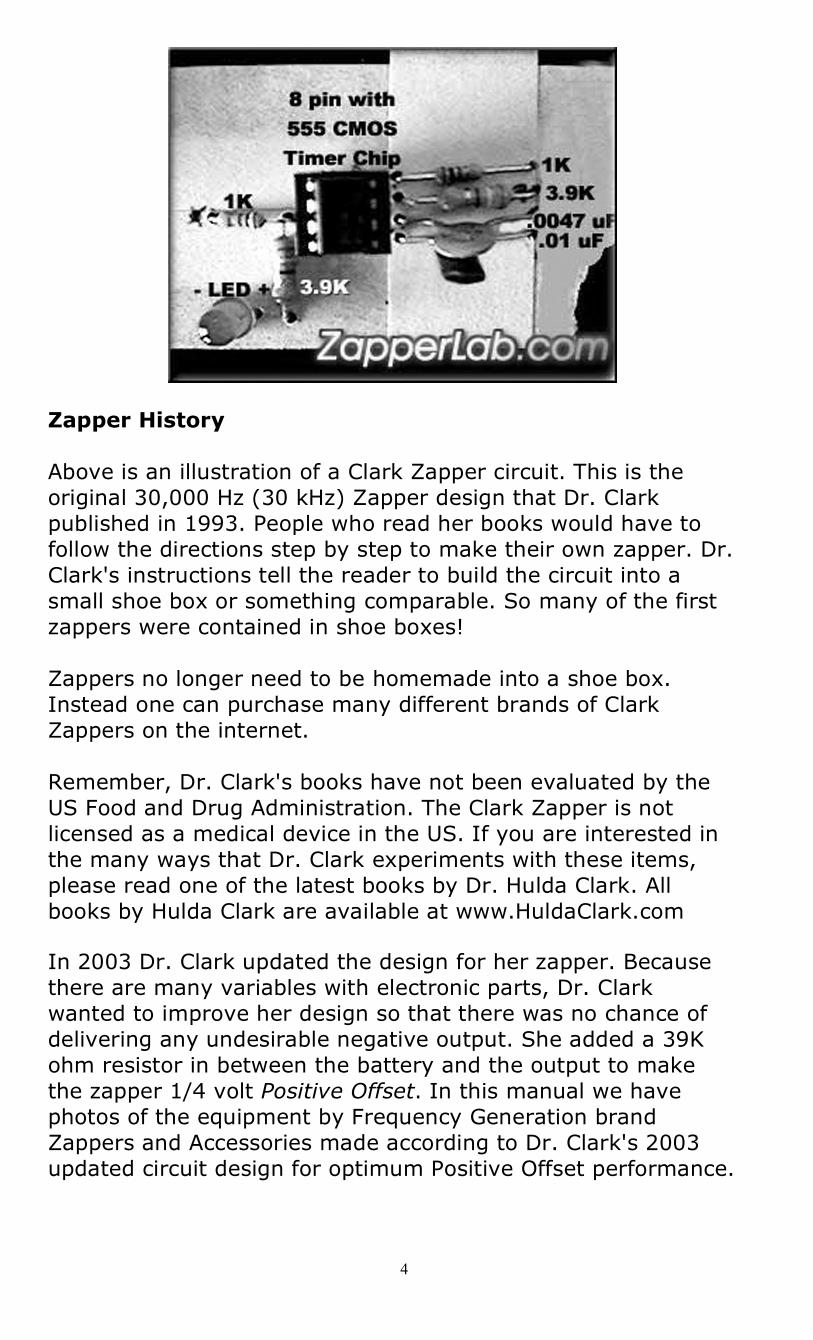
Zapper History Above is an illustration of a Clark Zapper circuit. This is the original 30,000 Hz (30 kHz) Zapper design that Dr. Clark published in 1993. People who read her books would have to follow the directions step by step to make their own zapper. Dr. Clark's instructions tell the reader to build the circuit into a small shoe box or something comparable. So many of the first zappers were contained in shoe boxes! Zappers no longer need to be homemade into a shoe box. Instead one can purchase many different brands of Clark Zappers on the internet. Remember, Dr. Clark's books have not been evaluated by the US Food and Drug Administration. The Clark Zapper is not licensed as a medical device in the US. If you are interested in the many ways that Dr. Clark experiments with these items, please read one of the latest books by Dr. Hulda Clark. All books by Hulda Clark are available at www.HuldaClark.com In 2003 Dr. Clark updated the design for her zapper. Because there are many variables with electronic parts, Dr. Clark wanted to improve her design so that there was no chance of delivering any undesirable negative output. She added a 39K ohm resistor in between the battery and the output to make the zapper 1/4 volt Positive Offset. In this manual we have photos of the equipment by Frequency Generation brand Zappers and Accessories made according to Dr. Clark's 2003 updated circuit design for optimum Positive Offset performance.
5
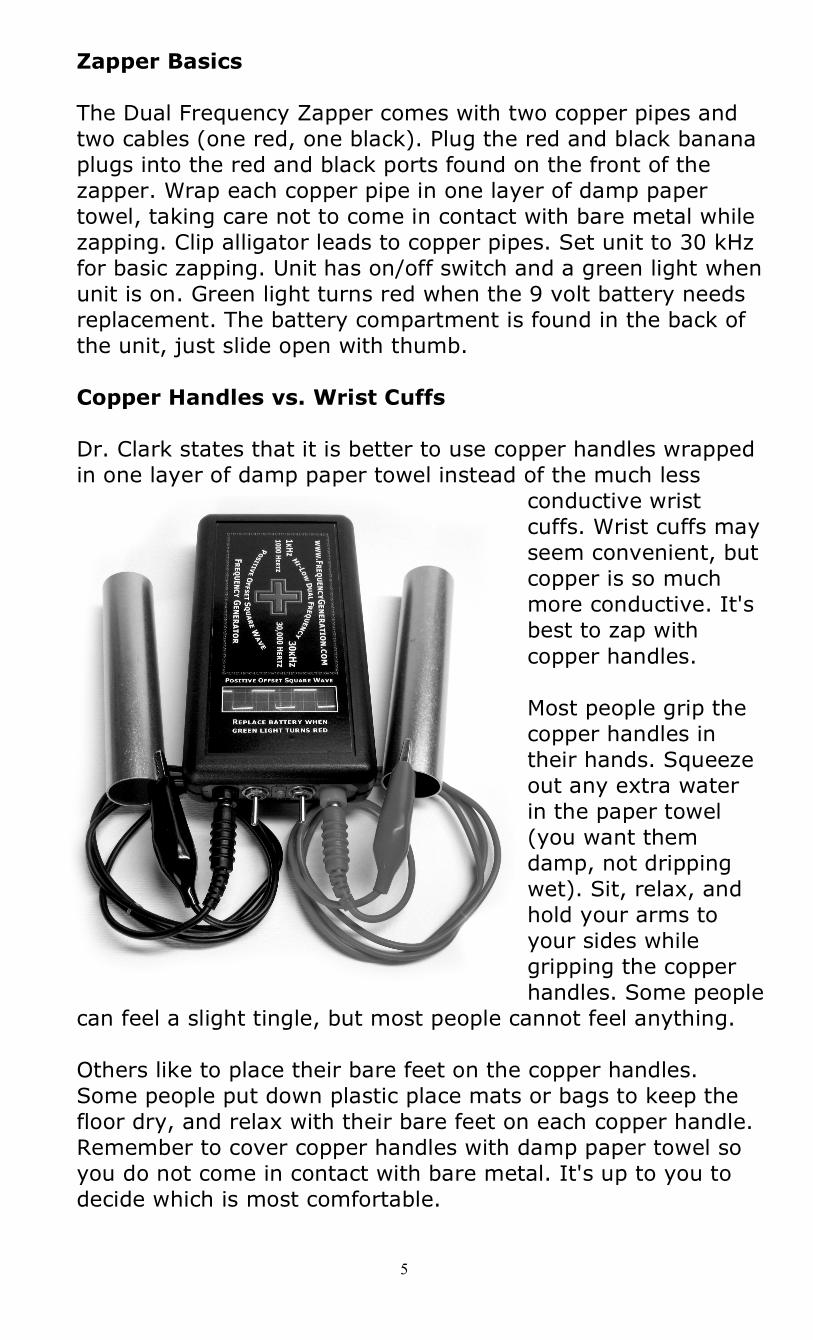
Zapper Basics The Dual Frequency Zapper comes with two copper pipes and two cables (one red, one black). Plug the red and black banana plugs into the red and black ports found on the front of the zapper. Wrap each copper pipe in one layer of damp paper towel, taking care not to come in contact with bare metal while zapping. Clip alligator leads to copper pipes. Set unit to 30 kHz for basic zapping. Unit has on/off switch and a green light when unit is on. Green light turns red when the 9 volt battery needs replacement. The battery compartment is found in the back of the unit, just slide open with thumb. Copper Handles vs. Wrist Cuffs Dr. Clark states that it is better to use copper handles wrapped in one layer of damp paper towel instead of the much less
conductive wrist cuffs. Wrist cuffs may seem convenient, but copper is so much more conductive. It's best to zap with copper handles. Most people grip the copper handles in their hands. Squeeze out any extra water in the paper towel (you want them damp, not dripping wet). Sit, relax, and hold your arms to your sides while gripping the copper handles. Some people
can feel a slight tingle, but most people cannot feel anything. Others like to place their bare feet on the copper handles. Some people put down plastic place mats or bags to keep the floor dry, and relax with their bare feet on each copper handle. Remember to cover copper handles with damp paper towel so you do not come in contact with bare metal. It's up to you to decide which is most comfortable.
6
When To Zap Dr. Clark stated that morning hours are optimum for zapping. If you are too busy and can only zap at night, that's better than nothing. Maybe you could get in a day zap during the weekend or other day off. How To Zap The zapping method Dr. Clark originally published is 7-20-7-20-7, that is, three 7 minute zapping sessions with a 20 minute break in between. The whole thing takes about an hour, and up to 4 people can zap together taking turns this way. Some people zap using this method once or twice a day, or just once or twice a week, depending on the urgency of their situation. Extended Zapping Dr. Clark has found that zapping for longer periods is even more effective. Many people zap 20 minutes on, 20 minutes off, 5 times or even more, perhaps on and off all day. For those who use conductive wrist straps for extended zapping, remember to NOT fall asleep while zapping. It is important to keep the conductive wrist straps moist where it makes contact with the skin. If worn for several hours at a time and allowed to dry out, the conductive wrist cuffs can cause small burns. Try to zap during the day when you are wide awake. Remoisten the cuffs often during zapping breaks. And get a pair of copper pipe handles as soon as you can. Advanced Zapping Techniques There have been a lot of advancements to zapping since 1993 when Dr. Clark published her first book. There are now two different ways to set up a Plate Zapper. The first was in Series, and in 2003 Dr. Clark published her method of setting up a Plate Zapper in Parallel. Here are some of Dr. Clark’s latest techniques in advanced zapping:
7
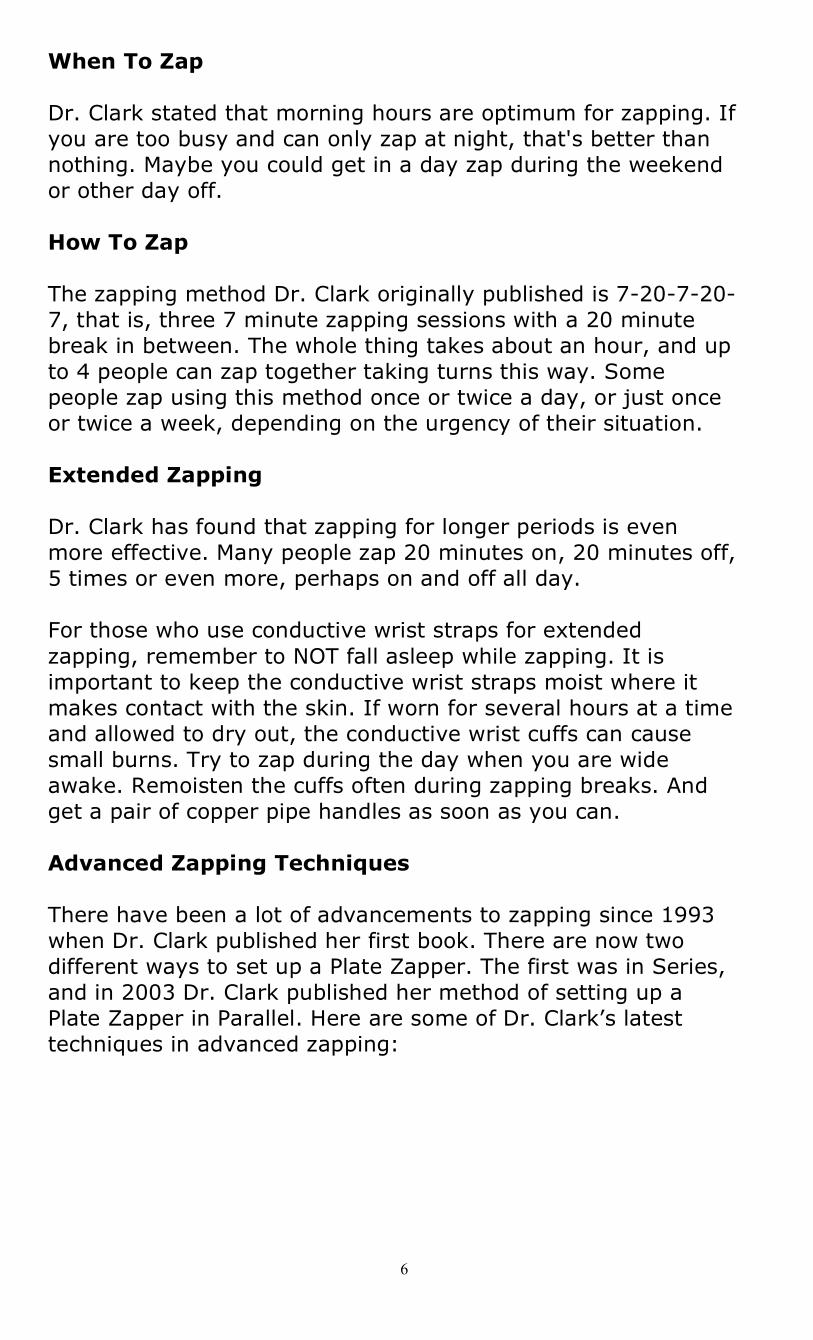
Setting Up A Plate Zapper In Series
1. Start with a short banana lead, and plug both ends into the two ports on one side of the Zap Plate.
2. Using the second short banana lead, connect the Zapper's red (+) Positive output to the Zap Plate. Test your zapper if your are not sure which output is (+).
3. Plug the red (+) lead that came with your Zapper into the remaining port on the Zap Plate, connect to handle.
4. Black (-) ground lead and remaining handle connects to Zapper.
5. Wrap a thin layer of damp paper towel around the two copper handles, and connect one to each alligator clip.
6. Set the Dual Frequency Zapper to 30 kHz.
Zap Plate comes with 2 short banana leads, 2 long banana leads, alligator clip and set up instructions. Dual Frequency Zapper and Zap Plate sold separately.
8
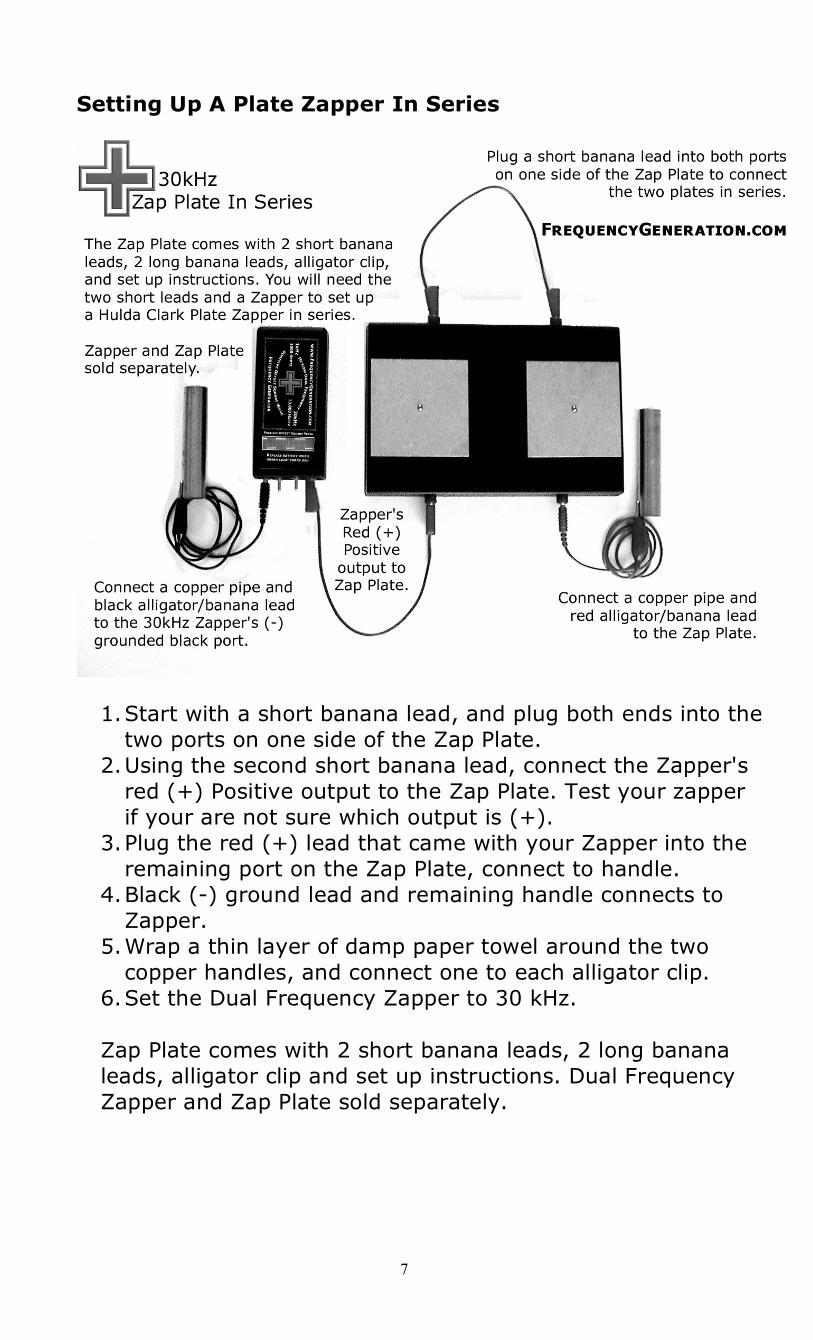
Setting Up A Plate Zapper In Parallel
1. The first step is to take the two short banana leads, and stack them together, making a V shaped lead.
2. The stacked ends push into the red (+) positive output on your Frequency Generation brand Zapper. (If you have a homemade or different brand zapper, be sure to test your zapper's positive output).
3. Then connect the two remaining loose ends to two ports on one side of the Zap Plate.
4. Now grab the two long banana leads, and stack them into another V shaped lead.
5. Plug the two loose ends into the remaining two ports on the other side of the Zap Plate.
6. Pull the long leads out until they look like a V, and at the point of the V, where the two plugs are stacked together, connect the alligator clip.
7. Connect the black lead as usual to the Zapper. 8. Wrap a thin layer of damp paper towel around the two
copper handles, and connect one to each alligator clip. 9. Set the Dual Frequency Zapper to 30 kHz. Detailed photos of each step at PlateZapping.com - Learn ways to experiment with a Zap Plate in Dr. Clark's books at: HuldaClark.com
9
Homeographic Bottle Copies
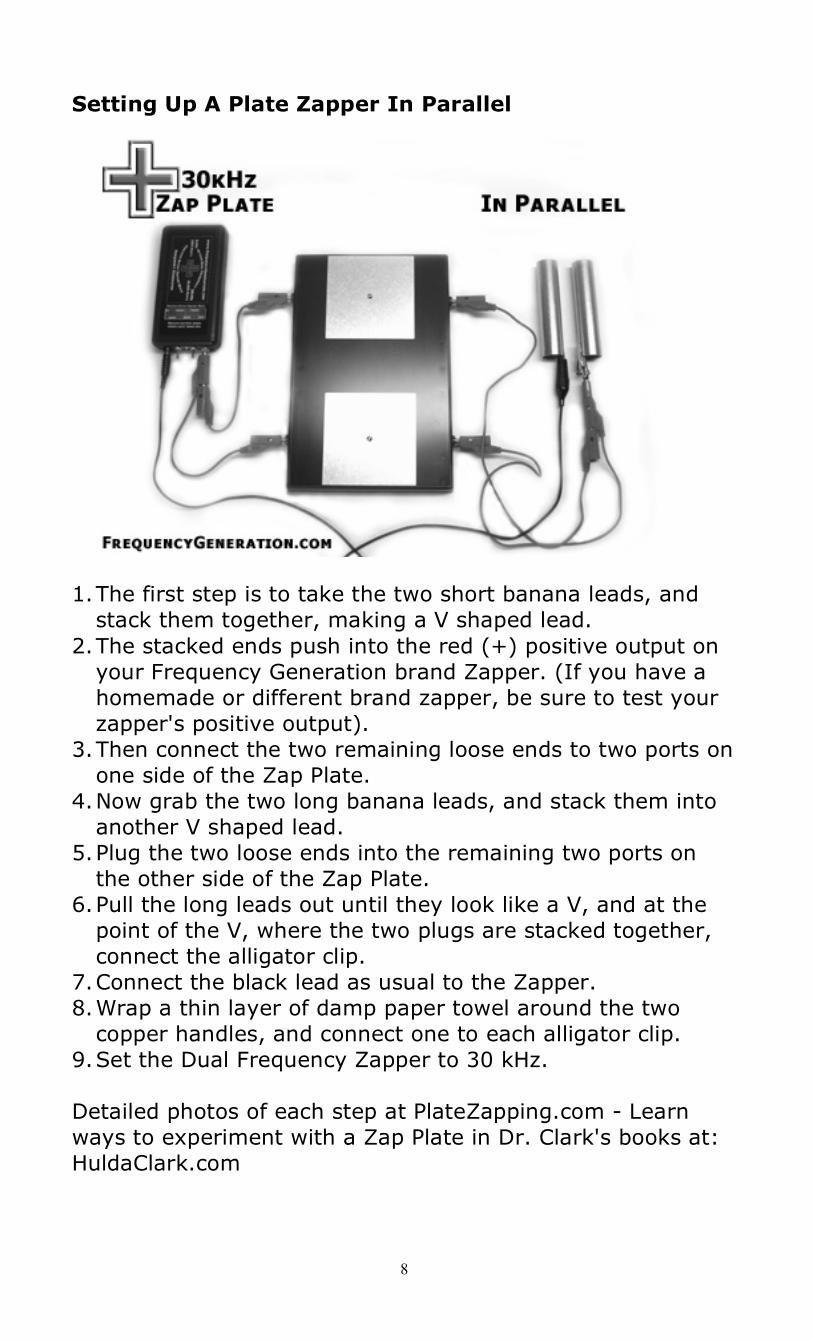
Another way that Dr. Clark uses a regular 30 kHz zapper is to make Homeographic Bottle Copies. This also requires some set
up: microscope slides, 15 ml amber glass bottles, a Zap Plate and so on. To make a bottle copy, one uses the zap plate differently. One connects the zapper's (red) positive output to the Zap Plate. The ground (black) is not used at all for making bottle copies. One puts the 15 ml amber glass bottle filled with distilled water on top of the plate, sets a microscope slide on the plate touching the
bottom of the bottle, and turns the Dual Frequency Zapper on at 30 kHz for about 20 seconds. One can shield the bottle with an aluminum tube for a better copy. The bottle is now a Homeographic Copy of the specimen on the slide. Bottle copies can be used in many Hulda Clark Syncrometer™ based experiments for further research. Dr. Clark’s latest books go into complete detail on these and many other Bottle Copy based experiments.
10
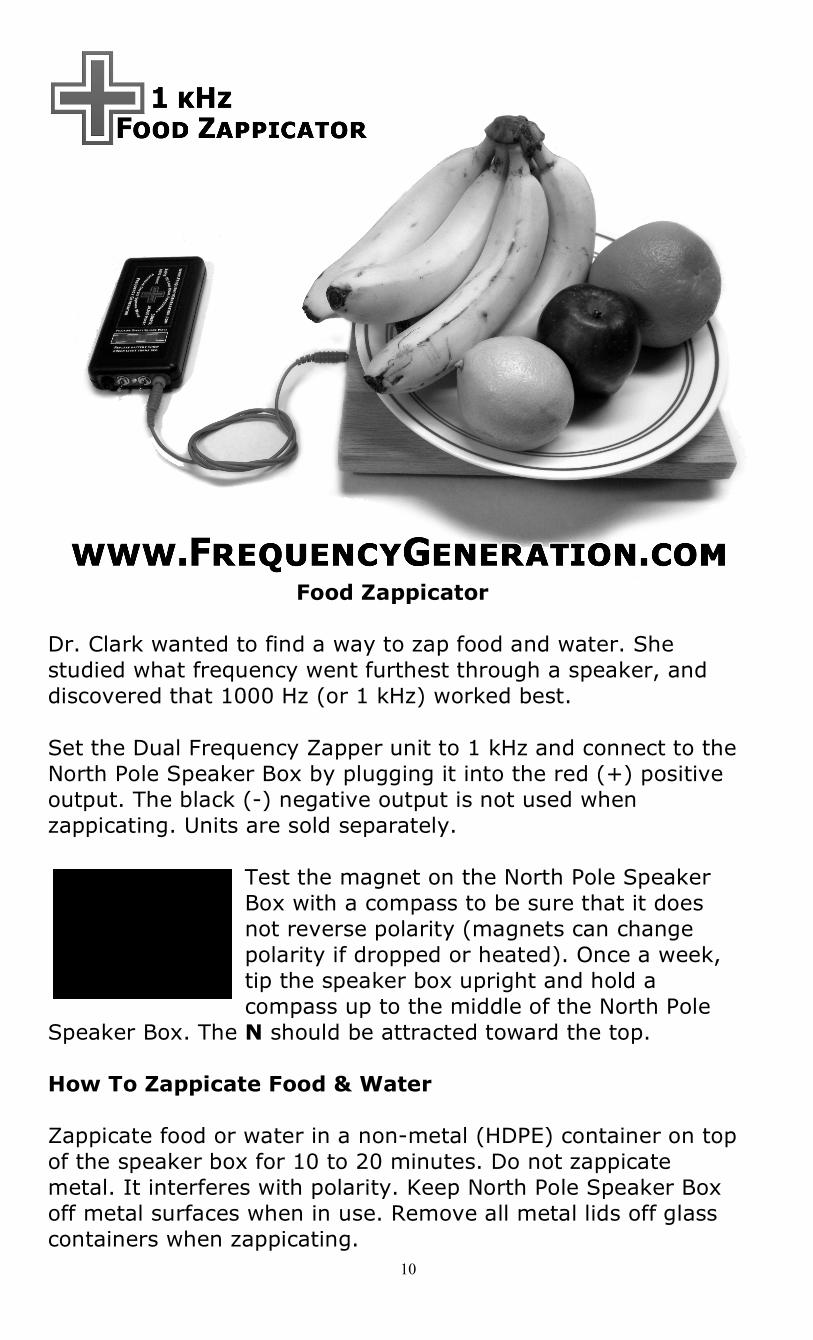
Food Zappicator
Dr. Clark wanted to find a way to zap food and water. She studied what frequency went furthest through a speaker, and discovered that 1000 Hz (or 1 kHz) worked best. Set the Dual Frequency Zapper unit to 1 kHz and connect to the North Pole Speaker Box by plugging it into the red (+) positive output. The black (-) negative output is not used when zappicating. Units are sold separately.
Test the magnet on the North Pole Speaker Box with a compass to be sure that it does not reverse polarity (magnets can change polarity if dropped or heated). Once a week, tip the speaker box upright and hold a compass up to the middle of the North Pole
Speaker Box. The N should be attracted toward the top. How To Zappicate Food & Water Zappicate food or water in a non-metal (HDPE) container on top of the speaker box for 10 to 20 minutes. Do not zappicate metal. It interferes with polarity. Keep North Pole Speaker Box off metal surfaces when in use. Remove all metal lids off glass containers when zappicating.
11
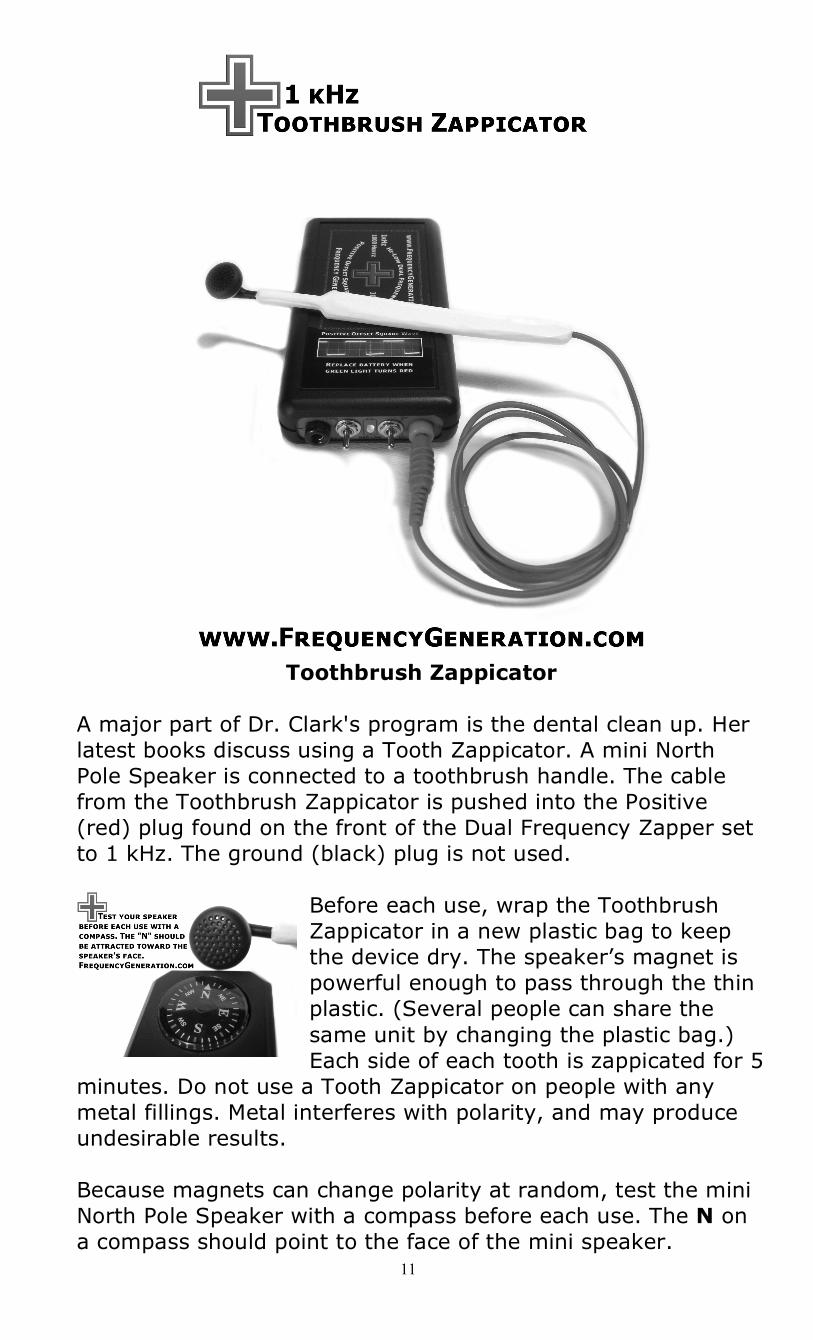
Toothbrush Zappicator
A major part of Dr. Clark's program is the dental clean up. Her latest books discuss using a Tooth Zappicator. A mini North Pole Speaker is connected to a toothbrush handle. The cable from the Toothbrush Zappicator is pushed into the Positive (red) plug found on the front of the Dual Frequency Zapper set to 1 kHz. The ground (black) plug is not used.
Before each use, wrap the Toothbrush Zappicator in a new plastic bag to keep the device dry. The speaker’s magnet is powerful enough to pass through the thin plastic. (Several people can share the same unit by changing the plastic bag.) Each side of each tooth is zappicated for 5
minutes. Do not use a Tooth Zappicator on people with any metal fillings. Metal interferes with polarity, and may produce undesirable results. Because magnets can change polarity at random, test the mini North Pole Speaker with a compass before each use. The N on a compass should point to the face of the mini speaker.
12