Ledger & Payables - Church Management Solutions · PUB 108_2017_December ConnectNow Accounting...
277
USER GUIDE Ledger & Payables
Transcript of Ledger & Payables - Church Management Solutions · PUB 108_2017_December ConnectNow Accounting...

USER GUIDE
Ledger & Payables

ConnectNow AccountingLedger and Payables User Guide
Pub 108, December 2017
3767 Ranchero DriveSuite 100
Ann Arbor, MI 48108
2011-2017 ParishSOFT LLC, all rights reserved.ParishSOFT grants licensed users the right to unlimited duplication of this publication
for internal use.
Web www.parishsoft.com
Email [email protected]@parishsoft.com
Phone (734) 205-1000 (main)(866) 930-4774 (support)
Fax (734) 205-1011
PUB 108_2017_December
Table of Contents
Title Page
List of Tables . . . . . . . . . . . . . . . . . . . . . . . . . . . . . . . . . . . . . . . . . . . . . . . . . . ixList of Figures . . . . . . . . . . . . . . . . . . . . . . . . . . . . . . . . . . . . . . . . . . . . . . . . . . xiChapter 1: Introduction . . . . . . . . . . . . . . . . . . . . . . . . . . . . . . . . . . . . . . . . . . . . 1Introduction to ConnectNow Ledger and Payables . . . . . . . . . . . . . . . . . . . . . . . . . . . . . . . 1
Closed Accounting System . . . . . . . . . . . . . . . . . . . . . . . . . . . . . . . . . . . . . . . . . . . . . 1Reporting . . . . . . . . . . . . . . . . . . . . . . . . . . . . . . . . . . . . . . . . . . . . . . . . . . . . . . . . . 1Hosting . . . . . . . . . . . . . . . . . . . . . . . . . . . . . . . . . . . . . . . . . . . . . . . . . . . . . . . . . . . 1User Checklist . . . . . . . . . . . . . . . . . . . . . . . . . . . . . . . . . . . . . . . . . . . . . . . . . . . . . . 2Training . . . . . . . . . . . . . . . . . . . . . . . . . . . . . . . . . . . . . . . . . . . . . . . . . . . . . . . . . . 2Functionality and Privileges . . . . . . . . . . . . . . . . . . . . . . . . . . . . . . . . . . . . . . . . . . . . . 2Data Conversions . . . . . . . . . . . . . . . . . . . . . . . . . . . . . . . . . . . . . . . . . . . . . . . . . . . . 2Cash or Accrual? . . . . . . . . . . . . . . . . . . . . . . . . . . . . . . . . . . . . . . . . . . . . . . . . . . . . 2
System Requirements . . . . . . . . . . . . . . . . . . . . . . . . . . . . . . . . . . . . . . . . . . . . . . . . . . . 3Automatic Logoff of Inactive User Sessions . . . . . . . . . . . . . . . . . . . . . . . . . . . . . . . . . . . . 4Contacting Us . . . . . . . . . . . . . . . . . . . . . . . . . . . . . . . . . . . . . . . . . . . . . . . . . . . . . . . . . 4About This Guide. . . . . . . . . . . . . . . . . . . . . . . . . . . . . . . . . . . . . . . . . . . . . . . . . . . . . . . 4Logging In . . . . . . . . . . . . . . . . . . . . . . . . . . . . . . . . . . . . . . . . . . . . . . . . . . . . . . . . . . . 4
Forgot Password . . . . . . . . . . . . . . . . . . . . . . . . . . . . . . . . . . . . . . . . . . . . . . . . . . . . 5Changing Your Password . . . . . . . . . . . . . . . . . . . . . . . . . . . . . . . . . . . . . . . . . . . . . . 5Allowing Pop-Up Windows and Menus . . . . . . . . . . . . . . . . . . . . . . . . . . . . . . . . . . . . . 6Enabling Cookies and Activating JavaScript. . . . . . . . . . . . . . . . . . . . . . . . . . . . . . . . . . 6Bookmarking the ConnectNow Accounting Website . . . . . . . . . . . . . . . . . . . . . . . . . . . . 6
Navigating the System . . . . . . . . . . . . . . . . . . . . . . . . . . . . . . . . . . . . . . . . . . . . . . . . . . . 6Main Navigation Buttons . . . . . . . . . . . . . . . . . . . . . . . . . . . . . . . . . . . . . . . . . . . . . . . 7Ledger and Payables Dashboard . . . . . . . . . . . . . . . . . . . . . . . . . . . . . . . . . . . . . . . . . 7
Helpful Suggestions for Data Entry . . . . . . . . . . . . . . . . . . . . . . . . . . . . . . . . . . . . . . . . . . 8Tips . . . . . . . . . . . . . . . . . . . . . . . . . . . . . . . . . . . . . . . . . . . . . . . . . . . . . . . . . . . . . 8Keyboard Shortcuts . . . . . . . . . . . . . . . . . . . . . . . . . . . . . . . . . . . . . . . . . . . . . . . . . . 9
Getting Video Help . . . . . . . . . . . . . . . . . . . . . . . . . . . . . . . . . . . . . . . . . . . . . . . . . . . . 10Logging Out . . . . . . . . . . . . . . . . . . . . . . . . . . . . . . . . . . . . . . . . . . . . . . . . . . . . . . . . . 10
Chapter 2: Setting Up Projects, Preferences, and Vendor Information . . . . . . . . . . 11Introduction . . . . . . . . . . . . . . . . . . . . . . . . . . . . . . . . . . . . . . . . . . . . . . . . . . . . . . . . . 11Creating Project Groups and Projects . . . . . . . . . . . . . . . . . . . . . . . . . . . . . . . . . . . . . . . 11
Creating Project Groups . . . . . . . . . . . . . . . . . . . . . . . . . . . . . . . . . . . . . . . . . . . . . . 11Creating a Project . . . . . . . . . . . . . . . . . . . . . . . . . . . . . . . . . . . . . . . . . . . . . . . . . . 12
Managing Project Groups and Projects. . . . . . . . . . . . . . . . . . . . . . . . . . . . . . . . . . . . . . . 13Finding a Project Group . . . . . . . . . . . . . . . . . . . . . . . . . . . . . . . . . . . . . . . . . . . . . . 13Deleting a Project Group. . . . . . . . . . . . . . . . . . . . . . . . . . . . . . . . . . . . . . . . . . . . . . 14
i
ConnectNow AccountingLedger and Payables User Guide
Finding a Project . . . . . . . . . . . . . . . . . . . . . . . . . . . . . . . . . . . . . . . . . . . . . . . . . . . 14Deleting a Project . . . . . . . . . . . . . . . . . . . . . . . . . . . . . . . . . . . . . . . . . . . . . . . . . . 15
Setting User Preferences and Default Accounts . . . . . . . . . . . . . . . . . . . . . . . . . . . . . . . . 15Setting Up Vendor Payment Terms . . . . . . . . . . . . . . . . . . . . . . . . . . . . . . . . . . . . . . . . . 19
Finding a Vendor Term . . . . . . . . . . . . . . . . . . . . . . . . . . . . . . . . . . . . . . . . . . . . . . . 20Editing a Vendor Term . . . . . . . . . . . . . . . . . . . . . . . . . . . . . . . . . . . . . . . . . . . . . . . 20
Setting Up Vendor Types . . . . . . . . . . . . . . . . . . . . . . . . . . . . . . . . . . . . . . . . . . . . . . . . 21
Chapter 3: Creating and Managing Your Chart of Accounts . . . . . . . . . . . . . . . . . . 23Managing a Chart of Accounts . . . . . . . . . . . . . . . . . . . . . . . . . . . . . . . . . . . . . . . . . . . . 23Selecting Accounts and Adding Sub-Accounts. . . . . . . . . . . . . . . . . . . . . . . . . . . . . . . . . . 23Building Your Chart of Accounts . . . . . . . . . . . . . . . . . . . . . . . . . . . . . . . . . . . . . . . . . . . 25
Components of a Chart of Accounts . . . . . . . . . . . . . . . . . . . . . . . . . . . . . . . . . . . . . . 26Account Types . . . . . . . . . . . . . . . . . . . . . . . . . . . . . . . . . . . . . . . . . . . . . . . . . . . 26Entities . . . . . . . . . . . . . . . . . . . . . . . . . . . . . . . . . . . . . . . . . . . . . . . . . . . . . . . . 27Levels . . . . . . . . . . . . . . . . . . . . . . . . . . . . . . . . . . . . . . . . . . . . . . . . . . . . . . . . . 27Sub-accounts and Sub-Account Numbers . . . . . . . . . . . . . . . . . . . . . . . . . . . . . . . . 29Shortcut Numbers . . . . . . . . . . . . . . . . . . . . . . . . . . . . . . . . . . . . . . . . . . . . . . . . 29
Getting Help with a Conversion . . . . . . . . . . . . . . . . . . . . . . . . . . . . . . . . . . . . . . . . . 29Setting Up Entities (for Standalone Organizations Only) . . . . . . . . . . . . . . . . . . . . . . . . 30
Finding and Viewing Entity Details . . . . . . . . . . . . . . . . . . . . . . . . . . . . . . . . . . . . . 30Editing an Entity. . . . . . . . . . . . . . . . . . . . . . . . . . . . . . . . . . . . . . . . . . . . . . . . . . 31
Defining Account Code Levels (for standalone organizations only). . . . . . . . . . . . . . . . . 31Defining Levels for Asset, Liability and Net Assets . . . . . . . . . . . . . . . . . . . . . . . . . . 32Asset, Liability and Level 1 Examples . . . . . . . . . . . . . . . . . . . . . . . . . . . . . . . . . . . 34Defining Levels for Income, Expense, and Dedicated Accounts . . . . . . . . . . . . . . . . . 35Income, Expense and Dedicated Account Level Examples. . . . . . . . . . . . . . . . . . . . . 36
Adding a New Account . . . . . . . . . . . . . . . . . . . . . . . . . . . . . . . . . . . . . . . . . . . . . . . 41Organizations Consolidating to a Higher-Level Organization . . . . . . . . . . . . . . . . . . . 41Standalone Organizations . . . . . . . . . . . . . . . . . . . . . . . . . . . . . . . . . . . . . . . . . . . 41Check Number Ceiling. . . . . . . . . . . . . . . . . . . . . . . . . . . . . . . . . . . . . . . . . . . . . . 44About the Account Information Views. . . . . . . . . . . . . . . . . . . . . . . . . . . . . . . . . . . 44
Archiving an Account . . . . . . . . . . . . . . . . . . . . . . . . . . . . . . . . . . . . . . . . . . . . . . . . 45Finding an Account. . . . . . . . . . . . . . . . . . . . . . . . . . . . . . . . . . . . . . . . . . . . . . . . . . 46Changing the Sort Option for Quick Find . . . . . . . . . . . . . . . . . . . . . . . . . . . . . . . . . . 47Deleting an Account . . . . . . . . . . . . . . . . . . . . . . . . . . . . . . . . . . . . . . . . . . . . . . . . . 47Finding a Record in the Entire List of Accounts . . . . . . . . . . . . . . . . . . . . . . . . . . . . . . 47Designating an Asset Account as a Bank Account . . . . . . . . . . . . . . . . . . . . . . . . . . . . 48Designating Accounts for Accounts Payable (Accrual Systems only). . . . . . . . . . . . . . . . 49Designating a Liability Account for Credit Card Transactions . . . . . . . . . . . . . . . . . . . . . 50Designating a Release Account for GAAP Compliance Functionality . . . . . . . . . . . . . . . . 51
Setting a Beginning Balance . . . . . . . . . . . . . . . . . . . . . . . . . . . . . . . . . . . . . . . . . . . . . . 51Gathering Information . . . . . . . . . . . . . . . . . . . . . . . . . . . . . . . . . . . . . . . . . . . . . . . 51Creating a Beginning Balance Entry . . . . . . . . . . . . . . . . . . . . . . . . . . . . . . . . . . . . . . 53Finding and Viewing a Beginning Balance Entry. . . . . . . . . . . . . . . . . . . . . . . . . . . . . . 54Editing a Beginning Balance Entry . . . . . . . . . . . . . . . . . . . . . . . . . . . . . . . . . . . . . . . 55Deleting a Beginning Balance Entry . . . . . . . . . . . . . . . . . . . . . . . . . . . . . . . . . . . . . . 55
ii
Contents
Chapter 4: Managing Vendors . . . . . . . . . . . . . . . . . . . . . . . . . . . . . . . . . . . . . . 57Introduction . . . . . . . . . . . . . . . . . . . . . . . . . . . . . . . . . . . . . . . . . . . . . . . . . . . . . . . . . 57Adding a New Vendor . . . . . . . . . . . . . . . . . . . . . . . . . . . . . . . . . . . . . . . . . . . . . . . . . . 57
Adding a Vendor on the Vendor Information Page. . . . . . . . . . . . . . . . . . . . . . . . . . . . 58Adding a Vendor from the Bill Information Page . . . . . . . . . . . . . . . . . . . . . . . . . . . . . 60
Finding a Vendor . . . . . . . . . . . . . . . . . . . . . . . . . . . . . . . . . . . . . . . . . . . . . . . . . . . . . . 61Finding a Vendor on the Vendor Information Page . . . . . . . . . . . . . . . . . . . . . . . . . . . 61
Method 1 . . . . . . . . . . . . . . . . . . . . . . . . . . . . . . . . . . . . . . . . . . . . . . . . . . . . . . . 61Method 2 . . . . . . . . . . . . . . . . . . . . . . . . . . . . . . . . . . . . . . . . . . . . . . . . . . . . . . . 62
Finding a Vendor on the Bill Information Page . . . . . . . . . . . . . . . . . . . . . . . . . . . . . . 62Editing a Vendor’s Record . . . . . . . . . . . . . . . . . . . . . . . . . . . . . . . . . . . . . . . . . . . . . . . 62Setting Up Account Distributions . . . . . . . . . . . . . . . . . . . . . . . . . . . . . . . . . . . . . . . . . . . 62Specifying Printing Preferences for Checks Issued to a Vendor. . . . . . . . . . . . . . . . . . . . . . 64Specifying Default Text for the Check Memo . . . . . . . . . . . . . . . . . . . . . . . . . . . . . . . . . . 65Setting Up Print 1099 Forms for a Vendor . . . . . . . . . . . . . . . . . . . . . . . . . . . . . . . . . . . . 65Recording Information About a Vendor . . . . . . . . . . . . . . . . . . . . . . . . . . . . . . . . . . . . . . 67Deleting a Vendor . . . . . . . . . . . . . . . . . . . . . . . . . . . . . . . . . . . . . . . . . . . . . . . . . . . . . 68Merging Vendor Records . . . . . . . . . . . . . . . . . . . . . . . . . . . . . . . . . . . . . . . . . . . . . . . . 68
Chapter 5: Entering Bills . . . . . . . . . . . . . . . . . . . . . . . . . . . . . . . . . . . . . . . . . . 71Introduction . . . . . . . . . . . . . . . . . . . . . . . . . . . . . . . . . . . . . . . . . . . . . . . . . . . . . . . . . 71Creating a Bill . . . . . . . . . . . . . . . . . . . . . . . . . . . . . . . . . . . . . . . . . . . . . . . . . . . . . . . . 71Finding a Bill . . . . . . . . . . . . . . . . . . . . . . . . . . . . . . . . . . . . . . . . . . . . . . . . . . . . . . . . . 73Editing a Bill . . . . . . . . . . . . . . . . . . . . . . . . . . . . . . . . . . . . . . . . . . . . . . . . . . . . . . . . . 74
Deleting a Line Item. . . . . . . . . . . . . . . . . . . . . . . . . . . . . . . . . . . . . . . . . . . . . . . . . 75Adding More Line Items . . . . . . . . . . . . . . . . . . . . . . . . . . . . . . . . . . . . . . . . . . . . . . 75
Deleting a Bill . . . . . . . . . . . . . . . . . . . . . . . . . . . . . . . . . . . . . . . . . . . . . . . . . . . . . . . . 75Voiding a Bill. . . . . . . . . . . . . . . . . . . . . . . . . . . . . . . . . . . . . . . . . . . . . . . . . . . . . . . . . 75Paying a Bill On-the-Fly . . . . . . . . . . . . . . . . . . . . . . . . . . . . . . . . . . . . . . . . . . . . . . . . . 76Recording a Manual or Electronic Check. . . . . . . . . . . . . . . . . . . . . . . . . . . . . . . . . . . . . . 76Memorizing a Bill . . . . . . . . . . . . . . . . . . . . . . . . . . . . . . . . . . . . . . . . . . . . . . . . . . . . . . 77
Chapter 6: Creating and Printing Checks . . . . . . . . . . . . . . . . . . . . . . . . . . . . . . . 79Introduction . . . . . . . . . . . . . . . . . . . . . . . . . . . . . . . . . . . . . . . . . . . . . . . . . . . . . . . . . 79Customizing Check Layouts . . . . . . . . . . . . . . . . . . . . . . . . . . . . . . . . . . . . . . . . . . . . . . 79Printing Checks . . . . . . . . . . . . . . . . . . . . . . . . . . . . . . . . . . . . . . . . . . . . . . . . . . . . . . . 81Recording Handwritten or Electronic Checks. . . . . . . . . . . . . . . . . . . . . . . . . . . . . . . . . . . 85Making a Partial Bill Payment . . . . . . . . . . . . . . . . . . . . . . . . . . . . . . . . . . . . . . . . . . . . . 86Finding Checks and Viewing Transaction Details . . . . . . . . . . . . . . . . . . . . . . . . . . . . . . . . 87Voiding a Check . . . . . . . . . . . . . . . . . . . . . . . . . . . . . . . . . . . . . . . . . . . . . . . . . . . . . . 89Deleting a Check . . . . . . . . . . . . . . . . . . . . . . . . . . . . . . . . . . . . . . . . . . . . . . . . . . . . . . 90Spoiling a Check . . . . . . . . . . . . . . . . . . . . . . . . . . . . . . . . . . . . . . . . . . . . . . . . . . . . . . 91Changing Check Numbers . . . . . . . . . . . . . . . . . . . . . . . . . . . . . . . . . . . . . . . . . . . . . . . 92Using Positive Pay . . . . . . . . . . . . . . . . . . . . . . . . . . . . . . . . . . . . . . . . . . . . . . . . . . . . . 93
How Does Positive Pay Protection Work? . . . . . . . . . . . . . . . . . . . . . . . . . . . . . . . . . . 93
iii

ConnectNow AccountingLedger and Payables User Guide
Before You Begin . . . . . . . . . . . . . . . . . . . . . . . . . . . . . . . . . . . . . . . . . . . . . . . . . . . 94Overview of the Steps for Implementing Positive Pay . . . . . . . . . . . . . . . . . . . . . . . . . 94
Step 1: Enable Positive Pay for Your Organization . . . . . . . . . . . . . . . . . . . . . . . . . . 94Step 2: Set up Positive Pay . . . . . . . . . . . . . . . . . . . . . . . . . . . . . . . . . . . . . . . . . . 95Step 3. Create and Save a Check Issue File. . . . . . . . . . . . . . . . . . . . . . . . . . . . . . . 98Step 4. Submit the Check Issue File . . . . . . . . . . . . . . . . . . . . . . . . . . . . . . . . . . . . 99
Using Bill Pay . . . . . . . . . . . . . . . . . . . . . . . . . . . . . . . . . . . . . . . . . . . . . . . . . . . . . . . . 99Overview. . . . . . . . . . . . . . . . . . . . . . . . . . . . . . . . . . . . . . . . . . . . . . . . . . . . . . . . . 99Enabling Bill Pay . . . . . . . . . . . . . . . . . . . . . . . . . . . . . . . . . . . . . . . . . . . . . . . . . . 100Setting Up Bill Pay . . . . . . . . . . . . . . . . . . . . . . . . . . . . . . . . . . . . . . . . . . . . . . . . . 101Creating a Bill Pay Check . . . . . . . . . . . . . . . . . . . . . . . . . . . . . . . . . . . . . . . . . . . . 103Finding a Bill Pay Check . . . . . . . . . . . . . . . . . . . . . . . . . . . . . . . . . . . . . . . . . . . . . 106Viewing Bill Pay History . . . . . . . . . . . . . . . . . . . . . . . . . . . . . . . . . . . . . . . . . . . . . 108Voiding a Bill Pay Check . . . . . . . . . . . . . . . . . . . . . . . . . . . . . . . . . . . . . . . . . . . . . 109
Chapter 7: Recording Credit Card Transactions . . . . . . . . . . . . . . . . . . . . . . . . . 111Introduction . . . . . . . . . . . . . . . . . . . . . . . . . . . . . . . . . . . . . . . . . . . . . . . . . . . . . . . . 111Recording Credit Card Transactions. . . . . . . . . . . . . . . . . . . . . . . . . . . . . . . . . . . . . . . . 111Reconciling Your Credit Card Statement. . . . . . . . . . . . . . . . . . . . . . . . . . . . . . . . . . . . . 113
Viewing and Editing a Credit Card Reconciliation Statement . . . . . . . . . . . . . . . . . . . . 116Reconciled Accounts. . . . . . . . . . . . . . . . . . . . . . . . . . . . . . . . . . . . . . . . . . . . . . . . 117Creating a Reconciliation Report . . . . . . . . . . . . . . . . . . . . . . . . . . . . . . . . . . . . . . . 117
Paying a Credit Card Bill. . . . . . . . . . . . . . . . . . . . . . . . . . . . . . . . . . . . . . . . . . . . . . . . 118
Chapter 8: Processing Deposits . . . . . . . . . . . . . . . . . . . . . . . . . . . . . . . . . . . . 119Introduction . . . . . . . . . . . . . . . . . . . . . . . . . . . . . . . . . . . . . . . . . . . . . . . . . . . . . . . . 119Entering a Deposit. . . . . . . . . . . . . . . . . . . . . . . . . . . . . . . . . . . . . . . . . . . . . . . . . . . . 119Finding and Viewing a Deposit . . . . . . . . . . . . . . . . . . . . . . . . . . . . . . . . . . . . . . . . . . . 121Editing Deposit Information . . . . . . . . . . . . . . . . . . . . . . . . . . . . . . . . . . . . . . . . . . . . . 122
Deleting a Line Item. . . . . . . . . . . . . . . . . . . . . . . . . . . . . . . . . . . . . . . . . . . . . . . . 122Adding More Line Items . . . . . . . . . . . . . . . . . . . . . . . . . . . . . . . . . . . . . . . . . . . . . 122
Deleting a Deposit . . . . . . . . . . . . . . . . . . . . . . . . . . . . . . . . . . . . . . . . . . . . . . . . . . . . 123Importing Deposit Transactions . . . . . . . . . . . . . . . . . . . . . . . . . . . . . . . . . . . . . . . . . . 123
Downloading and Modifying a Deposit Transaction Import Template . . . . . . . . . . . . . . 123Importing Deposit Transactions . . . . . . . . . . . . . . . . . . . . . . . . . . . . . . . . . . . . . . . . 125
Chapter 9: Recording Journal Entries . . . . . . . . . . . . . . . . . . . . . . . . . . . . . . . . 127Introduction . . . . . . . . . . . . . . . . . . . . . . . . . . . . . . . . . . . . . . . . . . . . . . . . . . . . . . . . 127Debits and Credits . . . . . . . . . . . . . . . . . . . . . . . . . . . . . . . . . . . . . . . . . . . . . . . . . . . . 127Adding a Journal Entry. . . . . . . . . . . . . . . . . . . . . . . . . . . . . . . . . . . . . . . . . . . . . . . . . 128Automating Journal Entries with GAAP Compliance . . . . . . . . . . . . . . . . . . . . . . . . . . . . . 129Finding and Viewing a Journal Entry . . . . . . . . . . . . . . . . . . . . . . . . . . . . . . . . . . . . . . . 129Editing Journal Entry Information . . . . . . . . . . . . . . . . . . . . . . . . . . . . . . . . . . . . . . . . . 130
Deleting a Line Item. . . . . . . . . . . . . . . . . . . . . . . . . . . . . . . . . . . . . . . . . . . . . . . . 130Adding More Line Items . . . . . . . . . . . . . . . . . . . . . . . . . . . . . . . . . . . . . . . . . . . . . 131
Deleting a Journal Entry. . . . . . . . . . . . . . . . . . . . . . . . . . . . . . . . . . . . . . . . . . . . . . . . 131
iv
Contents
Creating a Reversing Journal Entry . . . . . . . . . . . . . . . . . . . . . . . . . . . . . . . . . . . . . . . . 131Importing Payroll Data as a Journal Entry . . . . . . . . . . . . . . . . . . . . . . . . . . . . . . . . . . . 133
Before You Begin . . . . . . . . . . . . . . . . . . . . . . . . . . . . . . . . . . . . . . . . . . . . . . . . . . 133Downloading and Modifying a Payroll Import Template . . . . . . . . . . . . . . . . . . . . . . . 133Importing a Payroll Data File . . . . . . . . . . . . . . . . . . . . . . . . . . . . . . . . . . . . . . . . . . 136
Importing Journal Entries . . . . . . . . . . . . . . . . . . . . . . . . . . . . . . . . . . . . . . . . . . . . . . . 137Downloading and Modifying a Journal Entry Import Template . . . . . . . . . . . . . . . . . . 137Importing a Journal Entry . . . . . . . . . . . . . . . . . . . . . . . . . . . . . . . . . . . . . . . . . . . . 139
Chapter 10: Memorizing Transactions . . . . . . . . . . . . . . . . . . . . . . . . . . . . . . . . 141Introduction . . . . . . . . . . . . . . . . . . . . . . . . . . . . . . . . . . . . . . . . . . . . . . . . . . . . . . . . 141Memorizing a Transaction . . . . . . . . . . . . . . . . . . . . . . . . . . . . . . . . . . . . . . . . . . . . . . 141Viewing and Editing Memorized Transactions . . . . . . . . . . . . . . . . . . . . . . . . . . . . . . . . . 142Deleting a Memorized Transaction . . . . . . . . . . . . . . . . . . . . . . . . . . . . . . . . . . . . . . . . 143Creating New Transaction Entries from Memorized Transactions . . . . . . . . . . . . . . . . . . . 143Viewing and Editing Entries Created from Memorized Transactions. . . . . . . . . . . . . . . . . . 145
Chapter 11: Creating Due To/From Accounts . . . . . . . . . . . . . . . . . . . . . . . . . . . 147Introduction . . . . . . . . . . . . . . . . . . . . . . . . . . . . . . . . . . . . . . . . . . . . . . . . . . . . . . . . 147Due To/From Example . . . . . . . . . . . . . . . . . . . . . . . . . . . . . . . . . . . . . . . . . . . . . . . . . 147Due To/From Accounting Permissions . . . . . . . . . . . . . . . . . . . . . . . . . . . . . . . . . . . . . . 149Setting Up Due To/From Accounting . . . . . . . . . . . . . . . . . . . . . . . . . . . . . . . . . . . . . . . 149
Step 1: Create a Due To/From Account or Designate an Existing Account . . . . . . . . . . 149Step 2: Activate the Due To/From Feature . . . . . . . . . . . . . . . . . . . . . . . . . . . . . . . . 150Step 3: Define the Due To/From Accounts . . . . . . . . . . . . . . . . . . . . . . . . . . . . . . . . 151
How the Application Processes Due To/From Transactions . . . . . . . . . . . . . . . . . . . . . . . 153Statement of Financial Position . . . . . . . . . . . . . . . . . . . . . . . . . . . . . . . . . . . . . . . . . . . 153Deactivating the Due To/From Accounting Feature . . . . . . . . . . . . . . . . . . . . . . . . . . . . . 153Due To/From Audit Report . . . . . . . . . . . . . . . . . . . . . . . . . . . . . . . . . . . . . . . . . . . . . . 154
Chapter 12: Performing End-of-Period Processing. . . . . . . . . . . . . . . . . . . . . . . . 155About End-of-Period Processing . . . . . . . . . . . . . . . . . . . . . . . . . . . . . . . . . . . . . . . . . . 155Reconciling Bank Accounts . . . . . . . . . . . . . . . . . . . . . . . . . . . . . . . . . . . . . . . . . . . . . . 155
First Reconciliation After a New Data Conversion. . . . . . . . . . . . . . . . . . . . . . . . . . . . 156Reconciling a New Bank Statement . . . . . . . . . . . . . . . . . . . . . . . . . . . . . . . . . . . . . 156Viewing and Editing a Bank Reconciliation Statement . . . . . . . . . . . . . . . . . . . . . . . . 159Reconciled Accounts. . . . . . . . . . . . . . . . . . . . . . . . . . . . . . . . . . . . . . . . . . . . . . . . 160Creating a Reconciliation Report . . . . . . . . . . . . . . . . . . . . . . . . . . . . . . . . . . . . . . . 160
End-of-Month Reports . . . . . . . . . . . . . . . . . . . . . . . . . . . . . . . . . . . . . . . . . . . . . . . . . 161End-of-Fiscal-Year Reports . . . . . . . . . . . . . . . . . . . . . . . . . . . . . . . . . . . . . . . . . . . . . . 163Closing a Fiscal Year . . . . . . . . . . . . . . . . . . . . . . . . . . . . . . . . . . . . . . . . . . . . . . . . . . 164
Chapter 13: Managing Budgets. . . . . . . . . . . . . . . . . . . . . . . . . . . . . . . . . . . . . 167Creating Your First Budget . . . . . . . . . . . . . . . . . . . . . . . . . . . . . . . . . . . . . . . . . . . . . . 167Doing Subsequent Annual Budgets . . . . . . . . . . . . . . . . . . . . . . . . . . . . . . . . . . . . . . . . 168
Running a Monthly Budget/History Report . . . . . . . . . . . . . . . . . . . . . . . . . . . . . . . . 168
v

ConnectNow AccountingLedger and Payables User Guide
Running a Budget Worksheet Report . . . . . . . . . . . . . . . . . . . . . . . . . . . . . . . . . . . . 169Determining the Best Starting Point for Your Budget . . . . . . . . . . . . . . . . . . . . . . . . . 171
Current Year Budget Options . . . . . . . . . . . . . . . . . . . . . . . . . . . . . . . . . . . . . . . . 171Next Year Budget Options . . . . . . . . . . . . . . . . . . . . . . . . . . . . . . . . . . . . . . . . . . 171Next Year +1 Budget Options . . . . . . . . . . . . . . . . . . . . . . . . . . . . . . . . . . . . . . . 171
Choosing a Starting Point . . . . . . . . . . . . . . . . . . . . . . . . . . . . . . . . . . . . . . . . . . . . 172Changing Budget Amounts by Percentage . . . . . . . . . . . . . . . . . . . . . . . . . . . . . . . . 173Editing Budget Amounts . . . . . . . . . . . . . . . . . . . . . . . . . . . . . . . . . . . . . . . . . . . . . 174Locking and Unlocking Budgets . . . . . . . . . . . . . . . . . . . . . . . . . . . . . . . . . . . . . . . . 175
Locking a Budget . . . . . . . . . . . . . . . . . . . . . . . . . . . . . . . . . . . . . . . . . . . . . . . . 175Unlocking a Budget. . . . . . . . . . . . . . . . . . . . . . . . . . . . . . . . . . . . . . . . . . . . . . . 176
Chapter 14: Importing Contributions . . . . . . . . . . . . . . . . . . . . . . . . . . . . . . . . . 177Introduction . . . . . . . . . . . . . . . . . . . . . . . . . . . . . . . . . . . . . . . . . . . . . . . . . . . . . . . . 177Importing ParishSOFT Offering or LOGOS II Contributions. . . . . . . . . . . . . . . . . . . . . . . . 177Importing CMS Contributions . . . . . . . . . . . . . . . . . . . . . . . . . . . . . . . . . . . . . . . . . . . . 179
Chapter 15: Creating Reports . . . . . . . . . . . . . . . . . . . . . . . . . . . . . . . . . . . . . . 181Introduction . . . . . . . . . . . . . . . . . . . . . . . . . . . . . . . . . . . . . . . . . . . . . . . . . . . . . . . . 181Viewing Reports . . . . . . . . . . . . . . . . . . . . . . . . . . . . . . . . . . . . . . . . . . . . . . . . . . . . . 181Standard Reports . . . . . . . . . . . . . . . . . . . . . . . . . . . . . . . . . . . . . . . . . . . . . . . . . . . . 182
Transactions . . . . . . . . . . . . . . . . . . . . . . . . . . . . . . . . . . . . . . . . . . . . . . . . . . . . . 182Statements . . . . . . . . . . . . . . . . . . . . . . . . . . . . . . . . . . . . . . . . . . . . . . . . . . . . . . 183Accounts . . . . . . . . . . . . . . . . . . . . . . . . . . . . . . . . . . . . . . . . . . . . . . . . . . . . . . . . 183Vendors . . . . . . . . . . . . . . . . . . . . . . . . . . . . . . . . . . . . . . . . . . . . . . . . . . . . . . . . 184Budget/History. . . . . . . . . . . . . . . . . . . . . . . . . . . . . . . . . . . . . . . . . . . . . . . . . . . . 184Analytic Reports. . . . . . . . . . . . . . . . . . . . . . . . . . . . . . . . . . . . . . . . . . . . . . . . . . . 184Configuring a Report . . . . . . . . . . . . . . . . . . . . . . . . . . . . . . . . . . . . . . . . . . . . . . . 185
Report Configuration and Filter Options . . . . . . . . . . . . . . . . . . . . . . . . . . . . . . . . . . . . . 186Date Options . . . . . . . . . . . . . . . . . . . . . . . . . . . . . . . . . . . . . . . . . . . . . . . . . . . . . 186Standard Statement Reports and All Other Reports . . . . . . . . . . . . . . . . . . . . . . . . . . 186Entity Options . . . . . . . . . . . . . . . . . . . . . . . . . . . . . . . . . . . . . . . . . . . . . . . . . . . . 186Level Options. . . . . . . . . . . . . . . . . . . . . . . . . . . . . . . . . . . . . . . . . . . . . . . . . . . . . 187Print Columns . . . . . . . . . . . . . . . . . . . . . . . . . . . . . . . . . . . . . . . . . . . . . . . . . . . . 188Group Section and Sorting Options . . . . . . . . . . . . . . . . . . . . . . . . . . . . . . . . . . . . . 188Report Format Options . . . . . . . . . . . . . . . . . . . . . . . . . . . . . . . . . . . . . . . . . . . . . . 189Report Printing Options . . . . . . . . . . . . . . . . . . . . . . . . . . . . . . . . . . . . . . . . . . . . . 189Report Subtitle. . . . . . . . . . . . . . . . . . . . . . . . . . . . . . . . . . . . . . . . . . . . . . . . . . . . 191Report Notes . . . . . . . . . . . . . . . . . . . . . . . . . . . . . . . . . . . . . . . . . . . . . . . . . . . . . 191Resetting Report Criteria. . . . . . . . . . . . . . . . . . . . . . . . . . . . . . . . . . . . . . . . . . . . . 192Report Viewer . . . . . . . . . . . . . . . . . . . . . . . . . . . . . . . . . . . . . . . . . . . . . . . . . . . . 192
Memorized Report Groups . . . . . . . . . . . . . . . . . . . . . . . . . . . . . . . . . . . . . . . . . . . . . . 193Memorizing a Report . . . . . . . . . . . . . . . . . . . . . . . . . . . . . . . . . . . . . . . . . . . . . . . 193Printing a Memorized Report Group . . . . . . . . . . . . . . . . . . . . . . . . . . . . . . . . . . . . . 194
vi

Contents
Renaming a Memorized Report . . . . . . . . . . . . . . . . . . . . . . . . . . . . . . . . . . . . . . . . 194Editing Memorized Reports . . . . . . . . . . . . . . . . . . . . . . . . . . . . . . . . . . . . . . . . . . . 194
Exporting Reports . . . . . . . . . . . . . . . . . . . . . . . . . . . . . . . . . . . . . . . . . . . . . . . . . . . . 195Vendor 1099s . . . . . . . . . . . . . . . . . . . . . . . . . . . . . . . . . . . . . . . . . . . . . . . . . . . . . . . 196
Setting Up 1099 Payer Information . . . . . . . . . . . . . . . . . . . . . . . . . . . . . . . . . . . . . 196Reviewing 1099s . . . . . . . . . . . . . . . . . . . . . . . . . . . . . . . . . . . . . . . . . . . . . . . . . . 197Printing 1099s . . . . . . . . . . . . . . . . . . . . . . . . . . . . . . . . . . . . . . . . . . . . . . . . . . . . 198
Chapter 16: Integrating with Other Applications . . . . . . . . . . . . . . . . . . . . . . . . . 199Smart Tuition . . . . . . . . . . . . . . . . . . . . . . . . . . . . . . . . . . . . . . . . . . . . . . . . . . . . . . . 199
Chapter 17: Managing the System and User Accounts . . . . . . . . . . . . . . . . . . . . 201Introduction . . . . . . . . . . . . . . . . . . . . . . . . . . . . . . . . . . . . . . . . . . . . . . . . . . . . . . . . 201Managing Users . . . . . . . . . . . . . . . . . . . . . . . . . . . . . . . . . . . . . . . . . . . . . . . . . . . . . 201
Adding a New User. . . . . . . . . . . . . . . . . . . . . . . . . . . . . . . . . . . . . . . . . . . . . . . . . 201Resetting a User's Password . . . . . . . . . . . . . . . . . . . . . . . . . . . . . . . . . . . . . . . . . . 203Deactivating a User’s Account . . . . . . . . . . . . . . . . . . . . . . . . . . . . . . . . . . . . . . . . . 203
Understanding Entity-Level Permissions. . . . . . . . . . . . . . . . . . . . . . . . . . . . . . . . . . . . . 204Level 1 Entity-Level Permissions . . . . . . . . . . . . . . . . . . . . . . . . . . . . . . . . . . . . . . . 204
Turning On Level 1 Entity Permissions . . . . . . . . . . . . . . . . . . . . . . . . . . . . . . . . . 204Level 2 Entity-Level Permissions . . . . . . . . . . . . . . . . . . . . . . . . . . . . . . . . . . . . . . . 204
Understanding the Effects of Level 2 Entity Permissions . . . . . . . . . . . . . . . . . . . . 205Turning On Entity-Level Restrictions . . . . . . . . . . . . . . . . . . . . . . . . . . . . . . . . . . . 210
Limiting a Church User’s Account Access by Entity. . . . . . . . . . . . . . . . . . . . . . . . . . . 211Disabling the Beginning Balance Feature . . . . . . . . . . . . . . . . . . . . . . . . . . . . . . . . . . . . 214Auditing Transactions . . . . . . . . . . . . . . . . . . . . . . . . . . . . . . . . . . . . . . . . . . . . . . . . . 215Using the Primary and Subsidiary Bank Account Feature . . . . . . . . . . . . . . . . . . . . . . . . . 216
Understanding Primary and Subsidiary Bank Accounts . . . . . . . . . . . . . . . . . . . . . . . . 216Globally Activating the Primary and Subsidiary Bank Account Feature . . . . . . . . . . . . . 217Setting Up a Primary Bank Account with Subsidiary Bank Accounts . . . . . . . . . . . . . . . 217
Before You Begin . . . . . . . . . . . . . . . . . . . . . . . . . . . . . . . . . . . . . . . . . . . . . . . . 217Organizations Consolidating to a Higher-Level Organization . . . . . . . . . . . . . . . . . . 218Standalone Organizations or Organizations Allowed to Add Sub-Accounts . . . . . . . . 221
Enabling the Primary and Subsidiary Bank Accounts Option . . . . . . . . . . . . . . . . . . . . 223Setting Up Your ConnectNow Accounting System . . . . . . . . . . . . . . . . . . . . . . . . . . . 223Entering Bills . . . . . . . . . . . . . . . . . . . . . . . . . . . . . . . . . . . . . . . . . . . . . . . . . . . . . 228Creating Checks . . . . . . . . . . . . . . . . . . . . . . . . . . . . . . . . . . . . . . . . . . . . . . . . . . . 231Entering Deposits. . . . . . . . . . . . . . . . . . . . . . . . . . . . . . . . . . . . . . . . . . . . . . . . . . 232Reconciling Your Primary Bank Account . . . . . . . . . . . . . . . . . . . . . . . . . . . . . . . . . . 233Viewing Transaction Activity for Primary and Subsidiary Bank Accounts . . . . . . . . . . . . 235
Using the GAAP Compliance Feature . . . . . . . . . . . . . . . . . . . . . . . . . . . . . . . . . . . . . . . 236Understanding How GAAP Compliant Accounts Work . . . . . . . . . . . . . . . . . . . . . . . . . 236
Account Restriction Type Definitions. . . . . . . . . . . . . . . . . . . . . . . . . . . . . . . . . . . 237Conditions for the GAAP Compliance Option . . . . . . . . . . . . . . . . . . . . . . . . . . . . . 237Impact on Dedicated Accounts. . . . . . . . . . . . . . . . . . . . . . . . . . . . . . . . . . . . . . . 238
GAAP in Consolidated Group Implementations . . . . . . . . . . . . . . . . . . . . . . . . . . . . . 238
vii

ConnectNow AccountingLedger and Payables User Guide
viii
Reporting with GAAP Compliance. . . . . . . . . . . . . . . . . . . . . . . . . . . . . . . . . . . . . . . 238Consolidation-Level Reporting . . . . . . . . . . . . . . . . . . . . . . . . . . . . . . . . . . . . . . . 238Organization-Level Reporting. . . . . . . . . . . . . . . . . . . . . . . . . . . . . . . . . . . . . . . . 239
Activating the GAAP Compliance Feature . . . . . . . . . . . . . . . . . . . . . . . . . . . . . . . . . 239Before You Begin . . . . . . . . . . . . . . . . . . . . . . . . . . . . . . . . . . . . . . . . . . . . . . . . 239Permissions Required to Activate GAAP Compliance and Set Up Release Accounts . . 240
Process Overview. . . . . . . . . . . . . . . . . . . . . . . . . . . . . . . . . . . . . . . . . . . . . . . . . . 240GAAP Compliance Setup for Consolidation Manager Users . . . . . . . . . . . . . . . . . . . . . 240GAAP Compliance Setup for Organizations without Dedicated Accounts . . . . . . . . . . . . 241
Activating the GAAP Compliance Function . . . . . . . . . . . . . . . . . . . . . . . . . . . . . . . 241Setting Up Restricted and Unrestricted Income Release Accounts . . . . . . . . . . . . . . 241Using GAAP with your Bills, Deposits, and Checks . . . . . . . . . . . . . . . . . . . . . . . . . 243
GAAP Compliance Setup for Organizations with Dedicated Accounts . . . . . . . . . . . . . . 243Step 1: Set Up Restricted and Unrestricted Release Accounts . . . . . . . . . . . . . . . . . 244Step 2: Transfer Balances and Archive Dedicated Accounts. . . . . . . . . . . . . . . . . . . 245Step 3: Activate the GAAP Compliance Function . . . . . . . . . . . . . . . . . . . . . . . . . . 249Step 4: Set Release Account Restriction Option . . . . . . . . . . . . . . . . . . . . . . . . . . . 249
Viewing a List of GAAP Release Accounts . . . . . . . . . . . . . . . . . . . . . . . . . . . . . . . . . 251Managing Bills, Deposits, and Checks with GAAP Compliance . . . . . . . . . . . . . . . . . . . 252
Entering a Restricted Bill . . . . . . . . . . . . . . . . . . . . . . . . . . . . . . . . . . . . . . . . . . . 252Submitting the Journal Entry Automatically Created from Bill . . . . . . . . . . . . . . . . . 253Entering a Deposit to a Restricted Account . . . . . . . . . . . . . . . . . . . . . . . . . . . . . . 254Voiding a Restricted Bill or Check . . . . . . . . . . . . . . . . . . . . . . . . . . . . . . . . . . . . . 255Deleting a Journal Entry . . . . . . . . . . . . . . . . . . . . . . . . . . . . . . . . . . . . . . . . . . . 256
Index . . . . . . . . . . . . . . . . . . . . . . . . . . . . . . . . . . . . . . . . . . . . . . . . . . . 1

List of Tables
Table Page
1 Keyboard Shortcuts . . . . . . . . . . . . . . . . . . . . . . . . . . . . . . . . . . . . . . . . . . . . . 92 Generally Accepted Accounting Numbers for Different Types of Accounts . . . . . . 293 Level 1 Descriptions for Asset, Liability, and Net Asset Accounts . . . . . . . . . . . . . 344 Level 1 - Category . . . . . . . . . . . . . . . . . . . . . . . . . . . . . . . . . . . . . . . . . . . . . 365 Level 2 - Cost Center . . . . . . . . . . . . . . . . . . . . . . . . . . . . . . . . . . . . . . . . . . . 366 Level 3 - Account . . . . . . . . . . . . . . . . . . . . . . . . . . . . . . . . . . . . . . . . . . . . . . 387 Descriptions of the Fields on the Account Information Page . . . . . . . . . . . . . . . . 428 Debits and Credits . . . . . . . . . . . . . . . . . . . . . . . . . . . . . . . . . . . . . . . . . . . . . 519 Descriptions of the Fields on the Vendor Information Page . . . . . . . . . . . . . . . . 5710 Descriptions of the Fields in the Check Issue File. . . . . . . . . . . . . . . . . . . . . . . . 9411 Effect of Debits and Credits on Various Types of Accounts . . . . . . . . . . . . . . . . 12512 Journal Entries for Due To/From Example. . . . . . . . . . . . . . . . . . . . . . . . . . . . 14613 Due To/From Accounting Details for Journal Entry Example . . . . . . . . . . . . . . . 14614 Due To/From Transaction Postings for Journal Entry Example . . . . . . . . . . . . . 146
ix

ConnectNow AccountingLedger and Payables User Guide
x
List of Figures
Figure Page
1 Navigation Buttons . . . . . . . . . . . . . . . . . . . . . . . . . . . . . . . . . . . . . . . . . . . . . . . . 72 Ledger and Payables Main Page. . . . . . . . . . . . . . . . . . . . . . . . . . . . . . . . . . . . . . . 83 Project Groups Setup . . . . . . . . . . . . . . . . . . . . . . . . . . . . . . . . . . . . . . . . . . . . . 114 Project Setup . . . . . . . . . . . . . . . . . . . . . . . . . . . . . . . . . . . . . . . . . . . . . . . . . . . 125 Project Group Search Page . . . . . . . . . . . . . . . . . . . . . . . . . . . . . . . . . . . . . . . . . 136 Project Search Page . . . . . . . . . . . . . . . . . . . . . . . . . . . . . . . . . . . . . . . . . . . . . . 147 Account Format and Default Accounts Setup. . . . . . . . . . . . . . . . . . . . . . . . . . . . . 158 Default Bank Account Setup: Cash System . . . . . . . . . . . . . . . . . . . . . . . . . . . . . . 179 Default Bank Account Setup: Accrual System . . . . . . . . . . . . . . . . . . . . . . . . . . . . 1810 Default Bank Account Setup: Primary and Subsidiary Accounting . . . . . . . . . . . . . . 1811 Vendor Terms Setup. . . . . . . . . . . . . . . . . . . . . . . . . . . . . . . . . . . . . . . . . . . . . . 1912 Vendor Types Setup . . . . . . . . . . . . . . . . . . . . . . . . . . . . . . . . . . . . . . . . . . . . . . 2113 Examples of Account Codes. . . . . . . . . . . . . . . . . . . . . . . . . . . . . . . . . . . . . . . . . 2614 ConnectNow Accounting Provides a Multi-level Account Code Structure . . . . . . . . . . 2715 Example of an Income Statement from a Small Organization . . . . . . . . . . . . . . . . . 2816 Example of a Multi-level Income Statement from a Larger Organization. . . . . . . . . . 2817 Entity Information Setup. . . . . . . . . . . . . . . . . . . . . . . . . . . . . . . . . . . . . . . . . . . 3018 Account Information Page. . . . . . . . . . . . . . . . . . . . . . . . . . . . . . . . . . . . . . . . . . 4119 Example of a Statement of Financial Position . . . . . . . . . . . . . . . . . . . . . . . . . . . . 5220 Beginning Balance Search Page . . . . . . . . . . . . . . . . . . . . . . . . . . . . . . . . . . . . . . 5421 Vendor Information Page . . . . . . . . . . . . . . . . . . . . . . . . . . . . . . . . . . . . . . . . . . 5822 New Vendor Setup . . . . . . . . . . . . . . . . . . . . . . . . . . . . . . . . . . . . . . . . . . . . . . . 6123 Vendor Distribution Page . . . . . . . . . . . . . . . . . . . . . . . . . . . . . . . . . . . . . . . . . . 6324 Vendor 1099/Checks Page. . . . . . . . . . . . . . . . . . . . . . . . . . . . . . . . . . . . . . . . . . 6425 Vendor Comments . . . . . . . . . . . . . . . . . . . . . . . . . . . . . . . . . . . . . . . . . . . . . . . 6726 Merge Vendors Page. . . . . . . . . . . . . . . . . . . . . . . . . . . . . . . . . . . . . . . . . . . . . . 6827 Bill Information Page . . . . . . . . . . . . . . . . . . . . . . . . . . . . . . . . . . . . . . . . . . . . . 7128 Memorize This Transaction Setup. . . . . . . . . . . . . . . . . . . . . . . . . . . . . . . . . . . . . 7829 Check Layout Setup . . . . . . . . . . . . . . . . . . . . . . . . . . . . . . . . . . . . . . . . . . . . . . 7930 Create Checks Page . . . . . . . . . . . . . . . . . . . . . . . . . . . . . . . . . . . . . . . . . . . . . . 8131 Print Checks Page . . . . . . . . . . . . . . . . . . . . . . . . . . . . . . . . . . . . . . . . . . . . . . . 8332 Check Search Page. . . . . . . . . . . . . . . . . . . . . . . . . . . . . . . . . . . . . . . . . . . . . . . 8733 Organization Options Page: Enable Positive Pay . . . . . . . . . . . . . . . . . . . . . . . . . . 9534 Setup Positive Pay for Bank Accounts . . . . . . . . . . . . . . . . . . . . . . . . . . . . . . . . . . 9635 Filter Positive Pay for Bank Accounts . . . . . . . . . . . . . . . . . . . . . . . . . . . . . . . . . . 9836 Organization Options Page: Enable Bill Pay Option . . . . . . . . . . . . . . . . . . . . . . . 10037 Setup Bill Pay Page. . . . . . . . . . . . . . . . . . . . . . . . . . . . . . . . . . . . . . . . . . . . . . 10138 Find Check Link on Create Checks Page . . . . . . . . . . . . . . . . . . . . . . . . . . . . . . . 10739 Bill Pay History Link on the Create Checks Page . . . . . . . . . . . . . . . . . . . . . . . . . 108
xi

ConnectNow AccountingLedger and Payables User Guide
40 Charge Information Page . . . . . . . . . . . . . . . . . . . . . . . . . . . . . . . . . . . . . . . . . 11141 Credit Card Statement Information Page . . . . . . . . . . . . . . . . . . . . . . . . . . . . . . 11342 Reconcile Credit Card Account Page . . . . . . . . . . . . . . . . . . . . . . . . . . . . . . . . . . 11443 Reconciled Credit Card Account . . . . . . . . . . . . . . . . . . . . . . . . . . . . . . . . . . . . . 11744 Deposit Information Page . . . . . . . . . . . . . . . . . . . . . . . . . . . . . . . . . . . . . . . . . 11945 Deposit Search Page. . . . . . . . . . . . . . . . . . . . . . . . . . . . . . . . . . . . . . . . . . . . . 12146 Journal Entry Information Page . . . . . . . . . . . . . . . . . . . . . . . . . . . . . . . . . . . . . 12847 Journal Entry Search Page . . . . . . . . . . . . . . . . . . . . . . . . . . . . . . . . . . . . . . . . 12948 Import Payroll Page . . . . . . . . . . . . . . . . . . . . . . . . . . . . . . . . . . . . . . . . . . . . . 13349 Journal Entry Information: Imported Payroll . . . . . . . . . . . . . . . . . . . . . . . . . . . . 13650 Journal Entry Information: Imported Journal Entry . . . . . . . . . . . . . . . . . . . . . . . 13951 Memorize Transaction Setup . . . . . . . . . . . . . . . . . . . . . . . . . . . . . . . . . . . . . . . 14152 Organization Options Page: Enable Due To/From Entity Processing Option . . . . . . 15053 Due To/ From Accounts Page . . . . . . . . . . . . . . . . . . . . . . . . . . . . . . . . . . . . . . 15154 Due To /From Entity Information Page . . . . . . . . . . . . . . . . . . . . . . . . . . . . . . . . 15255 Bank Statement Information Page . . . . . . . . . . . . . . . . . . . . . . . . . . . . . . . . . . . 15656 Reconciled Bank Account . . . . . . . . . . . . . . . . . . . . . . . . . . . . . . . . . . . . . . . . . 16057 Account Budget Filter . . . . . . . . . . . . . . . . . . . . . . . . . . . . . . . . . . . . . . . . . . . . 16758 Example of a Budget Worksheet for an Entity . . . . . . . . . . . . . . . . . . . . . . . . . . . 17059 Lock/Unlock Budgets . . . . . . . . . . . . . . . . . . . . . . . . . . . . . . . . . . . . . . . . . . . . 17560 Transfer Contributions Page . . . . . . . . . . . . . . . . . . . . . . . . . . . . . . . . . . . . . . . 17861 Standard and Memorized Report Groups. . . . . . . . . . . . . . . . . . . . . . . . . . . . . . . 18162 Reports in the Transactions Group . . . . . . . . . . . . . . . . . . . . . . . . . . . . . . . . . . . 18263 Reports in the Statements Group . . . . . . . . . . . . . . . . . . . . . . . . . . . . . . . . . . . . 18364 Reports in the Accounts Groups. . . . . . . . . . . . . . . . . . . . . . . . . . . . . . . . . . . . . 18365 Reports in the Vendors Group . . . . . . . . . . . . . . . . . . . . . . . . . . . . . . . . . . . . . . 18466 Reports in the Budget/History Group . . . . . . . . . . . . . . . . . . . . . . . . . . . . . . . . . 18467 Reports in the Analytic Reports Group . . . . . . . . . . . . . . . . . . . . . . . . . . . . . . . . 18468 Report Viewer . . . . . . . . . . . . . . . . . . . . . . . . . . . . . . . . . . . . . . . . . . . . . . . . . 19269 Descriptions of the Report Viewer Toolbar Buttons . . . . . . . . . . . . . . . . . . . . . . . 19270 1099 Payer Info Setup . . . . . . . . . . . . . . . . . . . . . . . . . . . . . . . . . . . . . . . . . . . 19671 User Information Page . . . . . . . . . . . . . . . . . . . . . . . . . . . . . . . . . . . . . . . . . . . 20172 Organization Options Page: Entity Level Restrictions Option . . . . . . . . . . . . . . . . . 21073 Example of Accounts List in Header (Top) Portion of the Bills Page . . . . . . . . . . . . 21174 Organization Options Page: Disable Beginning Balance . . . . . . . . . . . . . . . . . . . . 21475 Diagram of the Relationship between Primary and Subsidiary Bank Accounts . . . . . 21676 Chart of Accounts Window . . . . . . . . . . . . . . . . . . . . . . . . . . . . . . . . . . . . . . . . 21877 Primary and Subsidiary Bank Account Setup Window . . . . . . . . . . . . . . . . . . . . . . 22378 Process Unpaid Bills Window . . . . . . . . . . . . . . . . . . . . . . . . . . . . . . . . . . . . . . . 22579 Bill Information Window . . . . . . . . . . . . . . . . . . . . . . . . . . . . . . . . . . . . . . . . . . 22980 Deposit Information Page . . . . . . . . . . . . . . . . . . . . . . . . . . . . . . . . . . . . . . . . . 23281 Bank Statement Information Window . . . . . . . . . . . . . . . . . . . . . . . . . . . . . . . . . 23482 Dedicated Accounts Example Report . . . . . . . . . . . . . . . . . . . . . . . . . . . . . . . . . 24683 Project Setup . . . . . . . . . . . . . . . . . . . . . . . . . . . . . . . . . . . . . . . . . . . . . . . . . . 24784 Journal Entry Information Page . . . . . . . . . . . . . . . . . . . . . . . . . . . . . . . . . . . . . 24885 Read-only List of GAAP Release Accounts . . . . . . . . . . . . . . . . . . . . . . . . . . . . . . 25186 Restricted Bill Information Page with GAAP Account Restriction Field. . . . . . . . . . . 25287 Journal Entry Automatically Created from Restricted Account Bill . . . . . . . . . . . . . 253
xii

xiii
88 Bill Information Page with Associated Journal Entry Number. . . . . . . . . . . . . . . . . 25489 Deposit Information Page . . . . . . . . . . . . . . . . . . . . . . . . . . . . . . . . . . . . . . . . . 25590 Reverse Journal Entry Automatically Created with Voided Check or Bill . . . . . . . . . 25591 Reverse Journal Entry Detail . . . . . . . . . . . . . . . . . . . . . . . . . . . . . . . . . . . . . . . 256

Chapter 1Introduction
Introduction to ConnectNow Ledger and PayablesParishSOFT’s ConnectNow Ledger and Payables brings you a powerful, fully featured accounting system with the freedom of anytime, anywhere access, and the peace and security of tracking all users of the system.
As an online application, Ledger and Payables is the ideal solution for all churches, whether their account-ing systems stand alone or are connected to a higher-level organization’s financials. For those churches that must compile reports for their higher-level organizations, Ledger and Payables can greatly reduce the hours spent compiling reports and tying out financials from separate accounting systems.
Your business manager or administrator will appreciate using the powerful Dashboard summary of live activity to quickly identify problems and make adjustments. Its secure, web-browser interface is easy for anyone in your organization to use. In addition, seamless integration of records from ParishSOFT’s Offer-ing and Pledges Module is available.
The ConnectNow Accounting family includes Ledger and Payables, Payroll, Accounts Receivable, and an upcoming module, Ledger Report Writer.
Closed Accounting SystemLedger and Payables complies with Financial Accounting Standards Board (FASB) requirements for closed accounting systems to help you safeguard your financials. No edits are allowed to saved entries in a closed period, and changes to entries are tracked in a log file. See “Functionality and Privileges” on page 2 for more information.
ReportingLedger and Payables offers full reporting on historical data for all prior years, so you can quickly access the records you need at any time. You can even work in next year’s file without having to close the prior year.
Its web-browser interface makes it easy for anyone in your organization to use. Any time you need to see what makes up any number from the financial report, just double-click and view the transactions—no lengthy searching is required.
HostingParishSOFT hosts your data for you. This enables ParishSOFT to update and backup your system automatically.
1

ConnectNow AccountingLedger and Payables User Guide
User ChecklistBefore you can access records on the ConnectNow Accounting Ledger and Payables website, you needthe following:
• Your organization’s secure web address • A valid login (that is, a correct username and password).
TrainingParishSOFT offers classes in two convenient formats: virtual classroom and on site. Each class is taught by an experienced ParishSOFT instructor and conducted in a hands-on format that is designed to help you get comfortable with the Ledger and Payables software quickly.
Functionality and PrivilegesBecause this guide covers functionality for both standalone accounting systems and those hosted by higher-level organizations, some of the options illustrated may not be available to you. Login-based system privilege settings may also render certain functions unavailable to your user account.
Ledger and Payables provides five different system privilege levels: diocesan administrator, diocesan user, consolidation user, church administrator, and church user. The diocesan administrator can do a journal entry to a closed month and can extend that capability to other users as necessary (if hosted by a higher-level organization, permission must first be granted at the consolidation level).
Contact your organization’s Ledger and Payables administrator to request additional system privileges.
Data ConversionsSome churches that use Ledger and Payables choose to have ParishSOFT convert their old accounting data in order to get started right away without re-keying any historical records. If your church wants to request a data conversion, contact our team of experts at [email protected] or 866-930-4774 x2.
Cash or Accrual?The ConnectNow Accounting system allows you to set up your accounting system using either cash or accrual accounting methods.
• Cash Accounting: recognizes both income and expenses at the time when money is received or paid.
• Accrual Accounting: recognizes income at the time money is earned and expenses at the time they are incurred, even though they may not yet have been received or actually paid in cash.
If your higher-level organization requires and requests a specific accounting method, the ConnectNow Accounting system will be configured as requested by your higher-level organization. If your data is being converted from another application, the accounting method will be converted as well.
If you are not converting your data and your higher-level organization does not requiring a specific accounting method, be sure to inform your account representative which accounting method you prefer. Systems are configured for cash accounting if no method is specified.
2
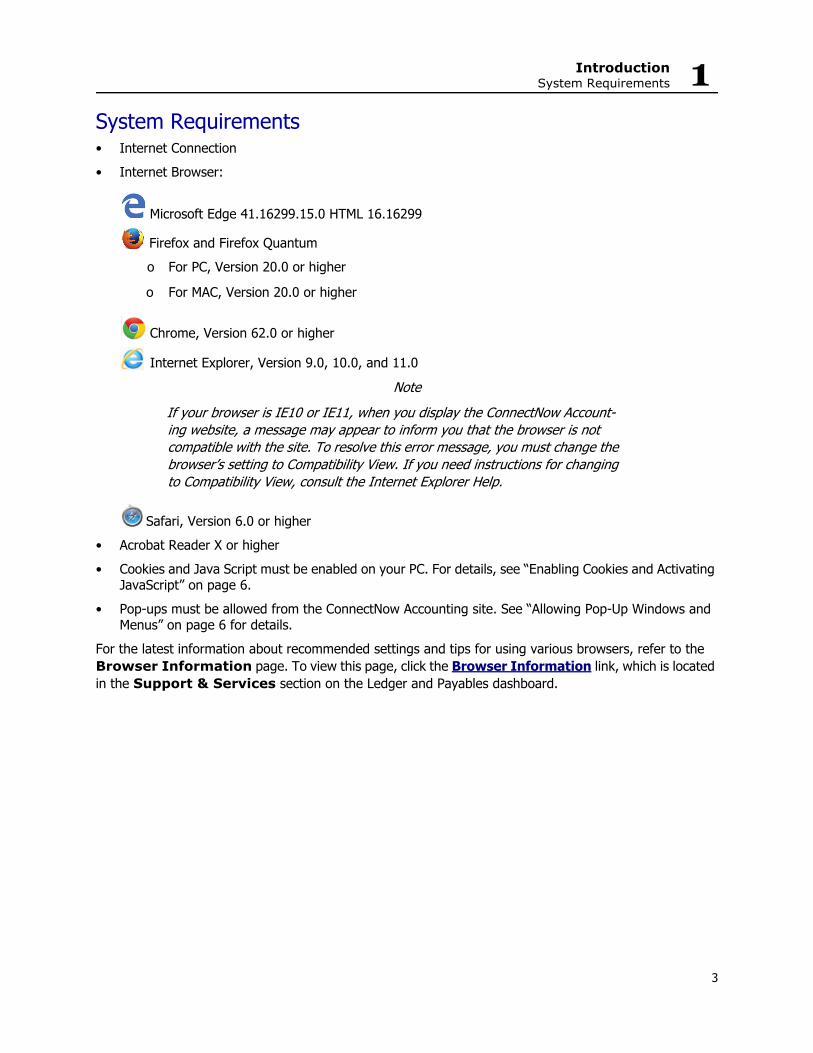
IntroductionSystem Requirements 1
System Requirements• Internet Connection• Internet Browser:
Microsoft Edge 41.16299.15.0 HTML 16.16299
Firefox and Firefox Quantumo For PC, Version 20.0 or higher
o For MAC, Version 20.0 or higher
Chrome, Version 62.0 or higher
Internet Explorer, Version 9.0, 10.0, and 11.0
NoteIf your browser is IE10 or IE11, when you display the ConnectNow Account-ing website, a message may appear to inform you that the browser is not compatible with the site. To resolve this error message, you must change the browser’s setting to Compatibility View. If you need instructions for changing to Compatibility View, consult the Internet Explorer Help.
Safari, Version 6.0 or higher• Acrobat Reader X or higher• Cookies and Java Script must be enabled on your PC. For details, see “Enabling Cookies and Activating
JavaScript” on page 6.• Pop-ups must be allowed from the ConnectNow Accounting site. See “Allowing Pop-Up Windows and
Menus” on page 6 for details.For the latest information about recommended settings and tips for using various browsers, refer to the Browser Information page. To view this page, click the Browser Information link, which is located in the Support & Services section on the Ledger and Payables dashboard.
3

ConnectNow AccountingLedger and Payables User Guide
Automatic Logoff of Inactive User SessionsFor security purposes, a user’s session logs off after 45 minutes of inactivity. The system defines an inac-tive user as one who has not performed any of the following actions during the 45-minute time period:
• Submitted or saved a transaction• Refreshed the page• Navigated to another page in the applicationIf the user is in the middle of entering a transaction, the user’s session does not log off. After the user sub-mits or saves the transaction, or after the user refreshes or leaves the page, the user’s session then logs off.
After a user is logged off, the system displays the following message: Logged off due to inactivity
To log in again, the user must re-enter his or her login credentials.
Contacting UsIf you have questions about ConnectNow Accounting or need support while using the application, use any of the following methods to contact us:
About This GuideThis guide documents the features and functionality of the Ledger and Payables application using simple, task-based instructions to show you how to use features that help you efficiently manage your chart of accounts, track and pay bills, issue checks, record deposits, make journal entries, and much more.
The examples shown in this manual use demonstration data and do not represent the actual records of any organization.
Logging In1. Open your web browser application (for example, Mozilla Firefox or Internet Explorer).
2. In the browser’s address field, type your Ledger and Payables secure (https) address.
3. Type the login credentials (username and password) provided by your organization administrator.
4. Click to display the website’s Home page.
Web www.parishsoft.com
Email [email protected]@parishsoft.com
Phone (734) 205-1000 (main)(866) 930-4774 (support)
Fax (734) 205-1011
4
IntroductionLogging In 1
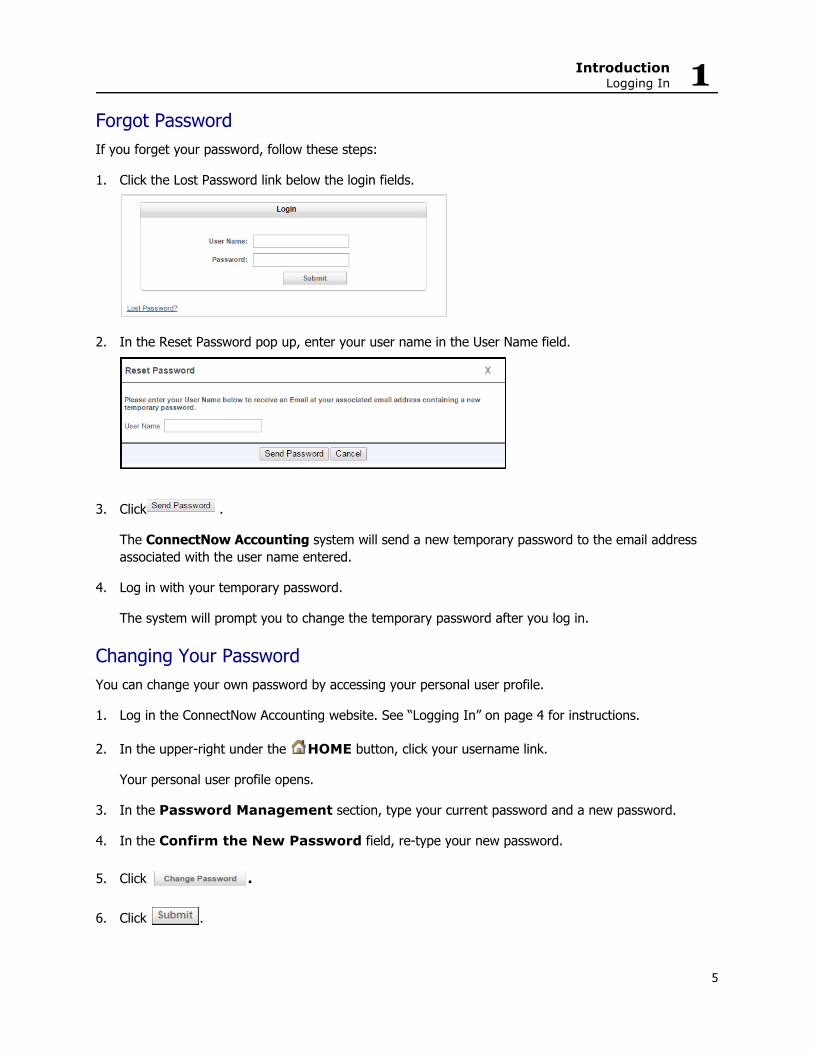
Forgot PasswordIf you forget your password, follow these steps:
1. Click the Lost Password link below the login fields.
2. In the Reset Password pop up, enter your user name in the User Name field.
3. Click .
The ConnectNow Accounting system will send a new temporary password to the email address associated with the user name entered.
4. Log in with your temporary password.
The system will prompt you to change the temporary password after you log in.
Changing Your PasswordYou can change your own password by accessing your personal user profile.
1. Log in the ConnectNow Accounting website. See “Logging In” on page 4 for instructions.
2. In the upper-right under the HOME button, click your username link.
Your personal user profile opens.
3. In the Password Management section, type your current password and a new password.
4. In the Confirm the New Password field, re-type your new password.
5. Click .
6. Click .
5
ConnectNow AccountingLedger and Payables User Guide
Your password is now changed.
Allowing Pop-Up Windows and MenusPop-up windows (or menus) are special types of windows that display when you click a button or select an option with the mouse. They give you quick access to the application’s functions. To use the ConnectNow website, you must allow pop-up windows and menus to display. If they cannot display, you may have trou-ble viewing pages or using certain features in the application.
By default, some browsers block pop-up windows. All browsers, however, contain an option that enables you to control whether or not pop-up windows can display. If you receive a message to inform you that pop-up windows are blocked, you must change the browser’s pop-up window’s setting to allow them. To find out how to allow pop-up windows to display in your browser, consult your browser’s Help.
Enabling Cookies and Activating JavaScriptYou must enable cookies and activate JavaScript on your computer. Failure to do so can cause the applica-tion not to function correctly and can prevent you for being able to use certain features. Javascript enhances the way functions, such as menus, forms, and buttons, work thereby providing a more enjoyable experience.
If the website reports that cookies are blocked, you need to unblock them. If, for some reason, JavaScript is disabled, you must enable your browser to use it. See your browser’s Help for instructions.
Bookmarking the ConnectNow Accounting Website Instead of memorizing the address of the ConnectNow Accounting website, you can use a bookmark to save the page so that the next time all you have to do is choose the page from the bookmarks menu. Most browsers provide several ways to bookmark a page. See your browser’s Help for instructions.
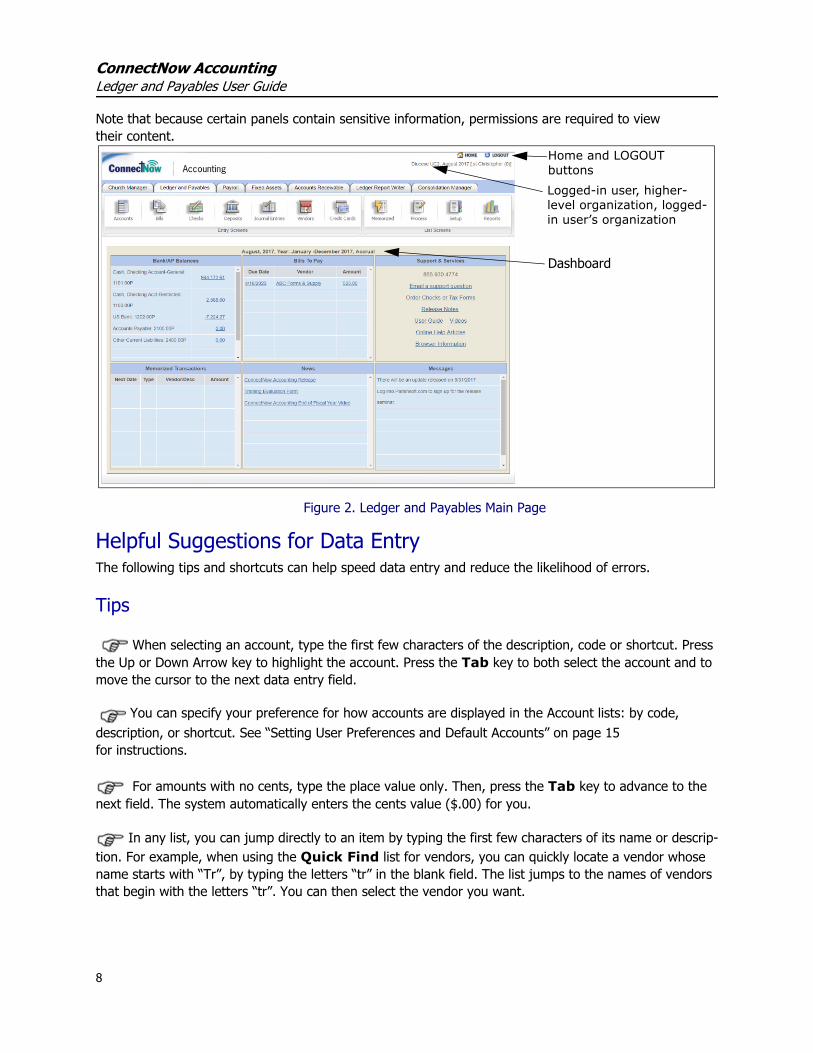
Navigating the SystemAfter logging in to the ConnectNow Accounting Ledger and Payables module, users see the Ledger and Payables main page (Figure 2).
The main page includes a row of main navigation buttons across the top and the Ledger and Payables dashboard. The upper-right portion of the main page also shows your login information, higher-level organization, and church name.
NoteUsers with certain administrator privileges see additional tabs on the main page.
6

IntroductionNavigating the System 1
Main Navigation ButtonsThe main navigation buttons (for example, Accounts, Bills, Checks, Vendors, Process, Setup, and Reports) are aligned across the top of the module. These buttons provide quick and easy access to areas of the application where you can manage everyday tasks.
As shown in Figure 1, clicking a navigation button displays a menu or opens a data entry or information page.
Figure 1. Navigation Buttons
Ledger and Payables DashboardThe dashboard (Figure 2) is located under the row of navigation buttons. The dashboard provides real-time information, such as bank/AP balances and upcoming bills due for payment.
Each dashboard panel has a specific focus. The Support & Services panel, for example, contains important links to videos and online Help articles to help you learn to use the application, while the Mem-orized Transactions panel gives you a quick view of transactions that are due for creation. A special financial data chart gives you at-a-glance views at the financials most vital to your office. The News and Messages panels provide you with the latest information from your higher-level organization (if you are a consolidating organization) as well as updates from ParishSOFT. In the News panel, you can find links to blogs, posts, and relevant content on external web pages. In the Messages panel, you can see recent messages and announcements sent to your organization from the diocese and ParishSOFT personnel.
7
ConnectNow AccountingLedger and Payables User Guide
Note that because certain panels contain sensitive information, permissions are required to view their content.
Figure 2. Ledger and Payables Main Page
Helpful Suggestions for Data EntryThe following tips and shortcuts can help speed data entry and reduce the likelihood of errors.
Tips
When selecting an account, type the first few characters of the description, code or shortcut. Press the Up or Down Arrow key to highlight the account. Press the Tab key to both select the account and to move the cursor to the next data entry field.
You can specify your preference for how accounts are displayed in the Account lists: by code, description, or shortcut. See “Setting User Preferences and Default Accounts” on page 15for instructions.
For amounts with no cents, type the place value only. Then, press the Tab key to advance to the next field. The system automatically enters the cents value ($.00) for you.
In any list, you can jump directly to an item by typing the first few characters of its name or descrip-tion. For example, when using the Quick Find list for vendors, you can quickly locate a vendor whose name starts with “Tr”, by typing the letters “tr” in the blank field. The list jumps to the names of vendors that begin with the letters “tr”. You can then select the vendor you want.
Home and LOGOUT buttonsLogged-in user, higher-level organization, logged-in user’s organization
Dashboard
8

IntroductionHelpful Suggestions for Data Entry 1
Keyboard ShortcutsTo save you time and to enable you to work less with the mouse, the application supports the use of key-board shortcuts (“hot keys”). The keyboard shortcuts are active on all transaction pages and for the vari-ous search functions within modules. The shortcuts are assigned to commonly performed actions.
If you enter data regularly, we recommend that you learn the keyboard shortcuts because they can help you enter data more quickly and efficiently.
IMPORTANT NOTE FOR SAFARI USERS
Not all keyboard shortcuts are compatible in the Safari browser. We recommend that Safari users continue using the mouse or the Tab or Enter key.
To use a shortcut, press and hold the Alt key, and then press the indicated character key (see the shortcut key assignments in Table 1.
Note that if a shortcut is available for an action, the indicated character key is bolded and underlinedon the interface, as shown in the following illustration of the Bill Information page in Ledger and Payables.
Table 1. Keyboard Shortcuts
To Do This: Press This Key Combination
Submit Alt-s
Memorize Alt-m
More Lines Alt-l
New Alt-n
Find Alt-i
Print Alt-p
9

ConnectNow AccountingLedger and Payables User Guide
Getting Video Help The ConnectNow Accounting website is designed to be easy to use. If you have a question, an instruc-tional video may be available. If video help is available for a feature, this video link is displayed:
Simply click the Watch Help Video! link to start the video.
Logging OutTo protect your financial information, log out of the Ledger and Payables website when you are finished working in the system or if you need to leave your computer unattended.
NoteIf the system detects no activity for 45 minutes, you will be automatically logged out. See “Automatic Logoff of Inactive User Sessions” on page 4 for more details.
To log out, click . This button is located in the upper-right corner of your Ledger and Payables browser window.
Assign a check number(on Bills page)
Alt-g
Chart of Accounts (Add Sub-Accounts)
(Accounts page)
Alt-r
Group Type and Sub-Group pages
(Return to Groups)
(Return to Group Type)
Alt-r
Table 1. Keyboard Shortcuts (Continued)
To Do This: Press This Key Combination
10
Chapter 2Setting Up Projects, Preferences,
and Vendor Information
IntroductionYour workflow for recurring tasks, such as entering bills and making deposits, can be faster and easier to implement if you do some initial setup. This chapter covers the setup tasks that you may want to complete before using certain features in ConnectNow Ledger and Payables.
Creating Project Groups and ProjectsProject groups and projects allow you to connect specific bills, deposits, and journal entries together to allow for easy reporting on special events such as a festival, craft show, or fundraiser. Projects allow you to track ledger and payables for specific events without cluttering your chart of accounts with redundant accounts. Project Groups allow you to group multiple projects together for reporting purposes, for example when you need to report on all festivals put on by your organization.
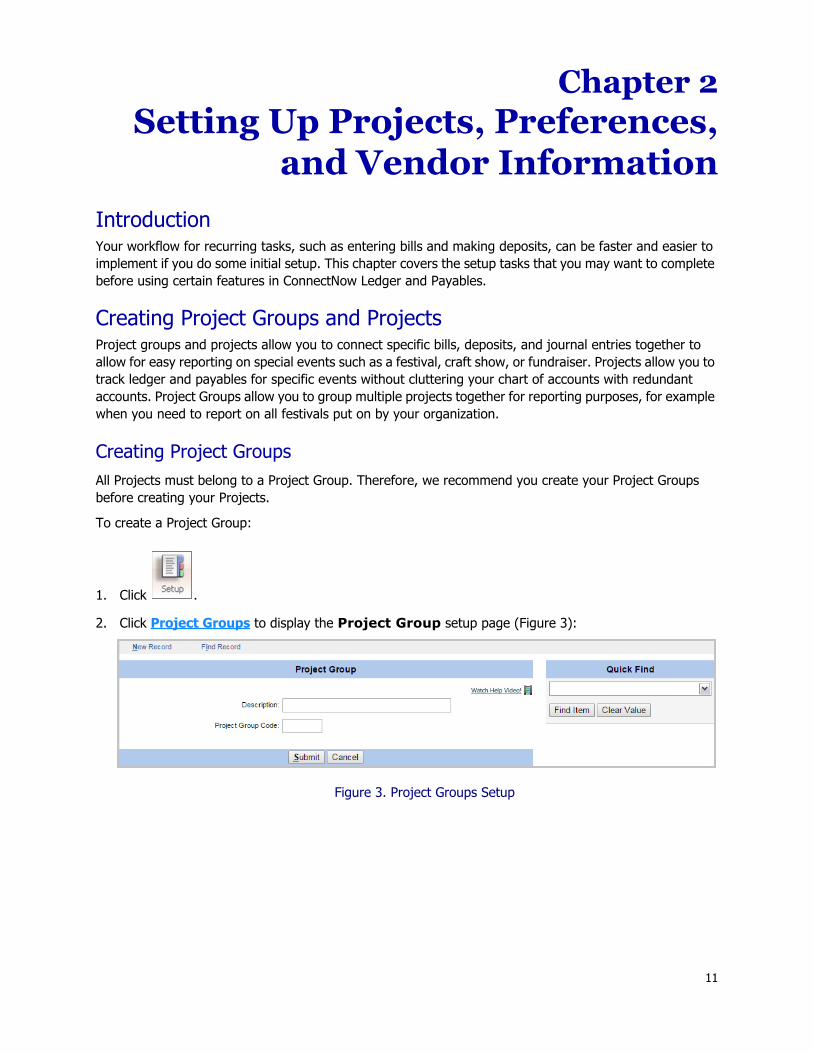
Creating Project GroupsAll Projects must belong to a Project Group. Therefore, we recommend you create your Project Groups before creating your Projects.
To create a Project Group:
1. Click .
2. Click Project Groups to display the Project Group setup page (Figure 3):
Figure 3. Project Groups Setup
11
ConnectNow AccountingLedger and Payables User Guide
3. Do the following:
a. In the Description field, type a description for the project group.
b. In the Project Group Code field, type the project group code.
The project group code is intended for use with the Consolidation Manager Transaction Import Feature. The code uniquely identifies the project group to your organization. Supplying this code is optional, but if you create a code, it must be unique to the organization. The code can contain a mix of alphabetic and numeric characters, but the length is limited to 20 characters.
c. Click .
Creating a ProjectTo create a Project:
1. Click .
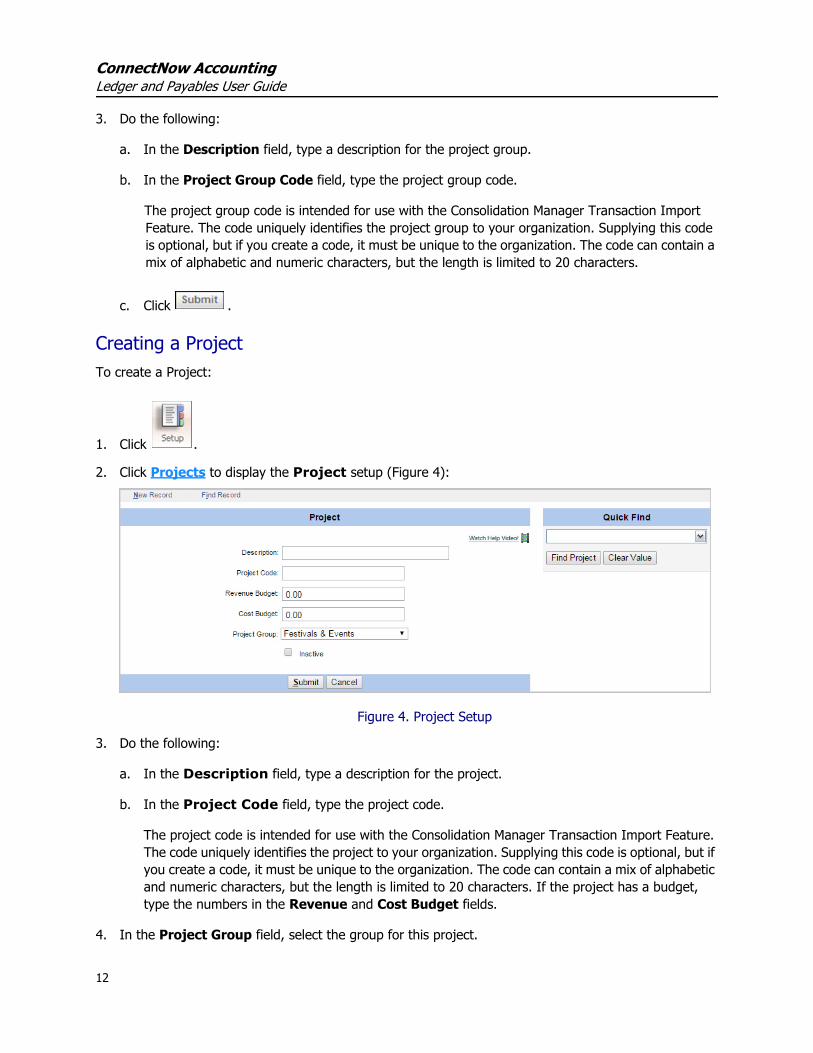
2. Click Projects to display the Project setup (Figure 4):
Figure 4. Project Setup
3. Do the following:
a. In the Description field, type a description for the project.
b. In the Project Code field, type the project code.
The project code is intended for use with the Consolidation Manager Transaction Import Feature. The code uniquely identifies the project to your organization. Supplying this code is optional, but if you create a code, it must be unique to the organization. The code can contain a mix of alphabetic and numeric characters, but the length is limited to 20 characters. If the project has a budget, type the numbers in the Revenue and Cost Budget fields.
4. In the Project Group field, select the group for this project.
12
Setting Up Projects, Preferences, and Vendor InformationManaging Project Groups and Projects 2
The default entry for all projects is Miscellaneous.
5. Click .
Managing Project Groups and ProjectsFinding a Project GroupThere are two methods for finding project groups that are entered into your system: the Quick Find list and the Find Record link. Both methods are located on the Project Group setup page (Figure 3 on page 11). To find a project group:
1. Click .
2. Click Project Groups to display the Project Groups page.
3. Do one of the following:
• To find the project group using the Quick Find list:
a. Search for the project group in the Quick Find list.
b. Click .
Information for the project group is displayed.
• To find the project group using the Find Record link:
a. Click the Find Record link or press Alt+I to display the Project Group Search page (Figure 5).
Figure 5. Project Group Search Page
b. Click to select the project group.
Information for the project group is displayed.
13
ConnectNow AccountingLedger and Payables User Guide
Deleting a Project Group
You can delete a project group only if there are no projects assigned to it. The button is not vis-ible if the selected project group has a project assigned to it.
1. Complete Steps 1 - 4 under “Finding a Project Group”.
2. Click .
The project group is removed from your system.
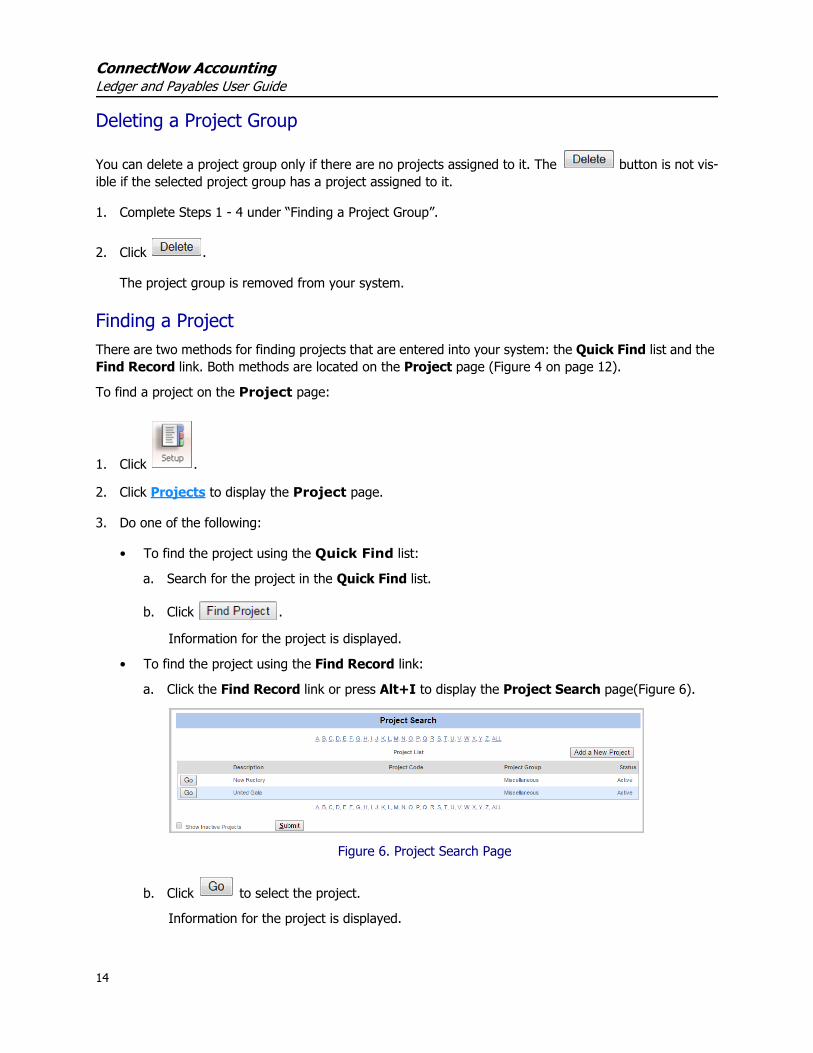
Finding a ProjectThere are two methods for finding projects that are entered into your system: the Quick Find list and the Find Record link. Both methods are located on the Project page (Figure 4 on page 12).
To find a project on the Project page:
1. Click .
2. Click Projects to display the Project page.
3. Do one of the following:
• To find the project using the Quick Find list:
a. Search for the project in the Quick Find list.
b. Click .
Information for the project is displayed.
• To find the project using the Find Record link:
a. Click the Find Record link or press Alt+I to display the Project Search page(Figure 6).
Figure 6. Project Search Page
b. Click to select the project.
Information for the project is displayed.
14

Setting Up Projects, Preferences, and Vendor InformationSetting User Preferences and Default Accounts 2
Deleting a Project
You can delete a project only if it has no activity. The button is not visible if the selected project has any activity associated with it.
1. Complete Steps 1 - 4 under “Finding a Project”.
2. Click .
The project is removed from your system.
Setting User Preferences and Default AccountsThe following instructions show you how to set preferences that affect the way elements of the applica-tion’s user interface are presented to you. For example, you can configure your preference for the account format, which is the way in which information for accounts is presented in the Account lists throughout the application. You can also set up which accounts display by default in those lists.
1. Click .
2. Click User Options to display the User Options setup (Figure 7):
NoteThe following illustration shows the setup for an accrual system. The options in the Default Accounts section vary depending on the accounting system you are using.
Figure 7. Account Format and Default Accounts Setup
15
ConnectNow AccountingLedger and Payables User Guide
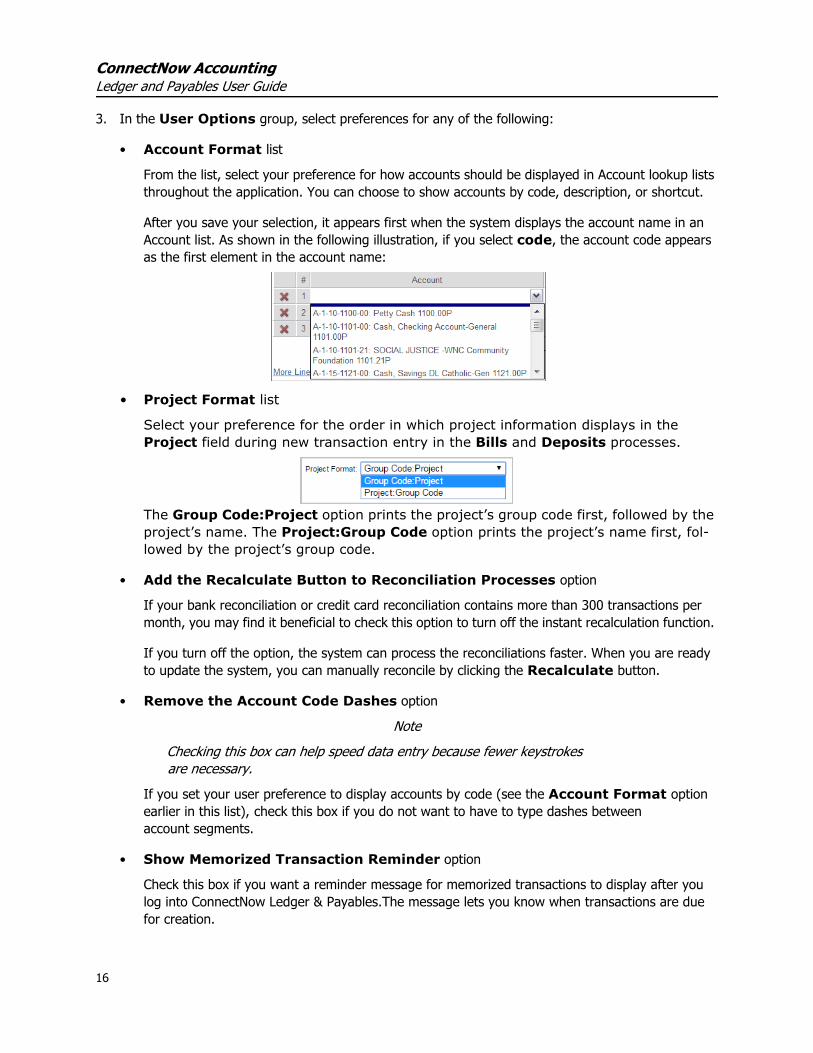
3. In the User Options group, select preferences for any of the following:
• Account Format list
From the list, select your preference for how accounts should be displayed in Account lookup lists throughout the application. You can choose to show accounts by code, description, or shortcut.
After you save your selection, it appears first when the system displays the account name in an Account list. As shown in the following illustration, if you select code, the account code appears as the first element in the account name:
• Project Format list
Select your preference for the order in which project information displays in the Project field during new transaction entry in the Bills and Deposits processes.
The Group Code:Project option prints the project’s group code first, followed by the project’s name. The Project:Group Code option prints the project’s name first, fol-lowed by the project’s group code.
• Add the Recalculate Button to Reconciliation Processes option
If your bank reconciliation or credit card reconciliation contains more than 300 transactions per month, you may find it beneficial to check this option to turn off the instant recalculation function.
If you turn off the option, the system can process the reconciliations faster. When you are ready to update the system, you can manually reconcile by clicking the Recalculate button.
• Remove the Account Code Dashes option
NoteChecking this box can help speed data entry because fewer keystrokes are necessary.
If you set your user preference to display accounts by code (see the Account Format option earlier in this list), check this box if you do not want to have to type dashes between account segments.
• Show Memorized Transaction Reminder option
Check this box if you want a reminder message for memorized transactions to display after you log into ConnectNow Ledger & Payables.The message lets you know when transactions are due for creation.
16

Setting Up Projects, Preferences, and Vendor InformationSetting User Preferences and Default Accounts 2
4. In the Default Accounts group, select the default accounts that the system should display on the Bills, Checks, Deposits, Invoices, Payments, and Credit Memos pages.
NoteIf you set up a default account, when you first display a transaction page (for example, Bill Information), the application always pre-selects the account you specify as the default choice—unless you change it. You can change it in one of two ways: by specifying a different account in the setup or by selecting a different account from the account list on a transaction page. Be aware that after you select a different account, the system shows that account first in the list. In other words, the system always pre-selects the last account you used. If you do not specify a default account in this setup, the application organizes the accounts in the list in alphanumeric order and pre-selects the first account according to that scheme.
The default accounts setup varies depending on the type of accounting system you are using.
Do one of the following:
• If you are using a cash system, select the default bank account from the Bank Account list, as shown in Figure 8:
Figure 8. Default Bank Account Setup: Cash System
The selected account is displayed as the default in the Bank Account list for Bills, Checks, and Deposits.
17
ConnectNow AccountingLedger and Payables User Guide
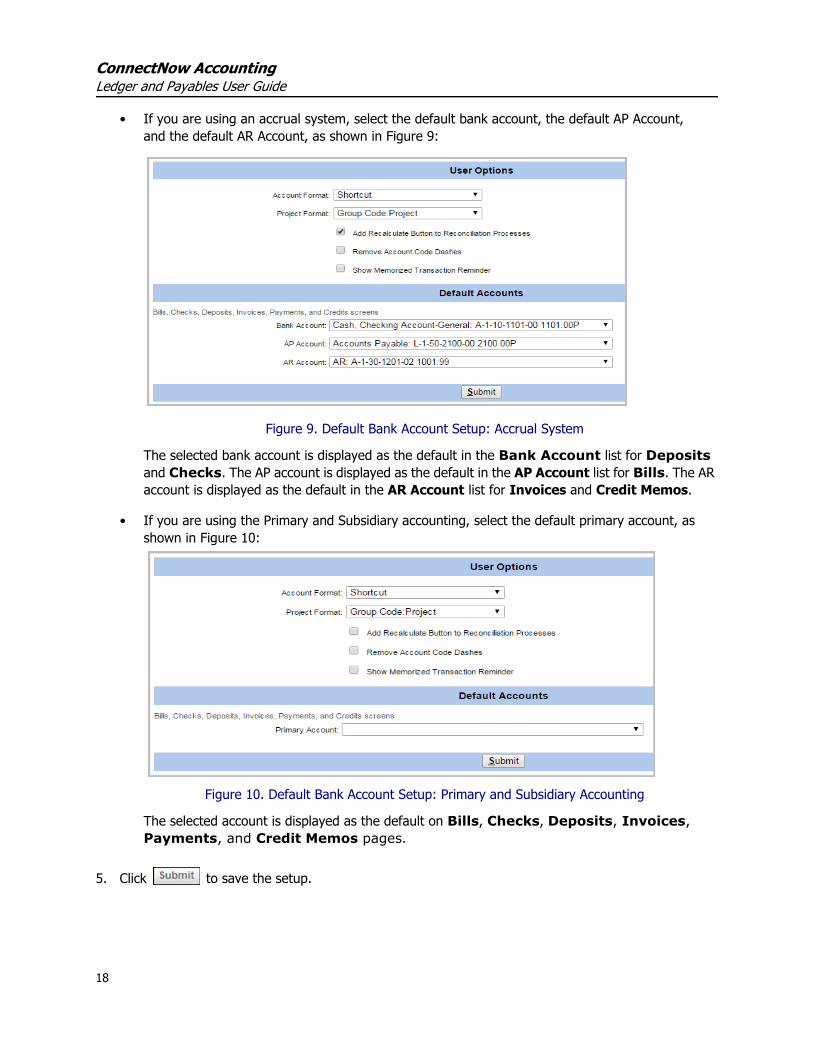
• If you are using an accrual system, select the default bank account, the default AP Account, and the default AR Account, as shown in Figure 9:
Figure 9. Default Bank Account Setup: Accrual System
The selected bank account is displayed as the default in the Bank Account list for Deposits and Checks. The AP account is displayed as the default in the AP Account list for Bills. The AR account is displayed as the default in the AR Account list for Invoices and Credit Memos.
• If you are using the Primary and Subsidiary accounting, select the default primary account, as shown in Figure 10:
Figure 10. Default Bank Account Setup: Primary and Subsidiary Accounting
The selected account is displayed as the default on Bills, Checks, Deposits, Invoices, Payments, and Credit Memos pages.
5. Click to save the setup.
18

Setting Up Projects, Preferences, and Vendor InformationSetting Up Vendor Payment Terms 2
Setting Up Vendor Payment TermsThis section shows you how to set up vendor payment terms in your system. A vendor term represents a condition of payment (for example, Net 30 and Due Upon Receipt). Each term that you add in this setup is available for selection when you specify payment terms for a new vendor or when you need to change payment terms for an existing vendor.
NoteA vendor’s payment terms are also available from the Quick Find list on the Vendor Terms setup page and on the Bill Information page (where you can change the default pay-ment terms for a vendor, including the due date, discount date, and terms, to meet the specif-ics of the bill).
An advantage of setting up vendor payment terms now is that, when entering bills, you can select the terms you want from the Terms list, thus saving time and reducing errors.
To set up the payment terms for a vendor, complete the following:
1. Click .
2. Click Vendor Terms to display the Vendor Terms setup (Figure 11):
Figure 11. Vendor Terms Setup
3. Do the following:
a. In the Description field, type a description of the payment terms (for example, NET 30 or Discount 2%).
19

ConnectNow AccountingLedger and Payables User Guide
b. In the Vendor Terms Code field, type a vendor terms code that uniquely identifies the vendor terms to your organization. Supplying the code is optional, but if you create one, it must be unique to the organization. The code can contain a mix of alphabetic and numeric characters, but the length is limited to 20 characters.
NoteThe Vendor Terms Code field is intended for use with the Consolidation Manager Transaction Import feature.
c. As needed, complete the setup by specifying discount days, a discount percent, and net days.
4. Click to save the information.
Finding a Vendor TermTo look up the details of any vendor's terms:
1. Click .
2. Select Vendor Terms.
3. In the Quick Find list, select the desired vendor term:
4. Click .
The Vendor Terms fields display values for Description, Vendor Terms Code, Discount Days, Discount Percent, and Net Days, if specified.
NoteThe vendor terms code applies to transaction imports only and is used by a higher-level organization.
Editing a Vendor Term1. To edit a vendor term, complete Steps 1 - 4 under “Finding a Vendor Term”.
2. Click inside the field and type the new value.
3. Click to save your changes.
20

Setting Up Projects, Preferences, and Vendor InformationSetting Up Vendor Types 2
Setting Up Vendor TypesVendor types are categories that you can assign vendors in your system to. Vendors for whom you assign a type can then be organized for reporting purposes and searches.
1. Click .
2. Click Vendor Types to display the Vendor Types setup (Figure 12):
Figure 12. Vendor Types Setup
3. In the Description field, type a description of the vendor (for example, 1099 Contractors, Snow Removal, Advertising).
4. Click .
The description appears in the Quick Find list on the right side of the Vendor Types setup page.
The vendor type is also available for selection from the Type list when you add a new vendor or edit an existing vendor’s information. It is also available as a filter (Vendor Type) in the configuration for vendor reports.
21

ConnectNow AccountingLedger and Payables User Guide
22
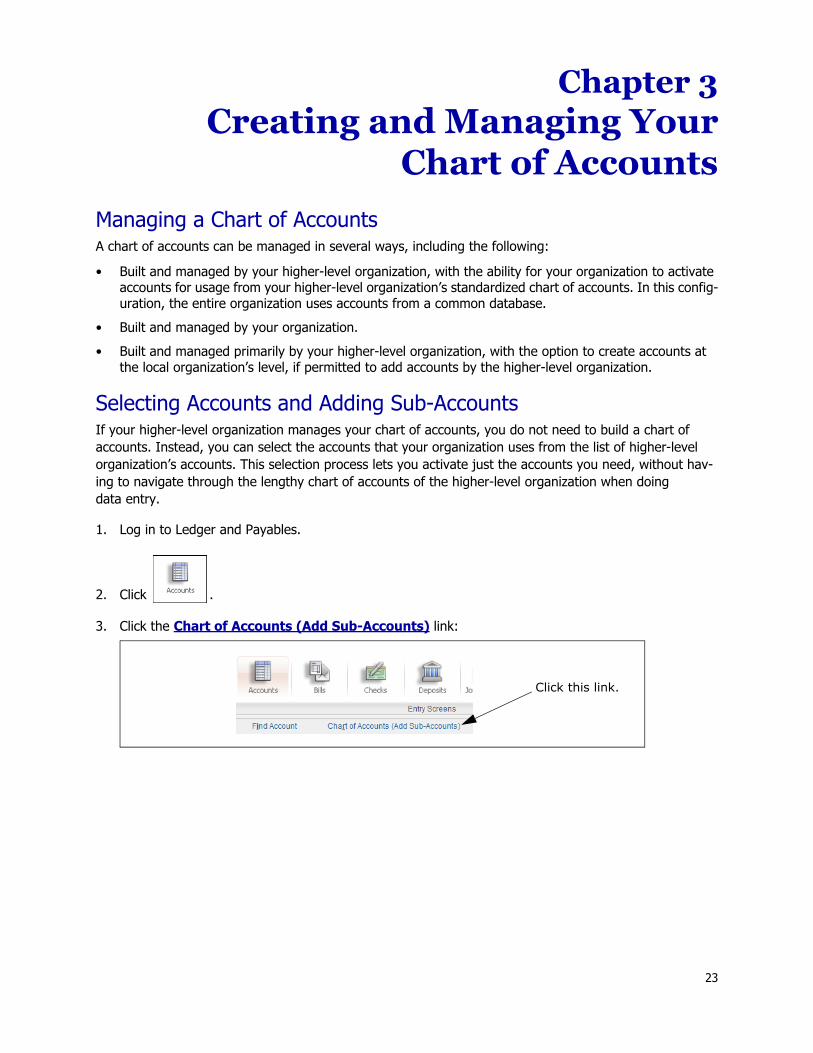
Chapter 3Creating and Managing Your
Chart of Accounts
Managing a Chart of AccountsA chart of accounts can be managed in several ways, including the following:
• Built and managed by your higher-level organization, with the ability for your organization to activate accounts for usage from your higher-level organization’s standardized chart of accounts. In this config-uration, the entire organization uses accounts from a common database.
• Built and managed by your organization. • Built and managed primarily by your higher-level organization, with the option to create accounts at
the local organization’s level, if permitted to add accounts by the higher-level organization.
Selecting Accounts and Adding Sub-AccountsIf your higher-level organization manages your chart of accounts, you do not need to build a chart of accounts. Instead, you can select the accounts that your organization uses from the list of higher-level organization’s accounts. This selection process lets you activate just the accounts you need, without hav-ing to navigate through the lengthy chart of accounts of the higher-level organization when doing data entry.
1. Log in to Ledger and Payables.
2. Click .
3. Click the Chart of Accounts (Add Sub-Accounts) link:
Click this link.
23
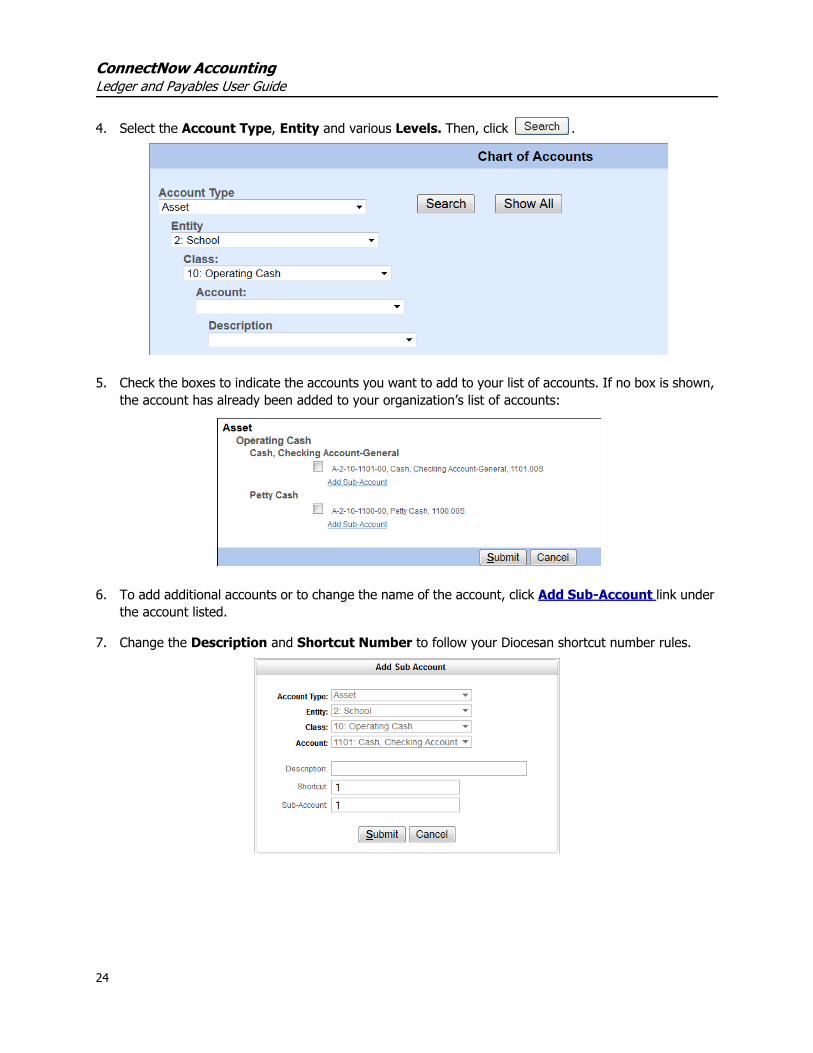
ConnectNow AccountingLedger and Payables User Guide
4. Select the Account Type, Entity and various Levels. Then, click .
5. Check the boxes to indicate the accounts you want to add to your list of accounts. If no box is shown, the account has already been added to your organization’s list of accounts:
6. To add additional accounts or to change the name of the account, click Add Sub-Account link under the account listed.
7. Change the Description and Shortcut Number to follow your Diocesan shortcut number rules.
24

Creating and Managing Your Chart of AccountsBuilding Your Chart of Accounts 3
8. Click .
The accounts are now available in your organization’s Quick Find list, located on the right side of the Account Information page.
NoteFor data sets that have 1500 or more accounts activated, the application initially loads no accounts into the list. After you type at least two characters into the search field, the application filters your entire chart of accounts and loads only those accounts that match the characters you typed. The field accepts alphabetic characters to enable you to search by description as well as numeric characters to enable you to search by the full account code or the shortcut. This process speeds up the opening of the window if you have a large number of activated accounts.
Building Your Chart of AccountsA Charts of Accounts is essentially a listing of the various categories for income, expenses, asset, and lia-bilities associated with the finances of an organization. While the exact configuration of the line items on a Chart of Accounts may vary slightly from one entity to another, there are a few basic categories that are found in just about every accounting ledger.
If your organization is not associated with a higher-level organization that has mandated you use a stan-dard chart of accounts, and if you did not convert your previous application data into ConnectNow Ledger & Payables, you need to design your own Chart of Accounts.
If you have not previously designed a chart of accounts, start by reviewing the Statement of Activities (Income Statement or Profit & Loss Statement), the Statement of Financial Position (Balance Sheet), and the detailed Trial Balance report from your old system. These reports usually contain all of the information you need.
Before you can enter your accounts, you must first review and design the account code dimensions, account type, entities, levels, and sub-accounts.
25
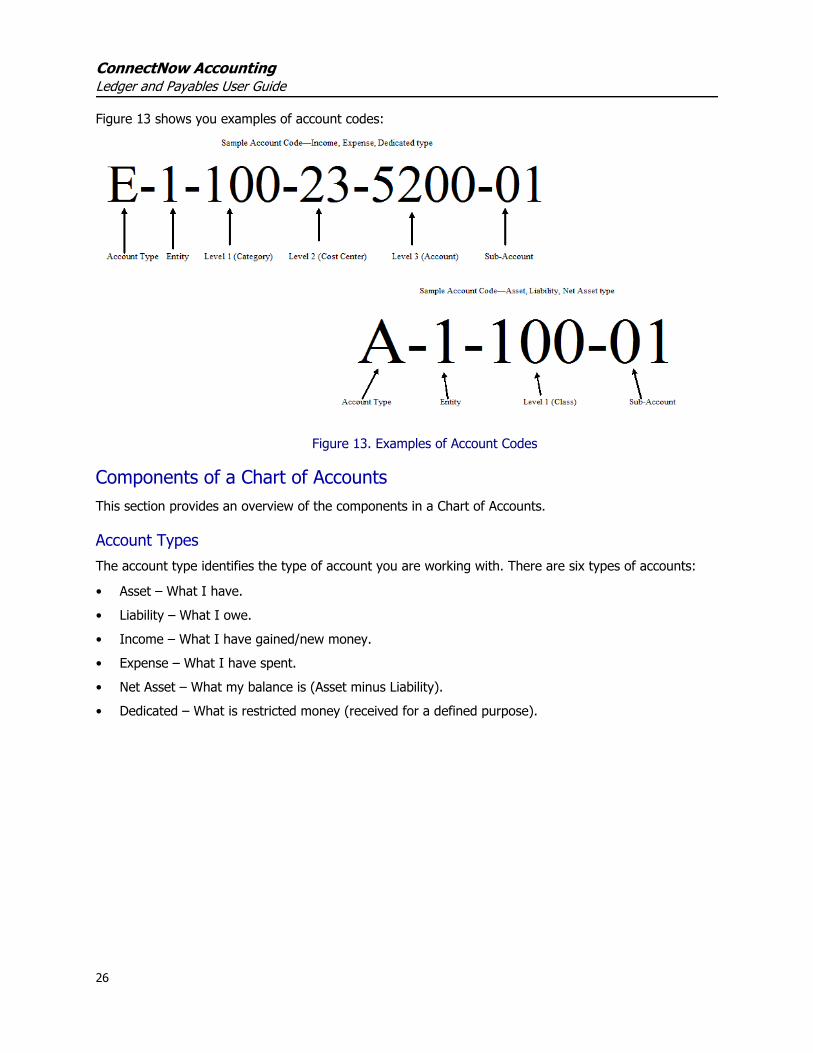
ConnectNow AccountingLedger and Payables User Guide
Figure 13 shows you examples of account codes:
Figure 13. Examples of Account Codes
Components of a Chart of AccountsThis section provides an overview of the components in a Chart of Accounts.
Account TypesThe account type identifies the type of account you are working with. There are six types of accounts:
• Asset – What I have.• Liability – What I owe.• Income – What I have gained/new money.• Expense – What I have spent.• Net Asset – What my balance is (Asset minus Liability).• Dedicated – What is restricted money (received for a defined purpose).
26
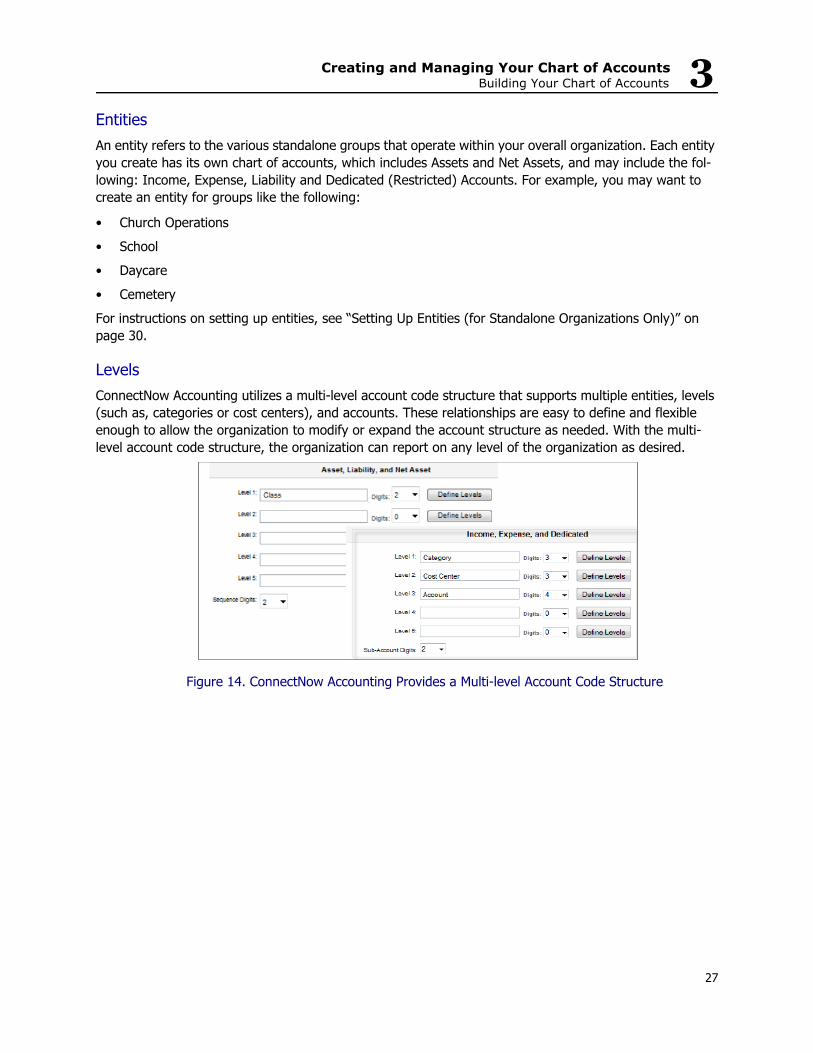
Creating and Managing Your Chart of AccountsBuilding Your Chart of Accounts 3
EntitiesAn entity refers to the various standalone groups that operate within your overall organization. Each entity you create has its own chart of accounts, which includes Assets and Net Assets, and may include the fol-lowing: Income, Expense, Liability and Dedicated (Restricted) Accounts. For example, you may want to create an entity for groups like the following:
• Church Operations• School• Daycare• Cemetery For instructions on setting up entities, see “Setting Up Entities (for Standalone Organizations Only)” on page 30.
LevelsConnectNow Accounting utilizes a multi-level account code structure that supports multiple entities, levels (such as, categories or cost centers), and accounts. These relationships are easy to define and flexible enough to allow the organization to modify or expand the account structure as needed. With the multi-level account code structure, the organization can report on any level of the organization as desired.
Figure 14. ConnectNow Accounting Provides a Multi-level Account Code Structure
27
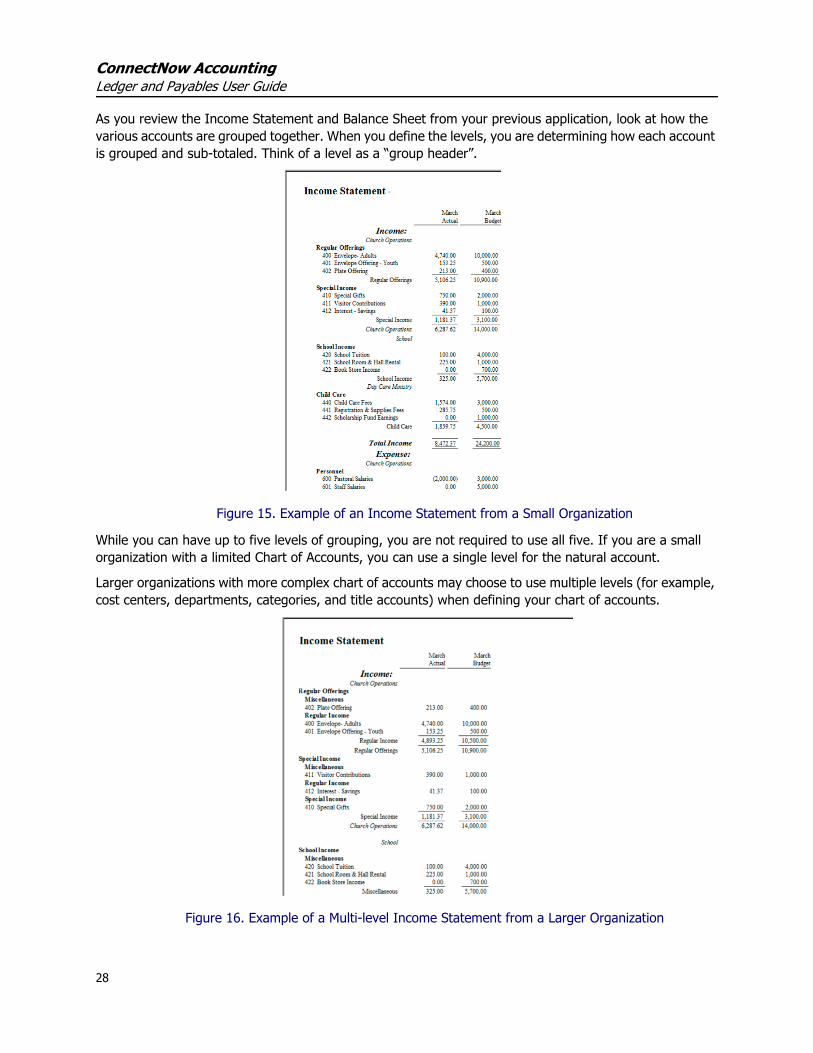
ConnectNow AccountingLedger and Payables User Guide
As you review the Income Statement and Balance Sheet from your previous application, look at how the various accounts are grouped together. When you define the levels, you are determining how each account is grouped and sub-totaled. Think of a level as a “group header”.
Figure 15. Example of an Income Statement from a Small Organization
While you can have up to five levels of grouping, you are not required to use all five. If you are a small organization with a limited Chart of Accounts, you can use a single level for the natural account.
Larger organizations with more complex chart of accounts may choose to use multiple levels (for example, cost centers, departments, categories, and title accounts) when defining your chart of accounts.
Figure 16. Example of a Multi-level Income Statement from a Larger Organization
28

Creating and Managing Your Chart of AccountsBuilding Your Chart of Accounts 3
Sub-accounts and Sub-Account NumbersIf you have a single account that needs to be broken into multiple concepts for recording and reporting purposes, dividing it into several smaller accounts can make it more manageable. These concepts grouped under the larger account are called sub-accounts. Sub-accounts let you track related income, expenses, assets, and liabilities independently but still keep them under a parent account. Creating sub-accounts can help you organize your accounts. A utility account can serve as a helpful example. You can create sub-accounts for electric, water, and gas to review transactions and summary information.
A sub-account number simply keeps the longer account code unique if you have several similar account codes.
Shortcut NumbersThe purpose of the longer account codes is to give you control over how each account is sorted and fil-tered on your financial statements. However, using the longer account codes for data entry can be cumbersome, as illustrated by this long-code example:
E-1-10-6000-00The shortcut number is an easy reference number for each of the accounts in your Chart of Accounts. If you used shortcut numbers or shorter account numbers in your previous application, you can choose to re-use those shortcut account numbers when setting up your Chart of Accounts.
If you have never used shortcut numbers before, you may want to keep your shortcut numbers within cer-tain ranges. By using easy-to-remember shortcut numbers, you can increase the ease and speed of data entry. Table 2 shows you sample ranges for a shortcut numbering scheme. To be useful, your shortcut numbers must have a logical connection to your long account codes. Shortcut numbers can consist of a combination of alphabetic and numeric characters and are limited to 20 characters.
Getting Help with a ConversionParishSOFT can convert an existing Chart of Accounts from QuickBooks®, LOGOS, and Church Manage-ment Solutions (CMS) applications. We can also assist you with loading your chart of accounts. Contact [email protected] or (866) 930-4774 for assistance.
Table 2: Generally Accepted Accounting Numbers for Different Types of Accounts
Type of Account From To
Asset 1000 1999
Liability 2000 2999
Net Asset 3000 3999
Income 4000 5999
Expense 6000 8999
Dedicated 9000 9999
29
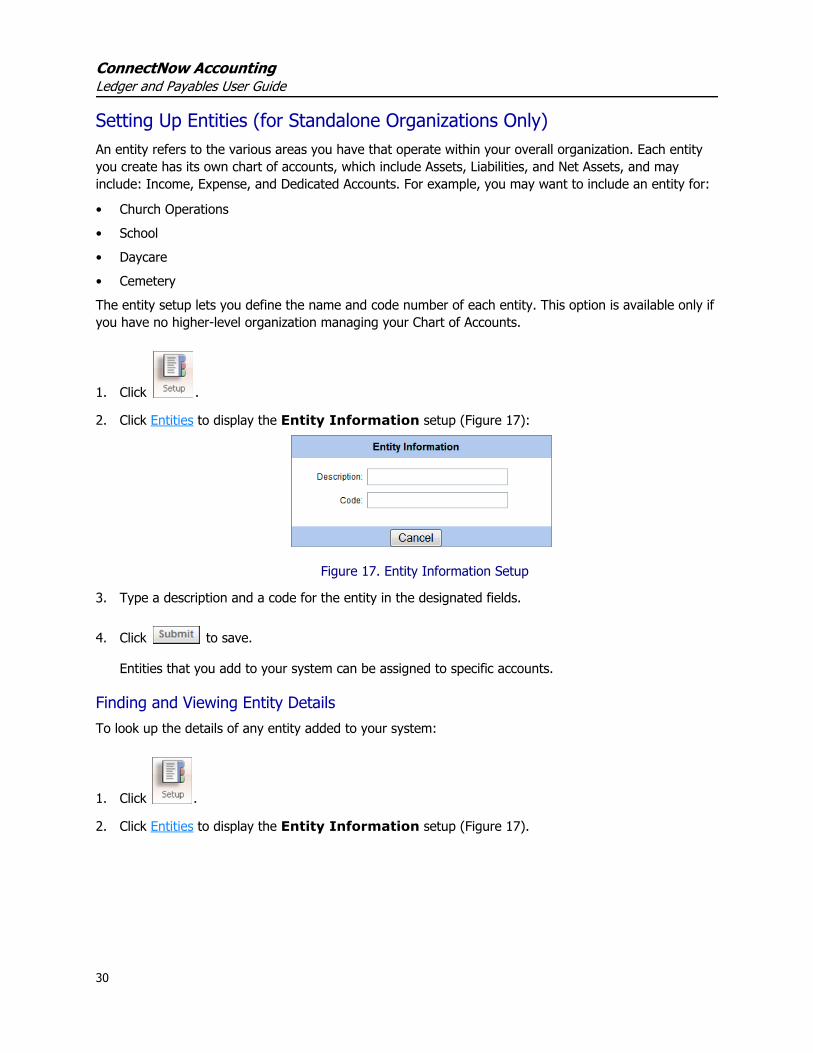
ConnectNow AccountingLedger and Payables User Guide
Setting Up Entities (for Standalone Organizations Only)An entity refers to the various areas you have that operate within your overall organization. Each entity you create has its own chart of accounts, which include Assets, Liabilities, and Net Assets, and may include: Income, Expense, and Dedicated Accounts. For example, you may want to include an entity for:
• Church Operations• School• Daycare• CemeteryThe entity setup lets you define the name and code number of each entity. This option is available only if you have no higher-level organization managing your Chart of Accounts.
1. Click .
2. Click Entities to display the Entity Information setup (Figure 17):
Figure 17. Entity Information Setup
3. Type a description and a code for the entity in the designated fields.
4. Click to save.
Entities that you add to your system can be assigned to specific accounts.
Finding and Viewing Entity DetailsTo look up the details of any entity added to your system:
1. Click .
2. Click Entities to display the Entity Information setup (Figure 17).
30
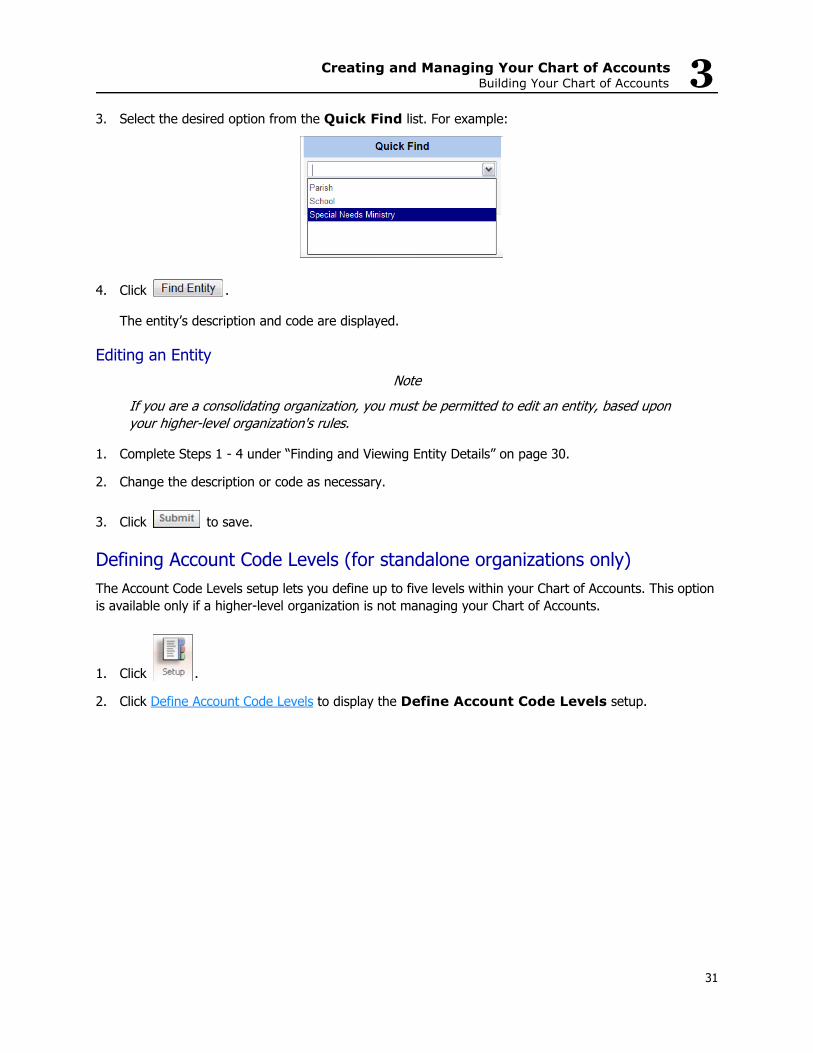
Creating and Managing Your Chart of AccountsBuilding Your Chart of Accounts 3
3. Select the desired option from the Quick Find list. For example:
4. Click .
The entity’s description and code are displayed.
Editing an EntityNote
If you are a consolidating organization, you must be permitted to edit an entity, based upon your higher-level organization's rules.
1. Complete Steps 1 - 4 under “Finding and Viewing Entity Details” on page 30.
2. Change the description or code as necessary.
3. Click to save.
Defining Account Code Levels (for standalone organizations only)The Account Code Levels setup lets you define up to five levels within your Chart of Accounts. This option is available only if a higher-level organization is not managing your Chart of Accounts.
1. Click .
2. Click Define Account Code Levels to display the Define Account Code Levels setup.
31
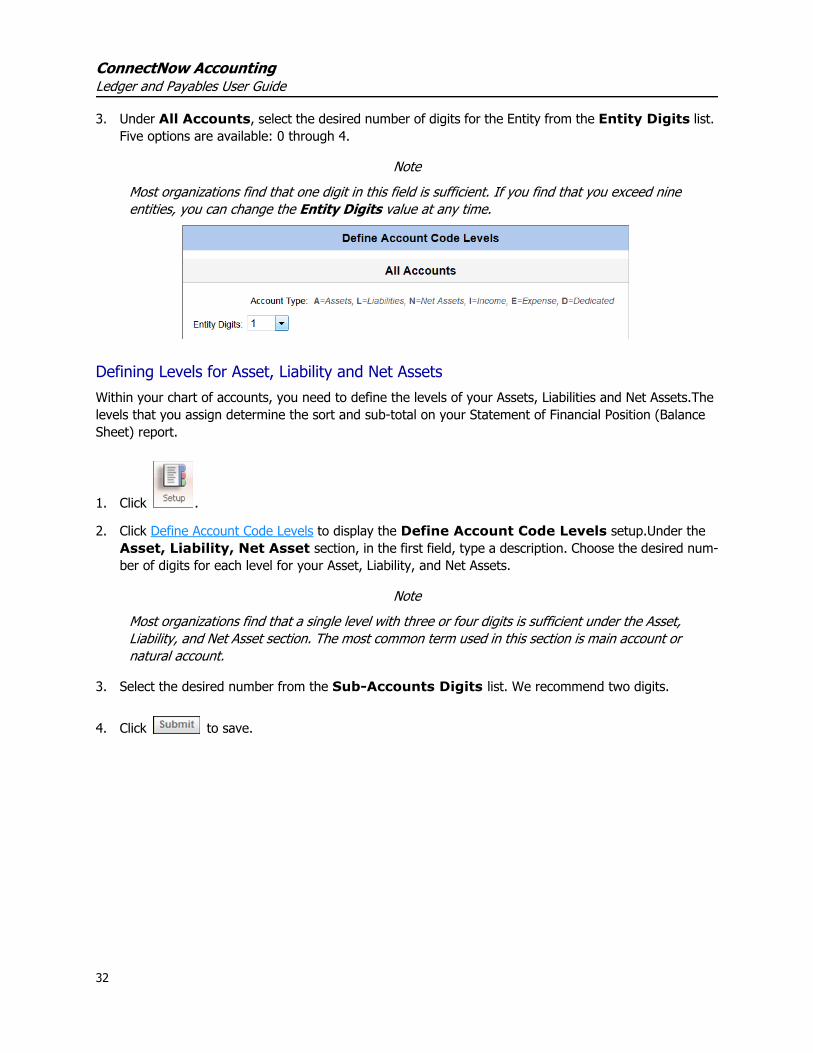
ConnectNow AccountingLedger and Payables User Guide
3. Under All Accounts, select the desired number of digits for the Entity from the Entity Digits list. Five options are available: 0 through 4.
NoteMost organizations find that one digit in this field is sufficient. If you find that you exceed nine entities, you can change the Entity Digits value at any time.
Defining Levels for Asset, Liability and Net AssetsWithin your chart of accounts, you need to define the levels of your Assets, Liabilities and Net Assets.The levels that you assign determine the sort and sub-total on your Statement of Financial Position (Balance Sheet) report.
1. Click .
2. Click Define Account Code Levels to display the Define Account Code Levels setup.Under the Asset, Liability, Net Asset section, in the first field, type a description. Choose the desired num-ber of digits for each level for your Asset, Liability, and Net Assets.
NoteMost organizations find that a single level with three or four digits is sufficient under the Asset, Liability, and Net Asset section. The most common term used in this section is main account or natural account.
3. Select the desired number from the Sub-Accounts Digits list. We recommend two digits.
4. Click to save.
32

Creating and Managing Your Chart of AccountsBuilding Your Chart of Accounts 3
5. Click for Level 1 in the Asset, Liability and Net Asset section.
The Level Information setup is displayed:
6. Type a description and code for the level. Then, click .
Click this button.
33
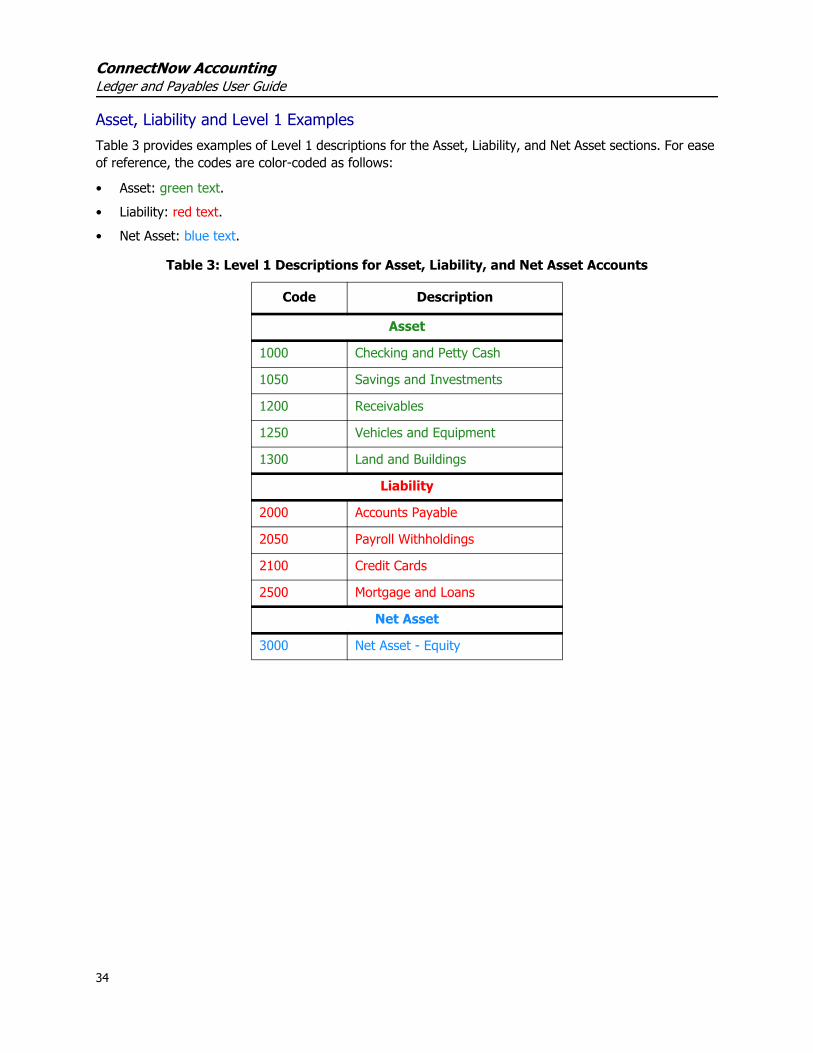
ConnectNow AccountingLedger and Payables User Guide
Asset, Liability and Level 1 ExamplesTable 3 provides examples of Level 1 descriptions for the Asset, Liability, and Net Asset sections. For ease of reference, the codes are color-coded as follows:
• Asset: green text.• Liability: red text.• Net Asset: blue text.
Table 3: Level 1 Descriptions for Asset, Liability, and Net Asset Accounts
Code Description
Asset
1000 Checking and Petty Cash
1050 Savings and Investments
1200 Receivables
1250 Vehicles and Equipment
1300 Land and Buildings
Liability
2000 Accounts Payable
2050 Payroll Withholdings
2100 Credit Cards
2500 Mortgage and Loans
Net Asset
3000 Net Asset - Equity
34
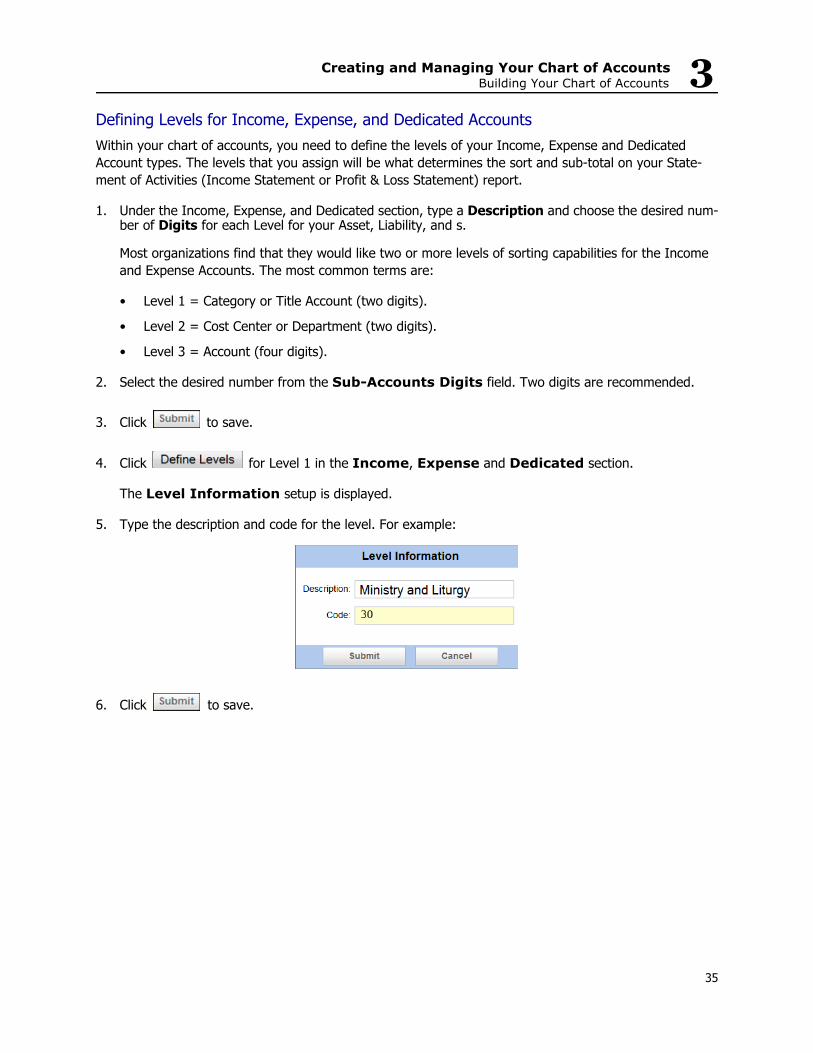
Creating and Managing Your Chart of AccountsBuilding Your Chart of Accounts 3
Defining Levels for Income, Expense, and Dedicated AccountsWithin your chart of accounts, you need to define the levels of your Income, Expense and Dedicated Account types. The levels that you assign will be what determines the sort and sub-total on your State-ment of Activities (Income Statement or Profit & Loss Statement) report.
1. Under the Income, Expense, and Dedicated section, type a Description and choose the desired num-ber of Digits for each Level for your Asset, Liability, and s.
Most organizations find that they would like two or more levels of sorting capabilities for the Income and Expense Accounts. The most common terms are:
• Level 1 = Category or Title Account (two digits).
• Level 2 = Cost Center or Department (two digits).
• Level 3 = Account (four digits).
2. Select the desired number from the Sub-Accounts Digits field. Two digits are recommended.
3. Click to save.
4. Click for Level 1 in the Income, Expense and Dedicated section.
The Level Information setup is displayed.
5. Type the description and code for the level. For example:
6. Click to save.
35
ConnectNow AccountingLedger and Payables User Guide
Income, Expense and Dedicated Account Level ExamplesThe following tables provide examples of tri-level account structure codes for Income, Expense, and Dedi-cated Account types. For ease of reference, the codes are color-coded as follows:
• Income: green text.• Expense: red text.• Dedicated: blue text.
NoteIn the following tables, Category and Cost Center are used as examples of levels. Your ownlevels will vary depending on your organization’s needs.
Table 4: Level 1 - Category
Code Description
01 General
02 Ministry and Liturgy
03 Religious Education
04 Charity and Outreach
05 Preschool and Daycare
06 Cemetery/Columbarium
07 Other Programs
08 Facilities
09 General and Administrative
10 Endowments
11 Capital
12 School
13 Restricted Donations
Table 5: Level 2 - Cost Center
Code Description
01 General Church Revenue
02 Liturgy
03 Music
04 Evangelization
36
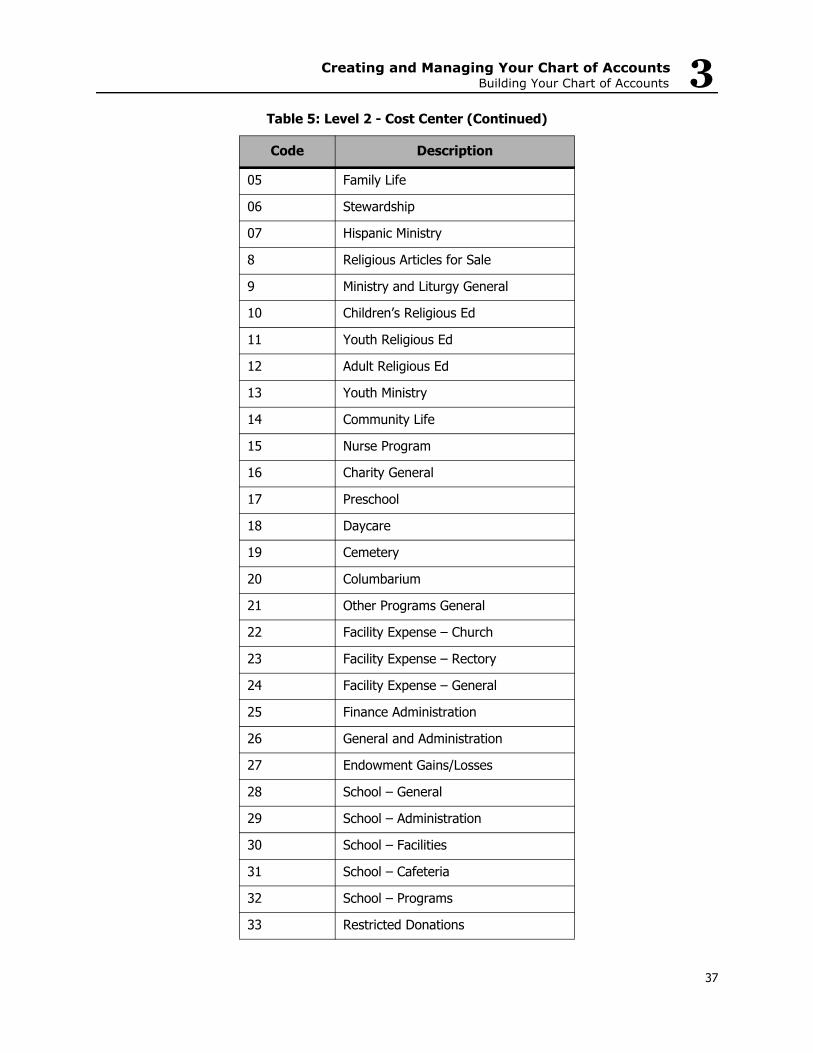
Creating and Managing Your Chart of AccountsBuilding Your Chart of Accounts 3
05 Family Life
06 Stewardship
07 Hispanic Ministry
8 Religious Articles for Sale
9 Ministry and Liturgy General
10 Children’s Religious Ed
11 Youth Religious Ed
12 Adult Religious Ed
13 Youth Ministry
14 Community Life
15 Nurse Program
16 Charity General
17 Preschool
18 Daycare
19 Cemetery
20 Columbarium
21 Other Programs General
22 Facility Expense – Church
23 Facility Expense – Rectory
24 Facility Expense – General
25 Finance Administration
26 General and Administration
27 Endowment Gains/Losses
28 School – General
29 School – Administration
30 School – Facilities
31 School – Cafeteria
32 School – Programs
33 Restricted Donations
Table 5: Level 2 - Cost Center (Continued)
Code Description
37

ConnectNow AccountingLedger and Payables User Guide
Table 6: Level 3 - Account
Code Description
4101 Offertory
4102 Sacramental Offerings
4103 Donations, General
4104 Donations, In Kind
4115 Bequests, Unrestricted
4121 Subsidies, Diocesan
4122 Subsidies, Non Diocesan
4131 Poor Box Receipts
4132 Votive Lamp Offerings
4141 Fundraising Activity Revenue
4142 Fundraising Activity Expense
4145 Tuition and Fees – School
4147 Tuition Assistance
4150 Fees – Religious Education
4152 Fees – Daycare
4153 Fees – Preschool
4154 Fees – Cemetery Income
4155 Fees – Cemetery Perpetual Care Income
4156 Fees – Columbarium Income
4158 Product Sales Income
4160 Rental Income
4170 Interest Income
4190 Gain/Loss Disposal of Assets
4199 Other Income
4200 Capital/Facilities Fund General
4201 Debt Reduction Collection
4300 Gain/Loss on Endowments
38

Creating and Managing Your Chart of AccountsBuilding Your Chart of Accounts 3
5110 Clergy Compensation
5111 Clergy Health Ins and Expenses
5113 Clergy 403b Expense
5114 Extra Clergy Compensation
5120 Lay Employees – Salaries
5121 Lay Employees – Payroll Taxes
5122 Lay Employees – Health Insurance
5123 Lay Employees – Retirement
5130 Depreciation
5133 Equipment & Furnishings
5134 Equipment Repairs & Servicing
5137 Building Repairs, Maintenance, Improvements
5138 Janitorial Service & Supplies
5139 Grounds Maintenance
5140 Property/Liability Insurance
5141 Property Tax
5142 Building Rent
5143 Electricity
5144 Heat
5145 Water & Sewer
5146 Telephone/Internet/Cable TV
5147 Events/Programs
5148 Program Supplies
5149 Curriculum/Instructional Supplies
5150 Vehicle Lease/Maint Expense
5151 Mileage Reimbursement
5152 Travel & Meal Expense
5153 Professional Services
5154 Religious Supplies
Table 6: Level 3 - Account (Continued)
Code Description
39
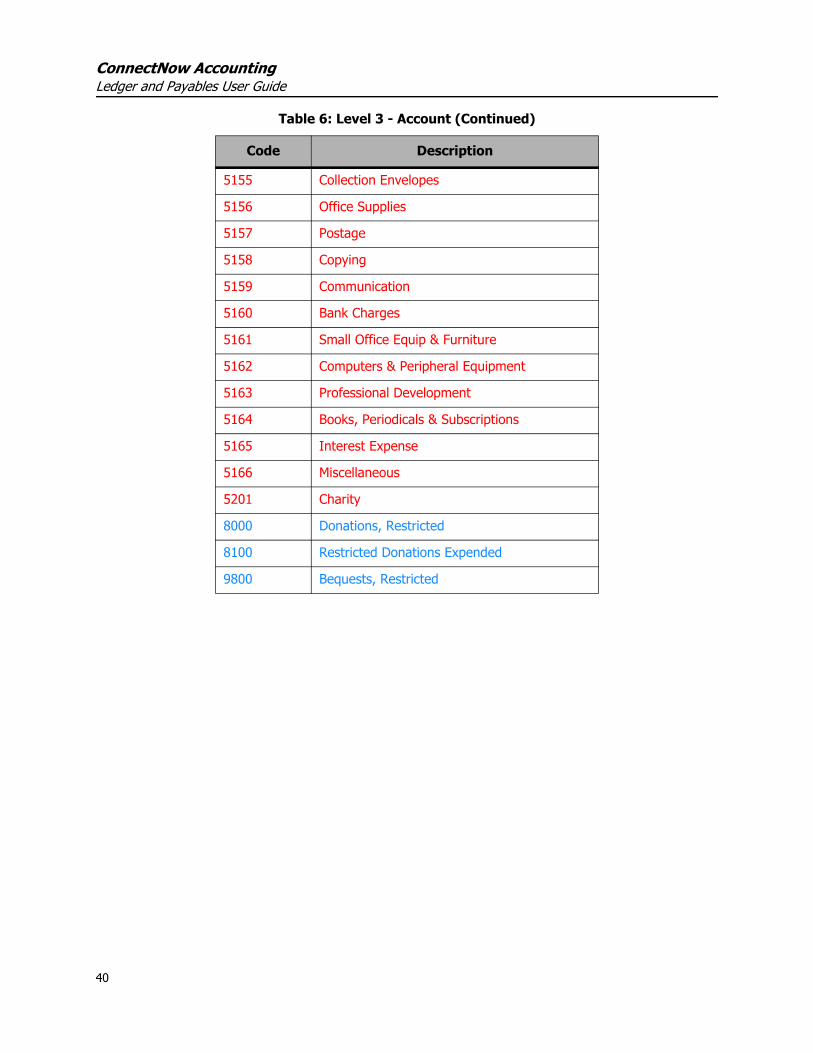
ConnectNow AccountingLedger and Payables User Guide
5155 Collection Envelopes
5156 Office Supplies
5157 Postage
5158 Copying
5159 Communication
5160 Bank Charges
5161 Small Office Equip & Furniture
5162 Computers & Peripheral Equipment
5163 Professional Development
5164 Books, Periodicals & Subscriptions
5165 Interest Expense
5166 Miscellaneous
5201 Charity
8000 Donations, Restricted
8100 Restricted Donations Expended
9800 Bequests, Restricted
Table 6: Level 3 - Account (Continued)
Code Description
40

Creating and Managing Your Chart of AccountsBuilding Your Chart of Accounts 3
Adding a New AccountThe process of adding a new account varies depending upon whether your organization is connected to a higher-level organization or whether your organization is a standalone organization. Follow the instructions that fit your particular circumstance.
Organizations Consolidating to a Higher-Level OrganizationIf your accounting system is connected to a higher-level organization, your ability to add new accounts may be restricted by that higher-level organization. Some higher-level organizations allow local organiza-tions to add sub-accounts; others maintain exclusive rights over accounts. If your organization is in either of these categories, contact your higher-level organization to request that a new account be added.
Standalone OrganizationsIf your organization uses a standalone chart of accounts, you can use the following procedure to add a new account.
1. Click to display the Account Information page (Figure 18):
Figure 18. Account Information Page
By default, the Definition window (shown in Figure 18) is displayed.
2. Click New Account.
3. In the Description field, type a description for the account (for example, Lakewood Bank - Church).
4. From the Account Type list, select the type of account from the list (for example, Asset).
The Account Information form refreshes. The fields displayed vary depending on the type of account you selected from the Account Type dropdown list.
41

ConnectNow AccountingLedger and Payables User Guide
5. Complete the remaining fields in the form to specify details for the account you are adding. For descriptions of the fields, refer to Table 7.
6. Click to save.
Your new account is now ready for transactions.
Table 7: Descriptions of the Fields on the Account Information Page
Account Information
Field Description
Description Unique name, title, or statement that describes the purpose of the account.
Account Type Category to which the account belongs. Select one: Asset, Liability, Net Asset, Income, or Expense.
Shortcut Often called an “alias.” A short account number or code assigned to the account that identifies it for easy reference. The shortcut number must have a logical connection to the longer account code it is associated with. Can consist of a combination of alpha-numeric characters.
Entity Standalone group or business unit in the overall organization that uses the account. For example: Church Operations.
Level 1 Custom name given to a segment or group (for example, a department or cost center) in the chart of accounts. Used to organize the chart of accounts into meaningful sections for reporting purposes only. Also includes a Natural Account. You can have up to five levels.
Level 2 Custom name given to a segment or group in the chart of accounts (for example, a department or cost center). Used to organize the chart of accounts into meaningful sections for reporting purposes only. Also includes a Natural Account. You can have up to five levels.
Level 3 Custom name given to a segment or group (for example, a department or cost center) in the chart of accounts. Used to organize the chart of accounts into meaningful sections for reporting purposes only. Also includes a Natural Account. You can have up to five levels.
Level 4 Custom name given to a segment or group (for example, a department or cost center) in the chart of accounts. Used to organize the chart of accounts into meaningful sections for reporting purposes only. Also includes a Natural Account. You can have up to five levels.
Level 5 Custom name given to a segment or group (for example, a department or cost center) in the chart of accounts. Used to organize the chart of accounts into meaningful sections for reporting purposes only. Also includes a Natural Account. You can use up to five levels.
42
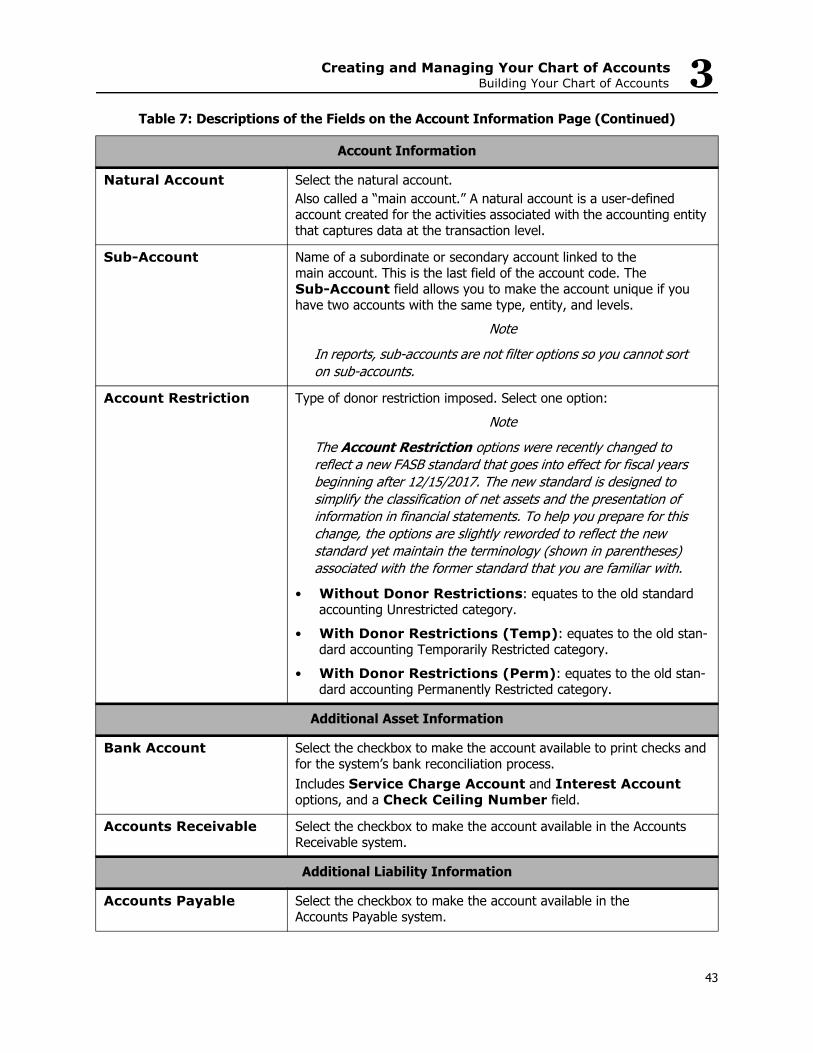
Creating and Managing Your Chart of AccountsBuilding Your Chart of Accounts 3
Natural Account Select the natural account.Also called a “main account.” A natural account is a user-defined account created for the activities associated with the accounting entity that captures data at the transaction level.
Sub-Account Name of a subordinate or secondary account linked to themain account. This is the last field of the account code. The Sub-Account field allows you to make the account unique if you have two accounts with the same type, entity, and levels.
NoteIn reports, sub-accounts are not filter options so you cannot sort on sub-accounts.
Account Restriction Type of donor restriction imposed. Select one option:Note
The Account Restriction options were recently changed to reflect a new FASB standard that goes into effect for fiscal years beginning after 12/15/2017. The new standard is designed to simplify the classification of net assets and the presentation of information in financial statements. To help you prepare for this change, the options are slightly reworded to reflect the new standard yet maintain the terminology (shown in parentheses) associated with the former standard that you are familiar with.
• Without Donor Restrictions: equates to the old standard accounting Unrestricted category.
• With Donor Restrictions (Temp): equates to the old stan-dard accounting Temporarily Restricted category.
• With Donor Restrictions (Perm): equates to the old stan-dard accounting Permanently Restricted category.
Additional Asset Information
Bank Account Select the checkbox to make the account available to print checks and for the system’s bank reconciliation process. Includes Service Charge Account and Interest Account options, and a Check Ceiling Number field.
Accounts Receivable Select the checkbox to make the account available in the Accounts Receivable system.
Additional Liability Information
Accounts Payable Select the checkbox to make the account available in the Accounts Payable system.
Table 7: Descriptions of the Fields on the Account Information Page (Continued)
Account Information
43
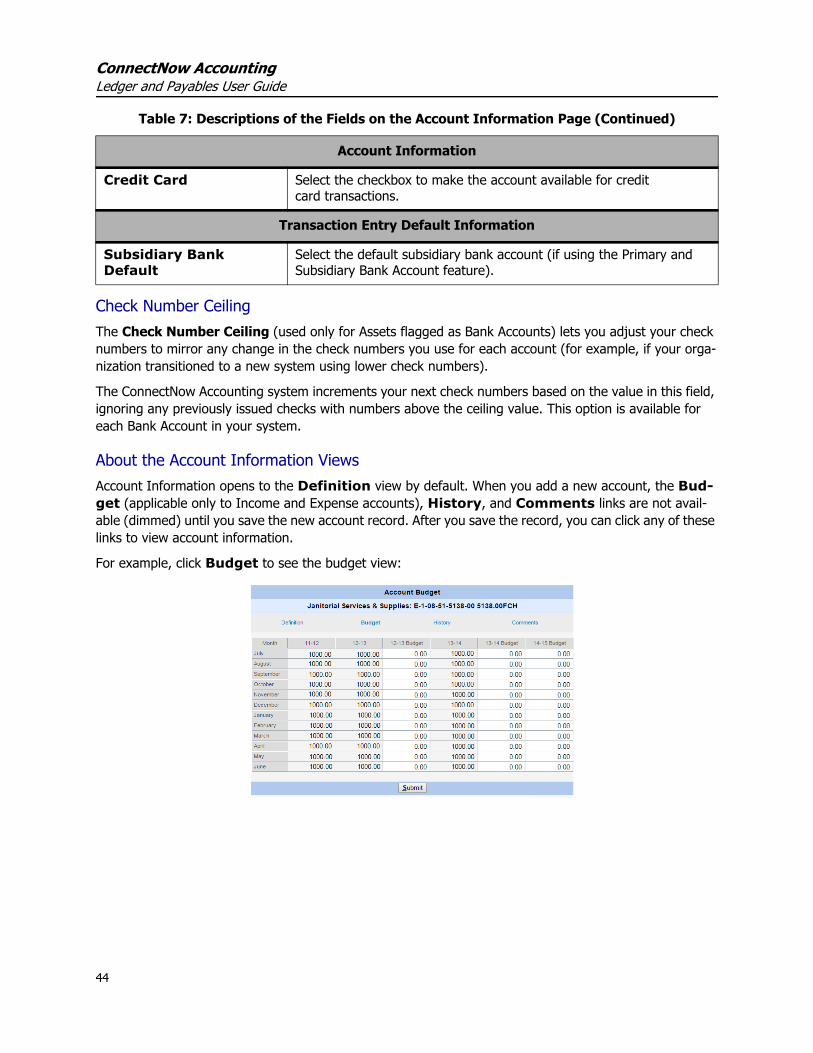
ConnectNow AccountingLedger and Payables User Guide
Check Number CeilingThe Check Number Ceiling (used only for Assets flagged as Bank Accounts) lets you adjust your check numbers to mirror any change in the check numbers you use for each account (for example, if your orga-nization transitioned to a new system using lower check numbers).
The ConnectNow Accounting system increments your next check numbers based on the value in this field, ignoring any previously issued checks with numbers above the ceiling value. This option is available for each Bank Account in your system.
About the Account Information ViewsAccount Information opens to the Definition view by default. When you add a new account, the Bud-get (applicable only to Income and Expense accounts), History, and Comments links are not avail-able (dimmed) until you save the new account record. After you save the record, you can click any of these links to view account information.
For example, click Budget to see the budget view:
Credit Card Select the checkbox to make the account available for credit card transactions.
Transaction Entry Default Information
Subsidiary Bank Default
Select the default subsidiary bank account (if using the Primary and Subsidiary Bank Account feature).
Table 7: Descriptions of the Fields on the Account Information Page (Continued)
Account Information
44

Creating and Managing Your Chart of AccountsBuilding Your Chart of Accounts 3
Click History to see the history view:
Click Comments to view comments for the account:
Archiving an AccountIf you are no longer using an account, you can archive it.
NoteIf an account has a budget in the current or future year, the system does not allow you to archive it. If the account has a budget in closed years, you are permitted to archive it.
1. Locate the account using the Quick Find.
2. Click to view the full account details.
3. Check the Archive Account box.
4. Click to archive the account.
An archived account remains in the Quick Find list (to enable historical reporting and for research purposes). However, the account is no longer available for transaction entry. If desired, you can choose not to include archived accounts in your reports and statements.
45
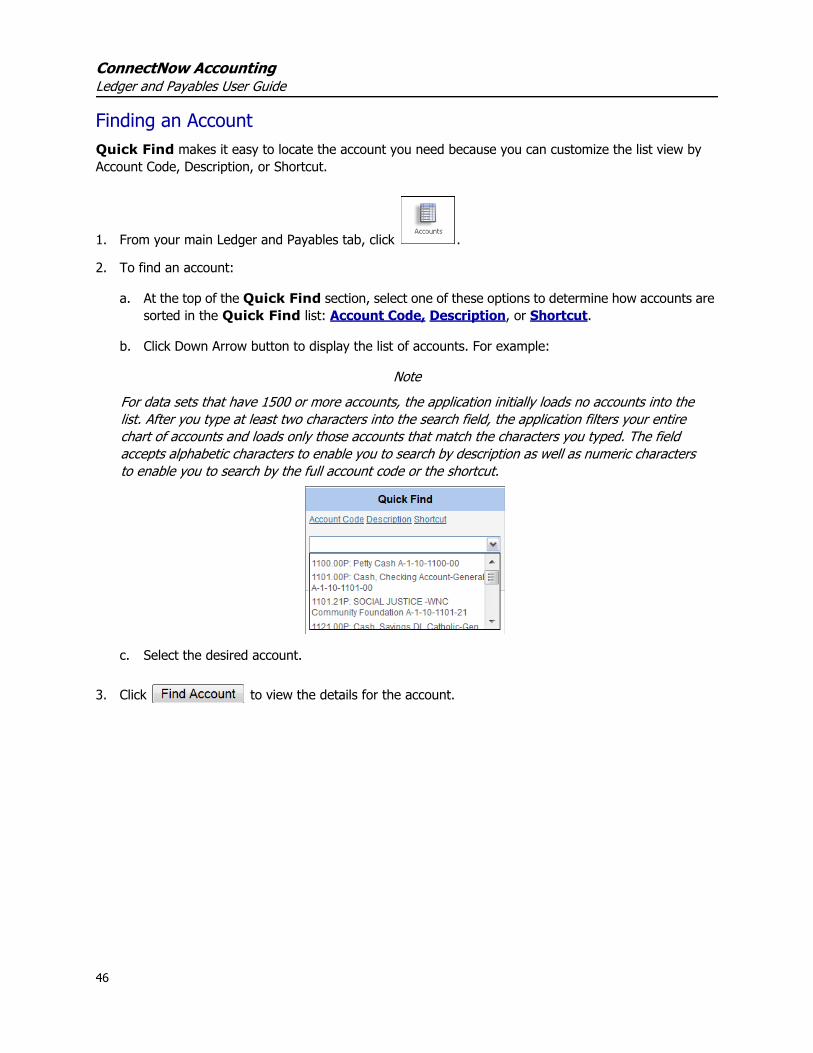
ConnectNow AccountingLedger and Payables User Guide
Finding an AccountQuick Find makes it easy to locate the account you need because you can customize the list view by Account Code, Description, or Shortcut.
1. From your main Ledger and Payables tab, click .
2. To find an account:
a. At the top of the Quick Find section, select one of these options to determine how accounts are sorted in the Quick Find list: Account Code, Description, or Shortcut.
b. Click Down Arrow button to display the list of accounts. For example:
NoteFor data sets that have 1500 or more accounts, the application initially loads no accounts into the list. After you type at least two characters into the search field, the application filters your entire chart of accounts and loads only those accounts that match the characters you typed. The field accepts alphabetic characters to enable you to search by description as well as numeric characters to enable you to search by the full account code or the shortcut.
c. Select the desired account.
3. Click to view the details for the account.
46

Creating and Managing Your Chart of AccountsBuilding Your Chart of Accounts 3
Changing the Sort Option for Quick FindTo change the sorting options in Quick Find, click Account Code, Description, or Shortcut to sort the list of accounts by that option.
The accounts shown in the following illustration are sorted in account code order:
The next illustration shows accounts sorted in description order:
Deleting an AccountAfter you find and view the account record using the procedure given under “Finding an Account” on page 46, you can choose to delete an account that has not been used.
Accounts with transactions cannot be deleted but can be archived. See “Archiving an Account” on page 45 for instructions on archiving an account.
Finding a Record in the Entire List of AccountsThe full account list view displays the same description, account code, and shortcut as the Quick Find in a larger list view.
1. To view the full list of accounts, click the Find Account link.
Click this link to find an account.
47

ConnectNow AccountingLedger and Payables User Guide
The Account Search list is displayed:
2. Scroll through the alphanumeric list to locate the account you need, or click the alphanumeric shortcut options at the top to advance to the first occurrence of the letter or number that you select.
3. When you find the account you need, click to view the full account details.
Designating an Asset Account as a Bank AccountWhile you may create multiple Asset accounts in your Chart of Accounts, not all Asset accounts are Bank Accounts. You need to indicate which of your Asset accounts are bank accounts.
This designation makes only the appropriate accounts available for bill payment and check posting.
1. Click .
2. Locate the account using Quick Find.
3. Click to view the account details.
4. In the Additional Asset Information section, check the Bank Account box.
Select this checkbox
48

Creating and Managing Your Chart of AccountsBuilding Your Chart of Accounts 3
5. In the Service Charge Account list, select the expense account you created for bank charges. This field is required for bank reconciliation processing.
6. In the Interest Income list, select the income account you created for interest income. This field is required for bank reconciliation processing.
7. Click .
The accounts are now available from the Bank Account lookup on the Bills, Checks, Deposits, and Bank Reconciliation pages.
Designating Accounts for Accounts Payable (Accrual Systems only)For organizations using an Accrual Method, you must designate any Accounts Payable accounts to popu-late the AP Account lookup on the Bill Information page (this step is not necessary if using a Cash Method).
This designation makes only the appropriate accounts available for bill payment and check posting.
1. Locate the account using Quick Find.
2. Click to view the account details.
3. In the Additional Liability Information section, check the Accounts Payable box.
4. Click .
The accounts are now available from the AP Account list on the Bill Information page. For example:
Select this checkbox
49
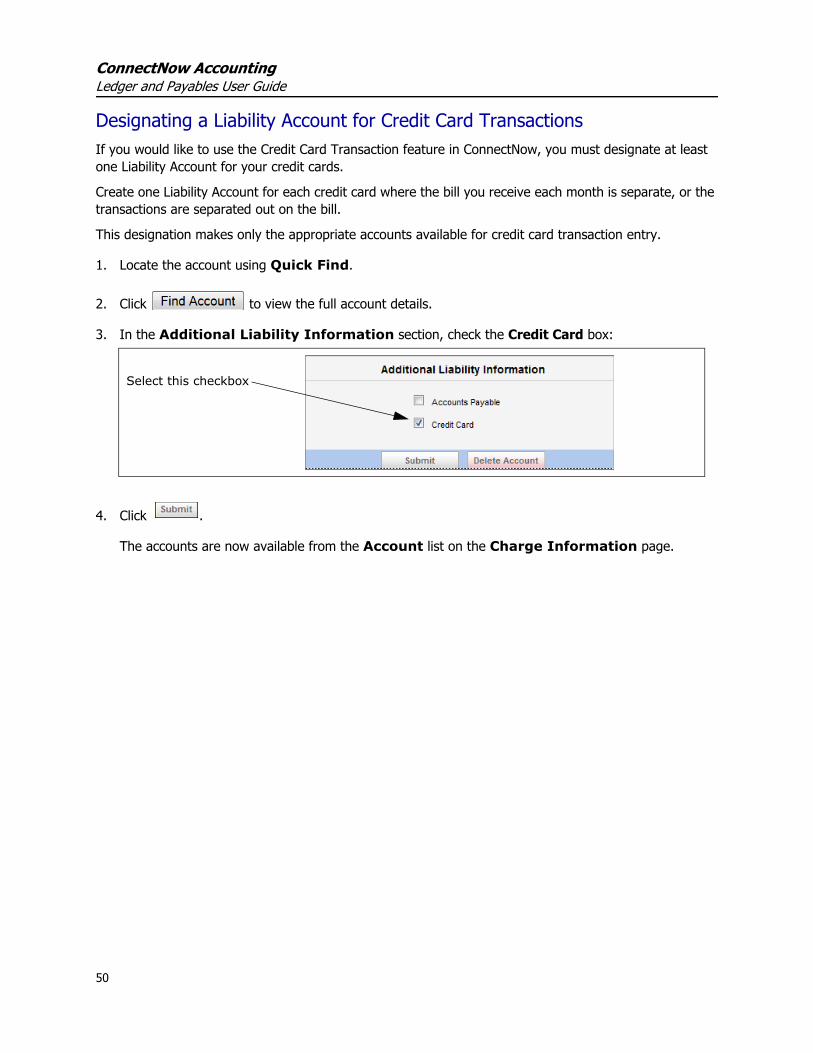
ConnectNow AccountingLedger and Payables User Guide
Designating a Liability Account for Credit Card TransactionsIf you would like to use the Credit Card Transaction feature in ConnectNow, you must designate at least one Liability Account for your credit cards.
Create one Liability Account for each credit card where the bill you receive each month is separate, or the transactions are separated out on the bill.
This designation makes only the appropriate accounts available for credit card transaction entry.
1. Locate the account using Quick Find.
2. Click to view the full account details.
3. In the Additional Liability Information section, check the Credit Card box:
4. Click .
The accounts are now available from the Account list on the Charge Information page.
Select this checkbox
50

Creating and Managing Your Chart of AccountsSetting a Beginning Balance 3
Designating a Release Account for GAAP Compliance FunctionalityThe Account Restriction field is available on the Account Information page if the GAAP Compli-ance Function is enabled for your system. The Account Restriction setting designates an account as a “GAAP Release Account.” See “Using the GAAP Compliance Feature” on page 236.
NoteThe Account Restriction options were recently changed to reflect a new FASB standard that goes into effect for fiscal years beginning after 12/15/2017. The new standard is designed to simplify the classification of net assets and the presentation of information in financial statements. To help you prepare for this change, the options are slightly reworded to reflect the new standard yet maintain the terminology (shown in parentheses) associated with the former standard that you are familiar with.
Setting a Beginning BalanceIf you did not have a comprehensive conversion from your previous application, you need to enter begin-ning balances for your asset, liability, net asset, and dedicated accounts. Beginning balances are not appli-cable to income and expense accounts.
Gathering InformationWe recommend you take the Statement of Financial Position (Balance Sheet) as of the last day of your previous fiscal year from your previous application and use this as your base when entering beginning balances.
Wording of the Account Restric-tion options was changed to reflect both the new and former FASB terminology used to categorize income and expense
51

ConnectNow AccountingLedger and Payables User Guide
Review the list of accounts and enter the amounts in the appropriate Debit or Credit column in the Led-ger and Payables. Table 8 is provided to help you determine whether you should enter a debit or credit.
Figure 19. Example of a Statement of Financial Position
Table 8: Debits and Credits
Account Type Typical Balance Debit Effect Credit Effect
Asset Debit + Increase - Decrease
Liability Credit - Decrease + Increase
Net Asset Credit - Decrease + Increase
Dedicated Credit - Decrease + Increase
Use the Statement of Financial Position as your base when entering beginning balances.
52
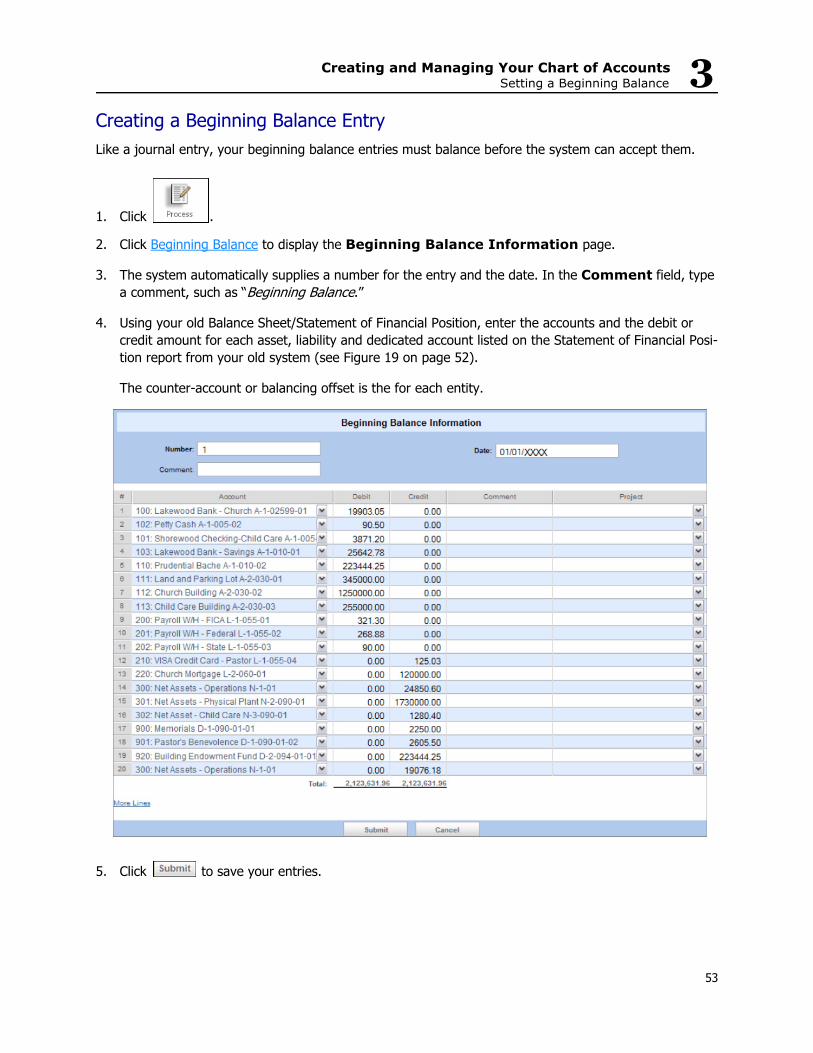
Creating and Managing Your Chart of AccountsSetting a Beginning Balance 3
Creating a Beginning Balance EntryLike a journal entry, your beginning balance entries must balance before the system can accept them.
1. Click .
2. Click Beginning Balance to display the Beginning Balance Information page.
3. The system automatically supplies a number for the entry and the date. In the Comment field, type a comment, such as “Beginning Balance.”
4. Using your old Balance Sheet/Statement of Financial Position, enter the accounts and the debit or credit amount for each asset, liability and dedicated account listed on the Statement of Financial Posi-tion report from your old system (see Figure 19 on page 52).
The counter-account or balancing offset is the for each entity.
5. Click to save your entries.
53
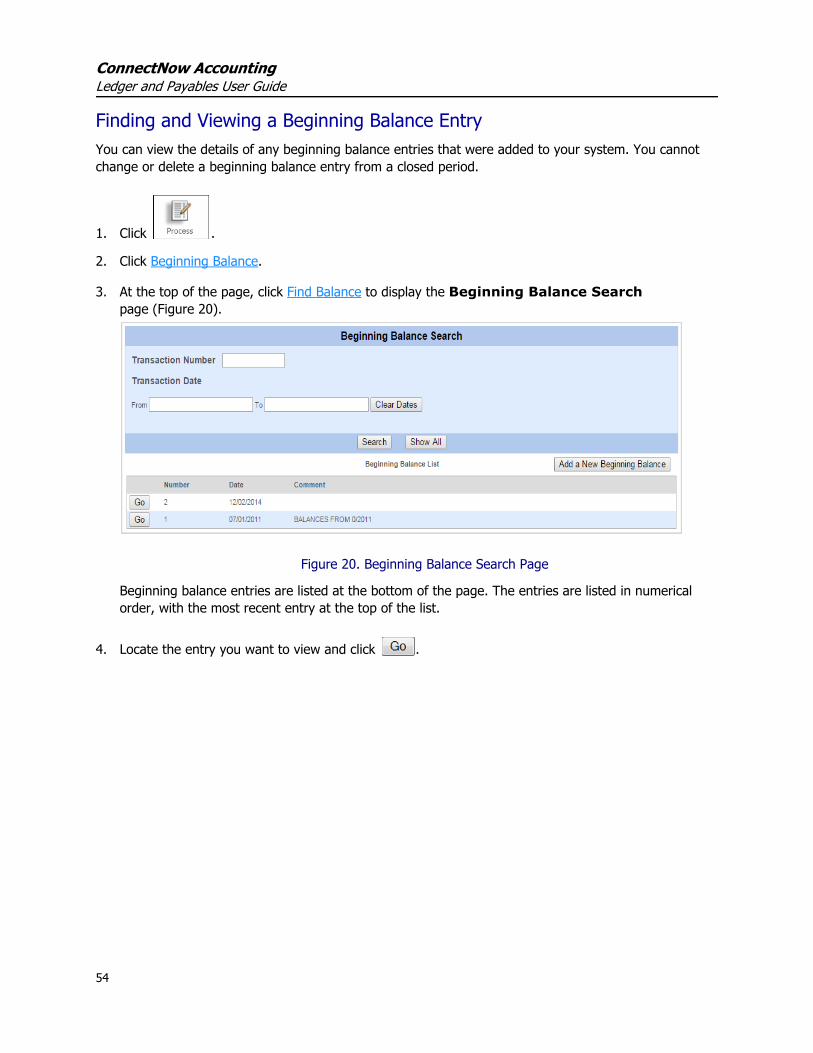
ConnectNow AccountingLedger and Payables User Guide
Finding and Viewing a Beginning Balance EntryYou can view the details of any beginning balance entries that were added to your system. You cannot change or delete a beginning balance entry from a closed period.
1. Click .
2. Click Beginning Balance.
3. At the top of the page, click Find Balance to display the Beginning Balance Search page (Figure 20).
Figure 20. Beginning Balance Search Page
Beginning balance entries are listed at the bottom of the page. The entries are listed in numerical order, with the most recent entry at the top of the list.
4. Locate the entry you want to view and click .
54

Creating and Managing Your Chart of AccountsSetting a Beginning Balance 3
Editing a Beginning Balance EntryNote
You cannot edit a beginning balance from a prior accounting period.
1. Complete Steps 1 - 4 under “Finding and Viewing a Beginning Balance Entry”.
2. Make the desired changes.
3. Click to save your changes.
Deleting a Beginning Balance EntryNote
You cannot delete a beginning balance from a prior accounting period.
1. Complete Steps 1 - 4 under “Finding and Viewing a Beginning Balance Entry”.
2. To remove a beginning balance entry, click .
55

ConnectNow AccountingLedger and Payables User Guide
56

Chapter 4Managing Vendors
IntroductionVendors or suppliers are a source for bills and a destination for bill payments. This chapter shows you how to manage your vendors. Topics include how to do the following tasks:
• Add a new vendor record• Find a vendor in your system• Make changes to a vendor record• Set up account distributions for a vendor• Specify default printing preferences for checks• Set up a 1099 • Add comments to vendor record• Delete a vendor record• Merge two vendor records
Adding a New VendorYou can add a new vendor in two areas of the application:
• On the main Vendor Information page.• On the fly as you enter bills on the Bill Information page. If you converted your data from a previous system, ParishSOFT recommends that you enter your core ven-dors (those who you pay on a monthly basis) into the system as new vendors. You can enter vendors that you pay less frequently on-the-fly as you enter bills into the system. Instructions for both methods are pro-vided in this section.
57

ConnectNow AccountingLedger and Payables User Guide
Adding a Vendor on the Vendor Information PageWhen you add a vendor, you can enter basic information about the vendor, including the name, address, and contact numbers. The following procedure shows you how to add this information in your system.
1. Click to display the Vendor Information page (Figure 21):
Figure 21. Vendor Information Page
58
Managing VendorsAdding a New Vendor
4
2. Search your system to locate the name of the vendor you want to add.NoteBefore you add a new vendor, you should conduct a search to verify that the vendor is not already set up in your system. An initial search helps to ensure that you do not create duplicate vendor records in your database.
Complete the following:
a. In the Quick Find list, click the Down Arrow button to display the current list of vendors. Alterna-tively, type the first few letters of the vendor’s name to view a list of possible name matches.
b. Look for the vendor in the displayed list. Then, do the following:
• If you find the vendor’s name, the vendor is already in the system. If desired, click
to view details in the vendor’s record. If you need to add information to the record, go to Step 3. If the record is complete, you are done.
• If the vendor’s name is not in the list, the vendor is not in the system. Add the vendor’s information. Go to Step 3.
3. Complete the fields on the Vendor Information page as necessary. Refer to Table 9 for descriptions.
4. Click to save the record.
The vendor’s name is now available in all of the application’s Vendor lists.
Table 9: Descriptions of the Fields on the Vendor Information Page
Field Description
Vendor Name (required) Name of the vendor. Must be unique.
Check Name (required) This field automatically populates based on the name of the vendor. If the vendor requires a different name on the printed check, type the name as you want it to appear on your printed checks.
Vendor Code Unique code that identifies the vendor to your organization. The code can contain a mix of alphabetic and numeric characters but is limited to 20 characters. The code is used for diocesan transaction imports only.
Address, Address 2, City, State, ZIP Code, and Country
Vendor’s complete mailing address.
Account Number Vendor’s account number for your organization’s account. This account number prints on the check stub.
59
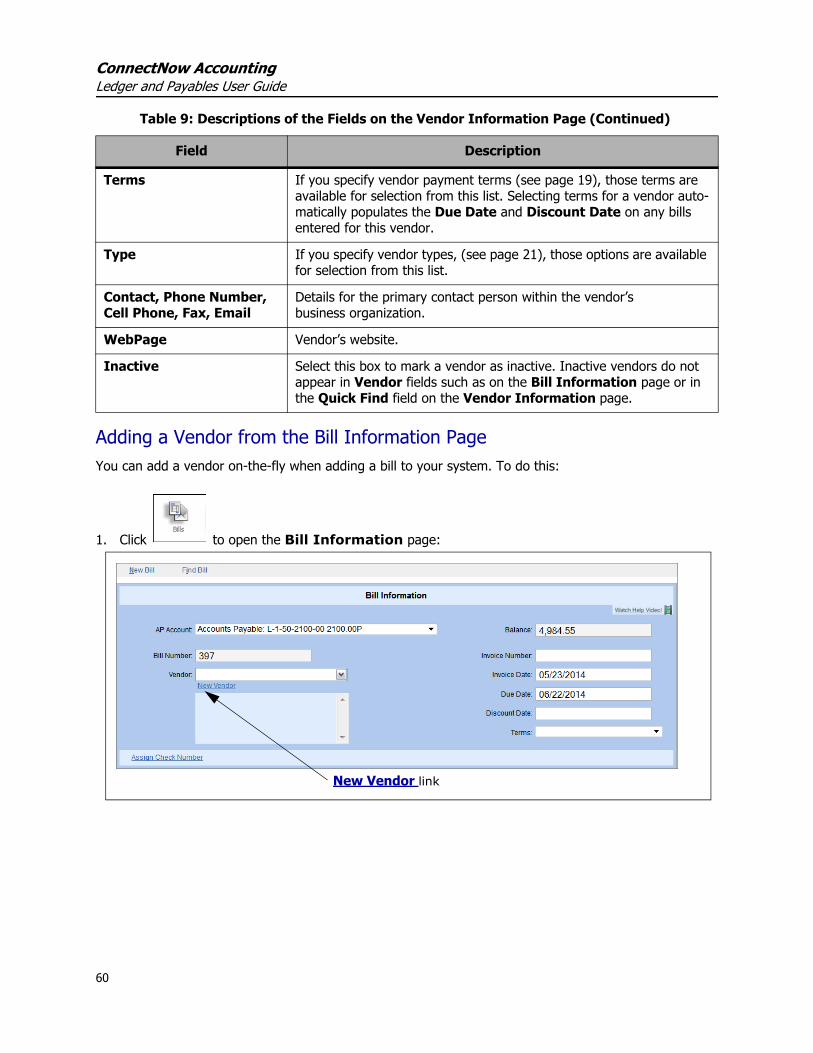
ConnectNow AccountingLedger and Payables User Guide
Adding a Vendor from the Bill Information PageYou can add a vendor on-the-fly when adding a bill to your system. To do this:
1. Click to open the Bill Information page:
Terms If you specify vendor payment terms (see page 19), those terms are available for selection from this list. Selecting terms for a vendor auto-matically populates the Due Date and Discount Date on any bills entered for this vendor.
Type If you specify vendor types, (see page 21), those options are available for selection from this list.
Contact, Phone Number, Cell Phone, Fax, Email
Details for the primary contact person within the vendor’s business organization.
WebPage Vendor’s website.
Inactive Select this box to mark a vendor as inactive. Inactive vendors do not appear in Vendor fields such as on the Bill Information page or in the Quick Find field on the Vendor Information page.
Table 9: Descriptions of the Fields on the Vendor Information Page (Continued)
Field Description
New Vendor link
60

Managing VendorsFinding a Vendor
4
2. Click the New Vendor link to display the New Vendor setup (Figure 22):Figure 22. New Vendor Setup
3. Complete the New Vendor setup. See Table 9 on page 59 for field descriptions.
4. Click .
The current bill information is updated with the vendor’s information, and the vendor is added to your system.
Finding a VendorYou can find a vendor in your system in two areas of the application:
• On the Vendor Information page • On the Bill Information page The two methods of finding a vendor are described in the following sections.
Finding a Vendor on the Vendor Information PageUse either of the following methods to find a vendor.
Method 1
1. On the Vendor Information page (see Figure 21 on page 58), do one of the following:
• Click the Quick Find Down Arrow button to display the list of vendors.
• Type the first few letters of the vendor’s name in the Quick Find field to jump to names in the list that match the letters you typed.
2. Select the vendor. Then, click to view the vendor’s record.
61
ConnectNow AccountingLedger and Payables User Guide
Method 2
1. On the Vendor Information page (see Figure 21 on page 58), click Find Record.
A list of all the vendor records in your system is displayed.
2. Use the alphanumeric filters at the top or bottom of the vendor list to view a specific group of vendors (for example, all vendors whose name begins with “G”).
3. Next to the desired record, click to open and view the vendor’s record.
Finding a Vendor on the Bill Information Page
1. Click to display the Bill Information page, do one of the following:
• Click the Quick Find Down Arrow button to display the list of vendors.
• Type the first few letters of the vendor’s name in the Quick Find field to jump to names in the list that match the letters you typed.
2. Select the vendor.
Details from the selected vendor’s record populate the fields on the Bill Information page.
Editing a Vendor’s RecordTo edit a vendor’s record:
1. Find the vendor’s record using the instructions under “Finding a Vendor” on page 61.
2. Edit any of the fields in the selected vendor’s record as needed.
3. Click to save the changes.
Setting Up Account DistributionsYou can save data entry time by setting and saving account distribution options in each vendor’s record. The Vendor Account Distribution automatically displays the Expense, Liability, or Dedicated accounts nor-mally used by a vendor. You can then apply (or opt not to apply) them to bills entered for that vendor.
To set up distribution options for a vendor, complete the following steps:
1. Click to display the Vendor Information page (see Figure 21 on page 58).
2. In the Quick Find list, select the desired vendor. Then, click to display the selectedvendor’s record.
62
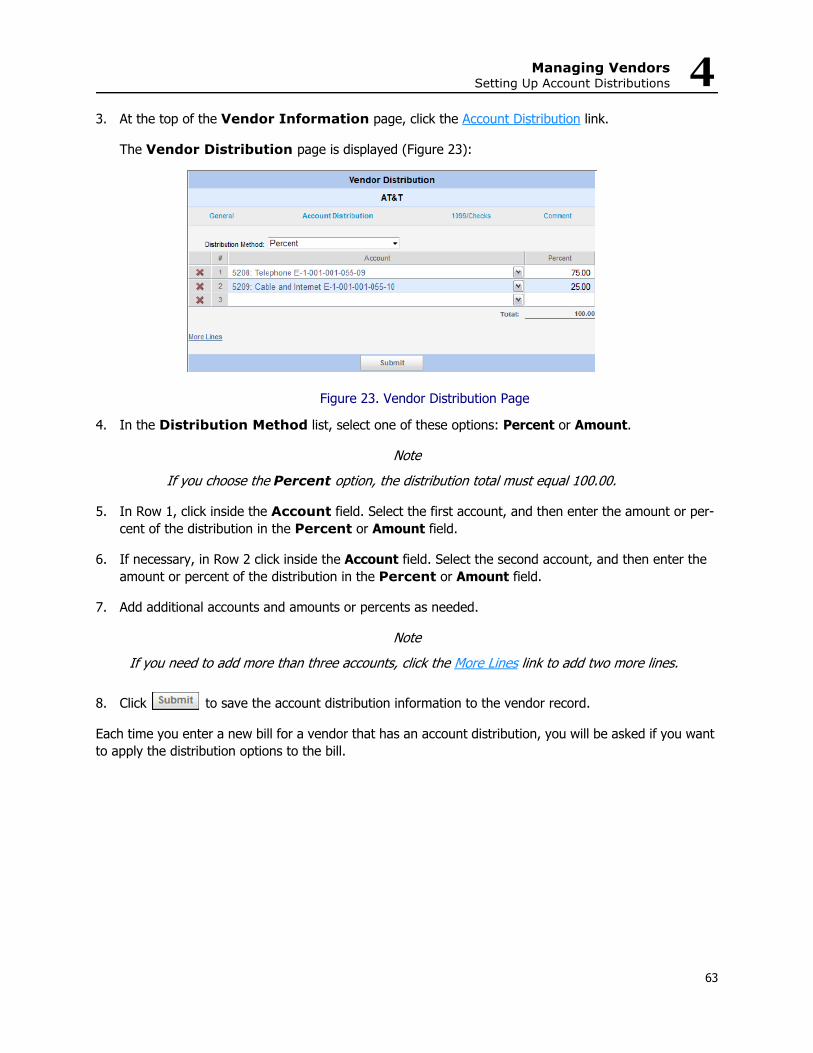
Managing VendorsSetting Up Account Distributions
4
3. At the top of the Vendor Information page, click the Account Distribution link.The Vendor Distribution page is displayed (Figure 23):
Figure 23. Vendor Distribution Page
4. In the Distribution Method list, select one of these options: Percent or Amount.
NoteIf you choose the Percent option, the distribution total must equal 100.00.
5. In Row 1, click inside the Account field. Select the first account, and then enter the amount or per-cent of the distribution in the Percent or Amount field.
6. If necessary, in Row 2 click inside the Account field. Select the second account, and then enter the amount or percent of the distribution in the Percent or Amount field.
7. Add additional accounts and amounts or percents as needed.
NoteIf you need to add more than three accounts, click the More Lines link to add two more lines.
8. Click to save the account distribution information to the vendor record.
Each time you enter a new bill for a vendor that has an account distribution, you will be asked if you want to apply the distribution options to the bill.
63
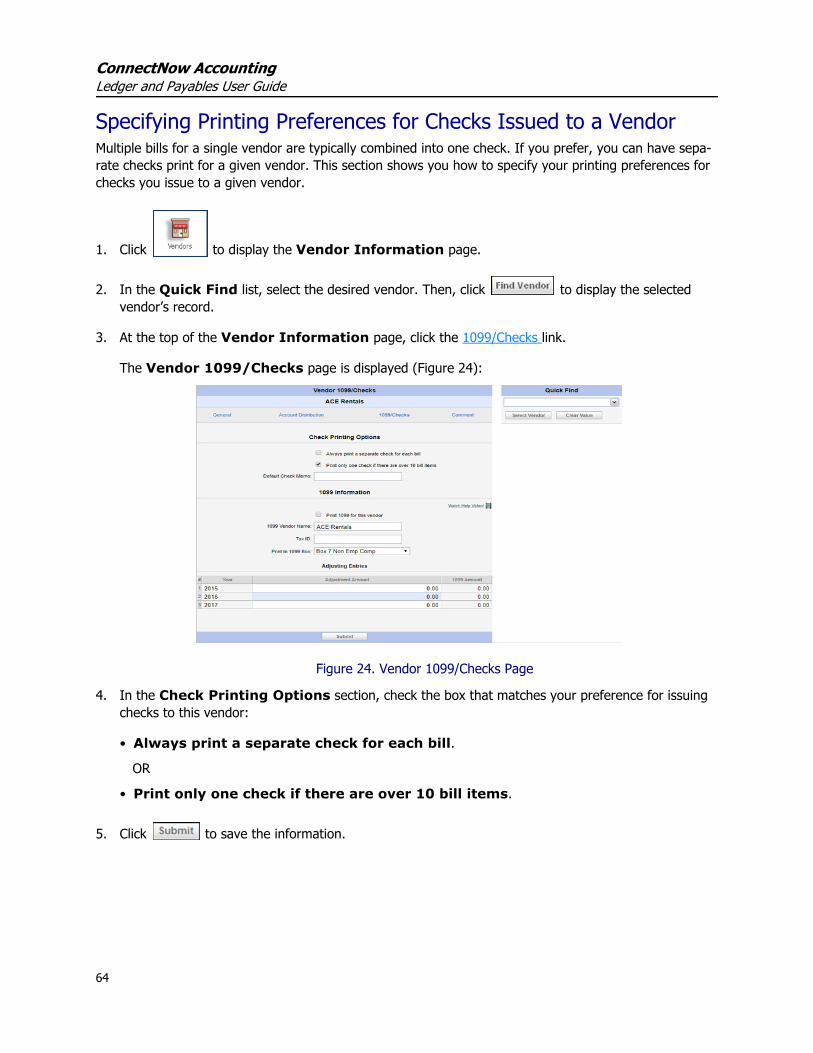
ConnectNow AccountingLedger and Payables User Guide
Specifying Printing Preferences for Checks Issued to a VendorMultiple bills for a single vendor are typically combined into one check. If you prefer, you can have sepa-rate checks print for a given vendor. This section shows you how to specify your printing preferences for checks you issue to a given vendor.
1. Click to display the Vendor Information page.
2. In the Quick Find list, select the desired vendor. Then, click to display the selected vendor’s record.
3. At the top of the Vendor Information page, click the 1099/Checks link.
The Vendor 1099/Checks page is displayed (Figure 24):
Figure 24. Vendor 1099/Checks Page
4. In the Check Printing Options section, check the box that matches your preference for issuing checks to this vendor:
• Always print a separate check for each bill.
OR
• Print only one check if there are over 10 bill items.
5. Click to save the information.
64

Managing VendorsSpecifying Default Text for the Check Memo
4
Specifying Default Text for the Check MemoThis procedure shows you how to create text that appears in the memo field on all checks issued to a given vendor. If you prefer to individually add memo text to your checks, you can add that information when you do a check run. See “Printing Checks” on page 81 for details.1. Click to display the Vendor Information page.
2. In the Quick Find list, select the desired vendor. Then, click to display the selected vendor’s record.
3. At the top of the Vendor Information page, click the 1099/Checks link.
The Vendor 1099/Checks page (Figure 24) is displayed.
4. In the Default Check Memo field, type the information you want displayed in the check memo field on all checks to this vendor. The maximum number of characters allowed in the field is 50.
NoteEven if you specify the default text here in this setup, you can edit the text later when you do a check run. See “Printing Checks” on page 81 for details.
5. Click to save the information.
Setting Up Print 1099 Forms for a VendorNon-Incorporated vendors to whom you have paid over $600.00 in a calendar year for services, products related to that service, and other income payments must receive a 1099 from your organization. This pro-cedure shows you how to set up a vendor to receive a 1099.
1. Click .
2. In the Quick Find list, select the desired vendor. Then, click to display the vendor’s record.
3. At the top of the Vendor Information page, click the 1099/Checks link.
The Vendor 1099/Checks page (Figure 24) is displayed.
65
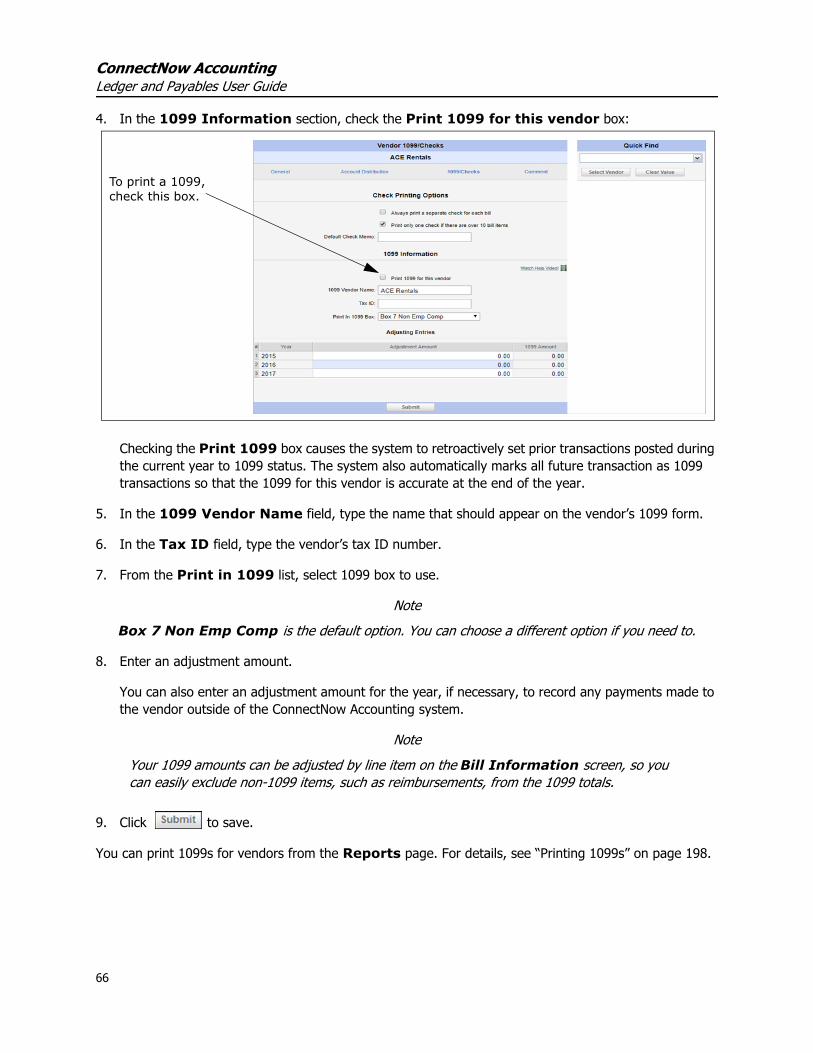
ConnectNow AccountingLedger and Payables User Guide
4. In the 1099 Information section, check the Print 1099 for this vendor box:
Checking the Print 1099 box causes the system to retroactively set prior transactions posted during the current year to 1099 status. The system also automatically marks all future transaction as 1099 transactions so that the 1099 for this vendor is accurate at the end of the year.
5. In the 1099 Vendor Name field, type the name that should appear on the vendor’s 1099 form.
6. In the Tax ID field, type the vendor’s tax ID number.
7. From the Print in 1099 list, select 1099 box to use.
NoteBox 7 Non Emp Comp is the default option. You can choose a different option if you need to.
8. Enter an adjustment amount.
You can also enter an adjustment amount for the year, if necessary, to record any payments made to the vendor outside of the ConnectNow Accounting system.
NoteYour 1099 amounts can be adjusted by line item on the Bill Information screen, so you can easily exclude non-1099 items, such as reimbursements, from the 1099 totals.
9. Click to save.
You can print 1099s for vendors from the Reports page. For details, see “Printing 1099s” on page 198.
To print a 1099, check this box.
66

Managing VendorsRecording Information About a Vendor
4
Recording Information About a Vendor The Comments feature enables you to record information specific to a vendor in your database. This information does not print on the check or check stub. It is simply available for your reference.To add a comment:
1. Click to display the Vendor Information page.
2. In the Quick Find list, select the desired vendor. Then, click to display the selected vendor’s record.
3. At the top of the Vendor Information page, click the Comment link.
The Vendor Comments page (Figure 25) is displayed.
Figure 25. Vendor Comments
4. Type your notes in the Comments field.
5. Click to save.
67
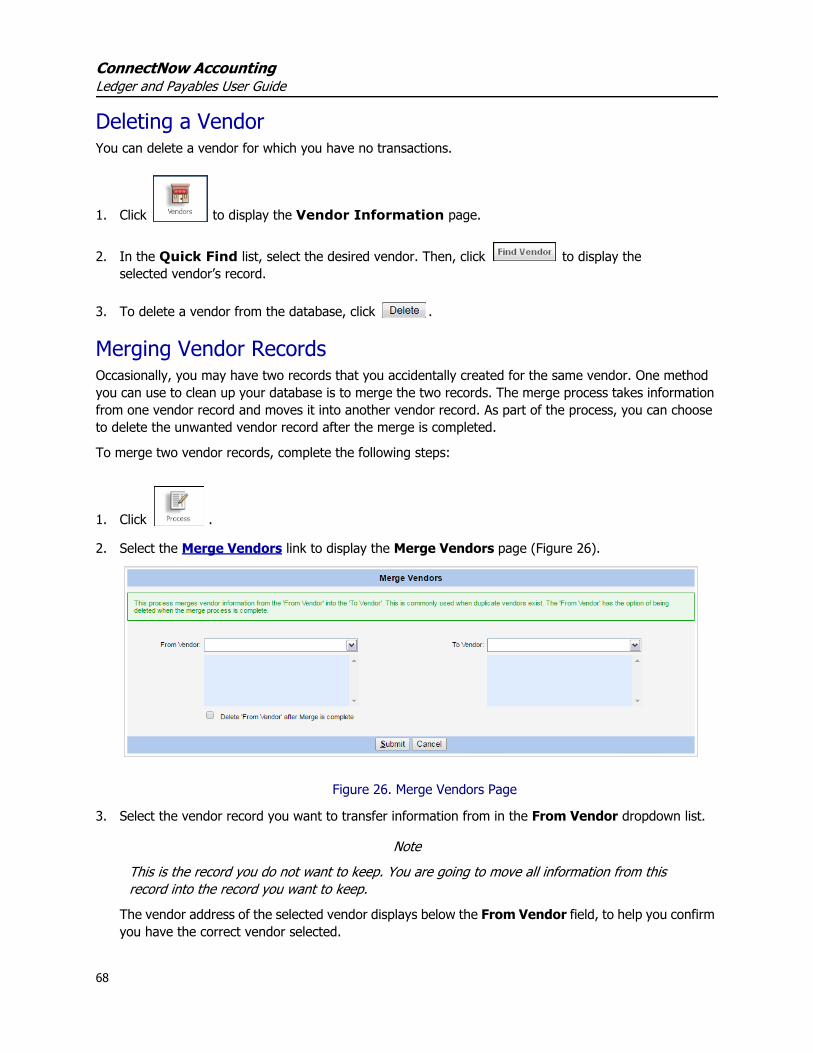
ConnectNow AccountingLedger and Payables User Guide
Deleting a VendorYou can delete a vendor for which you have no transactions.
1. Click to display the Vendor Information page.
2. In the Quick Find list, select the desired vendor. Then, click to display the selected vendor’s record.
3. To delete a vendor from the database, click .
Merging Vendor RecordsOccasionally, you may have two records that you accidentally created for the same vendor. One method you can use to clean up your database is to merge the two records. The merge process takes information from one vendor record and moves it into another vendor record. As part of the process, you can choose to delete the unwanted vendor record after the merge is completed.
To merge two vendor records, complete the following steps:
1. Click .
2. Select the Merge Vendors link to display the Merge Vendors page (Figure 26).
Figure 26. Merge Vendors Page
3. Select the vendor record you want to transfer information from in the From Vendor dropdown list.
NoteThis is the record you do not want to keep. You are going to move all information from this record into the record you want to keep.
The vendor address of the selected vendor displays below the From Vendor field, to help you confirm you have the correct vendor selected.
68
Managing VendorsMerging Vendor Records
4
4. If desired, select the Delete ‘From Vendor’ after Merge is complete checkbox to remove theFrom Vendor record as part of the merge process.
Note:If you do not select the checkbox to get rid of the From Vendor record, the system keeps the record in your database after the merge.
5. Select the vendor record you want to transfer information to in the To Vendor dropdown list.
The vendor address of the selected vendor displays below the To Vendor field to help you confirm you have the correct vendor selected.
6. Click .
The merge process does the following:
• Moves all bill, check, and credit card information from the From Vendor record to the To Vendor record. For reporting purposes, the system retains the vendor name originally used on all transactions.
• Selects the Print 1099 for this vendor checkbox in the record of the To Vendor, if this checkbox is selected in the record of the From Vendor. The system does not transfer the remaining profile infor-mation from the record of the From Vendor to the record of the To Vendor.
• Deletes the Distribution data, if specified, from the record of the From Vendor.• Deletes the From Vendor record, if the user selected the Delete ‘From Vendor’ after Merge is
complete checkbox.• Creates an Audit log entry to record the change.
69

ConnectNow AccountingLedger and Payables User Guide
70

Chapter 5Entering Bills
IntroductionThe Ledger and Payables system makes it easy for you to enter bills for expenses into your system. This chapter shows you how to create a bill and do the following tasks related to managing bills in your system:
• Find a bill • Edit a bill • Void a bill• Pay a bill on-the-fly• Record a bill paid by a handwritten check or electronic payment • Memorize a recurring bill to make regular scheduled payments without having to repeat data entry• See also, “Managing Bills, Deposits, and Checks with GAAP Compliance” on page 252
Creating a Bill
1. Click to display the Bill Information page (Figure 27):
Figure 27. Bill Information Page
The system opens a new bill record and generates a unique bill number for the bill, which is displayed in the Bill Number field.
71
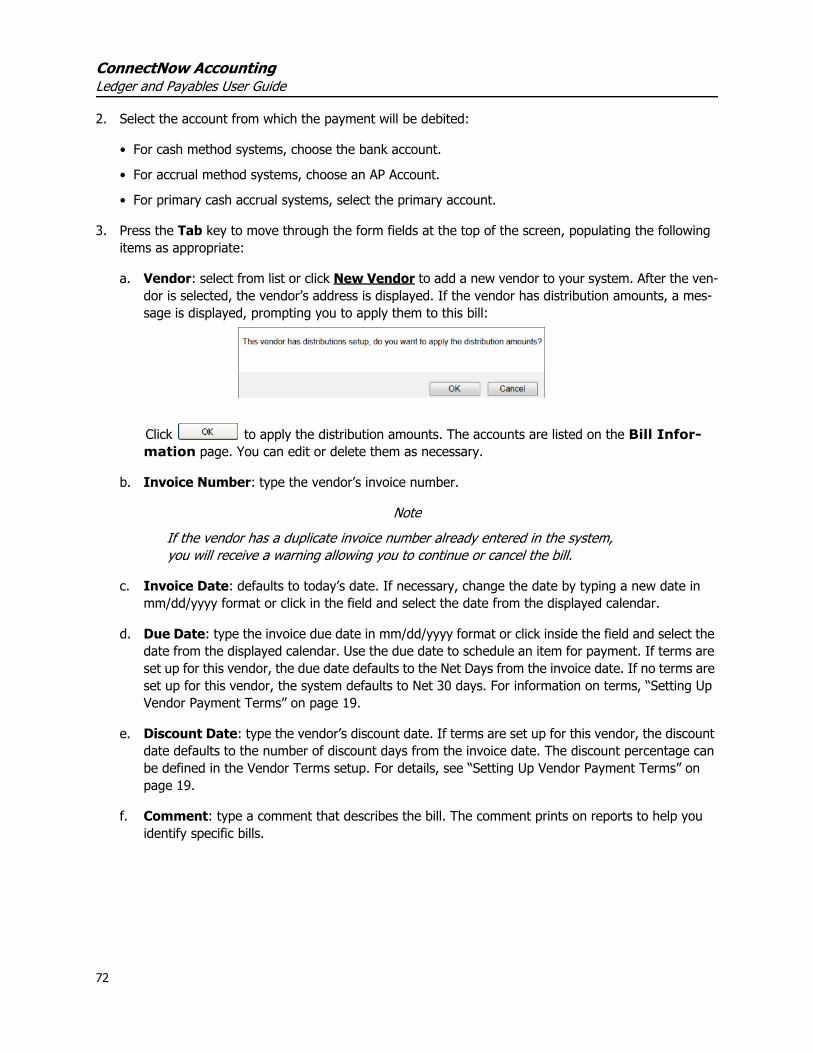
ConnectNow AccountingLedger and Payables User Guide
2. Select the account from which the payment will be debited:
• For cash method systems, choose the bank account.
• For accrual method systems, choose an AP Account.
• For primary cash accrual systems, select the primary account.
3. Press the Tab key to move through the form fields at the top of the screen, populating the following items as appropriate:
a. Vendor: select from list or click New Vendor to add a new vendor to your system. After the ven-dor is selected, the vendor’s address is displayed. If the vendor has distribution amounts, a mes-sage is displayed, prompting you to apply them to this bill:
Click to apply the distribution amounts. The accounts are listed on the Bill Infor-mation page. You can edit or delete them as necessary.
b. Invoice Number: type the vendor’s invoice number.
NoteIf the vendor has a duplicate invoice number already entered in the system, you will receive a warning allowing you to continue or cancel the bill.
c. Invoice Date: defaults to today’s date. If necessary, change the date by typing a new date in mm/dd/yyyy format or click in the field and select the date from the displayed calendar.
d. Due Date: type the invoice due date in mm/dd/yyyy format or click inside the field and select the date from the displayed calendar. Use the due date to schedule an item for payment. If terms are set up for this vendor, the due date defaults to the Net Days from the invoice date. If no terms are set up for this vendor, the system defaults to Net 30 days. For information on terms, “Setting Up Vendor Payment Terms” on page 19.
e. Discount Date: type the vendor’s discount date. If terms are set up for this vendor, the discount date defaults to the number of discount days from the invoice date. The discount percentage can be defined in the Vendor Terms setup. For details, see “Setting Up Vendor Payment Terms” on page 19.
f. Comment: type a comment that describes the bill. The comment prints on reports to help you identify specific bills.
72

Entering BillsFinding a Bill 5
4. Enter the individual line items for the bill, designating the following:
a. Account Restriction: this field is visible only if your organization is using the GAAP Compliance Function. For a restricted expense, choose With Donor Restrictions (Temp) or With Donor Restrictions (Perm), as appropriate. See “Using the GAAP Compliance Feature” on page 236 for details.
b. Account: select the appropriate Expense, Liability or Dedicated Account. Type the first few char-acters to filter your account list.
Accounts in this list are sorted according to your account settings. To change these settings, see “Setting User Preferences and Default Accounts” on page 15.
c. Amount: type the dollar amount in xxx or xxx.00 format. The cents value defaults to .00 if you do not type a decimal value.
d. Comment: type a comment for the line item. The comment appears on the check stub.
e. If the line item applies to a project, select the project name from the Project list.
NoteTo set up a new project, see “Creating Project Groups and Projects” on
page 11.
f. Check the 1099 box for any items that should be included on a vendor’s 1099 tax form. Leave the box unchecked for items such as reimbursements, which should not be included on a 1099.
5. To add another line item, press the Tab key to move your cursor to the next line. Repeat steps 4a – 4e.
6. To add more line items to the bill form, press the Tab key to advance to the More Lines link and press Enter. Two more lines are added to the bill.
7. Click to save the bill and place it in the queue for payment by check.
Finding a Bill
1. Click to display the Bill Information page (Figure 27).
2. Click the Find Bill link.
73
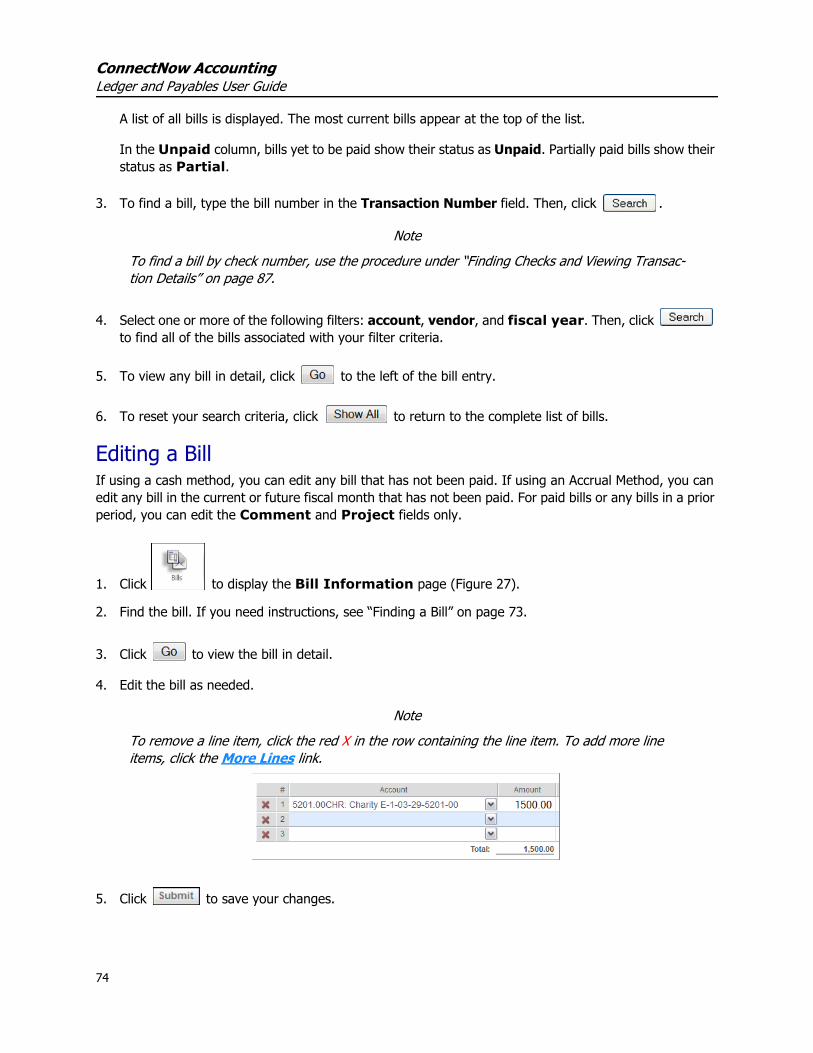
ConnectNow AccountingLedger and Payables User Guide
A list of all bills is displayed. The most current bills appear at the top of the list.
In the Unpaid column, bills yet to be paid show their status as Unpaid. Partially paid bills show their status as Partial.
3. To find a bill, type the bill number in the Transaction Number field. Then, click .
NoteTo find a bill by check number, use the procedure under “Finding Checks and Viewing Transac-tion Details” on page 87.
4. Select one or more of the following filters: account, vendor, and fiscal year. Then, click to find all of the bills associated with your filter criteria.
5. To view any bill in detail, click to the left of the bill entry.
6. To reset your search criteria, click to return to the complete list of bills.
Editing a BillIf using a cash method, you can edit any bill that has not been paid. If using an Accrual Method, you can edit any bill in the current or future fiscal month that has not been paid. For paid bills or any bills in a prior period, you can edit the Comment and Project fields only.
1. Click to display the Bill Information page (Figure 27).
2. Find the bill. If you need instructions, see “Finding a Bill” on page 73.
3. Click to view the bill in detail.
4. Edit the bill as needed.
NoteTo remove a line item, click the red X in the row containing the line item. To add more line items, click the More Lines link.
5. Click to save your changes.
74

Entering BillsDeleting a Bill 5
Deleting a Line ItemTo delete an individual line item from a bill, click the red X in that row.
Adding More Line ItemsTo add more line items, click the More Lines link.
Deleting a BillIf you are using cash method and enter a bill by mistake, you can delete the bill from the list at any time as long as the bill has not been paid. If you are using an accrual method, you can delete an unpaid bill that is dated within your current or future fiscal month.
To delete a bill:
1. Click to display the Bill Information page (Figure 27).
2. Find the bill you want to delete. If you need instructions, see “Finding a Bill” on page 73.
3. Click to view the bill in detail.
4. Confirm that the bill is the one you want to delete. Then, click .
5. Click to confirm the deletion or if the record for the bill should remain in the database.
Voiding a BillIf using an accrual method, you cannot delete a bill from a closed fiscal month. However, you can void the bill. Voiding the bill automatically creates a Journal Entry that reverses the effect of the bill.
1. Click to display the Bill Information page (Figure 27).
2. Find the bill. If you need instructions, see “Finding a Bill” on page 73.
3. Click to view the bill in detail.
4. Click to void the bill.
See also, “Managing Bills, Deposits, and Checks with GAAP Compliance” on page 252, for information on voiding bills with an Associated Journal Entry Number.
75

ConnectNow AccountingLedger and Payables User Guide
Paying a Bill On-the-FlyTo pay a bill immediately, add the bill as usual, using the instructions provided on page 71.
1. Click to display the Create Checks page (see Figure 30 on page 81).
2. Specify details for the check:
• Select a payment method option (check or bill pay).
• Select the bank account or primary account.
• Specify or accept today’s date as the check date.
• Specify the beginning check number.
NoteFor information on checks, see Chapter 6: "Creating and Printing Checks".
3. In the lower section of the page, check the Pay box for each item that you want to pay now.
4. Do one of the following:
• If printing paper checks, click .
• If using Bill Pay, click .
Recording a Manual or Electronic Check
1. Click to display the Bill Information page (Figure 27).
2. Choose one of the following methods to record the check:
• If the vendor was paid with a handwritten or electronic check, complete these steps:
a. Click Assign Check Number.
b. If the bill was paid by a manual check, select the Bank Account (if Accrual).
c. The check number defaults to the next available number. If necessary, type a new check number in the Check Number field.
d. The check date defaults to today’s date. If necessary, type a new date in the Check Date field or click in the field and select a date from the displayed calendar.
e. Click to return to the Bill Information page.
OR
76

Entering BillsMemorizing a Bill 5
• If the bill was paid electronically, complete these steps:
a. Click Assign Check Number.
b. In the Check Number field, type a check number that begins with “EFT” or “ACH” along with the confirmation number provided at the time of the transfer by the bank or vendor.
c. Click to return to the Bill Information page.
NotesChecks that begin with alpha characters do not affect the next available check number feature.If you find that you made an entry error, you can click the Assign Check Number link again and make any corrections, or click Clear Check to remove the check record from this bill.
3. Click to save the transaction.
See “Recording Handwritten or Electronic Checks” on page 85 for more information.
Memorizing a BillYou can memorize a new bill or a bill that you created previously.
1. Click to display the Bill Information page (Figure 27).
2. To memorize a bill, find and view an existing bill record, or create a new record for the bill that you want to memorize.
77
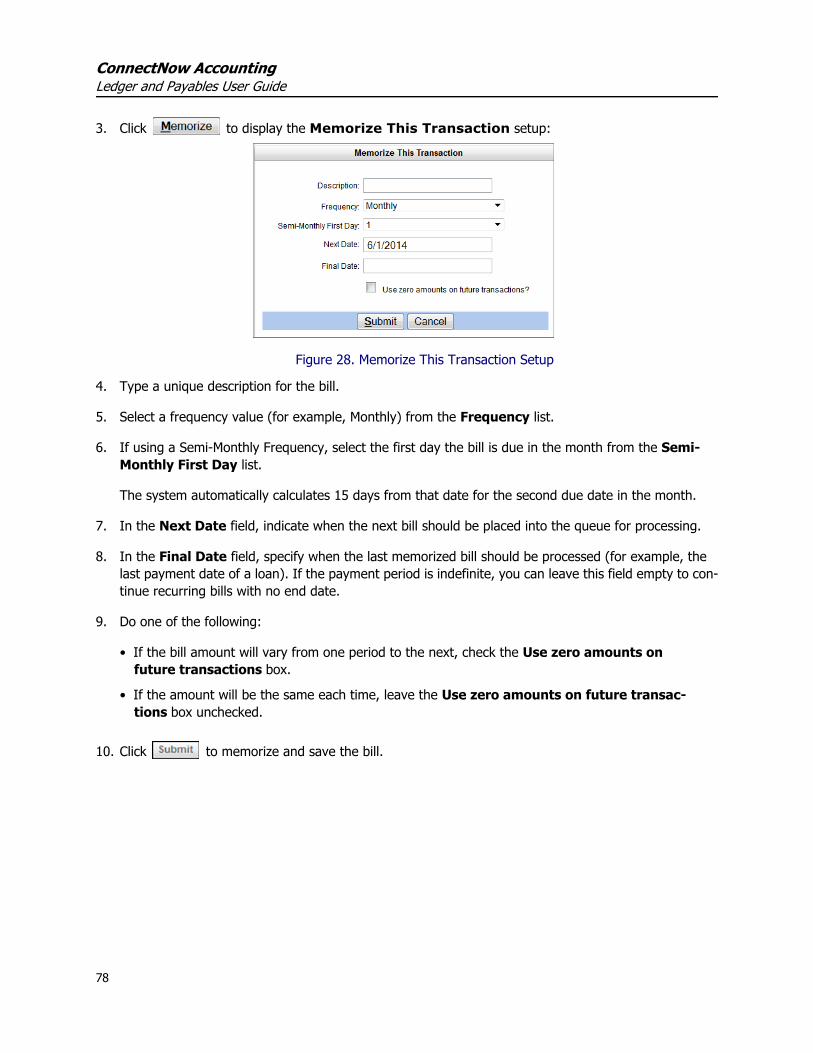
ConnectNow AccountingLedger and Payables User Guide
3. Click to display the Memorize This Transaction setup:
Figure 28. Memorize This Transaction Setup
4. Type a unique description for the bill.
5. Select a frequency value (for example, Monthly) from the Frequency list.
6. If using a Semi-Monthly Frequency, select the first day the bill is due in the month from the Semi-Monthly First Day list.
The system automatically calculates 15 days from that date for the second due date in the month.
7. In the Next Date field, indicate when the next bill should be placed into the queue for processing.
8. In the Final Date field, specify when the last memorized bill should be processed (for example, the last payment date of a loan). If the payment period is indefinite, you can leave this field empty to con-tinue recurring bills with no end date.
9. Do one of the following:
• If the bill amount will vary from one period to the next, check the Use zero amounts on future transactions box.
• If the amount will be the same each time, leave the Use zero amounts on future transac-tions box unchecked.
10. Click to memorize and save the bill.
78
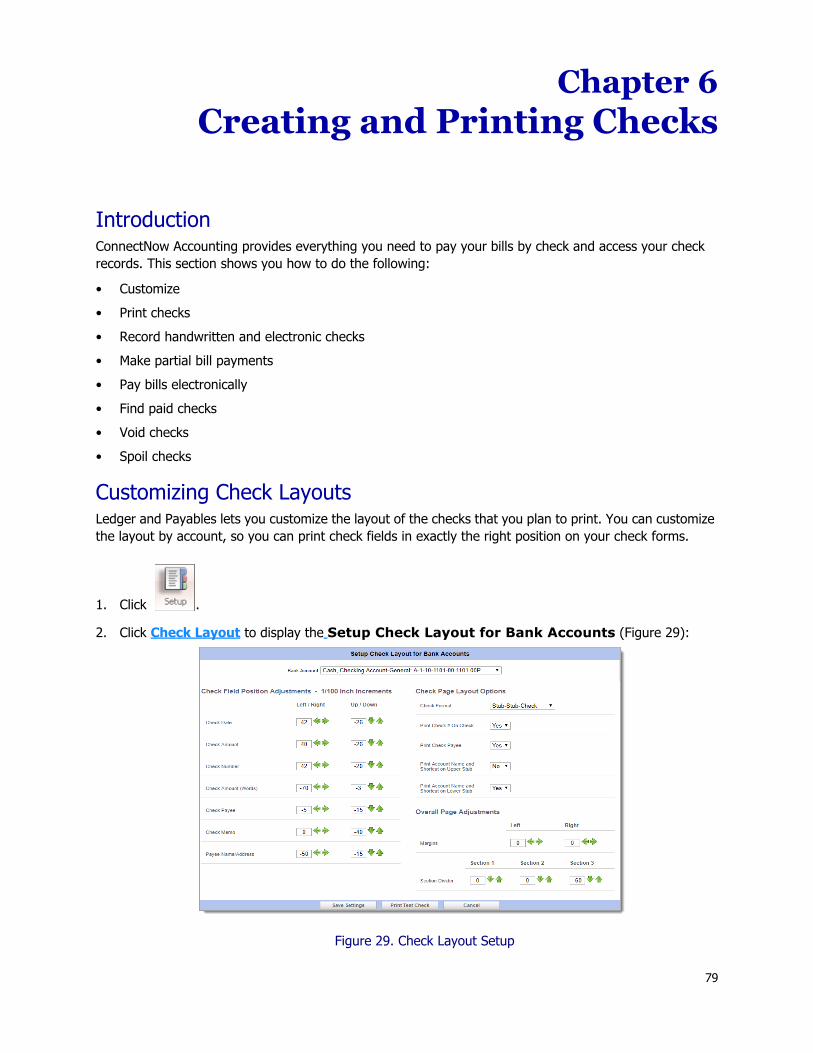
Chapter 6Creating and Printing Checks
IntroductionConnectNow Accounting provides everything you need to pay your bills by check and access your check records. This section shows you how to do the following:
• Customize • Print checks• Record handwritten and electronic checks• Make partial bill payments• Pay bills electronically• Find paid checks• Void checks• Spoil checks
Customizing Check LayoutsLedger and Payables lets you customize the layout of the checks that you plan to print. You can customize the layout by account, so you can print check fields in exactly the right position on your check forms.
1. Click .
2. Click Check Layout to display the Setup Check Layout for Bank Accounts (Figure 29):
Figure 29. Check Layout Setup
79

ConnectNow AccountingLedger and Payables User Guide
3. In the Bank Account dropdown list, select the desired bank account.
4. Using the arrows as a visual guide, nudge the check field positions left or right and up or down.
NoteAdjustments are made in increments of 1/100 of an inch. To move ¼ inch, enter 25; to move ½ inch, enter 50; to move 1 inch, enter 100.
5. In the Check Page Layout Options group, complete the following:
a. In the Check Format dropdown list, select the check format as one of the following: Stub-Stub-Check, Check-Stub-Stub, Stub-Check-Stub, or Check-Check-Check.
b. In the Print Check # on Check dropdown list, specify to print (Yes) or not to print (No) the check number on your checks.
c. In the Print Check Payee dropdown list, specify whether to print (Yes) or not to print (No) the name of the payee on your checks.
d. Specify whether include the account name and shortcut numbers on your checks and where to print this information. The available options give you flexibility regarding placement of this information:
• Upper stub only: select Yes to print on upper stub and No to print on lower stub.
• Lower stub only: select No to print on upper stub and Yes to print on lower stub.
• Neither the upper or lower stub: leave both options set to No (the default).
• Both the upper and lower stubs: select Yes to print on upper stub and Yes to print on lower stub.
6. If desired, make adjustments to the overall page by adjusting margins and dividers for the three sections of the check.
7. Click to save the check layout for the selected bank account.
NoteYou must click Save Settings before clicking Print Test Check or the system will revert to your previous settings.
8. Click to check the alignment of the current settings.
80
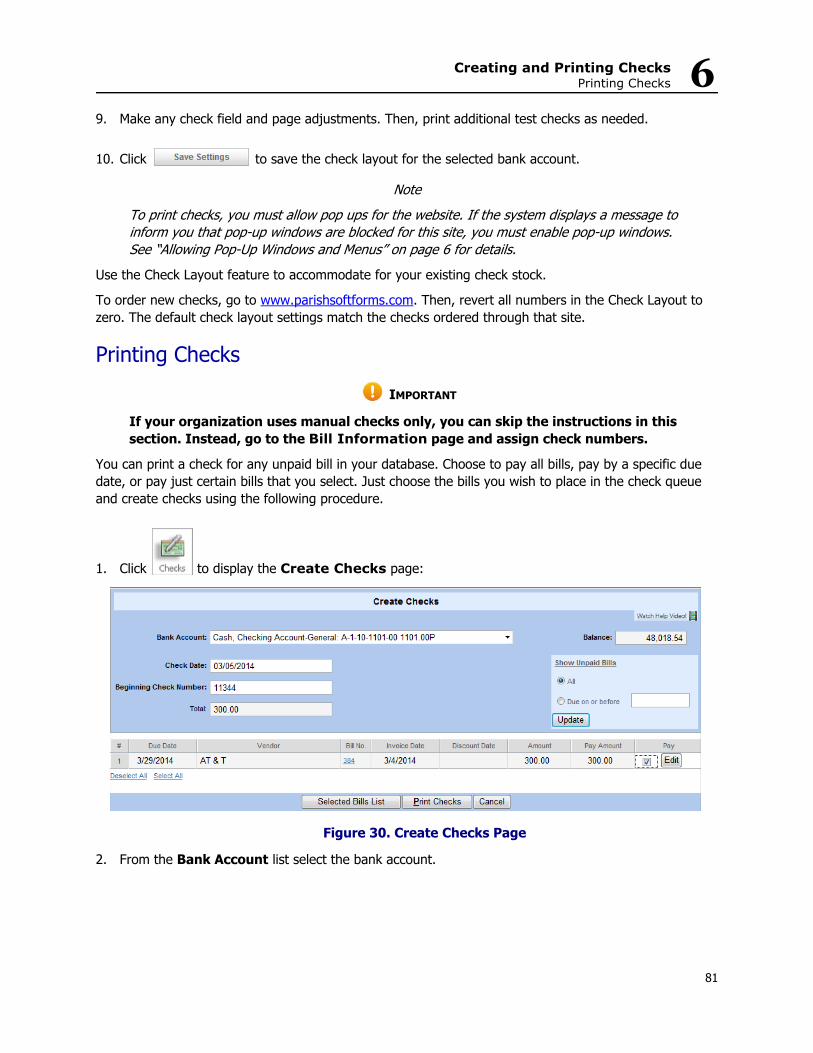
Creating and Printing ChecksPrinting Checks 6
9. Make any check field and page adjustments. Then, print additional test checks as needed.
10. Click to save the check layout for the selected bank account.
NoteTo print checks, you must allow pop ups for the website. If the system displays a message to inform you that pop-up windows are blocked for this site, you must enable pop-up windows. See “Allowing Pop-Up Windows and Menus” on page 6 for details.
Use the Check Layout feature to accommodate for your existing check stock.
To order new checks, go to www.parishsoftforms.com. Then, revert all numbers in the Check Layout to zero. The default check layout settings match the checks ordered through that site.
Printing ChecksIMPORTANT
If your organization uses manual checks only, you can skip the instructions in this section. Instead, go to the Bill Information page and assign check numbers.
You can print a check for any unpaid bill in your database. Choose to pay all bills, pay by a specific due date, or pay just certain bills that you select. Just choose the bills you wish to place in the check queue and create checks using the following procedure.
1. Click to display the Create Checks page:
Figure 30. Create Checks Page
2. From the Bank Account list select the bank account.
81
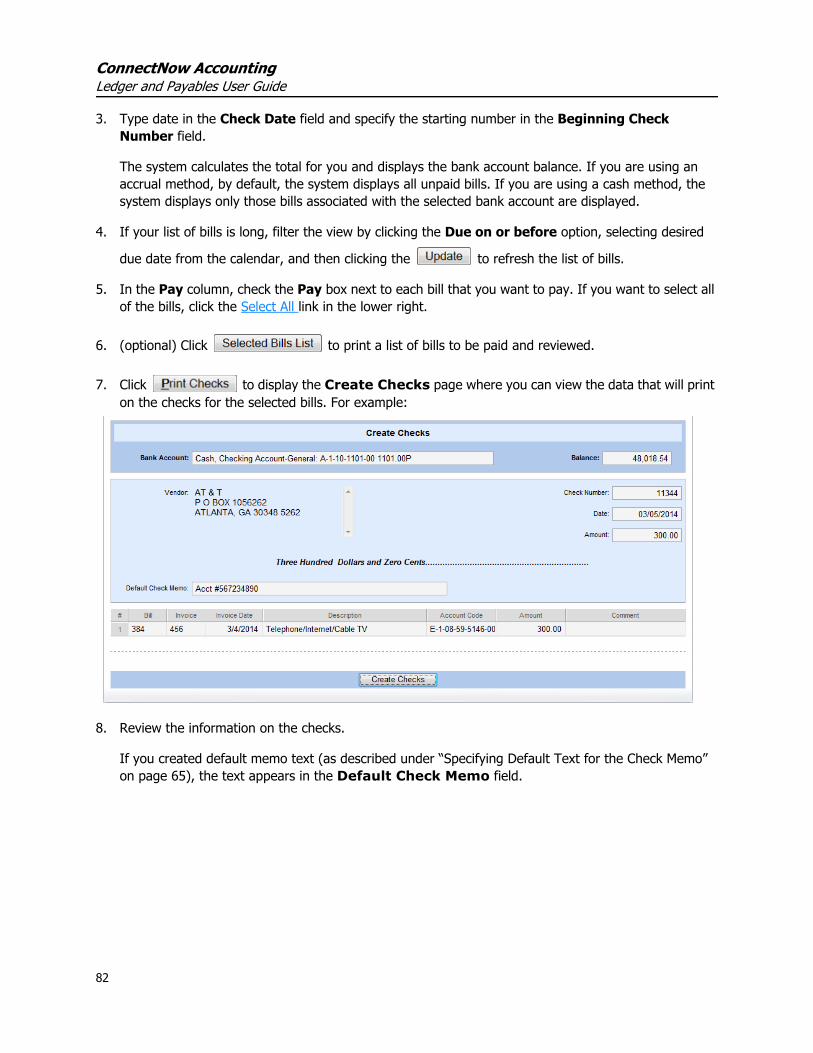
ConnectNow AccountingLedger and Payables User Guide
3. Type date in the Check Date field and specify the starting number in the Beginning Check Number field.
The system calculates the total for you and displays the bank account balance. If you are using an accrual method, by default, the system displays all unpaid bills. If you are using a cash method, the system displays only those bills associated with the selected bank account are displayed.
4. If your list of bills is long, filter the view by clicking the Due on or before option, selecting desired
due date from the calendar, and then clicking the to refresh the list of bills.
5. In the Pay column, check the Pay box next to each bill that you want to pay. If you want to select all of the bills, click the Select All link in the lower right.
6. (optional) Click to print a list of bills to be paid and reviewed.
7. Click to display the Create Checks page where you can view the data that will print on the checks for the selected bills. For example:
8. Review the information on the checks.
If you created default memo text (as described under “Specifying Default Text for the Check Memo” on page 65), the text appears in the Default Check Memo field.
82
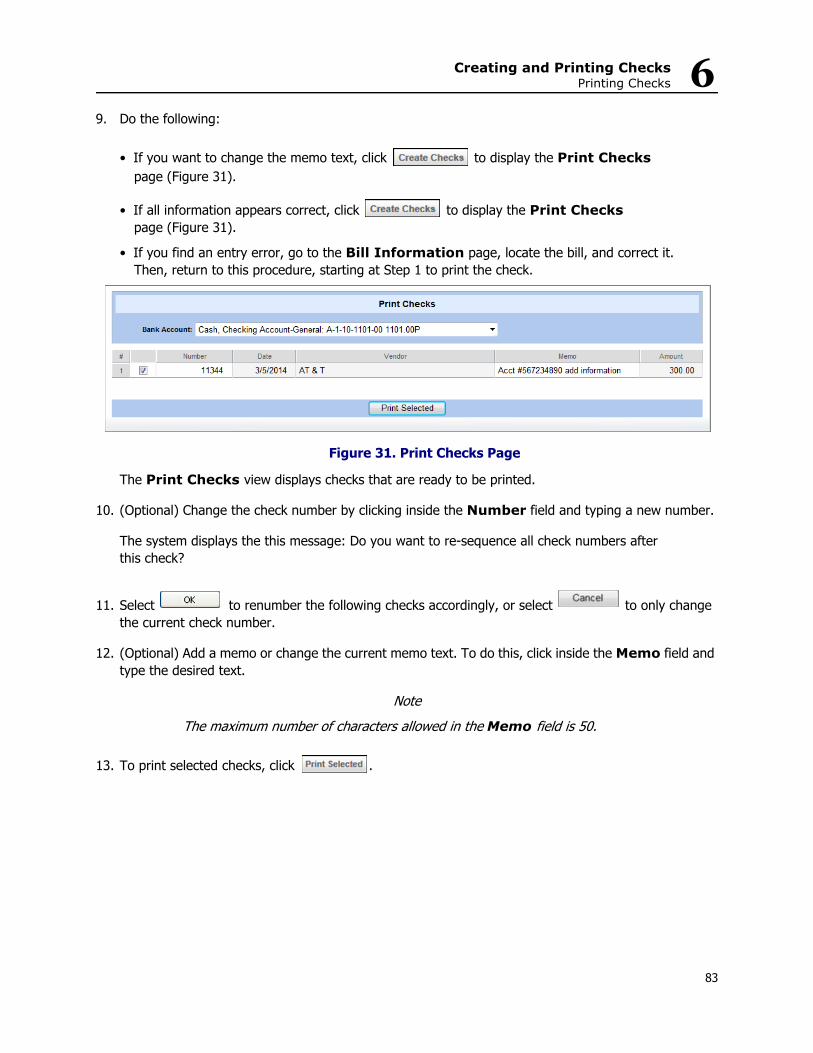
Creating and Printing ChecksPrinting Checks 6
9. Do the following:
• If you want to change the memo text, click to display the Print Checks page (Figure 31).
• If all information appears correct, click to display the Print Checks page (Figure 31).
• If you find an entry error, go to the Bill Information page, locate the bill, and correct it. Then, return to this procedure, starting at Step 1 to print the check.
Figure 31. Print Checks Page
The Print Checks view displays checks that are ready to be printed.
10. (Optional) Change the check number by clicking inside the Number field and typing a new number.
The system displays the this message: Do you want to re-sequence all check numbers after this check?
11. Select to renumber the following checks accordingly, or select to only change the current check number.
12. (Optional) Add a memo or change the current memo text. To do this, click inside the Memo field and type the desired text.
NoteThe maximum number of characters allowed in the Memo field is 50.
13. To print selected checks, click .
83
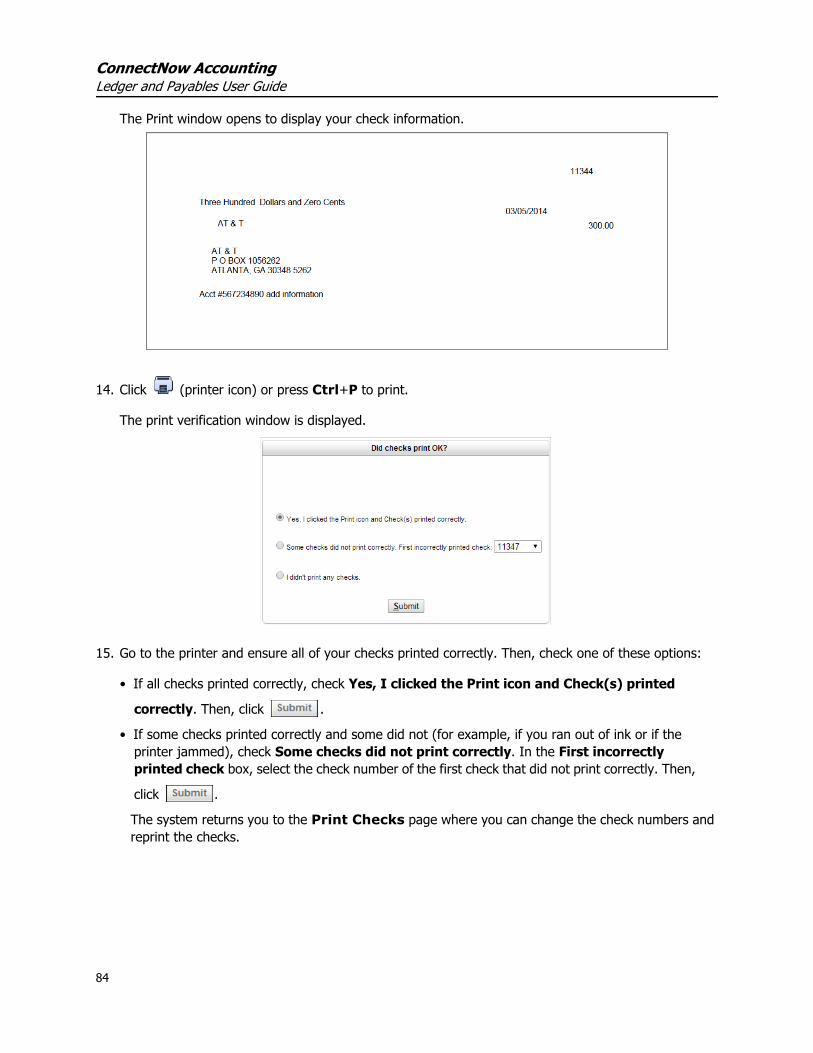
ConnectNow AccountingLedger and Payables User Guide
The Print window opens to display your check information.
14. Click (printer icon) or press Ctrl+P to print.
The print verification window is displayed.
15. Go to the printer and ensure all of your checks printed correctly. Then, check one of these options:
• If all checks printed correctly, check Yes, I clicked the Print icon and Check(s) printed
correctly. Then, click .
• If some checks printed correctly and some did not (for example, if you ran out of ink or if the printer jammed), check Some checks did not print correctly. In the First incorrectly printed check box, select the check number of the first check that did not print correctly. Then,
click .
The system returns you to the Print Checks page where you can change the check numbers and reprint the checks.
84

Creating and Printing ChecksRecording Handwritten or Electronic Checks 6
• If the printer did not print any checks (for example, if you selected the wrong printer or forgot to
put checks in printer), choose the option I didn’t print any checks. Then, click .
The system returns you to the Print Checks page where you can change the check numbers and reprint the checks.
Note You may receive a message that pop-up windows are blocked for this site. To print checks, pop-ups must be enabled. See “Allowing Pop-Up Windows and Menus” on page 6 for information.
Recording Handwritten or Electronic ChecksYou can record a handwritten check or electronic payment to mark a bill paid.
1. Click to display the Bill Information page.
2. Add the bill. For instructions, see “Creating a Bill” on page 71.
3. Click the Assign Check Number link.
4. In the Enter Check Information window, do the following:
NoteIf you make an entry error, click the Assign Check Number link again and make any corrections, or
click to remove the check record from this bill.
• If you are using an accrual system, provide the check information (bank account, the check number, and check date).
• If the bill was paid electronically, type a check number in the Check Number field that begins with ETF or ACH along with the confirmation number provided for the transfer.
Note
85

ConnectNow AccountingLedger and Payables User Guide
Checks that begin with alpha characters do not affect the next available check number feature.
5. Click .
6. Click to save the transaction.
The Bill Information window now displays the check number and check date. The information in the Paid changes from N (for No) to Y (for Yes).
If the bill and payment are recurring transactions, you can Memorize the bill and check to post them each month without the repeated data entry. See Chapter 10: "Memorizing Transactions" for details.
Making a Partial Bill Payment
1. Click to display the Create Checks page:
2. Select the bank account. Type the check date and the beginning check number.
3. Click in the line item containing the bill information.
4. In the Pay Amount field that displays under the bill’s line item, type the amount. Or, check the box next to the items on the bill you want to pay.
86
Creating and Printing ChecksFinding Checks and Viewing Transaction Details 6
5. Click to save the revised pay amount and close the line item’s edit fields.
6. Update any other information for this check run.
7. Click .
See “Printing Checks” on page 81 for information on creating checks from Ledger and Payables.
Finding Checks and Viewing Transaction DetailsYou can look up and view the transaction detail for any check recorded in your ConnectNow Ledger and Payables system.
1. Click to display the Create Checks page.
2. Click the Find Check link.
The Check Search page (Figure 32) is displayed:
Figure 32. Check Search Page
The bottom of the page shows you a list of checks ordered by check number. Checks that were cleared on a bank reconciliation show a date in the Cleared Date column. Voided checks show a date in the Void Date column.
87
ConnectNow AccountingLedger and Payables User Guide
3. Use any of the following methods to locate a check:
Note
To reset your search criteria, click to re-display all checks.
• To locate a check by check number, type the number in the Transaction Number field.
• To find all of the checks associated with a given bank account, select the bank account from the Account list.
• To find all of the checks associated with a given vendor, select the vendor from the Vendor list.
• To find all of the checks associated with a given fiscal year, select the fiscal year from the Fiscal Year list.To find all checks issued within a certain date range, click inside the From and To fields under Transaction Date and respectively select a date for the beginning and the end of the range.
• To find all checks within a range of amounts, click inside the From and To fields under Trans-action Amount and respectively specify an amount for the lower and upper limit of the range.
Then, click .A list of checks matching your search criteria is displayed in the check list at the bottom of the page.
4. To view any bill in detail, click .
Details for the check are displayed on the Check Information page. Account and balance informa-tion are shown at the top of the page.
Complete information for the check, including the associated bill number and account code are pro-vided. Clicking the bill number in the Bill column takes you to the Bill Information page where you can view details for the bill.
Click to exit the Bill Information page and return to the Check Search page.
If you need to void the check, see “Voiding a Check”, which follows, for instructions.
88

Creating and Printing ChecksVoiding a Check 6
Voiding a Check1. Find the check you want to void. If you need instructions for finding a check, go to “Finding Checks
and Viewing Transaction Details” on page 87 and complete Steps 1 - 4.
2. On the Check Information page, click to display the following:
3. In the Void Date field, type the date you are voiding the check.
IMPORTANT
The void date must be in the current or future fiscal month.
The system creates a journal entry to reverse the effect of the check. The date you specify as the void date is recorded in the journal entry.
4. If you want to issue a replacement check, check this box: Make a new copy of the original bill for repayment.
5. Click .
The original bill and check information remain in your system, but the check is now flagged as voided on the Check Register, Check Information, and Bill Information pages. For example:
89

ConnectNow AccountingLedger and Payables User Guide
The system creates a journal entry for the voided check. For example:
IMPORTANT
Do not delete the journal entry the system creates for the voided check. The journal entry is the reversing transaction that represents the voided check.
Deleting a CheckDepending on the configuration of your system, certain users may be granted the privilege to delete checks from the Ledger and Payables system. Deleting a check removes the check from the system, sets the status of the original bill to “Unpaid”, and allows you to reuse the check number.
The Delete Checks feature is available only if enabled by the higher-level organization (this is done in Con-solidation Manager). While this feature may be available in your system, we discourage its use and recom-mend voiding a check instead. Voiding is a better practice because it creates reversing journal entries for the accounts. For instructions on voiding a check, see “Voiding a Check” on page 89.
Be aware that you cannot delete a check from a closed period or a check that has been marked as “cleared” on a Bank Reconciliation.
If your Ledger and Payables system is connected with a higher-level organization, that organization has the ability to allow or prohibit this functionality for all organizations. This control enables the higher-level organization to maintain consistent accounting standards for each entity. Contact your higher-level organi-zation to request they temporarily turn on this feature if needed.
If your account has Delete privileges, you can delete a check from the system using the following steps.
1. Find the check you want to delete. If you need instructions for finding a check, go to “Finding Checks and Viewing Transaction Details” on page 87 and complete Steps 1 - 4.
2. On the Check Information page, click .
3. When prompted, click to delete the check from the system.
90
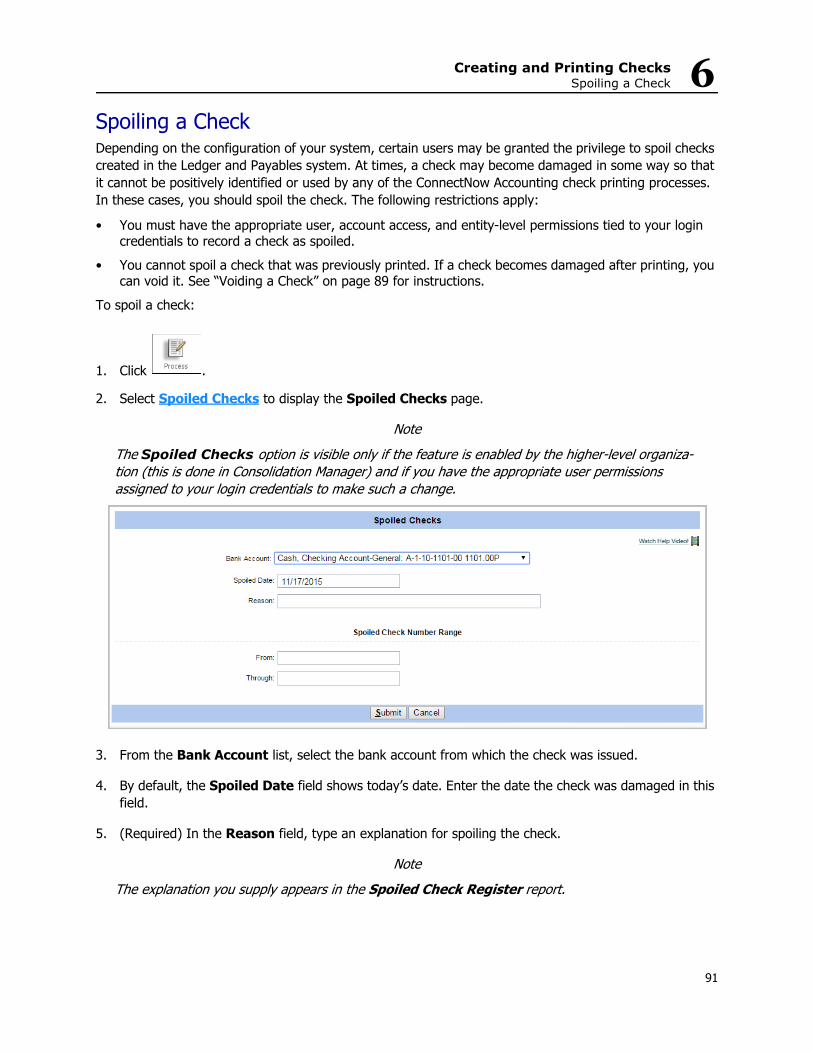
Creating and Printing ChecksSpoiling a Check 6
Spoiling a CheckDepending on the configuration of your system, certain users may be granted the privilege to spoil checks created in the Ledger and Payables system. At times, a check may become damaged in some way so that it cannot be positively identified or used by any of the ConnectNow Accounting check printing processes. In these cases, you should spoil the check. The following restrictions apply:
• You must have the appropriate user, account access, and entity-level permissions tied to your login credentials to record a check as spoiled.
• You cannot spoil a check that was previously printed. If a check becomes damaged after printing, you can void it. See “Voiding a Check” on page 89 for instructions.
To spoil a check:
1. Click .
2. Select Spoiled Checks to display the Spoiled Checks page.
NoteThe Spoiled Checks option is visible only if the feature is enabled by the higher-level organiza-tion (this is done in Consolidation Manager) and if you have the appropriate user permissions assigned to your login credentials to make such a change.
3. From the Bank Account list, select the bank account from which the check was issued.
4. By default, the Spoiled Date field shows today’s date. Enter the date the check was damaged in this field.
5. (Required) In the Reason field, type an explanation for spoiling the check.
NoteThe explanation you supply appears in the Spoiled Check Register report.
91
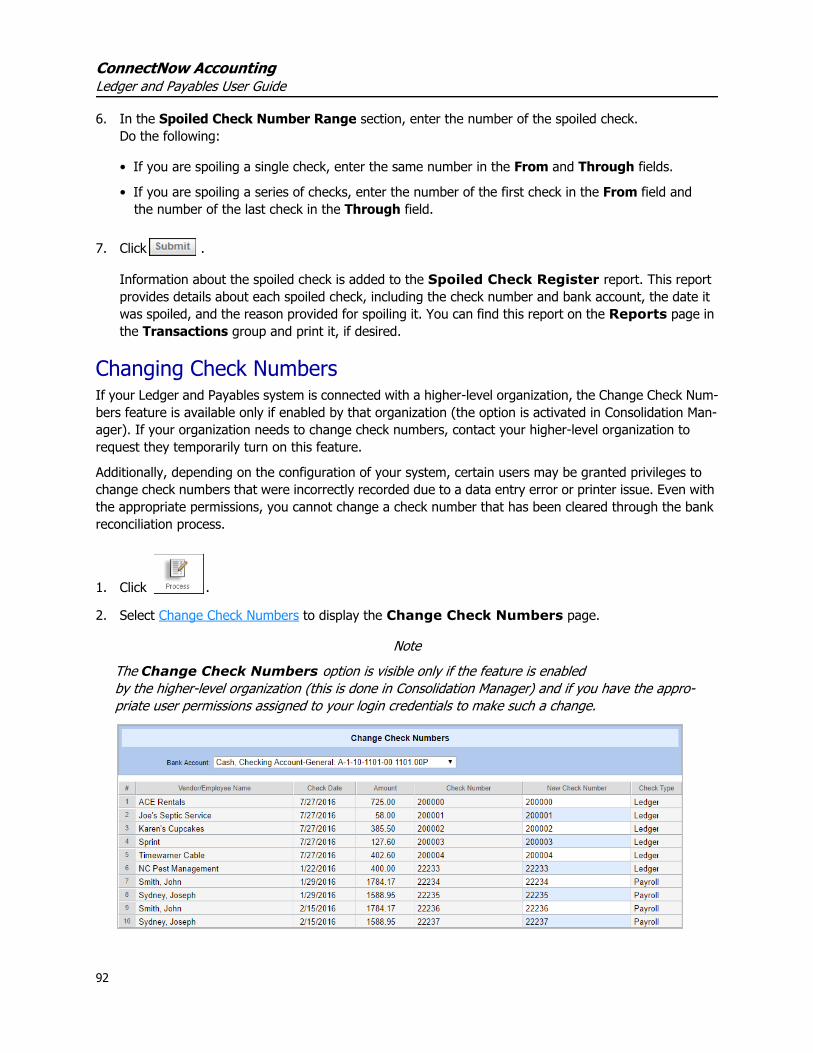
ConnectNow AccountingLedger and Payables User Guide
6. In the Spoiled Check Number Range section, enter the number of the spoiled check. Do the following:
• If you are spoiling a single check, enter the same number in the From and Through fields.
• If you are spoiling a series of checks, enter the number of the first check in the From field and the number of the last check in the Through field.
7. Click .
Information about the spoiled check is added to the Spoiled Check Register report. This report provides details about each spoiled check, including the check number and bank account, the date it was spoiled, and the reason provided for spoiling it. You can find this report on the Reports page in the Transactions group and print it, if desired.
Changing Check NumbersIf your Ledger and Payables system is connected with a higher-level organization, the Change Check Num-bers feature is available only if enabled by that organization (the option is activated in Consolidation Man-ager). If your organization needs to change check numbers, contact your higher-level organization to request they temporarily turn on this feature.
Additionally, depending on the configuration of your system, certain users may be granted privileges to change check numbers that were incorrectly recorded due to a data entry error or printer issue. Even with the appropriate permissions, you cannot change a check number that has been cleared through the bank reconciliation process.
1. Click .
2. Select Change Check Numbers to display the Change Check Numbers page.
NoteThe Change Check Numbers option is visible only if the feature is enabled by the higher-level organization (this is done in Consolidation Manager) and if you have the appro-priate user permissions assigned to your login credentials to make such a change.
92

Creating and Printing ChecksUsing Positive Pay 6
3. From the Bank Account list, select the bank account from which the checks were issued.
4. Scroll down to the incorrect line item that contains the incorrect check number. In the New Check Number column, type the correct number for the check.
5. Click .
Using Positive Pay Positive Pay is an automated check matching service offered by most commercial U.S. banks to help deter check fraud. ConnectNow Accounting now offers support for Positive Pay to enable your organization to implement Positive Pay with their banks. Using this service, an organization can monitor checks processed for payment against its accounts to ensure that only authorized checks are paid.
How Does Positive Pay Protection Work?Positive Pay uses a matching and validation process to protect your organization from paying unauthorized checks. After you set up this feature, the verification process is simple. You continue writing checks as you typically do. Each day that you write checks, Positive Pay requires you to send a check issue file to the bank. This file lists all of your written checks, and for each check includes the check number, account num-ber, issue date, and dollar amount. The payee’s name is sometimes included, but payee information is not required for validation.
The bank keeps your file and uses it to verify checks written against your account. Specifically, when the actual paper checks are presented at the bank for payment, they are matched against the checks in your file. If there is a discrepancy between the presented check and the information in your file, the bank flags the check as an exception. The bank then sends a scanned image of the check back to you for review. After reviewing the item, you must instruct the bank to either pay or return the check.
Note
Any check you want returned should be entered as a voided check in your ConnectNow Accounting system.
Your workflow begins with sending your check file to the bank and then ends when you pay the check or when you inform the bank that the check should be returned.
93

ConnectNow AccountingLedger and Payables User Guide
Before You BeginEvery bank’s process for handling Positive Pay is different. Before setting up your ConnectNow Accounting system to use Positive Pay, do the following:
1. Most banks do, but you should contact your bank to ensure that they offer Positive Pay. You need to sign up for the service and pay the fee.
2. Obtain the bank’s file format specifications for the check issue file.
NoteMost banks have service guide that explains their guidelines and procedures and contains their for-mat specifications for the check issue file. You will need these specifications to complete the initial file setup.
3. Obtain procedures for submitting the check issue file from your bank. Typically, banks require you to log in to their Web site and upload the check issue over a secure Internet connection.
Overview of the Steps for Implementing Positive PayTo implement Positive Pay, you must follow these four main steps:
1. Enable Positive Pay for your organization.
2. Set up Positive Pay.
3. Create and save a check issue file.
4. On the days you write checks, submit the check issue file to your bank. This file contains a list of all the checks you issued for a certain date or date range.
The following sections show you how to complete each step in the process.
Step 1: Enable Positive Pay for Your OrganizationTo use Positive Pay, you must enable the Positive Pay option. Complete the following:
1. Log in to your organization.
2. Select the Church Manager tab.
94

Creating and Printing ChecksUsing Positive Pay 6
3. Click to display the Organization Options page.
4. Scroll down to the Positive Pay section and check the Enable Positive Pay checkbox, as shown in Figure 33:
Figure 33. Organization Options Page: Enable Positive Pay
5. Click to save the setting.
You can now set up the check issue file for Positive Pay.
Step 2: Set up Positive PayThe setup entails configuring a template for Positive Pay. The template is a re-usable file that contains your check data. You will set up the file to meet your bank’s requirements for the exact content and layout of information in the check file is sent to the bank. (The bank requires the file to be in a specific format so that checks are written consistently.)
If your bank is J.P. Morgan Chase or Wells Fargo, minimal setup is required. The Positive Pay process includes templates that match J.P. Morgan Chase and Wells Fargo specifications. The contents and format of the templates were tested and verified to comply with their check issue file specifications. If you use a different bank, you will need to set up the file match your bank’s requirements and test the file first to ensure that can be processed without errors.
95

ConnectNow AccountingLedger and Payables User Guide
You can set up Positive Pay in the Payroll or in the Ledger and Payables module.
1. Do one of the following:
• Select the Ledger and Payables tab.
• Select the Payroll tab.
2. Click . Then, select the Positive Pay link.
The Setup Positive Pay for Bank Accounts page (Figure 34) is displayed:
Figure 34. Setup Positive Pay for Bank Accounts
This page contains the specifications for the template. See Table 10 for details.
3. From the Bank Account list, select the account you will issue checks from.
4. From the Banks Supported list, select one of the following options:
• JPMorgan Chase & Co. (the default): select this option if your bank is J.P. Morgan Chase.
• Wells Fargo: select this option if your bank is Wells Fargo.
• Custom: select this option if your bank is not J.P. Morgan Chase or Wells Fargo.
5. Do one of the following:
• If you selected JPMorgan Chase & Co.or Wells Fargo, skip to Step 7.
• If you selected Custom, go to Step 6.
96
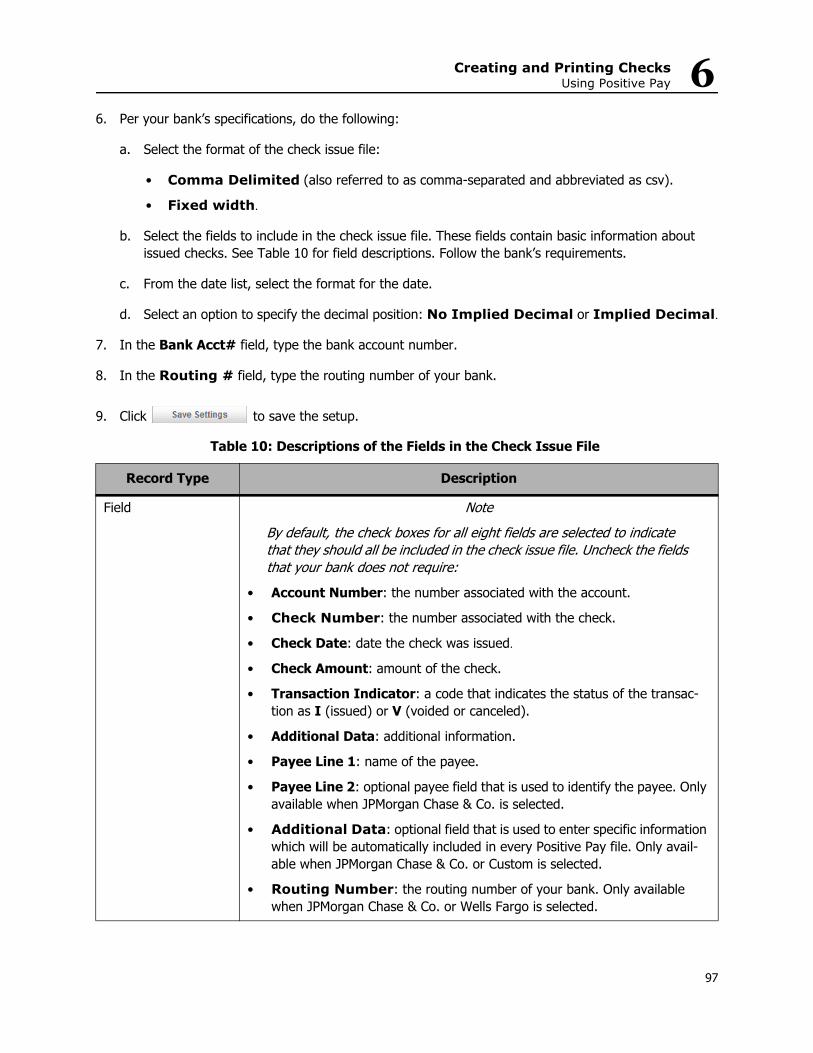
Creating and Printing ChecksUsing Positive Pay 6
6. Per your bank’s specifications, do the following:
a. Select the format of the check issue file:
• Comma Delimited (also referred to as comma-separated and abbreviated as csv).
• Fixed width.
b. Select the fields to include in the check issue file. These fields contain basic information about issued checks. See Table 10 for field descriptions. Follow the bank’s requirements.
c. From the date list, select the format for the date.
d. Select an option to specify the decimal position: No Implied Decimal or Implied Decimal.
7. In the Bank Acct# field, type the bank account number.
8. In the Routing # field, type the routing number of your bank.
9. Click to save the setup.
Table 10: Descriptions of the Fields in the Check Issue File
Record Type Description
Field NoteBy default, the check boxes for all eight fields are selected to indicate that they should all be included in the check issue file. Uncheck the fields that your bank does not require:
• Account Number: the number associated with the account.
• Check Number: the number associated with the check.
• Check Date: date the check was issued.
• Check Amount: amount of the check.
• Transaction Indicator: a code that indicates the status of the transac-tion as I (issued) or V (voided or canceled).
• Additional Data: additional information.
• Payee Line 1: name of the payee.
• Payee Line 2: optional payee field that is used to identify the payee. Only available when JPMorgan Chase & Co. is selected.
• Additional Data: optional field that is used to enter specific information which will be automatically included in every Positive Pay file. Only avail-able when JPMorgan Chase & Co. or Custom is selected.
• Routing Number: the routing number of your bank. Only available when JPMorgan Chase & Co. or Wells Fargo is selected.
97

ConnectNow AccountingLedger and Payables User Guide
Step 3. Create and Save a Check Issue FileDepending on which module you are licensed to use, you can create your check issue file either from Led-ger and Payables or the Payroll module.
Note
This procedure assumes that you have completed the setup for Positive Pay.
1. Do one of the following:
• Select the Ledger and Payables tab.
• Select the Payroll tab.
2. Click . Then, select the Positive Pay Export link to display the Filter Positive Pay for Bank Accounts page (Figure 35):
Figure 35. Filter Positive Pay for Bank Accounts
Order Specify the order in which the fields are listed in the export file. Enter a value between 1 and 8. No duplicates are allowed.
Justification Select how the information in the field should be aligned on the check:• Left: flush left
• Right: flush right
Only available if JPMorgan Chase & Co. is selected.
Padding Specify how the unused portion of a field should be filled:• If you enter a zero, the unused portion of the field is filled with zeros (0s).
• If you leave the field blank, the unused portion of the field is filled with spaces.
Only available if JPMorgan Chase & Co. is selected.
Max Length The maximum number of characters allowed for the field.
Table 10: Descriptions of the Fields in the Check Issue File (Continued)
Record Type Description
98

Creating and Printing ChecksUsing Bill Pay 6
3. From the Bank Account list, select the bank account.
4. Do one of the following:
• If the entries in the check file are to be processed by check number, select By Check Number and then specify the check number range by typing the beginning and ending check numbers.
WARNING
The By Check Number option requires that all checks in the range have check num-bers consisting of numeric characters only. An alphabetic character in any one of the checks in the range will produce an error. If you want to transmit a check that contains alphabetic characters in its check number, enter the check by itself in the check issue file. Select By Check Number and then enter the same check number in the Starting Check and Ending Check fields.
• If the entries in the check file are to be processed by date, select By Date. Then, select a date from the calendar displayed in both the Starting Date and Ending Date fields.
5. Click to create the file.
6. Save the file to your PC or laptop.
Step 4. Submit the Check Issue FileFollow your bank’s procedure for submitting the check issue file. If you are using a bank other than J.P. Morgan Chase or Wells Fargo, your bank may ask you to submit test files to ensure that your check issue files can be processed without formatting errors. After your test files transmit successfully, you will be ready to begin transmission of live check issue files.
Using Bill Pay The Bill Pay feature enables you to pay bills electronically. Bill Pay is used by many banks and financial institutions and businesses to manage their billing and settle payments for goods and services. It is a con-venient, secure, and efficient process that replaces physical check writing with electronic checks that are written by the bank.
OverviewIn ConnectNow Accounting, the Bill Pay feature uses the services of JPMorgan/Chase & Co. The process entails the creation of an electronic file that contains the details of the transaction. This file is sent to JPMorgan/Chase for processing. Bill Pay files are proprietary to each financial institute. ConnectNow Accounting uses the JPMorgan/Chase Bill Pay process template. To use Bill Pay, you will either need to cre-ate an account at JPMorgan/Chase or supply a copy of the Chase template to your financial institution to determine if that template is acceptable.
You must activate the Bill Pay feature before you can use it. Activation is simple. However, depending on the type of organization you are in, activation is a one- or two-step process. After you activate the feature, you can set up Bill Pay and use it to manage your organization’s billing.
99

ConnectNow AccountingLedger and Payables User Guide
The Checks page is where you enter information that is converted into an electronic payment. The check writing process is similar to the method you use when creating checks in ConnectNow Accounting except that you must let the system know whether you want to generate an electronic check using Bill Pay or print a physical check using the standard process.
The system keeps track of your checks, showing you which ones are paid using the Bill Pay process and which ones are not. The system assigns check numbers that are included in the file that is sent to the bank. The ConnectNow Accounting system also creates a file that you can save to your system and then upload to your financial institution. Just in case a problem arises, a history file is also created that you can send to your financial institution to help resolve any disputes.
The Bill Pay service is available for bill payments only. You cannot use Bill Pay to create payroll checks.
Enabling Bill Pay 1. Log in to your organization.
2. Select the Church Manager tab.
3. Click to display the Organization Options page.
4. In the Bill Pay section, select the Enable Bill Pay option:
NoteFor consolidating organizations, the Enable Bill Pay option is visible only if the Bill Pay feature is enabled by the higher-level organization. Additionally, the option is visible only to users whose role permissions are set to Church Administrator, Consolidation User, Diocesan User, or Diocesan Admin-istrator If you do not see the option, contact your higher-level organization or ParishSOFT Technical Support for help.
Figure 36. Organization Options Page: Enable Bill Pay Option
100

Creating and Printing ChecksUsing Bill Pay 6
5. Click to enable Bill Pay for organizations in your district.
Now that the Bill Pay feature is enabled, you can set it up. Go to “Setting Up Bill Pay ”, which follows, for instructions.
Setting Up Bill Pay 1. Do one of the following:
• On the Organization Options page, select this link in the Bill Pay description: Setup is available at Setup, Billpay.
• Select the Ledge & Payables tab. Then, click . On the Setup page, select Bill Pay.
NoteThe Bill Pay option is available only if the feature is activated. See “Enabling Bill Pay ” on page 100 for details.
The Setup Bill Pay page (Figure 37) is displayed:
Figure 37. Setup Bill Pay Page
A list of bank accounts available in your system is displayed. (These are accounts in your organiza-tion’s Chart of Accounts that are identified as bank accounts on the Accounts page). In the Bill Pay Enabled column on the right, the system identifies whether or not the account is currently set up as a Bill Pay account (Y=yes; N=no).
The list also includes a primary bank account if the Primary/Subsidiary process is set up for your orga-nization. Archived accounts are not included in this list.
2. Click for the bank account you want to set up to use the Bill Pay feature.
101
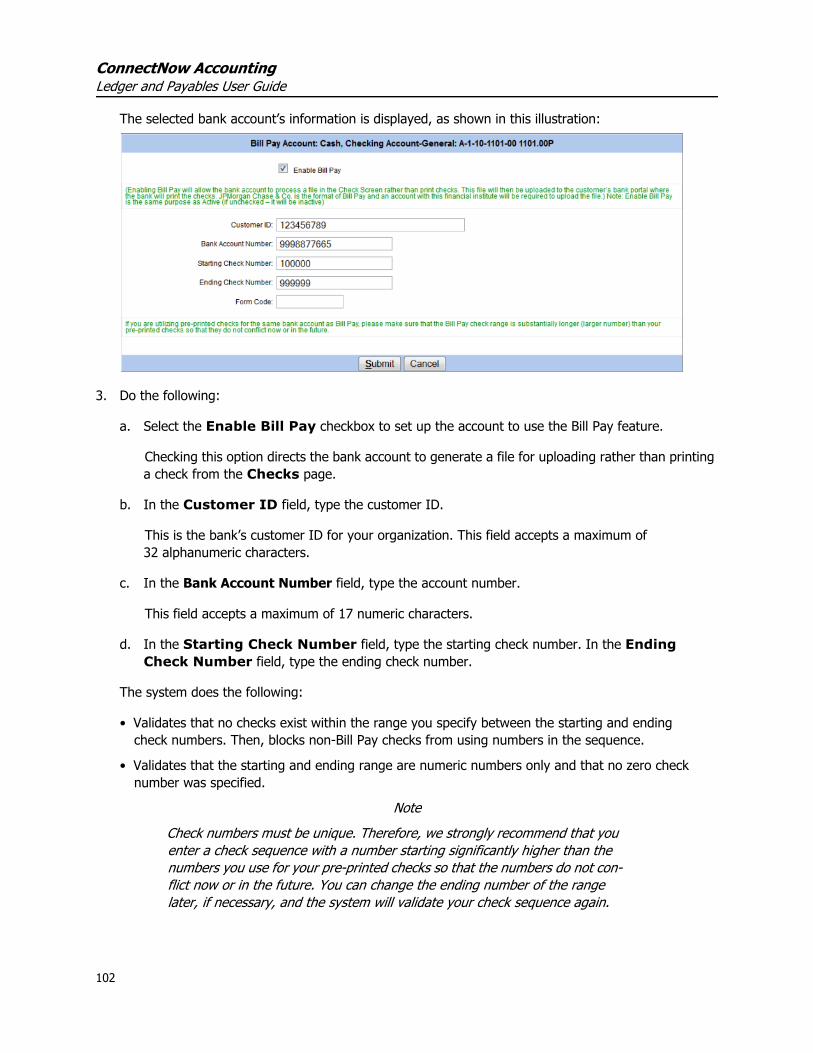
ConnectNow AccountingLedger and Payables User Guide
The selected bank account’s information is displayed, as shown in this illustration:
3. Do the following:
a. Select the Enable Bill Pay checkbox to set up the account to use the Bill Pay feature.
Checking this option directs the bank account to generate a file for uploading rather than printing a check from the Checks page.
b. In the Customer ID field, type the customer ID.
This is the bank’s customer ID for your organization. This field accepts a maximum of 32 alphanumeric characters.
c. In the Bank Account Number field, type the account number.
This field accepts a maximum of 17 numeric characters.
d. In the Starting Check Number field, type the starting check number. In the Ending Check Number field, type the ending check number.
The system does the following:
• Validates that no checks exist within the range you specify between the starting and ending check numbers. Then, blocks non-Bill Pay checks from using numbers in the sequence.
• Validates that the starting and ending range are numeric numbers only and that no zero check number was specified.
NoteCheck numbers must be unique. Therefore, we strongly recommend that you enter a check sequence with a number starting significantly higher than the numbers you use for your pre-printed checks so that the numbers do not con-flict now or in the future. You can change the ending number of the range later, if necessary, and the system will validate your check sequence again.
102
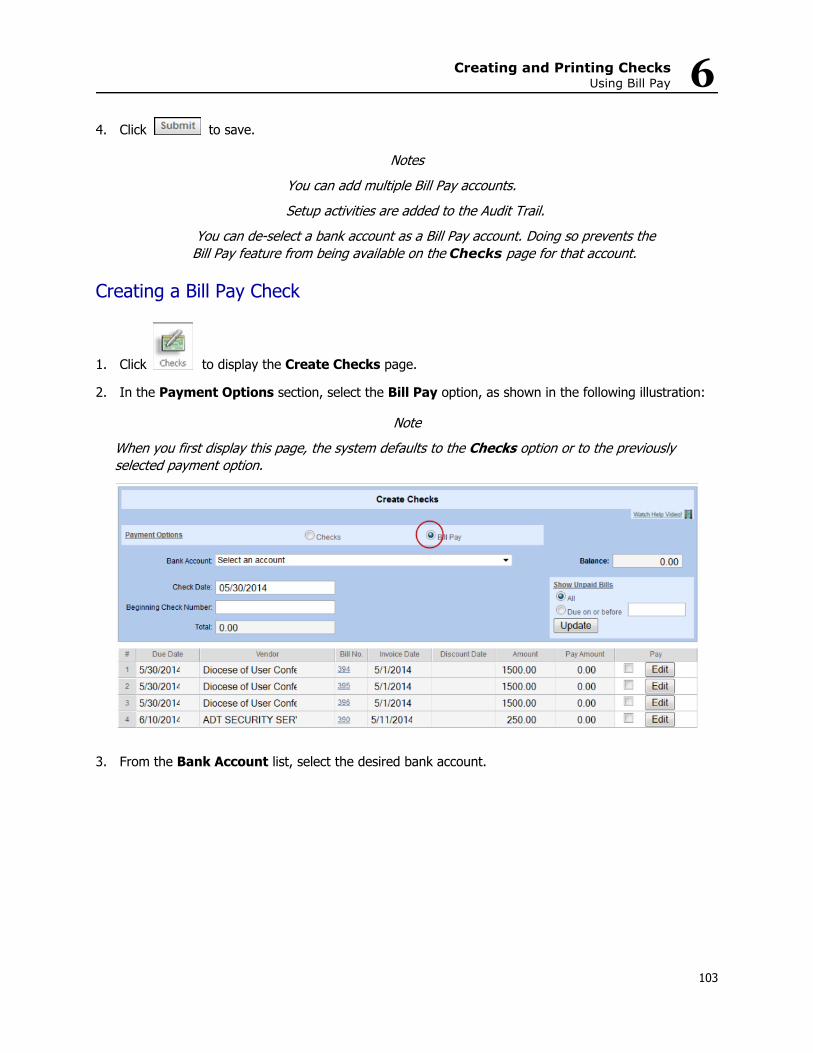
Creating and Printing ChecksUsing Bill Pay 6
4. Click to save.
NotesYou can add multiple Bill Pay accounts.Setup activities are added to the Audit Trail.
You can de-select a bank account as a Bill Pay account. Doing so prevents the Bill Pay feature from being available on the Checks page for that account.
Creating a Bill Pay Check
1. Click to display the Create Checks page.
2. In the Payment Options section, select the Bill Pay option, as shown in the following illustration:
NoteWhen you first display this page, the system defaults to the Checks option or to the previously selected payment option.
3. From the Bank Account list, select the desired bank account.
103
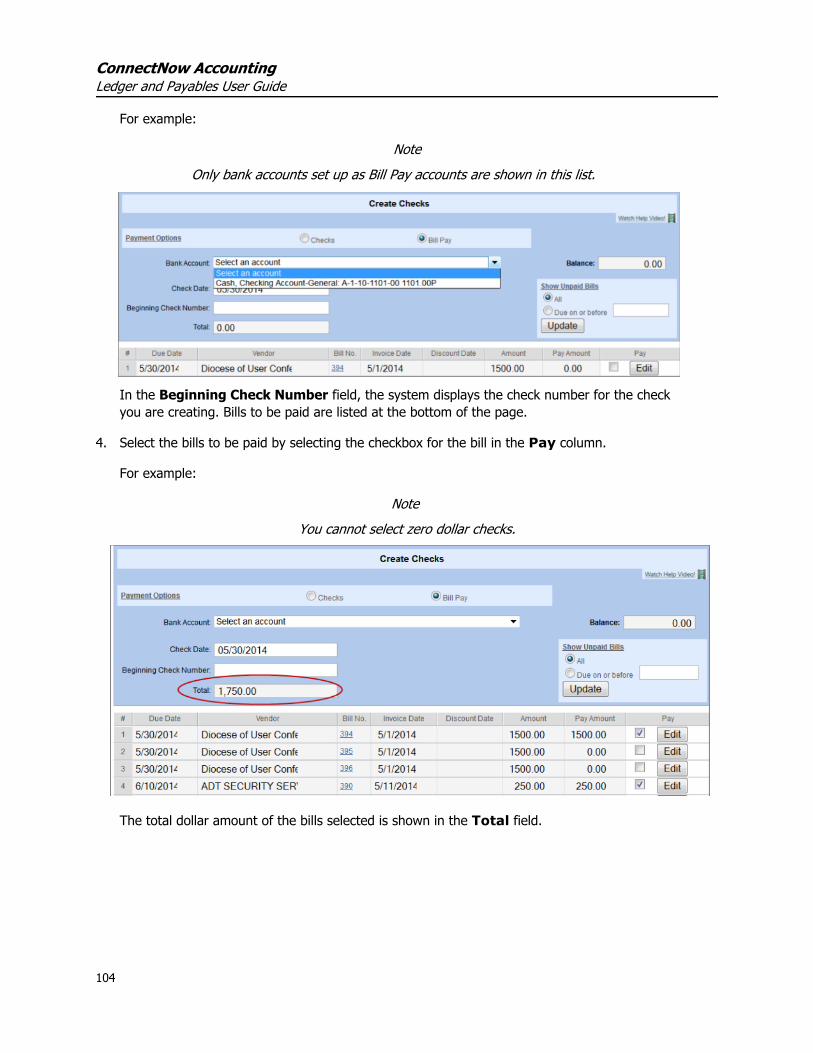
ConnectNow AccountingLedger and Payables User Guide
For example:
NoteOnly bank accounts set up as Bill Pay accounts are shown in this list.
In the Beginning Check Number field, the system displays the check number for the check you are creating. Bills to be paid are listed at the bottom of the page.
4. Select the bills to be paid by selecting the checkbox for the bill in the Pay column.
For example:
Note You cannot select zero dollar checks.
The total dollar amount of the bills selected is shown in the Total field.
104
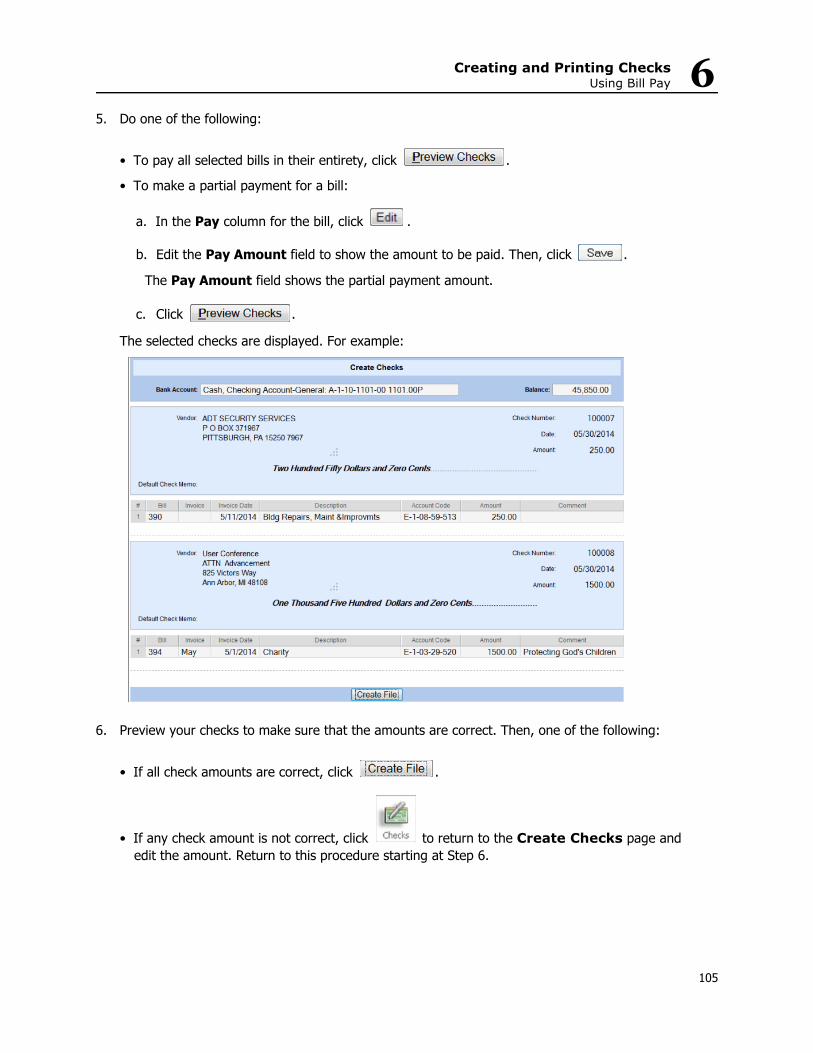
Creating and Printing ChecksUsing Bill Pay 6
5. Do one of the following:
• To pay all selected bills in their entirety, click .
• To make a partial payment for a bill:
a. In the Pay column for the bill, click .
b. Edit the Pay Amount field to show the amount to be paid. Then, click .
The Pay Amount field shows the partial payment amount.
c. Click .
The selected checks are displayed. For example:
6. Preview your checks to make sure that the amounts are correct. Then, one of the following:
• If all check amounts are correct, click .
• If any check amount is not correct, click to return to the Create Checks page and edit the amount. Return to this procedure starting at Step 6.
105

ConnectNow AccountingLedger and Payables User Guide
A preview of the Bill Pay file is displayed in the Report Viewer. The following illustration shows you an example of the contents of the Bill Pay file:
7. Click (Export button) on the toolbar at the top of the viewer. In the Save As dialog box, rename the file and then save it to your local computer or server.
8. Click .
The system uploads the saved file to the JPMorgan/Chase website that was set up for you to use Bill Pay.
Finding a Bill Pay CheckTo locate a check that was paid using the Bill Pay service, do the following:
1. Click to display the Create Checks page (Figure 38).
106

Creating and Printing ChecksUsing Bill Pay 6
2. Select the Find Check link:
Figure 38. Find Check Link on Create Checks Page
The Check Search page is displayed.This page includes a column labeled Bill Pay, which lets you know which checks were paid using the Bill Pay service.
3. Find the check. (If you need instructions, see “Finding Checks and Viewing Transaction Details” on page 87.)
If the check was paid using the Bill Pay feature, the letter Y is shown in the Bill Pay column.
107

ConnectNow AccountingLedger and Payables User Guide
Viewing Bill Pay History
1. Click to display the Create Checks page.
2. Select the Bill Pay History link, as shown in this illustration:
Figure 39. Bill Pay History Link on the Create Checks Page
Links to previously uploaded Bill Pay files are displayed. For example:
3. Select the desired link to view the file in the Report Viewer.
4. If desired, you can click the Export button to export the file and resend it to the bank.
108

Creating and Printing ChecksUsing Bill Pay 6
Voiding a Bill Pay CheckIf a bill pay check is not approved by the bank, you must void the check in the ConnectNow Accounting system. Follow the same process that you use to void a physical check. For instructions on voiding a check, see “Voiding a Check” on page 89.
If the electronic file is rejected by the bank, you must void all checks in the file. The bank sends you immediate confirmation so you will quickly be informed if any issue occurred at the bank level.
109

Creating and Printing ChecksUsing Bill Pay 6
110

Chapter 7Recording Credit Card
Transactions
Introduction The Credit Card transaction area provides a place for you to enter the purchases that you make using a credit card and reconcile charges with each monthly statement.
Recording Credit Card TransactionsWhile you may be currently recording your credit card transactions as a single bill to your credit card com-pany (for example, Visa and MasterCard), ParishSOFT recommends you now use the Credit Card transac-tion area because it enables you to keep more accurate records and retain the vendor association for each transaction.
Credit Card transactions are included both in the 1099 calculation for 1099 Vendors and in Vendor Audit reports.
1. Click to display the Charge Information page (Figure 40):
Figure 40. Charge Information Page
2. Select the account from the Account list.
NoteSee “Designating a Liability Account for Credit Card Transactions” on page 50 for information on setting up credit card accounts. Note that you must check the Credit Card box to enable a liability account to display in the Account list.
3. Select the name of the vendor (that is, the name of the retailer or business that was paid by credit card).
111
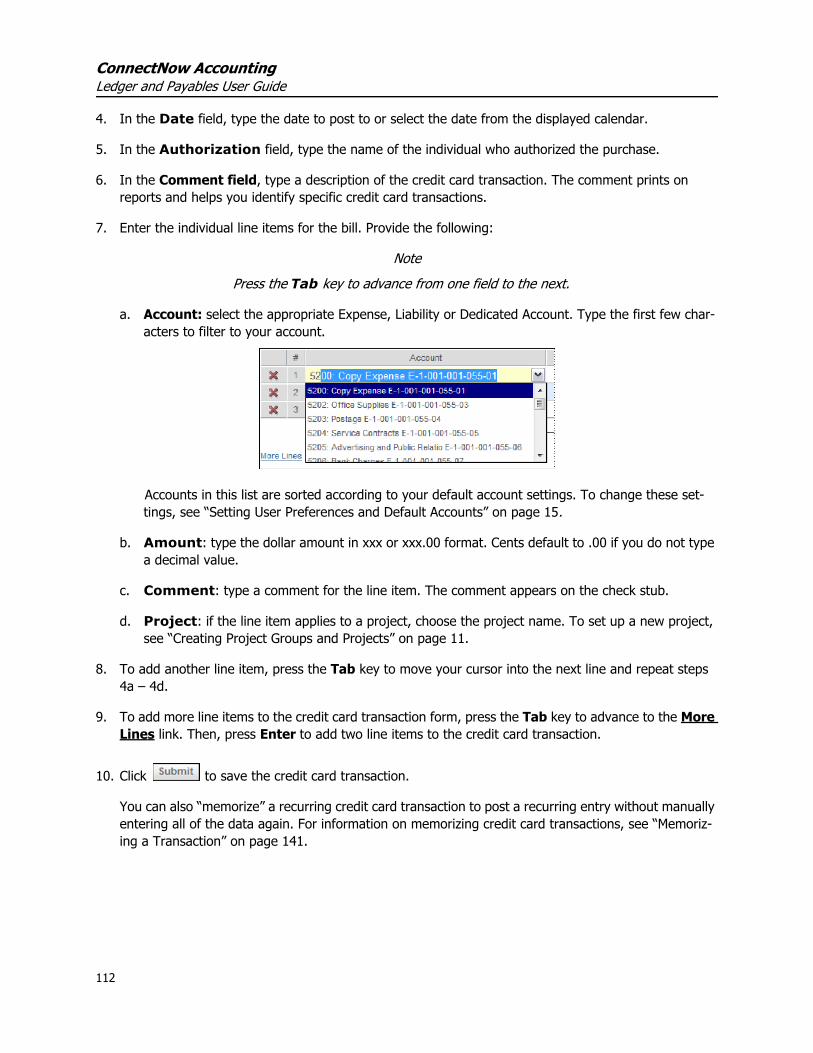
ConnectNow AccountingLedger and Payables User Guide
4. In the Date field, type the date to post to or select the date from the displayed calendar.
5. In the Authorization field, type the name of the individual who authorized the purchase.
6. In the Comment field, type a description of the credit card transaction. The comment prints on reports and helps you identify specific credit card transactions.
7. Enter the individual line items for the bill. Provide the following:
NotePress the Tab key to advance from one field to the next.
a. Account: select the appropriate Expense, Liability or Dedicated Account. Type the first few char-acters to filter to your account.
Accounts in this list are sorted according to your default account settings. To change these set-tings, see “Setting User Preferences and Default Accounts” on page 15.
b. Amount: type the dollar amount in xxx or xxx.00 format. Cents default to .00 if you do not type a decimal value.
c. Comment: type a comment for the line item. The comment appears on the check stub.
d. Project: if the line item applies to a project, choose the project name. To set up a new project, see “Creating Project Groups and Projects” on page 11.
8. To add another line item, press the Tab key to move your cursor into the next line and repeat steps 4a – 4d.
9. To add more line items to the credit card transaction form, press the Tab key to advance to the More Lines link. Then, press Enter to add two line items to the credit card transaction.
10. Click to save the credit card transaction.
You can also “memorize” a recurring credit card transaction to post a recurring entry without manually entering all of the data again. For information on memorizing credit card transactions, see “Memoriz-ing a Transaction” on page 141.
112

Recording Credit Card TransactionsReconciling Your Credit Card Statement 7
Reconciling Your Credit Card StatementWhen you receive your monthly credit card statement, you can compare the charges on the statement with those you already entered into the Ledger and Payables system. You can view the charges in your system by creating a Credit Card Transaction report. To do this:
1. Click .
2. Click Credit Card Reconciliation.
3. Click Create a New Statement.
The Credit Card Statement Information page (Figure 41) is displayed.
Figure 41. Credit Card Statement Information Page
4. In the Credit Card Account list select the credit card account.
5. Supply the Statement Date and Ending Balance.
113
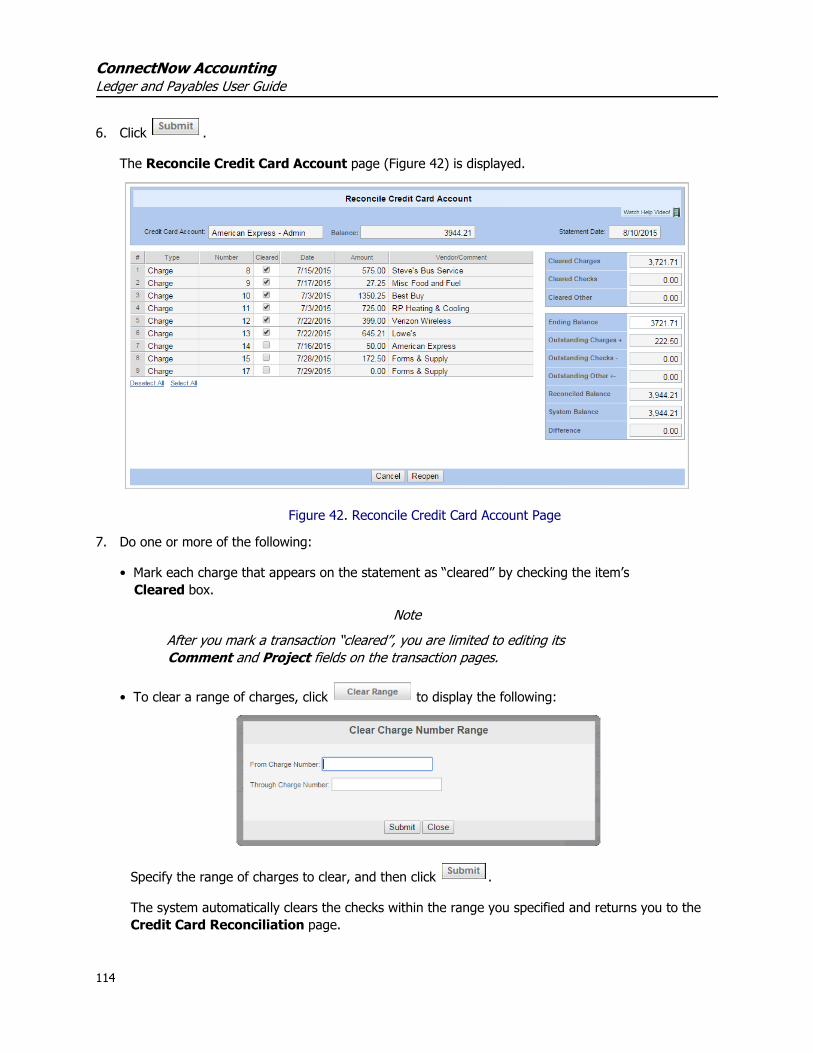
ConnectNow AccountingLedger and Payables User Guide
6. Click .
The Reconcile Credit Card Account page (Figure 42) is displayed.
Figure 42. Reconcile Credit Card Account Page
7. Do one or more of the following:
• Mark each charge that appears on the statement as “cleared” by checking the item’s Cleared box.
NoteAfter you mark a transaction “cleared”, you are limited to editing its Comment and Project fields on the transaction pages.
• To clear a range of charges, click to display the following:
Specify the range of charges to clear, and then click .
The system automatically clears the checks within the range you specified and returns you to the Credit Card Reconciliation page.
114
Recording Credit Card TransactionsReconciling Your Credit Card Statement 7
8. Click to save your work.
NotesIf you are interrupted while reconciling, click Submit to save your work. (Clicking Cancel exits the page without saving your work.) When you return later to continue working on the state-ment, all of your work is saved. Follow the instructions under “Viewing and Editing a Credit Card Reconciliation Statement” on page 116 to locate a statement you saved.
When the value for Difference reaches zero, the bank statement is successfully reconciled.
9. Click to complete the reconciliation.
The system informs you that after the statement is reconciled, edits are no longer permitted.
10. Do one of the following:
• Click to close and lock the reconciliation.
• Click to continue work on reconciling the statement.
11. Run a Credit Card Reconciliation Report. For instructions, see “Creating a Reconciliation Report” on page 117.
115

ConnectNow AccountingLedger and Payables User Guide
Viewing and Editing a Credit Card Reconciliation StatementUse the following procedure to view any credit card reconciliation statement and to make changes to any non-reconciled statement.
1. Click .
2. Select Credit Card Reconciliation to display a list similar to the following:
3. Select the name of the statement you want to view.
4. Edit any details as needed.
NoteOnly the Comment and Project fields can be edited for reconciled credit card transactions.
5. When done, click .
116

Recording Credit Card TransactionsReconciling Your Credit Card Statement 7
Reconciled AccountsFigure 43 shows an example of a reconciled credit card account. Note that after an account is reconciled, the system displays its status as “Reconciled”, and the Difference field displays $0.00. You can make no additional changes to a reconciled account.
Figure 43. Reconciled Credit Card Account
Creating a Reconciliation ReportThe following procedure show you how to create a credit card reconciliation report. You can create this report for reconciled credit card accounts at any time—even for accounts reconciled in prior periods.
1. Click .
2. Select Transactions and then Credit Card Reconciliation Report.
117
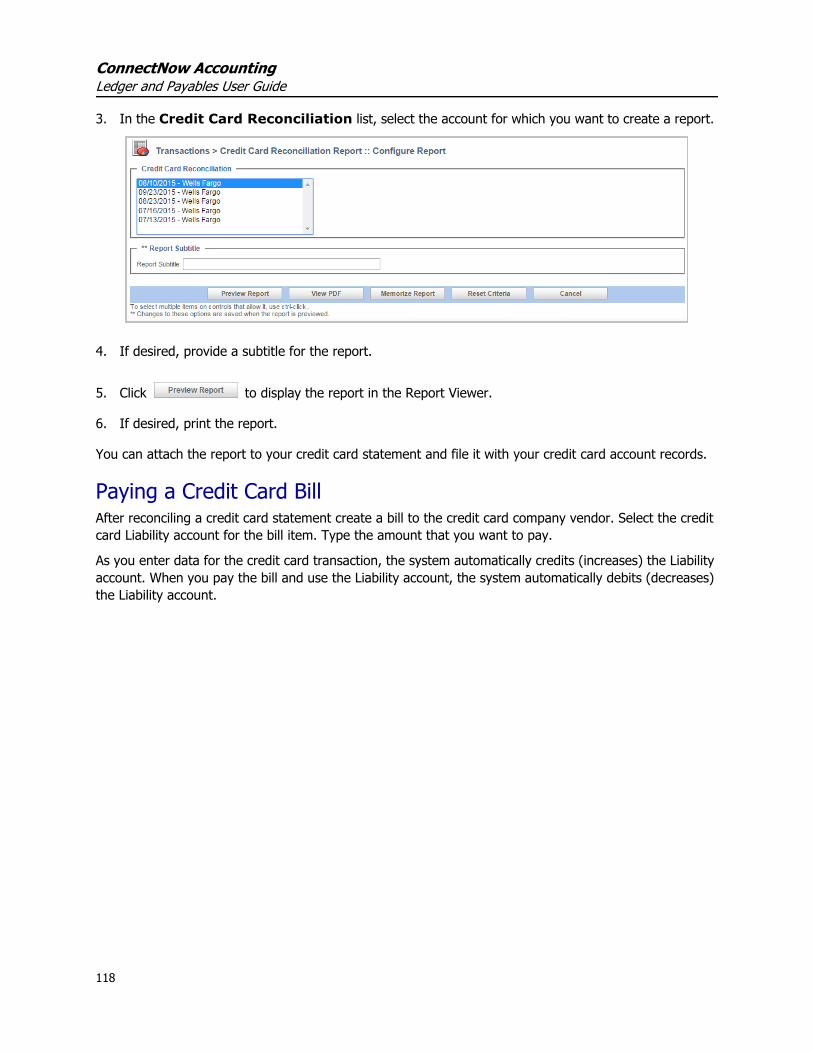
ConnectNow AccountingLedger and Payables User Guide
3. In the Credit Card Reconciliation list, select the account for which you want to create a report.
4. If desired, provide a subtitle for the report.
5. Click to display the report in the Report Viewer.
6. If desired, print the report.
You can attach the report to your credit card statement and file it with your credit card account records.
Paying a Credit Card BillAfter reconciling a credit card statement create a bill to the credit card company vendor. Select the credit card Liability account for the bill item. Type the amount that you want to pay.
As you enter data for the credit card transaction, the system automatically credits (increases) the Liability account. When you pay the bill and use the Liability account, the system automatically debits (decreases) the Liability account.
118
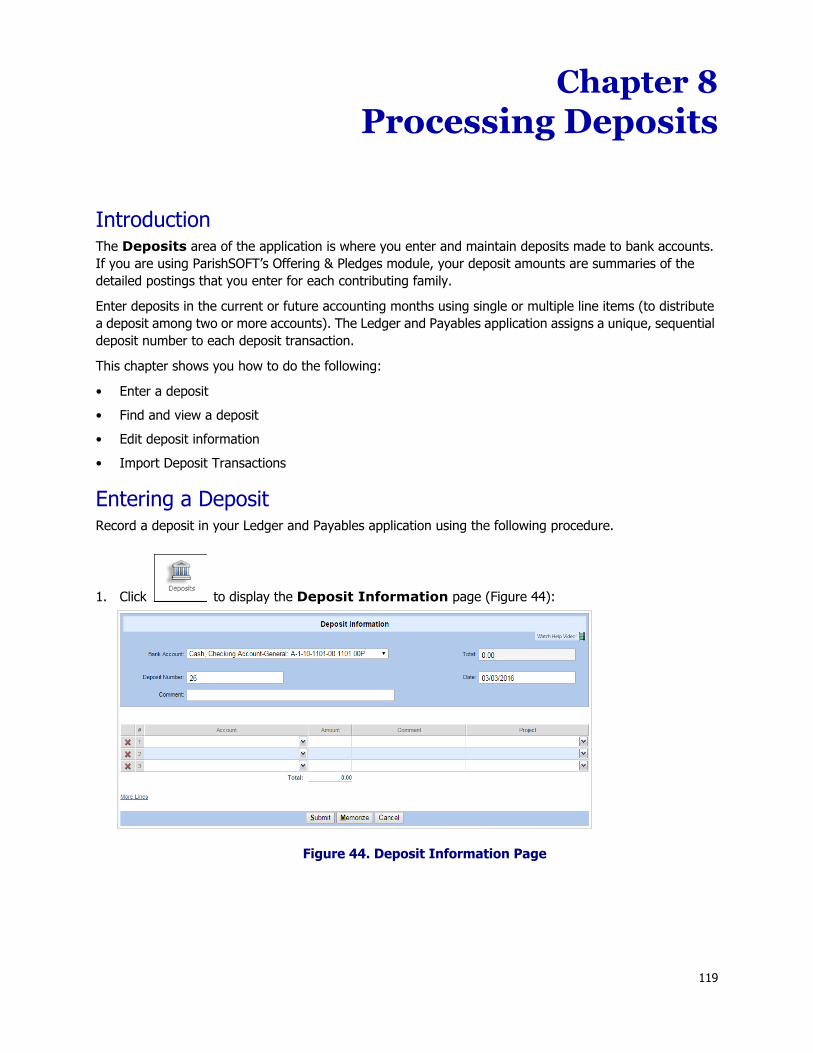
Chapter 8Processing Deposits
IntroductionThe Deposits area of the application is where you enter and maintain deposits made to bank accounts. If you are using ParishSOFT’s Offering & Pledges module, your deposit amounts are summaries of the detailed postings that you enter for each contributing family.
Enter deposits in the current or future accounting months using single or multiple line items (to distribute a deposit among two or more accounts). The Ledger and Payables application assigns a unique, sequential deposit number to each deposit transaction.
This chapter shows you how to do the following:
• Enter a deposit• Find and view a deposit• Edit deposit information • Import Deposit Transactions
Entering a DepositRecord a deposit in your Ledger and Payables application using the following procedure.
1. Click to display the Deposit Information page (Figure 44):
Figure 44. Deposit Information Page
119
ConnectNow AccountingLedger and Payables User Guide
2. Choose the bank account from the Bank Account list.
The system automatically adds the deposit number and date to the Deposit Number and Date fields.
3. Change date to the actual date of the deposit.
4. Enter a Comment that describes the deposit. The comment prints on reports and helps you identify specific deposits.
5. In the first row in the list view, choose the account from the Income, Restricted Income, or Dedicated Account list.
NoteIf your organization uses the GAAP Compliance option, deposits of restricted funds should be posted to the appropriate Restricted Income Account. See “Using the GAAP Compliance Feature” on page 236 for more information.
6. Type the amount.
7. If the deposit includes amounts from one or more other accounts, press the Tab key to advance to the next row. Repeat Steps 4 and 5.
The system automatically calculates the total in the Total field.
8. If the line item applies to a project, select the name of the project.
NoteIf you need set up a new project, see “Creating Project Groups and Projects” on page 11.
9. To add more line items to the deposit form, press the Tab key to advance to the More Lines link. Press Enter.
Two lines are added to the deposit transaction.
10. When you finish entering line items, click .
You can memorize a recurring deposit (for example, rental fees for buildings or classrooms) to post the deposit each month without the repeated data entry.
If you have a standard Counter’s Sheet, listing your standard accounts contributed with their totals, you may want to memorize the Counter’s Sheet using zero amounts on future transactions. Then each week, you can create that memorized deposit and enter the amounts.
Memorizing deposits is also a time saver if you utilize Online Giving. For information on memorizing transactions, see Chapter 10: "Memorizing Transactions".
120
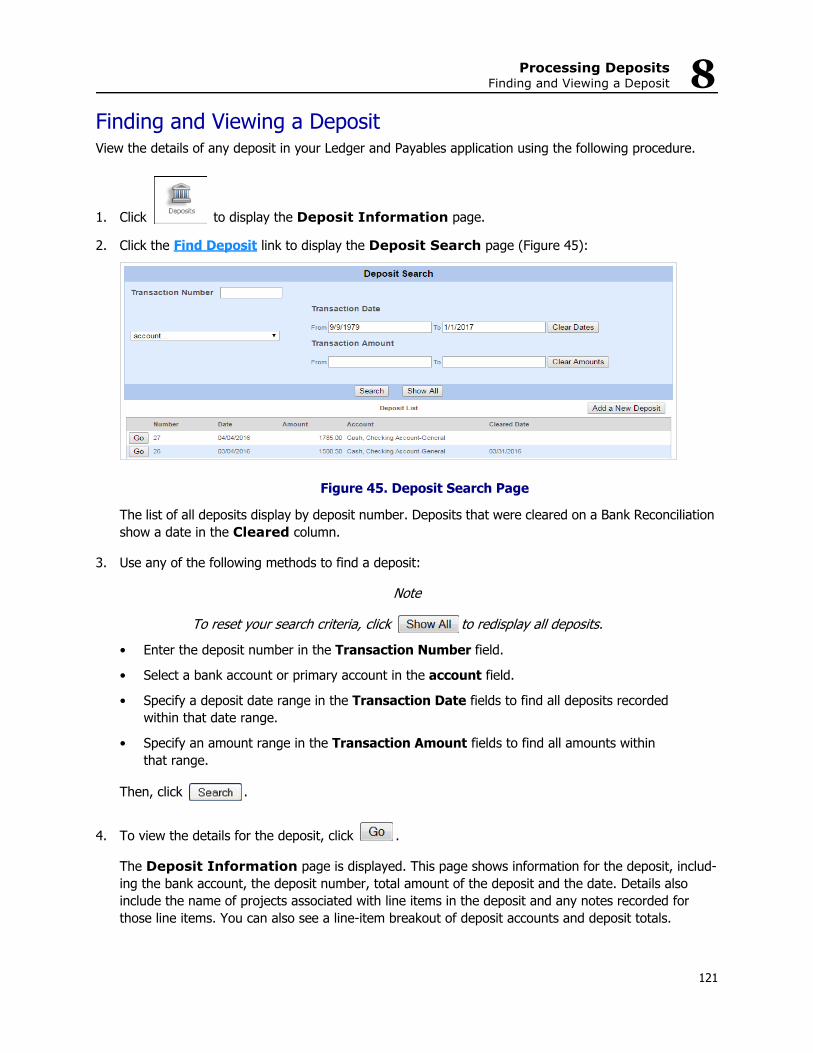
Processing DepositsFinding and Viewing a Deposit 8
Finding and Viewing a DepositView the details of any deposit in your Ledger and Payables application using the following procedure.
1. Click to display the Deposit Information page.
2. Click the Find Deposit link to display the Deposit Search page (Figure 45):
Figure 45. Deposit Search Page
The list of all deposits display by deposit number. Deposits that were cleared on a Bank Reconciliation show a date in the Cleared column.
3. Use any of the following methods to find a deposit:
Note
To reset your search criteria, click to redisplay all deposits.
• Enter the deposit number in the Transaction Number field.
• Select a bank account or primary account in the account field.
• Specify a deposit date range in the Transaction Date fields to find all deposits recorded within that date range.
• Specify an amount range in the Transaction Amount fields to find all amounts within that range.
Then, click .
4. To view the details for the deposit, click .
The Deposit Information page is displayed. This page shows information for the deposit, includ-ing the bank account, the deposit number, total amount of the deposit and the date. Details also include the name of projects associated with line items in the deposit and any notes recorded for those line items. You can also see a line-item breakout of deposit accounts and deposit totals.
121

ConnectNow AccountingLedger and Payables User Guide
Editing Deposit InformationYou can edit a deposit dated in the current or future fiscal month.
NoteYou can only edit the Comment and Project fields for a deposit that is marked as cleared on a bank reconciliation or a deposit that has a date from a prior fiscal month.
1. Use the procedure under “Finding and Viewing a Deposit” on page 121 to locate the deposit you want to edit.
2. On the Deposit Information page (Figure 44), make any of following changes to a deposit:
• Change the bank account. To do this, select a different account from the Bank Account list.
• Edit the deposit date. To do this, click inside the Date field and select a new date from the calendar.
• Delete a line item. To do this, click the red X in the row containing the line item.
• Correct a deposit amount. To do this, click inside the Amount field for a line item and change the amount.
• Add a comment. To do this, click inside the Comment field for a line item and type your notes.
• Specify a project name. To do this, click inside the Project field for a line item and select a project.
• Delete the deposit. To do this, click .
• Add more line items. To do this, click the More Lines link.
3. Click to save any changes.
Deleting a Line ItemTo delete an individual line item from a deposit, click the red X in that row.
Adding More Line ItemsTo add more line items, click the More Lines link.
122
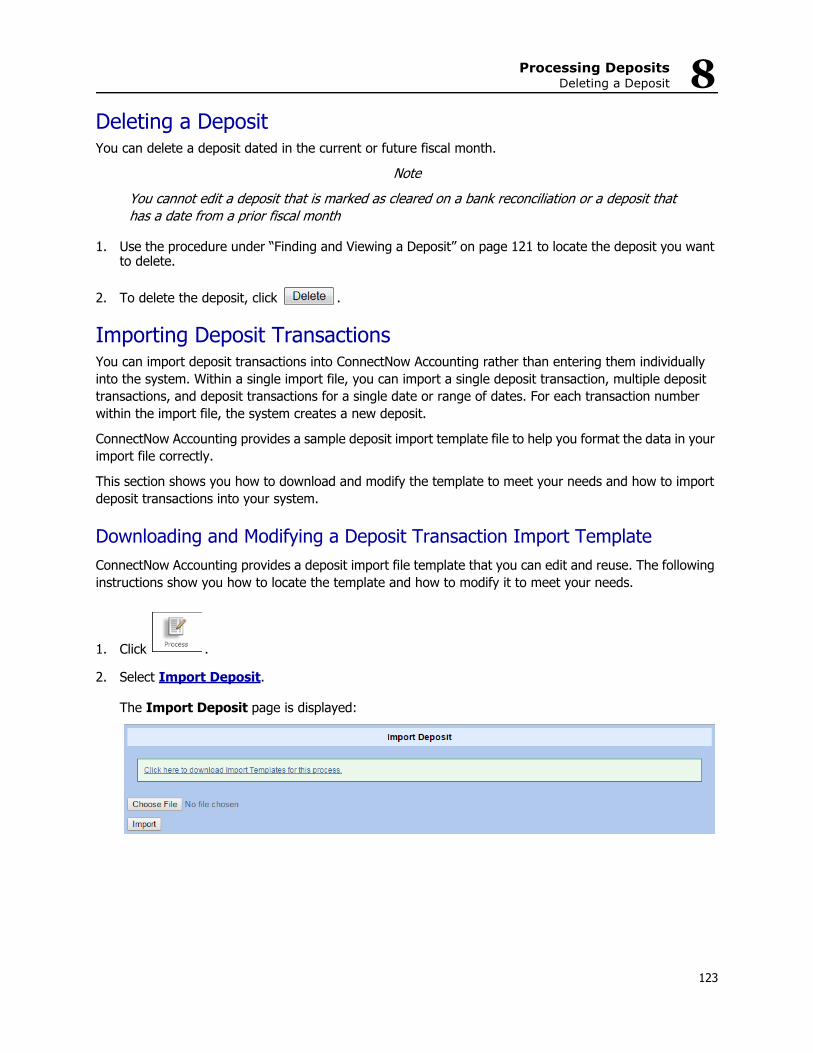
Processing DepositsDeleting a Deposit 8
Deleting a DepositYou can delete a deposit dated in the current or future fiscal month.
NoteYou cannot edit a deposit that is marked as cleared on a bank reconciliation or a deposit that has a date from a prior fiscal month
1. Use the procedure under “Finding and Viewing a Deposit” on page 121 to locate the deposit you want to delete.
2. To delete the deposit, click .
Importing Deposit TransactionsYou can import deposit transactions into ConnectNow Accounting rather than entering them individually into the system. Within a single import file, you can import a single deposit transaction, multiple deposit transactions, and deposit transactions for a single date or range of dates. For each transaction number within the import file, the system creates a new deposit.
ConnectNow Accounting provides a sample deposit import template file to help you format the data in your import file correctly.
This section shows you how to download and modify the template to meet your needs and how to import deposit transactions into your system.
Downloading and Modifying a Deposit Transaction Import TemplateConnectNow Accounting provides a deposit import file template that you can edit and reuse. The following instructions show you how to locate the template and how to modify it to meet your needs.
1. Click .
2. Select Import Deposit.
The Import Deposit page is displayed:
123
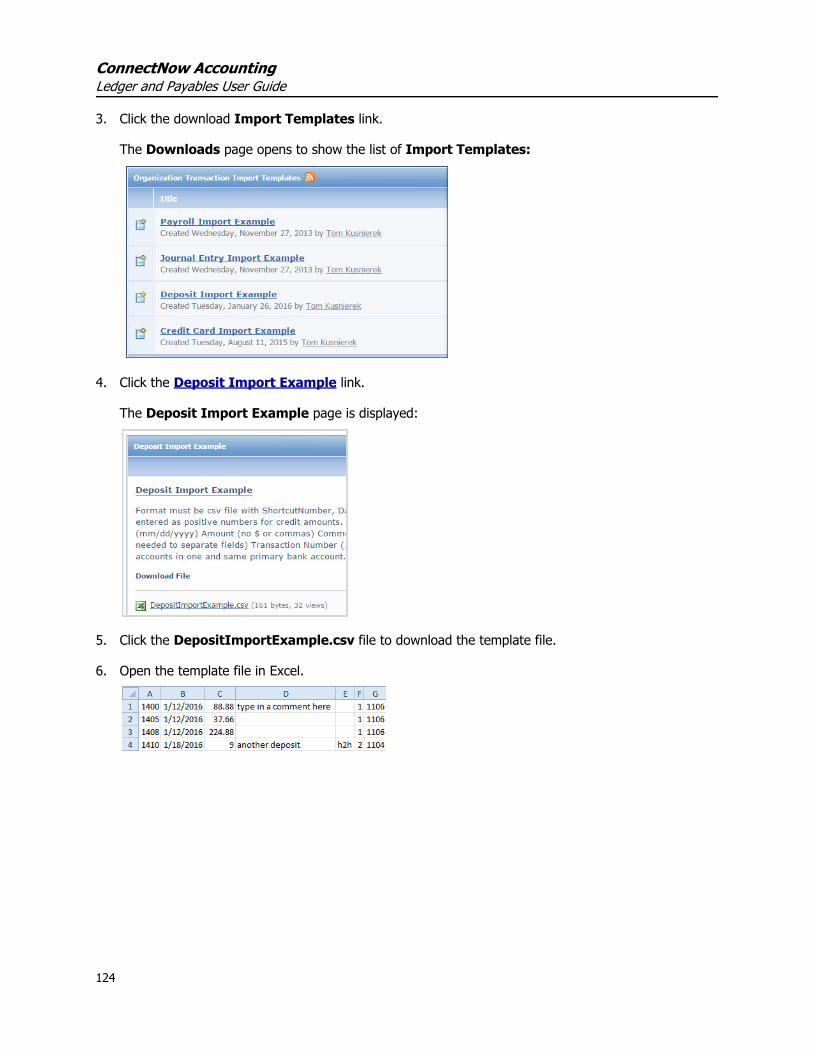
ConnectNow AccountingLedger and Payables User Guide
3. Click the download Import Templates link.
The Downloads page opens to show the list of Import Templates:
4. Click the Deposit Import Example link.
The Deposit Import Example page is displayed:
5. Click the DepositImportExample.csv file to download the template file.
6. Open the template file in Excel.
124
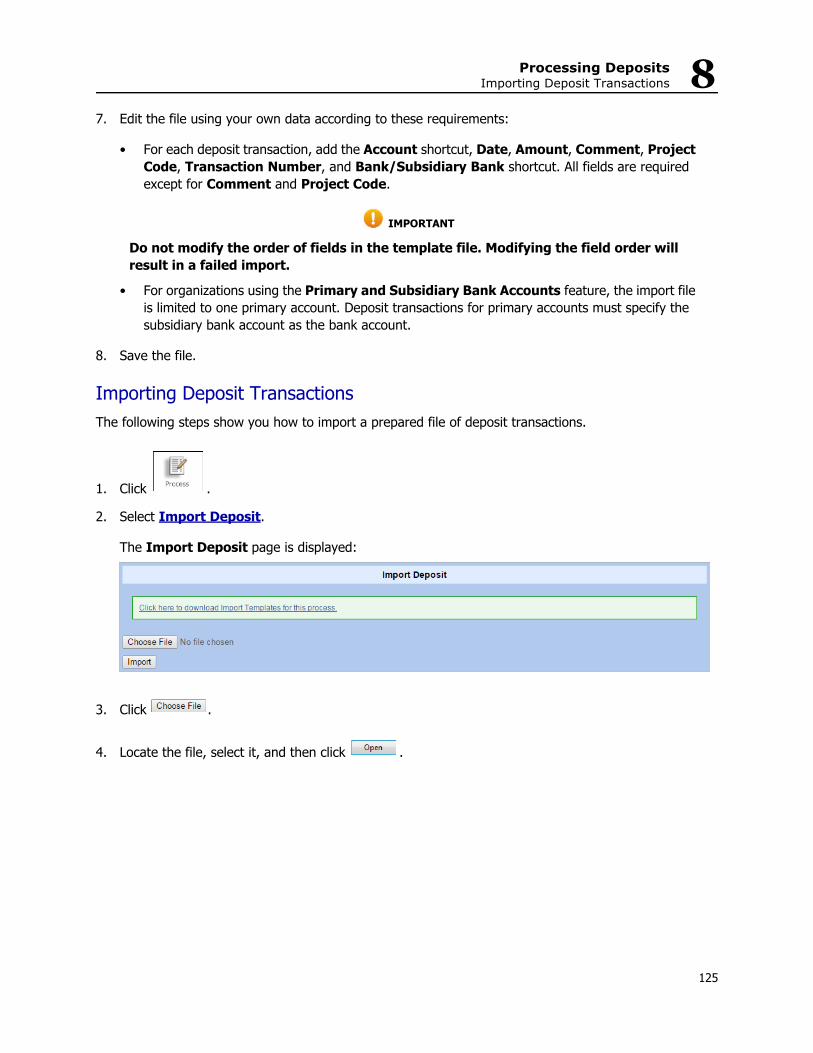
Processing DepositsImporting Deposit Transactions 8
7. Edit the file using your own data according to these requirements:
• For each deposit transaction, add the Account shortcut, Date, Amount, Comment, Project Code, Transaction Number, and Bank/Subsidiary Bank shortcut. All fields are required except for Comment and Project Code.
IMPORTANT
Do not modify the order of fields in the template file. Modifying the field order will result in a failed import.
• For organizations using the Primary and Subsidiary Bank Accounts feature, the import file is limited to one primary account. Deposit transactions for primary accounts must specify the subsidiary bank account as the bank account.
8. Save the file.
Importing Deposit TransactionsThe following steps show you how to import a prepared file of deposit transactions.
1. Click .
2. Select Import Deposit.
The Import Deposit page is displayed:
3. Click .
4. Locate the file, select it, and then click .
125

ConnectNow AccountingLedger and Payables User Guide
5. Click to bring the file into the ConnectNow Accounting program.
• If the import process validates the file successfully, the system displays the current date at the
top of the page, and displays the button.
• If the import process cannot validate the file, the system displays a failure notification and pro-vides the reason for the failure.
6. Do one of the following:
• Click to create the deposit transactions.
The system creates the deposit and displays it on the Deposit Information page.
OR
• If the import process cannot validate the file, troubleshoot the file using the provided reason as a guide. Correct the file, and then re-import it into the system.
126

Chapter 9Recording Journal Entries
IntroductionUse the Journal Entry Information page to enter all miscellaneous account transactions required to transfer monies from one account to another, make funds transfers, correct mistakes, and record adjust-ments. Journal Entries can be used for any item not readily handled by a bill, check, or deposit.
Journal entries must balance in order to post, so your total debit amount must be equal to the total credit amount. This chapter shows you how to add, edit, and delete journal entries.
Debits and CreditsConnectNow Ledger and Payables supports the entry of debits and credits (pluses and minuses) to affect account balances. The effect of a debit or credit on a specific account type is shown in Table 11.
Table 11: Effect of Debits and Credits on Various Types of Accounts
Account Type Typical Account Typical Balance Debit Effect Credit Effect
Asset Checking Account Debit + Increase - Decrease
Liability Mortgage Credit - Decrease + Increase
Net Asset Equity Credit - Decrease + Increase
Income Weekly Offerings Credit - Decrease + Increase
Expense Telephone Charges Debit + Increase - Decrease
Dedicated Memorial Fund Credit - Decrease + Increase
127

ConnectNow AccountingLedger and Payables User Guide
Adding a Journal EntryTo add a journal entry:
1. Click to display the Journal Entry Information page (Figure 46):
Figure 46. Journal Entry Information Page
The system automatically adds a number for the journal entry number and today’s date.
2. In the Comment field, type a comment for the entire journal entry.
NoteIndividual line item comments that you add to the journal entry appear on your detailed drill-down reports.
3. For the first line item of the journal entry (Line 1), select an account from the Account list.
4. Press the Tab key. Then, do the following:
a. Type the amount of the debit or credit.
b. Add a line item comment in the Comment field.
c. From the Project list, choose a project, if applicable.
d. Press the Tab key. Then, repeat Steps 4a - 4c for each remaining line item of the journal entry.
NoteTo add more lines to the journal entry form, select the More Lines link.
After you finish adding the entry, the total amount in the Debit column equals the total amount in the Credit column.
5. Click to post the transaction.
You can also “memorize” a recurring journal entry to post a recurring entry without manually entering all of the data again. For information on memorizing journal entries, see Chapter 10.
128
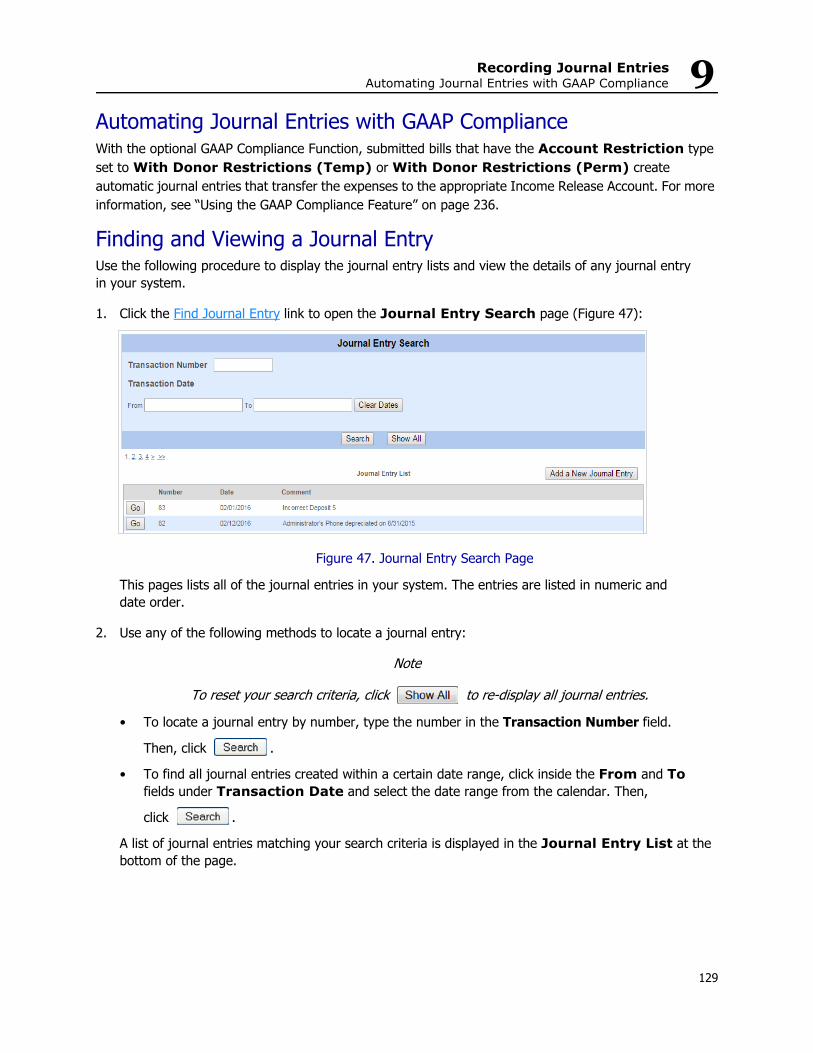
Recording Journal EntriesAutomating Journal Entries with GAAP Compliance 9
Automating Journal Entries with GAAP ComplianceWith the optional GAAP Compliance Function, submitted bills that have the Account Restriction type set to With Donor Restrictions (Temp) or With Donor Restrictions (Perm) create automatic journal entries that transfer the expenses to the appropriate Income Release Account. For more information, see “Using the GAAP Compliance Feature” on page 236.
Finding and Viewing a Journal EntryUse the following procedure to display the journal entry lists and view the details of any journal entry in your system.
1. Click the Find Journal Entry link to open the Journal Entry Search page (Figure 47):
Figure 47. Journal Entry Search Page
This pages lists all of the journal entries in your system. The entries are listed in numeric and date order.
2. Use any of the following methods to locate a journal entry:
Note
To reset your search criteria, click to re-display all journal entries.
• To locate a journal entry by number, type the number in the Transaction Number field.
Then, click .
• To find all journal entries created within a certain date range, click inside the From and To fields under Transaction Date and select the date range from the calendar. Then,
click .
A list of journal entries matching your search criteria is displayed in the Journal Entry List at the bottom of the page.
129

ConnectNow AccountingLedger and Payables User Guide
3. To view any journal entry in detail, click to display the Journal Entry Information page:
The number of the journal entry is shown at the top of the page along with the date the journal entry was created. Individual line items within the journal entry are provided at the bottom. Details include name of the account, debit and credit amounts, a comment, and the name of the project.
Editing Journal Entry InformationYou can make changes to the line items in a journal entry as long as the entry is in an open month. You can only edit the Comment and Project fields for journal entries in closed months.
1. Use the procedure under “Finding and Viewing a Journal Entry” on page 129 to locate the journal entry you want to edit.
2. On the Journal Entry Information page, make any of the following changes to a journal entry:
• Change the date. To do this, click inside the Date field and select a date from the calendar.
• Delete a line item. To do this, click the red X in the row containing the line item.
• Correct debit and credit line item amounts. To do this, click inside the Debit and Credit fields for a line item and change the amount.
• Add a comment. To do this, click inside the Comment field for a line item and type your notes.
• Specify a project name. To do this, click inside the Project field for a line item and select a project.
• Add more line items. To do this, click the More Lines link.
3. Click to save any changes.
Deleting a Line ItemTo delete an individual line item from a journal entry, click the red X in that row.
130

Recording Journal EntriesDeleting a Journal Entry 9
Adding More Line ItemsTo add more line items, click the More Lines link.
Deleting a Journal Entry Notes
You cannot delete a journal entry for a closed month. Do not delete a journal entry that has an Associated Bill Number. Instead, void the Associated Bill and, as part of your system’s GAAP Compliance func-tionality, the reversing journal entry will be created automatically (see “Void-ing a Restricted Bill or Check” on page 255.)A deleted journal entry is permanently removed from the system. You cannot recover a deleted journal entry.
1. Use the procedure under “Finding and Viewing a Journal Entry” on page 129 to locate the journal entry you want to delete.
2. Click .
3. Click .
The journal entry is permanently removed from your Ledger and Payables system.
Creating a Reversing Journal EntryIn ConnectNow Accounting, you can create a reversing journal entries to make a month-end or year-end adjustment. For example, you may not have received an invoice but need the amount of the invoice to show in your Statement of Activities report. By creating a reversing journal entry, you can record the amount of the invoice in this month and automatically reverse the amount the following month. Then, when the invoice is actually received, you can enter it as you normally would.
To create a reversing journal entry, you create a normal journal entry and check the box to insert a revers-ing journal entry at the same time (see instructions that follow). The line-item details in the reversing jour-nal entry match the line item details of the original journal entry, but the credit and debit amounts are reversed. So, in the reversing journal entry, the accounts and project information for each line item match those fields in the original journal entry, but the credit amounts in the original are now debit amounts in the reversal. The debit amounts in the original are now credit amounts in the reversal. The entry in the Comment field defaults to Reversing Journal Entry.
The reversing journal entry is linked to the original journal entry, so that you can see which journal entry is tied to which reversing journal entry and quickly view the details for each.
131
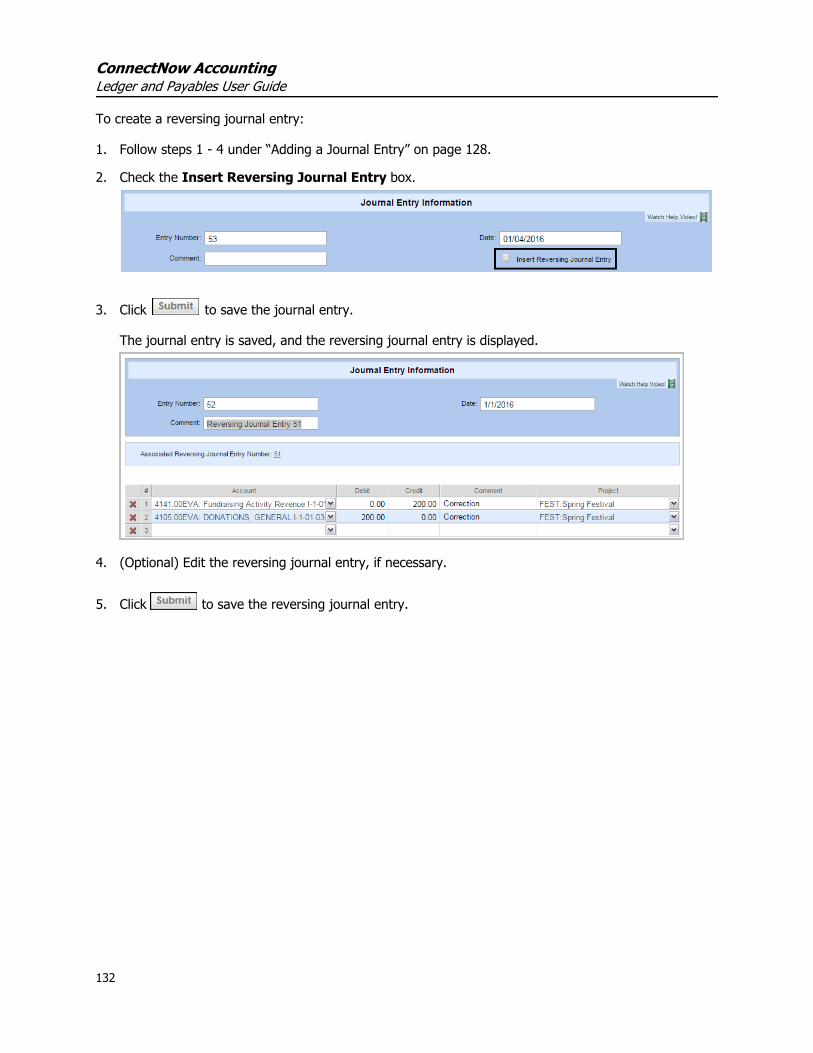
ConnectNow AccountingLedger and Payables User Guide
To create a reversing journal entry:
1. Follow steps 1 - 4 under “Adding a Journal Entry” on page 128.
2. Check the Insert Reversing Journal Entry box.
3. Click to save the journal entry.
The journal entry is saved, and the reversing journal entry is displayed.
4. (Optional) Edit the reversing journal entry, if necessary.
5. Click to save the reversing journal entry.
132
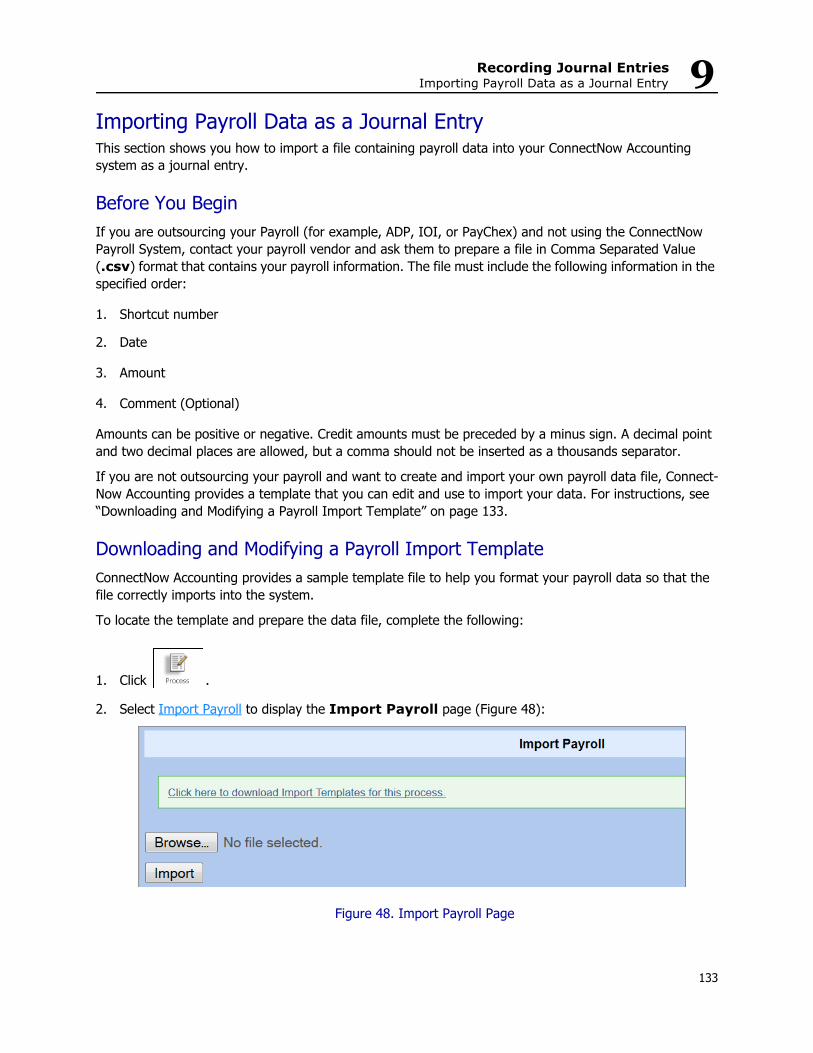
Recording Journal EntriesImporting Payroll Data as a Journal Entry 9
Importing Payroll Data as a Journal EntryThis section shows you how to import a file containing payroll data into your ConnectNow Accounting system as a journal entry.
Before You BeginIf you are outsourcing your Payroll (for example, ADP, IOI, or PayChex) and not using the ConnectNow Payroll System, contact your payroll vendor and ask them to prepare a file in Comma Separated Value (.csv) format that contains your payroll information. The file must include the following information in the specified order:
1. Shortcut number
2. Date
3. Amount
4. Comment (Optional)
Amounts can be positive or negative. Credit amounts must be preceded by a minus sign. A decimal point and two decimal places are allowed, but a comma should not be inserted as a thousands separator.
If you are not outsourcing your payroll and want to create and import your own payroll data file, Connect-Now Accounting provides a template that you can edit and use to import your data. For instructions, see “Downloading and Modifying a Payroll Import Template” on page 133.
Downloading and Modifying a Payroll Import TemplateConnectNow Accounting provides a sample template file to help you format your payroll data so that the file correctly imports into the system.
To locate the template and prepare the data file, complete the following:
1. Click .
2. Select Import Payroll to display the Import Payroll page (Figure 48):
Figure 48. Import Payroll Page
133

ConnectNow AccountingLedger and Payables User Guide
3. Click the download Import Templates link.
The Downloads page opens:
4. Click the Payroll Import Example link. Then, select the PayrollImportExample.txt file.
The template file opens on a page in a separate browser window.
5. Right-click on the page, and from the displayed menu select the Save Page As or Save as option:
6. In the Save As dialog, rename the file, making sure to change the extension to .csv. Then, click
to save the file to a location on your hard drive. Make note of where you save the file.
Click the right mouse button to display a menu similar to the following.
134
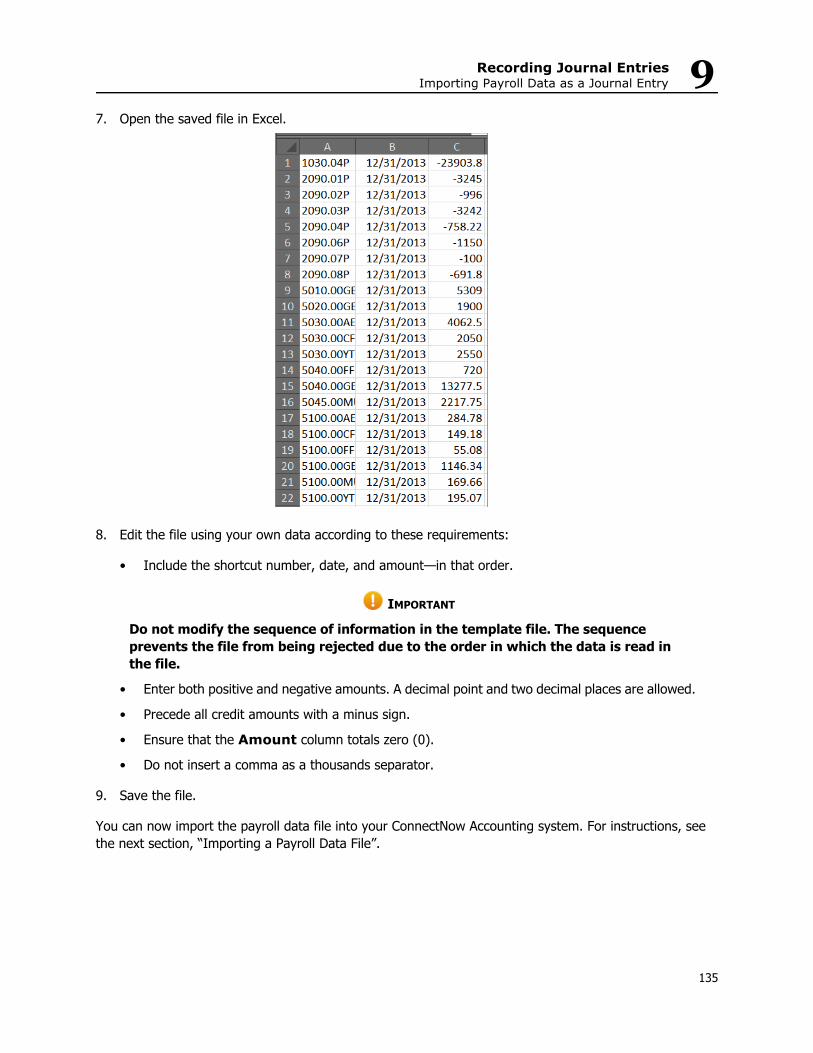
Recording Journal EntriesImporting Payroll Data as a Journal Entry 9
7. Open the saved file in Excel.
8. Edit the file using your own data according to these requirements:
• Include the shortcut number, date, and amount—in that order.
IMPORTANT
Do not modify the sequence of information in the template file. The sequence prevents the file from being rejected due to the order in which the data is read in the file.
• Enter both positive and negative amounts. A decimal point and two decimal places are allowed.
• Precede all credit amounts with a minus sign.
• Ensure that the Amount column totals zero (0).
• Do not insert a comma as a thousands separator.
9. Save the file.
You can now import the payroll data file into your ConnectNow Accounting system. For instructions, see the next section, “Importing a Payroll Data File”.
135
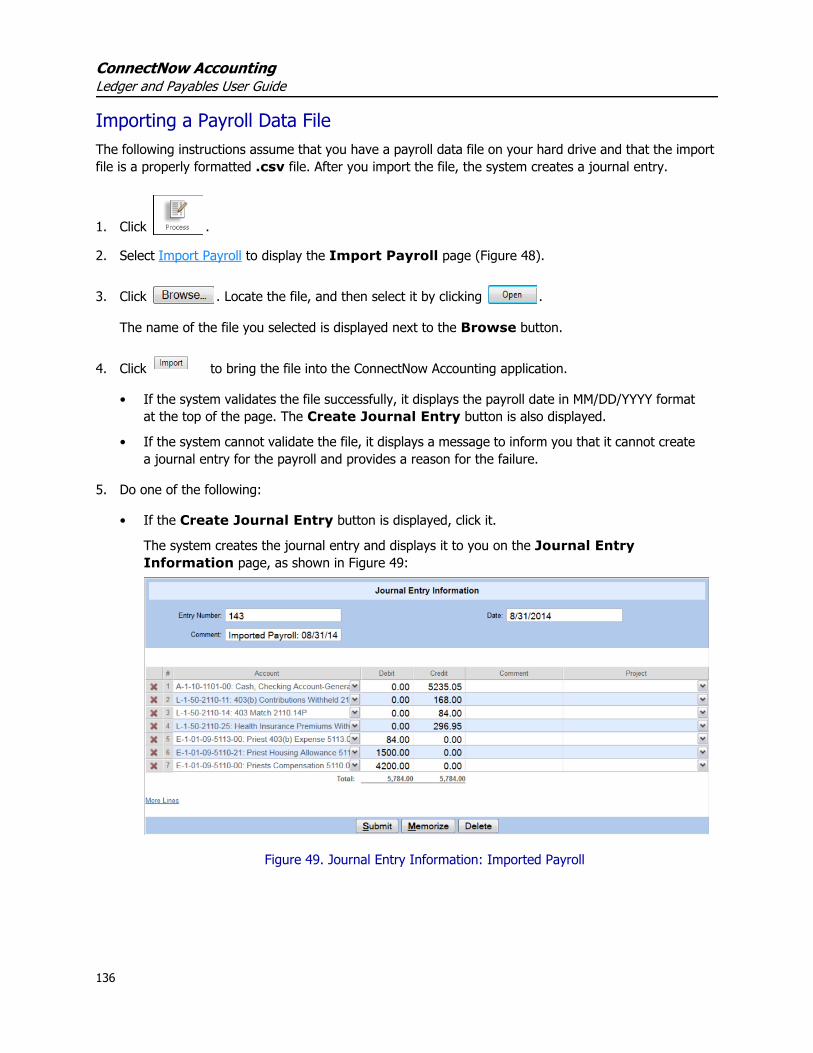
ConnectNow AccountingLedger and Payables User Guide
Importing a Payroll Data FileThe following instructions assume that you have a payroll data file on your hard drive and that the import file is a properly formatted .csv file. After you import the file, the system creates a journal entry.
1. Click .
2. Select Import Payroll to display the Import Payroll page (Figure 48).
3. Click . Locate the file, and then select it by clicking .
The name of the file you selected is displayed next to the Browse button.
4. Click to bring the file into the ConnectNow Accounting application.
• If the system validates the file successfully, it displays the payroll date in MM/DD/YYYY format at the top of the page. The Create Journal Entry button is also displayed.
• If the system cannot validate the file, it displays a message to inform you that it cannot create a journal entry for the payroll and provides a reason for the failure.
5. Do one of the following:
• If the Create Journal Entry button is displayed, click it.
The system creates the journal entry and displays it to you on the Journal Entry Information page, as shown in Figure 49:
Figure 49. Journal Entry Information: Imported Payroll
136

Recording Journal EntriesImporting Journal Entries 9
Do the following:
o Make sure that the Date field shows the correct payroll date.
o Review the line items and reconcile them with the information in the imported payroll file.
o Check that the Comment field displays the following: Imported Payroll: MM/DD/YYYY.
After you verify that the information in the journal entry is correct, click to save it.
OR
• If the system cannot validate the file, troubleshoot the file using the reason provided by the system as a guide. Correct the file, and then re-import it into the system.
Importing Journal EntriesYou can import journal entries into ConnectNow Accounting rather than entering them individually into the system. You can import journal entries for a single date or a range of dates. The date of the first line item for a transaction determines the transaction’s date.
ConnectNow Accounting provides a sample journal entry template file to help you format the data in a file correctly.
This section shows you how to download and modify the template to meet your needs and how to import journal entries into your system.
Downloading and Modifying a Journal Entry Import TemplateConnectNow Accounting has a journal entry template that you can edit and reuse. The following instruc-tions show you how to locate the template and how to modify it to meet your needs.
1. Click .
2. Select Import Journal Entry to display the Import Journal Entry page (Figure 48).
3. Click the download Import Templates link.
The Downloads page opens:
137
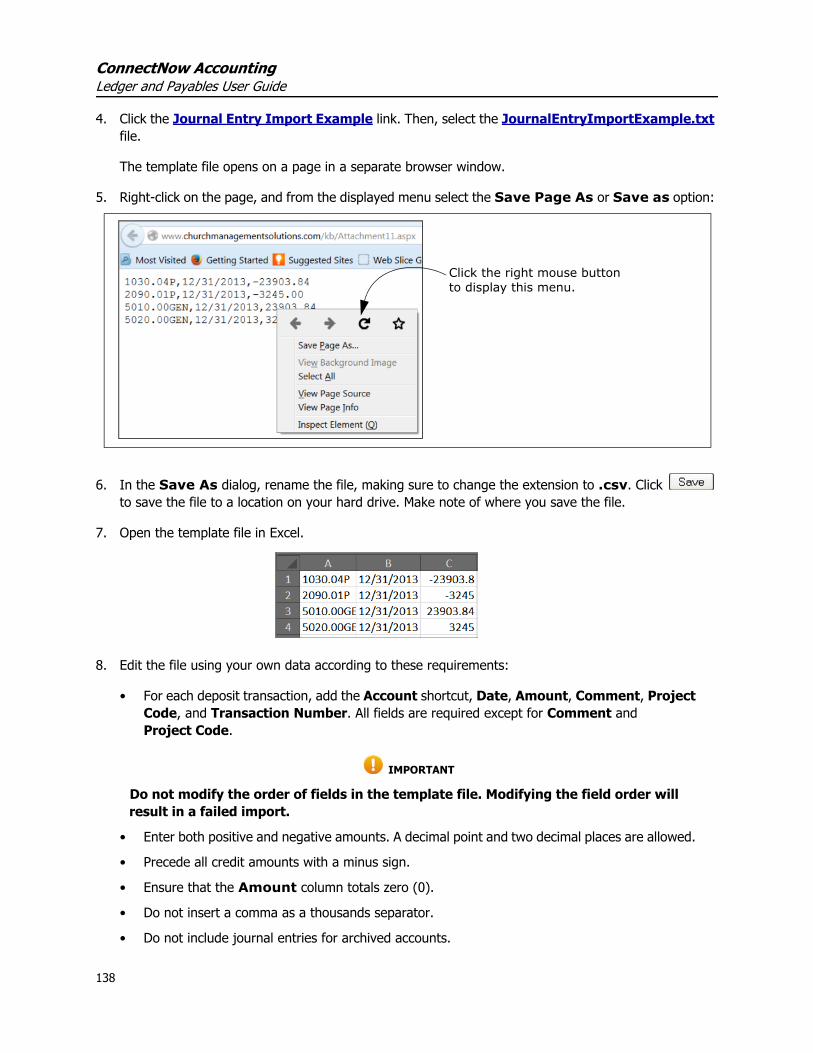
ConnectNow AccountingLedger and Payables User Guide
4. Click the Journal Entry Import Example link. Then, select the JournalEntryImportExample.txt file.
The template file opens on a page in a separate browser window.
5. Right-click on the page, and from the displayed menu select the Save Page As or Save as option:
6. In the Save As dialog, rename the file, making sure to change the extension to .csv. Click to save the file to a location on your hard drive. Make note of where you save the file.
7. Open the template file in Excel.
8. Edit the file using your own data according to these requirements:
• For each deposit transaction, add the Account shortcut, Date, Amount, Comment, Project Code, and Transaction Number. All fields are required except for Comment and Project Code.
IMPORTANT
Do not modify the order of fields in the template file. Modifying the field order will result in a failed import.
• Enter both positive and negative amounts. A decimal point and two decimal places are allowed.
• Precede all credit amounts with a minus sign.
• Ensure that the Amount column totals zero (0).
• Do not insert a comma as a thousands separator.
• Do not include journal entries for archived accounts.
Click the right mouse button to display this menu.
138

Recording Journal EntriesImporting Journal Entries 9
9. Save the file.
You can now import the journal entry into your ConnectNow Accounting system. For instructions, see the next section, “Importing a Journal Entry”.
Importing a Journal Entry
1. Click .
2. Select Import Payroll to display the Import Payroll page (see Figure 48).
3. Click . Locate the file, and then select it by clicking .
The name of the file you selected is displayed next to the Browse button.
4. Click to bring the file into the ConnectNow Accounting application.
• If the system validates the file successfully, it displays the date in MM/DD/YYYY format at the top of the page. It also displays the Create Journal Entry button.
• If the system cannot validate the file, it displays a message to inform you that it could not cre-ate a journal entry and provides a reason for the failure.
5. Do one of the following:
• Click to create a journal entry.
The system creates the journal entry and displays it on the Journal Entry Information page, as shown in Figure 50:
Figure 50. Journal Entry Information: Imported Journal Entry
139

ConnectNow AccountingLedger and Payables User Guide
Do the following:
o Verify that the information in the Date field matches the date in the import file.
o Review the line items and reconcile them with the information in the imported file. Specifically, verify that all negative amounts from the file are contained in the Credit column and all pos-itive amounts are in the Debit column.
If the information is correct, click to save the journal entry.
OR
• If the system cannot validate the file, troubleshoot the file using the reason provided as a guide. Correct the file, and then re-import it into the system.
140

Chapter 10Memorizing Transactions
IntroductionUse the Memorize feature to create a library of recurring bills, credit card transactions, deposits, and jour-nal entries that you can use again and again—without having to manually do the data entry each time.
Memorized transactions can save you time in processing regular utility, vehicle lease, and rent bills; as well as regular journal entries like typical account transfers, and any other item that you handle on a regular basis.
This chapter shows you how to perform these tasks:
• Memorize a Transaction • View and Edit Memorized Transactions• Delete a Transaction• Create New Transaction Entries from Memorized Transactions • View and Edit New Transaction Entries Created from Memorized Transactions
Memorizing a TransactionYou can memorize a new transaction or a transaction that you created previously.
1. Open the existing transaction record or create a new record for the bill, deposit, journal entry, or credit card item that you wish to memorize.
2. Click to display the Memorize Transaction setup (Figure 51):
Figure: 51. Memorize Transaction Setup
3. Type a unique description for the transaction in the Description field.
4. Select the frequency of the transaction from the Frequency list (that is, Annually, Bi-weekly, Monthly, Semi-Annually, Semi-Monthly, Quarterly, or Weekly).
141

ConnectNow AccountingLedger and Payables User Guide
5. If you select Semi-Monthly, from the Semi-Monthly First Day list, select the first day the bill is due in the month, and the system will automatically calculate 15 days from that date for the second due date in the month.
6. Click inside the Next Date field, and from the displayed calendar select the next date to indicate when the next transaction should be placed into the queue for processing.
7. Specify the final date to indicate when the last memorized transaction should be pro-cessed (for example, the last payment date of a loan). If the payment period is indefi-nite, you may leave this field empty to continue recurring transactions with no end date.
8. Do one of the following:
• If the transaction amount will vary from one period to the next, check the box labeled Use zero amounts on future transactions.
• If the amount will be the same each time, leave this box unchecked.
9. Click to memorize and save the transaction.
Viewing and Editing Memorized TransactionsTo view all memorized transactions:
1. Click to display the menu of memorized transactions:
2. Select the type of transactions you want to view.
For example, if you select Memorized Bills, a list of transactions similar to the following is displayed:
142
Memorizing TransactionsDeleting a Memorized Transaction 10
3. To edit a memorized transaction, complete the following:
a. Click inside any of the following fields and make the desired change:
NoteEdits are not permitted in the Vendor, Frequency, or Amount fields.
• Description
• Next Date
• Final Date
b. Click the to save your changes.
Deleting a Memorized Transaction
WARNING
Deletes are not recoverable and the system will not ask you if you are sure you wish to remove the selected item prior to deleting the record.
To remove a line item from the list of memorized transactions:
1. Click the red X in the row containing the line item.
2. Click to save the change or click to exit without saving the change.
Creating New Transaction Entries from Memorized TransactionsThis process automatically creates new transactions as entries into your Ledger and Payables system as of the date that you specify. You will want to schedule this process to match the frequency of your memo-rized transactions. For example, if you set up your weekly Offertory deposit as a memorized transaction, you will want to process memorized transactions on a weekly basis.
Complete the following steps to process your memorized transactions.
1. Click to display the menu of memorized transactions:
2. Select Create From Memorized Transactions.
143
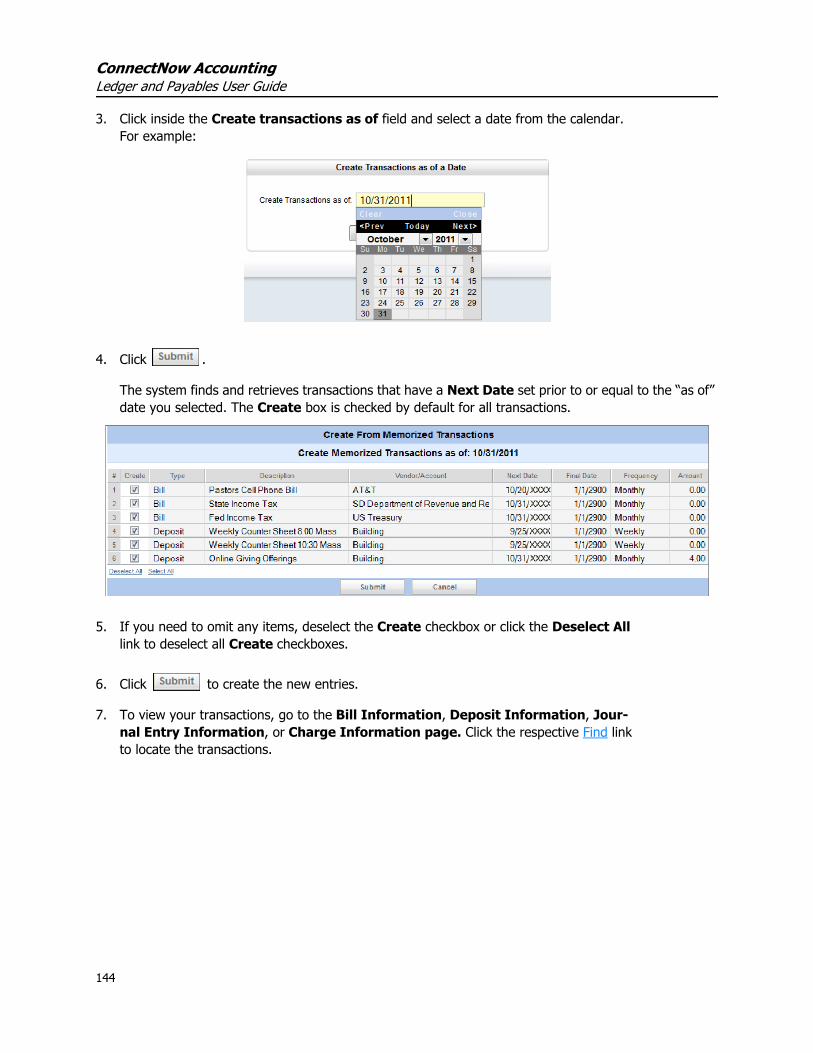
ConnectNow AccountingLedger and Payables User Guide
3. Click inside the Create transactions as of field and select a date from the calendar. For example:
4. Click .
The system finds and retrieves transactions that have a Next Date set prior to or equal to the “as of” date you selected. The Create box is checked by default for all transactions.
5. If you need to omit any items, deselect the Create checkbox or click the Deselect All link to deselect all Create checkboxes.
6. Click to create the new entries.
7. To view your transactions, go to the Bill Information, Deposit Information, Jour-nal Entry Information, or Charge Information page. Click the respective Find link to locate the transactions.
144
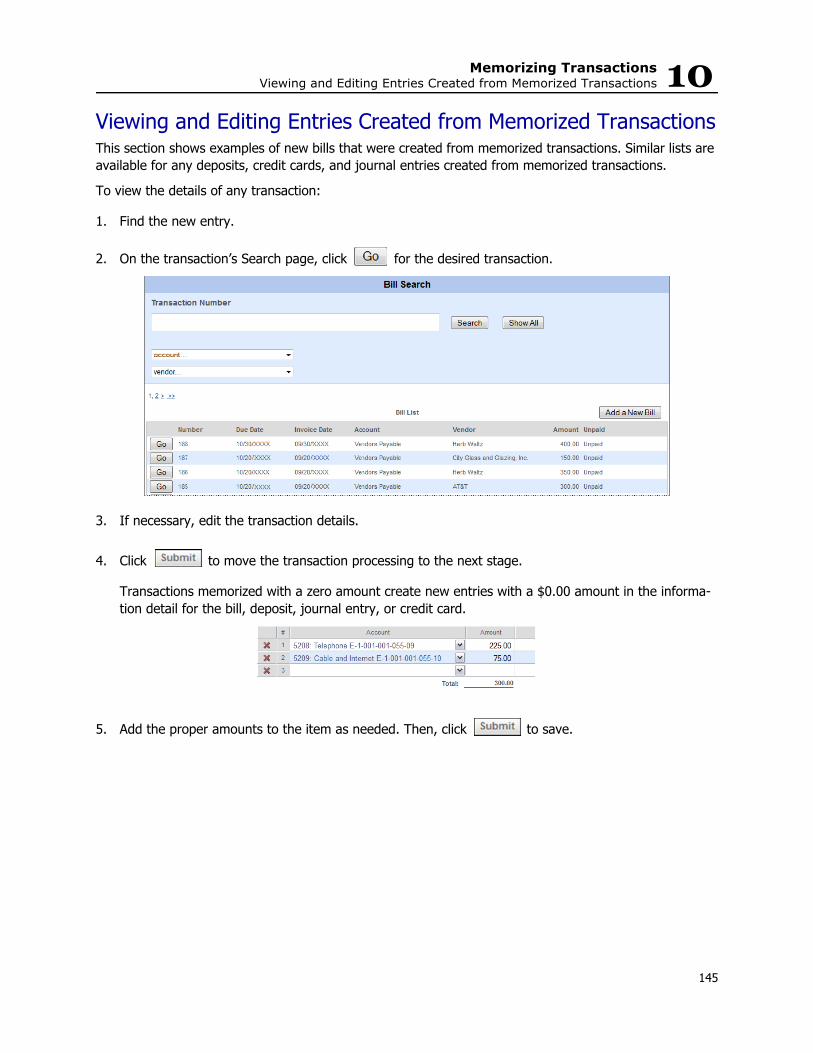
Memorizing TransactionsViewing and Editing Entries Created from Memorized Transactions 10
Viewing and Editing Entries Created from Memorized TransactionsThis section shows examples of new bills that were created from memorized transactions. Similar lists are available for any deposits, credit cards, and journal entries created from memorized transactions.
To view the details of any transaction:
1. Find the new entry.
2. On the transaction’s Search page, click for the desired transaction.
3. If necessary, edit the transaction details.
4. Click to move the transaction processing to the next stage.
Transactions memorized with a zero amount create new entries with a $0.00 amount in the informa-tion detail for the bill, deposit, journal entry, or credit card.
5. Add the proper amounts to the item as needed. Then, click to save.
145

ConnectNow AccountingLedger and Payables User Guide
146
Chapter 11Creating Due To/From Accounts
IntroductionThe Due To/From Accounts accounting feature in the Ledger and Payables module provides a means for you to record transactions between entities in your organization, whereby you can track debits and credits and keep them constantly in balance. Whenever a transaction occurs between entities, the system auto-matically creates a counter entry in the each entity's Due To/From account so that the debit and credit for each entity are always equal. When transaction entries in the accounts are consolidated, the amount always equals $0.00.
The Due To/From accounting feature offers all users the advantage of being able to keep finances for each entity separate from one another and properly balanced with independent Statements of Financial Posi-tion. Users can easily reconcile which accounts money is due to and due from. Users who have been using ConnectNow Accounting for years can simply activate the feature, set up the accounts, and then for each entity instantly create a Statement of Financial Position, which displays the correct credit or debit due to/due from balance.
Due To/From ExampleThe following example illustrates a common accounting transaction that can take advantage of the Due To/From accounting feature:
A church purchases $400 worth of office supplies for itself (Entity #1) and the school (Entity #2). The church pays for these supplies out of the church checking account, but because the school is responsi-ble for a portion of the expenditure, the church expenses $250 to the school. The net effect is that the school (Entity #2) owes $250 to the church (Entity #1).
An essential feature of Due To /From accounting is that the debits and credits in cross-entity transactions are continuously tracked and kept in balance. To track respective balances, each entity must have its own Due To/From account. The system can then automatically keep track of all cross-entity transactions to rec-oncile which accounts money is due to and due from. When Statements of Financial Position are created for both entities, the accounts always show as balanced.
147

ConnectNow AccountingLedger and Payables User Guide
Using our purchasing example, the Journal Entries for the account the transaction look like those shown in Table 12:
The Journal Entries show the transaction as balanced. However, the entities themselves are not. As shown in Table 13, the Due To/From accounting corrects this by tracking the details of the transaction and record-ing the portion of the expense Entity #2 is responsible for; that is, the amount that Entity #2 owes Entity #1.
Note the counter entries in the Due To/From accounts and that these entries are balanced (total 0).
NoteThe Due To/From accounts feature automatically handles the booking to each Due To/From account in the background so that when a Statement of Financial Position is created, it always shows as balanced. This automation allows you to always show your Statements as balanced.
When the church pays the bill out of its checking account, the transaction is posted to the account as shown in Table 14:
Table 12: Journal Entries for Due To/From Example
Account Debit Credit
Accounts Payable 400
Entity #1 Expense Account (for supplies)
150
Entity #2 Expense Account (for supplies)
250
Table 13: Due To/From Accounting Details for Journal Entry Example
Account Activity Due To/From Debit Credit
Entity #1Due To/From Account(typically an Asset account)
Owed by Entity #2 to Entity #1 250.00
Entity #2Due To/From Account (typically a Liability account)
Owed to Entity #1 from Entity #2 250.00
Table 14: Due To/From Transaction Postings for Journal Entry Example
Account Activity Debit Credit
Entity #1 Checking Account 400.00
Entity #1 Accounts Payable 400.00
148

Creating Due To/From AccountsDue To/From Accounting Permissions 11
Due To/From Accounting PermissionsTo activate the Due To/From Accounting feature, you must be assigned Church Administrator, Consolida-tion User, or Diocesan Administrator privileges.
User permissions in ConnectNow Accounting are in effect for all pages and reports in the application unless otherwise noted.
Setting Up Due To/From AccountingComplete Steps 1 - 3 to set up the Due To/From accounting feature.
Step 1: Create a Due To/From Account or Designate an Existing AccountFor each entity in your organization that uses Due To/From accounting, do one of the following:
• Create a new account to serve as the Due To/From account.• Designate an existing account in your Chart of Accounts to serve as the Due To/From account. Keep the following information in mind:
• Each entity is allowed only one account to be used for tracking its respective transactions as credits and debits. This account must be reserved for exclusive use by Due To/From accounting.
• The Due To/From account can either be an Asset account or a Liability account. Typically, an Asset account is created for the entity that runs a debit balance (for example, the main church entity), and a Liability account is created for each entity that runs a credit balance.
• If you choose to designate an existing account as the Due To/From account, the account must not have any transactions associated it.
NoteFor this reason, Due To/From accounts do not appear on any of the dropdown lists on the Con-nectNow Accounting transaction pages; that is, Bills, Deposits, Journal Entries, Invoices, and Credit Memos.
If you need instructions for creating an account, see “Adding a New Account” on page 41.
149
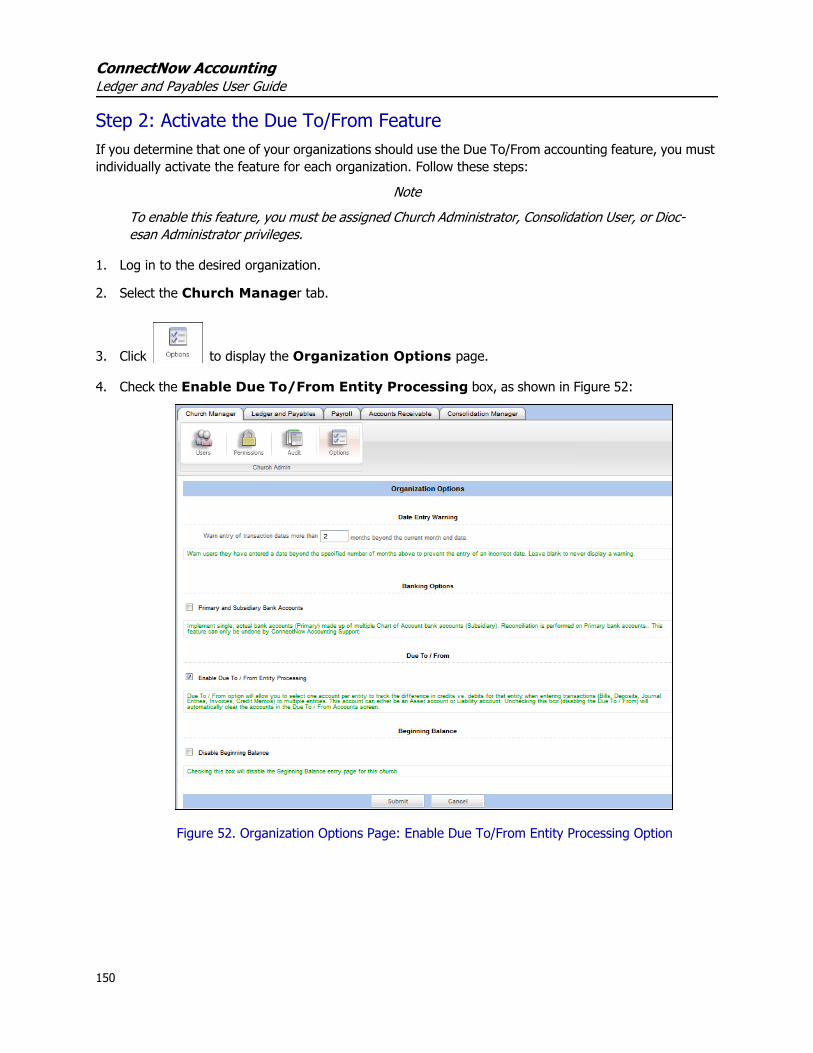
ConnectNow AccountingLedger and Payables User Guide
Step 2: Activate the Due To/From Feature If you determine that one of your organizations should use the Due To/From accounting feature, you must individually activate the feature for each organization. Follow these steps:
NoteTo enable this feature, you must be assigned Church Administrator, Consolidation User, or Dioc-esan Administrator privileges.
1. Log in to the desired organization.
2. Select the Church Manager tab.
3. Click to display the Organization Options page.
4. Check the Enable Due To/From Entity Processing box, as shown in Figure 52:
Figure 52. Organization Options Page: Enable Due To/From Entity Processing Option
150
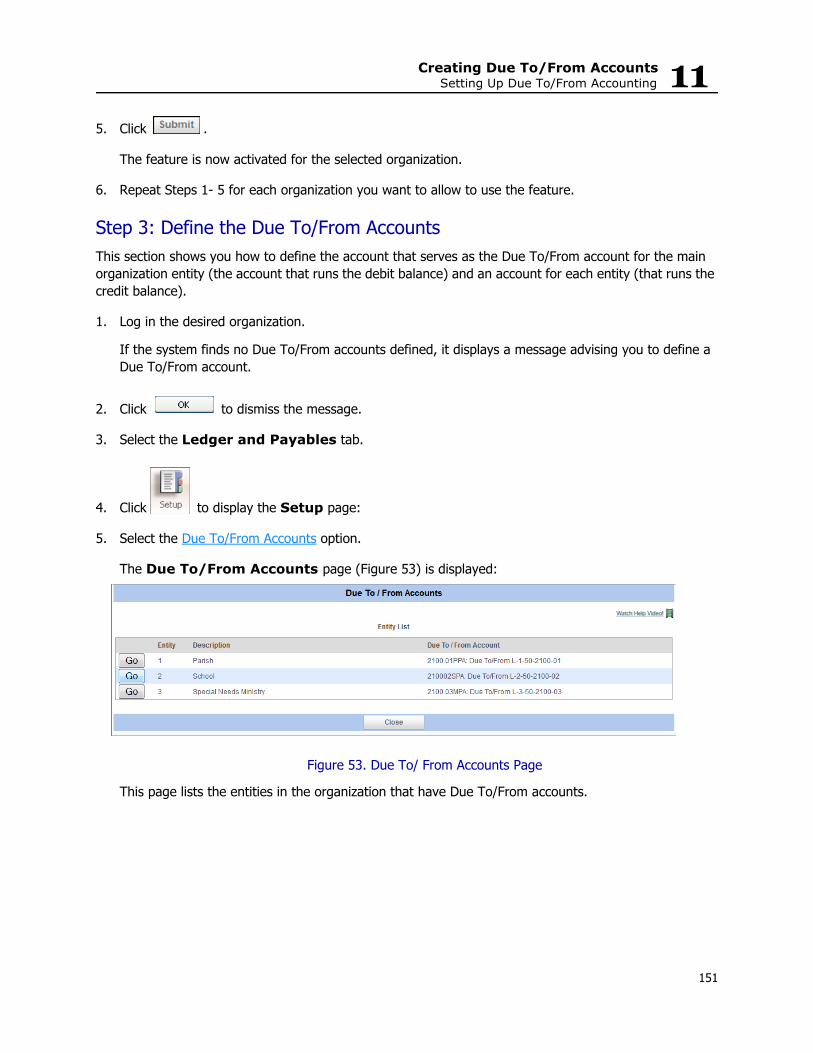
Creating Due To/From AccountsSetting Up Due To/From Accounting 11
5. Click .
The feature is now activated for the selected organization.
6. Repeat Steps 1- 5 for each organization you want to allow to use the feature.
Step 3: Define the Due To/From AccountsThis section shows you how to define the account that serves as the Due To/From account for the main organization entity (the account that runs the debit balance) and an account for each entity (that runs the credit balance).
1. Log in the desired organization.
If the system finds no Due To/From accounts defined, it displays a message advising you to define a Due To/From account.
2. Click to dismiss the message.
3. Select the Ledger and Payables tab.
4. Click to display the Setup page:
5. Select the Due To/From Accounts option.
The Due To/From Accounts page (Figure 53) is displayed:
Figure 53. Due To/ From Accounts Page
This page lists the entities in the organization that have Due To/From accounts.
151

ConnectNow AccountingLedger and Payables User Guide
6. You must select one account per entity to be able to track credits and debits for that entity. To do this, complete the following:
a. To the left of the entity you want to specify a Due To/From account for, click .
The Due To/From Entity Information page for the selected entity is displayed. In Figure 54, the School entity is selected.
Figure 54. Due To /From Entity Information Page
b. From the Due To/From Account list, select the entity's Due To/From account.
NoteThe only accounts listed are those that have no transactions associated with them.
The account you selected is displayed in the Due To/From Account field.
c. Click to save your selection.
d. Repeat Steps 6a - 6c until you specify accounts for each entity that uses Due To/From accounting.
Setup is complete. The Due To/From account balances are now automatically maintained by the application.
To view Due To/From transactions and balances, you can run a Statement of Financial Position for an entity. See “Statement of Financial Position” on page 153.
152
Creating Due To/From AccountsHow the Application Processes Due To/From Transactions 11
How the Application Processes Due To/From TransactionsYou do not have to have Due To/From accounts defined to enter transactions. However, the system checks to make sure that the accounts are defined for each entity before it generates a Statement of Financial Position.
When the system calculates a Due To/From balance for an entity's account, it starts by summing each transaction against the account (in much the same way that it calculates other account balances). How-ever, the Due To/From process also entails summing the total debits and the total credits for the account and then adding the result to the account balance.
Statement of Financial PositionWhen you configure a Statement of Financial Position for a single entity (by selecting the name of one entity from the Entity filter) and then preview the report, the statement will show a balanced accounting equation. That is:
Assets = Liabilities + Net AssetsWhen you configure a Statement of Financial Position for all entities (by selecting the names of all entities entity from the Entity filter) and then preview the report, the net effect of the Due To/From accounts will equal 0.
Deactivating the Due To/From Accounting FeatureIf you decide that you want an organization to discontinue use of the Due To / From accounting feature, you can deactivate it. Complete the following:
1. Log in to the desired organization.
2. Select the Church Manager tab.
3. Click to display the Organization Options page.
4. To deactivate the feature, uncheck the Enable Due To/From Entity Processing option.
5. Click .
The feature is now de-activated for the selected organization.
6. Repeat Steps 1 - 5 for each organization for which you want to discontinue use of this feature.
153
ConnectNow AccountingLedger and Payables User Guide
Due To/From Audit ReportThe audit report includes a history of information about changes made to the data within Due To/From accounting. The report contains the following information:
• The date when the Due To/From option is activated or deactivated and the name of the individual who performed the action.
• The date when a Due To/From account was set up, changed, or deleted, and the name of the individ-ual who performed the action.
154
Chapter 12Performing End-of-
Period Processing
About End-of-Period ProcessingUse the end-of-year process to close a fiscal year. Use the end-of-month processes to close a month. Monthly closings are required and will ensure that your annual reports are correct. Before you begin clos-ing a period, ensure that all transactions for the period you are closing are entered and imported from the ParishSOFT Offering & Pledges module (see Chapter 14: "Importing Contributions").
After a period is closed, no adjustments to records in the closed period are permitted. Corrections to any errors in journal entries, deposits, or credit card items must be made by journal entry. In a cash method accounting system, bills that have not been paid are not included in month end closing and can be changed or paid at any time. In an accrual method system, bills that have not been paid are included in month end closing and cannot be changed, but can be voided.
This chapter shows how to perform the following tasks:
• Reconcile bank accounts• Produce end-of-month reports• Close a month• Close a fiscal year
Reconciling Bank AccountsBefore you close each month, we recommend reconciling your bank statement with the income and expenses records in the Ledger and Payables system. This helps ensure that you haven’t missed a transac-tion and verifies that your bank’s information is correct.
Ledger and Payables offers a Bank Reconciliation, which displays all checks, deposits and journal entries that have not yet been marked as “Reconciled” in the system.
Each account must be selected as a “Bank Account” in the Ledger and Payables system to be available for reconciliation.
Select the Bank Account option.
155
ConnectNow AccountingLedger and Payables User Guide
Checking the Bank Account box on the Account Information page makes the account available in the Bank Account list, so that you can select it when creating a new Bank Reconciliation statement.
First Reconciliation After a New Data ConversionIf you have had a comprehensive data conversion, you will notice several Journal Entries marked “From Account History” on your first reconciliation statement. You must mark all of these entries as “cleared” on the first bank reconciliation you complete in the new system.
Reconciling a New Bank Statement
1. Click .
2. Select Bank Reconciliation.
3. Select Create a New Statement.
The Bank Statement Information page (Figure 55) is displayed:
Figure 55. Bank Statement Information Page
156

Performing End-of-Period ProcessingReconciling Bank Accounts 12
4. In the Bank Account list select the bank account.
5. Supply the statement date, ending balance, service charge, and interest income.
The system automatically creates a Journal Entry recording the interest income and bank service charges when it completes the reconciliation. Therefore, you do not need to manually record this information.
6. Click to open the statement. For example:
7. Do one or a combination of the following:
• Mark each check and deposit that appears on the bank statement as “cleared” by checking the item’s Cleared box, or click the Select All link to mark every Cleared box.
NoteAfter you mark a transaction “cleared”, you cannot make additional edits to it on the transaction pages.
157
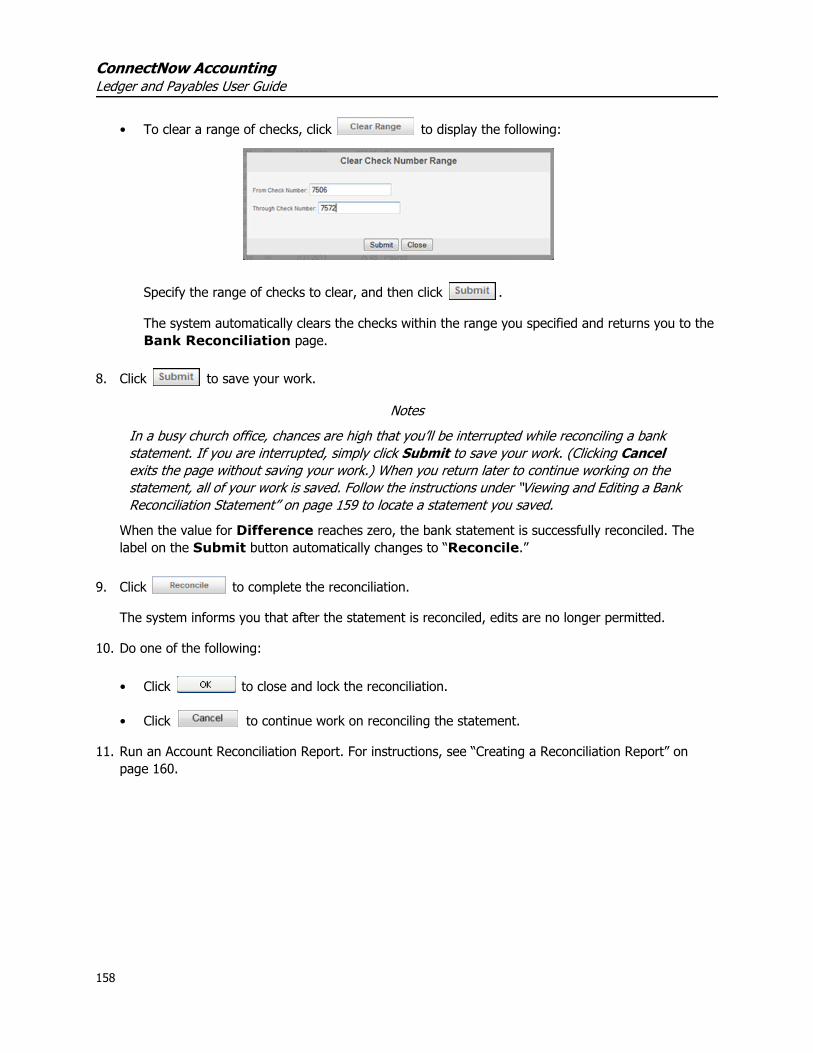
ConnectNow AccountingLedger and Payables User Guide
• To clear a range of checks, click to display the following:
Specify the range of checks to clear, and then click .
The system automatically clears the checks within the range you specified and returns you to the Bank Reconciliation page.
8. Click to save your work.
NotesIn a busy church office, chances are high that you’ll be interrupted while reconciling a bank statement. If you are interrupted, simply click Submit to save your work. (Clicking Cancel exits the page without saving your work.) When you return later to continue working on the statement, all of your work is saved. Follow the instructions under “Viewing and Editing a Bank Reconciliation Statement” on page 159 to locate a statement you saved.
When the value for Difference reaches zero, the bank statement is successfully reconciled. The label on the Submit button automatically changes to “Reconcile.”
9. Click to complete the reconciliation.
The system informs you that after the statement is reconciled, edits are no longer permitted.
10. Do one of the following:
• Click to close and lock the reconciliation.
• Click to continue work on reconciling the statement.
11. Run an Account Reconciliation Report. For instructions, see “Creating a Reconciliation Report” on page 160.
158
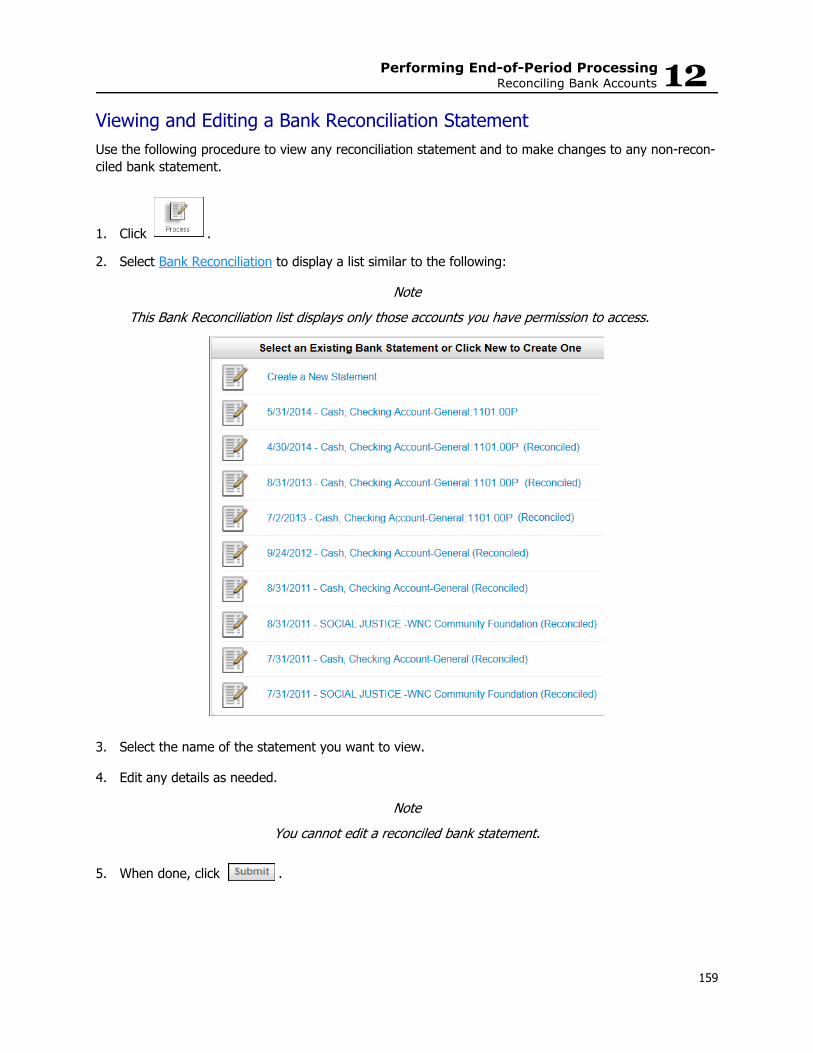
Performing End-of-Period ProcessingReconciling Bank Accounts 12
Viewing and Editing a Bank Reconciliation StatementUse the following procedure to view any reconciliation statement and to make changes to any non-recon-ciled bank statement.
1. Click .
2. Select Bank Reconciliation to display a list similar to the following:
NoteThis Bank Reconciliation list displays only those accounts you have permission to access.
3. Select the name of the statement you want to view.
4. Edit any details as needed.
NoteYou cannot edit a reconciled bank statement.
5. When done, click .
159

ConnectNow AccountingLedger and Payables User Guide
Reconciled AccountsFigure 56 shows an example of a reconciled bank account. Note that after an account is reconciled, the system displays its status as “Reconciled”, and the Difference field displays $0.00. You can make no additional changes to a reconciled account.
Figure 56. Reconciled Bank Account
Creating a Reconciliation ReportThe following procedure show you how to create a bank account reconciliation report. You can create this report for reconciled accounts at any time—even for accounts reconciled in prior periods.
1. Click .
2. Select Transactions and then Bank Account Reconciliation Report.
160
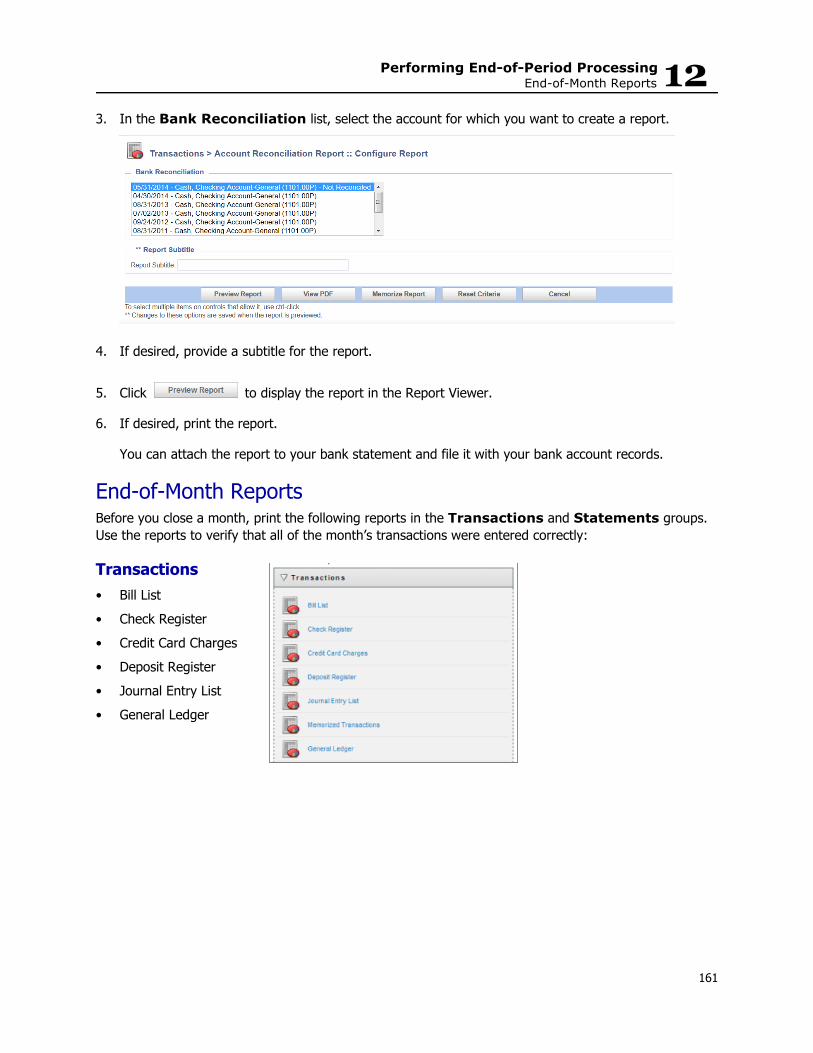
Performing End-of-Period ProcessingEnd-of-Month Reports 12
3. In the Bank Reconciliation list, select the account for which you want to create a report.
4. If desired, provide a subtitle for the report.
5. Click to display the report in the Report Viewer.
6. If desired, print the report.
You can attach the report to your bank statement and file it with your bank account records.
End-of-Month ReportsBefore you close a month, print the following reports in the Transactions and Statements groups. Use the reports to verify that all of the month’s transactions were entered correctly:
Transactions• Bill List• Check Register• Credit Card Charges• Deposit Register• Journal Entry List• General Ledger
161
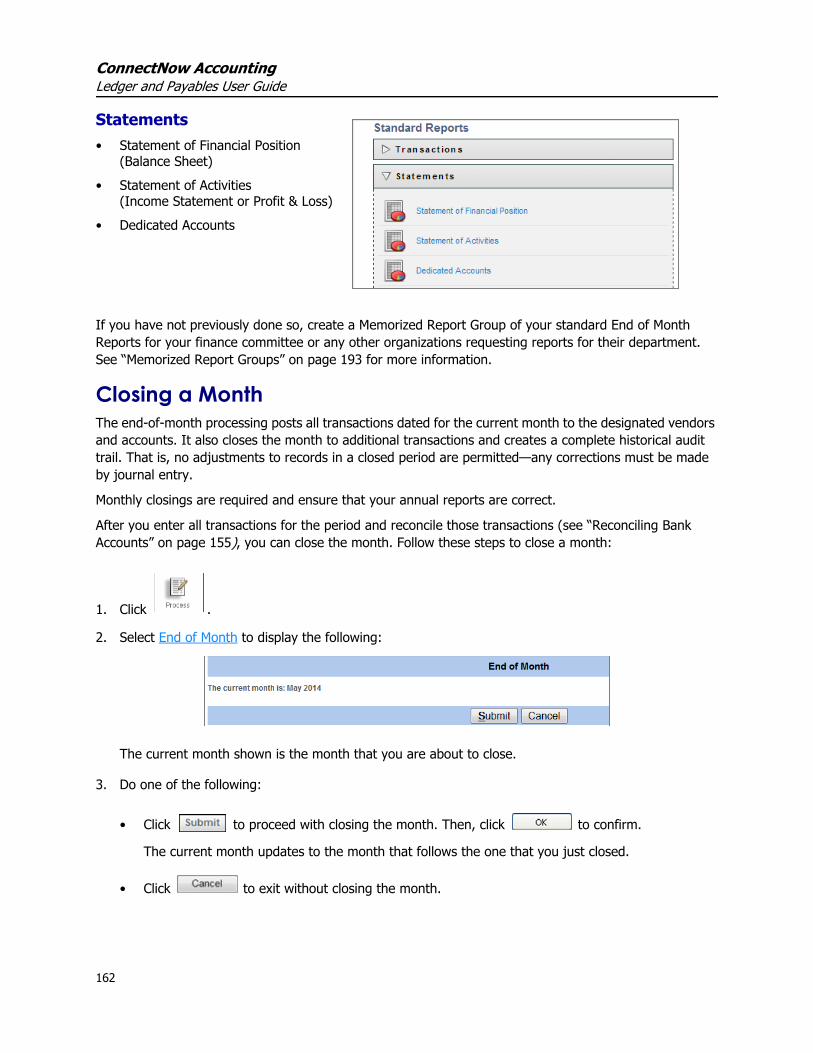
ConnectNow AccountingLedger and Payables User Guide
Statements• Statement of Financial Position
(Balance Sheet)• Statement of Activities
(Income Statement or Profit & Loss)• Dedicated Accounts
If you have not previously done so, create a Memorized Report Group of your standard End of Month Reports for your finance committee or any other organizations requesting reports for their department. See “Memorized Report Groups” on page 193 for more information.
Closing a MonthThe end-of-month processing posts all transactions dated for the current month to the designated vendors and accounts. It also closes the month to additional transactions and creates a complete historical audit trail. That is, no adjustments to records in a closed period are permitted—any corrections must be made by journal entry.
Monthly closings are required and ensure that your annual reports are correct.
After you enter all transactions for the period and reconcile those transactions (see “Reconciling Bank Accounts” on page 155), you can close the month. Follow these steps to close a month:
1. Click .
2. Select End of Month to display the following:
The current month shown is the month that you are about to close.
3. Do one of the following:
• Click to proceed with closing the month. Then, click to confirm.
The current month updates to the month that follows the one that you just closed.
• Click to exit without closing the month.
162
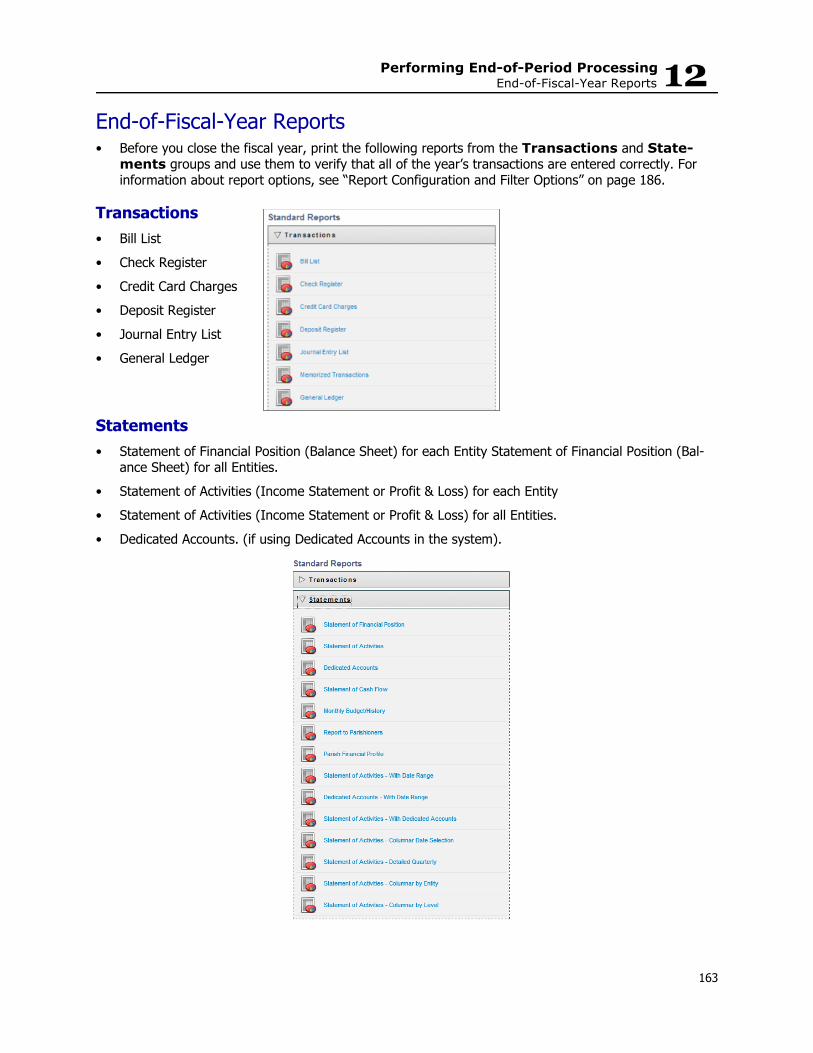
Performing End-of-Period ProcessingEnd-of-Fiscal-Year Reports 12
End-of-Fiscal-Year Reports• Before you close the fiscal year, print the following reports from the Transactions and State-
ments groups and use them to verify that all of the year’s transactions are entered correctly. For information about report options, see “Report Configuration and Filter Options” on page 186.
Transactions• Bill List• Check Register• Credit Card Charges• Deposit Register• Journal Entry List• General Ledger
Statements• Statement of Financial Position (Balance Sheet) for each Entity Statement of Financial Position (Bal-
ance Sheet) for all Entities.• Statement of Activities (Income Statement or Profit & Loss) for each Entity • Statement of Activities (Income Statement or Profit & Loss) for all Entities.• Dedicated Accounts. (if using Dedicated Accounts in the system).
163

ConnectNow AccountingLedger and Payables User Guide
If you have not previously done so, create a Memorized Report Group of your standard End of Fiscal Year Reports for your finance committee or any other organizations requesting reports for their department. See “Memorized Report Groups” on page 193 for more information.
Closing a Fiscal YearThe End-of-Year process closes the fiscal year. This process also zeros out all Income and Expense accounts, and their difference is transferred to the selected Net Asset account.
Reports can be printed for a prior fiscal year, but additional transactions cannot be entered for a prior fiscal year, except for authorized audit entries. This ensures that a complete historical audit trail is created.
1. Click .
2. Select End of Year to display the following:
3. Do the following:
• If you have more than one Net Asset account for an entity, click . Then, select the appro-priate Net Asset account for each entity listed.
• If you have a single Net Asset account for each entity, do nothing. The system automatically selects the Net Asset accounts.
4. Click .
164

Performing End-of-Period ProcessingClosing a Fiscal Year 12
5. Follow any system prompts to submit your closing.
The Year End Process advances the following values in your system:
• Year Beginning Balance
• Year Ending Balance
• Month Balance
• Fiscal Month Balance
• Month Beginning Balance
• Month Ending Balance
The Income and Expense accounts are zeroed out. If you entered a next year budget, those figures transfer over as the current year’s budget.
165

ConnectNow AccountingLedger and Payables User Guide
166
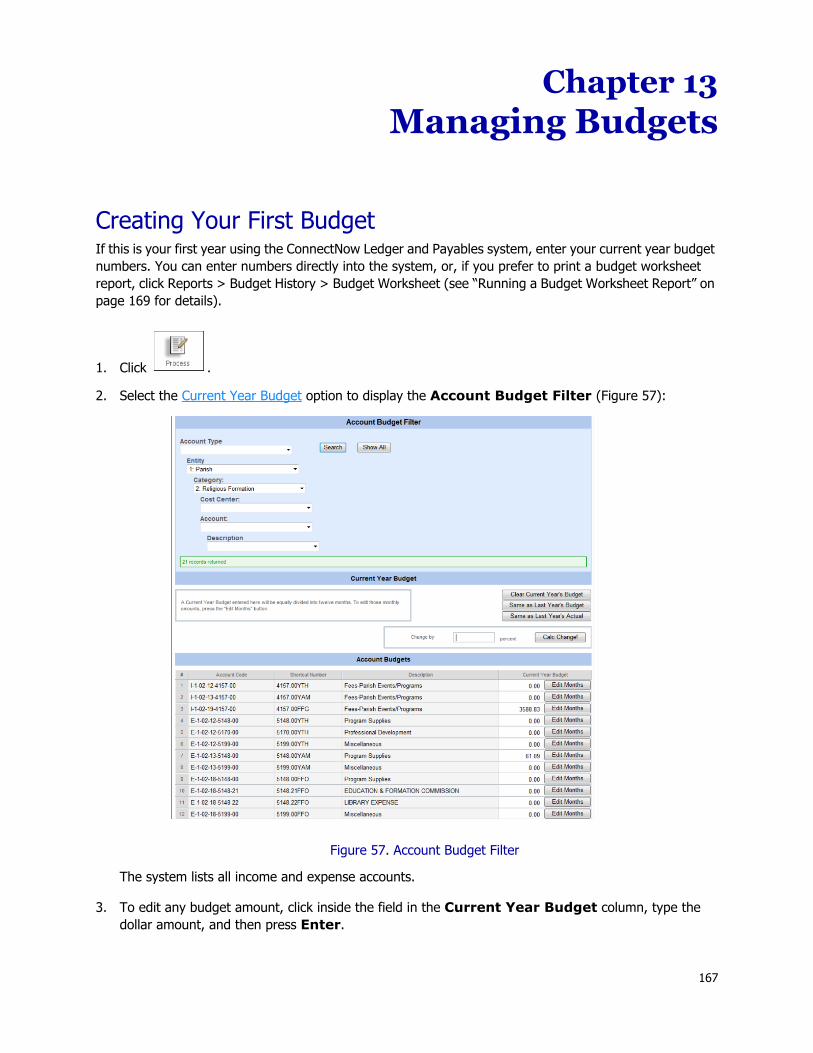
Chapter 13Managing Budgets
Creating Your First BudgetIf this is your first year using the ConnectNow Ledger and Payables system, enter your current year budget numbers. You can enter numbers directly into the system, or, if you prefer to print a budget worksheet report, click Reports > Budget History > Budget Worksheet (see “Running a Budget Worksheet Report” on page 169 for details).
1. Click .
2. Select the Current Year Budget option to display the Account Budget Filter (Figure 57):
Figure 57. Account Budget Filter
The system lists all income and expense accounts.
3. To edit any budget amount, click inside the field in the Current Year Budget column, type the dollar amount, and then press Enter.
167

ConnectNow AccountingLedger and Payables User Guide
The system automatically divides the total amount by 12 and inserts the result into each month of the fiscal year. For example:
4. To edit the monthly amounts, click and type the new values.
5. Click to save your changes.
Doing Subsequent Annual BudgetsLedger & Payables offers several ways to quickly do your subsequent annual budgets. The method you choose depends on the financial circumstances of your individual church, so we provide a Monthly Budget/History Report to help you determine which option works best for your budget.
Running a Monthly Budget/History Report Many users find it helpful to use their Monthly Budget/History Report for all accounts as a starting point in their budgeting process. You can choose to print from the following information for each income and expense account:
• Proposed Budget (work area is available to write in numbers for next year)• Next Year Budget• Next Year +1 Budget• Current Year Budget• Current Year Actual• Last Year Budget• Last Year Actual• Two Years Ago Actual
168

Managing BudgetsDoing Subsequent Annual Budgets 13
To run this report, complete the following steps.
1. Click .
2. Under Standard Reports, select Budget History. Then select Monthly Budget/History.
3. Click to view your Monthly Budget/History report for all entities and levels.
NoteFor a full-scoped budget review, we recommend that you view all entities and levels.
4. (Optional) If you want to filter this report by entity or level, select the options you need and then click
the .
5. Click (Printer icon) to print your report.
6. Review the information on the report to determine whether to use last year's budgeted or actual num-bers, whether to increase or decrease your budgeted amounts from the prior year by a fixed percent-age, or whether to edit the amounts manually.
Running a Budget Worksheet ReportThe Budget Worksheet report offers a printed working copy of your budget. If necessary, you can filter this report by entity and level. For example, if your religious education director needs to review and determine budget numbers for next year, you can filter this report to include only the accounts he or she needs to review. Print the report, distribute it to the appropriate staff or finance committee members, and when they return their budget numbers, you can enter them into your budget in the Ledger and Payables system.
The Budget Worksheet report lists the following information for each income and expense account:
• Two Years Ago Actual• Last Year Actual• Current Year Actual• Current Year Budget• Next Year Budget• Next Year Revisions (work area is available to write in numbers for next year)
169
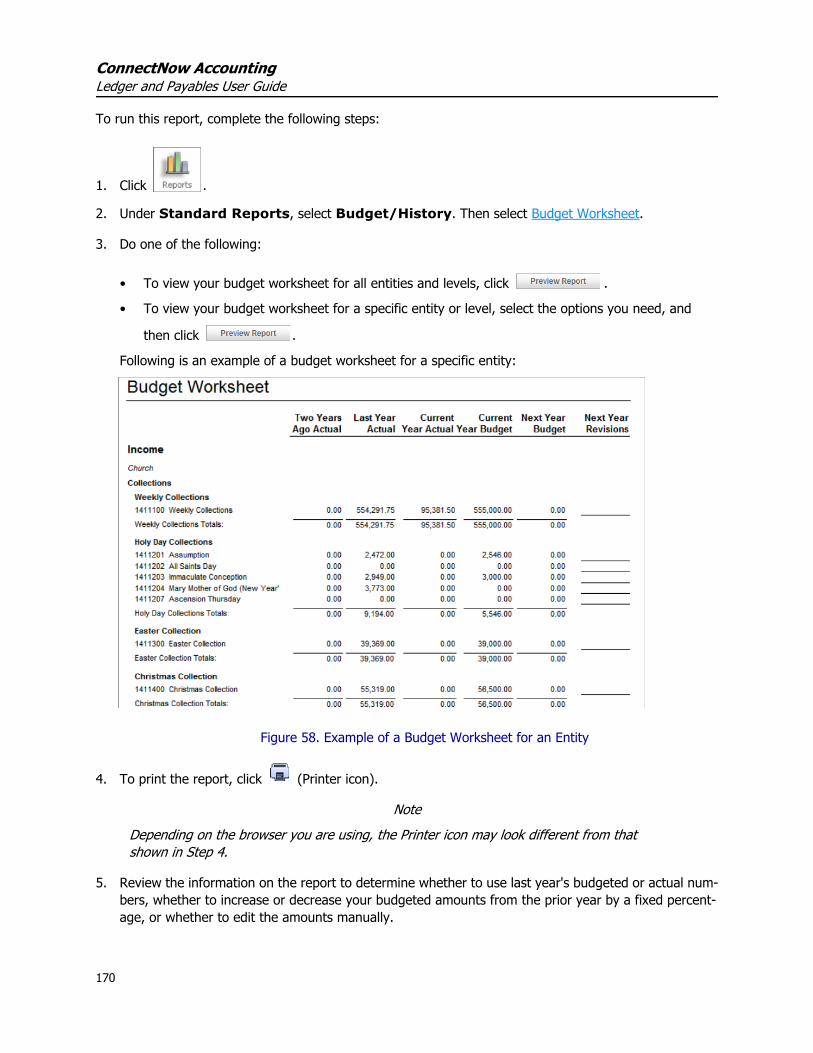
ConnectNow AccountingLedger and Payables User Guide
To run this report, complete the following steps:
1. Click .
2. Under Standard Reports, select Budget/History. Then select Budget Worksheet.
3. Do one of the following:
• To view your budget worksheet for all entities and levels, click .
• To view your budget worksheet for a specific entity or level, select the options you need, and
then click .
Following is an example of a budget worksheet for a specific entity:
Figure 58. Example of a Budget Worksheet for an Entity
4. To print the report, click (Printer icon).
NoteDepending on the browser you are using, the Printer icon may look different from that shown in Step 4.
5. Review the information on the report to determine whether to use last year's budgeted or actual num-bers, whether to increase or decrease your budgeted amounts from the prior year by a fixed percent-age, or whether to edit the amounts manually.
170
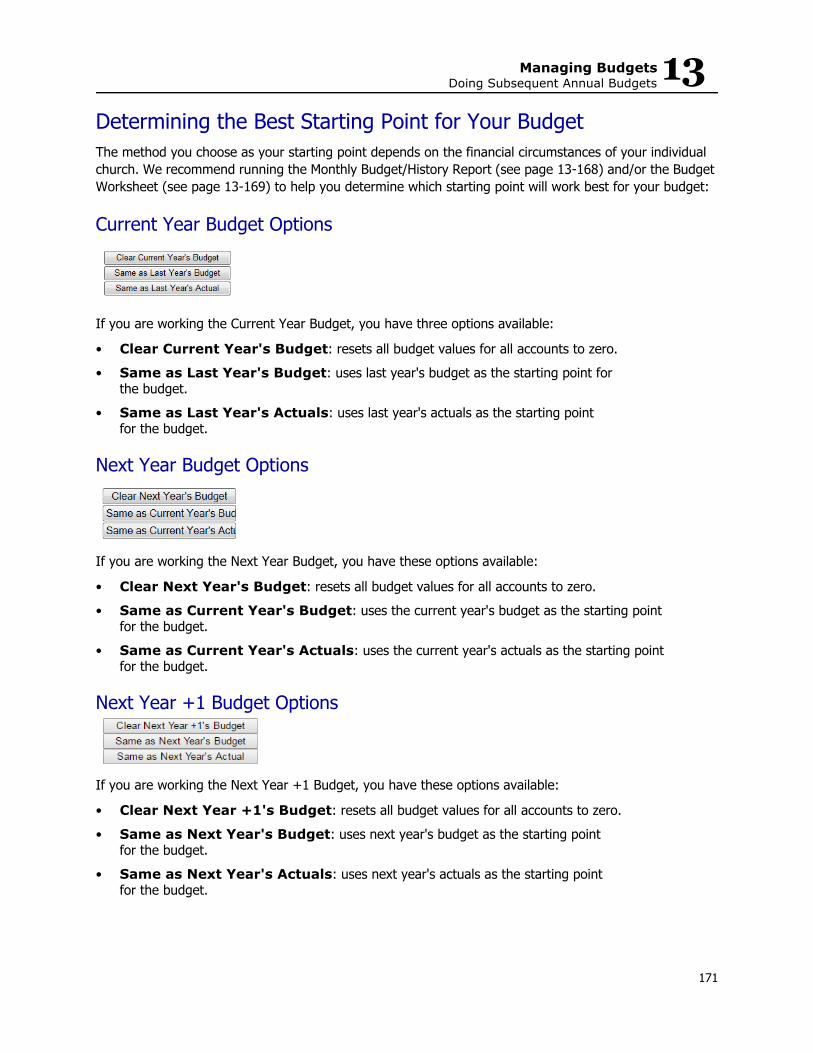
Managing BudgetsDoing Subsequent Annual Budgets 13
Determining the Best Starting Point for Your Budget The method you choose as your starting point depends on the financial circumstances of your individual church. We recommend running the Monthly Budget/History Report (see page 13-168) and/or the Budget Worksheet (see page 13-169) to help you determine which starting point will work best for your budget:
Current Year Budget Options
If you are working the Current Year Budget, you have three options available:
• Clear Current Year's Budget: resets all budget values for all accounts to zero. • Same as Last Year's Budget: uses last year's budget as the starting point for
the budget.• Same as Last Year's Actuals: uses last year's actuals as the starting point
for the budget.
Next Year Budget Options
If you are working the Next Year Budget, you have these options available:
• Clear Next Year's Budget: resets all budget values for all accounts to zero.• Same as Current Year's Budget: uses the current year's budget as the starting point
for the budget.• Same as Current Year's Actuals: uses the current year's actuals as the starting point
for the budget.
Next Year +1 Budget Options
If you are working the Next Year +1 Budget, you have these options available:
• Clear Next Year +1's Budget: resets all budget values for all accounts to zero.• Same as Next Year's Budget: uses next year's budget as the starting point
for the budget.• Same as Next Year's Actuals: uses next year's actuals as the starting point
for the budget.
171

ConnectNow AccountingLedger and Payables User Guide
Choosing a Starting Point Once you choose a starting point, you can edit any annual or monthly budget amounts as needed. Alterna-tively, you can choose to enter all of your new budget numbers without using any prior data as a starting point. Complete the following steps.
1. Click .
2. Depending on whether you are budgeting for the current year or next year, select one of these options:
• Current Year Budget
• Next Year Budget
• Next Year +1 Budget
The system lists all of the income and expense accounts.
3. To populate the budget fields for the selected year with the dollar amounts from your selected starting point, click one of the Same as buttons. (See “Current Year Budget Options” , “Next Year Budget Options” and “Next Year +1 Budget Options” on page 171 for descriptions of these buttons.)
A message is displayed asking you to confirm your selection.
4. Click .
5. To make changes to budget amounts, do one of the following:
• Edit annual or monthly amounts as desired. For instructions, go to Step 3 under “Editing Bud-get Amounts” on page 174.
OR
• Change amounts by a percentage. For instructions, go to “Changing Budget Amounts by Per-centage” on page 173.
172

Managing BudgetsDoing Subsequent Annual Budgets 13
Changing Budget Amounts by PercentageYou can adjust your existing budget amounts for the selected year by a fixed positive or negative percent-age. The following procedure shows you how.
1. In the Change by _ percent field, type the desired percentage as a negative or positive value.
In the following illustration, the percentage increase is set to 1:
2. Click .
The system updates the budgeted amounts for all accounts by the percentage value you specified. It may take several seconds for the system to complete the calculation. After the completing the calcula-tion the system displays updated amounts.
In the following example, you can see that the 1% change specified earlier is reflected in the new amounts for each account:
NoteAny accounts with a $0.00 amount remain at $0.00.
3. Click to save the changes.
173
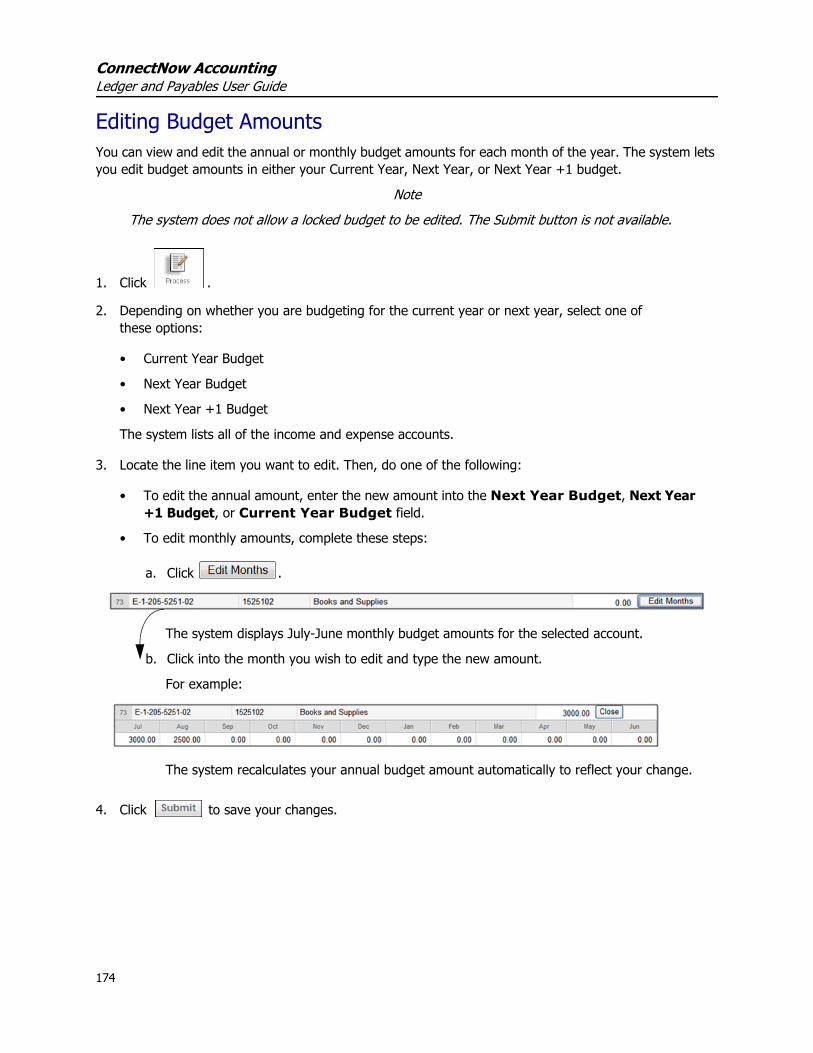
ConnectNow AccountingLedger and Payables User Guide
Editing Budget AmountsYou can view and edit the annual or monthly budget amounts for each month of the year. The system lets you edit budget amounts in either your Current Year, Next Year, or Next Year +1 budget.
NoteThe system does not allow a locked budget to be edited. The Submit button is not available.
1. Click .
2. Depending on whether you are budgeting for the current year or next year, select one of these options:
• Current Year Budget
• Next Year Budget
• Next Year +1 Budget
The system lists all of the income and expense accounts.
3. Locate the line item you want to edit. Then, do one of the following:
• To edit the annual amount, enter the new amount into the Next Year Budget, Next Year +1 Budget, or Current Year Budget field.
• To edit monthly amounts, complete these steps:
a. Click .
The system displays July-June monthly budget amounts for the selected account.
b. Click into the month you wish to edit and type the new amount.
For example:
The system recalculates your annual budget amount automatically to reflect your change.
4. Click to save your changes.
174

Managing BudgetsDoing Subsequent Annual Budgets 13
Locking and Unlocking BudgetsThe system gives users with the appropriate permissions the ability to lock and unlock budgets. The bene-fit of locking a budget is to ensure that users cannot make changes to the budget’s most recent values. However, if an error is discovered in a locked budget, it can be unlocked so that the neces-sary corrections can be made. The system allows budgets to be locked and unlocked at any time.
NoteYou must have the required permission to lock and unlock budgets. Permission to perform these tasks is assigned by a Consolidation Manager user. If you believe you should have this permission, contact your diocese for assistance.
Locking a Budget
IMPORTANT
Locking the budget prevents changes (imports and edits) to the budget during the selected year.
1. Click .
2. Select Lock/Unlock Budget to display the list of budgets you can lock, as shown in Figure 59:
Figure 59. Lock/Unlock Budgets
3. You can lock one or more of the listed budgets. To lock a budget, select its checkbox.
Note To undo a selection, simply select the checkbox again to remove the checkmark.
175

Managing BudgetsDoing Subsequent Annual Budgets 13
4. Click to lock the selected budgets.
Be aware that locking a budget affects both the budget entry and budget import processes. Be aware of the following changes after a budget is locked:
• The system does not allow the locked budget to be edited. To prevent changes, the Submit button is not available.
• The system blocks the import of data into a locked budget. If an attempt is made to import data, the system displays a message to inform you that the import failed because the budget is locked.
Unlocking a Budget
1. Click .
2. Select Lock/Unlock Budget to display the list of budgets (refer to Figure 59).
If a budget is locked, you will see checkmark in the box to its left.
3. To unlock a budget, select the checkbox to remove the checkmark.
4. Click to save the change.
The system unlocks the selected budgets so that you can now make changes to them.
176

Chapter 14Importing Contributions
IntroductionUse this process to import contributions that are posted in the ParishSOFT desktop Offering & Pledges application, LOGOS II, and CMS into the ConnectNow Ledger and Payables system.
We recommend that you import your contributions from once per week, or, at a minimum, once each month—before you close your month.
Importing ParishSOFT Offering or LOGOS II Contributions
1. Click .
2. Select Transfer from ParishSOFT Offering or Logos II Contributions to display the following:
3. Click .
4. Navigate to the location where you saved the exported .txt file. Open the file.
The name of the file is displayed next to the Browse button.
5. Click .
177

ConnectNow AccountingLedger and Payables User Guide
6. For each line item, map the description in the PSEntityDescription column with an account in your chart of accounts.
NoteYour mappings are saved so the next time you import, you do not need to repeat this step.
7. Click to display the Transfer Contributions page (Figure 60):
Figure 60. Transfer Contributions Page
8. Check the Selected box for each line item. Then, click .
9. The system processes the import and does the following:
• If the system detects any posting dates prior to the current period, it displays a message requesting that you change the posting date for those transactions. To change a date:
a. Click inside the Posting Date field.
b. Select a date from the calendar.
c. Click to proceed with the import.
• If the system successfully completes the export, it displays this message along with the date and time of the import: Records have been imported!
178

Importing ContributionsImporting CMS Contributions 14
Importing CMS Contributions
1. Click .
2. Select Transfer from CMS Contributions to display the following:
3. Click .
4. Navigate to the location where you saved the exported .txt file. Open the file.
The name of the file is displayed next to the Browse button.
5. Click .
6. For each line item, map the description in the PSEntityDescription column with an account in your chart of accounts.
NoteYour mappings are saved so the next time you import, you do not need to repeat this step.
179

ConnectNow AccountingLedger and Payables User Guide
7. Click to display the Transfer Contributions page (see Figure 60).
8. Check the Selected box for each line item. Then, click .
9. The system processes the import and does the following:
• If the system detects any posting dates prior to the current period, it displays a message requesting that you change the posting date for those transactions. To change a date:
a. Click inside the Posting Date field.
b. Select a date from the calendar.
c. Click to proceed with the import.
• If the system successfully completes the export, it displays this message along with the date and time of the import: Records have been imported!
180
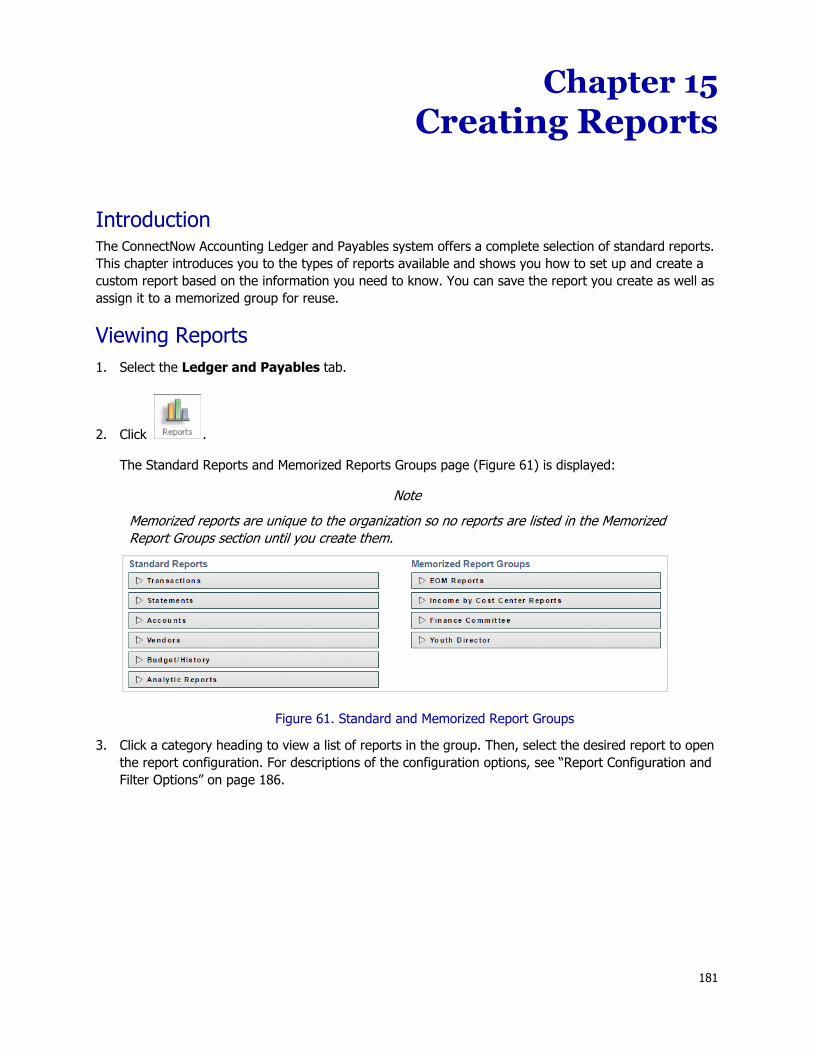
Chapter 15Creating Reports
IntroductionThe ConnectNow Accounting Ledger and Payables system offers a complete selection of standard reports. This chapter introduces you to the types of reports available and shows you how to set up and create a custom report based on the information you need to know. You can save the report you create as well as assign it to a memorized group for reuse.
Viewing Reports1. Select the Ledger and Payables tab.
2. Click .
The Standard Reports and Memorized Reports Groups page (Figure 61) is displayed:
NoteMemorized reports are unique to the organization so no reports are listed in the Memorized Report Groups section until you create them.
Figure 61. Standard and Memorized Report Groups
3. Click a category heading to view a list of reports in the group. Then, select the desired report to open the report configuration. For descriptions of the configuration options, see “Report Configuration and Filter Options” on page 186.
181
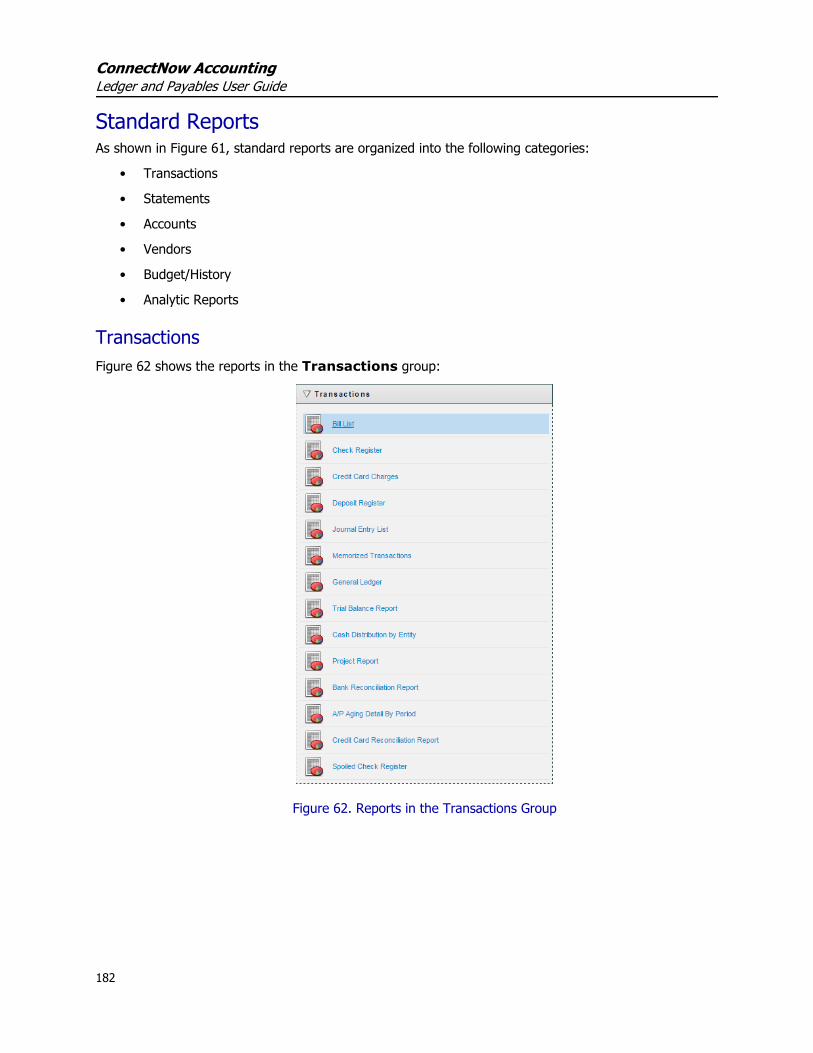
ConnectNow AccountingLedger and Payables User Guide
Standard ReportsAs shown in Figure 61, standard reports are organized into the following categories:
• Transactions
• Statements
• Accounts
• Vendors
• Budget/History
• Analytic Reports
TransactionsFigure 62 shows the reports in the Transactions group:
Figure 62. Reports in the Transactions Group
182
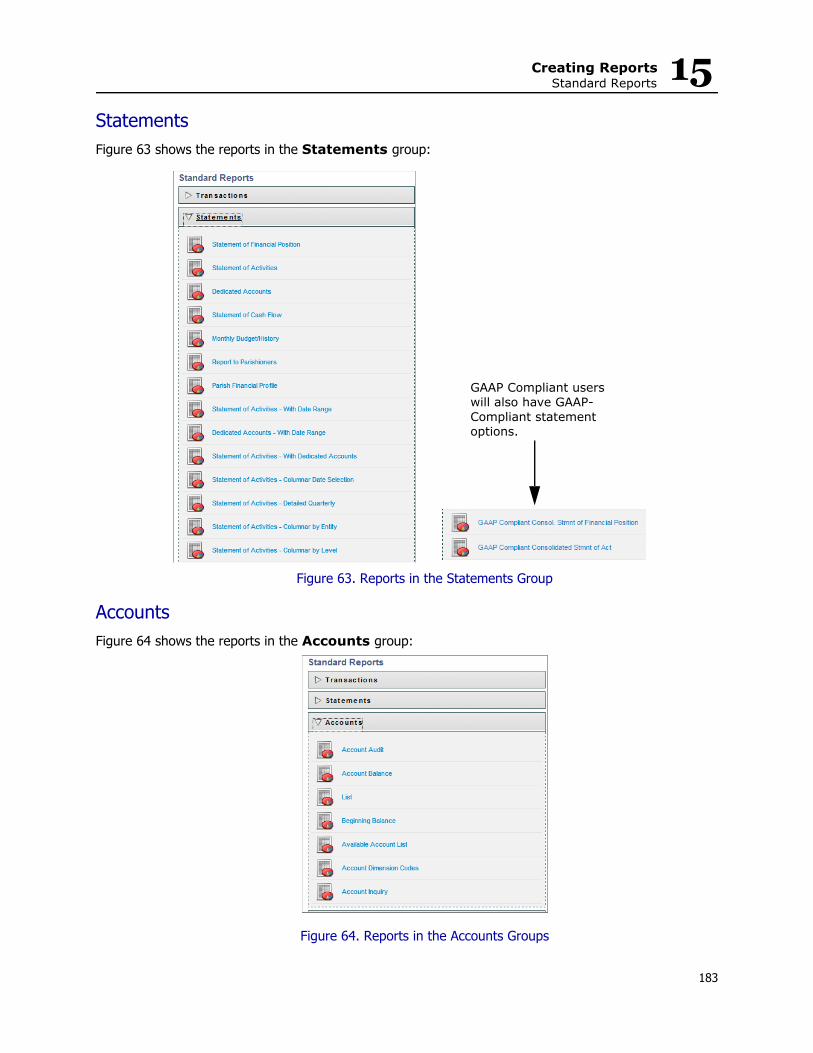
Creating ReportsStandard Reports 15
StatementsFigure 63 shows the reports in the Statements group:
Figure 63. Reports in the Statements Group
AccountsFigure 64 shows the reports in the Accounts group:
Figure 64. Reports in the Accounts Groups
GAAP Compliant users will also have GAAP-Compliant statement options.
183
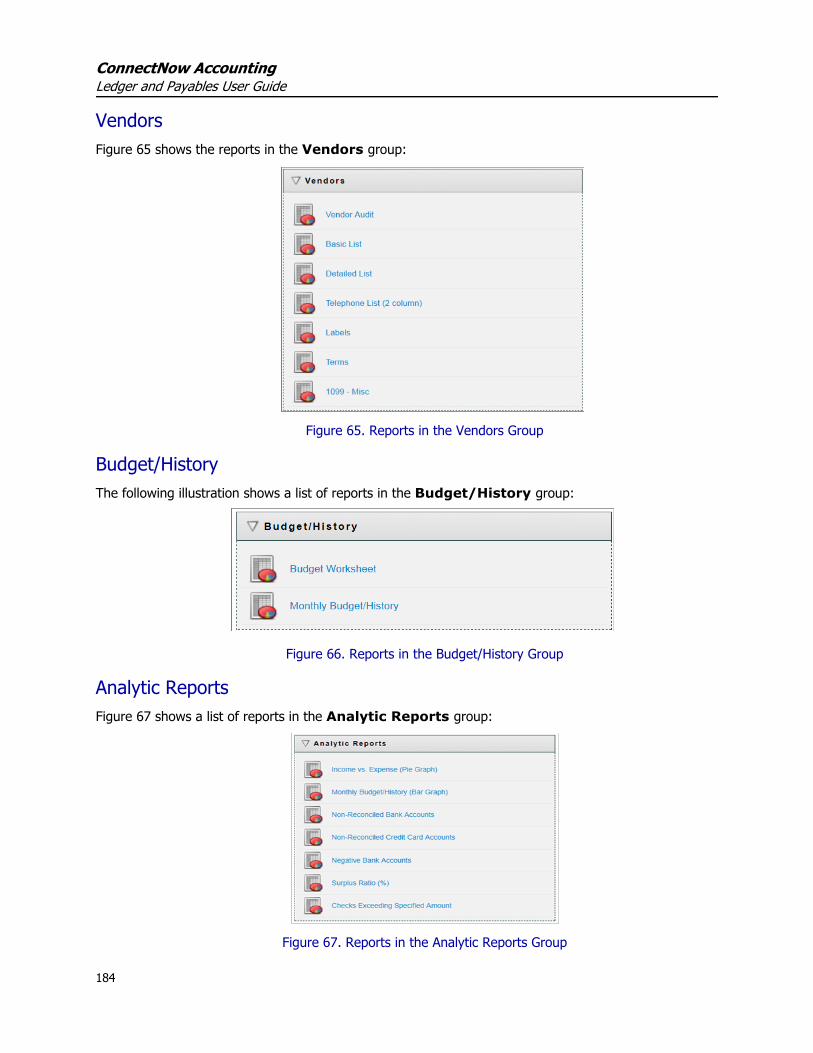
ConnectNow AccountingLedger and Payables User Guide
VendorsFigure 65 shows the reports in the Vendors group:
Figure 65. Reports in the Vendors Group
Budget/HistoryThe following illustration shows a list of reports in the Budget/History group:
Figure 66. Reports in the Budget/History Group
Analytic ReportsFigure 67 shows a list of reports in the Analytic Reports group:
Figure 67. Reports in the Analytic Reports Group
184

Creating ReportsStandard Reports 15
Configuring a Report
1. Click to display the report menus (Figure 61).
2. From the Standard Reports menu, select the report group to view a list of its reports.
For example, selecting the Statements group displays the following:
3. Select the desired report to display its configuration page.
4. Configure the report as needed. See “Report Configuration and Filter Options” on page 186, for descriptions of the report configuration options.
5. Do one of the following:
• Click to view the report in the Report Viewer. For details, see “Report Viewer” on page 192.
• Click to create a PDF version of the report. You can then print or download the report.
• Click to save your configuration in a memorized report. See “Memorizing a Report” on page 193 for details.
GAAP Compliant users will also have GAAP-Compliant statement options.
185

ConnectNow AccountingLedger and Payables User Guide
Report Configuration and Filter OptionsThis section describes the report configuration and filter options available.
Date OptionsStandard reports default to the current fiscal month and year. You can, however, create reports for any time frame you need.
To verify your current fiscal month and year, look on the Ledger and Payables dashboard. You can also find this information under the HOME and LOGOUT buttons in the upper right corner of the Connect-Now Accounting Home page:
Standard Statement Reports and All Other ReportsStandard Statement reports let you specify the fiscal month and year you want to report on:
All reports other reports allow you to configure the date by selecting one of the Date Range options, shown in the following illustration:
The Date Range option you select applies to the columns you choose when setting up your report.
Entity OptionsYou can create a single report for one entity or you can consolidate multiple entities into one report.
The Entity list contains all of the entities in your system. By default, all entities are selected.
If you want to include just one entity in the report, select it from the list. The entity is highlighted in blue to mark its selection.
By default, all entities are selected.
186

Creating ReportsReport Configuration and Filter Options 15
If you want to include more than one entity in the report, press and hold the Ctrl key while selecting the desired entities. Each entity is highlighted in blue to mark its selection, as this illustration shows:
To clear your individual selections, click the X in the upper-right corner. After you clear them, the blue highlighting disappears. The list returns to the default state, in which all entities are selected.
Level OptionsMany reports allow you to select the various levels built in your Chart of Accounts. These options enable you to report on certain departments or cost centers in your church.
By default, all entities are included.
If you want to include just one entity in the report, select it. The entity is highlighted in blue to mark its selection.
If you want to include more than one entity in the report, press and hold the Ctrl key while selecting the desired entities. Each entity is highlighted in blue to mark its selection, as this illustration shows:
To clear your individual selections, click the X in the upper-right corner. After you clear them, the blue highlighting disappears. The list returns to the default state, in which all entities are selected.
187
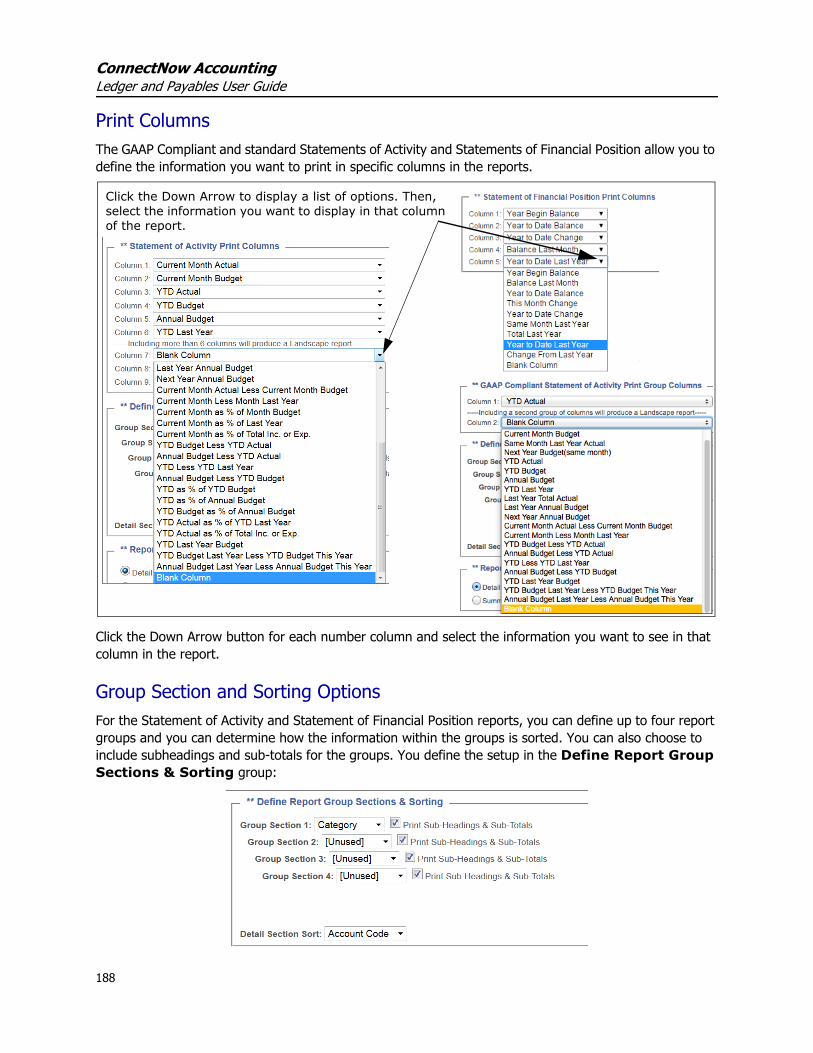
ConnectNow AccountingLedger and Payables User Guide
Print ColumnsThe GAAP Compliant and standard Statements of Activity and Statements of Financial Position allow you to define the information you want to print in specific columns in the reports.
Click the Down Arrow button for each number column and select the information you want to see in that column in the report.
Group Section and Sorting OptionsFor the Statement of Activity and Statement of Financial Position reports, you can define up to four report groups and you can determine how the information within the groups is sorted. You can also choose to include subheadings and sub-totals for the groups. You define the setup in the Define Report Group Sections & Sorting group:
Click the Down Arrow to display a list of options. Then, select the information you want to display in that column of the report.
188
Creating ReportsReport Configuration and Filter Options 15
To select report sections, click the Down Arrow button and select the type of group. Then, from the Detail Section Sort list, select how you want to sort the information within each of the groups. If you want to include subheadings and sub-totals for a group, check the print Sub-Headings & Sub-Totals box.
Report Format OptionsFor the Statement of Activity and Statement of Financial Position reports, you can create a summary ver-sion and a detail version. The summary version includes only the totals based on your group section selec-tions (see “Group Section and Sorting Options”). The detail version shows each account listed in your Chart of Accounts. To create either version, select the desired option for Report Format:
Report Printing OptionsThe Statement of Activity and Statement of Financial Position reports offer a number of printing options that let you determine what to print:
NoteThe options available depend on the type of report you are printing.
• Include Inactive History Accounts: only accounts marked Inactive are displayed.• Show Numbers Without Cents: shows dollar values only. Cents are rounded to the
nearest dollar.• Temp/Perm Restriction Format: specifies the terminology used for category labels in reports
used to classify income and expense (GAAP) or net assets (Dedicated Accounts). o By default, this option is deselected (unchecked). If you want to use the latest FASB standard
accounting terminology, which categorizes net assets in your reports into two categories (see note below), leave the option deselected.
o If you want to use the former FASB standard accounting terminology, which categorizes net assets in your reports into three categories (see note below), select the option.
NoteIn 2016, the Financial Accounting Standards Board (FASB) issued a new accounting standard for non-profit organizations that goes into effect for fiscal years beginning after 12/15/2017. The new standard is designed to simplify the classification of net assets and the presentation of information in financial statements. In the new standard, the FASB eliminated the Unrestricted, Temporarily Restricted, and Permanently Restricted categories and replaced them with these two categories: With Donor Restrictions and Without Donor Restrictions. The Temp/Perm Restriction Format was added as a report option to help prepare you for the FASB changes. Leaving the option deselected allows you to generate official reports using the new FASB terminology for category labels. Selecting the option lets you generate unofficial (for internal use) reports using the older FASB terminology for category labels.
189

ConnectNow AccountingLedger and Payables User Guide
• Print Account Codes: prints the long account code.• Show Dimension Codes: prints codes for dimension types.• Suppress Zero Accounts: does not display accounts with zero activity.• Print Shortcuts: prints the account shortcut number.• Print Only Net Asset Summary: for GAAP Compliance Function users, prints End-of-Period Net
Asset Summary for unrestricted and restricted (both temporary and permanent) accounts and omits detail and subtotals for Net Asset Accounts and Current Period Changes to Net Assets.
These options are located in the Report Options group. Select those that you want to apply:
The Project Report also offers several additional printing options that let you determine what to print:
• Include Inactive Projects: includes inactive projects in the report.• Group By Project Group: organizes the report by project groups. Each group section prints a proj-
ect group subheading and a project group subtotal.• Print Transaction Comments: allows you to print header-level comments, which are entered when
creating bills, deposits, and credit card transactions, on the Memorized Transactions and Vendor Audit reports.
• Project Group: allows you to filter the report by project groups. By default, all projects are selected. If you want to include just one project in the report, select it from the list. The project is highlighted in blue to mark its selection. If you want to include more than one project in the report, press and hold the Ctrl key while selecting the desired projects.
• Report Format: allows you to print either detail information or summary information for each transaction. Each transaction detail section is separated by Revenue and Cost, with a subheading and subtotal for each.
• Font Size: allows you to decrease the font size for the amount fields in most statement reports from the default 8.25pt to 7.75 pt. By selecting the smaller font size option, larger negative amounts can fit on the report. All statement reports that include the Font Size option can accommodate up to $-9,000,000.00 amounts when the smaller font size is selected. Some statement reports can accom-modate up to $-99,000,000.00 amounts when the smaller font size is selected.
GAAP-Compliant Statements Only
190

Creating ReportsReport Configuration and Filter Options 15
Report SubtitleAll reports in the ConnectNow Fund Accounting system comply with all FASB rules for non-profit reporting. This means that what is known in the corporate world as a “Balance Sheet” is called a “Statement of Financial Position” report in the church world.
If you find that your Finance committee is made up of local business people and not accountants, you may choose to add a report subtitle to your statements to make it easier on your Finance committee. The reports are still in compliance. You are simply adding an additional sub-title.
The report subtitle is configured in the Report Subtitle group. Simply type the text you want to appear in the report’s subtitle in the field:
The subtitle appears under the main title of the report. For example:
Report NotesReport Notes is available for the following reports only:
• Statement of Financial Position• Statement of Activities• GAAP Compliant Statement of Financial Position• GAAP Compliant Statement of ActivitiesAs shown in the following illustration, Report Notes is a text field where you can type comments or information about the report:
After you generate a report, your comments appear in the Notes section on the last page of the report.
Subtitle
191

ConnectNow AccountingLedger and Payables User Guide
Resetting Report CriteriaTo reset all report configuration and filter options back to their original (default) settings,
click .
Report Viewer
After you configure a report you can click to view the report in the Report Viewer. Figure 68 shows you an example of a report displayed in the Report Viewer:
Figure 68. Report Viewer
A toolbar is located at the top and bottom of the Report Viewer. The toolbar contains buttons that let you perform report-related functions, such as printing, saving, and exporting the report to other applications. To view the function of a toolbar button, position your mouse over the button to display its tooltip, as shown in this illustration.
Figure 69 provides descriptions of the toolbar buttons:
Figure 69. Descriptions of the Report Viewer Toolbar Buttons
A toolbar is located at the top and bottom of the Report Viewer. The toolbar contains buttons for interacting with the displayed report.
Print report
Print current page Jump to page
Page through a multi-page report
Export and save to disk
Export and show in new window
Export formats
192

Creating ReportsMemorized Report Groups 15
Memorized Report GroupsAny Ledger and Payables report groups that your church staff has memorized are listed in the Memo-rized Report Groups section.
Memorizing a ReportThe Memorize Report feature lets you save a report with any special selections and filters that you applied. To memorize a report, complete the following steps.
1. Select your report and set it up by applying report options and filters.
2. Click to display the following:
3. In the Memorized Report Name field, type a name for your report.
4. Do one of the following:
• If you already created a group to which you can assign this report, select it from the Choose Existing Group list.
Note:We recommend that you do not add more than 15 reports to Memorized Report Group. Printing a Memorized Report Group that contains more than 15 reports can potentially fail due to the amount of memory the system needs to print that many reports.
OR
• If you need to create a new group, type the name of the group in the Enter New Group Name field.
5. Click .
The report is added to the Memorized Report Groups menu on the Reports page.
193

ConnectNow AccountingLedger and Payables User Guide
Printing a Memorized Report Group
1. Click .
The Standard Reports and Memorized Reports Groups page is displayed.
2. In the Memorized Report Groups section, select the group you want to print.
3. Click << Preview All Reports >> to view and print all of the reports in the group.
Note:Memorized Report Groups that contain more than 15 reports may encounter printing issues. We recommend you limit your Memorized Report Groups to 15 reports or less, to ensure your computer has enough system memory to print all the reports in the group.
Renaming a Memorized Report
1. Click .
The Standard Reports and Memorized Reports Groups page is displayed.
2. In the Memorized Report Groups section, select the group you want to rename.
3. Click << Rename Group >> to display the following:
4. In the New Group Name field, type the new name for the group. Then, click .
You return to the main Reports page. The name you specified is now the new name for the group.
Editing Memorized Reports
1. Click .
The Standard Reports and Memorized Reports Groups page (Figure 61 on page 181) is displayed.
194
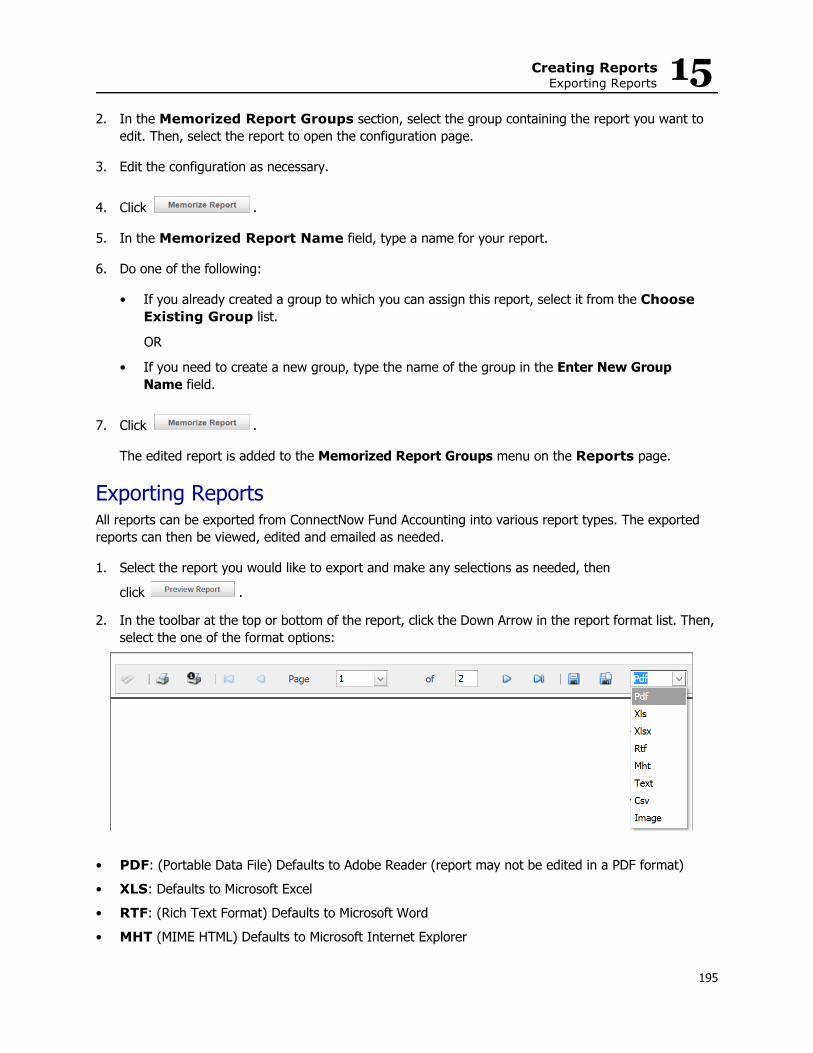
Creating ReportsExporting Reports 15
2. In the Memorized Report Groups section, select the group containing the report you want to edit. Then, select the report to open the configuration page.
3. Edit the configuration as necessary.
4. Click .
5. In the Memorized Report Name field, type a name for your report.
6. Do one of the following:
• If you already created a group to which you can assign this report, select it from the Choose Existing Group list.
OR
• If you need to create a new group, type the name of the group in the Enter New Group Name field.
7. Click .
The edited report is added to the Memorized Report Groups menu on the Reports page.
Exporting ReportsAll reports can be exported from ConnectNow Fund Accounting into various report types. The exported reports can then be viewed, edited and emailed as needed.
1. Select the report you would like to export and make any selections as needed, then
click .
2. In the toolbar at the top or bottom of the report, click the Down Arrow in the report format list. Then, select the one of the format options:
• PDF: (Portable Data File) Defaults to Adobe Reader (report may not be edited in a PDF format)• XLS: Defaults to Microsoft Excel • RTF: (Rich Text Format) Defaults to Microsoft Word • MHT (MIME HTML) Defaults to Microsoft Internet Explorer
195
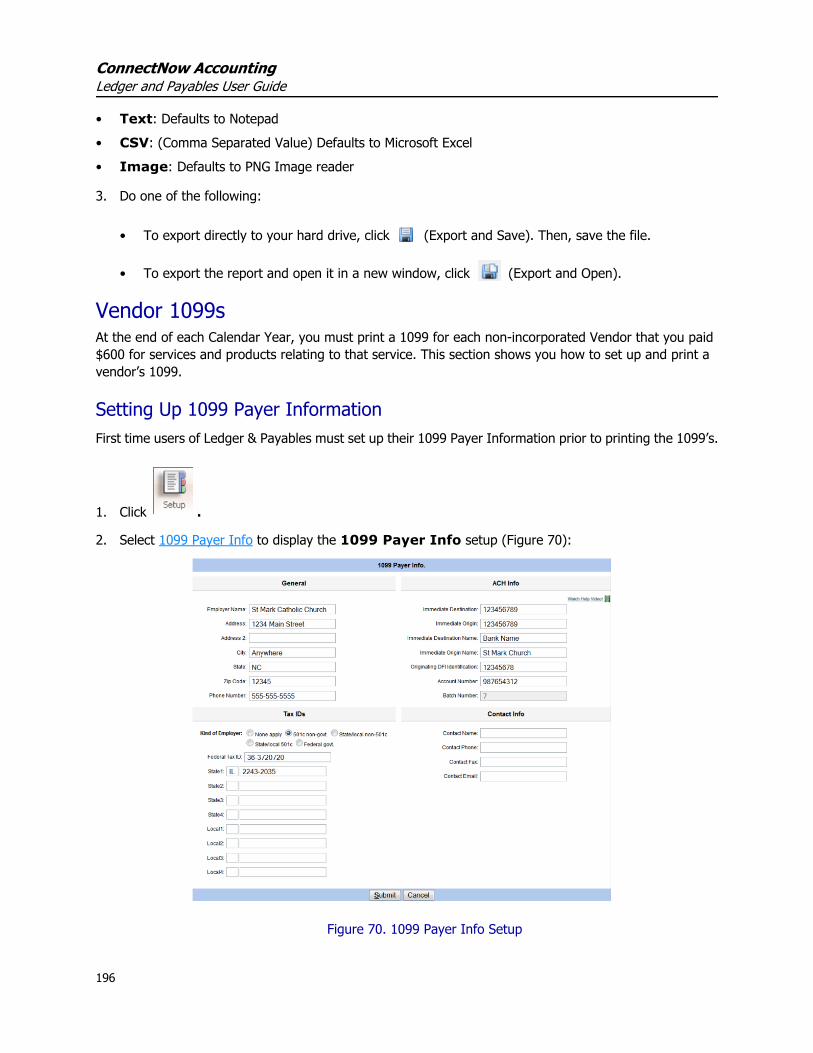
ConnectNow AccountingLedger and Payables User Guide
• Text: Defaults to Notepad• CSV: (Comma Separated Value) Defaults to Microsoft Excel• Image: Defaults to PNG Image reader
3. Do one of the following:
• To export directly to your hard drive, click (Export and Save). Then, save the file.
• To export the report and open it in a new window, click (Export and Open).
Vendor 1099sAt the end of each Calendar Year, you must print a 1099 for each non-incorporated Vendor that you paid $600 for services and products relating to that service. This section shows you how to set up and print a vendor’s 1099.
Setting Up 1099 Payer InformationFirst time users of Ledger & Payables must set up their 1099 Payer Information prior to printing the 1099’s.
1. Click .
2. Select 1099 Payer Info to display the 1099 Payer Info setup (Figure 70):
Figure 70. 1099 Payer Info Setup
196

Creating ReportsVendor 1099s 15
3. In the General section, type the name of the employer (the church) and address.
4. In the Tax ID section, type the Federal tax and State tax ID numbers.
5. Click .
This information is shared with the ConnectNow Payroll system. It is not necessary to enter the ACH information or contact information for a 1099. If you use the ConnectNow Payroll system, this infor-mation may already be in your system.
Reviewing 1099sPrior to printing a vendor’s 1099, it is recommended you print and review the Vendor Audit for accuracy. You need to confirm that you have all of the appropriate vendors listed and that all of the transactions listed are 1099 worthy.
1. Click .
2. Select Vendors. Then, select Vendor Audit.
3. In the Date Range section, select Custom Date Range Specified. In the Start Date field, select January 1, and in the End Date field, select December 31 of the year you are reporting.
4. In the Report Options section, select Include Only 1099 Transactions.
5. Click .
The report list the vendors marked as 1099 vendors and the transactions as 1099 transactions.
6. If you find that you are missing a vendor on this list, go back to that vendor and review the 1099/Checks tab to ensure the vendor is correctly marked as a 1099 vendor (see “Setting Up Print 1099 Forms for a Vendor” on page 65).
197
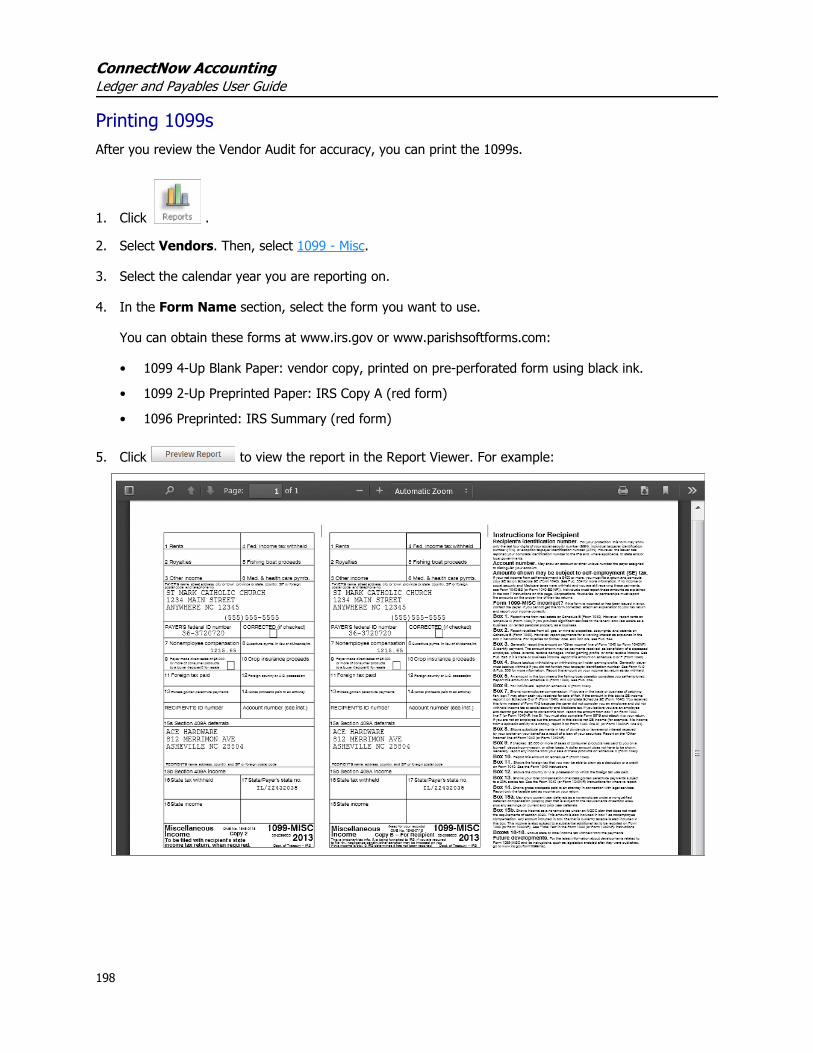
ConnectNow AccountingLedger and Payables User Guide
Printing 1099sAfter you review the Vendor Audit for accuracy, you can print the 1099s.
1. Click .
2. Select Vendors. Then, select 1099 - Misc.
3. Select the calendar year you are reporting on.
4. In the Form Name section, select the form you want to use.
You can obtain these forms at www.irs.gov or www.parishsoftforms.com:
• 1099 4-Up Blank Paper: vendor copy, printed on pre-perforated form using black ink.
• 1099 2-Up Preprinted Paper: IRS Copy A (red form)
• 1096 Preprinted: IRS Summary (red form)
5. Click to view the report in the Report Viewer. For example:
198
Chapter 16Integrating with Other
Applications
Smart Tuition ConnectNow Accounting integrates with Smart Tuition to automatically bring tuition billing and payments from the Smart Tuition system into Ledger and Payables. The payments show up as journal entries in Led-ger and Payables. The transfer occurs each evening, bringing in information from Smart Tuition that is ready to be processed.
After the transfer, a message is displayed on the Ledger and Payables dashboard notifying you that a jour-nal entry was created. The message gives you instructions for viewing the entry. Note that the message
appears once only. Click to clear the message.
To view journal entries, click the Find Journal Entry link a the top of the Journal Entry Information page.
For information on Smart Tuition services, visit their website at: http://www.smarttuition.com/.
199

ConnectNow AccountingLedger and Payables User Guide
200

Chapter 17Managing the System
and User Accounts
IntroductionAs an administrator, you perform the primary user management and security tasks for the ConnectNow Accounting system. Typical responsibilities include managing user access and permissions, viewing trans-action histories in audit trail records, and setting up various features and banking options. This chapter covers the typical tasks that you need to perform in your administrator role either as an administrator of a standalone organization or an organization granted permission by a higher-level organization to perform these tasks.
Managing UsersThis section shows you how to add new user accounts, reset passwords, and deactivate user accounts.
Adding a New User1. Click the Church Manager tab.
2. Click to display the User Information page (Figure 71):
Figure 71. User Information Page
201
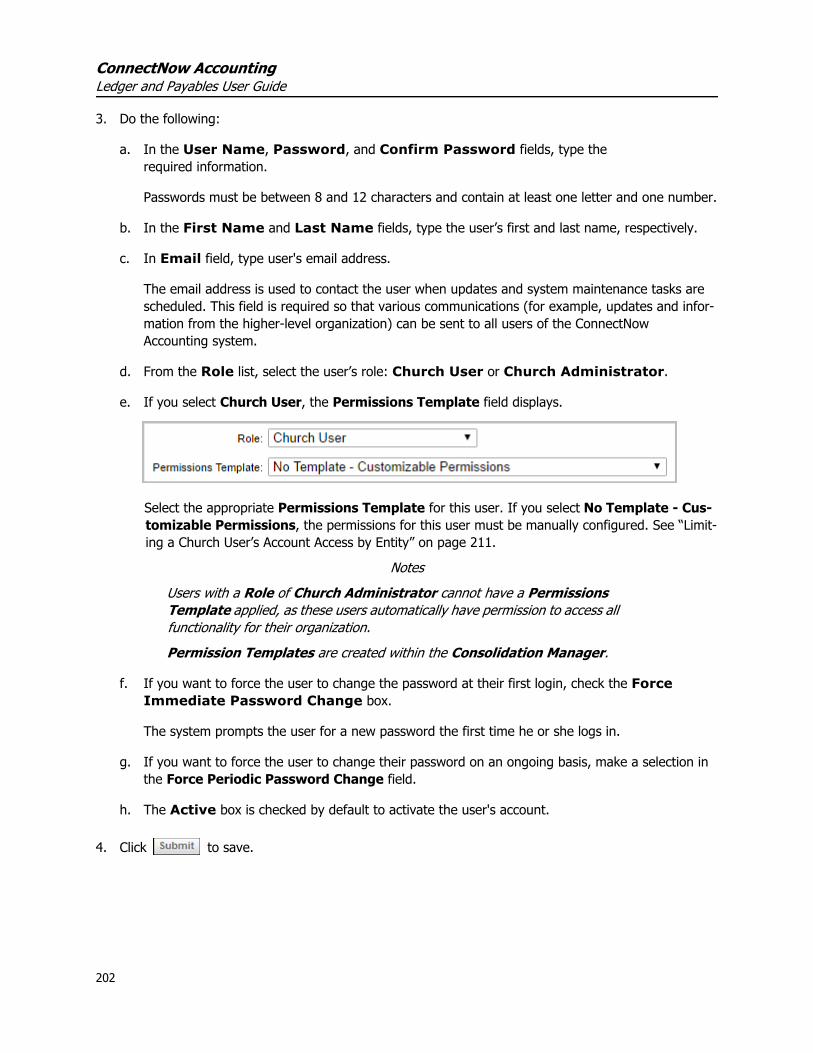
ConnectNow AccountingLedger and Payables User Guide
3. Do the following:
a. In the User Name, Password, and Confirm Password fields, type the required information.
Passwords must be between 8 and 12 characters and contain at least one letter and one number.
b. In the First Name and Last Name fields, type the user’s first and last name, respectively.
c. In Email field, type user's email address.
The email address is used to contact the user when updates and system maintenance tasks are scheduled. This field is required so that various communications (for example, updates and infor-mation from the higher-level organization) can be sent to all users of the ConnectNow Accounting system.
d. From the Role list, select the user’s role: Church User or Church Administrator.
e. If you select Church User, the Permissions Template field displays.
Select the appropriate Permissions Template for this user. If you select No Template - Cus-tomizable Permissions, the permissions for this user must be manually configured. See “Limit-ing a Church User’s Account Access by Entity” on page 211.
NotesUsers with a Role of Church Administrator cannot have a Permissions Template applied, as these users automatically have permission to access all functionality for their organization.Permission Templates are created within the Consolidation Manager.
f. If you want to force the user to change the password at their first login, check the Force Immediate Password Change box.
The system prompts the user for a new password the first time he or she logs in.
g. If you want to force the user to change their password on an ongoing basis, make a selection in the Force Periodic Password Change field.
h. The Active box is checked by default to activate the user's account.
4. Click to save.
202

Managing the System and User AccountsManaging Users
17
Resetting a User's Password You can reset passwords for users who forget their passwords. The passwords you assign are temporary. After a user logs in with the temporary password, the system prompts the user to change it.To reset a password:
1. Click the Church Manager tab.
2. Next to the name of the user whose password you want to change, click .
The user’s account is displayed.
3. In the Password Management section, click, .
The system displays a system-generated password. This is a temporary password.
4. Write down the password. Then, click .
5. Give the temporary password to the user.
After logging in, the user is prompted to change the temporary password.
Deactivating a User’s AccountDeactivating a user’s account disables access to the account so that it can no longer be used.
To deactivate an account:
1. Click the Church Manager tab.
2. Next to the name of the user whose account you want to deactivate, click .
The user’s account is displayed.
3. At the bottom of the Registered Users section, uncheck the Active box.
4. Click to save the change.
The system deactivates the user’s account. In the Login User List (on the Users page), the status in the Active column for the user’s account changes to False.
NoteOnly users with an account status set to True in the Active column can log in to Ledger and Payables.
203
ConnectNow AccountingLedger and Payables User Guide
Understanding Entity-Level PermissionsYour organization’s sensitive financial information must be kept confidential and closely protected from unauthorized access, modification, and disclosure. However, users of your accounting system need visibil-ity and access to the accounts and data they work with so that they can accomplish tasks within the scope of their work responsibilities. One of the administrator’s responsibilities is to appropriately safeguard data yet give users sufficient access to accounts and reports and to be able to process transactions to effec-tively do their jobs.
To enable users to perform their assigned duties yet not expose them to data they should not see, Con-nectNow Accounting provides an entity-level permissions framework. This solution enables you to assign permissions that control and manage access to your data. Entity permissions are activated at two levels: Level 1 and Level 2.
Level 1 Entity-Level Permissions If your church is connected to a higher-level organization, the higher-level organization has the ability to globally allow or prohibit entity-level permissions for organizations in its database to maintain consistent accounting standards for each entity. Level 1 entity-level permissions limits line-item account access throughout most of the system, including all transaction and reporting.
NoteEntity-level permissions are not enforced for budgets and beginning balances or within the Payroll module.
Turning On Level 1 Entity PermissionsLevel 1 entity permissions must be turned on (in Consolidation Manager) by your higher-level organization. Contact your higher-level organization to request activation, if needed.
Level 2 Entity-Level PermissionsAfter the higher-level organization activates Level 1 entity-level permissions, a second level of permissions can be activated to enforce entity-level restrictions that restrict which accounts the user is allowed to access from lists in the header (top) portion and in line-item entries on transaction pages (for example, Bills and Deposits). This second level of restrictions applies to bank accounts, primary accounts, credit card accounts, AR Accounts, and subsidiary accounts and restricts the user’s ability to view certain dashboard panels.
204

Managing the System and User AccountsUnderstanding Entity-Level Permissions
17
Understanding the Effects of Level 2 Entity Permissions The Entry Level Restriction option controls user access to accounts shown in the header (top) portion on transaction pages in Ledger and Payables and in Accounts Receivable. This section describes the dif-fering effect each setting (On/Off) has on the transaction pages in the two modules:• Bills• Checks• Deposits• Credit Cards• Ledger & Payables Dashboard• Bank Reconciliation• Invoices• Payments• Credits• Accounts Receivable Dashboard
BillsStandard Accrual• Off (not checked; the default): in the AP Account list, the logged-in user has access to
all AP Accounts. • On (checked): in the AP Account list, the logged-in user has access only to AP Accounts that are
within his or her permitted entities as defined by the Chart of Accounts and permissions set on their Permissions page.
Standard Cash• Off (not checked; the default): in the Bank Account list, the logged-in user has access to
all bank accounts.• On (checked): in the Bank Account list, the logged-in user has access only to bank accounts that
are within his or her permitted entities as defined by the Chart of Accounts and permissions set on their Permissions page.
205
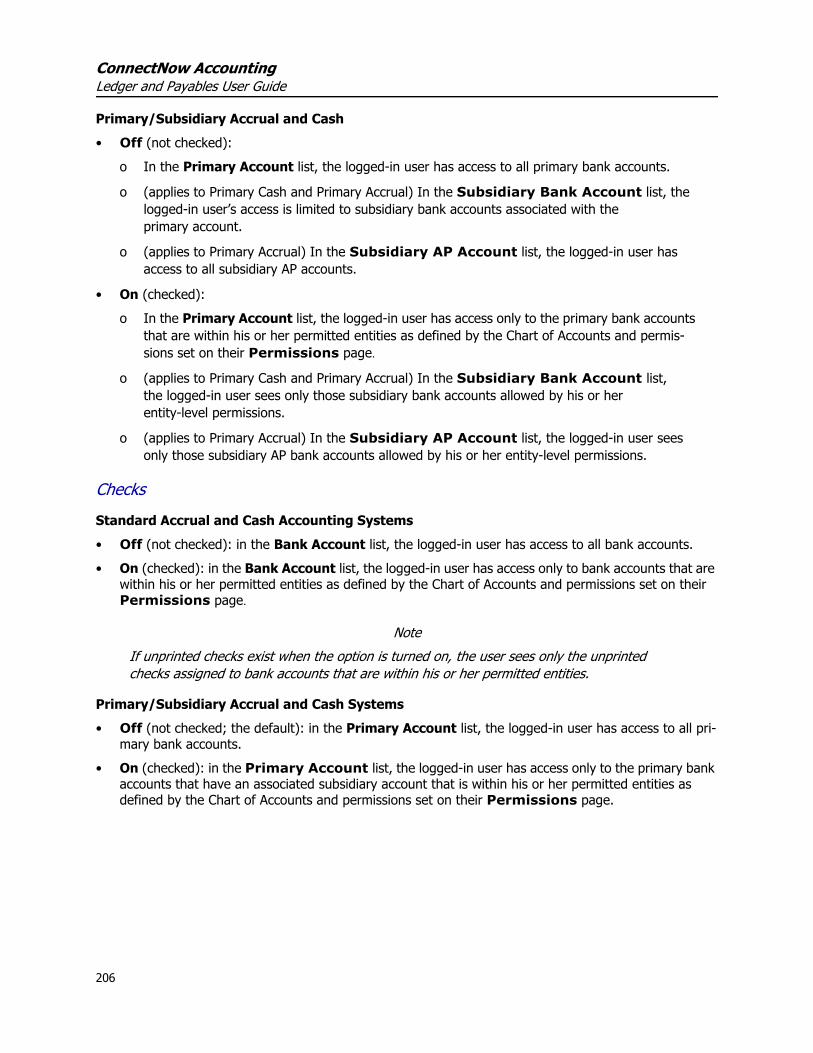
ConnectNow AccountingLedger and Payables User Guide
Primary/Subsidiary Accrual and Cash• Off (not checked):
o In the Primary Account list, the logged-in user has access to all primary bank accounts.
o (applies to Primary Cash and Primary Accrual) In the Subsidiary Bank Account list, the logged-in user’s access is limited to subsidiary bank accounts associated with the primary account.
o (applies to Primary Accrual) In the Subsidiary AP Account list, the logged-in user has access to all subsidiary AP accounts.
• On (checked): o In the Primary Account list, the logged-in user has access only to the primary bank accounts
that are within his or her permitted entities as defined by the Chart of Accounts and permis-sions set on their Permissions page.
o (applies to Primary Cash and Primary Accrual) In the Subsidiary Bank Account list, the logged-in user sees only those subsidiary bank accounts allowed by his or her entity-level permissions.
o (applies to Primary Accrual) In the Subsidiary AP Account list, the logged-in user sees only those subsidiary AP bank accounts allowed by his or her entity-level permissions.
ChecksStandard Accrual and Cash Accounting Systems• Off (not checked): in the Bank Account list, the logged-in user has access to all bank accounts.• On (checked): in the Bank Account list, the logged-in user has access only to bank accounts that are
within his or her permitted entities as defined by the Chart of Accounts and permissions set on their Permissions page.
NoteIf unprinted checks exist when the option is turned on, the user sees only the unprinted checks assigned to bank accounts that are within his or her permitted entities.
Primary/Subsidiary Accrual and Cash Systems• Off (not checked; the default): in the Primary Account list, the logged-in user has access to all pri-
mary bank accounts. • On (checked): in the Primary Account list, the logged-in user has access only to the primary bank
accounts that have an associated subsidiary account that is within his or her permitted entities as defined by the Chart of Accounts and permissions set on their Permissions page.
206

Managing the System and User AccountsUnderstanding Entity-Level Permissions
17
DepositsStandard Accrual and Cash Systems• Off (not checked; the default): in the Bank Account list, the logged-in user has access to all bankaccounts.• On (checked): in the Bank Account list, the logged-in user has access only to bank accounts that
are within his or her permitted entities as defined by the Chart of Accounts and permissions set on their Permissions page.
Primary/Subsidiary Accrual and Cash Systems• Off (not checked; the default):
o In the Primary Account list, the logged-in user sees all primary bank accounts.
o In the Subsidiary Bank Account list, the logged-in user’s access is limited to subsidiary bank accounts associated with the primary account.
• On (checked):o In the Primary Account list, the logged-in user has access only to the primary accounts that
have a subsidiary account within his or her permitted entities as defined by the Chart of Accounts and permissions set on their Permissions page.
o In the Subsidiary Bank Account list, the logged-in user sees only those subsidiary bank accounts allowed by his or her entity-level permissions.
Credit Cards• Off (not checked; the default): in the Account list, the logged-in user has access to all
credit card liability accounts.• On (checked): in the Account list, the logged-in user has access only to the credit card liability
accounts that are within his or her permitted entities as defined by the Chart of Accounts and permis-sions set on their Permissions page.
Ledger & Payables Dashboard• Off (not checked): the logged-in user has access to all accounts with the Bank/AP Balances panel.
Level 1 permissions are applied to the Bills to Pay, Memorized Transactions, and the Monthly Expense and Budget graph panels.
• On (checked): the following rules apply for standard accrual and cash-basis systems:o Bank/AP: displays balances according to the logged-in user’s entity permissions.
o Bills to Pay: the only bills shown are those allowed by Level 1 and Level 2 permissions. As applicable, the system evaluates bank accounts and line-item accounts to determine which bills the user sees.
o Memorized: the only entries shown are those allowed by Level 1 and Level 2 permissions. As applicable, the system evaluates bank accounts and line-item accounts to determine which memorized entries the user sees.
o Graph: reflects only accounts that the logged-in user has permissions to.
207

ConnectNow AccountingLedger and Payables User Guide
• On (checked): the following rules apply for Primary/Subsidiary accrual and cash-basis systems: o Bank/AP: displays no information.
o Bills to Pay: the only bills shown are those allowed by Level 1 and Level 2 permissions. As applicable, the system evaluates the primary bank account, subsidiary bank account, and subsidiary AP account as well as line-item accounts to determine which bills the user sees.
o Memorized: the only entries shown are those allowed by Level 1 and Level 2 permissions. As applicable, the system evaluates the primary bank account, subsidiary bank account, and subsidiary AP account as well as line-item accounts to determine which entries the user sees.
o Graph: reflects information only for accounts the logged-in user has permissions to.
Bank Reconciliation• Off (not checked; the default): in the Bank Reconciliation Statement list, the logged-in user has
access to all bank reconciliations.• On (checked): in the Bank Reconciliation Statement list, the logged-in user has access only to
bank reconciliations that are within his or her permitted entities as defined by the Chart of Accounts and permissions set on their Permissions page.
InvoicesStandard Accrual• Off (not checked; the default): in the Account list and the Sales Tax list, the logged-in user has
access to any permitted entity accounts.• On (checked): in the AR Account list, the Account list, and the Sales Tax list, the logged-in user
has access only to accounts that are within his or her permitted entities as defined by the chart of accounts.
Standard Cash• Off (not checked; the default) and On (checked): in the Account list and the Sales Tax list, the
logged-in user has access to any permitted entity accounts.
Primary/Subsidiary Accrual and Cash• Off (not checked; the default): in the Account list and the Sales Tax list, the logged-in user has
access to any permitted entity accounts.• On (checked): in the Primary Account list, the Account list, the Subsidiary Bank Account list,
the Subsidiary AR Account list (accrual only), and the Sales Tax list, the logged-in user has access only to the accounts that are within his or her permitted entities as defined by the chart of accounts.
PaymentsStandard Accrual and Standard Cash• Off (not checked; the default): the list of invoices for the selected customer is filtered based upon the
line item account(s) and the sales tax liability account.• On (checked): the list of invoices is filtered for the selected customer based upon the AR account, the
line item account(s), and the sales tax liability account.
208

Managing the System and User AccountsUnderstanding Entity-Level Permissions
17
Primary/Subsidiary Accrual and Cash• Off (not checked; the default): the list of invoices for the selected customer is filtered based upon theline item account(s) and the sales tax liability account. In the Primary Account list, the logged-in user has access to all primary accounts and subsidiary bank accounts.
• On (checked): the list of invoices is filtered for the selected customer based upon the primary account, the subsidiary bank account, the subsidiary AR account, the line item account(s), and the sales tax lia-bility account. In the Primary Account list, the logged in user has access only to the primary bank accounts with associated subsidiary bank accounts that are within his or her permitted entities as defined by the chart of accounts.
CreditsStandard Accrual• Off (not checked; the default): in the Account list and the Sales Tax list, the logged-in user has
access to all permitted entity accounts.• On (checked): in the AR Account list, the Account list, and the Sales Tax list, the logged-in user
has access only to accounts that are within his or her permitted entities as defined by the chart of accounts.
Standard Cash• Off (not checked; the default) and On (checked): in the Account list and the Sales Tax list, the
logged-in user has access to all permitted entity accounts.
Primary/Subsidiary Accrual and Cash• Off (not checked; the default): in the Account list and the Sales Tax list, the logged-in user has
access to all permitted entity accounts.• On (checked): in the Primary Account list, the Account list, the Subsidiary Bank Account list,
the Subsidiary AR Account list (accrual only), and the Sales Tax list, the logged-in user has access only to the accounts that are within his or her permitted entities as defined by the chart of accounts.
Accounts Receivable DashboardEnter Payment Panel• Off (not checked; the default): the list of invoices for the selected customer is filtered based upon the
line item account(s) and the sales tax liability account.• On (checked): the list of invoices is filtered for the selected customer based upon the AR account, the
line item account(s), and the sales tax liability account.
Open Invoice Aging Panel• Off (not checked; the default): the logged in user sees aging totals based on all permitted
entity accounts.• On (checked): the logged in user sees aging totals based on accounts that are within his or her per-
mitted entities as defined by the chart of accounts.
209
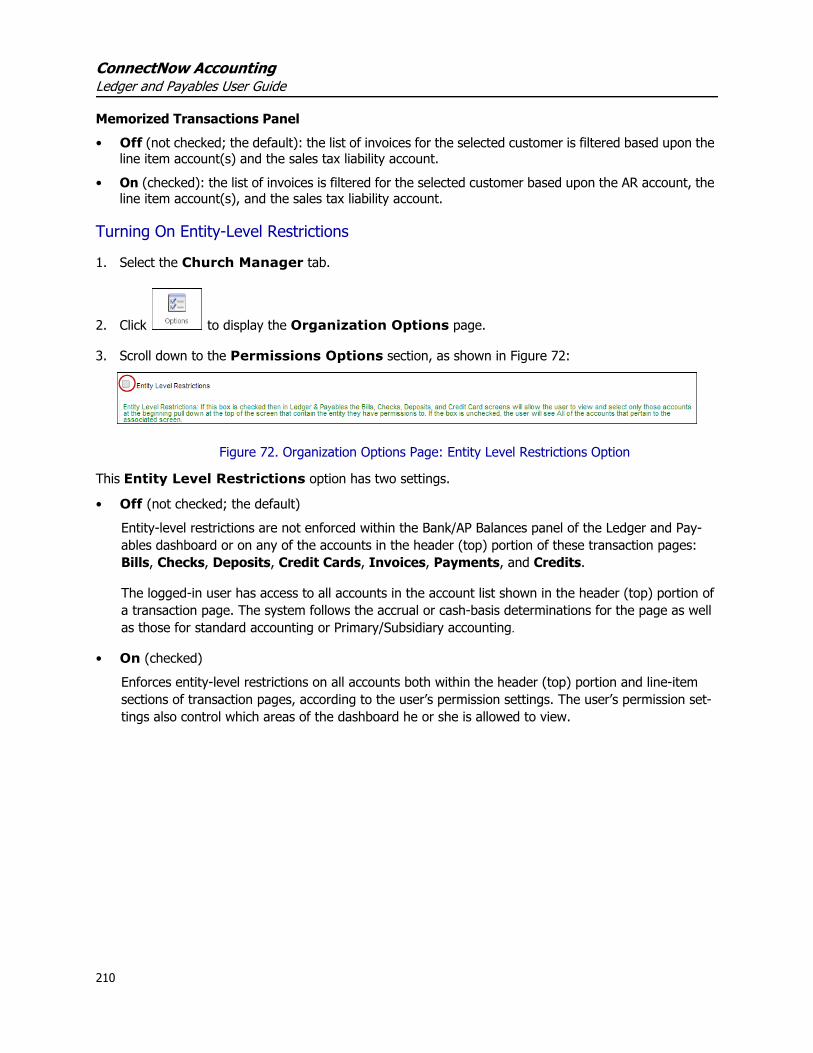
ConnectNow AccountingLedger and Payables User Guide
Memorized Transactions Panel• Off (not checked; the default): the list of invoices for the selected customer is filtered based upon the
line item account(s) and the sales tax liability account.• On (checked): the list of invoices is filtered for the selected customer based upon the AR account, the
line item account(s), and the sales tax liability account.
Turning On Entity-Level Restrictions
1. Select the Church Manager tab.
2. Click to display the Organization Options page.
3. Scroll down to the Permissions Options section, as shown in Figure 72:
Figure 72. Organization Options Page: Entity Level Restrictions Option
This Entity Level Restrictions option has two settings.
• Off (not checked; the default)Entity-level restrictions are not enforced within the Bank/AP Balances panel of the Ledger and Pay-ables dashboard or on any of the accounts in the header (top) portion of these transaction pages: Bills, Checks, Deposits, Credit Cards, Invoices, Payments, and Credits.
The logged-in user has access to all accounts in the account list shown in the header (top) portion of a transaction page. The system follows the accrual or cash-basis determinations for the page as well as those for standard accounting or Primary/Subsidiary accounting.
• On (checked)Enforces entity-level restrictions on all accounts both within the header (top) portion and line-item sections of transaction pages, according to the user’s permission settings. The user’s permission set-tings also control which areas of the dashboard he or she is allowed to view.
210

Managing the System and User AccountsUnderstanding Entity-Level Permissions
17
The logged-in user can view and select only those accounts associated with the entities he or she has permission to access. The system filters the account list shown in the header (top) portion of a trans-action page, showing only those accounts within the logged-in user’s entity permissions. For example:Figure 73. Example of Accounts List in Header (Top) Portion of the Bills Page
4. To turn on the option, check the Entity Level Restrictions box.
5. Click to save your selection.
The system is updated with the change. An audit trail is created to identify who made the change and to indicate when it was made.
Limiting a Church User’s Account Access by Entity You can limit the access of each user whose role is set to Church User to the accounts for each entity. When you make a selection by entity, the user cannot view transactions that do not contain their permitted entities.
Individuals assigned the role of Church Administrator have complete access to all areas and features in the ConnectNow Accounting system. For users in the Church Administrator role, there is no manage-ment of permissions. Therefore, we recommend that you limit the number of users assigned the role of Church Administrator to one or two individuals in your organization.
The Church Administrator can control the permissions of individuals assigned the role of Church User. Permissions settings limit Church User access and data processing capabilities to specific areas and fea-tures in the Ledger and Payables system. These limits can be set by applying a Permission Template to a Church User profile (see Step 3-e on page 202) or by manually configuring the permission settings for a specific user.
To limit a Church User’s permissions by manually configuring the permission settings for a specific user:
1. Log in to the organization.
2. Click the Church Manager tab. Then, click .
The Entity Level Restrictions option in Church Manager con-trols which accounts the logged-in user sees in the Accounts lists in the header (top) portion of a transaction page.
211

ConnectNow AccountingLedger and Payables User Guide
3. The Quick Find list contains the names of users assigned the role of Church User. To find the user whose permissions you want to change, do one of the following:
• Click the Down Arrow button to display the list of church users. Select the user whose permis-
sions you want to assign. Then, click .
• In the blank field, type the first few letters of the user’s last name to view names that match the letters you typed. Select the user whose permissions you want to assign. Then,
click .
The selected user’s current permissions settings are displayed.
NoteUsers who are assigned to a Permission Template will list that template at the top, along with the following message:
PERMISSIONS CANNOT BE EDITED
4. By default, the Church User has complete access to each licensed module. To limit the user’s access to a specific module and to assign permissions within an unrestricted module, do the following:
a. For any module that you want to restrict access, deselect the (show) box.
For example, if you want the user to see the Ledger and Payables module but not the Pay-roll module, deselect the (show) box for Payroll. The Payroll tab will not be visible to the user when he or she logs in. Therefore, the user cannot access any elements within the module.
b. Within each module that has the (show) box selected, you can grant specific permissions for areas and features:
NoteYou must select the module’s (show) box before selecting permissions.
• Read: allows the user to view information in the area.
• Allow/Write: allows the user to add new or change (edit) existing data for the area.
• Delete: allows the user to remove the item in its entirety.
c. To grant permissions, use one or a combination of the following methods:
• To grant permissions to all areas listed, click Select All.
The system checks all of the boxes.
NoteTo uncheck all of the boxes, click Deselect All.
• To select specific permissions for an area, select the permission’s check box.
• To select specific permissions, click Select All to check all of the boxes. Then, deselect those permissions (check the box to remove the check mark) that you do not want to grant.
212
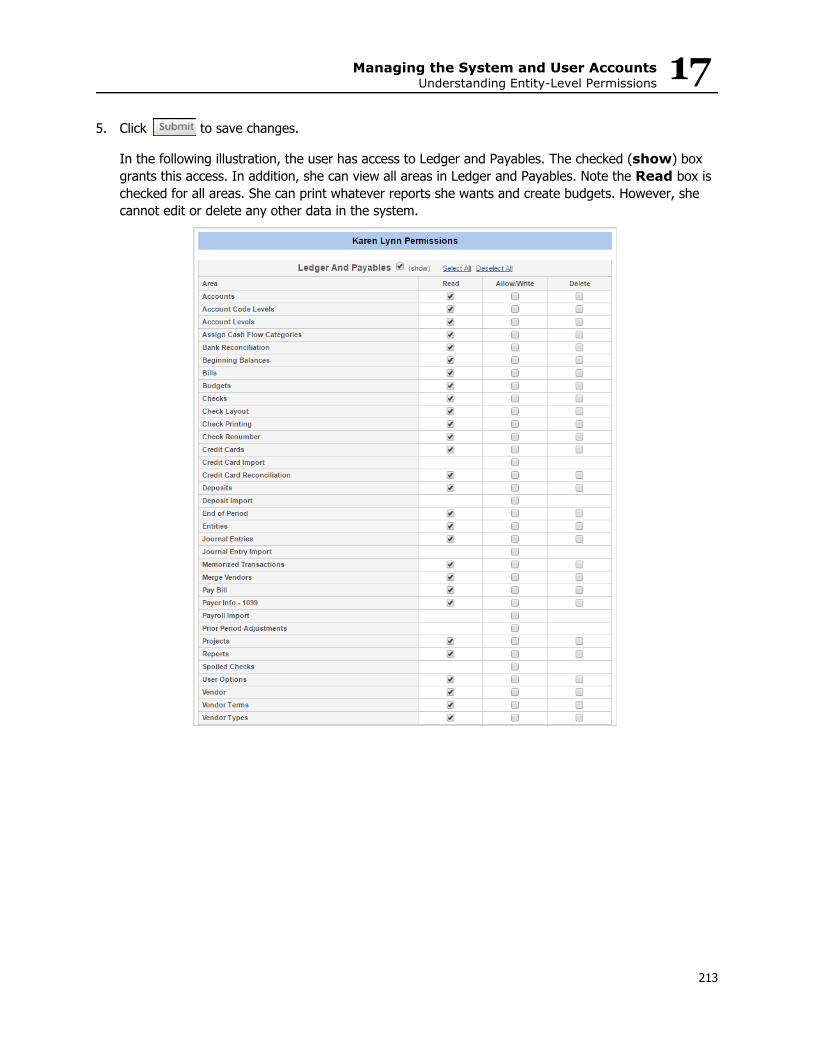
Managing the System and User AccountsUnderstanding Entity-Level Permissions
17
5. Click to save changes.In the following illustration, the user has access to Ledger and Payables. The checked (show) box grants this access. In addition, she can view all areas in Ledger and Payables. Note the Read box is checked for all areas. She can print whatever reports she wants and create budgets. However, she cannot edit or delete any other data in the system.
213
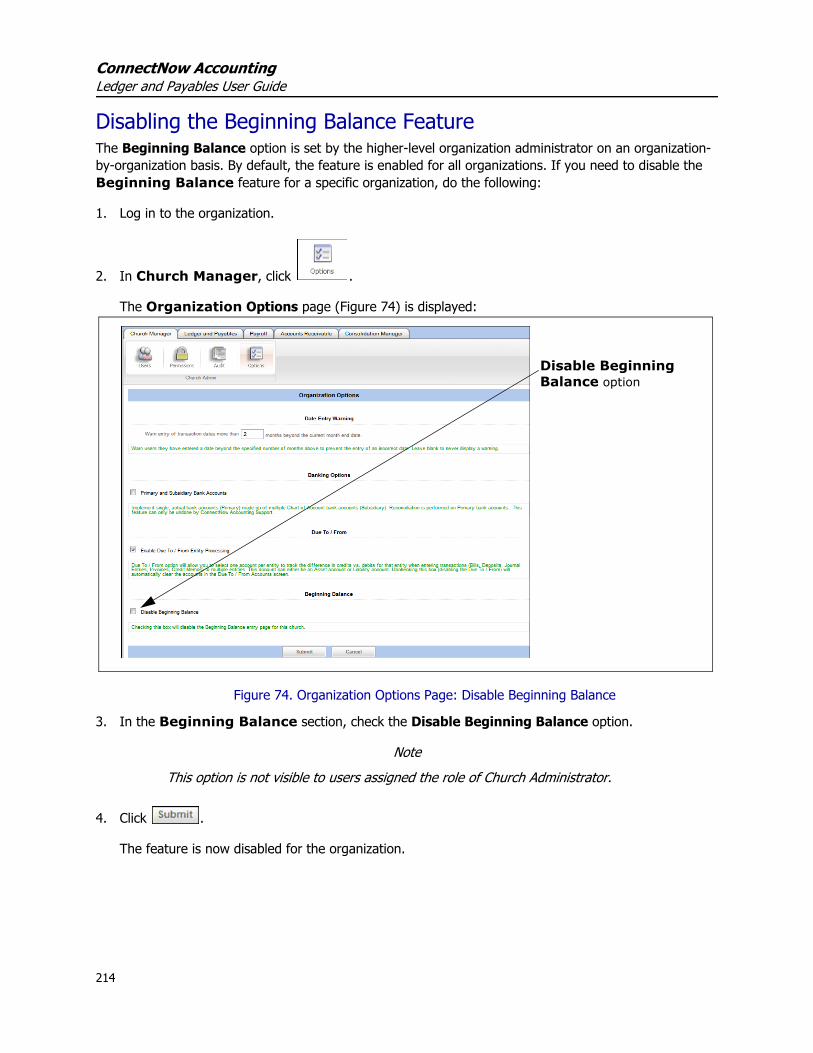
ConnectNow AccountingLedger and Payables User Guide
Disabling the Beginning Balance FeatureThe Beginning Balance option is set by the higher-level organization administrator on an organization-by-organization basis. By default, the feature is enabled for all organizations. If you need to disable the Beginning Balance feature for a specific organization, do the following:
1. Log in to the organization.
2. In Church Manager, click .
The Organization Options page (Figure 74) is displayed:
Figure 74. Organization Options Page: Disable Beginning Balance
3. In the Beginning Balance section, check the Disable Beginning Balance option.
NoteThis option is not visible to users assigned the role of Church Administrator.
4. Click .
The feature is now disabled for the organization.
Disable Beginning Balance option
214
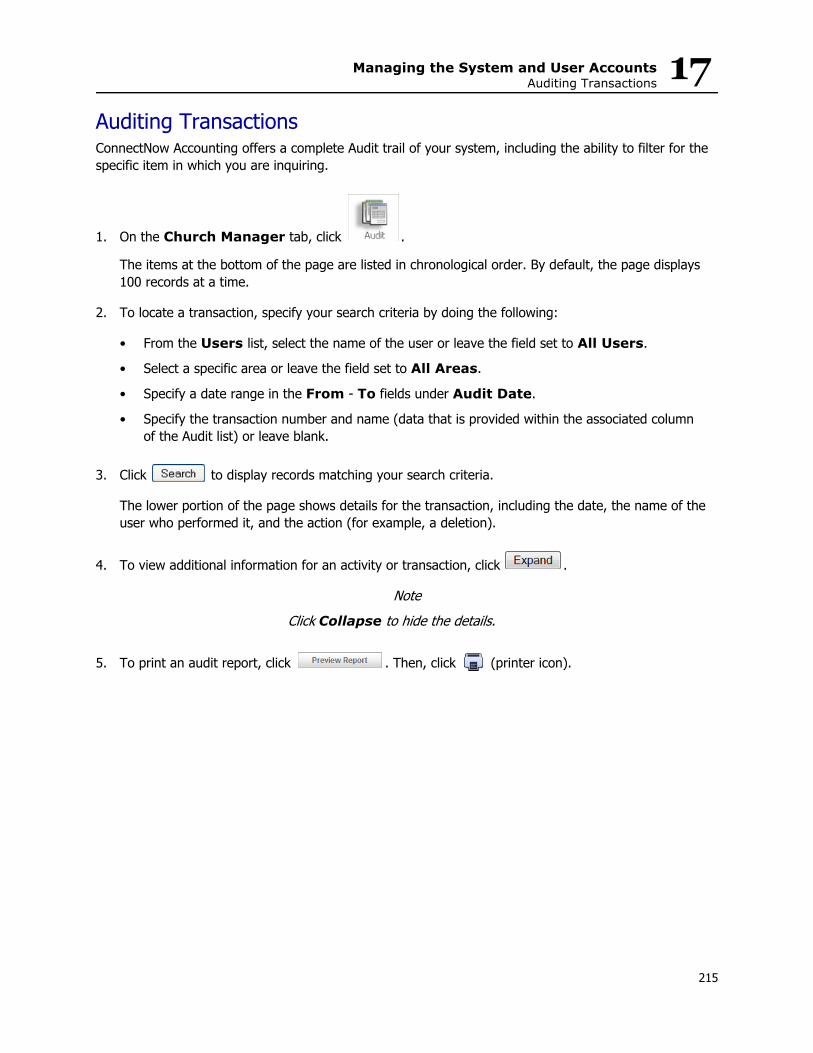
Managing the System and User AccountsAuditing Transactions
17
Auditing TransactionsConnectNow Accounting offers a complete Audit trail of your system, including the ability to filter for the specific item in which you are inquiring.1. On the Church Manager tab, click .
The items at the bottom of the page are listed in chronological order. By default, the page displays 100 records at a time.
2. To locate a transaction, specify your search criteria by doing the following:
• From the Users list, select the name of the user or leave the field set to All Users.
• Select a specific area or leave the field set to All Areas.
• Specify a date range in the From - To fields under Audit Date.
• Specify the transaction number and name (data that is provided within the associated column of the Audit list) or leave blank.
3. Click to display records matching your search criteria.
The lower portion of the page shows details for the transaction, including the date, the name of the user who performed it, and the action (for example, a deletion).
4. To view additional information for an activity or transaction, click .
NoteClick Collapse to hide the details.
5. To print an audit report, click . Then, click (printer icon).
215

ConnectNow AccountingLedger and Payables User Guide
Using the Primary and Subsidiary Bank Account FeatureThe Primary and Subsidiary Bank Account feature enables you to maintain multiple asset (bank) accounts in your Chart of Accounts to differentiate funds or amounts yet attach those internal bank accounts to a single bank account established at a banking institution.
Understanding Primary and Subsidiary Bank AccountsThe relationship between the Primary and Subsidiary Bank accounts is hierarchical, as shown in Figure 75:
Figure 75. Diagram of the Relationship between Primary and Subsidiary Bank Accounts
Primary bank accounts are defined as physical bank accounts established at a banking institution (for example, “Chase Checking”). All of the organization's external disbursements are processed through a pri-mary bank account. For example, all bills generated by departments and cost centers are paid by checks issued from a primary bank account. In addition, bank reconciliations are performed only on a primary bank account.
Subsidiary bank accounts, on the other hand, are specific asset accounts in your COA that are set up as “bank” accounts (the Bank Account option is checked in the account setup). These accounts are subsidiary (subordinate) in function to a primary account because they cannot exist independently; they must be linked or assigned to a primary bank account. Subsidiary bank accounts enable you to separately track funds for various organizational entities and associate billing charges so that you can better understand your cash flow and expenditures. The setup details are presented later in this document, but they entail identifying all of your primary bank accounts and designating which bank accounts in your COA function as their respective subsidiaries.
216

Managing the System and User AccountsUsing the Primary and Subsidiary Bank Account Feature
17
In addition, subsidiary bank accounts are listed in your organization's COA. Each subsidiary bank account, therefore, has a COA number (see Figure 1). Subsidiary bank accounts can be comprised of a single entity (for example, “Sacraments” and “Daycare”), department (for example, “Choir” and “Education”), or cost center (for example, “Cafeteria” and “Mortgage”). Every entity, department, and cost center is assigned a COA number.You can have more than one primary bank account in your accounting system. However, each primary account must have at least one subsidiary bank account linked to it, and every subsidiary account must be linked to a primary account. (A primary account that is not linked to a subsidiary account cannot be used in the Bills and Deposit Entry functions of the application.) Unlike its linked subsidiary accounts, a primary bank account is external to your accounting system; therefore, it is not listed in your COA and has no assigned COA number. Primary bank accounts are distinguished by a user-assigned name (for example, “Chase Checking”).
Finally, all transactions (debits and credits) within your accounting system are applied directly against the subsidiary bank accounts-not against the primary bank account(s). When you perform a transaction, such as entering a bill or making a deposit, you must select both the primary account and the appropriate sub-sidiary bank account so that the application knows which subsidiary bank account to apply the transaction against. The combined total of individual subsidiary bank account balances matches the balance in the pri-mary bank account to which they are linked. The subsidiary bank accounts provide the detail to support the primary account's balance. For example, if the primary account shows a $5000 balance, when you add up its subsidiary bank account balances, you will find that they add up to $5000.
Globally Activating the Primary and Subsidiary Bank Account FeatureIf you are a consolidating organization, a higher-level administrator must globally activate the Primary and Subsidiary Account feature before you can use it. Contact the higher-level organization to discuss activa-tion of this feature.
If you are a standalone organization, contact ParishSOFT Technical Support for assistance with activating the feature. See “Contacting Us” on page 4 for details.
Setting Up a Primary Bank Account with Subsidiary Bank AccountsThe instructions in this section show you how to set up your system to use the Primary and Subsidiary Bank Account feature.
Before You BeginBefore transitioning your ConnectNow Accounting system to use the Primary and Subsidiary Bank Accounts feature, you need to make modifications to your current system to ensure that all of your bank accounts are included and correctly associated. Two methods are presented in this section. Use the method that fits your organization type.
217
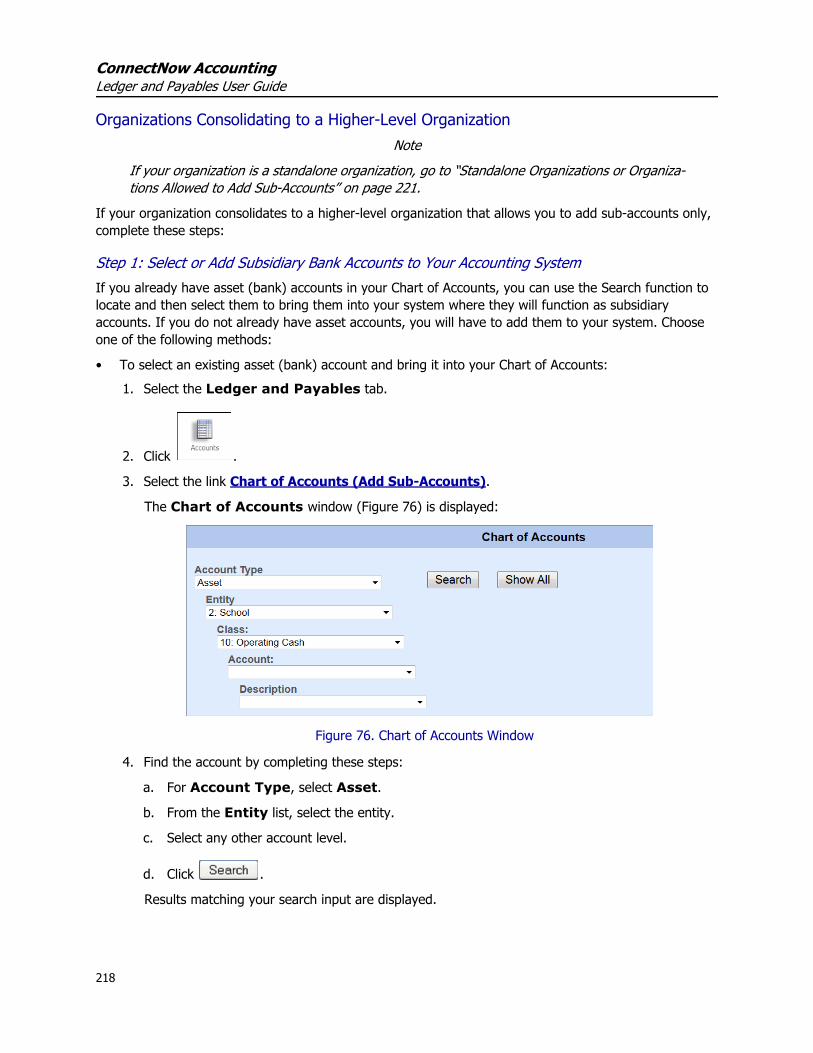
ConnectNow AccountingLedger and Payables User Guide
Organizations Consolidating to a Higher-Level OrganizationNote
If your organization is a standalone organization, go to “Standalone Organizations or Organiza-tions Allowed to Add Sub-Accounts” on page 221.
If your organization consolidates to a higher-level organization that allows you to add sub-accounts only, complete these steps:
Step 1: Select or Add Subsidiary Bank Accounts to Your Accounting SystemIf you already have asset (bank) accounts in your Chart of Accounts, you can use the Search function to locate and then select them to bring them into your system where they will function as subsidiary accounts. If you do not already have asset accounts, you will have to add them to your system. Choose one of the following methods:
• To select an existing asset (bank) account and bring it into your Chart of Accounts:1. Select the Ledger and Payables tab.
2. Click .
3. Select the link Chart of Accounts (Add Sub-Accounts).
The Chart of Accounts window (Figure 76) is displayed:
Figure 76. Chart of Accounts Window
4. Find the account by completing these steps:
a. For Account Type, select Asset.
b. From the Entity list, select the entity.
c. Select any other account level.
d. Click .
Results matching your search input are displayed.
218

Managing the System and User AccountsUsing the Primary and Subsidiary Bank Account Feature
17
5. At the bottom of the window, check the box next to each account that you want to use as asubsidiary bank account.
6. Click .
The Account Information page is displayed. Each account is brought into your system and has a unique accounting code to identify it in your Chart of Accounts.
7. If the account is not displayed, use the Quick Find search on the Account Information page to locate the account.
8. In the Additional Asset Information section, check the Bank Account option:
9. Repeat Steps 3-8 for each account that you want to select and bring in to your system as a subsidiary bank account.
Check the box to use the account as a subsidiary asset (bank) account.
219

ConnectNow AccountingLedger and Payables User Guide
• To add a new asset (bank) account to your Chart of Accounts:1. Select the Ledger and Payables tab.
2. Click .
3. Select the link Chart of Accounts (Add Sub-Accounts).
The Chart of Accounts window (Figure 76) is displayed.
4. Find the account by completing these steps:
a. From the Account Type list, select Asset.
b. From the Entity list, select the entity.
c. Select any other account level.
d. Click .
Results matching your search input are displayed.
5. As shown in the following illustration, do one of the following:
• Check the box for the account you want.
OR
• Select the account you want to add the sub-account to. Then, select the Add Sub- Account link.
Select the checkbox to use the account asa subsidiary asset (bank) account.
OR
Select Add Sub-Account.
220
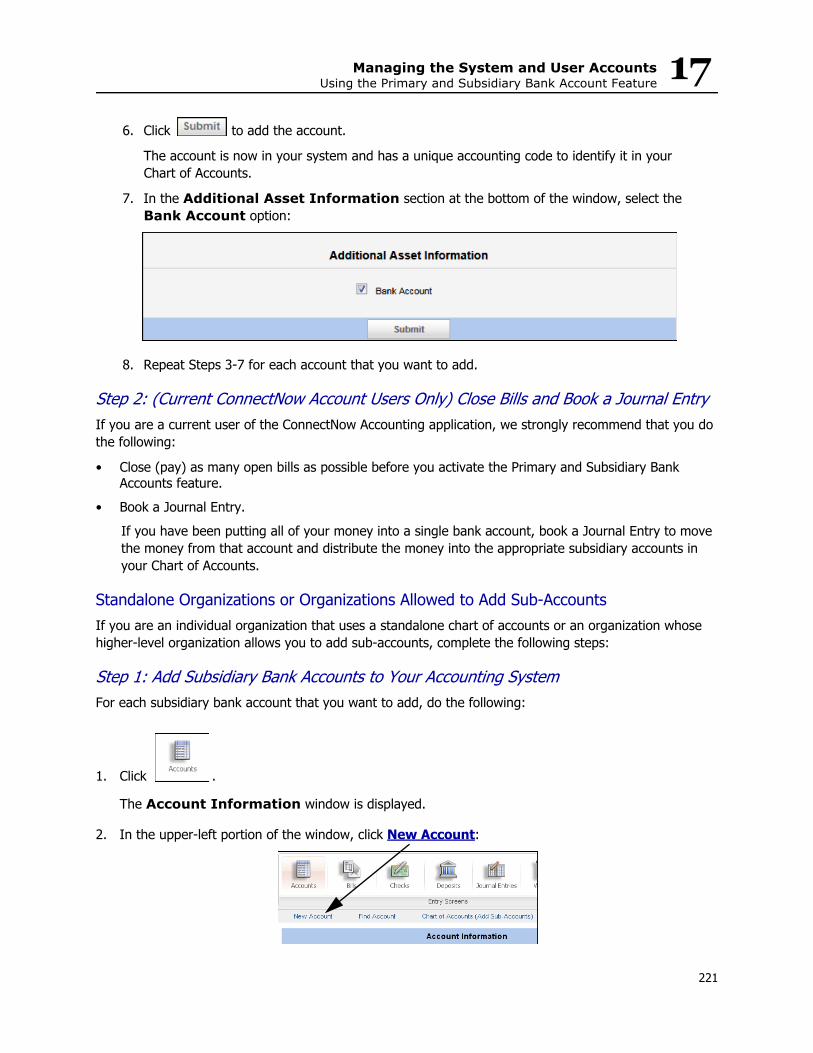
Managing the System and User AccountsUsing the Primary and Subsidiary Bank Account Feature
17
6. Click to add the account.The account is now in your system and has a unique accounting code to identify it in your Chart of Accounts.
7. In the Additional Asset Information section at the bottom of the window, select the Bank Account option:
8. Repeat Steps 3-7 for each account that you want to add.
Step 2: (Current ConnectNow Account Users Only) Close Bills and Book a Journal EntryIf you are a current user of the ConnectNow Accounting application, we strongly recommend that you do the following:
• Close (pay) as many open bills as possible before you activate the Primary and Subsidiary Bank Accounts feature.
• Book a Journal Entry. If you have been putting all of your money into a single bank account, book a Journal Entry to move the money from that account and distribute the money into the appropriate subsidiary accounts in your Chart of Accounts.
Standalone Organizations or Organizations Allowed to Add Sub-AccountsIf you are an individual organization that uses a standalone chart of accounts or an organization whose higher-level organization allows you to add sub-accounts, complete the following steps:
Step 1: Add Subsidiary Bank Accounts to Your Accounting SystemFor each subsidiary bank account that you want to add, do the following:
1. Click .
The Account Information window is displayed.
2. In the upper-left portion of the window, click New Account:
221
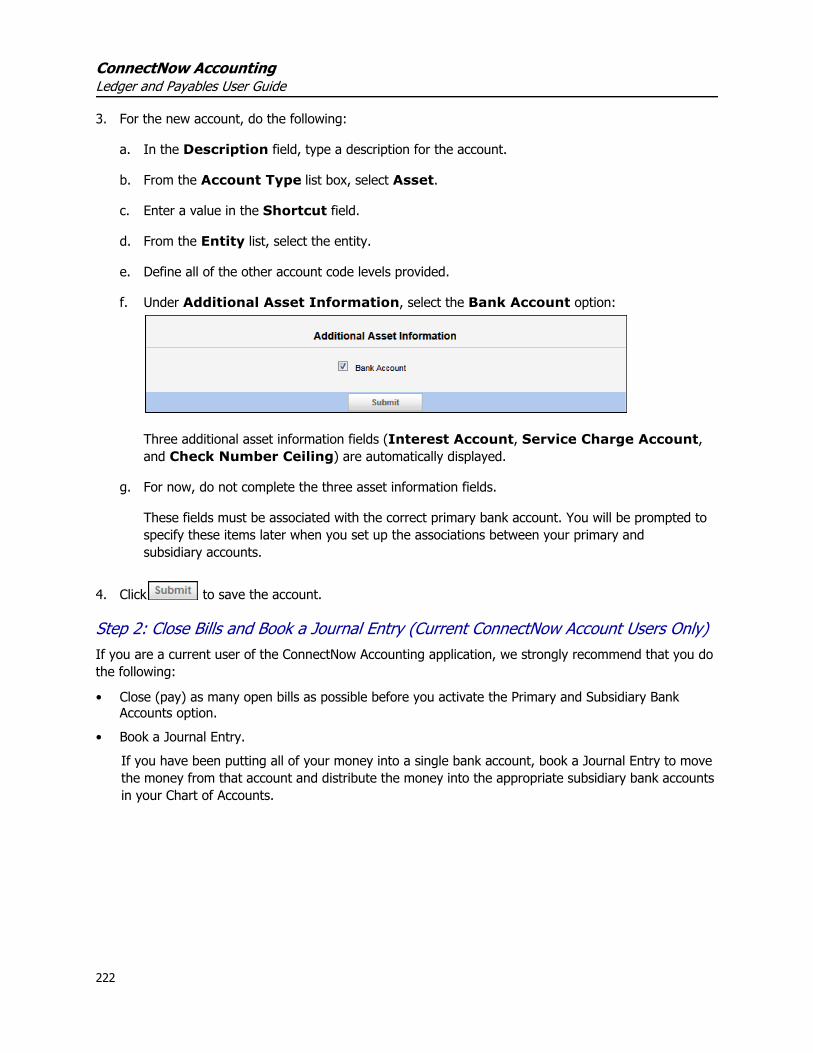
ConnectNow AccountingLedger and Payables User Guide
3. For the new account, do the following:
a. In the Description field, type a description for the account.
b. From the Account Type list box, select Asset.
c. Enter a value in the Shortcut field.
d. From the Entity list, select the entity.
e. Define all of the other account code levels provided.
f. Under Additional Asset Information, select the Bank Account option:
Three additional asset information fields (Interest Account, Service Charge Account, and Check Number Ceiling) are automatically displayed.
g. For now, do not complete the three asset information fields.
These fields must be associated with the correct primary bank account. You will be prompted to specify these items later when you set up the associations between your primary and subsidiary accounts.
4. Click to save the account.
Step 2: Close Bills and Book a Journal Entry (Current ConnectNow Account Users Only) If you are a current user of the ConnectNow Accounting application, we strongly recommend that you do the following:
• Close (pay) as many open bills as possible before you activate the Primary and Subsidiary Bank Accounts option.
• Book a Journal Entry.If you have been putting all of your money into a single bank account, book a Journal Entry to move the money from that account and distribute the money into the appropriate subsidiary bank accounts in your Chart of Accounts.
222
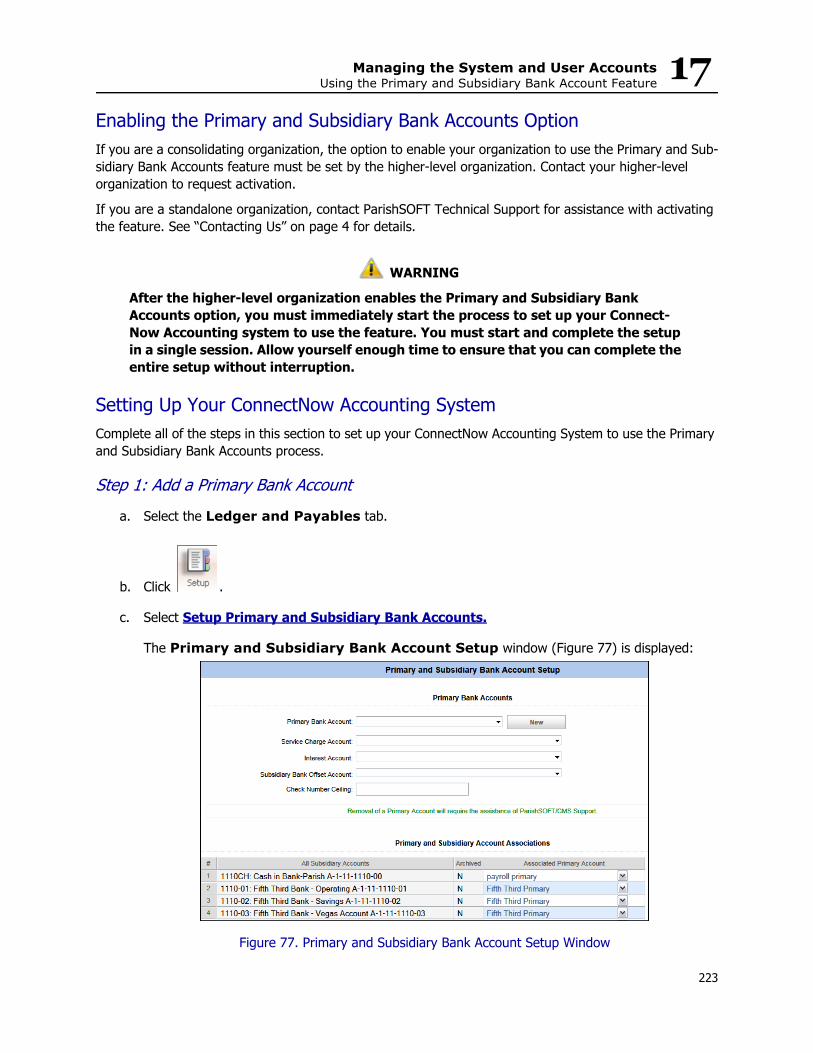
Managing the System and User AccountsUsing the Primary and Subsidiary Bank Account Feature
17
Enabling the Primary and Subsidiary Bank Accounts OptionIf you are a consolidating organization, the option to enable your organization to use the Primary and Sub-sidiary Bank Accounts feature must be set by the higher-level organization. Contact your higher-level organization to request activation.If you are a standalone organization, contact ParishSOFT Technical Support for assistance with activating the feature. See “Contacting Us” on page 4 for details.
WARNING
After the higher-level organization enables the Primary and Subsidiary Bank Accounts option, you must immediately start the process to set up your Connect-Now Accounting system to use the feature. You must start and complete the setup in a single session. Allow yourself enough time to ensure that you can complete the entire setup without interruption.
Setting Up Your ConnectNow Accounting SystemComplete all of the steps in this section to set up your ConnectNow Accounting System to use the Primary and Subsidiary Bank Accounts process.
Step 1: Add a Primary Bank Account a. Select the Ledger and Payables tab.
b. Click .
c. Select Setup Primary and Subsidiary Bank Accounts.
The Primary and Subsidiary Bank Account Setup window (Figure 77) is displayed:
Figure 77. Primary and Subsidiary Bank Account Setup Window
223
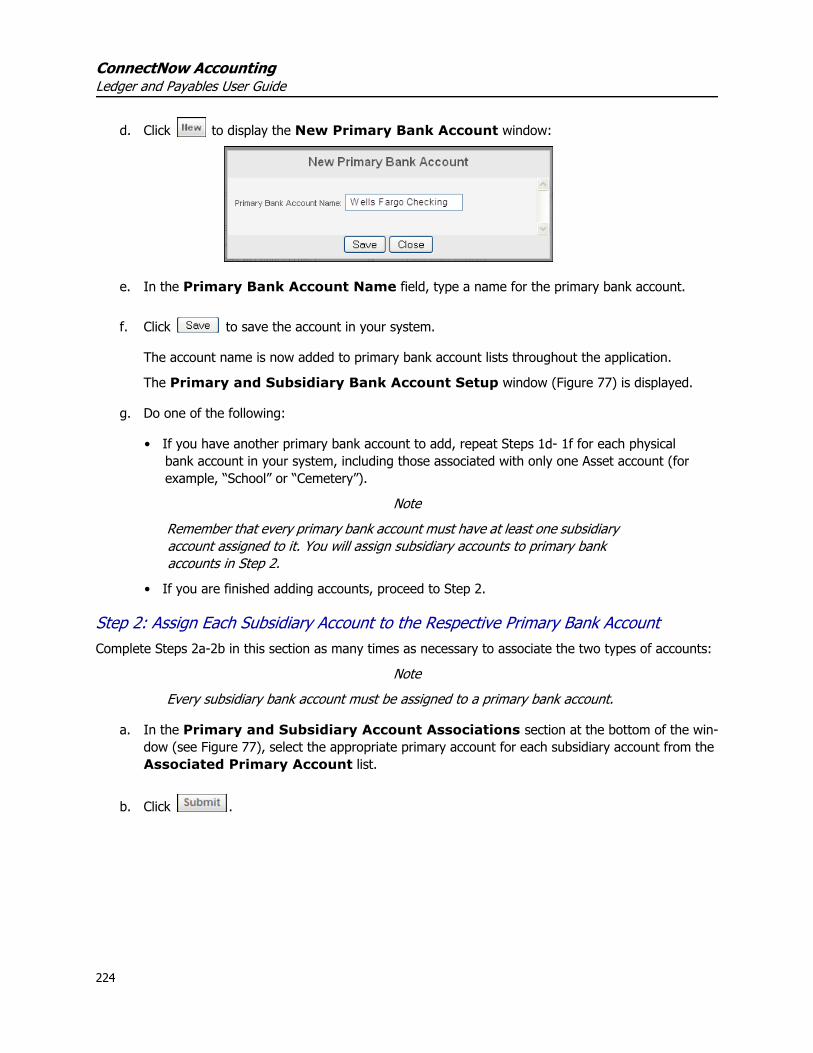
ConnectNow AccountingLedger and Payables User Guide
d. Click to display the New Primary Bank Account window:
e. In the Primary Bank Account Name field, type a name for the primary bank account.
f. Click to save the account in your system.
The account name is now added to primary bank account lists throughout the application.
The Primary and Subsidiary Bank Account Setup window (Figure 77) is displayed.
g. Do one of the following:
• If you have another primary bank account to add, repeat Steps 1d- 1f for each physical bank account in your system, including those associated with only one Asset account (for example, “School” or “Cemetery”).
NoteRemember that every primary bank account must have at least one subsidiary account assigned to it. You will assign subsidiary accounts to primary bank accounts in Step 2.
• If you are finished adding accounts, proceed to Step 2.
Step 2: Assign Each Subsidiary Account to the Respective Primary Bank Account Complete Steps 2a-2b in this section as many times as necessary to associate the two types of accounts:
NoteEvery subsidiary bank account must be assigned to a primary bank account.
a. In the Primary and Subsidiary Account Associations section at the bottom of the win-dow (see Figure 77), select the appropriate primary account for each subsidiary account from the Associated Primary Account list.
b. Click .
224

Managing the System and User AccountsUsing the Primary and Subsidiary Bank Account Feature
17
Step 3: Select Administrative and Offset Subsidiary Bank Accountsa. At the top of the Primary and Subsidiary Bank Account Setup window (Figure 77), select the desired primary bank account.
b. In the Service Charge Account field and in the Interest Account field, select the appro-priate account for the primary bank account you selected.
These accounts will be used as the defaults for the bank reconciliation.
c. In Subsidiary Bank Offset Account field, select the subsidiary account that you want to use as the offset account for the service charge and interest income.
The offset account is used to reconcile the selected primary bank account (for automatic Journal Entry, for the bank’s service charges, and for interest income).
d. In the Check Number Ceiling field, enter the maximum check number for the account.
e. Click .
Step 4: Process Unpaid Bills and Memorized BillsIf you have open bills and/or memorized bills in your database, the application displays them to you and prompts you to associate each bill with a primary and subsidiary bank account and, if accrual, with an A/P Account. Figure 78 shows you an example of the Process Unpaid Bills window, which is displayed if your organization has open bills. Similarly, if you have memorized bills in your system, the application displays the Process Memorized Bills window. Before proceeding, you must associate each of the listed bills with a primary bank account and a subsidiary bank account and, if accrual, with an A/P Account.
IMPORTANT
You cannot enter a bill or deposit, create a check, or open any process until you associate each of the unpaid bills in your database with a primary and subsidiary bank account and, if accrual, with an A/P Account.
Figure 78. Process Unpaid Bills Window
225
ConnectNow AccountingLedger and Payables User Guide
To process any unpaid or memorized bills, do the following:
• To process unpaid bills:1. From the Primary Account list (Figure 78), select the primary account.
2. Select the subsidiary account for each of the bill's line items that belong to the selected primary account.
3. Click to save the information.
4. If your organization has multiple primary accounts, repeat Steps 1 - 3 for each primary account.
If you also have memorized bills, the Process Memorized Bills window is displayed next.
• To process memorized bills:1. Select the primary account from the Primary Account list.
2. Select the subsidiary account for each memorized bill's line items.
3. Click to save the information.
4. If your organization has multiple primary accounts, repeat Steps 1 - 3 for each primary account.
You can now access the Bills, Checks, and Deposit areas of the application.
You have completed the main setup. You can now do any of the following:
• Complete these optional setup tasks:o If you want to assign a default subsidiary bank account, or, where applicable, a subsidiary AP
account, to the Income, Expense and Dedicated accounts in your system, go to Step 5.
o If you want to input vendor distributions or update existing vendor distributions, go to Step 6.
• Log out of the application. To do this, click .• Perform these other Ledger and Payables tasks in the application:
o Enter bills. Go to “Entering Bills” on page 228.
o Enter deposits. Go to “Entering Deposits” on page 232.
o Reconcile a bank statement for a primary bank account. Go to “Reconciling Your Primary Bank Account” on page 233.
226

Managing the System and User AccountsUsing the Primary and Subsidiary Bank Account Feature
17
(Optional) Step 5: Assign a Default Subsidiary Bank Account and A/P Account (Where Applicable) to the Income, Expense, and Dedicated Accounts in your System Complete this step for each of the following account types: Income, Expense, and Dedicated.NoteIf you take the time now to specify a default subsidiary bank account for each Income, Expense, and Dedicated account in your system, you can save your-self time when doing future data entry work. For example, whenever you use a Bills or Deposit function, the default subsidiary bank account you specify in this procedure is automatically displayed.
a. Select the Ledger and Payables tab.
b. Click .
c. In the Quick Find section, select the desired account from the list. Click .
Details for the account you selected are displayed in the left pane under Account Information.
d. From the Subsidiary Bank Default box, select the subsidiary bank account that you want to use as the default for the type of account that appears in the Account Type list box (for exam-ple, Income, Expense, or Dedicated).
e. (Accrual-basis accounting systems only) From the Accounts Payable Default list, select an accounts payable account.
f. Click to save your selection.
(Optional) Step 6: Input or Update Vendor DistributionsNote
The Print Expense Distribution option in the configuration for the Detailed List report for vendors (Reports > Standard Reports > Vendors > Detailed List) enables you to identify existing vendors with account distributions.
a. Select the Ledger and Payables tab.
b. Click .
c. In the Quick Find list, select the desired vendor. Then, click .
The vendor's information is displayed in the left pane.
227
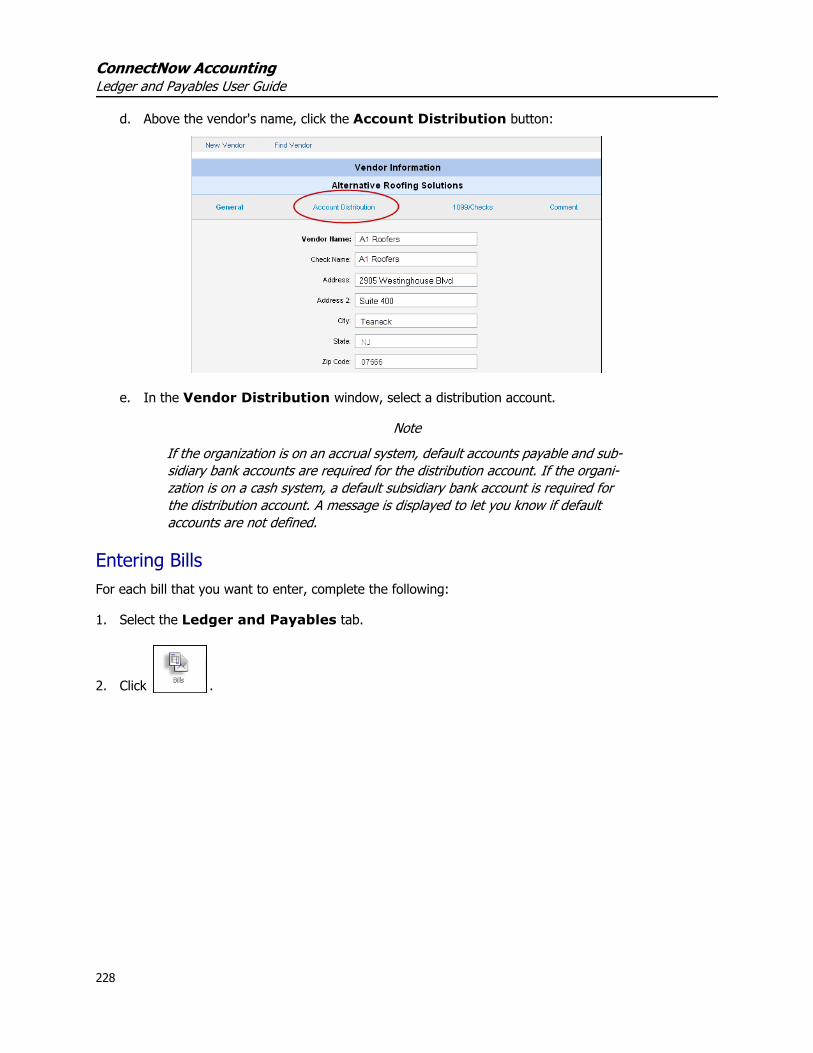
ConnectNow AccountingLedger and Payables User Guide
d. Above the vendor's name, click the Account Distribution button:
e. In the Vendor Distribution window, select a distribution account.
Note If the organization is on an accrual system, default accounts payable and sub-sidiary bank accounts are required for the distribution account. If the organi-zation is on a cash system, a default subsidiary bank account is required for the distribution account. A message is displayed to let you know if default accounts are not defined.
Entering Bills For each bill that you want to enter, complete the following:
1. Select the Ledger and Payables tab.
2. Click .
228

Managing the System and User AccountsUsing the Primary and Subsidiary Bank Account Feature
17
The Bill Information page (Figure 79) is displayed:Figure 79. Bill Information Window
The Primary Account field shows the default primary account if you defined one in the default account setup. If you did not define a default primary account, primary accounts are listed in alphabetic order.
NoteIf you want to define a default primary account, see “Setting User Preferences and Default Accounts” on page 15).
3. If necessary, select a primary account.
4. Select the vendor from the Vendor list. Then, type the invoice number, the invoice date, and the due date for the bill.
5. Do one of the following:
• If you already specified an account distribution for the vendor, the application automatically fills in the account information field at the bottom of the window. Go to Step 6.
NoteIf a distribution account is utilized from the vendor and the default subsidiary account you select for distribution is not associated with the primary bank account you selected for the bill, the distribution option is not displayed. You must enter all information manually.
OR
229

ConnectNow AccountingLedger and Payables User Guide
• If you did not set up an account distribution for the vendor, select the appropriate Expense accounts for the bill.
NoteIf the default subsidiary bank account for the Expense account you select for the line item is not assigned to the primary bank account you selected for the bill, no default accounts are listed at the bottom of the window. If you see no accounts, you must select a subsidiary bank account. The account you select must be assigned to the primary bank account you selected for the bill. To assign a subsidiary bank account, see “(Optional) Step 5: Assign a Default Subsidiary Bank Account and A/P Account (Where Applicable) to the Income, Expense, and Dedicated Accounts in your System” on page 227.
6. Enter the amount of the bill. If applicable, enter information in the Comment, Paid, Project, and 1099 fields.
7. Enter the second row for the line item. Then, do one of the following:
• Accept the defaults.
OR
• Select the subsidiary bank account and the subsidiary AP account from the list (for Primary Accrual).
8. Do one of the following:
• If you are printing checks, click to save the bill. Then, go to “Creating Checks” on page 231.
OR
• If you are issuing a manual check or need to record an electronic bill payment, complete these steps:
a. Select the link Assign Check Number.
b. In the Check Information window, enter the check number (or EFT number) and a date for the check.
c. Click .
d. Click to enter the bill.
230
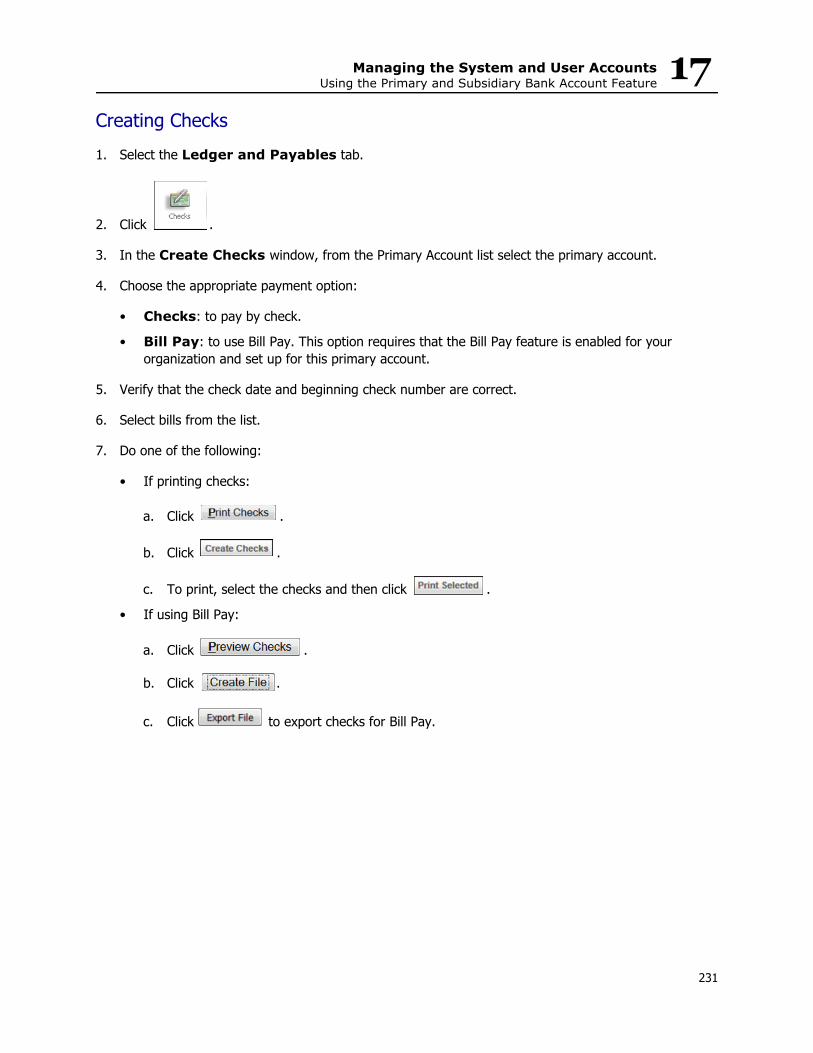
Managing the System and User AccountsUsing the Primary and Subsidiary Bank Account Feature
17
Creating Checks1. Select the Ledger and Payables tab.2. Click .
3. In the Create Checks window, from the Primary Account list select the primary account.
4. Choose the appropriate payment option:
• Checks: to pay by check.
• Bill Pay: to use Bill Pay. This option requires that the Bill Pay feature is enabled for your organization and set up for this primary account.
5. Verify that the check date and beginning check number are correct.
6. Select bills from the list.
7. Do one of the following:
• If printing checks:
a. Click .
b. Click .
c. To print, select the checks and then click .
• If using Bill Pay:
a. Click .
b. Click .
c. Click to export checks for Bill Pay.
231
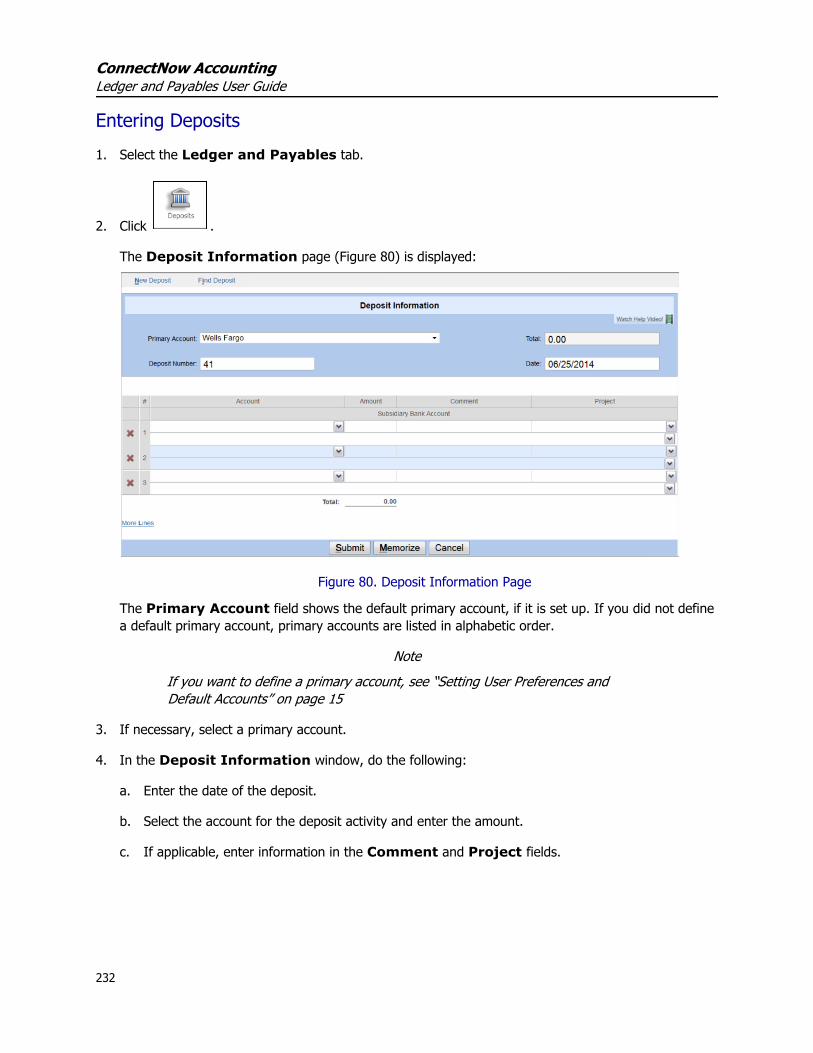
ConnectNow AccountingLedger and Payables User Guide
Entering Deposits1. Select the Ledger and Payables tab.
2. Click .
The Deposit Information page (Figure 80) is displayed:
Figure 80. Deposit Information Page
The Primary Account field shows the default primary account, if it is set up. If you did not define a default primary account, primary accounts are listed in alphabetic order.
NoteIf you want to define a primary account, see “Setting User Preferences and Default Accounts” on page 15
3. If necessary, select a primary account.
4. In the Deposit Information window, do the following:
a. Enter the date of the deposit.
b. Select the account for the deposit activity and enter the amount.
c. If applicable, enter information in the Comment and Project fields.
232

Managing the System and User AccountsUsing the Primary and Subsidiary Bank Account Feature
17
5. Do one of the following:• If you already defined the default subsidiary bank account for this Income/Dedicated account, the application automatically fills in the subsidiary bank account information field for the line item. Go to Step 6.
NoteIf you previously specified a default subsidiary bank account for the selected account in the line item, the subsidiary bank account information field is auto-matically filled in. The subsidiary bank account must be associated with the primary bank account for this to happen automatically. If the subsidiary account is not associated with the primary account, no account is displayed. You must choose one from the list.
• If you did not specify the default subsidiary bank account for this Income/Dedicated account, select it from the Subsidiary Bank Account list in the second entry line for the item.
6. Click .
Reconciling Your Primary Bank AccountNote
You must complete all bank reconciliations for pre-existing subsidiary bank accounts before creating a new statement for that subsidiary bank account’s primary account.
Bank reconciliation is performed on your primary bank account. To reconcile, follow these steps:
1. Select the Ledger and Payables tab.
2. Click .
3. Select the link Bank Reconciliation.
4. Do one of the following:
• Select the link Create a New Statement.
• Select a previous statement that is not reconciled.
233

ConnectNow AccountingLedger and Payables User Guide
The Bank Statement Information window (Figure 81) is displayed:
Figure 81. Bank Statement Information Window
5. From the Primary Account list, select the primary account.
6. Enter the statement date, the ending balance, service charge, and interest income amount, as applicable.
7. If you did not specify a subsidiary bank offset account (in Step 3c on page 225), select an account from the Subsidiary Bank Offset Account list.
The account you select is the Asset account that the application uses when creating an automatic Journal Entry for interest and bank service charge amounts.
8. Click .
All transactions associated with this primary bank account (regardless of the subsidiary account used in the Bill and Deposit entries) are displayed.
9. Reconcile your bank accounts as you typically do.
234
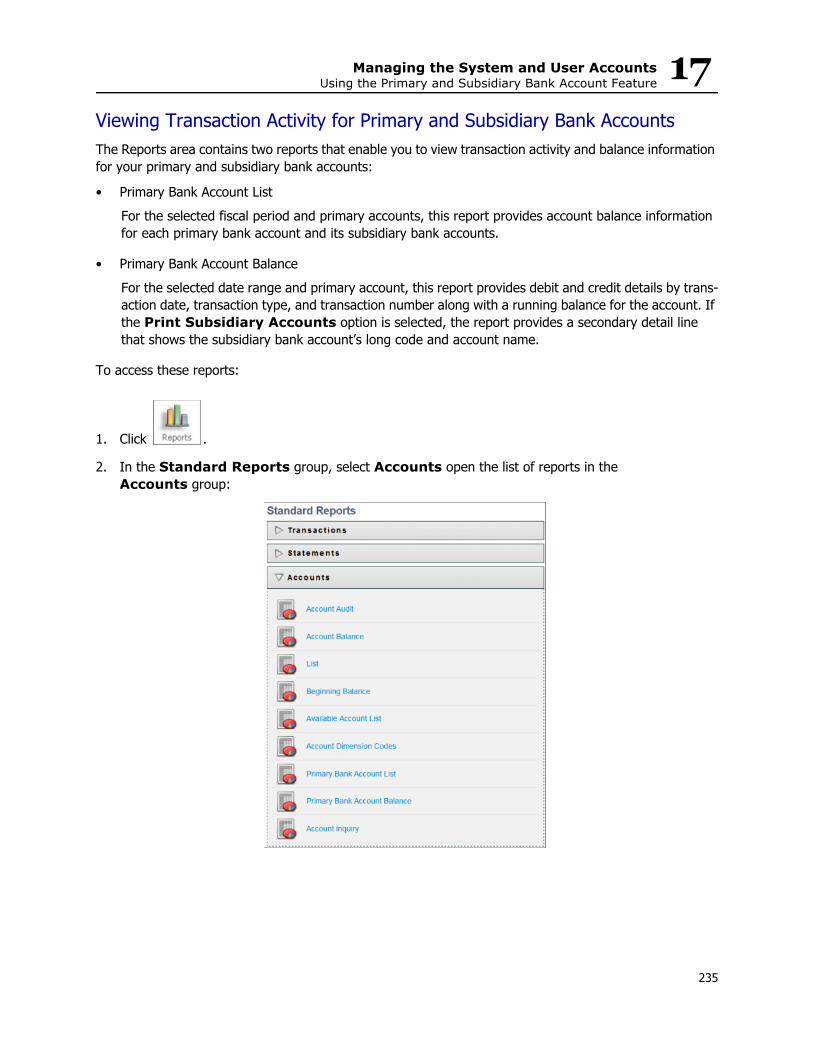
Managing the System and User AccountsUsing the Primary and Subsidiary Bank Account Feature
17
Viewing Transaction Activity for Primary and Subsidiary Bank AccountsThe Reports area contains two reports that enable you to view transaction activity and balance information for your primary and subsidiary bank accounts:• Primary Bank Account List For the selected fiscal period and primary accounts, this report provides account balance information for each primary bank account and its subsidiary bank accounts.
• Primary Bank Account Balance For the selected date range and primary account, this report provides debit and credit details by trans-action date, transaction type, and transaction number along with a running balance for the account. If the Print Subsidiary Accounts option is selected, the report provides a secondary detail line that shows the subsidiary bank account’s long code and account name.
To access these reports:
1. Click .
2. In the Standard Reports group, select Accounts open the list of reports in the Accounts group:
235

ConnectNow AccountingLedger and Payables User Guide
3. Select the desired report from the list to display its configuration page.
4. Configure the report as desired.
5. Do one of the following:
• To view a PDF of the report, click .
• To view the report in the Report Viewer, click .
Using the GAAP Compliance FeatureThe GAAP Compliance feature enables you to maintain specific, designated accounts (funds) to track restricted monies in accordance with Generally Accepted Accounting Principles (GAAP). GAAP Compliance is an option that authorized administrators can activate for their ConnectNow Accounting database(s) using the accrual method of accounting.
Understanding How GAAP Compliant Accounts WorkConnectNow Accounting’s GAAP Compliance functionality differs significantly from “Dedicated Accounts,” which track the balance remaining after expenses in a given fund but do not provide a way for expenses posted to that Dedicated Account to be shown in the Statement of Activities report. With GAAP Compli-ance, revenue for restricted accounts is posted to Income Accounts, and bills are posted to Expense Accounts as usual. What’s special is that when the bill amount is submitted in the system, ConnectNow Accounting automatically posts a journal entry that books the expense to the appropriate Income “Release Account” for that entity.
The automated journal entries are generated on an ongoing basis following a one-time, initial administra-tive process during which Income Release Accounts are defined for all three account restriction types— Without Donor Restrictions, With Donor Restrictions (Temp), With Donor Restrictions (Perm)—and for all entitles that include Income or Expense Accounts. Expense Accounts are then mapped to the proper Release Accounts via the Account Restriction setting (also a one-time setup), so the restricted expenses are recognized properly as expenses in the Statement of Activities, as GAAP compliance requires, and they are properly designated as either restricted or unrestricted funds. In ConnectNow, GAAP Compli-ance is designed to help organizations achieve GAAP-compliant accounting practices and reporting, while automating the day-to-day work in a highly streamlined process.
236

Managing the System and User AccountsUsing the GAAP Compliance Feature
17
Account Restriction Type DefinitionsNoteThe Account Restriction options were recently changed to reflect a new FASB standard that goes into effect for fiscal years beginning after 12/15/2017. The new standard is designed to simplify the classification of net assets and the presentation of information in financial statements. To help you prepare for this change, the options are slightly reworded to reflect the new standard yet maintain the terminology (shown in parentheses) associated with the former standard that you are familiar with.
• Without Donor RestrictionsEquates to the old standard accounting Unrestricted category. Monies in funds without donor restric-tions are not designated for a specific purpose and may be allocated for any purpose your governing financial body deems appropriate.
• With Donor Restrictions (Temp)Equates to the old standard accounting Temporarily Restricted category. Monies in funds with donor restrictions are given to an organization for a specific purpose with time or condition stipulations. For example, a donor may give money to purchase new equipment for the youth group’s mission trip, but the money must be spent by December 31 and can be spent only if 25 volunteers sign up for the trip. The money is available for the designated expenses only if the stipulations are met.
• With Donor Restrictions (Perm)Equates to the old standard accounting Permanently Restricted category. Monies in funds with donor restrictions are given with the stipulation that the organization must maintain the net assets in perpe-tuity, spending the interest earned but not the principal. A donor may also stipulate how the organiza-tion may spend the principal. For example, an endowment to a scholarship fund would need to be disbursed from interest earnings in the form of educational scholarships. Financial statements would need to show that the original endowment principal remains intact, while interest earned could be allocated to a temporarily restricted fund from which expenses for scholarship awards are booked.
After individual organizations define income release accounts for all three restriction types for all enti-tles that include income or expense accounts, money coming into your organization will be booked through revenue accounts.
Conditions for the GAAP Compliance OptionGAAP Compliance options are conditionally available at two levels:
• Individual organization, for both standalone and consolidated group implementations of ConnectNow Accounting
• Consolidating parent (higher-level) organization using Consolidation ManagerFor individual organizations using ConnectNow Accounting as a standalone system (that is, not consolidat-ing financial records with a parent organization), the Accounting Method must be set to “Accrual” in order for the GAAP Compliance option to be available. For individual organizations using ConnectNow Accounting as part of a consolidation with a parent or higher-level organization, the Accounting Methods must be set to “Accrual” at both the consolidating parent organization level as well as the individual organization level in order for the GAAP Compliance option to be visible at the individual organization level. GAAP Compliance will not display as an available option if the Accounting Method is set to “Cash.”
237

ConnectNow AccountingLedger and Payables User Guide
For all users, enabling GAAP Compliance should be considered a permanent change for an organization. Once activated, users are not permitted to “turn off” the GAAP Compliance option. Users who wish to return their databases to a non-GAAP status will need to contact customer service (fees may apply).
Impact on Dedicated AccountsEnabling the GAAP Compliance option within an individual ConnectNow Accounting database makes all “Dedicated Accounts” unavailable for transaction entry. Once GAAP Compliance is “turned on,” your organi-zation will no longer be able to designate any fund within the chart of accounts as a “Dedicated Account.”
If your organization has active Dedicated Accounts (the Statement of Dedicated Accounts report will provide you a list of accounts and balances), ConnectNow Accounting will require you to archive all of those Dedicated Accounts before it will allow you to enable GAAP Compliance functionality. Accounts must be at a $0 balance before you can archive them. See “Step 2: Transfer Balances and Archive Dedicated Accounts” on page 245 for guidance on journal entries and other tasks you’ll need to complete.
GAAP in Consolidated Group ImplementationsFor consolidated group implementation of ConnectNow Accounting, we recommend that all organizations activate the GAAP Compliance Function to streamline reporting at the consolidating organization level. The system, however, allows for a mixture of GAAP and non-GAAP organizations within the database. For example, you may have some churches or schools “turn on” GAAP Compliance, while others do not. Indi-vidual organizations are not impacted by the GAAP- or non-GAAP status of any other organization within the consolidated group.
For the consolidating parent or higher-level organization, having such a mix would affect the way you run consolidated reports. See “Reporting with GAAP Compliance” on page 238.
Reporting with GAAP Compliance
Consolidation-Level ReportingGAAP Compliance Consolidation Manager users will find that their statement options now provide a GAAP Compliant Consolidated Statement of Financial Position and GAAP Compliant Consolidated Statement of Activities.
If you need to produce consolidated reporting for a mix of GAAP-Compliant and non-GAAP organizations, you’ll need to run the GAAP Compliant Statements of Financial Position and/or Activity for those organiza-tions that are GAAP-Compliant and then run the standard Statements of Financial Position and Activities for those organizations that are not using the GAAP Compliance Function.
To access these statements:
1. Click .
2. In the Standard Reports group, select Statements to open the list of reports in the Statements group.
238
Managing the System and User AccountsUsing the GAAP Compliance Feature
17
3. Scroll to the bottom to locate the GAAP Compliant statements.Organization-Level ReportingFor individual organizations, activating the GAAP Compliance feature enables the new GAAP Compliant Statement of Activities and GAAP Compliant Statement of Financial Position reports.
The GAAP Compliant Statement of Activities is a landscape-format report that offer a choice of two primary column options, such as YTD Actual or YTD Budget. The system will produce a statement with four sec-ondary columns under each primary column selection:
• Without Donor Restrictions
• With Donor Restrictions (Temp)
• With Donor Restrictions (Perm)
• Total
See “Print Columns” on page 188 for more on column options.
GAAP Compliant individual organizations will no longer see a “Dedicated Accounts” section in their State-ment of Financial Position because their Dedicated Accounts will have been archived to enable the GAAP option.
Activating the GAAP Compliance Feature
Before You BeginBefore transitioning your ConnectNow Accounting system to use the GAAP Compliance feature, you need to understand the following requirements and permanent nature of the change.
• GAAP Compliance is a permanent change for your organization that enables new system-wide func-tionality and changes to reports. GAAP Compliance activation cannot be reversed by any administra-tive-level user.
• The system requires that all “Dedicated Accounts” be archived (and at $0 balances) before you can enable GAAP Compliance. Once GAAP Compliance is enabled, Dedicated Accounts will no longer be available for transaction posting.
• The ConnectNow customer service team can reverse the change for your ConnectNow Accounting sys-tem if necessary. Due to the staff time required to restore an organization to non-GAAP status, a pro-fessional services fee may apply.
239
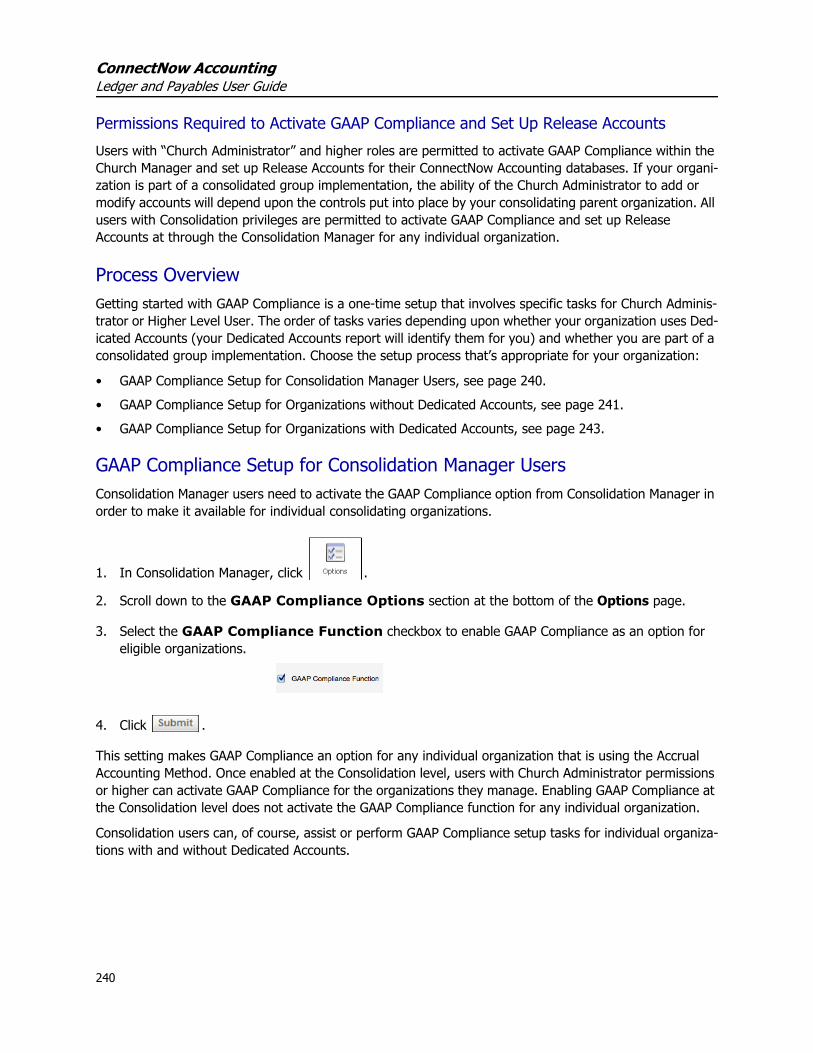
ConnectNow AccountingLedger and Payables User Guide
Permissions Required to Activate GAAP Compliance and Set Up Release AccountsUsers with “Church Administrator” and higher roles are permitted to activate GAAP Compliance within the Church Manager and set up Release Accounts for their ConnectNow Accounting databases. If your organi-zation is part of a consolidated group implementation, the ability of the Church Administrator to add or modify accounts will depend upon the controls put into place by your consolidating parent organization. All users with Consolidation privileges are permitted to activate GAAP Compliance and set up Release Accounts at through the Consolidation Manager for any individual organization.
Process OverviewGetting started with GAAP Compliance is a one-time setup that involves specific tasks for Church Adminis-trator or Higher Level User. The order of tasks varies depending upon whether your organization uses Ded-icated Accounts (your Dedicated Accounts report will identify them for you) and whether you are part of a consolidated group implementation. Choose the setup process that’s appropriate for your organization:
• GAAP Compliance Setup for Consolidation Manager Users, see page 240. • GAAP Compliance Setup for Organizations without Dedicated Accounts, see page 241.• GAAP Compliance Setup for Organizations with Dedicated Accounts, see page 243.
GAAP Compliance Setup for Consolidation Manager UsersConsolidation Manager users need to activate the GAAP Compliance option from Consolidation Manager in order to make it available for individual consolidating organizations.
1. In Consolidation Manager, click .
2. Scroll down to the GAAP Compliance Options section at the bottom of the Options page.
3. Select the GAAP Compliance Function checkbox to enable GAAP Compliance as an option for eligible organizations.
4. Click .
This setting makes GAAP Compliance an option for any individual organization that is using the Accrual Accounting Method. Once enabled at the Consolidation level, users with Church Administrator permissions or higher can activate GAAP Compliance for the organizations they manage. Enabling GAAP Compliance at the Consolidation level does not activate the GAAP Compliance function for any individual organization.
Consolidation users can, of course, assist or perform GAAP Compliance setup tasks for individual organiza-tions with and without Dedicated Accounts.
240
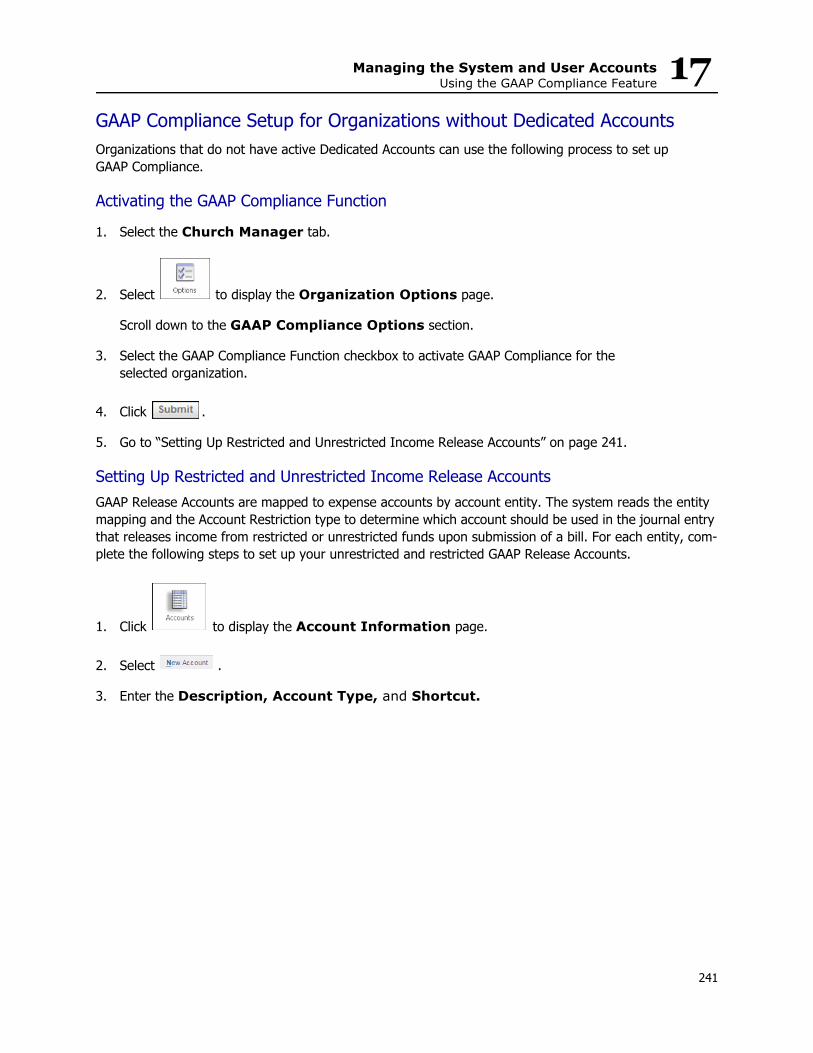
Managing the System and User AccountsUsing the GAAP Compliance Feature
17
GAAP Compliance Setup for Organizations without Dedicated AccountsOrganizations that do not have active Dedicated Accounts can use the following process to set up GAAP Compliance.Activating the GAAP Compliance Function
1. Select the Church Manager tab.
2. Select to display the Organization Options page.
Scroll down to the GAAP Compliance Options section.
3. Select the GAAP Compliance Function checkbox to activate GAAP Compliance for the selected organization.
4. Click .
5. Go to “Setting Up Restricted and Unrestricted Income Release Accounts” on page 241.
Setting Up Restricted and Unrestricted Income Release AccountsGAAP Release Accounts are mapped to expense accounts by account entity. The system reads the entity mapping and the Account Restriction type to determine which account should be used in the journal entry that releases income from restricted or unrestricted funds upon submission of a bill. For each entity, com-plete the following steps to set up your unrestricted and restricted GAAP Release Accounts.
1. Click to display the Account Information page.
2. Select .
3. Enter the Description, Account Type, and Shortcut.
241

ConnectNow AccountingLedger and Payables User Guide
4. Select the Entity (for example, church, school, cemetery).
5. Select the Cost Center (required for Income accounts but not for Net Asset Accounts), Category, Account, and Sub-Account.
6. From the Account Restriction dropdown list, one of these restriction types for the account:
NotesFor guidance with selecting the appropriate restriction type, see “Account Restriction Type Defi-nitions” on page 237.The Account Restriction field is available on the Account Information page after the GAAP Compliance Function is enabled for your system. The Account Restriction setting designates an account as a “GAAP Release Account.”
• Without Donor Restrictions
• With Donor Restrictions (Temp)
• With Donor Restrictions (Perm)
7. Click to save.
8. For each entity (for example, church, school, cemetery), repeat Steps 2 - 7 to add the Income Release Accounts you need.
You can view a complete list of your GAAP Release Accounts from your Setup menu’s GAAP Release Accounts link. See “Viewing a List of GAAP Release Accounts” on page 251 for more information.
242
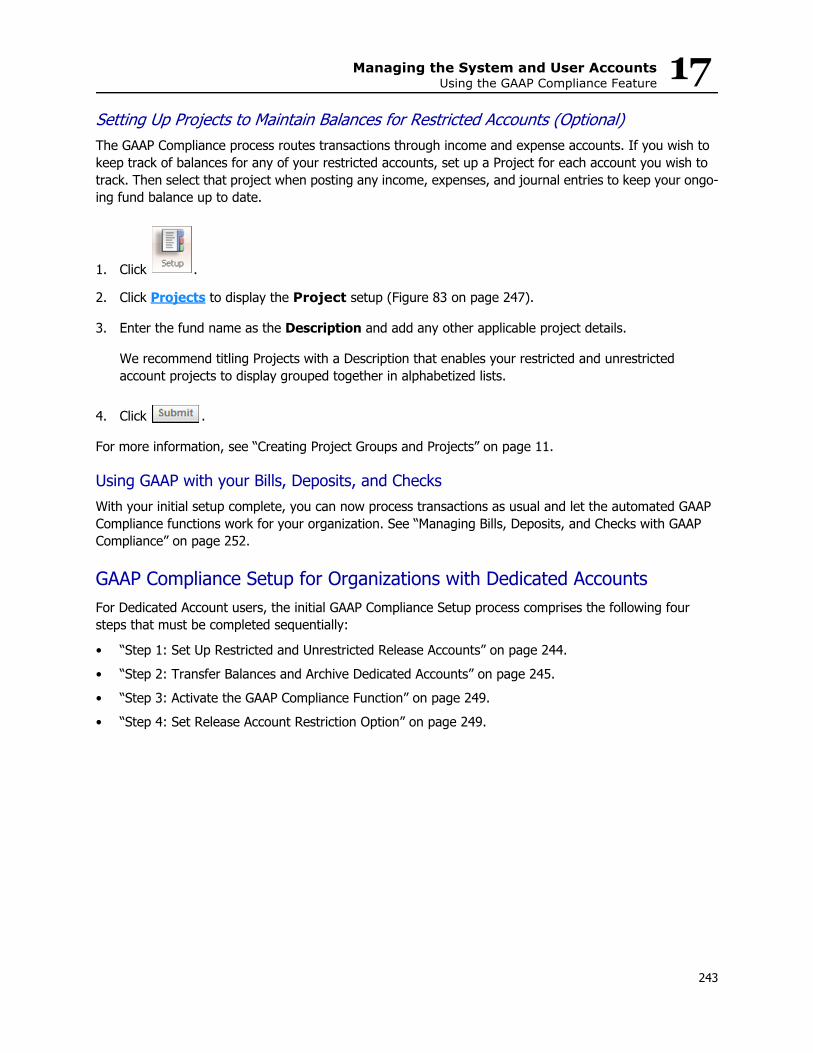
Managing the System and User AccountsUsing the GAAP Compliance Feature
17
Setting Up Projects to Maintain Balances for Restricted Accounts (Optional)The GAAP Compliance process routes transactions through income and expense accounts. If you wish to keep track of balances for any of your restricted accounts, set up a Project for each account you wish to track. Then select that project when posting any income, expenses, and journal entries to keep your ongo-ing fund balance up to date.1. Click .
2. Click Projects to display the Project setup (Figure 83 on page 247).
3. Enter the fund name as the Description and add any other applicable project details.
We recommend titling Projects with a Description that enables your restricted and unrestricted account projects to display grouped together in alphabetized lists.
4. Click .
For more information, see “Creating Project Groups and Projects” on page 11.
Using GAAP with your Bills, Deposits, and Checks With your initial setup complete, you can now process transactions as usual and let the automated GAAP Compliance functions work for your organization. See “Managing Bills, Deposits, and Checks with GAAP Compliance” on page 252.
GAAP Compliance Setup for Organizations with Dedicated AccountsFor Dedicated Account users, the initial GAAP Compliance Setup process comprises the following four steps that must be completed sequentially:
• “Step 1: Set Up Restricted and Unrestricted Release Accounts” on page 244.• “Step 2: Transfer Balances and Archive Dedicated Accounts” on page 245.• “Step 3: Activate the GAAP Compliance Function” on page 249.• “Step 4: Set Release Account Restriction Option” on page 249.
243

ConnectNow AccountingLedger and Payables User Guide
Step 1: Set Up Restricted and Unrestricted Release AccountsNote
If your accounting system is connected to a higher-level organization, your ability to add new accounts may be restricted by that higher-level organization. Some higher-level organizations allow local organizations to add sub-accounts; others maintain exclusive rights over accounts. If your organization is in either of these categories, contact your higher-level organization to request that a new account be added.
Dedicated Account users will need to establish their Release Accounts and archive Dedicated Accounts before they can activate the GAAP Compliance Function. Once those steps are complete, you’ll return to the Accounts Page to designate the appropriate GAAP Account Restriction type for each Release Account.
GAAP Release Accounts are mapped to expense accounts by account entity. The system reads the entity mapping and the Account Restriction type to determine which account should be used in the journal entry that releases income from restricted or unrestricted funds upon submission of a bill.
For each entity, complete the following steps to set up your unrestricted and restricted GAAP Release Accounts.
1. Click to display the Account Information page.
2. Select .
3. Enter the Description, Account Type, and Shortcut.
4. Select the Entity (for example, church, school, cemetery).
5. Select the Cost Center (required for Income accounts but not for Net Asset Accounts), Category, Account, and Sub-Account.
244

Managing the System and User AccountsUsing the GAAP Compliance Feature
17
NoteThe Account Restriction field is available on the Account Information page after the GAAP Compliance Function is enabled for your system. The Account Restriction setting designates an account as a “GAAP Release Account.”
6. Click to save.
7. Repeat steps 2 through 6 to add the Income Release Accounts you need for each Entity (for example, church, school, cemetery).
When your Income Release Accounts are added, close your Dedicated Accounts by completing “Step 2: Transfer Balances and Archive Dedicated Accounts” on page 245.
Step 2: Transfer Balances and Archive Dedicated AccountsYour Dedicated Accounts need to have a $0 balance before you can archive them. Complete the following procedures to run a Dedicated Accounts Report, transfer any balances to the appropriate accounts, and then archive each Dedicated Account. While the accounting decisions you make are unique to your organization, we recommend the following guidelines:
• For Dedicated Accounts holding income from the previous fiscal year, transfer those dollars to a Restricted Net Asset Account.
• For Dedicated Account balances from the current fiscal year, transfer those dollars to a Restricted Income or Restricted Income Release Account.
NoteIf your accounting system is connected to a higher-level organization, your ability to add new accounts may be restricted by that higher-level organization. Some higher-level organizations allow local organizations to add sub-accounts; others maintain exclusive rights over accounts. If your organization is in either of these categories, contact your higher-level organization to request that a new account be added or that they make Net Asset Accounts visible (to do this, select the Hide Net Asset Accounts checkbox from the Consolidation Manager’s Options page).
Step 2a: Run the Dedicated Accounts ReportThis report lists all the Dedicated Accounts and balances as of your selected fiscal period and prepares you for the journal entries needed before these accounts can be archived.
1. Click .
2. Select Statements.
3. Select to open the report configuration page.
245

ConnectNow AccountingLedger and Payables User Guide
4. Set any desired report options.
5. Click Preview Report.
The Dedicated Accounts Report (similar to the one shown in Figure 82) is displayed. The report lists each Dedicated Account and its ending balance.
Figure 82. Dedicated Accounts Example Report
246

Managing the System and User AccountsUsing the GAAP Compliance Feature
17
(Optional) Step 2b: Set Up Projects Needed to Continue Tracking Dedicated Fund Balances The GAAP Compliance process routes transactions through income and expense accounts. Therefore, with the absence of Dedicated Accounts to track balances for each fund, you may want to use Projects on your new restricted accounts to maintain that level of reporting to which your organization has become accus-tomed. When posting any income, expenses, and journal entries, simply select the project to ensure the fund balance is always up to date.1. Click .
2. Click Projects to display the Project setup (Figure 83):
Figure 83. Project Setup
3. Enter the Dedicated Fund name as the Description and add any other applicable project details.
We recommend you title projects with a description that enables your restricted and unrestricted account projects to display grouped together in alphabetized lists (for example, titling two projects as “RT-Roof” and “RT-Stage” keeps these two projects grouped together in your lists.).
4. Click to save the project.
For more information on how to create projects, see “Creating Project Groups and Projects” on page 11.
247

ConnectNow AccountingLedger and Payables User Guide
Step 2c: Post Journal Entries to Transfer Dedicated Account Balances
1. Click to display the Journal Entry Information page (Figure 84):
Figure 84. Journal Entry Information Page
2. Submit your journal entries to transfer the Dedicated Account fund balances to the appropriate accounts per your organization practices and affiliate the journal entry line items with a project, if desired.
3. Run the Dedicated Accounts Report again to ensure all balances are set to $0 (see page 245).
For more information on journal entries, see “Adding a Journal Entry” on page 128.
Step 2d: Archive Dedicated AccountsAfter your Dedicated Accounts have $0 balances, you must archive the accounts. Then, you can enable the GAAP Compliance Function for your system.
To archive a Dedicated Account:
1. Locate the Dedicated Account using the Quick Find.
2. Click to view the full account details.
3. Select the Archive Account checkbox.
4. Click to archive the account.
The account remains in the Quick Find list (to enable historical reporting and for research pur-poses). Archived accounts, however, are no longer available for transaction entry. If desired, you can choose not to include archived accounts in your reports and statements. Dedicated Accounts are not included in GAAP Compliant statements.
248
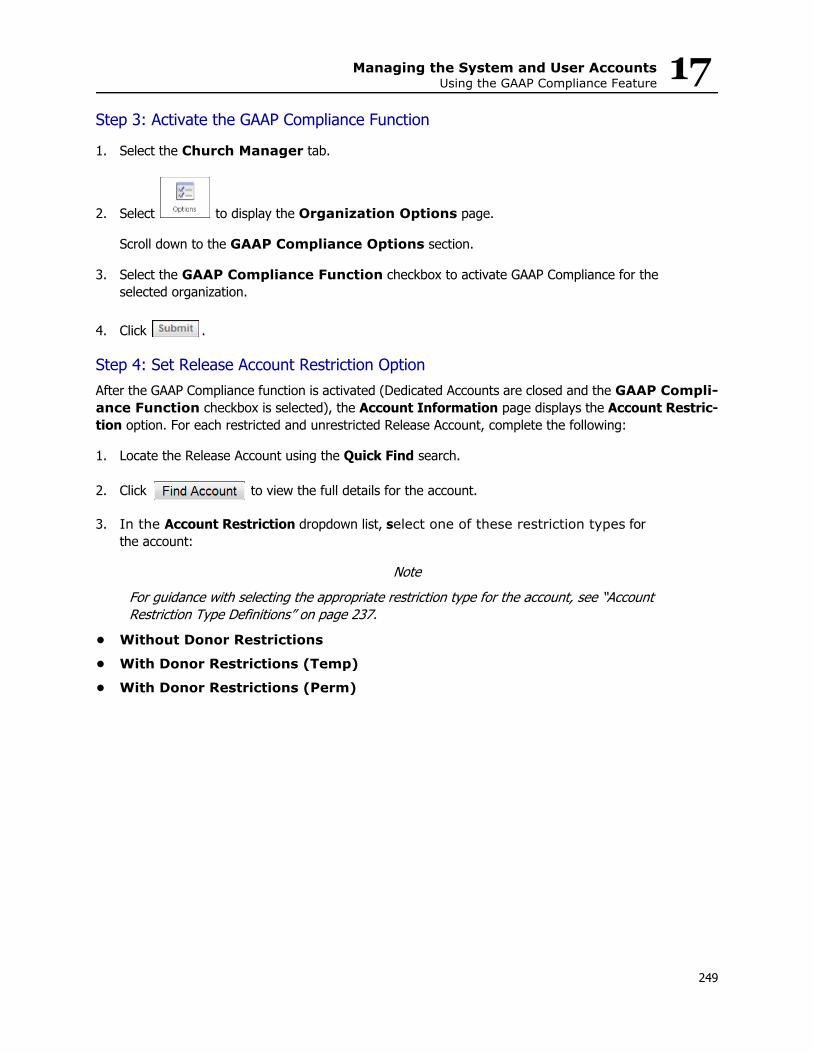
Managing the System and User AccountsUsing the GAAP Compliance Feature
17
Step 3: Activate the GAAP Compliance Function1. Select the Church Manager tab.
2. Select to display the Organization Options page.
Scroll down to the GAAP Compliance Options section.
3. Select the GAAP Compliance Function checkbox to activate GAAP Compliance for theselected organization.
4. Click .
Step 4: Set Release Account Restriction Option After the GAAP Compliance function is activated (Dedicated Accounts are closed and the GAAP Compli-ance Function checkbox is selected), the Account Information page displays the Account Restric-tion option. For each restricted and unrestricted Release Account, complete the following:
1. Locate the Release Account using the Quick Find search.
2. Click to view the full details for the account.
3. In the Account Restriction dropdown list, select one of these restriction types for the account:
NoteFor guidance with selecting the appropriate restriction type for the account, see “Account Restriction Type Definitions” on page 237.
• Without Donor Restrictions
• With Donor Restrictions (Temp)
• With Donor Restrictions (Perm)
249

ConnectNow AccountingLedger and Payables User Guide
The selected Account Restriction type tells the system to use this Release Account for the auto-mated journal entries whenever expenses of the selected Account Restriction type and Entity are sub-mitted on the Bill Information page.
4. Click to save.
5. For each Entity (for example, church, school, and cemetery), repeat Steps 2 - 4 to set an Account Restriction type for each Release Account.
250

Managing the System and User AccountsUsing the GAAP Compliance Feature
17
Viewing a List of GAAP Release AccountsThe GAAP Release Accounts link under your Setup menu provides a read-only list of the restricted and unrestricted release accounts set up for each entity.To view your list of GAAP Release Accounts, follow these steps:
1. Click .
2. Select .
The GAAP Release Accounts page (Figure 85) opens:
Figure 85. Read-only List of GAAP Release Accounts
251

ConnectNow AccountingLedger and Payables User Guide
Managing Bills, Deposits, and Checks with GAAP ComplianceAfter the GAAP setup is complete, individuals with user-level permissions can enter deposits, bills, and cre-ate checks as usual, choosing the proper restricted designation.
GAAP Release Accounts are mapped to expense accounts by account entity. The system reads the entity mapping and the Account Restriction type to determine which account should be used in the journal entry that releases income from restricted or unrestricted funds upon submission of a bill. Complete the follow-ing steps to set up your unrestricted, temporarily restricted, and permanently restricted GAAP Release Accounts for each entity.
Entering a Restricted Bill
1. Click to display the Bill Information page.
2. In Account Restriction dropdown list (Figure 86), select one of these options:
NoteFor proper GAAP Compliance functionality and proper mapping of expenses to release accounts where appropriate for the automated journal, you must select an Account Restriction option.
• With Donor Restrictions (Temp): this option equates to the old standard accounting Temporarily Restricted category.
• With Donor Restrictions (Perm): this option equates to the old standard accounting Permanently Restricted category.
Figure 86. Restricted Bill Information Page with GAAP Account Restriction Field
252

Managing the System and User AccountsUsing the GAAP Compliance Feature
17
3. Select the appropriate expense account from the Account dropdown list.4. Enter the amount of the bill.
5. In the Project dropdown list, select a project, if applicable.
6. Click .
For more information about bills, see “Creating a Bill” on page 71.
Submitting the Journal Entry Automatically Created from BillSubmitting a bill with an Account Restriction type set to With Donor Restrictions (Temp) or With Donor Restrictions (Perm) results in the automated creation and submission of a journal entry that transfers the expense to the appropriate Income Release Account, as specified in your Expense Account to GAAP Release Account mapping. After you click the Submit button on the Bill Information page, the system displays the Journal Entry Information page.
At the top of the Journal Entry Information page, the system displays this message: Journal Entry created from Bill! The bill number is displayed in Associated Bill Number field is displayed and linked. Click the bill number link to open the original bill. (Figure 87).
Figure 87. Journal Entry Automatically Created from Restricted Account Bill
253

ConnectNow AccountingLedger and Payables User Guide
Likewise, the Bill Information page displays the linked journal entry number in the Associated Journal Entry Number field (see Figure 88). Click the journal entry number to open the journal entry.
Figure 88. Bill Information Page with Associated Journal Entry Number
For more information on journal entries, see “Adding a Journal Entry” on page 128.
Entering a Deposit to a Restricted Account
1. Click to display the Deposit Information page (Figure 89).
2. Select the bank account.
3. Select the appropriate restricted income account.
254

Managing the System and User AccountsUsing the GAAP Compliance Feature
17
4. In the Amount field, enter the amount.5. If desired, add a comment and specify the project.
Figure 89. Deposit Information Page
6. Click .
For more information about deposits, see “Entering a Deposit” on page 119.
Voiding a Restricted Bill or CheckVoiding a bill for a restricted expense results in the automatic creation and submission of a reversing jour-nal entry. Voiding a check for a restricted expense voids the bill and also results in the automatic creation and submission of a reversing journal entry. The system displays a message at the top of the page to let you know that a reverse journal entry was submitted (see Figure 90).
Figure 90. Reverse Journal Entry Automatically Created with Voided Check or Bill
255
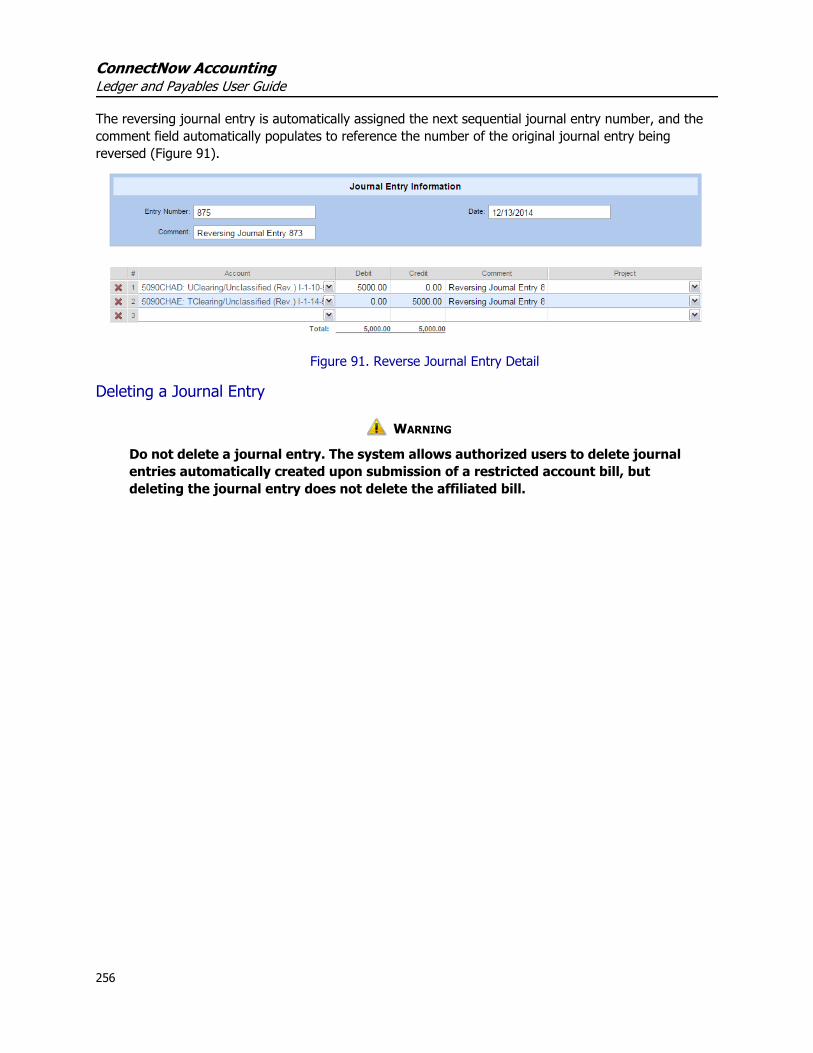
ConnectNow AccountingLedger and Payables User Guide
The reversing journal entry is automatically assigned the next sequential journal entry number, and the comment field automatically populates to reference the number of the original journal entry being reversed (Figure 91).
Figure 91. Reverse Journal Entry Detail
Deleting a Journal Entry
WARNING
Do not delete a journal entry. The system allows authorized users to delete journal entries automatically created upon submission of a restricted account bill, but deleting the journal entry does not delete the affiliated bill.
256
Index
Numerics1099, 66
1099 Payer Information, 196Field in Bill, 73Mark Bill Item as 1099 Expense, 73Print 1099's, 198Review 1099's, 197Set up 1099 Vendors, 64, 65, 67
1099 Vendor Name field, 661099/Checks
in Vendor Record, 64
AAbout this Manual, 4Access Permissions, Assigning, 211Account Distribution in Vendor record, 62Account Number of Vendor, 59Account Reconciliation Report, 117, 158, 160Account Restriction
FASB changes, 237Field in Account, 242Set Type, 242, 249Type Definitions, 237
Accounting MethodAccrual, 2Cash, 2
AccountsAccounts Payable Account for Bills, 72Add a new account, 41Archiving, 45, 248Bank Account for Bills, 72Bank Accounts for Checks, 81Budget window, 44Comments window, 45Creating a New Account, 41Default Accounts, Setting Up, 15Definition window, 41for Credit Card, 111for Deposit, 120for Deposit of restricted funds using GAAP Com-
pliance, 120for Journal Entries, 128for Journal Entry, 128Full list View, 47History Window, 45
Permanently Restricted, 237Select for Bill, 72Sort in Quick Find list, 47Temporarily Restricted, 237
Accrual Accounting Method, 2Accrual Requirement for GAAP Compliance, 237Accrual vs. Cash Accounting Systems, 2Add a New Account, 41Adding a New User, 201Administrator
Adding a New User, 201Assigning Access Permissions, 211Auditing Transactions, 215Deactivating a User’s Account, 203Designate Accounts Payable Account, 49Designate Bank Account Accounts, 48Designate Credit Card accounts, 50GAAP Compliance, 240Primary and Subsidiary Bank Accounts, 216Resetting Passwords, 203
Analytic Reports, 184Archive Dedicated Account, 248Archive Dedicated Accounts, 245Archiving Accounts, 45, 248Archiving Dedicated Accounts, 245Assign Check Number, 85Associated Bill Number, 131Associated Journal Entry Number, 75Audits, 215
BBalance Sheet, 162, 163Bank Account
for Checks, 81for Deposit, 120
Bank Reconciliation, 155Account Reconciliation Report, 117, 160After Conversion, 156Clear Range of Checks, 157Create New, 156Difference is Zero, 158View, Edit Statement, 159
Beginning Balance EntryCreating a Beginning Balance Entry, 53Find, Edit, Delete, 54Setting a Beginning Balance, 51
1
ConnectNow AccountingLedger and Payables User Guide
Beginning Balance Option, disabling, 214Bill List Report, 161, 163Bill Pay Feature, 99Bills
Account Restriction, 73Accounts, 73Adding More Lines, 73Adding New, 71Comments, 73Deleting, 75Electronic Check, 76Electronic payment, 99Finding, 73Manual Check, 76Memorizing, 77, 141Pay on-the-fly, 76Record Paid, 76Voiding, 75
Bookmarking the ConnectNow Website, 6Browser Compatibility, 3Budget window, 44Budgets
Budget Worksheet Report, 169Changing Amounts By Percentage, 173Creating First, 167Creating Subsequent, 168Current Year Options, 171Editing, 174Locking and Unlocking, 175Next Year Budget Options, 171
CCash Accounting Method, 2Cash vs. Accrual Accounting Systems, 2Chart of Accounts, 23
Account Level Examples, 36Add new, 41Add Sub-Account, 23Build Chart of Accounts, 25Convert from old system, 29Define Account Code Levels, 31Delete, 47Entities, 30Management of, 23Quick Find list, 25Select from Diocesan list, 23Sub-Account Number, 29
Check Date, 82Check Layouts, Configuring, 79Check Name, 59Check Number Ceiling, 44Check Register Report, 161, 163
ChecksBank Account, 81Beginning Check Number, 82Changing Check Numbers, 92Check Date, 82Deleting, 90Due on or before option, 82Electronic Check, 76, 85Finding, 87Layouts, Configuring, 79Manual Check, 76, 85Not Printed Correctly, 84Numbers with Alpha Characters, 77, 86Paying All, 82Paying Partial Amounts, 86Pop Up Blocker, 85Printed Correctly, 84Printing, 81Record Electronic, 85Record Handwritten, 85Select Which to Pay, 82Some Printed Correctly, 84Spoiling, 91Voiding, 89
Close Month, 155, 162Close Year, 164Comments
Accounts, 45Bills, 73Credit Cards, 112Journal Entry, 128Vendor Record, 67
Configuring a Report, 185Conversion from QuickBooks, 29Creating a New Account, 41Credit Card Charges Report, 161, 163Credit Cards
Account, 111Add More Lines, 112, 120Administrator Setup, 50Memorize Transaction, 141Pay the Credit Card Bill, 118Reconciling, 113Record Transactions, 111
Current Year Budge Options, 171Customizing Check Layouts, 79
DDashboard, 1, 7Data Conversion, 2Data Entry Permissions, Assigning, 211Deactivating a User’s Account, 203
2

Index
Dedicated AccountsArchiving, 248Archiving for GAAP Compliance, 245Journal Entry to Close, 248
Dedicated Accounts Archiving for GAAP Compli-ance, 238Dedicated Accounts Report, 245Dedicated Accounts Statement, 162, 163Deleting
Accounts, 47Bills, 75Checks, 90Deposits, 123Journal Entries, 131Memorized Transactions, 143Vendors, 68
Deposit Register Report, 161, 163Deposits, 119
Deleting, 123Editing, 122Entering, 119Finding, 121Importing, 177Memorizing, 120, 141Transferring from ParishSOFT Offering, 177
Discount Date, 72Due Date, 72Due on or before option, 82Due To/From Accounting
About, 147Audit Reports, 154Discontinuing Use, 153Example, 147Permissions, 149Processing Transactions, 153Setting Up, 149
EElectronic Check, 76, 85End of Fiscal Year Processing, 164
Reports, 163Reports to Run, 163
End of Month Processing, 155Close Month, 162Reconcile Bank Account, 155Reports, 161Reports to Run, 161
EntitiesAssigning Permissions, 204Setting Up, 30Viewing and Editing, 30
Entity-level permissions, 204
Entity-level RestrictionsEffect on Transaction Pages, 205
Entity-level Restrictions, Turning On, 210Exporting Reports, 195
FFASB (Financial Accounting Standards Board)
account restriction types, 237changes in categorization of net assets, 43, 51,
189compliance, 1
FindingAccounts, 46Bills, 73Checks, 87Deposits, 121Journal Entries, 129Vendors, 61
Font Size, 190Forgot Password, 5
GGAAP Compliance
Account Restriction Types, 237Accounts, 51Activating, 241, 249Archiving Dedicated Accounts, 245Automating Journal Entries, 129Before You Activate, 239Bils, 73Conditions, 237Deposits, 120How Accounts Work, 236Impact on Dedicated Accounts, 238In Consolidated Group Implementations, 238Net Asset Summary on Statement, 190Overview, 236Permissions, 240Permissions Required, 240Process Overview, 240Setup for Consolidation Manager Users, 240Setup for Organizations with Dedicated Ac-
counts, 243Setup for Organizations without Dedicated Ac-
counts, 241Statements, 238
GAAP Release AccountsSet Up, 241View List, 251
General Ledger Report, 161, 163Group By Project Group, 190
3

ConnectNow AccountingLedger and Payables User Guide
HHistory of Account, 45History window, 45Hosting, 1
IImporting Journal Entries, 137Importing Payroll Data, 133Include Inactive History Accounts, 189Include Inactive Projects, 190Income Release Accounts
Setting Up for GAAP Compliance, 241, 244Income Statement, 162, 163Introduction to Ledger and Payables, 1
JJournal Entries
Automating with GAAP Compliance Function,129
Creating New, 128, 248Debit or Credit?, 127Deleting, 131Editing, 130Example Effects on Accounts, 127Finding Records, 129Importing, 137Importing Payroll Data, 133Memorizing, 112, 128, 141
Journal Entry List Report, 161, 163
KKeyboard Shortcuts, 9
LLedger, 1Levels, 28, 32, 35Locking a Budget, 175Logging In, 4Logging Out
Inactive User Sessions, 4User, 10
Lost Password, 5
MManual Check, 76, 85Memorized Report Group, 193Memorized Transactions
Create New Transactions Entries, 143Dates, 78, 142Delete, 143Frequency, 141
View, 142Viewing and Editing Entries, 145Zero Amounts, 78, 142
MemorizingBills, 77Credit Cards, 112Deposits, 120Journal Entries, 112, 128Transactions, 141
Microsoft Edge, 3More Lines
for Bills, 73for Credit Cards, 112for Deposits, 120for Journal Entries, 128
NNavigation Buttons, 6Net Asset Summary
Print Option, 190New Vendor, 72Next Year +1 Budget Options, 171Next Year Budget Options, 171
PParishSOFT Offering, Importing Contributions, 177ParishSOFT, Contacting, 4Passwords
Changing, 5Recovering, 5Resetting (Administrator), 203
Pay a BillCredit Card, 118On the Fly, 76Partial Amount, 86Selecting Bills to Pay, 82
PermissionsAccess, 211Entity-Level, 204
Permissions TemplateApplying, 202
Pop-Up Blocker, 6, 85Pop-Up Windows, Allowing, 6Positive Pay, 93
Create Check Issue File, 98Enable, 94Set up, 95
Primary and Subsidiary Bank AccountsActivating, 217, 239Overview, 216Reconciliation, 233Setting Up Accounts, 217
4

Index
Setting Up ConnectNow Accounting, 223Print Account Codes, 190Print Shortcuts, 190Print Transaction Comments, 190Printing Options for Reports, 189Profit or Loss Statement, 162, 163Project Group, 190Project Groups, 11
Deleting, 14Finding, 13
ProjectsBills, 73Credit Cards, 112Deleting, 15Deposits, 120Finding, 14Groups, 11Journal Entries, 128Setting Up, 11Using with GAAP Compliance Function, 243,
247
QQuick Find
Accounts, 46Sort options, 47Vendors, 61, 62
QuickBooks, conversion from, 29
RReconciling
Bank Accounts, 155Credit Cards, 113
ReportDedicated Accounts, 245
Report Format, 190Report Viewer, 192Reporting
with GAAP Compliance, 238Reports, 181
1099, 184, 198A/P Aging Detail By Period, 182Account Audit, 183Account Balance, 183Account Dimension Codes, 183Account Inquiry, 183Account List, 183Account Reconciliation, 158Account Reconciliation Report, 184Analytic Reports, 184Available Account List, 183Balance Sheet (Statement of Financial Posi-
tions), 183Beginning Balance, 183Bill List, 184Budget Worksheet, 184Cash Distribution by Entity, 182Check Register, 184Configuring, 185Credit Card Charges, 184Date Selections, 186Dedicated Accounts, 183Deposit Register, 184Exporting Reports, 195GAAP Compliant Statement of Activities, 239GAAP Compliant Statement of Financial Posi-
tion, 239General Ledger, 184Income vs Expense Graph, 184Journal Entry List, 182, 184Level Selections, 187Memorize, 193Memorized Report Group, 193Memorized Transactions, 184Monthly Budget History (Budget/History), 184Monthly Budget/History (Statements), 183Options, 186Parish Financial Profile, 183Print Columns, 188Print Options, 189Project Report, 184Report Format, 189Report Sub-Title, 193Report to Parishioners, 183Report Viewer, 192Resetting Configuration Options, 192Statement of Activities, 183Statement of Activities-Columnar by Entity, 183Statement of Activities-Columnar by Level, 183Statement of Activities-Columnar Date Selec-
tion, 183Statement of Activities-Detailed Quarterly, 183Statement of Activities-With Date Range, 183Statement of Activities-With Dedicated Ac-
counts, 183Statement of Cash Flow, 183Statement of Financial Position, 183Transactions, 182Trial Balance Report, 184Vendor 1099 Misc, 184Vendor Audit, 184Vendor Basic List, 184Vendor Detailed List, 184Vendor Labels, 184
5
ConnectNow AccountingLedger and Payables User Guide
Vendor Telephone List, 184Vendor Terms, 184Viewing, 181
Resetting a Password, 203Resetting Report Criteria, 192Restricted Accounts
Setting Up for GAAP Compliance, 241, 244Reversing Journal Entries, 131
SSchedule Payment for Due Date, 72Setting Up
Account Distributions, 62Chart of Accounts, 23Check Layout, 79GAAP Compliance, 239Print 1099 Forms, 65Projects, 11User Preferences and Default Accounts, 15Vendor Terms, 19Vendor Types, 21
Shortcut, 42Show Dimension Codes, 190Show Numbers Without Cents, 189Smart Tuition, 199Spoiling a Check, 91Statement of Activities, 162, 163Statement of Financial Position, 162, 163Sub-Accounts, 43Support Contact Information, 4Suppress Zero Accounts, 190System Requirements, 3
TTechnical Support, 4Temp/Perm Restriction Format, 189Terms, 59Training, 2Type of Vendor, 59
UUnlocking a Budget, 176Unrestricted Accounts
Setting Up for GAAP Compliance, 241, 244
VVendors
1099/Checks Window, 64Account Distribution Window, 62Account Number, 59Adding New, 57
Address Information, 59Bill Information, 72Contact Information, 59Deleting, 68Discount Date, 59Due Date, 59Editing Record, 62Finding, 61Name on Check, 59Payment Terms, Specifying, 59Type, 59Web Page, 59
Video Help, 10Voiding Checks, 89
WWatch Help Video! Link, 10With Donor Restrictions (Permanent) Account, 237With Donor Restrictions (Temporary) Account, 237Without Donor Restrictions Account, 237
6