LED-Beam-Moving-Head - Monacor · with LED strip on each edge. 2. ... roteante e il cubo di luci...
23
ELECTRONICS FOR SPECIALISTS ELECTRONICS FOR SPECIALISTS ELECTRONICS FOR SPECIALISTS ELECTRONICS FOR SPECIALISTS BEDIENUNGSANLEITUNG INSTRUCTION MANUAL MODE D’EMPLOI ISTRUZIONI PER L’USO MINICUBE-60 Bestell-Nr. • Order No. 38.7980 LED-Beam-Moving-Head mit LED-Kantenstreifen LED Beam Moving Head with LED strip on each edge
Transcript of LED-Beam-Moving-Head - Monacor · with LED strip on each edge. 2. ... roteante e il cubo di luci...

ELECTRONICS FOR SPECIALISTS ELECTRONICS FOR SPECIALISTS ELECTRONICS FOR SPECIALISTS ELECTRONICS FOR SPECIALISTS
BEDIENUNGSANLEITUNG
INSTRUCTION MANUAL
MODE D’EMPLOI
ISTRUZIONI PER L’USO
MINICUBE-60Bestell-Nr. • Order No. 38.7980
LED-Beam-Moving-Headmit LED-Kantenstreifen
LED Beam Moving Headwith LED strip on each edge

2
ELECTRONICS FOR SPECIALISTS ELECTRONICS FOR SPECIALISTS ELECTRONICS FOR SPECIALISTS ELECTRONICS FOR SPECIALISTS
Deutsch . . . . . . . . . . Seite 4
English . . . . . . . . . . . Page 8
Français . . . . . . . . . . Page 12
Italiano . . . . . . . . . . . Pagina 16

3
ELECTRONICS FOR SPECIALISTS ELECTRONICS FOR SPECIALISTS ELECTRONICS FOR SPECIALISTS ELECTRONICS FOR SPECIALISTS
Menüpunkt Menu item Point menu Voce del menu
Funktion Function Fonction Funzione
DMX Address 001-512
DMX-Startadresse einstellen ( DMX-Tabellen siehe Seite 20 – 22)
Setting the DMX start address (DMX tables on pages 20 – 22
Réglage adresse de démarrage DMX (tableaux DMX voir pages 20 – 22)
Impostare l'indirizzo di start DMX (tabelle DMX vedi pagg. 20 – 22
Channel Mode 69/27/23/8
Anzahl der DMX- Kanäle wählen
Selecting the num-ber of DMX channels
Sélection du nombre de canaux DMX
Scegliere il numero dei canali DM
Slave Mode Master, Slave 1, 2
Slave-Modus wählen Selecting the slave mode Sélection mode Slave Scegliere il modo slave
AutoRun Mode Auto 0-16 Speed 0-9
Show-Programm aus wählen, Geschwin-digkeit einstellbar
Selecting the show program, adjusting the speed
Sélection programme Show, vitesse réglable
Scegliere il programma show, velocità impo-stabile
Show Mode 0-16
Show-Programm aus-wählen, Musiksteue-rung möglich
Selecting the show program, music control available
Sélection programme Show, gestion par la musique possible
Scegliere il programma show, possibilità di comando musica
Sound State On/Off
Musiksteuerung ein- und ausschalten Music control on /off
Activation / désacti-vation gestion par la musique
Attivare e disattivare il comando tramite la musica
Sound Sense 0-100
Mikrofonempfindlich-keit für die Musiksteu-erung einstellen
Setting the micro-phone sensitivity for music control
Réglage sensibilité micro pour la gestion par la musique
Impostare la sensibilità del microfono per il comando tramite la musica
Back Light On/Off
Display nach dem letzten Tastendruck automatisch dunkel-schalten
Automatic deactiva-tion of display back-light if no button is pressed
Assombrir automati-quement l'affichage après la dernière pres-sion sur une touche
Oscurare il display automaticamente dopo l'ultima pressione di un tast
Pan Inverse On/Off
Drehrichtung des Dreh arms entgegen-gesetzt
Movement of rota-ting arm in opposite direction
Inversion du sens de rotation du bras
Direzione opposta di rotazione del braccio roteante
Auto Test
Testdurchlauf Test run Auto-test Svolgimento di un tes
Fixture Time
Betriebsstunden anzeigen
Indication of operating hours
Affichage des heures de fonctionnement
Visualizzare le ore di funzionamento
Firmware Version
Firmware-Version anzeigen
Indication of firmware version
Affichage de la ver-sion du Firmware
Visualizzare la versione del firmware
Reset
Dreharm und Leuchtwürfel in die Ausgangsstellung zurücksetzen
Resetting the rotating arm and the cube to starting position
Réinitialisation du bras tournant et du cube lumineux sur la position de départ
Riportare il braccio roteante e il cubo di luci nella posizione di partenza
1. Menüpunkt mit Taste MENU anwählen (mit DOWN wieder einen Menüpunkt zurück).
2. Zum Aktivieren ENTER drücken.3. Einstellung mit UP/ DOWN ändern.4. Mit ENTER speichern.
1. Use button MENU to select menu item (use button DOWN to return to previous menu item).
2. Press ENTER to activate.3. Use UP/DOWN to change settings.4. Use ENTER to save settings.
1. Sélectionner un point du menu avec la touche MENU (reculer d'un point de menu avec la touche DOWN).
2. Appuyer sur ENTER pour activer.3. Modifier le réglage avec UP/ DOWN.4. Mémoriser avec ENTER.
1. Scegliere la voce del menu con il tasto MENU (con DOWN sempre una voce indietro).
2. Per attivare premere ENTER.3. Modificare l'impostazione con UP/DOWN.4. Salvare con ENTER.

4
Deu
tsch
EnglishEnglish Page
FrançaisFrançais Page
ItalianoItaliano Pagina
EspañolEspañol Página
NederlandsNederlands Pagina
PolskiPolski Strona
MENU UP DOWN
MINICUBE-60
ENTER
DM
X IN
DM
X O
UT
230
V~/5
0H
zPO
WER
OU
T
FUSE
1
5
6
2 8
3
4 4
9
7
MINICUBE-60
DeutschDeutsch Seite
Kompakter LED-Beam-Moving-HeadDiese Anleitung richtet sich an den Installateur des Geräts und an Bediener mit Grundkenntnis-sen in der DMX-Steuerung . Bitte lesen Sie die Anleitung vor dem Betrieb gründlich durch und heben Sie sie für ein späteres Nachlesen auf .
1 Übersicht
1 Dreharm
2 Unterteil, zum Tragen nur hier anfassen
3 Bedientasten MENU, UP, DOWN und ENTER für den Betriebsmodus und für Ein stellungen über ein Menü
4 Halterung für die beiliegenden Montagebügel (☞ Kapitel 3, zweiter Absatz)
5 DMX-Signal-Ausgang (3-pol . XLR) zum An-schluss an den DMX-Eingang eines weiteren DMX- Lichteffektgeräts
6 DMX-Signal-Eingang (3-pol . XLR) zum An-schluss eines DMX-Lichtsteuergeräts oder zum Anschluss an den DMX-Ausgang eines weiteren DMX-gesteuerten Geräts
7 Powercon®-Netzbuchse POWER OUT zur Stromversorgung eines weiteren Lichteffekt-geräts
8 Halterung für die Netzsicherung Eine geschmolzene Sicherung nur durch eine gleichen Typs ersetzen!
9 Powercon-Netzbuchse zum Anschluss an eine Steckdose (230 V/ 50 Hz) über das beiliegende Netzkabel
2 Hinweise für den sicheren Gebrauch
Das Gerät entspricht allen relevanten Richt linien der EU und trägt deshalb das -Zeichen .
WARNUNG Das Gerät wird mit lebensgefähr-licher Netzspannung versorgt . Nehmen Sie deshalb nie selbst Eingriffe am Gerät vor und ste-
cken Sie nichts durch die Lüftungsöffnungen . Es besteht die Gefahr eines elektrischen Schlages .
• Verwenden Sie das Gerät nur im Innenbereich und schützen Sie es vor Tropf- und Spritzwas-ser sowie vor hoher Luftfeuchtigkeit . Der zulässige Einsatztemperaturbereich beträgt 0 – 40 °C .
• Die in dem Gerät entstehende Wärme muss durch Luftzirkulation abgegeben werden . Decken Sie darum die Lüftungsöffnungen des Gehäuses nicht ab .
• Zie hen Sie sofort den Netzstecker aus der Steckdose,1 . wenn sichtbare Schäden am Gerät oder am
Netzkabel vorhanden sind,2 . wenn nach einem Sturz oder Ähnlichem
der Verdacht auf einen Defekt besteht,3 . wenn Funktionsstörungen auftreten .Geben Sie das Gerät in jedem Fall zur Repa-ratur in eine Fachwerkstatt .
• Ziehen Sie den Netzstecker nie am Kabel aus der Steckdose, fassen Sie immer am Stecker an .

5
Deu
tsch• Fassen Sie das Gerät zum Tragen nur am
Unter teil (2) an . Auf keinen Fall das Gerät am Leuchtwürfel oder Dreharm (1) tragen!
• Verwenden Sie zum Reinigen des Gehäuses nur ein trockenes, weiches Tuch, niemals Was-ser oder Chemikalien . Für die Kunststofflinsen der LEDs kann auch ein mildes Reinigungs-mittel verwendet werden . Ziehen Sie vor dem Reinigen den Netzstecker aus der Steckdose!
• Wird das Gerät zweckentfremdet, nicht sicher montiert, falsch angeschlossen, nicht richtig be dient oder nicht fach gerecht repariert, kann keine Haftung für daraus resultierende Sach- oder Personenschäden und keine Garantie für das Gerät übernommen werden .
Soll das Gerät endgültig aus dem Be-trieb genommen werden, übergeben Sie es zur umweltgerechten Entsor-gung einem örtlichen Recyclingbetrieb .
3 Einsatz- und Aufstell-möglichkeiten
Der Moving-Head dient zur Effektbeleuchtung, z . B . auf Bühnen und in Diskotheken . Als Licht-quelle sind sechs leistungsstarke 10-W-RGBW-LEDs eingesetzt und als besonderer Akzent an den 12 Kanten RGB-LED-Streifen . Der MINICUBE-60 ist für die Steuerung über ein DMX-Lichtsteuergerät ausgelegt . Er kann aber auch allein betrieben werden, indem verschie-dene Lichtshow-Programme automatisch oder musik gesteuert ablaufen .
Das Gerät auf eine feste, ebene Fläche auf-stellen . Es lässt sich aber auch kopfüber an ein entsprechendes Trägersystem montieren . Dazu werden zwei stabile Montageschellen benötigt . Die Schellen an den mitgelieferten Montage- bügeln festschrauben . Die Bolzen der Bügel in die vorgesehenen Öffnungen (4) auf der Geräte-unterseite stecken und im Uhrzeigersinn bis zum Anschlag drehen . Die Schellen zusammen mit dem Gerät am Trägersystem festschrauben .
Der Abstand zu angestrahlten Flächen sollte mindestens 50 cm betragen .
4 StromversorgungWichtig! Zur Stromversorgung ist der MINI-CUBE-60 mit Powercon-Anschlüssen ausgestat-tet . Ein Powercon-Stecker darf nicht unter Span-nung ein- oder ausgesteckt werden . Stellen Sie darum immer zuerst die Powercon-Verbindung her, dann die Verbindung zur Netzsteckdose und trennen Sie die Verbindung zur Netzsteckdose immer vor der Powercon-Verbindung .
1) Den Moving-Head über die blaue Netzbuchse „230 V~ / 50 Hz“ (9) mit dem beiliegenden Netzkabel an eine Steckdose (230 V/ 50 Hz) anschließen . Den blauen Powercon-Stecker des Netzkabels nach dem Einstecken in die Netz buchse nach rechts drehen, bis er ein-rastet . Zum späteren Herausziehen den Si-cherungsriegel am Stecker zurückziehen und den Stecker nach links drehen .
2) Werden mehrere MINICUBE-60 verwen-det, kann die weiße Buchse POWER OUT (7) des ersten Geräts mit der Netzbuchse „230 V~ / 50 Hz“ des zweiten Gerätes verbun-den werden . Dazu wird ein Netzkabel mit Powercon-Steckern (NAC-3FCB und NAC-3FCA) benötigt . Das zweite Gerät kann dann wieder mit dem dritten Gerät verbunden werden usw ., bis alle Geräte in einer Kette angeschlossen sind . Auf diese Weise lassen sich maximal 20 Geräte zusammenschalten .
3) Die Buchse POWER OUT (7) kann auch zur Stromversorgung anderer (Lichteffekt-) Ge-räte genutzt werden . Jedoch dürfen die Buchsen „230 V~ / 50 Hz“ und POWER OUT nicht mit einem Strom von mehr als 16 A be-lastet werden . Es kann sonst durch die Über-lastung ein Kurzschluss und Brand entstehen .
Sobald der Moving-Head mit Strom versorgt wird, beginnt der Startvorgang . Danach schaltet das Gerät auf den zuletzt gewählten Betriebs-modus .
WARNUNG Blicken Sie nicht direkt in die LEDs, das kann zu Augenschä-den führen .Beachten Sie, dass sehr schnelle Lichtwechsel bei fotosensib-len Menschen und Epilep tikern epileptische Anfälle aus lösen können!

6
Deu
tsch 5 Betrieb ohne Steuergerät
Für den eigenständigen Betrieb lassen sich ver-schiedene Lichtshow-Programme auswählen:
1) Die Taste MENU so oft drücken, bis der ge-wünschte Modus angezeigt wird:AutoRun Mode Geschwindigkeit wählbarShow Mode Musiksteuerung möglich
2) Die Taste ENTER drücken .
3) Wurde AutoRun Mode ausgewählt, blinkt AUTO und die zuletzt gewählte Nummer des Lichtshow-Programms . Innerhalb von 8 s lässt sich mit der Taste UP oder DOWN eine andere Nummer (0 – 16) wählen .
Zum Bestätigen der gewählten Nr . die Taste ENTER drücken . Jetzt blinkt SPEED und die zuletzt gewählte Nr . für die Geschwindig-keit . Innerhalb von 8 s lässt sich mit der Taste UP oder DOWN eine andere Geschwindigkeit wählen (1 = langsam, 9 = sehr schnell) . Die Einstellung mit der Taste ENTER speichern . Nach 8 s startet das Showprogramm .
4) Wurde Show Mode gewählt, lässt sich nach dem Drücken der Taste ENTER eine andere Programm-Nr . (0 – 16) auswählen . Die Einstel-lung mit der Taste ENTER speichern . Nach 8 s startet das gewählte Programm .
Zur Auswahl, ob das Programm musik-gesteuert oder automatisch ablaufen soll, mit der Taste MENU den Menüpunkt Sound State anwählen . Die Taste ENTER drücken und mit der Taste UP oder DOWN die Musiksteuerung ein- (On) oder ausschalten (Off) . Zum Speichern die Taste ENTER noch einmal drücken .
Sollte die Musiksteuerung nicht optimal funktionieren, mit der Taste MENU den Menü-punkt Sound Sense anwählen, die Taste ENTER drücken und die Mikrofonempfind-lichkeit mit der Taste UP erhöhen oder mit der Taste DOWN verringern . Abschließend zum Speichern wieder die Taste ENTER drücken .
5.1 Zusammenschalten mehrerer Scheinwerfer: Master/Slave-Betrieb
Mehrere Geräte MINICUBE-60 können synchron betrieben werden . Dabei übernimmt ein Gerät (Master-Gerät) die Steuerung der übrigen Geräte (Slave-Geräte) .
1) Die DMX-Anschlüsse der Geräte miteinander
zu einer Kette verbinden . Siehe dazu Kapi-tel 6 .1, jedoch ohne den Bedienschritt 1 zu beachten .
2) Mit der Taste MENU den Menüpunkt Slave Mode anwählen und die Taste ENTER drücken .
3) Mit der Taste UP oder DOWN wählen:Master für das Master-GerätSlave1 oder Slave2* für die Slave-Geräte
* Drehrichtung dem Master-Gerät entgegengesetzt
4) Die Einstellung mit der Taste ENTER spei-chern .
5.2 Weitere Einstellmöglichkeiten und Funktionen
Alle Einstellmöglichkeiten und Funktionen sind über das Menü anwählbar . Alle Menüpunkte und deren Funktionen sind auf der Seite 3 aufgeführt .
6 Bedienung über ein Lichtsteuergerät
Zur Bedienung über ein DMX-Lichtsteuergerät (z . B . DMX-1440 oder DMX-510USB von IMG STAGELINE) verfügt der MINICUBE-60 über 69 DMX-Steuerkanäle . Er lässt sich aber auch über nur 27, 23 oder 8 Kanäle steuern, wenn die dann verfügbaren Funktionen ausreichen (☞ Seite 20 – 22) oder am Lichtsteuergerät nicht genügend Kanäle frei sind .
DMX ist die Abkürzung für Digital Multiplex und bedeutet digitale Steuerung von mehreren DMX-Geräten über eine gemeinsame Steuer-leitung .
6.1 AnschlussFür die DMX-Signalübertragung sollten spe-zielle Kabel verwendet werden (z . B . Kabel der CDMXN-Serie) . Bei Leitungslängen ab 150 m oder bei der Steuerung von mehr als 32 Geräten über einen DMX-Ausgang wird grundsätzlich das Zwischenschalten eines DMX-Aufholverstärkers empfohlen (z . B . SR-103DMX) .
1) Den DMX-Eingang (6) mit dem DMX-Aus-gang des Lichtsteuergerätes verbinden .
2) Den DMX-Ausgang (5) mit dem DMX-Ein-gang des nächsten Lichteffektgerätes

7
Deu
tschverbinden . Dessen Ausgang wieder mit dem
Eingang des nachfolgenden Gerätes verbin-den usw ., bis alle Licht effektgeräte in einer Kette angeschlossen sind .
3) Den DMX-Ausgang des letzten DMX- Geräts der Kette mit einem 120-Ω-Widerstand (> 0,3 W) abschließen: In die DMX-Ausgangs-buchse einen DMX-Abschlussstecker stecken (z . B . DLT-123) .
6.2 Startadresse und Anzahl der DMX-Kanäle einstellen
Um alle am Lichtsteuergerät angeschlossenen DMX-Geräte separat bedienen zu können, muss jedes Gerät eine eigene Startadresse erhalten . Soll der erste DMX-Kanal des MINICUBE-60 vom Lichtsteuergerät z . B . über die DMX-Adresse 6 gesteuert werden, am MINICUBE-60 die Start-adresse 6 einstellen . Die übrigen DMX-Kanäle des MINICUBE-60 sind dann automatisch den darauffolgenden Adressen zugeordnet .Beispiele mit verschiedenen Startadressen:
Anzahl der DMX-
Kanäle
Start-adresse
vom MINICUBE-60
belegte Adressen
nächstmögliche Startadresse für
das nachfolgende DMX-Gerät
81 1 – 8 9
6 6 – 13 14
231 1 – 23 24
24 24 – 46 47
271 1 – 27 28
486 486 – 512 –
691 1 – 69 70
444 444 – 512 –
1) Die Taste MENU einmal drücken, sodass das Display DMX Address anzeigt .
2) Die Taste ENTER drücken . Die Adresse wird blinkend angezeigt . Innerhalb von 8 s mit der Taste UP oder DOWN die gewünschte Start-adresse einstellen .
3) Die Taste ENTER drücken: Das Display zeigt wieder DMX Address an .
4) Die Taste MENU einmal drücken, sodass Channel Mode angezeigt wird .
5) Die Taste ENTER drücken . Die Anzahl der DMX-Kanäle wird blinkend angezeigt . Inner-halb von 8 s mit der Taste UP oder DOWN die gewünschte Anzahl einstellen .
6) Zum Speichern der Einstellung die Taste ENTER drücken .
7) Für alle weiteren MINICUBE-60, die synchron gesteuert werden sollen, dieselbe Start-adresse und dieselbe Kanalanzahl einstellen .
8) Der Moving-Head kann nun per DMX gesteu-ert werden . Die DMX-Funktionen finden Sie auf den Seiten 20 – 22 . Empfängt der MINI-CUBE-60 kein DMX-Steuersignal, schaltet er auf den eigenständigen Betrieb um (Kap . 5) .
Tipp: Werden zwei oder mehrere MINICUBE-60 syn-chron über dieselbe Startadresse gesteuert, die Drehrich-tung des Dreharms bei einem oder mehreren Geräten entgegengesetzt einstellen (siehe Seite 3, Menüpunkt „Pan Inverse“) . So bewegen sich die Dreharme z . B . bei einem Gerätepaar spiegelbildlich .
7 Technische DatenDatenprotokoll: . . . . . . DMX 512
Anzahl der DMX-Kanäle: . . . . . . . 69, 27, 23 oder 8
Leuchtmittel 6 × Beam-LED: . . . . 10-W-RGBW-LED von
OSRAM Abstrahlwinkel 10°
12 × LED-Streifen: . . 6 × 5050SMD (RGB)
Drehwinkel: . . . . . . . . Pan 560°, Tilt ∞
Lüftung: . . . . . . . . . . . interner Lüfter
Einsatztemperatur: . . . 0 – 40 °C
Stromversorgung: . . . . 230 V/ 50 Hz
Leistungsaufnahme: . . 175 VA
Abmessungen: . . . . . . 27 × 35 × 20 cm
Gewicht: . . . . . . . . . . . 6 kg
Anschlüsse DMX: . . . . . . . . . . . XLR, 3-polig
(1 × In, 1 × Out) Netz: . . . . . . . . . . . . Powercon
(1 × In, 1 × Out)
Änderungen vorbehalten .
Diese Bedienungsanleitung ist urheberrechtlich für MONACOR ® INTERNATIONAL GmbH & Co. KG geschützt. Eine Reproduktion für eigene kommerzielle Zwecke – auch auszugsweise – ist untersagt.

8
EnglishDeutsch
Deutsch Seite
FrançaisFrançais Page
ItalianoItaliano Pagina
EspañolEspañol Página
NederlandsNederlands Pagina
PolskiPolski Strona
MENU UP DOWN
MINICUBE-60
ENTER
DM
X IN
DM
X O
UT
230
V~/5
0H
zPO
WER
OU
T
FUSE
1
5
6
2 8
3
4 4
9
7
MINICUBE-60
Compact LED Beam Moving HeadThese instructions are intended for installers of the unit and for users with basic knowledge in DMX control . Please read the instructions care-fully prior to operation and keep them for later reference .
1 Overview
1 Rotating arm
2 Lower part, always hold the lower part when carrying the unit
3 Control buttons MENU, UP, DOWN and ENTER for the operating mode and for making set-tings via the menu
4 Support for the mounting brackets provided (☞ chapter 3, second paragraph)
5 DMX signal output (XLR, 3 poles) to connect the DMX input of another DMX light effect unit
6 DMX signal input (XLR, 3 poles) to connect a DMX light controller or to connect the DMX output of another DMX-controlled unit
7 Powercon® mains jack POWER OUT for power supply of another light effect unit
8 Support for the mains fuse Always replace a blown fuse by one of the same type!
9 Powercon mains jack for connection to a socket (230 V/ 50 Hz) via the mains cable pro-vided
2 Safety NotesThe unit corresponds to all relevant directives of the EU and is therefore marked with .
WARNING The unit uses dangerous mains voltage . Leave servicing to skilled personnel and do not insert any-thing into the air vents . Inexpert handling may result in electric shock .
• The unit is suitable for indoor use only . Protect it against dripping water, splash water and high air humidity . The admissible ambient temperature range is 0 – 40 °C .
• The heat produced inside the unit must be dissipated by air circulation; never cover the air vents of the housing .
• Immediately disconnect the mains plug from the socket 1 . if the unit or the mains cable is visibly
damaged,2 . if a defect might have occurred after the
unit was dropped or suffered a similar accident,
3 . if malfunctions occur .In any case, the unit must be repaired by skilled personnel .
• Never pull the mains cable to disconnect the mains plug from the socket, always seize the plug .
• When carrying the unit, always hold the lower part . Never carry the unit by the cube or by the rotating arm (1)!
EnglishEnglish Page

9
English• For cleaning the housing, only use a dry,
soft cloth; never use water or chemicals . For cleaning the plastic lenses of the LEDs, a mild detergent may be used . Always disconnect the mains plug before cleaning .
• No guarantee claims for the unit and no li-ability for any resulting personal damage or material damage will be accepted if the unit is used for other purposes than originally intended, if it is not safely installed or not correctly connected or operated, or if it is not repaired in an expert way .
If the unit is to be put out of operation definitively, take it to a local recycling plant for a disposal which is not harm-ful to the environment .
3 Applications and Setting UpThe moving head is used for effect illumination, e . g . on stage and in clubs . It is equipped with six powerful 10 W RGBW LEDs and, as the most striking feature, with RGB LED strips on the 12 edges of the cube . The MINICUBE-60 is designed for operation via a DMX light controller, but it is also suited for independent operation . In this mode, various automatic or music-controlled light show programs are available .
Set up the unit on a solid, flat surface . Alternatively, install it upside down on a lighting stand system . For this, two sturdy mounting clamps are required . Fasten the clamps on the mounting brackets provided . Insert the bolts into the holes (4) provided on the lower side of the unit and turn clockwise to the stop . Screw the clamps, together with the unit, onto the lighting stand system .
Always keep a minimum distance of 50 cm to the illuminated surface .
4 Power SupplyImportant! For power supply, the MINICUBE-60 is equipped with Powercon connectors . Never connect or disconnect a Powercon plug while voltage is applied . Always make the Powercon connection before connecting the unit to the mains socket . After operation, disconnect the unit from the mains socket before disconnecting the Powercon connection .
1) Via the mains jack “230 V~ / 50 Hz” (9), con-nect the moving head to a mains socket (230 V/ 50 Hz) using the mains cable provided . Insert the blue Powercon plug of the mains cable into the mains jack . Turn the plug clock-wise until it engages . To remove the plug, pull back the safety latch of the plug and turn the plug counter-clockwise .
2) If multiple MINICUBE-60 are used, connect the white jack POWER OUT (7) of the first unit to the mains jack “230 V~ / 50 Hz” of the second unit . For this, a mains cable with Powercon plugs (NAC-3FCB and NAC-3FCA) is required . Then connect the second unit to the third unit etc . until all units have been connected in a chain . Thus, up to 20 units can be interconnected .
3) The jack POWER OUT (7) can also be used for supply power of other (light effect) units . However, the current load of the jacks “230 V~ / 50 Hz” and POWER OUT must not exceed 16 A: Risk of short and fire due to overload!
As soon as the moving head is supplied with power, it will start and go to the last operating mode selected .
WARNING To prevent damage to your eyes, never look directly into the LEDs . Please note that fast changes in lighting may trigger epileptic sei-zures with photosensitive persons or persons with epilepsy!

10
English 5 Operation without Controller
Various light show programs are available for independent operation:
1) Press the button MENU repeatedly until the desired mode is indicated:AutoRun Mode speed selectableShow Mode music control available
2) Press the button ENTER .
3) When AutoRun Mode has been selected, AUTO and the number of the last light show program selected start flashing . Use the but-ton UP or DOWN to select a different number (0 – 16) within 8 seconds .
Press the button ENTER to confirm the number selected . SPEED and the last num-ber selected for the speed start flashing . Use the button UP or DOWN to select a different speed within 8 seconds (1 = slow, 9 = very fast) . Press the button ENTER to save the setting . The show program will start after 8 seconds .
4) When Show Mode has been selected, press the button ENTER to select a different program number (0 – 16) . Press the button ENTER to save the setting . The show program selected will start after 8 seconds .
For selection between music-controlled program and automatic program, use the button MENU to select the menu item Sound State . Press the button ENTER and use the button UP or DOWN to switch the music control on (On) or off (Off) . Press the button ENTER again to save the setting .
If the music control is not optimal, use the button MENU to select the menu item Sound Sense, press the button ENTER and use the button UP to increase the microphone sensitivity or the button DOWN to reduce it . Press the button ENTER again to save the setting .
5.1 Interconnecting multiple moving heads: master/slave mode
Synchronous operation of multiple MINI-CUBE-60 is possible: The first unit (master) will control the other units (slaves) .
1) Connect the DMX connections of the units in a chain according to chapter 6 .1, but skip step 1 .
2) Use the button MENU to select the menu item Slave Mode and press the button ENTER .
3) Use the button UP or DOWN to select:Master for the master unitSlave1 or Slave2* for the slave units
* direction of movement opposite to master unit
4) Press the button ENTER to save the setting .
5.2 Additional setting options and functions
All setting options and functions can be selected via the menu . All menu items and their functions are listed on page 3 .
6 Operation via a Light ControllerFor operation via a DMX light controller (e . g . DMX-1440 or DMX-510USB from IMG STAGE-LINE), the MINICUBE-60 is equipped with 69 DMX control channels . The unit can also be con-trolled via 27, 23 or 8 channels if the functions provided are sufficient (☞ pages 20 – 22) or if the number of channels available on the light controller is less than 69 .
DMX (Digital Multiplex) means digital control of multiple DMX units via a common control line .
6.1 ConnectionFor DMX signal transmission, special cables are recommended (e . g . cables of the CDMXN se-ries from IMG STAGELINE) . For cable lengths exceeding 150 m or when controlling more than 32 units via a single DMX output, it is generally recommended to insert a DMX level matching amplifier (e . g . SR-103DMX) .
1) Connect the DMX input (6) to the DMX out-put of the light controller .
2) Connect the DMX output (5) to the DMX input of the following light effect unit . Pro-ceed in the same way to connect the output of the second unit to the input of the third unit etc . until all light effect units have been connected in a chain .
3) Terminate the DMX output of the last DMX unit in the chain with a 120 Ω resistor (> 0 .3 W): Connect a corresponding termi-nating plug (e . g . DLT-123) to the DMX output jack .

11
English6.2 Setting the start address and
the number of DMX channelsFor separate control of all DMX units connected to the light controller, each unit must have its own start address . Example: If the first DMX channel of the MINICUBE-60 is to be controlled by the light controller via DMX address 6, set the start address on the MINICUBE-60 to 6 . All other DMX channels of the MINICUBE-60 will be automatically assigned to the subsequent addresses .Examples with different start addresses:
Number of DMX channels
Start address
Addresses used by
MINICUBE-60
Next possible start address for the
following DMX unit
81 1 – 8 9
6 6 – 13 14
231 1 – 23 24
24 24 – 46 47
271 1 – 27 28
486 486 – 512 –
691 1 – 69 70
444 444 – 512 –
1) Press the button MENU once: The display will show DMX Address .
2) Press the button ENTER . The address starts flashing . Use the button UP or DOWN to set the start address within 8 seconds .
3) Press the button ENTER: The display will show DMX Address again .
4) Press the button MENU once: The display will show Channel Mode .
5) Press the button ENTER . The number of DMX channels starts flashing . Use the button UP or DOWN to set the number within 8 seconds .
6) Press the button ENTER to save the setting .
7) Set the same start address and the same num-ber of channels for all other MINICUBE-60 to be controlled synchronously .
8) DMX control of the moving head will now be possible . The DMX functions can be found on pages 20 – 22 . If the moving head does not receive any DMX control signal, it will go to the independent mode (chapter 5) .
Hint: When two or more MINICUBE-60 are controlled via the same start address, invert the direction of move-ment on one or more moving heads (refer to page 3, menu item “Pan Inverse”) . Thus, when a pair of moving heads is used, their rotating arms will move in opposite directions (mirror-inverted movements) .
7 SpecificationsData protocol: . . . . . . . DMX 512
Number of DMX channels: . . . . . . 69, 27, 23 or 8
Light source 6 × beam LED: . . . . . 10 W RGBW LED from
OSRAM beam angle: 10°
12 × LED strips: . . . . 6 × 5050SMD (RGB)
Pan / TIlt angle: . . . . . . . Pan 560°, Tilt ∞
Ventilation: . . . . . . . . . integrated fan
Ambient temperature: 0 – 40 °C
Power supply: . . . . . . . 230 V/ 50 Hz
Power consumption: . . 175 VA
Dimensions: . . . . . . . . 27 × 35 × 20 cm
Weight: . . . . . . . . . . . 6 kg
Connections DMX: . . . . . . . . . . . XLR, 3 poles
(1 × In, 1 × Out) Mains: . . . . . . . . . . . Powercon
(1 × In, 1 × Out)
Subject to technical modification .
All rights reserved by MONACOR ® INTERNATIONAL GmbH & Co. KG. No part of this instruction manual may be reproduced in any form or by any means for any commercial use.
12
Fran
çaisDeutsch
Deutsch Seite
EnglishEnglish Page
ItalianoItaliano Pagina
EspañolEspañol Página
NederlandsNederlands Pagina
PolskiPolski Strona
MENU UP DOWN
MINICUBE-60
ENTER
DM
X IN
DM
X O
UT
230
V~/5
0H
zPO
WER
OU
T
FUSE
1
5
6
2 8
3
4 4
9
7
MINICUBE-60
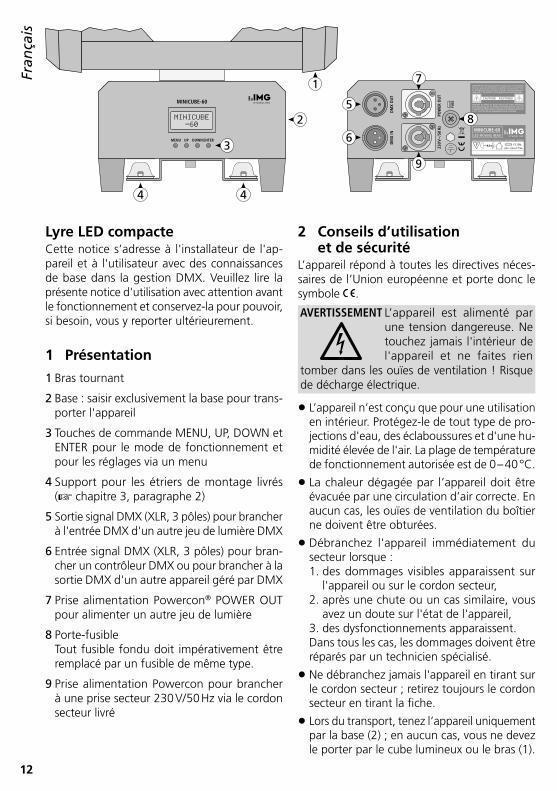
Lyre LED compacteCette notice s’adresse à l'installateur de l'ap-pareil et à l'utilisateur avec des connaissances de base dans la gestion DMX . Veuillez lire la présente notice d'utilisation avec attention avant le fonctionnement et conservez-la pour pouvoir, si besoin, vous y reporter ultérieurement .
1 Présentation
1 Bras tournant
2 Base : saisir exclusivement la base pour trans-porter l'appareil
3 Touches de commande MENU, UP, DOWN et ENTER pour le mode de fonctionnement et pour les réglages via un menu
4 Support pour les étriers de montage livrés (☞ chapitre 3, paragraphe 2)
5 Sortie signal DMX (XLR, 3 pôles) pour brancher à l'entrée DMX d'un autre jeu de lumière DMX
6 Entrée signal DMX (XLR, 3 pôles) pour bran-cher un contrôleur DMX ou pour brancher à la sortie DMX d'un autre appareil géré par DMX
7 Prise alimentation Powercon® POWER OUT pour alimenter un autre jeu de lumière
8 Porte-fusible Tout fusible fondu doit impérativement être remplacé par un fusible de même type .
9 Prise alimentation Powercon pour brancher à une prise secteur 230 V/ 50 Hz via le cordon secteur livré
2 Conseils d’utilisation et de sécurité
L’appareil répond à toutes les directives néces-saires de l’Union européenne et porte donc le symbole .
AVERTISSEMENT L’appareil est alimenté par une tension dangereuse . Ne touchez jamais l'intérieur de l'appareil et ne faites rien
tomber dans les ouïes de ventilation ! Risque de décharge électrique .
• L’appareil n’est conçu que pour une utilisation en intérieur . Protégez-le de tout type de pro-jections d'eau, des éclaboussures et d'une hu-midité élevée de l'air . La plage de température de fonctionnement autorisée est de 0 – 40 °C .
• La chaleur dégagée par l’appareil doit être évacuée par une circulation d’air correcte . En aucun cas, les ouïes de ventilation du boîtier ne doivent être obturées .
• Débranchez l'appareil immédiatement du secteur lorsque :1 . des dommages visibles apparaissent sur
l'appareil ou sur le cordon secteur,2 . après une chute ou un cas similaire, vous
avez un doute sur l'état de l'appareil,3 . des dysfonctionnements apparaissent .Dans tous les cas, les dommages doivent être réparés par un technicien spécialisé .
• Ne débranchez jamais l'appareil en tirant sur le cordon secteur ; retirez toujours le cordon secteur en tirant la fiche .
• Lors du transport, tenez l’appareil uniquement par la base (2) ; en aucun cas, vous ne devez le porter par le cube lumineux ou le bras (1) .
FrançaisFrançais Page

13
Fran
çais• Pour nettoyer le boîtier, utilisez un tissu sec et
doux, en aucun cas de produits chimiques ou d'eau . Pour les lentilles plastiques des LEDs, vous pouvez également utiliser un produit de nettoyage doux . Avant tout nettoyage, vous devez impérativement débrancher l'appareil du secteur !
• Nous déclinons toute responsabilité en cas de dommages matériels ou corporels résultants si l’appareil est utilisé dans un but autre que celui pour lequel il a été conçu, s’il n’est pas monté d’une manière sûre, s'il n'est pas cor-rectement branché ou utilisé ou s'il n’est pas réparé par une personne habilitée ; en outre, la garantie deviendrait caduque .
Lorsque l’appareil est définitivement retiré du service, vous devez le déposer dans une usine de recyclage adaptée pour contribuer à son élimination non polluante .
CARTONS ET EMBALLAGE PAPIER À TRIER
3 Possibilités de positionnement et d'utilisation
La lyre permet de créer des effets lumineux, par exemple sur scène et en discothèque . Comme source de lumière, elle possède six LEDs RGBW 10 W puissantes et, particularité notable, des flexleds RGB sur les 12 arêtes . La MINICUBE-60 est prévue pour un fonctionnement via un contrôleur DMX . Elle peut également fonction-ner seule ; dans ce cas, différents programmes de lumière défilent soit automatiquement soit gérés par la musique .
Placez l'appareil sur une surface fixe et plane . La lyre peut également être montée, tête en bas, sur un portique adapté . Pour ce faire, deux colliers de serrage solides sont né-cessaires . Vissez les colliers sur les étriers de montage livré . Mettez les boulons des étriers dans les ouvertures prévues (4) sur la base de l'appareil et tournez dans le sens des aiguilles d'une montre jusqu'à la butée . Vissez les colliers avec l'appareil sur le portique .
La distance avec la surface à éclairer doit être de 50 cm au moins .
4 AlimentationImportant ! La MINICUBE-60 est dotée de connexions Powercon pour l'alimentation . Une fiche Powercon ne doit pas être branchée ou dé-branchées sous tension . Effectuez tout d'abord le branchement Powercon avant d'effectuer le branchement à la prise secteur ; débranchez tout d'abord le branchement à la prise secteur avant de débrancher le branchement Powercon .
1) Via la prise secteur bleue «230 V~ / 50 Hz» (9), reliez la lyre, avec le cordon secteur livré, à une prise secteur 230 V/ 50 Hz . Une fois mise dans la prise secteur, tournez la fiche Power-con bleue du cordon secteur vers la droite jusqu'à ce qu'elle s'enclenche . Pour pouvoir la retirer ultérieurement, retirez le verrouillage de sécurité sur la fiche et tournez la prise vers la gauche .
2) Si vous utilisez plusieurs MINICUBE-60, la prise blanche POWER OUT (7) du premier appareil peut être reliée à la prise secteur «230 V~ / 50 Hz» du second appareil . Pour ce faire, un cordon secteur avec fiches Powercon (NAC-3FCB et NAC-3FCA) est nécessaire . Le deuxième appareil peut être relié au troisième et ainsi de suite jusqu'à ce que tous les ap-pareils soient reliés en une chaîne . Il est ainsi possible de brancher jusqu'à 20 appareils ensemble .
3) La prise POWER OUT (7) peut également être utilisée pour alimenter d'autres appa-reils (jeux de lumière) . Cependant les prises «230 V~ / 50 Hz» et POWER OUT ne doivent pas recevoir un courant de plus de 16A . Il y a risque de court-circuit et d'incendie à cause d'une surcharge .
Dès que la lyre est alimentée, le processus de dé-marrage débute . Ensuite l'appareil commute sur le dernier mode de fonctionnement sélectionné .
AVERTISSEMENT Ne regardez jamais directe-ment les LEDs, cela pourrait causer des troubles de la vi-sion .N'oubliez pas que des chan-gements très rapides de lu-mière peuvent déclencher des crises d'épilepsie chez les personnes photosensibles et épileptiques .
14
Fran
çais 5 Fonctionnement sans contrôleur
Pour un fonctionnement autonome, vous pou-vez sélectionner parmi différents programmes de lumière :
1) Appuyez sur la touche MENU de manière répétée jusqu'à ce que le mode souhaité soit affiché :
AutoRun Mode vitesse sélectionnable
Show Mode gestion par la musique possible
2) Appuyez sur la touche ENTER .
3) Si AutoRun Mode est sélectionné, AUTO et le dernier numéro du programme sélectionné clignotent . En l'espace de 8 secondes, vous pouvez sélectionner un autre numéro (0 – 16) avec la touche UP ou DOWN .
Pour confirmer le numéro sélectionné, appuyez sur la touche ENTER . SPEED et le dernier numéro sélectionné pour la vitesse clignotent . En l'espace de 8 secondes, vous pouvez sélectionner une autre vitesse avec la touche UP ou DOWN (1 = lent, 9 = très rapide) . Mémorisez le réglage avec la touche ENTER . Le programme Show démarre après 8 secondes .
4) Si Show Mode est sélectionné, vous pouvez sélectionner un autre numéro de programme (0 – 16) après avoir appuyé sur la touche ENTER . Mémorisez le réglage avec la touche ENTER . Le programme sélectionné démarre après 8 secondes .
Pour sélectionner si le programme doit défiler automatiquement ou géré par la musique, sélectionnez le point de menu Sound State avec la touche MENU . Appuyez sur la touche ENTER et avec la touche UP ou DOWN, activez (On) ou désactivez (Off) la gestion par la musique . Pour mémoriser, appuyez encore une fois sur la touche ENTER .
Si la gestion par la musique venait à ne pas fonctionner de manière optimale, sélec-tionnez le point de menu Sound Sense avec la touche MENU, appuyez sur la touche ENTER et augmentez la sensibilité du micro avec la touche UP ou diminuez-la avec la touche DOWN . Ensuite, appuyez à nouveau sur la touche ENTER pour mémoriser .
5.1 Branchement de plusieurs appareils : mode Master / Slave
Plusieurs appareils MINICUBE-60 peuvent fonc-tionner de manière synchrone . Un appareil (ap-pareil Master) prend en charge la gestion des autres appareils (appareils Slave) .
1) Reliez les connexions DMX des appareils en-semble en une chaîne . Voir chapitre 6 .1 sans tenir compte du point 1 .
2) Avec la touche MENU, sélectionnez le point de menu Slave Mode et appuyez sur la touche ENTER .
3) Avec la touche UP ou DOWN, sélectionnez : Master pour l'appareil MasterSlave 1 ou Slave 2* pour les appareils
Slave * sens de rotation opposé à l'appareil Master
4) Mémorisez le réglage avec la touche ENTER .
5.2 Autres possibilités de réglage et fonctions
Toutes les possibilités de réglage et fonctions sont sélectionnables via le menu . Tous les points de menu et leurs fonctions sont présentés sur la page 3 .
6 Fonctionnement avec un contrôleur DMX
Pour une gestion via un contrôleur DMX (par exemple DMX-1440 ou DMX-510USB de IMG STAGELINE), la MINICUBE-60 dispose de 69 canaux de commande DMX . Selon les besoins, elle peut être gérée uniquement via 27, 23 ou 8 canaux si les fonctions disponibles suffisent (☞ pages 20 – 22) ou s'il n'y a pas assez de canaux disponibles sur le contrôleur .
DMX est l'abréviation de Digital Multiplex et signifie commande digitale de plusieurs appa-reils DMX via un câble commun de commande .
6.1 BranchementPour la transmission de signaux DMX, il est recommandé d'utiliser des câbles spécifiques (p . ex . câbles de la série CDMXN) . Pour des lon-gueurs de liaison à partir de 150 m et pour la commande de plus de 32 appareils via une seule sortie DMX, il est recommandé d'insérer un am-plificateur de signal DMX (p . ex . SR-103DMX) .

15
Fran
çais1) Reliez l’entrée DMX (6) à la sortie DMX du
contrôleur .
2) Reliez la sortie DMX (5) à l’entrée DMX du prochain jeu de lumière . Reliez sa sortie à l’entrée de l’appareil suivant et ainsi de suite de manière à ce que tous les jeux de lumière soient reliés en une chaîne .
3) Terminez la sortie DMX du dernier appareil DMX de la chaîne avec une résistance 120 Ω (> 0,3 W) : mettez un bouchon DMX (p . ex . DLT-123) dans la prise de sortie DMX .
6.2 Réglage de l’adresse de démarrage et réglage du nombre de canaux DMX
Pour pouvoir utiliser séparément les appareils DMX reliés au contrôleur, chaque appareil doit avoir une adresse de démarrage propre . Si le premier canal DMX de la MINICUBE-60 doit être géré par le contrôleur, par exemple via l’adresse DMX 6, il faut régler l’adresse de démarrage 6 sur la MINICUBE-60 . Les autres canaux DMX de la MINICUBE-60 sont automatiquement at-tribués aux adresses suivantes .Exemples avec différentes adresses de démar-rage :
Nombre de
canaux DMX
Adresse de
démarrage
Adresses utilisées par la MINICUBE-60
Prochaine adresse de démarrage pos-sible pour l’appareil
DMX suivant
81 1 – 8 9
6 6 – 13 14
231 1 – 23 24
24 24 – 46 47
271 1 – 27 28
486 486 – 512 –
691 1 – 69 70
444 444 – 512 –
1) Appuyez une fois sur la touche MENU pour que l'affichage indique DMX Address .
2) Appuyez sur la touche ENTER . L'adresse est affichée en clignotant . En l'espace de 8 se-condes, réglez l'adresse de démarrage sou-haitée avec la touche UP ou DOWN .
3) Appuyez sur la touche ENTER : l'affichage indique à nouveau DMX Addresss .
4) Appuyez une fois sur la touche MENU pour que Channel Mode s'affiche .
5) Appuyez sur la touche ENTER . Le nombre de canaux DMX s'affiche en clignotant . En l'es-pace de 8 secondes, réglez le nombre voulu avec la touche UP ou DOWN .
6) Pour mémoriser le réglage, appuyez sur la touche ENTER .
7) Réglez la même adresse de démarrage et le même canal pour d'autres MINICUBE-60 devant être gérées de manière synchrone .
8) La lyre peut maintenant être gérée par DMX . Vous trouverez les fonctions DMX sur les pages 20-22 . Si la MINICUBE-60 ne reçoit pas de signal de commande DMX, elle commute sur le fonctionnement autonome (chapitre 5) .
Remarque : Si deux ou plusieurs MINICUBE-60 sont gérées de manière synchrone via la même adresse de démarrage, réglez à l'inverse le sens de rotation du bras sur un ou plusieurs appareils (voir page 3, point de menu «Pan Inverse») . Ainsi, les bras se déplacent, par exemple pour une paire d'appareils, en mode miroir .
7 Caractéristiques techniquesProtocole données : . . DMX 512
Nombre de canaux DMX : . . . . . . . 69, 27, 23 ou 8
Source de lumière 6 × LED Beam : . . . . LED 10 W RGBW de
OSRAM, angle : 10° 12 × flexleds : . . . . . 6 × 5050MSD (RGB)
Angles : . . . . . . . . . . . Pan 560°, Tilt ∞
Ventilation : . . . . . . . . ventilateur interne
Température fonc . : . . . 0 – 40 °C
Alimentation : . . . . . . . 230 V/ 50 Hz
Consommation : . . . . . 175 VA
Dimensions : . . . . . . . . 27 × 35 × 20 cm
Poids : . . . . . . . . . . . . . 6 kg
Branchements DMX : . . . . . . . . . . . XLR, 3 pôles
(1 × In, 1 × Out) Secteur : . . . . . . . . . Powercon
(1 × In, 1 × Out)
Tout droit de modification réservé .
Notice d’utilisation protégée par le copyright de MONACOR ® INTERNATIONAL GmbH & Co. KG. Toute reproduction même partielle à des fins commerciales est interdite.

16
ItalianoDeutsch
Deutsch Seite
EnglishEnglish Page
FrançaisFrançais Page
EspañolEspañol Página
NederlandsNederlands Pagina
PolskiPolski Strona
MENU UP DOWN
MINICUBE-60
ENTER
DM
X IN
DM
X O
UT
230
V~/5
0H
zPO
WER
OU
T
FUSE
1
5
6
2 8
3
4 4
9
7
MINICUBE-60
Moving-Head LED beam compattaQueste istruzioni sono rivolte all'installatore dell'apparecchio e agli utenti con conoscenze base dei comandi DMX . Vi preghiamo di leggerle attentamente prima della messa in funzione e di conservarle per un uso futuro .
1 Panoramica1 Braccio roteante
2 Base, per il trasporto afferrare l'apparecchio solo qui
3 Tasti funzione MENU, UP, DOWN e ENTER per il modo di funzionamento e per le impostazioni tramite il menu
4 Supporti per le staffe di montaggio in dota-zione (☞ Capitolo 3, secondo comma)
5 Ingresso dei segnali DMX (XLR a 3 poli) per il collegamento con l'ingresso DMX di un'ulte-riore unità DMX per effetti di luce
6 Ingresso dei segnali DMX (XLR a 3 poli) per il collegamento di un'unità DMX di comando luce oppure per il collegamento con l'uscita DMX di un ulteriore apparecchio con comandi DMX
7 Presa di rete Powercon® POWER OUT per l'a-limentazione di un'ulteriore unità per effetti di luce
8 Portafusibile Sostituire un fusibile difettoso solo con uno dello stesso tipo!
9 Presa di rete Powercon per il collegamento con una presa di rete (230 V/ 50 Hz) tramite il cavo in dotazione
2 Avvertenze per l'uso sicuroQuest’apparecchio è conforme a tutte le diret-tive rilevanti dell’UE e pertanto porta la sigla .
AVVERTIMENTO L’apparecchio è alimentato con pericolosa tensione di rete . Non intervenire mai personal-mente al suo interno e non
inserire niente nelle fessure di aerazione! Esiste il pericolo di una scarica elettrica .
• Usare l’apparecchio solo all’interno di lo-cali e proteggerlo dall'acqua gocciolante e dagli spruzzi d'acqua nonché da alta umidità dell'aria . La temperatura d’esercizio ammessa è 0 – 40 °C .
• Dev’essere garantita la libera circolazione dell’aria per dissipare il calore che viene pro-dotto all’interno dell'apparecchio . Non coprire in nessun modo le fessure d’aerazione .
• Staccare subito la spina rete se:1 . l’apparecchio o il cavo rete presentano dei
danni visibili;2 . dopo una caduta o dopo eventi simili sus-
siste il sospetto di un difetto;3 . l’apparecchio non funziona correttamente .Per la riparazione rivolgersi sempre ad un’of-ficina competente .
• Staccare il cavo rete afferrando la spina, senza tirare il cavo .
• Per il trasporto afferrare l'apparecchio solo alla base (2) . In nessun caso portare l'apparecchio afferrando il cubo o il braccio roteante (1)!
• Per la pulizia usare solo un panno morbido, asciutto; non impiegare in nessun caso acqua o prodotti chimici . Per le lenti di plastica dei
ItalianoItaliano Pagina

17
ItalianoLED si può usare un detergente delicato . Prima
della pulizia staccare la spina dalla presa di rete!
• Nel caso d’uso improprio, di montaggio in-sicuro, di collegamento sbagliato, d’impiego scorretto o di riparazione non a regola d’arte dell'apparecchio, non si assume nessuna re-sponsabilità per eventuali danni consequen-ziali a persone o a cose e non si assume nes-suna garanzia per l'apparecchio .
Se si desidera eliminare l'apparecchio definitivamente, consegnarlo per lo smaltimento ad un'istituzione locale per il riciclaggio .
3 Possibilità d'impiego e di collocamento
La testa mobile moving-head serve per l'illumi-nazione ad effetto, p . es . sul palcoscenico e in discoteca . Come fonti di luce sono integrati sei LED RGBW di 10 W e come particolarità delle strisce con LED RGBW collocate sui 12 bordi . La MINICUBE-60 è prevista per il comando attraverso un apparecchio DMX di comando luce, ma può essere usata anche in modo auto-nomo con vari programmi di lightshow a svol-gimento automatico o comandati dalla musica .
Sistemare l'apparecchio su un piano solido . È possibile montarlo anche rovesciato su un si-stema portante . In questo caso sono richieste due fascette robuste di montaggio . Avvitare le fascette alle staffe di montaggio in dotazione . Inserire i perni delle staffe nelle aperture previ-ste (4) della parte inferiore dell'apparecchio e girarli in senso orario fino all'arresto . Avvitare le fascette con l'apparecchio al sistema portante .
La distanza dalle superfici irradiate dovrebbe essere non inferiore a 50 cm .
4 AlimentazioneImportante! Per l'alimentazione, la MINI-CUBE-60 è equipaggiata con contatti Powercon . Un connettore Powercon non deve essere inse-rito o staccato sotto tensione . Perciò effettuare sempre prima la connessione Powercon e poi il collegamento con la presa di rete e staccare il collegamento con la presa di rete sempre prima della connessione Powercon .
1) Collegare la testa mobile con una presa di rete (230 V/ 50 Hz) tramite la presa blu “230 V~ / 50 Hz” servendosi del cavo rete in dotazione . Dopo aver inserito il connet-tore Powercon blu del cavo rete nella presa, girarlo a destra fino allo scatto . Per sfilarlo successivamente, tirare indietro la levetta di sicurezza sul connettore e girare il connettore a sinistra .
2) Se si usano più MINICUBE-60, la presa bianca POWER OUT (7) del primo apparec-chio può essere collegata con la presa di rete “230 V~ / 50 Hz” del secondo apparecchio . Per fare ciò è richiesto un cavo rete con con-nettori Powercon (NAC-3FCB e NAC-3FCA) . Il secondo apparecchio può essere collegato a sua volta con un terzo apparecchio ecc . finché tutti chi apparecchi sono collegati for-mando una catena . In questo modo è possi-bile collegare un massimo di 20 apparecchi .
3) La presa POWER OUT (7) può essere usata anche per l'alimentazione di altri apparec-chi (per effetti di luce) . Tuttavia, le prese “230 V~ / 50 Hz” e POWER OUT non pos-sono sopportare una corrente di oltre 16 A . Altrimenti, il sovraccarico può provocare un cortocircuito e un incendio .
Non appena la testa mobile è alimentata, inizia il processo d'avvio . Quindi, l'apparecchio passa nel modo di funzionamento scelto per ultimo .
AVVERTIMENTO Non guardare direttamente nei LED per non danneggiare gli occhi .Tenete presente che i veloci cambi di luce possono pro-vocare attacchi d'epilessia presso persone fotosensibili o epilettici!

18
Italiano 5 Funzionamento senza unità
di comandoPer il funzionamento autonomo si possono sce-gliere vari programmi lightshow:
1) Premere il tasto MENU tante volte finché non viene visualizzato il modo richiesto:AutoRun Mode velocità impostabileShow Mode possibilità di comando
musica
2) Premere il tasto ENTER .
3) Se è stato scelto AutoRun Mode, si vede lampeggiare AUTO nonché il numero scelto per ultimo del lightshow . Entro 8 s, con il tasto UP o DOWN si può scegliere un altro numero (0 – 16) .
Per confermare il numero scelto premere il tasto ENTER . Allora lampeggia SPEED non-ché l'ultimo numero scelto per la velocità . Entro 8 s, con il tasto UP o DOWN si può sce-gliere un'altra velocità (1 = lento, 9 = molto veloce) . Salvare l'impostazione con il tasto ENTER . Dopo 8 s, il programma show si avvia .
4) Se è stato scelto Show Mode, dopo aver premuto il tasto ENTER si può scegliere un altro numero del programma (0 – 16) . Salvare l'impostazione con il tasto ENTER . Dopo 8 s, il programma scelto si avvia .
Per decidere se il programma deve svol-gersi comandato dalla musica o automati-camente, con il tasto MENU aprire la voce del menu Sound State . Premere il tasto ENTER e con il tasto UP o DOWN attivare (On) o disattivare (Off) il comando tramite la musica . Per salvare l'impostazione premere ancora il tasto ENTER .
Se il comando musica non dovesse fun-zionare in modo ottimale, con il tasto MENU aprire la voce del menu Sound Sense, pre-mere il tasto ENTER e con il tasto UP aumen-tare la sensibilità del microfono oppure con il tasto DOWN ridurla . Alla fine, per salvare l'impostazione premere ancora il tasto ENTER .
5.1 Assemblaggio di più proiettori: funzionamento Master / Slave
È possibile gestire in sincronia più apparecchi MINICUBE-60 . In questo caso, un apparecchio provvede ai comandi (apparecchio master) degli altri apparecchi (apparecchi slave) .
1) Collegare in una catena i contatti DMX degli apparecchi . Vedi in merito il capitolo 6 .1, tra-lasciando il punto 1 .
2) Con il tasto MENU aprire la voce del menu Slave Mode e premere il tasto ENTER .
3) Con il tasto UP o DOWN scegliere:Master per l'apparecchio masterSlave1 o Slave2* per gli apparecchi slave
* Direzione di rotazione opposta a quella dell'appa-recchio master
4) Confermare l'impostazione con il tasto ENTER .
5.2 Ulteriori possibilità d'impostazione e funzioni
Tutte le possibilità d'impostazione possono es-sere scelte con il menu . Tutte le voci del menu e le loro funzioni sono elencate a pagina 3 .
6 Funzionamento con un'unità di comando luce
Per il funzionamento con un'unità DMX di co-mando luce (p . es . DMX-1440 o DMX-510USB di IMG STAGELINE), la MINICUBE-60 dispone di 69 canali di comando DMX . Può essere ge-stita anche tramite soli 27, 23 o 8 canali, se le funzioni disponibili in quel caso sono sufficienti (☞ pagine 20 – 22) o se sull'unità di comando luce non è disponibile un numero sufficiente di canali .
DMX è l'abbreviazione per Digital Multiplex e significa comando digitale di più apparecchi DMX tramite una linea comune di comando .
6.1 CollegamentoPer la trasmissione di segnali DMX si dovrebbero usare cavi speciali (p . es . cavi della serie CDMXN) . Nel caso di lunghezze oltre i 150 m o del co-mando di più di 32 apparecchi tramite una sola uscita DMX, si consiglia per principio l’impiego di un amplificatore DMX (p . es . SR-103DMX) .
1) Collegare l'ingresso DMX (6) con l'uscita DMX dell'unità di comando luce .
2) Collegare l'uscita DMX (5) con l'ingresso DMX dell'unità per effetti di luce succes-siva e l'uscita di quest'ultima con l'ingresso dell'apparecchio successivo ecc . finché tutti gli apparecchi sono collegati formando una catena .

19
Italiano3) Terminare l'uscita DMX dell'ultimo apparec-
chio DMX della catena con una resistenza di 120 Ω (> 0,3 W): inserire una resistenza di terminazione DMX (p . es . DLT-123) nella presa d'uscita DMX .
6.2 Impostare l'indirizzo di start e il numero dei canali DMX
Per poter comandare separatamente tutti gli ap-parecchi DMX collegati con l'unità di comando luce, occorre impostare per ogni apparecchio un suo indirizzo di start . Se p . es . il primo canale DMX del MINICUBE-60 deve essere comandato tramite l'indirizzo DMX 6, sul MINICUBE-60 im-postare l'indirizzo di start 6 . I restanti canali DMX del MINICUBE-60 saranno assegnati automati-camente agli indirizzi successivi .Esempi con differenti indirizzi di start:
Numero dei
canali DMX
Indirizzo di start
Indirizzi occupati dal
MINICUBE-60
Prossimo indirizzo di start possibile per l'apparecchio DMX
successivo
81 1 – 8 9
6 6 – 13 14
231 1 – 23 24
24 24 – 46 47
271 1 – 27 28
486 486 – 512 –
691 1 – 69 70
444 444 – 512 –
1) Premere una volta il tasto MENU, in modo che il display indichi DMX Address .
2) Premere il tasto ENTER . L'indirizzo viene visualizzato lampeggiante . Entro 8 s, con il tasto UP o DOWN, impostare l'indirizzo di start desiderato .
3) Premere il tasto ENTER: il display visualizza nuovamente DMX Address .
4) Premere una volta il tasto MENU in modo da visualizzare Channel Mode .
5) Premere il tasto ENTER . Il numero dei canali DMX viene visualizzato lampeggiante . Entro 8 s, con il tasto UP o DOWN, impostare il numero desiderato .
6) Per salvare l'impostazione premere il tasto ENTER .
7) Per tutti gli altri MINICUBE-60 da comandare in sincronia impostare lo stesso indirizzo di start e lo stesso numero di canali .
8) A questo punto, la moving-head può es-sere comandata tramite DMX . Le funzioni DMX si trovano alle pagine 20 – 22 . Se la MINICUBE-60 non riceve nessun segnale di comando DMX, passa al funzionamento autonomo (Cap . 5) .
Un consiglio: Se due o più MINICUBE-60 vengono comandate in sincronia attraverso lo stesso indirizzo di start, impostare in modo opposto la direzione di rota-zione del braccio roteante in uno o più apparecchi (vedi pagina 3, voce del menu “Pan Inverse”) . Così, i bracci roteanti si muovono p . es . in una coppia di apparecchi, in modo speculare .
7 Dati tecniciProtocollo dati: . . . . . . . . DMX 512
Numero dei canali DMX: . . . . . . . . . . 69, 27, 23 o 8
Lampadine 6 × LED beam: . . . . . . . LED RGBW di 10 W
dell'OSRAM angolo d'irradia-zione10°
12 × strisce con LED: . . 6 × 5050SMD (RGB)
Angolo di rotazione: . . . . Pan 560°, Tilt ∞
Ventilazione: . . . . . . . . . . ventilatore interno
Temperatura d'esercizio: . 0 – 40 °C
Alimentazione: . . . . . . . . 230 V/ 50 Hz
Potenza assorbita: . . . . . . 175 VA
Dimensioni: . . . . . . . . . . . 27 × 35 × 20 cm
Peso: . . . . . . . . . . . . . . . . 6 kg
Contatti DMX: . . . . . . . . . . . . . XLR, 3 poli
(1 × In, 1 × Out) Rete: . . . . . . . . . . . . . . Powercon
(1 × In, 1 × Out)
Con riserva di modifiche tecniche .
La MONACOR ® INTERNATIONAL GmbH & Co. KG si riserva ogni diritto di elaborazione in qualsiasi forma delle presenti istruzioni per l’uso. La riproduzione – anche parziale – per propri scopi commerciali è vietata.

20
8 Kanäle / Channels / Canaux / CanaliDMX-Kanal
ChannelCanalCanale
DMX-WertValueValeurValore
FunktionFunctionFonctionFunzione
1 000 – 255 Dimmer: LED 1 … LED 62 000 – 255 Strobe: LED 1 … LED 63 000 – 255 Dimmer: Strip 1 – 124 000 – 255 Strobe: Strip 1 – 12
5
Pan / Tilt Movement ( Bewegungsablauf / mouvement / movimento)
000 – 007 Stopp / stop / arrêt008 – 022 Pan / Tilt Movement 1023 – 037 Pan / Tilt Movement 2038 – 052 Pan / Tilt Movement 3053 – 067 Pan / Tilt Movement 4068 – 082 Pan / Tilt Movement 5083 – 097 Pan / Tilt Movement 6098 – 112 Pan / Tilt Movement 7113 – 127 Pan / Tilt Movement 8128 – 142 Pan / Tilt Movement 9143 – 157 Pan / Tilt Movement 10158 – 172 Pan / Tilt Movement 11173 – 187 Pan / Tilt Movement 12188 – 202 Pan / Tilt Movement 13203 – 217 Pan / Tilt Movement 14218 – 232 Pan / Tilt Movement 15233 – 247 Pan / Tilt Movement 16
248 – 255Musiksteuerung / music control / gestion par la musique / comando tramite la musica
6 000 – 255MovementGeschwindigkeit / speed / vitesse / velocità: –> … –>>>
7
000 – 014 Farbe / colour / couleur / colore
015 – 255
autom. Farbwechsel autom. colour change changement de couleurs autom. cambio colori autom.
8 000 – 255
Farbwechselgeschwindigkeitspeed of colour change vitesse de changement de couleur velocità cambio colori: –> … –>>>
DMX-Kanäle / DMX Channels / Canaux DMX / Canali DMX
–>>> = schnell / fast / rapide / veloce, –> = langsam / slow / lent / lenta
LED1
LED3
LED4
LED2
LED5
LED6Strip 1
Strip 9
Strip 8
Strip 7
Strip 11
Strip 6
Strip 5
Strip
4
Strip
2
Strip
10
Strip 3
Strip
12
21
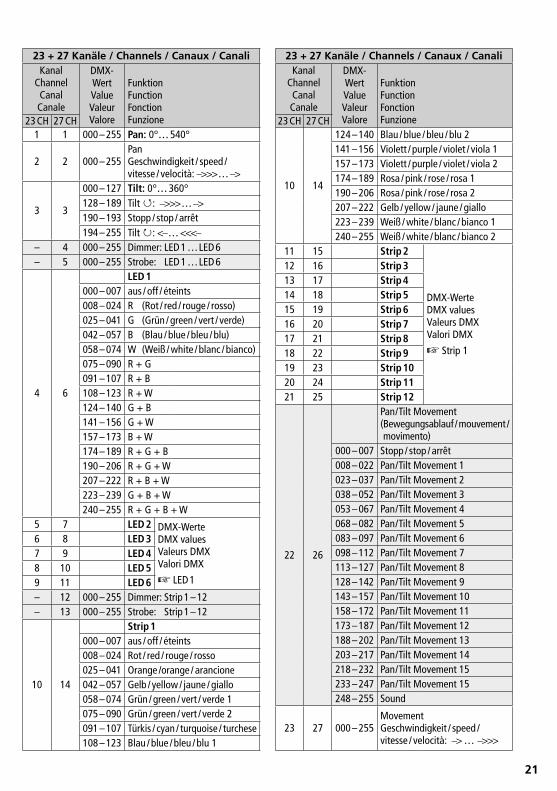
23 + 27 Kanäle / Channels / Canaux / CanaliKanal
ChannelCanalCanale
DMX-WertValueValeurValore
FunktionFunctionFonctionFunzione23 CH 27 CH
1 1 000 – 255 Pan: 0°… 540°
2 2 000 – 255PanGeschwindigkeit / speed / vitesse / velocità: –>>> … –>
3 3
000 – 127 Tilt: 0°… 360°128 – 189 Tilt ↺: –>>> … –>190 – 193 Stopp / stop / arrêt194 – 255 Tilt ↻: <– … <<<–
– 4 000 – 255 Dimmer: LED 1 … LED 6– 5 000 – 255 Strobe: LED 1 … LED 6
4 6
LED 1000 – 007 aus / off / éteints008 – 024 R (Rot / red / rouge / rosso)025 – 041 G (Grün / green / vert / verde)042 – 057 B (Blau / blue / bleu / blu)058 – 074 W (Weiß / white / blanc / bianco)075 – 090 R + G091 – 107 R + B108 – 123 R + W124 – 140 G + B141 – 156 G + W157 – 173 B + W174 – 189 R + G + B190 – 206 R + G + W207 – 222 R + B + W223 – 239 G + B + W240 – 255 R + G + B + W
5 7 LED 2 DMX-WerteDMX valuesValeurs DMXValori DMX
☞ LED 1
6 8 LED 37 9 LED 48 10 LED 59 11 LED 6– 12 000 – 255 Dimmer: Strip 1 – 12– 13 000 – 255 Strobe: Strip 1 – 12
10 14
Strip 1000 – 007 aus / off / éteints008 – 024 Rot / red / rouge / rosso025 – 041 Orange /orange / arancione042 – 057 Gelb / yellow / jaune / giallo058 – 074 Grün / green / vert / verde 1075 – 090 Grün / green / vert / verde 2091 – 107 Türkis / cyan / turquoise / turchese108 – 123 Blau / blue / bleu / blu 1
23 + 27 Kanäle / Channels / Canaux / CanaliKanal
ChannelCanalCanale
DMX-WertValueValeurValore
FunktionFunctionFonctionFunzione23 CH 27 CH
10 14
124 – 140 Blau / blue / bleu / blu 2141 – 156 156 Violett / purple / violet / viola 1157 – 173 Violett / purple / violet / viola 2174 – 189 Rosa / pink / rose / rosa 1190 – 206 Rosa / pink / rose / rosa 2207 – 222 Gelb / yellow / jaune / giallo223 – 239 Weiß / white / blanc / bianco 1240 – 255 Weiß / white / blanc / bianco 2
11 15 Strip 2
DMX-WerteDMX valuesValeurs DMXValori DMX
☞ Strip 1
12 16 Strip 313 17 Strip 414 18 Strip 515 19 Strip 616 20 Strip 717 21 Strip 818 22 Strip 919 23 Strip 1020 24 Strip 1121 25 Strip 12
22 26
Pan / Tilt Movement ( Bewegungsablauf / mouvement / movimento)
000 – 007 Stopp / stop / arrêt008 – 022 Pan / Tilt Movement 1023 – 037 Pan / Tilt Movement 2038 – 052 Pan / Tilt Movement 3053 – 067 Pan / Tilt Movement 4068 – 082 Pan / Tilt Movement 5083 – 097 Pan / Tilt Movement 6098 – 112 Pan / Tilt Movement 7113 – 127 Pan / Tilt Movement 8128 – 142 Pan / Tilt Movement 9143 – 157 Pan / Tilt Movement 10158 – 172 Pan / Tilt Movement 11173 – 187 Pan / Tilt Movement 12188 – 202 Pan / Tilt Movement 13203 – 217 Pan / Tilt Movement 14218 – 232 Pan / Tilt Movement 15233 – 247 Pan / Tilt Movement 15248 – 255 Sound
23 27 000 – 255MovementGeschwindigkeit / speed / vitesse / velocità: –> … –>>>

22
NederlandsNederlands Pagina
DanskDansk Sida
SvenskaSvenska Sidan
SuomiSuomi Sivulta
69 Kanäle / Channels / Canaux / CanaliDMX-Kanal
ChannelCanalCanale
DMX-WertValueValeurValore
FunktionFunctionFonctionFunzione
1 000 – 255 Pan: 0°… 540°
2 000 – 255
Pan Feineinstellung fine adjustment réglage précis regolazione fine
3 000 – 255Pan Geschwindigkeit / speed / vitesse / velocità: –>>> … –>
4
000 – 127 Tilt: 0°… 360°128 – 189 Tilt ↺: –>>> … –>190 – 193 Stopp / stop / arrêt194 – 255 Tilt ↻: <– … <<<–
5 000 – 255 Dimmer: LED 1 … LED 66 000 – 255 Strobe: LED 1 … LED 6
7, 11, 1519, 23, 27 000 – 255 LED 1, 2, 3
LED 4, 5, 6R Rot / red
rouge / rosso 8, 12, 1620, 24, 28 000 – 255 LED 1, 2, 3
LED 4, 5, 6G Grün / green
vert / verde 9, 13, 1721, 25, 29 000 – 255 LED 1, 2, 3
LED 4, 5, 6B Blau / blue
bleu / blu10, 14, 1822, 26, 30 000 – 255 LED 1, 2, 3
LED 4, 5, 6W Weiß / whiteblanc / bianco
31 000 – 255 Dimmer: Strip 1 – 1232 000 – 255 Strobe: Strip 1 – 12
33, 36, 3942, 45, 4851, 54, 5760, 63, 66
000 – 255
Strip 1, 2, 3Strip 4, 5, 6Strip 7, 8, 9Strip 10, 11, 12
RRot / red
rouge / rosso
34, 37, 4043, 46, 4952, 55, 5861, 64, 67
000 – 255
Strip 1, 2, 3Strip 4, 5, 6Strip 7, 8, 9Strip 10, 11, 12
GGrün / greenvert / verde
35, 38, 4144, 47, 5053, 56, 5962, 65, 68
000 – 255
Strip 1, 2, 3Strip 4, 5, 6Strip 7, 8, 9Strip 10, 11, 12
BBlau / bluebleu / blu
69
000 – 199 —200 – 209 Reset210 – 239 —
240 – 255Musiksteuerung / music control / gestion par la musique / comando tramite la musica
–>>> = schnell / fast / rapide / veloce, –> = langsam / slow / lent / lenta
LED1
LED3
LED4
LED2
LED5
LED6Strip 1
Strip 9
Strip 8
Strip 7
Strip 11
Strip 6
Strip 5
Strip
4
Strip
2
Strip
10
Strip 3
Strip
12

MONACOR INTERNATIONAL GmbH & Co. KG • Zum Falsch 36 • 28307 Bremen • Germany Copyright © by MONACOR INTERNATIONAL. All rights reserved. A-1841.99.01.07.2017