Lecture 2: Data in Linguistics, Git/GitHub, Jupyter …...Your first local repository: getting...
22
Lecture 2: Data in Linguistics, Git/GitHub, Jupyter Notebook LING 1340/2340: Data Science for Linguists Na-Rae Han
Transcript of Lecture 2: Data in Linguistics, Git/GitHub, Jupyter …...Your first local repository: getting...

Lecture 2: Data in Linguistics, Git/GitHub,
Jupyter Notebook
LING 1340/2340: Data Science for Linguists
Na-Rae Han
Objectives
What do linguistic data look like?
Tools:
Git and GitHub
Jupyter Notebook
1/10/2019 2
You should be taking NOTES!

To-do #1
1/10/2019 3
What linguistic data sets did you look at?
Corpus data?
Non-corpus data?
What makes a dataset a corpus?

First thing to do every class
1/10/2019 4
1. Open up a Terminal/Git Bash window ("shell" window).
2. Move into your Data_Science directory.
cd Documents/Data_Science
3. Make sure you are in the right directory.
pwd
4. Look at what's inside the directory.
ls
or
ls -la
Hit TAB for auto-completion.
"Print Working Directory"
ls for "list directory".-la for "long/all". Shows all hidden files in long output.

1/10/2019 5

Your first local repository: getting started
1/10/2019 6
1. Create a directory called languages
2. Initiate it as a Git repository:
git init
3. Create a new text file 'zulu.txt', add lines to it
4. Add files to staging area:
git add zulu.txt
5. Commit the change:
git commit -m "started zulu"
Follow steps in Tutorial Part 1, Creating a Repository
6. Edit the text file again
7. Add files to be committed:
git add zulu.txt
8. Commit the change:
git commit -m "details on…"
Check status between steps: git status

Your first local repository: tracking, history
1/10/2019 7
To view entire version history:
git log
To view changes:
git diff
git diff HEAD~1 file.txt
git diff --staged
To view what changed in a particular version:
git show HEAD~1
Follow steps in Tutorial Part 1: Tracking Changes, A Commit Workflow, and Exploring History.
If thrown into pagination, use SPACE to page down,
q to quit.
To scrap new changes since the last commit:
git checkout HEAD file.txt
To restore an earlier version:
git checkout VERSION file.txt
commit to make this the new HEAD
HEAD: the last committed version
HEAD~1: one before that

Your first local repository
1/10/2019 8
languages is now:
tracked by Git
all changes will be documented
able to revert back to earlier version, if needs be
But is this all?
How about backup? collaboration? social?
commit
Your directory languages was set up with a Git repository.

GitHub: a remote repository
1/10/2019 9
This is where GitHub comes in.
GitHub is a repository hosting service.
A website where you can keep a copy of your Git repository.
REMOTE repository on GitHub, LOCAL repository on your laptop.
Great way to backup, and also showcase your work
push
pull
commit

Setting up a remote repo
1/10/2019 10
There are TWO main methods of setting up a remote GitHub repo.
Scenario 1: Your laptop already has an existing LOCAL Git repo. You configure it to link it up to a new, empty repo on GitHub, then push up the content.
We can set up our languages repo with a GitHub repo this way.
Part 2 Linking Git with GitHub goes this route.
Scenario 2: Start from scratch. Create a new repository on GitHub, and then clone it onto your laptop as a brand-new local repository.
This YouTube tutorial shows you how.
Let's have you try this.

Your first GitHub repo
1/10/2019 11
On GitHub, create a new repository called "practice-repo".
Provide a short description.
Keep it public.
Initialize it with a README.

Cloning first GitHub repo
1/10/2019 12
GitHub shows a URL to use in cloning. Copy to clipboard.
In Terminal/Git Bash, move into your Data_Science/ directory (use cd command,) then execute:
git clone https://github.com/yourid/practice-repo.git
practice-repo directory is cloned as a local repository.

Local repository ⬌ remote repository
1/10/2019 13
After committing, you now need to push to remote repo.
1. Create a new text file 'notes.txt'
2. Add files to be committed:
git add notes.txt
3. Commit:
git commit -m "first commit"
4. Push change to GitHub: git push
5. Edit the text file
6. Add files to be committed:
git add notes.txt
7. Commit:
git commit -m "changed x, y, z"
8. Push change to GitHub: git push
Check frequently: git statusgit diffgit log
push
pull
commit
No need unless collaborating

GitHub: a social, remote repository
1/10/2019 14
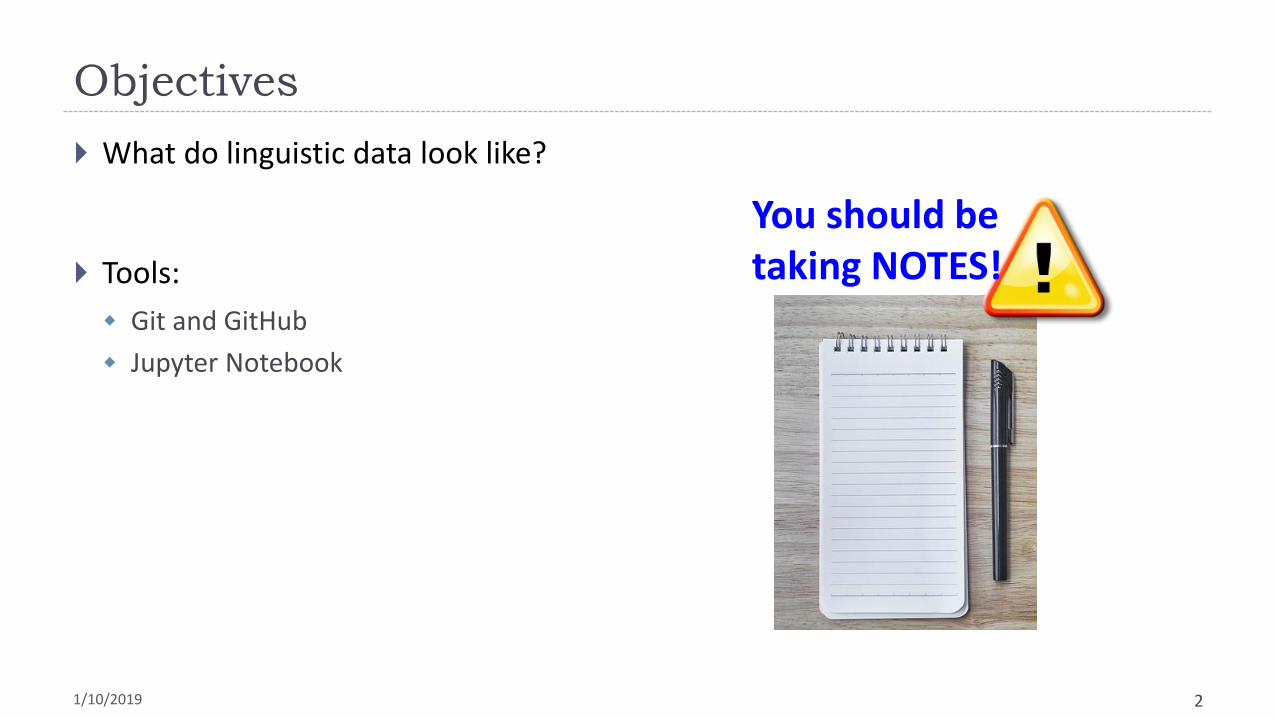
GitHub also works as a central remote repository among a group of collaborators working on a shared project.
Everyone works on their own local copy of the repository, making changes.
Git is able to keep track and merge changes submitted by everyone.
push & pull push
& pull
push & pull
*Avatar icons by FLATICON
GitHub: a social, remote repository
1/10/2019 15
GitHub also works as a central remote repository among a group of collaborators working on a shared project.
Everyone works on their own local copy of the repository, making changes.
Git is able to keep track and merge changes submitted by everyone.
Everyone is an equal collaborator with push (=write) access.
push & pull push
& pull
push & pull
*Avatar icons by FLATICON

But first, forking
1/10/2019 16
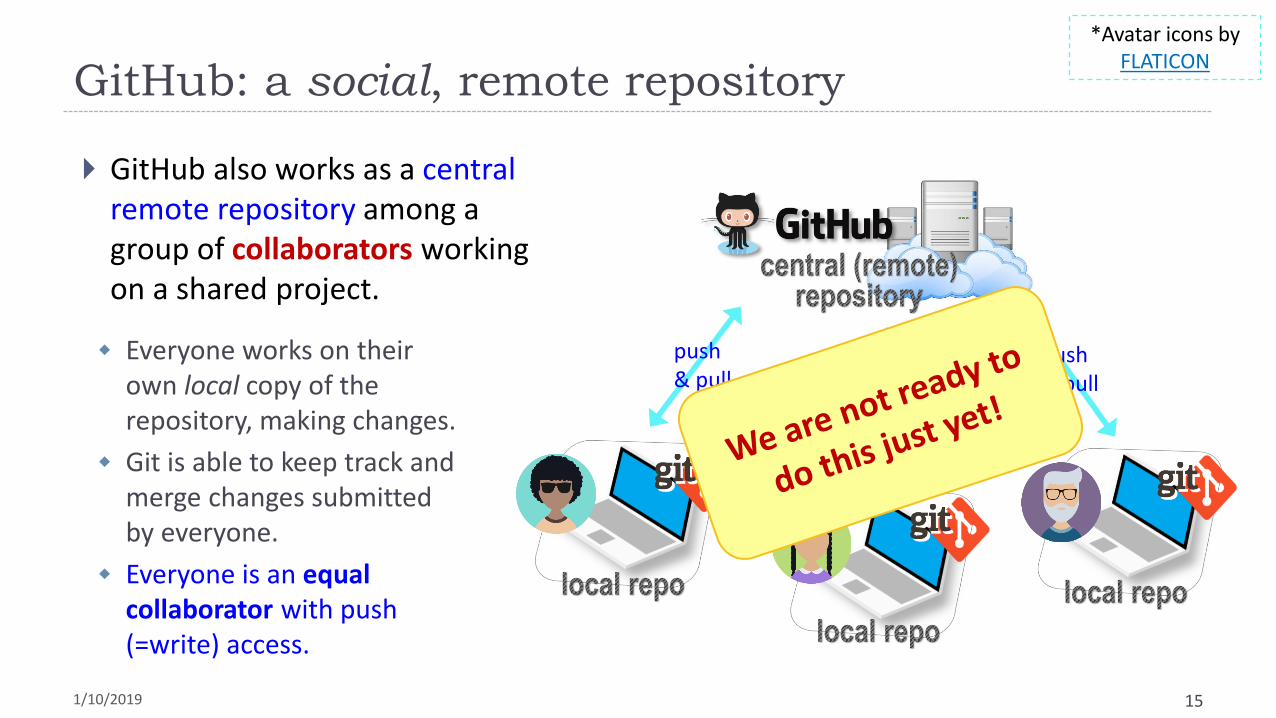
When you start with someone else's project.
You are not a collaborator in their repo. (No push access)
https://help.github.com/articles/fork-a-repo/
You fork the original repo into your own GitHub account, creating your own "fork".
You make changes in your own fork. The original repo is not affected!

Forking, one-way
1/10/2019 17
push
commit
fork (1st time only)
"upstream"
*Avatar icons by FLATICON
"origin"
After the spin-off, your fork works as if your own GitHub repo.
You are content to do your own development, not bothering the original project owner…
Or are you??
Forking: contributing back
1/10/2019 18
When you start with someone else's project.
You are not a collaborator in their repo. (No push access)
https://help.github.com/articles/fork-a-repo/
You fork the original repo into your own GitHub account, creating your own "fork".
You make changes in your own fork. The original repo is not affected!
pull request: When you think the original project could benefit from your new work, you ask the owner to "pull" from your fork. Owner of original ("upstream") will review your contribution, and then
either merge it or reject it.

Offering to contribute
1/10/2019 19
push
commit
fork (1st time only)
"upstream"pull request
*Avatar icons by FLATICON
Will the project owner like what you did?
If so, they will accept the pull request and merge, updating their repo.
If not, they will reject the request.
"origin"
Your first fork
1/10/2019 20
On GitHub:
1. Go to narae's GitHub profile.
2. Fork "Class-Exercise-Repo". You will now have the exact same content in your own account.
On your laptop:
1. Move into your Data_Science/ directory. Clone your fork there via git clone.
2. Copy over your To-Do1 submission file into todo1/ directory. Make sure the file name has your name in it: lingdata_narae.txt etc.
3. Add, commit, and then push to your fork.
Back on GitHub:
1. Confirm your GitHub fork now has your submission file.
2. Create a pull request for Na-Rae.

Jupyter Notebook
1/10/2019 21
Allows you to create and share documents that contain live code, equations, visualizations and explanatory text.
Learn how to use it. Your Python code should be in the Jupyter Notebook format:
xxxx.ipynb
You can launch it from the command line.
Move into the desired directory, and then execute
jupyter notebook &
'&' is not necessary, but it lets you keep using the terminal
Wrapping up
1/10/2019 22
Homework #1 is out: due on Tuesday.
Don't be too ambitious!
Office hours
Posted on Course home page.
We are all happy to meet by appointment.
I will be sending out DataCamp invitation.
Start learning:
Git, GitHub
Jupyter Notebook
numpy


![Git History - s3-ap-southeast-1.amazonaws.comGit commands command description git clone url [dir] copy a git repository so you can add to it git add files adds file contents to the](https://static.fdocuments.in/doc/165x107/5e4ffc64fe3b0704a66aa143/git-history-s3-ap-southeast-1-git-commands-command-description-git-clone-url.jpg)