Learning to Script With AutoIt V3 (Last Updated 17 Feb 2010)
106
Learning to Script with AutoIt V3 Document last updated 17 February 2010 AutoIt Version 3.3.0.0 Original Document: Alex Peters (LxP) http://yallara.cs.rmit.edu.au/~apeters/ Updated By: Brett Francis (BrettF) http://signa5.com This document is for you if you are interested in learning to script with AutoIt. Where possible, I will try to assume that you have no prior coding experience and I aim to teach you some good general coding habits, which will be beneficial should you decide to move on to other languages.
-
Upload
prasadreddymandala -
Category
Documents
-
view
737 -
download
6
description
autoit scripting documentatin
Transcript of Learning to Script With AutoIt V3 (Last Updated 17 Feb 2010)

Learning to Script with AutoIt V3 Document last updated 17 February 2010
AutoIt Version 3.3.0.0
Original Document: Alex Peters (LxP) http://yallara.cs.rmit.edu.au/~apeters/
Updated By: Brett Francis (BrettF)
http://signa5.com
This document is for you if you are interested in learning to script with AutoIt. Where possible, I will try to assume that you have no prior coding experience and I aim to teach you some good general coding habits, which will be
beneficial should you decide to move on to other languages.

LEARNING TO SCRIPT WITH AUTOIT V3 Page 2
Table of Contents Acknowledgements ................................................................................................................................. 6
Introduction ............................................................................................................................................ 7
What Is AutoIt? ................................................................................................................................... 7
Features of AutoIt ............................................................................................................................... 7
A little about this tutorial .................................................................................................................... 7
1 Starting Off ........................................................................................................................................... 8
1.1 Download and Install AutoIt V3 .................................................................................................... 8
1.2 Install SciTE4AutoIt3 ..................................................................................................................... 8
1.3 Know how to access the help file .................................................................................................. 9
1.4 Know what you want to achieve ................................................................................................... 9
1.5 What is contained in this tutorial? ................................................................................................ 9
2 Your First Steps .................................................................................................................................. 10
2.1 Creating and Organizing Script Files ........................................................................................... 10
2.2.1 Organization of Scripts ......................................................................................................... 10
2.1.2 Creating a Script from Explorer ............................................................................................ 10
2.1.3 Creating a Script from SciTE ................................................................................................. 11
2.2 Hello World Example .................................................................................................................. 11
2.2. 1 The Steps ............................................................................................................................. 11
2.2.2 Explanation .......................................................................................................................... 11
2.2.3 Extended Work .................................................................................................................... 12
2.2.4 The Code .............................................................................................................................. 13
2.3 Simple Notepad Automation ...................................................................................................... 13
2.4. 1 The Steps ............................................................................................................................. 13
2.3.2 Explanation .......................................................................................................................... 15
2.3.3 Extended Work .................................................................................................................... 15
2.3.4 The Code .............................................................................................................................. 15
2.5 Exercies ....................................................................................................................................... 17
3 Programming—it’s all about values ................................................................................................... 18
3.1 How values are used ................................................................................................................... 18
3.2 Different types of values ............................................................................................................. 19
3.3 Values in Depth ........................................................................................................................... 19
3.3.1 Numeric Values .................................................................................................................... 19
3.3.2 Strings .................................................................................................................................. 19

LEARNING TO SCRIPT WITH AUTOIT V3 Page 3
3.3.3 Booleans ............................................................................................................................... 20
3.4 Exercises ...................................................................................................................................... 21
4 Arrays of Variables ............................................................................................................................. 22
4.1 Declaring and naming variables .................................................................................................. 22
4.2 The Naming Convention ............................................................................................................. 23
4.3 Assigning variable values ............................................................................................................ 23
4.4 Accessing variable values ............................................................................................................ 23
4.5 Constants .................................................................................................................................... 24
4.6 Macros ........................................................................................................................................ 24
4.7 Arrays .......................................................................................................................................... 26
4.8 Exercises ...................................................................................................................................... 27
5 Functions ............................................................................................................................................ 28
5.1 Example function calls ................................................................................................................ 29
5.1.1 Run() and RunWait() ............................................................................................................ 29
5.1.2 WinWait() ............................................................................................................................. 29
5.1.3 Send() ................................................................................................................................... 30
5.2 Exercises .................................................................................................................................. 31
6 Operators ........................................................................................................................................... 32
6.1 True or False? .............................................................................................................................. 34
True ............................................................................................................................................... 34
False .............................................................................................................................................. 34
6.2 Exercises ...................................................................................................................................... 35
7 Branching ........................................................................................................................................... 36
7.1 Conditional Functions ................................................................................................................. 36
7.1.1 If…Then…Else ....................................................................................................................... 36
7.1.2 Select Case ........................................................................................................................... 36
7.1.3 Switch Case .......................................................................................................................... 36
7.1.4 ContinueCase ....................................................................................................................... 37
7.2 Exercises ...................................................................................................................................... 38
8 Loops .................................................................................................................................................. 39
8.1 Types of Loops ............................................................................................................................ 39
8.1.1 For…Next .............................................................................................................................. 39
8.1.2 While…Wend ........................................................................................................................ 39
8.1.3 Do…Until .............................................................................................................................. 40

LEARNING TO SCRIPT WITH AUTOIT V3 Page 4
8.1.4 ExitLoop ................................................................................................................................ 40
8.1.5 ContinueLoop ....................................................................................................................... 40
8.2 Exercises ...................................................................................................................................... 41
9 The Graphical User Interface (GUI) .................................................................................................... 42
9.1 Creating the GUI .......................................................................................................................... 42
9.2 Creating the Controls .................................................................................................................. 43
9.2.1 Pictures .................................................................................................................................... 43
9.2.1.1 Creating the control .......................................................................................................... 43
9.2.1.2 Setting the control ............................................................................................................ 43
9.2.2 Buttons ................................................................................................................................. 43
9.2.2.1 Creating the control .......................................................................................................... 43
9.2.2.2 Setting the control ............................................................................................................ 43
9.2.3 Inputs ................................................................................................................................... 43
9.2.3.1 Creating the control .......................................................................................................... 43
9.2.3.2 Setting the control ............................................................................................................ 44
9.2.4 Labels ................................................................................................................................... 44
9.2.4.1 Creating the control .......................................................................................................... 44
9.2.4.2 Setting the control ............................................................................................................ 44
9.3 Getting Input ............................................................................................................................... 44
9.3.1 Message Loop. ..................................................................................................................... 45
9.3.2 On event Mode .................................................................................................................... 46
9.4 Koda ............................................................................................................................................ 48
10 User Defined Functions (UDF) .......................................................................................................... 49
10.1 What are they? ......................................................................................................................... 49
10.2 Creating Your Own Function ..................................................................................................... 49
11 String Manipulation ......................................................................................................................... 52
11.1 Common Functions ................................................................................................................... 52
11.1.1 String Len ........................................................................................................................... 52
11.1. 2 StringInStr ......................................................................................................................... 52
11.1.3 StringLeft and StringRight .................................................................................................. 53
11.1.4 StringTrimLeft and StringTrimRight ................................................................................... 53
11.1.5 StringSplit ........................................................................................................................... 54
11.1.6 String StripWS and StringStripCR ....................................................................................... 54
11.1.7 StringMid ............................................................................................................................ 55
LEARNING TO SCRIPT WITH AUTOIT V3 Page 5
11.2 Other uses ................................................................................................................................. 55
11.3 Exercises .................................................................................................................................... 58
12 Downloading Files Using the Internet .............................................................................................. 59
12.1 In the Background ..................................................................................................................... 59
12.1.1 URL ..................................................................................................................................... 59
12.1.2 Filename ............................................................................................................................. 59
12.1.3 Options ............................................................................................................................... 59
12.1.4 Background ........................................................................................................................ 60
12.2 Example Usage .......................................................................................................................... 60
12.2.1 Make the script wait .......................................................................................................... 60
12.2.2 Downloading in the Background ........................................................................................ 60
12.2.3 Downloading from a Password Protected Source ............................................................. 60
13 Putting it to the test ......................................................................................................................... 62
Conclusion ............................................................................................................................................. 63
Answers ................................................................................................................................................. 64
Exercises- Section 2 ........................................................................................................................... 64
Exercises- Section 3 ........................................................................................................................... 65
Exercises- Section 4 ........................................................................................................................... 66
Exercises- Section 5 ........................................................................................................................... 67
Exercises- Section 6 ........................................................................................................................... 68
Exercises- Section 7 ........................................................................................................................... 69
Exercises- Section 8 ........................................................................................................................... 70
Exercises- Section 11 ......................................................................................................................... 71
Frequently Asked Questions ................................................................................................................. 72
Epilogue............................................................................................................................................... 106
LEARNING TO SCRIPT WITH AUTOIT V3 Page 6
Acknowledgements Alex Peters (LxP): Thank you for all the hard work put into the original tutorial! Without you, this probably would never exist! Acknowledgements made by him are as follows:
• Herewasplato o Pointed out problems pasting code from the document into a script, prompted better o Explanation of strings and suggested the addition of exercise solutions.
My Acknowledgements are as follows:
• SmokeN o Provided an excellent example to the workings of BitOr.
• GeoSoft o A great help when I needed a way to clarify a part o One of my proofreaders…
• SpookMeister o Suggested section 6.1 (In depth on True and False operators), also made the base for the
code example.

LEARNING TO SCRIPT WITH AUTOIT V3 Page 7
Introduction
What Is AutoIt? AutoIt v3 is a freeware BASIC-like scripting language designed for automating the Windows GUI and general scripting.
Features of AutoIt • Easy to learn BASIC-like syntax • Simulate keystrokes and mouse movements • Manipulate windows and processes • Interact with all standard windows controls • Scripts can be compiled into standalone executables • Create Graphical User Interfaces (GUIs) • COM support • Regular expressions • Directly call external DLL and Windows API functions • Scriptable RunAs functions • Detailed help file and large community-based support forums • Compatible with Windows 95 / 98 / ME / NT4 / 2000 / XP / 2003 / Vista / 2008 • Unicode and x64 support • Digitally signed for peace of mind • Works with Windows Vista's User Account Control (UAC)
A little about this tutorial This tutorial is a continuation and update of LxP’s original hard work. As well as the tutorial, you may have noticed the resources folder. This folder contains printable question/answer sheets, .au3 files for most examples in this tutorial.

LEARNING TO SCRIPT WITH AUTOIT V3 Page 8
1 Starting Off
1.1 Download and Install AutoIt V3 First of you will need to download and install the latest stable release of AutoIt. Although you have the option of downloading a Compressed .ZIP distribution, it is advised to download the installer, as it has many advantages, such as easier access to the help file, the ability to double-click AutoIt scripts to start them or to edit them, and the painless use of the Includes code library (A large library of various UDFs [we’ll get into that later]) in your scripts.
Download Latest Installer for AutoIt:
http://www.autoitscript.com/cgi-bin/getfile.pl?autoit3/autoit-v3-setup.exe
For comprehensive instructions on how to install AutoIt, follow the following link:
http://www.signa5.com/autoit/tutorial/video.php?id=installing
A new video will be replacing that as soon as I have the time. I plan on filming and adding subtitles so you don’t have to listen to my horrible speaking voice…
1.2 Install SciTE4AutoIt3 "SciTE is a Scintilla based Text Editor. Originally built to demonstrate Scintilla, it has grown to be a generally useful editor with facilities for building and running programs." – Niel Hodgson
SciTE4AutoIt3 contains SciTE, wrapped into a single installer with all needed configuration settings and lots of utility programs like Tidy, Obfuscator, AU3Check, ScriptWriter, AutoIt3Wrapper to enhanced SciTE for use with AutoIt3. It contains around 10 tools for use and ease of scripting.

LEARNING TO SCRIPT WITH AUTOIT V3 Page 9
I recommend that you download SciTE, as scripting using this is much easier, especially with all the tools available for quick and easy use.
1.3 Know how to access the help file The help file that is included with every installation is very comprehensive, and contains examples for every almost every function. You can easily access the help file in one of two ways:
Through All Programs:
Start > All Programs > AutoIt V3 > AutoIt Help File
Through SciTE:
If you have installed SciTE, using the help file when scripting is much easier. When you press <F1>, the help file will open displaying the keyword that the cursor was on.
It is very important to get comfortable with the help file, both with what it contains, and how to use it because it will be your primary source on how to use any specific function. This tutorial covers the basic use of functions, but does not go into great depth of every function.
1.4 Know what you want to achieve This is very important for any project you undertake. Knowing what you want to achieve is the starting point in your script, and in turn will make what you want to achieve much easier. A good idea is to sit down with a piece of paper, and just brainstorm ideas.
A common topic that I see in the forums is “what to make next”. Some responses to that age old question are:
• Start multiple programs and arrange them nicely on the screen. • Start a single program and adjust some values on the window, then hide it. • Periodically perform an action in some open program (without interrupting any work taking
place at that time) • Shut down the computer after some lengthy operation (like a backup or perhaps a
download) • Automate some ‘housekeeping’ chores such as backing up important files and emptying the
Recycle Bin
1.5 What is contained in this tutorial? This tutorial teaches you basic knowledge with scripting in AutoIt. At the end of every chapter, there are some Chapter Review questions, and exercises for you to complete. Answers for the chapter review and some exercises can be found at on page 39. A list of Frequently Asked Questions (a must read after this tutorial!) can be found on page 72.

LEARNING TO SCRIPT WITH AUTOIT V3 Page 10
2 Your First Steps Your first steps are important, with how to code, and what practices you should pick up early, to make you a more productive coder. To start off though, we will work through some examples, explaining what we are doing, and what everything means.
2.1 Creating and Organizing Script Files Creating a script file is the first step in starting to create your scripts.
2.2.1 Organization of Scripts Organization is one of the many keys to being able to create scripts (especially large projects) efficiently. It is always a good idea to keep your scripts contained in one folder, so that you always know where files are, and in some cases, what they are. For an example of how you could go about organizing this folder, we will look at what I have done. Basically in “My Documents” I have an “AutoIt” folder. The folders inside the “AutoIt” folder house my projects, scripts and programs from the Example Scripts Forum, that I like, or may want to build upon and study later, and a special folder which I dedicate to solutions of where I or others have helped people on the forums. Having it set up this way means I can easily find my scripts, examples for support in the forums or for personal use, and easy offline access to a large range of UDF libraries.
2.1.2 Creating a Script from Explorer 1. Navigate to any folder in Windows Explorer (I am in “My Documents\AutoIt\Tutorials”) 2. Right Click and select New > AutoIt Script
3. Type your filename in. Leave “.au3” intact if it is visible.

LEARNING TO SCRIPT WITH AUTOIT V3 Page 11
2.1.3 Creating a Script from SciTE SciTE is the editor you will be using for most if not all of your scripting, so it is important that you can0020at least create a script using it.
1. Open SciTE from Start > All Programs > AutoIt v3 > SciTE > SciTE 2. Go File > New or press <CTRL> + <N> to create a new script. 3. Save your script by File > Save As or <CTRL> + <SHIFT> + <S>.
When saving a file in SciTE, it is very important that you make sure the file has .au3 (the file extension for AutoIt V3 scripts) on the end, as not having it will causing it to be saved as a plain file.
2.2 Hello World Example This is a modified version of the ‘Hello World’ tutorial available in the AutoIt V3 Help file (Under Tutorials). Like the tutorial it assumes that you have AutoIt V3 installed, and SciTE.
This tutorial will teach you how to display a message box by use of native function, explain parameters of functions, the use of numeric flags, and basic use of strings and comments. It also discusses basic use of the help file.
2.2. 1 The Steps 1. Create a new script using the previously discussed explorer method and open it for
editing in SciTE. 2. The code you can see in SciTE is comments. These are ignored by the interpreter. The
character to make comments is a semi-colon (;). These can be placed at the start of lines, or after functions.
3. Now we want to tell AutoIt to display a message box. To do that, we have to use the MsgBox function. After the last comment, add the following line:
MsgBox(0, "Tutorial", "Hello World!")
4. Save the script. 5. Run the script by either
a. Right Click > Run Script on the saved .au3 file in explorer b. In SciTE, going to Tools > Go or pressing <F5>
6. Congratulations! You have just created your first script.
2.2.2 Explanation Almost every function in AutoIt will take a parameter. Parameters define what is to be done in a function, and changes things, such as text and how certain things are displayed. For this example, the MsgBox takes three parameters - a flag, a title and a message. The first parameter, the flag is a number that changes the way MsgBox displays. In this example we used 0. The next 2 parameters, the title and message are both strings. When using strings in AutoIt you are able to surround the text in double or single quotes. Both "This is some text" and 'This is some text' will work fine. Later on in this book we will discuss strings in more depth.

LEARNING TO SCRIPT WITH AUTOIT V3 Page 12
2.2.3 Extended Work
So we used the function MsgBox, gave it a title and a message, and ran it. But we can do more to make the message box gain more attention, or to make it look different to standard. To change the effect that our message box created, we can alter the flag parameter. With the flag we can change the icon, some display options, what buttons are displayed, and much more. So open the help file and find the entry for MsgBox.
As you can see, there is the title of the function, a short abstract of what the function does, the parameters of the function, return values, the remarks section, containing the flags to alter our message box and some more information that may help the reader, related functions, and an example.
Now to change how our message box displays. As you can see by the picture above we can change the icon displayed, and the buttons. So how can we do that? In the remarks section the help file, there is a table containing the flags for changing the message box. To use more than one flag add them together. Experiment with different values and see what you get.
Remember, add the flag values together, and if you run your script and nothing happens, there is no need for alarm. It is more than likely that you have made a mistake in adding the values together. An invalid flag will not display a message box, so be careful when adding values together. One of the simplest methods for combining flags is using a calculator, and it is also fairly foolproof.

LEARNING TO SCRIPT WITH AUTOIT V3 Page 13
2.2.4 The Code This is the full code for this example and some extended examples.
; Script Start - Add your code below here ;Basic Example MsgBox(0, "Tutorial", "Hello World!") ;Extended Work MsgBox(18, "Tutorial", "Hello World!"); Abort, Retry, Ignore with Stop Icon MsgBox(32, "Tutorial", "Hello World!"); Normal message box with exclamation icon. MsgBox(12345, "Tutorial", "Hello World!") ; A message box with and invalid flag. This will NOT display.
2.3 Simple Notepad Automation This tutorial is about the automation of notepad.
This tutorial will teach you basic use of the AutoIt v3 Window Info Tool, give you an introduction to Send, to window titles, to the Run function, to some Win* functions, and show you some basic automation. In the extended task, window states and Sleep function are also explored, as well as some basic macros.
2.4. 1 The Steps 1. Create a new script and open it for editing. 2. The first thing we need to do is run Notepad. To do that we get the Notepad executable
(notepad.exe). We got that from looking at the short cut to notepad in the Start Menu. So to execute notepad.exe, we must use the run function. And the following line into your script.
Run(“notepad.exe”)
3. Save the script and run it. If all goes well, we should have a new instance of notepad appear. Don’t close this instance just yet, we still need to work with it in the next few steps.
4. When automating applications AutoIt can check for window title so that it knows which window it should work with. With Notepad the window title is Untitled - Notepad. AutoIt is case-sensitive when using window titles so you must get the title exactly right -the best way to do this is to use the AutoIt Window Information Tool. Run the Information Tool from Start Menu > AutoIt v3 > AutoIt Window Info, or since we are in SciTE, Tools > AU3Info, or use the hotkey <CTRL> + <F6>.

LEARNING TO SCRIPT WITH AUTOIT V3 Page 14
5. With the Info Tool open click on the newly opened Notepad window to activate it; the
Info Tool will give you information about it. The information we are interested in is the window title. While in the notepad window, press <CTRL> + <ALT> + <F> to freeze the Info tool. That way we can access the information we just gathered about notepad.
6. Highlight the title in the AutoIt Info Tool window and press CTRL-C to copy it to the clipboard - we can then paste the title into our script without fear of misspelling it.
7. After running a copy of Notepad we need to wait for it to appear and become active before we send any keystrokes. We can wait for a window using the WinWaitActive function. Most window-related functions in AutoIt take a window title as a parameter. Enter the following as the second line in the script (use <CTRL> + <V> or Edit > Paste to paste our window title from the clipboard). Add the following line into the script:
WinWaitActive(“Untitled – Notepad”)
1. After we are sure the Notepad window is visible we want to type in some text. This is done with the Send function. Now we will add this line to our script.
Send("This is some text.")
2. Close the copy of Notepad that we previously opened (you will need to do this every time you run the script otherwise you will end up with lots of copies running!). Run the script.
3. You should see Notepad open, and then some text will magically appear! 8. Next we want to close notepad, we can do this with the WinClose function.
WinClose("Untitled - Notepad")
4. When Notepad tries to close you will get a message asking you to save the changes. Use the Window Info Tool to get details of the dialog that has popped up so that we can respond to it :)
9. So, we add a line to wait for this dialog to become active (we will also use the window text to make the function more reliable and to distinguish this new window from the original Notepad window):
WinWaitActive("Notepad", "Do you want to save")
10. Next we want to automatically press Alt-N to select the No/Don't save button (Underlined letters in windows usually indicate that you can use the ALT key and that letter as a keyboard shortcut). In the Send function to send an ALT key we use an exclamation point (!).
Send("!n")
5. Run the script and you will see Notepad open, some text appears, then it closes!

LEARNING TO SCRIPT WITH AUTOIT V3 Page 15
2.3.2 Explanation Basically what we did in this script was run notepad, using the function Run. The only parameter we had was the path. Then we waited for the window to open, sent text, and then closed it. It was pretty much all explained as we went.
2.3.3 Extended Work So what if we wanted to send new lines, or stop the user from interfering from the text being sent?
First off, we will start with making the sent text have new lines. Find the following line in your script:
Send("This is some text.") And replace it with the following:
Send("This is some text." & @CRLF & "This is on a new line! ") Notice we added the & (a string concentrator, meaning we can join 2 values together. For example $var = “one” & “two” will have $var equal “onetwo”. ‘&’ is an operator, which is a character which AutoIt interprets to assign variables, perform mathematical operations, comparison of values and logical operations. For a complete list, look in the help file under ‘Operators’. We also used the macro @CRLF, which is a carriage return and a line feed.
Now how about stopping the user from interfering with our automation? For that we have a simple command, BlockInput. It is very simple to achieve this. We just have to add the following line at the start of the script.
BlockInput (1) And this line at the end, to enable input for the user again.
BlockInput (0) Have a look in the help file for BlockInput, and read more about it.
2.3.4 The Code This is the full code for this example and the extended example.
#cs ---------------------------------------------------------------------------- AutoIt Version: 3.2.12.1 Author: None Script Function: Simple notepad example with example to send multiple lines. #ce ---------------------------------------------------------------------------- ; Script Start - Add your code below here Run("notepad.exe") WinWaitActive("Untitled - Notepad") Send("This is some text.") WinClose("Untitled - Notepad") WinWaitActive("Notepad", "Do you want to save") Send("!n") #cs ---------------------------------------------------------------------------- Extended Example

LEARNING TO SCRIPT WITH AUTOIT V3 Page 16
#ce ---------------------------------------------------------------------------- Run("notepad.exe") WinWaitActive("Untitled - Notepad") Send("This is some text." & @CRLF & "This is on a new line!") WinClose("Untitled - Notepad") WinWaitActive("Notepad", "Do you want to save") Send("!n")

LEARNING TO SCRIPT WITH AUTOIT V3 Page 17
2.5 Exercies 1. What character is a comment? 1 Mark 2. What flag do I use for displaying a message box with a Stop Icon, Yes, No, and
Cancel and right alignment of title and the text? 3 Marks
3. What does the message box flag ‘68’ display? 2 Marks 4. Will ‘ “I am a string!” ’ display “I am a string?” 1 Mark 5. What tool did we use to get the title of Notepad? 1 Mark 6. How can I run the tool in Question 5? 3 Marks 7. What command did we use to send text to notepad? 1 Mark 8. What macro did we use to send a new line? 1 Mark 9. What operator do I use to concentrate two strings? 1 Mark 10. If I use BlockInput(1), am I blocking input, or allowing it? 1 Mark
15 Marks Total

LEARNING TO SCRIPT WITH AUTOIT V3 Page 18
3 Programming—it’s all about values
3.1 How values are used This is Alex’s theory of values. I think it is very effective in describing what they are in relation to AutoIt. “In my opinion the most essential thing to realize when it comes to programming is this: it’s not much more than a game of throwing values around”
Justification for that includes:
The script made as part of the 2.2 Hello World Example instructs AutoIt to display a message box. To do this three values are needed: one dictating the style of the box (like icon and buttons), one for the title and one for the message.
Suppose that you wanted to write a simple number guessing game. You would have a value for the number to guess and a value for what the user has entered as their guess. You would compare those two values to determine if the user has made a correct guess, and then you would probably display one of two human-readable messages informing them of the outcome, which are also values.
On the very other end of the spectrum, perhaps you want to write a utility that updates the Windows operating system. You would have values to indicate which files are to be manipulated. You would open the files specified by those values and search for certain values in each file to determine whether you need to make adjustments. If you do, you would overwrite some part of each file with a new set of values.
It can be seen rather clearly from the above scenarios that values can take many forms: numbers, characters, strings of characters, binary data or even a combination. For instance, these are all potential values:
123 Abc 0.5
ZMZ . - = _ ? + `
This is a sentence!
In my opinion, understanding and thinking about things in terms of values should make any coding task much easier. Consider what values might be involved for any task that you plan to undertake; by knowing what values will be needed, you’ll be better prepared to know exactly how these values must be manipulated to get the job done. (You’ll also know exactly what to look for in the help file since AutoIt instructions are named according to what they do.)
In the next few sections we will be looking at exactly what these values are, and different methods of storing the data.

LEARNING TO SCRIPT WITH AUTOIT V3 Page 19
3.2 Different types of values There are many different types of values. We have already encountered two- “Numeric Values”, “String Values”. Those values are probably the most important, and the most encountered value type. Common values you will encounter in AutoIt include:
• Strings • Numerical Values • Booleans
We will go through them in detail in the next section.
3.3 Values in Depth In the previous section we briefly discussed different types of values. Now we will go in depth on what they are, and then in the next section, how to store them.
3.3.1 Numeric Values Numeric values are entered into a script in the same fashion as one would enter numbers into spreadsheet software—that is, digit grouping symbols (also known as thousand separators) are not used, and numbers are made negative by placing a minus sign (-) to the front. Regardless of the standard notation for your region, a period is used to represent a decimal point (e.g. 124.45 and not 123,45).
-1 ; Negative Number 10 ; Integer 10000 ; Ten Thousand 1.5 ; One and a half or One point five
3.3.2 Strings Since the value of a string can be virtually anything, AutoIt needs to be told where strings start and end. This is necessary to prevent symbols belonging to the string from being interpreted by AutoIt in another way, and is done by placing a single quote (') or double quote (") at both ends of the string. (You may have noticed that the script from the tutorials uses double quotes.) When a string doesn’t contain either type of quote, whichever one you choose to surround the string makes no difference If a string should contain one type of quote but not the other then it makes sense to use that other type of quote to surround the string. What happens though if the string should contain both types of quote? In such a case you must nominate which quote you will use to surround the string, and then double up on any occurrences of that quote within the string. Here’s an example of a line of text containing both types of quote:
I'm a string with single and "double" quotes If we wanted to surround the string with double quotes then we would double up on the double quotes within the string, giving us this:
"I'm a string with single and ""double"" quotes." If we wanted to instead use single quotes then we would double up on the single quote and this would be the result:
LEARNING TO SCRIPT WITH AUTOIT V3 Page 20
'I''m a string with single and "double" quotes.'
Both of these are complete strings, and should give you an understanding on how to use strings, as they are, or with single and double quotation marks.
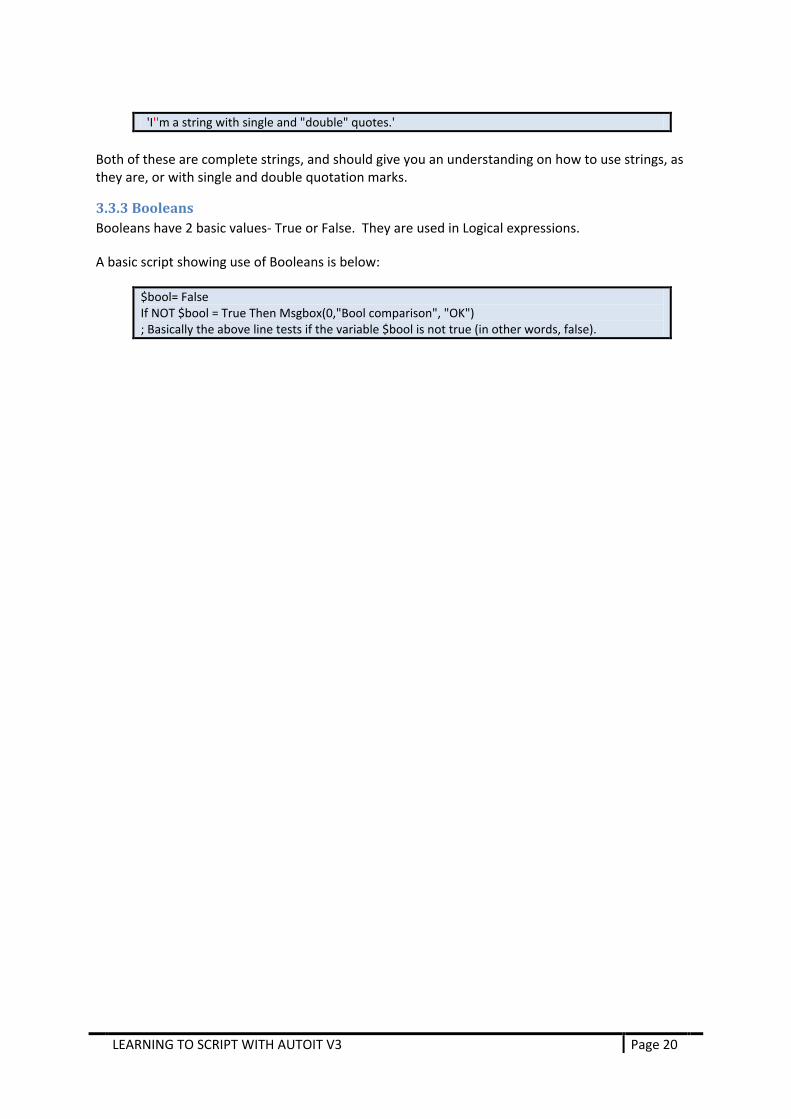
3.3.3 Booleans Booleans have 2 basic values- True or False. They are used in Logical expressions.
A basic script showing use of Booleans is below:
$bool= False If NOT $bool = True Then Msgbox(0,"Bool comparison", "OK") ; Basically the above line tests if the variable $bool is not true (in other words, false).

LEARNING TO SCRIPT WITH AUTOIT V3 Page 21
3.4 Exercises 1. What are examples of values? 5 Marks 2. What are the 3 main types of values in AutoIt 3 Marks 3. How can I use double quotes in a string incased in double quotes (“string
<INSERT STRING WITH “” HERE>”)? 1 Mark
4. What are Boolean values? 2 Marks 11 Marks Total

LEARNING TO SCRIPT WITH AUTOIT V3 Page 22
4 Arrays of Variables Variables are areas in computer memory, identified by name, that hold values. The value contained within a variable could come from the script itself, from a function (through its return value), from some other calculation (potentially involving other variables) or from any combination of these during the running lifetime of a script. A variable’s value can be read any number of times and it can be overwritten with some new value as often as desired.
4.1 Declaring and naming variables A variable’s name consists of a dollar sign ($) followed by any combination of one or more letters, numbers and the underscore character (_). Technically the $ is not part of the variable name itself, but it is used to indicate to AutoIt that it is a variable. Here are some examples of valid (although not necessarily advisable) variable names:
$MyVar $Msg $WAIT_TIME $Answer $_ ABC_ 123 $MsgBox $19283
It should be noted that variable names are case-insensitive, which means that the names below would all point to the same variable in memory:
$ABC $ABc $AbC $Abc $aBC $aBc $abC $abc
When declaring variables you have the option of declaring it in 3 scopes-
• Dim o Local scope if the variable name doesn't already exist globally, where it is then
global. • Global
o Forces creation of the variable in the Global scope • Local
o Forces creation of the variable in the Local/Function scope. You should use Local or Global, instead of Dim, to explicitly state which scope is desired for a variable/constant/array. Examples of declaring variables are shown below:
Dim $x, $y, $z ; Notice we can declare variables of the same scope on the same line if desired. Global $RADIUS ; Global Variable Local $_daysWorking ; Local Variable

LEARNING TO SCRIPT WITH AUTOIT V3 Page 23
4.2 The Naming Convention This is a naming standard for variables, used in UDFs (User Defined Functions)
The first set of characters after the dollar sign (“$”) should be used to specify the type of data that will be held in it. The following list signifies the different prefixes and their data type significance.
$a<letter> - Array (the following letter describes the data type taken from the rest of the data types below) $b - Binary data $h - File or window handle $i - Integer $f - Boolean $n - Floating point number $s - String $v - Variant (unknown/variable type of data)
The rest of the name uses capitalized words to describe the function of the variable. Names like “$iC” are unacceptable. "$aiWeekDayNames" or "$iCounter" are much preferable. All variables must be declared at the beginning of the UDF with a “Local” scope and before they are used for the first time. The “Dim” or “Global” keywords are ambiguous inside of a UDF and as such should be avoided, all variables should be transferred via the Function Parameters using ByRef when the updated value needs to be returned.
4.3 Assigning variable values A variable should have a value assigned to it before its value is requested. To do this the = symbol is used. Here are some examples of assigning values to variables:
$number = 123 ; Some Number $string = “Some String with “”double”” and ‘single’ quotes” ; A string $Return = SomeFunction (); The return value of a function
Since a variable’s name can be given wherever a value is expected, it is possible to assign the value of one variable to another.
$Var1 = 'West Richmond' $Var2 = $Var1
After running the above code, both $Var1 and $Var2 will contain the value West Richmond. If the value of one of these variables is subsequently changed, the other variable will still contain the value West Richmond.
4.4 Accessing variable values To use the value contained by a variable in place of some hard-coded value, simply give the variable’s name wherever a value is expected. A simple example is below.
$MyFlag = 0 $MyTitle = "This is a Title" $MyMsg = "Hello there!" MsgBox($MyFlag, $MyTitle, $MyMsg)

LEARNING TO SCRIPT WITH AUTOIT V3 Page 24
The value contained by $MyTitle will be used for the title of the resultant message box (since the second parameter to MsgBox() sets the title) and the value contained by $MyMsg will be displayed as the message, where the overall style of the message box is set by $MyFlag.
4.5 Constants One clever use of variables is to save unnecessary repetition. Consider the following code:
MsgBox(0, 'Example Script from Section 4', 'This is the first message box.') MsgBox(0, 'Example Script from Section 4', 'This is the second message box.') MsgBox(0, 'Example Script from Section 4', 'This is the third message box.')
Here the string value
Example Script from Section 4 is used in multiple places. Imagine this string value being used hundreds of times and then imagine the work that would be required if the section number needed to be changed. By preparing a variable to hold this data we can define it once (so that if it ever needs changing, it will only need changing in one location) and improve the overall size (and readability) of the script. Here’s a functionally identical script embracing this idea:
$Title = 'Example Script from Section 4' MsgBox(0, $Title, 'This is the first message box.') MsgBox(0, $Title, 'This is the second message box.') MsgBox(0, $Title, 'This is the third message box.')
Notice how the value of $Title is set once and not changed again. Variables of this nature are called constants as they are used for reading only (their values are constant). It is good programming practice to explicitly declare variables as constants when that is their intended use, because AutoIt can then protect the value of such a variable from being accidentally changed later. This is done by adding the word Const before the variable name when its value is initially declared, e.g.—
Const $Title = 'Example Script from Section 4' Constants can be set in the same scopes as variables. See the following example:
Dim Const $Debugging = True Global Const $FLAG1 = 543210 Local Const $PI = 3.14159
4.6 Macros Macros are like predefined constants in that they can be used wherever a value is expected. Refer to the help file for a complete list of macros. An example of use that includes Macros, Variables is on the next page.

LEARNING TO SCRIPT WITH AUTOIT V3 Page 25
Example of Use:
Dim $version = @AutoItVersion ; AutoIt Version Dim $computername = @ComputerName ; Computer Name Dim $OS = @OSVersion ; OS Version Dim $text = ""; Output text for message box. Switch $OS ; A Switch statement. We are going to make the value returned by @OSVERSION more readable. Case "WIN_2008" $OS = "Windows Server 2008" Case "WIN_VISTA" $OS = "Windows Vista" Case "WIN_2003" $OS = "Windows Server 2003" Case "WIN_XP" $OS = "Windows XP" Case "WIN_2000" $OS = "Windows 2000" Case "WIN_NT4" $OS = "Windows NT 4.0" Case "WIN_ME" $OS = "Windows ME" Case "WIN_98" $OS = "Windows 98" Case "WIN_95" $OS = "Windows 95" Case Else $OS = "Unknown!" EndSwitch $text = "AutoIt Version = " & $version & @CRLF ; The & character concentrates (joins) two values together. $text &= "Computer Name = " & $computername & @CRLF ; The &= adds to the variable. The same as doing $var = $var & "extra stuff" $text &= "Operating System = " & $OS MsgBox (0, "Computer Information", $text)
For me the script returns the following:
In that script I also stuck you in the deep end, using Switch and Concentration operators. Don’t worry if it doesn’t fully make sense now, we will go over them in a later chapter.

LEARNING TO SCRIPT WITH AUTOIT V3 Page 26
4.7 Arrays Arrays are variables that have the ability to store multiple values of data elements of the same type and size. Each element in this variable can be accessed by an index number.
A common situation where arrays would be the easiest is as follows:
Say you want to store a list of people’s names, but you don’t know how many people’s names you need to store. The most efficient (and the only “sensible” method) is to use arrays. To store names such as, “Alex”, “Brett”, “Nicholas”, “Jos”, “Michael”, “George”, we use an array. First off we must declare the array, and to do that we need to know how many elements to create. So in my previous list we had 6. So now we can declare the array.
Dim $names[6]
It should be noted that the index for arrays start at 0. Now we can set the values of each element.
$names[0] = “Alex” $names[1] = “Brett” $names[2] = “Nicholas” $names[3] = “Jos” $names[4] = “Michael” $names[5] = “George”
To access the variable names, it is much the same as normal variables, like so:
MsgBox (0, “Name”, $names[2]) Another method to declaring arrays like above is like so. Personally I prefer the above method, as it makes it easier to see exactly what is being declared, and where.
Dim $names[6] = ["Alex", "Brett", "Nicholas", "Jos", "Michael", "George"] MsgBox (0, "Name", $names[2])
This skims only the surface of arrays, as there is much more to them, such as multi dimensional arrays, but as this is a basic tutorial, we won’t go into them.

LEARNING TO SCRIPT WITH AUTOIT V3 Page 27
4.8 Exercises 1. What is a variable? 1 Mark 2. What can be used to name a variable? 3 Marks 4. Are variables case sensitive? 1 Mark 4. What scopes can I declare variables in? 3 Marks 5. Describe the ‘Naming Convention’ for variables. 1 Mark 6. How can I assign values to variables? 1 Mark 7. In the following code, display the value of $myVar in a message box.
$myVar = “String to display” ; Continue the code
1 Mark
8. What is a constant used for? 1 Mark 9. Can you change the value of a constant? 1 Mark 10. What macro will show the height of my desktop? 1 Mark 11. What is an array? 1 Mark 12. How can I access the value of an array? 1 Mark 13. What are the methods for setting the values of an array? 2 Marks
18 Marks Total

LEARNING TO SCRIPT WITH AUTOIT V3 Page 28
5 Functions When you get around to writing your own AutoIt scripts—which is soon—you will find that the majority of any work is done by calling functions. A function accepts zero or more parameters (i.e. input values), does its processing and then gives a return value (i.e. an output value) as a result. Here’s an example function call (which should look familiar):
MsgBox(64, 'Tutorial', 'Hello world!')
The name of the function is written to the left of the brackets. The parameters are entered within the brackets and are separated by commas. Here, we are passing three values to the MsgBox() function. Functions may or may not have a set number of parameters—for instance, there is actually a fourth argument to MsgBox() which assigns a timeout to the display of the message box. As it is an optional parameter, we have not used it. The help file states which parameters are optional for each function and what will be assumed if you do not specify them (in the case of MsgBox(), if a timeout isn’t specified then the box will show indefinitely). If a function doesn’t want any parameters at all then the brackets remain there, but are left empty:
FunctionWithoutInputs() The return value of the MsgBox() function is a number representing which button was pressed, but in the above examples we don’t actually catch any return values to use them; they are lost as a result. This is for two reasons:
1. It demonstrates that return values can be ignored. (We don’t need to know what button the user pressed since we only offered one.)
2. We have no other choice as we have not yet discussed variables.
However, it is still possible to write useful scripts even if the output of every function call is ignored. At this point you have been given the knowledge to be able to write scripts that:
• open, close, resize and focus windows; • adjust controls within them; • manipulate folders, files and their locations; • send mouse clicks and keyboard input; • shut down or restart the computer; • start programs; • play sounds through the computer’s speakers; or • Take any linear sequence of the above actions.
All you need to do is refer to the AutoIt help file, find the functions you’d like to experiment with and provide them with the right values.

LEARNING TO SCRIPT WITH AUTOIT V3 Page 29
5.1 Example function calls
5.1.1 Run() and RunWait() Syntax:
Run ( "filename" [, "workingdir" [, flag[, standard_i/o_flag]]] ) RunWait ( "filename" [, "workingdir" [, flag]] )
These functions are used to start programs. Using Run() instructs AutoIt to continue with the next instruction in the script immediately after the specified program starts, while RunWait() forces AutoIt to wait until the specified program ends before continuing. Try creating a new script (the tutorial taught you how to do this), pasting the following lines into it and running it:
Run('Calc') Run('Notepad') MsgBox(64, 'Functions', 'I started Calculator and Notepad.')
Notice how both Calculator and Notepad open on your screen, and the message box appears around the same time (possibly beneath the other windows). After closing them all, try changing the Run() calls to RunWait() and running the script again—you will find this time that Notepad only appears after Calculator is closed, and the message box only appears after Notepad is closed. Just in case your edit of the above code didn’t work, here an edited version.
RunWait('Calc') RunWait('Notepad') MsgBox(64, 'Functions', 'I started Calculator and then Notepad.')
5.1.2 WinWait() This function instructs AutoIt to wait until a window with a specific title exists. You pass this function a string indicating what the title is (or how it starts). Try this script:
Run('Calc') MsgBox(64, 'Functions', 'Your Calculator is showing.')
In its current form it can’t be guaranteed that the message box will appear after Calculator appears (especially on slower computers). This can be remedied by adding a WinWait() call like so:
Run('Calc') WinWait('Calculator') MsgBox(64, 'Functions', 'Your Calculator is showing.')
Try changing the window title in the script above to Claculator and running it. You will find that the message box never shows. This is because the titles have to be fairly exact for the script to work properly (default behavior is for the script to match partial titles from the start of the title). We will work in depth with titles in a later section.

LEARNING TO SCRIPT WITH AUTOIT V3 Page 30
5.1.3 Send() This function will simulate keyboard input to the window that currently has focus. Try this script (you may need to adjust the value passed to WinWait() if Notepad starts with a different title on your system):
Run('Notepad') WinWait('Untitled - Notepad') Send('AutoIt is typing text{ENTER}into this window.')
Notice when you run this that the {ENTER} token is replaced with an actual press of the Enter key. The appropriate help page will discuss other tokens that give this behavior.
LEARNING TO SCRIPT WITH AUTOIT V3 Page 31
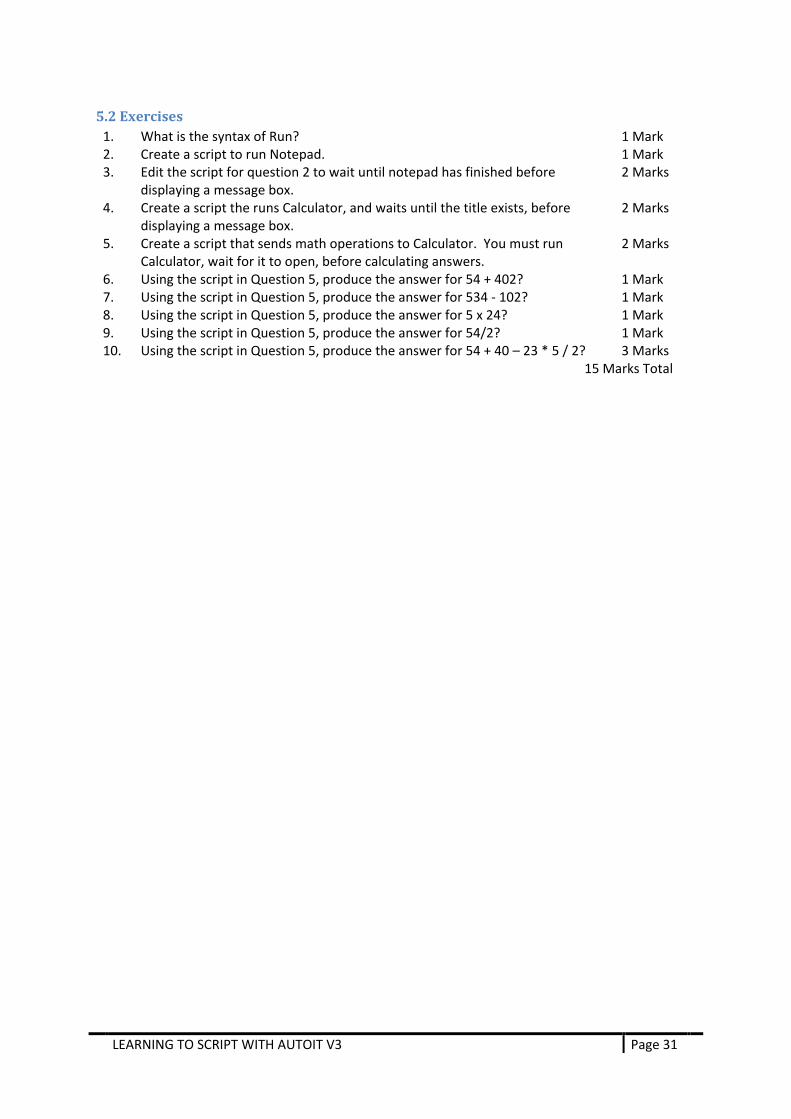
5.2 Exercises 1. What is the syntax of Run? 1 Mark 2. Create a script to run Notepad. 1 Mark 3. Edit the script for question 2 to wait until notepad has finished before
displaying a message box. 2 Marks
4. Create a script the runs Calculator, and waits until the title exists, before displaying a message box.
2 Marks
5. Create a script that sends math operations to Calculator. You must run Calculator, wait for it to open, before calculating answers.
2 Marks
6. Using the script in Question 5, produce the answer for 54 + 402? 1 Mark 7. Using the script in Question 5, produce the answer for 534 - 102? 1 Mark 8. Using the script in Question 5, produce the answer for 5 x 24? 1 Mark 9. Using the script in Question 5, produce the answer for 54/2? 1 Mark 10. Using the script in Question 5, produce the answer for 54 + 40 – 23 * 5 / 2? 3 Marks
15 Marks Total
LEARNING TO SCRIPT WITH AUTOIT V3 Page 32
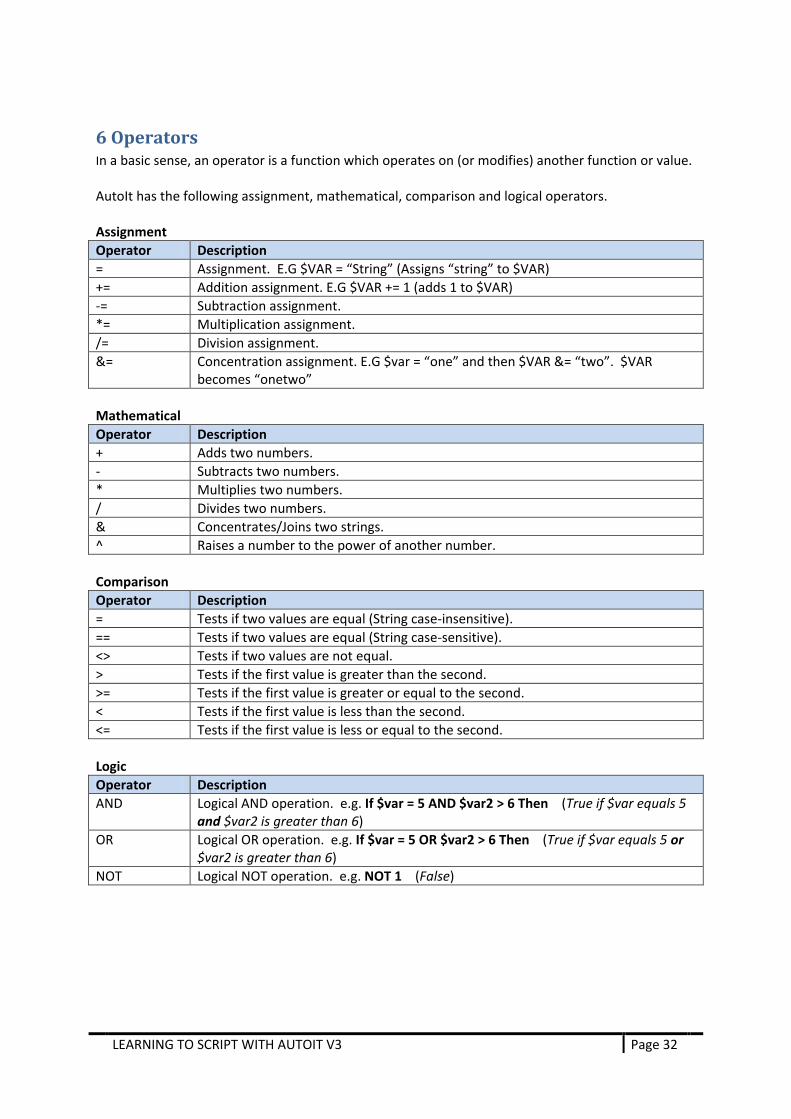
6 Operators In a basic sense, an operator is a function which operates on (or modifies) another function or value. AutoIt has the following assignment, mathematical, comparison and logical operators. Assignment Operator Description = Assignment. E.G $VAR = “String” (Assigns “string” to $VAR) += Addition assignment. E.G $VAR += 1 (adds 1 to $VAR) -= Subtraction assignment. *= Multiplication assignment. /= Division assignment. &= Concentration assignment. E.G $var = “one” and then $VAR &= “two”. $VAR
becomes “onetwo” Mathematical Operator Description + Adds two numbers. - Subtracts two numbers. * Multiplies two numbers. / Divides two numbers. & Concentrates/Joins two strings. ^ Raises a number to the power of another number. Comparison Operator Description = Tests if two values are equal (String case-insensitive). == Tests if two values are equal (String case-sensitive). <> Tests if two values are not equal. > Tests if the first value is greater than the second. >= Tests if the first value is greater or equal to the second. < Tests if the first value is less than the second. <= Tests if the first value is less or equal to the second. Logic Operator Description AND Logical AND operation. e.g. If $var = 5 AND $var2 > 6 Then (True if $var equals 5
and $var2 is greater than 6) OR Logical OR operation. e.g. If $var = 5 OR $var2 > 6 Then (True if $var equals 5 or
$var2 is greater than 6) NOT Logical NOT operation. e.g. NOT 1 (False)

LEARNING TO SCRIPT WITH AUTOIT V3 Page 33
These are used as described in the description of each. Here is a script showing example of using operators:
;Assigning $number_one = 20 $number_two = 10 $number_three = 5 $string1 = "String" $string2 = "String Two" $number_three += $number_one MsgBox (0, "Assignment", $number_three) $number_three -= $number_one MsgBox (0, "Assignment", $number_three) $number_three *= $number_one MsgBox (0, "Assignment", $number_three) $number_three /= $number_one MsgBox (0, "Assignment", $number_three) $number_three &= $number_one MsgBox (0, "Assignment", $number_three) ;Maths $number_three = $number_one + $number_two MsgBox (0, "Maths", $number_three) $number_three = $number_one - $number_two MsgBox (0, "Maths", $number_three) $number_three = $number_one * $number_two MsgBox (0, "Maths", $number_three) $number_three = $number_one / $number_two MsgBox (0, "Maths", $number_three) $number_three = $number_one & $number_two MsgBox (0, "Maths", $number_three) $number_three = $number_one ^ 2 MsgBox (0, "Maths", $number_three) ;Comparison If $number_one = 20 Then MsgBox (0, "Comparison", "Number 1 is 20!") If $string1 == $string2 Then MsgBox (0, "Comparison", "Both strings are the same!") If $number_two <> 20 Then MsgBox (0, "Comparison", "Number 2 is not 20!") If $number_two > 5 Then MsgBox (0, "Comparison", "Number 2 is greater than 5!") If $number_two >= 10 Then MsgBox (0, "Comparison", "Number 2 is greater or equal to 10!") If $number_one < 25 Then MsgBox (0, "Comparison", "Number 1 is less than 25!") If $number_one <= 20 Then MsgBox (0, "Comparison", "Number 1 is less or equal to 20!")

LEARNING TO SCRIPT WITH AUTOIT V3 Page 34
6.1 True or False? It is worth mentioning the way AutoIt interprets True and False. True and false are basically different values, which are outlined below:
True • A string that is not null • Numeric value that is not equal to zero.
False • A null string ("") • A numeric value that is equal to zero.
Here are some examples to AutoIt’s interpretation of the true and false operators.
$i_Value1 = 0 $i_Value2 = 0.0 $i_Value3 = 0.001 $i_Value4 = 1000 $i_Value5 = 20 - 25 $s_Value1 = "" $s_Value2 = "0" $s_Value3 = "0.00" $s_Value4 = "toast" If $i_Value1 Then MsgBox (0, "$i_Value1", $i_Value1 & "=TRUE" & @CRLF) Else MsgBox (0, "$i_Value1", $i_Value1 & "=FALSE" & @CRLF) EndIf If $i_Value2 Then MsgBox (0, "$i_Value2", $i_Value2 & "=TRUE" & @CRLF) Else MsgBox (0, "$i_Value2", $i_Value2 & "=FALSE" & @CRLF) EndIf If $i_Value3 Then MsgBox (0, "$i_Value3", $i_Value3 & "=TRUE" & @CRLF) If $i_Value4 Then MsgBox (0, "$i_Value4", $i_Value4 & "=TRUE" & @CRLF) If $i_Value5 Then MsgBox (0, "$i_Value5", $i_Value5 & "=TRUE" & @CRLF) If $s_Value1 Then MsgBox (0, "$s_Value1", $s_Value1 & "=TRUE" & @CRLF) Else MsgBox (0, "$s_Value1", $s_Value1 & "=FALSE" & @CRLF) EndIf If $s_Value2 Then MsgBox (0, "$s_Value2", $s_Value2 & "=TRUE" & @CRLF) If $s_Value3 Then MsgBox (0, "$s_Value3", $s_Value3 & "=TRUE" & @CRLF) If $s_Value4 Then MsgBox (0, "$s_Value4", $s_Value4 & "=TRUE" & @CRLF)

LEARNING TO SCRIPT WITH AUTOIT V3 Page 35
6.2 Exercises 1. What are the 3 types of operators? 4 Marks 2. Write a script that assigns a variable with an initial value of 3 to be 4 more. 2 Marks 4. Write a script to display to calculate 369-235 and display the result in a
message box. 2 Marks
4. What operator should you use if you want to compare two strings, with case sensitivity?
1 Mark
5. What about the operator for comparing strings without being case sensitive? 1 Mark 10 Marks Total

LEARNING TO SCRIPT WITH AUTOIT V3 Page 36
7 Branching Branching is the process of creating scripts that carry out tasks conditionally. We can then make scripts that are essentially failsafe. To create scripts with this in mind, we must first know the various conditional functions.
7.1 Conditional Functions Conditions are valued as True or False. Conditions generally use the conditional operators like =, ==, <>, >, <, >= and <=. All of the statements are similar, and decide on what to execute based depending on the conditions given.
7.1.1 If…Then…Else Here is an example of a simple If Statement.
$var = 20 If $var > 10 Then MsgBox(0, "Example", "$var was greater than 10!") Else MsgBox(0, "Example", "$var was less than 10") EndIf
7.1.2 Select Case A select case is similar to an If statement, but is generally used for a larger set of comparisons, as it is easier to read than a large If/ElseIf block.
$var = 30 Select Case $var > 1 AND $var <= 10 MsgBox(0, "Example", "$var was greater than 1") Case $var > 10 AND $var <= 20 MsgBox(0, "Example", "$var was greater than 10") Case $var > 20 AND $var <= 30 MsgBox(0, "Example", "$var was greater than 20") Case $var > 30 AND $var <= 40 MsgBox(0, "Example", "$var was greater than 30") Case $var > 40 MsgBox(0, "Example", "$var was greater than 40") EndSelect
7.1.3 Switch Case Switch Case is similar to a Select statement, except is generally only used when the same expression is compared multiple times against different values.
Switch Int($var) Case 1 To 10 MsgBox(0, "Example", "$var was greater than 1") Case 11 To 20 MsgBox(0, "Example", "$var was greater than 10") Case 21 To 30

LEARNING TO SCRIPT WITH AUTOIT V3 Page 37
MsgBox(0, "Example", "$var was greater than 20") Case 31 To 40 MsgBox(0, "Example", "$var was greater than 30") Case Else MsgBox(0, "Example", "$var was greater than 40 or less or equal to 0") EndSwitch
7.1.4 ContinueCase Basically ContinueCase aborts the current case and continues into the next case statement in a Select or Switch block.
An example showing use is below
$msg = "" $szName = InputBox(Default, "Please enter a word.", "", " M", Default, Default, Default, Default, 10) Switch @error Case 2 $msg = "Timeout " ContinueCase Case 1; Continuing previous case $msg &= "Cancellation" Case 0 Switch $szName Case "a", "e", "i", "o", "u" $msg = "Vowel" Case "QP" $msg = "Mathematics" Case "Q" To "QZ" $msg = "Science" Case Else $msg = "Others" EndSwitch Case Else $msg = "Something went horribly wrong." EndSwitch MsgBox(0, Default, $msg)

LEARNING TO SCRIPT WITH AUTOIT V3 Page 38
7.2 Exercises 1. What is the process of branching? 1 Mark 2. What are the conditional functions? 3 Marks 3. What is Continue Case? 2 Marks
6 Marks Total

LEARNING TO SCRIPT WITH AUTOIT V3 Page 39
8 Loops Loops are around to make coding easier, and to execute a block of code multiple times. Why copy and paste code 20 times (with minimal or no adjustments) when you could write the same block that has the same outcome with just a few extra lines?
AutoIt has 4 different Loops, but we only cover 3 as one loop is used exclusively with Objects.
8.1 Types of Loops
8.1.1 For…Next Is a loop based on an expression.
The loops is made up of a declaration of the variable that is incremented upon commencing each increment of the loop, the number of times the loop will increment, and the distance between the increment of each loop. Example is below.
For $i = 5 to 1 Step -1 MsgBox(0, "Count down!", $i) Next MsgBox(0,"", "Blast Off!")
There is also another version of For...Next that is for working with arrays and Objects. Example is below.
;Using an Array Dim $aArray[4] $aArray[0] = "a" $aArray[1] = 0 $aArray[2] = 1.3434 $aArray[3] = "test" $string = "" For $element In $aArray $string = $string & $element & @CRLF Next MsgBox(0, "For..IN Arraytest", "Result is: " & @CRLF & $string)
8.1.2 While…Wend A while loop is based on an expression. The loop continues until this expression is false. An example is below. The expression is tested before the loop is executed so the loop will be executed zero or more times. To create an infinite loop, use a non-zero number as the expression.
$i = 0 While $i <= 10 MsgBox(0, "Value of $i is:", $i) $i = $i + 1

LEARNING TO SCRIPT WITH AUTOIT V3 Page 40
Wend ;An infinite loop While 1 ToolTip ("Looping Still!") Wend
8.1.3 Do…Until Similar to a While loop, except the expression is tested after the loop is executed. Take a look at the example below.
$i = 0 Do MsgBox(0, "Value of $i is:", $i) $i = $i + 1 Until $i = 10
8.1.4 ExitLoop Quite simply terminates or breaks out of the current loop.
$sum = 0 While 1 ;use infinite loop since ExitLoop will get called $ans = InputBox("Running total=" & $sum, _ " Enter a positive number. (A negative number exits)") If $ans < 0 Then ExitLoop $sum = $sum + $ans WEnd MsgBox(0, "The sum was", $sum)
8.1.5 ContinueLoop ContinueLoop continues execution of the Loop’s code at the expression testing point. It should be used with caution however, as infinite loops may be created with incorrect use.
;Print all numbers from 1 to 10 except number 7 For $i = 1 To 10 If $i = 7 Then ContinueLoop MsgBox(0, "The value of $i is:", $i) Next

LEARNING TO SCRIPT WITH AUTOIT V3 Page 41
8.2 Exercises 1. What are the 3 types of loops we have learnt? 3 Mark 2. Create a script that uses a For Loop to display the values of 1 to 5 using a
message box. 2 Marks
3. Create a script that uses a While loop that displays a message box 5 times? 3 Marks 4. What is exit loop used for? 1 Mark 5. What is continue loop used for? 1 Mark 6. Write a script that uses a message box to display every number 1 through 10
except 4 and 9? 3 Marks
13 Marks Total

LEARNING TO SCRIPT WITH AUTOIT V3 Page 42
9 The Graphical User Interface (GUI) This allows you and your users to interact with your scripts. It can be as simple or elaborate as you like, containing many controls, or just a few. In this section we will go through the basics of creating a GUI and some controls, then on to how know when input is received.
9.1 Creating the GUI The first step to creating a GUI is to create the main window, where all the controls will be placed. To do that we use the following function:
GUICreate( "title" [, width [, height [, left [, top [, style [, exStyle [, parent]]]]]]] )
Similar to how the MsgBox accepted a flag, most of the GUI functions (well the creation functions) also have one! But in this case it sets 2 things- a style and an extended style. Have a browse through the help file and read up on the styles, you’ll find many different ways of altering the look and function of your GUI and its controls. It is important to note, that when using multiple styles, you should use the function BitOr. Even though some examples in the help file use the + operator to define multiple styles, it is preferred that you use BitOr. Reasoning for this is as follows.
To help understand why we should use BitOr over other the + operator, it is important to know how it works. In a nutshell, BitOr takes two or more integer values and returns the bitwise "OR" on the "binary representation" of the integers. The return result is always an integer, in the case that one of the parameters are zero/null, the zero/null parameter would not be processed in the bitwise "OR". So as the help file shows, performing a bitwise operation on 3 (0011 in binary) and 6 (0110 in binary) is 7 (0111 in binary), not 9(1001 in binary), as the result would be using the + operator. To show how parameters that are null/zero aren’t processed, we can add a 0 to our previous function. BitOr (3, 0, 6) returns 7, just like BitOr (3, 6).
Below is the syntax of BitOr.
BitOr ( value1, value2 [, value n] )

LEARNING TO SCRIPT WITH AUTOIT V3 Page 43
9.2 Creating the Controls There are many controls you can add into your GUI. For this tutorial we will only explore Labels, Input controls such as single line inputs or edits controls, and picture controls. If you wish to learn more about the other controls, have a look in the help file. You may notice there is not much explanation in this section; that is because the best thing you can do is play with it by yourself, as GUI’s are fairly simple.
9.2.1 Pictures
9.2.1.1 Creating the control Picture controls allow you to increase aesthetics of you GUI, and add to the visual appeal of programs.
The syntax is:
GUICtrlCreatePic ( filename, left, top [, width [, height [, style [, exStyle]]]] ) If you choose to use a picture as a background, you should disable it using GUICtrlSetState like follows:
GuiCtrlSetState (controlID, $GUI_DISABLE).
This prevents the picture control from interfering with other controls.
9.2.1.2 Setting the control The syntax is:
GUICtrlSetImage ( controlID, filename [, iconname [, icontype]] ) This allows you to change the image after initial creation.
9.2.2 Buttons
9.2.2.1 Creating the control Buttons are one of the many ways to receive input from users.
The syntax is:
GUICtrlCreateButton ( "text", left, top [, width [, height [, style [, exStyle]]]] )
9.2.2.2 Setting the control The syntax is:
GUICtrlSetData ( controlID, data [, default] )
9.2.3 Inputs
9.2.3.1 Creating the control Inputs allow you to receive text from users. They come in two forms- a single line and a multi line.

LEARNING TO SCRIPT WITH AUTOIT V3 Page 44
Edit Control Is the multi line input. The syntax is:
GUICtrlCreateEdit ( "text", left, top [, width [, height [, style [, exStyle]]]] )
Input Control A single line input. The syntax is:
GUICtrlCreateInput ( "text", left, top [, width [, height [, style [, exStyle]]]] )
9.2.3.2 Setting the control The syntax is:
GUICtrlSetData ( controlID, data [, default])
9.2.4 Labels
9.2.4.1 Creating the control Labels are the most common way to tell your user what to do and to display data.
The syntax is:
GUICtrlCreateLabel ( "text", left, top [, width [, height [, style [, exStyle]]]] )
9.2.4.2 Setting the control The syntax is:
GUICtrlSetData ( controlID, data [, default] )
9.3 Getting Input You have just created your GUI, and you want to do something, when some clicks a button, or you want to add text into your edit box when someone clicks on a picture. To do this and more, we must receive input from our GUI. For this section I will be using this as my GUI:
;Required Includes. #include <GUIConstantsEx.au3> ;Constants for GUI Events #include <EditConstants.au3> ;Edit constants. Required for the styles we used. ;Declare any variables. ;Create the GUI $hGUI = GUICreate ("Learning to script with AutoIt V3- Example GUI", 400, 300) ;Create a lable ;Below you can see & _. It allows us to split up lines, making it easier to read. $hLabel = GUICtrlCreateLabel ("This is a label control. Type text into the Input control" & _ "and press the button to set the text of the edit control. " & _ "Type /SPECIAL in the edit for a special message!",10, 10, 380, 40) ;Create an input control

LEARNING TO SCRIPT WITH AUTOIT V3 Page 45
$hInput = GUICtrlCreateInput ("This is an Input Control. Type stuff here!", 10, 50, 380, 20) ;Create an edit control $hEdit = GUICtrlCreateEdit ("This is the edit control. We used a style to make it multiline and read-only!!", 10, 80, 380, 170, BitOR ($ES_MULTILINE, $ES_READONLY)) ;Create the button $hButton = GUICtrlCreateButton ("Press me!", 320, 260, 70, 25) ;Show the GUI. We need this line, or our GUI will NOT be displayed! GUISetState (@SW_SHOW)
As I run through each step on getting input you may also see how I read the controls using GUICtrlRead. It is how we read data of most controls, other than some controls (Radios + Checkboxes) which we don’t cover in this tutorial. You may also notice the #Include lines. The comments explain what they are for.
There are two ways we can check for messages- A GUI Message loop or OnEvent messages. We will start with the GUI Message Loop.
9.3.1 Message Loop. This should be incased in a loop and then checked with conditional statement. In this example we will use a Switch Statement. See the commented code below to see how we’ve done everything. This code should be placed at the end of our initial GUI Code.
;Endless While loop While 1 $nMsg = GUIGetMsg () Switch $nMsg Case $GUI_EVENT_CLOSE; The red X is pressed Exit ;Exit the script Case $hLabel ;The label MsgBox (0, "Hello!", "We have clicked on the label!"); Say Hello Case $hButton ;The Button $read = GUICtrlRead ($hInput) ;Check to see if we have /SPECIAL using StringInStr. If StringInStr ($read, "/SPECIAL") Then ;We have it, display the message. MsgBox (0, "WOW!", "This is a special message!") Else ;Get Existing Data of edit $read2 = GUICtrlRead ($hEdit) $text = $read2 & @CRLF & $read ; Join the existing and the new text seperated by a line. GUICtrlSetData ($hEdit, $text) ; Set the edit control to have our new data! GUICtrlSetData ($hInput, "");Reset the data of the input. EndIf EndSwitch Wend

LEARNING TO SCRIPT WITH AUTOIT V3 Page 46
9.3.2 On event Mode To use OnEvent mode we must add the following line after we have our includes, so that AutoIt knows that we are using OnEvent mode.
Opt("GUIOnEventMode", 1)
Once we have done that, we have to tell AutoIt what functions to call when it receives a message from our controls. We will do that before GUISetState(@SW_SHOW)
GUICtrlSetOnEvent($hLabel, "LabelFunction") ; Set the label control's function GUICtrlSetOnEvent($hButton, "ButtonFunction") ; The button's function GUISetOnEvent($GUI_EVENT_CLOSE, "ExitGUI") ; What function to call when we try close the GUI
We also have to have a While loop to keep the GUI open, but with a sleep to keep CPU usage down.
;Endless While loop to keep the GUI Open While 1 Sleep(10); So we don't use heaps of CPU Wend
We also have to create the functions, so here they are.
Func LabelFunction() MsgBox(0, "Hello!", "We have clicked on the label!"); Say Hello EndFunc ;==>LabelFunction Func ButtonFunction() $read = GUICtrlRead($hInput) ;Check to see if we have /SPECIAL using StringInStr. If StringInStr($read, "/SPECIAL") Then ;We have it, display the message. MsgBox(0, "WOW!", "This is a special message!") Else ;Get Existing Data of edit $read2 = GUICtrlRead($hEdit) $text = $read2 & @CRLF & $read ; Join the existing and the new text seperated by a line. GUICtrlSetData($hEdit, $text) ; Set the edit control to have our new data! GUICtrlSetData($hInput, "");Reset the data of the input. EndIf EndFunc ;==>ButtonFunction Func ExitGui () Exit ; Exit the program EndFunc
If all was done correctly you should have a script that works just like the Message loop. If not here is the full code.
;Required Includes.

LEARNING TO SCRIPT WITH AUTOIT V3 Page 47
#include <GUIConstantsEx.au3> ;Constants for GUI Events #include <EditConstants.au3> ;Edit constants. Required for the styles we used. ;Declare any variables/opts. Opt("GUIOnEventMode", 1);We need this otherwise our GUI will not be OnEvent Mode. ;Create the GUI $hGUI = GUICreate("Learning to script with AutoIt V3- Example GUI", 400, 300) ;Create a lable ;Below you can see & _. It allows us to split up lines, making it easier to read. $hLabel = GUICtrlCreateLabel("This is a label control. Type text into the Input control" & _ "and press the button to set the text of the edit control. " & _ "Type /SPECIAL in the edit for a special message!", 10, 10, 380, 40) ;Create an input control $hInput = GUICtrlCreateInput("This is an Input Control. Type stuff here!", 10, 50, 380, 20) ;Create an edit control $hEdit = GUICtrlCreateEdit("This is the edit control. We used a style to make it multiline and read-only!!", 10, 80, 380, 170, BitOR($ES_MULTILINE, $ES_READONLY)) ;Create the button $hButton = GUICtrlCreateButton("Press me!", 320, 260, 70, 25) GUICtrlSetOnEvent($hLabel, "LabelFunction") ; Set the label control's function GUICtrlSetOnEvent($hButton, "ButtonFunction") ; The button's function GUISetOnEvent($GUI_EVENT_CLOSE, "ExitGUI") ; What function to call when we try close the GUI ;Show the GUI. We need this line, or our GUI will NOT be displayed! GUISetState(@SW_SHOW) ;Endless While loop to keep the GUI Open While 1 Sleep(10); So we don't use heaps of CPU WEnd Func LabelFunction() MsgBox(0, "Hello!", "We have clicked on the label!"); Say Hello EndFunc ;==>LabelFunction Func ButtonFunction() $read = GUICtrlRead($hInput) ;Check to see if we have /SPECIAL using StringInStr. If StringInStr($read, "/SPECIAL") Then ;We have it, display the message. MsgBox(0, "WOW!", "This is a special message!") Else ;Get Existing Data of edit $read2 = GUICtrlRead($hEdit) $text = $read2 & @CRLF & $read ; Join the existing and the new text seperated by a line. GUICtrlSetData($hEdit, $text) ; Set the edit control to have our new data! GUICtrlSetData($hInput, "");Reset the data of the input. EndIf EndFunc ;==>ButtonFunction Func ExitGui () Exit ; Exit the program EndFunc

LEARNING TO SCRIPT WITH AUTOIT V3 Page 48
9.4 Koda Koda is a GUI Builder that does all of the hard work for you. It allows you to create the GUI as you want it and can see it. To use Koda is simple. Since we installed SciTE4AutoIt3, we have no need to download it- the latest version is already included.
To start Koda through SciTE, we can go Tools Menu -> Koda(Form Designer) or use the hotkey, <Alt>+<M>.
Once you have it open it is fairly simple to use, so we won’t go into it- just have a go, and you should be fine!

LEARNING TO SCRIPT WITH AUTOIT V3 Page 49
10 User Defined Functions (UDF)
10.1 What are they? User Defined Functions or UDFs for short allow you to create your own functions. It can be as simple or as complex as you want the function to be. We will run through step by step to how to create your functions, call them, and then we’ll do some exercise for you to practice on.
10.2 Creating Your Own Function For this section we will be creating a function that returns the maximum of 2 numbers and then returns it to a variable that the user sets. You can find the completed function in the “Resources” directory contained in the .zip under tutorials.
To create it is very simple. For our max function, we start it is like so:
Func MaxOfTwo ($nNumber1, $nNumber2, ByRef $VReturn)
You may see we have used something called ByRef. That means that that the parameter specified has to be a variable and if it is changed inside the function, it is changed outside as well. By default the parameters are passed to the function, meaning they are copies of the original variable.
As we have specified our variables in the Func line, we don’t have to declare them again inside the function. We will now check our variables are numbers using IsNumber.
;Check if the numbers 1 and 2 are numbers. ;If The number isn't then we will retun an error. ;Because 1 = True and 0 = False, we will return ;False and tell the user which number we errored on ;by setting @Error to 1, and @Extended to the number. ;Test Number 1 If Not IsNumber ($nNumber1) Then Return SetError (1, 1, 0) ;Test Number 2 If Not IsNumber ($nNumber2) Then Return SetError (1, 2, 0)
We test it by using an if statement. Because IsNumber returns 0 or 1, we can eliminate the rest of the conditional statement. Once we’ve tested a number, if it returns false, then we will set an error, and stop the function from continuing. To do that we use Return in conjunction with SetError, which sets the @error, @extended and the return value for the function. We can also use return to return just about anything, but replacing SetError in our example with our number, string or variable.
Now we have to test the two numbers, and also check if they’re equal.
If $nNumber1 > $nNumber2 Then ; Number 1 is greater $vReturn = $nNumber1 Return SetError (0, 0, 1); Return True. ElseIf $nNumber2 > $nNumber1 Then ; Number 2 is greater $vReturn = $nNumber1 Return SetError (0, 0, 1)

LEARNING TO SCRIPT WITH AUTOIT V3 Page 50
ElseIf $nNumber1 = $nNumber2 Then ; They are equal $vReturn = $nNumber1) ;Return true but tell the user that the number was equal. Return SetError (2, 0, 1 EndIf
That code is fairly basic, as we are testing every condition that should be encounted in the function.
To finish the function we have to close it using EndFunc. The full code is found below:
Func _MaxOfTwo ($nNumber1, $nNumber2, ByRef $vReturn) ;Check if the numbers 1 and 2 are numbers. ;If The number isn't then we will retun an error. ;Because 1 = True and 0 = False, we will return ;False and tell the user which number we errored on ;by setting @Error to 1, and @Extended to the number. ;Test Number 1 If Not IsNumber ($nNumber1) Then Return SetError (1, 1, 0) ;Test Number 2 If Not IsNumber ($nNumber2) Then Return SetError (1, 2, 0) ;If we've got this far then the numbers were actually numbers. ;Now we will comapare them. If $nNumber1 > $nNumber2 Then ; Number 1 is greater $vReturn = $nNumber1 Return SetError (0, 0, 1); Return True. ElseIf $nNumber2 > $nNumber1 Then ; Number 2 is greater $vReturn = $nNumber1 Return SetError (0, 0, 1) ElseIf $nNumber1 = $nNumber2 Then ; They are equal $vReturn = $nNumber1 ;Return true but tell the user that the number was equal. Return SetError (3, 0, 1 EndIf ;Close the function EndFunc
You can test your function by using the following tests. I’ve included the correct results, so you can make sure everything is working.
Tests if 100 or 30 is greater (Function Returns 1, @error = 0, @extended = 0, Larger number = 100)
;Whats greater 100 or 30? Dim $return = 0 $1 = 100 $2 = 30 $ret = _MaxOfTwo ($1, $2, $return) MsgBox (0, "Test 1", "Function Returned = " & $ret & @CRLF & _ "@Error was = " & @error & @CRLF & _ "@Extended was = " & @extended & @CRLF & _ "Larger Number was = " & $return)

LEARNING TO SCRIPT WITH AUTOIT V3 Page 51
Tests if 110 or “string” is greater (Function Returns 0, @error = 1, @extended = 2, Larger number = 0)
;Whats greater? 110 or "string". (Will error out) Dim $return = 0 $1 = 100 $2 = "String" $ret = _MaxOfTwo ($1, $2, $return) MsgBox (0, "Test 1", "Function Returned = " & $ret & @CRLF & _ "@Error was = " & @error & @CRLF & _ "@Extended was = " & @extended & @CRLF & _ "Larger Number was = " & $return)
Tests if 110 or 110 is greater (Function Returns 1, @error = 3, @extended = 0, Larger number = 110)
;Whats greater? 110 or 110. (Will return 110 but tell us that they were equal) Dim $return = 0 $1 = 110 $2 = 110 $ret = _MaxOfTwo ($1, $2, $return) MsgBox (0, "Test 1", "Function Returned = " & $ret & @CRLF & _ "@Error was = " & @error & @CRLF & _ "@Extended was = " & @extended & @CRLF & _ "Larger Number was = " & $return)

LEARNING TO SCRIPT WITH AUTOIT V3 Page 52
11 String Manipulation There will be many times where you need to extract sections of a string or trim the ends off a word. It is in these and many other cases where we use different methods achieve it, generally classed as string manipulation. In AutoIt, we can find most of the string manipulation functions under “String Management” in the help file. In this section we will focus on the simpler functions like StringLeft, StringRight, StringTrimLeft, StringTrimRight, StringSplit, StringStripCR, StringStripWS, StringLen, StringInStr and StringMid.
For most of the examples I will use the following string as it contains all the letters and it is easy to work with, although some have the string manipulated already.
"The quick brown fox jumps over the lazy dog"
11.1 Common Functions These are the common functions used to manipulate strings.
11.1.1 String Len We start with this function for a very important reason, as it returns the length of our string.
Syntax:
StringLen ( "string" ) Example:
MsgBox(0, "Length of string", 'The length of "The quick brown fox jumps over the lazy dog" is ' StringLen("The quick brown fox jumps over the lazy dog") & ' characters')
The above example should return a value of 43 characters.
11.1. 2 StringInStr This returns where a string or character occurs in a string. We can use it to search for a specific occurrence from either the right or left of the string, and also set case sensitivity. We can also specify where to start the comparison and the number of comparisons to be made.
Syntax:
StringInStr ( "string", "substring" [, casesense [, occurrence [, start [, count]]]] ) Example:
MsgBox(0, "Length of string", 'The first occurrence of fox is at' & _ StringInStr ("The quick brown fox jumps over the lazy dog", "fox") & _ ' characters from the left-hand side of the string')
The above example should return a value of 17 characters.
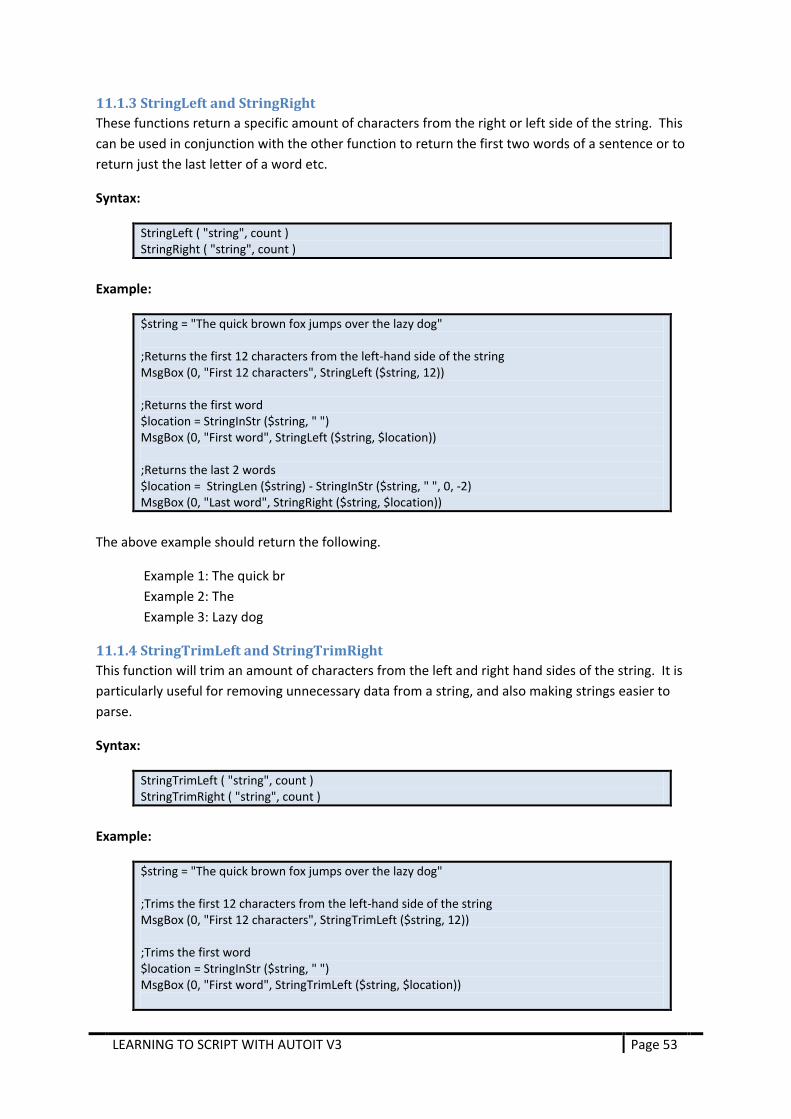
LEARNING TO SCRIPT WITH AUTOIT V3 Page 53
11.1.3 StringLeft and StringRight These functions return a specific amount of characters from the right or left side of the string. This can be used in conjunction with the other function to return the first two words of a sentence or to return just the last letter of a word etc.
Syntax:
StringLeft ( "string", count ) StringRight ( "string", count )
Example:
$string = "The quick brown fox jumps over the lazy dog" ;Returns the first 12 characters from the left-hand side of the string MsgBox (0, "First 12 characters", StringLeft ($string, 12)) ;Returns the first word $location = StringInStr ($string, " ") MsgBox (0, "First word", StringLeft ($string, $location)) ;Returns the last 2 words $location = StringLen ($string) - StringInStr ($string, " ", 0, -2) MsgBox (0, "Last word", StringRight ($string, $location))
The above example should return the following.
Example 1: The quick br Example 2: The Example 3: Lazy dog
11.1.4 StringTrimLeft and StringTrimRight This function will trim an amount of characters from the left and right hand sides of the string. It is particularly useful for removing unnecessary data from a string, and also making strings easier to parse.
Syntax:
StringTrimLeft ( "string", count ) StringTrimRight ( "string", count )
Example:
$string = "The quick brown fox jumps over the lazy dog" ;Trims the first 12 characters from the left-hand side of the string MsgBox (0, "First 12 characters", StringTrimLeft ($string, 12)) ;Trims the first word $location = StringInStr ($string, " ") MsgBox (0, "First word", StringTrimLeft ($string, $location))
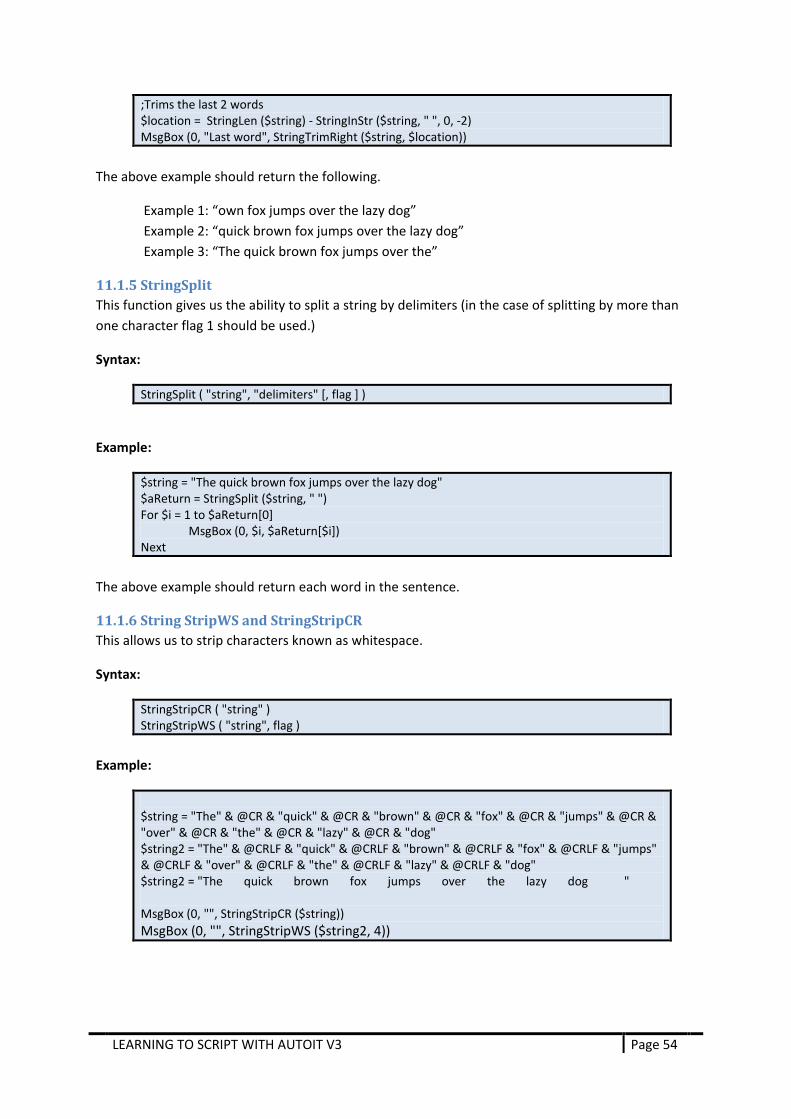
LEARNING TO SCRIPT WITH AUTOIT V3 Page 54
;Trims the last 2 words $location = StringLen ($string) - StringInStr ($string, " ", 0, -2) MsgBox (0, "Last word", StringTrimRight ($string, $location))
The above example should return the following.
Example 1: “own fox jumps over the lazy dog” Example 2: “quick brown fox jumps over the lazy dog” Example 3: “The quick brown fox jumps over the”
11.1.5 StringSplit This function gives us the ability to split a string by delimiters (in the case of splitting by more than one character flag 1 should be used.)
Syntax:
StringSplit ( "string", "delimiters" [, flag ] )
Example:
$string = "The quick brown fox jumps over the lazy dog" $aReturn = StringSplit ($string, " ") For $i = 1 to $aReturn[0] MsgBox (0, $i, $aReturn[$i]) Next
The above example should return each word in the sentence.
11.1.6 String StripWS and StringStripCR This allows us to strip characters known as whitespace.
Syntax:
StringStripCR ( "string" ) StringStripWS ( "string", flag )
Example:
$string = "The" & @CR & "quick" & @CR & "brown" & @CR & "fox" & @CR & "jumps" & @CR & "over" & @CR & "the" & @CR & "lazy" & @CR & "dog" $string2 = "The" & @CRLF & "quick" & @CRLF & "brown" & @CRLF & "fox" & @CRLF & "jumps" & @CRLF & "over" & @CRLF & "the" & @CRLF & "lazy" & @CRLF & "dog" $string2 = "The quick brown fox jumps over the lazy dog " MsgBox (0, "", StringStripCR ($string)) MsgBox (0, "", StringStripWS ($string2, 4))

LEARNING TO SCRIPT WITH AUTOIT V3 Page 55
The previous example should return the following:
Example 1: “Thequickbrownfoxjumpsoverthelazydog” Example 2: “The quick brown fox jumps over the lazy dog”
Have a play with different strings and the flags for StringStripWs to see how you go.
11.1.7 StringMid This allows us to return parts of a string. It is useful because we can return a string between others.
Syntax:
StringMid ( "string", start [, count] )
Example:
$string = "The quick brown fox jumps over the lazy dog" MsgBox (0, "20 characters starting from character 10", StringMid ($string, 10, 20)) $brownpos = StringInStr ($string, "brown") $overpos = StringLen ($string) - StringInStr ($string, "over") MsgBox (0, "String between brown and over", StringMid ($string, $brownpos, $overpos))
The above example should return the following.
Example 1: “brown fox jumps ove” Example 2: “brown fox jumps ”
11.2 Other uses There may be times where you want to split a string over a number of characters. Here are some examples on how to go about that.
Example 1:
#include <Array.au3> $string = "1234567890" $array = _StringSplitBy($string, 2) _ArrayDisplay($array) Func _StringSplitBy($string, $count) $c = 1 $split = StringSplit($string, "") Local $rArray[UBound($split)] ConsoleWrite(UBound($split) & @CRLF) For $i = 1 To UBound($split) - 1 Step $count

LEARNING TO SCRIPT WITH AUTOIT V3 Page 56
ConsoleWrite("I = " & $i & @CRLF) For $x = $i To $i + $count -1 ConsoleWrite("X = " & $x & @CRLF) $rArray[$c] &= $split[$x] Next $c += 1 Next ReDim $rArray[$c] $rArray[0] = $c - 1 Return $rArray EndFunc ;==>_StringSplitBy
Example 2:
#include <Array.au3> $string = "1234567890" $array = _StringSplitBy($string, 2) _ArrayDisplay($array) Func _StringSplitBy($string, $count) Local $rArray[StringLen ($string)] Local $x = 1 For $i = 1 To StringLen ($string) Step $count $rArray[$x] = StringMid ($string, $i, $count) $x += 1 Next ReDim $rArray[$x] $rArray[0] = $x - 1 Return $rArray EndFunc ;==>_StringSplitBy
Example 3:
#include <array.au3> $string = "1234" $aArray = MyStringSplit($string) _ArrayDisplay($aArray) Func MyStringSplit($string) Local $len = StringLen($string) / 2 Local $aArray[$len + 1] $aArray[0] = $len For $i = 1 To $len $aArray[$i] = StringMid($string, $i*2-1, 2) Next Return $aArray

LEARNING TO SCRIPT WITH AUTOIT V3 Page 57
EndFunc Try them and see what you like best. They all do the same thing in the end, so it really doesn’t matter which you use. Mainly it shows that there are many different ways of using string manipulation to achieve one result, so one right answer is probably not the only right one!

LEARNING TO SCRIPT WITH AUTOIT V3 Page 58
11.3 Exercises In all of these questions assume the string is “The quick brown fox jumps over the lazy dog” as shown in most of the above examples.
1. Return the last 15 characters from the string 1 Mark 2. Trim the last 3 and the first 10 characters from the string 2 Marks 3. Remove all spaces from the string. 1 Mark 4. What function(s) can I use to return the first 10 characters from a string? 2 Marks
6 Marks Total

LEARNING TO SCRIPT WITH AUTOIT V3 Page 59
12 Downloading Files Using the Internet There may be times where you have a need to download a file from the internet. The main function used for this is InetGet, but there a few different ways to go about it, so let’s first look at the function and it’s parameters then explore each method in detail.
12.1 In the Background InetGet has just one required parameter and three more option parameters.
12.1.1 URL The URL of the file we wish to download. For example:
ftp://ftp.mozilla.org/pub/mozilla.org/README Download the readme (.txt) http://www.autoitscript.com Download the index (.html) http://www.mozilla.org Download the index (.html) http://www.autoitscript.com/images/autoit_6_240x100.jpg Download the image (.jpg)
The URL can be in the form of basically anything you can type into the address bar of your browser. To use passwords (for example some password protected pages), you can attempt the following:
http://myuser:[email protected]
If you use a proxy to connect to the internet (inside your workplace for example), you will probably need to set the proxy using HttpSetProxy. The function is usually not required by most and is also fairly self explanatory to what parameters do what, so we won’t discuss it here.
12.1.2 Filename This is the filename (and path) that we want to download to. Examples include:
@ScriptDir & “\filename.txt” “C:\folder\file.txt” “file.txt”
12.1.3 Options There are several options that change how the function behaves.
0 = (default) Get the file from local cache if available. 1 = Forces a reload from the remote site. 2 = Ignore all SSL errors (with HTTPS connections). 4 = Use ASCII when transfering files with the FTP protocol (Can not be combined with flag 8). 8 = Use BINARY when transfering files with the FTP protocol (Can not be combined with flag 4). This is the default transfer mode if none are provided. 16 = By-pass forcing the connection online. By default AutoIt forces a connection before starting a download. For dial-up users this will prompt to go online or dial the modem (depending on how the system is configured). The option disables this behavior. Disabling the behavior can be useful for persistent connects (Broadband, LAN). However, it is also required to work around certain issues in Windows Vista and Windows 7.

LEARNING TO SCRIPT WITH AUTOIT V3 Page 60
12.1.4 Background By default (0) the script will wait for the download to finish before completion. If we set it to 1 we can track the progress of the download and display to our user or complete other tasks, letting it run in the background.
12.2 Example Usage For all of these examples we will be downloading files from my website- www.signa5.com. All files will be just .txt files. We will look at the three main ways to download- in the background, waiting for the script to finish and to finish with downloading from a URL that requires a password.
12.2.1 Make the script wait This is when we wait to tell the script to wait until the download has completed. Understandably for large files this isn’t always appropriate, but it is the easiest way to download a file.
$file = "http://www.signa5.com/LTSWA3/small.txt" $save = @ScriptDir & "\Downloads\smallfile.txt" ;Download $file, save it to $save. Force a reload (1) and make sure it waits until it is completed (0). InetGet ($file, $save, 1, 0)
12.2.2 Downloading in the Background This is probably the best way of downloading a file. This allows you to see the status of the download and know exactly how much has been downloaded. It also has the advantage of being able to let the user know that information as well.
$file = "http://www.signa5.com/LTSWA3/large.txt" $save = @ScriptDir & "\Downloads\largefile.txt" $iSize = InetGetSize ($file, 1) ;Download $file, save it to $save. Force a reload (1) and make it download in the background (1). $iHandle = InetGet ($file, $save, 1, 1) Do ToolTip ("Downloaded " & InetGetInfo ($iHandle, 0) & "/" & $iSize & " bytes", 0, 0, "Download Status") Sleep (100) Until InetGetInfo ($iHandle, 2) InetClose ($iHandle)
12.2.3 Downloading from a Password Protected Source This is slightly more complicated but is still pretty simple if you take a moment to understand what we are trying to achieve. This is a problem many people face with downloading files and usually it is fairly easy to fix. To start we will look at how it behaves in our browser and then implement the same basic functionality in our script.

LEARNING TO SCRIPT WITH AUTOIT V3 Page 61
First open your browser. Navigate to http://www.signa5.com/LTSWA3/PASSWORD/file.txt. You will notice the following dialouge pops up (depending on your browser).
This is a password protected directory. If you enter the following credentials:
Username: user Password: pass
Then you will be able to access the text file. So how do we go about doing this in AutoIt? If we try the following (very similar to the example in section 12.2.1) then it will fail with an error and no file will be downloaded!
$file = "http://www.signa5.com/LTSWA3/small.txt" $save = @ScriptDir & "\Downloads\smallfile.txt" ;Download $file, save it to $save. Force a reload (1) and make sure it waits until it is completed (0). InetGet ($file, $save, 1, 0)
The answer is simpler than it seems. All that is required is some simple manipulation of the URL. For example if you now try open http://user:[email protected]/LTSWA3/PASSWORD/file.txt in your browser(make sure you close your browser completely before trying again, this is to reset it) you will see that it works first time. So why is this? What we’ve done is tell the browser to log in with the credentials user:pass at the file we wish to access. The same goes for AutoIt. If we change the URL, the code works, first time!
$file = "http://user:[email protected]/LTSWA3/PASSWORD/file.txt" $save = @ScriptDir & "\Downloads\password.txt" InetGet ($file, $save, 1, 0) MsgBox (0, "", @error)

LEARNING TO SCRIPT WITH AUTOIT V3 Page 62
13 Putting it to the test -The rest of this section is still to come! -
This section will concentrate on you putting together what you have learnt throughout tutorial. They will put you to the test with what you have learnt by using some “real world” examples.

LEARNING TO SCRIPT WITH AUTOIT V3 Page 63
Conclusion Well congratulations. I assume as you are reading this, you have read almost all 106 pages in this document (or to make it sound massive all 20163 words). I hope you found this tutorial informative and it helps you learn AutoIt and gives you a basic platform for being able to learn other languages. Good luck with continuing to learn AutoIt.
Brett

LEARNING TO SCRIPT WITH AUTOIT V3 Page 64
Answers
Exercises- Section 2 1. ; (1 Mark) /1 2. Stop Icon = 16 (1 Mark)
Yes, No, Cancel = 3 (1 Mark) Right Align = 524288 (1 Mark) Flag = 524307
/3
3. Information Icon (1 Mark) Yes and No buttons (1 Mark)
/2
4. Yes it will. (1 Mark) /1 5. AutoIt Window Information Tool (1 Mark) /1 6. Start Menu > AutoIt v3 > AutoIt Window Info (1 Mark)
In SciTE: Tools > AU3Info (1 Mark) Hotkey <CTRL> + <F6> (1 Mark)
/3
7. Send () (1 Mark) /1 8. @CRLF (1 Mark) /1 9. & (1 Mark) /1 10. Blocking Input. (1 Mark) /1
Total: /15

LEARNING TO SCRIPT WITH AUTOIT V3 Page 65
Exercises- Section 3 1. Numbers- 123 (1 Mark)
Letters, both uppercase and lower case- ABC abc (2 Marks) Symbols- .`#(%)^ (1 Mark) Or a combination of any. (1 Mark)
/5
2. Strings (1 Mark) Numbers (1 Mark) Booleans (1 Mark)
/3
3. “string “”with double quotes”” yeah!” (1 Mark) /1 4. True (1 Mark)
False (1 Mark) /2
Total: /11

LEARNING TO SCRIPT WITH AUTOIT V3 Page 66
Exercises- Section 4 1. An area in computer memory, identified by name, which holds values. (1
Mark) /1
2. A-z (1 Mark) 0-9 (1 Mark) _ (1 Mark)
/3
3. No. (1 Mark) /1 4. Local (1 Mark)
Global (1 Mark) Dim (1 Mark)
/3
5. Describe the ‘Naming Convention’ for variables. /1 6. $myVar = “Value”
Or $myVar = 123 (1 Mark)
/1
7. MsgBox (0, “”, $myVar) /1 8. A variable that does not need to be changed. (1 Mark) /1 9. No. (1 Mark) /1 10. @DesktopHeight (1 Mark) /1 11. Arrays are variables that have the ability to store multiple values of data
elements of the same type and size. (1 Mark) /1
12. $myArray[index number] (1 Mark) /1 13. Method 1 (1 Mark)
$names[0] = “Alex” $names[1] = “Brett” Method 2 (1 Mark) Dim $names[6] = ["Alex", "Brett", "Nicholas", "Jos", "Michael", "George"] MsgBox (0, "Name", $names[2])
/2
Total: /18

LEARNING TO SCRIPT WITH AUTOIT V3 Page 67
Exercises- Section 5 1. Run ( "filename" [, "workingdir" [, flag[, standard_i/o_flag]]] ) 1 Mark 2. Run(“Notepad”) 1 Mark 3. RunWait(“Notepad”)
MsgBox (0, “”, “Script has finished”) 2 Marks
4. Run('Calc') WinWait('Calculator') MsgBox (64, 'Functions', 'Your Calculator is showing.')
2 Marks
5. Run('Calc'); (1 Mark) WinWait('Calculator') ; (1 Mark)
2 Marks
6. (1 Mark) Send (54) Send ("{+}") Send (402) Send ("{=}")
1 Mark
7. (1 Mark) Send (534) Send ("{-}") Send (102) Send ("{=}")
1 Mark
8. (1 Mark) Send (5) Send ("{*}") Send (24) Send ("{=}")
1 Mark
9. (1 Mark) Send (54) Send ("{/}") Send (2) Send ("{=}")
1 Mark
10. (1 Mark) Send (54) Send ("{+}") Send (40) Send ("{-}") Send (23) Send ("{*}") Send (5) Send ("{/}") Send (2) Send ("{=}")
3 Marks
Total: /15

LEARNING TO SCRIPT WITH AUTOIT V3 Page 68
Exercises- Section 6 1. Assignment (1 Mark)
Mathematical (1 Mark) Comparison (1 Mark) Logical (1 Mark)
4 Marks
2. $var = 3; 1 Mark $var += 4; 1 Mark
2 Marks
3. $var = 369-235; 1 Mark MsgBox (0, “Answer”, $var); 1 Mark
2 Marks
4. == (1 Mark 1 Mark 5. = (1 Mark) 1 Mark
Total: /10
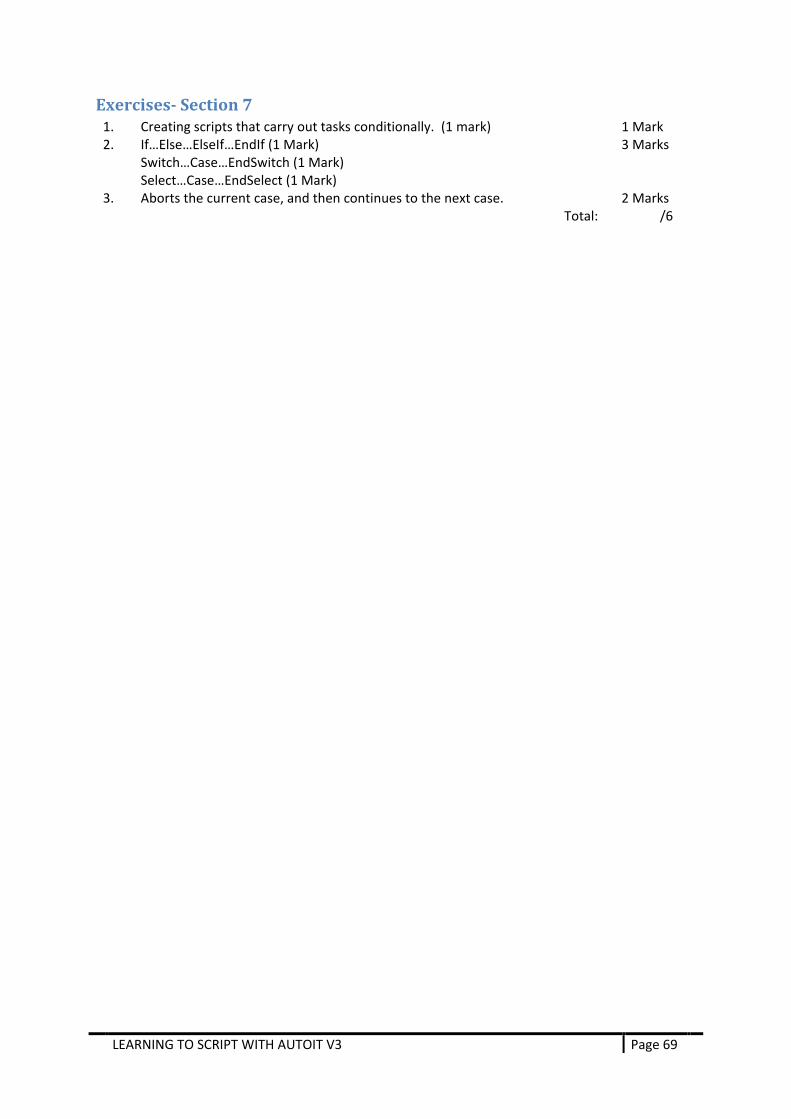
LEARNING TO SCRIPT WITH AUTOIT V3 Page 69
Exercises- Section 7 1. Creating scripts that carry out tasks conditionally. (1 mark) 1 Mark 2. If…Else…ElseIf…EndIf (1 Mark)
Switch…Case…EndSwitch (1 Mark) Select…Case…EndSelect (1 Mark)
3 Marks
3. Aborts the current case, and then continues to the next case. 2 Marks Total: /6

LEARNING TO SCRIPT WITH AUTOIT V3 Page 70
Exercises- Section 8 1. For…Next (1 Mark)
Do…Until (1 Mark) While…Wend (1 Mark)
3 Mark
2. For $i = 1 To 5; (1 Mark) MsgBox (0, "", $i) ; (1 Mark) Next
2 Marks
3. $i = 0 While 1; (0.5 Mark) $i += 1; (0.5 Mark) If $i = 6 Then ExitLoop; (1 Mark) MsgBox (0, "", $i) ; (1 Mark) Wend
3 Marks
4. Exit the current loop. (1 Mark) 1 Mark 5. Continue the loop again in the next iteration. (1 Mark) 1 Mark 6. This is an example for a While loop. A for loop or Do loop could be used.
$i = 0 While 1 $i += 1 If $i = 4 Then ContinueLoop; 1 Mark If $i = 9 Then ContinueLoop; 1 Mark If $i = 11 Then ExitLoop; 1 Mark MsgBox (0, "", $i) Wend
3 Marks
Total: /13

LEARNING TO SCRIPT WITH AUTOIT V3 Page 71
Exercises- Section 11 1. StringRight($string,15) 1 Mark 2. StringTrimLeft(StringTrimRight($string,10),3) 2 Marks 3. StringStripWS($string,8) 1 Mark 4. StringLeft()
StringMid() 2 Marks
6 Marks Total

LEARNING TO SCRIPT WITH AUTOIT V3 Page 72
Frequently Asked Questions The following frequently asked questions are taken from the FAQ thread located on the AutoIt forums. You can find it here. Thanks go to this-is-me, AlainP, martin, Yggdrasil, d3mon, nutster and Zedna for their excellent input in the list.
Q1. How can I debug my script?
A1. This one has a myriad of answers, but the most effective is to begin by using the SciTE4AutoIt3 Editor to create or edit scripts. This program is useful in debugging for the following reasons:
Syntax highlighting allows for immediate viewing of any mistakes from unended script tags or quotes. This allows the scripter to visibly see the difference between the following incorrect code
ControlSend("title", "text, controlID, "string") and the corrected version
ControlSend("title", "text", controlID, "string")
Global Syntax check built directly into the tools menu allows you to check an entire script for problems all at once.
Built-in code tidying program that correctly indents utidy code and repairs messy scripts to allow them to be more readable. It also corrects problems with incorrectly capitalised function names and variables.
Per-line trace insertion allows you to log every line of code executed to debug errors.
Debug MsgBoxes or ConsoleWrites are able to be added anywhere in the script directly from SciTE. ConsoleWrite lines are less intrusive and prevent the added annoyance to the user of MsgBoxes.
A2. You can also debug a script on any computer by adding the following code to your script:
Func dbg($msg) DllCall("kernel32.dll", "none", "OutputDebugString", "str", $msg) EndFunc
Then, when you need to add a debug line, call it as necessary. Example:
dbg("The value of Variable 1 at this time is " & $var1) This debugging is completely transparent to the user, and is only viewable with a program such as DebugView from SysInternals. This method of debugging has the added advantage of being available to the developer in situations where is not acceptable or feasable to install SciTE on a client's unit.

LEARNING TO SCRIPT WITH AUTOIT V3 Page 73
Q2. How can I run something that is not an exe file [.txt, .msi, .pdf, .jpg etc.] [or] How can I open a webpage in the default browser?
A1. It was for this reason that the ShellExecute function was created. Here is one example:
ShellExecute("C:\autoitscripts\test.au3", "", "", "edit", @SW_MAXIMIZE)
You can also specify a web address this way:
ShellExecute("http://www.autoitscript.com/forum") If you normally are able to right-click the file and select print, then you can also print the file from AutoIt using this function:
ShellExecute("C:\boot.ini", "", "", "print")
If you wish your script to wait until the process is finished, you can use the ShellExecuteWait function with the same parameters.

LEARNING TO SCRIPT WITH AUTOIT V3 Page 74
Q3. How can I prevent more than one copy of my script from running at once / detect another copy of my script running?
A1. You can use a function called _Singleton to detect multiple instances of your script. An example of how to use this code:
#include <Misc.au3> _Singleton("TheNameOfMyScript")
In this instance, the script will immediately exit if there is already one copy running. If you simply want know if another copy is running, you can use code similar to the next example:
#include <Misc.au3> If _Singleton("MyScriptName", 1) Then ; We know the script is already running. Let the user know. MsgBox(0, "Script Name", "This script is already running. Using multiple copies of this script at the same breaks the [(UltimaCoder)] License!") Exit Endif

LEARNING TO SCRIPT WITH AUTOIT V3 Page 75
Q4. How can I run my script as a service? This is also a question with multiple answers, and none of them are the only way to do it. The first question to ask yourself is whether or not you wish to install the service on other computers besides your own.
A1. If you only wish to install the service on your own computer, The easiest way to do this is to use Pirmasoft RunAsSvc. This program makes services easy to install and easy to remove when necessary. A2. If you wish to make the service available to anyone running your script, you can use SRVANY.EXE and ServiceControl.au3. You can then use this code to install your script as a service:
#include "ServiceControl.au3" $servicename = "MyServiceName" _CreateService("", $servicename, "My AutoIt Script", "C:\Path_to_srvany.exe", "LocalSystem", "", 0x110) RegWrite("HKLM\SYSTEM\CurrentControlSet\Services\" & $servicename & "\Parameters", "Application", "REG_SZ", @ScriptFullPath)
or use the following code to delete this service:
#include "ServiceControl.au3" $servicename = "MyServiceName" _DeleteService("", $servicename)
There is one caveat to setting up AutoIt as a service. If the service is not installed using the above code, it must have the "allow service to interact with the desktop" setting or else automation functions such as Control* or Win* functions will not function. To assure the service does indeed have this setting, use the following code:
RegWrite("HKLM\SYSTEM\CurrentControlSet\Services\[ServiceName]", "Type", "REG_DWORD", 0x110)

LEARNING TO SCRIPT WITH AUTOIT V3 Page 76
Q5. How can I start/stop or otherwise control a service?
A1. There are two include libraries that are designed specifically to interact with services. These are the following:
ServiceControl.au3 made by SumTingWong. Functionality:
_StartService()
_StopService()
_ServiceExists()
_ServiceRunning()
_CreateService()
_DeleteService()
_NTServices.au3 made by CatchFish. Functionality:
_ServiceStart()
_ServiceStop()
_ServiceStatus()
_ServicePause()

LEARNING TO SCRIPT WITH AUTOIT V3 Page 77
Q6. How can I display a progress bar while copying files/directories?
A1. An include file was written some time ago to handle this type of operation. You may download it here:

LEARNING TO SCRIPT WITH AUTOIT V3 Page 78
Q7. How can I make a hotkey that only works in my GUI?
A1. It was for this reason that GUISetAccelerators () was created:
; A simple custom messagebox that uses the MessageLoop mode #include <GUIConstantsEx.au3> GUICreate("Custom Msgbox", 210, 80) GUICtrlCreateLabel("Please click a button!", 10, 10) $YesID = GUICtrlCreateButton("Yes", 10, 50, 50, 20) $NoID = GUICtrlCreateButton("No", 80, 50, 50, 20) $ExitID = GUICtrlCreateButton("Exit", 150, 50, 50, 20) ; Set accelerators for Ctrl+y and Ctrl+n Dim $AccelKeys[2][2]=[["^y", $YesID], ["^n", $NoID]] GUISetAccelerators($AccelKeys) GUISetState() ; display the GUI Do $msg = GUIGetMsg() Select Case $msg = $YesID MsgBox(0, "You clicked on", "Yes") Case $msg = $NoID MsgBox(0, "You clicked on", "No") Case $msg = $ExitID MsgBox(0, "You clicked on", "Exit") Case $msg = $GUI_EVENT_CLOSE MsgBox(0, "You clicked on", "Close") EndSelect Until $msg = $GUI_EVENT_CLOSE Or $msg = $ExitID
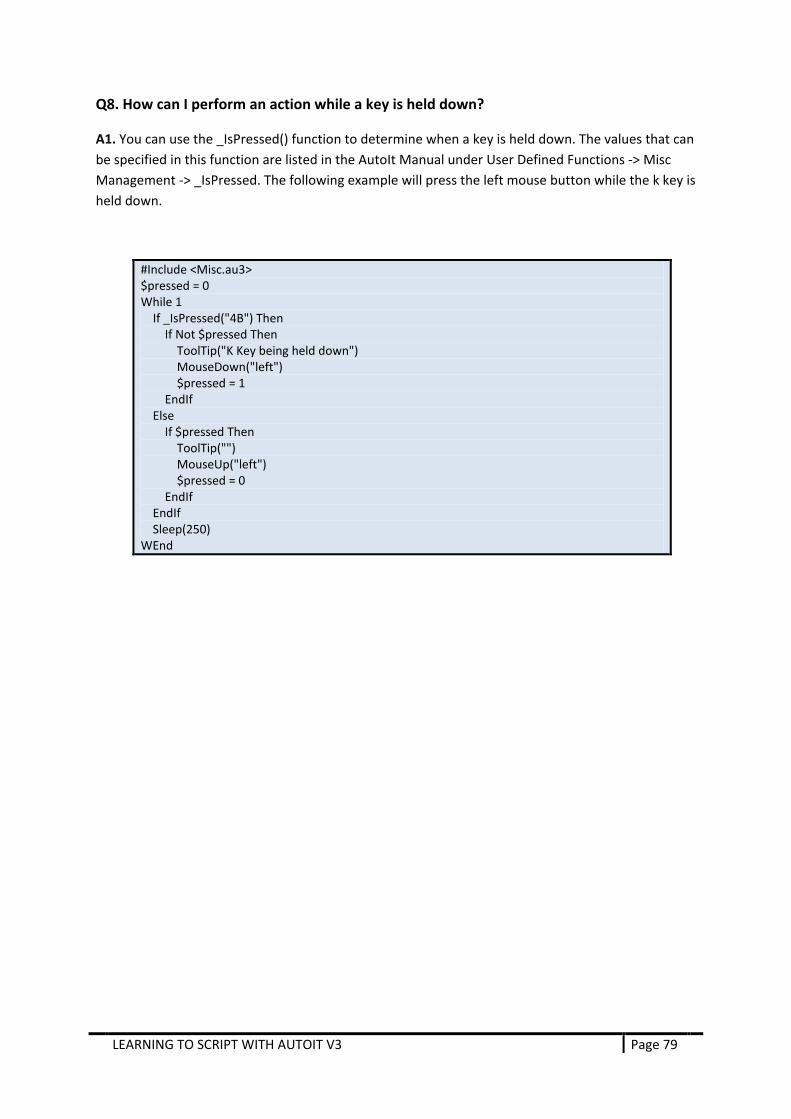
LEARNING TO SCRIPT WITH AUTOIT V3 Page 79
Q8. How can I perform an action while a key is held down?
A1. You can use the _IsPressed() function to determine when a key is held down. The values that can be specified in this function are listed in the AutoIt Manual under User Defined Functions -> Misc Management -> _IsPressed. The following example will press the left mouse button while the k key is held down.
#Include <Misc.au3> $pressed = 0 While 1 If _IsPressed("4B") Then If Not $pressed Then ToolTip("K Key being held down") MouseDown("left") $pressed = 1 EndIf Else If $pressed Then ToolTip("") MouseUp("left") $pressed = 0 EndIf EndIf Sleep(250) WEnd

LEARNING TO SCRIPT WITH AUTOIT V3 Page 80
Q9. How can I run my script on a remote computer over the network?
A1. The answer to this question depends on how much experience you have in networking. If the target system is a Windows 2000 or Windows XP Pro system that you have administrator access to, then you may use one of the following programs:
PsExec from SysInternals
BeyondExec from BeyondLogic
With either of these programs it is possible to launch any process on a remote system, and even copy your script to the target computer before starting it. Neither these programs nor any others will work with Windows XP Home Edition unless you create a custom "command listener" that you manually install on the target system. NOTE: Those of you with more advanced programming skills and a little imagination can figure out how to use the service control libraries and srvany.exe to do this same thing without either of the above mentioned programs.

LEARNING TO SCRIPT WITH AUTOIT V3 Page 81
Q10. How can I make a function with optional parameters like the ones I see in the Help File?
A1. You can specify optional parameters by giving them a default value in the Func declaration. An example of how this is done:
Func testme($param1, $param2 = "nothing", $param3 = 5) MsgBox(0, "", "Parameter one is required. The value of Parameter 1 is " & $param1 & @CRLF & "Parameter 2 is optional. The value of Parameter 2 is " & $param2 & @CRLF & "Parameter 3 is optional. The value of Parameter 3 is " & $param3) EndFunc
If testme() is called with only one parameter [I.E. testme("test")] then the output i
Parameter one is required. The value of Parameter 1 is test Parameter 2 is optional. The value of Parameter 2 is nothing Parameter 3 is optional. The value of Parameter 3 is 5
However, if the function is called with more than one parameter like this testme("test", "something"), then the output is
Parameter one is required. The value of Parameter 1 is test Parameter 2 is optional. The value of Parameter 2 is something Parameter 3 is optional. The value of Parameter 3 is 5

LEARNING TO SCRIPT WITH AUTOIT V3 Page 82
Q11. How can I make my script start every time windows starts?
A1. You can use one of the following codes to allow your script to start with windows:
RegWrite("HKLM\SOFTWARE\Microsoft\Windows\CurrentVersion\Run", "MyProgramName", "REG_SZ", @ScriptFullPath)
or
FileCreateShortcut(@ScriptFullPath, @StartupCommonDir & "\MyProgramName.lnk")

LEARNING TO SCRIPT WITH AUTOIT V3 Page 83
Q12. How can I have the script delete itself?
A1. The following code can delete a running script. WARNING: Make a copy of your script before calling this function!!!
Func _SelfDelete($iDelay = 0) Local $sCmdFile FileDelete(@TempDir & "\scratch.bat") $sCmdFile = 'ping -n ' & $iDelay & '127.0.0.1 > nul' & @CRLF _ & ':loop' & @CRLF _ & 'del "' & @ScriptFullPath & '"' & @CRLF _ & 'if exist "' & @ScriptFullPath & '" goto loop' & @CRLF _ & 'del ' & @TempDir & '\scratch.bat' FileWrite(@TempDir & "\scratch.bat", $sCmdFile) Run(@TempDir & "\scratch.bat", @TempDir, @SW_HIDE) EndFunc

LEARNING TO SCRIPT WITH AUTOIT V3 Page 84
Q13. How can I create a clickable website hyperlink in my gui?
A1. GaryFrost has made great advances in this area and has provided a UDF here to help with doing this.

LEARNING TO SCRIPT WITH AUTOIT V3 Page 85
Q14. How can I change the screen resolution / refresh rate / color depth?
A1. ChangeResolution.au3 is a library function created to make changes to these settings.

LEARNING TO SCRIPT WITH AUTOIT V3 Page 86
Q15. How can I get the screen resolution in multiple monitor setups?
A1. The following code was worked out by Larry to determine the total screen resolution of multiple monitors:
Global Const $SM_VIRTUALWIDTH = 78 Global Const $SM_VIRTUALHEIGHT = 79 $VirtualDesktopWidth = DLLCall("user32.dll", "int", "GetSystemMetrics", "int", $SM_VIRTUALWIDTH) $VirtualDesktopWidth = $VirtualDesktopWidth[0] $VirtualDesktopHeight = DLLCall("user32.dll", "int", "GetSystemMetrics", "int", $SM_VIRTUALHEIGHT) $VirtualDesktopHeight = $VirtualDesktopHeight[0]
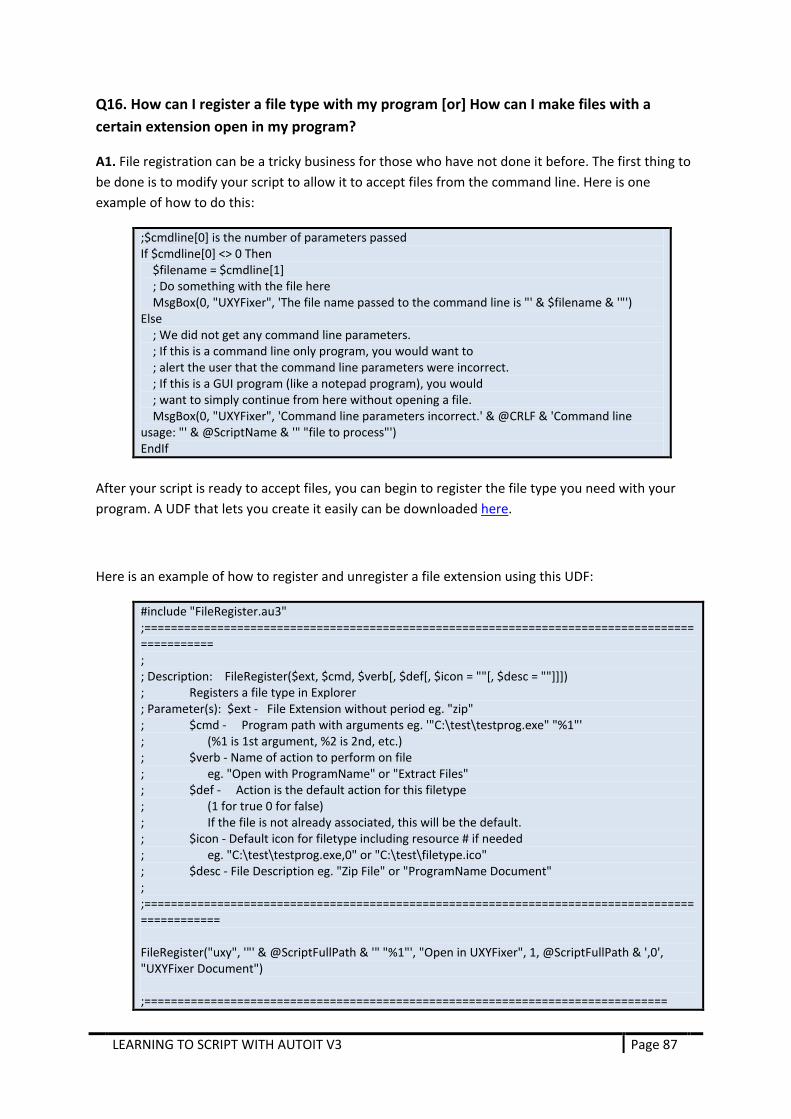
LEARNING TO SCRIPT WITH AUTOIT V3 Page 87
Q16. How can I register a file type with my program [or] How can I make files with a certain extension open in my program?
A1. File registration can be a tricky business for those who have not done it before. The first thing to be done is to modify your script to allow it to accept files from the command line. Here is one example of how to do this:
;$cmdline[0] is the number of parameters passed If $cmdline[0] <> 0 Then $filename = $cmdline[1] ; Do something with the file here MsgBox(0, "UXYFixer", 'The file name passed to the command line is "' & $filename & '"') Else ; We did not get any command line parameters. ; If this is a command line only program, you would want to ; alert the user that the command line parameters were incorrect. ; If this is a GUI program (like a notepad program), you would ; want to simply continue from here without opening a file. MsgBox(0, "UXYFixer", 'Command line parameters incorrect.' & @CRLF & 'Command line usage: "' & @ScriptName & '" "file to process"') EndIf
After your script is ready to accept files, you can begin to register the file type you need with your program. A UDF that lets you create it easily can be downloaded here.
Here is an example of how to register and unregister a file extension using this UDF:
#include "FileRegister.au3" ;============================================================================================== ; ; Description: FileRegister($ext, $cmd, $verb[, $def[, $icon = ""[, $desc = ""]]]) ; Registers a file type in Explorer ; Parameter(s): $ext - File Extension without period eg. "zip" ; $cmd - Program path with arguments eg. '"C:\test\testprog.exe" "%1"' ; (%1 is 1st argument, %2 is 2nd, etc.) ; $verb - Name of action to perform on file ; eg. "Open with ProgramName" or "Extract Files" ; $def - Action is the default action for this filetype ; (1 for true 0 for false) ; If the file is not already associated, this will be the default. ; $icon - Default icon for filetype including resource # if needed ; eg. "C:\test\testprog.exe,0" or "C:\test\filetype.ico" ; $desc - File Description eg. "Zip File" or "ProgramName Document" ; ;=============================================================================================== FileRegister("uxy", '"' & @ScriptFullPath & '" "%1"', "Open in UXYFixer", 1, @ScriptFullPath & ',0', "UXYFixer Document") ;===============================================================================

LEARNING TO SCRIPT WITH AUTOIT V3 Page 88
; ; Description: FileUnRegister($ext, $verb) ; UnRegisters a verb for a file type in Explorer ; Parameter(s): $ext - File Extension without period eg. "zip" ; $verb - Name of file action to remove ; eg. "Open with ProgramName" or "Extract Files" ; ;=============================================================================== FileUnRegister("uxy", "Open in UXYFixer")

LEARNING TO SCRIPT WITH AUTOIT V3 Page 89
Q17. Why doesn't my combobox (GUICtrlCreateCombo) show a dropdown list when clicked?
A1. When using GUICtrlCreateCombo be sure to enter the desired height for your combobox list in the "height" parameter. Windows XP automatically selects an appropriate height for combo boxes, but other versions of Windows usually do not.
$combo = GUICtrlCreateCombo("",10,10,200,20) Would be correctly changed to
$combo = GUICtrlCreateCombo("",10,10,200,200)

LEARNING TO SCRIPT WITH AUTOIT V3 Page 90
Q18. Why isn't my thread getting any replies?
A1. Did you give a good description of the problem? If your title or explanation of the issue is not descriptive, users are likely to bypass your issue instead of helping. Post titles such as "Help Me", "I Have A Problem", "Question", "Help me fix my code", "This code doesn't work" or similarly worded question titles will not readily draw forum users to your post. Experienced users (which are your best hope of resolving the issue) will often skip your post altogether in cases like this. An example of a post title descriptive enough to attract users to assist you is "Problem with WinWaitClose", or "Loop never ends". A2. Did you post example code? If you have not posted an example of the code you are having an issue with, then you will not recieve support. When posting a non-working script, please do so in the smallest amount of stand-alone code possible. If the code you post cannot run by itself on another person's computer, they will not be able to recreate the issue. A3. Did you use proper english? Here are guidelines for posting properly in the english language:
Use proper case. THIS IS CONSIDERED YELLING. if you post in ALL UPPERCASE or all lowercase, you look like a doofus when you do.
Use proper punctuation. Complete sentences need only one trailing punctuation mark, not three!!! Writing a sentance without simple punctuation such as commas or other punctuation is considered lazy, which is considered a good judge of the poster's coding style. If you cannot summon the strength to write a sentence with correct punctuation, you will most likely miss simple coding mistakes such as unterminated quotes.

LEARNING TO SCRIPT WITH AUTOIT V3 Page 91
Q19. Why does the Ctrl key get stuck down after I run my script?
A1. It could equally be the Shift Or the Alt key. If you use Send In a script And you have a problem With keys being stuck down Then Send is the most likely culprit. A similar problem can occur With BlockInput. The solution is generally quite simple. If there is a key like Shfit Or Alt held down at the start of the Send sequence, but that key is released by the time the Send sequence finishes Then the key will get 'stuck' down. As an example of a solution, you could replace the Send function In your script With the _SendEx function below. The _SendEx function waits For the Shift, Alt And Ctrl keys To be released Or pops up a warning If the $warn parameter is Not an empty string. Therefore it is Not intended To be used when one of these modifyer keys has been set To be down using any combination of {ALTDOWN}, {SHIFTDOWN} And {ALTDOWN}.
#include < Misc.au3 > ;Send the string $ss after the Shift Alt and Ctrl keys are released. Optionally give a warning after 1 sec if any of those keys still down. ;Requires misc.au3 to be included in the script for the _IsPressed function. Func _SendEx($ss, $warn = "") Local $iT = TimerInit() While _IsPressed("10") Or _IsPressed("11") Or _IsPressed("12") If $warn <> "" And TimerDiff($iT) > 1000 Then MsgBox(262144, "Warning", $warn) EndIf Sleep(50) WEnd Send($ss) EndFunc;==>_SendEx
A2. Shilbiz also discovered that the following can 'clear' locked down keys.
ControlSend("", "", "", "text", 0)

LEARNING TO SCRIPT WITH AUTOIT V3 Page 92
Q20.How can I use Pixel functions ? A1.PixelCheckSum
$PixelCheck=PixelChecksum(40,50,70,60) ;Check if a region of pixel has changed While 1 ;Always Check for Pixel If IsArray($PixelCheck)=1 Then ;If Pixel Region has changed (color) Then Msgbox(48,"PixelChecksum","Pixel region has changed !") EndIf WEnd
A2.PixelSearch
Local $PixelCheck, $NewCheck $PixelCheck = PixelCheckSum(40, 50, 60, 70) ; Get the checksum for this area. While 1 ; Keep going $NewCheck = PixelCheckSum(40, 50, 60, 70) If $PixelCheck <> $NewCheck Then ; The old pixel checksum and the new one are different. $PixelCheck = $NewCheck ; Update the $PixelCheck to the new value Msgbox(48,"PixelChecksum","Pixel region has changed !") ; Let us now it has changed. Change this to what you want to happen when the colour in the region changes. EndIf Sleep(50) ; Just to give the CPU a bit of a break. Wend

LEARNING TO SCRIPT WITH AUTOIT V3 Page 93
Q21. Why my script doesn't work on locked station? A21. On locked station any window will never be active (active is only dialog with text "Press Ctrl+Alt+Del") In Windows locked state applications runs hidden (behind that visible dialog) and haven't focus and active status. So generally don't use Send() MouseClick() WinActivate() WinWaitActive() WinActive() etc. Instead use ControlSend() ControlSetText() ControlClick() WinWait() WinExists() WinMenuSelectItem() etc. This way you may have your script resistive against another active windows. and it's possibe to run such script from scheduler on locked Windows station.

LEARNING TO SCRIPT WITH AUTOIT V3 Page 94
Q22. Are my AutoIt EXEs really infected? How and Why your EXEs have been deleted? (Thanks go to JSThePatriot. Original thread can be found here) If you have been using AutoIt for any length of time you will know that it is a great, and powerful scripting language. As with all powerful languages there comes a downside. Virus creation by those that are malicious. AutoIt has no virii installed on your system, and if a script you have created has been marked as a virus, (and you're not malicious) then this is a false positive. They found a set of instructions in an AutoIt EXE out there somewhere, took the general signature of the file, and now all AutoIt EXE's are marked (or most of them). This can be due to several reasons.
1. AutoIt is packed with UPX. UPX is an open source software compression packer. It is used with many virii (to make them smaller).
2. Malicious scripter got the AutoIt script engine recognized as a virus.
And I am sure there are more ways your executable could be marked, but that covers the basics. Now I am sure you are wanting to know what you can do to get back up and running without being recognized as a virus. You have to send in a report to the offending AV company alerting them to the false positive they have made. It never hurts to send in your source code along with a compiled exe, to help them realize their mistake. You may have to wait up to 24 hours for them to release an update. The time it takes really depends on the offending AV company. Anti-Virus Links
• AntiVir o Website o Contact
• Avast! o Website o Contact
• McAfee o Website o Contact
• Symantec (Norton) o Website o Contact
• AVG o Website o Contact
• ClamWin o Website o Contact
• ClamAV o Website o Contact

LEARNING TO SCRIPT WITH AUTOIT V3 Page 95
• BitDefender o Website o Contact
• ZoneLabs o Website o Contact
• Norman o Website o Contact
• eSafe o Website o Contact
• A2 (A-Squared) o Website o Contact

LEARNING TO SCRIPT WITH AUTOIT V3 Page 96
Q23. Why does my script no longer decompile? A1. Decompilation is no longer supported, and is only available for the older versions of AutoIt (Version 3.2.5.1 and earlier compiled scripts). Please do not post on this topic, but search the forums for more information. Posting topics like this will usually get the topic locked. Also posting the source (if a hacked decompiler was used) of other peoples compiled scripts, or otherwise mentioning these hacked decompiler's will probably get you banned. It is also in violation of the AutoIt EULA (End-User-License-Agreement)
You may not reverse engineer or disassemble the SOFTWARE PRODUCT or compiled scripts that were created with the SOFTWARE PRODUCT.

LEARNING TO SCRIPT WITH AUTOIT V3 Page 97
Q24. How can I get a window handle when all I have is a PID? A1. Refer to the following example, showing converting and use when manipulating the window. Function is based on work by Smoke_N/Hubertus and Helge.
;Run process $iPID = Run("Notepad.exe") ;Allow window to initialize... Sleep (500) ;Get HWND. $hWnd = _GetHwndFromPID($iPID) ;Maximize WinSetState($hWnd, "", @SW_MAXIMIZE) ;Wait 2 seconds Sleep(2000) ;Minimize WinSetState($hWnd, "", @SW_MINIMIZE) ;Wait 2 seconds Sleep(2000) ;Restore window WinSetState($hWnd, "", @SW_RESTORE) ;Wait 2 seconds Sleep(2000) ;Move top left corner of screen, and resize to 800x600 WinMove($hWnd, "", 0, 0, 800, 600) ;Wait 2 seconds Sleep(2000) ;Calculate Center of screen. $x = (@DesktopWidth / 2) - 400; Desktop width divided by 2, then minus half the width of the window $y = (@DesktopHeight / 2) - 300; Desktop height divided by 2, then minus half the height of the window ;Move to center of screen WinMove($hWnd, "", $x, $y) ;Wait 2 seconds Sleep(2000) ;Close notepad WinClose($hWnd) ;Function for getting HWND from PID Func _GetHwndFromPID($PID)

LEARNING TO SCRIPT WITH AUTOIT V3 Page 98
$hWnd = 0 $winlist = WinList() Do For $i = 1 To $winlist[0][0] If $winlist[$i][0] <> "" Then $iPID2 = WinGetProcess($winlist[$i][1]) If $iPID2 = $PID Then $hWnd = $winlist[$i][1] ExitLoop EndIf EndIf Next Until $hWnd <> 0 Return $hWnd EndFunc;==>_GetHwndFromPID
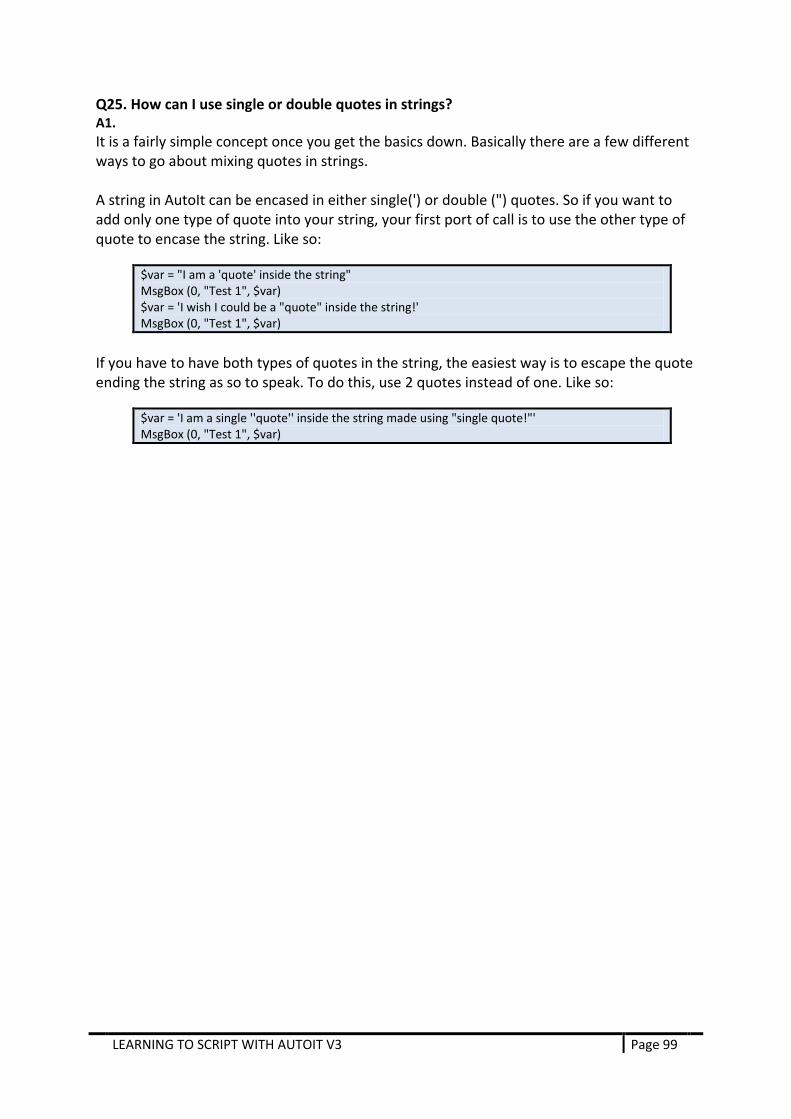
LEARNING TO SCRIPT WITH AUTOIT V3 Page 99
Q25. How can I use single or double quotes in strings? A1. It is a fairly simple concept once you get the basics down. Basically there are a few different ways to go about mixing quotes in strings. A string in AutoIt can be encased in either single(') or double (") quotes. So if you want to add only one type of quote into your string, your first port of call is to use the other type of quote to encase the string. Like so:
$var = "I am a 'quote' inside the string" MsgBox (0, "Test 1", $var) $var = 'I wish I could be a "quote" inside the string!' MsgBox (0, "Test 1", $var)
If you have to have both types of quotes in the string, the easiest way is to escape the quote ending the string as so to speak. To do this, use 2 quotes instead of one. Like so:
$var = 'I am a single ''quote'' inside the string made using "single quote!"' MsgBox (0, "Test 1", $var)

LEARNING TO SCRIPT WITH AUTOIT V3 Page 100
Q26. When should I bump my threads? A1. As courtesy to other users you should only bump your post once in a 24 hour period. Doing this allows all users the chance to get helped equally. Also refer to Q18. Why isn't my thread getting any replies?, as this will help you get replies.

LEARNING TO SCRIPT WITH AUTOIT V3 Page 101
Q27. How can I protect my code from decompilation? A1. The fact of the matter is you can't fully protect your code. AutoIt is an interpreted language, so all
scripts are interpreted, and that script has to get stored somewhere There is still hope though. You can take certain measures to prevent decompiled code from being usable to the person that decompiled. The first step is to obfuscate your code. This causes the code to become unreadable. Basically variables and functions are renamed, making it very hard to make head or tail of what is what.
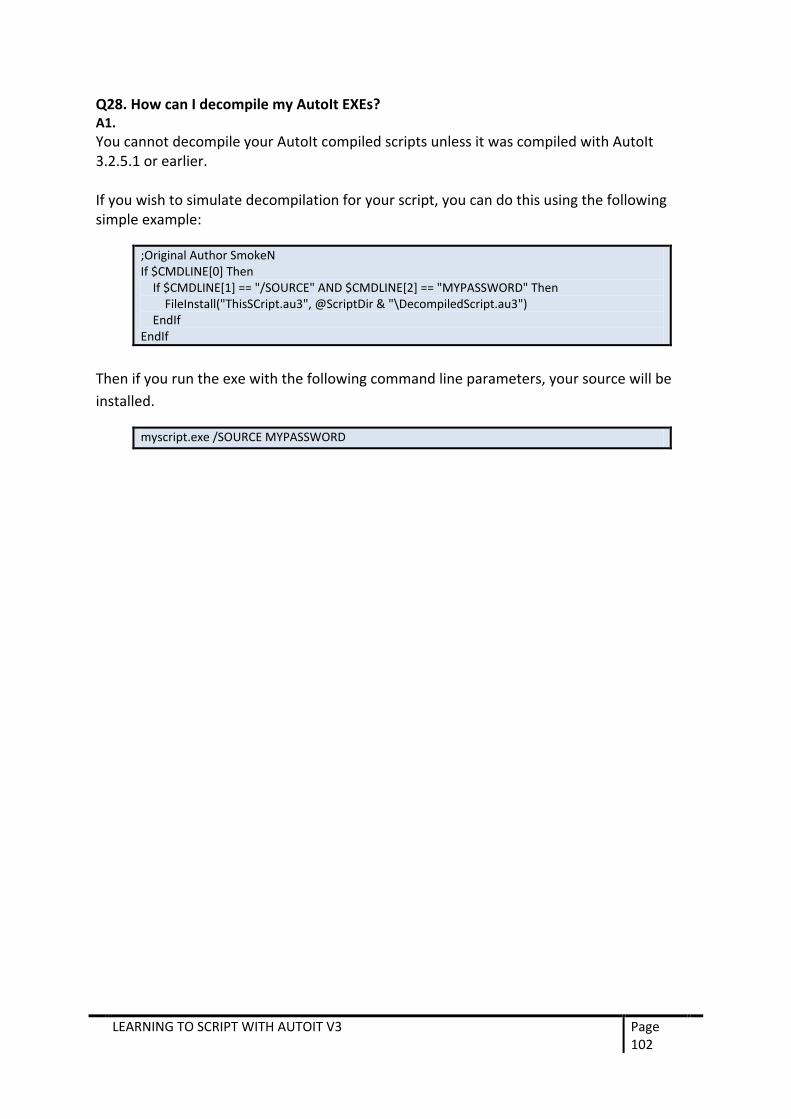
LEARNING TO SCRIPT WITH AUTOIT V3 Page 102
Q28. How can I decompile my AutoIt EXEs? A1. You cannot decompile your AutoIt compiled scripts unless it was compiled with AutoIt 3.2.5.1 or earlier. If you wish to simulate decompilation for your script, you can do this using the following simple example:
;Original Author SmokeN If $CMDLINE[0] Then If $CMDLINE[1] == "/SOURCE" AND $CMDLINE[2] == "MYPASSWORD" Then FileInstall("ThisSCript.au3", @ScriptDir & "\DecompiledScript.au3") EndIf EndIf
Then if you run the exe with the following command line parameters, your source will be installed.
myscript.exe /SOURCE MYPASSWORD

LEARNING TO SCRIPT WITH AUTOIT V3 Page 103
Q29. What is proper forum etiquette? What rules are there for the forum? A1. Proper forum etiquette will ensure you will stay a member of these forums. So try to follow these rules. Also see this FAQ post, as you should follow what is outlined there as well.
• Use proper English. MSN speak and the like makes it very hard to understand what you want. Keep posts in proper case, as UPPERCASE is considered yelling, and lowercase makes you look stupid. Also don't use more punctuation marks than necessary. For example �!!!� and �???� is completely unnecessary.
• Before posting help with a script, make sure you follow these steps: o Search for your issue.
There are many thousands of posts on this forum, and chances are your question has been asked before. Make sure to use a variety of terms, to maximize your results.
o Read the helpfile Most if not all things in the help file will have an example (native
functions) or two. Give them a go to try see how the functions works. Most of the time it helps!
o Give it a go Seriously, if you can't be bothered to give it a go, then why should we
be bothered to help you? If you feel you can't do it, and don�t try, how will you ever know? We always prefer you give it a go, as you can learn from your mistakes, and hopefully understand it better.
o Post your problem Make sure you post in the correct forum.
AutoIt Specific General Help and support (Most support questions) GUI Support (Support for the Graphical User Interface)
Non-AutoIT Chat Developer chat (Usually for C++ questions.)
Include a detailed description in the content of the post, and a detailed title
Titles such as 'Help' and 'Whats wrong?' are not acceptable. To get the most help with your problem, be as descriptive as you can in the title, but keep in mind your title cannot be too long.
Make sure you also include a descriptive question. Just saying 'what is wrong with the following' is also not acceptable, as we will have no idea what the problem is. Describe what you think is wrong, what is not working. It makes our job easier.
Include your code It shows us that you have tried, and gives us a head start with
something to play with. Always include it. • Usually asking for a script is not taken too well, within reason. Keep in mind that this
is a support forum, so please acknowledge that. Most of us would rather that you

LEARNING TO SCRIPT WITH AUTOIT V3 Page 104
learn over just having a script written for you. If you do need something written for you, maybe try RentACoder, as they are more suited to requests.
• Don't PM other members asking for them to look at threads, help you unless they request it. It is actually quite rude and annoying to receive PMs of that nature.
• Lurk a little before you dive right in. Read a number of posts, or check out the group's archives. Get a feel for the tone of the forum so you can participate accordingly.
• Say online exactly what you would say in person. In other words, if you wouldn't say it to the person's face in front of your Grandmother, you shouldn't type it here.
• Remember your face doesn't show. Words alone can convey sentiment, but without benefit of inflection or facial expression, they can be misconstrued. Use descriptive wording, emoticons or .gifs to ensure your meaning is clear. By the same token, don't jump to conclusions about another person's intent in posting an unclear comment. When in doubt, ask for clarification.
• Be respectful. Internet etiquette is similar to standard etiquette in this area. Appreciate that your opinion is one of many. You can disagree with another person without being disrespectful or rude to other people.
• Ignore Trolls. If you engage in conversation with one, you'll raise your blood pressure and empower the Troll. You can't win a flame war, and you can't sway a Troll's opinion. Often, they don't even care about the subject; they live for the conflict and nothing more. Trolls are common and not worthy of your time. Ignore their posts�no matter how inflammatory�and eventually they'll get bored and move on.
• When you have found an answer for your question. o Do not edit your post to be blank or to have worthless information. People
may be searching for the same issue you have, so be courteous to them by leaving your question there.
o It is also optional to add the likes of [SOLVED] into the title, and redirecting people to the answer that helped you. It can make the lives of people searching easier.
• Finally follow the rules: o Chat Forum Rules o Asking For Source o Some general policies o A must read on policies set in place
Some points taken from: here

LEARNING TO SCRIPT WITH AUTOIT V3 Page 105
Q30. Are there forums available in my local language? A1. Yes there are some available, with some users here participating in both. German Forums French Forums Spanish Forums Please note that these are independent, community-run message boards and not just a translation of this board.

LEARNING TO SCRIPT WITH AUTOIT V3 Page 106
Epilogue If your time reading this document was well-spent in your opinion, please consider donating to the AutoIt team:
www.autoitscript.com/donate.php
If you are also wondering where else to go after this tutorial there are many options.
1. There is a book called by Andy Flesner, which is similar to this one. You may find it here: http://www.oreilly.com/catalog/9780596515126/
2. AutoIt 1-2-3 By Valuater is an interactive program made in AutoIt, teaching you AutoIt. Something you should definitely look at! You can find it here: http://www.autoitscript.com/forum/index.php?showtopic=21048
3. Explore the Example Scripts forum- it contains many examples for you to look at.


![F.Ochsenbein, P. Fernique [CDS] Aladin V3 script mode for the VO.](https://static.fdocuments.in/doc/165x107/55149cf855034640138b4736/fochsenbein-p-fernique-cds-aladin-v3-script-mode-for-the-vo.jpg)