Learning Management System (LMS) Guide · PDF fileLearning Management System (LMS) ......
39
Learning Management System (LMS) Guide for Administrators www.corelearningonline.com
Transcript of Learning Management System (LMS) Guide · PDF fileLearning Management System (LMS) ......

Learning Management System (LMS)
Guide for Administrators
www.corelearningonline.com

Page 1 of 38
Core Learning Online LMS ‐ Guide for Administrators
Contents
Overview ........................................................................................................................................................................2 Section 1: Administrator Permissions ...............................................................................................................................3 Assigning Administrators .....................................................................................................................................3 Administrator Login .............................................................................................................................................4 Adding Users (Students).......................................................................................................................................5 Departments....................................................................................................................................................6
Adding a Single User ........................................................................................................................................6 Adding Multiple Users .....................................................................................................................................8 Editing User Details .......................................................................................................................................10 Searching For a User......................................................................................................................................10
Section 2: Tracking Results and Generating Reports ....................................................................................................12 Setting a Filter ....................................................................................................................................................12 Report Descriptions ...........................................................................................................................................16 List Users ............................................................................................................................................................16 List User Results (Summary) ..............................................................................................................................17 List User Results (Detailed) ................................................................................................................................18 Course Statistics .................................................................................................................................................18
Completion Report ............................................................................................................................................20 Incompletion Report ..........................................................................................................................................20
Finished Report ..................................................................................................................................................20 Inactive Users Report ........................................................................................................................................21 Expired Users Report .........................................................................................................................................22 View User Comments ........................................................................................................................................22 Date Report .......................................................................................................................................................22 Objective Report ................................................................................................................................................24 Detailed User Report .........................................................................................................................................24
Using Reports to Identify Problem Lessons and Questions ..............................................................................27 Exporting Reports...............................................................................................................................................29 Section 3: Communication Tools & Settings..................................................................................................................30
Changing Lesson Status......................................................................................................................................30 Changing Lesson Score ......................................................................................................................................30 Changing Times Run ..........................................................................................................................................30 Editing Administrator Settings ...........................................................................................................................31 Communicating with Users ................................................................................................................................33 Get a Custom Message to Appear Each Time any User Logs In.........................................................................33 Get a Custom Message to Appear Each Time a Particular User Logs In ............................................................33 Emailing a Message to a Single User..................................................................................................................33 Start a Skype Session with a Single User (Chat, Voice, Desktop Sharing, File Sharing) ....................................33 Communicating with Multiple Users (Email, Skype) .........................................................................................34
Department Settings ..........................................................................................................................................36 Administrator Generated Certificates................................................................................................................36
Changing the Color Scheme ...............................................................................................................................37 Removing Users .................................................................................................................................................38
Resetting a User Password ................................................................................................................................38 Searching for a User ...........................................................................................................................................38 Mobile Version...................................................................................................................................................38
Page 2 of 38
Overview
A Learning Management System, or LMS, manages users through a login process that ensures that their learning activity can be tracked. The features of an LMS vary widely and their use will depend upon the design of the course or application made accessible through the LMS. The Core Learning Online LMS includes features common to LMS’s in terms of tracking student results, reporting results, managing student permissions, and communication with students. This Manual provides detailed guidance for administrators on how to use this LMS. The Manual is organized in three sections:
1. Administrator Permissions: This section examines who should be an administrator, identifies options for organizing students by departments or other groups for tracking purposes, and how students are registered in the LMS.
2. Tracking Results & Generating Reports: This section examines how to look up student results, generate a variety of reports on student progress and course effectiveness, and how to export data in reports to a spreadsheet.
3. Communication Tools and Settings: This section examines how administrators can communicate with students and the options available in administrative settings to manage student use of the courses in the LMS.
Core Learning offers online access to lesson‐based courses and to ‘tool‐based’ software applications. For the courses, student activity in the lessons is tracked. For math and language arts courses, tests are administered at the lesson and Unit level of each course and the results of these tests are stored in the LMS. The LMS features on generating reports are especially applicable to evaluating such test results. For tool‐based software programs, the LMS will merely track the frequency of use of the application and date of last use.
For any questions on use of the Core Learning Online LMS or for technical support, please email [email protected].
Core Learning’s online learning portal is www.corelearningonline.com. Students and administrators can access the login area from the home page. For information on Core Learning and its products, go to the main web site: www.core‐learning.com.

Page 3 of 38
Section 1: Administrator Permissions
Assigning Administrators
Core Learning personnel have master control over set up of departments within the online LMS and access to subscribed courses and applications. A school customer will have a department set up in its name. One person at the school needs to be identified as the primary administrator for the school. That person will be have full rights to set up and delete users (students) and otherwise set permissions. Other school personnel can be assigned secondary administrative privileges as sub‐administrators which allow them to track results and generate reports. They will not be able to set up or delete users or to delete user records. All personnel wishing to have access as an administrator will be assigned a user name and password for the login to the administration area of the LMS. Assigned administrators can change their password if they wish but they cannot change their username.
There may be some situations where a school may wish to have more than one department set up. In most cases, a single department works best because each student has a single login. With multiple departments, if students are to participate in more than one department, a separate unique login must be established for that student for each department. The need for multiple departments may arise because of different needs by sub‐administrators for the communication settings (addressed in Section 3). While each administrator can select his or her own settings that will apply to them, those settings will also apply to all students in that department. So if an administrator wishes automatic email notification when a student attempts a lesson or a test, that notification will be enabled for all students in the department. If the administrator wants the notification for some, but not all students, then a separate department needs to be set up. Core Learning will set up additional departments, if requested. Send requests to [email protected].
This Manual is developed for LMS administration at the school level. For district level customers, a modified form of the online LMS can be used to enable another tier of administrators for use by district personnel.
Administrator Login
Unless a special web page has been arranged for login, go to the Core Learning Online web site at www.corelearningonline.com and on the home page, click the Course Login button for Schools.

Page 4 of 38
A login screen will appear. Registered users login here.
For administrators, click the Admin button on the menu and a login screen for administrators will appear.
Enter the assigned administrator name and password and then click Submit. The Administration home page appears.
Page 5 of 38
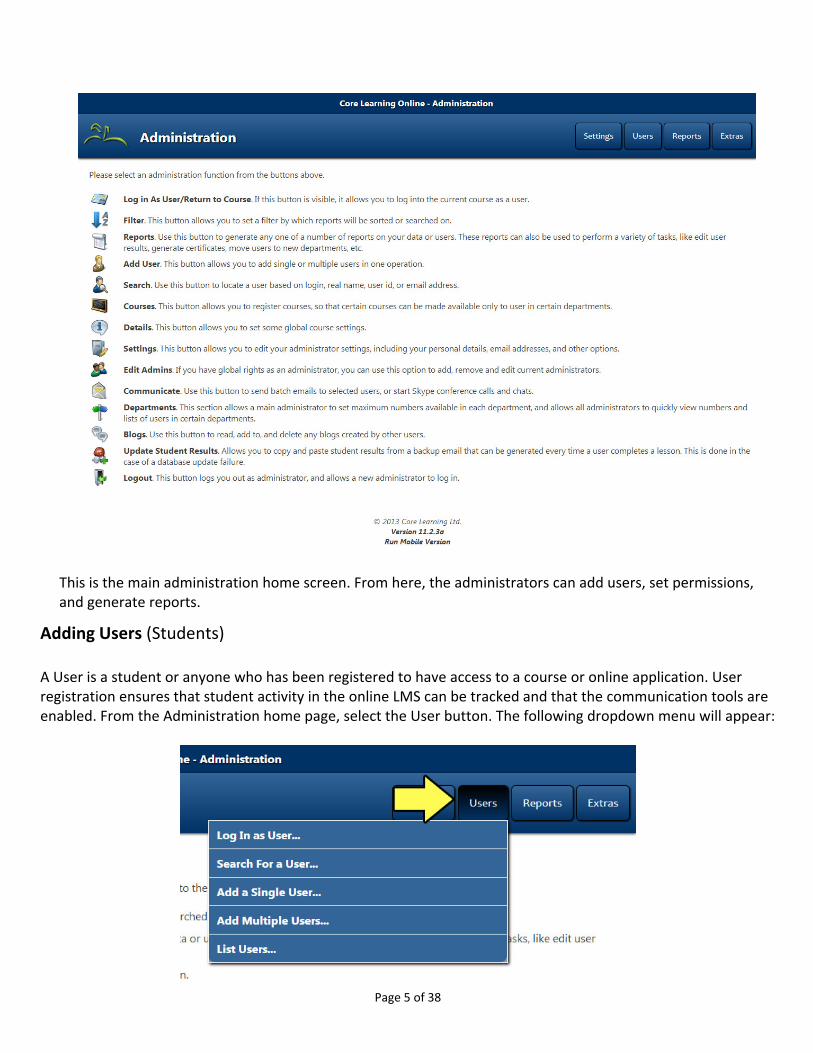
This is the main administration home screen. From here, the administrators can add users, set permissions, and generate reports.
Adding Users (Students) A User is a student or anyone who has been registered to have access to a course or online application. User registration ensures that student activity in the online LMS can be tracked and that the communication tools are enabled. From the Administration home page, select the User button. The following dropdown menu will appear:

Page 6 of 38
A group of students can be registered by selecting Add Multiple Users and copying data from a spreadsheet. The Add a Single User opens a screen with data fields for an individual user registration. These fields are applicable to multiple user registration and are important to the use of the LMS tracking, reporting and communication features. Here is the Add a Single User screen:

Page 7 of 38
Username and Password:
The username must be unique, not only for any school but for all users registered in Core Learning’s online LMS. A reliable way to ensure a unique username is to use a student’s email address. This is also something easily remembered by the student. The password does not need to be unique but should be something not easily known by someone else. A student number or ID might suffice. Security of login access is relevant to preventing tampering with student records in course activity. Students cannot however delete records so unintended access is mostly a privacy issue. Improper access could however, also alter course performance data so access control will help protect the integrity of performance data generated by the LMS.
Email:
An email address is needed to enable email communication by an administrator to a student. Emails can readily be sent within the LMS. When a student is added (registered) to the LMS, an email is automatically sent to the student’s email address and it will provide the login information.
Department:
A department must be selected. Only one department can be selected for each registration. If it is desired that a student be registered in more than one department, a separate registration with new username must be performed.
Address:
This information is optional and it is not required to utilize the LMS features. This feature is more applicable for students who are working from locations not in close proximity to the school.
Message to User:
This is also an option. It is typically used as a welcome message which the student will see posted on their main menu page after login.
GMT Offset:
The LMS records dates and times of student activity within the LMS. GMT means Greenwich Mean Time which establishes a ground zero time reference at Greenwich, England. For the United States, the GMT offset is as follows:
Eastern Time Zone: ‐ 5; Eastern Daylight Savings: ‐ 4
Central Time Zone: ‐ 6; Central Daylight Savings: ‐ 5
Mountain Time Zone: ‐ 7; Mountain Daylight Savings: ‐ 6
Pacific Time Zone: ‐ 8; Pacific Daylight Savings: ‐ 7 The LMS does not re‐set time settings automatically when times shift in or out of Daylight Savings time periods. In most cases, adjusting the time settings in the LMS for time changes is not necessary. Daylight Savings periods are from early March to the end of October. Gender and Language: These are potential searchable data fields but they are optional. Use them if there is interest in generating reports based on gender or language. Skype ID: Skype is a voice‐over‐internet service that can be accessed within the LMS if a Skype account has been obtained.

Page 8 of 38
If microphones are available, administrators and students can have a conversation through the internet, using the Skype service. If Skype service has not been obtained, leave this field blank. Points: Leave this field blank. It is promotional option not enabled for the Core Learning online LMS. Grade, Class, & Teacher: Use these fields, as desired, to facilitate report generation using these types of groups. Each administrator can use the Teacher field to identify themselves for specific students that they wish to monitor. When reports are to be generated, data can be confined to one Teacher so that student results connected to that Teacher only appear in the report. Class is a flexible field for defining various groups perhaps by home room number, a time period, or after school group. The grade field can be useful to see performance by grade. Every data field serves as a filter for report generation. Prevent User: There are three fields where student permissions can be disabled. The LMS has a blog where students can post comments. Student access to the blog area can be blocked. Use of Skype conferencing can also be blocked. Skype chat is not enabled for the Core Learning online LMS. Date In and Date Out: The Date In is the date of first authorized access. If it is desired to prevent access at a future time, the Date Out field can set that limit.
Adding Multiple Users
Multiple students can be registered as a group in an easy process that allows spreadsheet data to be simply copied into the LMS. After selecting Add User, select the Add Multiple Users button. The following screen will appear:

Page 9 of 38
From this screen, you use the New User(s) Details text box to add users. This screen contains detailed instructions on how this is done – you will be able to add users just by entering a user name, but also by entering almost every available field – including the user ID, if you wish. User names are added in the following format:
User Name, Date In, Date Out, User ID, User Password, User Email, User Department, User Address 1, User Address 2, Postcode, State, Country, Real User Name, Class, Grade, Teacher The following are valid entries:
Example 1: Bill Smith, , , ,password, sales is valid.
Example 2: Bill Smith is valid.
Example 3: Bill Smith Susan Waters John Hoskins is valid.
Example 4: Bill Smith,,,,,[email protected],sales Susan Waters,,,ID101,,[email protected],marketing John Hoskins
is also valid.
You can copy and paste from an Excel spreadsheet as well – tabs are automatically converted to commas when
information is pasted or entered into this textbox. If you click on the Load Excel Spreadsheet button it will load
an Excel spreadsheet you can use to fill out names and other details, and paste back. If you want to check that
the names you entered have been entered correctly – with commas in the correct place, etc., use the Check
Details button to see each user one by one, with the values that will be entered for each user. Check this
carefully to make sure you have made no mistakes.
You click on OK to view each user, or Cancel to get out of this check. You will be told how many users are to be added. Once you have entered and checked the user names, click on Submit to add them to the database. NOTE: Do not try to add too many users at one time – the script may time out, and not all the users may be added. Adding several hundred at one time should be fine – several thousand would be too many. If you have this many users to enter, do them in several operations. If any of the user names already exist in the database, you will be warned after this operation is complete.

Page 10 of 38
Editing User Details
You can edit user details for those users in a department you have control over. There are two ways to access a user’s registration information. You can generate a List of Users report (see page 16) and select a user from the report or you can locate a user’s registration by choosing Search For a User found under the Users button. You’ll see the following screen:
Here, enter the user name you wish to search for. This can be done via wildcards (i.e. D* will return all users whose user names begins with D, David* returns all users with begin with David, etc). Note that this option will search through the user name, the user ID, and the user email address for matching entries. Below, we have run a search for all users whose name begins with Da (using Da*):
From this list, or from any list, in any report, you will see a series of icons under each user name:
Page 11 of 38
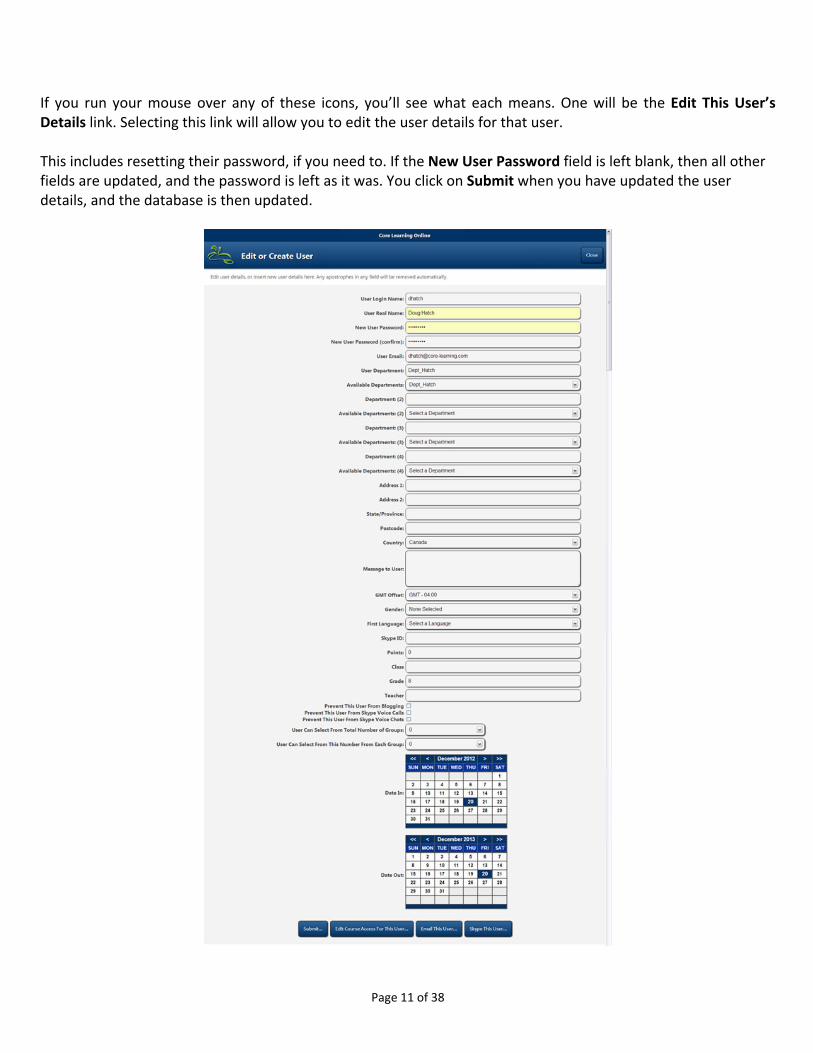
If you run your mouse over any of these icons, you’ll see what each means. One will be the Edit This User’s Details link. Selecting this link will allow you to edit the user details for that user. This includes resetting their password, if you need to. If the New User Password field is left blank, then all other fields are updated, and the password is left as it was. You click on Submit when you have updated the user details, and the database is then updated.
Page 12 of 38
Section 2: Tracking Results and Generating Reports
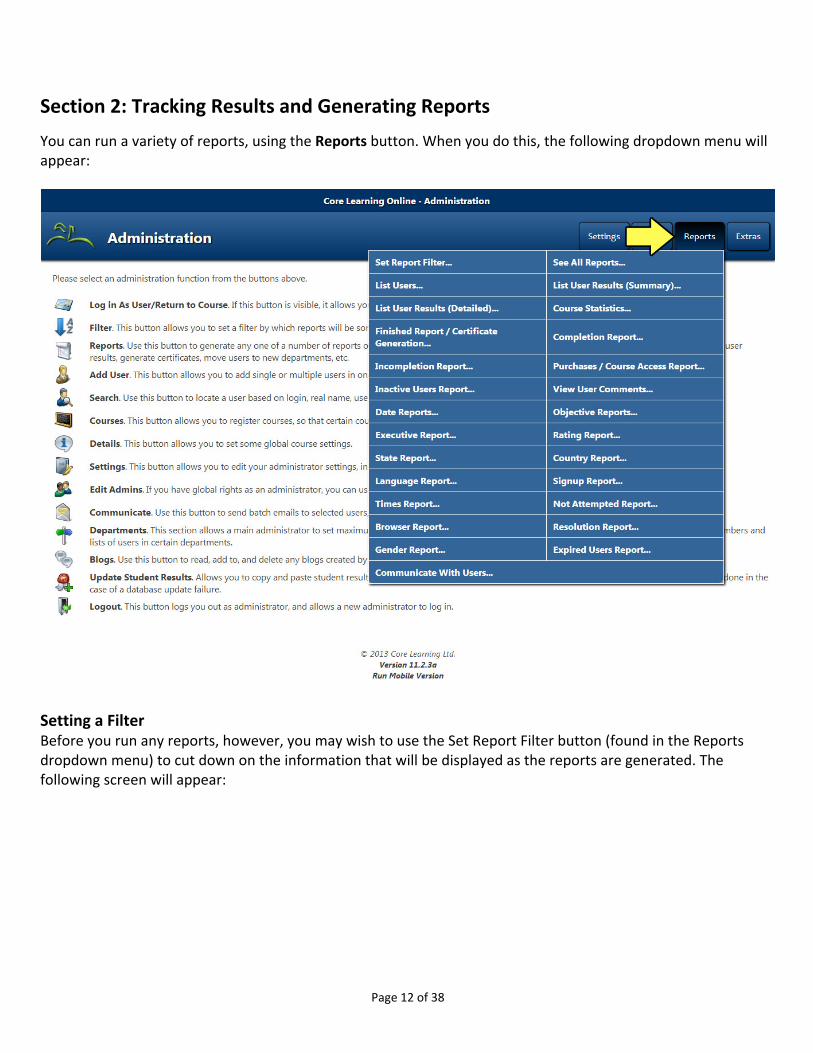
You can run a variety of reports, using the Reports button. When you do this, the following dropdown menu will appear:
Setting a Filter Before you run any reports, however, you may wish to use the Set Report Filter button (found in the Reports dropdown menu) to cut down on the information that will be displayed as the reports are generated. The following screen will appear:

Page 13 of 38

Page 14 of 38
A school will be assigned one department by the Core Learning LMS Administrator. For District customers, multiple departments can be used. The Set Report Filter screen allows selection of a department if more than one is available to the administrator. In the Set Report Filter screen, you enter which information you want displayed – it may be from only one class, grade, teacher, on lessons run between certain dates, or users who are enrolled between certain dates, for example. Entering D* on the User Name field will display only results for users whose user name begins with D.
The Lesson Name filter setting also work like the User Name filter. You can either enter a specific Lesson Name, or use the syntax Introduction* to get all lessons that start with Introduction reported on. On some reports, like the Objective Report, below, you’ll see a small red arrow next to a lesson name (this appears in a number of reports). If you click on this arrow, it will automatically set the Lesson Name filter so that only this lesson name is reported on.
If you do not set a filter, then all available information will be displayed, for all departments, all users, and all courses, when a report is generated. The only exception to this is one default setting – which you can deselect. This is the Expired Users Report option – by default, this will not be selected. This means all users whose accounts have expired will not be visible in any reports. Many reports provide quick links to changing filters as well – such as only displaying users whose login name begins with A, for example. Or when viewing a date report, quick links will allow you to view date reports for the last week, or month. At the top of almost all reports, you’ll see a quick rundown of what the current filter is, so you can see what you are actually viewing.

Page 15 of 38
When you see a filter displayed like this, you can also use the Filter button to open the Quick Filter screen and quickly change the filter without even leaving the current report – it will be updated automatically.
Page 16 of 38
Report Descriptions In all of the following reports, you will see some icons that allow you perform extra functions. These generally appear below the user name:
Some of these icons may not be available for all users – such as Send Message to User, which will only be available should the user have an email address in their account, and Skype User, which will only be available should the user have a Skype ID in their account.
All of the following reports display information based on the current filter settings, and the departments controlled by the current administrator:
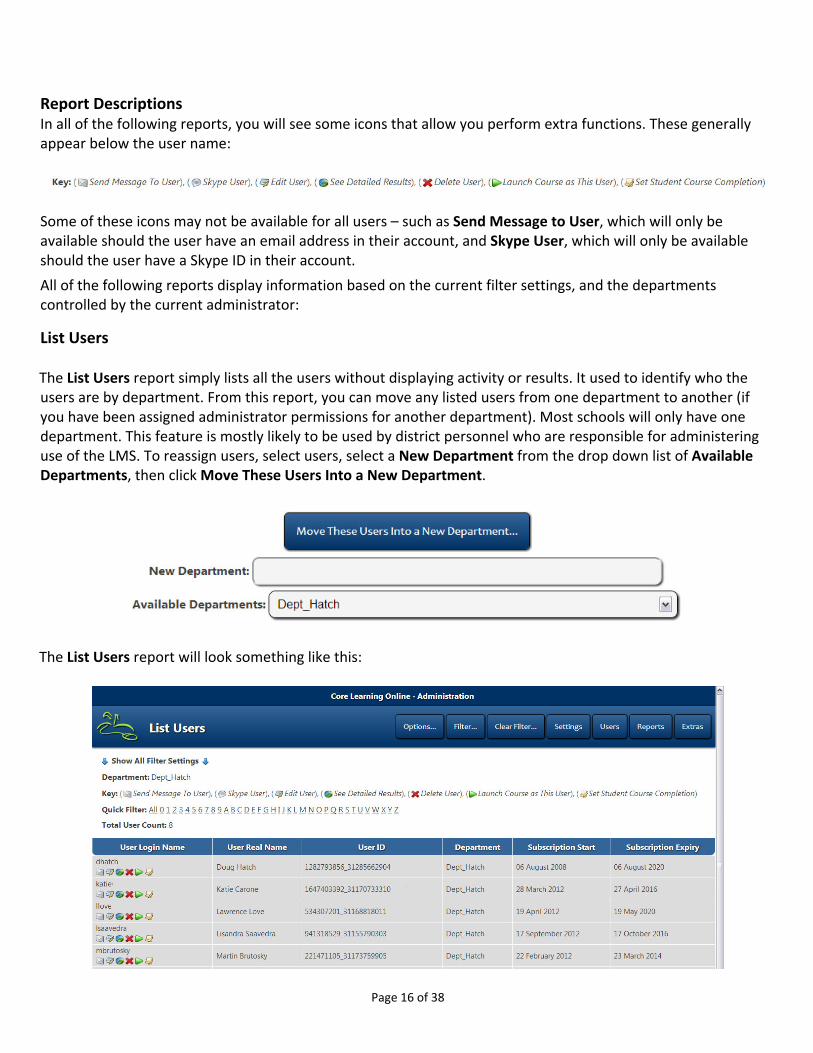
List Users
The List Users report simply lists all the users without displaying activity or results. It used to identify who the users are by department. From this report, you can move any listed users from one department to another (if you have been assigned administrator permissions for another department). Most schools will only have one department. This feature is mostly likely to be used by district personnel who are responsible for administering use of the LMS. To reassign users, select users, select a New Department from the drop down list of Available Departments, then click Move These Users Into a New Department.
The List Users report will look something like this:
Page 17 of 38
A Quick Filter on this report allows you to quickly filter names by first letter – so you can quickly see users whose name starts with A, for example. Of course, all other main filter settings are respected. This function will apply to all reports generated.
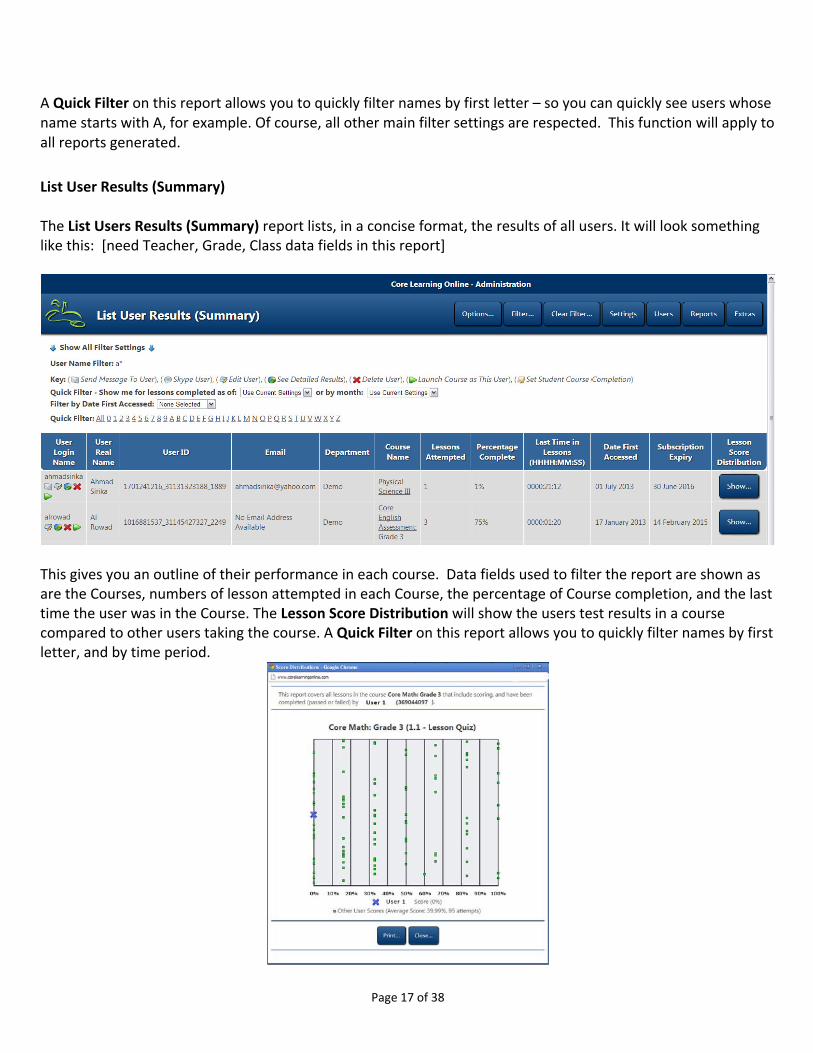
List User Results (Summary)
The List Users Results (Summary) report lists, in a concise format, the results of all users. It will look something like this: [need Teacher, Grade, Class data fields in this report]
This gives you an outline of their performance in each course. Data fields used to filter the report are shown as are the Courses, numbers of lesson attempted in each Course, the percentage of Course completion, and the last time the user was in the Course. The Lesson Score Distribution will show the users test results in a course compared to other users taking the course. A Quick Filter on this report allows you to quickly filter names by first letter, and by time period.
Page 18 of 38
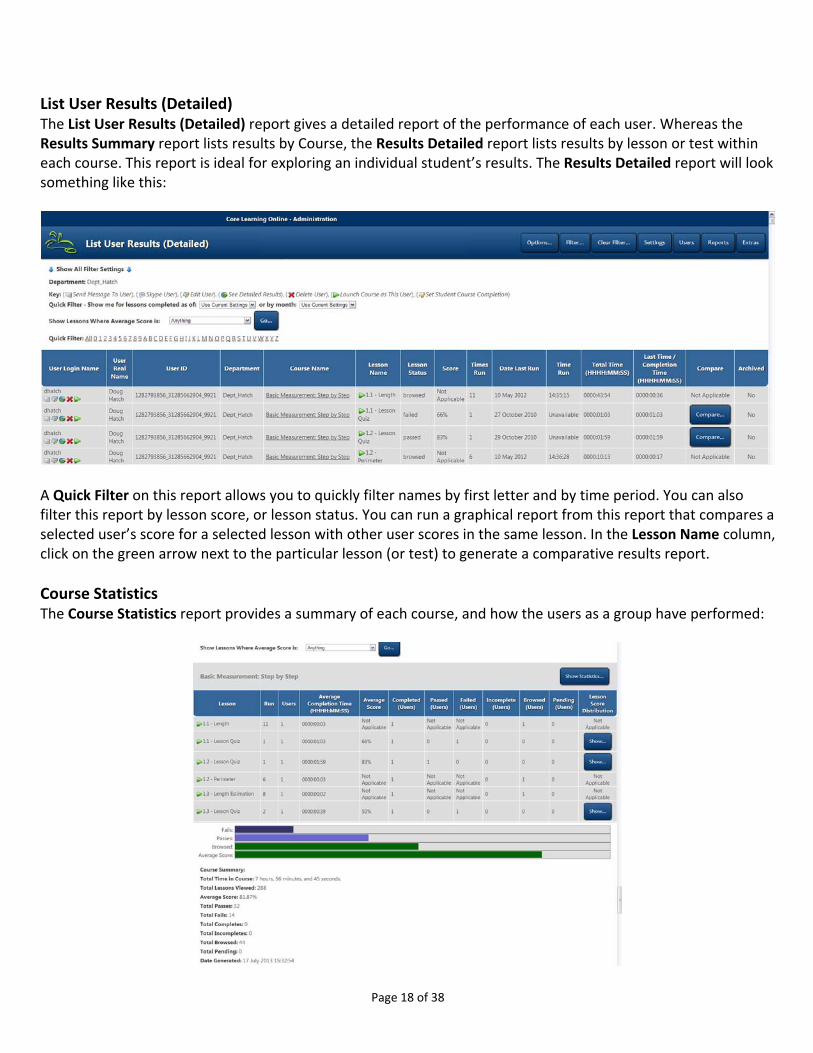
List User Results (Detailed) The List User Results (Detailed) report gives a detailed report of the performance of each user. Whereas the Results Summary report lists results by Course, the Results Detailed report lists results by lesson or test within each course. This report is ideal for exploring an individual student’s results. The Results Detailed report will look something like this:
A Quick Filter on this report allows you to quickly filter names by first letter and by time period. You can also filter this report by lesson score, or lesson status. You can run a graphical report from this report that compares a selected user’s score for a selected lesson with other user scores in the same lesson. In the Lesson Name column, click on the green arrow next to the particular lesson (or test) to generate a comparative results report.
Course Statistics The Course Statistics report provides a summary of each course, and how the users as a group have performed:

Page 19 of 38
A Quick Filter on this report allows you to quickly see results for today, the last week, month, year, or all time. Of course, all other main filter settings are respected. You can also filter this report by lesson score, or lesson status.
You can run a graphical report from this screen, allowing you to view your selected number of most‐used lessons. By default, this is ten, but as soon as the graph below appears, you can select a new number of lessons to show. You can also modify this report to see completed, failed, passed, incomplete, browsed, or pending lessons.
You can also run a graphical report allowing you to see the most prolific users in your course(s). This report only includes lessons that have been passed, completed, or browsed.

Page 20 of 38
You can also use this report to remove all references in the database to a selected course. See the Remove All References in Database to buttons when running this report.
Completion Report The Completion report shows which users have at least attempted every lesson in a given course, and what those courses are. This does not mean they have actually completed, or passed a course.
A Quick Filter on this report allows you to quickly filter names by first letter.
Incompletion Report
The Incompletion report shows which users have not completed a course. Note that only users who have at least attempted one lesson in a course are included:
A Quick Filter on this report allows you to quickly filter names by first letter.
Finished Report/Certificate Generation The Finished report displays a list of users that have actually completed the course – if they have passed (if there are tests involved), or completed every lesson in a course. For Core Learning Online Courses, a Course will be complete when: (a) every lesson has been opened (browsed), (b) each lesson Quiz has been passed (80%), and (c) each Unit Test has been passed (80%).

Page 21 of 38
When you display a Finished Report, you will also see a Generate Certificate button for each user ‐this lets you create, print, or email a certificate for and/or to a user. This is available whether or not you actually enable certificates to be generated by the user themselves or not.
A Quick Filter on this report allows you to quickly filter names by first letter or by time period. You can also run a graphical report from this report that can compare the results of a given course for a selected user to other users.
Inactive Users Report The Inactive Users report lists all users who are in the database, but have yet to attempt any lessons in any course.
A Quick Filter on this report allows you to quickly filter names by first letter.

Page 22 of 38
Expired Users Report The Expired Users report lists all users in the database whose subscriptions have expired.
A Quick Filter on this report allows you to quickly filter names by first letter.
View User Comments The View User Comments report displays any user comments on the lessons.
A Quick Filter on this report allows you to quickly filter names by first letter and by time period.
Date Report The Date report shows the number of lessons attempted on certain dates. For Core Learning Online Courses, this means the number of lessons and lesson Quizzes opened by users. The report will not show the number of pass or fail results for the lesson Quizzes.

Page 23 of 38
A Quick Filter on this report allows you to quickly see results for today, the last week, month, year, or all time. This report will also summarize the number of lessons for each lesson status type, and the total time spent in lessons on each day, and in total. You can also run a graphical last week or month report.
Alternatively, you can run some graphical reports that illustrate a day by day usage, month by month usage, and favorite lesson usage.
Page 24 of 38
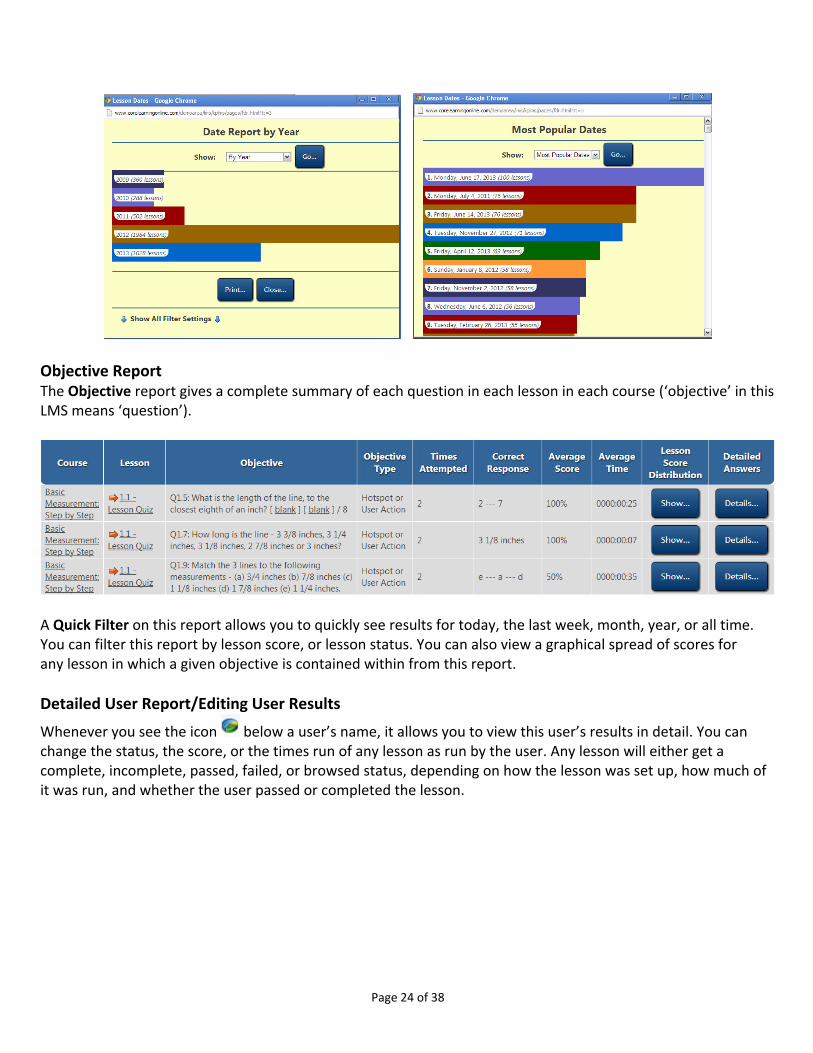
Objective Report The Objective report gives a complete summary of each question in each lesson in each course (‘objective’ in this LMS means ‘question’).
A Quick Filter on this report allows you to quickly see results for today, the last week, month, year, or all time. You can filter this report by lesson score, or lesson status. You can also view a graphical spread of scores for any lesson in which a given objective is contained within from this report.
Detailed User Report/Editing User Results
Whenever you see the icon below a user’s name, it allows you to view this user’s results in detail. You can change the status, the score, or the times run of any lesson as run by the user. Any lesson will either get a complete, incomplete, passed, failed, or browsed status, depending on how the lesson was set up, how much of it was run, and whether the user passed or completed the lesson.

Page 25 of 38
A Quick Filter on this report allows you to quickly see results for today, the last week, month, year, or all time. You can also filter this report by lesson score, or lesson status.
You can also compare a user’s results for any course with other scores using the Show Score Distribution button from this report.
From this report, you can also change the Lesson Status, the Score (if applicable), the Times they have been recorded as having run the lesson, and add a Comment to User, all specific for each lesson in each course.
Page 26 of 38
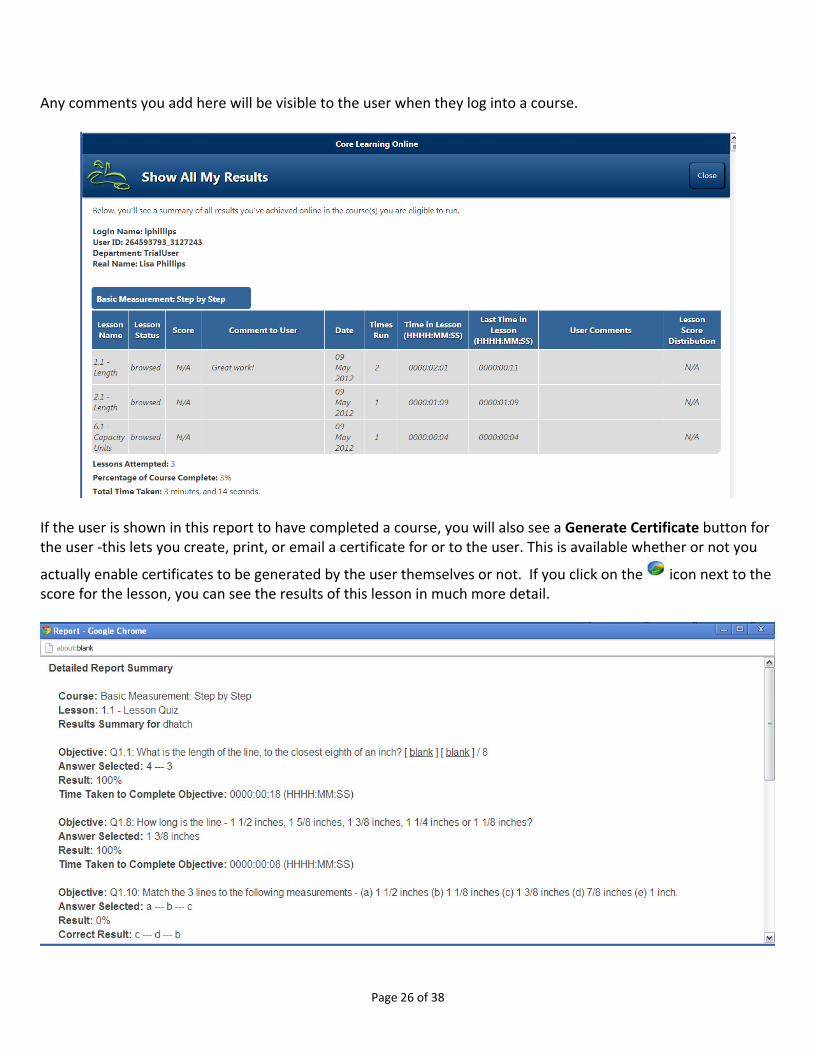
Any comments you add here will be visible to the user when they log into a course.
If the user is shown in this report to have completed a course, you will also see a Generate Certificate button for the user ‐this lets you create, print, or email a certificate for or to the user. This is available whether or not you
actually enable certificates to be generated by the user themselves or not. If you click on the icon next to the score for the lesson, you can see the results of this lesson in much more detail.
Page 27 of 38
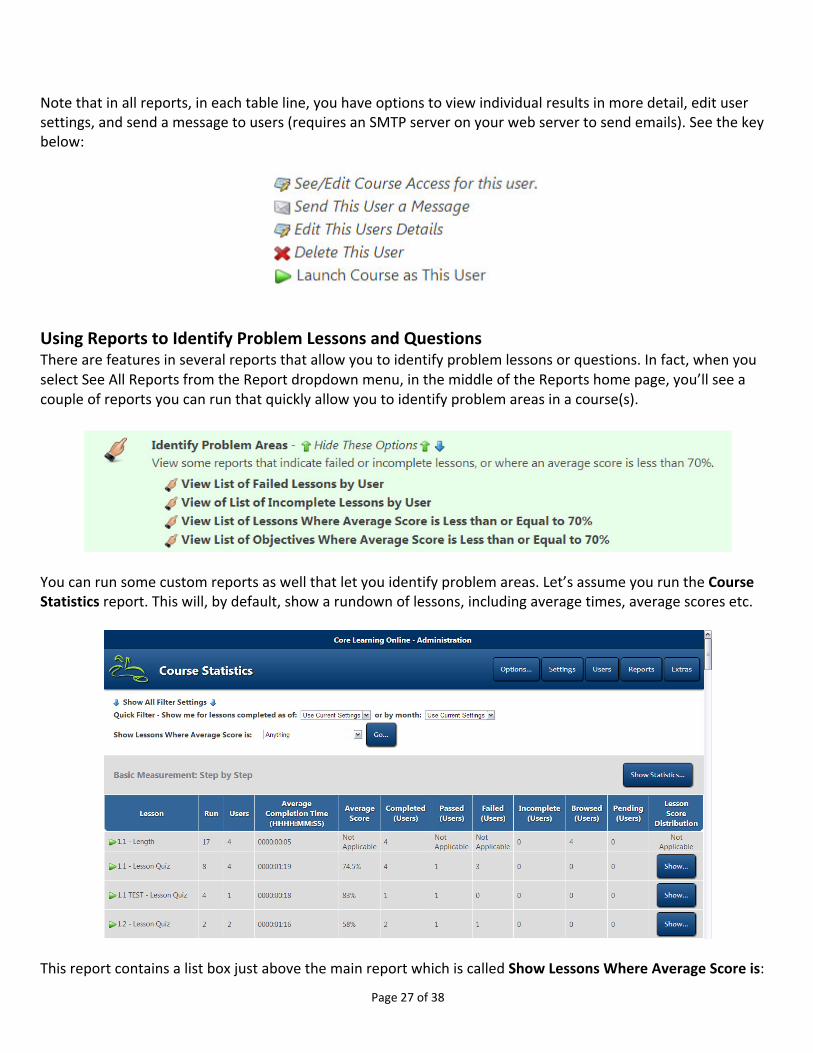
Note that in all reports, in each table line, you have options to view individual results in more detail, edit user settings, and send a message to users (requires an SMTP server on your web server to send emails). See the key below:
Using Reports to Identify Problem Lessons and Questions There are features in several reports that allow you to identify problem lessons or questions. In fact, when you select See All Reports from the Report dropdown menu, in the middle of the Reports home page, you’ll see a couple of reports you can run that quickly allow you to identify problem areas in a course(s).
You can run some custom reports as well that let you identify problem areas. Let’s assume you run the Course Statistics report. This will, by default, show a rundown of lessons, including average times, average scores etc.
This report contains a list box just above the main report which is called Show Lessons Where Average Score is:

Page 28 of 38
(selection). From this list box, you can elect to show just those lessons where the score falls within certain bounds – for example, Show Lessons Where the Average Score is Less Than or Equal to 50%.
This lets you see at a glance which lessons people are having most trouble with.
A similar feature can be used for the Objective report – you may elect, for example, to only report on individual questions where the average score is above or below a certain mark – below, we show a report where we look at questions where the Average Score is Less Than or Equal to 20%.

Page 29 of 38
For certain objectives (depending on the objective type, exactly), you’ll see a button marked Details. This allows you to view exactly what people are answering for each question.
Exporting Reports
Copying to Excel If you have Microsoft Excel installed on your system, you can copy each report to your clipboard and paste into Excel for further sorting or manipulation. At the end of each report, you’ll see this button:
Click on this button to generate the report in your browser window. You will shortly see the following message (may be different depending on your OS, and your browser).
Click OK to continue. The report will be generated and you will see a screen with this pop‐up message (may be different depending on your OS, and your browser).

Page 30 of 38
Click on Ctrl‐A to select all and then Ctrl‐C to copy the report. It can take several minutes to do this for larger reports, as the data is formatted correctly dynamically. Once copied, open Excel and click Ctrl‐V to paste the report. This feature only works when using Internet Explorer, on the Windows platform. Using the features in Excel, you will be able resort the data any way you wish, create graphs, remove unnecessary rows, and more.
Section 3: Communication Tools & Settings
Changing Lesson Status
Note that the column marked Lesson Status contains a dropdown list, reflecting the current lesson status, but allowing you to select a new status. Possible status settings are:
• Pending – this lesson is yet to be checked by an administrator to determine its new status. • Passed – lesson contained scoring, and a pass mark was achieved. • Failed – lesson contained scoring, and was either not completed, or a pass mark was not achieved. • Complete – lesson has been completed, but contained no scoring. • Incomplete – lesson was not completed. • Browsed – this lesson is not really there for scoring or completion – it is an instructional reference. • Not attempted ‐ this lesson has not been tried yet.
After confirming this selection with you, the status will be updated immediately – see below.
If you click on OK, above, you’ll shortly see this message:
Changing Lesson Score
Note that the column marked Score contains a dropdown list, reflecting the current lesson score, but it allows you to change this score to whatever you wish. This is only available if the lesson itself contained scoring of some kind.

Page 31 of 38
Changing Times Run
Note that the column marked Times Run contains a list box, reflecting the number of times the student has run the lesson. You can change this to whatever you like. This may need to be done where you have limited a user to a certain number of attempts for a certain lesson – and for some reason they need to be able to run it again.
Editing Administrator Settings To edit the settings for an administrator, go to the Settings button and select Administrator Account Settings from the list, and the following screen will appear:
Page 32 of 38
From this list, you can edit the following settings:
Administrator Name: This is the name, and login name of this administrator.
New Administrator Password: Use this field to enter the administrator password. If left blank, and you submit
this form, the administrator password will not be changed.
Administrator Email: The main administrator password.
Support Email: The main support email address.
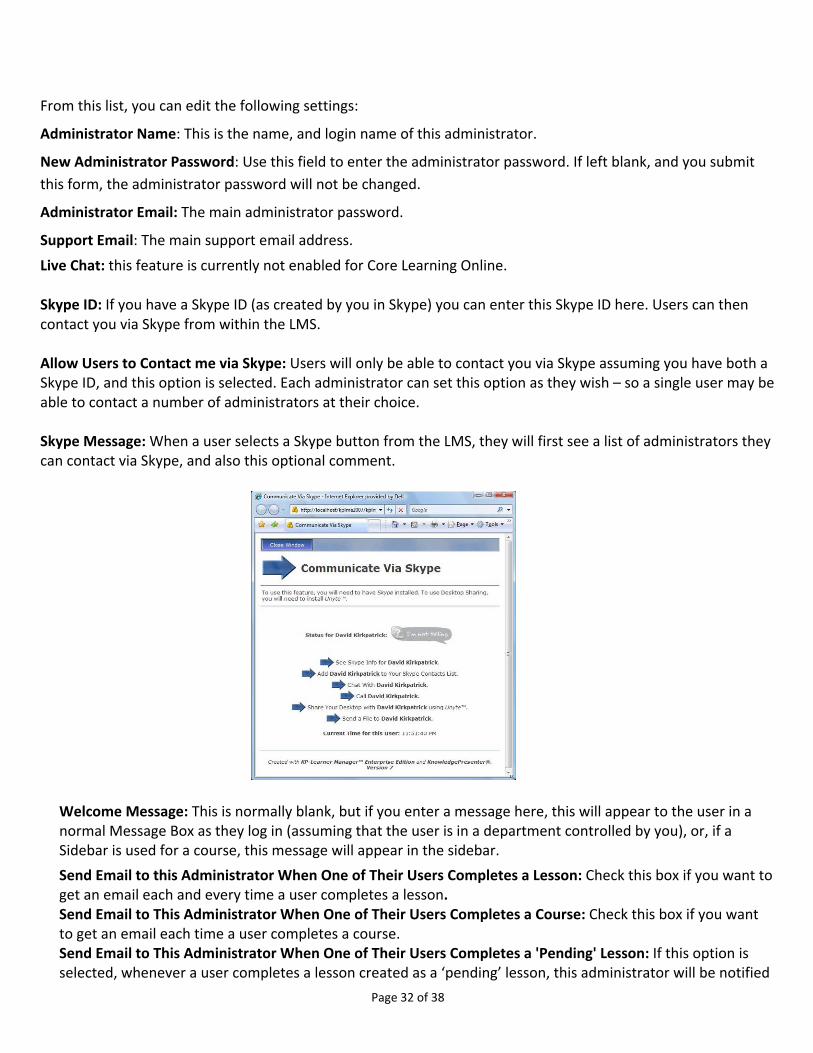
Live Chat: this feature is currently not enabled for Core Learning Online. Skype ID: If you have a Skype ID (as created by you in Skype) you can enter this Skype ID here. Users can then contact you via Skype from within the LMS. Allow Users to Contact me via Skype: Users will only be able to contact you via Skype assuming you have both a Skype ID, and this option is selected. Each administrator can set this option as they wish – so a single user may be able to contact a number of administrators at their choice. Skype Message: When a user selects a Skype button from the LMS, they will first see a list of administrators they can contact via Skype, and also this optional comment.
Welcome Message: This is normally blank, but if you enter a message here, this will appear to the user in a normal Message Box as they log in (assuming that the user is in a department controlled by you), or, if a Sidebar is used for a course, this message will appear in the sidebar.
Send Email to this Administrator When One of Their Users Completes a Lesson: Check this box if you want to get an email each and every time a user completes a lesson. Send Email to This Administrator When One of Their Users Completes a Course: Check this box if you want to get an email each time a user completes a course. Send Email to This Administrator When One of Their Users Completes a 'Pending' Lesson: If this option is selected, whenever a user completes a lesson created as a ‘pending’ lesson, this administrator will be notified

Page 33 of 38
by email. Pending lessons are lessons that require the administrator to mark the lesson.
Send Email to This Administrator When One of Their Leaves a Comment: If this option is selected, whenever a user finishes a lesson, and adds a comment, this administrator will be notified by email. Send Email to Users when First Registered: Check this box if you want to the user to get an email when they are first registered by this administrator.
Authority: This field determines what departments this administrator has access over.
This Administrator Only Has Chat and Skype Roles: This is very restrictive, as this administrator can hold Skype conferences but cannot generate reports so no evaluation of student results is permitted. Chat is disabled for the Core Learning Online LMS.
This Administrator Cannot Add and Remove Users: This option is selected to limit secondary administrators to only have access to viewing reports – and no ability to add or remove users. A school’s primary administrator can add and remove users but Core Learning will set this restriction for any secondary administrators. Remove This Administrator: Check this option to remove an administrator from the list of administrators. A primary administrator can remove a secondary administrator with this feature but only Core Learning can add administrators so if a replacement is desired, contact Core Learning at [email protected] .
Communicating with Users
Get a Custom Message to Appear Each Time any User Logs In
When you edit administrator settings, (using the Settings command) you will see an option marked Welcome Message. Enter, in this field, the message you want to appear to all users that exist in departments controlled by you, as soon as they log in.
Get a Custom Message to Appear Each Time a Particular User Logs In When you edit a user’s account, you can enter a message into the field below in their account. This message will appear whenever this user runs any course.
Emailing a Message to a Single User
Whenever you have a list of users on screen, you will see this icon: below that user’s name (if this icon is not there, then the user does not have an email address associated with their account). Click on this icon to send an email message to this user. It requires the user to have an email address in their account, and requires an email server set up on your web server. The email is sent directly from the LMS. You will see a Send Message screen and simply fill in the subject line, type the message in the box, and click Send Message. If email has been enabled in the LMS, you will receive a copy of any email you send via the administrator interface. This will then place the email in your regular email inbox.
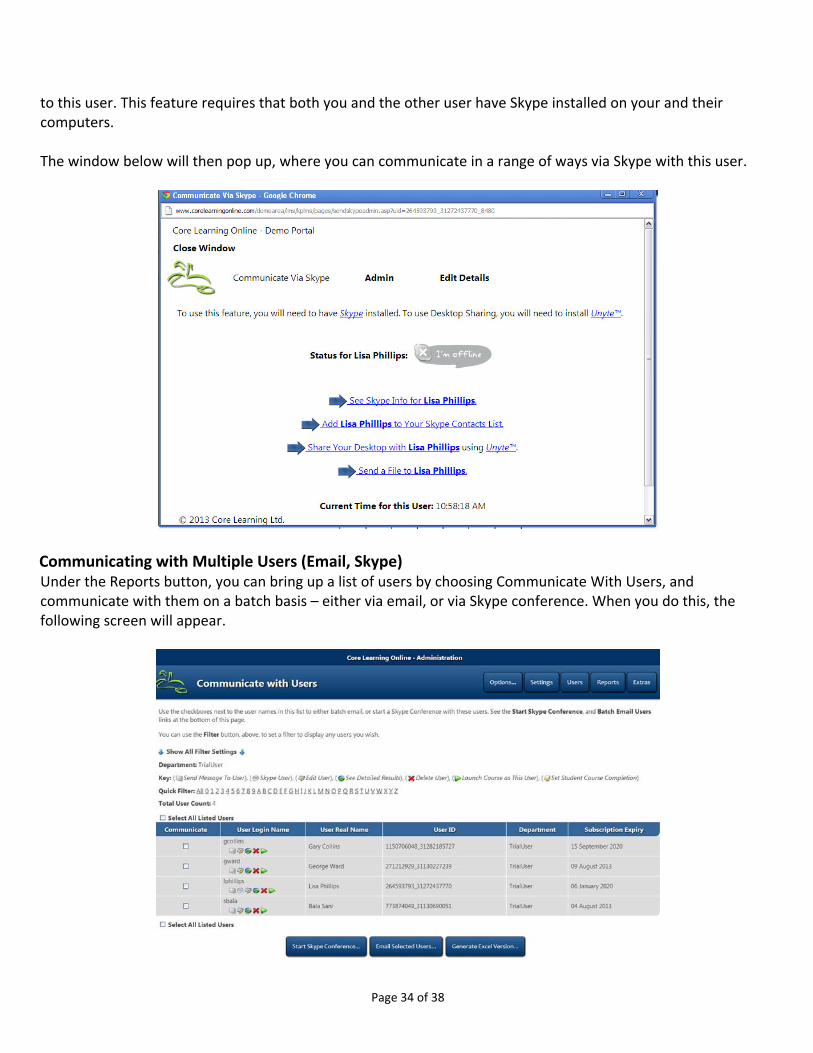
Start a Skype Session with a Single User (Chat, Voice, Desktop Sharing, File Sharing)
Whenever you have a list of users on screen, you will see this icon: below that user’s name (if this icon is not there, then the user does not have a Skype ID associated with their account). Click on this icon to send a message
Page 34 of 38
to this user. This feature requires that both you and the other user have Skype installed on your and their computers. The window below will then pop up, where you can communicate in a range of ways via Skype with this user.
Communicating with Multiple Users (Email, Skype) Under the Reports button, you can bring up a list of users by choosing Communicate With Users, and communicate with them on a batch basis – either via email, or via Skype conference. When you do this, the following screen will appear.

Page 35 of 38
The users listed depends on your filter settings. Once the list appears, you can select individual users using the checkbox in the Communicate column – or select the Select All Listed Users checkbox. You can select: Start Skype Conference. This will send out a message to all Skype enabled users (those who have a Skype ID in their accounts) that you wish to start a Skype conference. You’ll then see a window that allows you to select the type of Skype conference.
Email Selected Users. Select this option to send an email to all selected users. This assumes you have an email server set up and configured.

Page 36 of 38
After the message has been sent, you’ll see a report on screen about what was sent to whom. You will also receive an email confirming the email message sent and to whom it was sent.
Department Settings
Department Settings cannot be changed by school administrators. For District permissions, contact [email protected].
Administrator Generated Certificates The LMS allows you to set up courses where users can generate their own certificates. But you may want to disable this, and only allow administrators to generate the certificates. For administrator generated certificates, run a Finished report. From this report you can distribute certificates to users who have completed a course.
Page 37 of 38
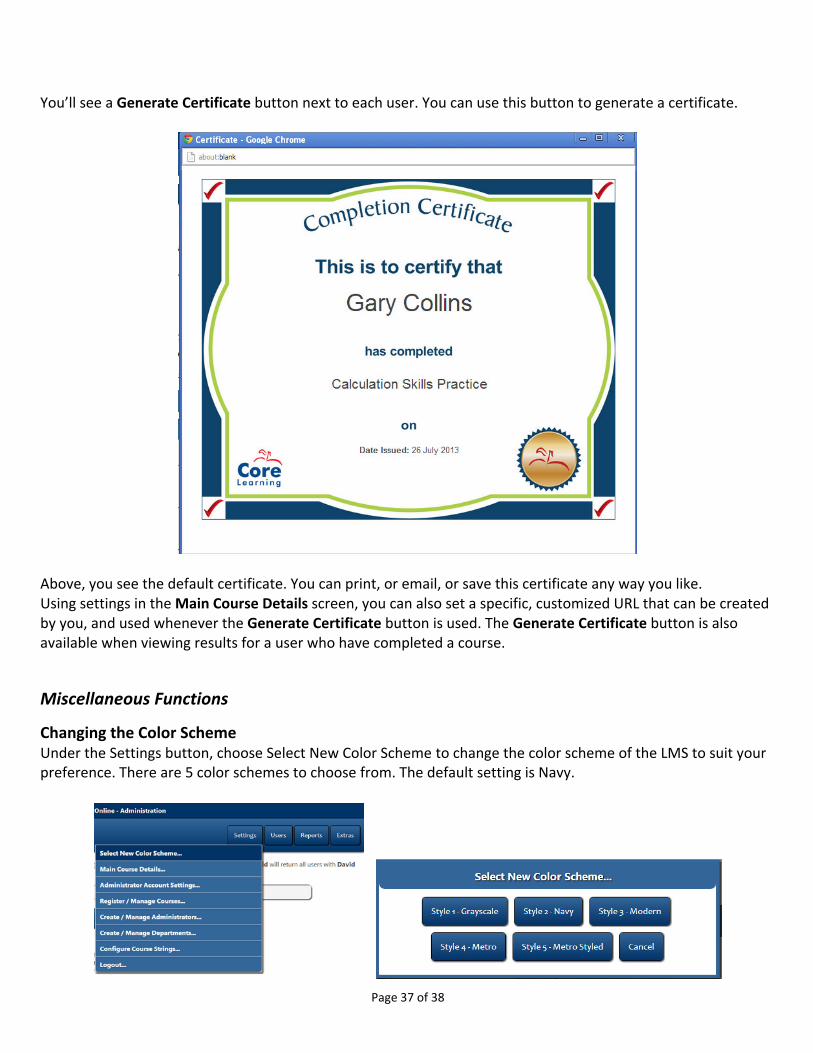
You’ll see a Generate Certificate button next to each user. You can use this button to generate a certificate.
Above, you see the default certificate. You can print, or email, or save this certificate any way you like. Using settings in the Main Course Details screen, you can also set a specific, customized URL that can be created by you, and used whenever the Generate Certificate button is used. The Generate Certificate button is also available when viewing results for a user who have completed a course.
Miscellaneous Functions
Changing the Color Scheme Under the Settings button, choose Select New Color Scheme to change the color scheme of the LMS to suit your preference. There are 5 color schemes to choose from. The default setting is Navy.
Page 38 of 38
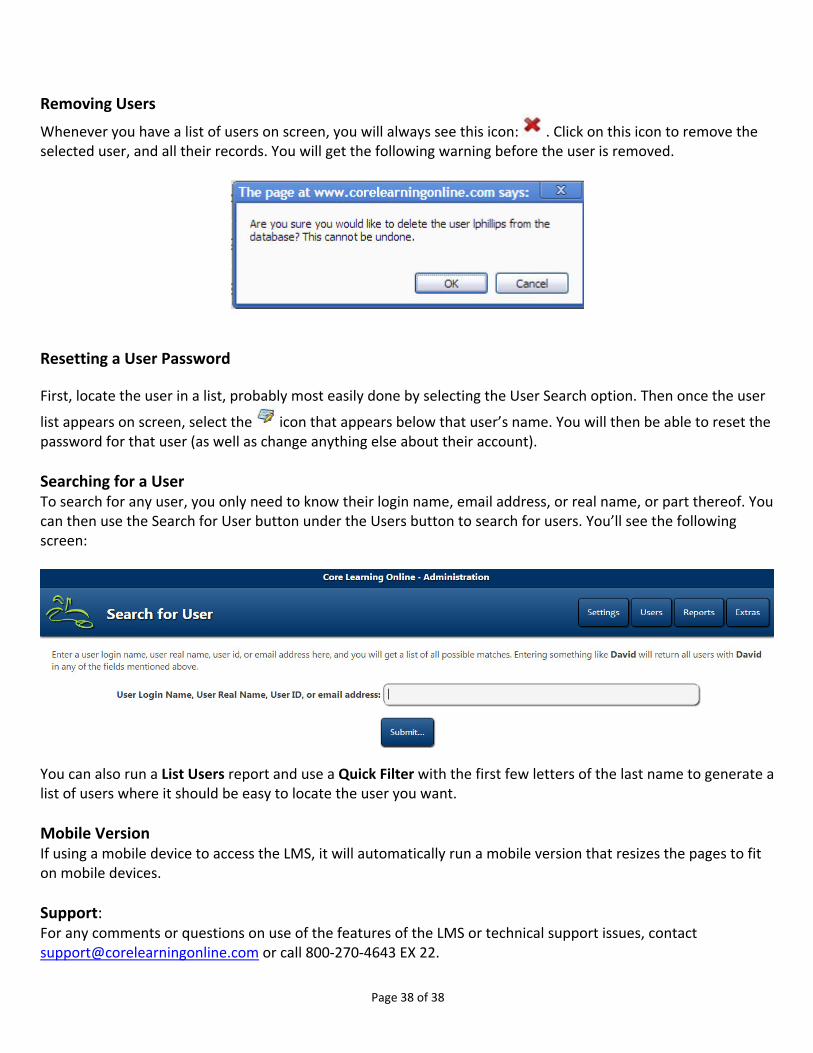
Removing Users
Whenever you have a list of users on screen, you will always see this icon: . Click on this icon to remove the selected user, and all their records. You will get the following warning before the user is removed.
Resetting a User Password
First, locate the user in a list, probably most easily done by selecting the User Search option. Then once the user
list appears on screen, select the icon that appears below that user’s name. You will then be able to reset the password for that user (as well as change anything else about their account).
Searching for a User To search for any user, you only need to know their login name, email address, or real name, or part thereof. You can then use the Search for User button under the Users button to search for users. You’ll see the following screen:
You can also run a List Users report and use a Quick Filter with the first few letters of the last name to generate a list of users where it should be easy to locate the user you want.
Mobile Version If using a mobile device to access the LMS, it will automatically run a mobile version that resizes the pages to fit on mobile devices.
Support: For any comments or questions on use of the features of the LMS or technical support issues, contact [email protected] or call 800‐270‐4643 EX 22.