
Learn to weave on the Rigid Heddle - ashford.co.nz a long table or set two tables in place until the...
16
Learn to weave on the Rigid Heddle
Transcript of Learn to weave on the Rigid Heddle - ashford.co.nz a long table or set two tables in place until the...

Learn to weave on the
Rigid Heddle

OPTIONAL ACCESSORIESReeds 5, 7.5, 10 and 12.5dpi (20, 30, 40 and 50/10cm) allow you to weave almost any yarn or project.
Loom stand Strong frame with 2 shelves and foot rest. Three widths 40, 60, 80cm (16, 24, 32ins).
Second heddle kit for multi heddle weaving.
YOUR FIRST PROJECT – A SCARFYou will need:A pair of sharp scissorsA measuring tapeCardboard warp sticksOne long table or two smaller tables
Yarn For this project we have used Ashford Tekapo, a smooth DK (double knit) sports weight yarn with a slightly textured handspun look, for the warp and the weft.
Quantity Ashford Tekapo 8ply/DK yarn (100% wool; 200m/218yds, 100gms net) #05 Moss 1 ball, #24 White 1 ball, #061 Random Forest 1 ball
Warp Use Ashford Tekapo in stripes of green and white solid colour and random-dyed yarn.Length – 2m (79ins) allowing 23cm (9ins) at each end for fringeNumber of ends – 84Finished width – 28cm (11ins)
Weft Use Ashford Tekapo in stripes of green and white solid colour and random-dyed yarn.
WARP & WEFTThese are 2 terms you will need to know as they form the basis of all weaving. The warp threads are put onto the loom first. They are held on the loom under tension between the front and back roller. The weft threads pass over and under the warp threads to form the woven fabric.
SHEDThe shed is the opening formed in the warp to allow the shuttle to pass.
Welcome to the wonderful world of weaving ...
warp weft

THE LOOM The reed has eyes and slots that the warp threads pass through to create the weaving shed. The reed is also used as a beater to push the rows of weaving into place. This reed sets the threads at 30 threads to each 10cm section of reed or 7.5 threads to 1 inch. The reed can also be called a heddle. The shuttle is used to carry the weft yarn from side to side to make the fabric. The warping tools, a warping peg, a threading hook and 2 clamps, are used to thread the warp onto the loom.
clamps
reed
back roller
front roller
shuttles
back warp stick warp stick ties
warping peg
back rail
front warp stick
reed support block
cardboard warp sticks
threading hook
cog
pawl

Use a long table or set two tables in place until the warping peg is 2m (79ins) from the back stick on the loom.
Clamp the back rail of the loom to a table. Insert the clamp into the centre hole on the back rail.
Note: The back of the loom has the cut-out piece in the lower edge. Put the front and back brakes on by engaging the front and back pawls into the teeth in the cogs.
Clamp the warping peg to the other end of the table. Note: If the table top is not deep enough, place the end of the clamp over the warping block.
01 02
03 04
cut-out
2m (79ins)
pawl

Note the three positions on the reed support block. As a guide tie a coloured marker in a slot.40cm (16ins) loom - 9 slots from one end. 60cm (24ins) loom - 24 slots from one end. 80cm (32ins) loom - 39 slots from one end.
There are 84 warp ends in this scarf. That is 42 double threads that first go through the slots in the reed. Tie the warp yarn to the back warp stick directly behind the coloured thread marker. The back warp stick should be approximately 8cm (3½ins) from the back roller.
Push the threading hook through the same slot as the thread marker. Catch the yarn with the hook and pull a loop through the slot.
07 08
05 06
down weaving position
rest position
up weaving position
8cm (3½ins)

Take the yarn to the warping peg and loop it over. Sit the ball of yarn on the floor behind the loom.Hint: Sit the ball of yarn in a bowl so it doesn’t roll around on the floor.
09

Go to the next slot. Take the yarn OVER the back stick, through the slot and over the warping peg. Continue this way, one yarn thread under, one thread over until you have 42 double loops/yarns through the slots (84 ends).
To change colours tie off one colour onto the back warp stick. Tie on the new colour to the back warp stick. Check tension. Cut the last thread at the back of the loom and tie it to the back warp stick.
Take a 15cm (6ins) length of yarn. Tie this yarn around all the warp threads in front of the warping peg. Tie firmly with a knot you can undo easily later.
10 11
12 13
Push the threading hook through the next slot. Take the yarn UNDER the back warp stick, catch the yarn on the hook and pull a loop through the slot. Place this loop over the warping peg in the same way as the first loop. Try and keep the tension even across the loom.

Cut through all the yarn loops at the warping peg. Ask a friend to hold the warp ends for you. They must hold the yarns at the tie and move forwards as you wind the warp onto the loom.Note: If you are by yourself, refer to the Solo Warping Instructions on our website www.ashford.co.nz
Stand at the back of the loom. Wind the back handle towards you until the back warp stick goes around the roller once.
Insert a cardboard warp stick or piece of paper the full width of the loom.
14 15
16 17

The cardboard warp sticks or paper separate the yarns and keeps the tension even. Add more cardboard warp sticks or paper as you wind the warp on.
Lift the first 2 threads on the left to the top of the slot. Look behind the reed and gently pull the left hand thread out of the slot. The other thread stays in the slot.
Use the threading hook to pull this thread through the eye to the left of the slot. Continue across all slots. Now threads are in both eyes and slots.
18 19
20
Stop when the tie is at the front of the loom. Remove the tie. Do not wind any further! Unclamp the loom.
BE CAREFUL. DON'T PULL TOO HARD AND BREAK THE THREAD!

Turn the handle until the front warp stick is approx. 5cm (2ins) from the front roller. Divide the threads into 8 groups. Start with a centre group. Take the group of threads over and around the front warp stick. Divide it in two. Tie in a flat SINGLE knot.
Tie the other groups in the same way. Check the tension. The tension of the threads should be the same. Tighten all the threads by winding the front handle towards you. Adjust the knots until all groups are the same tension.
Tie the second half of the knots to secure. Use half a bow tie. You want to be able to undo these knots easily when your scarf is finished.
21
22 23

There are 2 weaving positions. First lift the reed into the up weaving position. Insert a cardboard warp stick into the shed. Slide it to the front of the loom. Change the reed to the down weaving position. Insert a cardboard warp stick into the shed. Slide it to the front of the loom.
Wind the weft yarn onto the shuttle.
Change the reed to the up weaving position. Take the shuttle and pass it through the shed.
Leave the end of the yarn out approx. 5cm (2ins). To keep the edges straight do not pull the weft thread too tight – leave the yarn at an angle of 20 degrees before pushing into place with the reed.
24 25
26 27

Use the reed to gently push the first row of weaving up to the cardboard warp stick.
Pass the shuttle through the down shed. Use the reed to gently push the second row into place.
Sit in a comfortable chair with the loom in your lap and the back of the loom on the edge of the table.
28 29
30 31
Put the reed into the down weaving position. Use your fingers to place the end thread into the shed.
BEAT GENTLY! THERE MUST BE A SMALL SPACE BETWEEN THE ROWS.
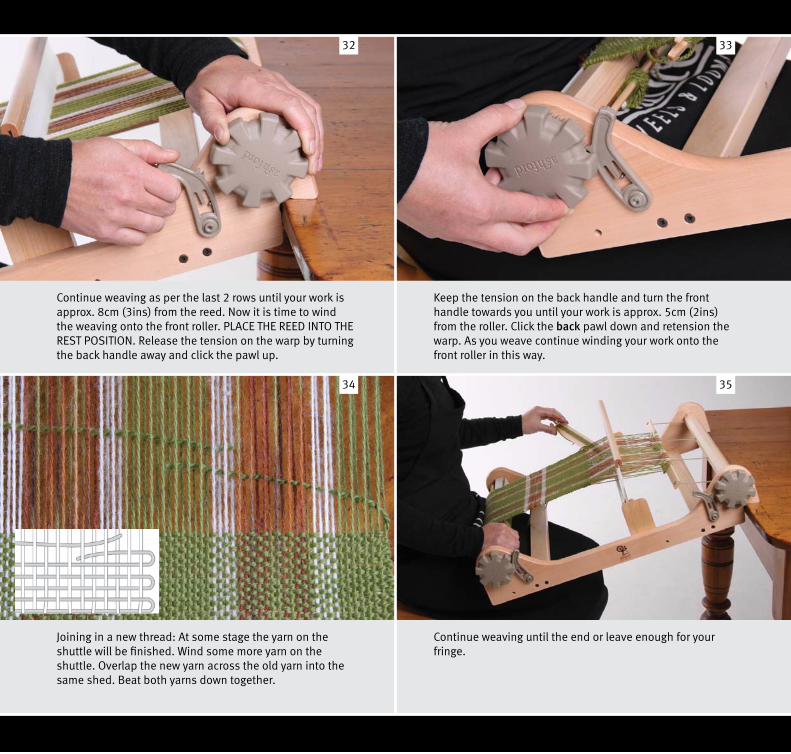
Continue weaving as per the last 2 rows until your work is approx. 8cm (3ins) from the reed. Now it is time to wind the weaving onto the front roller. PLACE THE REED INTO THE REST POSITION. Release the tension on the warp by turning the back handle away and click the pawl up.
Keep the tension on the back handle and turn the front handle towards you until your work is approx. 5cm (2ins) from the roller. Click the back pawl down and retension the warp. As you weave continue winding your work onto the front roller in this way.
Joining in a new thread: At some stage the yarn on the shuttle will be finished. Wind some more yarn on the shuttle. Overlap the new yarn across the old yarn into the same shed. Beat both yarns down together.
Continue weaving until the end or leave enough for your fringe.
32 33
3534

Cut the warp yarns along the back warp stick. Take care notto cut the warp stick ties. Cut the weft yarn and leave theend out.
Undo the knots on the front warp stick and remove the work from the loom. Take out the cardboard warp sticks.
36 37
38 39
Release the front pawl and unwind the weaving from the front roller.
Lay your work on the table and tie the ends in groups of four. Use overhand knots. Darn the end of the weft thread into your work using a wool needle.
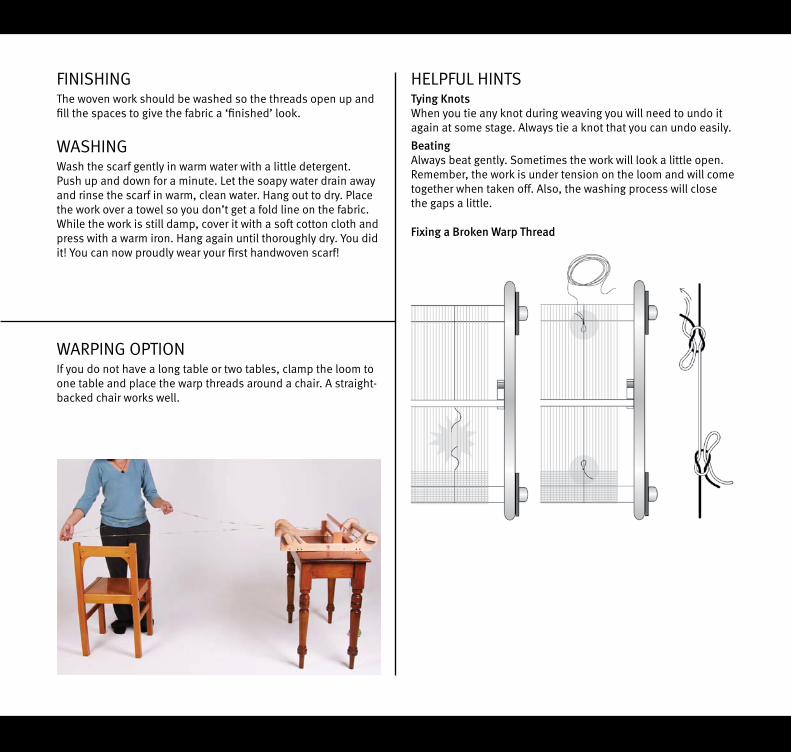
HELPFUL HINTSTying Knots When you tie any knot during weaving you will need to undo it again at some stage. Always tie a knot that you can undo easily.
Beating Always beat gently. Sometimes the work will look a little open. Remember, the work is under tension on the loom and will come together when taken off. Also, the washing process will close the gaps a little.
Fixing a Broken Warp Thread
FINISHINGThe woven work should be washed so the threads open up and fill the spaces to give the fabric a ‘finished’ look.
WASHINGWash the scarf gently in warm water with a little detergent. Push up and down for a minute. Let the soapy water drain away and rinse the scarf in warm, clean water. Hang out to dry. Place the work over a towel so you don’t get a fold line on the fabric. While the work is still damp, cover it with a soft cotton cloth and press with a warm iron. Hang again until thoroughly dry. You did it! You can now proudly wear your first handwoven scarf!
WARPING OPTIONIf you do not have a long table or two tables, clamp the loom to one table and place the warp threads around a chair. A straight-backed chair works well.

Ashford Handicrafts LimitedFactory and Showroom: 415 West Street P O Box 474, Ashburton, New Zealand Telephone: +64 3 308 9087Facsimile: +64 3 308 8664 Email: [email protected]: http://www.ashford.co.nz
For more information, helpful hints and inspiration we recommend The Ashford Book of Rigid Heddle Weaving, The Ashford Book of Weaving for Knitters (25 easy and exciting scarf patterns) and The Ashford Book of Projects (24 fashion projects).
9 418647 243147


![BASIC STATISTICS FOR HYPOTHESIS TESTING ...statistics * statistique] BASIC STATISTICS FOR CLINICIANS: 1. HYPOTHESIS TESTING Gordon Guyatt, *t MD; Roman Jaeschke, *t MD; Nancy Heddle,](https://static.fdocuments.in/doc/165x107/5ab0042f7f8b9a22118df1c5/basic-statistics-for-hypothesis-testing-statistics-statistique-basic-statistics.jpg)


