
Learn Coordination using Scratch - Kanwal Rekhivijaya/ssrvm/dokuwiki/media/...54 Jyoti (points to...
22
50 Lesson Learn Coordination using Scratch 3 In this lesson you will learn: To demonstrate actions like games, in Scratch. To program coordination between various Sprites. m A i Tejas: We want to animate two Sprites playing throw ball. Moz: How is this game played? Tejas: I throw the ball and Jyoti catches it. Next Jyoti throws and I have to catch it. Many players can also play this game together. Moz: Oh! I got it. Plan the Scratch project for the game before you start building the blocks. Jyoti: Let us start with two players. So we need two Sprites. Tejas: We need one more Sprite- the ball. Jyoti: Let us have a playground as the Background. Moz: Ok. Now list out what you need. Are you painting or importing the Sprites? Tejas: We can import the ball and paint the two players. Jyoti: Let us import the “playground” for the Background. What we need? 3 Sprites (two players, one throw ball). One Background.
Transcript of Learn Coordination using Scratch - Kanwal Rekhivijaya/ssrvm/dokuwiki/media/...54 Jyoti (points to...

50
Lesson
Learn Coordination using Scratch
3
In this lesson you will learn:To demonstrate actions like games, in Scratch.To program coordination between various Sprites. mAi
Tejas: We want to animate two Sprites playing throw ball.Moz: How is this game played?Tejas: I throw the ball and Jyoti catches it. Next Jyoti throws and I have to catch it. Many players can also play this game together. Moz: Oh! I got it. Plan the Scratch project for the game before you start building the blocks. Jyoti: Let us start with two players. So we need two Sprites.Tejas: We need one more Sprite- the ball.Jyoti: Let us have a playground as the Background.Moz: Ok. Now list out what you need. Are you painting or importing the Sprites?Tejas: We can import the ball and paint the two players. Jyoti: Let us import the “playground” for the Background.What we need? 3 Sprites (two players, one throw ball). One Background.

51
Moz: How does the game start? Tejas: We have to make them stand opposite to each other at the start of the game.Jyoti: Yes. And both have to stand at some distance apart.Tejas: How can we make the Sprite stand in one position at the start of the game? Moz (points to the “current Sprite info” window): Look at this. What is the number next to x and y?Jyoti: x: 0 and y: 0.
Moz: Where is the Sprite on the stage?Jyoti: At the center of the stage.

52
Moz: Now move the Sprite to the bottom-left corner of the stage. Check x and y again.Tejas: Oh! Look, now it is x: -159 and y: -82.
Jyoti: Why is x -159? What does it mean?
Moz: Look at this figure. Consider this as Scratch stage. What do you observe?
Jyoti: The stage is divided into four squares by a horizontal line and a vertical line. Tejas: They are also numbered. Moz: Correct. The four squares are called four quadrants.
Moz: Now move the mouse pointer to each corner of the stage and note x and y values.
Tejas: The top right corner has x:240 and y:180 but the top left corner has x -240 and y:180.
Current Sprite Info
Info
Current Sprite Info shows a Sprite’s name, x-y position, direction.You can also type in a new name for the Sprite.The Sprite’s direction indicates which direction the Sprite will move when it executes a move instruction. (0=up, 90=right, 180=down, -90=left).
The horizontal line is called the x-axis and the vertical line is called the y-axis.These two axes divide the Stage into four quadrants. The point at which the two axes meet is the center of the Stage and is also called the origin. The origin has x:0 and y:0.
CONCEPTS

53
Moz: Correct. What else do you observe about x and y values in each quadrant?Jyoti: In first and fourth quadrants x varies from 0 to 240. In second and third quadrant x varies from 0 to -240. Tejas: In first and second quardrant y varies from 0 to 180. In third and fourth quadrant y varies from 0 to -180.Moz: Very good.
Moz: Let us look at an example of this in real life. Jyoti, you stay in a four storey building. Isn’t it?Jyoti: Yes. I stay on 4C. Oh! I got it. On each floor we have 4 houses. The
horizontal line x, which represents houses on each floor, has values A, B, C, D. The vertical line y, which represents the floors, has
values 1, 2, 3, 4. Tejas: Then the address of the 3rd house in the second floor is 2C.
4
3
2
1
A B C D
Jyoti’s House
Each point on the stage is represented by x coordinate and y coordinate. x-coordinate is the perpendicular distance of the point from x-axis and y-coordinate is the perpendicular distance of the point from y-axis. On the Scratch stage x-coordinate varies from -240 to 240 and y-coordinate varies from -180 to 180. Points in the first, second, third and fourth quadrants are (x,y), (-x,y), (-x,-y) and (x,-y) respectively.
CONCEPTS
Moz: Good. Now, get back to the Scratch instructions. Tejas: We have to move the Sprite to a particular position on the stage at the start of the game.Moz: In which block will you find the movement instructions?Jyoti: Motion block.

54
Jyoti (points to the instruction) : Let us try out this instruction.
Jyoti: Now we have to import the second Sprite into the project.Steps to import a new Sprite:
Tejas and Jyoti use the go to x:_ _ , y: _ _ instruction to position the first Sprite on Stage.
Step 1: Click on the buttons to Import a new Sprite.
Step 2: The available list of folders are displayed. Select a folder to choose a new Sprite.

55
Step 3: Sprite inside the selected folder are displayed. Select the required Sprite.
The selected Sprite is added to the existing Sprite list.
Jyoti: The Sprite2 has to face Sprite1. How do we change the direction of the Sprite? This is again a movement of Sprite. Let us check in the Motion block.
Jyoti: The Script area is blank. What happened to the Script that we wrote.Moz: Click on Sprite1.Jyoti: Oh! It is back. Moz: Yes. But observe that this is the Script for Sprite1. You have to write a separate script for Sprite2.Jyoti: Ok. At the start we want both the Sprites to be positioned on the stage. The starting instruction has to be same.Moz: Correct.

56
Tejas: Now we have to import the ball Sprite (Sprite3).Jyoti: Next let us place the ball in the hand of Sprite1. Tejas uses the mouse and moves the ball Sprite into the hands of Sprite1. Then he points to the x and y position of the ball Sprite displayed in the Current Sprite Info window.
Tejas: The x and y position of the Sprite is displayed here, x: -134 and y:-106.
Tejas and Jyoti enter the following instructions to position the second Sprite on the stage.
Jyoti: When Sprite1 throws the ball then the ball has to be in the hands of Sprite2.Tejas (moves the ball Sprite into the hands of Sprite2): The x and y position of the Sprite displayed here is x: 161 and y:-113.Jyoti: To repeat the actions we have to use instructions from Control block.Moz: Good. Now, write the Scripts for the ball Sprite.
Tejas (points to the instruction block): We can use this.
57
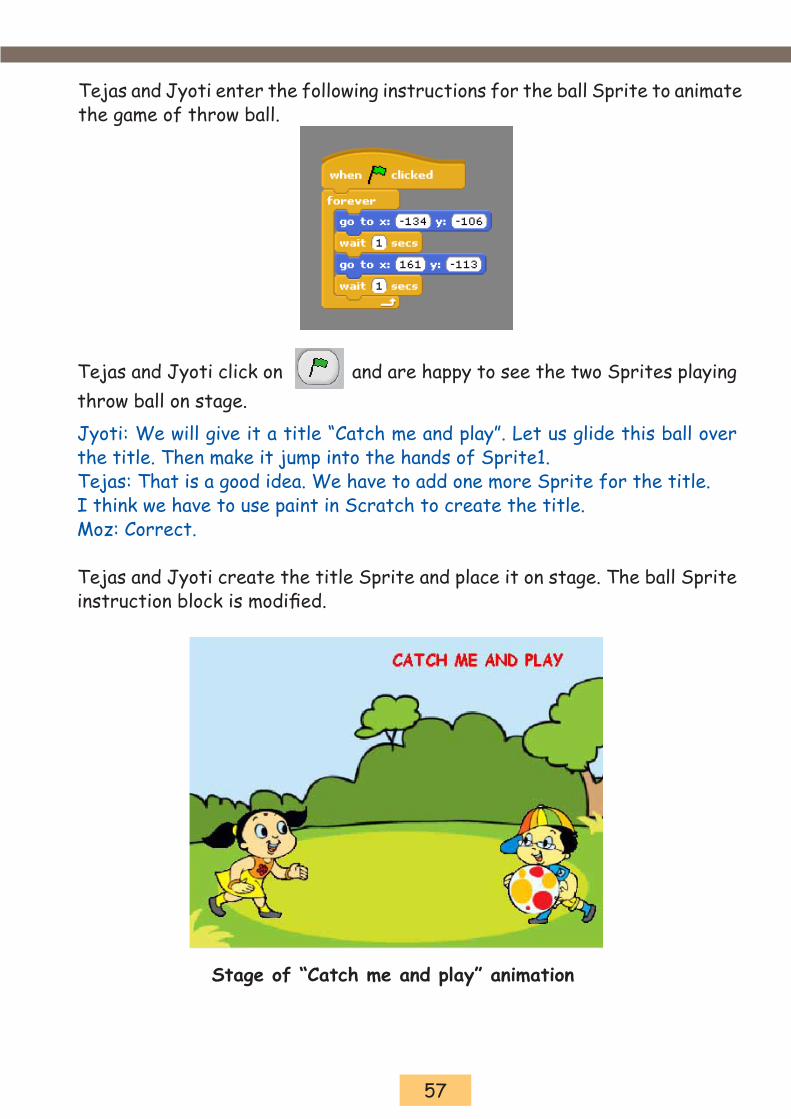
Tejas and Jyoti enter the following instructions for the ball Sprite to animate the game of throw ball.
Jyoti: We will give it a title “Catch me and play”. Let us glide this ball over the title. Then make it jump into the hands of Sprite1.Tejas: That is a good idea. We have to add one more Sprite for the title. I think we have to use paint in Scratch to create the title. Moz: Correct.
Tejas and Jyoti create the title Sprite and place it on stage. The ball Sprite instruction block is modified.
Tejas and Jyoti click on and are happy to see the two Sprites playing throw ball on stage.
Stage of “Catch me and play” animation
58
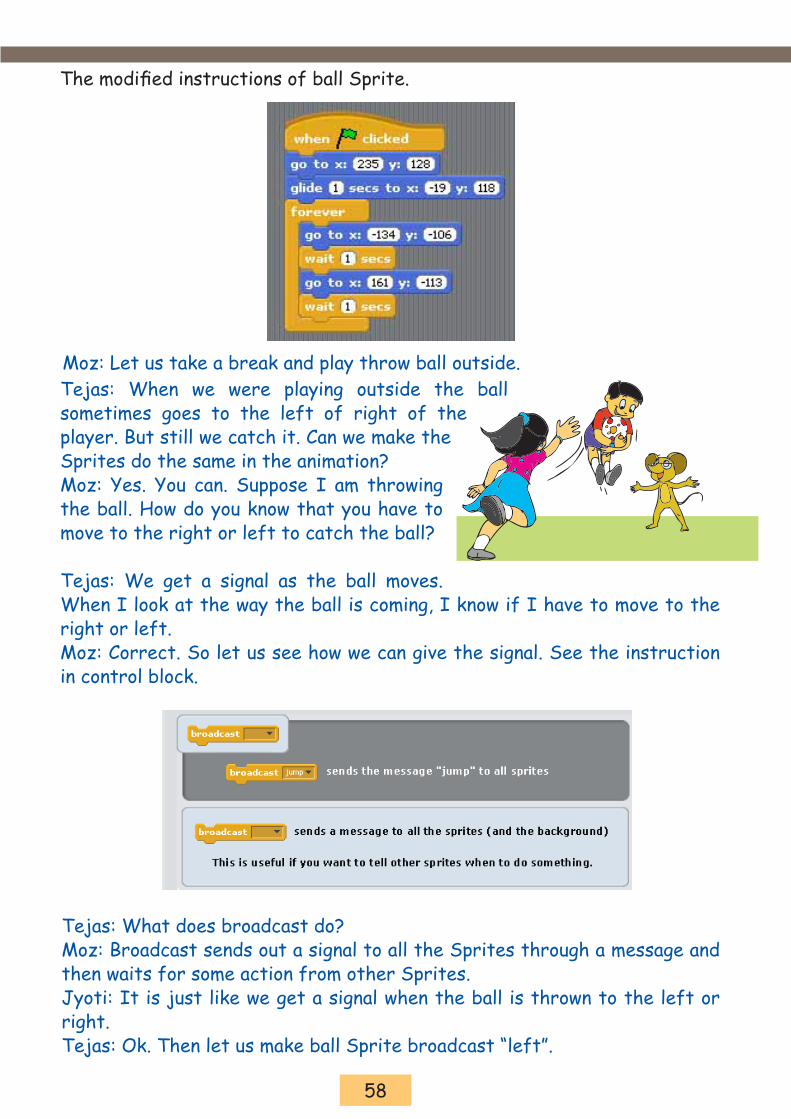
The modified instructions of ball Sprite.
Moz: Let us take a break and play throw ball outside.Tejas: When we were playing outside the ball sometimes goes to the left of right of the player. But still we catch it. Can we make the Sprites do the same in the animation?Moz: Yes. You can. Suppose I am throwing the ball. How do you know that you have to move to the right or left to catch the ball?
Tejas: We get a signal as the ball moves. When I look at the way the ball is coming, I know if I have to move to the right or left.Moz: Correct. So let us see how we can give the signal. See the instruction in control block.
Tejas: What does broadcast do?Moz: Broadcast sends out a signal to all the Sprites through a message and then waits for some action from other Sprites.Jyoti: It is just like we get a signal when the ball is thrown to the left or right.Tejas: Ok. Then let us make ball Sprite broadcast “left”.
59
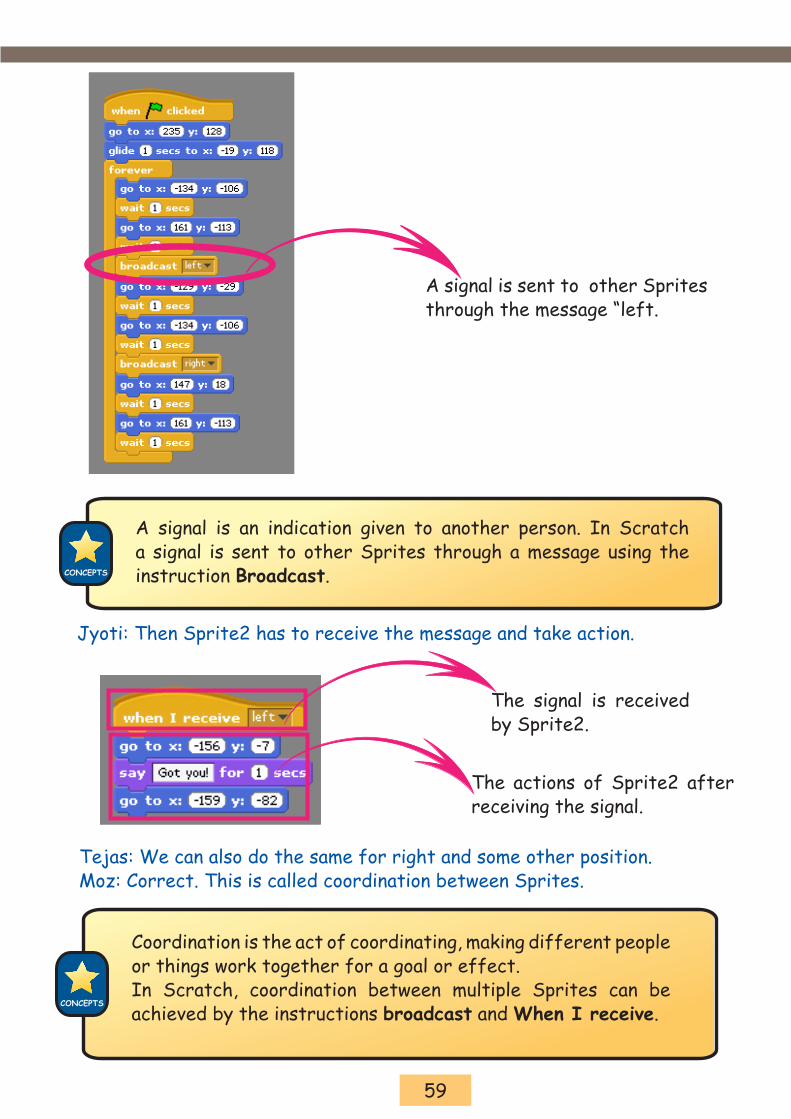
A signal is sent to other Sprites through the message “left.
Jyoti: Then Sprite2 has to receive the message and take action.
Tejas: We can also do the same for right and some other position.Moz: Correct. This is called coordination between Sprites.
The signal is received by Sprite2.
The actions of Sprite2 after receiving the signal.
A signal is an indication given to another person. In Scratch a signal is sent to other Sprites through a message using the instruction Broadcast.
Coordination is the act of coordinating, making different people or things work together for a goal or effect. In Scratch, coordination between multiple Sprites can be achieved by the instructions broadcast and When I receive.
CONCEPTS
CONCEPTS

60
Final scripts of “Catch me and play”.Scripts for Sprite1 along with the Stage.
Scripts for Sprite2 along with the Stage.
Title Sprite

61
Scripts for the Ball Sprite along with the Stage.
Lesson
Outcome
After you have studied this lesson,
you will be able to:
Write programs to demonstrate
actions like games in Scratch.
Coordinate the actions of the
various Sprites.
Tejas: Wow! The two Sprites are playing throw ball.Jyoti: We will write more programs like this.Moz: Yes. You can do some more interesting programs in Scratch next time. Chin Chinaki...

62
WORKSHEETSBook IV Lesson 3
Shilpa is at Powai. She has to go via L.B.S Road to Mulund. The 1. (x,y) positions of Powai, L.B.S Road, Mulund are given below. Write a program in Scratch for Shilpa to go from Powai to Mulund via L.B.S Road.
Vishal is programming an animation for his sister Jyotsna. He wants 2. to show her jumping on the trampoline.
Hint: The starting instructions are given below. Complete the program and run it in Scratch.

63
Arrange the following instructions on the right hand side to make a. Sprite Jyotsna, jump on the trampoline.
Vishal knows that following instructions are required to make Jyotsna b. do a somersault. Match the command with the correct action.
Moves Sprite smoothly to a specified position over specified length of time.
Runs Script below when green flag is clicked.
Changes Sprite’s appearance by switching to different Costume.
Runs the blocks inside over and over.
WORKSHEETSBook IV Lesson 3
64
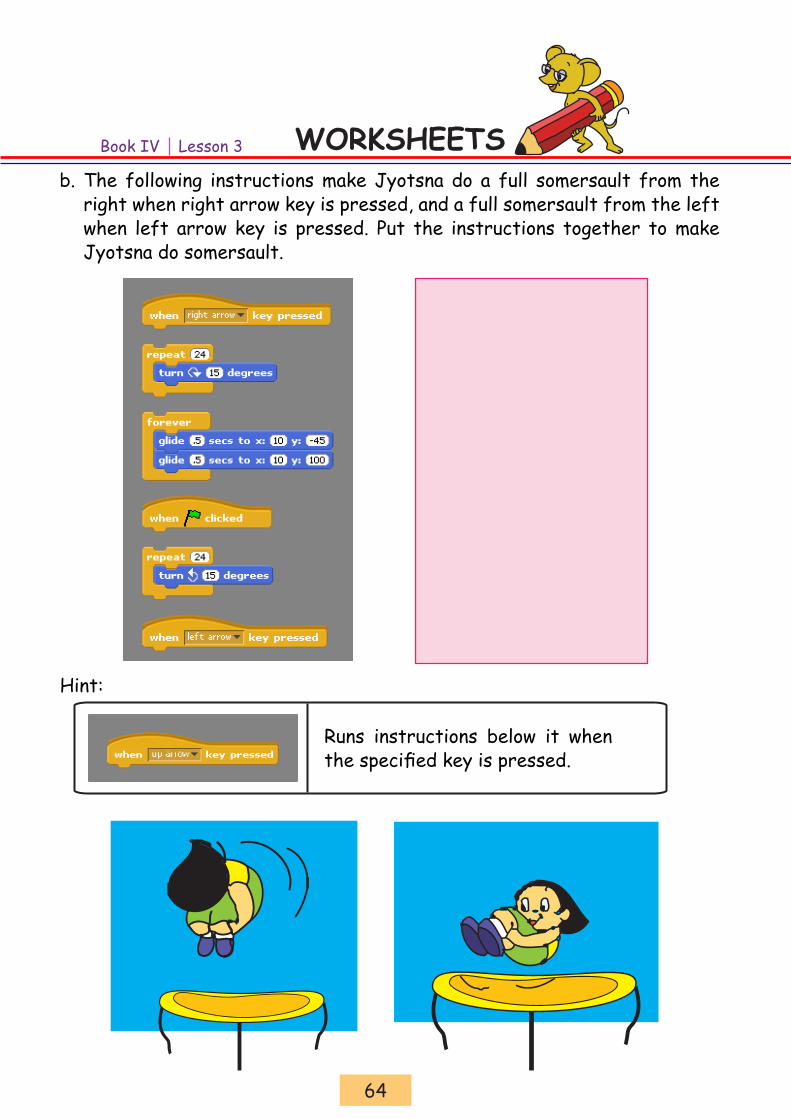
The following instructions make Jyotsna do a full somersault from the b. right when right arrow key is pressed, and a full somersault from the left when left arrow key is pressed. Put the instructions together to make Jyotsna do somersault.
WORKSHEETSBook IV Lesson 3
Hint:
Runs instructions below it when the specified key is pressed.
65
WORKSHEETSBook IV Lesson 3
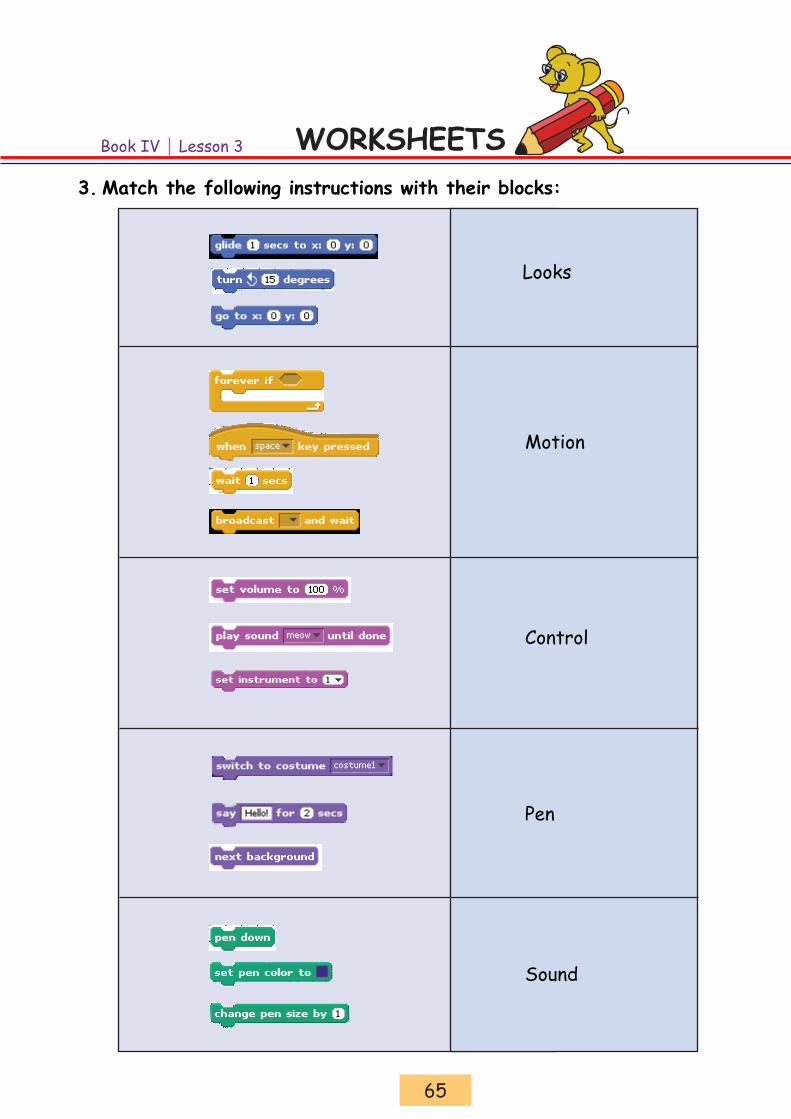
Match the following instructions with their blocks:3.
Looks
Motion
Control
Pen
Sound

66
WORKSHEETSBook IV Lesson 3
Fill in the blanks for Step 1 and Step 2:a. Step 1: ______ the background into the project. Step 2: Program the _____ Sprite to place it on the banana plant.
When flag clicked goto x: ___ y: ____
When flag clicked go to x: -115 y: -126 wait 1 secs go to x: ___ y: ___ wait __ secs go to x: ___ y: ___ wait __ secs go to x: ___ y: ___ wait __ secs go to x: ___ y: ___ wait __ secs go to x: ___ y: ___ wait __ secs go to x: ___ y: ___ wait __ secs
Program the Sprite Martha monkey to jump on the stones: Write the b. program block for Step 3 using the (x, y) positions given in the following picture.
Hint: The first three instructions are given to you. Complete the block.
Martha monkey again! Complete the sequence of actions and instructions 4. given in a), b) and c) to help Martha monkey jump on the stones and reach the bananas. You are given the following:
Sprites – Bananas and Martha monkey.
Background – A stream with the stones and the banana tree on the other side of the stream.
x, y positions of bananas and stones.

67
Add the instructions to Banana Sprite to make the bananas move to the c. hands of the monkey.
Hint: Find the correct (x, y) position and write these instructions.
WORKSHEETSBook IV Lesson 3
(O,O)

68
Book IV Lesson 3
Open the following Scratch projects and do the activities.
Activities to do: Edit the Costumes of the Sprites to draw using different shapes. Change the x and y position. Use the ‘change colour effect’ block to make different colours. Add more key controls.
Kaleidoscope:1. Use the arrow keys to move around and draw a symmetrical pattern. Follow these steps to start this project:
Scratch ---> Projects ---> Games ---> Kaleidoscope

69
Activities to do: Change the x and y position. Use the broadcast option. Add key controls.
Activities to do: Make changes to the Costume of each Sprite. Make the eyes glide to particular x and y position.
Monkey Dressup:2. Click the clothes to adorn the monkey. Follow these steps to start this project: Scratch ---> Projects ---> Interactive Art ---> Monkey DressUp
Expression Creator:3. Click on different parts of the face to change them. Follow these steps to start this project:
Scratch ---> Projects ---> Interactive Art ---> Expression Creator
Book IV Lesson 3

70
Write a project in Scratch that shows the game of badminton. 4. Hint: This is similar to the ball game described in the lesson.
You will need Sprites for the two players, play items.1. Use the following commands under motion block: 2.
Group ActivityDivide the class into groups of five each. Make two students Sprite and write a script for them to do an activity of your choice. Use your imagination to make them do actions under motion and control blocks.
While acting as Sprites, you can draw different shapes, for example:
Book IV Lesson 3
Explore!Open Scratch and click on the tab ‘want help?’ 1. [You will find it in the top row]. Now click on help screens and read to know the function of different instruction blocks.How will you draw a flower, a heart, circle, etc, using 2. Scratch?

71
Teacher’sCornerThe purpose of this lesson is to teach students how to plan and write a program in Scratch. It will enable students to think logically and plan an activity. Besides, they become confident in controlling the technology as writing programs they can make the computer do something.
Start the class by revising the Scratch concepts taught in Level 3 of Computer Masti. Revise the different blocks and instructions. You can ask the students to write a small project to refresh their memory of what they already know about Scratch.
Tell the students that they will now learn more interesting activities using Scratch. You can say that they will learn to do animations to arouse their curiosity.
Start Scratch and click on the motion block so that students can look at all the instructions under it. Ask them to read it. Students are already familiar with move, turn and point instructions. As they go through the list, draw their attention on the instruction:
Use this opportunity to explain what are x and y coordiantes and the concept of quadrants. Refer page number 52 of the lesson for this. Explain that the stage in Scratch is divided into four quadrants. The horizontal line represents x and the vertical line y. At the center x-coordinate is 0 and y-coordinate is 0. The values of x vary from -240 to 240 and that of y vary from -180 to 180. Ask them to note the x and y values for the Sprite. Drag the Sprite and ask them to note the change in x and y values. Now demonstrate how to make the Sprite move by changing the x and y values.
Get two Sprites and write scripts for the two so that the program runs with coordination.
You can use of various control blocks such as when Sprite 1 is pressed, broadcast.
Write the Script for the activity described in the lesson and demonstrate the use of the different instruction blocks covered in the lesson.
Emphasize that it is important to plan the program on paper before going to computer. Ask the students to write the script for the Scratch project in their notebook. Ensure that they think through the entire activity before they start writing the project on the computer. Of course, they can go back and forth on this and make changes, but this exercise will help them to plan the project appropriately.
Summarize the lesson and give the students activities to practice.
Further Reading:http://info.scratch.mit.edu/Support
Book IVLesson 3


![2. Be Gentle - Kanwal Rekhivijaya/ssrvm/dokuwiki/media/cm1_l3.pdf · playing loud music. Tejas [To Jyoti]: I have finished playing this game. It is your turn now. Moz: It is good](https://static.fdocuments.in/doc/165x107/5e0ac6d02d7bb62464196b76/2-be-gentle-kanwal-rekhi-vijayassrvmdokuwikimediacm1l3pdf-playing-loud.jpg)