LCD TV -...
65
LCD TV LW32A23W LW40A23W Owner’s Instructions Before operating the unit, please read this manual thoroughly, and retain it for future reference. ON-SCREEN MENUS PC DISPLAY PICTURE IN PICTURE (PIP) TELETEXT BN68-448D-03Eng 10/29/03 1:08 AM Page 1
Transcript of LCD TV -...
LCD TVLW32A23WLW40A23W
Owner’s InstructionsBefore operating the unit,
please read this manual thoroughly,and retain it for future reference.
ON-SCREEN MENUSPC DISPLAY
PICTURE IN PICTURE (PIP)TELETEXT
BN68-448D-03Eng 10/29/03 1:08 AM Page 1

English-2
Caution
CAUTION: TO PREVENT ELECTRICAL SHOCK,DO NOT REMOVE REAR COVER, NO USERSERVICEABLE PARTS INSIDE. REFER SERVICINGTO QUALIFIED SERVICE PERSONNEL.
RISK OF ELECTRIC SHOCKDO NOT OPEN
CAUTIONThe lightning flash and arrow headwithin the triangle is a warningsign alerting you of “dangerousvoltage” inside the product.
The exclamation point within thetriangle is a warning sign alertingyou of important instructionsaccompanying the product.
WARNING:TO PREVENT DAMAGE WHICH MAY RESULT IN FIRE OR SHOCK HAZARD, DO NOT EXPOSETHIS APPLIANCE TO RAIN OR MOISTURE.
The main voltage is indicated on the rear of your set and the frequency is 50 or 60 Hz.
Information in this document is subject to change without notice.© 2003 Samsung Electronics Co., Ltd. All rights reserved.Reproduction in any manner whatsoever without the written permission of Samsung Electronics Co., Ltd. is strictly forbidden.
Samsung Electronics Co., Ltd. shall not be liable for errors contained herein or for incidental or consequential damages inconnection with the furnishing, performance, or use of this material.
The Samsung logo is the registered trademarks of Samsung Electronics Co., Ltd.; Microsoft, Windows® and Windows® NT areregistered trademark of Microsoft Corporation; VESA, DPMS and DDC are registered trademarks of Video Electronics StandardAssociation. All other product names mentioned herein may be the trademarks or registered trademarks of their respective owners.
Plug and PlayThe adoption of the new VESA® Plug and Play solution eliminates complicated and time consuming setup. It allows you to installyour set in a Plug and Play compatible system without the usual hassles and confusion. Your computer system can easily identifyand configure itself for use with your set. Your set automatically tells the computer system its Extended Display Identification Data(EDID) using Display Data Channel (DDC) protocols so the computer system can automatically configure itself to use your set.
Power SaverThis set is EPA Energy Star® compliant when used with a computer equipped with VESA DPMS functionality. For energy conservation, turn your set Off when you are not using it or when leaving it unattended for long periods.
European Notice (Europe Only)Products with the CE Marking comply with both the EMC Directive (89/336/EEC), (92/31/EEC), (93/68/EEC) and the LowVoltage Directive (73/23/EEC) issued by the Commission of the European Community. Compliance with these directivesimplies conformity to the following European Norms:
EN55022:1998+A1:2000 - Radio Frequency Interference EN55024:1998 - Electromagnetic Immunity EN55013:1990+A12:1994+A13:1996+A14:1999 - Radio Frequency Interference EN55020:1994+A11:1996+A12/A13/A14:1999 - Electromagnetic Immunity EN61000-3-2:1995+A1/A2:1998 - Power Line Harmonics EN61000-3-3:1995 - Voltage Fluctuations EN60065:1997 or EN60950:1998 - Product Safety
BN68-448D-03Eng 10/29/03 1:08 AM Page 2

English-3
Safety Instructions
These illustrations represent precautions concerning your set.
THIS DEVICE IS NOT FOR USE IN INDUSTRIAL ENVIRONMENTS
5`
10%
H H
35`75% Do NOT expose your set to extreme
temperature or humidity conditions.
Do NOT expose your set to direct sunlight.
Do NOT expose your set to any liquids.
If your set is broken, do not try to repair it yourself.
Contact qualified service personnel.
During storm conditions (especially whenthere is lightning) unplug your set fromthe mains socket and aerial.
Do not overload wall outlets or extension cord. Possible fire hazard.
Always keep your set in awell-ventilated area.
Do not step on or twist the power cord.
Keep the power cord away fromany heat source. Possible fire hazard.
If the remote control is not used for a long period of time, remove the batteries and
store it in a cool, dry place.
BN68-448D-03Eng 10/29/03 1:09 AM Page 3

English-4
Contents
FOREWORD Caution ................................................................................................................ 2 Safety Instructions ................................................................................................ 3
CONNECTING AND PREPARING YOUR TV Viewing the Control Panel ................................................................................... 6 Viewing the Connection Panel............................................................................. 7
- Connecting an Aerial or Cable Television Network .......................................... 7- Connecting Set-Top Box, VCR or DVD ............................................................ 7- Connecting External A/V Devices ..................................................................... 7- Connecting Component Devices (DTV/DVD)................................................... 8- Connecting Computer ...................................................................................... 8- Connecting Digital Audio Inputs ...................................................................... 8- Connecting 5.1 Channel Speakers For Home Theater....................................... 9
Viewing the Remote Control (All Functions Except Teletext)................................ 10 Viewing the Remote Control (Teletext Functions) ................................................ 11 Installing Batteries in the Remote Control ............................................................ 12 Switching On and Off .......................................................................................... 13 Placing Your Television in Standby Mode............................................................ 13 Becoming Familiar with the Remote Control........................................................ 14 Plug and Play....................................................................................................... 15 Choosing Your Language ..................................................................................... 16
SETTING THE CHANNELS Storing Channels Automatically ........................................................................... 17 Sorting the Stored Channels ................................................................................. 18 Storing Channels Manually .................................................................................. 19 Editing the Channels ............................................................................................ 21 Assigning Channels Names .................................................................................. 22 Fine Tuning Channel Reception........................................................................... 23 LNA (Low Noise Amplifier) .................................................................................. 23
SETTING THE PICTURE Changing the Picture Standard............................................................................. 24 Adjusting the Custom Picture ............................................................................... 24 Changing the Colour Tone................................................................................... 25 Changing the Picture Size .................................................................................... 25 Freezing the Current Picture................................................................................. 26 DNIe (Digital Natural Image engine).................................................................... 26 Viewing the Picture In Picture (PIP) ..................................................................... 27
SETTING THE SOUND Adjusting the Volume .......................................................................................... 29 Switching the Sound Off Temporarily .................................................................. 29 Changing the Sound Standard.............................................................................. 30 Adjusting the Sound Settings ................................................................................ 30 Listening to the Sound of the Sub Picture............................................................. 31
BN68-448D-03Eng 10/29/03 1:09 AM Page 4

English-5
Contents
SETTING THE SOUND (cONTINUED) Setting the Dolby Digital Surround ...................................................................... 32 Setting the Dolby Pro Logic II .............................................................................. 34 Setting the External Digital Sound ........................................................................ 35 Connecting Headphones...................................................................................... 36 Adjusting Your Headphone Preferences ............................................................... 36 Selecting the Sound Mode ................................................................................... 37
SETTING THE TIME Setting and Displaying the Current Time.............................................................. 38 Setting the Sleep Timer ........................................................................................ 39 Switching the Television On and Off Automatically ............................................ 40
SETTING THE OTHERS Setting the Blue Screen Mode .............................................................................. 41 Selecting a Device from External Sources ............................................................ 42 Viewing Pictures from External Sources ............................................................... 42
SETTING THE PC Setting up Your PC Software (Based on Windows 2000 or XP) ............................ 43 Adjusting the PC Screen Automatically ................................................................ 44 Coarse and Fine Tuning of the Image................................................................... 45 Changing the Image Position ............................................................................... 46 Initializing the Image Settings............................................................................... 46 Selecting the DVI Mode....................................................................................... 47
USING THE TELETEXT FEATURE Teletext Decoder.................................................................................................. 48 Displaying the Teletext Information ..................................................................... 48 Selecting a Specific Teletext Page ........................................................................ 49 Using FLOF to Select a Teletext Page................................................................... 50
RECOMMENDATIONS FOR USE Troubleshooting: Before Contacting Service Personnel ........................................ 51 Installing Stand .................................................................................................... 52 Using the Anti-Theft Kensington Lock .................................................................. 53 How to Install the Wall Bracket ........................................................................... 54 Technical and Environmental Specifications ........................................................ 56 Display Mode (PC/DVI)........................................................................................ 57 Pin Configurations ............................................................................................... 58 Wiring the Mains Power Supply Plug (UK Only).................................................. 59 Setting Up Your Remote Control.......................................................................... 60
Press Important Note
Symbols
BN68-448D-03Eng 10/29/03 1:09 AM Page 5

English-6
Viewing the Control Panel
(Power)Press to turn the TV on and off.
Power IndicatorLights up when you turn the power off.
Remote Control Sensor Aim the remote control towards this spoton the TV.
TV/VIDEODisplays a menu of all of the available input sources (TV, AV1, AV2, AV3, S-VIDEO, COMP1, COMP2, PC/DVI).
MENUPress to see an on-screen menu ofyour TV’s features.
- +Press to increase or decrease the volume.Also used to select items on theon-screen menu.
C/P.Press to change channels.Also press to highlight various itemson the on-screen menu.(Without the Remote Control, You canturn on TV by using the Channel buttons.)
1 5
6
7
2
3
4
BN68-448D-03Eng 10/29/03 1:09 AM Page 6

English-7
Viewing the Connection Panel
Whenever you connect an audio or video system to your set, ensure that all elements are switchedoff.
Connecting an Aerial or Cable Television NetworkTo view television channels correctly, a signal must be received by the set from one of the following sources:- An outdoor aerial- A cable television network- A satellite network
Connecting Set-Top Box, VCR or DVD- Connect the VCR or DVD SCART cable to the SCART connector of the VCR or DVD.- If you wish to connect both the Set-Top Box and VCR (or DVD), you should connect the Set-Top Box
to the VCR (or DVD) and connect the VCR (or DVD) to your set.
Input/Output Specification
Connecting External A/V Devices- Connect RCA or S-VIDEO cable to an appropriate external A/V device such as VCR, DVD or Camcorder.- Connect RCA audio cables to “AUDIO(L)” and “AUDIO(R)” on the rear of your set and the other ends to
corresponding audio out connectors on the A/V device.- Headphone may be connected to the headphone output ( ) on the rear of your set. While the headphone
is connected, the sound from the built-in speakers will be disabled.
Power Input
1
2
3
4
Connector
SCART 1
SCART 2
Video Audio (L/R) S-Video RGB Video+Audio (L/R)
Only TV Out
Monitor Out
(TV/AV1/AV2/AV3/S-VHS)
Input Output
BN68-448D-03Eng 10/29/03 1:09 AM Page 7

English-8
Viewing the Connection Panel
Connecting Component Devices (DTV/DVD)- Connect component video cables to component connector (“Y”,“Pb”,“Pr”) on the rear of your set and the
other ends to corresponding component video out connectors on the DTV or DVD.- If you wish to connect both the Set-Top Box and DTV (or DVD), you should connect the Set-Top Box to the
DTV (or DVD) and connect the DTV (or DVD) to component connector (“Y”,“Pb”,“Pr”) on your set.- The Y, Pb and Pr connectors on your component devices (DTV or DVD) are sometimes labeled Y, B-Y and
R-Y or Y, Cb and Cr.- Connect RCA audio cables to “AUDIO(L)” and “AUDIO(R)” on the rear of your set and the other ends to
corresponding audio out connectors on the DTV or DVD.
Connecting Computer
- Connect the DVI connector to the PC video connector.- Connect the stereo audio cable to “PC AUDIO IN (STEREO)” on the rear of your set and the other end to
“Audio Out” of the sound card on your computer.
Connecting Digital Audio Inputs
Connect optical digital audio cable or coaxial cable (RCA audio cable) to “DIGITAL AUDIO IN” on the rear ofyour set and the other end to “DIGITAL OUT” of the equipment with a digital output to enjoy digital sound(Multi-Channel Surround Sound, Stereo or Dolby Pro-Logic II).
Source Video Horizontal Frequency Vertical Frequency Resolution(kHz) (Hz) (Lines)
TV/VIDEO PAL 15.625 50 575
SECAM 15.625 50 575
NTSC4.43 15.734 60 483
NTSC3.58 (Except RF) 15.704 60 483
Component 1/2 480/60i 15.734 60 483
480/60p 31.469 60 483
576/50i 15.625 50 576
576/50p 31.250 50 576
720/60p 45.000 60 720
1080/50i 28.125 50 1080
1080/60i 33.750 60 1080
5
6
7
BN68-448D-03Eng 10/29/03 1:09 AM Page 8

English-9
Viewing the Connection Panel
Connecting 5.1 Channel Speakers For Home Theater
The other speakers(Surround/Center/Subwoofer):Connect the eachspeaker audio cable to thespeaker output jack(surround/Center / Woofer 1 )on therear of your set making surethat the +, - polarities arecorrectly aligned.
Wind the speaker cable onthe core twice or more.
8
1012 11
Main Speaker : When the speakers are attached with LCD TV
Main Speaker : When the speakers are separated from LCD TV
Connect the speaker audio cables to the mainspeaker output jacks on the rear of your setmaking sure that the +, - polarities are correctlyaligned.
The speakers MUST have more than10watts rating (Impedance 8Ω).
Mount the brackets on the speakerand your set.
Connect the speaker and your setusing screws.
SurroundSpeaker
SurroundSpeaker
Woofer
Center Speaker
LCD TV Rear
Main Speaker Main Speaker
9
9
BN68-448D-03Eng 10/29/03 1:09 AM Page 9
POWER
P.MODETV SELECT
PRE-CH-/--
MUTE
P
VIDEO
TTX/MIX INFO
EXIT
MENU
STILL S.MODE
ENTER
DUAL I-II SURROUND
BN59-00373
1 2 3
4 5 6
7 8 9
0
BN59-00373ASET RESET
P.SIZE SLEEP PIP
DNIe PC SWAP P
REW STOP PLAY/PAUSE FF
English-10
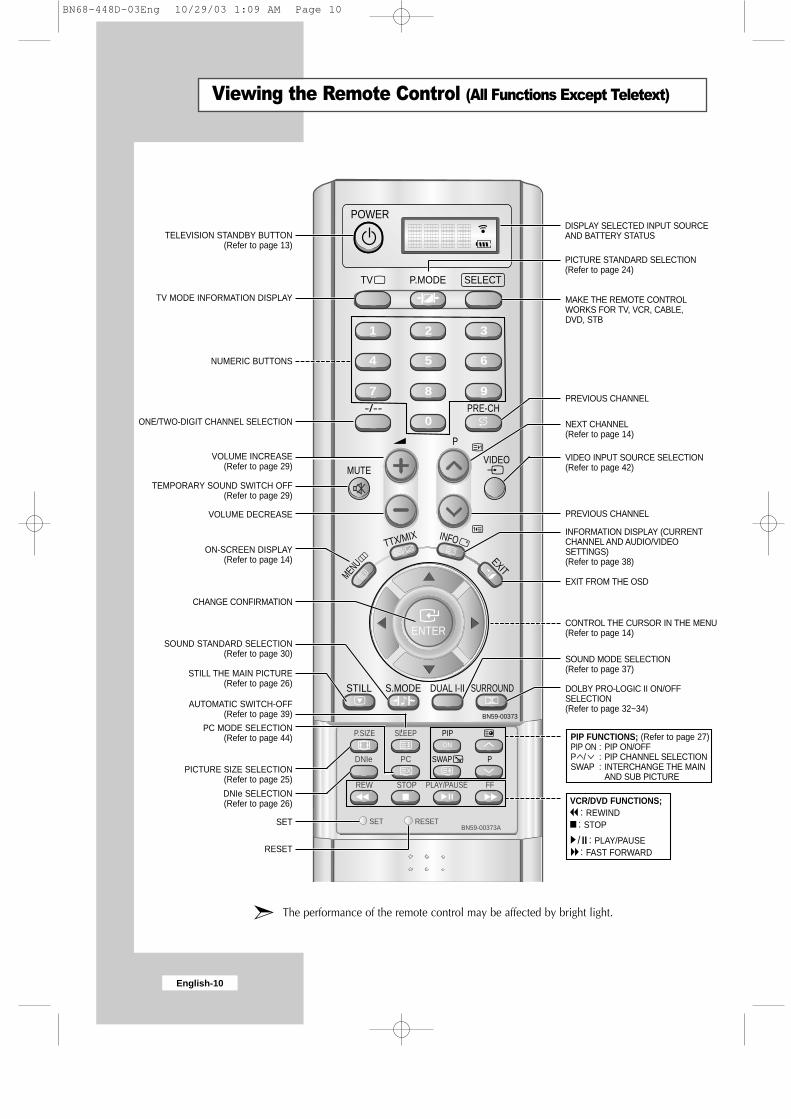
Viewing the Remote Control (All Functions Except Teletext)
NUMERIC BUTTONS
ONE/TWO-DIGIT CHANNEL SELECTION
VOLUME INCREASE(Refer to page 29)
SOUND STANDARD SELECTION(Refer to page 30)
AUTOMATIC SWITCH-OFF(Refer to page 39)
DNIe SELECTION(Refer to page 26)
SET
PC MODE SELECTION(Refer to page 44)
VCR/DVD FUNCTIONS;: REWIND
: STOP
/ : PLAY/PAUSE: FAST FORWARD
TEMPORARY SOUND SWITCH OFF(Refer to page 29)
ON-SCREEN DISPLAY(Refer to page 14)
STILL THE MAIN PICTURE(Refer to page 26)
PICTURE STANDARD SELECTION(Refer to page 24)
MAKE THE REMOTE CONTROLWORKS FOR TV, VCR, CABLE,DVD, STB
INFORMATION DISPLAY (CURRENTCHANNEL AND AUDIO/VIDEOSETTINGS)(Refer to page 38)
PREVIOUS CHANNEL
NEXT CHANNEL(Refer to page 14)
PREVIOUS CHANNEL
VIDEO INPUT SOURCE SELECTION(Refer to page 42)
EXIT FROM THE OSD
CHANGE CONFIRMATION
CONTROL THE CURSOR IN THE MENU(Refer to page 14)
DOLBY PRO-LOGIC II ON/OFFSELECTION(Refer to page 32~34)
SOUND MODE SELECTION (Refer to page 37)
PIP FUNCTIONS; (Refer to page 27)PIP ON : PIP ON/OFFP / : PIP CHANNEL SELECTIONSWAP : INTERCHANGE THE MAIN
AND SUB PICTURE
The performance of the remote control may be affected by bright light.
DISPLAY SELECTED INPUT SOURCEAND BATTERY STATUS
VOLUME DECREASE
TELEVISION STANDBY BUTTON(Refer to page 13)
TV MODE INFORMATION DISPLAY
PICTURE SIZE SELECTION(Refer to page 25)
RESET
BN68-448D-03Eng 10/29/03 1:09 AM Page 10
English-11
POWER
P.MODETV SELECT
PRE-CH-/--
MUTE
P
VIDEO
TTX/MIX INFO
EXIT
MENU
STILL S.MODE
ENTER
DUAL I-II SURROUND
BN59-00373
1 2 3
4 5 6
7 8 9
0
BN59-00373ASET RESET
P.SIZE SLEEP PIP
DNIe PC SWAP P
REW STOP PLAY/PAUSE FF
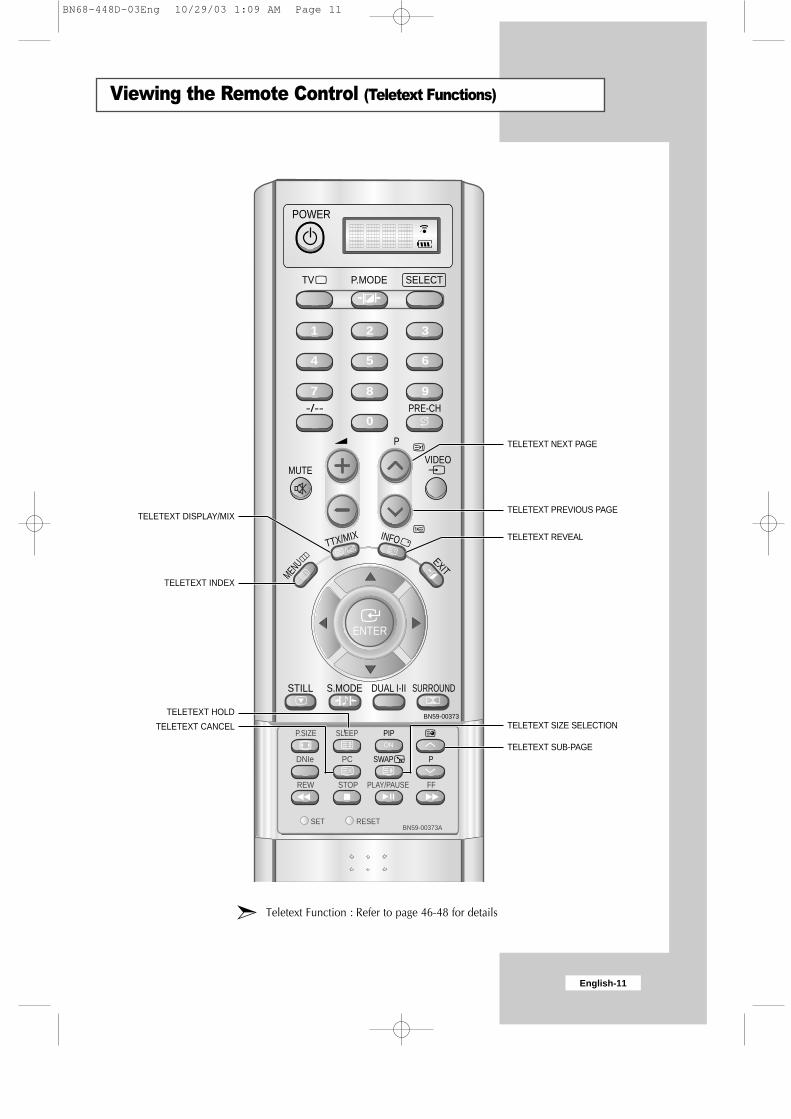
Viewing the Remote Control (Teletext Functions)
TELETEXT HOLD
TELETEXT CANCEL
TELETEXT INDEX
TELETEXT REVEAL
TELETEXT NEXT PAGE
TELETEXT PREVIOUS PAGE
TELETEXT SUB-PAGE
TELETEXT SIZE SELECTION
TELETEXT DISPLAY/MIX
Teletext Function : Refer to page 46-48 for details
BN68-448D-03Eng 10/29/03 1:09 AM Page 11

English-12
Installing Batteries in the Remote Control
1 Side the cover out completely.
2 Install two AAA size batteries.
Make sure to match the “+” and “–” ends of the batteries withthe diagram inside the compartment.
3 Replace the cover.
Remove the batteries and store them in a cool, dry place if youwon’t be using the remote control for a long time.
The remote control can be used up to about 23 feet from the TV.
(Assuming typical TV usage, the batteries last for about oneyear.)
The remote control doesn’t work!
Check the following:
1. Is the TV power switch on?
2. Is the selected source TV and not video, cable or DVD?
3. Are the plus end and the minus end of the battery reversed?
4. Did the battery run out?
5. Is there a power outage?
6. Is the power cord unplugged?
7. Is there a special fluorescent light or a neon sign nearby?
BN68-448D-03Eng 10/29/03 1:09 AM Page 12

English-13
Switching On and Off
Placing Your Television in Standby Mode
P.MODETV SELECT
PRE-CH-/--
MUTE
P
VIDEO
TTX/MIX INFO
EXIT
MENU
1 2 3
4 5 6
7 8 9
0
POWER
P.MODETV SELECT
P.MODETV SELECT
PRE-CH-/--
MUTE
P
VIDEO
TTX/MIX INFO
EXIT
MENU
1 2 3
4 5 6
7 8 9
0
Your set can be placed in Standby mode, in order to reduce the powerconsumption. The Standby mode can be useful when you wish tointerrupt viewing temporarily (during a meal, for example).
1 Press the POWER ( ) button on the remote control.Result: The screen is turned off and a orange standby indicator
appears on the front of your set.
2 To switch your set back on, simply press the POWER ( ), numericbuttons (0~9) or channel up/down ( / ) button again.
Do not leave your set in Standby mode for long periods of time(when you are away on holiday, for example). Turn your set off by pressing the POWER ( ) button on the front of the set. It is best to unplug the set from the mains and aerial.
1. Use of the 'Power' button on the remote is possible only when theTV is in 'Power Saving' (standby) mode. If the TV is powered off,the remote cannot be used to turn the TV on.
2. To retain the time and or automatic alarm settings, always put theTV in stand-by mode with the remote control.Use of the the power switch on the TV will clear all time relatedsettings. [Benefit] This full 'power off' function is as effective as unpluggingthe power cable. TV switches to standby mode when powered off by the remotecontrol. To return power ( ) to the screen, press the remotecontrol 'ON' or channel button( ). Pressing the power button onthe TV does not return power to the screen because in this case,the TV restores the last mode, which was 'Power Saving'.
The mains lead is attached to the rear of your set.
If you have purchased this set in the United Kingdom,refer to page 59 for further instructions on plug wiring.
1 Plug the mains lead into an appropriate socket.Result: The main voltage is indicated on the rear of your set and
the frequency is 50 or 60Hz.
2 Press the POWER ( ) button on the front of your set.Result: The standby indicator lights up on the front panel.
3 Press the POWER ( ), numeric button (0~9) or channelup/down( / ) button on the remote control or power or
C/P. button on the front of your set.Result: The programme that you were watching last is reselected
automatically.
When you switch the set on for the very first time, you will beasked to choose language in which the menus are to bedisplayed (see page 15).
4 To switch your set off, press the POWER ( ) again.
BN68-448D-03Eng 10/29/03 1:09 AM Page 13

English-14
Becoming Familiar with the Remote Control
The remote control is used mainly to:
Change channels and adjust the volume
Set up your set using the on-screen menu system
The following table presents the most frequently used buttons andtheir functions.
Button Viewing Function Menu Function
Used to display the -next stored channel.
Used to display the -previous stored channel.
to Used to display the corresponding channels.
For double digit channels, the second digit must be pushed immediately after the first. Failure to do this will result in a single digit channel being displayed.
_/_ _ Used to select a channel numbered ten or over. Press this button, and enter the two digit channel number.
Used to increase the -volume.
Used to decrease the -volume.
MUTE Used to switch the sound off temporarily.
To turn the sound back on, press this buttonagain, or press the +/- button.
MENU Used to display the Used to return to the on-screen menu system. previous menu or
normal viewing.
EXIT Used to exit the On-Screen menu system.
- Used to: Display a submenu
containing selectionsfor the current menuoption.
Search forwards/backwards manuallyfor channels
Increase/decrease amenu option value.
- Used to confirm yourENTER choice.
POWER
P.MODETV SELECT
PRE-CH-/--
MUTE
P
VIDEO
TTX/MIX INFO
EXIT
MENU
STILL S.MODE
ENTER
DUAL I-II SURROUND
BN59-00373
1 2 3
4 5 6
7 8 9
0
BN68-448D-03Eng 10/29/03 1:09 AM Page 14

English-15
Plug and Play
When the set is initially powered ON, several basic customer settingsproceed automatically and subsequently.The following settings are available.
1 If the set is in standby mode, press the POWER ( ) button on theremote control.
Result: The message Plug & Play is displayed. It appears for alittle while, and then the Language menu is automaticallydisplayed.
2 Select the appropriate Language by pressing the or❷ button.
The available languages are listed.You can choose one of 18 Languages.
3 Press the ENTER or ❿ button to confirm your choice.
Result: The message Ant. Input Check is displayed with the OKis selected.
4 Press the ENTER or ❿ button.
Result: The following countries are available:Belgie - Deutschland - Espania - France - Italia -Nederland - Schweiz - Sverige - UK - East Europe -Others
5 Select your Country by pressing the or❷ button.Press the ENTER or ❿ button.
Result: The channel search will start and end automatically.
6 Select the Hour or Min by pressing the or❿ button.Set the Hour/Min by pressing the or ❷ button.(Refer to “Switching the television on and off automatically” on page 40)
7 Press the ENTER button to confirm your setting.
Result: The message Enjoy Your Watching is displayed, andthen the channel which has been stored will be activated.
POWER
P.MODETV SELECT
BN68-448D-03Eng 10/29/03 1:09 AM Page 15

English-16
Plug and Play
If you want to reset this feature...
1 Press the MENU button.
Result: The main menu is displayed.
2 Press the or❷ button to select Setup.Press the ENTER or ❿ button.
Result: The options available in the Setup group are displayed.
3 Press the or ❷ button to select Plug & Play.
4 Press the ENTER button.
Result: The message is Plug & Play displayed.
5 For further details on how to set, refer to the previous page.
Choosing Your Language
When you start using your set for the first time, you must select thelanguage which will be used for displaying menus and indications.
1 Press the MENU button.
Result: The main menu is displayed.
2 Press the or❷ button to select Setup.
Result: The options available in the Setup group are displayed.
3 Press the ENTER or ❿ button.
4 Press the or ❷ button to select Language.Press the ENTER or ❿ button.
Result: The available languages are listed.
5 Select a particular language by pressing the or❷ buttonrepeatedly.Press the ENTER or ❿ button.
You can choose one of 18 Languages.
6 When you are satisfied with your choice, press the EXIT button toreturn to normal viewing.
TTX/MIX INFO
EXIT
MENU
STILL S.MODE
ENTER
DUAL I-II SURROUND
BN59-00373
TTX/MIX INFO
EXIT
MENU
STILL S.MODE
ENTER
DUAL I-II SURROUND
BN59-00373
BN68-448D-03Eng 10/29/03 1:09 AM Page 16

English-17
Storing Channels Automatically
You can scan for the frequency ranges available to you (andavailability depends on your country). Automatically allocatedprogramme numbers may not correspond to actual or desiredprogramme numbers. However you can sort numbers manually andclear any channels you do not wish to watch.
1 Press the MENU button.
Result: The main menu is displayed.
2 Press the or❷ button to select Channel.
Result: The options available in the Channel group are displayed.
3 Press the ENTER or ❿ button.
Result: The Country is selected.
4 Press the ENTER or ❿ button again. Select your Country bypressing the or❷ button repeatedly.The following countries are available:Belgie - Deutschland - Espania - France - Italia - Nederland- Schweiz - Sverige - UK - East Europe -Others
5 Press the ENTER button.
6 Press the ❷ button to select ATM.Press the ENTER or ❿ button.
Result: The Start is selected.
7 Press ENTER button to search the channels.The sub menu is changed from Start to Stop with channel searchstarted.
Result: The search will end automatically. Channels are sortedand stored in an order which reflects their position in thefrequency range, (with lowest first and highest last). The programme originally selected is then displayed.
To return to the previous menu, press or ❿ button to selectReturn and then press ENTER button.
To stop the search before it has finished, press ENTERbutton with stop selected.
8 When the channels have been stored, you can: Sort them in the order required (refer to page 18) Assign a name to the stored channels (refer to page 22) Add or delete the channels (refer to page 21) Fine tune channel reception if necessary (refer to page 23) Activate the LNA (Low Noise Amplifier) feature (refer to page 23)
TTX/MIX INFO
EXIT
MENU
STILL S.MODE
ENTER
DUAL I-II SURROUND
BN59-00373
BN68-448D-03Eng 10/29/03 1:09 AM Page 17

English-18
Sorting the Stored Channels
You can exchange the numbers of two channels, in order to:
Modify the numeric order in which the channels have beenautomatically stored.
Give easily remembered numbers to the channels that youwatch most often.
1 Press the MENU button.
Result: The main menu is displayed.
2 Press the or❷ button to select Channel.Press the ENTER or ❿ button.
Result: The options available in the Channel group are displayed.
3 Press the or❷ button to select Sort.Press the ENTER or ❿ button.
Result: The Prog. Channel and Name are displayed.
4 Select the Channel number that you wish to change by pressing theor❷ button repeatedly.
Press the ENTER or ❿ button.
Result: The selected Channel number and Name is moved toright side.
5 Press the or❷ button to move to the position which you wouldlike to change and then press the ENTER button.
Result: The selected channel is exchanged with the onepreviously stored to the chosen number.
6 Repeat step 4 to 5 for another channel to sort again.
TTX/MIX INFO
EXIT
MENU
STILL S.MODE
ENTER
DUAL I-II SURROUND
BN59-00373
BN68-448D-03Eng 10/29/03 1:09 AM Page 18

English-19
Storing Channels Manually
You can store up to 100 channels, including those received via cablenetworks. When storing channels manually, you can choose:
Whether or not to store each of the channels found
The programme number of each stored channel which youwish to identify
1 Press the MENU button.
Result: The main menu is displayed.
2 Press the or❷ button to select Channel.
Result: The options available in the Channel group are displayed.
3 Press the ENTER or ❿ button.
4 Press the or❷ button to select Manual Store.Press the ENTER or ❿ button.
Result: The options available in the Manual Store menu aredisplayed with Prog.No selected.
5 Press the ENTER button again.To assign a programme number to a channel, find the correctnumber by pressing the or❷ button and then press theENTER button.
6 Press the or❷ button to select Colour System and then pressthe ENTER or ❿ button. Select the Colour System required by pressing the or❷ buttonrepeatedly and then press the ENTER or ❿ button.
Result: The colour standards are displayed in the following order: AUTO - PAL - SECAM - NT4.43
7 Press the or❷ button to select Sound System and then press theENTER or ❿ button.Select the sound standard required by pressing the or❷ buttonrepeatedly and then press the ENTER or ❿ button.
Result: The sound standards are displayed in the following order: BG - DK - I - L
8 For all the channels to move to the required channel numbers,repeat steps 5 to 7 after selecting Prog.No by pressing or❷button.
BN68-448D-03Eng 10/29/03 1:09 AM Page 19

English-20
Storing Channels Manually (continued)
9 If you know the number of the channel to be stored....
Press the or❷ button to select Channel and then press theENTER or ❿ button.
Select C (Air channel) or S (Cable channel) by pressing the or❷ button and then press the ENTER or ❿ button.
Select the required number by pressing the or❷ button andthen press the ENTER or ❿ button.
If there is abnormal sound or no sound, re-select the soundsystem required.
10 If you do not know the channel numbers, press the or❷ button toselect Search and then press the ENTER or ❿ button. Search by pressing or❷ button and then press the ENTER or❿ button.
Result: The tuner scans the frequency range until the firstchannel or the channel that you selected is received onyour screen.
11 Press the or ❷ button to select Store and then press the ENTER or ❿ button.Select Yes by pressing the or❷ button and then press theENTER button.
Result: The channel and associated programme number arestored.
12 Repeat Steps 9 to11 for each channel to be stored.
Channnnel mode
P (Programme mode): When tuning is completed, thebroadcasting stations in your area will have beenassigned to position numbers from P00 to P99. You canselect a channel by entering the position number in thismode.
C (Real channel mode): You can select a channel byentering the assigned number to each broadcast station inthis mode.
S (Cable channel mode): You can select a channel byentering the assigned number to each cable channel inthis mode.
BN68-448D-03Eng 10/29/03 1:09 AM Page 20

English-21
Editing the Channels
You can exclude the channels you chosen from the channels youscanned. When you scan through the stored channels, those you havechosen to skip are not displayed.
All channels that you do not specifically choose to skip are displayedduring scanning.
1 Press the MENU button.
Result: The main menu is displayed.
2 Press the or❷ button to select Channel.Press the ENTER or ❿ button.
Result: The options available in the Channel group are displayed.
3 Press the or❷ button to select Add/Delete.Press the ENTER or ❿ button.
Result: The state of current channel is displayed.
4 Press the / button to select Channel that you wish to Add orDelete.
Result: If the channel that you wish to edit is not in memory, theAdd is selected and displayed.Otherwise, if the channel that you wish to edit is inmemory, the Delete is selected and displayed.
5 Press the ENTER button to Add or Delete channel.
6 To return to the previous menu, select Return by pressing the or ❿ button and then press the ENTER button.
7 Repeat Step 4 and 6 for each channel to be added or deleted.
TTX/MIX INFO
EXIT
MENU
STILL S.MODE
ENTER
DUAL I-II SURROUND
BN59-00373
BN68-448D-03Eng 10/29/03 1:09 AM Page 21
English-22
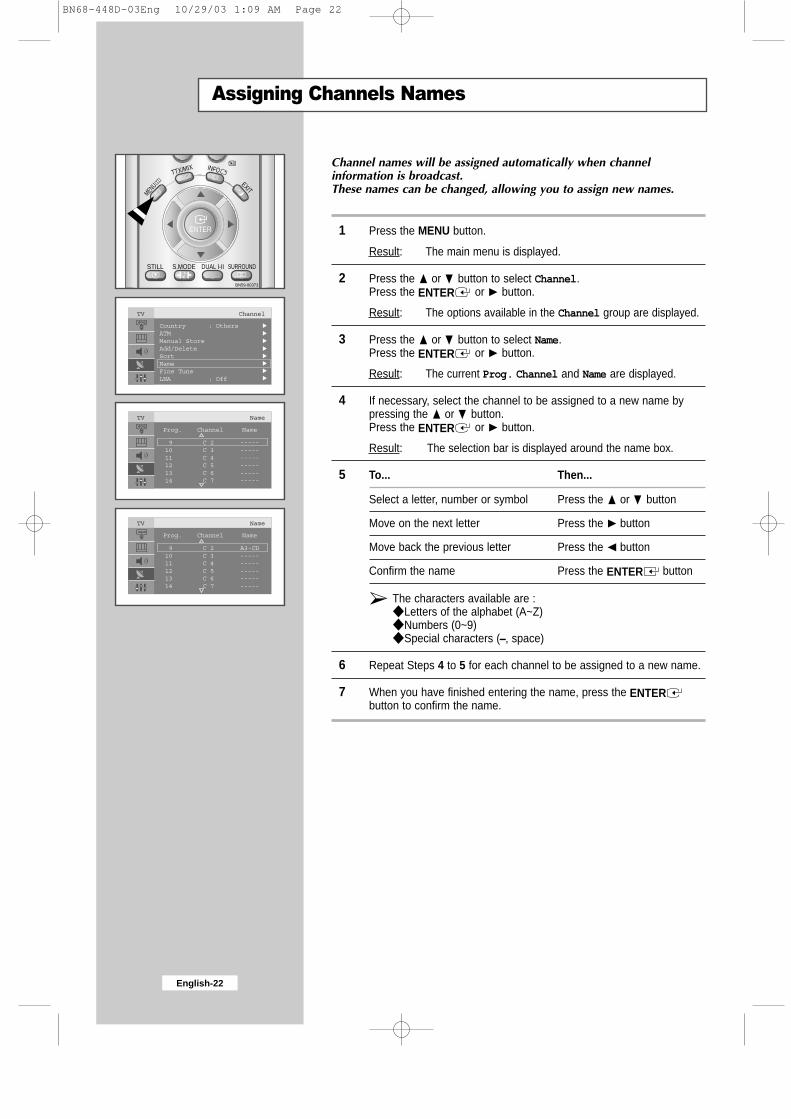
Assigning Channels Names
Channel names will be assigned automatically when channelinformation is broadcast.These names can be changed, allowing you to assign new names.
1 Press the MENU button.
Result: The main menu is displayed.
2 Press the or❷ button to select Channel.Press the ENTER or ❿ button.
Result: The options available in the Channel group are displayed.
3 Press the or❷ button to select Name.Press the ENTER or ❿ button.
Result: The current Prog. Channel and Name are displayed.
4 If necessary, select the channel to be assigned to a new name bypressing the or❷ button.Press the ENTER or ❿ button.
Result: The selection bar is displayed around the name box.
5 To... Then...
Select a letter, number or symbol Press the or❷ button
Move on the next letter Press the ❿ button
Move back the previous letter Press the button
Confirm the name Press the ENTER button
The characters available are : Letters of the alphabet (A~Z) Numbers (0~9) Special characters (_, space)
6 Repeat Steps 4 to 5 for each channel to be assigned to a new name.
7 When you have finished entering the name, press the ENTERbutton to confirm the name.
TTX/MIX INFO
EXIT
MENU
STILL S.MODE
ENTER
DUAL I-II SURROUND
BN59-00373
BN68-448D-03Eng 10/29/03 1:09 AM Page 22

English-23
Fine Tuning Channel Reception
If the reception is clear, you do not have to fine-tune the channel,as this is done automatically during the search and store operation.If however the signal is weak or distorted, you may have to fine-tunethe channel manually.
1 Press the MENU button.
Result: The main menu is displayed.
2 Press the or❷ button to select Channel.Press the ENTER or ❿ button.
Result: The options available in the Channel group are displayed.
3 Press the or❷ button to select Fine Tune.Press the ENTER or ❿ button.
4 Press the / button to select the channel that you wish to finetune.
5 Press or ❿ button until you reach the setting to obtain a sharpand clear picture and good sound quality. To store the setting, press the ENTER button.
6 To reset the fine tuning, select Reset by pressing or❷ button andthen press the ENTER button.To return to the previous menu, select Return by pressing or ❿button and press the ENTER button.
LNA (Low Noise Amplifier)
If the set is operating in a weak-signal area, sometimes the LNAfunction can improve the reception.
1 Press the MENU button.
Result: The main menu is displayed.
2 Press the or❷ button to select Channel.Press the ENTER or ❿ button.
Result: The options available in the Channel group are displayed.
3 Press the or❷ button to select LNA.Press the ENTER or ❿ button.
Result: The LNA menu is displayed.
4 Select On by pressing or❷ button.
Result: Amplifies signals when antenna reception is poor.However if incoming signals are interfering with eachother, turn off LNA as it may malfunction.
5 When it has finished, press the EXIT button to return to normal viewing.
BN68-448D-03Eng 10/29/03 1:09 AM Page 23

English-24
Changing the Picture Standard
You can select the type of picture which best corresponds to yourviewing requirements.
1 Press the MENU button.Result: The main menu is displayed.
2 Press the or❷ button to select Picture.Result: The options available in the Picture group are displayed.
3 Press the ENTER or ❿ button.Result: The Picture Mode is selected.
4 Press the ENTER or ❿ button again.Select the required picture effect by pressing the or❷ buttonrepeatedly. The following picture effects are available:
Custom - Dynamic - Standard - Movie
You can also display simply by pressing the P.MODE(Picture Mode) button.
Adjusting the Custom Picture
Your set has several settings which allow you to control picture quality.
1 Press the MENU button.Result: The main menu is displayed.
2 Press the or❷ button to select Picture.Result: The options available in the Picture group are displayed.
3 Press the ENTER or ❿ button.
4 Press or❷ button to select Custom Picture and press theENTER or ❿button.
5 Select the option (Contrast, Brightness, Sharpness, Colour orTint-NTSC only) to be adjusted by pressing the or❷ button.Press the ENTER or ❿ button.Result: The horizontal bar is displayed.
6 Press the or ❿ button to reach the required setting.
7 When you are satisfied with the setting, press the MENU button toreturn to the previous menu or press the EXIT button to return tonormal viewing.
POWER
P.MODETV SELECT
BN68-448D-03Eng 10/29/03 1:09 AM Page 24

English-25
Changing the Colour Tone
You can select the most comfortable colour tone to your eye.
1 Press the MENU button.
Result: The main menu is displayed.
2 Press the or❷ button to select Picture.Result: The options available in the Picture group are displayed.
3 Press the ENTER or ❿ button.
4 Press the or❷ button to select Colour tone and pressENTER or ❿ button. Select the required option by pressing the
or❷ button repeatedly. The following options are available:Cool2 - Cool1 - Normal - Warm1 - Warm2
5 When you are satisfied with your choice, press the EXIT button toreturn to normal viewing.
Changing the Picture Size
You can select the picture size which best corresponds to yourviewing requirements.
1 Press the MENU button.Result: The main menu is displayed.
2 Press the or❷ button to select Picture.Result: The options available in the Picture group are displayed.
3 Press the ENTER or ❿ button.
4 Press or❷ button to select Size and press the ENTER or ❿button.
5 Select the required option by pressing the or❷ button repeatedly.The following options are available:
AutoWide - Wide - Panorama - Zoom1 - Zoom2 - 4:3
You can select these options by simply pressing theP.SIZE(Picture Size) button on the remote control.
This feature does not work when the PIP feature is activating.
When the picture size is selected to Auto Wide, the PIP featurewill work.
STILL S.MODE DUAL I-II SURROUND
BN59-00373
P.SIZE SLEEP PIP
DNIe PC SWAP P
REW STOP PLAY/PAUSE FF
BN68-448D-03Eng 10/29/03 1:09 AM Page 25
English-26
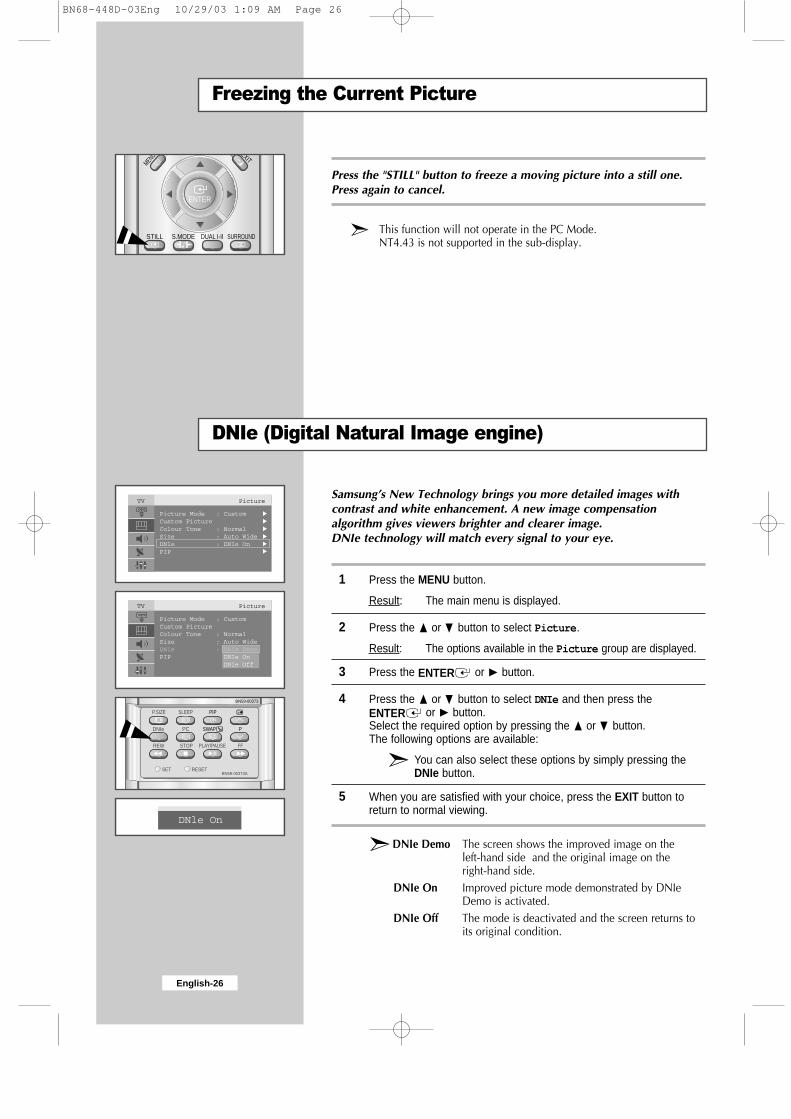
Freezing the Current Picture
DNIe (Digital Natural Image engine)
Press the "STILL" button to freeze a moving picture into a still one.Press again to cancel.
This function will not operate in the PC Mode.NT4.43 is not supported in the sub-display.
Samsung’s New Technology brings you more detailed images withcontrast and white enhancement. A new image compensationalgorithm gives viewers brighter and clearer image.DNIe technology will match every signal to your eye.
1 Press the MENU button.
Result: The main menu is displayed.
2 Press the or❷ button to select Picture.
Result: The options available in the Picture group are displayed.
3 Press the ENTER or ❿ button.
4 Press the or❷ button to select DNIe and then press theENTER or ❿ button.Select the required option by pressing the or❷ button. The following options are available:
You can also select these options by simply pressing theDNIe button.
5 When you are satisfied with your choice, press the EXIT button toreturn to normal viewing.
DNIe Demo The screen shows the improved image on the left-hand side and the original image on the right-hand side.
DNIe On Improved picture mode demonstrated by DNIeDemo is activated.
DNIe Off The mode is deactivated and the screen returns toits original condition.
EXIT
MENU
STILL S.MODE
ENTER
DUAL I-II SURROUND
BN59-00373
BN59-00373ASET RESET
P.SIZE SLEEP PIP
DNIe PC SWAP P
REW STOP PLAY/PAUSE FF
BN68-448D-03Eng 10/29/03 1:09 AM Page 26

English-27
Viewing the Picture In Picture (PIP)
You can display a sub picture within the main picture of set program orvideo input. In this way you can watch or monitor set program or thevideo input from any connected equipment while watching set or othervideo input.
1 Press the MENU button.
Result: The main menu is displayed.
2 Press the or❷ button to select Picture.
Result: The options available in the Picture group are displayed.
3 Press the ENTER or ❿ button.
4 Press the or❷ button to select PIP and then press the ENTERor ❿button.
Result: The options available in the PIP menu are displayed.
5 Press the ENTER or ❿ button again. Select On by pressing the or❷ button and then press theENTER or ❿ button.
6 Press the or❷ button to select TV/Video and press ENTERor ❿ button. Select a source of the sub picture by pressing the or❷ button and press the ENTER or ❿ button.
Result: The sources are displayed in the following order: TV - AV1 - AV2 - AV3 - S-Video - Comp1 - Comp2
7 To interchange the main picture and the sub picture, select SWAPoption and press the ENTER or ❿ button.
Result: The main picture and the sub picture are interchanged.
8 Press the or❷ button to select Size of sub picture and then pressthe ENTER or ❿ button.Select a size of the sub picture by pressing the or❷ button andthen press the ENTER or ❿ button.
Result: The sizes are displayed in the following order:
Small - Double1 - Double2
BN68-448D-03Eng 10/29/03 1:09 AM Page 27

9 Press the or❷ button to select Position and then press theENTER or ❿ button. Select the position of sub picture by pressing the or❷ button andthen press the ENTER or ❿ button.
Result: You can move the sub picture counterclockwise.
When the size of sub picture is set to Double1 or Double2,this feature does not work.
10 Press the or❷ button to select Prog.No. You can select the channel that you want to view through sub pictureby pressing the or❷ button.
Result: The memorized Prog.No is displayed.
11 To return to normal viewing press the EXIT button.
Remote-control functions while "PIP" is "On":
Features Description
PIP ON Used to operate ON/OFF function of PIPdirectly.
SWAP Used to interchange the main picture and the sub picture.
When the main picture is in the Videomode and the sub picture is in the setmode, you might not hear the sound ofmain picture when pressing the SWAPbutton after changing the sub picturechannel. At this time, reselect the mainpicture channel.
/ Used to select the channel of sub picture.
PIP Settings
English-28
Viewing the Picture In Picture (PIP) (continued)
BN59-00373
BN59-00373ASET RESET
P.SIZE SLEEP PIP
DNIe PC SWAP P
REW STOP PLAY/PAUSE FF
Sub TV AV1 AV2 AV3 S-Video COMP1 COMP2 PC/DVIMain
TV
AV1
AV2
AV3
S-Video
COMP1
COMP2
PC/DVI
O
O
O
O
O
O
O
O
O
X
O
O
O
X
X
O
O
O
X
O
O
O
O
O
O
O
O
X
O
O
O
O
O
O
O
O
X
O
O
O
O
X
O
O
O
X
X
O
O
X
O
O
O
X
X
O
X
X
X
X
X
X
X
X
BN68-448D-03Eng 10/29/03 1:09 AM Page 28
English-29
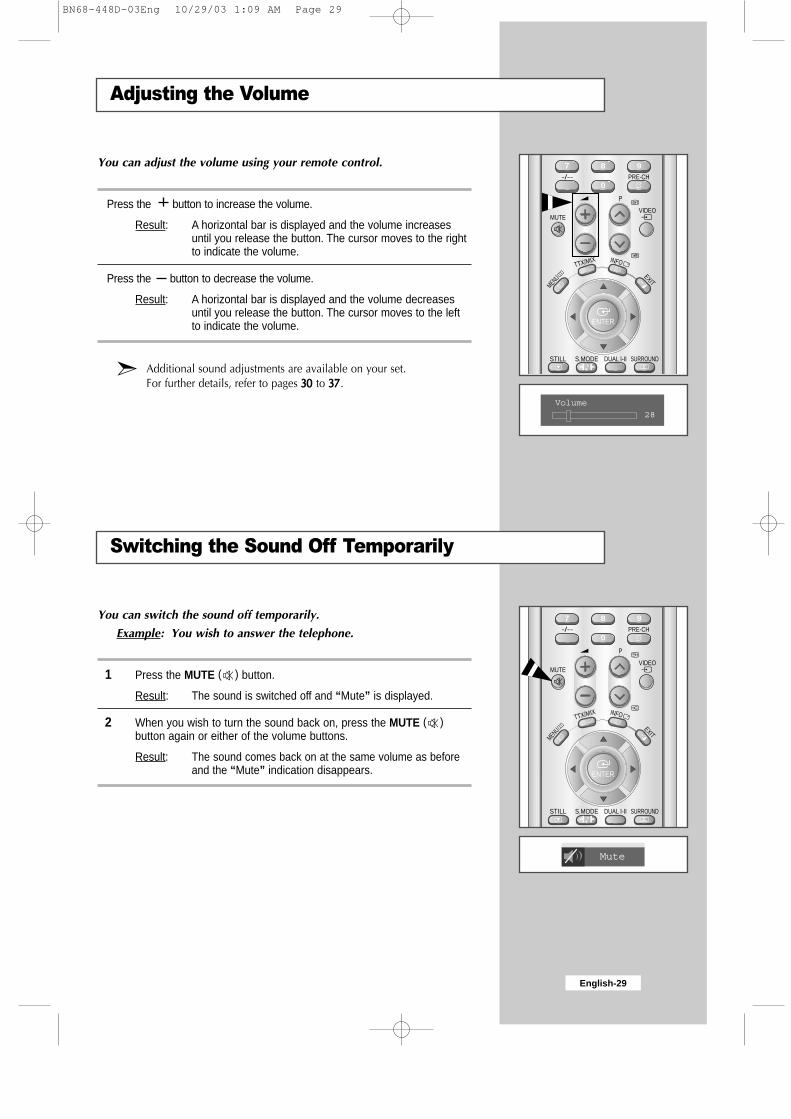
Adjusting the Volume
Switching the Sound Off Temporarily
You can adjust the volume using your remote control.
Press the button to increase the volume.
Result: A horizontal bar is displayed and the volume increasesuntil you release the button. The cursor moves to the rightto indicate the volume.
Press the button to decrease the volume.
Result: A horizontal bar is displayed and the volume decreasesuntil you release the button. The cursor moves to the leftto indicate the volume.
Additional sound adjustments are available on your set.For further details, refer to pages 30 to 37.
You can switch the sound off temporarily.
Example: You wish to answer the telephone.
1 Press the MUTE ( ) button.
Result: The sound is switched off and “Mute” is displayed.
2 When you wish to turn the sound back on, press the MUTE ( )button again or either of the volume buttons.
Result: The sound comes back on at the same volume as beforeand the “Mute” indication disappears.
PRE-CH-/--
MUTE
P
VIDEO
TTX/MIX INFO
EXIT
MENU
STILL S.MODE
ENTER
DUAL I-II SURROUND
7 8 9
0
PRE-CH-/--
MUTE
P
VIDEO
TTX/MIX INFO
EXIT
MENU
STILL S.MODE
ENTER
DUAL I-II SURROUND
7 8 9
0
BN68-448D-03Eng 10/29/03 1:09 AM Page 29
English-30
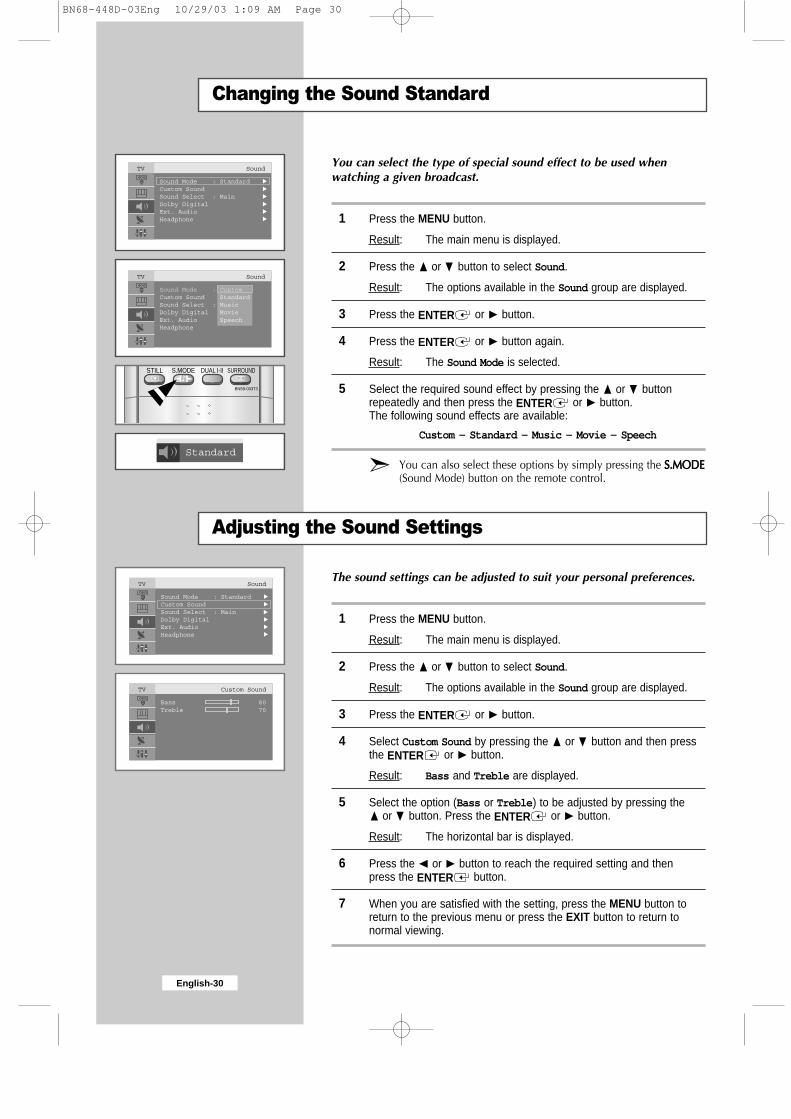
Changing the Sound Standard
Adjusting the Sound Settings
You can select the type of special sound effect to be used whenwatching a given broadcast.
1 Press the MENU button.
Result: The main menu is displayed.
2 Press the or❷ button to select Sound.
Result: The options available in the Sound group are displayed.
3 Press the ENTER or ❿ button.
4 Press the ENTER or ❿ button again.
Result: The Sound Mode is selected.
5 Select the required sound effect by pressing the or❷ buttonrepeatedly and then press the ENTER or ❿ button. The following sound effects are available:
Custom - Standard - Music - Movie - Speech
You can also select these options by simply pressing the S.MODE(Sound Mode) button on the remote control.
The sound settings can be adjusted to suit your personal preferences.
1 Press the MENU button.
Result: The main menu is displayed.
2 Press the or❷ button to select Sound.
Result: The options available in the Sound group are displayed.
3 Press the ENTER or ❿ button.
4 Select Custom Sound by pressing the or❷ button and then pressthe ENTER or ❿ button.
Result: Bass and Treble are displayed.
5 Select the option (Bass or Treble) to be adjusted by pressing the or❷ button. Press the ENTER or ❿ button.
Result: The horizontal bar is displayed.
6 Press the or ❿ button to reach the required setting and thenpress the ENTER button.
7 When you are satisfied with the setting, press the MENU button toreturn to the previous menu or press the EXIT button to return tonormal viewing.
STILL S.MODE DUAL I-II SURROUND
BN59-00373
BN68-448D-03Eng 10/29/03 1:09 AM Page 30

English-31
Listening to the Sound of the Sub Picture
During the PIP feature is activating, you can listen to the sound of thesub picture.
1 Press the MENU button.
Result: The main menu is displayed.
2 Press the or❷ button to select Sound.
Result: The options available in the Sound group are displayed.
3 Press the ENTER or ❿ button.
4 Press the or❷ button to select Sound Select and then press theENTER or ❿ button.
Result: Main and Sub are displayed.
When the PIP option only be "On", you can select these option.
5 Select the Sub by pressing the or❷ button.Press the ENTER or ❿ button.
Result: You can listen to the sound of the sub picture.
To listen the sound of current main picture, set to Main.
BN68-448D-03Eng 10/29/03 1:09 AM Page 31

English-32
Setting the Dolby Digital Surround
The following Dolby surround settings can be adjusted to suit yourpersonal preferences.
Dolby Pro-Logic II On/Off.
Dynamic range for adjusting the volume Dolby Pro-Logic IIOn/Off during night time viewing.
Speaker setting for Dolby Digital surround.
Activation/Deactivation of test tone to simulate the volumeon each speaker.
Volume level control of the each speaker.
Delay time for the rear speakers (0~15ms).
1 Press the MENU button.Result: The main menu is displayed.
2 Press the or❷ button to select Sound.Result: The options available in the Sound group are displayed.
3 Press the ENTER or ❿ button.
4 Press the or❷ button to select Dolby Digital.Press the ENTER or ❿ button.Result: The option available in the Dolby Digital group are
displayed with Dolby Pro-Logic II selected.
5 Press the ENTER or ❿ button.
6 Select the option (On or Off) by pressing the or❷ button.Press the ENTER or ❿ button.
You can also select these option(Dolby Pro-Logic II On/Off) bysimply pressing the SURROUND button on the remote control.
For further details of output depending on each option, refer to34 page.
7 Press the or❷ button to select Dynamic Range.Press the ENTER or ❿ button. If you wish to adjust the volume for nighttime viewing, select Off bypressing the or❷ button.
8 Press the ENTER or ❿ button.
9 Press the or❷ button to select Speaker Setting.Press the ENTER or ❿ button.Result: The options available in the Speaker Setting group are
displayed with front left selected.
10 Select the speaker (Front Left, Center, Front Right, Rear Right,Rear Left, Sub Woofer) to be adjusted by pressing the
or❷ button.Press the ENTER or ❿ button.
When 'Front Left/Right' is set to 'Large' on the Speaker Setting menu, thesub woofer is automatically turned off.If the sub woofer is switched on, 'Front Left/Right' is automatically set to'Small'.
STILL S.MODE DUAL I-II SURROUND
BN59-00373
BN68-448D-03Eng 10/29/03 1:09 AM Page 32

English-33
Setting the Dolby Digital Surround (continued)
11 Select the speaker size(Front Left, Front Right:Small/Large) andselect On or Off(Center, Rear Right, Rear Left and Sub Woofer)by pressing the or❷ button.Press the ENTER or ❿ button.
12 Press the MENU or button to return to the previous menu.
13 Press the or❷ button to select Level Control.Press the ENTER or ❿ button.Result: The option available in the Level Control group are
displayed with Test Tone selected.
14 Select Test Tone(On/Off) by pressing the or❷ button.Press the ENTER or ❿ button.
15 Select the speaker (Front Left, Center, Front Right, Rear Right,Rear Left, or Sub Woofer) by pressing the or❷ button and adjustLevel Control (-10dB~10dB) by pressing the or ❿ button.Press the ENTER or ❿ button.
16 Press the MENU or button to return to the previous menu.
17 Press the or❷ button to select Time Delay.Press the ENTER or ❿ button.Result: The options available in the Time Delay group are
displayed.
18 Select the speaker (Rear Left and Rear Right) by pressing the or❷ button.
Adjust the Time Delay (0~15ms) of the surround channel by pressingthe or ❿ button.Press the ENTER button.
19 When you are satisfied with the setting, press the MENU button toreturn to the previous menu or press the EXIT button to return tonormal viewing.
TRADEMARKS & LABELS
Sound Mode Trademark on Product License Notice
DTSDigital Surround
(DTS 5.1 decoding inside)
Pro Logic II & Dolby Digital
Manufactured under license from Digital Theater System, Inc. US Pat.No. 5,451,942, 5,956,674, 5,974,380, 5,978,762 and other world-widepatents issued and pending.“DTS” and “DTS Digital Surround” are registered trademarks of DigitalTheater System, Inc. Copyright 1996, 2000 Digital Theater Systems, Inc.All Rights Reserved.
Manufactured under license from Dolby Laboratories.“Dolby”, “Pro Logic”, and the double-D symbol are trademarks ofDolby Laboratories.
BN68-448D-03Eng 10/29/03 1:09 AM Page 33
English-34
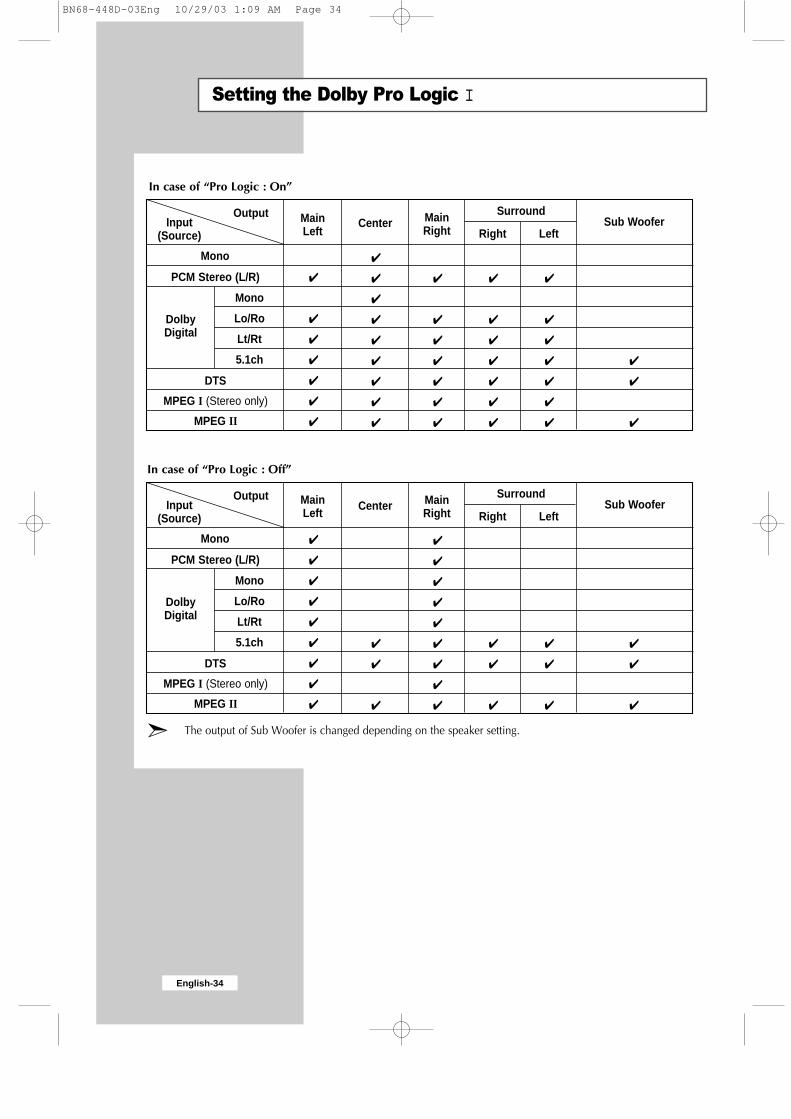
Setting the Dolby Pro Logic II
Mono
Mono
Lo/Ro
Lt/Rt
5.1ch
DolbyDigital
PCM Stereo (L/R)
DTS
MPEG I (Stereo only)
MPEG II
MainLeft
Center
MainRight
Right Left
SurroundSub Woofer
OutputInput
(Source)
Mono
Mono
Lo/Ro
Lt/Rt
5.1ch
DolbyDigital
PCM Stereo (L/R)
DTS
MPEG I (Stereo only)
MPEG II
MainLeft
Center
MainRight
Right Left
SurroundSub Woofer
OutputInput
(Source)
In case of “Pro Logic : On”
In case of “Pro Logic : Off”
The output of Sub Woofer is changed depending on the speaker setting.
BN68-448D-03Eng 10/29/03 1:09 AM Page 34

English-35
Setting the External Digital Sound
You can enjoy Digital sound when the equipment with Digital outputis connected to the television.
1 Press the MENU button.Result: The main menu is displayed.
2 Press the or❷ button to select Sound.Result: The options available in the Sound group are displayed.
3 Press the ENTER or ❿ button.
4 Press the or❷ button to select Ext. Audio.Press the ENTER or ❿ button.Result: The Ext. Audio menu are displayed.
5 Select the required output (Optical, Coaxial) by pressing the or❷ button.
6 Press the ENTER or ❿ button.Result: Off - AV1 - AV2 - AV3 - S-Video - Comp1 - Comp2 -
PC/DVI are displayedSelect the option (Off - AV1 - AV2 - AV3 - S-Video - Comp1 -Comp2 - PC/DVI) by pressing the or❷ button.
7 When you are satisfied with your choice, press the MENU button toreturn to the previous menu or press the EXIT button to return tonormal viewing.
Optical cable: Changes electric pulses into optical signals fortransmission. This transmission system transmitsthe digital audio signals in the S/PDIF format, inwhich the glass conductor transmits the signals inthe form of light.
Coaxial cable: Uses copper wires to transmit the digital signals.
Rear of the TV
Analog Optical
Coaxial
BN68-448D-03Eng 10/29/03 1:09 AM Page 35

English-36
Connecting Headphones
You can connect a set of headphones to your set if you wish to watcha TV programme without disturbing the other people in the room.
Plug a set of headphones into the 3.5mm mini-jack socket on the panel of theset.
Result: The sound is heard through the headphones.
For further details on how to set your headphonepreferences, refer to the section below.
Prolonged use of headphones at a high volume may damage yourhearing.
You will not receive sound from the speakers when you connectheadphones to the system.
You can adjust the headphone settings to suit your preferences.
The following headphones settings are available:
Volume, Balance, Bass, Treble.
1 Press the MENU button.Result: The main menu is displayed.
2 Press the or❷ button to select Sound.Result: The options available in the Sound group are displayed.
3 Press the ENTER or ❿ button.
4 Press the or❷ button to select Headphone.Press the ENTER or ❿ button.Result: The Headphone sound menu (Volume, Balance, Bass,
Treble) is displayed.
To... Then...
Change the option Press the or❷ button.
Change a setting Press the or ❿ button.
Confirm the changes Press the ENTER button.
Adjusting Your Headphone Preferences
BN68-448D-03Eng 10/29/03 1:09 AM Page 36
English-37
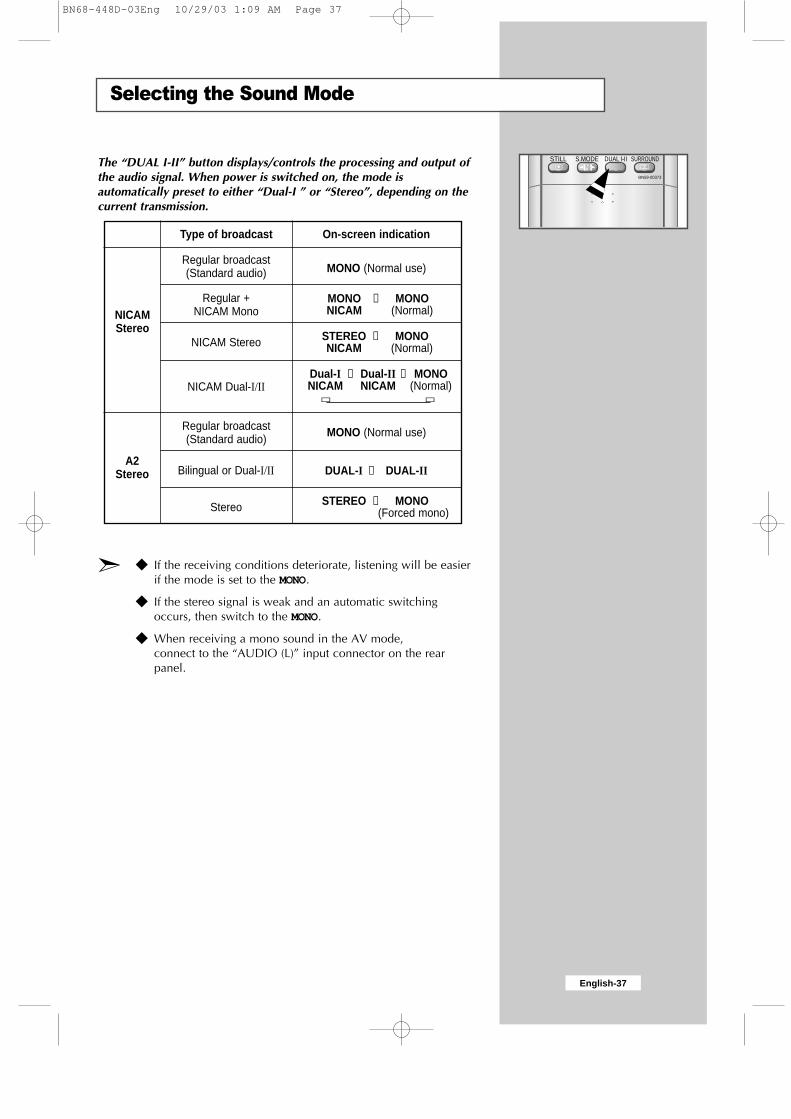
Selecting the Sound Mode
The “DUAL I-II” button displays/controls the processing and output ofthe audio signal. When power is switched on, the mode isautomatically preset to either “Dual-I ” or “Stereo”, depending on thecurrent transmission.
If the receiving conditions deteriorate, listening will be easierif the mode is set to the MONO.
If the stereo signal is weak and an automatic switchingoccurs, then switch to the MONO.
When receiving a mono sound in the AV mode,connect to the “AUDIO (L)” input connector on the rearpanel.
Type of broadcast
Regular broadcast(Standard audio)
Regular +NICAM Mono
NICAM Stereo
NICAM Dual-I/II
Regular broadcast(Standard audio)
Bilingual or Dual-I/II
Stereo
On-screen indication
MONO (Normal use)
MONO ↔ MONONICAM (Normal)
STEREO ↔ MONONICAM (Normal)
MONO (Normal use)
DUAL-I ↔ DUAL-II
STEREO ↔ MONO(Forced mono)
Dual-I → Dual-II → MONO NICAM NICAM (Normal)
NICAMStereo
A2Stereo
→ →
STILL S.MODE DUAL I-II SURROUND
BN59-00373
BN68-448D-03Eng 10/29/03 1:09 AM Page 37

English-38
Setting and Displaying the Current Time
You can set the TV’S clock so that the current time is displayed whenyou press the "INFO" button. You must also set the time if you wish touse the automatic On/Off timers.
If you disconnect the power cord or switch off the power on the frontpanel, you have to set the clock again.
1 Press the MENU button.
Result: The main menu is displayed.
2 Press the or❷ button to select Setup.Press the ENTER or ❿ button
Result: The options available in the Setup group are displayedwith Time selected.
3 Press the ENTER or ❿ button.
Result: The Time menu are displayed with clock selected.
4 Press the ENTER or ❿ button.
5 To... Press the...
Move to Hour or Min or ❿ button
Set the hour or minute or❷ button
6 When you have satisfied with the setting, press the MENU button toreturn to the previous menu or press the EXIT button to return tonormal viewing.
7 To display the... Press the...
Current time and selected audio/video INFO buttonsetting status
P.MODETV SELECT
1 2 3
4 5 6
MUTE
P
VIDEO
TTX/MIX INFO
EXIT
MENU
ENTER
BN68-448D-03Eng 10/29/03 1:09 AM Page 38

English-39
Setting the Sleep Timer
You can select a time period of between 30 and 180 minutes afterwhich the television automatically switches to standby mode.
1 Press the MENU button.
Result: The main menu is displayed.
2 Press the or❷ button to select Setup.Press the ENTER or ❿ button
Result: The options available in the Setup group are displayedwith Time selected.
3 Press the ENTER or ❿ button.
Result: The Time menu are displayed with clock selected.
4 Press the or❷ button to select Sleep timer.Press the ENTER or ❿ button.
5 Press the or❷ button repeatedly and cycle through the presettime intervals (30, 60, 90, 120, 150, 180).
Result: The TV automatically switches to standby mode when thetimer reaches 0.
6 To cancel the sleep timer function, select Set by pressing the or❿ button and then select "Off" by pressing the or❷ button.
You can set the sleep timer by simply pressing the "SLEEP" button on theremote control.
1 Press the SLEEP button on the remote control.
Result: If the sleep timer is not yet set, Off is displayed.Otherwise, the remaining time before which the televisionswitches to Standby mode is displayed.
2 Select the preset time interval for staying on by pressing the SLEEPbutton repeatedly.
BN59-00373
BN59-00373ASET RESET
P.SIZE SLEEP PIP
DNIe PC SWAP P
REW STOP PLAY/PAUSE FF
BN68-448D-03Eng 10/29/03 1:09 AM Page 39

You can set the On/Off timers so that the set will :
Switch on automatically and tune to the channel of yourchoice at the time you select.
Switch off automatically at the time you select.
The first step is to set the television’s clock (refer to “Settingand Displaying the Current Time” on page 38 ).
1 Press the MENU button.
Result: The main menu is displayed.
2 Press the or❷ button to select Setup.Press the ENTER or ❿ button
Result: The options available in the Setup group are displayedwith Time selected.
3 Press the ENTER or ❿ button.
Result: The Time menu are displayed with clock selected.
4 Press the or❷ button to select On timer.Press the ENTER or ❿ button.
Result: The On Time menu are displayed.
5 Set the time, channel and volume level at which you wish the set tobe switched on.
To... Press the...
Move to Hour, Min, Prog, and Volume or ❿ button
Set Hour, Minute, Prog.No, and or❷ buttonVolume level
Move to Set or ❿ button
Select On to enable above setting or❷ button
6 Press the or❷ button to select Off timer.In the same way, set the time at which you wish the set tobe switched off automatically.
7 To display the... Press the...
Current time and selected audio/video INFO buttonsetting status
English-40
Switching the Television On and Off Automatically
P.MODETV SELECT
1 2 3
4 5 6
MUTE
P
VIDEO
TTX/MIX INFO
EXIT
MENU
ENTER
BN68-448D-03Eng 10/29/03 1:09 AM Page 40

English-41
Setting the Blue Screen Mode
If no signal is being received or the signal is very weak, a blue screenautomatically replaces the noisy picture background.If you wish to continue viewing the poor picture, you must set the"Blue screen" mode to "Off".
1 Press the MENU button.
Result: The main menu is displayed.
2 Press the or❷ button to select Setup.Press the ENTER or ❿ button.
Result: The options available in the Setup group are displayed.
3 Press the or❷ button to select Blue Screen.Press the ENTER or ❿ button.
4 Select the required option (On or Off) by pressing the or❷button.
5 Press the EXIT button to return to normal viewing.
BN68-448D-03Eng 10/29/03 1:09 AM Page 41
English-42
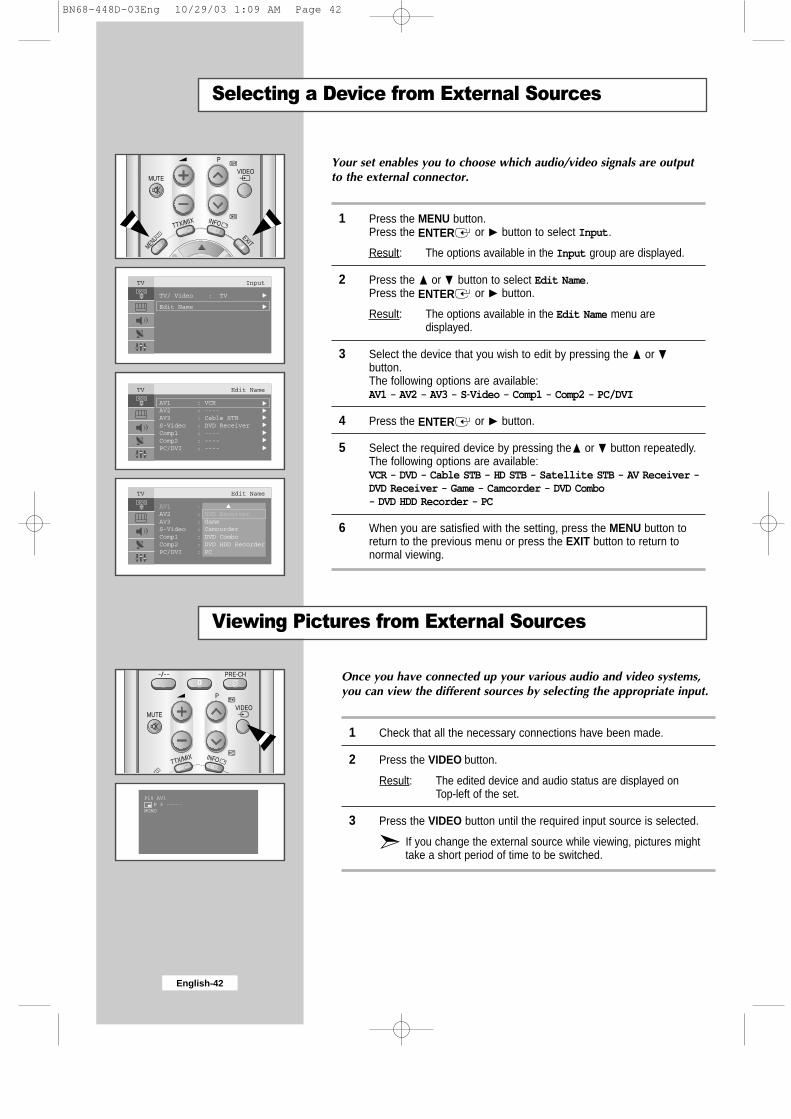
Selecting a Device from External Sources
Your set enables you to choose which audio/video signals are outputto the external connector.
1 Press the MENU button.Press the ENTER or ❿ button to select Input.
Result: The options available in the Input group are displayed.
2 Press the or❷ button to select Edit Name.Press the ENTER or ❿ button.
Result: The options available in the Edit Name menu aredisplayed.
3 Select the device that you wish to edit by pressing the or❷button.The following options are available:AV1 - AV2 - AV3 - S-Video - Comp1 - Comp2 - PC/DVI
4 Press the ENTER or ❿ button.
5 Select the required device by pressing the or❷ button repeatedly.The following options are available:VCR - DVD - Cable STB - HD STB - Satellite STB - AV Receiver -DVD Receiver - Game - Camcorder - DVD Combo- DVD HDD Recorder - PC
6 When you are satisfied with the setting, press the MENU button toreturn to the previous menu or press the EXIT button to return tonormal viewing.
Once you have connected up your various audio and video systems,you can view the different sources by selecting the appropriate input.
1 Check that all the necessary connections have been made.
2 Press the VIDEO button.
Result: The edited device and audio status are displayed on Top-left of the set.
3 Press the VIDEO button until the required input source is selected.
If you change the external source while viewing, pictures mighttake a short period of time to be switched.
PRE-CH-/--
MUTE
P
VIDEO
TTX/MIX INFO
0
Viewing Pictures from External Sources
MUTE
P
VIDEO
TTX/MIX INFO
EXIT
MENU
BN68-448D-03Eng 10/29/03 1:09 AM Page 42

English-43
Setting up Your PC Software (Based on Widows 2000 or XP)
The Windows display-settings for a typical computer are shown below. But the actual screens on yourPC will probably be different, depending upon your particular version of Windows and your particularvideo card. But even if your actual screens look different, the same, basic set-up information will applyin almost all cases. (If not, contact your computer manufacturer or Samsung Dealer.)
1 First, click on “Settings” on the Windows start menu.
While “Settings” is highlighted, move the cursor sothat “Control Panel” is highlighted.
3 Navigate to the “Settings” tab on the display dialog-box.
The correct setting of size (resolution)- 1280 x 768 pixels
If a vertical-frequency option exists on your display settingsdialog box, the correct value is “60” or “60 Hz”. Otherwise, just click “OK” and exit the dialog box.(Refer to 'Display Mode' on page 57)
2 When the control panel screen appears,click on “Display” and a display dialog-box will appear.
BN68-448D-03Eng 10/29/03 1:09 AM Page 43

English-44
Adjusting the PC Screen Automatically
Press the PC button on the remote control to select the PC mode. This function does not work in DVI-Digital mode.
1 Press the MENU button.
Result: The main menu is displayed.
2 Press the or❷ button to select Setup. Press ENTER or ❿ button.
Result: The options available in the Setup group are displayed.
3 Press the or❷ button to select PC Setup.Press the ENTER or ❿ button.
Result: The options available in the PC Setup menu are displayed.
4 Press the or❷ button to select Auto Adjustment.Press the ENTER or ❿ button.
Result: After the PC screen twists during the auto adjustmentprocedure, the screen quality and position areautomatically adjusted.
Auto adjustment allows the PC screen of set to self-adjust to theincoming PC video signal.The values of fine, coarse and position are adjusted automatically.
BN59-00373
BN59-00373ASET RESET
P.SIZE SLEEP PIP
DNIe PC SWAP P
REW STOP PLAY/PAUSE FF
BN68-448D-03Eng 10/29/03 1:09 AM Page 44

English-45
Coarse and Fine Tuning of the Image
Press the PC button on the remote control to select the PC mode. This function does not work in DVI-Digital mode.
1 Press the MENU button.
Result: The main menu is displayed.
2 Press the or❷ button to select Setup. Press ENTER or ❿ button.
Result: The options available in the Setup group are displayed.
3 Press the or❷ button to select PC Setup.Press the ENTER or ❿ button.
Result: The options available in the PC Setup menu are displayed.
4 Press the ENTER or ❿ button again.
Result: The Image Lock menu is selected.
5 Press the or❷ button to select Coarse or Fine.Press the ENTER or ❿ button.
Result: The horizontal bar is displayed.
6 Press the or ❿ button to adjust the screen quality. Vertical stripes may appear or the picture may become blurry.
7 When you are satisfied with the settings, press the MENU button toreturn to the previous menu or press the EXIT button to return tonormal viewing.
The purpose of picture quality adjustment is to remove or reducepicture noise.If the noise is not removed by Fine tuning alone, then adjust thefrequency as best as possible (coarse) and Fine tune again.After the noise has been reduced, re-adjust the picture so that it isaligned on the center of screen.
BN59-00373
BN59-00373ASET RESET
P.SIZE SLEEP PIP
DNIe PC SWAP P
REW STOP PLAY/PAUSE FF
BN68-448D-03Eng 10/29/03 1:09 AM Page 45

English-46
Changing the Image Position
1 Press the MENU button.
Result: The main menu is displayed.
2 Press the or❷ button to select Setup.Press ENTER or ❿ button.
3 Press the or❷ button to select PC Setup.Press the ENTER or ❿ button.
Result: The options available in the PC Setup menu are displayed.
4 Press the or❷ button to select Position.Press the ENTER or ❿ button.
Result: You can adjust the image Position.
5 Press the or ❿ button to adjust horizontal position.Press the or❷ button to adjust vertical position.
6 Press MENU button to return to the previous menu or press the EXITbutton to return to normal viewing.
Initializing the Image Settings
Press the PC button on the remote control to select the PC mode.
This function does not work in DVI-Digital mode.
1 Press the MENU button.
Result: The main menu is displayed.
2 Press the or❷ button to select Setup. Press the ENTER or ❿ button.
3 Press the or❷ button to select PC Setup.Press the ENTER or ❿ button.
Result: The options available in the PC Setup menu are displayed.
4 Press the or❷ button to select Image Reset. Press the ENTER or ❿ button.
Result: You can initialize all image settings (Image Lock, Position)to the factory default values.
You can replace all image settings with the factory default values.
Press the PC button on the remote control to select the PC mode. This function does not work in DVI-Digital mode.
BN59-00373
BN59-00373ASET RESET
P.SIZE SLEEP PIP
DNIe PC SWAP P
REW STOP PLAY/PAUSE FF
BN59-00373
BN59-00373ASET RESET
P.SIZE SLEEP PIP
DNIe PC SWAP P
REW STOP PLAY/PAUSE FF
BN68-448D-03Eng 10/29/03 1:09 AM Page 46

English-47
Selecting the DVI mode
Press the PC button on the remote control to select the PC mode.
1 Press the MENU button.
Result: The main menu is displayed.
2 Press the or❷ button to select Setup.Press the ENTER or ❿ button.
3 Press the or❷ button to select PC Setup.Press the ENTER or ❿ button.
Result: The options available in the PC Setup menu are displayed.
4 Press the or❷ button to select DVI Select.Press the ENTER or ❿ button.
5 Press the or❷ button to select DVI-Analog or DVI-Digital.
6 Press MENU button to return to the previous menu or press the EXITbutton to return to normal viewing.
You can select the DVI mode(DVI-Analog or DVI-Digital)according tothe pc input source(video board, video card or graphics card)
BN59-00373
BN59-00373ASET RESET
P.SIZE SLEEP PIP
DNIe PC SWAP P
REW STOP PLAY/PAUSE FF
BN68-448D-03Eng 10/29/03 1:09 AM Page 47

English-48
Teletext Decoder
Most set channels carry “teletext”, pages of written information thatprovide information such as:
Television programme times News bulletins and Weather forecasts Sports results Subtitles for the hard of hearing
The teletext pages are organized according to six categories:
Part Contents
A Selected page number.
B Broadcasting station identity.
C Current page number or search status.
D Date and time.
E Text.
F Status information.
Displaying the Teletext Information
You can display teletext information at any time, but signal receptionmust be good. Otherwise:
Information may be missing Some pages may not be displayed
To activate the teletext mode and display the contents page:
1 Using the P ( ) or P ( ) button, select the channel providingthe teletext service.
2 Press the TTX/MIX ( / ) button to activate the teletext mode.
Result: The contents page is displayed. It can be redisplayed atany time by pressing the INDEX ( ) button.
3 To display the actual broadcast simultaneously with the teletext page,press the TTX/MIX ( / ) button.
4 To return to normal viewing, press the CANCEL ( ) button.
5 Press the TTX/MIX ( / ) button again to exit from the TTX display.
If any broken character appears while TTX is being viewed,make sure that the TTX language is identical with thelanguage in the “Setup” menu mode. If both languages aredifferent, select the same language with the TTX language onthe “Setup” menu.
MUTE
P
VIDEO
TTX/MIX INFO
EXIT
MENU
STILL S.MODE
ENTER
DUAL I-II SURROUND
BN59-00373
BN59-00373ASET RESET
P.SIZE SLEEP PIP
DNIe PC SWAP P
REW STOP PLAY/PAUSE FF
BN68-448D-03Eng 10/29/03 1:09 AM Page 48

Press the number buttons on the remote control to enter the pagenumber directly:
1 Enter the three-digit page number listed in the contents by pressing thecorresponding numeric buttons.
Result: The current page counter is incremented and the page isthen displayed.
2 If the selected page is linked with several secondary pages, thesecondary pages are displayed in sequence. To freeze the display ona given page, press the HOLD ( ). Press the HOLD ( ) buttonagain to resume.
3 Using the various display options:
To display... Press the...
Both teletext information and TTX/MIX ( / )the normal broadcast
Hidden text REVEAL ( )(answers to quiz games, for example)
The normal screen REVEAL ( ) again
A secondary page, SUB-PAGE ( )by entering its 4-digit number
The next page PAGE UP ( )
The previous page PAGE DOWN ( )
Double-size letters in the: SIZE ( )• Upper half of the screen Once• Lower half of the screen Twice
Normal screen Three times
English-49
MUTE
P
VIDEO
TTX/MIX INFO
EXIT
MENU
STILL S.MODE
ENTER
DUAL I-II SURROUND
BN59-00373
BN59-00373ASET RESET
P.SIZE SLEEP PIP
DNIe PC SWAP P
REW STOP PLAY/PAUSE FF
Selecting a Specific Teletext Page
BN68-448D-03Eng 10/29/03 1:09 AM Page 49

English-50
Using FLOF to Select a Teletext Page
The various topics included in the teletext pages are color-coded, andcan be selected by pressing the colored buttons on the remote control.
1 Display the teletext contents page by pressing the TTX/MIX ( / )button.
2 Press the colored button corresponding to the topic that you wish toselect (The available topics are listed on the status information line).
Result: The page is displayed with additional color-codedinformation that can be selected in the same way.
3 To display the: Press the:
Previous page Red button.
Next page Green button.
4 When you have finished, press the CANCEL( ) button to return to thenormal broadcast.
MUTE
P
VIDEO
TTX/MIX INFO
EXIT
MENU
STILL S.MODE
ENTER
DUAL I-II SURROUND
BN59-00373
BN59-00373ASET RESET
P.SIZE SLEEP PIP
DNIe PC SWAP P
REW STOP PLAY/PAUSE FF
BN68-448D-03Eng 10/29/03 1:09 AM Page 50

English-51
Troubleshooting: Before Contacting Service Personnel
Before contacting Samsung after-sales service, perform the following simple checks.If you cannot solve the problem using the instructions below, note the model and serial number of yourset and contact your local dealer.
No sound or picture
Normal picture but no sound
No picture or black and white picture
Sound and picture interference
Blurred or snowy picture,distorted sound
Remote control malfunctions
“Check Signal Cable!” message isdisplayed.
On PC mode, “Not Supported Mode”message is displayed.
The image is too light or too dark.
On PC mode, horizontal bars appear toflicker, jitter or shimmer on the image.
On PC mode, vertical bars appear toflicker, jitter or shimmer on the image.
On PC mode, screen is black and power indicator light blinks every 1seconds
On PC mode, image is not stable and may appear to vibrate.
On PC mode, image is not centered on the screen.
Check that the mains lead has been connected to a wall socket. Check that you have pressed the POWER ( ) button on the
front of the TV. Check the picture contrast and brightness settings. Check the volume.
Check the volume. Check whether the MUTE ( ) button has been pressed on the
remote control.
Adjust the colour settings. Check that the broadcast system selected is correct.
Try to identify the electrical appliance that is affecting the set andmove it further away.
Plug your set into a different mains socket.
Check the direction, location and connections of your aerial.This interference is often due to the use of an indoor aerial.
Replace the remote control batteries. Clean the upper edge of the remote control (transmission window). Check the battery terminals.
Check that the signal cable is firmly connected to the PC or videosources.
Check that the PC or video sources are turned on.
Check the maximum resolution and the frequency of the videoadapter.
Compare these values with the data in the Display Modes TimingChart.
Adjust the Brightness and Contrast.
Adjust the Fine function.
Adjust the Coarse function and then adjust the Fine function.
The TV is using its power management system. Move the computer’s mouse or press a key on the keyboard.
Check that the display resolution and frequency from yourComputer or video board is an available mode for your set. On yourComputer check: Control Panel, Display, Settings.
If the setting is not correct, use your computer utility programme tochange the display settings.
Your set supports multiscan display functions within thefollowing frequency domain: Horizontal frequency: 30 ~ 61 kHz Vertical frequency: 56 ~ 75 Hz Maximum refresh rate: 1280 X 768@60Hz
Adjust the horizontal and vertical position.
BN68-448D-03Eng 10/29/03 1:09 AM Page 51

English-52
Installing Stand
<A> <B>
1. Lower the TV set in the direction of the arrow (at a right angle) and fix the stand.
2. Use the four screws to tightly fix the stand.
Maintenance of Your LCD TVWARNING: To avoid risk of electric shock, do not disassemble the TV cabinet.
Users cannot service the TV. User maintenance is restricted to cleaning as explained below:
Unplug the LCD TV from the power outlet before cleaning.• To clean your flat panel display screen, lightly dampen a soft, clean cloth with water or mild detergent.
If possible, use a special screen cleaning tissue or solution suitable for the antistatic coating.• To clean the LCD TV cabinet, use a cloth lightly dampened with a mild detergent.• Never use flammable cleaning material to clean your LCD TV or any other electrical apparatus.
BN68-448D-03Eng 10/29/03 1:09 AM Page 52

English-53
Using the Anti-Theft Kensington Lock
1. Insert the locking device into the Kensington slot on the LCD TV (figure 1), and turn it in the locking direction(figure 2).
2. Connect the Kensington lock cable.
3. Fix the Kensington lock to a desk or a heavy stationary object.
The Kensington lock is a device used to physically fix the system when using it in a public place. Thelocking device has to be purchased separately. The appearance and locking method may differ from theillustration depending on the manufacturer. Please refer to the manual provided with the Kensington lockfor proper use.
Figure 2
Figure 1
Cable
<Optional>
BN68-448D-03Eng 10/29/03 1:09 AM Page 53

English-54
How to Install the Wall Bracket
How to Adjust the Angle of the Bracket
List of Contents
Wall bracket Main body bracket Screws
1 Wall bracket plate
2 Assembly hinges(Make sure they are a
left/right pair.)
1 Bracket bar
2 Brackets (Left and Right)(The two brackets are interchangeable.)
Plastic screw anchors: 4
Screws: 8
Screws: 4
Please adjust the angle of the bracket to 0 degrees before you fix it to the wall.
Captive screws
Make sure you put the righthinge to the right side of thebracket and vice versa.
Be aware of the correct installation directionof the bracket when you set the angle to 30and 32 degrees. (The direction for 30 and 32degrees is indicated on the bracket surface.)When you first open the box, the bracket isnot assembled.Put the left and right brackets in the directionof the arrow and tighten the captive screws.
1. Attach the LCD TV onto the wall bracket.(Follow the instructions below.)
2. Pull the upper part of the LCD TV fixed tothe bracket forward in the direction of thearrow and adjust the angle.
3. You can adjust the angle to your likingbetween 0°~20°(±2°).
BN68-448D-03Eng 10/29/03 1:09 AM Page 54

English-55
How to Install the Wall Bracket
How to Attach the LCD TV to the Bracket
The LCD TV in the picture may not look exactly like yours. (You assemble the plastic screw anchors and the screws the same way regardless of the model of your TV.)
Assemble the main body bracket as in thepictures in 2. and below.
3
Put the four holders on the back of the TVinto the holes on the wall bracket, (1) lowerthe TV, and (2) hang the TV on the bracket.Fasten the TV securely to the wall bracket withstickscrews as in (3) so that the two will notseparate.
4
Assemble the plastic screw anchors and the screws. (See the picture below.)
1
Assemble the main body bracket as belowand put the plastic screw anchors in.
2
LCD TV
Wall bracketWall
1) Attach the plastic screw anchors to each of the left/right brackets as in 1.
2) Assemble the bracket bars to the left/right brackets as in the picture on the left.
They are left-right and upper-lower symmetry and the assembly direction does not matter.
Warning1. Installing a wall bracket must be done by a
qualified professional installer.2. After you hang the LCD TV on the wall
bracket, check from both sides to see if theplastic screw anchors are securely inplace.
3. Be careful not to get your fingers caughtduring installation or while adjusting theangle of the bracket.
4. The LCD TV may fall from the wall andhurt someone if the wall bracket is notattached securely to the wall. Make surethe bracket is screwed tightly to the wall.
BN68-448D-03Eng 10/29/03 1:09 AM Page 55

English-56
Technical and Environmental Specifications
Model Name LW32A23W LW40A23W
PanelSize 32" Diagonal 40" DiagonalDisplay Size 687.36 (H) x 412.42 (V) mm 871.68 (H) x 523.008 (V) mmType a-si TFT active matrixPixel Pitch 0.537 (H) x 0.537 (V) mm 0.681 (H) x 0.681 (V) mmViewing Angle 170/170 (H/V)
FrequencyHorizontal 30 ~ 61 kHzVertical 56 ~ 75 HzDisplay Colour 16,777,216 colours
Display ResolutionMaximum Mode 1280 x 768 @ 60 Hz
Input SignalSync. H/V Separate, TTL, P. or N.Video Signal 0.7 Vp-p @ 75 ohm
TVColour System PAL/SECAM/NTSC 4.3Sound System BG, DK, I, L
VideoColour System PAL/NTSC/SECAMVideo System CVBS, S-VHS, RGB
Scart 1Video Input/Output 1.0 Vp-p @ 75 ohmRGB Input 0.7 Vp-p @ 75 ohmAudio Input/Output 500mVrms
Scart 2Video Input/Output 1.0 Vp-p @ 75 ohmAudio Input/Output 500mVrms
Component Video Input 1.0 Vp-p @ 75 ohmAudio Input 500mVrms
Power SupplyInput AC 100 ~ 250 V (50/60Hz)
Power ConsumptionMaximum 180 W 260 WPower Saving < 1.0 W
Dimension (W x D x H)Body 801.0 x 218.0 x 625.0 mm 988.0 x 317.0 x 740.0 mm With Speaker 1013.0 x 218.0 x 625.0 mm 1230.0 x 317.0 x 740.0 mm
Weightwith stand 22 Kg 32 Kg
BN68-448D-03Eng 10/29/03 1:09 AM Page 56

English-57
Technical and Environmental Specifications
Display Mode (PC/DVI)
Model LW32A23W LW40A23W
Environmental Considerations
Operating Temperature 10 °C to 40 °C (50 °F to 104 °F)Operating Humidity 10% to 80%Storage Temperature -25 °C to 45 °C (- 13 °F to 113 °F)Storage Humidity 5% to 95%
Audio CharacteristicsAudio Input RCA Jack (L, R), 0.5Vrms (-9dB)Audio Input (PC) 3.5Ø Stereo Jack, 0.5Vrms (-9dB)Headphone Output Max. 10mW Output (3.5Ø Stereo Jack, 32Ω)Frequency RF: 80Hz ~ 15kHz (at- 3dB)Response A/V: 80Hz ~ 20kHz (at- 3dB)
Both screen position and size will vary depending on the type of PC monitor and its resolution.The table below shows all of the display modes that are supported:
Mode Resolution Horizontal Vertical Pixel Clock Sync PolarityFrequency (kHz) Frequency (Hz) Frequency (MHz) (H/V)
MAC 640 x 480 35.000 66.667 30.240 - / -832 x 624 49.726 74.551 49.500 + /+
IBM 640 x 480 31.469 59.940 25.175 - / -720 x 400 31.469 70.087 28.322 - / +
VESA 640 x 480 37.861 72.809 31.500 - / -640 x 480 37.500 75.000 31.500 - / -800 x 600 37.879 60.317 40.000 + /+800 x 600 48.077 72.188 50.000 + /+800 x 600 46.875 75.000 49.500 + /+1024 x 768 48.364 60.000 65.000 - / -1024 x 768 56.476 70.069 75.000 - / -1024 x 768 60.023 75.029 78.750 + /+
GTF 1280 x 768 47.700 60.000 80.136 - / +
The interlace mode is not supported. The set might operate abnormally if a non-standard video format is selected. The 4:3 mode does not work with input signals from "720 X 400". The DVI mode does not support "1024 X 768" (85Hz).
BN68-448D-03Eng 10/29/03 1:09 AM Page 57

English-58
Pin Configurations
Pin Description
1 Rx 2-
2 Rx 2+
3 Grounding
4 No connection
5 No connection
6 DDC Clock (SCL)
7 DDC Data (SDA)
8 Analog Vertical Sync
9 Rx 1-
10 Rx 1+
11 Grounding
12 No connection
13 No connection
14 DDC Input Power (+5V)
15 Self-Raster
Pin Description
16 Output Signal Connection
17 Rx 0-
18 Rx 0+
19 Grounding
20 No connection
21 No connection
22 Grounding
23 Rx C-
24 Rx C+
25(C3) Analog (Blue)
26(C5) Analog Grounding
27(C4) Analog Horizontal sync.
28(C2) Analog (Green)
29(C5) Analog Grounding
30(C1) Analog (Red)
DVI connector
BN68-448D-03Eng 10/29/03 1:09 AM Page 58

English-59
Wiring the Mains Power Supply Plug (UK Only)
IMPORTANT NOTICEThe mains lead on this equipment is supplied with a moulded plug incorporating a fuse. The value of the fuseis indicated on the pin face of the plug and, if it requires replacing, a fuse approved to BSI1362 of the samerating must be used. Never use the plug with the fuse cover omitted if the cover is detachable.If a replacement fuse cover is required, it must be of the same colour as the pin face of the plug. Replacementcovers are available from your dealer. If the fitted plug is not suitable for the power points in your house or thecable is not long enough to reach a power point, you should obtain a suitable safety approved extension leador consult your dealer for assistance. However, if there is no alternative to cutting off the plug, remove the fuseand then safely dispose of the plug. Do NOT connect the plug to a mains socket as there is a risk of shockhazard from the bared flexible cord.
IMPORTANTThe wires in the mains lead are coloured in accordance with the following code:
BLUE - NEUTRAL BROWN - LIVEAs these colours may not correspond to the coloured markings identifying the terminals in your plug, proceed as follows:The wire coloured BLUE must be connected to the terminal marked with the letter N or coloured BLUE orBLACK. The wire coloured BROWN must be connected to the terminal marked with the letter L or colouredBROWN or RED.
WARNING: DO NOT CONNECT EITHER WIRE TO THE EARTH TERMINAL, WHICH IS MARKEDWITH THE LETTER E OR BY THE EARTH SYMBOL , OR COLOURED GREEN ORGREEN AND YELLOW.
BN68-448D-03Eng 10/29/03 1:09 AM Page 59

Setting Up Your Remote Control
English-60
After it has been set up properly, your remote control can operate infour different modes: TV, VCR, Cable, or DVD. Pressing thecorresponding button on the remote control allows you to switchbetween these modes, and control whichever piece of equipment youchoose.
NoteThe remote control might not be compatible with all DVD Players,VCRs and Cable boxes.
Setting Up the Remote to Operate Your VCR
1 Turn off your VCR.
2 Press the SELECT button and make sure that the VCR LED isilluminated.
3 Press the SET button on your TV’s remote control.
4 Using the number buttons on your remote control, enter three digitsof the VCR code listed on page 63 of this manual for your brand ofVCR. Make sure you enter three digits of the code, even if the firstdigit is a “0”. (If more than one code is listed, try the first one.)
5 Press the Power button on the remote control. Your VCR should turn on if your remote is set up correctly.
If your VCR does not turn on after set up, repeat steps 2, 3, and 4,but try one of the other codes listed for your brand of VCR. If no other codes are listed, try each VCR code, 000 through 089.
Note on Using Remote Control Modes: VCRWhen your remote control is in “VCR” mode, the volume buttons still control your TV’s volume.
POWER
P.MODETV SELECT
PRE-CH-/--
MUTE
P
VIDEO
TTX/MIX INFO
EXIT
MENU
STILL S.MODE
ENTER
DUAL I-II SURROUND
BN59-00373
1 2 3
4 5 6
7 8 9
0
BN59-00373ASET RESET
P.SIZE SLEEP PIP
DNIe PC SWAP P
REW STOP PLAY/PAUSE FF
BN68-448D-03Eng 10/29/03 1:09 AM Page 60

Setting Up Your Remote Control
English-61
Setting Up the Remote to Operate Your Cable Box
1 Turn off your cable box.
2 Press the SELECT button and make sure that the Cable LED isilluminated.
3 Press the SET button on your TV’s remote control.
4 Using the number buttons on your remote control, enter three digitsof the cable box code listed on page 63 of this manual for yourbrand of cable box. Make sure you enter three digits of the code,even if the first digit is a “0”.If there is more than one code listed, try the first one.
5 Press the Power button on the remote control. Your cable box should turn on if your remote is set up correctly.
If your cable box does not turn on after set up, repeat steps 2, 3, and4, but try one of the other codes listed for your brand of cable box. If noother codes are listed, try each code, 000 through 077.
Note on Using Remote Control Modes: Cable BoxWhen your remote control is in “Cable Box” mode, the volumebuttons still control your TV’s volume.
POWER
P.MODETV SELECT
PRE-CH-/--
MUTE
P
VIDEO
TTX/MIX INFO
EXIT
MENU
STILL S.MODE
ENTER
DUAL I-II SURROUND
BN59-00373
1 2 3
4 5 6
7 8 9
0
BN59-00373ASET RESET
P.SIZE SLEEP PIP
DNIe PC SWAP P
REW STOP PLAY/PAUSE FF
BN68-448D-03Eng 10/29/03 1:09 AM Page 61

English-62
Setting Up Your Remote Control
POWER
P.MODETV SELECT
PRE-CH-/--
MUTE
P
VIDEO
TTX/MIX INFO
EXIT
MENU
STILL S.MODE
ENTER
DUAL I-II SURROUND
BN59-00373
1 2 3
4 5 6
7 8 9
0
BN59-00373ASET RESET
P.SIZE SLEEP PIP
DNIe PC SWAP P
REW STOP PLAY/PAUSE FF
Setting Up the Remote to Operate Your DVD
1 Turn off your DVD.
2 Press the SELECT button and make sure that the DVD LED isilluminated.
3 Press the SET button on your TV’s remote control.
4 Using the number buttons on your remote control, enter three digitsof the DVD code listed on page 63 of this manual for your brand ofDVD. Make sure you enter three digits of the code, even if the firstdigit is a “0”.If there is more than one code listed, try the first one.
5 Press the Power button on the remote control. Your DVD should turn on if your remote is set up correctly.
If your DVD does not turn on after set up, repeat steps 2, 3, and 4,but try one of the other codes listed for your brand of DVD.If no other codes are list-ed, try each code, 000 through 008.
Note on Using Remote Control Modes: DVDWhen your remote control is in “DVD” mode, the volume buttonsstill control your TV’s volume.
BN68-448D-03Eng 10/29/03 1:09 AM Page 62

English-63
AdmiralAiwaAudio DynamicsBell&HowellBroksonicCandleCanonCitizenColortymeCraigCurtis-MathesDaewooDBXDimensiaDynatechElectrohomeEmerson
FisherFunaiGEGo VideoHarman KardonHitachInstant ReplayJC PenneyJCLJVCkenwood
015,088024
022,025011019
016,018,022,054,055,061017,062
016,018,022,054,055,061023
016,021009,016,017,023,024,055,062,073,076003,004,005,006,007,008,022,054,085
009024036
017,018,019,022,024,029,032,036,043,050,051,056,058,066,071,074,076,077,079
011,021,027,028,052,057,067024
016023
014,024,044,045
017
011,014,016,017,023,025,039,044,060,062
011,017,023,025,039,055
011,023,025,039,055
015,016015,016015,016
054012,013,023,031,032,
033,038,044,075,076,077011,012,020,021,042,056
045,051,054012,013,023,031,032,033,038,044,054,070,073
045,051015,016,027,029,034,036,037,040,041,048,049
007008008002006004000
017024,046
024011,035,047,069
015,016,027,029,034,036,037,040,041,048,049026,028,052
015,016008,035,074011,020,021
010,041
000,011,030,052,071,072
054035054066
019,067019,067
025,029,057,058,063039,040,049
059,060015,016,027,029,034,036,037,040,041,048,049
052022,050,065,069
082001,002,007
024040024
017,038,062,065011,017,023,025,038,039,055,070
016,024
016,024,040,041011,023,025,039,055,070,073
015017,062,084,086
014,044055
017,038,062,065017,038
014,025,042,059
053,054,061009011
017,053011,015,017,018,021,024,028,036,052,062
KLHLGLloydLogikLXIMagnavoxMarantzMartaMEIMemorexMGAMidlandMinotaMitsubishiMontgomery wardMTCMultitechNECOptimusPanasonicPentaxPentex Reserch+PhilcoPhilipsPioneerPortlandProScanQuartzQuasarRadio Shack/Realistics
AnvisionCable starEagleEastrm Int.General InstrumentGI
HamlinHitachiJerroldMacomMagnavox
PhilipsProscanRCAToshibaPanasonicSonySamsung
NSCOakOsk SigmaPanasonicPhilipsPioneerRandtekRCARegalRegencySASamsung
SignatureSprucerStarcomStargate 2000SylvaniaTexscanTocomUnikaUniversalViewstarWarner AmexZenith
RCASamsung SansuiSanyoScottSearsSharpShintomSignatureSonySylvaniaSymphonicTandyTashikoTatungTeacTechnicsTemikaTMKToshibaTotevisionUnitechVector ResearchVictorVideo ConceptsVideosonicWardsYamahaZenith
009,014,016,017,037,044,046,063,078000,016,022,031,041,051
025011,021
022,050,058,077011,014,018,021,027,028,044,052,057
015,036,048,054026,035,040,064
024026,035,047
017,024,038,062,065024
011,024
039024,039,078
017
076014,022,028,057,058
016,018
Setting Up Your Remote Control
VCR Codes
Cable Box Codes
DVD Codes
Remote Control Codes
BN68-448D-03Eng 10/29/03 1:09 AM Page 63

English-64
Memo
BN68-448D-03Eng 10/29/03 1:09 AM Page 64

- AFTER SALES SERVICE
- Do not hesitate to contact your retailer or service agent if achange in the performance of your product indicates that afaulty condition may be present.
ELECTRONICS
BN68-448D-03Eng 10/29/03 1:09 AM Page 65