
Layer Management in Virtual Reality - Diva1120268/FULLTEXT01.pdf · En vanlig komponent i dagens...
81
IN DEGREE PROJECT COMPUTER SCIENCE AND ENGINEERING, SECOND CYCLE, 30 CREDITS , STOCKHOLM SWEDEN 2017 Layer Management in Virtual Reality An explorative technical design study RICKARD BERGELING KTH ROYAL INSTITUTE OF TECHNOLOGY SCHOOL OF COMPUTER SCIENCE AND COMMUNICATION
Transcript of Layer Management in Virtual Reality - Diva1120268/FULLTEXT01.pdf · En vanlig komponent i dagens...

IN DEGREE PROJECT COMPUTER SCIENCE AND ENGINEERING,SECOND CYCLE, 30 CREDITS
, STOCKHOLM SWEDEN 2017
Layer Managementin Virtual RealityAn explorative technical design study
RICKARD BERGELING
KTH ROYAL INSTITUTE OF TECHNOLOGYSCHOOL OF COMPUTER SCIENCE AND COMMUNICATION

Layer Management in Virtual Reality An Explorative Technical Design Study
Bildlagerhantering i Virtual Reality En Explorativ Teknisk Designstudie
Rickard Bergeling [email protected]
Master’s Thesis in Media Technology Master of Science in Engineering – Media Technology
Royal Institute of Technology
Supervisor: Björn Thuresson Company Supervisor: Johan Stålnacke
Examiner: Tino Weinkauf
Date: 2017-06-17

Abstract Virtual Reality has once again emerged as a platform with great potential for exploratory research. An expectation for the next generation virtual reality platforms is to be used as a tool for graphical designers as a new way to access the virtual world and interact with digital content. Just as mobile applications are developed for smaller screens with touch capabilities and desktop applications for computer screens with the input of mouse and keyboard, the interfaces of VR applications need to be designed with the capabilities and limitations of the platform in mind.
A common component in modern graphic editing software is layer management: having the final output of the application divided into sub-components. This thesis explores how layer management can best be implemented in room-scale Virtual Reality with a focus on selection, navigation and manipulation through an iterative design study.
The study concludes that, to improve the learnability of a system, interactions should be based on real-world interaction for naturalistic tasks while drawing inspiration from desktop applications for more abstract tasks. Furthermore, the environment needs to be adjusted to the systems designated tasks as well as the physical characteristics of the user. Lastly, as previous studies have suggested, amplifying the movement of manipulated objects in relation to the movement of the controller decreases the required movement of the user, reducing fatigue and increasing the user’s reach. However, this amplification was perceived as a reduction in precision, which some users valued more than movement reduction. Therefore, the amplification factor should be adjusted in relation to the operation’s precision requirements.
While directly applicable to layer management in VR, these findings could serve as guidelines for applications utilizing 2D content in a virtual environment, room-scale VR applications designed to perform abstract tasks, and productivity tools for Virtual Reality.
Sammanfattning Virtual Reality (VR) har på senare år sett ett uppsving både vad gäller teknisk utveckling och intresse hos konsumenter. Den nya generationens VR-plattformar har stor potential för utforskande studier både vad gäller användningsområden och interaktionsgränssnitt. En av förväntningarna är att VR ska kunna användas inom grafisk formgivning som ett verktyg för att tillgå- och interagera med digitalt innehåll på nya sätt. Precis som mobila applikationer är utvecklade för mindre touch-skärmar och PC-applikationer är designade för mus- och tangentbordsinteraktion med återkoppling genom en datorskärm så kommer gränssnitten för framtidens VR applikationer att vara utformade efter denna plattforms specifikationer.
En vanlig komponent i dagens grafiska redigeringsprogramvaror är bildlagerhantering; att ha en bild eller bildruta uppdelad i mindre delar där varje del kan redigeras och påverkas som en separat enhet. Denna uppsats utforskar genom en iterativ designstudie hur bildlagerhantering kan implementeras i en VR miljö med fokus på navigation, val av objekt och manipulation av objekt.

Studien visar att interaktionsgränssnitten som baseras på interaktioner med verkligheten och interaktion med traditionella PC applikationer för naturliga respektive abstrakta operationer gör interaktionerna lättare att lära sig och förstå. Förutom de uppgifter som systemet är ämnat att utföra bör även utformningen av den virtuella miljön ta hänsyn till de fysiska egenskaperna hos användaren.
Som tidigare studier har visat så kan ett förstärkt utslag av manipulerade objekt i förhållande till kontrollen minska den rörelse som krävs av användaren för att utföra en uppgift och därigenom minska trötthet och öka användarens effektiva räckvidd. Denna förstärkning uppfattades dock som en reducering av precision, vilket vissa användare värdesatte mer än reducering av krävd rörelse. Därför ska förstärkningsgraden sättas i relation till den precision som krävs av varje operation.
Studiens resultat är direkt applicerbara för lagerhantering i VR men kan också användas som riktlinjer för VR applikationer som hanterar 2D-innehåll i en 3D miljö samt VR applikationer med syfte att användas som produktivitetsverktyg.
Keywords: Virtual Reality, Interface Design, Virtual Reality Interface Design, Layer Management, Graphical Layer Management, Virtual Reality Selection Techniques, Virtual Reality Manipulation Techniques, Virtual Reality Productivity, Composite Image, Layers, Virtual Reality Pointer

Table of Contents 1Introduction...................................................................................................................1
1.1ResearchQuestion................................................................................................................11.2WordList..............................................................................................................................11.3EthicalAspects......................................................................................................................1
2.Background...................................................................................................................22.1LayerManagementin2D......................................................................................................22.2VirtualReality.......................................................................................................................3
2.2.1TheHistoryofVirtualReality.................................................................................................32.2.2VirtualRealityApplications...................................................................................................52.2.3HTCVive................................................................................................................................5
2.3Usability...............................................................................................................................52.3.1Usefulness.............................................................................................................................62.3.2Efficiency...............................................................................................................................62.3.3Effectiveness..........................................................................................................................62.3.4Learnability............................................................................................................................62.3.5Satisfaction............................................................................................................................6
3Methodology..................................................................................................................73.1PrototypeDevelopment........................................................................................................73.2UserStudies..........................................................................................................................7
3.2.1Introduction...........................................................................................................................83.2.2Accustomization....................................................................................................................83.2.3UsingthePrototype..............................................................................................................93.2.4Post-TestEvaluation............................................................................................................113.2.5ComparisonandGeneralComments..................................................................................123.2.6RecruitmentandStudySize.................................................................................................12
3.3DataAnalysis......................................................................................................................123.3.1QualitativeData...................................................................................................................133.3.2QuantitativeData................................................................................................................13
4.Execution.....................................................................................................................144.1PrototypeIterationOne-EvaluatingSelectionandNavigation...........................................14
4.1.1Selection..............................................................................................................................144.1.2Navigation...........................................................................................................................154.1.3Manipulation.......................................................................................................................18
4.2PrototypeIterationTwo-Re-EvaluatingSelectionandControls..........................................194.2.1AddingSecondaryController...............................................................................................194.2.2Selection..............................................................................................................................194.2.3Navigation...........................................................................................................................22

4.2.4Manipulation.......................................................................................................................234.2.5Logging................................................................................................................................244.2.6Scene...................................................................................................................................254.2.7Controls...............................................................................................................................25
5Result...........................................................................................................................265.1PresenceQuestionnaire......................................................................................................265.2InteractionLogs..................................................................................................................28
5.2.1ErrorRate............................................................................................................................285.2.2SelectionModesUsed.........................................................................................................295.2.3Navigation...........................................................................................................................295.2.4SelectingandManipulatingSingleorMultipleObjects......................................................30
5.3Interviews...........................................................................................................................315.3.1Usefulness...........................................................................................................................325.3.2Efficiency.............................................................................................................................325.3.3Effectiveness........................................................................................................................335.3.4Learnability..........................................................................................................................345.3.5Satisfaction..........................................................................................................................345.3.6Selection..............................................................................................................................355.3.7Manipulation.......................................................................................................................375.3.8General................................................................................................................................38
6Discussion....................................................................................................................416.1EvaluatingSelectionandNavigation...................................................................................41
6.1.1Selection..............................................................................................................................416.1.2Navigation...........................................................................................................................426.1.3CorrelationsBetweenSelectionandNavigation.................................................................42
6.2EvaluatingManipulation.....................................................................................................426.3GroupingButtonsbyFunction.............................................................................................436.4LimitingtheNumberofInteractions...................................................................................436.5MethodologyCriticism........................................................................................................44
6.5.1BugDiscoveredinFirstIteration.........................................................................................446.5.2Think-AloudExerciseAffectingLogData.............................................................................446.5.3DifferentLocationsandHardware......................................................................................446.5.4InterviewsTranscribedInsteadofRecorded.......................................................................456.5.5PresenceQuestionnaire......................................................................................................45
6.6Conclusion..........................................................................................................................456.6.1AdheretoTheConventionsofDesktopApplicationsWhenPossible.................................456.6.2AdjusttheEnvironmenttoTheTasksandTheUser...........................................................466.6.3AccuracyDependentonOperation.....................................................................................46
6.7ScalabilityandApplicability................................................................................................466.7.1Scalability.............................................................................................................................46
6.7.2Applicability.........................................................................................................................476.8FutureWork.......................................................................................................................47
6.8.1GroupingLayers...................................................................................................................476.8.2LayerManagementFor3DObjects.....................................................................................476.8.3ImprovedSinglePointSelection..........................................................................................47
7References....................................................................................................................49
Appendixes.....................................................................................................................51AppendixA.RecruitmentPosts................................................................................................51AppendixB.IntroductionQuestionnaire...................................................................................52AppendixC.IntroductionManuscript.......................................................................................54AppendixD.ConsentForm.......................................................................................................55AppendixE.PresenceQuestionnaire........................................................................................56AppendixF.Post-TestInterviewQuestions(Iteration1)...........................................................58AppendixG.Post-TestInterviewQuestions(Iteration2)...........................................................59AppendixH.Iteration2LogEvents...........................................................................................60AppendixI.IntroductionQuestionnaireSummary....................................................................61AppendixJ.PresenceQuestionnaireSummary.........................................................................62AppendixK.QualitativeDataSummaryIteration1...................................................................63AppendixL.QualitativeDataSummaryIteration2...................................................................66AppendixM.LogDataSummaryIteration1..............................................................................70AppendixN.LogDataSummaryIteration2..............................................................................71AppendixO.UserAliasesandConditions..................................................................................73

1
1 Introduction
1.1 Research Question This thesis explores how layer management, an essential task in graphics software, can be handled when working with layered 2D images in virtual 3D space. To narrow the scope of this thesis, I have focused on three key functions: selection, navigation and manipulation. The research question thus becomes: How can an image layer management system for Virtual Reality be designed and implemented with regards to selection, navigation, and manipulation?
1.2 Word List Layer - A sub-component of a composite image or frame.
HMD - Head-Mounted Display
Hitbox - A hitbox is an invisible shape commonly used in video games for real-time collision detection.
Play Area - The area in which the user can interact with the system. This area is determined when calibrating the Vive and is based on the available space in the physical room.
1.3 Ethical Aspects Participation in this study was fully voluntary and the participants had the option to abort the study at any time. Personal information was kept confidential during the study and erased once the study was completed. No personal information which could be directly connected to a single individual was published in the report.
Virtual Reality applications with low frame rate or poorly designed interaction can cause users to feel nauseous - a phenomenon also known as cyber sickness. To avoid this, high-end hardware was used with enough capacity to run the software at high frame rate and the interaction design of the prototypes was continuously evaluated during development before the user study.
The virtual environment in the study did not contain any offensive material or violence. The objects used in the prototypes were simple primitives of different sizes and colours, with the rest of the environment having a minimalistic designed to focus the full attention of the participant on the task at hand.

2
2. Background As a result of rapidly evolving technology, interfaces and the way information is presented needs to take new forms and adjust to new standards. Virtual Reality (VR) is once again an emerging technology and a platform with great potential for exploratory research.
Today, software interfaces are mainly designed for “regular” screens, conforming to conventions which have been shaped by being restricted to a two-dimensional surface. With VR, the added third dimension of spatial depth opens dramatic new possibilities in terms of interaction and interface design. A key feature in essentially all graphical design software is that of layer management - giving sub-components of a composite image/frame Z-indexes to indicate how “far” away from the camera they all are, subsequently affecting obstruction and in what order the content will be rendered. Having an image divided into multiple layers is also key for its editing capabilities as it lets the user affect specified elements of the final image. This master's thesis is an explorative design study on developing an interface for composite image layer management in Virtual Reality, working with two-dimensional images in 3D space.
The thesis was written at The Royal Institute of Technology (KTH) and XLENT Consulting in Stockholm during the spring of 2017.
2.1 Layer Management in 2D Today’s graphical design software such as Adobe Photoshop, Adobe Illustrator, and Adobe After Effects give the users an efficient workspace which serves users well. However, the hierarchies of the menus and the interaction patterns follow standards that have been developed using 2D screens with input from a mouse and keyboard. One of the great potentials for Virtual Reality is for it to be used as a tool for graphical designers working with, for example, 3D modelling, texturing, and lighting (Mihelj et al. 2014). When developing production environments for VR, there will be a demand for new design standards adjusted to the capabilities and limitations of this new platform.
Since the research topic of this thesis is how to manage composite 2D-image layers in Virtual Reality, I found it essential to find out what current work processes looked like in modern applications when it came to image-layer management. To do so, I interviewed Adam Marko Nord - Creative Director at Chimney Group in Stockholm, who had worked with software such as Adobe Photoshop and Adobe After Effects for the last 19 years (both of which strongly rely on the concept of layers).
According to Adam, the conventions for how to work with the software is shaped mostly by the community using it and the functionality provided in the user interface (UI).
There are two major branches of software in visual effects composite editing today - layer based and node based. The node-based performs better on a detailed level and lets the user have full control of every aspect of the final result while the layer-based has a lower entry level threshold and is faster to work with.

3
When managing big projects in a layer-based workflow, it is important to keep the components structured - both for the sake of the person currently working with it and for anyone who might be handed the project at a later time. By segmenting the layers into pre-comps [After Effects] or groups [Photoshop] and naming them after what they represent, the projects remain structured and understandable.
While understanding the hierarchic order of the image-layers is straightforward - knowing what each layer contains is a bit trickier. To know the contents of a specific layer, the layer must be individually selected. One of the hopes in the study was to create a system which could more easily visualize the relationship between a layer and its contents.
Even though grouping and renaming layers is evidently a big part of software layer management, the timeframe of the development phase in this study did not allow those features to be implemented. Instead, they are suggested as future work and can be found in chapter 6.8.
2.2 Virtual Reality
2.2.1 The History of Virtual Reality Virtual Reality might to many seem like a brand-new technology which has recently entered the market. Though not particularly successful in its initial commercial launch, Virtual Reality has been around since the late 1950’s when Morton Heilig developed the Sensorama, a machine which using stereoscopic 3D imaging, stereo sound, wind, aromas, and body tilting conveyed a virtual bicycle riding experience (Mihelj et al. 2014).
Morton Heilig’s Sensorama 1
Next up was Ivan Sutherland’s Sword of Damocles, developed 1968, which was a head-mounted display connected to a virtual environment. It encompassed an advanced motion tracking system to allow the user to move his/her head to change the view of the environment. The virtual environment was represented by wire models of three dimensional objects and was presented to the user on two
1 Source: https://en.wikipedia.org/wiki/Sensorama

4
small screens (one for each eye), which gave the illusion of three-dimensional vision. The screens were partially transparent, allowing the user to see both the real and the virtual world simultaneously. Sword of Damocles can thus be considered the first example of augmented reality (Mihelj et al. 2014).
While Sensorama and Sword of Damocles allowed the user to experience virtual worlds, it offered no interaction with the virtual objects. The first system to do so was developed 1970 by Myron Krueger and was called Videoplace. Using sensors such as video cameras and pressure sensors in the floor, the system could interpret the activities of the user and move objects in the virtual environment accordingly.
In 1993, Sega announced the Sega VR Headset for the Sega Genesis console at the eConsumer Electronics show. The wrap-around prototype glasses had head tracking, stereo sound and LCD screens in the visor. Unfortunately, technical development difficulties caused the device to forever remain in the prototype phase. Two years later, in 1995, Nintendo announced their shot at VR - the Nintendo Virtual Boy. The Virtual Boy was a monochromatic stereoscopic 3D image entertainment system which used oscillating mirrors, displaying a linear array of lines which was powered by LEDs to produce one image for each eye. The product was discontinued only one year later in 1996 after being a commercial failure. The Virtual Boy is estimated to have sold 770,000 units before the discontinuation (Zachara & Zagal 2009).
Sega VR Headset and Nintendo Virtual Boy 2
Perhaps the most famous VR product of the nineties was the CAVE (Cave Automatic Virtual Environment). The system is a room whose walls consist of screens which are displaying a virtual environment. 3D glasses can give the illusion of depth while electromagnetic sensors built into the walls allow for measurement of motions and three-dimensional sound is enabled by a surround system. Due to their steep price, CAVE systems are used mostly by universities and larger institutions (Mihelj et al. 2014).
2 Source: http://segaretro.org/Sega_VR and http://tomodachi.wikia.com/wiki/Virtual_Boy

5
2.2.2 Virtual Reality Applications While the applications for mainstream VR consumers today consists mainly of games, Virtual Reality has great potential to be applied within other areas as well such as flight and driving simulations, surgery simulations, design and visualization, telepresence and teleoperation, and remote control of robots (Mihelj et al. 2014).
2.2.3 HTC Vive The HTC Vive was the Virtual Reality platform of choice for this master’s thesis. It is a platform developed in collaboration between smartphone manufacturer HTC and video game developer/digital distribution company Valve Corporation. The technology behind the system is the SteamVR Lighthouse tracking system, with SteamVR hand-controllers, and a head-mounted display (HMD). It was released in April 2016 as one of the most sophisticated VR platforms on the commercial market. The HMD has a refresh rate of 90 Hz and the internal screens have a resolution of 1080 x 1200 pixels.
This platform was selected for two main reasons. First, it provides room-scale VR through the SteamVR Lighthouse tracking system, which allows for a wider spectrum of interaction research. Secondly, the collaboration between Valve and HTC is not exclusive. Valve is currently trying to build an ecosystem around Virtual Reality by providing a sophisticated open source tracking solution (Valve 2017; Kreylos 2016), a central distribution hub for VR content, as well as Software Development Kits for developers. If this strategy proves successful, it is likely that the SteamVR controller technology and design will be used for multiple systems outside of the HTC Vive (Charara 2017).
Figure 1. HTC Vive Controller
2.3 Usability Usability is not a one-dimensional measure - something simply being or not being usable - instead, it is a complex composite measure (Nielsen, 1994; Rubin & Chisnell, 2008) where two products can be equally usable but for very different reasons. For example, evaluating a software interface and a physical hardware manual can both consider usability, yet due to their different nature, the usability tests should be adjusted accordingly (Nielsen, 1994).

6
“When a product or service is truly usable, the user can do what he or she wants to do the way he or she expects to be able to do it, without hindrance, hesitation, or questions.” - Rubin & Chisnell, 2008
For this study, the definition of usability as described by Rubin & Chisnell (2008) will be used. This definition breaks usability into five components: Usefulness, Efficiency, Effectiveness, Learnability, and Satisfaction.
2.3.1 Usefulness Whether a product is useful or not is defined by to what degree it enables the user to achieve his or her goals. It is also an overall assessment of the user’s willingness to use the product at all.
Due to the scope of the study, the functionality of the prototypes was developed to cover the most essential areas of layer management; selection and manipulation, and the usefulness of the system was evaluated from that standpoint.
2.3.2 Efficiency Efficiency is measured by the speed with which the user’s goal can be accomplished accurately and completely. This is usually a measure of time. For example: “95% of all users will be able to load the software within 10 minutes”.
2.3.3 Effectiveness Effectiveness is the extent to which the product behaves in the way the users expect it to, as well as the relative ease of accomplishing a task. This is usually measured quantitatively with error rate. For an example: “95% of all users will be able to load the software correctly on the first attempt”.
2.3.4 Learnability Learnability is the user’s ability to operate the system to some defined level of competence after some predetermined period of training. It can also refer to the ability of infrequent users to re-learn the system after periods of inactivity.
2.3.5 Satisfaction Satisfaction is referred to as the user’s perceptions, feelings and opinions of the product. This is usually captured through both written and oral questioning. Users are more likely to perform well on a product that meets their needs.

7
3 Methodology To investigate the research question of this thesis, an iterative design study with two iterations was composed. For each iteration, a new prototype was developed and new user studies conducted. Employing an iterative design process allows for the application to be built based on strengths and weaknesses of previous iterations, gradually increasing the quality of the application.
3.1 Prototype Development The development was done using Unity 3D 5.5.1f1 with the SteamVR plugin.
In all the prototypes, the scene consisted of eight layers, each containing one image. The contained images were shapes in different sizes and colours. The functionality of the prototypes was limited to rearranging the order of the layers and moving the shapes within their respective layer, as position and occlusion are the most basic components that needs to be handled with layers and images to change the outcome of the final composite image with predetermined content.
Each layer image was represented by one of four primitives: a blue square, a yellow circle, a magenta hexagon or a green line. There were two of each shape, resulting in a total of eight objects. Each layer’s primitive had an individual size and a unique starting position on the canvas (Fig. 2).
Figure 2. Layer Image Starting Positions
SteamVR has an implemented feature called Chaperone which is activated by default. This displays a grid along the edges of the calibrated play area of the HTC Vive. The grid gets more prominent as the user gets closer to the edges. This effect is used to prevent the user from colliding with real world objects in their surrounding when using VR. Since the user would have no reason to move outside of the play area in this application, the Chaperone effect setting was set to “Professional”; only displaying lines on the floor.
3.2 User Studies User studies were conducted to gather the data needed for the usability analysis of the prototypes. The requirement for the participants in the study was previous experience with software including layer management features, such as Adobe Photoshop, Adobe Illustrator, Adobe After Effects, and GIMP.

8
The process for the two different iterations differed somewhat. In the first iteration, each participant underwent a three-stage process containing an introduction and accustomization phase, the main study, and an optional comparison phase where the participants got to test other versions of the prototype.
In the second iteration, the comparison phase was cut out since this iteration only featured one version of the prototype.
3.2.1 Introduction First off, the participants got to answer a questionnaire regarding their previous experience with virtual reality and composite image layer management. The questionnaire also inquired about basic information such as occupation and age for study demographics.
Next, the participants got a brief summary of the research topic and what would be expected of them: that they were to perform tasks in VR using a prototype for layer management. It was pointed out that what was being tested was the prototype itself and not the participants, therefore nothing they said or did during the test could be bad or wrong. It was also emphasized that all feedback and impressions of the prototype was important for me and that criticism would not hurt any feelings, encouraging the participants to speak freely. The manuscript was based on a usability test script by Steve Krug (Krug 2005).
The participants were asked to think out loud when performing the assigned tasks. During the test, the participants were continuously reminded to verbalise their thinking if they forgot to do so. This technique is called think-aloud (Mathison 2005, Rubin 2008) and was used to identify the participants’ locus of attention and any momentary frustrations experienced while using the prototypes.
Lastly, the participants got to read and sign a consent form stating:
● Participation in the study is voluntary. ● Participation can be withdrawn at any time during the experiment. ● The actions of the participants will be recorded. ● Personal information will be kept confidential and erased once the study is complete.
For the second iteration, the participants were also informed that their actions would be logged by the prototype and encouraged to speak up when they performed an action which resulted in an unexpected outcome. For the second iteration, the logging functionality of the prototype had been improved, allowing for more detailed logs as well as manual error entries.
3.2.2 Accustomization For the participants to be able to evaluate the usability of the prototype properly, it was important that they were not only focusing of the experience of being in Virtual Reality but rather that of using the prototype. To reduce potential novelty effects, the next step was familiarizing the participant with VR by letting them use a highly-rated VR application for a period of time. Each participant without recent

9
experience with the HTC Vive got to use the application for about 10 minutes before moving on to the next step. The application of choice was Google Tilt Brush, a VR application which lets the user paint in 3D space. The reason for choosing this application is that it is an application of similar nature as the prototype - performing creative abstract tasks in a virtual environment.
3.2.3 Using the Prototype The next step was for the participants to carry out predetermined tasks in the virtual environment using an assigned version of the prototype. Before entering VR, the participant got a walkthrough of the controller. The anatomy of the controller can be found in Figure 1. The HTC Vive Controller in chapter 2.3.3.
Once the user put the HMD on and the prototype application was started, they received a walkthrough based on verbal assignments of small tasks that together covered the functionality of the prototype. The functionality of the prototypes can be divided into four groups - selection, navigation, manipulation and menu interaction. Some of the functionality was only implemented in the second iteration (selecting and moving multiple layers simultaneously as well as menu interaction).
Selection refers to the act of specifying which layers or objects are to be manipulated when the user wants to rearrange the layers or change the position of the objects within their layers. To evaluate the user's ability to select objects and layers with the given interaction method, the selection tasks were defined as follows:
● Select a specified object ● Select multiple specified objects ● Select a specific layer ● Select multiple layers (if applicable)
Navigation in this prototype refers to the act of moving between the layers. This was done differently depending on which iteration and condition the participant was evaluating. The navigation tasks were:
● Get an overview of the result image. ● View a specified layer separately
Manipulation is the act of altering the position of an object within a layer or by moving the position of a layer itself. Moving the position of the layer allowed the user to rearrange the order of the layers. Even though manipulation was not one of the interactions being evaluated, it is relevant since it requires a target - given by the selection of the user. To be able to select the right objects and view specific parts of the image or the image as a whole, manipulation is also dependent on navigation between different layers. The manipulation tasks given to the participants were:
● Move a specified layer forward or backwards ● Move multiple layers forward or backwards (if applicable) ● Move a specified layer image to a specified position ● Move multiple layer images to a specified position simultaneously
10
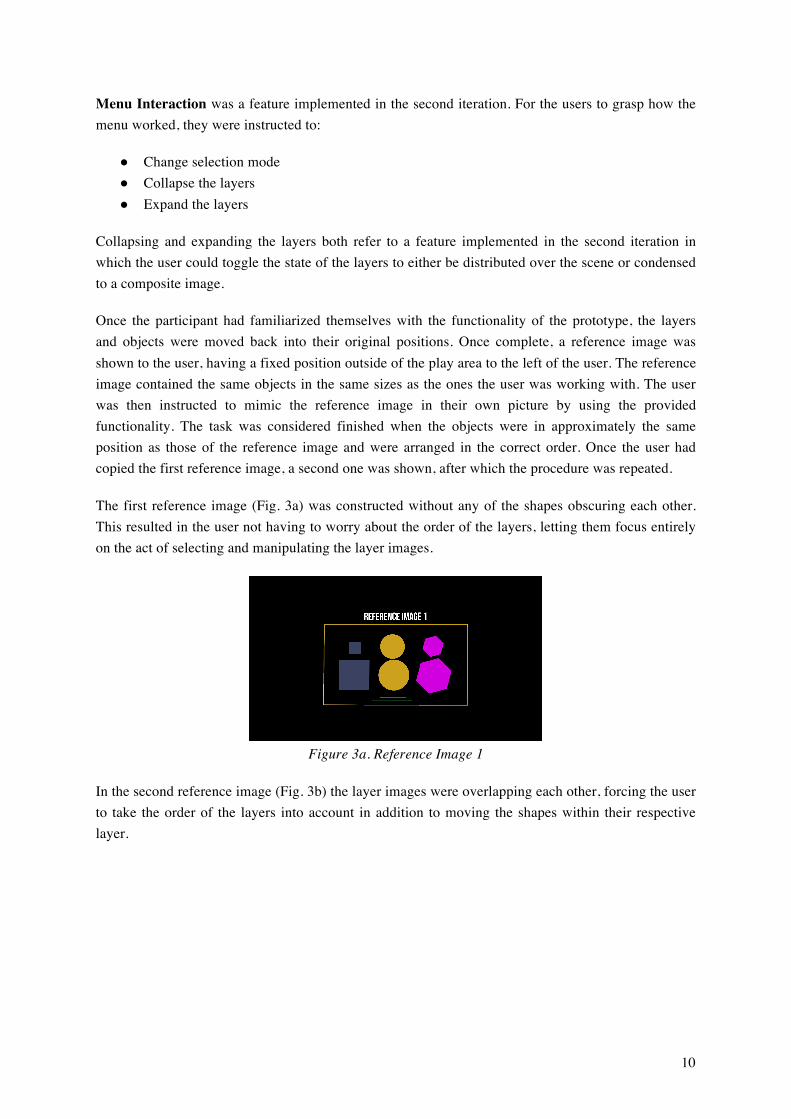
Menu Interaction was a feature implemented in the second iteration. For the users to grasp how the menu worked, they were instructed to:
● Change selection mode ● Collapse the layers ● Expand the layers
Collapsing and expanding the layers both refer to a feature implemented in the second iteration in which the user could toggle the state of the layers to either be distributed over the scene or condensed to a composite image.
Once the participant had familiarized themselves with the functionality of the prototype, the layers and objects were moved back into their original positions. Once complete, a reference image was shown to the user, having a fixed position outside of the play area to the left of the user. The reference image contained the same objects in the same sizes as the ones the user was working with. The user was then instructed to mimic the reference image in their own picture by using the provided functionality. The task was considered finished when the objects were in approximately the same position as those of the reference image and were arranged in the correct order. Once the user had copied the first reference image, a second one was shown, after which the procedure was repeated.
The first reference image (Fig. 3a) was constructed without any of the shapes obscuring each other. This resulted in the user not having to worry about the order of the layers, letting them focus entirely on the act of selecting and manipulating the layer images.
Figure 3a. Reference Image 1
In the second reference image (Fig. 3b) the layer images were overlapping each other, forcing the user to take the order of the layers into account in addition to moving the shapes within their respective layer.

11
Figure 3b. Reference Image 2
Once the second reference image had been copied successfully onto the canvas of the user, the prototype test session was complete.
The interaction was documented through automated interaction logs, observational notes, and notes from the think-aloud exercise.
3.2.4 Post-Test Evaluation Once the test was complete, additional data was collected through a questionnaire with seven point likert scale questions and a semi-structured interview.
3.2.4.1 Presence Questionnaire When evaluating virtual reality experiences a key term is that of presence.
“The key to defining virtual reality in terms of human experience rather than technological hardware is the concept of presence. Presence can be thought of as the experience of one’s physical environment.” - (Steuer 1992)
The presence questionnaire (Witmer & Singer 1998) is a questionnaire that is a common tool to use when evaluating presence in virtual environments. In addition to generating evaluation data, the questionnaire also adds comparability to related studies.
Since the system did not include any auditory components, any questions regarding audio was removed. Questions which didn’t concern the system itself but rather the hardware or virtual reality in general was also removed to ease the workload of the participants. The final revised version of the presence questionnaire that was used in the study can be found in Appendix E.
3.2.4.2 Semi-Structured Interview After the presence questionnaire had been filled out, a semi-structured interview was conducted. A semi-structured interview is organized around a set of predetermined open-ended question, with further questions emerging from the dialogue between the interviewer and interviewee. (DiCicco-Bloom & Crabtree 2006) The interview was structured around 14 questions in the user studies following the first iteration and 24 for the second iteration.

12
The questions mainly regarded the user’s experience using the prototype in terms of selection, manipulation and navigation. A full list of interview questions can be found in Appendix F and Appendix G.
3.2.5 Comparison and General Comments At the end of the user studies in the first iteration, participants were offered to test out other conditions. The participants were informed that this was not a component of the main study and the interaction would not be logged. Instead, the participants were encouraged to openly share any feelings and comments towards the systems. The purpose of this was to make clear the strengths and weaknesses of the variables in relation to each other were as well as give participants a better understanding of the study.
3.2.6 Recruitment and Study Size The first iteration of the prototype had four test conditions comprised of different combinations of selection and navigation methods. The selection methods were Direct Selection and Gaze Selection and the navigation methods were Spatial Navigation and Lever Navigation. The conditions are further described in chapter 4.1.
A good number of participants for a usability study is approximately five (Virizi 1992; Nielsen 2012). Given the four test conditions for the first iteration, the goal was to have four different user groups with a minimum of five subjects in each, totalling a minimum of 20 subjects. To compensate for potential “no-shows” and/or data loss, an extra four participants were recruited.
Direct Selection Gaze Selection
Spatial Navigation 5-6 subjects 5-6 subjects
Lever Navigation 5-6 subjects 5-6 subjects
Table 1. Iteration 1 Study Size
Since there was only one condition to test out in the second iteration, a smaller number of participants was needed. The initial goal was to have six participants evaluating this version as well. However, no one showing interest in participating in the study was denied entry even after the required quota was filled. As a result, eight participants evaluated the second iteration.
The participants were required to have previous experience with graphic editing software including layer management. They were recruited through social media (Facebook and Workplace). A majority of the participants were students at the Royal Institute of Technology (KTH) in Stockholm. The recruitment posts can be found in Appendix A.
3.3 Data Analysis Once user studies for the first iteration had been completed, the data was analyzed for common sources of frustration, strengths, and areas of improvement for the development of the second

13
iteration. Similarly, the data from the second iteration was summarized as a platform for the discussion and conclusion.
3.3.1 Qualitative Data The observational data from the think-aloud exercise and the semi-structured interviews were first organized into a matrix where each column represented a user and each row represented a qualitative data source, e.g. think-aloud data, observational data, or interview question.
Next, the matrix was analyzed and common factors were taken note of and highlighted. For the first iteration, an extra emphasis was put on the areas of improvement and points of frustration for the participants.
A subsequent matrix was formed with each user once again represented as a column but each row now represented by one of the major issues pulled from the body of data. The original matrix was then reanalyzed and any data relating to one of the extracted categories were transferred to the new spreadsheet. This resulted in a summary of the most recurring observations.
3.3.2 Quantitative Data The system logged and saved each interaction to an external file. In the first iteration, each entry contained an action, a target and a timestamp. The actions logged in the first iteration were:
● Trigger press ● Trigger hold ● Grip ● Application menu
In addition to actions, task performance was logged with entries describing task start time, reference image being shown, and task completion time.
For the second iteration, the logging function was improved to give more detailed data. Each entry was updated to contain an event, a target, number of targets being manipulated (if applicable), and a timestamp.
The “number of targets”-column indicated how many objects were being affected by a manipulation action. For other actions, the number of targets was set to a default value of -1. A list of logging events is listed in Appendix H.
The data from the logs were concatenated with their respective users through Google Sheets. The log data for each condition was then summarised based on several factors such as average number of interactions, task completion time, and selections with no target using Google Visualization API Query Language.
Similarly, the presence questionnaire answers were imported into Google Sheets and summarized using Google Visualization API Query Language. The answers were grouped and summarized based on test condition.

14
4. Execution
4.1 Prototype Iteration One - Evaluating Selection and Navigation The goal in the first iteration of the prototype was to uncover underdeveloped or undiscovered functions overlooked in the pre-study as well as examine in detail two methods of selecting objects and two methods of navigating between layers in virtual space. The two selection modes were Gaze Selection and Direct Selection while the two navigation modes were Spatial Movement and Virtual Lever. For this iteration, the participant only used one of the two controllers and was instructed to use their dominant hand. The reason for this was to rule out ambidexterity as a factor affecting the performance of the participants.
The layers had a width of 1.92 meters and a height of 1.08 meters, giving the image an aspect ratio of 16:9. This was based on the international standard for HDTV, which is 1920 samples per active line and 1080 active lines per picture (International Telecommunication Union 2015).
4.1.1 Selection Manipulating any object was a two-stage process where the object first needed to be selected. To indicate what objects would be affected by each manipulation, selected objects were highlighted blue. To give an indication as to what object was about to be selected, a similar white outline was added to objects being up for selection. Additionally, haptic feedback was given to the user through vibration in the controller once a new target was up for selection. Selection was done by pressing the trigger button.
Shape 1 Shape 2 Shape 3 Shape 4
Default
To Be Selected (Hovered)

15
Selected
Figure 4. Objects in Different States
4.1.1.1 Gaze Selection In this selection mode, the target for selection was determined by shooting a virtual ray from the position of the HMD in its facing direction and picking the first object hit. In addition to the object highlighting, a cursor was displayed in the centre of the field of view at the same position as the target hit.
4.1.1.2 Direct Selection In this selection mode, the target for selection was determined by which object the controller was currently colliding with. If multiple objects were collided with, the target would be set to the object which was first encountered and be kept so until the controller was moved away from that target, at which point the selector would find a new target amongst those objects currently being in contact with the controller.
4.1.2 Navigation The first iteration featured an effect which will henceforth be referred to as the accordion effect. The layers were distributed evenly over a fixed space, during the development named interaction area, giving each layer a base position. The accordion effect then for each layer determined an offset from the layer’s base position depending on the state of one of two objects: the position of the player or the angle of a virtual lever (depending on navigation mode).
Figure 5. Scene Layout
Moving the lever caused an invisible collider to move back or forth through space, which resulted in the same effect as that of walking with the headset forwards or backwards through the scene.

16
The position of each layer was calculated by:
𝑎𝑐𝑐𝑜𝑟𝑑𝑖𝑜𝑛𝑝𝑜𝑠𝑖𝑡𝑖𝑜𝑛= 𝑎𝑚𝑝𝑙𝑖𝑓𝑖𝑐𝑎𝑡𝑖𝑜𝑛𝑓𝑎𝑐𝑡𝑜𝑟 ∗ (𝑏𝑎𝑠𝑒𝑝𝑜𝑠𝑖𝑡𝑖𝑜𝑛𝑧 − 𝑟𝑒𝑓𝑒𝑟𝑒𝑛𝑐𝑒𝑜𝑏𝑗𝑒𝑐𝑡𝑧− 𝑎𝑐𝑡𝑖𝑜𝑛𝑑𝑖𝑠𝑡𝑎𝑛𝑐𝑒)8
Where the amplification factor had a value of 200. This value was determined during the development phase by testing out different values and tweaking it until the effect had the desired visual outcome. The action distance was set to 0.3 (m) based on an approximation of at what distance the user would want to interact with each layer. This value was also tested during the development phase and tweaked until the desired outcome was reached.
The position of the accordion effect was clamped between two values: the backmost and front most Z values of the interaction area - preventing the layers from moving too far in the scene.
Figure 6. Accordion Effect Plot
The mechanism which controlled the state of the accordion effect was an examined variable in this version.
4.1.2.1 Layer Positioning Through Spatial Movement By controlling the state of the accordion effect through spatial movement, the environment would be reactive to the movement of the user. In this navigation mode, the collider that controlled each layer’s accordion position was set to the position of the HMD in the room.
Standing at the back of the play area caused the layers to collapse at the far end of the room since the collider distance from all the layers’ base positions was high enough to cap the accordion effect offset at the maximum value. Moving forward towards the collapsed image then resulted in one layer at a time separating itself from the image, moving towards the user. Using spatial movement to control the state of a system can improve its learnability, especially for users with less prior experience of digital interfaces (Roupé 2013).

17
4.1.2.2 Layer Positioning Through Virtual Lever Another way to control the state of the accordion effect was through a virtual lever, placed to the right of the user in virtual space. Moving the lever caused an invisible collider to be moved forwards or backwards in the Z-axis through virtual space. This collider controlled the state of the accordion effect for each layer, causing the same effect as moving forward or backwards through the space in the Spatial Movement navigation mode.
Figure 7. Lever Models
Leftmost model displaying the default texture and rightmost displaying active texture.
The lever was modelled and textured using Blender and then imported as an asset to Unity. As a homage to XLENT Consulting, the company at which this thesis was written, their logotype was included at the long edges of the lever base. The colour of the lever knob changed when the user hovered over it with the controller to indicate that the object could be manipulated. In addition to that, a haptic feedback pulse was sent through the controller.
The angle span in which the layer affected the position of the accordion collider was ±45°. The default state of the lever was at -45°, pushing the collider to the front of the room, making the layers collapse at the far end of the room. When designing UIs for 3D interfaces, the default rule is to have objects attached to other objects (Bowman et al. 2008). To position the lever at a comfortable height for manipulation and avoid having it floating in the air or being too big, the lever was placed on a pedestal in the scene (Fig. 8).

18
Figure 8. Iteration 1 Scene Setup in lever navigation mode
4.1.3 Manipulation Since image and layer manipulation were analyzed in the first iteration of the prototype, the interaction for this was the same for all conditions, regardless of selection and navigation mode.
4.1.3.1 Manipulating Layers The layers didn’t have to be selected in the first iteration. Instead, they were manipulated indirectly by pressing and holding the trigger when hovering over an object contained in a specific layer. When a layer was being manipulated, the accordion effect was turned off and each layer not being manipulated was moved to its base position. The manipulated layer was continuously moved to the position of the controller. If the manipulated layer was moved beyond the position of another layer, the base positions of the layers were switched and the affected layer was animated to its new base position. Releasing the trigger turned the accordion effect back on and animated each layer to their new calculated accordion position.
4.1.3.2 Manipulating Layer Images Manipulating objects was done by pressing the trackpad button. When the trackpad button was pressed down, a calculation of the difference in position between each frame for the controller was made and stored in a difference vector. Each selected object was then moved by a value corresponding to the X and Y components of the difference vector multiplied by an amplification factor. The amplification factor was set to amplify the movement of the objects by a factor of 1.5, meaning that the objects were moved 50% further than they would if the controller / object ratio would be set to one to one. The amplified movement allowed users to have increased reach when manipulating objects.

19
4.2 Prototype Iteration Two - Re-Evaluating Selection and Controls The specification for changes to the second iteration of the prototype was based on the outcome of the user studies of the first iteration. While the tasks, layout of the scene, and shapes remained unchanged; multiple components were updated in the second iteration.
4.2.1 Adding Secondary Controller The first iteration was developed with focus on using a single controller. In that iteration, both controllers held the same scripts and functioned in the same way. Using both controllers at the same time could potentially cause the programs to enter states not foreseen in the development phase. Since all the actions could be performed using a single controller, a decision was made to only use one of the controllers during the test.
To make the interaction of the application more generally applicable and rely less on the user memorising the controls for each action; the second controller was re-introduced but with updated functionality. The secondary controller was used to toggle the visibility of a menu in which the user could change selection mode and expand/collapse the layers.
The expand/collapse feature was introduced to replace the accordion effect from the previous iteration. This effect can be read about further in chapter 4.2.3. Navigation.
Figure 9. Offhand Controller Menu
4.2.2 Selection The first iteration user studies concluded that the selection modes excelled in different areas and that users preferred different selection modes for different reasons. Some users liked the hands-on feeling of using direct selection while others liked being able to select objects from afar. While direct selection excelled when selecting small objects due to the larger size of the controller collider compared to the gaze pointer, the gaze selection allowed users to make selections and manipulate the image while maintaining an overview of the final outcome. As a result, variants of both selection modes were kept for the second iteration, allowing the user to choose the selection mode by interacting with the newly introduced menu.

20
4.2.2.1 From Gaze to Pointer A clear pattern in the user studies for the first iteration was that many of the participants, 42%, tried pointing with the controller either to determine what object to select or where to move selected objects.
“I first thought that the controller would work as a laser-pointer. It feels like something of a convention in VR.“ - User 08 (author's translation)
For the second iteration, a pointer selection was implemented to replace the gaze selection from the previous iteration. The pointer selector worked similarly to the gaze selector in the sense that it was used to move a cursor on the canvas which determined the target up for selection. The difference was that instead of controlling the position of the cursor with the orientation of the headset, the cursor was controlled by the orientation of the controller (Fig. 10).
Figure 10. Pointer Selector
4.2.2.2 Single and Additive Selection In the first iteration, selecting a new object simply toggled the selection status of that single object and did not affect the state of any other objects. As a result, if the user wanted to select and manipulate one object at a time, which was mostly the case, they would need to deselect what was previously selecting before selecting something new.
While having the ability to select multiple objects wasn’t seen as a bad idea in itself, many users forgot to deselect what was previously selected before selecting something new if they wanted to affect a single object with the upcoming manipulation (which was most often the case).
“It was a good thing that you could select multiple objects simultaneously. That is something you should be able to do, but it shouldn’t be default. I want to actively choose when to do so. I think this is something of a convention in PC applications. “ - User 06 (author's translation)
“It was annoying that the default mode was selecting multiple layers simultaneously, I didn’t really like it. It was like having a shift-button stuck pressed down.” - User 03 (author's translation)

21
The users with difficulties remembering to deselect what they did not want to be affected by the manipulation referred to the interaction pattern of not having to deselect when switching targets in most desktop applications.
In the second iteration, pressing the trigger deselected everything selected prior to selecting the object being hovered over. If no objects were hovered over, pressing the trigger simply deselected everything. To access the additive selection feature, which was the default mode in the previous iteration, the user would press and hold the grip button when pressing select. The decision to use the grip button for this purpose came from the interaction logs from the first iteration. They showed that a majority of the users, 87.5%, exclusively used the grip button to perform the deselect all action instead of using the application menu button which would also perform the same function.
4.2.2.3 Selection on Trigger Down and Trigger Up Six users, making up a fourth of the study participants, had difficulties selecting small shapes. Of these six users, five were using the gaze selection mode. In the first iteration, the object to be selected was being determined by the object being hovered over when the trigger was pressed down. To make selecting small objects easier, the logic for which object would be up for selection was updated.
When the user pressed the trigger down, a trigger down event was fired. Similarly, when the user released the trigger, a trigger up event was fired. If the selector had a target object when the trigger down even was fired, the target object would be the one selected once the trigger was released. If no object was hovered over when the trigger down action was fired, the object hovered over by the selector at the trigger up event would be the one selected (Fig. 11).
Figure 11. Iteration 2 Selection Logic
4.2.2.4 Layers Directly Selectable In the post-test interview, the participants were asked what operation they found hardest to perform. 54% reported that moving the layers, or more precisely to get to the state of moving a layer being the hardest part.

22
“The hardest part was probably moving in the Z direction. It was a multi-step process. First I needed to grab that layer and it was a bit tricky getting to the state in which I could move them. The interaction here wasn’t very clear to me. “ - User 21 (author's translation)
To make a clearer distinction between the layers and their contained objects, layers were made directly selectable in the same way that shapes were. To select a layer, the user would hover over the frame of the layer with the controller or point at the frame depending on selection mode and press the trigger, just as they would when selecting a shape. To signal what layers were selected or hovered over, the colour of the frame was set to light blue when selected and white when hovered. The default colour of the frame was, as in the first iteration, yellow. Just as with the objects, multiple layers could be selected by holding the grip button when selecting.
With the updated selection logic, layers could be selected directly though the frames. However, one of the benefits of selecting layers through their contained objects, as in the first iteration, was that the user didn’t have to know what layer an object belonged to in order to move it in any axis. To preserve this capability, layers could similarly be selected through their contained objects by hovering over the object and holding down the trigger. A trigger hold event was fired when the trigger had been pushed down consecutively for 500 milliseconds. To indicate to the user that a special event was about to fire, a circular progress bar of the time remaining until the event was fired was shown on the selection controller. The progress bar became visible once the trigger had been held down for 200 milliseconds and disappeared when the user released the trigger.
Layers could not be directly selected through their frames when the image was collapsed since all the frames were of the same shape and size and located in the same position. Once the image was collapsed, the only way of selecting a layer would be through its contained object. If a layer was selected and the manipulation button was pressed when the image was collapsed, the layers would temporarily be expanded while the user was moving the layer and collapsed once again when the user released the manipulation button.
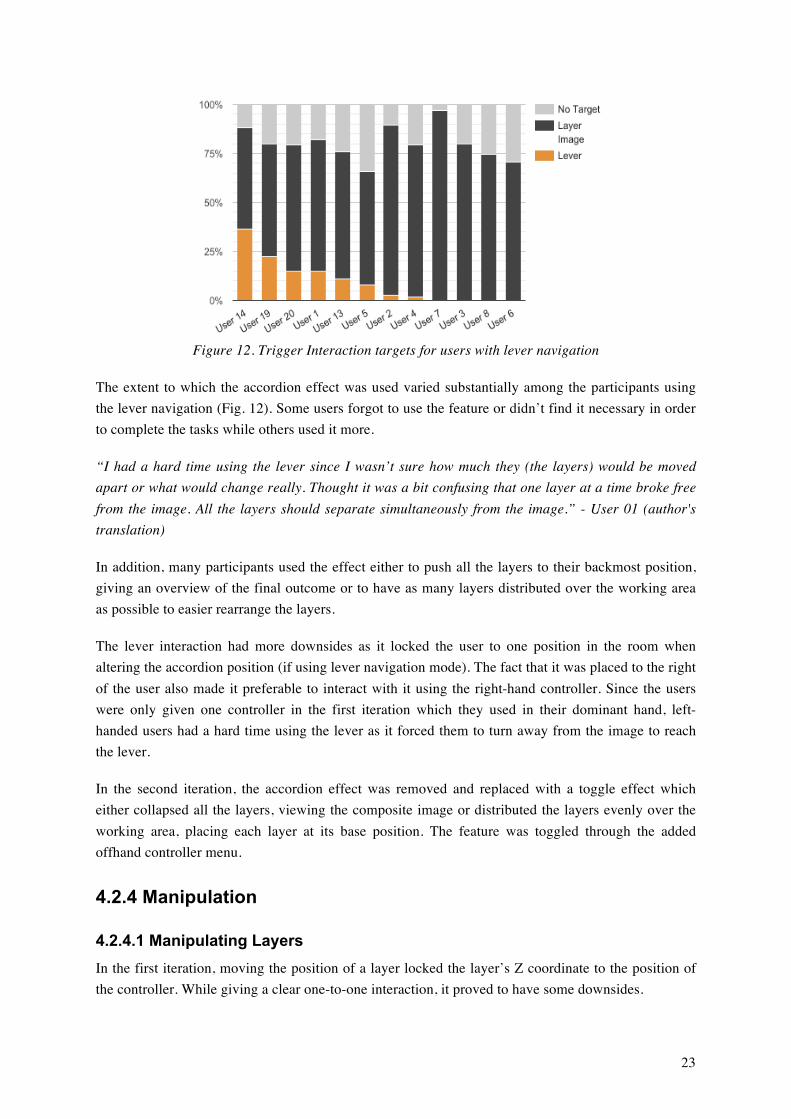
4.2.3 Navigation To examine how much the accordion effect was used, the log data from the participants using the lever navigation mode was analyzed. To use the accordion effect in this mode, the user would have to interact with the lever. The lever was pulled using the trigger button, which was the same button used for selection. Each logged trigger action had a specific interaction target. By comparing the trigger interaction targets, the extent to which the lever was used in relation to other trigger interactions can be examined.
23
Figure 12. Trigger Interaction targets for users with lever navigation
The extent to which the accordion effect was used varied substantially among the participants using the lever navigation (Fig. 12). Some users forgot to use the feature or didn’t find it necessary in order to complete the tasks while others used it more.
“I had a hard time using the lever since I wasn’t sure how much they (the layers) would be moved apart or what would change really. Thought it was a bit confusing that one layer at a time broke free from the image. All the layers should separate simultaneously from the image.” - User 01 (author's translation)
In addition, many participants used the effect either to push all the layers to their backmost position, giving an overview of the final outcome or to have as many layers distributed over the working area as possible to easier rearrange the layers.
The lever interaction had more downsides as it locked the user to one position in the room when altering the accordion position (if using lever navigation mode). The fact that it was placed to the right of the user also made it preferable to interact with it using the right-hand controller. Since the users were only given one controller in the first iteration which they used in their dominant hand, left-handed users had a hard time using the lever as it forced them to turn away from the image to reach the lever.
In the second iteration, the accordion effect was removed and replaced with a toggle effect which either collapsed all the layers, viewing the composite image or distributed the layers evenly over the working area, placing each layer at its base position. The feature was toggled through the added offhand controller menu.
4.2.4 Manipulation
4.2.4.1 Manipulating Layers In the first iteration, moving the position of a layer locked the layer’s Z coordinate to the position of the controller. While giving a clear one-to-one interaction, it proved to have some downsides.

24
When using the gaze selection mode, the users often preferred to stay back and manipulate the image from afar. Since moving the layer required the user to place the controller at the desired position, users were forced to move through the scene.
“Moving in the Z-direction felt like the most cumbersome task. What felt natural for me was to stand back and paint from a distance. I liked being able to do things from afar. Changing the layer position required you to walk around.“ - User 21 (author's translation)
In the second iteration, the selected layer’s movement from its base position was equivalent to a difference vector formed by the controller’s position at the current frame and the controller’s position at the start of the manipulation. To further reduce the required movement, the difference vector was multiplied by an amplification factor of two; meaning the layers moved twice as much as the controller.
4.2.4.2 Manipulating Layer Images In the first iteration, the way by which layer images were manipulated was the same regardless of selection mode and can be read about in the layer image manipulation chapter of the first iteration.
Similar to the layer manipulation in the second iteration, the layer image manipulation was based on a difference vector between the start point and the endpoint of the manipulation multiplied by an amplification factor. When manipulating layer images, the difference vector was a two-dimensional vector, containing the x and y components of the original three-dimensional difference vector.
In the first iteration, the layer image manipulation had been the same regardless of selection mode - moving the layer image by moving the controller. Users with the gaze selection mode expressed difficulties remembering to select using the orientation of their head and manipulating by using the position of the controller. Several users tried using the gaze cursor to move the objects - holding the manipulation button and moving the cursor instead of moving the controller.
In the second iteration, the start and ending position of the difference vector were calculated differently based on selection mode. In direct selection mode, these positions were based on the position of the controller at different times, while in pointer selection, they were set to the position of the cursor at different times.
Furthermore, when using the pointer selection, the amplification factor was set to one, resulting in the selected shapes moving linearly with the cursor. The reason was the similarity of a desktop application and that rotating the controller is not as physically demanding as moving it.
4.2.5 Logging When analyzing the log data from the first iteration, it became clear that the logging function could be improved to give more detailed data about the user interaction. Therefore, in the second iteration, the logging function was improved to record number of objects or layers being affected by each manipulation, type of target for each selection, active selection mode for each interaction, and type of selection (additive or single).

25
Additionally, to get an error rate measurement, an error logging function was implemented where errors could be manually logged by the observer by pressing a key. The users were instructed to let the observer know when the system didn’t perform as they had expected, they pressed the wrong button, or accidentally performed an action - upon which an error was logged.
For a more extensive description of the logged events, see Appendix H.
4.2.6 Scene In the first iteration, the outlines of the hovered over or selected objects were sometimes hard to distinguish in camouflage with the white floor. So, in the second iteration, the colour of the floor in the scene was updated to a hex value of #2B2B2B, giving it a dark gray colour.
4.2.7 Controls The data from the interviews and think-alouds in the first iteration revealed that the controls needed to be re-evaluated.
“You should focus on the number of interaction interfaces and build it so that the user can anticipate what will happen next when pressing a button. The operations are too segmented, it feels like using different interfaces for different interactions.” - User 03 (author's translation)
In the second iteration, the interaction of the main controller was limited to three buttons instead of the four used in the first iteration. Buttons used were the trigger, grip, and trackpad. The trigger was used as a selection button, with a single press selecting either a shape or layer and a long press selecting a layer through its contained shape. The grip was used as a modifier, adding additional functionality to the select button. When the grip was pressed, the select function toggled the selection status of the object being hovered over without affecting the selection status of any other objects or layers in the scene, allowing the user to select multiple objects or layers simultaneously. Lastly, the trackpad was used for manipulation, moving selected layer images or layers depending on what was currently selected.
Button First Iteration Second Iteration
Trigger Press Select layer image Select single object / menu option
Trigger Hold Select and manipulate layer Select layer through contained shape
Trackpad Hold Manipulate selected shapes Manipulate selected objects
Application Menu Deselect all selected shapes n/a
Grip Deselect all selected shapes n/a
Grip + Trigger Press n/a Add object to selection
Offhand Controller Trackpad n/a Toggle menu visibility
Table 2. Controller Actions

26
5 Result
5.1 Presence Questionnaire The presence questionnaire remained the same for both the first and the second iteration except for one question removed in the second iteration. Question number four, “How natural was the mechanism which controlled the movement of the image layers in the environment?” was removed because the accordion effect was removed.
To simplify the summarization and readability of the results, the answers of the questions was adjusted to follow the same scale, with 7 being the highest ranking answer and 1 being the lowest. For the questions whose likert scale was not following this pattern, the scale was inverted using the formula:
𝐼𝑛𝑣𝑒𝑟𝑡𝑒𝑑𝐴𝑛𝑠𝑤𝑒𝑟 = 7 − 𝑜𝑟𝑖𝑔𝑖𝑛𝑎𝑙𝑎𝑛𝑠𝑤𝑒𝑟 + 1
The questions affected by this adjustment were 14 And 15. The full list of questions can be found in Appendix E.
The answers from the questionnaire are summarized below. For each question, the answers of the participants have been grouped and averaged based on test condition and iteration. The standard deviation of each question is also included to give an indication of the unanimity of the participants. To give a better perception of how the answers relate to one another, a colour scale was added to the table with white cells in the average answer columns representing the lower values for responses and green cells representing higher values. The threshold value for white and maximum green is determined by the lowest and highest values in the range respectively. In the standard deviation columns, low values are represented by white cells, meaning that the responses are closer to each other than those with a higher standard deviation, represented by red cells.
Average Answer Standard Deviation
Question Spatial / Point
Spatial / Gaze
Lever / Point
Lever / Gaze
Spatial / Point
Spatial / Gaze
Lever / Point
Lever / Gaze
1 5.83 5.00 5.33 5.33 0.75 0.63 1.03 0.82
2 6.00 5.50 6.00 6.00 0.89 1.38 0.89 0.00
3 5.33 3.50 3.67 4.50 1.21 0.84 1.03 1.05
4 5.33 4.00 4.67 5.50 1.63 1.67 1.51 1.38
5 6.50 6.17 5.83 6.33 0.84 0.75 1.47 1.03
6 5.50 4.33 5.33 3.83 1.38 1.97 0.82 1.72
7 5.50 4.67 5.17 5.00 1.38 1.21 1.60 0.89
8 6.00 5.00 6.17 5.00 1.26 1.55 0.75 1.79
9 6.00 6.17 6.50 6.67 1.26 0.75 0.55 0.82

27
10 5.17 5.17 6.17 6.40 1.83 1.17 0.75 0.89
11 6.00 6.17 5.67 6.50 1.10 0.41 0.82 0.84
12 5.17 5.00 4.33 4.83 0.75 1.55 1.75 0.75
13 6.00 5.33 6.17 5.33 1.10 1.51 1.33 0.82
14 6.00 5.17 6.17 4.33 2.00 0.75 0.75 1.37
15 5.50 4.33 5.33 5.67 0.84 1.75 0.52 0.52
16 5.00 4.00 4.33 3.83 1.10 1.90 1.21 1.17
17 4.83 3.83 4.17 5.00 1.60 1.47 1.94 0.89
All 5.63 4.90 5.35 5.28 0.61 0.47 0.58 0.44
Table 3. Presence Questionnaire Score Summary for test conditions in Iteration 1
In order not to overcomplicate the graph, the result from the presence questionnaire has been divided into two tables. The first table, Table 3, showing the scores in relation to the different conditions in the same iteration while the second table, Table 4, shows the total score of the first iteration in relation to the second iteration.
Average Answer Standard Deviation
Question Iteration 1 Iteration 2 Iteration 1 Iteration 2
1 5.38 6.25 0.82 0.89
2 5.88 6.63 0.90 0.52
3 4.25 5.63 1.22 1.41
4 4.88 N/A 1.57 N/A
5 6.21 6.88 1.02 0.35
6 4.75 6.13 1.59 1.13
7 5.08 5.88 1.25 1.36
8 5.54 6.75 1.41 0.71
9 6.33 6.63 0.87 0.52
10 5.70 5.50 1.29 1.69
11 6.08 6.88 0.83 0.35
12 4.83 6.75 1.24 0.46
13 5.71 6.63 1.20 0.74
14 5.42 5.75 1.44 0.71
15 5.21 5.38 1.10 0.52
16 4.29 5.25 1.37 0.89
17 4.46 5.88 1.50 0.83
All 5.29 6.17 0.56 0.53
Table 4. Presence Questionnaire Score Summary Iteration 1 and Iteration 2

28
5.2 Interaction Logs Since the logs included actions as separate entries, the data needed to be aggregated to be of any use. This section presents relevant data from the aggregated interaction logs.
5.2.1 Error Rate Establishing an error rate from the logs of the first iteration was difficult because it was not evident from the data which interactions were to be counted as erroneous. To remedy this, an error logging function was introduced in the second iteration.
A common theme among participants in the first iteration, especially those using the gaze selection, was difficulty targeting and selecting smaller objects. Another common problem was that the selection was set to additive by default, not deselecting what was previously selected when selecting something new. To further examine this problem, the selection targets (targets hovered over by the selector when the trigger was pressed) of the first iteration were examined. Since pressing the trigger button without a target had no effect on the state of the system, it could be construed as error.
Figure 13. Iteration 1 Trigger Interaction Targets
The average number of failed selections (selections with no target) for users with spatial navigation was 21.66% and 20.39% for those using lever navigation. When comparing selection modes, the users with gaze selection had 25.6% selections made with no target while the users with direct selection had an average of 16.3% (Fig. 13).
For the second iteration, the logger included the possibility to log an error manually by the observer through a designated key. The errors logged ranged between 0 and 4 when completing the tasks, averaging 2 errors per user with a standard deviation of 1.58. However, the participants were only instructed to call out an error when the system behaved contrary to expectation or they accidentally pressed the wrong button. Factors such as not hitting the intended target were therefore not included in the error logs.

29
Since pressing the trigger without a target had a function in the second iteration (deselecting all currently selected) it cannot be viewed as a pure measurement of error. In the second iteration 16.4% of selections were made with no target (Fig. 14).
Figure 14. Iteration 2 Trigger Interaction Targets
5.2.2 Selection Modes Used In the second iteration, the users had a menu from which to choose selection mode. The logging function presented for each individual action which selection mode had been used.
Figure 15. Selection Modes Used in Iteration 2
The interactions in Figure 15 above refers to selection and manipulation.
5.2.3 Navigation With the removal of the accordion effect in the second iteration, the user could navigate through the layers using the expand/collapse feature implemented in the offhand controller. Another way to expand the layers temporarily was by selecting a layer through its contained object and manipulating it while the image was collapsed. This would cause the layers to temporarily expand while the layer was being manipulated and then collapse again when the manipulation was complete.
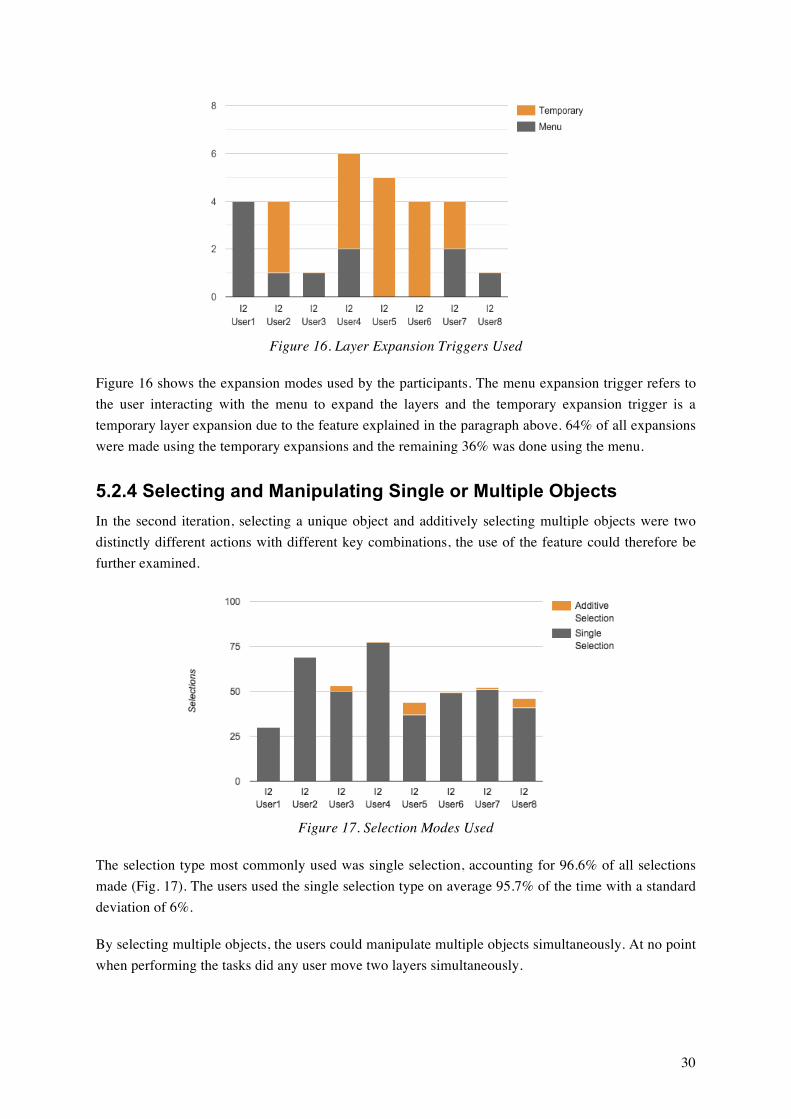
30
Figure 16. Layer Expansion Triggers Used
Figure 16 shows the expansion modes used by the participants. The menu expansion trigger refers to the user interacting with the menu to expand the layers and the temporary expansion trigger is a temporary layer expansion due to the feature explained in the paragraph above. 64% of all expansions were made using the temporary expansions and the remaining 36% was done using the menu.
5.2.4 Selecting and Manipulating Single or Multiple Objects In the second iteration, selecting a unique object and additively selecting multiple objects were two distinctly different actions with different key combinations, the use of the feature could therefore be further examined.
Figure 17. Selection Modes Used
The selection type most commonly used was single selection, accounting for 96.6% of all selections made (Fig. 17). The users used the single selection type on average 95.7% of the time with a standard deviation of 6%.
By selecting multiple objects, the users could manipulate multiple objects simultaneously. At no point when performing the tasks did any user move two layers simultaneously.

31
When examining number of targets for image manipulation, the single target manipulations accounted for 94.39% with a standard deviation of 3.94%. No users manipulated more than two objects simultaneously when performing the tasks.
Figure 18. Object Manipulation Targets
5.3 Interviews As the major findings in the interviews from the first iteration was the base on which the second iteration was built, the core discoveries of those have already been disclosed in chapter 4.2. This chapter will shift the focus more towards the findings of the second iteration post-test interviews.
The user studies for the second iteration were conducted with a 24 question semi-structured interview. The questions regarded the user’s experience with the prototype. The questions have been divided into a set of categories and the major findings for each such category is declared in the following sections. While there was no question directly relating to the navigation of the system, this aspect was discussed through other questions such as Question 4 and Question 12.
The full list of questions can be found in Appendix G.
Category Number of Questions Question Numbers
Usefulness 1 1
Efficiency 2 2, 3
Effectiveness 4 4, 19, 20
Learnability 2 5, 6
Selection 8 7, 8, 9, 10, 11, 14, 17, 18
General 4 12, 21, 22, 24, 26
Manipulation 3 13, 15, 16
Satisfaction 1 23
Table 5. Question Distribution

32
5.3.1 Usefulness As stated under chapter 2.3.1, the usefulness of a system is to what degree it enables the users to achieve their goals and is an overall assessment of the user’s willingness to engage with the product at all.
In both iterations, 100% of the users reported that they could perform the assigned tasks by using the prototype.
5.3.2 Efficiency Efficiency is the speed with which the user's goal can be accomplished accurately and completely. This parameter is most commonly reflected as a measure of time. Even though the task completion time was included in the interaction logs, comparison of that data gives little valuable result due to the think-aloud exercise which slows performance significantly (Rubin 2008). Instead, users were asked about their perceived efficiency when performing the tasks.
The efficiency was rated on a scale from one to seven where 1 was labelled as “Not at all efficient” and 7 was labelled “Very efficiently”. The average response on this question was 5.94 with a standard deviation of 0.8.
Figure 19. Perceived Efficiency
One user mistook the task of rating the perceived efficiency for giving a rating of the overall prospects of the system - weighing in factors such as scaling issues and cases not covered by the study.
“In this version, the objects were very distinct. I feel that it could become messy when you have more complicated scenes. I thought the interaction was intuitive.” - I2 User01 (author’s translation)
For some users, the depth perception was not enough to indicate where each layer was situated in relation to the others. When re-arranging a layer, it was difficult to keep the position of the all the different layers in mind. An example of this was I2 User02 who started off the second task by moving the layers into correct position before finally collapsing the image and moving the shapes into place.
“I basically had to keep the order of the stack in my head. At the end when I had moved 4-5 layers it became hard to remember where the layer should be placed. If there would have been a way to see

33
more clearly where the layers would end up in relation to each other it would have been more efficient.” - I2 User02 (author’s translation)
Another factor affecting efficiency was small hitboxes for smaller objects. Targets in the scene such as the green lines (see Shape 4 in Figure 4) and the frames of the layers became difficult to hit from a distance in pointer selection mode.
“At a comfortable distance, it was hard to hit the small lines because of their small hitboxes. I would like it if the hitboxes grew when you hovered over an object.” – I2 User02 (author’s translation)
Lastly, users commonly tried to move the hovered over objects directly, forgetting to first select them. This was also marked as inefficient.
“Something that did not behave as I anticipated was moving objects – having to select them before manipulating them. I often tried to move directly with the trackpad without first selecting them. It felt like an extra button press that wasn’t needed.” – I2 User04 (author’s translation)
5.3.3 Effectiveness Effectiveness is the extent to which the product behaves in the way the users expects and the ease with which users can complete tasks. Though usually measured quantitatively with error rate, qualitative data regarding the system’s performance compared to expectation can give further insights as to what decides the effectiveness of a system.
The amplified movement of the layer images during manipulation in direct selection mode was an unexpected feature.
“Everything behaved as expected except for moving an object within its layer where I expected the object to move with the controller.” – I2 User01 (author’s translation)
As previously mentioned in chapter 2.3.2, the manipulation action of objects did not work as anticipated. Objects had to first be selected with one button and then manipulated with a second button.
“Question: Did the system behave as you expected?
Answer: For the most part, yes. Except when you first needed to select things to manipulate them. Also, the menu was too big and appeared too close. The layer management visually behaved exactly like I expected it to.” – I2 User02 (author’s translation)
The menu was also perceived as too big when toggling the menu at a comfortable position. Another effectiveness issue stemmed from two users attempting to interact with the menu using the offhand controller.

34
5.3.4 Learnability Learnability is the user’s ability to operate the system to some defined level of competence after some predetermined amount of training. It can also refer to the ability of infrequent users to re-learn the system after periods of inactivity.
Since the users only tested the system once, the ability to re-learn the system after periods of inactivity could not be examined. All the users received the same training, going over each function of the system individually. Therefore, emphasis was placed on how easy or hard they found the system to learn and what they had the most difficulty remembering.
Question 5. How hard / easy did you find the system to learn?
I2 User01 On a scale from 1 to 7 with 1 being really hard and 7 being the easiest, I would say 6. It was really straight forward.
I2 User02 I thought it was pretty easy to learn. The things I had difficulties learning were relatively minor things. The decisions made in the design felt motivated by common intuition. Even if you hadn’t given me instructions in the beginning I think I still would have eventually figured it out. A lot of things were easy to learn.
I2 User03 Very easy. Sometimes I pressed the wrong button (move instead of select) but then you got instant feedback that the action you performed was not the one you intended.
I2 User04 It was really easy, I must say. It feels like all the interactions were pretty intuitive. It was pretty much point and play. The fact that there were only three buttons on the right-hand controller made it easy to understand.
I2 User05 It went super easy. It was a good thing it was like an exploded view of the image that you went into. It was a good thing that you could choose if you wanted the layers expanded or if you wanted them collapsed. You could always check if you needed to know how things were situated in the Z-direction or just get a hint of how the layers were organised in correlation to each other.
I2 User06 It was pretty easy. You only had four buttons to keep track of and conceptually the system was very logical.
I2 User07 It was not hard at all. It was just a matter of getting used to which button did what.
I2 User08 Very easy.
Table 6. Question 5 Answers (author’s translation)
The system was evaluated overall as easy to learn (Table 6). In terms of learning hindrances, six out of the eight users replied that selecting the layers before manipulating them was the hardest thing to remember. Other users repeatedly attempted to interact with the offhand controller whose sole function was the toggle menu, and many struggled with multi-object selection.
5.3.5 Satisfaction Satisfaction is referred to as the user’s perception of the product. Users are more likely to perform well on a product that provides satisfaction than one that does not.

35
To investigate whether the system was satisfactory, users were asked if there were any actions they wanted to perform during the test where they felt that the system lacked.
The common response was rotating objects. The participants reflected that the object rotation was not necessary to complete the tasks, but nevertheless an action which they intuitively thought the system would handle by rotating the controller around the roll axis when manipulating objects.
“... It was nothing required to complete these tasks but I tried rotating the controller to see if the objects rotated as well.” – I2 User03 (author’s translation)
Secondly, two users suggested the ability to select objects by selecting an area in which all containing objects would be selected, e.g. area selection.
Finally, one user suggested the ability to place layers freely in the scene, instead of snapping to their base positions. By placing layers behind the user, some layers could be hidden while focusing on others.
5.3.6 Selection When evaluating the selection feature, questions arose regarding selecting objects and layers using both direct selection and pointer selection, selecting multiple objects or layers, as well as selecting layers by pressing and holding the trigger over their contained object.
5.3.6.1 Selecting Layer Images and Frames As shown in the interaction logs, all users except one preferred using the pointer selection mode over the direct selection. When asked Question 8 and Question 10, regarding selection of objects and frames using the direct selection, the users generally answered they refrained from using it because they wanted to move as little as possible.
“It felt good, it was more physical because I had to walk forward to reach the image. Which was probably why I didn’t use it that much – because I’m lazy and prefer to stand in one place.” – I2 User03 (author’s translation)
The user who preferred the direct selection predominantly responded that the reason for this was that it felt more natural due to object reachability and manageable size.
When it came to selecting objects and frames using the more commonly preferred pointer selection mode, the major difficulty lied in hovering over thin targets, such as the green lines or the frames. This issue was brought up in some form by all the seven participants who used the pointer selection.
“The pointer was really neat. You always saw the beam and knew where it was pointing. The only downside was that it was hard hitting the frame and the lines.” – I2 User03 (author’s translation)
5.3.6.2 Selecting Frames Through Objects The feature to select frames through their contained object was positively reviewed by all the participants except for the one using the direct selection mode (Table 7).

36
Question 11. You could also select the frame of an object by pressing and holding the trigger over that object. How did that feel?
I2 User01 It felt strange. I tested it but it didn't feel like something I would use.
I2 User02 It was really good when you weren’t sure where in the picture you were. I would have liked some highlight on the layers when you just hovered over the objects as well.
I2 User03 With the pointer, I clearly preferred selecting the frame though the object. Partly because it was easier, bigger objects being easier to target than thin frames, and partly because it's the object that decides whether I want to move the layer or not.
I2 User04 It worked really well because all objects except for the small lines were easy to target.
I2 User05 It was the best! I'd rather use that then trying to hit the frame because it was thin. Selecting the frames would probably have been easier using the controller (direct selection) but I never used that.
I2 User06 It felt good, I used it a lot. It was easier to point at a larger object than trying to hit the thin frame. It also was more harmonic because most of the time you were already pointing at the object after having moved it in XY.
I2 User07 It was incredibly neat! When I understood how it worked I thought it was a really nice feature - a neat way to capture the layer.
I2 User08 It was really neat once you got into it. It was not as intuitive as the other features but once you got into it, it was an easier way to do it.
Table 7. Question 11 Answers (author’s translation)
5.3.6.3 Selecting Multiple Targets Selecting multiple objects or frames was accomplished by holding down the grip button when selecting as normal. As shown by the iteration logs, selecting and manipulating multiple layers simultaneously was never used when performing the tasks, even though all the participants tested the feature during the instructional phase before beginning the tasks.
The main reason why users did not use the additive selection stemmed from the way the tasks were constructed. The users found no need to move multiple layers simultaneously and little or no use in moving layer images simultaneously.
“I didn’t feel that any of the tasks required me to move multiple objects / layers simultaneously. I can see however that there is use for the feature.” – I2 User02 (author’s translation)
“I never used it during the test. In hindsight, I think it could have been a positive thing to use. It was absolutely a good thing that it was an available option!” – I2 User04 (author’s translation)
“I actually never used it besides from the demo (instruction phase) so I never really found any use for it. I think it’s more of a function for advanced users.” – I2 User06 (author’s translation)
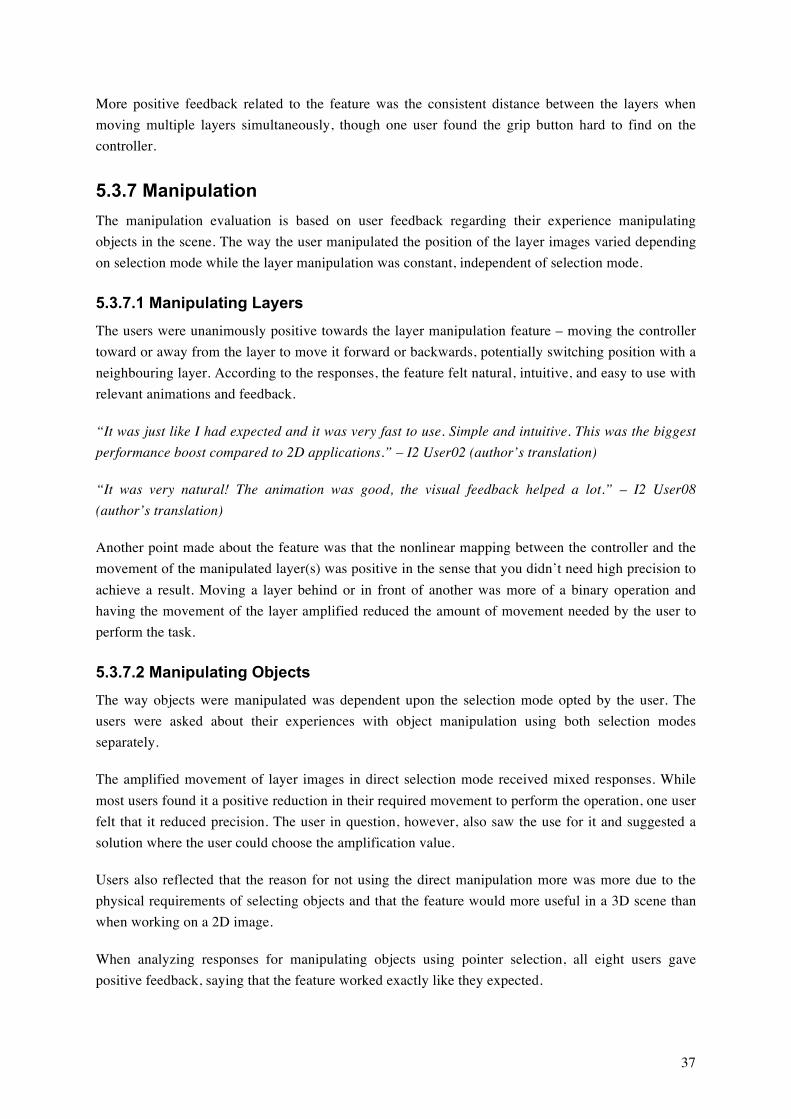
37
More positive feedback related to the feature was the consistent distance between the layers when moving multiple layers simultaneously, though one user found the grip button hard to find on the controller.
5.3.7 Manipulation The manipulation evaluation is based on user feedback regarding their experience manipulating objects in the scene. The way the user manipulated the position of the layer images varied depending on selection mode while the layer manipulation was constant, independent of selection mode.
5.3.7.1 Manipulating Layers The users were unanimously positive towards the layer manipulation feature – moving the controller toward or away from the layer to move it forward or backwards, potentially switching position with a neighbouring layer. According to the responses, the feature felt natural, intuitive, and easy to use with relevant animations and feedback.
“It was just like I had expected and it was very fast to use. Simple and intuitive. This was the biggest performance boost compared to 2D applications.” – I2 User02 (author’s translation)
“It was very natural! The animation was good, the visual feedback helped a lot.” – I2 User08 (author’s translation)
Another point made about the feature was that the nonlinear mapping between the controller and the movement of the manipulated layer(s) was positive in the sense that you didn’t need high precision to achieve a result. Moving a layer behind or in front of another was more of a binary operation and having the movement of the layer amplified reduced the amount of movement needed by the user to perform the task.
5.3.7.2 Manipulating Objects The way objects were manipulated was dependent upon the selection mode opted by the user. The users were asked about their experiences with object manipulation using both selection modes separately.
The amplified movement of layer images in direct selection mode received mixed responses. While most users found it a positive reduction in their required movement to perform the operation, one user felt that it reduced precision. The user in question, however, also saw the use for it and suggested a solution where the user could choose the amplification value.
Users also reflected that the reason for not using the direct manipulation more was more due to the physical requirements of selecting objects and that the feature would more useful in a 3D scene than when working on a 2D image.
When analyzing responses for manipulating objects using pointer selection, all eight users gave positive feedback, saying that the feature worked exactly like they expected.

38
5.3.8 General There were four questions under the general category. These were questions that did not directly relate to any of the other categories but were still of interest to the study. The questions regarded the haptic feedback in the selection controller, the users’ ability distinguishing which content belonged to which layer, general areas of improvement, and the users’ thoughts on whether VR could be used in everyday life as a working tool. The users were also asked to rate the overall usability of the system on a scale from one to ten.
5.3.8.1 Haptic Feedback Six of eight users noticed the controller vibrating at different points when they used the system. Attitudes toward this feature were positive as it was perceived as helpful when using the system for the first time.
“I liked it! In the beginning when I was getting into using the system I noticed it but then after using the prototype for a while, I stopped thinking about it. It helped me get in to it.” - I2 User01 (author’s translation)
“It absolutely helped! When I grabbed, or moved an object I got feedback that something happened. It was very positive that you got both visual and haptic feedback.” - I2 User04 (author’s translation)
5.3.8.2 Areas of Improvement The users were also asked to suggest general areas of improvement for the prototype. As it turned out, most of the problems had already been discussed in earlier questions. However, this question gave them a chance to reflect over how these challenges could be overcome and summarize their experience of using the prototype.
First, some users expressed a desired ability to hide layers in order to simplify the working scene and make it easier to focus on the layers currently being manipulated.
“I would have liked having the ability to hide all layers except for the one I am working with. For these specific tasks, it wasn’t really necessary because the shapes were quite simple but in more complex tasks I feel like it would have been a requirement.” - I2 User04 (author’s translation)
Secondly, users wanted an easier way to select small shapes. Suggestions included:
● Area Selection - having the ability to define an area in which all objects would be selected. ● Increased Hitbox - having the clickable area of smaller targets larger than the targets
themselves or having the hitbox grow once you hovered over the object, making it easier to keep the object targeted.
● Pointer Snapping - Having the pointer “glued” to objects for some distance after the controller has passed over the object.
● Zoom - Having the ability to scale up the size of the objects in the scene when working with small details and then making them smaller when performing operations that require less precision.

39
Lastly, the users saw room for improvement in menu interaction; specifically, using the right-hand controller to interact with a menu that was toggled with the left hand.
5.3.8.3 Overall Usability The users were asked in question 24 to rate the usability of the system from one to ten where one was “Not at all usable” and ten was “Very usable” for layer management in Virtual Reality. The average answer was 8.31 with a standard deviation of 1.5. The users were asked to elaborate on their rating and explain their thought process.
Figure 20. Overall Usability
The lowest rating user, I2 User01, which gave a rating of 6 explained:
“The basic functionality is there but you can’t really perform delicate operations. It becomes very limited to having just a few layers. Right now, it’s not optimal for complex images and complex tasks. It works well for what we have in this scene and for these tasks but if you want more complex images and complex layers, things will get harder. “ - I2 User01 (author’s translation)
Other negative aspects once again brought to light were difficulties selecting small or thin shapes and the issue of remembering to first select an object before manipulating it.
“9.9 - it is just selecting the lines that is missing” - I2 User05 (author’s translation)
“8 - It felt intuitive and provided a fast way to rearrange the layers. Then it took a while to learn the controllers and it wasn’t always easy to see to which layer an object belonged.” - I2 User08 (author’s translation)
5.3.8.4 Virtual Reality as A Working Tool The last question of the interview was whether users saw potential for Virtual Reality in everyday life as a working tool. In the first round of user studies, 16 of the 24 participants saw definite potential and in the second round, all 8 participants did. The major themes among areas of application were visualizing construction projects, city planning, remotely controlling robots, finite-element analysis, and using the three dimensions to visualize complex systems.

40
The biggest adversaries were those concerned with shutting out the world while working, the hefty space requirement for room-scale VR, the underdeveloped technology, and one user who said “I don’t want users to be lost in Virtual Reality. Live in the real world!”.

41
6 Discussion The purpose of this thesis was to explore how a composite image layer management system could be built in Virtual Reality with focus on selection and navigation from a usability perspective. Based on the results from chapter 5, this chapter discusses correlations in the data gathered, the strengths and weaknesses of the final iteration, and areas in which this research can be applied.
6.1 Evaluating Selection and Navigation
6.1.1 Selection In the first iteration, gaze selection and direct selection were evaluated. Based on the results of that iteration, the gaze selection mode was reworked and transformed into pointer selection. This since users experienced difficulties separating selection from navigation - meaning users attempted to use the same function to both select and manipulate an object instead of using gaze selection and controller manipulation, respectively. Furthermore, some users instinctively tried to use the controller as a pointer when first entering the system.
The second iteration allowed users to choose selection mode themselves. This investigated the strengths and weaknesses of the updated selection modes as well as how much and for what purpose they would be used.
As it turned out, the pointer selection was preferred by all users save one, suggesting it was more advantageous to use than direct selection. What most users reported as the upsides to this selection mode was that the image could be manipulated from a distance which allowed users to keep an overview of the image while manipulating it, and that the interaction was similar to that of a desktop application.
The major negative aspect of the pointer was that the single point of impact made it difficult to hit small targets. This was an issue found in the first iteration as well with the gaze selection. To remedy this, the trigger selection logic for the second iteration was updated, giving the user two chances of hitting the desired target, one when the trigger was pressed down and one when released. This was not enough to accommodate the problem and a number of suggestions were offered by the users to tackle the issue.
One feature already implemented to improve this issue was an option to select a layer by pressing and holding the trigger over one of its contained objects. This removed the necessity to hit thin frames as it allowed them to target the larger contained objects. It also generated the ability to move an object without knowing which layer contains it.
Since the pointer selection was preferred by a majority of the participants in the second iteration and received the most positive feedback, it is to be considered the most successfully implemented selection method in this study.

42
6.1.2 Navigation The accordion effect was discarded in the second iteration because it was hard for the users to anticipate how much the layers would move, especially using the lever navigation. Furthermore, users seemed more interested in expanding all layers simultaneously than separating one layer from the image at a time.
The first iteration also revealed most users preferred to move as little as possible. Whether this is a result of uncertainty regarding physical surroundings, or some other factor is hard to determine. Users who had little or no previous experience with room-scale VR were generally more stationary. At the same time, some users confessed this stemmed from laziness. The overall preference for stationary manipulation became even more apparent following the second iteration when users could choose selection mode and consequently how much they would need to move.
The expand/collapse effect was far easier for the participants to anticipate, since it only had two states. Problems with the updated navigation mode were instead related to the menu interaction controlling the effect. Issues relating to the menu were its lack of functionality, overwhelming size, inability to follow the controller, and inconsistent interaction method contingent upon selection mode. None of these points are particularly hard to remedy if a third iteration were to be made. A bigger problem, which has great potential for future exploratory research, would be how to design menus in Virtual Reality for large-scale applications with a multitude of options.
6.1.3 Correlations Between Selection and Navigation Selection mode and navigation mode are a strategic symbiosis. As displayed in the first iteration, having a selection mode which forces the user to move in the scene [direct selection] does not pair well with a navigation mode which forces the user to get back to a single position [lever navigation]. The direct selection mode forced the users to move to the target which they wanted to select. Since the lever was stationary and placed in one of the corners of the play area, where it would not be obscuring the image, the users had to move all the way in the scene to use the lever. The solution implemented in the second iteration was more well received, having a menu which could be toggled at the position of the user.
Similarly, combining a selection mode with the affordance of being used from a single position [gaze selection] and a navigation mode which forces the user to move through the scene to affect it [spatial navigation], was not particularly well received.
6.2 Evaluating Manipulation Manipulation was not initially being targeted for investigation in this study. As it turned out however, it is one of the fundamental components of layer management and was a strong talking-point in user feedback.
Based on user responses in the first iteration, it became apparent that the manipulation method of the system should match the selection method. For an example, using the movement of the hand controller to control the movement of the image layers (as in the first iteration) was more suited for

43
the direct selection mode where the selection was controlled by the movement of the controller as well. When using the gaze selection mode, the users initially thought that the movement of objects should be controlled by the cursor used for selecting objects.
In the second iteration, the manipulation mode was dependent upon selection mode. When using pointer selection, the objects moved in relation to the position of the cursor and when using direct selection, the manipulations were made in relation to the position of the controller (as in the first iteration). The exception to the rule was manipulation of layer position, in which the interaction was the same regardless of selection mode. To indicate to users using pointer selection mode that the layer manipulation was not being controlled by the cursor, both the cursor and the ray from the controller were hidden when the action was performed.
The layer manipulation operation was performed by either pushing the controller forward to push the layers back or pulling the controller backwards to move the selected layers closer. The unanimously positive feedback from users proved that this feature was intuitive and easy to use. Likely because of the operation’s clear parallel to pushing and pulling objects in real life.
Even though the system was developed for room-scale VR, a majority of users preferred to interact with the system from a single position, avoiding exerted movement. Users explained they desired to maintain an overview of the final condensed image when manipulating it, an action hard to perform when close to the image.
6.3 Grouping Buttons by Function In the first iteration, users struggled to remember which button was used to perform which action. In the second iteration, the issue was less prominent due to the reworked button logic. The buttons had been better grouped after functionality (trigger used for selection, trackpad used for manipulation, and grip to enable the selection of multiple objects). What users had difficulties remembering in the second iteration was more commonly to select objects before manipulating them. Instead of first pressing the trigger to select an object, users would press the trackpad directly to manipulate the object being hovered over.
6.4 Limiting the Number of Interactions Log data indicated that users were most likely to perform manipulations one object at a time. Knowing this, and that users often forgot to select objects before manipulating them; a third iteration of the prototype would have been designed with a new interaction pattern. This pattern would either presume that hovered over objects were the sole intended targets for manipulation, or have hovered over objects automatically selected when pressing the manipulation button, similarly to what would have happened in the second iteration if the user were to first press the trigger and then the trackpad.
Though multi-selection was not utilized by users in the second iteration, the function was praised in potential merit during interviews. To add support in a third iteration, the multi-select function would be implemented similarly to that of the second iteration: holding the grip button while selecting to add

44
multiple objects to the selection. If multiple objects were selected when the manipulation button was pressed, the manipulation would affect the selected objects instead of what was being hovered over.
6.5 Methodology Criticism
6.5.1 Bug Discovered in First Iteration While conducting the tests for the first iteration of the prototype, a bug was found where some layers would stick to their base position and not be affected by the layer navigation method. The bug was caused by the user holding down the trigger to move the layer and then releasing it before the toggle animation to rearrange the layers was complete. Since the animation was quite fast (layers moving at a speed of 2 m/s), the bug did not occur for all participants. While the bug had an easy fix; holding the trigger down over an object again and letting the animation finish - it caused some frustration for the affected users. No bugs were found for the second iteration.
6.5.2 Think-Aloud Exercise Affecting Log Data While think-aloud exercises provide rich, direct data, it is quite labour intensive and sometimes distracting for the participants. Furthermore, the exercise can often include verbosity in participants who feel that they are forced to speak at every turn (Mathison, 2005). As the technique slowed most performances significantly (Rubin 2008), the data regarding task completion times could not be used as intended.
After the first iteration, the idea developed of introducing a third reference image and a third task which the participants would be instructed to complete at top speed without the think-aloud technique. However, since there was no baseline from the first iteration to compare with, it was not implemented.
6.5.3 Different Locations and Hardware Conducting a user test session required a HTC Vive, a computer to run the application and a free space of approximately two by two meters for the participant to interact in. During the test phases of the study, I had access to three locations meeting these requirements: two in the visualization studio at KTH and one at the office of XLENT Consulting. Due to scheduling of different locations as well as participant logistics; the test environment and hardware was not identical for all participants. The hardware difference was minimal, all HTC Vives being fully functional and computers running prototypes at full frame rate. Once the participant put on the HMD to perform the test, the visuals of the surroundings should not have had any effect on the user.
However, since the systems did not contain any auditory components, ambient sounds in the environments could have affected the users. While two of the locations were completely isolated, allowing only the participant and myself to interact in an undisturbed environment, the third location was a bit more public, located in the visualization studio with no way to separate the participant from others in the studio. Having non-participating people in the vicinity of a user may influence the user’s willingness to openly share thoughts and feelings regarding the prototype. Hearing chatter in the surrounds might also remind participants of their physical location, reducing the sense of immersion.

45
6.5.4 Interviews Transcribed Instead of Recorded The original plan was to video record all participants, both during the main study and the post-test interview. The initial few participants of the first iteration were filmed using a Canon D60 camera with a Røde Videomic mounted on a tripod. However, the Canon D60 is primarily built for photography and the video recording function was not optimal for this task. The recording automatically stopped every 5 minutes and the output files were uncompressed avi which resulted in large file sizes.
After a few participants, I realised that recording the sessions using this setup was suboptimal. Furthermore, one participant had already participated in the test without being recorded. Making a judgement call, I decided not to record the remainder of the user tests and instead focus on taking detailed notes of both interactions and answers.
The fact that interviews were transcribed live instead of recorded and transcribed at a later stage had both advantages and disadvantages. The data produced from the exercises contained less noise and avoided the time-consuming task of transcribing audio recordings. Data such as body language, however, could not as easily be documented and quotes from the participants were paraphrased. However, since the interviews were done in Swedish, the transcriptions would have been paraphrased, regardless.
6.5.5 Presence Questionnaire During the study, participants questioned the relevance of interview questions to the prototype, as opposed to the hardware used to run the application. An example being question 14, How much did the visual display quality interfere or distract you from performing assigned tasks? While low perceived display quality could negatively affect a user’s sense of immersion, evaluating the hardware quality of the HTC Vive was not an objective of this study.
6.6 Conclusion
6.6.1 Adhere to The Conventions of Desktop Applications When Possible Just as with desktop and mobile applications, standards for VR applications will evolve with an expanding market. The standards are designed for the capabilities of each system; desktop applications being designed mainly for two-dimensional screens with the input of a mouse and keyboard, while mobile and tablet applications are designed based on touch input capabilities and limited screen space. As the market for Virtual Reality grows, I believe new standards for room-scale VR will emerge based on its unique capabilities, representing digital information in three dimensions and spatially locating the user in digital space. Until these standards are invented, the interaction design for virtual reality should be based on real world interaction for naturalistic tasks (Bowman et al. 2008; Nguyen 2016; Eriksson 2016) or based on interactions found in desktop and mobile applications for more abstract tasks (Bowman et al. 2008; Nguyen 2016).

46
6.6.2 Adjust the Environment to The Tasks and The User Naturally, the virtual environment of an application should be designed based on its purpose. Like an architect designing a building, be it an office with working areas and meeting rooms or an apartment with a bedroom, kitchen and bathroom; designing a virtual reality working environment needs to be completed with the needs and capabilities of the end-user in mind. A great benefit of designing a virtual space is that the environment can be tailored for each user.
In the first iteration, some users encountered issues unaccounted for during development. First, the lever positioned on the right-hand side of the user when facing the image caused an issue with left-handed users having to reaching for it or take their eyes of the image being navigated to manipulating the lever. Secondly, one very tall user “hit” his head on the layer frames when navigating through them. Consequently, the environments should be adjustable for individual users when designing applications for room-scale virtual reality.
6.6.3 Accuracy Dependent on Operation Positioning objects within a layer requires precision and accuracy. While having the movement of the objects amplified in relation to the movement of the cursor or controller is good for reducing fatigue in users (Wang, 2016) while increasing reach, it may reduce the accuracy of the operation. As suggested by users, the option to self-define the amplification factor would provide a more versatile system, capable of handling precision, accuracy and speed.
Positioning the layers, however, did not require strong precision. When moving layers, placing them in an interval between the adjacent layers elicits the same effect. The amplified movement was therefore perceived as more positive in this case than when moving the layer images.
In conclusion, amplified movement of objects in relation to the control device can reduce required movement and increase reach, thereby reducing fatigue, but may in turn decrease perceived accuracy. The amplification factor should therefore be adjusted for the task at hand.
6.7 Scalability and Applicability
6.7.1 Scalability The test scenario used to evaluate the prototypes was a scene with eight layers, each with one shape per individual layer. Scalability was not evaluated in the user studies but still a key aspect of building and designing any system. Adam Marko Nord who was interviewed in the pre-study mentioned that the key to keeping projects organized and manageable in today's layer based graphical editing software is by grouping and labelling layers. Grouping is the act of momentarily joining selected layers, making the objects contained within the layers act as if they all belonged to one layer. Building upon the work of this thesis, labelling- and grouping layers would be a logical next step for future work.
47
The scalability of the system in the second iteration could handle images with more layers than the eight it did now. Adding additional layers would cause the base positions of the expanded layers to be closer to each other, increasing the difficulty of discerning from the difference in perspective which objects are contained in each layer. However, since layers can be selected though their contained images, knowing which image is contained in which layer is more or less obsolete unless the content of a layer is completely covered by the content a previous layer.
6.7.2 Applicability The findings of this thesis could be applied to a number of areas with similar conditions and prerequisites, and to some extent VR applications in general. While directly applicable to layer management in VR, the findings are not limited to this specific application but can serve as guidelines for applications utilizing 2D content in a virtual environment, room-scale VR applications designed to perform abstract tasks, and productivity tools for VR in general.
6.8 Future Work This section lists questions arisen during the course of this thesis and aspects that were out of the scope of the thesis, but could be further explored.
6.8.1 Grouping Layers As previously mentioned, grouping layers is a fundamental feature of layer management in modern layer based graphical editing applications. This unfortunately fell beyond the scope of this study due to time constraints in the development phase. Interaction design research on layer grouping could be an extension of the topics in this thesis, primarily contributing to the scalability of applications.
6.8.2 Layer Management For 3D Objects One of the great benefits of VR applications over conventional desktop applications is the ease with which a 3D space can be understood and navigated. Using VR to interact with 3D scenes and objects is an affordance of the technology which has potential to give users an intuitive tool for handling digital 3D objects.
As a 3D workspace gets more complex, users will need a way to manage the grouping and visibility of the objects to keep the workspace organized. Partly to keep the workspace from getting cluttered and partly because objects in the scene may obscure each other. Therefore, implementing a layer management system for handling 3D objects would be an obvious candidate for exploratory interaction design research.
6.8.3 Improved Single Point Selection Users liked selecting objects from afar using the pointer selection - a single point selection interface. The downside to this selection mode, as observed by the users, was difficulty hitting small targets from a distance. Additional research could be conducted on the implementation of this technique with a focus on more easily targeting smaller objects.

48
These improvements, and more, are stepping stones for the ultimate revival of Virtual Reality to its utmost potential in terms of interaction technique and interface design. My passion for this study stems from a desire to contribute to the future of the virtual 3D world by paving the way for developers and interface designers in their quest for immersive, productive applications.
49
7 References Andale, 2016. Order Effects: Definition, Examples and Solutions. Available at: http://www.statisticshowto.com/order-effects/ [Accessed May 8, 2017].
Bowman, D. a. et al., 2008. 3D User Interfaces: New Directions and New Perspectives. Computer Graphics …, pp.1–19. Available at: http://citeseerx.ist.psu.edu/viewdoc/summary?doi=10.1.1.145.9379%5Cnhttp://ieeexplore.ieee.org/xpls/abs_all.jsp?arnumber=4670098.
DiCicco-Bloom, B. & Crabtree, B.F., 2006. The qualitative research interview. Medical Education, 40(4), pp.314–321. Available at: https://dx.doi.org/10.1111/j.1365-2929.2006.02418.x.
Eriksson, M., 2016. Reaching out to grasp in Virtual Reality.
International Telecommunication Union, 2015. Parameter values for the HDTV standards for production and international programme exchange BT Series Broadcasting service. Recommendation ITU-R BT.709-5, 5, pp.1–32. Available at: http://www.itu.int/dms_pubrec/itu-r/rec/bt/R-REC-BT.709-5-200204-I!!PDF-E.pdf.
Kreylos, O., 2016. Lighthouse Tracking Examined. Available at: http://doc-ok.org/?p=1478 [Accessed March 13, 2017].
Mathison, S., 2005. Encyclopedia of Evaluation. Available at: http://methods.sagepub.com/reference/encyclopedia-of-evaluation.
Mihelj, M., Novak, D. & Beguš, S., 2014. Virtual Reality Technology and Applications,
Nguyen, Minh-Tu, Hai-Khanh Nguyen, K.-D.V.-L., 2013. Virtual, Augmented and Mixed Reality. 5th International Conference, VAMR 2013, Held as Part of HCI International 2013, 8021, p.399. Available at: papers2://publication/uuid/9A4CA9C8-66E1-4370-A153-B76B9C00CF06.
Nielsen, J., 2012. How Many Test Users in a Usability Study? Available at: https://www.nngroup.com/articles/how-many-test-users/ [Accessed February 14, 2017].
Nielsen, J., 1994. Usability inspection methods. Conference companion on Human factors in computing systems - CHI ’94, 25(1), pp.413–414. Available at: http://portal.acm.org/citation.cfm?doid=157203.157207%5Cnhttp://portal.acm.org/citation.cfm?doid=259963.260531.
Roupé, M., Bosch-Sijtsema, P. & Johansson, M., 2014. Interactive navigation interface for Virtual Reality using the human body. Computers, Environment and Urban Systems, 43, pp.42–50. Available at: http://dx.doi.org/10.1016/j.compenvurbsys.2013.10.003.
Steuer, J., 1992. Defining Virtual Reality: Dimensions Determining Telepresence. Journal of Communication, 42(4), pp.73–93.

50
Valve, 2017. Use the World’s Best 3D Tracking Technology, Royalty Free. Available at: https://partner.steamgames.com/vrtracking [Accessed March 13, 2017].
Virizi, R.A., 1992. Refining the test phase of usability evaluation: how many subjects is enough? Human Factors, 34(4), pp.457–468.
Wang, H., 2016. How Will Different Control / Display Ratios Influence Muscle Fatigue and Game Experience in Virtual Reality Games?
Witmer, B.G. & Singer, M.J., 1998. Measuring Presence in Virtual Environments: A Presence Questionnaire. Presence: Teleoperators and Virtual Environments, 7(3), pp.225–240. Available at: http://dx.doi.org/10.1162/105474698565686.
Yoo, B. et al., 2010. 3D user interface combining gaze and hand gestures for large-scale display. Proceedings of the Conference on Human Factors in Computing Systems - CHI ’10, pp.3709–3714. Available at: http://portal.acm.org/citation.cfm?id=1753846.1754043.

51
Appendixes
Appendix A. Recruitment Posts

52
Appendix B. Introduction Questionnaire
Name
Your answer
____________________________
Occupation
Your answer
____________________________
Age
Your answer
____________________________
Previous VR experience
⃞ HTC Vive
⃞ Sony PlayStation VR
⃞ Oculus Rift
⃞ Samsung Gear VR
⃞ Google Daydream View
⃞ Google Cardboard
⃞ Other: ________________
How much time have you spent in Virtual Reality?
Estimated
◯ 0 - 10 min
◯ 10 - 30 min
◯ 30 min - 1 hour
◯ 1 - 3 hours

53
◯ 3 - 6 hours
◯ More than 6 hours
Do you have a colour vision deficiency?
Colour blindness, also known as colour vision deficiency, is the decreased ability to see colour or differences in colour.
◯ Yes
◯ No
◯ Other: ___________
Previous experience with software which includes layers *
⃞ Adobe Photoshop
⃞ Adobe Illustrator
⃞ Adobe After Effects
⃞ GIMP
⃞ Other: ___________

54
Appendix C. Introduction Manuscript [Greet the participant, offer refreshments, make small talk]
First of all, thank you for taking time to participate in my study!
Let me explain briefly what the study will be about. A lot of graphical software editing tools today use layers in composite images to make up a picture or a frame. In my master’s thesis, I’m exploring how layer management can be handled in a VR environment. You will be testing out a prototype which I have developed and I will give you tasks that you are to perform in the virtual environment.
One thing which is important to point out is that it’s the prototype that’s being tested and not your performance. Nothing you do during the test session can be bad or wrong.
Another thing which is important to keep in mind is that I am interested in your genuine experience of using the prototype - both the good parts and the bad. This test session is for me to find both the good and the bad aspects of the design and you are not going to hurt my feelings by saying something negative, okay?
During the test, I will ask you to say out loud what you’re thinking. This is called a “think-aloud” technique and is very common in usability testing. It might feel strange at first but it helps me in my study.
If you have any questions during the course of the test, just ask them out loud. I will try to answer as much as possible but some I might not be able to because of the integrity of the study. Any questions I can’t answer during the study will most likely be answered afterwards.
Before we begin I have prepared a consent form. Read it through and sign it if everything feels okay. The prototype will be logging your interactions and I will be taking notes.
[Participant signs consent form] Great, thanks! Do you have any questions before we begin?
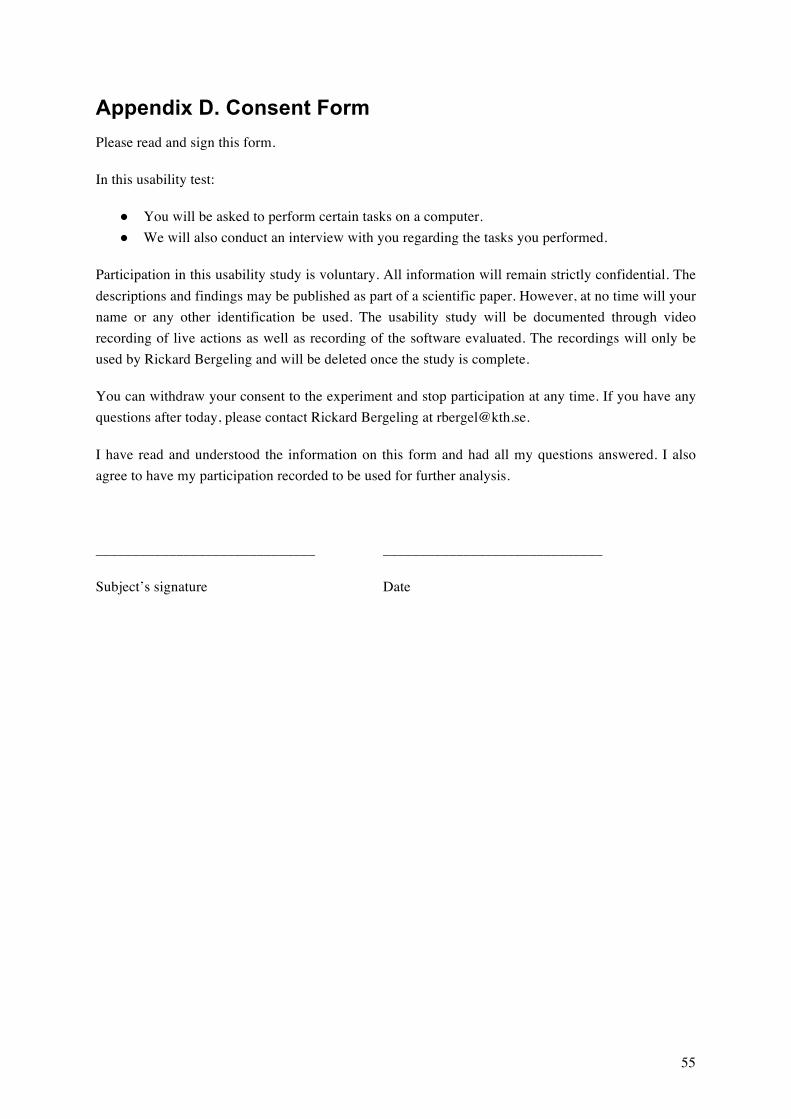
55
Appendix D. Consent Form Please read and sign this form.
In this usability test:
● You will be asked to perform certain tasks on a computer. ● We will also conduct an interview with you regarding the tasks you performed.
Participation in this usability study is voluntary. All information will remain strictly confidential. The descriptions and findings may be published as part of a scientific paper. However, at no time will your name or any other identification be used. The usability study will be documented through video recording of live actions as well as recording of the software evaluated. The recordings will only be used by Rickard Bergeling and will be deleted once the study is complete.
You can withdraw your consent to the experiment and stop participation at any time. If you have any questions after today, please contact Rickard Bergeling at [email protected].
I have read and understood the information on this form and had all my questions answered. I also agree to have my participation recorded to be used for further analysis.
______________________________ ______________________________
Subject’s signature Date

56
Appendix E. Presence Questionnaire Q1. How much were you in control of events?
Not At All 1 2 3 4 5 6 7 Completely
Q2. How responsive was the environment to actions that you initiated (or performed)?
Not Responsive 1 2 3 4 5 6 7 Completely Responsive
Q3. How natural did your interactions with the environment seem?
Extremely Artificial 1 2 3 4 5 6 7 Completely Natural
Q4. How natural was the mechanism which controlled the movement of the image layers in the environment?
Not At All 1 2 3 4 5 6 7 Completely Natural
Q5. How compelling was your sense of objects moving through space?
Not At All 1 2 3 4 5 6 7 Very Compelling
Q6. How much did you experiences in the virtual environment seem consistent with your real-world experiences?
Not Consistent 1 2 3 4 5 6 7 Very Consistent
Q7. Were you able to anticipate what would happen next in response to the actions that you performed?
Not At All 1 2 3 4 5 6 7 Completely
Q8. How compelling was your sense of moving around inside the virtual environment?
Not Compelling 1 2 3 4 5 6 7 Very Compelling
Q9. How closely were you able to examine objects?
Not At All 1 2 3 4 5 6 7 Very Closely
Q10. How well could you examine objects from multiple viewpoints?
Not At All 1 2 3 4 5 6 7 Extensively
Q11. How involved were you in the virtual environment experience?
Not Involved 1 2 3 4 5 6 7 Completely Engrossed
Q12. How much delay did you experience between your actions and expected outcomes?
Long Delays 1 2 3 4 5 6 7 No Delays

57
Q13. How quickly did you adjust to the virtual environment experience?
Not At All 1 2 3 4 5 6 7 Less Than One Minute Q14. How proficient in moving and interacting with the virtual environment did you feel at the end of the experience?
Not Proficient 1 2 3 4 5 6 7 Very Proficient
Q15. How much did the visual display quality interfere or distract you from performing assigned tasks or required activities?
Not At All 1 2 3 4 5 6 7 Prevented Task Performance
Q16. How much did the control devices interfere with the performance of assigned tasks or with other activities?
Not At All 1 2 3 4 5 6 7 Interfered Greatly
Q17. How well could you concentrate on the assigned tasks or required activities rather than on the mechanism used to perform those tasks or activities?
Not At All 1 2 3 4 5 6 7 Completely

58
Appendix F. Post-Test Interview Questions (Iteration 1) 1. Did you feel that you could perform the assigned tasks using the prototype?
a. Which tasks were harder to perform? b. Which tasks were easier to perform?
2. Did you feel that you could efficiently complete the tasks? 3. How did it feel it select objects within a layer? 4. How difficult or easy was it to separate what content belonged to each layer? 5. How did it feel to rearrange the layers? 6. Did you feel like you had control over which layer was selected when you pressed the
trigger? 7. Did you feel like you could move the shapes within a layer in a controlled manner? 8. How did you experience that you were able to select multiple layers simultaneously? 9. Separating the interaction of the prototype into operations (selecting objects, navigating
dependent on selection mode, manipulating objects, manipulating layers etc.), which operation was hardest to perform using the prototype?
10. Which operations felt more natural? 11. What areas of improvement do you see? 12. Did you notice the haptic feedback in the controller?
a. Did it help? 13. Were there any operations you wanted to perform but felt that the prototype was lacking in
functionality? 14. Today VR is used mostly for visualization and games. Do you see potential for Virtual
Reality to be used in everyday life as a working tool?

59
Appendix G. Post-Test Interview Questions (Iteration 2) 1. Did you feel like you could complete the assigned tasks using the prototype? 2. Did you feel like you could efficiently complete the given tasks using the prototype? 3. How efficiently could you complete the second task on a scale from 1 to 7 with 1 representing
“Not at all efficient” and 7 representing “Very Efficient”? 4. Did the system behave as you would have anticipated? 5. How easy / hard did you find the system to learn? 6. What was the hardest thing to remember when using the system? 7. How did it feel selecting objects within layers using the pointer? 8. How did it feel selecting objects within layers using the controller? 9. How did it feel to select layers (the frames) using the pointer? 10. How did it feel to select layers (the frames) using the controller? 11. You were also able to select a layer by pressing and holding the trigger when hovering over a
contained object of the layer. How did that feel? 12. How hard / easy was it to differentiate what objects belonged to which layer? 13. How did it feel rearranging the order of the layers? 14. Did you feel like you had control over which object / layer was selected when you pressed the
trigger? 15. Did you feel like you could move the contained objects of a layer in a controlled manner?
a. Using the pointer? b. Using the controller?
16. How did you experience the fact that you could select multiple objects simultaneously? 17. How did it feel to select multiple objects simultaneously? 18. What operation (select a layer, select an object, move in XY, move Z, interact with the menu)
was hardest to perform using the prototype? 19. What operations felt natural? 20. What areas of improvement do you see? 21. Did you notice the haptic feedback in the controllers?
a. Did it help? 22. Was there any operation that you wanted to perform but felt that the prototype was lacking
the functionality? 23. Rate the usability of the system on a scale from 1-10 where 1 is “Not at all useful” and 10 is
“Very Useful” for layer management in VR. 24. Today VR is used mostly for visualization and games. Do you see potential for Virtual
Reality to be used in everyday life as a working tool?

60
Appendix H. Iteration 2 Log Events Event Description
Trigger Down User presses the trigger.
Trigger Up User releases trigger.
Trigger Hold User presses and holds trigger down for 500 milliseconds.
Grip Down User presses grip button.
Grip Up User releases grip button.
Trackpad Down User presses the trackpad.
Trackpad Up User releases the trackpad.
Single Selection User selects an object using single selection. Target column specifying whether a layer, a shape or no target is being selected.
Additive Selection
User selects an object using additive selection. Target column specifying whether a layer, a shape or no target is being selected.
Layer Manipulation
User manipulates the position of a layer. Number of targets column specifying how many layers are being affected by manipulation.
Shape Manipulation
User manipulates the position of one or more shapes. Number of targets column specifying how many shapes are being affected by manipulation.
Menu Interaction User interacts with the menu. Target column specifies what menu action is being performed.
Collapse Layers Layers collapsed to composite image.
Expand Layers Layers expanded.
Error Manual error entry.

61
Appendix I. Introduction Questionnaire Summary

62
Appendix J. Presence Questionnaire Summary

63
Appendix K. Qualitative Data Summary Iteration 1

64

65

66
Appendix L. Qualitative Data Summary Iteration 2

67

68

69

70
Appendix M. Log Data Summary Iteration 1

71
Appendix N. Log Data Summary Iteration 2
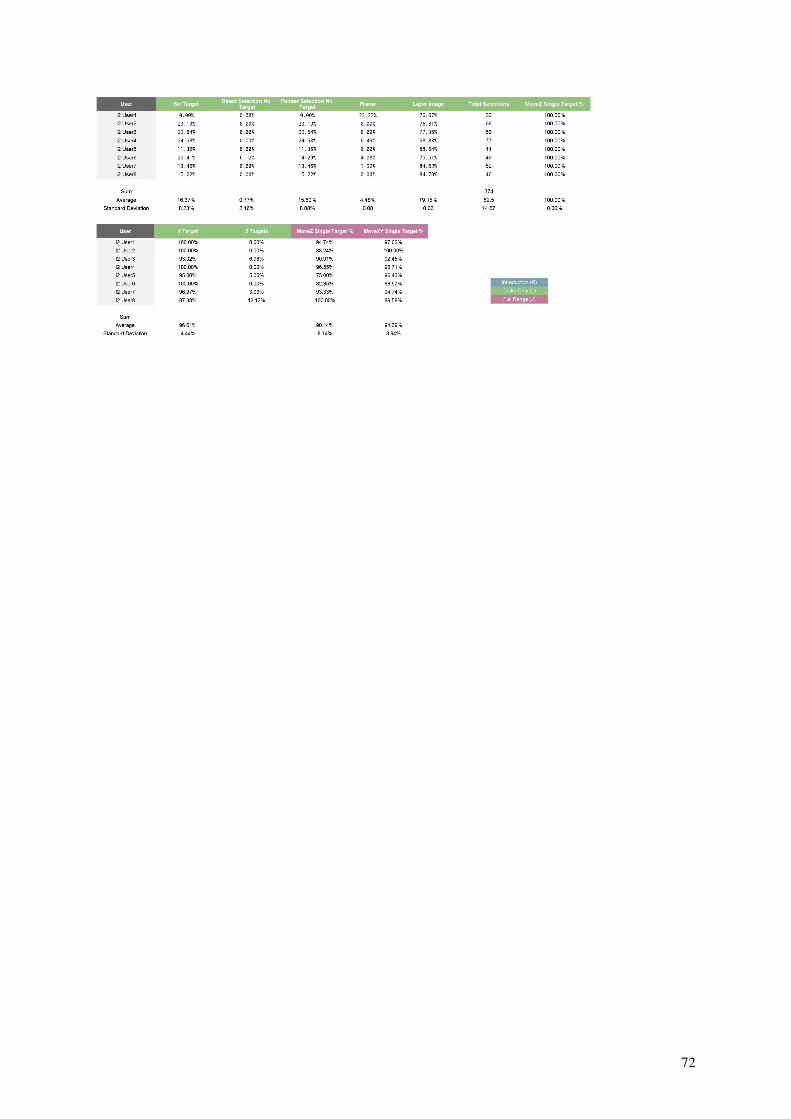
72

73
Appendix O. User Aliases and Conditions Alias Condition Navigation Mode Selection Mode
User01 Lever / Gaze Lever Gaze
User02 Lever / Point Lever Point
User03 Spatial / Gaze Spatial Gaze
User04 Spatial / Point Spatial Point
User05 Lever / Gaze Lever Gaze
User06 Lever / Point Lever Point
User07 Spatial / Gaze Spatial Gaze
User08 Spatial / Point Spatial Point
User09 Lever / Point Lever Point
User10 Spatial / Gaze Spatial Gaze
User11 Spatial / Point Spatial Point
User12 Spatial / Point Spatial Point
User13 Lever / Point Lever Point
User14 Lever / Gaze Lever Gaze
User15 Lever / Gaze Lever Gaze
User16 Lever / Gaze Lever Gaze
User17 Spatial / Gaze Spatial Gaze
User18 Lever / Point Lever Point
User19 Spatial / Gaze Spatial Gaze
User20 Spatial / Gaze Spatial Gaze
User21 Lever / Gaze Lever Gaze
User22 Lever / Point Lever Point
User23 Spatial / Point Spatial Point
User24 Spatial / Point Spatial Point
I2 User01 Iteration 2 Menu Selectable
I2 User02 Iteration 2 Menu Selectable
I2 User03 Iteration 2 Menu Selectable
I2 User04 Iteration 2 Menu Selectable
I2 User05 Iteration 2 Menu Selectable
I2 User06 Iteration 2 Menu Selectable
I2 User07 Iteration 2 Menu Selectable
I2 User08 Iteration 2 Menu Selectable

www.kth.se


![Untitled Document [] · Flere steder i Havna er det i dag vanlig med fritidsfiske fra kai. Trondheim havn tilføres 20 000 m3 masse fra Nidelva hvert år. For å beholde seilingsdybden](https://static.fdocuments.in/doc/165x107/5f344f908d68ba224b078c46/untitled-document-flere-steder-i-havna-er-det-i-dag-vanlig-med-fritidsfiske.jpg)
