Laura Noll Research Compliance Manager Radford University.
23
IRB Submission Process For New Applicants Laura Noll Research Compliance Manager Radford University
-
Upload
russell-payne -
Category
Documents
-
view
222 -
download
0
Transcript of Laura Noll Research Compliance Manager Radford University.

IRB Submission Process For New Applicants
Laura NollResearch Compliance Manager
Radford University

Overview of the ProcessPLAN AHEAD
Complete the Human Subjects TrainingView the IRBNet TutorialCreate Your IRBNet Account
PREPARE YOUR SUBMISSIONCreate Your Project in IRBNetDownload Application and Other Forms from IRBNetComplete Your Documents With Your Faculty MentorUpload Completed Forms and Supporting Documents
GO THROUGH THE SUBMISSION PROCESSSubmit Your Project in IRBNet Pre-Review, Review, and Approval ProcessesModifications, Continuations, and Closures After Approval

DefinitionsCITI – the online training service RU uses for human
subjects research and other compliance training
IRBNet – the online software RU uses for managing the IRB application process
Project – you create a Project within IRBNet for a new application. Consider your project the workspace for your submission.
Package - A Package is a subset of a Project and would be created for submissions such as an Amendment or a Continuation.

The Steps To IRB Approval – Step 1
1. PLAN AHEAD – a. Review the Faculty or Student CITI Training Tutorial.b. Complete the appropriate CITI training.c. Review the IRBNet Tutorial.d. Create an account in IRBNet.

The Steps To IRB Approval – Step 2
2. PREPARE YOUR SUBMISSION - a. Create a New Project in IRBNet for your project documents.b. Download and review the README File from IRBNet.c. Go to the RU IRB website for templates (e.g., consent form
templates) and other resources, as needed.d. Develop and upload your consent forms, survey tools, letters
of support, application, and other documents to your Project in IRBNet.

The Steps To IRB Approval – Step 3
3. GO THROUGH THE SUBMISSION PROCESS – a. Submit Your Project - Share (if appropriate), Sign, and Submit
your project in IRBNet.b. The Pre-Review Process - work with IRB Office as needed to
refine your submission before it is sent to a reviewer.c. The Review Process - work with the IRB Office as needed to
revise your submission based upon reviewer comments during the review process.
d. Approval Letter - Receive and retain your IRB approval letter and any stamped documents or work closely with the IRB Office to revise your project if it is not approved.

What Happens After IRB Approval? 1. Copy and use your stamped documents with your
participants, where appropriate (e.g., non-internet consent forms or recruitment materials such as flyers.)
2. Apply for a modification request when adding or deleting personnel or otherwise changing your project.
Create a new Package in your IRBNet submission from the Project History menu option
3. Close or Continue your protocol at or before it's one year expiration date, unless it is an Exempt submission
Create a new package in your IRBNet submission from the Project History menu option

Step 1a: CITI TrainingSee the training tutorials on the RU IRB website for detailed
instructions.
http://irb-iacuc.asp.radford.edu/public_html/Pages/IRB%20Human%20Subj%20Training.htm
Select the appropriate required CITI training tutorial.
Complete the correctCITI training course.
You don’t have to uploadyour training certificateto IRBNet.
Separate tutorials are provided for student and faculty course requirements!

Step 1b. Complete the TrainingGo to www.citiprogram.org
Create New Account
Select Correct Training Course Faculty - “Social and Behavioral Research Investigators” course Students - “Social and Behavioral Research Investigators” course OR
“Students conducting no more than minimal risk research” course. See Tutorial for Step-by-Step Instructions on which course to take and how to
find it.
Complete Training Course with Scores of 80% or Better
Protocols won’t be reviewed until all research team members have completed the training.
The Learner May Re-Take the Quizzes As Needed

Step 2: The IRBNet TutorialThere are two IRBNet tutorials available for your use:
View the first IRBNet tutorial to learn how to create and submit an IRB protocol in IRBNet.
View the second tutorial for help with revisions, continuations and modifications, if needed.
The tutorials are located at: http://irbnetresources.org/tresources/training.html
Use the following username and password to access these tutorials: Username: radford Password: training1
NOTE: Do Not Use This Username and Password for Any Other Log-in on IRBNet!

Step 3: Create Your IRBNet AccountGo to www.irbnet.org
Select “New User Registration” NOTE: Do not use the same login information used to access the
tutorial. Create a unique username and password (preferably using your
RU username, if possible).
Once created, you will be senta confirmation email by IRBNet.
Click on the link in the email tofinalize your registration.

Step 4: Create Your Project in IRBNetSelect “Create New Project”
Answer all required prompts.
List your faculty mentoras the Principal Investigator (PI).
Students cannot be the PI of their project!

Step 5: What Do I Need to Submit?Log onto IRBNet:
Select “Forms and Templates”.
Select and review the “README” file for assistance on what you need to submit to the IRB.
Consult with your Faculty Mentor, as appropriate.
Download the Initial Application and any other forms needed for your project.
There is also a Checklist File on the RU IRB website to help you ensure that all data is included in your submission.

Step 6: Templates & Other ResourcesSee the RU IRB Website for templates, a
handy checklist, and information about review categories:
http://irb-iacuc.asp.radford.edu/public_html/Pages/IRB%20Rev%20Cat.htm
NOTE: Classroom exercises (formerly referred to as Course Exempt research) no longer require IRB review.
See above link for additional information.

Step 7a: Upload Your SubmissionAll required documents need to be uploaded onto IRBNet from
the Designer page.
IRBNet is not a web-based system; it’s an upload-based system.
Tips for a smooth review process:
Start with the Application form to help organize your thoughts and the project requirements
Proofread ALL forms, especially all documents that will be given to the participants.
Any form that will be given to or read by your participant MUST be grammatically perfect and all spelling must be correct.
Remember, you are representing Radford University!

Step 7b: Finishing TouchesOnce all documents are uploaded and all training is completed, please do the following:
“Share This Project” with at least the PI of the project.
To Submit after his or her review, the PI must click on: “Sign This Package” “Submit This Package”
This user-friendly toolbar helps you organize, create, and submit your project.

Step 8: Pre-ReviewOnce you click on Submit, an email is sent by IRBNet to the IRB
Office, telling us that a protocol has been submitted.
A thorough pre-review of the submission is then conducted (allow up to 3 business days for pre-review.)
If the submission is incomplete, you will receive comments indicating what is needed. The package will be unlocked to allow for your revisions.
Complete all required revisions.
Re-lock the package from the Designer Page by selecting “Mark Revisions Complete” from the upper right corner of the screen.
NOTE: This is ESSENTIAL!

Step 9: Review ProcessWhen the application has passed the pre-review process, it
is then sent to a reviewer.
Allow up to 10 (ten) additional business days for this review.
Comments will be sent to the PI if revisions are required.
Make any requested revisions and then re-lock the package from the Designer Page by selecting “Mark Revisions Complete” from the upper right corner of the screen.
NOTE: This is ESSENTIAL!
This cycle may repeat until all concerns/comments are addressed and the reviewer recommends approval.
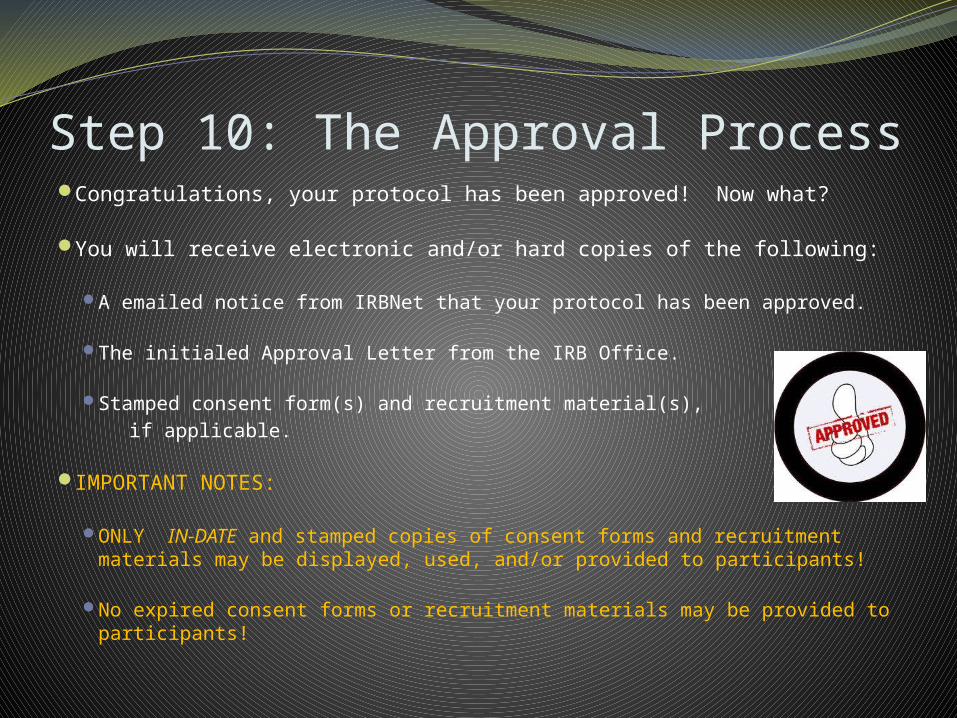
Step 10: The Approval Process Congratulations, your protocol has been approved! Now what?
You will receive electronic and/or hard copies of the following:
A emailed notice from IRBNet that your protocol has been approved.
The initialed Approval Letter from the IRB Office.
Stamped consent form(s) and recruitment material(s), if applicable.
IMPORTANT NOTES:
ONLY IN-DATE and stamped copies of consent forms and recruitment materials may be displayed, used, and/or provided to participants!
No expired consent forms or recruitment materials may be provided to participants!

1. After IRB ApprovalRemember to always use in-date (e.g., not
expired) and stamped consent forms and recruitment documents, where applicable, for Expedited and Full Board protocols.
You will receive electronic notification from IRBNet when your protocol is nearing expiration.
Exempt studies do not expire but can be closed.

2. Modifications (aka Amendments)All changes made to the protocol are to be submitted to the IRB for approval prior to implementation by creating a package within your existing protocol’s Project on IRBNet.
Log into IRBNet.
Select “Project History”.
Select “Create New Package”. **Do not create a new Project for your modifications**
Download and complete the Request For Modification form.
Upload the Request for Modification Form and other relevant documents from the Designer page.
Sign and Submit when complete.

3. Closures and ContinuationsExpedited and Full Review protocols expire 1 (one) year after
approval date.
Log into IRBNet.
Select “Project History” under the appropriate project.
Select “Create New Package”
For Closures – download, complete, and upload the Study Closure Report. Then sign the package and click submit.
For Continuations - download, complete, and upload the Request for Continuation Form and the last approved and new consent forms (if enrolling new participants). Then sign the package and click submit.
NOTE: Do not create a new Project for Closures or Continuations.

Hints and TipsReview the CITI and IRBNet tutorials.
CITI module quizzes can be re-taken.
Re-lock your IRBNet Project or Package when revisions are complete!
Check-in with IRB Office periodically if you have not received any notices. This usually means that something didn’t get to where it should be. The IRB Office is a 12 (twelve) month office. Laura Noll – x5290 , [email protected] GA – x6485 , [email protected]
List your Faculty Mentor as Principal Investigator (PI). **Students cannot be listed as PI**
Good luck!