
Latitude 5285 2-in-1 Owner's Manual - GfK Etilize · Latitude 5285 2-in-1 Owner's Manual Regulatory...
37
Latitude 5285 2-in-1 Owner's Manual Regulatory Model: T17G Regulatory Type: T17G001
Transcript of Latitude 5285 2-in-1 Owner's Manual - GfK Etilize · Latitude 5285 2-in-1 Owner's Manual Regulatory...

Latitude 5285 2-in-1Owner's Manual
Regulatory Model: T17GRegulatory Type: T17G001

Notes, cautions, and warnings
NOTE: A NOTE indicates important information that helps you make better use of your product.
CAUTION: A CAUTION indicates either potential damage to hardware or loss of data and tells you how to avoid the problem.
WARNING: A WARNING indicates a potential for property damage, personal injury, or death.
© 2017 Dell Inc. or its subsidiaries. All rights reserved. Dell, EMC, and other trademarks are trademarks of Dell Inc. or its subsidiaries. Other trademarks may be trademarks of their respective owners.
2017 - 02
Rev. A00

Contents
1 Technical specifications..................................................................................................................................5Processor specifications................................................................................................................................................... 5System specifications........................................................................................................................................................5Memory specifications...................................................................................................................................................... 5Video specifications........................................................................................................................................................... 6Audio specifications........................................................................................................................................................... 6Port and connector specifications................................................................................................................................... 6Communication specifications.......................................................................................................................................... 7Camera specifications........................................................................................................................................................7Display specifications......................................................................................................................................................... 7AC adapter specifications................................................................................................................................................. 8Battery specifications........................................................................................................................................................ 8Physical specifications.......................................................................................................................................................9Environmental specifications............................................................................................................................................ 9
2 Using your tablet...........................................................................................................................................11Deploying the kickstand....................................................................................................................................................11Before Working Inside Your Tablet.................................................................................................................................. 12
Turning off Your Tablet............................................................................................................................................... 12After working inside your tablet...................................................................................................................................... 14Installing a microSD and/or micro-SIM card..................................................................................................................14
3 Technology and components........................................................................................................................ 15Power adapter...................................................................................................................................................................15Processors......................................................................................................................................................................... 15
Identifying processors in Windows 10...................................................................................................................... 15Verifying processor usage in task manager............................................................................................................. 16Verifying processor usage in resource monitor....................................................................................................... 16
Chipset............................................................................................................................................................................... 17Identifying chipset in device manager on Windows 10...........................................................................................17
Memory features.............................................................................................................................................................. 18Verifying system memory in setup............................................................................................................................18Verifying system memory ......................................................................................................................................... 18Testing memory using ePSA......................................................................................................................................19
Display options.................................................................................................................................................................. 19Identifying display adapter......................................................................................................................................... 19Changing the screen resolution................................................................................................................................ 19
Camera features...............................................................................................................................................................20Identifying the camera in Device Manager on Windows 10..................................................................................20Starting the camera...................................................................................................................................................20Starting the camera application............................................................................................................................... 20
Hard drive options............................................................................................................................................................ 21Identifying the hard drive in the BIOS......................................................................................................................21
Contents 3

4 System setup...............................................................................................................................................22Entering BIOS without keyboard....................................................................................................................................22System setup options......................................................................................................................................................22
General screen options..............................................................................................................................................22System Configuration screen options......................................................................................................................23Video screen options................................................................................................................................................. 25Security screen options.............................................................................................................................................25Secure Boot screen options..................................................................................................................................... 26Intel software guard extensions screen options..................................................................................................... 27Performance screen options.....................................................................................................................................27Power management screen options........................................................................................................................ 28POST Behavior screen options................................................................................................................................ 29Virtualization support screen options......................................................................................................................30Wireless screen options.............................................................................................................................................30Maintenance screen options..................................................................................................................................... 31System logs screen options.......................................................................................................................................31
Updating the BIOS ...........................................................................................................................................................31System and setup password...........................................................................................................................................32
Assigning a system password and setup password...............................................................................................32Deleting or changing an existing system and/or setup password........................................................................32
5 Troubleshooting........................................................................................................................................... 34Enhanced Pre-boot System Assessment (ePSA)........................................................................................................34
Features:..................................................................................................................................................................... 34Running the ePSA Diagnostic Utility ...................................................................................................................... 34
Tablet LED.........................................................................................................................................................................34Diagnostic LED........................................................................................................................................................... 34
Real Time Clock (RTC) reset..........................................................................................................................................35Identifying the AC adapter shipped with your tablet...................................................................................................36
6 Contacting Dell............................................................................................................................................ 37
4 Contents

Technical specificationsNOTE: Offerings may vary by region. The following specifications are only those required by law to ship with your computer. For more information about the configuration of your computer, go to Help and Support in your Windows operating system and select the option to view information about your computer.
Topics:
• Processor specifications
• System specifications
• Memory specifications
• Video specifications
• Audio specifications
• Port and connector specifications
• Communication specifications
• Camera specifications
• Display specifications
• AC adapter specifications
• Battery specifications
• Physical specifications
• Environmental specifications
Processor specificationsFeature Specification
Types• 7th Generation Intel Core i3-7100U Processor (2.4GHz, 3M cache, 15W)
• 7th Generation Intel Core i5-7200U Processor (up to 3.1GHz, 3M cache, 15W)
• 7th Generation Intel Core i5-7300U Processor (up to 3.5GHz, 3M cache, 15W), vPro
• 7th Generation Intel Core i7-7600U Processor (up to 3.9GHz, 4M cache, 15W), vPro
System specificationsFeature Specification
Chipset Integrated in the processor
DRAM bus width 64-bit; 2 channels
Memory specificationsFeature Specification
Memory connector Onboard memory
1
Technical specifications 5
Feature Specification
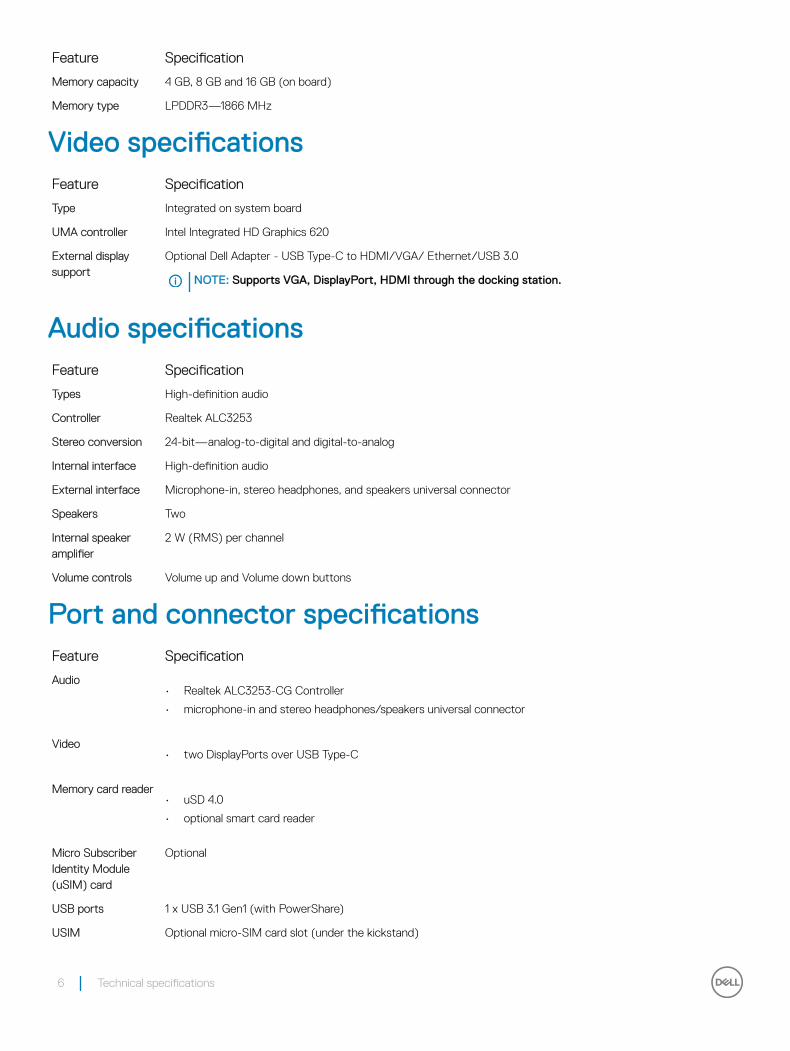
Memory capacity 4 GB, 8 GB and 16 GB (on board)
Memory type LPDDR3—1866 MHz
Video specificationsFeature Specification
Type Integrated on system board
UMA controller Intel Integrated HD Graphics 620
External display support
Optional Dell Adapter - USB Type-C to HDMI/VGA/ Ethernet/USB 3.0
NOTE: Supports VGA, DisplayPort, HDMI through the docking station.
Audio specificationsFeature Specification
Types High-definition audio
Controller Realtek ALC3253
Stereo conversion 24-bit—analog-to-digital and digital-to-analog
Internal interface High-definition audio
External interface Microphone-in, stereo headphones, and speakers universal connector
Speakers Two
Internal speaker amplifier
2 W (RMS) per channel
Volume controls Volume up and Volume down buttons
Port and connector specificationsFeature Specification
Audio• Realtek ALC3253-CG Controller
• microphone-in and stereo headphones/speakers universal connector
Video• two DisplayPorts over USB Type-C
Memory card reader• uSD 4.0
• optional smart card reader
Micro Subscriber Identity Module (uSIM) card
Optional
USB ports 1 x USB 3.1 Gen1 (with PowerShare)
USIM Optional micro-SIM card slot (under the kickstand)
6 Technical specifications

Feature Specification
Security Lock Noble Wedge Lock slot
Other• optional contacted smart card reader and touch finger print reader
• Windows Home Button
• Power Button
• I2C for Dock Pin Keyboard connection
Communication specificationsFeatures Specification
Wireless WiFi Display (Miracast)14
Wireless LAN• Qualcomm QCA61x4A 802.11ac Dual Band (2x2) Wireless Adapter+ Bluetooth 4.1
• Intel Dual-Band Wireless-AC 8265 Wi-Fi + BT 4.2 Wireless Card (2x2). Bluetooth Optional
Mobile Broadband (Optional) • Dell Wireless Qualcomm Snapdragon X7 LTE-A
• Dell Wireless Qualcomm Snapdragon X7 LTE-A
• Dell Wireless Qualcomm Snapdragon X7 HSPA+
• Dell Wireless Telit Intel Ln-930 AP LTE CAT4
WiGig (Optional) Intel Tri-Band Wireless-AC 18265 WiGig + Wi-Fi + BT4.2 Wireless Card
Camera specificationsFeature Specification
Type• Front Camera-5MP fixed focus
• Rear Camera- 8MP auto focus
• IR Camera- VGA IR camera
Sensor type CMOS sensor technology (Front and Rear camera)
Imaging rate Up to 30 frames per second
Video Resolution• Front Camera- 2592 x 1944 pixels
• Rear Camera- 3264 x 2448 pixels
Display specificationsFeature Specification
Type 12.3" 3:2 Touch with Corning Gorilla Glass 4, Anti-reflective and Anti-Smudge
Luminance 340 nits
Height 265.56 mm(10.55 inches)
Width 185.06 mm (7.28 inches)
Technical specifications 7

Feature Specification
Diagonal 312.42 mm (12.0 inches)
Maximum resolution 1920x1280
Refresh rate 60 Hz
Maximum viewing angles—horizontal
+/-80°
Maximum viewing angles—vertical
+/-80°
Pixel pitch 0.135 mm
AC adapter specificationsFeature Specification
Type 45 W USB Type-C and 65 W USB Type-C
Input voltage 100 V AC to 240 V AC
Input current—maximum
1.3 A / 1.7 A
Input frequency 47 Hz to 63 Hz
Output current 2.25 A, 3 A, and 3.25 A
Rated output voltage
20 VDC/15 VDC/9 VDC/5 VDC
Weight• 0.385 lbs(45 W) and 0.476 lbs(65 W)
• 175 g (45 W) and 216.2 g (65 W)
Dimensions• 0.191 x 0.121 x 0.048 inches (45 W) and 0.217 x 0.145 x 0.048 (65 W)
• 87 x 55 x 22 mm (45 W) and 99 x 66 x 22 mm (65 W)
Temperature range—Operating
0°C to 40°C (32°F to 104°F)
Temperature range—Non-Operating
–40°C to 70°C (–40°F to 158°F)
Battery specificationsFeature Specification
Type• 32Whr Polymer battery with ExpressCharge
• 42Whr Polymer battery with ExpressCharge
• 42WHr Polymer Long Life Cycle
32Whr :
Length 177.6 mm (6.99 inches)
8 Technical specifications

Feature Specification
Width 82.6 mm (3.25 inches)
Height 5.5 mm (0.21 inch)
Weight 135.0 g (0.29 lb) (126 GB m2 SATA)
Voltage 11.4 VDC
42 WHr:
Length 177.6 mm (6.99 inches)
Width 82.6 mm (3.25 inches)
Height 5.5 mm (0.21 inch)
Weight 170 g (0.37 lb)
Voltage 7.6 VDC
Life span 300 discharge per charge cycles
Temperature range
Operating• Charge: 0°C to 50°C (32°F to 122°F)
• Discharge: 0°C to 70°C (32°F to 158°F)
Non-operating - 20°C to 85°C (- 4°F to 185°F)
Physical specificationsFeature Specification
Weight - Tablet only (with 32 Whr battery and 126 GB m2 SATA base)
1.89 lbs (856 g)
Weight - Tablet+Keyboard
2.64 lbs (1.196 kg)
Input current—maximum
1.3 A / 1.7 A
Width 11.5 inches ( 292 mm)
Height (Tablet only) 0.38 inch ( 9.76 mm)
Height (Tablet+Keyboard only)
0.59 inch ( 14.9 mm)
Depth 8.22 inches ( 208.8 mm)
Environmental specificationsTemperature Specifications
Operating 0°C to 35°C (32°F to 95°F)
Storage –40°C to 65°C (–40°F to 149°F)
Technical specifications 9

Relative humidity—maximum
Specifications
Operating 10% to 90% (non-condensing)
Storage 10% to 95% (non-condensing)
Altitude—maximum
Specifications
Operating 0 m to 3048 m (0 to 10,000 ft)
Non-operating 0 m to 10,668 m (0 ft to 35,000 ft)
Airborne contaminant level
G2 or lower as defined by ISA S71.04–1985
10 Technical specifications

Using your tablet
This section covers how to power on and turn off your tablet including how to install the micro SD and uSIM cards.
Topics:
• Deploying the kickstand
• Before Working Inside Your Tablet
• After working inside your tablet
• Installing a microSD and/or micro-SIM card
Deploying the kickstand
1 Hold the tablet vertically on a plane surface.
2 Press the tablet to allow the kickstand to open.
2
Using your tablet 11

NOTE: The pegs at the bottom of the tablet allow the kickstand to open.
Before Working Inside Your TabletUse the following safety guidelines to help protect your tablet from potential damage and to help to ensure your personal safety. Unless otherwise noted, each procedure included in this document assumes that the following condition exists:
• You have read the safety information that shipped with your tablet.
WARNING: Before working inside your tablet, read the safety information that shipped with your tablet. For additional safety best practices information, see the Regulatory Compliance Homepage at www.dell.com/regulatory_compliance
CAUTION: Many repairs may only be done by a certified service technician. You should only perform troubleshooting and simple repairs as authorized in your product documentation, or as directed by the online or telephone service and support team. Damage due to servicing that is not authorized by Dell is not covered by your warranty. Read and follow the safety instructions that came with the product.
CAUTION: To avoid electrostatic discharge, ground yourself by using a wrist grounding strap or by periodically touching an unpainted metal surface, such as a connector on the back of the tablet.
CAUTION: Handle components and cards with care. Do not touch the components or contacts on a card. Hold a card by its edges or by its metal mounting bracket.
CAUTION: When you disconnect a cable, pull on its connector or on its pull-tab, not on the cable itself. Some cables have connectors with locking tabs; if you are disconnecting this type of cable, press in on the locking tabs before you disconnect the cable. As you pull connectors apart, keep them evenly aligned to avoid bending any connector pins. Also, before you connect a cable, ensure that both connectors are correctly oriented and aligned.
NOTE: The color of your tablet and certain components may appear differently than shown in this document.
To avoid damaging your tablet, perform the following steps before you begin working inside the tablet.
1 Ensure that your work surface is flat and clean to prevent the tablet cover from being scratched.
2 Turn off your tablet (see Turning Off Your Tablet).
3 If the tablet is connected to a docking device (docked) such as the optional docking station or keyboard dock, un-dock it.
4 Disconnect the power adapter from the tablet.
5 Press and hold the power button for a few seconds to remove the flea power from the system board.
CAUTION: To guard against electrical shock, always unplug your tablet from the electrical outlet.
CAUTION: Before touching anything inside your tablet, ground yourself by touching an unpainted metal surface, such as the metal at the back of the tablet. While you work, periodically touch an unpainted metal surface to dissipate static electricity, which could harm internal components.
6 Remove the storage SD card from the tablet.
Turning off Your TabletTurning off your tablet completely shuts down your tablet. You can turn off your tablet by two ways:
• Using power button
• Using charms menu
1 To turn off your tablet using power button:
a Press and hold the Power button until you see “Slide to shut down your PC” on the screen.
12 Using your tablet

NOTE: After you press and hold the Power button, by default, the “Slide to shut down your PC” screen displays only in Venue 11 Pro 7130. For Venue 11 pro 7130 vPro and Venue 11 Pro 7139, by default, the tablet enters sleep mode. However, if you change the power button setting to shut down, the tablet shuts down. To change the power button setting, go to Control Panel > Power Options > Change Plan Setting > Change Advanced Power Settings. To access Control Panel, swipe at the right edge of the screen, tap Search, enter Control Panel in the search box, and then click Control Panel.
b Slide to shut down your tablet.
NOTE: You can also turn off your tablet without sliding down the screen. Press and hold the Power button for >10 seconds to turn off your tablet. You can perform this force shutdown, if your tablet is not responding / behaving unexpectedly or touch is not working.
2 To turn off your tablet using the charms menu:
a Swipe from the right edge of the display to access the Charms menu.
b Touch Settings —> Power —> Shut down to turn off the tablet.
Using your tablet 13

After working inside your tabletCAUTION: Leaving stray or loose screws inside your tablet may severely damage your tablet.
1 Replace all screws and ensure that no stray screws remain inside your tablet.
2 Connect any external devices, peripherals, and cables you removed before working on your tablet.
3 Replace any media card, SIM card, and any other parts that you removed before working on your tablet.
4 Connect your tablet and all attached devices to their electrical outlets.
5 Turn on your tablet.
Installing a microSD and/or micro-SIM card
1 Flip the tablet on a plane surface.
2 Slide and lift the SD cover.
3 Insert the SD card and/or micro-SIM cards into the slots indicated on the slots.
4 Align the cover with the groove on the tablet and slide it inside to secure the microSD and the micro-SIM cards.
5 You can perform the same steps to remove the microSD or micro SIM cards
14 Using your tablet

Technology and componentsThis chapter details the technology and components available in the system.
Topics:
• Power adapter
• Processors
• Chipset
• Memory features
• Display options
• Camera features
• Hard drive options
Power adapterThis system is shipped with 45 W or 65 W Type-C power adapters.
WARNING: When you disconnect the power adapter cable from the tablet, grasp the connector, not the cable itself, and then pull firmly but gently to avoid damaging the cable.
WARNING: The power adapter works with electrical outlets worldwide. However, power connectors and power strips vary among countries. Using an incompatible cable or improperly connecting the cable to the power strip or electrical outlet may cause fire or equipment damage.
ProcessorsLatitude 5285 is shipped with:
• Intel Core i3-7100U (Dual Core, 3M cache, 2.4 GHz,15 W)
• Intel Core i5-7200U (Dual Core, 3M Cache, up to 3.1 GHz, 15 W)
• Intel Core i5-7300U ( vPro, Dual Core, 3M Cache, up to 3.5 GHz, 15 W)
• Intel Core i7-7600U (vPro, Dual Core, 4M cache, up to 3.9 GHz, 15 W)
NOTE: The clock speed and performance varies depending on the workload and other variables.
Identifying processors in Windows 10
1 Type Device Manager in Ask me anything field.
The iDevice Manager window is displayed.
2 Click Processor.
The processor information is displayed.
3
Technology and components 15

Figure 1. Processor
Verifying processor usage in task manager1 Right click on the desktop.
2 Select Start Task Manager.
The Windows Task Manager window is displayed.
3 Click the Performance tab in the Windows Task Manager window.
Verifying processor usage in resource monitor1 Right click the desktop.
2 Select Start Task Manager.
The Windows Task Manager window is displayed.
16 Technology and components

3 Click the Performance tab in the Windows Task Manager window.
The processor performance details are displayed.
4 Click Open Resource Monitor.
ChipsetThe chipset is integrated on the processor.
Identifying chipset in device manager on Windows 10
NOTE: The Chipset information displayed is a generic image and may be different from what is displayed.
1 Click All Settings on the Windows 10 Charms Bar.
2 From the Control Panel, select Device Manager.
3 Expand System Devices and search for the chipset.
Technology and components 17

Memory featuresLatitude 5285 supports the following memory configurations:
• 4G 1866MHz LPDDR3 - Intel Core i3-7100U
• 8G 1866MHz LPDDR3 - Intel Core i5-7200U/ Intel Core i5-7300U
• 16G 1866MHz LPDDR3 - Intel Core i7-7600U
Verifying system memory in setup1 Turn on or restart your tablet.
2 When the Dell logo appears, press F2.
Entering BIOS setup message appears.
3 On the left pane, select Settings > General > System Information,
The memory information is displayed on the right pane.
Verifying system memory
Windows 10
1 Click the Windows button and select All Settings > System .
2 Under System, click About.
18 Technology and components

Testing memory using ePSA1 Turn on or restart your tablet.
2 Perform one of the following actions after the Dell logo is displayed:
• With keyboard — Press F12.
• Tablet only — Press Volume Up button before pressing the Power button to turn on the tablet. Once the power sequence is initiated you can release the Volume Up button and ePSA will launch.
The PreBoot System Assessment (PSA) is launched on your tablet.
NOTE: If you wait too long and the operating system logo appears, continue to wait until you see the desktop. Turn off the tablet and try again.
3 Follow the steps in Running ePSA diagnostics.
Display optionsThis tablet is shipped with 12.3" 1920x1280 Touch with Corning Gorilla Glass, Anti-reflective and Anti-Smudge display.
Identifying display adapter
1 Type Device manager in the Ask me anything field.
The Display Manager window is displayed.
2 Expand the Display adapters.
The display adapter information is displayed.
Figure 2. display adapter
Changing the screen resolution1 Right click on the desktop and select Display Settings.
2 Tap or click the Advanced display settings.
3 Select the required resolution from the drop-down list and tap Apply.
Technology and components 19

Camera featuresThis system is shipped with front-facing camera with 5 MP and rear facing camera with 8 MP
Identifying the camera in Device Manager on Windows 101 In the Search box, type device manager, and tap to start it.
2 Under Device Manager, expand Imaging devices.
Starting the cameraTo start the camera, open an application that uses the camera. For instance, if you tap the Dell webcam central software or the Skype software that is shipped with the 2-in-1, the camera turns on. Similarly, if you are chatting on the internet and the application requests to access the webcam, the webcam turns on.
Starting the camera application1 Tap or click the Windows button and select All apps.
2 Select Camera from the apps list.
20 Technology and components

3 If the Camera App is not available in the apps list, search for it.
Hard drive optionsThis system supports M.2 SATA SSD, M.2 PCIe NVMe SSD, and M.2 PCIe NVMe SED.
Identifying the hard drive in the BIOS1 Turn on or restart your laptop.
2 When the Dell logo appears, perform one of the following actions to enter the BIOS setup program:
• With keyboard — Tap F2 until the Entering BIOS setup message appears. To enter the Boot selection menu, tap F12.
• In tablet mode — Press the Volume Up button to display the F12 boot selection or press Volume Down button to enter BIOS setup directly.
•
Hard drive is listed under the System Information under the General group.
Technology and components 21

System setupSystem Setup enables you to manage your tablet hardware and specify BIOS level options. From the System Setup, you can:
• Change the NVRAM settings after you add or remove hardware
• View the system hardware configuration
• Enable or disable integrated devices
• Set performance and power management thresholds
• Manage your computer security
Topics:
• Entering BIOS without keyboard
• System setup options
• Updating the BIOS
• System and setup password
Entering BIOS without keyboard1 Press the power button to turn on your tablet.
2 Press and hold the Volume Up button when the Dell logo appears on the screen.
3 When the F12 boot selection menu appears, select BIOS Setup using the Volume Up button.
4 Press the Volume Down button to enter BIOS setup program.
System setup optionsNOTE: Depending on the tablet and its installed devices, the items listed in this section may or may not appear.
General screen optionsThis section lists the primary hardware features of your tablet.
Option Description
System Information This section lists the primary hardware features of your tablet.
• System Information: Displays BIOS Version, Service Tag, Asset Tag, Ownership Tag, Ownership Date, Manufacture Date, Express Service Code, the Signed Firmware update—enabled by default
• Memory Information: Displays Memory Installed, Memory Available, Memory Speed, Memory Channels Mode, Memory Technology
• Processor Information: Displays Processor Type, Core Count, Processor ID, Current Clock Speed, Minimum Clock Speed, Maximum Clock Speed, Processor L2 Cache, Processor L3 Cache, HT Capable, and 64-Bit Technology
• Device Information: Displays M.2 SATA, M.2 PCIe SSD-0, Passthrough MAC address, Video Controller, Video BIOS Version, Video Memory, Panel Type, Native Resolution, Audio Controller, Wi-Fi Device, WiGig Device, Cellular Device, Bluetooth Device
4
22 System setup

Option Description
Battery Information Displays the battery status health and whether the AC adapter is installed.
Boot Sequence Allows you to change the order in which the tablet attempts to find an operating system.
• Internal SSD
• USB Storage Device
• CD/DVD/CD-RW Drive
• Onboard NIC
Boot sequence options
Allows you to change the order in which the tablet attempts to find an operating system:
• Windows boot manager-selected by default
Boot list options• Legacy
• UEFI—selected by default
Advanced Boot Options
This option allows you the legacy option ROMs to load. The options are:
• Enable Legacy Option ROMs-default
• Enable Attempt Legacy Boot
• Enable UEFI Network Stack
UEFI boot path security • Always, except internal SSD
• Always
• Never
Date/Time Allows you to change the date and time.
System Configuration screen options
Option Description
SMART Reporting This field controls whether hard drive errors for integrated drives are reported during system startup. This technology is part of the SMART (Self-Monitoring Analysis and Reporting Technology) specification. This option is disabled by default.
• Enable SMART Reporting
USB Configuration This is an optional feature.
This field configures the integrated USB controller. If Boot Support is enabled, the system is allowed to boot any type of USB Mass Storage Devices—HDD, memory key, floppy.
If USB port is enabled, device attached to this port is enabled and available for OS.
If USB port is disabled, the OS cannot see any device attached to this port.
The options are:
• Enable USB Boot Support—enabled by default
• Enable External USB Port—enabled by default
• Always Allow dell docks—enabled by default
System setup 23

Option DescriptionNOTE: USB keyboard and mouse always work in the BIOS setup irrespective of these settings.
USB PowerShare This field configures the USB PowerShare feature behavior. This option allows you to charge external devices using the stored system battery power through the USB PowerShare port. This option is disabled by default
Audio This field enables or disables the integrated audio controller. By default, the Enable Audio option is selected. The options are:
• Enable Microphone—enabled by default
• Enable Internal Speaker—enabled by default
Keyboard Illumination
This field lets you choose the operating mode of the keyboard illumination feature. The keyboard brightness level can be set from 0% to 100%. The options are:
• Disabled—enabled by default
• Dim (50%)
• Bright
Keyboard Backlight Timeout on Battery
The Keyboard Backlight Timeout dims out with the Battery option. The main keyboard illumination feature is not affected. Keyboard Illumination will continue to support the various illumination levels. This field has an effect when the backlight is enabled. The options are:
• 5 sec
• 10 sec—enabled by default
• 15 sec
• 30 sec
• 1 min
• 5 min
• 15 min
• Never
Keyboard Backlight with AC
The Keyboard Backlight with AC option does not affect the main keyboard illumination feature. Keyboard Illumination will continue to support the various illumination levels. This field has an effect when the backlight is enabled. This option is enabled by default.
Keyboard Backlight Timeout on AC
The Keyboard Backlight Timeout dims out with AC option. The main keyboard illumination feature is not affected. Keyboard Illumination will continue to support the various illumination levels. This field has an effect when the backlight is enabled. The options are:
• 5 sec
• 10 sec—enabled by default
• 15 sec
• 30 sec
• 1 min
• 5 min
• 15 min
• Never
Unobtrusive Mode This option, when enabled, pressing Fn+F7 turns off all light and sound emissions in the system. To resume normal operation, press Fn+F7 again. This option is disabled by default.
Miscellaneous Devices
Allows you to enable or disable the following devices:
• Enable Front Camera—enabled by default
24 System setup
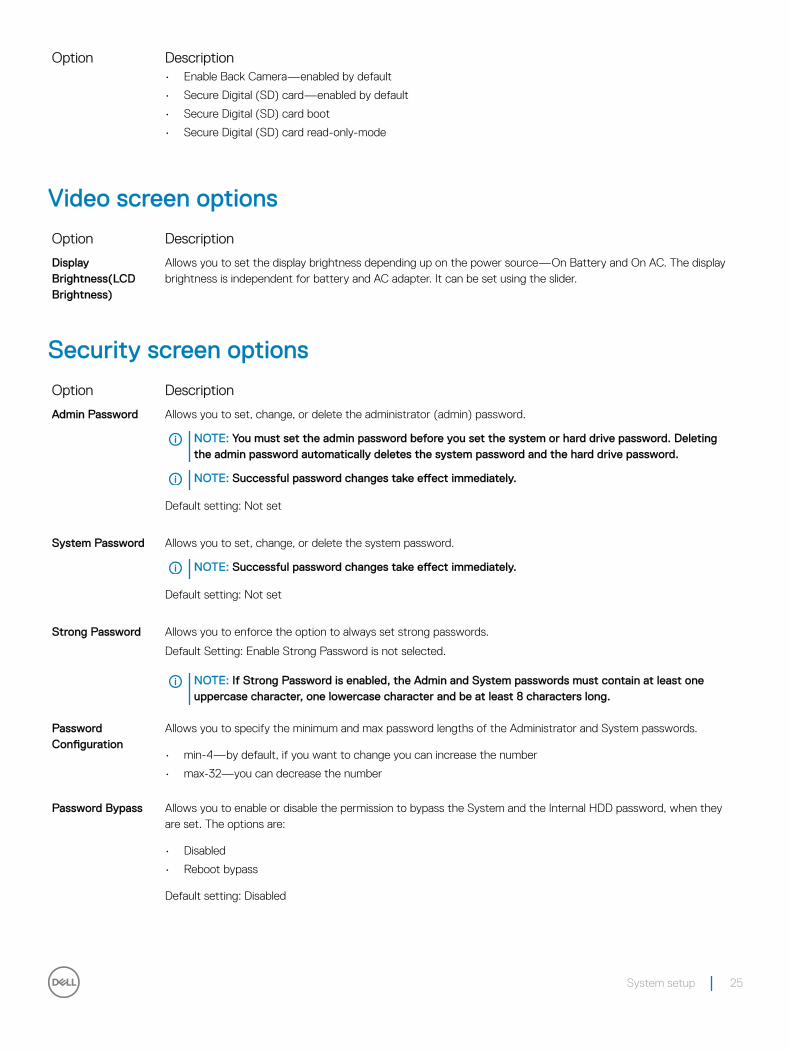
Option Description• Enable Back Camera—enabled by default
• Secure Digital (SD) card—enabled by default
• Secure Digital (SD) card boot
• Secure Digital (SD) card read-only-mode
Video screen options
Option Description
Display Brightness(LCD Brightness)
Allows you to set the display brightness depending up on the power source—On Battery and On AC. The display brightness is independent for battery and AC adapter. It can be set using the slider.
Security screen options
Option Description
Admin Password Allows you to set, change, or delete the administrator (admin) password.
NOTE: You must set the admin password before you set the system or hard drive password. Deleting the admin password automatically deletes the system password and the hard drive password.
NOTE: Successful password changes take effect immediately.
Default setting: Not set
System Password Allows you to set, change, or delete the system password.
NOTE: Successful password changes take effect immediately.
Default setting: Not set
Strong Password Allows you to enforce the option to always set strong passwords.
Default Setting: Enable Strong Password is not selected.
NOTE: If Strong Password is enabled, the Admin and System passwords must contain at least one uppercase character, one lowercase character and be at least 8 characters long.
Password Configuration
Allows you to specify the minimum and max password lengths of the Administrator and System passwords.
• min-4—by default, if you want to change you can increase the number
• max-32—you can decrease the number
Password Bypass Allows you to enable or disable the permission to bypass the System and the Internal HDD password, when they are set. The options are:
• Disabled
• Reboot bypass
Default setting: Disabled
System setup 25

Option Description
Password Change Allows you to enable the disable permission to the System and Hard Drive passwords when the admin password is set.
Default setting: Allow Non-Admin Password Changes is selected.
Non-Admin Setup Changes
Allows you to determine whether changes to the setup options are allowed when an Administrator Password is set. If disabled the setup options are locked by the admin password.
Option "allow wireless switch changes" is not selected by default.
UEFI capsule firmware updates
This option controls whether the system allows BIOS updates using UEFI capsule update packages. This option is enabled by default
TPM 2.0 Security Allows you to enable the Trusted Platform Module (TPM) during POST. The options are:
• TPM On—enabled by default
• Clear
• PPI Bypass for Enable Commands—disabled by default
• PPI Bypass for Disabled Commands
• Attestation enable—enabled by default
• Key storage enable—enabled by default
• SHA-256—enabled by default
• Disabled
• Enabled—enabled by default
Computrace Allows you to activate or disable the optional Computrace software The options are:
• Deactivate
• Disable
• Activate—enabled by default
NOTE: The Activate and Disable options will permanently activate or disable the feature and no further changes are allowed
CPU XD Support Allows you to enable the Execute Disable mode of the processor.
Enable CPU XD Support—enabled by default
Admin Setup Lockout
Allows you to prevent users from entering Setup when an Administrator password is set.
Default Setting: This option is enabled
Master password lockout
This option is not enabled by default
Secure Boot screen options
Option Description
Secure Boot Enable This option enables or disables the Secure Boot feature.
• Disabled
• Enabled
26 System setup

Option DescriptionDefault setting: Enabled
Expert Key Management
Allows you to manage all secure boot keys. Manage All Factory Keys (PK, KEK, DB, DBX)
NOTE: For Secure Boot to be enabled, the system needs to be in UEFI boot mode and the Enable Legacy Option ROMs option needs to be turned off.
Intel software guard extensions screen options
Option Description
Intel SGX Enable This field specifies you to provide a secured environment for running code/storing sensitive information in the context of the main OS. The options are:
• Software controlled—enabled by default
• Enabled
Default setting: Software controlled
Enclave Memory Size
This option allows you to set the SGX Enclave Reserve Memory Size. The options are:
• 32 MB
• 64 MB
• 128 MB—enabled by default
Performance screen options
Option Description
Multi-Core Support This field specifies whether the process has one or all cores enabled. The performance of some applications improves with the additional cores. This option is enabled by default. Allows you to enable or disable multi-core support for the processor. The installed processor supports two cores. If you enable Multi-Core Support, two cores are enabled. If you disable Multi-Core Support, one core is enabled.
• Enable Multi-Core Support
Default setting: The option is enabled.
Intel SpeedStep Allows you to enable or disable the Intel SpeedStep feature.
• Enable Intel SpeedStep
Default setting: The option is enabled.
C-States Control Allows you to enable or disable the additional processor sleep states.
• C states
Default setting: The option is enabled.
Intel TurboBoost Allows you to enable or disable the Intel TurboBoost mode of the processor.
System setup 27

Option Description• Enable Intel TurboBoost
Default setting: The option is enabled.
HyperThread Control
Allows you to enable or disable the Hyper-Threading in the processor.
• Disabled
• Enabled
Default setting: Enabled is selected.
Power management screen options
Option Description
AC Behavior Allows you to enable or disable the tablet from turning on automatically when an AC adapter is connected.
Default setting: Wake on AC is not selected.
Auto On Time Allows you to set the time at which the tablet must turn on automatically. The options are:
• Disabled
• Every Day
• Weekdays
• Select Days
Default setting: Disabled
USB Wake Support Allows you to enable USB devices to wake the system from Standby.
NOTE: This feature is only functional when the AC power adapter is connected. If the AC power adapter is removed during Standby, the system setup removes power from all the USB ports to conserve battery power.
• Wake on Dell USB-C dock
Default setting: The option is enabled by default.
Wireless Radio Control
Allows you to enable or disable the feature that automatically switches from wired or wireless networks without depending on the physical connection.
• Control WLAN Radio
• Control WWAN Radio
Default setting: The options are disabled.
Peak Shift This option enables you to minimize the AC power consumption during the peak power times of day. After you enable this option, your system runs only in battery even if the AC is attached.
• Enable peak shift
• Set battery threshold (15% to 100%) - 15 % (enabled by default)
28 System setup

Option Description
Advanced Battery Charge Configuration
This option enables you to maximize the battery health. By enabling this option, your system uses the standard charging algorithm and other techniques, during the nonwork hours to improve the battery health.
Disabled
Default setting: Disabled
Primary Battery Charge Configuration
Allows you to select the charging mode for the battery. The options are:
• Standard—Fully charges your battery at a standard rate—enabled by default
• ExpressCharge—The battery charges over a shorter time using Dell’s fast charging technology.
If Custom Charge is selected, you can also configure Custom Charge Start and Custom Charge Stop.
NOTE: All charging mode may not be available for all the batteries. To enable this option, disable the Advanced Battery Charge Configuration option.
POST Behavior screen options
Option Description
Adapter Warnings Allows you to enable or disable the system setup (BIOS) warning messages when you use certain power adapters.
Default setting: Enable Adapter Warnings
Keypad (Embedded)
Allows you to choose one of two methods to enable the keypad that is embedded in the internal keyboard.
• Fn Key Only—enabled by default
• By Numlock
NOTE: When setup is running, this option has no effect. Setup works in Fn Key Only mode.
Numlock Enable Allows you to enable the Numlock option when the tablet boots.
Enable Numlock. This option is enabled by default.
Fn Key Emulation Allows you to set the option where the Scroll Lock key is used to simulate the Fn key feature.
Enable Fn Key Emulation—enabled by default
Fn Lock Options Allows you to let hot key combinations Fn + Esc toggle the primary behavior of F1–F12, between their standard and secondary functions. If you disable this option, you cannot toggle dynamically the primary behavior of these keys. The available options are:
• Fn Lock—enabled by default
• Lock Mode Disable/Standard
• Lock Mode Enable/Secondary
Fastboot Allows you to speed up the boot process by bypassing some of the compatibility steps. The options are:
• Minimal
• Thorough—enabled by default
• Auto
System setup 29

Option Description
Extended BIOS POST Time
Allows you to create an additional preboot delay. The options are:
• 0 seconds—enabled by default
• 5 seconds
• 10 seconds
Full Screen Logo This option will display full screen logo if your image match screen resolution
• Enable Full Screen Logo
Warnings and Errors
This option will cause the boot process to only pause when warnings or errors are detected.
• Prompt on Warnings and Errors—enabled by default
• Continue on Warnings
• Continue on Warnings and Errors
NOTE: Error deemed critical to the operation of the system hardware will always halt the system.
Sign of Life Indication
This option is disabled by default.
Virtualization support screen options
Option Description
Virtualization Allows you to enable or disable the Intel Virtualization Technology.
Enable Intel Virtualization Technology—default.
VT for Direct I/O Enables or disables the Virtual Machine Monitor (VMM) from utilizing the additional hardware capabilities provided by Intel® Virtualization technology for direct I/O.
Enable VT for Direct I/O - enabled by default.
Trusted Execution This option specifies whether a Measured Virtual Machine Monitor (MVMM) can utilize the additional hardware capabilities provided by Intel Trusted Execution Technology. The TPM Virtualization Technology, and the Virtualization technology for direct I/O must be enabled to use this feature.
Trusted Execution - disabled by default.
Wireless screen options
Option Description
Wireless Device Enable
Allows you to enable or disable the internal wireless devices.
• WWAN/GPS
• WLAN/WiGig
• Bluetooth
All the options are enabled by default.
30 System setup

NOTE: IMEI number for WWAN can be found on the outer box or the WWAN card.
Maintenance screen options
Option Description
Service Tag Displays the Service Tag of your tablet.
Asset Tag Allows you to create a system asset tag if an asset tag is not already set. This option is not set by default.
BIOS Downgrade This controls flashing of the system firmware to previous revisions. Option 'Allow BIOS downgrade' is enabled by default.
Data Wipe This field allows users to erase the data securely from all internal storage devices. Option 'Wipe on Next boot' is not enabled by default. The following is list of devices affected:
• Internal M.2 SATA SDD
• Internal M.2 PCIe SSD
• Internal eMMC
BIOS Recovery This field allows you to recover from certain corrupted BIOS conditions from a recover file on the user primary hard drive or an external USB key.
• BIOS Recovery from Hard Drive—enabled by default
• Always perform integrity check—disabled by default
System logs screen options
Option Description
BIOS Events Allows you to view and clear the System Setup (BIOS) POST events.
Thermal Events Allows you to view and clear the System Setup (Thermal) events.
Power Events Allows you to view and clear the System Setup (Power) events.
Updating the BIOS It is recommended to update your BIOS (System Setup), on replacing the system board or if an update is available. For systems, ensure that your tablet battery is fully charged and connected to a power outlet
1 Restart the tablet.
2 Go to Dell.com/support.
3 Enter the Service Tag or Express Service Code and click Submit.
NOTE: To locate the Service Tag, click Where is my Service Tag?
NOTE: If you cannot find your Service Tag, click Detect My Product. Proceed with the instructions on screen.
4 If you are unable to locate or find the Service Tag, click the Product Category of your tablet.
5 Choose the Product Type from the list.
6 Select your tablet model and the Product Support page of your tablet appears.
7 Click Get drivers and click View All Drivers.
The Drivers and Downloads page opens.
System setup 31
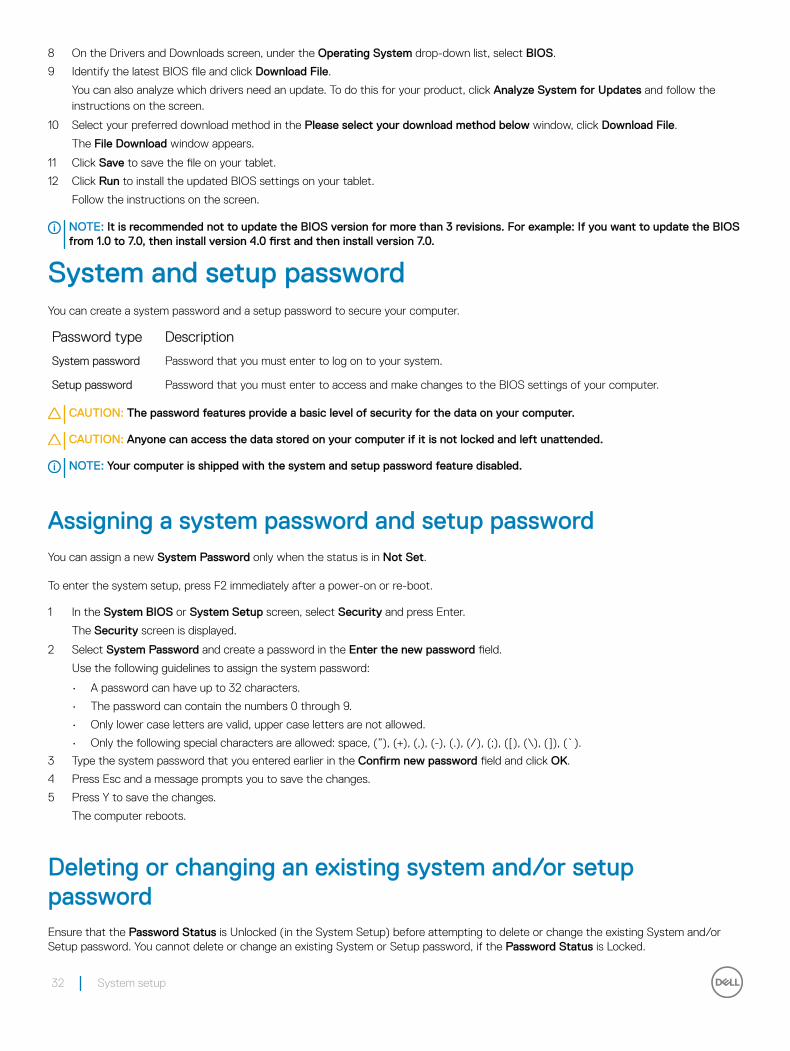
8 On the Drivers and Downloads screen, under the Operating System drop-down list, select BIOS.
9 Identify the latest BIOS file and click Download File.
You can also analyze which drivers need an update. To do this for your product, click Analyze System for Updates and follow the instructions on the screen.
10 Select your preferred download method in the Please select your download method below window, click Download File.
The File Download window appears.
11 Click Save to save the file on your tablet.
12 Click Run to install the updated BIOS settings on your tablet.
Follow the instructions on the screen.
NOTE: It is recommended not to update the BIOS version for more than 3 revisions. For example: If you want to update the BIOS from 1.0 to 7.0, then install version 4.0 first and then install version 7.0.
System and setup passwordYou can create a system password and a setup password to secure your computer.
Password type Description
System password Password that you must enter to log on to your system.
Setup password Password that you must enter to access and make changes to the BIOS settings of your computer.
CAUTION: The password features provide a basic level of security for the data on your computer.
CAUTION: Anyone can access the data stored on your computer if it is not locked and left unattended.
NOTE: Your computer is shipped with the system and setup password feature disabled.
Assigning a system password and setup passwordYou can assign a new System Password only when the status is in Not Set.
To enter the system setup, press F2 immediately after a power-on or re-boot.
1 In the System BIOS or System Setup screen, select Security and press Enter.
The Security screen is displayed.
2 Select System Password and create a password in the Enter the new password field.
Use the following guidelines to assign the system password:
• A password can have up to 32 characters.
• The password can contain the numbers 0 through 9.
• Only lower case letters are valid, upper case letters are not allowed.
• Only the following special characters are allowed: space, (”), (+), (,), (-), (.), (/), (;), ([), (\), (]), (`).
3 Type the system password that you entered earlier in the Confirm new password field and click OK.
4 Press Esc and a message prompts you to save the changes.
5 Press Y to save the changes.
The computer reboots.
Deleting or changing an existing system and/or setup passwordEnsure that the Password Status is Unlocked (in the System Setup) before attempting to delete or change the existing System and/or Setup password. You cannot delete or change an existing System or Setup password, if the Password Status is Locked.
32 System setup

To enter the System Setup, press F2 immediately after a power-on or reboot.
1 In the System BIOS or System Setup screen, select System Security and press Enter.
The System Security screen is displayed.
2 In the System Security screen, verify that Password Status is Unlocked.
3 Select System Password, alter or delete the existing system password and press Enter or Tab.
4 Select Setup Password, alter or delete the existing setup password and press Enter or Tab.
NOTE: If you change the System and/or Setup password, re-enter the new password when promoted. If you delete the System and/or Setup password, confirm the deletion when promoted.
5 Press Esc and a message prompts you to save the changes.
6 Press Y to save the changes and exit from System Setup.
The computer reboots.
System setup 33

Troubleshooting
Enhanced Pre-boot System Assessment (ePSA)The ePSA is a diagnostic utility available on the tablet. This utility includes a series of tests for a tablet's hardware. Customers can run these tests even if the computer lacks any media (hard drive, CD drive, etc.). If an ePSA-tested component fails, the system displays an error code and generates a beep code.
Features:• Graphical User Interface.
• Automatic Default Operation- runs test on all devices, allowing a user to interrupt and select any device.
• Checks the Master Boot Record for readiness to boot into a full OS environment.
• Tablet panel test.
• Video card.
• Battery test.
• Charger test.
• Primary battery.
• Multiprocessor cache test.
Running the ePSA Diagnostic Utility
NOTE: The following steps can be used to run the ePSA diagnostic utility in DOS mode without using an external keyboard.
1 Power on the system.
2 Before the Dell Logo is displayed, immediately press the Volume Up button to get the Boot Menu
3 Scroll down the Diagnostics and then press the Volume Down button to select
4 The tablet will begin running the ePSA utility.
Tablet LEDThis section details the diagnostic features of the battery LED in a tablet.
Diagnostic LEDTablets rely on the Battery LED light blinking amber/white pattern to determine failures listed in the following table:
5
34 Troubleshooting

NOTE:
• The blinking patterns will consist of 2 sets of numbers being represented by (First Group: Amber blinks, Second Group: White blinks)
• First Group : The LED blinks 1 to 9 times followed by a brief pause with LED off at the interval of 1.5 seconds. (This is in Amber color)
• Second Group : The LED blinks 1 to 9 times, that would be then followed by a longer pause before the next cycle starts again at the interval of 1.5 seconds. (This is in White color)
• Example: No Memory detected (2,3), Battery LED blinks two times of amber color followed by a pause, and then blinks three times of white color. The Battery LED will pause for 3 seconds before the next cycle repeat itself again
The following table depicts the amber and white blinking patterns with possible troubleshooting resolution:
Table 1. LED pattern
Blinking pattern Problem Description Suggested Resolution
2,1 processor processor failure
2,2 system board, BIOS ROM system board, covers BIOS corruption or ROM error
2,3 memory no memory/no RAM detected
2,4 memory memory failure/RAM failure
2,5 memory invalid memory installed
2,6 system board; chipset system board/ chipset error
2,7 display display failure
3,1 RTC power failure coin-cell battery failure
3,2 PCI/Video PCI/Video card/chip failure
3,3 BIOS recovery 1 recovery image not found
3,4 BIOS recovery 2 recovery image found but invalid
Real Time Clock (RTC) resetThe Real Time Clock (RTC) reset function allows you or the service technician to recover the recently launched model Dell Latitude and Precision systems from select No POST/No Boot/No Power situations. You can initiate the RTC reset on the system from a power off state only if it is connected to AC power. Press and hold the power button for 25 seconds. The system RTC reset occurs after you release the power button.
NOTE: If AC power is disconnected from the system during the process or the power button is held longer than 40 seconds, the RTC reset process is aborted.
The RTC reset will reset the BIOS to Defaults, un-provision Intel vPro and reset the system date and time. The following items are unaffected by the RTC reset:
• Service Tag
• Asset Tag
• Ownership Tag
• Admin Password
• System Password
• HDD Password
• Key Databases
• System Logs
The following items may or may not reset based on your custom BIOS setting selections:
Troubleshooting 35

• The Boot List
• Enable Legacy OROMs
• Secure Boot Enable
• Allow BIOS Downgrade
Identifying the AC adapter shipped with your tabletAC adapters are shipped based on customer requirements or based on regions. To identify the AC adapter shipped with your tablet, you can verify it from the service tag.
1 Go to Dell. com/support
2 Type the service tag of your tablet.
3 Click System configuration. System configuration details are displayed.
4 Click Original configuration to view the AC adapter shipped with your tablet.
36 Troubleshooting

Contacting DellNOTE: If you do not have an active Internet connection, you can find contact information on your purchase invoice, packing slip, bill, or Dell product catalog.
Dell provides several online and telephone-based support and service options. Availability varies by country and product, and some services may not be available in your area. To contact Dell for sales, technical support, or customer service issues:
1 Go to Dell.com/support.
2 Select your support category.
3 Verify your country or region in the Choose a Country/Region drop-down list at the bottom of the page.
4 Select the appropriate service or support link based on your need.
6
Contacting Dell 37