Lathe Centers
17
1 Mounting, Removing, and Aligning Lathe Centers Session 8
description
lathe
Transcript of Lathe Centers

1
Mounting, Removing, and Aligning Lathe Centers
Session 8

2
Lathe Centers
• Work machined between centers is turned for some portion of length, then reversed, and other end finished
• Critical when machining work between centers that live center be absolutely true
• Produces concentric diameters

3
Mounting Lathe Centers• Remove any burrs from lathe spindle,
centers, or spindle sleeves• Clean tapers on lathe centers and in
headstock and tailstock spindles• Partially insert cleaned center in lathe
spindle• Force center into spindle
• Follow same procedure when mounting tailstock center
• Check trueness of center• Use dial indicator

4
Removing Lathe Centers• Live center
• Use knockout bar pushed through headstock spindle (slight tap)
• Use cloth over center and hold to prevent damage
• Dead center• Turn tailstock handwheel to draw spindle
back into tailstock• End of screw contacts end of dead center, forcing
it out of spindle

5
Alignment of Lathe CentersWhen lathe center aligned Parallel
diameters produced
Three common methods used to align1. Aligning tailstock
2. Trial Cut
3. Test Bar and Indicator

6
Alignment of Lathe CentersAligning Tailstock• Aligning centerlines
on back of tailstock with each other
• Only a visual checkand not too accurate

7
Alignment of Lathe CentersAligning Tailstock

8
To Align Centers by Adjusting the Tailstock1. Loosen tailstock clamp nut or level2. Loosen one of the adjusting screws,
depending on direction tailstock must be moved and tighten other until line on top aligns with line on bottom half
3. Tighten screw to lock both halves in place
4. Make sure tailstock lines still aligned5. Lock tailstock clamp nut or lever

9
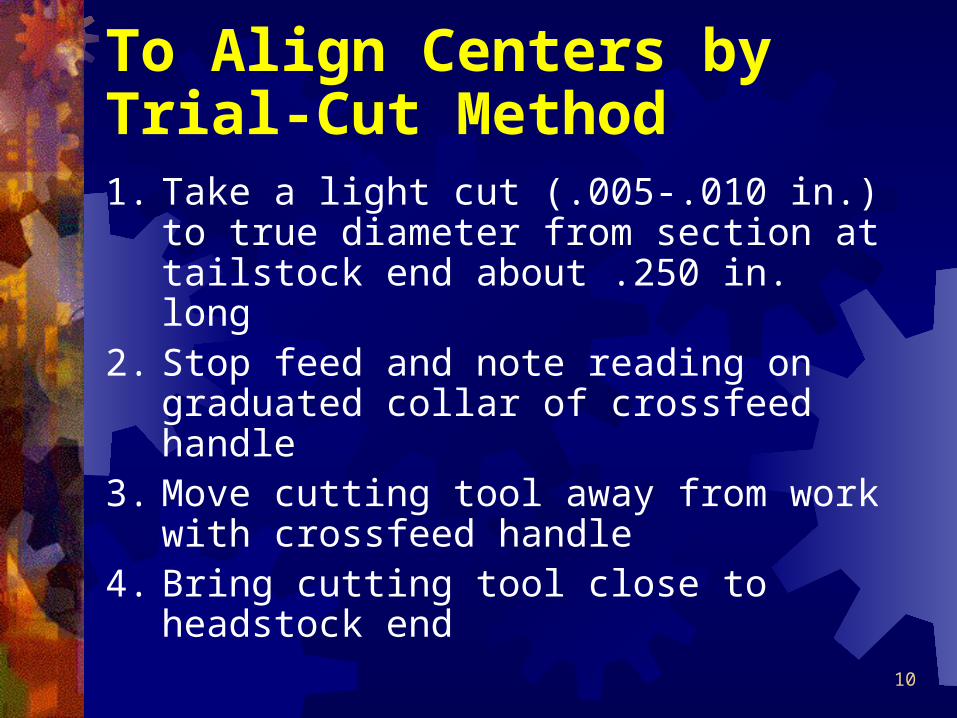
Alignment of Lathe CentersTrial-cut method
• Small cut taken from each end of work• Diameters measured with a micrometer
10
To Align Centers by Trial-Cut Method1. Take a light cut (.005-.010 in.) to true
diameter from section at tailstock end about .250 in. long
2. Stop feed and note reading on graduated collar of crossfeed handle
3. Move cutting tool away from work with crossfeed handle
4. Bring cutting tool close to headstock end

11
To Align Centers by Trial-Cut Method5. Return cutting tool to same graduated
collar setting as at first cut
6. Cut a .500-in (13 mm) length at headstock end and stop lathe
7. Measure both diameters with micrometer
12
To Align Centers by Trial-Cut Method8. If both diameters not same size, adjust
tailstock either toward or away from cutting tool ½ difference of two readings
9. Take another light cut at both points at same crossfeed graduated collar setting
10.Measure diameters and repeat as necessary

13
Alignment of Lathe CentersTest bar and dial indicator
• Fastest and most accurate method

14
Alignment of Lathe CentersTest bar and dial indicator

15
Aligning Centers Using Test Bar and Dial Indicator 1. Clean lathe and work center, mount
test bar2. Adjust test bar snugly between centers
and tighten tailstock spindle clamp3. Mount dial indicator on toolpost or
lathe carriage• Indicator plunger should be parallel to
lathe bed and contact point set on center

16
4. Adjust cross-slide • Indicator registers approximately .025 in
at tailstock, indicator bezel to 0
5. Move carriage by hand so indicator registers on diameter at headstock end and note indicator reading
6. If both indicator readings not same, adjust tailstock with adjusting screws until indicator registers same at both ends
Aligning Centers Using Test Bar and Dial Indicator

17
7. Tighten adjusting screw that was loosened
8. Tighten tailstock clamp nut
9. Adjust tailstock spindle until test bar snug between lathe centers
10.Recheck indicator readings at both ends and, if necessary, adjust tailstock
Aligning Centers Using Test Bar and Dial Indicator