LanTEK IV - delo.it
80
Proof of Performance LanTEK IV The Future of Cable Certification Quick Reference Guide
Transcript of LanTEK IV - delo.it

1Proof of PerformancePB www.idealnetworks.net 163819Proof of Performance
LanTEK IVThe Future of Cable Certification
Quick Reference Guide

2 www.idealnetworks.net 163819
LanTEK IV
Quick Reference Guide
Guide d’utilisation
Bedienungsanleitung
Guida utente
Manual de usuario
Guia do Usuario
163819 rev1 10/2019
IDEAL INDUSTRIES Networks Ltd.Stokenchurch House Oxford RoadStokenchurch High WycombeBuckinghamshireHP14 3SXUnited Kingdom

3Proof of Performance2 www.idealnetworks.net 163819
© IDEAL INDUSTRIES Networks Ltd 2019The information contained in this document is the property of IDEAL INDUSTRIES Networks Ltd. and is supplied without liability for errors and omissions. No part of this document may be reproduced or used except as authorized by contract or other written permission from IDEAL INDUSTRIES Networks Ltd. The copyright and all restrictions on reproduction and use apply to all media in which this information may be placed. IDEAL INDUSTRIES Networks Ltd. pursues a policy of continual product improvement and reserves the right to alter without notice the specification, design, price or conditions of supply of any product or service. All rights reserved.
Les informations dans ce document sont la propriété de IDEAL INDUSTRIES Networks Ltd. et elles sont fournies sans responsabilité pour les erreurs et les omissions. Aucune partie de ce document ne doit être reproduite ou utilisée, sauf en cas d’autorisation par contrat ou en cas d’autre autorisation écrite donnée par IDEAL INDUSTRIES Networks Ltd. Le copyright et toutes les limitations concernant la reproduction et l’utilisation s’appliquent à tous les supports sur lesquels cette information peut être placée. IDEAL INDUSTRIES Networks Ltd. améliore continuellement ses produits et se réserve le droit de modifier sans préavis la spécification, la conception, le prix ou les conditions de fourniture d’un produit ou d’un service. Tous droits réservés.
Die Informationen in diesem Dokument sind das Eigentum von IDEAL INDUSTRIES Networks Ltd. und werden ohne Gewährleistung der Vollständigkeit oder Korrektheit gegeben. Dieses Dokument darf nur soweit vertraglich oder anderweitig schriftlich von IDEAL INDUSTRIES Networks Ltd. Zugesichert ganz oder teilweise vervielfältigt werden. Das Urheberrecht und alle Einschränkungen zur Vervielfältigung und Nutzung gelten für alle Datenträger, auf denen diese Informationen gespeichert werden können. IDEAL INDUSTRIES Networks Ltd. bemüht sich um ständige Produktverbesserungen und behält sich das Recht vor, die Spezifikation, das Design, den Preis oder die Lieferbedingungen jeglicher Produkte oder Dienste ohne Vorankündigung zu ändern. Alle Rechte vorbehalten.
Le informazioni contenute nel presente documento sono di proprietà di IDEAL INDUSTRIES Networks Ltd. e sono fornite senza alcuna responsabilità relativa a errori e omissioni. Sono vietati la riproduzione o l’uso di tutto il documento o parte di esso, salvo se autorizzati da contratto o permesso scritto di IDEAL INDUSTRIES Networks Ltd. Il copyright e tutte le limitazioni sulla riproduzione e l’uso si applicano a tutti i supporti nei quali le presenti informazioni possono essere contenute. IDEAL INDUSTRIES Networks Ltd. segue una politica volta al miglioramento continuo dei prodotti e si riserva il diritto di modificare senza preavviso le specifiche, il disegno, il prezzo o le condizioni di fornitura di qualsivoglia prodotto o servizio. Tutti i diritti riservati.
La información que figura en este documento es propiedad de IDEAL INDUSTRIES Networks Ltd., quien no asume responsabilidad alguna sobre posibles errores u omisiones que puedan existir en este documento. Queda prohibida la reproducción parcial o total de este documento, así como darle un uso distinto al autorizado mediante contrato o autorización escrita por parte de IDEAL INDUSTRIES Networks Ltd. independientemente del formato y soporte de los contenidos. IDEAL INDUSTRIES Networks Ltd. sigue una política de mejora continua del producto y nos reservamos el derecho de modificar sin previo aviso las especificaciones, diseño, precio o condiciones de suministro de cualquier producto o servicio. Todos los derechos reservados.
As informações contidas neste documento são de propriedade de IDEAL INDUSTRIES Networks Ltd. e são fornecidas sem responsabilidade sobre erros e omissões. Nenhuma porção deste documento pode ser reproduzida ou usada exceto quando autorizada mediante contrato ou outra permissão por escrito da IDEAL INDUSTRIES Networks Ltd. Os direitos de cópia e restrições de reprodução e uso são aplicáveis a todas as mídias nas quais estas informações possam ser colocadas. A IDEAL INDUSTRIES Networks Ltd. segue uma política de melhora contínua do produto e se reserva ao direito de alterar sem aviso prévio as especificações, design, preço ou condições de fornecimento de qualquer produto ou serviço. Todos os Direitos Reservados.
English
Français
Italiano
Español
Português
Deutsch

4 www.idealnetworks.net 163819
INTRODUCTION
The LanTEK IV and IDEAL AnyWARE are a Cable Certification System. This guide will give you an overview of the key features of LanTEK IV and how to start using AnyWARE to manage your project and test results.
GETTING STARTED
Before you start using your LanTEK IV follow the steps below to ensure you can take advantage of all the features your LanTEK IV has to offer.
1. Fully charge the display and remote units using the power supply included in your case. This can be connected to the main charging port on the LanTEK IV or the quick charge port on the battery. The quick charge port reduces the charging time by 50%. To access the quick charge port the battery must first be removed by releasing the retaining screw.
2. Select the language by selecting the setup gear at the top left of the screen.
Handset charging port
Status LED Red = Charging
Green = Fully Charged
Quick Charge Port
EN

5Proof of Performance4 www.idealnetworks.net 163819
3. Visit anyware.idealnetworks.net to setup your free IDEAL AnyWARE account to Manage, Share, Edit and Pre-configure your projects. Select; sign up for cloud based software or download for the desktop version.
4. Link your LanTEK IV to your IDEAL AnyWARE Account by logging into your IDEAL AnyWARE account.
• Select Menu: Click Devices: Add Device:
• Enter your Device ID and select submit. The LanTEK IV device ID is found in the settings menu (below).
EN
6 www.idealnetworks.net 163819
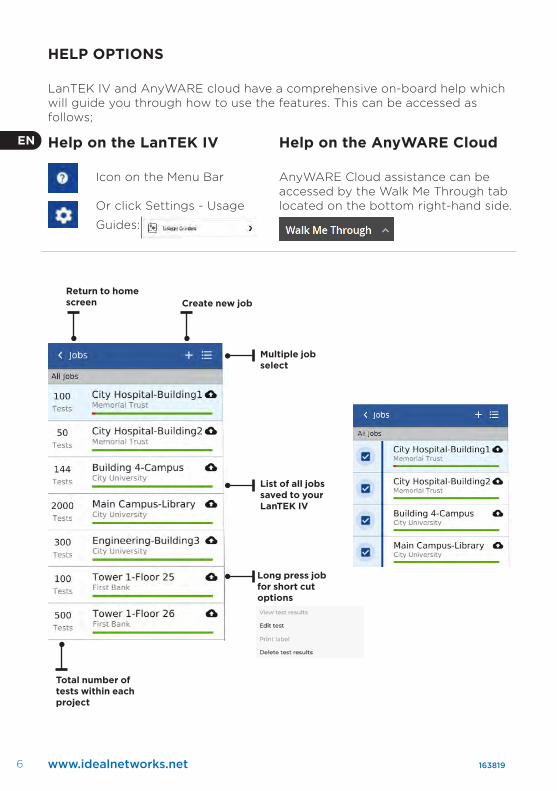
HELP OPTIONS
LanTEK IV and AnyWARE cloud have a comprehensive on-board help which will guide you through how to use the features. This can be accessed as follows;
Help on the LanTEK IV
Icon on the Menu Bar
Or click Settings - Usage
Guides:
Help on the AnyWARE Cloud
AnyWARE Cloud assistance can be accessed by the Walk Me Through tab located on the bottom right-hand side.
Return to home screen Create new job
Multiple job select
List of all jobs saved to your LanTEK IV
Total number of tests within each project
Long press job for short cut options
EN

7Proof of Performance6 www.idealnetworks.net 163819
KEY FUNCTIONS
LanTEK IV
USB Type AUSB Type C
Talkset Jack
Charging Port
LED IndicatorWhen power OFF Flashing Green = ChargingSolid Green = Fully ChargedWhen power ONWhite/Green flashing = ChargingWhite/Red flashing = Low Battery
Autotest Button (Press to start next test in sequence)
High Voltage WarningDisconnect cable immediately Status Connection
Blue when both units are connected
Touch Screen Display
Home Button (press to show the active
job test list)
Back button
Protective CapVisiLINQ™ incorporates a multi-color LED indicator and action button to initiate tests and report the status independent of the tester handsets.
Field Replaceable Tip
Tip Retaining Screw
LED Indicator Blue =Display and Remote connected Green = PassRed = FailAmber = Marginal Pass/FailWhite = Torch mode
Action button; Press to activate white torch when not linked. Press to initiate Autotest when handsets are linked
Contextual LED indicators - color indicates status
Power Button
EN
8 www.idealnetworks.net 163819
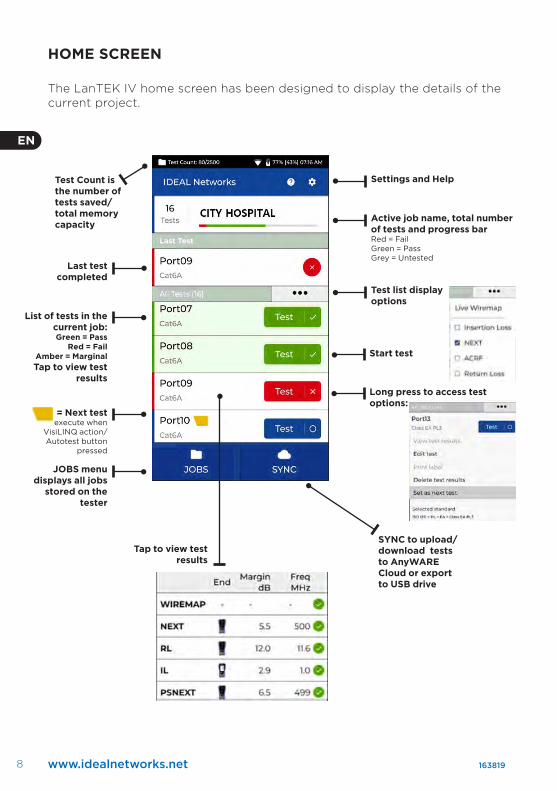
HOME SCREEN
The LanTEK IV home screen has been designed to display the details of the current project.
Test Count is the number of tests saved/total memory capacity
Settings and Help
Active job name, total number of tests and progress barRed = FailGreen = PassGrey = Untested
Last test completed
Test list display options
Start test
Long press to access test options:
List of tests in the current job:Green = Pass
Red = FailAmber = MarginalTap to view test
results
= Next testWill execute when
VisiLINQ action/Autotest button
pressed
JOBS menu displays all jobs
stored on the tester
SYNC to upload/download tests to AnyWARE Cloud or export to USB drive
Tap to view test results
EN

9Proof of Performance8 www.idealnetworks.net 163819
SETTINGS
The settings can be accessed from the settings menu on the home screen.
Choose language
Connect to a hotspot/Wi-Fi
Set reference for Cat 8.2, patch cord adapters and fiber jumper
calibration
View calibration details/export calibration certificate to USB as
PDF file
Start tone generator
Software version, serial number
and MAC address
How to use your LanTEK IV
Device ID, required to
register your LanTEK IV with
AnyWARE cloud
Set the date/time and measurement units
Set operator name
Sound on and off
Screen brightness
Activate remote control (Team Viewer)
Show cursor when using USB mouse
Autotest settings are your preferred set-up for a Job.
LanTEK IV will use these settings as default for all new jobs to
reduce set-up time
EN
10 www.idealnetworks.net 163819
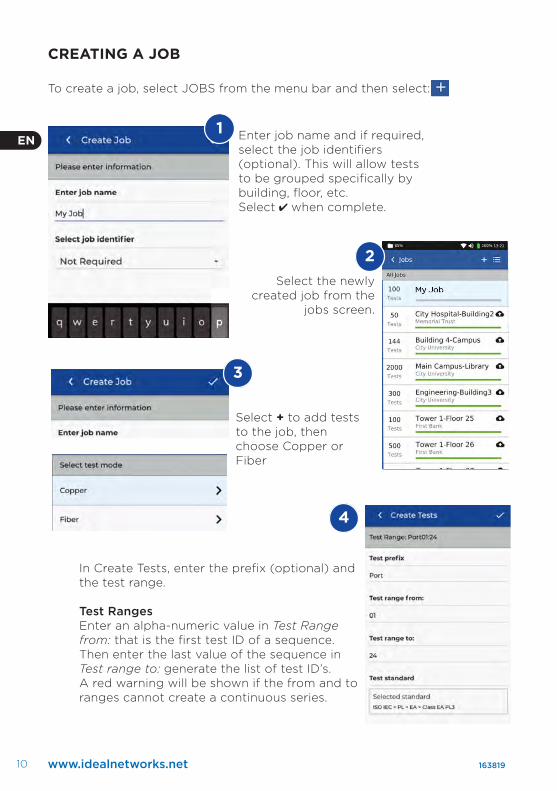
CREATING A JOB
To create a job, select JOBS from the menu bar and then select:
Enter job name and if required, select the job identifiers (optional). This will allow tests to be grouped specifically by building, floor, etc. Select when complete.
1
2Select the newly
created job from the jobs screen.
3
Select + to add tests to the job, then choose Copper or Fiber
4
In Create Tests, enter the prefix (optional) and the test range.
Test RangesEnter an alpha-numeric value in Test Range from: that is the first test ID of a sequence. Then enter the last value of the sequence in Test range to: generate the list of test ID’s.A red warning will be shown if the from and to ranges cannot create a continuous series.
EN

11Proof of Performance10 www.idealnetworks.net 163819
CREATING A JOB
8
9
Select standard5 6 Choose the appropriate standard
7 Choose type of link
Optional Step, During the set-up the Cable and Connector manufacture can be selected to add more detail to the finished report
Select when completed
EN
12 www.idealnetworks.net 163819
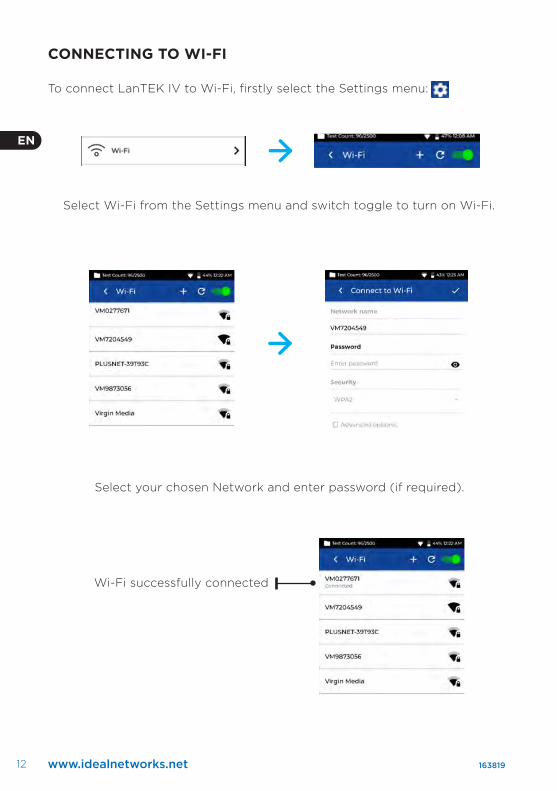
CONNECTING TO WI-FI
To connect LanTEK IV to Wi-Fi, firstly select the Settings menu:
Select Wi-Fi from the Settings menu and switch toggle to turn on Wi-Fi.
Select your chosen Network and enter password (if required).
Wi-Fi successfully connected
EN
13Proof of Performance12 www.idealnetworks.net 163819
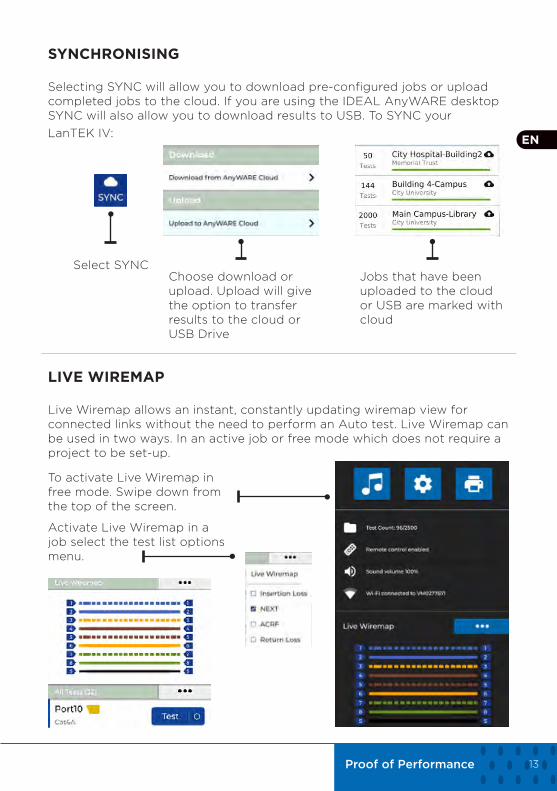
SYNCHRONISING
Selecting SYNC will allow you to download pre-configured jobs or upload completed jobs to the cloud. If you are using the IDEAL AnyWARE desktop SYNC will also allow you to download results to USB. To SYNC your LanTEK IV:
Select SYNCChoose download or upload. Upload will give the option to transfer results to the cloud or USB Drive
Jobs that have been uploaded to the cloud or USB are marked with cloud
LIVE WIREMAP
Live Wiremap allows an instant, constantly updating wiremap view for connected links without the need to perform an Auto test. Live Wiremap can be used in two ways. In an active job or free mode which does not require a project to be set-up.
To activate Live Wiremap in free mode. Swipe down from the top of the screen.
Activate Live Wiremap in a job select the test list options menu.
EN

14 www.idealnetworks.net 163819
CREATING A TEST REPORT
Jobs can be reviewed and edited using IDEAL AnyWARE Cloud or Desktop, Jobs synced via Wi-Fi will automatically be added to jobs menu of the cloud.
Key:
Upload jobs from USB using the Cloud and Desktop Swipe down from the top of the screen
Generate a PDF test report
View, download and email PDF reports
Share the report via an email link where the recipient can view and save the report
Download report
EN

15Proof of Performance14 www.idealnetworks.net 163819
INTRODUCTION
Les LanTEK IV et le logiciel IDEAL AnyWARE sont les éléments des systèmes de certification de câblages IDEAL Networks. Ce guide vous offrira un aperçu des principales caractéristiques des LanTEK IV et vous expliquera comment utiliser AnyWARE pour la gestion des projets et éditions de rapports.
DEMARRER
Avant de commencer à utiliser votre LanTEK IV, merci de suivre les étapes ci-dessous afin de bien maitriser toutes ses fonctionnalités.
1. Chargez totalement les deux boîtiers de tests en utilisant les deux blocs alimentation/chargeur fournis, qui vont ainsi remplir à 100% les batteries intégrées. Ces dernières peuvent également être extraites en dévissant la vis dédiée au dos de chaque appareil puis chargées directement avec les mêmes blocs alimentation/chargeur, hors des testeurs donc, pour des cycles de charge qui seront 50% plus rapides que si laissées dans les appareils.
2. Choisissez la langue française en allant dans les paramètres en haut à gauche de l’écran.
Interface de charge testeurs classique
Indicateur LED Rouge : en chargé
Vert : complètement chargé
Interface de charge batterie rapide
FR

16 www.idealnetworks.net 163819
3. Sur votre ordinateur, allez sur le site “anyware.idealnetworks.net” pour créer votre compte gratuit sur notre logiciel “IDEAL AnyWARE” et pouvoir ensuite gérer, préconfigurer, partager, modifier vos projets & tests. Sélectionnez “S’enregistrer” pour exploiter le logiciel via Cloud - ou sur “Télécharger” pour la version PC.
4. Pour lier votre compte IDEAL AnyWARE que vous venez de créer, avec votre LanTEK IV : valider en cliquant sur “S’enregistrer”
• Sélectionnez le Menu : Puis cliquez sur “Appareils” : Puis sur “Ajoutez un appareil” avec le + en haut à droite :
• Entrez l’identifiant de votre LanTEK IV constitué du N° de série à deux champs du boitier principal, et sélectionnez “Soumettre”; vous le trouverez dans les “Paramètres” de l’appareil (voir la capture ci-dessous). Pensez aussi à créer votre “Compte utilisateur”
FR

17Proof of Performance16 www.idealnetworks.net 163819
AIDES
Les LanTEK IV et AnyWARE Cloud intègrent une Aide didactique embarquée qui vous expliquera les fonctionnements et menus. Vous pouvez y accéder en suivant les étapes ci-dessous :
Rubrique “Aide” dans le LanTEK IV
Icône du Menu
Ou cliquez sur “Paramètres” - puis sur “Manuel
d’utilisation” :
Rubrique “Aide” sur IDEAL AnyWARE
Utilisez l’onglet Assistance étape par étape située en bas à droite de l’écran (“Aide didactique” = “Walk Me Through”)
Retour à l’écran principal
Créer un nouveau dossier
Sélectionner plusieurs dossiers
Liste de tous les dossiers sauvegardés dans le LanTEK IV
Nombre total de tests au sein de chaque dossier
En gardant le doigt appuyé longtemps sur un répertoire, on accède aux raccourcis (= clique droit d’une souris)
FR

18 www.idealnetworks.net 163819
FONCTIONS PRINCIPALES
LanTEK IV
USB Type AUSB Type C
Entrée talkie-walkie
Interface de charge batterie
Voyant LED Sur appareil éteint :Vert clignotant = en chargeVert fixe : complètement chargéSur appareil allumé :Blanc/Vert clignotant = en chargeBlanc/Rouge clignotant = batterie faible
Bouton Autotest (appuyez dessus pour lancer une certification)
Alerte tension détectéeDéconnecter immédiatement le testeur de la prise État de la connexion
Bleu quand ils sont connectés
Écran tactile
Bouton Accueil (pour revenir au dernier
dossier actif)
Bouton Retour en arrière
Capot de protection RJ45Les adaptateurs Permanent Link
VisiLINQ™ intègrent un anneau de LED à couleurs changeantes selon les différents statuts et un bouton de lancement direct des Autotest.
Contact RJ45 remplaçable
Vis de fixation
Indicateur LED :Bleu = les 2 boitiers sont connectés Vert = PasseRouge = EchecJaune = entre passe et échecBlanc = mode éclairage
Bouton Action ; Appuyez pour activer la lumière blanche lorsque rien n’est connecté.Appuyez pour lancer l’Autotest lorsque les 2 appareils sont connectés ensemble
Indicateurs LED : les différentes couleurs indiquent les statuts
Bouton Marche/Arrêt
FR

19Proof of Performance18 www.idealnetworks.net 163819
ÉCRAN D’ACCUEIL
L’écran d’accueil du LanTEK IV affiche les informations du répertoire actif.
Nombre de tests sauvegardés / capacité maximale de la mémoire
Paramètres appareil et Aide
Nom du dossier actif avec nombre total de tests et barre colorée de progressionRouge = ratio en EchecVert = ratio en PasseGris : ratio pas encore testéDernier lien testé
Options d’affichage de la liste de tests
Démarrez le test
Appuyez longtemps pour accéder aux options du test :
Liste des liens testés dans le
répertoire actif :Vert = Passe
Rouge = EchecJaune = Limite
margesAppuyez pour
voir les détails des mesures
= Futur lien à tester
Qui sera lancé si on presse un des
boutons Autotest ou sur le bouton
VisiLINQ
Le menu DOSSIERS
affiche tous les dossiers stockés
dans l’appareil
SYNCHRO. permet d’importer et exporter des tests vers AnyWARE Cloud ou de les transférer vers une clé mémoire USB
Appuyez pour voir les mesures du lien
FR

20 www.idealnetworks.net 163819
RÉGLAGES
Accéder aux divers paramètres depuis le menu “Paramètres” de l’écran d’accueil.
Choisir la langue
Se connecter au point d’accès Wi-Fi
Calibrer les 2 boitiers pour : Cat 8.2 - certifications de cordons RJ45 -
photométrie fibre optique
Lire les informations de calibrage / Copier le certificat de calibrage sur
une clé USB en format PDF
Lancer le générateur de tonalités sonores
Pour faire une mise à Jour logicielle
Modèle appareil, versions logicielles, N° de série, adresse MAC
Guides d’utilisation
Régler la date, l’heure et les unités de mesure
Entrer le nom de l’opérateur
Sons des testeurs
Luminosité de l’écran
Activer le contrôle à distance (Team Viewer)
Montrer le curseur lors de l’utilisation d’une souris en USB
Paramètres Autotests par défaut : à définir pour vos configurations
standards de futurs répertoires créés, afin de vous faire gagner du temps
FR
N° de série LanTEK IV à renseigner sur AnyWARE Cloud pour les
whronisations

21Proof of Performance20 www.idealnetworks.net 163819
CRÉER UN DOSSIER
Presser sur DOSSIERS dans le menu et pour en créé un nouveau, appuyer sur le :
Entrer un nom de dossier et si besoin définir des identifiants (facultatifs). Les tests pourront ainsi être regroupés en fonction des bâtiments, étages, baies ...Sélectionnez quand tout est configuré.
1
2Sélectionner le
dossier qui vient d’être créé dans l’écran Dossiers
3
Sélectionnez + en haut à droite pour créer des futurs tests dans ce dossier - puis choisissez “Cuivre” ou “Fibre”
4
Dans “Créer des tests” : définir le préfixe (facultatif) et la gamme des numéros identifiants.
Gammes des numéros de testsEntrez une valeur alphanumérique dans “Début de gamme” : c’est le futur premier numéro de la séquence. Puis entrez la dernière valeur de la séquence dans “Fin de gamme”. La liste des futures numérotations d’incrémentations automatisées sera alors générée.Une alerte rouge s’affichera en cas d’incohérences entre les gammes de début et de fin.
FR

22 www.idealnetworks.net 163819
SE CONNECTER AU Wi-Fi
Pour connecter le LanTEK IV en Wi-Fi, aller svp dans les Paramètres :
Sélectionnez “Wi-Fi” - puis activez le via le curseur en haut à droite (actif quand vert)
Sélectionnez le réseau de votre choix et entrez le mot de passe (si demandé)
Le Wi-Fi est alors connecté si le logo des ondes en haut à
droite n’est pas barré
FR
23Proof of Performance22 www.idealnetworks.net 163819
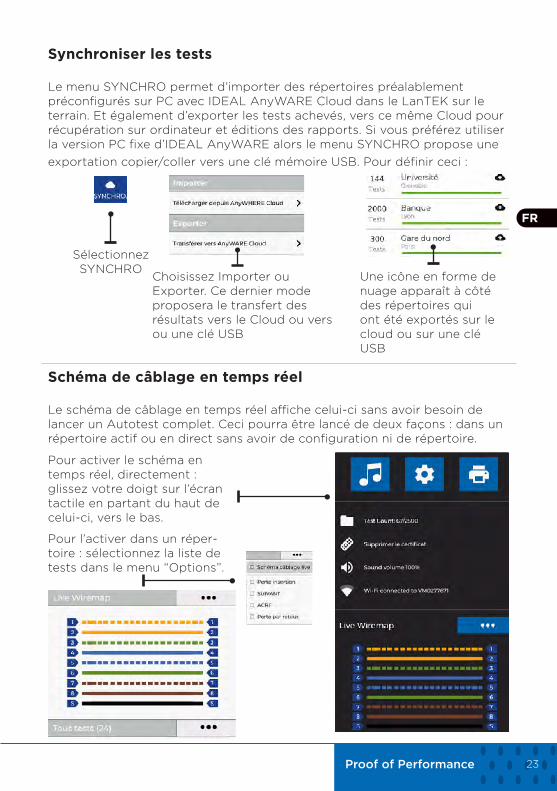
Synchroniser les tests
Le menu SYNCHRO permet d’importer des répertoires préalablement préconfigurés sur PC avec IDEAL AnyWARE Cloud dans le LanTEK sur le terrain. Et également d’exporter les tests achevés, vers ce même Cloud pour récupération sur ordinateur et éditions des rapports. Si vous préférez utiliser la version PC fixe d’IDEAL AnyWARE alors le menu SYNCHRO propose une exportation copier/coller vers une clé mémoire USB. Pour définir ceci :
Sélectionnez SYNCHRO
Choisissez Importer ou Exporter. Ce dernier mode proposera le transfert des résultats vers le Cloud ou vers ou une clé USB
Une icône en forme de nuage apparaît à côté des répertoires qui ont été exportés sur le cloud ou sur une clé USB
Schéma de câblage en temps réel
Le schéma de câblage en temps réel affiche celui-ci sans avoir besoin de lancer un Autotest complet. Ceci pourra être lancé de deux façons : dans un répertoire actif ou en direct sans avoir de configuration ni de répertoire.
Pour activer le schéma en temps réel, directement : glissez votre doigt sur l’écran tactile en partant du haut de celui-ci, vers le bas.
Pour l’activer dans un réper-toire : sélectionnez la liste de tests dans le menu “Options”.
FR
24 www.idealnetworks.net 163819
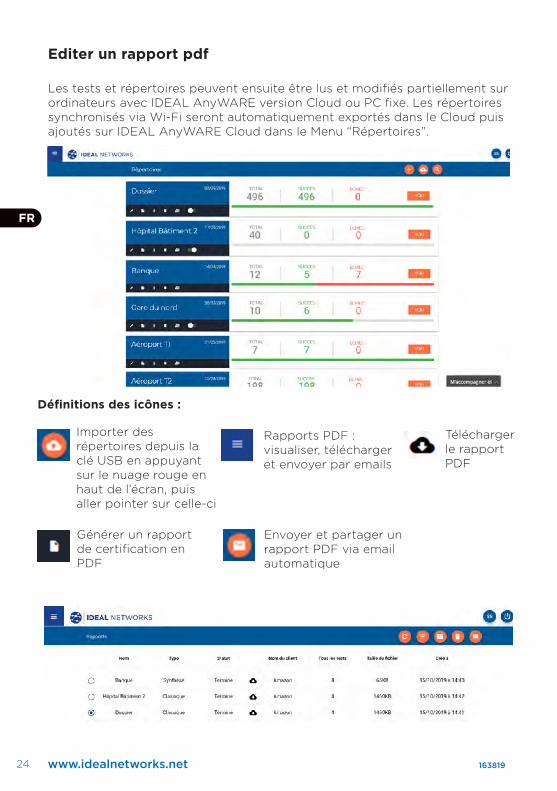
Editer un rapport pdf
Les tests et répertoires peuvent ensuite être lus et modifiés partiellement sur ordinateurs avec IDEAL AnyWARE version Cloud ou PC fixe. Les répertoires synchronisés via Wi-Fi seront automatiquement exportés dans le Cloud puis ajoutés sur IDEAL AnyWARE Cloud dans le Menu “Répertoires”.
Définitions des icônes :
Importer des répertoires depuis la clé USB en appuyant sur le nuage rouge en haut de l’écran, puis aller pointer sur celle-ci
Générer un rapport de certification en PDF
Rapports PDF : visualiser, télécharger et envoyer par emails
Envoyer et partager un rapport PDF via email automatique
Télécharger le rapport PDF
FR
25Proof of Performance24 www.idealnetworks.net 163819
Einführung
Der LanTEK IV und IDEAL AnyWARE bilden ein System zum Zertifizieren von Kabeln. Diese Kurzbedienungsanleitung vermittelt einen Überblick über die wichtigsten Leistungsmerkmale des Kabelzertifizierers LanTEK IV und informiert über die Nutzung von AnyWARE zum Management von Projekten und Testergebnissen.
Erste Schritte
Um sicherzugehen, dass Sie alle Leistungsmerkmale des LanTEK IV in vollem Umfang ausschöpfen können, sollten Sie die nachstehend aufgeführten Schritte ausführen:
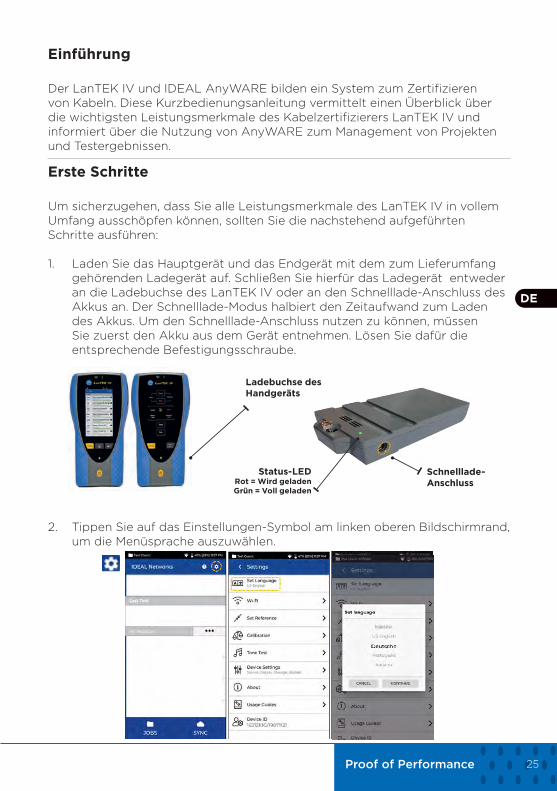
1. Laden Sie das Hauptgerät und das Endgerät mit dem zum Lieferumfang gehörenden Ladegerät auf. Schließen Sie hierfür das Ladegerät entweder an die Ladebuchse des LanTEK IV oder an den Schnelllade-Anschluss des Akkus an. Der Schnelllade-Modus halbiert den Zeitaufwand zum Laden des Akkus. Um den Schnelllade-Anschluss nutzen zu können, müssen Sie zuerst den Akku aus dem Gerät entnehmen. Lösen Sie dafür die entsprechende Befestigungsschraube.
2. Tippen Sie auf das Einstellungen-Symbol am linken oberen Bildschirmrand, um die Menüsprache auszuwählen.
Ladebuchse des Handgeräts
Status-LED Rot = Wird geladenGrün = Voll geladen
Schnelllade-Anschluss
DE

26 www.idealnetworks.net 163819
3. Gehen Sie auf anyware.idealnetworks.net, um Ihr kostenloses IDEAL AnyWARE Konto einzurichten. Dieses Konto erlaubt Ihnen, Ihre Projekte zu verwalten, zu bearbeiten, vorzukonfigurieren und mit anderen zu teilen. Registrieren Sie sich entweder für die cloudbasierte Software oder laden Sie die Desktop-Version herunter.
4. Verknüpfen Sie Ihren LanTEK IV mit Ihrem IDEAL AnyWARE Konto. Melden Sie sich hierfür bei Ihrem IDEAL AnyWARE Konto an.
• Wählen Sie das Menü aus: Tippen Sie auf das Geräte-Symbol: Fügen Sie den LanTEK IV hinzu:
• Geben Sie Geräte-ID ein und bestätigen Sie die Eingabe. Die Geräte-ID des LanTEK IV finden Sie im Einstellungen-Menü (siehe unten).
DE

27Proof of Performance26 www.idealnetworks.net 163819
Hilfe-Optionen
Der LanTEK IV und die AnyWARE Cloud bieten eine umfassende interne Hilfe-Funktion, die die Nutzung der Leistungsmerkmale erläutert. Die Hilfe-Funktion kann aufgerufen werden über:
Hilfe auf dem LanTEK IV
Hilfe in der AnyWARE-Cloud
Rückkehr zum Startbildschirm
Erstellen eines neuen Projekts
Auswahl mehrerer Projekte
Anzeige aller im LanTEK IV gespeicherten Projekte
Gesamtanzahl der in dem betreffenden jedem Projekt gespeicherten Tests
Länger auf Projekt tippen, um Kontextmenü zu öffnen
das Hilfe-Symbol in der Menüleiste
im Einstellungen-Menü über die Option Benutzeranleitungen:
Die Hilfe in der AnyWARE-Cloud wird über die Registerkarte Führung am rechten unteren Bildschirmrand aufgerufen.
DE

28 www.idealnetworks.net 163819
Hauptfunktionen
LanTEK IV
USB Typ AUSB Typ C
Sprechgarnitur-Anschluss
Ladebuchse
LED-AnzeigeBei AUSgeschaltetem Gerät:Grünes Blinklicht = Wird geladenGrünes Dauerlicht = Voll geladenBei EINgeschaltetem Gerät:Weiß-grünes Blinklicht = Wird geladenWeiß-rotes Blinklicht = Akkuwarnung
Autotest-Taste (Startet den nächsten Test der Testfolge)
Spannungsschutz leuchtetKabel sofort trennen Verbindungsstatus
Blau, wenn beide Geräte verbunden
Touchscreen
Home-Taste (Rückkehr zur
Testliste des aktiven Projekts)
Zurück-Taste
SchutzkappeDer VisiLINQ™ Adapter ist mit einer mehrfarbigen LED-Anzeige und einer Start-Taste ausgestattet, um Tests auszulösen und den Status unabhängig vom Hand- und Endgerät anzuzeigen.
Vor Ort auswechselbarer RJ45-Einsatz
Befestigung-sschraube
LED-AnzeigeBlau = Handgerät und Endgerät verbundenGrün = BestandenRot = FehlerGelb = GrenzwertigWeiß = Lampen-Modus
Start-Taste; Schaltet das weiße Licht ein, wenn noch kein Verbindungsaufbau zwischen den Geräten erfolgt ist. Nach dem Verbindungsaufbau startet die Betätigung dieser Taste einen Autotest.
Kontextabhängige LED-Anzeigen: Farbe informiert über Status
Ein/Aus-Schalter
DE

29Proof of Performance28 www.idealnetworks.net 163819
Startbildschirm
Der Startbildschirm des LanTEK IV gibt einen umfassenden Überblick über das aktuelle Projekt.
Der Testzähler zeigt die Anzahl der gespeicherten Tests sowie die verfügbare Speicherkapazität an
Einstellungen und Hilfe
Name des aktiven Projekts, Gesamtzahl der Tests und FortschrittsanzeigeRot = FehlerGrün = BestandenGrau = Nicht getestetZuletzt
ausgeführter TestAnzeige-Optionen der Testliste
Test starten
Zum Öffnen der Test-Optionen länger gedrückt halten:
Anzeige der Tests im aktiven
Projekt:Grün = Bestanden
Rot = FehlerGelb = GrenzwertigZur Anzeige der Testergebnisse
antippen
= Nächster TestAusführung nach
Drücken der VisiLINQ-Start-/
Autotest-Taste
Anzeige aller im Tester
gespeicherten Projekte
Upload/Download von Tests in die AnyWARE-Cloud oder Export auf USB-Stick
Zur Anzeige der Testergebnisse
antippen

30 www.idealnetworks.net 163819
Einstellungen
Die Einstellungen werden über das Einstellungen-Symbol des Startbildschirms aufgerufen.
Sprachauswahl
Verbindungsaufbau zu Hotspot/WLAN
Setzen der Referenz für Kat 8.2, Nullabgleich der Patchkabel-
Adapter und Glasfaser-Verbindungskabel
Anzeige Kalibrierungswerte, Export des
Kalibrierungszeugnisses als PDF-Datei auf USB
Tongenerator einschalten
Softwareversion, Seriennummer und MAC-Adresse
Hinweise zur Arbeit mit dem LanTEK IV
Geräte-ID (Benötigt zum Registrieren des LanTEK IV in
der AnyWARE Cloud)
Einstellen von Datum/Uhrzeit und Maßeinheiten
Eingabe des Bediener-Namens
Ein/Ausschalten des Tons
Bildschirmhelligkeit
Aktivierung der Fernsteuerung(Team Viewer)
Anzeige des Cursors bei Nutzung einer USB-Maus
Die Autotest-Einstellungen beinhaltet die von Ihnen
für ein Projekt bevorzugten Einstellungen. Der LanTEK IV
nutzt diese Einstellungen standardmäßig für alle neuen
Projekte, um den Zeitaufwand für die Einrichtung zu verringern
DE

31Proof of Performance30 www.idealnetworks.net 163819
Projekt erstellen
Zum Erstellen eines Projektes öffnen Sie in der Menüzeile das Menü PROJEKTE und wählen dann:
Tragen Sie einen Projektnamen ein und geben Sie bei Bedarf die Projektkennung (optional) ein. Diese Angaben erlauben, die Tests nach Gebäude, Etage usw. zu gruppieren.Zum Abschluss tippen Sie auf
1
2Wählen Sie das neu
erstellte Projekt aus dem Projekt-
Bildschirm aus
3
Tippen Sie auf + um Tests zum Projekt hinzuzufügen. Anschließend wählen Sie Kupfer oder Glasfaser aus
4
Geben Sie im Bildschirm Tests erstellen den Präfix (optional) und den Testbereich ein.
TestbereicheTragen Sie bei Testbereich von: einen alphanumerischen Wert ein. Das ist die erste Testkennung einer Testfolge. Anschließend tragen Sie bei Testbereich bis: den letzten Wert der Testfolge ein, um eine Liste mit Testkennungen zu erstellen.Eine rote Warnmeldung erscheint, wenn die Von-Bis-Werte keine durchgehende Testreihe erlauben.
DE

32 www.idealnetworks.net 163819
Projekt erstellen
8
9
Wählen Sie den Test-Standard aus
5 6 Wählen Sie den benötigten Standard aus
7 Wählen Sie den Link-Typ aus
Optional: Im Rahmen der Einrichtung ist es möglich, den Hersteller des Kabels und der Steckverbinder auszuwählen, die dann im Endbericht mit angegeben werden
Zum Abschluss bestätigen Sie mit
DE

33Proof of Performance32 www.idealnetworks.net 163819
WLAN-Verbindungsaufbau
Um den LanTEK IV mit einem WLAN zu verbinden, öffnen Sie zuerst das Einstellungen-Menü:
Wählen Sie im Menü die WLAN-Option aus und schalten Sie diese ein.
Wählen Sie das gewünschte Netzwerk aus und geben Sie
gegebenenfalls ein Passwort ein.
Erfolgreicher Verbindungsaufbau zum
WLAN
DE
34 www.idealnetworks.net 163819
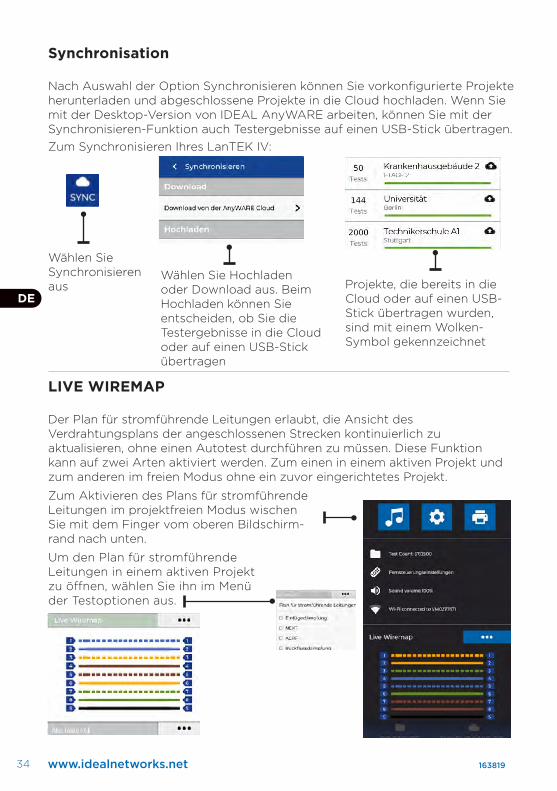
Synchronisation
Nach Auswahl der Option Synchronisieren können Sie vorkonfigurierte Projekte herunterladen und abgeschlossene Projekte in die Cloud hochladen. Wenn Sie mit der Desktop-Version von IDEAL AnyWARE arbeiten, können Sie mit der Synchronisieren-Funktion auch Testergebnisse auf einen USB-Stick übertragen. Zum Synchronisieren Ihres LanTEK IV:
Wählen Sie Synchronisieren aus
Wählen Sie Hochladen oder Download aus. Beim Hochladen können Sie entscheiden, ob Sie die Testergebnisse in die Cloud oder auf einen USB-Stick übertragen
Projekte, die bereits in die Cloud oder auf einen USB-Stick übertragen wurden, sind mit einem Wolken-Symbol gekennzeichnet
LIVE WIREMAP
Der Plan für stromführende Leitungen erlaubt, die Ansicht des Verdrahtungsplans der angeschlossenen Strecken kontinuierlich zu aktualisieren, ohne einen Autotest durchführen zu müssen. Diese Funktion kann auf zwei Arten aktiviert werden. Zum einen in einem aktiven Projekt und zum anderen im freien Modus ohne ein zuvor eingerichtetes Projekt.
Zum Aktivieren des Plans für stromführende Leitungen im projektfreien Modus wischen Sie mit dem Finger vom oberen Bildschirm-rand nach unten.
Um den Plan für stromführende Leitungen in einem aktiven Projekt zu öffnen, wählen Sie ihn im Menü der Testoptionen aus.
DE

35Proof of Performance34 www.idealnetworks.net 163819
Testbericht erstellen
Die Cloud- und Desktop-Versionen von IDEAL AnyWARE erlauben, Projekte anzuzeigen und zu bearbeiten. Projekte, die über WLAN synchronisiert wurden, werden automatisch zum Projekt-Menü der Cloud hinzugefügt.
Erläuterung der Schaltflächen:
Zum Hochladen von Projekten vom USB-Stick in die Cloud. Dazu mit dem Finger vom oberen Bildschirmrand nach unten wischen
Zum Erstellen eines PDF-Testberichts
Zum Anzeigen, Herunterladen und E-Mail-Versand von PDF-Berichten
Zum Teilen des Berichts über E-Mail, so dass der Empfänger den Bericht anzeigen und speichern kann
Zum Herunterladen eines Berichts
DE

36 www.idealnetworks.net 163819
Introduzione
Il LanTEK IV e IDEAL AnyWARE costituiscono un sistema di certificazione di cavi. Questa guida offre una panoramica delle funzionalità principali del LanTEK IV e spiega come iniziare a utilizzare AnyWARE per gestire progetti e risultati dei test.
Operazioni Preliminari
Prima di iniziare a utilizzare il LanTEK IV, seguire questi passaggi per assicurarsi di poter sfruttare tutte le funzionalità che il LanTEK IV ha da offrire.
1. Caricare completamente il display e le unità remote utilizzando l’alimentatore incluso nella custodia. Questo può essere collegato alla porta di ricarica principale del LanTEK IV o alla porta di ricarica rapida della batteria. La porta di ricarica rapida riduce il tempo di ricarica del 50%. Per accedere alla porta di ricarica rapida, è necessario rimuovere prima la batteria allentando la vite di fissaggio.
2. Selezionare la lingua mediante l’apposita funzione in alto a sinistra sullo schermo.
Porta di ricarica del ricevitore
LED di statoRosso = In carica
Verde = Completamente carico
Porta di ricarica rapida
IT

37Proof of Performance36 www.idealnetworks.net 163819
3. Visitare anyware.idealnetworks.net per configurare il proprio account gratuito IDEAL AnyWARE da cui è possibile gestire, condividere, modificare e preconfigurare progetti. Selezionare Registrati per il software basato su cloud o Scarica per la versione desktop.
4. Collega il LanTEK IV al proprio account IDEAL AnyWARE accedendo all’account IDEAL AnyWARE.
• Selezionare Menu: Fare click su Dispositivi: Aggiungere il dispositivo:
• Inserire l’ID dispositivo e selezionare Invia. L’ID dispositivo per il LanTEK IV si trova nel menu impostazioni (vedere sotto).
IT

38 www.idealnetworks.net 163819
Opzioni Della Guida
Il LanTEK IV ed AnyWARE Cloud dispongono di una guida integrata completa che spiega all’utente come utilizzare le funzionalità. È possibile accedervi come segue:
Guida sul LanTEK IV
Icona sulla barra del menu
Guida sulla AnyWARE Cloud
È possibile accedere alla guida sulla AnyWARE Cloud dalla scheda Guidami situata in basso a destra.
Ritorna alla schermata principale Crea un nuovo lavoro
Seleziona più lavori
Elenca tutti i lavori salvati sul LanTEK IV
Numero totale di test in ciascun progetto
Tenendo premuta l’icona del lavoro si aprono delle opzioni di scelta rapida
Oppure fare clic su Impostazioni - Guide d’uso:
IT

39Proof of Performance38 www.idealnetworks.net 163819
Funzioni Principali
LanTEK IV
USB Tipo AUSB Tipo C
Talkset Jack
Porta di ricarica
Indicatore LEDQuando il dispositivo è spentoVerde lampeggiante = in caricaVerde fisso = completamente caricoQuando il dispositivo è accesoBianco/Verde lampeggiante = in caricaBianco/Rosso lampeggiante = batteria scarica
Pulsante Autotest (premere per avviare il test successivo in sequenza)
Avviso di alta tensioneScollegare immediatamente il cavo Stato connessione
È blu quando entrambe le unità sono collegate
Touch Screen Display
Pulsante Home (premere per tornare
all’elenco test del lavoro attivo)
Tasto Indietro
Tappo protettivoVisiLINQ™ include un indicatore LED multicolore e un pulsante di azione per avviare i test e segnalare lo stato indipendentemente dai ricevitori del certificatore.
Punta sostituibile sul campo
Vite di fissaggio della punta
Indicatore LEDBlu = Display e telecomando collegatiVerde = OKRosso = NON OKGiallo = OK/NON OK marginaleBianco = modalità torcia
Pulsante Azione; Premere per attivare la torcia a luce bianca quando il ricevitore non è collegato. Premere per avviare l’autotest quando i ricevitori non sono collegati
Indicatori LED contestuali: il colore indica lo stato
Pulsante di accensione
IT

40 www.idealnetworks.net 163819
Schermata Principale
La schermata principale del LanTEK IV è stata progettata per visualizzare i dettagli del progetto attuale.
Conteggio test fornisce il numero di test salvati/la capacità di memoria totale
Impostazioni e Guida
Nome lavoro attivo, numero totale di test e barra di avanzamentoRosso = NON OKVerde = OKGrigio = Non testato
Ultimo test completato
Opzioni di visualizzazione elenco test
Inizia il test
Tenere premuto per accedere alle opzioni relative al test:
Elenco dei test compresi nel
lavoro attuale:Verde = OK
Rosso = NON OKAmbra = Marginale
Toccare per visualizzare i risultati dei testresults
= Prossimo testSarà eseguito quando
si preme il pulsante Azione VisiLINQ/
Autotest
Il menu LAVORI visualizza
tutti i lavori memorizzati sul
certificatore
SINC per caricare/scaricare i test sulla AnyWARE Cloud o per esportarli su una chiave USB
Toccare per visualizzare i
risultati dei test
IT

41Proof of Performance40 www.idealnetworks.net 163819
Impostazioni
È possibile accedere alle impostazioni dal menu Impostazioni sulla schermata principale.
Scegli lingua
Collega a hotspot/Wi-Fi
Imposta il riferimento per Cat 8.2, gli adattatori per cavo patch e la
calibrazione dei ponticelli fibra
Visualizza i dettagli di calibrazione/esporta il certificato di calibrazione
su chiave USB come file PDF
Avvia il generatore di toni
Versione software, numero di serie e indirizzo MAC
Come usare il LanTEK IV
ID dispositivo, necessario per registrare il LanTEK IV
sulla AnyWARE Cloud
Imposta data/ora e unità di misura
Imposta il nome dell’operatore
Attiva e disattiva l’audio
Luminosità dello schermo
Attiva il telecomando (Team Viewer)
Show cursor when using USB mouse
Le impostazioni di autotest sono la configurazione preferita per un lavoro. Il LanTEK IV utilizza queste impostazioni come predefinite per tutti i nuovi lavori
per ridurre i tempi di configurazione
IT

42 www.idealnetworks.net 163819
Creare un lavoro
Per creare un lavoro, selezionare LAVORI dalla barra del menu, quindi selezionare:
Inserire il nome del lavoro, e se necessario, selezionare gli identificativi del lavoro (facoltativo). Ciò consentirà di raggruppare i test per edificio, piano, ecc.Selezionare una volta completato.
2Selezionare il lavoro appena creato dalla
schermata dei lavori.
3
Selezionare + per aggiungere dei test al lavoro, quindi scegliere Rame o Fibra
4
In Crea test, inserire il prefisso (facoltativo) e l’intervallo del test.
Intervalli di testInserire un valore alfanumerico in Intervallo test da: questo è il primo ID test di una sequenza. Quindi, inserire l’ultimo valore della sequenza Intervallo Test per: generare l’elenco degli ID test.Sarà visualizzato un avviso rosso se gli intervalli da e a non possono creare una serie continua.
IT
1
43Proof of Performance42 www.idealnetworks.net 163819
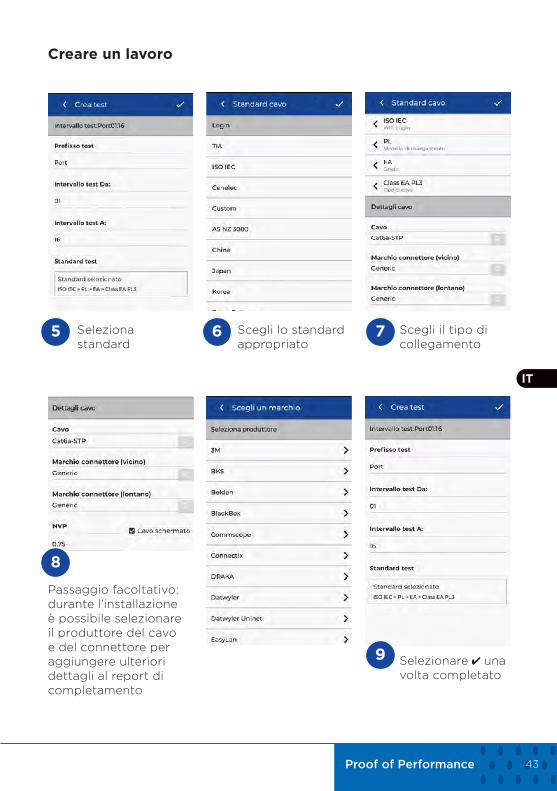
Creare un lavoro
8
Seleziona standard
5 6 Scegli lo standard appropriato
7 Scegli il tipo di collegamento
Passaggio facoltativo: durante l’installazione è possibile selezionare il produttore del cavo e del connettore per aggiungere ulteriori dettagli al report di completamento
Selezionare una volta completato
9
IT
44 www.idealnetworks.net 163819
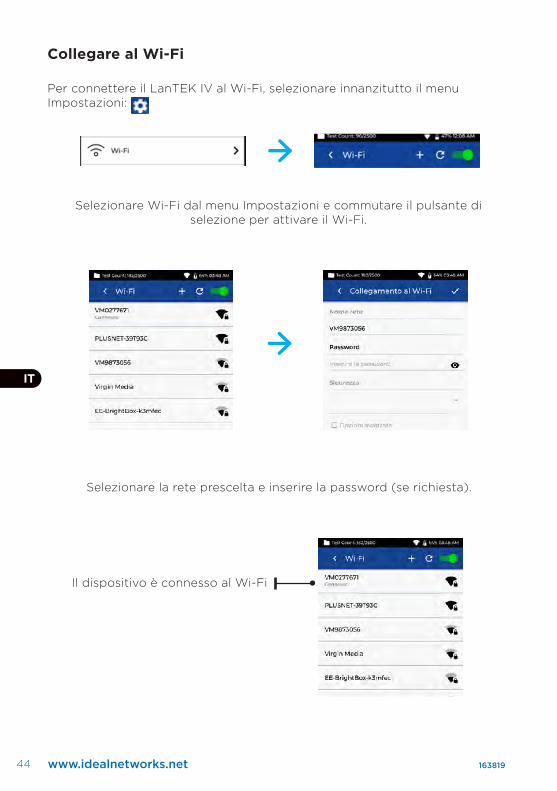
Collegare al Wi-Fi
Per connettere il LanTEK IV al Wi-Fi, selezionare innanzitutto il menu Impostazioni:
Selezionare Wi-Fi dal menu Impostazioni e commutare il pulsante di selezione per attivare il Wi-Fi.
Selezionare la rete prescelta e inserire la password (se richiesta).
Il dispositivo è connesso al Wi-Fi
IT
45Proof of Performance44 www.idealnetworks.net 163819
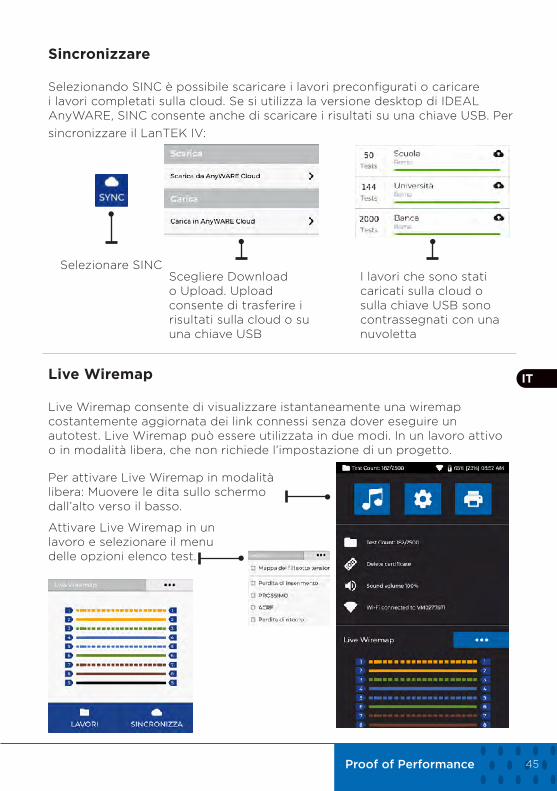
Sincronizzare
Selezionando SINC è possibile scaricare i lavori preconfigurati o caricare i lavori completati sulla cloud. Se si utilizza la versione desktop di IDEAL AnyWARE, SINC consente anche di scaricare i risultati su una chiave USB. Per sincronizzare il LanTEK IV:
Selezionare SINCScegliere Download o Upload. Upload consente di trasferire i risultati sulla cloud o su una chiave USB
I lavori che sono stati caricati sulla cloud o sulla chiave USB sono contrassegnati con una nuvoletta
Live Wiremap
Live Wiremap consente di visualizzare istantaneamente una wiremap costantemente aggiornata dei link connessi senza dover eseguire un autotest. Live Wiremap può essere utilizzata in due modi. In un lavoro attivo o in modalità libera, che non richiede l’impostazione di un progetto.
Per attivare Live Wiremap in modalità libera: Muovere le dita sullo schermo dall’alto verso il basso.
Attivare Live Wiremap in un lavoro e selezionare il menu delle opzioni elenco test.
IT
46 www.idealnetworks.net 163819
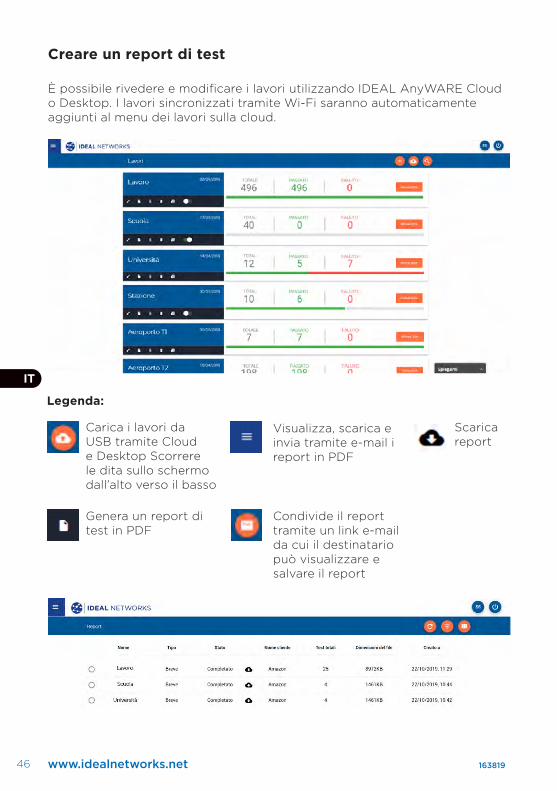
Creare un report di test
È possibile rivedere e modificare i lavori utilizzando IDEAL AnyWARE Cloud o Desktop. I lavori sincronizzati tramite Wi-Fi saranno automaticamente aggiunti al menu dei lavori sulla cloud.
Legenda:
Carica i lavori da USB tramite Cloud e Desktop Scorrere le dita sullo schermo dall’alto verso il basso
Genera un report di test in PDF
Visualizza, scarica e invia tramite e-mail i report in PDF
Condivide il report tramite un link e-mail da cui il destinatario può visualizzare e salvare il report
Scarica report
IT

47Proof of Performance46 www.idealnetworks.net 163819
Introducción
LanTEK IV e IDEAL AnyWARE es un sistema de certificación de cable. Esta guía le dará una visión general de las características clave de LanTEK IV y de cómo empezar a utilizar AnyWARE para gestionar su trabajos y los resultados de las pruebas.
Cómo empezar
Antes de empezar a utilizar su LanTEK IV, siga los siguientes pasos para asegurarse de que va a aprovechar todas las funciones que ofrece.
1. Cargue completamente la pantalla y las unidades remotas utilizando la fuente de alimentación incluida en el estuche. Esta puede conectarse al puerto de carga principal del LanTEK IV o al puerto de carga rápida de la batería. El puerto de carga rápida reduce el tiempo de carga en un 50 %. Para acceder al puerto de carga rápida, primero debe retirar la batería soltando el tornillo de retención.
2. Seleccione el idioma seleccionando el equipo de instalación en la parte superior izquierda de la pantalla.
Puerto de carga del terminal
LED de estado Rojo = cargando
Verde = completamente cargado
Puerto de carga rápida ES

48 www.idealnetworks.net 163819
3. Visite anyware.idealnetworks.net para configurar su cuenta gratuita de IDEAL AnyWARE para administrar, compartir, editar y preconfigurar sus trabajos. Seleccione; regístrese para obtener el software basado en la nube o descargue la versión de escritorio.
4. Vincule su LanTEK IV a su cuenta de IDEAL AnyWARE iniciando sesión en su cuenta de IDEAL AnyWARE.
• Elija Menú: Haga clic en Dispositivos: Añada Dispositivo:
• Introduzca su ID de dispositivo y seleccione Enviar. El ID de dispositivo de LanTEK IV se encuentra en el menú de configuración (abajo).
ES

49Proof of Performance48 www.idealnetworks.net 163819
Opciones de Ayuda
LanTEK IV y AnyWARE Cloud cuentan con una completa guía integrada que le ayudará a utilizar las funciones. Puede acceder a ella como se indica a continuación;
Ayuda con LanTEK IV
Icono en la Barra de Menú
O haciendo clic en Configuración - Guías de
uso:
Ayuda con AnyWARE Cloud
Puede acceder a la ayuda de AnyWARE Cloud mediante la pestaña «Walk Me Through» situada en la parte inferior derecha.
Volver a la pantalla de inicio Crear un nuevo trabajo
Selección de trabajos múltiples
Lista de todos los trabajos guardados en su LanTEK IV
Número total de pruebas en cada Trabajo
Pulsación prolongada para opciones de atajos
ES

50 www.idealnetworks.net 163819
Funciones de las teclas
LanTEK IV
USB Tipo AUSB Tipo C
Puerto Auriculares
Puerto de carga
Indicador LEDCuando el equipo está apagadoVerde intermitente = cargandoVerde continuo = completamente cargadoCuando el equipo está encendidoBlanco/Verde parpadeando = cargandoBlanco/Rojo parpadeando = batería baja
Botón de autoprueba (Pulse para iniciar la siguiente prueba en secuencia)
Advertencia de alta tensiónDesconecte el cable inmediatamente Conexión de estado
Azul cuando ambas unidades están conectadas
Pantalla táctil
Botón Inicio (Pulse para volver a la
lista de pruebas de trabajos activos)
Botón atrás
tapa protectoraVisiLINQ™ incorpora un indicador LED multicolor y un botón de acción para iniciar las pruebas e informar del estado independientemente de los terminales del probador.
Punta sustituible en el terreno
Tornillo de retención de la punta
Indicador LED Azul = pantalla y mando a distancia conectado Verde = aptoRojo = no aptoÁmbar = apto/no apto marginalBlanco = modo linterna
Botón pulsador; Pulse para activar la linterna blanca cuando no esté enlazada. Pulse este botón para iniciar la autoprueba cuando los terminales están conectados
Indicadores LED contextuales - el color indica el estado
Botón de encendido
ES
51Proof of Performance50 www.idealnetworks.net 163819
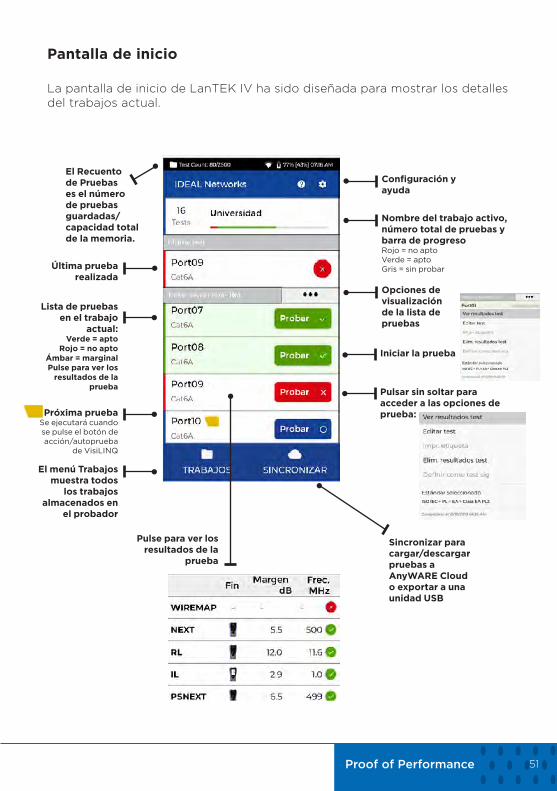
Pantalla de inicio
La pantalla de inicio de LanTEK IV ha sido diseñada para mostrar los detalles del trabajos actual.
El Recuento de Pruebas es el número de pruebas guardadas/capacidad total de la memoria.
Configuración y ayuda
Nombre del trabajo activo, número total de pruebas y barra de progresoRojo = no aptoVerde = aptoGris = sin probarÚltima prueba
realizadaOpciones de visualización de la lista de pruebas
Iniciar la prueba
Pulsar sin soltar para acceder a las opciones de prueba:
Lista de pruebas en el trabajo
actual:Verde = apto
Rojo = no aptoÁmbar = marginalPulse para ver los
resultados de la prueba
Próxima pruebaSe ejecutará cuando se pulse el botón de acción/autoprueba
de VisiLINQ
El menú Trabajos muestra todos
los trabajos almacenados en
el probador
Sincronizar para cargar/descargar pruebas a AnyWARE Cloud o exportar a una unidad USB
Pulse para ver los resultados de la
prueba
52 www.idealnetworks.net 163819
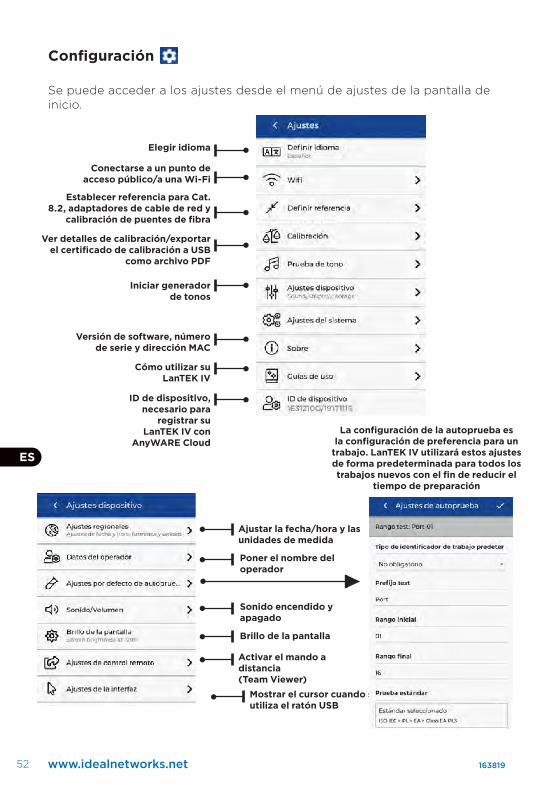
Configuración
Se puede acceder a los ajustes desde el menú de ajustes de la pantalla de inicio.
Elegir idioma
Conectarse a un punto de acceso público/a una Wi-Fi
Establecer referencia para Cat. 8.2, adaptadores de cable de red y
calibración de puentes de fibra
Ver detalles de calibración/exportar el certificado de calibración a USB
como archivo PDF
Iniciar generador de tonos
Versión de software, número de serie y dirección MAC
Cómo utilizar su LanTEK IV
ID de dispositivo, necesario para
registrar su LanTEK IV con
AnyWARE Cloud
Mostrar el cursor cuando se utiliza el ratón USB
Ajustar la fecha/hora y las unidades de medida
Poner el nombre del operador
Sonido encendido y apagado
Brillo de la pantalla
Activar el mando a distancia (Team Viewer)
La configuración de la autoprueba es la configuración de preferencia para un
trabajo. LanTEK IV utilizará estos ajustes de forma predeterminada para todos los trabajos nuevos con el fin de reducir el
tiempo de preparación
ES

53Proof of Performance52 www.idealnetworks.net 163819
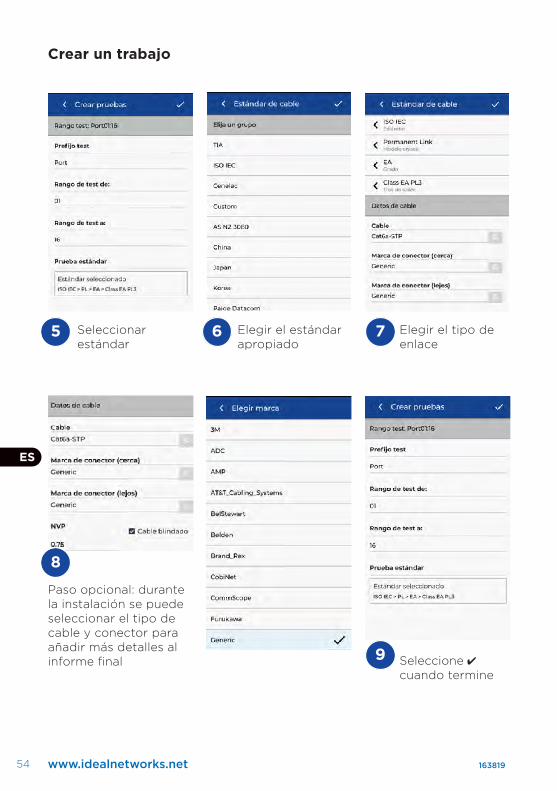
Crear un trabajo
Para crear un trabajo, seleccione JOBS en la barra de menús y, a continuación, seleccione:
Introduzca el nombre del trabajo y, si es necesario, seleccione los identificadores del trabajo (opcional). Esto permitirá que las pruebas se agrupen específicamente por edificio, planta, etc. Seleccione cuando termine.
1
2Seleccione el trabajo
recién creado en la pantalla de trabajos.
3
Seleccione + para añadir pruebas al trabajo y, a continuación, seleccione Cobre o Fibra
4
En Crear Pruebas, introduzca el prefijo (opcional) y el rango de prueba.
Rangos de PruebaIntroduzca un valor alfanumérico en Rango de Prueba desde: es el primer ID de prueba de una secuencia. A continuación, introduzca el último valor de la secuencia en Rango de Prueba para: generar la lista de ID de prueba.Se mostrará una advertencia roja si los rangos de ida y vuelta no pueden crear una serie continua.
ES
54 www.idealnetworks.net 163819
Crear un trabajo
8
9
Seleccionar estándar
5 6 Elegir el estándar apropiado
7 Elegir el tipo de enlace
Paso opcional: durante la instalación se puede seleccionar el tipo de cable y conector para añadir más detalles al informe final Seleccione
cuando termine
ES
55Proof of Performance54 www.idealnetworks.net 163819
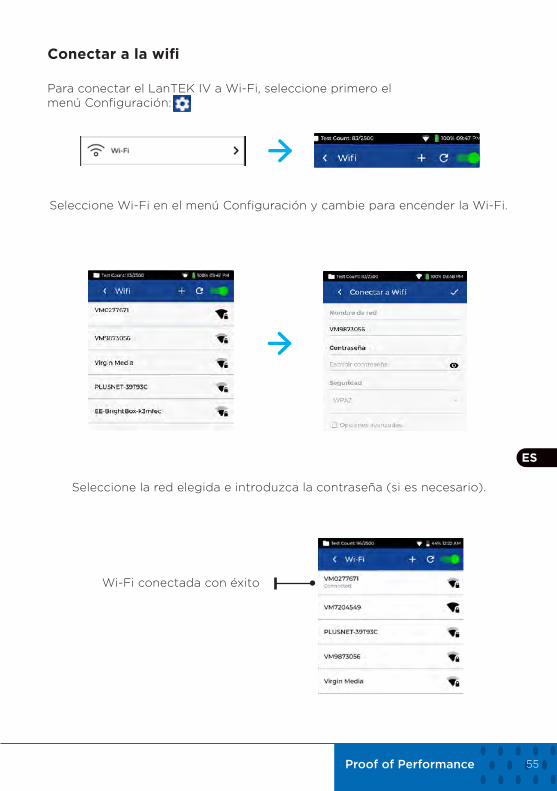
Conectar a la wifi
Para conectar el LanTEK IV a Wi-Fi, seleccione primero el menú Configuración:
Seleccione Wi-Fi en el menú Configuración y cambie para encender la Wi-Fi.
Seleccione la red elegida e introduzca la contraseña (si es necesario).
Wi-Fi conectada con éxito
ES
56 www.idealnetworks.net 163819
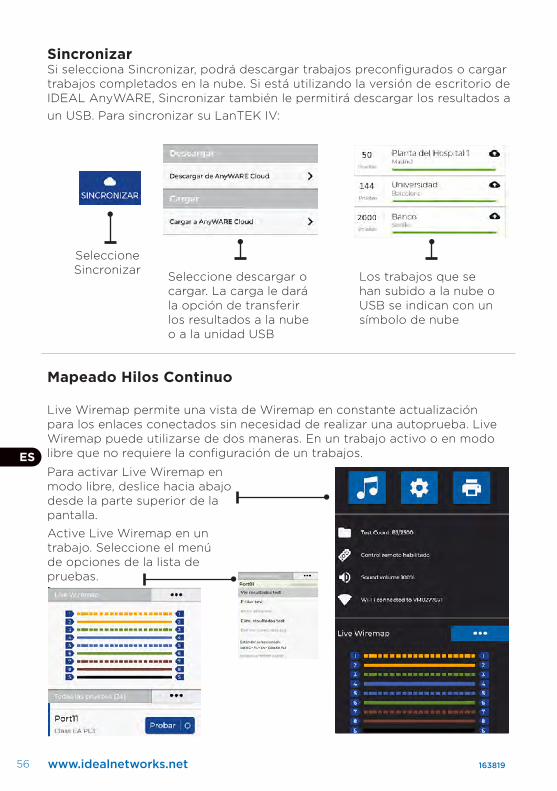
SincronizarSi selecciona Sincronizar, podrá descargar trabajos preconfigurados o cargar trabajos completados en la nube. Si está utilizando la versión de escritorio de IDEAL AnyWARE, Sincronizar también le permitirá descargar los resultados a un USB. Para sincronizar su LanTEK IV:
Seleccione Sincronizar Seleccione descargar o
cargar. La carga le dará la opción de transferir los resultados a la nube o a la unidad USB
Los trabajos que se han subido a la nube o USB se indican con un símbolo de nube
Mapeado Hilos Continuo
Live Wiremap permite una vista de Wiremap en constante actualización para los enlaces conectados sin necesidad de realizar una autoprueba. Live Wiremap puede utilizarse de dos maneras. En un trabajo activo o en modo libre que no requiere la configuración de un trabajos.
Para activar Live Wiremap en modo libre, deslice hacia abajo desde la parte superior de la pantalla.
Active Live Wiremap en un trabajo. Seleccione el menú de opciones de la lista de pruebas.
ES
57Proof of Performance56 www.idealnetworks.net 163819
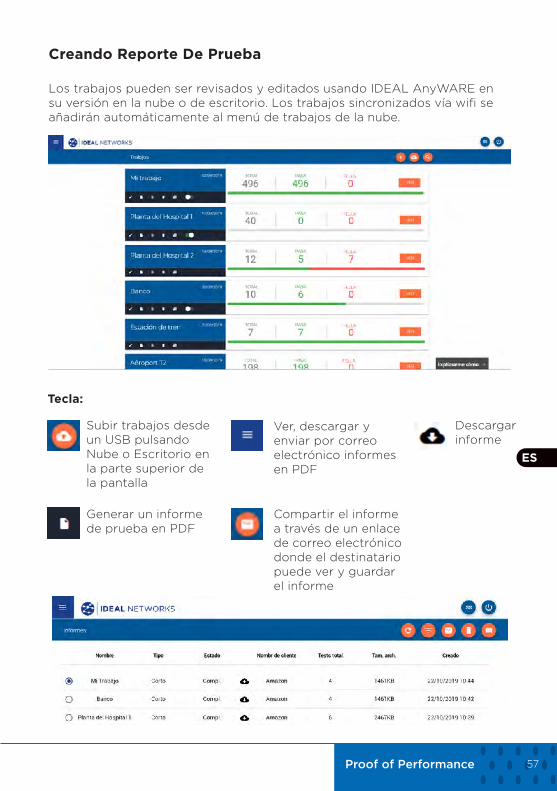
Creando Reporte De Prueba
Los trabajos pueden ser revisados y editados usando IDEAL AnyWARE en su versión en la nube o de escritorio. Los trabajos sincronizados vía wifi se añadirán automáticamente al menú de trabajos de la nube.
Tecla:
Subir trabajos desde un USB pulsando Nube o Escritorio en la parte superior de la pantalla
Generar un informe de prueba en PDF
Ver, descargar y enviar por correo electrónico informes en PDF
Compartir el informe a través de un enlace de correo electrónico donde el destinatario puede ver y guardar el informe
Descargar informe
ES

58 www.idealnetworks.net 163819
Introdução
O LanTEK IV e o IDEAL AnyWARE são um Sistema de Certificação de Cabos. Este guia fornecerá uma visão geral das principais funcionalidades do LanTEK IV e como começar a utilizar o AnyWARE para gerenciar seu projeto e resultados de testes.
Começando
Antes de começar a utilizar o seu LanTEK IV, siga os passos abaixo para assegurar que conseguirá usufruir de todas as funcionalidades disponibilizadas pelo seu LanTEK IV.
1. Carregue completamente as unidades principal e remota utilizando o adaptador de energia incluído na mala. Pode ser conectado à porta de carregamento principal no LanTEK IV ou à porta de carregamento rápido na bateria. A porta de carregamento rápido reduz o tempo de carregamento em 50%. Para ter acesso à porta de carregamento rápido, a bateria precisa ser removida soltando-se o parafuso de fixação.
2. Selecione o idioma tocando na engrenagem localizada no canto superior esquerdo da tela.
Porta de carregamento principal
LED de StatusVermelho = Carregando
Verde = Totalmente carregado
Porta de carregamento rápido
PT

59Proof of Performance58 www.idealnetworks.net 163819
3. Acesse anyware.idealnetworks.net para configurar a sua conta gratuita no IDEAL AnyWARE para que possa Gerenciar, Compartilhar, Editar e Pré-configurar seus projetos. Selecione “Cadastrar-se” para acessar o software na nuvem ou baixe a versão para desktop.
4. Associe o seu LanTEK IV à sua conta IDEAL AnyWARE iniciando sessão na sua conta IDEAL AnyWARE.
• Selecione Menu: Clique em Dispositivos: Adicionar Dispositivo:
• Informe o ID do seu dispositivo (localizado no menu de configuração abaixo) e selecione Enviar.
PT

60 www.idealnetworks.net 163819
Opções de Ajuda
O LanTEK IV e o AnyWARE Cloud disponibilizam uma ajuda de iniciação abrangente que irá orientá-lo sobre como usar as funcionalidades. Pode ser acessada conforme abaixo:
Ajuda no LanTEK IV Ajuda no AnyWARE Cloud
A assistência do AnyWARE Cloud pode ser acessada pela aba Oriente-me localizada no canto inferior direito da tela.
Retornar à tela inicial
Criar novo trabalho
Selecionar vários trabalhos
Lista de todos os trabalhos salvos no seu LanTEK IV
Número total de testes dentro de cada projeto
Mantenha o trabalho pressionado para acessar as opções de atalho
Ícone na barra de menu
Ou clique em Configurações Guias de Utilização:
PT

61Proof of Performance60 www.idealnetworks.net 163819
Funções Principais
LanTEK IV
USB Tipo AUSB Tipo C
Entrada para comunicador
Porta do Comunicador
Indicador LEDQuando DESLIGADO Verde piscando = CarregandoVerde aceso = Totalmente CarregadoQuando LIGADOBranco/Verde intermitente = CarregandoBranco/Vermelho intermitente = Bateria Fraca
Botão Auto-Teste (pressione para começar o próximo teste na sequência)
Aviso de alta tensãoDesligar imediatamente o cabo Status da Conexão
Azul quando ambas as unidades estão conectadas
Tela Sensível ao Toque
Botão Início (pressione para
voltar para a lista de testes do trabalho
ativo)
Botão Retornar
Capa de ProteçãoO VisiLINQ™ incorpora um indicador LED multicolorido e um botão de ação para iniciar testes e informar o status de forma independente das unidades do testador.
Ponta Substituível em Campo
Parafuso de Travamento da Ponta
Indicador LED Azul = Unidades Principal e Remota conectadasVerde = AprovadoVermelho = ReprovadoÂmbar = Resultado MarginalBranco = Modo Lanterna
Botão de ação: pressione para ativar a lanterna quando não houver interconexão. Pressione para iniciar o auto-teste quando as unidades estão interconectadas.
Indicadores LED contextuais - a cor indica o status
Botão Liga/Desliga
PT

62 www.idealnetworks.net 163819
Tela Inicial
A tela inicial do LanTEK IV foi concebida para mostrar os detalhes do projeto atual.
A Contagem de Testes corresponde ao número de testes salvos/capacidade total da memória
Configurações e ajuda
Nome do trabalho ativo, número total de testes e barra de andamentoVermelho = ReprovadoVerde = AprovadoCinza = Não testado
Último teste concluído
Opções de apresentação da lista de testes
Iniciar teste
Mantenha pressionado para acessar as opções do teste:
Lista de testes no trabalho atual:
Verde = AprovadoVermelho = Reprovado
Âmbar = MarginalToque para ver o
resultado do teste
Próximo testeSerá executado
quando o botão de ação do VisiLINQ
ou ou o botão Auto-Teste forem
pressionados
O menu TRABALHOS mostra todos os trabalhos
armazenados no testador
SINCRONIZAR permite carregar para e descarregar testes do AnyWARE Cloud ou exportar para um dispositivo USB
Toque para ver os resultados dos
testes
PT
63Proof of Performance62 www.idealnetworks.net 163819
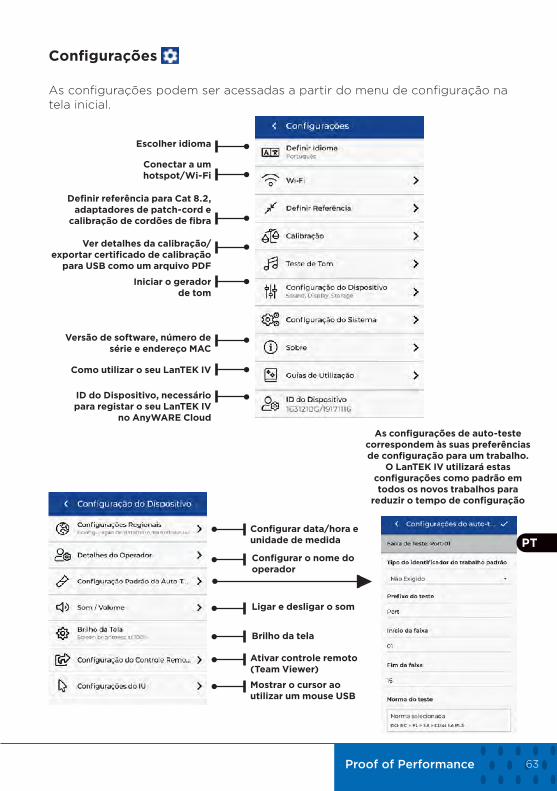
Configurações
As configurações podem ser acessadas a partir do menu de configuração na tela inicial.
Escolher idioma
Conectar a um hotspot/Wi-Fi
Definir referência para Cat 8.2, adaptadores de patch-cord e
calibração de cordões de fibra
Ver detalhes da calibração/exportar certificado de calibração
para USB como um arquivo PDF
Iniciar o gerador de tom
Versão de software, número de série e endereço MAC
Como utilizar o seu LanTEK IV
ID do Dispositivo, necessário para registar o seu LanTEK IV
no AnyWARE Cloud
Configurar data/hora e unidade de medida
Configurar o nome do operador
Ligar e desligar o som
Brilho da tela
Ativar controle remoto (Team Viewer)
Mostrar o cursor ao utilizar um mouse USB
As configurações de auto-teste correspondem às suas preferências de configuração para um trabalho.
O LanTEK IV utilizará estas configurações como padrão em todos os novos trabalhos para
reduzir o tempo de configuração
PT

64 www.idealnetworks.net 163819
Criar um Trabalho
Para criar um trabalho, selecione TRABALHOS na barra de menu e depois selecione:
Informe o nome do trabalho e, se necessário, selecione os identificadores (opcional). Isto permitirá que os testes sejam agrupados especificamente por edifício, andar, etc.Selecione quando tiver concluído.
1
2Selecione o trabalho recém-criado na tela
de trabalhos.
3
Selecione + para adicionar testes ao trabalho e depois escolha Cobre ou Fibra.
4
Em Criar Testes, informe o prefixo (opcional) e a faixa de teste.
Faixas de testeInforme um valor alfanumérico em “Faixa de teste de:” que seja o ID do primeiro teste de uma sequência. Depois, informe o último valor da sequência em “Faixa de teste até:” para gerar a lista dos ID dos testes.Será mostrado um aviso em vermelho se não for possível criar uma série contínua através das faixas “de” e “até”.
PT

65Proof of Performance64 www.idealnetworks.net 163819
Criar um Trabalho
8
9
Selecione a norma
5 6 Escolha a norma apropriada
7 Escolha o tipo de link
Opcional: durante a configuração, os fabricantes do cabo e dos conectores podem ser selecionados e assim adicionar mais informação no relatório
Toque no ícone quando tiver
concluído
PT

66 www.idealnetworks.net 163819
Conectando-se ao Wi-Fi
Para conectar o LanTEK IV ao Wi-Fi, primeiro selecione o menu Configurações:
Selecione Wi-Fi no menu Configurações e toque no botão de interruptor para ligar o Wi-Fi.
Selecione a Rede desejada e informe a senha (se necessária).
Wi-Fi conectado com sucesso
PT

67Proof of Performance66 www.idealnetworks.net 163819
Sincronizar
Selecionar SINCRONIZAR permitirá descarregar trabalhos pré-configurados ou carregar trabalhos concluídos para a nuvem. Se estiver usando o IDEAL AnyWARE para desktop, SINCRONIZAR também lhe permitirá transferir resultados para USB. Para SINCRONIZAR o seu LanTEK IV:
Selecione SINCRONIZAR Escolha descarregar ou
carregar. Carregar dará a opção de transferir os resultados para a nuvem ou para um dispositivo USB
Os trabalhos que foram carregados para a nuvem ou USB são marcados com uma nuvem
MAPA DE FIOS AO-VIVO
O Mapa de Fios Ao-Vivo proporciona uma visão instantânea e constantemente atualizada do mapa de fios para os links conectados, sem ser necessário realizar um auto-teste. O Mapa de Fios Ao-Vivo pode ser utilizado de duas formas: no âmbito de um trabalho ativo ou em modo livre, que não exige a configuração de um projeto.Para ativar o Mapa de Fios Ao-Vivo em modo livre, deslize para baixo a partir do topo da tela.
Para ativar o Mapa de Fios Ao-Vivo em um trabalho, selecione no menu de opções do teste.
PT

68 www.idealnetworks.net 163819
Criar um Relatório de Testes
Os trabalhos podem ser revisados e editados com o IDEAL AnyWARE Cloud ou Desktop. Os trabalhos sincronizados via Wi-Fi serão automaticamente adicionados ao menu de trabalhos na nuvem.
Legenda:
Importar testes do LanTEK a partir de um dispositivo USB ou localizados no PC
Gerar um relatório de testes em PDF
Visualizar, descarregar e enviar relatórios em PDF por e-mail
Compartilhar o relatório via link por e-mail, pelo qual o destinatário poderá visualizar e salvar o arquivo
Descarregar relatório
PT

69Proof of Performance68 www.idealnetworks.net 163819
简介
LanTEK IV和IDEAL AnyWARE是电缆认证系统。本指南将介绍LanTEK IV的主要功能以及如何使用AnyWARE管理项目和测试结果。
新手入门
开始使用LanTEK IV之前,请按照下列步骤进行操作,以便能够充分利用LanTEK IV提供的所有功能。
1. 用包装箱中随附的电源为显示器和远程装置充满电。可将其连接到LanTEK IV上的主充电端口或电池的快速充电端口。快速充电端口可使充电时间减少50%。要使用快速充电端口,必须先松开固定螺丝,将电池取出。
2. 选择屏幕左上方的齿轮(设置)符号来选择语言。
仪表充电端口
LED状态指示灯红色=正在充电绿色=已充满电
快速充电端口

70 www.idealnetworks.net 163819
3. 访问anyware.idealnetworks.net设置您的免费IDEAL AnyWARE账户,以便管理、共享、编辑和预配置您的项目。可选择注册基于Cloud的账户或下载桌面版软件使用。
4. 登录您的IDEAL AnyWARE账户,将LanTEK IV连接至IDEAL AnyWARE账户。
• 选择菜单: 点击设备: 添加设备:
• 输入您的设备ID,并点击提交。LanTEK IV设备ID可在设置菜单中找到(如下所示)。

71Proof of Performance70 www.idealnetworks.net 163819
帮助选项
LanTEK IV 和AnyWARE 云提供全面的在线帮助,指导您如何使用各项功能。可通过以下方式获取帮助:
LanTEK IV 上的帮助
菜单栏上的图标
或单击“设置”—“使用指 南”:
AnyWARE 云上的“帮助”
可通过右下角Walk Me Through选项卡访问AnyWARE云帮助。
返回主界面 创建新任务
多任务选择
上保存的所有任务列表 LanTEK IV
每个项目中的测试总数
长按任务可显示快捷方式选项

72 www.idealnetworks.net 163819
主要功能
LanTEK IV
A型USBC型USB
对讲机插孔
充电端口
LED指示灯电源关闭时绿色闪烁=正在充电绿色长亮=已充满电电源开启时白色/绿色闪烁=正在充电白色/红色闪烁=电池电量低
自动测试按钮(按此按钮可按顺序启动下一测试)
高压预警应立即断开电缆
连接状态主机和远端连接时显示蓝色
触摸屏显示
主界面按钮(按此按钮可返回活动任务测试
列表)
返回按钮
水晶头护帽VisiLINQ™ 带有多色LED指示灯和操作按钮,可不通过测试仪直接启动测试并显示测试结果和状态。
现场可更换水晶头插针
水晶头固定螺丝
LED 指示灯蓝色=显示和远程连接绿色=测试通过红色=测试未通过琥珀色=处于通过/未通过临界状态白色=手电筒模式
操作按钮;未连接时,按此按钮可启动白色手电筒功能。连接完成后,按此按钮可启动自动测试
LED情境指示灯——颜色指示状态
电源按钮

73Proof of Performance72 www.idealnetworks.net 163819
主画面
LanTEK IV主界面用于显示当前项目的详细信息。
测试计数栏显示已保存的测试数目/总存储容量
设置和帮助
活动任务名称、测试总数和进度条红色=未通过绿色=通过灰色=未测试最近完成的测试
测试列表显示选项
开始测试
长按可显示测试选项:
当前项目中的测试列表:
绿色=通过红色=未通过琥珀色=临界
点击查看测试结果
= 下一测试按VisiLINQ操作/自动测试按钮时执行
JOBS菜单显示测试仪上存储的所
有项目
SYNC可将测试上传/下载至AnyWARE云,或者导出至USB存储
点击查看测试结果
74 www.idealnetworks.net 163819
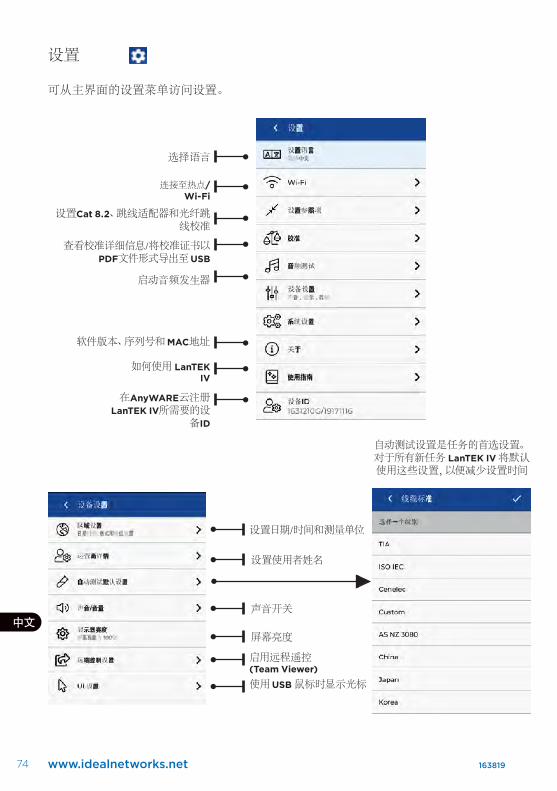
设置
可从主界面的设置菜单访问设置。
选择语言
连接至热点/Wi-Fi
设置Cat 8.2、跳线适配器和光纤跳线校准
查看校准详细信息/将校准证书以PDF文件形式导出至USB
启动音频发生器
软件版本、序列号和MAC地址
如何使用 LanTEK IV
在AnyWARE云注册LanTEK IV所需要的设
备ID
设置日期/时间和测量单位
设置使用者姓名
声音开关
屏幕亮度
启用远程遥控 (Team Viewer)
使用USB 鼠标时显示光标
自动测试设置是任务的首选设置。对于所有新任务 LanTEK IV 将默认使用这些设置,以便减少设置时间

75Proof of Performance74 www.idealnetworks.net 163819
创建任务如需创建任务,请从菜单栏选择“任务”(JOBS),然后选择::
输入任务名称;如果需要,选择任务标识符(可选)。这样便可根据建筑物、楼层等对测试进行分组。完成后选择:
1
2从任务界面选择新创建
的任务
3
选择 + 向任务添加测试,然后选择铜线或光纤
4
在“创建测试”中,输入前缀(可选)和测试范围。
测试范围在“测试范围自”中输入字母数字值:即序列的第一个测试ID。在“测试范围至”中输入序列的最后一个值:生成测试ID列表。如果使用“测试范围自”和“测试范围至”无法创建一个连续序列,则将显示红色警告。
76 www.idealnetworks.net 163819
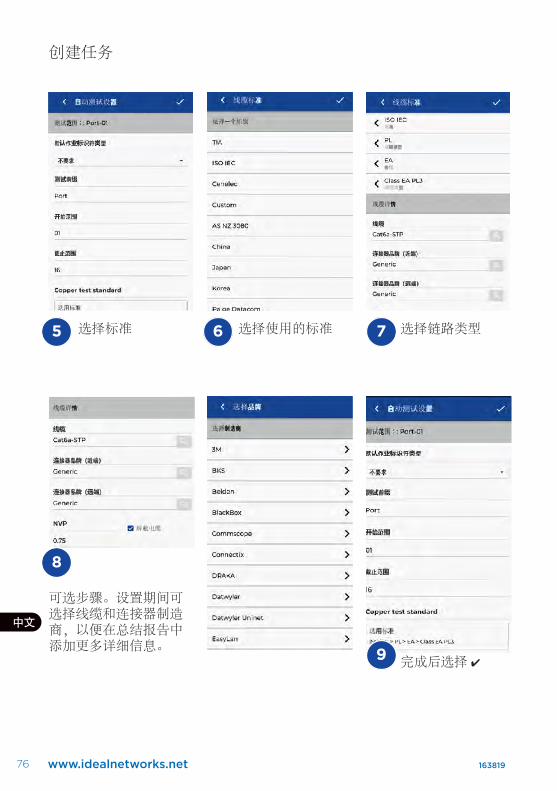
创建任务
8
选择标准5 6 选择使用的标准 7 选择链路类型
可选步骤。设置期间可选择线缆和连接器制造商,以便在总结报告中添加更多详细信息。
完成后选择 9
77Proof of Performance76 www.idealnetworks.net 163819
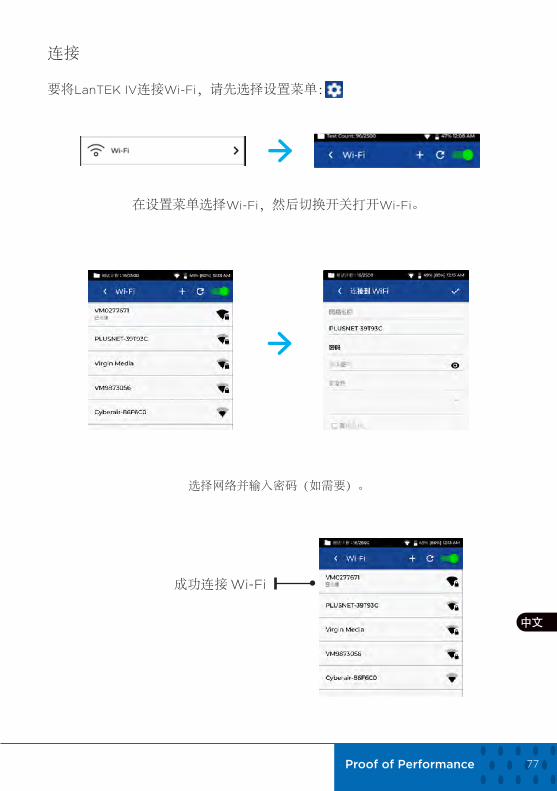
连接
要将LanTEK IV连接Wi-Fi,请先选择设置菜单:
在设置菜单选择Wi-Fi,然后切换开关打开Wi-Fi。
选择网络并输入密码(如需要)。
成功连接Wi-Fi
78 www.idealnetworks.net 163819
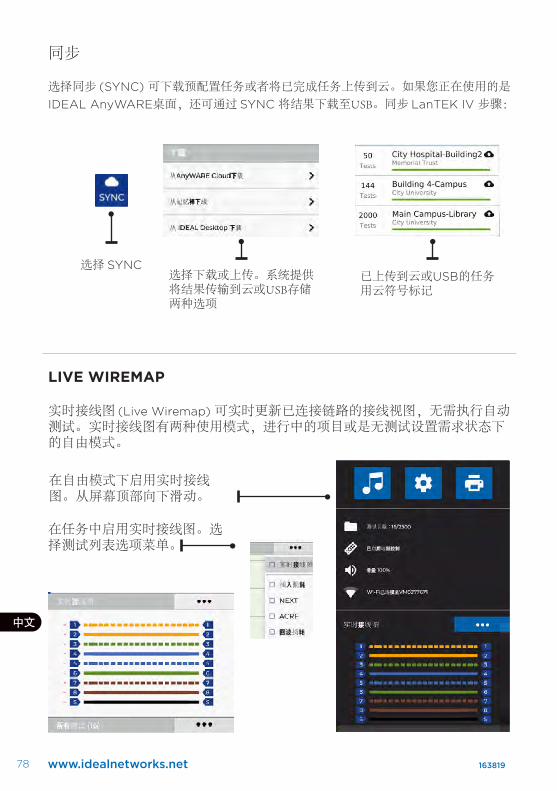
同步
选择同步(SYNC) 可下载预配置任务或者将已完成任务上传到云。如果您正在使用的是IDEAL AnyWARE桌面,还可通过SYNC 将结果下载至USB。同步LanTEK IV 步骤:
选择SYNC选择下载或上传。系统提供将结果传输到云或USB存储两种选项
已上传到云或USB的任务用云符号标记
LIVE WIREMAP
实时接线图(Live Wiremap) 可实时更新已连接链路的接线视图,无需执行自动测试。实时接线图有两种使用模式,进行中的项目或是无测试设置需求状态下的自由模式。
在自由模式下启用实时接线图。从屏幕顶部向下滑动。
在任务中启用实时接线图。选择测试列表选项菜单。
79Proof of Performance78 www.idealnetworks.net 163819
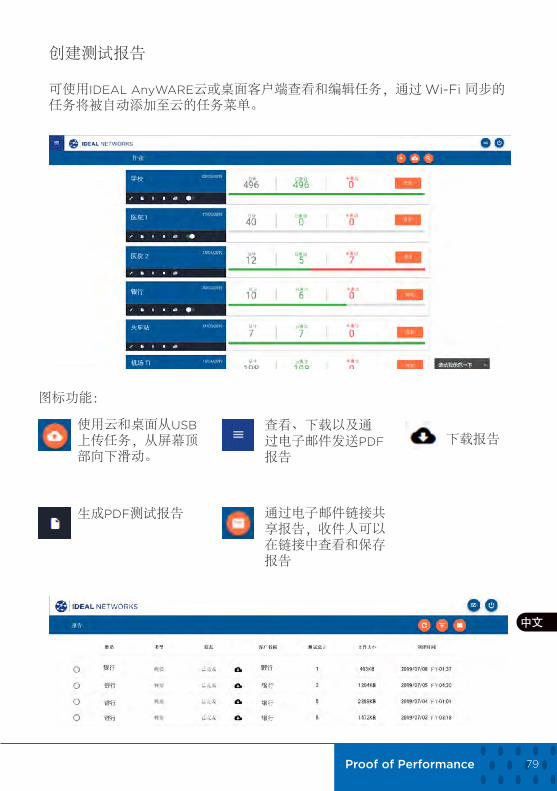
创建测试报告
可使用IDEAL AnyWARE云或桌面客户端查看和编辑任务,通过Wi-Fi 同步的任务将被自动添加至云的任务菜单。
图标功能:
使用云和桌面从USB上传任务,从屏幕顶部向下滑动。
生成PDF测试报告
查看、下载以及通过电子邮件发送PDF报告
通过电子邮件链接共享报告,收件人可以在链接中查看和保存报告
下载报告

IDEAL NETWORKS, LanTEK, FiberTEK,
VisiLINQ and the IDEAL AnyWARE logos
are trademarks or registered trademarks
of IDEAL INDUSTRIES Networks Ltd.
IDEAL INDUSTRIES Networks Ltd.Stokenchurch House, Oxford Road, Stokenchurch, High Wycombe, Buckinghamshire, HP14 3SX, UK.
Tel. +44 (0)1925 428 380 | Fax. +44 (0)1925 428 381
www.idealnetworks.net
Specification subject to change without notice.
E&OE
© IDEAL INDUSTRIES Networks Ltd. 2019
Publication no.: 163819. Rev 1.
English
Français
Deutsch
Italiano
Español
Português